

Page 1
Bring Home the Bakery
TM
AUTOMATIC BREAD MAKER
MACHINE À PAIN AUTOMATIQUE
RECIPES INCLUDED / RECETTES COMPRISES
Model/Modèle:
TR875
1
Page 2

Please Read and Save this Instruction Manual
IMPORTANT SAFEGUARDS
When using electrical appliances, basic safety precautions should always
be followed including the following:
❑ Read all instructions.
❑ Do not touch hot surfaces. Use handles or knobs.
❑ To protect against electrical shock do not immerse cord, plugs, or
appliance in water or other liquid.
❑ Close supervision is necessary when any appliance is used by or near
children.
❑ Unplug from outlet when not in use and before cleaning. Allow to cool
before putting on or taking off parts.
❑ Do not operate any appliance with a damaged cord or plug, or after the
appliance malfunctions or has been damaged in any manner. Contact
Consumer Services for examination, repair or electrical or mechanical
adjustment. Or, call the appropriate toll-free number on the cover of
this manual.
❑ The use of accessory attachments not recommended by the appliance
manufacturer may cause fire, electric shock or injury.
❑ Do not use outdoors.
❑ Do not let cord hang over edge of table or counter, or touch hot
surfaces, including the stove.
❑ Do not place on or near a hot gas or electric burner, or in a heated
oven.
❑ Extreme caution must be used when moving an appliance containing
hot oil or other hot liquids.
❑ To disconnect, press and hold the STOP (0) button for several seconds;
remove plug from wall outlet.
❑ Do not use appliance for other than intended use.
❑ Avoid contacting moving parts.
SAVE THESE INSTRUCTIONS
This product is for household use only.
CustomerCare Line:
1-800-231-9786
Accessories/Parts
(USA / Canada)
1-800-738-0245
2
USA/Canada
For online customer service
and to register your product, go to
www.prodprotect.com/applica
Page 3

Caution, hot surfaces: This appliance generates
heat and escaping steam during use. Proper precautions must be taken to prevent the risk of burns,
fires or other injury to persons or damage to prop-
erty.
POLARIZED PLUG (120V Models Only)
This appliance has a polarized plug (one blade is wider than the other). To
reduce the risk of electric shock, this plug is intended to fit into a polarized
outlet only one way. If the plug does not fit fully into the outlet, reverse the plug.
If it still does not fit, contact a qualified electrician. Do not attempt to modify the
plug in any way.
TAMPER-RESISTANT SCREW
Warning: This appliance is equipped with a tamper-resistant screw to prevent
removal of the outer cover. To reduce the risk of fire or electric shock, do not
attempt to remove the outer cover. There are no user-serviceable parts inside.
Repair should be done only by authorized service personnel.
ELECTRICAL CORD
a) A short power-supply cord (or detachable power-supply cord) is to be provided
to reduce the risk resulting from becoming entangled in or tripping over a longer cord.
b) Longer detachable power-supply cords or extension cords are available and
may be used if care is exercised in their use.
c) If a long detachable power-supply cord or extension cord is used,
1) The marked electrical rating of the detachable power-supply cord or
extension cord should be at least as great as the electrical rating of the
appliance,
2) If the appliance is of the grounded type, the extension cord should be a
grounding-type
3-wire cord, and
3) The longer cord should be arranged so that it will not drape over the
counter top or tabletop where it can be pulled on by children or tripped
over.
Note: If the power supply cord is damaged, it should be replaced by qualified
personnel; in Latin America, by an authorized service center.
3
Page 4

POWER OUTAGE
7-Minute Power Failure Back-Up
Your Professional Bread Maker has a 7-minute power failure back-up feature.
If the electricity goes out, the memory will store your cycle selection for up to 7
minutes. If the power comes back on within this time, bread making will resume
where it left off.
If the bread maker loses power for more than 7 minutes and you are using
any dairy products, perishables or meat in your bread, you should discard the
contents of the recipe and start again with new fresh ingredients due to health
and sanitary considerations. For nonperishable recipes you may try starting the
bread maker at the beginning of the cycle again. However, this may not always
produce an acceptable loaf of bread.
If you are not sure when the outage occurred, remove the dough and discard.
4
Page 5
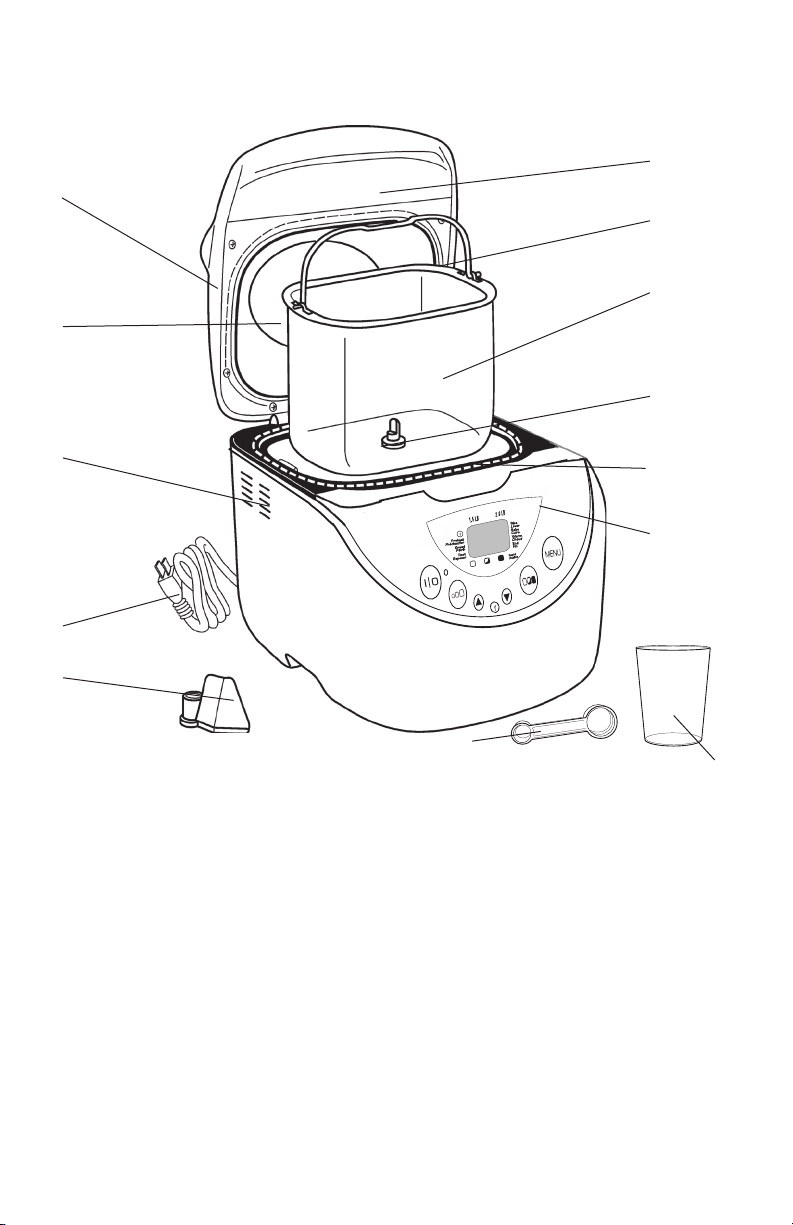
YOUR BREADMAN® BREAD MAKER
PRODUCT MAY VARY SLIGHTLY FROM ILLUSTRATIONS
1.
11.
10.
9.
8.
7.
1. BASIC
DE BASE
2. FRENCH
FRANÇAIS
3. WHOLE WHEAT
BLÉ ENTIER
4. SWEET
PAIN SUCRÉ
5. SUPER RAPID
SUPER-RAPIDE
12.
6. DOUGH
PÂTE
7. PASTA
PÂTES
8. GLUTEN FREE
SANS GLUTEN
9. JAM
CONFITURE
10. BAKE
CUISSON
2.
3.
4.
5.
6.
13.
1. Removable Lid (P/N 22826)
2. Bread Pan Handle
3. Bread Pan (P/N 22822)
4. Drive Shaft (inside)
5. Baking Chamber
6. Control Panel
7. Kneading Paddle (P/N 22823)
8. Power Supply Cord with
Polarized Plug
9. Air Exhaust
10. Viewing Window
11. Lid Handle
12. Measuring Spoon (P/N 22824)
13. Measuring Cup (P/N 22825)
5
Page 6

CONTROL PANEL
DISPLAY WINDOW
Shows your MENU cycle selection,
TIMER setting, crust COLOR, LOAF size
and process.
OPERATION/KEEP WARM LIGHT
The Operation Light next to the START/
STOP Button will illuminate while the
Breadman® Bread Maker is ON; when
the Breadman® is completed and in
Keep Warm phase, the Light will flash.
▲ (UP) and t (DOWN) Buttons
Use this pair of Buttons to set the
TIMER.
Use this pair of Buttons to add or
subtract time displayed in the Display
Window.
▲ Each time you press this Button,
the Timer advances 10 minutes.
t Each time you press this Button, the
Timer is set back 10 minutes.
MENU
Press this Button to select the cycle
you want out of the ten (1 to 10)
listed on the Control Panel. Each
time you press this Button, the
number of the cycle will change to
the next selection in the Display.
Press this Button until your choice is
indicated.
COLOR
Select the crust COLOR: Light,
Medium or Dark. The Breadman®
Bread Maker is preset to Medium.
Use this Button to select the
RAPID cycle for the MENU program
indicated in the Display.
LOAF
Select the LOAF size: 1.5 LB, or 2
LB. The Breadman® Bread Maker is
preset to 2 LB.
START/STOP
Press this Button to start the
chosen cycle and to begin the Timer
countdown. Press this Button for
a full second to reset the cycle’s
TIMER setting or to cancel the cycle
in progress.
When you press any Button, you
should hear a beep. This lets you
know you’ve pressed hard enough to
activate your selection.
6
Page 7

CONTROL PANEL (CONTINUED)
MENU OPTIONS
Select from these Bread/Dough cycles:
1. BASIC
Basic Light (1.5 LB)
Basic Light (2.0 LB)
Basic Medium (1.5 LB)
Basic Medium (2.0 LB)
Basic Dark (1.5 LB)
Basic Dark (2.0 LB)
Basic Rapid (1.5 LB)
Basic Rapid (2.0 LB)
2. FRENCH
French Light (1.5 LB)
French Light (2.0 LB)
French Medium (1.5 LB)
French Medium (2.0 LB)
French Dark (1.5 LB)
French Dark (2.0 LB)
French Rapid (1.5 LB)
French Rapid (2.0 LB)
3. WHOLE WHEAT
Whole Wheat Light (1.5 LB)
Whole Wheat Light (2.0 LB)
Whole Wheat Medium (1.5 LB)
Whole Wheat Medium (2.0 LB)
Whole Wheat Dark (1.5 LB)
Whole Wheat Dark (2.0 LB)
Whole Wheat Rapid (1.5 LB)
Whole Wheat Rapid (2.0 LB)
4. SWEET
Sweet Light (1.5 LB)
Sweet Light (2.0 LB)
Sweet Medium (1.5 LB)
Sweet Medium (2.0 LB)
Sweet Dark (1.5 LB)
Sweet Dark (2.0 LB)
Sweet Rapid (1.5 LB)
Sweet Rapid (2.0 LB)
5. SUPER RAPID
Super Rapid Light (1.5 LB)
Super Rapid Light (2.0 LB)
Super Rapid Medium (1.5 LB)
Super Rapid Medium (2.0 LB)
Super Rapid Dark (1.5 LB)
Super Rapid Dark (2.0 LB)
6. DOUGH
7. PASTA
8. GLUTEN FREE
Gluten Free Light (1.5 LB)
Gluten Free Medium (1.5 LB)
Gluten Free Dark (1.5 LB)
9. JAM
10. BAKE
Bake Light
Bake Medium
Bake Dark
7
Page 8

KNEADING AND BAKING CYCLES
Note: If at any time during bread making process you need to turn bread maker off, press
and hold the START/STOP (I/O) button for several seconds, then unplug the unit.
Note: If bread is not removed immediately after baking and START/STOP button is not
pressed, a controlled 60-minute Keep Warm mode will begin (except during Dough, Jam &
Pasta). For best results, remove bread immediately after baking process is complete.
BASIC
Used for breads that primarily include white bread flour, although some recipes may
include small amounts of whole wheat flour.
FRENCH
Traditionally, French bread has a slightly crispier crust and lighter texture than white
bread. Recipes usually do not include butter, margarine or milk.
WHOLE WHEAT
Used for recipes with significant amounts of whole wheat or rye flour, oats or bran.
Whole wheat cycle begins with rest period during which flours or grains absorb liquid
ingredients. Soaking causes flour or grain to soften and helps ingredients to combine.
Generally, whole wheat and multi-grain breads are shorter and denser than white, French
or sweet.
SWEET
Used for recipes that contain eggs, fruit juice, additional sugar or added sweet ingredients
such as coconut flakes, raisins, dried fruit or chocolate. Baking temperature is reduced to
prevent burning.
SUPER RAPID
Used for White, Whole Wheat and French cycles to decrease time to approximately 1 hour.
Choose recipe, then simply add ½ tsp. to amount of yeast listed for a 2-lb. loaf. Bread may
be shorter and denser than bread made using the longer program.
DOUGH
Use to prepare dough for making bread, rolls or pizza which are shaped and allowed to
rise before baking in a conventional oven. This setting blends and kneads the dough and
takes it through the first rise.
PASTA
Several different kinds of doughs can be mixed using the PASTA program. Remove dough
and follow directions with the recipe to complete the baking/cooking.
GLUTEN-FREE
Used for gluten-free recipes.
JAM
Use to prepare preserves, marmalade, chutneys and ketchup.
Add fruit, sugar and lemon juice for homemade preserves –
a great topping for homemade bread, waffles and ice cream.
BAKE ONLY
Used if crust is too light or you wish to bake pre-made dough – also especially useful if
your bread is not quite done. Check every few minutes. Bakes for up to 1 hour, 30 minutes.
8
Page 9

KNOW YOUR INGREDIENTS
FLOUR & OTHER GRAINS
ALL-PURPOSE FLOUR
BRAN
BREAD FLOUR
CORNMEAL AND OATMEAL
CRACKED WHEAT
RYE FLOUR
SELF-RISING FLOUR
7 GRAIN CEREAL BLEND
VITAL WHEAT GLUTEN
WHOLE WHEAT FLOUR
TIPS ON FLOUR STORAGE
Keep flour in a secure, airtight container. Store rye and whole wheat flours in a
refrigerator, freeze or a cool area to prevent them from becoming rancid. Allow flour to
come to room temperature before using.
Note: Flours, while visibly similar, can be very different in how they are ground, milled,
stored, etc. You may have to experiment with different brands of flour to help you make the
perfect loaf. See RECIPE TIPS to assist with these experiments.
YEAST
Active yeast, through a fermentation process, produces carbon dioxide gas necessary to
make bread rise. Yeast feeds on carbohydrates in sugar and flour to produce this gas.
Three different types of yeast are available: fresh (cake), active dry and quick-acting.
Quick, rapid rise and bread machine yeasts are quick-acting. Fresh (cake) yeast is NOT
RECOMMENDED for use with your bread maker.
TIPS ON YEAST
Ensure your yeast is fresh by checking its expiration date. Ideally, yeast should be used
several months before the expiration date. Once a package or jar of yeast is opened, it is
important that the remaining contents be immediately resealed and refrigerated or frozen
for future use. Often dough that fails to rise is due to stale yeast.
Note: Basic bread and dough recipes in this booklet were developed using active dry yeast.
You may use chart below to substitute any quick-acting yeast (quick rise, fast rise or bread
maker yeast) for active dry yeast.
CONVERSION CHART FOR BREAD MACHINE YEAST
¾ tsp. bread machine yeast = ½ tsp. quick-acting yeast
1 tsp. bread machine yeast = ¾ tsp. quick-acting yeast
1½ tsp. bread machine yeast = 1 tsp. quick-acting yeast
2¼ tsp. bread machine yeast = 1½ tsp. quick-acting yeast
1 tbsp. bread machine yeast = 2 tsp. quick-acting yeast
RAPID CYCLES
Rapid cycle settings for White, Whole Wheat and French decrease time for making your
favorite bread in approximately 1 hour. Choose recipe, then add an additional ½ tsp. of
bread machine yeast to the recipe. The bread may be shorter and denser.
All-purpose flour is a blend of refined hard and soft wheat flours ideally suited for making quick
breads and cakes.
Bran (unprocessed) is coarse outer portion of wheat or rye grains that is separated from flour
by sifting or bolting. It is often added to bread in small quantities for nutritional enrichment,
heartiness and flavor. It is also used to enhance bread texture.
Bread flour typically has higher gluten concentration than all-purpose flour. Using bread flour
will produce loaves with better volume and structure.
Cornmeal and oatmeal come from coarsely ground white or yellow corn and from rolled or
steel-cut oats. They are used primarily to enhance flavor and texture of bread.
Cracked wheat has very coarse texture. It comes from wheat kernels cut into angular
fragments. It gives whole grain breads a nutty flavor and crunchy texture.
Rye flour must always be mixed with high proportion of bread flour, as it does not contain
enough gluten to develop structure for high, even-grained loaf.
Self-Rising Flour is NOT RECOMMENDED for use with your bread maker. Self-rising flour
contains leavening ingredients that will interfere with bread and quick bread making.
7 grain cereal blend is a blend of cracked wheat, oats, bran, rye, cornmeal, flax seeds and
hulled millet. It is used primarily to enhance flavor and texture of bread.
Vital Wheat Gluten is manufactured from wheat flour that has been treated to remove nearly
all of the starch to leave a very high protein content. (Gluten is the protein in wheat that makes
dough elastic.) Vital Wheat Gluten is available at most health food stores. It can be used in small
portions to increase volume and lighten texture.
Whole wheat flour is milled from the entire wheat kernel, which contains the bran and germ.
This high fiber flour is richer in nutrients than all-purpose or bread flour. Breads made with this
flour are usually smaller and heavier than white loaves. Many recipes mix whole wheat flour
with bread flour or vital wheat gluten to produce higher, lighter-textured bread.
9
Page 10

MEASURING YOUR INGREDIENTS
The most important step when using your Breadman® Bread Maker for making bread is
measuring your ingredients. It is very important to measure each liquid and dry ingredient
accurately. For best results, add ingredients into the Bread Pan in the order given in each
recipe.
LIQUID MEASUREMENTS
Use transparent plastic or glass liquid measuring cups to measure all liquid ingredients.
Place the cup on a horizontal flat surface and view markings at eye level. The level of the
liquid must be aligned to the appropriate mark of measurement. A “guesstimate” is not
good enough, as it could throw off the critical balance of the recipe.
DRY MEASUREMENTS
Dry ingredients must be measured using standard size dry measuring cups. These cups
are available in various sizes. Gently spoon dry ingredients into the measuring cup and
level off with a knife. Do not scoop or tap measuring cup, as this will pack the ingredients.
This extra amount could affect the balance of the recipe. Do not sift flour in bread making.
When measuring small amounts of dry or liquid ingredients (i.e. yeast, sugar, salt, dry
milk, honey or molasses), a standard measuring spoon must be used. Measurements
must be level, not heaping.
The Breadman® Bread Maker produces delicious baked goods with ease. This marvelous
appliance asks only that you carefully follow the recipe instructions. In most cooking,
a pinch of this and a dash of that is fine, but this is not the case for automatic Bread
Makers. Using this Breadman® Bread Maker requires that you accurately measure each
ingredient.
MEASUREMENT/CONVERSION CHART
1-1/2 tsp = 1/2 TBL 8 TBL = 1/2 cup
3 tsp = 1 TBL 12 TBL = 3/4 cup
1/2 TBL = 1-1/2 tsp 16 TBL = 1 cup
2 TBL = 1/8 cup 3/8 cup = 1/4 cup + 2 TBL
4 TBL = 1/4 cup 5/8 cup = 1/2 cup + 2 TBL
5 TBL+ 1 tsp = 1/3 cup 7/8 cup = 3/4 cup + 2 TBL
10
Page 11

ADDITIONAL INGREDIENT NOTES
Important: Exact measurements for ingredients are the most important part of baking. It is the key to getting great texture and consistency
in your bread. Make sure to measure all ingredients exactly.
BAKING POWDER
BAKING SODA
EGGS
FATS
LIQUIDS
SALT
SUGAR
Double-acting baking powder is a leavening agent used in quick breads and cakes. This type of leavening agent does
not require rising time before baking, as chemical reaction works when liquid ingredients
are added and again during baking process.
Baking soda is another leavening agent, not to be confused or substituted for baking powder.
It also does not require rising time before baking, as chemical reaction works during baking process.
Eggs add richness and velvety texture to bread dough and cakes. When recipe calls for egg(s),
large egg(s) at room temperature should be used.
Butter, margarine and oil shorten or tenderize the texture of yeast breads. French bread gets unique crust and
texture from the lack of added fat. However, breads that call for fat stay fresh longer.
If butter is used directly from refrigerator, it should be cut into small pieces for easier blending
during kneading process.
All liquids should be warm 80ºF/27ºC to 90°F/32°C for all recipes. Liquids, such as milk, water or a combination of
powdered milk and water, can be used when making bread. Milk will improve flavor,
provide velvety texture and soften the crust, while water alone will produce a crispier crust. Vegetable
or fruit juices and potato water may be used for flavor variety.
Salt is necessary to balance flavor in breads and cakes; it also limits growth of yeast. Changing the amount of salt in
a given recipe may result in shorter, gummier bread. When first making a type of bread, do not increase or decrease
amount of salt shown in the recipe.
Sugar is important for color and flavor of breads. It also serves as food for yeast since it the supports fermentation
process. Recipes in this book that call for sugar require granulated sugar.
Important: Do not substitute powdered sugar. Artificial sweeteners cannot be used as substitute,
as yeast will not react properly with them.
CLIMATE CHANGES & BAKING
• In high-altitude areas (over 3,000 feet), dough tends to rise faster
as there is less air pressure. Therefore, less yeast is necessary.
• In dry climates, flour is drier and requires slightly more liquid.
• In humid climates, flour is wetter and will absorb less liquid, so less liquid is required.
How to Use
This product is for household use only.
GETTING STARTED
• Remove packing materials and any stickers.
• Please go to www.prodprotect.com/applica to register your warranty.
• Place bread maker on dry, stable, level surface away from heat and areas where
cooking grease or water may splatter on unit. Do not place near edge of counter top.
If placing beneath cabinets, make sure there is enough room to open the lid without
interference.
Important: Your bread maker will bake up to a 2lb. loaf. Do not put larger quantities of
ingredients into bread pan. Bread will not mix and bake correctly and bread maker may
become damaged. (See MAXIMUM INGREDIENT AMOUNTS.)
• Before first use, operate on Rapid White cycle without adding ingredients to burn off
manufacturing oils. (Follow instructions in USING YOUR BREAD MAKER.)
Note: During first use, bread maker may smoke and/or
emit an odor from mineral oils used in manufacturing. This is normal.
MAXIMUM INGREDIENT AMOUNTS
• Bread cycles 4 to 4-2/3 cups
• Batter Breads and prepackaged cake mixes 4 cups
• Dough cycles 4-2/3 cups
• Jam 3 cups fruit
11
Page 12

BREAD PAN TIPS
Inserting bread pan
Note: Remember to insert kneading paddles first, then add all ingredients in the order
listed BEFORE inserting the bread pan into baking chamber.
• When inserting bread pan into bread maker, make sure to set firmly in place.
Removing bread pan
• To remove bread pan from baking chamber, hold handle with an oven mitt and lift
straight up firmly.
Important: When you remove bread pan after baking, be sure to wear oven mitts to
prevent burning.
• After removing loaf (by turning bread pan upside down and shaking gently), check to
see that kneading paddle is removed from loaf. If it is stuck in bread, allow bread to
cool; then use a non-metal utensil to remove it, taking care not to scratch the kneading
paddle. Allow bread to cool before removing the kneading paddle.
CHECKING DOUGH CONSISTENCY
Although your bread maker will mix, knead and bake bread automatically,
when baking bread from scratch, it is recommended that you learn to
recognize condition of your dough. The ratio of flour to liquid is the most
critical factor in any bread recipe, yet the most easily remedied. After 5 to
8 minutes in Knead 2, open bread maker to check consistency of dough.
Dough should be in a soft, tacky ball (feel sticky like scotch tape). If it is
too dry, add 1 tsp. of liquid at a time. If it is too wet, add 1 tbsp. of flour at a
B
time.
USING YOUR BREAD MAKER
Note: Depending on the cycle or recipe used, some steps may not
apply or there may be additional steps. Refer to the respective recipes
instructions in the recipes portion of this booklet, as well as the specific
cycle instructions located at the end of these usage instructions.
1. Open lid and remove bread pan. Lift bread pan straight up and out
using the handle (B).
C
Caution: Do not turn or shake bread pan while taking it out. If the bread
pan is bent, temperature sensor may not work properly.
2. Position kneading paddle on the drive shaft. Match flat side of drive
Yeast
shaft to flat part of hole in kneading paddle (C). Make sure paddle is
secure.
3. Place ingredients into the bread pan.
Important: Add ingredients to bread pan in the order listed in the
recipe.
Dry
Liquid
D
Important: Always add yeast last.
4. Make small indentation on top of dry ingredients (not so deep it
reaches the wet layer) and add yeast (D).
Important:
Indentation for yeast is important, especially when using the
delay bake timer. It keeps yeast away from the wet ingredients until the
kneading process begins. (Liquid ingredients will prematurely activate
the yeast.)
5. Insert the bread pan into the baking chamber (E). Press down on
E
rim of bread pan until it snaps securely into place.
6. Close the Lid. Plug into 120V AC outlet. The Breadman® will beep and the Display
Window will illuminate.
12
Page 13

7. Press the MENU Button to choose the bread or dough cycle (1 to 10) you want. The
cycle names and corresponding numbers are listed on the Control Panel.
Each time the MENU Button is pressed, it will beep and the cycle number (1 to 10) will
appear in the Display Window.
8. Press COLOR to choose crust color. Bread maker is preset for medium crust.
Note: CRUST will not be activated for the following cycles: Jam, Dough and Pasta
9. Press LOAF to select loaf size. Bread maker is preset to 2 lb.
Note: Loaf size cannot be activated for the following cycles: Jam, Dough, Pasta & Bake
Note: The smaller size recipes and mixes will not fill the Bread Pan when finished. This is
especially true for bread recipes that contain whole grains or other special ingredients.
Note: When using the Gluten Free recipes provided in the Recipe Guide, always choose the
1.5 LB setting.
10. Press START/STOP button to begin kneading cycle. The time remaining will begin to
count down in display window. Bread making time and loaf size will be shown in display
window.
Note: During kneading cycle, yeast will activate and viewing window may begin to fog. (This
will clear eventually so you can view the progress.
11. Add ingredients, such as dried fruit or nuts, herbs, oats, etc. at the Add-Ingredient
Beep during the BASIC, WHOLE WHEAT and SWEET cycles. See Kneading and Baking
Cycles Chart for exact time on each cycle.
12. When your bread is finished baking the Breadman® Bread Maker
will beep and “0:00” will appear in the Display Window. Press the
START/STOP Button and open the Lid. (F)
Important: Remember, bread pan and loaf are both very hot! Be
careful not to place either on tablecloth, plastic surface or other
heat-sensitive surface that may scorch or melt.
NOTE: Keep Warm does not apply to the following cycles: Jam, Dough,
Bake Only, Pasta
13. Turn bread pan upside down and shake to release bread (G). Place
bread upright on wire rack to cool at least 20 minutes before
slicing.
Caution: Be sure to remove kneading paddle from the bread before serving.
Caution: Bread pan, kneading paddle and bread will be
very hot. Allow bread to cool before removing the paddle.
14. Unplug unit and allow to cool completely before cleaning.
(See CARE AND CLEANING INSTRUCTIONS.)
Important: Make sure to clean the inside of the baking
chamber thoroughly after each use.
15. Once bread has cooled (approximately 2 hours) store in
an airtight container.
SLICING AND STORING BREAD
For best results, place bread on wire rack and allow to cool at least 20 minutes before
slicing. Use electric knife or serrated knife for even slices.
Store unused bread, tightly sealed (sealable plastic bags or plastic containers work well)
at room temperature for up to 3 days. For longer storage, (up to 1 month) place bread in
sealed container in freezer. Since homemade bread has no preservatives, it tends to dry
out and become stale faster. Leftover or slightly hardened bread may be cut into ½-inch or
1-inch cubes and used in recipes to make croutons, bread pudding or stuffing.
G
F
13
Page 14

USING 15-HOUR DELAY BAKE TIMER
Important: Delay baking does not activate JAM cycle. Do not use delay bake timer if your
recipe includes perishables, such as, eggs, fresh milk, yogurt or other dairy products
and meats, etc. To preset your bread maker, follow these steps:
1. Add ingredients in the order listed as usual, taking care not to let yeast and liquid
ingredients contact one another.
Note: If your recipe contains salt, add it with the liquid ingredients, taking care to keep it
away from the yeast.
2. Close bread maker lid and plug it in.
3. Press MENU to select baking cycle. Standard cycle time will be shown in display
window.
4. Press ▲ to add time in 10-minute intervals. (Use t to subtract time.) Amount of time
set is shown in display window.
• For example, if it is 8:00 AM and you want bread ready at 1:00 PM, press ▲ until the
display reads 5:00 – meaning it will finish baking in 5 hours. This is the hour difference
between 8:00 AM and 1:00 PM.
Note: Actual baking times will not change.
5. Press LOAF to choose loaf size, press COLOR to choose crust color, then press START/
STOP to begin timer. The colon (:) in time display begins to flash, letting you know timer
is started. When your bread is finished baking, bread maker will beep and “0:00” will
appear in display window. Press START/STOP and open lid.
6. If you make an error after you’ve activated program and want to start over, press and
hold START/STOP for several seconds. Timer will clear and you can begin again.
BAKE ONLY
The BAKE ONLY cycle offers the flexibility to vary time. You can bake pre-made dough or
dough purchased at the store using this cycle. You may also use this cycle if crust color is
too light or if your sweet bread is not quite done. Check every few minutes.
1. Press the MENU Button until 10 (BAKE) appears in the Display Window.
2. Press the ▲ (UP) and t (DOWN) TIMER Buttons (arrows) to adjust the amount of time
you need to BAKE, from 1 to 15 hours.
3. Press the START/STOP Button to begin the BAKE cycle.
4. If you need less than 1 hour, press the START/STOP Button to cancel the BAKE cycle at
the desired time.
SPECIAL GLAZES FOR YEAST BREADS
Select 1 of the following special glazes to enhance your bread:
• Melted Butter Crust: Brush melted butter over just-baked bread for a softer, more
tender crust.
• Milk Glaze: For a softer, shiny crust, brush just-baked bread with milk or cream.
• Sweet Icing Glaze: Mix 1 cup sifted confectioner’s sugar with 1 to
2 tablespoons of milk, water or fruit juice until smooth. Drizzle glaze over raisin or
sweet bread when they are almost cool.
Note: If desired, generously sprinkle with your choice of nuts or seeds after glazing.
DOUGH CYCLE
Tips for Best Results
• If using delay bake timer, make sure yeast is on top of flour, away from liquids.
Important: Never allow dough to remain in bread maker after cycle is complete; it may
over rise and damage machine.
14
Page 15

• Rising times for dough after it is shaped and placed in baking pan will vary due to
recipe, temperature and humidity level of your kitchen. Optimum temperature for rising
is 80°– 85°F. Rising is the most essential feature in bread making.
• Bread maker allows dough to have first rise or fermentation before dough is removed.
Fermentation conditions gluten, (becoming pliable and elastic with a soft, smooth
quality) develops flavor and leavens product.
• Sometimes a double rising is beneficial especially for whole grain or 100% whole wheat
bread. Let dough rise once in bread maker. Remove from bread maker, punch down,
let rise again, punch down and let rest 10 minutes. Resting allows gluten to relax and
makes handling easier. Shape as desired and allow to rise until doubled in volume. If
only 1 rise is desired, remove from bread maker, let rest, shape and rise as above.
• Baker’s Tip: Dough has doubled in volume when an indentation remains after tip of a
finger is pressed lightly and quickly into dough. If indentation springs back, cover and
let rise a few more minutes and check again.
SPECIAL TIPS FOR MAKING DOUGH
Important: For use only with the Dough Cycle.
• Always allow optimum rising of shaped dough.
• Use pastry brush to apply glaze.
• Bake as directed in recipe.
Apply Just Before Baking:
Egg Yolk Glaze
For shiny golden crust, mix 1 slightly beaten egg or egg yolk with 1 tbsp. water or milk.
Egg White Glaze
For shiny, chewy crust, mix 1 slightly beaten egg white with 1 tbsp. water.
If desired, sprinkle chopped nuts or fruit and/or seeds after glazing.
Lightly Floured
Sprinkle enough flour onto work area so dough can be handled without sticking.
Shaped Rolls
Important: Once rolls are shaped, cover and let rise until doubled before baking.
Cloverleaf Rolls
Shape into ½-inch balls. Place 3 balls in each greased muffin tin.
Crisscross Rolls
Shape into balls, setting 2 aside. Combine balls and roll into a ¹⁄8-inch thick square. Cut
strips ¹⁄8-inch wide and 2-inches long. Brush top of roll with beaten egg. Place 1 strip
across top of each ball. Repeat process, placing second strip in opposite direction across
top of each ball.
Traditional Rolls
Shape into balls. For “pull apart” rolls, place dough balls with sides touching in 8 or 9 inch
round or square greased baking pan. For “individual” rolls place dough balls 2-inches
apart.
Crescent Rolls
On lightly floured board, roll dough to 12-inch circle. Spread with softened butter. Cut
into 16 wedges beginning at wider end. Place rolls 2 inches apart on greased baking sheet
with points underneath; curve rolls slightly. If desired, brush with melted butter just before
baking.
Rosettes
On lightly floured board, roll about 1 ½ oz piece of dough into 14 inch rope. Tie in a loose
knot, leaving 2 long ends. Tuck one end under knot and second end into the top center of
the loose knot. Place 2 inches apart on lightly greased baking sheet.
15
Page 16

JAM CYCLE METHOD AND RECIPES
Use this cycle for making jams from fresh or frozen fruits. Do not double recipes or allow
ingredients to boil over the Baking Pan into the Baking Chamber. Should this happen, stop
the Bread Maker immediately. Allow to cool and clean thoroughly.
Press the MENU Button until 9 (JAM) appears in the Display Window.
Method:
1. Remove the Bread Pan from the Breadman®. Attach the Kneading Paddle onto the
Drive Shaft. Have all ingredients ready. Clean fresh berries or fruit, cut into 1/2-inch
cubes and drain. If using frozen fruit, thaw and drain.
2. Use a liquid measuring cup to measure the drained fruit, then crush with a potato
masher or with your hands.
3. Use a dry measuring cup to measure the sugar.
4. Use a measuring spoon to measure the lemon juice, if using.
5. Place the Bread Pan into the Breadman®. Push down until it fits firmly into place.
Close Lid.
6. The Display Window will show 9 (JAM). Press the START/STOP Button.
7. The Bread Maker will pre-heat for 15 minutes before any movement occurs in the
Bread Pan. After pre-heating, the jam will be heated and mixed for approximately 50
minutes. The entire JAM cycle takes 1 hour 5 minutes.
8. When the jam is finished, the Breadman® will beep and “0:00” will appear in the
Display Window. Press the START/STOP Button and open the Lid.
CAUTION: THE OVEN CAVITY, BREAD PAN, KNEADING PADDLE AND JAM WILL BE VERY
HOT USE OVEN MITTS.
9. Remove the Bread Pan from the Breadman®. BE SURE TO USE OVEN MITTS.
10. Pour the hot jam into a heat-safe container. Leave on the counter top to cool;
stir frequently.
11. Pour the jam into a refrigerator/freezer-safe container, leaving 1/2" of space at the top.
12. Cover tightly to store. Jam will thicken upon cooling.
PASTA CYCLE
Use this cycle to mix doughs and then follow directions with the recipe to complete the
baking/cooking. Several different kinds of doughs can be mixed using the PASTA program.
Remove dough and follow directions with the recipe to complete the baking/cooking.
• It is very important that you assist the Bread Maker in the stirring process. After 5
minutes (:09), open the Lid and use a rubber spatula to gently scrape the ingredients
from the sides and corners of the Bread Pan and fold into the wet mixture. Close the
Lid and allow the Bread Maker to complete the cycle.
• Because cookie dough is more difficult to work with, it may be necessary to repeat part
or all of the PASTA cycle. Remember to check the mixture after 5 minutes and assist
when necessary.
16
Page 17

Care and Cleaning
This product contains no user serviceable parts. Refer service to qualified service
personnel.
CLEANING
Important: Always unplug bread maker and allow to cool completely prior to cleaning.
Bread pan and kneading paddle have nonstick surfaces, which make cleaning easier.
1. After baking each loaf of bread, unplug bread maker and allow to cool; discard any
crumbs.
2. Remove bread pan from oven chamber and kneading paddle from bread pan. Wash
bread pan and kneading paddle inside and out with warm, soapy water. Avoid scratching
nonstick surfaces.
Caution: Do not place bread pan in dishwasher, or soak it in water.
3. If kneading paddle is stuck to drive shaft, pour warm water into bread pan for up to 30
minutes, to loosen it. Do not use excessive force.
4. Wipe inside of lid and oven baking chamber with slightly damp cloth or sponge. If any
residue has scorched on heating element or elsewhere, wipe with nonabrasive pad to
clean. Lid can be removed for cleaning. Dry baking chamber and lid thoroughly.
Important: Do not put lid in dishwasher, as it may cause warping.
Do not immerse in water, as it contains sensitive electronic sensors.
5. To clean glass in lid, use glass cleaner or mild detergent and damp cloth or plastic
scouring pad. Do not use abrasive cleaners or scouring pads, as they may scratch
glass.
6. Do not use vinegar, bleach or harsh chemicals to clean bread maker.
7. Be sure bread maker is completely cooled before storing.
8. Baking chamber contains heating element and drive shaft. When cleaning, NEVER pour
water, solvents or cleaning solutions into this area.
STORAGE
• All removable parts should be thoroughly cleaned and dried.
• Store lid closed. Place bread pan into bread maker with kneading paddle inside.
TROUBLESHOOTING
QUESTION ANSWER
Why does height and shape
of bread differ in each loaf?
Bread has unusual aroma. Why? Stale ingredients may have been used or too much yeast may have been used. Always use fresh
Kneading paddle comes out with
bread.
Bread has floured corners. Sometimes flour in the corners of the bread pan may not have been completely kneaded into dough.
Can ingredients be halved
or doubled?
Can fresh milk be used
in place of dry milk?
Height and shape of bread may differ depending on the ingredients, room temperature and length of timer
cycle. Also, accurate measurement of ingredients is essential to make delicious bread.
ingredients. Accurate measurements are essential to make delicious bread.
This can happen, as kneading paddle is detachable. Use a nonmetal utensil to remove it.
Caution: Kneading paddle will be hot. Allow bread to cool before removing paddles.
Scrape it off the loaf with a knife. Check bread about 10 minutes into kneading cycle. If all flour is not
incorporated, use a rubber spatula to remove the flour from the sides of the bread pan so it can be
incorporated into the dough.
NO. If there is too little in bread pan, kneading paddle cannot knead well enough. If there is too much,
bread rises out of bread pan.
YES. Be sure to decrease same measurement of water to equal liquid substitution.
Fresh milk is not recommended when using delay bake timer, because it may spoil while
sitting in bread pan.
17
Page 18

NEED HELP?
For service, repair or any questions regarding your appliance, call the appropriate 800
number on cover of this book. Please DO NOT return the product to the place of purchase.
Also, please DO NOT mail product back to manufacturer, nor bring it to a service center.
You may also want to consult the website listed on the cover of this manual.
Two-Year Limited Warranty
(Applies only in the United States and Canada)
What does it cover?
• Any defect in material or workmanship provided; however, Applica’s liability will not
exceed the purchase price of product.
For how long?
• Two years from the date of original purchase with proof of such purchase.
What will we do to help you?
• Provide you with a reasonably similar replacement product that is either new or factory
refurbished.
How do you get service?
• Save your receipt as proof of date of sale.
• Visit the online service website at www.prodprotect.com/applica, or call toll-free 1-800-
231-9786, for general warranty service.
• If you need parts or accessories, please call 1-800-738-0245.
What does your warranty not cover?
• Damage from commercial use
• Damage from misuse, abuse or neglect
• Products that have been modified in any way
• Products used or serviced outside the country of purchase
• Glass parts and other accessory items that are packed with the unit
• Shipping and handling costs associated with the replacement
of the unit
• Consequential or incidental damages (Please note, however, that some states do
not allow the exclusion or limitation of consequential or incidental damages, so this
limitation may not apply to you.)
How does state law relate to this warranty?
• This warranty gives you specific legal rights. You may also have other rights that vary
from state to state or province to province.
18
Page 19

BASIC WHITE BREAD RECIPES
BASIC WHITE/FRENCH BREAD
Ingredients: 1.5 LB 2 LB
Water, 80°F/27°C 1-1/8 cup 1-1/2 cup
Vegetable Oil (optional) 1-1/2 TBL 2 TBL
Sugar 1/2 TBL 1 TBL
Salt 1-1/2 tsp 1-1/2 tsp
Bread Flour 3 cups 4 cups
Active Dry Yeast 2 tsp 2-1/2 tsp
Select BASIC cycle
Select RAPID BASIC cycle
Active Dry Yeast 2-1/2 tsp 2-3/4 tsp
FRENCH BREAD RECIPES
French BREAD
Ingredients: 1.5 LB 2 LB
Water, 80°F/27°C 1 cup + 2 TBL 1-1/3 cups
Olive Oil 1 TBL + 1 tsp 2 TBL
Sugar 1 TBL + 1-1/2 tsp 2 TBL
Salt 1 tsp 1-1/2 tsp
Bread Flour 3-1/4 cups 4 cups
Active Dry Yeast 2 tsp 2-1/4 tsp
Select FRENCH cycle
Select RAPID FRENCH cycle
Active Dry Yeast 2-3/4 tsp 1 TBL
ITALIAN HERB BREAD
Ingredients: 1.5 LB 2 LB
Water, 80°F/27°C 1 cup + 1 TBL 1-1/4 cups +
2 TBL
Oil 2 TBL 3 TBL
Sugar 2 TBL 3 TBL
Salt 1-1/2 tsp 2 tsp
Dry Milk 2 TBL 3 TBL
Bread Flour 3 cups 4 cups
Dried Italian Seasoning 2 tsp 1 TBL
Active Dry Yeast 2 tsp 2-1/4 tsp
Select FRENCH cycle
Select RAPID FRENCH cycle
Active Dry Yeast 2-3/4 tsp 1 TBL
19
Page 20

WHOLE WHEAT BREAD RECIPES
CARAWAY RYE BREAD
Ingredients: 1.5 LB 2 LB
Eggs(s), large, room temperature 1 2
plus enough Water, 80°F/27°C
to equal 1 cup + 1 TBL 1-1/3 cups
Oil 3 TBL 1/4 cup
Honey 3 TBL 1/4 cup
Dry Milk 2 TBL 3 TBL
Salt 1-1/2 tsp 2 tsp
Bread Flour 1-1/2 cups 2 cups
Whole Wheat Flour 3/4 cup 1 cup
Rye Flour 2/3 cup 1 cup
Caraway Seeds 2 TBL 3 TBL
Active Dry Yeast 2 tsp 2-1/4 tsp
Select WHOLE WHEAT cycle
Select RAPID WHOLE WHEAT cycle
Active Dry Yeast 2-3/4 tsp 1 TBL
WHOLE WHEAT WITH GLUTEN BREAD
Ingredients: 1.5 LB 2 LB
Water, 80°F/27°C 1-1/4 cups 1-1/2 cups
Oil 2-1/2 TBL 3 TBL
Molasses 2-1/2 TBL 3 TBL
Salt 1-1/2 tsp 2 tsp
Dry Milk 2 TBL 3 TBL
Whole Wheat Flour 3 3/4 cups 4 cups
Gluten 2-1/2 TBL 3 TBL
Active Dry Yeast 2 tsp 2-1/4 tsp
Select WHOLE WHEAT cycle
Select RAPID WHOLE WHEAT cycle
Active Dry Yeast 2-3/4 tsp 1 TBL
20
Page 21

SEVEN GRAIN BREAD
Ingredients: 1.5 LB 2 LB
Egg, large, room temperature plus 1 1
enough Water, 80°F/27°C
to equal 1 cup + 2 TBL 1-1/2 cups
Oil 2 TBL 3 TBL
Honey 2 tsp 1 TBL
Salt 1-1/2 tsp 2 tsp
Whole Wheat Flour 1-1/2 cups 2 cups
Bread Flour 1/2 cup 1 cup
Brown Rice Flour 1/4 cup 1/3 cup
Spelt Flour 1/4 cup 1/3 cup
Buckwheat Flour 1/4 cup 1/3 cup
Rye Flour 1/4 cup 1/3 cup
Oatmeal 1/4 cup 1/3 cup
Cornmeal 2 TBL 1/4 cup
Gluten 3 TBL 1/4 cup
Active Dry Yeast 2 tsp 2-1/4 tsp
Select Whole Wheat cycle
Select Rapid Whole Wheat cycle
Active Dry Yeast 2-3/4 tsp 1 TBL
SWEET BREAD RECIPES
TRAIL MIX BREAD
Ingredients: 1.5 LB 2 LB
Water, 80°F/27°C 1-1/4 cups 1-1/2 cups
Oil 3 TBL 1/4 cup
Honey 3 TBL 1/4 cup
Salt 1-1/2 tsp 2 tsp
Bread Flour 3 cups 4 cups
Active Dry Yeast 2 tsp 2-1/4 tsp
Add ingredients at beep:
Fruit & Nut Trail Mix 1/2 cup 2/3 cup
Select SWEET cycle
Select RAPID SWEET cycle
Active Dry Yeast 2-3/4 tsp 1 TBL
21
Page 22

CINNAMON RAISIN BREAD
Ingredients: 1.5 LB 2 LB
Water, 80°F/27°C 1 cup 1-1/4 cups
+ 2 TBL
Oil 1-1/2 TBL 2 TBL
Brown Sugar 2-1/2 TBL 3 TBL
Salt 1-1/2 tsp 2 tsp
Dry Milk 1-1/2 TBL 2 TBL
Cinnamon 2 tsp 1 TBL
Bread Flour 3 cups 4 cups
Walnuts, chopped 1/2 cup 2/3 cup
Active Dry Yeast 2 tsp 2-1/4 tsp
Add ingredients at beep:
Raisins 1/2 cup 2/3 cup
Select SWEET cycle
Select Rapid SWEET cycle
Active Dry Yeast 2-3/4 tsp 1 TBL
ITALIAN HERB BREAD
Ingredients: 1.5 LB 2 LB
Water, 115°-125°F/45°-51°C (warm) 1 cup + 3 TBL 1-1/2 cups
Oil 3/4 tsp 1 tsp
Salt 1 tsp 1-1/2 tsp
Sugar 2 TBL 3 TBL
Dry Milk 4 tsp 2 TBL
Italian Seasoning 4 tsp 2 TBL
Bread Flour 3 cups 4 cups
Red Star® Quick-Rise™ Yeast 1 TBL 4-1/2 tsp
or Bread Machine Yeast 1 TBL 4-1/2 tsp
Select SUPER RAPID cycle
22
Page 23

DOUGH CYCLE RECIPES
DINNER ROLL DOUGH
Ingredients: 1.5 LB 2 LB
18 Rolls 24 Rolls
Egg, large, room temperature plus 1 1
enough Water, 80ºF/27ºC
to equal 3/4 cup + 1 TBL 1-1/3 cups
Oil 3 TBL 1/4 cup
Sugar 3 TBL 1/4 cup
Salt 1-1/2 tsp 2 tsp
Bread Flour 3 -1/4 cups 4 cups
Active Dry Yeast 2 tsp 2-1/4 tsp
Select DOUGH cycle
Method:
1. Place on a lightly floured surface. Divide into pieces and shape.
2. Place on a greased baking sheet. Cover and let rise in a warm place for 30 minutes
or until doubled in size.
3. Bake at 350ºF/177ºC for 15 to 25 minutes, or until golden brown.
WHOLE WHEAT DINNER ROLL DOUGH
Ingredients: 2 LB
18 Rolls
Water, 80ºF/27ºC 1-1/2 cups
Oil 2 TBL
Brown Sugar 1/4 cup
Salt 2 tsp
Dry Milk 2 TBL
Bread Flour 2-1/2 cups
Whole Wheat Flour 2 cups
Active Dry Yeast 2-1/4 tsp
Select DOUGH cycle
Method:
1. Place on a lightly floured
surface. Divide into pieces
and shape.
2. Place on a greased baking
sheet. Cover and let
rise in a warm place for
30 minutes or until
doubled in size.
3. Bake at 350ºF/177ºC for
25 to 30 minutes, or until
golden brown.
23
Page 24

FOCACCIA DOUGH
Ingredients: 1.5 LB
1 Loaf
Water, 80ºF/27ºC 1 cup
Olive Oil 1/3 cup
Sugar 2 tsp
Salt 1-1/2 tsp
Bread Flour 3 cups
Dried Italian Seasoning 1 tsp
Active Dry Yeast 2 tsp
Select DOUGH cycle
Garlic-Cheese Topping:
Olive Oil 1/4 cup
Dried Oregano 1-1/2 tsp
Garlic, finely minced 1/4 cup
Parmesan Cheese, grated 1/3 cup
Salt 1/4 tsp
Greek-Style Topping:
Olive Oil 1/4 cup
Dried Oregano 1-1/2 tsp
Onion, thinly sliced 1 cup
Feta Cheese, crumbled 1/3 cup
Black Olives, sliced - drained 1/4 cup
Salt 1/4 tsp
Method:
1. With oiled hands, evenly press dough into a greased 9-inch x 13-inch Pan. Using your
fingertips, make indentations in the dough.
2. Cover, let rise in a warm place for 20 minutes or until doubled in size. While the
dough is rising, select the topping and prepare.
3. In a skillet, heat oil. For Garlic-Cheese Topping, stir in oregano and garlic.
Immediately remove from heat. For Greek-Style Topping, stir in oregano and onions.
Cook until onions are soft but not brown (approximately 5 minutes).
4. Spoon topping mixture evenly over dough. Sprinkle with remaining ingredients.
5. Bake at 400ºF/205ºC for 20 minutes or until golden brown.
24
Page 25

PASTA RECIPES
Use this cycle to mix doughs and then follow directions with the recipe to complete the
baking/cooking.
Several different kinds of doughs can be mixed using the PASTA program. Remove dough
and follow directions with the recipe to complete the baking/cooking.
• It is very important that you assist the Bread Maker in the stirring process. After
5 minutes (:09), open the Lid and use a rubber spatula to gently scrape the
ingredients from the sides and corners of the Bread Pan and fold into the wet
mixture. Close the Lid and allow the Bread Maker to complete the cycle.
• Because cookie dough is more difficult to work with, it may be necessary to repeat
part
or all of the PASTA cycle. Remember to check the mixture after 5 minutes and assist
when necessary.
SEMOLINA PASTA
Ingredients:
Milk, 80°F/27°C (warm) 3/4 cup
Oil 6 TBL
Salt 1/4 tsp
Semolina (Pasta) Flour 2 cups
Select PASTA cycle
Method:
1. Remove the Bread Pan from the Breadman® Bread Maker. Attach the Kneading
Paddle onto the Drive Shaft. Have all ingredients ready. Make sure all ingredients,
except milk, are at room temperature.
2. Use a liquid measuring cup to measure the milk (80°F/27°C) and pour into the Bread
Pan.
3. Use a measuring spoon to measure the oil and add to the Bread Pan.
4. Use a measuring spoon to measure salt; level off with the straight edge of a knife
and add to the Bread Pan.
5. Lightly spoon semolina (pasta) flour into a dry measuring cup; level off with the
straight edge of a knife and add to the Bread Pan.
6. Smooth into all corners. Lightly tap Pan on counter top 3 times to settle all
ingredients.
7. Place the Bread Pan into the Breadman®. Push down on the rim until it fits firmly
into place. Close the Lid.
8. Press the MENU Button until 7 (PASTA) appears in the Display Window.
9. Press the START/STOP Button.
10. After 5 minutes (:09), open the Lid and use a rubber spatula to gently scrape the
ingredients from the sides and corners of the Bread Pan and fold into the wet
mixture. Close the Lid and allow the program to complete.
11. Grasp the Handle to remove the Bread Pan after the end of the kneading/mixing
process.
25
Page 26

12. Turn Bread Pan upside down and shake several times to remove the dough onto a
lightly floured surface.
13. Using a rolling pin, on a floured surface, roll out dough to about 1/8 inch thickness.
Cut dough into strips about 1/2 inch wide.
14. Add finished pasta to 6 cups of boiling salted water and cook 10 to 15 minutes or
until tender. DO NOT OVERCOOK. Drain well.
15. UNPLUG UNIT AND ALLOW TO COOL COMPLETELY BEFORE CLEANING.
Clean Bread Pan after each use, DO NOT IMMERSE THE BREAD PAN IN WATER.
(See CLEANING INSTRUCTIONS outlined in this Instruction Manual.) Clean the
inside of the Breadman® Bread Maker after each use.
DUMPLINGS
Ingredients:
Milk, 80°F/27°C (warm) 1 cup
Oil 1/2 cup
Salt 1/4 tsp
All-Purpose Flour 2-2/3 cups
Baking Powder 4 tsp
Select PASTA cycle
Method:
1. Place dough in bowl.
2. Using a teaspoon, carefully drop dumplings into 6 cups of boiling
broth.
3. Turn down heat to medium and cook 10 to 15 minutes or until
tender. DO NOT OVERCOOK.
Makes 4 servings.
PIE CRUST
Ingredients:
Water 80°F/27°C (warm) 1/2 cup
Oil 3/4 cup
Salt 1/4 tsp
All-Purpose Flour 2-1/2 cups
Select PASTA cycle
Method:
1. Divide in half and roll out on a lightly floured surface.
2. Put in pie pan and pierce bottom with
a fork.
3. Bake at 425°F/218°C for 20 minutes or until done.
Makes 2 crusts.
26
Page 27

OATMEAL RAISIN COOKIES
Ingredients:
Eggs room temperature 2
Butter, melted 1 cup
Brown Sugar, packed 1 cup
Sugar 1/2 cup
All-Purpose Flour 1-1/2 cups
Cinnamon 1 tsp
Salt 1/2 tsp
Quaker® Quick or
Old Fashioned Oats 3 cups
Raisins 1 cup
Baking Soda 1 tsp
Select PASTA cycle
After 5 minutes, use a spatula to fold in any
flour from the sides of the Bread Pan. When
the cycle is complete, use a spatula to fold in
any unmixed ingredients and if necessary start
the cycle again.
Method:
1. Spoon onto a lightly greased
cookie sheet.
2. Bake at 350°F/177°C for 12-15 minutes or
until done.
Makes 2-1/2 dozen cookies.
AMARETTO RAISIN COOKIES
Ingredients:
Amaretto Liquor
or Vanilla Extract 1 TBL
Eggs room temperature 2
Butter, softened 1 cup
Brown Sugar, packed 3/4 cup
Raisins 3/4 cup
All-Purpose Flour 2-1/2 cups
Baking Powder 1-1/2 tsp
Select PASTA cycle
After 5 minutes, use a spatula to fold in any
flour from the sides of the Bread Pan. When
the cycle is complete, use a spatula to fold
in any unmixed ingredients and if necessary
start the cycle again.
Method:
1. Spoon on to a lightly greased cookie
sheet.
2. Bake at 350°F/177°C for 12-15 minutes
or until done.
Makes 2 dozen cookies.
27
Page 28

GLUTEN FREE BREAD RECIPES
GLUTEN FREE COUNTRY WHITE BREAD
Ingredients: 1.5 LB
Water, 110°– 115°F/43 – 46° C 1-1/3 cups
Extra Large Eggs 3
Oil 3 TBL
Cider vinegar 1 tsp
Sugar 3 TBL
Salt 1-1/2 tsp
Dry Milk 1/2 cup
White Rice Flour 2 cups
Potato Starch Flour 1-1/4 cups
Soy Flour 1/3 cup
Tapioca Flour 1/2 cup
Xanthan Gum 1 TBL
Red Star Quick RiseTM Yeast 4-1/2 tsp
Select GLUTEN FREE cycle
Method:
1. Remove the Bread Pan from the Bread Maker. Attach the Kneading Paddle onto the
Drive Shaft. Have all ingredients ready. Make sure all ingredients, except water, are
at
room temperature.
2. Use a liquid measuring cup to measure the water (110°-115°F/43°-46°C) and pour
into the Bread Pan.
3. Place whole, uncracked eggs in a bowl of warm water for 15 minutes to bring to
room temperature before adding to the pan.
4. Use a measuring spoon to measure the oil and cider vinegar; add to the Bread Pan.
5. Use a measuring spoon to measure the sugar and salt; level off with the edge of a
knife and add to the Bread Pan. Use a measuring cup to measure the dry milk; add to
the Bread Pan.
6. Lightly spoon white rice flour into a measuring cup, level off with the straight edge
of a knife and add to the Bread Pan. Repeat for the potato starch flour, soy flour, and
tapioca flour.
7. Use a measuring spoon to measure the xanthan gum; level off with the straight edge
of a knife and add to the Bread Pan. Smooth into all corners. Lightly tap the Bread
Pan 3 times to settle dry ingredients.
8. Use a measuring spoon to carefully measure the Red Star Quick RiseTM Yeast; level
off with the straight edge of a knife and add to the Bread Pan.
9. Place the Bread Pan into the Bread Maker. Push down on the rim until it snaps into
place. Close the lid.
28
Page 29

10. Press the MENU Button until 8 (GLUTEN FREE BREAD) appears in the Display
Window. Press the COLOR Button to choose crust color. Press the LOAF Button to
choose 1.5 LB. Press the START/STOP Button to begin.
11. After 5 to 10 minutes into the kneading process, check the mixture. It should swirl
about in the machine with a definite raised pattern on top. At this time, use a rubber
spatula to push any flour or dough from the sides of the bread down into the mixture.
12. After the beeper sounds, press the START/STOP Button and use oven mitts to
carefully remove the Bread Pan after baking. The Light will go out when the START/
STOP Button is activated.
CAUTION: THE PAN, KNEADING PADDLE AND BREAD WILL BE VERY HOT. USE OVEN
MITTS.
13. Turn Bread Pan upside down and shake several times to release the bread. Do not
use metal utensils inside the Bread Pan or Bread Machine. Remove the Kneading
Paddle and allow loaf to cool standing upright on wire rack approximately 15 to 30
minutes before slicing.
14. Cut the loaf in half, top to bottom and then cut each half into 1/2 inch slices.
15. When the bread has completely cooled, approximately 1 hour, store in an airtight
container.
16. UNPLUG UNIT AND ALLOW TO COOL COMPLETELY BEFORE CLEANING. Clean Bread
Pan after each use, DO NOT IMMERSE THE BREAD PAN IN WATER. (See CLEANING
INSTRUCTIONS outlined in this Instruction Manual.) Clean inside of Breadman®
after each use
29
Page 30

GLUTEN FREE PUMPERNICKEL BREAD
Ingredients: 1.5 LB
Water, 110°– 115°F/43 – 46° C 1 cup
Extra Large Eggs 3
Oil 3 TBL
Cider Vinegar 1 tsp
Molasses 3 TBL
Salt 1-1/2 tsp
Dry Milk 1/2 cup
Brown Rice Flour 2 cups
Potato Starch Flour 1/2 cup
Tapioca Flour 1/2 cup
Cocoa Powder 1 TBL
Xanthan Gum 1 TBL
Caraway Seeds 1 TBL
Red Star Quick Rise
Select GLUTEN FREE cycle
GLUTEN FREE CINNAMON RAISIN BREAD
TM
Yeast 4-1/2 tsp
Ingredients: 1.5 LB
Water, 110°– 115°F/43 – 46° C 1-1/4 cups
Extra Large Eggs 3
Oil 3 TBL
Cider Vinegar 1 tsp
Sugar 1/4 cup
Salt 1-1/2 tsp
Dry Milk 1/2 cup
White Rice Flour 2 cups
Potato Starch Flour 1/3 cup
Soy Flour 1/4 cup
Tapioca Flour 2/3 cup
Cinnamon 1-1/2 tsp
Raisin 3/4 cup
Xanthan Gum 1 TBL
Red Star Quick RiseTM Yeast 4-1/2 tsp
Select GLUTEN FREE cycle
30
Page 31

JAM RECIPES
STRAWBERRY, BLACKBERRY, OR RASPBERRY JAM
Ingredients:
Fresh or Frozen (thawed) Fruit 2 cups
Sugar 3-1/4 cups
Select JAM cycle
BLUEBERRY, APRICOT, PEACH OR PEAR JAM
Ingredients:
Fresh or Frozen (thawed) Fruit 2 cups
Sugar 3-1/4 cups
Lemon Juice 2 TBL
Select JAM cycle
CAUTION: DO NOT EXCEED THESE AMOUNTS!
31
Page 32

Veuillez lire et conserver ce guide d’entretien et d’utilisation
MISE EN GARDE IMPORTANTES
Lorsqu’on utilise des appareils électriques, il faut toujours respecter
certaines règles de sécurité fondamentales, notamment les suivantes :
❑ Lire toutes les instructions.
❑ Ne pas toucher aux surfaces chaudes; utiliser les poignées et les
boutons.
❑ Afin d’éviter les risques de choc électrique, ne pas immerger le cordon,
la fiche ou l’appareil dans l’eau ou tout autre liquide.
❑ Exercer une étroite surveillance lorsque l’appareil est utilisé par un
enfant ou près d’un enfant.
❑ Débrancher l’appareil lorsqu’il ne sert pas ou avant de le nettoyer.
Laisser l’appareil refroidir avant d’y placer ou d’en retirer des
composantes.
❑ Ne pas utiliser un appareil dont la fiche ou le cordon est abîmé,
qui fonctionne mal ou qui a été endommagé. Pour un examen, une
réparation ou un ajustement, rapporter l’appareil à un centre de service
autorisé, ou encore, composer le numéro sans frais approprié indiqué
sur la page couverture du présent guide.
❑ L’utilisation d’accessoires non recommandés par le fabricant de
l’appareil présente des risques d’incendie, de choc électrique et de
blessure.
❑ Ne pas utiliser l’appareil à l’extérieur.
❑ Ne pas laisser pendre le cordon sur le bord d’une table ou d’un comptoir
ni le laisser entrer en contact avec une surface chaude, notamment la
cuisinière.
❑ Ne pas placer l’appareil sur le dessus ou près d’un élément chauffant
électrique ou à gaz ni dans un four.
❑ Il faut être extrêmement prudent au moment de déplacer un appareil
qui contient de l’huile chaude ou d’autres liquides chauds.
❑ Pour débrancher l’appareil, appuyer sur le bouton ARRÊT (O) et le
maintenir enfoncé pendant deux secondes, et retirer la fiche de la prise.
❑ Utiliser l’appareil uniquement aux fins pour lesquelles il a été conçu.
❑ Éviter d’entrer en contact avec les pièces mobiles.
CONSERVER CES INSTRUCTIONS
Cet appareil est conçu uniquement pour
une utilisation domestique.
Service à la clientèle:
Canada 1-800-231-9786
Accessoires/Pièces (Canada)
1-800-738-0245
32
Pour accéder au service à la clientèle en ligne ou
pour inscrire votre produit en ligne, rendez-vour à
www.prodprotect.com/applica
Page 33

Avertissement : surfaces chaudes. Cet appareil
produit de la chaleur et de la vapeur s’en échappe
pendant l’utilisation. Il faut prendre les mesures
de sécurité adéquates pour prévenir les risques de
brûlures, de blessures, d’incendie et de dommages
matériels
FICHE POLARISÉE (Modèles de 120 V seulement)
L’appareil est muni d’une fiche polarisée (une lame plus large que l’autre). Afin
de minimiser les risques de secousses électriques, ce genre de fiche n’entre que
d’une façon dans une prise polarisée. Lorsqu’on ne peut insérer la fiche à fond
dans la prise, il faut tenter de le faire après avoir inversé les lames de côté. Si la
fiche n’entre toujours pas dans la prise, il faut communiquer avec un électricien
certifié. Il ne faut pas tenter de modifier la fiche.
VIS INDESSERRABLE
Avertissement : L’appareil est doté d’une vis indesserrable empêchant
l’enlèvement du couvercle extérieur. Pour réduire les risques d’incendie ou
de secousses électriques, ne pas tenter de retirer le couvercle extérieur.
L’utilisateur ne peut pas remplacer les pièces de l’appareil. En confier la
réparation seulement au personnel des centres de service autorisés.
CORDON
a) Le cordon d’alimentation de l’appareil est court (ou amovible) afin de mini-
miser les risques d’enchevêtrement ou de trébuchement.
b) Il existe des cordons d’alimentation amovibles ou de rallonge plus longs et il
faut s’en servir avec prudence.
c) Lorsqu’on utilise un cordon d’alimentation amovible ou de rallonge plus long,
il faut s’assurer que :
1) La tension nominale du cordon d’alimentation
amovible ou de rallonge soit au moins égale à celle
de l’appareil, et que;
2) Lorsque l’appareil est de type mis à la terre,
il faut utiliser un cordon de rallonge mis à la terre
à trois broches, et;
3) Le cordon plus long soit placé de sorte qu’il ne soit
pas étalé sur le comptoir ou la table d’où des
enfants pourraient le tirer, ni placé de manière
à provoquer un trébuchement
Note: Lorsque le cordon d’alimentation est endommagé, il faut le faire
remplacer par du personnel qualifié ou, en Amérique latine, par le personnel
d’un centre de service autorisé.
33
Page 34

PANNE DE COURANT
Mémoire de 7 minutes en cas de panne de courant
Votre machine à pain automatique est dotée d’une mémoire de 7 minutes en cas
de panne de courant. Si l’électricité vient à manquer, la machine à pain gardera
le cycle actuel en mémoire pendant jusqu’à 7 minutes. Si le courant est rétabli au
cours de cette période, la machine poursuivra là où elle s’était arrêtée.
Si le courant n’est pas rétabli après 7 minutes et que vous aviez mis des produits
laitiers ou périssables ou encore de la viande dans le pain, jeter le contenu de
la machine et recommencer la recette avec de nouveaux ingrédients frais, pour
des raisons de santé et d’hygiène. Dans le cas d’une recette faite de produits non
périssables, vous pouvez essayer de redémarrer la machine à pain au début de
son cycle. Il se peut toutefois que le pain ainsi produit ne soit pas satisfaisant.
S’il est impossible de déterminer le moment exact auquel la panne de courant
s’est produite, retirer la pâte et la jeter.
34
Page 35

VOTRE BREADMAN® MACHINE À PAIN
PRODUIT PEUT DIFFÉRER LÉGÈREMENT DE ILLUSTRATIONS
1.
11.
10.
9.
8.
7.
1. BASIC
DE BASE
2. FRENCH
FRANÇAIS
3. WHOLE WHEAT
BLÉ ENTIER
4. SWEET
PAIN SUCRÉ
5. SUPER RAPID
SUPER-RAPIDE
12.
2.
3.
4.
6. DOUGH
PÂTE
7. PASTA
PÂTES
8. GLUTEN FREE
SANS GLUTEN
9. JAM
CONFITURE
10. BAKE
CUISSON
5.
6.
13.
1. Couvercle amovible (P/N 22826)
2. Poignée du moule à pain
3. Moule à pain (P/N 22822)
4. Arbre d’entraînement (à l’intérieur)
5. Chambre de cuisson
6. Panneau de commande
7. Disque de malaxage (P/N 22823)
8. Cordon d’alimentation avec fiche
polarisée
9. Orifice d’évacuation d’air
10. Hublot
11. Poignée du couvercle
12. Cuillère à mesurer (P/N 22824)
13. Tasse à mesurer (P/N 22825)
35
Page 36

PANNEAU DE COMMANDE
ÉCRAN
Affiche vos choix quant au MENU de
cycles, aux réglages de la MINUTERIE,
à la COULEUR de la croûte, à la
GROSSEUR du pain et à la cuisson.
TÉMOIN DE FONCTIONNEMENT/
RÉCHAUD
Le témoin de fonctionnement situé à
côté du bouton START/STOP (MARCHE/
ARRÊT) s’allumera pendant que la
machine à pain BreadmanMD est EN
MARCHE; lorsque le BreadmanMD a
terminé un cycle et qu’il passe en mode
Keep Warm (RÉCHAUD), le témoin
clignotera.
BOUTONS ▲ (MONTER) ET t
(DESCENDRE)
Utiliser ces boutons pour régler la
MINUTERIE.
Utiliser ces boutons pour prolonger ou
écourter le temps affiché sur l’écran.
▲ Chaque fois que vous appuyez sur ce
bouton, 10 minutes sont ajoutées à la
minuterie.
t Chaque fois que vous appuyez sur ce
bouton, 10 minutes sont retirées de
la minuterie.
MENU
Appuyer sur ce bouton pour sélectionner
le cycle parmi les dix choix (1 à 10)
énumérés sur le panneau de commande.
Chaque fois que vous appuyez sur ce
bouton, l’écran affichera le numéro
de cycle suivant. Appuyer sur ce
bouton jusqu’à ce que votre choix
apparaisse..
COLOR (COULEUR)
Choisir la COULEUR de la croûte
: Light (pâle); Medium (moyen);
ou Dark (foncé). Le préréglage
par défaut de la machine à pain
BreadmanMD est Medium (moyen).
Utiliser ce bouton pour sélectionner
le cycle RAPID (CUISSON RAPIDE)
dans le MENU lorsqu’il s’affichera
sur l’écran.
LOAF (GROSSEUR DU PAIN)
Choisir la GROSSEUR du pain :
1.5 LB (680 g); ou 2 LB (908 g). Le
préréglage par défaut de la machine
à pain BreadmanMD est 2 LB (908
g).
START/STOP
Appuyer sur ce bouton pour
démarrer le cycle choisi et
commencer le décompte de
la minuterie. Appuyer sur ce
bouton pendant une seconde
pour réinitialiser le réglage de
la MINUTERIE du cycle ou pour
annuler le cycle en cours.
Lorsque vous appuyez sur un bouton,
vous devriez entendre un bip. Ce bip
vous indique que vous avez appuyé
suffisamment fort pour activer votre
choix.
36
Page 37

PANNEAU DE COMMANDE (CONTINUÉ)
OPTIONS DU MENU
Choisir parmi les cycles Bread/Dough
(pain/pâte) suivants:
1. BASIC (PAINS DE BASE)
Basic Light (1.5 LB)
(pain de base pâle de 680 g)
Basic Light (2.0 LB)
(pain de base pâle de 908 g)
Basic Medium (1.5 LB)
(pain de base moyen de 680 g)
Basic Medium (2.0 LB)
(pain de base moyen de 908 g)
Basic Dark (1.5 LB)
(pain de base foncé de 680 g)
Basic Dark (2.0 LB)
(pain de base foncé de 908 g)
Basic Rapid (1.5 LB)
(pain de base à cuisson rapide de 680 g)
Basic Rapid (2.0 LB)
(pain de base à cuisson rapide de 908 g)
2. FRENCH (PAINS FRANÇAIS)
French Light (1.5 LB)
(pain français pâle de 680 g)
French Light (2.0 LB)
(pain français pâle de 908 g)
French Medium (1.5 LB)
(pain français moyen de 680 g)
French Medium (2.0 LB)
(pain français moyen de 908 g)
French Dark (1.5 LB)
(pain français foncé de 680 g)
French Dark (2.0 LB)
(pain français foncé de 908 g)
French Rapid (1.5 LB)
(pain français à cuisson rapide de 680 g)
French Rapid (2.0 LB)
(pain français à cuisson rapide de 908 g)
3. WHOLE WHEAT
(PAINS DE BLÉ ENTIER)
Whole Wheat Light (1.5 LB)
(pain de blé entier pâle de 680 g)
Whole Wheat Light (2.0 LB)
(pain de blé entier pâle de 908 g)
Whole Wheat Medium (1.5 LB)
(pain de blé entier moyen de 680 g)
Whole Wheat Medium (2.0 LB)
(pain de blé entier moyen de 908 g)
Whole Wheat Dark (1.5 LB)
(pain de blé entier foncé de 680 g)
Whole Wheat Dark (2.0 LB)
(pain de blé entier foncé de 908 g)
Whole Wheat Rapid (1.5 LB)
(pain de blé entier à cuisson rapide
de 680 g)
Whole Wheat Rapid (2.0 LB)
(pain de blé entier à cuisson rapide
de 908 g)
4. SWEET (PAINS SUCRÉS)
Sweet Light (1.5 LB)
(pain sucré pâle de 680 g)
Sweet Light (2.0 LB)
(pain sucré pâle de 908 g)
Sweet Medium (1.5 LB)
(pain sucré moyen de 680 g)
Sweet Medium (2.0 LB)
(pain sucré moyen de 908 g)
Sweet Dark (1.5 LB)
(pain sucré foncé de 680 g)
Sweet Dark (2.0 LB)
(pain sucré foncé de 908 g)
Sweet Rapid (1.5 LB)
(pain sucré à cuisson rapide de 680 g)
Sweet Rapid (2.0 LB)
(pain sucré à cuisson rapide de 908 g)
5. SUPER RAPID
(PAINS À CUISSON ULTRA RAPIDE)
Super Rapid Light (1.5 LB)
(pain à cuisson ultra rapide pâle de 680 g)
Super Rapid Light (2.0 LB)
(pain à cuisson ultra rapide pâle de 908 g)
Super Rapid Medium (1.5 LB)
(pain à cuisson ultra rapide moyen
de 680 g)
Super Rapid Medium (2.0 LB)
(pain à cuisson ultra rapide moyen
de 908 g)
Super Rapid Dark (1.5 LB)
(pain à cuisson ultra rapide foncé
de 680 g)
Super Rapid Dark (2.0 LB)
(pain à cuisson ultra rapide foncé
de 908 g)
6. DOUGH (PÂTE)
7. PASTA (PÂTES ALIMENTAIRES)
8. GLUTEN FREE
(PAINS SANS GLUTEN)
Gluten Free Light (1.5 LB)
(pain sans gluten pâle de 680 g)
Gluten Free Medium (1.5 LB)
(pain sans gluten moyen de 680 g)
Gluten Free Dark (1.5 LB)
(pain sans gluten foncé de 680 g)
9. JAM (CONFITURES)
10. BAKE (CUISSON SEULEMENT)
Bake Light (cuisson seulement - pâle)
Bake Medium
(cuisson seulement - moyen)
Bake Dark
(cuisson seulement - foncé)
37
Page 38

CYCLES DE PÉTRISSAGE ET DE CUISSON
Note: Si, à n’importe quel moment pendant le processus de confection du pain, on doit
arrêter la machine à pain, appuyer sur le bouton I/O pendant plusieurs secondes et
débrancher ensuite l’appareil.
Note: Si le pain n’est pas retiré immédiatement après la cuisson et si le bouton I/O n’est
pas enfoncé, le mode de réchaud contrôlé de 60 minutes s’activera (sauf dans le cas des
cycles Pain rapide, Pâte et Confiture). Pour obtenir de meilleurs résultats, retirer le pain
immédiatement après la fin du cycle de cuisson..
DE BASE
Utilisé pour les pains principalement faits de farine blanche, même si la recette peut
contenir un peu de farine de blé entier.
FRANÇAIS
Traditionnellement, le pain français a une croûte légèrement plus croustillante et
une texture plus légère que le pain blanc. Le beurre, la margarine et le lait ne font
habituellement pas partie des ingrédients de la recette.
BLÉ ENTIER
Utilisé dans le cas des recettes contenant une quantité importante de farine de blé entier
ou de seigle, d’avoine ou de son. Le cycle pour pain de blé entier commence par une
période de repos au cours de laquelle la farine et les grains absorbent les ingrédients
liquides. Ce trempage ramollit la farine et les grains et facilite la combinaison des
ingrédients. Généralement, les pains de blé entier et multicéréales sont plus courts et
plus denses que les pains blancs, français ou sucrés.
PAIN SUCRÉ
Utilisé dans le cas des recettes qui contiennent des œufs, du jus de fruit, du sucre
supplémentaire ou des ingrédients avec sucre ajouté, comme des flocons de noix de coco,
des raisins, des fruits secs ou du chocolat. La température de cuisson est réduite afin
d’éviter que le pain brûle.
SUPER-RAPIDE
Utilisée pour les cycles Blanc, Blé entier et Pain sucré, cette option accélère le processus
pour qu’il dure environ une heure. Choisir la recette et ajouter simplement 2,5 ml (½ c. à
thé) de levure à la quantité de levure indiquée pour un pain de 910 g (2 lb). Le pain risque
d’être plus court et plus dense que lorsqu’un cycle plus long est appliqué.
PÂTE
Utilisé pour préparer de la pâte à pain, à petits pains ou à pizza, qui sera façonnée et qui
devra lever avant d’être cuite dans un four ordinaire. Ce cycle malaxe et pétrit la pâte, et
lui permet de parvenir à un premier levage.
PÂTES
Plusieurs types de pâtes peuvent être mélangés à l'aide du programme de pâtes. Retirer
la pâte et suivre les indications de la recette pour terminer la cuisson / cuisson.
SANS GLUTEN
Utilisé pour les recettes sans gluten.
CONFITURE
Utilisé pour préparer des conserves de fruits, de la marmelade, du chutney et du ketchup.
Ajouter des fruits, du sucre et du jus de citron pour obtenir des fruits en conserve maison.
Ces confitures font de délicieuses garnitures pour le pain maison, les gaufres et la crème
glacée.
CUISSON SEULEMENT
À utiliser si la croûte est trop pâle ou pour cuire de la pâte déjà faite. Particulièrement
utile si le pain n’est pas tout à fait cuit. Vérifier la cuisson à intervalles réguliers de
quelques minutes. Ce cycle cuit pendant 1 h 30 au maximum.
38
Page 39

FAMILIARISATION AVEC LES INGRÉDIENTS
FARINE ET AUTRES CÉRÉALES
Farine tout-usage
Son
Farine panifiable
Semoule de maïs et
farine d’avoine
Blé concassé
Farine de seigle
Farine auto-levante
Mélange à sept
céréales
Gluten de froment
élastique
Farine de blé entier
La farine tout-usage est un mélange de farines raffinées de blé tendre et de blé de force qui convient parfaitement à
la préparation rapide de pains et de gâteaux.
Le son (non traité) est la partie extérieure dure des grains de blé ou de seigle qui est séparée de la farine par blutage ou tamisage. Il est souvent ajouté au pain en petites quantités pour le rendre plus nutritif, consistant et savoureux. Il sert également à rehausser la texture du pain.
La farine panifiable a habituellement une concentration en gluten plus élevée que la farine tout-usage et son utilisation améliore le volume et la structure des miches.
La semoule de maïs et la farine d’avoine sont faites à partir de maïs blanc ou jaune moulu grossièrement et de
flocons d’avoine ou d’avoine épointée. Elles sont principalement utilisées pour rehausser la saveur et la texture du
pain.
Le blé concassé a une texture très grossière. Il consiste en des grains de blé coupés en fragments angulaires. Il
donne une saveur de noix et une texture croquante aux pains à grains entiers.
La farine de seigle doit toujours être mélangée avec une grande quantité de farine panifiable, car elle ne renferme
pas assez de gluten pour permettre de produire une miche bien gonflée et à texture uniforme.
Il N’EST PAS RECOMMANDÉ d’utiliser de la farine auto-levante dans la machine à pain. La farine auto-levante
renferme des agents de levage qui nuiront à la confection du pain, que l’utilisateur opte pour le processus rapide ou
non.
Le mélange à sept céréales est une combinaison de blé concassé, d’avoine, de son, de seigle, de semoule de maïs,
de graines de lin et de millet décortiqué. Il est principalement utilisé pour rehausser la saveur et la texture du pain.
Le gluten de froment élastique est fait à partir d’une farine de blé qui a été traitée pour en retirer presque tout l’amidon afin de produire un contenu très riche en protéines. (Le gluten est la protéine du blé qui rend la pâte élastique.)
On peut se procurer du gluten de froment élastique dans la plupart des magasins d’alimentation naturelle On l’utilise en petite quantité pour augmenter le volume et alléger la texture.
La farine de blé entier est faite à partir de grains de blé entiers décortiqués, qui renferment le son et le germe. Cette
farine, riche en fibres, contient plus d’éléments nutritifs que la farine tout-usage et la farine panifiable. Les pains
faits avec cette farine sont habituellement plus petits et plus lourds que les pains blancs. Dans un grand nombre de
recettes, on mélange la farine de blé entier avec de la farine blanche ou du gluten de froment élastique pour produire un pain plus haut et à texture légère.
CONSEILS RELATIFS À LA CONSERVATION DE LA FARINE
Garder la farine dans un contenant bien fermé et hermétique. Conserver les farines de
seigle et de blé entier au réfrigérateur, au congélateur ou dans un endroit frais pour éviter
qu’elles ne s’altèrent. Laisser la farine réchauffer à la température ambiante avant de
l’utiliser.
Note : Les farines, quoique d’apparence semblable, peuvent avoir des propriétés très
différentes en raison de la façon dont les grains ont été moulus, décortiqués, stockés,
etc. L’utilisateur devra peut-être expérimenter avec différentes marques de farine pour
parvenir à créer la miche parfaite. Consulter la section « CONSEILS POUR LES RECETTES
» afin de faciliter les essais.
LEVURE
La levure active, par fermentation, produit le dioxyde de carbone nécessaire à la levée
du pain. La levure utilise les hydrates de carbone du sucre et de la farine pour produire
ce gaz. Trois différents types de levure sont offerts : fraîche (à gâteau), sèche active
et à action rapide. La levure à action rapide et la levure pour machine à pain agissent
rapidement. IL N’EST PAS RECOMMANDÉ d’utiliser de la levure fraîche (à gâteau) avec la
machine à pain.
CONSEILS RELATIFS À LA LEVURE
S’assurer que la levure n’est pas périmée en vérifiant sa date d’expiration. Il est
préférable d’utiliser la levure plusieurs mois avant la date limite de consommation. Une
fois le sachet ou le contenant de levure ouvert, il est important de mettre le restant du
contenu dans un contenant scellé sur-le-champ et de le conserver au réfrigérateur ou
au congélateur jusqu’à la prochaine utilisation. Lorsque la pâte lève mal, le problème est
souvent attribuable à une levure périmée.
Note : Les recettes de pain et de pâte de base présentées dans ce livret sont conçues pour
la levure sèche active. Consulter le tableau ci-dessous afin de remplacer la levure à action
rapide (levure à levage rapide ou levure pour machine à pain) par de la levure sèche active
ou vice versa.
39
Page 40

TABLEAU DE CONVERSION POUR LA LEVURE POUR MACHINE À PAIN
3,75 ml (¾ c. à thé) de levure pour machine à pain = 2,5 ml (½ c. à thé) de levure à action
rapide
5 ml (1 c. à thé) de levure pour machine à pain = 3,75 ml (¾ c. à thé)
de levure à action rapide
7,5 ml (1½ c. à thé) de levure pour machine à pain = 5 ml (1 c. à thé)
de levure à action rapide
11,25 ml (2¼ c. à thé) de levure pour machine à pain = 7,5 ml (1½ c. à thé) de levure à
action rapide
15 ml (1 c. à table) de levure pour machine à pain = 10 ml (2 c. à thé)
de levure à action rapide
CYCLES DE CUISSON RAPIDE
Les cycles de cuisson rapide pour les pains blancs, de blé entier et français réduisent le
temps de préparation et permettent de confectionner son pain favori en une heure environ.
Choisir la recette, puis ajouter 2,5 ml (½ c. à thé) de plus de levure pour machine à pain
à la recette. Le pain sera peut-être plus court et plus dense
MESURE DES INGRÉDIENTS
Lorsque vous faites du pain avec votre machine à pain BreadmanMD, la mesure des
ingrédients représente l’étape la plus importante. Il est très important que vous mesuriez
chaque ingrédient liquide et sec avec précision. Pour obtenir les meilleurs résultats
possible, toujours ajouter les ingrédients dans le moule à pain selon l’ordre dans lequel ils
sont mentionnés dans la recette.
MESURE DES INGRÉDIENTS LIQUIDES
Utiliser des tasses à mesurer en plastique transparent ou des récipients gradués en
verre pour mesurer tous les ingrédients liquides. Placer la tasse sur une surface plate et
vérifier à la hauteur des yeux si la quantité de liquide est exacte. Le niveau du liquide doit
atteindre le repère pertinent. Mesurer « au pifomètre » n’est pas suffisant - une mesure
approximative pourrait perturber l’équilibre décisif de la recette.
MESURE DES INGRÉDIENTS SECS
Les ingrédients secs doivent être mesurés à l’aide de tasses à mesurer standards pour
ingrédients secs. Ces tasses sont offertes en plusieurs tailles. Ajouter délicatement les
ingrédients secs à la cuillère dans la tasse à mesurer et utiliser le dos d’un couteau pour
obtenir une mesure arasée. Pour éviter que les ingrédients soient tassés, prendre soin de
ne jamais taper la tasse à mesurer ou l’utiliser pour puiser les ingrédients directement
dans l’emballage. La quantité supplémentaire qui en résulterait pourrait perturber
l’équilibre de la recette. Ne pas tamiser la farine lors de la fabrication de pains.
Utiliser une cuillère à mesurer standard pour mesure les petites quantités d’ingrédients
secs ou liquides (p. ex., de la levure, du sucre, du sel, du lait en poudre, du miel ou de la
mélasse). Les mesures doivent être exactes; il ne faut pas que les ingrédients débordent
légèrement.
La machine à pain BreadmanMD fabrique aisément de délicieux produits de boulangeriepâtisserie. Vous n’avez qu’une chose à faire : suivre attentivement les directives de la
recette. Lorsqu’on cuisine, une pincée de ci et une cuillérée de ça font souvent l’affaire;
toutefois, cette technique ne fonctionne pas avec les machines à pain automatiques.
L’utilisation de la machine à pain BreadmanMD exige que chaque ingrédient soit mesuré
avec précision.
TABLEAU D’ÉQUIVALENCES/MESURES
7 ml (1 1/2 c. à thé = 1/2 c. à table) 125 ml (8 c. à table = 1/2 tasse)
15 ml (3 c. à thé = 1 c. à table) 175 ml (12 c. à table = 3/4 tasse)
7 ml (1/2 c. à table = 1 1/2 c. à thé) 250 ml (16 c. à table = 1 tasse)
30 ml (2 c. à table = 1/8 tasse) 90 ml (3/8 tasse = 1/4 tasse + 2 c. à table)
60 ml (4 c. à table = 1/4 tasse) 155 ml (5/8 tasse = 1/2 tasse + 2 c. à table)
90 ml (5 c. à table + 1 c. à table =1/3 tasse) 210 ml (7/8 tasse = 3/4 tasse + 2 c. à table)
40
Page 41

AUTRES REMARQUES RELATIVES AUX INGRÉDIENTS
Important : La mesure exacte des ingrédients constitue la partie la plus importante de la cuisson. C’est ce qui fera en sorte que le pain
aura une bonne texture et une bonne consistance. Il faut s’assurer de mesurer tous les ingrédients avec une grande précision.
Levure
chimique
Bicarbonate
de sodium
Œufs
Gras
Liquides
Sel
Sucre
La levure chimique à double action est un agent de levage utilisé dans la préparation rapide de pains et de gâteaux. Ce type
d’agent de levage n’exige pas de période de levage avant la cuisson, parce que la réaction chimique se produit au moment
de l’ajout des ingrédients liquides et pendant la cuisson.
Le bicarbonate de sodium est un autre agent de levage, qu’il ne faut pas confondre avec la levure chimique et qui ne doit
pas remplacer celle-ci. De plus, le bicarbonate de sodium ne demande pas de période de levage avant la cuisson, puisque
la réaction chimique survient au cours de la cuisson.
Les œufs confèrent une texture riche et veloutée à la pâte à pain et aux gâteaux. Lorsque la recette demande d’utiliser des
œufs, utiliser des œufs de calibre gros à la température ambiante.
Le beurre, la margarine et l’huile attendrissent la texture des pains à la levure. Le pain français doit sa croûte et sa texture
uniques à l’absence de gras ajouté. Toutefois, les pains qui contiennent du gras demeurent frais plus longtemps. S’il faut
utiliser du beurre directement sorti du réfrigérateur, le couper en petits morceaux afin qu’il se mélange mieux au cours du
pétrissage.
Tous les liquides doivent être tièdes et à une température de 27 ºC à 32 °C (80 ºF à 90 °F) pour toutes les recettes. Les liquides, tels que le lait, l’eau ou une combinaison de lait en poudre et d’eau, peuvent être utilisés pour préparer du pain. Le
lait améliore la saveur, confère une texture veloutée et ramollit la croûte, tandis que l’eau produira à elle seule une croûte
plus croustillante. Il est aussi possible d’utiliser du jus de légumes ou de fruits ou encore l’eau de cuisson de pommes de
terre pour faire varier la saveur.
Le sel est nécessaire à l’équilibre des saveurs du pain et des gâteaux. Le sel limite également la croissance de la levure.
Le fait de changer la quantité de sel d’une recette donnée peut rendre le pain plus court et plus collant. Lorsqu’on confectionne un type de pain pour la première fois, ne pas augmenter ou diminuer la quantité de sel indiquée dans la recette.
Le sucre est important pour la couleur et la saveur du pain. Il sert également de nourriture pour la levure, car il contribue
à la fermentation. Dans ce livret, les recettes qui comprennent du sucre demandent l’utilisation de sucre granulé.
Important : Ne pas le remplacer par du sucre en poudre ou par des édulcorants artificiels, car la levure ne pourra pas
agir correctement.
CHANGEMENTS CLIMATIQUES ET CUISSON DU PAIN
• Dans les régions en haute altitude (à plus de 915 mètres [3 000 pieds] au-dessus
du niveau de la mer), la pâte a tendance à lever plus rapidement, car la pression
atmosphérique est plus basse. Il faut donc utiliser moins de levure.
• Sous un climat sec, la farine est plus sèche et demande un peu plus de liquide.
• Sous un climat humide, la farine est plus mouillée et absorbe moins de liquide. Moins
de liquide est donc nécessaire.
UTILISATION
CET APPAREIL EST CONÇU POUR UN USAGE DOMESTIQUE.
POUR COMMENCER
• Retirer le matériau d’emballage et les autocollants de l’appareil.
• Visiter le www.prodprotect.com/applica pour enregistrer la garantie.
• Placer la machine à pain sur une surface sèche, stable et de niveau, à l’écart de la
chaleur et des endroits où du gras de cuisson ou de l’eau sont susceptibles d’asperger
l’appareil. Ne pas placer l’appareil près du rebord du comptoir. Si l’appareil est placé
sous un meuble de rangement, s’assurer que l’espace est suffisant pour ouvrir le
couvercle sans problème.
Important : La machine à pain peut cuire une miche pouvant peser jusqu’à 910 g
(2 lb). Ne pas placer une plus grande quantité d’ingrédients dans le moule à pain,
sinon les ingrédients ne seront pas mélangés correctement et ne cuiront pas bien; la
machine pourrait aussi être endommagée. (Voir la section « QUANTITÉ MAXIMALES
D’INGRÉDIENTS »).
• Avant la première utilisation, faire fonctionner l’appareil au cycle Blanc rapide sans
ajouter d’ingrédients afin de brûler les huiles utilisées au cours de la fabrication de
l’appareil. (Suivre les instructions à la section « UTILISATION DE LA MACHINE À PAIN »
Note : Pendant la première utilisation, il est normal que la machine émette de la fumée
et/ou une odeur en raison des huiles minérales utilisées au cours de la fabrication de
l’appareil.
QUANTITÉS MAXIMALES D’INGRÉDIENTS
• Cycles Bread (pains) 1 l à 1,1 l (4 à 4 2/3 tasses)
• Cycles Batter Breads (pains à pâte battue)
et mélanges à gâteaux préemballés 1 l (4 tasses)
• Cycles Dough (pâte) 1,1 l (4 2/3 tasses)
• Jam (confitures) 750 ml (3 tasses) de fruits
41
Page 42

CONSEILS RELATIFS AU MOULE À PAIN
Insertion du moule à pain
Note : Ne pas oublier d’insérer d’abord le disque de malaxage, puis d’ajouter tous les
ingrédients dans l’ordre AVANT d’insérer le moule à pain dans la chambre de cuisson.
• Au moment d’insérer le moule à pain dans la machine, s’assurer de le mettre
solidement en place.
Retrait du moule à pain
• Pour enlever le moule à pain de la chambre de cuisson, tenir la poignée
à l’aide de gants de cuisine, et soulever le moule fermement et en ligne
droite.
Important : Au moment d’enlever le moule à pain après la cuisson, porter
des gants de cuisine afin d’éviter les brûlures.
• Après avoir démoulé la miche de pain (en renversant le moule à pain à
l’envers et en l’agitant doucement), vérifier que le disque de malaxage
B
n’est pas demeuré dans la miche. S’il est coincé dans le pain, utiliser
un ustensile non métalliquepour le retirer, en veillant à ne pas rayer
le disque de malaxage. Laisser le pain refroidir avant de retirer le
disque de malaxage.
VÉRIFICATION DE LA CONSISTANCE DE LA PÂTE
Même si la machine mélange, pétrit et cuit le pain automatiquement,
lorsque l’utilisateur prépare du pain à partir de zéro, on lui recommande
d’apprendre à reconnaître l’état de la pâte. Le rapport farine-liquide est
le facteur le plus important de n’importe quelle recette de pain, mais
C
c’est aussi le facteur le plus facile à corriger. De 5 à 8 minutes après le début du 2e cycle
de pétrissage, ouvrir la machine à pain pour vérifier la consistance de la
pâte. La boule de pâte doit être tendre et adhérente (un peu comme du
Yeast
ruban adhésif). Si elle est trop sèche, ajouter 5 ml (1 c. à thé) de liquide
à la fois. Si elle est trop mouillée, ajouter 15 ml (1 c. à table) de farine à
la fois.
UTILISATION DE LA MACHINE À PAIN
Note : Selon le cycle ou la recette utilisée, certaines étapes peuvent ne
Dry
Liquid
D
pas s’appliquer, ou des étapes additionnelles peuvent être nécessaires.
Consulter la section traitant des recettes du présent guide, ainsi que les instructions
relatives aux cycles, qui se trouvent à la fin de la présente section.
1. Ouvrir le couvercle et retirer le moule à pain en le soulevant à l’aide de la poignée (B).
Mise en garde : Ne par tourner ni secouer le moule à pain au moment de le retirer de
la machine. Si le moule à pain est tordu, la sonde de température risque de ne pas
fonctionner correctement.
2. Placer le disque de malaxage sur l’arbre d’entraînement. Bien aligner le côté plat de
l’arbre d’entraînement et le côté plat du trou du disque de malaxage (C). S’assurer que
le disque de malaxage est solidement fixé.
3. Mettre les ingrédients dans le moule à pain.
Important : Ajouter les ingrédients dans le moule à pain en suivant l’ordre indiqué dans
la recette.
Important : Toujours ajouter la levure en dernier.
4. Pratiquer de petits renfoncements sur le dessus des ingrédients secs (mais pas
jusqu’aux ingrédients liquides) et ajouter la levure (D).
Important : Il est important de faire de petits renfoncements pour la levure,
particulièrement si la minuterie à retardateur de cuisson est utilisée. Ainsi, la levure
n’entrera pas en contact avec les ingrédients liquides avant le début du malaxage. (Les
42
Page 43

ingrédients liquides activeraient la levure prématurément.)
5. Insérer le moule à pain dans la chambre de cuisson (E). Appuyer
sur le pourtour du moule à pain jusqu’à ce qu’il s’enclenche
solidement.
6. Fermez le couvercle. Branchez-120V AC. Le Breadman ® émet un
bip et la fenêtre d'affichage s'allume.
7. Appuyez sur le bouton MENU pour choisir le cycle de pain ou de
la pâte (1 à 10) que vous voulez. Les noms de cycle et les numéros
correspondants sont répertoriés sur le Panneau de configuration. Chaque fois que le
bouton MENU est pressé, il émet un bip et le nombre de cycles (1 à 10) sera apparaît
dans la fenêtre d'affichage.
8. Presse COLOR pour choisir la couleur de la croûte. Machine à pain est préréglé pour la
croûte moyenne.
Note: La fonction de sélection de la couleur de la croûte n’est pas
offerte pour les cycles suivants :
Confiture, Pâte, Cuisson seulement, Rapide et Pâtes.
9. Appuyer sur le bouton LOAF pour sélectionner le format de la
miche désirée. Le format par défaut de la machine à pain est de
910 g (2 lb).
Note : La fonction de sélection de la grosseur de la miche n’est pas
offerte pour les cycles suivants :
Confiture, Pâte, Pâtes et Cuisson.
10. Appuyer sur le bouton pour lancer le cycle de malaxage. Le
décompte du temps de malaxage restant apparaît à l’écran, tout comme le temps de
préparation du pain et la grosseur de la miche.
Note : Pendant le cycle de malaxage, de la condensation
peut se former sur le hublot lorsque la levure commence à
agir. (Le hublot redeviendra clair; il sera ensuite possible de
vérifier la progression de la cuisson).
11. Ajouter des ingrédients, tels que les fruits séchés
ou des noix, des herbes, de l'avoine, etc à l'Bip ajout
d'ingrédients pendant la base, de blé entier et les cycles
douces. Voir pétrissage et la cuisson Cycles Graphique pour l'heure exacte à chaque
cycle.
12. Lorsque le pain est fini la cuisson de la Breadman® Machine à pain émet un bip et
"0:00" apparaît dans la fenêtre d'affichage. Appuyez sur le bouton START / STOP et
ouvrez le couvercle. (F)
Important: N'oubliez pas, pan du pain et du pain sont à la fois très chaud! Veillez à ne
pas placer soit sur la nappe, surface en plastique ou autre surface sensible à la chaleur
qui peuvent brûler ou faire fondre.
Note: Garder au chaud ne s'applique pas aux cycles suivants:
Confiture, Pâte et Pâtes.
13. Retourner le moule à pain et le secouer pour retirer le pain (G). Placer le pain à
l’endroit sur une grille et le laisser refroidir au moins 20 minutes avant de le trancher.
Mise en garde : S’assurer de séparer le disque de malaxage et le pain avant de servir.
Mise en garde : Le moule à pain, le disque de malaxage et le pain sont très chauds.
Laisser le pain refroidir avant de retirer le disque.
14. Débrancher l’appareil et le laisser refroidir complètement avant le nettoyage.
(Consulter la section « ENTRETIEN ET NETTOYAGE ».)
G
E
F
43
Page 44

Important : Nettoyer l’intérieur de la chambre de cuisson en profondeur après chaque
utilisation
15. Une fois le pain refroidi (après environ deux heures), le conserver dans un contenant
scellé.
TRANCHAGE ET CONSERVATION DU PAIN
Pour obtenir des résultats optimaux, placer le pain sur une grille et le laisser refroidir
au moins 20 minutes avant de le trancher. Utiliser un couteau électrique ou dentelé pour
obtenir des tranches uniformes.
Conserver le pain dans un contenant scellé (un contenant de plastique refermable ou
un sac de plastique scellable convient parfaitement) à la température ambiante pendant
un maximum de trois jours. Pour conserver le pain plus longtemps (jusqu’à un mois), le
placer au congélateur dans un contenant scellé. Comme le pain maison ne contient pas
d’agent de conservation, il a tendance à sécher et à rassir plus rapidement. Les restants
ou le pain légèrement durci peuvent être coupés en cubes de 1,3 à 2,5 cm (1/2 à 1 po) et
utilisés dans des recettes de croûtons, de pouding de pain perdu ou de farce.
UTILISATION DE LA MINUTERIE À RETARDATEUR DE CUISSON (JUSQU’À 15 HEURES)
Important : La cuisson retardée n’est pas offerte pour le cycle CONFITURE. Ne pas
utiliser la minuterie à retardateur de cuisson si la recette contient des aliments
périssables comme des œufs, du lait frais, du yogourt ou d’autres produits laitiers, de la
viande, etc.
Pour régler la machine à pain, suivre les étapes suivantes :
1. Comme toujours, ajouter les ingrédients dans l’ordre indiqué dans la recette en prenant
bien soin de ne pas laisser la levure et les ingrédients liquides entrer en contact.
Note : Si la recette contient du sel, l’ajouter avec les ingrédients liquides en prenant soin
de ne pas le mélanger à la levure.
2. Fermer le couvercle de la machine à pain et brancher l’appareil.
3. Appuyer sur le bouton MENU pour sélectionner le cycle de cuisson. La durée normale
du cycle de cuisson est affichée à l’écran.
4. Appuyer sur ▲ pour augmenter la durée du cycle par tranche de
10 minutes. (Appuyer sur t pour réduire la durée du cycle.) La durée du cycle réglée
est affichée à l’écran.
• Par exemple, s’il est 8 h et que le pain doit être prêt à 13 h, appuyer sur ▲ jusqu’à
ce que l’écran indique « 5:00 » (cela signifie que la cuisson sera terminée dans cinq
heures). Ce nombre correspond à la différence d’heures entre 8 h et 13 h.
Note : La durée réelle de cuisson ne change pas.
5. Appuyer sur le bouton LOAF pour sélectionner le format de la miche, appuyer sur le
bouton COLOR pour choisir la couleur de la croûte, puis appuyer sur le bouton I/O
pour lancer le décompte. Les deux points (:) figurant dans l’indication de la durée
commencent à clignoter pour signaler que la minuterie est activée. Une fois le pain
cuit, la machine à pain émet un bip et la donnée « 0:00 » est affichée à l’écran. Appuyer
sur I/O et ouvrir le couvercle.
6. Si une erreur est commise après l’activation du programme et qu’il faut recommencer,
tenir le bouton I/O enfoncé pendant quelques secondes. La minuterie sera réinitialisée,
et il sera possible de recommencer.
CUISSON SEULEMENT
Le cycle CUISSON SEULEMENT permet de modifier le temps de cuisson. Grâce à ce
cycle, il est possible de cuire de la pâte déjà faite ou de la pâte achetée en magasin. Il
est également utile si la croûte est trop pâle, ou si le pain sucré n’est pas tout à fait cuit.
Vérifier la cuisson à intervalles réguliers de quelques minutes.
44
Page 45

1. Appuyer sur le bouton MENU jusqu’à ce que l’option 10, BAKE (CUISSON), apparaisse
sur l’écran.
2. Appuyer sur les flèches ▲ (MONTER) et t (DESCENDRE) pour ajuster la durée de la
CUISSON, soit entre 1 et 15 heures.
3. Appuyer sur le bouton START/STOP (MARCHE/ARRÊT) pour commencer le cycle de
CUISSON.
4. Si vous souhaitez que la cuisson soit de moins de une heure, appuyer sur le bouton
START/STOP (MARCHE/ARRÊT) pour annuler le cycle de CUISSON au moment
souhaité.
DORURES SPÉCIALES POUR LE PAIN À LA LEVURE
Pour rehausser l’apparence du pain, choisir l’une des dorures spéciales ci dessous :
• Croûte au beurre fondu : Badigeonner du beurre fondu sur la miche fraîchement cuite
pour obtenir une croûte plus tendre.
• Dorure au lait : Pour une croûte plus tendre et plus luisante, badigeonner la miche
fraîchement cuite de lait ou de crème.
• Dorure au sucre glacé : Mélanger 235 ml (1 tasse) de sucre glace tamisé et 15 à 30 ml
(1 ou 2 c. à table) de lait, d’eau ou de jus de fruit jusqu’à l’obtention d’une consistance
uniforme. Appliquer la dorure sur le pain aux raisins ou sur des pains sucrés lorsqu’ils
sont presque refroidis.
Note : Au choix, garnir généreusement la dorure de noix ou de graines.
CYCLE DE CUISSON DE PÂTE
Conseils pour obtenir des résultats optimaux
• Lors de l’utilisation de la minuterie à retardateur, bien s’assurer que la levure est
placée sur la farine et qu’elle ne touche pas aux ingrédients liquides.
Important : Ne jamais laisser de pâte dans la machine à pain après la fin du cycle; la
pâte risque de trop lever et d’endommager la machine.
• Le temps de levage de la pâte (une fois qu’elle a été façonnée et déposée dans le moule
à pain) varie en fonction de la recette, de la température et du taux d’humidité dans la
cuisine. La température ambiante optimale pour le levage est de 27 à 29 °C (80 à 85 °F).
Le levage est l’étape la plus importante de la fabrication du pain.
• La machine à pain permet à la pâte de parvenir à un premier levage, ou à la
fermentation, avant qu’elle soit retirée. La fermentation transforme le gluten (ce
qui favorise la malléabilité et l’élasticité, et confère à la pâte une texture douce et
onctueuse), ajoute de la saveur et fait lever la pâte.
• Parfois, un deuxième levage est nécessaire, notamment dans le cas du pain de grains
entiers ou de blé entier. Permettre à la pâte de lever une première fois dans la machine
à pain. Retirer la pâte de la machine, la dégonfler en y enfonçant fermement son poing,
la laisser lever de nouveau et la dégonfler encore, puis la laisser reposer 10 minutes.
Cette pause permet au gluten de se relâcher et facilite la maniabilité. Façonner la pâte
tel que désiré et la laisser lever jusqu’à ce qu’elle double de volume. Si un seul levage
est souhaité, retirer la pâte de la machine à pain, la laisser reposer, la façonner et
suivre la méthode de levage susmentionnée.
• Conseil du boulanger : La pâte a doublé de volume lorsqu’une légère pression du doigt
y laisse une empreinte visible. Si l’empreinte disparaît, couvrir, laisser la pâte lever
quelques minutes de plus et vérifier de nouveau.
CONSEILS SPÉCIAUX POUR LA PRÉPARATION DE LA PÂTE
Important : À n’utiliser qu’avec le cycle Pâte.
• Toujours permettre à la pâte façonnée de lever complètement.
• Utiliser des pinceaux à pâtisserie pour appliquer la dorure.
• Cuire selon les instructions de la recette.
45
Page 46

À appliquer juste avant la cuisson :
Dorure au jaune d’œuf
Pour obtenir une croûte lustrée et dorée, mélanger 1 œuf ou 1 jaune d’œuf légèrement
battu avec 15 ml (1 c. à table) d’eau ou de lait.
Dorure au blanc d’œuf
Pour obtenir une croûte lustrée et moelleuse, mélanger 1 blanc d’œuf légèrement battu
avec 15 ml (1 c. à table) d’eau.
Au choix, garnir la dorure de noix hachées, de fruits ou de graines.
Un peu de farine
Saupoudrer suffisamment de farine sur la surface de travail pour empêcher la pâte de
coller pendant la préparation.
Petits pains façonnés :
Important : Une fois que les petits pains sont façonnés, les couvrir et laisser lever la
pâte jusqu’à ce qu’elle double de volume avant la cuisson.
Petits pains en trèfle
Faire de petites boules de 1,3 cm (½ po). Placer 3 boules dans chaque moule à muffins
graissés.
Petits pains entrecroisés
Faire des boules et en mettre 2 de côté. Combiner les boules et former de minces carrés
de 3 mm (¹⁄8 po) d’épaisseur. Découper des bandes de 3 mm (¹⁄8 po) de largeur et de 5 cm (2
po) de longueur. Badigeonner d’œuf battu le dessus de chaque pain. Déposer 1 bande sur
le dessus de chaque boule. Répéter l’opération en déposant une deuxième bande dans le
sens opposé sur le dessus de chaque boule.
Petits pains traditionnels
Faire des boules. Pour obtenir des petits pains à séparer, placer les boules de pâte côte à
côte sur une plaque de cuisson graissée ronde ou rectangulaire de 20 ou 23 cm (8 ou 9 po),
de manière à ce qu’elles se touchent. Pour obtenir des petits pains individuels, placer les
boules de pâte à 5 cm (2 po) les unes des autres.
Croissants
Sur une surface de travail légèrement enfarinée, rouler la pâte de manière à former
un cercle de 30 cm (12 po). Badigeonner de beurre ramolli. Couper en 16 pointes en
commençant par l’extérieur du cercle. Placer les croissants à 5 cm (2 po) les uns des
autres sur une plaque de cuisson graissée de façon à ce que la pointe se trouve en
dessous des croissants. Courber légèrement les croissants. Au choix, badigeonner de
beurre fondu juste avant la cuisson.
Rosettes
Sur une surface de travail légèrement enfarinée, rouler un morceau de 40 g (1½ oz)
de pâte de manière à former un rouleau de 35 cm (14 po). Faire un nœud desserré qui
laissera deux longues extrémités. Insérer les extrémités dans le centre du nœud en
faisant passer l’une d’elles par le dessus et l’autre par le dessous. Placer les rosettes à 5
cm (2 po) les unes des autres sur une plaque de cuisson légèrement graissée.
CYCLE JAM (CONFITURES) - MÉTHODES ET RECETTES
Ce cycle vous permet de préparer de la confiture à partir de fruits frais ou congelés. Ne
pas doubler les recettes et éviter que les ingrédients bouillent dans le moule à pain et
débordent dans la chambre de cuisson. Si cela se produit, arrêter immédiatement la
machine à pain, laisser refroidir puis bien nettoyer.
Appuyer sur le bouton MENU jusqu’à ce que l’option 9, JAM (CONFITURES), apparaisse sur
l’écran.
Méthode :
1. Retirer le moule à pain du BreadmanMD. Fixer le disque de malaxage dans l’arbre
d’entraînement. Avoir tous les ingrédients sous la main. Nettoyer les baies ou fruits
frais, couper en cubes de 1,5 cm (1/2 po) puis égoutter. Si vous utilisez des fruits
46
Page 47

congelés, décongeler puis égoutter.
2. Mesurer les fruits égouttés à l’aide d’une tasse à mesurer pour ingrédients liquides
puis écraser avec un pilon à pommes de terre ou avec vos mains.
3. Mesurer le sucre à l’aide d’une tasse à mesurer pour ingrédients secs.
4. Le cas échéant, mesurer le jus de citron à l’aide d’une cuillère à mesurer.
5. Placer le moule à pain dans le BreadmanMD. Appuyer sur le moule à pain jusqu’à ce
qu’il soit solidement en place. Fermer le couvercle.
6. L’écran affichera 9, JAM (CONFITURES). Appuyer sur le bouton START/STOP (MARCHE/
ARRÊT).
7. La machine à pain sera en mode préchauffage pendant 15 minutes avant que tout
mouvement se produise dans le moule à pain. Après le préchauffage, la confiture sera
chauffée et mélangée pendant environ 50 minutes. Le cycle CONFITURES prend une
heure et cinq minutes (1 h 05) au total.
8. Lorsque le cycle est terminé, le BreadmanMD émettra un bip et l’écran affichera « 0:00
». Appuyer sur le bouton START/STOP (MARCHE/ARRÊT) et ouvrir le couvercle.
MISE EN GARDE : LA CHAMBRE DE CUISSON, LE MOULE À PAIN, LE DISQUE DE
MALAXAGE ET LA CONFITURE SERONT TRÈS CHAUDS. UTILISER DES GANTS DE
CUISINE.
9. Retirer le moule à pain du BreadmanMD. S’ASSURER D’UTILISER DES GANTS DE
CUISINE.
10. Verser la confiture dans un contenant résistant à la chaleur. Laisser refroidir sur le
comptoir et remuer régulièrement.
11. Verser la confiture dans un contenant conçu pour aller au réfrigérateur/congélateur,
laissant 1,5 cm (1/2 po) d’espace au-dessus de la confiture.
12. Conserver la confiture dans un contenant fermé hermétiquement. La confiture
épaissira au fur et à mesure qu’elle refroidit.
CYCLE PASTA (PÂTES ALIMENTAIRES)
Ce cycle permet de mélanger des pâtes; ensuite, il faut suivre les directives de la recette
pour terminer la cuisson. Différents types de pâtes peuvent être mélangées grâce au
programme PÂTES ALIMENTAIRES. Retirer la pâte et suivre les directives de la recette
pour terminer la cuisson.
• Il est important d’aider la machine à pain pendant qu’elle mélange les ingrédients.
Après 5 minutes (:09), ouvrir le couvercle et utiliser une spatule en caoutchouc pour
racler les parois et les coins du moule à pain et replier la pâte. Fermer le couvercle et
laisser la machine à pain terminer le cycle.
• Puisque la pâte à biscuits est plus difficile à manipuler, il pourrait être nécessaire de
répéter une partie du cycle PÂTES ALIMENTAIRES, voire le cycle en entier. Vérifier la
pâte après 5 minutes et aider la machine à pain au besoin.
47
Page 48

Entretien et nettoyage
L’utilisateur ne peut effectuer lui-même l’entretien d’aucune pièce de ce produit. Confier
l’entretien à un technicien qualifié.
NETTOYAGE
Important : Toujours débrancher la machine à pain et la laisser refroidir complètement
avant de la nettoyer.
Le moule à pain et le disque de malaxage ont des surfaces antiadhésives, ce qui en rend le
nettoyage plus facile.
1. Après avoir fait cuire du pain, débrancher la machine à pain, la laisser refroidir et
enlever les miettes.
2. Retirer le moule à pain de la chambre de cuisson et le disque de malaxage du moule.
Ensuite, nettoyer complètement le moule à pain et le disque de malaxage avec de l’eau
tiède savonneuse. Éviter de rayer les surfaces antiadhésives.
Mise en garde : Ne pas mettre le moule à pain au lave vaisselle ni le faire tremper.
3. Si le disque de malaxage ne peut être séparé de l’arbre d’entraînement, verser de l’eau
tiède dans le moule à pain et laisser tremper jusqu’à 30 minutes pour le décoller. Ne
pas forcer de manière excessive.
4. Essuyer l’intérieur du couvercle et de la chambre de cuisson à l’aide d’un chiffon ou
d’une éponge légèrement humide. Si des résidus se sont carbonisés sur l’élément
chauffant ou à un autre endroit, essuyer avec un tampon non abrasif. Le couvercle
peut être retiré pour faciliter le nettoyage. Bien assécher la chambre de cuisson et le
couvercle.
Important : Ne pas mettre le couvercle dans le lave vaisselle, car il pourrait se tordre.
Ne pas l’immerger dans l’eau, car il contient des circuits électroniques fragiles.
5. Pour nettoyer le hublot, utiliser un nettoyant pour vitres ou un détergent doux avec
un chiffon humide ou un tampon à récurer en plastique. Ne pas utiliser de tampons à
récurer ou de produits de nettoyage abrasifs, car ils peuvent rayer le hublot.
6. Ne pas utiliser de vinaigre, d’eau de Javel ou de produits chimiques corrosifs pour
nettoyer la machine à pain.
7. Laisser l’appareil refroidir complètement avant de le ranger.
8. La chambre de cuisson contient un élément chauffant et un arbre d’entraînement. Lors
du nettoyage, ne JAMAIS y verser d’eau, de solvants ou de produits nettoyants.
RANGEMENT
• Nettoyer et sécher complètement toutes les pièces amovibles.
• Entreposer avec le couvercle fermé. Placer le moule à pain dans l’appareil avec le
disque de malaxage à l’intérieur.
DÉPANNAGE
Question Réponse
Pourquoi la hauteur et la forme du
pain changent-elles d’une miche
à l’autre?
Le pain a un arôme inhabituel.
Pourquoi?
Le disque de malaxage reste accroché au pain lors du démoulage.
Le pain a de la farine dans les
coins.
La quantité des ingrédients
peut-elle être divisée en deux ou
doublée?
48
La hauteur et la forme du pain peuvent changer selon les ingrédients, la température ambiante et
la durée du cycle. De plus, le dosage précis des ingrédients est essentiel à la préparation d’un pain
délicieux.
Il est possible que des ingrédients périmés aient été utilisés ou que la pâte comporte trop de levure.
Toujours utiliser des ingrédients frais. Le dosage précis des ingrédients est essentiel à la préparation
d’un pain délicieux.
Cela est susceptible d’arriver, car le disque de malaxage est amovible. Utiliser un ustensile non
métallique pour le séparer du pain.
Mise en garde : Le disque de malaxage sera chaud. Laisser le pain refroidir avant de retirer le
disque.
Parfois, la farine dans les coins du moule n’est pas complètement pétrie avec le reste de la pâte. La
racler de la miche à l’aide d’un couteau. Vérifier la miche environ 10 minutes après le début du cycle
de malaxage. Si la farine n’est pas complètement incorporée, utiliser une spatule de caoutchouc pour
retirer la farine des côtés du moule pour qu’elle puisse être incorporée à la pâte.
NON. Si le moule à pain n’est pas assez rempli, le disque de malaxage ne pourra pas pétrir la pâte
correctement. S’il est trop rempli, le pain sortira du moule en levant.
Page 49

Est-il possible d’utiliser du lait frais
à la place du lait en poudre?
OUI. Retirer cependant une quantité d’eau équivalente. Le lait frais n’est pas idéal pour l’utilisation
de la minuterie à retardateur de cuisson, car il risque de tourner pendant qu’il repose dans le moule
à pain.
BESOIN D’AIDE?
Pour communiquer avec les services d’entretien ou de réparation, ou pour adresser toute
question relative au produit, composer le numéro sans frais approprié indiqué sur la page
couverture. Ne pas retourner le produit où il a été acheté. Ne pas poster le produit au
fabricant ni le porter dans un centre de service. On peut également consulter le site web
indiqué sur la page couverture.
Garantie limitée de deux ans
(Valable seulement aux États-Unis et au Canada)
Quelle est la couverture?
• Tout défaut de main-d’oeuvre ou de matériau; toutefois, la responsabilité de la société
Applica se limite au prix d’achat du produit.
Quelle est la durée?
• Deux année(s) à compter de la date d’achat initiale, avec une preuve d’achat.
Quelle aide offrons nous?
• Remplacement par un produit raisonnablement semblable nouveau ou réusiné.
Comment se prévaut-on du service?
• Conserver son reçu de caisse comme preuve de la date d’achat.
• Visiter notre site web au www.prodprotect.com/applica, ou composer sans frais le 1 800
231-9786, pour obtenir des renseignements généraux relatifs à la garantie.
• On peut également communiquer avec le service des pièces et des accessoires au 1 800
738-0245.
Qu’est-ce que la garantie ne couvre pas?
• Des dommages dus à une utilisation commerciale.
• Des dommages causés par une mauvaise utilisation ou de la négligence.
• Des produits qui ont été modifiés.
• Des produits utilisés ou entretenus hors du pays où ils ont été achetés.
• Des pièces en verre et tout autre accessoire emballés avec le produit.
• Les frais de transport et de manutention reliés au remplacement du produit.
• Des dommages indirects (il faut toutefois prendre note que certains états ne permettent
pas l’exclusion ni la limitation des dommages indirects).
Quelles lois régissent la garantie?
• Les modalités de la présente garantie donnent des droits légaux spécifiques.
L’utilisateur peut également se prévaloir d’autres droits selon l’état ou la province qu’il
habite.
49
Page 50

RECETTES DE PAINS BLANCS DE BASE
PAIN BLANC DE BASE/PAIN FRANÇAIS
Ingrédients : 1,5 lb (680 g) 2 lb (908 g)
Eau à 27 °C (80 °F) 280 ml (1 1/8 tasse) 375 ml (1 1/2
tasse)
Huile végétale (facultatif) 22 ml (1 1/2 c. à table) 30 ml (2 c. à
table)
Sucre 7 ml (1/2 c. à table) 15 ml (1 c. à
table)
Sel 7 ml (1 1/2 c. à thé) 7 ml (1 1/2 c.
à thé)
Farine panifiable 750 ml (3 tasses) 1 l (4 tasses)
Levure sèche active 10 ml (2 c. à thé) 12 ml (2 1/2
c. à thé)
Choisir le cycle BASIC (PAINS DE BASE).
Choisir le cycle RAPID BASIC (PAINS DE BASE À CUISSON RAPIDE).
Levure sèche active 12 ml (2 1/2 c. à thé) 14 ml (2 3/4
c. à thé)
RECETTES DE PAINS FRANÇAIS
PAIN FRANÇAIS
Ingrédients : 1,5 lb (680 g) 2 lb (908 g)
Eau à 27 °C (80 °F) 280 ml 325 ml
(1 tasse + 2 c. à table) (1 1/3 tasse)
Huile d’olive 20 ml 30 ml
(1 c. à table + 1 c. à thé) (2 c. à table)
Sucre 17 ml 30 ml
(1 c. à table + 1/2 c. à thé) (2 c. à table)
Sel 5 ml (1 c. à thé) 7 ml (1 1/2 c.
à thé)
Farine panifiable 800 ml (3 1/4 tasses) 1 l (4 tasses)
Levure sèche active 10 ml (2 c. à thé) 11 ml (2 1/4
c. à thé)
Choisir le cycle FRENCH (PAINS FRANÇAIS).
Choisir le cycle RAPID FRENCH (PAINS FRANÇAIS À CUISSON RAPIDE).
Levure sèche active 14 ml (2 3/4 c. à thé) 15 ml (1 c. à
table)
PAIN ITALIEN AUX HERBES
Ingrédients : 1,5 lb (680 g) 2 lb (908 g)
Eau à 27 °C (80 °F) 265 ml 330 ml
(1 tasse + 1 c. à table) (1 1/4 tasse +
2 c. à table)
50
Page 51

Huile 30 ml (2 c. à table) 45 ml (3 c. à
table)
Sucre 30 ml (2 c. à table) 45 ml (3 c. à
table)
Sel 7 ml (1 1/2 c. à thé) 10 ml (2 c. à
thé)
Lait en poudre 30 ml (2 c. à table) 45 ml (3 c. à
table)
Farine panifiable 750 ml (3 tasses) 1 l (4 tasses)
Assaisonnement à l’italienne 10 ml (2 c. à thé) 15 ml (1 c. à
table)
Levure sèche active 10 ml (2 c. à thé) 11 ml (2 1/4
c. à thé)
Choisir le cycle FRENCH (PAINS FRANÇAIS).
Choisir le cycle RAPID FRENCH (PAINS FRANÇAIS À CUISSON RAPIDE).
Levure sèche active 14 ml (2 3/4 c. à thé) 15 ml (1 c. à
table)
RECETTES DE PAINS AU BLÉ ENTIER
PAIN DE SEIGLE AU CARVI
Ingrédients : 1,5 lb (680 g) 2 lb (908 g)
Oeuf(s) de calibre gros, à température ambiante, 1 2
plus suffisamment d’eau à 27 °C (80 °F)
pour obtenir 265 ml 325 ml
(1 tasse + 1 c. à table) (1 1/3 tasse)
Huile 45 ml (3 c. à table) 60 ml (1/4
tasse)
Miel 45 ml (3 c. à table) 60 ml (1/4
tasse)
Lait en poudre 30 ml (2 c. à table) 45 ml (3 c. à
table)
Sel 7 ml (1 1/2 c. à thé) 10 ml (2 c. à
thé)
Farine panifiable 375 ml (1 1/2 tasse) 500 ml (2
tasses)
Farine de blé entier 175 ml (3/4 tasse) 250 ml (1
tasse)
Farine de seigle 150 ml (2/3 tasse) 250 ml (1
tasse)
Sucre 30 ml (2 c. à table) 45 ml (3 c. à
table)
Levure sèche active 10 ml (2 c. à thé) 11 ml (2 1/4
c. à thé)
Choisir le cycle WHOLE WHEAT (PAINS AU BLÉ ENTIER).
Choisir le cycle RAPID WHOLE WHEAT (PAINS AU BLÉ ENTIER À CUISSON RAPIDE).
Levure sèche active 14 ml (2 3/4 c. à thé) 15 ml (1 c. à
table)
51
Page 52

PAIN AU BLÉ ENTIER ET AU GLUTEN
Ingrédients : 1,5 lb (680 g) 2 lb (908 g)
Eau à 27 °C (80 °F) 300 ml (1 1/4 tasse) 375 ml (1 1/2
tasse)
Huile 37 ml (2 1⁄2 c. à table) 45 ml (3 c. à
table)
Mélasse 37 ml (2 1⁄2 c. à table) 45 ml (3 c. à
table)
Sel 7 ml (1 1/2 c. à thé) 10 ml (2 c. à
thé)
Lait en poudre 30 ml (2 c. à table) 45 ml (3 c. à
table)
Farine de blé entier 925 ml (3 3/4 tasses) 1 l (4 tasses)
Gluten 37 ml (2 1⁄2 c. à table) 45 ml (3 c. à
table)
Levure sèche active 10 ml (2 c. à thé) 11 ml (2 1/4 c. à
thé)
Choisir le cycle WHOLE WHEAT (PAINS AU BLÉ ENTIER).
Choisir le cycle RAPID WHOLE WHEAT (PAINS AU BLÉ ENTIER À CUISSON RAPIDE).
Levure sèche active 14 ml (2 3/4 c. à thé) 15 ml (1 c. à
table)
PAIN AUX SEPT CÉRÉALES
Ingrédients : 1,5 lb (680 g) 2 lb (908 g)
Oeuf(s) de calibre gros, à température ambiante, 1 1
plus suffisamment d’eau à 27 °C (80 °F)
pour obtenir 280 ml 375 ml
(1 tasse + 2 c. à table) (1 1/2 tasse)
Huile 30 ml (2 c. à table) 45 ml (3 c. à
table)
Miel 10 ml (2 c. à thé) 15 ml (1 c. à
table)
Sel 7 ml (1 1/2 c. à thé) 10 ml (2 c. à
thé)
Farine de blé entier 375 ml (1 1/2 tasse) 500 ml (2
tasses)
Farine panifiable 125 ml (1/2 tasse) 250 ml (1 tasse)
Farine de riz brun 60 ml (1/4 tasse) 90 ml (1/3
tasse)
Farine d’épeautre 60 ml (1/4 tasse) 90 ml (1/3
tasse)
Farine de sarrasin 60 ml (1/4 tasse) 90 ml (1/3
tasse)
Farine de seigle 60 ml (1/4 tasse) 90 ml (1/3
tasse)
Farine d’avoine 60 ml (1/4 tasse) 90 ml (1/3
tasse)
Semoule de maïs 30 ml (2 c. à table) 60 ml (1/4
tasse)
52
Page 53

Gluten 45 ml (3 c. à table) 60 ml
(1/4 tasse)
Levure sèche active 10 ml (2 c. à thé) 11 ml (2
1/4 c. à thé)
Choisir le cycle Whole Wheat (pains au blé entier).
Choisir le cycle Rapid Whole Wheat (pains au blé entier à cuisson rapide).
Levure sèche active 14 ml (2 3/4 c. à thé) 15 ml (1 c. à
table)
Choisir le cycle Rapid Whole Wheat (pains au blé entier à cuisson rapide).
Levure sèche active 14 ml (2 3/4 c. à thé) 15 ml (1 c. à
table)
RECETTES DE PAINS SUCRÉS
PAIN AU MÉLANGE MONTAGNARD
Ingrédients : 1,5 lb (680 g) 2 lb (908 g)
Eau à 27 °C (80 °F) 300 ml (1 1/4 tasse) 375 ml (1 1/2
tasse)
Huile 45 ml (3 c. à table) 60 ml (1/4
tasse)
Miel 45 ml (3 c. à table) 60 ml (1/4
tasse)
Sel 7 ml (1 1/2 c. à thé) 10 ml (2 c. à
thé)
Farine panifiable 750 ml (3 tasses) 1 l (4 tasses)
Levure sèche active 10 ml (2 c. à thé) 11 ml (2 1/4 c.
à thé)
Ajouter les ingrédients lorsque la machine émet un bip.
Mélange de fruits séchés et de noix 125 ml (1/2 tasse) 150 ml (2/3
tasse)
Choisir le cycle SWEET (PAINS SUCRÉS).
Choisir le cycle RAPID SWEET (PAINS SUCRÉS À CUISSON RAPIDE).
Levure sèche active 14 ml (2 3/4 c. à thé) 15 ml (1 c. à
table)
PAIN AUX RAISINS ET À LA CANNELLE
Ingrédients : 1,5 lb (680 g) 2 lb (908 g)
Eau à 27 °C (80 °F) 265 ml 330 ml
(1 tasse + 1 c. à table) (1 1/4 tasse + 2
c. à table)
Huile 22 ml (1 1/2 c. à table) 30 ml (2 c. à
table)
Cassonade 37 ml (2 1⁄2 c. à table) 45 ml (3 c. à
table)
Sel 7 ml (1 1/2 c. à thé) 10 ml (2 c. à
thé)
53
Page 54

Lait en poudre 22 ml (1 1/2 c. à table) 30 ml (2 c. à
table)
Cannelle 10 ml (2 c. à thé) 15 ml (1 c. à
table)
Farine panifiable 750 ml (3 tasses) 1 l (4 tasses)
Noix de Grenoble concassées 125 ml (1/2 tasse) 175 ml (2/3
tasse)
Levure sèche active 10 ml (2 c. à thé) 11 ml (2 1/4 c.
à thé)
Ajouter les ingrédients lorsque la machine émet un bip.
Raisins secs 125 ml (1/2 tasse) 175 ml (2/3
tasse)
Choisir le cycle SWEET (PAINS SUCRÉS).
Choisir le cycle RAPID SWEET (PAINS SUCRÉS À CUISSON RAPIDE).
Levure sèche active 14 ml (2 3/4 c. à thé) 15 ml (1 c. à
table)
RECETTES POUR LE CYCLE DOUGH (PÂTE)
PÂTE À PETITS PAINS
Ingrédients : 1,5 lb (680 g) 2 lb (908 g)
18 petits pains 24 petits
pains
Oeuf(s) de calibre gros, à température ambiante, 1 1
plus suffisamment d’eau à 27 °C (80 °F)
pour obtenir 190 ml 325 ml
(3/4 tasse + 1 c. à table) (1 1/3 tasse)
Huile 45 ml (3 c. à table) 60 ml
(1/4 tasse)
Sucre 45 ml (3 c. à table) 60 ml
(1/4 tasse)
Sel 7 ml (1 1/2 c. à thé) 10 ml (2
c. à thé)
Farine panifiable 800 ml (3 1/4 tasses) 1 l (4
tasses)
Levure sèche active 10 ml (2 c. à thé) 11 ml (2
1/4 c. à
thé)
Choisir le cycle DOUGH (PÂTE).
Méthode:
1. Déposer sur une surface légèrement enfarinée. Diviser en différentes pièces et formes.
2. Déposer sur une plaque à biscuits graissée. Couvrir et laisser lever dans un endroit
chaud pendant 30 minutes, soit jusqu’à ce que leur taille ait doublé.
3. Cuire à 177 ºC (350 ºF) pendant 15 à 25 minutes ou jusqu’à ce qu’ils soient dorés.
54
Page 55

PÂTE À PETITS PAINS AU BLÉ ENTIER
Ingrédients : 2 lb (908 g)
18 petits
pains
Eau à 27 °C (80 °F) 375 ml (1 1/2
tasse)
Huile 30 ml (2 c. à
table)
Cassonade 60 ml (1/4
tasse)
Sel 10 ml (2 c. à
thé)
Lait en poudre 30 ml (2 c. à
table)
Farine panifiable 625 ml (2 1⁄2
tasses)
Farine de blé entier 500 ml (2
tasses)
Levure sèche active 11 ml (2 1/4
c. à thé)
Choisir le cycle DOUGH (PÂTE).
Méthode:
1. Déposer sur une surface
légèrement enfarinée.
Diviser en différentes
pièces et formes.
2. Déposer sur une plaque à
biscuits graissée. Couvrir
et laisser lever dans un
endroit chaud pendant 30
minutes, soit jusqu’à ce
que leur taille ait doublé.
3. Cuire à 177 ºC (350 ºF)
pendant 25 à 30 minutes
ou jusqu’à ce qu’ils soient
dorés.
55
Page 56

PÂTE À FOCACCIA
Ingrédients : 1,5 lb (680 g)
1 miche
Eau à 27 °C (80 °F) 250 ml (1 tasse)
Huile d’olive 75 ml (1/3 tasse)
Sucre 10 ml (2 c. à thé)
Sel 7 ml (1 1/2 c. à thé)
Farine panifiable 750 ml (3 tasses)
Assaisonnement à l’italienne 5 ml (1 c. à thé)
Levure sèche active 10 ml (2 c. à thé)
Choisir le cycle DOUGH (PÂTE).
Garniture à l’ail et au fromage :
Huile d’olive 60 ml (1/4 tasse)
Origan 7 ml (1 1⁄2 c. à thé)
2 gousses d’ail, émincées finement 60 ml (1/4 tasse)
Parmesan râpé 75 ml (1/3 tasse)
Sel 1,25 ml (1/4 c. à thé)
Garniture à la grecque :
Huile d’olive 60 ml (1/4 tasse)
Origan 7 ml (1 1⁄2 c. à thé)
Oignon, tranché finement 250 ml (1 tasse)
Fromage féta émietté 75 ml (1/3 tasse)
Olives noires tranchées égouttées 60 ml (1/4 tasse)
Sel 1,25 ml (1/4 c. à thé)
Méthode:
1. Avec les mains huilées, presser la pâte uniformément dans un moule de 23 cm
(9 po) x 33 cm (13 po). Avec le bout des doigts, faire des creux dans la pâte.
2. Couvrir et laisser lever dans un endroit chaud jusqu’à ce que leur taille ait doublé
(environ 20 minutes). Pendant le cycle de levage, choisir et préparer la garniture.
3. Dans une poêle à frire, faire chauffer l’huile. Pour la garniture à l’ail et au fromage,
ajouter l’origan et l’ail. Retirer immédiatement du feu. Pour la garniture à la grecque,
ajouter l’origan et l’oignon. Cuire jusqu’à ce que l’oignon soit tendre, en évitant qu’il
brunisse (soit environ 5 minutes).
4. À l’aide d’une cuillère, étendre la garniture sur la pâte. Saupoudrer les ingrédients
restants.
5. Cuire à 205 ºC (400 ºF) pendant 20 minutes ou jusqu’à ce que la focaccia soit dorée.
56
Page 57

RECETTES DE PÂTES ALIMENTAIRES
Ce cycle permet de mélanger des pâtes; ensuite, suivre les directives de la recette pour
terminer la cuisson.
Différents types de pâtes peuvent être mélangées grâce au programme PÂTES
ALIMENTAIRES. Retirer la pâte et suivre les directives de la recette pour terminer la
cuisson.
• Il est important d’aider la machine à pain pendant qu’elle mélange les ingrédients.
Après 5 minutes (:09), ouvrir le couvercle et utiliser une spatule en caoutchouc pour
racler les parois et les coins du moule à pain et replier la pâte. Fermer le couvercle
et laisser la machine à pain terminer le cycle.
• Puisque la pâte à biscuits est plus difficile à manipuler, il pourrait être nécessaire de
répéter une partie du cycle PÂTES ALIMENTAIRES, voire le cycle en entier. Vérifier la
pâte après 5 minutes et aider la machine à pain au besoin.
RECETTES DE PÂTES À LA SEMOULE
Ingrédients :
Lait chaud à 27 °C (80 °F) 175 ml (3⁄4
tasse)
Huile 90 ml (6 c. à
thé)
Sel 1,25 ml (1/4 c. à
thé)
Semoule de blé tendre 500 ml (2 tasses)
Choisir le cycle PASTA (PÂTES ALIMENTAIRES).
Method:
1. Retirer le moule à pain de la machine à pain BreadmanMD. Fixer le disque de
malaxage dans l’arbre d’entraînement. Avoir tous les ingrédients sous la main.
S’assurer que tous les ingrédients, sauf le lait, sont à la température ambiante.
2. Mesurer le lait à 27 °C (80 °F) à l’aide d’une tasse à mesurer pour ingrédients
liquides, puis verser dans le moule à pain.
3. Mesurer l’huile à l’aide d’une cuillère à mesurer puis ajouter au moule à pain.
4. Mesurer le sel à l’aide d’une cuillère à mesurer, égaliser au moyen du revers de la
lame d’un couteau puis ajouter au moule à pain.
5. À l’aide d’une cuillère, déposer la semoule de blé tendre dans une tasse à mesurer
pour ingrédients secs, égaliser au moyen du revers de la lame d’un couteau puis
ajouter au moule à pain.
6. Étaler les ingrédients dans tous les coins du moule. Frapper doucement le moule
sur le comptoir 3 fois pour que les ingrédients se tassent.
7. Placer le moule à pain dans le BreadmanMD. Appuyer sur le rebord du moule à pain
jusqu’à ce que ce dernier soit solidement en place. Fermer le couvercle.
8. Appuyer sur le bouton MENU jusqu’à ce que l’option 7, PASTA (PÂTES
ALIMENTAIRES), apparaisse sur l’écran.
9. Appuyer sur le bouton START/STOP (MARCHE/ARRÊT).
10. Après 5 minutes (:09), ouvrir le couvercle et utiliser une spatule en caoutchouc pour
racler les parois et les coins du moule à pain et replier la pâte. Fermer le couvercle
et laisser la machine à pain terminer le cycle.
57
Page 58

11. À l’aide de la poignée, retirer le moule à pain une fois que le processus de
pétrissage/mixage est terminé.
12. Retourner le moule à pain puis le secouer à quelques reprises jusqu’à la pâte s’en
détache.
13. Abaisser la pâte sur une surface enfarinée puis, à l’aide d’un rouleau à pâte,
étendre la pâte jusqu’à une épaisseur d’environ 0,25 cm (1/8 po). Couper la pâte en
languettes de 1,5 cm (1/2 po) de largeur.
14. Déposer les pâtes alimentaires dans 1,5 L (6 tasses) d’eau salée bouillante et cuire
de 10 à 15 minutes, ou jusqu’à ce qu’elles soient tendres. NE PAS TROP FAIRE
CUIRE. Bien égoutter.
15. DÉBRANCHER L’APPAREIL ET LAISSER REFROIDIR COMPLÈTEMENT AVANT LE
NETTOYAGE. Nettoyer le moule à pain après chaque utilisation. NE PAS IMMERGER
LE MOULE À PAIN DANS L’EAU. (Voir les CONSIGNES DE NETTOYAGE dans le Mode
d’emploi.) Nettoyer l’intérieur de la machine à pain BreadmanMD après chaque
utilisation.
DUMPLINGS
Ingrédients :
Lait chaud à 27 °C (80 °F) 250 ml
(1 tasse)
Huil 125 ml (1/2 tasse)
Sel 1,25 ml (1/4 c. à thé)
Farine tout-usage 650 ml (2 2/3 tasses)
Poudre à pâte 20 ml (4 c. à thé)
Choisir le cycle PASTA (PÂTES ALIMENTAIRES).
Méthode:
1. Déposer la pâte dans un bol.
2. À l’aide d’une cuillère à thé, déposer délicatement les
dumplings dans 1,5 L (6 tasses) de bouillon en ébullition.
3. Réduire à feu moyen et cuire de 10 à 15 minutes, ou jusqu’à
ce que les dumplings soient tendres. NE PAS TROP FAIRE
CUIRE.
Donne 4 portions.
58
Page 59

CROÛTE DE TARTE
Ingrédients :
Eau chaude à 27 °C (80 °F) 125 ml (1/2 tasse)
Huile 175 ml (3/4 tasse)
Sel 1,25 ml (1/4 c. à thé)
Farine tout-usage 625 ml (2 1⁄2 tasses)
Choisir le cycle PASTA (PÂTES ALIMENTAIRES).
Méthode:
1. Diviser en deux et déposer sur une surface légèrement enfarinée.
2. Abaisser la pâte dans le moule à tarte et piquer le fond à l’aide d’une
fourchette.
3. Cuire à 218 °C (425 °F) pendant 20 minutes ou jusqu’à ce que la pâte soit
cuite.
Donne 2 croûtes de tarte.
BISCUITS AUX FLOCONS D’AVOINE ET AUX RAISINS SECS
Ingrédients :
Oeufs à la température ambiante 2
Beurre, fondu 250 ml (1 tasse)
Cassonade tassée 250 ml (1 tasse)
Sucre 125 ml (1/2 tasse)
Farine tout-usage 375 ml (1 1/2 tasse)
Cannelle 5 ml (1 c. à thé)
Sel 2,5 ml (1/2 c. à thé)
Flocons d’avoine à cuisson rapide
QuakerMD ou roulée à l’ancienne 750 ml (3 tasses)
Raisins secs 250 ml (1 tasse)
Bicarbonate de soude 5 ml (1 c. à thé)
Choisir le cycle PASTA (PÂTES ALIMENTAIRES).
Après 5 minutes, utiliser une spatule pour racler
les parois du moule à pain et incorporer toute la
farine. Une fois que le cycle est terminé, utiliser
une spatule si le mélange n’est pas homogène; au
besoin, relancer le cycle.
Méthode:
1. À l’aide d’une cuillère, déposer sur une plaque à
pâtisserie graissée.
2. Cuire à 177 °C (350 °F) de 12 à 15 minutes ou
jusqu’à ce que les biscuits soient cuits.
Donne 30 biscuits.
59
Page 60

BISCUITS À L’AMARETTO ET AUX RAISINS SECS
Ingrédients :
Amaretto ou
extrait de vanille 15 ml (1 c.
à table)
Oeufs à la température ambiante 2
Beurre ramolli 250 ml (1
tasse)
Cassonade tassée 175 ml (3/4
tasse)
Raisins secs 175 ml (3/4
tasse)
Farine tout-usage 625 ml (2
1⁄2 tasses)
Poudre à pâte 7 ml (1⁄2 c.
à thé)
Choisir le cycle PASTA (PÂTES ALIMENTAIRES).
Après 5 minutes, utiliser une spatule pour racler
les parois du moule à pain et incorporer toute la
farine. Une fois que le cycle est terminé, utiliser
une spatule si le mélange n’est pas homogène;
au besoin, relancer le cycle.
Méthode:
1. À l’aide d’une cuillère, déposer sur une
plaque à pâtisserie graissée.
2. Cuire à 177 °C (350 °F) de 12 à 15 minutes
ou jusqu’à ce que les biscuits soient cuits.
Donne 24 biscuits.
60
Page 61

RECETTES DE PAINS SANS GLUTEN
PAIN BLANC RUSTIQUE SANS GLUTEN
Ingrédients : 1,5 lb (680 g)
Eau à 43-46 °C (110-115 °F) 340 ml
(1 1/3 tasse)
Oeuf(s) de calibre extra gros 3
Huile 45 ml (3 c. à table)
Vinaigre de cidre 5 ml (1 c. à thé)
Sucre 45 ml (3 c. à table)
Sel 7 ml (1 1/2 c. à thé)
Lait en poudre 125 ml (1/2 tasse)
Farine de riz blanc 500 ml (2 tasses)
Farine de pomme de terre 300 ml (1 1⁄4 tasse)
Farine de soya 75 ml (1⁄3 tasse)
Farine de tapioca 125 ml (1⁄2 tasse)
Gomme de xanthane 15 ml (1 c. à table)
Levure Red Star Quick RiseMC 22 ml (4 1/2 c. à thé)
Choisir le cycle GLUTEN FREE (PAINS SANS GLUTEN).
Méthode:
1. Retirer le moule à pain de la machine à pain. Fixer le disque de malaxage dans
l’arbre d’entraînement. Avoir tous les ingrédients sous la main. S’assurer que tous
les ingrédients, sauf l’eau, sont à la température ambiante.
2. Mesurer l’eau à 43-46 °C (110-115 °F) à l’aide d’une tasse à mesurer pour
ingrédients liquides, puis verser dans le moule à pain.
3. Pour qu’ils soient à la température ambiante, placez les oeufs entiers non cassés
dans un bol et recouvrez-les d’eau tiède pendant 15 minutes avant de les ajouter au
moule.
4. Mesurer l’huile et le vinaigre de cidre à l’aide d’une cuillère à mesurer puis ajouter
au moule à pain.
5. Mesurer le sucre et le sel à l’aide d’une cuillère à mesurer, égaliser au moyen du
revers de la lame d’un couteau puis ajouter au moule à pain. Mesurer le lait en
poudre à l’aide d’une tasse à mesurer puis ajouter au moule à pain.
6. À l’aide d’une cuillère, déposer délicatement la farine de riz blanc dans une tasse à
mesurer, égaliser au moyen du revers de la lame d’un couteau puis ajouter au moule
à pain. Faire la même chose pour la farine de pomme de terre, la farine de soya et la
farine de tapioca.
7. Mesurer le la gomme de xanthane à l’aide d’une cuillère à mesurer, égaliser au
moyen du revers de la lame d’un couteau puis ajouter au moule à pain. Étaler
les ingrédients dans tous les coins du moule. Frapper doucement le moule sur le
comptoir 3 fois pour que les ingrédients se tassent.
8. Mesurer la levure Red Star Quick RiseMC à l’aide d’une cuillère à mesurer, égaliser
au moyen du revers de la lame d’un couteau puis ajouter au moule à pain.
61
Page 62

9. Placer le moule à pain dans la machine à pain. Appuyer sur le rebord du moule à
pain jusqu’à ce que ce dernier soit solidement en place. Fermer le couvercle.
10. Appuyer sur le bouton MENU jusqu’à ce que l’option 8, GLUTEN FREE BREAD (PAINS
SANS GLUTEN), apparaisse sur l’écran. Appuyer sur le bouton COLOR (COULEUR)
pour choisir la couleur de la croûte. Appuyer sur le bouton LOAF (GROSSEUR DU
PAIN) et choisir 1,5 lb (680 g). Appuyer sur le bouton START/STOP (MARCHE/ARRÊT)
pour commencer.
11. Pendant le cycle de pétrissage, attendre de 5 à 10 minutes puis examiner le
mélange. La pâte doit tourner dans la machine et être bien texturée sur le dessus.
À ce moment, utiliser une spatule en caoutchouc pour racler les parois du moule et
décoller la farine et la pâte afin de l’ajouter au reste du mélange.
12. Après le bip, appuyer sur le bouton START/STOP (MARCHE/ARRÊT) et utiliser des
gants de cuisine pour retirer avec soin le moule à pain après la cuisson. Le témoin
s’éteindra une fois que le bouton START/STOP (MARCHE/ARRÊT) est activé.
MISE EN GARDE : LE MOULE À PAIN, LE DISQUE DE MALAXAGE ET LE PAIN SERONT
TRÈS CHAUDS. UTILISER DES GANTS DE CUISINE.
13. Retourner le moule à pain puis le secouer à quelques reprises jusqu’à le pain s’en
détache. Ne pas utiliser d’ustensiles en métal à l’intérieur du moule à pain ou de la
machine à pain. Retirer le disque de malaxage et laisser la miche refroidir sur une
grille, en position verticale, pendant environ 15 à 30 minutes avant de la couper.
14. Couper la miche en deux, de haut en bas, puis couper chaque moitié en tranches de
1,5 cm (1/2 po).
15. Attendre que le pain soit complètement refroidi, soit environ 1 heure, puis conserver
dans un contenant hermétique.
16. DÉBRANCHER L’APPAREIL ET LAISSER REFROIDIR COMPLÈTEMENT AVANT LE
NETTOYAGE. Nettoyer le moule à pain après chaque utilisation. NE PAS IMMERGER
LE MOULE À PAIN DANS L’EAU. (Voir les CONSIGNES DE NETTOYAGE dans le Mode
d’emploi.) Nettoyer l’intérieur du BreadmanMD après chaque utilisation.
62
Page 63

PAIN PUMPERNICKEL SANS GLUTEN
Ingrédients : 1,5 lb (680 g)
Eau à 43-46 °C (110-115 °F) 250 ml (1 tasse)
Oeuf(s) de calibre extra gros 3
Huile 45 ml (3 c. à table)
Vinaigre de cidre 5 ml (1 c. à thé)
Mélasse 45 ml (3 c. à table)
Sel 7 ml (1 1/2 c. à thé)
Lait en poudre 125 ml (1/2 tasse)
Farine de riz brun 500 ml (2 tasses)
Farine de pomme de terre 125 ml (1⁄2 tasse)
Farine de tapioca 125 ml (1⁄2 tasse)
Cacao en poudre 5 ml (1 c. à thé)
Gomme de xanthane 15 ml (1 c. à table)
Graines de carvi 15 ml (1 c. à table)
Levure Red Star Quick RiseMC 22 ml (4 1/2 c. à thé)
Choisir le cycle GLUTEN FREE (PAINS SANS GLUTEN).
PAIN AUX RAISINS ET À LA CANNELLE SANS GLUTEN
Ingrédients : 1,5 lb (680 g)
Eau à 43-46 °C (110-115 °F) 300 ml (1 1/4
tasse)
Oeuf(s) de calibre extra gros 3
Huile 45 ml (3 c. à table)
Vinaigre de cidre 5 ml (1 c. à thé)
Sucre 50 ml (1/4 tasse)
Sel 7 ml (1 1/2 c. à thé)
Lait en poudre 125 ml (1/2 tasse)
Farine de riz blanc 500 ml (2 tasses)
Farine de pomme de terre 75 ml (1⁄3 tasse)
Farine de soya 50 ml (1/4 tasse)
Farine de tapioca 150 ml (2/3 tasse)
Cannelle 7 ml (1 1/2 c. à thé)
Raisins secs 175 ml (3/4 tasse)
Gomme de xanthane 15 ml (1 c. à table)
Levure Red Star Quick RiseMC 22 ml (4 1/2 c. à thé)
Choisir le cycle GLUTEN FREE (PAINS SANS GLUTEN).
63
Page 64

RECETTES DE CONFITURE
CONFITURE DE FRAISES, DE MÛRES OU DE FRAMBOISES
Ingrédients :
Fruits frais ou congelés (décongelés) 500 ml
(2 tasses)
Sucre 800 ml
(3 1/4 tasses)
Choisir le cycle JAM (CONFITURES).
CONFITURE DE BLEUETS, D’ABRICOTS, DE
PÈCHES OU DE POIRES
Ingrédients :
Fruits frais ou congelés (décongelés) 500 ml
(2 tasses)
Sucre 800 ml
(3 1/4 tasses)
Jus de citron 30
ml (2 c. à table)
Choisir le cycle JAM (CONFITURES).
MISE EN GARDE : S’ASSURER DE NE PAS DÉPASSER CES QUANTITÉS!
© 2013 Applica Consumer Products, Inc.
Made In China
Printed in China
Fabriqué en République populaire de Chine
Imprimé en République populaire de Chine
2013-7-10-58 E/F
64
 Loading...