

Page 1

2LB Compact BreadmakeR
INSTRUCTION MANUAL
TR520 Series
T22-9002126-B E/F
RECIPES INCLUDED
see inside
www.breadman.com
Page 2

Page 3

TABLE OF CONTENTS
Important Safeguards .................................................... 2
Power Outage ................................................................ 3
Introduction To Your Bread Maker ...................................... 5
Before Using for the First Time ................................................... 5
Bread Maker Parts ............................................................ 6
Control Panel ................................................................ 7
Program Selection ............................................................. 8
Program Specifications Chart .................................................... 9
Helpful Hints for Bread & Dough........................................ 11
Measuring .................................................................. 11
Dough Ball .................................................................. 12
Ingredients .................................................................. 12
Substitutes .................................................................. 15
Bread Mixes & Other Cook Book Recipes ......................................... 16
High Altitude................................................................. 16
Freezing Baked Bread......................................................... 16
Freezing Dough .............................................................. 16
Operating Instructions.................................................. 17
Programming the Bread Maker .................................................. 17
Using the Delay Timer ......................................................... 20
User Maintenance Instructions......................................... 21
Cleaning.................................................................... 21
Storing ..................................................................... 21
Before Calling for Service ...................................................... 22
Check List .................................................................. 23
Suggestions ................................................................. 24
Display Information ........................................................... 25
Product Specifications ......................................................... 26
Recipe Guide ............................................................... 27
Bread ...................................................................... 28
FAST BAKE Bread............................................................ 38
Day-Old Bread (Uses For)...................................................... 43
Quick Bread & Cake .......................................................... 44
Dough ..................................................................... 48
Recipe Index ............................................................... 64
1
Page 4

IMPORTANT SAFEGUARDS
When using electrical appliances, basic safety precautions should always be followed
including the following:
1. Read all instructions.
2. Do not touch hot surfaces. Use handles or knobs.
3. To protect against electrical shock, do not immerse cord, plug, or appliance in water
or other liquid.
4. Close supervision is necessary when any appliance is used by or near children.
5. Unplug from outlet when not in use and before cleaning. Allow to cool before attaching or
removing parts.
6. Do not operate any appliance with a damaged cord or plug, or after the appliance malfunctions
or has been damaged in any manner. Contact Consumer Support at the toll free number listed
in the warranty section.
7. The use of accessory attachments not recommended by the appliance manufacturer may cause
fire, electric shock or injury.
8. Do not use outdoors.
9. Do not let cord hang over edge of table or counter, or touch hot surfaces including the stove.
10. Do not place on or near a hot gas or electric burner, or in a heated oven.
11. Extreme caution must be used when moving an appliance containing hot oil or
other hot liquids.
12. To disconnect, press and hold the START/STOP Button for a full second; remove plug from
the wall outlet.
13. Do not use appliance for other than intended use.
14. Avoid contact with moving parts.
SAVE THESE INSTRUCTIONS
FOR HOUSEHOLD USE ONLY
ADDITIONAL IMPORTANT SAFEGUARDS
CAUTION HOT SURFACES: This appliance generates heat and escaping steam during use. Proper
precautions must be taken to prevent the risk of burns, fires, or other injury to persons or damage to
property.
CAUTION: During use, the internal parts of the Bread Maker and the area around the Steam Vent are
HOT. Keep out of reach of children to avoid possible injury.
CAUTION : Risk of Electric Shock. Cook only in removable Bread Pan.
1. A person who has not read and understood all operating and safety instructions is not qualified
to operate this appliance. All users of this appliance must read and understand this Instruction
Manual before operating or cleaning this appliance.
2. If this appliance falls or accidentally becomes immersed in water, unplug it from the wall outlet
immediately. Do not reach into the water!
3. When using this appliance, provide adequate air space above and on all sides for air circulation.
Do not operate this appliance while it is touching or near curtains, wall coverings, clothing,
dishtowels or other flammable materials.
4. To reduce the risk of fire, do not leave this appliance unattended during use.
2
Page 5

5. If this appliance begins to malfunction during use, immediately unplug the cord. Do not use or
attempt to repair a malfunctioning appliance!
6. The cord to this appliance should only be plugged into a 120V AC electrical wall outlet.
7. Do not use this appliance in an unstable position.
SHORT CORD INSTRUCTIONS
A short power-supply cord is provided to reduce the risk resulting from becoming entangled
in or tripping over a longer cord.
Do not use an extension cord with this product.
ELECTRIC POWER
If electric circuit is overloaded with other appliances, your appliance may not work properly. It
should be operated on a separate electrical circuit from other appliances.
POLARIZED PLUG
This appliance has a polarized plug (one blade is wider than the other). To reduce the risk of
electric shock, this plug is intended to fit into a polarized outlet only one way. If the plug does not
fit fully in the outlet, reverse the plug. If it still does not fit, contact a qualified electrician. Do not
attempt to modify the plug in any way.
PLASTICIZER WARNING
CAUTION: To prevent Plasticizers from migrating from the finish of the counter top or table tops
or other furniture, place NON-PLASTIC coasters or place mats between the appliance and the
finish of the counter top or table top.
Failure to do so may cause the finish to darken.
Permanent blemishes may occur or stains can appear.
POWER OUTAGE
Your Bread Maker has a 7-minute power failure back-up feature. If the electricity goes off, the
memory will store the course in process for up to 7 minutes. If the power comes back on within
this time, the course will resume where it left off. If the Bread Maker loses power for more than this
time and you are using any dairy products, perishables or meat in your bread, you should discard
the contents of the recipe and start again with new fresh ingredients due to health and sanitary
considerations.
For non-perishable recipes, you may try starting the Bread Maker at the beginning of the course
again (for all courses except FAST BAKE). However, this may not always produce an acceptable
loaf of bread. If you are not sure when the outage occurred, remove the dough ball from the bread
pan and place in an oven-safe baking container. Allow to double in size and place in a preheated
350°F/177°C oven for 30-45 minutes or until done. The bread will sound hollow when tapped on
top of the loaf if it is done. Again, this may not always produce an acceptable loaf of bread.
If you are using the FAST BAKE course or if the bread has already begun to bake when the
outage occurs, you must begin with new ingredients.
NOTE: The power failure back-up feature does not cover power surges.
If you experience frequent surges, please use a surge protector.
3
Page 6

Page 7

INTRODUCTION
TO YOUR BREAD MAKER
BEFORE USING FOR THE FIRST TIME
1. Remove all packing material, any stickers, and the plastic band around the power plug.
2. Clean Bread Maker; see USER MAINTENANCE INSTRUCTIONS.
3. Place Bread Maker on a dry, stable surface away from heat and away from areas where cooking
grease or water may splatter onto it. Avoid placing Bread Maker where it may tip over during
use. Place away from the edge of the counter top.
4. The Bread Maker will bake up to a 2 pound loaf of bread. Do not put a larger quantity of
ingredients into the bread pan than recommended. If you do so, the bread may not mix or bake
correctly and the Bread Maker may be damaged. The maximum amount of ingredients to be
used is as follows
Bread programs 4 cups
Quick Bread programs 4 cups
Dough program 4 - 4½ cups
5. Before first use, operate the Bread Maker on the FAST BAKE program to burn off the
manufacturing oils. Follow the instructions outlined in the OPERATING INSTRUCTIONS section
of this Instruction Manual.
NOTE: During first use, this product may smoke and/or emit an odor from mineral oils used in
manufacturing. This is normal for a newly manufactured appliance.
5
Page 8

BREAD MAKER PARTS
Product may vary slightly from illustrations.
Lid Handle
Bread Pan
Handle
Lid
Drive Shaft
(inside Bread Pan;
rotates the Kneading Blade)
Air
Exhausts
Power
Supply
Cord
Power
Plug
Kneading Blade
(P/N 34923)
(fits on drive shaft)
Bread Pan
Baking Chamber
(P/N 34924)
Control Panel
Measuring cup
(P/N BK1060S-04)
Measuring spoon
(P/N BK1060S-05)
6
Page 9

CONTROL PANEL
NOTE: When using the touchpad controls, be sure to press the pad until you hear a beep.
NOTE: When a Bread Maker is packaged for shipment, a clear plastic film is placed over the control
panel; carefully peel it off.
DISPLAY
WINDOW
TIMER
PROGRAM
(PROG)
CRUST
COLOR
START/
STOP
LOAF Size
OPERATION
LIGHT
- Indicates the LOAF SIZE.
- Indicates the PROGRAM number selected, 1 to 8.
- Indicates the CRUST COLOR selected.
- Indicates minute-by-minute baking time countdown.
- Indicates delay, baking time selected.
- Use when setting the TIMER to delay baking.
- Press plus (+) and minus (-) buttons to set timer for delayed completion, up to
13 hours later.
- The time will go up or down in 10-minute increments. Press and hold button for
faster movement. TIMER is not available on some cycles, please check the Total
Time in the PROGRAM SPECIFICATION CHART.
- Press to select the baking cycle of your choice. The selected cycle automatically
assigns the time needed to complete the process.
- Press to select the CRUST COLOR for most programs. Your selection is
indicated by the horizontal line appearing above the image of a bread slice. Light
, Medium , Dark , and within the display: Light “L”, Medium “P”, Dark “H”
- Bread Maker will automatically bake on the medium setting ( , "P") unless
another is selected.
- Press to start operation or begin TIMER countdown for delayed completion.
- Press and hold until you hear a beep to stop operation or to cancel a
TIMER setting.
Note: Do not press STOP when checking the progress of bread.
- Press LOAF to select loaf size. A line under one of the three sizes of bread
slices on the menu will indicate your selection. The small icon is for 1.0 LBS,
the medium icon is 1.5 LBS and the large icon is 2.0 LBS. Bread Maker will
automatically bake the 2.0 LB loaf unless another size is selected.
- Indicates Bread Maker is operating.
7
Page 10

PROGRAM SELECTION
PROGRAMS
The control panel will let you choose different programs, loaf size, and crust color for some
programs. All programs except QUICK BREAD, DOUGH and BAKE contain a beep to check the
dough ball, to add additional ingredients (i.e., raisins, nuts, and spices) or to stir ingredients.
BASIC ................................ Use these programs for basic bread recipes and
most prepackaged bread mixes. You may choose
1
FAST BAKE 2.0 LB....................... Make a loaf of bread in less than one hour by using
2
FRENCH .............................. This program is best suited for breads low in fat
3
light, medium or dark crust color.
this program. Simply use the special instructions
and recipes found in the FAST BAKE bread
sections of this recipe book.
and sugar, which results in a crisp crust and coarse,
chewy interior.
WHOLE WHEAT ........................ If a recipe contains more than 50% whole wheat
flour or when instructed in the recipe, use this
4
SWEET ................................ This program works best if a recipe is high in fat,
program.
sugar, eggs or cheese.
5
QUICK BREAD ......................... This program is used for recipes that contain baking
powder or baking soda rather than yeast to make
6
DOUGH ............................... This program is used to prepare dough for making
7
BAKE ONLY............................ This program is used for baking breads or cakes for
bread or cake rise. Scratch cake recipes must be
specially designed for this setting. The Quick Bread
program may also be used to mix and bake a prepackaged cake or quick bread mix (15-18 ounces).
bread or rolls which are shaped by hand, allowed
to rise a final time before baking in a conventional
oven.
longer times in 10-minute increments.
8
8
Page 11

PROGRAM SPECIFICATIONS CHART
(approximate times)
COURSE PROCESS DELAY KND1 RISE1 KND2 RISE2 KND3 RISE3 BAKE BEEP WARM
BASIC LIGHT 1.0LB 2:55 13:00 10 20 15 20 30 sec. 55 55 2:20 60
BASIC MED 1.0LB
BASIC DARK 1.0LB
BASIC LIGHT 1.5LB 3:00 60 2:25
1
BASIC MED 1.5LB
BASIC DARK 1.5LB
BASIC LIGHT 2.0LB 3:05 65 2:30
BASIC MED 2.0LB
BASIC DARK 2.0LB
FAST BAKE 0:58 N/A 13 -------- -------- 10 -------- -------- 35 0:57 60
2
FRENCH LIGHT 1.0LB 3:45 13:00 18 40 22 20 30 sec. 60 65 2:42 60
FRENCH MED 1.0LB
FRENCH DARK 1.0LB
FRENCH LIGHT 1.5LB 3:50 70 2:47
3
FRENCH MED 1.5LB
FRENCH DARK 1.5LB
FRENCH LIGHT 2.0LB 3:55 75 2:52
FRENCH MED 2.0LB
FRENCH DARK 2.0LB
WH.WHT. LIGHT 1.0LB 3:35 13:00 10 25 20 30 30 sec. 70 60 2:55 60
WH.WHT. MED 1.0LB
WH.WHT. DARK 1.0LB
WH.WHT. LIGHT 1.5LB 3:40 65 3:00
4
WH.WHT. MED 1.5LB
WH.WHT. DARK 1.5LB
WH.WHT. LIGHT 2.0LB 3:45 70 3:05
WH.WHT. MED 2.0LB
WH.WHT. DARK 2.0LB
SWEET LIGHT 1.0LB 2:45 13:00 10 5 20 30 30 sec. 57 43 2:25 60
SWEET MED 1.0LB
SWEET DARK 1.0LB
SWEET LIGHT 1.5LB 2:50 48 2:30
5
SWEET MED 1.5LB
SWEET DARK 1.5LB
SWEET LIGHT 2.0LB 2:55 53 2:35
SWEET MED 2.0LB
SWEET DARK 2.0LB
QUICK BREAD 1:34 13:00 14 -------- 5 -------- -------- -------- 75 N/A 60
6
DOUGH 1:20 N/A 7 5 -------- 18 -------- 50 -------- N/A N/A
7
BAKE ONLY :10-1:00 N/A -------- -------- -------- -------- -------- ------- 10 N/A 60
8
ADD-IN
ADD-IN BEEP tells you when to add additional ingredients, i.e. raisins or nuts, during all programs except
QUICK BREAD, DOUGH & BAKE. Use this time to check dough ball and scrape ingredients from sides of pan.
The beeper sounds when baking is complete. To serve bread that has just been baked, press STOP button and
remove. You may remove the bread or leave it in the Bread Maker. If left, it will automatically be kept warm for
up to 1 hour during the keep warm process on all bake cycles except DOUGH. The display window will show
0:00, and the colon will flash. At the end of keep warm, the display window will indicate last program selected.
9
Page 12

10
Page 13

HELPFUL HINTS
FOR BREAD & DOUGH
We recommend that you read the following information before you shop for your ingredients. Your
Breadman® Bread Maker will bake up to a 2 pound loaf of fresh bread containing 4 cups of flour.
All ingredients except liquids must be at room temperature and liquids should be approximately
80°F/27°C (baby bottle temperature). When preparing bread for the FAST BAKE program, all liquid
temperatures must be 110°-115°F/43°-46°C. Always place the ingredients in the bread pan in the
order listed in the recipe: liquids, dry ingredients and then yeast. Some ingredient amounts are the
same for different size loaves.
MEASURING The Correct Way
Be sure to measure accurately for success. Mis-measuring, even slightly, can make a big difference
in your results.
When you are measuring liquids, use a clear
glass or plastic liquid measuring cup. To ensure
accuracy, set the measuring cup on the counter
½ CUP
¼ tsp.
¼ CUP
tsp.
½
1 Tbsp.
1 tsp.
top and read the measurement at eye level.
To measure your flour, spoon it lightly into a
standard dry ingredient measuring cup and level
it with a straight edge. Also, do not shake the
cup or tap it on the counter top. Do not scoop
the flour with the measuring cup as this tends to
pack more flour than the recipes call for.
Use standard measuring spoons and level with a
straight edge.
Measurement/Conversion Chart
1-½ tsp. = ½ Tbsp. 8 Tbsp. = ½ cup
3 tsp. = 1 Tbsp. 12 Tbsp. = ¾ cup
½ Tbsp. = 1-½ tsp. 16 Tbsp. = 1 cup
2 Tbsp. = 1/8 cup 3/8 cup = ¼ cup + 2 Tbsp.
4 Tbsp. = ¼ cup 5/8 cup = ½ cup + 2 Tbsp.
5 Tbsp. + 1 tsp. = 1/3 cup 7/8 cup = ¾ cup + 2 Tbsp.
MEASURING
CUP
1/3 CUP
1 CUP
GRADUATED
MEASURING
CUPS
GRADUATED
MEASURING
SPOONS
11
Page 14

DOUGH BALL Necessary for a Successful Loaf of Bread
We have found that liquid amounts called for in a recipe may need to be adjusted slightly because
different climates and seasons result in a wide variety of humidity levels. You should check the
dough ball at the beep during the kneading process, see program specifications. At this point, the
ball should be round, smooth-textured, soft and slightly tacky to the touch. When touched it will leave
a little dough on your finger. Push down any dough or flour that may be on the sides of the pan. If it
does not form a ball and is more like a batter, add 1 tablespoon of bread flour at a time
until it reaches the appropriate consistency. On the other hand, if the moisture is too dry to form a
ball, forms more than one ball, or is a ball but not soft and slightly tacky, add 1 teaspoon of water
and allow it to absorb. Add more water if necessary. Provided you have used all of the ingredients
specified in the recipe, measured the ingredients properly, and have a “good” dough ball, you
should achieve a successful loaf of bread.
When preparing bread in the FAST BAKE program, the dough ball will be a very soft, loose ball with
a smooth texture and will be sticky to the touch. When touched it will leave dough on your finger.
INGREDIENTS Read Before Shopping
Yeast: The Number One Ingredient
For all programs except FAST BAKE we used RED STAR® Active Dry Yeast when we developed the
bread recipes. However, RED STAR® QUICK•RISE® Yeast may also be used. We found that we did
not have to vary the amount used when we substituted one for the other. When using bread machine
yeast, follow the package instructions.
When developing the FAST BAKE program, we found that QUICK•RISE® or Bread Machine yeast
must be used. They may be substituted in equal amounts. You will find that this program requires
more yeast than other programs.
A ¼ ounce package of RED STAR® Yeast contains approximately 2 ¼ level teaspoons of yeast.
When the yeast is exposed to oxygen, moisture or warmth, the activity of it deteriorates. Therefore,
we recommend storing yeast in an airtight container and refrigerating for up to 6 weeks or freezing
it for up to 6 months. Measure out the amount you need and allow it to come to room temperature
before using it — this takes about 15 minutes.
If you have any doubt regarding the activity of the yeast, you may use one of the following tests to determine
its strength. Each test calls for a different amount of yeast as a base ingredient. This gives you more bread
choices once the test is complete. The yeast mixture should not be used for the fast bake program.
To test for one package (2¼ teaspoons) of RED STAR® Active Dry or QUICK•RISE® Yeast, use a
liquid measuring cup and fill to the ½ cup level with 110°-115°F/43°-46°C water. Stir in 1 teaspoon
granulated sugar and 1 package (2¼ teaspoons) RED STAR® Active Dry or QUICK•RISE® Yeast.
Leave your stirring spoon in the cup. Set a timer for 10 minutes. As the yeast absorbs liquid, it will
begin to activate and rise to the surface. If at the end of the 10 minutes the yeast has multiplied to
the 1 cup mark, it is very active. The yeast mixture may be used in your Bread Maker in a recipe
that calls for 2¼ teaspoons of yeast. Remember to adjust your recipe for the ½ cup of water and
2¼ teaspoons of yeast used in the test. The sugar does not need to be adjusted. To test for 1½
teaspoons of RED STAR® Active Dry or QUICK•RISE® Yeast, use a liquid measuring cup and fill
to the ¼ cup level with 110°-115°F/43°-46°C water. Stir in 1 teaspoon granulated sugar and 1½
teaspoons RED STAR® Active Dry or QUICK•RISE® Yeast. Leave your stirring spoon in the cup. Set
a timer for 10 minutes. As the yeast absorbs liquid, it will begin to activate and rise to the surface. If
at the end of the 10 minutes the yeast has multiplied to the ½ cups mark, it is very active. The yeast
mixture may be used in your Bread Maker in a recipe that calls for 1½ teaspoons or more of yeast.
Remember to adjust your recipe for the ¼ cup of water and 1½ teaspoons of yeast used in the test.
The sugar does not need to be adjusted.
12
Page 15

Flour: Bread Flour is Essential for Bread
All types of flour are affected by many factors, such as milling grades, moisture content, length
of storage and manufacturing process. Adjustments to the recipes may need to be made to
compensate for climactic changes in different regions to ensure an excellent loaf.
Bread flour is a definite necessity. Milled from hard winter or spring wheat, it has a higher protein
content that makes it more durable than all-purpose flour. The protein, when mixed with liquid,
becomes gluten.
When kneaded, gluten becomes elastic and gives the bread better structure. In contrast, all-purpose
flour, milled from a combination of soft and hard wheat, becomes elastic too easily for use in a Bread
Maker and quickly loses its ability to stretch well. As a result, bread made from all-purpose flour will
be smaller and more dense. Several well-known mills now market bread flour. It is labeled bread
flour on the package and is available at grocery stores.
Wheat is the only grain that contains the type of protein that becomes elastic when kneaded. Other
flours, such as rye, barley, oats, soy, rice and buckwheat add flavor and fiber to breads but do not
add structure to the dough. Therefore, wheat flour is essential as a base when making bread.
Vital Wheat Gluten is produced by processing white flour one more step. White flour contains both
protein and starch, and mills now can remove most of the starch leaving only the protein (gluten).
When gluten is added to recipes containing whole grain flours, it improves the volume and shape of
the loaf significantly. Many grocery stores stock gluten in the flour section. Health food and nutrition
centers also carry this item.
Flour is best kept in an airtight container. If you are storing the flour for a long period of time, you
may want to keep it in the freezer as the refrigerator tends to dry it out. Whole grain wheat flours,
which have a higher oil content, will become rancid much more quickly than white flour and should
always be kept in the freezer. Be sure, however, to allow all flours to return to room temperature
before placing in the Bread Maker.
Fat: Dough Enhancer and Conditioner
Our recipes were developed using vegetable oil. You may use any type of oil or substitute in
equal proportions solid shortening or real butter (divide them into small pieces). We have found
no noticeable difference in flavor but the crust may be more crisp with real butter. We do not
recommend the use of margarine as it tends to make the crust tough.
Liquids: Activate the Yeast and Bind the Dough
When we use the term liquid, we are referring to all wet ingredients used in the recipe. For all
programs except FAST BAKE, it is very important that the liquid temperature is 80°F/27°C. With this
water temperature, the yeast activates gradually to accommodate these programs.
13
Page 16

When preparing bread using the FAST BAKE program, all liquid temperatures must be
110°-115°F/43°-46°C. The warmer temperature is necessary for the yeast to activate quickly to
accommodate this specially designed program.
Eggs are also considered part of the total liquid amount. Eggs should be at room temperature. When
removing them from the refrigerator, place whole uncracked eggs in a bowl of warm water for 15
minutes to bring to room temperature.
Cinnamon and Garlic: Not True Friends of Yeast
Previously, cinnamon and sugar were sprinkled on dough before it was rolled up jelly-roll fashion.
Adding cinnamon and garlic to the dough in a Bread Maker, however, presents a problem. Cinnamon
and garlic react with bread dough just as a meat tenderizer reacts with meat. It breaks down the
structure. Although it smells wonderful as it is baking, the flavor is dissipated in the baking process.
DO NOT ADD MORE THAN LISTED IN THE RECIPE. For more flavor, use cinnamon and garlic as
spread for the bread rather than adding to the dough.
Fruits and Vegetables: Add Flavor and Nutrition
When adding fruits or vegetables to recipes, do not exceed the amount listed. These products, if
used in excessive amounts, may inhibit the rising of the bread.
Salt: Regulates Yeast Activity
Salt is necessary to control the activity of yeast, causing it to work slowly and steadily. Without salt,
yeast acts too rapidly. Salt also strengthens the structure of the dough. If too little or no salt is used,
the bread will rise rapidly and then fall. The texture will also be more coarse and/or uneven.
Sugar: Food for Yeast
Sugar is the favorite food of yeast, but too much sugar will cause the yeast to over-react. The loaf
of bread will be small and dense. Dried fruits also contribute sugar to the bread dough. We do not
recommend adding any more than is specified in each recipe. In addition, we do not recommend the
use of artificial sweeteners because the yeast cannot react with them.
14
Page 17

SUBSTITUTES
In our test kitchen, we experimented with these ingredient substitutions. We do want to mention that
your results may vary from ours. If you would like to try other substitutions, there are several helpful
hint books available from retail stores to assist you. Of course, we cannot guarantee their results.
Eggs
Liquid egg substitutes may be used as directed on the carton.
Two egg whites may be substituted for one whole egg.
REMINDER: All egg products must be at room temperature.
Milk
Coffee creamer, non-dairy creamer or dry buttermilk may be substituted for dry milk in equal
proportions. Liquid milk 80°F/27°C may be substituted for water in equal proportions for all bread
programs except FAST BAKE. The dry milk may then be eliminated all together. The loaf will be
slightly smaller.
Salt
Salt-free recipes are not successful. Dietetically sodium free (less than 5 mg sodium per serving) or
low salt (less than ½ the sodium of table salt) may be used in equal amounts. The bread will be more
coarse.
Sugar
Honey may be substituted for sugar in equal proportions; reduce the liquid by the same amount.
Brown sugar may be substituted for white sugar in equal proportions. Yeast needs sugar — no
artificial sweetener should be used.
Wheat Flour
For wheat-free bread recipes refer to gluten-free bread books.
Yeast
We used RED STAR® Yeast to develop our recipes. However, any brand may be used. Refer to
yeast ingredient section for other yeast substitutes.
Conversion Chart for Quick-Acting Yeast
1 tsp. active dry yeast = ¾ tsp. quick-acting yeast
1½ tsp. active dry yeast = 1 tsp. quick-acting yeast
2¼ tsp. active dry yeast = 1½ tsp. quick-acting yeast
1 Tbsp. active dry yeast = 2 tsp. quick-acting yeast
NOTE: The FAST BAKE recipes were developed using the quick-acting Red Star® QUICK•RISE® or
Bread Maker yeast. DO NOT substitute active dry yeast in these recipes.
15
Page 18

BREAD MIXES & OTHER COOK BOOK RECIPES
Use mixes labeled for up to 2 pound loaves. For best results, use the basic program. Even though
we offer a wide variety of recipes for bread and dough, you may be looking for one that we have not
included in our recipe book. Bread Maker helpful hints and recipe books are available at book and
retail stores. Refer to the PROGRAM SELECTION section of this book for the best bread program to
use for other recipes. Minor adjustments may be necessary for best results.
HIGH ALTITUDE
High elevations may make dough rise faster. We recommend that you try the recipe as it is printed
first. The dough ball should be round, smooth-textured, soft and slightly tacky to the touch. If you
find the results are unsuccessful, decrease your yeast ¼ teaspoon at a time. You may also have to
increase the liquid because of the drier air; start with 1 tablespoon and increase it if necessary. The
addition of gluten will help the structure of the bread. The recommended amount is 1 teaspoon per
cup of flour unless specified otherwise in the recipe.
FREEZING BAKED BREAD
When freezing bread and rolls, cool them before wrapping in plastic wrap. Place them in a plastic
bag and seal it. Bread may be frozen for up to six weeks. When you thaw, partially open the
wrapping to allow the moisture to escape gradually for best results.
FREEZING DOUGH
At the end of the dough program, you may remove the dough and freeze it for baking at a later time.
Form the dough into the desired shape and immediately freeze for one hour to harden. Remove from
the freezer and wrap in plastic wrap. Next, place it in a plastic bag and seal. Dough can be kept in
the freezer for up to four weeks. Thaw the dough in the plastic bag in the refrigerator overnight or for
several hours. Unwrap and place on a baking container. Cover and let stand in a warm, draft-free
place until it is double the original size. Because the dough is not room temperature, you will find that
it takes longer than usual to rise. Bake according to recipe instructions.
16
Page 19

OPERATING INSTRUCTIONS
PROGRAMMING THE BREAD MAKER
The following are the general steps for using the Bread Maker. Depending on the program or recipe
that you choose, some steps may not apply or there may be additional steps. Refer to the RECIPES
section for specific instructions regarding Basic Breads, FAST BAKE Breads, QUICK BREADS and
DOUGH. Add all ingredients to the pan in the order listed in the recipe.
NOTE: The illustrations in this use and care guide are for information purposes only. You may find
your Bread Maker looks different, however, the steps for operation are the same.
Open the lid and remove the bread pan
by pulling straight up, using the handle.
1
Mount the kneading blade on the shaft,
flat side down.
2
Place all ingredients, except yeast, in bread pan
in the order listed. Use a rubber spatula to smooth
3
the dry ingredients in the bread pan; be sure to
spread into all corners. Add yeast on top.
YEAST
DRY INGREDIENTS
WATER OR LIQUIDS
17
Page 20

4
5
6
Insert bread pan and push down on rim until it snaps securely
into place. Fold handle down.
If the pan does not snap securely into place, remove bread pan
by pulling straight up, using the handle. Insert bread pan again.
Close the lid. Plug into 120 V ~ 60 Hz outlet. The Bread Maker
display indicator will default to 1P and then 3:05, 2.0 LB, and
medium crust color.
Press the PROG (program) button to choose the
desired program. Each time the PROG
button is pressed, you will hear a beep and the number in the display window will advance
to the next program.
Press the LOAF button to select 1.0 LB, 1.5 LB, or 2.0 LB size recipe, (except for the FAST
BAKE, QUICK BREAD, DOUGH and BAKE ONLY programs).
Press the CRUST COLOR button to choose crust color desired (except for the FAST
BAKE,™ QUICK BREAD, DOUGH and BAKE ONLY programs). When you press the button,
you will hear a beep and the display window will show the color selected.
L = Light color
P = Medium color
H = Dark color
7
Press the START/STOP button. The OPERATION LIGHT will illuminate and the remaining
time for the program is displayed. The timer will count down in one minute increments. All
programs except QUICK BREAD, DOUGH and BAKE will beep to add additional ingredients
during the second knead. Opening the lid will not stop the kneading. Add ingredients quickly
and evenly over dough. Quickly close the lid to prevent heat loss. At this time also check the
dough ball and use a rubber spatula to scrape ingredients from the sides of the pan.
18
Page 21

The beeper will sound three times when the bread is
done. Press the START/STOP button and hold it until
8
NOTE: If you wish to make another loaf of bread right away, allow the Bread Maker to cool
9
you hear a beep. Hold the lid open while you remove the
bread pan using oven mitts. If the bread is not removed
after baking is complete, the unit will automatically go
into the Keep Warm cycle (for all programs except for
DOUGH). Your bread will be kept warm for 1 hour. You
may remove the bread pan at any time during the Keep
Warm cycle. To turn the Keep Warm cycle off before the
1 hour is up, press the START/STOP button and hold it
until you hear a beep.
down for 10 to 15 minutes with the cover open and pan removed. If you attempt to use the
unit too soon, it will signal and display will read E00 or E01. Press Start/Stop until screen
reverts to setting display and wait until unit has cooled.
Wearing oven mitts, turn the bread pan upside
down and shake to release the bread.
Place the bread upright on a wire rack to cool
20-30 minutes before cutting. This allows the
steam to escape. Be sure to remove the
kneading blade from the bread.
CAUTION:
• The bread pan, kneading blade and bread will be very hot.
• Always unplug after use.
19
Page 22

USING THE DELAY TIMER
The delay timer can be set to delay bread making up to 13 hours. The Bread Maker will begin the
baking process at just the right time so that your loaf is hot and fresh right at the desired time. The
delay works for all programs except FAST BAKE, DOUGH and BAKE.
Add all ingredients to the bread pan in the order listed. It is critical to add the yeast last on top of
the flour, and away from liquid. This will keep the yeast from activating until the Bread Maker starts
to mix.
We do not recommend using the delay timer for recipes that contain perishable ingredients.
Select the PROGRAM, LOAF SIZE, and CRUST COLOR. Before pressing START, set the TIMER for
the amount of time you want to wait before the bread is done.
EXAMPLE: It is 9:00 p.m. now. The bread is to be ready at 6:30 a.m. the next morning. Set the
timer for 9:30, because there are 9 hours and 30 minutes between 9:00 p.m. and 6:30 a.m.
1. When pressed, the time will advance in
10 minute increments.
2. When constant pressure is applied to
the pad, the time will advance quickly.
Once you count up to 13:00 hours, the
timer starts over again.
3. Press the Start pad. The time is set, and
the colon blinks. After one minute, 9:29
is displayed, and the timer continues to
count down in 1 minute increments.
NOTE: The Bread Maker will start
when the timer has counted down
to the start time for the program
selected to begin.
Colon will blink
20
Page 23

USER MAINTENANCE
INSTRUCTIONS
This appliance requires little maintenance. It contains no user serviceable parts. Do not try to repair it
yourself. Any servicing requiring disassembly must be performed by a qualified appliance repair technician.
CLEANING
ALWAYS UNPLUG THE UNIT AND ALLOW TO COOL COMPLETELY BEFORE CLEANING. Never
use vinegar, bleach, or harsh chemicals to clean your Bread Maker.
1. Unplug and allow to cool before cleaning.
2. Bread Pan & Kneading Blade
Remove bread pan from inside the baking chamber and remove the kneading blade from the
bread pan. Wash the bread pan (inside and out) and kneading blade with warm soapy water,
but DO NOT IMMERSE THE BREAD PAN IN WATER OR PUT IT IN A DISHWASHER. If the
kneading blade is stuck to the drive shaft, fill the bread pan with warm, soapy water and let
it stand for up to 30 minutes until loosened (any longer may damage the non-stick surface).
DO NOT USE EXCESSIVE FORCE.
Do not use steel wool, abrasive cleaners, or metal utensils on the bread pan or kneading blade
as they will damage the non-stick surface. Normal wear is to be expected. The non-stick surface
may discolor over time and in no way affects performance.
3. Exterior
Clean the exterior of the Bread Maker with a damp cloth and plastic scouring pad if necessary.
Do not rub too hard as the surface may be scratched.
4. Interior
Wipe the inside of the baking chamber with a slightly damp cloth or sponge. A plastic scouring
pad may be used if necessary. Do not rub too hard or the surface may be scratched. Never pour
water, solvents or cleaning solutions into the baking chamber.
5. Glass Lid
To clean the glass in the lid, use a glass cleaner or mild detergent and a damp cloth or
plastic scouring pad. Do not use an abrasive cleaner or pad as they might scratch the
glass. If necessary, the lid may be removed for more extensive cleaning. DO NOT PUT THE
LID IN A DISHWASHER OR SOAK IT IN WATER.
6. Make sure that all removable parts have been thoroughly cleaned and dried before storing.
STORING
All removable parts should be thoroughly cleaned and dried before storing. Reassemble the unit so
that the kneading blade is inside the bread pan, and the bread pan is inside the baking chamber.
Store the Bread Maker with the lid closed.
21
Page 24

BEFORE CALLING FOR SERVICE
Questions Answers
Why does the height and shape The height and shape of bread may differ
of bread differ in each loaf? depending on the ingredients, room
1
The bread has an unusual Stale ingredients or too much yeast may have
aroma. Why? been used. Always use fresh ingredients.
2
The kneading blade comes out This may happen as the kneading blade is
with the bread. detachable. Use a non-metal utensil to
3
remove it.
Caution: The kneading blade will be hot.
The baked loaf of bread has a Sometimes flour in the corner of the pan may
4
floured corner. not have been completely kneaded into the
temperature and length of the timer cycle.
Also accurate measurement of ingredients is
essential to make delicious bread.
Accurate measurements are essential to make
delicious bread.
dough. Scrape the flour off the loaf with a
spatula.
Why can the timer not be set for Longer delay times could alter the baking
more than 13 hours? results.
5
Can ingredients be halved or No. If there is too little in the pan, the knead doubled? ing blade cannot knead well enough. If there is
6
too much, bread swells out of the pan.
Can fresh milk be used in place Yes, for all programs except FAST BAKE.
of dry milk? Be sure to deduct the same measurement
7
Why is the display flashing E00 The bread machine cavity needs to cool down
or E01? before making the next loaf of bread.
8
of water to equal liquid substitution (warm to
80°F/27°C). Fresh milk is not recommended
when using the timer, because it may spoil
while setting in the pan.
22
Page 25

CHECK LIST
23
Page 26

SUGGESTIONS
The following suggestions have a corresponding number found on
the CHECK LIST. Be sure to read both.
1. Plug into 120 V ~ 60 Hz outlet. Refer to power outage instructions. PROGRAM was not
selected. Push START/STOP to clear display after last program.
2. Open lid, remove bread pan and allow to cool.
3. Wait until program is complete; unplug, allow to cool and clean.
4. Only open lid during kneading process to check dough ball or to add ingredients.
5. Remove bread as soon as program is done and place on wire rack.
6. Allow to cool approximately 20 minutes.
7. Put kneading blade on the shaft of bread pan.
8.-11. Check the dough ball at the beep.
Dough should be round, smooth-textured, soft and slightly tacky to the touch. (FAST
BAKE dough ball will be sticky to the touch.)
If more like a batter, add 1 Tbsp. flour. Allow to mix; add more if necessary.
If too dry, add 1 tsp. water. Allow to absorb; add more if necessary.
12. Follow recipe.
13. Increase by ¼ tsp.
14. Decrease by ¼ tsp.
15. Artificial sugar substitutes not recommended.
16. Follow recipe or substitution recommendations.
17. Flours cannot be substituted.
18. Place yeast on top of flour away from liquids.
19. Make sure yeast is fresh and room temperature.
20. Water should be 80°F/27°C for all courses except
110°-115°F/43°-46°C.
FAST BAKE
which should be
24
Page 27

DISPLAY INFORMATION
Always use the Bread Maker in a room that is free of drafts and is at least 59°F/15°C, but not
warmer than 90°F/32°C. Do not use Bread Maker in an unheated garage, outdoors, near a heat
vent, or in direct sunlight.
Generally the display window will tell you what is happening with your Bread Maker. Here are
some points to consider
Messages Reason Solution
0:00 Cycle is complete. Press START/STOP button to cancel.
(Colon flashing) Keep Warm is engaged.
E00 or E01 Unit is too cold (Below 59°F) Press START/STOP button to cancel.
signal beeping Unit is too hot Open cover, remove bread pan and allow unit
to cool with cover open or place Bread Maker
in a warm room and allow to warm up.
If display still shows E00 or E01 after cooling
completely, the unit may need servicing. Contact
Consumer Service for repair or replacement.
EEE Room temperature Press START/STOP button to cancel.
signal beeping is too low.
(Below 59F)
Display Blank Power has been Unplug unit and plug back into
interrupted. outlet. Unit must be reset.
EEE, HHH, E00 Short circuit of Contact Consumer Service
signal beeping sensor for repair or replacement.
25
Page 28

PRODUCT SPECIFICATIONS
Power Supply
Power Heater
Consumption
Kneading Motor
Dimension (WxDxH)
Weight
120 V ~ 60 Hz
560W
50W
12.6”x11.4”x11.6”
Approx. 9.5 LB.
26
Page 29

Recipe Guide
For Your Bread Maker
Page 30

BREAD RECIPES
. . . As Easy As 1 - 2 - 3
1. Add ingredients to the bread pan in the order listed. Refer to HELPFUL HINTS FOR BREAD &
DOUGH for measuring information. Place the bread pan in the Bread Maker.
2. Close the lid. Select the bread program, choose the Crust Color and press Start.
3. When finished baking, remove bread pan from the Bread Maker. Invert and shake to remove the
loaf. Allow loaf to cool standing upright on a wire rack before slicing.
We suggest starting your bread baking with the WHITE BREAD Recipe. Follow each step carefully.
These steps have been written to eliminate the most common errors in Bread Maker baking and may
be helpful for any recipe.
28
Page 31

WHITE BREAD
1.0 LB. loaf 1.5 LB. loaf 2.0 LB. loaf
Water 80°F/27°C ¾ cup 1 cup 1¼ cups
Oil 4 tsp. 2 Tbsp. 3 Tbsp.
Sugar 4 tsp. 2 Tbsp. 3 Tbsp.
Salt 1 tsp. 1½ tsp. 2 tsp.
Bread Flour 2¼ cups 3 cups 4 cups
RED STAR® Active Dry Yeast 1½ tsp. 2¼ tsp. 1 Tbsp.
or
RED STAR
QUICK•RISE® Yeast 1 tsp. 1½ tsp. 2 tsp.
or
Bread Machine Yeast 1 tsp. 1½ tsp. 2 tsp.
Program: BASIC
1. Remove the bread pan from the Bread Maker. Attach the kneading blade onto the shaft. Make
2. Use a liquid measuring cup to measure the water (80°F/27°C/baby bottle temperature) and pour
3. Use a measuring spoon to measure the oil and add to the bread pan.
4. Use a measuring spoon to measure the sugar and salt; level off with the straight edge of a knife
5. Lightly spoon bread flour into a dry measuring cup; level off with the straight edge of a knife and
6. Carefully measure yeast with a measuring spoon; level off with the straight edge of a knife and
7. Place the bread pan into the Bread Maker. Push down on rim until it snaps into place.
8. Press the PROGRAM button to select the PROGRAM, select the LOAF SIZE, CRUST COLOR
9. At the beep during the kneading process, check the dough ball. It should be slightly tacky to the
10. When the beeper sounds, the bread has finished baking and the keep warm cycle will start. The
11. Press Stop and use oven mitts to carefully remove the bread pan at any time during the keep
CAUTION: THE OVEN CAVITY, BREAD PAN, KNEADING BLADE AND BREAD WILL BE
12. Turn bread pan upside down and shake several times to release the bread. Do not use metal
13. If bread loaf does not easily release from pan, allow it to sit on a heat resistant surface 5
14. UNPLUG UNIT BEFORE CLEANING. DO NOT IMMERSE THE BREAD PAN IN WATER, see
®
sure all ingredients, except water, are at room temperature.
into the bread pan.
and add to the bread pan.
add to the bread pan. Smooth into all corners. Lightly tap pan on counter 3 times to settle all dry
ingredients.
add to the bread pan. If using delay timer, make sure yeast is on top of bread flour, away from
liquids.
Close the lid.
and set TIMER to delay, or press START for immediate start.
touch. Add more water or flour if necessary; see Dough Ball. At this time, push down any dough
or flour that may be on the sides of the pan.
display window will show 0:00, and the colon will flash.
warm process.
VERY HOT. USE OVEN MITTS.
utensils inside the bread pan or machine. Remove the kneading blade and allow loaf to cool
standing upright on wire rack approximately 20-30 minutes before cutting.
minutes, then remove. When the bread has completely cooled, approximately 1 hour, store in an
air tight container.
CLEANING AND STORING.
29
Page 32

EGG BREAD
1.0 LB. loaf 1.5 LB. loaf 2.0 LB. loaf
Egg(s), room temperature plus 1 2 3
enough Water 80°F/27°C to equal ¾ cup 1 cup 1½ cups
Oil 1 Tbsp. 2 Tbsp. 3 Tbsp.
Sugar 1 Tbsp. 2 Tbsp. 3 Tbsp.
Salt 1 tsp. 1½ tsp. 2 tsp.
Bread Flour 2¼ cups 3 cups 4 cups
RED STAR® Active Dry Yeast 1½ tsp. 2¼ tsp. 1 Tbsp.
or
RED STAR
QUICK•RISE® Yeast 1 tsp. 1½ tsp. 2 tsp.
or
Bread Machine Yeast 1 tsp. 1½ tsp. 2 tsp.
Program: BASIC
®
HONEY WHEAT BREAD
1.0 LB. loaf 1.5 LB. loaf 2.0 LB. loaf
Egg, room temperature plus 1 1 1
enough Water 80°F/27°C to equal ¾ cup 1 cup 1¼ cups
Oil 4 tsp. 2 Tbsp. 3 Tbsp.
Honey 2 Tbsp. 3 Tbsp. ¼ cup
Salt 1 tsp. 1½ tsp. 2 tsp.
Whole Wheat Flour ½ cup 1 cup 2 cups
Bread Flour 1½ cups 2 cups 2 cups
RED STAR® Active Dry Yeast 1½ tsp. 2¼ tsp. 1 Tbsp.
or
RED STAR
QUICK•RISE® Yeast 1 tsp. 1½ tsp. 2 tsp.
or
Bread Machine Yeast 1 tsp. 1½ tsp. 2 tsp.
®
Program: BASIC
30
Page 33

RYE BREAD
1.0 LB. loaf 1.5 LB. loaf 2.0 LB. loaf
Water 80°F/27°C ¾ cup 1 cup 1¼ cups
Oil 4 tsp. 2 Tbsp. 3 Tbsp.
Caraway Seeds 2 tsp. 1 Tbsp. 4 tsp.
Brown Sugar 4 tsp. 2 Tbsp. 3 Tbsp.
Salt 1 tsp. 1½ tsp. 2 tsp.
Bread Flour 1½ cups 2 cups 2 ½ cups
Medium Rye Flour ¾ cup 1 cup 1½ cups
RED STAR® Active Dry Yeast 1½ tsp. 2 ¼ tsp. 1 Tbsp.
or
RED STAR
QUICK•RISE® Yeast 1 tsp. 1½ tsp. 2 tsp.
or
Bread Machine Yeast 1 tsp. 1½ tsp. 2 tsp.
Program: BASIC
®
ONION BREAD
1.0 LB. loaf 1.5 LB. loaf 2.0 LB. loaf
Water 80°F/27°C ¾ cup 1 cup 1¼ cups
Oil 4 tsp. 2 Tbsp. 3 Tbsp.
Dry Onion Soup Mix 4 tsp. 2 Tbsp. 3 Tbsp.
Sugar 2 tsp. 1 Tbsp. 4 tsp.
Bread Flour 2¼ cups 3 cups 4 cups
RED STAR® Active Dry Yeast 1½ tsp. 2¼ tsp. 1 Tbsp.
or
RED STAR
QUICK•RISE® Yeast 1 tsp. 1½ tsp. 2 tsp.
or
Bread Machine Yeast 1 tsp. 1½ tsp. 2 tsp.
®
Program: BASIC
PESTO BREAD
1.0 LB. loaf 1.5 LB. loaf 2.0 LB. loaf
Water 80°F/27°C ²/3 cup 1 cup 1¼ cups
Pesto, room temperature 2 Tbsp. 3 Tbsp. ¼ cup
Dry Milk 1 Tbsp. 4 tsp. 2 Tbsp.
Sugar 1 Tbsp. 4 tsp. 2 Tbsp.
Salt ½ tsp. ¾ tsp. 1 tsp.
Bread Flour 2 cups 3 cups 4 cups
RED STAR® Active Dry Yeast 1½ tsp. 2¼ tsp. 1 Tbsp.
or
RED STAR
QUICK•RISE® Yeast 1 tsp. 1½ tsp. 2 tsp.
or
Bread Machine Yeast 1 tsp. 1½ tsp. 2 tsp.
Program: BASIC
®
31
Page 34

CHEESE AND CRACKED PEPPER BREAD
1.0 LB. loaf 1.5 LB. loaf 2.0 LB. loaf
Water 80°F/27°C ²/3 cup 1 cup 1¼ cups
Feta Cheese, room temperature 1½ oz 2¼ oz 3 oz
Dry Milk 4 tsp. 2 Tbsp. 3 Tbsp.
Salt ¾ tsp. 1 tsp. 1½ tsp.
Sugar 1 Tbsp. 2 Tbsp. 3 Tbsp.
Cracked Black Pepper 2 tsp. 1 Tbsp. 4 tsp.
Bread Flour 2¼ cups 3 cups 4 cups
RED STAR® Active Dry Yeast 1½ tsp. 2¼ tsp. 1 Tbsp.
or
RED STAR
QUICK•RISE® Yeast 1 tsp. 1½ tsp. 2 tsp.
or
Bread Machine Yeast 1 tsp. 1½ tsp. 2 tsp.
Program: BASIC
®
ITALIAN HERB BREAD
1.0 LB. loaf 1.5 LB. loaf 2.0 LB. loaf
Water 80°F/27°C ¾ cup + 2 Tbsp. 1 cup + 2 Tbsp. 1¼ cups
Oil 4 tsp. 2 Tbsp. 2½ Tbsp.
Sugar 1 Tbsp. 3 Tbsp. ¼ cup
Salt 1 tsp. 1½ tsp. 2 tsp.
Bread Flour 2 ¼ cups 3¼ cups 4 cups
Dried Italian Seasoning 1 tsp. 2 tsp. 1 Tbsp.
RED STAR® Active Dry Yeast 1¼ tsp. 1½ tsp. 2¼ tsp.
or
RED STAR
QUICK•RISE® Yeast 1 tsp. 1¼ tsp. 1½ tsp.
or
Bread Machine Yeast 1 tsp. 1¼ tsp. 1½ tsp.
®
Program: FRENCH
For best results, use light CRUST COLOR setting.
32
Page 35

SUNFLOWER AND SESAME SEED BREAD
1.0 LB. loaf 1.5 LB. loaf 2.0 LB. loaf
Egg room temperature plus 1 1 1
enough Water 80°F/27°C to equal ¾ cup 1 cup 1¼ cups
Oil 1½ Tbsp. 2 Tbsp. 3 Tbsp.
Molasses 2 tsp. 1 Tbsp. 2 Tbsp.
Sugar 2 tsp. 1 Tbsp. 2 Tbsp.
Salt 1 tsp. 1½ tsp. 2 tsp.
Bread Flour 1½ cups 2½ cups 3 cups
Whole Wheat Flour ½ cup ½ cup 1 cup
Sesame Seeds 1½ Tbsp. 2 Tbsp. 2½ Tbsp.
Cumin Seeds ¼ tsp. ¼ tsp. ¼ tsp.
Sunflower Seeds 1½ Tbsp. 2 Tbsp. 2 ¼ Tbsp.
RED STAR® Active Dry Yeast 1½ tsp. 2 tsp. 2 ¼ tsp.
or
RED STAR
QUICK•RISE® Yeast 1 tsp. 1¼ tsp. 1½ tsp.
or
Bread Machine Yeast 1 tsp. 1¼ tsp. 1½ tsp.
Program: FRENCH
®
FRENCH BREAD
1.0 LB. loaf 1.5 LB. loaf 2.0 LB. loaf
Water 80°F/27°C ¾ cup 1 cup 1¼ cups
Sugar 1½ tsp. 2 tsp. 1 Tbsp.
Salt 1 tsp. 1½ tsp. 2 tsp.
Bread Flour 2 ¼ cups 3 cups 4 cups
RED STAR® Active Dry Yeast 1½ tsp. 2 tsp. 2 ¼ tsp.
or
RED STAR
QUICK•RISE® Yeast 1 tsp. 1¼ tsp. 1½ tsp.
or
Bread Machine Yeast 1 tsp. 1¼ tsp. 1½ tsp.
®
Program: FRENCH
33
Page 36

SHREDDED WHEAT BREAD
1.0 LB. loaf 1.5 LB. loaf 2.0 LB. loaf
Egg, room temperature plus 1 1 1
enough Water 80°F/27°C to equal ¾ cup + 1 Tbsp. 1 cup + 1 Tbsp. 1¼ cups
Oil 2 Tbsp. 3 Tbsp. ¼ cup
Molasses 2 Tbsp. 3 Tbsp. ¼ cup
Salt 1 tsp. 1½ tsp. 2 tsp.
Bread Flour ½ cup 1 cup 1½ cups
Whole Wheat Flour 1½ cups 2 cups 2½ cups
Mini-Shredded Wheat, crushed ½ cup ¾ cup 1¼ cups
RED STAR® Active Dry Yeast 1½ tsp. 2 tsp. 2¼ tsp.
or
RED STAR
QUICK•RISE® Yeast 1 tsp. 1¼ tsp. 1½ tsp.
or
Bread Machine Yeast 1 tsp. 1¼ tsp. 1½ tsp.
Program: WHOLE WHEAT
®
100% WHOLE WHEAT BREAD
1.0 LB. loaf 1.5 LB. loaf 2.0 LB. loaf
Egg, room temperature plus 1 1 1
enough Water 80°F/27°C to equal ¾ cup 1 cup 1¹/3 cups
Oil 2 Tbsp. 3 Tbsp. ¼ cup
Sugar 2 Tbsp. 3 Tbsp. ¼ cup
Salt 1 tsp. 1½ tsp. 2 tsp.
Whole Wheat Flour 2 ¼ cups 3 cups 4 cups
Vital Wheat Gluten 1 Tbsp. 1½ Tbsp. 2 Tbsp.
RED STAR® Active Dry Yeast 1½ tsp. 2 tsp. 2 ¼ tsp.
or
RED STAR
QUICK•RISE® Yeast 1 tsp. 1¼ tsp. 1½ tsp.
or
Bread Machine Yeast 1 tsp. 1¼ tsp. 1½ tsp.
®
Program: WHOLE WHEAT
34
Page 37

PUMPERNICKEL BREAD
1.0 LB. loaf 1.5 LB. loaf 2.0 LB. loaf
Water 80°F/27°C ¾ cup 1 cup 1¼ cups
Oil 1 Tbsp. 4 tsp. 2 Tbsp.
Molasses 1 Tbsp. 4 tsp. 2 Tbsp.
Sugar 1 Tbsp. 4 tsp. 2 Tbsp.
Salt 1 tsp. 1½ tsp. 2 tsp.
Medium Rye Flour ¼ cup ¹/3 cup ½ cup
Whole Wheat Flour ¾ cup 1 cup 1¹/3 cups
Bread Flour 1¼ cups 2 cups 2 ¹/3 cups
Unsweetened Cocoa 1 Tbsp. 4 tsp. 2 Tbsp.
Instant Coffee 1 tsp. 1½ tsp. 2 tsp.
RED STAR® Active Dry Yeast 1½ tsp. 2 tsp. 2 ¼ tsp.
or
RED STAR
QUICK•RISE® Yeast 1 tsp. 1¼ tsp. 1½ tsp.
or
Bread Machine Yeast 1 tsp. 1¼ tsp. 1½ tsp.
Program: WHOLE WHEAT
®
TRIPLE WHEAT BREAD
1.0 LB. loaf 1.5 LB. loaf 2.0 LB. loaf
Egg, room temperature plus 1 1 1
enough Water 80°F/27°C to equal 1 cup 1 cup + 2 Tbsp. 1¼ cups
Oil 1 Tbsp. 2 Tbsp. 3 Tbsp.
Dark Molasses 2 Tbsp. 3 Tbsp. ¼ cup
Salt 1 tsp. 1½ tsp. 2 tsp.
Cracked Wheat 1½ Tbsp. 2 Tbsp. 3 Tbsp.
Wheat Bran 3 Tbsp. ¼ cup ¹/3 cup
Wheat Germ 3 Tbsp. ¼ cup ¹/3 cup
Whole Wheat Flour 1 cup 1½ cups 2 cups
Bread Flour 1 cup 1½ cups 2 cups
RED STAR® Active Dry Yeast 1½ tsp. 2 tsp. 2¼ tsp.
or
RED STAR
QUICK•RISE® Yeast 1 tsp. 1¼ tsp. 1½ tsp.
or
Bread Machine Yeast 1 tsp. 1¼ tsp. 1½ tsp.
®
Program: WHOLE WHEAT
35
Page 38

CRANBERRY WALNUT BREAD
1.0 LB. loaf 1.5 LB. loaf 2.0 LB. loaf
Egg(s), room temperature plus 1 2 2
enough Milk 80°F/27°C to equal ¾ cup 1 cup 1¼ cups
Butter, room temperature 3 Tbsp. ¼ cup ¹/3 cup
Sugar 3 Tbsp. ¼ cup ¹/3 cup
Salt 1 tsp. 1½ tsp. 2 tsp.
Lemon Peel ½ tsp. ¾ tsp. 1 tsp.
Bread Flour 2 ¼ cups 3 cups 4 cups
RED STAR® Active Dry Yeast 1½ tsp. 2¼ tsp. 1 Tbsp.
or
RED STAR
QUICK•RISE® Yeast 1 tsp. 1½ tsp. 2 tsp.
or
Bread Machine Yeast 1 tsp. 1½ tsp. 2 tsp.
Add at the beep
Dried Cranberries or
Dried Cherries ¼ cup ¹/3 cup ½ cup
Walnuts, chopped ¼ cup ¹/3 cup ½ cup
Program: SWEET
®
HOLIDAY BREAD
1.0 LB. loaf 1.5 LB. loaf 2.0 LB. loaf
Water 80°F/27°C ¼ cup ½ cup ½ cup
Milk 80°F/27°C ½ cup ²/3 cup ¾ cup
Oil 1 Tbsp. 2 Tbsp. 3 Tbsp.
Salt 1½ tsp. 2 tsp. 2 ¼ tsp.
Sugar 3 Tbsp. ¼ cup ¹/3 cup
Bread Flour 2 ¼ cups 3 ¹/3 cups 4 cups
RED STAR® Active Dry Yeast 1½ tsp. 2¼ tsp. 1 Tbsp.
or
RED STAR
QUICK•RISE® Yeast 1 tsp. 1½ tsp. 2 tsp.
or
Bread Machine Yeast 1 tsp. 1½ tsp. 2 tsp.
Add at the beep:
Walnuts, chopped ¹/3 cup ½ cup ²/3 cup
Candied Fruit ¹/3 cup ½ cup ²/3 cup
Program: SWEET
®
36
Page 39

RICH SWEET BREAD
1.0 LB. loaf 1.5 LB. loaf 2.0 LB. loaf
Egg(s), room temperature plus 1 2 2
enough Water 80°F/27°C to equal ¾ cup 1 cup 1¼ cups
Oil 4 tsp. 2 Tbsp. 3 Tbsp.
Sugar 4 tsp. 2 Tbsp. 3 Tbsp.
Salt 1 tsp. 1½ tsp. 2 tsp.
Bread Flour 2 ¼ cups 3 cups 4 cups
Raisins ¹/3 cup ½ cup ²/3 cup
RED STAR® Active Dry Yeast 1½ tsp. 2 ¼ tsp. 1 Tbsp.
or
RED STAR
QUICK•RISE® Yeast 1 tsp. 1½ tsp. 2 tsp.
or
Bread Machine Yeast 1 tsp. 1½ tsp. 2 tsp.
Add at the beep
Dried Cranberries or
Dried Cherries ¼ cup ¹/3 cup ½ cup
Walnuts, chopped ¼ cup ¹/3 cup ½ cup
Program: SWEET
®
CINNAMON RAISIN NUT BREAD
1.0 LB. loaf 1.5 LB. loaf 2.0 LB. loaf
Water 80°F/27°C ¾ cup 1 cup 1¼ cups
Oil 4 tsp. 2 Tbsp. 3 Tbsp.
Cinnamon ½ tsp. ¾ tsp. 1 tsp.
Dark Brown Sugar 2 tsp. 1 Tbsp. 4 tsp.
Salt 1 tsp. 1½ tsp. 2 tsp.
Bread Flour 2¼ cups 3 cups 4 cups
RED STAR® Active Dry Yeast 1½ tsp. 2¼ tsp. 1 Tbsp.
or
RED STAR
QUICK•RISE® Yeast 1 tsp. 1½ tsp. 2 tsp.
or
Bread Machine Yeast 1 tsp. 1½ tsp. 2 tsp.
Add at the beep:
Raisins ¹/3 cup ½ cup ²/3 cup
Nuts ¹/3 cup ½ cup ²/3 cup
Program: SWEET
®
37
Page 40

BASIC WHITE GLUTEN-FREE BREAD
1.0 LB. loaf 1.5 LB. loaf 2.0 LB. loaf
Rice flour 1 ⅓ 2 cups 2 ½ cups
Potato Starch ⅓ cup ½ cup ½ cup
Tapioca Flour ⅓ cup ½ cup ½ cup
Powdered Milk ½ cup ½ cup ⅔ cup
Xanthan Gum 2 tsp. 2 ½ tsp. 3 tsp.
Salt 1 tsp. 1½ tsp. 2 tsp.
Lukewarm Water (80-90°F) 1¼ cup 1⅔ cup 2 cups
Butter, melted 3 Tbsp 4 Tbsp 5 Tbsp
Eggs, room temperature, slightly beaten 2 3 4
Cider Vinegar ½ tsp. 1½ tsp. 2 tsp.
Sugar 1 Tbsp 1 Tbsp 1 Tbsp
Dry yeast granuals 3 tsp. 1½ Tbsp 2 Tbsp
**Preferred size for demo
1. Place first 6 dry ingredients in mixing bowl. Stir gently to combine; set aside. Combine water, butter,
beaten eggs and vinegar in small bowl. Whisk to combine. Stir in sugar.
2. Place liquid ingredients in the bottom of the bread pan.
3. Spoon dry ingredients evenly over liquids; spread dry ingredients to corners of pan.
4. Sprinkle yeast evenly over top of dry ingredients.
5. Insert bread pan into bread machine and push down until it snaps securely into place. Fold handle
down and close lid.
Plug in and program per instruction manual pg. 17 using the following settings:
P1- Basic
1.5 lb. loaf
Medium crust
Press start button to begin making your bread.
NOTE: The dough consistency of gluten free bread will be closer to cake batter than traditional yeast
dough. You should be able to see the motion of the kneading blade turning during mixing. Do not add
additional flours to thicken the dough.
TIPS/VARIATIONS
1. For best results, always use eggs at room temperature.
2. Add 1 Tbsp. linseed or crushed sunflower seeds during the second knead cycle for added flavor and
texture. (The bread machine will beep to indicate when it is time to add additional ingredients)
3. Substitute 1 cup of white rice flour with brown rice flour.
4. This bread freezes well for up to 6 weeks. Cool bread completely, wrap in plastic wrap and place in
a plastic storage bag. (For even more convenience, slice the bread before freezing)
5. Pre-packaged Gluten Free Products are available. Look for a variety of Gluten Free Bread Mixes
at your grocery store. Most of them include basic preparation instructions using a bread machine.
Flour is made by grinding uncooked polished rice into a powder. Rice flour must be used with
starches such as corn, tapioca or potato starches.
37
Page 41

FAST BAKE BREAD RECIPES
The FAST BAKE program, with hotter rise and bake temperatures, is convenient for baking a
hot fresh loaf of bread in under an hour. The longer bread programs, with lower rise and bake
temperatures, will bake a taller more developed loaf of bread. And remember, you can always use
the delay feature for the longer programs.
. . . As Easy As 1 - 2 - 3
1. Add ingredients to the bread pan in the order listed. Refer to HELPFUL HINTS FOR BREAD &
DOUGH for measuring information. Place the bread pan in the Bread Maker.
2. Close the lid. Select the FAST BAKE program and press START.
3. When finished baking, remove bread pan from the Bread Maker. Invert and shake to remove the
loaf. Allow loaf to cool standing upright on a wire rack before slicing.
We suggest starting your FAST BAKE bread baking with the WHITE BREAD Recipe. Refer to
HELPFUL HINTS FOR BREAD & DOUGH for measuring information. Follow each step carefully,
noticing the water temperatures must be 110°-115°F/43°-46°C and that QUICK•RISE®, RapidRise®
or Bread Machine yeast must be used.
FAST BAKE PROGRAM HINTS
- Water temperature must be 110°-115°F/43°-46°C.
- Larger amounts of QUICK•RISE®, RapidRise® or Bread Machine yeast must be used. They may
be substituted in equal amount.
- The dough ball for the FAST BAKE program should be a very soft, sticky to the touch, loose ball
with a smooth texture. Do not add extra flour.
- Check the dough ball at the beep, and if necessary, use a rubber spatula to push any flour or
dough from the sides of the bread pan down into the dough ball.
- As a result of the increased temperatures during the rise and bake process, the loaf of bread
produced from this program may have a dark crisp crust with a split on the top side of the loaf.
38
Page 42

WHITE BREAD
2.0 LB. loaf
Water 110°-115°F/43°-46°C 1½ cups
Oil 6 Tbsp.
Sugar 3 Tbsp.
Salt 1½ tsp.
Bread Flour 4 cups
RED STAR
QUICK•RISE® Yeast 4 tsp.
or
Bread Machine Yeast 4 tsp.
Program: FAST BAKE
1. Remove the bread pan from the Bread Maker. Attach the kneading blade onto the shaft. Make
2. Use a liquid measuring cup to measure the water (110°-115°F/43°-46°C) and pour into the bread
3. Use a measuring spoon to measure the oil and add to the bread pan.
4. Use a measuring spoon to measure the sugar and salt; level off with the straight edge of a knife
5. Lightly spoon bread flour into a dry measuring cup; level off with the straight edge of a knife and
6. Carefully measure QUICK•RISE® yeast with a measuring spoon; level off with the straight edge
7. Place the bread pan into the Bread Maker. Push down on rim until it snaps into place. Close the
8. Select FAST BAKE program, and press START.
9. About five minutes into the kneading process, check the dough ball. It should be sticky to the
10. When the beeper sounds, the bread has finished baking.
11. Use oven mitts to carefully remove the bread pan.
CAUTION: THE OVEN CAVITY, BREAD PAN, KNEADING BLADE AND BREAD WILL BE
12. Turn bread pan upside down and shake several times to release the bread. Do not use metal
13. When the bread has completely cooled, approximately 1 hour, store in an air tight container.
14. UNPLUG UNIT BEFORE CLEANING. DO NOT IMMERSE THE BREAD PAN IN WATER, see
®
sure all ingredients, except water, are at room temperature.
pan.
and add to the bread pan.
add to the bread pan. Smooth into all corners. Lightly tap pan on counter 3 times to settle all dry
ingredients.
of a knife and add to the bread pan.
lid.
touch. At this time, push down any dough or flour that may be on the sides of the pan.
VERY HOT. USE OVEN MITTS.
utensils inside the bread pan or machine. Remove the kneading blade and allow loaf to cool
standing upright on wire rack approximately 20 minutes before cutting.
CLEANING AND STORING.
39
Page 43

EGG BREAD
2.0 LB. loaf
Egg(s), room temperature plus 3
enough Water 110°-115°F/43°-46°C to equal 1¼ cups + 2 Tbsp.
Oil ¼ cup
Sugar 3 Tbsp.
Salt 1½ tsp.
Bread Flour 4 cups
RED STAR
QUICK•RISE® Yeast 4 tsp.
or
Bread Machine Yeast 4 tsp.
Program: FAST BAKE
®
PESTO BREAD
2.0 LB. loaf
Water 110°-115°F/43°-46°C 1¼ cups + 2 Tbsp.
Pesto, room temperature ¼ cup
Dry milk 2 Tbsp.
Sugar 2 Tbsp.
Salt 1 tsp.
Bread Flour 4 cups
RED STAR
QUICK•RISE® Yeast 4 tsp.
or
Bread Machine Yeast 4 tsp.
®
Program: FAST BAKE
CHEVRE-CRACKED PEPPER BREAD
2.0 LB. loaf
Water 110°-115°F/43°-46°C 1¼ cups + 2 Tbsp.
Feta Cheese, room temperature 3 oz
Dry Milk 3 Tbsp.
Salt 1 tsp.
Sugar 3 Tbsp.
Cracked Black Pepper 4 tsp.
Bread Flour 4 cups
RED STAR
QUICK•RISE® Yeast 4 tsp.
or
Bread Machine Yeast 4 tsp.
Program: FAST BAKE
®
40
Page 44

POTATO BREAD
2.0 LB. loaf
Water 115°-125°F/43°-51°C (warm) 1¾ cups
Oil ¼ cup
Instant Potatoes (buds or flakes) ⅔ cup
Salt 1½ tsp.
Sugar 3 Tbsp.
Bread Flour 4 cups
RED STAR
QUICK•RISE® Yeast 4 tsp.
or
Bread Machine Yeast 4 tsp.
Program: FAST BAKE
®
CHEESE’N ONION BREAD
2.0 LB. loaf
Water 115°-125°F/43°-51°C (warm) 1⅓ cups + 1 Tbsp.
Salt 1 tsp.
Sugar 2 Tbsp.
Sharp Cheddar Cheese, shredded ¾ cup
Dried Onion 2 Tbsp.
Bread Flour 4 cups
RED STAR
QUICK•RISE® Yeast 4½ tsp.
or
Bread Machine Yeast 4½ tsp.
®
Program: FAST BAKE
41
Page 45

ITALIAN HERB BREAD
2.0 LB. loaf
Water 115°-125°F/43°-51°C (warm) 1½ cups + 2 Tbsp.
Oil 6 Tbsp.
Salt 1½ tsp.
Sugar 3 Tbsp.
Dry Milk 2 Tbsp.
Italian Seasoning 2 Tbsp.
Bread Flour 4 cups
RED STAR
QUICK•RISE® Yeast 4½ tsp.
or
Bread Machine Yeast 4½ tsp.
Program: FAST BAKE
®
CRANBERRY ORANGE BREAD
2.0 LB. loaf
Water 115°-125°F/43°-51°C (warm) 1½ cups
Oil 3 Tbsp.
Dried Orange Peel 1 Tbsp.
Dried Cranberries ¾ cup
Salt 1½ tsp.
Sugar 3 Tbsp.
Dry Milk 2 Tbsp.
Bread Flour 4 cups
RED STAR
QUICK•RISE® Yeast 4½ tsp.
or
Bread Machine Yeast 4½ tsp.
®
Program: FAST BAKE
42
Page 46

DAY-OLD BREAD RECIPES
BREADED PINEAPPLE
Chunked Pineapple 1 15-oz can
Cornstarch 2 Tbsp.
Sugar ½ cup
Butter ¼ cup
White Bread, 1 inch cubes 2 cups
Drain pineapple, reserve juice, Add enough water to juice to equal 1 cup. Mix cornstarch and sugar,
add juice and butter and heat until thick. Pour over pineapple and bread, toss lightly to mix. Bake at
350°F/177°C for 30 minutes.
BREAD PUDDING
White Bread, 1 inch cubes 1½ cups
Vanilla Cook & Serve Pudding & Pie Filling 1 3-oz box
Cinnamon 1 tsp.
Milk, liquid 2 cups
Mix all ingredients in a microwave-safe one quart casserole. Cook uncovered in microwave on high
for 7 minutes or until boiling — stir occasionally during the last half of cooking. Or, bake in oven at
350°F/177°C for 30 minutes — stir halfway through cooking time. Serve warm or cold.
CRUNCHY BREAD SNACKS
Bread, sliced ½ inch thick 8 slices
Butter, melted ¼ cup
Dry Seasoning Mix* 4 tsp.
*Use any one of the following: dried spaghetti sauce seasoning, any ranch dressing, Italian herb
seasoning, garlic powder or garlic salt. Amounts may be adjusted to your taste.
Melt butter and seasoning. Place bread on baking container and lightly brush with butter mixture.
Bake at 350°F/177°C for 10-15 minutes or until brown. Allow to cool. Break into bite size pieces.
43
Page 47

QUICK BREAD &
CAKE RECIPES
Quick Breads and Cakes are made with baking powder and baking soda that are activated by
moisture and heat. The batter is mixed only long enough to blend all the ingredients, then baked
immediately.
Full size cake mixes (approximately 18 ounces) and quick bread mixes (approximately 15 ounces)
work well using the QUICK BREAD program. Add ingredients listed on the package and the QUICK
BREAD program will mix and bake the pre-packaged cake or quick bread.
It is suggested that all liquids should be 80°F/27°C (water, milk, eggs, oil, butter) and be placed in the
bottom of the bread pan, dry ingredients on top. After loading the bread pan in the machine, select
the QUICK BREAD program.
During the initial mixing of batter, dry ingredients may collect in the corners of the pan. It may be
necessary to help the machine mix by using a rubber spatula along corners to avoid flour clumps.
When the cycle is complete, the machine will beep. Before removing pan from bread machine, test
quick bread or cake for doneness by inserting a toothpick or cake tester into the top center. Remove
the toothpick. If the cake is done, the toothpick will come out clean. However, if there is batter on the
toothpick, set the machine on the BAKE setting to continue to bake additional time as needed. Check
cake after 10 minute increments. Depending on size of quick bread or cake and moistness of the
batter, 10-30 additional minutes may be necessary.
Note that the complete BAKE cycle is 60 minutes and the machine will indicate 1:00.
When baking is complete, remove the pan from the machine and allow the quick bread or cake to
remain in the pan for 10 minutes to “set.” Quick bread or cakes are more fragile than yeast breads.
They must sit in the pan before unmolding to allow the steam to subside and the interior of the loaf to
become more firm.
Remove the quick bread or cake from the pan and cool on a rack before slicing.
44
Page 48

BANANA NUT
Regular Large
Milk 80°F/27°C ½ cup 1 cup
Oil 2 Tbsp. ¼ cup
Bananas, ripe and mashed 1 cup 2 cups
Eggs, room temperature 2 4
Sugar ¼ cup ½ cup
Dark Brown Sugar, packed ¼ cup ½ cup
Walnuts, chopped ½ cup 1 cup
All-Purpose Flour 1½ cups 3 cups
Baking Soda 1 tsp. 2 tsp.
Salt 1 tsp. 2 tsp.
Program: QUICK BREAD
CORN
Large
Milk 80°F/27°C 1 cup
Eggs, room temperature 4
Oil ⅓ cup
Sugar ¼ cup
Salt 1 tsp.
All-Purpose Flour 2 ⅔ cups
Cornmeal 1 cup
Baking Powder 5 tsp.
Program: QUICK BREAD
CRANBERRY NUT
Large
Milk 80°F/27°C 1 cup
Egg, room temperature 1
Oil 2 Tbsp.
All-Purpose Flour 2 ½ cups
Sugar ¾ cup
Baking Powder 3½ tsp.
Salt 1 tsp.
Dried Cranberries, coarsely chopped 1 cup
Walnuts, chopped 1 cup
Program: QUICK BREAD
45
Page 49

BANANA CHOCOLATE CHIP
Regular
Bananas, mashed medium ripe 3
Butter or Margarine, melted ¼ cup
Egg, room temperature 1
Sour Milk 3 Tbsp. or (2 Tbsp. Milk + 1 Tbsp. Vinegar)
All-Purpose Flour 2 ¼ cups
Sugar ½ cup
Baking Soda 1 tsp.
Baking Powder 1 tsp.
Salt ½ tsp.
Nuts, chopped ½ - ¾ cup
Chocolate Chips ½ cup
Program: QUICK BREAD
ZUCCHINI
Large
Zucchini, shredded 2 cups (about 2 to 3 medium)
Oil ½ cup
Eggs, room temperature 2
Vanilla 2 tsp.
All-Purpose Flour 2 cups
Sugar 1 cup
Baking Soda ¾ tsp.
Cinnamon ½ tsp.
Baking Powder ¼ tsp.
Walnuts, chopped ½ cup
Program: QUICK BREAD
NUT BREAD
Large
Milk 80°F/27°C 1 cup
Eggs, room temperature 2
Oil 3 Tbsp.
All-Purpose Flour 2 ¾ cups
Sugar 1 cup
Brown Sugar, packed ⅓ cup
Baking Powder 3 ½ tsp.
Salt 1 tsp.
Cinnamon 1 tsp.
Nuts, chopped 1 cup
Program: QUICK BREAD
46
Page 50

DATE NUT
Regular
Orange Juice 80°F/27°C ¾ cup
Egg, room temperature 1
Butter or Margarine, melted 2 Tbsp.
All-Purpose Flour 2 ½ cups
Sugar ¾ cup
Baking Powder 2 tsp.
Baking Soda ¼ tsp.
Salt 1 tsp.
Dried Dates, chopped 1 cup
Almonds, slivered ½ cup
Program: QUICK BREAD
APPLE WALNUT
Regular Large
Egg(s), room temperature 1 2
Milk 80°F/27°C 1 Tbsp. 2 Tbsp.
Oil 2 Tbsp. ¼ cup
Sugar ½ cup 1 cup
Granny Smith Apples, peeled and grated 1 cup 2 cups
Walnuts, chopped ½ cup 1 cup
All-Purpose Flour 1½ cups 3 cups
Baking Soda ½ tsp. 1 tsp.
Baking Powder ¼ tsp. ½ tsp.
Salt ¼ tsp. ½ tsp.
Nutmeg ¼ tsp. ½ tsp.
Cinnamon ¼ tsp. ½ tsp.
Program: QUICK BREAD
47
Page 51

Dough Recipes
As Easy As 1 - 2 - 3
1. Add ingredients to the bread pan in the order listed. Refer to HELPFUL HINTS FOR BREAD &
DOUGH for measuring information. Place the bread pan in the Bread Maker.
2. Close the lid. Select DOUGH PROGRAM. Press START.
3. Remove the dough from the bread pan when the beeper sounds. Follow shaping and baking
instructions.
If you allow the dough to remain in the Bread Maker after the cycle is complete, it may over rise
and damage the machine.
Rising times for dough after it is shaped and placed in a baking pan will vary due to recipe,
temperature and humidity level of your kitchen. The optimum temperature of the room for rising is
80°-85°F/27°-29°C. Rising is the most essential feature in bread making. After the dough comes out
of the Bread Maker, the dough ferments and rises before punching and resting. The gluten becomes
pliable and elastic with a soft, smooth quality. Fermentation conditions gluten, develops flavor and
leavens the product.
Dough has doubled in bulk when an indentation remains after the tip of a finger is pressed lightly
and quickly into the dough. If the indentation springs back, cover and let rise a few more minutes and
check again. After punching down and dividing dough, cover and let rest 10 minutes. Resting allows
the gluten to relax and makes handling easier. Then shape the dough as desired.
Sometimes a double rising is beneficial especially for whole grain or 100% whole wheat bread. Let
the dough rise once, punch down, let rise again, punch down, let rest 10 minutes and shape.
CRUST TREATMENTS (use only with dough program)
Always allow optimum rising of shaped dough. Use a pastry brush to apply glaze. Bake as directed.
Egg Yolk Glaze — For shiny golden crust, mix 1 slightly beaten egg or egg yolk with 1tbs water or milk.
Egg White Glaze — For a shiny, chewy crust, mix 1 slightly beaten egg white with 1 tablespoon water.
Lightly Floured — Sprinkle enough flour onto work area so dough can be handled without sticking.
SHAPING ROLLS
Cloverleaf Rolls — Shape into ½ inch balls. Place 3 balls in each greased muffin tin and let rise until
double in size.
Crisscross Rolls — Shape into balls. Combine two of the balls and roll into a 1/8 inch thick square.
Cut strips 1/8 inch wide and place one strip across the top of each ball. Repeat this process, placing
the second strip in the opposite direction across the top of each ball.
Traditional Rolls — Shape into balls. For “pull apart” rolls, place dough balls with sides touching
in a baking pan. For “individual” rolls place dough balls 2 inches apart on a baking sheet.
Pan Sizes For Pull-Apart Rolls
For a 1 LB. (9 rolls) recipe, use an 8 x 8 inch baking pan.
For a 1.5 LB. (18 rolls) recipe, use two 8 x 8 inch baking pans.
For a 2 LB. (24 rolls) recipe, use a 9 x 13 inch baking pan.
48
Page 52

DINNER ROLL DOUGH
9 rolls 24 rolls
Egg, room temperature plus 1 1
enough Water 80°F/27°C to equal ¾ cup + 3 Tbsp. 1½ cups + 2Tbsp.
Oil 2 Tbsp. ¼ cup
Sugar ¼ cup ½ cup
Salt ¼ tsp. ½ tsp.
Bread Flour 2 ¼ cups 4¼ cups
RED STAR® Active Dry Yeast 2 ¼ tsp. 3½ tsp.
or
RED STAR® QUICK•RISE® Yeast 1½ tsp. 2 ½ tsp.
or
Bread Machine Yeast 1½ tsp. 2 ½ tsp.
Program: DOUGH
METHOD
1. Remove the bread pan from the Bread Maker. Attach the kneading blade onto the shaft. Make
sure all ingredients, except water, are at room temperature.
2. Place whole uncracked eggs in a bowl of warm water for 15 minutes to bring to room
temperature. To measure egg plus enough liquid to equal — after warming eggs, remove from
shell and place in a liquid measuring cup. Slowly add warm (80°F/27°C/baby bottle temperature)
liquid to measuring cup until it reaches the desired measurement.
3. Use a measuring spoon to measure the oil and add to the bread pan.
4. Use a measuring spoon to measure the sugar and salt; level off with the straight edge of a knife
and add to the bread pan.
5. Lightly spoon bread flour into a dry measuring cup, level off with the straight edge of a knife and
add to the bread pan.
6. Smooth into all corners. Lightly tap pan on counter 3 times to settle all dry ingredients.
7. Carefully measure yeast with a measuring spoon; level off with the straight edge of a knife and
add to the bread pan.
8. Place the bread pan into the Bread Maker. Press down on rim until it snaps into place. Close lid.
9. Select DOUGH PROGRAM and press START.
10. At the beep during the kneading process, check the dough ball. It should be slightly tacky to the
touch. At this time push down any dough or flour that may be on the sides of the pan.
11. When the beeper sounds, the dough is finished. Use oven mitts to carefully remove the
bread pan.
12. Turn bread pan upside down and shake several times to remove the dough. Do not use metal
utensils inside the bread pan or Bread Maker.
13. Place on a lightly floured surface. Divide into pieces and shape.
14. Place in a greased baking pan. Cover and let rise in a warm place for 1 hour or until double in
size.
15. Bake at 350°F/177°C for 20-30 minutes, or until done.
16. UNPLUG UNIT BEFORE CLEANING. DO NOT IMMERSE THE BREAD PAN IN WATER, see
CLEANING & STORING.
49
Page 53

FOCACCIA BREAD DOUGH
1 loaf
Water 80°F/27°C 1 cup
Olive Oil ⅓ cup
Sugar 2 tsp.
Salt 1 tsp.
Bread Flour 3 cups
RED STAR® Active Dry Yeast 1½ tsp.
or
RED STAR® QUICK•RISE® Yeast 1 tsp.
or
Bread Machine Yeast 1 tsp.
Program: DOUGH
Add at the beep:
Dried Italian Seasoning 1 tsp.
GARLIC-CHEESE TOPPING
Olive Oil ¼ cup
Dried Oregano 1½ tsp.
Garlic, coarsely chopped ⅓ cup
Parmesan Cheese, grated ⅓ cup
Salt ¼ tsp.
GREEK STYLE TOPPING
Olive Oil ¼ cup
Onion, thin sliced 1 cup
Dried Oregano 1½ tsp.
Feta Cheese, crumbled ⅓ cup
Black Olives, sliced and drained ¼ cup
Salt ¼ tsp.
METHOD
1. With oiled hands, evenly press dough into a greased 9 x 13 inch pan. Using your fingertips,
make indentations in the dough.
2. Cover and let rise in a warm place for 30 minutes or until almost double in size. While the dough
is rising, select the topping and prepare.
3. In a skillet, heat olive oil.
For garlic-cheese topping — stir in oregano and garlic then immediately remove from heat.
For Greek topping — add onions and cook until onions are soft but not brown, approximately
5 minutes.
4. Use fingers to press dimples into dough again. Spoon topping mixture evenly over dough.
Sprinkle with remaining ingredients.
5. Bake at 400°F/205°C for 20 minutes or until done.
50
Page 54

WHEAT DINNER ROLL DOUGH
9 rolls 24 rolls
Water 80°F/27°C ¾ cup 1½ cups
Oil 1 Tbsp. 2 Tbsp.
Brown Sugar 2 Tbsp. ¼ cup
Salt ½ tsp. 1 tsp.
Dry Milk 1 Tbsp. 2 Tbsp.
Bread Flour 1¼ cups 2½ cups
Whole Wheat Flour 1 cup 2 cups
RED STAR® Active Dry Yeast 1½ tsp. 3 tsp.
or
RED STAR® QUICK•RISE® Yeast 1 tsp. 1¼ tsp.
or
Bread Machine Yeast 1 tsp. 1¼ tsp.
Program: DOUGH
METHOD
1. Place on a lightly floured surface. Divide into pieces and shape.
2. Place in a greased baking pan. Cover and let rise in a warm place for 1 hour or until double in
size.
3. Bake at 350°F/177°C for 25-30 minutes, or until done.
BUTTERMILK ROLL DOUGH
9 rolls 18 rolls
Cultured Buttermilk, liquid 80°F/27°C 1 cup 1½ cups
Oil 3 Tbsp. ¼ cup
Honey 1½ Tbsp. 2 Tbsp.
Salt 1 tsp. 1½ tsp.
Bread Flour ¾ cup 1¼ cups
Whole Wheat Flour 1⅓ cups 2 cups
Wheat Germ ⅓ cup ½ cup
Baking Soda ¼ tsp. ¼ tsp.
RED STAR® Active Dry Yeast 1¾ tsp. 2 tsp.
or
RED STAR® QUICK•RISE® Yeast 1¼ tsp. 1½ tsp.
or
Bread Machine Yeast 1¼ tsp. 1½ tsp.
Program: DOUGH
TOPPING
Butter, melted 2 Tbsp. 3 Tbsp.
METHOD
1. Place on a lightly floured surface. Divide into pieces and shape.
2. Place in a greased baking pan. Cover and let rise in a warm place for 1 hour or until double in
size. Brush with melted butter.
3. Bake at 350°F/177°C for 15-20 minutes, or until done.
51
Page 55

FRENCH BREAD DOUGH (Italian Loaf, French Rolls and French Twists)
9 rolls
Water 80°F/27°C 1¼ cups
Sugar 1 Tbsp.
Salt 1 tsp.
Bread Flour 3½ cups
RED STAR® Active Dry Yeast 1 Tbsp.
or
RED STAR® QUICK•RISE® Yeast 2 tsp.
or
Bread Machine Yeast 2 tsp.
Program: DOUGH
GLAZE
Water 2 Tbsp.
Salt ½ tsp.
METHOD
1. Place on a lightly floured surface. Roll into a 12 x 18 rectangle. Starting with the longest side,
roll up tightly, pressing the seams to seal and tapering each end.
2. Place the loaf on a greased baking sheet, cover and let rise in a warm place for 40 minutes or
until double in size.
3. With a knife, cut three diagonal slashes across top of the loaf. Combine the glaze ingredients;
brush the loaf.
4. Bake at 400°F/205°C for 20 to 25 minutes, or until done.
VARIATIONS
ITALIAN LOAF
METHOD
1. Use recipe above. Place on a lightly floured surface and shape the dough into one large round
ball.
2. Place the loaf on a greased baking sheet, cover and let rise in a warm place for 40 minutes or
until double in size.
3. With a knife, cut three diagonal slashes across top of the loaf. Combine the glaze ingredients;
brush over loaf. Sprinkle loaf with sesame seeds, poppy seeds, caraway seeds or cracked
wheat.
4. Bake at 400°F/205°C for 20 to 25 minutes or until done.
FRENCH ROLLS
METHOD:
1. Use recipe above. Place on a lightly floured surface and divide dough into 12 pieces and shape
into a ball. Pinch the ends of each roll and taper slightly.
2. Place the loaves on a greased baking sheet, cover and let rise in a warm place for 40 minutes
or until double in size.
3. With a knife, cut diagonal slashes across top of the loaf. Combine the glaze ingredients; brush
over loaves.
4. Bake at 400°F/205°C for 15 to 20 minutes or until done.
FRENCH TWISTS
METHOD
1. Use recipe above. Place on a lightly floured surface and divide dough into 18 pieces. Roll into
14 inch ropes.
2. Fold each rope in half and twist, starting at fold.
3. Place on greased baking sheet and brush with 1/3 cup of melted butter. Cover and let rise in a
warm place until double in size.
4. Brush with glaze.
5. Bake at 400°F/205°C for 12 to 15 minutes or until done.
52
Page 56

CHEESY GARLIC ROLL DOUGH
9 rolls 24 rolls
Egg, room temperature plus 1 1
enough Water 80°F/27°C to equal 1 cup 1⅓ cups
Oil 2 Tbsp. 3 Tbsp.
Sugar ⅓ cup ½ cup
Salt 1 tsp. 1½ tsp.
Bread Flour 3 ½ cups 4½ cups
RED STAR® Active Dry Yeast 1¼ tsp. 2 tsp.
or
RED STAR® QUICK•RISE® Yeast 1 tsp. 1¼ tsp.
or
Bread Machine Yeast 1 tsp. 1¼ tsp.
Program: DOUGH
TOPPING
Parmesan Cheese ⅓ cup ⅔ cup
Garlic, minced 1½ Tbsp. 2 Tbsp.
Butter, melted 3 Tbsp. ¼ cup
METHOD
1. Place on a lightly floured surface. Divide into pieces and shape.
2. Combine cheese and garlic. Dip pieces in melted butter and then in cheese-garlic mixture. Place
coated side up in a greased baking pan, drizzle any remaining topping over rolls.
3. Cover and let rise in a warm place 1 hour or until double in size.
4. Bake at 325°F/163°C for 35-40 minutes, or until done.
PITA POCKET DOUGH
20 pita pockets
Water 80°F/27°C 1⅓ cups
Olive Oil 8 tsp.
Sugar 4 tsp.
Salt 1¼ tsp.
Bread Flour 2 cups
Whole Wheat Flour 1⅓ cups
RED STAR® Active Dry Yeast 2½ tsp.
or
RED STAR® QUICK•RISE® Yeast 1¾ tsp.
or
Bread Machine Yeast 1¾ tsp.
Program: DOUGH
METHOD
1. Place on a lightly floured surface. Divide into 10 pieces and shape each piece into a smooth
ball.
2. Place 5 balls on a large baking sheet. Place the remaining five balls on another baking sheet.
Let rise about 20 minutes. With fingertips flatten each ball into a 6 inch circle.
3. Bake at 500°F/260°C for 5 minutes until puffed and tops begin to brown.
4. Cut each in half to form 2 pockets.
53
Page 57

REFRESHING ROLL DOUGH
18 rolls 24 rolls
Water 80°F/27°C 1 cup 1½ cups
Oil ¼ cup ⅓ cup
Brown Sugar ⅓ cup ½ cup
Salt 1 tsp. 1½ tsp.
Bread Flour 3½ cups 4½ cups
RED STAR® Active Dry Yeast 1½ tsp. 2 tsp.
or
RED STAR® QUICK•RISE® Yeast 1 tsp. 1¼ tsp.
or
Bread Machine Yeast 1 tsp. 1¼ tsp.
Program: DOUGH
TOPPING
Orange Peel, grated 2 Tbsp. ¼ cup
Sugar ½ cup ¾ cup
Butter, melted ½ cup ¾ cup
METHOD
1. Place on a lightly floured surface. Divide into pieces and shape.
2. Combine orange peel and sugar. Dip pieces in melted butter and then in orange peel-sugar
mixture.
3. Place coated side up in greased baking pan. Drizzle any remaining topping over rolls. Cover
and let rise in a warm place 1 hour or until double in size.
4. Bake at 350°F/177°C for 20-30 minutes, or until done. Serve warm.
54
Page 58

CHALLAH BREAD DOUGH
regular large
Egg(s), room temperature plus 1 2
enough Water 80°F/27°C to equal ¾ cup 1½ cups
Oil 2 Tbsp. ¼ cup
Sugar 1½ Tbsp. 2 Tbsp.
Salt 1 tsp. 2 tsp.
Bread Flour 2 cups 4½ cups
RED STAR
or
RED STAR® QUICK•RISE® Yeast ¾ tsp. 1¼ tsp.
or
Bread Machine Yeast ¾ tsp. 1¼ tsp.
Program: DOUGH
GLAZE
Egg Yolk(s), beaten 1 2
Water 1 Tbsp. 1 Tbsp.
TOPPING
Poppy Seeds 1 tsp. 1½ Tbsp.
®
Active Dry Yeast 1 tsp. 2 tsp.
METHOD
1. Place on a lightly floured surface. Divide into thirds, making 3 (10 inch long for regular, 13 inch
long for large) ropes with tapered ends. Pinch ropes together at one end, braid together. Pinch
together at other end and secure braid.
2. Transfer braided dough to greased baking sheet; cover and let rise in a warm place for 1 hour or
until double in size.
3. Combine glaze ingredients and brush onto braid. Sprinkle with poppy seeds and bake at
350°F/177°C for 25 minutes, or until done.
55
Page 59

WHOLE WHEAT PIZZA CRUST DOUGH
1 thick or 2 thin crusts
Water 80°F/27°C 1 cup
Oil 2 Tbsp.
Sugar 1 Tbsp.
Salt 1 tsp.
Whole Wheat Flour 1 cup
Bread Flour 1½ cups
RED STAR® Active Dry Yeast 2 ¼ tsp.
or
RED STAR® QUICK•RISE® Yeast 1½ tsp.
or
Bread Machine Yeast 1½ tsp.
Program: DOUGH
METHOD
1. Place on a lightly floured surface. Divide in half and press onto a 12 inch pizza pan, raising
edges. Sprinkle each pan with 1 tablespoon of cornmeal if desired. Generously prick dough with
a fork. For one 12 inch thick crust do not divide.
2. Bake 400°F/205°C for 10-12 minutes or until edges of crust begin to turn a light golden brown.
Remove, add toppings and return to oven to bake an additional 15-20 minutes.
PIZZA CRUST DOUGH
1 thick or 2 thick or
2 thin crusts 4 thin crusts
Water 80°F/27°C ¾ cup 1½ cups + 3Tbsp.
Oil 1 Tbsp. 2 Tbsp.
Sugar 1 Tbsp. 2 Tbsp.
Salt ½ tsp. 1 tsp.
Dry Milk 1 Tbsp. 2 Tbsp.
Bread Flour 2¼ cups 4½ cups
RED STAR® Active Dry Yeast 1 tsp. 2 tsp.
or
RED STAR® QUICK•RISE® Yeast ¾ tsp. 1¼ tsp.
or
Bread Machine Yeast ¾ tsp. 1¼ tsp.
Program: DOUGH
METHOD
1. Place on a lightly floured surface. Divide and press onto a 12 inch pizza pan, raising edges.
2. Spread pizza sauce over the dough and sprinkle with toppings.
3. Bake 425°F/218°C for 20 minutes or until crust is golden brown around edges.
56
Page 60

BAGEL DOUGH
8 bagels
Water 80°F/27°C 1 cup
Sugar 1½ Tbsp.
Salt 1 tsp.
Bread Flour 3 cups
RED STAR® Active Dry Yeast 2¼ tsp.
or
RED STAR® QUICK•RISE® Yeast 1½ tsp.
or
Bread Machine Yeast 1½ tsp.
Program: DOUGH
GLAZE
Egg, beaten 1
TOPPINGS (OPTIONAL)
Sesame Seeds, Poppy Seeds, Cracked Wheat, Wheat Flakes or Dried Onion Flakes
BANANA WHEAT BAGEL DOUGH
12 bagels
Egg, room temperature plus 1
enough Water 80°F/27°C to equal 1 cup
Oil 2 Tbsp.
Honey 1 Tbsp.
Salt 1½ tsp.
Banana, mashed ½ cup
Whole Wheat Flour 2 ½ cups
Bread Flour 1 cup
RED STAR® Active Dry Yeast 2 ¼ tsp.
or
RED STAR® QUICK•RISE® Yeast 1½ tsp.
or
Bread Machine Yeast 1½ tsp.
Program: DOUGH
GLAZE
Egg White, beaten 1
Water 1 Tbsp.
TOPPINGS (OPTIONAL)
Poppy Seeds, Sesame Seeds
BAGEL RECIPES METHOD
1. Place on a lightly floured surface. Divide into pieces. Roll each in a small ball, making a hole in
the center of each with thumbs. Gently pull to make a one-inch hole.
2. Place on a greased baking sheet. Cover and let rise in a warm place for 30 minutes or until
double in size.
3. In a 3-quart sauce pan, bring to a boil 2 quarts water and 2 tablespoons sugar. Place a few
bagels at a time in boiling water. Simmer 3 minutes turning once. Remove with slotted spoon
and put back on greased baking sheet.
4. Brush with egg and sprinkle with choice of toppings. Bake at 400°F/205°C for 20-25 minutes or
until done; cool on a wire rack.
57
Page 61

ALMOND-CHERRY COFFEE CAKE DOUGH
1 coffee cake
Water 80°F/27°C 1 cup
Oil 1 Tbsp.
Sugar 1½ Tbsp.
Salt ¾ tsp.
Dry Milk 1 Tbsp.
Bread Flour 3¼ cups
RED STAR® Active Dry Yeast 1½ tsp.
or
RED STAR® QUICK•RISE® Yeast 1 tsp.
or
Bread Machine Yeast 1 tsp.
Program: DOUGH
FILLING
Cream Cheese, room temperature 8 oz
Sugar 2 Tbsp.
Maraschino Cherries, chopped ½ cup
Milk, liquid 1 Tbsp.
Almond Extract ½ tsp.
GLAZE
Powdered Sugar ½ cup
Sour Cream 1 Tbsp.
Milk, liquid 1-2 Tbsp.
Sliced Almonds, to decorate 2 Tbsp.
Maraschino Cherries, quartered, to decorate 2 Tbsp.
METHOD
1. Place on a lightly floured surface. Roll into a 5 x 10 inch rectangle. Combine filling ingredients
and spread over dough within ½ inch of edges. Starting with longest side, roll dough up tightly,
pressing edges to seal.
2. Place roll, seam-side down, on a greased baking sheet and join the ends to form a ring; pinch
to seal. With a knife, make cuts 1½ inches apart from the outside edge to within one inch of the
inside edge. Turn each section on its side so filling shows.
3. Cover and let rise in a warm place 1 hour or until almost double in size.
4. Uncover and bake at 375°F/190°C for 20-25 minutes or until done.
5. Combine the first three glaze ingredients, adding only enough milk for drizzling consistency.
Drizzle over the warm coffee cake. Decorate with almonds and cherries. Serve warm.
58
Page 62

CINNAMON ROLL DOUGH
18 Rolls 24 Rolls
Egg, room temperature plus 1 1
enough Water 80°F/27°C to equal 1 cup 1½ cups
Oil ¼ cup ⅓ cup
Sugar ⅓ cup ½ cup
Salt 1 tsp. 1½ tsp.
Bread Flour 3½ cups 4½ cups
RED STAR® Active Dry Yeast 1½ tsp. 2 tsp.
or
RED STAR® QUICK•RISE® Yeast 1 tsp. 1¼ tsp.
or
Bread Machine Yeast 1 tsp. 1¼ tsp.
Program: DOUGH
Add at the beep:
Walnuts, chopped (optional) ½ cup ⅔ cup
Raisins (optional) ½ cup ⅔ cup
FILLING
Butter, softened ⅓ cup ½ cup
Sugar ⅓ cup ½ cup
Cinnamon 2 Tbsp. 3 Tbsp.
GLAZE
Powdered Sugar ½ cup ⅔ cup
Milk, liquid 3 Tbsp. ¼ cup
Vanilla ¼ tsp. ½ tsp.
METHOD
1. Place on a lightly floured surface, roll dough in a 12 x 18 inch rectangle for 18 rolls, (12 x 24
inch rectangle for 24 rolls) and spread with butter. Combine remaining filling ingredients and
sprinkle over butter. Roll up tightly, jelly-roll style, starting with the longest side and cut into one
inch slices.
2. Place in greased baking pans and let stand in a warm place for 1 hour or until double in size.
3. Bake at 350°F/177°C for 25-30 minutes or until done.
4. Mix glaze ingredients until smooth and drizzle over top.
59
Page 63

STICKY BREAKFAST ROLL DOUGH
18 Rolls
Egg(s), room temperature plus 1
enough Water 80°F/27°C to equal 1 cup + 2 Tbsp.
Oil ¼ cup
Sugar ⅓ cup
Salt 1 tsp.
Bread Flour 3½ cups
RED STAR® Active Dry Yeast 1½ tsp.
or
RED STAR® QUICK•RISE® Yeast 1 tsp.
or
Bread Machine Yeast 1 tsp.
Program: DOUGH
Add at the beep:
Walnuts or Pecans, chopped ½ cup
FILLING
Butter, softened ½ cup
Sugar ⅓ cup
Cinnamon 1 Tbsp.
TOPPING
Butter, melted ¾ cup
Brown Sugar ¾ cup
METHOD
1. Place on a lightly floured surface, roll dough into a 12 x 18 inch rectangle for 18 rolls and spread
with butter. Combine remaining filling ingredients and sprinkle over dough. Roll up tightly, jellyroll style, starting with the longest side and cut into one inch slices.
2. Combine topping mixture and spread into baking pan. place slices on mixture and let rise in a
warm place for 1 hour or until double in size.
3. Bake at 350°F/177°C for 35 minutes or until done. Invert onto a heat-proof tray.
60
Page 64

SOFT PRETZEL DOUGH
16 pretzels
Water 80°F/27°C 1¼ cups
Egg Yolk, room temperature 1
Oil 1 Tbsp.
Sugar 2 Tbsp.
Salt 1 tsp.
White Pepper ⅛ tsp.
Bread Flour 3½ cups
RED STAR® Active Dry Yeast 1 Tbsp.
or
RED STAR® QUICK•RISE® Yeast 2 tsp.
or
Bread Machine Yeast 2 tsp.
Program: DOUGH
GLAZE
Egg White 1
Water 1 Tbsp.
TOPPINGS (OPTIONAL)
Kosher Salt 1 Tbsp.
Sesame Seeds 1 Tbsp.
METHOD
1. Place dough on a lightly floured surface and cut into pieces. Roll each piece into a 16 inch rope.
Cross the ends of the rope to make a loop; twist the crossed ends once and fold across the
loop.
2. Place on a greased baking sheet 1½ inches apart. Brush with glaze and sprinkle with topping.
Let rise until double in size, about 30 minutes. Bake at 375°F/190°C for 15-20 minutes or until
done.
VARIATION
PEPPERONI PRETZEL DOUGH
METHOD
1. Add 1 cup thin sliced pepperoni and 2 tablespoons Parmesan cheese to dough ingredients.
2. Follow method above for completion.
61
Page 65

CREAMED SOUP BREAD BOWL DOUGH
4 bowls
Eggs, room temperature plus 2
enough Water 80°F/27°C to equal 1 cup + 5 Tbsp.
Oil 2 Tbsp.
Honey ¼ cup
Dry Milk 3 Tbsp.
Salt 2 tsp.
Bread Flour 2¼ cups
Whole Wheat Flour 1 cup
Rye Flour 1 cup
Caraway Seeds 3 Tbsp.
Dehydrated Onions ¼ cup
RED STAR® Active Dry Yeast 2 ¾ tsp.
or
RED STAR® QUICK•RISE® Yeast 1¾ tsp.
or
Bread Machine Yeast 1¾ tsp.
Program: DOUGH
Note: Any 2 pound bread or dough recipe may be used; mix on dough program.
METHOD
1. Place dough on a lightly floured surface and divide into 4 equal pieces. Shape into 4 smooth
round balls and place on a greased baking sheet.
2. Cover and let rise in a warm place for 1 hour or until double in size.
3. Bake at 350°F/177°C for 25-30 minutes or until done. Allow to cool completely on a wire rack.
4. With a serrated knife, remove the top 1 inch of each bread bowl. Remove the center, leaving a
shell of ½ inch on sides and bottom.
5. Fill with approximately 1 cup of creamed soup (non-creamed soup will soak through the bread
bowl too easily.) Cut removed bread into 1 inch pieces and serve with soup.
62
Page 66

PARTY DIP BREAD BOWL DOUGH
1 bowl
Water 80°F/27°C 1¼ cups
Sugar 1 Tbsp.
Salt 1 tsp.
Bread Flour 3⅓ cups
RED STAR® Active Dry Yeast 1 Tbsp.
or
RED STAR® QUICK•RISE® Yeast 2 tsp.
or
Bread Machine Yeast 2 tsp.
Program: DOUGH
Note: Any 1.5 pound bread or dough recipe may be used; mix on dough program.
METHOD
1. Place dough on a lightly floured surface. Shape into a large smooth round ball and place on a
greased baking sheet.
2. Cover and let rise in a warm place for 1 hour or until double in size.
3. Bake at 350°F/177°C for 30-40 minutes or until done. Allow to cool completely on a wire rack.
4. With a serrated knife, remove the top 1-2 inches of the bowl. Remove the center, leaving a shell
of ½ inch on sides and bottom.
5. Fill with 3 cups of dip. Cut removed bread into 1 inch pieces and serve with dip.
SHREDDED BEEF DIP
Dried beef, chopped 5 oz
Cream Cheese, softened 2-8 oz pkg.
Sour Cream ½ cup
Green Onions, chopped 6
Accent™ Seasoning 2½ tsp.
Worcestershire Sauce to taste
Mix and chill before serving.
Makes 3 Cups
SHRIMP DIP
Canned Shrimp, drained and mashed 2 small cans
Cream Cheese, softened 8 oz pkg
Mayonnaise 1 cup
Green Onions, chopped 3
Mix and chill before serving.
Makes 3 Cups
63
Page 67

RECIPE INDEX
BREAD
Cheese and Cracked Pepper.............. 32
Cinnamon Raisin Nut .................... 37
Cranberry Walnut ....................... 36
Egg .................................. 30
French ............................... 33
Gluten-Free Bread ...................... 37
Holiday . . . . . . . . . . . . . . . . . . . . . . . . . . . . . . . 36
Italian Herb............................ 32
Honey Wheat .......................... 30
Onion ................................ 31
Pesto ................................ 31
Pumpernickel .......................... 35
Rich Sweet ............................ 37
Rye .................................. 31
Shredded Wheat ....................... 34
Sunflower & Sesame Seed ............... 33
Triple Wheat........................... 35
White ................................ 29
100% Whole Wheat . . . . . . . . . . . . . . . . . . . . . 34
QUICK BREAD & CAKE
Apple Walnut .......................... 47
Banana Chocolate Chip .................. 46
Banana Nut ........................... 45
Cranberry Nut.......................... 45
Corn ................................. 45
Date Nut .............................. 47
Nut .................................. 46
Zucchini .............................. 46
DAY-OLD BREAD (Uses For)
Bread Pudding ......................... 43
Breaded Pineapple...................... 43
Crunchy Bread Snacks................... 43
DOUGH
Almond-Cherry Coffee Cake .............. 58
Bagel ................................ 57
Banana Wheat Bagel .................... 57
Buttermilk Roll ......................... 51
Challah Bread.......................... 55
Cheesy Garlic Roll . . . . . . . . . . . . . . . . . . . . . . 53
Cinnamon Roll ......................... 59
Creamed Soup Bread Bowl ............... 62
Dinner Roll ............................ 49
Focaccia Bread ........................ 50
French Bread .......................... 52
Party Dip Bread Bowl.................... 63
Pita Pocket ............................ 53
Pizza Crust ............................ 56
Refreshing Roll......................... 54
Soft Pretzel............................ 61
Sticky Breakfast Roll .................... 60
Wheat Dinner Roll ...................... 51
Whole Wheat Pizza Crust ................ 56
FAST BAKE BREAD
Cheese‘n Onion ........................ 41
Chevre-Cracked Pepper.................. 40
Cranberry Orange ...................... 42
Egg .................................. 40
Italian Herb............................ 42
Pesto ................................ 40
Potato ................................ 41
White ................................ 39
64
Page 68

TWOYEAR LIMITED WARRANTY
NEED HELP?
For service, repair or any questions regarding your appliance, call the appropriate 800 number on cover of this
book. Please DO NOT return the product to the place of purchase. Also, please DO NOT mail product back to
manufacturer, nor bring it to a service center. You may also want to consult the website listed in this manual.
Two-Year Limited Warranty
(Applies only in the United States and Canada)
What does it cover?
• Any defect in material or workmanship provided; however, Spectrum Brands Inc.’s liability will not exceed the
purchase price of product.
For how long?
• Two years after date of purchase.
What will we do to help you?
• Provide you with a reasonably similar replacement product that is either new or factory refurbished.
How do you get service?
• Save your receipt as proof of date of sale.
• Visit the online service website at www.prodprotect.com, or call toll-free 1-800-231-9786, for general warranty service.
• If you need parts or accessories, please call 1-800-738-0245.
What does your warranty not cover?
• Damage from commercial use
• Damage from misuse, abuse or neglect
• Products that have been modied in any way
• Products used or serviced outside the country of purchase
• Glass parts and other accessory items that are packed with the unit
• Shipping and handling costs associated with the replacement of the unit
• Consequential or incidental damages (Please note, however, that some states do not allow
the exclusion or limitation of consequential or incidental damages, so this limitation may not apply to you.)
How does state law relate to this warranty?
• This warranty gives you specic legal rights. You may also have other rights that vary from state to state or
province to province.
Are there additional warranty exclusions?
• This warranty shall not be valid where it is contrary to U.S. and other applicable laws, or where the
warranty would be prohibited under any economic sanctions, export control laws, embargos, or other
restrictive trade measures enforced by the United States or other applicable jurisdictions. This includes,
without limitation, any warranty claims implicating parties from, or otherwise located in, Cuba, Iran, North
Korea, Syria and the disputed Crimea region.
560W 120V~ 60Hz.
© 2020 Spectrum Brands, Inc. All rights reserved.
Breadman is a Registered Trademark of Spectrum Brands, Inc.
QUICK-RISE® and RED STAR® are registered trademarks of LaSaffre Yeast
Corporation. RAPIDRISE® is a registered trademark of AB Mauri Food Inc.
Made in China.
28261
At the end of this product’s life,
you can mail it to Spectrum Brands at
507 Stokely Drive, Deforest, WI 53532
marked “Product Takeback: Please Recycle!”
Page 69
MACHINE À PAIN COMPACTE DE 2 LB
MODE D'EMPLOI
Série TR520
T22-9002126-B E/F
RECETTES COMPRISES
voir à l’ intérieur
www.breadman.com
www.breadman.com
Page 70

Page 71

TABLE DES MATIÈRES
MISES EN GARDE IMPORTANTES ...............................................2
Panne de courant ..............................................................3
COUP D´ŒIL SUR LA MACHINE À PAIN .........................................5
Avant la première utilisation.......................................................5
Pièces de la machine à pain ......................................................6
Panneau de commande..........................................................7
Choix de programmes ...........................................................8
Tableau des spécifications des programmes..........................................9
CONSEILS UTILES POUR LE PAIN ET LA PÂTE ..................................11
Mesurer .....................................................................11
Boule de pâte.................................................................12
Ingrédients ...................................................................12
Substituts ....................................................................15
Préparations pour pâte à pain et autres recettes .....................................16
Haute altitude.................................................................16
Congélation du pain cuit ........................................................16
Congélation de la pâte..........................................................16
MODE D´EMPLOI ..............................................................17
Programmation de la machine à pain ..............................................17
Utilisation de la minuterie .......................................................20
DIRECTIVES D´ENTRETIEN.....................................................21
Nettoyage....................................................................21
Rangement ..................................................................21
Avant de téléphoner pour obtenir du service.........................................22
Liste de contrôle ..............................................................23
Suggestions ..................................................................24
Information à l’écran ...........................................................25
Caractéristiques du produit ......................................................26
RECETTES.....................................................................27
Pains de base ................................................................28
Pains à CUISSON RAPIDE......................................................38
Pain de la veille (utilisations possibles).............................................43
Pains éclairs et gâteaux ........................................................44
Pâte ........................................................................48
INDEX DES RECETTES .........................................................64
1
Page 72

MISES EN GARDE IMPORTANTES
Des mesures de sécurité élémentaires, dont les suivantes, s’imposent lors de l’utilisation d’appareils
électriques :
1. Lire toutes les directives.
2. Ne pas toucher aux surfaces chaudes. Utiliser les poignées ou les boutons.
3. Pouréviterleschocsélectriques,nepasimmergerlecordon,lachenil’appareildansl’eauou
tout autre liquide.
4. Exercer une surveillance étroite lorsque ce type d’appareil est utilisé par un enfant ou près d’un enfant.
5. Débrancher l’appareil lorsqu’il ne sert pas et avant de le nettoyer. Le laisser refroidir avant d’y
placer ou d’en retirer des pièces.
6. Nepasfairefonctionnerunappareildontlecordonoulacheestendommagé,s’ilfonctionne
mal ou s’il a été endommagé de quelque manière que ce soit. Communiquer avec le service à la
clientèle au numéro sans frais indiqué dans la section Garantie.
7. L’utilisation d’accessoires non recommandés par le fabricant peut causer un incendie, un choc
électrique ou des blessures.
8. Ne pas utiliser à l’extérieur.
9. Ne pas laisser pendre le cordon sur le bord d’une table ou d’un comptoir, ni toucher à des
surfaces chaudes y compris la cuisinière.
10. Ne pas placer sur le dessus ni près d’un élément chauffant électrique ou à gaz, ni dans un four chaud.
11. Faire preuve d’une extrême prudence en déplaçant un appareil contenant de l’huile chaude ou
tout autre liquide chaud.
12. Pour débrancher l’appareil, appuyer sur la touche START/STOP et la maintenir enfoncée
pendantunesecondecomplètepuisretirerlachedelaprisedecourant.
13. Ne pas utiliser l’appareil pour un usage autre que celui auquel il est destiné.
14. Éviter tout contact avec les pièces en mouvement.
CONSERVER CES DIRECTIVES
CET APPAREIL EST DESTINÉ À UN USAGE DOMESTIQUE SEULEMENT.
AUTRES MISES EN GARDE IMPORTANTES
ATTENTION SURFACES CHAUDES : Cet appareil produit de la chaleur et de la vapeur s’en échappe
durant l’utilisation. Des précautions doivent être prises pour éviter le risque de brûlures, d’incendie ou
d’autres blessures ou dommages.
ATTENTION : Durant le fonctionnement, les pièces internes de la machine à pain et la zone entourant
les orifices à vapeur sont CHAUDES. TENIR HORS DE LA PORTÉE DES ENFANTS POUR ÉVITER
TOUTE BLESSURE.
ATTENTION : Risque de choc électrique. Cuire uniquement dans le moule à pain amovible.
1. Les personnes qui n’ont pas lu ni compris toutes les directives de fonctionnement et de sécurité
nesontpasqualiéespourutilisercetappareil.Touslesutilisateursdel’appareildoiventlireet
comprendre le présent mode d’emploi avant d’utiliser ou de nettoyer l’appareil.
2. Si cet appareil tombe ou se retrouve immergé accidentellement dans l’eau, le débrancher
immédiatement. NE PAS TENTER DE LE SORTIR DE L´EAU!
3. Lors de l’utilisation de l’appareil, prévoir suffisamment d’espace au-dessus et tout autour de l’appareil
pour que l’air circule librement. Ne pas utiliser cet appareil s’il touche à des rideaux, à des revêtements
muraux, à des vêtements, à des torchons à vaisselle ou à toute autre matière inflammable.
4. Afin de réduire le risque d’incendie, ne pas laisser cet appareil sans surveillance durant son
utilisation.
2
Page 73

5. Débrancher immédiatement l’appareil s’il commence à faire défaut durant son utilisation. Ne
pas utiliser ni tenter de réparer un appareil qui fait défaut!
6. Le cordon de cet appareil doit uniquement être branché dans une prise électrique murale de
120 V c.a.
7. Ne pas utiliser cet appareil dans une position instable.
DIRECTIVES CONCERNANT LE CORDON COURT
L’appareil est muni d’un cordon d’alimentation court afin d’éviter qu’il s’emmêle et risque de faire
trébucher comme c’est le cas avec les cordons plus longs.
Ne pas utiliser de rallonge avec cet appareil.
COURANT ÉLECTRIQUE
Si le circuit électrique est surchargé avec d’autres appareils, la machine à pain risque de ne pas bien
fonctionner. Elle devrait être branchée sur un circuit électrique distinct de celui des autres appareils.
FICHE POLARISÉE
Cet appareil est muni d’une fiche polarisée (dont une lame est plus large que l’autre). Afin de
réduire le risque de choc électrique, la fiche ne peut être branchée dans une prise polarisée
que dans un sens. Si la fiche n’entre pas dans la prise, la retourner. Si elle n’entre toujours pas,
communiquer avec un électricien qualifié. Ne pas tenter de modifier la fiche.
MISE EN GARDE RELATIVE AUX PLASTIFIANTS
ATTENTION : Pour éviter que les plastifiants dans le fini du plan de travail ou de la table ne
migrent, placer un napperon ou un sous-plat AUTRE QU’EN PLASTIQUE entre l’appareil et le
plan de travail ou la.
À DÉFAUT DE QUOI LE FINI RISQUE DE FONCER.
DES MARQUES OU DES TACHES PERMANENTES PEUVENT APPARAÎTRE.
PANNE DE COURANT
La machine à pain est dotée d’une fonction de sauvegarde d’une durée de 7 minutes en cas de
panne de courant. Si l’électricité manque, la mémoire enregistre le programme en cours pour
une durée maximale de 7 minutes. Si l’électricité revient avant que ce délai ne soit écoulé, le
programme reprend où il s’est arrêté. Pour des raisons sanitaires et de santé, si la panne dure
plus longtemps que 7 minutes et que la machine à pain contient des produits laitiers, des denrées
périssables ou de la viande, il est recommandé de jeter la recette et de la recommencer avec de
nouveaux ingrédients.
Si la recette ne contient aucun ingrédient périssable, il est possible de redémarrer le programme du
début (pour tous les programmes sauf le programme CUISSON RAPIDE). Cependant, cela risque
de ne pas donner des résultats satisfaisants. En cas de doute à quand remonte la panne, retirer la
boule de pâte du moule et la placer dans un plat de cuisson allant au four. Laisser la pâte doubler
de volume puis la cuire dans le four préchauffé à 350 °F/177 °C pendant 30 à 45 minutes ou jusqu’à
ce que le pain soit cuit. Taper doucement sur le dessus du pain et si cela produit un son creux, c’est
que le pain est cuit. Encore une fois, cela risque de ne pas donner des résultats satisfaisants.
Si le programme en cours est le programme CUISSON RAPIDE ou encore si le pain a commencé
à cuire lorsque la panne survient, on doit recommencer avec de nouveaux ingrédients.
REMARQUE : La fonction de sauvegarde en cas de panne de courant ne protège pas contre les
surtensions. Dans les zones où les surtensions sont fréquentes, il est recommandé d’utiliser un
parasurtenseur.
3
Page 74

Page 75

COUP D’ŒIL
SUR LA MACHINE À PAIN
AVANT LA PREMIÈRE UTILISATION
1. Retirer tous les matériaux d’emballage, les autocollants ainsi que la bande de plastique
entourant la fiche électrique.
2. Nettoyer la machine à pain; voir la section DIRECTIVES D’ENTRETIEN.
3. Placer la machine à pain sur une surface sèche et stable, à l’abri de la chaleur et à distance
des risques d’éclaboussures de graisse chaude ou d’eau. Éviter de placer la machine là où elle
pourrait se renverser pendant qu’elle fonctionne. La poser loin des bords du plan de travail.
4. La machine à pain peut faire des miches pesant jusqu’à 900 g (2 lb). Ne pas utiliser plus que la
quantité recommandée d’ingrédients dans le moule, à défaut de quoi le mélange des ingrédients
et la cuisson ne se feront pas correctement et cela risque d’endommager la machine à pain. La
quantité maximale d’ingrédients à utiliser est la suivante :
Programmes pour pains de base 4 tasses/1 L
Programme pour pains éclairs 4 tasses/1 L
Programme pour pâte 4 à 4 ½ tasses/1 à 1 125 L
5. Avant la première utilisation, faire fonctionner la machine à pain au programme CUISSON
RAPIDE pour brûler les huiles de fabrication. Suivre les directives données dans la section
MODE D’EMPLOI.
REMARQUE : Durant la première utilisation, de la fumée et/ou une odeur peuvent se dégager
de l’appareil en raison des huiles minérales utilisées lors de la fabrication. Ceci est normal pour
tout appareil neuf.
5
Page 76
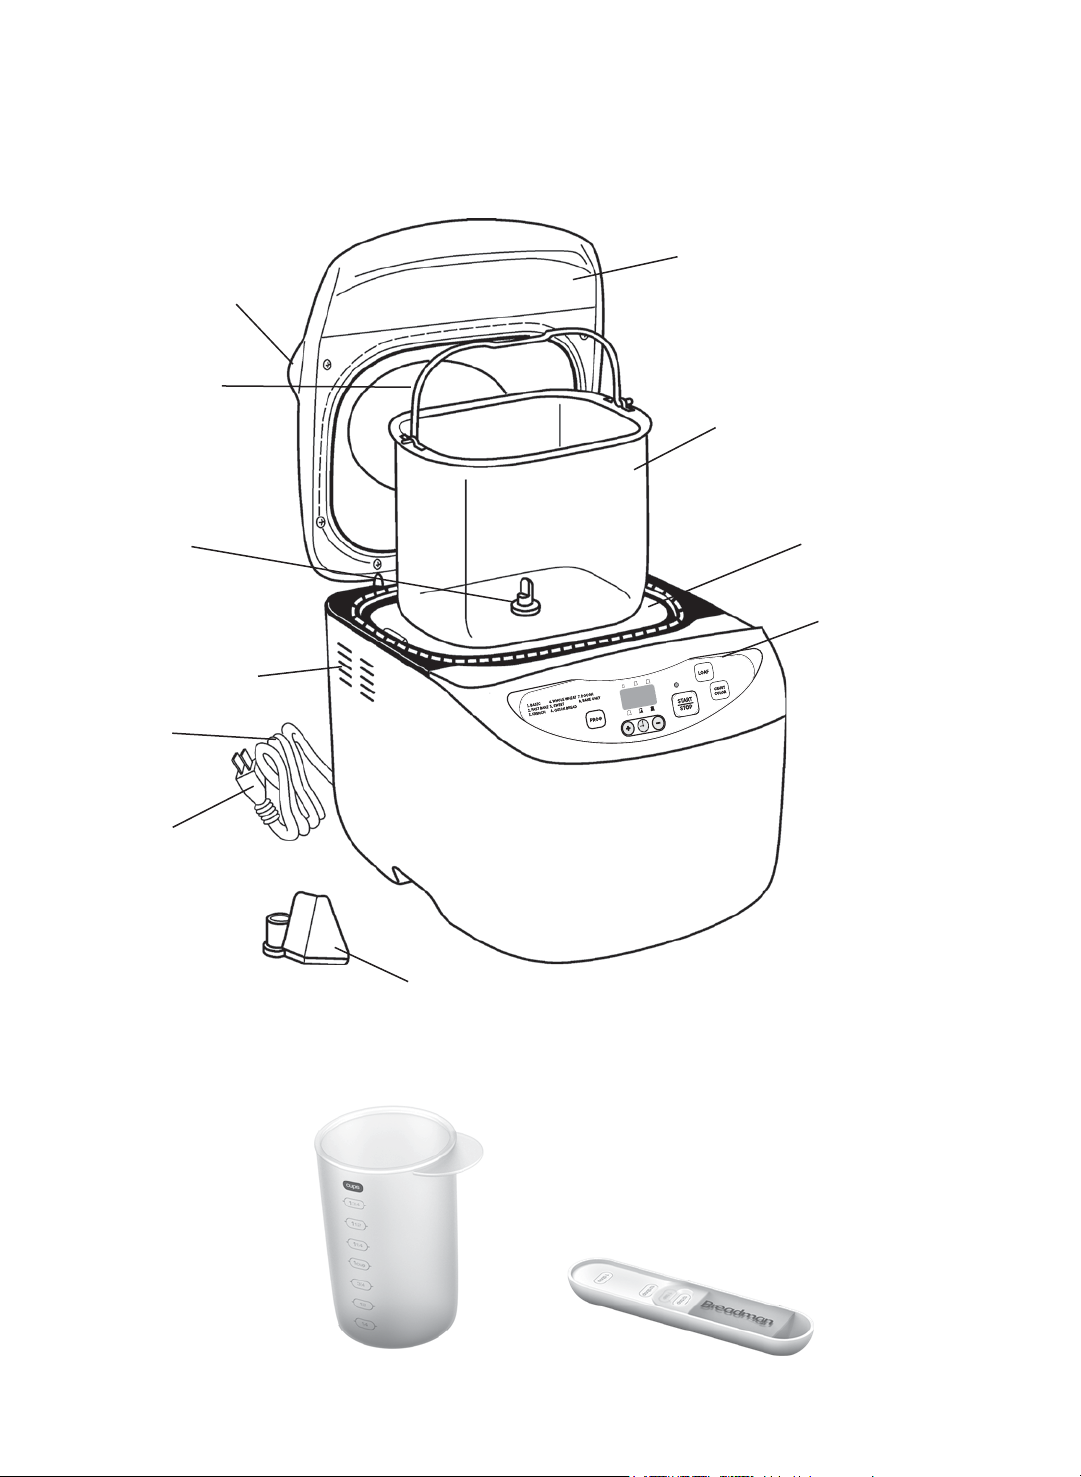
PIÈCES DE LA MACHINE À PAIN
Le produit peut différer légèrement des illustrations.
Poignée
du moule
à pain
Arbre de
transmission
(à l’intérieur du
moule à pain;
fait tourner
la lame de
pétrissage
Cordon
d’alimentation
Fiche
d’alimentation
Poignée du
couvercle
Sorties
d’air
Couvercle
Moule à pain
(pièce no 34924)
Chambre
de cuisson
Panneau
de commande
Lame de pétrissage (se fixe sur l’arbre
de transmission) (pièce no 34923)
Tasse à mesurer
(pièce no BK1060S-04)
Cuillère à mesurer
(pièce no
6
BK1060S-05)
Page 77

PANNEAU DE COMMANDE
ANGLAIS FRANÇAIS 8. BAKE ONLY 8. CUISSON SEULEMENT
1. BASIC 1. BASE PROG PROGRAMME
2. FAST BAKE 2. CUISSON RAPIDE MENU MENU
3. FRENCH 3. FRANÇAIS TIMER MINUTERIE
4. WHOLE WHEAT 4. BLÉ ENTIER START MARCHE
5. SWEET 5. SUCRÉ STOP ARRÊT
6. QUICK BREAD 6. PAIN ÉCLAIR LOAF MICHE
7. DOUGH 7. PÂTE CRUST COLOR COULEUR DE CROÛTE
REMARQUE : Pour activer les touches du panneau de commande, appuyer jusqu’à ce qu’un bip se fasse entendre.
REMARQUE : Lorsque la machine à pain est emballée pour l’expédition, une pellicule de plastique transparente est posée
sur le panneau de commande; la décoller soigneusement.
ÉCRAN
D´AFFICHAGE
MINUTERIE
PROGRAMME
COULEUR DE
CROÛTE
MARCHE/
ARRÊT
TAILLE DE LA
MICHE
TÉMOIN DE
FONCTION–
NEMENT
- Indique la TAILLE DE LA MICHE.
- Indique le numéro du PROGRAMME sélectionné, de 1 à 8.
- Indique la COULEUR DE CROÛTE sélectionnée.
- Indique la durée restante du programme, par tranches d’une minute.
- Indique la durée sélectionnée pour la minuterie.
- Sert à retarder l’heure de cuisson du pain.
- Utiliser les touches + et - pour régler la MINUTERIE et retarder l’heure à laquelle le pain sera cuit,
jusqu’à un maximum de 13 heures plus tard.
- En appuyant sur les touches + et - la durée avance ou recule par tranches de 10 minutes. Pour
faire avancer ou reculer la durée plus rapidement, il suffit d’appuyer sur l’une ou l’autre des touches et
de la maintenir enfoncée. La MINUTERIE ne fonctionne pas avec certains programmes, consulter à
ce sujet la durée totale dans le TABLEAU DES SPÉCIFICATIONS DES PROGRAMMES.
- Appuyer sur la touche PROG pour sélectionner le programme voulu. Le programme sélectionné
règle automatiquement la durée nécessaire au cycle de cuisson complet.
- Appuyer sur la touche CRUST COLOR pour sélectionner la COULEUR DE LA CROÛTE pour la
plupart des programmes.
- La couleur choisie est indiquée par un trait au-dessus d’une des trois tranches de pain, soit pâle
, moyenne ou foncée et la lettre L pour pâle, P pour moyenne et H pour foncée.
- La machine à pain cuira automatiquement le pain au réglage moyen ( , "P") à moins qu’un autre
réglage ne soit sélectionné.
- Appuyer sur la touche START/STOP pour démarrer la machine ou pour démarrer le compte à
rebours de la MINUTERIE.
- Appuyer sur cette touche et la maintenir enfoncée jusqu’à ce qu’un bip se fasse entendre pour
arrêter la machine ou pour annuler le réglage de la MINUTERIE.
Remarque : Ne pas appuyer sur la touche STOP pour vérifier la progression du pain.
- Appuyer sur la touche LOAF pour sélectionner la TAILLE DE LA MICHE. Un trait sous l’une des trois
tranches de pain indique la taille choisie. La petite icône correspond à une miche de 450 g/1 lb, l’icône
moyenne à une miche de 675 g/1 lb et la grande icône à une miche de 900 g/1 lb. La machine à pain
cuira automatiquement une miche de 900 g (2 lb) à moins qu’une autre taille ne soit sélectionnée.
- Indique que la machine à pain fonctionne.
7
Page 78

CHOIX DE PROGRAMMES
PROGRAMMES
Le panneau de commande permet de choisir le programme ainsi que différentes tailles et couleurs de
croûte pour certains programmes. Tous les programmes sauf les programmes PAIN ÉCLAIR, PÂTE
et CUISSON SEULEMENT émettent un bip pour indiquer qu’il est temps de vérifier la boule de pâte,
d’ajouter des ingrédients (p. ex. des raisins, des noix et des épices) ou de mélanger les ingrédients.
BASE ........................... Utiliser ce programme pour les recettes de pain de base et
pour la plupart des préparations à pain. Il est possible de
1
CUISSON RAPIDE 900 g (2,0 LB) La machine fait un pain en moins d’une heure avec ce
2
FRANÇAIS ...................... Ce programme convient tout particulièrement aux pains
3
choisir la couleur de croûte, soit pâle, moyenne ou foncée.
programme. Il suffit de suivre les indications spéciales et les
recettes qui se trouvent dans la section PAINS À CUISSON
RAPIDE du livre de recettes.
faibles en gras et en sucre, dont la croûte est croustillante et
l’intérieur moelleu.
BLÉ ENTIER...................... Utiliser ce programme si une recette contient plus de 50 %
de farine de blé entier ou lorsque la recette l’indique.
4
SUCRÉ ......................... Ce programme convient tout particulièrement aux recettes
à teneur élevée en gras et en sucre, ou qui contiennent des
5
PAIN ÉCLAIR .................... Ce programme est utilisé pour les recettes qui contiennent de
6
PÂTE............................ Ce programme est utilisé pour préparer de la pâte pour faire
7
CUISSON SEULEMENT ............ Ce programme est utilisé pour poursuivre la cuisson
8
œufs ou du fromage.
la poudre à pâte ou du bicarbonate de soude plutôt que de la
levure pour faire lever la pâte ou le gâteau. Les recettes de
gâteau maison doivent être spécialement conçues pour ce
réglage. Le programme PAIN ÉCLAIR peut également être
utilisé pour mélanger et cuire des préparations à gâteau et à
pain éclair en boîte (425 à 510 g).
du pain ou des petits pains qu’on façonne à la main et qu’on
laisse lever une dernière fois avant de les cuire dans un four
conventionnel.
des pains ou des gâteaux par tranches de 10 minutes
supplémentaires.
8
Page 79

TABLEAU DES SPÉCIFICATIONS DES PROGRAMMES
(durées approximatives)
DURÉE BIP D’AJOUT GARDE AU
PROGRAMME
BASE PÂLE 450 g 2h55 13h00 10 20 15 20 30 s 55 55 2h20 60
BASE MOY. 450 g
BASE FONCÉE 450 g
BASE PÂLE 675 g 3h00 60 2h25
1
BASE MOY. 675 g
BASE FONCÉE 675 g
BASE PÂLE 900 g 3h05 65 2h30
BASE FONCÉE 900 g
BASIC DARK 2.0LB
CUISSON RAPIDE 0h58 S/O 13 -------- -------- 10 -------- -------- 35 0h57 60
2
FRANÇAIS PÂLE 450 g 3h45 13h00 18 40 22 20 30 s 60 65 2h42 60
FRANÇAIS MOY. 450 g
FRANÇAIS FONCÉE 450 g
FRANÇAIS PÂLE 675 g 3h50 70 2h47
3
FRANÇAIS MOY. 675 g
FRANÇAIS FONCÉE 675 g
FRANÇAIS PÂLE 900 g 3h55 75 2h52
FRANÇAIS MOY. 900 g
FRANÇAIS FONCÉE 900 g
BLÉ ENTIER PÂLE 450 g 3h35 13h00 10 25 20 30 30 s 70 60 2h55 60
BLÉ ENTIER MOY. 450 g
BLÉ ENTIER FONCÉE 450 g
BLÉ ENTIER PÂLE 675 g 3h40 65 3h00
4
BLÉ ENTIER MOY. 675 g
BLÉ ENTIER FONCÉE 675 g
BLÉ ENTIER PÂLE 900 g 3h45 70 3h05
BLÉ ENTIER MOY. 900 g
BLÉ ENTIER FONCÉE 900 g
SUCRÉ PÂLE 450 g 2h45 13h00 10 5 20 30 30 s 57 43 2h25 60
SUCRÉ MOY. 450 g
SUCRÉ FONCÉE 450 g
SUCRÉ PÂLE 675 g 2h50 48 2h30
5
SUCRÉ MOY. 675 g
SUCRÉ FONCÉE 675 g
SUCRÉ PÂLE 900 g 2h55 53 2h35
SUCRÉ MOY. 900 g
SUCRÉ FONCÉE 900 g
PAIN ÉCLAIR 1h34 13h00 14 -------- 5 -------- -------- -------- 75 S/O 60
6
PÂTE 1h20 S/O 7 5 -------- 18 -------- 50 -------- S/O S/O
7
CUISSON SEULEMENT 0h10 à 1h00 S/O -------- -------- -------- -------- -------- ------- 10 S/O 60
8
TOTALE DÉLAI PÉTRIS1 LEVÉE1 PÉTRIS2 LEVÉE2 PÉTRIS3 LEVÉE3 CUISSON D’INGRÉDIENTS CHAUD
Le BIP D’AJOUT D’INGRÉDIENTS indique quand il faut ajouter des ingrédients à la recette, par exemple des raisins ou des noix, pour
tous les programmes sauf les programmes PAIN ÉCLAIR, PÂTE et CUISSON SEULEMENT. Ce moment peut servir à vérifier la boule
de pâte et à racler les ingrédients collés aux parois du moule. Trois bips se font entendre à la fin de la cuisson. Pour servir le pain qui
vient juste d’être cuit, appuyer sur la touche STOP et sortir le moule de la machine. Il est possible de sortir le moule immédiatement ou
de le laisser dans la machine à pain. Si on le laisse dans la machine, celle-ci gardera automatiquement le pain au chaud pendant une
heure maximum pour tous les programmes sauf le programme PÂTE. L’écran indiquera 0:00, et le deux-points clignotera. À la fin de la
période de garde au chaud, l’écran indiquera le dernier programme sélectionné.
9
Page 80

10
Page 81

CONSEILS UTILES POUR LE PAIN ET LA PÂTE
Il est recommandé de lire ce qui suit avant d’acheter ses ingrédients. La machine à pain peut faire
des miches pesant jusqu’à 900 g (2 lb) et contenant 4 tasses/1 L de farine. Tous les ingrédients sauf
les liquides doivent être à température ambiante et les liquides doivent être à environ 80 °F/27 °C
(la température d’un biberon). Lors de la préparation d’un pain au programme CUISSON RAPIDE,
la température de tous les liquides doit se situer entre 110° et 115 °F/43° et 46 °C. Toujours mettre
les ingrédients dans le moule en suivant l’ordre indiqué dans la recette : les liquides en premier, puis
les ingrédients secs et enfin la levure. La quantité de certains ingrédients est la même peu importe la
taille de la miche.
MESURER La bonne manière
Pour bien réussir le pain, il est important de mesurer les ingrédients avec précision. Mettre un peu
plus ou un peu moins d’un ingrédient peut donner des résultats très différents.
Pour mesurer les liquides, utiliser une tasser à
mesurer en verre transparent ou en plastique.
Pour une mesure précise, poser la tasse à
¼ TASSE /
mesurer sur le plan de travail et lire la mesure à
hauteur des yeux.
Pour mesurer la farine, la déposer doucement
avec une cuillère dans une tasse à mesurer
½ CUP
standard pour ingrédients secs et égaliser le
dessus avec une lame droite. Ne pas secouer la
tasse ni la frapper contre le plan de travail. Ne
pas plonger la tasse à mesurer directement dans
la farine car ceci tend à compacter la farine et à
¼ C. À THÉ /
1 ML
dépasser la quantité demandée dans la recette.
Tableau de mesure/conversion
1 ½ c. à thé = ½ c. à soupe = 7 ml
3 c. à thé = 1 c. à soupe = 15 ml
½ c. à soupe = 1 ½ c. à thé = 7 ml
2c.àsoupe = ⅛tasse = 30ml
4 c. à soupe = ¼ tasse = 60 ml
5c.àsoupe+1c.àthé = ⅓tasse = 80ml
8 c. à soupe = ½ tasse = 125 ml
12 c. à soupe = ¾ tasse = 180 ml
16 c. à soupe = 1 tasse = 250 ml
⅜tasse = ¼tasse+2c.àsoupe = 90ml
⅝tasse = ½tasse+2c.àsoupe = 150ml
⅞tasse = ¾tasse+2c.àsoupe = 210ml
60 ML
½ C. À THÉ
/ 2 ML
1 C. À THÉ /
5 ML
TASSE À
MESURER
1/3 TASSE / 80 ML
1 TASSE / 1 TASSE /
240 ML240 ML
1 C. À
SOUPE /
15 ML
TASSES À
MESURER
GRADUÉES
CUILLÈRES
À MESURER
GRADUÉES
11
Page 82

BOULE DE PÂTE Nécessaire pour réussir le pain
D’après notre expérience, les quantités de liquides indiquées dans les recettes ont parfois besoin
d’être légèrement ajustées parce que le degré d’humidité peut varier grandement selon le climat et
la saison. Il est recommandé de vérifier la boule de pâte au bip sonore d’ajout d’ingrédients durant le
pétrissage; voir les spécifications des programmes. À ce point du cycle, la boule devrait être ronde,
lisse, souple et légèrement collante au toucher. Lorsqu’on y touche, un peu de pâte reste collée au
doigt. Racler les parois du moule pour en décoller la pâte ou la farine qui pourrait y être restée collée.
Si la pâte ne forme pas une boule mais a plutôt la consistance d’une pâte à gâteau, ajouter 15 ml de
farine à pain à la fois jusqu’à ce qu’elle ait la consistance voulue. Si par contre la préparation est trop
sèche pour former une boule, qu’elle se divise en plusieurs boules ou encore que la boule formée
est grumeleuse et non légèrement collante, ajouter 5 ml d’eau et laisser la pâte l’absorber. Rajouter
de l’eau au besoin. Lorsqu’on utilise tous les ingrédients spécifiés dans la recette, qu’on mesure les
ingrédients avec précision et qu’on a une « bonne » boule de pâte, le résultat devrait être une miche
de pain réussie.
Lorsqu’on prépare un pain avec le programme CUISSON RAPIDE, la boule de pâte est très souple,
lisse, collante au toucher et détachée des parois. Lorsqu’on y touche, un peu de pâte reste collée au
doigt.
INGRÉDIENTS Lire avant d’acheter
LEVURE : L´INGRÉDIENT NUMÉRO UN
Pour tous les programmes sauf le programme CUISSON RAPIDE, nous avons utilisé la levure sèche
active RED STAR® pour élaborer nos recettes de pain. Cependant la levure à levée rapide de RED
STAR® peut également être utilisée. D’après notre expérience, la quantité à utiliser ne varie pas de
l’une à l’autre. Si on utilise de la levure pour machine à pain, suivre les directives sur l’emballage.
Lors de l’élaboration des recettes pour le programme CUISSON RAPIDE, nous avons découvert qu’il
faut utiliser de la levure à levée rapide ou pour machine à pain. La même quantité peut être utilisée
pour l’une ou l’autre. Ce programme nécessite plus de levure que les autres.
Un sachet de levure RED STAR® contient environ 11 ml de levure. Lorsque la levure est exposée à
l’oxygène, à l’humidité ou à la chaleur, elle devient moins active. Par conséquent, on recommande de
garder la levure dans un contenant hermétique et de la conserver jusqu’à 6 semaines au réfrigérateur
ou jusqu’à 6 mois au congélateur. Mesurer la quantité nécessaire et la laisser se réchauffer à la
température ambiante avant de l’utiliser - ceci prend environ 15 minutes.
En cas de doute à savoir si la levure est toujours active, les tests qui suivent peuvent aider à le
déterminer. Chaque test demande une quantité différente de levure comme ingrédient de base. Il
est alors possible de faire différents pains une fois le test effectué. Le mélange de levure ne doit
cependant pas être utilisé pour le programme CUISSON RAPIDE.
Pour faire un test avec un sachet (11 ml) de levure sèche active ou à levée rapide RED STAR®,
utiliser une tasse à mesurer et la remplir avec 125 ml d’eau à 110° à 115 °F/43° à 46 °C. Y ajouter
en brassant 5 ml de sucre granulé et un sachet (11 ml) de levure sèche active ou à levée rapide
RED STAR®. Laisser la cuillère dans la tasse. Régler une minuterie à 10 minutes. À mesure que la
levure absorbe le liquide, elle commence à s’activer et à gonfler. Si au bout des 10 minutes la levure
a gonflé jusqu’à la marque des 250 ml, c’est qu’elle est très active. Le mélange de levure peut être
utilisé dans la machine à pain pour une recette qui demande 11 ml de levure. Ne pas oublier d’ajuster
la recette pour tenir compte des 125 ml d’eau et 11 ml de levure utilisés pour le test. La quantité de
sucre n’as pas besoin d’être ajustée. Pour faire un test avec 7 ml de levure sèche active ou à levée
rapide RED STAR®, utiliser une tasse à mesurer et la remplir avec 60 ml d’eau à 110° à 115 °F/43° à
46 °C. Y ajouter en brassant 5 ml de sucre granulé et 7 ml de levure sèche active ou à levée rapide
RED STAR®. Laisser la cuillère dans la tasse. Régler une minuterie à 10 minutes. À mesure que la
levure absorbe le liquide, elle commence à s’activer et à gonfler. Si au bout des 10 minutes la levure
a gonflé jusqu’à la marque des 125 ml, c’est qu’elle est très active. Le mélange de levure peut être
utilisé dans la machine à pain pour une recette qui demande 7 ml de levure. Ne pas oublier d’ajuster
12
Page 83

la recette pour tenir compte des 60 ml d’eau et 7 ml de levure utilisés pour le test. La quantité de
sucre n’as pas besoin d’être ajustée.
FARINE : LA FARINE À PAIN EST ESSENTIELLE POUR FAIRE DU PAIN
Tous les types de farine sont affectés par de nombreux facteurs, dont le grade meunier, la teneur en
humidité, la durée de stockage et le procédé de fabrication. Il pourrait être nécessaire d’ajuster les
recettes en tenant compte des changements climatiques dans différentes régions pour obtenir une
excellente miche de pain.
Il faut catégoriquement utiliser de la farine à pain. Moulue à partir de blé dur d’hiver ou de printemps,
cette farine contient une teneur plus élevée en protéines qui la rend plus durable que la farine tout
usage. La protéine, une fois mélangée avec le liquide, devient du gluten.
Pendant le pétrissage, le gluten devient élastique et donne au pain une meilleure structure. Par
contraste, la farine tout usage, moulue à partir d’une combinaison de blé dur et de blé tendre,
devient trop facilement élastique pour être employée dans une machine à pain et perd rapidement
sa capacité d’étirement. Par conséquent, le pain fait avec de la farine tout usage est plus petit et
plus dense. Plusieurs usines bien connues fabriquent maintenant de la farine à pain. Facilement
identifiable – « Farine à pain » est inscrit sur l’emballage –, elle est vendue dans la plupart des
épiceries.
Le blé est le seul grain qui contient le type de protéine qui devient élastique au pétrissage. D’autres
farines, comme la farine de seigle, d’orge, d’avoine, de soya, de riz et sarrasin, ajoutent de la saveur
et des fibres aux pains mais n’améliorent pas la structure à la pâte. C’est pourquoi la farine de blé
est l’ingrédient de base essentiel pour faire du pain.
Le gluten de froment élastique est produit en ajoutant une étape au processus de transformation
de la farine blanche. La farine blanche contient à la fois des protéines et de l’amidon, et les usines
peuvent maintenant enlever la majeure partie de l’amidon pour ne garder que la protéine (le gluten).
Lorsqu’on ajoute du gluten aux recettes qui contiennent des farines de grains entiers, le volume et la
forme de la miche en sont grandement améliorés. De nombreuses épiceries vendent du gluten dans
la section des farines. On peut également trouver ce produit dans les magasins d’aliments naturels
et les centres de nutrition.
La meilleure façon de conserver la farine est dans un contenant hermétique. Si on garde sa farine
longtemps, il vaut mieux la conserver au congélateur car elle tend à sécher au réfrigérateur. Les
farines de grains entiers, qui ont une teneur plus élevée en huile, deviennent rances beaucoup
plus rapidement que la farine blanche, c’est pourquoi elles devraient toujours être conservées au
congélateur. Veiller toutefois à laisser le temps aux farines de revenir à température ambiante avant
de les mettre dans la machine à pain.
13
Page 84

MATIÈRE GRASSE : STIMULANT ET CONDITIONNEUR DE PÂTE
Nos recettes ont été élaborées avec de l’huile végétale. Il est toutefois possible d’employer
n’importe quel type d’huile ou d’y substituer du shortening solide ou du beurre en parts égales
(diviser le shortening ou le beurre en petits morceaux). Nous n’avons noté aucune différence de
goût appréciable mais la croûte peut être plus croustillante avec du beurre. Il n’est pas recommandé
d’utiliser de la margarine car celle-ci tend à durcir la croûte.
LIQUIDES : ACTIVENT LA LEVURE ET LIENT LA PÂTE
Le terme « liquide » employé ici fait référence à tous les ingrédients mouillés de la recette. Pour tous
les programmes sauf le programme CUISSON RAPIDE, il est très important que les liquides soit à 80
°F/27 °C. Lorsque l’eau est à cette température, la levure s’active graduellement pour convenir aux
différents programmes.
Lors de la préparation d’un pain au programme CUISSON RAPIDE, la température de tous les
liquides doit se situer entre 110° et 115 °F/43° et 46 °C. Il faut que la température soit plus élevée
pour que la levure s’active rapidement pour convenir à ce programme spécial.
Les œufs font également partie de la quantité totale de liquides. Les œufs devraient être à
température ambiante. Pour ce faire, sortir les œufs du réfrigérateur, les placer entiers dans un bol
rempli d’eau tiède et les laisser reposer pendant 15 minutes.
CANNELLE ET AIL : NE FONT PAS BON MÉNAGE AVEC LA LEVURE
Auparavant, on saupoudrait de la cannelle et du sucre sur la pâte avant de la rouler en forme de
gâteau roulé. L’ajout de cannelle et d’ail à la pâte dans une machine à pain présente cependant un
problème. En effet, la cannelle et l’ail réagissent avec la pâte à pain tout comme un attendrisseur
pour viande réagit avec la viande. Ils en décomposent la structure. Bien que le pain sente
délicieusement bon durant la cuisson, la saveur quant à elle se dissipe. NE PAS EN METTRE PLUS
QUE CE QUI EST STIPULÉ DANS LA RECETTE. Pour donner de la saveur, utiliser la cannelle et
l’ail comme trempette pour le pain plutôt que de les ajouter à la pâte.
FRUITS ET LÉGUMES : REHAUSSENT LA SAVEUR ET LA VALEUR NUTRITIVE
Lorsque des recettes contiennent des fruits ou des légumes, ne pas en mettre plus que la quantité
indiquée. Ces produits, s’ils sont employés en trop grande quantité, risquent d’empêcher la pâte de lever.
SEL : RÉGULARISE L´ACTIVITÉ DE LA LEVURE
Le sel est nécessaire pour maîtriser l’activité de la levure, la faisant agir lentement et régulièrement.
Sans sel, la levure agit trop rapidement. Le sel renforce également la structure de la pâte. Si on
n’utilise aucun sel ou pas assez, la pâte lève rapidement avant de retomber. La texture est aussi plus
grumeleuse et/ou inégale.
SUCRE : NOURRIT LA LEVURE
Le sucre est l’aliment préféré de la levure, mais trop de sucre fait surréagir la levure. La miche
est alors petite et dense. Les fruits séchés augmentent la teneur en sucre de la pâte à pain. Il
est déconseillé d’en mettre plus que la quantité spécifiée dans chaque recette. Par ailleurs, il est
déconseillé d’utiliser des édulcorants artificiels car ils ne font pas réagir la levure.
14
Page 85

SUBSTITUTS
Dans notre cuisine laboratoire, nous avons fait des essais de substitution avec les ingrédients
ci-dessous. Il est à noter que les résultats que nous avons obtenus ne seront peut-être pas les
mêmes pour tous. Il existe également sur le marché de nombreux livres qui donnent des trucs et des
idées de substitution. Évidemment, il nous est impossible d’en garantir les résultats.
Œufs
Des œufs liquides peuvent être utilisés en suivant les directives sur l’emballage. On peut remplacer
un œuf entier par deux blancs d’œuf.
RAPPEL : Tous les produits d’œuf doivent être à température ambiante.
Lait
On peut remplacer le lait en poudre par du colorant à café ou du babeurre sec en parts égales. On
peut utiliser du lait liquide à 80 °F/27 °C en remplacement de l’eau en parts égales pour tous les
programmes de pain sauf le programme CUISSON RAPIDE. On peut alors complètement éliminer le
lait en poudre. La miche sera légèrement plus petite.
Sel
Les recettes sans sel ne donnent pas de bons résultats. Le sel diététique sans sodium (moins de
5 mg de sodium par portion) ou le sel faible en sodium (moins de la moitié de sodium que le sel de
table) peut être utilisé en parts égales. Le pain sera cependant plus grumeleux.
Sucre
On peut remplacer le sucre par du miel en parts égales; réduire la même quantité du liquide. On
peut remplacer le sucre blanc par de la cassonade en parts égales. La levure a besoin de sucre – ne
pas employer d’édulcorant artificiel.
Farine de blé
Pour des recettes de pain sans blé, consulter des livres de recettes de pain sans gluten.
Levure
Nous avons utilisé la levure RED STAR® pour mettre au point nos recettes. Cependant, n’importe
quelle autre marque fait l’affaire. Consulter la section Ingrédients sous Levure pour d’autres
substituts de levure.
Tableau de conversion pour la levure à levée rapide
1 c. à thé / 5 ml de levure sèche active = ¾ c. à thé / 4 ml de levure à levée rapide
1 ½ c. à thé / 7 ml de levure sèche active = 1 c. à thé / 5 ml de levure à levée rapide
2 ¼ c. à thé / 11 ml de levure sèche active = 1 ½ c. à thé / 7 ml de levure à levée rapide
1 c. à soupe / 15 ml de levure sèche active = 2 c. à thé / 10 ml de levure à levée rapide
REMARQUE : Les recettes du programme CUISSON RAPIDE ont été élaborées avec la levure à
levée rapide de Red Star® ou de la levure pour machine à pain. NE PAS substituer la levure sèche
active dans ces recettes.
15
Page 86

PRÉPARATIONS POUR PÂTE À PAIN ET AUTRES RECETTES
Utiliser des préparations destinées à faire des miches jusqu’à 900 g/2 lb. Pour obtenir les meilleurs
résultats qui soient, utiliser le programme de base. Bien que ce livret contienne de nombreuses
recettes de pain et de pâte, d’autres recettes peuvent être intéressantes. On trouve des livres de
recettes et de conseils pratiques pour machine à pain dans les librairies et autres magasins de
détail. Consulter la section CHOIX DE PROGRAMMES du présent mode d’emploi pour savoir quel
programme employer pour d’autres recettes. Il se pourrait que des ajustements mineurs soient
nécessaires pour obtenir les meilleurs résultats qui soient.
HAUTE ALTITUDE
En haute altitude la pâte pourrait lever plus rapidement. Nous recommandons d’essayer la recette
en suivant les indications d’abord. La boule de pâte devrait être ronde, lisse, souple et légèrement
collante au toucher. Si le résultat n’est pas satisfaisant, diminuer la quantité de levure de 1 ml à la
fois. La quantité de liquide pourrait également devoir être augmentée en raison de l’air plus sec;
commencer par 15 ml, et augmenter la quantité au besoin. L’ajout de gluten améliorera la structure
du pain. La quantité recommandée est de 5 ml par 250 ml de farine sauf indication contraire dans la
recette.
CONGÉLATION DU PAIN CUIT
Pour congeler du pain et des petits pains cuits, les laisser refroidir puis les envelopper dans de
la pellicule plastique. Les placer dans un sac en plastique. Le pain peut se conserver jusqu’à six
semaines au congélateur. Pour décongeler le pain, ouvrir partiellement le sac pour laisser l’humidité
s’en échapper graduellement et obtenir les meilleurs résultats possible.
CONGÉLATION DE LA PÂTE
À la fin du programme de pâte, on peut retirer la pâte de la machine et la congeler pour la faire
cuire plus tard. Façonner la pâte selon la forme voulue et la congeler immédiatement pendant une
heure pour qu’elle durcisse. La retirer du congélateur et l’envelopper dans de la pellicule plastique
puis la placer dans un sac en plastique hermétique. La pâte se conserve jusqu’à quatre semaines
au congélateur. Dégeler la pâte dans son sac en plastique au réfrigérateur toute une nuit ou durant
plusieurs heures. Déballer la pâte et la placer sur une plaque de cuisson. La couvrir et la laisser
reposer à un endroit chaud à l’abri des courants d’air jusqu’à ce qu’elle ait doublé de volume.
Comme la pâte n’est pas à température ambiante, il lui faudra plus de temps pour gonfler. Cuire
selon les indications de la recette.
16
Page 87
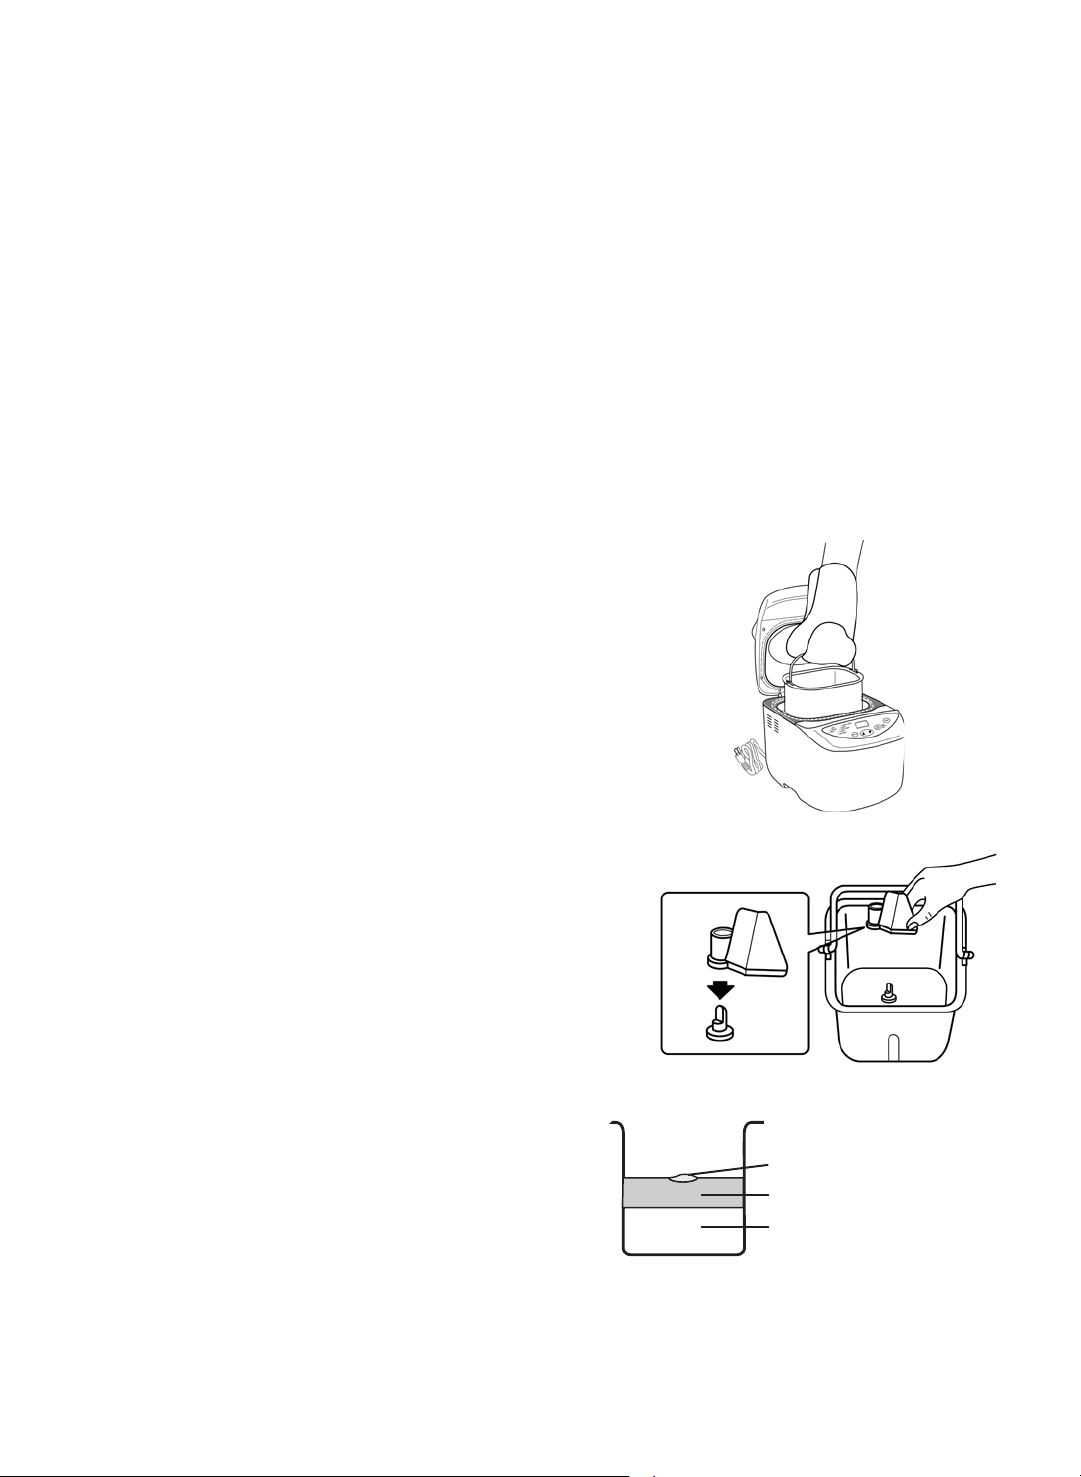
MODE D’EMPLOI
PROGRAMMATION DE LA MACHINE À PAIN
Les étapes ci-dessous sont les étapes générales à suivre pour utiliser la machine à pain. Selon
le programme ou la recette choisi, certaines étapes ne s’appliquent pas ou d’autres s’ajoutent.
Consulter la section RECETTES pour obtenir des directives spécifiques aux pains de BASE, à
CUISSON RAPIDE, PAIN ÉCLAIR et PÂTE. Mettre tous les ingrédients dans le moule dans l’ordre
indiqué dans la recette.
REMARQUE : Les illustrations contenues dans le présent mode d’emploi sont à titre indicatif seulement.
Votre modèle peut être différent cependant les étapes à suivre pour faire le pain sont les mêmes.
Ouvrir le couvercle et retirer le moule en
le tirant vers le haut par la poignée.
1
Fixer la lame de pétrissage à l’arbre,
le bord plat au fond.
2
Placer tous les ingrédients, sauf la levure, dans
le moule dans l’ordre indiqué dans la recette.
3
Utiliser une spatule en caoutchouc pour niveler les
ingrédients secs dans le moule; s’assurer de
les étendre dans tous les coins. Ajouter la
levure sur le dessus.
LEVURE
INGRÉDIENTS SECS
EAU OU LIQUIDES
17
Page 88

4
5
6
Insérer le moule et peser sur le bord jusqu’à ce qu’il s’emboîte
solidement. Replier la poignée. Si le moule ne s’emboîte pas
solidement, le retirer de la machine en le tirant vers le haut par la
poignée puis recommencer.
Fermer le couvercle. Brancher la machine dans une prise
de 120 V ~ 60 Hz. L’écran indiquera par défaut 1 et 3:05,
un pain de 900 g/2 lb, et la couleur de croûte moyenne.
A ppuyer sur la touche PROG pour choisir le programme voulu. Chaque fois qu’on appuie sur
la touche PROG, un bip se fait entendre et le chiffre à l’écran passe au programme suivant.
Appuyer sur la touche LOAF pour sélectionner la taille de la miche, soit 450 g/1 lb, 675 g/1,5
lb ou 900 g/2 lb (sauf pour les programmes CUISSON RAPIDE, PAIN ÉCLAIR, PÂTE et
CUISSON SEULEMENT). Chaque fois qu’on appuie sur la touche, un bip se fait entendre et
l’écran indique par un trait la taille sélectionnée.
Appuyer sur la touche CRUST COLOR pour choisir la couleur de croûte souhaitée (sauf
pour les programmes CUISSON RAPIDE, PAIN ÉCLAIR, PÂTE et CUISSON SEULEMENT).
Chaque fois qu’on appuie sur la touche, un bip se fait entendre et l’écran indique par un trait
la couleur sélectionnée.
7
L = Pâle
P = Moyenne
H = Foncée
Appuyer sur la touche START/STOP. Le témoin de fonctionnement s’allume et
la durée restante du programme est affichée. Le compte à rebours se fait par
tranches d’une minute. Tous les programmes sauf les programmes PAIN
ÉCLAIR, PÂTE et CUISSON SEULEMENT émettront un bip au moment
où il faudra ajouter des ingrédients durant le deuxième pétrissage. Le
pétrissage ne s’arrête pas pendant que le couvercle est ouvert. Ajouter
les ingrédients rapidement et uniformément par-dessus la pâte. Refermer
rapidement le couvercle pour éviter de perdre trop de chaleur. Profiter
de ce moment pour vérifier l’apparence de la boule de pâte et utiliser une
spatule en caoutchouc pour racler les ingrédients collés aux parois du moule.
18
Page 89

8
9
La machine émettra trois bips lorsque le pain sera cuit.
Appuyer sur la touche START/STOP et la maintenir
enfoncée jusqu’à ce qu’un bip se fasse entendre. Ouvrir
le couvercle puis sortir le moule au moyen de mitaines
de four. Si le pain est laissé dans la machine une fois
cuit, la machine se met automatiquement en mode
Garde au chaud (pour tous les programmes sauf le
programme PÂTE). Le pain sera gardé au chaud durant
une heure. Le moule peut être retiré de la machine à
n’importe quel moment durant le cycle Garde au chaud.
Pour mettre fin au cycle Garde au chaud avant que
l’heure complète ne soit écoulée, appuyer sur la touche
START/STOP et la maintenir enfoncée jusqu’à ce qu’un bip se fasse entendre.
REMARQUE : Si on souhaite faire immédiatement un autre pain, laisser la machine refroidir
pendant 10 à 15 minutes en laissant le couvercle ouvert et le moule à l’extérieur. Si on tente
d’utiliser l’appareil trop tôt, un signal sera émis et l’écran indiquera E00 ou E01. Appuyer sur
la touche START/STOP jusqu’à ce que l’écran indique à nouveau les réglages de base et
attendre que l’appareil ait refroidi.
Avec des mitaines de four, tourner le moule à
l’envers et le secouer pour en faire sortir le pain.
Placer le pain debout sur une grille et le laisser
refroidir pendant 20 à 30 minutes avant de
le couper. Ceci permet à la vapeur de s’en
échapper. S´ASSURER D´ENLEVER LA LAME DE
PÉTRISSAGE DU PAIN.
ATTENTION :
• LE MOULE, LA LAME DE PÉTRISSAGE ET LE PAIN SERONT TRÈS CHAUDS.
• TOUJOURS DÉBRANCHER L´APPAREIL APRÈS SON UTILISATION
19
Page 90

UTILISATION DE LA MINUTERIE
La minuterie peut être réglée pour reporter l’heure à laquelle le pain sera cuit jusqu’à 13 heures
plus tard. La machine se mettra en marche juste au bon moment pour que le pain soit tout
chaud et bien frais au moment voulu. La minuterie fonctionne pour tous les programmes sauf les
programmes CUISSON RAPIDE, PÂTE et CUISSON SEULEMENT.
Mettre les ingrédients dans le moule dans l’ordre indiqué. Il est essentiel d’ajouter la levure en
dernier par-dessus la farine en évitant tout contact avec les liquides. Ainsi la levure ne sera pas
activée tant que la machine ne commencera pas à mélanger les ingrédients.
Il est déconseillé d’utiliser la minuterie pour des recettes contenant des ingrédients périssables.
Sélectionner le PROGRAMME, la TAILLE DE LA MICHE et la COULEUR DE LA CROÛTE. Avant
d’appuyer sur la touche START, régler la minuterie pour la durée d’attente avant que le pain soit cuit.
PAR EXEMPLE : Disons qu’il est 21h00. On veut que le pain soit prêt à 6h30 le lendemain matin.
Régler la minuterie à 9:30, car il doit s’écouler 9 heures et 30 minutes entre 21h00 et 6h30.
1. Lorsqu’on appuie sur les touches + ou -,
l’heure avance ou recule par tranches de
10 minutes.
2. Si on enfonce l’une ou l’autre des touches
de la minuterie et qu’on la maintient
enfoncée, l’heure avance ou recule plus
rapidement. Si on dépasse la marque de
13:00, la durée reprend du début.
3. Si on enfonce l’une ou l’autre des touches
de la minuterie et qu’on la maintient
enfoncée, l’heure avance ou recule plus
rapidement. Si on dépasse la marque de
13:00, la durée reprend du début.
REMARQUE : La machine à pain se
mettra en marche lorsque le compte
à rebours atteindra l’heure à laquelle
le programme sélectionné doit
commencer.
Le deux-points
clignotera
20
Page 91

DIRECTIVES D’ENTRETIEN
Cet appareil nécessite peu d’entretien. Il ne contient aucune pièce pouvant être réparée par
l’utilisateur. Ne pas tenter de le réparer soi-même. Toute réparation nécessitant que l’appareil soit
démonté doit être faite par un technicien qualifié.
NETTOYAGE
TOUJOURS DÉBRANCHER L’APPAREIL ET LE LAISSER REFROIDIR COMPLÈTEMENT AVANT
DE LE NETTOYER. Ne jamais utiliser de vinaigre, d’eau de Javel ou de produits chimiques forts pour
nettoyer la machine à pain.
1. Débrancher la machine et la laisser refroidir avant de la nettoyer.
2. MOULE ET LAME DE PÉTRISSAGE
Sortir le moule de la chambre de cuisson et en retirer la lame de pétrissage. Laver le moule
(intérieur et extérieur) ainsi que la lame de pétrissage avec de l’eau chaude savonneuse, mais
NE PAS IMMERGER LE MOULE DANS L’EAU NI LE METTRE AU LAVE-VAISSELLE. Si la
lame de pétrissage est coincée sur l’arbre de transmission, remplir le moule avec de l’eau
chaude savonneuse et laisser reposer jusqu’à 30 minutes, jusqu’à ce que la lame se détache
(laisser reposer plus longtemps risque d’endommager la surface antiadhésive). NE PAS
UTILISER DE FORCE EXCESSIVE.
Ne pas utiliser de laine d’acier, de nettoyants abrasifs ni d’ustensiles en métal dans le moule ou
sur la lame de pétrissage au risque d’endommager la surface antiadhésive. Il est normal qu’une
certaine usure apparaisse avec le temps. La surface antiadhésive peut se décolorer légèrement
mais ceci n’affecte en rien le fonctionnement de l’appareil ni la qualité des résultats.
3.
EXTÉRIEUR
Nettoyer l’extérieur de la machine à pain avec un linge humide et un tampon à récurer en
plastique au besoin. Ne pas frotter trop fort sous peine d’égratigner la surface.
4. INTÉRIEUR
Nettoyer l’intérieur de la chambre de cuisson avec un linge ou une éponge légèrement humide.
Il est possible d’utiliser un tampon à récurer en plastique au besoin. Ne pas frotter trop fort sous
peine d’égratigner la surface. Ne jamais verser d’eau, de solvants ou de solutions de nettoyage
dans la chambre de cuisson.
HUBLOT EN VERRE
5.
Pour nettoyer le hublot en verre du couvercle, utiliser un nettoyant pour vitres ou un détergent
doux et un linge humide ou un tampon à récurer en plastique. Ne pas utiliser de nettoyant ni de
tampon abrasif sous peine d’égratigner le verre. Au besoin, le couvercle peut être enlevé pour
un nettoyage plus complet. NE PAS METTRE LE COUVERCLE AU LAVE-VAISSELLE NI LE
FAIRE TREMPER DANS L’EAU.
6. S’assurer que toutes les pièces amovibles ont été parfaitement nettoyées et essuyées avant de
ranger l’appareil.
RANGEMENT
S’assurer que toutes les pièces amovibles ont été parfaitement nettoyées et essuyées avant de ranger
l’appareil. Remettre les pièces en place dans la machine, c’est-à-dire la lame de pétrissage dans le
moule, et le moule dans la chambre de cuisson. Ranger la machine à pain avec le couvercle fermé.
21
Page 92

AVANT DE TÉLÉPHONER POUR OBTENIR DU SERVICE
Questions Réponses
Pourquoi la hauteur et la forme du pain
varient d’une miche à l’autre?
1
Le pain a une drôle d’odeur. Pourquoi?
2
La lame de pétrissage reste coincée
dans le pain.
3
Il y a de la farine sur un des coins de la
4
miche de pain.
Pourquoi ne peut-on pas régler la
5
minuterie à plus de 13 heures?
La hauteur et la forme du pain peuvent différer
dépendamment des ingrédients, de la température
ambiante et de la durée réglée pour la minuterie. De
plus, il est essentiel que les ingrédients soient mesurés
très exactement pour réussir un pain savoureux.
Les ingrédients utilisés n’étaient peut-être plus frais
ou on a utilisé trop de levure. Toujours utiliser des
ingrédients frais. Par ailleurs, il est essentiel que les
ingrédients soient mesurés très exactement pour
réussir un pain savoureux.
Ceci peut arriver puisque la lame de pétris-sage est
amovible. Utiliser un ustensile non métallique pour
l’enlever.
Attention : La lame de pétrissage sera chaude.
Parfois de la farine dans un coin du moule peut ne
pas s’être mélangée complètement dans la pâte.
Racler la farine de la miche avec une spatule.
Un délai plus long risquerait d’altérer les résultats.
Peut-on couper de moitié ou doubler la
quantité des ingrédients?
6
Peut-on utiliser du lait frais à la place du
lait en poudre?
7
Pourquoi le message E00 ou E01
clignote-t-il à l’écran?
8
Non. Si le moule ne contient pas assez
d’ingrédients, la lame de pétrissage ne réussira pas
à bien pétrir la pâte. S’il en contient trop, le pain
déborde du moule.
Oui, pour tous les programmes sauf le programme
CUISSON RAPIDE. S’assurer de soustraire la même
quantité d’eau pour arriver à la bonne quantité totale
de liquide (à une température de 80 °F/27 °C). Il est
cependant déconseillé d’utiliser du lait frais lorsqu’on
utilise la minuterie, car il pourrait se gâter dans le moule.
La cavité de la machine à pain a besoin de refroidir
avant de faire un autre pain.
22
Page 93

LISTE DE CONTRÔLE
RÉSULTATS
Raisons possibles :
1. Machine débranchée/panne de
cou-rant
2. L’écran indique E00 ou E01
3. Ingrédients répandus sur
l’élément chauffant
4. Couvercle ouvert durant la
cuisson
5. Pain laissé trop longtemps
dans le moule après la fin du
programme
6. Pain tranché tout de suite après
la cuisson (la vapeur n’a pas eu
le temps de s’échapper)
7. Lame de pétrissage non
installée
Eau 8. Pas assez
9. Trop
Farine 10. Pas assez
11. Trop
Levure 12. Pas de
ERREURS DE MESURE
15. Pas de sucre, de mélasse ni de
miel
PROBLÈMES AVEC LES INGRÉDIENTS ERREURS DE FONCTIONNEMENT
16. Ingrédients utilisés autres que
ceux recommandés
Farine 17. Mauvais type de farine
utilisée
Levure 18. Levure en contact
avec l’eau avant le
pétrissage
19. Levure périmée utilisée
20. Eau trop chaude ou trop froide
levure
13. Pas assez
14. Trop
Bread maker
does not
operate/
ingredients
not mixing
0
0
0
De la fumée
s’échappe
des sorties
d’air/odeur de
brûlé
0
Les bords
du pain
retombent/
le fond est
humide
Le pain
déborde/
texture
grumeleuse
0
0 0 0
0 0
0 0 0
Le pain
retombe/
texture
grumeleuse
0
Levée
insuffisante/
texture dense
0
0
0
0
0
0
0
0
0
0
Tranches
inégales et
collantes
0
23
Page 94

SUGGESTIONS
Le numéro de chacune des suggestions qui suivent correspond à
celui de la LISTE DE CONTRÔLE. S’assurer de lire les deux.
1. Brancher la machine dans une prise de 120 V ~ 60 Hz. Consulter les directives relatives aux
pannes de courant. Aucun programme n’a été sélectionné. Appuyer sur la touche START/
STOP pour effacer l’écran après le dernier programme.
2. Ouvrir le couvercle, sortir le moule et le laisser refroidir.
3. Attendre que le programme soit terminé; débrancher la machine, la laisser refroidir et la
nettoyer.
4. Ouvrir le couvercle uniquement durant le pétrissage pour vérifier la boule de pâte ou pour
ajouter des ingrédients.
5. Retirer le pain du moule dès que le programme est terminé et placer le pain sur une grille.
6. Laisser le pain refroidir environ 20 minutes.
7. Fixer la lame de pétrissage sur l’arbre dans le moule.
8. à 11. Vérifier la boule de pâte au bip sonore.
La boule devrait être ronde, lisse, souple et légèrement collante au toucher. (Avec le
programme CUISSON RAPIDE la boule de pâte sera très collante au toucher.)
Si la préparation a plutôt la consistance d’une pâte à gâteau, ajouter 15 ml de farine. Laisser
la farine se mélanger; en rajouter au besoin. Si la préparation est trop sèche, ajouter 5 ml
d’eau et laisser la pâte l’absorber. Rajouter de l’eau au besoin.
12. Suivre la recette.
13. Augmenter la quantité de 1 ml à la fois.
14. Réduire la quantité de 1 ml à la fois.
15. Les substituts de sucre artificiels ne sont pas recommandés.
16. Suivre la recette ou les recommandations de substitutions.
17. On ne peut remplacer une farine par une autre.
18. Verser la levure sur le dessus de la farine en évitant tout contact avec les liquides.
19. S’assurer que la levure est fraîche et à température ambiante.
20. L’eau doit être à 80 °F/27 °C pour tous les programmes sauf le programme CUISSON
RAPIDE pour lequel elle devrait être entre 110° et 115 °F/43° et 46 °C.
24
Page 95

INFORMATION À L´ÉCRAN
Toujours utiliser la machine à pain dans une pièce à l’abri des courants d’air et où la température
est d’au moins 59 °F/15 °C, mais ne dépasse pas 90 °F/32 °C. Ne pas utiliser la machine à
pain dans un garage non chauffé, à l’extérieur, près d’une bouche de chaleur ou directement au
soleil.En général, l’écran indique ce qui se passe avec la machine à pain. Voici certains points à
considérer :
Messages Raison Raison
00:00
(le deux-points
clignote)
Le cycle est terminé.
La fonction Garde au chaud
est activée.
Appuyer sur la touche START/STOP pour
annuler.
E00 ou E01
L’appareil émet
un bip
EEE
L’appareil émet
un bip
(sous 59 °F/15 °C)
Écran vide Le courant a été coupé. Débrancher et rebrancher l’appareil.
EEE, HHH, E00
L’appareil émet
un bip
L’appareil est trop froid
(sous 59 °F/15 °C).
L’appareil est trop chaud.
La température ambiante est
trop basse.
Court-circuit du capteur Communiquer avec le service à la clientèle
Appuyer sur la touche START/STOP pour
annuler.
Ouvrir le couvercle, sortir le moule et laisser
l’appareil refroidir avec le couvercle ouvert
ou placer la machine à pain dans une pièce
chaude et la laisser se réchauffer.
Si l’écran indique toujours E00 ou E01
après que l’appareil a complètement refroidi,
l’appareil peut nécessiter une réparation.
Communiquer avec le service à la clientèle
pour faire réparer ou remplacer l’appareil.
Appuyer sur la touche START/STOP pour
annuler.
L’appareil doit être réinitialisé.
pour faire réparer ou remplacer l’appareil.
25
Page 96

SPÉCIFICATIONS DU PRODUIT
Alimentation
Consommation Élément chauffant
de courant
Moteur de pétrissage
Dimension (LxPxH)
Poids
120 V ~ 60 Hz
560W
50W
32 x 29 x 29,5 cm
Approx. 4,3 kg
26
Page 97
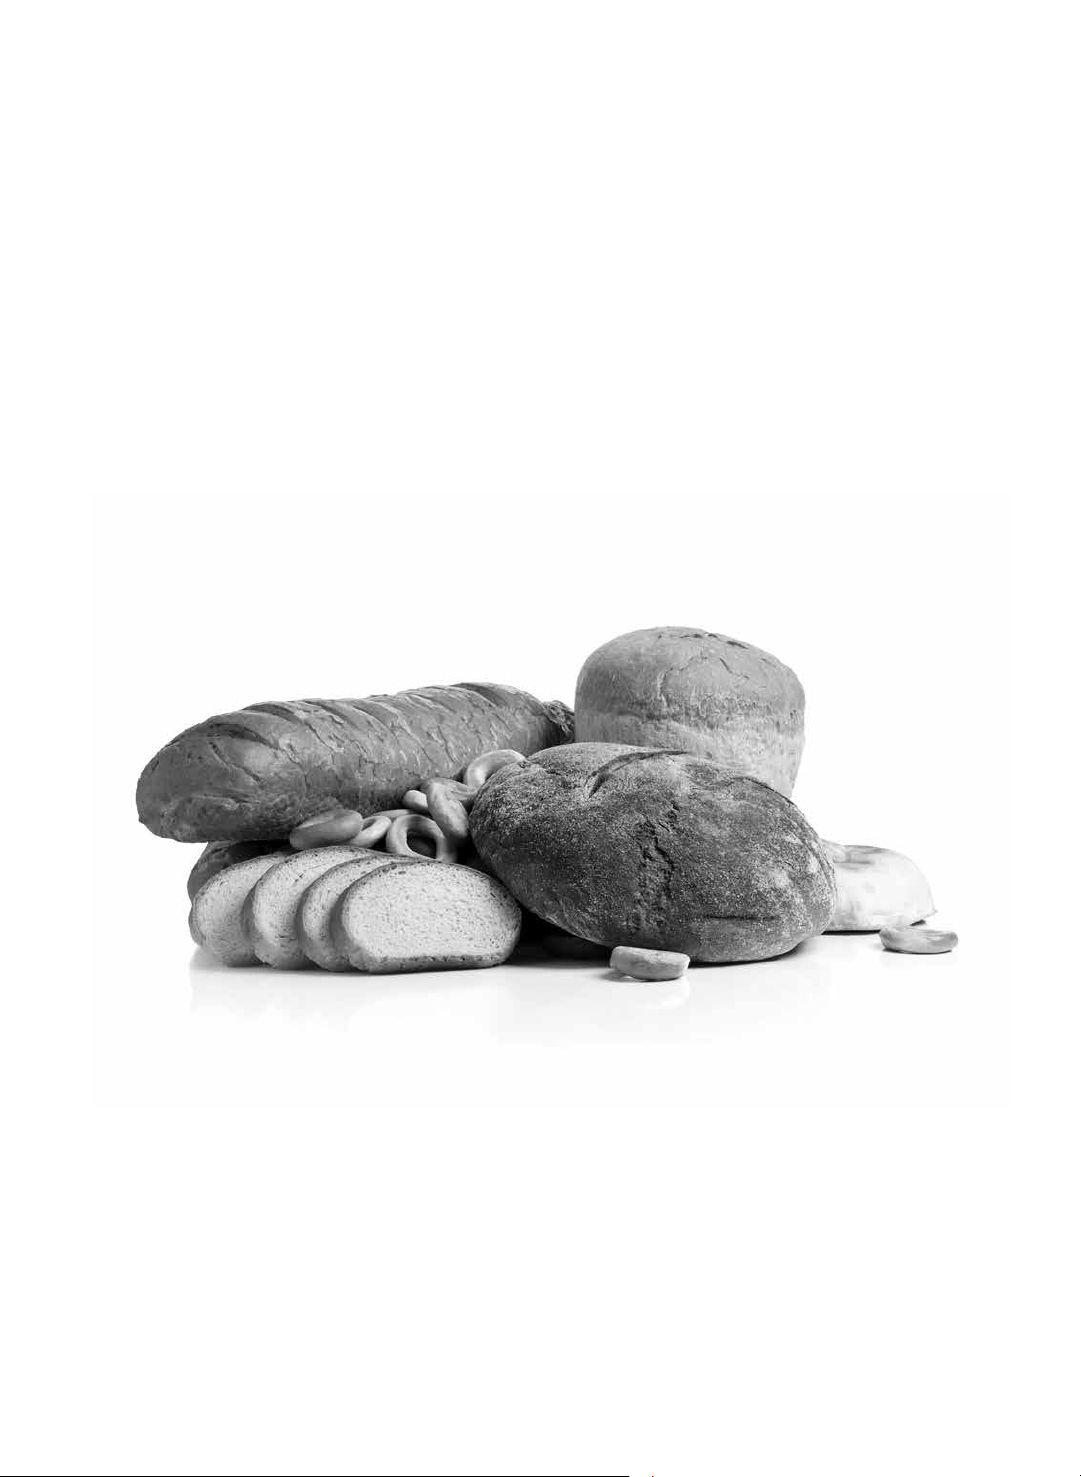
RECETTES
POUR LA MACHINE À PAIN
Page 98

PAINS DE BASE
. . . AUSSI SIMPLE QUE 1 – 2 – 3
1. Mettre les ingrédients dans le moule dans l’ordre indiqué. Consulter la section CONSEILS
UTILES POUR LE PAIN ET LA PÂTE pour savoir comment bien mesurer les ingrédients. Placer
le moule dans la machine à pain.
2. Fermer le couvercle. Sélectionner le programme pour pains de base, choisir la couleur de
croûte et appuyer sur Start.
3. Lorsque le pain est cuit, retirer le moule de la machine à pain. Renverser le moule et le secouer
pour en faire sortir la miche. Laisser la miche refroidir debout sur une grille avant de la trancher.
Nous suggérons de commencer par une recette de PAIN BLANC. Suivre chacune des étapes
attentivement. Ces étapes ont été formulées de façon à éliminer la plupart des erreurs courantes lors
de la fabrication de pain et peuvent être utiles pour toutes les recettes.
28
Page 99

PAIN BLANC
MICHE DE 450 g MICHE DE 675 g MICHE DE 900 g
Eau à 80 °F/27 °C ¾ tasse 1 tasse 1 ¼ tasse
Huile 4 c. à thé 2 c. à soupe 3 c. à soupe
Sucre 4 c. à thé 2 c. à soupe 3 c. à soupe
Sel 1 c. à thé 1 ½ c. à thé 2 c. à thé
Farine à pain 2 ¼ tasses 3 tasses 4 tasses
Levure sèche active RED STAR® 1½ c. à thé 2 ¼ c. à thé 1 c. à soupe
ou
Levure à levée rapide RED STAR® 1 c. à thé 1 ½ c. à thé 2 c. à thé
ou
Levure pour machine à pain 1 c. à thé 1 ½ c. à thé 2 c. à thé
Programme : BASE
1. Retirer le moule de la machine à pain. Fixer la lame de pétrissage sur l’arbre. Veiller à ce que tous
les ingrédients, sauf l’eau, soient à température ambiante.
2. Utiliser une tasse à mesurer les liquides pour mesurer l’eau (80 °F/27 °C/température d’un biberon)
et verser dans le moule.
3. Utiliser une cuillère à mesurer pour mesurer l’huile et verser dans le moule.
4. Utiliser une cuillère à mesurer pour mesurer le sucre et le sel; niveler le dessus de la cuillère avec
une lame droite et verser dans le moule.
5. Au moyen d’une cuillère, remplir de farine à pain une tasse à mesurer pour ingrédients secs;
niveler le dessus avec une lame droite et verser dans le moule. Étaler dans tous les coins. Frapper
doucement le moule contre le plan de travail 3 fois pour tasser tous les ingrédients secs.
6. Mesurer avec soin la levure avec une cuillère à mesurer; niveler le dessus avec une lame droite et
verser dans le moule. Si on utilise la minuterie, s’assurer que la levure est sur le dessus de la farine
à pain, sans aucun contact avec les liquides.
7. Placer le moule dans la machine à pain. Peser sur le bord jusqu’à ce qu’il s’emboîte solidement.
Fermer le couvercle.
8. Appuyer sur la touche PROG pour sélectionner le PROGRAMME, sélectionner la TAILLE DE MICHE,
la COULEUR DE CROÛTE et régler la MINUTERIE pour retarder la cuisson du pain ou appuyer sur
START pour démarrer la machine.
9. Au signal sonore durant le cycle de pétrissage, vérifier la boule de pâte. Elle devrait être légèrement
collante au toucher. Rajouter de l’eau ou de la farine au besoin; voir la section BOULE DE PÂTE. À
ce moment, racler les parois du moule pour en décoller la pâte ou la farine qui pourrait y être restée
collée.
10. Lorsque le pain est cuit trois bips se font entendre et le cycle Garde au chaud s’enclenche. L’écran
indiquera 0:00, et le deux-points clignotera.
11. Appuyer sur STOP et au moyen de mitaines de four retirer doucement le moule de la machine à
n’importe quel moment durant le cycle Garde au chaud.
ATTENTION : LA CAVITÉ DE LA MACHINE, LE MOULE, LA LAME DE PÉTRISSAGE ET LE PAIN
SERONT TRÈS CHAUDS. UTILISER DES MITAINES DE FOUR.
12. Renverser le moule et le secouer à plusieurs reprises pour en faire sortir le pain. Ne pas utiliser
d’ustensiles en métal à l’intérieur du moule ni de la machine. Retirer la lame de pétrissage et laisser
la miche refroidir debout sur une grille pendant environ 20 à 30 minutes avant de la trancher.
13. Si la miche ne sort pas facilement du moule, la laisser reposer sur une surface résistant à la chaleur
pendant 5 minutes, puis réessayer. Lorsque le pain a complètement refroidi, ce qui prend environ 1
heure, le ranger dans un contenant hermétique.
14. DÉBRANCHER LA MACHINE AVANT DE LA NETTOYER. NE PAS IMMERGER LE MOULE DANS
L’EAU, voir les sections NETTOYAGE et RANGEMENT.
29
Page 100

PAIN BRIOCHÉ
MICHE DE 450 g MICHE DE 675 g MICHE DE 900 g
Œuf(s), à température ambiante plus 1 2 3
Eau à 80 °F/27 °C, assez pour don-ner ¾ tasse 1 tasse 1 ½ tasse
Huile 1 c. à soupe 2 c. à soupe 3 c. à soupe
Sucre 1 c. à soupe 2 c. à soupe 3 c. à soupe
Sel 1 c. à thé 1 ½ c. à thé 2 c. à thé
Farine à pain 2 ¼ tasses 3 tasses 4 tasses
Levure sèche active RED STAR® 1 ½ c. à thé 2 ¼ c. à thé 1 c. à soupe
ou
Levure à levée rapide RED STAR® 1 c. à thé 1 ½ c. à thé 2 c. à thé
ou
Levure pour machine à pain 1 c. à thé 1 ½ c. à thé 2 c. à thé
PROGRAMME : BASE
PAIN DE BLÉ AU MIEL
MICHE DE 450 g MICHE DE 675 g MICHE DE 900 g
Œuf, à température ambiante plus 1 1 1
Eau à 80 °F/27 °C, assez pour donner ¾ tasse 1 tasse 1 ¼ tasse
Huile 4 c. à thé 2 c. à soupe 3 c. à soupe
Miel 2 c. à soupe 3 c. à soupe ¼ tasse
Sel 1 c. à thé 1 ½ c. à thé 2 c. à thé
Farine de blé entier ½ tasse 1 tasse 2 tasses
Farine à pain 1 ½ tasse 2 tasses 2 tasses
Levure sèche active RED STAR® 1 ½ c. à thé 2 ¼ c. à thé 1 c. à soupe
ou
Levure à levée rapide RED STAR® 1 c. à thé 1 ½ c. à thé 2 c. à thé
ou
Levure pour machine à pain 1 c. à thé 1 ½ c. à thé 2 c. à thé
PROGRAMME : BASE
30
 Loading...