

Page 1
Bring Home the Bakery
TM
Stainless Steel Convection Bread Maker
Máquina de hacer pan por convección
CustomerCare Line:
USA/Canada
1-800-231-9786
Mexico
01-800 714-2503
Accessories/Parts
(USA / Canada)
Accesorios/Partes
(EE.UU / Canadá)
1-800-738-0245
Model/Modelo ❑ TR2500BC
For online customer service
and to register your product, go to
www.prodprotect.com/applica
1
Page 2

Please Read and Save this Use and Care Book
IMPORTANT SAFEGUARDS
When using electrical appliances, basic safety precautions should always
be followed including the following:
qRead all instructions.
qDo not touch hot surfaces. Use handles or knobs.
qTo protect against electrical shock do not immerse cord, plugs, or
appliance in water or other liquid.
qClose supervision is necessary when any appliance is used by or near
children.
qUnplug from outlet when not in use and before cleaning. Allow to cool
before putting on or taking off parts.
qDo not operate any appliance with a damaged cord or plug, or after
the appliance malfunctions or has been damaged in any manner.
Contact Consumer Services for examination, repair or electrical or
mechanical adjustment. Or, call the appropriate toll-free number on
the cover of this manual.
qThe use of accessory attachments not recommended by the appliance
manufacturer may cause fire, electric shock or injury.
qDo not use outdoors.
qDo not let cord hang over edge of table or counter, or touch hot sur-
faces, including the stove.
qDo not place on or near a hot gas or electric burner, or in a heated
oven.
qExtreme caution must be used when moving an appliance containing
hot oil or other hot liquids.
qTo disconnect, press and hold the STOP button for 2 seconds, remove
plug from wall outlet.
qDo not use appliance for other than intended use.
qAvoid contacting moving parts.
SAVE THESE INSTRUCTIONS
This product is for household use only.
2
Page 3

Caution, hot surfaces: This appliance generates heat
and escaping steam during use. Proper precautions
must be taken to prevent the risk of burns, fires or
other injury to persons or damage to property.
POLARIZED PLUG (120V Models Only)
This appliance has a polarized plug (one blade is wider than the other). To
reduce the risk of electric shock, this plug is intended to fit into a polarized
outlet only one way. If the plug does not fit fully into the outlet, reverse the
plug. If it still does not fit, contact a qualified electrician. Do not attempt to
modify the plug in any way.
TAMPER-RESISTANT SCREW
Warning: This appliance is equipped with a tamper-resistant screw to
prevent removal of the outer cover. To reduce the risk of fire or electric
shock, do not attempt to remove the outer cover. There are no userserviceable parts inside. Repair should be done only by authorized service
personnel.
ELECTRICAL CORD
a) A short power-supply cord (or detachable power-supply cord) is to
be provided to reduce the risk resulting from becoming entangled in
or tripping over a longer cord.
b) Longer detachable power-supply cords or extension cords are
available and may be used if care is exercised in their use.
c) If a long detachable power-supply cord or extension cord is used,
ENGLISH
1) The marked electrical rating of the detachable power-supply
cord or extension cord should be at least as great as the
electrical rating of the appliance,
2) If the appliance is of the grounded type, the extension cord
should be a grounding-type 3-wire cord, and
3) The longer cord should be arranged so that it will not drape
over the countertop or tabletop where it can be pulled on by
children or tripped over.
Note: If the power supply cord is damaged, it should be replaced by qualified
personnel; in Latin America, by an authorized service center.
3
Page 4

POWER OUTAGE
7-Minute Power Failure Back-Up
Your Stainless Steel Convection Bread Maker has a 7-minute power failure backup feature. If the electricity goes off, the memory will store your course selection
for up to 7 minutes. If the power comes back on within this time, bread making
will resume where it left off.
If the bread maker loses power for more than 7 minutes and you are using any
dairy products, perishables or meat in your bread, you should discard the contents of the recipe and start again with new fresh ingredients due to health and
sanitary considerations. For nonperishable recipes you may try starting the bread
maker at the beginning of the course again. However, this may not always produce an acceptable loaf of bread.
If you are not sure when the outage occurred, remove the dough ball from the
bread pan and place in an oven-safe baking container. Allow to double in size
and place in a preheated (350ºF/177ºC) oven for 30 to 45 minutes or until done.
The bread will sound hollow when tapped on top of the loaf if it is done. Again,
this may not always produce an acceptable loaf of bread. If the bread has already
begun to bake when the outage occurs, you must begin with new ingredients.
Important: Power failure back-up does not cover surges. If you experience frequent surges, please use a surge protector.
4
Page 5
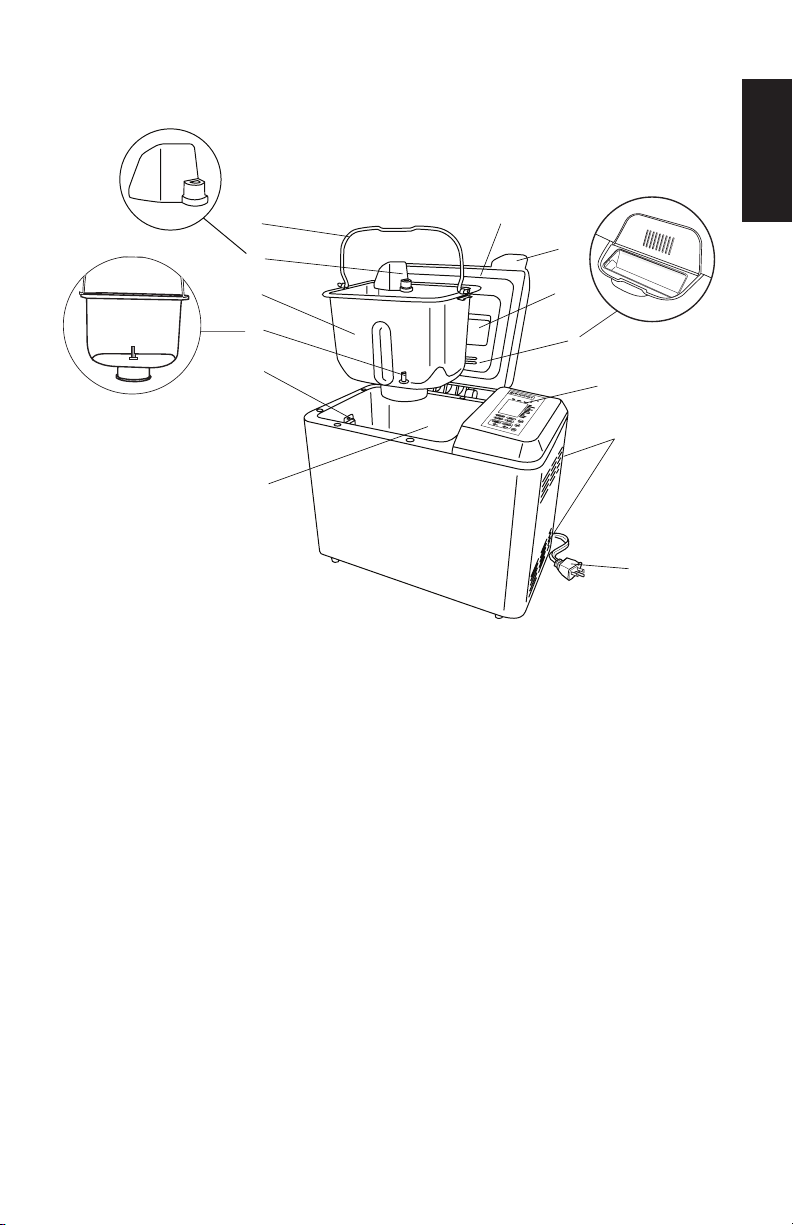
Product may vary slightly from what is illustrated.
13.
12.
11.
ENGLISH
1.
2.
3.
10.
9.
Sw
e
et Breads
Q
ui
c
k Br
e
ad
s
C
ru
s
PizzaDou
t C
on
trol
gh
L
oa
Ex
f Size
t
ra
s
Pau
S
P
rog
el
se
ect
ra
T
m
im
e
/T
e
m
p
Save/
E
r
No
ase
Sta
r
t
Y
e
s
8.
† 1. Removable lid (Part # TR2500BC-01)
2. Lid handle
3. Viewing window
4. Automatic fruit & nut dispenser
5. Control panel
6. Steam vents (both sides)
7. Power cord
8. Baking chamber
9. Bread pan clips
10. Drive shaft
† 11. Bread pan (Part # TR2500BC-02)
† 12. Kneading paddle (Part # TR2500BC-03)
13. Bread pan handle
Note: † indicates consumer replaceable/removable parts
4.
Ke
e
p
Warm
Op
e
ra
t
ion
5.
6.
7.
5
Page 6
CONTROL PANEL
1
11
13
12
Crust Control
Loaf Size
Program
Time/Temp
No
Extras
Pause
Save/Erase
Yes
Keep Warm
Operation
Sweet
Quick Breads
PizzaDough
Select
Start
2
3
4
5
6
7
8
9
10
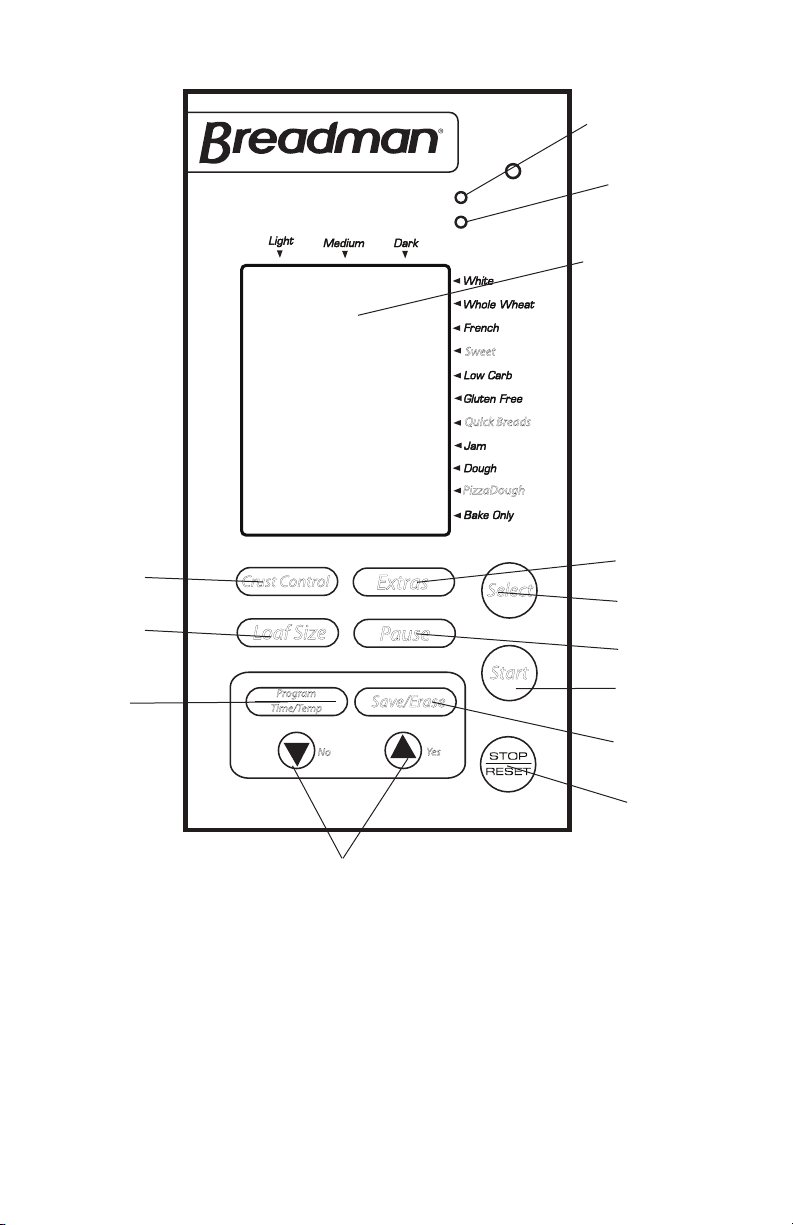
1. Keep Warm Light
Illuminates at start of 60-minute Keep Warm cycle.
2. Operation Light
Illuminates when START button is pressed; when the bread making cycle is
completed and in Keep Warm phase, the light will flash.
3. Display Window
Shows selection and timer setting
4. EXTRAS button
After you select your course, you can then push EXTRAS to activate. The
breadmaker is preset to NO EXTRAS. Press the button again to cancel.
6
Page 7

5. SELECT button
Selects bread/dough course you want. Each time the SELECT button is
pressed, an arrow will indicate which course that is currently selected. For
Rapid Bake, the word “RAPID” will appear in the display window.
6. PAUSE button
The 10-minute pause control can be activated only after machine has
started a bread making cycle. For more details, refer to PAUSE section in
this book.
7. START button
Press to start selected baking course.
8. SAVE/ERASE button
Press to save or erase changes made in PROGRAM function.
9. STOP/RESET button
Press and hold for approximately 5 seconds to clear display, reset baking
course or delay bake timer setting, or to simply stop baking.
10. YES (▲) and NO (▼) buttons
Use this pair of buttons to register changes made in PROGRAM function
and to set delay bake timer.
Use this pair of buttons to add or subtract time displayed in the display
window (see PROGRAM button).
▲ Increases in 10-minute intervals.
▼ Decreases time in 10-minute intervals.
Additional options can be activated using EXTRAS, PROGRAM, SAVE/
ERASE and DELAY BAKE.
11. PROGRAM button
Your bread maker has a unique 24-Hour Delay Bake Timer. You can delay
bake for up to 24 hours in advance.
PROGRAM time
The PROGRAM button expands your bread maker’s standard options by
giving you flexibility to alter times within a particular baking program. This
allows you to increase or decrease kneading, rising and baking times.
PROGRAM temperature
The PROGRAM button allows you to adjust baking temperatures using the
BAKE ONLY course, for creating a personal recipe or when using a custom
program.
12. LOAF SIZE button
Selects loaf size: 1 lb, 1½ lb. or 2 lb.
Loaf size is preset to 2 lb.
13. CRUST CONTROL button
Selects crust color: light, medium or dark
Crust color is preset to medium.
Note: When using Rapid bake, your crust color will be set to medium.
Note: When you press the buttons, you should hear a beep. This will let you
know you’ve pressed hard enough to make your selection.
ENGLISH
7
Page 8

KNEADING AND BAKING COURSES
Note: If at any time during bread making process you need to turn bread maker
off, press and hold the STOP/RESET button for approximately 5 seconds, then
unplug the unit.
Note: During all courses except Jam, an audible beep will sound to check dough
ball and scrape ingredients from sides of bread pan. Refer to KNEADING AND
BAKING COURSE chart to determine when beep will sound.
Note: If bread is not removed immediately after baking and STOP/RESET button
is not pressed, a controlled 60-minute Keep Warm cycle will begin (except during
Quick Breads, Dough and Jam). For best results, remove bread immediately after
baking process is complete.
White Bread
Used for breads that primarily include white bread flour, although some recipes
may include small amounts of whole wheat flour.
Whole Wheat Bread
Used for recipes with significant amounts of whole wheat or rye flour, oats, or
bran. Whole wheat course begins with rest period during which flours or grains
absorb liquid ingredients. Soaking causes flour or grain to soften and helps
ingredients to combine. Generally, whole wheat and multi-grain breads are
shorter and denser than white, French or sweet breads.
French Bread
Traditionally, French bread has crispier crust and lighter texture than white
bread. Recipes usually do not include butter, margarine or milk.
Sweet
Used for recipes that contain eggs, fruit juice, additional sugar or added sweet
ingredients such as coconut flakes, raisins, dried fruit or chocolate. Baking
temperature is reduced to prevent burning.
Low Carb Bread
Used for recipes that are lower in carbohydrates.
Gluten Free Bread
Used for gluten free recipes.
Quick Breads
Used for recipes that contain baking powder or baking soda, rather than yeast,
to make bread or cake rise. Cake recipes made from scratch must be specially
designed for this course. Use this course to prepare prepackaged cake and quick
bread mixes.
Jam
Add fruit, sugar and lemon juice for homemade jam – a great topping for
homemade bread, waffles and ice cream.
Dough
Use to prepare dough for making bread or rolls which are shaped and allowed to
rise before baking in a conventional oven. This program blends and kneads the
dough and takes it through the first rise.
8
Page 9

Pizza Dough
Use to prepare dough that requires less kneading and a single rise such as
pizza and Focaccia dough.
Rapid Bake
Used for White, Whole Wheat, French, and Sweet courses to decrease time by
approximately 1 hour. Choose recipe, then simply add amount of yeast listed
for Rapid course. Bread may be shorter and denser.
Bake Only
Used if crust is too light or you wish to bake pre-made dough. Especially
useful if your bread, sweet bread or cake is not quite done. Check every few
minutes. Bakes for up to 2 hours from 200°F to 375°F.
Personal Recipe
Your bread maker has 5 personal recipe memory cycles. You have 5 spaces
to program and save your favorite recipes. PERSONAL RECIPE lets you factor
brand and type of flour, quality of yeast and even climate into course times.
Information is stored in PERSONAL RECIPES file and kept separate from
regular courses.
Custom Program
Allows you to alter existing settings in preset programs to manually change
course lengths.
ENGLISH
9
Page 10

KNEADING AND BAKING COURSE CHART
Course Crust Size Preheat Knead 1 Knead 2 Rise 1 Punch Rise 2 Shape Rise 3 Bake Total
White Light
Medium
Dark
Rapid
White
Whole
Wheat
Light
Medium
Dark
Light
Medium
Dark
2 lb. - 5 min 20 min 40 min
1.5 lb. - 3 min 22 min 40 min 10 sec 24 m 50 s 15 sec 49 m 45 s 35 min 2:55
1 lb. - 3 min 22 min 40 min 10 sec 24 m 50 s 15 sec 49 m 45 s 30 min 2:50
2 lb. - 5 min 20 min 40 min
1.5 lb. - 3 min 22 min 40 min 10 sec 24 m 50 s 15 sec 49 m 45 s 45 min 3:05
1 lb. - 3 min 22 min 40 min 10 sec 24 m 50 s 15 sec 49 m 45 s 40 min 3:00
1 lb. - 5 min 20 min 40 min
1.5 lb. - 3 min 22 min 40 min 10 sec 24 m 50 s 15 sec 49 m 45 s 55 min 3:15
2 lb. - 3 min 22 min 40 min 10 sec 24 m 50 s 15 sec 49 m 45 s 50 min 3:10
2 lb. - 5 min 20 min 15 min
1.5 lb. - 3 min 22 min 15 min 10 sec 9 m 50 s 10 sec 29 m 50 s 35 min 1:55
1 lb. - 3 min 22 min 15 min 10 sec 9 m 50 s 10 sec 29 m 50 s 30 min 1:50
2 lb. - 5 min 20 min 15 min
1.5 lb. - 3 min 22 min 15 min 10 sec 9 m 50 s 10 sec 29 m 50 s 45 min 2:05
1 lb. - 3 min 22 min 15 min 10 sec 9 m 50 s 10 sec 29 m 50 s 40 min 2:00
2 lb. - 5 min 20 min 15 min
1.5 lb. - 3 min 22 min 15 min 10 sec 9 m 50 s 10 sec 29 m 50 s 55 min 2:15
1 lb. - 3 min 22 min 15 min 10 sec 9 m 50 s 10 sec 29 m 50 s 50 min 2:10
2 lb. 30 min 5 min 15 min 50 min
1.5 lb. 30 min 3 min 17 min 50 min 10 sec 24 m 50 s 10 sec 44 m 50 s 37 min 3:27
1 lb. 30 min 3 min 17 min 50 min 10 sec 24 m 50 s 10 sec 44 m 50 s 35 min 3:25
2 lb. 30 min 5 min 15 min 50 min
1.5 lb. 30 min 3 min 17 min 50 min 10 sec 24 m 50 s 10 sec 44 m 50 s 42 min 3:32
1 lb. 30 min 3 min 17 min 50 min 10 sec 24 m 50 s 10 sec 44 m 50 s 40 min 3:30
2 lb. 30 min 5 min 15 min 50 min
1.5 lb. 30 min 3 min 17 min 50 min 10 sec 24 m 50 s 10 sec 44 m 50 s 50 min 3:40
1 lb. 30 min 3 min 17 min 50 min 10 sec 24 m 50 s 10 sec 44 m 50 s 48 min 3:38
10
Page 11

10 sec 24 m 50 s 15 sec 49 m 45 s 40 min 3:00
10 sec 24 m 50 s 15 sec 49 m 45 s 50 min 3:10
10 sec 24 m 50 s 15 sec 49 m 45 s 60 min 3:20
10 sec 9 m 50 s 10 sec 29 m 50 s 40 min 2:00
10 sec 9 m 50 s 10 sec 29 m 50 s 50 min 2:10
10 sec 9 m 50 s 10 sec 29 m 50 s 60 min 2:20
ENGLISH
10 sec 24 m 50 s 10 sec 44 m 50 s 40 min 3:30
10 sec 24 m 50 s 10 sec 44 m 50 s 45 min 3:35
10 sec 24 m 50 s 10 sec 44 m 50 s 53 min 3:43
11
Page 12

Course Crust Size Preheat Knead 1 Knead 2 Rise 1 Punch Rise 2 Shape Rise 3 Bake Total
Rapid
Light
Whole
Wheat
Medium
Dark
French Light
Medium
Dark
Rapid
Light
French
Medium
Dark
2 lb. 5 min 5 min 15 min 30 min
1.5 lb. 5 min 3 min 17 min 30 min 10 sec 39 m 50 s - - 37 min 2:12
1 lb. 5 min 3 min 17 min 30 min 10 sec 39 m 50 s - - 35 min 2:10
2 lb. 5 min 5 min 15 min 30 min
1.5 lb. 5 min 3 min 17 min 30 min 10 sec 39 m 50 s - - 42 min 2:17
1 lb. 5 min 3 min 17 min 30 min 10 sec 39 m 50 s - - 40 min 2:15
2 lb. 5 min 5 min 15 min 30 min
1.5 lb. 5 min 3 min 17 min 30 min 10 sec 39 m 50 s - - 50 min 2:25
1 lb. 5 min 3 min 17 min 30 min 10 sec 39 m 50 s - - 48 min 2:23
2 lb. - 5 min 20 min 40 min
1.5 lb. - 3 min 22 min 40 min 10 sec 29 m 50 s 10 sec 59 m 50 s 42 min 3:17
1 lb. - 3 min 22 min 40 min 10 sec 29 m 50 s 10 sec 59 m 50 s 40 min 3:15
2 lb. - 5 min 20 min 40 min
1.5 lb. - 3 min 22 min 40 min 10 sec 29 m 50 s 10 sec 59 m 50 s 52 min 3:27
1 lb. - 3 min 22 min 40 min 10 sec 29 m 50 s 10 sec 59 m 50 s 50 min 3:25
2 lb. - 5 min 20 min 40 min
1.5 lb. - 3 min 22 min 40 min 10 sec 29 m 50 s 10 sec 59 m 50 s 62 min 3:37
1 lb. - 3 min 22 min 40 min 10 sec 29 m 50 s 10 sec 59 m 50 s 60 min 3:35
2 lb. - 5 min 20 min 20 min
1.5 lb. - 3 min 22 min 20 min 8 sec 44 m 52 s - - 42 min 2:12
1 lb. - 3 min 22 min 20 min 8 sec 44 m 52 s - - 40 min 2:10
2 lb. - 5 min 20 min 20 min
1.5 lb. - 3 min 22 min 20 min 8 sec 44 m 52 s - - 52 min 2:22
1 lb. - 3 min 22 min 20 min 8 sec 44 m 52 s - - 50 min 2:20
2 lb. - 5 min 20 min 20 min
1.5 lb. - 3 min 22 min 20 min 8 sec 44 m 52 s - - 62 min 2:32
1 lb. - 3 min 22 min 20 min 8 sec 44 m 52 s - - 60 min 2:30
12
Page 13

10 sec 39 m 50 s - - 40 min 2:15
10 sec 39 m 50 s - - 45 min 2:20
10 sec 39 m 50 s - - 53 min 2:28
10 sec 29 m 50 s 10 sec 59 m 50 s 45 min 3:20
10 sec 29 m 50 s 10 sec 59 m 50 s 55 min 3:30
10 sec 29 m 50 s 10 sec 59 m 50 s 65 min 3:40
8 sec 44 m 52 s - - 45 min 2:15
ENGLISH
8 sec 44 m 52 s - - 55 min 2:25
8 sec 44 m 52 s - - 65 min 2:35
13
Page 14

Course Crust Size Preheat Knead 1 Knead 2 Rise 1 Punch Rise 2 Shape Rise 3 Bake Total
Sweet Light
Medium
Dark
Rapid
Sweet
Low Carb
Gluten
Free
Jam
Dough
Pizza
Dough
Bake Only
Light
Medium
Dark
2 lb. - 5 min 20 min 40 min
1.5 lb. - 3 min 22 min 40 min 10 sec 24 m 50 s 5 sec 49 m 55 s 52 min 3:12
1 lb. - 3 min 22 min 40 min 10 sec 24 m 50 s 5 sec 49 m 55 s 50 min 3:10
2 lb. - 5 min 20 min 40 min
1.5 lb. - 3 min 22 min 40 min 10 sec 24 m 50 s 5 sec 49 m 55 s 62 min 3:22
1 lb. - 3 min 22 min 40 min 10 sec 24 m 50 s 5 sec 49 m 55 s 60 min 3:20
2 lb. - 5 min 20 min 40 min
1.5 lb. - 3 min 22 min 40 min 10 sec 24 m 50 s 5 sec 49 m 55 s 72 min 3:32
1 lb. - 3 min 22 min 40 min 10 sec 24 m 50 s 5 sec 49 m 55 s 70 min 3:30
2 lb. - 5 min 20 min 25 min
1.5 lb. - 3 min 22 min 25 min 10 sec 54 m 50 s - - 52 min 2:37
1 lb. - 3 min 22 min 25 min 10 sec 54 m 50 s - - 50 min 2:35
2 lb. - 5 min 20 min 25 min
1.5 lb. - 3 min 22 min 25 min 10 sec 54 m 50 s - - 62 min 2:47
1 lb. - 3 min 22 min 25 min 10 sec 54 m 50 s - - 60 min 2:45
2 lb. - 5 min 20 min 25 min
1.5 lb. - 3 min 22 min 25 min 10 sec 54 m 50 s - - 72 min 2:57
1 lb. - 3 min 22 min 25 min 10 sec 54 m 50 s - - 70 min 2:55
30 min 3 min 25 min 80 min
- 3 min 10 min 14 min
15 min - - -
2 lb. - 3 min 27 min 60 min
1.5 lb. - 3 min 24 min 60 min - - - - - 1:27
1 lb. - 3 min 21 min 60 min - - - - - 1:24
- 3 min 22 min 30 min
2 lb. - - - -
*Whole Wheat Courses have a rest period for up to 30 minutes before kneading
begins. No movement occurs in the Bread Pan. This is normal.
*Jam Course has a rest period for 15 minutes before kneading begins. No
movement occurs in the Bread Pan.
14
Page 15

10 sec 24 m 50 s 5 sec 49 m 55 s 55 min 3:15
10 sec 24 m 50 s 5 sec 49 m 55 s 65 min 3:25
10 sec 24 m 50 s 5 sec 49 m 55 s 75 min 3:35
10 sec 54 m 50 s - - 55 min 2:40
10 sec 54 m 50 s - - 65 min 2:50
10 sec 54 m 50 s - - 75 min 3:00
15 sec 31 sec 4 sec 46 sec 55 min 4:30
- - - - 52 min 1:19
- - - - 50 min 1:05
- - - - - 1:30
ENGLISH
- - - - - 0:55
- - - - 120 min 2:00
15
Page 16

Course Crust Knead 1 Knead 2 Knead 3 Rest Knead 4 Knead 5 Bake Total
Quick Breads
Light 1 min 3 min 2 min
Medium 1 min 3 min 2 min 2 min 1 min 2 min 79 min 1:30
Dark 1 min 3 min 2 min 2 min 1 min 2 min 89 min 1:40
KNOW YOUR INGREDIENTS
FLOUR & OTHER GRAINS
All-Purpose Flour
Bran
Bread Flour
Cornmeal and
Oatmeal
Cracked Wheat
Rye Flour
Self-Rising Flour
7 Grain Cereal
Blend
All-purpose flour is a blend of refined hard and soft
wheat flours ideally suited for making quick breads
and cakes.
Bran (unprocessed) is coarse outer portion of
wheat or rye grains that is separated from flour by
sifting or bolting. It is often added to bread in small
quantities for nutritional enrichment, heartiness and
flavor. It is also used to enhance bread texture.
Bread flour typically has higher gluten concentration
than all-purpose flour. Using bread flour with will
produce loaves with better volume and structure.
Bread flour should be used for all baking courses.
Cornmeal and oatmeal come from coarsely ground
white or yellow corn and from rolled or steel-cut
oats. They are used primarily to enhance flavor and
texture of bread.
Cracked wheat has very coarse texture. It comes
from wheat kernels cut into angular fragments. It
gives whole grain breads a nutty flavor and crunchy
texture.
Rye flour must always be mixed with high proportion
of bread flour, as it does not contain enough gluten
to develop structure for high, even-grained loaf.
Self-Rising Flour is NOT RECOMMENDED for use
with your bread maker. Self-rising flour contains
leavening ingredients that will interfere with bread
and cake making.
7 grain cereal blend is blend of cracked wheat, oats,
bran, rye, cornmeal, flax seeds and hulled millet. It
is used primarily to enhance flavor and texture of
bread.
16
Page 17

2 min 1 min 2 min 69 min 1:20
ENGLISH
Vital Wheat Gluten
Whole Wheat Flour
Gluten is manufactured from wheat flour that has
been treated to remove nearly all of the starch to
leave a very high protein content. (Gluten is the
protein in wheat that makes dough elastic.) Gluten is
available at most health food stores. It can be used
in small portions to increase volume and lighten
texture.
Whole wheat flour is milled from the entire wheat
kernel, which contains the bran and germ. This high
fiber flour is richer in nutrients than all-purpose or
bread flour. Breads made with this flour are usually
smaller and heavier than white loaves. Many recipes
mix whole wheat flour with bread flour or vital wheat
gluten to produce high, light-textured bread.
17
Page 18

Tips on Flour Storage
Keep flour in a secure, airtight container. Store rye and whole wheat flours in a
refrigerator, freezer, or a cool area to prevent them from becoming rancid. Allow
flour to come to room temperature before using.
Note: Flours, while visibly similar, can be very different in how they are ground,
milled, stored, etc. You may have to experiment with different brands of
flour to help you make the perfect loaf. See RECIPE TIPS to assist with these
experiments.
YEAST
Active yeast, through a fermentation process, produces carbon dioxide gas
necessary to make bread rise. Yeast feeds on carbohydrates in sugar and flour to
produce this gas. Three different types of yeast are available: fresh (cake), active
dry and quick-acting. Quick, rapid rise and bread maker yeasts are quick-acting.
Fresh (cake) yeast is NOT RECOMMENDED for use with your bread maker.
Tips on Yeast
Ensure your yeast is fresh by checking its expiration date. Ideally, yeast should be
used several months before the expiration date. Once a package or jar of yeast is
opened, it is important that the remaining contents be immediately resealed and
refrigerated or frozen for future use. Often dough that fails to rise is due to stale
yeast.
Note: Basic bread and dough recipes in this booklet were developed using active
dry yeast. You may use chart below to substitute any quick-acting yeast (quick
rise, fast rise or bread maker yeast) for active dry yeast.
Conversion Chart for Quick Rise Yeast
¾ tsp. active dry yeast = ½ tsp. quick-acting yeast
1 tsp. active dry yeast = ¾ tsp. quick-acting yeast
1½ tsp. active dry yeast = 1 tsp. quick-acting yeast
2¼ tsp. active dry yeast = 1½ tsp. quick-acting yeast
1 tbsp. active dry yeast = 2 tsp. quick-acting yeast
Rapid Course Yeast
Rapid course settings for White, French, Whole Wheat and Sweet decrease time
for making your favorite bread by approximately 1 hour. Choose recipe, then add
an additional ½ tsp. of active dry or quick-acting yeast to the recipe. The bread
may be shorter and denser.
18
Page 19

ADDITIONAL INGREDIENT NOTES
Important: Exact measurements for ingredients are the most
important part of baking. It is the key to getting great texture
and consistency in your bread. Make sure to measure all
ingredients exactly.
ENGLISH
Baking
Powder
Baking Soda
Eggs
Fats
Double acting baking powder is leavening agent
used in quick breads and cakes. This type of
leavening agent does not require rising time
before baking, as chemical reaction works when
liquid ingredients are added and again during
baking process.
Baking soda is another leavening agent, not to
be confused or substituted for baking powder. It
also does not require rising time before baking,
as chemical reaction works during baking
process.
Eggs add richness and velvety texture to bread
dough and cakes. When recipe calls for egg(s) at
room temperature, large egg(s) should be used.
Shortening, butter and oil shorten or tenderize
the texture of yeast breads. French bread gets
unique crust and texture from the lack of fat
added. However, breads that call for fat stay
fresh longer. If butter is used directly from
refrigerator, it should be cut into small pieces
for easier blending during kneading process.
Liquids
All liquids should be warm 80ºF/27ºC to
90°F/32°C for all recipes. Liquids, such as milk,
water or a combination of powdered milk and
water, can be used when making bread. Milk
will improve flavor, provide velvety texture and
soften the crust, while water alone will produce
a crispier crust. Vegetable or fruit juices and
potato water may be used for flavor variety.
19
Page 20

Salt
Salt is necessary to balance flavor in breads
and cakes; it also limits growth of yeast. Do not
increase or decrease amount of salt shown in
recipes.
Sugar
Sugar is important for color and flavor of
breads. It also serves as food for yeast since it
the supports fermentation process. Recipes in
this book that call for sugar require granulated
sugar.
Important: Do not substitute powdered sugar.
Artificial sweeteners cannot be used as
substitute, as yeast will not react properly with
them.
High-Altitude Baking
In high-altitude areas (over 3,000 feet) dough tends to rise faster, as there is less
air pressure. Therefore, less yeast is necessary. For more information on High
Altitude Baking guides contact:
Colorado Cooperative Extension Resource Center
Toll free: (877) 692-9358
E-mail: CERC@vines.colostate.edu
Website: www.ext.colostate/edu/depts/coopext
In dry climates, flour is drier and requires slightly more liquid.
In humid climates, flour is wetter and will absorb less liquid, so less liquid is
required.
20
Page 21

How to Use
This product is for household use only.
Important: Your bread maker has an intelligent fuse system designed to
protect the motor from overheating. It will automatically shut off the motor
if there is an overheat risk. If this occurs, unplug the appliance, wait a few
seconds for it to cool down, and plug in again following the instructions.
GETTING STARTED
• Remove packing materials and any stickers.
• Please go to www.prodprotect.com/applica to register your warranty.
• Place bread maker on dry, stable surface away from heat and areas where
cooking grease or water may splatter on unit. Do not place near edge of
countertop. If placing beneath cabinets, make sure there is enough room to
open the lid without interference.
Important: Your bread maker will bake up at 2-lb. loaf. Do not put larger
quantities of ingredients into bread pan. Bread will not mix and bake
correctly and bread maker may be damaged. (See MAXIMUM INGREDIENT
AMOUNTS.)
• Before first use, operate on Rapid White Course program without adding
ingredients to burn off manufacturing oils. (Follow instructions in USING
YOUR BREAD MAKER.)
Note: During first use, bread maker may smoke and/or emit an odor from
mineral oils used in manufacturing. This is normal.
MAXIMUM INGREDIENT AMOUNTS
• Bread courses: approximately 4 cups
• Quick breads and prepackaged cake mixes: 4 cups
• Dough courses: 4²/³ cups
• Jam: 3 cups of fruit
BREAD PAN TIPS
Inserting bread pan
Note: Remember to insert kneading paddle first, then add all ingredients
BEFORE inserting the bread pan into baking chamber in the order listed.
• When inserting bread pan into bread maker, make sure to set firmly in
place.
Removing bread pan
• To remove bread pan from baking chamber, hold handle with an oven mitt
and lift firmly.
Important: When you remove bread pan after baking, be sure to wear oven
mitts to prevent burning.
• After removing loaf (by turning bread pan upside down and shaking gently),
check to see that kneading paddle is removed from loaf. If it is stuck in
bread, use non-metal utensil to gently remove it, taking care not to scratch
the kneading paddle. Allow bread to cool before removing the kneading
paddle.
ENGLISH
21
Page 22

CHECKING DOUGH CONSISTENCY
Although your bread maker will mix, knead and bake bread automatically,
when baking bread from scratch, it is recommended that you learn to recognize
condition of your dough. The ratio of flour to liquid is the most critical factor in
any bread recipe, yet the most easily remedied. After 5 to 8 minutes in Knead
2, open bread maker to check consistency of dough. Dough should be in a soft,
tacky ball (feel sticky like scotch tape). If it is too dry, add ½ – 1 tsp. of liquid at a
time. If it is too wet, add ½ – 1 tbsp. of flour at a time.
USING YOUR BREAD MAKER
Note: Depending on the course or recipe used, some steps may not apply or
there may be additional steps. Refer to the respective course sections in this
booklet for more detailed instructions.
1. Open lid and remove bread pan. Lift bread pan straight
up and out using the handle (B).
Caution: Do not turn or shake bread pan while taking it
out. If the bread pan is bent, temperature sensor may
not work properly.
B
2. Position kneading paddle on the drive shaft. Match
flat side of drive shaft to flat part of hole in kneading
paddle. (C) Make sure paddle is secure.
3. Place ingredients into the bread pan.
Important: Add ingredients to bread pan in the order
listed in the recipe.
Important: Always add yeast, baking powder or baking
soda last.
C
22
Yeast
4. Make small indentation on top of dry ingredients (not
so deep it reaches the wet layer) and add yeast/baking
powder/baking soda (D).
Important: Indentation for yeast is important, especially
Dry
when using the delay bake timer. It keeps yeast away
from the wet ingredients until the kneading process
Liquid
begins. (Liquid ingredients will prematurely activate the
yeast.)
D
Page 23
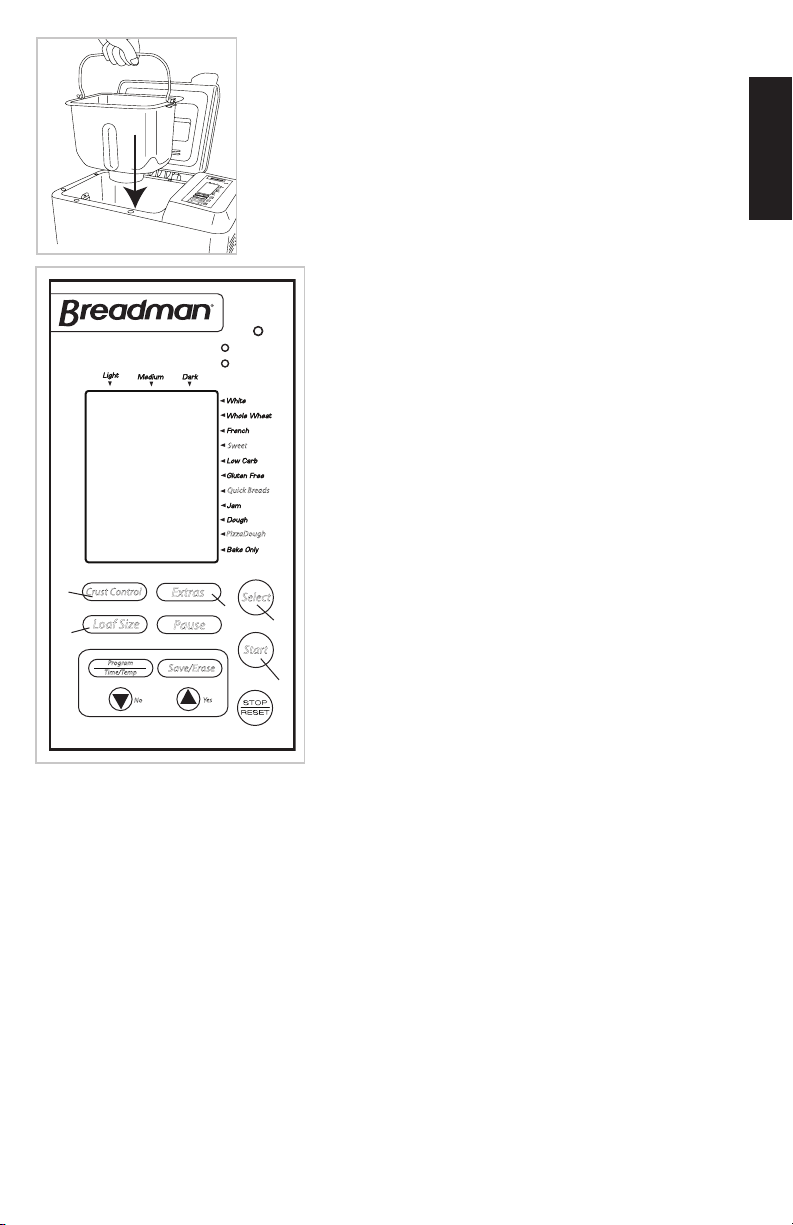
5. Insert the bread pan into the baking chamber (E).
Press down on rim of bread pan until it snaps
securely into place.
6. Close the lid. Plug into standard electrical outlet.
Bread maker will beep and three zeros will flash in
display window.
E
7. Press SELECT to choose desired course
(F1). The operation light will illuminate.
Each time SELECT is pressed, unit and
Keep Warm
Operation
display will move to next course.
Note: As the SELECT button is pressed, the
Rapid course setting will follow the regular
course setting for White, Whole Wheat, French
Sweet
and Sweet. The word RAPID will appear on the
digital display.
Quick Breads
8. Press CRUST CONTROL to choose crust
color (F2). Bread maker is preset for
PizzaDough
medium crust.
Note: CRUST CONTROL will not be activated
F
Crust Control
Loaf Size
Program
Time/Temp
Extras
Pause
Save/Erase
No
Select
Start
Yes
for the following courses:
• Jam
• Dough
• Pizza Dough
• Bake Only
• Rapid
9. Press LOAF SIZE to select loaf size (F3).
Bread maker is preset to 2 lb.
Note: Loaf size cannot be activated for the following courses:
• Sweet
• Jam
• Pizza Dough
Note: Although breadmaker is capable of making 1.0 lb. loaves, we
recommend baking 1.5 and 2.0 lb recipes for more uniform loaves of bread.
This is especially true for breads that contain whole grains or other special
ingredients such as sunflower or sesame seeds.
10. Add ingredients such as dried fruits or nuts and herbs, to the Fruit & Nut
Dispenser. Press EXTRAS (F4).
Important: Do not exceed ²/³ cup capacity.
Important: Do not pour liquids or spices into dispenser. Always make sure
fresh fruit or vegetables are not wet. Pat dry before putting them in the
dispenser.
ENGLISH
23
Page 24
11. Press START to begin kneading cycle (F5). The operation light will illuminate.
The time remaining will begin to count down in display window. COURSE,
LOAF SIZE, CRUST CONTROL and bread making cycle will be shown in
display window.
Note: During kneading cycle, yeast will activate and viewing window may begin
to fog. (This will clear eventually so you can view the progress.)
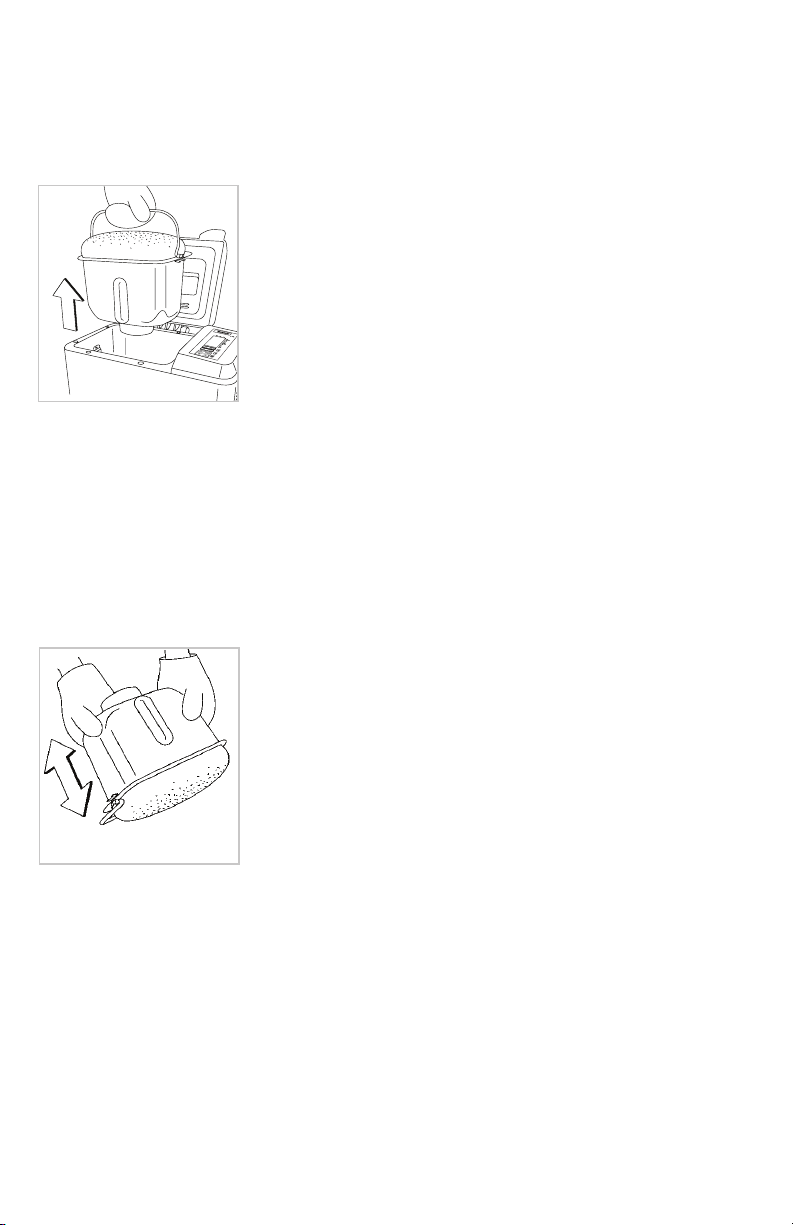
12. When your bread is finished baking, bread maker
will beep and “0:00” will appear in display window.
Press STOP/RESET and open lid. Using oven mitts,
remove bread pan (G).
Important: Remember, bread pan and loaf are both very
hot! Be careful not to place either on tablecloth, plastic
surface or other heat-sensitive surface that may scorch
or melt.
G
Note: If bread is not removed immediately after baking and STOP/RESET is not
pressed, the Keep Warm cycle will begin. Operation light will turn off and Keep
Warm light will illuminate. Bread maker will automatically turn off after 60
minutes. For best results, remove bread immediately after baking.
Note: Keep Warm cycle does not apply to the following courses:
• Jam
• Dough
• Pizza Dough
• Bake Only
13. Turn bread pan upside down and shake to release
bread (H). Place bread upright on wire rack to cool
15 – 30 minutes before cutting. This allows steam to
escape.
Caution: Be sure to remove kneading paddle from the
bread before serving.
Caution: Bread pan, kneading paddle and bread will be
very hot.
H
14. Unplug unit and allow to cool completely
before cleaning. (See CARE AND CLEANING
INSTRUCTIONS.)
15. Once bread has cooled (approximately 1 hour) store in an airtight container
SLICING AND STORING BREAD
For best results, place bread on wire rack and allow to cool for 15 – 30 minutes
before slicing. Use electric knife or serrated knife for even slices.
Store unused bread, tightly sealed (sealable plastic bags or plastic containers
work well) at room temperature for up to 3 days. For longer storage, (up to
1 month) place bread in sealed container in freezer. Since homemade bread has
no preservatives, it tends to dry out and become stale faster. Leftover or slightly
hardened bread may be cut into ½-inch or 1-inch cubes and used in recipes to
make croutons, bread pudding or stuffing.
24
Page 25

USING 24-HOUR DELAY BAKE TIMER
Important: Delay baking does not activate Jam Course. Don’t use delay
bake timer if your recipe includes eggs, fresh milk, yogurt or other dairy
products, meats, etc.
To preset your bread maker, follow these steps:
1. Add ingredients in the order listed as usual, taking care not to let yeast and
liquid ingredients contact one another.
Note: If your recipe contains salt, add it with the liquid ingredients, taking
care to keep it away from the yeast.
2. Close bread maker lid and plug it in.
3. Press SELECT to choose course. Time needed for selected course appears
in display window.
4. Press ▲ to add time in 10-minute intervals. (Use ▼ to subtract time.)
Amount of time set is shown in display window
• To fast forward time, continually press ▲.
• To fast reverse, continually press ▼.
• For example, if it is 8:00 AM and you want bread ready at 1:00 PM,
press ▲ until the display reads 5:00 – meaning it will finish baking in
5 hours. This is the hour difference between 8:00 AM and 1:00 PM.
Note: Actual baking times will not change.
5. Press LOAF SIZE to choose loaf size, press CRUST CONTROL to choose
crust color, press EXTRAS if you are adding extras, then press START to
begin timer. The colon (:) in time display begins to flash, letting you know
timer is started. When your bread is finished baking, bread maker will
beep and “0:00” will appear in display window. Press STOP and open lid.
6. If you make an error after you’ve activated program and want to start over,
press and hold STOP/RESET for approximately 5 seconds. Timer will clear
and you can begin again.
BAKE ONLY
The Bake Only course offers the flexibility to vary time and temperature. You
can bake pre-made dough or dough purchased at the store using this Course.
You may also use this Course if crust color is too light or if your bread or cake
is not quite done. Check every few minutes.
1. Press the PROGRAM button.
2. Using the ▲ and ▼ arrows, set temperature from 200°F – 375°F.
3. Adjust the amount of time you need up to 2 hours.
4. Press START to begin baking.
PAUSE
You can press PAUSE at any time, during any course. When you pause, bread
maker will remain paused for approximately 10 minutes. You will hear a beep
when the pause cycle begins; the time will flash until baking is resumed.
Press START at any time to resume baking.
Note: If you forget to touch START, baking will resume automatically after 10
minutes.
ENGLISH
25
Page 26

Press and hold STOP/RESET to cancel course completely and return to the
course selection display.
Use PAUSE to:
• Create decorative crusts
• Make pull-apart rolls
• Make braided breads
• Create rustic Mediterranean-style rolled bread
• Add crumbled toppings to coffee cakes
Important: Have all ingredients ready before starting PAUSE cycle.
Important: Do not leave lid standing open for extended periods of time. Always
use an oven mitt when handling the bread pan or any part of the interior of the
bread maker.
ADVANCED BAKING TECHNIQUES
Decorative Crusts
1. At start of baking process (see KNEADING AND BAKING COURSE CHART),
press PAUSE.
2. Leave bread pan in bread maker.
3. Using a knife or sharp blade, cut a decorative pattern in the top of the loaf
(crisscross, slashes, etc).
4. Prepare egg wash using 1 egg white OR 1 whole egg + 1 tbsp. water; mix well.
5. Carefully brush top of loaf and cuts with egg wash, being careful not to spill or
drip the wash into the bread pan or baking chamber. If desired, sprinkle with
seeds or nuts.
6. Press START when finished; work quickly to limit heat loss.
Pull-Apart Rolls
1. At start of final rise (see KNEADING AND BAKING COURSE CHART), press
PAUSE.
2. Remove bread pan from baking chamber and close lid.
3. Remove dough and kneading paddle from bread pan.
4. Divide dough evenly (12, 18 or 24 pieces).
5. Roll each piece into a round ball and arrange a single layer in the bread pan.
6. Carefully brush this layer with egg wash and sprinkle with spices.
7. Repeat layering and brushing with the remainder of the dough.
8. Return bread pan to bread maker and press START.
Note: Use Italian spices, cinnamon sugar, seeds or any combination of toppings
you desire.
Braided Breads
1. At start of last rise (see KNEADING AND BAKING COURSE CHART), press
PAUSE.
2. Remove bread pan from baking chamber and close lid.
3. Remove dough and kneading paddle from bread pan.
26
Page 27

4. Divide dough into 3 equal pieces.
5. Stretch and roll each piece into a 10” (25 cm) rope.
6. Place ropes on flat surface, side-by-side.
7. Starting at center, braid ropes to one end, then turn to braid the second
half; turn ends under and press to seal.
8. Return to bread pan and tuck ends under loaf.
9. If desired, brush with egg wash or water and sprinkle with seeds.
10. Return bread pan to bread maker and press START.
Mediterranean-Style Rustic Bread
Note: The below is an example of how to make a rolled, Mediterranean-style
rustic bread using a French bread recipe.
1. Press PAUSE at the end of the shaping process (see KNEADING AND
BAKING COURSE CHART).
2. Remove bread pan from bread maker and close lid.
3. Remove dough and kneading paddle from bread pan.
4. Roll dough to an 8” x 13” (20 cm x 33 cm) rectangle on a clean, lightly
floured surface.
5. Lightly brush with good olive oil, then sprinkle with fresh chopped garlic,
rosemary, basil and sun-dried tomatoes. Top with 1/3 cup crumbled feta
or goat cheese. If desired, you may also add 2 – 3 slices of prosciutto.
6. Tightly roll dough lengthwise into an 8” wide (20 cm) roll.
7. Tuck ends under and place in bread pan.
8. Return bread pan to bread maker, close lid and press START.
9. The final rise will begin, followed by the baking process.
10. As baking begins, press PAUSE again and remove bread pan.
11. Slash top of crust and gently mist loaf with cold water, then return bread
pan to baking chamber.
12. Close lid and press START to complete your rustic Mediterranean bread.
Adding Crumbled Toppings to Coffee Cakes
Note: Works best with Quick Bread recipes
1. At the end of last knead (see KNEADING AND BAKING CHART) press
PAUSE.
2. Remove bread pan from bread maker and close lid.
3. Remove kneading paddle from batter.
4. Top batter with desired crumb topping.
5. Place bread pan back in baking chamber, close lid and press START.
Important: Removing kneading paddle on the Quick Breads course will help
prevent tearing of cake/loaf when it is removed from pan after baking.
Special Glazes for Yeast Breads
Select 1 of the following special glazes to enhance your bread.
• Egg Glaze: Beat 1 large egg and 1 tablespoon of water together, brush
generously over dough – being careful not to touch the sides of the bread
pan – prior to baking.
ENGLISH
27
Page 28

• Melted Butter Crust: Brush melted butter over just-baked bread for a softer,
more tender crust.
• Milk Glaze: For a softer, shiny crust, brush just-baked bread with milk
or cream.
• Sweet Icing Glaze: Mix 1 cup sifted confectioner’s sugar with 1 to 2
tablespoons of milk until smooth. Drizzle glaze over raisin bread or sweet
breads when they are almost cool.
Note: If desired, generously sprinkle with your choice of poppy, sesame or
caraway seeds after glazing.
PERSONAL RECIPES
For advanced bakers, this bread maker has 5 personal recipe memory settings.
This means you have 5 spaces to program and save your favorite personal
recipes. With the personal recipe programmer, you can set the length of each
cycle or skip a cycle entirely based on the recipe you are creating. You can factor
in brand and type of flour, quality of yeast and even climate to determine cycle
times.
Important: To save or erase a personal recipe, follow the instructions provided
in CUSTOM PROGRAMS.
Note: We recommend that you keep a separate log of the cycle times for your
Personal Recipes.
1. To activate personal recipe program, press and hold PROGRAM for 1 second.
2. Program each cycle time using ▲/▼ arrows to set time and then pressing
PROGRAM again to set.
1st press: Preheat cycle
2nd press: Knead cycle 1
3rd press: Knead cycle 2
4th press: Rise 1
5th press: Punch
6th press: Rise 2
7th press: Shape
8th press: Rise 3
9th press: Bake cycle
10th press: Keep Warm cycle
11th press: Extras – Do you want to activate the fruit and nut dispenser?
YES or NO
12th press: Temperature
Note: To skip a cycle, press the arrows until you reach zero (0), then press
PROGRAM to move on to the next cycle of the baking program.
3. Press PROGRAM a final time. The word SAVE will flash on the display.
4. Select YES or NO. Selecting YES will save your changes. If you select NO, the
personal recipe course will proceed as programmed, but will revert back to
the previously saved times at the end of baking.
28
Page 29

Note: You can use the Delay Bake Timer when running personal recipe
programs. Simply use the ▲/▼ arrows to set the time difference and press
START.
CUSTOM PROGRAMS
The most versatile function on your bread maker, Custom Program is similar
to Personal Recipe in that you can manually change the length of each cycle of
a bread making course. Unlike Personal Recipe, Custom Program factors in
LOAF SIZE and CRUST CONTROL.
Note: You can also use Custom Program to change kneading and bake times
in Quick Breads course; heat and stir times in Jam course; knead and rise
times in Dough course.
To manually change a preprogrammed course, follow these steps:
1. Press SELECT until you reach desired course setting, such as White.
2. Press PROGRAM; a beep will sound and “CUSTOM PROGRAM” will appear
on the display in the upper left corner.
3. Following the instructions in PERSONAL RECIPES, enter or change cycle
times as outlined. Use KNEADING AND BAKING COURSE CHART as a
reference.
4. When you are finished, a final beep will sound, indicating your Custom
Program changes have been made.
To reset a preprogrammed course to its original times, follow these steps:
1. Press SELECT until you reach the Custom Program course setting you wish
to change. It will be displayed in the display window.
2. Press SAVE/RESET.
3. Display will prompt ERASE, and you may simply press YES to accept and
return to the default settings.
ENGLISH
29
Page 30

BREAD RECIPES...EASY AS 1-2-3
We suggest starting your bread making with this White Bread recipe. Follow
steps previously outlined in this Instruction Manual. These steps have been
written to eliminate most common errors in bread maker baking and may be
helpful for any recipe.
Note: For White, Rapid White, Whole Wheat, Rapid Whole Wheat, French, Rapid
French, Sweet, Rapid Sweet courses, following the instructions in USING YOUR
BREAD MAKER
WHITE BREAD
Ingredients 1.0 lb. 1½ lb. 2.0 lb.
Water (80°F/27°C) ¾ cup + 1 tbsp. 1 cup 1½ cups
Oil or butter 1 tbsp. 2 tbsp. 2½ tbsp.
Sugar 1½ tbsp. 2 tbsp. ¼ cup
Dry milk solids 1 tbsp. 1½ tbsp. 2 tbsp.
Bread flour 2¼ cups 3 cups 4 cups
Salt 1 tsp 1.5 tsp 2 tsp
Active dry yeast 1½ tsp. 2 tsp. 2¼ tsp.
Select White Course
Select Rapid White
Active dry yeast 2 tsp. 2½ tsp. 2¾ tsp.
30
Page 31

WHITE SOURDOUGH STARTER
Ingredients Amount
Active dry yeast 2¼ tsp.
Water (110°F/43°C) 2 cups
Bread flour 3½ cups
Sugar 1 tbsp.
In 4-qt. glass container, dissolve yeast in water (110°F/43°C); let stand
5 minutes, then add flour and sugar. Stir with plastic or wooden spoon
until blended. Mixture will be thick; remaining lumps will dissolve during
fermentation process. Cover loosely with plastic wrap and let stand in warm
place for 5 days, stirring 3 times a day. Starter will “rise and fall” during
fermentation period and become thinner as it stands. Sitting temperature of
80°F/27°C is best for sour flavor to develop. When starter is developed, it is
bubbly and may have yellow liquid layer on top; stir before using. It may be
used for baking or placed in the refrigerator to use later; cover loosely.
To use starter, measure amount specified in recipe. After refrigeration, let
container of starter come to room temperature before measuring – about
4 hours. If baking in the morning, leave starter out overnight.
Replenish with 1 cup flour, 2/3 cup water (110°F/43°C) and 1 tsp. sugar. Stir
until blended – some lumps may remain. Cover loosely and let stand 10 to
12 hours or overnight. Starter will rise and become bubbly. Stir, then place
in refrigerator to store. Stir in 1 tsp. of sugar to keep active if not used every
week.
ENGLISH
31
Page 32

WHITE SOURDOUGH BREAD
Ingredients 1.0 lb. 1½ lb. 2.0 lb.
Water (80°F/27°C) ½ cup + 1 tbsp. ¾ cup ¾ cup + 1 tbsp.
Starter
(see above recipe)
Sugar 2 tsp. 1 tbsp. 4 tsp.
Salt 1 tsp. 1½ tsp. 2 tsp.
Bread flour 2 cups 3 cups 4 cups
Active dry yeast 1½ tsp. 2 tsp. 2¼ tsp.
Select White
Course
Select Rapid White
Course
Active dry yeast 2 tsp. 2½ tsp. 2¾ tsp.
¾ cup 1 cup 1¼ cup
CORNBREAD
Ingredients 1.0 lb. 1½ lb. 2.0 lb.
Eggs, large; room
temperature
plus enough water
(80°F/27°C) to equal
¾ cup + 2 tbsp. 1 cup + 3 tbsp. 1¹/³ cups
1 1 2
Oil or butter 2 tbsp. 3 tbsp. ¼ cup
Honey 2 tbsp. 3 tbsp. ¼ cup
Salt 1 tsp. 1½ tsp. 2 tsp.
Dry milk solids 1 tbsp. 2 tbsp. 2½ tbsp.
Bread flour 2 cups 3 cups 4 cups
Cornmeal ¼ cup
Active dry yeast 1½ tsp. 2 tsp. 2¼ tsp.
Select White Course
Select Rapid White
Course
Active dry yeast 2 tsp. 2½ tsp. 2¾ tsp.
32
1
/3 cup ½ cup
Page 33

FAT-FREE WHITE BREAD
Ingredients 1.0 lb. 1½ lb. 2.0 lb.
Water (80°F/27°C) ¾ cup + 1 tbsp. 1 cup + 3 tbsp. 1½ cups
Applesauce 1 tbsp. 2 tbsp. 3 tbsp.
Sugar 1½ tbsp. 3 tbsp. ¼ cup
Salt 1 tsp. 1½ tsp. 2 tsp.
Dry milk solids 1 tbsp. 1½ tbsp. 2 tbsp.
Bread flour 2¼ cups 3 cups 4 cups
Cornmeal ¼ cup
Active dry yeast 1½ tsp. 2 tsp. 2¼ tsp.
Select White Course
Select Rapid White
Course
Active dry yeast 2 tsp. 2½ tsp. 2¾ tsp.
1
/3 cup ½ cup
EGG BREAD
ENGLISH
Ingredients 1.0 lb. 1½ lb. 2.0 lb.
Eggs, large; room
temperature
plus enough water
(80°F/27°C) to equal
Oil or butter 1 tbsp. 1½ tbsp. 2 tbsp.
Sugar 4 tsp. 2 tbsp. 2½ tbsp.
Salt 1 tsp. 1½ tsp. 2 tsp.
Dry milk solids 2 tbsp. 3 tbsp. ¼ cup
Bread flour
Active dry yeast 1½ tsp. 2 tsp. 2¼ tsp.
Select White Course
Select Rapid White Course
Active dry yeast 2 tsp. 2½ tsp. 2¾ tsp.
1 2 2
¾ cup + 1
tbsp.
2 cups + 2
tbsp.
1 cup + 1
tbsp.
3 cups 4 cups
1¹/³ cups
33
Page 34

HONEY GRANOLA BREAD
Ingredients 1.0 lb. 1½ lb. 2.0 lb.
Water (80°F/27°C) ¾ cup + 3
1 cup + 3 tbsp. 1½ cups
tbsp.
Oil or butter 2 tbsp. 3 tbsp. ¼ cup
Honey 2 tbsp. 3 tbsp. ¼ cup
Salt 1 tsp. 1½ tsp. 2 tsp.
Dry milk solids 2 tbsp. 2½ tbsp. 3 tbsp.
Bread flour 2 cups 3 cups 4 cups
Granola cereal
2
cup ¾ cup 1 cup
/3
Active dry yeast 1½ tsp. 2 tsp. 2¼ tsp.
Select White Course
Select Rapid White Course
Active dry yeast 2 tsp. 2½ tsp. 2¾ tsp.
34
Page 35

POTATO BREAD
Ingredients 1.0 lb. 1½ lb. 2.0 lb.
Eggs, large; room
temperature
plus enough water
(80°F/27°C) to equal
Oil or butter 1 tbsp. 2 tbsp. 3 tbsp.
Sugar 4 tsp. 2 tbsp. 3 tbsp.
Salt 1 tsp. 1½ tsp. 2 tsp.
Dry milk solids 2 tbsp. 3 tbsp. ¼ cup
White pepper
Instant potato buds ¼ cup
Green onion tops,
chopped
Bread flour 2 cups 3 cups 4 cups
Active dry yeast 1½ tsp. 2 tsp. 2¼ tsp.
Select White Course
Select Rapid White
Course
¾ cup + 2 tbsp. 1¼ cups 1½ cups
1 2 2
1
/8 tsp. ¼ tsp. ¼ tsp.
1
/3 cup ½ cup
1 tbsp. 1½ tbsp. 2 tbsp.
ENGLISH
Active dry yeast 2 tsp. 2½ tsp. 2¾ tsp.
35
Page 36

WHOLE GRAIN BREAD
Ingredients 1.0 lb. 1½ lb. 2.0 lb.
Water (80°F/27°C) ¼ cup
1
/3 cup ½ cup
Cultured buttermilk
(80°F/27°C)
Oil or butter 2 tsp. 1 tbsp. 1 tbsp. + 1 tsp.
Molasses 3 tbsp. ¼ cup
Salt 1 tsp. 1½ tsp. 2 tsp.
Baking soda ¾ tsp. 1 tsp. 1½ tsp.
Oat bran cereal,
uncooked
Cornmeal 3 tbsp. ¼ cup
Rye flour 3 tbsp. ¼ cup
Buckwheat flour 3 tbsp. ¼ cup
Whole wheat flour
Bread flour 11/3 cups 2 cups 3 cups
Active dry yeast 1½ tsp. 2 tsp. 2¼ tsp.
Select White Course
Select Rapid White
Course
2
/3 cup 1 cup 11/3 cups
1
/3 cup
3 tbsp. ¼ cup
1
/3 cup ½ cup
1
/3 cup
1
/3 cup
1
/3 cup
1
/3 cup
1
/3 cup
Active dry yeast 2 tsp. 2½ tsp. 2¾ tsp.
36
Page 37

CRUNCHY CRACKED WHEAT BREAD
Note: This recipe requires a few quick preparation instructions.
• Add cracked wheat to heatproof bowl. Pour in boiling water, stirring to
prevent lumps.
• Let mixture stand for 20 minutes (at 80°F/27°C). Stir, pour into bread pan
and add remainder of ingredients in order given.
Ingredients 1.0 lb. 1½ lb. 2.0 lb.
Cracked wheat ½ cup ¾ cup 1 cup
Water, boiling 1 cup 1½ cups 1¾ cups
Oil or butter 1½ tbsp. 2 tbsp. 3 tbsp.
Sugar 4 tsp. 2 tbsp. 3 tbsp.
Salt 1 tsp. 1½ tsp. 2½ tsp.
Bread flour 2 cups 3 cups 4 cups
Active dry yeast 1½ tsp. 2 tsp. 2¼ tsp.
Select White Course
Select Rapid White Course
ENGLISH
Active dry yeast 2 tsp. 2½ tsp. 2¾ tsp.
37
Page 38

SUNFLOWER & SESAME SEED WHOLE WHEAT BREAD
Ingredients 1½ lb. 2.0 lb.
Eggs, large; room
temperature
plus enough water
(80°F/27°C) to equal
Oil or butter 2 tbsp. 3 tbsp.
Molasses 1 tbsp. 2 tbsp.
Sugar 1 tbsp. 2 tbsp.
Salt 1½ tsp. 2 tsp.
Bread flour 2½ cups 3 cups
Whole wheat flour ½ cup 1 cup
Sesame seeds 2 tbsp. 2½ tbsp.
Cumin seeds ¼ tsp. ¼ tsp.
Sunflower seeds
(kernels)
Active dry yeast 2 tsp. 2¼ tsp.
Select Whole Wheat
Course
1 1
1 cup + 2 tbsp. 1¼ cups
1½ tbsp. 2 tbsp.
Select Rapid Whole
Wheat Course
Active dry yeast 2½ tsp. 2¾ tsp.
38
Page 39

WHOLE WHEAT BREAD
Ingredients 1.0 lb. 1½ lb. 2.0 lb.
Egg whites 1 1 1
plus enough cultured
buttermilk (80°F/27°C)
to equal
Oil or butter 2 tbsp. 3 tbsp. ¼ cup
Molasses 2 tbsp. 3 tbsp. ¼ cup
Salt 1 tsp. 1½ tsp. 2 tsp.
Baking soda ¼ tsp. ½ tsp. ¾ tsp.
Whole wheat flour 2 cups 3 cups 4 cups
Active dry yeast 1½ tsp. 2 tsp. 2¼ tsp.
Select Whole Wheat
Course
Select Rapid Whole
Wheat Course
Active dry yeast 2 tsp. 2½ tsp. 2¾ tsp.
1 cup
1 cup + 3
tbsp.
1½ cups
ENGLISH
39
Page 40

WHITE WHEAT BREAD
Ingredients 1.0 lb. 1½ lb. 2.0 lb.
Water (80°F/27°C) ¾ cup 1 cup + 2 tbsp. 1¼ cups + 2
tbsp.
Oil or butter 1 tbsp. 1½ tbsp. 2 tbsp.
Sugar 2 tbsp. 3 tbsp. ¼ cup
Salt 1 tsp. 1½ tsp. 2 tsp.
Dry milk solids 1 tbsp. 1½ tbsp. 2 tbsp.
Bread flour 1¾ cups 2
Whole wheat flour ¼ cup
Active dry yeast 1½ tsp. 2 tsp. 2¼ tsp.
Add to dispenser (press EXTRAS before pressing START to begin baking):
2
/3 cups 3½ cups
1
/3 cup ½ cup
Sunflower seeds
2 tbsp. 3 tbsp. ¼ cup
(kernels)
Select Whole Wheat Course
Select Rapid Whole Wheat Course
Active dry yeast 2 tsp. 2½ tsp. 2¾ tsp.
40
Page 41

CARAWAY RYE BREAD
Ingredients 1.0 lb. 1½ lb. 2.0 lb.
Eggs, large; room
temperature
plus enough water
(80°F/27°C) to equal
Oil or butter 2 tbsp. 3 tbsp. ¼ cup
Honey 2 tbsp. 3 tbsp. ¼ cup
Salt 1 tsp. 1½ tsp. 2 tsp.
Dry milk solids 1 tbsp. 2 tbsp. 3 tbsp.
Bread flour 1 cup 1½ cups 2 cups
Whole wheat flour ½ cup ¾ cup 1 cup
Caraway seeds 1 tbsp. 2 tbsp. 3 tbsp.
Active dry yeast 1½ tsp. 2 tsp. 2¼ tsp.
Select Whole Wheat
Course
Select Rapid Whole
Wheat Course
1 1 2
¾ cup 1 cup + 1 tbsp. 11/3 cups
ENGLISH
Active dry yeast 2 tsp. 2½ tsp. 2¾ tsp.
41
Page 42

ONION RYE BREAD
Ingredients 1.0 lb. 1½ lb. 2.0 lb.
Eggs, large; room
temperature
plus enough water
(80°F/27°C) to equal
Oil or butter 2 tbsp. 3 tbsp. ¼ cup
Honey 2 tbsp. 3 tbsp. ¼ cup
Salt 1 tsp. 1½ tsp. 2 tsp.
Dry milk solids 1 tbsp. 2 tbsp. 3 tbsp.
Bread flour 1 cup 1½ cups 2 cups
Whole wheat flour ½ cup ¾ cup 1 cup
Caraway seeds 1 tbsp. 2 tbsp. 3 tbsp.
Dehydrated onion 2 tbsp. 3 tbsp. ¼ cup
Active dry yeast 1½ tsp. 2 tsp. 2¼ tsp.
Select Whole Wheat
Course
Select Rapid Whole
Wheat Courset
¾ cup + 2 tbsp.
1 1 2
1 cup + 3
tbsp.
11/3 cups + 2 tbsp.
Active dry yeast 2 tsp. 2½ tsp. 2¾ tsp.
42
Page 43

SEVEN GRAIN BREAD
Ingredients 1½ lb. 2.0 lb.
Eggs, large; room
temperature
plus enough water
(80°F/27°C) to equal
Oil or butter 2 tbsp. 3 tbsp.
Honey 2 tsp. 1 tbsp.
Salt 1½ tsp. 2 tsp.
Whole wheat flour 1½ cups 2 cups
Bread flour ½ cup 1 cup
Brown rice flour ¼ cup ¹/³ cup
Spelt flour ¼ cup ¹/³ cup
Buckwheat flour ¼ cup ¹/³ cup
Rye flour ¼ cup ¹/³ cup
Oatmeal ¼ cup ¹/³ cup
Cornmeal 2 tbsp. ¼ cup
Gluten 3 tbsp. ¼ cup
Active dry yeast 2 tsp. 2¼ tsp.
1 1
1 cup + 2 tbsp. 1½ cups
ENGLISH
Select Whole Wheat
Course
Select Rapid Whole
Wheat Course
Active dry yeast 2½ tsp. 2¾ tsp.
43
Page 44

TWO CHEESE BREAD
Ingredients 1.0 lb. 1½ lb. 2.0 lb.
Eggs, large; room temperature
plus enough water
(80°F/27°C) to equal
Oil or butter 2 tsp. 1 tbsp. 1½ tbsp.
Honey 1 tsp. 2 tsp. 1 tbsp.
Salt 1 tsp. 1½ tsp. 2 tsp.
Dry milk or butter 2 tbsp. 2 tbsp. 3 tbsp.
Whole wheat flour ¼ cup ½ cup ¾ cup
Bread flour 1¾ cups 2½ cups 3¼ cups
Grated cheddar cheese
Grated Parmesan
cheese
Sesame seeds 1 tsp. 2 tsp. 1 tbsp.
Active dry yeast 1½ tsp. 2 tsp. 2¼ tsp.
Select Whole Wheat
Course
1 1 1
¾ cup 1 cup 1¼ cups
2
/3 cup 1 cup 11/3 cups
2 tbsp. 3 tbsp. ¼ cup
Select Rapid Whole
Wheat Course
Active dry yeast 2 tsp. 2½ tsp. 2¾ tsp.
44
Page 45

PUMPERNICKEL BREAD
Ingredients 1.0 lb. 1½ lb. 2.0 lb.
Eggs, large; room
temperature
plus enough water
(80°F/27°C) to equal
Oil or butter 2 tbsp. 3 tbsp. ¼ cup
Honey 2 tbsp. 3 tbsp. ¼ cup
Salt 1 tsp. 1½ tsp. 2 tsp.
Dry milk or butter 1 tbsp. 2 tbsp. 3 tbsp.
Bread flour 1 cup 1½ cups 2 cups
Whole wheat flour ½ cup ¾ cup 1 cup
Rye flour ½ cup
Caraway seeds 1 tbsp. 2 tbsp. 3 tbsp.
Instant coffee
granules
Cocoa powder 2 tbsp. 3 tbsp. ¼ cup
Active dry yeast 1½ tsp. 2 tsp. 2¼ tsp.
Select Whole Wheat
Course
¾ cup + 1 tbsp. 1 cup + 2 tbsp. 1 cup + 6 tbsp.
1 1 2
2
/3 cup 1 cup
1 tsp. 2 tsp. 1 tbsp.
ENGLISH
Select Rapid Whole
Wheat Course
Active dry yeast 2 tsp. 2½ tsp. 2¾ tsp.
45
Page 46

HEARTY NUT BREAD
Ingredients 1.0 lb. 1½ lb. 2.0 lb.
Water (80°F/27°C) 1 cup 1¼ cups
1 cup + 7
tbsp.
Oil or butter 2 tsp. 1 tbsp. 1½ tbsp.
Molasses 3 tbsp. ¼ cup
1
/3 cup
Salt 1 tsp. 1½ tsp. 2 tsp.
Dry oatmeal, quick or
regular
Whole wheat flour
Bread flour 1
Walnuts, chopped
1
/3 cup ½ cup
2
/3 cup 1 cup 1
1
/3 cups 2 cups 22/3 cups
2
/3 cup ¾ cup 1 cup
2
/3 cup
1
/3 cups
Active dry yeast 1½ tsp. 2 tsp. 2¼ tsp.
Select Whole Wheat
Course
Select Rapid Whole
Wheat Course
Active dry yeast 2 tsp. 2½ tsp. 2¾ tsp.
46
Page 47

FRENCH BREAD
Ingredients 1.0 lb. 1½ lb. 2.0 lb.
Water (80°F/27°C) ¾ cup + 2 tbsp. 1 cup + 2 tbsp. 1½ cups
Oil 1 tbsp. 1½ tbsp. 2 tbsp.
Sugar 1 tbsp. 1½ tbsp. 2 tbsp.
Salt 1 tsp. 1½ tsp. 2 tsp.
Bread flour 2¼ cups 3½ cups 4 cups
Active dry yeast 1½ tsp. 2 tsp. 2¼ tsp.
Select French Course
Select Rapid French
Course
Active dry yeast 2 tsp. 2½ tsp. 2¾ tsp.
ITALIAN HERB BREAD
ENGLISH
Ingredients 1.0 lb. 1½ lb. 2.0 lb.
Water (80°F/27°C)
Oil 1½ tbsp. 2 tbsp. 3 tbsp.
Sugar 1 tbsp. 2 tbsp. 3 tbsp.
Salt 1 tsp. 1½ tsp. 2 tsp.
Dry milk solids 1 tbsp. 2 tbsp. 3 tbsp.
Bread flour 2¼ cups 3 cups 4 cups
Active dry yeast 1½ tsp. 2 tsp. 2¼ tsp.
Select French Course
Select Rapid French
Course
Active dry yeast 2 tsp. 2½tsp. 2¾ tsp.
¾ cup + 2
tbsp.
1 cup + 1 tbsp.
1¼ cups
+ 2 tbsp.
47
Page 48

CINNAMON RAISIN BREAD
Ingredients 1.0 lb. 1½ lb. 2.0 lb.
Water (80°F/27°C) ¾ cup 1 cup 1¼ cups + 2 tbsp.
Oil or butter 1 tbsp. 1½ tbsp. 2 tbsp.
Brown sugar,
firmly packed
Salt 1 tsp. 1½ tsp. 2 tsp.
Dry milk solids 1 tbsp. 1½ tbsp. 2 tbsp.
Cinnamon 1 tsp. 2 tsp. 1 tbsp.
Bread flour 2¼ cups 3 cups 4 cups
Walnuts, chopped
Active dry yeast 1½ tsp. 2 tsp. 2¼ tsp.
Add to dispenser
(press EXTRAS before pressing START to begin baking):
Raisins
Select Sweet
Course
Select Rapid Sweet
Course
Active dry yeast 2 tsp. 2½ tsp. 2¾ tsp.
1½ tbsp. 2½ tbsp. 3 tbsp.
1
/3 cup ½ cup
1
/3 cup ½ cup
2
/3 cup
2
/3 cup
48
Page 49

DRIED FRUIT BREAD
Ingredients 1.0 lb. 1½ lb. 2.0 lb.
Water (80°F/27°C) ¾ cup 1 cup + 1 tbsp. 1¼ cups
Oil or butter 2½ tbsp. 3 tbsp. ¼ cup
Brown sugar 1½ tbsp. 2½ tbsp. ¼ cup
Salt 1 tsp. 1½ tsp. 2 tsp.
Dry milk solids 1 tbsp. 1½ tbsp. 2½ tbsp.
Bread flour 2¼ cups 3 cups 4 cups
Nutmeg ½ tsp. 1 tsp. 1½ tsp.
Active dry yeast 1½ tsp. 2 tsp. 2¼ tsp.
Add to dispenser (press EXTRAS before pressing START to begin baking):
Dried fruit
Select Sweet Course
Select Rapid Sweet Course
Active dry yeast 2 tsp. 2½ tsp. 2¾ tsp.
1
/3 cup ½ cup
2
/3 cup
ENGLISH
49
Page 50

SOY CINNAMON RAISIN BREAD
Note: For best results, choose LIGHT crust.
Ingredients 1½ lb.
Water (80°F/27°C) 1 cup
Oil or butter 3 tbsp.
Sugar 2 tbsp.
Salt 1½ tsp.
Dry milk ¼ cup
Bread flour 2½ cups
Cinnamon 1 tsp.
Soy flour ½ cup
Active dry yeast 2 tsp.
Add to dispenser (press EXTRAS before pressing START to begin baking):
Raisins ½ cup
Select Sweet Course
Select Rapid Sweet
Active dry yeast 2½ tsp.
50
Page 51

QUICK BREADS
Important: Removing the kneading paddle on the Quick Breads course
before the start of the Bake cycle will help prevent tearing your cake/loaf
when it is removed from pan after baking.
Note: Quick breads course can be used to mix and bake a prepackaged cake
mix or quick bread, in addition to making regular recipes.
Course Tips for Best Results
• It is important that you assist breadmaker in stirring process during Rest
cycle. Refer to KNEADING AND BAKING COURSE CHART for times. Use a
rubber spatula to gently scrape the ingredients from sides and corners of
pan, and fold into wet mixture.
• Full size cake mix (16-oz or larger), quick bread or muffin mix (13-oz
or larger) works well using the Quick Breads course. As with any other
liquid ingredients, the liquid should be 80ºF/27ºC and the eggs room
temperature. Otherwise, add ingredients as listed on package instructions.
1-step angel food cake mixes may also be used. 2-step and swirl mix will
work well using this program.
• Although delay bake timer is an option for this course, our experience has
shown recipes included do not mix well when delayed. You may find a few
of your recipes may work well; therefore, we have given you delay as an
option.
Important: Don’t use delay bake timer if your recipe includes eggs, fresh
milk, yogurt or other dairy products, meats, fish or any other ingredients
that may spoil.
ENGLISH
SWEET CORNBREAD
Ingredients
Eggs, large, at room temperature 2
Milk (80°F/27°C) 1 cup
Butter, melted ¼ cup
Sugar ¾ cup
Salt 1 tsp.
All-purpose flour 2 cups
Cornmeal 1 cup
Double acting baking powder 1 tbsp.
Select Quick Breads course
1 loaf
51
Page 52

PINEAPPLE COCONUT POUND CAKE
Ingredients 1 cake
Eggs, large, at room temperature 2
Crushed pineapple, undrained 1 cup
Butter, softened ¼ cup
Sugar ¾ cup
Salt ½ tsp.
Coconut, grated ½ cup
All-purpose flour 2 cups
Double acting baking powder 1 tbsp.
Add to dispenser (press EXTRAS before pressing START to begin baking):
Coconut, grated ½ cup
Select Quick Breads course
52
Page 53

CHEDDAR LOAF BREAD
Ingredients 1 loaf
Eggs, large, at room temperature 3
Crushed pineapple, undrained 1 cup
Shortening, room temp. ½ cup
Cheddar cheese, shredded 1 cup
Sugar ½ cup
Salt ¾ tsp.
All-purpose flour 2 cups
Double acting baking powder 1 tbsp.
Add to dispenser (press EXTRAS before pressing START to begin baking):
Pecans, chopped ½ cup
Select Quick Breads course
ENGLISH
53
Page 54

BANANA NUT CAKE
Ingredients
Whole eggs, large, at room temperature 2
Egg whites, at room temperature 2
Sour milk ¹/³ cup
Banana, mashed 1½ cups
Oil or butter 6 tbsp.
Sugar 1 cup
Salt ¾ tsp.
Cream of tartar 1½ tsp.
All-purpose flour 2 cups
Baking soda ¾ tsp.
Double acting baking powder 2 tsp.
Add to dispenser (press EXTRAS before pressing START to begin baking):
1 loaf
Nuts, chopped ¾ cup
Select Quick Breads course
54
Page 55

LOW CARB BREAD RECIPES... EASY AS 1-2-3
For all low carb recipes, use the Low Carb Course selection. Your bread maker
is preset to medium crust color and a 2 lb. (908 g) loaf size; these cannot be
changed on the Low Carb Course setting.
Important: Use exact ingredients listed in recipe; do not substitute! You may
only substitute quick or rapid yeast for active dry yeast as given in the YEAST
CONVERSION table on page 18.
LOW CARB WHITE BREAD
Ingredients 2 lb.
Water (80°F/27°C) 1½ cups
Canola oil 3 tbsp.
Lemon juice 2 tsp.
Liquid lecithin 1 tbsp.
Butter, cold and cut in small pieces ¼ cup
Eggs, large, at room temperature 2
Salt 2 tsp.
ENGLISH
Psyllium husks 3 tbsp.
Dry oatmeal, instant or regular 3 tbsp.
Nutritional yeast flakes 3 tbsp.
Oat bran ¾ cup
Splenda® ¼ cup
Rice bran ¼ cup
Vital wheat gluten 1 cup
Bread flour 2 cups
Active dry yeast 6 tsp.
Select Low Carb Course
Yield: 28 slices
55
Page 56

Nutritional Analysis*
Calories / slice 106
Calories from fat 45
Total fat 5 g
Cholesterol 20 mg
Sodium 187 mg
Potassium 90 mg
Carbohydrates 15
Dietary fiber 3 g
Sugar 0.4 g
Protein 5 g
Vit A 85 iu
Calcium 10 mg
Iron 1 mg
*Calories & nutritional information based on serving sizes listed in recipe.
LOW CARB CINNAMON RAISIN BREAD
Ingredients 2 lb.
Water (80°F/27°C) 2 cups
Canola oil 3 tbsp.
Liquid lecithin 1 tbsp.
Salt 1 tbsp.
Splenda® ¹/³ cup
Oat bran ¾ cup
Ground almonds ¾ cup
Vanilla-flavored whey protein powder 1 cup
Vital wheat gluten 2¾ cups
56
Page 57

Ingredients 2 lb.
Cinnamon 1 tbsp.
Active dry yeast 6 tsp.
Add to dispenser (press EXTRAS before pressing START to begin baking):
Raisins ¹/³ cup
Select Low Carb Course
Yield: 28 slices
Nutritional Analysis*
Calories / slice 77
Calories from fat 36
Total fat 4 g
Cholesterol 4 mg
Sodium 268 mg
Potassium 146 mg
Carbohydrates 10
Dietary fiber 2 g
Sugar 2 g
Protein 10 g
Vit A 1 iu
ENGLISH
Calcium 19 mg
Iron 1 mg
*Calories & nutritional information based on serving sizes listed in recipe.
57
Page 58

LOW CARB SWEET BREADS
Note: Use the Quick Breads course and Light CRUST CONTROL for low carb
quick breads.
LOW CARB CHOCOLATE CAKE
Ingredients 1 cake
Butter, melted 6 tbsp.
Sour cream, room temperature ½ cup
Eggs, large, at room temperature 6
Cocoa powder ¼ cup
Splenda® 3 tbsp.
Soy flour ¾ cup
Select Quick Course and LIGHT crust color.
Yield: 9 pieces
Nutritional Analysis*
Calories / slice 182
Calories from fat 144
Total fat 9 g
Cholesterol 171 mg
Sodium 222 mg
Potassium 280 mg
Carbohydrates 5
Dietary fiber 1 g
Sugar 2 g
Protein 8 g
Vit A 510 iu
Calcium 92 mg
Iron 1 mg
*Calories & nutritional information based on serving sizes listed in recipe.
58
Page 59

GLUTEN FREE BREAD RECIPES... EASY AS 1-2-3
The Gluten Free course on your bread maker allows you to prepare fresh
bread for a gluten-free diet or for bread lovers that have special dietary
needs. Your bread maker is preset to medium crust color and a 1.5 lb. (680 g)
loaf size; these cannot be changed on the Gluten Free course setting.
Important: Use exact ingredients listed in recipe; do not substitute! You
may only substitute quick or rapid yeast for active dry yeast as given in the
YEAST CONVERSION table.
Note: For all Gluten Free recipes, we used Red Star Quick Rise™ Yeast.
GLUTEN FREE COUNTRY WHITE BREAD
Ingredients 1.5 lb.
ENGLISH
Water (110 – 115 °F / 43 – 46 °C)
Extra large eggs 3
Oil 3 tbsp.
Cider vinegar 1 tsp.
Sugar 3 tbsp.
Salt 1½ tsp.
Dry milk ½ cup
White rice flour 2 cups
Potato starch flour 1¼ cups
Soy flour 1/3 cup
Tapioca flour ½ cup
Xanthan gum 1 tbsp.
Red Star Quick Rise™ Yeast 4½ tsp.
1¹/³ cups
Select Gluten Free Course
59
Page 60

GLUTEN FREE PUMPERNICKEL BREAD
Ingredients 1.5 lb.
Water (110 – 115 °F / 43 – 46 °C)
Extra large eggs 3
Oil 3 tbsp.
Cider vinegar 1 tsp.
Molasses 3 tbsp.
Salt 1½ tsp.
Dry milk ½ cup
Brown rice flour 2 cups
Potato starch flour ½ cup
Tapioca flour ½ cup
Cocoa powder 1 tbsp.
Xanthan gum 1 tbsp.
Caraway seeds 1 tbsp.
1 cup
Red Star Quick Rise™ Yeast 4½ tsp.
Select Gluten Free Course
60
Page 61

BREAD / PIZZA DOUGH COURSES
Dough Course Hints for Best Results
• If using delay bake timer, make sure yeast is on top of flour, away from
liquids.
Important: Never allow dough to remain in bread maker after course is
complete; it may over rise and damage machine.
• Rising times for dough after it is shaped and placed in baking pan will vary
due to recipe, temperature and humidity level of your kitchen. Optimum
temperature of room for rising is 80°– 85°F/27°– 29°C. Rising is most
essential feature in bread making.
• Breadmaker allows dough to have first rise or fermentation before dough
is removed. Fermentation conditions gluten, (becoming pliable and elastic
with a soft, smooth quality) develops flavor and leavens product.
• Sometimes a double rising is beneficial especially for whole grain or
100% whole wheat bread. Let dough rise once in breadmaker. Remove
from breadmaker, punch down, let rise again, punch down and let rest
10 minutes. Resting allows gluten to relax and makes handling easier.
Shape as desired and allow to rise until doubled in volume. If only 1 rise is
desired, remove from breadmaker, let rest, shape and rise as above.
Baker’s Hint:
• Dough has doubled in volume when an indentation remains after tip of a
finger is pressed lightly and quickly into dough. If indentation springs back,
cover and let rise a few more minutes and check again.
MAKING DOUGHS: CRUST TREATMENTS
Important: For use only with the Dough Courses
• Always allow optimum rising of shaped dough.
• Use pastry brush to apply glaze.
• Bake as directed.
Egg Yolk Glaze
For shiny golden crust, mix 1 slightly beaten egg or egg yolk with 1 tbsp.
water or milk.
Egg White Glaze
For shiny, chewy crust, mix 1 slightly beaten egg white with 1 tbsp. water.
Lightly Floured
Sprinkle enough flour onto work area so dough can be handled without
sticking.
Shaped Rolls:
Cloverleaf Rolls
Shape into ½-inch balls. Place 3 balls in each muffin tin and let rise until
doubled in size.
Crisscross Rolls
Shape into balls, setting 2 aside. Combine balls and roll into a ⅛-inch thick
square. Cut strips ¹/
8-inch wide and 2-inches long. Place 1 strip across top of
each ball. Repeat process, placing second strip in opposite direction across
top of each ball.
ENGLISH
61
Page 62

Traditional Rolls
Shape into balls. For “pull apart” rolls, place dough balls with sides touching.
For “individual” rolls place dough balls 2-inches apart.
DOUGH COURSE RECIPES...AS EASY AS 1-2-3
DINNER ROLL DOUGH
Ingredients 1 lb.
Eggs, large, at room
12 rolls
1 1 1
1.5 lb.
18 rolls
24 rolls
temperature
Plus enough water (80°F/27°C)
to equal
¾ cup ¾ cup + 1
tbsp.
1
1
/3 cups
Oil 2 tbsp. 3 tbsp. ¼ cup
Sugar 2 tbsp. 3 tbsp. ¼ cup
Salt 1 tsp. 1½ tsp. 2 tsp.
Bread flour 2 cups 3¼ cups 4 cups
Active dry yeast 1½ tsp. 2 tsp 2¼ tsp.
Select Dough Course
Method:
1. Place on lightly floured surface. Divide into pieces and shape.
2. Place on greased baking sheet. Cover and let rise in a warm place for
30 minutes or until doubled in size.
3. Bake at 350ºF/177ºC for 15 to 25 minutes, or until done.
2 lb.
62
Page 63

WHEAT DINNER ROLL DOUGH
Ingredients 1 lb.
9 rolls
Water (80°F/27°C) ¾ cup 1½ cups
Oil 1 tbsp. 2 tbsp.
Brown sugar 2 tbsp. ¼ cup
Salt 1 tsp. 2 tsp.
Bread flour 1¼ cups 2½ cups
Whole wheat flour 1 cup 2 cups
Active dry yeast 2 tsp. 2¼ tsp.
Select Dough Course
Method:
1. Place on lightly floured surface. Divide into pieces and shape.
2. Place on greased baking sheet. Cover and let rise in a warm place
for 30 minutes or until doubled in size.
3. Bake at 350ºF/177ºC for 25 – 30 minutes, or until golden brown.
2 lb.
18 rolls
ENGLISH
63
Page 64

CHEEZY GARLIC ROLL DOUGH
Ingredients
Eggs, large, at room temp. 1 1
Plus enough water (80°F/27°C)
to equal
Oil 2 tbsp. 3 tbsp.
Sugar 1/3 cup ½ cup
Salt 1½ tsp. 2 tsp.
Dry milk 1 tbsp. 2 tbsp.
Bread flour 3½ cups 4½ cups
Active dry yeast 2 tsp. 2¼ tsp.
Select Dough Course
Topping:
1.5 lb.
18 rolls
1 cup 1¹/³ cups
24 rolls
2 lb.
Parmesan cheese, grated ½ cup ²/³ cup
Garlic, finely minced 1½ tbsp. 2 tbsp.
Butter, melted 3 tbsp. ¼ cup
Method:
1. Place on lightly floured surface. Divide into pieces and shape.
2. Combine cheese and garlic. Dip pieces in melted butter and then in
cheese-garlic mixture. Place in greased 9” x 13” baking dish. Cover and
let rise in warm place for 45 minutes or until doubled in size.
3. Bake at 325ºF/163ºC for 35 to 40 minutes, or until done.
64
Page 65

STICKY BREAKFAST BUN DOUGH
Ingredients 1.5 lb.
Eggs, large, at room temp. 1
Plus enough water (80°F/27°C) to equal 1¼ cups
Oil 3½ tsp.
Sugar ¹/³ cup
Salt 1½ tsp.
Bread flour 3½ cups
Active dry yeast 2 tsp.
Select Dough Course
Filling:
12 rolls
ENGLISH
Butter, softened ½ cup
Sugar ¹/³ cup
Cinnamon 1 tbsp.
Pecans, chopped ½ cup
Topping:
Butter, melted ¾ cup
Brown sugar ¾ cup
65
Page 66

Ingredients 1.5 lb.
12 rolls
Pecan halves (optional) 1 cup
Method:
1. Place on lightly floured surface, roll dough into 12” x 16” rectangle and
spread with butter. Combine remaining filling ingredients and sprinkle
over dough. Roll up tightly, jelly-roll style, starting with longest side and
cut into 1” slices.
2. Combine topping mixture and spread into a 13” x 9” baking dish. If you
are using optional pecan halves, line bottom of the pan. Place slices on
mixture and let rise in a warm place for 30 minutes or until doubled in
size.
3. Bake at 350ºF/177ºC for 35 minutes, or until done. Use oven mitts to
carefully invert onto a heat-proof tray; syrup will be very hot.
FRENCH BREAD DOUGH
Ingredients 1.5 lb.
1 loaf
Water (80°F/27°C) 1¼ cups
Sugar 1 tbsp.
Salt 1½ tsp.
Bread flour 3½ cups
Active dry yeast 2 tsp.
Select Dough Course
Glaze:
Water 2 tbsp.
Salt ½ tsp.
66
Page 67

Method 1: Place on lightly floured surface. Roll into large rectangle. Starting
with the longest side, roll up tightly, pressing seams to seal and tapering
each end.
Method 2: Place loaf on greased baking sheet, cover and let rise in a warm
place 40 minutes or until doubled in size.
Method 3: With knife, cut 3 diagonal slashes across top of loaf. Combine
glaze ingredients and brush generously. Bake at 400ºF/205ºC for 20 – 25
minutes until golden brown.
Variations:
French Onion Bread: Add ¼ cup dehydrated onion to dough and shape
according Method 1 described above.
French Loaf: Shape dough into 1 large round ball. Continue Methods 2 and
3 above.
French Roll: Shape or divide into 12 pieces. Roll each into ovals, pinch
together ends of each roll and taper slightly. Place rolls on greased baking
sheet; cover and let rise in warm place 25 – 30 minutes or until doubled in
size. Bake at 400ºF/205ºC for 15 – 20 minutes or until golden brown.
French Twists: Shape or divide into 18 equal pieces. Roll into 14-inch long
ropes. Fold each rope in half and twist, starting at fold. Place on greased
baking sheet and brush with ¹/³ cup melted butter. Cover and let rise in a
warm place 25 – 30 minutes or until doubled in size. Brush with glaze and
bake at 400ºF/205ºC for 12 – 15 minutes or until golden brown.
Tip: If desired, brush with glaze and sprinkle loaves or rolls before baking
with 1 of following: sesame seeds, poppy seeds, caraway seeds or cracked
wheat.
ENGLISH
67
Page 68

CHALLAH BREAD DOUGH
Ingredients
Eggs, large, at room temp. 1 1
Plus enough water (80°F/27°C) to equal ¾ cup 1 cup + 1 tbsp.
Oil 2 tbsp. 3 tbsp.
Sugar 1½ tbsp. 2 tbsp.
Salt 1 tsp. 1½ tsp.
Bread flour 2 cups 3¼ cups
Active dry yeast 1½ tsp. 2 tsp.
Select Dough Course
Glaze:
Egg yolk, beaten 1 1
1 lb.
Regular
1.5 lb.
Large
Water 1 tbsp. 1 tbsp.
Topping:
Poppy seeds 1 tsp. 1 tbsp.
Method:
1. Place dough on lightly floured surface. Divide into thirds, making
3 (10-inch regular, 13-inch large) ropes with tapered ends. Pinch ropes
together at 1 end, braid together. Pinch together at other end and secure
braid.
2. Transfer braided dough to greased baking sheet; cover and let rise in a
warm place for 45 minutes or until doubled in size.
3. Combine glaze ingredients and brush onto braid. Sprinkle with poppy
seeds. Bake at 375ºF/190ºC for 25 minutes or until done.
68
Page 69

BAGEL DOUGH
Ingredients
Water (80°F/27°C) 1 cup
Sugar 1½ tbsp.
Salt 1½ tsp.
Bread flour 3 cups
Active dry yeast 2 tsp.
Select Dough Course
Glaze:
Egg, beaten 1
Toppings (optional) Sesame seeds, poppy
seeds, cracked wheat,
dry cereal or dehydrated
onions
Method:
1. Place on lightly floured surface. Divide into pieces. Roll each in
smooth ball, making hole in center of each with thumbs. Gently pull
to make 1-inch hole.
2. Place on greased baking sheet. Cover and let rise in a warm place for
10 minutes.
3. In 3-quart sauce pan, bring 2 quarts of water and 2 tablespoons
sugar to boil. Place few bagels at a time in boiling water. Simmer
3 minutes, turning each bagel once. Remove with slotted spoon and
put back on greased baking sheet.
4. Brush with egg and sprinkle with choice of toppings. Bake at
400ºF/204ºC for 20 – 25 minutes or until done; cool on wire rack.
1.5 lb.
8 bagels
ENGLISH
69
Page 70

SOFT PRETZEL DOUGH
Ingredients
Water (80°F/27°C) 1¼ cups
Egg yolk, room temp. 1
Oil 1 tbsp.
Sugar 2 tbsp.
Salt 1½ tsp.
White pepper ⅛ tsp.
Bread flour 3½ cups
Active dry yeast 2¼ tsp.
Select Dough Course
Glaze:
1.5 lb.
16 pretzels
Egg white 1
Water 1 tbsp.
Toppings (optional) Kosher salt, sesame seeds
Method:
1. On lightly floured surface cut dough into pieces. Roll each piece into
16-inch rope. Cross ends of the rope to make loop; twist crossed ends
once and fold across loop.
2. Place on greased baking sheet 1½ inches apart. Brush with glaze and
sprinkle with toppings. Bake at 375ºF/190ºC for 15 – 20 minutes or until
done.
Variation:
Pepperoni Pretzel: Add 1 cup sliced pepperoni and 2 tbsp. Parmesan cheese to
dough ingredients. Follow method of completion.
70
Page 71

PIZZA CRUST DOUGH
Ingredients 1 lb.
1 thick or 2 thin crusts
2 lb.
2 thick or 4 thin
crusts
Water (80°F/27°C) ¾ cup
Oil 1 tbsp.
Sugar 1 tbsp.
Salt 1½ tsp.
Dry milk 1 tbsp.
Bread flour 2¼ cups
Active dry yeast 1 tsp.
Select Pizza Dough Course
Method:
1. Place on lightly floured surface. Divide and press onto 12-inch pizza
pan, raising edges.
2. Spread pizza sauce over the dough and sprinkle with toppings.
3. Bake at 425ºF/218ºC for 20 minutes or until crust is golden brown
around edges.
1²/³ cups
2 tbsp.
2 tbsp.
2 tsp.
2 tbsp.
4½ cups
2 tsp.
ENGLISH
71
Page 72

WHOLE WHEAT PIZZA CRUST DOUGH
Ingredients
1 lb.
2 thin crusts
Water (80°F/27°C) 1 cup
Oil 2 tbsp.
Sugar 1 tbsp.
Salt 1 tsp.
Whole wheat flour 1 cup
Bread flour 1½ cups
Active dry yeast 1 tsp.
Select Pizza Dough Course
Method:
1. Place finished dough on lightly floured surface. Divide in half and press
onto 12-inch pizza pan, raising edges. (Sprinkle each pan with 1 tbsp. of
cornmeal if desired.) Generously prick dough with a fork. For 1 (12-inch
thick) crust, do not divide.
2. Bake at 425ºF/218ºC for 10 – 12 minutes or until edges of crust begin
to turn light golden brown. Remove, add toppings and return to oven to
bake additional 15 – 20 minutes.
72
Page 73

FOCACCIA DOUGH
Ingredients 1.5 lb.
Water (80°F/27°C) 1 cup
Oil ¹/³ cup
Sugar 2 tsp
Salt 1½ tsp.
Bread flour 3 cups
Dry Italian seasoning 1 tsp.
Active dry yeast 2 tsp.
Select Pizza Dough Course
Garlic-Cheese Topping:
Olive oil ¼ cup
1 loaf
ENGLISH
Dried oregano 1½ tsp.
Garlic, finely minced ¼ cup
Parmesan cheese, grated ¹/³ cup
Salt ¼ tsp.
Greek-Style Topping:
Olive oil ¼ cup
Dried oregano 1½ tsp.
Onion, thinly sliced 1 cup
Feta cheese, crumbled ¹/³ cup
Black olives, sliced & drained ¼ cup
73
Page 74

Ingredients 1.5 lb.
1 loaf
Salt ¼ tsp.
Method:
1. With oiled hands, evenly press dough into greased 9” x 13” pan . Using
your fingertips, make indentations in dough.
2. Cover, let rise in warm place for 20 minutes or until doubled in size.
While dough is rising, select topping and prepare.
3. In skillet, heat oil. For Garlic-Cheese Topping, stir in oregano and garlic
immediately; remove from heat. For Greek Topping, stir in oregano and
onions; cook until onions are soft, but not brown (approximately
5 minutes).
4. Spoon topping mixture evenly over dough. Sprinkle with remaining
ingredients.
5. Bake at 400ºF/205ºC for 20 minutes or until done.
JAM COURSE
Jam Course Method:
1. Following steps in USING YOUR BREAD MAKER, selecting Jam course.
2. Once Jam cycle is complete, remove bread pan from bread maker and pour
hot jam into heat-safe container. Leave on countertop to partially cool; stir
occasionally.
3. Pour partially-cool jam into refrigerator/freezer-safe container, leaving ½”
of space at the top.
4. Cover tightly to store. Jam will thicken upon cooling.
Course Hints for Best Results
• Do not reduce sugar or use sugar substitutes. Exact amounts of sugar, fruit,
and other ingredients are necessary for good set.
• Use only ripe fruit (not overripe or under-ripe) for best flavor.
• Do not puree fruit. Drain cubed fruit before crushing. Crush with potato
masher or food processor. Jam should have bits of fruit in it.
• Recipes should not exceed 3 cups fruit.
• Be sure to measure fruit AFTER is crushed, not before.
• Remove stems, seeds or pits from fruit before crushing.
• You may use strawberries, blackberries, raspberries or other thin skinned
berries. Fruit such as peaches, pears and apricots may be used, but should be
peeled and have seeds removed.
• Frozen berries or fruit (no sugar added) may be substituted for fresh. Thaw
and drain before measuring. For thinner jam, use juice as part of 3 cups of
berry or fruit amount.
• Lemon juice adds necessary acid to berries or fruit.
74
Page 75

• You may decrease amount of sugar, but it will produce a thinner result.
More sugar will make it thicker. For best results, sugar substitutes are not
recommended.
• Average refrigerated life of jam is 2 weeks or up to several months frozen.
STRAWBERRY, BLACKBERRY, OR RASPBERRY JAM
Fresh or frozen (thawed) fruit 3 cups
Sugar 5 cups
Select Jam Course
BLUEBERRY, APRICOT, PEACH OR PEAR JAM
Fresh or frozen (thawed) fruit 3 cups
Sugar 5 cups
Lemon 3 tbsp.
Select Jam Course
ENGLISH
Important: Do not exceed amounts given!
75
Page 76

Care and Cleaning
This product contains no user serviceable parts. Refer service to qualified service
personnel.
CLEANING
Important: Always unplug bread maker and allow to cool compeltely prior to
cleaing.
Bread pan and kneading paddle have nonstick surfaces, which make cleaning
easier.
1. After baking each loaf of bread, unplug bread maker and discard any crumbs.
2. Remove bread pan from oven chamber and kneading paddle from bread pan.
Then, as needed, wash bread pan and kneading paddle inside and out with
warm, soapy water. Avoid scratching nonstick surfaces.
Caution: Do not place bread pane in dishwashser, or soak it in water.
3. If kneading paddle is stuck to drive shaft, pour warm water into bread pan for
up to 30 minutes, to loosen it. Do not use excessive force.
4. Wipe inside of lid and oven cavity with slightly damp cloth or sponge. If any
residue has scorched on heating element or elsewhere, wipe with nonabrasive
pad to clean. Lid can be removed for cleaning.
Important: Do not put lid in dishwasher, as it may cause warping. Do not
immerse in water, as it contains sensitive eletronic sensors.
5. To clean glass in lid, use glass cleaner or mild detergent and damp cloth or
plastic scouring pad. Do not use abrasive cleaners or scouring pads, as they
may scratch glass.
6. Do not use vinegar, bleach or harsh chemicals to clean bread maker.
7. Be sure bread maker is completely cooled before storing.
8. Oven chamber contains heating element and drive shaft. Therefore, when
cleaning, NEVER pour water, solvents or cleaning solutions into this area.
STORAGE
• All removable parts should be thoroughly cleaned and dried.
76
Page 77

TROUBLESHOOTING
Question Answer
Why does height and shape of
bread differ in each loaf?
Bread has unusual aroma. Why? Stale ingredients may have been used
Kneading paddle comes out with
bread.
Bread has floured corners. Sometimes flour in corner of bread
Can ingredients be halved or
doubled?
Can fresh milk be used in place of
dry milk?
Height and shape of bread may differ
depending on the ingredients, room
temperature and length of timer
cycle. Also, accurate measurement of
ingredients is essential to make delicious bread.
or too much yeast may have been
used. Always use fresh ingredients.
Accurate measurements are essential to make delicious bread.
This can happen, as kneading paddle
is detachable. Use a nonmetal utensil
to remove it.
Caution: Kneading paddle will be hot.
pan may not have been completely
kneaded into dough. Scrape it off loaf
with knife.
NO. If there is too little in bread pan,
kneading paddle cannot knead well
enough. If there is too much, bread
rises out of bread pan.
YES. Be sure to decrease same measurement of water to equal liquid
substitution. Fresh milk is not recommended when using delay bake
timer, because it may spoil while sitting in bread pan.
ENGLISH
77
Page 78

NEED HELP?
For service, repair or any questions regarding your appliance, call the
appropriate 800 number on cover of this book. Please DO NOT return the
product to the place of purchase. Also, please DO NOT mail product back to
manufacturer, nor bring it to a service center. You may also want to consult the
website listed on the cover of this manual.
Two-Year Limited Warranty
(Applies only in the United States and Canada)
What does it cover?
• Any defect in material or workmanship provided; however, Applica’s liability
will not exceed the purchase price of product.
For how long?
• Two years after date of purchase.
What will we do to help you?
• Provide you with a reasonably similar replacement product that is either new
or factory refurbished.
How do you get service?
• Save your receipt as proof of date of sale.
• Visit the online service website at www.prodprotect.com/applica, or call
toll-free 1-800-231-9786, for general warranty service.
• If you need parts or accessories, please call 1-800-738-0245.
What does your warranty not cover?
• Damage from commercial use
• Damage from misuse, abuse or neglect
• Products that have been modified in any way
• Products used or serviced outside the country of purchase
• Glass parts and other accessory items that are packed with the unit
• Shipping and handling costs associated with the replacement of the unit
• Consequential or incidental damages (Please note, however, that some
states do not allow the exclusion or limitation of consequential or incidental
damages, so this limitation may not apply to you.)
How does state law relate to this warranty?
• This warranty gives you specific legal rights. You may also have other rights
that vary from state to state or province to province.
Made in People’s Republic of China
Printed in People’s Republic of China
78
Page 79

NOTES
ENGLISH
79
Page 80

Por favor lea este instructivo antes de usar el producto.
INSTRUCCIONES IMPORTANTES
DE SEGURIDAD
Al usar electrodomésticos, debe seguir precauciones básicas de seguridad
que incluyen:
qLea todas las instrucciones.
qNo toque las superficies calientes. Use las asas o perillas disponibles.
qPara protección contra descarga eléctrica, no sumerja el cable, enchufe,
ni el aparato en agua o en ningún otro líquido.
qMantenga supervisión estrecha cada vez que el aparato esté en uso por
niños o cerca de ellos.
qDesenchufe el aparato del tomacorriente cuando no lo vaya a usar
y antes de limpiarlo. Permita que se refresque antes de colocarle o
retirarle piezas.
qNo use el aparato con un cable o enchufe dañado, ni después que el
aparato falle o se dañe en forma alguna. Comuníquese con Servicios
al Consumidor para examen, reparación o para ajuste eléctrico o
mecánico; o llame al número gratuito que se encuentra en la portada de
este manual.
qEl uso de accesorios no recomendados por el fabricante puede causar
incendios, descargas eléctricas o lesiones.
qNo use el aparato al aire libre
qNo permita que el cable cuelgue del borde de un mostrador, ni que
toque superficies calientes, incluyendo la estufa.
qNo coloque el aparato ni encima, ni cerca de una hornilla de gas o
eléctrica, ni sobre un horno caliente.
qUse extrema precaución al mover un aparato que contenga aceite
u otros líquidos calientes.
qPara apagar la unidad, oprima y sostenga el botón STOP durante
2 segundos y retire el enchufe del tomacorriente.
qNo use el aparato para ningún otro propósito que el uso previsto.
qEvite contacto con las piezas movibles.
CONSERVE ESTAS INSTRUCCIONES.
Este aparato eléctrico es para uso doméstico
únicamente.
80
Page 81

Precaución, superficies calientes: Este aparato
genera calor y despide vapor durante su
funcionamiento. Tome precauciones adecuadas para
prevenir el riesgo de quemaduras, incendios y otras
lesiones a personas o daños a la propiedad.
ENCHUFE POLARIZADO
(Solamente para los modelos de 120V)
Este aparato cuenta con un enchufe polarizado (un contacto es más ancho
que el otro). A fin de reducir el riesgo de un choque eléctrico, este enchufe
encaja en un tomacorriente polarizado en un solo sentido. Si el enchufe no
entra en el tomacorriente, inviértalo y si aun así no encaja, consulte con un
electricista. Por favor no trate de alterar esta medida de seguridad
TORNILLO DE SEGURIDAD
Advertencia: Este aparato cuenta con un tornillo de seguridad para evitar
la remoción de la cubierta exterior del mismo. A fin de reducir el riesgo de
incendio o de choque eléctrico, por favor no trate de remover la cubierta
exterior. Este producto no contiene piezas reparables por el consumidor.
Toda reparación se debe llevar a cabo únicamente por personal de servicio
autorizado.
CABLE ELÉCTRICO
a) El producto debe proporcionarse con un cable corto (o uno
desmontable)para reducir el riesgo de enredarse o de tropezar con un
cable largo.
b) Se encuentran disponibles cables desmontables o de extensión más
largos, que es posible utilizar si se emplea el cuidado debido.
c) Si se utiliza un cable desmontable o de extensión,
1) El voltaje eléctrico del cable desmontable o del cable de extensión
debe ser, como mínimo, igual al del voltaje del aparato,
2) Si el aparato es del tipo que va connectado a tierra, el cable de
extensión deberá ser un cable de tres alambres connnectado
a tierra.
3) El cable más largo debe acomodarse de modo que no cuelgue del
mostrador o de la mesa, para evitar que un niño tire del mismo
o que alguien se tropiece.
Nota: Si el cordón de alimentación esta dañado, en América Latina debe
sustituirse por personal calificado o por el centro de servicio autorizado.
ESPAÑOL
81
Page 82

FALLAS ELÉCTRICAS
Reserva eléctrica por 7 minutos en caso de apagón
Su aparato tiene una reserva eléctrica por 7 minutos. Si se va la electricidad,
la memoria guardará el ciclo en proceso hasta por 7 minutos. Si la electricidad
regresa durante este tiempo, el ciclo se reanudará donde se detuvo.
Debido a consideraciones de salud y sanidad, si no hay corriente al aparato durante más de 7 minutos y usted está utilizando productos lácteos, perecederos,
o carne dentro del pan, deseche los contenidos de la receta y comience de nuevo
con ingredientes frescos. Para recetas no perecederas, puede intentar iniciar el
aparato nuevamente desde el principio del ciclo. Sin embargo, esto puede que
no siempre produzca un pan aceptable.
Si no está seguro de cuando ocurrió el apagón, retire la bola de masa de la
bandeja para pan y colóquela en un recipiente apto para horno. Deje que la masa
doble su tamaño y colóquela en un horno precalentado a 350ºF/177ºC de 30 a 45
minutos o hasta que esté hecho. El pan suena hueco al darle un golpecito por la
parte de arriba cuando está cocinado. Reiteramos que este proceso no siempre
produce un pan aceptable. Si el pan ya ha comenzado a hornearse cuando ocurre
el apagón, usted debe comenzar nuevamente con ingredientes frescos.
Importante: La reserva eléctrica no protege contra sobrecargas. Si usted experimenta aumentos de corriente repentinos con frecuencia, por favor utilice
un protector contra sobrecargas.
82
Page 83

El producto puede variar ligeramente de lo que aparece ilustrado.
13.
12.
11.
10.
9.
1.
2.
3.
4.
Ke
e
p
Warm
Op
e
ra
t
ion
Sw
e
et Breads
Q
ui
c
k Br
e
ad
s
C
ru
s
PizzaDou
t C
on
trol
gh
L
oa
Ex
f Size
t
ra
s
Pau
S
P
rog
el
se
ect
ra
T
m
im
e
/T
e
m
p
Save/
E
r
No
ase
Sta
r
t
Y
e
s
5.
6.
8.
† 1. Tapa separable (Pieza NO TR2700-01)
2. Mango de la tapa
3. Ventana de visibilidad
4. Dispensador automático de frutas y nueces
5. Panel de control
6. Asas frías al tacto (a ambos lados)
7. Cable eléctrico
8. Rejillas de vapor (a ambos lados)
9. Cámara de hornear
10. Presillas de la bandeja para pan
11. Eje propulsor
† 12. Bandeja para pan (Pieza NO TR2700-02)
† 13. Pala de amasar (Pieza NO TR2700-03)
14. Asa de la bandeja
Nota: † indica partes separables/reemplazables por el consumidor.
ESPAÑOL
7.
83
Page 84

PANEL DE CONTROL
Keep Warm
Operation
Sweet
Quick Breads
PizzaDough
1
2
12
Crust Control
Loaf Size
Program
Time/Temp
Extras
Pause
Save/Erase
No
Select
Start
Yes
11
10
9
1. Luz de funcionamiento
Se ilumina al oprimir el botón START; parpadea al terminar un ciclo o
durante la fase que mantiene calientes los alimentos (“Keep Warm”).
2. Pantalla
Muestra su selección y el tiempo del reloj automático programable.
3
4
5
6
7
8
84
Page 85

3. Botón de frutas y nueces (EXTRAS)
Luego que usted seleccione el ciclo de su preferencia, puede oprimir
el botón EXTRAS para activar o cancelar la función del dispensador.
La máquina de pan está programada para no añadir ingredientes (“NO
EXTRAS”).
4. Botón de SELECT
Selecciona el ciclo de pan/masa que usted desee. Cada vez que se
presiona el botón SELECT, una flecha le indicará el ciclo seleccionado.
Durante el ciclo de hornear rápido la palabra “RAPID” aparece en la
pantalla.
5. Botón de pausa (PAUSE)
La función de pausa solamente se puede activar después que la máquina
comience un ciclo. Para más detalles, consulte la sección PAUSE en este
libro.
6. Botón de comenzar (START)
Oprima para seleccionar el ciclo de hornear.
7. Botón de guardar/borrar (SAVE/ERASE)
Oprima este botón para guardar o borrar cambios hechos dentro de la
función de programación (PROGRAM).
8. Botón de parar/reajuste (STOP/RESET)
Oprima y sostenga el botón durante 5 segundos para borrar la pantalla,
reestablecer el ajuste del ciclo de hornear o del reloj automático
programable – o simplemente para dejar de hornear.
9. Botónes de si (YES/▲) y no (NO/▼)
Use este par de botones para registrar los cambios dentro de la función
de Programación y para ajustar el reloj automático programable.
Use este par de botones para añadir o substraer del tiempo que aparece
en la Pantalla.
▲ Aumenta el tiempo en intervalos de 10 minutos.
▼ Disminuye el tiempo en intervalos de 10 minutos.
Se pueden activar opciones adicionales al usar los botones FRUIT
& NUTS, PROGRAM, SAVE/ERASE y DELAY BAKE.
10. Botón de programación (PROGRAM)
Su aparato tiene una función única de horneado programable por
24 horas. Usted puede programar la función de hornear hasta con
24 horas de anticipación.
Programación (PROGRAM) de la duración de cada fase
El botón PROGRAM expande las opciones estándar de su máquina de pan
para hornear, dándole la flexibilidad de alterar el tiempo de duración de
cada fase del programa. El programar el tiempo le permite disminuir o
aumentar la duración del proceso de amasar, subir la masa, o de hornear.
Programación (PROGRAM) de la temperatura
El botón PROGRAM le permite ajustar la temperatura de hornear
mientras usa el ciclo de hornear solamente (BAKE ONLY), al crear su
programa personalizado o receta personal.
11. Tamaño del pan (LOAF SIZE)
Permite seleccionar el tamaño del pan entre: 1 lb, 1½ lb. o 2 lb.
El tamaño de pan programado es de 2 lb.
ESPAÑOL
85
Page 86

12. Botón del nivel de tostado de la corteza (CRUST CONTROL)
Permite seleccionar el nivel de tostado de la corteza del pan: claro (Light),
termino medio (Medium) y oscuro (Dark).
El nivel de tostado de la corteza está preprogramado para termino medio
(Medium).
Nota: Al usar el ciclo de hornear rápido, el nivel de la corteza estará ajustado
a mediano.
Nota: Al oprimir los botones, usted debe oír una señal. Esto le deja saber que ya
ha oprimido lo suficiente y hecho su selección.
CICLOS DE AMASAR Y HORNEAR
Nota: Si en algún momento durante el proceso de hacer pan, usted necesita
apagar su máquina, oprima y sostenga el botón STOP/RESET durante
aproximadamente 5 segundos, luego desenchufe la unidad.
Nota: Durante todos los ciclos, excepto el de mermelada (Jam), sonará una señal
para que usted revise la bola de masa y raspe los ingredientes de los lados de
la bandeja para pan. Ver la TABLA DE CICLOS DE AMASAR Y HORNEAR para
determinar a que tiempo suena la señal.
Nota: De no retirar el pan inmediatamente luego de hornearlo y no oprimir el
botón STOP/RESET, el ciclo controlado de mantener calientes los alimentos
(“KEEP WARM”) por 60 minutos, comenzará de acuerdo al ciclo seleccionado
(con excepción de los ciclos para pan dulce (Sweet), masa (Dough) o mermelada
(Jam)). Aunque esto ha de prevenir que el pan se pase, para obtener mejores
resultados, es preferible que retire el pan inmediatamente una vez que concluya
el proceso de hornear.
Pan blanco (White)
Se usa primordialmente para hacer panes de harina blanca, aunque algunas
recetas incluyen pequeñas cantidades de harina integral.
Pan integral (Whole Wheat)
Se usa para recetas con bastante cantidad de harina integral o de centeno, avena
o salvado. El ciclo de pan integral comienza con un período de descanso durante
el cual las harinas o granos absorben los ingredientes líquidos. Este proceso de
remojar da lugar a que la harina o los granos se suavicen y a que los ingredientes
se combinen. Generalmente, los panes integrales y multigranos son más cortos
y densos que los panes blancos, panes franceses o los panes dulces/de frutas y
nueces.
Pan francés (French)
Tradicionalmente, el pan francés tiene la corteza más crujiente y la textura
más ligera que el pan blanco. Las recetas usualmente no incluyen mantequilla,
margarina o leche.
Panes dulces (Sweet Breads)
Se usa para recetas que contienen jugo de frutas, azúcar adicional o ingredientes
dulces agregados, cómo coco rayado, pasas, frutos secos o chocolate.
La temperatura de hornear se reduce para evitar quemarlos.
86
Page 87

Pan bajo en carbohidratos (Low Carb)
Se usa para recetas bajas en carbohidratos.
Pan sin gluten (Gluten Free)
Se usa para recetas de pan sin gluten.
Panes rápidos (Quick Breads)
Se usa para recetas que contienen polvo de hornear o bicarbonato de sodio,
en lugar de levadura para subir el pan o pastel. Este ciclo está diseñado
especialmente para hacer recetas de pastel desde cero. Use este ciclo para
preparar mezclas envasadas para pastel y mezclas instantáneas para pan.
Mermelada (Jam)
Añada fruta, azúcar y jugo de limón para una mermelada casera – un
excelente acompañante por encima del pan casero, los waffles y el helado.
Masa (Dough)
Este ciclo se usa para preparar masa para pan o panecillos a los que hay
que darle forma y subir, antes de hornearlos de forma convencional. Este
programa mezcla y trabaja la masa y la deja subir por primera vez.
Masa para pizza (Pizza Dough)
Se usa para preparar masa que requiere menos trabajo y que sube una sola
vez, cómo la masa para pizza y Focaccia.
Hornear Solamente (Bake Only)
Use si la corteza está muy clara o si usted desea hornear masa ya hecha.
Esta función es especialmente útil si su pan o pastel no está completamente
hecho. Revise cada varios minutos. Este ciclo hornea hasta por 1 hora,
30 minutos, de 300°F a 375°F.
Ciclo rápido (Rapid Bake)
Se usa para disminuir el tiempo de los ciclos de pan blanco, pan Integral, pan
francés y pan dulce por 1 hora, aproximadamente. Escoja la receta, luego
simplemente añada la cantidad de levadura indicada para el ciclo rápido.
El pan puede ser más corto y denso.
Receta personal (Personal Recipe)
Su aparato tiene 5 ciclos de memoria reservados para recetas personales.
Usted tiene 5 espacios en que programar y guardar sus recetas favoritas.
RECETAS PERSONALES (PERSONAL RECIPES) permite tomar cómo factor
la marca y tipo de harina, calidad de la levadura y hasta el clima, para
programar el tiempo de cada fase en el ciclo. La información guardada en
el archivo PERSONALES (PERSONAL RECIPES) se mantiene separada de los
ciclos regulares.
Programa personalizado (Custom Program)
Le permite alterar las funciones existentes dentro de los programas
preconfigurados para manualmente cambiar el largo de cada ciclo.
ESPAÑOL
87
Page 88

TABLA DE AMASAR Y HORNEAR
Ciclo Corteza Tamaño Precalentar Amasar 1 Amasar 2 Subir 1 Golpear Subir
Pan Blanco Claro
Termino
medio
Oscuro
Pan Blanco
Rápido
Claro
2 lb. - 5 min 20 min
1.5 lb. - 3 min 22 min 40 min 10 seg. 24 m
1 lb. - 3 min 22 min 40 min 10 seg. 24 m
2 lb. - 5 min 20 min
1.5 lb. - 3 min 22 min 40 min 10 seg. 24 m
1 lb. - 3 min 22 min 40 min 10 seg. 24 m
1 lb. - 5 min 20 min
1.5 lb. - 3 min 22 min 40 min 10 seg. 24 m
2 lb. - 3 min 22 min 40 min 10 seg. 24 m
2 lb. - 5 min 20 min
88
Termino
medio
Oscuro
1.5 lb. - 3 min 22 min 15 min 10 seg. 9 m
1 lb. - 3 min 22 min 15 min 10 seg. 9 m
2 lb. - 5 min 20 min
1.5 lb. - 3 min 22 min 15 min 10 seg. 9 m
1 lb. - 3 min 22 min 15 min 10 seg. 9 m
2 lb. - 5 min 20 min
1.5 lb. - 3 min 22 min 15 min 10 seg. 9 m
1 lb. - 3 min 22 min 15 min 10 seg. 9 m
Page 89

Dar
2
forma
Subir 3Hornear Total
40 min 10 seg. 24 m
50 s
50 s
50 s
40 min 10 seg. 24 m
50 s
50 s
50 s
40 min 10 seg. 24 m
50 s
50 s
50 s
15 min 10 seg. 9 m
50 s
15
seg.
15
seg.
15
seg.
15
seg.
15
seg.
15
seg.
15
seg.
15
seg.
15
seg.
10
seg.
49 m
45 s
49 m
45 s
49 m
45 s
49 m
45 s
49 m
45 s
49 m
45 s
49 m
45 s
49 m
45 s
49 m
45 s
29 m
50 s
40 min 3:00
35 min 2:55
30 min 2:50
50 min 3:10
45 min 3:05
40 min 3:00
60 min 3:20
55 min 3:15
50 min 3:10
40 min 2:00
ESPAÑOL
50 s
50 s
15 min 10 seg. 9 m
50 s
50 s
50 s
15 min 10 seg. 9 m
50 s
50 s
50 s
10
seg.
10
seg.
10
seg.
10
seg.
10
seg.
10
seg.
10
seg.
10
seg.
29 m
50 s
29 m
50 s
29 m
50 s
29 m
50 s
29 m
50 s
29 m
50 s
29 m
50 s
29 m
50 s
35 min 1:55
30 min 1:50
50 min 2:10
45 min 2:05
40 min 2:00
60 min 2:20
55 min 2:15
50 min 2:10
89
Page 90

Ciclo Corteza Tamaño Precalentar Amasar 1 Amasar 2 Subir 1 Golpear Subir
Pan Integral Claro
Termino
medio
Oscuro
Pan Integral
Claro
Rápido
2 lb. 30 min 5 min 15 min
1.5 lb. 30 min 3 min 17 min 50 min 10 seg. 24 m
1 lb. 30 min 3 min 17 min 50 min 10 seg. 24 m
2 lb. 30 min 5 min 15 min
1.5 lb. 30 min 3 min 17 min 50 min 10 seg. 24 m
1 lb. 30 min 3 min 17 min 50 min 10 seg. 24 m
2 lb. 30 min 5 min 15 min
1.5 lb. 30 min 3 min 17 min 50 min 10 seg. 24 m
1 lb. 30 min 3 min 17 min 50 min 10 seg. 24 m
2 lb. 5 min 5 min 15 min
90
Termino
medio
Oscuro
1.5 lb. 5 min 3 min 17 min 30 min 10 seg. 39 m
1 lb. 5 min 3 min 17 min 30 min 10 seg. 39 m
2 lb. 5 min 5 min 15 min
1.5 lb. 5 min 3 min 17 min 30 min 10 seg. 39 m
1 lb. 5 min 3 min 17 min 30 min 10 seg. 39 m
2 lb. 5 min 5 min 15 min
1.5 lb. 5 min 3 min 17 min 30 min 10 seg. 39 m
1 lb. 5 min 3 min 17 min 30 min 10 seg. 39 m
Page 91

Dar
2
forma
Subir 3Hornear Total
50 min 10 seg. 24 m
50 s
50 s
50 s
50 min 10 seg. 24 m
50 s
50 s
50 s
50 min 10 seg. 24 m
50 s
50 s
50 s
30 min 10 seg. 39 m
50 s
10
seg.
10
seg.
10
seg.
10
seg.
10
seg.
10
seg.
10
seg.
10
seg.
10
seg.
44 m
50 s
44 m
50 s
44 m
50 s
44 m
50 s
44 m
50 s
44 m
50 s
44 m
50 s
44 m
50 s
44 m
50 s
40 min 3:30
37 min 3:27
35 min 3:25
45 min 3:35
42 min 3:32
40 min 3:30
53 min 3:43
50 min 3:40
48 min 3:38
- - 40 min 2:15
ESPAÑOL
50 s
50 s
30 min 10 seg. 39 m
50 s
50 s
50 s
30 min 10 seg. 39 m
50 s
50 s
50 s
- - 37 min 2:12
- - 35 min 2:10
- - 45 min 2:20
- - 42 min 2:17
- - 40 min 2:15
- - 53 min 2:28
- - 50 min 2:25
- - 48 min 2:23
91
Page 92

Ciclo Corteza Tamaño Precalentar Amasar 1 Amasar 2 Subir 1 Golpear Subir
Pan Frances Claro
Termino
medio
Oscuro
Pan Frances
Claro
Rápido
2 lb. - 5 min 20 min
1.5 lb. - 3 min 22 min 40 min 10 seg. 29 m
1 lb. - 3 min 22 min 40 min 10 seg. 29 m
2 lb. - 5 min 20 min
1.5 lb. - 3 min 22 min 40 min 10 seg. 29 m
1 lb. - 3 min 22 min 40 min 10 seg. 29 m
2 lb. - 5 min 20 min
1.5 lb. - 3 min 22 min 40 min 10 seg. 29 m
1 lb. - 3 min 22 min 40 min 10 seg. 29 m
2 lb. - 5 min 20 min
92
Termino
medio
Oscuro
1.5 lb. - 3 min 22 min 20 min 8 seg. 44 m
1 lb. - 3 min 22 min 20 min 8 seg. 44 m
2 lb. - 5 min 20 min
1.5 lb. - 3 min 22 min 20 min 8 seg. 44 m
1 lb. - 3 min 22 min 20 min 8 seg. 44 m
2 lb. - 5 min 20 min
1.5 lb. - 3 min 22 min 20 min 8 seg. 44 m
1 lb. - 3 min 22 min 20 min 8 seg. 44 m
Page 93

Dar
2
forma
Subir 3Hornear Total
40 min 10 seg. 29 m
50 s
50 s
50 s
40 min 10 seg. 29 m
50 s
50 s
50 s
40 min 10 seg. 29 m
50 s
50 s
50 s
20 min 8 seg. 44 m
52 s
10
seg.
10
seg.
10
seg.
10
seg.
10
seg.
10
seg.
10
seg.
10
seg.
10
seg.
59 m
50 s
59 m
50 s
59 m
50 s
59 m
50 s
59 m
50 s
59 m
50 s
59 m
50 s
59 m
50 s
59 m
50 s
45 min 3:20
42 min 3:17
40 min 3:15
55 min 3:30
52 min 3:27
50 min 3:25
65 min 3:40
62 min 3:37
60 min 3:35
- - 45 min 2:15
ESPAÑOL
52 s
52 s
20 min 8 seg. 44 m
52 s
52 s
52 s
20 min 8 seg. 44 m
52 s
52 s
52 s
- - 42 min 2:12
- - 40 min 2:10
- - 55 min 2:25
- - 52 min 2:22
- - 50 min 2:20
- - 65 min 2:35
- - 62 min 2:32
- - 60 min 2:30
93
Page 94

Ciclo Corteza Tamaño Precalentar Amasar 1 Amasar 2 Subir 1 Golpear Subir
Pan Dulce Claro
Termino
medio
Oscuro
Pan Dulce
Claro
Rápido
2 lb. - 5 min 20 min
1.5 lb. - 3 min 22 min 40 min 10 seg. 24 m
1 lb. - 3 min 22 min 40 min 10 seg. 24 m
2 lb. - 5 min 20 min
1.5 lb. - 3 min 22 min 40 min 10 seg. 24 m
1 lb. - 3 min 22 min 40 min 10 seg. 24 m
2 lb. - 5 min 20 min
1.5 lb. - 3 min 22 min 40 min 10 seg. 24 m
1 lb. - 3 min 22 min 40 min 10 seg. 24 m
2 lb. - 5 min 20 min
94
Termino
medio
Oscuro
1.5 lb. - 3 min 22 min 25 min 10 seg. 54 m
1 lb. - 3 min 22 min 25 min 10 seg. 54 m
2 lb. - 5 min 20 min
1.5 lb. - 3 min 22 min 25 min 10 seg. 54 m
1 lb. - 3 min 22 min 25 min 10 seg. 54 m
2 lb. - 5 min 20 min
1.5 lb. - 3 min 22 min 25 min 10 seg. 54 m
1 lb. - 3 min 22 min 25 min 10 seg. 54 m
Page 95

Dar
2
forma
Subir 3Hornear Total
40 min 10 seg. 24 m
50 s
50 s
50 s
40 min 10 seg. 24 m
50 s
50 s
50 s
40 min 10 seg. 24 m
50 s
50 s
50 s
25 min 10 seg. 54 m
50 s
5 seg. 49 m
55 min 3:15
55 s
5 seg. 49 m
52 min 3:12
55 s
5 seg. 49 m
50 min 3:10
55 s
5 seg. 49 m
65 min 3:25
55 s
5 seg. 49 m
62 min 3:22
55 s
5 seg. 49 m
60 min 3:20
55 s
5 seg. 49 m
75 min 3:35
55 s
5 seg. 49 m
72 min 3:32
55 s
5 seg. 49 m
70 min 3:30
55 s
- - 55 min 2:40
ESPAÑOL
50 s
50 s
25 min 10 seg. 54 m
50 s
50 s
50 s
25 min 10 seg. 54 m
50 s
50 s
50 s
- - 52 min 2:37
- - 50 min 2:35
- - 65 min 2:50
- - 62 min 2:47
- - 60 min 2:45
- v 75 min 3:00
- - 72 min 2:57
- - 70 min 2:55
95
Page 96

Ciclo Corteza Tamaño Precalentar Amasar 1 Amasar 2 Subir 1 Golpear Subir
Pan Bajo en
30 min 3 min 25 min
Carbohidratos
Pan Sin Gluten
Mermelada
Masa
- 3 min 10 min
15 min - -
2 lb. - 3 min 27 min
1.5 lb. - 3 min 24 min 60 min
1 lb. - 3 min 21 min 60 min
Masa de pizza
Hornear
- 3 min 22 min
2 lb. - - -
Solamente
*Los ciclos para Pan Integral tienen un período de descanso de hasta 30
minutos antes de comenzar el proceso de amasar. Durante este tiempo no
ocurre ningun movimiento en la bandeja para pan.
Esto es normal.
*El ciclo para Mermelada tiene un período de descanso de hasta 15 minutos
antes de comenzar el proceso de amasar. Durante este tiempo no ocurre ningun
movimiento en la bandeja para pan.
Ciclo Corteza Amasar 1 Amasar 2 Amasar 3 Descanso Amasar 4 Amasar 5 Hornear Total
Panes
rápidos
Claro 1 min 3 min 2 min
Termino medio 1 min 3 min 2 min 2 min 1 min 2 min 79 min 1:30
Oscuro 1 min 3 min 2 min 2 min 1 min 2 min 89 min 1:40
96
Page 97

Dar
2
forma
Subir 3Hornear Total
80 min 15 seg. 31
seg.
14 min - -
4 seg. 46
seg.
-
55 min 4:30
- 52 min 1:19
- - - - - 50 min 1:05
60 min
30 min
-
- - - - -
- - - - -
- - - - -
- - - - -
- - - -
120 min 2:00
1:30
1:27
1:24
0:55
ESPAÑOL
2 min 1 min 2 min 69 min 1:20
97
Page 98

CONOZCA SUS INGREDIENTES
HARINA Y OTROS GRANOS
Harina común
Salvado
Harina de pan
Harina de maíz y avena
Trigo quebrado
La harina común es una mezcla de harinas
de trigo refinadas, ásperas y blandas, que son
ideales en la preparación de panes y pasteles
rápidos.
El salvado (no procesado) es la porción
áspera de los granos de trigo o centeno que
se separan de la harina al cernir. A menudo
se añade al pan en pequeñas cantidades para
enriquecimiento nutricional, darle cuerpo y
sabor. También se utiliza para aumentar la
textura del pan.
La harina de pan es una harina alta en
gluten/proteína que típicamente tiene
una concentración de gluten más alta
que la harina común. El uso de harina de
pan produce panes con mejor volumen y
estructura. Se debe usar harina de pan para
todos los ciclos de hornear.
La harina de maíz y la avena vienen del
maíz blanco o amarillo molido grueso o
de hojuelas de avena o avena cortada en
máquina. Primordialmente se usan para
realzar el sabor y la textura del pan.
El trigo quebrado tiene una textura muy
áspera. Proviene de granos de trigo que
se cortan en fragmentos angulares. Le da
a los panes un sabor a nuez y una textura
crujiente.
Harina de centeno
Harina leudante
Mezcla de 7 granos de
cereal
98
La harina de centeno siempre tiene que
mezclarse con una gran proporción de harina
de pan, ya que no contiene suficiente gluten
para desarrollar la estructura para un pan
alto en granos.
El uso de harina leudante NO SE
RECOMIENDA. La harina leudante contiene
ingredientes con levadura que interfieren con
la hechura de pasteles y panes.
La mezcla de 7 granos de cereal contiene
trigo quebrado, avena, salvado, harina de
maíz, semillas de linaza y mijo mondado.
Page 99

Gluten de trigo vital
El gluten se fabrica de la harina integral que
ha sido tratada para extraerle todo el almidón
y así dejar un gran contenido de proteína.
(El gluten es la proteína en el trigo que le da
elasticidad a la masa). Puede encontrarla
en la mayoría de las tiendas de alimentos
naturales. Se puede utilizar en pequeñas
porciones para aumentar el volumen y
disminuir la textura del pan.
Harina integral
La harina integral se muele del grano de
trigo entero, que contiene el centeno y el
germen. Esta harina alta en fibra es más rica
en nutrientes que la común o la de pan. Los
panes creados con esta harina casi siempre
son más pequeños y pesados que los panes
blancos. Muchas recetas mezclan harina
integral con harina de pan o gluten vital para
producir un pan alto, de textura liviana.
Almacenamiento de la harina
Mantenga la harina en un envase hermético y seguro. Mantenga la harina de
centeno y la harina integral almacenadas en un refrigerador, congelador o en
un lugar fresco para evitar que se ponga rancia. Deje que la harina alcance la
temperatura ambiental antes de usarla.
Nota: Los tipos de harina, aunque visualmente similares, pueden ser muy
diferentes dependiendo de cómo se muelan, donde se almacenan, etc. Puede
que usted tenga que experimentar con diferentes marcas de harina para
ayudarle a lograr el pan perfecto. Ver CONSEJOS PARA RECETAS para asistir
con estos experimentos.
LEVADURA
La levadura activa produce, a través de un proceso de fermentación, gas de
dióxido de carbono necesario para subir el pan. La levadura se alimenta de
los carbohidratos en el azúcar y la harina para producir este gas. Existen
tres tipos de levadura: fresca (pastel), seca activa y de acción rápida. Las
levaduras de acción rápida incluyen: la levadura rápida, levadura de panadero
y la levadura que sube rápidamente. La levadura fresca (pastel) NO SE
RECOMIENDA para uso con su máquina de pan.
Consejos de la levadura
Revise la fecha de vencimiento de su levadura para asegurar que esté fresca.
Lo ideal sería que utilice la levadura varios meses antes de la fecha de
vencimiento. Una vez que se abra el paquete de levadura, es importante que
el contenido restante se selle inmediatamente y se refrigere o congele para
uso futuro. A menudo la masa no sube producto del uso de levadura rancia.
ESPAÑOL
99
Page 100

Nota: Las recetas básicas de pan y masa en este folleto se crearon utilizando
levadura seca activa. Usted puede usar la tabla a continuación para sustituir
cualquier levadura de acción rápida (o de panadero) por levadura seca activa.
Tabla de conversión para la levadura de acción rápida
¾ cdta. levadura seca activa = ½ cdta. levadura de acción rápida
1 cdta. levadura seca activa = ¾ cdta. levadura de acción rápida
1½ cdta. levadura seca activa = 1 cdta. levadura de acción rápida
2¼ cdta. levadura seca activa = 1½ cdta. levadura de acción rápida
1 cda. levadura seca activa = 2 cdtas. levadura de acción rápida
Cómo añadir levadura a los ciclos rápidos
Los ciclos rápidos para pan blanco, pan francés, pan integral y pan dulce están
configurados para disminuir el tiempo que toma hacer su pan favorito por
aproximadamente 1 hora. Escoja la receta, luego añada una ½ cdta. adicional de
levadura seca activa o levadura de acción rápida. El pan puede resultar más corto
y denso.
NOTAS ADICIONALES ACERCA DE LOS
INGREDIENTES
Importante: El elemento más importante al hornear es llevar las
medidas de los ingredientes exactas al pie de la letra. Es lo esencial para
obtener una textura y consistencia excelentes en su pan. Asegúrese de
medir todos los ingredientes con exactitud.
Azúcar
Bicarbonato de
sodio
Grasas
100
El azúcar es importante en el color y sabor de los
panes. También sirve para alimentar la levadura ya
que apoya el proceso de fermentación. Las recetas
en este libro que utilizan azúcar requieren azúcar
granulada.
Importante: No utilice azúcar en polvo, ni
edulcorantes artificiales cómo sustitutos, ya que
la levadura no reaccionará de forma adecuada con
estos ingredientes.
El bicarbonato de sodio es otro agente de levadura
que no debe confundirse ni sustituirse con el polvo
de hornear. Tampoco requiere tiempo de subir
antes de hornear, ya que la reacción química ocurre
durante el proceso de hornear.
La grasa, la mantequilla y el aceite cortan o
ablandan la textura de los panes de levadura. El
pan francés obtiene su corteza y textura únicas
de la falta de grasa. Sin embargo, los panes que
requieren grasa, se mantienen frescos durante más
largo tiempo. Si usa la mantequilla directamente del
refrigerador, debe cortarla en pedazos pequeños
para que se mezclen más fácilmente durante el
proceso de amasar.
 Loading...