

Braun Series 5 540, 540, 550, Series 5 550 User Manual
Series 5
550
540
f
of
on
fix
trim
100
80
60
40
0 20
Type 5647, 5649
Modèle 5647, 5649
Modelo 5647, 5649
www.braun.com/register

English 4
Français 12
Español 19
Thank you for purchasing a Braun product.
We hope you are completely satisfied with
your new Braun shaver.
If you have any questions, please call:
US residents 1-800-BRAUN-11
1-800-272-8611
Canadian residents 1-800-387-6657
Merci d’avoir fait l’achat d’un produit Braun.
Nous espérons que vous serez pleinement
satisfait de votre nouveau rasoir Braun.
Si vous avez des questions, veuillez appeler
Braun Canada : 1-800-387-6657
Gracias por haber comprado un producto
Braun.
Esperamos que quede completamente
satisfecho con su nueva afeitadora Braun.
Si tiene alguna duda, por favor llame al:
01(800) 508-5800
5-647-320/00/III-08
USA/CDN/MEX
4
1
2
4
5
6
7
8
9
10
11
12
f
of
on
fix
trim
charge
empty
540
8
4
f
of
on
fix
100
80
60
40
0 20
3
4
5
6
trim
7
51S
3
2
9
10
11
12
550
13

English
IMPORTANT SAFETY
INSTRUCTIONS
When using an electrical appliance, basic precautions should always be
followed, including the following:
Read all instructions before using this appliance.
DANGER
To reduce the risk of electric shock:
1. Do not reach for an appliance that has fallen into water.
Unplug immediately.
2. Do not use while bathing or in a shower when the appliance is connected to an
electrical outlet.
3. Do not place, store or charge the appliance where it can fall or be pulled
into a tub or sink. Do not place in or drop into water or other liquid.
4. When not using for a longer period of time, unplug this appliance from the
electrical outlet.
5. Unplug this appliance before cleaning.
6. This appliance is provided with a special cord set with integrated Safety Extra
Low Voltage power supply. Do not exchange or manipulate any part of it.
FOR HOUSEHOLD USE
SAVE THESE INSTRUCTIONS
4

WARNING
To reduce the risk of burns, fire, electric shock, or injury to persons:
1. Close supervision is necessary when this appliance is used by, on, or near
children or invalids.
2. Use this appliance only for its intended use as described in this manual.
Do not use attachments not recommended by the manufacturer.
3. Never operate this appliance if it has a damaged cord or plug, if it is not
working properly, if it has been dropped or damaged, or if the power supply
has been dropped into water. Return the appliance to a service center for
examination and repair.
4. Keep the cord away from heated surfaces.
5. Never drop or insert any object into any opening.
6. Do not use outdoors or operate where aerosol (spray) products are being used
or where oxygen is being administered.
7. Do not use this appliance with a damaged or broken foil, as serious skin
injuries may occur.
8. Always attach plug to appliance first, then to outlet. To disconnect, turn all
controls to «off», then remove plug from outlet.
9. When plugging to an electrical outlet outside the USA, use a plug adapter to
match the outlet’s pin configuration.
SAVE THESE INSTRUCTIONS
5
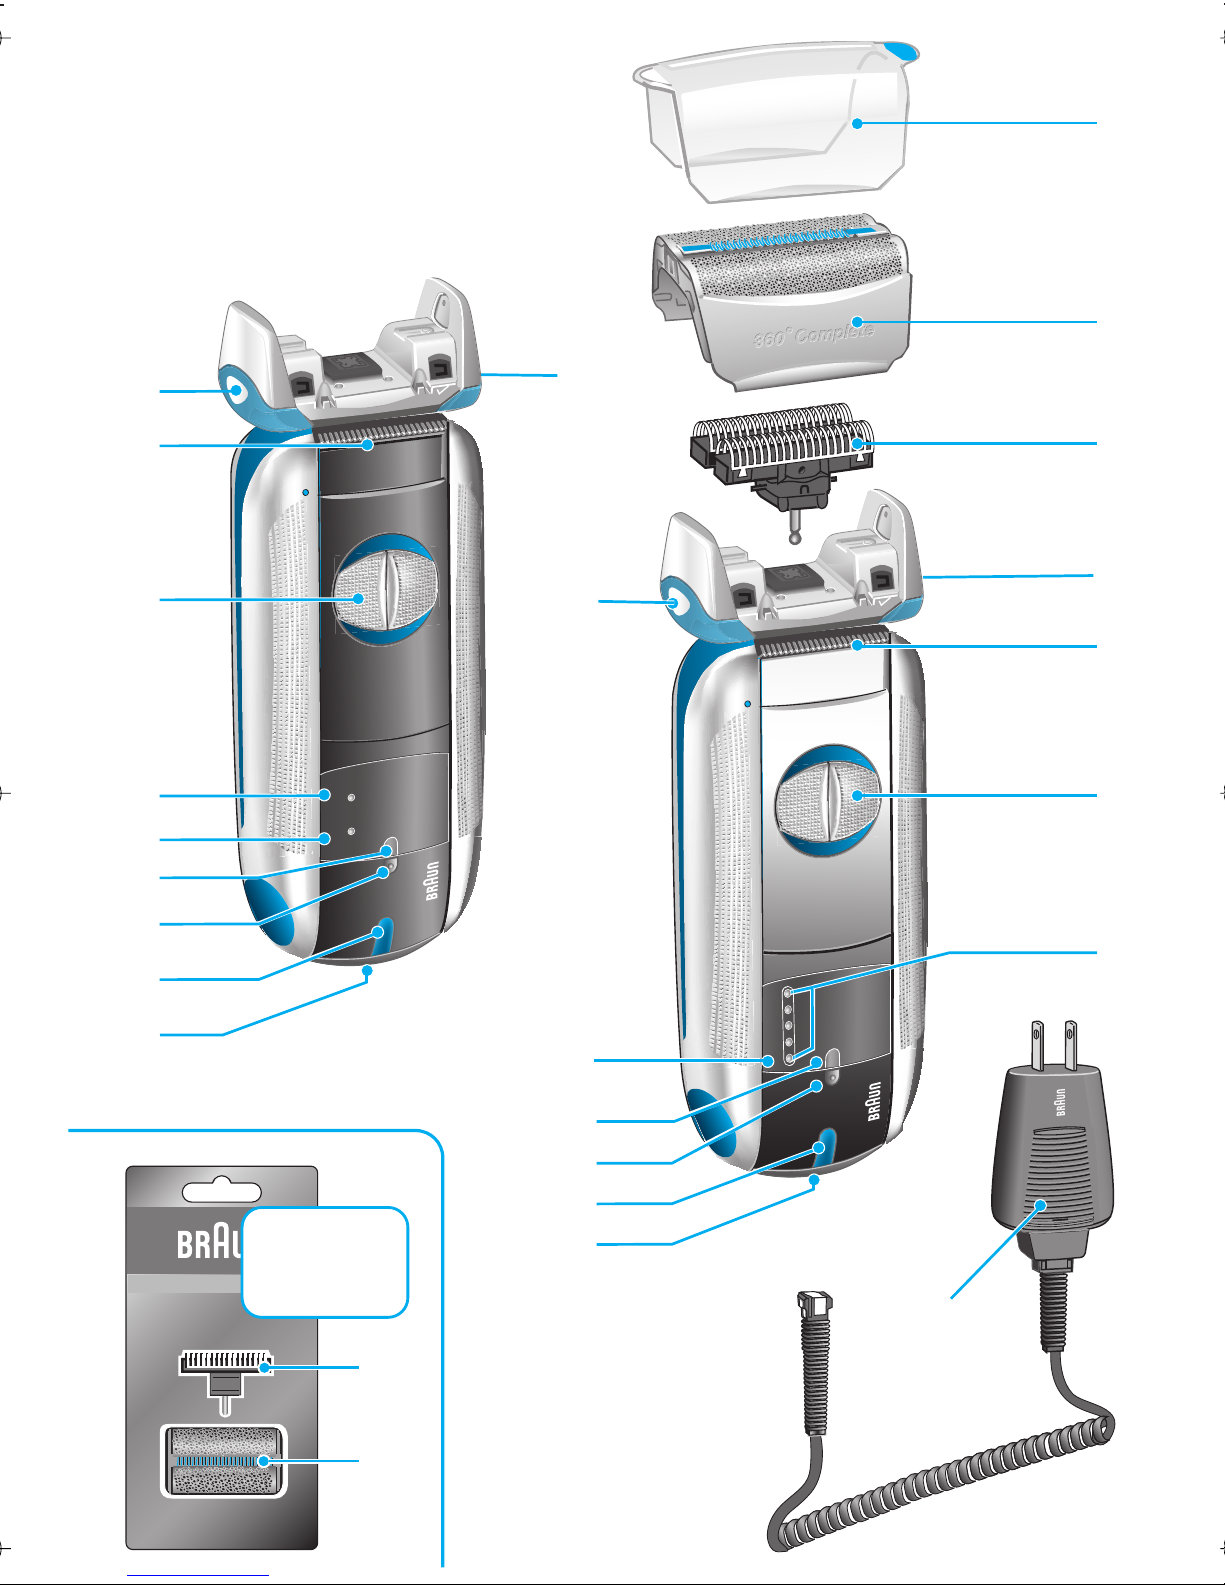
Description
1 Foil protection cap
2 Shaver foil
3 Cutter block
4 Release buttons
5 Long hair trimmer
6 Switch
7 Charging lights (green)
8 Low charge light (red)
9 Replacement light for shaving parts
10 Reset button
11 Pilot light
12 Shaver socket
13 Special cord set
Charging the shaver
• When charging for the first time: Using the special cord
set, connect the shaver to an electrical outlet.
The shaver must be switched off. Charge it for at least
4 hours (special cord set and shaver might get warm).
Once the shaver is completely charged, shave until
fully discharged. Then recharge to full capacity again
(1 hour).
• A full charge will give up to 50 minutes of cordless
shaving time, depending on your beard growth.
However, the maximum battery capacity will only be
reached after several charging/discharging cycles.
• Best environmental temperature range for charging is
from 60 °F to 95 °F / 15 °C to 35 °C.
• When fully discharged, you may also shave with the
shaver connected to an electrical outlet via the special
cord set.
60
40
0..20
100
charge
empty
80
60
40
0...20
6
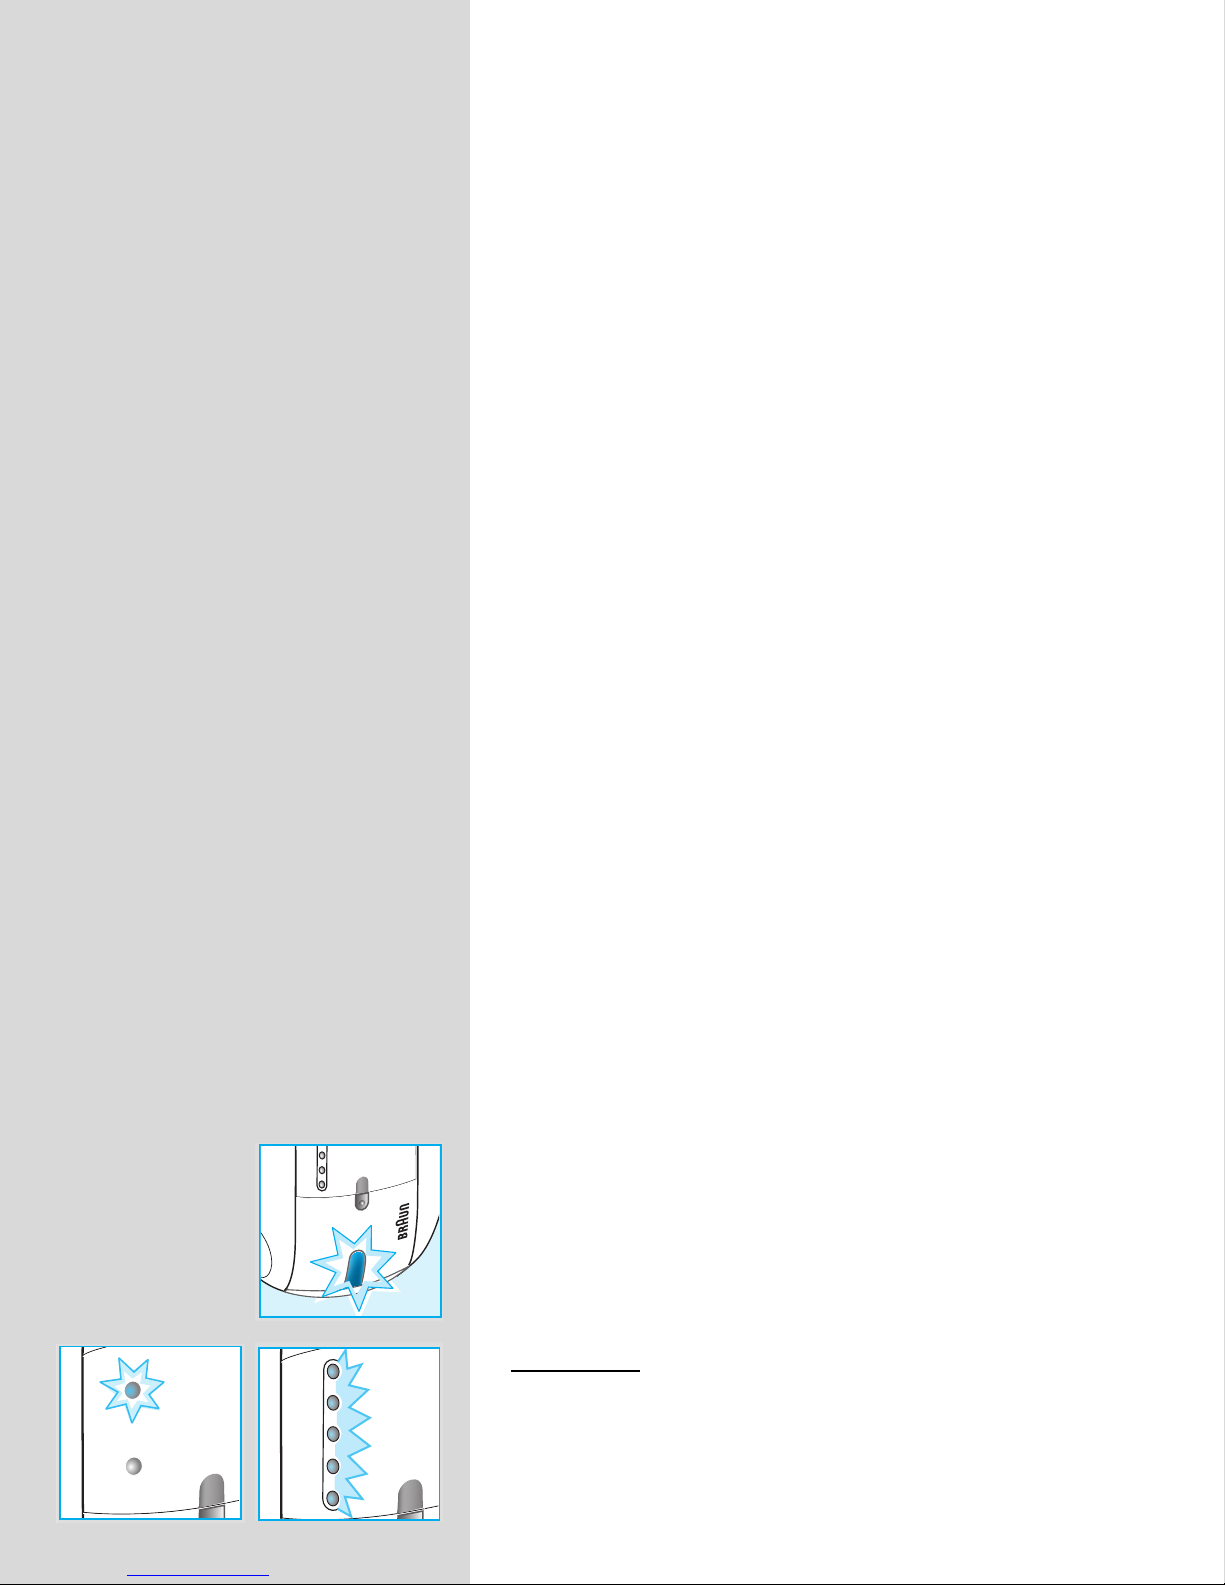
Indicator lights
Pilot light (11): The shaver is connected to an electrical
outlet.
Model 550:
charging lights (7) will light up (20% per light), provided
the shaver is connected to an electrical outlet or switched
on.
When the shaver is fully charged, all five

Model 540:
empty
charge
fix
on
fix
on
trim
fix
on
The green single charging light (7) shows that
the shaver is being charged. When fully charged, the
charging light flashes or goes off. If later on, the charging
light comes on again, this indicates that the shaver is
being recharged to maintain its full capacity.
The red low charge light (8) flashes when the battery
capacity has dropped below 20%, provided the shaver is
switched on. The remaining capacity will then be sufficient
for 2 to 3 shaves.
Shaving
Switch positions
off = (switch is locked)
Press and push up the switch to operate the shaver:
on = Shaving with the pivoting head
(the pivoting cutting system automatically adjusts
to every contour of your face).
100
80
60
40
0...20
fix = Shaving with the pivoting head locked at an angle
(to permit shaving in difficult areas, e.g. under the
nose).
trim= The long hair trimmer is activated
(for trimming sideburns, moustache and beard).
Tips for the perfect shave
• It can take up to 14-21 days for your beard to adjust
to the new shaving system.
• Shave before washing your face or taking a shower,
as skin tends to swell after washing.
• The drier the skin, the closer the shaving results will
be.
• Hold the shaver at right angles (90°) to the skin.
Stretch the skin and shave against the direction of
beard growth.
• To maintain 100% shaving performance, replace
your foil and cutter block, when the replacement light
(9) comes on (after about 18 months), or when worn.
7
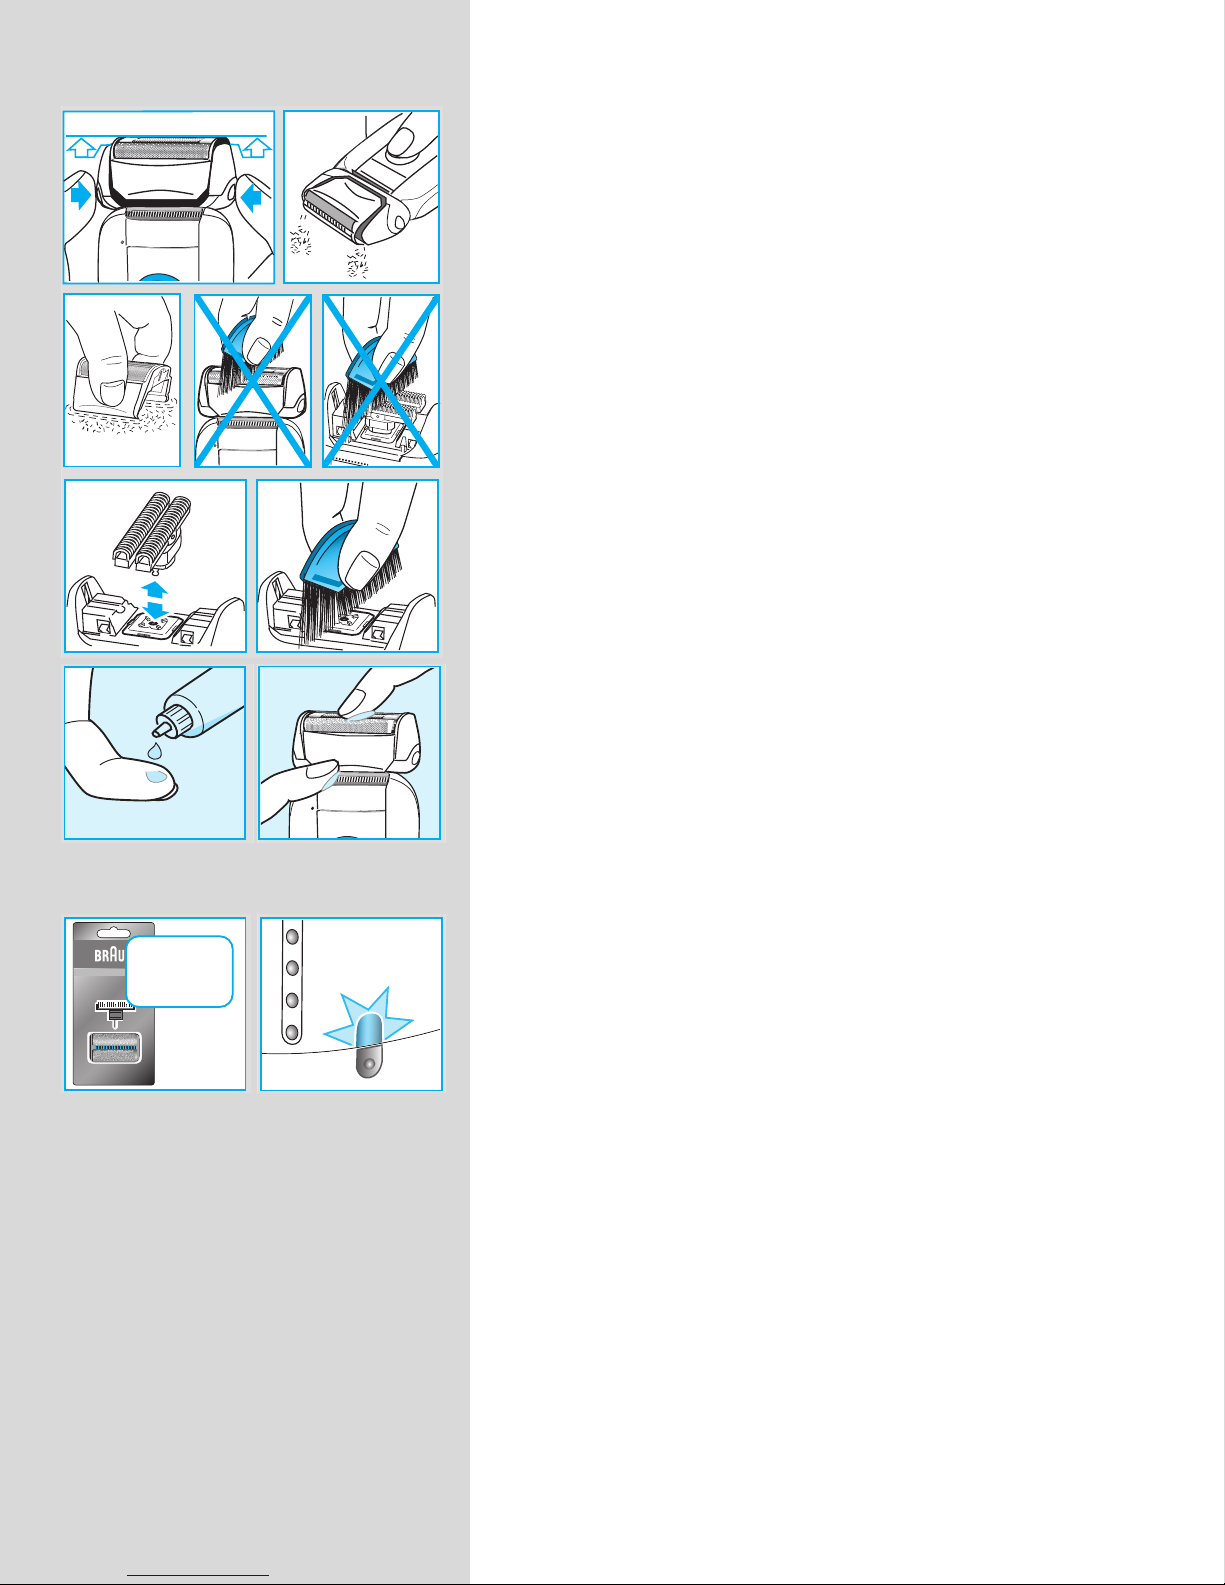
Cleaning
fix
on
off
on
off
Never use water to clean the shaver.
For easy cleaning after each shave, switch the shaver off.
Press the release buttons to lift the shaver foil (do not
remove the foil completely). Switch on the shaver for
approx. 5–10 seconds so that the shaved stubbles can
fall out.
Then remove the shaver foil and tap it out on a flat surface.
Using the brush, clean the inner area of the pivoting head.
However, do not clean the shaver foil nor the cutter block
with the brush as this may damage them.
Put a drop of light machine oil onto the long hair trimmer
and the shaver foil.
51S
oil
80
60
40
0...20
off
off
on
on
fix
fix
Replacement light for shaving parts / Reset
To maintain 100% shaving performance, replace your foil
and cutter block, when the replacement light for shaving
parts (9) comes on (after about 18 months) or when worn.
Change both parts at the same time for a closer shave with
less skin irritation.
(Shaver foil and cutter block: 51S)
The replacement light will remind you during the next 7
shaves to replace the shaving parts. Then the shaver will
automatically reset the display.
After you have replaced the shaving parts (foil and cutter
block), use a ball-pen to push the reset button (10) for at
least 3 seconds to reset the counter.
While doing so, the replacement light blinks and goes off
when the reset is complete. The manual reset can be done
at any time.
8
 Loading...