

Page 1

Multiquick
Minipimer
MR 6550 M FP-HC
t
u
r
b
o
6
0
0
W
o
b
a
r
t
u
t
t
www.braun.com/register
Page 2

Deutsch 6, 31
English 8, 31
Français 10, 31
Español 12, 31
Português 15, 31
Italiano 17, 32
Nederlands 19, 32
Dansk 21, 32
Norsk 23, 32
Svenska 25, 32
Suomi 28, 33
Braun Infolines
D
A 00 800 27 28 64 63
00 800 BRAUNINFOLINE
CH
08 44 - 88 40 10
GB
0800 783 70 10
IRL
1 800 509 448
F
0 810 309 780
B
0 800 14 592
E
901 11 61 84
P
808 20 00 33
I
(02) 6 67 86 23
NL
0 800-445 53 88
DK
70 15 00 13
N
22 63 00 93
S
020 - 21 33 21
FIN
020 377 877
HK
852-25249377
(Audio Supplies
Company Ltd.)
Internet:
www.braun.com
www.service.braun.com
Braun GmbH
Frankfurter Straße 145
61476 Kronberg/Germany
98626499/V-08
D/GB/F/E/P/I/NL/DK/N/S/FIN/GR
Page 3
15…20°C
4…8°C
max.
4 x
max. 400 ml
a
bc
a
bc
t
u
r
b
o
t
u
r
b
o
t
u
r
b
o
t
u
r
b
o
t
u
r
b
o
click!
t
u
r
b
o
click!
t
u
r
b
o
t
u
r
b
o
6
0
0
W
a
t
t
t
u
r
b
o
E
t
u
r
b
o
6
0
0
W
a
t
t
t
u
r
b
o
t
u
r
b
o
6
0
0
W
a
t
t
t
u
r
b
o
B
C
D
F
G
I
H
A
J
K
1
2
3
Page 4
3
2a
2b
1
6a
6b
2
3
6c
6d
2c
6e
4
6
5
I
bca
1
click!
2
def
t
u
r
b
t
u
r
b
o
t
u
r
b
o
o
click!
g
j
1
max.
sec.
ih
2
2
1cm
1c
m
700 g
500 g30500 g1030 g203020500 g15500 g25500 g30500 g20400 g
15-30
1 - 4 1 - 15 1 - 15 8 - 15 8 - 15 6 - 9
1
200 g
45-60
60
+5 sec +5 sec
t
o
u
b
r
turbo turbo
turboturboturboturbo turbo
II
ab
1
4
2
click!
Page 5
c
click!
de
t
u
r
b
o
t
u
r
b
t
u
r
b
o
o
f
t
u
r
b
o
g
1
hi
1
2
2
j
1 - 7 9 - 11 6 - 9 9 - 15 7 - 9 6 - 9
6a
6b
1 - 7
6c
6d
7 - 9 7 - 9 3 - 5 7 - 9 7 - 9 7 - 9
6e
1 - 7
1 - 7
9 - 15
7 - 9 9 - 15
6 - 9
9 - 15
t
u
turbo
o
b
r
4
a
b
c
1
2
d
e
f
3
t
u
r
b
o
6
t
u
r
b
o
t
u
r
b
o
4
g
hi
j
+
25
ml
max.
1cm
1c
m
100 g5100 g2050 g510 g57
80 g1080 g5100 g10100 g 90 g
sec.
5
10 45
1 - 15 1 - 15 1 - 15 1 17 - 15 15
+5 sec +5 sec
t
o
u
r
b
turbo
+5 sec
turbo turbo
turboturboturbo
5
Page 6

Deutsch
Unsere Produkte werden hergestellt, um
höchste Ansprüche an Qualität, Funktionalität
und Design zu erfüllen. Wir wünschen Ihnen
mit Ihrem neuen Braun Produkt viel Freude.
Vorsicht
Bitte lesen Sie die Gebrauchsanweisung
sorgfältig und vollständig, bevor Sie das
Gerät in Betrieb nehmen.
• Die Messer sind sehr scharf!
• Kinder oder Personen mit eingeschränkten
physischen, sensorischen oder geistigen
Fähigkeiten dürfen dieses Gerät nicht
benutzen, es sei denn, sie werden durch
eine für ihre Sicherheit zuständige Person
beaufsichtigt. Grundsätzlich raten wir aber,
das Gerät von Kindern fern zu halten.
• Dieses Gerät ist für die Verarbeitung haushaltsüblicher Mengen konstruiert.
• Ziehen Sie immer den Netzstecker vor dem
Zusammensetzen, Auseinandernehmen,
Reinigen oder Aufbewahren des Gerätes,
oder wenn es unbeaufsichtigt ist.
• Vor der Inbetriebnahme prüfen, ob die auf
dem Gerät angegebene Spannung mit Ihrer
Netzspannung übereinstimmt.
• Stellen Sie sicher, dass der Stabmixer nicht
eingeschaltet ist, insbesondere wenn Sie ihn
in heiße Flüssigkeiten eintauchen oder aus
solchen herausnehmen.
• Weder das Motorteil
teil ( für den Schlagbesen unter fl ießendes Wasser halten oder ins Wasser tauchen.
• Der Messbecher Á ist nicht mikrowellen-
geeignet.
• Das Multifunktions-Zubehör Í darf nur
betrieben werden, wenn die Verriegelung
(2c) eingerastet ist und der Stopfer (1) sich
im Einfüllschacht (2b) befi ndet.
• Zum Einfüllen in den Einfüllschacht (2b)
stets den Stopfer, keine anderen Gegenstände benutzen.
• Schalten Sie immer das Gerät aus, bevor
Sie den Deckel (2) abnehmen.
• Der Deckel (2) kann unter fl ießendem
Wasser gereinigt werden, darf aber weder
in Wasser getaucht noch im Geschirrspüler
gereinigt werden.
• Der Arbeitsbehälter (4) ist nicht mikrowellengeeignet.
• Braun Geräte entsprechen den einschlägigen Sicherheitsbestimmungen. Reparaturen
und das Auswechseln der Anschlussleitung
dürfen nur autorisierte Fachkräfte vornehmen. Durch unsachgemäße Reparaturen
können erhebliche Gefahren für den Benutzer entstehen.
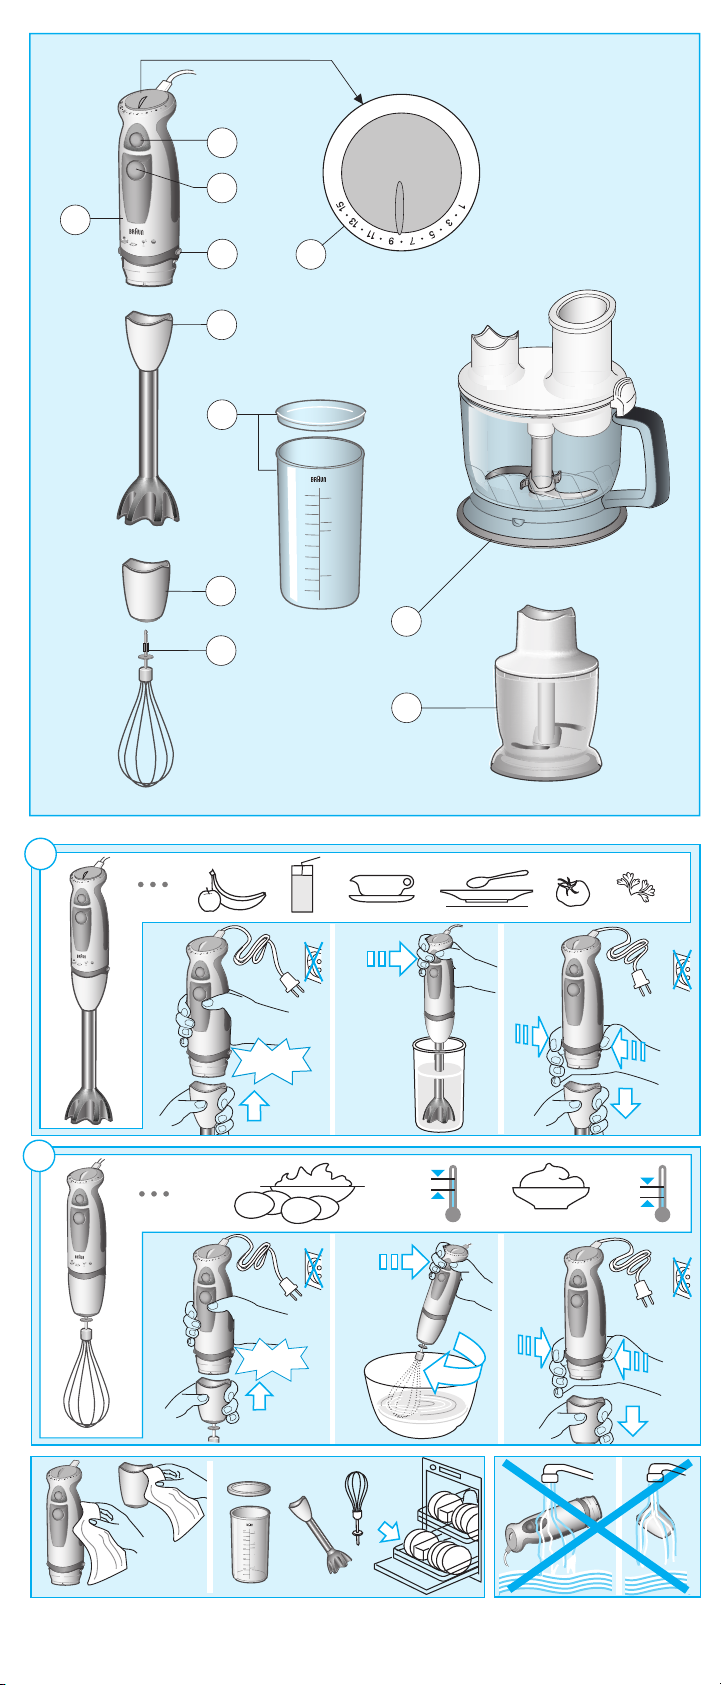
Gerätebeschreibung
! Motorteil
‚ Ein-/Ausschalter für variable Geschwin-
digkeit
# Turbo-Schalter
$ Drucktasten zum Lösen der Einsätze
% Stufenloser Geschwindigkeitsregler
& Pürierstab
Á Messbecher mit luftdicht schließendem
Deckel
( Getriebeteil für Schlagbesen
) Schlagbesen
* Multifunktions-Zubehör FP)
{ Zerkleinerer (HC)
Einstellen der Geschwindigkeit
Wird der Schalter ‚ betätigt, entspricht die
Verarbeitungsgeschwindigkeit der Einstellung
des stufenlosen Geschwindigkeitsreglers %.
Je höher die Einstellung, desto schneller die
Verarbeitung.
Die höchste Verarbeitungsgeschwindigkeit
erreichen Sie mit dem Turbo-Schalter #. Er
kann auch für kraftvolle Momentschaltungen
eingesetzt werden, ohne dass der Geschwindigkeitsregler betätigt werden muss.
· noch das Getriebe-
Je nach Anwendung werden folgende Einstellungen empfohlen:
Stabmixer 1...turbo
Schlagbesen 3...15
Multifunktions-Zubehör siehe Verarbeitungs-
Zerkleinerer siehe Verarbeitungs-
tabellen im Bildteil (j)
tabellen im Bildteil (j)
So bedienen Sie Ihren Braun
Stabmixer 1
Der Stabmixer eignet sich z.B. für die Zubereitung von Dips, Saucen, Suppen, Mayonnaise, Baby-Nahrung sowie zum Mixen von
Getränken und Milch-Shakes.
a) Motorteil ! auf den Pürierstab & setzen
und einrasten lassen.
b) Stabmixer in das zu verarbeitende Gut
eintauchen und erst dann mit Schalter
oder „ einschalten.
c) Zum Abnehmen des Pürierstabs die
beiden Drucktasten $ drücken und den
Pürierstab abziehen.
Sie können den Stabmixer in dem Messbecher Á verwenden, aber auch in jedem
anderen Gefäß. Wenn Sie beim Kochen direkt
im Kochtopf arbeiten wollen, nehmen Sie den
Topf vom Herd, um den Stabmixer nicht zu
überhitzen.
‚
So bedienen Sie Ihren
Schlagbesen 2
Benutzen Sie den Schlagbesen ausschließlich
zum Schlagen von Sahne, Eiweiß, Biskuitteig
und Fertig-Desserts.
a) Schlagbesen È in das Getriebeteil Ë
stecken, anschließend das Motorteil !
in das Getriebeteil setzen und einrasten
lassen.
b) Schlagbesen in das Gut eintauchen, erst
dann mit Schalter ‚ einschalten.
c) Zum Abnehmen die beiden Drucktasten
$ drücken und das Getriebeteil abziehen.
Anschließend den Schlagbesen vom
Getriebeteil abziehen.
Für beste Ergebnisse ...
• benutzen Sie eine breitere Schüssel anstelle
des Messbechers,
• Schlagbesen leicht schräg halten und im
Uhrzeigersinn bewegen.
Schlagsahne:
Maximal 400 ml gekühlte Sahne verwenden
(min. 30 % Fettgehalt, 4 – 8 °C).
Beginnen Sie mit einer niedrigen Geschwindigkeit (Stufe «1») und erhöhen Sie diese während des Schlagens langsam auf Stufe «15».
Eischnee:
Maximal 4 Eiweiße schlagen.
Beginnen Sie mit einer mittleren Geschwindigkeit (Stufe «7») und erhöhen Sie diese
während des Schlagens auf Stufe «15».
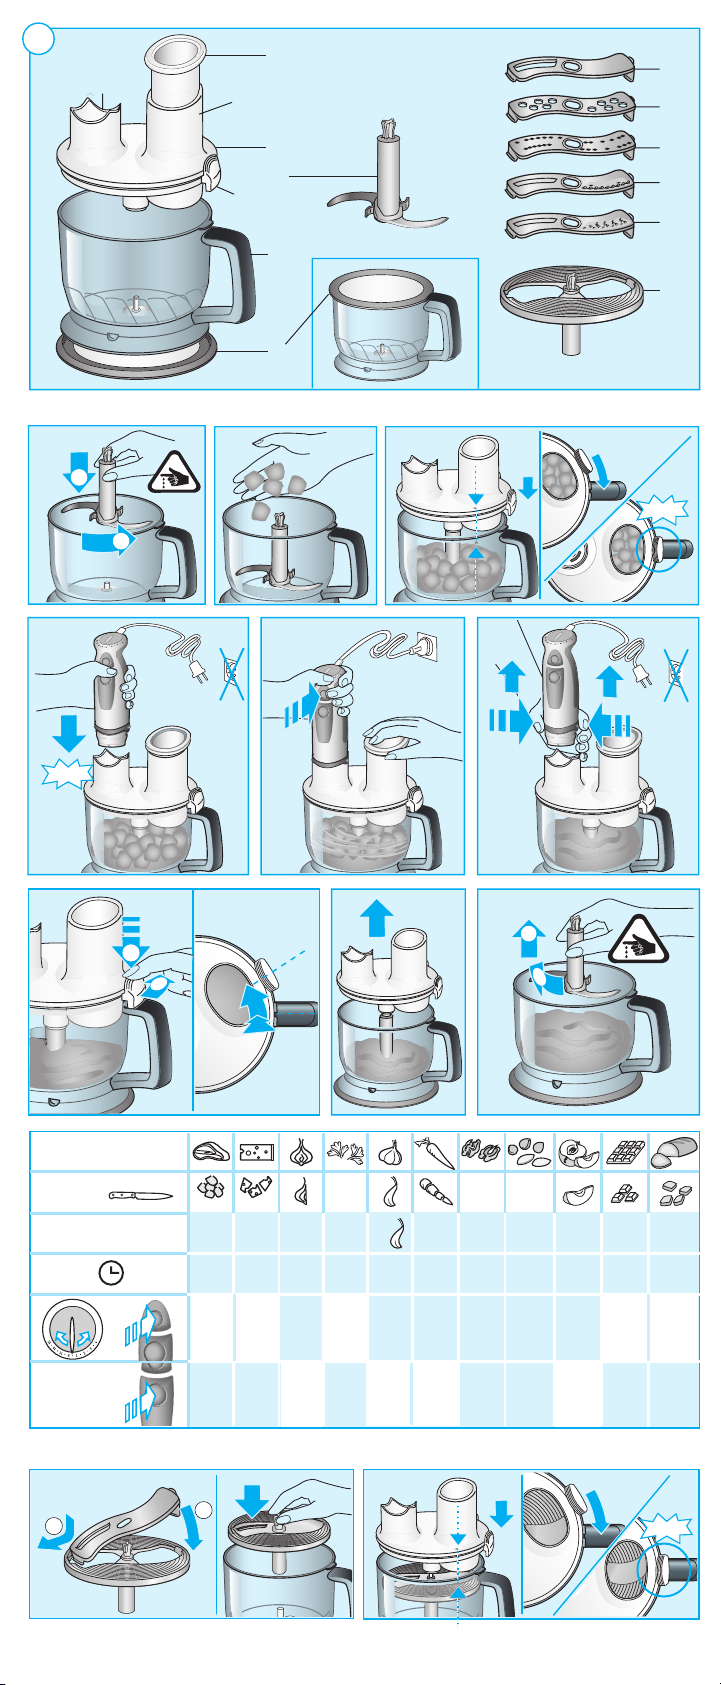
So verwenden Sie das
Multifunktions-Zubehör 3
1 Stopfer
2 Deckel
2a Kupplung für Motorteil
2b Einfüllschacht
2c Verriegelung
3 Messer
4 Arbeitsbehälter
5 Rutschfester Stützdeckel (dient auch zum
Verschließen des Arbeitsbehälters)
6 Einsatzträger für Schneid-/Raspelzubehör
6a Schneideinsatz
6b Raspeleinsatz (grob)
6c Raspeleinsatz (fein)
6d Julienne-Einsatz (viereckig)
6e Julienne-Einsatz (dreieckig)
6
Page 7

Zerkleinern
(siehe Bildabschnitt I mit Verarbeitungstabelle j)
Das Messer (3) eignet sich hervorragend zum
Hacken und Zerkleinern von Fleisch, Käse,
Zwiebeln, Kräutern, Knoblauch, Karotten,
Walnüssen, Mandeln etc.
Wählen Sie für das Zerkleinern harter Güter
(z.B. harter Käse) den Turbo-Schalter „.
Bitte beachten: Dieses Gerät ist nicht für
das Zerkleinern von extrem hartem Gut (z.B.
Muskatnüsse, Kaffeebohnen oder Getreide)
geeignet.
Vor dem Zerkleinern ...
• großes Gut in Stücke schneiden,
• Kräuterstiele und Nuss-Schalen entfernen,
• alle Knochen, Sehnen und Knorpelanteile
von Fleisch entfernen.
a) Vor dem Einsetzen des Messers (3) die
Kunststoffhülle vorsichtig entfernen.
Vorsicht: Das Messer ist sehr scharf.
Immer am Kunststoffschaft anfassen. Das
Messer auf die Achse im Arbeitsbehälter
(4) setzen und leicht drehen, damit es
einrastet. Arbeitsbehälter immer auf den
Stützdeckel (5) setzen.
b) Das zu verarbeitende Gut einfüllen.
c) Beim Aufsetzen des Deckels (2) muss
sich die Verriegelung (2c) rechts neben
dem Handgriff befi nden. Dann den Deckel
im Uhrzeigersinn drehen, so dass die
Verriegelung hörbar über dem Handgriff
einrastet.
d) Motorteil
und einrasten lassen. Stopfer (1) in den
Einfüllschacht (2b) setzen.
e) Schalter ‚ oder „ betätigen und mit
der anderen Hand den Arbeitsbehälter
festhalten.
f) Nach Gebrauch die Drucktasten ‰
betätigen, um das Motorteil abzunehmen.
Stopfer entnehmen.
g) Zum Abnehmen des Deckels die Verriege-
lung (2c) gedrückt halten und den Deckel
gegen den Uhrzeigersinn drehen, um ihn
zu lösen.
h/i) Messer zunächst etwas drehen, dann
vorsichtig herausnehmen. Anschließend
können Sie das verarbeitete Gut ent-
nehmen.
! auf die Kupplung (2a) setzen
c) Motorteil auf die Kupplung (2a) setzen
und einrasten lassen. Geschwindigkeit
entsprechend der Verarbeitungstabelle
(j) einstellen.
d) Das zu verarbeitende Gut in den Einfüll-
schacht geben. Nie bei laufendem Gerät
in den Einfüllschacht greifen. Immer den
Stopfer (1) verwenden.
e) Zum Einschalten des Motorteils Schalter
oder „ betätigen.
f) Nach Gebrauch die Drucktasten
betätigen, um das Motorteil abzunehmen.
Stopfer entnehmen.
g) Zum Abnehmen des Deckels die Verriege-
lung (2c) gedrückt halten und den Deckel
gegen den Uhrzeigersinn drehen, um ihn
zu lösen.
h) Entnehmen Sie zuerst den Einsatzträger,
dann das verarbeitete Gut. Zum Entnehmen der Einsätze (6a – 6e) aus dem Einsatzträger, drücken Sie das nach unten
ragende Ende des Einsatzes nach oben.
‚
‰
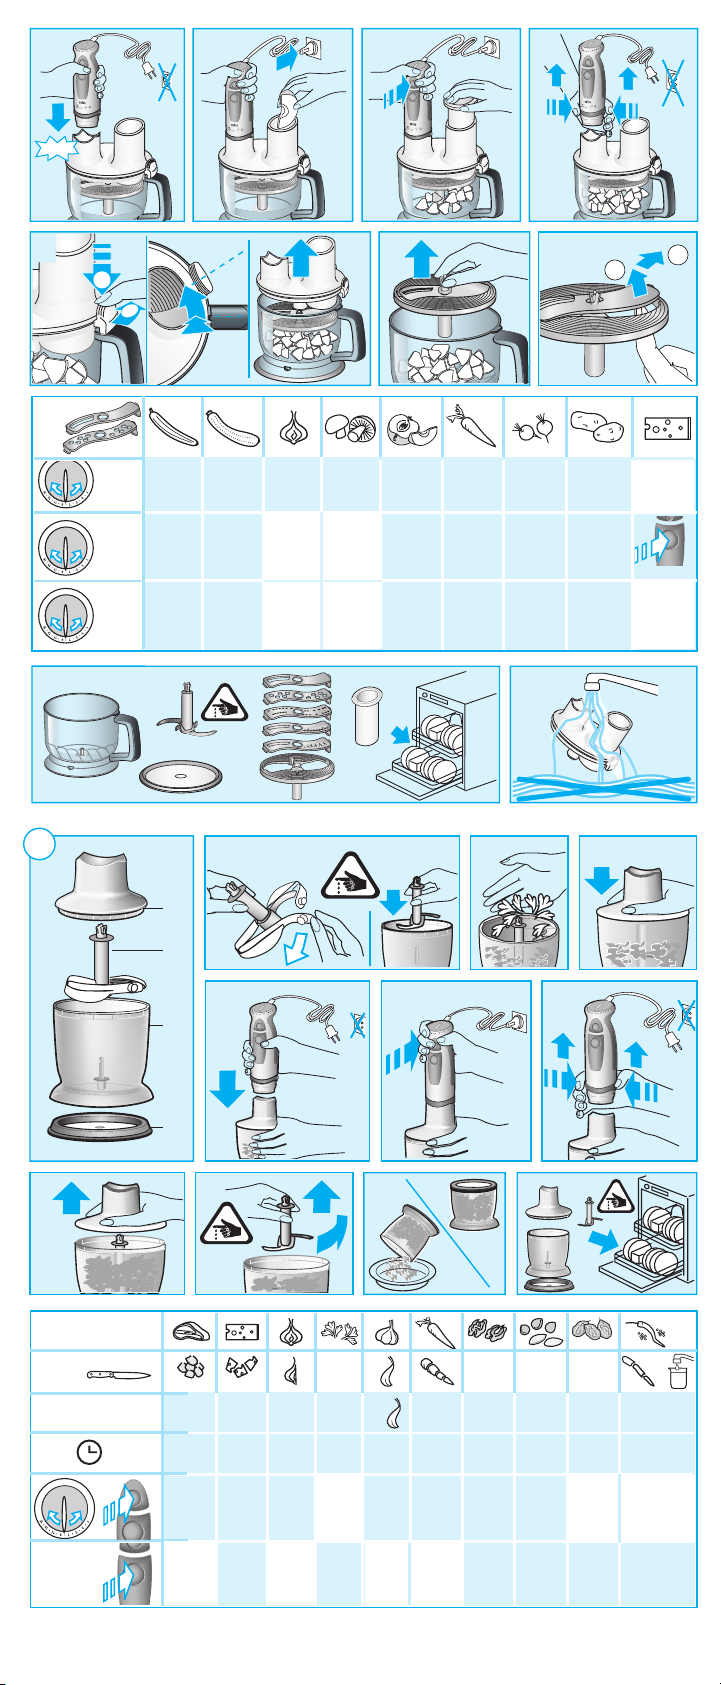
So bedienen Sie Ihren
Zerkleinerer 4
1 Oberteil
2 Messer
3 Arbeitsbehälter
4 Stützdeckel
Mit dem Zerkleinerer können Sie Fleisch,
Käse, Zwiebeln, Kräuter, Knoblauch, Chilis
(mit Wasser), Karotten, Walnüsse, Mandeln,
Trockenpfl aumen etc. perfekt hacken und
zerkleinern.
Verwenden Sie für das Zerkleinern harter Güter
(z.B. harter Käse) den Turbo-Schalter „.
Bitte beachten: Extrem hartes Gut (z.B.
Eiswürfel, Muskatnüsse, Kaffeebohnen und
Getreide) darf nicht zerkleinert werden.
Vor dem Zerkleinern ...
– großes Gut in Stücke schneiden.
– Stiele und Nuss-Schalen entfernen,
– alle Knochen, Sehnen und Knorpelanteile
bei Fleisch entfernen.
Für beste Ergebnisse die in der Verarbeitungstabelle (j) empfohlenen Geschwindigkeitseinstellungen beachten.
Mixen leichter Teige
Sie können das Messer (3) auch für das
Mixen leichter Teige verwenden (z.B. Pfannkuchenteig oder Fertigmischungen für bis zu
250 g Mehl).
Bei Pfannkuchenteig, z. B, zuerst fl üssige
Zutaten in den Arbeitsbehälter füllen, dann
Mehl und schließlich Eier hinzufügen. TurboSchalter „ drücken und den Teig mixen, bis
er glatt ist.
Schneid-/Raspelzubehör
(siehe Bildteil II mit Verarbeitungstabelle j)
Mit dem Schneideinsatz (6a) können Sie
z.B. Gurken, Zwiebeln, Pilze, Äpfel, Möhren,
Radieschen, rohe Kartoffeln, Zucchini oder
Kohl schneiden.
Mit den Raspeleinsätzen (6b, 6c) können
Sie z.B. Äpfel, Möhren, rohe Kartoffeln, rote
Beete, Kohl oder Käse (weich bis mittelhart)
raspeln. Die Julienne-Scheiben (6d, 6e)
schneiden Gemüse in Streifen.
a) Einsatz (6a – 6e) in den Einsatzträger (6)
einsetzen und einrasten lassen. Einsatz-
träger auf die Achse im Arbeitsbehälter
setzen und drehen, damit er hörbar ein-
rastet.
b) Beim Aufsetzen des Deckels (2) muss
sich die Verriegelung (2c) rechts neben
dem Handgriff befi nden. Dann den Deckel
im Uhrzeigersinn drehen, so dass die
Verriegelung hörbar über dem Handgriff
einrastet.
Hacken und Zerkleinern
a) Vor dem Einsetzen des Messers (2) die
Kunststoffhülle vorsichtig entfernen.
Vorsicht: Das Messer ist sehr scharf! Nur
am Kunststoffschaft anfassen und auf
die Achse im Arbeitsbehälter (3) setzen.
Herunterdrücken und um 90° drehen.
Arbeitsbehälter immer auf den Stützdeckel
(4) setzen.
b) Das zu verarbeitende Gut einfüllen.
c) Oberteil (1) auf den Arbeitsbehälter setzen.
d)
Das Motorteil ! in das Oberteil (1) stecken,
bis es einrastet.
e) Motorteil mit Schalter ‚ oder # einschal-
ten. Halten Sie während der Verarbeitung
das Motorteil mit der einen, den Zerklei-
nerer mit der anderen Hand fest. Den Zer-
kleinerer pro Anwendung maximal 2 Minu-
ten lang benutzen.
f) Nach Gebrauch die Drucktasten ‰
betätigen, um das Motorteil abzunehmen.
g) Oberteil abnehmen.
h) Messer vorsichtig herausnehmen.
i) Dann das Gut ausleeren. Der Stützdeckel
dient auch zum Verschließen des Arbeits-
behälters.
Reinigung
Das Motorteil und das Getriebeteil für den
Schlagbesen nur mit einem feuchten Tuch
abwischen. Der Deckel (2) kann unter fl ießendem Wasser gereinigt werden, darf aber
weder in Wasser getaucht noch im Geschirrspüler gereinigt werden. Alle anderen Teile
sind spülmaschinengeeignet.
7
Page 8

Bei farbstoffreichen Gütern (z.B. Karotten)
können die Kunststoffteile des Gerätes
beschlagen und sich verfärben. Wischen Sie
diese Teile mit Speiseöl ab, bevor Sie sie
spülen.
Zubehör
(beim Braun Kundendienst erhältlich, jedoch
nicht in allen Ländern)
BC: Zerkleinerer, ideal für das Zerkleinern
großer Mengen sowie das Zubereiten von
Shakes, leichten Teigen und das Zerkleinern
von Eiswürfeln.
• Do not insert other tools than the pusher (1)
into the fi lling tube during processing.
• Always switch off the appliance before
removing the lid (2).
• The lid (2) can be cleaned under running
water, but do not immerse it in water, nor
clean it in a dishwasher.
• The bowl (4) is not microwave-proof.
• Braun electric appliances meet applicable
safety standards. Repairs or the replacement of the mains cord must only be done
by authorised service personnel. Faulty,
unqualifi ed repair work may cause considerable hazards to the user.
Rezept-Beispiel
Mayonnaise (Stabmixer verwenden)
200–250 ml Öl
1 Ei (Eigelb und Eiweiß)
1 EL Zitronensaft oder Essig
Salz und Pfeffer nach Geschmack
Zutaten in der genannten Reihenfolge in den
Becher geben. Stabmixer senkrecht in den
Messbecher stellen und den Turbo-Schalter
„ drücken. Den Stabmixer in dieser Position
halten, bis das Öl emulgiert.
Ohne auszuschalten den Stabmixer dann
langsam anheben und wieder senken, bis die
Mayonnaise fertig ist.
Änderungen vorbehalten.
Dieses Gerät entspricht den
EU-Richtlinien EMV 2004/108/EG
und Niederspannung 2006/95/EC.
Das Gerät darf am Ende seiner
Lebensdauer nicht mit dem Hausmüll
entsorgt werden. Die Entsorgung kann
über den Braun Kundendienst oder
lokal verfügbare Rückgabe- und Sammelstellen erfolgen.
Description
! Motor part
‚ On/off switch for variable speed
# Turbo switch
$ Release buttons
% Variable speed regulator
& Blender shaft
Á Measuring beaker with air-tight lid
Ë Whisk gearbox
È Whisk
Í Food preparation (FP) attachment
{ Chopper (HC)
Setting the speed
When activating switch ‚, the processing
speed corresponds to the setting of the
variable speed regulator %. The higher
the speed setting, the faster and fi ner the
chopping results will be.
For maximum processing speed, press the
turbo switch #. You may also use the turbo
switch for instant powerful pulses without
having to manipulate the speed regulator.
Depending on your application, we recommend the following speed settings:
Handblender 1... turbo
Whisk 3... 15
Food preparation
attachment see speed tables in
picture sections (j)
Chopper see speed tables in
picture sections (j)
English
Our products are engineered to meet the
highest standards of quality, functionality and
design. We hope you thoroughly enjoy your
new Braun appliance.
Caution
Please read the use instructions carefully
and completely before using the appliance.
• The blades are very sharp!
• This appliance is not intended for use by
children or persons with reduced physical
or mental capabilities, unless they are given
supervision by a person responsible for their
safety. In general, we recommend that you
keep the appliance out of reach of children.
• The appliance is constructed to process
normal household quantities.
• Always unplug the appliance when it is left
unattended and before assembling, disassembling, cleaning or storing.
• Before operating, check whether your
voltage corresponds to the voltage printed
on the bottom of the appliance.
• Especially when operating the handblender
attachment in hot liquids, do not immerse
the blender shaft into – or remove it from the
liquid while the appliance is switched on.
• Do not hold the motor part !, nor the
whisk gearbox Ë under running water, nor
immerse them in water.
• The beaker Á is not microwave-proof.
• Before operating the food preparation
attachment Í, make sure that the lid interlock (2c) is properly clicked in and that the
pusher (1) is in place.
How to operate your handblender 1
The handblender is perfectly suited for
preparing dips, sauces, soups, mayonnaise
and baby food as well as for mixing drinks
and milkshakes:
a) Insert the motor part ! into the blender
shaft & until it locks.
b) Introduce the handblender vertically into
the vessel, then press switch ‚ or turbo
switch „.
c) To release the blender shaft after use,
press buttons ‰ and pull it off.
You can operate the handblender in the
measuring beaker Á, and just as well in any
other vessel. When blending directly in the
saucepan while cooking, take the pan from
the stove fi rst to protect the appliance from
overheating.
How to operate your whisk 2
Use the whisk only for whipping cream,
beating egg whites and mixing sponges and
ready-mix desserts:
a) Insert the whisk È into the whisk gearbox
Ë, then insert the motor part ! into the
gearbox until it locks.
b) Place the whisk in a vessel and only then,
press switch ‚ to operate it.
c) To release, press buttons ‰ and pull off
the gearbox. Then pull the whisk out of the
gearbox.
For best results ...
• use a wide bowl rather than the beaker
• move the whisk clockwise, holding it slightly
inclined
8
Page 9

Whipped cream:
Only whip up to 400 ml chilled cream
(min. 30 % fat content, 4 – 8 °C).
Start with a low speed setting «1» and while
whipping, increase the speed to setting «15».
Egg snow:
Only whip up to 4 egg whites.
Start with a medium speed setting «7» and while
beating, increase the speed to setting «15».
How to operate your food
preparation (FP) attachment 3
1 Pusher
2 Lid
2a Coupling for motor part
2b Filling tube
2c Lid interlock
3 Blade
4 Bowl
5 Anti-slip base (also serves as a lid)
6 Tool holder
6a Slicing tool
6b Shredding tool (coarse)
6c Shredding tool (fi ne)
6d Julienne tool (rectangular)
6e Julienne tool (triangular)
Chopping
(see picture section I with processing table j )
The blade (3) is perfectly suited for chopping
meat, cheese, onions, herbs, garlic, carrots,
walnuts, hazelnuts, almonds etc.
For chopping hard goods, use the turbo
switch „.
N.B.: Do not chop extremely hard food, such
as nutmeg, coffee beans and grains.
Before chopping ...
• pre-cut meat, cheese, onions, garlic,
carrots, chillies
• remove stalks from herbs, un-shell nuts
• remove bones, tendons and gristle from
meet.
a) Carefully remove the plastic cover from
the blade (3). Caution: the blade is very
sharp! Always hold it by the upper plastic
part. Place the blade on the centre pin of
the bowl (4) and give it a turn to lock into
place. Always place the bowl on the anti-
slip base (5).
b) Place the food in the chopper bowl.
c) Attach the lid (2) onto the bowl with the
interlock (2c) positioned next to the bowl
handle. To lock the lid, turn it clockwise so
that the interlock engages with a «click»
above the handle.
d) Insert the motor part ! into the coupling
(2a) until it locks. Make sure the pusher is
in place.
e) To operate, press switch ‚ or „ on the
motor part and take hold of the bowl with
your other hand.
f) After use, press buttons ‰ to remove the
motor part. Remove the pusher.
g) Pressing the lid interlock (2c), turn the lid
(2) counter-clockwise to unlatch it and lift it
up.
h/i) Carefully take out the blade by turning and
pulling it, before removing the processed
food.
Mixing light dough
Using the blade (3), you may also mix light
dough like a pancake batter or a cake mixture
based on up to 250 g fl our.
For a pancake batter, for instance, fi rst pour
liquids into the bowl, then add fl our and fi nally
eggs. Pressing the turbo switch „, mix the
batter until smooth.
Slicing / shredding
(see picture section II with processing table j )
Using the slicing tool (6a), you can slice e.g.
cucumbers, onions, mushrooms, apples,
carrots, radishes, raw potatoes, courgettes,
cabbage.
Using the shredding tools (6b, 6c), you can
shred e.g. apples, carrots, raw potatoes,
beetroot, cabbage, cheese (soft to medium).
The Julienne tools (6d, 6e) cut food into strips.
a) Place a tool (6a – 6e) into the tool holder
(6) and snap into position. Place the tool
holder on the centre pin of the bowl and
give it a turn to lock into place.
b) Attach the lid (2) onto the bowl with the
interlock (2c) positioned next to the bowl
handle. To lock the lid, turn it clockwise so
that the interlock engages with a «click»
above the handle.
c) Insert the motor part into the coupling until
it locks. Select speed settings according to
recommendations in picture (j).
d) Fill the food to be processed into the fi lling
tube. Never reach into the fi lling tube when
the appliance is switched on. Always use
the pusher (1) to feed in food.
e) Press switch
operate.
f) After use, press buttons ‰ to remove the
motor part.
g)
Pressing the lid interlock (2c), turn the lid
counter-clockwise to unlatch it and lift it up.
h) Take out the tool holder before removing
the processed food. To remove the tool
(6a – 6e), push it up at the end that
protrudes at the bottom of the tool holder.
‚ or „ on the motor part to
How to operate your chopper
attachment 4
1 Upper part
2 Blade
3 Chopper bowl
4 Anti-slip base/lid
The chopper is perfectly suited for chopping
meat, cheese, onions, herbs, garlic, chilis
(with water), carrots, walnuts, hazelnuts,
almonds, prunes etc.
When chopping hard goods (e.g. hard cheese)
use the turbo switch „.
N.B.: Do not chop extremely hard food, such
as ice cubes, nutmeg, coffee beans or grains.
Before chopping ...
– pre-cut meat, cheese, onions, garlic,
carrots, chillies,
– remove stems from herbs, shell nuts,
– remove bones, tendons and gristle from
meet.
For best results, please refer to the speed
settings recommended in the processing
table (j).
Chopping
a) Carefully remove the plastic cover from the
blade (2). Caution: The blade is very sharp!
Always hold it by the upper plastic part.
Place the blade on the centre pin of the
chopper bowl (3). Press down the blade
and turn 90° to lock it. Always place the
chopper bowl on the anti-slip base (4).
b) Place the food in the chopper bowl.
c) Put the upper part (1) on the chopper bowl.
d) Insert the motor part ! into the upper part
(1) until it locks into place.
e) Press switch ‚ or # to operate the
chopper. During processing, hold the
motor part with one hand and the chopper
bowl with the other. Do not use the
chopper for longer than 2 minutes.
f) After use, press buttons ‰ to remove the
motor part.
g) Then remove the upper part.
h) Carefully take out the blade.
i) Remove the processed food from the
chopper bowl. The anti-slip base also
serves as a lid for the chopper bowl.
9
Page 10

Cleaning the appliance
Clean the motor part · and the whisk
gearbox Ë with a damp cloth only. The lid
(2) can be cleaned under running water, but
do not immerse it in water, nor clean it in a
dishwasher.
All other parts can be cleaned in the dishwasher.
When processing foods with colour (e.g.
carrots), the plastic parts of the appliance may
become discoloured. Wipe these parts with
vegetable oil before cleaning them.
Accessories
(available at Braun Service Centres; however
not in every country)
BC: Chopper attachment, perfectly suited
for chopping large quantities as well as for
preparing shakes, making light doughs and
crushing ice cubes.
Recipe example
Mayonnaise (use handblender)
200–250 ml oil,
1 egg (yolk and white),
1 tbsp. lemon juice or vinegar,
salt and pepper to taste
• Durant l’utilisation du mixeur dans des
liquides chauds, ne pas immerger le pied
mixeur ou le retirer du liquide lorsque
l’appareil est en marche.
• Ne pas passer le bloc moteur ! ni le
système d’entraînement du fouet Ë sous
l’eau, ni les plonger dans l’eau.
• Le bol mesureur Á ne peut être utilisé dans
un four à micro-ondes.
• Avant d’utiliser le kit d’accessoires de
préparation
et le poussoir (1) sont bien en place
• Ne pas insérer d’autres instruments que le
poussoir (1) et le tube de remplissage du bol
(2b) pendant l’utilisation.
• Toujours éteindre l’appareil avant de retirer
le couvercle (2).
• Le couvercle (2) peut être nettoyé à l’eau
claire, mais ne pas l’immerger sous l’eau, ni
le laver au lave vaisselle.
• Le bol (4) ne peut être utilisé dans un four à
micro-ondes.
• Les appareils électriques Braun répondent
aux normes de sécurité en vigueur. Leur
réparation ou le remplacement du cordon
d’alimentation doivent être effectués
uniquement par les Centres de Service
Agréés Braun. Des réparations effectuées
par du personnel non qualifi é peuvent
causer accidents ou blessures à l’utilisateur.
Í, vérifi er que le couvercle (2c)
Put all ingredients into the beaker according
to the a.m. order. Introduce the handblender
to the base of the beaker. Pressing the turbo
switch „, keep the handblender in this
position until the oil emulsifi es. Then, without
switching off, slowly move it up and down
until the mayonnaise is well combined.
Subject to change without notice.
This product conforms to the European
Directives EMC 2004/108/EC and Low
Voltage 2006/95/EC.
Please do not dispose of the product in
the household waste at the end of its
useful life. Disposal can take place at a
Braun Service Centre or at appropriate
collection points provided in your country.
Français
Nos produits sont conçus et fabriqués pour
satisfaire aux plus hautes exigences de
qualité, de fonctionnalité et de design.
Nous espèrons que votre nouveau préparateur
culinaire Braun vous apportera entière satisfaction.
Description
! Bloc moteur
‚ Interrupteur marche/arrêt pour utilisation
avec le variateur de vitesses
# Touche turbo
$ Bouton de déverrouillage des accessoires
% Variateur de vitesses électronique
& Pied mixeur
Á Bol mesureur avec couvercle hermétique
Ë Système d’entraînement du fouet
È Fouet métal
Í Kit d’accessoires de préparation (FP)
{ Hachoir (HC)
Utilisation des vitesses
Lorsque vous appuyez sur la touche marche/
arrêt ‚, la vitesse correspond à celle
sélectionnée avec le variateur de vitesses
électronique %. Plus la vitesse sélectionnée
est élevée, plus les résultats sont rapides.
Cependant, la vitesse maximum ne peut être
atteinte qu’en appuyant sur la touche turbo
#. Vous pouvez aussi utiliser la fonction
turbo pour utiliser le maximum de puissance
de manière instantanée sans avoir à faire
de changement sur le variateur de vitesses
électronique.
Selon le type d’utilisation, nous vous recommandons l’utilisation des vitesses suivantes :
Pied mixeur 1…turbo
Fouet métal 3…15
Kit d’accessoires se référer aux dessins (j)
Hachoir se référer aux dessins (j)
Attention
Lisez le mode d’emploi attentivement et en
entier avant d’utiliser cet appareil.
• Les lames sont très tranchantes !
• Cet appareil n’est pas destiné à des enfants
ou à des personnes aux capacités mentales
et physiques réduites à moins qu’elles
ne soient sous la surveillance d’un adulte
responsable de leur sécurité. Mais de
manière générale nous recommandons de
maintenir cet appareil hors de portée des
enfants.
• Cet appareil a été conçu pour la préparation
de quantités domestiques classiques.
• Débranchez systématiquement l’appareil
lorsque vous ne l’utilisez pas, et avant de
monter ou de démonter des accessoires, de
le nettoyer ou de le ranger.
• Avant de brancher l’appareil, bien vérifi er
que la tension correspond à celle indiquée
sous l’appareil (bloc moteur).
10
Comment utiliser votre mixeur 1
Le mixeur est parfaitement adapté à la
préparation de sauces, soupes, mayonnaise,
aliments pour bébé, ainsi qu’à celle des
boissons mixées et milk-shakes:
a) Insérez le bloc moteur ! dans le pied
mixeur & jusqu’à ce qu’il s’enclenche et
se verrouille.
b) Introduisez verticalement le mixeur dans le
récipient et ensuite seulement appuyez sur
la touche marche/arrêt ‚ ou sur la touche
turbo #.
c) Pour démonter l’accessoire pied mixeur,
appuyez sur le bouton $ et retirez le pied
mixeur.
Vous pouvez utiliser le mixeur dans le bol
mesureur Á, aussi bien que dans d’autres
récipients. Si vous utilisez le mixeur directement dans une casserole pendant la cuisson,
Page 11

retirez-la d’abord du feu pour protéger votre
mixeur de toute chaleur excessive.
Comment utiliser le fouet métal 2
Utilisez le fouet métal uniquement pour fouetter la crème, monter les blancs en neige, mixer
gâteaux, mousselines et desserts réalisés à
base de préparations:
a Insérez le fouet métal È dans le système
d’entraînement du fouet
bloc moteur ! dans le système d’entraînement jusqu’à ce qu’il s’enclenche.
b Introduisez le fouet métal dans un récipient
et ensuite seulement appuyez sur la touche
marche/arrêt ‚ pour le faire fonctionner.
c Pour démonter l’accessoire fouet métal
après l’utilisation, appuyez sur le bouton
Ë, puis insérez le
‰ et retirez le système d’entraînement.
Ensuite, retirez le fouet métal du système
d’entraînement.
Pour de meilleurs résultats ...
• ne pas utiliser le bol mesuveur, mais un bol
plus grand,
• déplacer le fouet dans le sens des aiguilles
d’une montre en le maintenant légèrement
incliné.
Crème fouettée
Fouettez jusqu’à 400 ml de crème fraîche (min
30% de matière grasse, 4–8 °C) Commencez
à vitesse basse «1», puis, tout en fouettant,
augmentez la vitesse jusqu’à «15».
Oeufs en neige
Fouettez jusqu’à 4 blancs d’oeufs à la fois.
Commencez à vitesse moyenne «7», puis,
tout en fouettant, augmentez la vitesse
jusqu’à «15».
Comment utiliser le kit
d’accessoires de préparation 3
1 Poussoir
2 Couvercle
2a Fixation pour bloc moteur
2b Tube pour remplissage du bol
2c Système de fermeture du couvercle
3 Couteaux
4 Bol
5 Base anti-dérapante (sert aussi de
couvercle)
6 Disque de soutien des accessoires
6a Accessoire pour émincer
6b Accessoire pour râper (épais)
6c Accessoire pour râper (fi n)
6d Accessoire à Julienne (rectangulaire)
6e Accessoire à Julienne (triangulaire)
Hacher
(Voir image partie I dans la notice j)
Les couteaux (3) sont tout à fait adaptés
pour hacher de la viande, du fromage, des
oignons, des herbes des carottes, des noix,
des amandes. Pour hacher des aliments durs
(exemple: grains de café et fromages à pâte
dure), utiliser la fonction turbo #.
Remarque : Ne hachez pas des aliments
extrêmement durs, tels que noix de muscade,
grains de café et autres grains.
Avant de hacher …
• découper la viande, le fromage, les oignons,
les herbes, les carottes, les piments,
• enlever les tiges et dénoyauter les aliments,
• enlever les os, tendons et nerfs de la viande.
a) Enlever avec précaution le plastique des
couteaux (3). Attention : les lames sont
très tranchantes! Manipulez-les toujours
en tenant la partie supérieure en plastique.
Placer les couteaux sur l’axe central du
bol (4) et faites-les pivoter jusqu’à ce qu’il
s’enclenche. Toujours placer le bol sur son
socle anti-dérapant (5).
b) Mettez les aliments dans le bol.
c) Placer le couvercle (2) sur le bol en plaçant
le système de fermeture près de la poignée
du bol (2c). Pour fermer le couvercle du
bol, le tourner dans le sens des aiguilles
d’une montre, jusqu’à entendre un «clic»
de fermeture au niveau de la poignée.
d) Insérer le bloc moteur
de fi xation pour bloc moteur jusqu’à ce
qu’il s’enclenche (2a). S’assurer que le
poussoir est bien en place.
e) Appuyer sur le bouton ‚ ou # du bloc
moteur pour la mise en marche. Maintenir
le bloc moteur avec une main et le bol
avec l’autre.
f) Après utilisation, appuyer sur le bouton
! dans le système
$ pour enlever le bloc moteur. Enlever le
poussoir.
g) Appuyer sur le système de fermeture (2c)
pour enlever le couvercle. Vous pouvez
ensuite enlever le couvercle (2) en le
tournant dans le sens inverse des aiguilles
d’une montre pour le dévérouiller et
l’enlever.
h/i) Retirer le couteau avec précaution en les
tournant et les tirant, avant d’enlever les
aliments préparés.
Mixer des pâtes légères
En utilisant les couteaux (3), vous pouvez
mélanger des pâtes légères comme la pâte à
crêpes ou pâte à gateaux ayant une base de
250 g de farine.
Pour la pâte à crêpes par exemple, verser
d’abord les liquides dans le bol, ajouter
ensuite la farine, puis les oeufs. Appuyer sur
la touche Turbo #, mélanger la pâte jusqu’à
ce qu’elle soit lisse.
Emincer / Râper
(Voir image partie II dans la notice j)
En utilisant l’accessoire pour émincer (6a),
vous pouvez couper des concombres, des
oignons, des champignons, des pommes,
des carottes, des radis, des courgettes et des
choux.
En utilisant l’accessoires pour râper (6b, 6c),
vous pouvez râper des concombres, des
oignons, des champignons, des pommes,
des carottes, des radis, des courgettes, du
fromage et des choux. L’accessoire à Julienne
(6d, 6e) coupe les aliments en lamelles.
a) Placer l’accessoire (6a – 6e) dans le disque
de soutien des accessoires (6) jusqu’au
clic. Le placer sur l’axe central du bol et le
faire pivoter jusqu’à sa mise en place.
b) Placer le couvercle (2) sur le bol en plaçant
le système de fermeture près de la poignée
du bol (2c). Pour fermer le couvercle du
bol, le tourner dans le sens des aiguilles
d’une montre, jusqu’à entendre un «clic»
de fermeture au niveau de la poignée
c) Insérer le bloc moteur sur le système
d’entraînement (2a) jusqu’à ce qu’il
s’enclenche. Sélectionner les vitesses en
suivant les recommandations données
dans (j).
d) Remplir le bol avec les aliments à
hacher. Ne pas remplir le bol pendant le
fonctionnement de l’appareil. Toujours
utiliser le poussoir (1) pour remplir le bol de
nourriture.
e) Appuyer sur le bouton ‚ ou „) sur le bloc
moteur pour mettre en fonctionnement.
f) Après utilisation, appuyer sur le bouton
$ pour enlever le bloc moteur. Enlever le
poussoir.
g) Appuyer sur le système de fermeture (2c)
pour enlever le couvercle. Vous pouvez
ensuite enlever le couvercle en le tournant
dans le sens inverse des aiguilles d’une
montre pour le dévérouiller.
h) Enlever le disque de soutien des
accessoires avant d’enlever les aliments
préparés. Pour enlever les accessoires
pour émincer ou râper du disque de
soutien, appuyer sur le haut du niveau de
la languette métallique à l’extrémité de
l’accessoire.
11
Page 12

Mode d’emploi de l’accessoire
hachoir 4
1 Entraîneur
2 Lame
3 Bol du hachoir
4 Socle anti-déparant
Le hachoir convient parfaitement pour la
viande, le fromage, les oignons, les fi nes
herbes, l’ail, le piment (avec de l’eau), les
carottes, les noix, les noisettes, les amandes,
les pruneaux, etc.
Lorsque vous mixez des aliments durs
(fromages secs par exemple), utilisez le
bouton turbo
N.B. : Ne pas hacher d’aliments extrêmement
durs, tels que glaçons, noix de muscade,
grains de café ou grains de blé.
Avant de hacher ...
– pré-découper la viande, le fromage, les
oignons, l’ail, les carottes, le piment
– retirer la tige des fi nes herbes, écaler les
noix, les noisettes, etc.,
– retirer les os, les tendons et le cartilage de
la viande.
Pour de meilleurs résultats, regardez la vitesse
recommandée dans le guide d’utilisation.
„.
Mettre tous les ingredients dans le bol
mesureur dans l’ordre mentionné ci-dessus.
Introduire le pied mixeur jusqu’au fond du
bol, le mettre en marche (utiliser la touche
turbo #), tenir le mixeur dans cette position
jusqu’à ce que l’huile se mélange au reste de
la préparation.
Ensuite, sans arrêter le mixeur, le bouger
doucement de haut en bas jusqu’à ce que
tout soit bien mélangé et que la mayonnaise
ait épaissi.
Sujet à modifi cation sans préavis.
Cet appareil est conforme aux normes
Européennes fi xées par les Directives
2004/108/EC et la directive Basse
Tension 2006/95/EC.
A la fi n de vie de votre appareil, veuillez
ne pas le jeter avec vos déchets
ménagers. Remettez-le à votre Centre
Service agréé Braun ou déposez-le
dans des sites de récupération appropriés
conformément aux réglementations locales
ou nationales en vigueur.
Hacher
a) Faire très attention en retirant l’étui en
plastique de la lame (2). Attention : La lame
est très coupante ! Toujours la tenir par sa
partie supérieure en plastique. Placer la
lame sur l’axe central du bol du hachoir (3).
Appuyer sur la lame et la faire tourner de
90° pour la mettre en place. Toujours placer
le bol sur son socle anti-dérapant (5).
b) Placer les aliments dans le bol du hachoir.
c) Placer l’entraîneur (1) sur le bol du hachoir.
d) Verrouiller le bloc moteur ! sur l’entraîneur
(1).
e) Appuyer sur ‚ ou # pour faire fonctionner
le hachoir. Pendant le fonctionnement,
maintenir le moteur d’une main et le bol du
hachoir de l’autre. Ne pas utiliser le hachoir
plus de 2 minutes.
f) Après utilisation, appuyer sur le bouton $
pour enlever le bloc moteur.
g) Débrancher l’appareil et retirer l’entraîneur.
h) Sortir la lame avec le plus grand soin.
i) Retirer les aliments hachés du bol. Le
socle anti-dérapant sert également de
couvercle au bol du hachoir.
Nettoyage
Nettoyer le bloc moteur ! et le système
d’entraînement du fouet Ë avec un tissu
humide seulement. Le couvercle (2) peut être
rincé sous l’eau du robinet, mais ne doit pas
être plongé dans l’eau ou nettoyé au lavevaisselle.
Tous les autres éléments peuvent être
nettoyés au lave-vaisselle. Si vous utilisez
le mixeur pour la préparation de légumes
colorés (ex : les carottes), les parties en
plastique de l’appareil peuvent s’être colorées. Dans ce cas, enduisez ces parties avec
de l’huile végétale avant de les mettre dans
le lave-vaisselle.
Accessoires
(disponibles auprès des Centres de service
Braun, mais pas dans tous les pays)
BC : Bol hachoir, parfaitement adapté pour
hacher de grandes quantités, pour préparer
des milk-shakes, des pâtes légères et piler de
la glace.
Exemple de recette
Mayonnaise (utilisation du pied mixeur)
200-250 ml d’huile,
1 oeuf
1 cuillère à soupe de jus de citron ou vinaigre
Sel et poivre
Español
Nuestros productos están desarrollados
para alcanzar los más altos estándares de
calidad, funcionalidad y diseño. Esperamos
que disfrute de su nuevo pequeño electrodoméstico Braun.
Atención
Lea atentamente el folleto de instrucciones
antes de utilizar este aparato.
• ¡ Las cuchillas están muy afi ladas !
• Este aparato no es para uso de niños ni
personas con minusvalías físicas o mentales, salvo que se utilicen bajo la supervisión
de una persona responsable de su seguridad. En general, recomendamos mantener
este aparato fuera del alcance de los niños.
• Este producto esta diseñado para uso
domestico.
• Desenchufe su batidora siempre que no
este e funcionamiento y antes de montar,
desmontar, limpiar o guardar.
• Antes de conectar a la red, verifi que que el
voltaje indicado en la base del aparato se
corresponda con el de su hogar.
• Cuando el accesorio de la batidora esta
trabajando con líquidos caliente, no
sumergir la varilla dentro o sacarla cuando
la batidora esta funcionando.
• No coloque el cuerpo del motor ! y la caja
de engranajes Ë bajo el agua corriente no
los sumerja en ningún líquido.
• El vaso medidor Á no es apto para el
microondas.
• Antes de utilizar el accesorio de preparación
de alimentos Í, asegúrese que el cierre de
seguridad esta correctamente ajustado y
que el cilindro empujador (1) este colocado.
• No inserte otro accesorio que el cilindro
empujador en el tubo (2b) de la tapa durante
el funcionamiento.
• Apague siempre el aparato antes de quitar
la tapa (2).
• La tapa (2) se puede lavar debajo del agua
pero no sumergir en agua ni lavar en el
lavavajillas.
• El recipiente (4) no es apto para el microondas.
• Los aparatos Braun cumplen con las normas de seguridad. Tanto las reparaciones o
el reemplazo del cable de conexión deben
ser realizados por un Servicio Técnico
Autorizado. Las reparaciones efectuadas
por personal no autorizado pueden causar
accidentes o daños al usuario.
12
Page 13

Descripción
! Cuerpo del motor
‚ Interruptor para velocidad variable
# Botón de turbo
$ Botones de expulsión de los accesorios
% Selector de velocidades
& Varilla batidora
Á Vaso medidor con tapa hermética
Ë Caja de engranajes del batidor metálico
È Accesorio batidor metálico
Í
Accesorio de preparación de alimentos (FP)
{ Picador (HC)
Selector de velocidad
Al presionar el interruptor ‚, la velocidad
del motor se corresponderá con la indicada
por el selector de velocidades %. A mayor
velocidad, más rápido y más fi no el picado.
Para una velocidad aún mayor, presione el
botón de turbo
interruptor turbo para conseguir incrementos
puntuales de potencia sin tener que usar el
selector de velocidad.
Dependiendo del tipo de preparación,
recomendamos las siguientes velocidades:
Varilla batidora 1... turbo
Accesorio batidor 3... 15
Accesorio de preparación de alimentos ver tablas en la
sección de foto (j)
Picador ver tablas en la
sección de foto (j)
#. También puede utilizar este
Funcionamiento de la batidora 1
La batidora esta diseñada para preparar
salsas, sopas, mayonesas, comidas para
bebes así como mezclar bebidas y batidos:
a) Introduzca el cuerpo del motor ! en la
varilla de la batidora & hasta que encaje.
b) Introduzca la batidora en el recipiente
y presione el interruptor de puesta en
marcha ‚ o el botón de turbo #.
c) Para retirar la varilla, presione los botones
de expulsión $ y extraiga la varilla de la
batidora.
Puede utilizar la batidora en el vaso medidor
Á, o en cualquier otro recipiente u olla.
Cuando utilice la batidora directamente en
la olla retire la olla del fuero para proteger la
batidora de sobrecalentamientos.
Funcionamiento del accesorio
batidor 2
Utilice el accesorio batidor metálico
únicamente para montar nata, levantar claras
y preparar mousse o postres instantáneos:
a) Inserte el batidor metálico È en la caja
de engranajes Ë. A continuación inserte
el cuerpo de engranajes en el cuerpo del
motor ! hasta que encaje.
b) Coloque el batidor en un recipiente y
presione el interruptor ‚ para ponerlo en
marcha.
c) Para retirar el accesorio batidor, presione
los botones de expulsión $ y retire el
cuerpo de engranajes. A continuación,
separe el batidor metálico del cuerpo de
engranajes.
Para unos resultados óptimos ...
• utilice un recipiente ancho en vez del vaso,
• mueva el batidor en el sentido de las
agujas del reloj, manteniéndolo ligeramente
inclinado.
Nata montada:
Batir hasta 400 ml de nata muy fría (contenido
de grasa mínimo de 30 %, 4–8 ºC)
Comenzar con un nivel de velocidad bajo «1»
y sin dejar de batir, incrementar la velocidad
hasta el nivel «15».
Claras montadas:
Batir hasta 4 claras de huevo.
Comenzar con un nivel de velocidad medio
«7» y sin dejar de batir, incrementar la velocidad hasta el nivel «15».
Funcionamiento del accesorio de
preparación de alimentos 3
1 Cilindro empujador
2 Tapa
2a Acoplador de motor
2b Tubo empurador
2c Cierre de seguridad
3 Cuchilla
4 Recipiente
5 Base anti-deslizante (puede también servir
de tapa)
6 Porta cuchillas
6a Accesorio para cortar
6b Cuchilla para rallar (grande)
6c Cuchilla para rallar (fi no)
6d Accesorio corta-rodajas para cortar en
juliana (rectangular)
6e Accesorio corta-rodajas para cortar en
juliana (triangular)
Picar
(ver dibujo I con tabla j)
La cuchilla (3) está perfectamente apta para
picar carne, queso, cebolla, hierbas aromáticas, ajo, zanahorias, nueces, avellanas,
almendras, etc. Para picar alimentos muy
duros, utilice el botón turbo #.
N.B.: No pique comida demasiada dura tal
como nueces de moscada, granos de café o
cereales.
Antes de empezar a picar ...
• trocee la carne, el queso, la cebolla, el ajo,
las zanahorias, el chile,
• corte el tallo de las hierbas, saque la
cáscara de los frutos secos,
• limpie la carne de huesos, tendones y
nervios.
a) Retire cuidadosamente la cubierta de
plástico que cubre la cuchilla (3).
¡ Atención, la cuchilla está muy afi lada!
Coger siempre con la parte superior de
plástico. Coloque la cuchilla en el eje
del accesorio picador en el centro del
recipiente (4) y gírela hasta que se quede
fi ja. Nunca utilice el recipiente sin la tapa
anti-deslizante (5).
b) Introduzca los alimentos en el recipiente.
c) Coloque la tapa (2) encima del recipiente
con el cierre de seguridad (2c) posicionado
cerca del mango del recipiente. Para
cerrar la tapa, gírela en los sentidos de
la agujas del reloj hasta que el cierre de
seguridad encaje con un «clic» debajo del
mango.
d) Insertar el cuerpo del motor ! en el
acoplador de motor (2a) hasta que encaje.
Asegúrese que el cilindro empujador (1)
este colocado.
e) Para poner el accesorio en marcha,
presione el botón ‚ o # del mango de
la batidora y con la otra mano, sujete el
recipiente.
f) Cuando haya fi nalizado, presione el botón
$ para separar el cuerpo del motor. Quitar
el cilindro empujador.
g) Presionar el cierre de seguridad (2c), girar
la tapa (2) en el sentido contrario a las
agujas del reloj para desengancharla y
quitarla.
h/i) Antes de retirar los alimentos del reci-
piente, quitar con precaución las cuchillas
girándolas y tirando.
Mezclar masas cremosas
Usando la cuchilla (3), también puede mezclar
masas ligeras por ejemplo de crepes o masa
de pasteles que contienen un máximo de
250 g de harina.
13
Page 14

Para una masa de crepes, por ejemplo, bate
primero los líquidos en el recipiente, luego
añadir la harina y al fi nal los huevos. Presionar
el botón de turbo #, mezcle la masa hasta
que este cremosa.
Cortar rodajas / rallar
(ver dibujo II en la tabla de j)
Utilice el accesorio para cortar rodajas (6a),
puede cortar en rodajas pepinillos, cebollas,
champiñones, manzanas, zanahorias,
rábanos, patatas crudas, calabacines, col.
Utilizando la cuchilla para rallar (6b, 6c),
puede rallar manzanas, zanahorias, patatas
crudas, remolacha, col, queso (blando o
medio). El accesorio corta-rodajas (6d, 6e)
para cortar los alimentos en juliana.
a) Ponga el accesorio (6a – 6e) en el porta-
cuchillas (6) y empujarlo en la posición.
Coloque el porta cuchillas en el centro del
recipiente y gírelo para que se quede fi jo.
b) Ponga la tapa (2) en el recipiente con el
cierre de seguridad (2c) colocado cerca
del mango del recipiente. Para cerrar la
tapa, gírela en los sentidos de las agujas
del reloj hasta que el cierre de seguridad
encaje con un «clic» debajo del mango.
c) Insertar el cuerpo del motor
acoplador de motor (2a) hasta que encaje.
Seleccione la velocidad de acuerdo con
las recomendaciones de la imagen (j).
d) Ponga la comida que se quiere procesar
en el tubo empujador. Nunca ponga la
mano en el tubo empujador mientras este
funcionando su pequeño electrodoméstico. Utilice siempre el cilindro
empujador (1) para introducir la comida.
e) Para poner el accesorio en marcha,
presione el botón ‚ o # del mango de la
batidora.
f) Cuando haya fi nalizado, presione el botón
! en el
$ para separar el cuerpo del motor. Quitar
el cilindro empujador.
g) Presionar el cierre de seguridad (2c), girar
la tapa (2) en el sentido contrario a las
agujas del reloj para desengancharla y
quitarla.
h) Antes de retirar los alimentos del reci-
piente, quitar el accesorio portacuchillas.
Para desmontarlo, tirar del la parte que
sobresale por encima del accesorio.
siempre por la parte de plástico. Inserte
la cuchilla en el eje del recipiente picador
(3), presione hasta abajo y gire la cuchilla
90º hasta que quede fi ja. Nunca utilice el
picador sin la tapa/base antideslizante (4)
colocada.
b) Introduzca los alimentos en el recipiente
del picador (3).
c) Coloque la parte superior (1) en la parte
superior del recipiente picador (3).
d) Coloque el cuerpo del motor
de engranajes del accesorio picador hasta
que encaje perfectamente.
e) Presione el botón ‚ o # para poner el
accesorio picador en marcha. Durante su
funcionamiento, coja el cuerpo del motor
con una mano y el accesorio picador con
la otra. Nunca utilice el accesorio picador
durante más de 2 minutos.
f) Cuando haya fi nalizado, presione el botón
! en la caja
$ para separar el cuerpo del motor.
g) Retira la parte superior.
h) Retire la cuchilla cuidadosamente.
i) Retire los alimentos procesados del
recipiente. La base antideslizante se puede
usar como tapa para el recipiente.
Limpieza
Limpie el cuerpo del motor · y la caja de
engranajes del batidor metálico Ë únicamente con un paño húmedo. La tapa (2)
puede lavarse debajo del agua pero no puede
ser sumergida en el agua o lavada en el
lavavajillas.
Todas las otras partes se pueden lavar en el
lavavajillas.
Cuando se ha procesado alimentos con alta
pigmentación (por ejemplo zanahorias), los
componentes de plástico del aparato pueden
decolorarse. Frote estos componentes con
aceite de cocina antes de ponerlos en el
lavavajillas.
Accesorios
(disponibles a través de Servicio Técnico de
Braun; sin embargo, no en todos los paises).
BC: Accesorio picador, diseñado para picar
mayores cantidades, para preparar batidos,
masas ligeras y para picar cubitos de hielo.
Como utilizar el accesorio
picador 4
1 Parte superior
2 Cuchilla
3 Recipiente picador
4 Base/tapa antideslizante
El picador está diseñado para picar carne,
queso, cebolla, especias, ajo, chile (con
agua), zana-horias, frutos secos, ciruelas etc.
Cuando hay que picar alimentos duros ej.
queso duro se usa el botón Turbo #.
Nota: No intente picar alimentos
excesivamente duros como por ejemplo nuez
moscada, café en grano, cereales o hielo.
Antes de empezar a picar ...
– trocee la carne, el queso, la cebolla, el ajo,
las zanahorias
– corte el tallo de las hierbas, saque la
cáscara de los frutos secos
– limpie la carne de huesos, tendones y
nervios.
Para obtener unos mejores resultados, por
favor, lea la guía de preparaciones y preste
atención a las recomendaciones de velocidad.
Picar
a) Retire cuidadosamente la cubierta de
plástico que cubre la cuchilla (2). Atención:
¡La cuchilla está muy afi lada! Sujetar
Ejemplos de recetas
Mayonesa (utilización de la varilla de la
batidora)
200-250 ml de aceite,
1 huevo,
1 cucharada sopera de zumo de limón o
vinagre,
Sal, pimiento al gusto
Ponga todos los ingredientes en este orden
en el vaso mezclador. Introduzca la batidora
hasta el fondo del vaso. Pulsar el botón turbo
#, mantenga la batidora en esta posición
hasta que ligue el aceite. Manteniendo la
batidora en marcha, muévala lentamente
hacia arriba y abajo hasta que la mayonesa
quede ligada y suave.
Subject to change without notice.
Este producto cumple con las normas
de Compatibilidad Electromagnética
(CEM) establecidas por la Directiva
Europea 2004/108/EC y las Regulaciones para Bajo Voltaje (2006/95/EC).
No tire este producto a la basura al
fi nal de su vida útil. Llévelo a un Centro
de Asistencia Técnica Braun o a los
puntos de recogida habilitados por los
ayuntamientos.
14
Page 15

Português
Os nossos produtos foram desenhados por
forma a cumprir os mais elevados padrões
de qualidade, funcionalidade e design.
Esperamos que aprecie em pleno este seu
novo aparelho Braun.
Precaução
Por favor leia atenta e completamente
estas instruções antes de utilizar o aparelho.
• As laminas são muito afi adas!
• Este aparelho não deve ser usado por
crianças ou pessoas com capacidades
físicas ou mentais reduzidas, excepto
quando estejam sob a supervisão de
alguém responsável pela sua segurança.
Em geral, recomendamos que mantenha
o aparelho fora do alcance de crianças.
• O aparelho foi construido para processor as
quantidades normais num lar.
• Desconecte o aparelho da corrente sempre
que não esteja a vigiá-lo e antes de o
montar e desmontar, limpar ou guardar.
• Antes de o utilizar. Verifi que se a corrente do
seu lar corresponde à voltagem impressa na
base do aparelho.
• Especialmente, quando estiver a utilizar o
acessório misturador em líquidos quentes,
não insira nem retire o pé do líquido enquanto estiver a funcionar (pode queimar-se).
• Não coloque o motor
do batedor metálico Ë sob água corrente,
nem o imerja em água.
• O copo Á é não pode ser levado ao micro-
ondas.
• Antes de funcionar com o acessório de
preparação de alimentos Í, assegure-
-se de que o fecho da tampa (2c) está
devidamente fechado e que o cilíndro para
empurrar alimentos (1) está devidamente
colocado.
• Durante o processamento, não insira outras
peças no tubo de enchimento a não ser o
cilíndro de empurrar alimentos (1).
• Desligue sempre o aparelho antes de remover a tampa (2).
• A tampa (2) pode ser limpa sob água
corrente, mas não pode ser imersa em água
nem lavada na máquina de lavar loiça.
• A taça (4) é não pode ser levada ao microondas.
• Os aparelhos electrodomésticos Braun
cumprem as normas de seguranças
aplicáveis. Reparações do aparelho
ou substituição de cabos de corrente
devem ser realizados apenas por pessoal
dos serviços autorizados. Trabalhos de
reparação indevidos ou inqualifi cados
podem causar danos consideráveis ao
utilizador.
Descrição
! Motor
‚ Interruptor de velocidade variável
# Interruptor turbo
$ Botões de libertação dos vários elementos
% Selector de velocidade variável
& Pé misturador
Á Copo medidor com tampa vedante
Ë Engrenagem do batedor metálico
È Batedor metálico
Í Acessório preparação de alimentos (FP)
{ Acessório Picador (HC)
Determinação da velocidade
Quando activar o interruptor ‚, a velocidade
de processamento correspode à velocidade
determinada no selector de velocidade
variável %. Quanto mais elevada for a velocidade escolhida, mais rápidos e fi nos serão
os resultados.
Para uma velocidade de preparação máxima,
pressione o interruptor turbo #. Pode
também utilizar o interruptor turbo para
!, nem a engrenagem
momentos de máxima potência sem ter que
regular o selector de velocidade variável.
Dependendo da aplicação, recomendamos as
seguintes velocidades:
Varinha 1... turbo
Batedor metálico 3… 15
Acessório de preparação de alimentos ver quadro de velocida des nas imagens das
secções (j)
Acessório Picador ver quadro de velocida des nas imagens das
secções (j)
Como utilizar a varinha 1
A varinha adequa-se perfeitamente à preparação de dips, molhos, sopas, maioneses e
comida de bebés bem como para misturar
bebidas e batidos:
a) Insira o motor ! no pé misturador & até
bloquear.
b) Introduza a varinha verticalmente no
recipiente e pressione os interruptores ‚
ou turbo #.
c) Para libertar o pé misturador após a utiliza-
ção, pressione os botões $ e retire-o.
Pode utilizar a varinha com o copo medidor
Á, tal como em outro recipiente. Quando
misturar directamente na panela, enquanto
cozinha, retire primeiro a panela do fogão
para proteger o aparelho de sobreaquecimento.
Como utilizar o batedor metálico 2
Utilize o batedor metálico para bater natas,
levantar claras e misturar bavaroises e
sobremesas pré-preparadas:
a) Insira o batedor metálico È na engrena-
gem Ë, e insira o motor ! na engrenagem
do batedor metálico até que bloqueie.
b) Introduza o batedor metálico num
recipiente e pressione o interruptor ‚ para
funcionar.
c) Para libertar, pressione os botões $ e
retire a engrenagem Ë. Depois retire o
batedor da engrenagem, puxando.
Para melhores resultados ...
• utilize uma taça larga em vez do copo
medidor,
• mova o batedor metálico no sentido dos
ponteiros do relógio, segurando-o ligeiramente inclinado.
Natas batidas:
Bata até um máximo de 400ml de nata fresca
de cada vez (min. 30% de gordura, 4-8 ºC)
Comece com uma velocidade baixa «1» e,
enquanto bate, aumente a velocidade até ao
nível «15».
Claras em castelo:
Bata até um máximo de 4 claras de cada vez.
Comece com uma velocidade média «7» e,
enquanto bate, aumente a velocidade até ao
nível «15».
Como utilizar o acessório de
preparação de alimentos (FP) 3
1 Cilíndro de empurrar alimentos
2 Tampa
2a Encaixe para o motor
2b Tubo de enchimento
2c Fecho da tampa
3 Lâmina
4 Taça
5 Base anti-deslizante (serve também como
tampa)
6 Suporte de peças
6a Acessório para fatiar
6b Acessório para picar (grosso)
6c Acessório para picar (fi no)
6d Acessório Julienne (rectangular)
6e Acessório Julienne (triangular)
15
Page 16

Picar
(ver imagem da secção I, no quadro de
processamento j)
A lâmina (3) adequa-se perfeitamente para
picar carne, queijo, cebolas, ervas, cenouras,
nozes, avelãs, amêndoas, etc. Para picar
alimentos mais duros, utilize o interruptor
turbo #.
N.B. Não pique alimentos demasiado duros
tais como noz moscada, grãos de café e
outros grãos.
Antes de picar…
• corte em pequenos pedaços a carne,
queijo, cebolas, alhos, cenouras, chilis,
• retire os talos das ervas e descasque as
nozes, avelãs e amendoas,
• retire ossos, tendões e cartilagens da carne.
a) Retire cuidadosamente a protecção de
plástico da lâmina (3). Cuidado: a lâmina
está muito afi ada! Segure-a sempre pela
parte de plástico superior. Coloque a
lâmina do espigão metálico, colocado no
centro da taça (4) e gire-a até bloquear.
Coloque sempre a taça sobre a base anti-
deslizante (5).
b) Insira os alimentos na taça.
c) Coloque a tampa (2) na taça com o fecho
(2c) posicionado cerca da pega da taça.
Para fechar a tampa, rode-a no sentido
dos ponteiros do relógio por forma a que
encaixe com um clique, sobre a pega.
d) Insira o motor
(2a) até que bloqueie. Assegure-se que
o cilíndro de empurrar alimentos (1) está
devidamente colocado.
e) Para funcionar, pressione os interruptores
! no encaixe para o motor
‚ ou # do motor, e segure a pega da taça
com a outra mão.
f) Após a utilização, pressione os botões $
para retirar o motor. Retire o cilíndro de
empurrar alimentos.
g) Pressionando o fecho da tampa (2c),
rode a tampa (2) no sentido oposto ao
dos ponteiros do relógio, para destacar e
levante-a.
h/i) Retire cuidadosamente a lamina, rodando
e puxando, antes de retirar os alimentos
processados.
Misturar massas ligeiras
Utilizando a lâmina (3), pode também
misturar massas ligeiras tais como massa
de panquecas ou bolos até um máximo de
250 gr de farinha.
Para massa de panquecas, por exemplo,
primeiro verta os líquidos na taça, depois
adicione a farinha e fi nalmente os ovos.
Pressione o interruptor turbo # e misture a
massa até que fi que suave.
Laminar / ralar
(ver imagem da secção II, no quadro de
processamento j)
Utilizando a peça para laminar (6a), pode
laminar pepinos, cebolas, cogumelos,
maças, cenouras, rabanetes, batatas cruas,
courgettes, couves. Utilizando a peça para
ralar, pode ralar, por exemplo, maçãs,
cenouras, batatas cruas, beterrabas, couves,
queijo (de macio a médio). Os acessórios
da nova varinha mágica Julienne (6d, 6e)
permitem-lhe cortar qualquer alimento em
tiras.
a) Coloque as peças (6a – 6e) no suporte
para de peças (6) e encaixe-as. Coloque
o suporte de peças no espigão metálico,
colocado no centro da taça (4) e gire-o até
bloquear.
b) Coloque a tampa (2) na taça com o fecho
(2c) posicionado cerca da pega da taça.
Para fechar a tampa, rode-a no sentido
dos ponteiros do relógio por forma a que
encaixe com um clique, sobre a pega.
c) Insira o motor
(2a) até que bloqueie. Seleccione a velocidade de acordo com as recomendações
na imagem (j).
d) Coloque os alimentos a ser processados
no tubo de enchimento. Nunca coloque
os dedos no tubo de enchimento quando
o aparelho está em funcionamento. Utilize
sempre o cilíndro de empurrar alimentos
(1) para o efeito.
e) Pressione os interruptores
motor para funcionamento.
f) Após a utilização, pressione os botões $
para retirar o motor.
g) Pressionando o fecho da tampa (2c),
rode a tampa (2) no sentido oposto ao
dos ponteiros do relógio, para destacar e
levante-a.
h) Retire o suporte para peças antes de
retirar os alimentos processados. Para
remover a peça, puxe-a para cima pela
saliência na parte de baixo do suporte de
peças.
! no encaixe para o motor
‚ ou „ do
Como funcionar com o acessório
Picador 4
1 Parte superior do picador
2 Lâmina
3 Recipiente picador
4 Tampa/Base anti-deslizante
O Acessório Picador está desenhado para
picar carne, queijo, cebola, ervas, alho,
cenoura, chilis em conserva e frutos secos
(nozes, avelãs, amendoas, ameixas secas,
etc).
Quando cortar alimentos mais duros (ex.
queijo rijo), use o botão turbo „.
Nota: Não utilize o picador para picar
alimentos extermamente duros como cubos
de gelo, noz moscada, café em grão ou
cereais.
Antes de picar ...
– corte em pedaços a carne, cebolas, alho,
cenoura, chilis
– retire os talos das ervas aromáticas e as
cascas dos frutos secos
– limpe a carne de ossos, tendões e cartila-
gens.
Para melhores resultados, por favor consulte
o quadro de velocidades recomendadas (j).
Picar
a) Retire cuidadosamente a capa de plástico
que cobre a lâmina (2). Cuidado: A lâmina
encontra-se muito afi ada! Segure-a
sempre pela parte superior de plástico.
Coloque a lâmina no eixo do recipiente
picador (3). Pressione a lâmina para baixo
e rode-a 90º até encaixar.
Coloque sempre o acessório picador sobre
a base anti-deslizante (4).
b) Coloque os alimentos no recipiente
picador.
c) Cubra o recipiente picador com a parte
superior do picador (1).
d) Introduza o corpo do motor ! na parte
superior do picador (1) até encaixar.
e) Pressione o interruptor ‚ ou # para
colocar o acessório picador a funcionar.
Durante a operação de picar, segure o
corpo do motor com uma mão enquanto
segura o recipiente picador com outra.
Não utilize o acessório picador continuamente durante mais de 2 minutos.
f) Após a utilização, pressione os botões $
para retirar o motor.
g) De seguida, remova a parte superior do
picador.
h) Retire cuidadosamente a lâmina.
i) Finalmente, retire os alimentos processa-
dos do recipiente picador. A base anti-
deslizante pode ser utilizada como tampa
para o acessório picador.
16
Page 17

Limpar o aparelho
Limpe o motor ! e a engrenagem do batedor
metálico Ë apenas com um pano húmido.
A tampa (2) pode pode ser limpa sob água
corrente, mas não pode ser imersa em água
nem lavada na máquina de lavar loiça.
Todas as restantes peças podem ser lavadas
na máquina de lavar loiça.
Quando processar alimentos coloridos (ex.
Cenouras), as peças de plástico podem fi car
descoloradas. Passe óleo vegetal nas peças
antes de as limpar.
Acessórios
(disponíveis nos Serviços Técnicos
Autorizados Braun)
BC: Acessório picador, desenvolvido para
picar maiores quantidades, para preparar
batidos, massas e para picar cubos de gelo.
Exemplos de receitas
Maionese (use o pé misturador)
200-250 ml de óleo
1 ovo (gema e clara)
1 c.sopa de sumo de limão ou vinagre
Sal e pimenta a gosto
Verta todos os ingredientes no copo medidor
de acordo com as instruções. Introduza o pé
misturador no fundo do copo. Pressionando o
interruptor #, mantenha a varinha na posição
até que o óleo se emulsione. Depois, sem
desligar, mova suavemente a varinha, para
cima e para baixo, até que a maionese fi que
bem ligada.
Sujeito a alterações sem aviso prévio.
Este aparelho cumpre com a directiva
EMC 2004/108/EC e com a Regulamentação de Baixa Voltagem
(2006/95/EC).
Por favor não deite o produto no lixo
doméstico, no fi nal da sua vida útil.
Entregue-o num dos Serviços de Assistência Técnica da Braun, ou em locais
de recolha específi ca, à disposição no
seu país.
Italiano
Nello studio dei nostri prodotti perseguiamo
sempre tre obiettivi: qualità, funzionalità e
design.
Ci auguriamo che il prodotto Braun che avete
acquistato soddisfi pienamente le vostre
esigenze.
Attenzione
Prima di usare il prodotto, leggere attentamente le istruzioni
• Non immergere il gambo in liquidi bollenti
e non toglierlo dal liquido quando è l’apparecchio ancora acceso.
• Non tenere la parte del corpo motore !
né l’attacco per la frusta Ë sotto l’acqua
corrente, né immergerli in acqua.
• Il bicchiere graduato Á non può essere
utilizzato nel forno a microonde.
• Prima di utilizzare l’accessorio multifunzione
Í, assicurarsi che l’aggancio del coperchio
(2c) sia inserito nel modo corretto e che il
pestello (1) sia nella posizione corretta.
• Non inserire altri accessori oltre al pestello
(1) nel tubo di inserimento (2b) durante le
lavorazioni.
• Spegnere sempre l’apparecchio, prima di
rimuovere il coperchio (2).
• Il coperchio (2) può essere lavato sotto
l’acqua corrente, ma non deve essere
immerso nell’acqua, né lavato nella
lavastoviglie.
• La ciotola (4) non può essere utilizzata nel
microonde.
• Gli elettrodomestici Braun corrispondono
ai parametri di sicurezza vigenti. Se l’apparecchio mostra dei difetti, smettere di
usarlo e portarlo ad un Centro Assistenza
Braun per le riparazioni. Riparazioni errate
o eseguite da personale non qualifi cato
potrebbero causare danni ed infortuni agli
utilizzatori.
Descrizione
! Corpo motore
‚ Tasto interruttore acceso/spento per
velocità variabile
# Tasto velocità (turbo)
$ Tasto di sgancio
% Regolatore della velocità
& Gambo frullatore
Á Bicchiere graduato con coperchio a tenuta
d’aria
Ë Attacco per frusta
È Frusta
Í Accessorio multifunzione
{ Tritatutto (HC)
Regolazione della velocità
Quando si attiva l’interruttore ‚, la velocità di
funzionamento corrisponde a quella indicata
sul regolatore della velocità %. Più elevata è
quest’ultima, più velocemente e fi nemente si
trita il cibo.
Per ottenere la massima velocità, premere
il tasto velocità turbo #. La funzione turbo
consente di avere a disposizione la velocità
massima per alcuni istanti senza spostare il
regolatore di velocità.
Raccomandiamo le seguenti velocità:
Frullatore 1…turbo
Frusta 3…15
Per l’accessorio
multifunzione vedi le tabelle di velocità
nelle immagini delle
sezioni (j)
Tritatutto vedi le tabelle di velocità
nelle immagini delle
sezioni (j)
• Le lame sono molto affi late!
• Questo elettrodomestico non è progettato
per essere utilizzato da bambini o da
persone con capacità fi siche o mentali
ridotte, senza la supervisione di una
persona responsabile della loro sicurezza.
In generale, si raccomanda di tenere
l’elettrodomestico fuori dalla portata dei
bambini.
• Questo apparecchio è costruito per lavorare
normali quantità di cibo.
• Togliere sempre la spina prima di lasciare
l’apparecchio incustodito e prima di montarlo, smontarlo, pulirlo o riporlo.
• Assicurarsi che il voltaggio dell’ impianto
elettrico corrisponda a quello stampato sul
fondo del prodotto.
Come utilizzare il vostro frullatore 1
Il frullatore è perfetto per preparare salse,
minestre, maionese, pappe per bambini,
frullati e frappè, cocktails:
a) Inserire il gambo frullatore & nel corpo
motore ! fi nchè non si blocca.
b) Per evitare schizzi, premete il tasto inter-
ruttore ‚ o il tasto turbo „ solo dopo aver
introdotto verticalmente il frullatore nel recipiente da utilizzare.
c) Per sganciare il gambo frullatore, premere
il tasto $ e rimuovere il gambo frullatore.
E’ possibile utilizzare il frullatore nei bicchieri
Á in dotazione o anche in qualsiasi altra
stoviglia. Nel caso d’utilizzo direttamente
17
Page 18

nella pentola durante la cottura, spostare la
pentola dal fuoco per proteggere il frullatore
dal surriscaldamento.
Come usare la frusta 2
Usare la frusta solo per montare a neve panna
e chiare d’uovo e mescolare preparati già
pronti per dessert:
a) Inserire la frusta È nell’attacco Ë, poi
inserire il corpo motore
fi nchè si blocca.
b) Mettere la frusta in un recipiente e quindi
premere il tasto ‚ per la lavorazione.
c) Per smontare, premere il tasto $ e stac-
care l’attacco. Quindi togliere la frusta
dall’attacco.
Per ottenere i risultati migliori ...
• utilizzate un contenitore più ampio, invece
del bicchiere graduato,
• muovete la frusta in senso orario,
mantenendola leggermente inclinata.
Panna montata
Montare fi no a 400 ml di panna fresca
(30% di grasso minimo, 4 – 8 °C).
Cominciare con una velocità bassa «1» e
mentre si monta, aumentare gradualmente la
velocità fi no a «15».
Albume a neve
Montare fi no a 4 chiare d’uovo per volta.
Cominciare con una velocità media «7» e
mentre si monta, aumentare gradualmente la
velocità fi no a «15».
! nell’attacco
Come utilizzare l’accessorio
multifunzione 3
1 Pestello
2 Interruttore
2a Innesto per corpo motore
2b Tubo di inserimento
2c Aggancio del dispositivo di blocco
3 Lame
4 Ciotola
5 Base anti-scivolo / coperchio
6 Aggancio degli accessori
6a Accessorio per affettare
6b Accessorio Tritatutto grande
6c Accessorio Tritatutto piccolo
6d Accessorio Julienne (rettangolare)
6e Accessorio Julienne (triangolare)
Tritare
(vedi fi gura Sezione I con tavola di lavorazione j)
Le lame (3) sono ideali per tritare carne,
formaggio, cipolle, erbe, aglio, carote, noci,
mandorle, prugne, ecc. Quando si tritano cibi
molto duri, usare l’interruttore turbo #.
Nota: Non tritare cibi estremamente duri,
come noci-moscate, chicchi di caffé o
granaglie.
Prima di tritare …
• tagliare a pezz i carne, formaggio,cipolle,
aglio, carote, peperoni,
• rimuovere il gambo dalle erbe, sgusciare le
noci,
• rimuovere ossa, tendini e cartilagini dalla
carne.
a) Rimuovere con attenzione la copertura di
plastica dalle lame (3). Attenzione: le lame
sono molto affi late! Prenderle sempre dalla
parte superiore in plastica. Posizionare le
lame sul perno al centro della ciotola (4) e
premere verso il basso fi nché si bloccano.
Inserire sempre la ciotola sulla base anti-
scivolo (5).
b) Mettere il cibo nella ciotola tritatutto.
c) Agganciare il coperchio (2) alla ciotola con
l’apposito aggancio (2c) posizionato vicino
al manico della ciotola. Per bloccare il
coperchio, ruotarlo in senso orario fi no a
quando non scatta.
18
d) Inserire il corpo motore
fi no a quando si blocca. Assicurarsi che il
pestello sia al suo posto.
e) Premere il tasto ‚ o # sul corpo motore
e tenere la ciotola con la mano libera.
f) Dopo l’utilizzo, premere il tasto $ per
rimuovere il corpo motore. Rimuovere il
pestello.
g) Premere il tasto del coperchio (2c), girare
il coperchio (2) in senso anti-orario per
sganciarlo e sollevarlo.
h/i) Rimuovere le lame con attenzione, giran-
dole e tirandole, prima di togliere il cibo
dalla ciotola.
! nell’innesto (2a)
Preparare impasti leggeri
Usando le lame (3), si possono anche preparare impasti leggeri come l’impasto per le
frittelle o l’impasto per una torta contenente
fi no a 250 g di farina.
Per l’impasto delle frittelle, ad esempio,
versare per prima cosa i liquidi nella ciotola,
aggiungere poi la farina ed infi ne le uova.
Premere l’interruttore turbo #, miscelare
l’impasto fi no a quando diventa omogeneo.
Affettare / Sminuzzare
(vedi fi gura sezione II con tavola di lavorazione j)
Usando l’accessorio per affettare (6a), si possono affettare, ad esempio, cetrioli, cipolle,
funghi, mele, carote, radici, patate, zucchine,
cavoli.
Usando gli accessori tritatutto (6b, 6c), si
possono sminuzzare, ad esempio, mele,
carote, patate, barbabietole, cavoli, formaggio
(morbido o di media consistenza). Gli
accessori Julienne (6d, 6e) permettono di
tagliare il cibo a piccole strisce.
a) Inserire l’accessorio (6a – 6e) nell’apposito
aggancio (6) e farlo scattare. Inserire
l’aggancio sul perno al centro della ciotola
e ruotarlo fi nché si blocca.
b) Agganciare il coperchio (2) alla ciotola con
l’apposito aggancio (2c) posizionato vicino
al manico della ciotola. Per bloccare il
coperchio, ruotarlo in senso orario fi no a
quando si aggancia.
c)
Inserire il corpo motore nell’innesto (2a) fi no
a quando si blocca. Selezionare la velocità
in base alle raccomandazioni della fi gura (j).
d) Inserire il cibo da lavorare nel tubo di
inserimento. Non inserire nulla nel tubo
di inserimento quando l’apparecchio è
acceso. Utilizzare sempre il pestello (1) per
inserire il cibo.
e) Premere il tasto
per azionare l’apparecchio.
f) Dopo l’utilizzo, premere il tasto $ per
rimuovere il corpo motore.
g) Premendo l’aggancio del coperchio (2c),
girare il coperchio in senso anti-orario per
aprirlo e sollevarlo.
h) Rimuovere l’accessorio dall’aggancio
prima di togliere il cibo. Per rimuovere
l’aggancio, spingerlo verso l’alto fi no a
quando sporge dall’aggancio.
‚ o „ sul corpo motore
Come utilizzare gli accessori
tritatutto 4
1 Parte superiore
2 Lame
3 Ciotola tritatutto
4 Base antiscivolo/coperchio
Il tritatutto è perfettamente adatto per tritare
carne, formaggio, cipolle, aglio, chili (con
acqua), erbe, carote, noci, mandorle, nocciole,
prugne etc.
Per tritare cibi duri (come ad esempio il parmigiano) usare la funzione di velocità turbo „.
N.B.: Non tritate cose estremamente dure
come cubetti di ghiaccio, noci moscate,
chicchi di caffè o granaglie.
Page 19

Prima di tritare ...
– tagliare a pezzi la carne, il formaggio, le
cipolle, l‘aglio, le carote, peperoncino
– togliere il gambo dalle erbe, sgusciare le
noci
– rimuovere ossa, tendini e cartillagini dalla
carne.
Per risultati migliori, fare riferimento alle
raccomandazioni della guida sui settaggi della
velocità.
Tritare
a) Rimuovere attentamente la co-pertura di
plastica dalle lame (2). Attenzione: Le lame
sono molto affi late! Maneggiarle sempre
tenendola dalla parte superiore in plastica.
Posizionare le lame sul perno al centro
della ciotola (3). Premere le lame verso il
basso e girarle di 90° per bloccarle.
Inserire sempre la ciotola nella base anti-
scivolo (4).
b) Mettere il cibo nella ciotola/bicchiere
tritatutto
c) Mettere la parte superiore (1) sulla ciotola/
bicchiere tritatutto.
d) Inserire il corpo motore
superiore (1) fi no a quando si blocca.
e) Premere il tasto ‚ o # per accendere il
tritatutto. Durante la lavorazione, tenere il
corpo motore con una mano e la ciotola
o il bicchiere con l‘altra mano.
Non usare il tritatutto per più di 2 minuti.
f) Dopo l’utilizzo, premere il tasto $ per
rimuovere il corpo motore. Rimuovere il
pestello.
g) Quindi rimuovete la parte superiore.
h) Togliere la lame con attenzione.
i) Rimuovere il cibo dalla ciotola/bicchiere.
La base antiscivolo può servire come
tappo per la ciotola bicchiere.
! sulla parte
Pulire l’apparecchio
Pulire il corpo motore ! e l’attacco per la
frusta Ë solo con un panno umido.
Il coperchio (2) può essere risciacquato
sotto l’acqua corrente, ma non deve
essere immerso nell’acqua né lavato nella
lavastoviglie.
Quando si lavora cibo pigmentato (ad esempio le carote), le parti in plastica dell’apparecchio possono perdere il colore originario.
Immergere queste parti in olio vegetale prima
di pulirle.
Accessori
(disponibili nel centri di assistenza tecnica
Braun; non in tutti i paesi)
BC: Ideale per tritare grandi quantità di carne,
frullati, imasti soffi ci, tritare ghiaccio.
Esempio di ricetta
Maionese (usare il frullatore)
200-250 ml di olio
1 uovo (tuorlo e albume)
1 cucchiaio da tavola di succo di limone
o aceto
Sale e Pepe qb
Mettere tutti gli ingredienti nel bicchiere
graduato secondo l’ordine sopra descritto.
Introdurre il frullatore nel bicchiere fi no a
toccarne il fondo. Premere l’interruttore turbo
#, mantenere il frullatore in questa posizione
fi nchè l’olio si emulsiona. Poi, senza spegnere
l’apparecchio, muoverlo delicatamente su e
giù fi no a quando la maionese è composta e
soffi ce.
Salvo cambiamenti.
Questo prodotto è conforme alle
normative EMC come stabilito dalla
direttiva CE 2004/108 e alla Direttiva
Bassa Tensione (CE 2006/95).
Si raccomanda di non gettare il
prodotto nella spazzatura al termine
della sua vita utile. Per lo smaltimento,
rivolgersi ad un qualsiasi Centro
Assistenza Braun o ad un centro
specifi co.
Nederlands
Onze produkten worden gemaakt om te
kunnen voldoen aan de hoogste kwaliteitseisen, functionaliteit en design. Wij wensen u
veel plezier met uw nieuwe Braun apparaat.
Waarschuwing:
Lees eerst zorgvuldig en volledig de
gebruiksaanwijzing voordat u dit apparaat
gaat gebruiken.
• De messen zijn erg scherp!
• Dit apparaat is niet bedoeld voor gebruik
door kinderen of personen met verminderde
fysieke of mentale capaciteiten, tenzij zij
het apparaat gebruiken onder toezicht van
een persoon verantwoordelijk voor hun
veiligheid. Over het algemeen raden wij aan
dit apparaat buiten bereik van kinderen te
houden.
• Dit apparaat is bedoeld voor normaal
huishoudelijk gebruik.
• Haal altijd de stekker uit het stopcontact als
u het apparaat zonder toezicht achterlaat,
het uit elkaar haalt of weer in elkaar zet of
voordat u het apparaat opbergt.
• Controleer, voordat u de stekker in het
stopcontact steekt, of het voltage van het
stopcontact overeenkomt met het voltage
dat staat vermeld op de onderkant van het
apparaat.
• Vooral als u de staafmixervoet in hete
vloeistoffen zet, zorg er dan voor dat u
de staafmixervoet niet al werkend in de
vloeistof plaatst of deze er al werkend uit
haalt.
• Het motorgedeelte · en het tandwielge-
deelte van de garde Ë niet onder stromend
water houden; beide onderdelen ook niet
onderdompelen in water.
• De maatbeker Á is niet geschikt voor in de
magnetron.
• Zorg ervoor, voordat u de grote kom Í
gebruikt, dat de deksel (2c) is vastgeklikt en
dat de vulstop (1) op zijn plaats is.
• Plaats geen andere hulpstukken dan de
vulstop in de vulschacht.
• Schakel altijd het apparaat uit, voordat u het
deksel (2) verwijderd.
• Het deksel (2) kan onder stromend water
schoongemaakt worden; dompel deze
echter niet onder in water. Ook is deze niet
vaatwasbestendig.
• De grote kom (4) is niet geschikt voor in de
magnetron.
• De elektrische apparaten van Braun voldoen
aan de veiligheidsvoorschriften. Reparaties
aan de elektrische apparaten mogen alleen
worden uitgevoerd door deskundig servicepersoneel. Ondeskundig, oneigenlijk reparatiewerk kan ongelukken veroorzaken of de
gebruiker verwonden.
Beschrijving:
! Motorgedeelte
‚ Aan/uit schakelaar voor variabele snelheid
# Aan/uit-schakelaar voor turbosnelheid
$ Knoppen om de werkende onderdelen los
te klikken
% Snelheidsregelaar
& Steel van staafmixer
Á Maatbeker met luchtdicht deksel
Ë Tandwielgedeelte voor garde
È Garde
Í Hulpstuk voor voedselbereiding (FP)
{ Hakmolen (HC)
19
Page 20

De snelheid instellen
Als de schakelaar ‚ wordt ingedrukt, werkt
het apparaat met de snelheid die is ingesteld
met snelheidsregelaar %. Hoe hoger de
ingestelde snelheid, hoe sneller de messen
ronddraaien en hoe fi jner het resultaat van de
bewerking zal zijn.
De maximale snelheid wordt echter alleen
bereikt door turboschakelaar
U kunt de turboschakelaar ook gebruiken
om de snelheid tijdelijk op te voeren zonder
de snelheidsregelaar opnieuw in te hoeven
stellen.
Wij adviseren de volgende snelheden voor
onderstaande onderdelen:
Staafmixer 1...turbo
Garde 3...15
Hulpstuk voor snelheidstabel bij afvoedselbereiding beeldingsoverzichten (j)
Hakmolen snelheidstabel bij af beeldingsoverzichten (j)
# in te drukken.
De bediening van de staafmixer 1
De staafmixer is bij uitstek geschikt voor het
bereiden van (dip)sauzen, soep, mayonaise
en babyvoedsel, maar ook voor het mixen van
drankjes en milkshakes:
a) Steek het motorgedeelte ! in de steel van
de mixer & totdat deze vastklikt.
b) Houd de staafmixer in de schaal/kom/pan
etc. en druk op de aan/uit-schakelaar ‚ of
de turboschakelaar #.
c) Om de steel na gebruik weer los te klikken,
houdt u de knoppen $ ingedrukt terwijl u
aan de steel trekt.
U kunt de staafmixer gebruiken in combinatie
met de maatbeker Á, maar ook met kommen,
schalen, pannen etc. Als u tijdens het koken
de inhoud van een pan wilt pureren, dient u de
pan eerst van het fornuis te halen. Anders kan
de staafmixer namelijk oververhit raken.
De bediening van de garde 2
De garde dient alleen gebruikt te worden
voor het kloppen van slagroom en eieren en
voor het mengen van luchtig deeg en instant
desserts:
a) Steek de garde È in het tandwielgedeelte
Ë. Vervolgens steekt u het motorgedeelte
! in het tandwielgedeelte totdat dit
vastklikt.
b) Houd de garde in een kom/schaal etc. en
druk dan pas de schakelaar ‚ in om het
apparaat aan te zetten.
c) Wilt u de garde weer losklikken, dan houdt
u de knoppen $ ingedrukt terwijl u aan het
tandwielgedeelte trekt. Trek vervolgens de
garde uit het tandwielgedeelte.
Voor het beste resultaat is het raadzaam ...
• om niet de maatbeker te gebruiken, maar
een brede schaal/kom,
• om de garde met de klok mee te bewegen
en deze enigszins schuin te houden.
3 Mes
4 Kom
5 Anti-slip bodem/deksel
6 Snijplaathouder
6a Snijschijf
6b Raspplaat (grof)
6c Raspplaat (fi jn)
6d Julienneplaat (rechthoekig)
6e Julienneplaat (driehoekig)
Hakken
(zie afbeelding I bij tabel j)
Het mes (3) is uiterst geschikt voor het hakken
van vlees,ui, kruiden, knofl ook, walnoten,
amandelen, etc. Voor het hakken van harde
ingrediënten, de turbo schakelaar gebruiken.
N.B.: Hak geen extreem hard voedsel, zoals
nootmuskaat, koffi ebonen en granen.
Voordat u de hakmolen gebruikt ...
• snij vlees, kaas, uien, knofl ook, wortelen,
spaanse pepers voor
• verwijder steeltjes van kruiden, haal de
doppen van noten af
• verwijder botjes, pezen en kraakbeen uit
vlees.
a) Verwijder voorzichtig het plastic bescherm-
kapje van het mes (3). Voorzichtig: het mes
is zeer scherp! Pak het altijd vast bij het
plastic uiteinde. Plaats het mes op de pen
in het midden van de kom (4) en druk deze
naar beneden totdat het vastklikt. Plaats
de kom altijd op de anti-slip bodem (5).
b) Doe de ingrediënten in de kom.
c)
Plaats het deksel (2) op de kom en wel zo
dat het bevestigingsmechanisme (2c) wordt
geplaatst rechts naast de hendel van de
kom. Om het deksel vast te klikken, draait
u het kloksgewijs zodat het bevestigings-
mechanisme vastklikt boven de hendel.
d) Bevestig het motorgedeelte ! op het
aandrijfdeel (2a) tot dit vastklikt. Zorg dat
de vulstop (1) op zijn plek is.
e) Om het apparaat te bedienen, drukt u op
de aan/uit schakelaar ‚ of # Hou met uw
andere hand de kom vast.
f) Druk na gebruik op de knoppen $ om het
motorgedeelte te verwijderen. Verwijder de
vulstop.
g) Druk op het bevestigingsmechanisme (2c),
draai het deksel (2) tegen de klok in om het
te ontgrendelen en til het op.
h/i) Verwijder voorzichtig het mes door het te
draaien en op te tillen voor u het verwerkte
voedsel uit de kom haalt.
Dun beslag mixen
Met het mes (3), kunt u ook dun beslag zoals
pannekoekenbeslag of cakebeslag op basis
van maximaal 250 gram bloem mixen. Voor
bijvoorbeeld pannekoekenbeslag, giet u
eerst de vloeistof in de kom, vervolgens de
bloem en tenslotte de eieren. Druk op de
turboschakelaar „ en mix het beslag totdat
het glad is.
Slagroom:
Klop niet meer dan 400 ml gekoelde room
(minimaal 30 % vet, 4 – 8 °C).
Begin met een lage snelheid «1» en voer dit
op naar stand «15».
Geklopt eiwit:
Niet meer dan 4 eieren tegelijk te kloppen.
Begin met een matige snelheid «7» en voer dit
al kloppend op naar stand «15».
Het bedienen van het hulpstuk
voor voedselbereiding (FP) 3
1 Vulstop
2 Deksel
2a Aandrijfdeel
2b Vulschacht
2c Bevestigingsmechanisme
20
Snijden / raspen
(zie afbeelding II bij tabel j)
Gebruik de snijplaat (6a) voor bijvoorbeeld
het snijden van komkommers, uien, champignons, appels, wortelen, radijsjes, rauwe
aardappelen, courgettes en kool. Met de
raspplaat (6b, 6c) raspt u bijvoorbeeld appels,
wortelen, rauwe aardappelen, bietjes, kool
en zachte kaas. De Julienne platen (6d, 6e)
snijden voedsel in stroken.
a) Plaats (6a – 6e) in de snijplaathouder (6) en
klik het vast. Plaats de snijplaathouder op
de pen in het midden van de kom en druk
deze naar beneden totdat het vastklikt.
b) Plaats het deksel (2) op de kom en wel
zo dat het bevestigingsmechanisme (2c)
wordt geplaatst rechts naast de hendel
van de kom. Om het deksel vast te
Page 21

klikken, draait u het kloksgewijs zodat het
bevestigingsmechanisme vastklikt boven
de hendel.
c) Bevestig het motorgedeelte op het
aandrijfdeel tot dit vastklikt. Selecteer de
aanbevolen snelheid op basis van de tabel
op fi guur (j).
d) Vul de vulschacht met de ingrediënten.
Ga nooi met uw hand in de vulschacht
als het apparaat ingeschakeld is. Gebruik
altijd de vulstop (1) om eten mee door het
apparaat te duwen.
e) Druk op schakelaar
gedeelte.
f) Druk na gebruik op de knoppen
motorgedeelte te verwijderen.
g) Druk op het bevestigingsmechanisme (2c),
draai het deksel (2) tegen de klok in om het
te ontgrendelen en til het op.
h) Neem de snijplaathouder uit het de kom
voordat u het bereide voedsel er uit haalt.
Om de snij- of raspplaat (6a – 6e) uit de
houder te krijgen, drukt u op het uitstekende gedeelte onderop de houder.
‚ of „ op het motor-
$ om het
De bediening van de hakmolen 4
1 Bovenkant
2 Mes
3 Hakmolen
4 Anti-slip bodem/deksel
De hakmolen is uiterst geschikt voor het
hakken van vlees, kaas, uien, kruiden,
knofl ook, Spaanse pepers (met water),
wortels, walnoten, hazelnoten, amandelen,
pruimen, etc.
Bij het hakken van hard voedsel (bv harde
kaas) gebruikt u de Turbo schakelaar „.
N.B.: Gebruik de hakmolen niet voor
zeer harde ingrediënten zoals ijsblokjes,
nootmuskaat, koffi ebonen en granen.
Dompel deze echter niet onder in water. Ook
is deze niet vaatwasbestendig. Alle andere
onderdelen zijn vaatwasmachinebestendig.
Wanneer sterk gekleurd voedsel (bijv. wortel)
wordt bereid kunnen de plastic onderdelen
verkleuren. Deze kleur kunt u verwijderen met
plantaardige olie voordat u het schoonmaakt.
Accessoires
(verkrijgbaar bij de servicecentra van Braun;
dit geldt echter niet in alle landen)
BC: Extra snijstuk, bij uitstek geschikt voor
het snijden van grote hoeveelheden, maar ook
voor het bereiden van milkshakes en luchtig
deeg en voor het fi jnmalen van ijsblokjes.
Voorbeeldrecept
Mayonaise (met staafmixervoet)
200 – 250 ml. olie
1 ei (zowel de dooier als het eiwit)
1 eetlepel citroensap of azijn
Zout en peper naar smaak
Doe alle ingrediënten in bovenstaande
volgorde in de maatbeker. Houd de staafmixer
net boven de bodem van de maatbeker.
Houd de turboschakelaar # ingedrukt totdat
het geheel goed vermengd is; beweeg de
staafmixer hierbij niet. Vervolgens beweegt u
de mixer, zonder hem uit te zetten, langzaam
van boven naar beneden totdat er een mooie
gelijkmatige massa ontstaat.
Wijzigingen voorbehouden.
Dit produkt voldoet aan de EMCnormen volgens de EEG richtlijn
2004/108 en aan de EG laagspannings
richtlijn 2006/95.
Voordat u gaat snijden ...
– snijd vlees, kaas, uien, knofl ook, wortels
alsvast, Spaanse pepers in kleine stukken
– verwijder steeltjes van kruiden en haal
noten uit hun schaal
– verwijder botjes, pezen en kraakbeen van
het vlees.
Voor de beste resultaten verwijzen wij u naar
de aanbevolen snelheden in de gebruikstabel.
Snijden/hakken
a) Verwijder voorzichtig het plastic kapje van
het mes (2). Voorzichtig: het mes is zeer
scherp! Pak het mes altijd vast aan de
plastic bovenkant. Plaats het mes over de
pin in het midden van de hakmolen (3).
Druk het mes naar beneden en draai deze
90° tot het vastklikt. Plaats de hakmolen
altijd op de antislip bodem (4).
b) Doe de ingrediënten in de hakmolen.
c) Plaats de bovenkant (1) op de hakmolen.
d) Schuif het motorgedeelte ! in het boven-
kant (1) tot deze vastklikt.
e) Druk op schakelaar ‚ of # om de
hakmolen aan te zetten. Houdt tijdens het
snijden het motorhuis met de ene hand
vast en de hakmolen met de andere.
Gebruik de hakmolen niet langer dan
2 minuten.
f) Druk na gebruik op de knoppen $ om het
motorgedeelte te verwijderen.
g) Verwijder vervolgens de bovenkant.
h) Verwijder voorzichtig het mes uit de
hakmolen.
i) Verwijder het fi jngehakte voedsel uit de
hakmolen. De antislip bodem dient tevens
als deksel voor de hakmolen.
Schoonmaken
Het motorgedeelte ! en tandwielgedeelte
Ë van de garde mag alleen met een vochtig
doekje worden gereinigd. Het deksel (2) kan
gereinigd worden onder stromend water.
Gooi dit apparaat aan het eind van zijn
nuttige levensduur niet bij het huisafval.
Lever deze in bij een Braun Service
Centre of bij de door uw gemeente
aangewezen inleveradressen.
Dansk
Vores produkter er skabt til at opfylde de
højeste krav, hvad angår kvalitet, funktionalitet
og design. Vi håber, du vil få stor glæde af dit
nye apparat fra Braun.
Advarsel
Læs hele brugsvejledningen omhyggeligt,
før apparatet tages i brug.
• Bladene er meget skarpe!
• Dette produkt er ikke beregnet til at bruges
af børn eller svagelige personer uden
overvågning af en person der er ansvarlig
for deres sikkerhed. Generelt anbefaler vi at
produktet opbevares utilgængeligt for børn.
• Apparatet er konstrueret til mængder, som
normalt indgår i en husholdning.
• Tag altid stikket ud af stikkontakten, når du
forlader apparatet, og før du samler det,
skiller det ad, rengør og opbevarer det.
• Før brug kontrolleres det, om netspændingen svarer til spændingsangivelsen i
bunden af apparatet.
• Især når håndblenderens tilbehør anvendes
i varm væske, må blenderskaftet ikke
føres ned i eller fjernes fra væsken, mens
apparatet er tændt.
• Motordelen ! og piskerisets gearkasse Ë
må ikke holdes under rindende vand eller
nedsænkes i vand.
21
Page 22

• Kanden Á kan ikke gå i mikroovnen.
• Før der tændes for blenderglastilbehøret Í,
skal du kontrollere, at lågets låsemekanisme
(2c) er klikket korrekt ind, og at skubberen
(1) er på plads.
• Der må ikke indføres andre værktøjer i
påfyldningsrøret (2b) end skubberen (1)
under driften.
• Sluk altid for apparatet, før låget (2) fjernes.
• Låget (2) kan rengøres under rindende vand,
men må ikke nedsænkes i vand eller komme
i opvaskemaskinen.
• Skålen (4) kan ikke gå i mikroovnen.
• Brauns elektriske apparater overholder
gældende sikkerhedsforskrifter.
Reparationer eller udskiftning af el-ledning
må kun udføres af autoriseret personale.
Fejlbehæftede, ukvalifi cerede reparationer
kan udsætte brugeren for stor risiko.
Beskrivelse
! Motordel
‚ Tænd/sluk-knap til variabel hastighed
# Turboknap
$ Knapper til frigørelse af de bevægelige
dele
% Regulator til variabel hastighed
& Blenderskaft
Á Målebæger med lufttæt låg
Ë Piskerisets gearkasse
È Piskeris
Í Blenderglastilbehør (FP)
{ Hakker (HC)
Indstilling af hastighed
Når kontakten ‚ aktiveres, svarer funktionshastigheden til indstillingen på regulatoren for
variabel hastighed %. Jo højere hastighedsindstillingen er, jo hurtigere og fi nere bliver
fødevarerne hakkede.
Tryk på turboknappen # for at opnå maksimal
hastighed. Du kan også anvende turbokontakten til at få hurtige, kraftige pulseringer
uden at skulle stille på fartregulatoren.
Afhængig af model anbefaler vi følgende
hastighedsindstillinger:
Håndblender 1... turbo
Piskeris 3... 15
Blenderglastilbehør se hastighedstabeller i
billedafsnit (j)
Hakker se hastighedstabeller i
billedafsnit (j)
Sådan bruges din håndblender 1
Håndblenderen er perfekt til at tilberede dips,
saucer, supper, mayonnaise, babymad samt til
at blande drinks og milkshakes:
a) Sæt motordelen ! fast på blenderskaftet
&, indtil den låser.
b) Før håndblenderen ned i beholderen, og
tryk på knappen ‚ eller turboknappen „.
c) Tryk på knapperne $, og træk i blender-
skaftet for at frigøre det efter brug.
Håndblenderen kan bruges i målebægeret Á
eller i en hvilken som helst anden beholder.
Når du blender direkte i en gryde under
madlavningen, skal gryden først tages
af varmen for at beskytte apparatet mod
overophedning.
Sådan bruges piskeriset 3
Brug kun piskeriset til at piske fl ødeskum,
æggehvider, sandkagedej og færdige dessertblandinger:
a) Sæt piskeriset È i gearboksen Ë, og sæt
derpå motordelen ! fast på gearboksen,
til den låser.
b) Placer piskeriset langt nede i en beholder.
Først da trykkes på kontakten ‚ for at
starte.
c) For at frigøre gearkassen skal du trykke
på knapperne $ og trække den af. Træk
derefter piskeriset ud af gearkassen.
For at opnå de bedste resultater ...
• anvend en bred skål i stedet for kanden,
• bevæg piskeriset med uret, mens det
holdes en smule skråt.
Flødeskum:
Pisk kun op til 4 dl afkølet piskefl øde
(min. 30 % fedtindhold, 4 – 8 °C).
Start på lav hastighed «1», og øg hastigheden
til «15», mens du pisker.
Æggesne:
Pisk kun op til 4 æggehvider ad gangen.
Start på middel hastighed «7», og øg hastigheden til «15», mens du pisker.
Sådan bruges
blenderglastilbehøret 3
1 Skubber
2 Låg
2a Kobling til motordel
2b Påfyldningsrør
2c Låsemekanisme til låg
3 Blad
4 Skål
5 Skridsikkert underlag (fungerer også
som låg)
6 Tilbehørsholder
6a Skive-tilbehør
6b Opskærings-tilbehør
6c Finskærings-tilbehør
6d Julienne-tilbehør (fi rkantede strimler)
6e Julienne-tilbehør (trekantede strimler)
Hakke
(se illustration I med bearbejdningstabel j)
Bladet (3) er meget velegnet til at hakke kød,
ost, løg, krydderurter, hvidløg, gulerødder,
valnødder, hasselnødder, mandler etc. Brug
turboknappen # for at hakke hårde ting.
NB: Hak ikke ekstremt hårde madvarer som
muskatnød, kaffebønner og korn.
Før du hakker ...
• skær kød, løg, hvidløg, gulerødder og chili
i mindre stykker,
• fjern stilke fra krydderurter, knæk nødder og
fjern skallerne,
• fjern ben, sener og brusk fra kød.
a) Fjern forsigtigt plastdækslet fra bladet (3).
Advarsel: Bladet er meget skarpt! Hold
altid i den øverste plastikdel. Placer bladet
på tappen i midten af skålen (4), og drej
den for at låse den på plads. Placer altid
skålen på det skridsikre underlag (5).
b) Placer maden i hakkeskålen.
c) Sæt låget (2) fast på skålen med låseme-
kanismen (2c) placeret ved siden af skålens
håndtag. Låget låses ved at dreje det med
uret, så låsemekanismen klikker på plads
over håndtaget.
d) Sæt motordelen
indtil den låser. Kontroller, at skubberen (1)
er på plads.
e) For at betjene blenderen trykkes på
kontakten „ eller ‚ på motordelen, mens
du tager fat i skålen med den anden hånd.
f) Tryk på knapperne $ efter brug for at
løsne motordelen. Fjern skubberen.
g) Mens du trykker på lågets låsemekanisme
(2c), drejes låget (2) mod uret for at låse
det op og løfte det af.
h/i) Tag forsigtigt bladet af ved at dreje og
trække i det, før de behandlede madvarer
fjernes.
! fast på koblingen (2a),
Sådan blandes en let dej
Med bladet (3) kan du også blande en let dej
som f.eks. pandekagedej eller en kageblanding baseret på op til 250 g mel.
Til pandekagedej hældes de fl ydende ingredienser først i kanden. Derefter tilsættes mel
og til sidst æg. Bland dejen, til den er glat, ved
at trykke på turboknappen #.
22
Page 23

Snitte / rive
(se illustration afsnit II med bearbejdningstabel j)
Ved hjælp af snitteværktøjet (6a) kan du snitte
f.eks. agurker, løg, champignoner, æbler, gulerødder, radiser, rå kartofl er, courgetter, kål.
Ved hjælp af rivetilbehøret (6a) kan du rive
f.eks. æbler, gulerødder, rå kartofl er, rødbeder,
kål og blød til mellemhård ost. Julienne-tilbehørene (6d, 6e) strimler maden.
a) Placer et stykke tilbehør (6a – 6e) i
tilbehørsholderen (6), og klik det på plads.
Placer tilbehørsholderen på tappen i
midten af skålen, og drej den for at låse
den på plads.
b) Sæt låget (2) fast på skålen, så låsemeka-
nismen (2c) er placeret ved siden af skålens
håndtag. Låget låses ved at dreje det med
uret, så låsemekanismen klikker på plads
over håndtaget.
c) Sæt motordelen fast på koblingen (2a),
indtil den låser. Vælg hastighedsindstilling
efter anbefalingerne i illustration (j).
d) Fyld de madvarer, som skal bearbejdes,
i påfyldningsrøret. Ræk aldrig ned i
påfyldningsrøret, når der er tændt for
apparatet. Brug altid skubberen (1) til at
skubbe madvarerne ned med.
e) Tryk på kontakten ‚ eller „ på motor-
delen for at betjene apparatet.
f) Tryk på knapperne $ efter brug for at
løsne motordelen.
g) Mens du trykker på lågets låsemekanisme
(2c), drejes låget mod uret for at låse det
op og løfte det af.
h) Tag tilbehørsholderen af, før de behand-
lede madvarer fjernes. For at fjerne tilbehøret skal du trykke op på den ende, som
stikker ud i bunden af tilbehørsholderen.
Brug af hakketilbehør 4
1 Overdel
2 Knivindsats
3 Hakkeskål
4 Skridsikker bund/låg
Hakkeren er særdeles velegnet til hakning af
kød, ost, løg, krydderier, hvidløg, chili (med
vand), gulerødder, valnødder, hassselnødder,
mandler, svesker etc.
Brug turboknappen „ ved hakning af hårde
fødevarer (f.eks. fast ost).
N.B.: Hak ikke meget hårde fødevarer som
f.eks. isterninger, muskatnød, kaffebønner og
kerner.
g) Fjern derefter overdelen.
h) Tag forsigtigt kniven op.
i) Fjern ingredienserne fra hakkeskålen. Den
skridsikre bund fungerer også som låg på
hakkeskålen.
Rengøring af apparatet
Motordelen ! og piskerisets gearkasse Ë
må kun rengøres med en fugtig klud. Låget
(2) kan rengøres under rindende vand, men
må ikke nedsænkes i vand eller komme i
opvaskemaskinen.
Alle andre dele kan rengøres i opvaskemaskinen.
Hvis der hakkes stærkt farvede fødevarer (fx
gulerødder), kan apparatets plastikdele blive
misfarvede. Gnid disse dele med vegetabilsk
olie, inden de rengøres.
Tilbehør
(fås hos Braun Kundeservice; dog ikke i alle
lande)
BC: hakketilbehør, ideel til hakning af større
mængder, milkshakes, let dej samt til at knuse
isterninger.
Eksempler på opskrifter
Mayonnaise (brug håndblender)
2-2,5 dl olie
1 æg (blomme og hvide)
1 spsk. citronsaft eller vineddike
Salt og peber
Fyld alle ingredienser i målebægeret i den
orden, de står opført ovenfor. Sæt håndblenderen helt ned i bunden af målebægeret. Tryk
på turboknappen #, og hold håndblenderen
i denne stilling, til olien tykner. Uden at slukke
bevæges blenderen langsomt op og ned, til
mayonnaisen er ensartet.
Oplysningerne heri kan ændres uden varsel.
Dette produkt er i overensstemmelse
med bestemmelserne i EMC Direktiv
2004/108/EC og Lavspændingsdirektivet 2006/95/EC.
Apparatet bør efter endt levetid ikke
kasseres sammen med husholdningsaffaldet. Bortskaffelse kan ske på et
Braun Servicecenter eller passende,
lokale opsamlingssteder.
Før du begynder at hakke ...
– skær kød, ost, løg, hvidløg, gulerødder i
mindre stykker,
– fjern stilkene fra krydderurter, afskal
nødderne,
– fjern ben, sener og brusk fra kødet.
Se de anbefalede hastighedsindstillinger
i brugsvejledningen (j) for at få de bedste
resultater.
Brug af hakker
a) Fjern forsigtigt plasticbeskyttelsen fra
knivindsatsen (2). Vigtigt: Kniven er
meget skarp! Hold altid på den øverste
plasticdel. Anbring kniven på midterakslen
af hakkeskålen (3). Tryk knivindsatsen
ned og drej 90°, så den låser. Placer altid
hakkeskålen på den skridsikre bund (4).
b) Kom ingredienserne i hakkeskålen.
c) Sæt overdelen (1) på hakkeskålen.
d) Sæt motordelen ! på overdelen (1), til den
låser.
e) Tryk på knap ‚ eller # for at starte
hakkeren. Hold på motordelen med den
ene hånd og hakkeskålen med den anden,
mens du arbejder. Brug ikke hakkeren i
mere end 2 minutter.
f) Tryk på knapperne $ efter brug for at
løsne motordelen.
Norsk
Våre produkter er designet for å imøtekomme
de høyeste standarder når det gjelder kvalitet,
funksjon og design. Vi håper du blir fornøyd
med ditt nye Braun-produkt.
Advarsel
Les hele bruksanvisningen nøye før du tar
apparatet i bruk.
• Knivbladene er meget skarpe!
• Dette produktet er ikke ment å brukes av
barn eller personer med redusert fysisk
eller mental kapasitet, med mindre en
person ansvarlig for barnets eller den
andre personens sikkerhet har kontroll
over situasjonen. Generelt anbefaler vi at
produktet oppbevares utilgjengelig for barn.
• Apparatet er konstruert for bearbeiding av
normale husholdningsmengder.
• Trekk alltid ut kontakten når apparatet
forlates uten tilsyn og før montering,
demontering, rengjøring og oppbevaring.
23
Page 24

• Før du setter støpselet i stikkontakten,
sjekk at spenningen korresponderer med
spenningsangivelsen som er trykt på
apparatet.
• Når du bruker mikserredskapene i varme
væsker må du ikke senke motordelen i
væsken eller fjerne stavmikseren fra væsken
mens apparatet er påslått.
• Motordelen ! eller girkoplingen for visp Ë
skal ikke holdes under rennende vann eller
senkes ned i vann.
• Målebegeret Á kan ikke brukes i mikro-
bølgeovn.
• Før du bruker mattilberedningsredskapene
Í, må du forsikre deg om at låsehaken (2c)
er klikket på plass og at stapperen (1) er i
påfyllingsrøret (2b).
• Ikke bruk andre redskaper enn stapperen (1)
i påfyllingsrøret under tilberedningsprosessen.
• Slå alltid av apparatet før du tar av lokket
(2).
• Lokket (2) kan rengjøres under rennende
vann, men det må ikke senkes ned i vann
eller vaskes i oppvaskmaskin.
• Bollen (4) kan ikke brukes i mikrobølgeovn.
• Elektriske apparater fra Braun tilfredsstiller
gjeldende krav til sikkerhet. Reparasjoner
eller bytte av ledning må kun foretas av
autorisert servicepersonell. Mangelfulle,
ukvalifi serte reparasjoner kan føre til skader
eller ulykker.
Beskrivelse
! Motordel
‚ På/av-bryter for regulerbar hastighet
# Turbobryter
$ Knapper for å frigjøre delene
% Regulerbar hastighetskontroll
& Blandestav
Á Målebeger med lufttett lokk
Ë Girkopling for visp
È Visp
Í Mattilberedningsredskap (FP)
{ Hakketilbehør (HC)
Slik bruker du vispetilbehøret 2
Bruk vispetilbehøret kun til visping av krem,
eggehviter og miksing av sukkerbrød og
ferdigblandete desserter:
a) Monter vispen È i girkoplingen for vispen
Ë og monter deretter motordelen ! i
girkoplingen slik at den låses på plass.
b) Plasser vispen i en bolle og trykk deretter
inn bryteren ‚ før bruk.
c) For frigjøring, trykk på knappen $ og dra
av girkoplingen. Trekk deretter vispen ut av
girkoplingen.
For best resultat ...
• bruk ikke miksebegeret, men en vid arbeidsbolle,
• beveg vispen i klokkeretningen mens du
holder den lett på skrå.
Pisket krem:
Ikke pisk mer enn 400 ml kremfl øte
(minst 30 % fettinnhold, 4–8 °C).
Start med lav hastighet «1» og øk hastigheten
til «15» mens du pisker.
Stivpisket eggehvite:
Ikke pisk mer enn fi re eggehviter.
Start med middels hastighet «7» og øk til
hastighet «15» mens du pisker.
Hvordan du bruker hakkeutstyret 3
1 Stapper
2 Lokk
2a Kopling for motordel
2b Påfyllingsrør
2c Låsehake
3 Knivinnsats
4 Bolle
5 Anti-gli-base (fungerer også som lokk)
6 Innsatsholder
6a Skive-tilbehør
6b Oppskjærings-tilbehør
6c Finskjærings-tilbehør
6d Julienne-tilbehør (fi rkantede strimler)
6e Julienne-tilbehør (trekantede strimler)
Regulering av hastighet
Når bryteren ‚ aktiveres, vil hastigheten
for tilberedning være samsvarende med innstillingen av den regulerbare hastighetskontrollen %. Jo høyere innstilling, dess raskere
hakkeresultat.
For maksimal tilberedningshastighet, trykk
på turbobryteren #. Du kan også bruke
turbobryteren til kortere, kraftige pulser
uten å manipulere den regulerbare hastighetskontrollen.
Avhengig av redskapet som brukes, anbefaler
vi følgende innstillinger av hastighet:
Stavmikser 1... turbo
Visp 3... 15
Mattilberedningsredskap se hastighetstabell i
bildeseksjon (j)
Hakketilbehør se hastighetstabell i
bildeseksjon (j)
Slik bruker du stavmikseren 1
Stavmikseren passer utmerket til tilberedning
av dip, sauser, supper, majones og babymat
så vel som miksing av drikker og milkshake:
a) Sett motordelen ! på blandestaven & til
den går i lås.
b) Sett stavmikseren ned i beholderen og
trykk deretter på bryteren ‚ eller turbobryteren #.
c) Trykk på knappen $ for å frigjøre blande-
staven og trekk den så av.
Stavmikseren kan brukes både i målebegeret
Á og enhver annen beholder. Når du blander
direkte i en kasserolle under koking, skal
kasserollen først tas bort fra platen for å
beskytte stavmikseren mot overoppheting.
Hakking
(se bildeseksjon I med tilberedningstabell j)
Kniven (3) passer perfekt til hakking av kjøtt,
ost, løk, urter, hvitløk, gulrøtter, valnøtter,
hasselnøtter, mandler osv. Ved hakking av
harde ingredienser, bruk turbobryteren #.
NB: Ikke hakk ekstremt harde ingredienser,
som for eksempel muskatnøtter, kaffebønner
og korn.
Før hakking ...
• på forhånd kuttes kjøtt, ost, løk, hvitløk,
gulrøtter, paprika i biter,
• fjern stilker fra urter og skall fra nøtter,
• fjern ben, brusk og sener fra kjøtt.
a) Ta forsiktig av plastbeskyttelsen fra
knivinnsatsen (3). Advarsel: Kniven er
meget skarp! Hold alltid i den øvre plastdelen. Sett kniven på midtstaven i hakkebollen (4) og trykk den ned til den låses.
Sett alltid bollen på anti-gli-basen (5).
b) Legg ingrediensene i hakkebollen.
c) Sett lokket (2) på bollen med låsesperren
(2c) mot bollehåndtaket. Får å låse lokket,
drei det med urviseren slik at låsesperren
slår inn med et «klikk» over håndtaket.
d) Sett motordelen ! i girkoplingen (2a)
slik at den låses på plass. Sørg for at
stapperen (1) er satt i påfyllingsrøret (2b).
e) For å starte trykker du på bryter ‚ eller
# på motordelen. Hold med en hånd på
bollen under tilberedningen.
f) Etter bruk trykker du på knappen $ for å
ta av motordelen. Fjern stapperen.
g) Trykk på låsesperren (2c), drei lokket (2)
mot klokken for å løsne det og løfte det
opp.
h/i) Ta ut kniven forsiktig ved å dreie og dra
i den før du tar ut de tilberedte ingredien-
sene.
24
Page 25

Blande lette deiger
Ved bruk av knivinnsatsen (3) kan du også
mikse lette deiger som pannekakerøre eller
kakedeiger basert på inntil 250 g mel.
For pannekakerøre kan du først helle væsken
i bollen og deretter ha i mel og egg. Trykk
inn turbobryteren
glatt.
# og bland røren til den er
Kutting / rasping
(se bildeseksjon II med tilberedningstabell j)
Ved bruk av snitteinnsatsen (6a) kan du snitte
for eksempel agurker, løk, sopp, epler,
gulrøtter, reddik, rå poteter, squash, og kål.
Ved bruk av riveinnsatsen (6b, 6c) kan du
rive for eksempel epler, gulrøtter, rå poteter,
rødbeter, kål og ost (myk til medium).
Julienne-tilbehørene (6d, 6e) strimler maten.
a) Plasser et redskap (6a – 6e) i innsats-
holderen (6) og trykk den på plass. Sett innsatsholderen på midtstaven i hakkebollen
og trykk den ned til den låses.
b) Fest lokket (2) på bollen med låsesperren
(2c) rett over bollehåndtaket. For å låse
lokket, drei det med urviseren slik at
låsesperren slår inn med et «klikk» over
håndtaket.
c) Sett motordelen i girkoplingen slik at den
låses på plass. Velg hastighet i henhold til
anbefalingene på bilde (j).
d) Hell ingrediensene i påfyllingsrøret.
Stikk aldri fi ngrene ned i påfyllingsrøret
når apparatet er påslått. Bruk alltid stapperen (1) for å skyve ingredienser ned i
påfyllingsrøret.
e) Trykk for bryter
for å starte.
f) Etter bruk trykker du på knappen $ for å
ta av motordelen.
g) Trykk på låsesperren (2c), drei lokket (2)
mot klokken for å løsne det og løfte det
opp.
h) Ta ut redskapsholderen før du tar ut ingre-
diensene. For å løsne redskapet (6a – 6e)
trykker du opp den siden som stikker frem
underst på redskapsholderen.
‚ eller „ på motordelen
Hvordan du bruker hakketilbehøret 4
1 Øvre del
2 Kniv
3 Hakkebolle
4 Anti-gli base / lokk
Hakketilbehøret passer perfekt til hakking
av kjøtt, ost, løk, urter, hvitløk, paprika (med
væske), gulrøtter, valnøtter, hasselnøtter,
mandler, svisker etc.
Bruk Turbobrytesen „ når du hakker harde
matvarer (f.eks. fast ost).
NB: Isterninger eller ekstremt harde
ingredienser, som muskatnøtt, kaffebønner,
sjokolade og korn skal ikke hakkes.
e) Trykk på bryteren ‚ eller # for å starte
hakketilbehøret. Mens du tilbereder,
holder du motordelen med en hånd og
hakkebollen med den andre.
Bruk ikke hakkeren lenger enn 2 minutter.
f) Etter bruk trykker du på knappen $ for å
ta av motordelen.
g) Ta så av den øvre delen.
h) Ta forsiktig ut kniven.
i) Ta så ut den bearbeidede maten fra hakke-
bollen. Anti-gli basen kan også brukes som
lokk til hakkebollen.
Rengjøring av apparatet
Motordelen ! og girkoplingen for vispen Ë
rengjøres kun med en fuktig klut. Lokket (2)
kan rengjøres under rennende vann, men
det må ikke senkes ned i vann eller vaskes
i oppvaskmaskin. Alle de andre delene kan
vaskes i oppvaskmaskin.
Ved tilberedning av mat som inneholder mye
farge (for eksempel gulrøtter), kan apparatets
plastdeler bli misfarget. Tørk av disse delene
med vegetabilsk olje før rengjøring.
Tilbehør
(tilgjengelig hos Braun service senter; merk,
gjelder ikke i alle land)
BC: Hakketilbehør, velegnet for hakking av
større kvantiteter eller tilberedning av forskjellige typer shaker, lage små deiger og knuse
isbiter.
Oppskrifter
Majones (bruk stavmikseren)
200-250 ml olje
1 egg (plomme og hvite)
1 ss sitronsaft eller eddik
Salt og pepper etter smak
Fyll alle ingrediensene i miksebegeret i
ovenfor nevnte rekkefølge. Sett stavmikseren i bunnen av miksebegeret. Trykk inn
turbobryteren # og hold stavmikseren i den
samme posisjonen til oljen emulgerer. Deretter
beveger du stavmikseren sakte opp og ned til
majonesen er godt blandet.
Med forbehold om endringer.
Dette produktet oppfyller kravene
i EU-direktivene EMC 2004/108/EC
og Low Voltage 2006/95/EC.
Ikke kast dette produktet sammen
med husholdningsavfall når det skal
kasseres. Det kan leveres hos et Braun
servicesenter eller en miljøstasjon.
Før hakking ...
– skjær kjøtt, ost, løk, hvitløk, gulrøtter,
paprika i biter før hakking
– ta av stilker fra urter og fjern skallet på
nøtter
– fjern ben, sener og brusk fra kjøtt.
For best mulig resultat, vennligst følg anbefalte hastigheter i tilberedningstabellen.
Hakking
a) Ta forsiktig av plastdekselet fra kniven (2).
Knivbladene er meget skarpe! Advarsel:
Hold alltid i den øvre plastdelen. Sett
kniven på senterpinnen i hakkebollen (3).
Trykk ned knivinnsatsen og vri 90º for å
låse den. Plasser alltid hakkebollen i anti-
gli basen (4).
b) Legg ingrediensene i hakkebollen.
c) Sett øvre del (1) på hakkebollen.
d) Sett motordelen ! i øvre del (1) slik at den
låses på plass.
Svenska
Våra produkter är utformade att uppfylla de
högsta standarder vad gäller kvalitet, funktion
och design. Vi hoppas att du kommer att ha
mycket nytta av din nya apparat från Braun.
Varning!
Läs bruksanvisningen noga och i sin helhet
innan du använder apparaten.
• Knivbladen är mycket vassa!
• Denna produkt är inte menad att användas
av barn eller personer med reducerad
fyskisk eller mental kapacitet utan övervakning av en person som är ansvarig för deras
säkerhet. Generellt rekommenderar vi att
produkten förvaras utom räckhåll för barn.
25
Page 26

• Apparaten är utformad att hantera normala
hushållsmängder.
• Dra alltid ut kontakten ur eluttaget när apparaten lämnas obevakad samt före montering, demontering, rengöring eller förvaring
av apparaten.
• Innan du använder apparaten – kontrollera
att nätspänningen motsvarar den spänning
som anges på apparatens undersida.
• När du använder mixerstaven i het vätska
måste du vara försiktig och tänka på att
inte doppa mixerskaftet i den heta vätskan
eller lyfta upp det medan mixerstaven är
påslagen.
• Håll aldrig motordelen ! eller växelhuset Ë
under rinnande vatten eller doppa ner dem i
vatten.
• Bägaren Á får inte användas i mikro-
vågsugn.
• Innan du använder matberedartillbehöret
måste du säkerställa att lockspärren (2c) har
klickat i rätt läge och att pådrivaren (1) sitter
på plats.
• För aldrig in några andra redskap än
pådrivaren (1) i inmatningsröret (2b) när
matberedaren är i drift.
• Stäng alltid av apparaten innan du tar bort
locket (2).
• Du kan rengöra locket (2) under rinnande
vatten, men det får inte sänkas ner helt i
vatten eller diskas i diskmaskin.
• Skålen (4) får inte användas i mikrovågsugn.
• Brauns elapparater uppfyller tillämpliga
säkerhetsnormer. Reparationer eller byte av
nätsladd får endast utföras av auktoriserad
fackman. Felaktiga och icke fackmannamässigt utförda reparationsarbeten kan
innebära avsevärd risk för personskador
för användaren.
Í
Beskrivning
! Motordel
‚ På/av-knapp för variabel hastighet
# Turboknapp
$ Knappar för frigöring av arbetsredskap
% Hastighetsreglage (för inställning av olika
hastigheter)
& Mixerskaft
Á Mätbägare med lufttätt lock
Ë Växelhus för visp
È Visp
Í Matberedartillbehör (FP)
{ Hacktillsats (HC)
Ställa in hastigheten
När du startar apparaten med på/av-knappen
‚ kommer apparatens hastighet att motsvara
aktuell inställning på hastighetsreglaget %.
Ju högre hastighet, desto snabbare och mer
fi nhackat slutresultat får du.
Tryck på turboknappen # för maximal hastighet. Du kan även använda turboknappen
för att få omedelbara och kraftfulla hastighetsökningar utan att behöva använda hastighetsreglaget.
Beroende på användningsområde, rekommenderar vi följande hastighetsinställningar:
Mixerstav 1... turbo
Visp 3... 15
Matberedartillbehör se hastighetstabeller
i bildavsnitt (j)
Hacktillsats se hastighetstabeller
i bildavsnitt (j)
Använda mixerstaven 1
Mixerstaven är perfekt vid tillredning av
dippsåser, såser, soppor, majonnäs och
barnmat liksom även för att blanda till drinkar
och milkshake:
a) För in motordelen ! i mixerskaftet & tills
den spärras i rätt läge.
b) Placera mixerstaven i lodrätt läge i det
aktuella kärlet och tryck sedan på på/avknappen ‚ eller på turboknappen #.
c) När du är klar trycker du på knapparna $
och drar av mixerskaftet.
Du kan använda mixerstaven både i mätbägaren Á och i andra kärl. När du använder
mixerstaven direkt i kastrullen måste du först
dra bort kastrullen från den varma plattan för
att förhindra att mixerstaven blir överhettad.
Använda vispen 2
Använd vispen endast för att vispa grädde,
ägg, kaksmet och efterrättsmixer:
a) För in vispen È i växelhuset Ë och för
sedan in motordelen ! i växelhuset tills
den spärras i rätt läge.
b) Börja med att placera vispen i ett kärl och
tryck först därefter på knappen „ för att
börja vispa.
c) När du är klar trycker du på knapparna $
och drar bort växelhuset. Dra sedan bort
vispen från växelhuset.
För bästa resultat ...
• en vid skål är att föredra framför bägaren,
• rör vispen medurs samtidigt som du håller
den aningen lutad.
Vispad grädde:
Vispa max 4 dl kylskåpskall vispgrädde (minst
30 % fett, 4–8 °C).
Börja vispa på låg hastighet «1» och samtidigt
som du vispar ökas hastigheten gradvis till
«15».
Äggvita:
Vispa max fyra äggvitor.
Börja vispa på medelhastighet «7» och
samtidigt som du vispar ökas hastigheten
gradvistill «15».
Använda matberedartillbehöret
(FP) 3
1 Pådrivare
2 Lock
2a Anslutning för motordel
2b Inmatningsrör
2c Lockspärr
3 Knivblad
4 Skål
5 Antihalkplatta (fungerar även som lock)
6 Skivhållare
6a Skivare
6b Grovstrimlare
6c Finstrimlare
6d Julienne-tillbehör (fyrkantig strimling)
6e Julienne-tillbehör (trekantig strimling)
Hacka
(se bildavsnitt I med tabell j)
Knivbladen (3) är perfekt utformade för att
hacka kött, ost, lök, kryddörter, vitlök, morot,
valnötter, hasselnötter, mandlar o.s.v. Använd
turboknappen # när du hackar ingredienser
med hårdare konsistens.
Obs! Hacka inte ingredienser med mycket
hård konsistens, som muskotnöt, kaffebönor
och gryn.
Före hackning …
• skär upp kött, ost, lök, vitlök, morot, chilipeppar i mindre bitar,
• avlägsna stjälkar från kryddörter och skala
nötter,
• vid hackning av kött – avlägsna ben, senor
och brosk.
a) Ta försiktigt bort plastskyddet från kniv-
bladen (3). Varning! Knivbladen är mycket
vassa! Håll alltid i den övre plastdelen och
inte i själva knivbladen. Placera knivbladen
på skålens (4) mittapp och vrid dem för att
spärra dem i rätt läge. Ställ alltid skålen på
antihalkplattan (5).
b) Lägg ingrediensen som ska hackas i
skålen.
c) Sätt på locket (2) på skålen så att lock-
spärren (2c) hamnar bredvid handtaget.
För att spärra locket vrider du det medurs
så att lockspärren hakar i med ett «klick»
ovanför handtaget.
26
Page 27

d) Sätt i motordelen
tills den spärras i rätt läge. Kontrollera att
pådrivaren (1) sitter i inmatningsröret (2b).
e) För att starta hackningsprocessen trycker
du på ‚ eller # på motordelen samtidigt
som du håller fast skålen med den andra
handen.
f) När du är klar trycker du på knapparna
! i anslutningen (2a)
$ för att ta bort motordelen. Ta bort
pådrivaren.
g) Samtidigt som du trycker på lockspärren
(2c), vrider du locket (2) moturs för att
lossa spärren och lyfta upp locket.
h/i) Innan du kan tömma skålen, måste du
först försiktigt ta bort knivbladen genom att
vrida och dra i plastdelen.
Blanda till smet
Du kan även använda knivbladen (3) för att
blanda till smet, till exempel till pannkakor
eller en mjuk kaka med max 250 g mjöl.
Om du till exempel vill göra pannkakssmet,
häller du först i vätskan i skålen, tillsätter
sedan mjölet och slutligen äggen. Tryck på
turboknappen # och blanda tills smeten blir
jämn och slät.
Skiva / riva
(se bildavsnitt II med tabell j)
Med hjälp av skärskivan (6a) kan du skiva
exempelvis gurka, lök, svamp, morot, rädisa,
rå potatis, squash och kål. Med hjälp av
rivskivan (6b, 6c) kan du riva exempelvis
äpple, morot, rå potatis, rödbeta, kål och ost
(mjuk till mellanhård). Julienne-tillbehören
(6d, 6e) strimlar maten.
a) Placera önskat tillbehör (6a – 6e) i
skivhållaren (6) och spärra det i rätt läge.
Placera skivhållaren på skålens (4) mittapp
och vrid den för att spärra den i rätt läge.
b) Sätt på locket (2) på skålen så att lock-
spärren (2c) hamnar bredvid handtaget.
För att spärra locket vrider du det medurs
så att lockspärren hakar i med ett «klick»
ovanför handtaget.
c) Sätt i motordelen i anslutningen (2a) tills
den spärras i rätt läge. Ställ in hastigheten i
enlighet med rekommendationerna i bild (j).
d) Lägg ingredienserna som ska rivas eller
skivas i inmatningsröret. Stick aldrig in
fi ngrarna i inmatningsröret när matberedaren är påslagen. Använd alltid pådrivaren
(1) för att mata ner ingredienserna i skålen.
e) Tryck på knapp
för att börja riva/skiva.
f) När du är klar trycker du på knapparna $
för att ta bort motordelen.
g) Samtidigt som du trycker på lockspärren
(2c), vrider du locket moturs för att lossa
spärren och lyfta upp locket.
h) Innan du kan tömma skålen måste du lyfta
ur skivhållaren. För att ta bort skivhållaren
(6a – 6e) trycker du den uppåt i den ände
som sticker ut längst ner på skivhållaren.
‚ eller „ på motordelen
Så använder du hacktillsatsen 4
1 Övre del
2 Kniv
3 Hackkärl
4 Halkfri fot/lock
Hacktillsatsen passar utmärkt till att hacka
kött, ost, lök, kryddor, vitlök, chili (med vatten),
morötter, valnötter, hasselnötter, mandlar,
katrinplommon etc.
Använd turboknappen „ vid hackning av
hårda matvaror (tex. hårdost).
För bästa resultat – följ de hastighetsinställningar (j) som rekommenderas i guiden.
Hacka
a) Ta försiktigt av skyddsplasten från kniven
(2). Varning: Skärbladet är mycket vasst!
Hantera det alltid i övre plastdelen. Placera
kniven på centrumtappen mitt i kärlet (3).
Tryck ner det och vrid om ett kvarts varv
för att låsa det på plats.
Placera alltid kärlet på den halkfria foten/
locket (4).
b) Lägg livsmedlet i hackkärlet.
c) Placera övre delen (1) på kärlet.
d) Montera motordelen ! på övre delen (1)
så att det snäpper fast.
e) Tryck på knapp ‚ eller # för att starta
hacktillsatsen. När hacktillsatsen är
igång håll motordelen med en hand och
hacktillsatsen i den andra.
Kör inte hacktillsatsen i mer än 2 minuter.
f) När du är klar trycker du på knapparna
för att ta bort motordelen.
g) Lyft bort övre delen.
h) Ta försiktigt bort kniven.
i) Häll sedan ur den fi nhackade maten från
kärlet. Den halkfria foten under kärlet kan
även användas som lock för kärlet.
$
Rengöra apparaten
Motordelen ! och växelhuset för vispen Ë får
endast rengöras med en fuktig trasa. Du kan
rengöra locket (2) under rinnande vatten, men
det får inte sänkas ner helt i vatten eller diskas
i diskmaskin.
Alla andra delar kan diskas i diskmaskin.
Vid tillredning av ingredienser med starka
färgämnen (t.ex. morötter) kan apparatens
plastdelar missfärgas. Torka av berörda delar
med vegetabilisk olja innan du rengör dem.
Tillbehör
(fi nns hos auktoriserade Braun verkstäder;
dock inte tillgänglig i alla länder)
BC: Hacktillsats, passar utmärkt till att
hacka stora kvantiteter och till att göra
«milkshakes», enkla degar eller krossa is.
Receptexempel
Majonnäs (använd mixerstav)
200–250 ml olja
1 ägg (gula och vita)
1 msk citronsaft eller ättika
salt och peppar efter smak
Tillsätt alla ingredienser i bägaren i den
ordning som de listas i receptet ovan.
Placera mixerstaven i bägaren och se till att
nederdelen av mixerstaven nuddar botten.
Tryck på turboknappen # och håll kvar
mixerstaven i detta läge tills oljan emulgerar.
För sedan mixerstaven – utan att stänga
av den – uppåt och nedåt i bägaren tills
majonnäsen får önskad konsistens.
Kan ändras utan föregående meddelande.
Denna produkt uppfyller bestämmelserna i EU-direktiven 2004/108/EG
om elektromagnetisk kompatibilitet
(EMC) och 2006/95/EG om lågspänningsutrustning.
OBS: Hacka inte mycket hårda livsmedel
såsom is, muskot, kaffebönor och sädeskorn.
Innan du hackar ...
– tärna kött, ost lök, morötter, chili
– avlägsna stjälkar från kryddor och örter,
skala nötter
– skär bort ben, senor och brosk från kött.
När produkten är förbrukad får
den inte kastas tillsammans med
hushållssoporna. Avfallshantering kan
ombesörjas av Braun servicecenter
eller på din lokala återvinningsstation.
27
Page 28

Suomi
Tuotteemme on suunniteltu täyttämään
korkeimmat laadun, toimivuuden ja muotoilun
vaatimukset. Toivottavasti saat paljon iloa ja
hyötyä uudesta Braun-laitteestasi.
Varoitus
Lue käyttöohjeet huolellisesti ennen laitteen käyttöä.
• Terät ovat erittäin teräviä!
• Tätä laitetta ei ole tarkoitettu lasten
käyttöön. Tätä laitetta ei ole myöskään
tarkoitettu henkilöiden, joilla on alentunut
fyysinen tai psyykkinen tila, käytettäväksi.
Poikkeuksena, jos lapsi tai henkilö on hänen
turvallisuudestaan vastaavan henkilön
valvonnan alaisena. Suosittelemme, että
laitteen tulee olla lasten ulottumattomissa.
• Tämä laite on suunniteltu tavalliseen
kotitalouskäyttöön.
• Irrota laitteen pistoke pistorasiasta aina
jättäessäsi laitteen vartioimatta sekä
ennen laitteen kokoamista, purkamista,
puhdistusta ja säilytystä.
• Tarkista ennen käyttöä, että jännite vastaa
laitteen pohjassa näkyvää merkintää.
• Erityisesti käytettäessä pikasekoitinta
kuumissa nesteissä sekoitinvartta ei saa
upottaa nesteeseen tai poistaa nesteestä
laitteen ollessa käynnissä.
• Älä pidä moottoriosaa ! tai vispilän
vaihteisto-osaa Ë juoksevan veden alla
äläkä upota niitä veteen.
• Mittakulho Á ei ole mikroaaltouunin kestävä.
• Varmista ennen ruoanvalmistusosan Í
käyttämistä, että kannen lukitus (2c) on
napsahtanut kunnolla ja syöttöpainin (1) on
paikallaan.
• Älä aseta syöttösuppiloon käytön aikana
muita osia kuin syöttöpainin (1).
• Sammuta laite aina ennen kannen (2) irrottamista.
• Kansi (2) voidaan pestä juoksevalla vedellä,
mutta älä upota sitä veteen äläkä pese sitä
astianpesukoneessa.
• Kulho (4) ei ole mikroaaltouunin kestävä.
• Braun-sähkölaitteet täyttävät niitä koskevien
turvallisuussäädösten määräykset.
Verkkojohto voidaan korjata tai vaihtaa
ainoastaan valtuutetussa huoltoliikkeessä.
Puutteellinen valtuuttamaton huoltotyö voi
aiheuttaa vakavia vaaratilanteita käyttäjälle.
Laitteen osat
! Moottoriosa
‚ Virtakytkin, jossa säädettävä nopeus
# Turbokytkin
$ Vapautuspainikkeet osien irrottamiseen
% Nopeudensäätö
& Sekoitinvarsi
Á Mittakulho ilmatiiviillä kannella
Ë Vispilän vaihteisto-osa
È Vispilä
Í Ruoanvalmistusosa (FP)
{ Teholeikkuri (HC)
Nopeuden säätäminen
Kun painat virtakytkintä ‚, laitteen
toimintanopeus vastaa nopeudensäädön %
asetusta. Mitä korkeampi nopeusasetus, sitä
nopeampi ja hienojakoisempi lopputulos.
Enimmäisnopeuden saat painamalla turbokytkintä #. Voit käyttää turbokytkintä myös
pikakytkimenä painamalla sitä lyhyesti ja
nopeasti, jolloin nopeudensäätöä ei tarvitse
käyttää.
Suosittelemme seuraavia nopeusasetuksia
käytöstä riippuen:
Pikasekoitin 1... turbo
Vispilä 3... 15
Ruoanvalmistusosa katso nopeustaulukot
kuvasarjoista (j)
Teholeikkuri katso nopeustaulukot
kuvasarjoista (j)
Pikasekoittimen käyttö 1
Pikasekoitin soveltuu erinomaisesti dippien,
kastikkeiden, keittojen, majoneesin ja
vauvanruokien valmistukseen sekä juomien
ja pirtelöiden sekoitukseen:
a) Aseta moottoriosa
kunnes se lukkiutuu paikoilleen.
b) Vie pikasekoitin pystysuorasti astiaan
ja paina sen jälkeen virtakytkintä ‚ tai
turbokytkintä #.
c) Irrota sekoitinvarsi käytön jälkeen
painamalla vapautuspainikkeita $ ja
vetämällä se irti.
Voit käyttää pikasekoitinta mittakulhossa Á
sekä missä tahansa muussa astiassa. Jos
käytät pikasekoitinta kattilassa ruoanlaiton
yhteydessä, nosta kattila ensin pois levyltä
suojataksesi laitetta ylikuumenemiselta.
! sekoitinvarteen &,
Vispilän käyttö 2
Käytä vispilää ainoastaan kerman ja munanvalkuaisten vatkaukseen sekä vanukkaiden ja
jälkiruokien sekoitukseen:
a) Aseta vispilä È vispilän vaihteisto-osaan
Ë. Aseta sen jälkeen moottoriosa !
vaihteisto-osaan, kunnes se lukkiutuu
paikoilleen.
b) Laita vispilä syvälle astiaan ja käynnistä
virtakytkin ‚ vasta sen jälkeen.
c) Irrota painamalla vapautuspainikkeita $
ja vetämällä vaihteisto-osa irti. Vedä sen
jälkeen vispilä irti vaihteisto-osasta.
Parhaan lopputuloksen saavuttamiseksi ...
• käytä mieluummin laakeaa kulhoa kuin
mittakulhoa,
• liikuta vispilää myötäpäivään ja pidä hieman
kallistettuna.
Kermavaahto:
Vatkaa enintään 400 ml kylmää kermaa
(rasvapitoisuus vähintään 30 %, 4 – 8 °C)
kerrallaan.
Aloita alhaisella nopeudella «1» ja lisää
nopeutta vatkatessa asetukseen «15».
Valkuaisvaahto:
Vatkaa enintään 4 munanvalkuaista kerrallaan.
Aloita keskinopeudella «7» ja lisää nopeutta
vatkatessa asetukseen «15».
Ruoanvalmistusosan käyttö 3
1 Syöttöpainin
2 Kansi
2a Moottoriosan liitin
2b Syöttösuppilo
2c Kannen lukitus
3 Terä
4 Kulho
5 Liukumaton pohja (käytetään myös
kantena)
6 Osan pidike
6a Viipalointiosa
6b Silppuamisosa (karkea silppuaminen)
6c Silppuamisosa (hieno silppuaminen)
6d Julienne-osa (suorakaidesuikaleet)
6e Julienne-osa (kolmiosuikaleet)
Hienontaminen
(katso kuvasarja I ja käyttötaulukko j)
Terä (3) sopii erinomaisesti esimerkiksi
lihan, juuston, sipulin, yrttien, valkosipulin,
porkkanoiden, saksanpähkinöiden, hasselpähkinöiden ja manteleiden hienontamiseen.
Käytä kovien ruoka-aineiden hienontamiseen
turbokytkintä
HUOM.: Älä hienonna erittäin kovia
elintarvikkeita, kuten muskottipähkinää,
kahvipapuja tai jyviä.
Ennen hienontamista ...
• paloittele liha, juusto, sipuli, valkosipuli,
porkkanat, chilit,
• poista yrteistä varret, kuori pähkinät,
• poista lihasta luut, jänteet ja rustot.
#.
28
Page 29

a) Poista varovasti terän (3) muovisuojus.
Varoitus: terä on erittäin terävä! Pidä aina
kiinni terän muovisesta yläosasta. Aseta
terä kulhon (4) keskitappiin ja lukitse
paikalleen kääntämällä. Aseta kulho aina
liukumattomalle pohjalle (5).
b) Laita ruoka-aine leikkurikulhoon.
c) Liitä kansi (2) kulhoon siten, että kannen
lukitus (2c) on kulhon kahvan vieressä.
Lukitse kansi kääntämällä sitä myötäpäi-
vään, jolloin kannen lukitus napsahtaa
kahvan yläpuolella.
d) Aseta moottoriosa
kunnes se lukkiutuu paikoilleen. Varmista,
että syöttöpainin on paikallaan.
e) Käynnistä painamalla moottoriosan
kytkintä
toisella kädelläsi.
f) Irrota moottoriosa käytön jälkeen
painamalla vapautuspainikkeita
syöttöpainin.
g) Avaa kansi (2) painamalla kannen lukitusta
(2c) ja kääntämällä kantta vastapäivään.
Nosta kansi ylös.
h/i) Irrota terä varovasti kääntämällä ja
vetämällä sitä ennen hienonnetun ruoan
poistamista.
‚ tai # ja pidä kiinni kulhosta
! liittimeen (2a),
$. Irrota
Ohuen taikinan sekoittaminen
Terää (3) käyttämällä voit sekoittaa myös
kevyen taikinan, kuten ohukais- tai kakkutaikinan, jossa on enintään 250 g jauhoja.
Valmista esimerkiksi ohukaistaikina kaatamalla
ensin neste kulhoon ja lisäämällä sen jälkeen
jauhot ja viimeiseksi kananmunat. Sekoita taikina kuohkeaksi painamalla turbokytkintä #.
Viipalointi/silppuaminen
(katso kuvasarja II ja käyttötaulukko j)
Viipalointiosalla (6a) voit viipaloida esimerkiksi
kurkkua, sipulia, herkkusieniä, omenaa,
porkkanaa, retiisiä, raakaa perunaa, kesäkurpitsaa ja kaalia. Silppuamisosalla (6b, 6c)
voit silputa esimerkiksi omenaa, porkkanaa,
raakaa perunaa, punajuurta, kaalia ja juustoa
(pehmeästä keskikovaan). Julienne-työkalut
(6d, 6e) suikaloivat ruoan.
a) Aseta osa (6a – 6e) osan pidikkeeseen (6)
ja napsauta paikalleen. Aseta osan pidike
kulhon keskitappiin ja lukitse paikalleen
kääntämällä.
b) Liitä kansi (2) kulhoon siten, että kannen
lukitus (2c) on kulhon kahvan vieressä.
Lukitse kansi kääntämällä sitä myötäpäi-
vään, jolloin kannen lukitus napsahtaa
kahvan yläpuolella.
c)
Aseta moottoriosa liittimeen (2a), kunnes se
lukkiutuu paikoilleen. Valitse nopeusasetus
kuvan (j) suositusten mukaisesti.
d) Syötä käsiteltävä ruoka syöttösuppiloon.
Älä kosketa syöttösuppilon sisälle, kun
laite on käynnissä. Käytä ruoan syöttämi-
seen aina syöttöpaininta (1).
e) Käynnistä painamalla moottoriosan
kytkintä ‚ tai „.
f) Irrota moottoriosa käytön jälkeen paina-
malla vapautuspainikkeita $.
g) Avaa kansi painamalla kannen lukitusta
(2c) ja kääntämällä kantta vastapäivään.
Nosta kansi ylös.
h) Ota osan pidike pois ennen käsitellyn
ruoan poistamista. Irrota osa nostamalla
sitä osan pidikkeen pohjassa näkyvästä
päästä.
Teholeikkurin käyttö 4
1 Yläosa
2 Terä
3 Kulho
4 Liukumisen estävä pohja/kansi
hasselpähkinöiden, manteleiden, luumujen
jne. hienontamiseen.
Hienontaessasi kovia aineksia (kuten juustoa)
käytä turbokytkintä „.
Tärkeää: Alä hienonna erittäin kovia aineksia,
kuten jääkuutioita, muskottipähkinöitä,
kahvinpapuja ja jyviä.
Ennen hienontamista ...
– Esikäsittele liha, juusto, sipuli, valkosipuli,
porkkana, chili.
– Poista yrteistä varsi ja pähkinöistä kuoret.
– Poista luut, jänteet ja rustot lihasta.
Parhaan lopputuloksen saavutat noudattamalla suositeltuja nopeusasetuksia.
Hienontaminen
a) Terä on hyvin terävä! Irrota varovasti
terän (2) muovinen suojus. Varoitus:
Pidä aina kiinni muovisesta suojuksesta
käsitellessäsi terää. Aseta terä teholeik-
kurin kulhon (3) keskiakselille. Paina terä
alas ja käännä 90° niin, että terä lukittuu.
Aseta aina teholeikkurin kulho liukumisen
estävälle pohjalle/kannelle (4).
b) Lisää kulhoon käsiteltävät ainekset.
c) Laita yläosa (1) paikalleen kulhon päälle.
d) Kiinnitä moottoriosa
yläosaan (1) kunnes se lukittuu paikalleen.
e) Paina kytkintä ‚ tai # käynnistääksesi
teholeikkurin. Käytön aikana pidä moot-
toriosasta kiinni toisella ja teholeikkurin
kulhosta toisella kädellä. Alä käytä teho-
leikkuria yhtäjaksoisesti kahta minuuttia
kauemmin.
f) Irrota moottoriosa käytön jälkeen
painamalla vapautuspainikkeita $.
g) Irrota teholeikkurin yläosa.
h) Irrota terä varovasti.
i) Poista hienonnettu ruoka kulhosta. Voit
käyttää liukuesteenä toimivaa pohjaa myös
kulhon ilmatiiviinä kantena.
! teholeikkurin
Laitteen puhdistaminen
Puhdista moottoriosa ! ja vispilän vaihteistoosa Ë ainoastaan kostealla liinalla.
Kansi (2) voidaan pestä juoksevalla vedellä,
mutta älä upota sitä veteen äläkä pese sitä
astianpesukoneessa.
Muut osat voidaan pestä astianpesukoneessa.
Laitteen muoviosat voivat värjääntyä
värillisiä ruoka-aineita (esim. porkkanoita)
käsiteltäessä. Pyyhi nämä osat kasviöljyllä
ennen puhdistamista.
Lisävarusteet
(saatavana Braun-tuotteita myyvistä liikkeistä.
Huom! tarvikkeita ei ole saatavilla kaikissa
maissa)
BC: Teholeikkuri, sopii erinomaisesti isojen
määrien hienontamiseen ja sekoittamiseen,
pienien taikinoiden tekoon ja jäiden
murskaamiseen.
Reseptejä
Majoneesi (käytä pikasekoitinta)
200−250 ml öljyä
1 kananmuna (keltuainen ja valkuainen)
1 rkl sitruunanmehua tai viinietikkaa
Suolaa ja pippuria maun mukaan
Laita kaikki aineet mittakulhoon yllä
mainitussa järjestyksessä. Laita pikasekoitin
mittakulhon pohjalle. Paina turbokytkintä
# ja pidä pikasekoitinta tässä asennossa,
kunnes öljy emulgoituu. Liikuta sen jälkeen
pikasekoitinta hitaasti ylös ja alas laitetta
sammuttamatta, kunnes majoneesi on sekoittunut kunnolla.
Teholeikkuri sopii erinomaisesti lihan, juuston,
sipulin, yrttien, valkosipulin, chilin (veden
kanssa), porkkanoiden, saksanpähkinöiden,
Tiedot voivat muuttua ilman
ennakkoilmoitusta.
29
Page 30

Tämä tuote täyttää EU-direktiivin
2004/108/EC mukaiset EMC-vaatimukset sekä matalajännitettä koskevat
säännökset (2006/95/EC).
Kun laite on tullut elinkaarensa päähän,
säästä ympäristöä äläkä hävitä sitä
kotitalousjätteiden mukana. Hävitä
tuote viemällä se Braun-huoltoliikkeeseen tai asianmukaiseen
keräyspisteeseen.
30
Page 31

Deutsch
Garantie
Als Hersteller übernehmen wir für dieses
Gerät – nach Wahl des Käufers zusätzlich zu
den gesetzlichen Gewährleistungsansprüchen
gegen den Verkäufer – eine Garantie von
2 Jahren ab Kaufdatum. Innerhalb dieser
Garantiezeit beseitigen wir nach unserer Wahl
durch Reparatur oder Austausch des Gerätes
unentgeltlich alle Mängel, die auf Materialoder Herstellungsfehlern beruhen. Die
Garantie kann in allen Ländern in Anspruch
genommen werden, in denen dieses Braun
Gerät von uns autorisiert verkauft wird.
Von der Garantie sind ausgenommen:
Schäden durch unsachgemäßen Gebrauch,
normaler Verschleiß und Verbrauch sowie
Mängel, die den Wert oder die Gebrauchstauglichkeit des Gerätes nur unerheblich
beeinflussen. Bei Eingriffen durch nicht von
uns autorisierte Braun Kundendienstpartner
sowie bei Verwendung anderer als Original
Braun Ersatzteile erlischt die Garantie.
Im Garantiefall senden Sie das Gerät mit
Kaufbeleg bitte an einen autorisierten Braun
Kundendienstpartner. Die Anschrift für
Deutschland können Sie kostenlos unter
00800/27 28 64 63 erfragen.
English
Guarantee
We grant 2 years guarantee on the product
commencing on the date of purchase. Within
the guarantee period we will eliminate, free of
charge, any defects in the appliance resulting
from faults in materials or workmanship,
either by repairing or replacing the complete
appliance as we may choose.
This guarantee extends to every country
where this appliance is supplied by Braun or
its appointed distributor.
This guarantee does not cover: damage
due to improper use, normal wear or use as
well as defects that have a negligible effect
on the value or operation of the appliance.
The guarantee becomes void if repairs are
undertaken by unauthorised persons and if
original Braun parts are not used.
si des pièces de rechange ne provenant pas
de Braun ont été utilisées.
Pour toute réclamation intervenant pendant la
période de garantie, retournez ou rapportez
l‘appareil ainsi que l‘attestation de garantie à
votre revendeur ou à un Centre Service Agréé
Braun.
Appelez au 08.10.30.97.80 (ou se référez
à http://www.braun.com/global/contact/
servicepartners/europe.country.html) pour
connaitre le Centre Service Agrée Braun le
plus proche de chez vous.
Clause spéciale pour la France
Outre la garantie contractuelle exposée cidessus, nos clients bénéficient de la garantie
légale des vices cachés prévue aux articles
1641 et suivants du Code civil.
Español
Garantía
Braun concede a este producto 2 años de
garantía a partir de la fecha de compra.
Dentro del periodo de garantía, subsanaremos, sin cargo alguno, cualquier defecto
del aparato imputable tanto a los materiales
como a la fabricación, ya sea reparando,
sustituyendo piezas, o facilitando un aparato
nuevo según nuestro criterio.
La garantía no ampara averías por uso
indebido, funcionamiento a distinto voltaje del
indicado, conexión a un enchufe inadecuado,
rotura, desgaste normal por el uso que
causen defectos o una disminución en el valor
o funcionamiento del producto.
La garantía perderá su efecto en caso de ser
efectuadas reparaciones por personas no
autorizadas, o si no son utilizados recambios
originales de Braun.
La garantía solamente tendrá validez si la
fecha de compra es confirmada mediante la
factura o el albarán de compra correspondiente.
Esta garantía tiene validez en todos los
países donde este producto sea distribuido
por Braun o por un distribuidor asignado por
Braun.
To obtain service within the guarantee period,
hand in or send the complete appliance with
your sales receipt to an authorised Braun
Customer Service Centre.
For UK only:
This guarantee in no way affects your rights
under statutory law.
Français
Garantie
Nous accordons une garantie de 2 ans sur ce
produit, à partir de la date d‘achat.
Pendant la durée de la garantie, Braun
prendra gratuitement à sa charge la réparation
des vices de fabrication ou de matière en
se réservant le droit de décider si certaines
pièces doivent être réparées ou si l‘appareil
lui-même doit être échangé.
Cette garantie s‘étend à tous les pays où cet
appareil est commercialisé par Braun ou son
distributeur exclusif.
Cette garantie ne couvre pas : les dommages
occasionnés par une utilisation inadéquate
et l‘usure normale. Cette garantie devient
caduque si des réparations ont été effectuées
par des personnes non agréées par Braun et
En caso de reclamación bajo esta garantía,
diríjase al Servicio de Asistencia Técnica de
Braun más cercano.
Solo para España
Servicio al consumidor: Para localizar a su
Servicio Braun más cercano o en el caso
de que tenga Vd. alguna duda referente al
funcionamiento de este producto, le rogamos
contacte con el teléfono de este servicio
901 11 61 84.
Português
Garantia
Os nossos produtos dispõem de uma garantia
de 2 anos a partir da data de compra.
Qualquer defeito do aparelho imputável, quer
aos materiais, quer ao fabrico, que torne
necessário reparar, substituir peças ou trocar
de aparelho dentro de período de garantia
não terá custos adicionais,
A garantia não cobre avarias por utilização
indevida, funcionamento a voltagem diferente
da indicada, ligação a uma tomada de corrente eléctrica incorrecta, ruptura, desgaste
normal por utilização que causem defeitos ou
diminuição da qualidade de funcionamento
do produto.
31
Page 32

A garantia perderá o seu efeito no caso de
serem efectuadas reparações por pessoas
não autorizadas ou se não forem utilizados
acessórios originais Braun.
A garantia só é válida se a data de compra for
confirmada pela apresentação da factura ou
documento de compra correspondente.
of op te sturen naar een geauthoriseerd Braun
Customer Service Centre.
Bel 0 800 44 55 388 voor een Braun Customer
Service Centre bij u in de buurt.
Esta garantia é válida para todos os países
onde este produto seja distribuído pela Braun
ou por um distribuidor Braun autorizado.
No caso de reclamação ao abrigo de garantia,
dirija-se ao Serviço de Assistência Técnica
Oficial Braun mais próximo.
Só para Portugal
Apoio ao consumidor: Para localizar o
seu Serviço Braun mais próximo, no caso
de surgir alguma dúvida relativamente ao
funcionamento deste produto, contacte-nos
por favor pelo telefone 808 20 00 33.
Italiano
Garanzia
Braun fornisce una garanzia valevole per la
durata di 2 anni dalla data di acquisto.
Nel periodo di garanzia verranno eliminati,
gratuitamente, i guasti dell’apparecchio
conseguenti a difetti di fabbrica o di materiali,
sia riparando il prodotto sia sostituendo, se
necessario, l’intero apparecchio.
Tale garanzia non copre: danni derivanti
dall’uso improprio del prodotto, la normale
usura conseguente al funzionamento
dello stesso, i difetti che hanno un effetto
trascurabile sul valore o sul funzionamento
dell’apparecchio.
La garanzia decade se vengono effettuate
riparazioni da soggetti non autorizzati o con
parti non originali Braun.
Per accedere al servizio durante il periodo
di garanzia, è necessario consegnare o
far pervenire il prodotto integro, insieme
allo scontrino di acquisto, ad un centro di
assistenza autorizzato Braun.
Contattare il numero 02/6678623 per
avere informazioni sul Centro di assistenza
autorizzato Braun più vicino.
Nederlands
Garantie
Op dit produkt verlenen wij een garantie van
2 jaar geldend vanaf datum van aankoop.
Binnen de garantieperiode zullen eventuele
fabricagefouten en/of materiaalfouten gratis
door ons worden verholpen, hetzij door
reparatie, vervanging van onderdelen of
omruilen van het apparaat.
Deze garantie is van toepassing in elk land
waar dit apparaat wordt geleverd door Braun
of een officieel aangestelde vertegenwoordiger van Braun.
Beschadigingen ten gevolge van onoordeelkundig gebruik, normale slijtage en gebreken
die de werking of waarde van het apparaat
niet noemenswaardig beinvloeden vallen
niet onder de garantie. De garantie vervalt bij
reparatie door niet door ons erkende serviceafdelingen en/of gebruik van niet originele
Braun onderdelen.
Om gebruik te maken van onze service binnen
de garantieperiode, dient u het complete
apparaat met uw aankoopbewijs af te geven
Dansk
Garanti
Braun yder 2 års garanti på dette produkt
gældende fra købsdatoen. Inden for
garantiperioden vil Braun for egen regning
afhjælpe fabrikations- og materialefejl efter
vort skøn gennem reparation eller ombytning
af apparatet. Denne garanti gælder i alle
lande, hvor Braun er repræsenteret.
Denne garanti dækker ikke skader opstået
ved fejlbetjening, normalt slid eller fejl
som har ringe effekt på værdien eller
funktionsdygtigheden af apparatet. Garantien
bortfalder ved reparationer udført af andre
end de af Braun anviste reparatører og hvor
originale Braun reservedele ikke er anvendt.
Ved service inden for garantiperioden
afleveres eller indsendes hele apparatet
sammen med købsbevis til et autoriseret
Braun Service Center.
Ring 7015 0013 for oplysning om nærmeste
Braun Service Center.
Norsk
Garanti
Vi gir 2 års garanti på produktet gjeldende fra
kjøpsdato.
I garantitiden vil vi gratis rette eventuelle
fabrikasjons- eller materialfeil, enten ved
reparasjon eller om vi finner det hensiktsmessig å bytte hele produktet.
Denne garanti er gyldig i alle land der Braun
eller Brauns distributør selger produktet.
Denne garanti dekker ikke: skader på grunn
av feil bruk, normal slitasje eller skader som
har ubetydelig effekt på produktets verdi
og virkemåte. Garantien bortfaller dersom
reparasjoner utføres av ikke autorisert person
eller hvis andre enn originale Braun reservedeler benyttes.
For service i garantitiden skal hele produktet
leveres eller sendes sammen med kopi av
kjøpskvittering til nærmeste autoriserte Braun
Serviceverksted.
Ring 22 63 00 93 for å bli henvist til nærmeste
autoriserte Braun Serviceverksted.
NB
For varer kjøpt i Norge har kunden garanti
i henhold til NEL’s Leveringsbetingelser.
Svenska
Garanti
Vi garanterar denna produkt för två år från
och med inköpsdatum. Under garantitiden
kommer vi utan kostnad, att avhjälpa alla
brister i apparaten som är hänförbara till fel i
material eller utförande, genom att antingen
reparera eller byta ut hela apparaten efter eget
gottfinnande.
Denna garanti gäller i alla länder där denna
apparat levereras av Braun eller deras
auktoriserade återförsäljare.
Garantin gäller ej: skada på grund av felaktig
användning eller normalt slitage, liksom brister
32
Page 33

som har en försumbar inverkan på apparatens
värde eller funktion. Garantin upphör att gälla
om reparationer utförs av icke behörig person
eller om Brauns originaldelar inte används.
För att erhålla service under garantitiden skall
den kompletta apparaten lämnas in tillsammans med inköpskvittot, till ett auktoriserat
Braun verkstad.
Ring 020-21 33 21 för information om
närmaste Braun verkstad.
Suomi
Takuu
Tälle tuotteelle myönnämme 2 vuoden takuun
ostopäivästä lukien Suomessa voimassa
olevien alan takuuehtojen TE90 mukaan.
Takuuaikana korvataan veloituksetta kaikki
viat, jotka aiheutuvat materiaaliviasta tai
valmistusvirheestä. Korvaus tapahtuu
harkintamme mukaan korjaamalla, vaihtamalla
viallinen osa tai vaihtamalla koko laite uuteen.
Takuu on voimassa kaikkialla maailmassa
sillä edellytyksellä, että laitetta myydään ko.
maassa Braunin tai virallisen maahantuojan
toimesta.
Takuun piiriin eivät kuulu seuraavat viat:
viat, jotka johtuvat virheellisestä käytöstä,
normaalista kulumisesta tai viat, jolla
on vähäinen merkitys laitteen arvoon tai
toimintaan. Takuun voimassaolo lakkaa, jos
laitetta korjataan muualla kuin valtuutetussa
Braun-huoltoliikkeessä tai jos laitteessa
käytetään muita kuin alkuperäisiä varaosia.
Yksilöity ostokuitti riittää takuun voimassaolon
osoittamiseksi.
Lisätietoa takuuseen liittyvistä asioista saa
asiakaspalvelukeskuksestamme numerosta
020-377 877.
33
 Loading...