

Page 1

pulse
stir mix pu
ree liquify crush ice
5
1
2
3
4
chop
Instructions
JB 7192
JB 7172
JB 7130
JB 7000
www.braunhousehold.com
Type 4142, 4143, 4144
Jug Blender
2231046IBR_JB7192-7172-7130-7000_USCA_S1.indd 12231046IBR_JB7192-7172-7130-7000_USCA_S1.indd 1 09.11.15 09:1209.11.15 09:12
Print Spec J 92194885
Stapled booklet, 148 x 210 mm, 24 p (incl. 8 p cover), 1/1c = black
Page 2

IMPORTANT SAFEGUARDS
When using electrical appliances, basic safety precautions should always be followed to reduce
the risk of fire, electric shock and/or injury to persons, including the following:
READ ALL INSTRUCTIONS.
1. To protect against the risk of electrical shock, do not put motor body of blender in water or
other liquids.
2. The appliance is not intended for use by persons (including children) with reduced physical,
sensory or mental capabilities, or lack of experience and knowledge, unless they have been
given supervision or instructions concerning use of the appliance by a person responsible
for their safety.
3. Unplug from outlet when not in use, before putting on or taking off parts, and before
cleaning or removing contents from the pitcher. Never put hands into the pitcher, or handle
the blades with appliance plugged in.
4. Avoid any contact with blades or moveable parts.
5. Regularly inspect the power cord, power plug and actual appliance for any damage.
Do not operate if damaged in any way or after the appliance malfunctions. Immediately
cease use of the appliance and call Braun Customer Service for examination, repair or
adjustment.
6. The use of attachments, including canning or ordinary jars, not recommended or sold by
Braun may cause fire, electrical shock, or risk of injury to persons.
7. Do not use outdoors or for anything other than its intended purpose.
8. Do not let cord hang over edge of counter or table, or touch hot surfaces.
9. Do not use the blender for anything other than food and/or beverage preparation.
Misuse may cause injury.
10. Keep hands and utensils out of the pitcher while blending, to reduce the risk of severe injury
to persons or damage to blender itself. A rubber or plastic spatula may be used but must be
used only when the blender is turned OFF.
11. Flashing light indicates ready to operate. Avoid any contact with blades.
12. Blades are sharp. Handle carefully. Store out of reach of children.
13. To reduce the risk of injury, never place blade assembly on base unless assembled to the
pitcher.
14. Do not operate without the lid in place. Leave the measuring cap in place when blending hot
liquids.
15. Do not blend hot liquids or carbonated food in the Smoothie2Go attachment.
16. Never leave your blender unattended while it is running.
17. This appliance (type 4143 and 4144) has a polarized plug (one blade is wider than the other).
To reduce the risk of electric shock, this plug will fit in a polarized outlet only one way. If the
plug does not fit fully in the outlet, reverse the plug. If it still does not fit, contact a qualified
electrician. Do not modify the plug in any way.
2
2231046IBR_JB7192-7172-7130-7000_USCA_S2.indd 12231046IBR_JB7192-7172-7130-7000_USCA_S2.indd 1 04.11.15 10:5604.11.15 10:56
Page 3

3
18. This symbol states ON/OFF.
19. We suggest you save all packing materials in the event that future shipping of the machine
is needed. Keep all plastic bags away from children.
FOR HOUSEHOLD USE ONLY
SAVE THESE INSTRUCTIONS
2231046IBR_JB7192-7172-7130-7000_USCA_S3.indd 12231046IBR_JB7192-7172-7130-7000_USCA_S3.indd 1 04.11.15 10:5604.11.15 10:56
Page 4

English 6
Français 14
Español 20
De’Longhi Braun Household GmbH
Carl-Ulrich-Straße 4
63263 Neu-Isenburg/Germany
2231046IBR/11.15
EN/FR/ES
4
2231046IBR_JB7192-7172-7130-7000_USCA_S4.indd 12231046IBR_JB7192-7172-7130-7000_USCA_S4.indd 1 04.11.15 11:2904.11.15 11:29
Page 5
5
1
2
11
6
5
a
b
c
7
11
12*
13*
a
b
c
c
b
a
p
u
l
se
sti
r
m
i
x
p
u
ree
l
i
q
u
i
f
y
cru
sh ice
5
1
234
chop
*certain models only
Type 4144
8910
pulse
stir mix puree liquify crush ice
5
1234
chop
8910
pulse
stir liquify crush ice
2
1
4*
4a*
1
2
3
10
20
30
Type 4142
Type 4143
1
2
A
max
300 ml
200 ml
100 ml
2 oz
4 oz
6 oz
8 oz
10 oz
2231046IBR_JB7192-7172-7130-7000_USCA_S5.indd 12231046IBR_JB7192-7172-7130-7000_USCA_S5.indd 1 04.11.15 08:5704.11.15 08:57
Page 6
6
max
B
2
1
1
1
1
2
2
2
4
5
3
3
1
2
3
C
1
0
2
0
3
0
p
u
l
s
e
s
t
i
r
m
i
xp
u
r
e
el
i
q
u
i
fy
cr
u
s
h
i
ce
5
12
3
4
ch
o
p
max
300 ml
200 ml
100 ml
2 oz
4 oz
6 oz
8 oz
10 oz
max
300 ml
200 ml
100 ml
2 oz
4 oz
6 oz
8 oz
10 oz
max
300 ml
10 oz
max
300 ml
10 oz
max
300 ml
10 oz
max
300 ml
10 oz
max
300 ml
10 oz
max
300 ml
10 oz
max
300 ml
200 ml
100 ml
2 oz
4 oz
6 oz
8 oz
10 oz
max
300 ml
200 ml
100 ml
2 oz
4 oz
6 oz
8 oz
10 oz
m
a
x
30
0
ml
2
0
0
m
l
1
0
0
m
l
2
oz
4
o
z
6
oz
8 o
z
10 oz
max
300 ml
2
0
0
ml
1
0
0
m
l
2
o
z
4
o
z
6
oz
8 oz
10 oz
max
300 ml
200 ml
100 ml
2 oz
4 oz
6 oz
8 oz
10 oz
2231046IBR_JB7192-7172-7130-7000_USCA_S6-24.indd 62231046IBR_JB7192-7172-7130-7000_USCA_S6-24.indd 6 04.11.15 15:2804.11.15 15:28
Page 7
7
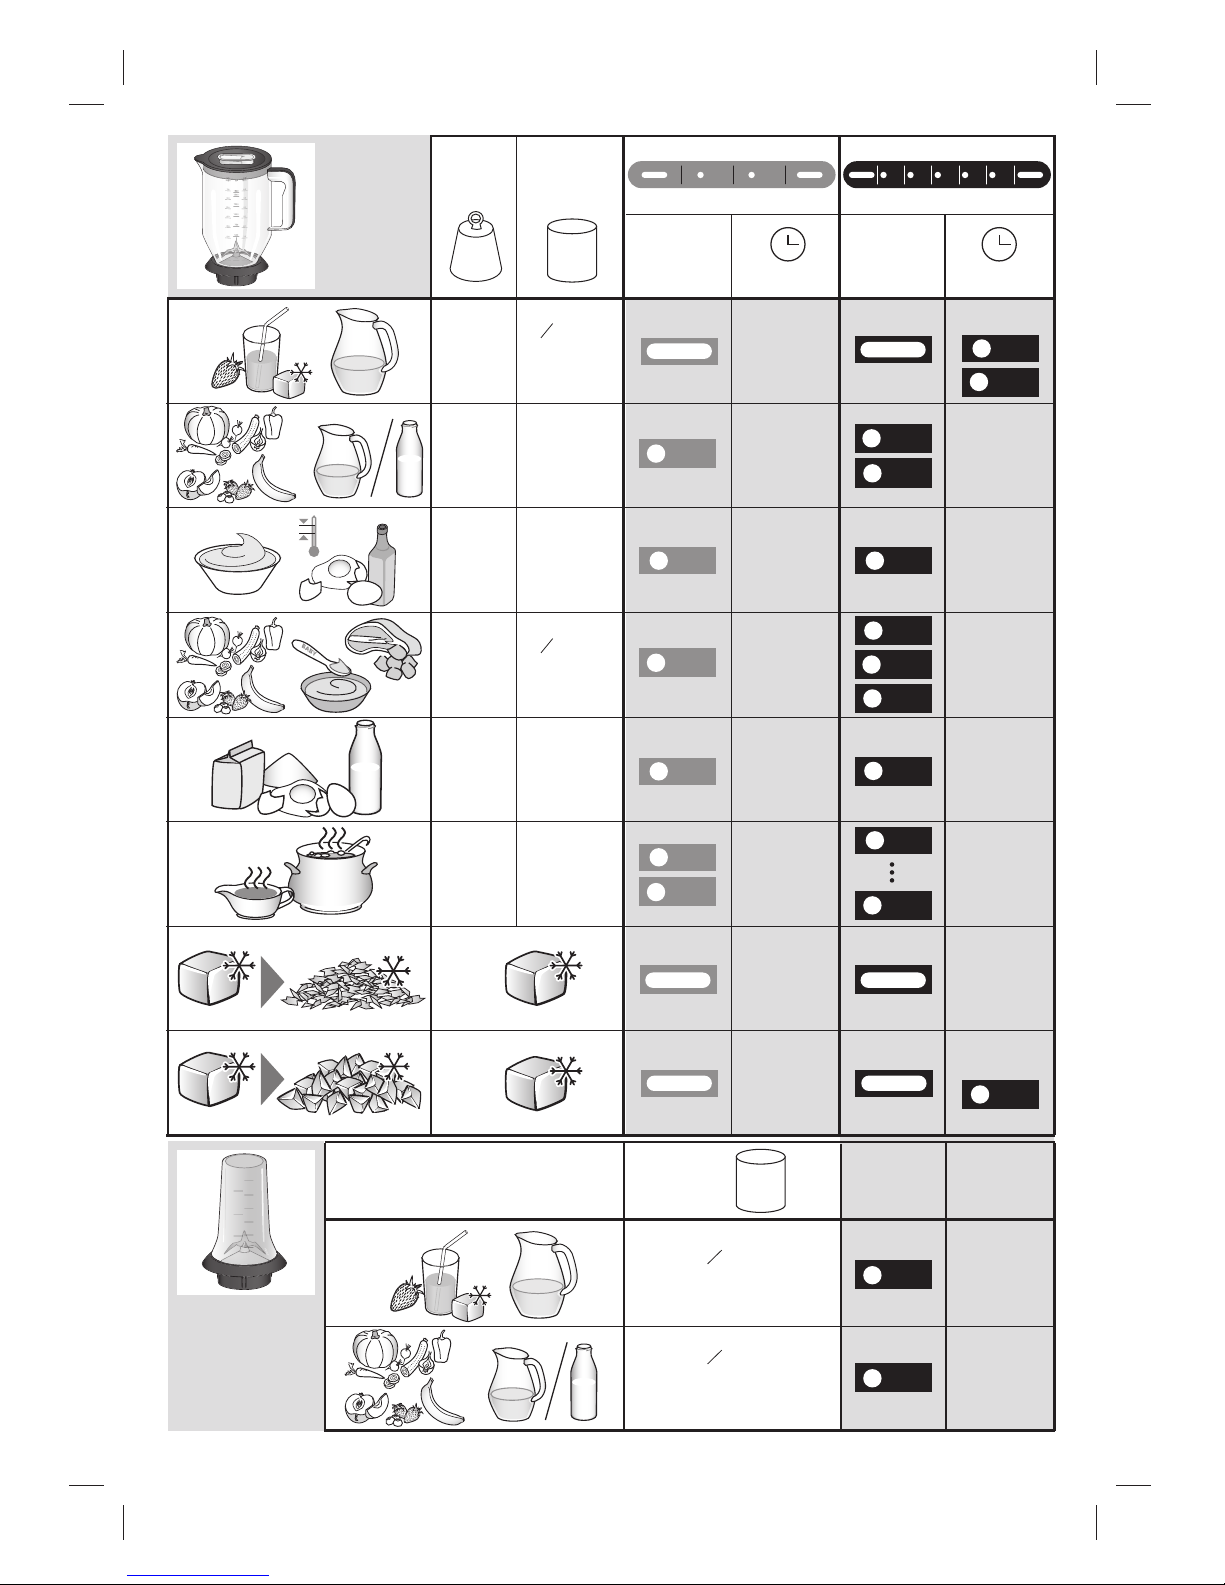
+
58…75°F
15…24°C
2 eggs
46 oz
3 lb
6 cups
52 fl. oz.
6 cups
48 fl. oz.
3 cups
24 fl. oz.
4 cups
32 fl. oz.
1 cup
8 fl. oz.
10x
5 cups
44 fl. oz.
1 cups
12 fl. oz.
30-90 s30-60 s
30-60 s
40-50 s
40-80 s
20-30 s
40-50 s
90 s120 s
3-6x
Flour
oz
lb
crush ice
liquify
5
liquify
2
liquify
2
30-50 s
liquify
2
mix
3
mix
3
mix
3
puree
4
liquify
5
liquify
5
liquify
5
liquify
5
puree
4
2
chop
modes modes
sec.sec.
pulse
3-8x
pulse
5-7x
pulse pulse
5-7x
stir
1
stir
1
stir
1
40-50 s
40-80 s
preset preset
stir
1
stir
1
stir
1
cup
fl. oz.
cup
fl. oz.
+
crush ice
3
4
1 cups
12 fl. oz.
3
4
10x
1
2
1
2
pulse
stir mix puree liquify crush ice
5
1234
chop
pulse
stir liquify crush ice
2
1
Max
Max Max
1
0
max
300 ml
200 ml
100 ml
2 oz
4 oz
6 oz
8 oz
10 oz
2231046IBR_JB7192-7172-7130-7000_USCA_S6-24.indd 72231046IBR_JB7192-7172-7130-7000_USCA_S6-24.indd 7 04.11.15 15:2804.11.15 15:28
Page 8

8
English
Our products are engineered to meet the highest
standards of quality, functionality and design.
We hope you thoroughly enjoy the new Braun
appliance.
Please read instructions carefully and completely
before using the appliance.
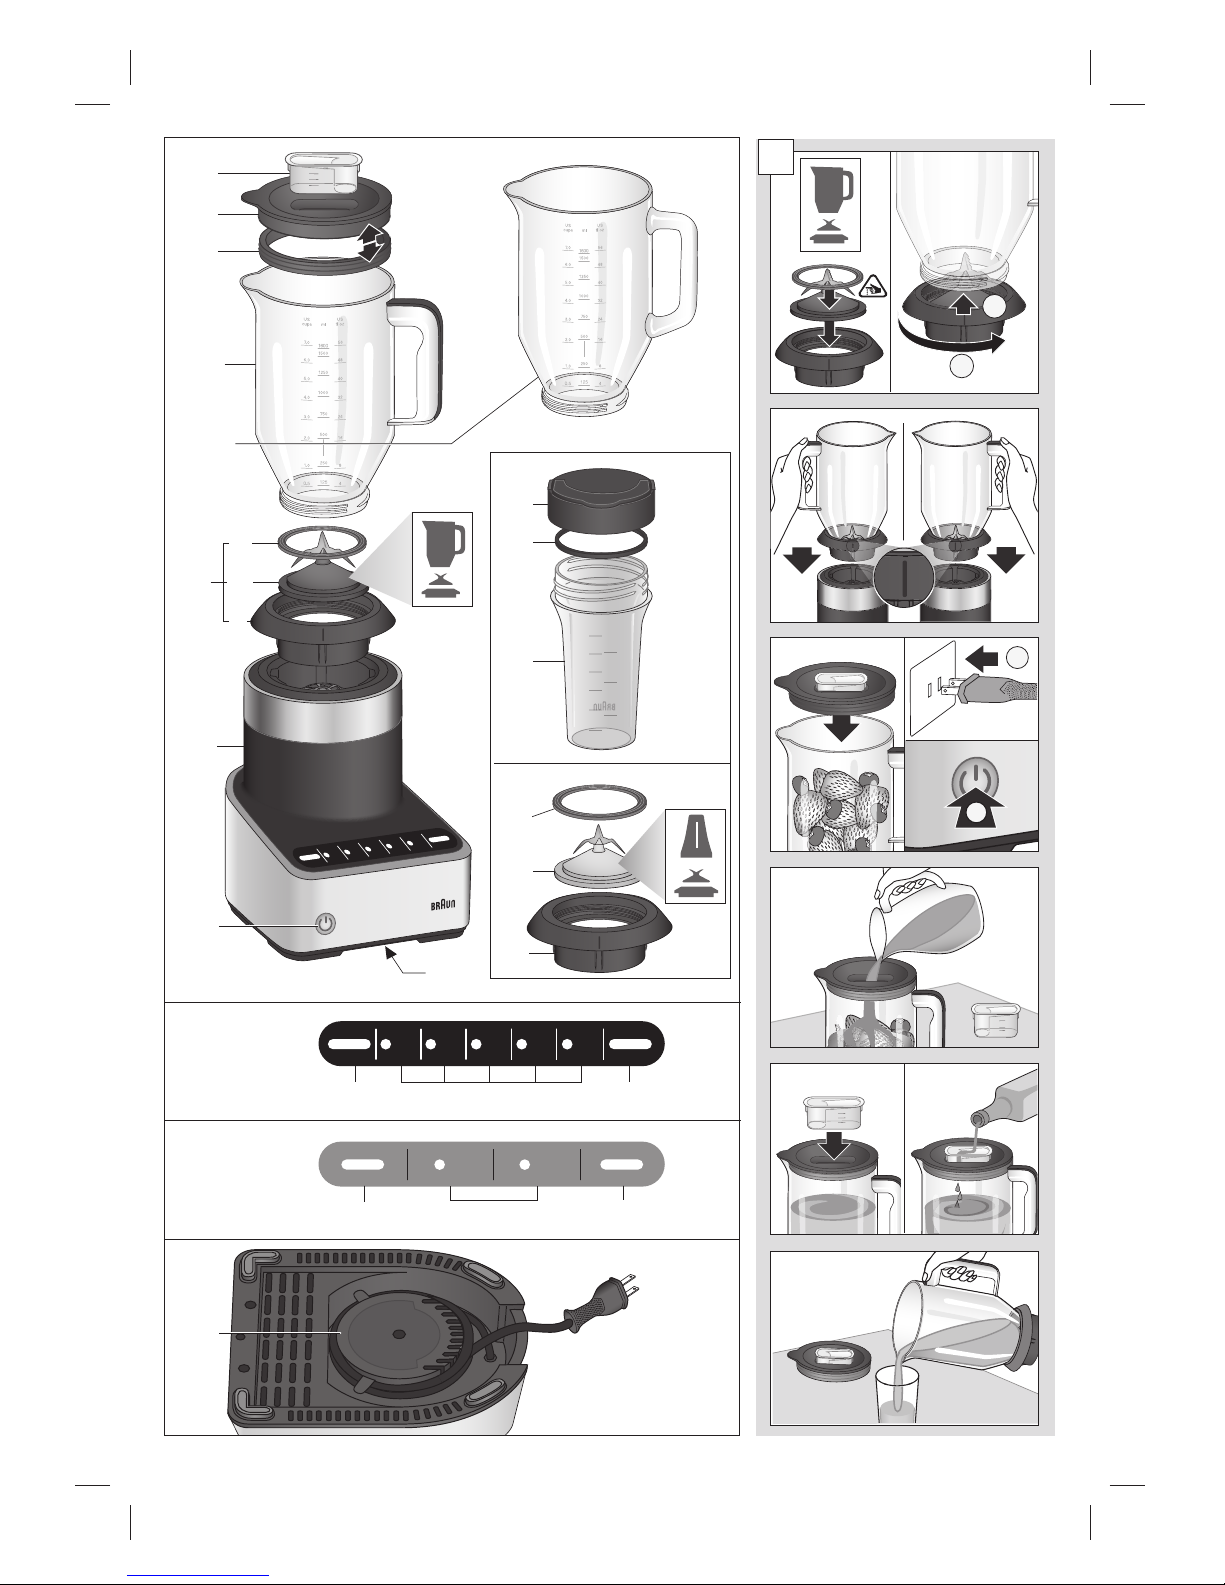
Parts and Accessories
1 Measuring cap
2 Lid
3 Lid gasket
4 Pitcher (plastic)
4a Pitcher (glass)
5 Blade assembly (pitcher)
5a Blade gasket
5b Blade group (black)
5c Locking ring
6 Motor body
7 On/Off button
8 Pulse button
9 Speed selection buttons
10 Crush ice button
11 Cord storage compartment
12 Smoothie2Go attachments (2 cups incl. lids)
12a Lid with drinking spout
12b Lid gasket
12c Cup
13 Blade assembly (Smoothie2Go attachment)
13a Blade gasket
13b Blade group (grey)
13c Locking ring
Max. capacity:
Pitcher: 56 fl. oz. / 7 cups
Smoothie cup: 12 fl. oz. / 1 ½ cups
Before Use
Clean all parts before using the blender for the first
time – refer to «Care and Cleaning».
Uncoil amount of cord needed from storage
compartment (11) at the bottom of the motor body.
Pitcher (A)
Assembly
• Ensure that the blade gasket (5a) is positioned on
the inside rim of the blade group (5b).
• Carefully place the blade group into the locking
ring (5c).
• Screw the blade assembly (5) to the pitcher
(4, 4a) in a clockwise motion until it can go no
further.
Blending with the Pitcher
• Make sure the appliance is turned off.
• Position the line on the locking ring (5c) in front of
you and push the pitcher down until it is securely
locked into place. The pitcher handle should be
on the right or left side of the motor body. When
properly positioned, the pitcher will rest completely
on the motor body.
• Add liquid ingredients first, followed by solid
ingredients. This will ensure all ingredients are
uniformly blended and prevent unnecessary
stress on the motor. Firmly place the complete lid
(1,2,3) on top.
• Plug in the power cord.
• Turn the appliance on by pressing the On/Off
button (7).
• The On/Off button will illuminate and all other
indicator lights (8,9,10) will flash. The blender
is in ON mode, but no speed has been selected.
To select a pre-programmed speed, refer to
«Operating Instructions».
• Always stop the blender when adding more
ingredients. Ensure the complete lid including the
measuring cap is replaced.
• During operation, you may add liquids through
the drip hole in the measuring cap.
• When finished, press the pre-selected speed
button.
• To switch off the appliance, press the On/Off
button and unplug blender before removing the
pitcher.
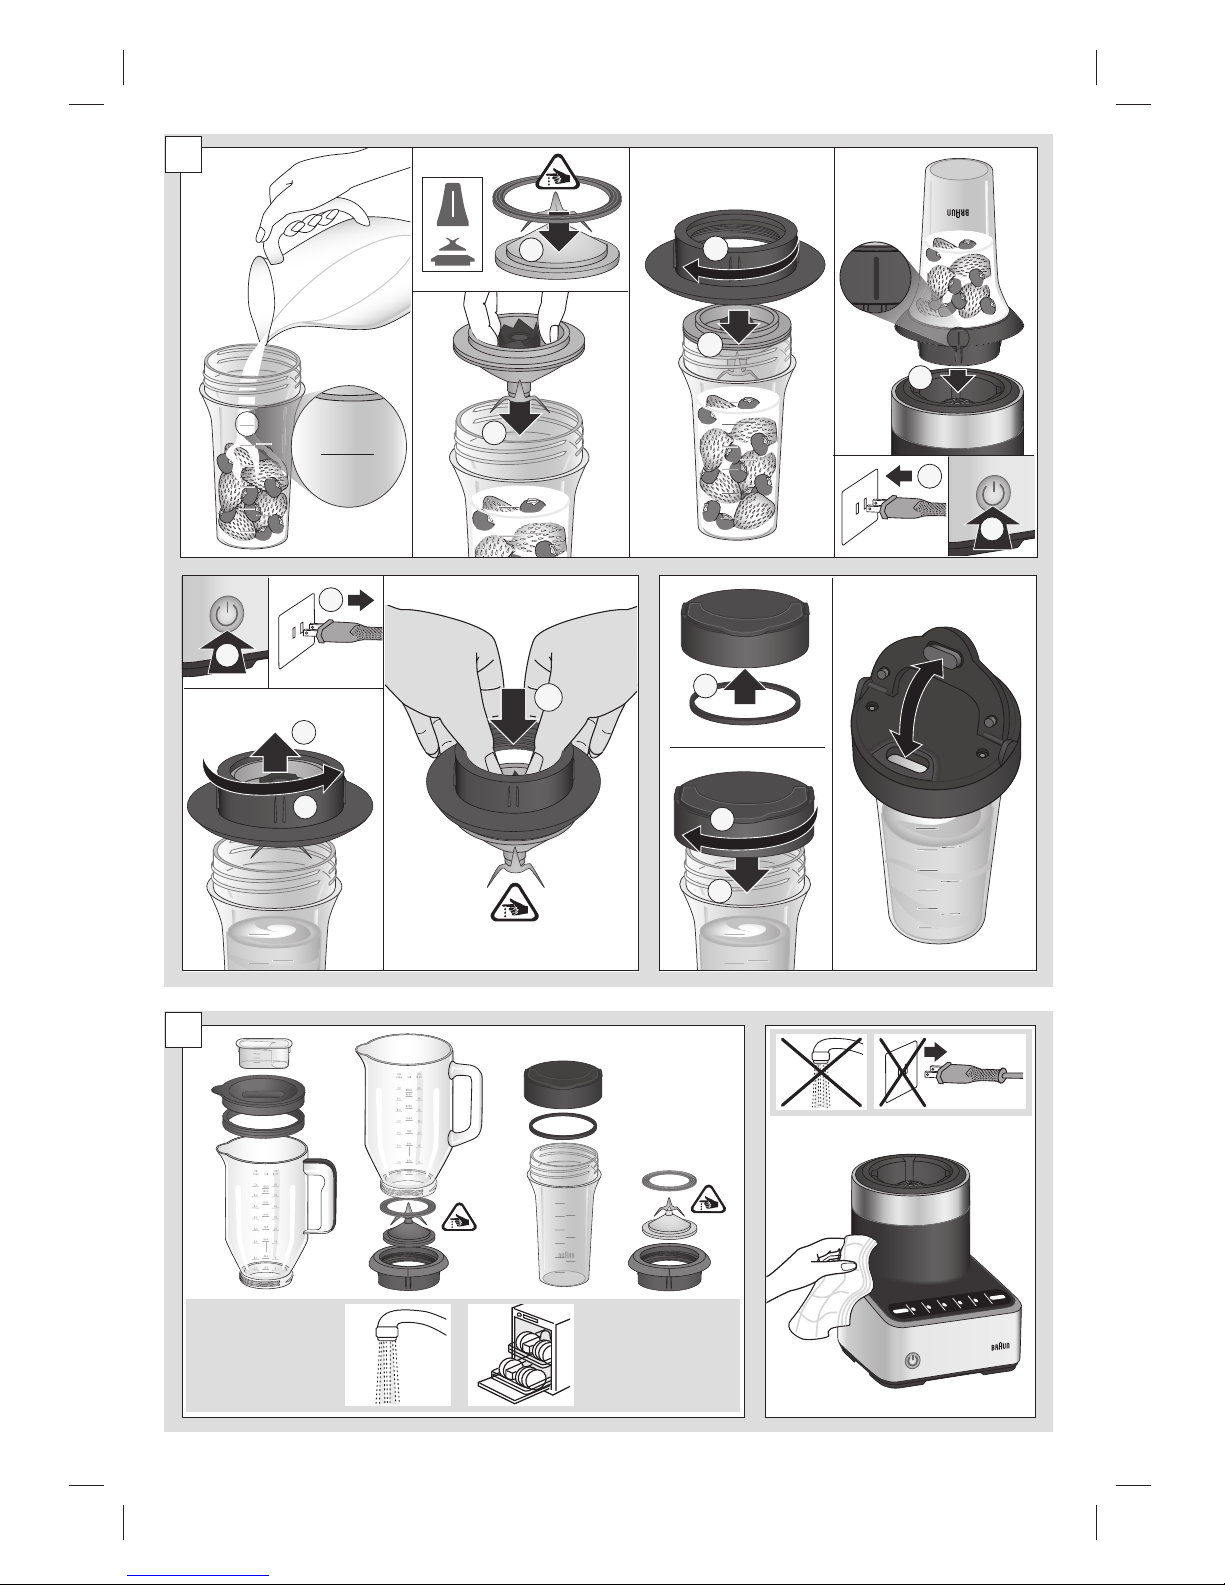
Smoothie2Go Attachment (B)
NOTE: The Smoothie2Go must only be operated
using its special blade group (13b) and for preparing
drinks and smoothies.
Assembly
• Ensure that the blade gasket is positioned on the
inside rim of the blade group (13b).
• Hold the blade group at the coupling from
underneath and place it upside down in the cup.
• Screw the locking ring (13c) to the cup (12c) in a
clockwise motion until it can go no further.
Blending with the Smoothie2Go
Attachment
• Make sure the appliance is turned off.
• Fill the cup (12c) with ingredients. Ingredients
should be added in reverse order of the regular
pitcher – solids first, then liquids.
• Carefully place the blade group including gasket
onto the cup.
• Screw the locking ring in a clockwise motion until
it can go no further.
2231046IBR_JB7192-7172-7130-7000_USCA_S6-24.indd 82231046IBR_JB7192-7172-7130-7000_USCA_S6-24.indd 8 04.11.15 15:2804.11.15 15:28
Page 9

9
• Turn the cup upside down, position the line on
the locking ring (13c) in front of you and push the
cup down until it is securely locked into place.
• Plug in the power cord.
• Turn the appliance on by pressing the On/Off
button (7).
• The On/Off button will illuminate and all other
indicator lights (8,9,10) will flash. The blender is
in ON mode, but no speed has been selected.
To select a pre-programmed speed, refer to
«Operating Instructions».
• When finished, press the pre-selected speed
button.
• To switch off the appliance, press the On/Off
button and unplug blender before removing the
Smoothie2Go attachment.
• Turn the cup upright and unscrew the blade
assembly.
• To remove the blade group from the locking ring,
push with both thumbs from inside the ring until it
snaps out.
• To attach the lid to the cup, ensure the gasket
(12b) is inside the rim of the lid (12a) and twist
clockwise. Carefully close the drinking spout.
NOTE: The Smoothie2Go attachment must not be
used to blend hot foods or carbonated liquids.
Operating Instructions
NOTE:
The blender will only operate when the On/Off button
is pressed before selecting the desired speed or
mode.
If the appliance is turned on and no speed or mode
is selected, it turns off automatically after 5 minutes.
To turn the appliance on again, press the On/Off
button.
Speed Selection
• Start blending by pressing one of the speed
buttons (9).
• The indicator light of the selected function will
glow and all other lights will turn off.
• Change the operating speed by pressing a higher
or lower speed button.
• To stop blending, press the selected speed
button again.
• When finished, press the On/Off button (7) to
switch off the appliance. Unplug blender.
Pulse Mode (type 4142 + 4143)
The pulse mode can be used to break apart larger
pieces of food or to control the texture of food when
chopping. It can be activated with any speed.
• Press the pulse button (8).
• The indicator light will glow and the indicator
lights of each speed program will flash to signify
all speeds are in pulse mode.
• Start pulsing by pressing one of the speed
buttons (9). Hold the selected speed button as
long as the pulse mode should run. You determine
the duration of each pulse.
• To finish the pulse mode, press the pulse button
again.
• When finished, press the On/Off button (7) to
switch off the appliance. Unplug blender.
Pulse Mode (type 4144)
• Press and release the pulse button (8) for short
bursts of power. You determine the duration of
each pulse. Repeat as desired.
• When finished, press the On/Off button (7) to
switch off the appliance. Unplug blender.
NOTE: Pulse mode will not work with the crush ice
feature.
Crush Ice Mode
When selected, the blender will automatically run
at staggered intervals (30 seconds) at a pre-set
speed.
• Press the crush ice button (10) to begin crushing.
• The indicator light will glow.
• The blender will cycle through a pre-programmed
time and stop automatically when finished.
• To stop the program earlier, press the crush ice
button again.
• When finished, press the On/Off button (7) to
switch off the appliance. Unplug blender.
For Best Results
• When mixing solid ingredients, cut them up into
small pieces (1 inch).
• Always start by mixing solid ingredients with a
small amount of liquid. Then gradually add more
liquid.
• When pureeing solid ingredients, feed small
portions into the pitcher (4/4a) gradually rather
than adding a large quantity at one time.
• If blending action stops during blending or
ingredients stick to sides of the pitcher, there may
not be enough liquid to blend efficiently.
• Use the pulse mode when mixing solid or highly
viscous ingredients to avoid the blade becoming
stagnant
• For preparing small amounts of foodstuff use a
low speed level.
2231046IBR_JB7192-7172-7130-7000_USCA_S6-24.indd 92231046IBR_JB7192-7172-7130-7000_USCA_S6-24.indd 9 04.11.15 15:2804.11.15 15:28
Page 10

10
• When preparing mayonnaise, oil can be added
through the drip hole in the measuring cap.
• Do not store food or liquids in the pitcher.
• Avoid bumping or dropping the blender when in
operation or at any time.
• We recommend keeping your hand on top of the
pitcher when operating the blender.
• Do not fill the pitcher beyond 32 fl. oz./ 4 cups
when preparing milk based drinks.
Blending Hot Ingredients
Blending very hot ingredients may result in hot liquid
and steam being forced past the lid or measuring
cap and cause severe personal injury.
• When preparing hot foods or liquids the complete
lid (including the gasket and measuring cap) must
be placed on the pitcher.
• Do not fill the pitcher beyond 24 fl. oz./ 3 cups for
hot foodstuff.
• If preparing greater amounts, the ingredients must
cool down to room temperature and the pitcher
must not be filled beyond 48 fl. oz./ 6 cups.
Care and Cleaning (C)
Motor body
Disconnect power before cleaning.
Do not immerse the motor body in water or any
other liquid. Wipe motor body, control panel and
power cord with a damp or dry cloth only.
Do not use abrasive cleaners or scouring pads.
Pitcher and Smoothie2Go
Attachments
Make sure the pitcher is empty before you unscrew
the locking ring. Handle the blade with caution.
• All detachable parts including the Smoothie2Go
attachments are dishwasher-safe. Do not use the
sanitizing program. The sanitization cycle could
damage your product.
• Parts may also be washed with hot, soapy water.
Rinse and dry thoroughly.
• For an efficient clean of the lids and the blades,
remove the gaskets (3/12b, 5a/13a).
Both the design specifications and these user
instructions are subject to change without notice.
Do not dispose the product in household waste
at the end of its useful life.
Troubleshooting Guide
Problem Potential Causes Solution
Blender does not operate.
No power. Check the fuse /circuit breaker in your
home. If none of the above works,
contact Braun Customer Service.
Pitcher is not attached properly. Check the position of the pitcher.
The pitcher handle should be on the
right or left side of the motor body.
Pitcher is leaking Gasket is loose, or even torn. Check if gasket is mounted properly and
in the right order.
Liquid splashing out of the
pitcher.
Pitcher is overfilled. Check maximum quantity
recommendation.
Speed selected is too high. Check speed recommendation.
2231046IBR_JB7192-7172-7130-7000_USCA_S6-24.indd 102231046IBR_JB7192-7172-7130-7000_USCA_S6-24.indd 10 04.11.15 15:2804.11.15 15:28
Page 11

11
RECIPES FOR THE PITCHER
MANGO SALSA
Ingredients:
• 2 semi-ripe mangos, pitted, chunked, unpeeled
• 1 ½ cups fresh cilantro
• ½ medium red onion, peeled (chopped into 1 inch
chunks)
• 1 jalapeño, halved and seeded
• 1 tbsp lime or lemon juice
Place all ingredients into the blender, in the order
listed and secure lid. Blend for 15 seconds on speed
3 «mix» (on speed 1 «stir» for type 4144), short stop,
then blend another 10 seconds using the same speed.
BABY FOOD
Ingredients:
• 2 cups (or 7 oz) potatoes
• 2 cups (or 7 oz) carrots
• 1 cup (or 3.5 oz) cooked beef
• 1 ½ cups (or 12 fl. oz.) water
All ingredients should be cooked, peeled and cut
into ½ – 1 inch.
Place all ingredients into the blender, in the order
listed and secure lid. Blend for 30 - 60 seconds on
speed 3 «mix» (on speed 1 «stir» for type 4144).
MANGO PINEAPPLE PASSIONFRUIT
JUICE SMOOTHIE
1 serving (1 ¼ cup or 10 fl.oz.)
Ingredients:
• ½ cup (5 fl. oz.) freshly squeezed orange juice
• 3 oz ripe mango (chopped into 1 inch chunks)
• 2.5 oz pineapple (chopped into 1 inch chunks)
• ½ passionfruit
• 1-3 ready to eat dried apricots (chopped into
½ inch pieces)
Place all ingredients into the blender, in the order
listed and secure lid. Blend for 40 – 60 seconds on
speed 4 «puree» (on speed 2 «liquify» for type 4144).
MARGARITA
Ingredients:
• ¾ cup (or 6 fl. oz.) water
• ½ cup (or 4 fl. oz.) orange syrup
• ½ cup (or 4 fl. oz.) lime juice
• ¼ cup sugar
• 10 ice cubes
Place all ingredients into the blender, in the order
listed and secure lid. Blend using the «crush ice»
program.
GUACAMOLE
Ingredients:
• ¼ cup yoghurt
• ¼ cup sunflower oil
• ¼ cup lemon juice
• ¼ cup onions, peeled and chopped
• 1 tsp salt
• 2 ripe avocados, peeled, pitted and chopped into
1 inch chunks
• 1 cup fresh cilantro leaves
• 1 medium tomato, quartered or ¾ cup chopped
Place all ingredients (except the tomato) into the
blender, in the order listed and secure lid. Blend for
10 – 15 seconds on speed 1 «stir». Turn off the
blender. Stir in the tomato with a spoon or spatula.
Pulse another 1 – 3 times on speed 5 «liquify» (on
speed 2 «liquify» for type 4144).
RECIPES FOR THE SMOOTHIE2GO
ATTACHMENT
ENERGY SMOOTHIE
Ingredients:
• 2 handfuls rinsed spring greens
• 1 banana
• 1 cup red grapes
• 1 cored pear
• ⅛ cup walnuts
• ½ cup (or 4 fl. oz.) water
Place all ingredients into the cup, in the order
listed. Blend on speed 5 «liquify» (max. speed) for
40 seconds.
PROTEIN SHAKE
Ingredients:
• 8 fl. oz. skimmed milk
• 1 banana (chopped into 1 inch chunks)
• ½ cup rolled oats
• 2 scoops protein powder
• ⅛ cup almonds
Place all ingredients into the cup, in the order
listed. Blend on speed 5 «liquify» (max. speed) for
60 seconds.
2231046IBR_JB7192-7172-7130-7000_USCA_S6-24.indd 112231046IBR_JB7192-7172-7130-7000_USCA_S6-24.indd 11 04.11.15 15:2804.11.15 15:28
Page 12

12
IMPORTANTES MESURES
DE PROTECTION
Lorsque vous utilisez des appareils électriques, vous devez toujours suivre des précautions de
sécurité de base pour réduire les risques d’incendie, de choc électrique et/ou de blessures, y
compris les suivantes:
LIRE TOUTES LES INSTRUCTIONS.
1. Pour prévenir les risques d’incendie, de choc électrique et de blessures, n’immergez pas le
cordon, la fiche ou l’appareil de base dans l’eau ou dans d’autres liquides.
2. Cet appareil n’est pas prévu pour être utilisé par des personnes (y compris les enfants) dont les
capacités physiques, sensorielles ou mentales sont réduites, ou des personnes dénuées
d’expérience ou de connaissance, sauf si elles ont pu bénéficier, par l’intermédiaire d’une
personne responsable de leur sécurité, d’une surveillance ou d’instructions préalables
concernant l’utilisation de l’appareil.
3. Débranchez l’appareil de la prise de courant quand vous ne l’utilisez pas ou avant d’enlever ou
d’installer des pièces et avant de le nettoyer ou de retirer le contenu du bol. Ne jamais mettre
les mains dans le bol ni manipuler les lames lorsque l’appareil est branché.
4. Évitez tout contact avec les lames ou les pièces mobiles.
5. Inspectez régulièrement le cordon d’alimentation, la fiche, ainsi que l’appareil pour y déceler
tout dommage. Ne faites pas fonctionner l’appareil s’il est endommagé ou s’il ne fonctionne
pas correctement. Arrêtez immédiatement d’utiliser l’appareil et appelez le Service clientèle de
Braun pour examen, réparation ou ajustement de l’appareil.
6. L’utilisation d’accessoires, y compris les bocaux de mise en conserve ou les pots ordinaires ne
sont pas recommandés et ne sont pas vendus par Braun et peuvent provoquer des incendies,
des chocs électriques ou des blessures.
7. Ne pas utiliser à l’extérieur ni à d’autres fins que celles prévues.
8. Ne pas laisser le cordon pendre du bord d’une table ou d’un plan de travail ou toucher une
surface chaude.
9. Ne pas utiliser le mixeur pour autre chose que la préparation d’aliments et/ou de boissons.
Une utilisation inappropriée peut provoquer des blessures.
10. Garder les mains et les ustensiles à l’écart du bol lors du mélange afin de réduire le risque de
blessures graves ou de dommages à l’appareil. On peut utiliser une spatule en caoutchouc
mais il doit être employé uniquement lorsque l’appareil est éteint.
11. Un voyant clignotant indique que l’appareil est prêt à fonctionner. Évitez tout contact avec les
lames.
12. Les lames sont tranchantes. Ranger Hors de portée des enfants.
13. Afin de réduire le risque de blessures, ne jamais placer l’assemblage de lames sur la base sans
l’avoir d’abord assemblé sur le bol.
14. Ne pas faire fonctionner sans que le couvercle soit en place. Garder le couvercle du doseur en
place lors du mélange de liquides chauds.
15. Ne pas mélanger de liquides chauds ni de boissons gazeuses dans l’accessoire pour
smoothies.
2231046IBR_JB7192-7172-7130-7000_USCA_S6-24.indd 122231046IBR_JB7192-7172-7130-7000_USCA_S6-24.indd 12 04.11.15 15:2804.11.15 15:28
Page 13

13
16. Ne jamais laisser le mixeur sans surveillance pendant qu’il fonctionne.
17. Cet appareil (type 4143 et 41144) est muni d’une fiche polarisée (une lame est plus large que
l’autre). Afin de réduire les risques de choc électrique, cette fiche ne peut être branchée sur
une prise polarisée que dans un seul sens. Si la fiche n’entre pas complètement dans la prise,
inversez la fiche. Si la fiche n’entre toujours pas dans la prise, contactez un électricien qualifié.
Ne modifiez pas la fiche de quelque façon que ce soit.
18.
Ce symbole signifie marche/arrêt (on/off).
19. Nous recommandons de conserver les matériaux d’emballage d’origine au cas où vous en
auriez besoin pour une expédition de l’appareil. Tenir tous les sacs en plastique hors de portée
des enfants.
USAGE DOMESTIQUE SEULEMENT
CONSERVEZ CES INSTRUCTIONS
2231046IBR_JB7192-7172-7130-7000_USCA_S6-24.indd 132231046IBR_JB7192-7172-7130-7000_USCA_S6-24.indd 13 04.11.15 15:2804.11.15 15:28
Page 14

14
Français
Nos produits sont conçus de manière à répondre
aux normes les plus exigeantes en matière de
qualité, de fonctionnalité et de design. Nous
espérons que votre nouvel appareil Braun vous
apportera entière satisfaction.
Lisez le mode d’emploi attentivement et en
entier avant d’utiliser cet appareil.
Pièces et accessoires
1 Bouchon doseur
2 Couvercle
3 Joint du couvercle
4 Pichet (plastique)
4a Pichet (verre)
5 Bloc lame (pichet)
5a Joint de la lame
5b Porte-lame (noir)
5c Bague de verrouillage
6 Base-moteur
7 Bouton marche/arrêt
8 Bouton « pulse » (impulsion)
9 Touches de sélection de la vitesse
10 Bouton « crush ice » (pilage de glace)
11 Range-cordon
12 Accessoires Smoothie2Go (2 coupes avec
couvercles)
12a Couvercle à bec
12b Joint du couvercle
12c Coupe
13 Bloc lame (accessoire Smoothie2Go)
13a Joint de la lame
13b Porte-lame (gris)
13c Bague de verrouillage
Capacité max :
Pichet : 56 fl. oz. / 7 tasses
Smoothie2Go : 2 fl. oz. / 1 ½ tasses
Avant l’utilisation
Nettoyez toutes les pièces avant d’utiliser le blender
pour la première fois – (référez-vous au
paragraphe intitulé « Entretien et nettoyage ».
Déroulez le cordon logé dans le range-cordon (11)
situé dans la partie inférieure de la base-moteur
jusqu’à l’obtention de la longueur souhaitée.
Pichet (A)
Montage
• Veillez à positionner le joint de la lame (5a) sur le
rebord intérieur du porte-lame (5b).
• Placez le porte-lame avec précaution dans la
bague de verrouillage (5c).
• Vissez complètement le bloc lame (5) au pichet
(4, 4a) en tournant dans le sens horaire.
Mixage avec le pichet
• Assurez-vous que l’appareil est éteint.
• Placez le repère de la bague de verrouillage (5c)
devant vous et enfoncez le pichet jusqu’à ce qu’il
s’enclenche. La poignée du pichet doit se trouver
du côté droit ou du côté gauche de la basemoteur. S’il est correctement positionné, le pichet
repose complètement sur la base-moteur.
• Ajoutez d’abord les ingrédients liquides, puis les
ingrédients solides. Vous obtiendrez ainsi un
mixage homogène des ingrédients sans forcer
inutilement sur le moteur. Positionnez fermement
le couvercle complet (1, 2 ,3) sur le dessus.
• Branchez le cordon d’alimentation.
• Allumez l’appareil en appuyant sur le bouton
marche/arrêt (7).
• Le bouton marche/arrêt s’allume et tous les
voyants (8, 9, 10) clignotent. Le blender est en
mode de marche mais aucune vitesse n’a été
sélectionnée. Pour sélectionner une vitesse
préprogrammée, référez-vous au paragraphe
« Mode d’emploi ».
• Arrêtez toujours le blender pour ajouter des
ingrédients. Assurez-vous de remettre en place
la totalité du couvercle, y compris le bouchon
doseur.
• Pendant le fonctionnement, vous pouvez ajouter
des liquides par le petit trou du bouchon doseur.
• Lorsque vous avez terminé, appuyez sur le bouton
de la vitesse présélectionnée.
• Avant de retirer le pichet, éteignez l’appareil en
appuyant sur le bouton marche/arrêt et
débranchez le blender.
Accessoire Smoothie2Go (B)
REMARQUE : Le Smoothie2Go ne doit être utilisé
qu’avec sa lame spéciale (13b) et pour la
préparation de boissons et de smoothies.
Montage
• Veillez à positionner le joint de la lame sur le
rebord intérieur du porte-lame (13b).
• Tenez la lame par la pièce d’assemblage de
dessous et placez-la à l’envers dans le coupe.
• Vissez complètement la bague de verrouillage (13c)
au coupe (12c) en tournant dans le sens horaire.
Mixage avec l’accessoire
Smoothie2Go
• Assurez-vous que l’appareil est éteint.
• Remplissez le coupecoupe (12c) avec des
ingrédients. Ceux-ci doivent être ajoutés dans
l’ordre inverse par rapport au pichet de base :
les solides d’abord, les liquides ensuite.
• Positionnez prudemment la lame et son joint sur
le coupe.
2231046IBR_JB7192-7172-7130-7000_USCA_S6-24.indd 142231046IBR_JB7192-7172-7130-7000_USCA_S6-24.indd 14 04.11.15 15:2804.11.15 15:28
Page 15

15
• Vissez complètement la bague de verrouillage en
tournant dans le sens horaire.
• Retournez le verre, placez le repère de la bague
de verrouillage (13c) devant vous et enfoncez le
coupe jusqu’à ce qu’il s’enclenche.
• Branchez le cordon d’alimentation.
• Allumez l’appareil en appuyant sur le bouton
marche/arrêt (7).
• Le bouton marche/arrêt s’allume et tous les
voyants (8, 9, 10) clignotent. Le blender est en
mode de marche mais aucune vitesse n’a été
sélectionnée. Pour sélectionner une vitesse
préprogrammée, référez-vous au paragraphe
« Mode d’emploi ».
• Lorsque vous avez terminé, appuyez sur le bouton
de la vitesse présélectionnée.
• Avant de retirer l’accessoire Smoothie2Go,
éteignez l’appareil en appuyant sur le bouton
marche/arrêt et débranchez le blender.
• Remettez le coupe à l’endroit et dévissez le bloc
lame.
• Pour retirer le porte-lame de la bague de
verrouillage, poussez-le avec vos deux pouces
depuis l’intérieur de la bague jusqu’à ce qu’il soit
éjecté.
• Pour visser le couvercle au coupe, assurez-vous
que le joint (12b) se trouve à l’intérieur du rebord
du couvercle (12a) et tournez dans le sens
horaire. Fermez le bec avec précaution.
REMARQUE : L’accessoire Smoothie2Go ne doit
pas être utilisé pour mixer des aliments chauds ou
des liquides gazeux.
Mode d’emploi
REMARQUE :
Le blender ne fonctionnera que si vous appuyez sur
le bouton marche/arrêt avant de sélectionner la
vitesse ou le mode souhaité.
Si l’appareil est allumé et qu’aucune vitesse ou
aucun mode n’est sélectionné, il s’éteint automatiquement au bout de 5 minutes. Pour rallumer
l’appareil, appuyez sur le bouton marche/arrêt.
Sélection de la vitesse
• Commencez à mixer en appuyant sur l’un des
boutons de vitesse (9).
• Le voyant de la fonction sélectionnée s’allume et
tous les autres voyants s’éteignent.
• Modifiez la vitesse de fonctionnement en
appuyant sur un bouton de vitesse inférieure ou
supérieure.
• Pour arrêter le mixage, appuyez à nouveau sur le
bouton de vitesse sélectionné.
• Lorsque vous avez terminé, appuyez sur le bouton
marche/arrêt (7) pour éteindre l’appareil.
Débranchez le blender.
Mode pulse (impulsion)
(type 4142 + 4143)
Le mode « pulse » peut être utilisé pour hacher des
plus gros morceaux d’aliments ou pour contrôler la
texture des aliments pendant le hachage. Il est
possible de l’utiliser avec n’importe quelle vitesse.
• Appuyez sur le bouton « pulse » (8).
• Le voyant s’allume et les voyants de chaque
programme de vitesse clignotent pour indiquer
que toutes les vitesses sont en mode pulse.
• Commencez à mixer en mode pulse en appuyant
sur l’un des boutons de vitesse (9). Maintenez le
bouton de vitesse sélectionné enfoncé aussi
longtemps que nécessaire. C’est vous qui
déterminez la durée de chaque impulsion.
• Pour désactiver le mode pulse, appuyez à
nouveau sur le bouton « pulse ».
• Lorsque vous avez terminé, appuyez sur le bouton
marche/arrêt (7) pour éteindre l’appareil.
Débranchez le blender.
Mode pulse (impulsion) (type 4144)
• Enfoncez et relâchez le bouton « pulse » (8) pour
lancer de courtes salves de puissance. C’est vous
qui déterminez la durée de chaque impulsion.
Répétez autant de fois que nécessaire.
• Lorsque vous avez terminé, appuyez sur le bouton
marche/arrêt (7) pour éteindre l’appareil.
Débranchez le blender.
REMARQUE : Le mode pulse ne fonctionne pas
avec la fonction crush ice.
Mode crush ice (pilage de glace)
Lorsque ce mode est sélectionné, le blender
fonctionne automatiquement de manière
fractionnée (intervalles de 30 secondes) à une
vitesse prédéfinie.
• Appuyez sur le bouton « crush ice » (10) pour
commencer le pilage.
• Le voyant s’allume.
• Le blender fonctionne pendant un temps
préprogrammé et s’arrête automatiquement en
fin de cycle.
• Pour arrêter le programme avant la fin, appuyez à
nouveau sur le bouton « crush ice ».
• Lorsque vous avez terminé, appuyez sur le bouton
marche/arrêt (7) pour éteindre l’appareil.
Débranchez le blender.
Pour des résultats parfaits
• Pour mixer des ingrédients solides, coupez-les en
petits morceaux (1 inch).
• Commencez toujours par mixer les ingrédients
solides avec une petite quantité de liquide. Puis
ajoutez le liquide petit à petit.
2231046IBR_JB7192-7172-7130-7000_USCA_S6-24.indd 152231046IBR_JB7192-7172-7130-7000_USCA_S6-24.indd 15 04.11.15 15:2804.11.15 15:28
Page 16

16
• Pour préparer une purée à partir d’ingrédients
solides, ajoutez progressivement de petites
portions dans le pichet (4/4a) plutôt qu’une
grande quantité d’un seul coup.
• Si le mixage s’arrête en cours de route ou si les
ingrédients collent à la paroi du pichet, il manque
probablement du liquide pour un mixage efficace.
• Utilisez le mode pulse pour mixer des ingrédients
solides ou très visqueux afin d’éviter que la lame
ne s’immobilise.
• Pour préparer de petites quantités d’aliments,
utilisez une vitesse lente.
• Pour préparer de la mayonnaise, vous pouvez
rajouter de l’huile par le petit trou du bouchon
doseur.
• Ne stockez pas de nourriture ou de liquides dans
le pichet.
• Évitez de heurter ou de faire basculer le blender,
à plus forte raison lorsqu’il est en fonctionnement.
• Nous vous conseillons de laisser votre main sur le
dessus du pichet pendant le mixage.
• Ne remplissez pas le pichet au-delà de 32 fl. oz./
4 tasses lorsque vous préparez des boissons à
base de lait.
Mixage d’ingrédients chauds
Mixer des ingrédients très chauds peut entraîner un
débordement de liquide chaud et de vapeur au
niveau du couvercle ou du bouchon doseur et
occasionner de graves blessures corporelles.
• Lorsque vous préparez des aliments ou liquides
chauds, le couvercle complet (avec joint et
bouchon doseur) doit être placé sur le pichet.
• Ne remplissez pas le pichet au-delà de 24 fl. oz./
3 tasses pour des aliments chauds.
• Pour préparer de plus grosses quantités, les
ingrédients doivent refroidir à température
ambiante et le pichet ne doit pas être rempli
au-delà de 48 fl. oz./ 6 tasses.
Entretien et nettoyage (C)
Base-moteur
Débranchez l’appareil avant le nettoyage.
N’immergez pas la base-moteur dans l’eau ou tout
autre liquide. Essuyez la base-moteur, le panneau
de commande et le cordon d’alimentation avec un
chiffon humide ou sec uniquement.
N’utilisez pas de produits de nettoyage abrasifs ni
de tampons à récurer.
Pichet et Smoothie2Go
Assurez-vous que le pichet est vide avant de
dévisser la bague de verrouillage. Manipulez la lame
avec précaution.
• Toutes les pièces amovibles, y compris les
accessoires Smoothie2Go, passent au lavevaisselle. N’utilisez pas le programme de
stérilisation. Le cycle de stérilisation pourrait
endommager votre produit.
• Les pièces peuvent également être lavées à l’eau
chaude savonneuse. Rincez et séchez
soigneusement.
• Pour un nettoyage efficace des couvercles et des
lames, retirez les joints (3/12b, 5a/13a).
Les caractéristiques de design et le présent mode
d’emploi peuvent être modifiés sans préavis.
Ne jetez pas votre appareil avec vos déchets
ménagers à la fin de sa durée de vie utile.
Guide de dépannage
Problème Causes possibles Solution
Le blender ne fonctionne
pas.
Pas d’alimentation électrique. Vérifiez si l’appareil est branché.
Vérifiez le fusible/disjoncteur de votre
logement.
Si aucune des solutions ci-dessus ne
fonctionne, contactez le service
après-vente Braun.
Le pichet est mal fixé. Vérifiez la position du pichet. La poignée
du pichet doit se trouver du côté droit ou
du côté gauche de la base-moteur.
Le pichet fuit. Le joint est lâche, voire fendu. Vérifiez que le joint est correctement
installé et dans le bon ordre.
Éclaboussures de liquide
hors du pichet.
Le pichet est trop rempli. Suivez nos recommandations quant au
remplissage maximal.
La vitesse sélectionnée est trop
élevée.
Suivez nos recommandations quant à la
vitesse.
2231046IBR_JB7192-7172-7130-7000_USCA_S6-24.indd 162231046IBR_JB7192-7172-7130-7000_USCA_S6-24.indd 16 04.11.15 15:2804.11.15 15:28
Page 17

17
RECETTES POUR LE PICHET
SALSA DE MANGUE
Ingrédients :
• 2 mangues pas trop mûres, dénoyautées, non
épluchées et coupées en gros morceaux
• 1 ½ tasse de coriandre fraîche
• ½ oignon rouge de taille moyenne, épluché
(coupé en tronçons de 1 inch)
• 1 piment jalapeño coupé en deux et épépiné
• 1 cuillère à soupe de jus de citron vert ou jaune
Mettez tous les ingrédients dans le pichet dans
l’ordre de la liste et fermez bien le couvercle. Mixez
pendant 15 secondes à vitesse 3 « mix » (à vitesse
1 « stir » pour le modèle 4144), faites un bref arrêt
puis mixez à nouveau 10 secondes à la même vitesse.
PLAT POUR BÉBÉ
Ingrédients :
• 2 tasses (ou 7 oz) de pommes de terre
• 2 tasses (ou 7 oz) de carottes
• 1 tasse (ou 3.5 oz) de bœuf cuit
• 1 ½ tasse (ou 12 fl. oz.) d’eau
Tous les ingrédients doivent être cuits, épluchés et
coupés en morceaux de ½ - 1.0 inch.
Mettez tous les ingrédients dans le pichet dans
l’ordre de la liste et fermez bien le couvercle.
Mixez pendant 30 à 60 secondes à vitesse 3 « mix »
(à vitesse 1 « stir » pour le modèle 4144).
SMOOTHIE AUX JUS DE MANGUE,
ANANAS ET FRUIT DE LA PASSION
1 portion (1 ¼ tasse ou 10 fl. oz.)
Ingrédients :
• ½ tasse (5 fl. oz.) de jus d’oranges fraîchement
pressées
• 3 oz de mangue mûre (coupée en tronçons de
1 inch)
• 2.5 oz d’ananas (coupé en tronçons de inch)
• ½ fruit de la passion
• 1 à 3 abricots séchés prêts à déguster (coupés en
tronçons de ½ inch)
Mettez tous les ingrédients dans le pichet dans
l’ordre de la liste et fermez bien le couvercle. Mixez
pendant 40 à 60 secondes à vitesse 4 « puree »
(à vitesse 2 « liquify » pour le modèle 4144).
MARGARITA
Ingrédients :
• ¾ de tassee (ou 6 fl. oz.) d’eau
• ½ tasse (ou 4 fl. oz.) de sirop d’orange
• ½ tasse (ou 4 fl. oz.) de jus de citron vert
• ¼ de tasse de sucre
• 10 cubes de glace
Mettez tous les ingrédients dans le pichet dans
l’ordre de la liste et fermez bien le couvercle.
Mixez en utilisant le programme « crush ice ».
GUACAMOLE
Ingrédients :
• ¼ de tasse de yaourt
• ¼ de tasse d’huile de tournesol
• ¼ de tasse de jus de citron
• ¼ d’oignon coupé, épluché et émincé
• 1 cuillère à café de sel
• 2 avocats mûrs, épluchés, dénoyautés et coupés
en tronçons de 1 inch
• 1 tasse de feuilles de coriandre fraîche
• 1 tomate de taille moyenne, coupée en quatre ou
émincée dans ¾ de tasse
Mettez tous les ingrédients (sauf la tomate)
dans le pichet dans l’ordre de la liste et fermez
bien le couvercle. Mixez pendant 10 à 15 secondes
à vitesse 1 « stir ». Éteignez le blender. Ajoutez
la tomate et mélangez avec une cuillère ou une
spatule. Mixez 1 à 3 fois à vitesse 5 « liquify »
(à vitesse 2 « liquify » pour le type 4144).
RECETTES POUR L’ACCESSOIRE
SMOOTHIE2GO
SMOOTHIE ÉNERGISANT
Ingrédients :
• 2 poignées de feuilles de chou rincées
• 1 banane
• 1 tasse de raisin rouge
• 1 poire sans trognon
• ⅛ de tasse de noix
• ½ tasse (ou 4 fl. oz .) d’eau
Mettez tous les ingrédients dans le coupe dans
l’ordre de la liste. Mixez à vitesse 5 « liquify » (vitesse
max.) pendant 40 secondes.
MILK-SHAKE PROTÉINÉ
Ingrédients :
• 8 fl. oz. de lait écrémé
• 1 banane (coupée en tronçons de 1 inch)
• ½ tasse de flocons d’avoine
• 2 cuillères de protéines en poudre
• ⅛ de tasse d’amandes
Mettez tous les ingrédients dans le coupe dans
l’ordre de la liste. Mixez à vitesse 5 « liquify » (vitesse
max.) pendant 60 secondes.
2231046IBR_JB7192-7172-7130-7000_USCA_S6-24.indd 172231046IBR_JB7192-7172-7130-7000_USCA_S6-24.indd 17 04.11.15 15:2804.11.15 15:28
Page 18

CUIDADOS IMPORTANTES
Al usar aparatos eléctricos, siempre se deben seguir las precauciones de seguridad básicas
para reducir el riesgo de incendio, descarga eléctrica o lesiones a las personas, incluyendo las
siguientes:
LEA TODAS LAS INSTRUCCIONES.
1. Para protegerse contra incendios, descargas eléctricas y lesiones a las personas, no coloque
el cable, la clavija ni la base de la unidad en agua u otros líquidos.
2. El aparato no está diseñado para que lo utilicen personas (incluidos los niños) con
capacidades físicas, sensoriales o mentales reducidas, o faltas de experiencia y conocimiento,
a menos que una persona responsable de su seguridad les haya dado supervisión o
instrucciones referentes al uso del aparato.
3. Desconecte del enchufe cuando no esté usándose, antes de ponerle o quitarle piezas, y antes
de limpiarlo o eliminar contenidos de la jarra. Nunca ponga las manos dentro de la jarra ni
manipule las cuchillas con el aparato enchufado.
4. Evite cualquier contacto con las cuchillas o piezas móviles.
5. Inspeccione periódicamente el cable de corriente, la clavija y el aparato en sí por si hubiera
daños. No lo utilice si está dañado de cualquier manera o después que el aparato muestre un
mal funcionamiento. Deje inmediatamente de usar el aparato y llame a Servicio al Cliente de
Braun para que lo examinen, reparen o ajusten.
6. El uso de accesorios, incluyendo jarras comunes o latas de conservas, no recomendados o
vendidos por Braun, puede provocar incendios, descargas eléctricas o riesgo de lesiones a las
personas.
7. No lo use al aire libre o para ninguna cosa que no sea el propósito para el que se diseñó.
8. No deje que el cable cuelgue sobre el borde de la mesa o el mostrador o toque superficies
calientes.
9. No utilice la batidora para nada que no sea la preparación de alimentos y bebidas. El mal uso
puede provocar heridas.
10. Mantenga las manos y utensilios fuera de la jarra mientras esté batiendo, a fin de reducir el
riesgo de lesiones graves a personas o daños a la misma batidora. Se puede utilizar una
espátula de goma o plástico, pero se debe usar sólo cuando la batidora esté apagada.
11. Una luz que parpadea indica que está listo para funcionar. Evite cualquier contacto con las
cuchillas.
12. Las cuchillas están afiladas. Manéjelas con cuidado. Manténgalas fuera del alcance de los
niños.
13. Para reducir el riesgo de lesiones, nunca coloque el conjunto de las cuchillas en la base, a
menos que esté ensamblado con la jarra.
14. No lo opere sin que la tapa esté en su sitio. Mantenga el tapón medidor en su lugar al batir
líquidos calientes.
15. No bata líquidos calientes o alimentos carbonatados en el accesorio de smoothies para viaje.
16. Nunca deje su batidora desatendida mientras esté en funcionamiento.
18
2231046IBR_JB7192-7172-7130-7000_USCA_S6-24.indd 182231046IBR_JB7192-7172-7130-7000_USCA_S6-24.indd 18 04.11.15 15:2804.11.15 15:28
Page 19

19
17. Este aparato (modelo 4143 y 4144) tiene una clavija polarizada (una cuchilla es más ancha que
la otra). Para reducir el riesgo de descarga eléctrica, esta clavija se ajustará en un enchufe
polarizado solamente de una forma. Si la clavija no entra bien en el enchufe, inviértala. Si aun
así no ajusta, contacte con un electricista cualificado. No modifique la clavija en modo alguno.
18.
Este símbolo queda para „encendido/apagado“.
19. Le sugerimos que guarde todos los materiales de embalaje en caso de que sea necesario el
envío de la máquina en el futuro. Conserve todas las bolsas de plástico lejos de los niños.
SÓLO PARA USO DOMÉSTICO
GUARDE ESTAS INSTRUCCIONES
2231046IBR_JB7192-7172-7130-7000_USCA_S6-24.indd 192231046IBR_JB7192-7172-7130-7000_USCA_S6-24.indd 19 04.11.15 15:2804.11.15 15:28
Page 20

20
Español
Nuestros productos han sido elaborados con el fin
de satisfacer los más altos estándares de calidad,
funcionalidad y diseño. Esperamos que disfrute al
máximo de su nuevo electrodoméstico Braun.
Lea atenta y enteramente el folleto de
instrucciones antes de usar el producto.
Partes y accesorios
1 Tapón medidor
2 Tapa
3 Junta de la tapa
4 Jarra (plástico)
4a Jarra (cristal)
5 Montaje de la cuchilla (jarra)
5a Junta de la cuchilla
5b Junta de la cuchilla (negra)
5c Anillo de bloqueo
6 Cuerpo del motor
7 Botón On/Off (encendido/apagado)
8 Botón Pulse (pulsación)
9 Botones de selección de velocidad
10 Botones para triturar hielo
11 Compartimento recogecable
12 Accesorios Smoothie2Go (2 vasos con tapa)
12a Tapa con surtidor para beber
12b Junta de la tapa
12c Vaso
13 Montaje de la cuchilla (accesorio de
Smoothie2Go)
13a Junta de la cuchilla
13b Grupo de la cuchilla (gris)
13c Anillo de bloqueo
Capacidad máxima:
Jarra: 56 fl. oz. / 7 tazas
Vaso de smoothie: 12 fl. oz. / 1 ½ tazas
Antes de usar
Limpie todas las partes antes de usar la batidora por
primera vez - consulte «Cuidado y limpieza».
Saque la cantidad de cable necesaria del
compartimento recogecables (11) en la parte
inferior del cuerpo del motor.
Jarra (A)
Montaje
• Asegúrese de que la junta de la cuchilla (5a) está
posicionada sobre el borde interior del grupo de
la cuchilla (5b).
• Coloque cuidadosamente el grupo de la cuchilla
en el anillo de bloqueo (5c).
• Enrosque el montaje de la cuchilla (5) a la jarra
(4, 4a) en sentido horario hasta que llegue al
topo.
Batir con la jarra
• Asegúrese de que el aparato está apagado.
• Posicione la línea del anillo de bloqueo (5c) hacia
usted y empuje la jarra hacia abajo hasta que esté
firmemente colocada en su sitio. El asa de la jarra
debería estar a la derecha o a la izquierda del
cuerpo del motor. Cuando esté debidamente
posicionada, la jarra descansará completamente
sobre el cuerpo del motor.
• Añada primero los ingredientes líquidos, y luego
los sólidos. Esto asegurará que todos los
ingredientes se mezclan de forma uniforme y
evita un estrés innecesario en el motor. Coloque
firmemente la tapa (1, 2, 3) en la parte superior.
• Enchufe el aparato.
• Encienda el aparato pulsando el botón On/Off (7).
• El botón On/Off se iluminará y todas las otras
luces indicadoras (8,9,10) parpadearán.
La batidora está en modo ON, pero no se ha
seleccionado ninguna velocidad.
• Para seleccionar una velocidad pre programada,
consulte «Instrucciones de funcionamiento».
• Pare siempre la batidora antes de añadir más
ingredientes. Asegúrese de que vuelve a colocar
la tapa incluyendo el tapón de medición.
• Durante el funcionamiento, puede añadir líquidos
a través del orificio del tapón de medición.
• Cuando haya acabado, pulse el botón de
velocidad preseleccionada.
• Para apagar el aparato, pulse el botón On/Off y
desenchufe la batidora antes de quitar la jarra.
Accesorio Smoothie2Go (B)
NOTA: El Smoothie2Go debe utilizarse usando su
grupo de cuchillas especial (13b) y para preparar
bebidas y smoothies.
Montaje
• Asegúrese de que la junta de la cuchilla está
posicionada sobre el borde interior del grupo de
la cuchilla (13b).
• Sujete el grupo de la cuchilla en el acople desde
la parte inferior y colóquelo bocabajo en el vaso.
• Enrosque el anillo de bloqueo (13c) al vaso (12c)
en sentido horario hasta que llegue a su tope.
Batir con el accesorio Smoothie2Go
• Asegúrese de que el aparato está apagado.
• Llene el vaso (12c) con los ingredientes. Los
ingredientes deben añadirse en orden inverso al
de la jarra regular; primero sólidos y luego
líquidos.
2231046IBR_JB7192-7172-7130-7000_USCA_S6-24.indd 202231046IBR_JB7192-7172-7130-7000_USCA_S6-24.indd 20 04.11.15 15:2804.11.15 15:28
Page 21

21
• Coloque cuidadosamente el grupo de la cuchilla
incluyendo la junta en el vaso.
• Enrosque el anillo de bloqueo en sentido horario
hasta que llegue a su tope.
• Gire el vaso bocabajo, posicione la línea en el
anillo de bloqueo (13c) frente a usted y empuje el
vaso hacia abajo hasta que esté firmemente
colocado en su sitio.
• Enchufe el aparato.
• Encienda el aparato pulsando el botón On/Off (7).
• El botón On/Off se iluminará y todas las otras
luces indicadoras (8,9,10) parpadearán.
La batidora está en modo ON, pero no se ha
seleccionado ninguna velocidad. Para seleccionar
una velocidad pre programada, consulte
«Instrucciones de funcionamiento».
• Cuando haya acabado, pulse el botón de
velocidad preseleccionada.
• Para apagar el aparato, pulse el botón On/Off
y desenchufe la batidora antes de quitar el
accesorio Smoothie2Go.
• Ponga el vaso en posición erguida y desenrosque
el montaje de la cuchilla.
• Para quitar el grupo de la cuchilla del anillo de
bloqueo, empuje con ambos pulgares desde la
parte interior del anillo hasta que se suelte.
• Para colocar la tapa en el vaso, asegúrese de
que la junta (12b) está dentro del borde de la
tapa (12a) y gire en sentido horario. Cierre
cuidadosamente el surtidor para beber.
NOTA: El accesorio Smoothie2Go no debe usarse
para batir comidas calientes o líquidos carbonatados.
Instrucciones de funcionamiento
NOTA:
La batidora solo funcionará cuando el botón On/Off
se haya pulsado antes de seleccionar la velocidad
o modo deseado.
Si el aparato se enciende y no se selecciona ninguna
velocidad o modo, se apagará automáticamente
tras 5 minutos. Para encender de nuevo el aparato,
pulse el botón On/Off.
Selección de velocidad
• Comience a batir pulsando uno de los botones de
velocidad (9).
• La luz indicadora de la función deseada se
iluminará y todas las otras luces se apagarán.
• Cambie la velocidad de funcionamiento pulsando
un botón de velocidad más alta o baja.
• Para dejar de batir, pulse el botón de la velocidad
seleccionada de nuevo.
• Cuando haya acabado, pulse el botón On/Off (7)
para apagar el aparato. Desenchufe la batidora.
Modo Pulsación (tipo 4142 + 4143)
El modo pulsación puede usarse para romper piezas
más grandes de alimentos o para controlar la textura
de la comida cuando se corte. Puede activarse a
cualquier velocidad.
• Pulse el botón Pulse (8).
• La luz indicadora se iluminará y las luces
indicadoras de cada programa de velocidad
parpadearán para indicar que todas las
velocidades están en modo pulso.
• Comience a pulsar pulsando uno de los botones
de velocidad (9). Mantenga pulsado el botón de
velocidad seleccionado durante el tiempo que
debe funcionar el modo de pulsación. Usted
determina la velocidad de cada pulsación.
• Para finalizar el modo de pulsación, pulse el botón
Pulse de nuevo.
• Cuando haya acabado, pulse el botón On/Off (7)
para apagar el aparato. Desenchufe la batidora.
Modo Pulsación (tipo 4144)
• Pulse y suelte el botón de pulsación (8) para
obtener breves aumentos de potencia. Usted
determina la duración de cada pulsación. Repita
si es necesario.
• Cuando haya acabado, pulse el botón On/Off (7)
para apagar el aparato. Desenchufe la batidora.
NOTA: El modo de pulsación no funcionará con la
función de trituración de hielo.
Modo de trituración de hielo
Cuando lo seleccione, la batidora funcionará
automáticamente a intervalos escalonados (30
segundos) a una velocidad prestablecida.
• Pulse el botón de trituración de hielo (10) para
comenzar.
• La luz indicadora se iluminará.
• La batidora realizará un ciclo durante un tiempo
pre programado y se detendrá automáticamente
cuando termine.
• Para detener el programa antes, pulse de nuevo
el botón de trituración de hielo.
• Cuando haya acabado, pulse el botón On/Off (7)
para apagar el aparato. Desenchufe la batidora.
Para obtener los mejores resultados
• Para mezclar ingredientes sólidos, córtelos en
trozos pequeños (1 inch).
• Empiece siempre a mezclar ingredientes sólidos
con una pequeña cantidad de líquido. Luego
añada gradualmente más líquido.
• A la hora de hacer purés con ingredientes sólidos,
añada gradualmente pequeñas porciones a la
jarra (4/4a) en lugar de grandes cantidades de
una vez.
2231046IBR_JB7192-7172-7130-7000_USCA_S6-24.indd 212231046IBR_JB7192-7172-7130-7000_USCA_S6-24.indd 21 04.11.15 15:2804.11.15 15:28
Page 22

22
• Si la acción de batir se detiene durante el proceso
o los ingredientes se adhieren a los lados de la
jarra, puede que no haya suficiente líquido para
batir de forma eficiente.
• Utilice el modo pulsación para mezclar
ingredientes sólidos o muy viscosos para evitar
que la cuchilla se quede atascada.
• Para la preparación de pequeñas cantidades de
comida, utilice un nivel de velocidad bajo.
• Al preparar mayonesa, puede añadirse el aceite a
través del orificio de goteo del vaso medidor.
• No guarde alimentos o líquidos en la jarra.
• Evite golpear o dejar caer la batidora en
funcionamiento.
• Recomendamos que mantenga su mano en la
parte superior de la jarra cuando la batidora esté
en funcionamiento.
• No llene la jarra más de 32 fl. oz. / 4 tazas cuando
prepare bebidas con base de leche.
Batir ingredientes calientes
Al batir ingredientes muy calientes es posible que el
líquido o el vapor caliente salga a la fuerza por la
tapa o el tapón de medición y puede causar graves
daños a su persona.
• Cuando prepare comidas o líquidos calientes,
toda la tapa (incluyendo la junta y el tapón de
medición) deben colocarse en la jarra.
• No llene la jarra más de 24 fl. oz. / 3 tazas de
alimentos/líquidos calientes.
• Si desea preparar mayores cantidades, los
ingredientes deben enfriarse a temperatura
ambiente y la jarra no debe llenarse más de
48 fl. oz. / 6 tazas.
Cuidado y limpieza (C)
Cuerpo del motor
Desconecte de la corriente eléctrica antes de
limpiarlo.
No sumerja el cuerpo del motor en agua o en
cualquier otro líquido. Limpie el cuerpo del motor,
el panel de control y el cable con un paño húmedo
o seco.
No utilice limpiadores abrasivos o estropajos.
Jarra y accesorio Smoothie2Go
Asegúrese de que la jarra está vacía antes de
desenroscar el anillo de sujeción. Manipule la
cuchilla con cuidado.
• Todas las partes extraíbles, incluyendo el
accesorio Smoothie2Go pueden lavarse en el
lavavajillas. No use el programa de desinfección.
El ciclo de desinfección podría dañar el producto.
• Las partes pueden lavarse también con agua
caliente y jabonosa. Enjuague y seque
completamente.
• Para una limpieza eficiente de las tapas y las
cuchillas, quite las juntas (3/12b, 5a/13a).
Las especificaciones de diseño y estas instrucciones
del usuario están sujetas a cambio sin aviso previo.
Una vez agotada la vida útil del producto, no lo
deseche en la basura doméstica.
Guía de resolución de problemas
Problema Causas potenciales Solución
La batidora no funciona.
No hay corriente. Compruebe que la batidora está
enchufada. Compruebe los fusibles/
interruptores de su casa. Si nada de lo
anterior funciona, contacte con el
Servicio de atención al cliente de Braun.
La jarra no está colocada
correctamente.
Compruebe la posición de la jarra. El asa
de la jarra debería estar a la derecha o a
la izquierda del cuerpo del motor.
La jarra tiene una fuga. La junta está suelta o incluso
rota.
Compruebe si la junta está montada
correctamente y en el orden correcto.
Salpica líquido de la jarra.
La jarra está demasiado llena. Consulte la recomendación de cantidad
máxima.
La velocidad seleccionada es
demasiado alta.
Consulte la recomendación de
velocidad.
2231046IBR_JB7192-7172-7130-7000_USCA_S6-24.indd 222231046IBR_JB7192-7172-7130-7000_USCA_S6-24.indd 22 04.11.15 15:2804.11.15 15:28
Page 23

23
RECETAS PARA LA JARRA
SALSA DE MANGO
Ingredientes:
• 2 Mangos semi maduros, sin semillas, en trozos y
sin pelar
• 1 taza y media de cilantro fresco
• Media cebolla roja, pelada (cortada en trozos de
2,5 cm)
• 1 jalapeño, cortado por la mitad y sin semillas
• 1 cucharadita de zumo de lima o limón
Coloque todos los ingredientes en la batidora, en
el orden indicado y cierre la tapa. Bata durante
15 segundos a la velocidad 3 «mix» (a la velocidad
1 «stir» para el tipo 4144), realice una breve parada y
bata durante otros 10 segundos usando la misma
velocidad).
COMIDA PARA BEBÉS
Ingredientes:
• 2 tazas (o 7 oz) de patatas
• 2 tazas (o 7 oz) de zanahorias
• 1 taza (o 3,5 oz) de ternera cocinada
• 1 taza y media (12 fl. oz) de agua
Todos los ingredientes deben estar cocinados,
pelados y cortados en trozos de 1 inch.
Coloque todos los ingredientes en la batidora, en el
orden indicado y cierre la tapa. Bata durante 30 a
60 segundos a la velocidad 3 «mix» (o a la velocidad
1 «stir» para el tipo 4144).
SMOOTHIE DE MANGO, PIÑA Y FRUTA
DE LA PASIÓN
1 ración (1 vaso y un cuarto o 10 fl. oz)
Ingredientes:
• Media taza (5 fl. oz.) de zumo de naranja recién
exprimido
• 3 oz de mango maduro (cortado en trozos de
1 inch)
• 2,5 oz de piña (cortada en trozos de 1 inch)
• Media fruta de la pasión
• De 1 a 3 albaricoques secos (cortados en trozos
de ½ inch)
Coloque todos los ingredientes en la batidora, en
el orden indicado y cierre la tapa. Bata durante
40 a 60 segundos a la velocidad 4 «puree» (o a la
velocidad 2 «liquify» para el tipo 4144).
MARGARITA
Ingredientes:
• ¾ de taza (o 6 fl. oz.) de agua
• ½ taza (o 4 fl. oz.) de sirope de naranja
• ½ taza (o 4 fl. oz.) de zumo de lima
• ¼ de taza de azúcar
• 10 cubitos de hielo
Coloque todos los ingredientes en la batidora, en
el orden indicado y cierre la tapa. Bata usando el
programa «triturar hielo».
GUACAMOLE
Ingredientes:
• ¼ de taza de yogur
• ¼ de taza de aceite de girasol
• ¼ de taza de zumo de limón
• ¼ de cebollas peladas y cortadas
• 1 cucharadita de sal
• 2 aguacates maduros, pelados, sin semilla,
cortados en trozos de 1 inch
• 1 taza de hojas de cilantro fresco
• 1 tomate mediano, en cuartos
Coloque todos los ingredientes (excepto el tomate)
en la batidora, en el orden indicado y cierre la tapa.
Bata durante 10 a 15 segundos a la velocidad
1 «stir». Apague la batidora. Añada el tomate,
mezclándolo con una cuchara o espátula. Bata con
pulsación de 1 a 3 veces a la velocidad 5 «liquify»
(velocidad 2 «liquify» en el tipo 4144).
RECETAS PARA EL ACCESORIO
SMOOTHIE2GO
SMOOTHIE ENERGÉTICO
Ingredientes:
• 2 manojos de brotes verdes de primavera
• 1 plátano
• 1 taza de uvas rojas
• 1 pera sin semillas
• ⅛ taza de nueces
• ½ taza (o 4 fl. oz.) de agua
Coloque todos los ingredientes en el vaso, en el
orden indicado. Bata a la velocidad 5 «liquify»
(máxima velocidad) durante 40 segundos.
BATIDO DE PROTEÍNAS
Ingredientes:
• 8 fl. oz. de leche desnatada
• 1 plátano (cortado en trozos de 1 inch)
• ½ taza de copos de avena
• 2 cucharadas de polvo de proteínas
• ⅛ taza de almendras
Coloque todos los ingredientes en el vaso, en el
orden indicado. Bata a la velocidad 5 «liquify»
(máxima velocidad) durante 60 segundos.
2231046IBR_JB7192-7172-7130-7000_USCA_S6-24.indd 232231046IBR_JB7192-7172-7130-7000_USCA_S6-24.indd 23 04.11.15 15:2804.11.15 15:28
Page 24

2231046IBR_JB7192-7172-7130-7000_USCA_S6-24.indd 242231046IBR_JB7192-7172-7130-7000_USCA_S6-24.indd 24 04.11.15 15:2804.11.15 15:28
 Loading...