

Braun BLACK300 Instruction Manual
1
Scouting Cam
BLACK300
Instruction Manual
BRAUN PHOTO TECHNIK GmbH
Klingenhofstraße 72
90411 Nürnberg
www.braun-phototechnik.de

2
Inhalt
1. Caution ............................................................................................................... 3
2. Instructions ........................................................................................................ 4
2.1 Camera Body Interface ................................................................................. 4
2.2 Camera components and features ................................................................ 4
2.3 Remote Control ............................................................................................. 5
2.3.1 Navigating .............................................................................................. 5
2.3.2 Laster Pointer ......................................................................................... 5
2.4 Shooting Information Display ........................................................................ 5
2.5 Supported Format ......................................................................................... 6
3. Easy Operation .................................................................................................. 6
3.1 Power Supply ................................................................................................ 6
3.2 Insert the SD-card ......................................................................................... 7
3.3 Power on and Enter into the ON Mode .......................................................... 7
3.4 Enter into the TEST Mode ............................................................................. 7
3.4.1 Custom Settings ..................................................................................... 7
3.4.2 Manual Capturing ................................................................................... 7
3.4.3 View Images or Videos ........................................................................... 7
3.5 Power Off ...................................................................................................... 8
4. Advanced Operations ........................................................................................ 8
4.1 Settings Menu ............................................................................................... 8
4.1.1 Photo Setting ......................................................................................... 8
4.1.2 Video Setting .......................................................................................... 9
4.1.3 System Setting ....................................................................................... 9
4.1.4 Default ................................................................................................. 10
4.1.5 General Settings .................................................................................. 10
4.1.6 Set Camera Mode ................................................................................ 10
4.1.7 Format SD-Card ................................................................................... 10
4.1.8 Set Photo Size ...................................................................................... 11
4.1.9 Set Video Size ...................................................................................... 11
4.1.10 Set Date and Time ................................................................................ 11
4.1.11 Set Multi ............................................................................................... 12
4.1.12 Set ISO ................................................................................................ 12
4.1.13 Set Video Length.................................................................................. 12
4.1.14 Set Video Sound .................................................................................. 12
4.1.15 Set Delay ............................................................................................. 12
4.1.16 Set Timer ............................................................................................. 13
4.1.17 Enter Password .................................................................................... 13
4.2 Playback ..................................................................................................... 13
4.2.1 Viewing Photo or Video ........................................................................ 13
4.2.2 Delete Photo or Video .......................................................................... 14
4.3 Laser Pointer .............................................................................................. 14
4.4 File Numbering ........................................................................................... 14

3
4.5 Firmware Upgrade ...................................................................................... 14
Appendix: Technical Specifications .................................................................... 15
1. Caution
1) Do not drop, knock or shake the camera.
2) The working voltage of the camera is 6.0V. The camera is supplied by eight
AA batteries.
3) Remove batteries from camera if camera is not be used for some time.
4) Only use a power supply (not supplied) with the rated input voltage (6V, min.
500mA) specified on the rating plate, as otherwise danger of fire and
electrocution.
5) Please unlock the write-protect before inserting the SD-card.
6) Please insert the SD-card when the power switch is at OFF position before
testing the camera.
7) Please do not insert or take out the SD-card when the power switch is at ON
position.
8) It is recommended to format the SD-card by the camera when used at the first
time.
9) The camera will be in USB mode when connected to an USB port of a
computer. In this case, the SD-card functions as a removable disk.
10) Please ensure sufficient power when having firmware upgrade, otherwise the
upgrade process could be interrupted incorrectly. If any fault occurs after
improper upgrading process, the camera may stop function properly.
11) Damage to the electronics, housing and display caused by external
influences, such as heavy jerks, electric shocks, having fallen or others aren’t
covered by the warranty.
12) Don’t dismantle or repair the camera. If repair is required, ask an expert or
technical service centre.
13) Keep the camera out of reach of children.
Attention! Legal and privacy protection
Please inform yourself carefully about the legal regulations in your
country concerning to data protection, personal identification,
copyright, duty of notification and privacy laws before using this device.
The Braun Photo Technik GmbH assumes no liability for violations
against the Federal Data Protection Act and other legal regulations!
Privacy of individuals must be preserved. Prepare your camera only at places
where this is guaranteed.
Recordings with people have to be deleted, if there is no agreement for
publishing.
The area of recording has to be displayed clearly to all public entry points.
4
2. Instructions
Thank you for purchasing BRAUN Scouting Cam BLACK300. This camera is a
surveillance camera working automatically. It can be triggered at once by any
movement of human (or animals) in a certain region of interested (ROI) monitored by
a high sensitive Passive Infrared (PIR) motion sensor, and then automatically
captures high quality pictures (up to 12MP) or records 1080p HD video clips (WVGA
or QVGA).
At sunrise the unit begins to take color photos and video until there is insufficient light
(dusk) when it begins to take infrared (monochrome) photos and video.
It is easy to use, there is a 2.0 inch colorful LCD display on camera. It is resistant
against water and snow for outside uses.
2.1 Camera Body Interface
The camera has the following I/O interfaces: USB connector, SD-card slot, TV output
and external DC power connector.
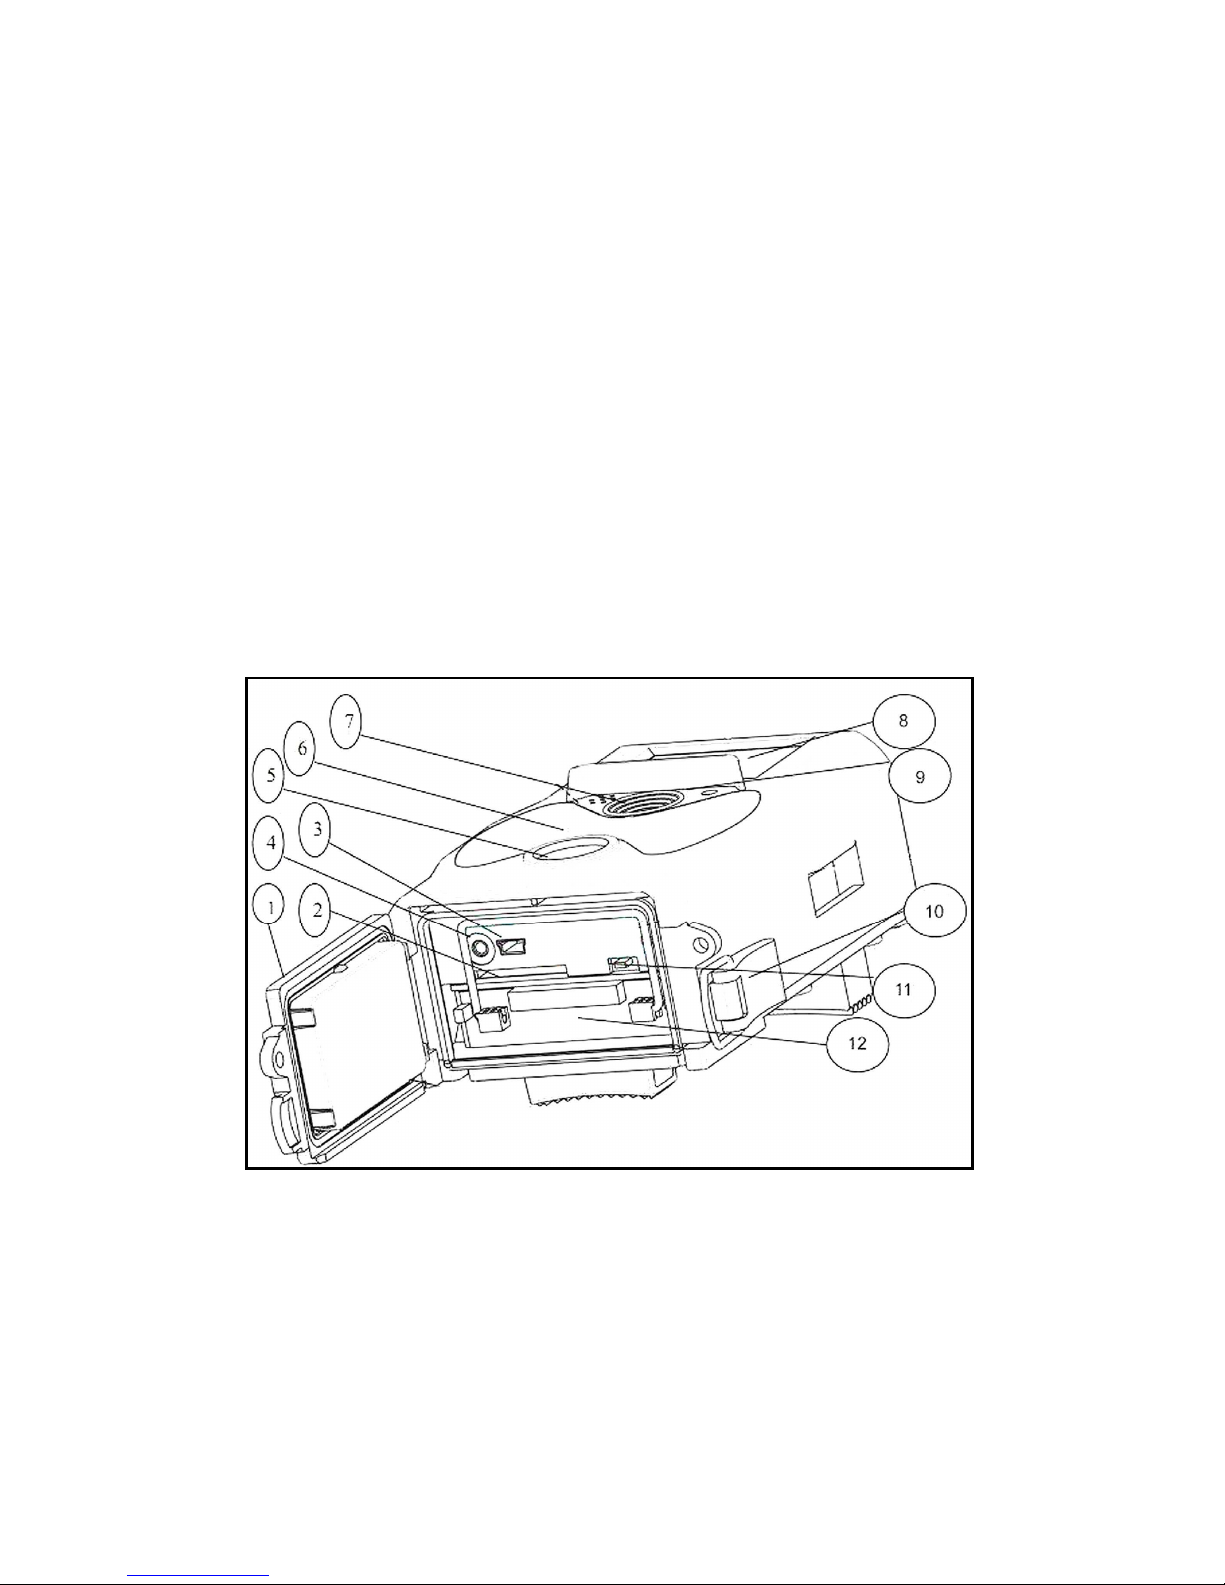
2.2 Camera components and features
1) Bottom Cover
2) SD-Card Slot: Memory card must be inserted to store photos or videos.
3) Mini USB connection (USB 2.0): For connecting the camera to a computer to
download photos and videos.
4) TV output (TV Out): The camera can be connected to the AV input of your TV
using the supplied AV cable in order to show the monitor image. (External power
supply can be connected via the DC IN socket (6V, min. 500 mA, not supplied))
5) PIR (Passive Infrared Sensor)
6) Infrared LED Flash
5
7) Lens
8) 2 inch color LCD Display
9) Sound recorder
10) Lock
11) Power switch (ON, TEST, OFF)
12) Battery Depot
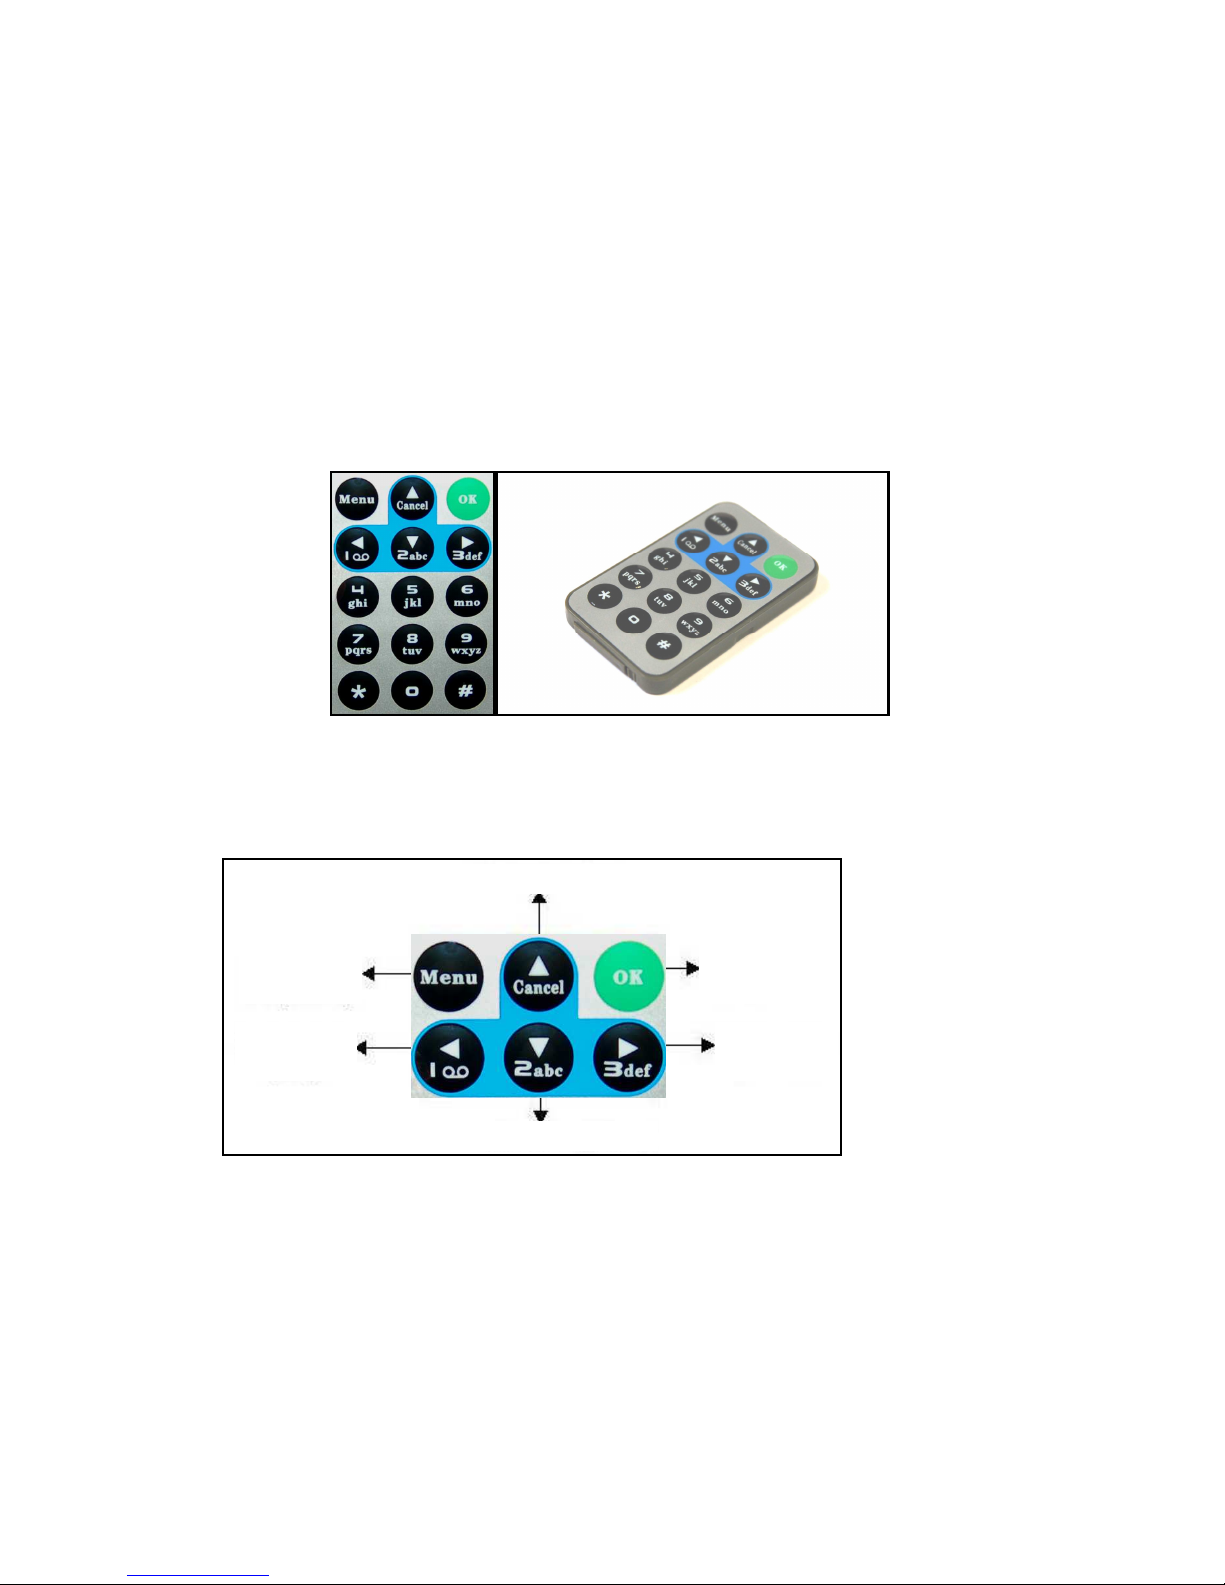
2.3 Remote Control
The remote control is an input device of the camera and is primarily used for
customer settings and password input. This is an infrared type wireless remote
control. The maximum remote distance is 9 meters.
2.3.1 Navigating
Press UP or DOWN to select or highlight the menu item, while press LEFT or RIGHT
to select the option of each item and press OK to make selection.
2.3.2 Laster Pointer
Press the punctuation “*” for laser pointer.
2.4 Shooting Information Display
When the camera is turned on (the power switch is slid to TEST position), the
shooting information will be displayed in the monitor.
Select Item(UP)
Display Menu
Exit(MENU)
Select Option
(Left)
Selection
(OK)
Select Option
(RIGHT)
Select Item(DOWN)
 Loading...