

Page 1
Series 7
Ty
6
91159396/VIII-16
7899cc
7898cc
Type 5696
pe 569
www.braun.com
7897cc
wet & dry
Page 2
Braun Infolines
English 6
Français 14
Polski 23
Česk 32
Slovensk 40
Magyar 48
Hrvatski 56
Slovenski 64
Türkçe 72
Română (RO/MD) 82
Български 90
Русский 99
Українська 109
129
Braun GmbH
Frankfurter Straße 145
61476 Kronberg/Germany
www.braun.com
UK 0800 783 7010
IE 1 800 509 448
FR 0 800 944 802
(service & appel gratuits)
BE 0 800 14 592
PL 801 127 286
801 1 BRAUN
CZ 800 11 33 22
SK 800 333 233
HU (06-1) 451-1256
HR 091 66 01 777
SI 080 2822
TR 0 800 261 63 65
RO 021.224.30.35
RU 8 800 200 20 20
UA 0 800 505 000
HK 2926 2300
(Jebsen Consumer Service Centre)
ZA 0860 112 188
(Sharecall charged at local rates)
www.service.braun.com
UK/FR/PL/CZ/SK/HU/HR/SI/TR/
RO/MD/BG/RU/UA/Arab
Page 3
tri
mm
er
t
r
i
m
m
e
r
t
r
i
mmer
Ser
ies
7
S
e
r
ie
s
7
Se
rie
s
7
34
Series 7
Series 7
Series 7
8
9
10
5
11
12
13
trimmer
trimmer
trimmer
trimmer
trimmer
trimmer
n
o
on
off
off
wet & dry
2
1
6
14
7
15
16
16a 16b 16c 16d
20
h
y
y
g
r
i
e
e
t
t
n
a
e
b
17
h
y
y
g
r
i
e
e
t
t
n
a
e
b
19
y
r
d
&
et
18
w
3
Page 4
1
t
rimmer
2
n
a
f
e
l
a
c
s
t
n
a
e
f
l
a
c
t
s
t
r
i
m
m
er
Se
r
ies 7
n
a
f
e
l
a
c
s
t
n
a
e
f
l
a
c
t
s
n
a
e
f
l
a
c
t
s
4
Page 5
tr
immer
re
le
a
s
e
ri
m
tr
S
eries 7
2
1
+
trimmer
lock
lock
lock
re
l
e
a
se
lock
90°
trimme
r
Series
re
l
e
a
s
e
mer
Series
re
le
a
s
e
mer
S
e
Series 7
rie
s
Series 7
Series
r
e
le
a
s
e
5
mer
Series 7
S
eri
Se
ries 7
es
7
re
le
a
s
e
Series 7
r
e
le
a
s
e
Page 6
English
Our products are designed to meet the highest standards of quality, functionality and
design. We hope you enjoy your new Braun Shaver.
Read these instructions completely, they contain safety information.
Keep them for future reference.
Warning
Your shaving system is provided with a special cord set, which has an
integrated Safety Extra Low Voltage power supply. Do not exchange
or tamper with any part of it, otherwise there is risk of an electric
shock. Only use the special cord set provided with your appliance.
If the appliance is marked 492, you can use it with any
Braun power supply coded 492-XXXX.
Do not shave with a damaged foil or cord.
This appliance is suitable for cleaning under running water
and use in a bath or shower. For safety reasons it can only
be operated cordless.
This appliance can be used by children aged from 8 years and above
and persons with reduced physical, sensory or mental capabilities
or lack of experience and knowledge if they have been given supervision or instruction concerning the safe use of the appliance and
understand the hazards involved. Children shall not play with the
appliance. Cleaning and user maintenance shall not be made by
children unless they are older than 8 years and supervised.
To prevent the cleaning fluid from leaking, ensure that the
Clean&Renew station is placed on a flat surface. When a cleaning
cartridge is installed, do not tip, move suddenly or transport the
station in any way as cleaning fluid might spill out of the cartridge.
Do not place the station inside a mirror cabinet, nor over a radiator,
nor place it on a polished or lacquered surface.
The cleaning cartridge contains a highly flammable liquid so keep
it away from sources of ignition. Do not smoke near the station.
Do not expose to direct sunlight for long periods of time.
Do not refill the cartridge and use only original Braun refill cartridges.
6
Page 7
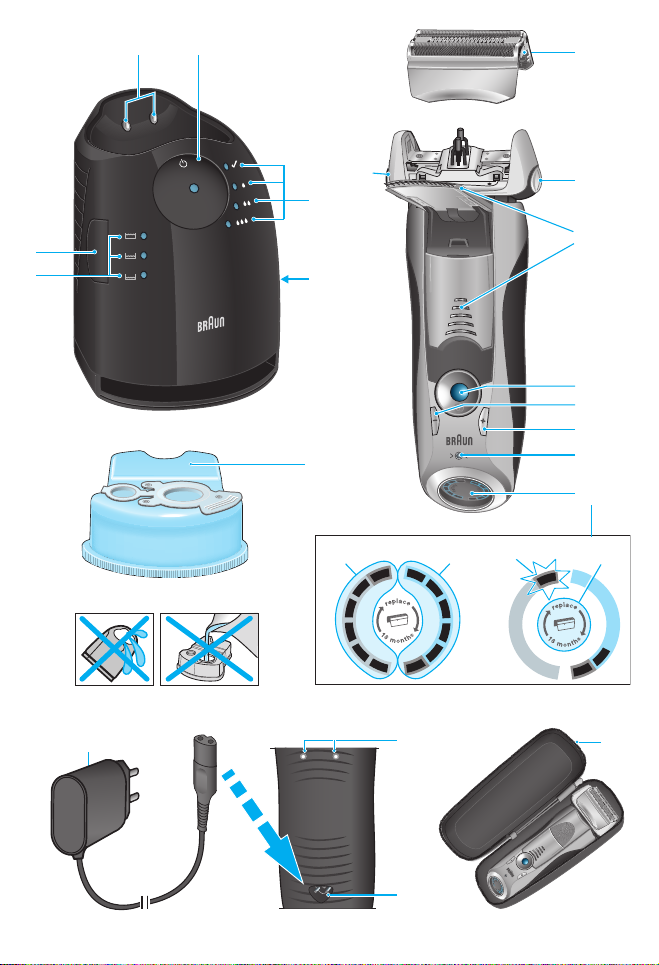
Description
Clean&Renew station
1 Cleaning fluid display
2 Lift button for cartridge exchange
3 Station-to-shaver contacts
4 Start button
5 Cleaning program indicators
6 Station power socket
7 Cleaning cartridge
Shaver
8 Foil & Cutter cassette
9 Cassette release button
10 Shaver head lock switch
11 Pop-out long hair trimmer
12 On/off switch
13 – setting button (sensitive)
14 + setting button (intensive)
15 Reset button
16 Shaver display
16a Battery segments
16b Hygiene segments
16c Low charge indicator
16d Replacement symbol
17 Shaver-to-station contacts
18 Shaver power socket
19 Travel case
20 Special cord set (design can differ)
Before shaving
Prior to first use you must connect the shaver to an electrical outlet using the special
cord set (20) or alternatively proceed as below.
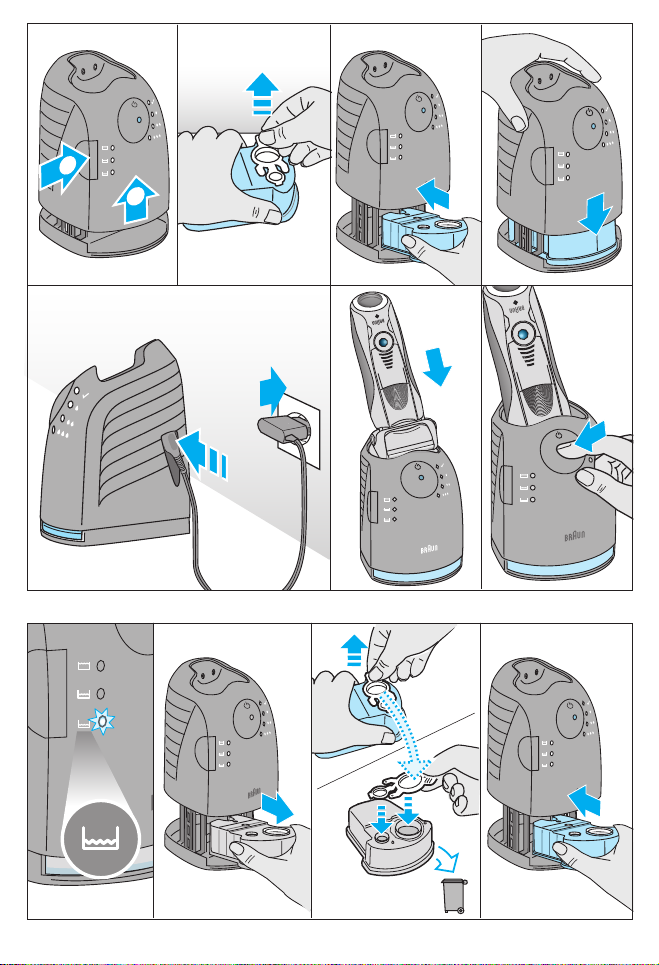
Installing the Clean&Renew station
• Press the lift button (2) to open the housing.
• Hold the cleaning cartridge (7) down on a flat, stable surface (e.g. table).
• Carefully remove the lid from the cartridge.
• Slide the cartridge into the base of the station as far as it will go.
• Slowly close the housing by pushing it down until it locks.
• Using the special cord set (20), connect the station power socket (6) to an electrical
outlet.
The cleaning fluid display (1) will show how much fluid is in the cartridge:
up to 30 cleaning cycles available
up to 7 cleaning cycles remaining
new cartridge required
Charging and cleaning the shaver
Insert the shaver head with the front showing and released head lock (10) into the
Clean&Renew. The contacts (17) on the back of the shaver will align with the contacts (3)
in the cleaning station. Important: The shaver needs to be dry and free from any
foam or soap residue!
If required, the Clean&Renew station will automatically charge the shaver. The hygiene
status of the shaver will also be analyzed and one of the following cleaning program
indicators (5) will light up:
7
Page 8
shaver is clean
short economical cleaning required
normal level of cleaning required
high intensive cleaning required
If the station selects one of the required cleaning programs, it will not start unless you
press the start button (4). For best shaving results, we recommend cleaning after
each shave.
Each cleaning program consists of several cycles, where cleaning fluid is flushed
through the shaver head. Depending on your Clean&Renew Station model and/or
program selected, the cleaning time takes up to 16 minutes. Leave the shaver in the
station for drying. It takes several hours until remaining moisture evaporates depending
on the climatic conditions.
When the program is finished, the blue
Stand-by mode
10 minutes after completing the charging or cleaning session, the Clean&Renew station
switches to the stand-by mode: The indicators of the Clean&Renew station turn off.
indicator will light up.
Shaver display
The shaver display (16) shows the charge status of the battery on the left, and the
hygiene status on the right. 6 dark segments are shown on each side when the battery
is fully charged and the shaver is hygienically clean.
Battery segments
During charging or when using the shaver, the respective battery segment (16a) will
blink. When fully charged all 6 segments are shown. With decreasing charge the
segments gradually disappear.
Low charge indicator
The low charge indicator (16c) provided with a red frame blinks to indicate that the
battery is running low. The remaining battery capacity is sufficient for 2 to 3 shaves.
Hygiene segments
All 6 hygiene segments (16b) will appear after the shaver has been cleaned in the
Clean&Renew station. When the shaver is being used, the hygiene segments will
gradually disappear. Once the shaver is returned to the station, the system will
automatically select the appropriate cleaning program and restore the segments to
maximum hygiene. Given that rinsing the shaver under tap water is not as hygienic as
the cleaning station, the hygiene segments will only restore themselves when the
shaver has been cleaned in the Clean&Renew station.
Charging information
• A full charge will take about 1 hour and provides up to 50 minutes of cordless shaving
time. This may vary according to your beard growth and environmental temperature.
5-minute quick charge is sufficient for a shave.
8
Page 9

• Recommended ambient temperature for charging is 5 °C to 35 °C. The battery may
not charge properly or at all under extreme low or high temperatures. Recommended
ambient temperature for shaving is 15 °C to 35 °C. Do not expose the shaver to
temperatures higher than 50 °C for extended periods of time.
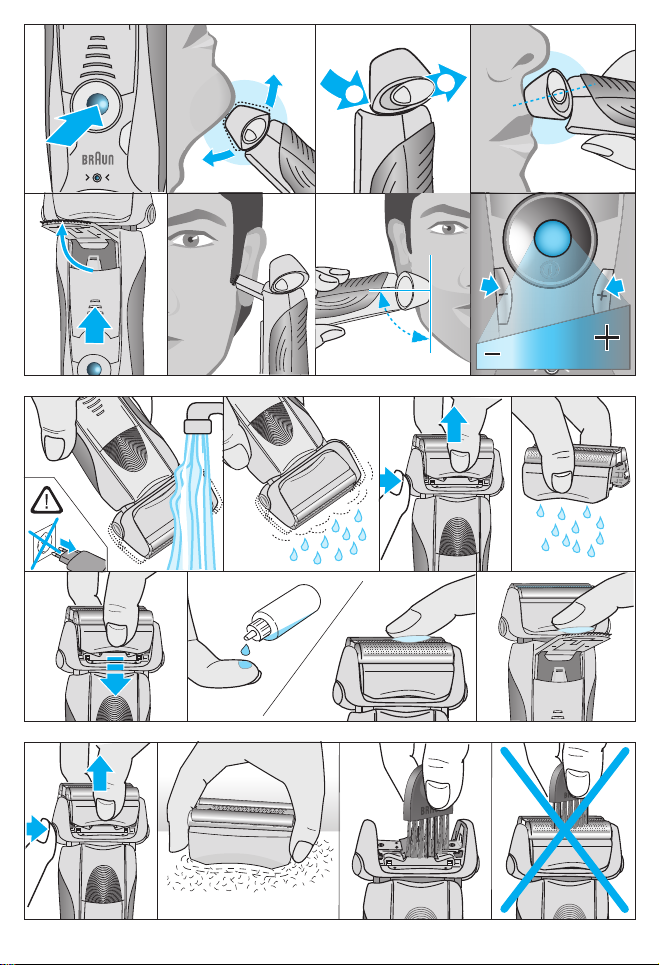
Using the shaver
How to use
Press the on/off switch (12) to operate the shaver:
• The pivoting shaver head and floating foils automatically adjust to every contour of
your face.
• To shave hard to reach areas (e.g. under the nose), first slide the shaver head to the
back position, afterwards move the head lock switch to the back. The pivoting head is
locked at this angle.
• To trim sideburns, moustache or beard, slide the pop-out long hair trimmer (11)
upwards.
Tips for the perfect dry shave
For best shaving results, Braun recommends you follow 3 simple steps:
1. Always shave before washing your face.
2. At all times, hold the shaver at right angles (90°) to your skin.
3. Stretch your skin and shave against the direction of your beard growth.
Personalizing your shaver
By holding down the accelerator button –/+ (13) or (14) you can adjust the shaving
power to your individual needs in the different areas of your face from sensitive to
intensive. The pilot light in the on/off switch ( 12 ) changes within the following range:
(–) sensitive shave
- light blue
- dark blue
- green
(+) intensive shave
For a thorough and fast shave we recommend the green (intensive) setting.
When switching on next time, the last used setting will be activated.
Cleaning
Automatic cleaning
After each shave, return the shaver to the Clean&Renew station and proceed as
described above in the section «Before shaving». All charging and cleaning needs are
then automatically taken care of. With daily use, a cleaning cartridge should be
sufficient for about 30 cleaning cycles.
The hygienic cleaning cartridge contains ethanol or isopropanol (specification see
cartridge), which once opened will naturally evaporate slowly. Each cartridge, if not
used daily, should be replaced after approximately 8 weeks to ensure optimal
disinfection.
9
Page 10

The cleaning cartridge also contains lubricants, which may leave residual marks on the
outer foil frame after cleaning. However, these marks can be removed easily by wiping
gently with a cloth or soft tissue paper.
Manual cleaning
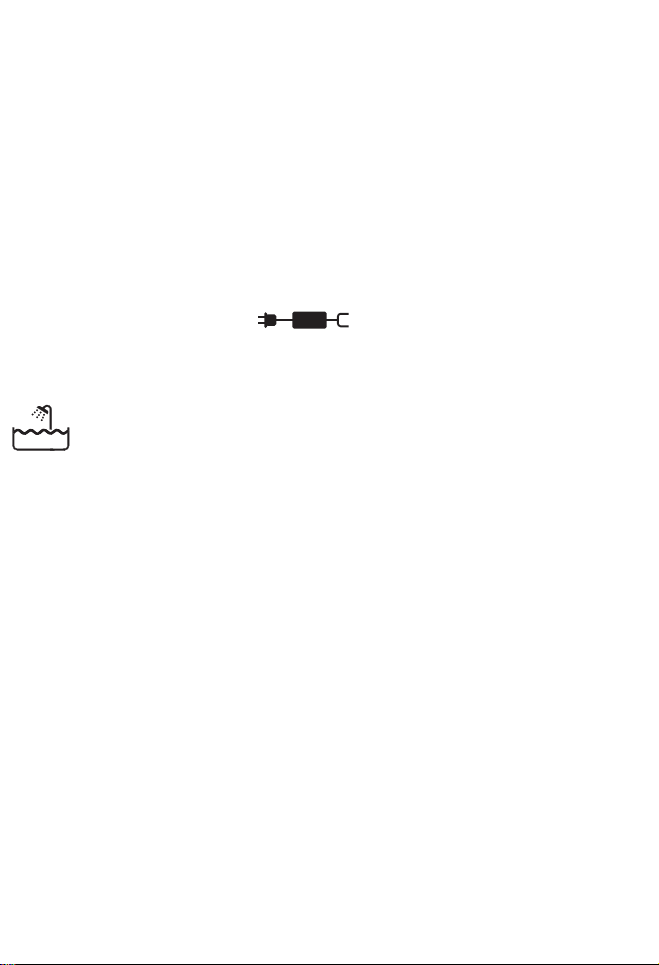
Cleaning under running water:
• Switch the shaver on (cordless) and rinse the shaver head under hot running
water until all residues have been removed. You may use liquid soap without
abrasive substances. Rinse off all foam and let the shaver run for a few more
seconds.
• Next, switch off the shaver, press the release button (9) to remove the Foil & Cutter
cassette (8) and let it dry.
• If you regularly clean the shaver under water, then once a week apply a drop of light
machine oil (not included) on top of the Foil & Cutter cassette and the long hair
trimmer.
The shaver should be cleaned after each foam usage.
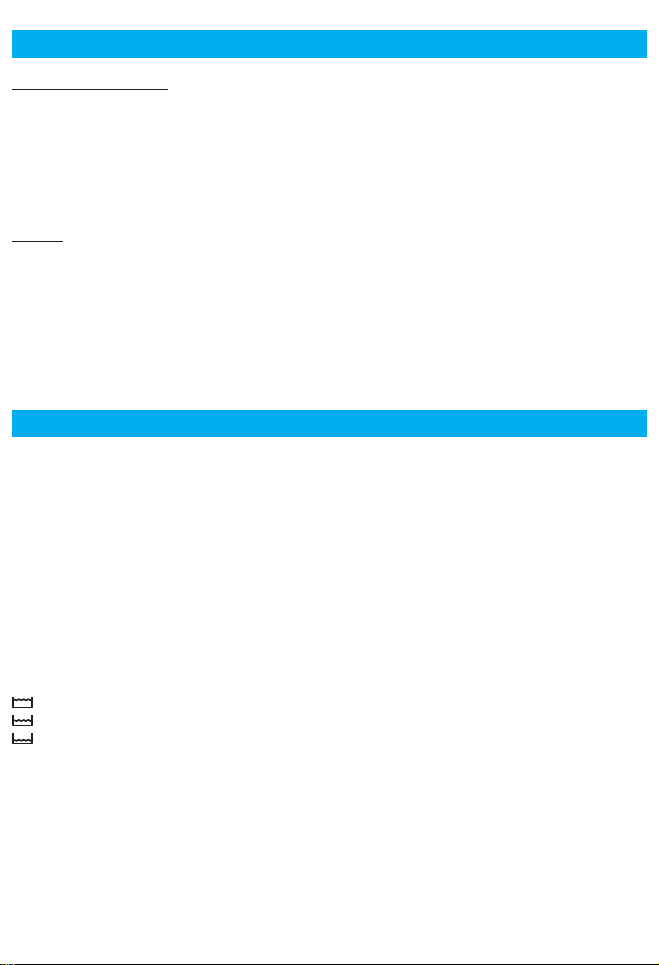
Cleaning with a brush:
• Switch off the shaver. Remove the Foil & Cutter cassette (8) and tap it out on a flat
surface. Using a brush, clean the inner area of the pivoting head. However, do not
clean the cassette with the brush as this may damage it.
Cleaning the housing
From time to time clean the housing of the shaver and the Clean&Renew station with
a damp cloth, especially inside the cleaning chamber where the shaver rests.
Replacing the cleaning cartridge
After having pressed the lift button (2) to open the housing, wait for a few seconds
before removing the used cartridge to avoid any dripping. Before discarding the used
cartridge, make sure to close the openings using the lid of the new cartridge, since the
used cartridge will contain contaminated cleaning solution.
Keeping your shaver in top shape
Replacing the Foil & Cutter cassette / reset
To maintain 100% shaving performance, replace the Foil & Cutter cassette (8), when
the replace ment symbol (16d) lights up on the shaver display (after about 18 months)
or when cassette is worn. The replacement symbol will remind you during the next 7
shaves to replace the Foil & Cutter cassette. Then the shaver will automatically reset the
display.
After you have replaced the Foil & Cutter cassette, use a ball-pen to push the reset
button (15) for at least 3 seconds to reset the counter. While doing so, the replacement
light blinks and goes off when the reset is complete. The manual reset can be done at
any time.
10
Page 11
Accessories
Available at your dealer or Braun Service Centres:
• Foil & Cutter cassette 70S/70B
• Cleaning cartridge Clean&Renew CCR
Environmental notice
Product contains batteries and/or recyclable electric waste. For environment
protection do not dispose of in household waste, but for recycling take to electric
waste collection points provided in your country.
The cleaning cartridge can be disposed of with regular household waste.
Subject to change without notice.
For electric specifications, see printing on the special cord set.
Trouble-Shooting
Problem: Possible reason: Remedy:
SHAVER
Unpleasant
smell from the
shaver head.
Battery
performance
dropped
significantly.
1. Shaver head is cleaned
with water.
2. Cleaning cartridge is in use
for more than
8 weeks.
1. Foil and cutter are worn
which requires more power
for each shave.
2.
Shaver head is regularly
cleaned with
lubricated.
water but not
1. When cleaning the shaver head with
water only use hot water and from
time to time some liquid soap
(without abrasive substances).
Remove Foil & Cutter cassette to let
it dry.
2. Change cleaning cartridge at least
every 8 weeks.
1. Renew Foil & Cutter cassette.
2. If the shaver is regularly cleaned
with water, apply a drop of light
machine oil on top of the foil once a
week for lubrication.
11
Page 12

Shaving
performance
dropped
significantly.
Shaver turns
off with fully
charged battery.
Battery
segments in the
display are
skipped with
decreasing
battery capacity.
Shaving parts
have been
changed recently
but replacement
symbol lights up.
Shaver head is
damp.
1. Foil and cutter are worn.
2. Personal setting of shaving
performance has been
changed.
3. Shaving system is clogged.
Foil and cutter are worn
which requires more power
than the motor can deliver.
The appliance turns off.
Foil and cutter are worn
which requires more power
for each shave.
Reset button has not been
pushed.
1. Drying time after automatic
cleaning was too short.
2. Drain of the Clean&Renew
station is clogged.
3. Cleaning cartridge has
been used for quite a while.
1. Renew Foil & Cutter cassette.
2. For a thorough and fast shave we
recommend the green (intensive)
setting.
3. Soak the Foil & Cutter cassette into
hot water with a drop of dish liquid.
Afterwards rinse it properly and tap
it out. Once dry apply a drop of light
machine oil on the foil.
– Renew Foil & Cutter cassette.
– Regularly oil the shaving system,
especially when cleaning with water
only.
– Renew Foil & Cutter cassette.
– Regularly oil the shaving system,
especially when cleaning with water
only.
– Push the reset button for at least 3
seconds to reset the counter.
1. Clean directly after shaving to allow
enough time for drying.
2. Clean the drain with a wooden
toothpick. Regularly wipe the tub
clean.
3. The ethanol/isopropanol proportion
has decreased while the oil
proportion has increased. Remove
residue with a cloth.
12
Page 13

CLEAN&RENEW STATION
Cleaning does
not start when
pressing the
start button.
Increased
consumption of
cleaning fluid.
Guarantee
We grant a 2 year guarantee on the product commencing on the date of purchase.
Within the guarantee period we will eliminate any defects in the appliance resulting from
faults in materials or workmanship, free of charge either by repairing or replacing the
complete appliance at our discretion.
This guarantee extends to every country where this appliance is supplied by Braun or its
appointed distributor.
This guarantee does not cover: damage due to improper use, normal wear and tear (e.g.
shaver foil or cutter block) as well as defects that have a negligible effect on the value or
operation of the appliance. The guarantee becomes void if repairs are undertaken by
unauthorised persons and if original Braun parts are not used.
To obtain service within the guarantee period, hand in or send the complete appliance
with your sales receipt to an authorised Braun Customer Service Centre (address
information available online at www.service.braun.com).
For UK only:
This guarantee in no way affects your rights under statutory law.
1. Shaver is not placed
properly in the
Clean&Renew station.
2. Cleaning cartridge contains
not enough cleaning fluid
(display lights red).
3. Appliance is in stand-by
mode.
Drain of the Clean&Renew
station is clogged.
1. Insert shaver into the Clean&Renew
station (contacts of the shaver need
to align with contacts in the station).
2. Insert new cleaning cartridge.
3. Press start button again.
– Clean the drain with a wooden
toothpick.
– Regularly wipe the tub clean.
13
Page 14
Français
Nos produits sont conçus pour répondre aux normes les plus élevées en matière de
qualité, fonctionnalité et design. Nous espérons que vous apprécierez votre nouveau
rasoir Braun.
Lisez l’intégralité des instructions d’utilisation, elles contiennent des
informations de sécurité. Conservez ce document pour le consulter également
ultérieurement.
Attention
Votre système de rasage est livré avec un câble d’alimentation qui
intègre une prise transformateur basse tension. Vous ne devez remplacer ou modifier aucun de ses composants, afin d’éviter tout risque
d’électrocution. Utilisez uniquement le câble d’alimentation fourni avec
votre rasoir.
Si l’appareil porte la référence
492, vous pouvez l’utiliser
avec n’importe quel alimentation marquée 492-XXXX.
Ne vous rasez pas avec une grille ou un câble endommagés.
Cet appareil peut être utilisé sans câble d’alimentation dans le bain
ou sous la douche. Dans ces cas pour des raisons de sécu-
rité, utilisez uniquement l’appareil sans fil.
Cet appareil peut être utilisé par des enfants de 8 ans et plus et par des
personnes dont les capacités physiques, sensorielles ou mentales sont
réduites, ou des personnes dénuées d’expérience ou de connaissance,
si elles ont pu bénéfi cier, par l’intermédiaire d’une personne responsable
de leur sécurité, d’une surveillance ou d’instructions préalables concernant l’utilisation de l’appareil en toute sécurité et les dangers encourus.
Les enfants ne doivent pas jouer avec l’appareil. Le nettoyage et l’entretien ne doivent pas être faits par des enfants, à moins qu’ils ne soient
âgés de plus de 8 ans et qu’ils ne soient sous surveillance.
Afin d’éviter toute fuite du liquide de nettoyage, placez le système autonettoyant Clean&Renew sur une surface plane et stable. Lorsqu’une
cartouche de liquide nettoyant est installée, ne pas incliner, ne pas
manipuler brusquement ou transporter le système autonettoyant pour
éviter de renverser le liquide de nettoyage de la cartouche. Veuillez ne
pas mettre le système dans une armoire de toilette, au dessus d’un
radiateur, ni le placer sur une surface polie ou vernie.
14
Page 15
La cartouche de liquide nettoyant contient du liquide hautement inflammable, gardez-la à l’écart des sources d’ignition. Ne fumez pas à proximité. Ne l’exposez pas directement à la lumière du soleil pendant une
longue période.
Ne remplissez pas la cartouche et utilisez uniquement les cartouches de
nettoyage d’origine Braun.
Description
Système autonettoyant Clean&Renew
1 Indicateur du niveau de liquide
de nettoyage
2 Bouton poussoir pour remplacer
la cartouche
3 Contacts station-rasoir
4 Bouton de démarrage du nettoyage
5 Témoins lumineux du cycle de
nettoyage
6 Prise d’alimentation de la station
7 Cartouche de liquide nettoyant
Rasoir
8 Grille et bloc couteau
9 Bouton d’éjection de la cassette
10 Verrouillage de la tête du rasoir
11 Tondeuse rétractable pour poils longs
12 Interrupteur marche/arrêt
13 – bouton de réglage sensible
14 + bouton de réglage intensif
15 Bouton de réinitialisation
16 Écran d’affichage du rasoir
16a Segments de la batterie
16b Segments d‘hygiène
16c Indicateur de charge faible
16d Symbole de remplacement
17 Contacts rasoir-station
18 Prise d’alimentation du rasoir
19 Pochette de voyage
20 Câble d’alimentation (le design peut
varier)
Avant le rasage
Avant la première utilisation, branchez le rasoir à une prise électrique en utilisant le
câble d’alimentation (20), procéder comme suit :
Installation du système autonettoyant Clean&Renew
• Appuyez sur le bouton curseur (2) pour ouvrir le boîtier.
• Posez la cartouche de liquide nettoyant (7) à plat sur une surface stable et plane (par
exemple une table).
• Retirez délicatement l’opercule de la cartouche.
• Introduisez la cartouche dans la base de la station aussi loin que possible.
• Fermez doucement en abaissant le boîtier jusqu’à son verrouillage.
• En utilisant le câble d’alimentation (20), raccordez la prise d’alimentation (6) du
système à une prise de courant.
L’indicateur du niveau de liquide de nettoyage (1) indique la quantité de liquide dans la
cartouche :
Jusqu’à 30 cycles de nettoyage disponibles
15
Page 16
Jusqu’à 7 cycles de nettoyage restants
Une nouvelle cartouche de nettoyage est nécessaire
Mise en charge et nettoyage du rasoir
Insérez le rasoir, avec sa tête (10) non verouillée en avant, dans la station Clean&Renew.
Les contacts (17) au dos du rasoir s’aligneront avec les contacts (3) du système
autonettoyant. Important : le rasoir doit être sec et propre de toute trace de
savon ou de mousse.
Si nécessaire, le système Clean&Renew rechargera automatiquement le rasoir. Le
niveau de propreté du rasoir sera également analysé et un des témoins lumineux du
cycle de nettoyage (5) suivants s’allumera :
le rasoir est propre
un rapide nettoyage économique est nécessaire
un nettoyage de niveau normal est nécessaire
un nettoyage intensif est nécessaire
Une fois que le système a déterminé le programme de nettoyage le mieux adapté,
appuyez sur le bouton de démarrage du nettoyage (4). Pour de meilleurs résultats
de rasage, nous recommandons un nettoyage après chaque rasage.
Chaque programme de nettoyage consiste en plusieurs cycles durant lesquels le
liquide de nettoyage est pompé dans la cartouche et circule vers la tête de rasage.
Selon le modèle de Clean&Renew et/ou le programme sélectionné, le temps de
démarrage du nettoyage peut prendre jusqu’à 16 minutes. Laissez le rasoir dans la
station pour le séchage. Cela prend plusieurs heures pour que l’humidité s’évapore
intégralement, selon les conditions climatiques.
Lorsque le programme est terminé, le voyant lumineux bleu s’allume.
Mode stand-by
10 minutes après la fin de la charge ou du nettoyage, le système Clean&Renew passe
en mode stand-by : les voyants lumineux de la station Clean&Renew s’éteignent.
Écran d’affichage du rasoir
L’afficheur du rasoir (16) indique le niveau de charge de la batterie sur la gauche, et le
niveau de propreté (hygiène) sur la droite. (6 segments noirs sont affichés de chaque
côté lorsque la batterie est complètement chargée et le rasoir propre).
Segments de la batterie :
Pendant le chargement ou lors de l’utilisation du rasoir, les segments de la batterie
correspondants clignoteront. En charge complète, les 6 segments sont affichés.
Les segments disparaissent graduellement au fur et à mesure du déchargement.
Indicateur de faible charge
Le témoin lumineux rouge clignote pour indiquer que la charge de la batterie est faible.
La capacité restante de la batterie est suffisante pour 2 à 3 rasages.
16
Page 17

Segments d’hygiène :
Les 6 segments d’hygiène apparaissent une fois que le rasoir a été nettoyé dans le
système Clean&Renew. Lorsque le rasoir est utilisé, les segments d’hygiène s’effacent
l’un après l’autre. Quand le rasoir est installé dans le système autonettoyant, le système
sélectionne automatiquement le cycle de nettoyage approprié, puis en fin de cycle tous
les segments de propreté s’affichent. Sur le plan hygiénique il n’est pas aussi
performant de rincer le rasoir sous l’eau du robinet que de le nettoyer dans le système
autonettoyant ; c’est pourquoi les segments d’hygiène s’affichent uniquement lorsque
le rasoir a été nettoyé dans la système Clean&Renew.
Informations sur la charge
• Une charge complète prend 1 heure et procure jusqu’à 50 minutes de rasage sans fil.
L’autonomie peut varier selon le type de votre barbe ainsi que de la température
ambiante. Une charge rapide de 5 minutes est suffisant pour un rasage.
• La température ambiante recommandée pour charger le rasoir est comprise entre 5 °C
et 35 °C. La batterie peut ne pas se charger correctement ou pas du tout à des
températures extrêmement basses ou élevées. La température ambiante
recommandée pour se raser est comprise entre 15° C et 35 °C.
rasoir à des températures supérieures à 50 °C pendant une période prolongée.
N’exposez pas votre
Utilisation du rasoir
Utilisation
Appuyez sur l’interrupteur marche/arrêt (12) pour mettre en marche le rasoir :
• La tête pivotante du rasoir et les grilles flexibles s’adaptent automatiquement aux
contours de votre visage.
• Pour un rasage optimal dans les zones difficiles d’accès (sous le nez par exemple),
déplacez la tête de rasage vers l’arrière, puis bloquez la en déplacant le loquet de
sécurité situé sur la face avant du rasoir. Vous maintenez ainsi la tête de rasage dans
cette position.
• Pour tailler les pattes, moustache et barbe, faites glisser la tondeuse rétractable pour
poils longs (11) vers le haut.
Conseils pour un rasage parfait
Pour des résultats de rasage optimaux, Braun vous invite à suivre les 3 recommandations
suivantes :
1. Rasez-vous toujours avant de vous laver le visage.
2. Tenez toujours le rasoir à angle droit (90°) par rapport à votre peau.
3. Tendez la peau et rasez la barbe dans le sens inverse de la pousse du poil.
Personnalisez votre rasoir
À l’aide des boutons de réglage (–/+) sensible
sélectionner le meilleur réglage pour raser les différentes zones de votre visage et pour
répondre à vos besoins spécifiques. Les différents réglages sont indiqués par la couleur
du témoin lumineux dans l’interrupteur marche/arrêt
(–) Rasage doux
- bleu clair
- bleu foncé
- vert
(+) Rasage puissant
et intensif
(13)
(12)
:
, vous pouvez
(14)
17
Page 18

Pour un rasage complet et rapide, nous recommandons le réglage vert (+) (intensif).
Lors de la prochaine mise en marche, le dernier réglage utilisé sera sélectionné.
Nettoyage
Nettoyage automatique
Après chaque utilisation mettez le rasoir dans la station Clean&Renew et procédez
comme décrit ci-dessus dans la rubrique « Avant le rasage ». La mise en charge et le
nettoyage sont automatiques. Pour une utilisation quotidienne, une cartouche de
liquide nettoyant sera suffisante pour environ 30 cycles de nettoyage.
La cartouche nettoyante hygiénique contient de l’éthanol et de l’isopropanol
(spécifications : voir cartouche), qui s’évaporeront une fois la cartouche ouverte.
Chaque cartouche, si non utilisée quotidiennement, doit être remplacée après environ
8 semaines pour une désinfection optimale.
La cartouche de liquide nettoyant contient également des lubrifiants, qui peuvent laisser des traces sur le châssis plastique de la grille en fin de nettoyage. Ces traces peuvent
s’enlever facilement à l’aide d’un tissu ou d’un papier de soie doux.
Nettoyage manuel
Nettoyage sous l’eau courante
• Allumez le rasoir (sans fil) et rincez la tête de rasage sous l’eau chaude jusqu’à
ce que tous les résidus aient disparu. Il est possible d’utiliser du savon liquide
ne contenant pas de substance abrasive. Rincez toute la mousse et laissez le
rasoir en marche pendant quelques secondes.
• Ensuite, arrêtez le rasoir, appuyez sur le bouton d’éjection de la cassette (9) pour
retirer la cassette de rasage (grille et bloc couteau) (8) et laissez-la sécher.
• Si vous nettoyez régulièrement le rasoir à l’eau, mettez une goutte d’huile de machine
légère (non inclue) sur la tondeuse pour poils longs et sur la recharge de grille et
d’élément de coupe
Le rasoir doit être lavé après chaque utilisation avec de la mousse à raser.
Nettoyage à la brosse :
• Arrêtez le rasoir. Retirez la cassette de rasage (8) et tapotez-la sur une surface plane.
Nettoyez l’intérieur de la tête pivotante à l’aide de la brosse. Toutefois, ne nettoyez
pas la cassette avec la brosse car cela risque de l’endommager.
Nettoyage du boîtier
Nettoyez le boîtier du rasoir et la station Clean&Renew de temps en temps à l’aide d’un
linge humide, en particulier à l’intérieur du bac de nettoyage dans lequel se place la
tête de rasage.
Remplacement de la cartouche de liquide nettoyant
Après avoir appuyé sur le bouton poussoir (2) pour ouvrir le boîtier, attendez quelques
secondes avant de retirer la cartouche usagée pour éviter qu’elle ne goutte.
Avant de jeter la cartouche usagée contenant le reste du liquide de nettoyage souillé,
refermez ses ouvertures à l’aide de l’opercule de la nouvelle cartouche.
18
Page 19
Gardez votre rasoir en bon état
Remplacement de la cassette de rasage / réinitialisation
Pour conserver une performance de rasage efficace à 100 %, remplacez la cassette de
rasage (8) lorsque le symbole s’allume sur l’écran du rasoir (au bout de 18 mois
environ) ou lorsque la cassette est usée.
Le symbole de remplacement vous rappellera durant les 7 prochains rasages de
remplacer la cassette de rasage. Le rasoir réinitialisera ensuite automatiquement
l’écran.
Après le remplacement de la cassette de rasage, utilisez un stylo pour presser
le bouton de réinitialisation (15) pendant au moins 3 secondes afin de réinitialiser le
compteur. Le témoin lumineux de remplacement clignote et s’éteint lorsque
la réinitialisation est terminée. Il est possible de faire une réinitialisation manuelle à tout
moment.
Accessoires
Disponibles chez votre vendeur ou dans les centres de service Braun :
• Grille et bloc couteau 70S/70B
• Cartouche de liquide nettoyant Clean&Renew CCR
Respect de l’environnement
Ce produit contient des batteries rechargeables et/ou des déchets électriques
recyclables. Afin de protéger l’environnement, ne jetez jamais l’appareil dans les
ordures ménagères à la fin de sa durée de vie. Remettez-le à votre centre service
agréé Braun ou déposez-le dans des sites de récupération appropriés conformément aux réglementations locales ou nationales en vigueur.
La cartouche de nettoyage peut être jetée dans la poubelle ménagère.
Susceptible d’être modifié sans préavis.
Pour les spécifications électriques, se référer aux inscriptions sur le bloc
d’alimentation.
19
Page 20

Dépannage
Problème Cause possible Solution
RASOIR ELECTRIQUE
La tête du rasoir
dégage une
odeur
désagréable.
La performance
de la batterie a
considérablement diminué.
Les performances de
rasage ont
considérablement baissé.
Le rasoir
s’arrête avec
une batterie
complètement
chargée.
1. La tête du rasoir est
nettoyée avec de l’eau.
2. La cartouche de liquide de
nettoyage est en utilisation
depuis plus de
8 semaines.
1. La cassette de rasage est
usée ce qui consomme
plus de puissance pour
chaque rasage.
2. La tête de rasoir est
régulièrement nettoyée
à l’eau sans être lubrifiée.
1. La cassette de rasage est
usée.
2. Votre réglage personnel du
rasoir a été modifié.
3. Le système de rasage est
encrassé.
La cassette de rasage est
usée et demande plus de
puissance que le moteur peut
fournir. L’appareil s’arrête.
1. Lors du nettoyage de la tête de
rasage à l’eau utiliser uniquement
de l’eau chaude et de temps en
temps du savon liquide (sans
substance abrasive). Retirez la
cassette de rasage et laissez-la
sécher.
2. Remplacez la cartouche au moins
toutes les 8 semaines.
1. Remplacez la cassette de rasage
(grille et bloc couteau).
2. Si vous nettoyez régulièrement le
rasoir à l’eau courante, appliquez
ensuite une fois par semaine une
goutte d’huile de machine légère
sur le haut de la cassette de
rasage.
1. Remplacez la cassette de rasage
(grille et bloc couteau).
2. Pour un rasage complet et rapide,
nous recommandons le réglage
vert (intensif).
3. Faites tremper la cassette de
rasage dans l’eau chaude avec une
goutte de liquide vaisselle. Ensuite
rincez bien et tapotez-la pour en
faire partir les résidus. Une fois la
cassette sèche appliquez une
goutte d’huile de machine légère
sur le haut de la cassette de
rasage.
– Remplacez la cassette de rasage.
– Appliquez régulièrement de l’huile
sur la cassette de rasage, surtout si
vous la nettoyez exclusivement à
l’eau.
20
Page 21

À l’écran,
l’affichage de la
charge de la
batterie diminue
en sautant des
segments avec
une baisse
rapide de la
capacité de la
batterie.
La cassette de
rasage a été
remplacée
récemment et le
témoin
lumineux de
remplacement reste
éclairé.
La tête du rasoir
est humide.
STATION CLEAN&RENEW
Le nettoyage
ne démarre pas
lorsque vous
appuyez sur
le bouton de
démarrage.
La
consommation
de liquide de
nettoyage a
augmenté.
La cassette de rasage est
usée ce qui consomme plus
de puissance à chaque
rasage.
Le reset n’a pas été fait en
appuyant sur le bouton reset.
1. Le temps de séchage
après un nettoyage
automatique était trop
court.
2. L’orifice d’évacuation du
liquide de la station du
Clean&Renew est bouché.
3. La recharge de liquide de
nettoyage est utilisée
depuis un certain temps.
1. Rasoir n’est pas positionné
correctement dans la
station Clean&Renew.
2. La cartouche ne con tient
pas suffisamment de
liquide de nettoyage (le
voyant clignote en rouge).
3. L’appareil est en mode
stand-by.
L’orifice de retour de la
station Clean&Renew est
bouché.
– Remplacez la cassette de rasage.
– Appliquez régulièrement de l’huile
sur la cassette de rasage, surtout
si vous la nettoyez exclusivement l
à l’eau.
– Appuyez sur le bouton de
réinitialisation pendant au moins
3 secondes pour remettre le
compteur à zéro.
1. Nettoyez le rasoir directement
après un rasage pour permettre un
temps de séchage suffisant.
2. Nettoyez l’orifice d’évacuation avec
un cure-dents en bois. Nettoyez
régulièrement le bac de nettoyage.
3. La proportion d’ethanol/
isopropanol a diminué alors que
celle de l’huile
a augmentée. Essuyez les résidus
avec un chiffon.
1. Positionnez correctement le rasoir
dans la station Clean&Renew et
appliquez-le sur l’arrière de la
station (les plots de contact du
rasoir doivent s’aligner avec ceux
de la station).
2. Insérez une nouvelle cartouche de
nettoyage.
3. Appuyez de nouveau sur le bouton
de démarrage.
– Nettoyez l’orifice d’évacuation avec
un cure-dent en bois.
– Essuyez régulièrement le bac de
nettoyage.
21
Page 22

Garantie
Nous accordons une garantie de 2 ans sur ce produit, à partir de la date d’achat.
Pendant la durée de la garantie, Braun prendra gratuitement à sa charge la réparation
des vices de fabrication ou de matière en se réservant le droit de décider si certaines
pièces doivent être réparées ou si l’appareil lui-même doit être échangé.
Cette garantie s’étend à tous les pays où cet appareil est commercialisé par Braun ou
son distributeur exclusif.
Cette garantie ne couvre pas : les dommages occasionnés par une utilisation
inadéquate, l’usure normale (par exemple, grille et bloc-couteaux) ainsi que les
défauts d’usures qui ont un effet négligeable sur la valeur ou l’utilisation de l’appareil.
Cette garantie devient caduque si des réparations ont été effectuées par des
personnes non agréées par Braun et si des pièces de rechange ne provenant pas de
Braun ont été utilisées.
Pour toute réclamation intervenant pendant la période de garantie, retournez ou
rapportez l’appareil ainsi que l’attestation de garantie à votre revendeur ou à un Centre
Service Agréé Braun.
Veuillez vous référer à www.service.braun.com ou appeler le 0 800 944 802 (service
consommateurs – service & appel gratuits) pour connaître le Centre Service Agréé
Braun le plus proche de chez vous.
Clause spéciale pour la France
Outre la garantie contractuelle exposée ci-dessus, nos clients bénéficient de la garantie
légale des vices caches prévue aux articles 1641 et suivants du Code civil.
22
Page 23
Polski
Nasze produkty zostały zaprojektowane tak, aby zaspokoić Państwa najwyższe oczekiwania w zakresie jakości, funkcjonalności i wzornictwa. Mamy nadzieję, że nowa golarka
Braun przypadnie Państwu do gustu.
Niniejszą instrukcję należy przeczytać w całości, gdyż zawiera ona informacje dotyczące bezpieczeństwa. Należy ją zachować do późniejszego wglądu.
Ostrzeżenie
Państwa system golenia jest zaopatrzony w przewód z wtyczką, ze
zintegrowanym, bezpiecznym zasilaczem o bardzo małym napięciu.
Nie należy wymieniać ani modyfikować żadnej jego części, w przeciwnym razie zaistnieje ryzyko porażenia prądem elektrycznym.
Jeśli urządzenie jest oznakowane 492 można je używać
z kablem oznaczonym symbolem 492-XXXX.
Należy używać tylko specjalnego przewodu dołączonego do
urządzenia.
Nie należy używać urządzenia, gdy folia lub przewód są uszkodzone.
Urządzenie można czyścić pod bieżącą wodą oraz używać
w wannie bądź pod prysznicem. Ze względów bezpieczeń-
stwa można go używać jedynie bezprzewodowo.
Urządzenie może być używane przez dzieci w wieku od lat 8, a także
przez osoby o ograniczonych zdolnościach fizycznych, sensorycznych lub umysłowych oraz osoby niemające wystarczającego
doświadczenia ani wiedzy, o ile są nadzorowane albo zostały poinstruowane w zakresie bezpiecznego użytkowania tego urządzenia i
są świadome istniejących zagrożeń. Nie wolno zezwalać dzieciom na
zabawę urządzeniem. Czyszczenie i konserwacja urządzenia nie
mogą być wykonywane przez dzieci, chyba że są one starsze niż
8 lat i nadzorowane.
Aby zapobiec wyciekaniu płynu czyszczącego, należy zapewnić,
by stacja Clean&Renew znajdowała się na płaskiej powierzchni.
Gdy zainstalowany jest wkład czyszczący, nie należy przechylać, nagle
przesuwać ani przenosić stacji w żaden sposób, gdyż płyn czyszczący może wylać się z wkładu. Nie należy umieszczać stacji
wewnątrz szafki łazienkowej ani nad grzejnikiem, ani też kłaść jej na
powierzchni polerowanej bądź lakierowanej.
23
Page 24
Wkład czyszczący zawiera łatwopalny płyn, więc należy go przechowywać z dala od źródeł ognia. Nie palić w pobliżu stacji czyszczącej.
Nie wystawiać na bezpośrednie działanie promieni słonecznych
przez dłuższy czas.
Nie należy ponownie napełniać wkładu, lecz używać jedynie oryginalnych
wkładów wymiennych firmy Braun.
Opis produktu
Stacja Clean&Renew
1 Wskaźnik poziomu płynu
czyszczącego
2 Przycisk podnoszący do wymiany
wkładu
3 Styki łączące stację z golarką
4 Przycisk „Start“
5 Wskaźniki programu czyszczenia
6 Gniazdko elektryczne stacji
7 Wkład czyszczący
Golarka
8 Kaseta (folia + nożyki).
9 Przycisk zwolnienia kasety
10 Przycisk blokady głowicy golarki
11 Wysuwający się trymer do przycinania
dłuższego zarostu
Przed goleniem
Przed pierwszym użyciem należy podłączyć golarkę do gniazdka elektrycznego przy
użyciu specjalnego przewodu z wtyczką (20) lub wykonać następujące kroki:
12 Włącznik
13 – przycisk ustawienia (delikatne)
14 + przycisk ustawienia (intensywne)
15 Przycisk „Reset“
16 Wskaźnik golarki
16a Segment akumulatora
16b Segment higieny
16c Wskaźniki niskiego poziomu
naładowania akumulatora.
16d Symbol konieczności wymiany bloku
folii i ostrzy
17 Styki łączące stację z golarką
18 Gniazdko elektryczne golarki
19 Etui podróżne
20 Przewód z wtyczką
(kształt może być różny)
Instalacja stacji Clean&Renew
• Należy przycisnąć przycisk podnoszący (2), by otworzyć obudowę.
• Położyć wkład czyszczący (7) na płaskiej, stabilnej powierzchni (np. na stole).
• Ostrożnie zdjąć wieczko wkładu.
• Wsunąć wkład w podstawę stacji do końca.
• Powoli zamknąć obudowę, dociskając ją w dół, aż się zamknie.
• Używając przewodu z wtyczką (20), należy podłączyć gniazdko elektryczne stacji (6)
do gniazdka elektrycznego na ścianie.
Wskaźnik poziomu płynu (1) wskaże, ile płynu jest wewnątrz wkładu:
dostępnych do 30 cykli czyszczenia
dostępnych do 7 cykli czyszczenia
wymagany nowy wkład
24
Page 25
Ładowanie i czyszczenie golarki
Wsuń golarkę do bazy Clean&Renew głowicą golącą skierowaną w dół i ze zwolnioną blokadą głowicy (10). Styki (17) z tylnej strony golarki połączą się ze stykami (3) stacji
czyszczącej. Ważne: Golarka musi być sucha i oczyszczona z resztek piany bądź
mydła!
W razie potrzeby stacja Clean&Renew automatycznie doładuje golarkę. Zostanie również przeanalizowany stan higieny na golarce i zaświeci się jeden z poniższych wskaźników programu czyszczącego (5):
golarka jest oczyszczona
wymagane krótkie, ekonomiczne czyszczenie
wymagane normalne czyszczenie
wymagane wysoce intensywne czyszczenie
Jeśli stacja wybierze jeden z wymaganych programów czyszczenia, należy nacisnąć
przycisk «Start» (4), aby rozpocząć. By uzyskać najlepsze rezultaty golenia, zale-
camy czyszczenie po każdym goleniu.
Każdy program czyszczenia składa się z kilku cykli, w których głowica golarki jest przepłukiwana płynem czyszczącym. W zależności od modelu stacji czyszcząco-ładującej i/lub
wybranego pro gramu czyszczenie może potrwać do 16 minut. Należy pozostawić
golarkę w stacji do wyschnięcia. Na wyparowanie pozostałej wilgoci potrzeba kilku
godzin, w zależności od warunków klimatycznych. Po tym czasie golarka jest gotowa do
użytku.
Po zakończeniu programu zaświeci się niebieski wskaźnik.
Tryb czuwania
10 minut po zakończeniu ładowania lub sesji czyszczenia, stacja Clean&Renew przełącza się w tryb czuwania: Wskaźniki stacji Clean&Renew wyłączają się.
Wskaźnik golarki
Wskaźnik golarki (16) wskazuje po lewej stronie stan naładowania akumulatora, a po
prawej stronie stan higieny. Gdy akumulator jest w pełni naładowany i gdy golarka jest
higienicznie czysta, na każdej stronie pokazuje się 6 ciemnych segmentów.
Segmenty akumulatora:
Podczas ładowania bądź używania golarki odpowiednie segmenty akumulatora będą
migać. Przy pełnym naładowaniu pokazuje się 6 segmentów. Przy mniejszych poziomach naładowania segmenty te stopniowo znikają.
Wskaźnik niskiego poziomu naładowania
Wskaźnik niskiego poziomu naładowania z czerwoną ramką miga, by wskazać, że akumulator się wyczerpuje. Pozostała pojemność akumulatora wystarczy na 2-3 golenia.
Segmenty higieny:
Po wyczyszczeniu golarki w stacji Clean&Renew pojawi się wszystkie 6 segmentów
higieny. W miarę stosowania golarki segmenty higieny będą stopniowo znikały. Po
25
Page 26

odłożeniu golarki do stacji system automatycznie wybierze odpowiedni program czyszczenia i doprowadzi segmenty do maksymalnego poziomu higieny. Mając na uwadze,
że czyszczenie golarki wodą z kranu nie jest tak higieniczne, jak przy użyciu stacji czyszczenia, segmenty higieny odnowią się jedynie wtedy, gdy golarka zostanie wyczyszczona przy użyciu stacji Clean&Renew.
Informacje o ładowaniu
• Pełne ładowanie trwa ok. 1 godzinę i zapewnia do 50 minut golenia bezprzewodowego. Czas działania zależy od długości brody i temperatury otoczenia. Szybkie,
5-minutowe ładowanie wystarcza na jedno golenie.
• Zalecana temperatura otoczenia podczas ładowania wynosi od 5 °C do 35 °C. Akumulator może nie naładować się prawidłowo w ekstremalnie niskiej bądź wysokiej temperaturze. Zalecana temperatura otoczenia podczas golenia wynosi od 15 °C do 35 °C.
Nie należy wystawiać golarki na temperatury wyższe niż 50 °C na dłuższy czas.
Używanie golarki
Sposób używania
Wcisnąć włącznik (12), by użyć golarki:
• Obrotowa głowica golarki oraz ruchome folie automatycznie dostosowują się do
każdego konturu twarzy.
• W celu ogolenia trudno dostępnych miejsc (np. pod nosem) należy przesunąć
przełącznik blokowania głowicy w dół, aby zablokować głowicę golarki pod
odpowiednim kątem.
• W celu przycięcia bokobrodów, wąsów lub brody należy wysunąć ostrze trymera (11)
w górę.
Porady dotyczące idealnego suchego golenia
Dla uzyskania najlepszych rezultatów Braun zaleca wykonanie trzech prostych kroków:
1. Golić się zawsze przed umyciem twarzy.
2. Przez cały czas utrzymywać golarkę pod właściwym kątem (90°) do skóry.
3. Naciągnąć lekko skórę i golić brodę pod włos.
Personalizacja golarki
Przytrzymując przycisk akceleratora –/+ ((13) or (14)) można dostosować moc golenia
(od delikatnej do intensywnej) do swoich indywidualnych potrzeb w różnych miejscach
na twarzy. Lampka kontrolna na wyłączniku (12) zmienia się w poniższym zakresie:
(–) delikatne golenie
- jasnoniebieski
- ciemnoniebieski
- zielony
(+) intensywne golenie
Do pełnego i szybkiego golenia zalecamy ustawienie zielone (intensywne).
Podczas kolejnego włączenia aktywowane zostanie ostatnie ustawienie.
26
Page 27
Czyszczenie
Automatyczne czyszczenie
Po każdym goleniu należy ponownie umieścić golarkę w stacji Clean&Renew i wykonać
powyższe kroki z sekcji «Przed goleniem». Ładowanie i czyszcznie zostanie automatycznie wykonane. Przy codziennym używaniu wkład czyszczący powinien wystarczyć na
około 30 cykli czyszczenia.
Higieniczny wkład czyszczący zawiera etanol lub izopropanol (specyfikacje znajdują się
na wkładzie), który po otwarciu w naturalny sposób powoli wyparowuje. W przypadku
nieużywania golarki codziennie, wkład należy wymienić po około 8 tygodniach.
Wkład czyszczący zawiera także środek smarujący, który po czyszczeniu może zostawić
plamy na zewnętrznej oprawie folii. Plamy te można jednak łatwo usunąć, delikatnie je
wycierając szmatką lub miękką papierową chusteczką.
Czyszczenie ręczne
Czyszczenie pod bieżąca wodą
• Należy włączyć golarkę (bezprzewodowo) i przepłukać głowicę golarki pod
ciepłą bieżącą wodą, aż do usunięcia wszelkich pozostałości. Można do tego
wykorzystać mydło w płynie, niezawierające substancji ściernych. Należy spłukać
całą pianę i uruchomić golarkę na kilka sekund.
• Następnie należy wyłączyć golarkę, wcisnąć przycisk wyjęcia kasety (9), by wyjąć
kasetę na folię i nożyki (8) i pozostawić do wyschnięcia.
• W przypadku regularnego mycia golarki wodą, raz w tygodniu należy nanieść kroplę
lekkiego oleju maszynowego na trymer i na folię kasety golącej.
Golarkę należy czyścić każdorazowo po zastosowaniu pianki.
Czyszczenie szczoteczką
• Wyłączyć golarkę. Wyjąć kasetę na folię i nożyki (8) i usunąć nieczystości na płaską
powierzchnię. Przy użyciu szczotki wyczyścić wnętrze obrotowej głowicy. Jednak nie
należy czyścić szczotką kasety, aby jej nie uszkodzić.
Czyszczenie obudowy
Od czasu do czasu należy wyczyścić obudowę golarki i stacji Clean&Renew wilgotną
szmatką, szczególnie wewnątrz komory czyszczenia, gdzie stoi golarka.
Wymiana wkładu czyszczącego
Po wciśnięciu przycisku podnoszącego (2) w celu otwarcia obudowy, należy zaczekać
chwilę przed wyjęciem zużytego wkładu, by uniknąć wyciekania. Przed wyrzuceniem
zużytego wkładu należy zamknąć jego otwory, używając wieczka nowego wkładu, gdyż
zużyty wkład zawiera zanieczyszczony roztwór czyszczący.
Utrzymywanie golarki w idealnym stanie
Wymiana/resetowanie kasety na folię i nożyki
W celu utrzymania maksymalnej wydajności golenia należy wymieniać kasetę na folię i
nożyki (8), gdy na wskaźniku golarki zapali się symbol wymiany, po około 18 miesiącach
lub gdy kaseta zużyje się.
27
Page 28

Symbol wymiany będzie w ciągu 7 kolejnych użyć golarki przypominał o konieczności
wymiany kasety na folię i nożyki. Następnie golarka automatycznie zresetuje wskaźnik.
Po wymianie kasety na folię i nożyki należy przy użyciu długopisu wcisnąć przycisk
«Reset» (15) na przynajmniej 3 sekundy, by zresetować licznik. W tym czasie lampka
wymiany będzie migać i zgaśnie po zakończeniu resetowania. Manualne resetowanie
można wykonać w dowolnym momencie.
Akcesoria
Dostępne u Państwa dealera lub w punktach obsługi firmy Braun:
• Kaseta na folię i nożyki 70S/70B
• Wkład czyszczący Clean&Renew CCR
Powiadomienie dot. ochrony środowiska
Produkt zawiera akumulatory i/lub odpady elektryczne podlegające
recyklingowi. By chronić środowisko, nie należy go wyrzucać wraz
z normalnymi odpadami, lecz zanosić do punktów zbiórki odpadów elektrycznych, dostępnych w danym kraju, w celu recyklingu.
Wkład czyszczący można wyrzucać z normalnymi odpadami.
Zastrzega się prawo do dokonywania zmian.
Specyfikacje elektryczne umieszczono na nadruku na przewodzie z wtyczką.
Rozwiązywanie problemów
Problem: Możliwa przyczyna: Zalecenie:
GOLARKA
Nieprzyjemny
zapach z głowicy golarki.
28
1. Głowica golarki jest czyszczona wodą.
2. Wkład czyszczący jest używany dłużej niż przez 8
tygodni.
1. Czyszcząc głowicę golarki wodą,
należy stosować jedynie ciepłą
wodę i od czasu do czasu niewielką
ilość mydła w płynie (niezawierającego substancji ściernych). Należy
wyjąć kasetę na folię i nożyki, by ją
wysuszyć.
2. Należy wymieniać wkład czyszczący co 8 tygodni.
Page 29
Wydajność akumulatora znacznie się zmniejszyła.
Wydajność
golenia znacznie się pogorszyła.
Golarka wyłącza
się przy całkowicie naładowanym akumulatorze.
Segmenty akumulatora na
wskaźniku są
pominięte, a
wydajność akumulatora
zmniejsza się.
Części golące
zostały niedawno wymienione, jednak
zapala
Głowica golarki
jest wilgotna.
1. Folia i nożyki są zużyte, co
wymaga więcej mocy przy
każdym goleniu.
2. Głowica golarki jest regularnie czyszczona wodą,
lecz nie smarowana.
1. Folia i nożyki są zużyte.
2. Osobiste ustawienie
wydajności golenia zostało
zmienione.
3. System golenia jest zapchany.
Folia i nożyki są zużyte, co
wymaga więcej mocy niż silnik jest w stanie wygenerować. Urządzenie wyłącza się.
Folia i nożyki są zużyte, co
wymaga więcej mocy przy
każdym goleniu.
Nie wciśnięto przycisku
«Reset».
1. Czas suszenia po automatycznym czyszczeniu był
zbyt krótki.
2. Odpływ stacji Clean&Renew jest zapchany.
3. Wkład czyszczący jest używany od długiego czasu.
1. Należy wymienić kasetę na folię
i nożyki.
2. Jeśli golarka jest regularnie czyszczona wodą, należy nanieść kroplę
lekkiego oleju maszynowego na
górę folii raz w tygodniu, w celu
naoliwienia.
1. Należy wymienić kasetę na folię
i nożyki.
2. Do pełnego i szybkiego golenia
zalecamy ustawienie zielone (intensywne).
3. Należy włożyć kasetę na folię i
nożyki do ciepłej wody z dodatkiem
kropli płynu do mycia naczyń.
Następnie należy odpowiednio ją
przepłukać i strząsnąć krople wody.
Po wysuszeniu należy nanieść
kroplę lekkiego oleju maszynowego
na folię.
– Należy wymienić kasetę na folię
i nożyki.
– Należy regularnie oliwić system
golenia, szczególnie jeśli czyści się
go jedynie przy użyciu wody.
– Należy wymienić kasetę na folię
i nożyki.
– Należy regularnie oliwić system
golenia, szczególnie jeśli czyści się
go jedynie przy użyciu wody.
– Należy wcisnąć przycisk «Reset» na
minimum 3 sekundy, by zresetować
licznik.
1. Czyść golarkę bezpośrednio po
goleniu, aby miała wystarczająco
dużo czasu na wyschnięcie.
2. Należy wyczyścić odpływ wykałaczką. Należy regularnie wycierać
pojemnik do czystości.
3. Proporcja etanolu/izopropanolu
zmniejszyła się, a proporcja oleju
zwiększyła się. Należy usunąć osad
ściereczką.
29
Page 30
STACJA CLEAN&RENEW
Po wciśnięciu
przycisku
«Start» czyszczenie nie rozpoczyna się.
Zwiększone
zużycie płynu
czyszczącego.
Warunki gwarancji
1. Procter & Gamble International Operation SA, z siedzibą w Route de
St-Georges 47, 1213 Petit Lancy 1 w Szwajcarii, gwarantuje sprawne działanie
sprzętu w okresie 24 miesięcy od daty jego wydania Konsumentowi. Ujawnione w
tym okresie wady będą usuwane bezpłatnie przez autoryzowany punkt serwisowy, w
terminie 14 dni od daty dostarczenia sprzętu do autoryzowanego punktu serwisowego.
2. Konsument może wysłać sprzęt do naprawy do najbliżej znajdującego się autoryzowanego punktu serwisowego lub skorzystać z pośrednictwa sklepu, w którym dokonał zakupu sprzętu. W takim wypadku termin naprawy ulegnie wydłużeniu o czas
niezbędny do dostarczenia i odbioru sprzętu.
3. Konsument powinien dostarczyć sprzęt w opakowaniu należycie zabezpieczonym
przed uszkodzeniem. Uszkodzenia spowodowane niedostatecznym zabezpieczeniem sprzętu nie podlegają naprawom gwarancyjnym. Naprawom gwarancyjnym nie
podlegają także inne uszkodzenia powstałe w następstwie okoliczności, za które
Gwarant nie ponosi odpowiedzialności, w szczególności zawinione przez Pocztę
Polską lub firmy kurierskie.
4. Niniejsza gwarancja jest ważna jedynie z dokumentem zakupu i obowiązuje w każdym kraju, w którym, to urządzenie jest rozprowadzane przez jednostkę organizacyjną firmy Procter & Gamble lub upoważnionego przez nią dystrybutora.
5. Dokument zakupu musi być opatrzony datą i numerem oraz określać nazwę i model
sprzętu.
6. Okres gwarancji przedłuża się o czas od zgłoszenia wady lub uszkodzenia do
naprawy sprzętu i zwrotnego postawienia go do dyspozycji Konsumenta.
7. Naprawa gwarancyjna nie obejmuje czynności przewidzianych w instrukcji, do wykonania których, Konsument zobowiązany jest we własnym zakresie i na własny koszt.
8. Ewentualne oczyszczenie sprzętu dokonywane jest na koszt Konsumenta według
cennika danego autoryzowanego punktu serwisowego i nie
będzie traktowane jako naprawa gwarancyjna, chyba, że oczyszczenie
jest niezbędne do usunięcia wady w ramach świadczeń objętych niniejszą gwarancją
i nie stanowi czynności, o których mowa w p. 7.
30
1. Nie umieszczono golarki
we właściwy sposób w stacji Clean&Renew.
2. Wkład czyszczący zawiera
niewystarczającą ilość
płynu czyszczącego
(zapala się czerwona
dioda).
3. Urządzenie jest w t
rybie czuwania.
Odpływ stacji Clean&Renew
jest zapchany.
1. Należy umieścić golarkę w stacji
Clean&Renew (styki golarki muszą
połączyć się ze stykami stacji).
2. Należy włożyć nowy wkład czyszczący.
3. Należy ponownie wcisnąć
przycisk „Start”.
– Należy wyczyścić odpływ wyka-
łaczką.
– Należy regularnie wycierać pojemnik
do czystości.
Page 31

9. Gwarancją nie są objęte:
a) mechaniczne uszkodzenia sprzętu spowodowane w czasie jego użytkowania lub
w czasie dostarczania sprzętu do naprawy;
b) uszkodzenia i wady wynikłe na skutek:
– używania sprzętu do celów innych niż osobisty użytek;
– niewłaściwego lub niezgodnego z instrukcją użytkowania, konserwacji, prze-
chowywania lub instalacji;
– używania niewłaściwych materiałów eksploatacyjnych;
– napraw dokonywanych przez nieuprawnione osoby; stwierdzenie faktu takiej
naprawy lub samowolnego otwarcia sprzętu powoduje utratę gwarancji;
– przeróbek, zmian konstrukcyjnych lub używania do napraw nieoryginalnych
części zamiennych firmy Braun;
– części szklane, żarówki oświetlenia;
– ostrza i folie do golarek, wymienne końcówki do szczoteczek elektrycznych i
10. Niniejsza gwarancja na sprzedany towar konsumpcyjny nie wyłącza, nie ogranicza
irygatorów oraz materiały eksploatacyjne.
ani nie zawiesza uprawnień Kupującego wynikających z przepisów o rękojmi za wady
rzeczy sprzedanej.
31
Page 32

Česk
Naše výrobky splňují nejvyšší nároky na kvalitu, funkčnost a design. Doufáme, že
budete se svým novým holicím strojkem Braun spokojeni.
Pečlivě si přečtěte tento návod – obsahuje důležité bezpečnostní informace.
Uschovejte jej pro pozdější použití.
Upozornění
Váš holicí systém je vybaven speciálním síťovým přívodem s integrovaným bezpečnostním síťovým adaptérem. Nevyměňujte ani nerozebírejte žádnou z jeho částí, jinak by mohlo dojít k úrazu elektrickým
proudem.
V případě, že spotřebič je označen 492, můžete jej použít
s libovolným napájecím Braun napájení kódovaných 492-XXXX.
Používejte pouze speciální kabel dodávaný společně s přístrojem.
Přístroj nepoužívejte, jestliže jsou planžeta nebo kabel poškozeny.
Tento přístroj je vhodný pro čištění pod tekoucí vodou a pou-
žívání ve vaně nebo ve sprše. Z bezpečnostních důvodů
smí být používán pouze bez připojení k elektrické síti.
Děti starší 8 let a osoby se sníženou fyzickou pohyblivostí, schopností vnímání či mentálním zdravím a osoby bez zkušeností nebo
odpovídajícího povědomí mohou tento spotřebič používat pod
dohledem nebo po obdržení pokynů k jeho bezpečnému používání a
seznámení se s možnými riziky. Spotřebič není určen jako hračka pro
děti. Děti bez dozoru a mladší 8 let nesmí provádět čištění a údržbu
přístroje.
Chcete-li zabránit úniku čisticí kapaliny, umístěte čisticí stanici
Clean&Renew na rovný povrch. Po instalaci čisticí kazety stanici
nenahýbejte, nijak s ní nepohybujte ani ji nepřemísťujte, protože by z
ní při manipulaci mohla vytéct čisticí kapalina Stanici neumísťujte do
zrcadlové skříňky, nad radiátor ani ji nepokládejte na leštěné či lakované povrchy.
Čisticí kazeta obsahuje vysoce hořlavou kapalinu, proto ji uchovávejte mimo možné zdroje vznícení. V blízkosti čisticí stanice nekuřte.
Nevystavujte ji delší dobu přímému slunečnímu záření.
32
Page 33

Použitou čisticí kazetu nedoplňujte a používejte pouze originální
náplň čisticí kazety Braun.
Popis
Čisticí stanice Clean&Renew
1 Ukazatel stavu náplně
2 Uvolňovací tlačítko pro výměnu kazety
3 Kontakty čisticí stanice – holicí strojek
4 Tlačítko pro zahájení čištění
5 Indikátory čisticího programu
6 Síťová zásuvka čisticí stanice
7 Čisticí kazeta
Holicí strojek
8 Kazeta s holicí planžetou a břitovým
blokem
9 Uvolňovací tlačítko kazety
10 Tlačítko uzamčení holicí hlavy
11 Výsuvný zastřihovač dlouhých vousů
Před holením
Před prvním použitím musíte připojit holicí strojek k síti za použití speciálního síťového
přívodu (20) nebo postupujte podle níže uvedeného návodu:
Instalace čisticí stanice Clean&Renew
• Stiskněte uvolňovací tlačítko (2) a otevřete kryt čisticí stanice.
• Čisticí kazetu (7) položte na rovnou a stabilní plochu (např. na stůl).
• Z kazety opatrně odstraňte uzávěr.
• Kazetu zasuňte co nejhlouběji do spodní části základny čisticí stanice.
• Kryt opatrně zavřete pomalým stlačováním dolů, dokud se nezavře.
• Pomocí speciálního síťového přívodu (20) zapojte zástrčku základny čisticí stanice (6)
do elektrické zásuvky.
12 Hlavní vypínač
13 Tlačítko – pro nastavení citlivého
režimu
14 Tlačítko + pro nastavení intenzivního
režimu
15 Tlačítko pro vynulování
16 Displej holicího strojku
16a Indikator baterie
16b Indikátor čistotu
16c Indikátor vyčerpání baterie
16d Symbol výměna
17 Kontakty holicí strojek – čisticí stanice
18 Síťová zásuvka holicího strojku
19 Cestovní pouzdro
20 Speciální síťový přívod
(provedení se může lišit)
Ukazatel stavu náplně (1) indikuje množství kapaliny v čisticí kazetě:
až na 30 čisticích cyklů
až na 7 čisticích cyklů
nutnost výměny kazety za novou
Nabíjení a čištění holicího strojku
Vložte hlavu holicího strojku do ákladny čisticí stanice. Kontakty (17) na zadní straně holicího strojku se spojí s kontakty (3) v čisticí stanici. Důležité: Holicí strojek musí být
čistý a bez jakýchkoli zbytků pěny či mýdla!
33
Page 34

Čisticí stanice Clean&Renew holicí strojek v případě potřeby automaticky dobije. Provede také analýzu hygienického stavu strojku a rozsvítí se jedna z těchto kontrolek čisticího programu (5):
holicí strojek je čistý
nutno provést krátké úsporné čištění
nutno provést standardní čištění
nutno provést intenzivní čištění
Vybere-li čisticí stanice jeden z potřebných programů čištění, ten se nespustí, dokud
nestisknete tlačítko zahájení čištění (4). Pro dosažení nejlepších výsledků holení
doporučujeme strojek vyčistit po každém oholení.
Každý čisticí program se skládá z několika cyklů, při nichž je hlava holicího strojku
propláchnuta čisticí kapalinou. Čištění trvá v závislosti na modelu čisticí a nabíjecí
stanice a/nebo zvoleném programu až 16 minuty. Nechte holicí strojek ve stanici
uschnout. Odpaření zbytkové vlhkosti zabere v závislosti na klimatických podmínkách až
několik hodin. Poté je holicí strojek připraven k použití.
Po dokončení čisticího programu se rozsvítí modrá kontrolka .
Pohotovostní režim
10 minut po ukončení nabíjení nebo čištění se čisticí stanice Clean&Renew vypne a přejde do pohotovostního režimu: kontrolky čisticí stanice Clean&Renew se vypnou.
Displej holicího strojku
Displej holicího strojku (16) zobrazuje stav nabití baterie na levé straně a hygienický stav
na pravé straně. Pokud je baterie plně nabitá a holicí strojek hygienicky čistý, je na
každé straně zobrazeno 6 tmavých segmentů.
Segmenty baterie:
V průběhu nabíjení nebo používání holicího strojku budou příslušné segmenty označující
stav nabití baterie blikat. Když je baterie plně nabitá, je zobrazeno všech 6 segmentů. S
klesajícím stavem nabití baterie segmenty postupně mizí.
Kontrolka nízkého nabití baterie
Jestliže bliká kontrolka nízkého nabití v červeném rámečku, znamená to, že je baterie
téměř vybitá. Zbývající kapacita baterie postačí na 2 až 3 oholení.
Segmenty hygienického stavu:
Po vyčištění holicího strojku ve stanici Clean&Renew bude vidět všech 6 segmentů indikujících hygienický stav strojku. Při používání holicího strojku budou segmenty hygienického stavu postupně mizet. Jakmile vrátíte přístroj do čisticí stanice, systém automaticky vybere odpovídající čisticí program a segmenty hygienického stavu se obnoví na
maximum. Vzhledem k tomu, že čištění holicího strojku pod tekoucí vodou není tak
hygienické jako čištění v čisticí stanici, segmenty hygienického stavu se obnoví pouze po
vyčištění strojku v čisticí stanici Clean&Renew.
34
Page 35

Informace o nabíjení
• Plné nabití trvá přibližně 1 hodinu a umožňuje až 50 minut holení bez zapojení do sítě.
Délka holení se může lišit v závislosti na délce vousů a teplotě okolního prostředí. Pro
jedno oholení postačí pětiminutové rychlé nabití.
• Doporučená okolní teplota pro nabíjení je 5 až 35 °C. Při extrémně nízkých nebo
vysokých teplotách se baterie nemusí nabít správně nebo se nenabije vůbec.
Doporučená okolní teplota pro holení je 15 až 35 °C. Nevystavujte holicí strojek po
delší dobu teplotám přesahujícím 50 °C.
Používání holicího strojku
Jak strojek používat
Zapnutí holicího strojku provedete stisknutím hlavního vypínače on/off (12):
• Výkyvná holicí hlava a pohyblivé planžety se automaticky přizpůsobí konturám vašeho
obličeje.
• Chcete-li holit obtížně dostupné oblasti (např. pod nosem), nejprve posuňte hlavu
holícího strojku do zadní polohy, pak přesuňte zámku hlavy přepínače na zadní straně.
Otočná hlava je zablokována v tomto úhlu.
• K zastřihování kotlet, knírku nebo bradky vysuňte zastřihovač dlouhých vousů (10)
směrem nahoru.
Tipy pro dokonalé oholení za sucha
Pro dosažení nejlepších výsledků holení vám Braun doporučuje dodržovat 3 jednoduchá
pravidla:
1. Holte se vždy předtím, než si budete mýt obličej.
2. Holicí strojek držte vždy kolmo (90°) k pokožce.
3. Napněte pokožku a holte se proti směru růstu vousů.
Přizpůsobení holicího strojku vašim potřebám
Podržením tlačítek nastavení intenzity – / +
((13) nebo (14)) můžete nastavit intenzitu holení podle vašich individuálních potřeb v
různých částech obličeje – od citlivého po intenzivní holení. Světlo kontrolky zabudované v hlavním vypínači (on/off) (12) se bude měnit:
(–) citlivé holení
- světle modrá
- tmavě modrá
- zelená
(+) intenzivní holení
Pro důkladné a rychlé oholení doporučujeme zelené (intenzivní) nastavení.
Při příštím zapnutí se aktivuje poslední použité nastavení.
Čištění
Automatické čištění
Po každém holení vraťte holicí strojek do čisticí stanice Clean&Renew a dále postupujte
podle pokynů uvedených v části «Před holením». Čisticí stanice se automaticky postará
35
Page 36

o potřebné dobíjení a čištění. Při každodenním používání postačí jedna čisticí kazeta na
cca 30 čisticích cyklů.
Hygienický roztok v čisticí kazetě obsahuje etanol nebo isopropanol (specifikace viz na
kazetě), které se po otevření přirozeně a pomalu vypařují do okolního vzduchu. Každou
kazetu, i když není používána denně, je třeba vyměnit přibližně po 8 týdnech.
Čisticí kazeta obsahuje i lubrikační látky, které mohou po čistění zanechat na vnější
straně planžety viditelné stopy. Tyto stopy se však dají snadno odstranit jemným setřením hadříkem nebo měkkým papírovým kapesníčkem.
Manuální čištění
Čištění pod tekoucí vodou:
• Zapněte holicí strojek (bezdrátové) a opláchněte holicí hlavu pod tekoucí
teplou vodou, abyste odstranili všechny zbytky. Můžete použít také tekuté mýdlo
bez abrazivních látek. Opláchněte všechnu pěnu a nechejte holicí strojek zapnutý
ještě několik sekund.
• Poté holicí strojek vypněte, stisknutím uvolňovacího tlačítka (9) uvolněte kazetu s
holicí planžetou a břitovým blokem (8) a nechte ji oschnout.
• Pro pravidelné čištění holicího strojku s vodou, jednou týdně, naneste kapku lehkého
strojního oleje na horní části zastřihovače a fóliových zásobnících a nožů.
Holicí strojek je třeba čistit pokaždé, když použijete holicí pěnu.
Cistící kartáč:
• Vypněte holicí strojek. Vyjměte kazetu s holicí planžetou a břitovým blokem (9) a oklepejte ji na rovném povrchu. Pomocí kartáčku vyčistěte vnitřní část výkyvné holicí hlavy.
Kartáček však nepoužívejte k čištění kazety, neboť by se mohla poškodit.
Čištění krytu
Příležitostně očistěte vlhkým hadříkem kryt holicího strojku a čisticí stanice Clean&Renew, zejména uvnitř čisticí komory, kam se vkládá holicí strojek.
Výměna čisticí kazety
Po stisknutí uvolňovacího tlačítka (2) a otevření krytu čisticí stanice počkejte několik
sekund, než použitou čisticí kazetu odstraníte, abyste zabránili odkapávání. Předtím,
než použitou čisticí kazetu vyhodíte, ujistěte se, že jste uzavřeli otvory pomocí víčka z
nové čisticí kazety, protože použitá kazeta obsahuje kontaminovaný čisticí roztok.
Udržování holicího strojku ve špičkovém stavu
Výměna kazety s holicí planžetou a břitovým blokem / vynulování
Pro zajištění 100% výkonu při holení vyměňte kazetu s holicí planžetou a břitovým blokem (8) vždy, když se na displeji holicího strojku rozsvítí symbol výměny (přibližně po
18 měsících nebo když je kazeta opotřebovaná).
Symbol výměny vám bude během následujících 7 holení připomínat, abyste kazetu
s holicí planžetou a břitovým blokem vyměnili. Displej holicího strojku se poté automaticky vynuluje.
36
Page 37

Po výměně kazety s holicí planžetou a břitovým blokem vynulujte displej holicího strojku
tak, že pomocí kuličkového pera zmáčknete tlačítko reset (15) alespoň na 3 sekundy.
Kontrolka výměny přitom bude blikat a po dokončení vynulování zcela zhasne. Manuální
vynulování lze provést kdykoliv.
Příslušenství
K dostání u vašeho prodejce nebo v servisních střediscích Braun:
• Kazeta s holicí planžetou a břitovým blokem 70S/70B
• Čisticí kazeta Clean&Renew CCR
Poznámka k ochraně životního prostředí
Výrobek obsahuje baterie a/nebo recyklovatelný elektrický odpad.
V zájmu ochrany životního prostředí nelikvidujte tento výrobek s běžným domovním odpadem, ale odevzdejte jej k recyklaci na sběrné místo elektrického
odpadu zřízené ve vaší zemi.
Deklarovaná hodnota emise hluku tohoto spotřebiče je 62 dB(A), což představuje
hladinu A akustického výkonu vzhledem na referenční akustický výkon 1 pW.
Čisticí kazetu je možno vyhazovat do běžného domovního odpadu.
Změny jsou vyhrazeny.
Elektrotechnické specifikace naleznete vytištěné na speciálním síťovém přívodu.
Odstraňování poruch
Problém: Možný důvod: Náprava:
HOLICÍ STROJEK
Z holicí hlavy
vychází
nepříjemný
zápach.
Výdrž baterie se
výrazně snížila.
1. Holicí hlavu čistíte pod
tekoucí vodou.
2. Čisticí kazetu používáte
více než
8 týdnů.
1. Planžeta a břity jsou opotřebované a pro každé
oholení potřebují více
energie.
2. Holicí hlavu pravidelně čistíte pod tekoucí vodou, ale
nepromazáváte.
1. Při čištění holicí hlavy pod tekoucí
vodou používejte pouze teplou
vodu a příležitostně tekuté mýdlo
(bez abrazivních látek). Vyjměte
kazetu s holicí planžetou a břitovým
blokem a nechte ji oschnout.
2. Vyměňujte čisticí kazetu alespoň
každých 8 týdnů.
1. Vyměňte kazetu s holicí planžetou
a břitovým blokem.
2. Pokud holicí strojek pravidelně čistíte pod tekoucí vodou, aplikujte
jednou za týden k promazání na
planžetu kapku jemného strojového
oleje.
37
Page 38

Výkonnost holicího strojku se
výrazně snížila.
Holicí strojek se
vypíná, přestože
je baterie plně
nabitá.
1. Planžeta a břity jsou opotřebované.
2. Osobní nastavení při holení
se změnilo.
3. Holicí systém je ucpaný.
Planžeta a břity jsou opotřebované, což vyžaduje více
energie, než motor dokáže
zajistit. Přístroj se vypíná.
1. Vyměňte kazetu s holicí planžetou a
břitovým blokem.
2. Pro důkladné a rychlé oholení
doporučujeme zelené (intenzivní)
nastavení.
3. Namočte kazetu s holicí planžetou
a břitovým blokem do horké vody s
kapkou prostředku na mytí nádobí.
Poté ji důkladně opláchněte a oklepejte. Po osušení aplikujte na planžetu kapku jemného strojového
oleje.
– Vyměňte kazetu s holicí planžetou a
břitovým blokem.
– Holicí systém pravidelně promazá-
vejte, zejména po jeho čištění pod
tekoucí vodou.
Segmenty baterie na displeji
nesignalizují
snížení kapacity
baterie, která
přitom klesá.
Holicí díly byly
nedávno vyměněny, ale symbol výměny se
znovu rozsvítil.
Hlava holicího
strojku je vlhká.
38
Planžeta a břity jsou opotřebované a pro každé oholení
potřebují více energie.
Nestiskli jste tlačítko reset. – Stiskněte tlačítko reset na dobu
1. Doba vysoušení po
automatickém čištění byla
příliš krátká.
2. Odtok čisticí stanice
Clean&Renew je ucpaný.
3. Čisticí kazetu používáte již
celkem dlouho.
– Vyměňte kazetu s holicí planžetou a
břitovým blokem.
– Holicí systém pravidelně promazá-
vejte, zejména po jeho čištění pod
tekoucí vodou.
alespoň 3 sekundy, abyste vynulovali čítač.
1. Čistěte strojek ihned po holení
a nechte dostatek času na
vyschnutí.
2. Vyčistěte odtok pomocí dřevěného
párátka. Nádobku pravidelně otírejte.
3. Podíl etanolu/isopropanolu se
snížil, zatímco podíl oleje se zvýšil.
Odstraňte zbytky měkkým
hadříkem.
Page 39

ČISTICÍ STANICE CLEAN&RENEW
Při stisknutí tla-
čítka pro zahájení čištění se
čištění nespustí.
Zvýšená spotřeba čisticí
kapaliny.
Záruka
Poskytujeme dvouletou záruku na výrobek s platností od data jeho zakoupení. V záruční
lhůtě bezplatně odstraníme všechny vady přístroje zapříčiněné chybou materiálu nebo
výroby, a to buď formou opravy, nebo výměnou celého přístroje (podle našeho vlastního
uvážení). Uvedená záruka je platná v každé zemi, ve které tento přístroj dodává
společnost Braun nebo její pověřený distributor.
Záruka se netýká následujících případů: poškození zapříčiněné nesprávným použitím,
běžné opotřebování (například plátků holicího strojku nebo pouzdra zastřihávače), jakož
i vady, které mají zanedbatelný dosah na hodnotu nebo funkci přístroje. Pokud opravu
uskuteční neautorizovaná osoba a nebudou-li použity původní náhradní díly společnosti
Braun, platnost záruky bude ukončena.
Pokud v záruční lhůtě požadujete provedení servisní opravy, odevzdejte celý přístroj
s potvrzením o nákupu v autorizovaném servisním středisku společnosti Braun nebo jej
do střediska zašlete.
1. Strojek není správně uložen ve stanici Clean&Renew.
2. Čisticí kazeta neobsahuje
dostatek čisticí kapaliny
(displej svítí červeně).
3. Zařízení je v pohotovostním režimu.
Odtok čisticí stanice
Clean&Renew je ucpaný.
1. Vložte holicí strojek do stanice
Clean&Renew (kontakty holicího
strojku se musí spojit s kontakty v
čisticí stanici).
2. Vložte novou čisticí kazetu.
3. Stiskněte znovu tlačítko pro zahájení čištění.
– Vyčistěte odtok pomocí dřevěného
párátka.
– Nádobku pravidelně otírejte.
39
Page 40

Slovensk
Naše výrobky spĺňajú najvyššie nároky na kvalitu, funkčnosť a dizajn.
Dúfame, že budete s novým holiacim strojčekom Braun plne spokojní.
Prečítajte si tieto pokyny celé, pretože obsahujú bezpečnostné informácie.
Pokyny si odložte, aby ste si ich mohli prečítať aj v budúcnosti.
Výstraha
Holiaci systém sa dodáva so špeciálnym káblom, ktorý obsahuje
integrovaný bezpečnostný nízkonapäťový zdroj. So žiadnou časťou
kábla neodborne nemanipulujte ani ho nevymieňajte, pretože by
mohlo dôjsť k zásahu elektrickým prúdom.
V prípade, že spotrebič je označený
492, môžete ho použiť
s ľubovoľným napájacím Braun, ktoré napájanie je kódovaných 492XXX.
Používajte len špeciálny kábel dodávaný so zariadením.
Nepoužívajte strojček, pokiaľ je poškodená planžeta alebo kábel.
Prístroj je možné umývať pod tečúcou vodou a používať ho vo
vani alebo v sprche. Z bezpečnostných dôvodov je možné ho
používať len s odpojeným napájacím káblom.
Deti staršie ako 8 rokov a osoby so zníženou fyzickou pohyblivosťou,
schopnosťou vnímania alebo mentálnym zdravím, prípadne osoby bez
skúseností alebo zodpovedajúceho povedomia, môžu tento prístroj
používať pod dohľadom alebo po prijatí pokynov na jeho bezpečné
používanie a po uvedomení si možných rizík. Dbajte na to, aby sa deti
nehrali so spotrebičom. Čistenie a spotrebiteľskú údržbu by nemali
vykonávať deti, pokiaľ nie sú staršie ako 8 rokov a pod dohľadom
dospelej osoby.
Aby sa zabránilo úniku čistiacej kvapaliny, čistiacu stanicu Clean&Renew umiestnite na rovný povrch. Po nainštalovaní čistiacej kazety stanicu nenakláňajte, neposúvajte a ani nepremiestňujte, pretože by
mohlo dôjsť k úniku čistiacej kvapaliny. Čistiacu stanicu neumiestňujte
do zrkadlovej skrinky, ani nad radiátor alebo leštený či lakovaný
povrch.
40
Page 41

Čistiaca kazeta obsahuje vysoko horľavú kvapalinu, preto ju udržujte
mimo horľavých zdrojov. V blízkosti čistiacej stanice nefajčite. Nevystavujte dlhší čas priamemu slnečnému svetlu.
Čistiacu kazetu znovu nenapĺňajte a používajte iba originálne kazety
Braun.
Popis
Čistiaca stanica Clean&Renew
1 Zobrazenie úrovne čistiacej kvapaliny
2 Vysúvacie tlačidlo na výmenu kazety
3 Elektrické kontakty pre holiaci strojček
4 Tlačidlo Start
5 Indikátory čistiaceho programu
6 Konektor napájania čistiacej stanice
7 Čistiaca kazeta
Holiaci strojček
8 Kazeta s planžetou a holiacimi
čepeľami
9 Tlačidlo na uvoľnenie kazety
10 Zámok holiacej hlavice
11 Vysúvací zastrihávač dlhých chlpov/
vlasov
12 Hlavný spínač
Pred holením
Pred prvým použitím je potrebné pripojiť holiaci strojček do elektrickej zásuvky pomocou špeciálneho napájacieho kábla (20), prípadne postupujte nasledovne:
13 Nastavovacie tlačidlo – (jemné
holenie)
14 Nastavovacie tlačidlo + (intenzívne
holenie)
15 Tlačidlo Reset
16 Displej holiaceho strojčeka
16a Indikátor batérie
16b Indikátor čistotu
16c Indikátor vyčerpania batérie
16d Symbol výmena
17 Elektrické kontakty pre čistiacu
stanicu
18 Konektor napájania holiaceho
strojčeka
19 Cestovné puzdro
20 Špeciálny napájací kábel
(Vykonanie sa môže líšiť)
Inštalácia čistiacej stanice Clean&Renew
• Stlačením vysúvacieho tlačidla (2) otvorte kryt.
• Čistiacu kazetu (7) položte a pridržte na rovnej a stabilnej ploche (napríklad na stole).
• Opatrne odstráňte z kazety uzáver.
• Zasuňte kazetu do základne stanice až na doraz.
• Kryt pomaly zatvorte tak, že naň zatlačíte, kým nezacvakne na miesto.
• Pomocou špeciálneho napájacieho kábla (20) pripojte zástrčku čistiacej stanice (6)
do elektrickej zásuvky.
Zobrazenie úrovne čistiacej kvapaliny (1) znázorní, koľko kvapaliny je v kazete:
k dispozícii je 30 čistiacich cyklov
k dispozícii je 7 čistiacich cyklov
potrebná výmena kazety
41
Page 42

Nabíjanie a čistenie holiaceho strojčeka
Vložte hlavu holiaceho strojčeka do základne čistiace stanica. Kontakty (17) na zadnej
strane holiaceho strojčeka sa zarovnajú s kontaktmi (3) v čistiacej stanici. Dôležité:
Holiaci strojček musí byť suchý a bez zvyškov peny a mydla.
V prípade potreby sa strojček v stanici Clean&Renew automaticky nabije. Analyzuje sa
tiež hygienický stav holiaceho strojčeka a rozsvieti sa jeden z nasledujúcich indikátorov
čistiaceho programu (5)
strojček je čistý
vyžaduje sa krátke úsporné čistenie
vyžaduje sa normálne čistenie
vyžaduje sa intenzívne čistenie
Keď stanica zvolí jeden z požadovaných čistiacich programov, čistenie sa nezačne,
pokiaľ nestlačíte tlačidlo Start (4). Na dosiahnutie čo najlepších výsledkov odporú-
čame čistiť strojček po každom holení.
Každý holiaci program pozostáva z niekoľkých cyklov, v ktorých je čistiaca kvapalina
preplachovaná cez hlavicu holiaceho strojčeka. V závislosti na modeli stanice na čistenie a nabíjanie a/alebo vybranom programe môže čistenie trvať až 16 minúty. Holiaci
strojček ponechajte v stanici, aby sa vysušil. Vyparenie zvyšnej vlhkosti trvá v závislosti
na klimatických podmienkach niekoľko hodín. Potom je holiaci strojček pripravený na
použitie.
Keď sa čistiaci program skončí, rozsvieti sa modrý indikátor.
Pohotovostný režim
10 minút po dokončení nabíjania alebo čistiaceho programu sa čistiaca stanica Clean&Renew prepne do pohotovostného režimu: Indikátory na stanici Clean&Renew
zhasnú.
Displej holiaceho strojčeka
Na displeji holiaceho strojčeka (16) sa vľavo zobrazuje stav nabitia batérie a vpravo
hygienický stav. Keď je batéria úplne nabitá a holiaci strojček hygienicky čistý, na každej
strane displeja sa zobrazuje 6 tmavých segmentov.
Indikátor batérie:
Počas nabíjania alebo pri holení bude príslušný segment indikátora batérie blikať. Keď
je batéria úplne nabitá na displeji sa zobrazuje všetkých 6 segmentov. Počas vybíjania
strojčeka segmenty postupne zhasínajú.
Indikátor vybitej batérie
Keď bliká indikátor vybitej batérie spolu s červeným rámikom, batéria sa onedlho úplne
vybije. Zvyšná kapacita batérie vystačí na 2 až 3 holenia.
Indikátor čistoty:
Potom, ako holiaci strojček vyčistíte v čistiacej stanici Clean&Renew, sa na displeji
zobrazí všetkých 6 segmentov indikátora čistoty. Počas používania strojčeka segmenty
indikátora čistoty postupne zhasínajú. Po vložení strojčeka do stanice systém automa-
42
Page 43

ticky zvolí príslušný čistiaci program, čím sa obnoví maximálne zobrazenie indikátora
čistoty. Keďže opláchnutie strojčeka pod tečúcou vodou nie je také účinné ako je čistenie v čistiacej stanici, segmenty indikátora čistoty sa obnovia iba vtedy, keď strojček
vyčistíte v čistiacej stanici Clean&Renew.
Informácie o nabíjaní
• Úplné nabitie bude trvať približne 1 hodinu a poskytne energiu na približne 50 minút
bezdrôtového holenia. Uvedený čas sa môže líšiť v závislosti od miery zarastenia a
okolitej teploty. 5-minútové rýchle nabitie vystačí na jedno oholenie.
• Odporúčaná okolitá teplota pri nabíjaní je 5 °C až 35 °C. Pri nadmerne nízkych alebo
vysokých teplotách sa batéria nemusí nabiť správne alebo vôbec. Odporúčaná okolitá
teplota pri nabíjaní je 15 °C až 35 °C. Nevystavujte holiaci strojček dlhší čas teplotám
nad 50 °C.
Používanie holiaceho strojčeka
Používanie
Stlačením hlavného vypínača (12) holiaci strojček zapnete a vypnete:
• Holiaca hlavica strojčeka je uložená na kĺbe a planžety majú plávajúce uchytenie,
vďaka čomu sa automaticky prispôsobujú každej kontúre vašej tváre.
• Pre holenie ťažko prístupných oblastí (napr. pod nosom) najprv posuňte hlavu
holiaceho strojčeka na theback pozícii, potom posuňte blokovací hlava prepínač na
zadnej strane. Otočná hlava islocked v tomto uhle.
• Na úpravu bokombrád, fúzov alebo brady vysuňte zastrihávač chlpov (11) do hornej
polohy.
Tipy na dokonalé oholenie nasucho
Na dosiahnutie čo najlepších výsledkov odporúča spoločnosť Braun dodržať 3 jednoduché kroky:
1. Vždy sa hoľte predtým, ako si umyjete tvár.
2. Holiaci strojček vždy držte kolmo (v 90° uhle) k pokožke.
3. Napnite kožu a hoľte proti smeru rastu chlpov.
Prispôsobenie holiaceho strojčeka
Stlačením a podržaním tlačidla rýchlosti –/+ ((13) alebo (14)) môžete nastaviť holiaci
výkon podľa vlastnej potreby pre každú oblasť tváre zvlášť, a to od jemného po intenzívne holenie. Kontrolka hlavného vypínača (12) mení farbu podľa nastavenej intenzity:
(–) jemné holenie
- svetlomodrá
- tmavomodrá
- zelená
(+) intenzívne holenie
Na dôkladné a rýchle oholenie odporúčame použiť zelené (intenzívne) nastavenie.
Pri ďalšom zapnutí holiaceho strojčeka bude aktívne predchádzajúce nastavenie
výkonu.
43
Page 44

Čistenie
Automatické čistenie
Po každom holení vložte holiaci strojček do čistiacej stanice Clean&Renew a postupujte
podľa pokynov v časti «Pred holením». O potrebné nabíjanie a čistenie strojčeka sa stanica postará automaticky. Pri každodennom používaní vystačí jedna čistiaca kazeta na
približne 30 čistiacich cyklov.
Čistiaca kazeta obsahuje látky etanol a izopropanol (technické údaje nájdete na kazete),
ktoré sa po otvorení kazety pomaly vyparujú. Každú kazetu, ktorá sa nepoužíva denne,
je potrebné vymeniť približne po 8 týždňoch.
Čistiaca kazeta tiež obsahuje mazivá, ktorých zvyšky sa môžu po čistení usadiť na vonkajšom ráme planžety. Tieto zvyšky však možno ľahko odstrániť jemným utretím
mäkkou handričkou alebo papierom.
Manuálne čistenie
Čistenie pod tečúcou vodou
• Zapnite holiaci strojček (bez pripojeného napájacieho kábla) a opláchnite
holiacu hlavicu pod horúcou tečúcou vodou, kým sa nevymyjú všetky zvyšky
nečistôt. Môžete tiež použiť tekuté mydlo bez abrazívnych prísad. Opláchnite všetku
penu a nechajte holiaci strojček ešte niekoľko sekúnd v prevádzke.
• Potom strojček vypnite, stlačením tlačidla (9) uvoľnite kazetu s planžetou a holiacimi
čepeľami (8) a nechajte časti vyschnúť.
• Ak holiaci strojček pravidelne čistíte pod tečúcou vodou, raz za týždeň aplikujte na
kazetu s planžetou a holiacimi čepeľami kvapku riedkeho oleja určeného na stroje.
Holiaci strojček je potrebné čistiť po každom použití peny.
Čistite kefou:
• Holiaci strojček vypnite. Odpojte kazetu s planžetou a holiacimi čepeľami (8)
a poklepte ňou o rovný povrch. Pomocou kefky vyčistite vnútorné priestory otočnej
hlavice. Kazetu však kefkou nečistite, pretože by ju mohla poškodiť.
Čistenie tela strojčeka a povrchov stanice
Z času na čas je vhodné vyčistiť telo strojčeka a povrchy čistiacej stanice pomocou vlhkej utierky, najmä priestory čistiacej komory, kde je odložený holiaci strojček.
Výmena čistiacej kazety
Po stlačení vysúvacieho tlačidla (2) a otvorení krytu počkajte niekoľko sekúnd, aby sa
zabránilo kvapkaniu a potom vyberte použitú kazetu. Pred likvidáciou použitej kazety
uzavrite všetky otvory pomocou viečok z novej kazety, pretože použitá kazeta bude
obsahovať kontaminovaný čistiaci roztok.
Udržiavanie holiaceho strojčeka v čo najlepšom stave
Výmena kazety s planžetou a holiacimi čepeľami/vynulovanie indikátora
Na zachovanie 100 % výkonu pri holení vymeňte kazetu s planžetou a holiacimi čepeľami (8) vždy, keď sa rozsvieti symbol na displeji holiaceho strojčeka, teda približne po
18 mesiacoch alebo po opotrebovaní kazety.
44
Page 45

Symbol výmeny vás bude upozorňovať na výmenu kazety s planžetou a holiacimi čepeľami po dobu 7 holení. Potom sa zobrazenie automaticky vynuluje.
Po výmene kazety s planžetou a holiacimi čepeľami stlačte pomocou guľôčkového pera
tlačidlo Reset (15) najmenej na 3 sekundy, čím sa počítadlo vynuluje. Počas tohto
postupu bude indikátor výmeny blikať a po vynulovaní zhasne. Manuálne vynulovanie je
možné vykonať kedykoľvek.
Príslušenstvo
Dostupné u vášho predajcu alebo v servisných centrách Braun:
• Kazeta s planžetou a holiacimi čepeľami 70S/70B
• Čistiaca kazeta Clean&Renew CCR
Upozornenie týkajúce sa životného prostredia
Tento prístroj obsahuje batérie a/alebo recyklovateľný elektronický odpad.
V záujme ochrany životného prostredia prístroj nelikvidujte s domovým odpadom,
ale ho odovzdajte na zbernom mieste pre elektronický odpad.
Deklarovaná hodnota emisie hluku tohto spotrebiča je 62 dB(A), čo predstavuje hladinu
A akustického výkonu vzhľadom na referenčný akustický výkon 1 pW.
Čistiacu kazetu možno zlikvidovať s bežným domovým odpadom.
Informácie sa môžu zmeniť bez upozornenia.
Elektrické špecifikácie nájdete na štítku špeciálneho napájacieho kábla.
Riešenie problémov
Problém: Možná príčina: Riešenie:
HOLIACI STROJČEK
Nepríjemný
zápach z holiacej hlavice.
Výdrž batérie sa
výrazne skrátila.
1. Holiacu hlavicu umývate
len vodou.
2. Čistiaca kazeta sa používa
už viac ako 8 týždňov.
1. Planžeta a holiace čepele
sú opotrebované, čo vyžaduje pri každom holení viac
energie.
2. Holiacu hlavicu pravidelne
umývate pod vodou, ale
nemažete ju.
1. Ak umývate holiacu hlavicu len čistou vodou, používajte horúcu vodu
a z času na čas trochu tekutého
mydla (bez abrazívnych prísad).
Odpojte kazetu s planžetou a holiacimi čepeľami a nechajte ju
vyschnúť.
2. Čistiacu kazetu vymieňajte najmenej raz za 8 týždňov.
1. Vymeňte kazetu s planžetou a
holiacimi čepeľami.
2. Ak holiaci strojček pravidelne umývate pod tečúcou vodou, raz za týždeň aplikujte na planžetu kvapku
riedkeho oleja určeného na stroje.
45
Page 46

Holiaci výkon sa
výrazne zhoršil.
Holiaci strojček
sa vypína aj
napriek tomu,
že batéria je
úplne nabitá.
1. Planžeta a holiace čepele
sú opotrebované.
2. Osobné nastavenie holiaceho výkonu sa zmenilo.
3. Holiaci systém je upchatý.
Planžeta a holiace čepele sú
opotrebované, čo vyžaduje
viac výkonu, než dokáže
motor vyvinúť. Preto sa prístroj vypína.
1. Vymeňte kazetu s planžetou a
holiacimi čepeľami.
2. Na dôkladné a rýchle oholenie
odporúčame použiť zelené (intenzívne) nastavenie.
3. Namočte kazetu s planžetou a
holiacimi čepeľami do horúcej vody
s kvapkou saponátu na riad. Potom
dôkladne opláchnite a vyklepte. Po
vyschnutí aplikujte na planžetu
kvapku riedkeho oleja určeného na
stroje.
– Vymeňte kazetu s planžetou a
holiacimi čepeľami.
– Holiaci systém pravidelne mažte
olejom, najmä vtedy, ak ho umývate
len čistou vodou.
Segmenty batérie na displeji sú
«posunuté»
následkom zníženej kapacity
batérie.
Súčasti holiaceho systému
boli nedávno
vymenené,
avšak symbol
výmeny naďalej
svieti.
Hlavica
holiaceho
strojčeka je
vlhká.
46
Planžeta a holiace čepele sú
opotrebované, čo vyžaduje
pri každom holení viac energie.
Nestlačili ste tlačidlo Reset. – Stlačte tlačidlo Reset najmenej na 3
1. Čas na vyschnutie po automatickom čistení bol príliš
krátky.
2. Výpust čistiacej stanice
Clean&Renew je upchatý.
3. Čistiaca kazeta sa už používa príliš dlho.
– Vymeňte kazetu s planžetou a
holiacimi čepeľami.
– Holiaci systém pravidelne mažte
olejom, najmä vtedy, ak ho umývate
len čistou vodou.
sekundy, čím sa počítadlo vynuluje.
1. Vykonávajte čistenie ihneď po
holení, aby ste na sušenie
ponechali dostatok času.
2. Vyčistite výpust čistiacej stanice
pomocou špáradla. Vaňu čistiacej
komory pravidelne utierajte do
čista.
3. Znížil sa podiel etanolu/izopropanolu a zvýšil podiel oleja. Odstráňte
zvyšky pomocou handričky.
Page 47

ČISTIACA STANICA CLEAN&RENEW
Po stlačení tla-
čidla Start sa
nespustí čistenie.
Zvýšená spotreba čistiacej
kvapaliny.
Záruka
Poskytujeme dvojročnú záruku na výrobok s platnosťou od dátumu jeho zakúpenia.
V záručnej lehote bezplatne odstránime všetky poruchy prístroja zapríčinené chybou
materiálu alebo výroby, a to buď formou opravy, alebo výmenou celého prístroja (podľa
nášho vlastného uváženia). Uvedená záruka je platná v každom štáte, v ktorom tento
prístroj dodáva spoločnosť Braun alebo jej poverený distribútor.
Záruka sa netýka nasledujúcich prípadov: poškodenie zapríčinené nesprávnym
použitím, normálne opotrebovanie (napríklad plátkov holiaceho strojčeka alebo puzdra
zastrihávača), ako aj poruchy, ktoré majú zanedbateľný účinok na hodnotu alebo
funkciu prístroja. Ak opravu uskutoční neautorizovaná osoba a ak sa nepoužijú pôvodné
náhradné súčiastky spoločnosti Braun, platnosť záruky bude ukončená.
Ak v záručnej lehote požadujete vykonanie servisnej opravy, odovzdajte celý prístroj
s potvrdením o nákupe v autorizovanom servisnom stredisku spoločnosti Braun alebo
ho do strediska zašlite.
1. Holiaci strojček nie je
správne vložený do čistiacej stanice Clean&Renew.
2. Čistiaca kazeta neobsahuje dostatočné množstvo
čistiacej kvapaliny (displej
svieti načerveno).
3. Prístroj je v pohotovostnom
režime.
Výpust čistiacej stanice Clean&Renew je upchatý.
1. Vložte holiaci strojček do čistiacej
stanice (kontakty na holiacom strojčeku je potrebné zarovnať s kontaktmi v čistiacej stanici).
2. Vložte novú čistiacu kazetu.
3. Znovu stlačte tlačidlo Start.
– Vyčistite výpust čistiacej stanice
pomocou špáradla.
– Vaňu čistiacej komory pravidelne
utierajte do čista.
47
Page 48

Magyar
Termékeinket a legmagasabb minőségi, funkcionális és design elvárások kielégítésére
tervezték. Reméljük, örömét leli majd új Braun borotvájában.
Olvassa el ezeket az utasításokat, mert biztonsági információkat
tartalmaznak. Őrizze meg, mert később szüksége lehet rájuk.
Figyelmeztetés
Borotváját egy integrált, biztonságos, kisfeszültségű rendszerrel
működő különleges csatlakozókábellel láttuk el. Semmilyen alkatrészét ne cserélje vagy alakítsa át, ellenkező esetben
áramütés veszélye állhat fenn.
Ha a készüléken található jelzés
492, akkor minden 492-
XXXX kóddal ellátott Braun tötővel tudja használni.
A különleges csatlakozókábelt csak ezzel a készülékkel használja.
Ne használja a borotvát, ha a szita vagy a kábel sérült.
A készülék tisztítható vízsugár alatt, illetve használható kádban
vagy zuhany alatt is. Biztonsági okokból csak vezeték
nélkül működtethető.
A készüléket 8 éves vagy ennél idősebb gyermekek, mozgássérültek,
szellemi vagy értelmi fogyatékosságban szenvedő személyek kizárólag a biztonságukért felelős felügyelet mellett használják, illetve, ha
utasításokat kaptak a készülék biztonságos használatára vonatkozóan, és megértették az esetleges veszélyeket. A készülékkel gyermekek nem játszhatnak. A tisztítást és karbantartást kizárólag olyan
gyermekek végezhetik, akik elmúltak 8 évesek, és felügyelet mellett
teszik ezt.
A tisztító folyadék szivárgásának megelőzése érdekében a Clean&Renew tisztító- és töltőegységet helyezze sima felületre. Amikor a tisztítópatron a helyén van, ne billentse meg, ne mozdítsa meg hirtelen
mozdulattal, illetve ne szállítsa a tisztító- és töltőegységet semmilyen
módon, mivel a tisztítófolyadék kifolyhat a patronból. Ne helyezze a
tisztító- és töltőegységet tükrös fürdőszobaszekrénybe vagy radiátor
fölé, illetve ne helyezze lakkozott felületre.
A tisztítópatron rendkívül gyúlékony folyadékot tartalmaz, ezért gyújtóforrástól távol tartandó. A tisztító- és töltőegység közelében ne
dohányozzon. Ne tegye ki közvetlen napfénynek hosszú ideig.
48
Page 49

Ne töltse újra a patront, és kizárólag eredeti Braun töltőpatronokat
használjon.
A készülék leírása
Clean&Renew tisztító- és töltőegység
1 Tisztító folyadék kijelző
2 Emelőgomb a patron cseréjéhez
3 Töltőegység - borotva érintkezők
4 Start gomb
5 Tisztítóprogram jelzőgombok
6 Töltőegység elektromos csatlakozó
bemenet
7 Tisztítópatron
Borotva
8 Szita- és nyíróegység
9 Töltő- és tisztítóegység-kioldó gomb
10 Borotvafej rögzítő gomb
11 Kipattintható hosszúszőrvágó
12 Be-/kikapcsoló gomb
Borotválkozás előtt
Az első használat előtt a különleges csatlakozókábellel (20) csatlakoztassa a borotvát
elektromos hálózathoz, vagy hajtsa végre az alábbi lépéseket:
A Clean&Renew tisztító- és töltőegység telepítése:
• Nyomja meg a kiemelőgombot (2), és nyissa fel a burkolatot.
• Sima, stabil felületen (pl. egy asztalon) tartsa lefelé a tisztítópatront (7).
• Óvatosan vegye le a patron fedelét.
• Csúsztassa a patront a tisztító- és töltőegységbe, amilyen mélyre csak tudja.
• Lassan zárja le a burkolatot. Ehhez nyomja lefelé, amíg be nem záródik.
• A különleges csatlakozókábellel (20) csatlakoztassa a tisztító- és töltőegység elektro-
mos csatlakozó bemenetét (6) elektromos hálózathoz.
A tisztítófolyadék kijelző (1) mutatja, hogy mennyi folyadék van a patronban:
legfeljebb 30 tisztításra elegendő
még legfeljebb 7 tisztításra elegendő
új patron szükséges
13 (–) beállító gomb (érzékenységi
fokozat)
14 (+) beállító gomb (intenzitás fokozat)
15 Alaphelyzet beállító gomb
16 Borotva kijelző
16a Akkumlátor töltésjelző
16b Tisztaság jelző
16c Alacsony töltöttségjelző
16d Csere szimbólum
17 Borotva – töltőegység érintkezők
18 Borotva elektromos csatlakozó
bemenet
19 Borotvatartó tok
20 Különleges csatlakozókábel
(szerkezete különbözik)
A borotva feltöltése és tisztítása
Helyezze bele a borotva fejet a tisztító rendszerbe. A borotva hátulján lévő érintkezők (17)
illeszkednek a tisztító- és töltőegységen lévő érintkezőkhöz (3). Fontos: A borotva
legyen száraz, valamint hab- és szappanmaradéktól mentes!
Ha szükséges, a Clean&Renew tisztító- és töltőegység automatikusan feltölti a borotvát. A borotva higiéniai szintjét is ellenőrzi, és az alábbi tisztítóprogram jelzők (5) egyike
fog felvillanni:
49
Page 50

a borotva tiszta
rövid, takarékos tisztítás szükséges
normál tisztítás szükséges
nagy intenzitású tisztítás szükséges
Ha a tisztító- és töltőegység kiválasztja valamelyik szükséges tisztítóprogramot, az csak
akkor indul el, ha Ön megnyomja a start gombot (4). A tökéletes borotválkozás érde-
kében minden borotválkozás után javasoljuk a tisztítást.
Minden tisztítóprogram több ciklusból áll, amelyek tisztítófolyadékkal öblítik át a borotvafejet. A tisztítási művelet a tisztító- és töltőállomás típusától és/vagy a kiválasztott
programtól függően legfeljebb 16 percet vesz igénybe. Hagyja a borotvát az állomásban
megszáradni. Időjárási viszonyoktól függően több óráig is eltarthat, míg a megmaradt
nedvesség teljesen elpárolog. Ezt követően a borotva használatra kész.
Ha a program véget ért, felvillan a kék
Készenléti üzemmód
A töltési vagy tisztítási folyamat befejezése után 10 perccel a Clean&Renew tisztító- és
töltőegység készenléti üzemmódra vált: A Clean&Renew tisztító- és töltőegység jelzőfényei kikapcsolnak.
jelzőfény.
Borotva kijelző
A borotva kijelzője (16) az akkumulátor töltöttségi szintjét mutatja a bal oldalon, illetve a
higiéniai szintet a jobb oldalon. Amikor az akkumulátor teljesen feltöltődött, és a borotva
is higiénikusan tiszta, mindkét oldalon 6 sötét színű rubrika
látható.
Az akkumulátort jelző rubrikák:
Töltés alatt vagy a borotva használata közben a megfelelő akkumulátor rubrikák villognak. Teljesen feltöltött állapotban 6 rubrika látszik. A töltöttségi szint csökkenésével a
rubrikák fokozatosan eltűnnek.
Alacsony töltöttségi szint jelző
A piros keretben lévő alacsony töltöttségi szint jelző villogása azt jelzi, hogy az akkumulátor töltöttségi szintje alacsony. Az akkumulátor még 2-3 borotválkozáshoz elegendő.
A higiéniát jelző rubrikák:
Miután a borotvát a Clean&Renew tisztító- és töltőegységben megtisztította, mind a
6 higiéniát jelző rubrika látható lesz. A borotva használatával a higiéniát jelző rubrikák
fokozatosan eltűnnek. Miután a borotvát visszahelyezte a tisztító- és töltőegységre,
a rendszer automatikusan kiválasztja a megfelelő tisztítóprogramot, majd visszaállítja
a maximális higiéniát jelző rubrikákat. A borotva vízsugár alatt történő átöblítésével nem
végezhető olyan higiénikus tisztítás, mint a tisztító- és töltőegységben. A higiéniát jelző
rubrikák csak akkor kerülnek visszaállításra, ha a borotva a Clean&Renew tisztító- és
töltőegységben került megtisztításra.
50
Page 51

A töltéssel kapcsolatos információk
• A készülék feltöltése körülbelül 1 órát vesz igénybe, a teljesen feltöltött készülék
pedig 50 perc vezeték nélküli borotválkozást tesz lehetővé. Ez az idő a szakállhosszúságtól és a környezeti hőmérséklettől függően eltérő lehet. Egyetlen borotválkozáshoz egy 5 perces gyors töltés elegendő.
• A töltés elvégzését környezeti hőmérsékleten (5 °C - 35 °C) javasoljuk. Előfordulhat,
hogy szélsőségesen alacsony vagy magas hőmérsékleten a borotva nem megfelelően vagy nem teljesen tölt fel. A borotválkozás szobahőmérsékleten (15 °C - 35 °C)
javasolt. A borotvát ne tegye ki 50 °C-nál magasabb hőmérsékletnek hosszú ideig.
A borotva használata
Használat
A borotva működtetéséhez nyomja meg a ki-/bekapcsoló gombot (12):
• A billenthető borotvafej és a lebegő szita automatikusan követi az arcvonalát.
• A nehezen hozzáférhető helyek (pl. orr alatti rész) borotválásához, a borotvafejet
csúsztassa hátsó pozícióba, ezt követően a kapcsolóval rögzítse. Ebben a szögben a
borotvafej fixálva van.
• A pajesz, bajusz illetve szakáll nyírásához csúsztassa fel a kipattintható
hosszúszőrvágót (11).
Tippek a tökéletes száraz borotválkozáshoz
A tökéletesebb borotválkozás érdekében a Braun az alábbi 3 lépést javasolja:
1. A borotválkozást mindig arcmosás előtt végezze.
2. Borotválkozás közben tartsa a készüléket megfelelő szögben (90°) az arcfelülethez
képest.
3. Feszítse meg a bőrt, és a szakáll növekedési irányával ellentétesen borotválkozzon.
A borotva beállítása
Az intenzitás fokozat beállító gombot +/– ((13) vagy (14)) lenyomva tartva egyéni igényei szerint beállíthatja a borotva intenzitását arcának különböző részein, érzékeny és
intenzív fokozat között. A be-/kikapcsoló gomb jelzőfénye (12) az alábbi tartományban
változhat:
(–) érzékeny borotválás
- világoskék
- sötétkék
- zöld
(+) intenzív borotválás
Az alapos és gyors borotválkozáshoz a zöld (intenzív) beállítást javasoljuk.
A készülék legközelebbi bekapcsolásakor az utolsó elmentett beállítás fog megjelenni.
Tisztítás
Automata tisztítás
Minden egyes borotválkozás után helyezze vissza a borotvát a Clean&Renew tisztító- és
töltőegységre, és végezze el a fenti «Borotválkozás előtt» című részben leírtakat. Ezután
51
Page 52

a rendszer automatikusan elvégzi a szükséges töltést és a tisztítást. Napi használat
során a tisztítópatron körülbelül 30 tisztítóprogramhoz elegendő.
A higiénikus tisztítópatron etanolt vagy izopropanolt (a specifikációkat lásd a patronon)
tartalmaz, amely felnyitást követően magától elpárolog. Ha nem naponta használja, a
patronokat körülbelül 8 hetente kell kicserélni.
A tisztítópatron kenőanyagokat is tartalmaz, amelyek foltot hagyhatnak a külső szitakereten tisztítás követően. Ezek a foltok azonban könnyen eltávolíthatóak: törlőkendővel
vagy puha papírtörlővel óvatosan törölje le.
Kézi tisztítás
Tisztítás folyóvíz alatt:
• Kapcsolja be a borotvát (vezeték nélkül), majd öblítse ki a borotvafejet forró
vízsugár alatt, amíg minden maradék szennyeződést el nem távolít. A
tisztításhoz használhat szemcsés összetevőktől mentes folyékony szappant is. Mossa
le a habot, és még pár másodpercig működtesse a készüléket.
• Ezután kapcsolja ki a borotvát, nyomja meg a kioldógombot (9) a szita- és
nyíróegység (8) eltávolításához, majd hagyja megszáradni.
• Ha rendszeresen tisztítja a borotvát vízben, akkor hetente egyszer cseppentsen egy
csepp könnyű gépolajat a szita- és nyíróegység tetejére.
A borotvát ajánlott minden borotvahabbal való használatot követően megtisztítani.
A borotvát kefével is megtisztíthatja:
• Kapcsolja ki a borotvát. Vegye ki a szita- és nyíróegységet (8), majd finoman ütögesse valamilyen sima felülethez. A kefe segítségével tisztítsa át a billenő borotvafej
belsejét. A nyíróegységet azonban ne tisztítsa kefével, mert kárt tehet benne.
A burkolat tisztítása
Időnként tisztítsa meg a borotva burkolatát és a Clean&Renew tisztító- és töltőegységet
egy nedves törlőkendővel, különösen a tisztítókamra részt, amelybe a borotvát beilleszti.
A tisztítópatron cseréje
A burkolat kinyitásakor a kiemelőgomb (2) megnyomása után várjon néhány másodpercet, mielőtt eltávolítja a használt patront, így elkerülheti a folyadékcsöpögést. Mielőtt
eldobná a használt patront, ellenőrizze, hogy a nyílásokat lezárta-e az új patron fedelével, mivel a használt patron szennyezett tisztító folyadékot tartalmaz.
A borotva teljesítményének megőrzése
A szita- és nyíróegység cseréje
A borotva 100%-os teljesítményének megőrzése érdekében cserélje ki a szita- és
nyíróegységet (8), amikor a borotva kijelzőjén körülbelül 18 hónap múlva megjelenik a
csere szimbólum, illetve, amikor a nyíróegység elhasználódik.
A csere szimbólum a következő 7 borotválkozás alkalmával emlékezteti Önt arra, hogy
cserélje ki a szita- és nyíróegységet. Ezt követően a borotva automatikusan visszaállítja a
kijelzőt alapállapotba.
52
Page 53

Miután kicserélte a szita- és nyíróegységet, egy golyóstoll segítségével nyomja be az
alapállapotba helyező gombot (15) legalább 3 másodpercen keresztül. A művelet elvégzése közben a cserére figyelmeztető fény villogni kezd, majd az alapbeállítás megtörténte után kialszik. A kézi beállítás bármikor elvégezhető.
Kiegészítők
Megvásárolhatók a forgalmazóknál és a Braun szervizekben Központok:
• Szita- és nyíróegység 70S/70B
• Clean&Renew tisztítópatron CCR
Környezetvédelem
A termék akkumulátorokat és/vagy újrafelhasználható elektromos hulladékot
tartalmaz. A környezet védelme érdekében ne dobja háztartási hulladék közé,
hanem újrafelhasználás céljából vigye azt az Ön lakhelye szerinti országban kijelölt elektromos hulladék gyűjtőpontokba.
A tisztítópatron normál háztartási hulladék közé dobható.
A változtatás jogát fenntartjuk.
Az elektromos leírás a speciális vezetékre nyomtatva olvasható.
Problémamegoldás
Probléma: Lehetséges ok: Megoldás:
BOROTVA
Kellemetlen
szag a borotvafejen.
Az akkumulátor
teljesítménye
jelentősen
csökkent.
1. Mossa meg a borotvafejet
vízzel.
2. A tisztítópatront már több
mint 8 hete használja.
1. A szita- és nyíróegység
elhasználódott, így minden
borotválkozás nagyobb
erőt igényel.
2. A borotvafejet rendszeresen tisztítja, ám kenőanyagot nem használ.
1. Ha a borotvafejet csak vízzel szokta
tisztítani, meleg vizet használjon,
időnként pedig egy kis folyékony
szappant (szemcsés összetevőket
tartalmazó szert ne használjon).
Távolítsa el a szita- és nyíróegységet, majd hagyja megszáradni.
2. A tisztítópatront legalább
8 hetente cserélje ki.
1. Cserélje ki a szita- és nyíróegységet.
2. Ha a borotvát rendszeresen tisztítja
vízzel, a kenés érdekében hetente
egyszer cseppentsen egy csepp
könnyű gépolajat a szita tetejére.
53
Page 54

A borotva teljesítménye jelentősen csökkent.
A borotva teljesen feltöltött
akkumulátornál
kikapcsol.
Az akkumulátor
kapacitásának
csökkenésével
az akkumulátor
kijelzőjén egyszerre több
rubrika alszik ki.
A borotva alkatrészeit nemrég
kerültek kicserélésre, a csere
szimbólum
azonban felvillan.
A borotvafej
nedves.
1. A szita- és nyíróegység
elhasználódott.
2. A borotva teljesítményéhez
használt személyes beállítások módosultak.
3. A borotvarendszer eldugult.
A szita- és nyíróegység
elhasználódott, ami több erőt
igényel, mint amire a motor
képes. A készülék kikapcsol.
A szita- és nyíróegység
elhasználódott, így minden
borotválkozás nagyobb erőt
igényel.
Nem nyomta meg a visszaállító gombot.
1. Az automatikus tisztítás
utáni száradási idő túl rövid
volt.
2. A Clean&Renew tisztító- és
töltőegység szűrője eltömődött.
3. A tisztítópatron már hosszú
ideje használatban van.
1. Cserélje ki a szita- és nyíróegységet.
2. Az alapos és gyors borotválkozáshoz a zöld (intenzív) beállítást javasoljuk.
3. Áztassa a szita- és nyíróegységet
forró vízbe egy csepp mosogatószerrel. Ezt követően öblítse ki alaposan, majd ütögesse ki. Ha megszáradt, cseppentsen egy csepp
könnyű gépolajat a szitára.
– Cserélje ki a szita- és nyíróegysé-
get.
– Rendszeresen olajozza be a borot-
vát, különösen akkor, ha csak vízzel
tisztítja.
– Cserélje ki a szita- és nyíróegysé-
get.
– Rendszeresen olajozza be a borot-
vát, különösen akkor, ha csak vízzel
tisztítja.
– A számláló visszaállításához lega-
lább 3 másodpercig nyomja a viszszaállítás gombot.
1. A tisztítást közvetlenül borotválkozás után végezze, elegendő
időt hagyva a száradásra.
2. Tisztítsa meg a szűrőt egy fogpiszkálóval. Rendszeresen törölje tisztára a kádat.
3. Az etanol/izopropanol mennyisége
csökkent, az olaj mennyisége azonban nőtt. Távolítsa el a maradék
szennyeződést egy törlőkendővel.
54
Page 55

CLEAN&RENEW tisztító- és töltőegység
A tisztítás csak
akkor indul el,
ha Ön megnyomta a start
gombot.
Megnövekedett
tisztító folyadék
használat.
Garancia
A vásárlás napjától számított 2 évig tartó garanciát biztosítunk a termékre.
A garancia-időszakon belül minden anyag- és kivitelezési hibát díjmentesen
helyrehozunk, belátásunk szerint vagy javítva, vagy cserélve a készüléket.
Ez a garancia minden olyan országra kiterjed, ahol a készülék a Braun vagy annak
kijelölt viszonteladója forgalmazásában kapható.
A garancia nem fedi a következőket: nem rendeltetésszerű használat miatt bekövetkező
károsodás; kopás és elhasználódás (pl. a borotva szita- és vágókazettája); illetve a
készülék értéke és működése szempontjából elhanyagolható jellegű hibák. A garancia
érvényét veszti, ha a javítást erre nem jogosult személy végzi, és ha nem Braun
alkatrészeket használnak.
A garancia-időszakon belüli javításhoz adja le vagy küldje el a teljes készüléket a
vásárláskor kapott számlával együtt valamely hivatalos Braun Ügyfélszolgálati
Szervizközpontnak vagy a vásárlás helyén.
1. A borotvát nem helyezte
be megfelelően a Clean&Renew tisztító- és töltőegységbe.
2. A tisztítópatron nem tartalmaz elegendő tisztítófolyadékot (a kijelző pirosan
világít).
3. A készülék készenléti
üzemmódban van.
A Clean&Renew tisztító- és
töltőegység szűrője eltömődött.
1. Helyezze a borotvát a Clean&
Renew tisztító- és töltőegységbe
(a borotva érintkezői a tisztító- és
töltőegység érintkezőihez illeszkednek).
2. Helyezzen be egy új tisztítópatront.
3. Nyomja meg ismét a start gombot.
– Tisztítsa meg a szűrőt egy fogpisz-
kálóval.
– Rendszeresen törölje tisztára a
kádat.
55
Page 56

Hrvatski
Naši su proizvodi dizajnirani tako da zadovoljavaju najviše standarde kvalitete, funkcionalnosti i dizajna. Nadamo se da ćete uživati u svojem novom aparatu za brijanje Braun.
Ove upute pročitajte u cijelosti jer sadrže informacije o sigurnosti. Sačuvajte ih
za buduće potrebe.
Upozorenje
Ovaj uređaj ima poseban priključni kabel s ugrađenim sigurnosnim
niskonaponskim adapterom. Nemojte mijenjati ili samostalno rukovati bilo kojim dijelom kabela ili adaptera, jer se tako izlažete opasnosti od strujnog udara. Koristite isključivo priključni kabel koji ste
dobili sa svojim uređajem.
Ako uređaj ima oznaku
492, možete ga koristiti s bilo
kojim Braunovim priključnim kabelom koji ima oznaku 492-XXXX.
Upotrebljavajte isključivo poseban komplet kabela isporučen s ure-
đajem.
Nemojte se brijati ako su mrežica ili kabel oštećeni.
Ovaj je uređaj pogodan za čišćenje pod tekućom vodom
i uporabu u kadi ili pod tušem. Zbog sigurnosnih se razloga
smije upotrebljavati samo bez kabela.
Ovaj uređaj mogu upotrebljavati djeca starija od 8 godina te osobe
sa smanjenim fizičkim, osjetilnim i mentalnim sposobnostima, kao
i osobe koje nemaju prethodno dostatno iskustvo i znanje, pod uvjetom da su pod nadzorom odrasle osobe ili da im je objašnjeno kako
se uređaj upotrebljava na siguran način tako da oni u potpunosti
razumiju moguće rizike prilikom upotrebe. Djeca se ne smiju igrati
s uređajem. Djeca ne smiju obavljati čišćenje i održavanje uređaja,
osim ako nisu starija od 8 godina i pod nadzorom odrasle osobe.
Kako biste spriječili istjecanje tekućine za čišćenje, uvjerite se da je
jedinica Clean&Renew postavljena na ravnu površinu. Kada je umetnuta patrona za čišćenje, jedinicu nemojte naginjati, naglo pomicati
ili premještati jer bi se tekućina za čišćenje mogla izliti iz patrone.
Jedinicu ne spremajte u kupaonski ormarić, ni iznad radijatora ili na
polirane ili lakirane površine.
Patrona za čišćenje sadrži visoko zapaljivu tekućinu stoga je držite
dalje od zapaljivih izvora. Ne pušite pored jedinice. Ne izlažite izravnom sunčevom svjetlu na duže razdoblje.
56
Page 57

Nemojte sami puniti patrone i koristite samo originalne Braunove
patrone.
Opis
Jedinica Clean&Renew
1 Indikator tekućine za čišćenje
2 Gumb za podizanje za zamjenu
patrone
3 Kontakti gdje se aparat za brijanje
priključuje na jedinicu
4 Gumb za pokretanje
5 Indikatori programa za čišćenje
6 Utičnica jedinice
7 Patrona sa sredstvom za čišćenje
Aparat za brijanje
8 Kaseta s mrežicom i blokom noža
9 Gumb za otpuštanje kasete
10 Prekidač za zaključavanje glave
aparata za brijanje
Prije brijanja
Prije prve uporabe priključite aparat za brijanje na električnu utičnicu posebnim priključnim kabelom (20) ili učinite sljedeće:
Instaliranje jedinice Clean&Renew
• Za otvaranje kućišta pritisnite gumb za podizanje (2).
• Patronu za čišćenje (7) držite bazu na ravnoj i stabilnoj površini (npr. na stolu).
• Pažljivo skinite poklopac s patrone.
• Patronu umetnite u bazu jedinice do kraja.
• Polako zatvorite kućište gurajući prema dolje dok sve ne sjedne na svoje mjesto.
• Ukopčajte jedinicu u električnu utičnicu preko niskonaponskog priključnog kabela
(20) koji prvo trebate uključiti u utičnicu jedinice (6).
11 Rasklopivi trimer za duge dlačice
12 Prekidač za uključivanje/isključivanje
13 – gumb za postavke (osjetljivo)
14 + gumb za postavke (intenzivno)
15 Gumb za resetiranje
16 Zaslon aparata za brijanje
16a Segmenti baterije
16b Segmenti čistoće
16c Indikator ispražnjene baterije
16d Indikator zamjene
17 Kontakti gdje se aparat za brijanje
priključuje na jedinicu
18 Utičnica aparata za brijanje
19 Putni etui
20 Posebni priključni kabel
(dizajn može biti različit od prikazanog)
Indikator tekućine za čišćenje (1) prikazat će količinu tekućine u patroni:
dostupno je do 30 ciklusa čišćenja
preostalo je do 7 ciklusa čišćenja
potrebna je nova patrona.
Punjenje i čišćenje aparata za brijanje
Umetnite glavu aparata za brijanje s otpuštenom blokadom glave (10) u jedinicu Clean&Review tako da prednji dio aparata gleda prema vama. Kontakti (17) na stražnjoj
strani aparata za brijanje poravnat će se s kontaktima (3) u jedinici za čišćenje. Važno:
Aparat za brijanje mora biti suh i bez ostataka pjene ili sapunice!
57
Page 58

Ako je potrebno, jedinica Clean&Renew će automatski početi puniti aparat za brijanje.
Analizirat će se i status čistoće aparata za brijanje te će se upaliti jedan od sljedećih
indikatora programa za čišćenje (5):
aparat za brijanje je čist
potrebno je kratko ekonomično čišćenje
potrebna je normalna razina čišćenja
potrebno je intenzivno čišćenje
Odabere li jedinica jedan od potrebnih programa čišćenja, on se neće pokrenuti dok ne
pritisnete gumb za pokretanje (4). Za najbolje rezultate brijanja preporučujemo
čišćenje nakon svakog brijanja.
Svaki program čišćenja sastoji se od nekoliko ciklusa tijekom kojih tekućina za čišćenje
prolazi kroz brijaću glavu. Ovisno o modelu jedinice Clean&Renew i odabranom
programu, vrijeme čišćenja može trajati do 16 minute. Ostavite aparat u jedinici da se
osuši. Imajte na umu da je ponekad potrebno nekoliko sati da cjelokupna vlažnost ispari
u zrak, ovisno o klimatskim uvjetima. Nakon toga aparat je spreman za uporabu.
Kada program završi, upalit će se plavi indikator.
Stanje mirovanja
10 minuta nakon dovršetka punjenja ili čišćenja, jedinica Clean&Renew prelazi u stanje
mirovanja: tada se isključuju indikatori jedinice Clean&Renew.
Zaslon aparata za brijanje
Zaslon aparata za brijanje (16) prikazuje status napunjenosti baterije s lijeve strane
i status čistoće s desne strane. Kada je baterija puna i kada je aparat za brijanje čist, na
svakoj se strani nalazi 6 tamnih segmenata.
Segmenti baterije:
Tijekom punjenja ili uporabe aparata za brijanje treperit će pripadajući segmenti baterije
(16c). Kada je baterija puna, prikazano je svih 6 segmenata. S pražnjenjem baterije
postupno nestaju i segmenti.
Indikator ispražnjene baterije
Indikator ispražnjene baterije (16c) ima crveni okvir koji treperi kako bi ukazao da je
baterija skoro prazna. Preostali kapacitet baterije dostatan je za 2 do 3 brijanja.
Segmenti čistoće:
Nakon čišćenja aparata za brijanje u jedinici Clean&Renew prikazat će se svih
6 segmenata (16b). Dok se aparat za brijanje upotrebljava, segmenti čistoće postupno
nestaju. Kada se aparat za brijanje vrati u jedinicu, sustav će automatski odabrati odgovarajući program čišćenja i vratiti segmente na maksimalnu čistoću. Budući da ispiranje
aparata za brijanje pod mlazom tekuće vode nije higijensko kao čišćenje u jedinici,
segmenti čistoće vratit će se samo kada se aparat za brijanje čisti u jedinici
Clean&Renew.
58
Page 59

Informacije o punjenju
• Potpuno punjenje traje oko 1 sat i omogućuje do 50 minuta bežičnog brijanja. To
može varirati ovisno o vrsti brade i temperaturi okoline. Brzo punjenje od 5 minuta
dostatno je za 1 brijanje.
• Preporučena sobna temperatura za punjenje je od 5 °C do 35 °C. Pri ekstremno niskim ili
visokim temperaturama baterija se možda neće pravilno puniti ili se neće uopće napuniti. Preporučena sobna temperatura za brijanje je od 15 °C do 35 °C. Aparat za brijanje
ne izlažite temperaturama višima od 50 °C na duža razdoblja.
Uporaba aparata za brijanje
Način uporabe
Za pokretanje aparata za brijanje pritisnite prekidač za uključivanje/isključivanje (12):
• Pokretna glava aparata za brijanje i pomična mrežica automatski se prilagođavaju
obrisima lica.
• Za brijanje kompliciranijih područja (npr. ispod nosa), gurnite brijaću glavu prema
natrag, a potom pomaknite i prekidač za zaključavanje prema natrag. Pokretna glava
je onda zaključana na toj poziciji.
• Za podrezivanje zalizaka, brkova ili brade rasklopite trimer za duge dlačice (11).
Savjeti za savršeno suho brijanje
Za što bolje rezultate brijanja Braun preporučuje ova 3 jednostavna koraka:
1. Uvijek se brijte prije umivanja.
2. Aparat za brijanje sve vrijeme držite pod pravim kutom (90°) u odnosu na kožu.
3. Zategnite kožu i brijte se u smjeru suprotnom od rasta brade.
Prilagođavanje aparata za brijanje
Pritiskom gumba za odabir brzine –/+ ((13) ili (14)) možete prilagoditi snagu brijanja
prema individualnim potrebama na različitim dijelovima lica, od osjetljivog do intenzivnog. Kontrolno svjetlo na prekidaču za uključivanje/isključivanje (12) mijenja se unutar
sljedećeg raspona:
(–) brijanje osjetljive kože
- svijetloplavo
- tamnoplavo
- zeleno
(+) intenzivno brijanje
Za temeljito i brzo brijanje preporučujemo zelenu (intenzivnu) postavku.
Prilikom sljedećeg uključivanja aktivna će biti posljednja primijenjena postavka.
Čišćenje
Automatsko čišćenje
Nakon svakog brijanja aparat vratite u jedinicu Clean&Renew i slijedite postupak opisan
u odjeljku „Prije brijanja“. Tada se automatski rješavaju sve potrebe punjenja i čišćenja.
59
Page 60

Kada se koristi svakoga dana, patrona za čišćenje trebala bi biti dostatna za oko 30
ciklusa čišćenja.
Patrona sa sredstvom za čišćenje sadrži etanol ili izopropanol, koji jednom kada se
patrona otvori, polako isparava u zrak. Svaka se patrona, ako se ne koristi svakodnevno,
treba zamijeniti nakon otprilike 8 tjedana kako biste bili sigurni da će optimalno
dezinficirati vaš aparat.
Patrona za čišćenje sadrži i sredstva za podmazivanje koja nakon čišćenja mogu ostaviti
tragove na vanjskom okviru mrežice. Međutim, te se tragove može lako ukloniti nježnim
brisanjem krpom ili papirnatim ubrusima.
Ručno čišćenje
Čišćenje tekućom vodom:
• Uključite uređaj (ali pripazite da pritom ne bude uključen u struju preko
kabela) i ispirite glavu toplom tekućom vodom dok ne uklonite sve ostatke.
Smijete upotrebljavati tekući sapun bez abrazivnih tvari. Isperite svu pjenu i pustite da
aparat za brijanje radi još nekoliko sekundi.
• Zatim isključite aparat za brijanje, pritisnite gumb za otpuštanje (9) za uklanjanje
kasete s mrežicom i blokom noža (8) i pustite da se osuši.
• Čistite li redovito aparat tekućom vodom, jednom tjedno nanesite kapljicu laganog
mašinskog ulja (ne dolazi s uređajem) na trimer za podrezivanje dugih dlačica i kasetu
s mrežicom i blokom noža.
Aparat za brijanje se treba očistiti nakon svake uporabe pjene ili gela za brijanje.
Čišćenje četkicom:
• Isključite aparat za brijanje. Uklonite kasetu s mrežicom i blokom noža
udarajte po ravnoj površini. Četkom očistite unutrašnjost pokretne glave. Međutim,
kasetu ne čistite četkom jer bi se mogla oštetiti.
Čišćenje kućišta
Povremeno vlažnom krpom očistite kućište aparata za brijanje i jedinicu Clean&Renew,
posebno unutar komore za čišćenje u kojoj stoji aparat za brijanje.
Zamjena patrone za čišćenje
Nakon pritiska gumba za podizanje (2) radi otvaranja kućišta, pričekajte nekoliko
sekundi prije uklanjanja iskorištene patrone kako biste izbjegli kapanje. Prije nego što
bacite iskorištenu patronu, provjerite jeste li poklopcem nove patrone zatvorili otvore
stare budući da iskorištena patrona sadrži kontaminiranu otopinu za čišćenje.
8 i lagano
Održavanje aparata za brijanje u najboljem stanju
Zamjena kasete s mrežicom i blokom noža / resetiranje
Kako biste održali 100-postotnu učinkovitost aparata, zamijenite kasetu s mrežicom i
blokom noža (8) kada se na indikatoru aparata za brijanje upali simbol za zamjenu (16d)
nakon približno 18 mjeseci ili kada se istroši.
Simbol za zamjenu tijekom sljedećih 7 brijanja podsjećat će vas da zamijenite kasetu s
mrežicom i blokom noža. Zatim će aparat za brijanje automatski resetirati indikator.
60
Page 61

Nakon što zamijenite kasetu s mrežicom i blokom i noža, pomoću kemijske olovke pritisnite gumb za resetiranje (15) na najmanje 3 sekunde kako biste resetirali brojač. Dok
to radite, svjetlo za zamjenu treperi i isključuje se nakon dovršetka resetiranja. Ručno
resetiranje možete provesti bilo kada.
Zamjenski dijelovi Dostupni su
Dostupna kod trgovca ili u servisnim centrima tvrtke Braun:
• Kaseta s mrežicom i blokom noža 70S/70B
Patrona za čišćenje Clean&Renew CCR
Napomena o zaštiti okoliša
Ovaj proizvod sadrži (punjive) baterije i/ili reciklabilni električni otpad. U interesu
zaštite okoliša, molimo da ga na kraju njegovog radnog vijeka ne odlažete
zajedno s kućnim otpadom, već na mjestima predviđenima za prikupljanje takvog
otpada u vašoj zemlji.
Patronu za čišćenje možete baciti s običnim kućnim otpadom.
Podložno promjenama bez prethodne najave.
Za električne specifikacije pogledajte natpis na kompletu posebnog kabela.
Rješavanje problema
Problem: Mogući razlog: Rješenje:
APARAT ZA BRIJANJE
Neugodan miris
iz glave aparata
za brijanje.
Učinkovitost
baterije značajno je smanjena.
1. Glava aparata za brijanje
čisti se vodom.
2. Patrona za čišćenje
u uporabi je duže od 8 tjedana.
1. Mrežica i blok noža su
istrošeni što zahtijeva više
snage za svako brijanje.
2. Glava aparata za brijanje
redovito se čisti vodom, ali
se ne podmazuje.
1. Kada glavu aparata za brijanje
čistite vodom, upotrebljavajte samo
vruću vodu i povremeno tekući
sapun (bez abrazivnih tvari). Izvadite kasetu s mrežicom i blokom
noža kako bi se osušila.
2. Patronu za čišćenje zamijenite najmanje svakih 8 tjedana.
1. Zamijenite kasetu s mrežicom i blokom noža.
2. Ako se aparat za brijanje redovito
čisti vodom, nanesite kap laganog
strojnog ulja na vrh mrežice jednom
tjedno radi podmazivanja.
61
Page 62

Učinkovitost brijanja značajno
je opala.
Aparat za brijanje isključuje se
s potpuno
napunjenom
baterijom.
Segmenti baterije na indikatoru preskaču
se sa smanjenjem kapaciteta
baterije.
Dijelovi za brijanje su nedavno
promijenjeni, ali
simbol za
zamjenu i dalje
svijetli.
Brijaća glava je
vlažna.
1. Mrežica i blok noža su
istrošeni.
2. Osobna postavka intenziteta brijanja je promijenjena.
3. Sustav za brijanje je začepljen.
Mrežica i blok noža su istrošeni što zahtijeva više snage
nego što motor može isporučiti. Aparat se isključuje.
Mrežica i blok noža su istrošeni što zahtijeva više snage
za svako brijanje.
Gumb za resetiranje nije pritisnut.
1. Vrijeme sušenja nakon
automatskog čišćenja je
bilo prekratko.
2. Odvod jedinice Clean&
Renew je začepljen.
3. Patrona za čišćenje već je
dugo u uporabi.
1. Zamijenite kasetu s mrežicom i blokom noža
2. Za temeljito i brzo brijanje preporučujemo zelenu (intenzivnu)
postavku.
3. Kasetu s mrežicom i blokom noža
namočite u vrućoj vodi s malo tekućeg deterdženta. Nakon toga temeljito isperite i tapkanjem odstranite
vodu. Kada se osuši, na mrežicu
nanesite kap blagog strojnog ulja.
– Zamijenite kasetu s mrežicom i blo-
kom noža
– Redovito podmazujte sustav za bri-
janje, posebno kada čistite samo
vodom.
– Zamijenite kasetu s mrežicom i blo-
kom noža.
– Redovito podmazujte sustav za bri-
janje, posebno kada čistite samo
vodom.
– Pritisnite gumb za resetiranje na
najmanje 3 sekunde radi resetiranja
brojača.
1. Aparat čistite odmah nakon brijanja
kako bi ostalo dovoljno vremena za
sušenje.
2. Drvenom čačkalicom očistite
odvod. Redovito brišite kadicu.
3. Smanjio se omjer etanola/izopropanola, a povećao omjer ulja.
Naslage uklonite krpom.
JEDINICA CLEAN&RENEW
Čišćenje se ne
pokreće kada
pritisnete gumb
za pokretanje.
62
1. Aparat za brijanje
nije pravilno postavljen u
jedinicu Clean&Renew.
2. Patrona za čišćenje ne
sadrži dovoljno tekućine za
čišćenje (indikator svijetli
crvenim svjetlom).
3.
Uređaj je u stanju mirovanja.
1. Aparat za brijanje umetnite u jedinicu Clean&Renew (kontakti na
aparatu za brijanje trebaju se
poravnati s kontaktima u jedinici).
2. Umetnite novu patronu za čišćenje.
3. Ponovno pritisnite gumb za pokretanje.
Page 63

Povećana
potrošnja
tekućine za
čišćenje.
Jamstvo
Za ovaj proizvod jamčimo jamstveno razdoblje od 2 godine od dana kupnje. U okviru tog
razdoblja besplatno ćemo otkloniti bilo kakvu neispravnost uređaja do koje je došlo
zbog zamora materijala ili pogrešaka u radu ili popravkom ili zamjenom uređaja ovisno o
procjeni.
Ovo jamstvo vrijedi za svaku zemlju u kojoj ovaj uređaj distribuira Braun ili njegov
ovlašteni distributer.
Ovo jamstvo ne pokriva: štetu nastalu zbog nepravilne upotrebe, normalno trošenje
materijala (npr. u slučaju trošenja mrežice na uređaju za brijanje), kao i oštećenja koja
imaju neosporan utjecaj na vrijednost ili rad uređaja. Jamstvo prestaje vrijediti ako
popravke vrše neovlaštene osobe te ako se ne koriste originalni Braunovi dijelovi.
Ako tijekom jamstvenog razdoblja zatrebate servis, donesite ili pošaljite cijeli uređaj
zajedno s računom na adresu Braunovog ovlaštenog servisnog centra.
Napomena: Ako ne možete riješiti svoj problem putem servisne mreže navedene u
nastavku, molimo nazovite 091 66 01 777 kako biste dobili daljnje upute.
SINGULI D.O.O., www.singuli.hr
10000, Zagreb, Primorska 3,
10000, Zagreb, CMP, Savica Šanci 145, ) 01 24 04 451
10000, Zagreb, Jospia Strganca 12, ) 01 37 79 029
JEŽIĆ COLOR SERVIS, 43000, Bjelovar, Petra Zrinskog 13, ) 043 243 500
ELMIN, 48350, Đurđevac, R. Boškovića 20, ) 048 813 365
MAGREL vl.Grković Marko, 51211, Rijeka / Matulji, Frana Supila 11, ) 095 911 0009
RTV SERVIS KALAICA, 34310, Pleternica, A.M.Relkovića 6, ) 034 252 000
SORIĆ ELEKTRONIKA, 44000, Sisak, A.Starčevića 35, ) 044 549 117
MERC&DUJMOVIĆ, 21000, Split, Alojzija Stepinca 6, ) 021 537 780
ELEKTRO OBRT MARKOVIĆ, 42000, Varaždin, K.Filića 9, ) 042 210 588
ALTA , 23000, Zadar, Vukovarska 3c, ) 023 327 666
Odvod jedinice Clean&Renew
je začepljen.
01 37 72 644
)
– Drvenom čačkalicom očistite
odvod.
– Redovito brišite kadicu.
63
Page 64

Slovenski
Naši izdelki so zasnovani tako, da ustrezajo najvišjim standardom kakovosti, funkcionalnosti in oblike. Upamo, da uživate v britju z vašim novim brivnikom Braun.
Preberite celotna navodila za uporabo, saj vsebujejo pomembne varnostne
informacije. Shranite jih za poznejšo uporabo.
Opozorilo
Sistem za britje ima poseben kabel z vgrajenim tokokrogom z varnostno nizko napetostjo SELV (»Safety Extra Low Voltage«). Ne posegajte v sistem in ne menjavajte delov sistema, saj obstaja nevarnost
električnega udara.
Če je aparat označen z
492, ga lahko uporabljate s kate-
rim koli Braun napajalnikom kodiranim z 492-XXXX.
Uporabljajte samo poseben kabel, ki je priložen napravi.
Brivnika ne uporabljajte, če je kabel ali folija poškodovana.
Napravo lahko čistite pod tekočo vodo in jo uporabljate v kadi
ali pod tušem. Zaradi varnosti lahko brivnik uporabljate
samo brez kabla.
Otroci, starejši od 8 let, ter osebe z zmanjšanimi telesnimi, senzoričnimi ali duševnimi sposobnostmi ali s pomanjkljivimi izkušnjami in
znanjem lahko napravo uporabljajo samo pod nadzorom ali če so bile
poučene o varni uporabi naprave in razumejo nevarnosti, povezane
z uporabo naprave. Otroci se z napravo ne smejo igrati. Otroci
naprave ne smejo čistiti in vzdrževati, razen če so starejši od 8 let
in pod nadzorom.
Da bi preprečili iztekanje čistilne tekočine, postajo Clean&Renew
namestite na ravno površino. Ko vstavite čistilno kartušo, postaje ne
nagibajte, premikajte ali prenašajte na način, ki bi vodil v uhajanje
čistilne tekočine iz kartuše. Postaje ne odlagajte v kopalniško omarico ali na radiator ali na polirano ali lakirano površino.
Čistilna kartuša vsebuje zelo vnetljivo tekočino, ki je ne smete shranjevati v bližini vnetljivih virov. Ne kadite v bližini postaje. Postaje ne
izpostavljajte neposredni sončni svetlobi daljši čas.
Ne polnite kartuše in uporabljajte samo originalne nadomestne kartuše znamke Braun.
64
Page 65

Opis
Postaja Clean&Renew
1 Prikazovalnik čistilne tekočine
2 Potisni gumb za menjavo kartuše
3 Kontakti za povezavo postaje in
brivnika
4 Gumb za vklop
5 Indikatorji programa za čiščenje
6 Vtičnica postaje
7 Čistilna kartuša
Brivnik
8 Kaseta s folijo in rezilnikom
9 Gumb za sprostitev kasete
10 Stikalo za zaklepanje glave brivnika
11 Izvlečni prirezovalnik za daljše dlake
12 Stikalo za vklop/izklop
13 Gumb za nastavitve – (nežno)
14 Gumb za nastavitve + (intenzivno)
15 Gumb za ponastavitev
16 Prikazovalnik brivnika
16a Segmenti akumulatorja
16b Segmenti higienskega statusa
16c Indikator za nizko stanje napolnjenosti
16d Indikator za menjavo
17 Kontakti za povezavo brivnika in
postaje
18 Vtičnica brivnika
19 Potovalna torbica
20 Posebni kabel
(oblika priključka je lahko drugačna)
Pred britjem
Pred prvo uporabo morate brivnik vključiti v električno omrežje s posebnim kablom (20)
ali izvesti naslednje korake:
Nameščanje postaje Clean&Renew
• Pritisnite potisni gumb (2), da odprete ohišje.
• Čistilno kartušo (7) položite na ravno in stabilno podlago (npr. mizo).
• Previdno privzdignite pokrov kartuše.
• Kartušo potisnite na dno postaje, kolikor je mogoče.
• Ohišje počasi zaprite in ga potisnite navzdol, dokler ne zaskoči.
• S posebnim kablom (20) vtičnico čistilne naprave (6) povežite z električnim omrežjem.
Prikazovalnik čistilne tekočine (1) prikazuje količino tekočine v kartuši:
na voljo za do 30 čiščenj
na voljo za največ 7 čiščenj
potrebna je nova kartuša
Polnjenje in čiščenje brivnika
Vstavite brivno glavo s sprednjim delom in sprostite zaklep glave (10) v postaji Clean &
Renew. Kontakti (17) na hrbtni strani brivnika se poravnajo s kontakti (3) čistilne postaje.
Pomembno: Brivnik mora biti suh, na njem pa ne smejo biti ostanki pene ali mila.
Po potrebi se na postaji Clean&Renew izvede samodejno polnjenje brivnika. Prav tako
se izvede analiza higienskega stanja brivnika in zasveti eden od indikatorjev programa
za čiščenje (5):
brivnik je čist
potrebno je kratko varčno čiščenje
potrebno je običajno čiščenje
potrebno je visoko intenzivno čiščenje
65
Page 66

Če na postaji izberete enega od programov za čiščenje, se ne zažene, če ne pritisnete
gumba za vklop (4). Za najboljše rezultate britja priporočamo, da čiščenje izve-
dete po vsaki uporabi.
Vsak program čiščenja je sestavljen iz več ciklusov, med katerimi čistilna tekočina steče
skozi glavo brivnika. Čas čiščenja je odvisen od modela za čiščenje in polnjenje in/ali
izbranega programa in traja do 16 minut. Brivnik pustite v enoti, da se posuši. Odvisno
od klimatskih razmer lahko traja več ur, dokler vsa vlaga izhlapi. Brivnik je nato
pripravljen na uporabo.
Po koncu programa zasveti modra
Način pripravljenosti
Deset minut po koncu polnjenja ali čiščenja se postaja Clean&Renew preklopi v način
pripravljenosti: Kontrolne lučke postaje Clean&Renew prenehajo svetiti.
kontrolna lučka.
Prikazovalnik brivnika
Na levi strani prikazovalnika brivnika (16) je prikazano stanje napolnjenosti akumulatorja, na desni pa higienski status. Ko je akumulator povsem napolnjen in ko je brivnik
čist, je na vsaki strani prikazanih šest temnih segmentov.
Segmenti akumulatorja:
Med polnjenjem ali med uporabo brivnika utripajo ustrezni segmenti akumulatorja. Ko je
akumulator povsem napolnjen, je prikazanih vseh 6 segmentov. Z manjšanjem napolnjenosti akumulatorja segmenti postopoma izginjajo.
Indikator praznega akumulatorja
Indikator za nizko stanje napolnjenosti z rdečim okvirjem nakazuje, da je napolnjenost
akumulatorja nizka. Vendar preostala zmogljivost akumulatorja zadošča še za 2–3 britja.
Segmenti higienskega statusa:
Po čiščenju brivnika v postaji Clean&Renew se prikaže vseh 6 segmentov higienskega
stanja. Z uporabo brivnika pa segmenti postopoma izginjajo. Ko je brivnik nameščen
na čistilni postaji, sistem samodejno izbere ustrezni program za čiščenje in prikažejo
se vsi segmenti, ki označujejo najvišji higienski status. Spiranje brivnika pod tekočo
vodo ni tako higiensko temeljito kot čiščenje v čistilni postaji, zato se bodo vsi
segmenti higienskega statusa prikazali šele po čiščenju brivnika v čistilni postaji
Clean&Renew.
Informacije o polnjenju
• Polnjenje akumulatorja traja eno uro in omogoča 50-minutno uporabo brez napajanja.
Čas britja je odvisen od vzorca rasti brade in temperature okolice. Za enkratno uporabo je dovolj, da se brivnik polni pet minut.
• Priporočena temperatura prostora, v katerem poteka polnjenje, je 5 °C do 35 °C. Pri
višjih ali nižjih temperaturah se baterija morda ne bo ustrezno napolnila. Priporočena
temperatura okolice za britje znaša med 15 °C do 35 °C. Brivnika ne izpostavljajte temperaturam nad 50 °C za daljši čas.
66
Page 67

Uporaba brivnika
Uporaba brivnika
Za vklop brivnika pritisnite gumb za vklop (12):
• Gibljiva glava brivnika in lebdeče folije se samodejno prilagajajo površini vašega
obraza.
• Za britje težko dostopnih mest (npr pod nosom), najprej potisnite brivno glavo v zadnji
položaj, nato premaknite stikalo za zaklepanje glave na hrbtu. Nagibna brivna glava je
zaklenjena v tem kotu.
• Za striženje zalizkov, brkov in brade izvlečni prirezovalnik za daljše dlake (11) potisnite
navzgor.
Nasveti za popolno suho britje
Za najboljše rezultate britja vam družba Braun priporoča, da sledite naslednjim 3 preprostim korakom.
1. Vedno se brijte, preden si umijete obraz.
2. Brivnik morate vedno držati pod ustreznim kotom (90°) na površino kože.
3. Kožo napnite in z brivnikom drsite v nasprotni smeri rasti dlak.
Prilagajanje brivnika
S pritiskom gumba za pospešitev –/+ ((13) ali (14)) lahko intenzivnost britja na različnih
delih obraza prilagodite svojim potrebam ter izbirate intenzivnejšim ali nežnejšim
britjem. Lučka stikala za vklop/izklop (12) se spreminja glede na nastavitev:
(–) nežno britje
- svetlo modra
- temno modra
- zelena
(+) intenzivno britje
Za temeljito in hitro britje priporočamo nastavitev na zeleno (intenzivno). Ob naslednjem
vklopu brivnika se aktivira zadnja uporabljena nastavitev.
Čiščenje
Samodejno čiščenje
Po vsakem britju brivnik namestite na postajo Clean&Renew in izvedite postopek, opisan v poglavju »Pred britjem«. Čiščenje in polnjenje se izvedeta samodejno. Ob vsakodnevni uporabi čistilna kartuša zadošča 30 ciklom čiščenja.
Higienska čistilna kartuša vsebuje etanol ali izopropanol (glejte tehnične zahteve na
kartuši), ki po odprtju kartuše začne naravno izhlapevati. Če postaje ne uporabljate vsak
dan, morate kartušo po približno 8 tednih menjati.
Čistilna kartuša vsebuje tudi maziva, ki lahko po čiščenju pustijo sledi na zunanjem
nosilcu folije. Te sledi lahko preprosto odstranite tako, da jih obrišete s krpo ali mehkim
papirnatim robčkom.
67
Page 68

Ročno čiščenje
Spirate pod tekočo vodo:
• Brivnik vklopite (brez kabelske povezave) in sperite glavo brivnika pod toplo
tekočo vodo, da odstranite vse dlake. Uporabite lahko tudi tekoče milo brez agre-
sivnih sestavin. Peno sperite in pustite brivnik delovati še nekaj sekund.
• Brivnik nato izključite, pritisnite gumb za sprostitev kasete (9) in kaseto z rezalnikom
in folijo (8) ter pustite, da se posuši.
• Če brivnik redno spirate s tekočo vodo, na vrh kasete z rezalnikom in folijo enkrat
tedensko nanesite kapljico lahkega strojnega olja.
Brivnik je treba očistiti po vsaki uporabi pene.
Očistite tudi s krtačko:
• Brivnik izklopite. Odstranite kaseto z rezalnikom in folijo (8) ter jo izpraznite tako,
da z njo nežno udarjate ob ravno površino. S krtačko očistite notranjost gibljive glave.
Vendar krtačke ne uporabljajte za čiščenje kasete, saj jo lahko poškodujete.
Čiščenje ohišja
Občasno ohišje brivnika in postajo Clean&Renew očistite z vlažno krpo, zlasti notranjost
čistilne komore, kjer je nameščen brivnik.
Menjavanje čistilne kartuše
Ko ohišje odprete s pritiskom potisnega gumba (2), preden odstranite izrabljeno kartušo nekaj sekund počakajte in preprečite kapljanje iz kartuše. Odprtine izrabljene kartuše pred odlaganjem obvezno prekrijte s pokrovom nove kartuše, saj izrabljena kartuša
vsebuje onesnaženo čistilno tekočino.
Ohranjanje brezhibnega delovanja brivnika
Menjavanje kasete z rezalnikom in folijo / ponastavitev
Za ohranjanje 100-odstotne učinkovitosti delovanja brivnika kaseto z rezalnikom in folijo
(8) menjajte, ko na prikazovalniku brivnika zasveti simbol za menjavo, tj. po 18 mesecih
oz. ko je kaseta obrabljena.
Simbol za menjavo kasete vas bo na menjavo kasete z rezalnikom in folijo opomnil še
sedemkrat ob uporabi brivnika. Nato se prikazovalnik brivnika samodejno ponastavi.
Po menjavi kasete z rezalnikom in folijo s konico svinčnika za vsaj tri sekunde pridržite
gumb za ponastavitev (15), da ponastavite števec. Med ponastavitvijo kontrolna lučka
utripa, po koncu ponastavitve pa preneha svetiti. Vrednost lahko kadar koli ponastavite
tudi ročno.
Dodatki
Na voljo pri vašem trgovcu ali v servisnih centrih družbe Braun:
• kaseta z rezalnikom in folijo 70S/70B
• čistilna kartuša postaje Clean&Renew CCR
68
Page 69

Okoljsko opozorilo
Izdelek vsebuje akumulator in/ali električne odpadke, ki jih je mogoče reciklirati.
Ne zavrzite ga med običajne gospodinjske odpadke, temveč ga za namen recikliranja posredujte v zbirni center za električne in elektronske odpadke v vaši državi.
Čistilno kartušo lahko zavržete med običajne gospodinjske odpadke.
Pridržujemo si pravico do sprememb brez predhodnega obvestila.
Za tehnične zahteve za napajanje glejte oznako na posebnem kablu.
Odpravljanje težav
Težava: Možni vzrok: Rešitev:
BRIVNIK
Neprijetne
vonjave iz glave
brivnika.
Zmogljivost
akumulatorja se
je bistveno
zmanjšala.
Zmogljivost
brivnika se je
bistveno zmanjšala.
1. Glavo brivnika čistite z
vodo.
2. Čistilno kartušo uporabljate že več kot
8 tednov.
1. Folija in rezalnik sta obrabljena, zato pri vsakem britju porabita več energije.
2. Glavo brivnika redno čistite
z vodo, vendar nanjo ne
nanašajte olja.
1. Folija in rezalnik sta izrabljena.
2. Osebne nastavitve za delovanje brivnika so bile spremenjene.
3. Sistem za britje je zamašen.
1. Pri čiščenju glave brivnika z vodo
uporabljajte samo toplo vodo in
občasno malce tekočega mila (brez
agresivnih sestavin). Odstranite
kaseto rezalnika in folije ter pustite,
da se posuši.
2. Čistilno kartušo menjajte vsaj na 8
tednov.
1. Obnovite kaseto z rezalnikom in
folijo.
2. Če brivnik redno čistite z vodo,
enkrat tedensko na vrh folije kanite
kapljico lahkega strojnega olja, da
jo naoljite.
1. Obnovite kaseto z rezalnikom in
folijo.
2. Za temeljito in hitro britje priporočamo nastavitev na zeleno lučko
(intenzivno).
3. Kaseto z rezalnikom in folijo namočite v toplo vodo s tekočim čistilom
za posodo. Kaseto nato dobro sperite in ji povsem izpraznite tako, da
jo z njo nežno udarjate ob površino.
Ko se posuši, na vrh folije kanite
kapljico lahkega strojnega olja.
69
Page 70

Ko je akumulator napolnjen,
se brivnik
izklopi.
Segmenti prikaza akumulatorja na prikazovalniku se
manjšajo glede
na zmanjševanje zmogljivosti
akumulatorja.
Dele brivnika
ste nedavno
menjali, vendar
kljub temu simbol za menjavo
sveti.
Glava brivnika je
vlažna.
POSTAJA CLEAN&RENEW
Ob pritisku
gumba za vklop
se čiščenje ne
prične.
Povečana
poraba čistilne
tekočine.
Folija in rezalnik sta obrabljena, zato za delovanje potrebujeta več moči, kot jo
lahko zagotovi motor.
Naprava se izklopi.
Folija in rezalnik sta obrabljena, zato pri vsakem britju
porabita več energije.
Gumba za ponastavitev niste
pritisnili.
1. Prekratek čas sušenja po
samodejnem čiščenju.
2. Odprtina za izpust postaje
Clean&Renew je zamašena.
3. Čistilna kartuša je že dalj
časa v uporabi.
1. Brivnik ni pravilno nameščen na postajo Clean&Renew.
2. V čistilni kartuši ni dovolj
čistilne tekočine (prikazovalnik je osvetljen rdeče).
3. Naprava je v načinu pripravljenosti.
Odprtina za izpust postaje
Clean&Renew je zamašena.
– Obnovite kaseto z rezalnikom in
folijo.
– Sistem za britje redno mažite z
oljem, zlasti če za čiščenje uporabljate samo vodo.
– Obnovite kaseto z rezalnikom in
folijo.
– Sistem za britje redno mažite z
oljem, zlasti če za čiščenje uporabljate samo vodo.
– Za tri sekunde pridržite gumb za
ponastavitev, da ponastavite števec.
1. Napravo očistite takoj po britju, da
je na voljo dovolj časa za sušenje.
2. Odprtino za izpust očistite z
zobotrebcem. Redno brišite
posodo.
3. Delež etanola/izopropanola se je
zmanjšal, delež olja pa povečal.
Ostanke odstranite s krpo.
1. Brivnik namestite na postajo Clean&Renew (kontakti brivnika
morajo biti poravnani s kontakti
postaje).
2. Vstavite novo čistilno kartušo.
3. Znova pritisnite gumb za vklop.
– Odprtino za izpust očistite z
zobotrebcem.
– Redno brišite posodo.
70
Page 71

Garancijski list
Za izdelek velja dveletna garancija, ki začne veljati z datumom izročitve blaga.
Proizvajalec jamči, da bo izdelek deloval v garancijskem roku ob pravilni uporabi v
skladu z njegovim namenom in priloženimi navodili. V garancijski dobi bomo brezplačno
odpravili vse okvare izdelka, ki so posledica napak v materialu ali izdelavi, tako da vam
bomo izdelek po naši presoji popravili ali v celoti zamenjali.
Če pooblaščeni servis vašega izdelka ne popravi v 45 dneh, imate pravico zahtevati nov
izdelek. Za sprejem v reklamacijo se šteje dan, ko je izdelek sprejet v pooblaščeni
servis, pri prodajalcu(distributerju) ali v trgovino, kjer ste izdelek kupili.
Čas zagotavljanja servisa, vzdrževanja, nadomestnih delov in priklopnih aparatov je 3
leta po preteku garancijskega roka.
Popravila na domu zaradi zahtevnosti in neprenosljivosti sodobne servisne opreme in
razpoložljivosti rezervnih delov niso mogoča.
Garancija velja na območju Republike Slovenije, pa tudi v vseh državah, kjer izdelek
dobavlja podjetje Braun ali njegov pooblaščeni distributer.
Garancija ne izključuje pravic potrošnika, ki izhajajo iz odgovornosti prodajalca za
napake na blagu.
Garancija ne velja:
– Za okvare, ki so posledica nepravilne uporabe, normalne obrabe ali rabe oziroma
napake, ki imajo zanemarljiv učinek na vrednost in delovanje izdelka.
– Ob vsakem posegu nepooblaščene osebe ali kakršnekoli druge predelave izdelka in
če pri popravilu niso uporabljeni originalni Braunovi rezervni deli.
Za popravilo v garancijski dobi celotno napravo skupaj z računom in/ali izpolnjenim
garancijskim listom odnesite ali pošljite na pooblaščeni servisni center Braun:
JEŽEK SERVIS D.O.O. , Cesta 24. Junija 2, 1231 Ljubljana
Tel. št.: +386 1 561 66 30
E-mail: jezektrg.servis@siol.net
Potrošnik lahko zahtevo za popravilo v garancijski dobi za celotno napravo, skupaj z
računom in/ali izpolnjenim garancijskim listom, prav tako uveljavlja tudi pri prodajalcu ali
pri proizvajalcu (distributerju).
Za dodatne informacije smo vam na voljo na brezplačni telefonski številki 080 2822.
Distributer: Orbico, d. o. o., Verovškova ul. 72, 1000 Ljubljana
Proizvajalec: Braun GmbH, Frankfurter Str. 145, 61476 Kronberg, Nemčija
71
Page 72

Türkçe
Ürünlerimiz kalite, kullanım ve tasarımda en yüksek standartlara ulaşabilmek için
üretilmiştir. Yeni Braun tıraş makinenizden memnun kalacağınızı umarız.
Lütfen kullanma talimatlarını eksiksiz bir biçimde okuyun.
Kullanma talimatları, güvenlikle ilgili bilgiler içermektedir. leride ihtiyaç
duyduğunuzda okumak üzere saklayın.
Uyarı
Tıraş makinenizin ekstra düşük voltaj için güvenlik sağlayan adaptör
içeren özel kablo seti vardır. Lütfen değiştirmeyiniz herhangi bir
parçası ile oynamayınız, aksi takdirde elektrik şoku riski vardır.
Sadece makinenizle birlikte verilen özel kablo setini kullanın.
Eğer cihazınızda
492 işareti varsa, bu cihazı 492-XXXX
kodlu Braun şarj cihazıyla kullanabilirsiniz.
Eleği veya kablosu hasar görmüş tıraş makinesini kullanmayınız.
Bu cihaz, akan su altında temizleme ve banyo veya duşta
kullanım için uygundur. Emniyetli olması açısından sadece
kablosuz olarak çalıştırılması gerekir.
Bu aygıt, 8 yaş ve üzerindeki çocuklar tarafından kullanılabilir. Hafif
fiziksel ya da ruhsal engelli kişiler veya deneyimi ve bilgisi olmayan
kişiler ise; gözetim altında ya da cihazın güvenli kullanımı hakkında
eğitim gördükten ve yanlış kullanımı durumunda oluşabilecek zararlar
hakkında bilgi sahibi olduktan sonra cihazı kullanabilirler. Çocuklar
cihazla oynamamalıdır. Temizleme ve bakım işlemleri, gözetim altında
ve 8 yaşından büyük olmayan çocuklar tarafından yapılmamalıdır.
Temizleme sıvısının akmasını engellemek için, Temizleme ve
Yenileme stasyonunuzun düz bir zeminde durduğundan emin olunuz.
Temizleme kartuşu takılı iken, istasyonu ani hareket ettirmeyiniz aksi
takdirde sıvı dışarıya taşabilir. stasyonu ayna dolap içerisine, radyatör
üzerine, ya da kaygan bir yüzeye bırakmayınız.
Temizleme kartuşu yüksek yanıcı sıvı içerdiğinden tutuşmaya neden
olabilecek kaynaklardan uzak tutunuz. stasyonun yanında sigara
içmeyiniz. Güneş ışığına direkt maruz bırakmayınız.
Kartuşu tekrar doldurmayınız ve sadece orijinal Braun yedek
kartuşlarını kullanınız.
72
Page 73

Tanımlamalar
Temizleme ve Yenileme stasyonu
1 Temizleme Sıvısı Göstergesi
2 Kartuş değişimi için kaldırma butonu
3 Ünite - Tıraş Makinesi bağlantısı
4 Başlatma butonu
5 Temizleme programı göstergeleri
6 stasyon güç soketi
7 Temizleme kartuşu
Tıraş Makinesi
8 Elek ve Bıçak Kaseti
9 Kaset çıkarma butonu
10 Tıraş başlığı kilit butonu
11 Açılır uzun tüy kırpma başlığı
12 Açma/kapama düğmesi
13 – hassas buton
14 + yoğun buton
15 Sıfırlama butonu
16 Tıraş göstergesi
16a Pil bölmeleri
16b Hijyen bölgeleri
16c Düşük şarj göstergesi
16d Değiştirme sembolü
17 Tıraş Makinesi - Ünite bağlantısı
18 Tıraş Makinesi güç soketi
19 Seyahat çantası
20 Özel kablo seti
(tasarım değişkenlik gösterebilir)
Tıraş Etmeden Önce
lk kullanımdan önce tıraş makinenizi özel kablo setini (20) kullanarak elektrik prizine
bağlayınız ya da aşağıdaki adımları takip ediniz.
Temizleme ve Yenileme stasyonunu Kurmak
• Kaldırma butonuna (2) basarak gövdeyi açınız.
• Temizleme kartuşunu (7) masa gibi düz bir yüzeye koyunuz.
• Dikkatli bir şekilde temizleme kartuşunun kapağını çıkarınız.
• Kartuşu ünitenin alt kısmında en son noktaya kadar sokunuz.
• Yavaşça gövdeyi kilitlenene kadar aşağı doğru bastırınız.
• Özel kablo setini (20) kullanarak ünite güç soketini (6) elektrik prizine bağlayınız.
Temizleme sıvı göstergesi (1) size kartuşun içinde ne kadar sıvı kaldığını gösterecektir:
30 temizlemeye kadar
7 temizlemeye kadar
yeni kartuş gerekmektedir
Tıraş Makinesini Şarj etme ve Temizleme
Tıraş başlığını öne bakar şekilde ve başlık kilidi (10) ile beraber Temizleme ve Yenileme
stasyonuna yerleştirin. Tıraş makinesinin değme noktaları (17) temizleme ünitesinin
değme noktaları (3) ile birebir yerleşmelidir. Önemli: Tıraş makinesi kuru olmalı ve
köpük ve sabun kalıntılarından arındırılmış olmalıdır!
Eğer gerekirse Temizleme ve Yenileme istasyonu otomatik olarak aleti şarj eder. Hijyen
durumu analiz edilecek aşağıdaki program göstergelerinden (5) bir tanesi seçilecektir:
tıraş makinesi temizdir
kısa ekonomik programda temizleme gereklidir
73
Page 74

normal temizleme gereklidir
yüksek yoğun temizleme gereklidir
Eğer ünite yukarıdaki programlardan birini seçerse, siz temizlemeyi başlat butonuna (4)
basana kadar temizleme başlamayacaktır. En iyi tıraş sonuçlarını almak için her tıraş
sonrasında makinenizi temizlemenizi tavsiye ederiz.
Temizleme programlarının her biri, temizleme sıvısının tıraş başlığından fışkırtıldığı birkaç
döngüden oluşur. Temizleme ve Yenileme modelinize ve/veya seçilen programa göre,
temizlik 16 dakikaya kadar sürebilir. Tıraş makinesini kuruması için ünitede bırakın. İklim
koşullarına bağlı olarak kalan nemin buharlaşması birkaç saat sürebilir.
Program bittiğinde, mavi
Stand-by (Bekleme) Modu
Temizleme veya şarj tamamlandıktan 10 dakika sonra, Temizleme ve Yenileme stasyonu
stand-by yani bekleme moduna geçer: Temizleme ve Yenileme istasyonundaki
göstergeler kapanır.
temiz göstergesi yanacaktır.
Tıraş Göstergesi
Tıraş makinesi ekranının (16) sol tarafında makinenin şarj durumu, sağ tarafında ise
hijyen durumu görüntülenir. Makine tam şarjlı ve hijyenik olarak tamamen temiz
olduğunda her iki tarafta 6 adet koyu bölge gözükecektir.
Pil bölmeleri
Tıraş makinesini kullanırken veya şarj ederken, ilgili pil bölmeleri (16a) yanıp söner. Tam
şarjlı olduğunda tüm 6 bölme de ekranda görünür durumda olacaktır. Kullanıldıkça azalan
şarj ile beraber, ekranda görülen bölmelerde azalma ile size kalan şarj oranını
gösterecektir.
Düşük şarj göstergesi
Kırmızı çerçeve ile belirlenmiş düşük şarj göstergesi (16c), pil şarjının azaldığını gösterir.
Bu durum, pilde 2–3 tıraş için yetecek kadar güç kaldığı anlamına gelir.
Hijyen Bölmeleri
Bütün 6 hijyen bölmesi (16b) tıraş makineniz Temizleme ve Yenileme stasyonunda
temizlendikten sonra belirmeye başlar. Tıraş makineniz kullanım halindeyken, hijyen
bölmeleri giderek sönmeye başlar. Tıraş makinesi tekrar üniteye döndüğünde, sistem
otomatik olarak uygun temizleme programını seçecek ve maksimum hijyeni sağlayacaktır.
Musluk suyu altında temizlemek temizleme ünitesinde temizlemekten daha hijyenik
olmadığından, hijyen bölmeleri ancak Temizleme ve Yenileme stasyonunda temizlendikten sonra belirecektir.
Şarj ile ilgili bilgiler
• Tam bir şarj işlemi yaklaşık 1 saat sürecektir ve 50 dakikaya kadar kablosuz kullanım
imkanı sağlayacaktır. Sakal uzunluğunuza ve ortam sıcaklığına göre bu süre
değişebilir. 5-dakikalık hızlı şarj, tek bir tıraş için yeterlidir.
74
Page 75

• Şarj için ortam sıcaklığının 5 °C ile 35 °C arasında olması tavsiye edilir. Aşırı derecede
düşük ya da yüksek sıcaklıklarda pil tam olarak veya hiç şarj olmayabilir. Tıraş için
ortam sıcaklığının 15 °C ile 35 °C arasında olması tavsiye edilir. Makineyi uzun süre
50 °C’den yüksek sıcaklıklara maruz bırakmayın.
Tıraş makinesini kullanma
Nasıl Kullanacaksınız
Tıraşı başlatmak için açma/kapama düğmesine (12) basınız:
• Oynar başlık ve kayar elekler yüzünüzün bütün kıvrımlarına uyum sağlamak için
hareket eder.
• Ulaşılması zor alanları (örneğin, burun altını) tıraş etmek için, önce tıraş başlığını geri
pozisyona kaydırın, ardından kilit düğmesini geri konuma hareket ettirin. Oynar başlık,
bu açıda kilitlenir.
• Favori, bıyık ve sakal gibi tüyleri düzeltmek için açılır uzun tüy kırpma başlığını (11)
kaydırarak çıkartınız.
Mükemmel kuru tıraş için ipuçları
En mükemmel tıraş için, Braun size aşağıdaki 3 adımı öneriyor:
1. Her zaman yüzünüzü yıkamadan önce tıraş olun.
2. Her zaman, tıraş makinesini cildinize 90 derece açı ile tutun.
3. Cildinizi gerin ve sakalların çıkış yönünün tersine doğru tıraş edin.
Tıraş makinenizi kişiselleştirme
Hızlandırıcı –/+ butona basılı tutarak ( (13) veya (14) ), bireysel ihtiyaçlarınız
doğrultusunda, yüzünüzün farklı bölgeleri için hassas - yoğun tıraş gücünü
ayarlayabilirsiniz. Açma/kapama düğmesine
içinde değişir:
(–) hassas tıraş
- açık mavi
- koyu mavi
- yeşil
(+) yoğun tıraş
Yakın ve hızlı tıraş için yeşil (yoğun) programı seçiniz.
Diğer bir tıraşa başladığınızda en son kullanılmış programı başlatacaktır.
yerleştirilmiş pilot ışığı aşağıdaki aralık
(12)
Temizleme
Otomatik temizleme
Her tıraştan sonra, tıraş makinesini Temizleme ve Yenileme stasyonuna yeniden
bırakarak „Tıraş Etmeden Önce“ bölümünde anlatılan adımları takip ediniz. Tüm şarj ve
temizleme gereksinimleri otomatik olarak gerçekleşecektir.
• Hijyenik temizleme kartuşu etanol ya da izopropil alkol (bkz. kartuş teknik özellikleri)
içerir. Kartuş açıldıktan sonra doğal olarak yavaşça buharlaşarak havaya karışır. Her
bir kartuş, günlük kullanılmazsa, 8 haftada bir değiştirilmelidir.
75
Page 76

• Temizleme kartuşu aynı zamanda tıraş başlığında kalıntılar bırakabilecek yağ da içerir.
Bununla birlikte, bu kalıntılar bir bez veya yumuşak bir kağıt havluyla kolayca
temizlenebilir.
El ile Temizleme
Akan su altında temizleme
• Tıraş makinesini (kablosuz olarak) çalıştırın. Tıraş başlığını temizlenene kadar
sıcak su altında tutun. Dilerseniz aşındırıcı madde içermeyen sıvı sabun
kullanabilirsiniz. Bütün köpükten arındığından emin olunuz ve tıraş makinenizi birkaç
saniye daha çalışır durumda suyun altında tutunuz.
• Daha sonra, tıraş makinesini kapatınız, çıkarma butonuna (9) basınız, elek ve bıçak
kasetini (8) kuruması için çıkarınız.
• Tıraş makinesini düzenli olarak su altında temizlerseniz, Elek ve Bıçak kasetinin ve
uzun tüy düzelticinin üzerine haftada bir kere bir damla makine yağı (dahil değildir)
damlatın.
Her köpük kullandıktan sonra tıraş makinesi temizlenmelidir.
Fırça ile temizleme:
• Tıraş makinesini kapatın. Elek ve Bıçak kasetini (8) çıkartın ve düz bir yüzeye yavaşça
vurarak sakalların dökülmesini sağlayın. Fırçayı kullanarak tıraş başlığının iç haznesini
temizleyin ama elek bıçak kasetini kesinlikle fırça ile temizlemeyin, aksi takdirde
eleklere ve bıçaklara zarar verirsiniz.
Gövdeyi Temizleme
Zaman zaman nemli bir bez parçası ile Temizleme ve Yenileme istasyonunun, özellikle
de tıraş makinesinin oturduğu yuvanın içini siliniz.
Temizleme kartuşunu değiştirme
Gövdeyi ayırmak için kaldırma butonuna (2) basınız, herhangi bir akmayı önlemek için
kullanılmış kartuşu çıkarmadan önce birkaç saniye bekleyiniz. Kullanılmış kartuşu
atmadan önce, yeni kartuşun kapağı ile eski kartuşu kapatınız öyle atınız.
Tıraş Makinenizin ömrünü uzatmak için
Elek ve Bıçak Kasetini Değiştirme / Sıfırlama
%100 tıraş performansını sürdürmek için, değiştirme sembolü (16d) yandığında (ortalama
18 ay sonra) veya kaset eskidiğinde, Elek ve Bıçak kasetini (8) değiştirin.
Değiştirme sembolü sizi önünüzdeki 7 tıraş süresince uyarmaya devam edecektir. Daha
sonra otomatik olarak göstergeler sıfırlanacaktır.
Bıçak ve elek kasetini değiştirdikten sonra, bir kalem ucu kullanarak sıfırlama butonuna
(15) ortalama 3 saniye kadar basınız. Basılı tuttuğunuzda, değiştirme ışığı yanacaktır ve
sıfırlama işlemi bittiğinde de sönecektir. El ile sıfırlamayı istediğiniz zaman
gerçekleştirebilirsiniz.
76
Page 77

Aksesuarlar
Satıcınızdan ya da Braun servislerinden temin edebilirsiniz.
• Elek ve Bıçak Kaseti 70S/70B
• Temizleme ve Yenileme stasyonu için temizleme kartuşu CCR
Çevre ile ilgili duyuru
Bu ürün, pil ve/veya geri dönüştürülebilir elektrikli atık içerir. Çevresel koruma için,
evsel atıklarla birlikte atmayın ancak geri dönüşüm için bölgenizdeki elektrikli atık
dönüştürme merkezlerine götürün.
Temizleme kartuşu evsel atıklarla birlikte atılabilir.
Bu bilgiler, bildirim yapılmadan değiştirilebilir.
Özel kablo setinin üzerinde elektrikle ilgili ayrıntılar yer almaktadır.
Arıza Tespiti
Sorun Olası Neden Çözüm
TIRAŞ MAKİNESİ
Tıraş
başlığından
gelen nahoş bir
koku.
Pil performansı
önemli ölçüde
düştü.
Tıraş
performansı
önemli ölçüde
düştü.
1. Tıraş başlığı su ile
temizlendi.
2. Temizleme kartuşu
8 haftadan daha uzun
süredir kullanılıyor.
1. Elek ve bıçak eskimiş. Bu
da her bir tıraş işlemi için
daha fazla enerji
gerektiriyor.
2. Tıraş başlığı düzenli olarak
su ile temizleniyor ancak
yağlanmıyor.
1. Elek ve bıçak yıpranmış.
2. Kişisel Tıraş performansı
ayarı değişmiş.
3. Tıraş etme sistemi
tıkanmış.
1. Tıraş başlığını su ile temizlerken
sadece sıcak su ve bazen
(aşındırıcı madde içermeyen) sıvı
sabun kullanın. Kuruması için Elek
ve Bıçak kasetini çıkartın.
2. Temizleme kartuşunu en az 8
haftada bir değiştirin.
1. Elek ve bıçak kasetini
yenileyin.
2. Eğer tıraş makinesi düzenli
olarak su ile temizleniyorsa,
yağlama için haftada bir kez eleğin
üzerine bir damla hafif makine yağı
dökün.
1. Elek ve bıçak kasetini yenileyin.
2. Yakın ve hızlı tıraş için yeşil (yoğun)
programı seçiniz.
3. Bir damla sıvı bulaşık deterjanı ile
birlikte elek ve bıçak kasetini sıcak
su içine batırın. Daha sonra iyice
durulayın ve süzdürün.
Kuruduktan sonra elek üzerine bir
damla hafif makine yağı uygulayın.
77
Page 78

Tıraş makinesi
pili tam dolu
olmasına
rağmen
kapandı.
Bilgi ekranındaki
pil seviyeleri
düşen pil
kapasitesi ile
birlikte atlanıyor.
Tıraş parçaları
yeni değişti
ama değiştirme
lambası yanıyor.
Tıraş başlığı
nemli.
TEMİZLEME VE YENİLEME İSTASYONU
Başlatma
düğmesine
basıldığında
temizlik
başlamıyor.
Temizleme sıvısı
çabuk
tükenmeye
başladı.
Elek ve bıçak eskimiş. Bu da
motorun sağlayabildiğinden
daha fazla enerji gerektiriyor.
Cihaz kapanıyor.
Elek ve bıçak eskimiş. Bu da
her bir tıraş işlemi için daha
fazla enerji gerektiriyor.
Sıfırlama butonuna
basılmamış.
1. Otomatik temizlikten sonra
kuruma zamanı çok
kısaydı.
2. Temizleme ve Yenileme
istasyonu tıkanmış olabilir.
3. Temizleme kartuşu uzun
süredir kullanılıyor olabilir.
1. Tıraş makinesi Temizleme
ve Yenileme İstasyonuna
düzgün yerleşmemiş.
2. Temizleme kartuşunda
yeterince temizleme sıvısı
yok (ekran kırmızı olarak
yanıp sönüyor).
3. Makine bekleme
modundadır.
Temizleme ve Yenileme
İstasyonunun boşaltma kanalı
tıkanmış.
– Elek ve bıçak kasetini yenileyin.
– Özellikle yalnızca su ile
temizlendiğinde tıraş sistemini
düzenli olarak yağlayın.
– Elek ve bıçak kasetini
yenileyin.
– Özellikle yalnızca su ile
temizlendiğinde tıraş sistemini
düzenli olarak yağlayın.
– Sayacı sıfırlamak için en az
3 saniye kadar sıfırlama
butonuna basın.
1. Kuruması için yeterli zamanı
ayırabilmek için tıraş sonrası
doğrudan temizleyin.
2. Tıkanan bölümü tahta bir kürdanla
temizleyin. Hazneyi düzenli olarak
silin.
3. Yağ oranı yükselirken, ethanol/
isopropanol oranı düşmüştür.
Kalıntıları bir bezle temizleyin.
1. Tıraş makinesini Temizleme ve
Yenileme İstasyonuna yerleştirin ve
ünitenin arka kısmına
doğru itin (tıraş makinesinin
bağlantısının istasyon bağlantısı ile
eşleşmesi gerekir).
2. Yeni temizleme kartuşu yerleştirin.
3. Başlama düğmesine yeniden basın.
– Boşaltma kanalını tahta bir kürdan
ile temizleyin.
– Tüpü düzenli olarak silerek
temizleyin.
78
Page 79

AEEE Yönetmeliğine Uygundur.
Bakanlıkça tespit ve ilan edilen kullanım ömrü 7 yıldır.
Üretici firma ve CE uygunluk değerlendirme kuruluşu:
Braun GmbH
Frankfurter Strase 145
61476 Kronberg / Germany
Procter & Gamble Satış ve Dağıtım Ltd. Şti. Nida Kule – Kuzey, Barbaros Mahallesi
Begonya Sokak No:3 34746 Ataşehir, İstanbul tarafından ithal edilmiştir. P&G Tüketici
İlişkilerine, mesai günleri saat 09.00 ile 17.00 arasında sabit hattınızdan ücretsiz
0800 261 63 65 veya GSM dahil tüm hatlardan şehir içi ücretli 0216 463 83 83 numaralı
telefonlardan ulaşabilirsiniz. www.pg.com.tr
TÜKETİCİNİN HAKLARI
Malın ayıplı olduğunun anlaşılması durumunda tüketici, 6502 sayılı Tüketicinin
Korunması Hakkında Kanunun 11 inci maddesinde yer alan; a) Sözleşmeden dönme,
b) Satış bedelinden indirim isteme, c) Ücretsiz onarılmasını isteme, ç) Satılanın ayıpsız
bir misli ile değiştirilmesini isteme, seçimlik haklarından birini kullanabilir.
Tüketici; şikâyet ve itirazları konusundaki başvurularını Tüketici Mahkemelerine ve
Tüketici Hakem Heyetlerine yapabilir.
Braun Servis İstasyonları listemize internet sitemizden veya Tüketici Hizmetleri
Merkezimizi arayarak ulaşabilirsiniz. www.braun.com/tr
GARANTİ BELGESİ
Bu bölüm müşteride kalacaktır.
GARANTİ ŞARTLARI
1- Garanti süresi, malın teslim tarihinden itibaren başlar ve 2 yıldır.
2- Malın bütün parçaları dahil olmak üzere tamamı garanti kapsamındadır.
3- Malın ayıplı olduğunun anlaşılması durumunda tüketici, 6502 sayılı Tüketicinin
Korunması Hakkında Kanunun 11 inci maddesinde yer alan;
a) Sözleşmeden dönme, b) Satış bedelinden indirim isteme, c) Ücretsiz
onarılmasını isteme, ç) Satılanın ayıpsız bir misli ile değiştirilmesini isteme
haklarından birini kullanabilir.
4- Tüketicinin bu haklardan ücretsiz onarım hakkını seçmesi durumunda satıcı; işçilik
masrafı, değiştirilen parça bedeli ya da başka herhangi bir ad altında hiçbir ücret talep
etmeksizin malın onarımını yapmak veya yaptırmakla yükümlüdür. Tüketici ücretsiz
onarım hakkını üretici veya ithalatçıya karşı da kullanabilir. Satıcı, üretici ve ithalatçı
tüketicinin bu hakkını kullanmasından müteselsilen sorumludur.
79
Page 80

5- Tüketicinin, ücretsiz onarım hakkını kullanması halinde malın; garanti süresi içinde
tekrar arızalanması, tamiri için gereken azami sürenin aşılması, tamirinin mümkün
olmadığının, yetkili servis istasyonu, satıcı, üretici veya ithalatçı tarafından bir raporla
belirlenmesi durumlarında; tüketici malın bedel iadesini, ayıp oranında bedel
indirimini veya imkân varsa malın ayıpsız misli ile değiştirilmesini satıcıdan talep
edebilir. Satıcı, tüketicinin talebini reddedemez. Bu talebin yerine getirilmemesi
durumunda satıcı, üretici ve ithalatçı müteselsilen sorumludur.
6- Malın tamir süresi 20 iş gününü geçemez. Bu süre, garanti süresi içerisinde mala
ilişkin arızanın yetkili servis istasyonuna veya satıcıya bildirimi tarihinde, garanti süresi
dışında ise malın yetkili servis istasyonuna teslim tarihinden itibaren başlar. Malın
arızasının 10 iş günü içerisinde giderilememesi halinde, üretici veya ithalatçı; malın
tamiri tamamlanıncaya kadar, benzer özelliklere sahip başka bir malı tüketicinin
kullanımına tahsis etmek zorundadır. Malın garanti süresi içerisinde arızalanması
durumunda, tamirde geçen süre garanti süresine eklenir. Ulusal, resmi ve dini bayram
günleri ile yılbaşı, 1 Mayıs ve Pazar günleri dışındaki çalışma günleri iş günü olarak
sayılmaktadır.
7- Malın kullanma kılavuzunda yer alan hususlara aykırı kullanılması durumları ile
aşınmaya tabi olan ve niteliği doğrultusunda sarf malzeme olarak nitelendirilen (elek/
bıçak vb.) parçalar garanti kapsamı dışındadır.
8- Tüketici, garantiden doğan haklarının kullanılması ile ilgili olarak çıkabilecek
uyuşmazlıklarda yerleşim yerinin bulunduğu veya tüketici işleminin yapıldığı yerdeki
Tüketici Hakem Heyetine veya Tüketici Mahkemesine başvurabilir.
9- Satıcı tarafından bu Garanti Belgesinin verilmemesi durumunda, tüketici Gümrük
ve Ticaret Bakanlığı Tüketicinin Korunması ve Piyasa Gözetimi Genel
Müdürlüğüne başvurabilir.
KULLANIM HATALARI
1- BRAUN ürünlerinin kullanma kılavuzunda gösterildiği şekilde kullanılması
gerekmektedir. BRAUN ürünlerine Procter & Gamble Satış ve Dağıtım Limited Şirketi’nin
yetkili kıldığı servis elemanları dışındaki şahıslar tarafından bakım onarım veya başka bir
nedenle müdahale edilmemelidir.
2- Kullanma Kılavuzunda yer alan hususlara aykırı kullanılmasından kaynaklanan arızalar
garanti kapsamı dışındadır.
3- Voltaj düşüklüğü veya fazlalığı, hatalı elektrik tesisatı ve mamulün etiketinde yazılı
voltajdan farklı voltajda kullanma nedenlerinden meydana gelecek hasar ve arızalar
garanti kapsamı dışındadır.
4- Dış etkenlerden (vurulma, çarpma, düşürülme, kırılma vs.) hasar ve arıza meydana
gelmemesine dikkat edilmelidir.
80
Page 81

Procter & Gamble Satış ve Dağıtım Limited Şirketi
Finans Müdürü Müşteri Takımları Finans Müdürü
MALIN
Cinsi:
Markası:
SATICI FİRMA
Unvan:
Adres:
Tel, Faks:
e-posta:
Kaşe ve İmza:
Fatura Tarihi ve Sayısı: Teslim Yeri ve Tarihi:
Procter & Gamble Satış ve Dağıtım Ltd. Şti. Nida Kule – Kuzey, Barbaros Mahallesi
Begonya Sokak No:3 34746 Ataşehir, İstanbul tarafından ithal edilmiştir. P&G Tüketici
İlişkilerine, mesai günleri saat 09.00 ile 17.00 arasında sabit hattınızdan ücretsiz
0800 261 63 65 veya GSM dahil tüm hatlardan şehir içi ücretli 0216 463 83 83
numaralı telefonlardan ulaşabilirsiniz. www.pg.com.tr
Braun Servis İstasyonları listemize internet sitemizden veya Tüketici Hizmetleri
merkezimizi arayarak ulaşabilirsiniz. www.braun.com/tr
Modeli:
Bandrol ve Seri Numarası:
81
Page 82

Română (RO/MD)
Produsele noastre sunt realizate pentru a răspunde celor mai exigente cerinţe de calitate, funcţionalitate și design. Sperăm să vă facă plăcere să utilizaţi noul dumneavoastră aparat de ras Braun.
Citiţi aceste instrucţiuni în întregime, deoarece conţin informaţii privind siguranţa. Păstraţi-le pentru consultări viitoare.
Avertisment
Sistemul de bărbierit este furnizat împreună cu un set de cablu special , care are încorporată o sursă de alimentare cu tensiune foarte
scăzută, pentru siguranţă. Nu schimbaţi și nu modificaţi nicio componentă a acestuia; în caz contrar, există riscul de electrocutare.
Dacă aparatul este marcat
492, îl puteţi folosi cu orice
sursă de alimentare Braun codificată 492-XXXX.
Utilizaţi numai setul de cablu special , furnizat împreună cu aparatul
dvs. electrocasnic.
Nu vă bărbieriţi cu acest aparat dacă sita sau cablul sunt deteriorate.
Acest aparat electrocasnic este adecvat pentru curăţare sub
jet de apă şi utilizare în cada de baie sau la duş. Din motive de
siguranţă, acesta poate fi utilizat numai fără cablu.
Acest aparat electrocasnic poate fi utilizat de către copiii cu vârsta de
peste 8 ani, de către persoanele cu capacităţi fizice, senzoriale sau
mentale reduse, precum și de către persoanele lipsite de experienţa și
cunoștinţele necesare, cu condiţia să fie supravegheate, să primească instrucţiuni privind utilizarea în siguranţă a aparatului și să înţeleagă posibilele riscuri. Copiii nu trebuie să se joace cu acest aparat.
Operaţiunile de curăţare și întreţinere nu se vor efectua de către copii,
decât dacă aceștia au peste 8 ani și sunt supravegheaţi.
Pentru a preveni scurgerea lichidului de curăţare, asiguraţi-vă că staţia
Clean&Renew este amplasată pe o suprafaţă plană. Atunci când este
instalat un cartuș de curăţare, nu loviţi, nu mișcaţi brusc și nu transportaţi staţia în niciun fel, întrucât lichidul de curăţare se poate scurge
din cartuș. Nu amplasaţi staţia într-un dulăpior de baie sau deasupra
unui radiator, și nici pe o suprafaţă lustruită sau lăcuită.
Cartușul de curăţare conţine un lichid extrem de inflamabil, așadar
feriţi-l de sursele de foc. Nu fumaţi în aproprierea staţiei. Nu expuneţi
la lumina directă a soarelui pentru perioade lungi de timp.
82
Page 83

Nu reumpleţi cartușul și utilizaţi numai cartușe de rezervă Braun originale.
Descriere
Staţia Clean&Renew
1 Afișaj pentru lichidul de curăţare
2 Buton de ridicare pentru schimbarea
cartușului
3 Contacte staţie-aparat de ras
4 Buton de pornire
5 Indicatoare pentru programul de
curăţare
6 Mufă de alimentare a staţiei
7 Cartuș de curăţare
Aparat de ras
8 Casetă cu lamă și dispozitiv de tăiere
9 Buton de eliberare a casetei
10 Comutator de blocare a capului
aparatului de ras
Înainte de bărbierit
Înainte de prima utilizare, trebuie să conectaţi aparatul de ras la o priză electrică utilizând setul de cablu special (20) sau, alternativ, să procedaţi după cum urmează:
Instalarea staţiei Clean&Renew
• Apăsaţi butonul de ridicare (2) pentru a deschide carcasa.
• Ţineţi cartușul de curăţare (7) pe o suprafaţă plană și stabilă (de ex. o masă).
• Scoateţi cu grijă capacul de pe cartuș.
• Glisaţi cartușul în baza staţiei, atât cât vă permite.
• Închideţi ușor carcasa împingând-o în jos până se fixează.
• Utilizând setul de cablu special (20), conectaţi mufa de alimentare a staţiei (6)
la o priză electrică.
11 Cap de tuns ejectabil pentru firele de
păr lungi
12 Buton pornire/oprire
13 Buton de setare – (sensibil)
14 Buton de setare + (intensiv)
15 Buton de resetare
16 Afișajul aparatului de ras
16a Segmente baterie
16b Segmente igienă
16c Indicator baterie descărcată
16d Simbol de înlocuire
17 Contacte aparat de ras-staţie
18 Mufă de alimentare a aparatului de ras
19 Cutie de transport
20 Set de cablu special
(designul poate fi diferit)
Afișajul pentru lichidul de curăţare (1) va indica nivelul de lichid din cartuș:
până la 30 de cicluri de curăţare disponibile
până la 7 cicluri de curăţare rămase
este necesar un cartuș nou
Încărcarea și curăţarea aparatului de ras
Introduceţi capul aparatului de ras în staţia de curăţare şi igienizare, astfel încât partea
frontală să fie vizibilă şi comutatorul de blocare a capului aparatului (10) să fie pe pe
poziţia 1 (eliberat). Contactele (17) din partea din spate a aparatului de ras se vor alinia
cu contactele (3) de pe staţia de curăţare. Important: Aparatul de ras trebuie să fie
uscat și să nu prezinte spumă sau reziduuri de săpun!
83
Page 84

Dacă este necesar, staţia Clean&Renew va încărca automat aparatul de ras. Nivelul de
igienă va fi, de asemenea, analizat, și unul dintre următoarele indicatoare pentru programul de curăţare (5) se va aprinde:
aparatul de ras este curat
este necesar un ciclu economic scurt de curăţare
este necesar un nivel normal de curăţare
este necesar un ciclu foarte intens de curăţare
Dacă staţia selectează unul dintre programele de curăţare necesare, acesta nu va
începe decât dacă dumneavoastră apăsaţi butonul de pornire (4). Pentru cele mai
bune rezultate, vă recomandăm curăţarea după fiecare bărbierit.
Fiecare program de curăţare constă din câteva cicluri, în care lichidul de curăţare trece
prin capul de bărbierit. În funcţie de modelul staţiei Clean& Renew şi/sau de programul
selectat, timpul de curăţare este de până la 16 minute. Lăsaţi aparatul în dispozitiv
pentru uscare. Va dura câteva ore până când umezeala rămasă se va evapora, în funcţie
de condiţiile dvs. climatice. Apoi, aparatul de ras este gata pentru utilizare.
La finalizarea programului, se va aprinde indicatorul albastru.
Modul de repaus
La 10 minute după finalizarea încărcării sau sesiunii de curăţare, staţia Clean&Renew
trece în modul de repaus: indicatoarele staţiei Clean&Renew se vor stinge.
Afișajul aparatului de ras
Afișajul aparatului de ras (16) indică starea de încărcare a bateriei în partea stângă și
nivelul de igienă în partea dreaptă. Pe fiecare parte sunt afișate 6 segmente închise la
culoare atunci când bateria este încărcată complet și aparatul de ras este curat și igienizat.
Segmentele aferente bateriei:
În timpul încărcării sau atunci când utilizaţi aparatul de ras, segmentele aferente bateriei
(16a) vor lumina intermitent. Atunci când aceasta este încărcată complet, vor fi afișate
toate cele 6 segmente. Pe măsură ce încărcarea scade, segmentele dispar treptat.
Indicatorul de încărcare scăzută
Indicatorul de încărcare scăzută încadrat într-un chenar roșu luminează intermitent
pentru a indica faptul că bateria este aproape descărcată. Capacitatea rămasă a bateriei este suficientă pentru 2 până la 3 utilizări.
Segmentele aferente nivelului de igienă:
Toate cele 6 segmente de igienă (16b) vor apărea după ce aparatul de ras a fost curăţat
cu ajutorul staţiei Clean&Renew. Atunci când aparatul de ras este în uz, segmentele
aferente nivelului de igienă vor dispărea treptat. După ce aparatul de ras este introdus la
loc în staţie, sistemul va selecta automat programul de curăţare corespunzător și va
restabili segmentele pentru a indica nivelul maxim de igienă. Deoarece curăţarea aparatului de ras sub jet de apă nu este la fel de igienică precum curăţarea cu ajutorul staţiei, segmentele aferente nivelului de igienă se vor restabili numai atunci când aparatul
de ras a fost curăţat cu ajutorul staţiei Clean&Renew.
84
Page 85

Informaţii privind încărcarea
• O încărcare completă va dura aproximativ 1 oră și asigură până la 50 de minute de
bărbierit fără cablu. Această valoare poate varia în funcţie de dimensiunea firelor de
păr și de temperatura ambientală. Încărcarea rapidă de 5 minute este suficientă pentru o utilizare.
• Temperatura ambientală recomandată pentru încărcare este cuprinsă între 5 °C și
35 °C. Este posibil ca bateria să nu se încarce corespunzător, sau chiar să nu se
încarce deloc, în condiţii de temperatură foarte scăzută sau foarte ridicată. Temperatura ambientală recomandată pentru bărbierit este cuprinsă între 15 °C și 35 °C. Nu
expuneţi aparatul de ras la temperaturi mai mari de 50 °C pentru perioade lungi de
timp.
Utilizarea aparatului de ras
Mod de utilizare
Apăsaţi butonul pornire/oprire (12) pentru a utiliza aparatul de ras:
• Capul pivotant al aparatului de ras și sitele mobile se ajustează automat la orice
contur al feţei.
• Pentru a bărbieri zonele greu accesibile (de exemplu sub nas), glisaţi mai întâi capul
de ras înapoi şi mutaţi apoi comutatorul de blocare cap înspre spate. Capul pivotant
este blocat la acest unghi.
• Pentru a tunde perciunii, mustaţa sau barba, glisaţi capul de tuns ejectabil pentru
firele de păr lungi (11) în sus.
Sfaturi pentru un bărbierit uscat, perfect
Pentru cele mai bune rezultate, Braun vă recomandă să urmaţi 3 pași simpli:
1. Bărbieriţi-vă întotdeauna înainte de a vă spăla pe faţă.
2. Ţineţi în permanenţă aparatul de ras în unghi drept (90°) faţă de suprafaţa pielii.
3. Întindeţi-vă pielea și bărbieriţi mai întâi contrar direcţiei de creștere a părului.
Personalizarea aparatului de ras
Ţinând apăsat butonul accelerator –/+ ((13) sau (14)), puteţi ajusta puterea aparatului
de ras pentru a răspunde nevoilor dumneavoastră individuale din diferite zone ale feţei,
de la sensibil la intensiv. Lumina pilot de pe butonul pornire/oprire (12) se modifică în
cadrul următorului interval:
(–) bărbierit sensibil
- albastru deschis
- albastru închis
- verde
(+) bărbierit intensiv
Pentru un bărbierit complet și rapid, vă recomandăm setarea verde (intensiv).
La următoarea pornire, va fi activată ultima setare utilizată.
85
Page 86

Curăţare
Curăţarea automată
După fiecare bărbierit, introduceţi la loc aparatul de ras în staţia Clean&Renew și continuaţi în modul descris mai sus, în secţiunea „Înainte de bărbierit”. Apoi, toate funcţiile
de încărcare și curăţare vor fi îndeplinite automat. În condiţii de utilizare zilnică, un cartuș de curăţare ar trebui să fie suficient pentru aproximativ 30 de cicluri de curăţare.
Cartuşul pentru curăţare igienică are în compoziţie etanol sau izopropanol (pentru specificaţii, verificaţi cartuşul) care, odată deschis cartuşul, se va evapora treptat în mod
natural. Dacă nu este utilizat zilnic, cartuşul trebuie înlocuit după aproximativ
8 săptămâni. Cartușul de curăţare conţine și lubrifianţi, care pot lăsa urme reziduale pe
rama exterioară a sitei după curăţare. Cu toate acestea, respectivele urme pot fi îndepărtate cu ușurinţă prin ștergerea ușoară cu o lavetă sau un șerveţel de hârtie.
Curăţarea manuală
Curăţarea sub jet de apă:
• Porniţi aparatul de ras (fără cablu) și clătiţi capul aparatului de ras sub jet de
apă fierbinte până când au fost eliminate toate reziduurile. Puteţi utiliza un
săpun lichid care nu conţine substanţe abrazive. Clătiţi toată spuma și lăsaţi aparatul
de ras să funcţioneze câteva secunde în plus.
• Ulterior, opriţi aparatul de ras, apăsaţi butonul de eliberare (9) pentru a scoate caseta
cu lama și dispozitivul de tăiere (8) și lăsaţi-o să se usuce.
• Dacă curăţaţi cu regularitate aparatul de ras sub jet de apă, atunci aplicaţi săptămânal
o picătură de ulei de mecanisme fine pe partea de sus a casetei cu lama și
dispozitivul de tăiere și pe capul de tuns ejectabil.
Aparatul de ras trebuie curăţat după fiecare utilizare a spumei de ras.
Puteţi curăţa aparatul de ras cu o perie:
• Opriţi aparatul de ras. Scoateţi caseta cu lama și dispozitivul de tăiere (8) și loviţi-o
ușor de o suprafaţă plană. Utilizând o perie, curăţaţi zona interioară a capului pivotant.
Cu toate acestea, nu trebuie să curăţaţi caseta cu peria, deoarece acest lucru o poate
deteriora.
Curăţarea carcasei
Din când în când, curăţaţi carcasa aparatului de ras și a staţiei Clean&Renew cu o lavetă
umedă, în special interiorul compartimentului de curăţare în care este depozitat aparatul de ras.
Înlocuirea cartușului de curăţare
După ce aţi apăsat butonul de ridicare (2) pentru a deschide carcasa, așteptaţi câteva
secunde înainte de a scoate cartușul uzat, pentru a evita scurgerile. Înainte de eliminarea cartușului uzat, asiguraţi-vă că aţi închis orificiile utilizând capacul cartușului nou,
deoarece cartușul uzat va conţine soluţie de curăţare contaminată.
Păstrarea aparatului de ras într-o formă optimă
Înlocuirea casetei cu lama și dispozitivul de tăiere/resetarea
Pentru a păstra intacte performanţele de bărbierit, înlocuiţi caseta cu lama și dispozitivul de tăiere (8) atunci când simbolul de înlocuire se aprinde pe afișajul aparatului de
86
Page 87

ras (16d); acest lucru se întâmplă după aproximativ 18 luni sau atunci când caseta este
uzată.
Simbolul de înlocuire vă va reaminti în timpul următoarelor 7 utilizări că trebuie să înlocuiţi caseta cu lama și dispozitivul de tăiere. Ulterior, aparatul de ras resetează automat
afișajul.
După ce înlocuiţi caseta cu lama și dispozitivul de tăiere, utilizaţi un pix pentru a împinge
butonul de resetare (15) timp de cel puţin 3 secunde; astfel, veţi reseta contorul. În timp
ce faceţi acest lucru, lumina de înlocuire se aprinde intermitent, stingându-se atunci
când resetarea este finalizată. Resetarea manuală poate fi efectuată în orice moment.
Accesorii
Disponibile de la distribuitorul dumneavoastră sau de la centrul de service Braun :
• Casetă cu lamă și dispozitiv de tăiere 70S/70B
• Cartuș de curăţare Clean&Renew CCR
Notificare privind mediul înconjurător
Produsul conţine baterii și/sau deșeuri electrice reciclabile. Pentru a proteja
mediul înconjurător, nu aruncaţi produsul împreună cu gunoiul menajer, ci duceţi
componentele la punctele de colectare a deșeurilor electrice din ţara dumneavoastră, în scopul reciclării.
Conform Hotãrârii nr. 482 din 1 aprilie 2004 privind stabilirea conditiilor de introducere pe
piatã a aparatelor electrocasnice în functie de nivelul zgomotului transmis prin aer,
valoarea de zgomot dB(A) pentru acest aparat este de 62 dB(A).
Cartușul de curăţare poate fi eliminat împreună cu deșeurile menajere obișnuite.
Instrucţiunile se pot modifica fără notificare prealabilă.
Pentru specificaţii electrice, consultaţi informaţiile imprimate pe setul de cablu special.
Depanare
Problemă: Cauză posibilă: Rezolvare:
APARAT DE RAS
Miros neplăcut
care provine de
la capul aparatului de ras.
1. Capul aparatului de ras se
curăţă cu apă.
2. Cartușul de curăţare este
utilizat timp de mai mult de
8 săptămâni.
1. Atunci când curăţaţi capul aparatului de ras cu apă, utilizaţi numai apă
fierbinte și, din când în când, o cantitate mică de săpun lichid (fără
substanţe abrazive). Scoateţi
caseta cu lama și dispozitivul de
tăiere pentru a permite uscarea.
2. Schimbaţi cartușul de curăţare cel
puţin la fiecare 8 săptămâni.
87
Page 88

Performanţele
bateriei au scăzut semnificativ.
Performanţele
de bărbierit au
scăzut semnificativ.
Aparatul de ras
se oprește deși
bateria este
încărcată complet.
Segmentele
aferente bateriei de pe afișaj
sunt omise
atunci când
capacitatea
bateriei scade.
Componentele
de bărbierit au
fost schimbate
recent, dar simbolul de înlocuire se aprinde.
Capul de
bărbierit este
umed
88
1. Lama și dispozitivul de
tăiere sunt uzate, ceea ce
necesită mai multă putere
pentru fiecare bărbierit.
2. Capul aparatului de ras
este curăţat cu regularitate
cu apă, dar nu este lubrifiat.
1. Lama și dispozitivul de
tăiere sunt uzate.
2. Setarea personală pentru
performanţele de bărbierit
a fost modificată.
3. Sistemul de bărbierit este
înfundat.
Lama și dispozitivul de tăiere
sunt uzate, ceea ce necesită
mai multă putere decât poate
să furnizeze motorul. Aparatul se oprește.
Lama și dispozitivul de tăiere
sunt uzate, ceea ce necesită
mai multă putere pentru fiecare bărbierit.
Butonul de resetare nu a fost
apăsat.
1. Timpul de uscare după
curăţarea automată a fost
prea scurt.
2. Scurgerea staţiei
Clean&Renew este înfundată.
3. Cartușul de curăţare a fost
utilizat de prea mult timp.
1. Înlocuiţi caseta cu lama și dispozitivul de tăiere cu una nouă.
2. Dacă aparatul de ras este curăţat
cu regularitate cu apă, aplicaţi săptămânal o picătură de ulei de
mecanisme fine pe lamă, pentru
lubrifiere.
1. Înlocuiţi caseta cu lama și dispozitivul de tăiere cu una nouă.
2. Pentru un bărbierit complet și
rapid, vă recomandăm setarea
verde (intensiv).
3. Înmuiaţi caseta cu lama și dispozitivul de tăiere în apă fierbinte, în care
aţi adăugat o picătură de detergent
de vase lichid. Ulterior, clătiţi-o bine
și uscaţi-o prin tamponare. După
uscare, aplicaţi o picătură de ulei
de mecanisme fine pe lamă.
– Înlocuiţi caseta cu lama și dispoziti-
vul de tăiere cu una nouă.
– Ungeţi cu regularitate sistemul de
bărbierit cu ulei, în special atunci
când îl curăţaţi numai cu apă.
– Înlocuiţi caseta cu lama și dispoziti-
vul de tăiere cu una nouă.
– Ungeţi cu regularitate sistemul de
bărbierit cu ulei, în special atunci
când îl curăţaţi numai cu apă.
– Apăsaţi butonul de resetare timp de
cel puţin 3 secunde pentru a reseta
contorul.
1. Curăţaţi imediat după bărbierit,
pentru a permite aparatului să se
usuce suficient timp.
2. Curăţaţi scurgerea cu o scobitoare
de lemn. Ștergeţi cu regularitate
tubul pentru a-l curăţa.
3. Proporţia de etanol/izopropanol a
scăzut, în timp ce proporţia de ulei
a crescut. Îndepărtaţi reziduurile cu
o lavetă.
Page 89

STAŢIA CLEAN&RENEW
Curăţarea nu
începe atunci
când este apăsat butonul de
pornire.
Consum crescut
de lichid de
curăţare.
Garanţie
Acordăm o garanţie de 2 ani pentru acest produs, de la data livrării produsului. Durata
medie de utilizare: 5 ani, cu condiţia respectării instrucţiunilor de utilizare si efectuării
intervenţiilor tehnice numai de către personalul service autorizat.
În perioada de garanţie vom remedia gratuit neconformităţile aparatului, prin repararea
sau înlocuirea produsului, după caz. Această garanţie este valabilă în orice ţara în care
acest aparat este furnizat de către compania Braun sau de către distribuitorul desemnat
al acesteia. Repararea sau înlocuirea produselor se va efectua în cadrul unei perioade
rezonabile de timp (maxim 15 zile de la data aducerii la cunoştinţă a neconformităţii).
Prezenta garanţie nu acoperă: defectele datorate utilizării necorespunzatoare, uzurii
normale, precum si defectele care au un efect neglijabil asupra valorii sau funcţionării
aparatului. Garanţia devine nulă dacă se efectuează reparaţii de către persoane
neautorizate şi dacă nu se utilizează componente originale Braun.
Pentru a beneficia de service în perioada de garanţie, prezentaţi produsul împreună cu
factura (bonul/chitanţa de cumpărare) la una dintre unităţile service agreate.
PUNCT CENTRAL DE SERVICE BRAUN
Şos. Viilor, Nr.14, Corp Clădire C2, Etaj 2,
Biroul nr. 3, Sector 5, București (acces din Str. Năsăud)
Tel: 021.224.30.35
Mobil: 0722.541.548
E-mail: service.braun@interbrands.ro
1. Aparatul de ras nu este
poziţionat corespunzător în
staţia Clean&Renew.
2. Cartușul de curăţare nu
conţine suficient lichid de
curăţare (afișajul este iluminat cu roșu).
3. Aparatul electrocasnic
este în modul repaus.
Scurgerea staţiei Clean&Renew este înfundată.
1. Introduceţi aparatul de ras în staţia
Clean&Renew (contactele aparatului de ras trebuie să se alinieze cu
contactele de pe staţie).
2. Introduceţi un nou cartuș de curăţare.
3. Apăsaţi butonul de pornire din nou.
– Curăţaţi scurgerea cu o scobitoare
de lemn.
– Ștergeţi cu regularitate tubul pentru
a-l curăţa.
89
Page 90

Български
Нашите продукти са проектирани така, че да отговарят на най-високите стандарти за качество, функционалност и дизайн. Надяваме се да използвате с удоволствие Вашата нова самобръсначка Braun..
Прочетете внимателно тези инструкции, те съдържат информация за безопасност. Запазете ги за справка в бъдеще.
Предупреждение
Вашата система за бръснене е снабдена със специален комплект
кабели, в които е интегрирана система за защита при ниско напрежение. Не заменяйте и не променяйте която и да е част от оригиналните, в противен случай има риск от токов удар.
Ако уредът е маркиран
492, можете да го използвате
с всяко Braun захранване, кодирано 492-XXXX.
Използвайте уреда само с предоставения специален комплект
кабели.
Не се бръснете, ако мрежичката или кабелът са повредени.
Този уред е подходящ за почистване под течаща вода и за
използване във вана или под душ. Поради съображения
за безопасност, може да се експлоатира само
безжично.
Този уред не е предназначен за употреба от деца под 8 години или
лица с ограничени физически, сетивни или умствени
възможности,
или без опит и познания, освен ако бъдат наглеждани от лице, отговорно
за тяхната безопасност, или бъдат инструктирани за безопасно използване на уреда и ако са разбрали за съществуващите
рискове. Не се разрешава деца да играят с уреда. Почистването и
поддръжката не трябва да се извършват от деца, освен ако те са
над 8 години и бъдат наблюдавани.
За да се предотврати теч на почистващата течност, се уверете, че
станцията за почистване и зареждане е поставена на равна
повърхност. Когато се инсталира почистващата касета, не накланяйте, не местете с резки движения и не транспортирайте станцията по никакъв начин, тъй като почистващата течност може да прелее от касетата. Не поставяйте станцията в шкаф с огледало, нито
върху радиатор, нито върху полирана или лакирана повърхност.
90
Page 91

Почистващата касета съдържа силно запалима течност, така че я
пазете далече от източници на запалване. Не пушете в близост до
станцията. Не излагайте на пряка слънчева светлина за продължителни периоди от време.
Не пълнете касетата и използвайте само оригинална презаредена
касета Braun.
Описание
Станция за почистване и зареждане
1 Дисплей за почистващата течност
2 Повдигащ бутон за смяна на
касетата
3 Контакти „станция към
самобръсначка“
4 Бутон старт
5 Показатели на програмата за
почистване
6 Щепсел за захранване на станцията
7 Почистваща касета
Самобръсначка
8 Бръснеща глава
9 Бутон за освобождаване на главата
10 Ключ за блокиране на бръснещата
глава
11 Изскачаща приставка за
подрязване на дълги косми
12 Ключа за вкл./изкл.
13 Бутон за настройка – (чувствително
бръснене)
14 Бутон за настройка + (интензивно
бръснене)
15 Бутон за нулиране
16 Дисплей на самобръсначката
16a Индикатор за заряд на батерията
16b Индикатор за почистване
16c Светлинен индикатор за нисък
заряд
16d Индикатор за смяна на бръснещата
глава
17 Контакти „самобръсначка към
станцията“
18 Щепсел за захранване на
самобръсначката
19 Калъф за пътуване
20 Специален комплект кабели
(дизайнът може да се различава)
Преди бръснене
Преди първото използване трябва да свържете самобръсначката към електрически контакт с помощта на специалния комплект от кабели (20) или да изпълните
стъпките, описани по-долу:
Монтаж на станцията за почистване и зареждане
• Натиснете повдигащия бутон (2), за да отворите корпуса.
• Дръжте почистваща касета (7) надолу върху плоска, стабилна повърхност (напр.
маса).
• Внимателно свалете капака на касетата.
• Плъзнете касетата в основата на станцията докрай.
• Бавно затворете корпуса, като го натиснете надолу, докато се заключи.
• Като използвате специалния комплект кабели (20), свържете извода за захран-
ване на станцията (6) към електрически контакт.
91
Page 92

Дисплеят за почистващата течност (1) ще даде индикация колко течност има в
касетата:
остават още 30 почистващи цикъла
остават още 7 почистващи цикъла
необходима е нова касета
Зареждане и почистване на самобръсначката
Поставете бръзнещата глава така че да се вижда предната част и (10) отпуснете
ключа за блокиране на бръснещата глава. Контактите (17) на гърба на самобръсначката трябва да се изравнят с контактите (3) в станцията. Важно: Самобръс-
начката трябва да бъде суха и без пяна или остатъци от сапун!
Ако е необходимо, станцията за почистване и зареждане ще зареди автоматично
самобръсначката. Хигиенното състояние на самобръсначката ще бъде анализирано и един от следните програмни индикатори ще светне (5):
самобръсначката е чиста
необходимо е кратко икономично почистване
необходимо е нормално ниво на почистване
необходимо е високо интензивно почистване
Ако станцията избере една от изискваните програми за почистване, тя няма да
започне да работи, освен ако не натиснете стартовия бутон (4). За най-добри
резултати при бръснене, ние препоръчваме да почиствате след всяко
бръснене.
Всяка почистваща програма се състои от няколко цикъла, при които почистващата
течност преминава на струя през главата на самобръсначката. В зависимост от
вашия модел «Почистване и зареждане» и/или избраната програма, времето за
почистване отнема до 16 минути. Оставете самобръсначката в станцията за изсушаване. Отнема няколко часа докато останалата влага се изпари, в зависимост от
климатичните условия. След това самобръсначката е готова за употреба.
Когато програмата завърши, ще светне син индикатор .
Режим на готовност
10 минути след като е завършило почистването или зареждането, станцията за
почистване и зареждане се превключва в режим на готовност: индикаторите на
станцията за почистване и зареждане се изключват.
Дисплей на самобръсначката
Дисплеят на самобръсначката (16) показва в ляво състоянието на заряда на батерията, а в дясно — хигиенния статут. Когато батерията е с пълен заряд и самобръсначката е чиста, от двете страни на дисплея се показват по
6 тъмни сегмента.
Сегменти на батерията:
По време на зареждане или когато използвате самобръсначката, сегментите на
батерията ще мигат. Когато зарядът на батерията е пълен, ще се показват всичките 6 сегмента. С намаляването на заряда, сегментите постепенно ще изчезват.
92
Page 93

Индикатор за нисък заряд
Индикаторът за нисък заряд (16c) мига в червено, за да покаже, че батерията е
изтощена. Оставащият заряд на батерията е достатъчен за 2 до 3 бръснения.
Сегменти за нивото на хигиена:
Всичките 6 сегмента за нивото на хигиената (16b) ще се покажат, след като самобръсначката се почисти в станцията за почистване и зареждане. Когато самобръсначката се използва, сегментите за нивото на хигиената постепенно ще изчезват. След като самобръсначката се върне в станцията, системата автоматично
избира необходимата програма за почистване и възстановява сегментите за максимална хигиена. Като се има предвид, че изплакване на самобръсначката с
течаща вода не е така хигиенично както почистването в станцията за почистване,
сегментите за нивото на хигиената ще се възстановят само когато самобръсначката се почисти в станцията за почистване и зареждане.
Информация за зареждане
• Пълният заряд осигурява до 50 минути време за бръснене без употребата на
захранващ кабел и се постига при 1 час зареждане. Това време може да варира
в зависимост от растежа на брадата Ви и температурата на околната среда.
Бързото зареждане за 5 минути е достатъчно за едно бръснене.
• Препоръчителната температура на околната среда при зареждане е от 5 °C до
35 °C. Батерията може да не се зарежда правилно или изобщо да не се зарежда
при твърде ниски или твърде високи температури. Препоръчителната температура на околната среда за бръснене е от 15 °C до 35 °C. Не излагайте уреда на
температури по-високи от 50 °C за продължителни периоди от време.
Употреба на самобръсначката
Как да се използва
Натиснете ключа за вкл./изкл. (12), за да задействате самобръсначката:
• Подвижната бръснеща глава и самонагаждащите се мрежи автоматично се
адаптират към всяка извивка на лицето Ви.
• За да избръснете труднодостъпни места (напр. под носа), първо плъзнете
бръснещата глава до предходната позиция, след това преместете ключът за
заключване на главата назад. Люлеещата се глава е заключена под този ъгъл.
• За да подрежете бакенбарди, мустаци или брада, плъзнете приставката за подрязване на дълги косми (11) нагоре.
Съвети за идеално сухо бръснене
За най-добри резултати при бръснене Braun Ви препоръчва да следвате 3 лесни
стъпки:
1. Винаги се бръснете преди да миете лицето си.
2. При всички случаи дръжте самобръсначката под прав ъгъл (90°) спрямо
кожата си.
3. Опънете кожата си и бръснете срещу посоката на растежа на брадата си.
Персонализирайте самобръсначката си
Чрез натискане и задържане на бутона за скорост –/+ ((13) или (14) можете да
регулирате мощността за бръснене съобразно индивидуалните си нужди в раз-
93
Page 94

лични области на лицето от чувствително към интензивно бръснене. Сигналната
лампа на ключа за вкл./изкл. (12) се променя в рамките на следните граници:
(–) чувствително бръснене
- светлосиньо
- тъмносиньо
- зелено
(+) интензивно бръснене
За гладко и бързо бръснене препоръчваме настройка на зелена светлина (интен-
зивно бръснене). При следващо включване последната използвана настройка ще
се активира.
Почистване
Автоматично почистване
След всяко бръснене връщайте самобръсначката на станцията за почистване и
зареждане и следвайте процедурата, описана по-горе в секцията „Преди бръснене“. Автоматично ще бъдат извършени всички необходими действия по
почистване и зареждане. При ежедневна употреба една почистваща касета би
трябвало да е достатъчна за около 30 цикъла на почистване.
Хигиеничната почистваща касета съдържа етанол или изопропанол (вижте касетата за спецификации), който започва бавно да се изпарява, след като пълнителят бъде отворен. Ако не се използва ежедневно, всяка касета трябва да се сменя
приблизително на 8 седмици, за да се осигури оптимална дезинфекция.
Почистващата касета също така съдържа смазочни течности за бръснещата система, които могат да оставят остатъчни петна върху външната рамка с мрежа след
почистване. Тези петна могат да бъдат премахнати лесно с нежно избърсване с
влажна кърпа.
Ръчно почистване
Почистване под течаща вода:
• Включете самобръсначката (безжично) и изплакнете главата й под
течаща топла вода, докато всички остатъци са отстранени. Можете да
използвате течен сапун без абразивни вещества. Изплакнете цялата пяна и
оставете самобръсначката да работи за още няколко секунди.
• След това изключете самобръсначката, натиснете бутона за освобождаване (9),
за да свалите бръснещата глава, (8) и я оставете да изсъхне.
• Ако редовно почиствате самобръсначката под вода, тогава веднъж седмично
слагайте по една капка леко машинно масло (не е осигурено) върху тримера за
дълги косми и върху мрежичката и режещия блок.
Самобръсначката трябва да се почиства след всяка употреба с пяна.
Почистване с четка:
• Изключете самобръсначката. Свалете бръснещата глава (8) и я поставете върху
плоска повърхност. Като използвате четката, почистете вътрешната зона на
въртящата се глава. Не почиствайте главата с четката, защото това може да я
повреди.
94
Page 95

Почистване на корпуса
От време на време почиствайте корпуса на самобръсначката и станцията за
почистване и зареждане с влажна кърпа, особено вътре в почистващата камера,
където стои самобръсначката.
Смяна на почистващата касета
След като сте натиснали повдигащия бутон (2), за да отворите корпуса, почакайте
няколко секунди, преди да извадите използваната касета, за да избегнете капане.
Преди да изхвърлите използваната касета, уверете се, че сте затворили отворите, като използвате капачето от новата касета, защото използваната касета
съдържа замърсен почистващ разтвор.
Поддържане на самобръсначката в отлично състояние
Подмяна на бръснещата глава / нулиране
За да се поддържа 100 % ефективност при бръснене, сменете бръснещата глава
(8), когато символът за подмяна светне на дисплея на самобръсначката, след
около 18 месеца или когато касетата е изхабена. Символът за смяна ще Ви
напомня по време на следващите 7 бръснения да подмените бръснещата глава.
След това дисплеят на самобръсначката автоматично ще се нулира.
След като сте сменили бръснещата глава, използвайте химикалка, за да
натиснете бутона за нулиране (15) за най-малко 3 секунди, за да нулирате брояча.
Докато правите това, светлинният индикатор за смяна ще мига и ще угасне,
когато нулирането завърши. Ръчно нулиране може да се извърши по всяко време.
Aксесоари
Налични при Вашия търговец или сервизните центрове на Braun:
• Бръснеща глава 70S/70B
• Почистваща касета за почистване и зареждане CCR
Защита на околната среда
Този продукт съдържа батерии и/или електрически отпадъци, които
подлежат на рециклиране. С цел опазването на околната среда моля,
не изхвърляйте продукта заедно с битовите отпадъци, а на подходящите
места за събиране на такива отпадъци във Вашата страна.
Почистващата касета може да бъде изхвърлена с редовните битови отпадъци.
Подлежи на промени без предупреждение.
За електрическите спецификации вижте надписа върху специалния комплект кабели.
95
Page 96

Отстраняване на проблеми
Проблем: Възможна причина: Решение:
САМОБРЪСНАЧКА
Неприятна
миризма от
главата на
самобръсначката.
Работните
показатели на
батерията са
намалели значително.
Работата при
бръснене е
намаляла значително.
Самобръсначката се
изключва при
пълен заряд на
батерията.
Сегментите на
батерията на
дисплея намаляват с намаляването на
заряда на
батерията.
1. Главата на самобръсначката е почиствана с вода.
2. Почистващата касета е
употребявана повече от
8 седмици.
1. Мрежата и бръсначите са
изхабени, което изисква
повече заряд за всяко
бръснене.
2. Бръснещата глава се
почиства редовно с вода,
но не се смазва.
1. Мрежата и бръсначите са
изхабени.
2. Персоналните настройки
на работа при бръснене
са се променили.
3. Системата за бръснене е
задръстена.
Мрежата и бръсначите са
изхабени, което изисква
повече заряд отколкото
може да осигури мотора.
Уредът се изключва.
Мрежата и бръсначите са
изхабени, което изисква
повече заряд за всяко
бръснене.
1. При почистване на главата на
самобръсначката само с вода,
използвайте гореща вода и от
време на време някакъв течен
сапун (без абразивни вещества).
Свалете бръснещата глава, за да
я оставите да се изсуши.
2. Сменяйте почистващата касета
най-малко веднъж на
8 седмици.
1. Сменете бръснещата глава.
2. Ако самобръсначката се
почиства редовно с вода, нанасяйте капка машинно масло
върху мрежата веднъж седмично
за смазване.
1. Сменете бръснещата глава.
2. За пълно и бързо бръснене препоръчваме настройка на зелена
светлина (интензивно бръснене).
3. Потопете бръснещата глава в
гореща вода с капка препарат за
миене на съдове. След това я
почистете добре и я измийте.
След като изсъхне, нанесете
капка леко машинно масло върху
мрежата.
– Сменете бръснещата глава.
– Смазвайте редовно с масло сис-
темата за бръснене, особено
когато се почиства само с вода.
– Сменете бръснещата глава.
– Смазвайте редовно с масло сис-
темата за бръснене, особено
когато се почиства само с вода.
96
Page 97

Бръснещите
части са подменени скоро,
но въпреки
това светлинният индикатор
за смяна
свети.
Главата на самобръсначката
е влажна
СТАНЦИЯ ЗА ПОЧИСТВАНЕ И ЗАРЕЖДАНЕ
Почистването
не стартира
при натискане
на бутона
„Старт“.
Увеличена е
консумацията
на почистваща
течност.
Бутонът за нулиране не е
бил натиснат.
1. Времето за изсъхване
след автоматично почистване е било твърде
кратко.
2. Отводняването на станцията за почистване и
зареждане е запушено.
3. Почистваща касета се
използва от дълго време.
1. Самобръсначката не
е поставена правилно
в станцията за
почистване и зареждане.
2. Почистващата касета не
съдържа достатъчно
почистваща течност
(дисплеят мига в червено).
3. Уредът е в режим на
готовност.
Отводняването на станцията за почистване и зареждане е запушено.
– Натиснете бутона за нулиране в
продължение на поне 3 секунди,
за да нулирате брояча.
1. Почиствайте веднага след бръснене, за да осигурите необходимото време за изсушаване
2. Почистете отводняването с дървена клечка за зъби. Редовно
избърсвайте контейнера, за да
почистите.
3. Пропорцията на етанол/изопропанол е намаляла, а на маслото
се е увеличила. Почистете остатъците с кърпа.
1. Поставете самобръсначката в
станцията за почистване и
зареждане (контактите на самобръсначката трябва да се изравнят с контактите на станцията).
2. Поставете нова почистваща
касета.
3. Натиснете отново бутона
„Старт“.
– Почистете отводняването с дър-
вена клечка за зъби.
– Редовно избърсвайте контей-
нера, за да почистите.
Гаранция
Нашите продукти са с гаранция 2 години, считано от датата на покупката.
В рамките на гаранционния срок безплатно се отстраняват дефектите в материалите
и производството чрез поправка, смяна на части или целия уред, по преценка на сервизния център. Тази гаранция се признава във всички страни, където Braun и неговият
изключителен дистрибутор продават този уред и няма ограничение за внос или официална разпоредба не забранява да се извърши предвиденото гаранционно обслужване.
97
Page 98

Гаранцията не покрива: повреди от неправилна употреба (работа при неподходящо
напрежение, включване в неподходящ източник на електрически ток, счупване);
износване и незначителни дефекти, които не пречат на нормалната работа на уреда.
Гаранцията не се признава при поправка на уреда от неоторизирани лица или ако не
са използвани оригинални резервни части на Braun. Гаранцията е валидна при правилно попълнени: дата на покупката, печат и подпис в гаранционната карта.
За всички рекламации, възникнали в гаранционния срок, изпратете уреда както и
гаранционната му карта в най-близкия сервиз на Braun.
За справки 0800 11 003 – национален телефон на БГ сервиз без увеличение на телефонната услуга или www.bgs.bg.
98
Page 99

Русский
Руководство по эксплуатации
Наши продукты призваны удовлетворять наивысшим стандартам качества, функциональности и дизайна. Надеемся, что вы останетесь довольны бритвой Braun.
Внимательно ознакомьтесь с приведенными инструкциями — они содержат
информацию о безопасной эксплуатации. Храните их для использования в будущем.
Внимание
Ваша бритвенная система оборудована специальным кабелем питания со встроенным безопасным источником питания сверхнизкого напряжения.
Не допускайте замены или порчи каких-либо его элементов, иначе возможен риск
поражения электрическим током.
Если на устройстве имеется маркировка
с любым шнуром сетевого адаптера Braun, маркированном 492-ХХХХ.
Использовать следует только специальный кабель питания, поставляемый вместе
с изделием.
Использовать изделие с поврежденной бреющей сеткой или кабелем запрещено.
Изделие можно промывать под проточной водой и использовать в ванной
или душе. Из соображений безопасности использование
устройства, подключенного к сети питания, запрещено.
Данный прибор может использоваться детьми в возрасте от 8 лет и лицами с
ограниченными физическими, сенсорными или умственными возможностями или
лицами, не имеющими достаточного опыта и знаний, только если они находятся
под присмотром или получили необходимые инструкции по безопасному использованию прибора и понимают сопряженные с его применением риски. Детям
нельзя использовать прибор в качестве игрушки. Дети могут производить очистку
и осуществлять пользовательское техническое обслуживание, только если они
старше 8 лет и находятся под присмотром.
Для предотвращения утечки чистящей жидкости убедитесь, что станция очистки
и зарядки размещена на горизонтальной поверхности. При установленном чистящем картридже избегайте наклонов, резких движений или транспортировки станции, иначе возможна утечка чистящей жидкости из картриджа. Не помещайте
станцию в зеркальный шкафчик, на радиатор, а также на полированную или лакированную поверхность.
Чистящий картридж содержит легковоспламеняющуюся жидкость: держите его
вдали от источников возгорания. Не курите вблизи станции. Не допускайте продолжительного воздействия солнечного света.
Не заправляйте картридж; используйте только оригинальные сменные картриджи
производства Braun.
492, то его можно использовать
99
Page 100

Описание и комплектность
Станция очистки и зарядки
1 Экран состояния чистящей
жидкости
2 Кнопка смены картриджа
3 Контакты станции для связи с
бритвой
4 Кнопка пуска
5 Индикаторы программы очистки
6 Разъем питания станции
7 Чистящий картридж
Бритва
8 Кассета с бреющей сеткой и
режущим блоком
9 Кнопка отсоединения кассеты
10 Блокиратор бритвенной головки
11 Откидной триммер для длинных
волос
12 Переключатель
13 Кнопка «–» (чувствительный режим)
14 Кнопка «+» (интенсивный режим)
15 Кнопка сброса
16 Экран бритвы
16a Сегменты индикатора заряда
аккумулятора
16b Сегменты индикатора
гигиенического состояния
16c Индикатор низкого заряда
аккумулятора
16d Индикатор замены бреющей
кассеты
17 Контакты бритвы для связи со
станцией
18 Разъем питания бритвы
19 Чехол для хранения
20 Специальный кабель питания
(могут отличаться по внешнему
виду от изображения)
Перед процедурой бритья
Перед первым использованием подключите бритву к электрической розетке с
помощью предусмотренного кабеля питания (20); также можно использовать альтернативный способ:
Установка станции очистки и зарядки
• Нажмите кнопку отсоединения кассеты (2), чтобы открыть доступ к отсеку.
• Положите чистящий картридж (7) на неподвижную горизонтальную поверхность
(например, стол).
• Аккуратно снимите крышку картриджа.
• Вставьте картридж в основание корпуса станции до упора.
• Закройте отсек, медленно прижимая его, пока не услышите щелчок.
• С помощью предусмотренного кабеля (20) соедините разъем питания станции
(6) с электрической розеткой.
На экране состояния чистящей жидкости (1) будет отображено количество оставшейся жидкости в картридже:
до 30 доступных циклов очистки
до 7 оставшихся циклов очистки
необходимо поменять картридж
Зарядка и очистка бритвы
Поместите бритву бреющей головкой вниз, предварительно сняв с неё блокировку
(10), в устройство чистки и подзарядки. Положение контактов (17) в задней части
бритвы совпадет с положением контактов (3) станции очистки. Важно: Бритва
должна быть сухой, без остатков пены или мыла!
100
 Loading...