

Page 1
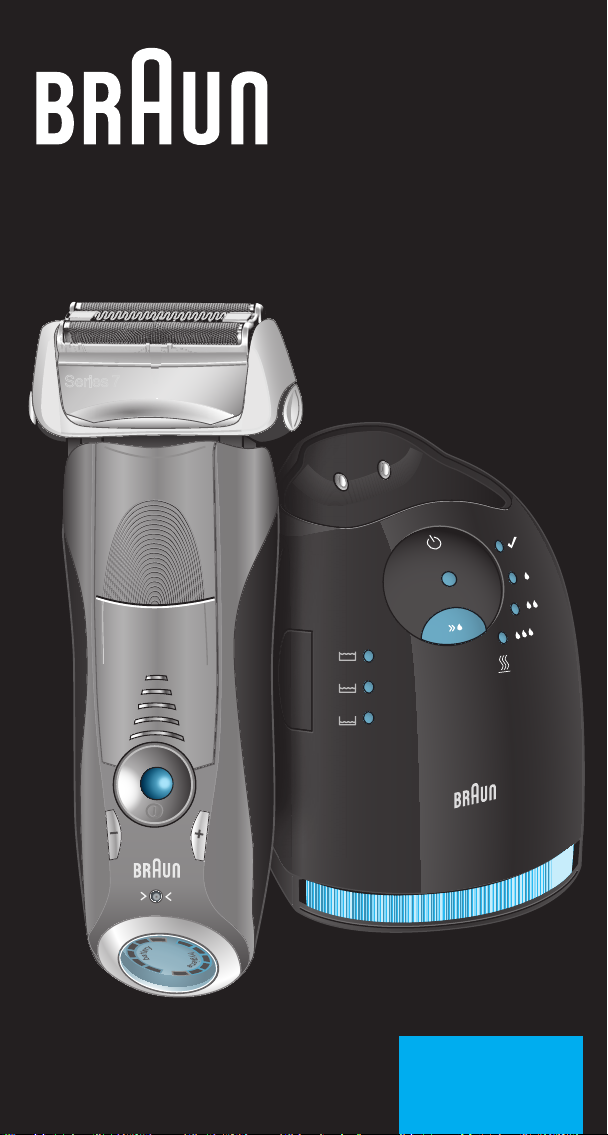
Series 7
Series 7
Series 7
trimmer
trimmer
trimmer
wet & dry
Type 5696
www.braun.com
799cc-6
Wet & Dry
Page 2
Braun Infolines
Deutsch 4
English 12
Français 22
Español 31
Português 39
Italiano 48
Nederlands 56
Dansk 64
Norsk 72
Svenska 80
Suomi 87
Türkçe 95
∂ППЛУИО¿ 103
DE / AT 00 800 27 28 64 63
00 800 BRAUNINFOLINE
CH 08 44 - 88 40 10
UK 0800 783 7010
IE 1 800 509 448
FR 0 800 944 802
BE 0 800 14 592
ES 901 11 61 84
PT 808 20 00 33
IT 800 440 017
NL 0 800-445 53 88
DK 70 15 00 13
NO 22 63 00 93
SE 020 - 21 33 21
FI 020 377 877
TR 0 800 261 63 65
GR 210-9478700
Braun GmbH
Frankfurter Straße 145
61476 Kronberg/Germany
www.braun.com
97144162/XII-14
DE/UK/FR/ES/PT/IT/NL/DK/NO/SE/FI/
TR/GR
HK 2926 2300
(Jebsen Consumer Service
Centre)
www.service.braun.com
Page 3
trimmer
trimmer
trimmer
Serie
s 7
Seri
es 7
34
4a
Series 7
Series 7
8
9
5
2
1
6
trimmer
trimmer
trimmer
trimmer
trimmer
trimmer
on
on
off
off
wet & dry
7
10
11
12
13
14
15
16
17
20
18
19
wet & dry
Page 4

Deutsch
Unsere Produkte werden hergestellt, um höchste Ansprüche an Qualität,
Funktionalität und Design zu erfüllen. Wir wünschen Ihnen mit Ihrem Braun
Rasierer viel Freude.
Bitte lesen Sie diese Gebrauchsanweisung vollständig, da sie Sicherheitsinformationen enthält. Bitte bewahren Sie die Gebrauchsanweisung für
zukünftige Fragen auf.
Achtung
Ihr Rasierer-System ist mit einem Spezialkabel mit integriertem Netzteil für Sicherheitskleinspannung ausgestattet. Es
dürfen weder Teile ausgetauscht noch Veränderungen vorgenommen werden, da sonst Stromschlaggefahr besteht.
Verwenden Sie ausschließlich das mitgelieferte Spezialkabel.
Verwenden Sie das Gerät nicht mit beschädigter Scherfolie
oder defektem Spezialkabel.
Dieses Gerät ist geeignet für die Verwendung in
Badewanne oder Dusche. Aus Sicherheitsgründen
kann es nur kabellos verwendet werden.
Dieses Gerät kann von Kindern ab 8 Jahren und von Personen mit reduzierten physischen, sensorischen oder mentalen
Fähigkeiten oder Mangel an Erfahrung und/oder Wissen
benutzt werden, wenn sie beaufsichtigt oder bezüglich des
sicheren Gebrauchs des Gerätes unterwiesen wurden und
die daraus resultierenden Gefahren verstanden haben. Kinder
dürfen nicht mit dem Gerät spielen. Reinigung und BenutzerWartung dürfen nicht durch Kinder durchgeführt werden, es
sei denn, sie sind älter als 8 Jahre und beaufsichtigt.
Um ein Auslaufen der Reinigungsfl üssigkeit zu vermeiden,
achten Sie beim Aufstellen der Station auf einen sicheren,
waagerechten Stand. Die Station darf mit eingesetzter
Kartusche nicht gekippt, nicht heftig bewegt und in keiner
Weise transportiert werden. Die Station sollte weder in Spiegelschränken oder über Heizungen aufbewahrt, noch auf
empfi ndlichen (polierten oder lackierten) Flächen abgestellt
werden.
Die Reinigungskartusche enthält leicht entzündliche Flüssigkeit. Von Zündquellen fernhalten, in der Nähe der Station nicht
rauchen. Nicht längere Zeit direktem Sonnenlicht aussetzen.
Die Reinigungskartusche nicht neu füllen. Verwenden Sie
ausschließlich die original Reinigungskartusche von Braun.
4
Page 5
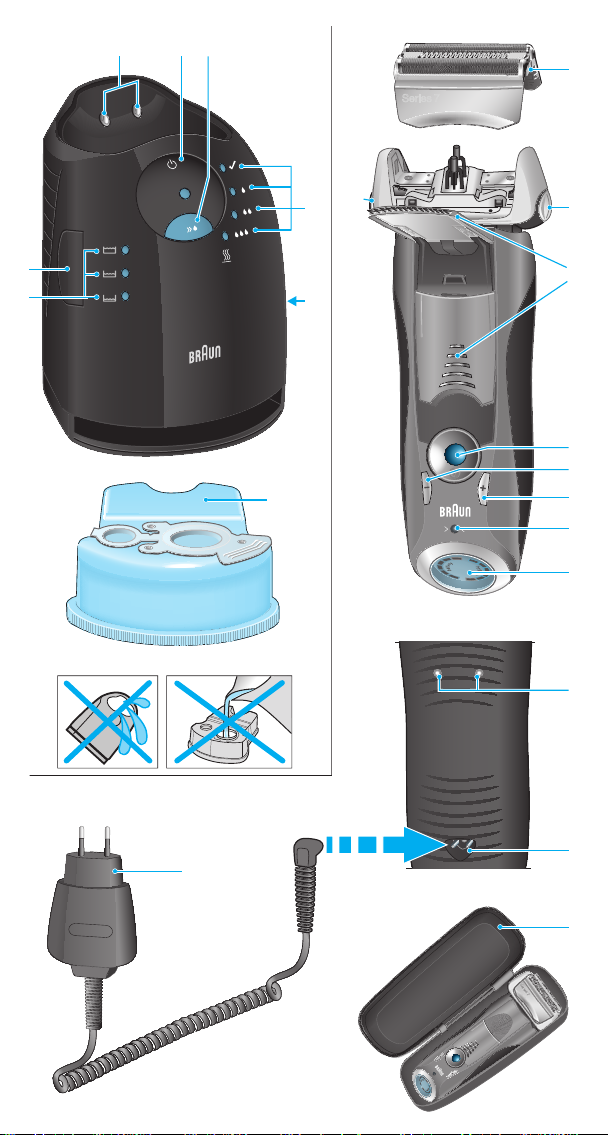
Beschreibung
Clean&Renew Station
1 Füllstands-Anzeige
2 Lift-Taste für Kartuschenwechsel
3 Kontakte Station – Rasierer
4 Start-Taste
D Schnellreinigungs-Taste
5 Leuchtdioden der Reinigungsprogramme
6 Steckerbuchse
7 Reinigungskartusche
Rasierer
8 Schersystem
9 Entriegelungstaste für das Schersystem
0 «lock» Taste für den Scherkopf
q Ausklappbarer Langhaarschneider
w Ein-/Ausschalter
e (–) Taste (sensitiv)
r (+) Taste (intensiv)
t Reset-Taste
z Rasierer-Display
u Kontakte Rasierer – Station
i Steckerbuchse (Rasierer)
o Reiseetui
p Spezialkabel
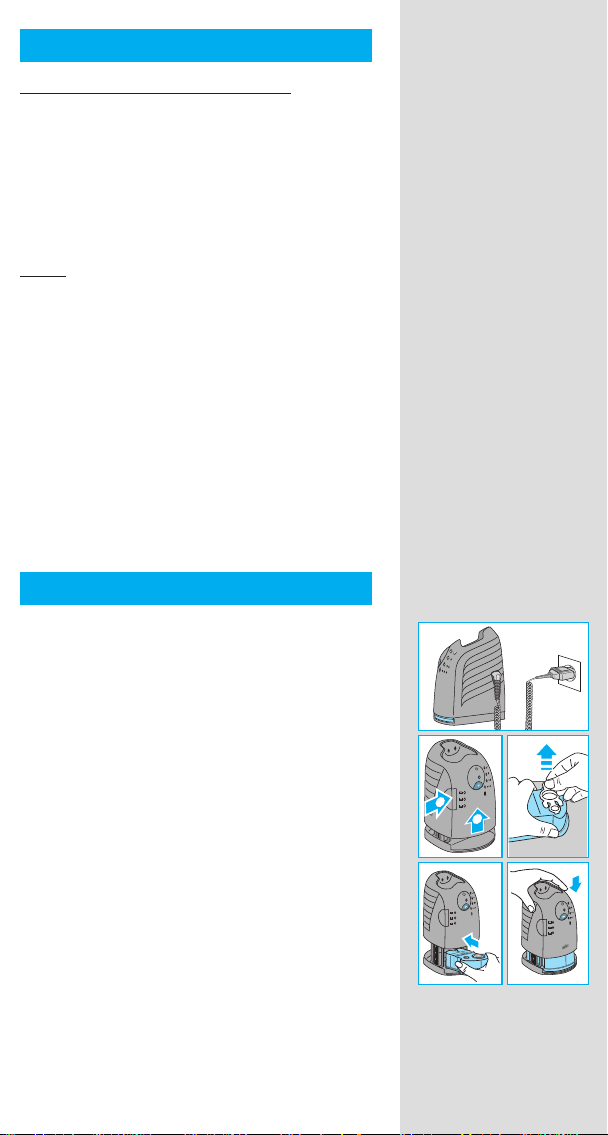
Vor der Rasur
Vor dem ersten Gebrauch muss der Rasierer mit
dem Spezialkabel p an das Netz angeschlossen
werden oder gehen Sie wie folgt vor:
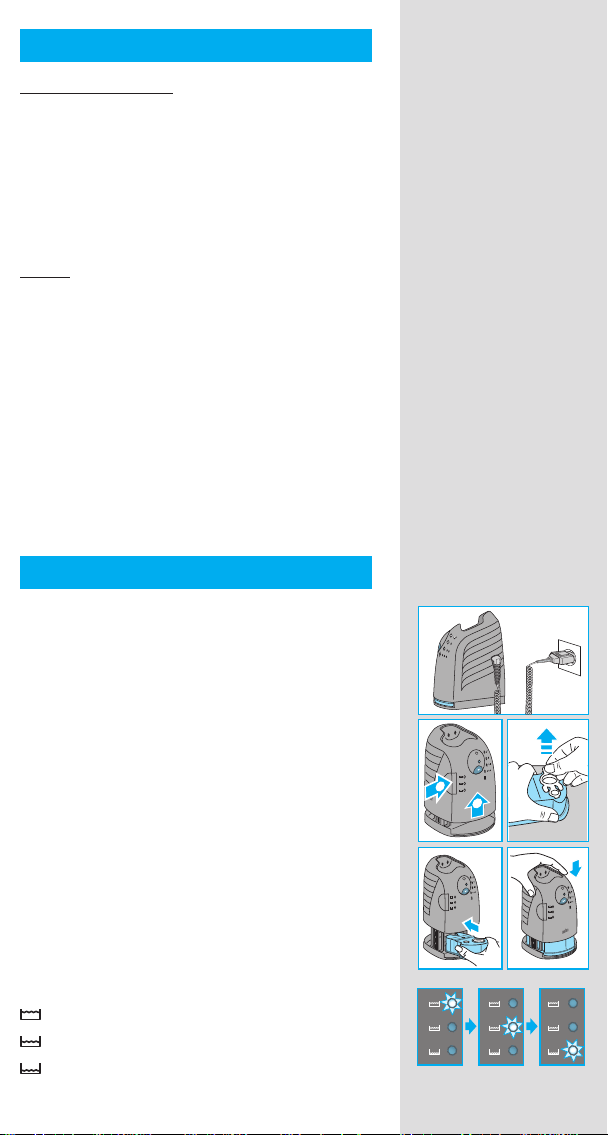
Inbetriebnahme der Clean&Renew Station
• Verbinden Sie die Steckerbuchse der Station
6 über das Spezialkabel p mit dem Netz.
• Drücken Sie die Lift-Taste
Gehäuse-Oberteil anzuheben.
• Halten Sie die Kartusche
festen Unterlage.
• Ziehen Sie den Verschluss vorsichtig ab.
• Schieben Sie die Kartusche bis zum Anschlag
in das Bodenfach.
• Drücken Sie das Gehäuse-Oberteil langsam
nach unten, bis es einrastet.
Die Füllstands-Anzeige
gungsfl üssigkeit in der Kartusche ist:
ausreichend Flüssigkeit vorhanden
noch bis zu 7 Reinigungen möglich
neue Kartusche erforderlich
2, um das
7 auf einer ebenen,
1 zeigt, wie viel Reini-
1
2
n
a
f
e
l
a
c
s
t
n
a
f
e
l
a
c
s
t
n
a
f
e
l
a
c
s
t
5
Page 6
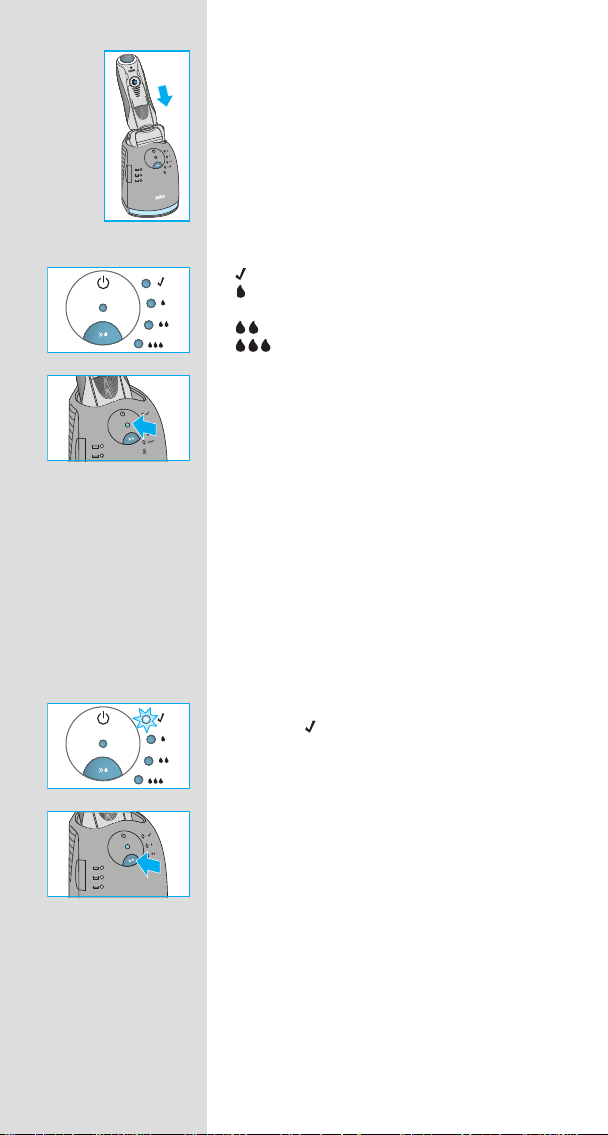
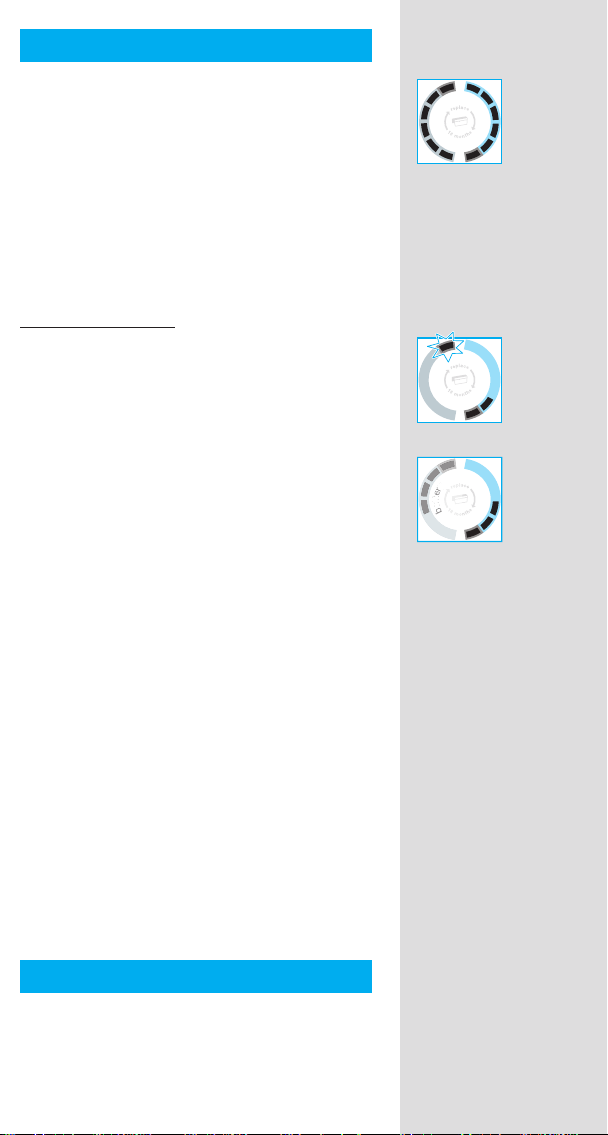
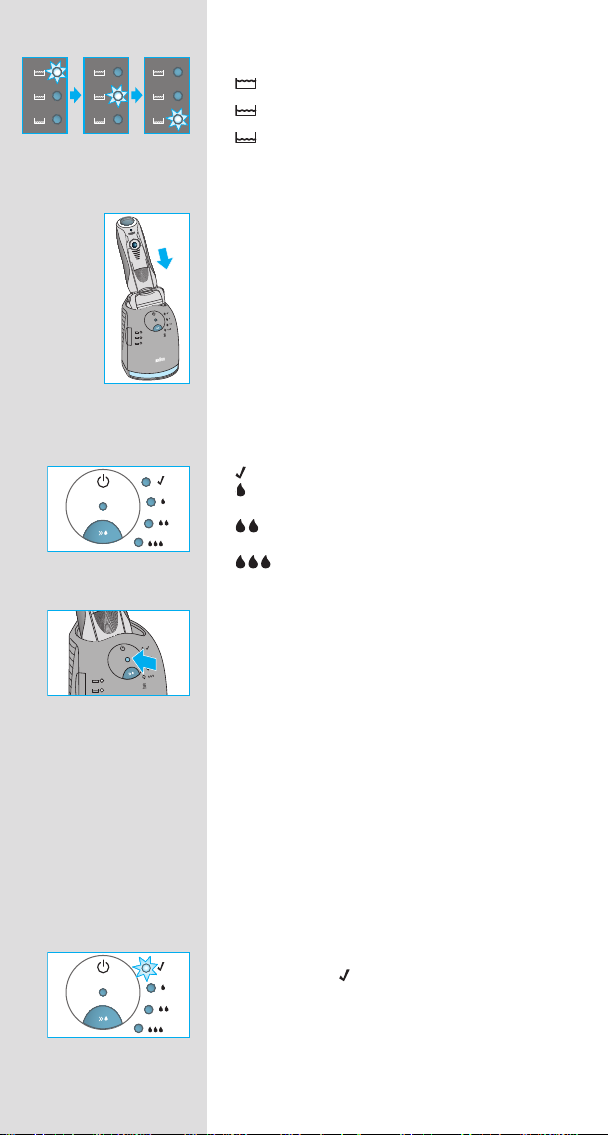
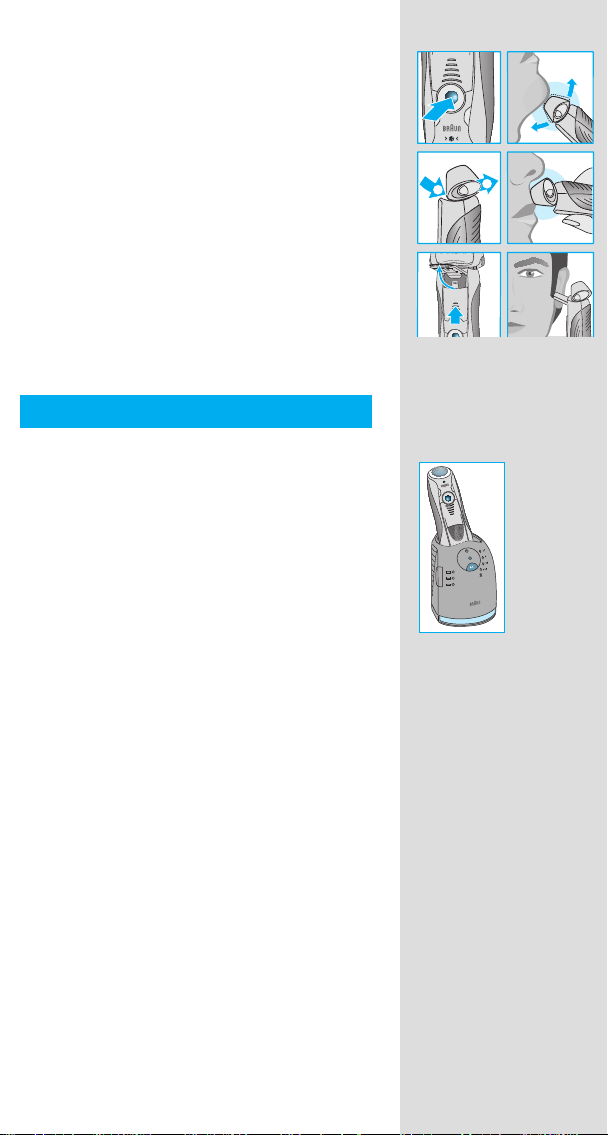
Laden und Reinigen des Rasierers
trimmer
Stellen Sie den Rasierer mit dem Kopf nach
unten in die Station, die Kontakte
u auf der
Rasierer-Rückseite berühren dann die Kontakte
3 in der Station. Wichtig: Der Rasierer muss
Series 7
trocken und frei von jeglichen Schaum- oder
Seifenrückständen sein.
Wenn erforderlich, wird der Rasierer jetzt
aufgeladen. Zudem wird der Reinigungsstatus
überprüft und eine der vier Leuchtdioden der
Reinigungsprogramme
5 leuchtet auf:
der Rasierer ist sauber
Sparprogramm – nur kurze Reinigung
erforderlich
normale Reinigung erforderlich
intensive Reinigung erforderlich
Hat die Station eines der drei Reinigungsprogramme gewählt, wird sie erst beginnen,
wenn Sie die Start-Taste 4 drücken. Für beste
Rasur-Ergebnisse empfehlen wir, nach jeder
Rasur zu reinigen.
Während das Reinigungsprogramm läuft,
blinkt die entsprechende Leuchtdiode. Jedes
Reinigungsprogramm besteht aus mehreren
Zyklen (in denen die Reinigungsfl üssigkeit
durch den Rasiererkopf gespült wird) und
einer Trocknungsphase (durch Erwärmung).
Die Gesamt-Reinigungszeit beträgt je nach
Programm zwischen 32 und 43 Minuten.
Die Reinigungsprogramme sollten nicht unterbrochen werden. Beachten Sie, dass das Schersystem während des Trocknens heiß und nass
sein kann.
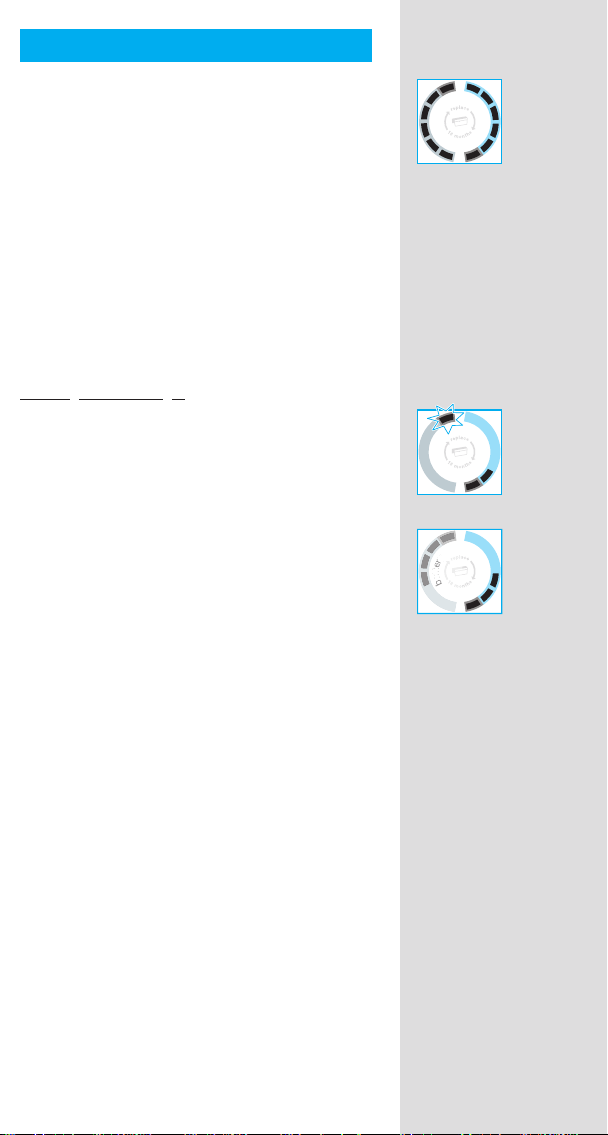
Ist das Reinigungsprogramm beendet, leuchtet
die blaue -Diode. Ihr Rasierer ist jetzt sauber
und bereit zur Benutzung.
Schnellreinigung
Wenn Sie die Schnellreinigungs-Taste D drücken,
wird ein Reinigungsvorgang ohne Trocknungsphase gestartet. Dieses Programm dauert nur
ca. 25 Sekunden und wird empfohlen, wenn Sie
keine Zeit für eines der Komplettprogramme
haben. Sollten Sie den Rasierer sofort nach
Ablauf dieses Programms entnehmen, wischen
Sie den Scherkopf mit einem Tuch ab, da er
noch tropfen kann.
Stand-by Betrieb
10 Minuten nach Beendigung des Lade- oder
Reinigungsvorgangs schaltet die Station in den
Stand-by Betrieb: Die Leuchtdioden an der
Station werden ausgeschaltet.
6
Page 7
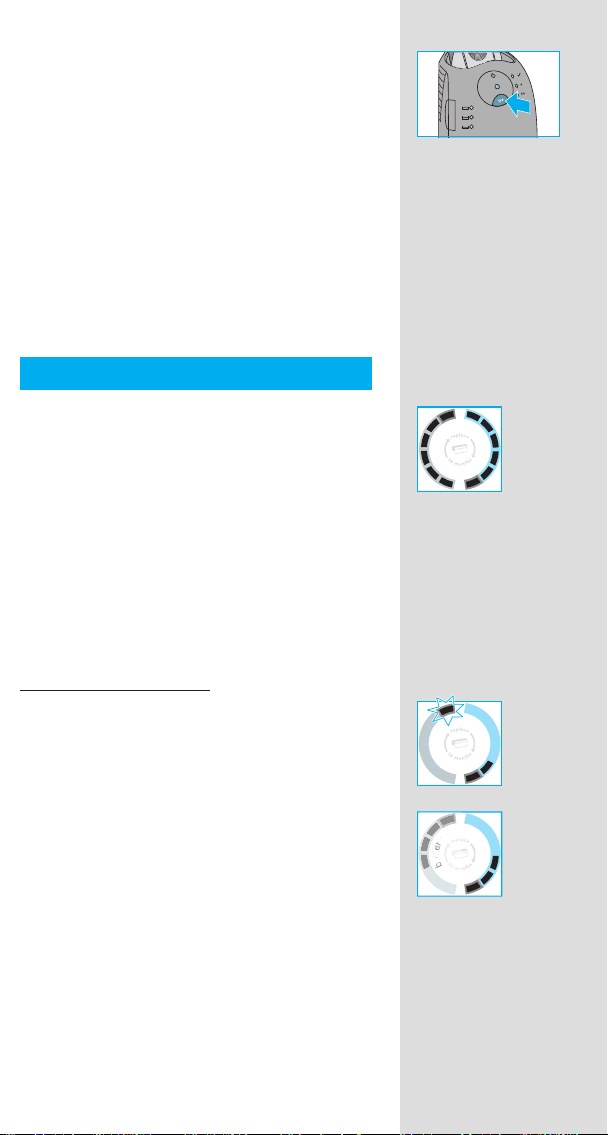
Rasierer-Display
b
a
t
y
Das Rasierer-Display z zeigt auf der linken Seite
den Akku-Ladezustand und auf der rechten
Seite den Hygiene-Status des Scherkopfes an.
Sechs dunkle Segmente werden auf jeder Seite
angezeigt, wenn der Rasierer voll geladen und
hygienisch sauber ist.
Akku-Segmente:
Während des Ladens oder beim Betrieb des
Rasierers blinkt das entsprechende AkkuSegment. Bei Vollladung werden alle sechs
Segmente permanent angezeigt. Die Segmente
verschwinden nach und nach mit abnehmender
Ladung.
Restkapazitätsanzeige:
Die Restkapazitätsanzeige «low» im roten
Rahmen blinkt, wenn die Akku-Ladung unter
20% abgesunken ist. Die verbleibende Ladung
reicht dann noch für 2–3 Rasuren.
Hygiene-Segmente:
Nach einer Reinigung in der Clean&Renew
Station werden alle sechs Hygiene-Segmente
angezeigt. Wird der Rasierer benutzt, verschwinden die Hygiene-Segmente nach und nach
und werden erst wieder vollständig angezeigt,
nachdem der Rasierer in der Clean&Renew
Station gereinigt wurde. Je nach HygieneStatus wählt die Station automatisch das
geeignete Reinigungsprogramm. Die HygieneSegmente werden jedoch nur dann wieder
vollständig angezeigt, wenn der Rasierer in der
Clean&Renew Station gereinigt wird, weil der
Reinigungsvorgang dort hygienischer ist als
unter fl ießendem Wasser.
h
y
y
r
g
e
i
t
e
t
n
a
e
b
h
y
y
r
g
e
i
t
e
t
n
a
e
b
h
y
y
r
g
e
i
t
e
t
n
a
e
b
Informationen zum Laden
• Voll geladen kann der Rasierer je nach
Bartstärke ca. 50 Minuten ohne Netzanschluss
betrieben werden.
• Die empfohlene Umgebungstemperatur
zum Laden ist 5 °C bis 35 °C. Bei extrem
niedrigen oder hohen Temperaturen kann
es sein, dass der Akku nicht richtig oder gar
nicht geladen werden kann. Die empfohlene
Umgebungstemperatur zum Rasieren liegt bei
15 °C bis 35 °C. Setzen Sie den Rasierer nicht
längere Zeit Temperaturen über 50° C aus.
7
Page 8

Gebrauch des Rasierers
r
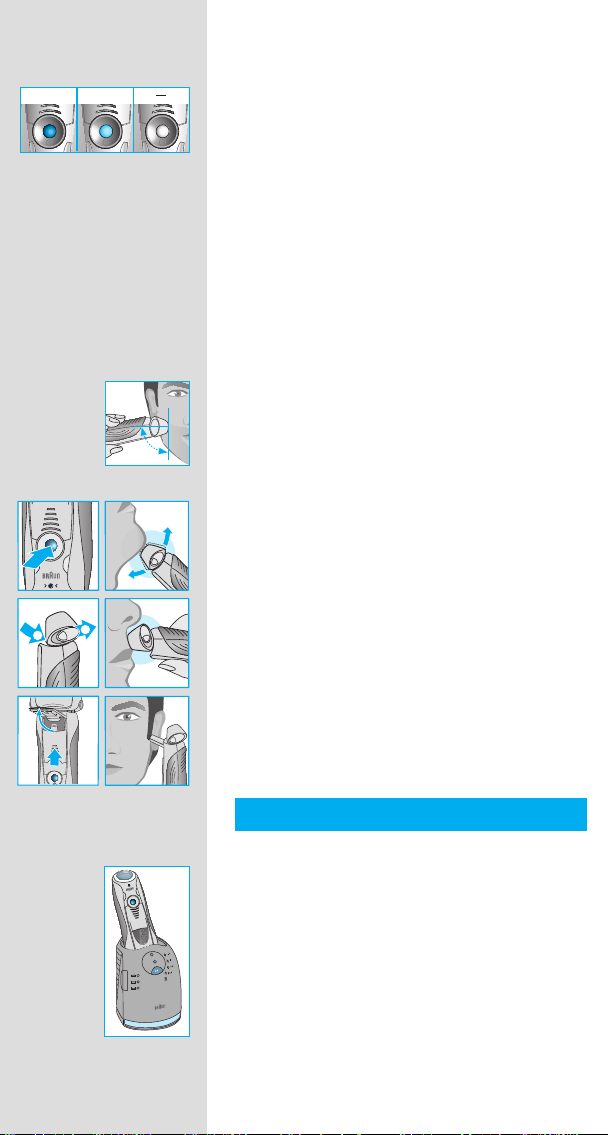
Persönliche Einstellung Ihres Rasierers
Mit den Tasten (–) e und (+) r können Sie Ihren
Rasierer auf ihre persönlichen Bedürfnisse
anpassen, die in den verschiedenen Gesichtspartien unterschiedlich sein können.
Die drei möglichen Einstellungen werden mit der
Kontrollleuchte im Ein-/Ausschalter
w angezeigt:
normal
+
• dunkelblau (mit viel Power bei starkem
Bartwuchs)
• hellblau (normal)
• weiß (für gründliche Rasur auch in
empfi ndlichen Bereichen des Gesichts und
Halses)
Für die gründlichste und schnellste Rasur
empfehlen wir die Einstellung (+).
Beim Wiedereinschalten ist automatisch die
zuletzt gewählte Einstellung aktiv.
Tipps für eine optimale Trockenrasur
Für optimale Rasier-Ergebnisse empfehlen wir
drei einfache Schritte:
1. Rasieren Sie sich immer, bevor Sie Ihr Gesicht
waschen.
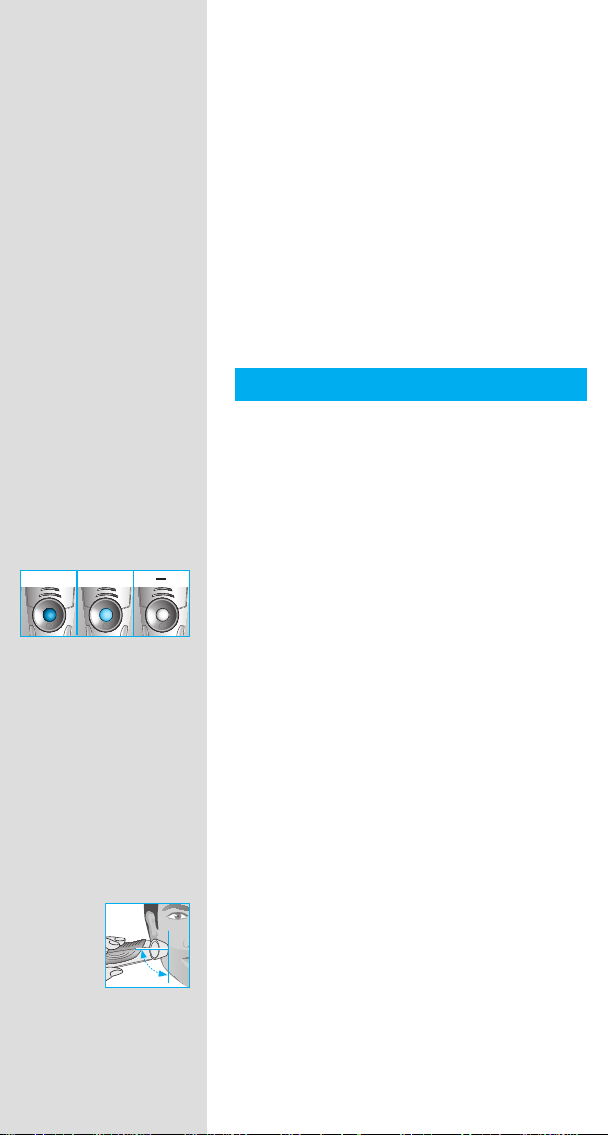
2. Rasierer stets im rechten Winkel (90°) zur
release
90°
t
Haut halten.
3. Haut straffen und gegen die Bartwuchsrich-
tung rasieren.
Rasieren
Drücken Sie den Ein-/Ausschalter
w, um den
Rasierer einzuschalten:
+
lock
• Der bewegliche Schwingkopf und die
fl exiblen Scherfolien sorgen automatisch
für eine optimale Anpassung an die
2
lock
1
lock
Gesichtsform.
• Für die Rasur an engen Gesichtspartien
(z.B. unter der Nase) schieben Sie die «lock»
Taste 0 nach hinten, um den Schwingkopf in
Winkelstellung zu fi xieren.
trimmer
lock
• Zum kontrollierten Trimmen von Schnauzbart
und Haaransatz schieben Sie den ausklappbaren Langhaarschneider q («trimmer») nach
oben.
8
Page 9
Reinigung
re
le
a
s
e
Automatische Reinigung
Stellen Sie den Rasierer nach jeder Rasur in
die Station und verfahren Sie wie im Abschnitt
«Vor der Rasur» beschrieben.
Alle Reinigungs- und Ladefunktionen werden
dann automatisch durchgeführt. Bei täglicher
Reinigung reicht eine Kartusche für ca. 30 Reinigungsvorgänge.
Die Reinigungsfl üssigkeit enthält Ethanol oder
Isopropanol (Einzelheiten siehe Kartusche),
das sich nach Öffnen der Kartusche langsam
verfl üchtigt. Daher sollte eine Kartusche, falls sie
nicht täglich verwendet wird, nach ca. 8 Wochen
ausgetauscht werden.
Die Reinigungsfl üssigkeit enthält ölige
Substanzen, die Rückstände auf dem Scherkopf
hinterlassen können. Wischen Sie eventuelle
Rückstände einfach mit einem weichen Tuch ab.
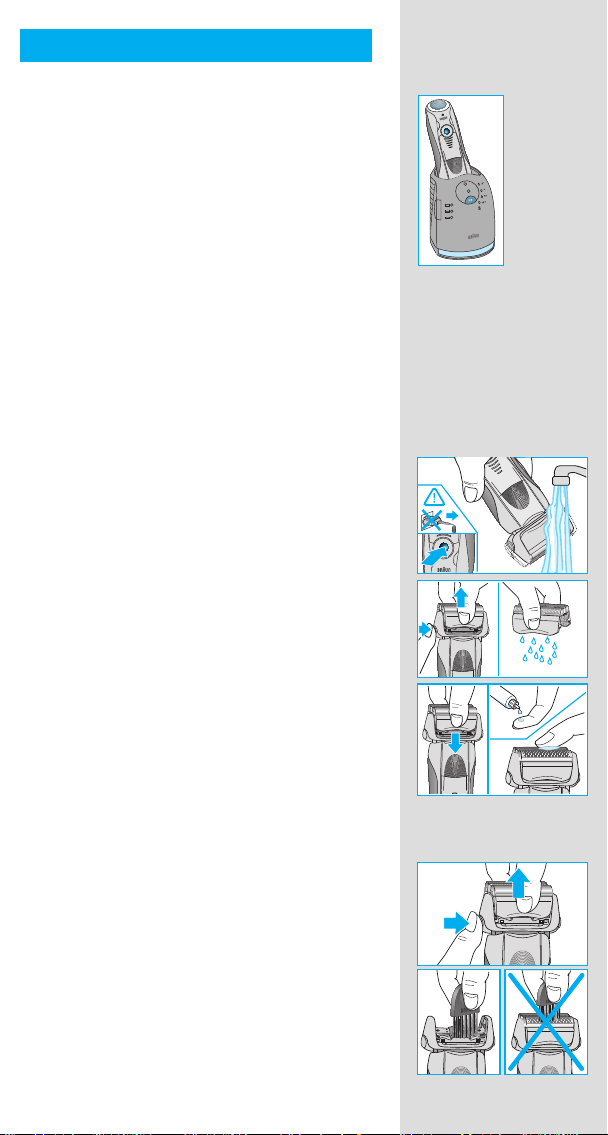
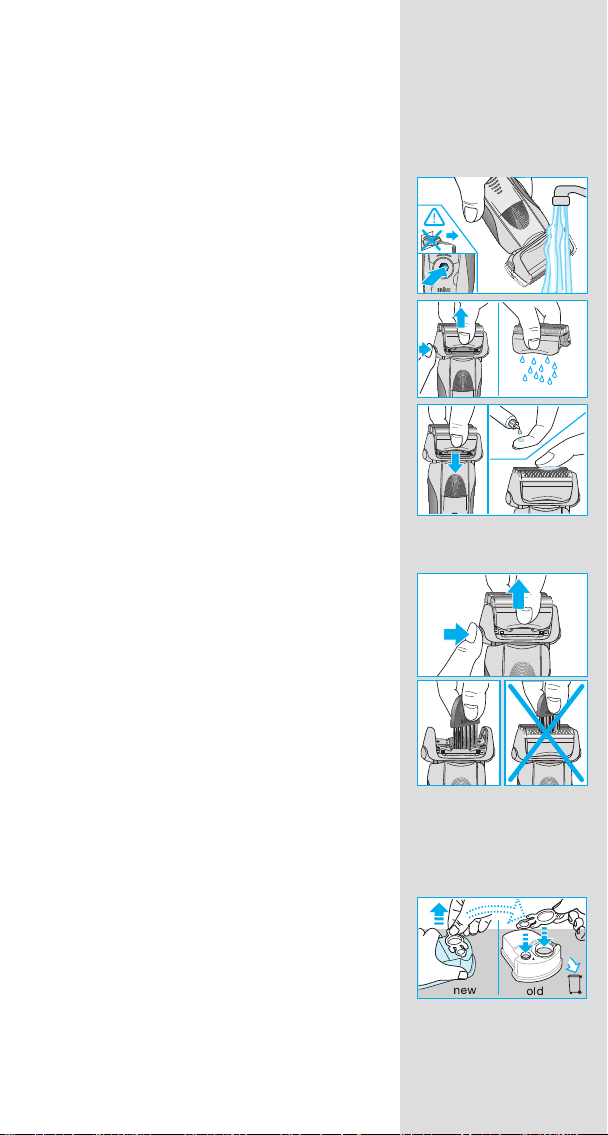
Manuelle Reinigung
Das Reinigen des Scherkopfs unter fl ießendem
Wasser ist eine alternative Reinigungsmethode,
die wir vor allem empfehlen, wenn Sie auf Reisen
sind:
•
Schalten Sie den Rasierer ein (kabellos) und
reinigen Sie den Scherkopf unter heißem,
fl ießendem Wasser, bis alle Rückstände entfernt
wurden.
Gelegentlich Flüssigseife (ohne
Scheuermittel) benutzen. Schaum vollständig
abspülen und den Rasierer noch einige
Sekunden laufen lassen.
• Dann den Rasierer ausschalten, die Entriegelungstaste 9 drücken, das Schersystem 8
abnehmen und trocknen lassen.
• Bei regelmäßiger Nassreinigung sollten Sie
wöchentlich einen Tropfen Leichtmaschinenöl
auf der Oberfl äche des Schersystems
verteilen.
trimmer
trimmer
Series
re
le
a
s
e
Series 7
re
le
a
s
e
trimmer
Series
er
Series 7
Alternativ können Sie den Rasierer mit einer
Bürste reinigen:
• Rasierer ausschalten. Das Schersystem
abnehmen und ausklopfen. Mit der Bürste die
Scherkopf-Innenseite reinigen.
Das Schersystem darf nicht mit der Bürste
gereinigt werden.
8
Series 7
re
le
a
s
e
re
le
a
s
e
Series 7
re
le
a
s
e
9
Page 10
Reinigung des Gehäuses
re
le
a
s
e
Von Zeit zu Zeit das Gehäuse des Rasierers und
der Station mit einem feuchten Tuch abwischen,
insbesondere die Mulde in der Station, in der der
Rasierer sitzt.
Kartuschenwechsel
Nach dem Drücken der Lift-Taste
2 zum Öffnen
des Gehäuses einige Sekunden warten, bevor
die gebrauchte Kartusche herausgenommen
wird.
Schließen Sie vor dem Entsorgen der gebrauchten Kartusche die Öffnungen mit dem Verschluss
der neuen Kartusche, denn die gebrauchte
Kartusche enthält verschmutzte Reinigungsfl üssigkeit.
So halten Sie Ihren Rasierer in Bestform
Wechselanzeige für das Schersystem/Reset
y
h
r
y
e
t
g
t
i
a
e
b
n
e
Series 7
70S
Um 100 % der Rasierleistung zu erhalten,
wechseln Sie das Schersystem 8, wenn die
Wechselanzeige auf dem Display z aufl euchtet
nach ca. 18 Monaten oder wenn es Verschleißerscheinungen zeigt.
Die Wechselanzeige leuchtet noch während der
nächsten 7 Rasuren, um Sie an den Schersystemwechsel zu erinnern. Danach erfolgt ein
automatisches Reset der Anzeige.
Wenn Sie das Schersystem gewechselt haben,
drücken Sie die Reset-Taste t mindestens
3 Sekunden lang, um die Wechselanzeige
manuell zurückzustellen. Dabei blinkt die
Wechselanzeige zunächst noch und erlischt,
sobald das Reset abgeschlossen ist. Die
Wechselanzeige kann zu jeder Zeit manuell
zurückgesetzt werden.
Zubehör
Im Handel oder beim Braun Kundendienst
70S
erhältlich:
• Schersystem 70S
• Reinigungskartusche Clean&Renew CCR
Informationen zum Umweltschutz
Das Gerät enthält Akkus und/oder wiederverwertbare Elektrobauteile. Im Sinne des
Umweltschutzes darf dieses Gerät am
Ende seiner Lebensdauer nicht im Hausmüll entsorgt werden, sondern kann bei
entsprechenden lokal verfügbaren Rückgabeund Sammelstellen abgegeben werden.
10
Page 11

Die Kartusche kann im Hausmüll entsorgt
werden.
Änderungen vorbehalten.
Elektrische Angaben siehe Bedruckung auf dem
Spezialkabel.
Garantie
Als Hersteller übernehmen wir für dieses
Gerät – nach Wahl des Käufers zusätzlich zu
den gesetzlichen Gewährleistungsansprüchen
gegen den Verkäufer – eine Garantie von
2 Jahren ab Kaufdatum. Innerhalb dieser
Garantiezeit beseitigen wir nach unserer Wahl
durch Reparatur oder Austausch des Gerätes
unentgeltlich alle Mängel, die auf Material- oder
Herstellungsfehlern beruhen. Die Garantie kann
in allen Ländern in Anspruch genommen werden,
in denen dieses Braun Gerät von uns autorisiert
verkauft wird.
Von der Garantie sind ausgenommen:
Schäden durch unsachgemäßen Gebrauch
(Knickstellen an der Scherfolie, Bruch),
normaler Verschleiß (z.B. Scherfolie oder
Klingenblock) sowie Mängel, die den Wert oder
die Gebrauchstauglichkeit des Gerätes nur
unerheblich beeinfl ussen. Bei Eingriffen durch
nicht von uns autorisierte Braun Kundendienstpartner sowie bei Verwendung anderer als
Original Braun Ersatzteile erlischt die Garantie.
Im Garantiefall senden Sie das Gerät mit
Kaufbeleg bitte an einen autorisierten Braun
Kundendienstpartner. Die Anschrift fi nden Sie
unter www.service.braun.com oder können Sie
kostenlos unter 00800/27 28 64 63 erfragen.
11
Page 12

English
Our products are designed to meet the highest standards of quality,
functionality and design. We hope you enjoy your new Braun Shaver.
Read these instructions completely, they contain safety information.
Keep them for future reference.
Warning
Your shaving system is provided with a special cord set,
which has an integrated Safety Extra Low Voltage power
supply. Do not exchange or tamper with any part of it, otherwise there is risk of an electric shock. Only use the special
cord set provided with your appliance.
Do not shave with a damaged foil or cord.
This appliance is suitable for use in a bathtub or
shower. For safety reasons this appliance can only be
operated cordlessly.
This appliance can be used by children aged from 8 years and
above and persons with reduced physical, sensory or mental
capabilities or lack of experience and knowledge if they have
been given supervision or instruction concerning the safe
use of the appliance and understand the hazards involved.
Children shall not play with the appliance. Cleaning and user
maintenance shall not be made by children unless they are
older than 8 years and supervised.
To prevent the cleaning fl uid from leaking, ensure that the
Clean&Renew station is placed on a fl at surface. When a
cleaning cartridge is installed, do not tip, move suddenly or
transport the station in any way as cleaning fl uid might spill
out of the cartridge. Do not place the station inside a mirror
cabinet, nor over a radiator, nor place it on a polished or
lacquered surface.
The cleaning cartridge contains a highly fl ammable liquid so
keep it away from sources of ignition. Do not smoke near the
station. Do not expose to direct sunlight for long periods of
time.
Do not refi ll the cartridge and use only original Braun refi ll
cartridges.
12
Page 13
Description
Clean&Renew station
1 Cleaning fl uid display
2 Lift button for cartridge exchange
3 Station-to-shaver contacts
4 Start button
D Fast clean button
5 Cleaning program indicators
6 Station power socket
7 Cleaning cartridge
Shaver
8 Foil & Cutter cassette
9 Cassette «release» button
0 Shaver head «lock» switch
q Pop-out long hair trimmer
w On/off switch
e (–) setting button (sensitive)
r (+) setting button (intensive)
t Reset button
z Shaver display
u Shaver-to-station contacts
i Shaver power socket
o Travel case
p Special cord set
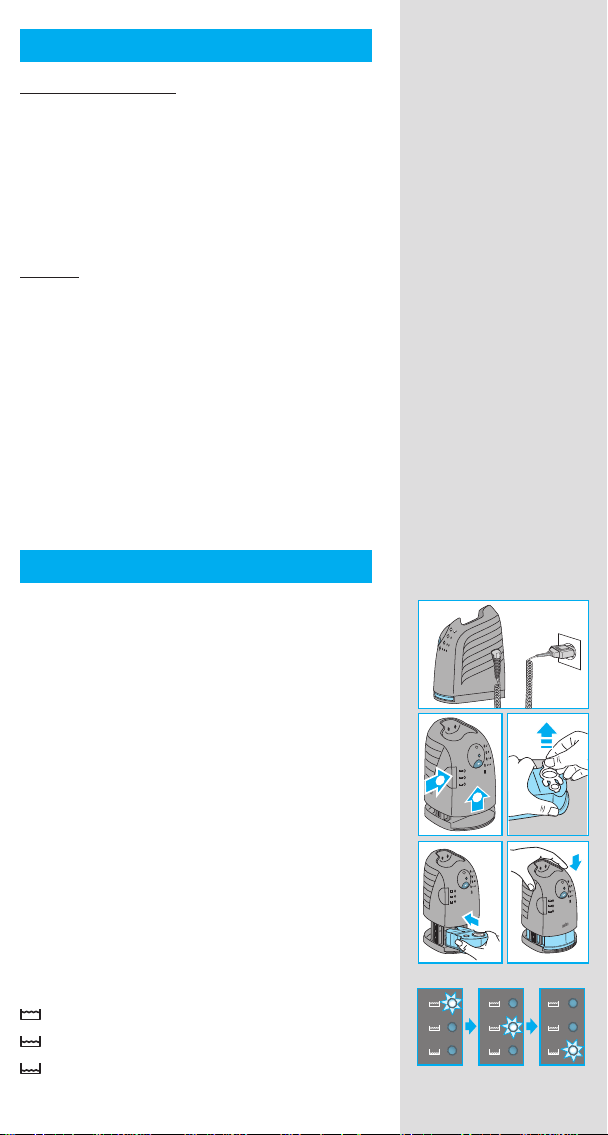
Before shaving
Prior to fi rst use you must connect the shaver to
an electrical outlet using the special cord set p
or alternatively proceed as below.
Installing the Clean&Renew station
• Using the special cord set p, connect the
station power socket 6 to an electrical outlet.
• Press the lift button 2 to open the housing.
• Hold the cleaning cartridge 7 down on a fl at,
stable surface (e.g. table).
• Carefully remove the lid from the cartridge.
• Slide the cartridge into the base of the station
as far as it will go.
• Slowly close the housing by pushing it down
until it locks.
The cleaning fl uid display 1 will show how much
fl uid is in the cartridge:
up to 30 cleaning cycles available
up to 7 cleaning cycles remaining
new cartridge required
1
2
n
a
f
e
l
a
c
s
t
n
a
f
e
l
a
c
s
t
n
a
f
e
l
a
c
s
t
13
Page 14

Charging and cleaning the shaver
trimmer
Insert the shaver head down into the cleaning
station. The contacts
u on the back of the
shaver will align with the contacts 3 in the
cleaning station. Important: The shaver needs
Series 7
to be dry and free from any foam or soap
residue!
If required, the Clean&Renew station will automatically charge the shaver. The hygiene status
of the shaver will also be analyzed and one of
the following cleaning program indicators
5 will
light up:
shaver is clean
short economical cleaning required
normal level of cleaning required
high intensive cleaning required
If the station selects one of the required cleaning
programs, it will not start unless you press the
start button
4. For best shaving results, we
recommend cleaning after each shave.
Whilst cleaning is in progress, the respective
cleaning program indicator will blink. Each
cleaning program consists of several cycles,
where cleaning fl uid is fl ushed through the
shaver head and a heat drying process dries
the shaver. Depending on the program selected
the total cleaning time will range from 32 to 43
minutes.
14
The cleaning programs should not be interrupted. Please note that whilst the shaver is
drying, the shaver head may be hot and wet.
When the program is fi nished, the blue
indicator will light up. Your shaver is now clean
and ready for use.
Fast cleaning
Push the fast clean button D to activate
the fast clean program without drying. This
program takes about 25 seconds only and is
recommended when you do not have time to
wait for one of the automatic cleaning programs.
If you remove the shaver just after the program
has fi nished, wipe off the shaver head with a
tissue to avoid dripping.
Stand-by mode
10 minutes after completing the charging or
cleaning session, the Clean&Renew station
switches to the stand-by mode: The indicators
of the Clean&Renew station turn off.
Page 15
Shaver display
b
a
t
y
The shaver display z shows the charge status
of the battery on the left, and the hygiene status
on the right. 6 dark segments are shown on each
side when the battery is fully charged and the
shaver is hygienically clean.
Battery segments:
During charging or when using the shaver, the
respective battery segments will blink. When
fully charged all 6 segments are shown. With
decreasing charge the segments gradually
disappear.
Low charge indicator:
The low charge indicator provided with a red
frame blinks to indicate that the charge has
dropped below 20%. The remaining battery
capacity is suffi cient for 2 to 3 shaves.
Hygiene segments:
All 6 hygiene segments will appear after the
shaver has been cleaned in the Clean&Renew
station. When the shaver is being used, the
hygiene segments will gradually disappear.
Once the shaver is returned to the station, the
system will automatically select the appropriate
cleaning program and restore the segments
to maximum hygiene. Given that rinsing the
shaver under tap water is not as hygienic as the
cleaning station, the hygiene segments will only
restore themselves when the shaver has been
cleaned in the Clean&Renew station.
h
y
y
r
g
e
i
t
e
t
n
a
e
b
h
y
y
r
g
e
i
t
e
t
n
a
e
b
h
y
y
r
g
e
i
t
e
t
n
a
e
b
Charging information
• A full charge provides up to 50 minutes
of cordless shaving time. This may vary
according to your beard growth.
• Recommended ambient temperature for
charging is 5 °C to 35 °C. The battery may not
charge properly or at all under extreme low or
high temperatures. Recommended ambient
temperature for shaving is 15 °C to 35 °C.
Do not expose the appliance to temperatures
higher than 50 °C for extended periods of time.
Using your shaver
Personalizing your shaver
With the (–) e and (+) r buttons you can choose
the best setting for shaving different areas of
your face and as per your specifi c needs.
15
Page 16
The different settings are indicated by the pilot
r
light incorporated in the on/off switch w:
normal
+
• dark blue (powerful shave)
• light blue (normal)
• white (for a thorough comfortable shave in
sensitive areas of your face such as neck)
For a thorough and fast shave we recommend
the (+) setting.
When switching on next time, the last used
setting will be activated.
Tips for the perfect dry shave
For best shaving results, Braun recommends you
follow 3 simple steps:
1. Always shave before washing your face.
2. At all times, hold the shaver at right angles
release
90°
t
+
lock
(90°) to your skin.
3. Stretch your skin and shave against the
direction of your beard growth.
How to use
Press the on/off switch
w to operate the shaver:
• The pivoting shaver head and fl oating foils
automatically adjust to every contour of your
face.
2
lock
1
lock
• To shave hard to reach areas (e.g. under the
nose) slide the shaver head «lock» switch 0 to
the back position to lock the pivoting head at
an angle.
16
• To trim sideburns, moustache or beard, slide
trimmer
lock
the pop-out long hair trimmer upwards.
Cleaning
Automatic cleaning
After each shave, return the shaver to the
Clean&Renew station and proceed as described
trimmer
above in the section «Before shaving».
All charging and cleaning needs are then
automatically taken care of. With daily use, a
cleaning cartridge should be suffi cient for about
30 cleaning cycles.
The hygienic cleaning cartridge contains ethanol
or isopropanol (specifi cation see cartridge),
which once opened will naturally evaporate
slowly. Each cartridge, if not used daily, should
be replaced after approximately 8 weeks.
Page 17
The cleaning cartridge also contains lubricants,
re
le
a
s
e
which may leave residual marks on the outer foil
frame after cleaning. However, these marks can
be removed easily by wiping gently with a cloth
or soft tissue paper.
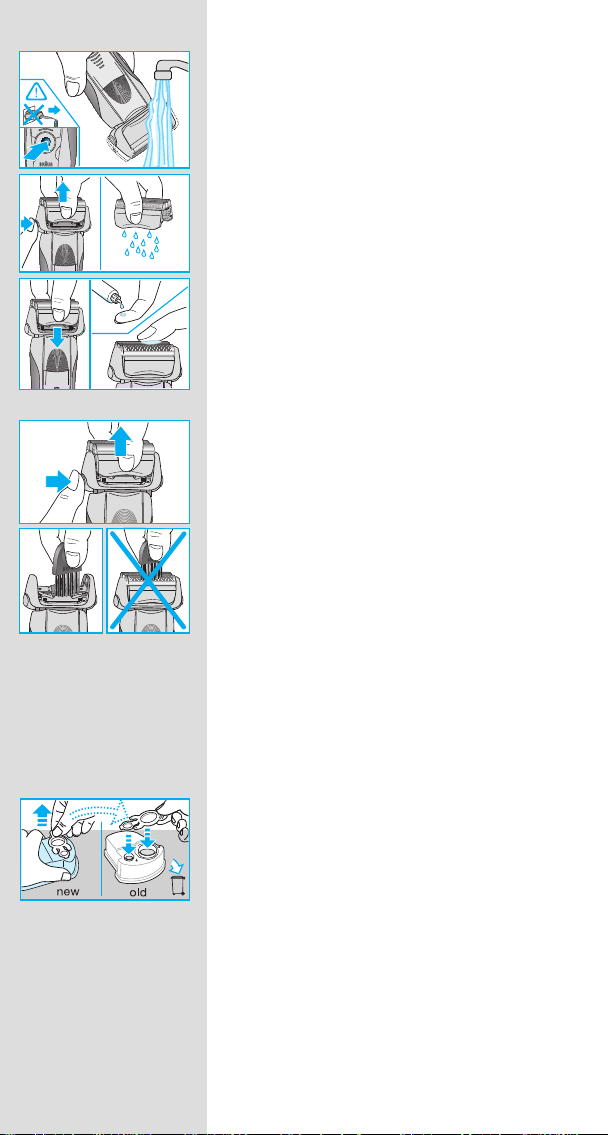
Manual cleaning
Rinsing the shaver head under running water
is an alternative way to keep the shaver clean,
especially when travelling:
• Switch on the shaver (cordless) and rinse the
shaver head under hot running water until all
residues have been removed. You may use
liquid soap without abrasive substances. Rinse
off all foam and let the shaver run for a few
more seconds.
• Next, switch off the shaver, press the «release»
button
9 to remove the Foil & Cutter cassette
8 and let it dry.
• If you regularly clean the shaver under
water, then once a week apply a drop of
light machine oil on top of the Foil & Cutter
cassette.
Alternatively, you may clean the shaver using a
brush:
• Switch off the shaver. Remove the Foil & Cutter
cassette 8 and tap it out on a fl at surface.
Using the brush, clean the inner area of the
pivoting head. However, do not clean the
cassette with the brush as this may damage it.
trimmer
Series
re
le
a
s
e
Series 7
re
le
a
s
e
trimmer
Series
er
Series 7
Series 7
re
le
a
s
e
Cleaning the housing
From time to time clean the housing of the
shaver and the Clean&Renew station with a
damp cloth, especially inside the cleaning
chamber where the shaver rests.
Replacing the cleaning cartridge
After having pressed the lift button 2 to open the
housing, wait for a few seconds before removing
the used cartridge to avoid any dripping.
Before discarding the used cartridge, make sure
to close the openings using the lid of the new
cartridge, since the used cartridge will contain
contaminated cleaning solution.
re
le
a
s
e
Series 7
re
le
a
s
e
17
Page 18

Keeping your shaver in top shape
re
le
a
s
e
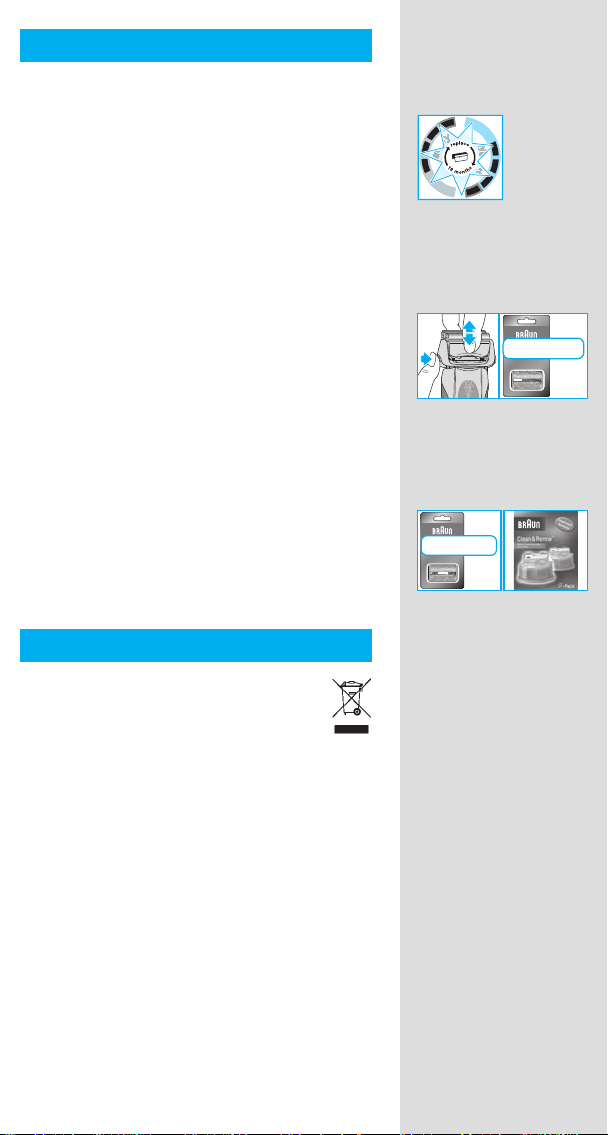
Replacing the Foil & Cutter cassette / reset
y
h
r
y
e
t
g
t
i
a
e
b
n
e
To maintain 100% shaving performance, replace the Foil & Cutter cassette 8, when the
replacement symbol lights up on the shaver
z after about 18 months or when
display
cassette is worn.
The replacement symbol will remind you during
the next 7 shaves to replace the Foil & Cutter
cassette. Then the shaver will automatically reset
the display.
Series 7
70S
70S
After you have replaced the Foil & Cutter
cassette, use a ball-pen to push the reset button
t for at least 3 seconds to reset the counter.
While doing so, the replacement light blinks and
goes off when the reset is complete. The manual
reset can be done at any time.
Accessories
Available at your dealer or Braun Service
Centres:
• Foil & Cutter cassette 70S
• Cleaning cartridge Clean&Renew CCR
Environmental notice
Product contains batteries and/or
recyclable electric waste. For environment
protection do not dispose of in household
waste, but for recycling take to electric
waste collection points provided in your country.
The cleaning cartridge can be disposed with
regular household waste.
Subject to change without notice.
For electric specifi cations, see printing on the
special cord set.
18
Page 19

Guarantee
We grant a 2 year guarantee on the product
commencing on the date of purchase. Within the
guarantee period we will eliminate any defects in
the appliance resulting from faults in materials or
workmanship, free of charge either by repairing
or replacing the complete appliance at our
discretion.
This guarantee extends to every country where
this appliance is supplied by Braun or its
appointed distributor.
This guarantee does not cover: damage due
to improper use, normal wear or use as well as
defects that have a negligible effect on the value
or operation of the appliance. The guarantee
becomes void if repairs are undertaken by
unauthorised persons and if original Braun parts
are not used.
To obtain service within the guarantee period,
hand in or send the complete appliance with
your sales receipt to an authorised Braun
Customer Service Centre (address information
available online at www.service.braun.com).
For UK only:
This guarantee in no way affects your rights
under statutory law.
19
Page 20

For Australia only:
Warranty
In Australia, our goods come with guarantees that cannot be excluded
under the Australian Consumer Law. You are entitled to a replacement or
refund for a major failure and for compensation for any other reasonably
foreseeable loss or damage. You are also entitled to have the goods
repaired or replaced if the goods fail to be of acceptable quality and the
failure does not amount to a major failure.
The benefi ts given by this warranty are in addition to other rights and
remedies of the consumer law.
For Claims in Australia please contact:
Procter & Gamble Australia Pty Ltd
1 Innovation Road, Macquarie Park
NSW 2113
Telephone: +612 8864 5000; Facsimile: +612 8864 5574
Email: gillette@au.pgconsumers.com
For claims in New Zealand please contact:
Procter & Gamble Distributing New Zealand Limited
Unit 3, Building I, 5 Orbit Drive
Rosedale, North Shore City 0632
Auckland, New Zealand
Telephone: +649 477 6400; Facsimile: +649 477 6399
Email: gillette@nz.pgconsumers.com
Our Warranty
This appliance is also covered by a 24 Month Replacement Warranty
commencing on the date of purchase (Our Warranty).
Our Warranty applies in all States and Territories of Australia and in
New Zealand and is in addition to any mandatory statutory obligations
imposed on Procter & Gamble Australia Pty. Ltd., its distributors and its
manufacturer. Our Warranty does not purport to exclude, restrict or modify
any such mandatory statutory obligations.
Our Warranty only covers defects in the appliance resulting from faults in
workmanship or materials. Therefore, if your appliance becomes faulty as a
result of faults in workmanship or materials, it will be exchanged by your retailer,
on presentation of proof of purchase.
Our Warranty only applies to domestic or household use of this appliance and
the warranty will only apply if the correct operating instructions included with this
product have been followed. For any appliance replaced under this warranty,
Our Warranty ends on the expiry of the warranty period that applied to the
original appliance.
Our Warranty does not cover:
A. Damage arising from improper use or operation on incorrect voltages.
B. Breakages to shaver foils, glass jars, etc.
C. Normal wear due to moving parts.
D. Repairs undertaken by unauthorised service personnel or use of non
genuine parts.
E. Appliances that are outside the warranty period or are not faulty.
This appliance is not intended for use by young children or infi rm persons
without supervision. Young children should be supervised to ensure that they do
not play with the appliance.
If the appliance is powered by a cord extension set or electrical portable outlet
device these should be positioned so they are not subject to splashing or ingress
of moisture.
20
Page 21

To the extent permitted by the laws of the Commonwealth of Australia and New
Zealand and applicable laws of a State or Territory of Australia, and without
affecting any mandatory statutory obligations imposed by law, Our Warranty is
given in exchange for any other rights you may have against Procter & Gamble
Australia Pty. Ltd. or its distributors or manufacturer, whether at law, in tort
(including negligence), in equity or under statute.
Please retain proof of purchase of this appliance. If you have any questions in relation
to Our Warranty, please call our Consumer Service line (see below for numbers).
If you intend to make a claim please telephone our Customer Service line on the
numbers set out below to obtain information about your claim and any costs
associated with claiming under Our Warranty. You will bear the cost of returning
your product to us.
Repairs and service
If you are sending your appliance for repair under Our Warranty, please pack the
appliance adequately and send it to your nearest Service Agent, at your
expense. For service or replacement parts refer to the authorised Service Agents
listed overleaf. Local Service Agents may change from time to time – in that
event please contact the Consumer Service free call number below for updated
local service agent details.
Australian Consumer Service (free call): 1 800 641 820
New Zealand Consumer Service (free call): 0 800 108 909
Australian & New Zealand Service Agents
VICTORIA & TASMANIA
Statewide Services Pty Ltd trading
as J A Appliances
17-19 Hossack Avenue
Coburg North, VIC 3058
Tel. (03) 8371 9100
Fax. (03) 9355 8644
Email: jaappliances@
statewideservices.com.au
QUEENSLAND
Walters Import trading as Brisbane
Appliance Service Centre
449 Beaudesert Road
Moorooka QLD 4105
Tel. (07) 3277 0360
Fax. (07) 3274 2909
Email: basc@waltersimport.com.au
NEW SOUTH WALES & ACT
Faulder Appliance Services Pty Ltd
Shop 4,
9 Evans Road,
Rooty Hill, NSW 2766
Tel. (02) 9625 3064
Fax. (02) 9625 3037
Email: fas16@bigpond.com
SOUTH AUSTRALIA & NT
Adelaide Service Centre
Shop B2,
Parkholme Shopping Centre
319 Oaklands Road, Parkholme
Adelaide, SA 5043
Tel. (08) 8357 5800
Fax. (08) 8357 5833
Email: ascpkh@adam.com.au
WESTERN AUSTRALIA
Mark 1 Appliances
Unit 1, 46 Abernethy Road
Belmont, WA 6104
Tel. (08) 9475 0911
Fax. (08) 9475 0922
Email: mark1app@iinet.net.au
NEW ZEALAND
Key Service Ltd
7D Echelon Place East Tamaki
Manukau City
Auckland, New Zealand
(PO Box 38569, Howick, Auckland,
New Zealand)
Tel. (09) 916 0960
Fax. (09) 916 0970
Email: key-service-ltd@xtra.co.nz
21
Page 22

Français
Nos produits sont conçus pour répondre aux normes les plus élevées en matière
de qualité, fonctionnalité et design. Nous espérons que vous apprécierez votre
nouveau rasoir Braun.
Lisez l’intégralité des instructions d’utilisation, elles contiennent des informations
de sécurité. Conservez ce document pour le consulter également ultérieurement.
Attention
Votre système de rasage est livré avec un cordon d’alimentation
qui intègre une prise transformateur basse tension. Vous ne
devez remplacer ou modifi er aucun de ses composants, afi n
d’éviter tout risque d’électrocution. Utilisez uniquement le cordon
d’alimentation fourni avec votre rasoir.
Ne vous rasez pas avec une grille ou un cordon endommagés.
Cet appareil peut être utilisé sans codon d’alimentation
dans le bain ou sous la douche ; dans ces cas pour
des raisons de sécurité, utilisez uniquement l’appareil
sur batterie.
Cet appareil peut être utilisé par des enfants de 8 ans et plus et
par des personnes dont les capacités physiques, sensorielles ou
mentales sont réduites, ou des personnes dénuées d’expérience
ou de connaissance, si elles ont pu bénéfi cier, par l’intermédiaire
d’une personne responsable de leur sécurité, d’une surveillance
ou d’instructions préalables concernant l’utilisation de l’appareil
en toute sécurité et les dangers encourus. Les enfants ne doivent
pas jouer avec l’appareil. Le nettoyage et l’entretien ne doivent
pas être faits par des enfants, à moins qu’ils ne soient âgés de
plus de 8 ans et qu’ils ne soient sous surveillance.
Afi n d’éviter toute fuite du liquide de nettoyage, placez le système
autonettoyant Clean&Renew sur une surface plane et stable.
Lorsqu’une cartouche de liquide nettoyant est installée, ne pas
incliner, ne pas manipuler brusquement ou transporter le système
autonettoyant pour éviter de renverser le liquide de nettoyage de
la cartouche. Veuillez ne pas mettre le système dans une armoire
de toilette, au dessus d’un radiateur, ni le placer sur une surface
polie ou vernie.
La cartouche de liquide nettoyant contient du liquide hautement
infl ammable, gardez-la à l’écart des sources d’ignition. Ne fumez
pas à proximité. Ne l’exposez pas directement à la lumière du
soleil pendant une longue période.
Ne remplissez pas la cartouche et utilisez uniquement les cartouches
de nettoyage d’origine Braun.
22
Page 23
Description
Système autonettoyant Clean&Renew
1 Indicateur du niveau de liquide de nettoyage
2 Bouton poussoir pour remplacer la cartouche
3 Contacts station-rasoir
4 Bouton de démarrage du nettoyage
D Bouton de nettoyage rapide
5 Témoins lumineux du cycle de nettoyage
6 Prise d’alimentation de la station
7 Cartouche de liquide nettoyant
Rasoir
8 Cassette de rasage
9 Bouton d’éjection de la cassette
0 «lock» de verrouillage de la tête du rasoir
q Tondeuse rétractable pour poils longs
w Interrupteur marche/arrêt
e (–) bouton de réglage sensible
r (+) bouton de réglage intensif
t Bouton de réinitialisation
z Ecran d’affi chage du rasoir
u Contacts rasoir-station
i Prise d’alimentation du rasoir
o Trousse de voyage
p Cordon d’alimentation
Avant le rasage
Avant la première utilisation, branchez le rasoir
à une prise électrique en utilisant le cordon
d’alimentation p, procéder comme suit :
Installation du système autonettoyant
Clean&Renew
• En utilisant le cordon d’alimentation
cordez la prise d’alimentation 6 du système à
une prise de courant.
• Appuyez sur le bouton curseur 2 pour ouvrir le
boîtier.
• Posez la cartouche de liquide nettoyant 7
à plat sur une surface stable et plane (par
exemple une table).
p, rac-
1
2
n
a
f
e
l
a
c
s
t
• Retirez délicatement l’opercule de la
cartouche.
• Introduisez la cartouche dans la base de la
station aussi loin que possible.
• Fermez doucement en abaissant le boîtier
jusqu’à son verrouillage.
n
a
f
e
l
a
c
s
t
n
a
f
e
l
a
c
s
t
23
Page 24
L’indicateur du niveau de liquide de nettoyage
trimmer
1
indique la quantité de liquide dans la cartouche :
Jusqu’à 30 cycles de nettoyage disponibles
Jusqu’à 7 cycles de nettoyage restants
Une nouvelle cartouche de nettoyage est
nécessaire
Mise en charge et nettoyage du rasoir
Mettre la tête de rasage du rasoir dans le
système autonettoyant. Les contacts u au dos
du rasoir s’aligneront avec les contacts 3 du
Series 7
doit être sec et propre de toute trace de
système autonettoyant. Important : le rasoir
savon ou de mousse
Si nécessaire, le système Clean&Renew
rechargera automatiquement le rasoir. Le niveau
de propreté du rasoir sera également analysé et
un des témoins lumineux du cycle de nettoyage
5 suivants s’allumera :
Le rasoir est propre
Un rapide nettoyage économique est
nécessaire
Un nettoyage de niveau normal est
nécessaire
Un nettoyage intensif est nécessaire
Une fois que le système a déterminé le programme de nettoyage le mieux adapté, appuyez
sur le bouton de démarrage du nettoyage 4.
Pour de meilleurs résultats de rasage, nous
recommandons un nettoyage après chaque
rasage.
24
Pendant le nettoyage, le voyant lumineux du
cycle de nettoyage en cours clignotera. Chaque
cycle de nettoyage a plusieurs phases, au cours
desquelles le liquide nettoyant lave la tête du
rasoir puis un système de chauffage sèche la
tête du rasoir. Selon le programme sélectionné,
la durée totale du cycle de nettoyage varie entre
32 et 43 minutes.
Le cycle de nettoyage ne doit pas être interrompu. Pendant la phase de séchage, la tête du
rasoir peut être chaude et humide.
Lorsque le programme est terminé, le voyant
lumineux bleu s’allume. Votre rasoir est
désormais propre et prêt à être utilisé.
Page 25
Nettoyage rapide
b
a
t
y
Appuyez sur le bouton de nettoyage rapide D
pour démarrer le cycle de nettoyage rapide sans
séchage. Ce cycle dure environ 25 secondes
seulement et est recommandé si vous n’avez
pas le temps d’utiliser l’un des cycles
automatiques de nettoyage. Si vous retirez le
rasoir juste après la fi n du programme, essuyez
la tête du rasoir avec un mouchoir en papier afi n
d’éviter qu’elle ne goutte.
Mode stand-by
10 minutes après la fi n de la charge ou du
nettoyage, la système Clean&Renew passe en
mode stand-by : les voyants lumineux de la
station Clean&Renew s’éteignent.
Ecran d’affi chage du rasoir
L’affi cheur du rasoir z indique le niveau de
charge de la batterie sur la gauche, et le niveau
de propreté (hygiene) sur la droite. 6 segments
noirs sont affi chés de chaque côté lorsque la
batterie est complètement chargée et le rasoir
propre.
Segments de la batterie :
Pendant le chargement ou lors de l’utilisation
du rasoir, les segments de la batterie correspondants clignoteront. En charge complète,
les 6 segments sont affi chés. Les segments
disparaissent graduellement au fur et à mesure
du déchargement.
Indicateur de faible charge
Le voyant lumineux rouge de faible charge
clignote pour indiquer que le niveau de charge
est inférieur à 20 %. La capacité restante est
suffi sante pour 2 à 3 rasages.
Segments d’hygiène :
Les 6 segments d’hygiène apparaissent une
fois que le rasoir a été nettoyé dans le système
Clean&Renew. Lorsque le rasoir est utilisé,
les segments d’hygiène s’effacent l’un après
l’autre. Quand le rasoir est installé dans le
système autonettoyant, le système sélectionne
automatiquement le cycle de nettoyage approprié, puis en fi n de cycle tous les segments de
propreté s’affi chent. Sur le plan hygiénique il
n’est pas aussi performant de rincer le rasoir
sous l’eau du robinet que de le nettoyer dans
le système autonettoyant ; C’est pourquoi les
segments d’hygiène s’affi chent uniquement
lorsque le rasoir a été nettoyé dans la système
Clean&Renew.
h
y
y
r
g
e
i
t
e
t
n
a
e
b
h
y
y
r
g
e
i
t
e
t
n
a
e
b
h
y
y
r
g
e
i
t
e
t
n
a
e
b
25
Page 26
Informations sur la charge
• Une charge complète procure jusqu’à 50
minutes de temps de rasage sans fi l. Cela peut
varier selon la densité, la dureté et la longueur
de votre barbe.
• La température ambiante recommandée
pour charger le rasoir est comprise entre
5 °C et 35 °C. La batterie peut ne pas se
charger correctement ou pas du tout à des
températures extrêmement basses ou élevées.
La température ambiante recommandée pour
se raser est comprise entre 15° C et 35 °C.
N’exposez pas votre rasoir à des températures
supérieures à 50 °C pendant une période
prolongée.
Utilisation votre rasoir
Personnalisez votre rasoir
A l’aide des boutons de réglage sensible
(–) e et intensif (+) r, vous pouvez sélectionner
le meilleur réglage pour raser les différentes
zones de votre visage et pour répondre à vos
besoins spécifi ques. Les différents réglages
sont indiqués par le voyant lumineux intégré à
l’interrupteur marche / arrêt w :
normal
+
• bleu foncé (rasage puissant)
• bleu clair (normal)
• blanc (pour un rasage doux, complet et agréable
des zones sensibles du visage ou du cou)
26
90°
Pour un rasage complet et rapide, nous
recommandons le réglage (+).
Lors de la prochaine mise en marche, le dernier
réglage utilisé sera sélectionné.
Conseils pour un rasage parfait
Pour des résultats de rasage optimaux, Braun
vous invite à suivre les 3 recommandations
suivantes :
1. Rasez-vous toujours avant de vous laver le
visage.
2. Tenez toujours le rasoir à angle droit (90°) par
release
rapport à votre peau.
3. Tendez la peau et rasez la barbe dans le sens
inverse de la pousse du poil.
Page 27
Utilisation
r
Appuyez sur l’interrupteur marche/arrêt
mettre en marche le rasoir :
• La tête pivotante du rasoir et les grilles
fl exibles s’adaptent automatiquement aux
contours de votre visage.
w pour
t
+
lock
• Pour raser les zones diffi ciles à atteindre
(ex. : sous le nez), faites glisser le verrouillage de la tête du rasoir
0 vers l’arrière
pour bloquer la tête pivotante en position
inclinée.
• Pour tailler les pattes, moustache et barbe,
faites coulisser la tondeuse rétractable pour
poils longs vers le haut.
Nettoyage
Nettoyage automatique
Après chaque utilisation mettre le rasoir dans
la station Clean&Renew et procédez comme
décrit ci-dessus dans la rubrique « Avant le
rasage ». La mise en charge et le nettoyage sont
automatiques. Pour une utilisation quotidienne,
une cartouche de liquide nettoyant sera suffi sante pour environ 30 cycles de nettoyage.
La cartouche de nettoyage hygiénique contient de
l’éthanol et de l’isopropanol (selon le pays – pour
plus de précision, cf. cartouche), qui une fois
ouverte va naturellement s’évaporer doucement.
Si elle n’est pas utilisée quotidiennement,
chaque cartouche doit être remplacée toutes les
8 semaines environ.
La cartouche de liquide nettoyant contient
également des lubrifi ants, qui peuvent laisser
des traces sur le châssis plastique de la grille en
fi n de nettoyage. Ces traces peuvent s’enlever
facilement à l’aide d’un tissu ou d’un papier de
soie doux.
2
lock
1
trimmer
trimmer
lock
lock
27
Page 28
Nettoyage manuel
re
le
a
s
e
trimmer
Une autre façon de nettoyer la tête du rasoir, tout
particulièrement lorsque vous voyagez, est de la
rincer sous l’eau courante :
• Allumez le rasoir (sans le cordon) et rincez la
tête du rasoir sous l’eau chaude jusqu’à retirer
tous les résidus. Il est possible d’utiliser du
savon liquide ne contenant pas de substance
Series
re
le
a
s
e
Series 7
re
le
a
s
e
Series
er
Series 7
trimmer
abrasive. Rincez toute la mousse et laissez le
rasoir en marche pendant quelques secondes.
• Ensuite, arrêtez le rasoir, appuyez sur le
bouton d’éjection de la cassette
la cassette de rasage 8 et laissez-la sécher.
9 pour retirer
• Si vous nettoyez régulièrement le rasoir sous
l’eau, appliquez ensuite une fois par semaine
une goutte d’huile fl uide de machine à coudre
sur le haut de la cassette de rasage.
Vous pouvez aussi nettoyer le rasoir à sec avec
la brosse fournie :
Series 7
re
le
a
s
e
• Arrêtez le rasoir. Retirez la cassette de
8 et tapotez-la sur une surface plane.
rasage
Nettoyez l’intérieur de la tête pivotante à l’aide
de la brosse. Toutefois, ne nettoyez pas la
cassette avec la brosse car cela risque de
l’endommager.
re
le
a
s
e
Series 7
re
le
a
s
e
Nettoyage du boîtier
Nettoyez le boîtier du rasoir et la station
Clean&Renew de temps en temps à l’aide d’un
linge humide, en particulier à l’intérieur du bac
de nettoyage dans lequel se place la tête de
rasage.
Remplacement de la cartouche de liquide
nettoyant
Après avoir appuyé sur le bouton poussoir
2 pour ouvrir le boîtier, attendez quelques
secondes avant de retirer la cartouche usagée
pour éviter qu’elle ne goutte.
Avant de jeter la cartouche usagée contenant le
reste du liquide de nettoyage souillé, refermer
ses ouvertures à l’aide de l’opercule de la
nouvelle cartouche.
28
Page 29
Gardez votre rasoir en bon état
re
le
a
s
e
Remplacement de la cassette de rasage /
réinitialisation
Pour conserver une performance de rasage
effi cace à 100 %, remplacez la cassette de
8 lorsque le symbole s’allume sur l’écran
rasage
du rasoir z au bout de 18 mois environ ou
lorsque la cassette est usée.
Le symbole de remplacement vous rappellera
durant les 7 prochains rasages de remplacer la
cassette de rasage. Le rasoir réinitialisera ensuite
automatiquement l’écran.
Après le remplacement de la cassette de rasage,
utilisez un stylo pour presser le bouton de
réinitialisation t pendant au moins 3 secondes
afi n de réinitialiser le compteur.
Le témoin lumineux de remplacement clignote et
s’éteint lorsque la réinitialisation est terminée. Il
est possible de faire une réinitialisation manuelle
à tout moment.
Accessoires
Disponibles chez votre vendeur ou dans les
centres de service Braun :
• Cassette de rasage 70S
• Cartouche de liquide nettoyant
Clean&Renew CCR
y
h
r
y
e
t
g
t
i
a
e
b
n
e
Series 7
70S
70S
Informations relatives à l’environnement
Ce produit contient des batteries rechargeables et/ou des déchets électriques
recyclables. Afi n de protéger l’environnement, ne jetez jamais l’appareil dans les
ordures ménagères a la fi n de sa durée de vie.
Remettez-le à votre centre service agréé Braun
ou déposez-le dans des sites de récupération
appropriés conformément aux réglementations
locales ou nationales en vigueur.
La cartouche de nettoyage peut être jetée dans
la poubelle ménagère.
Susceptible d’être modifi é sans préavis.
Pour les spécifi cations électriques, se référer aux
inscriptions sur le bloc d’alimentation.
29
Page 30

Garantie
Nous accordons une garantie de 2 ans sur ce
produit, à partir de la date d’achat.
Pendant la durée de la garantie, Braun prendra
gratuitement à sa charge la réparation des vices
de fabrication ou de matière en se réservant
le droit de décider si certaines pièces doivent
être réparées ou si l’appareil lui-même doit être
échangé.
Cette garantie s’étend à tous les pays où cet
appareil est commercialisé par Braun ou son
distributeur exclusif.
Cette garantie ne couvre pas : les dommages
occasionnés par une utilisation inadéquate,
l’usure normale (par exemple, grille et bloccouteaux) ainsi que les défauts d’usures qui ont
un effet négligeable sur la valeur ou l’utilisation
de l’appareil. Cette garantie devient caduque
si des réparations ont été effectuées par des
personnes non agréées par Braun et si des
pièces de rechange ne provenant pas de Braun
ont été utilisées.
Pour toute réclamation intervenant pendant la
période de garantie, retournez ou rapportez
l’appareil ainsi que l’attestation de garantie à votre
revendeur ou à un Centre Service Agréé Braun.
Veuillez vous référer à www.service.braun.com
ou appeler le 0 800 944 802 (service consommateurs - appel gratuit depuis un poste fi xe) pour
connaître le Centre Service Agrée Braun le plus
proche de chez vous.
Clause spéciale pour la France
Outre la garantie contractuelle exposée
ci-dessus, nos clients bénéfi cient de la garantie
légale des vices caches prévue aux articles 1641
et suivants du Code civil.
30
Page 31

Español
Nuestros productos han sido diseñados para cumplir los más altos estándares
de calidad, funcionalidad y diseño. Esperamos que su nueva afeitadora Braun
sea de tu entera satisfacción.
Lea las instrucciones completamente, contienen información de seguridad.
Guárdelas para consultarlas en el futuro.
Precaución
Esta afeitadora incluye un cable de conexión a la red eléctrica.
No cambie o manipule ninguna de sus partes, de otro modo
podría correr el riesgo de recibir una descarga eléctrica.
Utilice solo el cable especial suministrado con su afeitadora.
No se afeite si una lamina o un cable están en mal estado.
Este dispositivo es apto para su uso en baño o ducha.
Por razones de seguridad, se tiene que usar siempre
desenchufado.
Este aparato puede ser utilizado por niños a partir de los
8 años y personas con capacidades físicas, sensoriales o
mentales reducidas o con falta de experiencia y conocimiento
si se les ha dado la supervisión o instrucciones adecuadas
para el uso seguro del aparato y entienden los riesgos que
implica. Los niños no deberían jugar con el aparato.
Los niños no deberían realizar la limpieza y el mantenimiento
del aparato a no ser que sean mayores de 8 años y lo hagan
bajo supervisión.
Para evitar fi ltraciones o escapes de la solución limpiadora
del cartucho limpiador, sitúe el centro Clean&Renew sobre
una superfi cie plana y estable. No lo incline, agite o mueva
de sitio el centro Clean&Renew cuando el cartucho esté
colocado dentro de él. No coloque el centro Clean&Renew
dentro de una vitrina de espejos, o deje sobre radiadores, ni
sobre superfi cies pulidas o lacadas. No debe exponerlo a la
luz directa del sol.
El líquido del cartucho contiene líquido altamente infl amable.
Manténgalo alejado de fuentes de calor, no fume cerca de él,
ni lo deje sobre un radiador. Manténgalo fuera del alcance de
los niños.
No intente rellenar el líquido del cartucho y utilice recambios
originales de Braun.
31
Page 32

Descripción
Centro Cargador Limpiador Clean&Renew
1 Pilotos indicadores de nivel de líquido
limpiador en el cartucho
2 Botón de apertura del compartimento que
aloja el cartucho limpiador
3 Conectores del centro Clean&Renew con la
afeitadora
4 Botón de comenzar limpieza
D Botón de limpieza rápida
5 Pilotos indicadores tipo de limpieza
6 Clavija de entrada del cable de conexión a la
red eléctrica con el centro Clean&Renew
7 Cartucho limpiador
Afeitadora
8 Lámina y bloque de cuchillas
9 Botón para liberar la lámina y el bloque de
cuchillas
0 Botón para bloquear el movimiento del
cabezal («lock«)
q Corta-patillas
w Botón de encendido y apagado
e (–) botón para la opción sensibles
r (+) botón para la opción intensivo
t Botón de re-inicio
z Pantalla digital de la afeitadora
u Conectores del la afeitadora con el centro
Clean&Renew
i Clavija de entrada del cable de conexión a la
red eléctrica con la afeitadora
o Estuche de viaje
p Cable de conexion a la red eléctrica
32
Antes del afeitado
Antes del primer afeitado debe conectar al
afeitadora a la red eléctrica usando el cable de
conexión a la red eléctrica p o alternativamente
proceder como se indica a continuación:
Instalación del Centro Cargador Limpiador
Clean&Renew
• Conecte el cable de conexión a la red eléctrica
1
2
n
a
f
e
l
a
c
s
t
n
a
f
e
l
a
c
s
t
n
a
f
e
l
a
c
s
t
p a la clavija de entrada del cable de conexión
a la red eléctrica 6, y este a su vez a la red
eléctrica.
• Presione el botón de apertura del compartimiento que aloja el cartucho limpiador 2 y
ábralo.
• Coloque el cartucho limpiador 7 sobre una
superfi cie plana y estable (por ej. una mesa).
• Extraiga con cuidado la tapa del cartucho.
Page 33

• Deslice el cartucho horizontalmente hasta que
trimmer
al fondo del compartimiento hasta que ajuste
perfectamente.
• Cierre cuidadosamente el compartimiento
presionando hacia abajo la parte superior del
centro hasta que se haya cerrado.
Los pilotos indicadores de nivel de líquido limpiador en el cartucho
1 mostrarán la cantidad
de líquido disponible en el cartucho:
carga completa de líquido limpiador –
hasta 30 limpiezas
liquido limpiador disponible para más de
7 limpiezas
es necesario cambiar el cartucho limpiador
Recarga y limpieza de la afeitadora
Introduzca el cabezal de la afeitadora en el
centro Clean&Renew. Los conectores de
la afeitadora con el centro Clean&Renew
u se ajustarán al correspondiente conector
de enganche 3 del centro Clean&Renew.
Importante: La afeitadora tiene que estar
seca y libre de todo tipo de residuos como
espuma o jabón!
Si el sistema detecta que es necesario, comenzará a cargar la afeitadora. Por otra parte, el
centro Clean&Renew analizará automáticamente
el estado de limpieza de la afeitadora y uno de
los cuatro diodos de los que consta el indicador
de estado de limpieza 5 se encenderá:
Series 7
la afeitadora está limpia
la afeitadora necesita una limpieza
rápida
la afeitadora necesita una limpieza
normal
la afeitadora necesita una limpieza
intensiva
Si el centro Clean&Renew ha seleccionado
uno de los tres programas de limpieza, éste no
comenzará hasta que se presione el botón de
comenzar limpieza 4. Recomendamos que
se efectúe una limpieza después de cada
afeitado.
Mientras se efectúa la limpieza, el piloto correspondiente al programa de limpieza seleccionado parpadeará. Cada limpieza consta de
varios ciclos de limpieza, durante los cuales el
líquido limpiador actuará en el cabezal, y de una
fase de secado. La duración total del proceso de
limpieza oscila entre los 32 y 43 minutos.
33
Page 34

El proceso de limpieza no debe ser interrumpido.
b
a
t
y
Durante la fase de secado, los componentes de
metal de la afeitadora pueden estar calientes.
Una vez terminado el programa de limpieza, el
piloto azul , que se encuentra en el indicador
de programas de limpieza, se encenderá. La
afeitadora estará limpia y lista para su uso.
Limpieza rápida
Presione el botón de limpieza rápida
D para
comenzar el proceso que no incluye proceso
de secado. Este proceso dura sólo unos 25
segundos y está recomendado cuando no tiene
tiempo para esperar un proceso completo de
limpieza. Al retirar la afeitadora al terminar el
proceso, limpie el cabezal con un pañuelo para
evitar el goteo.
Modo ahorro de energía
10 minutos después de terminar el proceso de
carga o limpieza, el centro Clean&Renew pasará
a modo de ahorro de energía: los pilotos de
centro Clean&Renew se apagarán.
La pantalla digital de la afeitadora
h
y
y
r
g
e
i
t
e
t
n
a
e
b
La pantalla digital de la afeitadora z muestra el
nivel de carga de la batería a la izquierda, y el
nivel de limpieza a la derecha. 6 pilotos de nivel
indican el nivel de carga y de limpieza.
Niveles de carga:
Durante el proceso de carga o de uso de
la afeitadora, el respectivo nivel de carga
parpadeará. Cuando la batería esté totalmente
cargada los 6 niveles de cargas se visualizaran.
Conforme la batería pierda carga los niveles de
carga irán desapareciendo.
Indicador de batería baja:
Piloto indicador de batería baja (rojo) se
h
y
y
r
g
e
i
t
e
t
n
a
e
b
iluminará intermitentemente siempre y cuando
la capacidad de la batería esté por debajo del
20%. Esto supone que tiene lo sufi ciente para
efectuar 2 o 3 afeitados más.
Nivel de limpieza:
Los 6 niveles de limpieza se visualizarán
h
y
y
r
g
e
i
t
e
t
n
a
e
b
después de limpiar la afeitadora en el centro
Clean&Renew. Cuando la afeitadora se esté
utilizando los niveles de limpieza irán desapareciendo. Una vez colocada la afeitadora en el
centro Clean&Renew, el sistema seleccionará
automáticamente el programa de limpieza
34
Page 35

adecuado y reestablecerá los niveles de limpieza
al máximo. Lavar la afeitadora bajo del agua
no es tan higiénico como hacerlo con el centro
Clean&Renew, y los niveles de limpieza sólo se
reestablecerán cuando la afeitadora se limpie en
el centro Clean&Renew.
Información de Carga
• Una carga completa proporcionará más de 50
minutos de afeitado sin cable. Esto dependerá
del tipo de barba.
• La temperatura ambiente recomendada para
la carga es de entre 5 °C y 35 °C. La batería
puede no cargarse adecuadamente, o no
cargarse, en condiciones de temperaturas
extremas. La temperatura ambiente recomendada para el afeitado es de entre 15 °C y 35 °C.
No exponga la afeitadora a temperaturas
superiores a 50 °C durante períodos
prolongados.
Utilización de la afeitadora
Personaliza tu afeitado
Con los botones (–) e e (+) r puede elegir el
mejor modo de afeitado para las diferentes
zonas de tu rostro así como ajustarse a sus
necesidades específi cas. Los diferentes modos
de personalización vienen indicados por el piloto
de luz incorporado en el botón de encendidoapagado w:
• azúl oscuro (afeitado potente)
• azúl claro (normal)
• blanco (para un afeitado minucioso y confortable en las zonas sensibles de su rostro
como el cuello)
Para un preciso y rápido afeitado recomendamos el modo (+).
Cuando encienda de nuevo la afeitadora la
próxima vez se activará el modo último que haya
activado.
Consejos para un afeitado perfecto
Para tener un mejor afeitado, Braun recomienda
que siga los siguientes 3 pasos:
1. Aféitese siempre antes de lavarse la cara.
2. Aféitese siempre con la afeitadora en un
ángulo de 90 grados con respecto a su piel.
3. Estire su piel y aféitese siempre en dirección
contraria al crecimiento de su barba.
+
normal
release
90°
35
Page 36

t
r
re
le
a
s
e
Modo de empleo
Presione el botón de encendido-apagado
w
para usar la afeitadora:
+
lock
• El cabezal pivotante y las láminas fl otantes se
adaptan automáticamente a cada contorno de
su rostro.
• Para afeitar zonas de difícil acceso (por
2
lock
1
lock
ejemplo debajo de la nariz) deslice el cabezal
hasta el ángulo deseado y pulse el botón
«lock» para bloquear el movimiento pivotante
del cabezal
0.
• Para recortar patillas, bigote o barba, deslice el
trimmer
lock
corta-patillas hacia arriba.
Limpieza
Limpieza automática
Después de cada afeitado, coloque la afeitadora
en el centro Clean&Renew y proceda como se
trimmer
recoge en al apartado «Antes del afeitado».
Toda limpieza y carga de su afeitadora se hace
automáticamente. Usándola diariamente, el
cartucho de limpieza tiene una vida aproximada
de unos 30 ciclos de limpieza.
El cartucho de limpieza higiénica contiene
etanol o isopropanol (véase la especifi cación del
cartucho), que una vez abierto se evaporará de
manera natural lentamente. Cada cartucho, si
no se usa diariamente, deberá ser reemplazado
aproximadamente cada 8 semanas.
El líquido limpiador también contiene lubricante,
que puede dejar manchas en la lámina después
de la limpieza. Estas manchas se pueden eliminar fácilmente pasando delicadamente sobre la
lámina un pañuelo.
Limpieza manual
trimmer
Limpiar el cabezal de la afeitadora bajo el
agua es una manera alternativa de mantener la
afeitadora limpia, especialmente en ocasiones
como pueden ser viajes:
• Ponga en marcha la afeitadora (sin cable)
y enjuague el cabezal bajo el grifo de agua
caliente hasta eliminar todos los residuos. Es
posible usar un jabón natural que no contenga
Series
re
le
a
s
e
Series
sustancias abrasivas. Aclare el jabón y deja
la afeitadora en funcionamiento durante unos
segundos más.
er
• A continuación, apague la afeitadora, presione
el botón retire la lamina y bloque de cuchillas
Series 7
re
le
a
s
e
trimmer
36
Series 7
9 y deje la lámina y bloque de cuchillas 8
desmontadas hasta que se sequen.
• Si limpia con regularidad la afeitadora bajo el
agua, una vez a la semana aplique una gota de
lubricante en la lámina y bloque de cuchillas.
Page 37

También, puede limpiar su afeitadora con un
re
le
a
s
e
cepillo:
• Apague la afeitadora. Extraiga la lámina y
bloque de cuchillas
8 y déle unos pequeños
golpecitos sobre una superfi cial lisa, para
que se desprendan los restos de pelo. Con un
cepillo, limpie la cara interna del cabezal. No
debe limpiar ni la lámina con el cepillo ya que
éstas podrían resultar dañadas.
Limpieza del centro Clean&Renew
Limpie el centro de vez en cuando con un paño
húmedo, especialmente, el espacio donde se
aloja la afeitadora.
Sustitución del cartucho limpiador
Después de presionar el botón de apertura del
compartimiento que aloja el cartucho limpiador
2, espere durante unos segundos antes de
extraer el cartucho usado.
Antes de tirar el cartucho usado, es conveniente
asegurarse de cerrar éste con la tapa del nuevo,
de este modo que evitaremos efectos contaminantes por los restos de solución limpiadora que
pudieran quedar.
Mantenga su afeitadora en óptimo
estado
Reemplazo de la lámina y bloque de
cuchillas / reiniciar (reset)
Para lograr un apurado perfecto 100%, sustituya
a lámina y bloque de cuchillas 8 cuando la
luz indicadora de sustitución lo indique en la
pantalla digital de la afeitadora z una vez cada
18 meses o cuando esté desgastado por el uso.
El piloto de sustitución se encenderá durante
siete afeitados para recordar que es necesario
cambiar la lámina y bloque de cuchillas.
Después se borrará automáticamente.
Series 7
re
le
a
s
e
re
le
a
s
e
Series 7
re
le
a
s
e
y
h
r
y
e
t
g
t
i
a
e
b
n
e
Una vez la lámina y bloque de cuchillas han sido
cambiadas, con ayuda de un bolígrafo presionar
el botón de reinicio
t e durante 3 segundos
para poner el contador a cero.
Mientras se hace el cambio de la lámina y bloque
de cuchillas el piloto de sustitución parpadeará y
se apagará cuando se haya fi nalizado el proceso
de sustitución. El reinicio se puede hacer siempre que se desee.
Accesorios
Disponible en servicios técnicos de Braun o en
tiendas o distribuidores autorizados Braun:
• Lámina y bloque de cuchillas: 70S
• Cartucho limpiador Clean&Renew: CCR
Series 7
70S
70S
37
Page 38

Información medioambiental
El producto contiene baterías y/o residuos
eléctricos reciclables. Para proteger el
medio ambiente, no tire este producto
con los demás residuos domésticos,
colóquelo en el contenedor de reciclaje para
llevarlo a los puntos de recogida de residuos
eléctricos de su país.
Sujeto a modifi caciones sin previo aviso.
Las especifi caciones eléctricas aparecen
impresas en el cable de conexión a la red
eléctrica.
Garantía
Braun concede a este producto 2 años de
garantía a partir de la fecha de compra.
Dentro del periodo de garantía, subsanaremos,
sin cargo alguno, cualquier defecto del aparato
imputable tanto a los materiales como a la
fabricación, ya sea reparando, sustituyendo
piezas, o facilitando un aparato nuevo según
nuestro criterio.
La garantía no ampara averías por uso indebido,
funcionamiento a distinto voltaje del indicado,
conexión a un enchufe inadecuado, rotura,
desgaste normal (p.ej. la lámina o bloque de
cuchillas) por el uso que causen defectos o una
disminución en el valor o funcionamiento del
producto.
La garantía perderá su efecto en caso de ser
efectuadas reparaciones por personas no
autorizadas, o si no son utilizados recambios
originales de Braun.
La garantía solamente tendrá validez si la fecha
de compra es confi rmada mediante la factura o
el albarán de compra correspondiente.
Esta garantía tiene validez en todos los países
donde este producto sea distribuido por Braun
o por un distribuidor asignado por Braun:
www.service.braun.com.
En caso de reclamación bajo esta garantía,
diríjase al Servicio de Asistencia Técnica de
Braun más cercano.
38
Solo para España
Servicio al consumidor: Para localizar a su
Servicio Braun más cercano o en el caso
de que tenga Vd. alguna duda referente al
funcionamiento de este producto, le rogamos
contacte con el teléfono de este servicio
901 11 61 84.
Page 39

Português
Os nossos produtos são concebidos para ir ao encontro dos mais elevados
padrões de qualidade, funcionalidade e design. Esperamos que desfrute ao
máximo da sua nova Máquina de Barbear Braun.
Leia atenta e cuidadosamente estas instruções de utilização, pois contêm
informações de segurança. Guarde-as para consulta futura.
Aviso
O seu sistema de barbear vem equipado com um cabo de
alimentação especial e um transformador de voltagem extra
baixa de segurança integrado. Para evitar risco de choque
eléctrico, não substitua, troque ou manipule nenhuma das
peças que o compõem. Utilize apenas o cabo de alimentação
especial fornecido com o seu aparelho.
Não use a máquina de barbear se a lâmina ou o cabo se
encontrarem danifi cados.
Este aparelho é adequado para uso na banheira ou
chuveiro. Por razões de segurança, o aparelho só
poderá ser utilizado, nestas situações, sem cabo.
Este aparelho pode ser utilizado por crianças com idade igual
ou superior a 8 anos e por pessoas com capacidades físicas,
sensoriais ou mentais reduzidas, ou com falta de experiência
e conhecimento, desde que sejam supervisionadas ou lhes
tenham sido dadas instruções quanto à utilização segura do
aparelho e se tiverem compreendido os perigos envolvidos.
As crianças não devem brincar com o aparelho. Só é permitido
às crianças com idade superior a 8 anos fazer a limpeza e a
manutenção do aparelho quando supervisionadas.
Por forma a evitar qualquer derrame ou fuga do líquido de
limpeza, coloque o sistema Clean&Renew numa superfície
plana e estável. Não incline, não agite, não efectue movimentos
repentinos nem transporte o aparelho se a recarga de limpeza
estiver colocada, dado que o líquido de limpeza se pode
entornar. Não coloque o aparelho num armário de casa de
banho com espelho nem sobre radiadores e evite colocá-lo
em superfícies polidas, lacadas ou envernizadas.
O cartucho de limpeza contém um líquido altamente
infl amável. Mantenha-o afastado de fontes de combustão
ou ignição. Não fume próximo do aparelho nem o exponha
directamente à luz do sol durante longos períodos.
Não volte a encher a recarga com nenhum outro líquido e
utilize apenas recargas originais da Braun.
39
Page 40

Descrição
Aparelho de limpeza Clean&Renew
1 Visor do líquido de limpeza
2 Botão de desengate para substituição da
recarga
3 Terminais de contacto aparelho-máquina de
barbear
4 Botão de início de limpeza
D Botão de limpeza rápida
5 Luzes indicadoras dos programas de limpeza
6 Ficha de alimentação do aparelho de limpeza
7 Cartucho de limpeza
Máquina de barbear
8 Rede e Bloco de laminas
9 Botão de extracção para substituição do
cartucho
0 Botão de confi guração de precisão («lock»)
da cabeça de corte
q Aparador de pêlos longos extensível
w Botão ligar/desligar
e (–) selector do modo de funcionamento
sensível
r (+) selector do modo de funcionamento
intensivo
t Botão de reinício
z Visor da máquina de barbear
u Terminais de contacto aparelho-máquina de
barbear
i Ficha de alimentação da máquina de barbear
o Bolsa
p Cabo de alimentação especial
40
Antes de barbear
Antes da primeira utilização, e usando o cabo de
alimentação especial p, deverá ligar a máquina
de barbear a uma fi cha eléctrica ou utilizar o
método alternativo abaixo indicado.
Instalação do aparelho de limpeza
Clean&Renew
• Usando o cabo de alimentação especial
1
2
n
a
f
e
l
a
c
s
t
ligue a fi cha do aparelho 6 a uma tomada
eléctrica.
• Prima o botão de desengate
2 para abrir a
estrutura.
• Segure o cartucho de limpeza
7 e coloque-o
sobre uma superfície plana e estável (sobre
uma mesa, por exemplo).
• Retire cuidadosamente a tampa da recarga de
n
a
f
e
l
a
c
s
t
n
a
f
e
l
a
c
s
t
limpeza.
p
Page 41

• Empurre o mais possível o cartucho, fazendo-
trimmer
-o deslizar para o interior da base do aparelho
de limpeza.
• Feche a estrutura lenta e cuidadosamente,
empurrando para baixo até fi car bem
encaixado.
O visor do estado da recarga de limpeza
1 mos-
trará a quantidade de líquido que se encontra na
recarga:
(elevado) disponível até 30 ciclos de limpeza
(baixo) permite até 7 ciclos de limpeza
(vazio) é necessário colocar uma nova
recarga de limpeza
Carregamento e limpeza da máquina de
barbear
Coloque a máquina com a cabeça de corte
virada para baixo no aparelho de limpeza. Os
terminais de contacto u situados na parte de
trás da máquina de barbear correspondem aos
terminais de contacto 3 do aparelho de limpeza.
Importante: É necessário que a máquina
de barbear esteja seca e livre de qualquer
resíduo de espuma/gel ou sabão.
Caso seja necessário, o sistema Clean&Renew
carregará automaticamente a máquina de
barbear. O estado de limpeza da máquina é
também analisado e acender-se-á uma das
seguintes luzes indicadoras do programa de
limpeza 5:
(limpo) a máquina está limpa
é necessário efectuar uma limpeza
ligeira e económica
é necessário efectuar uma limpeza
normal
é necessário efectuar uma limpeza
profunda
Series 7
Se o sistema seleccionar um dos programas
de limpeza acima indicados, a máquina só
funcionará se premir o botão de início de
limpeza 4. Para obter os melhores resultados
de barbear, recomendamos que limpe a
máquina após cada utilização.
A luz indicadora do respectivo programa de
limpeza seleccionado pisca durante todo
o processo de limpeza. Cada programa de
limpeza é constituído por vários ciclos, em que
o líquido de limpeza envolve o interior da cabeça
de corte e o período de secagem a quente
seca a máquina. Dependendo do programa
seleccionado, o tempo total de limpeza rondará
entre os 32 e os 43 minutos.
41
Page 42

Não interrompa os programas de limpeza.
b
a
t
y
Durante a secagem da máquina de barbear, a
cabeça de corte poderá fi car quente e húmida.
Quando o programa de limpeza terminar, a luz
indicadora azul (limpo) acende-se.
A máquina de barbear está limpa e pronta a ser
utilizada.
Limpeza rápida
Prima o botão limpeza rápida
D para accionar
o programa de limpeza rápida sem secagem.
Este programa demora cerca de 25 segundos
apenas e é recomendado para quando não tem
disponibilidade de tempo para efectuar um dos
programas de limpeza automática. Se retirar a
máquina logo após a conclusão do programa,
limpe a cabeça de corte com um lenço de papel
para evitar que pingue.
Modo em espera («stand-by»)
10 minutos após concluir o carregamento ou a
limpeza, o aparelho Clean&Renew passa para
o modo em espera: as luzes indicadoras do
sistema Clean&Renew desligam-se.
Visor da máquina de barbear
h
y
y
r
g
e
i
t
e
t
n
a
e
b
h
y
y
r
g
e
i
t
e
t
n
a
e
b
O visor da máquina de barbear z mostra no
seu lado esquerdo o nível de carga da bateria,
e no seu lado direito o nível de higiene. Quando
a bateria se encontra totalmente carregada, são
visualizados 6 sinais escuros em ambos os lados
e a máquina de barbear encontra-se limpa.
Indicador do nível da bateria:
O respectivo indicador da bateria pisca durante
o carregamento da bateria ou durante o uso
da máquina de barbear. Quando a bateria da
máquina se encontrar completamente carregada,
os 6 sinais do indicador são visualizados. Os
sinais do indicador desaparecem gradualmente
à medida que a bateria é descarregada.
Indicador de carga baixa:
O indicador de carga baixa, num quadrado
vermelho, pisca quando a capacidade da
máquina está abaixo dos 20%. A capacidade
restante será sufi ciente para 2 a 3 utilizações.
Segmentos de limpeza:
Após a limpeza da máquina de barbear no
h
y
y
r
g
e
i
t
e
t
n
a
e
b
aparelho Clean&Renew, aparecem todos os
6 segmentos de limpeza. Quando estiver a
utilizar a máquina de barbear, os segmentos
de limpeza irão desaparecer gradualmente.
42
Page 43

Sempre que colocar a máquina no aparelho,
o sistema selecciona automaticamente o
programa de limpeza adequado e restabelece
os segmentos para a limpeza máxima. Dado que
o enxaguamento da máquina em água corrente
não é tão higiénico como o aparelho de limpeza,
os segmentos de limpeza só são novamente
repostos quando a máquina é limpa no aparelho
Clean&Renew.
Informações de carregamento
• Uma carga completa permite a utilização sem
fi os até 50 minutos de tempo de barbear,
dependendo do comprimento da barba.
• A temperatura ambiente recomendada para
efetuar o carregamento situa-se entre os 5 °C e
os 35 °C. A bateria pode não carregar corretamente ou não carregar de todo a temperaturas
muito baixas ou muito altas. A temperatura
ambiente recomendada para fazer a barba
situa-se entre os 15 °C e os 35 °C. Não exponha
o aparelho a temperaturas superiores a 50 °C
por períodos prolongados.
Utilizar a máquina de barbear
Personalizar a sua máquina de barbear
Os botões (–) e e (+) r permitem-lhe escolher
a melhor confi guração para barbear as diferentes áreas do rosto, de acordo com as suas
necessidades específi cas. A luz piloto, integrada
no botão on/off w, indica os diferentes modos
de funcionamento:
• azul escuro (barbear potente)
• azul claro (normal)
• branco (para um barbear apurado e confortável em áreas sensíveis do rosto, como, por
exemplo, o pescoço).
Para um barbear apurado e rápido, recomendamos o modo de funcionamento (+).
Quando ligar novamente a máquina, accionará a
última confi guração utilizada.
Conselhos para um barbear perfeito
Para optimizar os resultados, a Braun recomenda
que siga estes 3 passos simples:
1. Barbeie-se sempre antes de lavar o rosto.
2. Segure sempre a máquina de barbear em
ângulos rectos (90º) relativamente à pele.
3. Estique a pele e barbeie-se no sentido con-
trário ao do crescimento do pêlo.
+
normal
release
90°
43
Page 44

t
r
Modo de utilização
Prima o botão ligar/desligar
w para colocar a
máquina de barbear em funcionamento:
+
lock
• A cabeça de corte em pivot e as redes adaptáveis ajustam-se automaticamente a todos os
contornos do seu rosto.
2
lock
1
lock
• Para um barbeado apurado em áreas de
difícil acesso (como, por exemplo, por baixo
do nariz), deslize o interruptor de precisão
da cabeça de corte «lock» 0 para a posição
posterior para travar a cabeça em pivot num
determinado ângulo.
trimmer
lock
• Para aparar patilhas, bigode ou barba, deslize
o acessório aparador de pêlos longos para
cima.
Limpeza
Limpeza automática
Depois de cada utilização, coloque a máquina
no sistema Clean&Renew e proceda como
trimmer
indicado acima na secção «Antes de barbear».
Desta forma, todas as necessidades de limpeza
e carregamento fi carão automaticamente
asseguradas.
Com uma utilização diária, uma recarga de
limpeza deverá ser sufi ciente para cerca de
30 ciclos de limpeza.
O cartucho de limpeza higiénica contém etanol
ou isopropanol (consulte as especifi cações no
cartucho) que, uma vez aberta a embalagem, se
evaporará natural e lentamente no ambiente.
Cada recarga de limpeza, se não for
utilizada diariamente, deverá ser substituída
aproximadamente após 8 semanas.
44
O cartucho de limpeza contém também óleo
lubrifi cante, o qual poderá deixar marcas
residuais na rede exterior após a limpeza. No
entanto, poderá eliminar facilmente estas marcas
se as limpar cuidadosamente com um pano ou
com um lenço de papel.
Page 45

Limpeza manual
re
le
a
s
e
Enxaguar a cabeça de corte com água corrente,
depois de cada utilização, é uma forma alternativa de a manter limpa, especialmente quando
viaja:
• Ligue a máquina de barbear (sem o cabo de
alimentação) e enxagúe a cabeça de corte em
água quente corrente até saírem todos os
resíduos. Poderá utilizar um sabonete líquido
que não contenha substâncias abrasivas.
Enxagúe os restos de sabão e ponha a
máquina de barbear a funcionar por mais
alguns segundos.
• Em seguida, desligue a máquina de barbear,
prima o botão de extracção
9 para retirar a
Rede e Bloco de lâminas 8 e deixe secar.
• Se tem por hábito limpar a máquina de barbear com água, aplique uma vez por semana
uma gota de óleo de máquina no cimo da
Rede e Bloco de lâminas.
Alternativamente, poderá limpar a máquina de
barbear com uma escova.
• Desligue a máquina de barbear. Retire a Rede
e Bloco de lâminas 8 e bata suavemente
numa superfície plana. Utilize a escova para
limpar a área interior da cabeça em pivô. No
entanto, não limpe o bloco de lâminas com a
escova pois poderá danifi cá-lo.
trimmer
Series
re
le
a
s
e
Series
er
Series 7
re
le
a
s
e
trimmer
re
le
a
s
e
Series 7
Series 7
re
le
a
s
e
Series 7
re
le
a
s
e
Limpeza da estrutura
Limpe a estrutura da máquina e o aparelho
Clean&Renew de tempos a tempos com um
pano húmido, especialmente a abertura onde se
coloca a máquina de barbear.
Substituição da recarga de limpeza
Depois de pressionar o botão de desengate
para abrir a estrutura, aguarde alguns segundos
antes de retirar o cartucho usado, evitando
assim qualquer derramamento do líquido.
Antes de deitar fora a recarga usada, certifi que-
-se de que fecha todas as aberturas, utilizando
para o efeito a tampa da nova recarga, uma vez
que o cartucho usado contém uma solução de
limpeza tóxica.
2
45
Page 46

Manter a sua máquina de barbear
re
le
a
s
e
em óptimo estado
Substituição da Rede e Bloco de lâminas /
reiniciar
y
h
r
y
e
t
g
t
i
a
e
b
n
e
Para que a máquina de barbear mantenha um
desempenho perfeito, substitua a Rede e Bloco
de lâminas
8 quando se acender o símbolo de
substituição no visor da máquina z após cerca
de 18 meses ou quando a rede e o bloco de
lâminas estiverem gastos.
Series 7
70S
70S
O símbolo de substituição lembrá-lo-á durante
as próximas 7 utilizações que deverá substituir
a Rede e Bloco de lâminas. Posteriormente, a
máquina de barbear restaurará automaticamente
o visor.
Depois de substituir a rede e bloco de lâminas,
utilize uma esferográfi ca para empurrar o botão
de reinício t, pressionando pelo menos durante
3 minutos para restaurar o contador.
Nesta operação, a luz de substituição pisca e
desliga-se uma vez concluída a reinicialização.
A reinicialização manual pode ser efectuada em
qualquer altura.
Acessórios
Disponíveis no seu revendedor ou nos Centros
de Venda Braun:
• Rede e Bloco de lâminas 70S
• Cartucho de limpeza Clean&Renew CCR
Nota ambiental
Este produto contém baterias recarregáveis e/ou resíduos domésticos recicláveis.
Com o intuito de proteger o ambiente,
não elimine o produto juntamente com o
lixo doméstico. Entregue-o para reciclagem num
dos locais de recolha específi ca à disposição no
seu país.
Poderá deitar o cartucho de limpeza no lixo
doméstico.
Sujeito a modifi cações sem aviso prévio.
Para especifi cações eléctricas, consulte a
informação impressa no cabo de alimentação.
46
Page 47

Garantia
Braun concede a este produto 2 anos de
garantia a partir da data de compra.
Dentro do período de garantia qualquer defeito
do aparelho, devido aos materiais ou ao seu
fabrico, será reparado, substituindo peças ou
trocando por um aparelho novo segundo o
nosso critério, sem qualquer custo.
A garantia não cobre avarias por utilização
indevida, funcionamento a voltagem diferente
da indicada, ligação a uma tomada de corrente
eléctrica incorrecta, ruptura, normal utilização
e desgaste (ex: rede e bloco de lâminas) por
utilização que causem defeitos ou diminuição
da qualidade de funcionamento do produto.
A garantia perderá o seu efeito no caso de
serem efectuadas reparações por pessoas
não autorizadas ou se não forem utilizados
acessórios originais Braun.
A garantia só é válida se a data de compra fôr
confi rmada pela apresentação da factura ou
documento de compra correspondente.
Esta garantia é válida para todos os países onde
este produto seja distribuído por Braun ou por
um distribuidor Braun autorizado.
No caso de reclamação ao abrigo de garantia,
dirija-se ao Serviço de Assistência Técnica
Ofi cial Braun mais próximo:
www.service.braun.com.
Só para Portugal
Apoio ao consumidor: Para localizar o seu
Serviço Braun mais próximo o no caso de surgir
alguma dúvida relativamente ao funcionamiento
deste produto, contacte por favor este serviço
pelo telefone 808 20 00 33.
47
Page 48

Italiano
I nostri prodotti sono progettati per rispondere ai più elevati standard di
qualità, funzionalità e design. Ci auguriamo che il suo nuovo Braun soddisfi
pienamente le sue esigenze.
Leggere il manuale di istruzioni completo, contiene informazioni sulla sicurezza.
Conservare per una consultazione in futuro.
Attenzione
Il rasoio è dotato di un cavo di alimentazione speciale, che ha
un sistema integrato di sicurezza a basso voltaggio. Per evitare
il rischio di scosse elettriche, non cercare di sostituire o di
manipolare nessuna parte del prodotto. Utilizzare solamente lo
speciale cavo di rete che è stato fornito con l’elettrodomestico.
Non radere utilizzando una lamina o un cavo danneggiato.
Il rasoio è indicato anche per un uso nella vasca o
sotto la doccia. Per ragioni di sicurezza può essere
utilizzato solamente con il fi lo non attaccato alla
corrente.
L’apparecchio può essere utilizzato da bambini di almeno 8 anni
e persone con ridotta capacità fi sica, sensoriale o mentale o
mancanza di esperienza e informazioni, se supervisionati da
una persona o se hanno ricevuto istruzioni sull’utilizzo corretto
dell’apparecchio e a conoscenza dei rischi derivanti dall’utilizzo.
I bambini non dovrebbero giocare con l’apparecchio. La pulizia
e la manutenzione dell’apparecchio non dovrebbe essere
effettuata da bambini a meno che non abbiano più di 8 anni
e supervisionati.
Per evitare fuoriuscite del liquido di pulizia, posizionare
l’apparecchio su una superfi cie piana e stabile. Non inclinare,
muovere bruscamente o trasportare in alcun modo se la
cartuccia di pulizia è installata. Non collocare l’apparecchio in
un armadio di specchio, non custodirlo su un termosifone o
su una superfi cie lucidata o verniciata.
La cartuccia di pulizia contiene un liquido altamente infi ammabile; mantenerlo quindi lontano dalle fi amme o dal fumo di
sigaretta. Non esporlo alla luce diretta del sole.
Non ricaricare la cartuccia; utilizzare solo ricariche originali
Braun.
48
Page 49

Descrizione
Supporto Clean&Renew
1 Display liquido di pulizia
2 Pulsante di espulsione cartuccia
3 Contatti supporto/rasoio
4 Pulsante avvio pulizia
D Pulsante pulizia rapida
5 LED programma di pulizia
6 Presa di alimentazione supporto
7 Cartuccia di pulizia
Rasoio
8 Sistema di rasatura a lamina e pettine radente
integrato
9 Pulsante di rilascio sistema di rasatura
0 Interruttore di blocco testina rasoio («lock»)
q Tagliabasette estensibile
w Interruttore accensione/spegnimento
e (–) pulsante settaggio sensibili
r (+) pulsante settaggio ad alta intensità
t Pulsante di «reset»
z Display rasoio
u Contatti rasoio/supporto
i Presa elettrica rasoio
o Custodia da viaggio
p Set cavo speciale
Prima della rasatura
Prima di usare il rasoio per la prima volta,
collegare il rasoio ad una presa elettrica
utilizzando il set cavo speciale p o eventualmente procedere come indicato qui sotto.
Installazione del supporto Clean&Renew
• Utilizzando il set cavo speciale p, collegare la
presa del supporto 6 a una presa elettrica.
•
Premere il pulsante 2 per aprire l’alloggiamento.
• Trattenere la cartuccia di pulizia 7 su una
superfi cie piana stabile (es. tavolo).
• Rimuovere delicatamente il coperchio dalla
cartuccia.
• Inserire la cartuccia nella base del supporto
facendola scorrere fi no in fondo.
• Chiudere lentamente l’alloggiamento
premendolo verso il basso fi nché scatta.
Il display del liquido di pulizia
liquido nella cartuccia:
ancora 30 cicli di pulizia disponibili
ancora max. 7 cicli di pulizia disponibili
sostituire la cartuccia
1 indica il livello di
1
2
n
a
f
e
l
a
c
s
t
n
a
f
e
l
a
c
s
t
n
a
f
e
l
a
c
s
t
49
Page 50

Carica e pulizia del rasoio
trimmer
Inserire la testina del rasoio nel supporto con
sistema di pulizia i contatti
u sul retro del
rasoio si allineano con i contatti 3 del supporto.
Importante: Il rasoio deve essere asciutto e
Series 7
privo di residui di schiuma o sapone!
Se necessario, il supporto Clean&Renew ricarica
automaticamente il rasoio. Dopo l’analisi delle
condizioni igieniche del rasoio, si accenderà uno
dei seguenti LED del programma di pulizia
5:
il rasoio è pulito
è richiesta una breve pulizia
è richiesta una pulizia normale
è richiesta una pulizia intensiva
Se il supporto seleziona uno dei programmi
di pulizia richiesti, non si avvierà fi nchè non si
premerà il pulsante di avvio pulizia 4. Per una
rasatura ottimale consigliamo la pulizia dopo
ogni uso.
Durante il ciclo di pulizia il LED corrispondente
al programma lampeggia. Ciascun programma
di pulizia è composto da più cicli in cui prima
il liquido viene spinto attraverso la testina del
rasoio e quindi il rasoio viene asciugato a caldo.
A seconda del programma selezionato, il tempo
di pulizia complessivo dura tra 32 e 43 minuti.
I programmi di pulizia non devono essere interrotti. Si prega di ricordare che durante il ciclo di
asciugatura del rasoio la testina potrebbe essere
molto calda e bagnata.
Una volta completato il programma si accende
il LED blu . Ora il rasoio è pulito e pronto per
l’uso.
50
Pulizia veloce
Per attivare il programma di pulizia veloce senza
asciugatura premere il pulsante pulizia veloce
D. Questo programma richiede solo 25 secondi
circa ed è consigliabile quando non si ha tempo
di aspettare lo svolgimento di uno dei programmi
di pulizia automatici. Se si rimuove il rasoio
appena terminato il programma, asciugare la
testina con un panno per evitare che goccioli.
Modalità di stand-by
10 minuti dopo aver completato la carica o la
sessione di pulizia, il supporto Clean&Renew
entra in modalità di stand-by: i LED del supporto
Clean&Renew e il display del rasoio si spengono.
Page 51

Display del rasoio
b
a
t
y
Il display del rasoio z indica lo stato di carica
della batteria sulla sinistra e lo stato di pulizia
(hygiene) sulla destra. Quando la batteria
è completamente carica e il rasoio è pulito
vengono visualizzate 6 tacche scure per lato.
Tacche batteria:
Durante la carica o quando si utilizza il rasoio le
tacche batteria lampeggiano. A carica completa
vengono visualizzati tutti e 6 i segmenti. I segmenti scompaiono gradualmente mano a mano
che la carica si esaurisce.
Spia di basso livello carica:
La spia di basso livello di carica con profi lo
rosso lampeggia, indicando che la carica è
scesa sotto al 20%. La carica rimanente basta
per 2 – 3 rasature.
Tacche di pulizia:
Dopo che il rasoio è stato trattato nel supporto
Clean&Renew appaiono tutte e sei le tacche
pulizia. Le tacche pulizia scompaiono gradualmente utilizzando il rasoio. Dopo aver ricollocato
il rasoio sul supporto, il sistema seleziona automaticamente il programma di pulizia adeguato
e riporta le tacche al massimo livello di igiene.
Dal momento che risciacquare il rasoio sotto
l’acqua è meno igienico della pulizia nel supporto, le tacche si resettano solo quando il
rasoio viene pulito nel supporto Clean&Renew.
Informazioni di carica
• Una carica completa garantisce un’autonomia
di 50 minuti senza utilizzare il cavo.
L’autonomia può variare in funzione della
ricrescita della barba.
• La temperatura ambientale consigliata per la
carica è dai 5 °C ai 35 °C. La batteria può non
caricarsi adeguatamente o completamente in
caso di temperature troppo basse o troppo
elevate. La temperatura ambientale per la
conservazione e la rasatura è compresa tra
i 15 °C e i 35 °C. Non esporre l’apparecchio
a temperature superiori ai 50 °C per lunghi
periodi di tempo.
h
y
y
r
g
e
i
t
e
t
n
a
e
b
h
y
y
r
g
e
i
t
e
t
n
a
e
b
h
y
y
r
g
e
i
t
e
t
n
a
e
b
Utilizzo del rasoio
Personalizzare il proprio rasoio
Per adattare la testina alle proprie esigenze di
comfort e per radere diverse parti del viso, è
possibile selezionare la modalità (–) e e (+) r.
51
Page 52

I diversi settaggi sono indicati dalla luce pilota
r
incorporata nel tasto di accensione/spegnimento
w:
normal
+
release
90°
t
+
lock
• blu scuro (per una rasatura profonda)
• blu chiaro (normal)
• bianco (per una rasatura accurata nelle aree
sensibili del viso come ad esempio il collo)
Per una rasatura accurata e veloce si raccomanda il settaggio (+).
Quando si riaccenderà il rasoio la volta
successiva, verrà automaticamente attivato
l’ultimo settaggio utilizzato.
Consigli per una rasatura perfetta
Per risultati di rasatura ottimali Braun consiglia di
seguire 3 semplici passaggi:
1. Radersi sempre prima di lavarsi il viso.
2. Tenere sempre il rasoio ad angolo retto (90°)
rispetto alla pelle.
3. Distendere la pelle e radersi in senso
contrario a quello di crescita della barba.
Come utilizzare il rasoio
Per utilizzare il rasoio premere l’interruttore di
accensione/spegnimento
w:
• Le lamine oscillanti del rasoio seguono automaticamente ogni curva del viso.
52
2
lock
1
lock
• Per radere zone diffi cili (es. sotto al naso)
scorrere indietro l’interruttore di blocco della
testina oscillante 0 in modo da fi ssarla in
determinata angolazione.
• Per regolare basette, baffi e barba far scorrere
trimmer
lock
verso l’alto il tagliabasette estensibile.
Pulizia
Pulizia automatica
Dopo ogni rasatura, riporre il rasoio nel supporto
Clean&Renew e procedere come descritto
trimmer
nella sezione «Prima della rasatura». Tutte le
operazioni di carica e pulizia vengono svolte
automaticamente. Se utilizzata quotidianamente,
una cartuccia dovrebbe essere suffi ciente per
circa 30 cicli di pulizia.
La cartuccia di pulizia igienica contiene etalono
o isopropanolo (per le specifi che vedere la
cartuccia), che una volta aperta evaporerà
lentamente in maniera naturale. Se non utilizzata
Page 53

quotidianamente, la cartuccia deve essere
re
le
a
s
e
sostituita dopo circa 8 settimane.
La cartuccia di pulizia contiene, tra le altre,
sostanze lubrifi canti che potrebbero lasciare
residui sulla parte esterna della lamina dopo
la pulizia. Nell’eventualità, tali residui possono
essere facilmente rimossi con l’aiuto di un panno
morbido.
Pulizia manuale
Risciacquare la testina di rasatura sotto l’acqua
corrente è una valida alternativa per mantenere
pulito il rasoio, specialmente in viaggio:
• Accendere il rasoio (cordless) e sciacquare
la testina sotto l’acqua corrente. È possibile
utilizzare sapone liquido esente da sostanze
abrasive. Rimuovere tutta la schiuma e lasciare
il rasoio in funzione ancora per alcuni secondi.
• Successivamente spegnere il rasoio, premere il
pulsante di rilascio
9 per rimuovere il sistema
di rasatura 8 e lasciarlo asciugare.
trimmer
Series
re
le
a
s
e
Series
er
• Se si pulisce regolarmente il rasoio sotto
l’acqua, una volta alla settimana applicare al
sistema di rasatura una goccia di olio lubrifi cante leggero.
Puoi altrimenti pulire il rasoio con una spazzolina.
• Spegnere il rasoio. Rimuovere il sistema di
rasatura 8 e batterlo leggermente su una
superfi cie piana. Pulire la zona interna della
testina oscillante con lo spazzolino.
Non utilizzare lo spazzolino sul sistema di
rasatura perché potrebbe danneggiarlo.
Pulizia dell’alloggiamento
Pulire regolarmente l’alloggiamento del rasoio e il
supporto Clean&Renew con un panno umido, in
particolare l’interno della camera di pulizia in cui
viene appoggiato il rasoio.
Sostituzione della cartuccia di pulizia
Dopo aver premuto il pulsante 2 per aprire
l’alloggiamento, per evitare l’eventuale gocciolamento attendere alcuni secondi prima di rimuovere la cartuccia usata.
Dal momento che la cartuccia usata contiene
soluzione contaminata, prima di gettarla
ricordarsi di chiudere le aperture con il coperchio
della cartuccia nuova.
Series 7
re
le
a
s
e
trimmer
re
le
a
s
e
Series 7
Series 7
re
le
a
s
e
Series 7
re
le
a
s
e
53
Page 54

re
le
a
s
e
Series 7
70S
y
r
e
t
t
a
b
70S
Per mantenere il rasoio in perfette
condizioni
Sostituzione del sistema di rasatura / reset
Per mantenere le prestazioni al 100%, sostituire
h
y
g
i
e
n
e
il sistema di rasatura
rispondente si accende sul display del rasoio z
dopo circa 18 mesi oppure quando il sistema è
8 quando il simbolo cor-
usurato.
Nel corso delle 7 rasature successive il simbolo
di sostituzione ricorderà di sostituire il sistema di
rasatura. Successivamente il rasoio effettuerà il
reset automatico del display.
Una volta sostituito il sistema di rasatura, tenere
premuto il pulsante di «reset» t e con una
penna a sfera per almeno 3 secondi e azzerare il
contatore.
La spia di sostituzione lampeggia nel corso
di questa operazione e si spegne una volta
completato il reset. Il reset manuale può essere
effettuato in qualsiasi momento.
Accessori
Disponibili presso il proprio rivenditore o i Centri
Assistenza Braun:
• Sistema di rasatura a lamina e pettine
radente 70S
• Cartuccia di pulizia Clean&Renew CCR
Nota sull’impatto ambientale
Questo prodotto contiene batterie
ricaricabili. Per tutelare e proteggere
l’ambiente, non gettare il prodotto nei
residui domestici dopo l’uso. Lo smaltimento può essere effettuato presso un centro
assistenza Braun o presso un adeguato punto
di raccolta in zona.
La cartuccia di pulizia può essere smaltita con i
normali rifi uti domestici.
Con riserva di modifi che senza preavviso.
Per le specifi che elettriche vedere la
stampigliatura sul set cavo speciale.
54
Page 55

Garanzia
Braun fornisce una garanzia valevole per la
durata di 2 anni dalla data di acquisto.
Nel periodo di garanzia verranno eliminati,
gratuitamente, i guasti dell’apparecchio
conseguenti a difetti di fabbrica o di materiali,
sia riparando il prodotto sia sostituendo, se
necessario, l’intero apparecchio.
Tale garanzia non copre: i danni derivanti dall’uso
improprio del prodotto, la normale usura (ad
esempio di lamina o blocco coltelli) conseguente
al funzionamento dello stesso, i difetti che
hanno un effetto trascurabile sul valore o sul
funzionamento dell’apparecchio.
La garanzia decade se vengono effettuate
riparazioni da soggetti non autorizzati o con parti
non originali Braun.
Per accedere al servizio durante il periodo
di garanzia, è necessario consegnare o far
pervenire il prodotto integro, insieme allo
scontrino di acquisto, ad un centro di assistenza
autorizzato Braun.
Contattare www.service.braun.com o il numero
800 440 017 per avere informazioni sul Centro di
assistenza autorizzato Braun più vicino.
55
Page 56

Nederlands
Onze producten zijn ontworpen om te voldoen aan de hoogste eisen van
kwaliteit, functionaliteit en design. Wij wensen u veel plezier met uw nieuwe
Braun scheerapparaat.
Lees deze gebruiksaanwijzing volledig, het bevat veiligheidsinformatie. Bewaar
het voor toekomstig gebruik.
Waarschuwing
Uw scheerapparaat is voorzien van een speciaal snoer met
een geïntegreerd veiligheids laag-voltage aanpassingssysteem. Om deze reden mag u geen enkel onderdeel
vervangen of bewerken, om het risico van een elektrische
schok te voorkomen. Gebruik alleen de speciale snoerenset
die geleverd is met uw apparaat.
Gebruik het apparaat niet wanneer het scheerblad of het snoer
beschadigd is.
Dit apparaat is geschikt voor gebruik in bad of onder
de douche. Wegens veiligheidsredenen kan het alleen
snoerloos gebruikt worden.
Dit apparaat is geschikt voor gebruik voor kinderen ouder dan
8 jaar en personen met een fysieke, sensorische of mentale
beperking indien zij het product gebruiken onder begeleiding
of instructies hebben gekregen over het veilig gebruik van het
apparaat en de gevaren inzien. Laat kinderen niet met het
apparaat spelen. Laat het apparaat niet schoonmaken of
onderhouden worden door kinderen, behalve onder toezicht
en als ze 8 jaar of ouder zijn.
Om lekken van de reinigingsvloeistof te voorkomen, dient
u het Clean&Renew station op een vlakke ondergrond te
plaatsen. Indien een reinigingscartridge geplaatst is dient u
het station niet te kantelen, plots te bewegen of het station te
verplaatsen omdat er anders vloeistof uit de cartridge kan
lekken. Plaats het station niet in een badkamerkastje of op
een gepolijst of gelakt oppervlak.
De reinigingscartridge bevat een zeer licht ontvlambare
vloeistof. Houd deze daarom buiten bereik van ontstekingsbronnen. Niet blootstellen aan direct zonlicht of sigaretten.
Niet boven een verwarming bewaren.
De cartridge niet bijvullen. Gebruik alleen originele Braun
cartridges.
56
Page 57

Beschrijving
Clean&Renew station
1 Reinigingsvloeistof display
2 Lift knop voor verwisselen cartridge
3 Station-naar-scheerapparaat contactpunten
4 Start knop
D Snel reinigen knop
5 Reinigingsprogramma lampjes
6 Station snoeringang
7 Reinigingscartridge
Scheerapparaat
8 Scheerblad & messenblok cassette
9 Cassette ontgrendelingsknop
0 Scheerhoofd «lock» schakelaar
q Uitklapbare tondeuse
w Aan/uit schakelaar
e (–) instelling knop gevoelig
r (+) instelling knop intensieve
t Reset knop
z Scheerapparaat display
u Scheerapparaat-naar-station contactpunten
i Scheerapparaat snoeringang
o Reisetui
p Speciaal snoer
Voor het scheren
Voordat u het apparaat voor de eerste keer gaat
gebruiken dient u het scheerapparaat aan te
sluiten op het lichtnet met het speciale snoer p
of als volgt te werk te gaan.
Het Clean&Renew station installeren
• Gebruik het speciale snoer p, en sluit de
station snoeringang 6 aan op het lichtnet.
• Druk op de lift knop
openen.
• Houd de reinigingscartridge
plat, stabiel oppervlak (bijv. tafel). Verwijder
voorzichtig het deksel van de cartridge.
• Schuif de cartridge zover als mogelijk in het
station.
• Sluit de behuizing langzaam door deze naar
beneden te duwen tot hij vastklikt.
Het reinigingsvloeistof display
hoeveel vloeistof zich in de cartridge bevindt:
tot 30 reinigingscycli mogelijk
nog voldoende voor ca. 7 reinigingscycli
cartridge nodig
2 om de behuizing te
7 plat op een
1 zal aantonen
1
2
n
a
f
e
l
a
c
s
t
n
a
f
e
l
a
c
s
t
n
a
f
e
l
a
c
s
t
57
Page 58

Het scheerapparaat opladen en schoonmaken
trimmer
Plaats het scheerhoofd in het reinigingsstation.
De contactpunten u aan de achterkant van het
scheerapparaat passen nu op de contactpunten
Series 7
3 van het reinigingsstation. Belangrijk: Het
scheerapparaat moet vrij zijn van zeep- of
scheerschuimresten.
Indien nodig, zal het Clean&Renew station het
scheerapparaat nu opladen. De hygiëne status
van het scheerapparaat zal tevens worden
geanalyseerd en één van de volgende reinigingsprogramma lampjes
scheerapparaat is schoon
5 zal oplichten:
korte economische reiniging is nodig
normale reiniging is nodig
intensieve reiniging is nodig
Indien het station één van de reinigingsprogramma’s selecteert, zal dit niet starten tot u de
start knop 4 indrukt. Voor de beste scheer-
resultaten raden wij aan het scheerapparaat
na iedere scheerbeurt schoon te maken.
Tijdens het reinigingen, zal het bijbehorende
reinigingsprogramma lampje knipperen. Ieder
reinigingsprogramma bestaat uit verschillende
cycli, waarbij reinigingsvloeistof door het
scheerhoofd wordt gespoeld en een proces
waarbij het scheerhoofd wordt gedroogd.
Afhankelijk van het geselecteerde programma
duurt een totale reinigingscyclus 32 tot 43
minuten.
De reinigingsprogramma’s mogen niet worden
onderbroken. Let op: tijdens het drogen van het
scheerapparaat, kan het scheerhoofd heet en
nat zijn.
Wanneer het programma is afgelopen, zal het
blauwe
lampje oplichten. Uw scheerapparaat
is nu schoon en klaar voor gebruik.
58
Snel reinigen
Druk op de snel reinigen knop
D om het snelle
reinigingsprogramma zonder drogen te activeren.
Dit programma duurt ca. 25 seconden en wordt
aangeraden als u geen tijd heeft voor één van
de automatische reinigingsprogramma’s. Veeg
het scheerhoofd af met een tissue als u het
scheerapparaat na het programma verwijdert uit
het station om druppels te voorkomen.
Stand-by mode
10 minuten nadat het oplaad- of reinigingsprogramma is voltooid, zal het Clean&Renew station
overschakelen naar de stand-by functie: de lampjes van het Clean&Renew station zullen doven.
Page 59

Scheerapparaat display
b
a
t
y
Het scheerapparaat display z geeft aan de
linkerzijde de capaciteit van de accu aan, en aan
de rechterzijde de hygiëne status. 6 donkere
segmenten aan iedere kant geven aan wanneer
de accu volledig is opgeladen en het scheerapparaat hygiënisch schoon is.
Accu segmenten:
Tijdens het opladen en bij gebruik van het
scheerapparaat zullen de respectievelijke batterij
segmenten knipperen. Wanneer de accu volledig
is opgeladen, zullen alle 6 de segmenten worden
weergegeven. Bij het afnemen van de capaciteit
van de accu zullen de segmenten geleidelijk
verdwijnen.
Lage capaciteit indicatielampje:
Het lage capaciteit indicatielampje is voorzien
van een rood kader en zal knipperen om aan te
geven dat de capaciteit van de accu gedaald
is onder de 20%. De resterende capaciteit is
voldoende voor 2 tot 3 scheerbeurten.
Hygiëne segmenten:
Alle 6 hygiëne segmenten zullen verschijnen
nadat het scheerapparaat is gereinigd in
het Clean&Renew station. Bij gebruik van
het scheerapparaat zullen de segmenten
geleidelijk verdwijnen. Zodra het apparaat weer
in het station is geplaatst, zal het systeem
automatisch het benodigde reinigingsprogramma
selecteren en de segmenten weer instellen op
maximale hygiëne. Aangezien het afspoelen
van het scheerapparaat onder de kraan niet zo
hygiënisch is als het reinigingsstation, zullen
de hygiëne segmenten alleen op nieuw worden
ingesteld als het scheerapparaat gereinigd is in
het Clean&Renew station.
h
y
y
r
g
e
i
t
e
t
n
a
e
b
h
y
y
r
g
e
i
t
e
t
n
a
e
b
h
y
y
r
g
e
i
t
e
t
n
a
e
b
Oplaad informatie
• Een volledig opgeladen accu is voldoende
voor ca. 50 minuten snoerloos scheren. Dit is
afhankelijk van uw baardgroei.
•
De aangeraden omgevingstemperatuur om bij
op te laden is 5 °C tot 35 °C. De batterij kan
niet goed opladen onder extreem hoge of lage
temperaturen.
De aangeraden omgevingstemperatuur voor een scheerbeurt is 15 °C
tot 35 °C. Stel het apparaat niet bloot aan
temperaturen boven de 50 °C voor een langere
tijd.
59
Page 60

Gebruik van uw scheerapparaat
r
Persoonlijke instellingen van uw scheerapparaat
Met de (–) e en (+) r knoppen kunt u
kiezen welke instelling het beste is voor de
verschillende gebieden van uw gezicht en uw
specifi eke behoeften.
De drie verschillende instellingen worden
aangegeven door het controlelampje in de aan/
uit schakelaar
w:
normal
+
• donkerblauw (met veel Power, bij zware
baardgroei)
• lichtblauw (normal)
• wit (voor grondig, maar comfortabel scheren,
ook in gevoelige gedeeltes van het gezicht
zoals de nek)
Voor een grondige en snelle scheerbeurt adviseren wij het apparaat op (+) in te stellen.
Bij een volgend gebruik zal de laatste gebruikte
instelling worden geactiveerd.
Tips voor de perfecte gladde scheerbeurt
Voor de beste resultaten, adviseert Braun de
volgende 3 eenvoudige stappen:
1. Scheer u altijd voordat u uw gezicht wast.
2. Houd het scheerapparaat altijd in een rechte
release
90°
t
hoek van 90° op uw huid.
3. Trek uw huid strak en scheer tegen de
haargroeirichting in.
Scheren
Druk op aan/uit schakelaar
w om het scheer-
apparaat aan te zetten:
+
lock
• Het zwenkende scheerhoofd en scheerblad
passen zich automatisch aan aan de contouren
van uw gezicht.
2
lock
1
lock
• Om lastige plekken te scheren (bijv. onder de
neus) schuift u de scheerhoofd «lock» schakelaar 0 naar achteren om het zwenkende
scheerhoofd in een hoek te vergrendelen.
60
• Om uw bakkebaarden, snor of baard te
trimmer
lock
scheren, schuift u de uitklapbare tondeuse
naar boven.
Page 61

Reinigen
re
le
a
s
e
Automatisch reinigen
Plaats na iedere scheerbeurt het scheerapparaat terug in het Clean&Renew station en
ga te werk zoals beschreven in sectie «Voor het
scheren». Al het benodigde opladen en reinigen
wordt dan automatisch gedaan. Bij dagelijks
gebruik zal een reinigingscartridge voldoende
zijn voor ca. 30 reinigingscycli.
De hygiëne reinigingscartridge bevat ethanol of
isopropanol (kijk voor details op de cartridge),
wat automatisch, langszaam zal verdampen
wanneer hij geopend wordt. Elke cartridge
dient, indien deze niet dagelijks wordt gebruikt,
ongeveer na 8 weken vervangen te worden.
De reinigingscartridge bevat tevens smeermiddelen, die restjes kunnen achterlaten op de
buitenkant van het scheerblad. Deze restjes
kunnen eenvoudig worden verwijderd door het
scheerblad voorzichtig schoon te wrijven met
een doek of tissue.
Handmatig reinigen
Het afspoelen van het scheerhoofd onder
stromend water is een alternatieve manier om
het scheerapparaat schoon te houden, in het
bijzonder tijdens het reizen:
• Zet het scheerapparaat aan (draadloos) en
spoel het scheerhoofd onder warm, stromend
water af tot alle restjes verdwenen zijn. U
mag hierbij vloeibare zeep zonder schurende
deeltjes gebruiken. Spoel al het schuim af
en laat het scheerapparaat nog een paar
seconden aan staan.
• Schakel vervolgens het scheerapparaat uit,
druk op de ontgrendelingsknop
scheerblad en de messenblok cassette 8 te
verwijderen en laat deze drogen.
• Indien u het scheerapparaat regelmatig
schoonmaakt met water, dient u eenmaal
per week een druppel naaimachine olie op
het scheerblad en de messenblok cassette
te druppelen.
9 om het
trimmer
trimmer
Series
re
le
a
s
e
Series 7
re
le
a
s
e
trimmer
Series
er
Series 7
U kunt het scheerapparaat ook met een borsteltje
reinigen:
• Zet het apparaat uit. Verwijder het scheerblad
en de messenblok cassette en klop deze uit op
een vlakke ondergrond.
Gebruik het borsteltje om de binnenkant van
het scheerhoofd schoon te maken. Gebruik
het borsteltje nooit op het scheerblad en
de messenblok cassette aangezien dit het
scheerblad kan beschadigen.
Series 7
re
le
a
s
e
re
le
a
s
e
Series 7
re
le
a
s
e
61
Page 62

De behuizing reinigen
re
le
a
s
e
Maak van tijd tot tijd de behuizing van het
scheerapparaat en van het Clean&Renew station
schoon met een vochtige doek, in het bijzonder
in de reinigingskamer waarin u het scheerapparaat plaatst.
Vervangen van de reinigingscartridge
Wacht, na het drukken op de lift-knop
2 om de
behuizing te openen, enkele seconden voordat u
de gebruikte cartridge verwijdert, om druppelen
te voorkomen.
Zorg ervoor dat de openingen in de gebruikte
cartridge afgesloten zijn met behulp van het
deksel van de nieuwe cartridge voordat u de
gebruikte cartridge weggooit. De gebruikte
cartridge bevat namelijk verontreinigde
reinigingsoplossing.
De gebruikte cartridge kunt u bij het gewone
huisvuil weggooien.
Uw scheerapparaat in topconditie
houden
Het scheerblad en de messenblok cassette
vervangen / reset
y
h
r
y
e
t
g
t
i
a
e
b
n
e
Om een 100% scheerprestatie te houden, dient
u het scheerblad en de messenblok cassette 8
te vervangen wanneer het vervangingssymbool
oplicht op het scheerapparaat display z na
ongeveer 18 maanden of wanneer de cassette
versleten is.
Het vervangingssymbool zal u gedurende de
volgende 7 scheerbeurten herinneren uw scheerblad en messenblok cassette te vervangen.
Hierna zal het scheerapparaat het display automatisch resetten.
Druk, nadat u het scheerblad en de messenblok
Series 7
70S
cassette heeft vervangen, gedurende tenminste
3 seconden met een balpen op de reset knop t
om de teller te resetten. Terwijl u dit doet, zal het
vervangingslampje knipperen en doven wanneer
de reset is voltooid. Een handmatige reset kunt
u op elk moment uitvoeren.
Accessoires
Verkrijgbaar bij onderdelenwinkels of Braun
70S
62
Service Centers:
• Scheerblad & messenblok cassette 70S
• Reinigingscartridge Clean&Renew CCR
Page 63

Mededeling ter bescherming van
het milieu
Dit product bevat oplaadbare batterijen.
Ter bescherming van het milieu mag dit
product aan het einde van zijn nuttige
levensduur niet met het gewone huisvuil
worden weggegooid. Verwijdering kan plaatsvinden bij een Braun Service Centre of bij de
bekende verzamelplaatsen.
Wijzigingen voorbehouden.
Voor elektrische specifi caties, zie de print op het
speciale snoer.
Garantie
Op dit produkt verlenen wij een garantie van
2 jaar geldend vanaf datum van aankoop.
Binnen de garantieperiode zullen eventuele
fabricagefouten en/of materiaalfouten gratis door
ons worden verholpen, hetzij door reparatie,
vervanging van onderdelen of omruilen van het
apparaat.
Deze garantie is van toepassing in elk land waar
dit apparaat wordt geleverd door Braun of een
offi cieel aangestelde vertegenwoordiger van
Braun.
Beschadiging ten gevolge van onoordeelkundig
gebruik, normale slijtage (bijv. aan scheerblad
of messenblok) en gebreken die de werking of
waarde van het apparaat niet noemenswaardig
beïnvloeden, vallen niet onder de garantie. De
garantie vervalt bij reparatie door niet door ons
erkende service-afdelingen en/of gebruik van
niet originele Braun onderdelen.
Om gebruik te maken van onze service binnen
de garantieperiode, dient u het complete
apparaat met uw aankoopbewijs af te geven
of op te sturen naar een geautoriseerd
Braun Customer Service Centre:
www.service.braun.com.
Bel 0 800 44 55 388 voor een Braun Customer
Service Centre bij u in de buurt.
63
Page 64

Dansk
Vores produkter er skabt til at opfylde de højeste krav med hensyn til kvalitet,
funktionalitet og design. Vi håber, du vil få glæde af din nye barbermaskine fra
Braun.
Læs denne instruktionsmanual fuldstændigt da den indeholder sikkerhedsinformation. Behold den for fremtidig reference.
Advarsel
Dit barbersystem er forsynet med en specialledning med
integreret strømforsyning med ekstra lav spænding for større
sikkerhed. Du må ikke udskifte eller pille ved nogen af delene,
da du kan risikere at få elektrisk stød. Anvend kun specialkablet, der følger med apparatet.
Brug ikke barbermaskinen, hvis skæreblad eller ledning er
beskadigede.
Dette apparat kan anvendes i badet eller brusebadet.
Af sikkerhedsmæssige grunde må det kun anvendes
ledningsfrit.
Dette apparat kan anvendes af børn fra 8 år og personer
med nedsatte fysiske, sansemæssige eller mentale evner eller
manglende erfaring eller viden, hvis de er under opsyn og
får instruktioner om sikker brug af apparatet og forstår den
involverede fare. Børn må ikke lege med apparatet. Rengøring
og brugervedligeholdelse må ikke udføres af børn, med
mindre de er over 8 år og er under opsyn.
Sørg for, at Clean&Renew-stationen er placeret på en fl ad
overfl ade for at forhindre lækage af rengøringsvæske.
Når en rengøringspatron er sat i, må stationen ikke vippes,
fl yttes pludseligt eller transporteres, da rengøringsvæske
derved kan løbe ud af patronen. Stationen må ikke placeres
i et spejlskab, over en radiator eller på en poleret eller lakeret
overfl ade.
Rengøringspatronen indeholder meget brændbar væske
og skal holdes væk fra antændingskilder. Undlad at ryge
i nærheden af stationen. Må ikke udsættes for direkte sollys
i længere tid.
Patronen må ikke genfyldes. Brug kun originale Braun refi llpatroner.
64
Page 65

Beskrivelse
Clean&Renew-station
1 Display for rensevæske
2 Løfteknap til udskiftning af patron
3 Kontakter fra station til barbermaskine
4 Startknap
D Hurtig rensningknap
5 Indikatorer til renseprogram
6 Stik til station
7 Rensepatron
Barbermaskine
8 Kassette med skæreblade og lamelknive
9 Udløserknap til kassette
0 Låsekontakt til barberhoved
q Pop-out trimmer til langt hår
w Tænd/sluk-knap
e (–) indstillingsknap følsom
r (+) indstillingsknap intensiv
t Nulstil-knap
z Barbermaskinens display
u Kontakter fra station til barbermaskine
i Stik til barbermaskine
o Rejseetui
p Specialledning
Før barbering
Før du tager barbermaskinen i brug, skal du
sætte barbermaskinen i en stikkontakt ved hjælp
af specialledningen p eller følge nedenstående
procedure.
Installering af Clean&Renew-stationen
• Tilslut stationens stik 6 til lysnettet med
specialledningen p.
• Tryk på løfteknappen
• Hold rengøringspatronen
stabil overfl ade (fx et bord).
• Fjern forsigtigt låget fra patronen.
• Lad patronen glide så langt ind i bunden af
stationen som muligt.
• Luk kabinettet langsomt ved at trykke ned, til
det låser.
Displayet for rensevæske
rensevæske patronen indeholder:
op til 30 cyklusser tilbage
op til 7 rensecyklusser tilbage
patronen skal udskiftes
2 for at åbne kabinettet.
7 ned mod en fl ad,
1 viser, hvor meget
1
2
n
a
f
e
l
a
c
s
t
n
a
f
e
l
a
c
s
t
n
a
f
e
l
a
c
s
t
65
Page 66

Opladning og rensning af barbermaskinen
trimmer
Sæt barberhovedet i rensestationen. Kontakterne
u bag på barbermaskinen justeres med
kontakterne 3 i rengøringsstationen. Vigtigt:
Shaveren skal være tør og fri for barberskum
Series 7
og sæberester!
Hvis det er nødvendigt, vil Clean&Renewstationen automatisk oplade barbermaskinen.
Barbermaskinens hygiejnestatus analyseres
også, og en af følgende renseprogramindikatorer
5 lyser:
barbermaskinen er ren
shortkort økonomisk rensning
påkrævet
normalt rensningsniveau påkrævet
intensiv rensning påkrævet
Hvis stationen vælger et af de tre renseprogrammer, starter den ikke, før du trykker på startknappen 4. For at opnå de bedste barberings-
resultater anbefaler vi rensning efter hver
barbering.
Når renseprogrammet kører, blinker en lysindikator for det respektive renseprogram. Hvert renseprogram består af adskillige cyklusser, hvor
rensevæsken skyller gennem barberhovedet, og
en varmetørringsproces tørrer barbermaskinen.
Afhængig af det valgte program varer den totale
rensning fra 32 til 43 minutter.
66
Renseprogrammet bør ikke afbrydes.
Bemærk, at mens barbermaskinen tørrer, kan
barberhovedet være varmt og vådt.
Når programmet er færdigt, lyser den blå
-indikator. Din barbermaskine er nu ren og klar
til brug.
Hurtig rensning
Tryk på knappen hurtig rensning
D for at
aktivere det hurtige renseprogram uden tørring.
Programmet tager cirka 25 sekunder og
anbefales, når du ikke har tid til at vente på et
af de automatiske renseprogrammer. Hvis du
fjerner barbermaskinen lige efter, at programmet
er færdigt, skal du tørre barberhovedet med en
renseserviet for at undgå, at det drypper.
Stand-by-tilstand
10 minutter efter at opladnings- eller renseprogrammet er afsluttet, skifter Clean&Renewstationen til stand-by-tilstand. Indikatorerne på
Clean&Renew-stationen slukker.
Page 67

Barbermaskinens display
b
a
t
y
Barbermaskinens display z viser batteriets
opladningsstatus til venstre og hygiejnestatus til
højre. 6 mørke segmenter vises på hver side, når
batteriet er fuldt opladet, og barbermaskinen er
hygiejnisk ren.
Batterisegmenter:
Under opladning, eller når barbermaskinen er
i brug, blinker batterisegmenterne. Når den er
fuldt opladet, vises alle 6 segmenter. I takt med
at opladningen falder, forsvinder segmenterne
gradvist.
Indikator for lavt batteriniveau
Indikatoren for lavt batteriniveau, som har en
rød ramme, blinker for at vise, at batteriniveauet
er faldet til under 20 %. Den tilbageværende
batterikapacitet rækker til 2-3 barberinger.
Hygiejnesegmenter:
Alle 6 hygiejnesegmenter vises, efter at barbermaskinen er renset i Clean&Renew-stationen.
Når barbermaskinen bruges, forsvinder hygiejnesegmenterne gradvist. Når barbermaskinen
sættes i stationen igen, vælger systemet automatisk det relevante renseprogram og gendanner
segmenterne til maksimal hygiejne. Da det ikke
er så hygiejnisk at rengøre barbermaskinen
under rindende vand som i rensestationen, bliver
hygiejnesegmenterne kun gendannet, når barbermaskinen er renset i Clean&Renew-stationen.
h
y
y
r
g
e
i
t
e
t
n
a
e
b
h
y
y
r
g
e
i
t
e
t
n
a
e
b
h
y
y
r
g
e
i
t
e
t
n
a
e
b
Information om opladning
• En fuld opladning giver op til 50 minutters
ledningsfri barbering. Dette kan variere
afhængig af din skægvækst.
• Anbefalet temperatur ved opladning er 5 °C
til 35 °C. Batteriet oplades måske ikke
ordentligt eller slet ikke ved en ekstremt lav
eller høj temperatur. Anbefalet temperatur ved
barbering er 15 °C til 35 °C. Apparatet må
ikke udsættes for temperaturer over 50 °C i
længere perioder.
Brug av barbermaskinen
Tilpas din barbermaskine til dine behov
Med knapperne (–) e og (+) r kan du vælge den
bedste indstilling til barbering forskellige steder
i ansigtet, så det passer til dine specielle behov.
67
Page 68

De forskellige indstillinger er vist med lyset, der
r
er indbygget i tænd/sluk-knappen
normal
+
• Mørkeblå (kraftig barbering)
w:
• Lyseblå (normal)
• hvid (til en meget behagelig barbering
følsomme steder i ansigtet og på halsen)
Til en omhyggelig og hurtig barbering anbefaler
vi (+)-indstillingen.
Når du tænder maskinen næste gang, vil den
sidst anvendte indstilling blive aktiveret.
Tips til en perfekt tør barbering
For at opnå de bedste barberingsresultater
anbefaler Braun 3 enkle trin:
1. Barber dig altid, før du vasker dig i ansigtet.
2. Hold altid barbermaskinen i en ret vinkel (90°)
release
90°
t
mod huden.
3. Stræk huden og barber mod skæggets
vokseretning.
Brugsanvisning
Tryk på start/stop-knappen
w for at tænde for
barbermaskinen.
+
lock
• Det svingbare barberhoved og svævende
skæreblad tilpasser sig automatisk ansigtets
konturer.
2
lock
1
lock
• For at barbere vanskeligt tilgængelige områder
(fx under næsen) skal barberhovedets «lock»kontakt 0 skydes til bageste position for at
låse det svingbare hoved i en vinkel.
• For at trimme bakkenbarter, overskæg eller
trimmer
lock
skæg skal pop-out trimmeren til langt hår
skydes opad.
Rengøring
68
Automatisk rengøring
Placer barbermaskinen i Clean&Renew-stationen
efter hver barbering og fortsæt som beskrevet
trimmer
i afsnittet «Før barbering». Herefter foregår al
opladning og al nødvendig rengøring automatisk.
Ved daglig brug rækker en rensepatron til
omkring 30 rensningscyklusser.
Den hygiejniske rengøringspatron indeholder
ethanol og isopropanol (se patron for specifi kation),
som fordamper langsomt, når den bliver åbnet.
Hver patron bør udskiftes ca. hver 8. uge, hvis
den ikke bruges dagligt.
Page 69

Rensepatronen indeholder også glidemidler, som
re
le
a
s
e
kan efterlade mærker på den ydre skærebladsramme efter rensning. Disse mærker kan imidlertid nemt fjernes ved forsigtig aftørring med en
klud eller en blød renseserviet.
Manuel rengøring
At skylle barberhovedet under rindende vand er
en alternativ måde at holde barbermaskinen ren
på, især under rejser:
• Tænd for shaveren (trådløs), og skyl barberhovedet under varmt, rindende vand, indtil
alle rester er blevet fjernet. Der kan anvendes
fl ydende sæbe uden slibemidler. Skyl al
skummet væk, og lad barbermaskinen køre i et
par sekunder mere.
• Sluk så for barbermaskinen, tryk på udløserknappen
9 for at fjerne kassetten med
skæreblade og lamelknive 8 og lad den tørre.
• Dryp en dråbe let maskinolie på kassetten
med skæreblade og lamelknive, hvis du
regelmæssigt rengør din barbermaskine under
rindende vand.
Alternativt kan barbermaskinen renses med en
børste:
• Sluk for barbermaskinen. Tag kassetten med
skæreblade og lamelknive 8 af og bank
den mod en fl ad overfl ade. Rens derefter
indersiden af det bevægelige hoved med
børsten. Kassetten må imidlertid ikke renses
med børsten, da det kan ødelægge den.
Rengøring af kabinet
Barbermaskinens kabinet og Clean&Renewstationen rengøres af og til med en fugtig
klud, især inde i rengøringskammeret, hvor
barbermaskinen står.
trimmer
Series
re
le
a
s
e
Series 7
re
le
a
s
e
trimmer
re
le
a
s
e
Series
er
Series 7
Series 7
re
le
a
s
e
Series 7
re
le
a
s
e
Udskiftning af rensepatron
Tryk på løfteknappen 2 for at åbne kabinettet,
og vent nogle få sekunder, før den brugte patron
fjernes for at undgå dryp.
Sørg for at lukke åbningerne med låget fra den
nye patron, før den brugte patron kasseres, da
den indeholder forurenet rengøringsopløsning.
69
Page 70

re
le
a
s
e
Series 7
70S
y
r
e
t
t
a
b
70S
Hold din barbermaskine i topform
Udskiftning af kassetten med skæreblade og
lamelknive / nulstilling
For at opnå optimal barbering hver gang bør
h
y
g
i
e
n
e
kassetten med skæreblade og lamelknive
udskiftes, når udskiftningssymbolet z lyser
efter ca. 18 måneders brug, eller når kassetten
8
er slidt.
Udskiftningssymbolet minder dig under de
næste 7 barberinger om at udskifte kassetten
med skæreblade og lamelknive. Derefter nulstiller
barbermaskinen automatisk displayet.
Når du har udskiftet kassetten med skæreblade
og lamelknive, trykkes på nulstil-knappen t med
en kuglepen i mindst 3 sekunder for at nulstille
tælleren.
Imens blinker udskiftningslyset, som slukker, når
nulstillingen er afsluttet. Manuel nulstilling kan
foretages til enhver tid.
Tilbehør
Fås hos din forhandler eller Braun Service
Centre:
• Kassette med skæreblade og lamelknive
70S
• Rensepatron Clean&Renew CCR
Miljømæssige oplysninge
Dette produkt indeholder genopladelige
batterier og/eller genbrugeligt elektrisk
affald. For at beskytte miljøet, smid
venligst ikke ud med husholdsaffald, men
lever til genbrug eller til elektrisk affald på de
dertil anrettede afl everingspunkter.
Rengøringspatronen kan kasseres sammen med
det almindelige husholdningsaffald.
Kan ændres uden varsel.
Elektriske specifi kationer fi ndes på specialkablet.
70
Page 71

Garanti
Braun yder 2 års garanti på dette produkt
gældende fra købsdatoen. Inden for garantiperioden vil Braun for egen regning afhjælpe
fabrikations- og materialefejl efter vort skøn
gennem reparation eller ombytning af apparatet.
Denne garanti gælder i alle lande, hvor Braun er
repræsenteret.
Denne garanti dækker ikke skader opstået ved
fejlbetjening, normalt slid (f.eks. skæreblad
og lamelkniv) samt fejl, som har ringe effekt
på apparatets værdi eller funktionsdygtighed.
Garantien bortfalder ved reparationer udført af
andre end de af Braun anviste reparatører og
hvor originale Braun reservedele ikke er anvendt.
Ved service inden for garantiperioden afl everes
eller indsendes hele apparatet sammen med
købsbevis til et autoriseret Braun Service Center:
www.service.braun.com.
Ring 7015 0013 for oplysning om nærmeste
Braun Service Center.
71
Page 72

Norsk
Våre produkter er utviklet for å oppfylle de høyeste standardene for kvalitet,
funksjonalitet og design. Vi håper at du vil få stor glede av din nye Braun
barbermaskin.
Les denne instruksjonen grundig, den inneholder sikkerhetsinformasjon.
Spar den for fremtidig bruk.
Advarsel
Din barbermaskin har en spesialledning med integrert
lavspenningsadapter. Skift ikke ut eller foreta endringer på
noen del av den, ellers kan du bli utsatt for elektrisk støt.
Bruk kun ledningssettet som følger med barbermaskinen.
Ikke barber med skadet skjæreblad eller ledning.
Dette apparatet kan brukes i bad og dusj. Av
sikkerhetsgrunner kan det bare brukes uten ledning.
Dette apparatet kan brukes av barn fra og med 8 år og
personer med reduserte fysiske, sensoriske eller mentale
evner, eller manglende erfaring og kunnskap, hvis de er under
tilsyn eller har fått instruksjon om sikker bruk av apparatet og
forstår farene ved bruk av apparatet. Barn skal ikke leke med
apparatet. Rengjøring og vedlikehold av apparatet skal ikke
foretas av barn med mindre de er eldre enn 8 år og har tilsyn
av en voksen.
For å sikre at rensevæsken ikke lekker, bør du forsikre deg om
at Clean&Renew-stasjonen er plassert på en plan overfl ate.
Når en rensepatron er installert, må du ikke tippe, bevege
på eller forfl ytte stasjonen på noen måte, fordi rensevæsken
da kan renne ut av patronen. Plasser ikke stasjonen inni en
speilkommode, over en radiator eller på en polert eller lakkert
overfl ate.
Rensepatronen inneholder en svært brannfarlig væske, så
hold den vekk fra antenningskilder. Ikke røyk i nærheten av
stasjonen. Må ikke utsettes for direkte sollys over lengre
perioder.
Patronen må ikke fylles opp på nytt. Bruk kun originale
refi llpatroner fra Braun.
72
Page 73

Beskrivelse
Clean&Renew-stasjon
1 Display for rensevæsken
2 Løfteknapp for bytte av patron
3 Kontaktpunkter mellom stasjon og
barbermaskin
4 Startknapp for rengjøring
D Knapp for rask rengjøring
5 Indikatorer for rengjøringsprogrammer
6 Stasjonens strømuttak
7 Rensepatron
Barbermaskin
8 Kassett med skjæreblad og lamellkniv
9 Utløserknapp for kassett med skjæreblad og
lamellkniv
0 Låseknapp for barberhodet («lock»)
q Utskyvbar langhårtrimmer
w På/av-bryter
e Innstillingsknapp for skånsom barbering (–)
r Innstillingsknapp for intensiv barbering (+)
t Tilbakestillingsknapp
z Barbermaskinens display
u Kontaktpunkter mellom barbermaskin og
stasjon
i Barbermaskinens strømtilkobling
o Reiseetui
p Spesialledning
Før barbering
Før du bruker barbermaskinen for første gang,
må du koble den til et elektrisk strømuttak ved
bruk av spesialledningen p eller gå frem slik det
blir forklart nedenfor.
Installering av Clean&Renew-stasjonen
• Bruk spesialledningen p og koble stasjonens
støpsel 6 til et strømuttak.
• Trykk på løfteknappen 2 for å åpne beholderen.
• Hold rensepatronen 7 ned mot en plan, stabil
overfl ate (f.eks. et bord).
• Ta forsiktig lokket av patronen.
• Skyv patronen inn i basen på stasjonen så
langt det går.
• Lukk beholderen sakte ved å skyve den ned til
den låses.
1
2
n
a
f
e
l
a
c
s
t
n
a
f
e
l
a
c
s
t
n
a
f
e
l
a
c
s
t
73
Page 74

Displayet for rensevæske
trimmer
1 viser hvor mye
rensevæske det er i patronen:
inntil 30 rensesykluser tilgjengelig
inntil 7 rensesykluser igjen
patronen må skiftes ut
Lading og rengjøring av barbermaskinen
Sett i barberhodet i rensestasjonen. Kontaktene
u bak på barbermaskinen skal være på linje
med kontaktene 3 i rensestasjonen. Viktig:
Barbermaskinen må være tørr, og fri for
Series 7
skum- og såperester!
Hvis nødvendig vil Clean&Renew-stasjonen
automatisk lade opp barbermaskinen.
Hygienestatusen til barbermaskinen vil også
analyseres, og ett av de følgende indikatorlysene
for renseprogrammene 5 vil lyse:
barbermaskinen er ren
en kort, økonomisk rengjøring er
påkrevd
et normalt rengjøringsnivå er påkrevd
intensiv rengjøring er nødvendig
Hvis systemet har valgt én av de tre rengjøringsprogrammene, må du trykke på startknappen 4
for at rengjøringen skal starte. For best mulig
barberingsresultat, anbefaler vi rengjøring
etter hver barbering.
74
Under rengjøringen blinker det aktuelle indikatorlyset for rengjøring. Hvert rengjøringsprogram
består av fl ere sykluser, hvor rensevæsken skylles gjennom barberhodet og en varmetørkingsprosess tørker barbermaskinen. Avhengig av
valgt program, vil den totale rengjøringstiden
variere fra 32 til 43 minutter.
Rengjøringsprogrammene bør ikke avbrytes.
Legg merke til at mens barbermaskinen tørker,
kan barberhodet fortsatt være varmt og vått.
Når programmet er fullført, lyser det blå indikatorlyset for rengjøring. Barbermaskinen er nå ren
og klar til bruk.
Rask rengjøring
Trykk på knappen for rask rengjøring D for
å aktivere programmet for rask rengjøring
uten tørking. Dette programmet tar bare
ca. 25 sekunder og anbefales når du ikke
har tid til å vente på et av de automatiske
rengjøringsprogrammene. Hvis du fl ytter på
barbermaskinen like etter at programmet er
Page 75

avsluttet, bør du tørke av barberhodet med
b
a
t
y
tørkepapir for å unngå drypping.
Standby-modus
10 minutter etter at ladingen eller rengjøringen er
avsluttet, vil Clean&Renew-stasjonen gå over i
standby-modus: Indikatorene til Clean&Renewstasjonen slås av.
Barbermaskinens display
Barbermaskinens display z viser batterinivået
på venstre side, og hygienestatusen på høyre
side. 6 mørke streker vises på begge sider når
batteriet er fullt ladet og barbermaskinen er
hygienisk ren.
Batteristreker:
Under lading eller når barbermaskinen er i bruk,
vil de respektive batteristrekene blinke. Når
batteriet er fullt ladet, vil alle de 6 strekene vises.
Når batterinivået blir lavere, vil strekene gradvis
forsvinne.
Indikator for lavt batterinivå:
Indikatoren for lavt batterinivå, som er markert
med en rød fl amme, vil blinke for å vise at batterinivået er under 20 %. Gjenværende batterikapasitet er tilstrekkelig for 2–3 barberinger.
h
y
y
r
g
e
i
t
e
t
n
a
e
b
h
y
y
r
g
e
i
t
e
t
n
a
e
b
Hygienestreker:
Alle de 6 hygienestrekene vil vises etter at
barbermaskinen har blitt rengjort i Clean&Renewstasjonen. Når barbermaskinen er i bruk, vil
hygienestrekene gradvis forsvinne. Når barbermaskinen settes tilbake i stasjonen, vil systemet
automatisk velge det rengjøringsprogrammet
som passer og strekene vil gjenopprettes til
maksimal hygienestandard. Å skylle barbermaskinen under rennende vann er ikke like hygienisk
som bruk av rengjøringsstasjonen, derfor vil
hygienestrekene bare gjenopprettes når barbermaskinen har blitt rengjort i Clean&Renewstasjonen.
Ladeopplysninger
• Når barbermaskinen er fullt ladet, gir den opptil
50 minutters ledningsfri barberingstid. Dette
kan variere avhengig av din skjeggvekst.
• Beste temperatur for lading er mellom 5 °C
og 35 °C. Ved ekstremt lave eller høye
temperaturer vil kanskje ikke batteriet lades
opp ordentlig, eller kanskje ikke lades i det
h
y
y
r
g
e
i
t
e
t
n
a
e
b
75
Page 76

hele tatt. Anbefalt omgivelsestemperatur for
r
barbering er mellom 15 °C og 35 °C. Ikke
utsett barbermaskinen for temperaturer som
er høyere enn 50 °C i lengre perioder.
Bruk av barbermaskinen
Personlig tilpasning av din barbermaskin
Med knappene (–) e og (+) r kan du velge
de beste innstillingene for barbering av ulike
områder av ansiktet og etter dine spesifi kke
behov. De ulike innstillingene vises ved indikatorlyset som er integrert i på/av-bryteren w:
normal
+
• mørk blått (kraftig barbering)
• lyseblått (normal)
• hvitt (for en grundig og komfortabel barbering
av sensitive områder som f.eks. halsen)
For en grundig og rask barbering anbefaler vi
innstillingen (+).
Neste gang du slår på barbermaskinen, vil den
sist benyttede innstillingen bli aktivert.
Tips for en perfekt barbering
For et best mulig barberingsresultat, anbefaler
Braun at du følger 3 enkle trinn:
1. Du bør alltid barbere deg før du vasker
ansiktet.
2. Hold barbermaskinen vinkelrett (90°) mot
release
90°
t
huden.
3. Strekk huden og barber mot skjeggets
vekstretning.
Slik bruker du barbermaskinen
Trykk på på/av-knappen
w for å slå på barber-
maskinen:
+
lock
• Det svingbare barberhodet og de bevegelige
skjærebladene tilpasser seg automatisk til alle
konturene i ansiktet ditt.
2
lock
1
lock
• For å barbere deg på steder hvor det er
vanskelig å komme til (f.eks. under nesen),
skyver du låseknappen på barberhodet 0
til bakerste posisjon for å låse det svingbare
hodet i en fast stilling.
trimmer
lock
• For å trimme kinnskjegg, barter eller skjegg,
skyver du den utskyvbare langhårtrimmeren
oppover.
76
Page 77

Rengjøring
re
le
a
s
e
Automatisk rengjøring
Sett barbermaskinen i Clean&Renew-stasjonen
etter hver barbering, og følg beskrivelsen i
avsnittet «Før barbering» ovenfor. All nødvendig
lading og rengjøring blir automatisk utført. Ved
daglig bruk vil en rensepatron rekke til omtrent
30 rengjøringer.
Den hygieniske rensepatronen inneholder etanol
eller isopropanol (se spesifi kasjon på patronen),
som fordamper sakte når den er blitt åpnet. Hvis
patronen ikke brukes daglig, bør den byttes ut
etter omtrent 8 uker.
Rensepatronen inneholder også smørende
midler som kan etterlate rester på skjærebladrammen etter rengjøringen. Disse fl ekkene kan
imidlertid enkelt tørkes bort med en myk klut
eller et tørkepapir.
Manuell rengjøring
Man kan også rengjøre barberhodet under rennende vann, noe som er spesielt aktuelt når man
er på reise:
• Slå på barbermaskinen (trådløs) og skyll
barberhodet under varmt, rennende vann.
Du kan bruke fl ytende såpe uten skuremidler.
Skyll bort alt skummet, og la barbermaskinen
gå i noen sekunder.
• Slå deretter av barbermaskinen, trykk på
utløserknappen
lamellkniven 8 og la dem tørke.
9 for å fjerne skjærebladet og
trimmer
trimmer
Series
re
le
a
s
e
Series
er
• Hvis du rengjør barbermaskinen regelmessig
under vann, bør du påføre en dråpe lett
maskinolje på skjærebladet og lamellkniven en
gang i uken.
Du kan også rengjøre barbermaskinen med en
børste:
• Slå av barbermaskinen. Ta av skjærebladet og
lamellkniven 8 og bank dem lett mot en plan
overfl ate. Bruk børsten og rengjør den indre
delen av det bevegelige hodet. Rengjør ikke
lamellkniven med børsten fordi det kan skade
den.
Rengjøring av beholderen
Av og til bør du rengjøre beholderen til barbermaskinen og Clean&Renew-stasjonen med en
fuktig klut, særlig inni rengjøringskammeret hvor
barbermaskinen plasseres.
Series 7
re
le
a
s
e
trimmer
re
le
a
s
e
Series 7
Series 7
re
le
a
s
e
Series 7
re
le
a
s
e
77
Page 78

Bytte av rensepatron
re
le
a
s
e
Etter at du har trykket på løfteknappen
2 for å
åpne beholderen, må du vente i noen sekunder
før du tar ut den brukte patronen slik at det ikke
drypper fra den.
Før du kaster den brukte patronen, må du lukke
åpningene med lokket fra den nye patronen
ettersom den brukte patronen inneholder
forurenset rensevæske.
Vedlikehold av barbermaskinen
Bytte av skjæreblad og lamellkniv /
tilbakestilling
y
h
r
y
e
t
g
t
i
a
e
b
n
e
For å opprettholde 100 % barberingsytelse
må du skifte ut skjærebladet og lamellkniven
når indikatorlampen z tennes etter omtrent
18 måneder, eller når delene er slitt.
Symbolet for utskifting vil i løpet av de neste
7 barberingene minne deg på å skifte ut
kassetten med skjæreblad og lamellkniv.
Deretter tilbakestilles displayet automatisk.
Når du har skiftet ut kassetten med skjæreblad
Series 7
70S
og lamellkniv, bruker du en kulepenn for å
trykke inn tilbakestillingsknappen t i minst tre
sekunder for å tilbakestille telleren.
Indikatorlyset blinker mens du gjør dette, og det
slukker når tilbakestillingen er fullført. Manuell
tilbakestilling kan foretas når som helst.
Tilbehør
Tilgjengelig hos din forhandler eller et Braun
70S
servicesenter:
• Kassett med skjæreblad og lamellkniv 70S
• Rensepatron Clean&Renew CCR
Miljømessige opplysninger
Dette produktet inneholder oppladelige
batterier og/eller resirkulerbart elektrisk
avfall. For å beskytte miljøet, vennligst
kast i husholdsavfall, men lever til
gjenbruk eller til elektrisk avfall på dertil egnet
avleveringspunkt.
Rensepatronen kan kastes sammen med vanlig
husholdningsavfall.
Med forbehold om endringer.
78
Page 79

Elektriske spesifi kasjoner er angitt på
spesialledningssettet.
Garanti
Vi gir 2 års garanti på produktet gjeldende fra
kjøpsdato.
I garantitiden vil vi gratis rette eventuelle
fabrikasjons- eller materialfeil, enten ved
reparasjon eller om vi fi nner det hensiktsmessig
å bytte hele produktet.
Denne garanti er gyldig i alle land der Braun eller
Brauns distributør selger produktet.
Denne garantien dekker ikke: skader på
grunn av feil bruk, normal slitasje (f.eks. på
skjæreblad eller lamellkniven) eller skader som
har ubetydelig effekt på produktets verdi og
virkemåte sitat slutt. Garantien bortfaller dersom
reparasjoner utføres av ikke autorisert person
eller hvis andre enn originale Braun reservedeler
benyttes.
For service i garantitiden skal hele produktet
leveres eller sendes sammen med kopi av
kjøpskvittering til nærmeste autoriserte Braun
Serviceverksted: www.service.braun.com.
Ring 88 02 55 03 for å bli henvist til nærmeste
autoriserte Braun Serviceverksted.
NB
For varer kjøpt i Norge har kunden garanti i
henhold til NEL’s Leveringsbetingelser.
79
Page 80

Svenska
Våra produkter har utformats för att uppfylla de högsta standarder för kvalitet,
funktionalitet och design. Vi hoppas att du blir nöjd med din nya Braun Shaver.
Läs denna instruktion i sin helhet. Den innehåller säkerhetsinformation. Spara
den för framtida referens.
Varning
Ditt raksystem är utrustat med en specialsladd med en
inbyggd, säker elförsörjning med extra låg spänning. Byt inte
ut eller ändra på någon del, annars fi nns det risk för elektriska
stötar. Använd endast den medföljande specialsladden.
Raka aldrig med ett skadat skärblad eller en skadad sladd.
Den här apparaten är lämplig för användning i
samband med bad eller dusch. Av säkerhetsskäl kan
den endast användas utan sladd.
Den här produkten får endast användas av barn från 8 års
ålder och personer med nedsatt fysisk, sensorisk eller mental
förmåga eller bristande erfarenhet/kunskap under övervakning
av en person som är ansvarig för deras säkerhet samt efter att
ha fått instruktioner om hur produkten kan användas på ett
säkert sätt. Barn ska inte leka med produkten. Rengöring och
underhåll ska inte utföras av barn och dessa inte är över 8 år
och övervakas av en vuxen person.
För att hindra att rengöringsvätskan läcker ut måste du se
till att rengöringsstationen står på en plan yta. När du har
installerat en rengöringskassett får du inte tippa eller plötsligt
röra eller fl ytta stationen eftersom rengöringsvätskan då kan
rinna ut ur kassetten. Rengöringsstationen bör inte placeras i
spegelskåp, ovanför element eller på polerade eller lackerade
ytor.
Rengöringskassetten innehåller ytterst lättantändlig vätska
varför den skall förvaras på avstånd från brandkällor. Rök inte
i närheten av rengöringsstationen. Utsätt inte apparaten för
direkt solljus under längre perioder.
Fyll inte på kassetten själv – använd enbart Braun original
refi llkassetter.
80
Page 81

Beskrivning
Rengöringsstation
1 Indikator för rengöringsvätska
2 Lyftknapp för kassettbyte
3 Stationens kontakter mot rakapparaten
4 Starta rengöring knapp
D Snabbrengöring knapp
5 Indikatorer för rengöringsprogram
6 Strömuttag för rengöringsstationen
7 Rengöringskassett
Rakapparat
8 Skärblads- & saxkassett
9 Kassettfrigöringsknapp
0 Låsknapp för skärhuvud («lock»)
q Utfällbar trimmer för långt hår
w På-/av-knapp
e Känslig knapp (–)
r Intensiv knapp (+)
t Återställningsknapp
z Rakapparatens display
u Rakapparatens kontakter mot stationen
i Rakapparatens eluttag
o Resefodral
p Specialsladd
Före rakningen
Innan du börjar raka dig måste rakapparaten
anslutas till ett eluttag med specialsladden p
eller gör enligt nedanstående beskrivning.
Installation av rengöringsstationen
• Anslut rengöringsstationen 6 till ett eluttag
med specialsladden p.
• Tryck ned lyftknappen
• Håll rengöringskassetten
stabil yta (t.ex. ett bord).
• Ta försiktigt bort locket från kassetten.
• Skjut in kassetten så långt in i stationens bas
som möjligt.
• Stäng försiktigt höljet genom att trycka ned det
tills det låses.
Rengöringsvätskeindikatorn
vätska som fi nns i kassetten.
räcker till 30 rengöringar
räcker till 7 rengöringar
ny kassett behövs
2 för att öppna höljet.
7 mot en plan och
1 visar hur mycket
1
2
n
a
f
e
l
a
c
s
t
n
a
f
e
l
a
c
s
t
n
a
f
e
l
a
c
s
t
81
Page 82

Laddning och rengöring av rakapparaten
trimmer
Sätt in rakapparaten med rakhuvudet nedåt i
rengöringsstationen. Kontakterna
u på rakap-
paratens baksida ansluts till kontakterna 3 på
rengöringsstationen. Viktigt: Rakapparaten ska
Series 7
vara torr och fri från rakskum och tvålrester!
Rengöringsstationen laddar nu automatiskt
rakapparaten vid behov. Rakapparatens
hygieniska tillstånd analyseras också och en av
rengöringsprogrammets följande indikatorer
5
börjar lysa:
rakapparaten är ren
snabbrengöring behövs
normalrengöring behövs
intensivrengöring behövs
Om stationen väljer ett av de erforderliga
rengöringsprogrammen startas det dock inte
såvida du inte trycker på starta rengöring
knappen 4. För bästa resultat rekommenderar
vi att apparaten rengörs efter varje rakning.
När rengöringen pågår blinkar respektive
programindikator. Varje rengöringsprogram
består av fl era olika moment där rengöringsvätskan spolas genom rakhuvudet och en
värmeprocess därefter torkar rakapparaten.
Beroende på program kan den totala rengöringstiden variera mellan 32 och 43 minuter.
82
Rengöringsprogrammen bör inte avbrytas.
Observera att rakhuvudet under torkningen kan
vara både hett och vått.
När programmet är klart lyser den blå indikatorn
ren . Rakapparaten är nu rengjord och klar att
användas.
Snabbrengöring
Tryck in knappen snabbrengöring D för
aktivera snabbrengöringsprogrammet utan
torkning. Programmet tar bara 25 sekunder och
rekommenderas när du inte har tid att vänta på
ett av de automatiska rengöringsprogrammen.
Om du tar ut rakapparaten precis när programmet har slutat bör du torka av den med en
servett för att undvika dropp.
Viloläge
10 minuter efter att laddning eller rengöring
avslutats går rengöringsstationen till viloläge:
Indikatorerna på rengöringsstationen och
rakapparaten släcks.
Page 83

Rakapparatens display
b
a
t
y
Rakapparatens display z visar batteriets
laddningsstatus till vänster och hygienstatus
till höger. 6 mörka indikatorer visas på var sida
när batteriet är fulladdat och rakapparaten är
hygieniskt ren.
Batteriindikatorer:
Under laddning eller vid användning blinkar
respektive batteriindikator. Vid fulladdat batteri
visas samtliga 6 indikatorer. I och med att
laddningen sjunker försvinner indikatorerna
successivt.
Indikator för låg batteriladdning:
Laddningsindikatorn (låg) är försedd med en
röd ram som blinkar och indikerar att batteriladdningen har sjunkit under 20 %. Återstående
batterikapacitet räcker till 2 eller 3 rakningar.
Hygienindikatorer:
Samtliga 6 hygienindikatorer visas efter att
rakapparaten har rengjorts i rengöringsstationen.
När rakapparaten används försvinner hygienindikatorerna successivt. När rakapparaten
återigen har satts i stationen väljer systemet
automatiskt lämpligt rengöringsprogram och
återställer indikatorerna för att visa bästa
hygienstatus. Eftersom rengöring av rakapparaten under rinnande vatten inte är lika
hygieniskt som i rengöringsstationen återställs
hygienindikatorerna endast när rakapparaten
har rengjorts i stationen.
h
y
y
r
g
e
i
t
e
t
n
a
e
b
h
y
y
r
g
e
i
t
e
t
n
a
e
b
h
y
y
r
g
e
i
t
e
t
n
a
e
b
Laddningsinformation
• Ett fulladdat batteri ger upp till 50 minuters
sladdlös rakning. Tiden kan emellertid variera
på grund av skägglängden.
• Rekommenderad omgivningstemperatur vid
laddning är 5 °C till 35 °C. Vid extremt låga
eller höga temperaturer kan det hända att
batteriet inte laddas ordentligt eller inte laddas
alls. Rekommenderad omgivande temperatur
för rakning är 15 °C till 35 °C. Utsätt inte
apparaten för temperaturer som överstiger
50 °C under längre tidsperioder.
Så här använder du rakapparaten
Anpassa rakapparatens inställningar
Med knapparna (–) e och (+) r kan du välja
bästa inställning för olika ansiktsdelar. Aktuell
83
Page 84

inställning indikeras av pilotlampan som fi nns
r
inbyggd i på/av-knappen
normal
+
• mörkblå (kraftig rakning).
:
w
• ljusblå (normal)
• vit (för en skonsam rakning av känslig hud,
t.ex. i nacken)
För grundlig och snabb rakning rekommenderar
vi inställningen (+).
Senast använda inställning används automatiskt
nästa gång du använder rakapparaten.
Tips för en perfekt torr rakning
För den perfekta rakningen rekommenderar
Braun följande 3 enkla steg:
1. Raka dig alltid innan du tvättar ansiktet.
2. Håll alltid rakapparaten i rät vinkel (90°) mot
release
90°
t
huden.
3. Sträck ut huden och raka mot skäggets
växtriktning.
Hur den används
Tryck in på/av-knappen
w för att sätta igång
rakapparaten.
+
lock
• Det svängbara rakhuvudet och rörliga skärbladen anpassar sig automatiskt till ansiktets olika
konturer.
2
lock
1
lock
• För att raka svårtillgängliga ställen (t.ex. under
näsan) kan du ställa rakhuvudets (lås) knapp
0 i sitt bakersta läge för att låsa huvudet i en
viss vinkel.
• För upp den utfällbara trimmern för långt hår
trimmer
lock
för att klippa mustasch eller skägg.
Rengöring
Automatisk rengöring
Efter varje rakning bör du ställa tillbaka rakapparaten i rengöringsstationen och göra enligt
trimmer
beskrivningen i avsnittet «Före rakning».
Laddning och rengöring sker då helt automatiskt.
Vid dagligt bruk bör en rengöringskassett räcka
till ca 30 rengöringar.
Den hygieniska rengöringskassetten innehåller
etanol eller isopropanol (se kassett för
specifi kation) som långsamt avdunstar efter
öppning. En kassett som inte används dagligen
bör bytas ut efter ca åtta veckor.
Rengöringskassetten innehåller också smörjmedel som efter rengöring kan lämna rester
på den yttre skärbladsramen. Dessa rester kan
84
Page 85

emellertid lätt avlägsnas med en tygbit eller mjuk
re
le
a
s
e
servett.
Manuell rengöring
Rengöring av rakapparaten under rinnande
vatten är ett alternativt sätt, i synnerhet på resor.
• Slå på rakapparaten (utan sladd) och rengör
rakhuvudet under varmt, rinnande vatten.
Flytande tvål utan slipmedel kan användas.
Skölj av allt lödder och låt rakapparaten vara
igång i ytterligare några sekunder.
• Stäng sedan av rakapparaten, tryck in
frigöringsknappen
9 för att ta bort skärblads-
och saxkassetten 8 och låt torka.
• Rengör rakapparaten regelbundet under
rinnande vatten och droppa sedan lite symaskinsolja ovanpå skärblads- och saxkassetten.
Du
kan också rengöra rakapparaten med en borste.
• Stäng av rakapparaten. Ta bort skärblads- och
saxkassetten 8 och knacka den försiktigt på
en plan yta. Rengör det svängbara huvudets
inre delar med borsten. Använd emellertid inte
borsten för att rengöra själva kassetten då den
kan skadas.
Rengöring av höljet
Rengör rakapparatens hölje och rengöringsstationen med en fuktig trasa då och då, i
synnerhet insidan på rengöringskammaren där
rakapparaten ligger.
Byta rengöringskassett
Efter att du tryckt in lyftknappen 2 för att öppna
höljet bör du vänta några sekunder innan du tar
ur kassetten för att undvika dropp.
Innan du kastar den använda refi llen bör du
försäkra dig om att dess öppning är stängd
genom att sätta på locket från den nya refi llen.
trimmer
Series
re
le
a
s
e
Series 7
re
le
a
s
e
trimmer
re
le
a
s
e
Series
er
Series 7
Series 7
re
le
a
s
e
Series 7
re
le
a
s
e
Hålla rakapparaten i topptrim
Byta ut skärblads- och saxkassetten/återställa
För att bibehålla en 100% rakning bör du byta
ut skärblads- och saxkassetten 8 när bytutsymbolen på rakapparatens display z lyser
efter ca 18 månaders användning eller när
kassetten är utsliten.
Byt-utsymbolen är till för att påminna dig om att
du under de kommande 7 rakningarna bör byta
y
h
r
y
e
t
g
t
i
a
e
b
n
e
85
Page 86

re
le
a
s
e
Series 7
70S
70S
ut skärblads- och saxkassetten. Rakapparaten
återställer därpå displayen automatiskt.
Efter att du bytt ut skärblads- och saxkassetten
kan du använda en kulspetspenna för att trycka
in återställningsknappen
t i minst 3 sekunder
för att återställa räknaren.
Återställningslampan blinkar under tiden och
släcks när återställningsproceduren är klar. Du kan
när som helst återställa rakapparaten manuellt.
Tillbehör
Finns hos din återförsäljare eller hos Braun
Service Centre:
• Skärblads- & saxkassett 70S
• Rengöringskassett Clean&Renew CCR
Miljöskyddsmeddelande
Produkten innehåller batterier och/eller
återvinningsbart elavfall. Av hänsyn till
miljön ska denna apparat inte slängas
med hushållsavfallet. Återvinning bör ske
enligt gällande lokala föreskrifter.
Den använda rengöringspatronen kan kastas i
hushållssoporna.
Med förbehåll för eventuella ändringar.
För elektriska specifi kationer, se texten på
specialsladden.
Garanti
Vi garanterar denna produkt för två år från och
med inköpsdatum. Under garantitiden kommer vi
utan kostnad, att avhjälpa alla brister i apparaten
som är hänförbara till fel i material eller
utförande, genom att antingen reparera eller byta
ut hela apparaten efter eget gottfi nnande.
Denna garanti gäller i alla länder där denna
apparat levereras av Braun eller deras
auktoriserade återförsäljare.
Denna garanti gäller inte: skada på grund
av felaktig användning, normalt slitage (t.ex.
skärblad och saxhuvud) eller skador som har
en försumbar effekt på värdet eller apparatens
funktion. Garantin upphör att gälla om
reparationer utförs av icke behörig person eller
om Brauns originaldelar inte används.
För att erhålla service under garantitiden skall
den kompletta apparaten lämnas in tillsammans
med inköpskvittot, till ett auktoriserat Braun
verkstad: www.service.braun.com.
Ring 020-21 33 21 för information om närmaste
Braun verkstad.
86
Page 87

Suomi
Tuotteemme on suunniteltu täyttämään korkeimmat laatu-, toimivuus- ja
muotoiluvaatimukset. Toivomme sinun saavan iloa ja hyötyä uudesta Braunparranajokoneestasi.
Lue nämä turvallisuustietoja sisältävät ohjeet huolellisesti. Säilytä ohjeet
myöhempää tarvetta varten.
Varoitus
Parranajokoneen verkkojohto on varustettu matalajännitesovittimella. Sähköiskun vaaran välttämiseksi älä vaihda siihen
mitään osia tai tee mitään muutoksia. Käytä ainoastaan laitteen mukana toimitettua verkkojohtoa/johtoja.
Älä käytä laitetta, jos teräverkko tai verkkojohto on vahingoittunut.
Tätä
laitetta voi käyttää kylvyssä ja suihkussa.
Turvallisuussyistä sitä voidaan käyttää vain ilman
verkkojohtoa.
Yli 8-vuotiaat lapset tai sellaiset henkilöt, joiden fyysinen,
sensorinen tai henkinen toimintakyky on rajoittunut tai joilla ei
ole tarvittavaa kokemusta tai tietoa laitteen käytöstä, voivat
käyttää laitetta, jos heitä valvotaan ja ohjeistetaan laitteen
turvallisen käytön osalta ja he ymmärtävät käyttöön liittyvät
vaaratekijät. Lasten ei saa antaa leikkiä laitteella. Laitetta
saavat puhdistaa vain yli 8-vuotiaat lapset, kun heitä valvotaan.
Aseta Clean&Renew-huoltokeskus tasaiselle pinnalle puhdistusnesteen vuotojen välttämiseksi. Kun puhdistuskasetti on
asennettu, älä kallista, liikuta äkkinäisesti tai kuljeta huoltokeskusta, koska kasetista voi läikkyä puhdistusnestettä. Älä säilytä huoltokeskusta peilikaapissa tai patterin päällä äläkä aseta
sitä kiillotetuille tai lakatuille pinnoille.
Puhdistuskasetti sisältää herkästi syttyvää nestettä, joten pidä
se poissa syttymislähteiden ulottuvilta. Älä tupakoi huoltokeskuksen lähettyvillä. Älä altista suoralle auringonvalolle pitkäksi
aikaa.
Älä täytä kasettia uudestaan. Käytä ainoastaan alkuperäistä
Braunin puhdistuskasettia.
87
Page 88

Laitteen osat
Clean&Renew-huoltokeskus
1 Puhdistusnesteen näyttö
2 Irrotuspainike kasetin vaihtoa varten
3 Huoltokeskuksen liitäntä parranajokoneeseen
4 Aloita puhdistuspainike
D Nopea puhdistuspainike
5 Puhdistusohjelman merkkivalot
6 Huoltokeskuksen verkkolaitteen liitin
7 Puhdistuskasetti
Parranajokone
8 Teräverkon ja leikkurin kasetti
9 Kasetin vapautuspainike
0 Ajopään lukituskytkin («lock»)
q Ulostyönnettävä pitkien karvojen trimmeri
w Virtakytkin
e «Sensitive»-asetuksen painike (–)
r «Intensive»-asetuksen painike (+)
t Reset-painike
z Parranajokoneen näyttö
u Parranajokoneen liitäntä huoltokeskukseen
i Parranajokoneen verkkolaitteen liitin
o Matkakotelo
p Verkkojohto
Ennen parranajoa
Kytke parranajokone ennen ensimmäistä
käyttökertaa verkkojohdolla p verkkovirtaan tai
toimi alla kuvatulla tavalla.
Clean&Renew-huoltokeskuksen asentaminen
• Kytke huoltokeskuksen verkkolaitteen liitin
verkkojohdolla i verkkovirtaan.
• Avaa kotelo painamalla irrotuspainiketta
1
2
n
a
f
e
l
a
c
s
t
• Pidä puhdistuskasettia
(esim. pöydällä).
• Irrota kasetin kansi varovasti.
7 tasaisella pinnalla
• Työnnä kasetti huoltokeskukseen niin pitkälle
kuin se menee.
• Sulje kotelo hitaasti työntämällä sitä alaspäin,
kunnes se lukkiutuu.
n
a
f
e
l
a
c
s
t
n
a
f
e
l
a
c
s
t
Puhdistusnesteen näyttö
1 osoittaa, kuinka
paljon kasetissa on nestettä:
enintään 30 puhdistuskertaa jäljellä
enintään 7 puhdistuskertaa jäljellä
vaihda uusi kasetti
6
2.
88
Page 89

Parranajokoneen lataaminen ja puhdistaminen
trimmer
Aseta ajopää huoltokeskukseen.
Parranajokoneen kääntöpuolen liitännät
u
tulevat huoltokeskuksen liitäntöjen 3 kohdalle.
Tärkeää: Parranajokoneen on oltava kuiva
eikä siinä saa olla partavaahdon tai saippuan
jäämiä!
Clean&Renew-huoltokeskus lataa automaattisesti parranajokoneen, jos se on tarpeen.
Myös parranajokoneen puhtaustaso analysoidaan, ja yksi seuraavista puhdistusohjelman
merkkivaloista
5 syttyy:
parranajokone on puhdas
lyhyt ekopuhdistus on tarpeen
normaalipuhdistus on tarpeen
tehopuhdistus on tarpeen
Jos huoltokeskus valitsee puhdistusohjelman,
puhdistus alkaa vasta kun painat aloita
puhdistuspainiketta 4. Suosittelemme
puhdistusta jokaisen parranajon jälkeen
parhaan ajotuloksen saavuttamiseksi.
Puhdistuksen ollessa käynnissä puhdistusohjelmaa vastaava merkkivalo vilkkuu. Jokainen
puhdistusohjelma koostuu useista kierroista,
joissa puhdistusneste huuhtelee ajopään ja
lämpökuivausjakso kuivaa parranajokoneen.
Valitusta ohjelmasta riippuen kokonaispuhdistusaika on 32–43 minuuttia.
Series 7
Puhdistusohjelmaa ei saa keskeyttää. Kun
parranajokone kuivuu, ajopää voi olla kuuma ja
märkä.
Kun ohjelma on päättynyt, sininen (puhdas)
-merkkivalo syttyy. Parranajokone on nyt puhdas
ja käyttövalmis.
Nopea puhdistus
Kun haluat käyttää nopeaa puhdistusohjelmaa
ilman kuivausta, paina nopea puhdistuspainike
D. Ohjelma kestää ainoastaan noin 25 sekuntia.
Sen käyttöä suositellaan, kun automaattiselle
puhdistusohjelmalle ei ole aikaa. Jos otat parranajokoneen huoltokeskuksesta heti ohjelman
päätyttyä, pyyhi ajopää kuivaksi kankaalla.
Stand-by-tila
Clean&Renew-huoltokeskus siirtyy stand-bytilaan10 minuuttia latauksen tai puhdistuksen
jälkeen: Clean&Renew-huoltokeskuksen
merkkivalot sammuvat
89
Page 90

Parranajokoneen näyttö
b
a
t
y
h
y
y
r
g
e
i
t
e
t
n
a
e
b
latauksen tilan vasemmalla ja puhtaustason
oikealla. Kummallakin puolella näkyy 6 tummaa
segmenttiä, kun akut ovat täysin latautuneet ja
parranajokone on puhdas.
Akkusegmentit:
Latauksen aikana ja parranajokonetta käytettäessä vastaavat akkusegmentit vilkkuvat. Kun
akut ovat täysin latautuneet, kaikki 6 segmenttiä
ovat näkyvissä. Kun akkujen latauksen taso
Parranajokoneen näyttö z osoittaa akkujen
vähenee, segmentit häviävät asteittain.
Latauksen tyhjenemisen osoitin:
Kun punaisella kehyksellä varustettu latauksen
h
y
y
r
g
e
i
t
e
t
n
a
e
b
tyhjenemisen merkkivalo vilkkuu, latauksen taso
on tippunut alle 20 %:n. Akuissa riittää virtaa
tällöin kahteen tai kolmeen parranajoon.
Puhtaustason segmentit:
Kaikki 6 puhtaustason segmenttiä ilmestyy
h
y
y
r
g
e
i
t
e
t
n
a
e
b
näkyviin, kun parranajokone on puhdistettu
Clean&Renew-huoltokeskuksessa. Kun
parranajokonetta käytetään, puhtaustason
segmentit häviävät asteittain. Kun parranajokone
laitetaan takaisin keskukseen, järjestelmä valitsee
automaattisesti sopivan puhdistusohjelman
ja palauttaa segmentit, jolloin parranajokone
pysyy mahdollisimman puhtaana. Koska
parranajokoneen huuhteleminen juoksevassa
vedessä ei ole yhtä hygieenistä kuin puhdistus
huoltokeskuksessa, puhtaustason segmentit
palautuvat ainoastaan, kun parranajokone on
puhdistettu Clean&Renew-huoltokeskuksessa.
Tietoa latauksesta
• Kun parranajokone on ladattu täyteen, akussa
riittää virtaa jopa 50 minuutin parranajoon.
Aika voi vaihdella parrankasvusta riippuen.
• Latauksen kannalta suositeltu lämpötila on
5–35 °C. Akku ei ehkä lataudu kunnolla tai
ollenkaan erittäin kylmissä tai kuumissa
olosuhteissa. Parranajon kannalta suositeltu
lämpötila on 15–35 °C. Älä säilytä laitetta
pitkään yli 50 °C:een lämpötilassa.
Parranajokoneen käyttäminen
Parranajokoneen mukauttaminen
(–)- e ja (+)-painikkeilla r voit valita parhaan
asetuksen kasvojen eri alueiden ajamiseen omien
90
Page 91

tarpeidesi mukaisesti. Eri asetukset ilmaistaan
r
virtakytkimen
merkkivalolla:
w
• tummansininen (tehokas parranajo)
• vaaleansininen (normal)
• valkoinen (kasvojen herkkien alueiden kuten
kaulan perusteelliseen ja miellyttävään ajoon)
Perusteelliseen ja nopeaan parranajoon suosittelemme (+)-asetusta.
Kun kytket virran seuraavan kerran, viimeksi
käytetty asetus aktivoituu.
Vinkkejä täydelliseen parranajoon
Parhaan ajotuloksen saavuttamiseksi Braun
suosittelee seuraavien 3 vaiheen noudattamista:
1. Aja parta ennen kasvojen pesua.
2. Pidä parranajokonetta aina suorassa
kulmassa (90°) ihoon nähden.
3. Venytä ihoa ja aja parta karvojen
kasvusuuntaa vasten.
normal
+
release
90°
Käyttöohje
Käynnistä laite painamalla virtakytkintä
w:
• Kääntyvä ajopää ja jousitetut ajopäät
myötäilevät kasvojen muotoja automaattisesti.
• Kun ajat vaikeapääsyisiä alueita (esim. nenän
alta), työnnä ajopään lukituskytkin 0 takaasentoon, jolloin kääntyvä ajopää lukittuu
kulmaan.
• Trimmaa pulisongit, viikset tai parta työntämällä
ulostyönnettävä pitkien partakarvojen trimmeri
ylöspäin.
Puhdistaminen
Automaattinen puhdistus
Laita parranajokone jokaisen ajon jälkeen takaisin
Clean&Renew-huoltokeskukseen ja toimi kappaleessa «Ennen parranajoa» kuvatulla tavalla.
Lataus ja puhdistus hoituvat automaattisesti.
Puhdistuskasetti riittää päivittäisessä käytössä
noin 30 puhdistuskertaan.
Kasetin puhdistusneste sisältää etanolia tai
isopropanolia (katso tiedot kasetista), joka
haihtuu luonnostaan hitaasti kasetin avaamisen
jälkeen. Jos laitetta ei käytetä päivittäin, kasetti
on vaihdettava noin kahdeksan viikon välein.
t
+
2
lock
1
trimmer
trimmer
lock
lock
lock
91
Page 92

Puhdistuskasetti sisältää myös voiteluaineita,
re
le
a
s
e
jotka voivat jättää jälkiä teräverkon kehykseen
puhdistuksen jälkeen. Jäljet voidaan kuitenkin
poistaa helposti pyyhkimällä liinalla tai pehmeällä
WC-paperilla.
Manuaalinen puhdistus
trimmer
Ajopään huuhtelu juoksevassa vedessä on
vaihtoehtoinen tapa puhdistaa parranajokone,
erityisesti matkustettaessa:
• Irrota parranajokoneesta virtajohto ja kytke
siihen virta. Huuhtele ajopää kuumalla
juoksevalla vedellä, kunnes kaikki jäämät
on puhdistettu. Voit käyttää nestemäistä
saippuaa, joka ei sisällä hankaavia aineosia.
Series
re
le
a
s
e
Series
Huuhtele kaikki vaahto pois ja anna parranajokoneen olla käynnissä muutaman sekunnin
ajan.
er
• Katkaise seuraavaksi parranajokoneesta
virta, poista teräverkon ja leikkurin kasetti
Series 7
re
le
a
s
e
trimmer
Series 7
8 painamalla vapautuspainiketta 9 ja anna
kuivua.
• Jos puhdistat parranajokoneen säännöllisesti
vedellä, voitele teräverkon ja leikkurin kasetti
kerran viikossa pisaralla ohutta koneöljyä.
Voit puhdistaa parranajokoneen myös harjalla:
Series 7
re
le
a
s
e
• Sammuta parranajokoneesta virta. Poista
teräverkon ja leikkurin kasetti
8 ja kopauta
sitä kevyesti tasaista pintaa vasten. Puhdista
kääntyvän ajopään sisäosat harjalla. Älä
puhdista harjalla kasettia, sillä kasetti voi
vahingoittua.
re
le
a
s
e
Series 7
re
le
a
s
e
Kotelon puhdistaminen
Puhdista parranajokoneen kotelo ja
Clean&Renew-huoltokeskus ajoittain kostealla
liinalla, erityisesti syvennys johon parranajokone
asetetaan.
Puhdistuskasetin vaihto
Kun olet avannut kotelon painamalla irrotuspainiketta 2, odota muutama sekunti ennen kuin
poistat käytetyn kasetin, jotta kasetista ei tipu
nestettä.
Ennen kuin hävität käytetyn kasetin, sulje se
uuden kasetin kannella. Käytetty kasetti sisältää
likaista puhdistusnestettä.
92
Page 93

Parranajokoneen pitäminen
re
le
a
s
e
huippukunnossa
Teräverkon ja leikkurin kasetin vaihtaminen /
nollaus
Parhaan mahdollisen ajotuloksen saavuttamiseksi teräverkon ja leikkurin kasetti
8 kannat-
taa vaihtaa vaihdon symbolin syttyessä parranajokoneen näytölle z noin 18 kuukauden kuluttua
tai kun kasetti on kulunut.
Vaihdon symboli muistuttaa teräverkon ja
leikkurin kasetin vaihdosta seuraavien 7 parranajon aikana. Tämän jälkeen parranajokone
nollaa asetuksen automaattisesti.
Voit nollata laskimen vaihdettuasi teräverkon ja
leikkurin kasetin painamalla reset-painiketta t
kynällä vähintään 3 sekunnin ajan.
Parranajo-osien vaihdon merkkivalo vilkkuu ja
sammuu, kun nollaus on suoritettu. Manuaalinen
nollaus voidaan tehdä milloin tahansa.
Lisävarusteet
Saatavana jälleenmyyjiltä tai Braun-huoltoliikkeistä:
• Teräverkon ja leikkurin kasetti 70S
• Puhdistuskasetti Clean&Renew CCR
y
h
r
y
e
t
g
t
i
a
e
b
n
e
Series 7
70S
70S
Ympäristöseikkoihin liittyviä tietoja
Tuote sisältää pattereita ja/tai kierrätettävää
sähköjätettä. Suojellaksesi ympäristöä
älä hävitä talousjätteen mukana, vaan
vie maassasi oleviin sähköjätteen
keräyspisteisiin.
Puhdistuskasetti voidaan hävittää tavallisen
kotitalousjätteen mukana.
Tiedot voivat muuttua ilman ennakkoilmoitusta.
Katso sähkömääräyksiä koskevat tiedot
matalajännitesovittimesta.
93
Page 94

Takuu
Tälle tuotteelle myönnämme 2 vuoden takuun
ostopäivästä lukien Suomessa voimassa
olevien alan takuuehtojen TE90 mukaan.
Takuuaikana korvataan veloituksetta kaikki
viat, jotka aiheutuvat materiaaliviasta tai
valmistusvirheestä. Korvaus tapahtuu
harkintamme mukaan korjaamalla, vaihtamalla
viallinen osa tai vaihtamalla koko laite uuteen.
Takuu on voimassa kaikkialla maailmassa sillä
edellytyksellä, että laitetta myydään ko. maassa
Braunin tai virallisen maahantuojan toimesta.
Takuun piiriin eivät kuulu viat, jotka johtuvat
virheellisestä käytöstä tai normaalista
kulumisesta (esim. teräverkko tai leikkuuterä).
Takuu ei myöskään kata sellaisia vikoja, jotka
eivät merkittävästi vaikuta laitteen arvoon tai
toimintaan. Takuun voimassaolo lakkaa, jos
laitetta korjataan muualla kuin valtuutetussa
Braun-huoltoliikkeessä tai jos laitteessa
käytetään muita kuin alkuperäisiä varaosia.
Yksilöity ostokuitti riittää takuun voimassaolon
osoittamiseksi: www.service.braun.com.
Lisätietoa takuuseen liittyvistä asioista saa
asiakaspalvelukeskuksestamme numerosta
020-377 877.
94
Page 95

Türkçe
Ürünlerimiz kalite, kullanım ve tasarımda en yüksek standartlara ulaşabilmek
için üretilmiştir. Yeni Braun tıraş makinenizden memnun kalacağınızı umarız.
Lütfen kullanma talimatlarını eksiksiz bir biçimde okuyun. Kullanma talimatları,
güvenlikle ilgili bilgiler içermektedir. leride ihtiyaç duyduğunuzda okumak üzere
saklayın.
Uyar
Tıraş makinenizin ekstra düşük voltaj için güvenlik sağlayan
adaptör içeren özel kablo seti vardır. Lütfen değiştirmeyiniz
herhangi bir parçası ile oynamayınız, aksi takdirde elektrik
şoku riski vardır. Sadece makinenizle birlikte verilen özel kablo
setini kullanın.
Eleği veya kablosu hasar görmüş tıraş makinesini
kullanmayınız.
Bu cihaz duş altında kullanım için uygundur. Emniyetli
olması açısından sadece kablosuz olarak çalıştırılması
gerekir.
Bu aygıt, 8 yaş ve üzerindeki çocuklar tarafından kullanılabilir.
Hafif fiziksel ya da ruhsal engelli kişiler veya deneyimi ve
bilgisi olmayan kişiler ise; gözetim altında ya da cihazın güvenli
kullanımı hakkında eğitim gördükten ve yanlış kullanımı
durumunda oluşabilecek zararlar hakkında bilgi sahibi olduktan
sonra cihazı kullanabilirler. Çocuklar cihazla oynamamalıdır.
Temizleme ve bakım işlemleri, gözetim altında ve 8 yaşından
büyük olmayan çocuklar tarafından yapılmamalıdır.
Temizleme sıvısının akmasını engellemek için, Clean&Renew
üniteunun düz bir zeminde durduğundan emin olunuz.
Temizleme kartuşu takılı iken, üniteu ani hareket ettirmeyiniz
aksi takdirde sıvı dışarıya taşabilir. stasyonu radyatör üzerine,
ya da kaygan bir yüzeye bırakmayınız.
Temizleme kartuşu yüksek yanıcı sıvı içerdiğinden tutuşmaya
neden olabilecek kaynaklardan uzak tutunuz. Güneş ışığına
direk maruz bırakmayınız.
Kartuşu tekrar doldurmayınız ve sadece orjinal braun yedek
kartuşlarını kullanınız.
95
Page 96

Tanımlamalar
Temizleme&Yenileme «Clean&Renew» Ünitesi
1 Temizleme Sıvısı Göstergesi
2 Kartuş değişimi için kaldırma butonu
3 Ünite-Tıraş Makinesi kontakt kısmı
4 Temizlemeyi başlatma butonu
D Hızlı temizleme butonu
5 Temizleme programı göstergeleri
6 stasyon güç soketi
7 Temizleme kartuşu
Tıraş Makinesi
8 Elek & Bıçaklar Kaseti
9 Kaset çıkarma butonu
0 Tıraş başlığı «lock» kilit butonu
q Uzun tüy düzeltici kaldırma butonu
w Açma/Kapama düğmesi
e (–) hassas buton
r (+) yoğun buton
t Resetleme butonu
z Tıraş göstergesi
u Ünite –Tıraş Makinesi kontakt kısmı
i Tıraş güç soketi
o Seyahat çantası
p Özel kablo seti
Tıraş Etmeden Önce
lk kullanımdan önce tıraş makinenizi özel kablo
setini p kullanarak elektrik prizine bağlayınız ya
da aşağıdaki adımları takip ediniz.
Temizleme &Yenileme stasyonunu Kurmak
• Özel kablo setini
soketini elektrik prizine bağlayınız.
• Kaldırma butonuna
1
2
n
a
f
e
l
a
c
s
t
• Temizleme kartuşunu
yüzeye koyunuz.
• Dikkatli bir sekilde temizleme kartuşunun
kapağını çıkarınız.
• Kartuşu ünitenin alt kısmında en son noktaya
kadar sokunuz.
• Yavaşça gövdeyi kilitlenene kadar aşağı doğru
n
a
f
e
l
a
c
s
t
n
a
f
e
l
a
c
s
t
bastırınız.
Temizleme sıvı göstergesi
ne kadar sıvı kaldığını gösterecektir.
(yüksek) 30 temizlemeye kadar
(düşük) 7 temizlemeye kadar
(boş) yeni kartuş gerekmektedir
p kullanarak ünite güç
2 basarak gövdeyi açınız.
7 masa gibi düz bir
1 size kartuşun içinde
96
Page 97

Tıraş Makinesini Şarj etme ve Temizleme
trimmer
Tıraş başlığını temizleme ünitesine baş aşağı
bir şekilde yerleştiriniz. Tıraş makinesinin
değme noktaları
u temizleme ünitesinin değme
noktaları 3 ile birebir yerleşmelidir. Önemli:
Tıraş makinesi kuru ve köpük ve sabun
kalıntılarından arındırılmış olmalıdır.
Eğer gerekirse temizleme & yenileme ünitesi
otomatik olarak aleti şarj eder. Hijyen durumu
analiz edilecek aşağıdaki programlardan bir
tanesi seçilecektir:
(temiz) tıraş makinesi temizdir
kısa ekonomik programda temizleme
yeterlidir
normal temizleme yeterlidir
yüksek yoğun temizleme gereklidir
Eğer ünite yukarıdaki programlardan birini
seçerse, siz temizlemeyi başlat butonuna 4
basana kadar temizleme başlamayacaktır.
Temizleme halindeyken, seçilmiş programın
gösterge ışığı yanacaktır. Her bir temizleme
programı birkaç aşamadan oluşur, temizleme
sıvısının tıraş başlığına yayıldığı ve tıraş
başlığının kurutma aşaması. Seçilmiş programa
göre, toplam temizleme süresi 32 ila 43 dakika
arası sürecektir.
Temizleme programları durdurulmamalıdır.
Tıraş başlığı kurutma halindeyken tıraş başlığı
ıslak yada sıcak olabilir.
Program bittiğinde, mavi temiz göstergesi
yanacaktır. Tıraş makineniz artık temiz ve
kullanımınıza hazırdır.
Series 7
Hızlı Temizleme
Hızlı temizleme butonu D kurutmadan hızlı
temizleme programını aktive eder. Programı
başlatmak için bu tuşa basınız. Bu program
ortalama 25 saniye sürer ve yeterli zamanınız
olmadığında kullanmanız içindir. Tıraş makinesini
program biter bitmez çıkartırsanız, bir mendil ile
tıraş makinenizi kurulayınız.
Stand-by (Bekleme) Modu
Temizleme ve şarj tamamlandıktan10 dakikada
sonra, Clean&Renew ünitesi stand-by yani
bekleme moduna geçer: Temizleme &Yenileme
ünitesindeki göstergeler kapanır.
97
Page 98

Tıraş Göstergesi
b
a
t
y
h
y
y
r
g
e
i
t
e
t
n
a
e
b
makinenin şarj durumu, sağ tarafında ise hijyen
durumu görüntülenir. Makine tam şarjlı ve
hijyenik olarak tamamen temiz olduğunda her iki
tarafta 6 adet koyu bölge gözükecektir.
Pil bölmeleri:
Tıraş makinesini kullanırken veya şarj ederken,
ilgili pil bölmeleri yanıp söner. Tam şarjlı
olduğunda tüm 6 bölmede ekranda görünür
durumda olacaktır. Kullanıldıkça azalan şarj ile
Tıraş makinesi ekranının z sol tarafında
beraber, ekranda görülen bölmelerde azalma
olarak size kalan şarj oranını gösterecektir.
Düşük şarj göstergesi
Düşük şarj göstergesi batarya gücü %20 nin
h
y
y
r
g
e
i
t
e
t
n
a
e
b
altına düştüğü zaman yanmaya başlar. Geriye
kalan batarya 2 ila 3 tıraş için yeterlidir.
Hijyen Bölgeleri:
Bütün 6 hijyen bölgesi tıraş makineniz
h
y
y
r
g
e
i
t
e
t
n
a
e
b
Temizleme &Yenileme üniteunda temizlendikten
sonra belirmeye başlar. Tıraş makineniz
kullanım halindeyken, hijyen bölgeleri giderek
sönmeye başlar. Tıraş makinesi tekrar üniteye
döndüğünde, sistem otomatik olarak uygun
temizleme programını seçecek ve maksimum
hijyeni sağlayacaktır. Musluk suyu altında
temizlemek temizleme ünitesinde temizlemekten
daha hijyenik olmadığından, hijyen bölgeleri
ancak Temizleme &Yenileme ünitesinde
temizlendikten sonra belirecektir.
Şarj Bilgisi
• Tam dolu şarj 50 dakika kablosuz kullanım
sağlamaktadır. Sakalınızın durumuna göre bu
süre değişebilir.
• Şarj etmek için önerilen çevre ısısı 5 °C ila
35 °C arasındadır. Pil bu derecelerin çok
altında ya da çok üstündeki ısılarda şarj
olmayabilir. Şarj etmek için önerilen çevre
ısısı 5 °C ila 35 °C arasındadır. Ürünü
50 °C’den fazla sıcaklıklara uzun süre maruz
bırakmayınız.
Tıraş makinesi kullanımı
Tıraş makinenizi kişiselleştirme
(–) Hassas e ve (+) Yoğun r butonları ile
yüzünüzün değişik bölgeleri için farklı ayarları
98
Page 99

seçebilirsiniz. Değişik ayarlar açma/kapama
r
düğmesine yerleştirilmiş pilot ışığı ile gösterilmektedir
.
w
• Yoğun koyu mavi (güçlü tıraş)
• Normal açık mavi (normal)
• Hassas beyaz – boyun gibi hassas bölgelerde
mükemmel tıraş için
Yakın ve hızlı tıraş için (+) yoğun programı
seçiniz.
Diğer bir tıraşa başladığınızda en son kullanılmış
programı başlatacaktır.
Mükemmel kuru tıraş için ipuçları
En mükemmel tıraş için, Braun size aşağıdaki
3 adımı öneriyor:
1. Her zaman yüzünüzü yıkamadan önce tıraş
olun.
2. Her zaman, tıraş makinesini cildinize
90 derece açı ile tutunuz.
3. Cildinizi geriniz ve sakalların çıkış yönünün
tersine doğru tıraş edin.
Nasıl Kullanacaksınız
Tıraşı başlatmak için açma/kapama düğmesine
basınız
w:
• Oynar başlık ve kayar elekler yüzünüzün bütün
kıvrımlarına uyum sağlamak için hareket eder.
• Ulaşımı zor yerleri tıraş etmek için (burun alt
gibi) tıraş başlığını uygun açıdayken «lock» kilit
noktasına 0 getiriniz.
normal
+
release
90°
t
+
2
lock
1
lock
lock
• Favori, bıyık ve sakal gibi tüyleri düzeltmek için
uzun tüy düzelticiyi kaydırarak çıkartınız.
Temizleme
Otomatik temizleme
Her tıraştan sonra, tıraş makinesini
Temizleme &Yenileme ünitesinde temizleyiniz.
Günlük kullanımdai bir temizleme kartuşu
30 temizleme işlemi için yeterlidir.
Hijyenik temizleme kartuşu etanol ya da izopropil
alkol (bkz. kartuş teknik özellikleri) içerir. Her
bir kartuş, günlük kullanılmazsa, 8 haftada bir
değiştirilmedir.
trimmer
trimmer
lock
99
Page 100

El ile Temizleme
re
le
a
s
e
trimmer
Tıraş başlığını musluk altında temizlemek
tıraş makinenizi temiz tutmak için alternatif bir
yöntemdir:
• Tıraş makinesini (kablosuz olarak) çalıştırın.
Tıraş başlığını temizlenene kadar sıcak su
altında tutun. Ayrıca yıkamak için sabunlu su
da kullanabilirsiniz. Yıkadıktan sonra köpüğün
gitmesi için tıraş makinesini çalışır durumda
Series
re
le
a
s
e
Series
suyun altında tutunuz.
• Daha sonra, tıraş makinesini kapatınız, çıkarma
er
butonuna
kuruması için çıkarınız.
Series 7
re
le
a
s
e
trimmer
Series 7
• Eğer düzenli olarak haftada bir kere bir
damla makine yağını bıçak ve elek kasetine
damlatabilirsiniz.
9 basınız , elek ve bıçak kasetini 8
Alternatif olarak, makineyi fırçayla da temizleyebilirsiniz:
Series 7
re
le
a
s
e
• Tıraş makinesini kapatın. Elek bıçak kasetini
8 çıkartın ve düz bir yüzeye yavaşça vurarak
sakalların dökülmesini sağlayın. Fırçayı
kullanarak tıraş başlığının iç haznesini
temizleyin ama elek bıçak kasetini kesinlikle
fırça ile temizlemeyin, eleklere ve bıçaklara
re
le
a
s
e
Series 7
re
le
a
s
e
zarar verirsiniz.
Gövdeyi Temizlemek
Zaman zaman bir bez parçası ile
Temizleme &Yenileme ünitesi içini siliniz.
Temizleme kartuşunu değiştirmek
Gövdeyi ayırmak için kaldırma butonuna 2
basınız, herhangi bir akmayı önlemek için
kullanılmış kartuşu çıkarmadan önce birkaç
saniye bekleyiniz.
Kullanılmış kartuşu atmadan önce, yeni kartusun
kapagı ile eski kartuşu kapatınız öyle atınız.
Tıraş Makinenizin ömrünü
uzatmak için
Bıçak & Elek Kasetini Değiştirmek / Resetlemek
y
h
r
y
e
t
g
t
i
a
e
b
n
e
100
100% tıraş performansını sürdürmek için,
değiştirme lambası z yandığında bıçak&elek
kasetini değiştiriniz 8 ortalama 18 ay sonra veya
kaset eskidiğinde.
Değiştirme sembolü size önünüzdeki 7 tıraş
süresince uyarmaya devam edecektir. Daha
sonra otomatik olarak göstergeler resetlenecektir.
 Loading...