

Page 1
7497
7640
7630
7511
+
7497/7640/7630/7511
BS 7 497
BS 7 640
BS 7 630
BS 7 511
7497
Syncro SystemSmart Logic
Page 2
23456
Page 3
Page 4
Page 5
Page 6
Page 7
Syncro
1
Syncro
Syncro
Syncro
2
3
10
4
5
7
4
8
7495
6
7
11
8
9
7497
7
Page 8
7497
210
8
Page 9
9
Page 10
10
0..20 40 60 80 100
0..20 40 60 80
+
Page 11
21
21
1
2
3
k
c
o
l
c
i
t
a
m
o
t
u
a
11
Page 12
12
Page 13

10
7497
3
a
u
t
o
m
a
t
i
c
l
o
c
2
k
10
13
Page 14

14
Page 15

10
15
Page 16

161718
Page 17

Page 18

1
2
3
5 6
4
Page 19

19
Page 20

7497
3
a
u
t
o
m
a
t
i
c
l
o
c
k
2
1
0
20
Clean&Charge
Page 21

21
Page 22

3
2
4
select
1
clean
charge
cartridge
5
6
7
10
8
9
22
Page 23

7497
2
1
new
23
Page 24

24
old
new
Page 25

7497
3
a
u
t
o
m
a
t
i
c
l
o
c
2
k
1
0
7497
select
7497
3
a
u
t
o
m
a
t
i
c
l
o
c
21
k
0
7497
3
a
u
t
o
m
a
t
i
c
l
o
c
k
on/off
clean
charge
2
cartridge
1
0
25
Page 26

7497
select
7497
select
26
Page 27

select
clean
charge
cartridge
27
Page 28

282930
Page 29

Page 30

Page 31

Our products are designed to meet the highest standards
of quality, functionality and design. We hope you enjoy
your new Braun shaver. Your Braun Syncro is supplied
with a Braun Clean&Charge (please see separate use
instructions)
SmartLogic
The «SmartLogic» electronics inside your shaver
analyzes your personal shaving patterns, and then
adapts the battery care to ensure optimal performance.
Warning
Your shaver is provided with a low voltage adaption
system. Therefore you must not exchange or manipulate
any part of it. Otherwise there is risk of electric shock.
Technical specifications:
•
Wattage via low voltage cord: 7 W
•
Power supply via mains adapter, input voltage:
100-240 V 2/50 or 60 Hz (automatic adaptation)
•
Shaver input voltage: 12 V
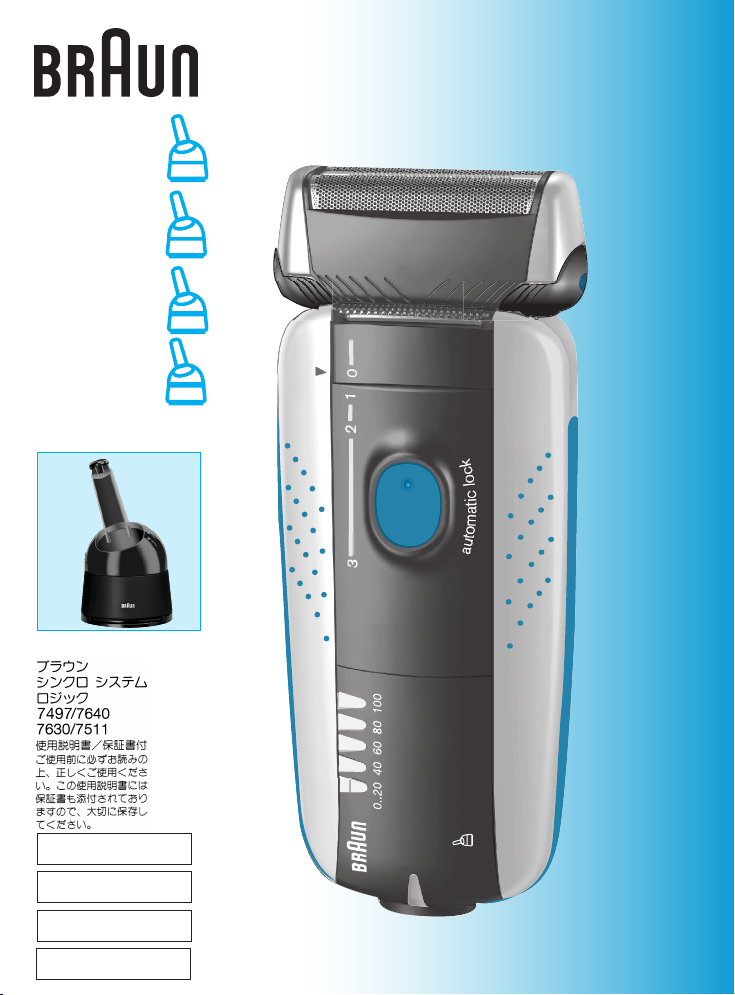
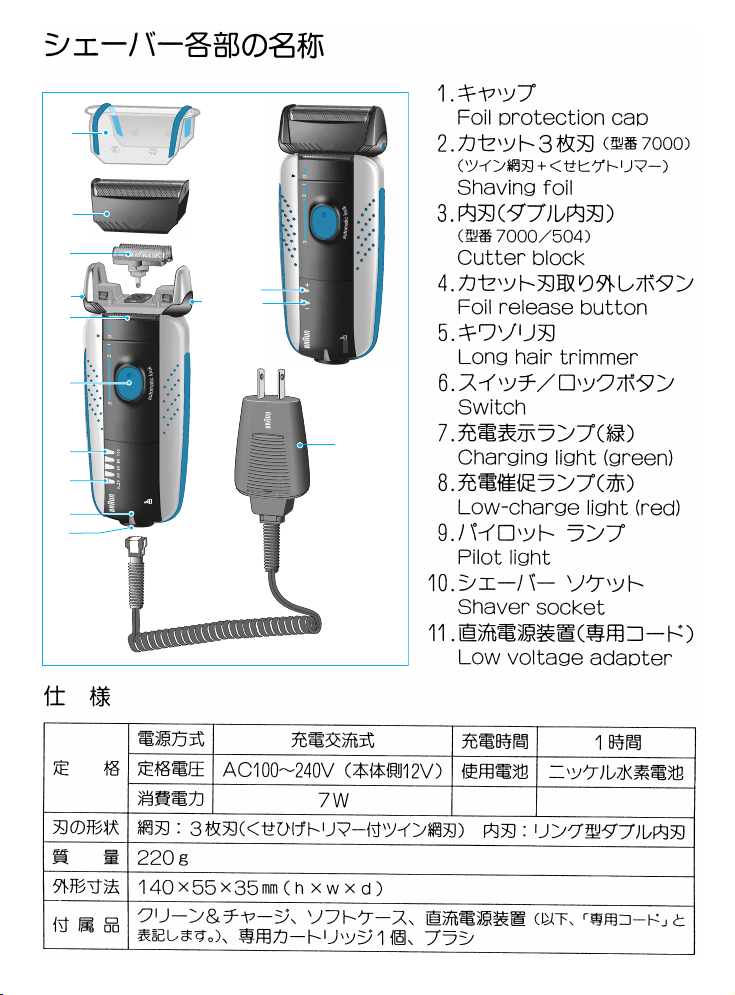
Description
1 Foil protection cap 7 Charging lights (green)
2 Shaver foil 8 Low-charge light (red)
3 Cutter block 9 Pilot light
4 Foil release button 10 Shaver socket
5 Long hair trimmer 11 Power supply cord set
6 Switch
English
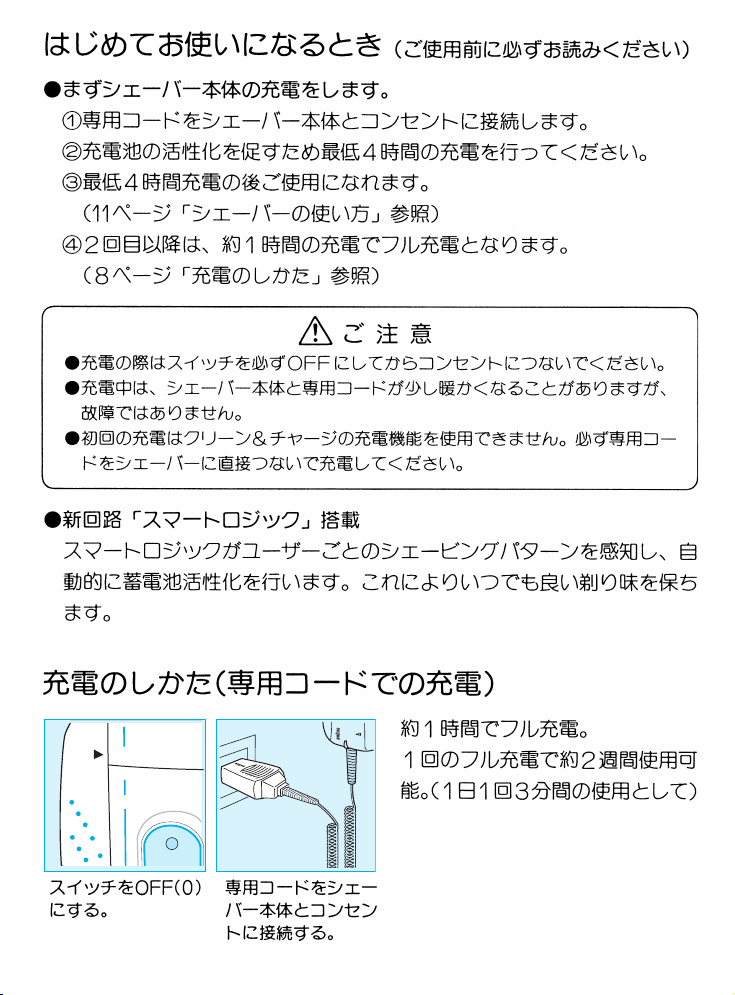
Charging the shaver
•
First charging: Using the power supply cord set, connect
the shaver to the mains with the switch in position «0»
and charge it for at least 4 hours (plug might get warm).
The SmartLogic inside your shaver automatically
monitors the condition of the batteries as well as the
charging/discharging processes and adapts them to
your personal shaving patterns.
•
From now on, the SmartLogic inside your shaver will
ensure optimal care of the battery. If, for instance, it is
your habit to never let the batteries get low, the
SmartLogic will recognize this, look for a pause when you
are likely to not use the shaver and completely discharge
and then recharge your shaver to recondition the batteries (every six months at the most, and only when
necessary).
7497
210
31
Page 32

+35°C
+15°C
•
A full charge will give up to 50 minutes of cordless
shaving time depending on your beard growth.
However, the maximum battery capacity will only be
reached after several charging/discharging cycles.
•
Best environmental temperature range for charging is
15 °C to 35°C.
•
Do not expose the shaver to temperatures of more than
50 °C for longer periods of time.
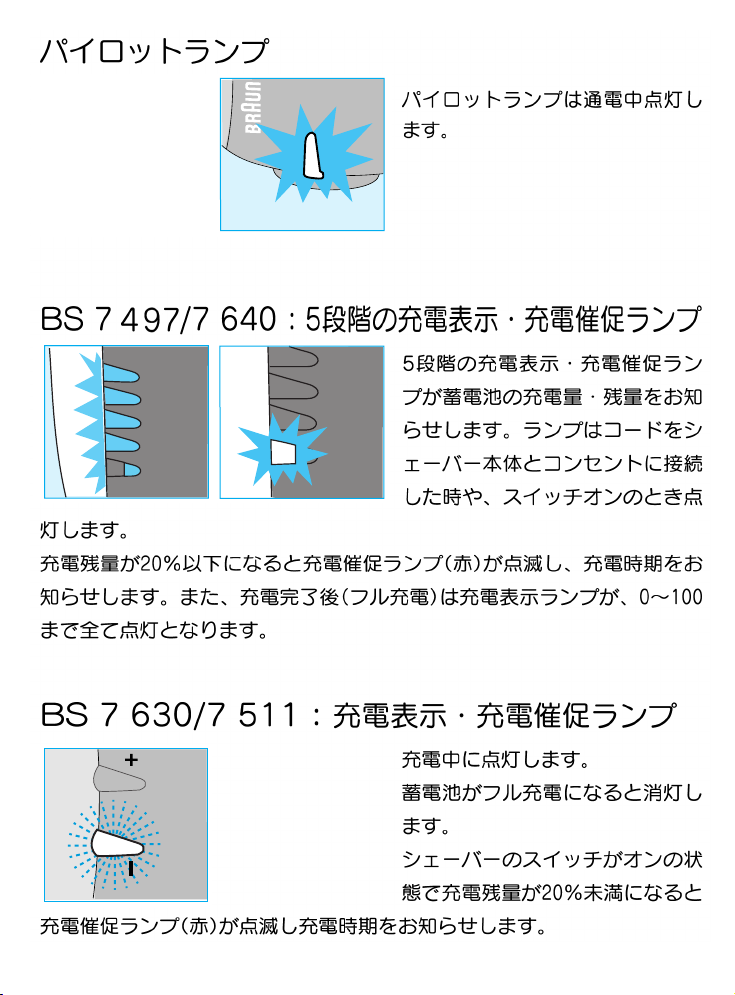
Indicator lights
The pilot light shows that the shaver is connected to the
mains.
32
21
21
1
2
3
0..20 40 60 80 100
0..20 40 60 80
k
c
o
l
c
i
t
a
m
o
t
u
a
7497/7640:
When the rechargeable battery is fully
charged, all five charging lights illuminate (20% per light),
provided the shaver is connected to the mains or
switched on.
+
7630/7511:
shaver is being charged. When the rechargeable battery
The green charging light shows that the
is fully charged, the charging light flashes or goes off.
If later on, the charging light comes on again, this
indicates that the shaver is being recharged to maintain
its full capacity.
7497/7640/7630/7511:
The red low-charge light flashes
when the battery capacity has dropped below 20%,
provided the shaver is switched on. The remaining
capacity will then be sufficient for 2 to 3 shaves.
Shaving
Switch positions
0 = Off (switch is locked)
Press and push up the switch to operate the shaver:
1 = Shaving with the pivoting head
The pivoting cutting system automatically adjusts
to every contour of your face
2 = Shaving with the pivoting head locked at an angle
(to permit shaving in difficult areas, e.g. under the
nose)
3 = The long hair trimmer is activated
(for trimming sideburns, moustache and beard)
Page 33

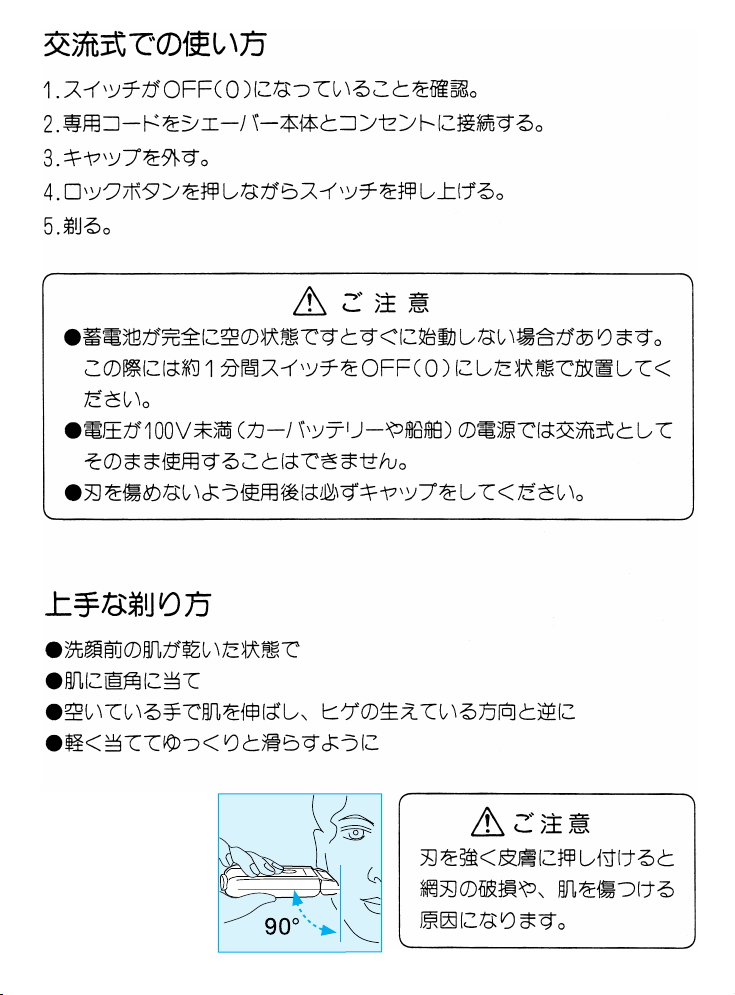
Shaving with the cord
If the rechargeable battery is discharged, you may also
shave with the shaver connected to the mains via the
power supply cord set.
(If the shaver does not run immediately, charge it with
the switch on position «0» for approx. 1 minute.)
Tips for the perfect shave
•
We recommend that you shave before washing,
as the skin tends to be slightly swollen after washing.
•
Hold the shaver at right angles (90°) to the skin.
•
Stretch your skin and shave against the direction
of beard growth.
•
Replace the shaver foil and cutter block every
11/2 years, or when the parts are worn, to ensure
optimum shaving performance.
Keeping your shaver in top shape
Automated cleaning
The Braun Clean&Charge takes care of all cleaning and
lubrication needs for your shaver. Please refer to the
seperate use instructions
Manual cleaning
For easy cleaning after each shave, switch the shaver
off. Press the release buttons to lift the shaver foil
(do not remove the foil completely).
shaver for approx. 5-10 seconds so that the shaved
stubbles can fall out.
For a thorough cleaning (weekly), remove the shaver
foil and tap it out on a flat surface. Using the brush,
clean the cutter block and the inner area of the pivoting
head. About every four weeks, clean the cutter block
with Braun cleaning agents.
If your skin is very dry and you notice a reduced operation
time of the shaver, apply a drop of light machine oil onto
the shaver foil.
Switch on the
10
10
oil
33
Page 34

1
7497
3
5 6
Replacing the shaving parts
The shaver foil and cutter block are precision parts that,
Syncro
in time, are subject to wear. Replace your foil and cutter
block every 18 months and get a 25% better shave.*
(Shaver foil and cutter block: part no. 7000)
7000
7000
(* Overall evaluation from Braun users comparing their
shave with new parts and those used for 18 months.)
Accessories
Available at your dealer or Braun Service Centres:
Shaver foil and cutter block
(part no. 7000)
Environmental notice
2
4
This appliance is provided with nickel-hydride rechargeable batteries. To protect the environment, do not dispose of the appliance in the household waste at the end
of its useful life. Open the housing as shown, remove
and dispose of the batteries at your retail store or at
appropriate collection sites according to national or
local regulations.
Subject to change without notice.
This product conforms to the EMC-Requirements as laid down by the Council Directive
89/336/EEC and to the Low Voltage Regulation
(73/23 EEC).
34
Page 35

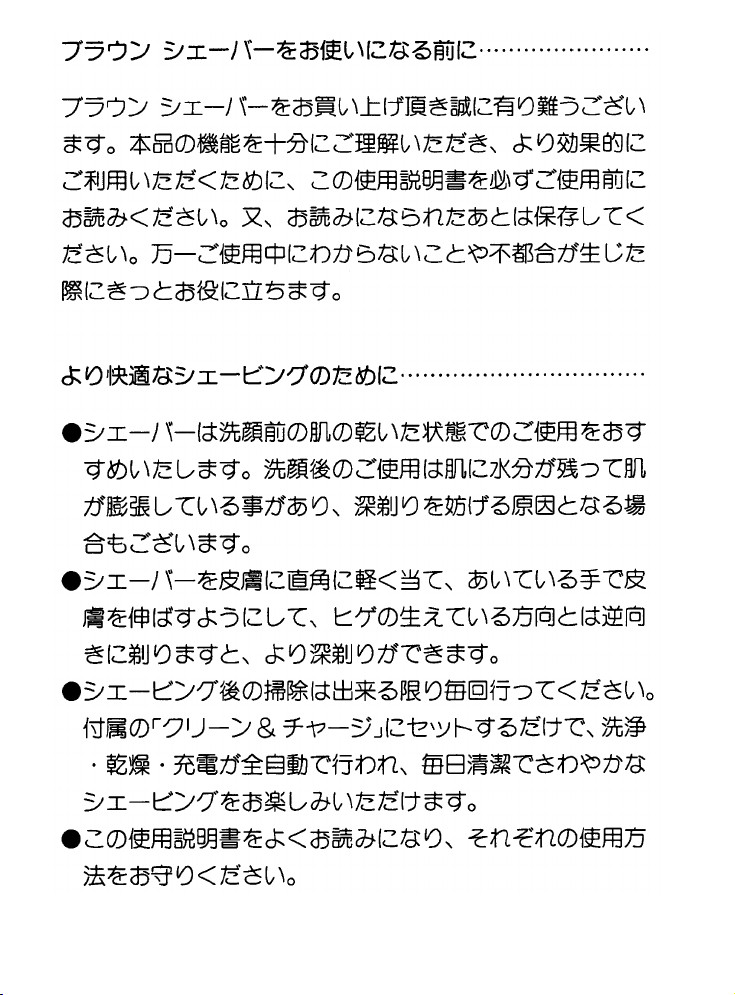
Clean&Charge
Braun Clean&Charge has been developed
for cleaning, charging and storing your
shaver. Clean your shaver daily in the
Clean&Charge.
During the automated cleaning process,
the shaver is switched on and off at
intervals to obtain best cleaning results.
Since the specially formulated cleaning fluid
contains a small amount of oil, the cleaning
procedure also fulfills the lubrication needs
of the shaver.
Important
•
Only use the power supply cord set
supplied with the shaver.
•
In order to avoid any leakage of the cleaning
fluid, place the appliance on a flat, stable
surface. Do not tip, move suddenly
or transport in any way if a cleaning
cartridge is installed.
•
Do not place the appliance in a mirror
cabinet, nor store it over radiators, nor
place it on polished or laquered surfaces.
•
Do not expose to direct sunlight.
•
The appliance contains highly
flammable liquid. Keep it away
from sources of ignition.
No smoking. Keep out of reach of children.
Do not leave cartridge open. Do not refill
cartridge. Use only original Braun refill
cartridge.
A Description
1 Lift button for cartridge exchange
2 Contact bow
3 Release button
4 Operation mode selector
5 «clean» light: cleaning process indicator
6 «charge» light:
charging process indicator
7 «cartridge» light:
cartridge replacement indicator
8 Cleaning cartridge
9 Socket
10 Ventilation
Technical specifications
•
Power consumption:
3 W when cleaning
7 W when charging
•
Power supply: 100-240 V 2/ 50 or 60 Hz
(automatic adaptation)
•
Input voltage: 12 V
B Before using Clean&Charge
Only applies for cordless shavers:
For the first charge of the shaver, connect
the power supply cord set directly to the
shaver, charge it for 4 hours and shave at
least once.
Only then can the shaver be cleaned or
recharged in the Braun Clean&Charge.
If the rechargeable battery is discharged,
select the combined «clean» + «charge»
programme rather than the «clean»
programme alone.
Installing the cartridge
•
Press the lift button (1) to open the housing.
•
Hold the cartridge down on a flat, stable
surface (e.g. table). Carefully remove the lid
from the cartridge. Slide the cartridge into
the base as far as it will go.
•
Slowly close the housing by pushing it
down until it locks.
Replacing the cartridge
After having pressed the lift button to open
the housing, wait for a few seconds before
removing the used cartridge.
Before discharging the used cartridge,
make sure to close the openings using the
lid of the new cartridge, since the used
cartridge will contain contaminated
cleaning solution.
35
Page 36

C Operating your Clean&Charge
•
Connect your Clean&Charge with the cord
set to the mains electricity supply.
Open the contact bow (2) by pressing the
release button (3). After shaving, switch the
shaver off and place it upside down into the
Clean&Charge (without having released the
shaver foil).
•
Select the operation mode by toggling with
the mode selector (4):
•
When the «cartridge» light illuminates
constantly, the cleaning function is locked
and a new cartridge has to be installed.
Only then, the next cleaning cycle can be
started.
•
A cleaning cartridge should be sufficient
for about 30 cleaning cycles. With daily use,
the cleaning cartridge should be replaced
approx. every 4 weeks.
«clean» (about 15 min)
«clean» + «charge» (about 75 min)
«charge» (about 60 min)
The corresponding lights will come on.
(With cord shavers, only the «clean»
function can be selected.)
•
Slide down the contact bow to connect the
shaver and to start the selected programme.
If no programme is selected, the default
function «clean» will be started.
•
Do not interrupt a running programme,
as it leaves the shaver wet and not fit for
use. If interruption is needed nonetheless,
press the release button.
•
After a programme has finished, the corresponding light will go out. Prior to the next
shave, press the release button to release
the shaver.
•
When the «cartridge» light starts flashing,
the remaining fluid in the cartridge is
sufficient for about 5 more cleaning cycles.
After these 5 cycles, the cleaning performance will be reduced and the cartridge
has to be replaced.
•
The hygienic cleaning solution cartridge
contains alcohol which, once opened,
will naturally evaporate slowly into the
surrounding air. Each cartridge, if not used
daily, should be replaced after approx.
8 weeks.
•
Do not leave the appliance plugged-in
without the shaver inserted.
•
Clean the housing from time to time with a
damp cloth, especially the opening where
the shaver rests.
36
Page 37

B
7497
C
7497
3
a
u
t
o
m
a
t
i
c
l
o
c
2
k
1
0
7497
2
1
3
a
u
t
o
m
a
t
i
c
l
o
c
k
on/off
clean
charge
2
cartridge
1
0
7497
new
new
old
select
7
497
select
select
clean
char
ge
cartridge
37
Page 38

Page 39

5-492-463/01/VII-03
 Loading...