

Page 1
Series1
Series 1
190s-1
Type 5727
Type 5729
www.braun.com
190s-1
170s-1
Page 2

Braun Infolines
English 6
Français 10
Polski 14
âesk˘ 18
Slovensk˘ 22
Magyar 26
Hrvatski 30
Slovenski 34
Türkçe 38
Română (RO/MD) 41
кЫТТНЛИ 45
ì͇ªÌҸ͇ 50
61
Braun GmbH
Frankfurter Straße 145
61476 Kronberg/Germany
www.braun.com
UK 0800 783 7010
IE 1 800 509 448
FR 0 800 944 802
BE 0 800 14 592
PL 801 127 286
801 1 BRAUN
CZ 221 804 335
SK 02/5710 1135
HU (06-1) 451-1256
HR 091 66 01 777
SI 080 2822
TR 0 800 261 63 65
RO 021-224.00.47
RU 8 800 200 20 20
UA 0 800 505 000
HK 852-25249377
(Audio Supplies
Company Ltd.)
www.service.braun.com
92270136/IV-12
UK/FR/PL/CZ/SK/HU/HR/SL/TR/RO/MD/
RU/UA/Arab
Page 3
90°
1
1
2
2
3
4
5
4
Series 1
190s-
1
6
90°
7
Page 4

a
b
c
d
5
oil
Page 5

English
Our products are designed to meet the highest standards of quality, functionality
and design. We hope you enjoy your new Braun Shaver.
Warning
Your shaver is provided with a special cord set, which has an integrated Safety
Extra Low Voltage power supply. Do not exchange or tamper with any part of it,
otherwise there is risk of electric shock.
Never use the appliance with a damaged foil or cord.
This appliance is not intended for use by children or persons with reduced
physical, sensory or mental capabilities, unless they are given supervision by a
person responsible for their safety. In general, we recommend that you keep the
appliance out of reach of children. Children should be supervised to ensure that
they do not play with the appliance.
Oil bottle
Keep out of reach of children. Do not swallow. Dispose of properly when empty.
Description
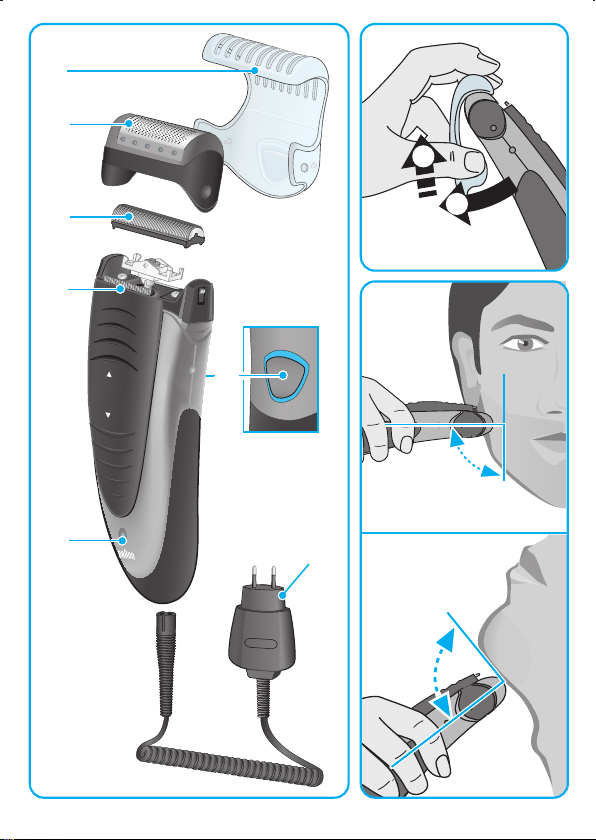
1 Foil protection cap
2 Shaver foil
3 Cutter block
4 Long hair trimmer
5 Charging light (model 190s only)
6 On/off switch
7 Special cord set
Charging (model 190s only)
The best environmental temperature for charging is between 15 °C and 35 °C.
• Using the special cord set, connect the shaver to an electrical outlet with the
motor switched off.
• When charging for the first time, leave the shaver to charge continuously for
4 hours. The charging light (5) shows that the shaver is being charged. When
the battery is fully charged, the charging light intermittently blinks on and off.
This indicates that the battery maintains its full capacity.
• A full charge provides up to 30 minutes of cordless shaving time depending on
your beard growth.
• Once the shaver is completely charged, discharge the shaver through normal
use. Then recharge to full capacity. Subsequent charges will take about 1 hour.
• Maximum battery capacity will only be reached after several charging /
discharging cycles.
• If the rechargeable batteries are discharged, you may also shave by connecting
the shaver to an electrical outlet via the special cord set.
6
Page 6
Shaving
Remove the foil protection cap (1). Activate the on/off switch (6). The floating foil
frame automatically adapts to your skin surface for a close, smooth shave.
For pre-shaving after a few days of not having shaved, use the long hair trimmer
(4) to pre-cut long hairs. For a close, smooth shave, finish with the foil.
Trimming
Push out the long hair trimmer (a). It allows controlled trimming of moustache and
sideburns. It evenly cuts and trims larger areas: ideal for shaping sideburns,
moustaches and partial short beards.
Frequent use of the long hair trimmer may reduce the battery capacity (model
190s only).
Tips for the perfect shave
For best shaving results, Braun recommends you to follow 3 simple steps:
1. Always shave before washing your face.
2. At all times, hold the shaver at right angles (90°) to your skin.
3. Stretch your skin and shave against the direction of your beard growth.
Cleaning
The shaver head is suitable for cleaning under running tap water.
Warning: Detach the shaver from the power supply before cleaning the
shaver head in water.
Regular cleaning ensures better shaving performance. Rinsing the shaving head
under running water after each shave is an easy and fast way to keep it clean (b):
Model 190s only:
• Switch the shaver on and rinse the shaver head under hot running water.
• You may use liquid soap without abrasive substances. Rinse off all foam and let
the shaver run for a few more seconds.
• Next, switch off the shaver, remove the shaver foil (2) and cutter block (3).
Then leave the disassembled shaving parts to dry.
• If you regularly clean the shaver under water, then once a week apply a drop of
light machine oil onto the long hair trimmer and shaver foil (d).
Model 170s only:
• After each shave, rinse the shaver head under hot running water (b).
You may use liquid soap without abrasive substances. Rinse off all foam.
• Next, remove the shaver foil (2) and cutter block (3). Then leave the
disassembled shaving parts to dry.
7
Page 7

Alternatively, you may clean the shaver using the brush provided (c):
• Switch off the shaver. Remove the shaver foil and tap it out on a flat surface.
• Using the brush, clean the cutter block and the inner area of the shaver head.
However, do not clean the shaver foil with the brush as this will damage the foil.
Keeping your shaver in top shape
About every four weeks, clean the cutter block with Braun cleaning agents.
Put a drop of light machine oil onto the long hair trimmer and the shaver foil (d).
Replacing the shaver foil and cutter block
To maintain 100% shaving performance, replace the shaver foil (2) and cutter
block (3) at least every 18 months or when worn. Change both parts at the same
time for a closer shave with less skin irritation.
(Shaver foil and cutter block: 10B)
Preserving the batteries (model 190s only)
In order to maintain the optimum capacity of the rechargeable batteries, the
shaver has to be fully discharged (by shaving) every 6 months approximately.
Then recharge the shaver to full capacity. Do not expose the shaver to temperatures higher than 50 °C for extended periods of time.
Environmental notice
This appliance contains rechargeable batteries. In the interest of protecting
the environment, please do not dispose of the product in household waste
at the end of its useful life. Disposal can take place at a Braun Service
Centre or at appropriate collection points provided in your country.
Subject to change without notice.
For electric specifications, see printing on the special cord set.
Guarantee
We grant a 2 year guarantee on the product commencing on the date of
purchase. Within the guarantee period we will eliminate any defects in the
appliance resulting from faults in materials or workmanship, free of charge either
by repairing or replacing the complete appliance at our discretion.
This guarantee extends to every country where this appliance is supplied by
Braun or its appointed distributor.
8
Page 8

This guarantee does not cover: damage due to improper use, normal wear and
tear (e.g. shaver foil or cutter block) as well as defects that have a negligible effect
on the value or operation of the appliance. The guarantee becomes void if repairs
are undertaken by unauthorised persons and if original Braun parts are not used.
To obtain service within the guarantee period, hand in or send the complete
appliance with your sales receipt to an authorised Braun Customer Service Centre
(address information available online at www.service.braun.com).
For UK only:
This guarantee in no way affects your rights under statutory law.
9
Page 9

Français
Nos produits sont conçus pour satisfaire les plus hautes exigences en matière
de qualité, fonctionnalité et design. Nous espérons que vous serez pleinement
satisfait de votre nouveau rasoir Braun.
Avertissement
Votre rasoir est livré avec un cordon d’alimentation spécial qui intègre un adaptateur sécuritaire de basse tension. Par conséquent, vous ne devez modifier ou
manipuler aucun de ses composants, afin d’éviter tout risque d’électrocution.
Ne vous rasez pas avec une grille ou un cordon endommagés.
Cet appareil n’est pas destiné à des enfants ou à des personnes aux capacités
mentales, sensorielles et physiques réduites à moins qu’elles ne soient sous la
surveillance d’un adulte responsable de leur sécurité. Il convient de surveiller les
enfants pour s’assurer qu’ils ne jouent pas avec l’appareil. Conserver hors de
portée des enfants.
Bouteille d’huile
Conserver hors de la portée des enfants. Ne pas avaler. Eliminer comme il
convient après usage.
Description
1 Capot de protection de la grille
2 Grille de rasage
3 Bloc-couteaux
4 Tondeuse rétractable
5 Témoin lumineux de charge (seulement sur le modèle 190s)
6 Bouton marche/arrêt
7 Cable d‘alimentation
Mise en charge du rasoir (seulement sur le modèle 190s)
La température idéale pour la mise en charge est comprise entre 15°C et 35°C.
• Utilisez le cordon d’alimentation, branchez le rasoir sur le secteur en veillant à
ce que l’appareil soit en position arrêt.
• Lors de la première mise en charge, laissez l’appareil branché pendant au
moins 4 heures. Le témoin de charge (5) vous indique que le rasoir est en cours
de charge. Lorsque la batterie est complètement pleine, le voyant s’éteint, puis
se rallume ponctuellement lors des auto-contrôles de charge.
• Une pleine charge procure jusqu’à 30 minutes de rasage sans fil en fonction du
type de barbe.
• Une fois que le rasoir est complètement chargé, déchargez-le en l’utilisant
normalement sans le cordon. Rechargez-le ensuite. Le temps de charge supplémentaire prendra environ une heure.
10
Page 10

• La capacité maximum de batterie sera atteinte seulement après plusieurs
cycles de charge et de décharge.
• Lorsque la batterie est déchargée, vous pouvez également vous raser avec le
rasoir branché sur le secteur grâce au cordon d’alimentation.
Rasage
Retirez le capot de protection de la grille (1). Appuyez sur le bouton marche/arrêt
pour mettre en marche le rasoir. La grille flottante s’adapte automatiquement à
votre surface de peau pour un rasage précis et doux.
Pour vous pré-raser lorsque vous ne vous êtes pas rasé depuis quelques temps,
utilisez la tondeuse rétractable (4) et ce afin de pré-coupez les poils les plus
longs.
Tondeuse
Poussez la tondeuse rétractable vers l’avant (a). Cela permet de mieux maîtriser la
tonte de votre barbe ou de vos pattes. L’appareil peut éventuellement couper ou
tondre des zones plus larges : idéale pour dessiner les contours de barbes, de
moustaches ou les barbes de 3 jours.
Une utilisation fréquente de la tondeuse rétractable pourrait réduire la capacité de
la batterie (seulement sur le modèle 190s).
Les astuces pour un rasage parfait
Pour obtenir le meilleur rasage possible, Braun vous recommande de suivre
3 simples conseils :
1. Rasez-vous toujours avant de vous laver le visage.
2. Pendant toute la durée du rasage, tenez le rasoir perpendiculairement (90°)
à la peau.
3. Tendez votre peau et rasez-vous dans le sens contraire à la pousse du poil.
Nettoyage
Vous pouvez nettoyer la tête du rasoir en le passant sous l’eau courante.
Attention : Débranchez l’appareil de la prise de courant avant de nettoyer
la tête du rasoir sous l’eau.
Un nettoyage régulier assure une meilleure performance de rasage. Le nettoyage
de la tête du rasoir sous l’eau courante après chaque rasage est un moyen
efficace et rapide pour le garder propre (b) :
Précision pour le modèle 190s :
• Mettez en marche le rasoir (sans le cordon d’alimentation) et rincez la tête du
rasoir sous l’eau chaude. Vous pouvez utiliser un peu de savon liquide s’il ne
11
Page 11

contient aucune substance abrasive. Rincez bien la mousse et laissez le rasoir
en marche pendant quelques secondes.
• Ensuite, arrêtez le rasoir, puis enlevez la grille de rasage (2) et le bloc-couteaux
(3). Laissez sécher.
• Si vous nettoyez régulièrement votre rasoir sous l’eau, appliquez une fois par
semaine une goutte de l’huile fournie ou d’huile de machine à coudre sur la
tondeuse et sur la grille de rasage (d).
Précision pour le modèle 170s :
• Après chaque rasage, rincez la tête du rasoir sous l’eau chaude (b).
Vous pouvez utiliser un peu de savon liquide s’il ne contient aucune substance
abrasive. Rincez bien toute la mousse.
• Ensuite, enlevez la grille de rasage (2) et le bloc-couteaux (3) pour les laisser
sécher.
Vous pouvez également nettoyer votre rasoir à sec en utilisant la brossette (c) :
• Arrêtez le rasoir. Enlevez la grille de rasage et tapez la légèrement sur une
surface plane.
• A l’aide de la brossette, nettoyez le bloc-couteaux et la partie intérieure de la
tête du rasoir. Cependant, ne nettoyez pas la grille de rasage avec la brossette
car cela risquerait de l’abîmer.
Entretien du rasoir
Environ toutes les 4 semaines, nettoyez le bloc-couteaux avec du liquide
nettoyant Braun.
Remplacement de la grille de rasage et du bloc-couteaux
Pour conserver 100% de la performance de votre rasoir, remplacez la grille de
rasage (2) et le bloc-couteaux (3) tous les 18 mois au maximum ou quand ils sont
usés. Changez les 2 pièces en même temps pour assurer un rasage plus précis
avec moins d’irritations.
(Références Grille et Bloc-couteaux : 10B)
Entretien de la batterie (seulement sur le modèle 190s)
Afin de conserver la capacité maximum de la batterie, le rasoir doit être complètement déchargé (en se rasant) environ tous les 6 mois. Puis rechargez le rasoir à sa
pleine capacité. Ne pas exposer le rasoir à une température au dessus de 50°C
pendant de longues périodes.
Respect de l’environnement
Ce produit contient des batteries rechargeables. Afin de protéger
l’environnement, ne jetez jamais l’appareil dans les ordures ménagères
à la fin de sa durée de vie. Remettez-le à votre centre service agréé Braun
ou déposez-le dans des sites de récupération appropriés conformément
aux réglementations locales ou nationales en vigueur.
12
Page 12

Susceptible d’être modifié sans préavis.
Pour les spécifications électriques, se référer aux inscriptions sur le cable
d’alimentation.
Garantie
Nous accordons une garantie de 2 ans sur ce produit, à partir de la date d‘achat.
Pendant la durée de la garantie, Braun prendra gratuitement à sa charge la
réparation des vices de fabrication ou de matière en se réservant le droit de
décider si certaines pièces doivent être réparées ou si l’appareil lui-même doit
être échangé.
Cette garantie s’étend à tous les pays où cet appareil est commercialisé par
Braun ou son distributeur exclusif.
Cette garantie ne couvre pas : les dommages occasionnés par une utilisation
inadéquate, l’usure normale (par exemple, grille et bloc-couteaux) ainsi que les
défauts d’usures qui ont un effet négligeable sur la valeur ou l’utilisation de
l’appareil. Cette garantie devient caduque si des réparations ont été effectuées
par des personnes non agréées par Braun et si des pièces de rechange ne
provenant pas de Braun ont été utilisées.
Pour toute réclamation intervenant pendant la période de garantie, retournez ou
rapportez l’appareil ainsi que l’attestation de garantie à votre revendeur ou à un
Centre Service Agréé Braun.
Appelez au 0 800 944 802 (ou se référez à http://www.service.braun.com) pour
connaitre le Centre Service Agrée Braun le plus proche de chez vous.
Clause spéciale pour la France
Outre la garantie contractuelle exposée ci-dessus, nos clients bénéficient de la
garantie légale des vices cachés prévue aux articles 1641 et suivants du Code
civil.
13
Page 13

Polski
Nasze wyroby spełniają najwyższe wymagania dotyczące jakości, funkcjonalności
i wzornictwa. Życzymy zadowolenia z użytkowania nowej golarki marki Braun.
Ostrzeżenie
Golarka jest wyposażona w specjalny kabel z wbudowanym zasilaczem zapewniającym bezpieczne, niskie napięcie. Elementów kabla nie wolno wymieniać ani
modyfikować, ponieważ grozi to porażeniem prądem elektrycznym.
Urządzenia nie należy używać z uszkodzoną folią golącą lub kablem sieciowym.
Urzàdzenie to nie mo˝e byç u˝ywane przez dzieci lub osoby fizycznie lub
umys∏owo upoÊledzone, jeÊli nie znajdujà si´ one pod nadzorem osoby odpowiedzialnej za ich bezpieczeƒstwo. Zalecamy przechowywaç urzàdzenie w miejscu
niedost´pnym dla dzieci. Dzieci powinny być nadzorowane podczas używania
urządzenia w celu zapewnienia odpowiedniego bezpieczeństwa.
Pojemnik z olejem
Przechowywać poza zasięgiem dzieci. Nie połykać. Puste opakowanie wyrzucić.
Opis
1 Ochronna os∏ona na foli´
2 Folia golàca
3 G∏owica golàca
4 Trymer do d∏u˝szego zarostu
5 Wskaênik ∏adowania (tylko model 190s)
6 W∏àcznik/wy∏àcznik
7 Specjalny przewód zasilajàcy
Ładowanie (tylko model 190s)
Golark´ najlepiej jest ∏adowaç przy temperaturze otoczenia mi´dzy 15 °C
a 35 °C.
• Przy u˝yciu specjalnego przewodu zasilajàcego pod∏àcz golark´ do gniazdka,
ale nie w∏àczaj jej.
• Za pierwszym razem golark´ nale˝y ∏adowaç bez przerwy przez 4 godziny.
Wskaênik ∏adowania (5) wskazuje, ˝e trwa ∏adowanie golarki. Gdy akumulatory
zostanà w pe∏ni na∏adowane, wskaênik zacznie migaç. Oznacza to, ˝e baterie
utrzymujà pe∏nà pojemnoÊç.
• Pe∏ne ∏adowanie zapewnia oko∏o 30 minut golenia bez zasilania w zale˝noÊci
od tego, jak szybko roÊnie Twoja broda i jak cz´sto si´ golisz.
• Po ca∏kowitym na∏adowaniu golarki, roz∏aduj jà poprzez normalne u˝ywanie, a
nast´pnie ponownie ca∏kowicie na∏aduj. Kolejne ∏adowania trwajà oko∏o
godziny.
• Maksymalna pojemnoÊç baterii osiàgana jest dopiero po kilkunastu cyklach
pe∏nego na∏adowania i roz∏adowania.
14
Page 14
• W przypadku roz∏adowania si´ akumulatorów mo˝esz goliç si´ po pod∏àczeniu
golarki do gniazdka specjalnym przewodem zasilajàcym.
Golenie
Zdejmij z folii ochronnà os∏on´ (1). W∏àcz golark´ w∏àcznikiem (6). Elastyczna
folia automatycznie dopasowuje si´ do kszta∏tów Twojej twarzy, zapewniajàc
dok∏adne golenie i g∏adkà skór´.
W przypadku u˝ycia po kilkudniowej przerwie w goleniu u˝yj trymera do
d∏u˝szego zarostu (4), aby wst´pnie skróciç d∏u˝sze w∏osy. Reszt´ zarostu
mo˝esz zgoliç folià, dzi´ki której golenie jest dok∏adne, a Twoja skóra staje si´
g∏adka.
Przystrzyganie
Wysuƒ trymer do d∏u˝szego zarostu (a). Pozwala on w kontrolowany sposób
przystrzygaç wàsy i baki. Równomiernie przycina i przystrzyga wi´ksze obszary
zarostu: idealnie nadaje si´ do modelowania baków, wàsów i niewielkich bród.
Cz´ste korzystanie z trymera do d∏u˝szego zarostu mo˝e zmniejszyç pojemnoÊç
akumulatorów (tylko model 190s).
Wskazówki, jak golić się dokładnie
Jeśli chcesz osiągnąć najlepsze efekty golenia, radzimy:
1. Zawsze golić się przed umyciem twarzy.
2. Trzymać golarkę przez cały czas przy skórze pod odpowiednim kątem (90°).
3. Naciągnąć skórę i golić pod włos.
Czyszczenie
Głowica golarki jest przystosowana do czyszczenia pod bieżącą wodą.
Uwaga: Przed umyciem głowicy golarki w wodzie należy wyciągnąć
wtyczkę z gniazdka sieciowego.
Regularne czyszczenie zapewnia lepsze efekty golenia. Opłukanie głowicy golącej
pod bieżącą wodą po każdym goleniu pozwala w łatwy i szybki sposób utrzymać
golarkę w czystości (b):
Tylko model 190s:
• Włącz golarkę i opłucz głowicę golącą pod strumieniem gorącej wody. Możesz
także użyć mydła w płynie bez środków ścierających. Spłucz resztki piany i
odczekaj kilka sekund, zanim wyłączysz golarkę.
• Następnie wyłącz golarkę, zdejmij folię (2) i blok ostrzy tnących (3), a potem
poczekaj aż rozłożone części wyschną.
• Jeśli regularnie czyścisz golarkę pod bieżącą wodą, raz na tydzień nasmaruj
trymer do dłuższego zarostu i folię golącą niewielką ilością lekkiego oleju do
maszyn do szycia (d).
15
Page 15

Tylko model 170s:
• Po każdym goleniu opłucz głowicę golącą pod strumieniem gorącej wody (b).
Możesz użyć mydła w płynie bez środków ścierających. Spłucz resztki piany.
• Następnie zdejmij folię (2) i blok ostrzy tnących (3), a potem poczekaj aż
rozłożone części wyschną.
Ewentualnie możesz także oczyścić golarkę dołączoną do zestawu szczoteczką
(c):
• Wyłącz golarkę. Zdejmij folię golącą i postukaj nią o płaską powierzchnię.
• Oczyść szczoteczką blok ostrzy tnących oraz wnętrze głowicy golarki. Folii
golącej nie należy czyścić szczoteczką, ponieważ grozi to jej uszkodzeniem.
Konserwacja
Mniej wi´cej raz na cztery tygodnie oczyÊç g∏owic´ golàcà przy u˝yciu Êrodków
do czyszczenia marki Braun.
Wymiana folii golącej I bloku ostrzy tnących
Aby zapewnić 100 proc. skuteczność golenia, folię (2) i głowicę golarki (3) należy
wymieniać minimum co 18 miesięcy lub gdy części te zużyją się. Obie części
należy wymienić jednocześnie, co zapewni dokładniejsze golenie i zmniejszy
ryzyko podrażnień skóry.
(Folia goląca i blok ostrzy tnących: 10B)
PojemnoÊç akumulatorów (tylko model 190s)
Aby utrzymaç optymalnà pojemnoÊç akumulatorów, golark´ nale˝y ca∏kowicie
roz∏adowaç (poprzez normalne u˝ywanie) w przybli˝eniu raz na 6 miesi´cy.
Nast´pnie, golark´ nale˝y ponownie ca∏kowicie na∏adowaç. Golarki nie wolno
wystawiaç na d∏ugotrwa∏e dzia∏anie temperatur powy˝ej 50 °C.
Uwagi dotyczàce ochrony Êrodowiska
Urzàdzenie to wyposa˝one jest w baterie przystosowane do wielokrotnego
∏adowania. Aby zapobiec zanieczyszczaniu Êrodowiska, pod koniec
okresu eksploatacji produktu nie wyrzucaj go do kosza na Êmieci.
Mo˝esz pozostawiç go w punkcie serwisowym marki Braun lub jednym
ze specjalnych punktów zajmujàcych si´ zbiórkà zu˝ytych produktów
w wybranych miejscach na terenie kraju.
Powy˝sze informacje mogà ulec zmianie bez uprzedniego powiadomienia.
Specyfikacje elektryczne zosta∏y wydrukowane na specjalnym kablu sieciowym.
16
Page 16

Warunki gwarancji
1.
Procter & Gamble International Operations SA z siedzibą w Route de St-Georges 47,
1213 Petit Lancy 1 w Szwajcarii, gwarantuje sprawne działanie sprzętu w okresie
24 miesięcy od daty jego wydania Kupującemu. Ujawnione w tym okresie wady
będą usuwane bezpłatnie, przez autoryzowany punkt serwisowy, w terminie 14 dni
od daty dostarczenia sprzętu do autoryzowanego punktu serwisowego.
2. Kupujący może wysłać sprzęt do naprawy do najbliżej znajdującego się
autoryzowanego punktu serwisowego lub skorzystać z pośrednictwa sklepu,
w którym dokonał zakupu sprzętu. W takim wypadku termin naprawy ulegnie
wydłużeniu o czas niezbędny do dostarczenia i odbioru sprzętu.
3. Kupujący powinien dostarczyć sprzęt w opakowaniu należycie zabezpieczonym
przed uszkodzeniem. Uszkodzenia spowodowane niedostatecznym
zabezpieczeniem sprzętu nie podlegają naprawom gwarancyjnym. Naprawom
gwarancyjnym nie podlegają także inne uszkodzenia powstałe w następstwie
okoliczności, za które Gwarant nie ponosi odpowiedzialności, w szczególności
zawinione przez Pocztę Polską lub firmy kurierskie.
4. Niniejsza gwarancja jest ważna jedynie z dokumentem zakupu i obowiązuje
wyłącznie na terytorium Rzeczypospolitej Polskiej.
5. Okres gwarancji przedłuża się o czas od zgłoszenia wady lub uszkodzenia do
naprawy sprzętu i zwrotnego postawienia go do dyspozycji Kupującego.
6. Naprawa gwarancyjna nie obejmuje czynności przewidzianych w instrukcji, do
wykonania, których Kupujący zobowiązany jest we własnym zakresie i na własny
koszt.
7. Ewentualne oczyszczenie sprzętu dokonywane jest na koszt Kupującego według
cennika danego autoryzowanego punktu serwisowego i nie będzie traktowane jako
naprawa gwarancyjna, chyba, że oczyszczenie jest niezbędne do usunięcia wady w
ramach świadczeń objętych niniejszą gwarancją i nie stanowi czynności, o których
mowa w p. 6.
8. Gwarancją nie są objęte:
a) mechaniczne uszkodzenia sprzętu spowodowane w czasie jego użytkowania
lub w czasie dostarczania sprzętu do naprawy;
b) uszkodzenia i wady wynikłe na skutek:
– używania sprzętu do celów innych niż osobisty użytek;
– niewłaściwego lub niezgodnego z instrukcją użytkowania, konserwacji,
przechowywania lub instalacji;
– używania niewłaściwych materiałów eksploatacyjnych;
– napraw dokonywanych przez nieuprawnione osoby; stwierdzenie faktu takiej
naprawy lub samowolnego otwarcia plomb lub innych zabezpieczeń sprzętu
powoduje utratę gwarancji;
– przeróbek, zmian konstrukcyjnych lub używania do napraw nieoryginalnych
części zamiennych;
c) części szklane, żarówki, oświetlenia;
d) ostrza i folie do golarek oraz materiały eksploatacyjne.
9. Bez nazwy, modelu sprzętu i daty jego zakupu potwierdzonej pieczątką i podpisem
sprzedawcy albo paragonu lub faktury zakupu z nazwą i modelem sprzętu, karta
gwarancyjna jest nieważna.
10. Niniejsza gwarancja na sprzedany towar konsumpcyjny nie wyłącza, nie ogranicza
ani nie zawiesza uprawnień Kupującego wynikających z niezgodności towaru z
umową.
17
Page 17

âesk˘
Naše výrobky jsou navrženy tak, aby splňovaly nejvyšší standardy kvality,
funkčnosti a designu. Věříme, že budete mít z nového holicího strojku Braun
radost.
Varování
Váš holicí strojek je vybaven speciální napájecí šňůrou se zabudovaným zdrojem
bezpečného malého napětí. Tuto sadu nezaměňujte ani nenahrazujte žádné její
části, mohli byste se tím vystavit riziku úrazu elektrickým proudem.
Přístroj nepoužívejte, je-li poškozena planžeta nebo vadný síťový přívod.
Pfiístoj nesmí pouÏívat dûti ani osoby se sníÏen˘mi fyzick˘mi nebo psychick˘mi
schopnostmi bez dohledu osoby, která je zodpovûdná za jejich bezpeãnost.
Obecnû je doporuãeno uchovávat pfiístroj mimo dosah dûtí. Děti by měly být pod
dozorem, aby se zajistilo, že nebudou spotřebič používat na hraní.
Lahvička s olejem
Uchovávejte mimo dosah dětí. Nepolykejte. Po vyprázdnění zlikvidujte v rámci
tříděného odpadu.
Popis
1 Ochrann˘ kryt planÏety
2 Holicí planÏeta
3 Bfiitov˘ blok
4 Zastfiihovaã dlouh˘ch vousÛ
5 Kontrolka nabíjení (pouze u modelu 190s)
6 Spínaã zapnutí/vypnutí
7 Speciální síÈov˘ pfiívod
Napájení (pouze u modelu 190s)
Nejlep‰í okolní teplota pro nabíjení je 15 °C aÏ 35 °C.
• Pfii pouÏití speciálního síÈového pfiívodu dbejte na to, aby byl holicí strojek pfii
pfiipojování k zásuvce elektrické sítû vypnut˘.
• Pfii prvním nabíjení nechejte holicí strojek nabíjet nepfietrÏitû 4 hodiny.
Kontrolka nabíjení (5) ukazuje, Ïe se holicí strojek nabíjí. KdyÏ jsou baterie
plnû nabité, kontrolka nabíjení pfieru‰ovanû bliká. Znamená to, Ïe baterie
udrÏuje svoji plnou kapacitu.
• Plné nabití umoÏÀuje aÏ 30 minut holení bez síÈového pfiívodu, v závislosti na
vzrÛstu vousÛ.
• Poté, co je holicí strojek plnû nabit˘, vybijte jej normálním pouÏíváním. Pak jej
opût dobijte na plnou kapacitu. Pfií‰tí nabíjení budou trvat pfiibliÏnû 1 hodinu.
• Maximální kapacita baterie bude dosaÏena aÏ po nûkolika cyklech nabití/vybití.
• Pokud jsou akumulátorové baterie vybity, mÛÏete se holit bez nabíjení tak, Ïe
pfiipojíte holicí strojek prostfiednictvím speciálního síÈového pfiívodu k zásuvce
elektrické sítû.
18
Page 18
Holení
Sejmûte ochrann˘ kryt planÏety (1). Aktivujte spínaã zapnutí/vypnutí (6).
Rámeãek holicí planÏety se automaticky pfiizpÛsobuje povrchu va‰í pokoÏky, aby
se dosáhlo hladkého oholení.
Pokud jste se nûkolik dní neholili, pouÏijte zastfiihovaã dlouh˘ch vousÛ (4) pro
pfiedbûÏné zkrácení vousÛ. Pak je oholte dohladka holicí planÏetou.
Zastfiihování
VysuÀte zastfiihovaã dlouh˘ch vousÛ (a). UmoÏÀuje dobfie kontrolovat zastfiihování bradky nebo kotlet. Rovnomûrnû zastfiihuje i vût‰í partie: ideální pro tvarování kotlet, kníru a ãástí vousu.
âasté pouÏívání zastfiihovaãe dlouh˘ch vousÛ mÛÏe sniÏovat kapacitu baterie
(pouze u modelu 190s).
Tipy pro dokonalé oholení
Braun vám radí řídit se následujícími třemi jednoduchými kroky. Zajistíte si tak
perfektní výsledek holení:
1. Nikdy si před holením neumývejte tvář.
2. Holicí strojek vždy držte v pravém úhlu (90°) k pokožce.
3. Natáhněte kůži a holte se proti směru růstu vousů.
Čištění
Hlava holicího strojku se může omývat pod tekoucí vodou.
Varování: Vždy před omýváním vodou vytáhněte strojek ze zdroje elektrické energie.
Pravidelné čištění zajišťuje lepší výsledky holení. Oplachování strojku pod tekoucí
vodou po každém použití představuje jednoduchý a snadný způsob jak udržovat
strojek v čistotě (b):
Pouze pro model 190s:
• Zapněte strojek a opláchněte jeho hlavu pod horkou tekoucí vodou. Můžete také
použít tekuté mýdlo bez abrazivních (brusných) složek. Opláchněte veškerou
pěnu a nechte strojek několik dalších sekund běžet.
• Poté strojek vypněte a sejměte holicí fólii (2) a břitový blok (3). Rozebrané
součástky nechte vyschnout.
• Pokud strojek pravidelně čistíte pod tekoucí vodou, aplikujte jednou týdně kapku
jemného strojového oleje na zastřihovač dlouhých vousů a na holicí fólii (d).
Pouze pro model 170s:
• Hlavu holicího strojku opláchněte po každém holení pod horkou tekoucí vodou
(b). Můžete také použít tekuté mýdlo bez abrazivních (brusných) složek.
Opláchněte veškerou pěnu.
19
Page 19

• Poté strojek vypněte a sejměte holicí fólii (2) a břitový blok (3). Rozebrané
součástky nechte vyschnout.
Holicí strojek můžete čistit také pomocí přiloženého kartáčku (c):
• Vypněte holicí strojek. Sejměte holicí fólii a oklepněte ji na místě s rovným
povrchem.
• Vyčistěte břitový blok a vnitřní část holicí hlavy pomocí kartáčku. Nikdy
kartáčkem nečistěte holicí fólii, zničili byste ji.
Jak si uchovat holicí strojek ve špičkovém stavu
PfiibliÏnû kaÏdé ãtyfii t˘dny oãistûte bfiitov˘ blok ãistícím prostfiedkem Braun.
Výměna holicí fólie a břitového bloku
Holicí fólii (2) a břtiový blok (3) je nutno pro zachování 100% holicího výkonu
vyměnit nejméně 1-krát za 18 měsíců nebo když jsou opotřebované. Pro hladší
oholení s menším podrážděním pokožky vyměňujte obě součástky vždy zároveň.
(Holicí fólie a břitový blok: 10B)
Ochrana akumulátorov˘ch baterií (pouze u modelu 190s)
Aby byla udrÏována optimální kapacita akumulátorov˘ch baterií, mûl by b˘t
holicí strojek (normálním holením) plnû vybit kaÏd˘ch cca 6 mûsícÛ. Pak strojek
nabijte na plnou kapacitu. Nevystavujte po del‰í dobu holicí strojek teplotám
vy‰‰ím neÏ 50 °C.
Poznámka k Ïivotnímu prostfiedí
Tento v˘robek obsahuje akumulátorové baterie. V zájmu ochrany Ïivotního
prostfiedí neodkládejte prosím tento v˘robek po skonãení jeho Ïivotnosti
do bûÏného domovního odpadu. Odevzdejte jej do servisního stfiediska
Braun nebo na pfiíslu‰né sbûrné místo zfiízené dle pfiedpisÛ ve va‰í zemi.
Deklarovaná hodnota emise hluku tohoto spotfiebiãe je 63 dB(A), coÏ
pfiedstavuje hladinu A akustického v˘konu vzhledem na referenãní akustick˘
v˘kon 1 pW.
MÛÏe b˘t zmûnûno bez upozornûní.
Elektrikáfiské specifikace najdete v návodu na speciální sadû ‰ÀÛr.
20
Page 20

Záruka
Poskytujeme dvojletou záruku na výrobek s platností od data jeho zakoupení.
V záruční lhůtě bezplatně odstraníme všechny vady přístroje zapříčiněné chybou
materiálu nebo výroby, a to buď formou opravy, nebo výměnou celého přístroje
(podle našeho vlastního uvážení). Uvedená záruka je platná v každé zemi, ve
které tento přístroj dodává společnost Braun nebo její pověřený distributor.
Záruka se netýká následujících případů: poškození zapříčiněné nesprávným
použitím, běžné opotřebování (například plátků holicího strojku nebo pouzdra
zastřihávače), jakož i vady, které mají zanedbatelný dosah na hodnotu nebo
funkci přístroje. Pokud opravu uskuteční neautorizovaná osoba a nebudou-li
použity původní náhradní díly společnosti Braun, platnost záruky bude ukončena.
Pokud v záruční lhůtě požadujete provedení servisní opravy, odevzdejte celý
přístroj s potvrzením o nákupu v autorizovaném servisním středisku společnosti
Braun nebo jej do střediska zašlete.
21
Page 21

Slovensk˘
Naše výrobky sú vyrobené tak, aby spĺňali tie najvyššie nároky na kvalitu, funkčnosť
a dizajn. Dúfame, že budete so svojim novým holiacim strojčekom Braun spokojní.
Upozornenie
Váš holiaci strojček je vybavený špeciálnym prevodníkom na nízke napätie
(špeciálnym sieťovým káblom so sieťovým adaptérom). Žiadnu jeho časť nesmiete
meniť, ani ho rozoberať, inak by mohlo dôjsť k úrazu elektrickým prúdom.
Strojček nepoužívajte, ak je poškodená planžeta alebo sieťová šnúra.
Tento prístroj nie je urãen˘ pre deti a osoby so zníÏen˘mi fyzick˘mi a mentálnymi
schopnosÈami, ak pri jeho pouÏívaní nie sú pod dozorom osoby, ktorá je
zodpovedná za ich bezpeãnosÈ. Vo v‰eobecnosti odporúãame, aby ste prístroj
uchovávali mimo dosahu detí. Dávajte pozor, aby deti prístroj nepoužívali na
hranie.
Fľaštička s olejom
Uchovávajte mimo dosahu detí. Nekonzumujte. Po vyprázdnení obsahu fľaštičku
zahoďte.
Popis
1 Ochrann˘ kryt planÏety
2 Holiaca planÏeta
3 Britov˘ blok
4 Zastrihávaã dlh˘ch chæpkov
5 Kontrolka nabíjania (iba model 190s)
6 Prepínaã zapnutie/vypnutie
7 ·peciálna sieÈová ‰núra
Nabíjanie (iba model 190s)
Optimálna teplota prostredia pri nabíjaní je 15 °C aÏ 35 °C.
• Keì pouÏívate ‰peciálnu sieÈovú ‰núru, holiaci strojãek musí byÈ pri pripájaní
do zásuvky elektrickej siete vypnut˘.
• Pri prvom nabíjaní nabíjajte holiaci strojãek nepretrÏite 4 hodiny. Poãas
nabíjania akumulátora holiaceho strojãeka svieti kontrolka nabíjania (5), ãím
indikuje nabíjanie. Keì je akumulátor maximálne nabit˘, kontrolka nabíjania
bliká. Znamená to, Ïe si akumulátor udrÏiava maximálnu kapacitu.
• Maximálne nabitie umoÏÀuje v závislosti od dæÏky a pevnosti chæpkov aÏ 30
minút holenia bez potreby pripojiÈ strojãek k elektrickej sieti.
• Po maximálnom nabití holiaci strojãek beÏn˘m pouÏívaním postupne vybite.
Následne ho znova nabite na maximálnu kapacitu. V‰etky ìal‰ie nabíjania uÏ
budú trvaÈ cca 1 hodinu.
• Maximálna kapacita akumulátora sa dosiahne aÏ po niekoºk˘ch cykloch
nabitia/vybitia.
22
Page 22

• Ak je akumulátor vybit˘, môÏete sa holiÈ bez nutnosti nabíjania tak, Ïe holiaci
strojãek pripojíte prostredníctvom ‰peciálnej sieÈovej ‰núry do zásuvky
elektrickej siete.
Holenie
ZloÏte ochrann˘ kryt planÏety (1). Aktivujte prepínaã zapnutie/vypnutie (6).
Rámãek holiacej planÏety sa za úãelom hladkého oholenia automaticky
prispôsobuje povrchu va‰ej pokoÏky.
Ak ste sa niekoºko dní neholili, pouÏite zastrihávaã dlh˘ch chæpkov na predbeÏné skrátenie chæpkov (4). Potom sa nahladko ohoºte holiacou planÏetou.
Zastrihávanie
VysuÀte zastrihávaã dlh˘ch chæpkov (a). Zastrihávaã umoÏÀuje dobrú
manipuláciu pri zastrihávaní «kozej» briadky alebo bokombrád. Rovnomerne
zastriháva aj väã‰ie partie: ideálne na tvarovanie bokombrád, fúzov a ãastí
brady.
âasté pouÏívanie zastrihávaãa dlh˘ch chæpkov môÏe zniÏovaÈ kapacitu
akumulátora (iba model 190s).
Tipy pre najlepšie holenie:
Na dosiahnutie najlepších výsledkov holenia vám Braun odporúča dodržiavať
3 jednoduché pravidlá:
1. Vždy sa hoľte predtým, ako si umyjete tvár.
2. Holiaci strojček držte vždy v pravom uhle (90°) k pokožke.
3. Pokožku držte napnutú a hoľte sa proti smeru rastu chĺpkov.
Čistenie
Holiacu hlavu môžete umývať pod tečúcou vodou.
Upozornenie: pred čistením vo vode odpojte strojček z elektrickej siete.
Pravidelné čistenie zaisťuje lepší holiaci výkon. Opláchnite holiacu hlavu po
každom holení pod tečúcou vodou, pretože je to veľmi jednoduchý a rýchly
spôsob, ako udržať strojček čistý (b):
Iba model 190s:
• Holiaci strojček zapnite a holiacu hlavu opláchnite pod teplou tečúcou vodou.
• Môžete použiť aj tekuté mydlo bez abrazívnych látok. Penu dôkladne opláchnite
a nechajte strojček zapnutý ešte niekoľko sekúnd.
• Potom strojček vypnite a zložte z neho holiacu planžetu (2) a britový blok (3).
Jednotlivé časti nechajte dôkladne uschnúť.
23
Page 23

• Ak holiaci strojček pravidelne čistíte pod tečúcou vodou, raz do týždňa aplikujte
na holiacu planžetu a na zastrihávač dlhých chĺpkov kvapku špeciálneho
jemného oleja (d).
Iba model 170s:
• Po každom holení opláchnite holiacu hlavu pod teplou tečúcou vodou (b).
Môžete použiť aj tekuté mydlo bez abrazívnych látok. Penu dôkladne opláchnite.
• Potom zložte holiacu planžetu (2) a britový blok (3). Jednotlivé časti nechajte
dôkladne uschnúť.
Alternatívne môžete holiaci strojček vyčistiť pomocou priloženej kefky (c):
• Holiaci strojček vypnite. Zložte holiacu planžetu a vyklepte ju na rovnom
povrchu.
• Kefkou vyčistite britový blok a vnútornú časť holiacej hlavy. Holiacu planžetu
však kefkou nečistite, pretože by sa mohla poškodiť.
Udržanie holiaceho strojčeka v špičkovej forme
Cca kaÏdé ‰tyri t˘Ïdne vyãistite britov˘ blok ãistiacim prostriedkom Braun.
Výmena holiacej planžety a britového bloku
Holiacu planžetu (2) a britový blok (3) vymieňajte aspoň každých 18 mesiacov
alebo vždy, keď sú opotrebované, aby ste zaistili 100 % výkon holiaceho strojčeka.
Pre hladké oholenie bez podráždenia pokožky vymieňajte obidva diely súčasne
(Holiaca planžeta a britový blok: 10B).
Ochrana akumulátora (iba model 190s)
Aby sa udrÏiavala optimálna kapacita akumulátora, je potrebné akumulátor
holiaceho strojãeka (beÏn˘m holením) úplne vybiÈ kaÏd˘ch cca 6 mesiacov.
Potom ho nabite na maximálnu kapacitu. Nevystavujte holiaci strojãek dlh‰í ãas
teplotám vy‰‰ím neÏ 50 °C.
Poznámka k Ïivotnému prostrediu
Tento v˘robok obsahuje akumulátorové batérie. V záujme ochrany
Ïivotného prostredia nevyhadzujte zariadenie po skonãení jeho Ïivotnosti
do beÏného domového odpadu. Odovzdajte ho do servisného strediska
Braun alebo do príslu‰ného zberného strediska zriadeného v zmysle
platn˘ch miestnych predpisov a noriem.
Deklarovaná hodnota emisie hluku tohto spotfiebiãa je 63 dB(A), ão predstavuje
hladinu A akustického v˘konu vzhºadom na referenãn˘ akustick˘ v˘kon 1 pW.
Právo na zmeny vyhradené.
Podrobné technické údaje sa nachádzajú na ‰peciálnom sieÈovom kábli.
24
Page 24

Záruka
Poskytujeme dvojročnú záruku na výrobok s platnosťou od dátumu jeho
zakúpenia. V záručnej lehote bezplatne odstránime všetky poruchy prístroja
zapríčinené chybou materiálu alebo výroby, a to buď formou opravy, alebo
výmenou celého prístroja (podľa nášho vlastného uváženia). Uvedená záruka je
platná v každom štáte, v ktorom tento prístroj dodáva spoločnosť Braun alebo
jej poverený distribútor.
Záruka sa netýka nasledujúcich prípadov: poškodenie zapríčinené nesprávnym
použitím, normálne opotrebovanie (napríklad plátkov holiaceho strojčeka alebo
puzdra zastrihávača), ako aj poruchy, ktoré majú zanedbateľný účinok na
hodnotu alebo funkciu prístroja. Ak opravu uskutoční neautorizovaná osoba a ak
sa nepoužijú pôvodné náhradné súčiastky spoločnosti Braun, platnosť záruky
bude ukončená.
Ak v záručnej lehote požadujete vykonanie servisnej opravy, odovzdajte celý
prístroj s potvrdením o nákupe v autorizovanom servisnom stredisku spoločnosti
Braun alebo ho do strediska zašlite.
25
Page 25

Magyar
Termékeinket a legmagasabb minőségi, funkcionalitás és design elvárások
kielégítésére tervezték. Reméljük, örömét leli új Braun borotvájában!
Figyelem!
A készülék speciális csatlakozókábellel, és integrált SELV (Biztonságosan Extra
Alacsony Feszültségű) adapterrel rendelkezik. Ezért ne cserélje, vagy babrálja
egyik darabját sem, ellenkező esetben áramütés veszélye áll fenn!
Ne szőrtelenítsen sérült szitával vagy vezetékkel.
A készüléket mozgássérültek, szellemi vagy értelmi fogyatékosságban szenvedŒ
gyermekek vagy személyek, – kizárólag a biztonságukért felelŒs felügyelet
mellett használják! Javasoljuk, hogy a terméket gyermekektŒl elzárva tartsa!
Általában javasoljuk, hogy a készüléket tartsa gyermekek által nem hozzáférhető
helyen!
Olajtartó flakon
Gyermekektől elzárva tartandó! Ne nyelje le! Javasoljuk, hogy a kiürült flakont
kimosás után helyezze el szelektív hulladékgyűjtőben!
Leírás
1 SzitavédŒ
2 Szita
3 Kés
4 HosszúszŒrvágó
5 TöltésjelzŒ (csak a 190s-ös modellnél)
6 Be/ki kapcsoló
7 Speciális csatlakozókábel
A készülék töltése (csak a 190s-ös modellnél)
A feltöltésre legalkalmasabb környezeti hŒmérséklet 15 °C és 35 °C között van.
ElsŒ feltöltés: A csatlakozókábel segítségével csatlakoztassa a kikapcsolt
készüléket a hálózatra.
• ElsŒ alkalommal töltse legalább 4 óra hosszán keresztül. A töltésjelzŒ (5)
visszajelzŒ fénye jelzi a töltést. Amikor az akku teljesen feltöltŒdött a töltésjelzŒ
fénye idŒnként felvillan. Ez jelzi az akku teljes feltöltöttségét.
• A teljesen feltöltött készülék kb. 30 perces vezeték nélküli borotválkozást tesz
lehetŒvé, a szakáll erŒsségétŒl függŒen.
• Ha a készülék teljesen feltöltŒdött, használja amíg teljesen lemerül. Ezután
ismét töltse fel teljesen, a teljes feltöltés kb. egy órát vesz igénybe.
• Az akkumulátor teljes kapacitását két, három feltöltés, és teljes lemerítés után
éri el.
• Borotválkozás hálózatról: ha az akkumulátor lemerült, használhatja a készülé-
ket a hálózati csatlakozóval.
26
Page 26

Borotválkozás
ElŒszŒr távolítsa el a szitavédŒt (1). Kapcsolja be a borotvát a be/ki kapcsoló
gombbal (6). A «lebegŒ» szitakeret automatikusan felveszi az arc formáját,
biztosítva a tökéletes és egyenletes borotválkozást.
Amennyiben néhány napig nem borotválkozik, borotválkozás elŒtt használja a
hosszúszŒrvágót (4) a hosszabb szŒrszálak lerövidítéséhez. A tökéletesen és
egyenletesen borotvált arc eléréséhez fejezze be a borotválkozást a borotvaszita
használatával.
A hosszúszŒrvágó használata
Emelje ki a hosszúszŒrvágót (a). Ez lehetŒvé teszi a szabályos körvonalak
kialakítását a bajusznál és az oldalszakállnál. Egyenletes hosszúságúra vágja a
szŒrszálakat az arc nagyobb területein: ideális az oldalszakáll, a bajusz és a
formára nyírt szakáll egyes részeinek formázására.
A formázó rendszeres használata csökkentheti az akkumulátor teljesítményét
(csak a 190s-ös modellnél).
Tippek a tökéletes borotválkozáshoz
A legjobb borotválkozási eredmény eléréséhez, kövesse a Braun három
egyszerű lépésből álló jó- tanácsát:
1. Mindig arcmosás előtt borotválkozzon!
2. A borotválkozás alatt tartsa végig a borotvát a megfelelő szögben (90°) az
arcfelülethez képest!
3. Feszítse ki az arcbőrét, és borotválkozzon a szakáll növekedési irányával
ellentétes irányban!
Tisztítás
A borotvafej meleg folyóvíz alatt tisztítható.
Figyelmeztetés! A borotvafej vízzel történő tisztítása előtt, mindig húzza ki
a készüléket a hálózatból!
A készülék rendszeres tisztítása, tökéletesebb borotválkozást eredményez.
A tisztítás legegyszerűbb és leggyorsabb módja, ha a borotvafejet minden egyes
borotválkozás után folyóvíz alatt átöblíti (b)!
Csak a 190s-ös modellnél:
• Kapcsolja be a borotvát, és forró folyóvíz alatt öblítse le! Alkalmanként használjon folyékony, szemcsés összetevőktől mentes szappant! Öblítse le a habot,
majd hagyja a készüléket még pár másodpercig járni!
• Ezután kapcsolja ki a borotvát, és távolítsa el a szitát (2) valamint a nyíróegységet! (3) Hagyja a szétszedett alkatrészeket megszáradni!
27
Page 27

• Amennyiben borotváját rendszeresen tisztítja víz alatt, célszerű a hosszúszőrvá-
gót valamint a szitát hetente egyszer, egy csepp finom műszerolajjal átkenni.
Csak a 170s-ös modellnél:
• Öblítse át a borotvafejet minden egyes borotválkozás után, forró folyóvíz alatt
(b)! A tisztításhoz használhat folyékony, - szemcsés összetevőktől mentes
szappant. Öblítse le a keletkezett habot!
• Ezután vegye le a szitát (2) valamint a nyíróegységet! (3) Hagyja a szétszedett
alkatrészeket megszáradni!
A borotva tisztítása történhet más módon, - a készülékhez tartozó tisztítókefe
segítségével is (c):
• Kapcsolja ki a készüléket, vegye le a szitát, majd ütögesse egy lapos felülethez!
• A kefe segítségével tisztítsa ki a nyíróegységet, valamint a borotvafej belső
részét! Mivel a kefe kárt tehet a szitában, ezért ügyeljen arra, hogy a szitát ne
tisztogassa kefével!
A borotva tökéletes karbantartása
Körülbelül 4 hetente a kést Braun tisztítófolyadékkal ápolja.
A szita és nyíróegység cseréje
A borotva 100%-os teljesítményének megőrzéséhez, az alkatrészek megkopásakor, - de legalább 18 havonta cserélje ki a szitát (2) és a nyíróegységet! (3) A még
alaposabb borotválkozás és a bőrirritáció megakadályozásának érdekében,
mindkét alkatrészt cserélje egyidejűleg!
(szita és nyíróegység: 10B)
Az akkumulátor megóvása (csak a 190s-ös modellnél)
Az akkumulátor optimális kapacitásának megtartása érdekében, a borotvát kb.
6 havonta teljesen le kell meríteni (borotválkozással). Ezután töltse fel teljesen a
borotvát ismét. Hosszabb idŒre ne tegye ki a borotvát 50 °C -nál magasabb
hŒmérsékletnek.
Környezetvédelmi megjegyzés
Ez a készülék újra tölthetŒ akkumulátorral készült. A környezetszennyezés
elkerülése érdekében arra kérjük, ha a készülék tönkrement ne dobja azt
a háztartási szemétbe. A mıködésképtelen készüléket leadhatja a Braun
szervizközpontban, illetve az elhasznált elemek gyıjtésére kijelölt
telepeken.
A változtatás jogát fenntartjuk.
Az elektromos leírás a speciális vezetékre nyomtatva olvasható.
28
Page 28

Garancia
A vásárlás napjától számított 2 évig tartó garanciát biztosítunk a termékre.
A garancia-időszakon belül minden anyag- és kivitelezési hibát díjmentesen
helyrehozunk, belátásunk szerint vagy javítva, vagy cserélve a készüléket.
Ez a garancia minden olyan országra kiterjed, ahol a készülék a Braun vagy
annak kijelölt viszonteladója forgalmazásában kapható.
A garancia nem fedi a következőket: nem rendeltetésszerű használat miatt
bekövetkező károsodás; kopás és elhasználódás (pl. a borotva szita- és
vágókazettája); illetve a készülék értéke és működése szempontjából
elhanyagolható jellegű hibák. A garancia érvényét veszti, ha a javítást erre
nem jogosult személy végzi, és ha nem Braun alkatrészeket használnak.
A garancia-időszakon belüli javításhoz adja le vagy küldje el a teljes készüléket
a vásárláskor kapott számlával együtt valamely hivatalos Braun Ügyfélszolgálati
Szervizközpontnak vagy a vásárlás helyén.
29
Page 29

Hrvatski
Naši su proizvodi oblikovani tako da zadovoljavaju najviše standarde kvalitete,
funkcionalnosti i dizajna. Nadamo se da ćete i vi u potpunosti uživati u upotrebi
svog novog brijaćeg aparata Braun.
Upozorenje
Vaš brijaći aparat ima posebni priključni kabel s ugrađenim sigurnosnim niskonaponskim sustavom. Nemojte mijenjati ili samostalno rukovati bilo kojim dijelom
kabela jer se tako izlažete opasnosti od strujnog udara.
Nikada nemojte koristiti aparat kojem je oštećena mrežica ili priključni kabel.
Nije predvi∂eno da ovaj ure∂aj koriste djeca ili osobe smanjenih fiziãkih
ili mentalnih sposobnosti, osim ako ih ne nadgleda osoba odgovorna za njihovu
sigurnost. Općenito, preporučujemo da ovaj uređaj držite van dosega djece, a
kada ga koriste pripazite da se ne igraju s njime.
Boca s uljem
Držati dalje od dosega djece. Ne gutati. Odložiti u skladu s propisima kada se
isprazni.
Opis
1 Za‰titna kapica
2 MreÏica
3 Blok noÏa
4 Trimmer (Rezaã za duge dlaãice)
5 Lampica punjaãa (samo model 190s)
6 Prekidaã za ukljuãivanje/iskljuãivanje aparata
7 Niskonaponski prikljuãni kabel
Punjenje (samo model 190s)
Preporuãujemo da temperatura okoli‰a u kojem punite svoj aparat bude od 15 °C
do 35 °C.
• Ukljuãite aparat u utiãnicu preko niskonaponskog prikljuãnog kabela. Pazite da
aparat bude iskljuãen.
• Kod prvog punjenja, pustite aparat da se puni najmanje 4 sata. Lampica
punjaãa (5) svijetlit çe dok god se aparat puni. Kada je baterija u potpunosti
napunjena, lampica çe svijetliti isprekidanim svjetlom, ‰to oznaãava da je
punjenje baterija zavr‰eno.
• Pun kapacitet baterija dostatan je za oko 30 minuta brijanja bez prikljuãnog
kabela, ‰to naravno ovisi i o jaãini rasta Va‰e brade.
• Kada je aparat jednom u potpunosti napunjen, praznit çe se normalnom
upotrebom. Kada se isprazni ponovno ga napunite do punog kapaciteta.
Za to çe vam trebati oko 1 sat vremena.
• Baterije dostiÏu maksimum svojeg kapaciteta tek nakon nekoliko uzastopnih
ciklusa punjenja i praÏnjenja.
30
Page 30

• Ako su baterije potpuno prazne, moÏete se brijati i bez da ih prethodno
napunite. Samo ukljuãite aparat u struju preko niskonaponskog prikljuãnog
kabela.
Brijanje
Skinite za‰titnu kapicu (1). Ukljuãite aparat (6). Pokretna glava aparata
automatski çe se prilagoditi obliku Va‰eg lica, pruÏajuçi maksimalno ugodno i
temeljito brijanje.
Ukoliko se niste brijali nekoliko dana, prvo skratite dlaãice trimmerom – rezaãem
za duge dlaãice (4), pa nastavite brijanje na uobiãajen temeljit i njeÏan naãin,
mreÏicom.
Podrezivanje dlaãica
Ukljuãite rezaã za duge dlaãice – trimmer (a). On je oblikovan upravo za ‰to
jednostavnije podrezivanje brkova i zalisaka: jednakomjerno zahvaça i podrezuje
i veçe povr‰ine ‰to ga ãini idealnim za oblikovanje zalisaka, brkova i kratkih
brada.
âesto kori‰tenje trimmera moÏe smanjiti kapacitet baterija (samo model 190s).
Savjeti za savršeno brijanje
Za najbolje brijanje Braun preporuča da slijedite ova tri jednostavna koraka:
1. Preporučujemo da se brijete prije umivanja.
2. Uređaj držite pod pravim kutem (90°) u odnosu na kožu.
3. Zategnite kožu i pomičite brijaći aparat u pravcu suprotnom od smjera rasta
dlačica.
Čišćenje
Ovaj uređaj možete čistiti pod mlazom tekuće vode.
Upozorenje: Prije ispiranja uređaja vodom, prvo odvojite glavu uređaja od
izvora napajanja električnom energijom.
Redovito čišćenje omogućuje kvalitetniji i bolji rad uređaja. Ispiranje glave uređaja
tekućom vodom nakon svakog brijanja, jednostavan je i brz način održavanja
uređaja čistim (b):
Samo model 190s:
• Uključite uređaj i isperite glavu aparata tekućom vrućom vodom. Za čišćenje
možete koristiti i tekući sapun ako ne sadrži abrazivna sredstva. Isperite pjenu i
pustite neka uređaj radi još nekoliko sekundi.
• Zatim isključite uređaj te skinite mrežicu i izvucite blok noža. Ostavite ih da se
osuše.
31
Page 31

• Čistite li redovito uređaj tekućom vodom, jednom tjedno nanesite kapljicu
laganog ulja za podmazivanje na nastavak za podrezivanje dužih dlačica i
mrežicu (d).
Samo model 170s:
• Nakon svakog brijanja isperite glavu uređaja vrućom tekućom vodom (b).
Možete koristiti i tekući sapun bez abrazivnih sredstava. Isperite svu pjenu.
• Zatim isključite uređaj te skinite mrežicu i izvucite blok noža. Ostavite ih da se
osuše.
Uređaj možete i čistiti četkicom koja dolazi s njim (c):
• Isključite uređaj. Uklonite mrežicu i lagano tucite njome o ravnu površinu.
• Četkicom očistite blok noža i unutrašnjost glave uređaja. Četkicom nikad
nemojte čistiti mrežicu koja bi se tako mogla oštetiti.
Održavanje uređaja u vrhunskom stanju
Blok noÏa ãistite Braun sredstvima za ãi‰çenje, otprilike svakih ãetiri tjedna.
Zamjena mrežice i bloka noža
Kako biste zadržali 100-postotnu učinkovost uređaja, zamijenite mrežicu i blok
noža svakih 18 mjeseci ili kada se istroše. Uvijek ih mijenjajte zajedno jer tako
osiguravate preciznije brijanje i manju iritaciju kože.
(Mrežica i blok noža: 10B)
OdrÏavanje baterija (samo model 190s)
Kako biste odrÏali optimalni kapacitet baterija, treba pustiti aparat da se do kraja
sam isprazni (upotrebom) otprilike svakih 6 mjeseci. Tada ga napunite do punog
kapaciteta. Ne izlaÏite aparat na dulje vrijeme na temperaturama vi‰ima od 50 °C.
Napomena o brizi za okoli‰
Ovaj ure∂aj dolazi s baterijama na punjenje. Kako biste za‰titili okoli‰,
kada se baterije u potpunosti istro‰e nemojte ih odlagati zajedno s kuçnim
otpadom. OdloÏiti ih moÏete u Braun servisnim centrima ili mjestima
predvi∂enima za odlaganje potro‰enih baterija.
PodloÏno promjeni bez prethodne obavijesti.
Detalji o elektriãnoj energiji otisnuti su na specijalnom prikljuãnom kabelu.
32
Page 32

Jamstvo
Za ovaj proizvod jamčimo jamstveno razdoblje od 2 godine od dana kupnje.
U okviru tog razdoblja besplatno ćemo otkloniti bilo kakvu neispravnost uređaja
do koje je došlo zbog zamora materijala ili pogrešaka u radu ili popravkom ili
zamjenom uređaja ovisno o procjeni.
Ovo jamstvo vrijedi za svaku zemlju u kojoj ovaj uređaj distribuira Braun ili njegov
ovlašteni distributer.
Ovo jamstvo ne pokriva: štetu nastalu zbog nepravilne upotrebe, normalno
trošenje materijala (npr. u slučaju trošenja mrežice na uređaju za brijanje), kao
i oštećenja koja imaju neosporan utjecaj na vrijednost ili rad uređaja. Jamstvo
prestaje vrijediti ako popravke vrše neovlaštene osobe te ako se ne koriste
originalni Braunovi dijelovi.
Ako tijekom jamstvenog razdoblja zatrebate servis, donesite ili pošaljite cijeli
uređaj zajedno s računom na adresu Braunovog ovlaštenog servisnog centra.
Servisna mjesta:
Poštovani, u koliko niste u mogućnosti riješiti Vaš problem putem priložene
servisne mreže, molimo Vas da nazovete broj 091 66 01 777 kako bi dobili daljnje
upute.
Singuli d.o.o., 10000, Zagreb, Primorska 3, ) 01 37 72 644, 01 66 01 777
Elektromehaničarski obrt „Marković“, 42000, Varaždin, K.Filića 9,
042 21 05 88
)
Elektromehaničarski obrt „Marković“, 42240, Ivanec, Mirka Maleza 39,
042 78 42 99
)
ELMIN vl. Božidar Jakupanec, 48350, Đurđevac, Ruđera Boškovića 20,
048 81 33 65
)
Obrt za trgovinu i servis „Ježić color servis“ vl. Alen Jurić, 43000, Bjelovar,
Petra Zrinskog 13, ) 043 24 35 00
TI-SAN d.o.o., 33000, Virovitica, Strossmayerova 9, ) 033 80 04 00
G-SERVIS d.o.o., 33520, Slatina, Grigora Viteza 2, ) 033 55 25 29
Kumex d.o.o., 31000, Osijek, Prolaz J.Leovića 5, ) 031 37 34 44
Konikom d.o.o., 31000, Osijek, Jablanova 43, ) 031 49 48 85
RTV servis vl. Mijo Kalaica, 34310, Pleternica, A.M.Relković 6, ) 034 25 20 00
Sorić elektronika, 44000, Sisak, A.Stračevića 35, ) 044 54 91 17
E.E.K.A., 51000, Rijeka, Baštijanova 36, ) 051 22 84 01
Čulig d.o.o., 47000, Karlovac, Banija 2, ) 047 41 59 55
Tehno - Jelčić, vl. Josip Jelčić, 22000, Šibenik, 8. DAL. UDAR. BRIGADE 71,
022 34 02 29
)
ALTA d.o.o., 23000, ZADAR, Vukovarska 3c, ) 023 32 76 66
Merc & Dujmović, 21000, SPLIT, Alojza Stepinca 6, ) 021 53 77 80
33
Page 33

Slovenski
Naši izdelki so zasnovani tako, da ustrezajo najvišjim standardom kakovosti,
funkcionalnosti in dizajna. Upamo, da boste vaš novi Braunov brivnik z veseljem
uporabljali.
Opozorilo
Brivnik je opremljen s posebno priključno vrvico z vgrajenim varnostnim nizkonapetostnim napajanjem. Njenih delov ne smete zamenjati ali spreminjati, sicer
obstaja tveganje električnega udara.
Brivnika ne smete uporabljati, če sta mrežica ali priključna vrvica poškodovani.
Ta naprava ni namenjena, da bi jo uporabljali otroci ali osebe z zmanj‰ano
fiziãno in umsko sposobnostjo, razen pod nadzorom osebe odgovorne za njihovo
varnost. Priporočamo vam, da napravo hranite izven dosega otrok oziroma
zagotovite, da se otroci ne igrajo z njo.
Steklenička z oljem
Hranite izven dosega otrok. Ne zaužijte. Prazno embalažo odvrzite na ustrezno
mesto.
Opis
1 Za‰ãitni pokrovãek
2 MreÏica brivnika
3 Blok rezil
4 Prirezovalnik dalj‰ih dlak
5 Indikator polnjenja (samo model 190s)
6 Stikalo za vklop/izklop
7 Posebna prikljuãna vrvica
Polnjenje (samo model 190s)
Najprimernej‰a temperatura okolice med polnjenjem brivnika je med 15 °C
in 35 °C.
• Brivnik prikljuãite na elektriãno omreÏje s posebno prikljuãno vrvico. Motor
brivnika mora biti pri tem izkljuãen.
• Pri prvem polnjenju naj se brivnik neprekinjeno polni 4 ure. Indikator polnjenja
(5) oznaãuje, da se brivnik polni. Ko je baterija povsem napolnjena, indikator
utripa v presledkih. To oznaãuje, da baterija vzdrÏuje svojo polno kapaciteto.
• Povsem napolnjena baterija omogoãa do 30 minut britja brez prikljuãne vrvice,
odvisno od rasti va‰e brade.
• Ko je baterija brivnika povsem napolnjena, jo izpraznite z normalno uporabo.
Nato jo ponovno napolnite do polne kapacitete. Nadaljnja polnjenja bodo
trajala pribliÏno 1 uro.
• Baterija bo dosegla svojo maksimalno kapaciteto ‰ele po nekajkratnem
polnjenju/praznjenju.
• âe je baterija brivnika prazna, se lahko brijete tudi tako, da brivnik prikljuãite
na elektriãno omreÏje s pomoãjo posebne prikljuãne vrvice.
34
Page 34

Britje
Odstranite za‰ãitni pokrovãek (1). Vkljuãite aparat s stikalom za vklop/izklop (6).
Gibljiv okvir mreÏice se samodejno prilagaja povr‰ini va‰e koÏe in tako omogoãa
temeljito in gladko britje.
âe se nekaj dni niste brili, pred ponovnim britjem dolge dlake najprej skraj‰ajte
z uporabo prirezovalnika (4). Nato nadaljujte britje z mreÏico, da bo va‰a koÏa
temeljito in gladko obrita.
Prirezovanje
Prirezovalnik dalj‰ih dlak (a) potisnite navzgor. Prirezovalnik vam omogoãa
oblikovanje brkov in zalizcev. Enakomerno postriÏe in prireÏe veãja obmoãja:
idealen je za oblikovanje zalizcev, brkov in delno kratkih bradic.
S pogosto uporabo prirezovalnika se lahko zmanj‰a kapaciteta baterije (samo
model 190s).
Nasveti za brezhibno britje
Za kar najboljše rezultate britja vam Braun priporoča, da upoštevate tri
preproste nasvete:
1. Vedno se obrijte pred umivanjem obraza.
2. Brivnik ves čas držite pravokotno na kožo (90°).
3. Kožo z roko rahlo napnite in se brijte v nasprotni smeri rasti brade.
Čiščenje
Glavo brivnika lahko čistite pod tekočo vodo.
Opozorilo: Preden glavo brivnika očistite z vodo, morate brivnik izključiti iz
električnega omrežja.
Redno čiščenje brivnika vam zagotavlja boljše rezultate britja. Izpiranje glave
brivnika pod tekočo vodo po vsakem britju je preprost in hiter način za vzdrževanje
njene čistoče (b):
Samo pri modelu 190s:
• Vključite brivnik (brez priključne vrvice) in glavo brivnika izperite pod vročo
tekočo vodo. Uporabite lahko tudi tekoče milo, ki ne vsebuje abrazivnih snovi.
Peno dobro izperite in pustite, da brivnik deluje še nekaj sekund.
• Nato izključite brivnik, odstranite mrežico (2) in blok rezil (3). Razstavljene dele
brivnika pustite, da se posušijo.
• Če brivnik redno čistite pod tekočo vodo, na prirezovalnik daljših dlak in na
mrežico vsak teden nanesite kapljico lahkega strojnega olja (d).
35
Page 35

Samo pri modelu 170s:
• Po vsakem britju brivsko glavo sperite pod vročo tekočo vodo (b). Uporabite
lahko tudi tekoče milo, ki ne vsebuje abrazivnih snovi. Peno milnice temeljito
izperite.
• Nato odstranite mrežico (2) in blok rezil (3). Razstavljene dele brivnika pustite,
da se posušijo.
Brivnik lahko očistite tudi s priloženo ščetko (c):
• Izključite brivnik. Odstranite mrežico brivnika in jo iztrkajte na ravni površini.
• S ščetko očistite blok rezil in notranjost glave brivnika. Mrežice brivnika ne smete
čistiti s ščetko, ker jo s tem lahko poškodujete.
Vzdrževanje brivnika
PribliÏno vsake ‰tiri tedne blok rezil oãistite z Braunovim ãistilom.
Zamenjava mrežice brivnika in bloka rezil
Za 100 % učinkovitost britja morate mrežico (2) in blok rezil (3) zamenjati najmanj
vsakih 18 mesecev oziroma takoj, ko se obrabita. Oba dela zamenjajte istočasno,
saj bo tako britje bolj temeljito, koža pa manj razdražena.
(Mrežica brivnika in blok rezil: 10B)
Ohranjanje kapacitete baterij (samo model 190s)
Da bodo baterije za ponovno polnjenje ohranile optimalno kapaciteto, jih morate
pribliÏno vsakih 6 mesecev (z britjem) povsem izprazniti. Nato brivnik ponovno
napolnite do polne kapacitete. Brivnika ne smete dalj ãasa izpostaviti temperaturam, vi‰jim od 50 °C.
Va‰ prispevek k varovanju okolja
Izdelek je opremljen z baterijami za ponovno polnjenje. Prosimo vas,
da izdelka ob koncu njegove Ïivljenjske dobe ne odvrÏete skupaj z
gospodinjskimi odpadki, ampak ga odnesete na Braunov servisni center
oz. na ustrezno zbirno mesto in tako prispevate k varovanju okolja.
PridrÏujemo si pravico do sprememb.
Podatki o elektriãnem prikljuãku so odtisnjeni na posebnem prikljuãnem kablu.
36
Page 36

Garancijski list
Za izdelek velja dveletna garancija, ki začne veljati z datumom izročitve blaga.
Proizvajalec jamči, da bo izdelek deloval v garancijskem roku ob pravilni uporabi v
skladu z njegovim namenom in priloženimi navodili. V garancijski dobi bomo
brezplačno odpravili vse okvare izdelka, ki so posledica napak v materialu ali
izdelavi, tako da vam bomo izdelek po naši presoji popravili ali v celoti zamenjali.
Če pooblaščeni servis vašega izdelka ne popravi v 45 dneh, imate pravico
zahtevati nov izdelek. Za sprejem v reklamacijo se šteje dan, ko je izdelek sprejet
v pooblaščeni servis ali v trgovino, kjer ste izdelek kupili.
Čas zagotavljanja servisa, vzdrževanja, nadomestnih delov in priklopnih aparatov
je 3 leta po preteku garancijskega roka.
Popravila na domu zaradi zahtevnosti in neprenosljivosti sodobne servisne
opreme in razpoložljivosti rezervnih delov niso mogoča.
Garancija velja na območju Republike Slovenije, pa tudi v vseh državah, kjer
izdelek dobavlja podjetje Braun ali njegov pooblaščeni distributer.
Garancija ne izključuje pravic potrošnika, ki izhajajo iz odgovornosti prodajalca za
napake na blagu.
Garancija ne velja:
– Za okvare, ki so posledica nepravilne uporabe, normalne obrabe ali rabe
oziroma napake, ki imajo zanemarljiv učinek na vrednost in delovanje izdelka.
– Ob vsakem posegu nepooblaščene osebe ali kakršnekoli druge predelave
izdelka in če pri popravilu niso uporabljeni originalni Braunovi rezervni deli.
Za popravilo v garancijski dobi celotno napravo skupaj z računom in/ali izpolnjenim
garancijskim listom odnesite ali pošljite na pooblaščeni servisni center Braun:
Jože Ježek, Cesta 24. junija 21, 1231 Črnuče – Ljubljana
Tel. št.: +386 1 561 66 30, E-mail: jezektrg.servis@siol.net
Za dodatne informacije smo vam na voljo na brezplačni telefonski številki 080 2822.
37
Page 37

Türkçe
Ürünlerimiz en yüksek kalite, fonksiyonellik ve tasarım standartlarına göre
üretilmiştir. Yeni Braun tıraş makinenizden memnun kalmanızı dileriz.
Uyarı
Tıraş makinenizde ekstra düşük voltaj için güvenlik sağlayan adaptör içeren özel
kablo seti vardır. Bu setin hiçbir parçasını değiştirmeyin veya başka amaçlar için
kullanmayın aksi taktirde elektrik şoku meydana gelebilir.
Eleği veya kablosu hasar görmüş tıraş makinesini kullanmayınız.
Bu aygıt sorumlu bir kiμinin gözetiminde olmaksızın çocukların ve fiziksel
yada ruhsal engelli kiμilerin kullanmasına uygun de©ildir. Aygıtınızı çocukların
ulaμabilece©i yerlerden uzak tutmanızı öneririz. Çocukların cihazla oynama-
sını engellemek için gözetim altında tutunuz.
Yağ Şişesi
Çocukların erişemeyeceği yerde saklayınız. Yutmayınız. Boşaldığında uygun
biçimde atınız.
Tanım
1 Elek koruma kapaπı
2 Tıraμ makinesi eleπi
3 Sakal kesici
4 Uzun tüy düzeltici
5 Ωarj ıμıπı (sadece model 190s)
6 Açma/Kapama düπmesi
7 Özel kablo seti
Şarj (sadece model 190s)
Ωarj etmek için en ideal sıcaklık 15 °C ve 35 °C arasıdır.
• Tıraμ makineniz kapalıyken özel kablo setini kullanarak makinenizi prize takın.
• Makinenizi ilk defa μarj ederken 4 saat boyunca μarj edin. Ωarj ıμıπı (5)
makinenin μarj olmakta olduπunu gösterir. Makine tamamen sarj olduπunda μarj
ıμıπı yanıp söner. Bu, pilin tam kapasiteye ulaμtıπını gösterir.
• Tam μarj olmuμ bir makine sakal uzunluπunuza göre ortalama 30 dakikalık
kablosuz kullanım saπlar.
• Tıraμ makinesi μarj olduktan sonra, μarjı bitene dek kullanın. Daha sonra, tam
dolana kadar yine μarj edin. Ωarj olması yaklaμık 1 saat sürecektir.
• Birkaç μarj döngüsünden sonra pil maksimum performansına ulaμacaktır.
• Sarj edilebilir piller boμsa, tıraμ makinenizi elektrikli olarak da (özel kablo setini
prize takarak) kullanabilirsiniz.
Tıraμ Olmak
Elek koruyucu kapaπı çıkartın (1). Açma/Kapama düπmesine (6) basarak çalıμtırın.
Oynar baμlıklı elek çerçevesi otomatik olatak yüzünüzdeki kıvrımlara uyum saπlayarak yakın ve pürüzsüz bir tıraμ saπlar.
38
Page 38

Birkaç gün tıraμ olmamıμsanız tıraμ öncesinde uzun sakalları kesmek için uzun tüy
düzelticisini kullanın (4). Yakın ve pürüzsüz tıraμ için tıraμınızı elek baμlıπı ile
bitirin.
Düzeltme
Uzun tüy düzelticisini basarak açın (a).
Uzun tüy düzelticisinin çok sık kullanımı pilin μarj kapasitesini azaltabilir (sadece
model 190s).
En iyi sonuçlar için
En iyi sonuç için, Braun 3 basit noktayı unutmamanızı tavsiye eder:
1. Her zaman yüzünüzü yıkamadan önce tıraş olun.
2. Tıraş olurken makinenizi cildinize 90 derece (90°) açı yapacak şekilde
kullanın.
3. Cildinizi gerin ve tıraş makinenizi sakal uzama yönünün aksine doğru hareket
ettirin.
Temizleme
Bu makinenin tıraş başlığı akan musluk suyu altında yıkanmaya uygun
dizayn edilmiştir.
Uyarı: Tıraş başlığını suyun altına sokmadan önce cihazın elektrik
kaynağıyla bağlantısının kesik olduğundan mutlaka emin olunuz.
Makineyi sık sık temizlemek tıraş performansını arttıran bir unsurdur. Makineyi her
zaman temiz tutmanın en kolay ve hızlı yolu akan su altında tıraş başlığını durulamak olacaktır (b):
Sadece model 190s’de:
• Kablosuzken tıraş makinesini çalıştırın ve tıraş başlığını sıcak suyun altına tutun.
Partiküller ve aşındırıcı maddeler bulundurmayan bir sabun da kullanılabilir.
Köpük temizlendikten sonra birkaç saniye daha suyun altında tutup çalıştırabilirsiniz.
• Sonra, makineyi kapatın, tıraş makinesi eleğini (2) ve kesici bıçakları (3) çıkarın.
Sonra bu parçaları kurumaya bırakın.
• Tıraş makinenizi düzenli olarak suyla temizliyorsanız, haftada bir elek ve
düzeltici bıçaklar üzerine bir damla ince makine yağı damlatmanızı öneririz (d).
Sadece model 170s’de:
• Her tıraştan sonra, tıraş başlığını sıcak suyun altında durulayın (b). Partiküller ve
aşındırıcı maddeler bulundurmayan bir sabun da kullanılabilir. Tüm köpüğün
durulandığından emin olun.
• Sonra, makineyi kapatın, tıraş makinesi eleğini (2) ve kesici bıçakları (3) çıkarın.
Sonra bu parçaları kurumaya bırakın.
39
Page 39

Diğer bir yol olarak makinenizi verilen temizleme fırçası ile de temizleyebilirsiniz (c):
• Makineyi kapatın. Tıraş makinesi eleğini çıkartın ve düz bir yüzeye elek
çerçevesini hafifçe vurarak fazla sakal artıklarının dökülmesini sağlayın.
• Fırçayı kullanarak kesici bıçakları ve iç bölmeyi temizleyin. Fakat, eleği kesinlikle
fırça ile temizlemeyin, eleğe zarar verebilir.
Tıraş makineninizin ideal performansını her zaman korumak için
Yaklaμık 4 haftada bir kesiciyi Braun temizleyicileriyle temizleyin.
Elek ve kesici bıçakları yenilemek
Tıraş performansını %100 korumak için tıraş makinesi eleğini (2) ve kesici bıçakları
(3) her 18 ayda bir ya da eskidiğinde yenileyin. Daha az cilt tahrişi ve yakın tıraş
için iki parçayı aynı anda değiştirin. (Tıraş makinesi eleği ve kesici: 10B).
Pillerin saklanması (sadece model 190s)
Ωarj edilebilir pillerin maksimum kapasitede çalıμabilmesi için, tıraμ makinenizin
μarjının yaklaμık her 6 ayda bir tamamen boμalması gerekir
(tıraμ olarak). Sonra tıraμ makinenizi tam dolana kadar μarj edin. Tıraμ makinenizi
uzun süreli olarak 50°C nin üzerindeki ortamlarda bırakmayın.
Çevre ile ilgili duyuru:
Bu ürün μarj edilebilir piller içermektedir. Doπal çevreyi korumak adına,
lütfen ürünü kullanım ömrü sonunda diπer ev atıkları ile beraber atmayınız.
Ürünü atmak istedinizde Braun servis merkezlerine götürebilirsiniz ya da
bulunduπunuz ülkenin katı atık kuralları çerçevesinde yok ediniz.
Bu bilgiler, bildirim yapılmadan değiştirilebilir.
Özel kablo setinin üzerinde elektrikle ilgili ayrıntılar yer almaktadır. Bakanlıkça
tespit ve ilan edilen kullanım ömrü yedi yıldır.
EEE STANDARTLARINA UYGUNDUR
Bakanlıkça tespit ve ilan edilen kullanım ömrü 7 yıldır.
Üretici firma ve CE işareti uygunluk değerlendirme kuruluşu:
Braun GmbH, Frankfurter Straße 145
61476 Kronberg / Germany
“ (49) 6173 30 0, Fax (49) 6173 30 28 75
Procter & Gamble Satış ve Dağıtım Ltd. Şti.
İçerenköy Mah. Serin Sok. Kosifler İş Merkezi
No:3 A 34752 Ataşehir, İstanbul
P & G Tüketici Hizmetleri
0 800 261 63 65,
trconsumers@custhelp.com
40
Page 40

Română (RO/MD)
Produsele noastre sunt concepute pentru a satisface cele mai înalte standarde
de calitate, funcţionalitate şi design.
Sperăm să vă bucuraţi de noul dumneavoastră Aparat de Ras de la Braun.
Avertizare
Sistemul de bărbierit este dotat cu un cablu special prevăzut cu un sistem
integrat de securitate pentru alimentarea de foarte joasă tensiune.Nu schimbaţi
sau nu încercaţi să modificaţi nicio componentă a aparatului; în caz contrar,
există risc de electrocutare.
Nu vă bărbieriţi dacă sita pentru bărbierit sau cablul sunt deteriorate.
Acest aparat nu este destinat utilizării de către copii sau persoane cu capacităţi
fizice, senzoriale sau mentale reduse, cu excepţia cazului în care sunt sub
supravegherea unei persoane responsabile pentru siguranţa lor. În general,
vă recomandăm să nu lăsaţi aparatul la îndemâna copiilor. Copiii trebuie
supravegheaţi pentru a se asigura că nu se joacă cu aparatul.
Sticla de ulei
A nu se lăsa la îndemâna copiilor. A nu se înghiţi. A se arunca în mod
corespunzător după golire.
Descriere
1 Capacul protector al sitei
2 Sita pentru bărbierit
3 Blocul de tăiere
4 Dispozitivul de tuns (trimmer) pentru păr lung
5 Indicator de încărcare (doar pentru modelele din seria 190)
6 Întrerupător on/off
7 Cablul special
Încărcarea (doar pentru modelele din seria 190)
Temperatura ideală a mediului ambiant pentru încărcare este situată în intervalul
15 °C – 35 °C.
• Cu ajutorul cablului special, conectaţi aparatul de ras la o priză electrică având
motorul oprit.
• Când încărcaţi aparatul pentru prima dată, lăsaţi-l la încărcat continuu, timp de
4 ore. Indicatorul de încărcare (5) arată faptul că aparatul se încarcă. Când
bateria este complet încărcată, indicatorul de încărcare clipeşte intermitent.
Acest lucru indică faptul că bateria se menţine la capacitate maxima.
• O încărcare completă asigură până la 30 de minute de bărbierit fără fir, în
funcţie de ritmul de creştere a bărbii dumneavoastră.
• După ce aparatul de ras este complet încărcat, descărcarea acestuia se va
face prin utilizarea lui normală. Apoi reîncărcaţi aparatul de ras la capacitate
maximă. Încărcările ulterioare vor dura aproximativ 1 oră.
41
Page 41

• Capacitatea maximă a bateriei poate fi atinsă numai după câteva cicluri de
încărcare/descărcare.
• În cazul în care bateriile reîncărcabile sunt consumate, vă puteţi bărbieri şi prin
conectarea aparatului de ras la o priză electrică prin intermediul cablului
special.
Bărbieritul
Îndepărtaţi capacul protector al sitei (1). Acţionaţi întrerupătorul on/off (6).
Cadrul mobil al sitei se adaptează automat la suprafaţa pielii, pentru a conferi un
bărbierit precis şi neted.
Pentru un bărbierit preliminar după câteva zile în care nu v-aţi bărbierit, folosiţi
dispozitivul de tuns (trimmer) pentru păr lung (4) pentru a pre-tăia firele lungi.
Pentru un ras precis, neted, încheiaţi operaţiunea folosind sita pentru bărbierit.
Modelarea
Împingeţi în afară dispozitivul de tuns (trimmer) pentru păr lung (a). Acesta
permite tunsul controlat al mustăţii şi perciunilor. Taie şi tunde suprafeţe mai
mari: este ideal pentru a da formă perciunilor, mustăţii şi bărbii de dimensiuni
medii.
Utilizarea frecventă a dispozitivului de tuns pentru păr lung poate diminua
capacitatea bateriei (doar la modelele din seria 190).
Sfaturi pentru un bărbierit perfect
Pentru cele mai bune rezultate, Braun vă recomandă să urmaţi 3 paşi simpli:
1. Bărbieriţi-vă întotdeauna înainte să vă spălaţi pe faţă.
2. Pe tot parcursul bărbieritului ţineţi aparatul de ras în unghi drept (90°) faţă
de piele.
3. Întindeţi pielea şi folosiţi aparatul de ras în sensul opus direcţiei de creştere
a bărbii dumneavoastră.
Curăţarea
Capul aparatului de ras este adaptat pentru o curăţare sub jet de apă de
la robinet.
Avertizare: Decuplaţi aparatul de ras de la sursa de alimentare înainte de
a curăţa capul acestuia folosind apă.
Curăţarea regulată asigură o mai bună eficienţă a bărbieritului. Clătirea capului
aparatului de ras sub jet de apă după fiecare bărbierit reprezintă o modalitate
facilă şi rapidă de a-l păstra curat (b):
42
Page 42

Doar pentru modelele din seria 190:
• Porniţi aparatul de ras şi clătiţi capul acestuia sub jet de apă fierbinte.
• Puteţi folosi săpun lichid, fără substanţe abrazive. Clătiţi toată spuma şi lăsaţi
aparatul pornit pentru alte câteva secunde.
• Apoi opriţi aparatul de ras, îndepărtaţi sita de bărbierit (2) şi blocul de tăiere
(3). După aceea, lăsaţi componentele dezasamblate la uscat.
• Dacă dumneavoastră curăţaţi în mod regulat aparatul de ras sub apă, atunci
aplicaţi, o dată pe săptămână, câte o picătură de ulei uşor de maşină pe
dispozitivul de tuns (trimmer) pentru păr lung şi pe sita de bărbierit (d).
Doar pentru modelele din seria 170:
• După fiecare bărbierit, clătiţi capul aparatului de ras sub jet de apă fierbinte
(b). Puteţi folosi săpun lichid, fără substanţe abrazive. Clătiţi toată spuma.
• Apoi îndepărtaţi sita de bărbierit (2) şi blocul de tăiere (3). După aceea, lăsaţi
componentele dezasamblate la uscat.
Alternativ, puteţi curăţa aparatul de ras folosind peria cu care este prevăzut
acesta (c):
• Opriţi aparatul de ras. Îndepărtaţi sita de bărbierit şi loviţi-o uşor de o suprafaţă
plană.
• Folosind peria, curăţaţi blocul de tăiere şi suprafaţa interioară a capului
aparatului de ras. Cu toate acestea, nu curăţaţi sita de bărbierit cu peria,
deoarece deteriorează sita.
Cum să vă păstraţi aparatul de ras în perfectă stare
Cam la fiecare patru săptămâni, curăţaţi blocul de tăiere cu agenţi de curăţare
Braun. Aplicaţi câte o picătură de ulei uşor de maşină pe dispozitivul de tuns
(trimmer) pentru păr lung şi pe sita de bărbierit (d).
Înlocuirea sitei de bărbierit şi a blocului de tăiere
Pentru a menţine performanţa bărbieritului la nivelul de 100%, înlocuiţi sita de
bărbierit (2) şi blocul de tăiere (3) la cel puţin 18 luni sau atunci când se uzează.
Schimbaţi ambele componente în acelaşi timp, pentru un bărbierit mai precis şi
mai puţine iritaţii ale pielii. (Sita de bărbierit şi blocul de tăiere: 10B)
Conservarea bateriilor (doar pentru modelele din seria 190)
Pentru a se menţine capacitatea optimă a bateriilor reîncărcabile, aparatul de
ras trebuie să fie în întregime descărcat (prin folosirea la bărbierit) la fiecare
aproximativ 6 luni. Apoi reîncărcaţi aparatul de ras la capacitate maximă. Nu
expuneţi aparatul de ras la temperaturi mai mari de 50 °C pentru perioade lungi
de timp.
Conform Hotãrârii nr. 672 din 19 iulie 2001 privind stabilirea conditiilor de
introducere pe piatã a aparatelor electrocasnice în functie de nivelul zgomotului
transmis prin aer, valoarea de zgomot dB(A) pentru acest aparat este de 63 dB(A).
43
Page 43

Avertisment referitor la mediu
Acest produs conţine baterii reîncărcabile. În scopul protejării mediului,
vă rugăm să nu aruncaţi produsul în gunoiul menajer la sfârşitul duratei
sale de viaţă utilă. Debarasarea poate avea loc într-un Centru de Service
Braun sau în locaţii adecvate de colectare, existente în ţara
dumneavoastră.
Specificaţiile pot fi modificate fără avertizare prealabilă.
Pentru specificaţii electrice, a se vedea imprimarea de pe cablul special.
Garanţie
Acordăm o garanţie de 2 ani pentru acest produs, de la data achiziţionării. Durata
medie de utilizare: 5 ani, cu condiţia respectării instrucţiunilor de utilizare si
efectuării intervenţiilor tehnice numai de către personalul service autorizat.
În perioada de garanţie vom remedia gratuit neconformităţile aparatului, prin
repararea sau înlocuirea produsului, după caz. Această garanţie este valabilă în
orice ţara în care acest aparat este furnizat de către compania Braun sau de
către distribuitorul desemnat al acesteia. Repararea sau înlocuirea produselor se
va efectua în cadrul unei perioade rezonabile de timp (maxim 15 zile de la data
aducerii la cunoştinţă a neconformităţii).
Prezenta garanţie nu acoperă: defectele datorate utilizării necorespunzatoare,
uzurii normale (de ex: ale sitei aparatului sau ale blocului de taiere), precum si
defectele care au un efect neglijabil asupra valorii sau funcţionării aparatului.
Garanţia devine nulă dacă se efectuează reparaţii de către persoane neautorizate
şi dacă nu se utilizează componente originale Braun.
Pentru a beneficia de service în perioada de garanţie, prezentaţi produsul
împreună cu factura (bonul/chitanţa de cumpărare) la una dintre unităţile service
agreate.
PUNCT CENTRAL DE SERVICE BRAUN
Şos. Viilor, Nr.14, Corp Clădire C2, Etaj 2, Biroul nr.3, Sector 5, Bucureti
(acces din Str. Năsăud)
Tel: 021–224.00.47
Mobil: 0722.541.548
E-mail: service.braun@interbrands.ro
44
Page 44

кЫТТНЛИ
Руководство по эксплуатации
Наши изделия разработаны в соответствии с самыми высокими стандартами
качества, функциональности и дизайна. Надеемся, что Вам понравится
Ваша новая бритва Braun.
Предупреждение
Бритва снабжена шнуром питания со встроенным сетевым адаптером,
подающим низкое напряжение. Не пытайтесь заменить какие-либо детали
этого устройства, иначе Вы подвергаете себя опасности поражения
электрическим током.
Не используйте бритву с порванной сеткой или поврежденным шнуром
сетевого адаптера.
Прибор не предназначен для использования лицами (включая детей)
с пониженными физическими, чувственными или умственными способностями или при отсутствии у них опыта или знаний, если они не находятся под
контролем или не проинструктированы об использовании прибора лицом,
ответственным за их безопасность. Дети должны находиться под контролем
для недопущения игры с прибором.
Маслёнка
Держать вдали от детей. Не употреблять в пищу. Утилизировать как бытовой
отход.
Описание и комплектность
1 б‡˘ЛЪМ‡fl Н˚¯Н‡ ·В˛˘ВИ ТВЪНЛ
2 ЕВ˛˘‡fl ТВЪН‡
3 кВКЫ˘ЛИ ·ОУН
4 нЛППВ ‰Оfl ‰ОЛММ˚ı ‚УОУТ
5 аМ‰ЛН‡ЪУ Б‡fl‰НЛ ‡ННЫПЫОflЪУ‡ (только в модели 190s)
6 èÂÂÍβ˜‡ÚÂθ
7 Шнур питания со встроенным сетевым адаптером
Зарядка бритвы (только в модели 190s)
йФЪЛП‡О¸М‡fl ЪВПФВ‡ЪЫ‡ УНЫК‡˛˘ВИ ТВ‰˚ ‰Оfl Б‡fl‰НЛ УЪ 15 °C
‰У 35 °C.
• èË ÔÓÏÓ˘Ë сетевого адаптера ÔÓ‰Íβ˜ËÚ ·ËÚ‚Û Ò ÓÚÍβ˜ÂÌÌ˚Ï
ПУЪУУП Н ˝ОВНЪЛ˜ВТНУИ УБВЪНВ.
• 肇fl Á‡fl‰Í‡ ÔÓËÁ‚Ó‰ËÚÒfl ‚ Ú˜ÂÌË 4 ˜‡ÒÓ‚. ÇÓ ‚ÂÏfl Á‡fl‰ÍË
·ЛЪ‚˚ Б‡„У‡ВЪТfl Т‚ВЪУ‚УИ ТЛ„М‡О ЛМ‰ЛН‡ЪУ‡ (5). дУ„‰‡ ‡ННЫПЫОflЪУ
ФУОМУТЪ¸˛ Б‡flКВМ, ЛМ‰ЛН‡ЪУ М‡˜ЛМ‡ВЪ ФВЛУ‰Л˜ВТНЛ ПЛ„‡Ъ¸.
• иУОМ‡fl Б‡fl‰Н‡ У·ВТФВ˜Л‚‡ВЪ ‰У 30 ПЛМЫЪ ‡·УЪ˚ ·ВБ ФУ‰НО˛˜ВМЛfl
Н ТВЪЛ, ‚ Б‡‚ЛТЛПУТЪЛ УЪ ЛМ‰Л‚Л‰Ы‡О¸М˚ı УТУ·ВММУТЪВИ ˘ВЪЛМ˚.
45
Page 45

• иУТОВ ФУОМУИ Б‡fl‰НЛ ·ЛЪ‚˚, ВВ ‡Бfl‰Н‡ ФУЛТıУ‰ЛЪ ‚ ФУˆВТТВ
У·˚˜МУИ ˝НТФОЫ‡Ъ‡ˆЛЛ. иУТОВ ˜В„У ·ЛЪ‚‡ Б‡flК‡ВЪТfl ФУ‚ЪУМУ, ‰У
ФУОМУИ Б‡fl‰НЛ. иУТОВ‰Ы˛˘‡fl Б‡fl‰Н‡ Б‡МЛП‡ВЪ УНУОУ 1 ˜‡Т‡.
• е‡НТЛП‡О¸М‡fl ВПНУТЪ¸ ‡ННЫПЫОflЪУ‡ ‰УТЪЛ„‡ВЪТfl ЪУО¸НУ ФУТОВ МВТНУО¸НЛı ˆЛНОУ‚ Б‡fl‰НЛ/‡Бfl‰НЛ.
• З ТОЫ˜‡В ФУОМУИ ‡Бfl‰НЛ З˚ ПУКВЪВ ·ЛЪ¸Тfl ·ЛЪ‚УИ, ФУ‰НО˛˜ВММУИ
Н ˝ОВНЪЛ˜ВТНУИ УБВЪНВ ФУТВ‰ТЪ‚УП ˝ОВНЪУ¯МЫ‡.
ÅËÚ¸Â
лМЛПЛЪВ Б‡˘ЛЪМЫ˛ Н˚¯НЫ ·В˛˘ВИ ТВЪНЛ (1). ЗНО˛˜ЛЪВ ·ЛЪ‚Ы Т ФУПУ˘¸˛
ФВВНО˛˜‡ЪВОfl (6). иО‡‚‡˛˘‡fl ·В˛˘‡fl ТВЪН‡ ·ЛЪ‚˚ ЪУ˜МУ ТОВ‰ЫВЪ
НУМЪЫ‡П ‚‡¯В„У ОЛˆ‡, „‡‡МЪЛЫfl ˜ЛТЪУВ Л Пfl„НУВ ·ЛЪ¸В.
ЦТОЛ ‚˚ МВ ·ЛОЛТ¸ МВТНУО¸НУ ‰МВИ, ЛТФУО¸БЫИЪВ ЪЛППВ ‰Оfl ‰ОЛММ˚ı
‚УОУТ (4) ‰Оfl ФУ‰ВБ‡МЛfl ‰ОЛММ˚ı ‚УОУТНУ‚ ‰У УФЪЛП‡О¸МУИ ‰Оfl ·ЛЪ¸fl
‰ОЛМ˚. уЪУ·˚ У·ВТФВ˜ЛЪ¸ ˜ЛТЪУВ, „О‡‰НУВ ·ЛЪ¸В, Б‡‚В¯ЛЪВ ФУˆВТТ,
ЛТФУО¸БЫfl ТВЪНЫ.
нЛППЛМ„
З˚‰‚ЛМ¸ЪВ ЪЛППВ ‰Оfl ‰ОЛММ˚ı ‚УОУТ (a). л ФУПУ˘¸˛ ЪЛППВ‡ ПУКМУ
ФУ‰‡‚МflЪ¸ ЫТ˚ Л ·‡НВМ·‡‰˚. дУПВ ˝ЪУ„У ЪЛППВ У‚МУ ФУ‰ТЪЛ„‡ВЪ Л
ФУ‰‡‚МЛ‚‡ВЪ НЫФМ˚В Ы˜‡ТЪНЛ: Л‰В‡О¸МУ ФУ‰ıУ‰ЛЪ ‰Оfl ФЛ‰‡МЛfl ЩУП˚
·‡ÍÂÌ·‡‰, ÛÒÓ‚ Ë ÍÓÓÚÍËı ·ÓÓ‰ÓÍ.
у‡ТЪУВ ЛТФУО¸БУ‚‡МЛВ ЪЛППВ‡ ‰Оfl ‰ОЛММ˚ı ‚УОУТ ПУКВЪ ТМЛБЛЪ¸ У·˙ВП
‡ННЫПЫОflЪУ‡ (только в модели 190s).
Советы по оптимизации бритья
Для лучшего результата Braun рекомендует следовать 3 простым шагам:
1. Всегда брейтесь до умывания
2. Всегда держите бритву под прямым углом (90°) к коже.
3. В процессе бритья слегка натягивайте кожу и брейтесь в направлении
против роста волос.
Чистка бритвы
Возможная чистка бреющей головки под струей воды.
Внимание: Отключите устройство от источника электроэнергии
перед чисткой под струей воды.
Регулярная чистка обеспечивает лучшее качество бритья. Чистка бреющей
головки под струей воды после каждого бритья – легкий и быстрый способ
поддержания чистоты бреющей головки (b):
46
Page 46

Только в модели 190s:
• Включите бритву и поместите бреющую головку под струю теплой воды.
Также можно использовать жидкое мыло, не содержащее абразивных
веществ. Смойте остатки пены и оставьте бритву включенной несколько
секунд.
• Затем выключите бритву и снимите бреющую сетку (2) и режущий блок
(3). Оставьте детали для сушки.
• Регулярно производите чистку бритвы под струей воды, раз в неделю
наносите небольшое количество бытового машинного масла на триммер
для длинных волос и бреющую сетку (d).
Только в модели 170s:
• После каждого бритья производите чистку бреющей головки под струей
воды (b). Также можно использовать жидкое мыло, не содержащее
абразивных веществ. Смойте остатки пены.
• Затем снимите бреющую сетку (2) и режущий блок (3). Оставьте детали
для сушки.
Другой способ чистки бритвы – с помощью прилагаемой щеточки (c):
• Выключите бритву. Снимите бреющую сетку и слегка постучите ей по
ровной поверхности.
• Используя щеточку, произведите тщательную чистку режущего блока и
внутренней поверхности бреющей головки. Не очищайте бреющую сетку
щеточкой, это может ее повредить.
Поддержание бритвы в оптимальном состоянии
иЛПВМУ ‡Б ‚ ПВТflˆ ˜ЛТЪЛЪВ ВКЫ˘ЛИ ·ОУН ТФВˆЛ‡О¸М˚ПЛ ТВ‰ТЪ‚‡ПЛ
˜ЛТЪНЛ Braun.
Замена рабочих деталей
Для поддержания 100% эффективности работы бритвы необходимо
регулярно производить замену бреющей сетки (2) и режущего блока (3).
Замену рекомендуется производить по мере износа, но не реже, чем
каждые 18 месяцев. Для обеспечения более чистого бритья и уменьшения
вероятности раздражения кожи, заменяйте обе детали одновременно.
(Бреющая сетка + набор бреющей сетки и режущего блока: 10B)
й·ВТФВ˜ВМЛВ ‡·УЪУТФУТУ·МУТЪЛ ‡ННЫПЫОflЪУУ‚ (только в модели 190s)
уЪУ·˚ У·ВТФВ˜ЛЪ¸ УФЪЛП‡О¸МЫ˛ ВПНУТЪ¸ ‡ННЫПЫОflЪУМ˚ı ·‡Ъ‡ВИ,
МВУ·ıУ‰ЛПУ ФЛПВМУ ‡Б ‚ 6 ПВТflˆВ‚ ФУОМУТЪ¸˛ ‡БflК‡Ъ¸ Лı (ФУО¸БЫflТ¸
·ЛЪ‚УИ). б‡ЪВП Б‡fl‰ЛЪВ ·‡Ъ‡ВЛ М‡ ФУОМЫ˛ ВПНУТЪ¸. зВ ФУ‰‚В„‡ИЪВ
·ЛЪ‚Ы ‚УБ‰ВИТЪ‚Л˛ ЪВПФВ‡ЪЫ˚ ‚˚¯В + 50 °C ‚ ЪВ˜ВМЛВ ‰ОЛЪВО¸МУ„У
ФВЛУ‰‡ ‚ВПВМЛ.
47
Page 47

Содержание можеть быть изменено без предварительного уведомления.
С‡ММУВ ЛБ‰ВОЛВ ТУУЪ‚ВЪТЪ‚ЫВЪ ‚ТВП ЪВ·ЫВП˚П В‚УФВИТНЛП
ТЪ‡М‰‡Ъ‡П ·ВБУФ‡ТМУТЪЛ Л „Л„ЛВМ˚.
Электрическая бритва Braun Series 1 190s-1/170s-1, Тип 5727/5729
Изготовлено в Китае для Браун ГмбХ/Braun GmbH,
Frankfurter Strasse 145, 61476, Kronberg, Germany.
Изделие использовать по назначению в соответствии с данным
руководством по эксплуатации.
ëÔˆËÙË͇ˆËË ÔÓ ˝ÎÂÍÚ˘ÂÒÚ‚Û – ÒÏ. ̇‰ÔËÒ¸ ̇ шнуре питания.
RU: Импортер/Служба потребителей: OOO «Проктер энд Гэмбл
Дистрибьюторская Компания», Россия, 125171, Москва, Ленинградское
шоссе, 16А, стр.2. Тел. 8-800-200-20-20.
BY: Импортер: ООО «Электросервис и Ко», Беларусь, 220012, г. Минск, ул.
Чернышевского, 10А, к. 412А3. Сервисный центр: ООО «Катрикс», Беларусь,
220012, г. Минск, ул. Чернышевского, 10А, к.409.
Й‡‡МЪЛИМ˚В У·flБ‡ЪВО¸ТЪ‚‡ BRAUN
СОfl ‚ТВı ЛБ‰ВОЛИ П˚ ‰‡ВП „‡‡МЪЛ˛ М‡ ‰‚‡ „У‰‡, М‡˜ЛМ‡fl Т ПУПВМЪ‡
ФЛУ·ВЪВМЛfl ЛБ‰ВОЛfl.
З ЪВ˜ВМЛВ „‡‡МЪЛИМУ„У ФВЛУ‰‡ П˚ ·ВТФО‡ЪМУ ЫТЪ‡МЛП ФЫЪВП ВПУМЪ‡,
Б‡ПВМ˚ ‰ВЪ‡ОВИ ЛОЛ Б‡ПВМ˚ ‚ТВ„У ЛБ‰ВОЛfl О˛·˚В Б‡‚У‰ТНЛВ ‰ВЩВНЪ˚,
‚˚Б‚‡ММ˚В МВ‰УТЪ‡ЪУ˜М˚П Н‡˜ВТЪ‚УП П‡ЪВЛ‡ОУ‚ ЛОЛ Т·УНЛ.
З ТОЫ˜‡В МВ‚УБПУКМУТЪЛ ВПУМЪ‡ ‚ „‡‡МЪЛИМ˚И ФВЛУ‰ ЛБ‰ВОЛВ ПУКВЪ
·˚Ъ¸ Б‡ПВМВМУ М‡ МУ‚УВ ЛОЛ ‡М‡ОУ„Л˜МУВ ‚ ТУУЪ‚ВЪТЪ‚ЛЛ Т Б‡НУМУП
«й Б‡˘ЛЪВ Ф‡‚ ФУЪВ·ЛЪВОВИ».
Й‡‡МЪЛfl У·ВЪ‡ВЪ ТЛОЫ, ЪУО¸НУ ВТОЛ ‰‡Ъ‡ ФУНЫФНЛ ФУ‰Ъ‚ВК‰‡ВЪТfl ФВ˜‡Ъ¸˛
Л ФУ‰ФЛТ¸˛ ‰ЛОВ‡ (П‡„‡БЛМ‡) М‡ ФУТОВ‰МВИ ТЪ‡МЛˆВ оригинального
руководства ФУ ˝НТФОЫ‡Ъ‡ˆЛЛ BRAUN, НУЪУ‡fl fl‚ОflВЪТfl „‡‡МЪЛИМ˚П
Ъ‡ОУМУП.
щЪ‡ „‡‡МЪЛfl ‰ВИТЪ‚ЛЪВО¸М‡ ‚ О˛·УИ ТЪ‡МВ, ‚ НУЪУЫ˛ ˝ЪУ ЛБ‰ВОЛВ
ФУТЪ‡‚ОflВЪТfl ЩЛПУИ BRAUN ЛОЛ М‡БМ‡˜ВММ˚П ‰ЛТЪЛ·¸˛ЪУУП, Л „‰В
МЛН‡НЛВ У„‡МЛ˜ВМЛfl ФУ ЛПФУЪЫ ЛОЛ ‰Ы„ЛВ Ф‡‚У‚˚В ФУОУКВМЛfl МВ
ФВФflЪТЪ‚Ы˛Ъ ФВ‰УТЪ‡‚ОВМЛ˛ „‡‡МЪЛИМУ„У У·ТОЫКЛ‚‡МЛfl.
Й‡‡МЪЛfl МВ ФУН˚‚‡ВЪ ФУ‚ВК‰ВМЛfl, ‚˚Б‚‡ММ˚В МВФ‡‚ЛО¸М˚П
ЛТФУО¸БУ‚‡МЛВП (ТП. Ъ‡НКВ ТФЛТУН МЛКВ) Л МУП‡О¸М˚И ЛБМУТ ‰ВЪ‡ОВИ
(М‡ФЛПВ, ТВЪНЛ Л ВКЫ˘В„У ·ОУН‡) ‚ ФУˆВТТВ ˝НТФОЫ‡Ъ‡ˆЛЛ ЛБ‰ВОЛfl.
щЪ‡ „‡‡МЪЛfl ЪВflВЪ ТЛОЫ, ВТОЛ ВПУМЪ ФУЛБ‚У‰ЛОТfl МВ ЫФУОМУПУ˜ВММ˚П
48
Page 48

М‡ ЪУ ОЛˆУП, Л ВТОЛ ЛТФУО¸БУ‚‡М˚ МВ УЛ„ЛМ‡О¸М˚В ‰ВЪ‡ОЛ BRAUN.
З ТОЫ˜‡В ФВ‰˙fl‚ОВМЛfl ВНО‡П‡ˆЛЛ ФУ ЫТОУ‚ЛflП ‰‡ММУИ „‡‡МЪЛЛ,
ФВВ‰‡ИЪВ ЛБ‰ВОЛВ ˆВОЛНУП ‚ПВТЪВ Т „‡‡МЪЛИМ˚П Ъ‡ОУМУП ‚ О˛·УИ ЛБ
ˆВМЪУ‚ ТВ‚ЛТМУ„У У·ТОЫКЛ‚‡МЛfl BRAUN.
ЗТВ ‰Ы„ЛВ ЪВ·У‚‡МЛfl, ‚НО˛˜‡fl ЪВ·У‚‡МЛfl ‚УБПВ˘ВМЛfl Ы·˚ЪНУ‚,
ЛТНО˛˜‡˛ЪТfl, ВТОЛ М‡¯‡ УЪ‚ВЪТЪ‚ВММУТЪ¸ МВ ЫТЪ‡МУ‚ОВМ‡ ‚ Б‡НУММУП
ФУfl‰НВ.
кВНО‡П‡ˆЛЛ, Т‚flБ‡ММ˚В Т НУППВ˜ВТНЛП НУМЪ‡НЪУП Т ФУ‰‡‚ˆУП МВ
ФУФ‡‰‡˛Ъ ФУ‰ ˝ЪЫ „‡‡МЪЛ˛.
З ТУУЪ‚ВЪТЪ‚ЛЛ Т Б‡НУМУП ко ‹ 2300-1 УЪ 7.02.1992 „. «й б‡˘ЛЪВ Ф‡‚
ФУЪВ·ЛЪВОВИ» ЩЛП‡ BRAUN ЫТЪ‡М‡‚ОЛ‚‡ВЪ ТУН ТОЫК·˚ М‡ Т‚УЛ ЛБ‰ВОЛfl
‡‚М˚П ‰‚ЫП „У‰‡П Т ПУПВМЪ‡ ФЛУ·ВЪВМЛfl ЛОЛ Т ПУПВМЪ‡ ФУЛБ‚У‰ТЪ‚‡,
ВТОЛ ‰‡ЪЫ ФУ‰‡КЛ ЫТЪ‡МУ‚ЛЪ¸ МВ‚УБПУКМУ.
аБ‰ВОЛfl BRAUN ЛБ„УЪУ‚ОВМ˚ ‚ ТУУЪ‚ВЪТЪ‚ЛЛ Т ‚˚ТУНЛПЛ ЪВ·У‚‡МЛflПЛ
В‚УФВИТНУ„У Н‡˜ВТЪ‚‡. иЛ ·ВВКМУП ЛТФУО¸БУ‚‡МЛЛ Л ФЛ ТУ·О˛‰ВМЛЛ
Ф‡‚ЛО ФУ ˝НТФОЫ‡Ъ‡ˆЛЛ, ФЛУ·ВЪВММУВ З‡ПЛ ЛБ‰ВОЛВ BRAUN, ПУКВЪ
ЛПВЪ¸ БМ‡˜ЛЪВО¸МУ ·УО¸¯ЛИ ТУН ТОЫК·˚, ˜ВП ТУН ЫТЪ‡МУ‚ОВММ˚И ‚
ТУУЪ‚ВЪТЪ‚ЛЛ Т кУТТЛИТНЛП Б‡НУМУП.
ëÎÛ˜‡Ë, ̇ ÍÓÚÓ˚ „‡‡ÌÚËfl Ì ‡ÒÔÓÒÚ‡ÌflÂÚÒfl:
– ‰ВЩВНЪ˚, ‚˚Б‚‡ММ˚В ЩУТ-П‡КУМ˚ПЛ У·ТЪУflЪВО¸ТЪ‚‡ПЛ;
– ЛТФУО¸БУ‚‡МЛВ ‚ ФУЩВТТЛУМ‡О¸М˚ı ˆВОflı;
– М‡Ы¯ВМЛВ ЪВ·У‚‡МЛИ руководства ФУ ˝НТФОЫ‡Ъ‡ˆЛЛ;
– МВФ‡‚ЛО¸М‡fl ЫТЪ‡МУ‚Н‡ М‡ФflКВМЛfl ФЛЪ‡˛˘ВИ ТВЪЛ (ВТОЛ ˝ЪУ ЪВ·ЫВЪТfl);
– ‚МВТВМЛВ ЪВıМЛ˜ВТНЛı ЛБПВМВМЛИ;
– ПВı‡МЛ˜ВТНЛВ ФУ‚ВК‰ВМЛfl;
– ФУ‚ВК‰ВМЛfl ФУ ‚ЛМВ КЛ‚УЪМ˚ı, „˚БЫМУ‚ Л М‡ТВНУП˚ı (‚ ЪУП ˜ЛТОВ
ТОЫ˜‡Л М‡ıУК‰ВМЛfl „˚БЫМУ‚ Л М‡ТВНУП˚ı ‚МЫЪЛ ФЛ·УУ‚);
– ‰Îfl ÔË·ÓÓ‚, ‡·ÓÚ‡˛˘Ëı ÓÚ ·‡Ú‡ÂÂÍ, – ‡·ÓÚ‡ Ò ÌÂÔÓ‰ıÓ‰fl˘ËÏË ËÎË
ЛТЪУ˘ВММ˚ПЛ ·‡Ъ‡ВИН‡ПЛ, О˛·˚В ФУ‚ВК‰ВМЛfl, ‚˚Б‚‡ММ˚В
ЛТЪУ˘ВММ˚ПЛ ЛОЛ ЪВНЫ˘ЛПЛ ·‡Ъ‡ВИН‡ПЛ (ТУ‚ВЪЫВП ФУО¸БУ‚‡Ъ¸Тfl ЪУО¸НУ
ФВ‰Уı‡МВММ˚ПЛ УЪ ‚˚ЪВН‡МЛfl ·‡Ъ‡ВИН‡ПЛ);
– ‰Îfl ·ËÚ‚ – ÒÏflÚ‡fl ËÎË ÔÓ‚‡Ì̇fl ÒÂÚ͇.
ЗМЛП‡МЛВ! йЛ„ЛМ‡О¸М˚И Й‡‡МЪЛИМ˚И н‡ОУМ ФУ‰ОВКЛЪ ЛБ˙flЪЛ˛ ФЛ
У·‡˘ВМЛЛ ‚ ТВ‚ЛТМ˚И ˆВМЪ ‰Оfl „‡‡МЪЛИМУ„У ВПУМЪ‡. иУТОВ ФУ‚В‰ВМЛfl
ВПУМЪ‡ Й‡‡МЪЛИМ˚П н‡ОУМУП ·Ы‰ВЪ fl‚ОflЪ¸Тfl Б‡ФУОМВММ˚И УЛ„ЛМ‡О гЛТЪ‡
‚˚ФУОМВМЛfl ВПУМЪ‡ ТУ ¯Ъ‡ПФУП ТВ‚ЛТМУ„У ˆВМЪ‡ Л ФУ‰ФЛТ‡ММ˚И
ФУЪВ·ЛЪВОВП ФУ ФУОЫ˜ВМЛЛ ЛБ‰ВОЛfl ЛБ ВПУМЪ‡. нВ·ЫИЪВ ФУТЪ‡‚ОВМЛfl
‰‡Ъ˚ ‚УБ‚‡Ъ‡ ЛБ ВПУМЪ‡, ТУН „‡‡МЪЛЛ ФУ‰ОВ‚‡ВЪТfl М‡ ‚ВПfl
М‡ıУК‰ВМЛfl ЛБ‰ВОЛfl ‚ ТВ‚ЛТМУП ˆВМЪВ.
З ТОЫ˜‡В ‚УБМЛНМУ‚ВМЛfl ТОУКМУТЪВИ Т ‚˚ФУОМВМЛВП „‡‡МЪЛИМУ„У ЛОЛ
ФУТОВ„‡‡МЪЛИМУ„У У·ТОЫКЛ‚‡МЛfl ФУТ¸·‡ ТУУ·˘‡Ъ¸ У· ˝ЪУП ‚
аМЩУП‡ˆЛУММЫ˛ лОЫК·Ы лВ‚ЛТ‡ BRAUN ФУ ЪВОВЩУМЫ 8 800 200 20 20
(Б‚УМУН ЛБ кУТТЛЛ ·ВТФО‡ЪМУ).
49
Page 49

ì͇ªÌҸ͇
Керівництво з експлуатації
Наші вироби розроблені, щоб відповідати найвищим стандартам якості,
функціональності та дизайну. Сподіваємося, що Вам сподобається Ваша
нова бритва BRAUN.
Важливо
До комплекту Вашої бритви входить спеціальний шнур живлення з вмонтованим блоком запасного енергопостачання на випадок падіння напруги.
Не можна замінювати чи зачіпати будь-яку з деталей, оскільки це може
призвести до ураження електричним струмом.
Не використовуйте бритву з пошкодженими сіткою або спеціальним шнуром
живлення.
Прилад не призначений для використання особами (включаючи дітей)
зі зниженими фізичними, чуттєвими або розумовими можливостями або за
відсутності у них досвіду або знань, якщо вони не знаходяться під контролем
або не проінструктовані про використання приладу особою, відповідальною
за їх безпеку. Діти повинні знаходитися під контролем для недопущення гри
з приладом.
Баночка з олійкою
Тримати подалі від дітей. Не ковтати. Утилізувати як побутовий відхід.
Опис та комплектність
1 б‡ıЛТМЛИ НУ‚Ф‡˜УН Т¥ЪУ˜НЛ ‰Оfl „УО¥ММfl
2 л¥ЪУ˜Н‡ ‰Оfl „УО¥ММfl
3 к¥КЫ˜ЛИ ·ОУН
4 нЛПВ ‰Оfl ‰У‚„У„У ‚УОУТТfl
5 г‡ПФУ˜Н‡-¥М‰ЛН‡ЪУ Б‡fl‰К‡ММfl (тільки для моделі 190s)
6 ЗЛПЛН‡˜ ‚‚¥ПНМ./‚ЛПНМ.
7 лФВˆ¥‡О¸МЛИ ¯МЫ
Заряджання (тільки для моделі 190s)
йФЪЛП‡О¸М‡ ЪВПФВ‡ЪЫ‡ ТВВ‰У‚Л˘‡ Ф¥‰ ˜‡Т Б‡fl‰К‡ММfl ТЪ‡МУ‚ЛЪ¸ ‚¥‰
15 °л ‰У 35 °л.
• б‡ ‰УФУПУ„У˛ ТФВˆ¥‡О¸МУ„У ¯МЫ‡ Ф¥‰НО˛˜¥Ъ¸ ·ЛЪ‚Ы ‰У ВОВНЪЛ˜МУª
ПВВК¥, ФЛ˜УПЫ ПУЪУ ФУ‚ЛМВМ ·ЫЪЛ ‚ЛПНМВМЛИ.
• 襉 ˜‡Ò ÔÂ¯Ó„Ó Á‡fl‰Ê‡ÌÌfl ·ËÚ‚Ë ªª ÒÎ¥‰ Á‡Î˯ËÚË Á‡fl‰Ê‡ÚËÒfl
·ВБФВВ‚МУ ФУЪfl„УП 4 „У‰ЛМ. ьН˘У „УЛЪ¸ О‡ПФУ˜Н‡-¥М‰ЛН‡ЪУ (5), ˆВ
УБМ‡˜‡π, ˘У ·ЛЪ‚‡ Б‡fl‰К‡πЪ¸Тfl. дУОЛ ‡НЫПЫОflЪУ ФУ‚М¥ТЪ˛ Б‡fl‰КВМЛИ,
О‡ПФУ˜Н‡-¥М‰ЛН‡ЪУ ФУ˜ЛМ‡π ·ОЛП‡ЪЛ. сВ УБМ‡˜‡π, ˘У ‡НЫПЫОflЪУ
ФУ‚М¥ТЪ˛ Б‡fl‰КВМЛИ.
50
Page 50

• иУ‚М‡ Б‡fl‰Н‡ ‰УБ‚УОflπ „УОЛЪЛТfl ФУЪfl„УП ФЛ·ОЛБМУ 30 ı‚ЛОЛМ, Б‡ОВКМУ
‚¥‰ ÓÒÚÛ Ç‡¯Óª щетини, ·ВБ Ф¥‰НО˛˜ВММfl ‰У ВОВНЪУПВВК¥.
• дУОЛ ·ЛЪ‚‡ ФУ‚М¥ТЪ˛ Б‡fl‰ЛЪ¸Тfl, „УО¥Ъ¸Тfl МВ˛ Ы Б‚Л˜‡ИМУПЫ ВКЛП¥ ‰У
ФУ‚МУ„У УБfl‰КВММfl. иУЪ¥П БМУ‚Ы ФУ‚М¥ТЪ˛ ФВВБ‡fl‰¥Ъ¸. з‡ТЪЫФМ¥ ТВ‡МТЛ
Б‡fl‰К‡ММfl ЪЛ‚‡ЪЛПЫЪ¸ ·ОЛБ¸НУ 1 „У‰ЛМЛ.
• е‡НТЛП‡О¸МУª ФУЪЫКМУТЪ¥ ‡НЫПЫОflЪУ‡ ПУКМ‡ ‰УТfl„ЪЛ ОЛ¯В Ф¥ТОfl Н¥О¸НУı
ˆЛНО¥‚ заряджання/розряджання.
• ьН˘У ‡НЫПЫОflЪУЛ УБfl‰ЛОЛТfl, ЗЛ ПУКВЪВ „УОЛЪЛТfl, Ф¥‰НО˛˜Л‚¯Л
·ЛЪ‚Ы ‰У ВОВНЪЛ˜МУª ПВВК¥ Б‡ ‰УФУПУ„У˛ ТФВˆ¥‡О¸МУ„У ¯МЫ‡.
ÉÓÎ¥ÌÌfl
бМflЪЛ Б‡ıЛТМЛИ НУ‚Ф‡˜УН Т¥ЪУ˜НЛ ‰Оfl „УО¥ММfl (1). иЛ‚ВТЪЛ Ы ‰¥˛ ‚ЛПЛН‡˜
(‚‚¥ПНМ./‚ЛПНМ.). иУ‚УУЪМЛИ ¥КЫ˜ЛИ ·ОУН ‡‚ЪУП‡ЪЛ˜МУ підлаштовується до
контурів LJ¯Ó„Ó Ó·Î˘˜fl ¥ ˘¥Î¸ÌÓ ÔËÎfl„‡π ‰Ó ÈÓ„Ó ÔÓ‚ÂıÌ¥, Á‡‚‰flÍË ˜ÓÏÛ
Á‡·ÂÁÔ˜ÛπÚ¸Òfl ÂÚÂθÌ ¥ ˜ËÒÚ „ÓÎ¥ÌÌfl.
ьН˘У ЗЛ Н¥О¸Н‡ ‰М¥‚ МВ „УОЛОЛТfl, ЪУ ‰Оfl ФУФВВ‰М¸У„У „УО¥ММfl ‚ЛНУЛТЪУ‚ЫИЪВ ЪЛПВ ‰Оfl ‰У‚„У„У ‚УОУТТfl (4), ‰Оfl ЪУ„У ˘У· Ф¥‰¥Б‡ЪЛ ‰У‚„В ‚УОУТТfl.
СОfl ЪУ„У ˘У· ФУ„УОЛЪЛТfl ВЪВО¸МУ ¥ ˜ЛТЪУ, М‡ Б‡‚В¯‡О¸МУПЫ ВЪ‡Ф¥
НУЛТЪЫИЪВТfl Т¥ЪУ˜НУ˛.
äÓËÒÚÛ‚‡ÌÌfl ÚËÏÂÓÏ
ЗЛТЫМ¸ЪВ ЪЛПВ ‰Оfl ‰У‚„У„У ‚УОУТТfl (a). З¥М ‰УБ‚УОflπ Б‰¥ИТМ˛‚‡ЪЛ
НУМЪУО¸У‚‡МВ Ф¥‰ТЪЛ„‡ММfl ‚ЫТ Ъ‡ НУУЪНЛı ·‡Н¥‚. З¥М ¥‚МУ Ф¥‰¥Б‡π ¥
Ф¥‰ТЪЛ„‡π ‚ВОЛН¥ ‰¥ОflМНЛ: ¥‰В‡О¸МЛИ ‰Оfl М‡‰‡ММfl ЩУПЛ НУУЪНЛП ·‡Н‡П,
‚ЫТ‡П Ъ‡ МВ‚ВОЛН¥И ·У¥‰ˆ¥.
у‡ТЪВ Б‡ТЪУТЫ‚‡ММfl ЪЛПВ‡ ‰Оfl ‰У‚„У„У ‚УОУТТfl ПУКВ БМЛБЛЪЛ ФУЪЫКМ¥ТЪ¸
‡НЫПЫОflЪУ¥‚ (тільки для моделі 190s).
Маленькі поради для ідеального гоління
Щоб результати гоління були якнайкращими, Braun дає Вам 3 прості
поради:
1. Завжди голіться перед вмиванням.
2. Завжди тримайте бритву під прямим кутом (90°) до шкіри.
3. Натягуйте шкіру і голіть у напрямку проти росту бороди.
Чищення
Голівку бритви зручно чистити під струменем води.
Увага: Вимкніть бритву з електричної мережі, перш ніж починати
чищення голівки бритви у воді.
51
Page 51

Регулярне чищення гарантує найкращу роботу бритви. Щоб легко та швидко
очистити бритву після гоління, промивайте голівку, що голить, під проточною водою (b):
Лише для моделі 190s:
• Ввімкніть бритву та промийте голівку, що голить, під струменем гарячої
води. Можна також використовувати рідке мило без абразивних часточок.
Змийте всю піну та залиште бритву попрацювати ще декілька секунд.
• Після цього вимкніть бритву, зніміть сіточку для гоління (2) та ріжучий блок
(3). Потім дайте розібраним частинам просохнути.
• Якщо Ви регулярно чистите бритву у воді, слід раз на тиждень наносити
краплю легкого машинного мастила на тример для довгого волосся і
сіточку для гоління (d).
Лише для моделі 170s:
• Після кожного гоління промивайте голівку, що голить, під струменем
гарячої води (b). Ви можете також використовувати рідке мило без абразивних часточок. Змийте всю піну.
• Після цього зніміть сіточку для гоління (2) та ріжучий блок (3). Потім дайте
розібраним частинам просохнути.
Ви також можете почистити бритву за допомогою щіточки, що входить
в комплект (c):
• Вимкніть бритву. Зніміть сіточку для гоління та витрусіть її на плоскій
поверхні.
• За допомогою щіточки почистіть ріжучий блок та внутрішню частину
голівки бритви. Однак, не можна чистити сіточку для гоління щіткою,
оскільки це може її пошкодити.
Як тримати Вашу бритву у найкращому стані
иЛ·ОЛБМУ ‡Б М‡ ˜УЪЛЛ ЪЛКМ¥ ¥КЫ˜ЛИ ·ОУН ТО¥‰ ˜ЛТЪЛЪЛ ТФВˆ¥‡О¸МЛПЛ
Б‡ТУ·‡ПЛ ‰Оfl ˜Л˘ВММfl Braun.
Заміна сіточки для гоління та ріжучого блоку
Щоб зберігати стовідсоткову якість гоління, замінюйте сіточку для гоління
(2) та ріжучий блок (3) кожні 18 місяців або коли вони зношуються.
Замінюйте обидві деталі одночасно, для чистішого гоління з меншим
подразненням шкіри.
(Сіточка для гоління та ріжучий блок: 10B)
СУ„Оfl‰ Б‡ ‡НЫПЫОflЪУ‡ПЛ (тільки для моделі 190s)
СОfl Ф¥‰ЪЛП‡ММfl П‡НТЛП‡О¸МУª ФУЪЫКМУТЪ¥ ‡НЫПЫОflЪУ¥‚ МВУ·ı¥‰МУ
ФЛ·ОЛБМУ ‡Б М‡ 6 П¥Тflˆ¥‚ ФУ‚М¥ТЪ˛ УБfl‰К‡ЪЛ ·ЛЪ‚Ы, НУЛТЪЫ˛˜ЛТ¸ МВ˛.
и¥ТОfl ˆ¸У„У ТО¥‰ БМУ‚Ы ФУ‚М¥ТЪ˛ Б‡fl‰ЛЪЛ ªª. зВ Ф¥‰‰‡‚‡ИЪВ ·ЛЪ‚Ы ‚ФОЛ‚Ы
ЪВПФВ‡ЪЫЛ ФУМ‡‰ 50 °л ФУЪfl„УП ‰У‚„У„У ˜‡ТЫ.
52
Page 52

ЦНУОУ„¥˜МВ ФУФВВ‰КВММfl
сВИ ФЛТЪ¥И П¥ТЪЛЪ¸ ·‡Ъ‡ВИНЛ, ˘У ФВВБ‡fl‰К‡˛Ъ¸Тfl. З ¥МЪВВТ‡ı
Б‡ıЛТЪЫ М‡‚НУОЛ¯М¸У„У ТВВ‰У‚Л˘‡, ФУТЛПУ МВ НЛ‰‡ЪЛ ªı ‰У НУБЛМЛ
Б ‰УП‡¯М¥ПЛ ‚¥‰ıУ‰‡ПЛ Ф¥ТОfl Б‡Н¥М˜ВММfl терміну ‚ЛНУЛТЪ‡ММfl.
ЗЛ ПУКВЪВ Б‰‡ЪЛ ªı ‰У лВ‚¥ТМУ„У ˆВМЪЫ ‡·У ‰У ‚¥‰ФУ‚¥‰МУ„У ˆВМЪЫ
Б·УЫ, ˘У БМ‡ıУ‰ЛЪ¸Тfl Ы ‚‡¯¥И Н‡ªМ¥.
Вміст може бути змінений виробником без попереднього повідомлення.
ЦОВНЪЛ˜М¥ ТФВˆЛЩ¥Н‡ˆ¥ª М‡‚В‰ВМУ М‡ ТФВˆ¥‡О¸МУПЫ НУПФОВНЪ¥ КЛ‚ОВММfl.
Бритва Braun Series 1 190s-1/170s-1, Тип 5727/5729
ÇË„ÓÚÓ‚ÎÂÌÓ Û äËÚ‡ª для Браун ГмбХ: BRAUN Electric (Shanghai)
Co Ltd., Lu Chun Road 475-495, Minhang, Shanghai 200245. P.R. of China.
Товар використовувати за призначенням, відповідно до інструкції з
експлуатації.
Дата виготовлення продукції Braun вказана безпосередньо на виробі
(в місці маркування) і складається з трьох цифр: перша цифра є останньою
цифрою року виробництва, інші дві цифри є порядковим номером тижня у
році.
Гарантія – 2 роки.
Адреса в Україні: ТОВ «Проктер енд Гембл Трейдінг Україна», Україна,
04070, м.Київ, вул. Набережно-Хрещатицька, 5/13, корпус літ. А.
Тел. (0-800) 505-000. www.pg.com.ua
Обладнання відповідає вимогам Технічного регламенту обмеження
використання деяких небезпечних речовин в електричному та електронному
обладнані.
53
Page 53

ɇ‡ÌÚ¥ÈÌ¥ ÁÓ·Ó‚’flÁ‡ÌÌfl виробника
Для всіх виробів ми даємо гарантію на два роки, починаючи з моменту
придбання виробу або з дати його виробництва, у разі відсутності або
неналежного оформлення гарантійного талону на виріб.
èÓÚfl„ÓÏ „‡‡ÌÚ¥ÈÌÓ„Ó ÔÂ¥Ó‰Û ÏË безкоштовно ЫТЫ‚‡πПУ ¯ОflıУП ВПУМЪЫ,
Б‡ПiМЛ ‰ВЪ‡ОВИ ‡·У Б‡П¥МЛ ‚Т¸У„У ‚ЛУ·Ы ·Ы‰¸-flН¥ Б‡‚У‰Т¸Н¥ ‰ВЩВНЪЛ,
‚ЛНОЛН‡М¥ МВ‰УТЪ‡ЪМ¸У˛ flН¥ТЪ˛ П‡ЪВ¥‡О¥‚ ‡·У ТНО‡‰‡ММfl.
м ‚ЛФ‡‰НЫ МВПУКОЛ‚УТЪ¥ ВПУМЪЫ ‚ „‡‡МЪ¥ИМЛИ ФВ¥У‰ ‚Л¥· ПУКВ ·ЫЪЛ
Б‡П¥МВМЛИ М‡ МУ‚ЛИ ‡·У ‡М‡ОУ„¥˜МЛИ ‚¥‰ФУ‚¥‰МУ ‰У б‡НУМЫ ФУ Б‡ıЛТЪ Ф‡‚
ТФУКЛ‚‡˜¥‚.
Й‡‡МЪ¥fl М‡·Ы‚‡π ТЛОЛ ОЛ¯В, flН˘У ‰‡Ъ‡ НЫФ¥‚О¥ Ф¥‰Ъ‚В‰КЫπЪ¸Тfl ФВ˜‡ЪНУ˛ Ъ‡
Фi‰ФЛТУП дилера (П‡„‡БЛМЫ) М‡ УЛ„¥М‡О¸МУПЫ „‡‡МЪ¥ИМУПЫ Ъ‡ОУМ¥ З„aun ‡·У
М‡ УТЪ‡ММ¥И ТЪУ¥Мˆ¥ УЛ„¥М‡О¸МУª ¥МТЪЫНˆ¥ª Б ВНТФОЫ‡Ъ‡ˆ¥ª Зr‡un, flН‡ Ъ‡НУК
ПУКВ ·ЫЪЛ „‡‡МЪiИМЛП Ъ‡ОУМУП.
сfl „‡‡МЪ¥fl ‰¥ИТМ‡ Ы ·Ы‰¸-flН¥И Н‡ªМ¥, ‚ flНЫ ˆВИ ‚Л¥· ФУТЪ‡‚ОflπЪ¸Тfl
представником компанії виробника ‡·Ó ÔËÁ̇˜ÂÌËÏ дистриб’ютором, Ъ‡ ‰В
КУ‰М¥ У·ПВКВММfl Б ¥ПФУЪЫ ‡·У ¥М¯¥ Ф‡‚У‚¥ ФУОУКВММfl МВ ФВВ¯НУ‰К‡˛Ъ¸
М‡‰‡ММ˛ „‡‡МЪ¥ИМУ„У У·ТОЫ„У‚Ы‚‡ММfl.
Й‡‡МЪ¥fl М‡ Б‡П¥МВМ¥ ˜‡ТЪЛМЛ Б‡Н¥М˜ЫπЪ¸Тfl ‚ ПУПВМЪ Б‡НiМ˜ВММfl „‡‡МЪ¥ª М‡
‰‡МЛИ ‚Лi·.
Й‡‡МЪ¥fl МВ ФУНЛ‚‡π ФУ¯НУ‰КВММfl, ‚ЛНОЛН‡М¥ МВ‚iМЛП ‚ЛНУЛТЪ‡ММflП (‰Л‚.
Ъ‡НУК ФВВОiН МЛК˜В) нормальне зношування Т¥ЪУН Ъ‡ МУК¥‚ ‰Оfl „УОiММfl,
‰ВЩВНЪЛ, ˘У МВБМ‡˜МЛП ˜ЛМУП ‚ФОЛ‚‡˛Ъ¸ М‡ flН¥ТЪ¸ У·УЪЛ ФЛО‡‰Ы. сfl
„‡‡МЪ¥fl ‚Ъ‡˜‡π ТЛОЫ, flН˘У ВПУМЪ Б‰iИТМ˛πЪ¸Тfl МВ ‚ФУ‚МУ‚‡КВМУ˛ ‰Оfl
ˆ¸У„У УТУ·У˛ Ъ‡, flН˘У ‚ЛНУЛТЪУ‚Ы˛Ъ¸Тfl МВ УЛ„¥М‡О¸Мi запасні частини
виробника.
У випадку пред’явлення рекламації за умовами даної гарантії, передайте
виріб у повному комплекті згідно опису в оригінальній інструкції з
експлуатації разом з гарантійним талоном у будь-який сервісний центр,
який офіційно вповноважений представником компанії виробника.
ЗТ¥ ¥М¯¥ ‚ЛПУ„Л, ‡БУП Б ‚ЛПУ„‡ПЛ ‚¥‰¯НУ‰Ы‚‡ММfl Б·ЛЪН¥‚, МВ ‰¥ИТМ¥, flН˘У
М‡¯‡ ‚¥‰ФУ‚i‰‡О¸М¥ТЪ¸ МВ ‚ТЪ‡МУ‚ОВМ‡ Б‡НУММЛП ˜ЛМУП.
ÇËÔ‡‰ÍË, ̇ flÍ¥ Ì ÓÁÔÓ‚Ò˛‰ÊÛπÚ¸Òfl „‡‡ÌÚ¥fl:
– ‰ВЩВНЪЛ, ‚ЛНОЛН‡М¥ ЩУТ-П‡КУМЛПЛ У·ТЪ‡‚ЛМ‡ПЛ;
– використання з професійною метою або з метою отримання прибутку;
– ФУЫ¯ВММfl ‚ЛПУ„ ¥МТЪЫНˆ¥ª Б ВНТФОЫ‡Ъ‡ˆ¥ª;
– МВ‚iМВ ‚ТЪ‡МУ‚ОВММfl М‡ФЫ„Л ПВВКi КЛ‚ОВММfl (flН˘У ˆВ ‚ЛП‡„‡πЪ¸Тfl);
– Б‰iИТМВММfl ЪВıМ¥˜МЛı БП¥М;
– ПВı‡М¥˜Мi ФУ¯НУ‰КВММfl;
– ‰Оfl ФЛО‡‰¥‚, ˘У Ф‡ˆ˛˛Ъ¸ М‡ ·‡Ъ‡ВИН‡ı – У·УЪ‡ Б МВ‚i‰ФУ‚¥‰МЛПЛ
‡·У ТФ‡ˆ¸У‚‡МЛПЛ ·‡Ъ‡ВИН‡ПЛ, ·Ы‰¸flН¥ ФУ¯НУ‰КВММfl, ‚ЛНОЛН‡М¥
ТФ‡ˆ¸У‚‡МЛПЛ ‡·У Ф¥‰Ъ¥Н‡˛˜ЛПЛ ·‡Ъ‡ВИН‡ПЛ;
54
Page 54

– пошкодження з вини тварин, гризунів та комах (в тому числі у випадках
знаходження гризунів та комах усередині приладів)
– ‰Îfl ·ËÚ‚ – Á¥Ï’flÚ‡ ‡·Ó ÔÓ‚‡Ì‡ Ò¥Ú͇.
Увага! Гарантійний талон підлягає вилученню в разі звернення до сервісного
центру з проханням про виконання гарантійного ремонту. Після проведення
ремонту гарантійним талоном буде вважатися заповнений оригінал листа
виконаного ремонту зі штампом сервісного центру та підписаний
споживачем про отримання виробу з ремонту. Гарантійний термін
подовжується на період, який даний виріб знаходився в сервісному центрі
в ремонті.
В разі виникнення труднощів з виконанням гарантійного та післягарантійного
обслуговування, прохання звертатися до інформаційної служби сервісу
представника компанії виробника в Україні.
Телефон гарячої лінії 0800505 000. Дзвінки по Україні зі стаціонарних
телефонних номерів є безкоштовними. Дзвінки з мобільних телефонів
оплачуються згідно тарифів відповідного оператора.
Також можна отримати додаткову інформацію на сервісному порталі
виробника в інтернеті www.service.braun.com
55
Page 55

565758
Page 56

Page 57

(10B
170s
(c)
Page 58

596061
Page 59

Page 60

 Loading...