

Brandt WTC1398K User Manual

FR GUIDE D’INSTALLATION & D’UTILISATION
EN INSTRUCTIONS FOR USE
DE GEBRAUCHSANWEISUNG
EL Ο∆ΗΓΙΕΣ ΕΓΚΑΤΑΣΤΑΣΗΣ & ΧΡΗΣΗΣ
IT GUIDA D'INSTALLAZIONE E DI UTILIZZO
PT INSTRUÇOES DE USO
Lave-Linge
Washing machine
Wäschmaschine
Πλυντήριο ρούχων
Lavatrice
Máquina de lavar roupa

2
FR Page 3
Page 15
EN
Important :
Avant de mettre votre appareil en route, veuillez lire attentivement ce guide d’installation et d’utilisation afin de vous
familiariser plus rapidement avec son fonctionnement
Dans le souci d’une amélioration constante de nos produits, nous nous réservons le droit d’apporter à leurs caractéristiques
techniques, fonctionnelles ou esthétiques toutes modifications liées à leur évolution.
Warning :
Before installing and using your appliance, please carefully read this Guide to Installation and Use, which will allow
you to quickly familiarise yourself with its operation.
As part of our commitment to constantly improving our products, we reserve the right to make changes to them based
on technical advances to their technical and functional features and appearance.
Seite 27DE
Wichtig:
Bitte lesen Sie vor der Inbetriebnahme des Gerätes diese Einbau- und Gebrauchsanleitung aufmerksam durch, damit
Sie sich sehr rasch mit seinem Betrieb vertraut machen können.
Da wir unsere Produkte ständig verbessern möchten, behalten wir uns das Recht vor, ihre technischen, funktionellen und
ästhetischen Merkmale zu verändern, damit sie mit der technischen Weiterentwicklung Schritt halten.
IT Pagina 51
Importante :
Prima di usare il vostro elettrodomestico per la prima volta, raccomandiamo di leggere con attenzione la guida
d’installazione e d’utilizzo per prendere dimestichezza più rapidamente col suo funzionamento.
Al fine di migliorare costantemente i nostri prodotti, ci riserviamo il diritto di apportare le modifiche tecniche, funzionali
od estetiche necessarie alla loro evoluzione.
Página 63PT
Importante:
Antes de pôr o aparelho a funcionar, leia este guia de instalação e de utilização com atenção para se familiarizar mais
rapidamente com o seu funcionamento.
Com a preocupação de melhorar constantemente os nossos produtos, reservamo nos o direito de modificar as respectivas
características técnicas, funcionais ou estéticas por motivos ligados à sua evolução.
Σελίδα 39
EL
Σηµαντικό:
Πριν θέσετε τη συσκευή σε λειτουργία, παρακαλείστε να διαβάσετε προσεχτικά αυτές τις οδηγίες ώστε να
εξοικειωθείτε γρηγορότερα µε τη λειτουργία της συσκευής.
Μεριµνώντας για τη συνεχή βελτίωση των προϊόντων µας, κρατάµε το δικαίωµα για οποιαδήποτε τροποποίηση
των τεχνικών λειτουργικών ή αισθητικών χαρακτηριστικών τους που συνδέεται µε την εξέλιξή τους.
15
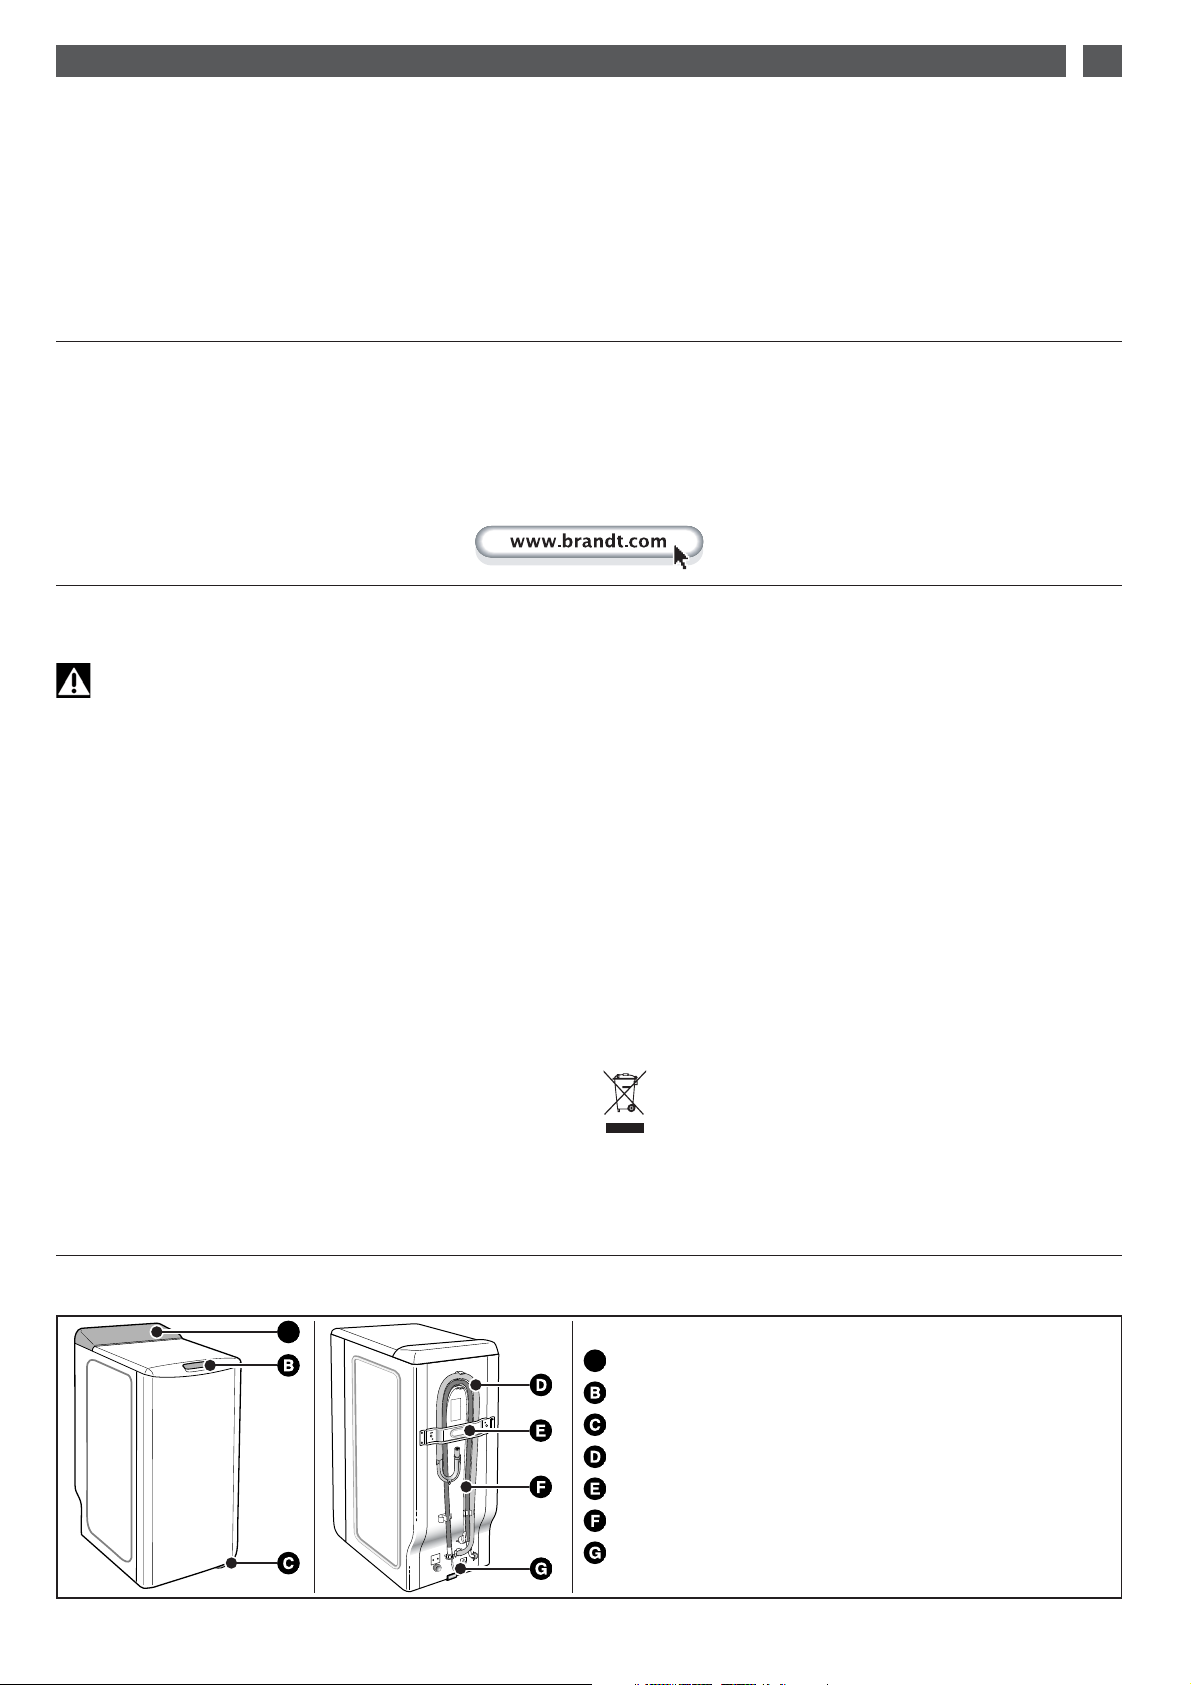
EN1 / INTRODUCTION TO YOUR MACHINE
Control panel
Handle for opening the lid (remains locked during the cycle)
Lever for raising the machine on castors (depending on the model)
Drain hose
Cross clamp
Water supply hose (not connected)
Power supply cable
A
•DESCRIPTION OF YOUR MACHINE
D 1 D 2
A
•SAFETY ADVICE
Important :
This machine is only for domestic use and is designed to
wash, rinse and spin machine-washable textiles.
Y
ou must observe the following instructions. We refuse to accept
any liability and the guarantee if you do not observe these
recommendations since this could result in damage to equipment
or physical injury.
— The machine must only be used in accordance with its normal method
of operation in order to avoid damaging your washing and your machine.
Only use washing and maintenance products certified for use in domestic
washing machines.
— If you pre-treat your washing with stain removers, solvents or, in general,
any inflammable or potentially highly explosive product, do not insert
them into the machine immediately.
Furthermore, you are also recommended not to use solvents or products
in aerosol cans near to your washing machine or any electrical appliance
in general in a poorly ventilated room (risk of fire and explosion).
— If any incidents occur and you cannot resolve them using the remedies
we recommend (see the section “INCIDENTS THAT MAY ARISE”), call
in a qualified professional.
— If you have to open your machine during a cycle (for example, to add
or remove washing), depending on the stage the programme is at (during
washing essentially), be careful of the temperature inside the machine,
which may be very high (risk of severe burns).
— When making a new installation, the machine must be connected to
the water supply with a new hose: the old hose must not be re-used.
— Do not let children play with the machine and keep your pets away
from it.
— You must immediately make any obsolete machine unusable.
Disconnect and cut off the power cable flush with the machine. Close
the water tap and remove the hose. Disable the door lock.
— If there is a risk of frost, disconnect the water hose and drain off any
water that may remain in the drain hose by placing this as low as possible
in a bowl.
•SAVING ENERGY
— Only programme a prewash when it is absolutely necessary: for
example, for very dirty sports or working clothes, etc.
— A low temperature programme is sufficient for impeccable washing
results when your washing is only slightly or moderately dirty.
— For washing that is only slightly dirty, select a short washing cycle
(“Rapid”, “Express” or “Flash”, depending on the model).
— Use the right amount of washing products for the hardness of the
water, the amount of washing and how dirty it is and follow the instructions
on the detergent packs.
•ENVIRONMENTAL PROTECTION
This appliance’s packaging material is recyclable. Help recycle it and
protect the environment by dropping it off in the municipal receptacles
provided for this purpose.
Your appliance also contains a great amount of recyclable material.
It is marked with this label to indicate the used appliances that
should not be mixed with other waste.
This way, the appliance recycling organised by your manufacturer
will be done under the best possible conditions, in compliance with
European Directive 2002/96/EC on Waste Electrical and Electronic
Equipment. Contact your town hall or your retailer for the used appliance
collection points closest to your home.
We thank you doing your part to protect the environment.
Dear Customer,
You have just acquired a BRANDT washing machine and we would like to thank you.
We have invested all our dedication and know-how in this appliance so that it would best meet your needs. With innovation and performance, we
designed it to be always easy to use.
In the BRANDT product range, you will also find a wide choice of ovens, microwaves, cooking hobs, ventilation hoods, cookers, dishwashers,
driers, fridges and freezers, that you can coordinate with your new BRANDT washing machine.
Visit our website www.brandt.com where you will find all of our products, as well as useful and complementary information.
BRANDT
•CONTENTS
Page
Removing the transport packing . . . . . . . . . . . . . . . . . . . . . . . . . . . . .16
Moving your machine . . . . . . . . . . . . . . . . . . . . . . . . . . . . . . . . . . . . . .16
Connecting to the cold water supply . . . . . . . . . . . . . . . . . . . . . . . . .16
Draining away the waste water . . . . . . . . . . . . . . . . . . . . . . . . . . . . . .16
Connecting to the electricity supply . . . . . . . . . . . . . . . . . . . . . . . . . .17
Installing your machine . . . . . . . . . . . . . . . . . . . . . . . . . . . . . . . . . . . . .17
Loading your washing
. . . . . . . . . . . . . . . . . . . . . . . . . . . . . . . . . . . . .
17
Loading the washing products . . . . . . . . . . . . . . . . . . . . . . . . . . . . . .17
Page
Programming . . . . . . . . . . . . . . . . . . . . . . . . . . . . . . . . . . . . . . . . . . . . .18
Children’s safety system . . . . . . . . . . . . . . . . . . . . . . . . . . . . . . . . . . .22
Details of the programmes and options . . . . . . . . . . . . . . . . . . . . . . .23
Automatic safety systems . . . . . . . . . . . . . . . . . . . . . . . . . . . . . . . . . .23
Modifying a washing programme . . . . . . . . . . . . . . . . . . . . . . . . . . . .24
Incidents that may arise . . . . . . . . . . . . . . . . . . . . . . . . . . . . . . . . . . . .24
Cleaning the pump filter . . . . . . . . . . . . . . . . . . . . . . . . . . . . . . . . . . . .25
Maintaining your machine . . . . . . . . . . . . . . . . . . . . . . . . . . . . . . . . . .25
Messages shown on the display . . . . . . . . . . . . . . . . . . . . . . . . . . . .26
16
EN 2 / INSTALLING YOUR MACHINE
D 10 D 11 D 12
10 mm
3/4
D 3
F
G
1
2
1
2
A
D 4
D 7 D 8 D 9
D 5
D 6
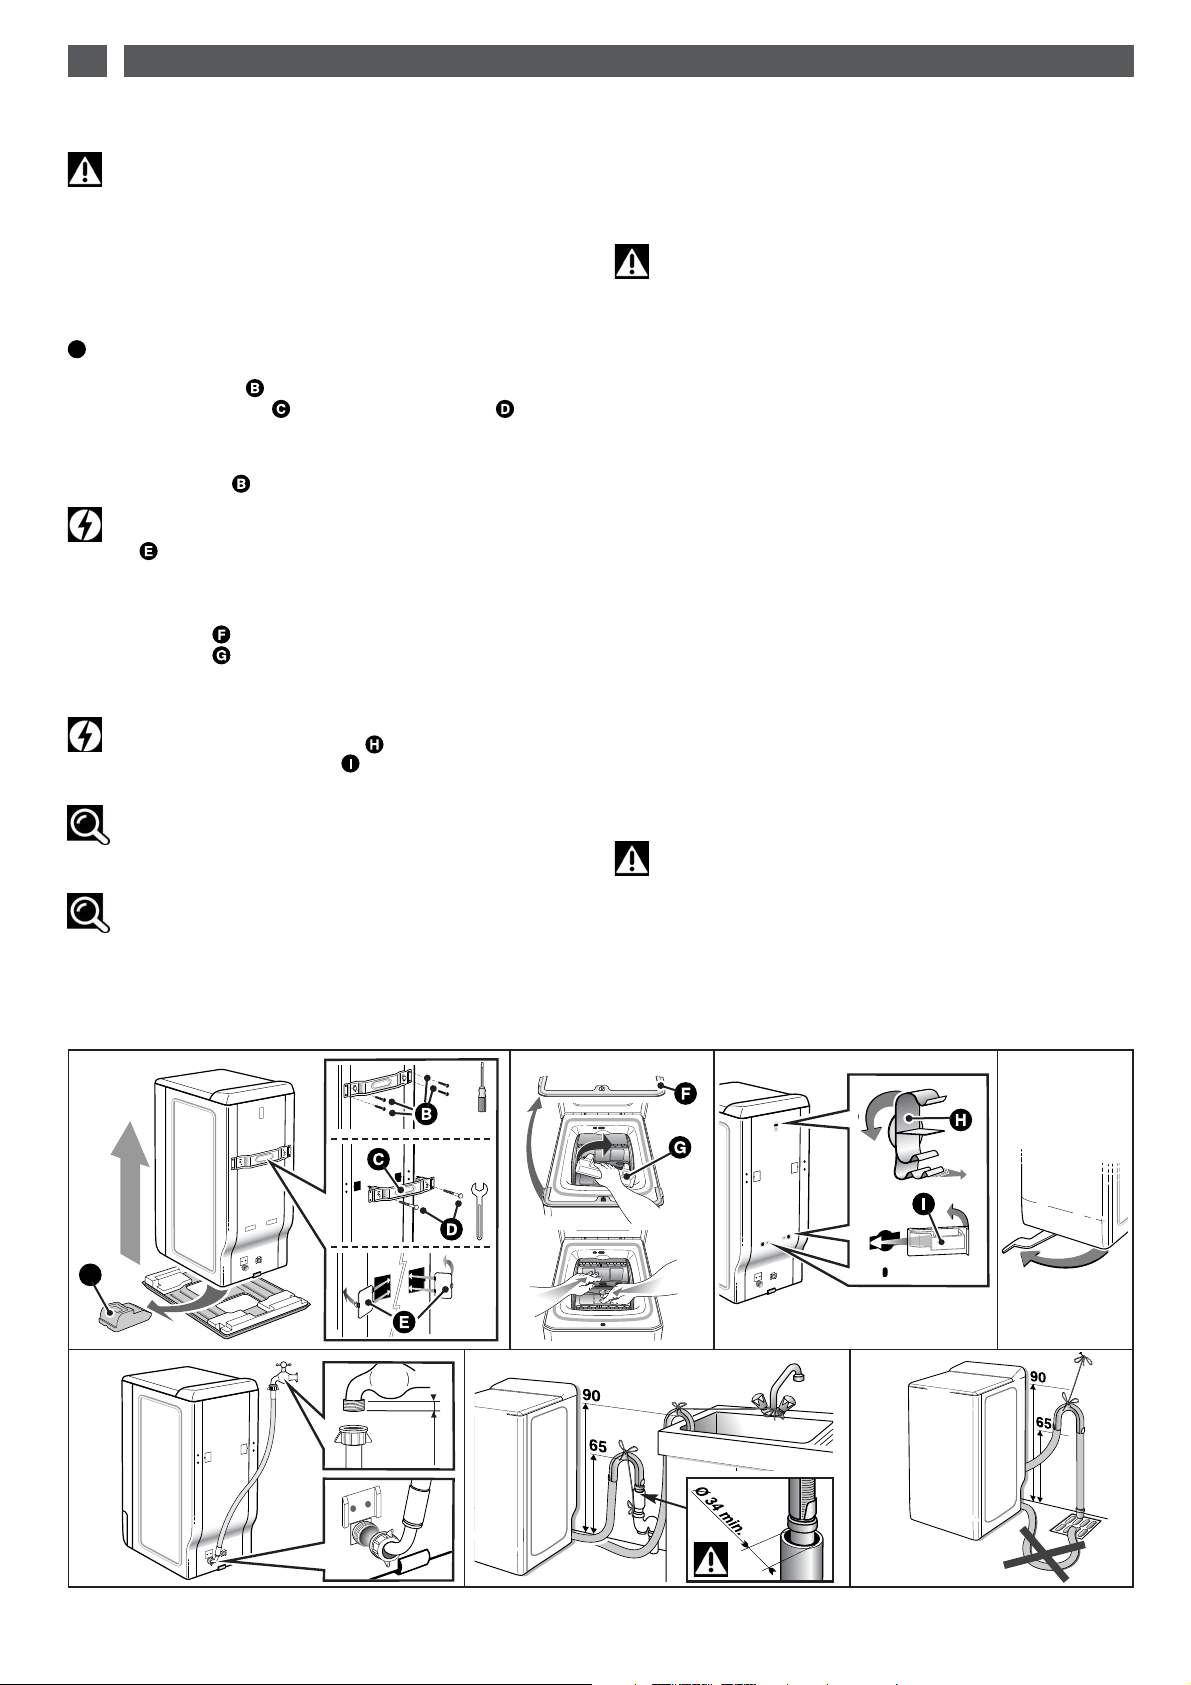
•REMOVING THE TRANSPORT CLAMPS
Important :
Before using the machine in any way, you must first perform
the following operations.
These comprise removing all the components designed to immobilise
the drum in your machine during transport.
These so-called “releasing” operations are necessary for your machine
to operate correctly and to conform to the prevailing safety standards.
If they are not carried out completely, this could cause severe damage
to your machine while it is operating.
— Remove the washing machine from its plinth (check that the wedge
supporting the motor is not still inserted in the machine) (
Diagram
D3)
— Remove the 4 screws with a screwdriver
(Diagram D4)
— Remove the cross clamp by removing the 2 screws
(Diagram
D5)
using a 10 or 13mm spanner (depending on the model). (Ensure
that you remove the two plastic braces fixed on the cross clamp at the
same time as the clamp itself).
— Replace the screws in their initial positions.
Warning:
You must block off the two holes using the hole covers
provided (supplied in the accessories bag) (Diagram D6)
— Remove the drum-tank assembly locking wedge
(Diagram D7)
.
To do this:
- Lift the lid on the machine
- Remove wedge
- Remove wedge by turning it a quarter turn
- Release the drum doors, locked in the lower position, by pressing
down on both eaves simultaneously.
Warning:
Remove the pipe support collars You must block off the
holes revealed with the hole covers supplied in the accessories
bag (Diagram D8).
Advice:
We would recommend that you keep all the locking
components since these must be refitted if you must subsequently
transport your machine again.
Information:
Your machine has been scrupulously checked before it left the
factory. You may therefore notice a little water still remaining in the
tank or the products box.
•MOVING YOUR MACHINE
•Mounting it on castors
If your machine is equipped with removable castors, you will be able
to move it quite easily.
To mount it on castors, swivel the lever on the bottom of the machine
from the right to the far left
(Diagram D9)
.
Important:
The machine must not rest on the “front” castors while it is
operating: remember to return the lever to its initial position.
•CONNECTING TO THE COLD WATER SUPPLY
Connect the supply hose
(Diagram D10)
:
— At one end to the connection on the back of the machine
— On the other end to a tap fitted with a threaded end 20mm dia. x 27
(3/4 BSP).
If you use a self-piercing tap, the useful aperture must have a minimum
diameter of 6mm.
Water supply:
- Minimum water pressure: 0.1 MPa or 1 bar
- Maximum water pressure: 1 MPa or 10 bars
•Replacing a water supply hose
When replacing the hose, ensure that the hose is tightly fastened and
that there is a seal at both ends.
•DRAINING AWAY THE WASTE WATER
Fit the hose bracket provided inside your machine to the end of the drain
hose and then connect the hose
(Diagram D11)
:
— Either, temporarily, over a sink or a bathtub.
— Or permanently to a ventilated U-bend.
If your installation does not have a ventilated U-bend, check that the
connection is not sealed. In fact, to avoid any waste water flowing
back into the machine, you are strongly recommended to leave an air
gap between the machine’s drain hose and the drainpipe.
In any case, the drain hose bracket must be placed at a height of 65 to
90cm higher than the base of the machine.
Important:
Ensure that the drain hose is tied firmly in place with cord to
avoid the bracket coming loose during draining and causing a flood.
The waste water can be drained away to the ground provided that the
drain hose passes through a point 65 to 90cm higher than the base of
the machine
(Diagram D12)
.
A
13
2
1
2
1
a
a
b
17
EN3 / PREPARING YOUR WASHING AND YOUR MACHINE
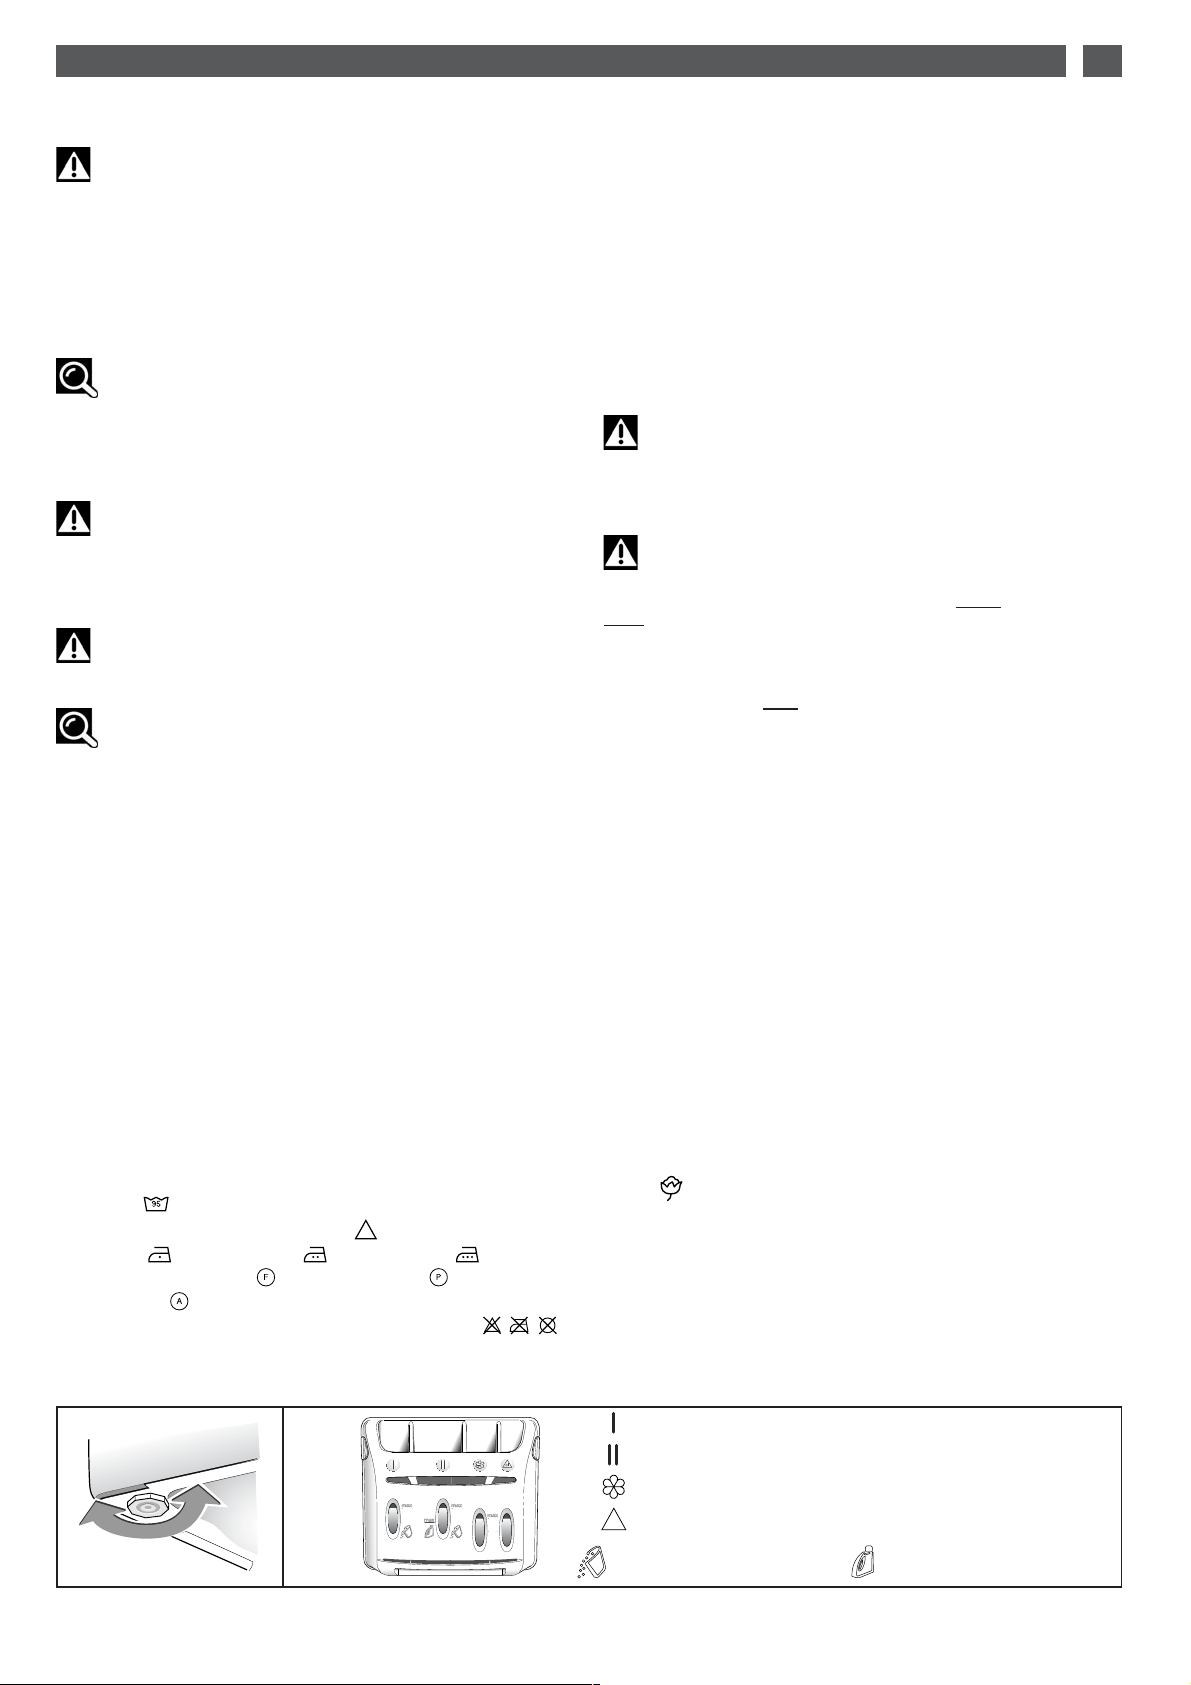
➀➁ ➃➂
➀
Pre-wash container (powder)
➁
Wash container (powder or liquid)
➂
Softener
➃
Bleach
:
POWDERED DETERGENT
:
LIQUID DETERGENT
cl
D 13 D 14
•CONNECTING TO THE ELECTRICITY SUPPLY
Important:
For your safety, you must comply with the instructions below.
— Before connecting your machine, you must ensure that your
installation’s electrical characteristics match those of your machine (see
the details provided on the information plate affixed to the back of the
machine).
The electrical installation must comply with the prevailing standards and
the Electricity Board’s regulations in the country concerned, particularly
as regards Earthing and installation in shower rooms.
We cannot be held responsible for any incident caused by the machine
being incorrectly earthed.
Advice:
Advice on the electrical installation of your machine
— Do not use an extension lead, adapter or multiple socket.
— Never cut out the Earth wire.
— The socket must be readily accessible but out of the reach of children.
If in any doubt, please contact your installer.
Important:
Your machine conforms to European Directives EEC/73/23
(Low Voltage Directive) and EEC/89/336 (Electromagnetic
Compatibility) as modified by Directive EEC/93/68..
•INSTALLING YOUR MACHINE
Important:
If you are installing your machine next to another machine or a
unit, we recommend that you leave a gap between them to allow for
air circulation.
Advice:
We also strongly recommend that you do NOT:
— Install your machine in a damp, poorly ventilated room.
— Install your machine in an area where it could be subject to water
splashes.
— Install your machine on a carpeted floor.
If you cannot avoid doing this, please take every precaution to avoid
blocking air circulation at the bottom of the machine in order to ensure
that the internal components are well ventilated.
•Levelling the machine:
Use a spirit level to check that the floor is horizontal: maximum slope
2°, i.e. a discrepancy of approximately 1cm over the width and of 1.5cm
over the depth of the machine.
•Adjustable feet
Some machines are fitted with two adjustable feet at the front to enable
you to compensate for any unevenness in the floor. Proceed as follows
to adjust the feet to level and stabilize your machine:
— Set the machine on its castors (or tilt it slightly backwards if it does
not have retractable castors)
— Screw in or unscrew the feet to adjust the height to suit the shape of
the floor
(Diagram D13)
— Set the machine back on its feet and check that it is stable.
•TEXTILE MAINTENANCE CODES
— Washing : Never exceed the indicated temperatures
— Use of cold diluted bleach possible:
— Iron: Low Medium High
— Dry clean: mineral spirit perchlorethylene
all solvents
— NB: A crossed-out code indicates that it is forbidden
•LOADING YOUR WASHING
Perform these actions in the following order:
•Open the machine
— Check that the “On/Off” button is released.
— Depending on the model, lift the opening handle or press the push
button on the front of the machine.
The lid will open.
— Open the drum by pressing the button on the front door.
•Insert your washing
For optimum washing performance, place your washing, preferably
sorted and folded, in the drum, distributing it evenly without heaping it
up. Mix large and small items to obtain an optimum, well-balanced spin.
•Close the drum
Ensure that the drum is correctly closed.
Important:
Check that the three hooks and the border of the button are
fully visible.
•LOADING THE WASHING PRODUCTS
Important:
(Diagram D14)
— The “WASH” container may contain powder or liquid but liquid
detergent should not be used for programmes WITH
Prewash and/or
WITH
“Delayed Start” (depending on the model).
— Concentrated softener should be diluted with warm water.
— Concentrated bleach must be diluted.
— To fill the product containers correctly, place the lid fully open.
— Do not exceed the MAX
level.
•Dispensing the detergent
The amount of detergent to be used depends on the hardness of the
water, the extent to which your washing is soiled and the amount of
washing to be washed.
Please refer to the dosing instructions on your pack of detergent.
Warning: in most cases, the detergent manufacturer’s recommendations
apply to the drum filled to the maximum. Adjust the dosage correctly to
the weight of the washing you have placed in the machine.
These recommendations will help you to avoid using too much detergent,
which causes foam to be produced. Too much foam can reduce your
machine’s performance and increase the length of the washing cycle
and the consumption of water.
•Detergents for woollens and delicate fabrics
You are recommended to use an appropriate detergent for washing
these fabrics (avoid placing such detergents directly on the drum because
they have an aggressive action on the metal).
•Before your first wash
Before making your first wash, we recommend that you carry out a
“COTTON 90 wash without pre-wash” and with no washing in the drum,
using a 1/2 measure of your usual detergent in order to eliminate any
residues from manufacturing that may remain in your machine.
•
STANDARD COMPARISON TESTING PROGRAMME
Cotton 60°C - 5 kg - no options – max spin.
To comply with the statement on the label, the tests are conducted in accordance with
European Directive 92/75/EEC at nominal capacity, ensuring complete use of the CEI
detergent from the start of the washing phase.
cl
 Loading...