

Page 1

INSTRUCTIONS FOR USE
CONSIGNES D’UTILISATION
BEDIENUNGSANLEITUNG
Washing machine
Lave-linge
Waschmaschine
Page 2

2
Contents
Page
• Safety instructions ...................................................................................................... 3
• The environment and tips on saving energy ............................................................... 3
• Description of the machine ......................................................................................... 4
• Environmental protection ............................................................................................5
1 - How to install your machine for the first time
• Removing the transport clamps from your machine ................................................... 6
• Preparing to install your machine ............................................................................... 7
• Installation under a worktop ........................................................................................ 7
• Connecting the water supply ...................................................................................... 8
• Connecting to the drain .............................................................................................. 9
• Connecting to the electricity supply ............................................................................ 9
2 - How to operate your machine
• Textile maintenance code ........................................................................................10
• Preparing your washing (sorting, colour test, loads and checks) ..............................11
• Treating stubborn stains ........................................................................................... 12
• Loading your washing ............................................................................................... 13
• Loading the washing products .................................................................................. 13
• Programming / cancelling a program ............................................................... 14 to 17
• Function details ............................................................................................... 18 to 19
• Changing a washing programme .............................................................................. 20
• Automatic safety systems ......................................................................................... 21
3 - General maintenance
• Cleaning the machine and the internal components ................................................ 22
• Risk of frost ............................................................................................................... 22
• Cleaning the products' box ....................................................................................... 22
• Cleaning the filters .................................................................................................... 23
• Cleaning and upkeep of your appliance ...................................................................23
4 - Incidents that may arise
• The cycle does not start ........................................................................................... 25
• Heavy vibrations during spin .................................................................................... 25
• The washing is not spun or is not spun enough ....................................................... 25
• A pool of water forms around the machine ............................................................... 25
• The machine does not drain ..................................................................................... 25
• The door does not open ........................................................................................... 25
• The machine refuses to accept a programme .......................................................... 25
5 - Particular messages provided by the indicator lights or on the display
• Problems that you can rectify yourself ...................................................................... 26
• Problems requiring a service engineer .................................................................... 26
Page 3

3
Safety instructions
This machine is designed solely for domestic use, for washing, rinsing and spinning
machine-washable textiles.
You must comply with the following instructions. We will refuse any liability and rescind
the guarantee if these recommendations are not observed, which can cause damage to
equipment or physical injury.
• To avoid damaging your machine and
your washing, your machine must only
be used for the purpose for which it has
been designed. Only use washing and
maintenance products certified as being
for use in domestic washing machines.
• If you treat your washing with stain
removers, solvents and, in general,
any inflammable or potentially
explosive product, do not put them
into the machine immediately (see the
section on "TREATING STUBBORN
STAINS"). Furthermore, you are strongly
recommended not to use solvents or
products in an aerosol can near to your
machine or, any electrical appliance in
general, in a poorly ventilated room (risk
of fire and explosion).
• If an incident should occur, which you
cannot resolve using the remedies
we recommend (see the section on
"INCIDENTS THAT MAY ARISE"), call a
professional service engineer.
•When making a new installation, the
machine must be connected to the water
supply with a new hose. The old hose
must not be re-used. Check the water
and drain hoses regularly: this will help
you avoid water damage.
•Do not allow children to play with the
machine and keep pets away from it.
•Worn-out machines must immediately be
rendered unusable. Unplug the power
cable and cut it off next to the machine.
Shut off the water supply and remove the
hose. Break the lock on the machine's
door.
The environment and tips on saving energy
• Programme a pre-wash only when it is
absolutely necessary: e.g. for sportswear
or very dirty working clothes, etc.
• If your washing is only slightly or
moderately dirty, a low temperature
programme is quite enough to provide
you with a perfect result.
• For only slightly dirty washing, select a
short washing cycle ("Rapid", "Express"
or "FLASH", depending on the model).
the instructions on the detergent pack.
• Both the packaging and the component
parts of your machine use recyclable
materials. Please bear this in mind when
disposing of them.
Please contact your dealer or the
technical Services Department in your
town regarding how to dispose of them
appropriately, in an environmentally
friendly manner.
• Use an amount of detergent to suit the
hardness of the water, the quantity of
washing and how dirty it is. Always follow
Page 4
4
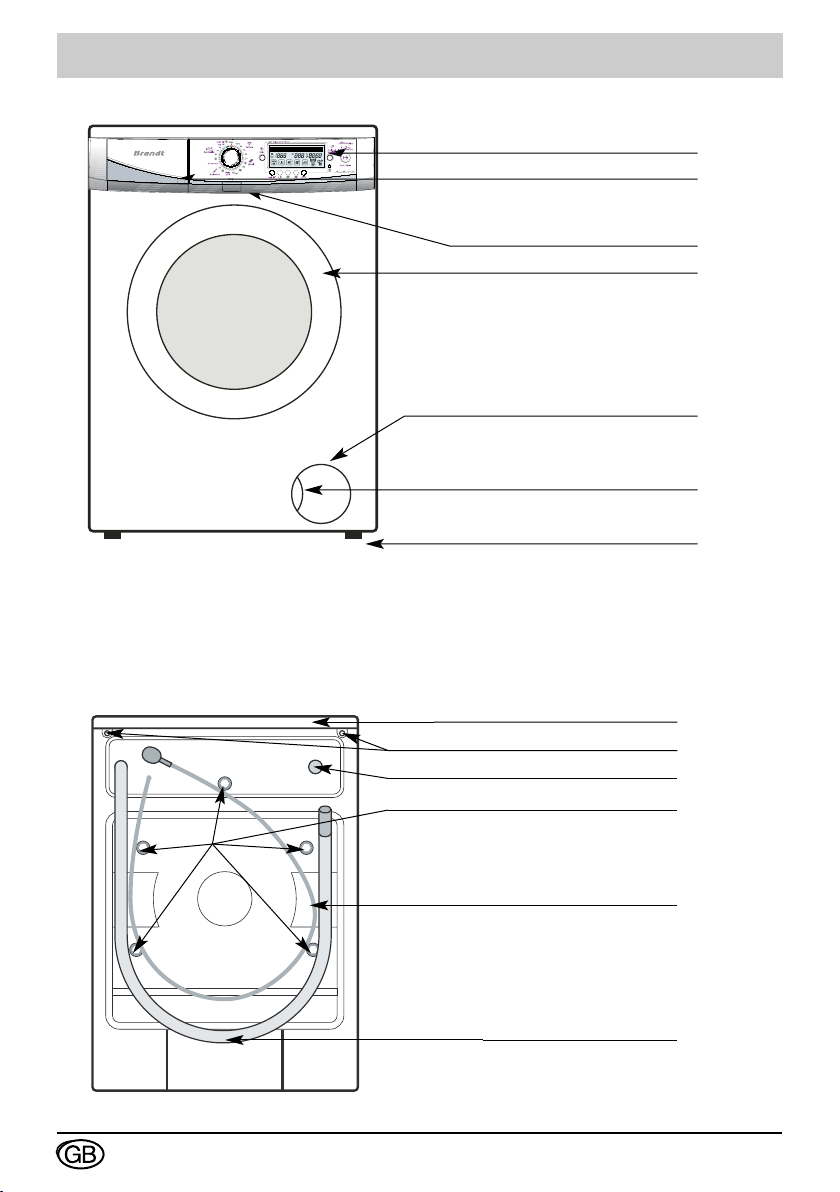
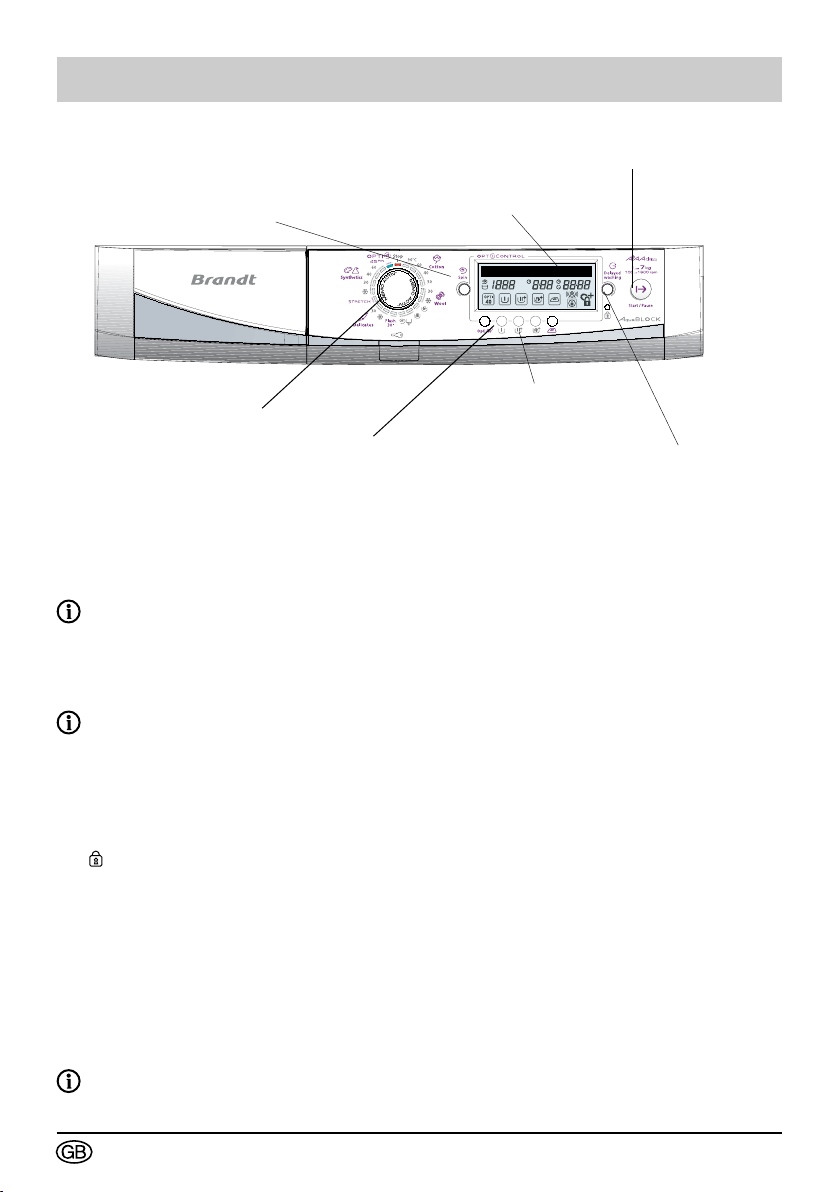
Description of the machine
Detergent Dispensing Drawer
Control panel
Door Opener
Door
Drain pump access hatch
the drain pump access hatch
Fixing screw for the top of the machine
Water supply connection
Electrical power cable
Button to open
Adjustable feet
Top
Securing screw
Drain hose
Page 5

5
Environmental Protection
This appliance’s packaging material is recyclable. Help recycle it and protect the
environment by dropping it off in the municipal receptacles provided for this purpose.
Your appliance also contains a great amount of recyclable material. It is marked with this
label to indicate the used appliances that should not be mixed with other waste. This way,
the appliance recycling organised by your manufacturer will be done under the best
possible conditions, in compliance with European Directive 2002/96/EC on Waste
Electrical and Electronic Equipment. Contact your town hall or your retailer for the
used appliance collection points closest to your home.
We thank you doing your part to protect the environment.
Page 6

6
Removing the transport clamps from your
machine
YOU MUST PERFORM THE OPERATIONS DESCRIBED BELOW BEFORE
These operations consist of removing all the elements designed to immobilize
your machine's internal components while it is being transported. These so-called
"releasing" operations are required for your machine to operate properly and to comply
with the prevailing safety standards. If you do not perform these operations completely,
this can cause severe damage to your machine while it is operating.
1. Remove the transport clamps before you
start your machine. These are the screws
marked “C” (Figure1).
2. Use a spanner to unscrew the“C” screws
anti-clockwise (Fig. 2) until you can
remove them by hand.
3. Finish removing the “C” screws and their
rubber seals by pulling them towards you
(Fig. 3)
To facilitate this operation, pour a drop
of washing-up liquid on the screws and
release them a little at a time, working
from top to bottom.
USING THE MACHINE
4. You must block up the holes left by the
"C" screws with the covers provided (in
the accessories bag).
Your machine was scrupulously checked
before it left the factory: you may
therefore notice the presence of a small
amount of water in the drum or in the
products' box.
We advise you to keep all the clamping
components because these must be
re- inserted if you subsequently have to
transport your machine.
Page 7
7
Preparing to install your machine
Your machine's surroundings:
If you are installing your machine next
to another appliance or a unit, we
recommend that you always leave a
gap between them to help the air to
circulate. On the other hand, we would
strongly advise you NOT:
- To install your machine in a damp,
poorly ventilated room.
- To install your machine in a location
where it could be splashed with water.
- To install your machine on a carpeted
floor.
If you cannot avoid this, take every
precaution against obstructing the
air flow to the base of the machine
to ensure good ventilation for the
machine's internal components.
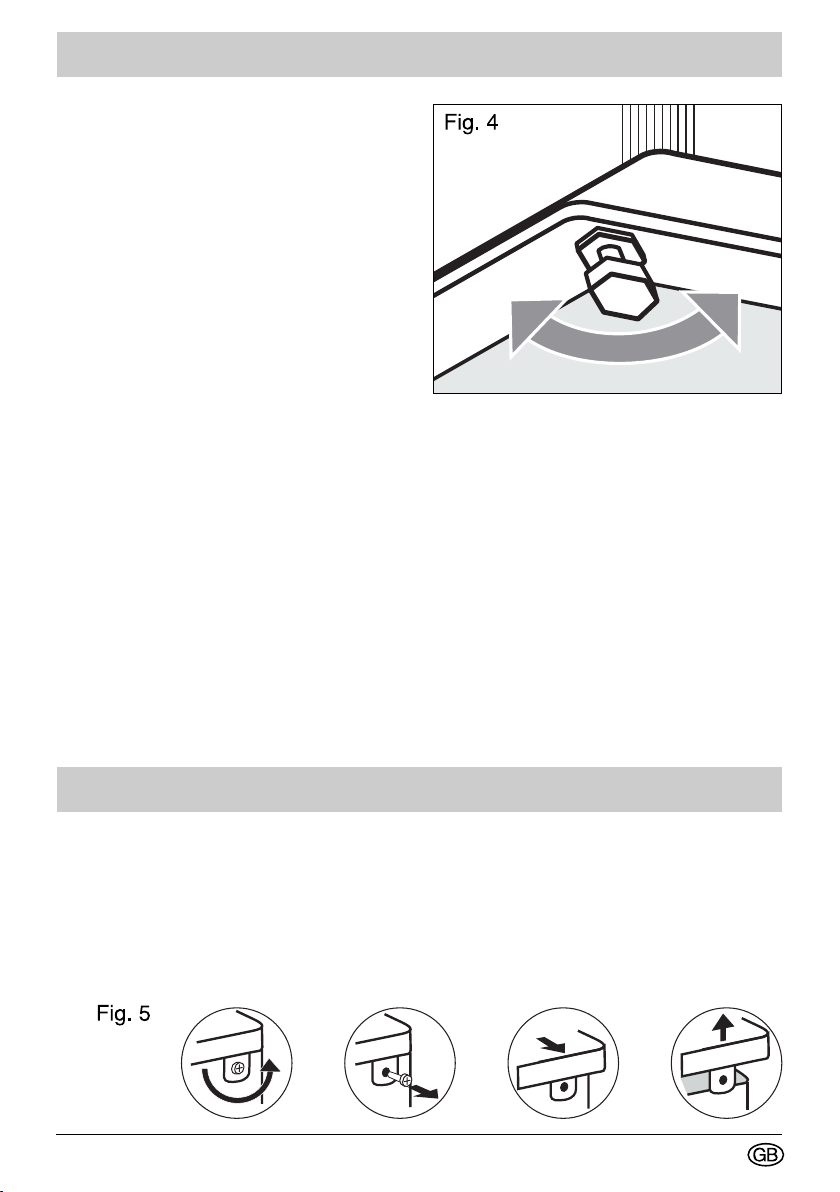
Levelling:
Use a spirit level to check that the floor
is horizontal: maximum slope: 2°, i.e. a
discrepancy of approximately 1cm over
the width and 1.5cm over the depth of the
machine.
safely and quietly, its feet must be fitted.
Your machine is supplied with four
adjustable feet. If your machine is unstable,
- Unscrew the white plastic lock nut,
- Screw or unscrew the adjustable feet until
your machine is perfectly balanced,
- Once the feet have been set, tighten the
bolt to retain your setting.
Adjusting the feet:
To ensure that your machine operates
Installation under a worktop
If you wish to install your washing machine
under a worktop, you must remove the top
of the machine (Fig. 5)
Ensure that your machine is not
connected to the electricity supply.
Unscrew and remove the two screws
holding the top at the back of the machine
Pull the top gently towards you to release it
and then lift and remove it.
Page 8
8
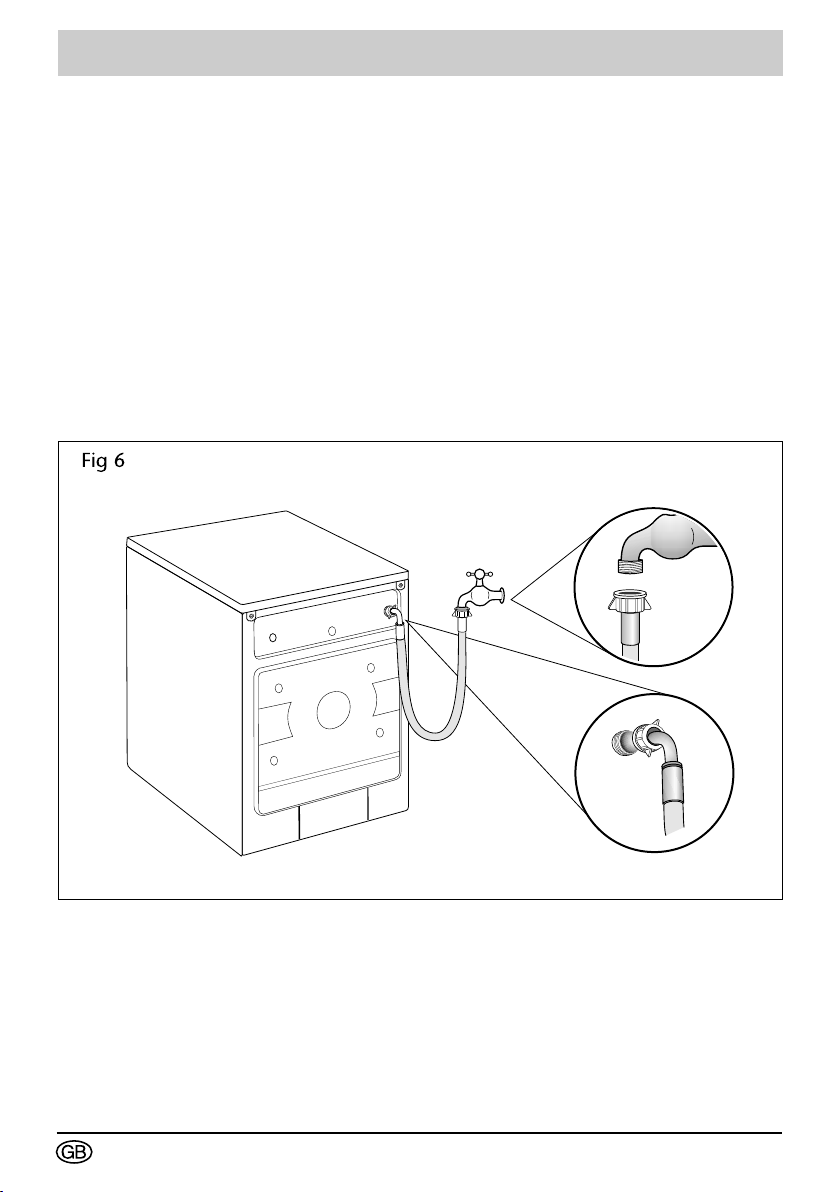
Connecting your machine
Connecting to the cold water
supply
Connect the water hose (Fig. 6)
- By screwing the elbowed end to the
connection on the back of the machine
- By screwing the other end to a tap
fitted with a threaded end piece diameter
20x27 (3/4 BSP).
If you use a self-piecing tap, the useful
opening must be at least 6mm in diameter.
To avoid any water leaks, remember to fit
the rubber seals in each end and tighten
your connections correctly. The seals are
provided in the accessories bag.
Water supply:
- Minimum water pressure: 0.1 MPa or 1
bar
- Maximum water pressure: 1 MPa or 10
bars
Page 9
9
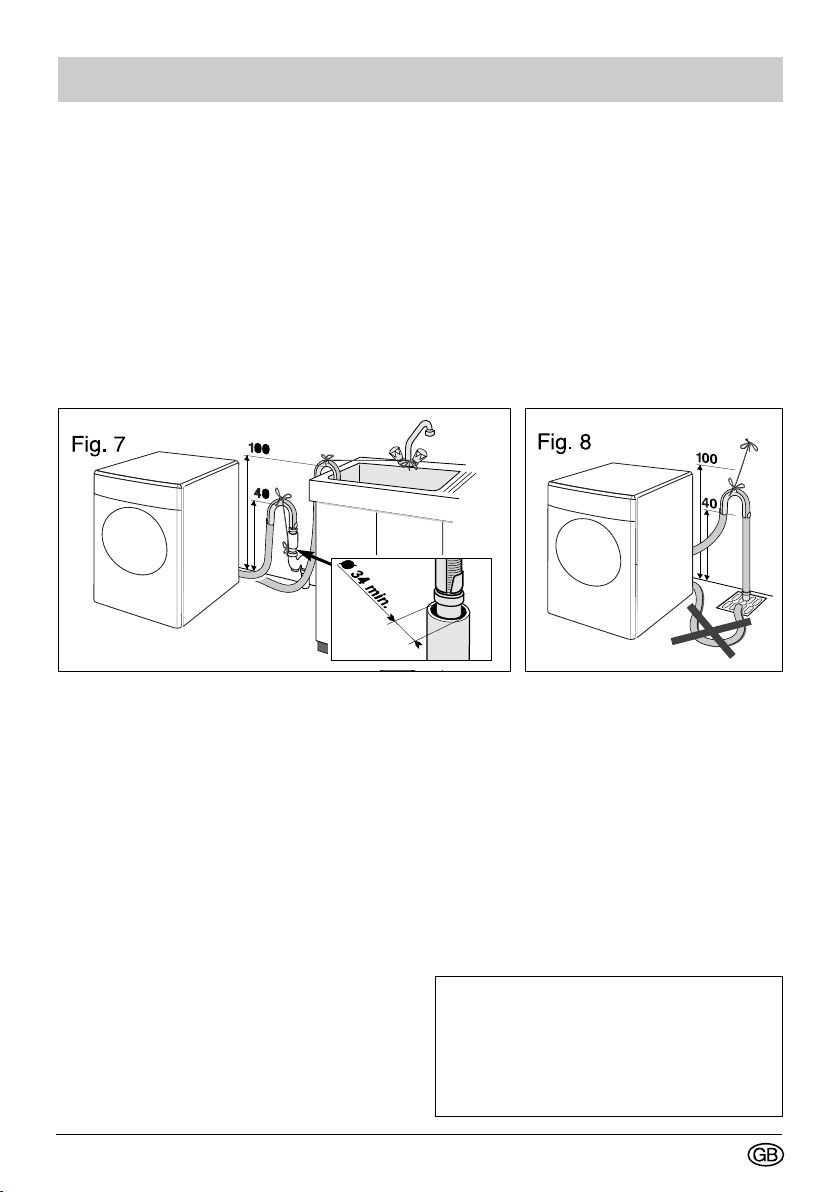
Connecting to the drain
Connect the drain hose (Fig. 7)
• Either, temporarily, to a sink or a bath tub
• Or, permanently, to a ventilated U bend. If
your installation does not have a ventilated
U bend, ensure that the connection is not
airtight. In fact, to avoid any flowback of
the waste water into the machine, you are
strongly recommended to leave an air gap
between the drain hose and the waste pipe.
The hose must not be twisted or kinked and
must be held by the hose hook to avoid it
falling to the ground (Fig. 8)
The hose hook must be placed 40 to
100 cm above the base of the machine.
Ensure that it is tied firmly in place to
avoid it coming loose during draining
and causing a flood.
Electricity supply
For your safety, you must comply with
the instructions below.
The electrical installation must comply with
Standard NF C 15-100, particularly as
regards the Earthing requirements. Line
3x2.5 mm2 single-phase 230V connected
to :
- A single-phase 20A 230V-50Hz meter
- A differential circuit breaker and a
separate fuse (10 or 16A, depending on the
model)
- A 2-pin + Earth 10/16A socket
We cannot be held responsible for any
accident caused by improper electrical
installation.
Advice on the electrical installation of your
machine:
• Do not use an extension lead, an adapter
or a multiple-outlet socket.
• Never remove the Earth.
• The socket must be easily accessible but
out of the reach of children.
If in any doubt at all, please contact your
installer.
Your machine complies with
European Directives EEC/73/23 (Low
Voltage Directive) and EEC/89/336
(Electromagnetic Compatibility) as
modified by Directive EEC/93/68.
Page 10

10
Textile maintenance codes
To assist you in caring for your textiles, they are provided with a label summarising
the information required. This information is expressed as a code using the symbols
below :
WASHING
Max. temperature : 95°C
- Normal mechanical action
- Normal rinsing
- Normal spin dry
- Reduced mechanical action
- Rinsing at decreasing temperature
- Reduced spin-drying
Max. temperature : 95°C
- Normal mechanical action
- Normal rinsing
- Normal spin dry
- Reduced mechanical action
- Rinsing at decreasing temperature
- Reduced spin-drying
- Reduced mechanical action
- Rinsing at decreasing temperature
- Reduced spin-drying
Max. temperature : 40°C
- Normal mechanical action
- Normal rinsing
- Normal spin dry
- Reduced mechanical action
- Rinsing at decreasing temperature
- Reduced spin-drying
- Reduced mechanical action
- Rinsing at decreasing temperature
- Reduced spin-drying
Max. temperature : 30°C
- Highly reduced mechanical action
- Normal rinsing
- Reduced spin
Hand wash only
Max. temperature: 40°C
(Certain machines are now equipped
with a programme enabling this type
of textile to be machine-washed)
Do not wash
BLEACHING
Diluted cold bleach Use no bleach
IRONING
200°C
hot setting
150°C
medium setting
110°C
low setting
DRY-CLEANING
All the usual
solvents
Perchloreth-
ylene
Mineral oil
Normal processing
- Reduced mechanical action
- Reduced drying temperature
- No addition of water
(Free-service cleaning impossible)
Mineral oil and
F113 fluorinated
solvents
DOMESTIC TUMBLE-DRYING
Hot dry
Cool dry
Do not iron
(use no steam)
Do not dry-clean
nor use solvent
stain removers
Do not tumble-dry
Page 11

11
Preparing your washing
Sorting your washing
Please refer to the table on the preceding page for sorting your washing and selecting
a suitable programme for the labels. Whenever you are washing a mixed load, use the
programme for the most delicate fabric. When washing new textiles, as a precaution, first
check that the textile does not run: see "Colour test" below.
Colour test
When being washed for the first time,
coloured textiles frequently run unless
guaranteed to be colourfast. Before
starting the machine, perform the
following test :
- Select an invisible part of the textile
- Dampen it with warm water
- Then press it against a white cloth
• If the textile does not run, you can
machine-wash it normally
• If the textile runs, machine-wash it
separately of by hand.
Do not exceed the following maximum loads :
COTTON / COLOURS / MIXED FIBRES : .............................................................7kg
SYNTHETICS: .........................................................................................................3kg
DELICATE FABRICS / SILK: ...................................................................................2kg
WOOLLENS: ....................................................................................................... 1,5 kg
HANDWASH ..........................................................................................................1 kg
Average weight of various "thin" items of washing
Single sheet ........................ 400 to 500 g
Double sheet ................................. 800 g
Pillow case..................................... 200 g
Light nightdress ............................. 150 g
Children's cotton trousers .............. 120 g
Adult's cotton trousers ................... 500 g
Men's cotton/polyester shirt ........... 200 g
Large size cotton T-shirt ................ 150 g
Dishcloth ........................................ 100 g
Tablecloth ...................................... 250 g
Delicate lingerie ............................... 50 g
Children's synthetic woollens .......... 50 g
Sock................................................. 20 g
Adult's cotton pyjamas ................... 250 g
Average weight of various "thick" items of washing
Adult jeans ...........................800 g to 1kg
Large terry towel ............................ 700 g
Small terry towel ............................ 300 g
Adult jogging pants ........................350 g
Children's terry pyjamas ................ 100 g
Bathrobe ......................................1200 g
Sweatshirt ...................................... 250 g
Duvet cover ................................. 1500 g
Checking your washing
Non-observance of the following
instructions may result in severe and
even irremediable damage (damage to the
drum, torn washing, etc.) and cancel the
guarantee.
- Empty the pockets
- Close any zips and press-studs
- Remove any curtain hooks or place your
curtains in a washing net.
- Remove any poorly attached buttons, pins
and hooks
- Place small items of laundry (ribbons,
pouches,etc.) in a washing net
- Turn multi-layer textiles inside out (sleeping
bags, anoraks)
- Turn knitwear, textiles with sewn-on
decorations and trousers inside out
Page 12

12
Treating stubborn stains
Stains caused by sweat, blood, fruit, wine or chocolate generally disappear when using
biological detergents but some stains require specific treatment before being place din
the machine. Perform a test first of all on a scarcely visible part of the textile and rinse
thoroughly. If you use a stain remover, always start at the outside of the stain to avoid any
rings.
GRASS: dab the stain with white vinegar or
90° proof alcohol* (if this is suitable for the
textile) and then rinse and wash
BALLPOINT / FELT TIP PEN: remove as
much of the ink as possible by dabbing the
stain with absorbent paper. Place a clean
white cloth under the stain and dab the
stain with another cloth soaked in white
vinegar for synthetic and artificial fibres or
90° proof alcohol* for other fibres (if this is
suitable for the textile)
RUST: for slight stains, cover with salt,
squeeze lemon juice over the salt and
leave overnight: then rinse thoroughly
and wash. For heavier stains,use an
anti-rust product, carefully following the
manufacturer's instructions.
CHEWING GUM: chill it using an ice cube.
As soon as it is hard enough, scrape it off
with your fingernail. Remove any remaining
ring with a degreasing product* OIL - TAR:
use liquid stain remover* or, failing this,
spread a little fresh butter on the stain,
leave it for a while and then dab with
turpentine*.
PAINT: do not leave paint stains to
dry. Treat them immediately with the
solvent indicated on the paint tin (water,
turpentine*, white spirit*). Soap and then
rinse.
CANDLEWAX: remove as much of the
stain as possible by scratching it. Then
place absorbent paper on both sides of the
textile and iron the stain to melt the rest of
the wax.
MAKE-UP: place the stained surface of the
fabric on absorbent paper, then dampen
the reverse of the fabric with 90° proof
alcohol* (if this is suitable for the textile)
and provided that the stain is not greasy.
Otherwise, opt for a de-greasing product
(trichlorethylene* type).
COFFEE - TEA: On white cotton: dab
the stain with oxygenated water* before
washing normally - On coloured cotton:
dab the stain with a watervinegar solution
(2 soup spoons of white vinegar to 1/4 litre
of water) before washing normally - On
woollen: dab the stain with a mixture of
equal parts of alcohol* and white vinegar
before washing the item
CHOCOLATE - FRUIT - FRUIT JUICE
- WINE: dab the stain with a water vinegar
solution (2 soup spoons of white vinegar
to 1/4˘ litre of water). Rinse well and wash
normally.
GREASE: sprinkle the textile immediately
with talc. Leave to dry and brush gently
to remove the talc. Then dab with a degreasing product of the mineral oil* type.
Rinse and wash normally.
BLOOD: soak the stained item as quickly
as possible in cold salty water, then
proceed to wash normally.
KETCHUP - TOMATO SAUCE: prepare a
solution of one part glycerene to one part
warm water. Soak the item for an hour;
then proceed to wash normally.
USING STAIN-REMOVING PRODUCTS:
To avoid any risk of fire or explosion:
(*) If you are using the products recommended in the remedies above, take care to rinse
your washing thoroughly before placing it in the machine.
- If you are using commercial stain removers, follow the manufacturer's instructions
very carefully.
We would remind you that, generally, stains treated immediately can be easily removed.
On the other hand, old stains that have been ironed or tumble-dried cannot be removed.
Page 13

13
Loading your washing
Proceed as follows:
Open the machine
• To access the drum, pres the "Door"
button located just above the door.
Insert your washing
For optimum washing performance, sort
and fold your washing and then place it the
drum, distributing it evenly, without piling it
up. Mix large and small items together for
optimum spinning.
Close the machine
• Check that no item is caught in the door
when you close it.
• Close the door by pressing it gently.
• Ensure that the door is locked. If it is
not, a safety system will prevent you from
starting your machine.
For your safety, the door is locked
throughout the washing cycle.
Loading the washing products
Wash compartment (powder or liquid)
Pre-wash compartment (powder)
Softener
Siphon
You can place liquid or powder in the
"WASH" compartment but should never use
liquid detergent for programmes WITH a
Pre-wash and/or WITH "Delayed
Start" (depending on the model).
Concentrated softener must be diluted with
warm water.
To fill the compartments properly, open
the detergent dispensing drawer to its
maximum extent.
Never fill beyond the MAX level.
Dispensing the detergent
The amount of detergent to use depends
on the water hardness, how dirty the
washing is and how much washing there is.
Please refer to the dosage instructions on
the detergent pack.
Warning: The detergent manufacturers'
recommendations are generally based
on filing the drum to the maximum. Adapt
the dosage appropriately for the weight of
washing you are inserting in the machine.
These recommendations will avoid too high
a dose of detergent, which can cause foam.
Too much foam can reduce your machine's
performance and increase the washing
time and the water consumption.
Detergents for woollens and delicate
textiles. Detergents for woollens and
delicate textiles. You are recommended
to sue an appropriate detergent to wash
these types of textiles (avoid putting such
detergents directly into the drum because
some of these products can attack the
metal.
Page 14
14
Programming
[5] Start/Pause button: push briey
[L] LCD display
Messages about spin speed, programme
[2] Spin speed, Hold and
rinse, no spin
[1] Programme selector
duration, current/end of cycle time, Options,
signal status, door lock, child proong
[4] Selections
Change time,
signal, language
[3] Options: Opti 40º, Pre-wash,
Intensive, Extra rinse, Easy ironing, Lock
(i) To start machine, push on programme selector [1]. Screen shows “Hello”
All buttons are touch-sensitive. That means the buttons do not remain pushed in. We
recommend you just push them briey.
Any push on the “Start/Pause” button should be brief unless you are cancelling a programme*. In that case you should hold the button down.
(*) Details of this function are shown in the following pages.
When starting your machine, if the screen is displaying a cycle status message - such
as Pre-wash, Wash, Rinse, Spin, Drain - push the “Start/Pause” button [5] in until the
messages disappear, before doing any other operation.
Cancel: Push for a long time
[R] Change time,
For delayed end time,
for current time
Setting the current time.
You can set the current time by simultaneously pushing on the Easy Ironing and Lock
buttons for at least 3 seconds, until screen L shows “Set the time”. Then turn knob
R to set time. The screen shows “Time Setting” and the time display ashes. You can
turn knob R both ways and adjust the speed fairly closely. To set the current time, push
“Start/Pause”. Screen L displays “Time set”, Push “Start/Pause” again: screen displays
“Summer time” or “Winter time”, turn knob R to make your choice, then push “Start/
Pause” again to set.
To change to and from daylight saving time, proceed as above, checking the time displayed and only needing to change the “Winter time” or “Summer time” setting.
Page 15
15
Programming
When the power supply is on, your washing-machine has a Memo Activ system that automatically offers you the
programme that you use the most.
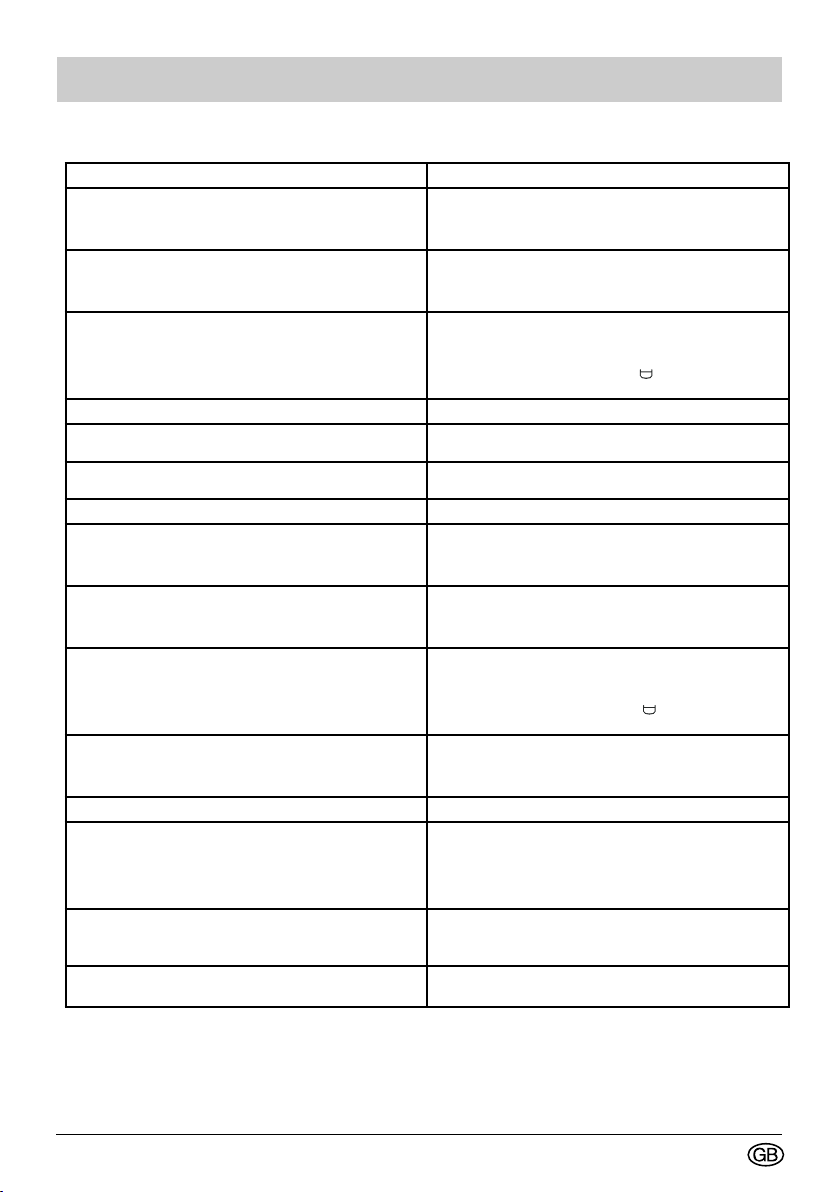
Programming a washing cycle without options Signals and messages
When you push selector [1], machine automatically selects the
programme you use most often (*).
Use selector 1 if you want to choose a different programme. The blue indicator corresponding to the new programme selected
Use “Spin” button 2 to
- change the proposed spinning speed,
- drain, for a cycle ending without a spin stage,
- Hold and rinse. Your machine will stop full of water before nal
spin.
Choose instant start by briey pressing “Start/Pause” 5. Screen L will show “Start”.
The LCD screen L shows the cycle stage and remaining time so
that you continuously see the progress of the selected programme.
When the screen L shows “Completed program”, the machine has
completed the cycle (**).
Programming a washing cycle with options: Signals and messages
When you push selector 1, machine automatically selects the
programme you use most often (*).
Use selector 1 if you want to choose a different programme. The blue indicator corresponding to the new programme selected
Use “Spin” knob 2 to
- change the proposed spinning speed,
- drain, for a cycle ending without spinning,
- Hold ano rinse. Your machine will stop full of water before nal
spin.
The blue indicator corresponding to the programme selected lights
up.
Screen L indicates programme name, maximum spin speed, washing time, nish time and available options.
lights up.
Screen L indicates programme name, maximum spin speed, washing time, nish time and available options.
Display shows “spin speed” when you turn knob 2 to increase or
decrease spin speed and the new speed ashes on the screen.
If you choose a drain option, the display will show “000” speed.
If you choose a “Hold ano rinse” option, no speed gure will appear
and the display will show the pictogram
The programme stage messages are “Pre-wash”, “Wash”, “Rinse”,
“Spin”, and “Empty”.
Display shows “Completed program” and the current time.
The blue indicator corresponding to the programme selected lights
up.
Screen L indicates programme name, maximum spin speed, washing time, nish time and available options.
lights up.
Screen L indicates programme name, maximum spin speed, washing time, nish time and available options.
Display shows “spin speed” when you turn knob 2 to increase or
decrease spin speed, and the new speed ashes on the screen.
If you choose a drain option, the display will show “000” speed.
If you choose a “Hold ano rinse” option, no speed gure will appear
and the display will show the pictogram
.
.
Use the buttons to select from options “Opti 40º”, “Pre-wash”,
“Extra rinse” or “Easy ironing”.
Choose instant start by briey pressing “Start/Pause” 5. Screen L will show “Start”.
Or choose “delayed end” time as follows:
- use knob R to set ‘Delayed end’ time in multiples of 15 minutes
to a maximum of 24 hours.
- press “Start/Pause” briey. After 5 seconds without touching the
“Start/Pause” button, the “Delayed time” is automatically set.
- washing will automatically begin at the time programmed in.
The LCD screen L shows the cycle stage and remaining time
so that you continuously see the progress of the selected
programme.
When the screen L shows “
has completed the cycle (**).
(*) Check that the electric cable is connected and the water tap is open before starting the machine. Also make sure that the
machine door is correctly closed.
(**) When the washing cycle is nished and the screen shows “Completed program”, you can programme your machine again.
If you press the “Start/Pause” button 5, the machine will automatically start the previous completed cycle again, including
options.
Completed program”, the machine
Screen L shows available options. The frame of the option button
lights up when selected.
If you select incompatible options (such as “Easy ironing” with
“Intesive” at the same time), the last option selected will remain.
When you are setting a “delayed end” time, screen L will show
“End of cycle time at 19:00”. Once you have set the “delayed end”
time, the screen will show “Start at 17:45”. The screen shows just
the starting time after 30 seconds.
The programme stage messages are “Pre-wash”, “Wash”,
“Rinse”, “Spin”, and “Empty”.
Display shows “Completed program” and the current time.
Page 16
16
Programming
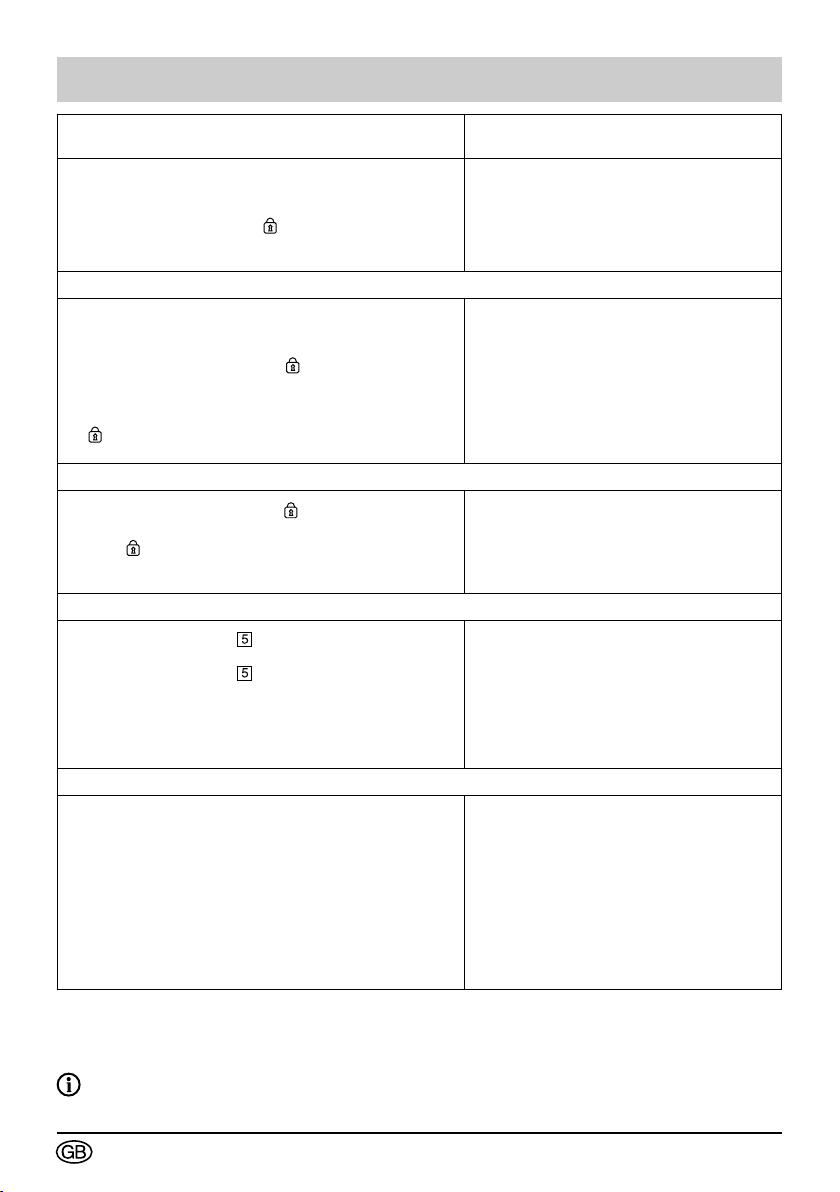
Locking control buttons during washing cycles (Child
protection)
If you want to lock your washing machine control buttons
during washing - to avoid, for example, a child modifying the
programme during the cycle - do the following: If no lock option
has been selected, push on the
seconds. Control panel is automatically locked all washing
cycle long
Controls completely locked (child protection)
If you want completely to lock your washing machine control
buttons both during washing and when stopped - to avoid a
child accidentally starting a cycle - do the following: If no lock
option has been selected, push the
3 seconds to lock controls during the cycle, then do the same
thing again to lock controls completely. If Control panel has
already been locked during the cycle, you just have to press
the
lock button once again to lock completely Control panel.
Control panel is then immediately locked.
Unlocking Control panel (Removing child safety mode)
To unlock Control panel, press the
seconds minimum if Control panel is locked completely, or
press the
locked only during the cycle.
Control panel is then immediately unlocked.
Adding or taking out an item during the cycle (not possible during spin stage):
• Briey push “Start/Pause”
• Insert or remove laundry items*.
• Briey push “Start/Pause”
pour relancer le cycle.
(*) the time before the door can be opened can be between
1 and 2 minutes.
If you chose “Delayed end”, you can immediately access the
drum at any moment during the preceding phase.
To cancel washing or pause mode during programming:
• Push “Start/Pause” [5] for at least 3 seconds. You can do
this at any time during the period preceding the cycle or even
during a pause. If you programmed in one “delayed end” hour
and you cancelled it during the waiting period before the cycle
started, your whole programming will be cancelled. If you want
to cancel only the “delayed end” hour, turn knob [R] to the left
to the point you were coming to, at the time when the selected
cycle stops.
If there is water still in the drum, the machine will begin to
discharge it. After the programme is cancelled, the machine will
have no water in it and will be ready to be used again.
lock button for 3 seconds twice if Control panel is
lock button for at least 3
lock button for at least
lock button once for 3
to interrupt the cycle.
to restart the cycle.
Messages
After pushing the lock button for 3 seconds,
the screen L displays “Child protection...Lock:
cycle”. Then the pictogram of a padlock appears
at bottom right of the screen.
If Control panel are manipulated during washing,
the screen L shows “Control panel locked”.
When the lock button is rst pushed, the screen
L displays “Child protection: lock cycle”. When
the button is pushed again, the screen shows
“Child protection...Lock: Full”. Then the pictogram of a padlock with a “+” sign appears at
bottom right of the screen.
If Control panel are manipulated, the screen L
shows “Control panel locked”.
Screen L shows “Child protection...Unlock”, then
the open-lock pictogram appears bottom right of
the screen.
When the programme is interrupted, screen
shows “Paused programme” and “Push Start
button”.
Display will again show the programme stage in
progress when the programme is restarted.
During cancellation, screen shows “Programme
cancelling”.
For more details on the various functions, refer to “FUNCTION DETAILS”
Important: if you stopped your machine during the wash cycle by selecting the “Stop” position - or if you
had a cut in power supply - the wash cycle will systematically return to the point at which it was interrupted when the machine is switched on again.
Page 17

17
Programming
According
to textile
To choose the best programme for your type of clothing, follow the instructions shown
on the labels on most textiles.
Programs table
Type of textile
Temperature
(C°)
Maximum load
(Kg)
Pre Wash
Intensive
Extra Rinse
Easy ironiing
Draining
Hold and rinse
COTTON 30 – 90° 7,0
SYNTHETICS Cold – 60° 3,0
DELICATE Cold – 30° 2,0
WOOLLENS Cold – 30° 1,5
Special programs
HAND WASHABLE
TEXTILES
FLASH 30’ 30° 3,0
OPTIA45 40° 3,5
STRETCH 30° 2,5
Specic programs
RINSING only
SPINNING only,
DRAIN
• : These options can be performed with the maximum load for the textile concerned.
• : These functions can be used alone or combined – illogical combinations are
impossible.
30° 1,0
>40˚
• • • • •
>40˚
• • • • •
• • • •
• • •
•
•
•
• • • •
•
•
Page 18
18
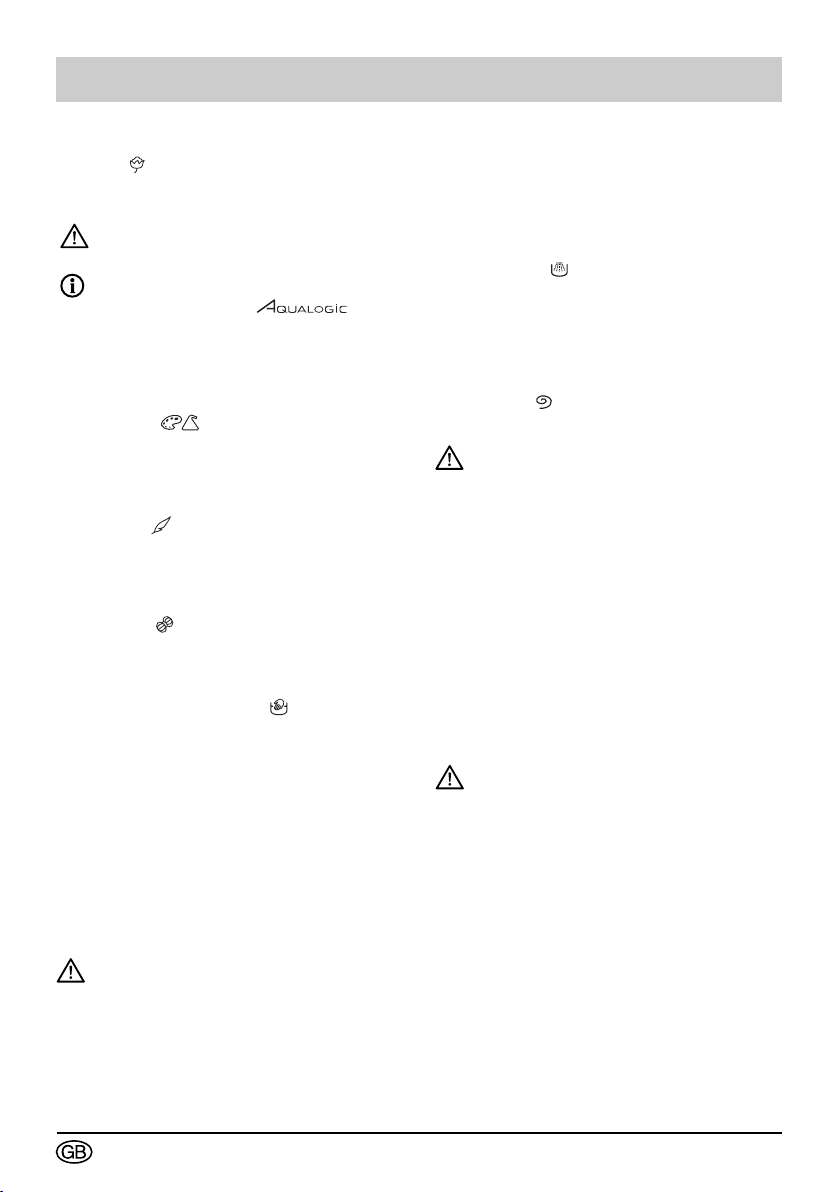
Function details
Programmes
Cotton “ ”
For a load of white COTTON or fast colours.
If you are washing coloureds, do not
go above 60° temperature.
During the rst few minutes of this
programme, using .
washing machine automatically ad-
justs water and energy consumption
levels to make a perfect wash
Synthetics “ ”
For COLOURED DELICATES, COLOUR
FAST SYNTHETICS and MIXED FIBRES
Delicates “
For NET CURTAINS, DELICATE TEXTILES
and FRAGILE CLOTHING.
Woollens “
For “MACHINE WASHABLE” WOOLLENS.
Hand washable textiles “
For SILK and PARTICULARLY DELICATE
TEXTILES.
Flash 30’
This programme allows you to clean 3 kg of
lightly soiled WHITE COTTON, COLOURS
and COLOUR FAST SYNTHETICS. Programme duration 30 minutes maximum.
This programme automatically sets the
washing temperature to 30
Detergent levels must be halved for this
programme.
”
”
o
C.
, your
”
Stretch:
This programme allows you to wash carefully your Elasthane-based textiles such as
Lycra so that they can keep their elasticity
longer.
Rinse only “
Separate rinsing followed by choice of
- spin and drain
- drain only (”drain” option)
- stop full of water.
Spin only “
This allows a separate spin with drain.
For “rinse only” followed by “spin” or
“spin only” make sure you choose a
suitable spin speed for the type of
wash in the machine.
”
”
Options
Pre-wash
For dirty clothing with mud, blood, etc.
A specically cold pre-wash stage pre-
cedes the washing phase.
This cold wash removes the dirt particles in
the clothes before any hot water cycle.
Detergent must be put in the “ ” container in the dispenser drawer.
Intensive
This function improves washing performance and helps remove difcult stains
by automatically raising washing temperature and increasing agitation time.
The “Intensive” option is available only for
programmes where the wash temperature
is 40°C or above.
OptiA45minutes:
This programme allows you to wash a
normal 3.5 kg load of mixed cotton and synthetics in only 45 minutes.
Extra rinse
“Special for sensitive and allergic skin”:
adds another rinse stage to the wash cycle.
Page 19

19
Function details
Easy-ironing
Makes it easier to iron your laundry.
This option also enables you to wash and
spin your clothing more delicately while
retaining identical wash performance.
Hold and rinse
This function is for textiles that you do not
want to spin, or if you expect to be away for
a long time after washing nishes.
This function stops the cycle before the
nal spin so your laundry stays soaked in
water to avoid creasing.
When the machine is stopped full
of water, the “Holding at Rinse” icon
ashes and the “Programme stopped”
message is displayed until the cycle
ends.
- If you want to drain and spin.
Turn Selector [1] to “Spin” and use knob [2]
to choose a speed suitable to your laundry load, then push “Start/Pause” [5]. The
screen displays “Spin” and the spin speed,
and the programme nishes automatically.
- if you want only to drain. Turn Selector [1]
to “Spin” and use knob [2] to choose “000”,
then push “Start/Pause” [5]. The screen displays “Drain” and the spin speed, and the
programme nishes automatically.
- if you change the washing temperature
(even during spin), or if you add or cancel
any options, the time will be re-calculated
and updated on the display.
- Some operating problems (unbalanced
load or excess of foam) can alter the cycle
length and thus the displayed end time.
- If the power supply is cut during the washing phase, when the power is restored,
the time displayed can be earlier than the
real end time. This time will be updated at
the start of the rinsing phase.
Load out of balance”: when you wash
very small amounts of laundry it can
ball up in the drum. This prevents your
machine working at its best.
Activating sound alarm
Your washing machine has a sound alarm
that you can activate or de-activate by
pushing on “Easy Ironing” and “Extra rinse”
simultaneously for 3 seconds. Screen L
shows “Buzzer:YES” and the machine
makes a beep when the alarm is activated.
Screen L shows “Buzzer:NO” and the
machine makes two beeps when the alarm
is de-activated.
Screen L shows “Buzzer:NO” and the
machine makes one beep when the alarm
is de-activated.
˚
Opti40
This programme efciently washes a full
cotton load at 40
electricity.
End time
As soon as the programme starts, the display shows the chosen end of cycle time”
.
The time shown by the machine at the
start of the programme can vary during the
cycle:
o
C whilst economising on
Language selection
You can change the display language by
pushing the Opti40
simultaneously for two seconds.
In default the display shows “Language:
English”.
Turn the time adjustment button [R] to
change the language.
Conrm the new language by pushing
Start/Pause button [5].
o
and Pre-wash button
Page 20

20
Delayed end
You can delay the programme nishing time
by between one and twenty-four hours to
take advantage of electricity night tariffs, or
to have the programme nish at a time that
you desire.
To do that, use knob [R] to select the nishing time you want. As you are adjusting
to get that time, the screen shows “End
of cycle time at...” shows the programme
end time along with the current time which
ashes. After the programme end time is
selected, the screen [L] will show the cycle
beginning time “Start at 19:45”. Screen [L]
will go blank 30 seconds after cycle valida-
tion. Your washing machine will automatically start at the time programmed in.
When the machine is in time delay mode,
the screen [L] shows the beginning time
along with the time delay pictogram.
Before you select the time delay programme, screen [L] shows the time and the
clock icon until the cycle starts.
Changing a washing programme
During programming:
All changes are possible before you press
the ”Start/ Pause” ”
After the cycle starts:
• You cannot change the type of textile
(for example changing from “COTTON”
to “SYNTHETIC”, from “SYNTHETIC” to
“DELICATE” etc).
To change the type of textile during
a cycle, you must cancel the current
programme and programme a new cycle.
• You can change the temperature at the
start of the washing phase, after putting the
machine in the “Pause” mode.
• You can change the spin speed during the
entire cycle preceding spin.
• You can select a “draining” and a “Hold
and Rinse” up to the end of the rinse (until
the “rinse” cycle progress indicator lamp
goes out).
• When you select the “Delayed wash” you
can only activate the “Pre-wash” and “Easy
ironing” options during the period preceding
the effective start of the cycle.
• You can activate the “Extra Rinse” option
until rinsing starts (until the “rinsing” cycle
progress indicator lamp lights up).
“ ” button.
• You can deactivate all the options during
the entire cycle as long as their action has
not yet started.
At the end of the cycle:
When the message “Completed program”
appears in [L] display :
- You can programme a new cycle without
having to go via the “Stop” position.
You can press on any one of the
buttons, or turn the program selector to
position
The machine is then ready for new
programming.
- If at the end of the cycle you press
the ”Start/ Pause”
machine will re-launch the last programme
cycle, including the options.
.
button directly, the
, ,
Page 21

21
Automatic safety systems
Door opening safety:
Your machine’s door will be locked when
the wash cycle has started.
When the cycle is completed or when the
machine has stopped with the tank full of
water, the door unlocks immediately. If you
have programmed a “Delayed end”, the
door is not locked throughout all the waiting
period preceding the start of the cycle.
If you want to open the door during the
cycle, press briefly on
wait 1 or 2 minutes for the door safety to
unlock.
Depending on the time in the cycle when
you want to open the door, this time can
be longer since there will be a cooling
period added to it.
During this cycle the door safety will not
unlock unless the interior temperature is
below 60°C, and this is to prevent you
from being seriously scolded.
“
” button and
Water safety:
The continuous water level control will prevent any overflow duirng operation.
Spinning safety:
Your washing machine is equipped with
a safety system which can limit spinning
when the load is incorrectly distributed
(this incorrect distribution is called “Out of
balance”). In this case, your wash may be
insufficiently spun. So spread your wash
uniformly around the drum and programme
a new spin.
Anti-foam safety system:
Your washing machine knows how to
detect when too much foam is produced,
during spin cycle, LCD display shows following messages “Excess of detergent” or
“Request of a rinse more.
At that time the spin stops and the machine
is drained.
Then the cycle re-starts, using a more
appropriate spin rate and adding, where
necessary a supplementary rinse.
The End time is changed.
Reduce your doses of detergent during the
following washes.
Tap closed
When you can read on LCD display following messages “Open tap” or “Press Start”,
, this shows that there is a blockage in the
water supply of your machine,
- check if the water supply tap is indeed
open,
- check if the water supply tube is not bent
or kinked.
Programme for comparative and standardised
tests.
Programme ....................................................................................................... COTTON
Temperature ............................................................................................................. 60°C
Load ..........................................................................................................................7 kg
Duration ................................................................................................................ 2 h 15
Energy consumption .......................................................................................... 1,19 kWh
Water ...........................................................................................................................49 l
For the display written on the energy label, the tests are made in accordance with European Directive 92/75/CEE at
nominal capacity ensuring the total use of the CEI detergent from the start of the wash phase.
Page 22

22
General maintenance
Cleaning the machine
To clean the casing, the control panel
and all the plastic components in general,
use a sponge or a cloth dampened only
with water and liquid soap.
Never use:
• Abrasive powders
• Plastic or metal sponges
• Alcohol-based products (alcohol, thinner,
etc.)
Maintaining the internal
components
To ensure optimum hygiene, we
recommend that you:
• Leave the door open for a short time after
the wash, (ensure that your children and
pets cannot get into the machine)
•Clean the plastic and rubber components
providing access to the inside
approximately once a month with a
slightly chlorinated cleaning product.
To eliminate any residual traces of this
product, programme a rinse.
• Run a 90°C washing cycle at least once
a month.
Risk of frost
If there is a risk of frost, disconnect the
water hose and empty any water in the
drain hose by placing it as low as possible
in a basin.
Periodic checks
We recommend that you check the
condition of the water and drain hoses. If
you notice the slightest cracking, do not
hesitate to replace them with identical
hoses available from the manufacturer or
his After-Sales Service.
Replacing the water hose
When replacing this, ensure that the
connections are tight and that there is a
rubber seal at both ends.
Replacing the power cable
For your own safety, this operation must be performed
by the manufacturer's After-Sales Service or by a
qualified electrician.
Cleaning the detergent
dispensing drawer
To clean the products' box, pull it towards
you and then remove it from its housing
by pressing on the point indicated on the
siphon (the coloured component). Rinse
the box in water
Fig 10
Cleaning the siphon
Wash the siphon (the coloured component
in the products' box) every 30 to 40 doses
of detergent. Remove the siphon by
holding it by the edges. To avoid the siphon
becoming blocked, rinse any residual
softener away carefully and ensure that it is
refitted perfectly in place before using the
machine.
Fig 11
Page 23

23
Cleaning the pump filter
This filter collects any small items that you
may have inadvertently left in the clothes
and prevents them from disrupting the
pump's operation.
To clean it, proceed as follows:
When the drum is full (for example,
if there is a power cut), there can be
up to 15 litres of water that must be
drained away: provide a large enough
receptacle.
Take precautions, the water to be
drained may still be scalding hot.
- Remove your machine's power cable from
the socket.
- Open the access hatch by pressing on the
button (Fig. 12).
- Tilt the chute in front of the filter towards
your receptacle,
- To control the flow of water coming out,
slightly unscrew the filter by turning it
Fig 12
anti-clockwise,
- If your receptacle becomes full before you
have drained the machine completely,
screw in the filter, empty your receptacle
and then start again until there is no
more water,
- Then open the filter by turning it anticlockwise and empty the small amount
of water from the filter's lid (30ml
maximum).
- Remove any residue left in the filter's
housing,
- Clean the filter,
- Replace the filter in its housing and lock it
in place by turning it clockwise.
- Refit the chute
- Close the filter access hatch.
Ensure that the filter is correctly
repositioned to avoid any water leaks.
Cleaning the filters
on the water supply
The filters at the point where the water
hose is connected to your machine and
to the tap prevent dirt and small objects
entering your machine. We recommend
that you clean them from time to time.
Proceed as follows to clean them:
- First of all, close the water tap,
- Unscrew the part of the hose that is
connected to the back of your machine,
- Remove the filter from the back of your
machine using a pair of pliers and wash it
under the tap,
- Refit the filter and the hose,
- Unscrew the hose connected to the water
tap,
- Remove the filter with your hands and
clean it under the tap
- Refit the filter and the hose,
Page 24

24
Cleaning and upkeep of your appliance
To keep your appliance in good working order, we recommend that you use Clearit
household products.
Professional expertise for the general public
Clearit offers you professional products and adapted solutions for the daily upkeep of
your household and kitchen appliances.
You may find them in conventional retail outlets, along with a complete line of byproducts and consumables.
Page 25

25
Incidents that may arise
Some incidents may occur while you are using your machine;
these are the points to check.
Incidents Possible causes / remedies
The cycle does not start • You have forgotten to press the "Start/Pause" button .
Heavy vibrations during
spinning
• There is no electricity to the machine:
- Check that the plug is correctly connected.
- Check the circuit breaker and the fuses.
• The water tap is closed.
• The machine's door is not closed properly.
• The transport clamps have not been correctly removed from
your machine:- See the section on "REMOVING THE
TRANSPORT CLAMPS FROM YOUR MACHINE"
• The floor is not horizontal.
• The feet are wrongly adjusted or their nuts have come loose.
The washing has not been
spun or has not been spun
enough
A pool of water forms
around the machine
The machine does not drain
The door does not open
The machine refuses to
accept the programme
• You have selected a programme without a spin, for
example: "No spin".
• The spin safety system has detected that the washing is
poorly distributed in the drum:- Redistribute the items
better and programme a new spin.
First of all remove the plug from the socket or remove the
relevant fuse and close the water tap.
While your machine is operating, constant control of the
water level avoids any water overflowing. If, despite this,
water is leaking from the machine, it may be that:
• The drain hose hook is poorly positioned in the drain pipe.
• The connections for the water hose on the machine and
at the tap are not tight:- Check that the seals are in place
and that the connections are tight.
• You have programmed a "Hold and RInse".
• The pump filter is blocked:- Clean it (see the section on
"CLEANING THE FILTERS" for how to do this).
• The drain hose is kinked or squashed
• The programme has not finished yet.The door remains
locked throughout the whole of the programme.
• The "Child safety" system is active, (see the section on
"PROGRAMMING")
• You have interrupted a cycle while it is running. Cancel it
(see the section on "PROGRAMMING")
In general, whenever you notice an anomaly, it is advisable to stop the machine, unplug
the power cable and close the water tap.
Page 26

26
Problems that you can rectfiy yourself.
In this section, we explain how you can rectify these problems very easily yourself.
Your machine automatically detects certain operating faults and informs you of these
by means of the indicator lights which light up red or by special messages which
appear on the display.
Messages Causes / Remedies
Water supply tap closed. Check that the water supply tap is open,
Closed tap indicator
light on
Foam detection light
on
then press the “Start/Pause” button again to re-launch the cycle. This
incident can also be caused by incorrect connection of the drain hose
(see section ”CONNECTING YOUR MACHINE: Draining of used
water”).
Too much detergent. The machine automatically starts an extra rinse.
Check the amount of detergent you use on your next wash.
Incidents shown on the display, which require the
services of a service technician
First of all check that the message displayed is not an incident that you can solve
yourself (see above) .
Your machine also detects certain operating faults which can only be solved by the visit
of a service technician and informs you of this by other messages, some examples of
which we show below
Page 27

27
After-Sales Service
Any work on your machine must be performed by your dealer or some other service
engineer approved by the manufacturer.
When you call, mention your machine's full reference (model, type and serial number).
This information is given on the identification plate.
Page 28

Page 29

Page 30

2
FR
Sommaire
Page
• Consignes de sécurité .........................................................................................................3
• Environnement et conseils en matière d’économies d’énergie ..........................................3
• Description de l’appareil ......................................................................................................4
• Protection de l’environnement .............................................................................................5
1 - Comment procéder à l’installation de votre appareil pour la première fois
• Démontage des brides de transport de votre appareil ........................................................6
• Préparation de l’installation de votre appareil .....................................................................7
• Installation sous un plan de travail ......................................................................................7
• Raccordement de l’arrivée d’eau ........................................................................................8
• Raccordement au conduit d’évacuation ..............................................................................9
• Raccordement à l’alimentation électrique ...........................................................................9
2 - Comment faire fonctionner votre appareil
• Préparation de votre linge (tri, test de couleur, charges et vérifications) ..........................11
• Traitement des taches difficiles .........................................................................................12
• Chargement de votre linge ................................................................................................13
• Chargement de vos produits de lavage ............................................................................13
• Programmation / annulation d’un programme ..............................................................14-17
• Description détaillée des fonctions ...............................................................................18-19
• Modification d’un programme de lavage ...........................................................................20
• Systèmes de sécurité automatiques .................................................................................21
3 - Entretien courant
• Nettoyage de l’appareil et des composants internes ........................................................22
• Risque de gel ....................................................................................................................22
• Nettoyage du bac à produits .............................................................................................22
• Nettoyage des filtres .........................................................................................................23
• Nettoyage et entretien de votre appareil ...........................................................................24
4 - Incidents pouvant survenir
• Le cycle ne démarre pas ...................................................................................................25
• Fortes vibrations lors de l’essorage ..................................................................................25
• Le linge n’est pas essoré ou insuffisamment essoré.........................................................25
• Une flaque d’eau se forme autour de la machine .............................................................25
• La machine ne vidange pas ..............................................................................................25
• La porte ne s’ouvre pas .....................................................................................................25
• L’appareil refuse d’accepter un programme ......................................................................25
5 - Messages spécifiques indiqués par les voyants lumineux ou à l’écran
• Problèmes que vous pouvez corriger vous-même ............................................................26
• Problèmes nécessitant l’assistance d’un dépanneur ........................................................26
Page 31

3
FR
Consignes de sécurité
Cet appareil, destiné à un usage exclusivement domestique, a été conçu pour laver, rincer et
essorer les textiles lavables en machine.
Il est impératif de vous conformer aux indications suivantes. Nous déclinerons toute
responsabilité et annulerons la garantie en cas de non respect de ces recommandations
pouvant entraîner des dégâts matériels ou corporels.
• L’appareil ne doit être utilisé que
conformément au mode d’emploi, pour
éviter des dommages à votre linge et à
votre appareil. Utilisez uniquement des
produits de lavage et d’entretien certifiés
pour l’emploi dans les machines à laver à
usage domestique.
• Si vous traitez votre linge à l’aide de
détachants, dissolvants et, en règle
générale, de tous produits inflammables
ou à fort pouvoir détonant, ne l’introduisez
pas immédiatement dans l’appareil (voir
le chapitre « TRAITEMENT DES TACHES
DIFFICILES »). De même, il vous est
fortement recommandé de ne pas utiliser
de solvants ou de produits en bombe
aérosol à proximité de votre lave-linge ou
plus généralement d’appareils électriques
dans une pièce mal aérée (risque
d’incendie et d’explosion).
• En cas d’incident que vous ne pouvez
résoudre à l’aide des solutions que nous
préconisons (voir chapitre « INCIDENTS
POUVANT SURVENIR »), faites appel à un
professionnel qualifié.
• Lors d’une nouvelle installation, l’appareil
doit être raccordé au réseau de distribution
d’eau avec un tuyau neuf. Le tuyau
usagé ne doit pas être réutilisé. Contrôlez
les tuyaux d’alimentation en eau et
d’évacuation à intervalles réguliers: vous
éviterez ainsi des dégâts des eaux.
• Ne laissez pas les enfants jouer avec
l’appareil et éloignez les animaux
domestiques.
• Les appareils usagés doivent
immédiatement être rendus inutilisables.
Débranchez et coupez le câble
d’alimentation au ras de l’appareil. Fermez
l’arrivée d’eau et enlevez le tuyau. Rendez
la fermeture de la porte inutilisable.
Environnement et conseils en matière
d’économies d’énergie
• Ne programmez le prélavage que lorsque
c’est absolument nécessaire : par ex. Pour
des vêtements de sport ou de travail très
sales, etc.
• Pour du linge peu ou moyennement sale,
un programme à basse température est
suffisant pour obtenir un résultat de lavage
impeccable.
• Pour du linge peu sale choisissez un cycle
de lavage court (”Rapide”, ” Express” ou “
FLASH” suivant le modèle).
• Dosez le produit de lavage selon la dureté
de l’eau, la quantité de linge et son degré
de salissure. Respectez toujours les
conseils figurant sur l’emballage de vos
produits de lavage.
• Les matériaux d’emballage de même
que les composants de votre appareil
contiennent des matériaux recyclables.
Veuillez vous en rappeler en les jetant.
Veuillez contacter votre vendeur ou le
Département de service technique de
votre ville pour savoir comment vous
en débarrasser de façon appropriée et
respectueuse de l’environnement.
Page 32

4
FR
Description de l’appareil
Bandeau de commande
Bac à produits de lavage
Dispositif d’ouverture de la
Trappe d’accès à la pompe de
vidange
Poussoir d’ouverture de la trappe
d’accès à la pompe de vidange
Pieds réglables
Dessus
Vis de fixation du dessus de l’appareil
Raccord de l’arrivée d’eau
Vis de fixation
porte
Porte
Cordon d’alimentation électrique
Tuyau de vidange
Page 33

5
FR
Protection de l’environnement
Les matériaux d’emballage de cet appareil sont recyclables. Participez à leur recyclage et
contribuez ainsi à la protection de l’environnement en les déposant dans les conteneurs
municipaux prévus à cet effet.
Votre appareil contient également de nombreux matériaux recyclables. Il porte cette étiquette
Nous vous remercions de participer à la protection de l’environnement.
afin de vous indiquer que les appareils usagés ne doivent pas être mélangés avec
d’autres déchets. Le recyclage des appareils qu’organise votre fabricant sera
ainsi réalisé dans les meilleures conditions possibles, conformément à la directive
européenne 2002/96/CE sur les déchets d’équipements électriques et électroniques.
Adressez vous à votre mairie ou votre revendeur pour connaître les points de collecte
des appareils usagés les plus proches de votre domicile.
Page 34

6
FR
Démontage des brides de transport de votre appareil
AVANT TOUTE UTILISATION, IL EST IMPÉRATIF D’EFFECTUER LES OPÉRATIONS
Ces opérations consistent à retirer toutes les pièces qui immobilisent des pièces internes
majeures de votre appareil pendant le transport. Ces opérations dites ”de débridage” sont
nécessaires pour le bon fonctionnement de votre appareil et le respect des normes en
vigueur en matière de sécurité. Si ces opérations n’étaient pas effectuées dans leur totalité,
cela pourrait causer des dommages graves à votre appareil pendant son fonctionnement.
1. Retirez les brides de transport avant toute
mise en marche de votre appareil. Ce sont
les vis désignées par un “ C” (Figure 1).
2. Dévissez les vis “ C” dans le sens inverse
des aiguilles d’une montre à l’aide
d’une clé (Figure 2) jusqu’à ce que vous
puissiez les retirer à la main.
3. Finissez de démonter les vis “ C” et leurs
joints de caoutchouc en les tirant vers
vous. (Figure 3).
Afin de faciliter cette opération, versez
sur les vis une petite goutte de liquide
vaisselle et faites leur faire de petits
mouvements du haut vers le bas.
DÉCRITES CI-APRÈS.
4. Obstruez impérativement les trous laissés
par les vis “C”, à l’aide des cache-orifices
prévus à cet effet (fournis dans le sachet
d’accessoires).
Avant sa sortie d’usine, votre appareil a
été minutieusement contrôlé. Il est donc
possible que vous constatiez la présence
d’un peu d’eau dans le tambour ou au
niveau du bac à produits.
Nous vous conseillons de conserver
toutes les pièces de bridage, car il faudra
obligatoirement les remonter si vous
devez, par la suite, transporter votre
machine.
Page 35

7
FR
Préparation de l’installation de votre appareil
Environnement de l’appareil :
Si vous placez votre machine à côté d’un
autre appareil ou d’un meuble, nous vous
conseillons de toujours laisser entre eux
un espace pour faciliter la circulation de
l’air. D’autre part, nous vous déconseillons
fortement :
- d’installer votre appareil dans une pièce
humide et mal aérée.
- d’installer votre appareil dans un lieu où
il pourrait être soumis à des projections
d’eau.
- d’installer votre appareil sur un sol en
moquette.
Si vous ne pouvez l’éviter, prenez toutes
les dispositions pour ne pas gêner
la circulation de l’air à sa base, afin
d’assurer une bonne ventilation des
composants internes.
Mise à niveau :
Vérifiez à l’aide d’un niveau que le sol est
horizontal : inclinaison maximale : 2°, soit un
écart d’environ 1 cm mesuré sur la largeur et
de 1,5 cm sur la profondeur de la machine.
Ajustement des pieds
réglables:
Pour une utilisation sûre et silencieuse,
votre appareil doit être installé sur ses pieds.
Votre machine est livrée avec quatre pieds
réglables. Si votre appareil n’est pas stable,
- desserrez le contre-écrou en plastique
blanc,
- vissez ou dévissez le pied réglable jusqu’à
ce que l’appareil soit parfaitement équilibré,
- une fois les pieds réglés, serrez le boulon
pour conserver votre réglage.
Installation sous un plan de travail
Si vous voulez installer votre lave-linge sous
un plan de travail, vous devez enlever le
dessus de votre appareil (Figure 5).
Assurez-vous que votre appareil ne soit
pas raccordé à l’alimentation électrique.
Dévissez et retirez les 2 vis qui maintiennent
le dessus à l’arrière de l’appareil.
Tirez légèrement le dessus vers vous pour le
dégager, puis soulevez et enlevez-le.
Page 36

8
FR
Raccordements de votre appareil
Alimentation en eau froide
Branchez le tuyau d’arrivée d’eau (Figure 6)
- en vissant le côté coudé sur le raccord
situé à l’arrière de la machine et
- en vissant l’autre côté sur un robinet muni
d’un embout fileté de 20x27 de diamètre
(3/4 BSP).
Si vous utilisez un robinet auto-perceur,
l’ouverture pratiquée doit être d’un diamètre
minimum de 6 mm.
Afin d’éviter toutes fuites d’eau, n’oubliez
pas de placer les joints en caoutchouc à
chaque extrémité et de bien serrer vos
raccordements. Les joints sont fournis dans le
sachet d’accessoires.
Arrivée d’eau :
- Pression d’eau minimale : 0,1 MPa ou 1 bar
- Pression d’eau maximale : 1 MPa ou 10 bar
Page 37

9
FR
Raccordement de votre appareil
Évacuation des eaux usées
Raccordez le tuyau de vidange (Figure 7)
• soit, de façon provisoire, à un évier ou une
baignoire,
• soit, de façon permanente, sur un siphon
ventilé. Si votre installation n’est pas équipée
d’un siphon ventilé, veillez à ce que le
raccordement ne soit pas étanche. En effet,
pour éviter tout refoulement d’eaux usées
dans la machine, il est vivement recommandé
de laisser libre passage à l’air entre le tuyau
de vidange de la machine et le conduit
d’évacuation.
Le tuyau ne doit pas être tordu ou plié et doit
être maintenu par la crosse de vidange pour
qu’il ne tombe pas par terre (Figure 8).
La crosse de vidange doit être située à
une hauteur comprise entre 40 et 100
cm au dessus de la base de la machine.
Veillez à bien l’attacher afin d’éviter que le
tuyau ne se dégage en cours de vidange
et provoque une inondation.
Alimentation électrique
Pour votre sécurité, il est impératif de
respecter les indications données cidessous.
L’installation électrique doit être conforme à
la Norme NF C 15-100, en particulier en ce
qui concerne les exigences de mise à la terre.
Ligne de 3x2,5 mm2, 230 V mono connecté
à :
- un compteur 20 A mono 230 V-50 Hz
- un disjoncteur différentiel et un fusible
individuel (10 ou 16 A suivant le modèle)
- une prise de courant 10/16 A 2 pôles + terre
Nous ne pouvons pas être tenus pour
responsable de tout incident causé par une
mauvaise installation électrique.
Conseils pour l’installation électrique de votre
appareil :
• N’utilisez pas de rallonge, adaptateur ou
prise multiple.
• Ne supprimez jamais la mise à la terre.
Votre appareil est conforme aux
directives européennes CEE/73/23
(directive basse tension) et CEE/89/336
(compatibilité électromagnétique)
modifiées par la directive CEE/93/68.
Page 38

10
FR
Codes d’entretien des textiles
Afin de vous aider à entretenir vos textiles, ces derniers sont munis d’une étiquette résumant
les informations essentielles. Ces renseignements sont exprimés sous forme de code composé
des symboles
LAVAGE
Température maximale : 95°C
- Action mécanique normale
- Rinçage normal
- Essorage normal
- Action mécanique réduite
- Rinçage à température décroissante
- Essorage réduit
Température maximale : 95°C
- Action mécanique normale
- Rinçage normal
- Essorage normal
- Action mécanique réduite
- Rinçage à température décroissante
- Essorage réduit
- Action mécanique réduite
- Rinçage à température décroissante
- Essorage réduit
Température maximale : 40°C
- Action mécanique normale
- Rinçage normal
- Essorage normal
- Action mécanique réduite
- Rinçage à température décroissante
- Essorage réduit
- Action mécanique réduite
- Rinçage à température décroissante
- Essorage réduit
Température maximale : 30°C
- Action mécanique très réduite
- Rinçage normal
- Essorage réduit
Lavage à la main uniquement
Température maximale : 40°C
(Certains appareils sont maintenant
équipés d’un programme qui permet
de laver ce type de textiles en
machine)
Ne pas laver
CHLORAGE
Chlorage dilué et à froid Pas de chlorage
REPASSAGE
200°C
réglage chaud
150°C
réglage moyen
110°C
réglage doux
NETTOYAGE À SEC
Tous les
solvants
courants
Perchloré-
thylène huile
minérale
Traitement normal
- Action mécanique réduite
- Température de séchage réduite
- Pas d’addition d’eau
(Nettoyage en libre-service
impossible)
Huile minérale et
solvants fluorés
F113
SÈCHE-LINGE MÉNAGER
Séchage à
chaud
Séchage à froid
Ne pas mettre au
Pas de
repassage (pas
de vapeur)
Ne pas nettoyer
à sec ni utiliser
de détachants
sèche-linge
Page 39

11
FR
Préparation de votre linge
Tri de votre linge
Reportez-vous au tableau de la page précédente pour trier votre linge et choisir le programme
correspondant aux étiquettes. Lorsque vous lavez une charge mixte, utilisez le programme
adapté au textile le plus délicat. Pour du linge neuf, prenez au préalable la précaution de vérifier
que le textile ne déteigne pas : voir “Le test de couleur” ci-dessous.
Test de couleur
Au premier lavage, les textiles de couleur
déteignent souvent à moins qu’ils soient
garantis grand teint. Avant de le mettre en
machine, faites le test suivant :
- Prenez une partie non visible du linge.
- Trempez-la dans l’eau tiède.
- Pressez-la ensuite contre un chiffon blanc.
• Si le textile ne déteint pas, vous pouvez
le laver normalement en machine.
• S’il déteint, lavez-le en machine séparément
ou à la main.
Ne dépassez pas les charges maximales suivantes :
COTON / COULEURS / FIBRES MÉLANGÉES : ..........................................................7kg
FIBRES SYNTHÉTIQUES : .............................................................................................3kg
TISSUS DÉLICATS / SOIE : ............................................................................................2kg
LAINAGES :.................................................................................................................1,5 kg
LAVAGE À LA MAIN ......................................................................................................1 kg
Poids moyen de quelques articles “peu épais”
Drap simple ............................400 to 500 g
Drap double ....................................... 800 g
Taie d’oreiller .....................................200 g
Chemise de nuit légère...................... 150 g
Pantalon enfant en coton................... 120 g
Pantalon adulte en coton ................... 500 g
Chemise homme en coton/polyester . 200 g
Tee-shirt grande taille en coton .........150 g
Torchon .............................................. 100 g
Nappe ................................................ 250 g
Lingerie délicate ..................................50 g
Lainage synthétique enfant .................50 g
Chaussette ..........................................20 g
Pyjama adulte en coton ..................... 250 g
Poids moyen de quelques articles “épais”
Jean adulte ............................. 800 g to 1kg
Grande serviette éponge ................... 700 g
Petite serviette éponge ...................... 300 g
Pantalon de jogging adulte ................ 350 g
Pyjama enfant en éponge.................. 100 g
Peignoir ...........................................1200 g
Sweat-shirt......................................... 250 g
Housse de couette........................... 1500 g
Vérification de votre linge
Le non respect des conseils suivants
peut engendrer des dégâts graves, voire
irrémédiables (tambour détérioré, linge
déchiré, etc.) et annuler la garantie.
- Videz les poches.
- Fermez les fermetures à glissières et à
pression.
- Enlevez les crochets des rideaux ou placez
vos rideaux dans un filet de lavage.
- Retirez les boutons décousus, les épingles et
les agrafes.
- Mettez les petits articles (rubans, pochettes,
etc.) dans un filet de lavage.
- Retournez les textiles multicouches (sac de
couchage, anoraks).
- Mettez les tricots, textiles à décoration
rapportée et les pantalons à l’envers.
Page 40

12
FR
Traitement des taches difficiles
Les taches de transpiration, sang, fruit, vin ou chocolat disparaissent généralement à l’aide de
détergents biologiques mais certaines nécessitent un traitement spécifique avant la mise en
machine. Faites d’abord un essai sur un endroit peu visible du textile et rincez abondamment. Si
vous utilisez un détachant, commencez toujours par l’extérieur de la tache pour éviter les auréoles.
HERBE : Tamponnez la tache avec du vinaigre
blanc ou de l’alcool à 90°* (si le textile le permet)
puis rincez et procédez au lavage.
STYLO À BILLE / FEUTRE : Enlevez le
maximum d’encre en tamponnant la tache à
l’aide d’un papier absorbant. Placez un chiffon
blanc propre sous la tache et tamponnez-la
avec un autre chiffon imbibé de vinaigre blanc
pour les fibres synthétiques et artificielles ou
d’alcool à 90°* pour les autres fibres (si le textile
le permet).
ROUILLE : Pour les taches légères, recouvrez
de sel, pressez du jus de citron sur le sel
et laissez reposer une nuit. Puis rincez
abondamment et procédez au lavage. Pour
les taches plus importantes, utilisez un produit
antirouille en suivant très attentivement les
instructions du fabricant.
CHEWING-GUM : Le refroidir à l’aide d’un
glaçon. Dès qu’il est suffisamment dur, grattez-le
avec votre ongle. Enlevez l’auréole qui subsiste
à l’aide d’un produit dégraissant*.
HUILE - GOUDRON : Utilisez un détachant
liquide* ou, à défaut, étalez un peu de
beurre frais sur la tache, laissez reposer puis
tamponnez avec de l’essence de térébenthine*.
PEINTURE : Ne laissez pas sécher les taches
de peinture. Traitez-les immédiatement avec
le solvant indiqué sur la boite de peinture (eau,
térébenthine*, white spirit*). Savonnez puis
rincez.
CIRE DE BOUGIE : Enlevez le maximum de
la tache en grattant. Mettez ensuite du papier
absorbant des deux côtés du tissu et passez un
fer à repasser sur la tache pour faire fondre le
reste de cire.
MAQUILLAGE : Placez la surface tachée du
tissu sur du papier absorbant puis tamponnez
l’envers du tissu avec de l’alcool à 90°* (si le
textile le permet) à condition que la tache ne soit
pas grasse. Dans le cas contraire, préférez un
produit dégraissant (type trichloréthylène*).
CAFÉ - THÉ : Sur du coton blanc : tamponnez
la tache avec de l’eau oxygénée* avant de
procéder à un lavage normal. Sur du coton
de couleur : tamponnez la tache avec une
solution d’eau vinaigrée (2 cuillérées à soupe de
vinaigre blanc pour 1/4 de litre d’eau) avant de
procéder à un lavage normal. Sur les lainages:
tamponnez la tache avec un mélange à parts
égales d’alcool* et de vinaigre blanc avant de
laver l’article.
CHOCOLAT - FRUIT - JUS DE FRUIT - VIN
: tamponnez la tache avec une solution d’eau
vinaigrée (2 cuillérées à soupe de vinaigre blanc
pour 1/4 de litre d’eau). Rincez bien et lavez
normalement.
GRAISSE : Saupoudrez immédiatement
le tissu de talc. Laissez sécher et brossez
soigneusement pour éliminer le talc. Puis
tamponnez à l’aide d’un produit dégraissant
du type huile minérale*. Rincez et lavez
normalement.
SANG : Trempez l’article taché dans l’eau froide
salée le plus vite possible, puis procédez à un
lavage normal.
KETCHUP - SAUCE TOMATE : Préparez une
solution à base de glycérine et d’eau tiède.
Faites tremper l’article pendant une heure puis
lavez-le normalement.
UTILISATION DE PRODUITS DÉTACHANTS :
Pour éviter tout risque d’incendie ou d’explosion :
(*) Si vous utilisez les produits recommandés dans les solutions présentées ci-dessus, veillez à bien
rincer votre linge avant de le mettre en machine.
- Si vous utilisez des détachants du commerce, suivez les instructions du fabricant
très attentivement.
Nous vous rappelons que, en général, les taches traitées immédiatement s’éliminent facilement.
Par contre, les taches anciennes qui ont été repassées ou séchées au sèche-linge ne peuvent plus
être enlevées.
Page 41

13
FR
Chargement de votre linge
Procédez comme suit :
Ouvrir l’appareil
• Pour accéder au tambour, appuyez sur le
bouton “Porte” situé juste au-dessus de la
porte.
Introduire votre linge
Pour des résultats de lavage optimaux, triez
et dépliez le linge puis introduisez-le dans le
tambour en le répartissant uniformément et
sans le tasser. Mélangez les gros et petits
articles pour obtenir un essorage optimal.
Fermer l’appareil
• Vérifiez qu’aucun vêtement ne soit resté
coincé dans la porte lors de la fermeture.
• Fermez la porte en la poussant doucement.
• Assurez-vous de la bonne fermeture de la
porte. Si elle est mal fermée, un système de
sécurité empêchera votre appareil de démarrer.
Pour votre sécurité, la porte est verrouillée
pendant toute la durée du cycle de lavage.
Chargement de vos produits de lavage
Bac lavage (poudre ou liquide)
Bac prélavage (poudre)
Assouplissant
Siphon
Le bac ”LAVAGE” peut recevoir des poudres
ou des liquides, mais n’utilisez pas de
détergent liquide pour les programmes AVEC
prélavage et/ou AVEC “départ
différé” (selon le modèle).
L’assouplissant concentré doit être dilué à
l’eau chaude.
Pour un remplissage approprié des bacs,
ouvrez le tiroir à produits au maximum.
Ne dépassez pas le niveau MAX.
Dosage de la lessive
La quantité de lessive à utiliser dépend de
la dureté de l’eau, du degré de saleté de
votre linge et de la quantité de linge à laver.
Reportez-vous toujours aux prescriptions de
dosage figurant sur l’emballage de vos produits
de lavage.
Avertissement : les préconisations des
fabricants de lessive correspondent, dans la
plupart des cas, à un remplissage maximal du
tambour. Adaptez votre dosage en fonction du
poids du linge introduit dans la machine.
Ces préconisations vous éviteront un dosage
excessif responsable de la génération de
mousse. Une surproduction de mousse peut
diminuer les performances de votre machine
et augmenter la durée de lavage ainsi que la
consommation d’eau.
Lessives pour lainages et textiles délicats :
Lessives pour lainages et textiles délicats Pour
le lavage de ces textiles, il est recommandé
d’utiliser une lessive appropriée (évitez de
mettre cette dernière directement dans le
tambour car certains de ces produits peuvent
attaquer le métal).
Page 42

14
FR
Programmation
Vitesse d’essorage, arrêt
cuve pleine, sans essorage
Touche Départ / Pause: appuyer brièvement
Fenêtre LCD
Vitesse d’essorage , durée du programme,
heure actuelle/de n du cycle, Options, Statut
du signal, verrou du hublot, sécurité-enfants
2
Annuler: appuyer longtemps
L
5
1
Sélecteur de programmes
Options: Opti40°, Prélavage, Intensif,
Rinçage Plus, Anti-froissage, Sécurité
3
Sélections
Réglage de l’heure,
du signal, de la langue
4
R
Réglage de l’heure,
Pour la retardation de n,
pour l’heure actuelle
(i) Pour mettre en marche la machine, appuyez sur le sélecteur de programmes [1]. Le
message d’accueil « Bonjour » apparaît sur l’écran
Toutes les touches sont sensitives. Elles ne restent donc pas enfoncées.Nous vous conseillons
d’agir sur elles par appuis brefs.
L’action sur la touche ”Départ/Pause” se fait par appuis brefs sauf pour une annulation de programme* , dans ce cas vous devez la maintenir appuyée.
(*) Détail de cette fonction dans les pages suivantes.
« Si lors de la mise en marche l’un des messages de progrès de cycle (Prélavage, Lavage,
Rinçage, Essorage, Purge) est afché, baisser le bouton « Start/Pause » [5] vers le bas avant de
faire toutes autres opérations.
Réglage de l’heure courante
Vous pouvez réglez l’heure courante en appuyant simultanément au moins 3 secondes sur les
touches « Anti-froissage » et sécurité •, jusqu’à ce que le message « Réglez l’heure » apparaîsse
dans l’afcheur L. Ensuite, réglez l’heure en manipulant le bouton R, le message « Réglage de
l’heure » apparaît dans l’écran et l’heure courante clignote. Vous pouvez tourner le bouton R dans
les 2 sens et ajuster sa vitesse an d’obtenir un réglage plus ou moins n. Pour valider l’heure
courante, appuyez sur la touche « Départ / Pause », le message « Heure réglée » s’afche dans
l’écran L. Ensuite, sélectionnez la période, « Heure d’été » ou « Heure d’hiver », soit en validant
par un appui sur la touche « Départ / Pause » la période proposée, soit en la modiant en tournant à nouveau le bouton R, puis en la validant par un appui sur la touche « Départ / Pause ».
Pour modier l’heure courante lors du changement d’heure, procéder de la même façon que
ci-dessus, en validant l’heure afchée et en modiant seulement la période « Heure d’hiver » ou
« Heure d’été ».
Page 43

15
FR
Programmation
Votre lave-linge est muni d’une fonction appelée Memo Activ’ qui vous propose automatiquement le programme que
vous utilisez le plus, dès la mise sous tension.
Programmation d’un cycle de lavage sans options Voyants et messages
Appuyer sur le sélecteur 1, la machine sélectionne automatiquement le programme que vous utilisez le plus souvent (*).
Si vous souhaitez effectuer un programme différent, choisissez-le à
l’aide du sélecteur 1.
Choisissez à l’aide du bouton « Essorage »2
- soit de modier la vitesse d’essorage proposée,
- soit un égouttage, dans ce cas le cycle se terminera par une
vidange sans essorage,
- soit un arrêt cuve pleine, dans ce cas votre machine s’arrêtera la
cuve pleine d’eau avant l’essorage nal.
Choisissez un départ immédiat en faisant un appui bref sur la
touche « Départ/Pause »5.
Les messages de déroulement du cycle et le temps restant vous
indiquent en permanence l’avancée du programme sélectionné.
Lorsque le message « Programme terminé » s’afche dans l’écran
L, la machine a ni son cycle (**).
Programmation d’un cycle de lavage avec option : Voyants et messages
Appuyer sur le sélecteur 1 , la machine sélectionne automatiquement le programme que vous utilisez le plus souvent (*).
Si vous souhaitez effectuer un programme différent, choisissez-le
à l’aide du sélecteur 1 .
Choisissez à l’aide du bouton « Essorage »2
- soit de modier la vitesse d’essorage proposée,
- soit un égouttage, dans ce cas le cycle se terminera par une
vidange sans essorage,
- soit un arrêt cuve pleine, dans ce cas votre machine s’arrêtera la
cuve pleine d’eau avant l’essorage nal.
Sélectionnez les options disponibles « Opti 40° », « Prélavage »,
« Intensif », « Rinçage Plus » ou « Anti-froissage » en utilisant les
touches .
Choisissez un départ immédiat en faisant un appui bref sur la
touche « Départ/Pause » 5.
Ou choisissez une heure de « Fin différée » de la façon suivante :
- réglez l’heure de « Fin différée » de 15 minutes en 15 minutes
avec le bouton R. Vous pouvez retarder au maximum l’heure de
« Fin différée » de 24 heures.
- faites un appui bref sur la touche « Départ/Pause » . Après 5
secondes sans appui sur la touche « Départ/pause » , l’heure de
« Fin différée » est automatiquement enclanchée.
- le lavage débute automatiquement à l’heure programmée.
Les messages de déroulement du cycle et le temps restant vous
indiquent en permanence l’avancée du programme sélectionné.
Lorsque le message « Programme terminé » s’afche dans
l’écran L, la machine a ni son cycle (**).
(*) Avant de mettre votre machine en marche, vériez que le cordon électrique est branché et le robinet d’eau ouvert. Assurezvous aussi de la bonne fermeture de la porte de la machine.
(**) Lorsque le cycle de lavage est terminé et que le message « Programme terminé » s’afche, il est possible de programmer à nouveau votre machine. Si vous appuyez sur la touche « Départ/Pause » 5, la machine relancera automatiquement le
dernier cycle effectué, options incluses.
Le voyant bleu correspondant au programme sélectionné s’éclaire.
L’afcheur L indique le nom du programme, la vitesse d’essorage
maxi, la durée de lavage, l’heure de n et les options disponibles.
Le voyant bleu correspondant au nouveau programme sélectionné
s”’éclaire.
L’afcheur L indique le nom du programme, la vitesse d’essorage
maxi, la durée de lavage, l’heure de n et les options disponibles.
La vitesse d’essorage augmente/décroît, et la nouvelle vitesse
clignote lorsque l’on tourne le bouton pendant que le message
« Modication d’essorage » s’afche.
Si vous choisissez un égouttage, la vitesse « 000 » s’afchera.
Si vous choisissez un arrêt cuve pleine, aucune vitesse
n’apparaîtra et le picto
Le message « Départ » s’afche dans l’écran L.
Les messages de déroulement de programme sont « Prélavage »,
« Lavage», « Rinçage », « Essorage » et « Vidange ».
Le message « Programme terminé » et l’heure courante s’afchent.
Le voyant bleu correspondant au programme sélectionné s’éclaire.
L’afcheur L indique le nom du programme, la vitesse d’essorage
maxi, la durée de lavage, l’heure de n et les options disponibles.
Le voyant bleu correspondant au nouveau programme sélectionné
s”’éclaire.
L’afcheur L indique le nom du programme, la vitesse d’essorage
maxi, la durée de lavage, l’heure de n et les options disponibles.
La vitesse d’essorage augmente/décroît, et la nouvelle vitesse
clignote lorsque l’on tourne le bouton 2 pendant que le message
« Modication d’essorage » s’afche.
Si vous choisissez un égouttage, la vitesse « 000 » s’afchera.
Si vous choisissez un arrêt cuve pleine, aucune vitesse
n’apparaîtra et le picto
Les options disponibles s’afchent à l’écran L. Le cadre de
chaque option sélectionnée s’éclaire en appuyant sur la touche
correspondante.
En cas d’options incompatibles (par exemple, « Repassage facile »
et « Intensif » ne peuvent pas être activés en même temps), la
dernière option sélectionnée sera retenue.
Le message « Départ » s’afche dans l’écran L.
Lorsque vous réglez l’heure de « Fin différée », le message
« Heure de n à 19 :00 » apparaît dans l’écran L. Une fois l’heure
de « Fin différée » sélectionnée, le message « Départ à 17 :45 »
s’afche. Après 30 secondes, l’écran s’éteint, seule l’heure de
départ restant afchée.
Les messages de déroulement de programme sont « Prélavage », « Lavage», « Rinçage », « Essorage » et « Vidange ».
Le message « Programme terminé » et l’heure courante
s’afchent.
s’afchera.
s’afchera.
Page 44

16
FR
Programmation
Verrouillage des commandes en cours de cycle (Protection enfant) Messages
Si vous souhaitez verrouiller les commandes de votre lave-linge
durant le lavage, par exemple, pour éviter qu’un enfant ne modie
le programme en cours de cycle, procédez de la façon suivante : Si
aucune sécurité n’est sélectionnée, appuyez sur la touche sécurité
pendant au moins 3 secondes. Les commandes sont alors
automatiquement verrouillées durant tout le cycle de lavage.
Verrouillage total des commandes (Protection enfant)
Si vous souhaitez verrouiller complètement les commandes de
votre lave-linge, durant le lavage et à l’arrêt, pour éviter qu’un
enfant ne démarre par inadvertance un cycle, procédez de la façon
suivante : Si aucune sécurité n’est sélectionnée, appuyez sur la
touche sécurité
un verrouillage des commandes pendant le cycle, puis recommencer de la même façon pour sélectionner un verrouillage totale
des commandes. Si le verrouillage des commandes en cours
de cycle est déjà sélectionné, n’appuyez qu’une seule fois sur la
touche sécurité
Les commandes sont alors immédiatement verrouillées.
Déverrouillage des commandes (Suppression de la protection enfant)
Pour déverrouiller les commandes, appuyer une fois 3 secondes
minimum sur la touche sécurité
ment verrouillées ou deux fois 3 secondes sur la touche sécurité
si les commandes sont uniquement verrouillées durant le
cycle.
Les commandes sont alors immédiatement déverrouillées.
Ajouter ou retirer un objet pendant le cycle (impossible lors de l’essorage) :
• Faîtes un appui bref sur la touche ”Départ/Pause”
rompre le cycle.
• Mettez ou enlevez la ou les pièces de linge*.
• Faîtes un appui bref sur la touche ”Départ/Pause”
relancer le cycle.
(*) le temps de déverrouillage de la porte peut être de 1 à 2
minutes
Si vous avez choisi une“ Fin différée”, vous pouvez accéder
instantanément au tambour à tout moment pendant la phase
précédant
Annuler pendant la programmation, le lavage ou l’interruption momentanée (pause) :
• Appuyez sur la touche”Départ/Pause” [5] pendant au moins 3
secondes. Vous pouvez le faire à tout moment durant la période
qui précède le cycle ou même pendant une pause. Si vous avez
programmé une heure de « retardation de n de programme » et
que vous l’avez annulée pendant la période d’attende précédant le
commencement du cycle, toute votre programmation sera annulée.
Si vous souhaitez uniquement annuler l’heure de « retardation de
n de programme », tournez le bouton [R] vers la gauche jusqu’à
ce que vous arriviez à l’heure à laquelle le cycle sélectionné
s’arrête.
S’il y a encore de l’eau dans le tambour, la machine
commencel’écoulement. Après l’annulation d’un programme,
la machine ne contient pas d’eau et est prête à être utilisée de
nouveau.
pendant au moins 3 secondes pour sélectionner
pour bloquer totalement les commandes.
si les commandes sont totale-
pour inter-
pour
Après 3 secondes d’appui sur la touche sécurité, le message
suivant s’afche dans l’écran L : « Protection enfant…Verrouillage :
cycle ». Puis le pictogramme représentant un cadenas s’afche en
bas à droite dans l’écran.
Pendant le lavage, en cas de manipulation des commandes, le
message « Commandes verrouillées » apparaît dans l’écran L.
Lors du premier appui sur la touche sécurité, le message suivant
s’afche dans l’écran L : « Protection enfant : Verrouillage cycle ».
Lors du second appui, le message suivant apparaît : « Protection
enfant…Verrouillage : Total ». Puis le pictogramme représentant un
cadenas avec un « + » s’afche en bas à droite dans l’écran.
En cas de manipulation des commandes, le message « Commandes verrouillées » apparaît dans l’écran L.
Le message suivant apparaît dans l’écran L : « Protection
enfant…Déverouillage », puis le pictogramme du cadenas ouvert
apparaît en bas à droite dans l’afcheur.
Les messages “Programme interrompu” et “Appuyez sur la touche
Départ » s’afchent pendant que le programme est interrompu.
Le message d’étape du programme en cours s’afche de nouveau
lorsque le programme est redémarré.
Annuler pendant la programmation, le lavage ou l’interruption
momentanée (pause) :
Le message « Annulation du programme » s’afche sur la fenêtre
pendant l’annulation.
Pour avoir plus de précisions sur les différentes fonctions, reportez-vous au chapitre
“DÉTAIL DES FONCTIONS”.
Important : si vous avez arrêté votre machine durant un cycle de lavage en sélectionnant la position
“Stop” ou après une coupure de courant, à la remise sous tension, le cycle de lavage reprendra
systématiquement là où il a été interrompu.
Page 45

17
FR
Programmation
selon le textile
Pour choisir le programme le mieux adapté au type de linge, conformez-vous aux
indications figurant sur les étiquettes de la plupart des textiles.
Tableau des
programmes
Type de textile
Temperature
(C°)
COTON
SYNTHÉTIQUE
DÉLICAT
LAINE
Programmes spéciaux
TEXTILES LAVABLES
À LA MAIN
Flash 30'
OPTIA45 40° 3,5
STRETCH 30° 2,5
Programmes spéciaux
RINÇAGE seul
ESSORAGE seul,
VIDANGE
30 – 90° 7,0
Froid – 60° 3,0
Froid – 30° 2,0
Froid – 30° 1,5
30° 1,0
30° 3,0
Maximum load
(Kg)
Prélavage
>40˚
• • • • •
>40˚
• • • • •
Intensif
Rinçage plus
Anti-froissage
• • • •
• • •
• • • •
Vidange
Arrêt cuve pleine
•
•
•
•
•
• : Ces options sont réalisables pour la charge maximale que supporte le textile concerné.
• : Ces fonctions peuvent être utilisées seules ou cumulées – les combinaisons illogiques sont
impossibles.
Page 46

18
FR
Description détaillée des fonctions
Programmes
Coton “ ”
Pour une charge de linge composée de
COTON blanc ou de couleur résistant.
Si vous lavez du linge de couleur,
ne dépassez pas la température de
60° maxi.
Dans les premières minutes de ce
programme, votre lave-linge adapte
automatiquement grâce à
la consommation d’eau
et d’énergie pour un lavage parfait.
Synthétique “ ”
Pour une charge de linge composée
de COULEURS DÉLICATES SYNTHÉTIQUES RÉSISTANTS ou FIBRES
MÉLANGÉES.
Délicat “
Pour une charge de linge composée de
VOILAGES TEXTILES DÉLICATS ou
LINGE FRAGILE.
Laine “
Pour une charge de linge composée de
LAINES “LAVABLES EN MACHINE”.
Textiles lavables à la main “
Pour une charge de linge composée de
SOIE ou de TEXTILES PARTICULIÈREMENT DÉLICATS.
Flash 30’
Ce programme vous permet de rafraîchir
une charge de linge peu sale de 3 kg
composée de COTON BLANC, COULEURS ou SYNTHÉTIQUES RÉSIS-
TANTS
Sa durée est limitée à 30 minutes.
Dans ce programme, la température de
lavage est automatiquement programmée à 30°C.
Pour ce programme, les doses de lessive
doivent être réduites de moitié.
”
”
”
OptiA45minutes :
Ce programme vous permet de laver
efcacement une charge usuelle de linge
mixte (3,5 kilos de coton ou synthétique)
en 45 minutes seulement.
Fibres Modernes:
Ce programme vous permet de laver avec
soin vos textiles à base d’élasthane (Lycra,
par exemple) an de conserver plus longtemps leur élasticité.
Rinçage seul “
Rinçage séparé suivi, au choix :
- soit d’un essorage avec vidange
- soit d’une vidange seule (option “égouttage”)
- soit d’un arrêt cuve pleine d’eau.
Permet un essorage séparé avec vidange.
Dans le cas d’un “rinçage seul” suivi
d’un essorage ou d’un ”essorage
seul”, prenez garde de bien choisir
une vitesse d’essorage adaptée à
la nature du linge introduit dans la
machine.
”
Options
Prélavage
Spécialement conçu pour du linge souillé
(boue, sang...).
Un premier brassage à froid spécique
précède la phase de lavage.
Ce brassage à froid permet d’enlever,
avant chauffage, les particules souillant
le linge.
Il est nécessaire d’introduire du
détergent dans le bac “ ” de la boîte
à produits.
Intensif
Cette fonction améliore les performances
de lavage et permet, en augmentant
automatiquement la température du bain
de lavage ainsi que le temps de brassage, de traiter les taches rebelles
Page 47

19
FR
Description détaillée des fonctions
réputées difciles. L’option “Intensif” n’est
active que pour les programmes dont la
température de lavage est supérieure ou
égale à 40°C .
Rinçage plus
“Spécial peaux sensibles et allergiques”:
ajoute un rinçage supplémentaire au
cycle de lavage.
Anti-froissage
Facilite le repassage de votre linge.
Cette option permet aussi de laver et
d’essorer votre linge plus délicatement
tout en conservant des performances de
lavage identiques.
Arrêt cuve pleine
Cette fonction est à utiliser pour les
textiles que vous ne souhaitez pas essorer ou si vous prévoyez une absence
prolongée à la n du lavage.
Cette fonction ayant été sélectionnée,
le cycle est interrompu avant l’essorage
nal, ce qui permet à votre linge de tremper dans l’eau pour éviter le froissage.
Quand la machine est interrompu
avec le tambour remplit d’eau, l’icône
“Maintient et Rinçage” clignote et le
message “Programme arrêté” est
afché jusqu’à la n du cycle.
- Si vous voulez purger et essorer.
Réglez la molette [1] à “Essorage” @ et
utilisez le bouton [2], pour choisir une
vitesse convenable au type des pièces à
laver; puis appuyez sur “Start/Pause” [5],
Le message de programme “Essorage”
et la vitesse d’essorage est afchée sur
l’écran et le programme nit automatiquement.
- Ou si vous voulez seulement purger.
Réglez la molette [1] à “Essorage” @ et
utilisez le bouton [2], pour choisir “non
essorage”; puis appuyez sur “Start/
Pause” [5], Le message de programme
“Purge” est afchée sur l’écran et le programme nit automatiquement.
Opti A 40
Ce programme de laver efcacement à
40˚C une pleine charge de coton tout en
permettant des économies d’électricité.
Heure de n
Dès le début de la programmation,
l’afcheur vous indique “l’Heure de n”du
cycle choisi.
L’heure afchée par la machine en début
de programme peut varier en cours de
cycle:
- Si vous changez la température de
lavage (même pendant l’essorage), si
vous ajoutez ou supprimez des options,
l’heure sera recalculée et mise à jour
sur l’afcheur.
- Certains aléas de fonctionnement (par
exemple: détection de “balourd”, de
mousse...) peuvent, également, faire
varier la durée du cycle donc de l’heure
de n afchée.
- En cas de coupure de courant pendant
la phase de lavage, au retour du courant l’heure afchée peut être inférieure
à l’heure de n réelle. Cette heure sera
remise à jour au début de la phase de
rinçage.
Le “Balourd” : lorsque vous lavez
des très petites charges de linge,
il peut arriver que Cela gène le
fonctionnement optimal de votre
machine.
Activation de la sonnerie
Votre lave-linge dispose d’une sonnerie
que vous pouvez activer ou désactiver
en appuyant simultanément pendant 3
secondes sur les touches « Repassage
facile » et « Rinçage Plus ». Le message
« Sonnerie : Oui » s’afche dans l’écran
L et la machine émet un bip lorsque
celle-ci est activée. Le message « Sonnerie : Non » s’afche dans l’écran L et la
machine émet 2 bips lorsque celle-ci est
désactivée.
Le message « Sonnerie : Non » s’afche
dans l’écran L et la machine émet un bip
lorsque celle-ci est désactivée
Page 48

20
FR
Sélection de la langue.
Vous pouvez changer la langue
d’afchage en appuyant sur les boutons
Opti 40˚ et prélavage en même temps
pendant 2 secondes.
La langue en défaut est afchée
« Langue: English”.
Tournez bouton de réglage de l’heure [R]
pour changer la préférence de langue.
Veuillez conrmer la nouvelle langue en
appuyant sur le bouton Start [5].
Quand vous réglez la n du temps du
cycle, le message «Fin du temps du
cycle à» montre le temps de n du programme avec l’écran de l’heure courante
qui clignote. Après avoir choisi l’heure
de la n du programme, l’heure de début
du cycle va être afchée sur l’écran [L]
« Commence à 19 :45 ». L’écran [L] va
s’éteindre 30 secondes après la validation du cycle. Votre lave-linge se mettra
en marche automatiquement à l’heure
prévue.
I Lorsqu’une n différée a été sélectionnée, l’écran [L] garde afché jusqu’au
démarrage du cycle l’heure et le picto de
Fin différée
Vous pouvez retarder la n du programme de 1 à 24 heures pour bénécier
de l’avantage des tarifs d’électricité
de nuit ou pour terminer le programme
n différée.
Avant que la « retardation de la n
de programme » est choisi, le temps sur
l’écran [L] et l’icone de montre reste xe
jusqu’à que le cycle commence.
quand vous le désirez.
Pour cela, utiliser la molette [R] pour
choisir le temps de n que vous désirez.
Modification d’un programme de lavage
Pendant la programmation :
Avant d’avoir appuyé sur la touche ”Départ/
Pause ”
possibles.
Après le départ du cycle :
• Vous ne pouvez pas modifier le type de
textile (par exemple passer de “COTON” à
“SYNTHÉTIQUE”, de “SYNTHÉTIQUE” à
“DELICAT”etc...).
Pour changer de type de textile en cours de
cycle, vous devrezannuler le programme en
cours puis programmer un nouveau
• Vous pouvez modifier la température au
début de la phase de lavage, après avoir mis la
machine en mode “Pause”.
• Vous pouvez modifier les vitesses d’essorage
pendant tout le cycle précédent l’essorage.
• Vous pouvez sélectionner un “égouttage” et
un “arrêt cuve pleine” jusqu’à la fin du rinçage
(jusqu’à ce que le voyant de déroulement de
cycle “Rinçage” s’éteigne).
• Lorsque vous avez sélectionné un “Lava ge
“ ”, toutes les modifications sont
différée” vous ne pouvez activer les options
“Prélavage” et “Repassage Facile” que
pendant la période précédant le départ effectif
du cycle.
• Vous pouvez activer l’option “
” jusqu’au début du rinçage (jusqu’à ce que
le voyant de déroulement de cycle “Rinçage”
s’allume).
• Vous pouvez désactiver toutes les options
pendant toute la durée du cycle dans la mesure
où leur action n’est pas déjà commencée.
En fin de cycle :
Lorsque le voyant " Fin" est allumé :
- vous pouvez programmer un nouveau cycle
sans avoir à repasser par la position “Stop”.
Il suffit pour cela d’appuyer indifféremment sur
une des touches
sélecteur de programme
- Si en fin de cycle vous appuyez directement
sur la touche ”Départ/ Pause”
relance le dernier cycle programmé, options
comprises.
, , , ou de tourner le
.
, la machine
Page 49

21
FR
Sécurités automatiques
Sécurité d'ouverture de la
porte:
Dès que le cycle de lavage a démarré, la porte
de votre appareil se verrouille.
Dès que le cycle est terminé ou lorsque la
machine est arrêtée cuve pleine d'eau, la porte
se déverrouille immédiatement.Si vous avez
programmé une "Fin différée", la porte n'est pas
verrouillée pendant toute la période d'attente
précédant le départ effectif du cycle.
Si vous souhaitez ouvrir la porte pendant le
cycle, appuyez brièvement sur la touche
” et attendez au moins 1 à 2 minutes afin
que la sécurité de porte se déverrouille.
Suivant le moment du cycle où vous désirez
ouvrir la porte, ce délai peut être plus
long car il faut lui ajouter une période de
refroidissement.
En effet, en cours de cycle, pour que
la sécurité de porte se déverrouille, la
température intérieure ne doit pas dépasser
60° C, ceci afin de vous éviter des brûlures
graves.
“
Sécurité des eaux :
En cours de fonctionnement, le contrôle
permanent du niveau d’eau prévient tout
débordement éventuel.
Sécurité d'essorage :
Votre lave-linge est équipé d'une sécurité qui
peut limiter l'essorage lorsqu'une mauvaise
répartition de la charge est détectée
(cette mauvaise répartition est appelée
“balourd”). Dans ce cas votre linge peut être
insuffisamment essoré. Répartissez, alors,
uniformément votre linge dans le tambour et
programmez un nouvel essorage.
Sécurité anti-mousse :
Votre lave-linge sait détecter une trop forte
production de mousse , le voyant
lors de l’essorage.
A ce moment-là, l’essorage s’arrête et la
machine est vidangée.
Ensuite le cycle reprend son cours en adaptant
les cadences d’essorage et en ajoutant
éventuellement un rinçage supplémentaire.
L’heure de fin est modifiée.
Lors des lavages suivants réduisez vos doses
de lessives.
s’allume
Robinet fermé
Quand le voyant “Robinet fermé” est allumé
cela signifie qu’il y a un blocage sur l’arrivée
d’eau de votre appareil,
- vérifiez si le robinet d’arrivée d’eau est bien
ouvert,
- vérifiez si le tuyau d’arrivée d’eau n’est pas
coudé ou plié.
Programme pour les essais comparatifs et normalisés
Programme ...................................................................................................................COTON
Température ..................................................................................................................... 60°C
Charge ................................................................................................................................7 kg
Durée .............................................................................................................................. 2 h 15
Energie ...................................................................................................................... 1,19 kWh
Eau ......................................................................................................................................49 l
Pour l’annonce écrite sur l’étiquette énergétique, les tests sont faits selon la directive européenne 92/75/CEE, à
capacité nominale en s’assurant de l’utilisation totale du détergent CEI dès le début de la phase de lavage.
Page 50

22
FR
Entretien courant
Nettoyage de l’appareil
Pour le nettoyage de la carrosserie, du
bandeau de commande, et, en général, de
toutes les pièces en plastique, utilisez une
éponge ou un chiffon humidifié avec de l’eau
et du savon liquide uniquement.
Dans tous les cas, proscrire :
• Poudres abrasives
• Éponges métalliques ou plastiques
• Produits à base d’alcool (alcool, diluant, etc.)
Entretien des composants
internes
Afin d’obtenir une hygiène optimale, nous vous
conseillons de :
• Laisser la porte ouverte un moment après
le lavage (assurez-vous que vos enfants et
vos animaux ne puissent pas entrer dans la
machine)
• Nettoyer les composants en plastique et en
caoutchouc de l’accès au tambour à l’aide
d’un produit légèrement chloré environ une
fois par mois.
Pour éliminer tout résidu de ce produit,
lancez un programme de rinçage.
• Faire un cycle de lavage à 90°C au moins
une fois par mois.
Risque de gel
En cas de risque de gel, déconnectez le tuyau
d’arrivée d’eau et vidangez l’eau qui pourrait
subsister dans le tuyau de vidange en plaçant
ce dernier le plus bas possible dans une
cuvette.
Vérifications périodiques
Nous vous recommandons de vérifier l’état des
tuyaux d’arrivée d’eau et de vidange. Si vous
constatez le moindre fendillement, n’hésitez
pas à les remplacer par des tuyaux identiques
disponibles auprès du fabriquant ou de son
Service Après Vente.
Remplacement du tuyau
d’arrivée d’eau
Lors du changement, veillez à bien serrez les
raccordements et à la présence de joints aux
deux extrémités.
Remplacement du cordon
d’alimentation électrique
Pour votre sécurité, cette opération doit impérativement
être effectuée par le Service Après Vente du fabricant
ou un professionnel qualifié.
Nettoyage du tiroir à produits
Pour nettoyer le bac à produits, tirez-le vers
vous puis retirez-le de son logement en
exerçant une pression à l’emplacement indiqué
sur le siphon (pièce de couleur). Rincez le bac
à l’eau.
Fig 10
Nettoyage du Siphon
Lavez le siphon (la pièce de couleur située
dans le bac à produits) toutes les 30 à 40
lessives. Retirez le siphon en le tenant
par les bords. Pour éviter l’obstruction du
siphon, rincez soigneusement les résidus
d’assouplissant et assurez-vous que le siphon
soit parfaitement remis à sa place avant toute
utilisation de la machine.
Fig 11
Page 51

23
FR
Nettoyage des filtres
Nettoyage du filtre de la pompe
Ce filtre récupère les petits objets que
vous avez pu laisser par mégarde dans les
vêtements et évite qu’ils ne perturbent le
fonctionnement de la pompe.
Pour le nettoyer, procédez comme suit :
Lorsque le tambour est plein, (par exemple
en cas de coupure de courant) jusqu’à 15
litres d’eau doivent être vidangés, prévoyez
donc un récipient de taille suffisante.
Prenez garde, l’eau à vidanger peut
éventuellement être encore brûlante.
- Débranchez le cordon d’alimentation
électrique de votre appareil.
- Ouvrez la trappe d’accès en appuyant sur le
bouton (Figure 12).
- Inclinez la goulotte située devant le filtre vers
votre récipient.
- Afin de contrôler le flux d’eau sortant,
dévissez légèrement le filtre en le tournant
dans le sens inverse des aiguilles d’une
montre.
Fig 12
- Si votre récipient est plein avant d’avoir
tout vidangé, revissez le filtre, videz votre
récipient et recommencez jusqu’à ce qu’il n’y
ait plus d’eau.
- Ouvrez alors le filtre en tournant dans le
sens inverse des aiguilles d’une montre et
videz la petite quantité d’eau restante dans le
couvercle du filtre (30 ml maximum).
- Retirez les résidus restant dans le logement
du filtre.
- Nettoyez le filtre.
- Réinstallez le filtre dans son logement et
verrouillez-le en tournant dans le sens des
aiguilles d’une montre.
- Remontez la goulotte
- Fermez la trappe d’accès au filtre.
Assurez vous que le filtre soit correctement
repositionné, ceci afin de prévenir toute fuite
d’eau.
Nettoyage des filtres situés sur
l’arrivée d’eau
Les filtres situés à l’endroit où le tuyau d’arrivée
d’eau se raccorde à votre appareil et au
robinet empêchent la saleté ou de petits objets
de pénétrer dans votre appareil. Nous vous
conseillons de les nettoyer de temps en temps.
Pour les nettoyer, procédez comme suit :
- Fermez d’abord le robinet d’arrivée d’eau.
- Dévissez la partie du tuyau qui est raccordée à
l’arrière de votre appareil.
- Retirez le filtre situé à l’arrière de votre appareil
à l’aide de pinces et nettoyez-le à l’eau.
- Remettez le filtre et le tuyau en place.
- Dévissez le tuyau raccordé au robinet.
- Retirez le filtre avec les mains et nettoyez-le à
l’eau.
- Remettez le filtre et le tuyau en place.
Page 52

24
FR
Nettoyage et entretien de votre appareil
Pour préserver votre appareil, nous vous recommandons d’utiliser les produits d’entretien Clearit.
L’expertise professionnelle au service des
particuliers
Clearit vous propose des produits professionnels adaptés pour l’entretien quotidien de vos
appareils électroménagers et de vos cuisines.
Vous les trouverez en vente chez votre revendeur habituel, ainsi que toute une ligne de
produits accessoires et consommables.
Page 53

25
FR
Incidents pouvant survenir
Quelques incidents peuvent survenir lors de l’utilisation de votre appareil, voici des points à
vérifier.
Incidents Causes possibles / solutions
Le cycle ne démarre pas • Vous avez omis d’appuyer sur la touche ”Départ/Pause”.
Fortes vibrations lors de
l’essorage
• L’appareil n’est plus alimenté en électricité :
- vérifiez si la prise de courant est correctement branchée.
- vérifiez le disjoncteur et les fusibles.
• Le robinet d’arrivée d’eau est fermé.
• La porte de l’appareil est mal fermée.
• Votre appareil n’a pas été correctement débridé : voir le
chapitre “DÉMONTAGE DES BRIDES DE TRANSPORT DE
VOTRE APPAREIL”.
• Le sol n’est pas horizontal.
• Les pieds sont mal réglés ou leurs écrous sont desserrés.
Le linge n’a pas été essoré
ou est insuffisamment essoré
Une flaque d’eau se forme
autour de la machine
La machine ne vidange pas
La porte ne s’ouvre pas
La machine refuse d’accepter
un programme
• Vous avez sélectionné un programme sans essorage, par
exemple : “Pas d’essorage”.
• La sécurité d’essorage a détecté une mauvaise répartition
du linge dans le tambour : répartissez mieux le linge et
programmez un nouvel essorage.
Retirez tout d’abord la prise de courant ou coupez le fusible
correspondant et fermez le robinet d’arrivée d’eau.
Pendant le fonctionnement de l’appareil, le contrôle constant
du niveau empêche l’eau de déborder. Si, malgré cela, de
l’eau sort de la machine, il se peut que :
• la crosse de vidange soit mal positionnée dans le conduit
d’évacuation.
• les raccordements du tuyau d’arrivée d’eau sur la machine
et sur le robinet ne soient pas étanches : vérifiez la
présence des joints ainsi que le serrage des raccords.
• Vous avez programmé un “Contenir et rincer”.
• Le filtre de la pompe de vidange est obstrué : nettoyez-le
(voir la façon de procéder dans le chapitre “NETTOYAGE
DES FILTRES”).
• Le tuyau d’évacuation est plié ou écrasé.
• Le programme n’est pas encore terminé. La porte reste
verrouillée pendant toute la durée du programme.
• La “ sécurité enfants” est activée, (voir le chapitre
“PROGRAMMATION”).
• Vous avez interrompu un cycle en cours. Annulez-le (voir le
chapitre “PROGRAMMATION”).
De manière générale, quelle que soit l’anomalie constatée, il convient d’arrêter la machine,
débrancher le cordon d’alimentation électrique et fermer le robinet d’arrivée d’eau.
Page 54

26
FR
Incidents dépannables par vous-même
Dans ce chapitre, nous vous expliquons comment remédier vous-même, très facilement à
ces incidents.
Votre appareil détecte de lui-même certains incidents de fonctionnement et vous le signale
apparaissent sur l’afficheur.
Messages Causes / Remèdes
Robinet d’arrivée d’eau fermé. Vérifiez l’ouverture du robinet
Voyant de Robinet
fermé allumé
d’arrivée d’eau, puis appuyez de nouveau sur la touche “Départ/
Pause”pour relancer le cycle. Cet incident peut aussi être provoqué
par un mauvais raccordement du tuyau de vidange (voir chapitre
”RACCORDEMENTS DE VOTRE APPAREIL : Evacuation des eaux
usées”).
Voyant de détection
de mousse allumé
Surdosage lessiviel. La machine déclenche automatiquement un
rinçage supplémentaire. Surveillez votre dosage lors de votre prochain
lavage.
Incidents signalés nécessitant l’intervention d’un
dépanneur
Vérifiez bien que le message affiché ne correspond pas à un incident que vous pouvez
dépanner vous même (voir ci-dessus)
Votre appareil détecte aussi certains défauts de fonctionnement qui nécessitent
l’intervention systématique d’un dépanneur et vous le signale par d’autres messages dont
nous vous donnons, ci-après, quelques exemples
Page 55

27
FR
Service Après-Vente
Tout travail à effectuer sur votre appareil est réservé à votre vendeur ou à un professionnel
qualifié agréé par le fabricant.
Lors de votre appel, mentionnez la référence complète de votre appareil (modèle, type et
numéro de série).
Ces informations figurent sur la plaque signalétique de l’appareil.
Page 56

Page 57

Page 58

2
DE
Inhalt
Seite
• Sicherheitsvorschriften ........................................................................................................3
• Hinweise zum Umweltschutz und Tipps zum Energiesparen ..............................................3
• Gerätebeschreibung ............................................................................................................4
Umweltschutz ................................................................................................................... 5
•
1 - Die erste Installation
• Entfernen der Transportsicherungen ...................................................................................6
• Vorbereitung zum Aufstellen des Gerätes ...........................................................................7
• Aufstellen unter einer Arbeitsplatte ......................................................................................7
• Anschluss an die Wasserversorgung ..................................................................................8
• Anschluss an die Abwasserleitung ......................................................................................9
• Anschluss an das Stromnetz ...............................................................................................9
2 - Einsatz der Waschmaschine
• Vorbereiten der Wäsche (Sortieren, Farbtest, Ladungen und Prüfung) ............................ 11
Behandlung hartnäckiger Flecken..................................................................................12
•
• Wäsche laden ...................................................................................................................13
• Waschmittel einfüllen ........................................................................................................13
• Programmieren / Stornieren eines Programms ........................................................14 to 17
• Funktionsdetails .......................................................................................................18 to 19
• Ändern eines Waschprogramms .......................................................................................20
• Automatische Sicherheitssysteme ....................................................................................21
3 - Allgemeine Wartung
• Reinigen des Gerätes und der internen Bauteile ..............................................................22
• Frostgefahr ........................................................................................................................22
• Reinigen des Waschmittelbehälters ..................................................................................22
• Reinigen der Filter .............................................................................................................23
• Reinigung und Pflege Ihres Gerätes .................................................................................24
4 - Mögliche Störungen
• Der Zyklus startet nicht .....................................................................................................25
• Starke Schwingungen beim Schleudern ...........................................................................25
• Die Wäsche wird nicht oder nicht ausreichend geschleudert ............................................25
• Es bildet sich eine Pfütze um die Maschine herum ...........................................................25
• Die Maschine pumpt nicht ab ............................................................................................25
• Die Tür lässt sich nicht öffnen ...........................................................................................25
• Die Maschine nimmt kein Programm an ...........................................................................25
5 - Bestimmte Meldungen der Kontrollleuchten oder der Anzeige
• Kleine Fehler, die Sie selbst beheben können ..................................................................26
• Fehler, die von einem Techniker behoben werden müssen .............................................26
Page 59

3
DE
Sicherheitsvorschriften
Dieses Gerät ist ausschließlich für den häuslichen Einsatz gedacht: Zum Waschen, Spülen und
Schleudern maschinenwaschbarer Textilien.
Sie müssen sich an die folgenden Anweisungen halten. Wir lehnen jegliche Haftung ab und
treten von der Gewährleistung zurück, wenn diese Empfehlungen nicht beachtet werden,
was zu Schäden am Gerät oder zu Verletzungen führen kann.
• Damit weder die Maschine noch ihre
Wäsche beschädigt wird, dürfen Sie Ihr
Gerät nur bestimmungsgemäß einsetzen.
Verwenden Sie ausschließlich Wasch- und
Wartungsprodukte, die für den Einsatz in
Haushaltswaschmaschinen vorgesehen
sind.
• Sollten Sie die Wäsche mit Fleckenoder Lösungsmitteln oder generell mit
brennbaren oder möglicherweise explosiven
Produkten behandelt haben, darf sie
nicht sofort in die Maschine gegeben
werden (siehe Kapitel „BEHANDLUNG
HARTNÄCKIGER FLECKEN“). Darüber
hinaus empfehlen wir Ihnen, Lösungsmittel
oder Sprühdosen nicht in der Nähe des
Gerätes oder allgemein in der Nähe von
Elektrogeräten in schlecht belüfteten
Räumen zu benutzen (Brand- und
Explosionsgefahr).
• Sollten Störungen auftreten, die nicht
anhand der empfohlenen Abhilfen gelöst
werden können (siehe Kapitel „MÖGLICHE
STÖRUNGEN“), ziehen Sie einen
qualifizierten Fachmann zu Rate.
• Bei einer Neuinstallation muss das
Gerät mit einem neuen Schlauch am
Wassernetz angeschlossen werden. Der
gebrauchte Schlauch darf nicht wieder
verwendet werden. Überprüfen Sie Zu- und
Ablaufschläuche regelmäßig: Auf diese
Weise beugen Sie der Entstehung von
Wasserschäden vor.
• Lassen Sie keine Kinder mit dem Gerät
spielen und halten Sie Haustiere fern.
• Altgeräte müssen unverzüglich
unbrauchbar gemacht werden. Ziehen Sie
den Netzstecker und schneiden Sie das
Netzkabel direkt am Gerät ab. Schließen
Sie den Wasserzulauf und entfernen
Sie den Schlauch. Machen Sie den
Türverschluss unbrauchbar.
Hinweise zum Umweltschutz und Tipps zum
Energiesparen
• Programmieren Sie eine Vorwäsche nur,
wenn sie absolut notwendig ist: zum
Beispiel bei stark verschmutzter Sport- und
Arbeitskleidung, etc.
• Bei gering oder normal verschmutzter
Wäsche genügt ein Programm bei
niedriger Temperatur für ein einwandfreies
Waschergebnis.
• Für gering verschmutzte Wäsche wählen
Sie ein kurzes Waschprogramm („Kurz“,
„Express“ oder „FLASH“ - je nach Modell).
• Dosieren Sie das Waschmittel
entsprechend der Wasserhärte,
dem Verschmutzungsgrad und
der Wäschemenge. Beachten Sie
dabei immer die Hinweise auf den
Waschmittelpackungen.
• Sowohl die Verpackung als auch die
Komponenten Ihre Maschine bestehen aus
recyclingfähigen Materialien. Bitte denken
Sie beim Entsorgen daran.
Bei Ihrem Händler oder Ihren städtischen
Entsorgungseinrichtungen erfahren Sie,
wie Sie Ihr Altgerät auf umweltfreundliche
Weise entsorgen können.
Page 60

4
DE
Gerätebeschreibung
Bedienungstafel
Waschmittelbehälter
Türöffner
Tür
Entleerungspumpe-Zugangsklappe
Entleerungspumpe-Zugangsklappe
Befestigungsschrauben für das Oberteil
Anschluss für den Wasserzulauf
Taste zum Öffnen der
Einstellbare Füße
Oberteil
Sicherungsschraube
Netzkabel
Abwasserschlauch
Page 61

5
DE
Umweltschutz
Das Verpackungsmaterial des Gerätes ist recyclingfähig. Helfen Sie beim Recycling
und schützen Sie die Umwelt, indem Sie die Verpackung bei einer städtischen
Entsorgungseinrichtung abgeben.
Ihre Maschine besteht zum Großteil aus recyclingfähigen Materialien. Sie ist mit diesem
Wir danken Ihnen, dass Sie Ihren Teil zum Schutz unserer Umwelt leisten.
Aufkleber gekennzeichnet, der besagt, dass Altgeräte nicht mit dem gewöhnlichen
Hausmüll entsorgt werden sollten. Auf diese Weise wird das vom Hersteller organisierte
Recycling ordnungsgemäß und unter bestmöglichen Bedingungen gemäß der
Europäischen Direktive 2002/96/EC zu elektrischen und elektronischen Altgeräten
durchgeführt. Bei Ihrer Stadtverwaltung oder Ihrem Händler erfahren Sie, wo sich die
nächste Sammelstelle befindet.
Page 62

6
DE
Entfernen der Transportsicherungen
VOR DEM EINSATZ MÜSSEN UNBEDINGT DIE NACHFOLGEND BESCHRIEBENEN
Diese Schritte bestehen darin, alle Teile zu entfernen, die zur Sicherung der wichtigsten
internen Bauteile während des Transports dienen. Das Entfernen der Transportsicherungen
ist für den einwandfreien Gerätebetrieb und für die Einhaltung der geltenden
Sicherheitsnormen notwendig. Falls Sie die Schritte nicht komplett ausführen, kann dies zu
schweren Beschädigungen Ihres Gerätes im Betrieb führen.
1. Entfernen Sie vor der Inbetriebnahme die
Transportsicherungen. Hierbei handelt
es sich um die mit „C“ bezeichneten
Schrauben (Abbildung 1).
2. Drehen Sie die Schrauben „C“ mit einem
Schraubenschlüssel entgegen dem
Uhrzeigersinn heraus (Abbildung 2), bis
sie von Hand herausgenommen werden
können.
3. Ziehen Sie die Schrauben „C“ mitsamt
den Gummidichtungen zu sich hin heraus
(Abbildung 3).
Um diesen Schritt zu erleichtern, geben
Sie einen Tropfen Spülmittel auf die
Schrauben und lösen sie schrittweise.
Arbeiten Sie sich dabei von oben nach
unten vor.
SCHRITTE DURCHGEFÜHRT WERDEN
4. Verschließen Sie die Schraubenlöcher
von „C“ unbedingt mit den hierfür
vorgesehenen Abdeckungen (im
Zubehörbeutel enthalten).
Vor dem Verlassen des Werks wurde
das Gerät sorgfältig geprüft; es ist daher
möglich, dass sich etwas Wasser in der
Trommel oder in den Waschmittelbehältern
befindet.
Wir empfehlen das Aufbewahren aller
Transportsicherungen, da diese für den
eventuellen späteren Transport der
Maschine unbedingt wieder eingebaut
werden müssen.
Abb.
Abb.
Abb.
Abb.
Page 63

7
DE
Vorbereitung zum Aufstellen des Gerätes
Geräteumgebung:
Sollte die Maschine neben einem anderen
Gerät oder einem Möbelstück aufgestellt
werden, muss immer ein Zwischenraum
gelassen werden, damit die Luft
zirkulieren kann. Des Weiteren wird
dringend davon abgeraten:
- Das Gerät in einem feuchten, schlecht
belüfteten Raum aufzustellen.
- Das Gerät an einem Ort aufzustellen, an
dem es Spritzwasser ausgesetzt werden
könnte.
- Das Gerät auf Teppichboden
aufzustellen.
Sollte sich dies nicht vermeiden
lassen, treffen Sie alle notwendigen
Vorkehrungen, damit die Luftzirkulation
am Boden nicht behindert wird, so dass
die inneren Bauteile gut belüftet werden.
Waagerecht-Einstellung:
Prüfen Sie mit Hilfe einer Wasserwaage, ob
der Boden waagerecht ist: Maximale Neigung:
2 °, d. h. eine Abweichung von ca. 1 cm in
der Breite und von 1,5 cm in der Tiefe der
Maschine.
Justieren der einstellbaren
Füße:
Damit Ihr Gerät sicher und leise arbeiten
kann, müssen die Füße angebracht werden.
Ihr Gerät wird mit vier einstellbaren Füßen
geliefert. Falls das Gerät nicht stabil stehen
sollte,
- Lösen Sie die Kontermutter aus weißem
Kunststoff,
- Drehen Sie den einstellbaren Fuß ein oder
aus, bis das Gerät absolut gerade steht,
- Sobald die Füße eingestellt sind, drehen Sie
die Kontermutter fest, um die Einstellung zu
fixieren.
Aufstellen unter einer Arbeitsplatte
Soll die Waschmaschine unter einer
Arbeitsplatte aufgestellt werden, müssen Sie
das Oberteil abmontieren (Abbildung 5)
Stellen Sie sicher, dass das Gerät nicht an
das Stromnetz angeschlossen ist.
Lösen und entfernen Sie die 2
Abb.
Halteschrauben, die das Oberteil an der
Rückwand der Maschine fixieren.
Ziehen Sie das Oberteil zum Lösen leicht
zu sich heran, heben Sie es dann an und
entfernen Sie es.
Page 64

8
DE
Geräteanschlüsse
Anschluss der
Kaltwasserversorgung
Schließen Sie den Zulaufschlauch (Abbildung
6) an
- Verschrauben Sie das gekrümmte Ende
mit dem Anschluss an der Rückseite des
Gerätes
- Verschrauben Sie das andere Ende mit
einem Wasserhahn mit Gewindenase,
Durchmesser 20 x 27 (3/4 Zoll BSP).
Wenn Sie einen selbstschneidenden
Hahn verwenden, muss die Nutzöffnung
einen Durchmesser von mindestens 6 mm
Abb.
aufweisen.
Vergessen Sie nicht, die Gummidichtungen
an beiden Enden anzubringen und die
Anschlüsse gut festzuziehen, damit kein
Wasser auslaufen kann. Die Dichtungen
werden im Zubehörbeutel mitgeliefert.
Wasserzulauf:
- Minimaler Wasserdruck: 0,1 MPa oder 1 bar
- Maximaler Wasserdruck: 1 MPa oder 10 bar
Page 65

9
DE
Geräteanschlüsse
Abwasser abpumpen
Schließen Sie den Abwasserschlauch
(Abbildung 7) an
• Vorübergehend können Sie den Schlauch
in ein Waschbecken oder in eine Badewanne
hängen.
• Bei dauerhafter Befestigung schließen
Sie den Schlauch an einen belüfteten
Geruchsverschluss (U-Rohr) an. Sollte
die Anlage nicht mit einem belüfteten
Geruchverschluss (U-Rohr) ausgestattet
sein, achten Sie darauf, dass der Anschluss
nicht luftdicht ist. Um einen Rückfluss von
Abwasser in die Maschine zu vermeiden,
empfehlen wir dringend, einen freien
Abb.
Luftdurchlass zwischen dem Ablassschlauch
der Maschine und der Abwasserleitung zu
lassen.
Der Schlauch darf weder verdreht noch
geknickt werden. Er muss durch den
Entleerungsbogen gehalten werden, damit er
nicht herunterfällt (Abbildung 8).
Der Entleerungsbogen muss sich in einer
Höhe zwischen 40 und 100 cm vom
Maschinenboden befinden. Achten Sie
darauf, dass der Abwasserschlauch stabil
fixiert wird (z. B. durch Festbinden), damit
sich der Bogen beim Abpumpen nicht löst
und eine Überschwemmung verursacht.
Abb.
Stromanschluss
Aus Sicherheitsgründen müssen die
folgenden Anweisungen unbedingt
eingehalten werden.
Die elektrische Anlage muss insbesondere
hinsichtlich des Erdanschlusses der Norm NF
C 15-100 entsprechen. Anschluss des Kabels
(3 x 2,5 mm2,Einphasen-Wechselstrom, 230
V) an:
• Einphasen-Wechselstromzähler, 20 A, 230
V, 50 Hz
• Fehlerstrom-Schutzschalter und eigene
Sicherung (10 oder 16 A, je nach Modell)
• 10/16-Ampere-Steckdose mit 2 Polen +
Erde.
Wir sind für keine Betriebsstörungen haftbar,
die auf falschen elektrischen Anschluss
zurückzuführen sind.
Hinweis zum Stromanschluss des Gerätes:
• Verwenden Sie keine Verlängerungskabel,
Adapter oder Mehrfachsteckdosen.
• Entfernen Sie niemals den Erdanschluss.
• Die Steckdose muss leicht zugänglich,
jedoch für Kinder unerreichbar sein.
Im Zweifelsfall wenden Sie sich bitte an Ihren
Elektroinstallateur.
Das Gerät entspricht den europäischen
Richtlinien 73/23/EWG (Niederspa
nnungsrichtlinie) und 89/336/EWG
(elektromagnetische Verträglichkeit),
die durch die Richtlinie 93/68/EWG
abgeändert wurden.
Page 66

10
DE
Textilpflegesymbole
Damit Ihre Textilien optimal gepflegt werden, sind diese mit einem Etikett versehen, das die
wichtigsten
Informationen zusammenfasst. Diese Informationen werden durch die nachstehend
aufgeführten Symbole repräsentiert:
WASCHEN
Maximale Temperatur: 95 °C
- Normale Maschinenwäsche
- Normales Spülen
- Normale Schleudertrocknung
- Reduzierte Maschinenleistung
- Spülen bei reduzierter Temperatur
- Reduzierte Schleudertrocknung
Maximale Temperatur: 95 °C
- Normale Maschinenwäsche
- Normales Spülen
- Normale Schleudertrocknung
- Reduzierte Maschinenleistung
- Spülen bei reduzierter Temperatur
- Reduzierte Schleudertrocknung
- Reduzierte Maschinenleistung
- Spülen bei reduzierter Temperatur
- Reduzierte Schleudertrocknung
Maximale Temperatur: 40 °C
- Normale Maschinenwäsche
- Normales Spülen
- Normale Schleudertrocknung
- Reduzierte Maschinenleistung
- Spülen bei reduzierter Temperatur
- Reduzierte Schleudertrocknung
- Reduzierte Maschinenleistung
- Spülen bei reduzierter Temperatur
- Reduzierte Schleudertrocknung
Maximale Temperatur: 30 °C
-Stark reduzierte Maschinenleistung
- Normales Spülen
- Reduziertes Schleudern
Nur Handwäsche
Maximale Temperatur: 40 °C
(Bestimmte Maschinen sind
mittlerweile mit einem Programm
ausgestattet, das die Reinigung dieser
Textilien in der Maschine ermöglicht.)
Nicht waschen
BLEICHEN
Wasserbleiche, kalt Kein Bleichmittel verwenden
BÜGELN
200°C
Hohe
Einstellung
(heiß)
150°C
Mittlere
Einstellung
110°C
Niedrige
Einstellung
TROCKENREINIGUNG
Sämtliche
gebräuchlichen
Reinigungsmittel
Perchlorethylen-
Mineralöl
Normale Behandlung
- Reduzierte Maschinenleistung
- Reduzierte Trocknungstemperatur
- Kein Wasserzusatz
(Keine Selbstreinigung möglich)
Anorganische
Flüssigkeiten
und 1,1,2-
Trichlortrifluorethan
(F113)
HAUSHALT-SCHLEUDERTROCKNUNG
Heiß trocknen
Kalt trocknen
Nicht bügeln
(kein Dampf)
Nicht
trockenreinigen,
keine
Fleckentferner auf
Lösungsmittelbasis
Nicht schleudern
Page 67

11
DE
Vorbereiten der Wäsche
Sortieren der Wäsche
Bitte halten Sie sich an die Tabelle auf der nächsten Seite, um Ihre Wäsche zu sortieren und
ein Programm auszuwählen, das auf die Waschanweisungen der Pflegeetiketten angepasst
ist. Wenn Sie gemischte Textilien waschen, verwenden Sie das für den empfindlichsten Stoff
geeignete Programm. Wenn Sie neue Textilien waschen, prüfen Sie sicherheitshalber zuerst, ob
diese abfärben: Halten Sie sich dazu an den folgenden „Farbtest“.
Farbtest
Beim ersten Waschen können farbige Textilien
abfärben, sofern diese nicht farbecht sind.
Bevor Sie die Maschine starten, führen Sie
folgenden Test aus:
- Suchen Sie sich eine Stelle des
Wäschestücks aus, die beim normalen Tragen
nicht zu sehen ist.
- Feuchten Sie diese mit warmem Wasser an
Überschreiten Sie niemals folgende Höchstladungen:
BAUMWOLLE / BUNTWÄSCHE / MISCHFASERN: .....................................................7kg
SYNTHETIKFASERN: .....................................................................................................3kg
EMPFINDLICHE STOFFE / SEIDE: ................................................................................2kg
WOLLE: .......................................................................................................................1,5 kg
HANDWÄSCHE .............................................................................................................1 kg
Durchschnittsgewicht verschiedener „dünner“ Wäschestücke
Einzelbettlaken ....................... 400 to 500 g
Doppelbettlaken................................. 800 g
Kissenbezug ...................................... 200 g
Leichtes Nachthemd .......................... 150 g
Kinder-Stoffhose ................................ 120 g
Erwachsenen-Stoffhose ....................500 g
Herren-Baumwoll-/Polyester-Hemd
...... 200 g
- Drücken Sie die Stelle anschließend gegen
ein weißes Tuch
• Wenn das Wäschestück nicht abfärbt,
können Sie es normal mit der Maschine
waschen
• Sollte das Wäschestück abfärben, waschen
Sie es separat oder von Hand.
Großes Baumwoll-T-Shirt .................. 150 g
Geschirrtuch ...................................... 100 g
Tischtuch ........................................... 250 g
Feine Damenwäsche ........................... 50 g
Kinderstricksachen aus Synthetikfasern
Socke................................................... 20 g
Erwachsenen-Baumwollschlafanzug
.... 50 g
.... 250 g
Durchschnittsgewicht verschiedener „dicker“ Wäschestücke
Erwachsenen-Jeans ............... 800 g to 1kg
Großes Frotteehandtuch ...................700 g
Kleines Frotteehandtuch.................... 300 g
Erwachsenen-Jogginghose ............... 350 g
Frottee-Kinderschlafanzug ................100 g
Bademantel .....................................1200 g
Sweatshirt .......................................... 250 g
Bettbezug ........................................1500 g
Prüfen der Wäsche
Nichteinhalten der folgenden Vorschriften
kann zu schweren oder sogar irreparablen
Schäden (Beschädigung der Trommel,
zerrissene Wäsche, und so weiter) und zum
Erlöschen der Garantie führen.
- Leeren Sie die Taschen
- Schließen Sie sämtliche Reißverschlüsse und
Druckknöpfe
- Entfernen Sie sämtliche Vorhanghaken oder
geben Sie Ihre Vorhänge in ein Waschnetz.
- Entfernen Sie sämtliche losen Knöpfe, Nadeln
und Haken
- Legen Sie kleine Wäscheteile (Bänder,
Ziertücher, usw.) in ein Waschnetz.
- Drehen Sie mehrschichtige Textilien
(Schlafsack, Anorak, usw.) auf links.
- Drehen Sie Stricksachen, Textilien mit
aufgenähtem Dekor und Hosen auf links.
Page 68

12
DE
Behandlung hartnäckiger Flecken
Durch Schweiß, Blut, Früchte, Wein oder Schokolade entstandene Flecken verschwinden gewöhnlich beim
Reinigen mit biologischen Waschmitteln. Einige Flecken allerdings müssen speziell behandelt werden, ehe
das Wäschestück in die Maschine gegeben wird. Testen Sie zunächst an einer unauffälligen Stelle des
Kleidungsstücks und spülen Sie gründlich. Beginnen Sie beim Auftragen eines Fleckenwassers immer auf
der Außenseite des Flecks, um Ringe zu vermeiden.
GRAS: Betupfen Sie den Fleck mit weißem Essig
oder 90 %igem Alkohol (sofern das Wäschestück
nicht darunter leidet), spülen und waschen Sie das
Kleidungsstück.
KUGELSCHREIBER / FILZSTIFT Entfernen
Sie möglichst viel Tinte, indem Sie den Fleck mit
Löschpapier abtupfen. Legen Sie ein sauberes
Stück weißen Stoffes unter den Fleck und betupfen
Sie den Fleck mit einem anderen Stück Stoff, das
mit weißem Essig (bei Synthetik- und Kunstfasern)
oder mit 90 %igem Alkohol (bei anderen Fasern)
(sofern das Textil dies erlaubt) getränkt ist.
ROST: Schwache Flecken bedecken Sie mit Salz,
träufeln Zitronensaft auf das Salz und lassen die
Mischung über Nacht einwirken. Danach spülen
Sie das Wäschestück gut aus und geben es dann
in die Maschine. Bei hartnäckigeren Flecken
verwenden Sie ein Anti-Rost-Mittel. Befolgen Sie
die Anweisungen des Herstellers.
KAUGUMMI: Kühlen Sie die Stelle mit einem
Eiswürfel. Sobald das Kaugummi hart geworden ist,
kratzen Sie es mit dem Fingernagel ab. Entfernen
Sie den zurückgebliebenen Ring mit einem
Fettlösemittel*.
ÖL / TEER: Verwenden Sie einen flüssigen
Fleckentferner* oder (wenn dies nicht helfen sollte)
verteilen Sie etwas frische Butter auf dem Fleck,
lassen die Butter etwas einwirken und betupfen den
Fleck dann mit Terpentin*.
FARBE: Lassen Sie die Farbe nicht erst trocknen.
Behandeln Sie den Fleck sofort mit einem auf der
Farbdose angegebenen Lösungsmittel (Wasser,
Terpentin*, Brennspiritus*). Behandeln Sie die
Stelle mit Seife und spülen Sie gut aus.
KERZENWACHS: Entfernen Sie möglichst viel des
Flecks durch Abkratzen. Legen Sie dann auf beide
Seiten des Flecks Löschpapier und gehen Sie mit
Ihrem Bügeleisen darüber, um das restliche Wachs
aufzuweichen und zu entfernen.
MAKE-UP: Legen Sie das Wäschestück mit der
verschmutzten Seite auf ein Blatt Löschpapier,
feuchten Sie dann die Rückseite des Stoffes mit 90
%igem Alkohol an (sofern dieser dem Wäschestück
nicht schadet). Dies gilt, sofern der Fleck nicht
fettig ist. Andernfalls versuchen Sie es mit einem
Fettlöser (vom Trichlorethylen-Typ).
KAFFEE / TEE: Auf weißer Baumwolle: Betupfen
Sie den Fleck mit mit Sauerstoff angereichertem
Wasser*, bevor Sie das Wäschestück normal
waschen. – Auf farbiger Baumwolle: Betupfen
Sie den Fleck mit einer Wasser-Essig-Lösung
(zwei Esslöffel weißer Essig auf 1/4 Liter Wasser),
danach normal waschen. – Auf Wolle: Befeuchten
Sie den Fleck mit einer Mischung aus gleichen
Teilen Alkohol* und weißem Essig, bevor sie das
Wäschestück normal waschen.
SCHOKOLADE – FRÜCHTE – FRUCHTSAFT
- WEIN: Betupfen Sie den Fleck mit einer Wasser-
Essig-Lösung (zwei Esslöffel weißer Essig auf
1/4 Liter Wasser). Spülen Sie das Wäschestück
gründlich aus, waschen Sie es anschließend ganz
normal.
FETT: Bestreuen Sie den Fleck sofort mit TalkumPuder. Lassen Sie das Talkum antrocknen
und bürsten Sie es vorsichtig ab. Betupfen
Sie den Fleck danach mit einem Fettlöser auf
Mineralölbasis. Spülen Sie das Wäschestück aus,
waschen Sie es anschließend ganz normal.
BLUT: Weichen Sie das verschmutzte
Wäschestück so schnell wie möglich in kaltem
Salzwasser ein, waschen Sie es dann normal.
KETCHUP – TOMATENSAUCE: Bereiten Sie eine
Mischung aus einem Teil Glyzerin und einem Teil
warmem Wasser. Weichen Sie das Wäschestück
eine Stunde lang darin ein, waschen Sie es dann
normal.
VERWENDUNG VON FLECKENTFERNERN:
Um Brand- oder Explosionsgefahr zu vermeiden:
(*) Wenn Sie die oben empfohlenen Produkte verwenden, spülen Sie die Wäsche gründlich durch,
bevor Sie sie in die Maschine geben.
- Wenn Sie handelsübliche Fleckentferner verwenden, halten Sie sich genau an die Anweisungen
des Herstellers.
Wir möchten Sie daran erinnern, dass sofort behandelte Flecken in der Regel leicht entfernt
werden können.
Im Gegenzug gilt: Alte Flecken, die bereits gebügelt und getrocknet wurden, lassen sich nur schwer
oder gar nicht entfernen.
Page 69

13
DE
Einlegen der Wäsche
So wird’s gemacht:
Maschine öffnen
•
Um an die Trommel heranzukommen, drücken
Sie auf die „Tür“-Taste oberhalb der Tür.
Wäschestücke einlegen
Um eine optimale Waschleistung zu erreichen,
sortieren und falten Sie Ihre Wäsche und
legen sie dann in die Trommel. Dabei
verteilen Sie die Wäsche gleichmäßig und
vermeiden ein Aufstapeln. Mischen Sie große
und kleine Wäschestücke, um ein optimales
Schleuderergebnis zu erzielen.
Waschmittel einfüllen
Abb.
Maschine schließen
• Achten Sie darauf, dass keine Wäschestücke
beim Schließen in der Tür eingeklemmt werden.
• Drücken Sie die Tür sanft zu.
• Stellen Sie sicher, dass die Tür richtig
geschlossen ist. Sollte sie nicht richtig
geschlossen sein, verhindert eine
Sicherheitseinrichtung das Starten der
Maschine.
Aus Sicherheitsgründen ist die Tür während des
gesamten Waschzyklus verriegelt.
Hauptwaschbehälter (Pulver oder Flüssigkeit)
Vorwaschbehälter (Pulver)
Weichspüler
Siphon
Der Hauptwaschbehälter kann sowohl Pulver
als auch Flüssigkeit aufnehmen. Verwenden
Sie jedoch kein Flüssigwaschmittel für
Programme MIT Vorwäsche und/oder MIT
„verzögertem Start“ (je nach Modell).
Dosieren des Waschmittels
Die zu verwendende Waschmittelmenge
hängt vom Härtegrad des Wassers, dem
Verschmutzungsgrad der Wäsche und der
Wäschemenge ab. Bitte halten Sie sich an die
Dosierhinweise auf der Waschmittelpackung.
Achtung: Die Empfehlungen der
Waschmittelhersteller entsprechen in
den meisten Fällen einer maximalen
Trommelfüllung. Passen Sie die Dosierung
dem Gewicht der Wäsche an, die Sie in die
Maschine geben.
Konzentrierter Weichspüler muss mit warmem
Wasser verdünnt werden.
Für das richtige Befüllen der Produktbehälter
öffnen Sie das Waschmittelfach so weit wie
möglich.
Überschreiten Sie niemals den durch MAX
gekennzeichneten Höchststand.
Wenn Sie diesen Empfehlungen folgen,
verhindern Sie eine Überdosierung, die zur
Schaumbildung führen kann. Eine übermäßige
Schaumbildung kann die Maschinenleistung
verringern und die Waschdauer sowie den
Wasserverbrauch erhöhen.
Woll- und Feinwaschmittel. Woll- und
Feinwaschmittel. Für das Waschen dieser
Textilien wird der Einsatz eines geeigneten
Waschmittels empfohlen. (Dieses möglichst
nicht direkt in die Trommel geben, da einige
dieser Mittel Metall angreifen.)
Page 70

14
DE
Programmieren
LC-Display
Schleudergeschwindigkeit, Programmdauer,
Schleudergeschwndigkeit,
Spülstopp, nicht schleudern
aktuelle/restliche Zykluszeit, Optionen, Signalstatus, Türsperre, Kindersicherung
Start/Pause-Taste: Kurz drücken
Abbrechen: Länger gedrückt halten
5
2
L
Programmselektor
1
Optionen: Opti 40 °,
Vorwaschen, Intensiv,
Spülen Plus, Bügelleicht,
Sperre
3
Auswahlen
Zeit, Signal,
Sprache ändern
4
R
Zeit ändern:
Verzögerte Endzeit,
aktuelle Zeit
(i) Zum Starten der Maschine drücken Sie den Programmselektor [1]. Im Display wird
„Hallo“ angezeigt.
Alle Tasten sind als Tipptasten ausgelegt. Das bedeutet, dass die Tasten nicht eingedrückt bleiben. Am besten drücken Sie sie nur kurz.
Ein Druck auf die „Start/Pause“-Taste sollte immer kurz sein; es sei denn, Sie möchten ein Programm abbrechen*. In diesem Fall müssen Sie die Taste etwas länger gedrückt halten.
(*) Details zu dieser Funktion nden Sie auf den nächsten Seiten.
Wenn beim Einschalten der Maschine eine Zyklus-Statusmeldung im Display zu sehen sein sollte
– wie Vorwaschen, Waschen, Spülen, Schleudern, Abpumpen –, halten Sie die Start/PauseTaste [5] gedrückt, bis die Meldung verschwindet. Danach können Sie die Maschine ganz normal
bedienen.
Aktuelle Zeit einstellen.
Sie können die aktuelle Zeit einstellen, indem Sie die Tasten Bügelleicht und Sperre
ns 3 Sekunden lang gedrückt halten: Bis „Zeit einstellen“ im Display L erscheint. Danach stellen
Sie die Zeit durch Drehen des Knopfes R ein. Im Display wird „Zeiteinstellung“ angezeigt, die
Zeitanzeige blinkt. Sie können den Knopf R in beide Richtungen drehen und damit die Geschwindigkeit vorgeben, mit der sich die Zeitanzeige bei der Einstellung ändert. Um die angezeigte
Zeit als aktuelle Zeit festzulegen, drücken Sie die Start/Pause-Taste. Das Display zeigt nun „Zeit
eingestellt“ an; drücken Sie noch einmal auf Start/Pause: Nun zeigt das Display „Sommerzeit“
oder „Winterzeit“ ein. Treffen Sie Ihre Auswahl mit dem Knopf R, zum Festlegen der Einstellung
drücken Sie noch einmal die Start/Pause-Taste.
mindeste-
Wenn Sie die Zeit lediglich von Sommer- auf Winterzeit oder umgekehrt einstellen möchten,
gehen Sie wie oben vor, ignorieren jedoch die Uhrzeiteinstellung und stellen lediglich „Winterzeit“
oder „Sommerzeit“ ein.
Page 71

15
DE
Programmieren
Solange die Maschine an das Stromnetz angeschlossen ist, arbeitet das „Memo-Aktivsystem“, das Ihnen automatisch das meistgenutzte Programm vorschlägt.
Programmieren eines Waschzyklus ohne Optionen Signale und Meldungen
Wenn Sie den Programmselektor 1 drücken, wählt die Maschine
automatisch das Programm aus, das Sie am meisten benutzen (*).
Mit dem Programmselektor 1 können Sie auch ein anderes Programm
auswählen.
Mit der Schleudern-Taste 2 können Sie:
- die vorgeschlagene Schleudergeschwindigkeit ändern,
- Wasser abpumpen (bei einem Programm, das ohne Schleudern
endet),
- einen Spülstopp festlegen. Das bedeutet, dass Ihre Maschine vor dem
letzten Schleudergang mit wassergefüllter Trommel stoppt.
Sie können die Maschine sofort starten, indem Sie kurz auf Start/Pause
5 drücken.
Das LC-Display L zeigt den Zyklusverlauf und die Restzeit – so können Sie den Fortschritt des ausgewählten Programms kontinuierlich
verfolgen.
Wenn im Display L „Programm beendet“ angezeigt wird, ist der Zyklus
abgeschlossen (**).
Programmieren eines Waschzyklus mit Optionen: Signale und Meldungen
Wenn Sie den Programmselektor 1 drücken, wählt die Maschine
automatisch das Programm aus, das Sie am meisten benutzen (*).
Mit dem Programmselektor 1 können Sie auch ein anderes Programm
auswählen.
Mit der Schleudern-Taste 2 können Sie:
- die vorgeschlagene Schleudergeschwindigkeit ändern,
- Wasser abpumpen (bei einem Programm, das ohne Schleudern
endet),
- einen Spülstopp festlegen. Das bedeutet, dass Ihre Maschine vor dem
letzten Schleudergang mit wassergefüllter Trommel stoppt.
Mit den Tasten wählen Sie die Optionen „Opti 40 °“, „Vorwaschen“,
„Spülen Plus“ oder „Bügelleicht“.
Sie können die Maschine sofort starten, indem Sie kurz auf Start/Pause
5 drücken.
Oder Sie wählen auf die folgende Weise einen „Verzögerten Start“:
- Mit dem Knopf R stellen Sie die „verzögerte Endzeit“ ein – in Schritten
von 15 Minuten, maximal 24 Stunden.
- Drücken Sie kurz die Start/Pause -Taste. Nach 5 Sekunden (in dieser
Zeit bitte nicht die Start/Pause-Taste drücken) wird die Verzögerungszeit
automatisch festgelegt.
- Das Waschen beginnt automatisch nach der einprogrammierten
Verzögerungszeit.
Das LC-Display L zeigt den Zyklusverlauf und die Restzeit – so können Sie den Fortschritt des ausgewählten Programms kontinuierlich
verfolgen.
Wenn im Display L „Programm beendet“ angezeigt wird, ist der Zyklus
abgeschlossen (**).
Die blaue Anzeige leuchtet passend zum ausgewählten Programm auf.
Im Display L werden Programmname, maximale Schleudergeschwindigkeit, Waschzeit, Beendigungszeit und verfügbare Optionen angezeigt.
Die blaue Anzeige leuchtet passend zum neu ausgewählten Programm
auf.
Im Display L werden Programmname, maximale Schleudergeschwindigkeit, Waschzeit, Beendigungszeit und verfügbare Optionen angezeigt.
Wenn Sie den Knopf 2 zum Erhöhen oder Vermindern der Schleudergeschwindigkeit drehen, wird „Schleudergeschwindigkeit ändern“ im
Display angezeigt, die neue Geschwindigkeit blinkt.
Wenn Sie eine Option zum Abpumpen wählen, wird als Geschwindigkeit
„000“ angezeigt.
Wenn Sie eine Spülstopp-Option wählen, erfolgt keine Geschwindigkeitsanzeige; im Display erscheint das Symbol
Im Display L wird „Start“ angezeigt.
Die einzelnen Programmabschnitte werden mit „Vorwaschen“,
„Waschen“, „Spülen“, „Schleudern“ und „Leeren“ angezeigt.
Im Display wird „Programm beendet“ sowie die aktuelle Uhrzeit
angezeigt.
Die blaue Anzeige leuchtet passend zum ausgewählten Programm auf.
Im Display L werden Programmname, maximale Schleudergeschwindigkeit, Waschzeit, Beendigungszeit und verfügbare Optionen angezeigt.
Die blaue Anzeige leuchtet passend zum neu ausgewählten Programm
auf.
Im Display L werden Programmname, maximale Schleudergeschwindigkeit, Waschzeit, Beendigungszeit und verfügbare Optionen angezeigt.
Wenn Sie den Knopf 2 zum Erhöhen oder Vermindern der Schleudergeschwindigkeit drehen, wird „Schleudergeschwindigkeit ändern“ im
Display gezeigt, die neue Geschwindigkeit blinkt.
Wenn Sie eine Option zum Abpumpen wählen, wird als Geschwindigkeit
„000“ angezeigt.
Wenn Sie eine Spülstopp-Option wählen, erfolgt keine Geschwindigkeitsanzeige; im Display erscheint das Symbol
Das Display L zeigt die verfügbaren Optionen. Die ausgewählte Option
wird mit einem Rahmen umgeben.
Wenn Sie gleichzeitig Optionen wählen, die nicht miteinander kombiniert
werden können (z. B. „Bügelleicht“ und „Intensiv“), bleibt die zuletzt
gewählte Option ausgewählt.
Im Display L wird „Start“ angezeigt.
Wenn Sie eine „verzögerte Endzeit“ wählen, wird im Display L „Endzeit
19:00“ angezeigt. Nachdem die „verzögerte Endzeit“ eingestellt wurde,
zeigt das Display „Beginn um 17:45“. Die Startzeit wird nach 30 Sekunden im Display angezeigt.
Die einzelnen Programmabschnitte werden mit „Vorwaschen“,
„Waschen“, „Spülen“, „Schleudern“ und „Leeren“ angezeigt.
Im Display wird „Programm beendet“ sowie die aktuelle Uhrzeit
angezeigt.
.
.
(*) Prüfen Sie vor dem Einschalten der Maschine, ob das Netzkabel angeschlossen und der Wasserzulaufhahn geöffnet ist.
Achten Sie auch darauf, dass die Tür der Maschine richtig geschlossen ist.
(**) Nachdem der Waschzyklus abgeschlossen ist und im Display „Programm beendet“ angezeigt wird, können Sie Ihre Maschine neu programmieren. Wenn Sie die Start/Pause-Taste 5 drücken, startet die Maschine den zuletzt abgelaufenen Zyklus
automatisch erneut – einschließlich aller eingestellten Optionen.
Page 72

16
DE
Programmieren
Steuertaste während der Waschzyklen sperren (Kindersicherung) Meldungen
Wenn Sie die Steuertasten Ihrer Waschmaschine im Betrieb sperren möchten – zum Beispiel, damit Kinder das laufende Programm
nicht verändern können –, tun Sie Folgendes: Wenn das Gerät
noch nicht gesperrt ist, halten Sie die
3 Sekunden lang gedrückt. Danach werden die Bedienelemente
automatisch über den gesamten Waschzyklus gesperrt.
Bedienelemente komplett gesperrt (Kindersicherung)
Sperrtaste mindestens
Nachdem Sie die Sperrtaste 3 Sekunden lang gedrückt haben,
wird im Display L „Kindersicherung... Sperre: Zyklus“ angezeigt.
Danach erscheint ein Schlosssymbol in der unteren rechten Ecke
des Displays.
Beim Versuch, Bedienelemente im laufenden Zyklus zu betätigen,
wird „Bedienelemente gesperrt“ im Display angezeigt.
Wenn Sie die Steuertasten Ihrer Waschmaschine im Betrieb und
im Leerlauf komplett sperren möchten – zum Beispiel, damit Kinder
keinen Waschzyklus starten können –, tun Sie Folgendes: Bei
nicht gesperrtem Gerät halten Sie die
3 Sekunden lang gedrückt, um die Bedienelemente während des
Zyklus zu sperren; danach halten Sie die Sperrtate nochmals über
3 Sekunden lang gedrückt, um die Bedienelemente komplett zu
sperren. Sollten Sie Bedienelemente bereits im Betrieb gesperrt
sein, müssen Sie die
halten, um die Bedienelemente komplett zu sperren.
Die Bedienelemente werden dann sofort gesperrt.
Entsperren der Bedienelemente (Kindersicherung aufheben)
Zum Entsperren der Bedienelemente halten Sie die
mindestens 3 Sekunden lang gedrückt (bei kompletter Sperrung)
oder halten die
lang gedrückt (wenn Sie lediglich eine Sperre im laufenden Zyklus
eingestellt haben).
Die Bedienelemente werden dann sofort entsperrt.
Einlegen oder Herausnehmen von Wäschestücken bei laufendem Waschzyklus (nicht beim Schleudern möglich):
• Unterbrechen Sie den Waschzyklus durch kurzes Drücken der
Start/Pause-Taste
• Legen Sie Wäschestücke ein oder nehmen Sie Wäsche heraus.*
• Durch kurzes Drücken der Start/Pause-Taste
den Waschzyklus fort.
(*) Es kann 1 bis 2 Minuten dauern, bis sich die Tür öffnen lässt.
Wenn Sie „verzögertes Ende“ gewählt haben, können Sie die
Trommel in der Vorlaufphase jederzeit öffnen.
Wasch- oder Pausemodus während der Programmierung stornieren:
• Halten Sie die Start/Pause-Taste [5] mindestens 3 Sekunden
lang gedrückt. Dies können Sie jederzeit vor Beginn eines Zyklus
und während einer Pause tun. Wenn Sie ein Stunde verzögertes
Ende programmiert haben und dies in der Vorlaufzeit vor Beginn
des Zyklus stornieren, wird die gesamte Programmierung storniert.
Wenn Sie lediglich die verzögerte Endzeit stornieren möchten,
drehen Sie den Knopf [R] nach links und wählen einen Zeitpunkt
vor der verzögerten Endzeit.
Wenn sich noch Wasser in der Trommel bendet, beginnt die Maschine mit dem Abpumpen. Nach dem Stornieren eines Programms
wird das Wasser aus der Trommel gepumpt, die Maschine kann
danach wieder benutzt werden.
Sperrtaste nur noch einmal gedrückt
Sperrtaste zweimal mindestens 3 Sekunden
.
Sperrtaste mindestens
Sperrtaste
setzen Sie nun
Beim ersten Betätigen der Sperrtaste wird im Display L „Kindersicherung... Sperre: Zyklus“ angezeigt. Beim erneuten Betätigen
der Taste zeigt das Display „Kindersicherung... Sperre: Komplett“.
Danach erscheint ein Schlosssymbol mit einem „+“-Zeichen in der
unteren rechten Ecke des Displays.
Beim Versuch, Bedienelemente zu betätigen, wird „Bedienelemente gesperrt“ im Display L angezeigt.
Im Display L wird „Kindersicherung... Entsperren” angezeigt, danach erscheint ein geöffnetes Schlosssymbol in der unteren rechten
Ecke des Displays.
Wird ein Programm unterbrochen, wird im Display „Programm
unterbrochen“ und „Starttaste drücken“ angezeigt.
Im Display wird wieder die Programmstufe angezeigt, die beim
Fortsetzen des Programms ausgeführt wird.
Wasch- oder Pausemodus während der Programmierung stornieren:
Beim Stornieren wird „Programmstornierung“ im Display angezeigt.
Weitere Details zu den verschiedenen Funktionen nden Sie im Abschnitt „FUNKTIONSDETAILS“.
Wichtig: Wurde die Maschine während eines Waschzyklus durch Auswahl von „Stopp“ oder durch einen
Stromausfall unterbrochen, wird der Zyklus beim Wiedereinschalten automatisch dort fortgesetzt, wo er
unterbrochen wurde.
Page 73

17
DE
Programmieren
Je nach Stoff
Zur Auswahl des für die Wäsche am besten geeigneten Programms, befolgen Sie die
Angaben auf den, in den meisten Wäschestücken angebrachten Pflegeetiketten.
Programmtabelle
Wäscheart
BAUMWOLLE
SYNTHTIKFASERN
FEINWÄSCHE
WOLLE
Sonderprogramme
HANDWÄSCHE
FLASH 30’ 30° 3,0
OPTIA45 40° 3,5
STRETCH 30° 2,5
Sonderprogramme
nur SPÜLEN
nur SCHLEUDERN,
ABPUMPEN
• : Diese Optionen können mit der Höchstladung des entsprechenden Stoffes durchgeführt
werden.
• : Diese Funktionen können allein benutzt oder kombiniert werden - unlogische
Kombinationen sind nicht möglich.
(C˚)
Temperature
30 – 90° 7,0
Kalt – 60° 3,0
Kalt – 30° 2,0
Kalt – 30° 1,5
30° 1,0
(kg)
Höchstladung
Vorwäsche
>40˚
• • • • •
>40˚
• • • • •
Intensiv
Bügelleicht
Spülen plus
• • • •
• • •
• • • •
Abpump
•
•
•
•
•
Spülstopp
Page 74

18
DE
Funktionsdetails
Programme
Baumwolle “
Für eine Wäscheladung aus weißer
BAUMWOLLE oder strapazierfähiger
Buntwäsche.
Wenn Sie Buntwäsche waschen,
achten Sie darauf, dass die Waschtemperatur 60 ° nicht überschreitet.
”
In den ersten paar Minuten dieses
Programms mit
, stellt Ihre
Maschine den Wasser- und Energieverbrauch automatisch ein, um ein
perfektes Waschergebnis zu erzielen.
Synthetikfasern “ ”
Für BUNTE FEINWÄSCHE, FARBECHTE
SYNTHETIKFASERN und MISCHFASERN
Feinwäsche “
Für GARDINEN, EMPFINDLICHE TEXTIL-
IEN und EMPFINDLICHE KLEIDUNG
Wolltextilien “
Für „MASCHINENWASCHBARE“ WOLL-
TEXTILIEN.
Handwäsche-Textilien “
Für SEIDE und BESONDERS EMPFINDLI-
CHE TEXTILIEN.
Blitz 30’
Mit diesem Programm können Sie 3 kg
leicht verschmutzte Wäsche (WEISSE
BAUMWOLLE, BUNTWÄSCHE und
FARBECHTE SYNTHETIKFASERN) reinigen. Dieses Programm läuft maximal 30
Minuten.
Die Waschtemperatur wird bei diesem Programm automatisch auf 30 ° C eingestellt.
Bei diesem Programm müssen Sie die
Waschmittelmenge halbieren.
OptiA45Minuten:
Mit diesem Programm können Sie eine
normale, gemischte 3,5 kg-Ladung aus
Baumwolle und Synthetikfasern in nur 45
Minuten waschen.
Moderne Fasern:
”
”
”
Dieses Programm ermöglicht Ihnen das schonende Waschen von Textilien mit ElasthanAnteil (wie Lycra), damit solche Materialien
ihre Elastizität auf lange Zeit behalten.
Nur spülen “
Separates Spülen, gefolgt von entweder:
- Schleudern und Abpumpen
- nur Abpumpen (Option „Abpumpen“)
- Stopp mit wassergefüllter Trommel.
Nur schleudern “
Ermöglicht ein separates Schleudern mit
Abpumpen.
Mit „Nur spülen“, gefolgt von „schleudern“ oder „nur schleudern“ können Sie
dafür sorgen, dass die richtige Schleudergeschwindigkeit für die Wäsche in
der Maschine gewählt wird.
Optionen
Vorwäsche
Für stark verschmutzte Wäsche
(Schlammecken, Blut, und so weiter).
Vor dem eigentlichen Waschen wird kalt
vorgewaschen.
Diese kalte Vorwäsche löst und entfernt
Schmutzpartikel aus der Wäsche, bevor
das Waschen mit heißem Wasser beginnt.
Das Waschmittel wird in den Behälter
im Waschmittelfach gegeben.
Intensivwäsche
Diese Funktion verbessert die Waschleistung und unterstützt durch Erhöhen der
Waschtemperatur und Verlängern der Waschzeit das Entfernen hartnäckiger Flecken.
Die Option „Intensivwäsche“ steht nur bei
Programmen mit einer Mindesttemperatur
von 40 ° Celsius zur Verfügung.
Spülen Plus
„Speziell für empndliche und zu Allergien
neigende Haut“: Führt einen zusätzlichen
Spülgang im Waschzyklus aus.
Bügelleicht
Erleichtert das Bügeln Ihrer Wäsche.
Mit dieser Option wird die Wäsche bei glei-
cher Waschleistung obendrein behutsamer
”
”
Page 75

19
DE
Funktionsdetails
gewaschen und geschleudert.
Stopp mit wassergefüllter Trommel
Diese Funktion ist für Textilien gedacht, die
nicht geschleudert werden sollen - oder die
nach dem Abschluss des Waschvorgangs
noch länger in der Trommel verbleiben
werden.
Diese Funktion stoppt den Zyklus vor dem
letzten Schleudern; Ihre Wäsche verbleibt
daher im Wasser, Faltenbildung wird somit
vermieden.
Wenn die Maschine mit wassergefüllter Trommel gestoppt wird, blinkt das
Symbol „Spülstopp“, die Meldung „Programm gestoppt“ wird bis zum Ende
des Zyklus angezeigt.
- Abpumpen und schleudern.
Drehen Sie den Selektor [1] auf „Schleud-
ern“ @, wählen Sie mit dem Knopf [2] eine
für Ihre Waschladung geeignete Geschwindigkeit, drücken Sie dann auf die Start/
Pause-Taste [5]. Im Display wird „Schleudern“ sowie die Schleudergeschwindigkeit
angezeigt, danach wird das Programm
automatisch beendet.
- Nur Abpumpen. Drehen Sie den Selektor
[1] auf „Schleudern“ @, wählen Sie mit dem
Knopf [2] „Nicht schleudern“ aus, drücken
Sie dann auf die Start/Pause-Taste [5]. Im
Display wird „Abpumpen“ sowie die Schleudergeschwindigkeit angezeigt, danach wird
das Programm automatisch beendet.
OptiA40
Dieses Programm sorgt für die perfekte
Reinigung einer kompletten BaumwollWaschladung bei 40 °C und spart dabei
Energie.
Endzeit
Sobald das Programm startet, zeigt das
Display die gewählte Zyklus-„Endzeit“
an.
Die Zeit, die zum Beginn des Programms
angezeigt wird, kann im Laufe des Zyklus
variieren:
- Wenn Sie die Waschtemperatur (auch
während des Schleuderns) verändern,
eine Option hinzufügen oder stornieren,
wird die Zeit neu berechnet und in der
Anzeige aktualisiert.
- Einige Betriebsprobleme (unregelmäßige
Beladung oder übermäßige Schaumbildung) können sich auf die Zykluslänge
und damit auch auf die angezeigte Endzeit auswirken .
- Wenn die Stromversorgung beim
Waschen unterbrochen wird, kann beim
Wiederherstellen der Stromversorgung
eine vorgezogene Endzeit angezeigt
werden. Diese Zeit wird zu Beginn der
Spülphase aktualisiert.
Load out of balance”: when you wash
very small amounts of laundry it can
ball up in the drum. This prevents your
machine working at its best.
Tonsignal aktivieren
Ihre Waschmaschine verfügt über eine
akustische Alarmfunktion, die Sie durch
gleichzeitiges Gedrückthalten (3 Sekunden) von „Bügelleicht“ und „Spülen Plus“
ein- oder ausschalten können. Im Display
L wird „Tonsignal EIN“ angezeigt, wenn der
Alarm ausgelöst wird, ertönt ein akustisches Signal. „Tonsignal AUS“ wird im Display
angezeigt, beim Abschalten des Alarms
ertönen zwei akustische Signale.
„Tonsignal AUS“ wird im Display angezeigt,
beim Abschalten des Alarms ertönt ein
akustisches Signal.
Sprachauswahl
Sie können die Anzeigesprache ändern,
indem Sie die Tasten „Opti 40°“ und
„Vorwäsche“ 2 Sekunden lang gleichzeitig
gedrückt halten.
Per Vorgabe wird im Display „Language:
English“ angezeigt.
Durch Drehen des Einstellknopfes [R]
können Sie die gewünschte Sprache auswählen.
Bestätigen Sie die neue Spracheinstellungen, indem Sie die Start/Pause-Taste [5]
drücken.
Page 76

20
DE
Verzögertes Ende
Sie können die Programm-Endzeit um eine
bis 24 Stunden verzögern – zum Beispiel
um günstigere Nachttarife zu nutzen oder
ein Programm zu einer von Ihnen gewünschten Zeit enden zu lassen.
ungsmodus bendet, zeigt das Display
[L] die Anfangszeit zusammen mit einem
Verzögerungssymbol an.
Bevor Sie ein zeitverzögertes Programm
wählen, werden Uhrzeit und ein Uhrensymbol im Display [L] angezeigt.
Dazu wählen Sie mit dem Knopf [R] die
gewünschte Endzeit. Während der Einstellung zeigt das Display die „Zyklus-Endzeit:
...“ sowie die aktuelle Uhrzeit (blinkt).
Nachdem Sie eine Programm-Endzeit
ausgewählt haben, wird im Display [L] die
Zyklus-Anfangszeit angezeigt: „Beginn um
19:45“. 30 Sekunden nach der Bestätigung
des Zyklus erlischt das Display [L]. Das
Waschen beginnt automatisch zur programmierten Zeit.
Wenn sich die Maschine im Verzöger-
Änderung eines Waschprogramms
During programming:
Vor dem Drücken der Taste „Start / Pause“ ”
” sind sämtliche Änderungen möglich.
“
Nach dem Zyklusbeginn:
• Die Textilart kann nicht mehr geändert
werden (beispielsweise von „BAUMWOLLE“
auf „SYNTHETIKFASERN“, von
„SYNTHETIKFASERN“ auf „FEINWÄSCHE“,
etc.).
Um während des Zyklus die Textilart zu
ändern, muss das laufende Programm
storniert und ein neuer Zyklus programmiert
werden.
• Die Temperatur kann zu Beginn des
Waschgangs geändert werden, nachdem die
Maschine in “Pause” geschaltet wurde.
• Die Schleudergeschwindigkeit kann während
des gesamten Zyklus vor dem Schleudern
geändert werden.
• Abpumpen” und “Halt ohne Abpumpen”
können bis zum Ende des Spülvorgangs (bis
zum Erlöschen der Kontrollleuchte “Spülen” im
Zyklusablauf) gewählt werden.
• Wurde ein “Verzögerter Start” gewählt, können
die Optionen „Vorwäsche“ und „Knitterschutz“
nur während der Wartezeit vor dem Zyklusstart
aktiviert werden.
• Die Option “Extra spülen” kann bis zum
Beginn des Spülvorgangs (bis zum Einschalten
der Kontrollleuchte „Spülen“ im Zyklusablauf)
gewählt werden.
• Alle Optionen können während der gesamten
Zyklusdauer deaktiviert werden, sofern ihre
Wirkung nicht bereits begonnen hat.
Am Zyklusende:
Wenn die Kontrollleuchte „Stopp“ brennt:
- * Sie können einen neuen Zyklus
programmieren, ohne über die Stoppposition zu
gehen.
Sie können eine der Tasten
oder den Programmauswahlknopf auf die
Position
Die Maschine ist nun für eine neue
Programmierung bereit.
- Wird am Zyklusende direkt die Taste „Start
/ Pause“
erneut den zuletzt ausgeführten Zyklus,
einschließlich Optionen.
drehen.
gedrückt, startet die Maschine
, , drücken,
Page 77

21
DE
Automatische Sicherungen
Öffnungssicherung der Tür:
Sobald der Waschzyklus begonnen hat, wird
die Gerätetür verriegelt.
Sobald der Zyklus beendet ist, oder wenn die
Maschine ohne Abpumpen stehen bleibt, wird
die Tür sofort entriegelt. Wurde ein „Verzögerter
Start“ programmiert, bleibt die Tür während
der gesamten Wartezeit vor Beginn des Zyklus
entriegelt.
Soll die Tür während des Zyklus geöffnet
werden, drücken Sie kurz auf die Taste
“
” Warten Sie 1 bis 2 Minuten, bis sich die
Türsicherung entriegelt.
Je nachdem, zu welchem Zeitpunkt des
Zyklus die Tür geöffnet werden soll, kann
diese Dauer länger sein, da ein gewisser
Abkühlungszeitraum dazugerechnet werden
muss.
Während dieser Phase wird die Tür nicht
freigegeben, bis die Innentemperatur unter
60 °C gesunken ist. Dadurch wird ernsthaften
Verbrennungen vorgebeugt.
Wassersicherung:
Während des Betriebs beugt die ständige
Wasserstandskontrolle einem eventuellen
Überlaufen vor.
Schleudersicherheit:
Die Waschmaschine ist mit einer Sicherung
ausgestattet, die das Schleudern einschränken
kann, wenn eine schlechte Lastenverteilung
(„Unwucht“) festgestellt wird. In diesem Fall
kann die Wäsche ungenügend geschleudert
werden. Verteilen Sie die Wäsche daher
gleichmäßig und programmieren Sie ein
erneutes Schleudern.
Überschäumsicherung:
Die Waschmaschine kann eine zu starke
Schaumbildung erkennen. Die Kontrollleuchte
schaltet sich beim Schleudern ein.
In diesem Moment wird das Schleudern
gestoppt und die Maschine entleert.
Anschließend fährt der Zyklus fort, indem er
den Schleuderrhythmus anpasst und eventuell
einen zusätzlichen Spülvorgang hinzufügt.
Die Endzeit wird geändert.
Reduzieren Sie bei den nächsten
Waschvorgängen die Waschmittelmenge.
Wasserhahn geschlossen
Wenn die Kontrollleuchte “Wasserhahn zu”
brennt, bedeutet dies, dass der Wasserzulauf
des Geräts blockiert ist.
- Prüfen Sie, ob der Wasserzulaufhahn offen ist.
- Prüfen Sie, ob der Wasserzulaufschlauch
geknickt ist.
Programm für die Vergleichs- und Normtests
Programm ......................................................................................................... BAUMWOLLE
Temperatur ....................................................................................................................... 60°C
Ladung ..............................................................................................................................7 kg
Dauer ............................................................................................................................ 2 h 15
Energieverbrauch ...................................................................................................... 1,19 kWh
Wasser ................................................................................................................................49 l
Für die auf dem Energieetikett vermerkten Angaben erfolgen Tests gemäß der europäischen Richtlinie 92/75/EWG
bei Nennkapazität, wobei man sich davon überzeugt, dass das gesamte Reinigungsmittel CEI sofort bei Beginn der
Waschphase verwendet wird.
Page 78

22
DE
Allgemeine Wartung
Reinigen des Geräts
Verwenden Sie zum Reinigen des Gehäuses,
der Bedienungstafel und generell aller
Kunststoffteile nur einen mit Wasser und
Flüssigseife befeuchteten Schwamm oder
ein Tuch.
Was Sie in jedem Fall vermeiden sollten:
• Scheuerpulver
• Kunststoff- oder Metallschwämme
• Alkoholische Produkte (Alkohol, Verdünnung,
etc.)
Wartung der internen
Komponenten
Für einen hygienisch einwandfreien Betrieb
empfehlen wir:
• Lassen Sie die Tür nach dem Waschen eine
Weile offen stehen (sorgen Sie dafür, dass
weder Kinder noch Haustiere in die Maschine
gelangen können).
• Reinigen Sie die Kunststoff- und Gummiteile,
über die Sie an den Innenraum gelangen,
einmal monatlich mit einem leicht
chlorhaltigen Reinigungsmittel.
Lassen Sie einen Spüldurchgang
durchlaufen, um Reste des
Reinigungsproduktes zu entfernen.
• Lassen Sie mindestens einmal monatlich
einen Waschzyklus bei 90 °C durchlaufen.
Frostgefahr
Bei Frostgefahr trennen Sie den
Wasserschlauch ab und lassen sämtliches
Wasser aus dem Abwasserschlauch ablaufen,
indem Sie das Schlauchende möglichst tief
über einem Auffangbehälter platzieren.
Regelmäßige Prüfungen
Wir empfehlen Ihnen, den Zustand des
Wasserzulauf- und des Abwasserschlauchs
zu prüfen. Wenn Sie auch nur die kleinsten
Risse bemerken, tauschen Sie den Schlauch
unverzüglich gegen einen identischen Schlauch
aus, den Sie vom Hersteller, Händler oder
Kundendienst erhalten.
Austausch des
Wasserzulaufschlauchs
Achten Sie beim Austausch auf ein gutes
Festdrehen und auf das Vorhandensein der
Dichtung an beiden Enden.
Austausch des Netzkabels
Aus Sicherheitsgründen muss dieser Eingriff unbedingt
vom Kundendienst des Herstellers oder von einem
qualifizierten Fachmann durchgeführt werden.
Reinigen des
Waschmittelfachs
Zum Reinigen des Waschmittelfachs
ziehen Sie es zu sich hin und nehmen es
aus dem Gehäuse, während Sie auf den
gekennzeichneten Punkt am Siphon (dem
farbigen Teil) drücken. Spülen Sie den Behälter
mit Wasser aus.
Abb. 10
Reinigen des Siphons
Reinigen Sie den Siphon (farbiges Teil
im Waschmittelbehälter) nach 30 bis 40
Waschzyklen. Fassen Sie den Siphon am Rand
und nehmen Sie ihn heraus. Um ein Verstopfen
des Siphons zu vermeiden, spülen Sie die
Weichspülerreste sorgfältig ab. Überzeugen Sie
sich vor dem erneuten Gebrauch der Maschine
davon, dass der Siphon einwandfrei sitzt.
Abb. 11
Page 79

23
DE
Reinigen des Pumpenfilters
Dieser Filter sammelt die kleinen Gegenstände,
die versehentlich in den Kleidungsstücken
geblieben sind, und verhindert, dass diese den
Pumpbetrieb stören.
Gehen Sie zum Reinigen wie folgt vor:
Bei gefüllter Trommel (zum Beispiel
beim Stromausfall) können sich bis zu
15 l Wasser darin befinden, die ablaufen
müssen: Bereiten Sie einen ausreichend
großen Auffangbehälter vor.
Treffen Sie Vorsichtsmaßnahmen, da das
abzulassende Wasser noch heiß sein
könnte.
- Ziehen Sie den Netzstecker.
- Öffnen Sie die Zugangsklappe durch Drücken
des Knopfes (Abbildung 12).
- Neigen Sie die Rutsche vor dem Filter zum
Behälter.
- Um den austretenden Wasserstrom zu
kontrollieren, drehen Sie den Filter leicht
gegen den Uhrzeigersinn und öffnen Sie ihn.
Abb. 12
- Sollte der Behälter voll sein, bevor das
gesamte Wasser ausgelaufen ist, drehen
Sie den Filter ein und leeren Sie dann den
Behälter. Wiederholen Sie den Vorgang, bis
kein Wasser mehr in der Maschine ist.
- Danach drehen Sie den Filter gegen den
Uhrzeigersinn und öffnen ihn. Leeren Sie
dann das Restwasser (maximal 30 ml) des
Filterdeckels.
- Entfernen Sie sämtliche Rückstände, die
noch im Filtergehäuse verblieben sind.
- Reinigen Sie den Filter.
- Schieben Sie den Filter in die Aufnahme und
drehen Sie ihn im Uhrzeigersinn, um ihn zu
verriegeln.
- Bringen Sie die Rutsche wieder an.
- Schließen Sie die Zugangsklappe zum Filter.
Überzeugen Sie sich davon, dass der
Filter richtig sitzt, um eventuellen Lecks
vorzubeugen..
Reinigen der Filter am
Wasserzulauf
Die am Geräteanschluss des Zulaufschlauchs
und am Wasserhahn befindlichen Filter
verhindern, dass Schmutz bzw. kleine
Gegenstände in das Gerät eindringen. Wir
empfehlen ein gelegentliches Reinigen.
Gehen Sie zum Reinigen wie folgt vor:
- Schließen Sie zunächst den Wasserzulaufhahn.
- Schrauben Sie das an der Geräterückseite
angeschlossene Schlauchteil ab.
- Nehmen Sie den Filter auf der Geräterückseite
mit einer Zange heraus und spülen Sie ihn unter
fließendem Wasser aus.
- Bringen Sie den Filter und den Schlauch wieder
an.
- Schrauben Sie den am Wasserhahn
angeschlossenen Schlauch ab.
- Entfernen Sie den Filter von Hand und spülen
Sie ihn unter fließendem Wasser aus.
- Bringen Sie den Filter und den Schlauch wieder
an.
Page 80

24
DE
Reinigung und Pflege Ihres Gerätes
Um Ihr Gerät in gutem Zustand zu halten, empfehlen wir Clearit-Haushaltsprodukte.
Professionelle Erfahrung für den Einsatz zuhause
Clearit bietet Ihnen professionelle Produkte und maßgeschneiderte Lösungen für die tägliche
Pflege Ihrer Haushalts- und Küchengeräte.
Diese Produkte und eine Reihe von weiteren nützlichen Produkten und Verbrauchsartikeln
erhalten Sie in guten Fachgeschäften.
Page 81

25
DE
Mögliche Störungen
Während des Gebrauchs der Waschmaschine kann es zu kleinen Zwischenfällen kommen. Dies
sind zu prüfende Punkte.
Zwischenfälle Mögliche Ursachen / Abhilfen
Der Zyklus startet nicht • Sie haben vergessen, auf die Taste „Start / Pause“ zu
Starke Schwingungen beim
Schleudern
drücken.
• Das Gerät wird nicht mit Strom versorgt:
- Prüfen Sie, ob der Netzstecker richtig angeschlossen ist.
- Prüfen Sie den Sicherungsautomaten und die Sicherungen.
• Der Wasserzulaufhahn ist geschlossen.
* Die Transportsicherungen des Geräts wurden nicht
richtig entfernt: - Siehe Abschnitt „ENTFERNEN DER
TRANSPORTSICHERUNGEN“
* Der Boden ist nicht eben.
* Die Füße sind schlecht eingestellt bzw. die Muttern sind lose.
Die Wäsche wurde nicht
oder nicht ausreichend
geschleudert
Es bildet sich eine Pfütze um
die Maschine herum
Die Maschine pumpt nicht ab
Die Tür lässt sich nicht öffnen
Die Maschine will kein
Programm annehmen
* Sie haben ein Programm ohne Schleudern gewählt, zum
Beispiel: „Kein Schleudern“.
* Die Schleudersicherung hat eine schlechte Verteilung
der Wäsche in der Trommel festgestellt: * Verteilen Sie
die Wäsche besser und programmieren Sie ein weiteres
Schleudern.
Ziehen Sie zuerst den Netzstecker oder lösen Sie die entsprechende
Sicherung aus und schließen Sie den Wasserzulaufhahn.
Während des Gerätebetriebes verhindert die ständige
Wasserstandsüberwachung ein Überlaufen. Sollte dennoch Wasser
aus der Maschine austreten, kann es daran liegen:
* Der Entleerungsbogen ist nicht richtig in die Abwasserleitung
eingeführt.
* Die Anschlüsse des Wasserzulaufschlauchs an der Maschine und
am Wasserhahn sind undicht: Prüfen Sie, ob Dichtungen eingesetzt
sind und die Anschlüsse fest sitzen.
* Sie haben einen Spülstopp programmiert.
* Der Filter der Entleerungspumpe ist verstopft: Reinigen Sie
diesen (für die Vorgehensweise siehe Abschnitt „REINIGEN
DES FILTERS“).
* Der Abwasserschlauch ist geknickt oder gequetscht.
* Das Programm ist noch nicht abgelaufen. Die Tür bleibt
während der gesamten Programmdauer verriegelt.
* Die „Kindersicherung“ ist aktiv (siehe Abschnitt
„PROGRAMMIEREN“).
* Der laufende Zyklus wurde unterbrochen. Das
Programm muss storniert werden (siehe Kapitel
„PROGRAMMIEREN“).
Allgemein gilt: Wenn Sie etwas Ungewöhnliches feststellen sollten, stoppen Sie die Maschine,
ziehen den Netzstecker und schließen den Wasserzulauf.
Page 82

26
DE
Kleine Fehler, die Sie selbst beheben können
In diesem Abschnitt erklären wir Ihnen, wie Sie kleine Fehler sehr leicht selbst beheben
können.
Ihr Gerät stellt manche Betriebsstörungen von selbst fest und zeigt diese durch rote
Alarmleuchten oder spezielle Meldungen, die im Display erscheinen.
Meldungen Ursachen / Abhilfen
Kontrollleuchte
“Wasserhahn zu”
brennt
Kontrollleuchte
„Übermäßige
Schaumbildung“
brennt
Der Wasserzulaufhahn ist geschlossen. Prüfen Sie, ob der
Wasserhahn offen ist und drücken Sie erneut auf die Taste „Start /
Pause”, um den Zyklus zu starten. Dieser Fehler kann auch durch
einen schlechten Anschluss des Abwasserschlauchs verursacht
werden (siehe Kapitel „GERÄTEANSCHLÜSSE: Abwasserableitung“).
Zu viel Waschmittel. Die Maschine löst automatisch einen zusätzlichen
Spülgang aus. Achten Sie bei der nächsten Wäsche auf die
Dosierung.
Fehlern, bei denen Sie einen Installateur benötigen
Prüfen Sie als erstes, ob der angezeigte Fehler keine der Störungen ist, die Sie selbst
beheben können (siehe oben).
Ihre Maschine erkennt auch bestimmte Betriebsfehler, die nur von einem Installateur
behoben werden können und informiert Sie darüber durch andere Meldungen, von denen
wir Ihnen nun einige Beispiele nennen.
Page 83

27
DE
Kundenservice
Sämtliche Arbeiten an Ihrem Gerät müssen vom Händler oder einem vom Hersteller ernannten
Servicetechniker durchgeführt werden.
Wenn Sie anrufen, halten Sie bitte sämtliche relevanten Daten zu Ihrer Maschine bereit
(Modelle, Typ und Seriennummer).
Diese Angaben finden Sie auf dem Typenschild.
Page 84

 Loading...