

Page 1

GB
Contents
• Safety instructions................................................................................................. 83
• The environment and tips on saving energy ................................................................ 83
• Description of the machine ............................................................................................ 84
1 - How to install your machine for the first time
• Removing the transport clamps from your machine .................................................. 85
• Preparing to install your machine .................................................................................. 86
• Installation under a worktop .......................................................................................... 86
• Connecting the water supply .......................................................................................... 87
• Connecting to the drain .................................................................................................. 88
• Connecting to the electricity supply .............................................................................. 88
2 - How to operate your machine
• Preparing your washing (sorting, colour test, loads and checks) ............................ 89
•Loading the washing ...................................................................................................... 90
• Loading the washing products ...................................................................................... 90
• Programming / cancelling a programme ........................................................... 91 to 94
• Details of the functions ........................................................................................95 to 96
• Altering a washing programme ...................................................................................... 96
• Automatic safety systems .............................................................................................. 97
3 - General maintenance
• Cleaning the machine and the internal components .................................................. 98
• Risk of frost.......................................................................................................... 98
• Checking and replacing the hoses ................................................................................ 98
• Cleaning the products' box ............................................................................................ 98
• Cleaning the filters ............................................................................................ 99
4 - Incidents that may arise
• The cycle does not start .................................................................................................. 100
• Heavy vibrations during spin .......................................................................................... 100
• The washing is not spun or is not spun enough ........................................................ 100
• A pool of water forms around the machine.................................................................. 100
• The machine does not drain .......................................................................................... 100
• The door does not open .................................................................................................. 100
• The machine refuses to accept a programme ............................................................ 100
5 - Particular messages provided by the indicator lights or on the display
• Problems that you can rectify yourself ........................................................................ 101
• Problems requiring a service engineer ........................................................................ 101
Page
You will encounter the following symbols as your read these instructions. They mean:
Safety instructions (for you, for your machine or for your washing) which must be
carefully observed.
Electrical risk
Important information and instructions
Before you start your machine, please read these instructions carefully. This will enable
you to familiarise yourself with its operation very quickly
82
Page 2

83
GB
Safety instructions
•To avoid damaging your machine and your
washing, your machine must only be used
for the purpose for which it has been
designed. Only use washing and
maintenance products certified as being
for use in domestic washing machines.
•If you treat your washing with stain
removers, solvents and, in general, any
inflammable or potentially explosive
product, do not put them into the machine
immediately (see the section on
"TREATING STUBBORN STAINS").
Furthermore, you are strongly
recommended not to use solvents or
products in an aerosol can near to your
machine or, any electrical appliance in
general, in a poorly ventilated room (risk of
fire and explosion).
•If an incident should occur, which you
cannot resolve using the remedies we
recommend (see the section on
"INCIDENTS THAT MAY ARISE"), call a
professional service engineer.
•When making a new installation, the
machine must be connected to the water
supply with a new hose. The old hose must
not be re-used. Check the water and drain
hoses regularly: this will help you avoid
water damage.
•Do not allow children to play with the
machine and keep pets away from it.
•Worn-out machines must immediately be
rendered unusable. Unplug the power cable
and cut it off next to the machine. Shut
off the water supply and remove the hose.
Break the lock on the machine's door.
You must comply with the following instructions. We will refuse any liability and rescind
the guarantee if these recommendations are not observed, which can cause damage to
equipment or physical injury.
This machine is designed solely for domestic use, for washing, rinsing and spinning
machine-washable textiles.
The environment and tips on saving energy
•Only programme a pre-wash when it is
absolutely necessary: e.g. for sportswear or
very dirty working clothes, etc.
•If your washing is only slightly or moderately
dirty, a low temperature programme is quite
enough to provide you with a perfect result.
•For only slightly dirty washing, select a short
washing cycle ("Rapid", "Express" or
"FLASH", depending on the model).
•Use an amount of detergent to suit the
hardness of the water, the quantity of washing
and how dirty it is. Always follow the
instructions on the detergent pack.
•Both the packaging and the component
parts of your machine use recyclable
materials. Please bear this in mind when
disposing of them.
Please contact your dealer or the technical
Services Department in your town regarding
how to dispose of them appropriately, in
an environmentally friendly manner.
Page 3
84
GB
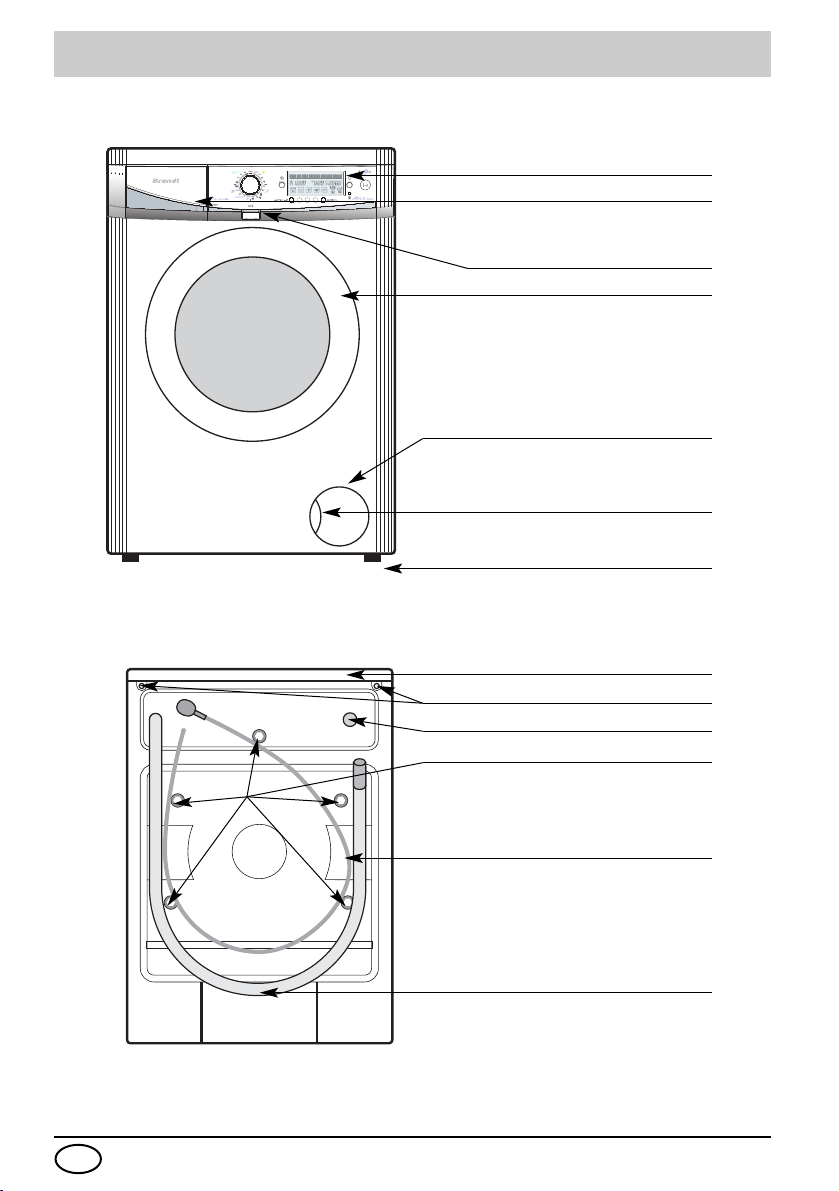
Door Opener
Description of the machine
Control panel
Detergent Dispensing Drawer
Drain pump access hatch
Button to open
the drain pump access hatch
Door
Water supply connection
Securing screw
Electrical power cable
Top
Fixing screw for the top of the machine
Adjustable feet
Drain hose
Page 4
GB
Removing the transport clamps from your machine
YOU MUST PERFORM THE OPERATIONS DESCRIBED BELOW BEFORE
USING THE MACHINE
These operations consist of removing all the elements designed to immobilize your
machine's internal components while it is being transported.
These so-called "releasing" operations are required for your machine to operate properly
and to comply with the prevailing safety standards.
If you do not perform these operations completely, this can cause severe damage to your
machine while it is operating.
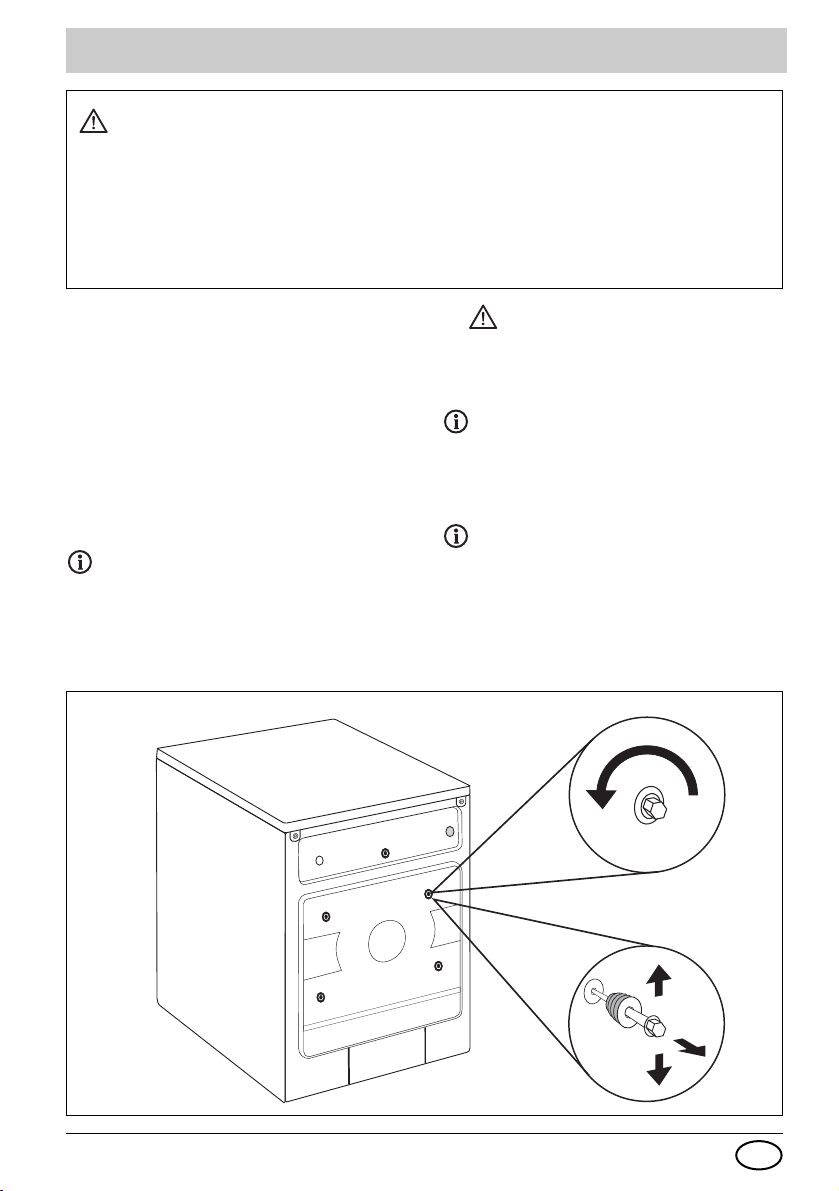
1 -Remove the transport clamps before you
start your machine. These are the screws
marked “C”
2 -Use a spanner to unscrew the “C” screws
anti-clockwise
remove them by hand.
3 -Finish removing the “C” screws and their
rubber seals by pulling them towards you
(Fig. 3)
To facilitate this operation, pour a drop
of washing-up liquid on the screws and
release them a little at a time, working
from top to bottom.
.
Fig. 1
(Figure1).
(Fig. 2)
until you can
C
4 - You must block up the holes left by
the "C" screws with the covers provided
(in the accessories bag).
Your machine was scrupulously checked
before it left the factory: you may therefore
notice the presence of a small amount of
water in the drum or in the products' box.
We advise you to keep all the clamping
components because these must be reinserted if you subsequently have to
transport your machine.
Fig. 2
C
C
Fig. 3
C
C
85
Page 5
86
GB
Your machine's surroundings:
If you are installing your machine next
to another appliance or a unit, we
recommend that you always leave a gap
between them to help the air to circulate.
On the other hand, we would strongly
advise you NOT:
- To install your machine in a damp,
poorly ventilated room.
- To install your machine in a location
where it could be splashed with water.
- To install your machine on a carpeted
floor.
If you cannot avoid this, take every
precaution against obstructing the air
flow to the base of the machine to
ensure good ventilation for the
machine's internal components.
Levelling:
Use a spirit level to check that the floor is
horizontal: maximum slope: 2°, i.e. a
discrepancy of approximately 1cm over the
width and 1.5cm over the depth of the
machine.
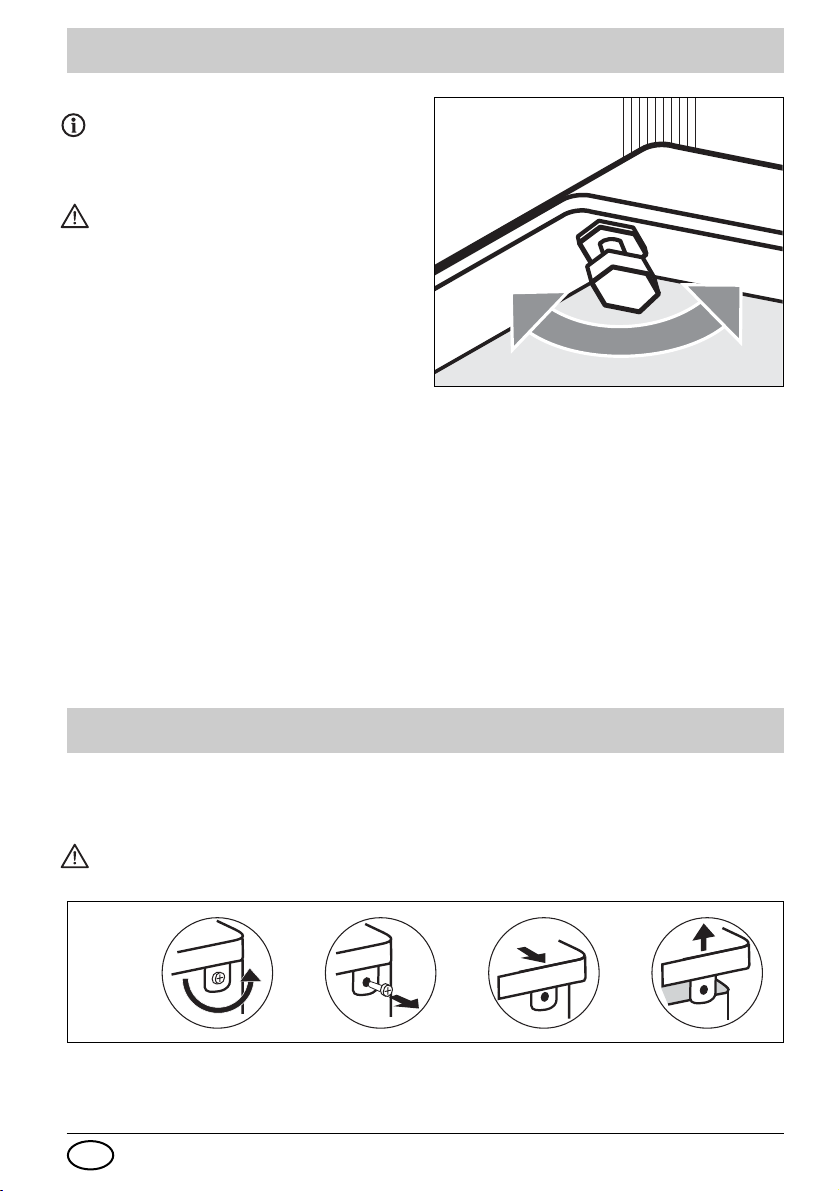
Adjusting the feet:
To ensure that your machine operates safely
and quietly, its feet must be fitted. Your
machine is supplied with two adjustable feet.
If your machine is unstable,
- Unscrew the white plastic lock nut,
- Screw or unscrew the adjustable feet until
your machine is perfectly balanced,
- Once the feet have been set, tighten the
bolt to retain your setting.
Preparing to install your machine
Installation under a worktop
Fig. 4
Fig. 5
If you wish to install your washing machine
under a worktop, you must remove the top
of the machine
(Fig. 5)
:
Ensure that your machine is not
connected to the electricity supply.
Unscrew and remove the two screws holding
the top at the back of the machine
Pull the top gently towards you to release it and
then lift and remove it.
Page 6
GB
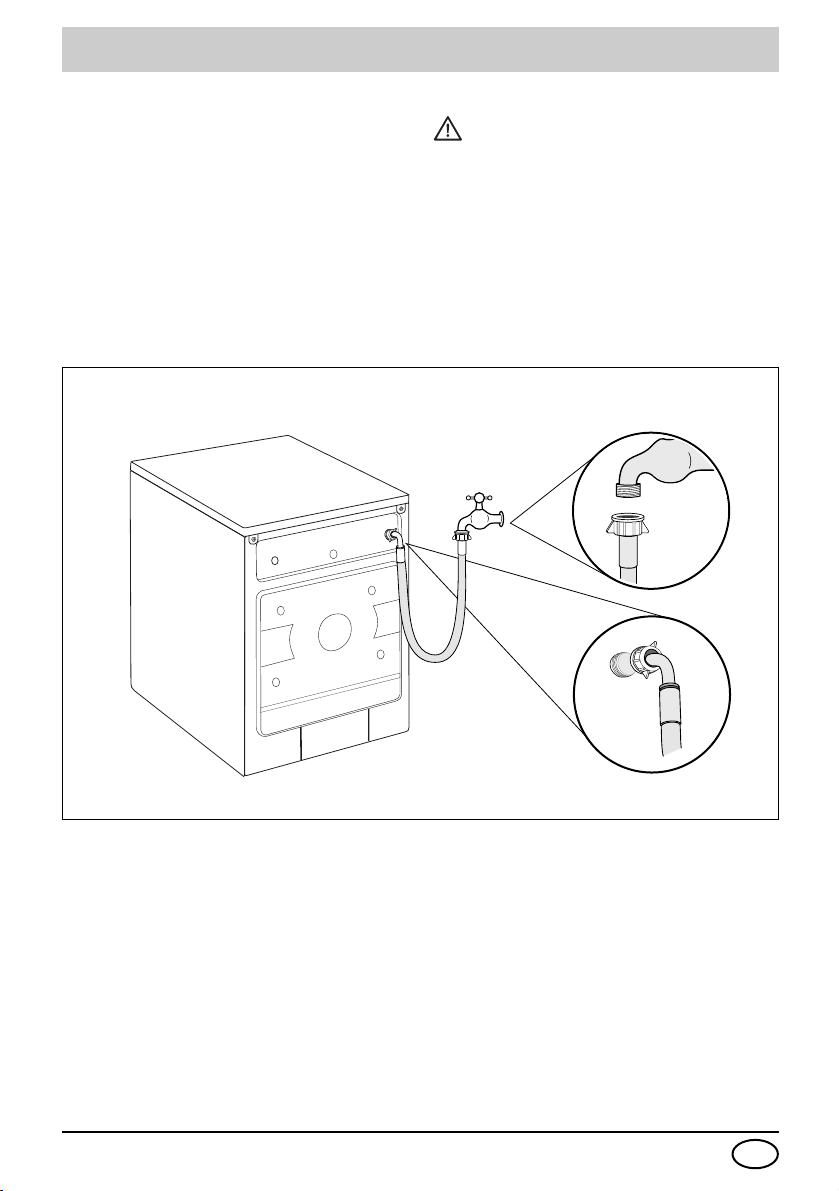
Connecting your machine
Connecting to the cold water
supply
Connect the water hose
- By screwing the elbowed end to the
connection on the back of the machine
- By screwing the other end to a tap fitted
with a threaded end piece diameter 20x27
(3/4 BSP).
If you use a self-piecing tap, the useful
opening must be at least 6mm in diameter.
Fig. 6
(Fig. 6)
:
To avoid any water leaks, remember to
fit the rubber seals in each end and
tighten your connections correctly. The
seals are provided in the accessories
bag.
Water supply:
-- Minimum water pressure: 0.1 MPa or 1 bar
-Maximum water pressure: 1 MPa or 10 bars
87
Page 7

Electricity supply
For your safety, you must comply with
the instructions below.
The electrical installation must comply with
Standard NF C 15-100,particularly as
regards the Earthing requirements.
Line 3x2.5 mm2 single-phase 230V connected
to :
- A single-phase 20A 230V-50Hz meter
- A differential circuit breaker and a separate
fuse (10 or 16A, depending on the model)
- A 2-pin +Earth10/16A socket
We cannot be held responsible for any
accident caused by improper electrical
installation.
Advice on the electrical installation of your
machine:
• Do not use an extension lead, an adapter or
a multiple-outlet socket.
• Neverremove the Earth.
• The socket must be easily accessible but out
of the reach of children.
If in any doubt at all, please contact your
installer.
88
GB
Connecting your machine
Fig. 7
Fig. 8
Draining away the waste water
Connect the drain hose
(Fig. 7)
:
• Either, temporarily, to a sink or a bath tub
• Or, permanently, to a ventilated U bend.
If your installation does not have a ventilated
U bend, ensure that the connection is not
airtight. In fact, to avoid any flowback of the
waste water into the machine, you are
strongly recommended to leave an air gap
between the drain hose and the waste pipe.
The hose must not be twisted or kinked and
must be held by the hose hook to avoid it
falling to the ground
(Fig. 8).
The hose hook must be placed 40 to
100 cm above the base of the machine.
Ensure that it is tied firmly in place to
avoid it coming loose during draining
and causing a flood.
Your machine complies with European
Directives EEC/73/23 (Low Voltage Directive)
and EEC/89/336 (Electromagnetic
Compatibility) as modified by Directive
EEC/93/68.
Page 8

GB
Preparing your washing
Sorting your washing
Please ensure that all your items are machine-washable. Please refer to the labels on your
items to select the most suitable programme . When washing a mixed load, use the programme
suitable for its most fragile items.
For new items, as a precaution, first of all check that they are colour-fast: see"Colour
test" below.
Colour test
A coloured item frequently runs when it is
first washed unless it is guaranteed colourfast.
Before placing the item in your machine,
conduct the following test:
Do not exceed the following maximum loads:
COTTON / COLOUREDS / MIXED FIBRES:..............................................................................6 kg
SYNTHETICS
DELOCATES
WOOLLENS
HAND-WASHABLE ITEMS
Average weight of various "thin" dry items
Single sheet ........................................400 to 500 g
Double sheet ..................................................800 g
Pillow slip ........................................................200 g
Light nightgown..............................................150 g
Child's cotton trousers ................................120 g
Adult's cotton trousers ................................500 g
Man's cotton/polyester shirt ........................200 g
AVERAGE WEIGHT OF VARIOUS "THICK" DRY ITEMS
Adult jeans ..........................................800 g to 1 kg
Large towel ....................................................700 g
Small towel ......................................................300 g
Adult jogging trousers ..................................350 g
: ............................................................................................................................3 kg
: ............................................................................................................................2 kg
: ............................................................................................................................1,5 kg
: ......................................................................................................1 kg
- Select an invisible area of the item
- Dampen it with warm water
- Then press it on a white cloth
• If the item does not run, you can wash
it normally in your machine.
• If the item runs, wash itseparately in
your machine or by hand.
Large cotton T-shirt ......................................150 g
Dish towel........................................................100 g
Tablecloth........................................................250 g
Delicate lingerie ................................................50 g
Children's synthetic woollens ........................50 g
Sock....................................................................20 g
Adult's cotton pyjamas ................................250 g
Child's towelling pyjamas ............................100 g
Bathrobe........................................................1200 g
Sweatshirt ......................................................250 g
Duvet cover ..................................................1500 g
Checking your washing
Failure to observe the following
instructions can cause sever, and even
irremediable damage (damaged drum,
torn washing, etc.), and will rescind the
guarantee.
- Empty the pockets.
- Fasten any zips and press-studs.
- Remove the hooks from curtains or place
them in a net bag.
- Remove any loose buttons, pins, staples,
etc.
- Place small items of laundry (ribbons,
handkerchiefs, etc.) in a net bag.
- Turn multi-layer items inside out (sleeping
bags, anoraks, etc.).
- Turn any items with sewn-on decorations,
trousers and knitwear inside out.
89
Page 9

90
GB
Wash compartment (powder or liquid)
Pre-wash compartment (powder)
Softener
Siphon
Loading your washing
Proceed as follows:
Open the machine
• To access the drum, pres the "Door" button
located just above the door.
Insert your washing
For optimum washing performance, sort and
fold your washing and then place it the drum,
distributing it evenly, without piling it up. Mix
large and small items together for optimum
spinning.
Close the machine
• Check that no item is caught in the door when
you close it.
• Close the door by pressing it gently.
• Ensure that the door is locked. If it is not, a
safety system will prevent you from starting
your machine.
For your safety, the door is locked
throughout the washing cycle.
Dispensing the detergent
The amount of detergent to use depends on
the water hardness, how dirty the washing is
and how much washing there is.
Please refer to the dosage instructions on the
detergent pack.
Warning: The detergent manufacturers'
recommendations are generally based on filing
the drum to the maximum. Adapt the dosage
appropriately for the weight of washing you are
inserting in the machine.
These recommendations will avoid too high a
dose of detergent, which can cause foam. Too
much foam can reduce your machine's
performance and increase the washing time
and the water consumption.
Detergents for woollens and delicate textiles.
Detergents for woollens and delicate textiles.
You are recommended to sue an appropriate
detergent to wash these types of textiles (avoid
putting such detergents directly into the drum
because some of these products can attack
the metal.
Loading the washing products
You can place liquid or powder in the
"WASH" compartment but should never
use liquid detergent for programmes
WITH a Pre-wash and/or WITH "Delayed
Start" (depending on the model).
Concentrated softener must be diluted
with warm water.
To fill the compartments properly, open
the detergent dispensing drawer to its
maximum extent.
Never fill beyond the MAX level.
Fig. 9
1
2
3
4
Page 10

91
GB
Programming
Spin speed, Hold and Rinse, No spin
Start/Pause: short press
LCD Screen
Spin speed, program duration, current/end of cycle
time, Options, buzzer status, door lock, child lock
L
2
Cancel: long press
55
STOP, Programs and Temperatures
Program selection knob
Options: OptiA40, Pre-wash, Intensive,
Extra rinse, Surfliss and Security
To switch on the machine, press on the Selector knob [1]. “Hello” welcome message appears
on the screen.
All the buttons are sensitive. They do not stay pushed in. We recommend that you only use a brief press.
You should only press the "Start/Pause" button briefly unless cancelling a programme*, in
which case you should hold the button down.
(*) Details of this function in the following pages.
If one of the cycle progress messages (Prewash, Wash, Rinse, Spin, Drain) is displaying
when you switch on, hold down “Start/Pause” button [5] to cancel program before you
do anything else.
Warning:switching to the "Stop" position cannot cancel a programme.
1
Time setting,
3
Selections
Time Setting, Buzzer, Language
For delayed end, For current time
4
R
Setting the current time
You set the Current Time function by holding the Security and buttons simultaneously
for at least 3 seconds until displaying “Set the Time” message. Then set the time with the [R] knob
while “Time Setting” message is displaying and current hour is blinking.
- By turning the knob slowly you can fine-tune minute by minute,
- By turning the knob rapidly, you can set in 5-minute intervals. You can turn the knob in either direction.
- Winter/Summer time selection will be available by Press START [5] button for approval of current
time. To change the seasonal time, turn the [R] knob. The selection displays on the [L] screen as
“Winter time” or “Summer time”.
“Time set” message displays by the pressing on the [5] button for approval.
For more details of the various functions, please refer to the section on "DETAILS OF THE
FUNCTIONS".
Important: if you have stopped your machine during a washing cycle by selecting the "Stop"
position or after a power failure, when the machine is switched on again, the washing cycle
automatically returns to the point at which it was interrupted.
Page 11

GB
Programming
Programming a washing cycle without options:
• Press on the knob [1] to switch on the machine.
• Use the knob [1] to select a programme(*)
• Use the knob [2] :
- Either to alter the proposed spin speed,
- Or to select No spin ,
the cycle will finish by draining without a spin,
- Or to select Hold and Rinse ,
your machine will stop, with the drum full of water, before the
final spin.
• Select an immediate start by briefly pressing "Start/ Pause" [5]
• Program step messages and remain time constantly indicates
how far your machine's cycle has progressed.
• When the "Completed program" message is displaying [L], the
washing cycle is complete**.
Programming a complete washing cycle:
• Press on the knob [1] to switch on the machine.
• Use the knob [1] to select a programme(*)
• Use the knob [2] :
- Either to alter the proposed spin speed,
- Or to select No spin ,
the cycle will finish by draining without a spin,
- Or to select Hold and Rinse ,
your machine will stop, with the drum full of water, before the
final spin.
• Select, if required, the available options "OptiA 40", "Prewash",
"Intensive", "Extra Rinse" or "Anti-creasing" using buttons [4].
• Select an immediate start by briefly pressing "Start/ Pause" [5]
• Or select a "Delayed Finish” time :
- Set the "Delayed Finish" time in quarters of an hour using
button [R],
You can delay the "Delayed Finish" time by up to 24 hours
- Briefly press "Start / Pause [5]. If [5] is not pressed after 5
seconds
the "Delayed Finish" time is automatically re-engaged)
- Washing starts automatically at the starting time.
• Program step messages and remain time constantly indicates
how far your machine's cycle has progressed.
• When the "Completed program" message is displaying [L], the
washing cycle is complete**.
Messages
The display [L] indicates Selected program name, available
options, maximum spin speed , program duration and end
of cycle hour.
Spin speed increases/decreases and new speeds blinks
by turning of knob [2] while "Spin change" message is
displaying.
No spin displays as "000"
Rinse hold icon turns on, while the "Hold and Rinse" is
selected.
Program steps displayed on the screen. "Wash" message
is starting message of washing.
Program step messages are "Prewash", "Wash", "Rinse",
"Spin" and "Drain".
"Completed program" message and current hour is
displaying,.
Messages
The display [L] indicates Selected program name, available
options, maximum spin speed , program duration and end
of cycle hour.
Spin speed increases/decreases and new speeds blinks
by turning of knob [2] while "Spin change" message is
displaying.
No spin displays as "000"
Rinse hold icon turns on, while the "Hold and Rinse" is
selected.
The available options are displayed on the screen [L]. The
selected options rounded with a rectangle by pressing of
buttons.
- The last option selections will be valid, in case of conflicted
options.
(Example: intensive and anti-creasing can not be activated
at the same time)
Program steps displayed on the screen. "Wash" message
is starting message of washing.
After setting of end of cycle hour, program starting time
displays on the screen as "Start at 17:45". Screen will be
turned off after 30 seconds, only starting time displays.
Program step messages are "Prewash", "Wash", "Rinse",
"Spin" and "Drain".
"Completed program" message and current hour is
displaying,.
(*) - Before starting your machine, check that the power cable is connected to the socket and that the water tap
is open. Also ensure that the machine's door is properly closed.
(**) When the washing cycle is complete and the "Completed program" message is displaying, you can
reprogram your machine. If you press the "Start/Pause" button [5], the machine restarts the last cycle it has
performed, including the options.
- As a safety measure, once the cycle is complete, we would recommend that you unplug the power cable and
then shut the water tap.
Page 12

93
GB
Programming
Child safety
• If you wish to protect your programming, use the "Child
Safety"
system by pressing the "Security" button for at least 3
seconds..
It is useless to press the "Start /Pause" button again :
once you have selected "Child Safety" the controls and
the options are locked to avoid any erroneous operation.
• If you wish to protect your machine even you are not
using, you can activate the + security option by repressing security button.
• To alter your programming, you must deactivate the
"Child Safety" system. Proceed in the same way: Press
"Security" [4] button for at least 3 seconds.
You can deactivate the "Child Safety" system at any
time.
Messages
"Lock: cycle" message displays when it is activated.
The lock icon shows the safety activation.
"Child protection" message appears by touching
the knobs or buttons while child safety is active.
Only Security button will be active during this stage,
the "+" icon shows that the full security is active in
"Lock:Full" security.
"Unlock" message displays the child lock is released.
The open lock icon shows the lock is open.
Inserting or removing an item during the cycle (impossible during spin):
• Briefly press the "Start/Pause" button [5] to interrupt
the cycle.
• Insert or remove the item(s)*.
• Briefly press the "Start/Pause" button [5] to restart the
cycle .
(*) It may take 1 or 2 minutes for the lid to unlock.
If you have selected a "Delayed Finish", you can
instantaneously access the drum at any time during the
phase before the cycle starts without having to interrupt
and restart the cycle.
"Program paused" and "Press start button"
messages are displayed in sequence, while the
program paused.
Running program step message displayed again
when the program restarted.
Cancelling during programming, washing or a pause:
• Hold down the "Start/Pause" button [5] for at least 3
seconds. You can do this at any time during the period
before the cycle, during the cycle or even during a
pause.
If you have programmed a "Delayed Finish" time and
have cancelled during the waiting period before the
cycle effectively starts, all your programming will be
cancelled. If you only wish to cancel the "Delayed Finish"
time, turn the [R] knob to the left until you return to the
time the selected washing cycle finishes.
If there is water inside the drum, machine starts to
Draining. After cancellation of a program, you will have
a machine without water inside and ready to re-use.
"Cancelling program" message displayed on the
screen, during cancelling.
For more details of the various functions, please refer to the section on "DETAILS OF THE
FUNCTIONS".
Important: if you have stopped your machine during a washing cycle by selecting the "Stop"
position or after a power failure, when the machine is switched on again, the washing cycle
automatically returns to the point at which it was interrupted.
Page 13

GB
Programming
To select the most suitable programme for your type of washing, follow the instructions on the
labels attached to most textiles.
Programmes' table
Type of textile
COTTON
DELICATES
WOOLLENS
Special programmes
HAND-WASHABLE TEXTILES
Flash 30’
Individual programmes
RINSE ONLY
SPIN ONLY, DRAIN
: These options can be performed with the maximum load for the textile concerned
•
: These functions can be used individually or combined - illogical combinations are impossible
•
(°C)
Tempefature
30
- 90°
Cold
- 60°
Cold
- 40°
Cold
- 40°
30°
30° 3,0
(kg)
Max. load
6,0
••
3,0SYNTHETICS
•
2,0
1,5
1,0
on
the textile
Depending
Intensive
Pre-wash
•
Extra rinse
•
•
•
•
•
•
•
Details of the functions
Cotton
For a wash load comprising white or hardwearing coloured COTTON.
SYNTHETICS
For a wash load comprising DELICATE
COLOUREDS, HARD-WEARING SYNTHETICS
OR MIXED FIBRES.
Delicates
For a wash load comprising NET CURTAINS,
DELICATE TEXTILES or FRAGILE ITEMS.
“”
If you are washing coloured cottons, do
not exceed the maximum washing
temperature of 60°.
During the first few minutes of the programme,
thanks to , your machine
automatically adapts the water and energy
consumption to provide perfect washing results.
“”
Woollens
For a wash load comprising "MACHINEWASHABLE" WOOLLENS.
Hand-washable textiles
For a wash load comprising SILK OR
ESPECIALLY DELICATE TEXTILES.
Flash 30’
This programme enables you to refresh a slightly dirty
3kg-load of laundry consisting of WHITE COTTON,
COLOURED COTTON or HARD-WEARING
SYNTHETICS.
The programme is limited to 30 minutes.
During this programme, the temperature is
automatically set to 30°C.
“”
“”
“”
The doses of detergent must be reduced by
half for this programme.
No Spin
•
•
•
•
•
•
•
•
RInse
Hold and
•
•
•
•
94
Page 14

GB
Details of the functions
Rinse only
A separate rinse, followed by:
- Either a spin and drain
- Or drain only ("No Spin" option)
- Or a Hold and Rinse.
Spin only
This provides a separate spin and drain.
In the case of a "Rinse only" followed by a spin
“”
“”
or a "Spin only", ensure that you select the
spin speed suitable for the type of items in
your machine.
Options
Pre-wash “
Specially designed for heavily soiled washing
(mud, blood, etc.).
An initial specific agitation in cold water
precedes the washing phase. This enables the
particles soiling the washing to be removed
before the water is heated.
You must place some detergent in the ” ”
compartment in the products' box.
Intensive “
This function improves washing performance
by automatically increasing the temperature
of the washing water and also the agitation time
in order to handle so-called stubborn stains. The
"Intensive" option is only active on programmes
where the washing temperature is 40°C or
above.
Extra rinse “
"Especially for sensitive and allergic skins": this
adds an extra rinse to the washing cycle.
Anti-crease“
This helps you with ironing your washing.
This option enables you to wash and spin your
washing more gently, without loss of washing
performance.
”
”
”
”
Hold and Rinse
This function is for use with textiles that you
do not wish to spin or if you envisage being away
fro a long time after washing is complete.
Once this function is selected, the cycle is
interrupted before the final spin to enable your
washing to soak in the water to avoid creasing.
When the machine is stopped with the drum
full of water, the "Hold and Rinse" icon flashes
and the "Program paused" message displayed
until you programme the end of the cycle.
- Either you wish to drain and spin.
Set the knob [1] to “Spin" @ and use the button
[2], to select a suitable spin speed for the type
of items; then press the "Start/Pause" [5], The
"Spin" program message and spin speed
displayed on the screen and the programme
finishes automatically.
- Or you wish to drain only.
Set the knob [1] to “Spin" @ and use the button
[2], to select no spin; then press the
"Start/Pause" [5], The "Drain" program
message displayed on the screen and the
programme finishes automatically.
Opti A 40
This programme enables you to save energy
of cotton and synthetic loads.
This program gives you A washing
performance in 40C temperature with longer
washing duration.
Buzzer activation.
You can activate or disactivate the buzzer by
pressing Anti-Creasing and ExtraRinse [4]
buttons at same time during 2 seconds.
- "Buzzer: Yes" or "Buzzer: No" messages
displays the buzzer situation.
- Buzzer rings one time when it is disactivated.
- Buzzer rings two times when it is activated.
Finishing time
As soon as you start programming, the
display shows you the "Finishing time" for
the selected cycle.
The time shown by the machine at the start of
the programme may vary during the cycle:
- If you change the washing temperature (even
during spin) or if you add or remove any
options, the time is recalculated and
updated on the display.
- Some random operating factors (for instance,
the detection of an "imbalance" or foam,
etc.) can also alter the cycle time and
therefore the finishing time displayed.
- If there is a power failure during the washing
phase, when the power returns, the time
displayed may be earlier than the actual
finishing time. The time will be updated
during the spin phase.
95
Page 15

GB
Details of the functions
"Imbalance":when you are washing very
small wash loads, the washing may ball up
in the drum. This affects the optimum
operation of the machine.
Language Selection.
You can change the display language by
pressing OptiA-40 and Prewash buttons [4]
at the same time during 2 seconds.
Default language displayed as "Language:
English".
Turn the time setting knob [R] to change the
language settings.
Please approve new language by pressing to
Start [5] button.
Delayed Finish
You can delay the end of the programme
by 1 to 24 hours in order to take advantage
of night rate electricity tariffs or to have the
programme finish when you wish.
To do this, use the [R] knob to select the
delayed finishing time you wish.
All the time before the “Delayed finish”
selected, the time on the display [L] and
clock icon indication remains fixed until the
cycle starts.
Altering a washing programme
During programming :
Any alteration is possible before you press the
"Start/Pause" button .
"Finishing time"
to suit your alterations.
If you select a "Delayed finish” , the finishing
time is kept unless the new programming
involves the set finishing time being exceeded.
In this case, the "Delayed finish" option is
cancelled and the cycle finishing time is
corrected.
After the start of the cycle:
• You cannot alter the type of textile (for instance,
switch from "COTTON" to "SYNTHETICS" or
from "SYNTHETICS" to "DELICATES" etc.).
To change the type of textile during a cycle,
you must cancel the current programme and
then programme a new cycle.
• You can alter the temperature at the start of
the washing phase, after putting the machine
in "Pause" mode.
The finishing time displayed will then alter
accordingly.
• You can alter the spin speed during the whole
of the cycle before spinning commences.
• You can select "No Spin" 100 and "Hold and
Rinse"
(until “Rinse” message on the screen [L]
goes out)
• You can alter the "Delayed finish" time at
any time during the waiting period before the
cycle effectively starts.
up to the end of the rinsing phase
55
for the cycle is updated
If you wish to cancel the delayed finish
time, during this period, turn the knob [R]
anti-clockwise until the time shown on the
display [L] can reduce no further (the time
displayed therefore corresponds to the
finishing time for your programme) and
“End of cycle time at” message changes
to program name then briefly press the
[5]. The cycle will start immediately.
• Once you have selected a "Delayed finish", you
can only activate the "Pre-wash"
“ ” (anti-creasing) options
during the period before the cycle effectively
starts.
• You can activate the "Extra rinse" until rinsing
starts (until the "Rinse" message on the
screen [L] goes out).
• You can switch of any of the options throughout
the cycle, provided that the relevant action has
not already started.
At the end of the cycle:
When the “Completed program” message is
displaying:
- You can programme a new cycle without
having to switch to the "Stop" position on the
11
knob . All you have to do is press any of the
buttons , , , or turn the knobs or .
The machine is then ready for a new
programme.
- If you press the "Start/Pause" , button
directly after the end of the cycle, the machine
restarts the last cycle programmed, including
any options.
22
and
11
4433
RR
55
96
Page 16

97
GB
Automatic safety systems
Door safety lock:
As soon as the washing cycle starts, the door
on your machine locks.
“Door locked” icon displays lock status on the
screen [L].
Once the cycle is complete and when the
machine is stopped without water inside the
drum, the door unlocks immediately. And
“Door Locked” icon disappears when the door
can open.
If you have programmed a "Delayed finish",
,the door is unlocked throughout the
waiting period before the cycle effectively
starts.
If you wish to open the door during a cycle,
briefly press the "Start/Pause" button and
wait a moment or two for the door safety
system to unlock.
Depending on exactly when in the cycle
you wish to open the door, the time delay
may be longer because a cooling-down
period must be added.
In fact, during the cycle, for the door safety
lock to release, the temperature of inside
the machine must not
be higher than 60∞C and water level must
be lover than safety level so that you do
not risk receiving being scalded, burnt or
leakage.
Water safety system:
While your machine is operating, constant
control of the water level avoids any water
overflowing.
Load Balancing system:
Your washing machine is fitted with a safety
system to limit spinning when it detects a
poorly distributed load (this poor distribution
is called an "imbalance"). In this case, your
washing may not be adequately spun. You
should therefore redistribute it evenly in the
drum and programme a new spin.
Anti-foam safety system:
Your washing machine can detect too high
a production of foam and the messages of
“Too much detergent” and “Extra rinse added”
displays on the screen [L] during spinning.
At such times, the spin stops and the machine
drains.
Then the cycle continues, adapting the spin
sequences and possibly adding an extra rinse.
The finishing time is altered.
During subsequent washes, reduce the
amounts of detergent you use.
Tap closed
When the "Open tap" and “And press start”
messages is displaying, this means that the
water supply to your machine is blocked:
- Check whether the water tap is open
correctly,
- Check whether the water hose is bent or
kinked.
Programme for standardised comparative testing
Programme ................................................................................................ COTTON
Temperature..................................................................................................... 60°C
Load ................................................................................................................. 6 kg
Duration...........................................................................................................1 h 55
Energy .........................................................................................................1,02 kWh
Water ................................................................................................................. 43 l
To comply with the statement on the energy label, the tests are conducted in accordance with European Directive 92/75/EEC,
with a nominal capacity ensuring that all the CEI detergent is used as soon as the washing phase starts.
Page 17

GB
General maintenance
Cleaning the machine
To clean the casing, the control panel
and all the plastic components in
general, use a sponge or a cloth
dampened only with water and liquid
soap.
Never use:
• Abrasive powders
• Plastic or metal sponges
• Alcohol-based products (alcohol, thinner,
etc.)
Maintaining the internal
components
To ensure optimum hygiene, we recommend
that you:
• Leave the door open for a short time after
the wash, (ensure that your children and pets
cannot get into the machine)
• Run a 90°C washing cycle at least once a
month.
Risk of frost
If there is a risk of frost, disconnect the water
hose and empty any water in the drain hose
by placing it as low as possible in a basin.
Periodic checks
We recommend that you check the condition
of the water and drain hoses. If you notice the
slightest cracking, do not hesitate to replace
them with identical hoses available from the
manufacturer or his After-Sales Service.
Replacing the water hose
When replacing this, ensure that the
connections are tight and that there is a rubber
seal at both ends.
•Clean the plastic and rubber components
providing access to the inside approximately
once a month with a slightly chlorinated
cleaning product.
To eliminate any residual traces of this
product, programme a rinse.
Cleaning the detergent dispensing
drawer
To clean the products' box, pull it towards you
and then remove it from its housing by pressing
on the point indicated on the siphon (the
coloured component). Rinse the box in water
and also clean its housing before replacing it.
Fig. 10
Replacing the power cable
For your own safety, this operation must be
performed by the manufacturer's After-Sales
Service or by a qualified electrician.
Cleaning the siphon
Wash the siphon (the coloured component
in the products' box) every 30 to 40 doses of
detergent. Remove the siphon by holding it
by the edges. To avoid the siphon becoming
blocked, rinse any residual softener away
carefully and ensure that it is refitted perfectly
in place before using the machine.
Fig. 11
98
Page 18

GB
Cleaning the filters
Cleaning the pump filter
This filter collects any small items that you
may have inadvertently left in the clothes and
prevents them from disrupting the pump's
operation.
To clean it, proceed as follows:
When the drum is full (for example, if
there is a power cut), there can be up
to 15 litres of water that must be drained
away: provide a large enough
receptacle.
Take precautions, the water to be
drained may still be scalding hot.
- Remove your machine's power cable from
the socket.
- Open the access hatch by pressing on the
button (Fig. 12).
- Tilt the chute in front of the filter towards
your receptacle,
- To control the flow of water coming out,
slightly unscrew the filter by turning it anticlockwise,
- If your receptacle becomes full before you
have drained the machine completely,
screw in the filter, empty your receptacle
and then start again until there is no more
water,
- Then open the filter by turning it anticlockwise and empty the small amount of
water from the filter's lid (30ml maximum).
- Remove any residue left in the filter's
housing,
- Clean the filter,
- Replace the filter in its housing and lock it
in place by turning it clockwise.
- Refit the chute
- Close the filter access hatch.
Ensure that the filter is correctly
repositioned to avoid any water leaks.
Fig. 12
Cleaning the filters on the water
supply
The filters at the point where the water hose
is connected to your machine and to the tap
prevent dirt and small objects entering your
machine. We recommend that you clean
them from time to time.
Proceed as follows to clean them:
- First of all, close the water tap,
- Unscrew the part of the hose that is
connected to the back of your machine,
- Remove the filter from the back of your
machine using a pair of pliers and wash it
under the tap,
- Refit the filter and the hose,
- Unscrew the hose connected to the water
tap,
- Remove the filter with your hands and clean
it under the tap
- Refit the filter and the hose,
99
Page 19

GB
Incidents that may arise
Some incidents may occur while you are using your machine; these are the points to check.
Incidents
The cycle does not start
Heavy vibrations during
spinning
The washing has not been
spun or has not been spun
enough
A pool of water forms
around the machine
Possible causes / remedies
• You have forgotten to press the "Start/Pause" button .
• There is no electricity to the machine:
- Check that the plug is correctly connected.
- Check the circuit breaker and the fuses.
• The water tap is closed.
• The machine's door is not closed properly.
• The transport clamps have not been correctly removed from
your machine:- See the section on "REMOVING THE
TRANSPORT CLAMPS FROM YOUR MACHINE"
• The floor is not horizontal.
• The feet are wrongly adjusted or their nuts have come loose.
• You have selected a programme without a spin, for example:
"No spin".
• The spin safety system has detected that the washing is poorly
distributed in the drum:- Redistribute the items better and
programme a new spin.
First of all remove the plug from the socket or remove
the relevant fuse and close the water tap.
While your machine is operating, constant control of the water
level avoids any water overflowing. If, despite this, water is
leaking from the machine, it may be that:
• The drain hose hook is poorly positioned in the drain pipe.
• The connections for the water hose on the machine and at
the tap are not tight:- Check that the seals are in place and
that the connections are tight.
The machine does not drain
The door does not open
The machine refuses to
accept the programme
In general, whenever you notice an anomaly, it is advisable to stop the machine, unplug
the power cable and close the water tap.
• You have programmed a "Hold and RInse".
• The pump filter is blocked:- Clean it (see the section on
"CLEANING THE FILTERS" for how to do this).
• The drain hose is kinked or squashed
• The programme has not finished yet.The door remains locked
throughout the whole of the programme.
* Door cannot open while the "Door Locked" icon is ON.
• The "Child safety" system is active, (see the section on
"PROGRAMMING")
• You have interrupted a cycle while it is running. Cancel it (see
the section on "PROGRAMMING")
100
Page 20

101
GB
Problems that you can rectify yourself
In this section, we explain how you can rectify these problems very easily.
Your machine automatically detects certain operating faults and informs you of these by
means of the indicator lights, which light up red, or by means of particular messages on the
display.
Messages
Causes / Remedies
The pump filter is blocked.Clean the pump filter (see the section on "CLEANING
THE FILTERS" for how to do this) and then press the "Start/Pause" button I->
again to restart the cycle.Also check the drain hose's position in the drain pipe:
the connection should not be airtight (see the section on "CONNECTING YOUR
MACHINE: Draining away the waste water").
The door is not closed properly.Check that the door is closed properly and
then press the "Start/Pause" button I-> again to restart the cycle.
Open Tap
And Press start
Too much detergent,
Extra rinse added
Alert: Water leak
The water tap is closed.Check whether the tap is open and then press the
"Start/Pause" button I-> again to restart the cycle. This incident can also be
caused by the drain hose being connected improperly (see the section on
"CONNECTING YOUR MACHINE: Draining away the waste water").
Too much detergent.The machine automatically initiates an extra rinse. Check
the amount of detergent you use on your next wash.
When the Aquastop system detects any water leakage inside the machine,
“Alert: Water leak" message displayed on the screen.
- Please close tap and call After-sales service
Problems requiring a service engineer
Check that the message displayed does not correspond to a problem that you can rectify
yourself (see above)..
Your machine also detects some faults that necessarily require rectification by a service engineer
and indicates this by other messages, of which we provide some examples below.
Messages
etc...
If you encounter one of these messages, remember to note down the message displayed so that you
can tell your service engineer when you call him to help him in his task.
After-Sales Service
Any work on your machine must be performed by your dealer or some other service engineer
approved by the manufacturer.
When you call, mention your machine's full reference (model, type and serial number).
This information is given on the identification plate.
 Loading...