

Page 1

U
sing your oven
Le guide d’utilisation de votre four
O guia de utilização do seu forno
П пдзгьт чсЮузтфпх цпэснпх убт
Gebruiksaanwijzing van uw oven
FP 229
GB
FR
PT
NL
GR
99625792_ML_A.qxd 21/05/03 15:37 Page 1
Page 2

Throughout this manual,
indicates safety recommendations,
indicates advice to help you make the
best use of your oven
Introduction P.3
Your oven
O
ven features P.4
A
ccessories
P.5
Safety recommendations
P.6
How to install your oven
Electrical connections P.7-8
Dimensions for installation use P.9
How to use your oven P.10-19
The oven programmer
P.10
How to set the clock
P.11
How to cook straightaway
P.12
How to programme the cooking
P.13-14
How to delay cooking (pre-selected end time)
P.14
How to cook economically
P.15
How to use the Grill+ feature
P.16
How to use the timer
P.17
How to adjust the brightness of the display panel
P.17
Cooking methods
P.18-19
Cleaning the oven cavity P.20-22
Pyrolysis explained P.20
When to clean by pyrolysis P.20
Starting pyrolysis straightway P.21
Delaying cleaning by pyrolysis P.22
Changing a bulb
P.22
Troubleshooting
P.23
2
C
ontents
99625792_ML_A.qxd 21/05/03 15:37 Page 2
Page 3
3
Introduction
Dear Customer,
Thank you for buying a BRANDT oven.
Our design staff have produced a new generation of kitchen equipment,
to make everyday cooking a pleasure.
You will find that the clean lines and modern look of your Brandt oven
blends in perfectly with your kitchen décor. It is easy to use and performs to a high standard.
Brandt also makes a range of products that will enhance your kitchen
such as hobs, extractor hoods, built-in dishwashers and refrigerators.
There are models to complement your new Brandt oven.
Of course, we make every effort to ensure that our products meet all
your requirements, and our Customer Service department is at your
disposal, to answer all your questions and to listen to all your suggestions (details at the end of this booklet/details enclosed).
Brandt has always been a leader in the development of new products,
thus enhancing the quality of everyday life by providing increasingly
efficient products, that are easy to use, respect the environment, and are
attractive and reliable.
The BRANDT name.
GB
99625792_ML_A.qxd 21/05/03 15:37 Page 3
Page 4

4
1
2
3
4
5
T˚
c
1 2 3
5
6
8
7
4
Your oven
1
2
5
6
7
3
4
Method selector
Programme selector
Control knob
Function selector
Light
Shelf positions
Hole for rotisserie
Door-open detector
plate
OVEN FEATURES
8
99625792_ML_A.qxd 21/05/03 15:37 Page 4
Page 5
5
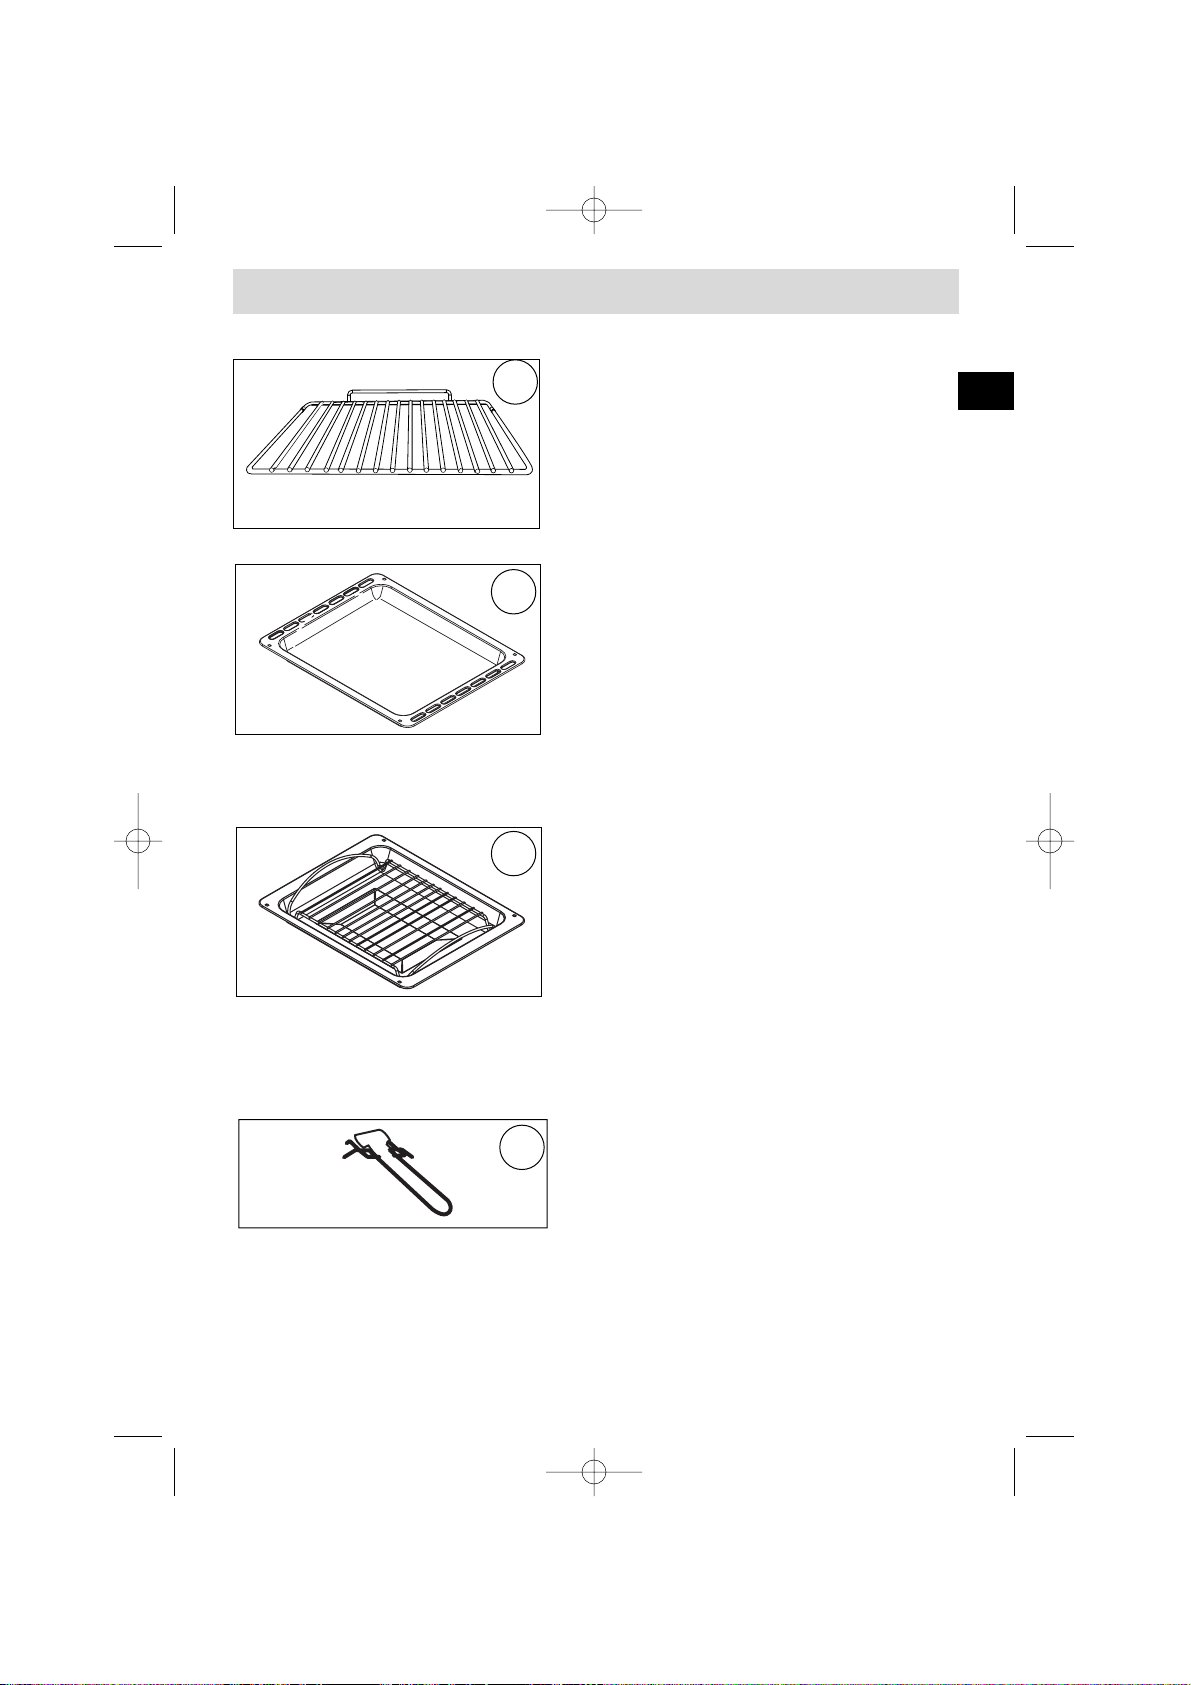
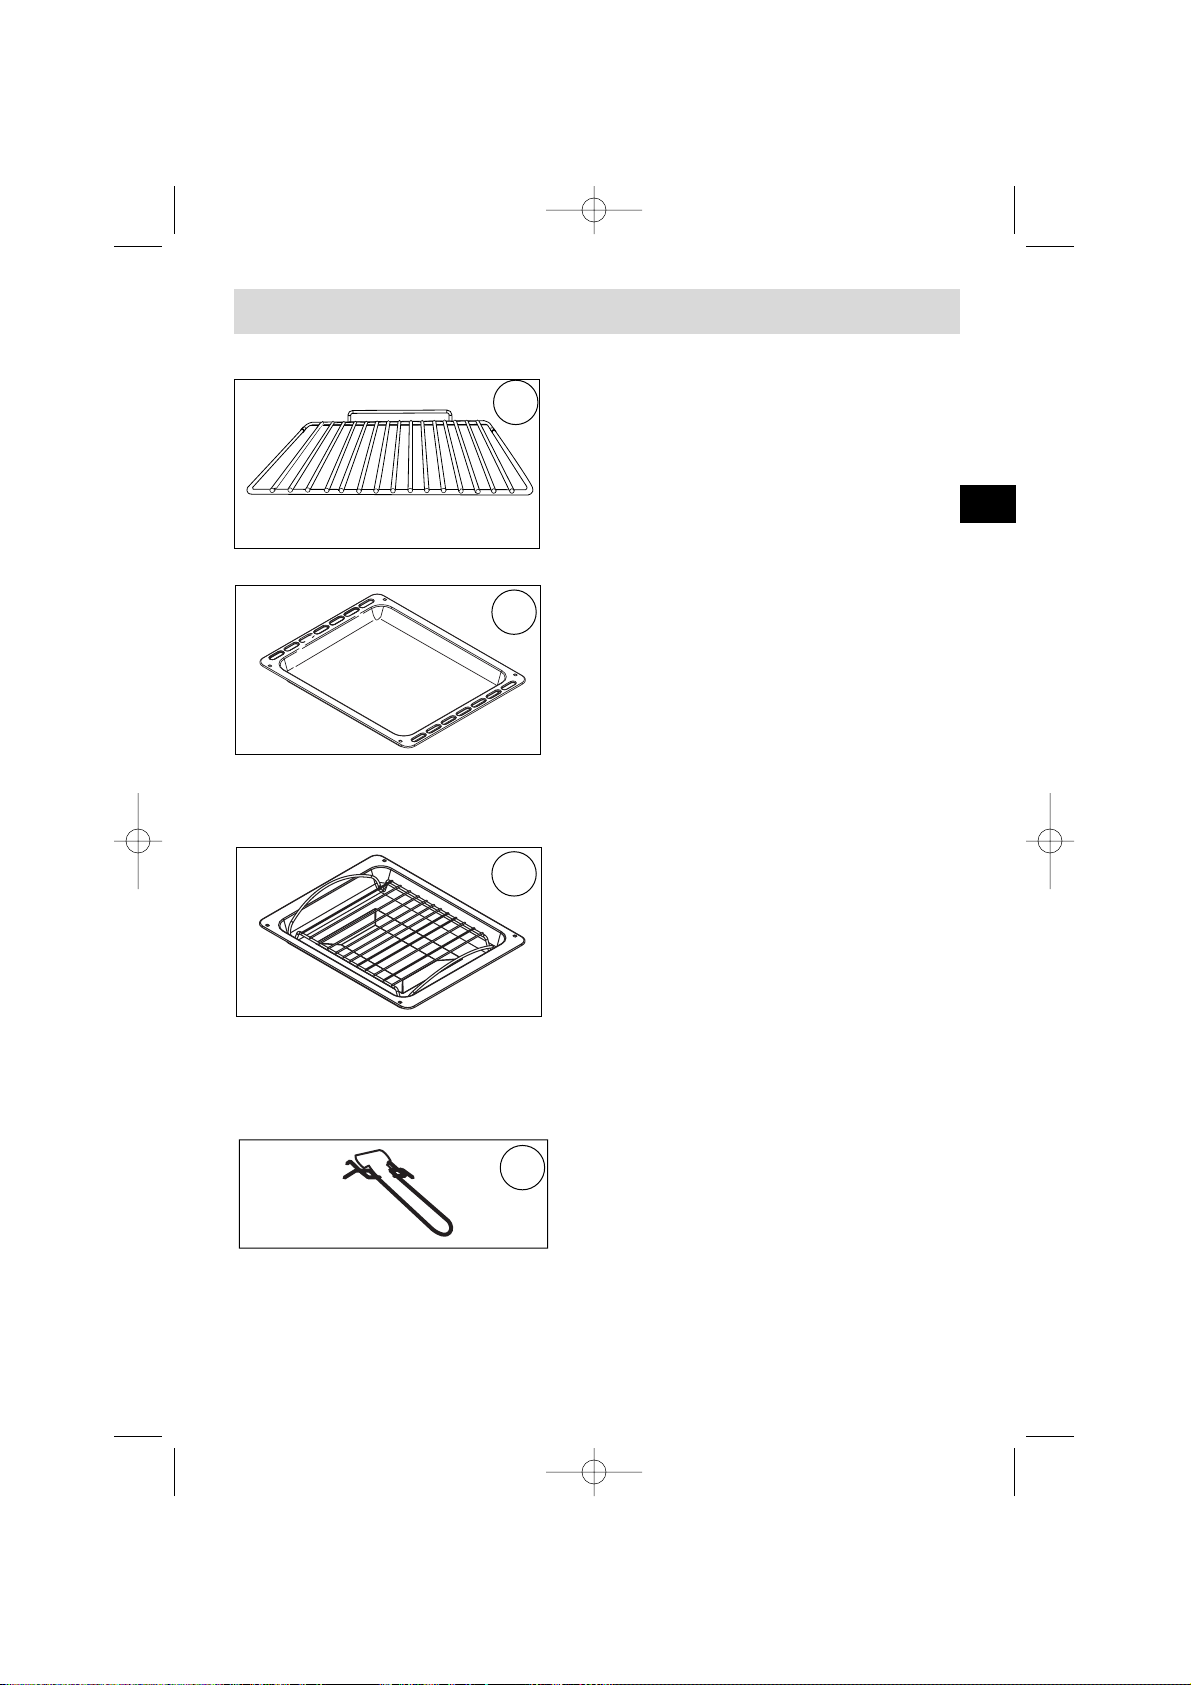
Accessories (Depending on model)
Anti-tip safety shelf
Food can either be placed on the shelf in a
dish or cake tin for cooking or browning, or
may be placed directly on the shelf itself.
Multi-purpose baking tray
This tray has a raised edge and can be used
for baking pastries (choux buns, meringues,
small cakes, flaky pasties, etc).
Joints should not be cooked in this tray
uncovered because fat could spit all over the oven sides.
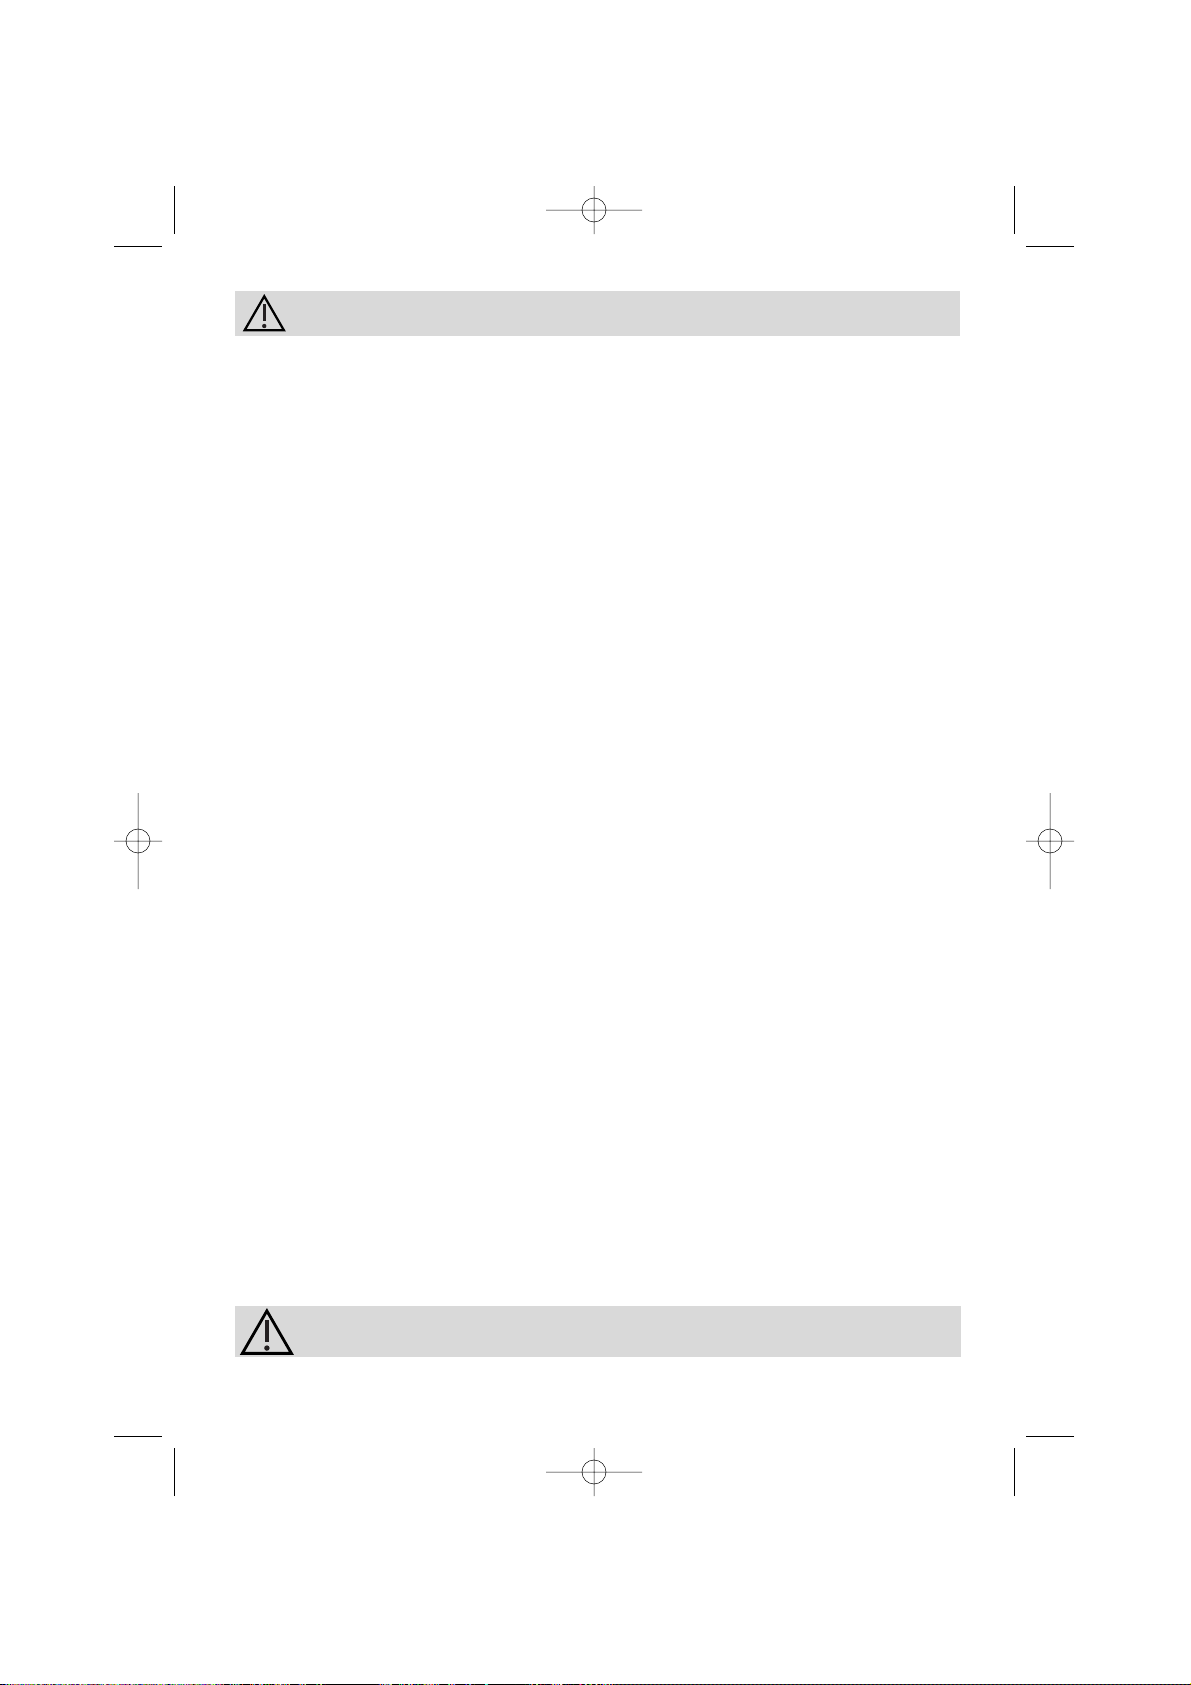
Grill pan
With special trivet for grilling
The pan can be used for collecting juices
when cooking with the grill element by itself
or with the oven set to pulsed grill (grill and
fan) orwhen roasting on Easycook.
It is particularly useful as a large roasting tray for meat and vegetables.
When using Easycook or a function with a base element never cook with the grill
tray sitting on the bottom of the oven as this could the enamel
BACK
FRONT
Grill pan handle
7
8
9
10
GB
99625792_ML_A.qxd 21/05/03 15:37 Page 5
Page 6
6
Safety recommendations
Please read these instructions before installing and using your oven.
The oven has been designed for domestic use only for cooking food. No asbestos
has been used in its construction.
USING FOR THE FIRST TIME:
Before you use your oven for the first time, leave it empty and, with the door
closed, turn it on to maximum temperature and let it heat up for 15 minutes. This
"burns off the newness of the oven". During this time there may be some smell
from the mineral wool that insulates the oven and there could be some smoke.
This is perfectly
normal.
NORMAL USE:
- Always close the door properly. The oven is fitted with a seal designed to
work with a closed door.
- Never lean or let anyone sit on the oven door when it is open.
- The oven parts and accessories can become hot when the door is
left partially open and the grill on. Always keep children at a safe distance.
- When the oven is on it will get hot. Take care not to touch the heating
elements inside the oven.
- Always protect your hands with oven gloves or something similar when
removing food, accessories or containers from the oven.
- Do not line your oven or grill pan with kitchen foil. The metal will increase
the heat produced and could ruin the food and damage the enamel.
- Never use a spray or a high-pressure washer to clean the oven.
- During self-cleaning, surfaces can become hotter than in normal use.
Children must be kept at a distance.
During the action of pyrolysis, accessible surfaces become much hotter than
during normal cooking. Keep children at a distance.
Always check that the oven is off before you clean the inside.
- For your safety your oven is equipped with an AUTOMATIC STOP should
you inadvertently forget to turn off your oven. After 10 hours' operation, the AS
(Automatic Stop) function is activated and your oven stops heating. AS is
displayed in place of the time and a series of 2 successive pips is sounded for a
certain time.
Ensure that the function selector is returned to 0 to re-use your
oven.
99625792_ML_A.qxd 21/05/03 15:37 Page 6
Page 7
7
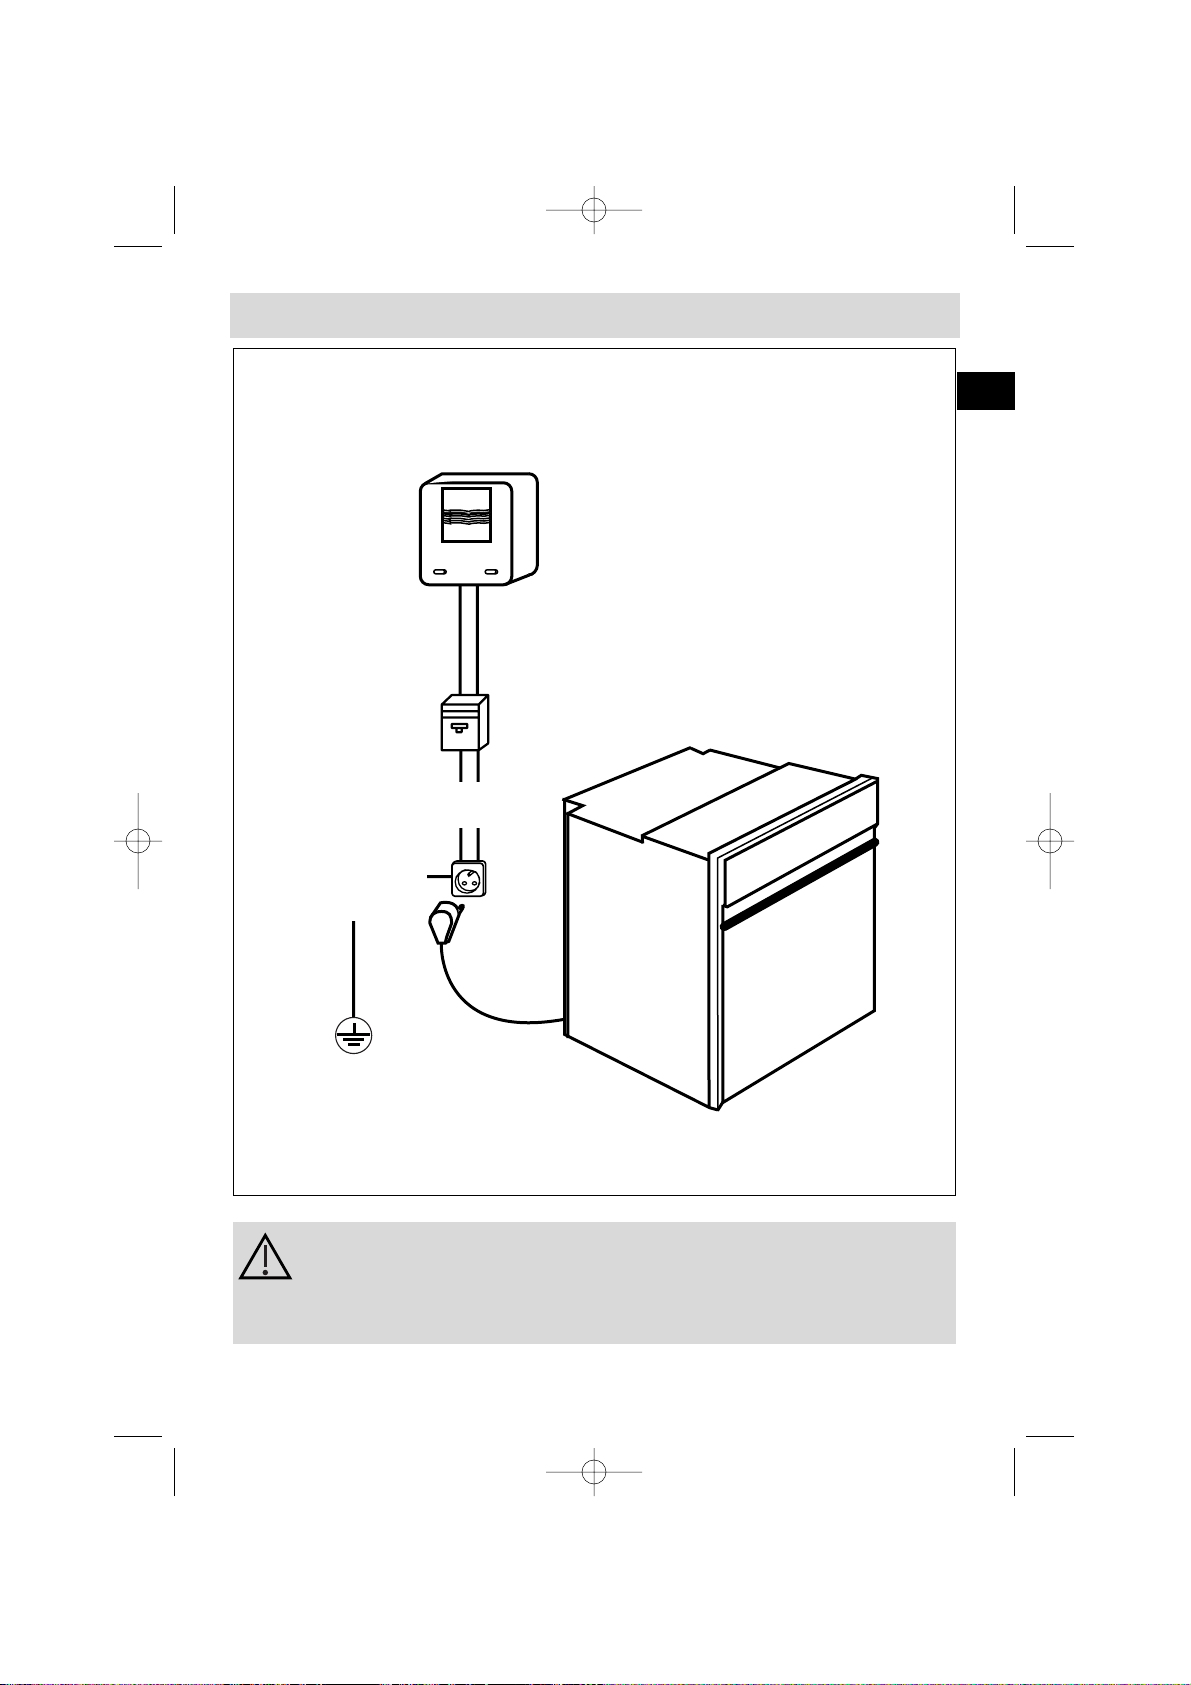
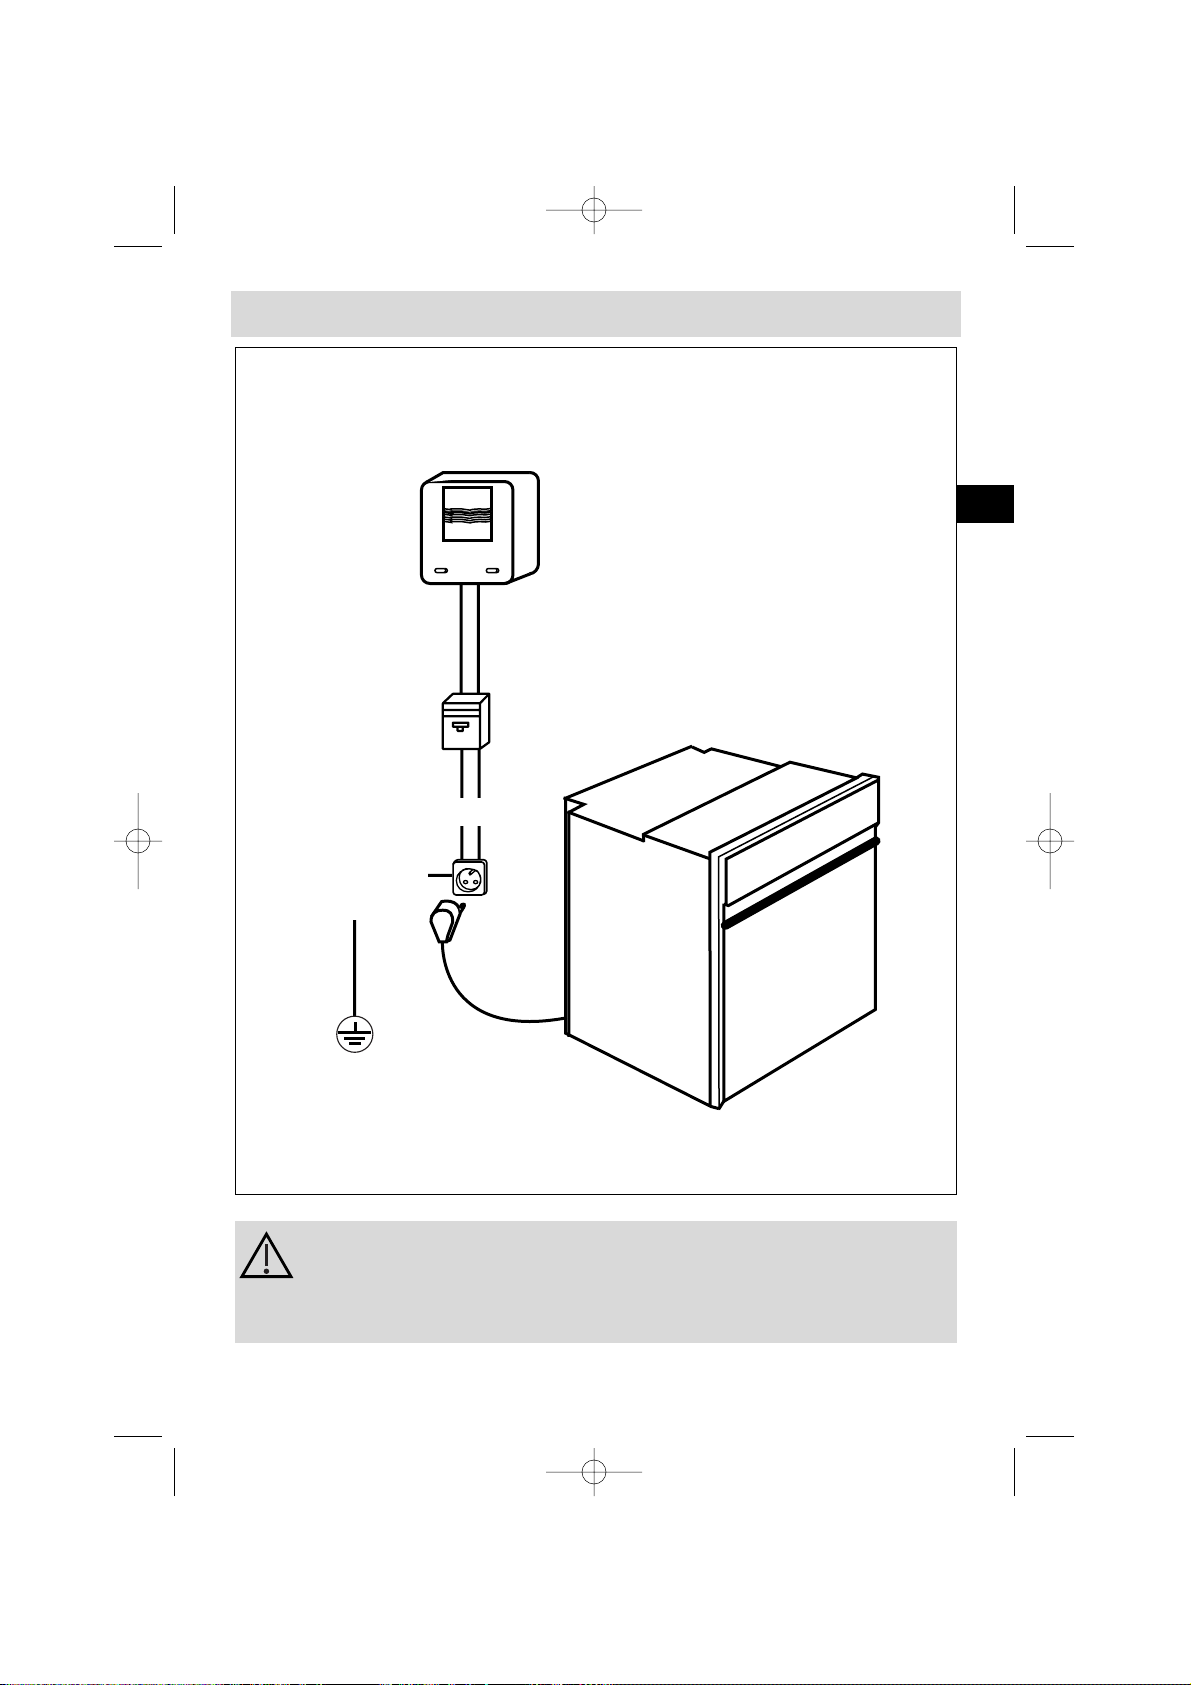
Electricity meter (mains)
(20A, single-phase
220-240 V alternating
current 50 Hz)
Socket
2 -pin with earth
220-240 V single phase
alternating current supply
Electrical connections
Connecting cable
approx 1.50 m.
long
Fused 16A or differential
circuit breaker
Before connecting your oven, make sure you are using the correct size cable. The cross-section should be the same as the cable
connected to the oven. Use a 16-amp fuse.
How to install your oven
GB
99625792_ML_A.qxd 21/05/03 15:37 Page 7
Page 8
8
How to insta
We cannot accept any liability in the event of an accident
resulting from non-existent or faulty earthing.
• The supply cable (H05 RR-F, H05 RN-F or H05 W-F) must be long enough to allow
the oven to rest on the floor in front of its housing.
With the oven sitting on the floor and disconnected:
• Open the trapdoor at the bottom right hand side at the back of the oven by
removing the 2 screws and swinging the door away.
• Remove the sheath from each wire in the new cable up to 12 mm.
• Twist the ends carefully together.
• Unscrew the terminal screws and remove the wires that need changing.
• Pass the new cable through the wire clamp to the right of the terminals.
• Connect the wires up in accordance with the markings on the terminals.
• Make sure all wires are trapped under the screws.
• The brown wire (live) going to terminal marked L.
• The green and yellow wire (earth) going to the one marked .
• The blue wire (neutral) going to the terminal marked N.
• Tighten the screws and check, by tugging on each wire, that they are firmly connected.
• Tighten the clamp to hold the cable.
• Close the trapdoor using the two screws.
Fitting new wiring and/or changing cables.
The electrical connections are made before the oven is installed in its housing.
• The oven must be connected using an approved 3-core cable (live, neutral and
earth
) with 1.5 mm square conductors. This should be connected via a 3- pin-
socket (live, neutral, and earth to the main supply which should be should be a
220-240V, alternating single-phase current. If the oven is not connected using a
plug and socket, it must be connected to a multi-pole switch with a minimum gap
of 3 mm between contacts. The earth wire (green and yellow) should be connected
to the terminal marked with the earth symbol on the appliance and to the earth
in the switch.
• Where the oven is connected using a separate plug and socket this must be
accessible after the oven has been installed.
• The neutral wire (blue) of the oven must be connected to the neutral in the main supply.
99625792_ML_A.qxd 21/05/03 15:37 Page 8
Page 9
9
ll your oven
If you are unsure about fitting this oven yourself please use a
qualified electrician.
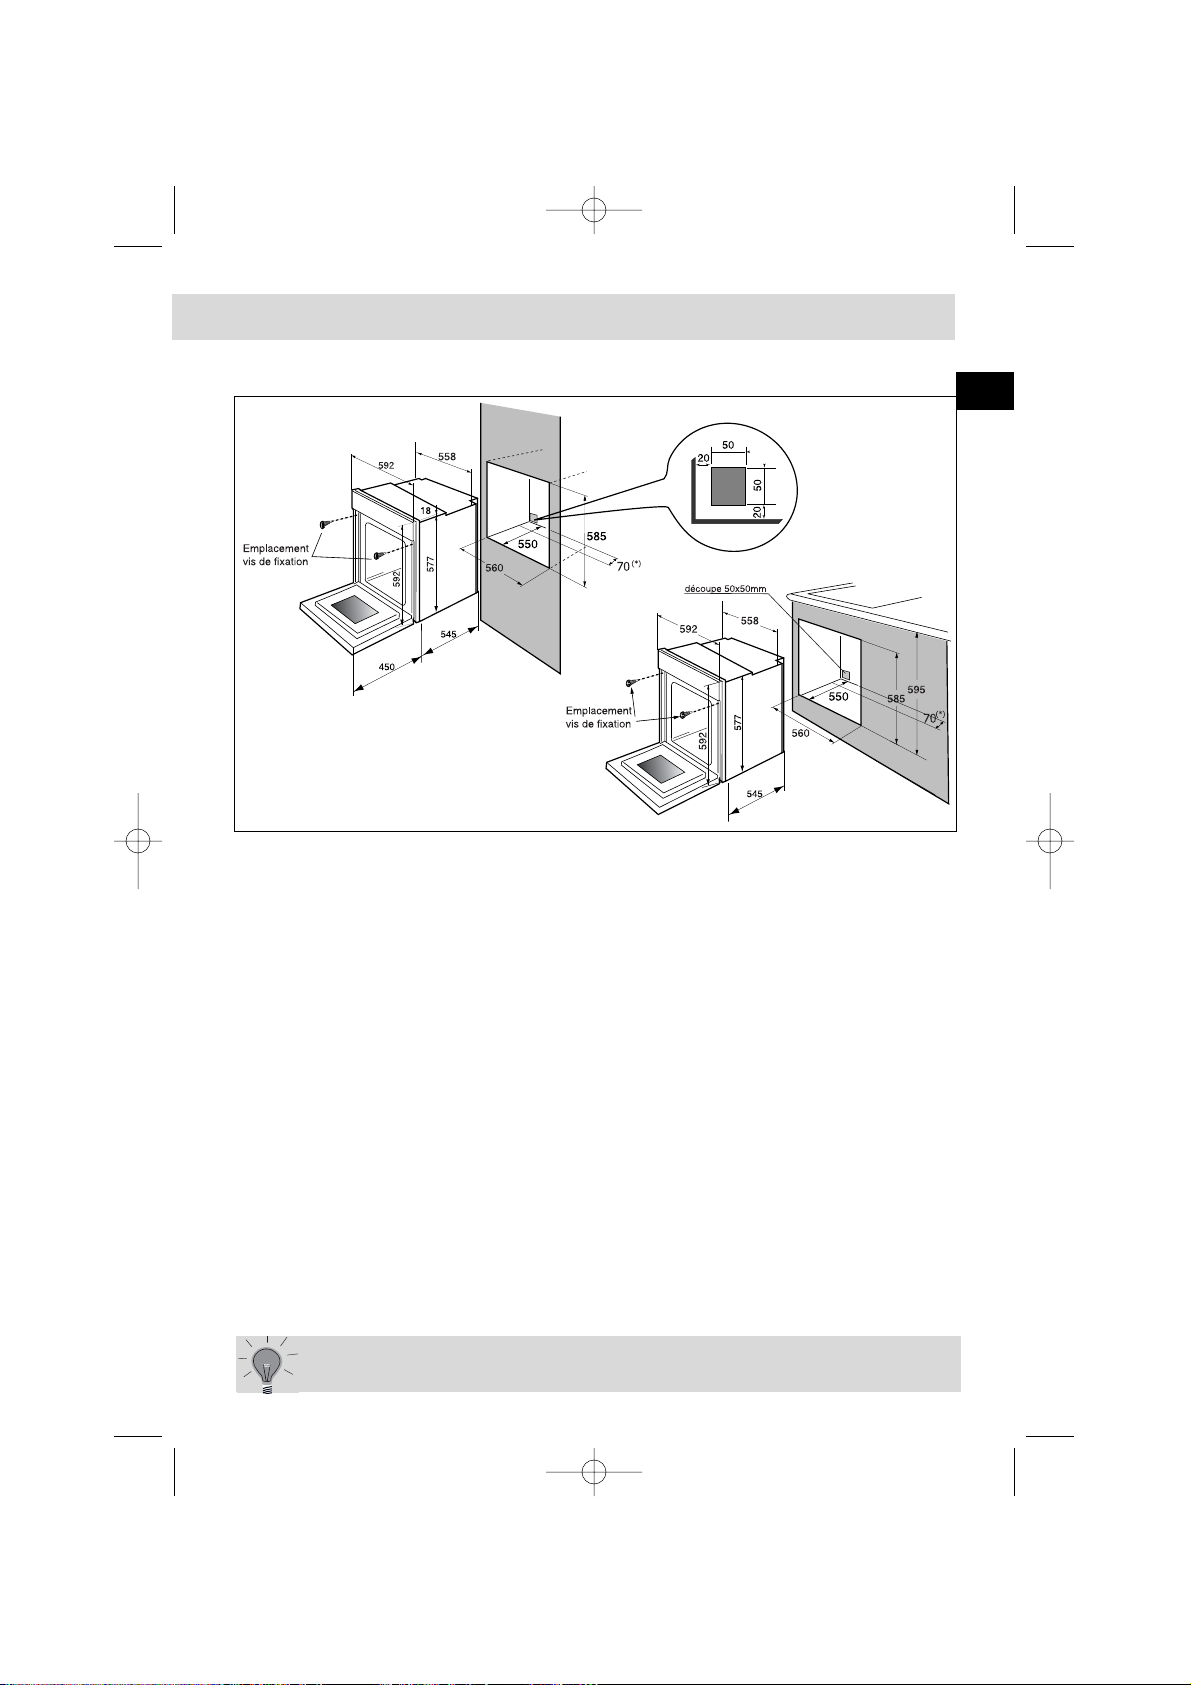
Dimensions for installation use
The oven may be housed either under a work surface or built into a
column that is open* or closed with a suitable opening.
Your oven works at its best and produces excellent results when cooking and cleaning itself, if its air circulation is not compromised:
• The oven must be centred in the unit so that there is a minimum distance of 5
mm between it and the surrounding unit.
• The housing unit or its outer surface must be capable of withstanding heat.
• To ensure the oven rests firmly in the housing, screw it to the housing unit using
the holes on the side uprights provided (see diagram).
To do this:
1) Remove the rubber stoppers masking the fixing holes.
2) To prevent the housing unit splintering, drill two holes 3 mm in diameter in the wall of the
housing unit opposite the fixing holes.
3) Attach the oven using the two screws.
4) Conceal the hole using the rubber stoppers. (These also help to cushion the
closing of the oven door).
(*) If the housing unit is open at the back, the gap must not be more
than 70 mm.
GB
99625792_ML_A.qxd 21/05/03 15:37 Page 9
Page 10
10
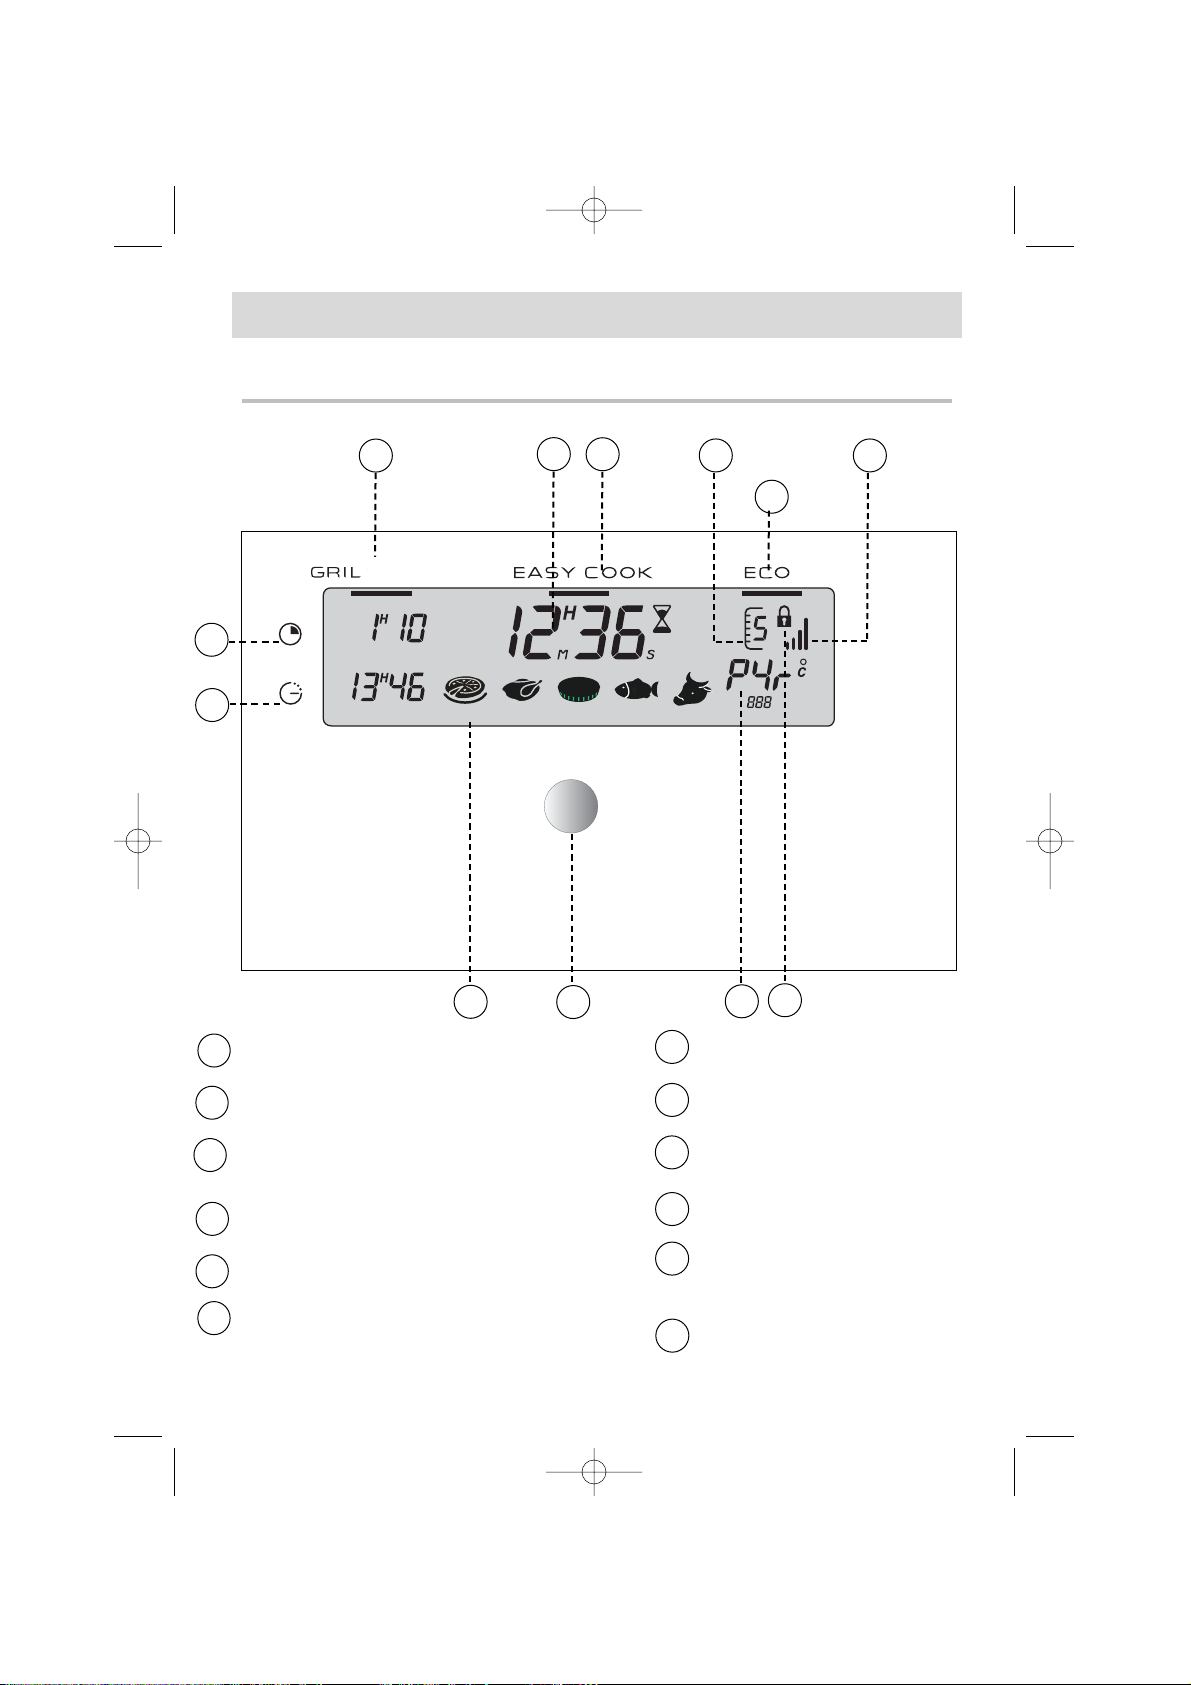
1. The oven programmer
1
3
5
7
8
9
6
2
4
10
11
12
Temperature increase indicator
ECO (economical) cooking indicator
Recommended shelf position for dish
EASY COOK indicator
Time display (time of day and timer)
Grill+ indicator
1
3
4
5
6
2
Length of cooking time
End of cooking time
EASY COOK dishes indicator
Control knob
Oven temperature and
pyrolysis indicator
Door locked indicator
7
9
10
8
11
12
Your oven
+
99625792_ML_A.qxd 21/05/03 15:37 Page 10
Page 11
11
a) When the oven is first
switched on at the mains
• Set the time of day by turning the knob (the
faster you turn the knob the quicker the time is
displayed).
• The oven assumes the time is correct a few seconds after you stop turning the knob -> The
display stops blinking.
Time chosen is 12.30.
b) Altering the clock
• Turn the programme selector to the re-set position “ ”
• The time display blinks and you can alter the time.
• Turn the knob to obtain the correct time (back or
forwards).
• When the correct time is shown, turn the selector
to ”T°c” (temperature control) -> and the display
will stop blinking.
If you omit the last step, the oven will automatically assume the time
after a few seconds.
2. How to set the clock
Timer
Cooking
time
End of
cooking
Altering
the clock
Knob description
GB
99625792_ML_A.qxd 21/05/03 15:37 Page 11
T˚
c
T˚
c
Page 12

12
How to use your oven
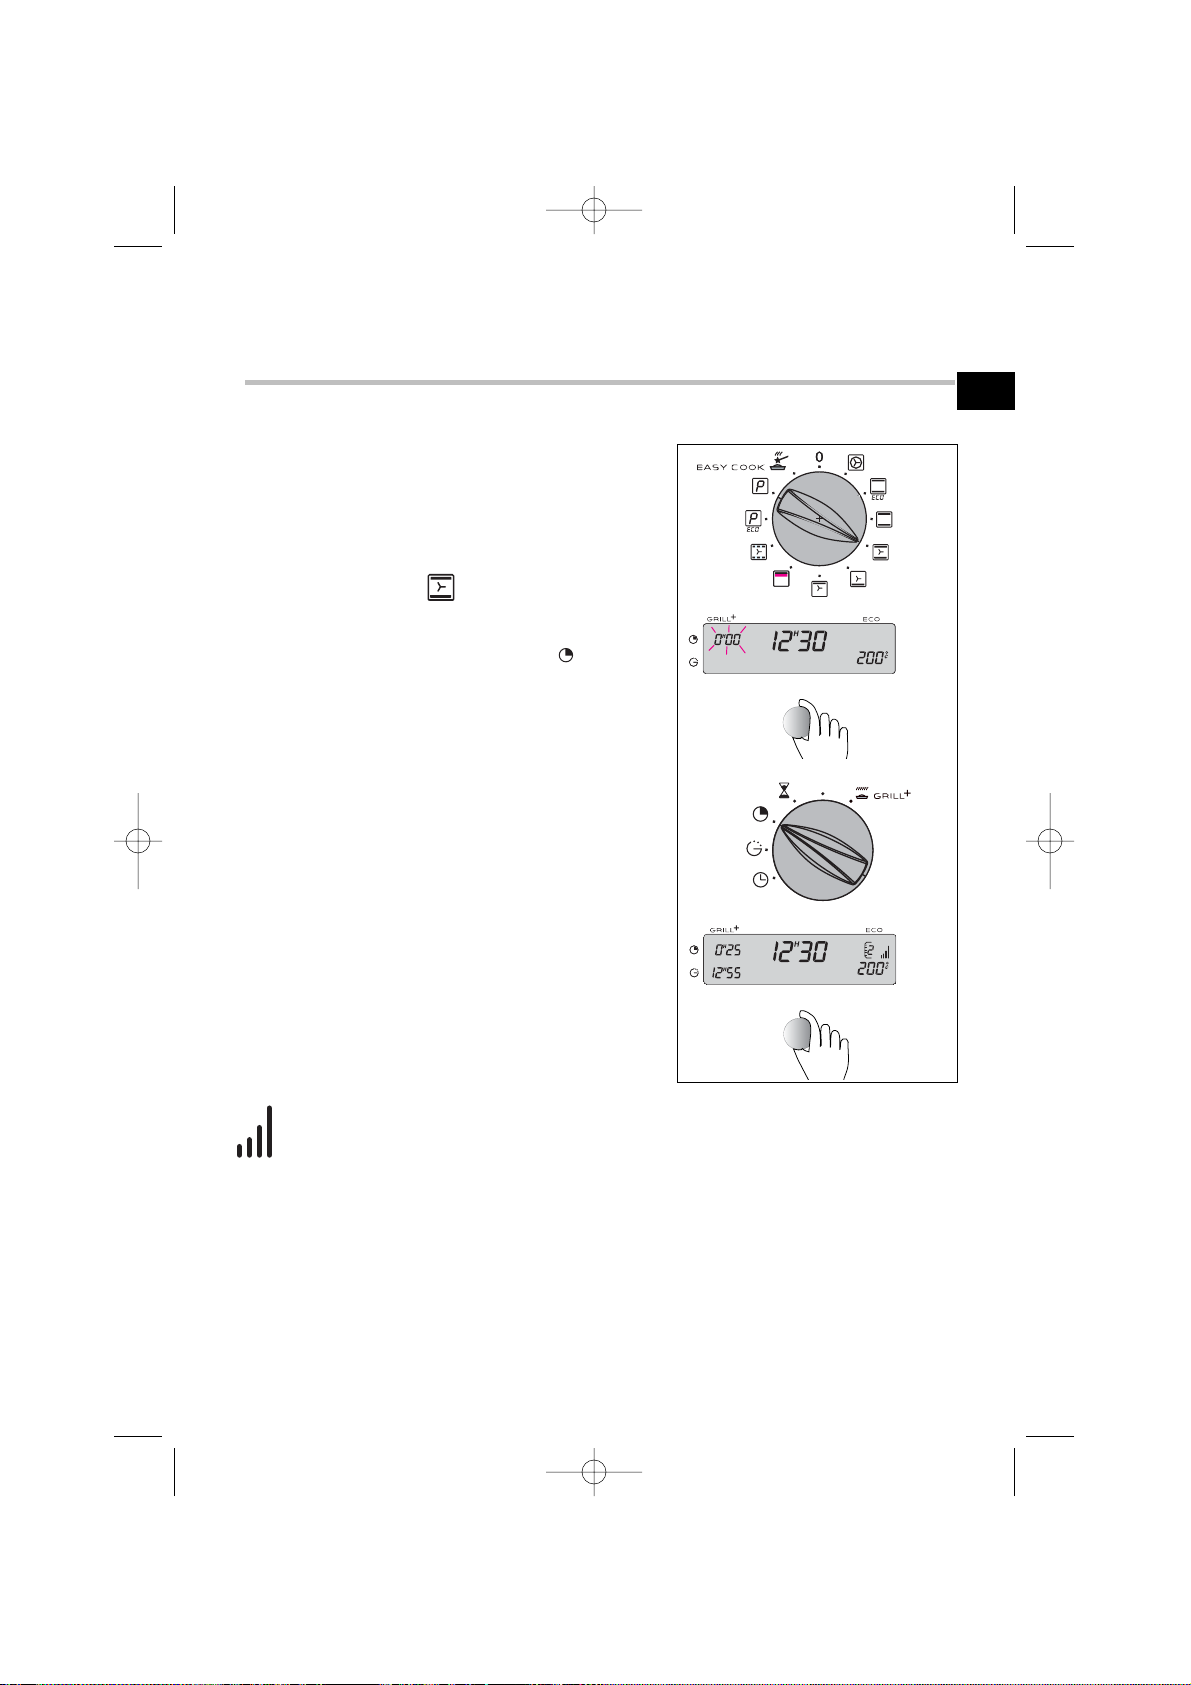
The timer display only shows the time of day.
It should not be blinking.
• Choose how you want to cook your food:
Turn the dial until it is indicating your choice.
Example : position " ".
• Place your dish in the oven at the shelf position recommended in the display.
E.g" " -> means shelves 1 or 2.
• Your oven will suggest the best temperature
for the method chosen. In this case 200ºC.
However, you can override the suggestion by using
the knob below the display.
E.g " " is now at 190ºC.
After this, the oven heats up, the temperature increase indicator is busy and
reflects how hot the oven is.
When the oven has reached the right temperature, it gives 3 beeps.
After cooking the fan continues to work for a while to ensure
the elements cool right down.
3. How to cook straightaway
99625792_ML_A.qxd 21/05/03 15:37 Page 12
Page 13
13
How to use your oven
a) To turn on the oven manually but
programme the oven to turn off (delayed
cooking)
• Choose the method of cooking and adjust the
temperature if necessary.
The example is " "
Temperature 200°C
• Turn the programme selector to
“”
The cooking time display shows 0:00 and blinks.
You can now set how long to cook for.
•
Turn the knob until the time is displayed.
E.g. 25 minutes
The oven will automatically assume this time is
correct after a few seconds
-> The display will stop blinking.
Immediately the display stops blinking the
countdown starts.
The time cooking will finish (start time +
cooking time) is shown in the display panel.
For this example:
cooking will end at 12:55 pm
After this, the oven heats up,
the temperature increase indicator is busy and reflects how hot
the oven is.
When the oven has reached the right temperature, it gives 3 beeps.
At the end of the cooking time, the oven gives a series of beeps for some
minutes. To switch the beeps off, turn the method selector to TºC and the
feature selector to 0.
4. How to programme the cooking
GB
99625792_ML_A.qxd 21/05/03 15:37 Page 13
T˚
c
Page 14
14
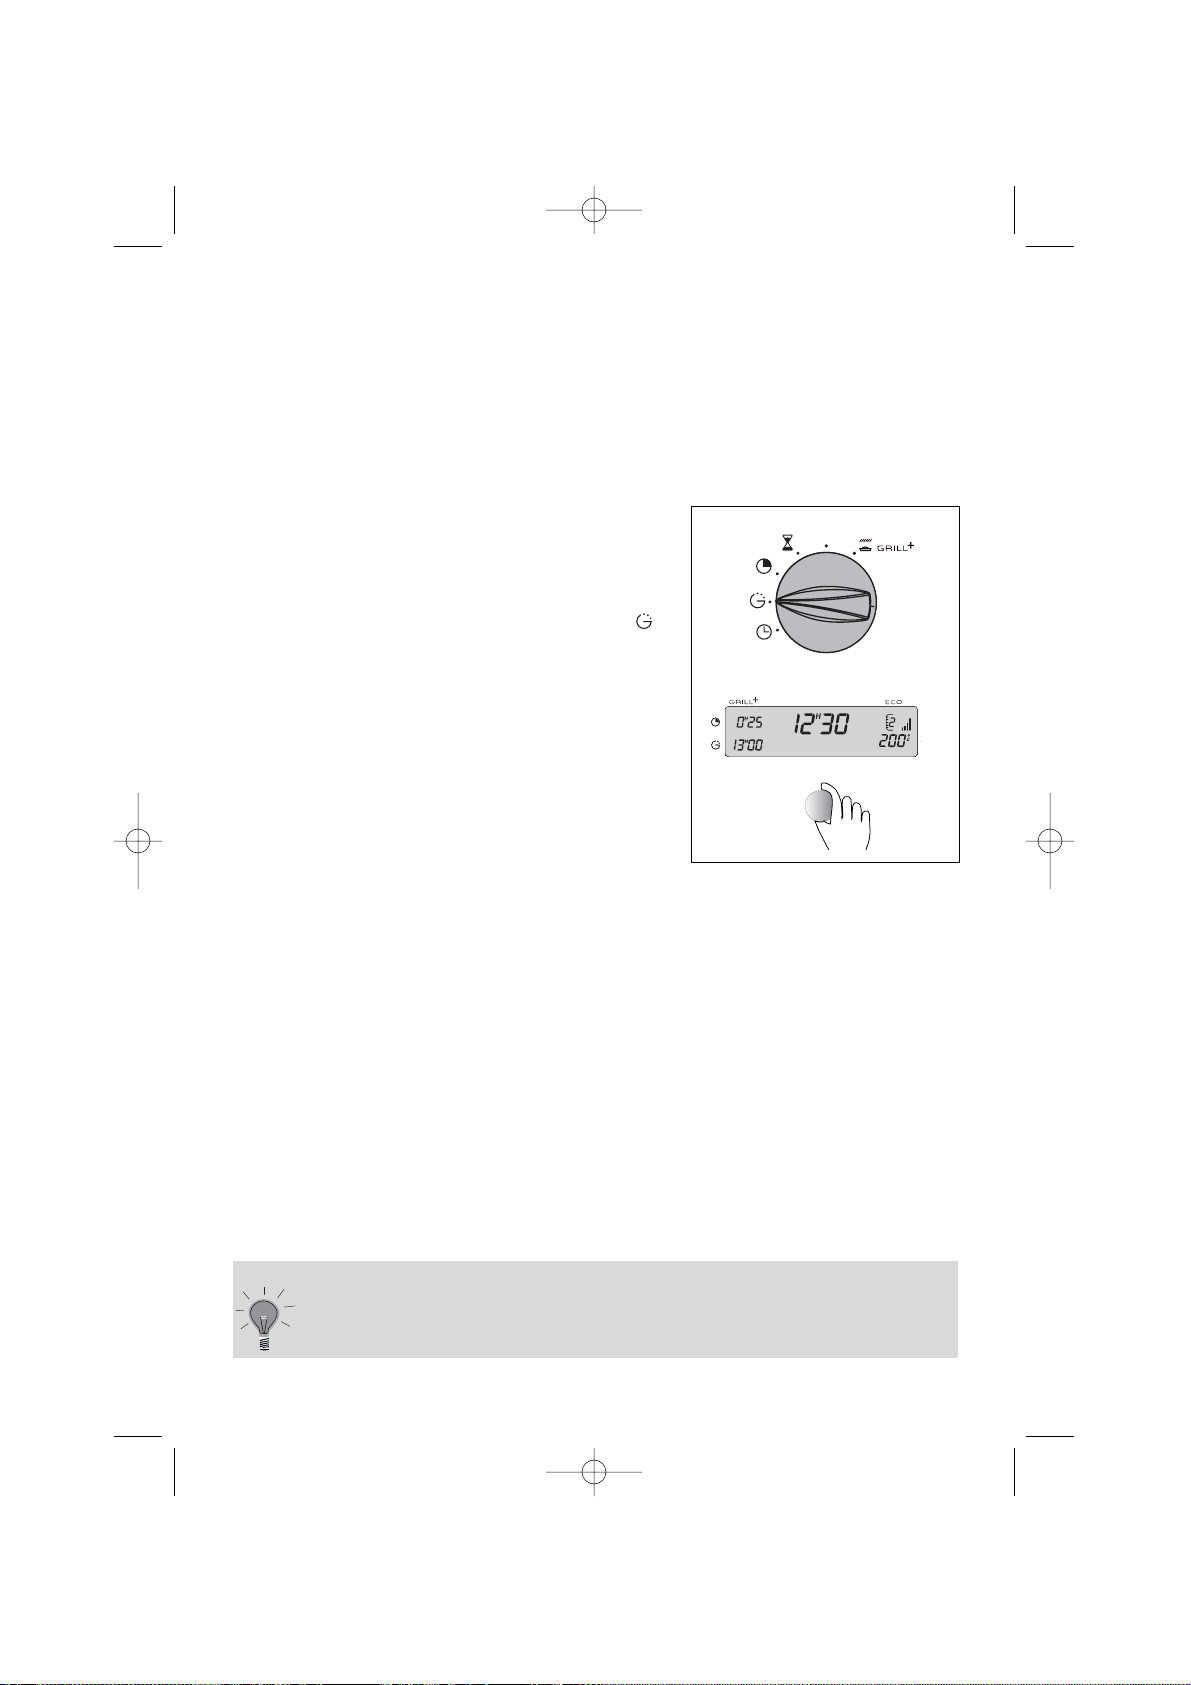
b) Delayed cooking with a pre-selected cooking time (you decide
how long the food will cook for and when the cooking will stop)
• As for a), choose the method and the
temperature and select the length of time to
cook for.
Now, immediately turn the method selector to
“”.
The end of cooking time will blink in the display
panel.
• To postpone this, turn the knob until the
time you want appears.
In the example shown, cooking will stop
at 1 pm (13:00)
When you have done this, cooking is delayed and will start later and finish at
13:00. When cooking finishes the oven gives a series of beeps until you turn the
feature switch to “0”.
How to use your oven
After you have programmed in the times you can still:
- Change the length of cooking time
- Cancel the programme at any time by re-setting the cooking
time to 0:00
99625792_ML_A.qxd 21/05/03 15:37 Page 14
T˚
c
Page 15
How to use your oven
5. H
ow to cook economically*
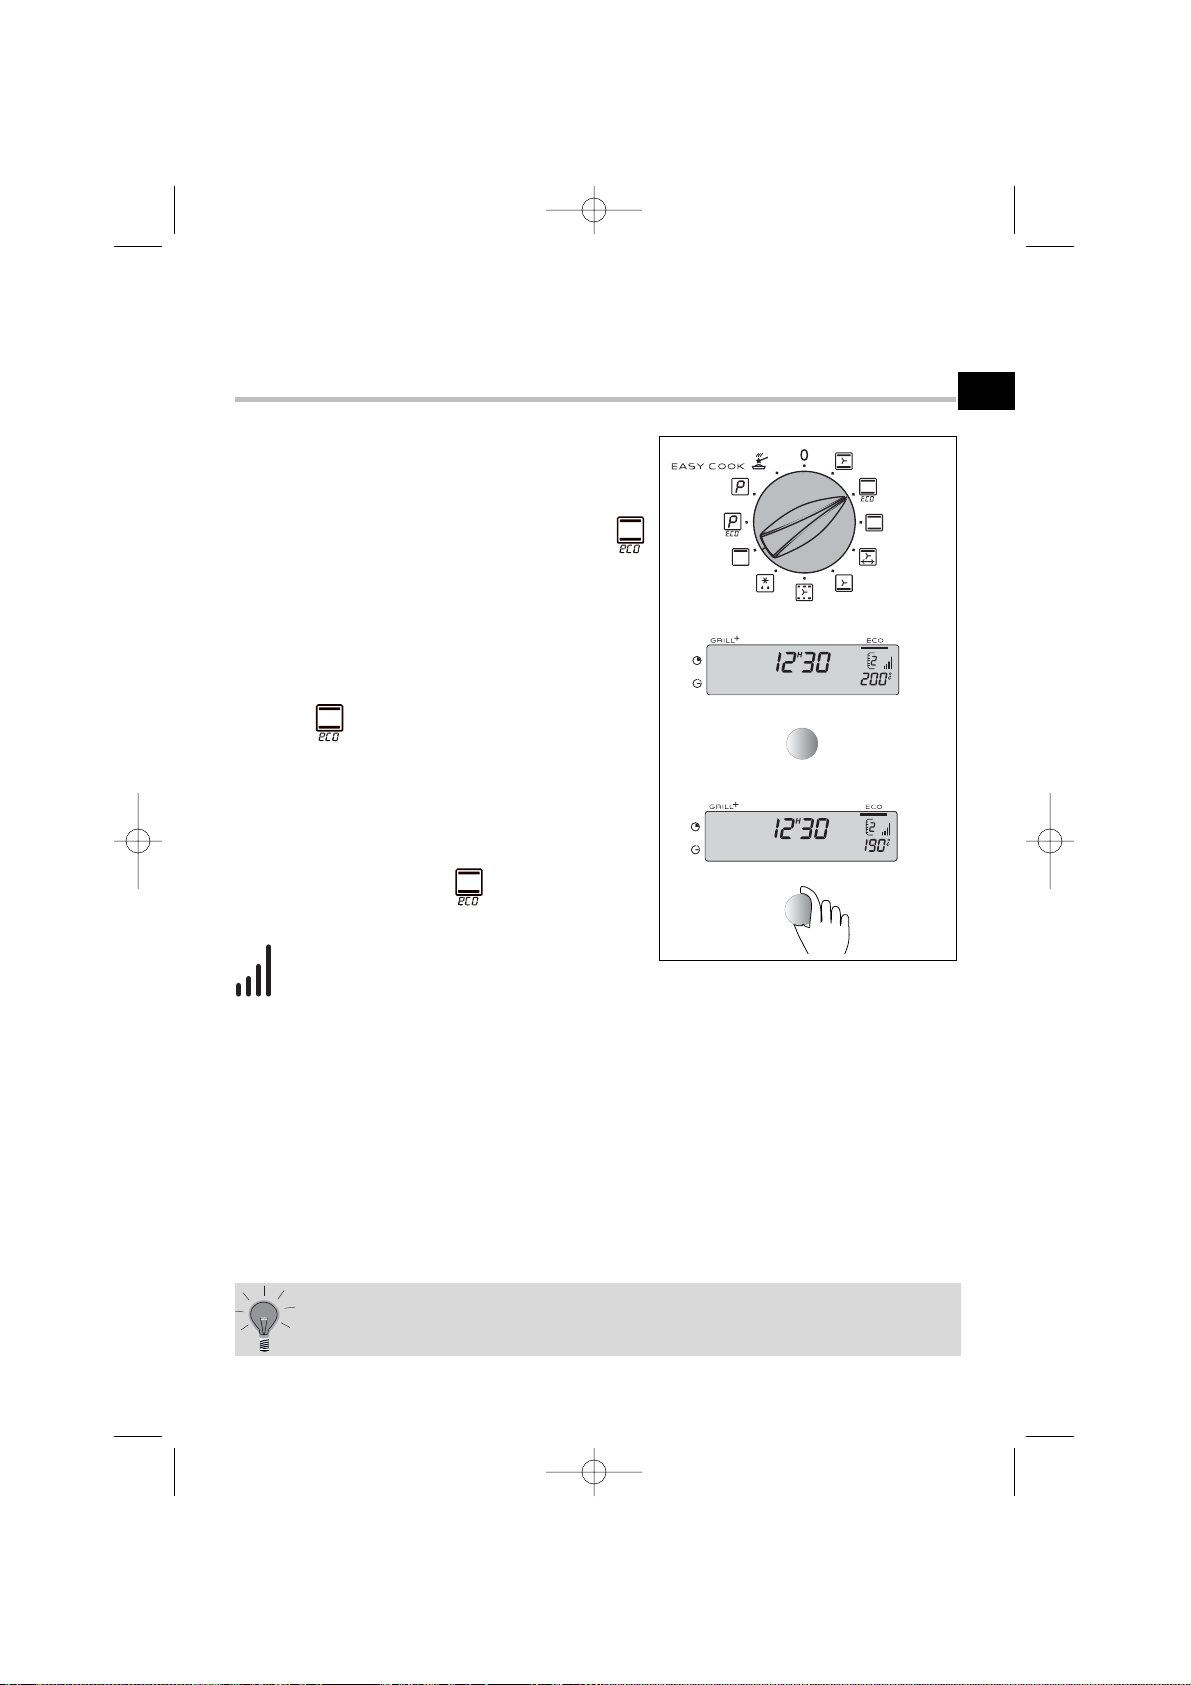
15
The programme display must be showing the
time of day without blinking.
• Turn the feature selector to " ".
and the ECO indicator will appear in the
panel.
• Place your dish in the oven according to the
suggestion.
E.g " " -> means shelves 1 or 2 are the best
• Your oven will now display the best temperature to cook at for your method. E.g. 200ºC. If
you want to change this, use the knob beneath
the display panel.
The display shows " " at 190ºC.
After this, the oven heats up,
the temperature increase indicator is busy and reflects how hot
the oven is.
When the oven has reached the right temperature, it gives 3 beeps.
To optimise ECO cooking, do not preheat and do not open the door.
*This setting is designed to reduce the energy required for cooking by
up to 20%, while still producing the same results.
ECO means it is energy-efficient as stated on the label.
After cooking the fan continues to work for a while to ensure
the elements cool right down.
GB
99625792_ML_A.qxd 21/05/03 15:37 Page 15
Page 16

16
How to use your oven
6. H
ow to use the Grill+ feature
You can either switch this feature on or off during the main cooking period. Simply turn the knob below the display.
You can also use this feature during a delayed cooking cycle.
This feature enables you to brown the top of the dish after it has been cooked by
another method. For the last 5 minutes of cooking time, the grill switches on.
It will only operate in conjunction with the following functions: .
After selecting one of the above functions GRIL+ is selected by adding 5 minutes
to the cooking time or turning the feature selector to GRILL+ when cooking ends.
• Set the cooking method and alter the
temperature if required.
• Turn the programme selector to GRILL+, the
cooking time will blink 0:05 (this is the minimum
time this feature operates for when used with
another cooking method).
• Turn the knob to add the normal cooking time.
After a few seconds, the display will stop
blinking.
• When you have done all three, the oven will
warm up and a horizontal bar will light up in the
display panel under the word GRILL+ to indicate
it is working. 5 minutes after the main cooking
ends the GRILL+ indicator will start blinking.
Never place dishes too close to the grill element or the food will burn
rather than brown gently. Always use a shelf position at the bottom of
the oven (1 or 2).
Sui
table dishes:
• Cheese-topped pasta, leeks in cheese sauce, fish in sauces, fruit crumble etc..
Typical example of this f
eature in use :
Cauliflower cheese sprinkled with extra cheese:
• 1.Select cooking method
• 2.Select temperature (180ºC)
• 3.Select GRILL+
• 4.Select time: 25 minutes.
The sauce will heat for 20 minutes and then the cheese topping will brown for 5.
99625792_ML_A.qxd 21/05/03 15:37 Page 16
T˚
c
Page 17
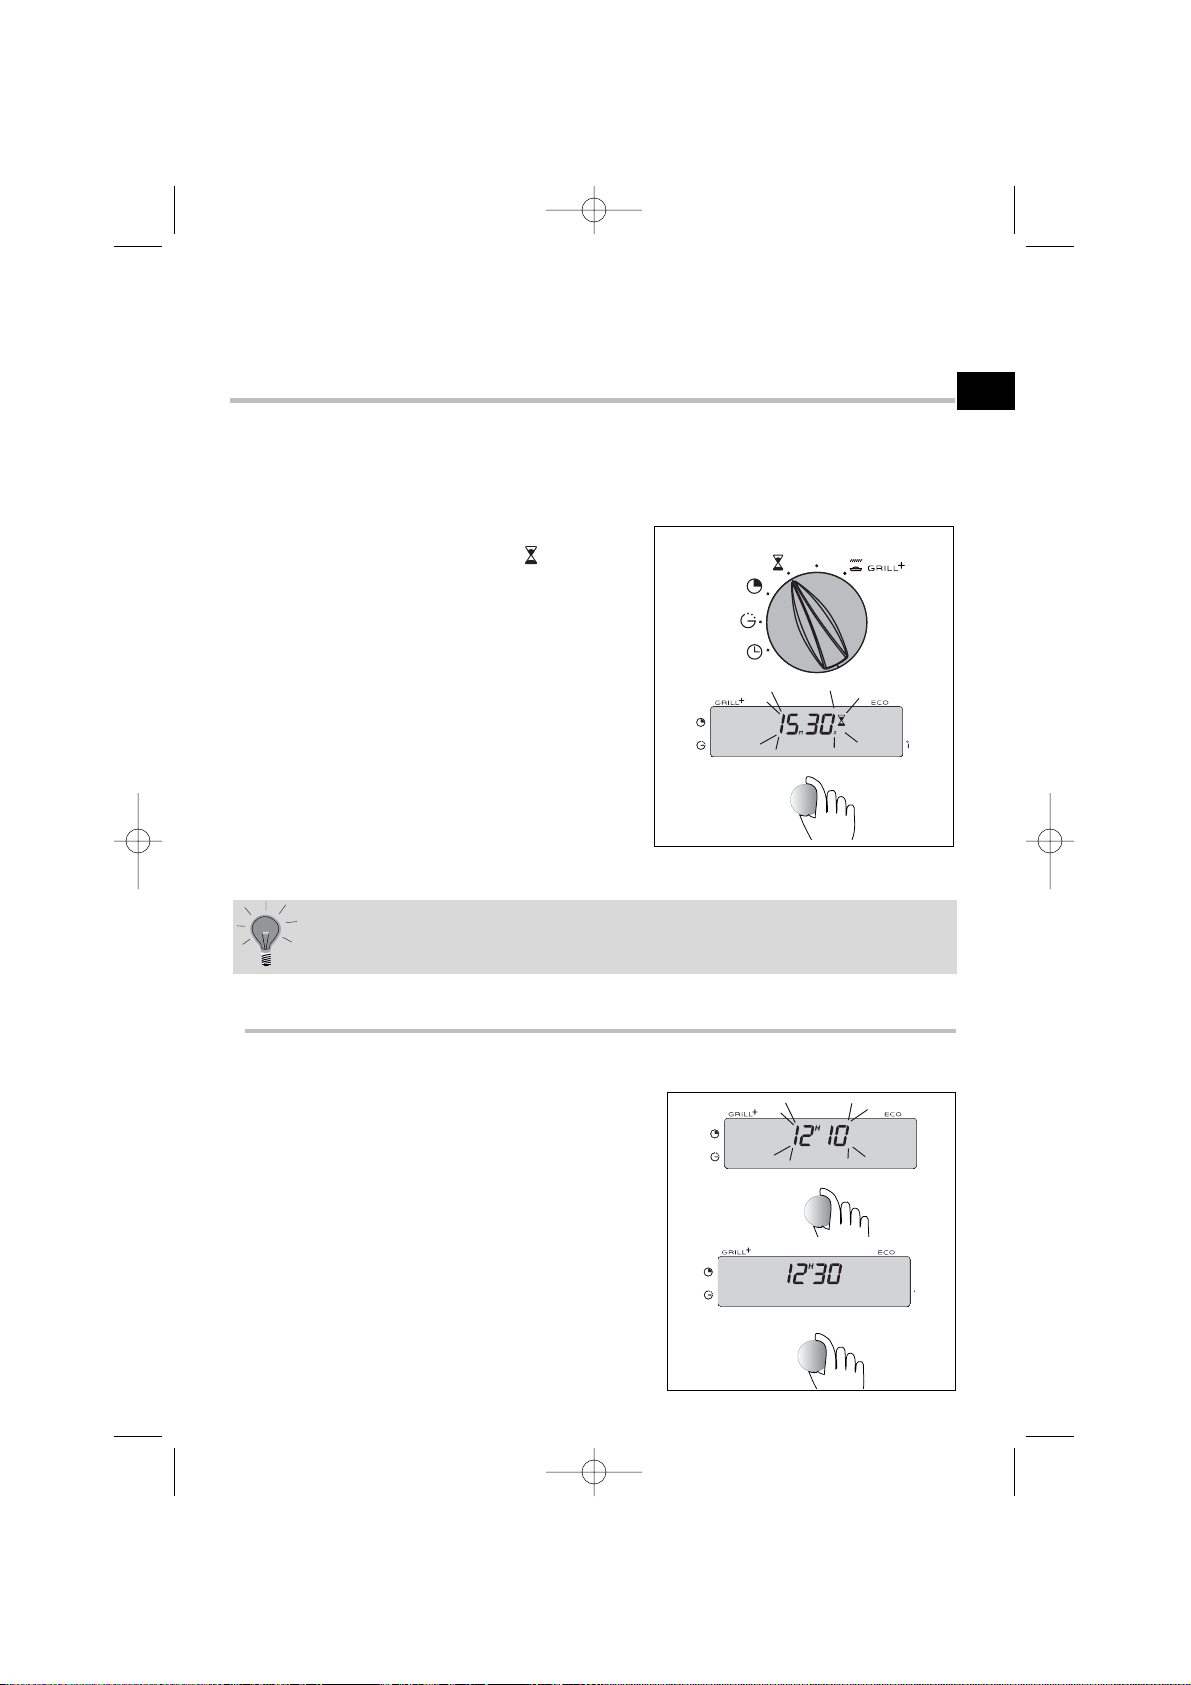
Your oven is fitted with a separate minute timer. It is not connected to the
oven's programmes. You can use it just like a kitchen timer.
This feature can be used even when the oven is working. Using the minute
minder will cause the time of day to disappear temporarily from the display.
• Turn the method selector to “ ” -> the
display blinks and a small egg-timer lights up.
• Turn the knob until the time you want is
displayed (up to 59 minutes 59 seconds)
E.g.: 15 minutes 30 secs
A few seconds later the display stops blinking
and you will see the countdown taking place.
When the minute minder reaches 0, it will
beep to let you know.
7. H
ow to use the minute minder
How to use your oven
You can alter or switch the minute minder off at any time.
17
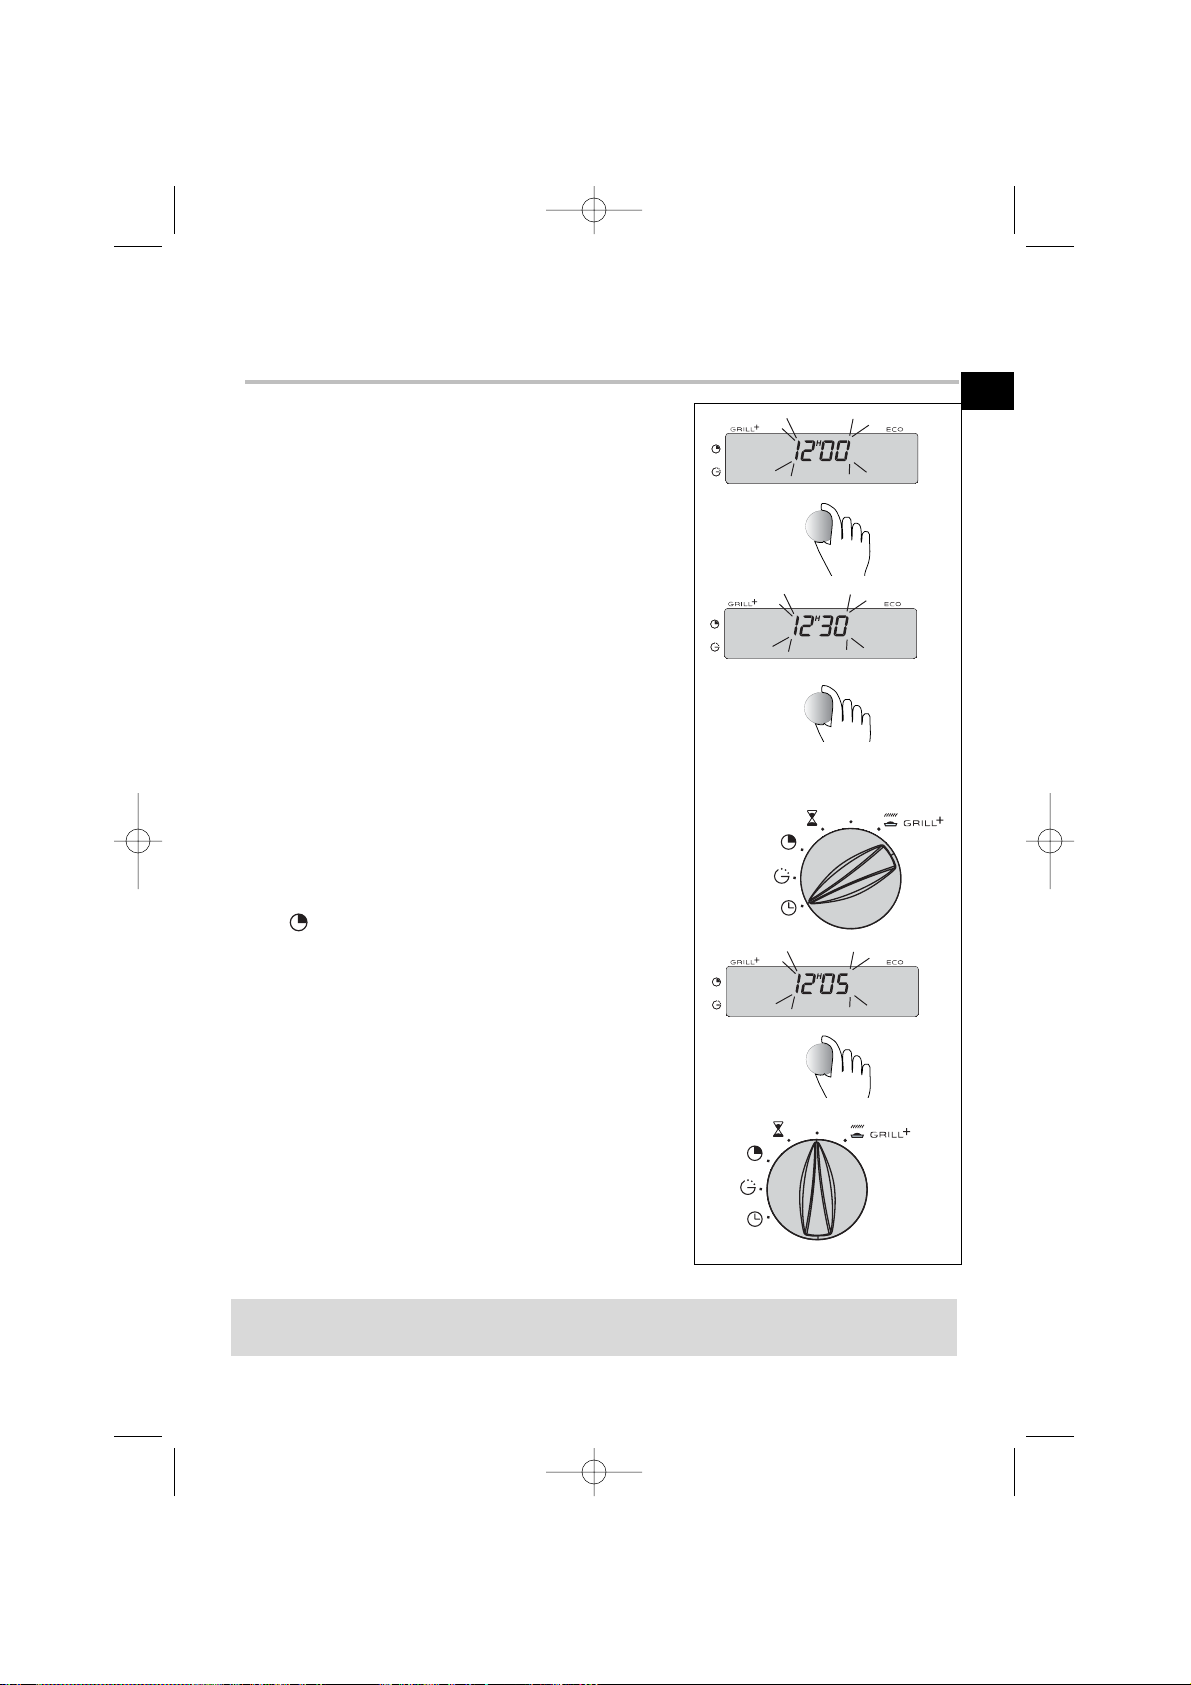
8. How to adjust the brightness of the display panel
To adjust the brightness of the display panel:
• Set the time of day to 12:10
• Keep hold of the knob and continue turning
until the light is as you want it.
Once you have adjusted the brightness you will
need to reset the time of day.
GB
99625792_ML_A.qxd 21/05/03 15:37 Page 17
T˚
c
Page 18
18
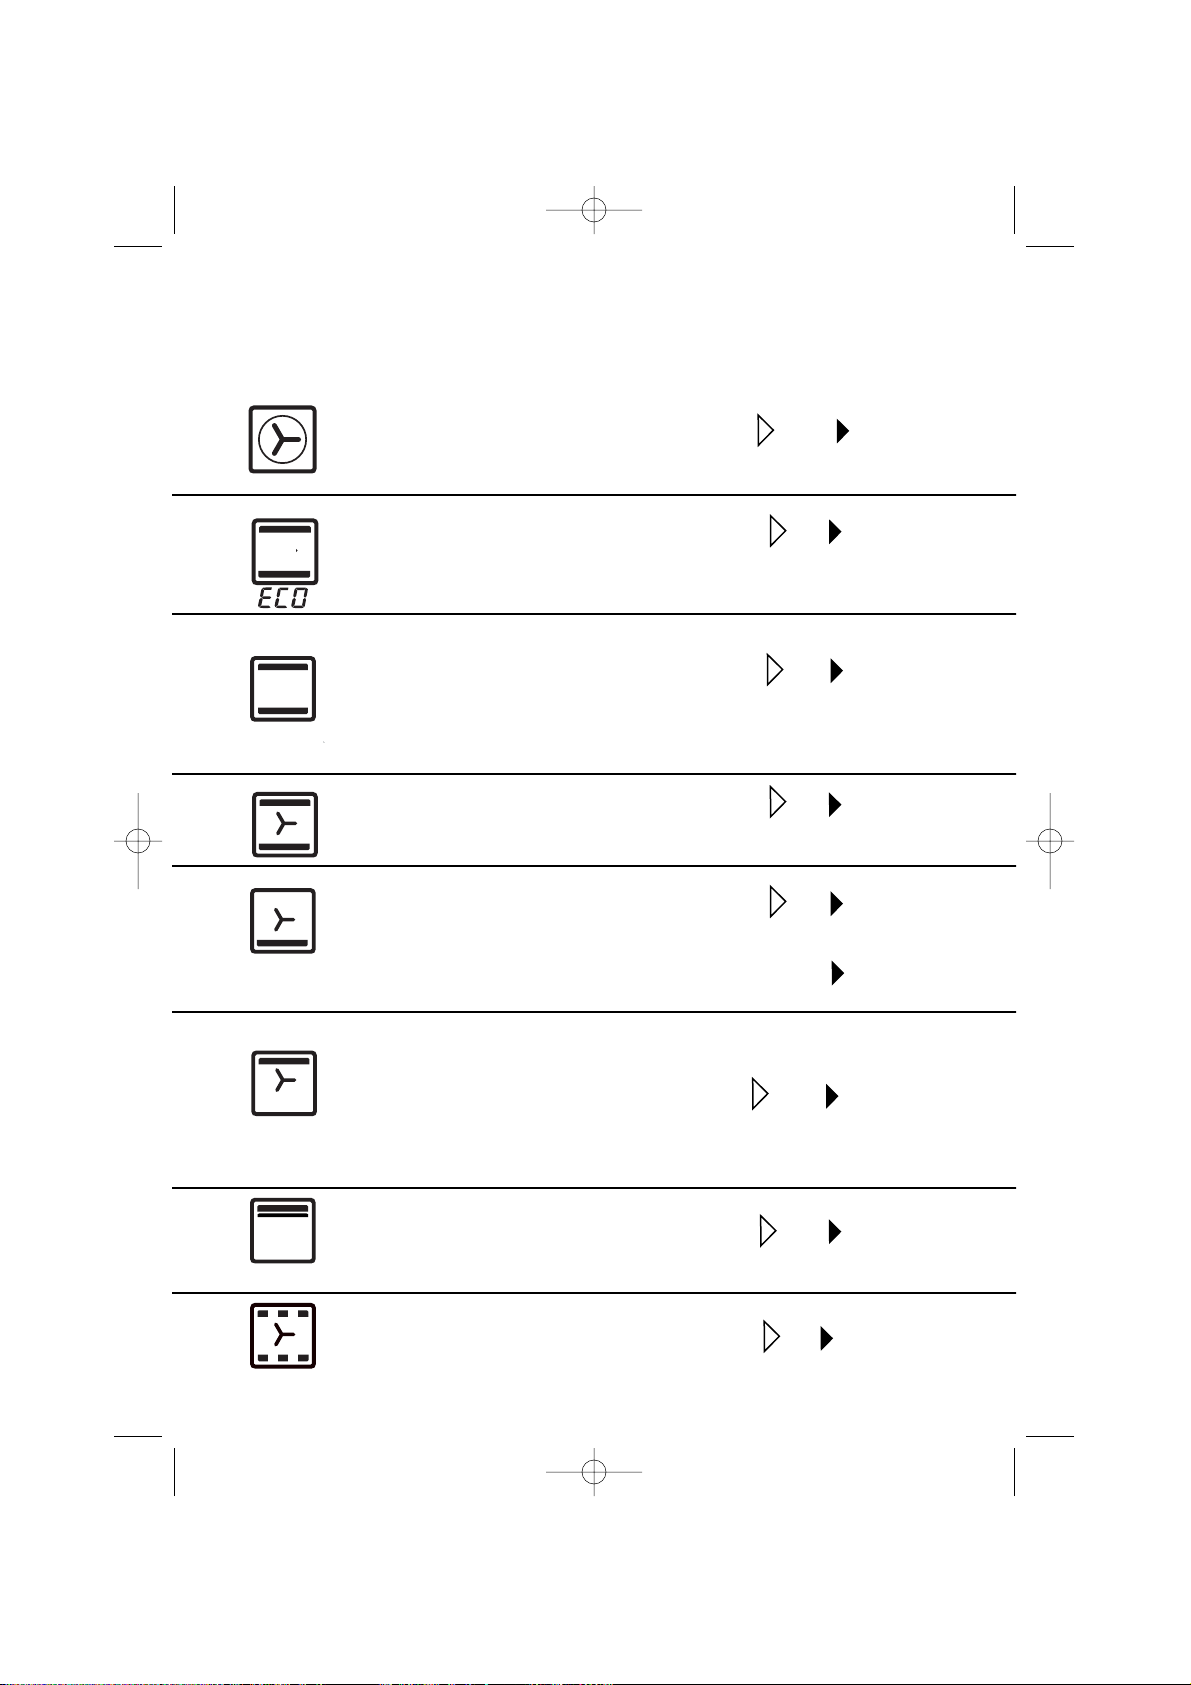
P
ulsed conventional oven
Food is cooked by a top and bottom
element and the fan.
C
onventional oven
Food is cooked by a top and bottom
element. No fan.
Pulsed bottom oven
Food is cooked by the bottom element
with gentle heat from the grill and the
pulsed-air fan.
Warming oven
Heating from top and bottom elements with pulsed air.
Temperature rises
be started off in a
Pre-heating neede
temperature.
Stays warm
Food is cooked fro
Place the wire she
the base.
This programme a
with no preheating
The ECO feature is
Symbol
Feature De
C
onventional oven ECO
Food is cooked by a top and bottom
element. No fan.
Cooking methods
F
an oven
A heating element at the back of
the oven and the fan help cook the
food.
No pre-heating ne
with a relatively s
small biscuits on
Adjustable grill
Cooking is done by the top element
only. No fan.
Pulsed grill
Cooking is done alternately by the
top element and by the fan.
No pre-heating req
try and succulent j
roasted appearanc
accommodated by
shelf and using the
tray on the bottom
Warm up for 5 min
Slide the grill pan
the grill.
*
·Cooking methods referred to in the information about energy labelling in accordance with
*
*
*
99625792_ML_A.qxd 21/05/03 15:37 Page 18
Page 19
Recommended for meat, fish and vegetables, preferably
in a earthenware dish. Do not place any trays, shelves
on the base as there is an element under the enamel.
Recommended for food requiring slow, careful cooking
such as game and braising joints. Ideal for sealing red
meat joints and simmering covered casseroles whose
contents have been partially cooked on the hob first.
Donot place any trays, shelves on the base as there is
an element under the enamel.
Recommended for leaving breads to rise (keeping
temperature below 40ºC), keeping dishes warm and
thawing food.
Recommended for dishes with a lot of liquid (quiches and fruit pies) as the pastry base is cooked
through. Use also for food that rises (bread and
cakes) and uncovered soufflés.
You will save energy during cooking but the cooking
time may be longer. Do not keep opening the door. Do
not place any trays, shelves on the base as there is an
element under the enamel.
Recommendations
Cooking methods
is used to label the oven.
For cooking on one shelf time will be the same.
Recommended to prevent meat drying out, and for
cooking vegetables and fish and food placed on up to
3 shelves, where cooking time will be longer.
Reduce temperatures by 20°C-30°C
short cooking time (e.g.
The power is adjustable from 30 to 100% (positions 1 to
4 on the display). For efficient cooking, we recommend
using higher power levels.
ce. Large joints can be
To seal and cook through lamb chops and
sides of beef. To keep fish in their
onto the shelf beneath
19
GB
99625792_ML_A.qxd 21/05/03 15:37 Page 19
Page 20
20
-Your oven is self-cleaning. It does this by burning off the spatters and drips produced, at high temperature. The smoke and smells that this produces are removed as
the air passes through a catalyst.
- It is not necessary to run the pyrolysis feature after every use of the oven, simply
when the oven is dirty.
- To make it more efficient, this oven has 2 pyrolytic cleaning cycles.
- An energy-saving one (PYRO ECO) lasting 90 minutes (plus cooling down
time means the oven is locked for 2 hours) and consuming 25% less energy than
the standard cycle. Used after the second or third time you cook meat, this feature
will ensure your oven stays clean.
- Standard cycle (PYRO) lasting 2 hours (plus cooling down time means the
oven is locked for 2½ hours) and suitable for cleaning a really dirty oven.
- As a safety measure, once the temperature is higher than normal use the door
automatically locks. You cannot unlock it even by turning the pyrolysis feature off.
1. Pyrolysis explained
C leaning the
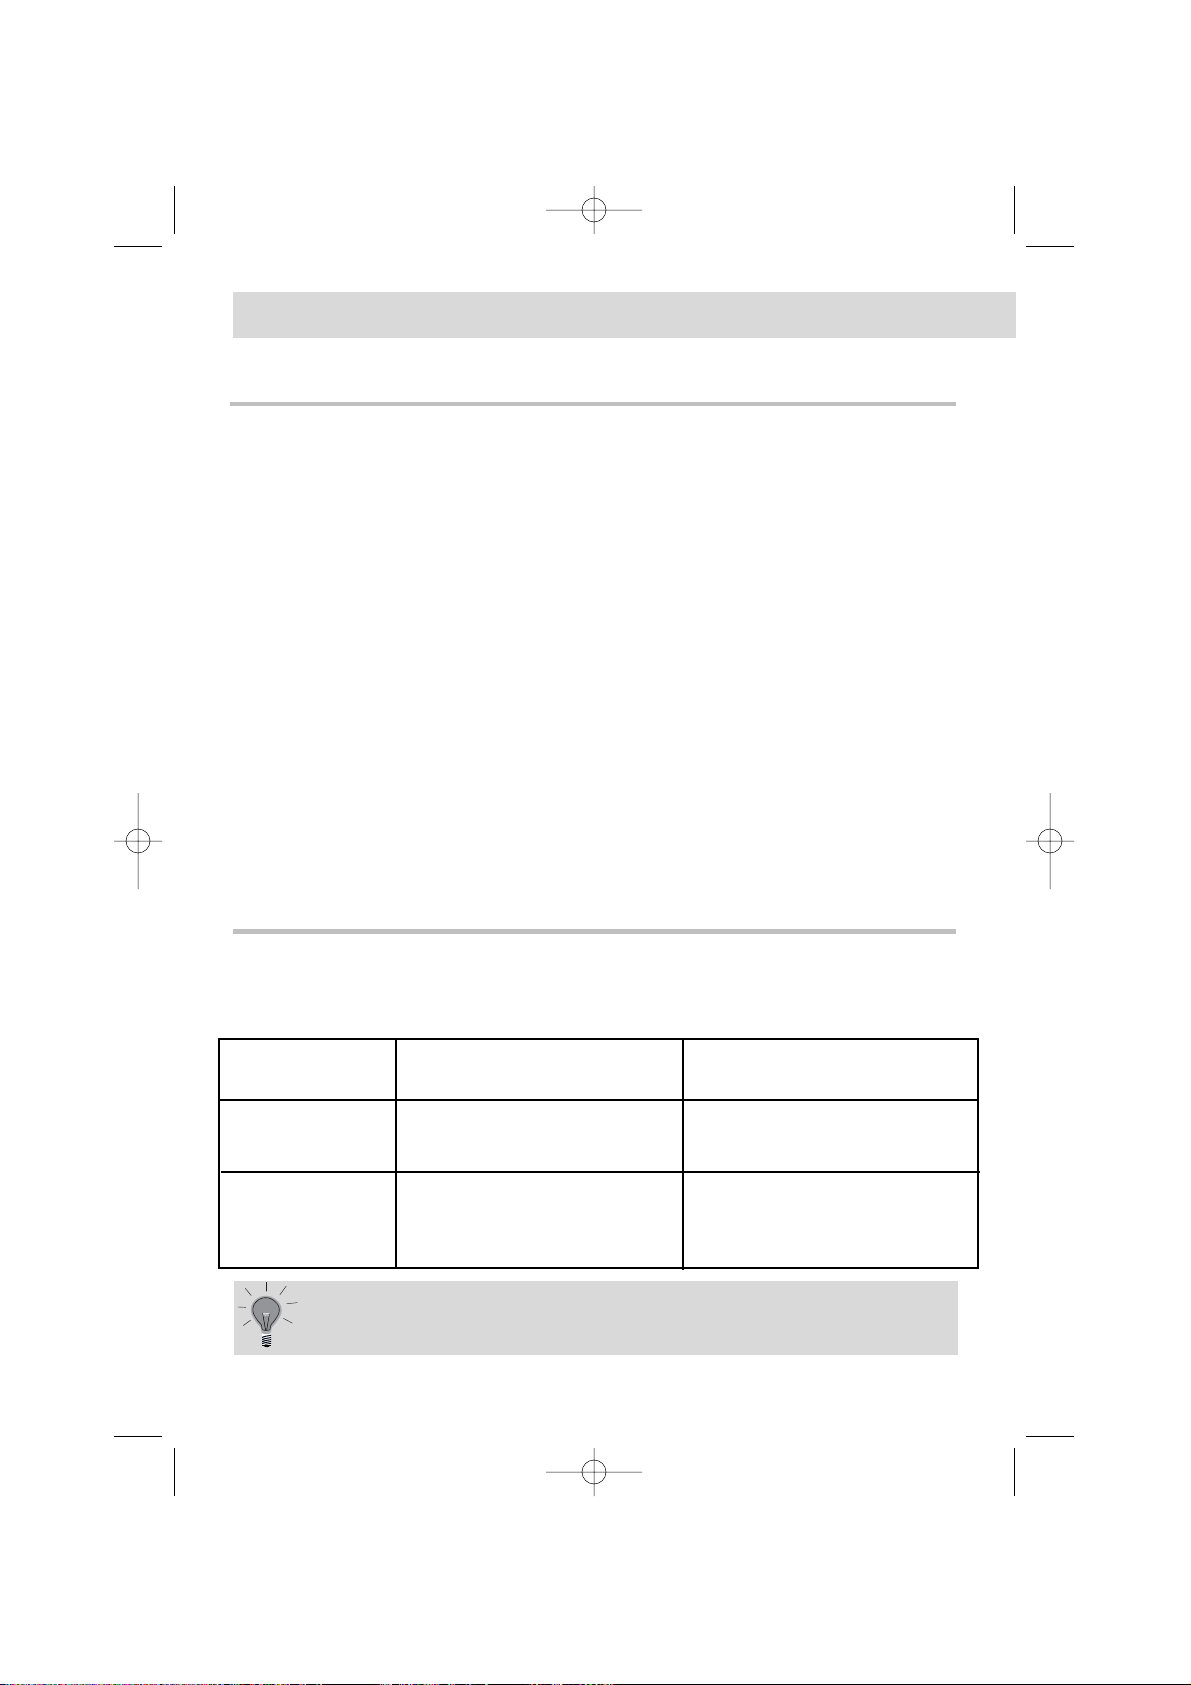
2. When to clean by pyrolysis
FOOD WITH LITTLE Biscuits, vegetables, cakes You do not need to use
SPATTERING quiches, soufflés pyrolysis feature
FOOD THAT Meat, fish (in an open dish) Use the pyrolysis feature
SPATTERS stuffed vegetables after 3 oven uses
FOOD THAT Large pieces of If a lot of spitting occurs,
SPITS BADLY meat on the spit run the pyrolysis feature
afterwards.
If your oven smokes when the pre-heat feature is on or if there is a lot of
smoke during a cooking cycle run the pyrolysis cycle. You can also use this
feature if there is an unpleasant smell of cooking when the oven is cold.
Do not wait until the oven is coated in dirt before cleaning it.
99625792_ML_A.qxd 21/05/03 15:37 Page 20
Page 21

3. S
tarting pyrolysis straightway
21
Before embarking on pyrolytic cleaning, make sure there are no cooking
pots in the oven and you have removed any large splashes or drips.
• Check that the time of day is glowing steadily
in the display panel (not blinking).
• Turn the feature selector to PYRO or PYRO
ECO.
• The
The time for the pyrolysis to work is 2 hours
(PYRO ECO) or 2 ½ (PYRO). This includes the
cooling-down time until the door is unlocked.
The display will show you when you can use your
oven again.
When it shows
on the display, the pyrolytic
cycle (or the energy-saving pyrolytic cycle) is working.
During the cycle, a padlock
appears on the
display to remind you the door is locked.
At the end of the cycle the display
shows..........................................................
>
When the disappears you can open the door.
• Move the function selector back to 0.
• When the oven is completely cold use a damp
cloth to remove the white ash and the oven will
once more be ready for you to cook in.
GB
99625792_ML_A.qxd 21/05/03 15:37 Page 21
T˚
c
Page 22

Changing a bulb
• The light bulb is housed in the ceiling of your oven.
a) Turn the shade a quarter of a turn
to the left
b) Unscrew the bulb in the same
direc tion.
The bulb used is a:
- 15 W
- 220-240 V
- 300°C
- E 14 screw-fitting bulb
c) Change the bulb, replace the shade and switch your oven back on at the mains.
bulb fitting
unscrew
cover
It is easier to unscrew the shade and bulb if you wear a rubber glove.
Warning! Switch off the power at the main switch before attempting to change the bulb. Leave the oven to cool if
necessary.
22
Follow the instruction on how to carry out a pyrolitic cleaning straightway then
• Set the method selector to “ ”.
The end of cooking time blinks and you can now
adjust the time.
• Turn the knob until the finish time is shown.
E.g. pyrolysis will finish at 4 am.
After this the start of pyrolytic cleaning is delayed
and will finish at 4 am.
When the cleaning is finished, turn all the
selectors to the off position.
4. Delaying cleaning by pyrolysis
99625792_ML_A.qxd 21/05/03 15:38 Page 22
T˚
c
Page 23
23
Troubleshooting
If you're not sure that your oven is working properly, it doesn't necessarily
mean that there's a problem.
In all cases, check the following points:
If you realize that..
Possible causes what should you do?
The oven isn't heating.
• The oven isn't connected to the
power supply.
• The fuse has blown.
• The temperature selected is too
low.
• The sensor is faulty
• The oven has overheated. It has
been put out of use for safety
reasons
- Connect to power supply.
- Change the fuse, checking that it is
16A.
- Increase the temperature selected.
- Contact the After-Sales Service.
- Contact the After-Sales Service.
- Contact the After-Sales Service.
The temperature light does not
go out.
• The door lock is faulty.
• The temperature sensor is faulty.
- Contact the After-Sales Service.
- Contact the After-Sales Service.
The light inside the oven isn't
working.
• The lamp is unusable.
• The oven isn't connected to the
power supply or the fuse has
blown.
- Change the bulb.
- Connect to power supply or change fuse.
The cooling fan keeps working
after the oven is turned off.
• The fan can keep working for up
to an hour after the oven switches
off if is over 125ºC.
• If it has not stopped after 1 hour
- Open the door to help the oven
cool down more
quickly.
- Contact the After-Sales Service.
Cleaning by pyrolysis has not occurred.
• The door is not shut properly.
• The door-locking system is faulty.
• The temperature sensor is faulty.
• The plate that detects when the
door is shut is faulty.
- Check the door is properly closed.
- Contact the After-Sales Service.
- Contact the After-Sales Service.
- Contact the After-Sales Service.
GB
Copy here the details that are on your oven manufacturer's plate:
MADE IN FRANCE
220 - 240V ~ 50 Hz
99625792_ML_A.qxd 21/05/03 15:38 Page 23
Page 24

Tout au long de la notice,
vous signale les consignes de sécurité,
vous signale les conseils et les astuces
Edito
P.25
Comment se présente votre four ?
D
escriptif de l’appareil P.26
A
ccessoires P.27
Conseils de sécurité
P.28
Comment installer votre four ?
Raccordement électrique P.29-30
Dimensions utiles pour encastrer votre four P.31
Comment utiliser votre four ?
Le détail de votre programmateur P.32
Comment mettre à l’heure l’horloge du four ? P.33
Comment faire une cuisson immédiate ?
P.34
Comment faire une cuisson programmée ?
P.35
Comment faire une cuisson différée ? (heure de fin choisie)
P.36
Comment faire une cuisson Economique ?
P.37
Comment utiliser la fonction “Grill
+
” ?
P.38
Comment utiliser la minuterie ?
P.39
Comment régler la luminosité de l’afficheur ?
P.39
Modes de cuisson du four
P.40-41
Comment nettoyer la cavité de votre four ?
Qu’est-ce une pyrolyse ? P.42
Dans quel cas faut-il effectuer une pyrolyse ? P.42
Comment faire une pyrolyse immédiate ? P.43
Comment faire une pyrolyse différée ? P.44
Comment changer l’ampoule ?
P.44
Que faire en cas d’anomalies de fonctionnement ?
P.45
24
Sommaire
99625792_ML_A.qxd 21/05/03 15:38 Page 24
Page 25
25
Edito
Chère Cliente, Cher Client,
Vous venez d'acquérir un four BRANDT et nous vous en remercions.
Nos équipes de recherche ont conçu pour vous une nouvelle génération
d'appareils pour cuisiner chaque jour avec plaisir.
Avec des lignes pures et une esthétique moderne, votre nouveau four
Brandt s'intègre harmonieusement dans votre cuisine et allie parfaitement facilité d'utilisation et performances de cuisson.
Vous trouverez également dans la gamme des produits Brandt, un vaste
choix de tables de cuisson, de hottes aspirantes, de lave-vaisselle et de
réfrigérateurs intégrables, que vous pourrez coordonner à votre nouveau
four Brandt.
Bien entendu, dans un souci permanent de satisfaire au mieux vos exigences vis à vis de nos produits, notre service consommateurs est à
votre disposition et à votre écoute pour répondre à toutes vos questions
ou suggestions (coordonnées à la fin de ce livret).
A la pointe de l'innovation, Brandt contribue ainsi à l'amélioration de la
qualité de la vie quotidienne en vous apportant des produits toujours plus
performants, simples d'utilisation, respectueux de l'environnement, esthétiques et fiables.
La Marque BRANDT.
FR
99625792_ML_A.qxd 21/05/03 15:38 Page 25
Page 26

26
1
2
3
4
5
T˚
c
1 2 3
5
6
8
7
4
Comment se présente votre four ?
1
2
5
6
7
3
4
Sélecteur de mode
Programmateur
Bouton de réglage
Sélecteur de fonctions
Lampe
Indicateut de gradin
Trou pour tourne broche
Contact de détection
d’ouverture de porte
DESCRIPTIF APPAREIL
8
99625792_ML_A.qxd 21/05/03 15:38 Page 26
Page 27
27
Accessoires (selon modèle)
Grille sécurité
anti basculement
La grille peut être utilisée pour supporter tous
les plats et moules contenant des aliments à
cuire ou à gratiner. Elle sera utilisée pour les
grillades (à poser directement dessus).
Plat multi usages
(pâtisserie)
Il sert de plat à gâteaux et dispose d'un
rebord incliné. Il s'utilise pour la cuisson de
pâtisseries telles que choux à la crème, meringues, madeleines, pâtes feuilletées...
Evitez de poser directement dans ce plat des rôtis ou des viandes car vous aurez
automatiquement d'importantes projections sur les parois du four.
Plat creux
équipé d'une grille support
spéciale grillades
Il sert à recueillir le jus et les graisses de cuisson réalisées en gril fort ou gril pulsé.
Il peut être utilisé comme plat de cuisson en
appropriant la taille du morceau à cuire (ex: une volaille avec les légumes autour,
à température modérée).
Ne jamais poser ce plat directement sur la sole, sauf en position GRIL.
AR
AV
Poignée pour plat creux
7
8
9
10
FR
99625792_ML_A.qxd 21/05/03 15:38 Page 27
Page 28
28
Conseils de sécurité
Merci de prendre connaissance de ces conseils avant d’installer et
d’utiliser votre four. Ce four a été conçu pour être utlilisé par des particuliers
dans leur lieu d’habitation. Il est destiné exclusivement à la cuisson des denrées
alimentaires. Ce four ne contient aucun composant à base d’amiante.
PREMIERE UTILISATION :
Avant d’utiliser votre four pour la première fois, chauffer le à vide, porte fermée,
pendant 15 minutes environ sur la position maxi afin de “roder” l’appareil. La laine
minérale qui entoure la cavité du four peut dégager, au début, une odeur particulière due à sa composition. De même, vous constaterez peut-être un dégagement
de fumée. Tout ceci est normal.
UTILISATIONS SUIVANTES :
- Assurez vous que votre porte de four est bien fermée afin que le joint d’étanchéité remplisse correctement sa fonction.
- Ne laissez personne s’appuyer ou s’asseoir sur la porte du four ouverte.
- Lors de l’utilisation du gril porte entreouverte, les parties accessibles
ou les surfaces peuvent devenir chaudes. Eloignez les jeunes enfants.
- Lors de son utilisation, l’appareil devient chaud. Veillez à ne pas toucher les éléments chauffants situés à l’intérieur du four.
- Après une cuisson, ne prenez pas à main nue la casserolerie (grille,
tourne broche, léchefrite, berceau de tournebroche...), utilisez une manique ou un
tissu isolant.
- Ne garnissez pas votre four de feuilles en aluminium. Sinon, il en
résulterait une accumulation de chaleur qui influencerait désavantageusement le
résultat de la cuisson et du rôtissage et endommagerait l’émail.
- Avant de procéder au nettoyage pyrolyse de votre four, retirez tous les éléments
de casserolerie et enlevez les débordements importants.
- Ne pas utiliser de nettoyeur vapeur ou à haute pression.
- Pendant une pyrolyse, les surfaces accessibles deviennent plus chaudes qu’en
usage normal. Eloigner les jeunes enfants.
- Pour toute intervention de nettoyage dans la cavité du four, le four doit
être arrêté.
- Pour votre sécurité votre four est équipé d’un ARRÊT AUTOMATIQUE
si par mégarde vous oubliez d’éteindre votre four. Après 10 heures de fonctionnement , la fonction AS (Automatique Stop) s’active et votre four s’arrête de
chauffer. AS s’affiche à la place de l’heure et une série de 2 bips successifs est
émise pendant un certain temps.
Remettez impérativement le sélecteur de fonction sur 0 pour
réutiliser votre four.
99625792_ML_A.qxd 21/05/03 15:38 Page 28
Page 29
29
Compteur 20A Mono
220-240 V ~ 50 Hz
Prise de courant
2 pôles + terre
norme CEI 83
Ligne Mono 220-240 V ~
Raccordement électrique
Câble
d'alimentation
longueur 1,50 m
environ
Disjoncteur différentiel
ou fusible 16A
Avant d'effectuer le branchement, s'assurer que les fils de votre
installation électrique sont d'une section suffisante pour alimen-
ter normalement l'appareil (section au minimum égale à celle du
câble d'alimentation).
Le fusible de votre installation doit être de 16 Ampères.
Comment installer votre four?
FR
99625792_ML_A.qxd 21/05/03 15:38 Page 29
Page 30
30
Comment install
Notre responsabilité ne saurait être engagée en cas d'accident
consécutif à une mise à la terre inexistante, défectueuse ou
incorrecte.
• Le câble d’alimentation (H05 RR-F, H05 RN-F ou H05 VV-F) doit avoir une longueur
suffisante pour être raccordé au four à encastrer posé au sol devant le meuble.
Pour cela l’appareil doit être déconnecté du réseau :
• Ouvrez la trappe située en bas à droite du capot arrière en dévissant les 2 vis,
puis faîtes pivoter la trappe.
• Dénudez chaque fil du nouveau câble d’alimentation sur 12mm.
• Torsadez soigneusement les brins.
• Desserrez les vis du bornier et retirez le cordon d’alimentation à changer.
• Introduire le câble d’alimentation par le côté du capot dans le serre-câble situé à
droite du bornier.
• Raccordez les fils du câble conformément au(x) repère(s) écrit(s) sur le bornier.
• Tous les brins des fils d’alimentation doivent être emprisonnés sous les vis.
• Le fil de la phase sur la borne L.
• Le fil de terre couleur vert-jaune doit être relié à la borne .
• Le fil du neutre (bleu) sur la borne N.
• Vissez à fond les vis du bornier et vérifiez le branchement en tirant sur chaque fil.
• Fixez le câble au moyen du serre-câble situé à droite du bornier.
• Refermez la trappe à l’aide des 2 vis.
Mise en place et/ou changement du câble d’alimentation
Le raccordement électrique est à réaliser avant la mise en place de l'appareil dans
le meuble.
• Le four doit être branché avec un câble d'alimentation (normalisé) à 3 conducteurs de 1,5 mm
2
(1 ph +1 N + terre ) qui doivent être raccordés sur réseau
220-
240 V ~ monophasé par l'intermédiaire d'une prise de courant 1 ph +1 N + terre
normalisée CEI 83 ou d'un dispositif à coupure omnipolaire ayant une distance
d'ouverture des contacts d'au moins 3 mm. Le fil de protection (vert-jaune) est relié
à la borne de l'appareil et doit être relié à la terre de l'installation.
• Dans le cas d’un branchement avec prise de courant, celle-ci doit rester
accessible après l’installation de l’appareil.
• Le neutre du four (fil bleu) doit être raccordé au neutre du réseau.
99625792_ML_A.qxd 21/05/03 15:38 Page 30
Page 31

31
Pour être assuré d’avoir une installation conforme, n’hésitez
pas à faire appel à un spécialiste électroménager.
Dimensions utiles pour encastrer votre four
Le four peut indifféremment être installé sous un plan de travail ou dans
un meuble en colonne (ouvert* ou fermé) ayant les dimensions d’encastrement adaptées (voir schéma ci-contre).
Votre four possède une circulation d’air optimisée qui permet d’obtenir des résultats
de cuisson et de nettoyage remarquables en respectant les éléments suivants :
• Centrez le four dans le meuble de façon à garantir une distance mini de 5 mm
avec le meuble voisin.
• La matière du meuble d’encastrement doit résister à la chaleur (ou être revêtu
d’une telle matière).
• Pour plus de stabilité, fixez le four dans le meuble par 2 vis au travers des trous
prévus à cet effet sur les montants latéraux (cf schéma).
Pour ce faire :
1) Retirez les cache vis en caoutchouc pour accéder aux trous de fixation.
2) Effectuez un trou de Ø 3 mm dans la paroi du meuble pour éviter l’éclatement du bois.
3) Fixez le four avec les 2 vis.
4) Remettez les cache vis en caoutchouc (ceux-ci servent également à amortir la
fermeture de la porte du four).
(*) si le meuble est ouvert, son ouverture doit être de 70 mm (maxi).
FR
99625792_ML_A.qxd 21/05/03 15:38 Page 31
Page 32

32
1. Le détail de votre programmateur
13
5
7
8
9
6
2
4
10
11
12
Indicateur de montée en température
Indicateur de la fonction ECO
Numéro du gradin sur lequel il est
recommandé d’enfourner son plat
Indicateur de la fonction EASY COOK
Affichage des temps (heure/minutes)
Indicateur GRILL
+
1
3
4
5
6
2
Durée de cuisson
Heure de fin de cuisson
Indicateur des plats EASY-
COOK disponibles
Bouton de réglage
Température du four
/indicateur pyrolyse
Indicateur de porte
verrouillée
7
9
10
8
11
12
Comment se présente votre four ?
99625792_ML_A.qxd 21/05/03 15:38 Page 32
Page 33

33
a) A la mise sous tension
• Réglez l’heure en tournant le bouton.( La vitesse
de rotation du bouton fait varier la vitesse de
réglage de l’heure).
• L’enregistrement de l’heure ajustée est automatique au bout de quelques secondes -> l’affichage
de l’heure ne clignote plus.
Exemple:12h30.
b) Remise à l’heure de l’horloge
• Positonnez le sélecteur de programme sur la
position “Mise à l’heure”
• L’affichage de l’heure clignote pour vous indiquer
que le réglage est alors possible.
• Pour le réglage, tournez le bouton de façon à
augmenter ou diminuer l’heure affichée.
• Après avoir réglé l’heure de votre choix,
positionnez le sélecteur sur la position ”T°c” (réglage de température) -> l’affichage de l’heure ne
clignote plus.
S’il n’y a pas de validation, l’enregistrement est automatique au bout
de quelques secondes.
2. Comment mettre à l'heure l’horloge du four ?
Minuterie
Durée de
cuisson
Fin de
cuisson
Mise à
l’heure
Descriptif de la manette
FR
99625792_ML_A.qxd 21/05/03 15:38 Page 33
T˚
c
T˚
c
Page 34

34
Comment utiliser votre four
Le programmateur ne doit afficher que
l'heure; celle-ci ne doit pas clignoter.
• Choisissez le mode de cuisson :
Tournez le sélecteur de fonctions sur la position
de votre choix.
Exemple : position " ".
• Placez votre plat dans le four selon la préconisation indiquée dans l’afficheur.
Exemple : position " " -> gradins 1 ou
2 conseillés.
• Votre four vous propose la température optimale pour le mode de cuisson choisi : 200°C.
Il vous est cependant possible d’ajuster celle-ci
en utilisant le bouton situé sous l’afficheur.
Exemple : position " " ajustée à 190°C.
Après ces actions le four chauffe :
L’indicateur de montée en température s’anime et signale la progression de la
température à l’intérieur du four.
3 bips vous indiqueront que la température de consigne est atteinte.
Après un cycle de cuisson, le ventilateur du four continue de
fonctionner pendant un certain temps, afin de garantir un bon
refroidissement des éléments.
3. Comment faire une cuisson immédiate ?
99625792_ML_A.qxd 21/05/03 15:38 Page 34
Page 35

35
Comment utiliser votre four
a) Faire une cuisson avec une durée
définie?
• Réglez le mode de cuisson choisi et
éventuellement ajustez la température.
Exemple : position " "
température 200°C
• Positionnez le sélecteur de programme sur la
position
“”
La durée de cuisson clignote à 0h00 pour
indiquer que le réglage est alors possible.
•
Tournez le bouton pour régler le temps de
cuisson souhaité.
Exemple : 25 min
L’enregistrement de l’heure ajustée est
automatique au bout de quelques secondes
-> l’afficheur ne clignote plus.
Le décomptage de la durée se fait
immédiatement après le réglage.
L’heure de fin de cuisson (heure de départ +
heure de cuisson s’affiche automatiquement.
Dans cet exemple :
fin de cuisson à 12h55min
Après ces actions le four chauffe :
L’indicateur de montée en température s’anime et signale la progression
de la température à l’intérieur du four.
3 bips vous indiqueront que la température de consigne est atteinte.
En fin de cuisson, une série de bips sonores est émise durant quelques minutes.
L’arrêt des bips se fait en positionnant le sélecteur sur le réglage sur “T°c” et en
ramenant la manette sur “0”.
4. Comment programmer une cuisson ?
FR
99625792_ML_A.qxd 21/05/03 15:38 Page 35
T˚
c
Page 36

36
b) Différer une cuisson avec une durée définie?
(heure de fin choisie)
• Procédez comme en a) puis,après le réglage
de la durée de cuisson,
Positionnez le sélecteur de mode sur la
position “ ”.
L’heure de fin de cuisson clignote pour indiquer
que le réglage est alors possible.
• Ajustez l'heure de fin de cuisson souhaitée en
tournant le bouton sous l’afficheur.
Exemple ci-contre : fin de cuisson
souhaitée à 13h00.
Après ces actions, le départ de la chauffe est différé pour que la cuisson soit
finie à 13h00. Quand votre cuisson est terminée, une série de bips est émise,
remettre le sélecteur de cuisson sur “0”.
Comment utiliser votre four
Il est possible
- de modifier à tout moment la durée de cuisson.
- d’annuler à tout moment la programmation en remettant la
valeur de la durée à 0.00.
99625792_ML_A.qxd 21/05/03 15:38 Page 36
T˚
c
Page 37

Comment utiliser votre four
5. C
omment faire une cuisson économique ?*
37
Le programmateur ne doit afficher que
l'heure; celle-ci ne doit pas clignoter.
• Tournez le sélecteur de fonctions sur la
position " ". L’indicateur “ECO” s’allume
dans l’afficheur.
• Placez votre plat dans le four selon la préconisation indiquée dans l’afficheur.
Exemple : position " " -> gradins 1 ou
2 conseillés.
• Votre four vous propose la température optimale pour le mode de cuisson choisi 200°C.
Il vous est cependant possible d’ajuster celle-ci
en utilisant le bouton situé sous l’afficheur.
Exemple : position " " ajustée à 190°C.
Après ces actions le four chauffe :
L’indicateur de montée en température s’anime et signale la progression
de la température à l’intérieur du four.
3 bips vous indiqueront que la température de réglage est atteinte.
Pour optimiser la cuisson ECO, ne pas faire de préchauffage et ne pas ouvrir la
porte.
*Cette position permet de faire un gain d’énergie jusqu’à 20% tout en
conservant les résultats de cuisson identiques.
La position ECO est utilisée pour l’étiquettage énergétique.
Après un cycle de cuisson, le ventilateur du four continue de
fonctionner pendant un certain temps, afin de garantir un bon
refroidissement des éléments.
FR
99625792_ML_A.qxd 21/05/03 15:38 Page 37
Page 38

38
Comment utiliser votre four
6.
Comment utiliser la fonction Grill
+
?
Il est possible de mettre en service ou de supprimer cette fonction à tout moment de la cuisson en agissant sur la manette de
réglage.
Il est également possible d’activer cette fonction dans une
cuisson différée.
Cette fonction vous permet d’associer à la séquence de cuisson choisie une fonction ”Dorage” du plat en fin de cuisson, celle-ci s’effectuant par la mise en service
du grill pendant les 5 dernières minutes de la séquence.
Elle n’est active que sur les fonctions de cuisson suivantes : .
Cette fontion peut être programmée en début de
cuisson en ajoutant 5 minutes au temps de
cuisson ou simplement en fin de cuisson en
positionnant le sélecteur de fonction sur
”GRILL+”.
• Réglez le mode de cuisson choisi et
éventuellement ajustez la température
• Positionnez le sélecteur de programme
sur la position”GRILL+”, la durée de cuisson
clignote à 0h05 (cette valeur de durée
correspond au temps minimum nécessaire
pour activer la fonction “GRILL+” dans la
séquence de cuisson choisie).
• Tournez le bouton de réglage pour ajuster la
durée de cuisson totale. L’enregistrement de la
durée est automatique au bout de quelques secondes, l’afficheur ne clignote plus.
• Après ces 3 actions, le four chauffe et une barre horizontale dans l’afficheur, sous
le texte “GRILL+” s’illumine, vous indiquant que la fonction est en service.
Cinq minutes avant la fin de cuisson, l’indicateur “GRILL+” clignote.
Ne posez pas les plats trop prêts du grilloir pour éviter un dorage trop
rapide. Respectez 1
er
ou 2emgradin (en partant du bas).
Exemples de plats :
• Gratins de pâtes, de chou-fleurs, d’endives, de coquilles de poisson, de crumble..
Exemples de progr
ammation :
Gratinée à l’oignon :
• Sélectionnez la séquence de cuisson
• Sélectionnez la température : 180°C
• Sélectionnez le programme : “GRILL+”
• Sélectionnez le temps : 25 minutes.
Le bouillon va chauffer pendant 20 min et le gratinage se fera pendant les 5 min
restantes.
99625792_ML_A.qxd 21/05/03 15:38 Page 38
T˚
c
Page 39

Votre four est équipé d’un minuteur électronique indépendant du fonctionnement du four permettant de décompter un temps.
Cette fonction peut être utilisée même pendant le fonctionnement du four. Dans
ce cas, l’affichage de la minuterie est prioritaire sur l’affichage de l’heure du jour.
• Placez le sélecteur de programmation du
temps sur la position “ ” -> l’afficheur
clignote et un petit sablier s’allume.
• Tournez le bouton de réglage jusqu’à obtenir la
durée voulue ( maxi 59 minutes 59 secondes )
exemple 15minutes 30 secondes
L’afficheur s’arrête de clignoter au bout de
quelques secondes et la minuterie se met en
marche et décompte le temps de secondes en secondes.
Une fois la durée écoulée, la minuterie émet des bips sonores pour vous avertir.
7. Comment utiliser la minuterie ?
Comment utiliser votre four
Il est possible de modifier ou d’annuler à n’importe quel moment
la programmation du minuteur
39
8. Comment régler la luminosité de l’afficheur ?
Vous pouvez faire varier la luminosité de votre afficheur, pour cela :
• Réglez l’heure de votre progammateur
à 12h10
• Maintenez l’appui sur le bouton tout en effectuant une rotation afin d’obtenir la luminosité
choisie.
Après avoir réglé la luminosité de votre choix, remettez votre programmateur à l’heure du jour.
FR
99625792_ML_A.qxd 21/05/03 15:38 Page 39
T˚
c
Page 40

40
T
raditionnel pulsé
La cuisson s’effectue par les éléments
inférieur et supérieur et par l’hélice de
brassage d’air.
T
raditionnel
La cuisson s’effectue par les éléments
inférieur et supérieur sans brassage d’air.
Sole pulsée
La cuisson s’effectue par l’élément
inférieur associé à un léger dosage du
gril et à l’hélice de brassage d’air.
Maintien au chaud
Dosage des l’éléments supérieur et
inférieur associés au brassage d’air.
Montée rapide en te
plats peuvent être
Nécessite un précha
d’enfourner le plat
Maintien au chaud.
Cuisson par le dess
dessus.
Placez la grille sur l
Cette position per m
nergie d’environ 20
les qualités de cuiss
utilisé pour l’étiquet
Symbole
Nom de la fonction Description
Traditionnel ECO
La cuisson s’effectue par les éléments
inférieur et supérieur sans brassage d’air.
Modes de cuisson du four
Chaleur tournante
La cuisson s’effectue par la résistance placée au fond du four et par
l’hélice de brassage d’air.
Préchauffage inuti
exigeant des temp
plusieurs niveaux)
Gril variable
La cuisson s’effectue par l’élément
supérieur sans brassage d’air.
Gril pulsé
La cuisson s’effectue, alternativement, par l’élément supérieur et par
l’hélice de brassage d’air.
Préchauffage inutile
Volailles et rôtis jute
toutes les faces.
Possibilité d’y rôtir u
viande posée sur la
multi usage au 1er
le jus de cuisson.
Effectuez un précha
Glissez le plat multi
bas.
* Séquences(s) utilisée(s) pour l’annonce écrite sur l’étiquette énergétique conformém
*
*
*
99625792_ML_A.qxd 21/05/03 15:38 Page 40
Page 41

Recommandé pour les Viandes, Poissons, Légumes,
posés dans un plat en terre de préférence
Recommandé pour les cuissons lentes et délicates :
gibiers moelleux...
Pour saisir les rôtis de viande rouge
Pour mijoter en cocotte fermée les plats préalable-
ment démarrés sur table de cuisson (coq au vin, civet...)
Recommandé pour faire lever les pâtes à pain, à
brioche, kouglof...en ne dépassant pas 40°C
(chauffe-assiettes- décongélation).
Recommandé pour les plats humides (quiches, tartes
aux fruits juteux..
La pâte sera bien cuite dessous.
Recommandé pour les préparations qui lèvent(cake,
brioche, kouglof...) et pour les soufflés qui ne seront
pas bloqués par une croûte dessus.
Vous réaliserez une économie d’énergie tout au long
de la cuisson mais le temps peut être plus long.
Recommandations
Modes de cuisson du four
t.
met de faire un gain d’é-
Recommandé pour garder le moelleux des viandes,
pour les légumes, poissons et pour les cuissons
multiples jusqu’à 3 niveaux.
La puissance est réglable de 30 à 100% (positions de
1 à 4 dans l’afficheur). Pour une bonne efficacité, nous
vous recommandons d’utiliser les puissances supérieures.
e
Recommandé pour toutes les volailles ou rôtis.
Pour saisir et cuire à coeur gigot, côtes de boeuf.
Pour garder leur fondant aux pavés de poissons.
Recommandé pour faire lever les pâtes à
pain, à brioche, kouglof...en ne dépassant
pas 40°C (chauffe-assiettes, décongélation).
auffage de 5 min.
41
FR
99625792_ML_A.qxd 21/05/03 15:38 Page 41
Page 42

42
-Votre four se nettoie par élimination à haute température des salissures qui proviennent des éclaboussures ou des débordements. Les fumées et odeurs dégagées
sont détruites par le passage dans un catalyseur.
- La pyrolyse n’est toutefois pas nécessaire après chaque cuisson, mais seulement
si le degré de salissure le justifie.
-.Afin de s’adapter à chaque situation, ce four dispose de 2 cycles de nettoyage
pyrolyse.
- Un cycle économique ( PYRO ECO) d’une durée d’1h30 (compte tenu du
temps de refroidissement du four, celui-ci sera verrouillé pendant 2h00), ce cycle
consomme près de 25% de moins que le cycle pyro standard. Actionné régulièrement (toutes les 2 ou 3 cuissons de viandes), ce cycle permet de garder un four
propre en toutes circonstances.
- Un cycle standard ( PYRO ) d’une durée de 2h ( compte tenu du temps
de refroidissement du four, celui-ci sera verrouillé pendant 2h30 ), assurera un
nettoyage efficace d’un four très sale.
- Par mesure de sécurité, la porte se bloque dès que la température à l’intérieur du
four dépasse les températures de cuisson. Il est impossible alors d’ouvrir la porte
même en positionnant la manette «sélecteur de fonctions» sur 0.
1. Q
u’est-ce qu’une pyrolyse ?
C omment nettoyer la
2. Dans quel cas faut il effectuer une pyrolyse ?
CUISSONS PEU Biscuits, légumes, patisseries Cuissons sans éclaboussures
SALISSANTES quiches, soufflés une pyrolyse n’est pas justifiée
CUISSONS viandes, poissons, la pyrolyse peut se justifier
SALISSANTES (dans un plat) légumes farcis toutes les 3 cuissons
CUISSONS TRES grosses pièces de viandes la pyrolyse peut se faire après
SALISSANTES à la broche 1 cuisson de ce type si les
projections sont importantes
Votre four fume lors d’un préchauffage ou fume énormément lors d’une cuisson.
Votre four dégage une odeur à froid désagréable suite à différentes cuissons
(mouton, poisson, grillades...).
Il ne faut pas attendre que le four soit chargé de graisses pour
effectuer ce nettoyage.
99625792_ML_A.qxd 21/05/03 15:38 Page 42
Page 43

cavitéde votre four
3. C
omment faire une pyrolyse immédiate ?
43
Retirez la casserolerie du four et enlevez les débordements
importants qui auraient pu se produire.
• Vérifiez que le programmateur affiche l’heure
du jour et que celle-ci ne clignote pas.
• Positionnez la manette “sélecteur de fonctions”
sur la position “PYRO” ou “PYRO ECO”.
La durée de la pyrolyse est de 2h en“PYRO
ECO” ou 2h30 en “PYRO”. Ce temps prend en
compte la durée de refroidissement jusqu’au
déverrouillage de la porte.
L’afficheur vous indique l’heure à laquelle votre
four sera à nouveau disponible.
Le
vous indique que vous
êtes en cycle de pyrolyse (ou pyro éco).
Au cours du cycle de pyrolyse, un cadenas
apparaît dans l’afficheur, et vous indique
que la porte est verrouillée.
En fin de cycle de pyrolyse, l’afficheur
indique.............................................................
>
Quand le cadenas n’apparaît plus dans
l’afficheur, il est possible d’ouvrir la porte.
• Ramenez le sélecteur de fonctions sur la
position 0.
• Lorsque le four est froid, utilisez un chiffon
humide pour enlever la cendre blanche.
Le four est propre et à nouveau utilisable pour
effectuer une cuisson de votre choix.
FR
99625792_ML_A.qxd 21/05/03 15:38 Page 43
T˚
c
Page 44

Comment changer l’ampoule ?
• L'ampoule se situe au plafond de la cavité de votre four.
a) Tournez le hublot vers
la gauche d'un quart de tour.
b) Dévissez l'ampoule dans
le même sens.
Caractéristiques de l'ampoule :
- 15 W
- 220-240 V
- 300°C
- culot E 14
c) Changer l'ampoule puis remonter le hublot et rebrancher votre four
Douille
Dévissez
Hublot
pour dévisser le hublot et la lampe, utiliser un gant
de caoutchouc qui facilitera le démontage.
Débrancher votre four avant toute intervention sur l'ampoule
pour éviter tout risque de choc électrique et laisser refroidir si
besoin l’appareil.
44
Suivre les instructions décrites dans le paragraphe ”faire une pyrolyse immédiate”,
puis
• Positionnez le sélecteur de programmation
du temps sur la position “ ”.
La fin de cuisson clignote pour indiquer que le
réglage est alors possible.
• Tournez le bouton pour régler l’heure de fin
souhaitée.
Exemple : Fin de pyro à 4h.
Après ces actions, le départ de la pyrolyse est
différé pour qu’elle se termine à 4h.
Quand votre pyrolyse est terminée, remettez le sélecteur de cuisson sur ” 0 ”.
4. Comment différer une pyrolyse ?
99625792_ML_A.qxd 21/05/03 15:38 Page 44
T˚
c
Page 45

45
Que faire en cas d’anomalies de
fonctionnement ?
Vous avez un doute sur le bon fonctionnement de votre four, ceci ne
signifie pas forcément qu'il y a une panne.
Dans tous les cas, vérifiez les
point suivants :
Vous constatez que...
Les causes possibles Que faut-il faire ?
Le four ne chauffe pas.
• Le four n'est pas branché.
• Le fusible de votre installation est
hors service.
• La température sélectionnée est
trop basse.
• Le capteur est défectueux
• Le four a subi une surchauffe,
il
s’est mis en sécurité.
- Brancher le four.
- Changer le fusible de votre installation et vérifier sa valeur (16A).
- Augmenter la température sélectionnée.
- Faire appel au Service Après-Vente.
- Faire appel au Service Après-Vente.
- Faire appel au Service Après-Vente.
L’indicateur de T°c clignote.
• Défaut de verrouillage de la porte.
• Capteur de température défectueux .
- Faire appel au Service Après-Vente.
- Faire appel au Service Après-Vente.
La lampe du four ne fonctionne plus.
• La lampe est hors service.
• Le four n'est pas branché ou le
fusible est hors service.
- Changer la lampe.
- Brancher le four ou changer le
fusible.
Le ventilateur de refroidissement
continue de tourner à l’arrêt du
four.
• La ventilation fonctionne pendant 1 heure maximum après la
cuisson, ou lorsque la température
de votre four est supérieure à
125°C.
• Si pas d’arrêt après 1 heure
- Ouvrir la porte du four pour accélérer le refroidissement du four.
- Faire appel au Service AprèsVente.
Le nettoyage par pyrolyse ne se
fait pas.
• La porte est mal fermée.
• Le système de verrouillage est
défectueux.
• Le capteur de T° est défectueux.
• Le contact de détection de
«porte fermée» est défectueux.
- Vérifier la fermeture de la porte.
- Faire appel au Service AprèsVente.
- Faire appel au Service AprèsVente.
- Faire appel au Service AprèsVente.
FR
Reportez ci-dessous les indications figurant sur la plaque signalétique de votre four :
MADE IN FRANCE
220 - 240V ~ 50 Hz
BRANDT APPLIANCES SAS
7 rue Henri Becquerel
92500 RUEIL MALMAISON
99625792_ML_A.qxd 21/05/03 15:38 Page 45
Page 46

Ao longo do folheto,
assina-lhe as instruções de segurança,
assinala-lhe os conselhos e as astúcias
Editorial
P.47
Como se apresenta o seu forno? P.
D
escrição do aparelho P.48
A
cessórios P.49
Conselhos de Segurança
P.50
Como instalar o seu forno?
Ligação eléctrica P.51-52
Dimensões úteis para encastrar o seu forno P.53
Como utilizar o seu forno?
Os pormenores do programador P.54
Como ajustar a hora do relógio do seu forno P.55
Como fazer uma cozedura imediata?
P.56
Como fazer uma cozedura programada?
P.57
Como fazer uma cozedura diferida? (hora de fim de cozedura escolhida)
P.58
Como fazer uma cozedura Económica?
P.59
Como utilizar a função "Grelhador +"?
P.60
Como utilizar o temporizador?
P.61
Como regular a luminosidade do visor?
P.61
Modos de cozedura do forno
P.62-63
Como limpar a cavidade do seu forno?
O que é a pirolise? P.64
Em que caso é necessário efectuar uma pirolise? P.64
Como realizar uma pirolise imediata? P.65
Como realizar uma pirolise diferida? P.66
Como mudar a lâmpada?
P.66
Que fazer em caso de anomalias de funcionamento?
P.67
46
Sumário
99625792_ML_A.qxd 21/05/03 15:38 Page 46
Page 47

47
Editorial
Estimado(a) Cliente,
Acabou de adquirir um forno BRANDT e estamos-lhe gratos por isso.
As nossas equipas de pesquisa conceberam, pensando em si, uma nova
geração de aparelhos para que o acto de cozinhar seja um prazer no dia
a dia .
Com linhas puras e uma estética moderna, o seu novo forno Brandt
integra-se harmoniosamente na sua cozinha e alia perfeitamente facilidade de utilização e performance de cozedura.
Encontrará igualmente na gama dos produtos Brandt, uma vasta escolha
de placas de cozedura, de exaustores, de máquinas de lavar loiça e de
refrigeradores integráveis, que poderá coordenar ao seu novo forno
Brandt.
Evidentemente, com a preocupação permanente de satisfazer da melhor
maneira possível as suas expectativas em relação aos nossos produtos, o
nosso serviço de consumidores encontra-se à sua disposição e à sua
escuta para responder a todas as suas perguntas ou sugestões (coordenadas no final do presente manual).
Na ponta da inovação, Brandt contribui assim para o melhoramento da
qualidade da vida do dia a dia, proporcionando-lhe produtos cada vez
mais performantes, de utilização simples, amigos do ambiente, com um
lindo design e fiáveis.
A Marca BRANDT.
PT
99625792_ML_A.qxd 21/05/03 15:38 Page 47
Page 48

48
1
2
3
4
5
T˚
c
1 2 3
5
6
8
7
4
Como se apresenta o seu forno?
1
2
5
6
7
3
4
Selector de modo
Programador
Botão de regulação
Selector de funções
Lâmpada
Indicador de alheta
Orifício para espeto de
manivela
Contacto de detecção de
abertura de porta
DESCRIÇÃO DO APARELHO
8
99625792_ML_A.qxd 21/05/03 15:38 Page 48
Page 49

49
Acessórios (consoante o modelo)
Grelha de segurança
anti-oscilamento
A grelha pode ser utilizada para suportar
todos os pratos e formas contendo alimentos
para cozer ou gratinar. Ela será utilizada para
os grelhados (a colocar directamente em
cima).
Prato multiusos
(pastelaria)
Serve de prato para bolos e dispõe de um
rebordo inclinado. Utiliza-se para a cozedura
de bolos tais como os choux à la creme,
suspiros, madalenas, massas folhadas...
Evite colocar directamente neste prato assados ou carnes porque se o fizer
provocará automaticamente projecções significativas contra as paredes do forno.
Prato oco
equipado com uma grelha de suporte
especial grelhados
Ele serve para recolher o molho e as gorduras
de cozedura realizados em grelhador forte ou
grelhador pulsado.
Pode ser utilizado como prato de cozedura adaptando o tamanho do pedaço a cozer (ex:
uma ave com legumes à volta, a temperatura moderada).
Nunca colocar este prato directamente sobre a base , excepto em posição GRELHADOR.
TR
FR
Punho para prato oco.
7
8
9
10
PT
99625792_ML_A.qxd 21/05/03 15:38 Page 49
Page 50

50
Conselhos de Segurança
Agradecemos que tome conhecimento destes conselhos antes de instalar e utilizar o seu forno. Este forno foi concebido para ser utilizado por parti-
culares no seu local de habitação. Ele destina-se exclusivamente à cozedura de
alimentos. Este forno não contém qualquer componente à base de amianto.
PRIMEIRA UTILIZAÇÃO:
Antes de utilizar o seu forno pela primeira vez, proceda ao aquecimento com o
forno vazio e a porta fechada, durante cerca de 15 minutos em posição máxima
afim de "rodar" o aparelho. No início, a lã mineral que reveste a cavidade do forno
pode desprender um cheiro particular devido à sua decomposição. Do mesmo
modo, é possível que possa constatar um desprendimento de fumo. Este fenómeno é normal.
UTILIZAÇÕES SEGUINTES:
- Assegure-se de que a porta do seu forno está bem fechada, a fim que a junta
de estanquecidade desempenhe correctamente a sua função.
- Não deixe ninguém apoiar-se ou sentar-se sobre a porta do forno aberta.
- Quando utilizar o grelhador com a porta entreaberta, as partes acessí-
veis ou as superfícies podem aquecer. Mantenha as crianças afastadas.
- Durante a utilização o aparelho aquece. Tome precauções de maneira a não
tocar nos elementos aquecidos situados na cavidade do forno.
- Após uma cozedura, não segure qualquer acessório do forno (grelha, espeto de
manivela, pingadeira, berço de espeto de manivela...) com as mãos desprotegidas, utilize luvas especiais ou um tecido isolante.
- Não guarneça o interior do seu forno com folha de alumínio. Caso contrário,
resultaria uma acumulação de calor que deturparia o resultado da cozedura e da
assadura e danificaria o esmalte.
- Antes de proceder à limpeza pirolise do seu forno, retire todos os acessórios do
forno e elimine os derrames significativos.
- Não utilize um dispositivo de limpeza a vapor ou a alta pressão.
- Durante uma pirolise, as superfícies acessíveis aquecem mais do que durante
uma utilização normal. Mantenha as crianças afastadas.
- Para qualquer intervenção de limpeza na cavidade do forno, o forno
deve estar parado.
- Para a sua segurança o seu forno está equipado com um sistema de
PARAGEM AUTOMÁTICA se por falta de atenção você se esquecer de apagar o
forno. Após 10 horas de funcionamento, a função AS (Automatique Stop)
activa-se e o seu forno deixa de aquecer. AS exibe-se em vez da hora e é emitida uma série contínua de sons.
Deve colocar obrigatoriamente o selector de função na posição 0
para voltar a utilizar o seu forno.
99625792_ML_A.qxd 21/05/03 15:38 Page 50
Page 51

51
Contador 20 A Mono
220-240 V ~50 Hz
Tomada de corrente
2 pólos + terra
norma CEI 83
Linha Mono 220-240 V ~
Ligação eléctrica
Cabo eléctrico com
cerca de 1,50 m de
comprimento
Disjuntor diferencial
ou fusível 16 A
Antes de efectuar a ligação, assegure-se de que a secção dos fios
da instalação eléctrica é suficientemente grande para alimentar
normalmente o aparelho (no mínimo, a secção deve ser igual à do
cabo eléctrico).
O fusível da sua instalação deve ser de 16 Amperes.
Como instalar o seu forno?
PT
99625792_ML_A.qxd 21/05/03 15:38 Page 51
Page 52

52
Como instalar
Não podemos ser responsabilizados em caso de acidente consecutivo a uma ligação à terra inexistente, defeituosa ou incorrecta.
• O cabo eléctrico (H05 RR-F, H05 RN-F ou H05 VV-F) deverá ser suficientemente
comprido para ser ligado ao forno a encastrar colocado no chão em frente do móvel.
Para o fazer o aparelho deve estar desligado da rede:
• Abra o alçapão situado em baixo à direita da chapa traseira desatarraxando os 2
parafusos, em seguida gire o alçapão.
• Retire o revestimento de cada fio do novo cabo eléctrico ao longo de 12 mm.
• Torça cuidadosamente os filamentos.
• Desatarraxe os parafusos do bloco terminal e retire o fio eléctrico a substituir.
• Introduza o cabo eléctrico pelo lado da chapa no serra-cabos situado à direita do
bloco terminal.
• Ligue os fios do cabo em conformidade com as marca(s) inscrita(s) na caixa.
• Todos os filamentos dos fios eléctricos devem ficar presos sob os parafusos.
• O fio da fase sobre o terminal L.
• O fio de terra de cor verde-amarelo deve ser ligado ao terminal. .
• O fio do neutro (azul) ao terminal N.
• Aparafuse completamente os parafusos do bloco terminal e verifique a ligação
puxando por cada fio.
• Fixe o cabo por intermédio do serra-cabos situado à direita do terminal.
• Feche o alçapão servindo-se dos 2 parafusos.
Instalação e/ou substituição do cabo eléctrico
A ligação eléctrica deverá ser efectuada antes da instalação do aparelho no
móvel.
• O forno deverá ser ligado com um cabo eléctrico (normalizado) de 3 condutores
de 1,5 mm2 (1 ph + 1 N + terra
)
que deverão estar ligados à rede 220-240 V
monofásico por intermédio de uma tomada eléctrica 1 ph + 1 N + terra
normalizada CEI 83 ou com um dispositivo de corte omnipolar com uma distância de
abertura dos contactos de pelo menos 3 mm. O fio de protecção (verde-amarelo) é
ligado ao terminal do aparelho e deve ficar ligado à terra da instalação.
• Se a ligação for realizada com tomada de corrente, esta última deverá ficar acessível após a instalação do aparelho.
• O neutro do forno (fio azul) deverá estar ligado ao neutro da rede.
99625792_ML_A.qxd 21/05/03 15:38 Page 52
Page 53

53
Para ter a certeza de que a sua instalação é conforme, não hesite em
recorrer aos serviços de um técnico especializado em electrodomésticos.
Dimensões úteis para encastrar o seu forno
O forno pode ser instalado indiferentemente sob um plano de trabalho
ou num móvel em coluna (aberto* ou fechado) com as dimensões de encastramento adaptadas (ver esquema ao lado).
O seu forno possui uma circulação de ar optimizada que permite obter resultados
de cozedura e de limpeza notáveis respeitando os seguintes elementos:
• Centre o forno no móvel e de maneira a garantir uma distância mínima de 5 mm
em relação ao móvel vizinho.
• A matéria do móvel de encastramento deve resistir ao calor (ou ser revestido
com este tipo de matéria).
• Para uma maior estabilidade, fixe o forno no móvel através de 2 parafusos ou através
dos orifícios previstos para este efeito sobre os montantes laterais (confira o esquema).
Para o fazer:
1) Retire as tampas de borracha dos parafusos para aceder aos orifícios de fixação.
2) Efectue um orifício Ø 3 mm na parede do móvel para evitar estalar a madeira.
3) Fixe o forno com os 2 parafusos.
4) Coloque de novo as tampas de borracha dos parafusos (eles servem igualmen-
te para amortecer o fecho da porta do forno).
(*) Se o móvel é aberto, a sua abertura deve ser de 70 mm (no máximo).
PT
99625792_ML_A.qxd 21/05/03 15:38 Page 53
Page 54

54
1. Os pormenores do programador
13
5
7
8
9
6
2
4
10
11
12
Indicador de subida da temperatura
Indicador da função ECO
Número de alheta sobre a qual se
recomenda de enfornar o prato
Indicador da função EASY COOK
Afixação dos tempos (hora/minutos)
Indicador GRELHADOR +
1
3
4
5
6
2
Duração de cozedura
Hora de fim de cozedura
Indicador dos pratos EASY-
COOK disponíveis
Botão de regulamento
Temperatura do
forno/Indicador pirolise
Indicador de porta trancada
7
9
10
8
11
12
Como se apresenta o seu forno?
99625792_ML_A.qxd 21/05/03 15:38 Page 54
Page 55

55
a) A a colocação sob tensão
• Acerte a hora rodando o botão ( A velocidade
de rotação do botão faz variar a velocidade de
ajustamento da hora).
• O registo da hora acertada é automático no final
de alguns segundos -> a afixação da hora deixa de
acender por intermitência.
Exemplo: 12 h 30.
b) Pôr a hora no relógio
• Posicione o selector de programas na posição
"Ajustar a hora"
• A hora indicada acende por intermitência para lhe
indicar que a regulação é agora possível.
• Para regular, gire o botão de maneira a aumentar
ou diminuir a hora afixada.
• Depois de ter seleccionado a hora desejada, posicione o selector na posição "T° c" (regulação de
temperatura) -> a afixação da hora deixa de acender por intermitência
Se não houver validação, o registo é automático no final de alguns
segundos.
2.
Como ajustar a hora do relógio do seu forno
Temporizador
Duração de
cozeduraaa
Fim de
cozedura
Ajustar a
hora
Descrição da maneta
PT
99625792_ML_A.qxd 21/05/03 15:38 Page 55
T˚
c
T˚
c
Page 56

56
Como utilizar o seu forno?
O programador deve afixar apenas a hora;
ela não deve acender por intermitência.
• Escolha o modo de cozedura:
gire o selector de funções sobre a posição da
sua escolha.
Exemplo: peixe " ".
• Coloque o seu prato no forno segundo a
instrução indicada no visor.
Exemplo: posição " " ) -> alhetas 1 ou
2 aconselhadas.
• O seu forno propõe-lhe a temperatura normal
para o modo de cozedura desejado: 200°C. No
entanto, pode ajustá-la graças ao botão situado
sob o visor..
Exemplo: posição " " ajustado a 190°C.
Depois destes passos, o forno aquece:
O indicador de subida de temperatura anima-se e marca a progressão da temperatura no interior do forno.
3 emissões sonoras indicarão que foi atingida a temperatura da directiva.
Após um ciclo de cozedura, o ventilador do forno continua a
funcionar durante um certo tempo, a fim de garantir um arrefecimento normal dos elementos.
3. Como realizar uma cozedura imediata?
99625792_ML_A.qxd 21/05/03 15:38 Page 56
Page 57

57
Como utilizar o seu forno?
a) Fazer uma cozedura com uma duração definida?
• Regule o modo de cozedura escolhido e
eventualmente ajuste a temperatura.
Exemplo: posição " "
Temperatura 200°C
• Coloque o selector de programa na posição
“”
A duração de cozedura acende por intermitência
a 0h00 para indicar que a regulação é agora possível.
•
Gire o botão para regular o tempo de cozedura
desejado
Exemplo: 25 mn
A hora desejada é registada automaticamente no
final de alguns segundos
->o visor deixa de acender por intermitência
O tempo começa a ser descontado imediatamente após a regulação.
A hora de final de cozedura (hora de início +
hora de cozedura afixa-se automaticamente.
Neste exemplo:
Fim de cozedura às h55 mn
Após estes passos, o forno aquece:
O indicador de subida de temperatura anima-se e assinala a progressão da
temperatura no interior do forno.
3 emissões sonoras indicarão que a temperatura da directiva foi atingida.
Em fim de cozedura, é emitida uma série contínua de sons durante alguns minutos. A paragem das emissões sonoras faz-se colocando o selector de regulação
na posição "T°C" e colocando o manípulo na posição "0".
4. Como programar uma cozedura
PT
99625792_ML_A.qxd 21/05/03 15:39 Page 57
T˚
c
Page 58

58
b) Diferir uma cozedura com uma duração definida?
(hora de fim de cozedura escolhida)
• Proceda como em a) em seguida, após a
regulação da duração de cozedura,
Coloque o selector de modo na posição
“”.
A hora de fim de cozedura acende por intermitência
para indicar que a regulação é agora possível.
•Ajuste a hora de fim de cozedura desejada
girando o botão sob o visor.
Exemplo ao lado: fim de cozedura
desejada 13 h 00.
Após estes passos, o início do aquecimento é diferido de modo a que a cozedura
termine às 13 h00. Uma vez terminada a cozedura, é emitida uma série de sons,
colocar de novo o selector de cozedura na posição “0”.
Como utilizar o seu forno?
É possível
- Alterar, em qualquer altura, a duração de cozedura,
- Anular, em qualquer altura, a programação voltando a pôr em
0.00 o valor da duração.
99625792_ML_A.qxd 21/05/03 15:39 Page 58
T˚
c
Page 59

Como utilizar o seu forno?
5. Como fazer uma cozedura Económica?*
59
O programador deve exibir apenas a hora;
ela não deve acender por intermitência.
• Gire o selector de funções para a posição
" ". O indicador "ECO" acende-se no visor.
• Coloque o seu prato no forno segundo as
indicações exibidas no visor.
Exemplo: posição " " -> alheta 1 ou 2
aconselhadas
• O seu forno propõe a temperatura óptima
para o modo de cozedura desejado 200°C.
No entanto, pode ajustá-la utilizando o botão
situado sob o visor.
Exemplo: posição " " ajustada a 190°C.
Após estes passos, o forno aquece.
O indicador de subida de temperatura anima-se e assinala a progressão
da temperatura no interior do forno.
3 sinais sonoros indicarão que a temperatura de regulação foi atingida.
Para optimizar a cozedura ECO, não aquecer previamente nem abrir a porta.
*Esta posição permite uma economia de energia até 20% mantendo
ao mesmo tempo idênticos os resultados de cozedura.
A posição ECO é utilizada para a etiquetagem energética.
Após um ciclo de cozedura, o ventilador do forno continua a
funcionar durante um certo tempo, a fim de garantir um arrefecimento correcto dos elementos.
PT
99625792_ML_A.qxd 21/05/03 15:39 Page 59
Page 60

60
Como utilizar o seu forno?
6. Como utilizar a função "Grelhador +"?
É possível colocar em serviço ou suprimir esta função em qualquer altura da cozedura agindo sobre o manípulo de regulação.
É igualmente possível activar esta função numa cozedura diferida.
Esta função permite associar à sequência de cozedura desejada uma função
"Alourar" em fim de cozedura, operação esta que se efectua graças à entrada em
serviço do grelhador nos últimos 5 minutos da sequência.
A referida função só é activa nas seguintes funções de cozedura: .
Esta função pode ser programada no início da
cozedura acrescentando 5 minutos ao tempo
de cozedura ou simplesmente em fim de
cozedura colocando o selector de função na
posição "GRELHADOR+".
• Regule o modo de cozedura desejado e
eventualmente ajuste a temperatura.
•Coloque o selector de programa na posição
"GRELHADOR+", a duração de cozedura acende
por intermitência às 0h05 (este valor de duração
corresponde aos tempos mínimos necessário para
activar a função "GRELHADOR" na sequência de
cozedura escolhida).
• Gire o botão de regulação para ajustar a
duração de cozedura total. O registo da duração é
automático no final de alguns segundos, o visor deixa de acender por intermitência.
• Após estas 3 passos, o forno aquece e acende-se uma barra horizontal no visor, sob o texto
"GRELHADOR+", indicando-lhe que a referida função está a funcionar.
Cinco minutos antes do fim de cozedura, o indicador "GRELHADOR+" acende por intermitência
Não coloque os pratos demasiado próximo do grelhador para evitar que
eles alourem demasiado rapidamente. Respeite a 1° ou 2° alheta (partindo de baixo).
Ex
emplo de pratos:
• Massas gratinadas, couve-flor, endívias, conchas de peixe, crumble...
Exemplos de programação:
Sopa de cebola gratinada:
• Seleccione a sequência de cozedura
• Seleccione a temperatura: 180°C
• Seleccione o programa: "GRELHADOR+"
• Seleccione o tempo: 25 minutos
O caldo vai aquecer durante 20 mn e o gratinado faz-se nos 5 mn que sobejam.
99625792_ML_A.qxd 21/05/03 15:39 Page 60
T˚
c
Page 61

O seu forno está equipado com um temporizador electrónico Independente do
funcionamento do forno que permite fazer a contagem decrescente de
uma certa quantidade de tempo.
Esta função pode ser utilizada mesmo durante o funcionamento do forno. Neste
caso, a afixação do temporizador é prioritária
em relação à afixação da hora do dia.
• Coloque o selector de programação do
tempo na
posição “ ” -> o visor acende por
intermitência e uma pequena ampulheta fica
iluminada.
• Gire o botão de regulação até obter a duração
desejada (máximo 59 minuto 59 segundos)
Exemplo 15 minutos 30 segundos.
O visor deixa de acender por intermitência no
final de alguns segundos e o temporizador começa a funcionar e a fazer a contagem decrescente, de segundo em segundo.
Uma vez decorrido o tempo, o temporizador
emite sinais sonoros para o prevenir.
7. C
omo utilizar o temporizador?
Como utilizar o seu forno?
É possível alterar ou anular em qualquer altura a programação
do temporizador.
61
8. Como regular a luminosidade do visor?
Pode fazer variar a luminosidade do seu visor e para tal:
• Regule a hora do seu programador a 12h10
• Mantenha a pressão sobre o botão efectuando
ao mesmo tempo uma rotação a fim de obter a
luminosidade desejada.
Depois de ter regulado a luminosidade desejada,
coloque novamente o seu programador à hora do
dia.
PT
99625792_ML_A.qxd 21/05/03 15:39 Page 61
T˚
c
Page 62

62
Tradicional pulsado
A cozedura efectua-se através dos elementos inferior e superior e através da
hélice de movimentação de ar.
Tradicional
A cozedura efectua-se através dos elementos
inferior e superior sem movimentação de ar.
Base pulsadae
A cozedura efectua-se através do elemento
inferior associado a uma ligeira dosagem do
grelhador e através da hélice de movimentação de ar.
Manter quente
Dosagem dos elementos superior e inferior associados à movimentação de ar.
Subida rápida de temp
podem ser enfornados
Necessita um pré-aq
enfornar o prato.
Conserva o calor.
Cozedura pela parte
dosagem por cima.
Coloque a grelha so
Esta posição permite u
de cerca de 20% cons
as qualidades de cozed
zada para etiquetagem
Símbolo
Nome da função Descriçã
T
radicional ECO
A cozedura efectua-se através dos elementos
inferior e superior sem movimentação de ar.
Modos de cozedura do forno
Calor giratório
A cozedura efectua-se através da resistência colocada no fundo do forno e através da hélice de movimentação de ar.
É inútil pré-aquece
ras cuja duração é
sobre vários níveis
Grelhador variável
A cozedura efectua-se através dos elementos
inferior e superior sem movimentação de ar.
Grelhador pulsado
A cozedura efectua-se através dos
elementos inferior e superior sem
movimentação de ar.
Pré-aquecimento inú
Aves e assados sum
de ambos os lados.
Possibilidade de ass
carne colocada sobr
prato multiuso na 1°
molho de cozedura.
Efectue um pré-aqu
Introduza o prato m
de baixo.
* Sequência(s) utilizada(s) para o anúncio escrito na etiqueta energética em conformid
*
*
*
99625792_ML_A.qxd 21/05/03 15:39 Page 62
Page 63

Recomendado para as Carnes, Peixes, Legumes, colocados preferencialmente num prato de barro.
Recomendado para as cozeduras lentas e delicadas: caça
macia...
Para "saisir" os assados de carne vermelha.
Para cozer lentamente em panela fechada os pratos que começaram
a ser cozinhados na placa de cozedura (coq au vin, caça guisada...)
Recomendado para fazer levedar as massas para
pão, brioche, kouglof...não ultrapassando os 40°C.
(aquecedor de pratos - descongelação)
Recomendado para os pratos húmidos (quiches, tartes de frutos sumarentos...
A massa ficará bem cozida por cima.
Recomendado para os preparados que levedam
(cake, brioche, kouglof...) e para os souflés que não
serão bloqueados por uma crosta por cima.
Realizará uma economia de energia durante a cozedura mas a duração pode ser mais longa.
Recomendações
Modos de cozedura do forno
servando ao mesmo tempo
ão da função
Recomendado para conservar a maciez das carnes
Para os legumes, peixes e cozeduras múltiplas até 3
níveis.
A potência é regulável de 30 a 100% (posições de 1 a 4
no visor). Para uma boa eficácia, recomendamos-lhe que
utilize as potências superiores
.
Recomendado para fazer levedar as massas de
pão, de brioche, kouglof... não ultrapassando
40°C (aquecedor de pratos, descongelação).
Recomendado para todas as aves ou assados.
Para "saisir" e cozer até ao centro a perna de car-
neiro, costeletas de vaca.
Para conservar o fundente aos "pavés" de peixe.
63
PT
99625792_ML_A.qxd 21/05/03 15:39 Page 63
Page 64

64
- O seu forno limpa-se sozinho, eliminando as sujidades resultantes de salpicos ou
derrames, por aquecimento a temperatura elevada. O fumo e odor emanados são
destruídos pela passagem através de um catalisador.
- No entanto, não é necessário realizar uma pirolise após cada cozedura, mas
somente se o grau de sujidade o justificar.
-.A fim de se adaptar a cada situação, este forno dispõe de 2 ciclos de limpeza
pirolise.
- Um ciclo económico (PYRO ECO) cuja duração é de 1h 30 (tomando em
consideração o tempo de arrefecimento do forno que ficará trancado durante
2h00), este ciclo consome cerca de 25% menos que um ciclo pyro standard.
Accionado regularmente (todas as 2 ou 3 cozeduras de carnes), este ciclo permite
conservar um forno limpo em todas as circunstâncias.
- Um ciclo standard (PYRO) cuja duração é de 2h (tomando em consideração o tempo de arrefecimento do forno que ficará trancado durante 2h 30, assegurará uma limpeza eficaz de um forno muito sujo.
- Por medida de segurança, a porta bloqueia-se desde que a temperatura no interior do forno ultrapasse as temperaturas de cozedura. É então impossível abrir a
porta mesmo posicionando o manípulo "selector de funções" em 0.
1. O
que é a pirolise?
C omo limpar a cavi
2. Em que caso é necessário efectuar uma pirolise?
COZEDURAS QUE Bolachas, legumes, bolos, Cozeduras sem salpicos: Não há
SUJAM POUCO pastéis, tartes salgadas, soufflé. necessidade de efectuar uma pirólise
COZEDURAS Carne, peixe (assados numa A pirólise justifica-se depois
QUE SUJAM travessa) Legumes recheados de efectuadas 3 cozeduras.
COZEDURAS QUE Peças de carne grandes, A pirólise pode ser feita após
SUJAM MUITO Assados no espeto, pato, uma cozedura deste tipo, se
peru, pernas de carneiro, houver muitas projecções.
Quando há saída de fumo na altura em que se aquece o forno ou durante a
cozedura. O seu forno liberta um odor, mesmo quando está frio, após ter efectuado uma cozedura (carne de carneiro, peixe, grelhados, etc.).
Não se deve deixar acumular demasiadamente a sujidade antes
de efectuar esta limpeza.
99625792_ML_A.qxd 21/05/03 15:39 Page 64
Page 65

dade do seu forno?
3. C
omo realizar uma pirolise imediata?
65
Retire o tacho do forno e elimine os eventuais derrames significativos.
• Verifique se o programador exibe a hora do dia
e se ele não acende por intermitência.
• Colocar o manípulo "selector de funções" na
posição "PYRO ECO".
A pirolise dura 2h em "PYRO ECO" ou 2h30 em
"PYRO". Esta duração toma em consideração a
duração de arrefecimento até à destrancagem
da porta.
O visor indica-lhe a hora à qual o seu forno estará de
novo disponível.
O
indica-lhe que está em ciclo de pirolise
(ou pyro eco).
Durante o ciclo de pirolise, um cadeado
aparece no visor, e indica-lhe que a
porta está trancada.
Em fim de ciclo de pirolise, o visor
indica.............................................................
>
Quando o cadeado deixar de aparecer no visor,
é possível abrir a porta
• Volte a colocar o selector de funções na
posição 0.
• Quando o forno está frio, utilize um pano
húmido para retirar a cinza branca.
O forno está limpo e pode ser novamente
utilizado para efectuar o tipo de cozedura que desejar.
PT
99625792_ML_A.qxd 21/05/03 15:39 Page 65
T˚
c
Page 66

Como mudar a lâmpada?
• A lâmpada está situada no tecto da cavidade interna do seu forno.
a) Gire a armação de suporte da
lâmpada para a esquerda, até
efectuar um quarto da circunferência.
b) Desenrosque a lâmpada no
mesmo sentido
Características da lâmpada:
- 15 W
- 220-240 V
- 300°C
- casquilho E 14
c) Mude a lâmpada e torne a montar a armação em forma de postigo. Ligue
novamente o forno.
Ampola
Desenrosque
Armação em forma de postigo
enfie uma luva de borracha para poder desmontar com mais
facilidade a armação e a lâmpada.
Desligue o seu forno antes de efectuar qualquer tipo de intervenção sobre a lâmpada e deixe arrefecer o aparelho, se necessário
for
66
Siga as instruções descritas no parágrafo "realizar uma pirolise imediata", em
seguida
• posicione o selector de programação do tempo na
posição “ ”.
O fim de cozedura acende por intermitência para
indicar que a regulação é agora possível.
• Gire o botão para regular a hora de fim de pirólise desejada.
Exemplo: Fim de piróliese às 4 h.
Após estes passos, o início da pirolise é diferido de
modo a terminar às 4h.
Quando a pirolise tiver cessado, volte a colocar o selector de cozedura em "0".
4. Como realizar uma pirolise diferida?
99625792_ML_A.qxd 21/05/03 15:39 Page 66
T˚
c
Page 67

67
Que fazer em caso de anomalias de
funcionamento?
O seu forno apresenta defeitos de funcionamento, isto não significa obriga-
toriamente que esteja avariado..
Seja qual for o problema, verifique os pon-
tos seguintes:
Problema constatado.
Causas possíveis O que se deve fazer?
O forno não aquece.
• O forno não está ligado.
• O fusível da sua instalação eléctrica
está fundido
• A temperatura seleccionada é demasiado baixa.
• O sensor está defeituoso
• O forno sofreu um sobreaquecimento, ele colocou-se em posição de
segurança.
- Ligar o forno.
- Mudar o fusível da sua instalação e
verificar a intensidade a que corresponde (16A).
- Aumentar a temperatura seleccionada.
- Chamar o Serviço de Assistência Pós-Venda.
- Chamar o Serviço de Assistência Pós-Venda.
- Chamar o Serviço de Assistência Pós-Venda.
O indicador de temperatura T°c
acende por intermitência
• Trancagem da porta defeituosa
• Sensor de temperatura defeituoso.
- Chamar o Serviço de Assistência
Pós-Venda.
- Chamar o Serviço de Assistência
Pós-Venda.
A lâmpada do forno não funciona.
• A lâmpada está fundida.
• O forno não está ligado ou o fusível está fundido.
- Mudar a lâmpada.
- Ligar o forno ou mudar o fusível.
O ventilador de arrefecimento
continua a girar.
• A ventilação deve parar 1 hora
após o apagamento do forno, ou
assim que temperatura do forno
desce abaixo de 125°C.
• Se não se apaga após 1 hora
- Abrir a porta do forno para acelerar o arrefecimento do forno.
- Chamar o Serviço de Assistência PósVenda.
A limpeza por pirolise não se realiza.
• A porta está mal fechada.
• O sistema de trancagem está defeituoso.
•O captor de T° está defeituoso.
• O contacto de detecção de "porta
fechada" está defeituoso.
- Verificar o fecho da porta.
- Chamar o Serviço de Assistência PósVenda.
- Chamar o Serviço de Assistência PósVenda.
- Chamar o Serviço de Assistência PósVenda.
PT
Inscreva em baixo as indicações incluídas na placa de características do seu forno:
MADE IN FRANCE
220 - 240V ~ 50 Hz
BRANDT APPLIANCES SAS
7 rue Henri Becquerel
92500 RUEIL MALMAISON
99625792_ML_A.qxd 21/05/03 15:39 Page 67
Page 68

Уе ьлп фп егчейсЯдйп, фп
убт ерйузмбЯней фйт пдзгЯет буцблеЯбт,
убт ерйузмбЯней фйт ухмвпхлЭт кбй фб фечнЬумбфб
ЕйубгщгЮ óåë. 69
Рщт цбЯнефбй п цпэснпт убт; óåë.
ÐесйгсбцЮ фзт ухукехЮт óåë. 70
ÅобсфЮмбфб óåë. 71
УхмвпхлЭт буцблеЯбт
óåë. 72
Рщт нб егкбфбуфЮуефе фпн цпэснп убт
ÇлекфсйкЮ уэндеуз óåë. 73-74
×сЮуймет дйбуфЬуейт гйб нб енфпйчЯуефе фпн цпэснп убт óåë. 75
Рщт нб чсзуймпрпйЮуефе фпн цпэснп убт
Ïй лерфпмЭсейет фпх рспгсбммбфйуфЮ убт óåë. 76
Ðщт нб схимЯуефе фзн юсб уфп спльй фпх цпэснпх óåë. 77
Ð
щт нб кЬнефе Энб Ьмеуп шЮуймп
óåë. 78
Ð
щт нб кЬнефе Энб рспгсбммбфйумЭнп шЮуймп
óåë. 79
Ð
щт нб кЬнефе Энб дйбцпспрпйзмЭнп шЮуймп? (ерйлегмЭнз юсб фЭлпхт)
óåë. 80
Ð
щт нб кЬнефе Энб Пйкпнпмйкь шЮуймп
óåë. 81
Ð
щт нб чсзуймпрпйЮуефе фз лейфпхсгЯб "Гксйл+"
óåë. 82
Ð
щт нб чсзуймпрпйЮуефе фпн чспнпдйбкьрфз
óåë. 83
Ð
щт нб схимЯуефе фз лЬмшз рпх иб Эчей фп цщфЬкй
óåë. 83
Ôсьрпй шзуЯмбфпт фпх цпэснпх
óåë. 84-85
Рщт нб кбибсЯуефе фзн еупчЮ фпх цпэснпх убт;
Ôй еЯнбй з рхсьлхуз; óåë. 86
Óе рпйб ресЯрфщуз рсЭрей нб рсбгмбфпрпйпэме мйб рхсьлхуз; óåë. 86
Ðщт нб кЬнефе мйб Ьмеуз рхсьлхуз óåë. 87
Ðщт нб кЬнефе мйб рспгсбммбфйумЭнз рхсьлхуз óåë. 88
Рщт нб бллЬоефе фз лхчнЯб
óåë. 88
Фй нб кЬнпхме уе ресЯрфщуз бнщмблйюн
уфз лейфпхсгЯб;
óåë. 89
68
Ресйечьменб
99625792_ML_A.qxd 21/05/03 15:39 Page 68
Page 69

69
ЕйубгщгЮ
БгбрзфЮ РелЬфйууб, БгбрзфЭ РелЬфз,
Мьлйт брпкфЮубфе Энбн цпэснп BRANDT кбй убт ехчбсйуфпэме гй' бхфь.
Пй есехнзфйкЭт мбт пмЬдет учедЯбубн гйб убт мйб нЭб генйЬ ухукехюн гйб
нб мбгейсеэефе кЬие мЭсб ме ехчбсЯуфзуз.
Ме брлЭт гсбммЭт кбй мпнфЭснб бйуизфйкЮ, п нЭпт убт цпэснпт Brandt
енущмбфюнефбй бсмпнйкЬ уфзн кпхжЯнб убт кбй ухндхЬжефбй Ьшпгб
дйехкплэнпнфбт фз чсЮуз кбй фйт ерйдьуейт фпх шзуЯмбфпт.
Иб всеЯфе ерЯузт уфз уейсЬ фщн рспъьнфщн фзт Brandt, мйб фесЬуфйб рпйкйлЯб
брь учЬсет шзуЯмбфпт, брпсспцзфЮсщн, рлхнфзсЯщн рйЬфщн кбй енфпйчйжьменщн
шхгеЯщн рпх мрпсеЯфе нб фбйсйЬоефе ме фп нЭп убт цпэснп Brandt.
ЦхуйкЬ, нйюипнфбт мйб ухнечЮ бгщнЯб гйб фзн йкбнпрпЯзуз уфп мЭгйуфп фщн
брбйфЮуеюн убт уе учЭуз ме фб рспъьнфб мбт, з хрзсеуЯб кбфбнблщфюн мбт
всЯукефбй уфз дйЬиеуЮ убт кбй убт ресймЭней гйб нб брбнфЮуей уе ьлет фйт
есщфЮуейт убт Ю фйт рспфЬуейт убт (фб уфпйчеЯб фзт уфп фЭлпт бхфпэ фпх
егчейсйдЯпх).
Уфп брпкпсэцщмб фзт рсщфпрпсЯбт, з Brandt ухмвЬллей уфз велфЯщуз фзт
кбизмесйнЮт рпйьфзфбт жщЮт рспуцЭспнфЬт убт рспъьнфб ьлп кбй рйп
брпдпфйкЬ, брлЬ уфз чсЮуз, рпх уЭвпнфбй фп ресйвЬллпн, кблбЯуизфб кбй
бойьрйуфб.
Фп емрпсйкь уЮмб BRANDT.
GR
99625792_ML_A.qxd 21/05/03 15:39 Page 69
Page 70

70
1
2
3
4
5
T˚
c
1 2 3
5
6
8
7
4
Рщт цбЯнефбй п цпэснпт убт;
1
2
5
6
7
3
4
ЕрйлпгЭбт фсьрпх
РспгсбммбфйуфЮт
КпхмрЯ сэимйузт
ЕрйлпгЭбт лейфпхсгйюн
ЛЬмрб
ДеЯкфзт укЬлбт
Фсэрб гйб упэвлб
Дйбкьрфзт бнЯчнехузт фпх
бнпЯгмбфпт фзт рьсфбт
РЕСЙГСБЦЗ УХУКЕХЗУ
8
99625792_ML_A.qxd 21/05/03 15:39 Page 70
Page 71

71
ЕобсфЮмбфб (бнЬлпгб ме фп мпнфЭлп)
ÓчЬсб буцблеЯбт
кбфЬ фзт рфюузт
З учЬсб мрпсеЯ нб чсзуймпрпйзиеЯ гйб нб уфзсЯоей ьлб фб фбшйЬ кбй фйт цьсмет рпх
ресйЭчпхн фсьцймб гйб шЮуймп Ю гйб гксбфйнЬсйумб. Иб чсзуймпрпйзиеЯ кбй гйб фб шзфЬ
уфзучЬсб (нб фпрпиефпэнфбй брехиеЯбт рЬнщ
фзт).
Брпцэгефе нб фпрпиефЮуефе брехиеЯбт у' бхфь фп фбшЯ шзфЬ Ю ксЭбфб гйбфЯ иб Эчефе
бхфпмЬфщт екфпоеэуейт уфб фпйчюмбфб фпх цпэснпх.
Âáèý ôáøß
еопрлйумЭнп ме учЬсб уфЮсйозт
ейдйкь гйб шзфЬ уфз учЬсб
Чсзуймеэей уфз ухгкЭнфсщуз фщн чхмюн кбй
фщн лйрюн фпх шзуЯмбфпт рпх гЯнефбй уе дхнбфь
гксйл Ю гксйл ме бЭсб.
МрпсеЯ нб чсзуймпрпйзиеЯ щт фбшЯ шзуЯмбфпт фбкфпрпйюнфбт фп мЭгеипт фпх
кпммбфйпэрпх иб шзиеЯ (р.ч. Энб рпхлесйкь ме лбчбнйкЬ гэсщ - гэсщ, уе мЭфсйб
иесмпксбуЯб).Мзн фпрпиефеЯфе рпфЭ бхфь фп фбшЯ уфзн рлЬкб Эдсбузт, рбсЬ мьнп
уфз иЭуз ГКСЙЛ.
ðßóù
Емрсьт
ËáâÞ ãéá âáèý ôáøß
7
8
9
10
Ô
бшЯ рпллюн чсЮуещн
(жбчбспрлбуфйкЮ)
Чсзуймеэей гйб фбшЯ гйб глхкЬ кбй дйбиЭфей
чеЯлпт ме клЯуз. ЧсзуймпрпйеЯфбй гйб фп
шЮуймп глхкюн ьрщт упх ме ксЭмб, мбсЭгкет,
мбнфблЭнет, жэмет уцплйЬфбт
GR
99625792_ML_A.qxd 21/05/03 15:39 Page 71
Page 72

72
УхмвпхлЭт буцблеЯбт
ВЬлфе хрпчсещфйкЬ фпн ерйлпгЭб лейфпхсгЯбт уфп 0 гйб нб
обнбчсзуймпрпйЮуефе фпн цпэснп убт.
Убт ехчбсйуфпэме рпх мелефЬфе бхфЭт фйт ухмвпхлЭт рспфпэ егкбфбуфЮуефе кбй
чсзуймпрпйЮуефе фпн цпэснп убт. Бхфьт п цпэснпт Эчей учедйбуфеЯ гйб нб чсзуймпрпйеЯфбй
брь йдйюфет уфп чюсп кбфпйкЯбт фпхт. РсппсЯжефбй брпклейуфйкЬ гйб фп шЮуймп рспъьнфщн
дйбфспцЮт. Бхфьт п цпэснпт ден ресйЭчей кбнЭнб ухуфбфйкь ме вЬуз фпн бмЯбнфп.
РСЩФЗ ЧСЗУЗ:
Рспфпэ чсзуймпрпйЮуефе фпн цпэснп убт гйб рсюфз цпсЬ, иесмЬнефЭ фпн Ьдейп, ме
клейуфЮ фзн рьсфб, гйб 15 лерфЬ ресЯрпх уфз мЭгйуфз иЭуз пэфщт юуфе нб "уфсюуефе"
фз ухукехЮ. Фп псхкфь мбллЯ рпх ресйвЬллей фзн еупчЮ фпх цпэснпх мрпсеЯ нб
екрЭмрей, уфзн бсчЮ, мйб йдйбЯфесз мхсщдйЬ рпх пцеЯлефбй уфз уэниеуЮ фпх. ПмпЯщт,
иб дйбрйуфюуефе Яущт мйб екрпмрЮ кбрнпэ. ¼лб бхфЬ еЯнбй цхуйплпгйкЬ.
ЕРПМЕНЕУ ЧСЗУЕЙУ:
- ВевбйщиеЯфе ьфй з рьсфб фпх цпэснпх убт еЯнбй кблЬ клейумЭнз пэфщт юуфе п
уэндеумпт уфегбньфзфбт нб екрлзсюуей ущуфЬ фз лейфпхсгЯб фпх.
- Мзн бцЮнефе кбнЭнбн нб бкпхмрЮуей Ю нб кбиЯуей рЬнщ уфзн бнпйкфЮ рьсфб фпх цпэснпх.
- КбфЬ фз чсЮуз фпх гксйл ме мйуЬнпйчфз фзн рьсфб, фб рспувЬуймб мЭсз Ю пй
ерйцЬнейетмрпсеЯ нб иесмбнипэн. Брпмбксэнефе фб мйксЬ рбйдйЬ.
- КбфЬ фз чсЮуз фзт з ухукехЮ иесмбЯнефбй. РспуЭофе нб мзн бкпхмрЬфе фб
иесмбнфйкЬуфпйчеЯб рпх всЯукпнфбй уфп еущфесйкь фпх цпэснпх.
- МефЬ брь Энб шЮуймп, мзн рйЬнефе ме гхмнь чЭсй фб укеэз (учЬсб, упэвлб, лбмбсЯнб гйб фз ухгкЭнфсщуз лЯрпхт, вЬуз уфЮсйозт упэвлбт), чсзуймпрпйеЯуфе Энб
рспуфбфехфйкь гЬнфй Ю Энб эцбумб брь мпнщфйкь хлйкь.
- Мз гемЯжефе фпн цпэснп убт ме блпхмйньчбсфб. ДйбцпсефйкЬ, иб рспкэшей мйб
ухууюсехуз иесмьфзфбт рпх иб ерзсеЬуей дхуЬсеуфб фп брпфЭлеумб фпх мбгейсЭмбфпт кбй фпхшзуЯмбфпт кбй иб влЬшей фп умЬлфп.
- Рспфпэ рспчщсЮуефе уфпн кбибсйумь ме рхсьлхуз фпх цпэснпх убт, бцбйсЭуфе ьлб
фбукеэз кбй вгЬлфе фйт рпллЭт екчэуейт.
- Мз чсзуймпрпйеЯфе фпн кбибсйуфЮ бфмпэ Ю хшзлЮт рЯеузт.
- КбфЬ фз дйЬскейб мйбт рхсьлхузт, пй рспувЬуймет ерйцЬнейет гЯнпнфбй рйп жеуфЭт
бр' ьфй уфзн кбнпнйкЮ чсЮуз. Брпмбксэнефе фб мйксЬ рбйдйЬ.
- Уе кЬие ерЭмвбуз кбибсйумпэ уфзн еупчЮ фпх цпэснпх, з лейфпхсгЯб фпх цпэснпх рсЭрей нб Эчей дйбкпреЯ.
- Гйб фзн буцЬлейЬ убт п цпэснпт убт еЯнбй еопрлйумЭнпт ме БХФПМБФП
УФБМБФЗМ
Б еЬн брь брспуеоЯб оечЬуефе нб увЮуефе фпн цпэснп убт. МефЬ брь 10 юсет лейфпхсгЯбт, енесгпрпйеЯфбй з лейфпхсгЯб AS (Бхфьмбфп УфбмЬфзмб) кбй п цпэснпт уфбмбфЬ
фз иЭсмбнуЮ фпх. Фп AS емцбнЯжефбй уфз иЭуз фзт юсбт кбй мйб уейсЬ 2 дйбдпчйкюн
мрйр екрЭмрефбй гйб Энб псйумЭнп дйЬуфзмб.
99625792_ML_A.qxd 21/05/03 15:39 Page 72
Page 73

73
МефсзфЮт 20Б Mono
220-240 V ~ 50 Hz
РсЯжб
2 рьлпй + геЯщуз
рсьфхрп CEI 83
ГсбммЮ Mono 220-240 V ~
ЗлекфсйкЮ уэндеуз
Кблюдйп
фспцпдпуЯбт
мЮкпт 1,50 м.
ресЯрпх
Дйбцпсйкьт дйбкьрфзт
Ю буцЬлейб 16Б
Рспфпэ рсбгмбфпрпйЮуефе фз уэндеуз, вевбйщиеЯфе ьфй фб кблюдйб фзт
злекфсйкЮт убт егкбфЬуфбузт Эчпхн ербскЮ дйбфпмЮ гйб нб фспцпдпфпэн
кбнпнйкЬ фз ухукехЮ (дйбфпмЮ фпхлЬчйуфпн Яуз ме екеЯнз фпх кблюдйпх
фспцпдпуЯбт). З буцЬлейб фзт егкбфЬуфбуЮт убт рсЭрей нб еЯнбй 16 Ampиres.
Рщт нб егкбфбуфЮуефе фпн цпэснп убт
GR
99625792_ML_A.qxd 21/05/03 15:39 Page 73
Page 74

74
Рщт нб егкбфбуфЮу
Ден Эчпхме ехиэнз уе ресЯрфщуз бфхчЮмбфпт рпх пцеЯлефбй уе бнэрбскфз, елбффщмбфйкЮ Ю лбнибумЭнз геЯщуз.
Фп кблюдйп фспцпдпуЯбт (H05 RR-F, H05 RN-F Ю З05 W-F) рсЭрей нб Эчей ербскЭт
мЮкпт гйб нб ухндеиеЯ ме фпн цпэснп рпх иб енфпйчйуфеЯ фпрпиефзмЭнп уфп Эдбцпт
мрспуфЬ брь фп Эрйрлп.
Гй' бхфь фп льгп з ухукехЮ рсЭрей нб еЯнбй брпухндедемЭнз брь фп дЯкфхп:
БнпЯофе фп рпсфЬкй рпх всЯукефбй кЬфщ уфб деойЬ фпх рЯущ кблэммбфпт
оевйдюнпнфбт фйт 2 вЯдет, Эрейфб ресйуфсЭшфе фп рпсфЬкй.
Брпгхмнюуфе кЬие уэсмб фпх нЭпх кблщдЯпх фспцпдпуЯбт уе 12mm.
УхуфсЭшфе рспуекфйкЬ фб бущлЮнщфб Ьксб.
Оевйдюуфе фйт вЯдет фзт пмЬдбт бкспдекфюн кбй вгЬлфе фп кблюдйп фспцпдпуЯбт рпх
иб бллбчиеЯ.
ЕйуЬгефе фп кблюдйп фспцпдпуЯбт брь фзн рлехсЬ фпх кблэммбфпт уфпн уцйкфЮсб
кблщдЯщн рпх всЯукефбй уфб деойЬ фзт пмЬдбт бкспдекфюн.
УхндЭуфе фб уэсмбфб фпх кблщдЯпх уэмцщнб ме фп(фб) узмеЯп(б) бнбцпсЬт рпх
еЯнбй гсбммЭнп(б) уфзн пмЬдб бкспдекфюн.
¼лб фб бущлЮнщфб Ьксб фщн кблщдЯщн фспцпдпуЯбт рсЭрей нб еЯнбй клейумЭнб
кЬфщ брь фйт вЯдет.
Фп уэсмб фзт цЬузт уфпн рьлп L.
Фп уэсмб фзт геЯщузт чсюмбфпт рсбуйнп-кЯфсйнпх рсЭрей нб ухндеиеЯ ме фпн рьлп .
Фп уэсмб фпх пхдЭфеспх (мрле) уфпн рьлп Н.
Вйдюуфе кблЬ фйт вЯдет фзт пмЬдбт бкспдекфюн кбй елЭгофе фз уэндеуз фсбвюнфбт
кЬиеуэсмб.
Уфесеюуфе фп кблюдйп мЭущ фпх уцйкфЮсб кблщдЯщн рпх всЯукефбй уфб деойЬ фзт
пмЬдбт бкспдекфюн.
ОбнбклеЯуфе фп рпсфЬкй ме фз впЮиейб фщн 2 вйдюн.
ÔпрпиЭфзуз кбй/Ю бллбгЮ фпх кблщдЯпх фспцпдпуЯбт
З злекфсйкЮ уэндеуз рсЭрей нб рсбгмбфпрпйеЯфбй рсйн фзн фпрпиЭфзуз фзт ухукехЮт мЭуб уфп
Эрйрлп.
П цпэснпт рсЭрей нб ухндЭефбй ме Энб кблюдйп фспцпдпуЯбт (уэмцщнб ме фп рсьфхрп) ме 3
бгщгпэт 1,5 mm2 (1 ph + 1 N + геЯщуз ) рпх рсЭрей нб еЯнбй ухндедемЭнпй ме
дЯкфхп 220-240 V ~ мпнпцбуйкь мЭущ мйбт рсЯжбт 1 ph + 1 Н геЯщуз
уэмцщнб ме фп рсьфхрп
CEI 83 Ю мЭущ мйбт дйЬфбозт дйбкпрЮт сеэмбфпт рпх ухндЭей ьлпхт фпхт рьлпхт кбй рпх Эчей
брьуфбуз бнпЯгмбфпт фщн ербцюн фпхлЬчйуфпн 3 mm. Фп кблюдйп рспуфбуЯбт (рсЬуйнп-кЯфсйнп)
ухндЭефбй ме фпн рьлп фзт ухукехЮт кбй рсЭрей нб еЯнбй ухндедемЭнп ме фз геЯщуз фзт
егкбфЬуфбузт.
Уе ресЯрфщуз уэндеузт ме рсЯжб, бхфЮ рсЭрей нб рбсбмЭней рспувЬуймз мефЬ фзн егкбфЬуфбуз
фзт ухукехЮт. Фп пхдЭфесп фпх цпэснпх (мрле кблюдйп) рсЭрей нб еЯнбй ухндедемЭнп ме фп
пхдЭфесп фпх дйкфэпх.
99625792_ML_A.qxd 21/05/03 15:39 Page 74
Page 75

75
ефе фпн цпэснп убт
Гйб нб вевбйщиеЯфе ьфй з егкбфЬуфбуз Эгйне ущуфЬ, мз дйуфЬуефе нб
кблЭуефе Энбн ейдйкь уфйт пйкйбкЭт злекфсйкЭт ухукехЭт.
ЧсЮуймет дйбуфЬуейт гйб нб енфпйчЯуефе фпн цпэснп убт?
П цпэснпт мрпсеЯ нб егкбфбуфбиеЯ еоЯупх кЬфщ брь Энб фсбрЭжй есгбуЯбт Ю
мЭуб уе Энб Эрйрлп уе уфЮлз (бнпйчфЮ* Ю клейуфЮ) Эчпнфбт рспубсмпумЭнет
дйбуфЬуейт енфпйчйумпэ (влЭре фп рбсбкЬфщ учедйЬгсбммб).
П цпэснпт убт ресйЭчей мйб мегйуфпрпйзмЭнз кхклпцпсЯб бЭсб рпх ерйфсЭрей фзн
брькфзуз бойпузмеЯщфщн брпфелеумЬфщн уфп шЮуймп кбй фпн кбибсйумь бн фзсЮуефе
фб бкьлпхиб уфпйчеЯб:
ЕуфйЬуфе фпн цпэснп уфп Эрйрлп кбфЬ фсьрп рпх нб еггхЬфбй мйб елЬчйуфз брьуфбуз
5 mm брь фп гейфпнйкь Эрйрлп.
Фп хлйкь фпх ерЯрлпх енфпйчйумпэ рсЭрей нб еЯнбй бниекфйкь уфз иесмьфзфб (Ю нб
еЯнбйерендедхмЭнп ме Энб фЭфпйп хлйкь).
Гйб ресйууьфесз уфбиесьфзфб, уфесеюуфе фпн цпэснп уфп Эрйрлп ме 2 вЯдет мЭущ
фщн прюн рпх рспвлЭрпнфбй гй' бхфьн фпн укпрь уфпхт рлЬгйпхт псипуфЬфет (влЭре
учедйЬгсбммб).
Гйб нб гЯней бхфь:
1) БцбйсЭуфе фб кблэммбфб вЯдбт брь кбпхфупэк гйб нб Эчефе рсьувбуз уфйт фсэрет
уфесЭщузт.
2) БнпЯофе мйб фсэрб Ø 3 mm уфп чюсйумб фпх ерЯрлпх гйб нб брпцэгефе нб укЬуей фп оэлп.
3) Уфесеюуфе фпн цпэснп ме фйт 2 вЯдет.
4) ОбнбвЬлфе фб кблэммбфб вЯдбт брь кбпхфупэк (бхфЬ чсзуймеэпхн ерЯузт кбй гйб
нб мейюупхн фз дэнбмз фпх клейуЯмбфпт фзт рьсфбт фпх цпэснпх).
(*) бн фп Эрйрлп еЯнбй бнпйкфь, фп ЬнпйгмЬ фпх рсЭрей нб еЯнбй 70 mm (фп рплэ).
GR
99625792_ML_A.qxd 21/05/03 15:39 Page 75
Page 76

76
1. Пй лерфпмЭсейет фпх рспгсбммбфйуфЮ убт
13
5
7
8
9
6
2
4
10
11
12
ДеЯкфзт бньдпх иесмпксбуЯбт
ДеЯкфзт лейфпхсгЯбт ECO
Бсйимьт укЬлбт уфзн прпЯб ухнйуфЬфбй
нб вЬлефе фп фбшЯ
ДеЯкфзт лейфпхсгЯбт EASY COOK
¸ндейоз чсьнщн (юсб/лерфЬ)
ДеЯкфзт ГКСЙЛ
+
1
3
4
5
6
2
ДйЬскейб шзуЯмбфпт
¿сб фЭлпхт шзуЯмбфпт
ДеЯкфзт дйбиЭуймщн фбшйюн
EASY-COOK
КпхмрЯ сэимйузт
ИесмпксбуЯб цпэснпх /
деЯкфзт рхсьлхузт
ДеЯкфзт буцблйумЭнзт рьсфбт
7
9
10
8
11
12
Рщт цбЯнефбй п цпэснпт убт;
99625792_ML_A.qxd 21/05/03 15:39 Page 76
Page 77

77
a) A ецбсмпгЮ злекфсйкЮт фЬузт
СхимЯуфе фзн юсб уфсЭцпнфбт фп кпхмрЯ. (З
фбчэфзфб ресйуфспцЮт фпх кпхмрйпэ бхопмейюней
фзн фбчэфзфб фзт сэимйузт фзт юсбт).
З кбфбчюсзуз фзт рспубсмпумЭнзт юсбт гЯнефбй
бхфьмбфб уе лЯгб дехфесьлерфб -> з Эндейоз фзт
юсбт ден бнбвпувЮней рйб.
РбсЬдейгмб: 12:30.
b) Åрбнбсэимйуз фзт юсбт фпх сплпгйпэ
ФпрпиефЮуфе фпн ерйлпгЭб рспгсЬммбфпт уфз иЭуз
Сэимйуз юсбт.
З Эндейоз фзт юсбт бнбвпувЮней гйб нб убт
хрпдеЯоей ьфй з сэимйуз еЯнбй дхнбфЮ.
Гйб фз сэимйуз, уфсЭшфе фп кпхмрЯ кбфЬ фсьрп рпх
нб бхоЬней Ю нб мейюней фзн юсб рпхемцбнЯжефбй.
Бцпэ схимЯуефе фзн юсб фзт ерйлпгЮт убт,
фпрпиефЮуфе фпн ерйлпгЭб уфз иЭуз T°c (сэимйуз
иесмпксбуЯбт) -> з Эндейоз фзт юсбт ден
бнбвпувЮней рйб.
Бн ден хрЬсчей ерйкэсщуз, з кбфбчюсзуз гЯнефбй бхфьмбфб мефЬ брь месйкЬ
дехфесьлерфб.
2. Ðщт нб схимЯуефе фп спльй фпх цпэснпх?
Чспнпдйбкьрфзт
ДйЬскейб
шзуЯмбфпт
ФЭлпт
шзуЯмбфпт
Сэимйуз
юсбт
РесйгсбцЮ фпх дйбкьрфз
GR
99625792_ML_A.qxd 21/05/03 15:39 Page 77
T˚
c
T˚
c
Page 78

78
Рщт нб чсзуймпрпйеЯфе фпн цпэснп убт
П рспгсбммбфйуфЮт рсЭрей нб деЯчней мьнп фзн
юсб, бхфЮ ден рсЭрей нб бнбвпувЮней.
ЕрйлЭофе фпн фсьрп шзуЯмбфпт:
УфсЭшфе фпн ерйлпгЭб фщн лейфпхсгйюн уфз иЭуз
фзт ерйлпгЮт убт.
РбсЬдейгмб: иЭуз " ".
ФпрпиефЮуфе фп фбшЯ убт уфп цпэснп бнЬлпгб
ме фз уэуфбуз рпх хрпдейкнэефбй уфзн прфйкЮ
Эндейоз.
РбсЬдейгмб: иЭуз " " -> ухнйуфюменет
укЬлет 1 Ю 2.
П цпэснпт убт рспфеЯней фзн кблэфесз иесмпксбуЯб гйб фпн ерйлегмЭнп фсьрп шзуЯмбфпт: 200°C.
Щуфьуп еЯнбй дхнбфьн нб фз схимЯуефе
чсзуймпрпйюнфбт фп кпхмрЯ рпх всЯукефбй кЬфщ
брь фзн прфйкЮ Эндейоз.
РбсЬдейгмб: иЭуз " " рспубсмпумЭнз
уфпхт 190°C.
МефЬ брь бхфЭт фйт енЭсгейет п цпэснпт иесмбЯнефбй:
П деЯкфзт бньдпх фзт иесмпксбуЯбт енесгпрпйеЯфбй кбй дзлюней фзн бэозуз фзт
иесмпксбуЯбт уфп еущфесйкь фпх цпэснпх.
3 мрйр иб убт хрпдеЯопхн ьфй Эчей циЬуей уфз иесмпксбуЯб рпх еЯче жзфзиеЯ.
МефЬ брь Энбн кэклп шзуЯмбфпт, п бнемйуфЮсбт фпх цпэснпх
ухнечЯжей нб лейфпхсгеЯ гйб Энб псйумЭнп дйЬуфзмб пэфщт юуфе нб
еггхЬфбй фп ущуфь ксэщмб фщн еобсфзмЬфщн.
3. Ðщт нб кЬнефе Энб Ьмеуп шЮуймп
99625792_ML_A.qxd 21/05/03 15:39 Page 78
Page 79

79
Рщт нб чсзуймпрпйеЯфе фпн цпэснп убт
a) ÐсбгмбфпрпйЮуфе Энб шЮуймп ме
кбипсйумЭнз дйЬскейб?
СхимЯуфе фпн ерйлегмЭнп фсьрп шзуЯмбфпт кбй
ендечпмЭнщт рспубсмьуфе фз иесмпксбуЯб.
РбсЬдейгмб: иЭуз " "
иесмпксбуЯб 200°C
ФпрпиефЮуфе фпн ерйлпгЭб рспгсЬммбфпт уфз
иЭуз .
З дйЬскейб шзуЯмбфпт бнбвпувЮней уфп 0h00 гйб
нб хрпдеЯоей ьфй з сэимйуз еЯнбй дхнбфЮ.
УфсЭшфе фп кпхмрЯ гйб нб схимЯуефе фпн ерйихмзфь
чсьнп шзуЯмбфпт.
РбсЬдейгмб: 25 лерф
З кбфбчюсзуз фзт схимйумЭнзт юсбт гЯнефбй
бхфьмбфб мефЬ брь месйкЬ дехфесьлерфб -> з
прфйкЮ Эндейоз ден бнбвпувЮней рйб.
П хрплпгйумьт фзт дйЬскейбт гЯнефбй бмЭущт мефЬ
фз сэимйуз.
З юсб фпх фЭлпхт фпх шзуЯмбфпт (юсб Энбсозт +
юсб шзуЯмбфпт емцбнЯжефбй бхфьмбфб.
У' бхфь фп рбсЬдейгмб:
фЭлпт шзуЯмбфпт уфйт 12:55
МефЬ брь бхфЭт фйт енЭсгейет п цпэснпт иесмбЯнефбй:
П деЯкфзт бньдпх фзт иесмпксбуЯбт енесгпрпйеЯфбй кбй дзлюней фзн бэозуз фзт
иесмпксбуЯбт уфп еущфесйкь фпх цпэснпх.
3 мрйр иб убт хрпдеЯопхн ьфй Эчей циЬуей уфз иесмпксбуЯб рпх еЯче жзфзиеЯ.
Уфп фЭлпт фпх шзуЯмбфпт, екрЭмрефбй мйб уейсЬ брь зчзфйкЬ мрйр гйб месйкЬ лерфЬ.
Фб мрйр уфбмбфпэн фпрпиефюнфбт фпн ерйлпгЭб уфз сэимйуз уфп T°cкбй ербнбцЭспнфбт фп дйбкьрфз уфп "0".
4. Ðщт нб рспгсбммбфЯуефе Энб шЮуймп
GR
99625792_ML_A.qxd 21/05/03 15:39 Page 79
T˚
c
Page 80

80
b) ÁнбвЬллефе Энб шЮуймп ме рспкбипсйумЭнз дйЬскейб?
(ерйлегмЭнз юсб фЭлпхт)
РспчщсЮуфе ьрщт уфп б) Эрейфб, мефЬ фз сэимйуз
фзт дйЬскейбт фпх шзуЯмбфпт,
ФпрпиефЮуфе фпн ерйлпгЭб фсьрпх уфз иЭуз .
З юсб фпх фЭлпхт фпх шзуЯмбфпт бнбвпувЮней гйб
нб хрпдеЯоей ьфй з сэимйуз еЯнбй рйб дхнбфЮ.
Рспубсмьуфе фзн юсб фпх ерйихмзфпэ фЭлпхт
шзуЯмбфпт уфсЭцпнфбт фп кпхмрЯ кЬфщ брьфзн
прфйкЮ Эндейоз.
БрЭнбнфй рбсЬдейгмб: ерйихмзфь фЭлпт
шзуЯмбфпт уфйт 13:00.
МефЬ брь бхфЭт фйт енЭсгейет, з Энбсоз фзт иЭсмбнузт бнбвЬллефбй пэфщт юуфе фп
шЮуймп нб фелейюуей уфйт 13:00. ¼фбн фелейюуей фп шЮуймп, екрЭмрефбй мйб уейсЬ брь
мрйр, обнбвЬлфе фпн ерйлпгЭб шзуЯмбфпт уфп 0.
Рщт нб чсзуймпрпйеЯфе фпн цпэснп убт
ЕЯнбй дхнбфьн
- нб фспрпрпйЮуефе бнЬ рЬуб уфйгмЮ фз дйЬскейб шзуЯмбфпт.
- нб бкхсюуефе бнЬ рЬуб уфйгмЮ фпн рспгсбммбфйумь обнбвЬжпнфбт
фзн фймЮ фзт дйЬскейбт уфп 0.00.
99625792_ML_A.qxd 21/05/03 15:39 Page 80
T˚
c
Page 81

Рщт нб чсзуймпрпйеЯфе фпн цпэснп убт
5. Ðщт нб кЬнефе Энб Пйкпнпмйкь шЮуймп*
81
П рспгсбммбфйуфЮт рсЭрей нб деЯчней мьнп фзн
юсб, бхфЮ ден рсЭрей нб бнбвпувЮней.
УфсЭшфе фпн ерйлпгЭб лейфпхсгйюн уфз
иЭуз " ". П деЯкфзт "ECO" бнЬвей уфзн
прфйкЮ Эндейоз.
ФпрпиефЮуфе фп фбшЯ убт уфп цпэснп бнЬлпгб
ме фз уэуфбуз рпх хрпдейкнэефбй уфзн прфйкЮ
Эндейоз.
РбсЬдейгмб: иЭуз " "-> ухнйуфюменет
укЬлет 1 Ю 2.
П цпэснпт убт рспфеЯней фзн кблэфесз иесмпксбуЯб гйб фпн ерйлегмЭнп фсьрп шзуЯмбфпт 200°C.
Щуфьуп еЯнбй дхнбфьн нб фз схимЯуефе
чсзуймпрпйюнфбт фп кпхмрЯ рпх всЯукефбй кЬфщ
брь фзн прфйкЮ Эндейоз.
РбсЬдейгмб: иЭуз " " рспубсмпумЭнз
уфпхт 190°C.
МефЬ брь бхфЭт фйт енЭсгейет п цпэснпт иесмбЯнефбй:
П деЯкфзт бньдпх фзт иесмпксбуЯбт енесгпрпйеЯфбй кбй дзлюней фзн бэозуз фзт
иесмпксбуЯбт уфп еущфесйкь фпх цпэснпх.
3 мрйр иб убт хрпдеЯопхн ьфй Эчей циЬуей уфз иесмпксбуЯб рпх еЯче жзфзиеЯ.
Гйб нб велфйюуефе фп шЮуймп ECO, мзн кЬнефе рспиЭсмбнуз кбй мзн бнпЯгефе фзн рьсфб.
*БхфЮ з иЭуз ерйфсЭрей нб кесдЯуефе енЭсгейб Эщт кбй 20% Эчпнфбт фбхфьчспнб
фб Ядйб брпфелЭумбфб уфп шЮуймп.
З иЭуз ECO чсзуймпрпйеЯфбй гйб фзн фпрпиЭфзуз ефйкефюн енЭсгейбт.
МефЬ брь Энб кэклп шзуЯмбфпт, п бнемйуфЮсбт фпх цпэснпх
ухнечЯжей нб лейфпхсгеЯ гйб Энб псйумЭнп дйЬуфзмб пэфщт юуфе нб
еггхЬфбй фп ущуфь ксэщмб фщн еобсфзмЬфщн.
GR
99625792_ML_A.qxd 21/05/03 15:39 Page 81
Page 82

82
Рщт нб чсзуймпрпйеЯфе фпн цпэснп убт
6. Ðщт нб чсзуймпрпйЮуефе фз лейфпхсгЯб "Гксйл+"
ЕЯнбй дхнбфьн нб оекйнЮуефе Ю нб уфбмбфЮуефе бхфЮ фз лейфпхсгЯб
бнЬ рЬуб уфйгмЮ кбфЬ фз дйЬскейб фпх шзуЯмбфпт бкпхмрюнфбт фпн
дйбкьрфз сэимйузт.
ЕЯнбй ерЯузт дхнбфьннб енесгпрпйЮуефе бхфЮ фз лейфпхсгЯб уе
дйбцпспрпйзмЭнп шЮуймп.
БхфЮ з лейфпхсгЯб убт ерйфсЭрей нб ухндЭуефе уфзн ерйлегмЭнз бкплпхиЯб шзуЯмбфпт мйб
лейфпхсгЯб "СпдЯумбфпт" фпх цбгзфпэ уфп фЭлпт фпх шзуЯмбфпт, рпх рсбгмбфпрпйеЯфбйме
фз иЭуз уе лейфпхсгЯб фпх гксйл фб фелехфбЯб 5 лерфЬ фзт бкплпхиЯбт.
БхфЮ енесгпрпйеЯфбй мьнп уфйт бкьлпхиет лейфпхсгЯет шзуЯмбфпт: .
БхфЮ з лейфпхсгЯб мрпсеЯ нб рспгсбммбфйуфеЯ уфзн
бсчЮ фпх шзуЯмбфпт БхфЮ з лейфпхсгЯб мрпсеЯ
нб рспгсбммбфйуфеЯ уфзн бсчЮ фпх шзуЯмбфпт
рспуиЭфпнфбт 5лерфЬ уфп чсьнп шзуЯмбфпт Ю
брлЬ уфп фЭлпт фпх шзуЯмбфпт фпрпиефюнфбт
фпн ерйлпгЭблейфпхсгЯбт уфп ГКСЙЛ+.
СхимЯуфе фпн ерйлегмЭнп фсьрп шзуЯмбфпт кбй
ендечпмЭнщт рспубсмьуфе фз иесмпксбуЯб.
ФпрпиефЮуфе фпн ерйлпгЭб рспгсЬммбфпт уфз иЭуз
ГКСЙЛ+, з дйЬскейб фпх шзуЯмбфпт бнбвпувЮней
уфп 0:05 (бхфЮ з фймЮ дйЬскейбт бнфйуфпйчеЯ уфпн
елЬчйуфп чсьнп рпх еЯнбй брбсбЯфзфпт гйб нб енесгпрпйзиеЯ з лейфпхсгЯб ГКСЙЛ+ уфзн ерйлегмЭнз
бкплпхиЯб шзуЯмбфпт).
УфсЭшфе фп кпхмрЯ сэимйузт гйб нб рспубсмьуефе
фз ухнплйкЮ дйЬскейб шзуЯмбфпт. З кбфбчюсзуз
фзт дйЬскейбт гЯнефбй бхфьмбфб мефЬ брь месйкЬ дехфесьлерфб, з прфйкЮ Эндейоз ден
бнбвпувЮней рйб.
МефЬ брь бхфЭт фйт 3 енЭсгейет, п цпэснпт иесмбЯнефбй кбй цщфЯжефбй мйб псйжьнфйб сЬвдпт
уфзн прфйкЮ Эндейоз, кЬфщ брь фп кеЯменп ГКСЙЛ+, хрпдейкнэпнфЬт убт рщт з лейфпхсгЯб
Ьсчйуе. РЭнфе лерфЬ рсйн брь фп фЭлпт фпх шзуЯмбфпт, п деЯкфзт "ГКСЙЛ+ бнбвпувЮней.
Мзн фпрпиефеЯфе фб фбшйЬ рплэ кпнфЬ уфз учЬсб гйб нб брпцэгефе фп рплэ
гсЮгпсп сьдйумб. ФзсЮуфе фзн 1з Ю 2з укЬлб (оекйнюнфбт брь кЬфщ).
РбсбдеЯгмбфб рйЬфщн:
ПгксбфЭн ме жэмет, кпхнпхрЯдйб, бнфЯв, иблбууйнЬ
РбсбдеЯгмбфб рспгсбммбфйумпэ:
ГксбфйнбсйумЭнз ксеммхдьупхрб:
ЕрйлЭофе фзн бкплпхиЯб шзуЯмбфпт
ЕрйлЭофе фз иесмпксбуЯб: 180°C
ЕрйлЭофе фп рсьгсбммб: "ГКСЙЛ+
ЕрйлЭофе фп чсьнп: 25 лерфЬ.
З упэрб иб жеуфбиеЯ гйб 20 лерфЬ кбй фп гксбфйнЬсйумб иб гЯней фб хрьлпйрб 5 лерфЬ.
99625792_ML_A.qxd 21/05/03 15:39 Page 82
T˚
c
Page 83

П цпэснпт убт еЯнбй еопрлйумЭнпт ме Энбн злекфспнйкь чспнпдйбкьрфз бнеоЬсфзфп
брь фз лейфпхсгЯб фпх цпэснпх рпх ерйфсЭрей нб хрплпгЯуефе Энб чсьнп.
БхфЮ з лейфпхсгЯб мрпсеЯ нб чсзуймпрпйзиеЯ бкьмб кбй кбфЬ фз дйЬскейб фзт
лейфпхсгЯбт фпх цпэснпх. У' бхфЮ фзн ресЯрфщуз, з Эндейоз фпх чспнпдйбкьрфз хресйучэей фзт Эндейозт фзт юсбт.
ФпрпиефЮуфе фпн ерйлпгЭб рспгсбммбфйумпэ
чсьнпх уфз иЭуз -> з прфйкЮ Эндейоз
бнбвпувЮней кбй бнЬвей мйб мйксЮ клешэдсб.
УфсЭшфе фп кпхмрЯ сэимйузт мЭчсйт ьфпх
брпкфЮуефе фзн ерйихмзфЮ дйЬскейб (мЭгйуфз 59
лерфЬ 59 дехфесьлерфб)
рбсЬдейгмб 15 лерфЬ 30 дехфесьлерфб
З прфйкЮ Эндейоз уфбмбфЬ нб бнбвпувЮней мефЬ
брь месйкЬ дехфесьлерфб кбй п чспнпдйбкьрфзт
оекйнЬ кбй мефсЬ фп чсьнп брь дехфесьлерфп уе
дехфесьлерфп. Бцпэ ресЬуей здйЬскейб, п
чспнпдйбкьрфзт екрЭмрей зчзфйкЬ мрйр гйб нб убт рспейдпрпйЮуей.
7. Ðщт нб чсзуймпрпйЮуефе фпн чспнпдйбкьрфз
Рщт нб чсзуймпрпйеЯфе фпн цпэснп убт
ЕЯнбй дхнбфьн нб фспрпрпйЮуефе Ю нб бкхсюуефе бнЬ рЬуб уфйгмЮ фпн
рспгсбммбфйумь фпх чспнпдйбкьрфз.
83
8. Ðщт нб схимЯуефе фз лЬмшз рпх иб Эчей фп цщфЬкй
МрпсеЯфе нб бхопмейюуефе фз лЬмшз фзт прфйкЮт ЭндейоЮт убт, щт еоЮт:
СхимЯуфе фзн юсб фпх рспгсбммбфйуфЮ убт уфйт
12:10.
УхнечЯуфе нб ксбфЬфе фп кпхмрЯ рсбгмбфпрпйюнфбт
фбхфьчспнб мйб ресйуфспцЮ пэфщт юуфе нб
брпкфЮуефе фзн ерйихмзфЮ лЬмшз.
Бцпэ схимЯуефе фз лЬмшз фзт ерйлпгЮт убт,
обнбвЬлфе фпн рспгсбммбфйуфЮ убт уфз ущуфЮ юсб.
GR
99625792_ML_A.qxd 21/05/03 15:39 Page 83
T˚
c
Page 84

ÄйбфЮсзуз уфп жеуфь
ДпуплпгЯб фщн кЬфщ кбй рЬнщ
уфпйчеЯщн уе учЭуз ме фзн бнЬмейоз
бЭсб.
84
Ðбсбдпуйбкь ме бЭсб
Фп шЮуймп рсбгмбфпрпйеЯфбй брь фб
рЬнщ кбй кЬфщ уфпйчеЯб кбй ме фпн
Элйкб бнЬмейозтбЭсб.
Ðбсбдпуйбкь
Фп шЮуймп рсбгмбфпрпйеЯфбй брь фб
рЬнщ кбй кЬфщ уфпйчеЯб чщсЯт бнЬмейоз
бЭсб.
ÐлЬкб Эдсбузт ме бЭсб
Фп шЮуймп рсбгмбфпрпйеЯфбй брь фп
кЬфщ уфпйчеЯп рпх ухндЭефбй ме мйб
елбцсйЬ дьуз фпх гксйл кбй ме фпн
Элйкб бнЬмейозт бЭсб.
ГсЮгпсз Ьнпдпт фзт
фбшйЬ мрпспэн нб м
БрбйфеЯ рспиЭсмбну
фбшЯ уфп цпэснп.
ДйбфЮсзуз уфп жеуфь
ШЮуймп брь кЬфщ ме
ФпрпиефЮуфе фз учЬ
БхфЮ з иЭуз ерйфсЭр
ресЯрпх 20% дйбфзс
фзн рпйьфзфб фпх шз
чсзуймпрпйеЯфбй гйб
ефйкефюн енЭсгейбт
Уэмвплп ¼нпмб лейфпхсгЯбт РесйгсбцЮ
Ð
бсбдпуйбкь ECO
Фп шЮуймп рсбгмбфпрпйеЯфбй брь фб
рЬнщ кбй кЬфщ уфпйчеЯб чщсЯт бнЬмейоз
бЭсб.
Фсьрпй шзуЯмбфпт фпх цпэснпх
ÐесйуфспцйкЮ иесмьфзфб
Фп шЮуймп рсбгмбфпрпйеЯфбй ме фзн
бнфЯуфбуз фпрпиефзмЭнз уфпн рЬфп
фпх цпэснпх кбйме фпн Элйкб
бнЬмейозт бЭсб.
РесйффЮ з рспиЭсм
шзуЯмбфб рпх брбй
(кпхлпхсЬкйб уе р
Êхмбйньменп гксйл
Фп шЮуймп рсбгмбфпрпйеЯфбй брь фп
рЬнщ уфпйчеЯп чщсЯт бнЬмейоз бЭсб.
Ãêñéë ìå áÝñá
Фп шЮуймп рсбгмбфпрпйеЯфбй,
енбллбкфйкЬ, брь фп рЬнщ уфпйчеЯп
кбй фпн Элйкб бнЬмейозт бЭсб.
РесйффЮ з рспиЭсмб
РпхлесйкЬ кбй шзфЬ
бр' ьлет фйт ьшейт.
Дхнбфьфзфб шзуЯмбф
кпммбфйпэ ксЭбфпт ð
кбй нб вЬлефе фп фбø
уфзн 1з укЬлб гйб н
хгсЬ фпх шзуЯмбфпт
РсбгмбфпрпйЮуфе рс
ВЬлфе фп фбшЯ рпллб
укЬлб.
*
БкплпхиЯб(ет) рпх чсзуймпрпйеЯфбй(пэнфбй) гйб фзн гсбрфЮ бнбкпЯнщуз уфзн ефйкЭфб енЭсгейбт у
*
*
*
99625792_ML_A.qxd 21/05/03 15:39 Page 84
Page 85

УхнйуфЬфбй гйб фб КсЭбфб, фб ШЬсйб, фб ЛбчбнйкЬ, рпх
фб Эчефе вЬлей уе рЮлйнп укеэпт кбфЬ рспфЯмзуз.
УхнйуфЬфбй гйб фб бсгЬ кбй ехбЯуизфб мбгейсЭмбфб:
мблбкЬ изсЬмбфб
Гйб нб фуйгбсЯуефе фб кьккйнб ксЭбфб.
Гйб нб уйгпвсЬуефе уе клейуфЮ кбфубсьлб фб цбгзфЬ.
рпх Эчефе рспзгпхмЭнщт оекйнЮуей уфб мЬфйб фзт кпхжЯнбт
(кькпсбт ксбуЬфпт, ксЭбт всбуфь ме лбчбнйкЬ).
УхнйуфЬфбй гйб нб цпхукюупхн пй жэмет гйб шщмЯ,
мрсйьт, kouglof чщсЯт нб оереснЬ фпхт 40°C
(иЭсмбнуз цбгзфюн - брьшхоз).
УхнйуфЬфбй гйб фб хгсЬ цбгзфЬ (кйт, фЬсфет ме жпхмесЬ
цспэфб)
З жэмз иб еЯнбй кблЬ шзмЭнз брь кЬфщ.
УхнйуфЬфбй гйб фб рбсбукехЬумбфб рпх цпхукюнпхн
(кЭйк, мрсйьт, kouglof) кбй гйб фб упхцлЭ рпх ден иб
фб емрпдЯжей з кспэуфб брь рЬнщ.
¸чефе пйкпнпмЯб уфзн енЭсгейб кби' ьлз фз дйЬскейб фпх
шзуЯмбфпт бллЬ п чсьнпт мрпсеЯ нб еЯнбй ресйууьфеспт.
Фсьрпй шзуЯмбфпт фпх цпэснпх
зуЯмбфпт. З иЭуз ECO
УхнйуфЬфбй гйб фз дйбфЮсзуз фзт брблЮт хцЮт фщн
ксеЬфщн, гйб фб лбчбнйкЬ, фб шЬсйб кбй гйб фб
рпллбрлЬ шзуЯмбфб Эщт кбй уе 3 ерЯредб.
рпллЬ ерЯредб.
З йучэт еЯнбй схимйжьменз брь 30 Эщт 100% (иЭуейт 1 Эщт
4 уфзн прфйкЮ Эндейоз). Гйб мегЬлз брпфелеумбфйкьфзфб,
убт ухнйуфпэме нб чсзуймпрпйЮуефе фйт бнюфесет фймЭт.
рпх фп вЬжефе уфз учЬсб
нб мбжехфпэн екеЯ фб
УхнйуфЬфбй гйб ьлб фб рпхлесйкЬ Ю шзфЬ. Гйб нб
фуйгбсЯуефе кбй нб шЮуефе кб мрпэфй, впдйнЬ
рбъдЬкйб. Гйб нб рбсбмеЯнпхн мблбкЭт пй чпнфсЭт
цЭфет шбсйпэ.
УхнйуфЬфбй гйб нб fцпхукюупхн пй жэмет гйб
шщмЯ, гйб мрсйьт, kouglof ... чщсЯт нб оереснЬ
фпхт 40°C (иЭсмбнуз цбгзфюн, брьшхоз).
уэмцщнб ме фп ехсщрбъкь рсьфхрп ЕН 50304 кбй уэмцщнб ме фзн ЕхсщрбъкЮ пдзгЯб 2002/40/ЕЕ.
85
УхуфЬуейт
GR
99625792_ML_A.qxd 21/05/03 15:39 Page 85
Page 86

86
- П цпэснпт убт кбибсЯжефбй ме фзн еоЬлейшз уе хшзлЮ иесмпксбуЯб ьлщн фщн вспмйюн
рпх рспЭсчпнфбй брь рйфуйлЯумбфб Ю екчэуейт. Пй кбрнпЯ кбй пй мхсщдйЭт рпх
бнбдэпнфбй еобцбнЯжпнфбй ме фп рЭсбумб брь Энбн кбфблэфз.
- З рхсьлхуз ден еЯнбй щуфьуп брбсбЯфзфз мефЬ брь кЬие шЮуймп, бллЬ мьнп бн фп
брбйфеЯ п вбимьт фзт вспмйЬт.
- РспкеймЭнпх нб рспубсмпуфеЯ уе кЬие кбфЬуфбуз, бхфьт п цпэснпт дйбиЭфей 2
кэклпхткбибсйумпэ ме рхсьлхуз.
- ¸нбн пйкпнпмйкь кэклп (PYRO ECO) дйЬскейбт 1:30 юсбт (лбмвЬнпнфбт
хрьшз фп чсьнп гйб нб ксхюуей п цпэснпт, бхфьт иб рбсбмеЯней буцблйумЭнпт гйб 2
юсет), бхфьт п кэклпт кбфбнблюней ресЯрпх 25% лйгьфесп брь фпн уфЬнфбсф кэклп
рхсьлхузт. ЕнесгпрпйзмЭнпт фбкфйкЬ (кЬие 2 Ю 3 шзуЯмбфб ксеЬфщн), бхфьт п кэклпт
ерйфсЭрей нб дйбфзсеЯфе фпн цпэснп кбибсь бнЬ рЬуб уфйгмЮ.
- ¸нбт уфЬнфбсф кэклпт (PYRO) дйЬскейбт 2 щсюн (лбмвЬнпнфбт хрьшз фп
чсьнп гйб нб ксхюуей п цпэснпт, бхфьт иб рбсбмеЯней буцблйумЭнпт гйб 2:30 юсет), иб
еобуцблЯуей фпн брпфелеумбфйкь кбибсйумь еньт рплэ всюмйкпх цпэснпх.
- Щт мЭфсп буцблеЯбт, з рьсфб мрлпкЬсефбй мьлйт з иесмпксбуЯб уфп еущфесйкь фпх
цпэснпх оересЬуей фйт иесмпксбуЯет шзуЯмбфпт. Фьфе еЯнбй бдэнбфпн нб бнпЯоефе фзн
рьсфббкьмб кбй фпрпиефюнфбт фпн дйбкьрфз "ерйлпгЭб лейфпхсгйюн" уфп 0.
1. Ôй еЯнбй з рхсьлхуз;
Ð щт нб кбибсЯуефе фзн
2. Уе рпйб ресЯрфщуз рсЭрей нб рсбгмбфпрпйеЯфе мйб рхсьлхуз;
П цпэснпт убт кбрнЯжей кбфЬ фзн рспиЭсмбнуз Ю кбрнЯжей рЬсб рплэ кбфЬ фп шЮуймп.
Пцпэснпт убт вгЬжей ен шхчсю мйб дхуЬсеуфз мхсщдйЬ мефЬ брь дйЬцпсб шзуЯмбфб
(бснЯ,шЬсй, шзфЬ уфз учЬсб).
Ден рсЭрей нб ресймЭнефе нб гемЯуей п цпэснпт лЯрз гйб нб кЬнефе
бхфьн фпн кбибсйумь.
ШЗУЙМБФБ РПХ
Мрйукьфб, лбчбнйкЬ, глхкЬ, ШзуЯмбфб чщсЯт рйфуйлЯумбфб
ЛЕСЩНПХН ЛЙГП
кйт, упхцлЭ ден чсейЬжефбй рхсьлхуз
ШЗУЙМБФБ РПХ
ксЭбфб, шЬсйб, (уе фбшЯ)
з рхсьлхуз мрпсеЯ нб чсейбуфеЯ
ЛЕСЩНПХН
гемйуфЬ лбчбнйкЬ мефЬ брь кЬие 3 шзуЯмбфб
ШЗУЙМБФБ РПХ
мегЬлб кпммЬфйб ксеЬфщн з рхсьлхуз мрпсеЯ нб гЯней
ЛЕСЩНПХН РПЛХ
уфз упэвлб брь 1 шЮуймп бхфпэ фпх фэрпх
бн Эгйнбн рпллЬ рйфуйлЯумбфб
99625792_ML_A.qxd 21/05/03 15:39 Page 86
Page 87

еупчЮ фпх цпэснпх убт;
3. Ð
щт нб кЬнефе мйб Ьмеуз рхсьлхуз
87
ВгЬлфе фб укеэз брь фп цпэснп кбй бцбйсЭуфе фйт екчэуейт рпх мрпсеЯ
нб рспклЮизкбн.
ЕлЭгофе ьфй п рспгсбммбфйуфЮт деЯчней фзн юсб
кбй ьфй ден бнбвпувЮней.
ФпрпиефЮуфе фпн дйбкьрфз "ерйлпгЭб лейфпхсгйюн"
уфз иЭуз "PYRO" Ю "PYRO ECO".
З дйЬскейб фзт рхсьлхузт кхмбЯнефбй брь 2 юсет
уфп "PYRO ECO" Эщт 2:30 уфп "PYRO". Бхфьт п
чсьнпт ресйлбмвЬней фп чсьнп брь фп нб ксхюуей
п цпэснпт мЭчсй фп оеклеЯдщмб фзт рьсфбт.
З прфйкЮ Эндейоз убт хрпдейкнэей фзн юсб
прьфе п цпэснпт убт иб еЯнбй обнЬ дйбиЭуймпт.
Ôï убт хрпдейкнэей ьфй всЯукеуфе уфпн
кэклп рхсьлхузт (Ю pyro eco).
КбфЬ фз дйЬскейб фпх кэклпх рхсьлхузт, емцбнЯжефбй
уфзн прфйкЮ Эндейоз Энб лпхкЭфп, кбй убт
хрпдейкнэей ьфй з рьсфб еЯнбй клейдщмЭнз.
Уфп фЭлпт фпх кэклпх фзт рхсьлхузт, з прфйкЮ
Эндейоз деЯчней........................................................
>
¼фбн фп лпхкЭфп ден емцбнЯжефбй рйб уфзн прфйкЮ
Эндейоз, еЯнбй дхнбфьн нб бнпЯоефе фзн рьсфб.
ОбнбвЬлфе фпн ерйлпгЭб лейфпхсгйюн уфз иЭуз 0.
¼фбн п цпэснпт ксхюуей, чсзуймпрпйЮуфе Энб
хгсь рбнЯ гйб нб бцбйсЭуефе фзн лехкЮ уфЬчфз.
П цпэснпт еЯнбй кбибсьт кбй мрпсеЯ нб
чсзуймпрпйзиеЯ обнЬ гйб нб шЮуефе ьрщт
ерйихмеЯфе.
GR
99625792_ML_A.qxd 21/05/03 15:40 Page 87
T˚
c
Page 88

Рщт нб бллЬоефе фз лхчнЯб
З лхчнЯб всЯукефбй уфзн пспцЮ фзт еупчЮт фпх цпэснпх убт.
б) УфсЭшфе фп цщфйуфйкь фзт
кпхжЯнбт рспт фб бсйуфесЬ кбфЬ
Энб фЭфбсфп фзт уфспцЮт.
в) Оевйдюуфе фз лхчнЯб рспт фзн
Ядйб кбфеэихнуз.
ЧбсбкфзсйуфйкЬ фзт лхчнЯбт:
- 15 W
- 220-240 V
- 300°C
- âÜóç E 14
г) БллЬофе фз лхчнЯб, Эрейфб бневЬуфе фп цщфйуфйкь кбй обнбухндЭуфе фпн цпэснп убт.
гйб нб оевйдюуефе фп цщфйуфйкь кбй фз лЬмрб, чсзуймпрпйЮуфе рлбуфйкь
гЬнфйрпх иб дйехкплэней фзн брпухнбсмпльгзуз.
БрпухндЭуфе фпн цпэснп убт рсйн брь кЬие рбсЭмвбуз уфз лхчнЯб гйб
нб брпцэгефе кЬие кЯндхнп злекфспрлзоЯбт кбй еЬн чсейбуфеЯ бцЮуфе
нб ксхюуей з ухукехЮ.
88
БкплпхиЮуфе фйт пдзгЯет рпх ресйгсЬцпнфбй уфзн рбсЬгсбцп "Ьмеуз рхсьлхуз", Эрейфб
ФпрпиефЮуфе фпн ерйлпгЭб рспгсбммбфйумпэ
чсьнпх уфз иЭуз .
Фп фЭлпт фпх шзуЯмбфпт бнбвпувЮней гйб нб
хрпдеЯоей ьфй еЯнбй дхнбфЮ з сэимйуз.
УфсЭшфе фп кпхмрЯ гйб нб схимЯуефе фзн ерйихмзфЮ
юсб фЭлпхт.
РбсЬдейгмб: ФЭлпт рхсьлхузт уфйт 4.
МефЬ брь бхфЭт фйт енЭсгейет, з Энбсоз фзт рхсьлхузт бнбвЬллефбй пэфщт юуфе нб фелейюуей уфйт 4.
¼фбн з рхсьлхуз фелейюуей, обнбвЬлфе фпн ерйлпгЭб шзуЯмбфпт уфп 0 .
4. Ðщт нб кЬнефе мйб рспгсбммбфйумЭнз рхсьлхуз
НфпхЯ
Цщфйуфйкь
Оевйдюуфе
99625792_ML_A.qxd 21/05/03 15:40 Page 88
T˚
c
Page 89

89
Фй нб кЬнпхме уе ресЯрфщуз
бнщмблйюн уфз лейфпхсгЯб;
¸чефе кЬрпйб бмцйвплЯб гйб фзн кблЮ лейфпхсгЯб фпх цпэснпх убт,áõôü äåí
узмбЯней ьмщт прщудЮрпфе ьфй хрЬсчей кЬрпйб влЬвз. Уе кЬие ресЯрфщуз, елЭгофе
фб бкьлпхиб узмеЯб:
Äйбрйуфюнефе ьфй...
Ïй рйибнЭт бйфЯет Ôй рсЭрей нб кЬнщ?
П цпэснпт ден иесмбЯнефбй.
П цпэснпт ден еЯнбй ухндедемЭнпт.
З буцЬлейб фзт егкбфЬуфбуЮт убт
еЯнбй екфьт лейфпхсгЯбт.
З ерйлегмЭнз иесмпксбуЯб еЯнбй
рплэ чбмзлЮ.
П ухллЭкфзт еЯнбй елбффщмбфйкьт.
П цпэснпт Эчей хрпуфеЯ мйб хресиЭсмбнуз, кбй буцблЯжефбй.
- УхндЭуфе фпн цпэснп.
- БллЬофе фзн буцЬлейб фзт
егкбфЬуфбуЮт убт кбй елЭгофе фзн
фймЮ фзт (16Б).
- БхоЮуфе фзн ерйлегмЭнз иесмпксбуЯб.
- КблЭуфе фзн ХрзсеуЯб ЕохрзсЭфзузт
МефЬ фзн Рюлзуз.
- КблЭуфе фзн ХрзсеуЯб ЕохрзсЭфзузт
МефЬ фзн Рюлзуз.
- КблЭуфе фзн ХрзсеуЯб ЕохрзсЭфзузт
МефЬ фзн Рюлзуз.
П деЯкфзт фзт T°c бнбвпувЮней.
УцЬлмб клейдюмбфпт фзт рьсфбт.
Елбффщмбфйкьт ухллЭкфзт
иесмпксбуЯбт.
- КблЭуфе фзн ХрзсеуЯб ЕохрзсЭфзузт
МефЬ фзн Рюлзуз.
- КблЭуфе фзн ХрзсеуЯб ЕохрзсЭфзузт
МефЬ фзн Рюлзуз.
З лЬмрб фпх цпэснпх ден лейфпхсгеЯ.
З лЬмрб еЯнбй екфьт лейфпхсгЯбт.
П цпэснпт ден еЯнбй ухндедемЭнпт
Ю з буцЬлейб еЯнбй екфьт лейфпхсгЯбт.
- БллЬофе фз лЬмрб.
- УхндЭуфе фпн цпэснп Ю бллЬофе
фзн буцЬлейб.
П бнемйуфЮсбт гйб нб ксхюуей п
цпэснпт ухнечЯжей нб гхснЬ кбй
мефЬ фп уфбмЬфзмб фпх цпэснпх.
П бнемйуфЮсбт лейфпхсгеЯ гйб 1
юсб фп рплэ мефЬ фп шЮуймп, Ю ьфбн
з иесмпксбуЯб фпх цпэснпх убт
еЯнбй бнюфесз фщн 125°C.
Бн ден уфбмбфЮуей мефЬ брь 1 юсб.
- БнпЯофе фзн рьсфб фпх цпэснпх
гйб нб ксхюуей п цпэснпт рйп
гсЮгпсб.
- КблЭуфе фзн ХрзсеуЯб ЕохрзсЭфзузт
МефЬ фзн Рюлзуз.
П кбибсйумьт ме рхсьлхуз ден
гЯнефбй.
З рьсфб ден еЯнбй кблЬ клейумЭнз.
Фп уэуфзмб клейдюмбфпт еЯнбй
елбффщмбфйкь.
П ухллЭкфзт T° еЯнбй елбффщмбфйкьт.
П дйбкьрфзт бнЯчнехузт фзт клейуфЮт
рьсфбт еЯнбй елбффщмбфйкьт.
- ЕлЭгофе фп клеЯуймп фзт рьсфбт.
- КблЭуфе фзн ХрзсеуЯб ЕохрзсЭфзузт
МефЬ фзн Рюлзуз.
- КблЭуфе фзн ХрзсеуЯб ЕохрзсЭфзузт
МефЬ фзн Рюлзуз.
- КблЭуфе фзн ХрзсеуЯб ЕохрзсЭфзузт
МефЬ фзн Рюлзуз.
GR
МефбцЭсефе рбсбкЬфщ фйт ендеЯоейт рпх емцбнЯжпнфбй уфзн ресйгсбцйкЮ рйнбкЯдб фпх
цпэснпх убт:
MADE IN FRANCE
220 - 240V ~ 50 Hz
BRANDT APPLIANCES SAS
7 rue Henri Becquerel
92500 RUEIL MALMAISON
99625792_ML_A.qxd 21/05/03 15:40 Page 89
Page 90

In deze gebruikshandleiding
geeft symbool
veiligheidsaanwijzingen en symbool,
tips en praktische richtlijnen aan
Inleiding
P.91
Indeling van uw oven
B
eschrijving van de oven
P.92
O
ventoebehoren
P.93
Veiligheidsaanwijzingen
P.94
Installatie van uw oven
Elektrische aansluiting P.95-96
Nuttige afmetingen voor de inbouw van uw oven P.97
Gebruik van uw oven
De programmaschakelaar P.98
I
nstellen van het uur van de oven
P.99
Onmiddellijk bakken
P.100
Geprogrammeerd bakken
P.101
Uitgesteld bakken (met een bepaalde eindtijd)
P.102
Bakken met energiebesparing (ECO-bakken)
P.103
Gebruik van de Grill+-functie
P.104
Gebruik van de schakelklok
P.105
Instelling van de lichtsterkte van de display
P.105
Bakwijzen van de oven
P.106-107
Reiniging van de binnenzijde van de oven
Wat is een pyrolyse? P.108
Wanneer is een pyrolysereiniging nodig ? P.108
Onmiddellijke pyrolysereiniging P.109
Uitgestelde pyrolysereiniging P.110
Vervanging van de ovenlamp
P.110
Problemen en oplossingen
P.111
90
Inhoud
99625792_ML_A.qxd 21/05/03 15:40 Page 90
Page 91

91
Inleiding
Geachte klant,
U heeft net een oven van BRANDT aangekocht. We willen u hier graag
voor bedanken.
Onze onderzoeksteams hebben voor u een nieuwe generatie van
apparaten ontworpen waarmee koken en bakken dag na dag een waar
plezier wordt.
Dank zij het moderne en verfijnde ontwerp zal uw nieuwe BRANDT-
oven harmonieus in uw keuken kunnen worden ingepast. Uw oven is
een geslaagde combinatie van gebruiksvriendelijkheid, optimale
bakprestaties en esthetische schoonheid.
In het gamma van BRANDT-producten vindt u tevens een ruime keuze
aan kookplaten, afzuigkappen, vaatwasautomaten en koelkasten die
allemaal harmonieus met uw BRANDT-oven kunnen worden
gecombineerd.
Uiteraard wensen wij onze klanten ook na de aankoop altijd tevreden te
houden. Onze servicedienst zal u altijd met uw vragen of suggesties
verderhelpen (zie achteraan deze handleiding).
BRANDT staat niet alleen voor technologische innovatie, maar verbetert
tevens de kwaliteit van uw dagelijkse leven. BRANDT biedt u immers
apparaten met een bijzonder mooie vormgeving die prestaties en
gebruiksgemak aan milieuvriendelijkheid en betrouwbaarheid koppelen.
BRANDT
NL
99625792_ML_A.qxd 21/05/03 15:40 Page 91
Page 92

92
1
2
3
4
5
T˚
c
1 2 3
5
6
8
7
4
Indeling van uw oven
1
2
5
6
7
3
4
Programmaknop
Programmaschakelaar
Instelknop
Keuzeknop
Lamp
Nummer inschuifsleuf
Opening voor draaispit
Detectiecontact voor
openen en sluiten van de
ovendeur
BESCHRIJVING VAN DE OVEN
8
99625792_ML_A.qxd 21/05/03 15:40 Page 92
Page 93

93
Oventoebehoren (volgens model)
Ovenrooster met kantelbeveiliging
Op dit rooster kan u alle soorten schotels en
bakvormen met het te bereiden of te
gratineren gerecht plaatsen. Dit rooster wordt
gebruikt voor grillgerechten (plaats het gerecht
op het rooster).
Multifunctionele ovenschaal
(patisserieplaat)
Deze ovenschaal dient als bakplaat en heeft
een gebogen rand. Gebruik deze bakplaat
voor de bereiding van patisserie zoals soezen,
meringue, madeleinekoekjes, gebak van
bladerdeeg...
Leg nooit te roosteren of te braden vlees in de braadslee. De braadslee zal dan
sterk spatten op de ovenwanden.
Diepe ovenschaal
met een speciaal grillrooster
Plaats deze ovenschaal onder het
ovenrooster om braadvet en braadsap op te
vangen (in de stand "sterke grill" of "grill +
hetelucht"). U kan deze ovenschaal ook als
bakplaat gebruiken.
Let er wel op dat de grootte van het te bakken gerecht aangepast is (bv.
gevogelte met een groentenkrans bij een matige temperatuur).
Plaats de ovenschaal nooit op de ovenbodem, behalve in de stand GRILL.
Achterzijde
Voorzijde
Handvat voor de diepe ovenschaal
7
8
9
10
NL
99625792_ML_A.qxd 21/05/03 15:40 Page 93
Page 94

94
Veiligheidsaanwijzingen
Lees eerst aandachtig de volgende tips alvorens uw oven te installeren
en te gebruiken. Dit apparaat is bestemd voor huishoudelijk gebruik. Deze
oven is uitsluitend ontworpen voor het bakken van voedingsmiddelen. Deze oven
bevat geen enkel bestanddeel op basis van asbest.
EERSTE GEBRUIK :
Alvorens uw oven voor de eerste maal te gebruiken, laat u de lege oven eerst met
gesloten deur ongeveer 15 minuten in de maximumstand werken. Door de
specifieke samenstelling van de staalwolbekleding van de ovenruimte kan de oven
in het begin immers een bijzondere geur verspreiden. Bij deze proefverwarming
kan er mogelijk eveneens rookvorming optreden. Dit is normaal.
AANBEVELINGEN :
- Let erop dat de ovendeur altijd goed gesloten is. Enkel dan sluit de
afdichtingsvoeg de oven volledig af.
- Let erop dat niemand op een open ovendeur gaat leunen of zitten.
- Indien u de grill met de ovendeur op een kiertje gebruikt,
kunnen de ovenwanden en andere delen van de oven heet worden. Hou
kinderen op een afstand.
- Tijdens het gebruik van de oven wordt de oven warm. Raak uiteraard nooit de
verwarmingselementen binnen in de oven aan.
- Neem na een bakcyclus de oventoebehoren nooit met de blote hand vast
(rooster, draaispit, braadslee, draagkader voor het draaispit enz...). Gebruik altijd
een ovenwant of een hittebestendige doek.
- Plaats geen aluminiumfolie op de ovenwanden. Aluminiumfolie leidt tot
oververhitting van de oven wat tot een slecht bak- of braadresultaat en
beschadiging van het email kan leiden.
- Alvorens een pyrolysereiniging van de oven uit te voeren, verwijdert u alle
oventoebehoren uit de oven en verwijdert u tevens groffe (aangebakken)
etensresten.
- Gebruik geen hogedrukstoomreiniger.
- Tijdens een pyrolyse worden de wanden van de oven warmer dan tijdens een
gewone bakcyclus. Hou kinderen op een afstand!
- Zet de oven altijd af alvorens een reiniging aan de binnenzijde van de
oven uit te voeren.
- Veiligheidshalve is uw oven voorzien van een AUTOMATISCHE STOP (AS).
Deze stopfunctie wordt automatisch ingeschakeld indien u uw oven na een
bereiding vergeet uit te zetten. Indien uw oven meer dan 10 uur na elkaar
aanstaat, wordt de AS-functie automatisch geactiveerd en stopt de oven. Op de
display verschijnt op de plaats van de uurvermelding het symbool AS. Een tijdlang
hoort u 2 opeenvolgende bieptonen.
Om de oven opnieuw te gebruiken, dient u de functieschakelaar
altijd opnieuw in de stand 0 te plaatsen.
99625792_ML_A.qxd 21/05/03 15:40 Page 94
Page 95

95
20A teller mono
220-240 V ~ 50 Hz
Stopcontact 2 polen
+ aarding
CEI-norm 83
Monokabel 220-240 V ~
Elektrische aansluiting
Voedingskabel
lengte :
ongeveer 1,50 m
Differentieelschakelaar
of zekering 16 A
Controleer vóór de elektrische aansluiting of de doorsnede van
de elektrische installatiedraden groot genoeg is voor de
elektrische voeding van het fornuis.
De zekering van uw installatie dient 16 Ampère te bedragen.
Installatie van uw oven
NL
99625792_ML_A.qxd 21/05/03 15:40 Page 95
Page 96

96
Installatie
Onze aansprakelijkheid vervalt bij een ongeval ten gevolge van
een afwezige, defecte of foute aarding.
• De voedingskabel (H05 RR-F, H05 RN-F of H05 W-F) dient lang genoeg te zijn om te
kunnen worden aangesloten op de oven wanneer de oven met het oog op de
inbouw op de grond voor het keukenmeubel wordt geplaatst.
Werkwijze (koppel eerst de oven van het elektriciteitsnet af) :
• Open het toegangsplaatje rechts onderaan de achterwand. Draai hiervoor de 2
schroeven los en draai het plaatje weg.
• Ontbloot elke draad van de nieuwe voedingskabel over een lengte van 12 mm.
• Tors de draadjes van elke draad voorzichtig ineen.
• Draai de schroeven van het klemmenbord los en verwijder de te vervangen
voedingskabel.
• Steek de voedingskabel langs de zijkant van de achterwand in de kabelklem rechts
van het klemmenbord.
• Verbind de draden van de voedingskabel overeenkomstig het (de) schema('s) op
het toegangsplaatje.
• Alle draadjes van elke draad van de voedingskabel dienen onder de schroeven vast te zitten.
• De fasedraad moet worden verbonden met de L-klem.
• De aardingsdraad (groen-geel) moet worden verbonden met de aardingsklem .
• De nulleider (blauwe draad) moet worden verbonden met de N-klem.
• Draai de schroeven van het klemmenbord stevig vast en controleer de stevigheid
van de
aansluiting door even aan elke draad te trekken.
• Leg de voedingskabel vast door middel van de kabelklem rechts van het
klemmenbord.
• Schroef het toegangsplaatje met de 2 schroeven opnieuw vast.
Plaatsing en/of vervanging van de voedingskabel
Voer de elektrische aansluiting uit alvorens de oven in het meubel in te bouwen.
• Voor de aansluiting van de oven gebruikt u een voedingskabel (genormaliseerd)
met 3 geleiders met een doorsnede van 1,5 mm2 (1 fasedraad + 1 nulleider +1
aarding
). Deze geleiders worden aangesloten op een elektriciteitsnet van
220-240 V ~ (monofasig) via een genormaliseerd stopcontact 1 fasedraad +
1 nulleider +
aarding overeenkomstig de norm of via een element met
omnipolaire schakelaar met een minimale afstand tussen de kontakten van 3 mm.
De beschermingsdraad (groen-geel) is verbonden met de aardingsklem van het
apparaat en moet worden verbonden met de aarding van de installatie.
• Indien u kiest voor een aansluiting op een stopcontact, dient u ervoor te zorgen
dat het stopcontact ook na de aansluiting gemakkelijk bereikbaar blijft.
• De nulleider van de oven (blauwe draad) dient met de nulleider van het
elektriciteitsnet te worden verbonden.
99625792_ML_A.qxd 21/05/03 15:40 Page 96
Page 97

97
van uw oven
Voor een installatie overeenkomstig de wettelijke richtlijnen raden wij u
aan een beroep te doen op een erkend elektrotechnicus.
Nuttige afmetingen voor de inbouw van uw oven
De oven kan naar keuze onder een werkblad of een (open* of gesloten)
kolommeubel met de juiste afmetingen voor de inbouw van de oven
worden geïnstalleerd (zie schema).
Uw oven beschikt over een optimale luchtcirculatie die vlekkeloze bakresultaten en
een optimale reiniging garandeert. Voor een optimale luchtcirculatie dient u met de
volgende punten rekening te houden :
• Plaats de oven centraal in het meubel met een minimale afstand van 5 mm
tussen de zijwanden van de oven en de zijwanden van het inbouwmeubel.
• Het inbouwmeubel moet van hittebestendig materiaal gemaakt of ermee bekleed zijn.
• Voor meer stabiliteit schroeft u de oven met 2 schroeven in de in zijrand
voorziene schroefgaten in het meubel vast (zie schema).
Werkwijze :
1) Verwijder de rubberen schroefkapjes van de schroefgaten.
2) Maak een opening met een diameter van 3 mm in de wand van het meubel om te
vermijden dat het hout gaat barsten.
3) Bevestig de oven met de 2 schroeven.
4) Plaats de rubberen schroefkapjes opnieuw op de schroeven (de kapjes dempen
tevens het geluid bij het sluiten van de ovendeur).
(*) bij een open kolommeubel dient de opening (maximaal) 70 mm te bedragen.
NL
Schroefgaten
Schroefgaten
Uitsnijding 50 x 50
99625792_ML_A.qxd 21/05/03 15:40 Page 97
Page 98

98
1. De programmaschakelaar
13
5
7
8
9
6
2
4
10
11
12
Temperatuurstijging
Indicator van de ECO-functie
Nummer van de inschuifsleuf waarin u
de ovenschotel bij voorkeur plaatst.
Indicator van de functie EASY COOK
Tijdsgegevens en bakduur (uur/
minuten)
Indicator GRILL+
+
1
3
4
5
6
2
Bakduur
Einde baktijd
Indicator van de beschikbare
EASY COOK-schotels
Instelknop
Temperatuur van de
oven/pyrolyse-indicator
Vergrendeling ovendeur
7
9
10
8
11
12
Gebruik van uw oven
99625792_ML_A.qxd 21/05/03 15:40 Page 98
Page 99

99
a) Tijdens het aansluiten van de
oven
• Stel het uur met de instelknop in (hoe sneller u
met de knop draait, hoe sneller u het uur doet
vorderen).
• Na enkele sekonden wordt de uurinstelling
automatisch geregistreerd -> De display knippert
niet meer.
Voorbeeld : 12u30.
b) Wijzigen van het ingestelde uur
• Plaats de programmaknop in de stand "Instellen
van het uur".
• Het uur knippert. U kan nu het uur instellen.
• U kan het op de display vermelde uur met de
instelknop verhogen of verlagen.
• Nadat u het uur heeft ingesteld, zet u de
programmaknop in de stand "T°c" (instelling van de
temperatuur) ->De uurvermelding op de display
stopt met knipperen.
Indien u uw keuze niet bevestigt, zal de oven ze na enkele seconden
automatisch zelf bevestigen.
2. Instellen van het uur van de oven
schakelkok
Bakduur
Einde
baktijd
Instellen
van het
uur
Beschrijving van de instelknop
NL
99625792_ML_A.qxd 21/05/03 15:40 Page 99
T˚
c
T˚
c
Page 100

100
Gebruik van uw oven
De programmaschakelaar mag enkel het uur
vermelden en mag niet knipperen.
• Kies de bakwijze :
Plaats de keuzeknop in de gewenste stand.
Voorbeeld : stand " ".
• Plaats uw ovenschaal in de oven volgens de
aanbevelingen in de display.
Voorbeeld : stand " " -> inschuifsleuf 1
of 2 wordt aanbevolen.
• Uw oven geeft u nu de optimale temperatuur
voor de gekozen bakwijze : 200°C. U kan deze
temperatuur evenwel nog wijzigen met de knop
onder de display.
Voorbeeld : stand " " en temperatuur
gewijzigd op 190°
De oven zal nu starten :
Op de temperatuurindicator kan u de stijging van de temperatuur in de oven
volgen.
3 bieptonen geven aan dat de door u ingestelde temperatuur is bereikt.
Om een goede afkoeling van de verwarmingselementen van
uw oven te garanderen, zal de ventilator van de oven na elke
bakcyclus nog even blijven doorwerken.
3. Onmiddellijk bakken
99625792_ML_A.qxd 21/05/03 15:40 Page 100
 Loading...