

Page 1
Using your oven
Le guide d’utilisation de votre four
O guia de utilização do seu forno
ΟΟ οοδδηηγγόόςς χχρρήήσσηηςςττοουυ φφοούύρρννοουυ σσααςς
Gebruiksaanwijzing van uw oven
FP 225
GB
FR
PT
NL
GR
99625635_A_ML.qxp 14/11/2005 11:30 Page 1
Page 2

Contents
Throughout this manual,
indicates safety recommendations,
indicates advice to help you make the
best use of your oven
Introduction P.3
Your oven
H
ow it works P.4
A
ccessories P.5
Safety recommendations
P.6
How to install your oven
Electrical connections P.7-8
Dimensions for installation use P.9
How to use your oven
The oven programmer
P.10
How to set the clock
P.11
How to cook straightaway
P.12
How to programme the cooking
P.13
How to use the timer
P.14
Changing a bulb
P.15
Cooking methods
P.16-17
Cleaning the oven cavity
Pyrolysis explained P.18
When to clean by pyrolysis P.18
Starting pyrolysis P.19
Troubleshooting
P.20
2
99625635_A_ML.qxp 14/11/2005 11:30 Page 2
Page 3
3
Introduction
Dear Customer,
Thank you for buying a BRANDT oven.
Our design staff have produced a new generation of kitchen equipment,
to make everyday cooking a pleasure.
You will find that the clean lines and modern look of your Brandt oven
blends in perfectly with your kitchen décor. It is easy to use and performs to a high standard.
Brandt also makes a range of products that will enhance your kitchen
such as hobs, extractor hoods, built-in dishwashers and refrigerators.
There are models to complement your new Brandt oven.
Of course, we make every effort to ensure that our products meet all
your requirements, and our Customer Relations department is at your
disposal, to answer all your questions and to listen to all your suggestions (see back cover of manual).
Brandt has always been a leader in the development of new products,
thus enhancing the quality of everyday life by providing increasingly
efficient products, that are easy to use, respect the environment, and are
attractive and reliable.
The BRANDT name.
GB
99625635_A_ML.qxp 14/11/2005 11:30 Page 3
Page 4
4
1
3
5
T˚c
1
2
3
4
5
6
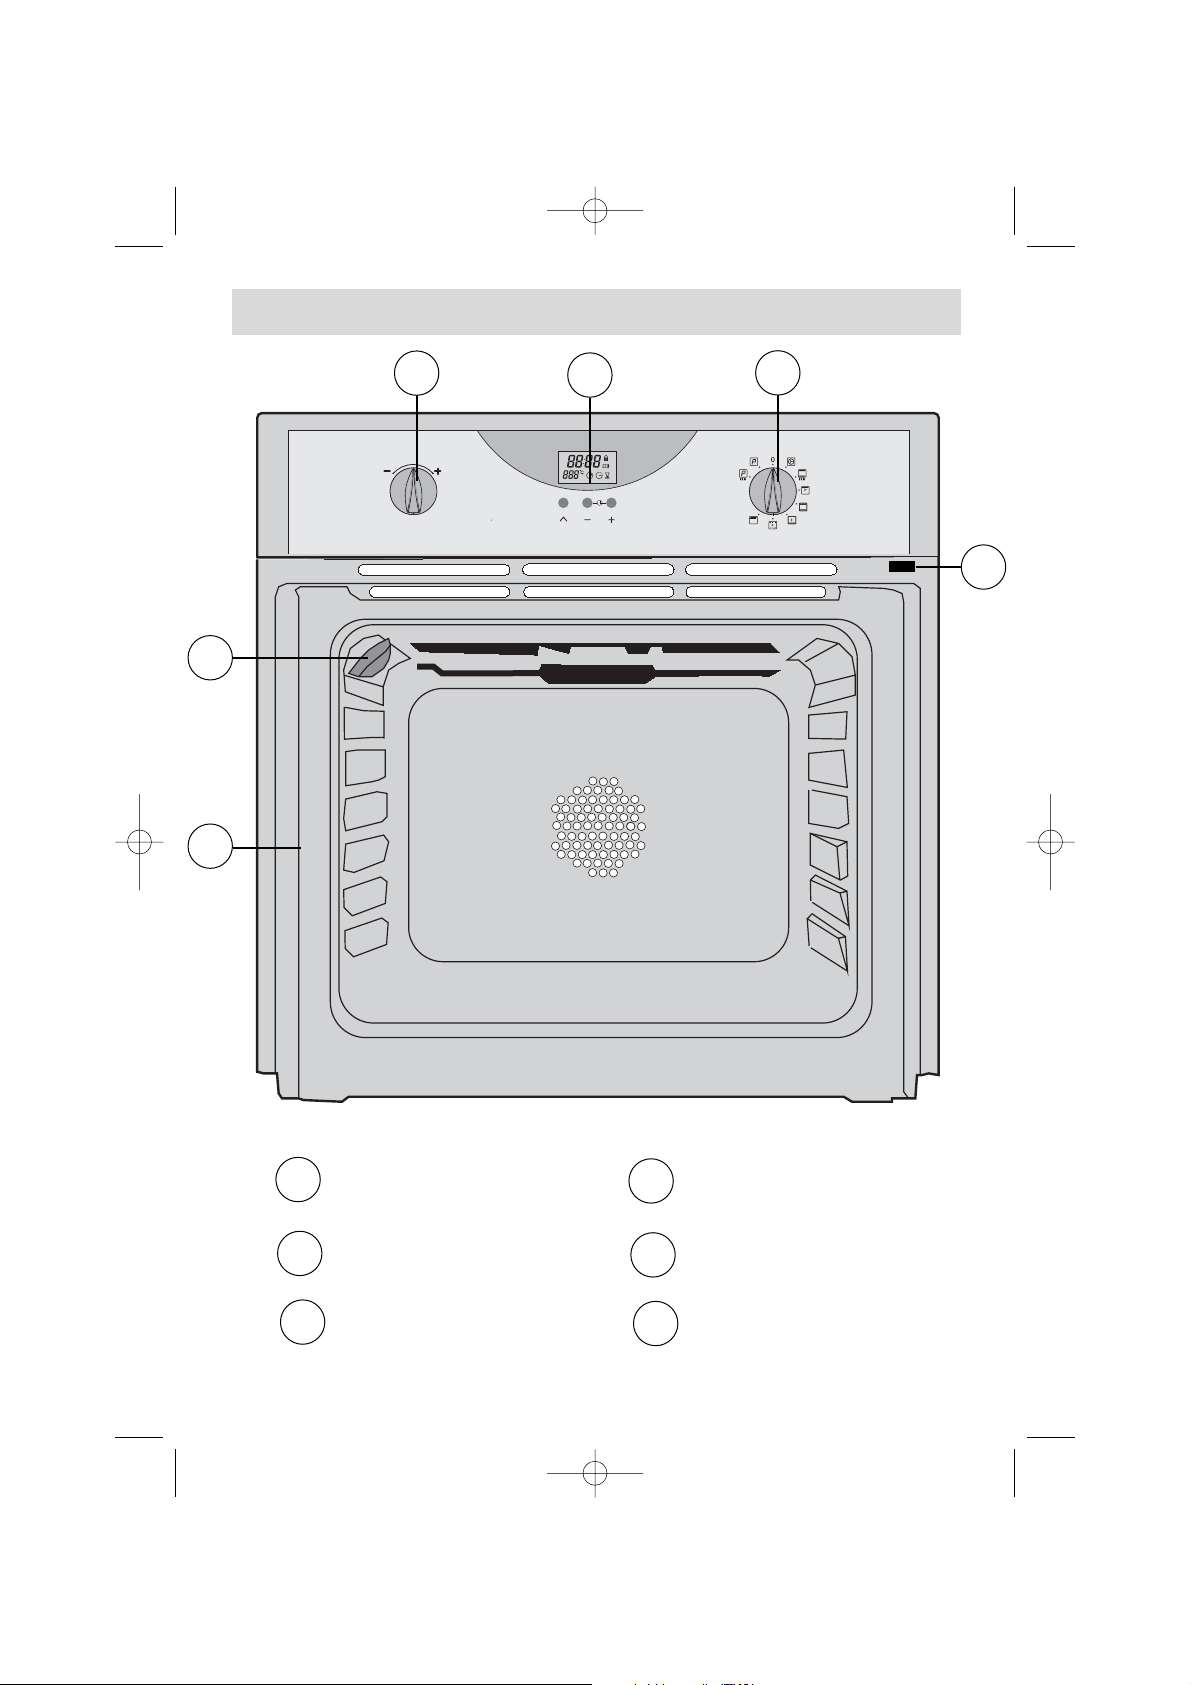
Your oven
Temperature control
Programme selector
Feature selector
OVEN FEATURES
1
2
3
Light
Rail positions
Door-open detector plate
4
5
6
99625635_A_ML.qxp 14/11/2005 11:30 Page 4
Page 5
5
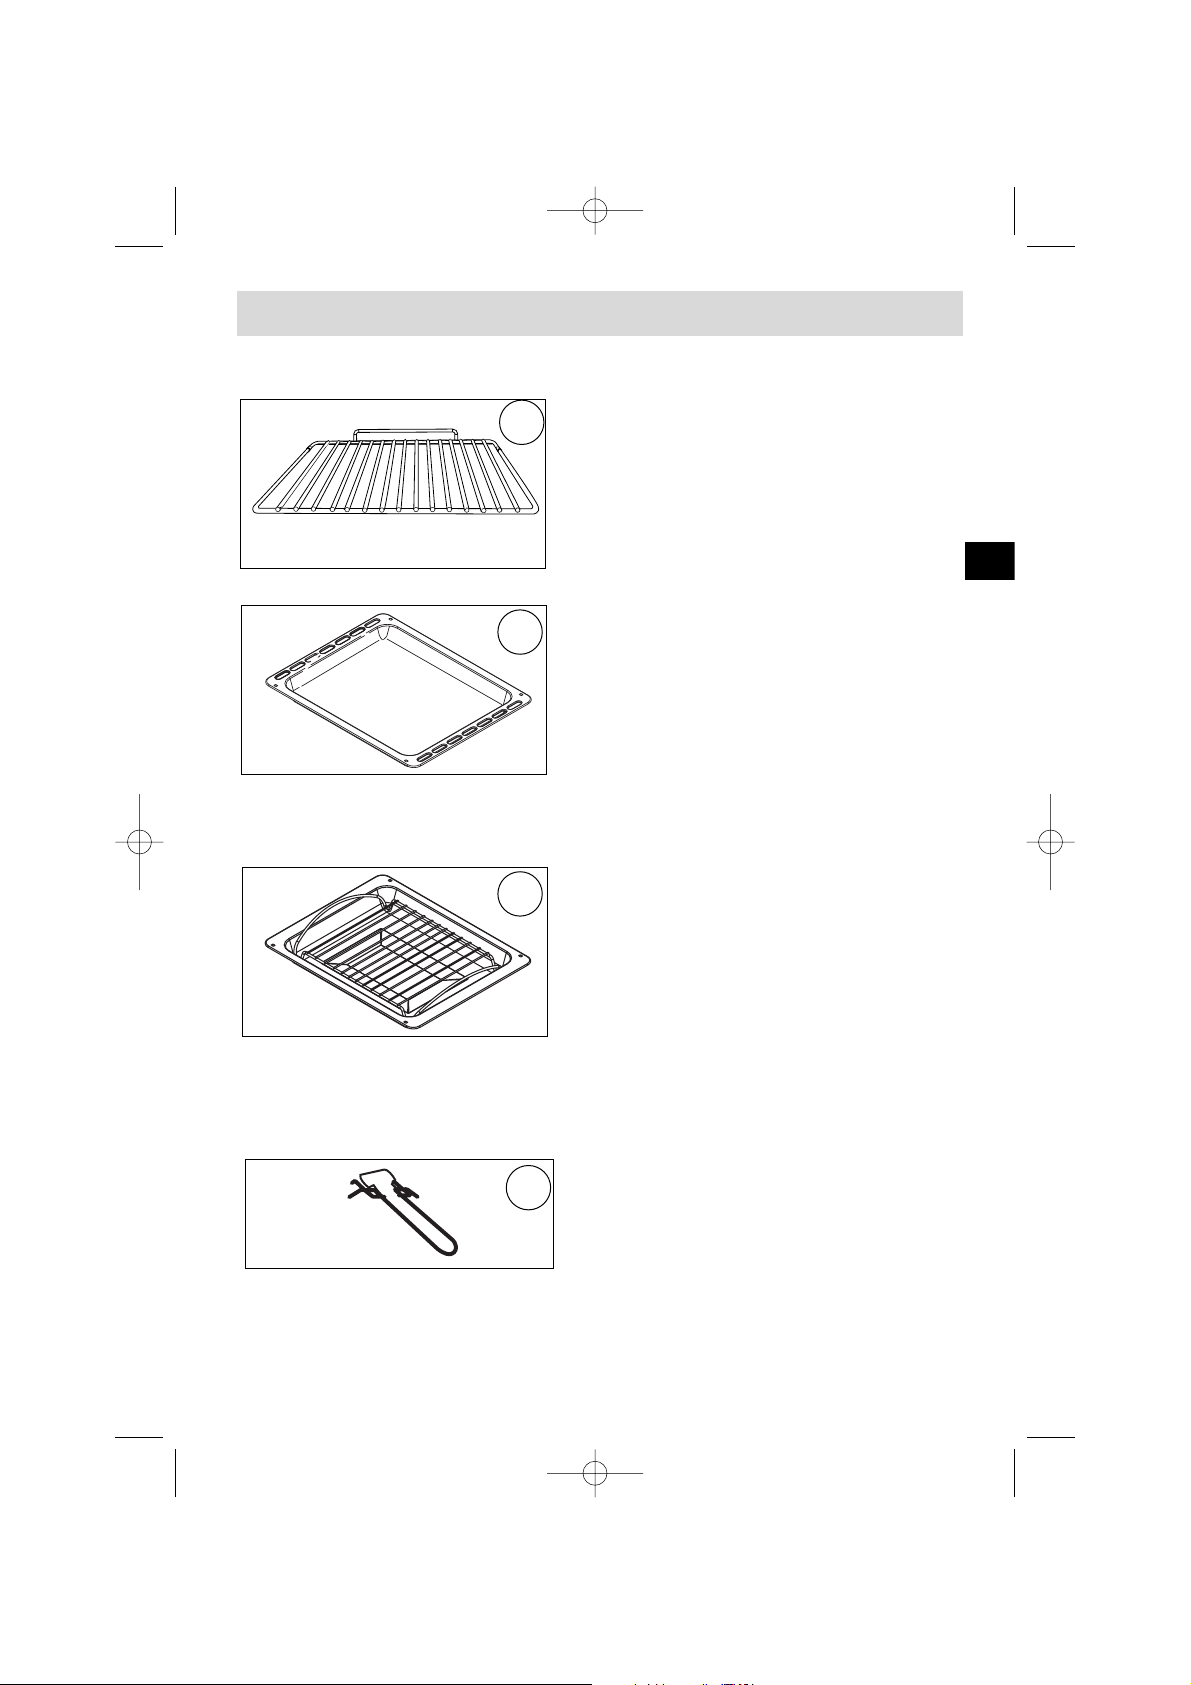
Accessories (Depending on model)
Anti-tip safety shelf
Food can either be placed on the shelf in a
dish or cake tin for cooking or browning, or
may be placed directly on the shelf itself.
Multi-purpose baking tray
This tray has a raised edge and can be used
for baking pastries (choux buns, meringues,
small cakes, flaky pasties, etc).
Joints should not be cooked in this tray
uncovered because fat could spit all over the oven sides.
Grill Tray
With special grid for grilling
The tray can be used for collecting juices
when cooking with the grill element by itself
or with the oven set to pulsed grill (grill and
fan).
It is particularly useful as a large roasting tray for meat and vegetables.
Never cook with the grill tray sitting on the bottom of the oven.
BACK
FRONT
Handle for grill tray
7
8
9
10
GB
99625635_A_ML.qxp 14/11/2005 11:30 Page 5
Page 6
6
Safety recommendations
Please read these instructions before installing and using your oven.
The oven has been designed for domestic use only for cooking food. No asbestos
has been used in its construction.
USING FOR THE FIRST TIME:
Before you use your oven for the first time, leave it empty and, with the door
closed, turn it on to maximum temperature and let it heat up for 15 minutes. This
"runs the oven in". During this time there may be some smell from the mineral
wool that insulates the oven and there could be some smoke. This is perfectly
normal.
NORMAL USE:
- Always close the door properly. The oven is fitted with a seal designed to
work with a closed door.
- Never lean or let anyone sit on the oven door when it is open.
- The oven parts and accessories can become hot when the door is
left partially open and the grill on. Always keep children at a safe distance.
- When the oven is on it will get hot. Take care not to touch the heating
elements inside the oven.
- Always protect your hands with oven gloves or something similar when
removing food, accessories or containers from the oven.
- Do not line your oven with kitchen foil. The metal will increase the heat pro-
duced and could ruin the food and damage the enamel.
- Never use a spray or a high-pressure washer to clean the oven.
- During self-cleaning, surfaces can become hotter than in normal use.
Children must be kept at a distance.
During the action of pyrolysis, accessible surfaces become much hotter than
during normal cooking. Keep children at a distance.
Always check that the oven is off before you clean the inside.
ENVIRONMENTAL PROTECTION
This appliance’s packaging material is recyclable. Help recycle it and protect the
environment by dropping it off in the municipal receptacles provided for this purpose.
Your appliance also contains a great amount of recyclable material. It is
marked with this label to indicate the used appliances that should not be
mixed with other waste. This way, the appliance recycling organised by
your manufacturer will be done under the best possible conditions, in
compliance with European Directive 2002/96/EC on Waste Electrical and
Electronic Equipment. Contact your town hall or your retailer for the
used appliance collection points closest to your home.
We thank you doing your part to protect the environment.
Ensure that the function selector is returned to 0 to re-use your
oven.
99625635_A_ML.qxp 14/11/2005 11:30 Page 6
Page 7
7
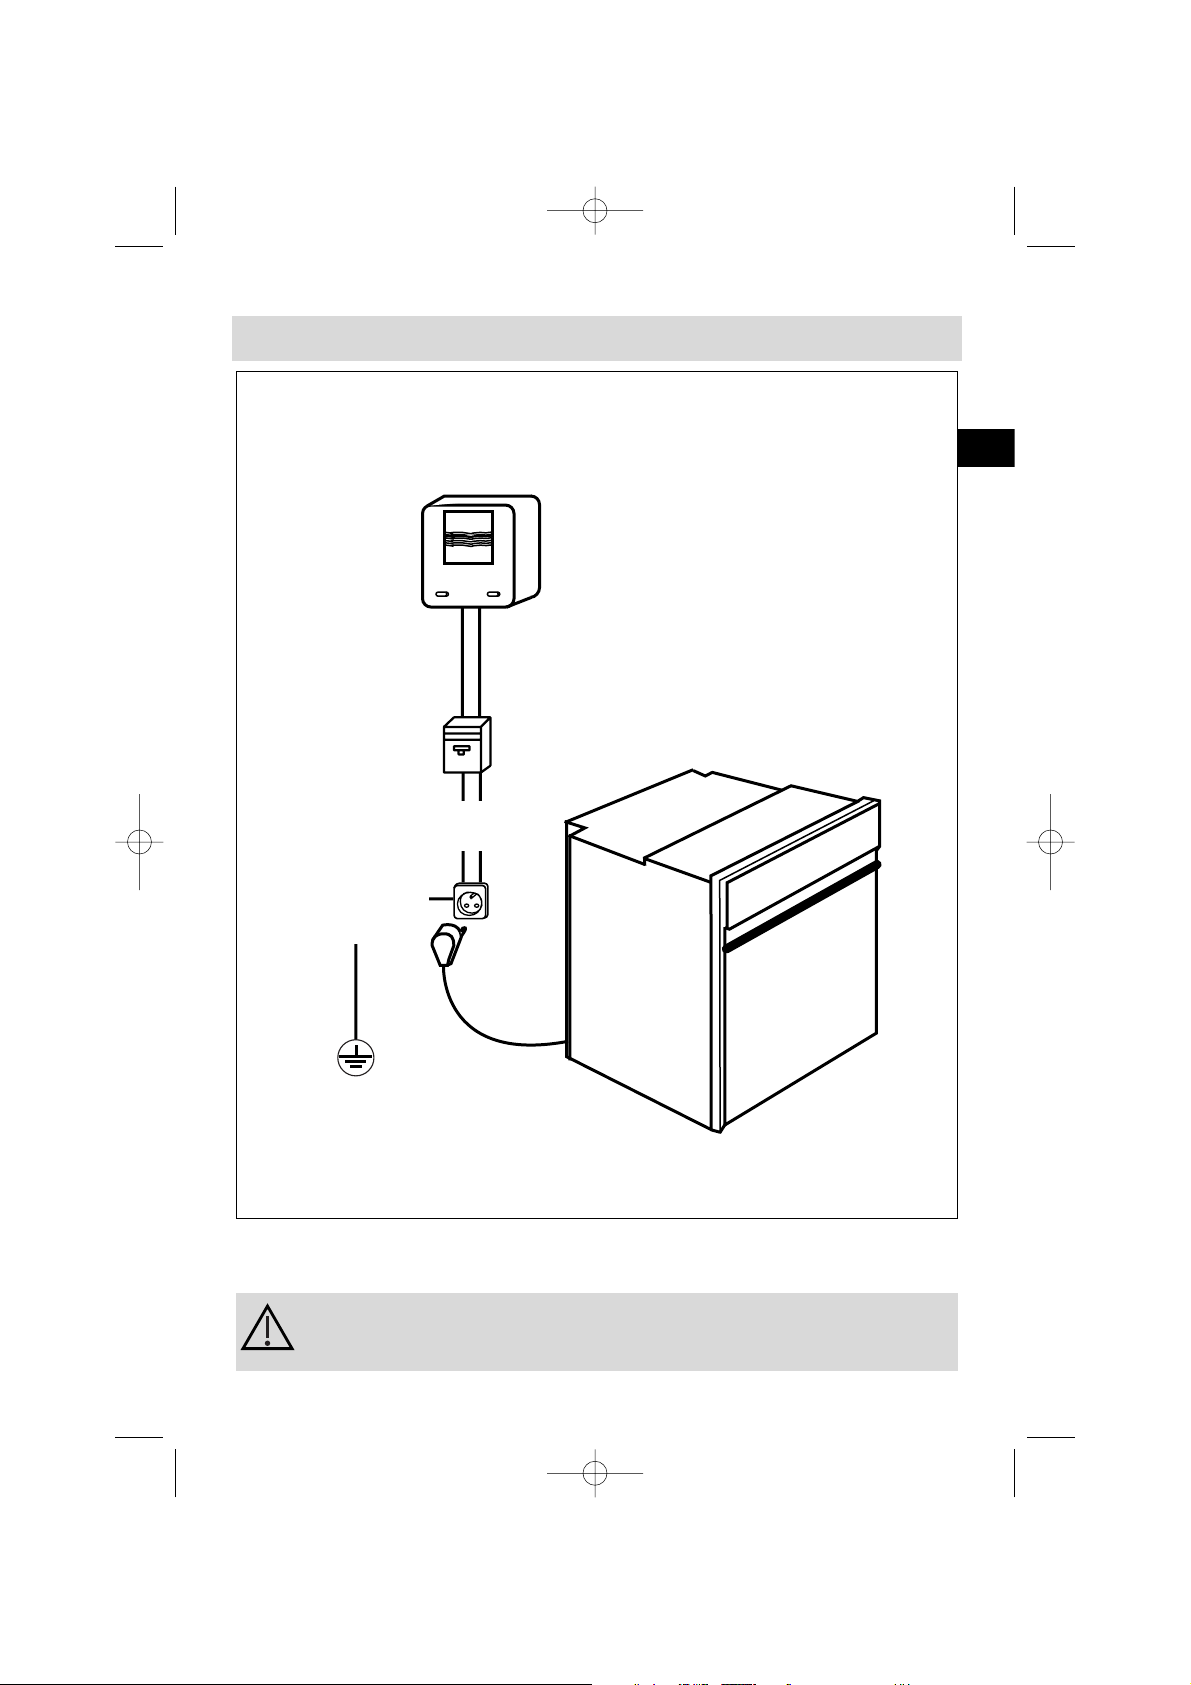
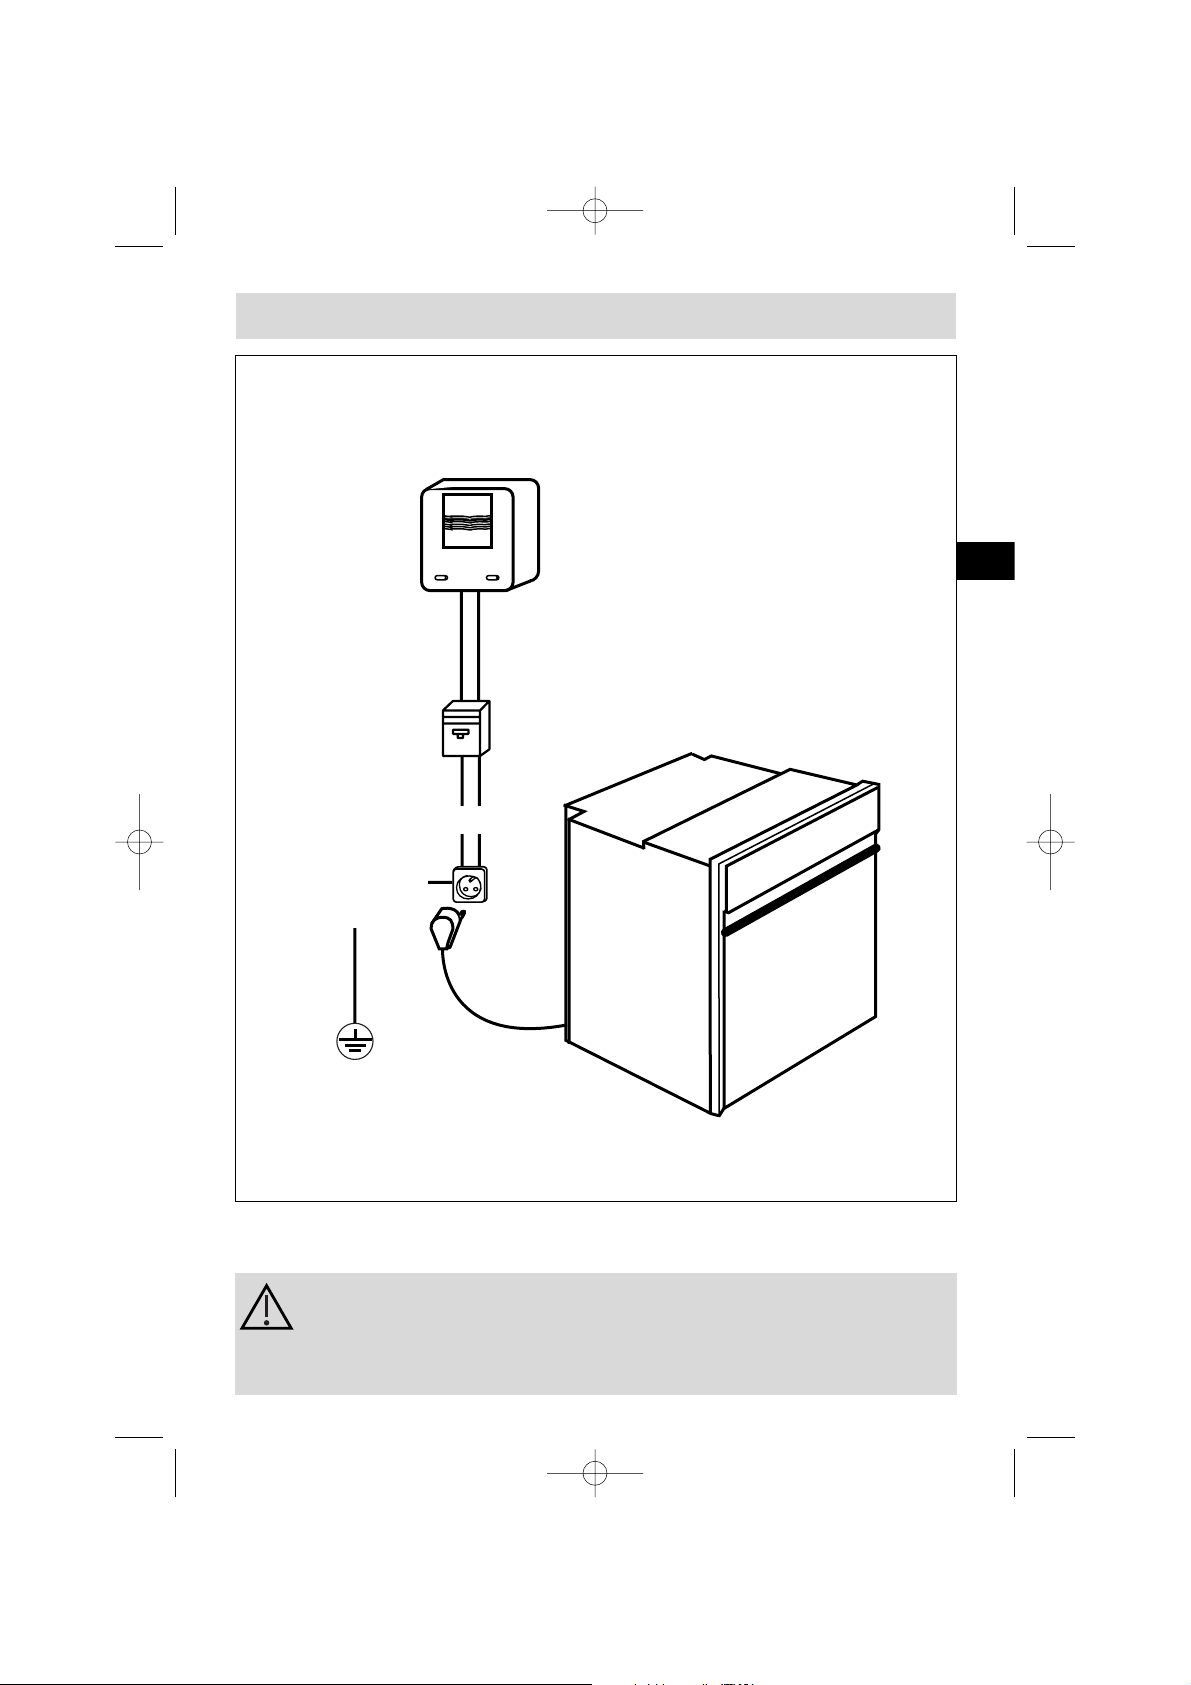
Electricity meter (mains)
(20A, single-phase
220-240 V alternating
current 50 Hz)
Socket
2 -pin with earth
220-240 V single phase
alternating current supply
Electrical connections
Connecting cable
approx 1.50 m.
long
Fused 16A or differential
circuit breaker
Before connecting your oven, make sure you are using the correct size cable. The cross-section should be the same as the cable
connected to the oven. Use a 16-amp fuse.
How to install your oven
GB
99625635_A_ML.qxp 14/11/2005 11:30 Page 7
Page 8
8
How to insta
We cannot accept any liability in the event of an accident
resulting from non-existent or faulty earthing.
• The supply cable (H05 RR-F, H05 RN-F or H05 W-F) must be long enough to allow
the oven to rest on the floor in front of its housing.
With the oven sitting on the floor and disconnected:
• Open the trapdoor at the bottom right hand side at the back of the oven by
removing the 2 screws and swinging the door away.
• Remove the sheath from each wire in the new cable up to 12 mm.
• Twist the ends carefully together.
• Unscrew the terminal screws and remove the wires that need changing.
• Pass the new cable through the wire clamp to the right of the terminals.
• Connect the wires up in accordance with the markings on the terminals.
• Make sure all wires are trapped under the screws.
• The brown wire (live) going to terminal marked L.
• The green and yellow wire (earth) going to the one marked .
• The blue wire (neutral) going to the terminal marked N.
• Tighten the screws and check, by tugging on each wire, that they are firmly connected.
• Tighten the clamp to hold the cable.
• Close the trapdoor using the two screws.
Fitting new wiring and/or changing cables.
The electrical connections are made before the oven is installed in its housing.
• The oven must be connected using an approved 3-core cable (live, neutral and
earth
) with 1.5 mm square conductors. This should be connected via a 3- pin-
socket (live, neutral, and earth to the main supply which should be should be a
220-240V, alternating single-phase current. If the oven is not connected using a
plug and socket, it must be connected to a multi-pole switch with a minimum gap
of 3 mm between contacts. The earth wire (green and yellow) should be connected
to the terminal marked with the earth symbol on the appliance and to the earth
in the switch.
• Where the oven is connected using a separate plug and socket this must be
accessible after the oven has been installed.
• The neutral wire (blue) of the oven must be connected to the neutral in the main supply.
99625635_A_ML.qxp 14/11/2005 11:30 Page 8
Page 9
9
ll your oven
If you are unsure about fitting this oven yourself please use a
qualified electrician.
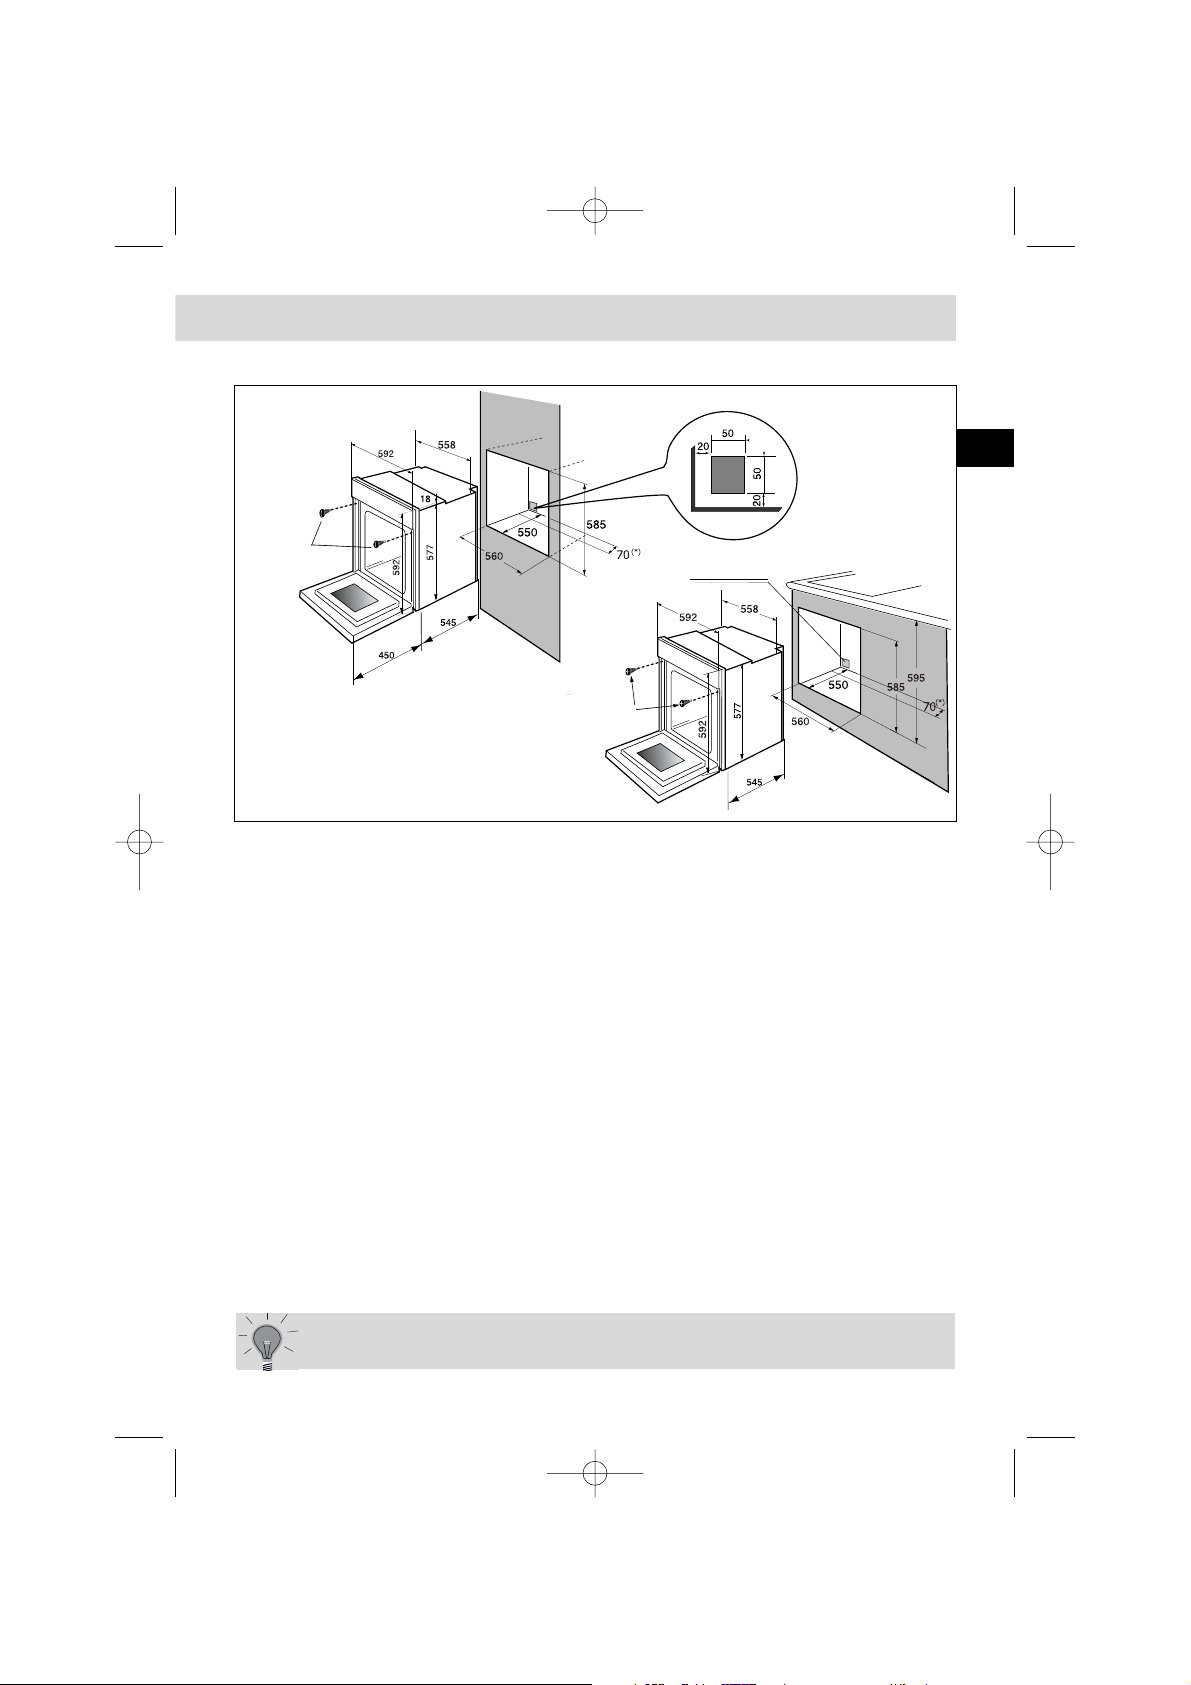
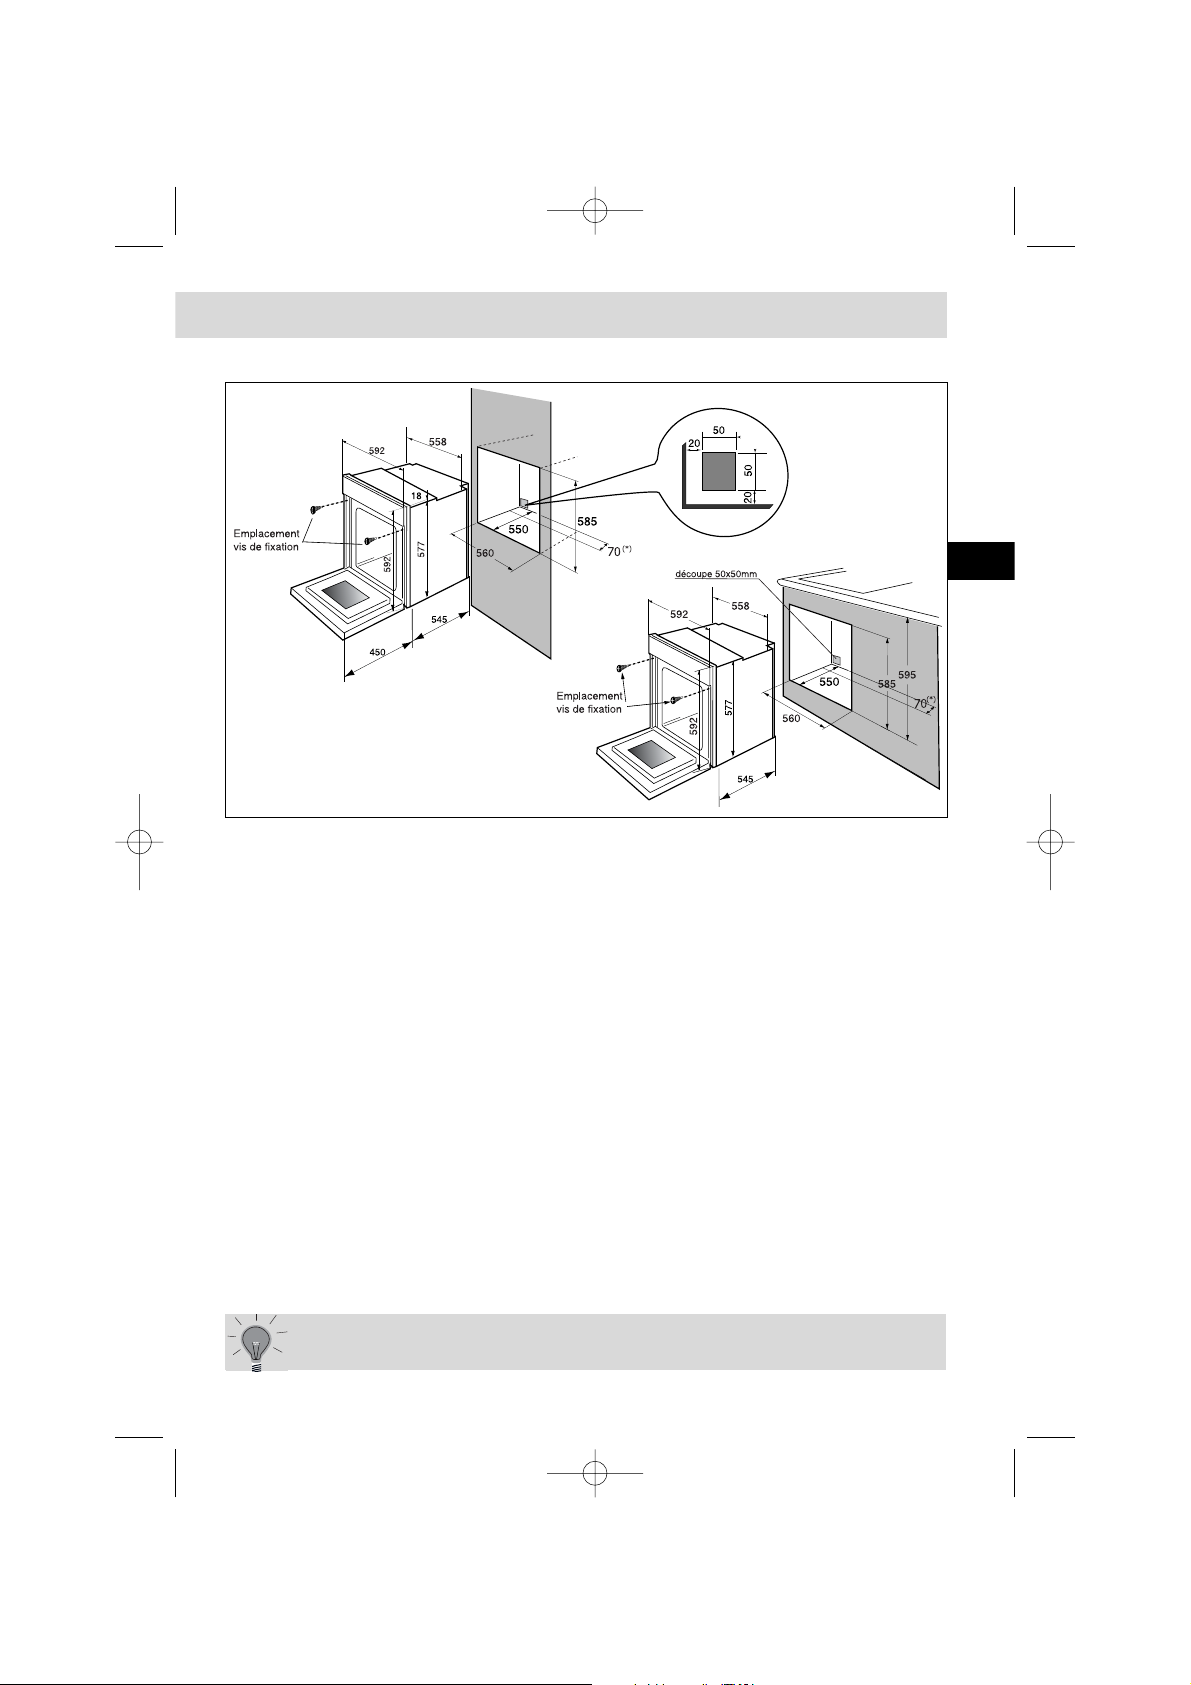
Dimensions for installation use
The oven may be housed either under a work surface or built into a
column that is open* or closed with a suitable opening.
Your oven works at its best and produces excellent results when cooking and cleaning itself, if its air circulation is not compromised:
• The oven must be centred in the unit so that there is a minimum distance of 5
mm between it and the surrounding unit.
• The housing unit or its outer surface must be capable of withstanding heat.
• To ensure the oven rests firmly in the housing, screw it to the housing unit using
the holes on the side uprights provided (see diagram).
To do this:
1) Remove the rubber stoppers masking the fixing holes.
2) To prevent the housing unit splintering, drill two holes 3 mm in diameter in the wall of the
housing unit opposite the fixing holes.
3) Attach the oven using the two screws.
4) Conceal the hole using the rubber stoppers. (These also help to cushion the
closing of the oven door).
(*) If the housing unit is open at the back, the gap must not be more
than 70 mm.
GB
Fixation screw
position
Fixation screw
position
Cutout 50 x 50 cm
99625635_A_ML.qxp 14/11/2005 11:30 Page 9
Page 10
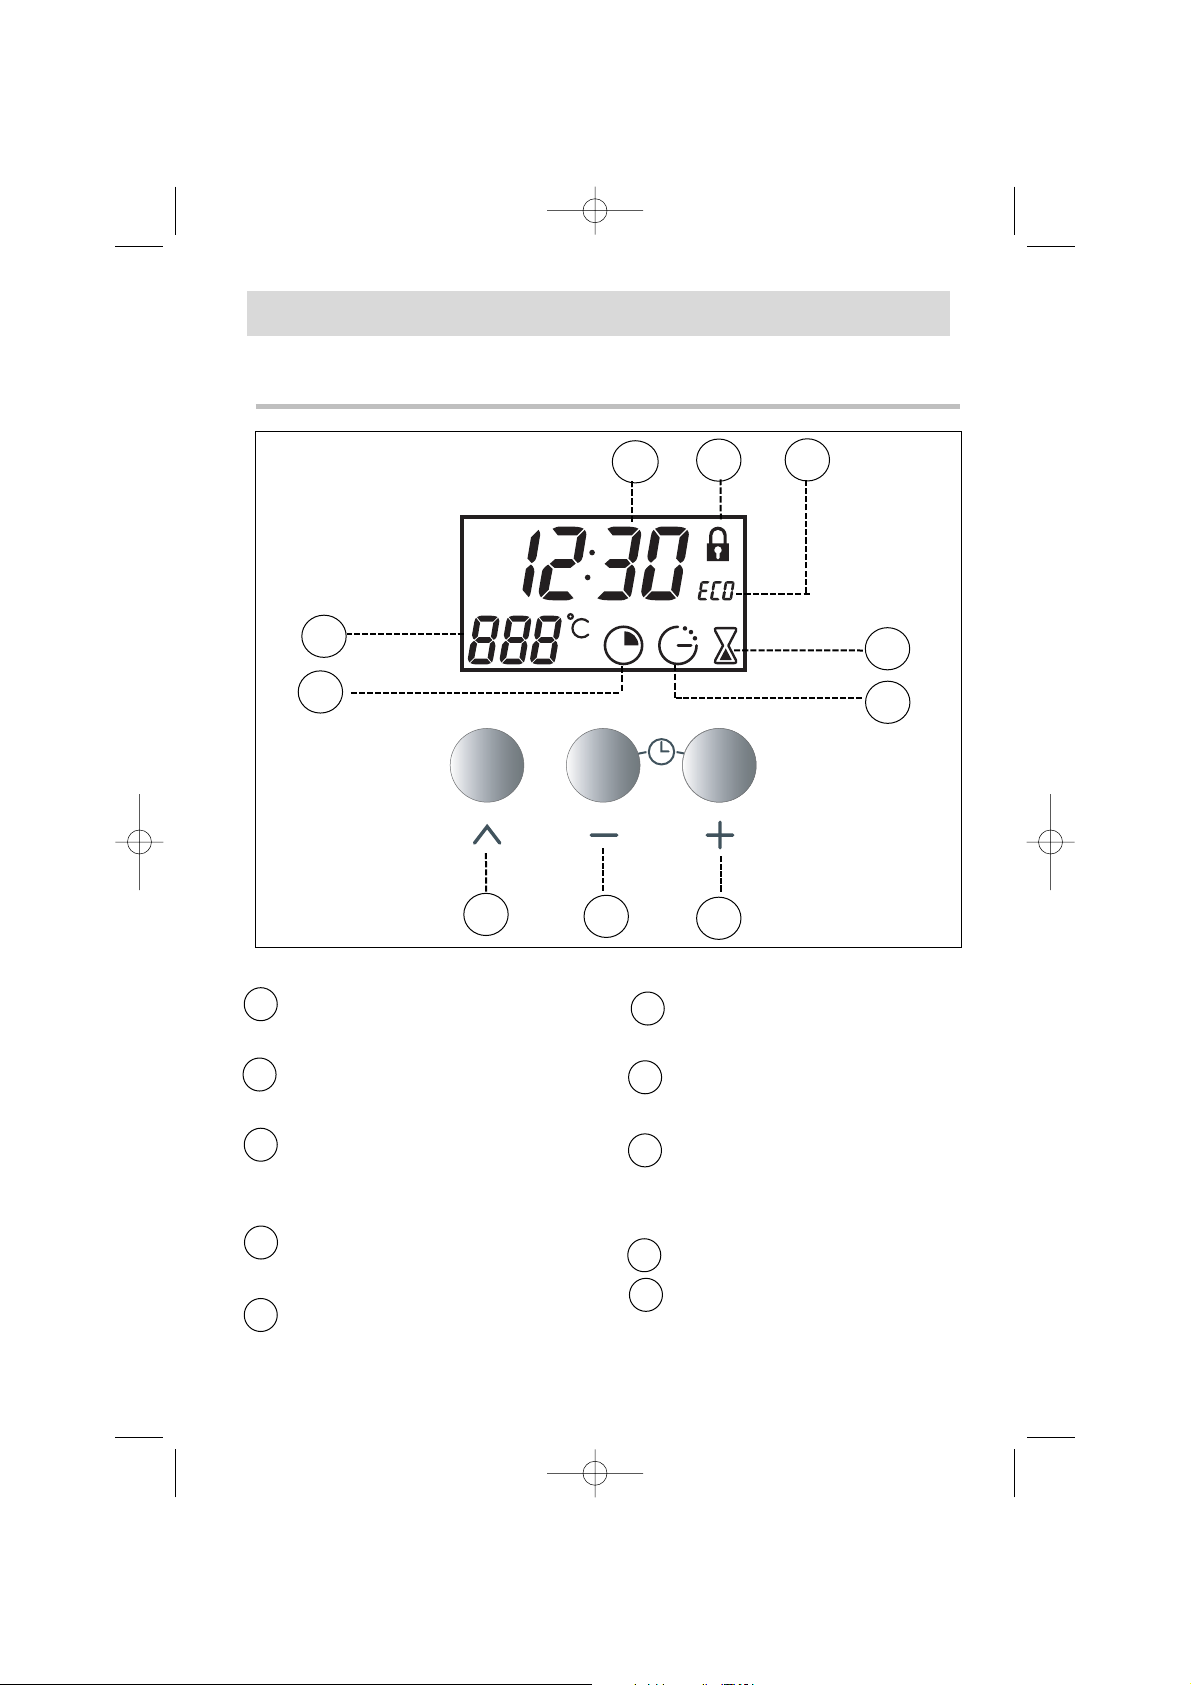
H
ow to use your oven
10
1. T
he oven programmer
5
3
4
2
8
9
10
1
7
6
1
3
4
5
6
7
9
10
8
2
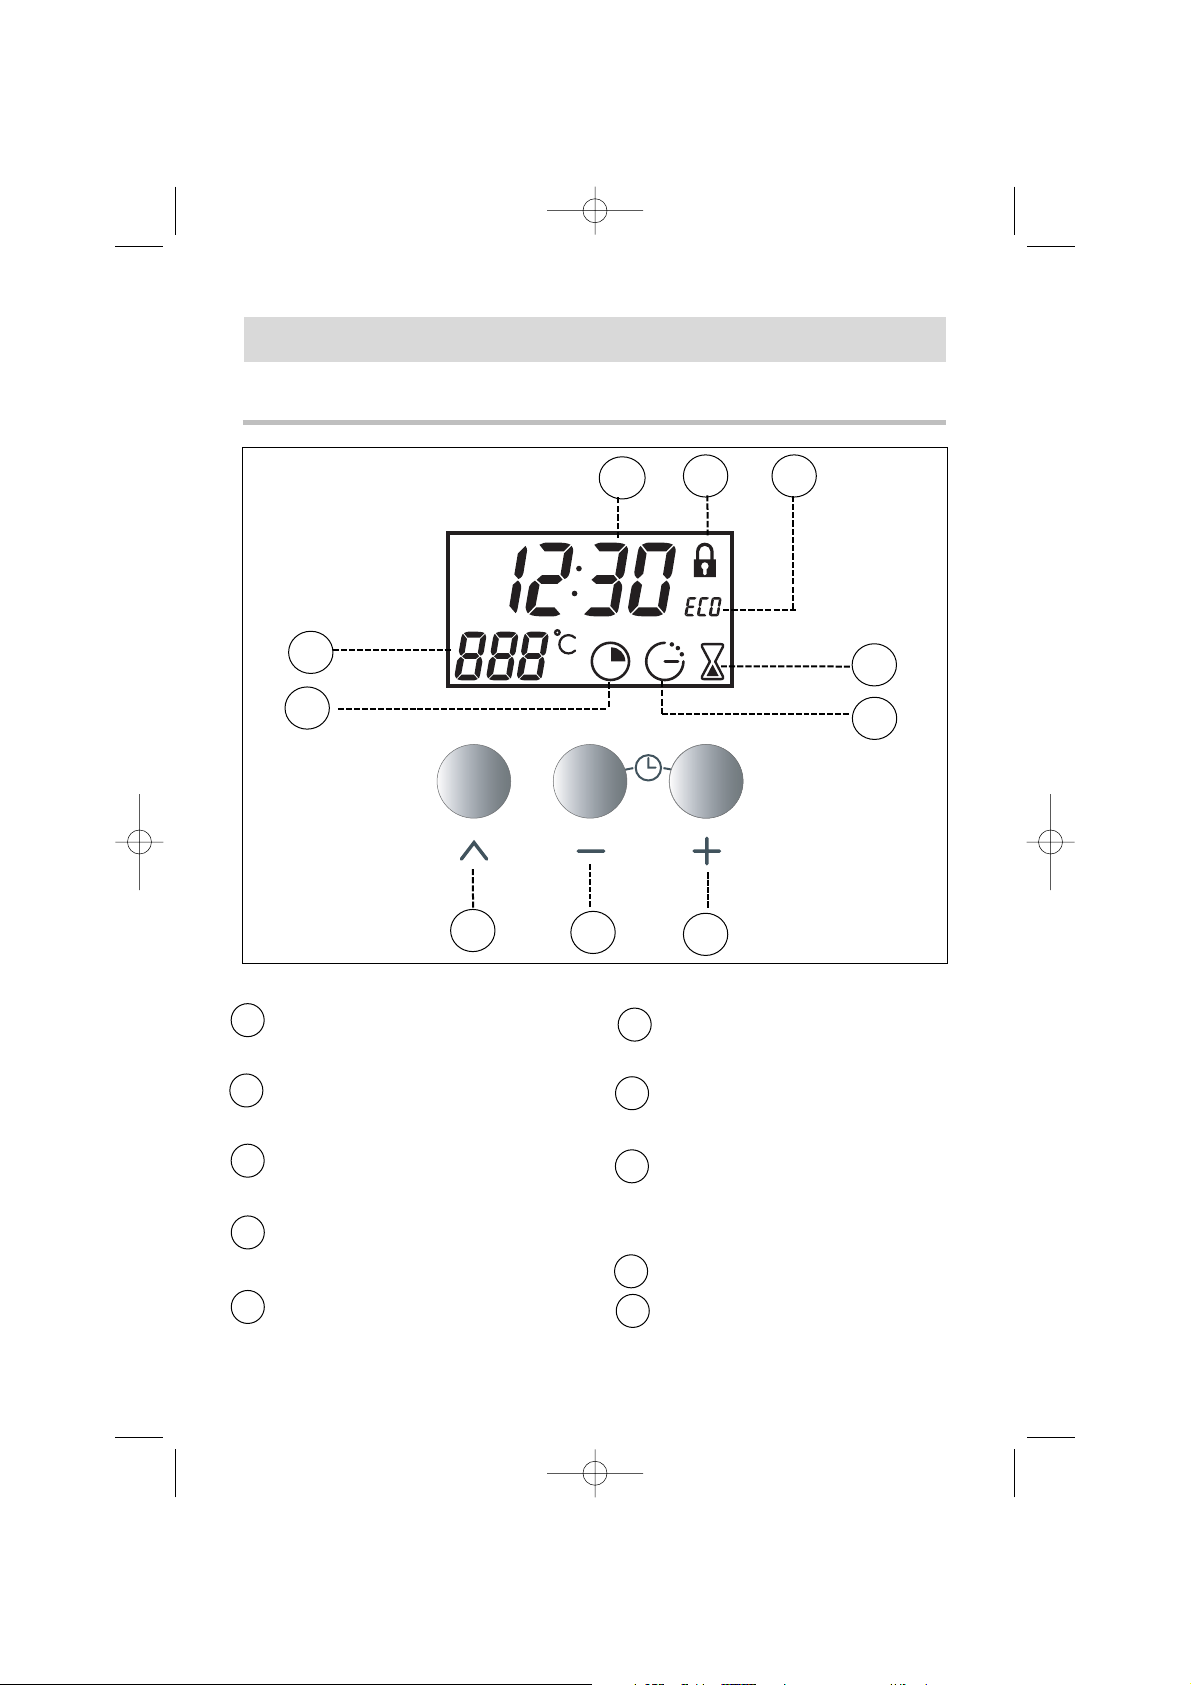
Clock and cooking time display
Temperature display
Cooking time symbol
End of cooking time symbol
Timer symbol
ECO (economical) cooking indicator
Door locked indicator
Button for setting timed
programmes
Buttons for adjusting the time
99625635_A_ML.qxp 14/11/2005 11:30 Page 10
Page 11
11
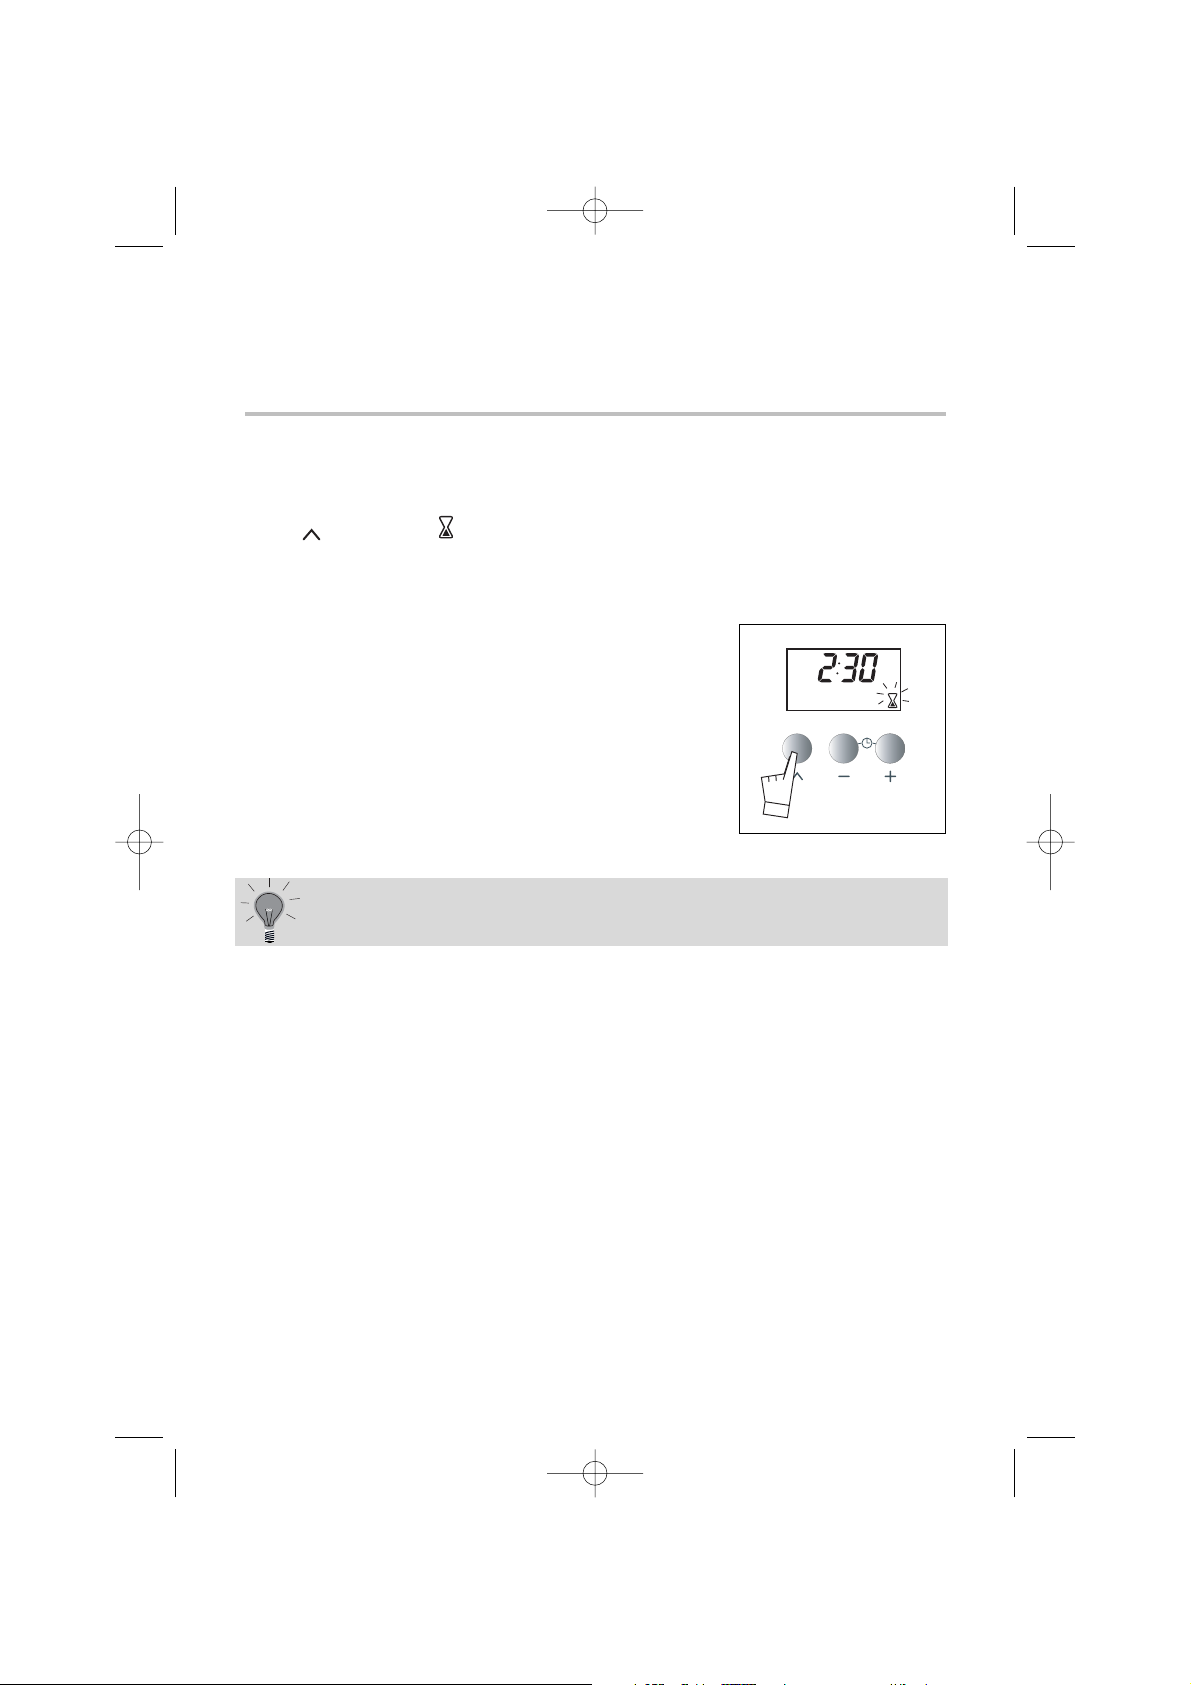
How to use your oven
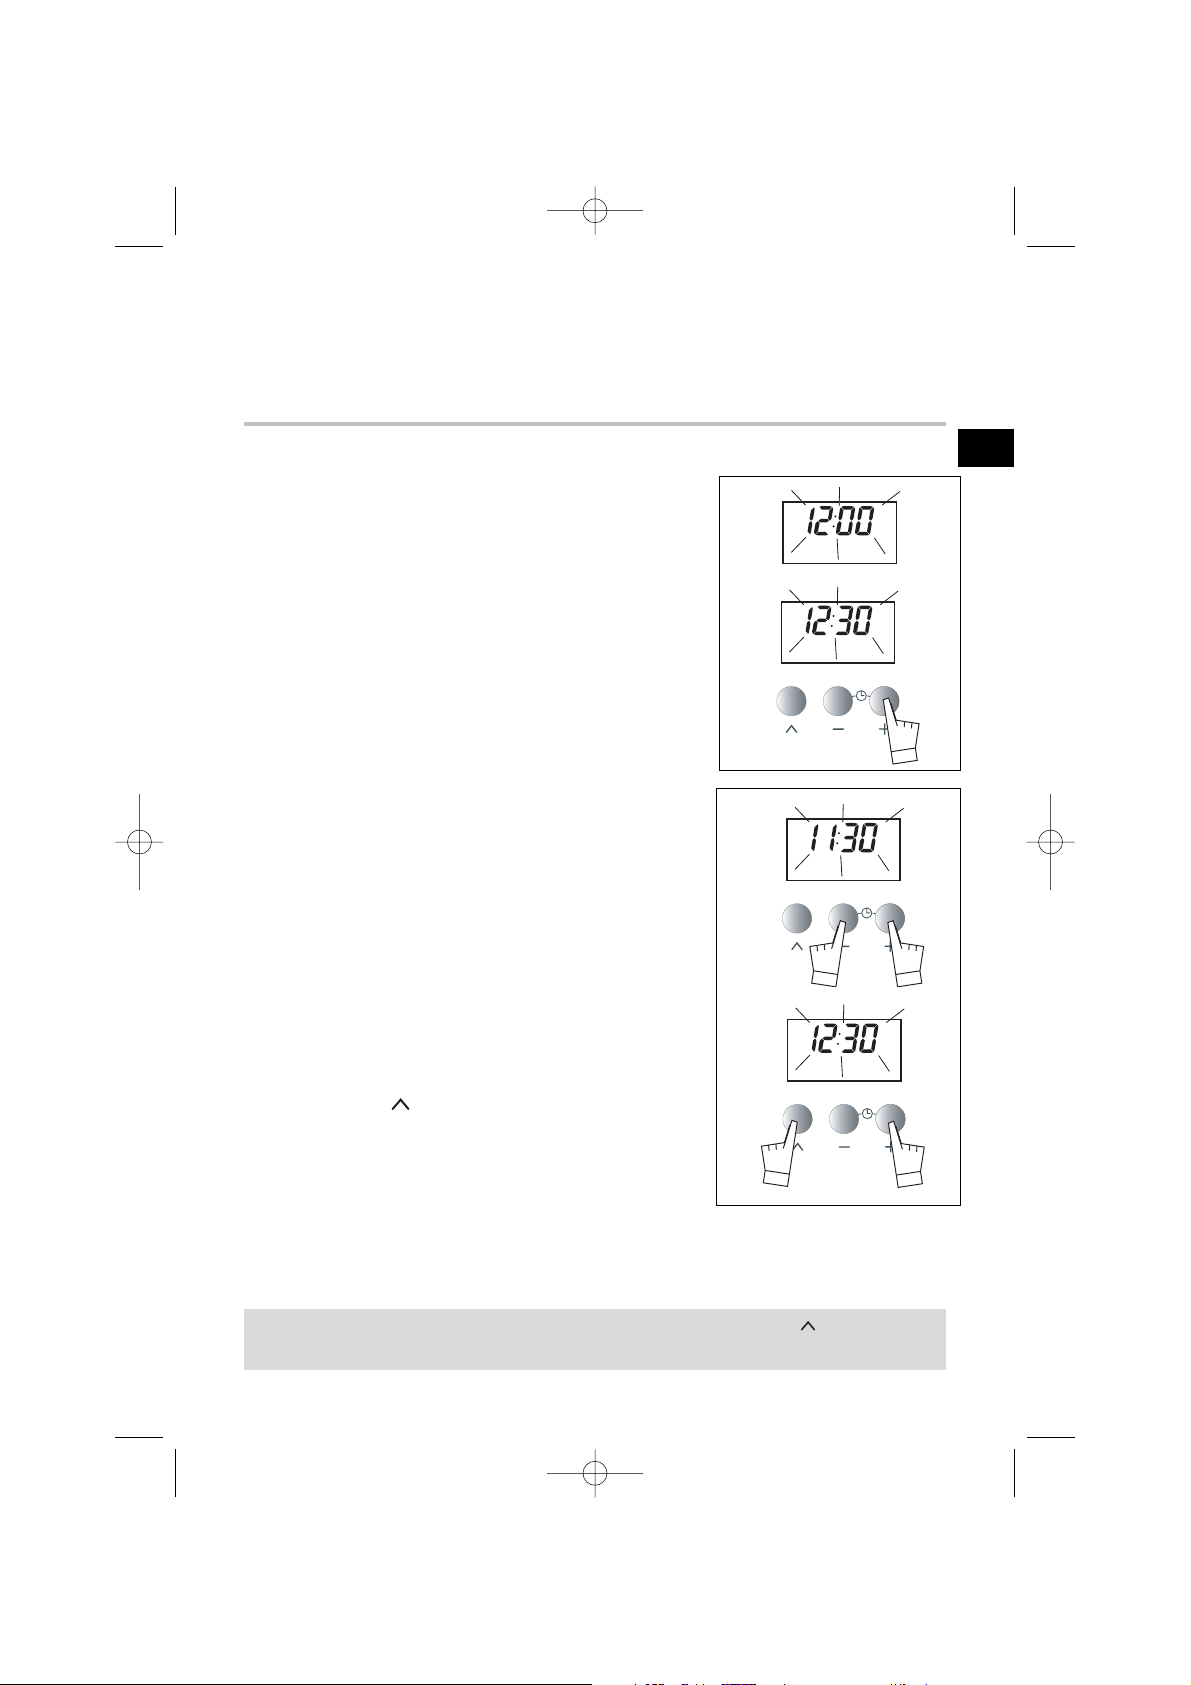
a) When the oven is first switched on at the mains
• The display blinks to 12h00.
• Press on the + and - buttons until the correct
time is shown (Keeping a finger on the button,
rather than tapping it, is quicker)
The example shows 12.30
Registration of the amended time is automatic after a
few seconds.
-> the display no longer flashes
b) Altering the clock
• Press on both + and - buttons together for a few
seconds until the display blinks.
The time display blinks and you can alter the time.
Press on both + and - buttons together to obtain
the correct time (back or forwards).
• Press button to confirm the time.
Setting the hour is not possible if the cooking method
selector is in the "Pyro" or "Pyro Eco" position.
2.
How to set the clock
1
1
2
3
If you forget to confirm the time by pressing button , the oven
will do it automatically after a few seconds.
GB
99625635_A_ML.qxp 14/11/2005 11:30 Page 11
Page 12
12
How to use your oven
3. H
ow to cook straightaway
The timer display only shows the time of day. It should not be blinking.
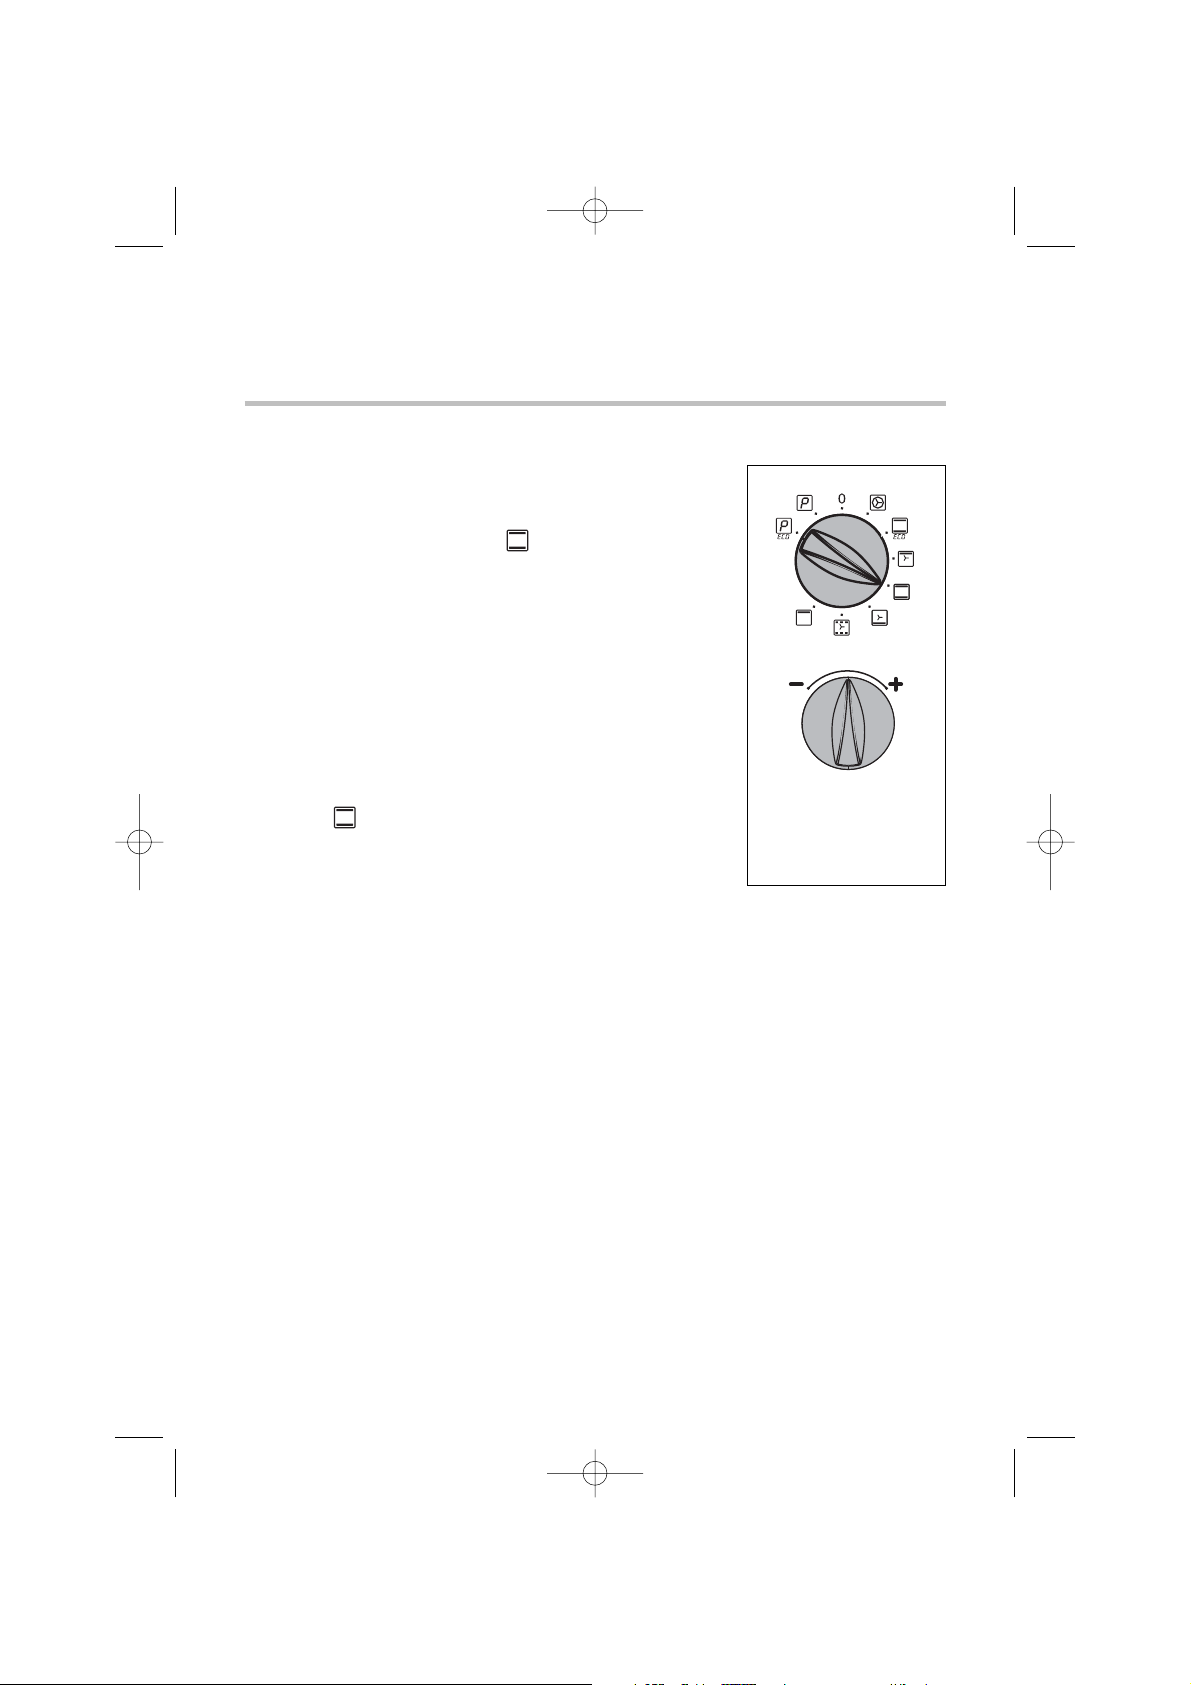
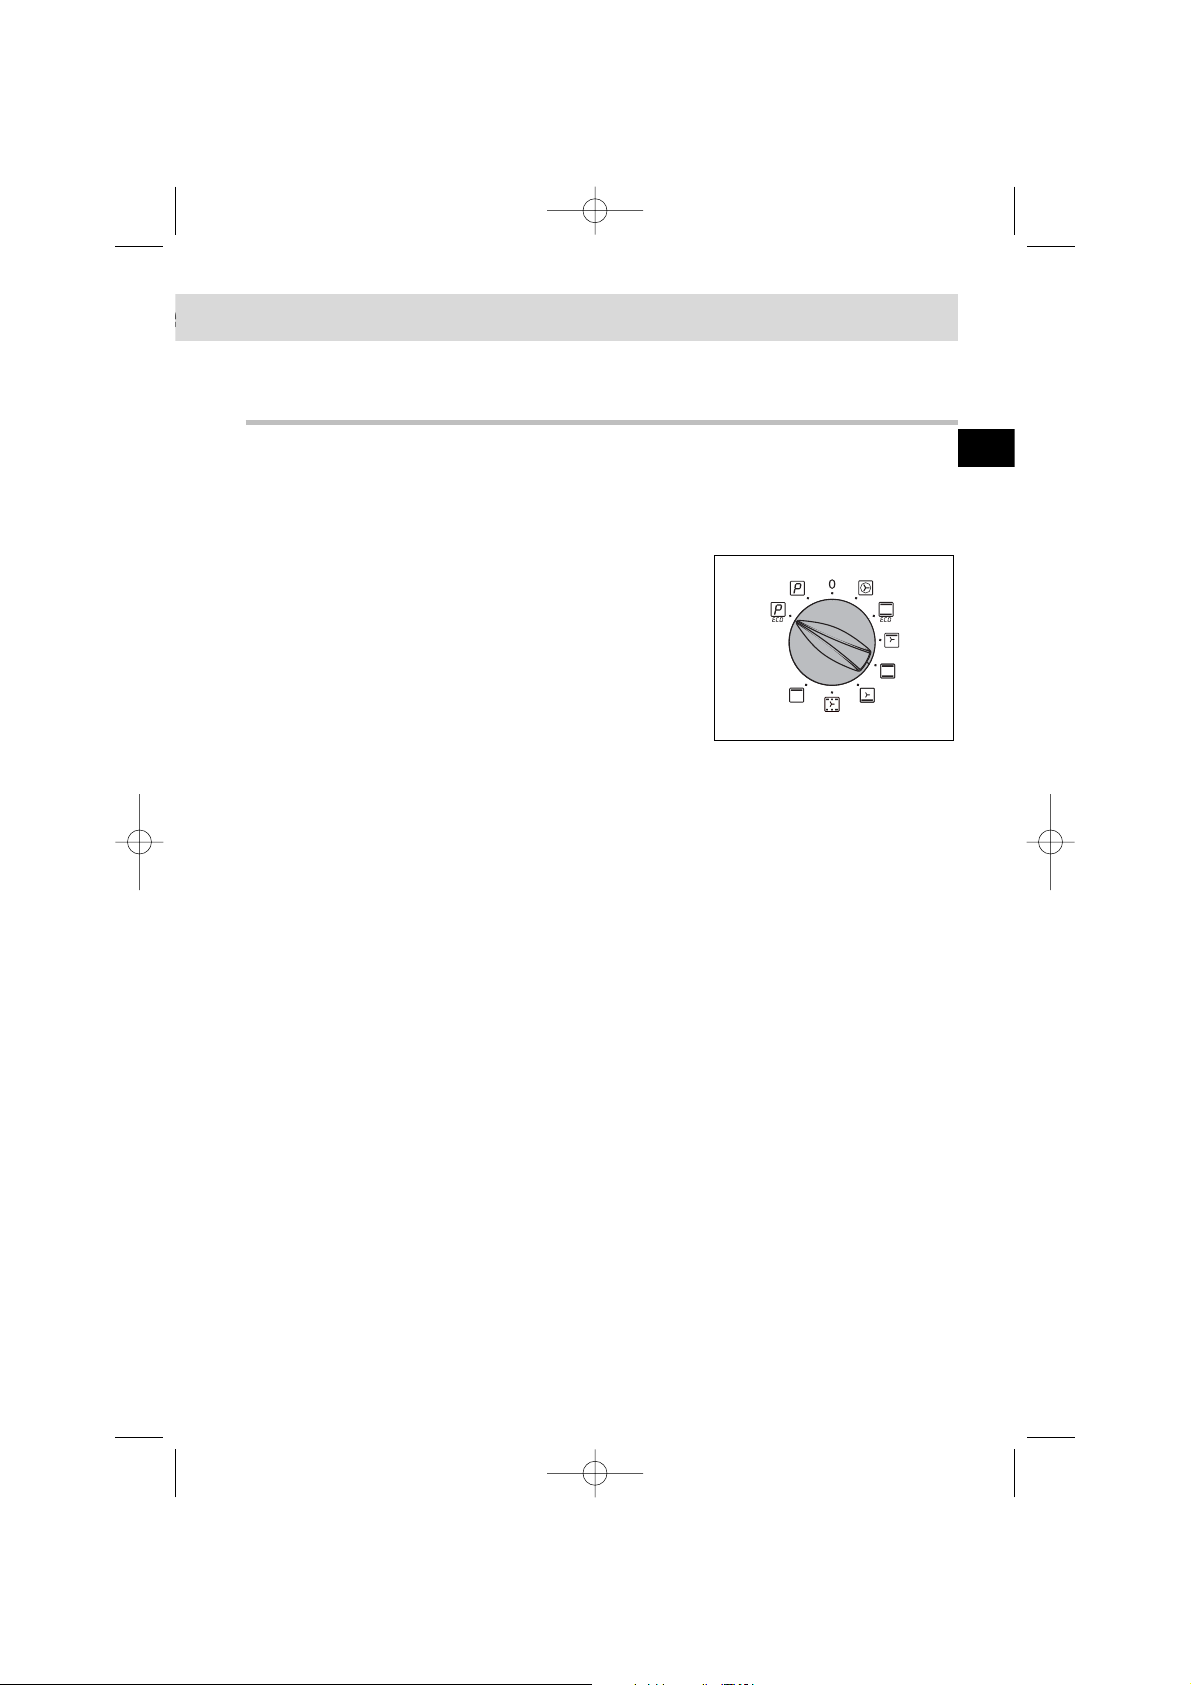
• Choose how you want to cook your food:
Turn the dial until it is indicating your choice.
The example chosen is “ ”-> the oven start
functioning.
Your oven will give the temperature normally used.
Place your food in the oven as suggested by the
cooking guide.
You can alter the temperature by moving the switch
TºC towards + or -
E.g “ ” altered to 210°.
After this, the oven heats up and the temperature (210ºC) blinks.
You will hear a series of beeps when the correct temperature is reached and the
temperature itself will cease blinking.
After cooking, the fan will continue to work for a while in order to cool
the oven down.
99625635_A_ML.qxp 14/11/2005 11:30 Page 12
T˚c
Page 13
13
How to use your oven
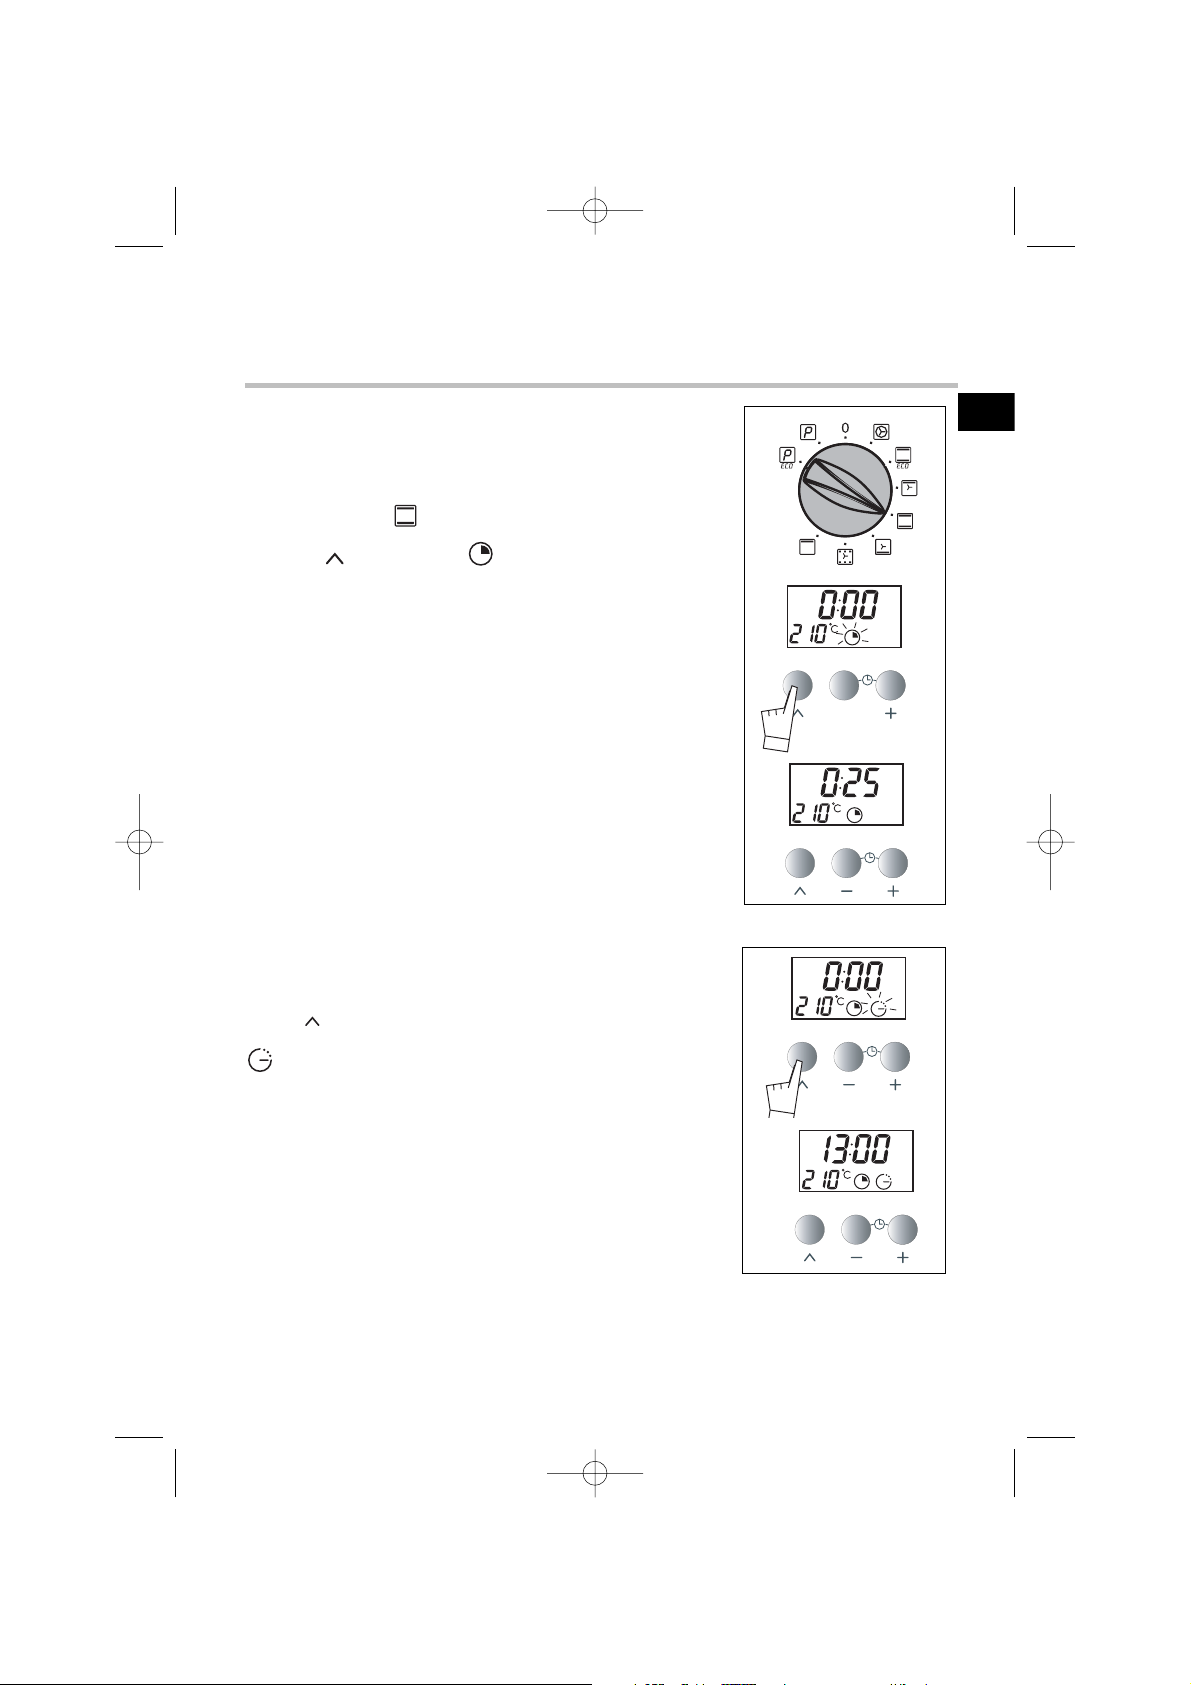
4. How to programme the cooking
b) Delaying the cooking (pre-selected finishing time)
Follow the instructions for programming cooking.
After you have set the length of cooking time,
Press “ ” until the symbol
“ ” (end of cooking symbol) starts blinking
The time display blinks and you can alter the time.
Press + or - to set the time you want cooking to stop.
E.g. Cooking ends 1 pm (13:00)
When you have done this, cooking is delayed and will
start later and finish at 13:00.
When cooking is finished, switch the selector to O.
In the case of pre-programmed cooking the oven cavity is lit until cooking begins
and once cooking is finished.
In the case of pre-programmed, fan-assisted cooking, if the function selector is not reset
to 0, the fan continues to operate in order to even out the temperature in the oven.
a) Cook straightaway
1.
Choose the method of cooking and adjust the tem-
perature if necessary.
The example is
“”
Temperature
210°C.
2. Press“ ” until the “ ” symbol blinks (length of
cooking time).
The time 0:00 blinks on the display panel. You can now
alter it.
3. Press + or - to set the time chosen.
E.g. 25 minutes cooking time.
The oven assumes the time is correct a few seconds after
you stop turning the knob -> The display stops blinking.
The count-down starts as soon as you stop
pressing the + and - buttons.
After these three actions, the oven heats up:
You will hear a series of beeps when the chosen temperature is reached and the cooking stops.
GB
99625635_A_ML.qxp 14/11/2005 11:31 Page 13
Page 14
How to use your oven
5. H
ow to use the timer
Your oven is fitted with a separate minute timer. It is not connected to
the oven's programmes. You can use it just like a kitchen timer.
For this, the timer display makes the hour of day temporarily disappear.
Press “ ” until the (timer)
-> symbol (a small egg-timer) blinks.
Press + or - until the display shows the length of
cooking time required. (up to 60 minutes)
A few seconds later the display stops blinking and you
will see the countdown taking place. When the timer
reaches 0, it will beep to let you know.
You can alter or switch the timer off at any time.
14
99625635_A_ML.qxp 14/11/2005 11:31 Page 14
Page 15
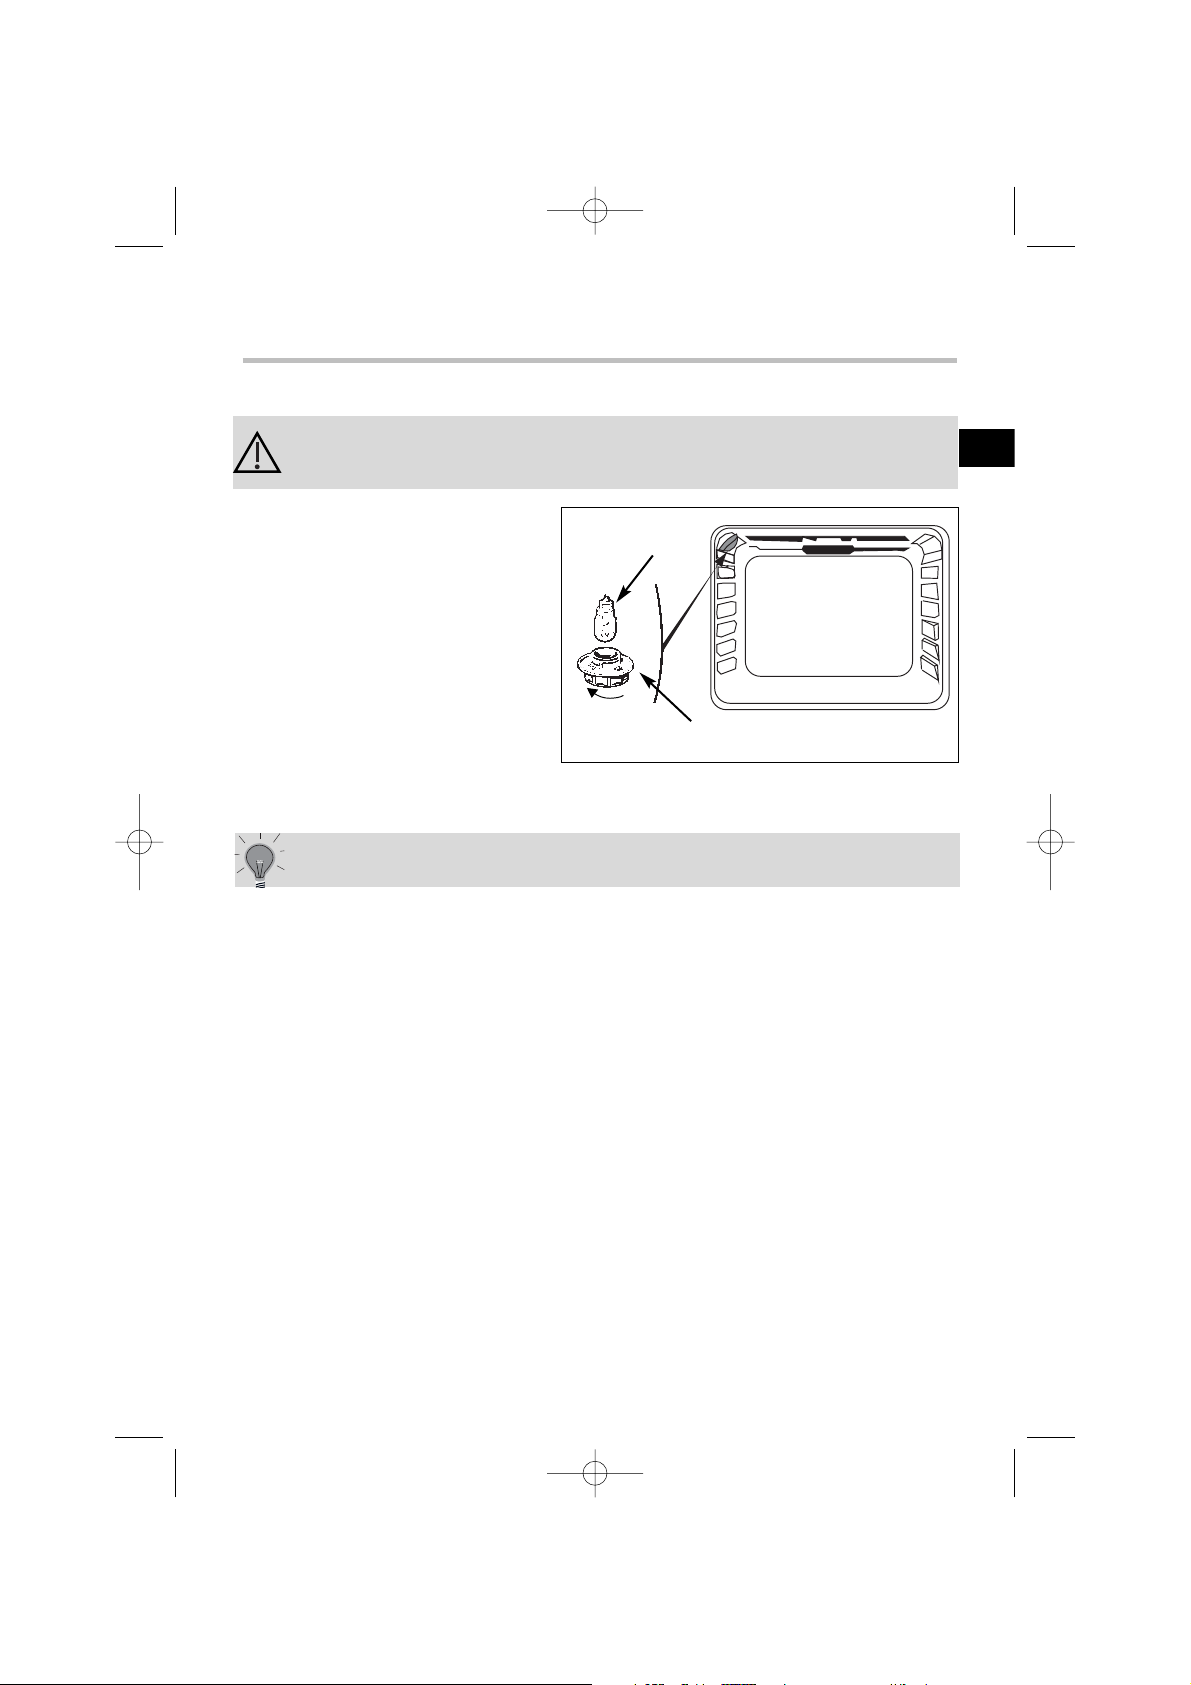
• The light bulb is housed in the ceiling of your oven.
a) Unscrew the protective shade (see
diagram).
b) Unscrew the bulb in the same direction.
The bulb used is a:
- 15 W
- 220-240 V
- 300°C
- E 14 screw-fitting bulb
c) Change the bulb, replace the shade and switch your oven back on at the mains.
bulb fitting
unscrew
cover
It is easier to unscrew the shade and bulb if you wear a rubber glove.
Warning! Switch off the power at the main switch before attempting to change the bulb. Leave the oven to cool if
necessary.
6. Changing a bulb
15
GB
99625635_A_ML.qxp 14/11/2005 11:31 Page 15
Page 16
16
Pulsed grill
Cooking is done alternately
by the top element and by
the fan.
Pulsed bottom oven
Food is cooked by the bottom element with gentle
heat from the grill and the
pulsed-air fan.
Adjustable grill
No need to pre-heat.
Suitable for poultry and succulent
joints that have a spit-roasted appearance.
Warm up for 5 minutes.
Slide the grill pan onto the rail
beneath the grill.
Food is cooked from underneath.
Place the wire shelf on the lower
rail
Warming oven
Top and bottom element at
a control temperature.
Stays warm
Symbol
Feature Description
7. C
ooking methods
C
onventional oven
Food is cooked by a top
and bottom element. No
fan.
Pre-heating needed to reach the
required temperature.
This is an energy-saving programme that still produces good
results. The ECO feature is used
to label the oven.
C
onventional oven ECO
Food is cooked by a top and
bottom element. No fan.
*
F
an oven
A heater element at the
back of the oven and the
fan help cook the food.
No pre-heating necessary except
for food with a relatively short
cooking time (e.g. small biscuits
on several shelves).
*
*
Cooking methods referred to in the advertisement about energy labelling in acco
99625635_A_ML.qxp 14/11/2005 11:31 Page 16
Page 17
17
For sealing and thoroughly cooking gigot lamb chops, and
sides of beef. Also good for cooking fish in breadcrumbs.
The power is adjustable from 30 to 100% from 1 to 4. For efficient cooking, we recommend using higher power levels.
Recommended for dishes with a lot of liquid (quiches and fruit
pies) as the pastry base is cooked through. Use also for food
that rises (bread and cakes) and uncovered soufflés.
Recommended for leaving breads to rise (keeping temperature
below 40ºC), keeping dishes warm and thawing food.
Recommendations
Cooking methods
Recommended for food requiring slow, careful cooking such
as game and braising joints. Ideal for sealing red meat joints
and simmering lidded casseroles whose contents have been
partially cooked on the hob first.
NB. All food is cooked without pre-heating the oven
Recommended to prevent meat drying out, and for cooking
vegetables and fish and food placed on up to 3 shelves.
rdance with European Standard EN50304 and the European Directive 2002/40/EC
GB
99625635_A_ML.qxp 14/11/2005 11:31 Page 17
Page 18
18
C leaning the
1. Pyrolysis explained
FOOD WITH LITTLE Biscuits, vegetables, cakes You do not need to use
SPATTERING quiches, soufflés pyrolysis feature
FOOD THAT Meat, fish (in an open dish) Use the pyrolysis feature
SPATTERS stuffed vegetables after 3 oven uses
FOOD THAT Large pieces of If a lot of spitting occurs,
SPITS BADLY meat on the spit run the pyrolysis feature
afterwards.
If your oven smokes when the pre-heat feature is on or if there is a lot of
smoke during a cooking cycle run the pyrolysis cycle. You can also use this
feature if there is an unpleasant smell of cooking when the oven is cold.
2. When to clean by pyrolysis
Do not wait until the oven is coated in dirt before cleaning it.
-Pyrolysis is a cleaning method during which the oven is heated to a high temperature to remove debris and splatter caused by spitting and dripping food.
The smoke and smells that this produces are removed as the air passes through a
catalyst.
- It is not necessary to run the pyrolysis feature after every use of the oven, simply when the oven is dirty.
- As a safety measure, once the temperature is higher than normal use the door
automatically locks. You cannot unlock it even by turning the pyrolysis feature off.
99625635_A_ML.qxp 14/11/2005 11:31 Page 18
Page 19
3. Starting pyrolysis
19
a) Remove the grids and trays from the oven and clean any major
spill residue.
b) Check that the time of day is glowing steadily in the display panel (not
blinking).
c) Turn the feature selector switch to PYRO or
PYRO ECO.
Pyrolysis takes 90 minutes as part of the
PYRO ECO cycle and 2 hours for the PYRO cycle.
This does not include the time for the oven to cool
down afterwards. Allow approx. 30 minutes for this.
• During pyrolysis the door lock light (a padlock) glows to show the door is
locked.
• When the padlock disappears from the display panel, you can open the door.
d) Move the feature selector back to 0.
e) When the oven is completely cold use a damp cloth to remove the white
ash and the oven will once more be ready for you to cook in.
GB
99625635_A_ML.qxp 14/11/2005 11:31 Page 19
Page 20
20
T
roubleshooting
If you're not sure that your oven is working properly, it doesn't necessarily
mean that there's a problem.
In all cases, check the following points:
Copy here the details that are on your oven manufacturer's plate:
MADE IN FRANCE
220 - 240V ~ 50 Hz
BRANDT APPLIANCES SAS
7 rue Henri Becquerel
92500 RUEIL MALMAISON
If you realize that..
Possible causes what should you do?
The oven isn't heating.
• The oven isn't connected to the
power supply.
• The fuse has blown.
• The temperature selected is too
low.
• The sensor is faulty
• The oven has overheated. It has
been put out of use for safety
reasons
- Connect to power supply.
- Change the fuse, checking that it is
16A.
- Increase the temperature selected.
- Contact the After-Sales Service.
- Contact the After-Sales Service.
- Contact the After-Sales Service.
Err: "V" is displayed
Err: "M" is displayed
• The door lock is faulty.
• Pyro cleaning requested while
the door is already locked
• The temperature sensor is faulty.
- Contact the After-Sales Service.
- Contact the After-Sales Service.
The light inside the oven isn't
working.
• The lamp is unusable.
• The oven isn't connected to the
power supply or the fuse has
blown.
- Change the bulb.
- Connect to power supply or change fuse.
The cooling fan keeps working
after the oven is turned off.
• The fan can keep working for up
to an hour after the oven switches
off if is over 125ºC.
• If it has not stopped after 1 hour
- Open the door to help the oven
cool down more
quickly.
- Contact the After-Sales Service.
Cleaning by pyrolysis has not occurred.
• The door is not shut properly.
• The door-locking system is faulty.
• The temperature sensor is faulty.
• The plate that detects when the
door is shut is faulty.
- Check the door is properly closed.
- Contact the After-Sales Service.
- Contact the After-Sales Service.
- Contact the After-Sales Service.
99625635_A_ML.qxp 14/11/2005 11:31 Page 20
Page 21

Le guide d’utilisation
de votre four
de
Référence : FP 225
FR
99625635_A_ML.qxp 14/11/2005 11:31 Page 21
Page 22

Sommaire
Tout au long de la notice,
vous signale les consignes de sécurité,
vous signale les conseils et les astuces
Edito P.23
Comment se présente votre four ?
Descriptif de l’appareil
P.24
Accessoires
P.25
Conseils de sécurité
P.26
Comment installer votre four ?
Raccordement électrique P.27-28
Dimensions utiles pour encastrer votre four P.29
Comment utiliser votre four ?
Le détail de votre programmateur P.30
C
omment mettre à l’heure l’horloge du four ?
P.31
Comment faire une cuisson immédiate ? P.32
Comment programmer une cuisson ? P.33
Comment utiliser votre minuteur ? P.34
Comment changer l’ampoule ?
P.35
Modes de cuisson du four P.36-37
Comment nettoyer la cavité de votre four ?
Qu’est-ce qu’une pyrolyse ? P.38
Dans quel cas faut-il effectuer une pyrolyse ? P.38
Comment faire une pyrolyse ? P.39
Que faire en cas d’anomalies de fonctionnement ?
P.40
22
99625635_A_ML.qxp 14/11/2005 11:31 Page 22
Page 23
23
Edito
Chère Cliente, Cher Client,
Vous venez d'acquérir un four BRANDT et nous vous en remercions.
Nos équipes de recherche ont conçu pour vous une nouvelle génération
d'appareils pour cuisiner chaque jour avec plaisir.
Avec des lignes pures et une esthétique moderne, votre nouveau four
Brandt s'intègre harmonieusement dans votre cuisine et allie parfaitement facilité d'utilisation et performances de cuisson.
Vous trouverez également dans la gamme des produits Brandt, un vaste
choix de tables de cuisson, de hottes aspirantes, de lave-vaisselle et de
réfrigérateurs intégrables, que vous pourrez coordonner à votre nouveau
four Brandt.
Bien entendu, dans un souci permanent de satisfaire au mieux vos exigences vis à vis de nos produits, notre service consommateurs est à
votre disposition et à votre écoute pour répondre à toutes vos questions
ou suggestions (coordonnées à la fin de ce livret).
A la pointe de l'innovation, Brandt contribue ainsi à l'amélioration de la
qualité de la vie quotidienne en vous apportant des produits toujours plus
performants, simples d'utilisation, respectueux de l'environnement, esthétiques et fiables.
La Marque BRANDT.
FR
99625635_A_ML.qxp 14/11/2005 11:31 Page 23
Page 24
24
1
3
5
T˚c
1
2
3
4
5
6
Comment se présente votre four ?
Sélecteur de température
Programmateur
Sélecteur de fonctions
DESCRIPTIF APPAREIL
1
2
3
Lampe
Indicateur de gradin
Contact de détection
d’ouverture de porte
4
5
6
99625635_A_ML.qxp 14/11/2005 11:31 Page 24
Page 25
25
Accessoires (selon modèle)
Grille sécurité
anti basculement
La grille peut être utilisée pour supporter tous
les plats et moules contenant des aliments à
cuire ou à gratiner. Elle sera utilisée pour les
grillades (à poser directement dessus).
Plat multi usages
(pâtisserie)
Il sert de plat à gâteaux et dispose d'un
rebord incliné. Il s'utilise pour la cuisson de
pâtisseries telles que choux à la crème, meringues, madeleines, pâtes feuilletées...
Evitez de poser directement dans ce plat des rôtis ou des viandes car vous aurez
automatiquement d'importantes projections sur les parois du four.
Plat creux
équipé d'une grille support
spéciale grillades
Il sert à recueillir le jus et les graisses de cuisson réalisées en gril fort ou gril pulsé.
Il peut être utilisé comme plat de cuisson en
appropriant la taille du morceau à cuire (ex: une volaille avec les légumes autour,
à température modérée).
Ne jamais poser ce plat directement sur la sole, sauf en position GRIL.
AR
AV
Poignée pour plat creux
7
8
9
10
FR
99625635_A_ML.qxp 14/11/2005 11:31 Page 25
Page 26
26
Conseils de sécurité
Merci de prendre connaissance de ces conseils avant d’installer et
d’utiliser votre four. Ce four a été conçu pour être utlilisé par des particuliers
dans leur lieu d’habitation. Il est destiné exclusivement à la cuisson des denrées
alimentaires. Ce four ne contient aucun composant à base d’amiante.
PREMIERE UTILISATION :
Avant d’utiliser votre four pour la première fois, chauffer le à vide, porte fermée,
pendant 15 minutes environ sur la position maxi afin de “roder” l’appareil. La laine
minérale qui entoure la cavité du four peut dégager, au début, une odeur particulière due à sa composition. De même, vous constaterez peut-être un dégagement
de fumée. Tout ceci est normal.
UTILISATIONS SUIVANTES :
- Assurez vous que votre porte de four est bien fermée afin que le joint d’étanchéité remplisse correctement sa fonction.
- Ne laissez personne s’appuyer ou s’asseoir sur la porte du four ouverte.
- Lors de l’utilisation du gril porte entre-ouverte, les parties accessibles
ou les surfaces peuvent devenir chaudes. Eloignez les jeunes enfants.
- Lors de son utilisation, l’appareil devient chaud. Veillez à ne pas toucher les éléments chauffants situés à l’intérieur du four.
- Après une cuisson, ne prenez pas à main nue la casserolerie (grille,
tourne broche, léchefrite, berceau de tournebroche...), utilisez une manique ou un
tissu isolant.
- Ne garnissez pas votre four de feuilles en aluminium. Sinon, il en
résulterait une accumulation de chaleur qui influencerait désavantageusement le
résultat de la cuisson et du rôtissage et endommagerait l’émail.
- Avant de procéder au nettoyage pyrolyse de votre four, retirez tous les éléments
de casserolerie et enlevez les débordements importants.
- Ne pas utiliser de nettoyeur vapeur ou à haute pression.
- Pendant une pyrolyse, les surfaces accessibles deviennent plus chaudes qu’en
usage normal. Eloigner les jeunes enfants.
- Pour toute intervention de nettoyage dans la cavité du four, le four doit
être arrêté.
PROTECTION DE L’ENVIRONNEMENT
Les matériaux d’emballage de cet appareil sont recyclables. Participez à leur recyclage et contribuez ainsi à la protection de l’environnement en les déposant dans
les conteneurs municipaux prévus à cet effet.
Votre appareil contient également de nombreux matériaux recyclables. Il
est donc marqué de ce logo afin de vous indiquer que les appareils usagés ne doivent pas être mélangés avec d’autres déchets. Le recyclage des
appareils qu’organise votre fabricant sera ainsi réalisé dans les meilleures
conditions, conformément à la directive européenne 2002/96/CE sur les
déchets d’équipements électriques et électroniques. Adressez vous à
votre mairie ou à votre revendeur pour connaître les points de collecte
des appareils usagés les plus proches de votre domicile.
Nous vous remercions pour votre collaboration à la protection de l’environnement.
Remettez impérativement le sélecteur de fonction sur 0 pour
réutiliser votre four.
99625635_A_ML.qxp 14/11/2005 11:31 Page 26
Page 27
27
Compteur 20A Mono
220-240 V ~ 50 Hz
Prise de courant
2 pôles + terre
norme CEI 83
Ligne Mono 220-240 V ~
Raccordement électrique
Câble
d'alimentation
longueur 1,50 m
environ
Disjoncteur différentiel
ou fusible 16A
Avant d'effectuer le branchement, s'assurer que les fils de votre
installation électrique sont d'une section suffisante pour alimen-
ter normalement l'appareil (section au minimum égale à celle du
câble d'alimentation).
Le fusible de votre installation doit être de 16 Ampères.
Comment installer votre four?
FR
99625635_A_ML.qxp 14/11/2005 11:31 Page 27
Page 28
28
Comment install
Notre responsabilité ne saurait être engagée en cas d'accident
consécutif à une mise à la terre inexistante, défectueuse ou
incorrecte.
• Le câble d’alimentation (H05 RR-F, H05 RN-F ou H05 VV-F) doit avoir une longueur
suffisante pour être raccordé au four à encastrer posé au sol devant le meuble.
Pour cela l’appareil doit être déconnecté du réseau :
• Ouvrez la trappe située en bas à droite du capot arrière en dévissant les 2 vis,
puis faîtes pivoter la trappe.
• Dénudez chaque fil du nouveau câble d’alimentation sur 12mm.
• Torsadez soigneusement les brins.
• Desserrez les vis du bornier et retirez le cordon d’alimentation à changer.
• Introduire le câble d’alimentation par le côté du capot dans le serre-câble situé à
droite du bornier.
• Raccordez les fils du câble conformément au(x) repère(s) écrit(s) sur le bornier.
• Tous les brins des fils d’alimentation doivent être emprisonnés sous les vis.
• Le fil de la phase sur la borne L.
• Le fil de terre couleur vert-jaune doit être relié à la borne .
• Le fil du neutre (bleu) sur la borne N.
• Vissez à fond les vis du bornier et vérifiez le branchement en tirant sur chaque fil.
• Fixez le câble au moyen du serre-câble situé à droite du bornier.
• Refermez la trappe à l’aide des 2 vis.
Mise en place et/ou changement du câble d’alimentation
Le raccordement électrique est à réaliser avant la mise en place de l'appareil dans
le meuble.
• Le four doit être branché avec un câble d'alimentation (normalisé) à 3 conducteurs de 1,5 mm
2
(1 ph +1 N + terre ) qui doivent être raccordés sur réseau
220-
240 V ~ monophasé par l'intermédiaire d'une prise de courant 1 ph +1 N + terre
normalisée CEI 83 ou d'un dispositif à coupure omnipolaire ayant une distance
d'ouverture des contacts d'au moins 3 mm. Le fil de protection (vert-jaune) est relié
à la borne de l'appareil et doit être relié à la terre de l'installation.
• Dans le cas d’un branchement avec prise de courant, celle-ci doit rester
accessible après l’installation de l’appareil.
• Le neutre du four (fil bleu) doit être raccordé au neutre du réseau.
99625635_A_ML.qxp 14/11/2005 11:31 Page 28
Page 29
29
er votre four ?
Pour être assuré d’avoir une installation conforme, n’hésitez
pas à faire appel à un spécialiste électroménager.
Dimensions utiles pour encastrer votre four
Le four peut indifféremment être installé sous un plan de travail ou dans
un meuble en colonne (ouvert* ou fermé) ayant les dimensions d’encastrement adaptées (voir schéma ci-contre).
Votre four possède une circulation d’air optimisée qui permet d’obtenir des résultats
de cuisson et de nettoyage remarquables en respectant les éléments suivants :
• Centrez le four dans le meuble de façon à garantir une distance mini de 5 mm
avec le meuble voisin.
• La matière du meuble d’encastrement doit résister à la chaleur (ou être revêtu
d’une telle matière).
• Pour plus de stabilité, fixez le four dans le meuble par 2 vis au travers des trous
prévus à cet effet sur les montants latéraux (cf schéma).
Pour ce faire :
1) Retirez les cache vis en caoutchouc pour accéder aux trous de fixation.
2) Effectuez un trou de Ø 3 mm dans la paroi du meuble pour éviter l’éclatement du bois.
3) Fixez le four avec les 2 vis.
4) Remettez les cache vis en caoutchouc (ceux-ci servent également à amortir la
fermeture de la porte du four).
(*) si le meuble est ouvert, son ouverture doit être de 70 mm (maxi).
FR
99625635_A_ML.qxp 14/11/2005 11:31 Page 29
Page 30
Comment utiliser votre four ?
30
1. Le détail de votre programmateur
5
3
4
2
8
9
10
1
7
6
1
3
4
5
6
7
9
10
8
2
Affichage des temps et durées
Affichage de la température
Indicateur de la durée de cuisson
Indicateur de fin de cuisson
Indicateur du minuteur
Indicateur de cuisson ECO
Indicateur de porte verrouillée
Touche d’accès aux différents
programmes de réglage du
temps
Touches de réglages du temps
99625635_A_ML.qxp 14/11/2005 11:31 Page 30
Page 31

31
Comment utiliser votre four ?
a) A la mise sous tension
• L’afficheur clignote à 12h00.
• Réglez l’heure en appuyant sur les touches
+ ou - (le maintien du doigt sur la touche permet
d’obtenir un défilement rapide)
Exemple:12h30.
L’enregistrement de l’heure ajustée est automatique
au bout de quelques secondes
-> l’affichage ne clignote plus
b) Remise à l’heure de l’horloge
• Appuyez simultanément sur les touches + et pendant quelques secondes jusqu’à faire clignoter
l’affichage.
L’affichage de l’heure clignote pour vous indiquer
que le réglage est alors possible.
Pour le réglage, appuyez sur les touches + ou - de
façon à augmenter ou diminuer l’heure affichée.
• Appuyez sur la touche pour valider.
Le réglage de l’heure n’est pas possible si le sélecteur de cuisson est sur la
position “Pyro” ou “Pyro Eco”.
2. Comment mettre à l'heure l’horloge du four ?
1
1
2
3
S’il n’y a pas de validation par la touche , l’enregistrement
est automatique au bout de quelques secondes.
FR
99625635_A_ML.qxp 14/11/2005 11:31 Page 31
Page 32

32
Comment utiliser votre four ?
3. C
omment faire une cuisson immédiate ?
Le programmateur ne doit afficher que l'heure; celle-ci ne doit pas clignoter.
• Choisissez le mode de cuisson :
Tournez le sélecteur de fonctions sur la position de
votre choix.
Exemple : position “ ”-> le four se met en marche.
Votre four vous propose la température la plus couramment utilisée.
Placez votre plat dans le four selon les recommandations fournies par le guide de cuisson.
Il vous est cependant possible d’ajuster la température
en actionnant la manette “T°c” vers + ou -.
Exemple “ ” ajustée à 210°.
Après ces actions, le four chauffe et l’affichage de la température (210°c) clignote.
Une série de bips sonores retentit lorsque le four atteint la température choisie.
Celle-ci cesse de clignoter.
Après un cycle de cuisson, la turbine de ventilation continue de fonctionner pendant un certain temps, afin de refroidir le four.
99625635_A_ML.qxp 14/11/2005 11:31 Page 32
T˚c
Page 33

33
Comment utiliser votre four ?
4. Comment programmer une cuisson ?
b) Comment différer une cuisson ?(heure de fin choisie)
Procédez comme une cuisson programmée.
Après le réglage de la durée de cuisson,
Appuyez sur la touche “ ” jusqu’à faire clignoter
le symbole “ ” (fin de cuisson).
L’affichage clignote pour indiquer que le réglage est alors
possible.
Appuyez sur la touche + ou - pour régler l’heure de fin
souhaitée.
Exemple : Fin de cuisson à 13h.
Après ces actions, le départ de la chauffe est différé
pour que la cuisson soit finie à 13h.
Quand votre cuisson est terminée, remettre le sélecteur
de cuisson sur ” 0 ”.
Dans le cas de cuissons programmées, la cavité est éclairée en attente de départ
de cuisson et en fin de cuisson.
Dans le cas de cuissons programmées et pulsées, sans remise à 0 du sélecteur
de fonctions, l’hélice de brassage d’air continue de tourner pour homogénéiser la
température dans le four.
a) Avec départ immédiat
1. Réglez le mode de cuisson choisi et éventuellement
ajustez la température.
Exemple : position “ ” température 210°C.
2. Appuyez sur la touche “ ” jusqu’à faire clignoter
le symbole “ ” (durée de cuisson).
L’affichage clignote à 0h00 pour indiquer que le réglage
est alors possible.
3. Appuyez sur la touche + ou - pour régler le temps
souhaité.
Exemple : 25 min de cuisson.
L’enregistrement de l’heure ajustée est automatique au
bout de quelques secondes, ->l’afficheur ne clignote
plus.
Le décomptage de la durée se fait immédiatement
après le réglage.
Après ces 3 actions, le four chauffe :
Une série de bips sonores retentit lorsque le four atteint
la température choisie.
FR
99625635_A_ML.qxp 14/11/2005 11:31 Page 33
Page 34

Comment utiliser votre four ?
5. Comment utiliser le minuteur ?
Votre four est équipé d’un minuteur électronique indépendant du fonctionnement du four permettant de décompter un temps.
Dans ce cas, l’affichage du minuteur est prioritaire sur l’affichage de l’heure du
jour.
Appuyez sur la touche “ ” jusqu’à faire clignoter le symbole (Minuteur)
-> l’afficheur et un petit sablier clignotent.
Appuyez sur la touche ( + ou - ) jusqu’à obtenir la
durée voulue ( maxi 60 minutes )
L’afficheur s’arrête de clignoter au bout de quelques
secondes et le minuteur se met en marche et décompte le temps de secondes en secondes.
Une fois la durée écoulée, la minuterie émet une série
de bips sonores pour vous avertir.
Il est possible de modifier ou d’annuler à n’importe quel moment
la programmation de la minuterie.
34
99625635_A_ML.qxp 14/11/2005 11:31 Page 34
Page 35

• L'ampoule se situe au plafond de la cavité de votre four.
a) Dévissez le hublot (voir ci-contre).
b) Dévissez l'ampoule dans le même
sens.
Caractéristiques de l'ampoule :
- 15 W
- 220-240 V
- 300°C
- culot E 14
c) Changer l'ampoule puis remonter le hublot et rebrancher votre four
Ampoule
Dévissez
Hublot
pour dévisser le hublot et la lampe, utiliser un gant
de caoutchouc qui facilitera le démontage.
Débrancher votre four avant toute intervention sur l'ampoule
pour eviter tout risque de choc électrique et laisser refroidir si
besoin l’appareil.
6. Comment changer l’ampoule ?
35
FR
99625635_A_ML.qxp 14/11/2005 11:31 Page 35
Page 36

36
Gril pulsé
La cuisson s’effectue, alternativement, par l’élément supérieur et
l’hélice de brassage d’air.
Sole pulsée
La cuisson s’effectue par l’élément inférieur associé à un léger
dosage du gril et à l’hélice de
brassage d’air.
Gril variable
Préchauffage inutile
Volailles et rôtis juteux et croustillantes sur toutes les faces.
Effectuez un préchauffage de
5 min.
Glissez le plat multiusages sur
le gradin du bas.
Cuisson par le dessous avec
léger dosage dessus.
Placez la grille sur le gradin
bas.
Maintien au chaud
Dosage de l’élément supérieur et
inférieur.
Maintien au chaud.
Symbole
Nom de la fonction Description de la fonction
7.
Modes de cuisson du four
Traditionnel
La cuisson s’effectue par les éléments inférieur et supérieur sans
brassage d’air.
Nécessite un préchauffage
avant d’enfourner le plat.
Cette position per met de faire
un gain d’énergie tout en
conservant les qualités de cuisson. La position ECO est utilisé
pour l’étiquetage énergétique.
Traditionnel ECO
La cuisson s’effectue par les éléments inférieur et supérieur sans
brassage d’air.
*
Chaleur tournante
La cuisson s’effectue par la résistance placée au fond du four et
par l’hélice de brassage d’air.
Préchauffage inutile sauf pour
des cuissons exigeant des
temps très courts (sablés sur
plusieurs niveaux).
*
* Séquences(s) utilisée(s) pour l’annonce écrite sur l’étiquette énergétique conformé
99625635_A_ML.qxp 14/11/2005 11:32 Page 36
Page 37

37
Pour saisir et cuire à coeur gigot, côtes de boeuf.
Pour garder leur fondant aux pavés de poissons.
La puissance est réglable de 30 à 100%
de 1 à 4. Pour une bonne efficacité, nous vous recommandons d’utiliser
les puissances supérieures
Recommandé pour les plats humides (quiches, tartes aux fruits juteux...)
La pâte sera bien cuite dessous.
Recommandé pour les préparations qui lèvent (cake, brioche, kouglof...)
et pour les soufflés qui ne seront pas bloqués par une croute dessus.
Recommandé pour faire lever les pâtes à pain, à brioche,
kouglof...en ne dépassant pas 40°C (chauffe-assiettes, décongélation).
Recommandations
Modes de cuisson du four
Recommandé pour les cuissons lentes et délicates : gibiers moelleux...
Pour saisir rôtis de viande rouge
Pour mijoter en cocotte fermée plats prealablement démarrés sur table
de cuisson (coq au vin, civet...)
Nota : toutes les cuissons se font sans préchauffage.
Recommandé pour garder le moelleux des viandes, pour les légumes, poissons et pour les cuissons multiples jusqu’à 3 niveaux.
FR
99625635_A_ML.qxp 14/11/2005 11:32 Page 37
Page 38

38
C omment nettoyer la cavi
1. Qu’est-ce qu’une pyrolyse ?
CUISSONS PEU Biscuits, légumes, patisseries Cuissons sans éclaboussures
SALISSANTES quiches, soufflés une pyrolyse n’est pas justifiée
CUISSONS viandes, poissons, la pyrolyse peut se justifier
SALISSANTES (dans un plat) légumes farcis toutes les 3 cuissons
CUISSONS TRES grosses pièces de viandes la pyrolyse peut se faire après
SALISSANTES à la broche 1 cuisson de ce type si les
projections sont importantes
Votre four fume lors d’un préchauffage ou fume énormément lors d’une cuisson.
Votre four dégage une odeur à froid désagréable suite à différentes cuissons
(mouton, poisson, grillades...).
2. Dans quel cas faut il effectuer une pyrolyse ?
Il ne faut pas attendre que le four soit chargé de graisses pour
effectuer ce nettoyage.
-La pyrolyse est un cycle de chauffe de la cavité du four à très haute température qui permet d’éliminer toutes les salissures qui proviennent des éclaboussures
ou des débordements. Les fumées et odeurs dégagées sont détruites par le passage dans un catalyseur.
- La pyrolyse n’est toutefois pas nécessaire après chaque cuisson, mais seulement si le degré de salissure le justifie.
- Par mesure de sécurité, l’opération de nettoyage ne s’effectue qu’après blocage automatique de la porte. Dès que la température à l’intérieur du four dépasse les températures de cuisson, il est impossible de déverrouiller la porte même
en positionnant la manette «sélecteur de fonctions» sur 0.
99625635_A_ML.qxp 14/11/2005 11:32 Page 38
Page 39

3. Comment faire une pyrolyse ?
té du four par pyrolyse ?
39
a) Retirez la casserolerie du four et enlevez les débordements impor-
tants qui auraient pu se produire.
b) Vérifiez que le programmateur affiche l’heure du jour et que celle-ci ne cli-
gnote pas.
c) Positionnez la manette «sélecteur de fonctions
sur la position “PYRO” ou “PYRO ECO”.
La durée de la pyrolyse est de 1h30 en “PYRO ECO”
ou de 2h en “PYRO”.
Ce temps ne prend pas en compte la durée de re-
froidissement du four qui est d’1/2 heure environ.
• Au cours du cycle de pyrolyse, le voyant de ver-
rouillage s’allume pour vous indiquer que la porte est verrouillée (symbolisée
par un cadenas).
• Quand le cadenas de verrouillage n’apparaît plus dans l’afficheur, il est alors
possible d’ouvrir la porte.
d) Ramenez le sélecteur de fonctions sur la position 0.
e) Lorsque le four est froid, utilisez un chiffon humide pour enlever la cendre
blanche. Le four est propre et à nouveau utilisable pour effectuer une cuisson de
votre choix.
FR
99625635_A_ML.qxp 14/11/2005 11:32 Page 39
Page 40

40
Que faire en cas d’anomalies de
fonctionnement ?
Vous avez un doute sur le bon fonctionnement de votre four, ceci ne
signifie pas forcément qu'il y a une panne.
Dans tous les cas, vérifiez les
point suivants :
Vous constatez que...
Les causes possibles Que faut-il faire ?
Le four ne chauffe pas.
• Le four n'est pas branché.
• Le fusible de votre installation est
hors service.
• La température sélectionnée est
trop basse.
• Le capteur est défectueux
• Le four a subi une surchauffe,
il
s’est mis en sécurité.
- Brancher le four.
- Changer le fusible de votre installation et vérifier sa valeur (16A).
- Augmenter la température sélectionnée.
- Faire appel au Service Après-Vente.
- Faire appel au Service Après-Vente.
- Faire appel au Service Après-Vente.
Er : V s’affiche.
Er : M s’affiche.
• Défaut de verrouillage de la porte.
• Demande de pyro alors que la
porte est verrouillée.
• Capteur de température défectueux.
- Faire appel au Service Après-Vente.
- Faire appel au Service Après-Vente.
La lampe du four ne fonctionne plus.
• La lampe est hors service.
• Le four n'est pas branché ou le
fusible est hors service.
- Changer la lampe.
- Brancher le four ou changer le
fusible.
Le ventilateur de refroidissement
continue de tourner à l’arrêt du
four.
• La ventilation fonctionne pendant 1 heure maximum après la
cuisson, ou lorsque la température
de votre four est supérieure à
125°C.
• Si pas d’arrêt après 1 heure
- Ouvrir la porte du four pour accélérer le refroidissement du four.
- Faire appel au Service AprèsVente.
Le nettoyage par pyrolyse ne se
fait pas.
• La porte est mal fermée.
• Le système de verrouillage est
défectueux.
• Le capteur de T° est défectueux.
• Le contact de détection de
«porte fermée» est défectueux.
- Vérifier la fermeture de la porte.
- Faire appel au Service AprèsVente.
- Faire appel au Service AprèsVente.
- Faire appel au Service AprèsVente.
Reportez ci-dessous les indications figurant sur la plaque signalétique de votre four :
MADE IN FRANCE
220 - 240V ~ 50 Hz
BRANDT APPLIANCES SAS
7 rue Henri Becquerel
92500 RUEIL MALMAISON
99625635_A_ML.qxp 14/11/2005 11:32 Page 40
Page 41

O guia de utilização do seu forno
de
R
eferência: FP 225
PT
99625635_A_ML.qxp 14/11/2005 11:32 Page 41
Page 42

Sumário
Ao longo do folheto,
assina-lhe as instruções de segurança,
assinala-lhe os conselhos e as astúcias
Editorial P.43
Como se apresenta o seu forno?
D
escrição do aparelho P.44
A
cessórios P.45
Conselhos de Segurança
P.46
Como instalar o seu forno?
Ligação eléctrica P.47-48
Dimensões úteis para encastrar o seu forno P.49
Como utilizar o seu forno?
Os pormenores do programador P.50
C
omo ajustar a hora do relógio do seu forno
P.51
Como fazer uma cozedura imediata? P.52
Como fazer uma cozedura programada? P.53
Como utilizar o temporizador P.54
Como mudar a lâmpada?
P.55
Modos de cozedura do forno P.56-57
Como limpar a cavidade do seu forno?
O que é a pirolise? P.58
Em que caso é necessário efectuar uma pirolise? P.58
Como realizar uma pirolise P.59
Que fazer em caso de anomalias de funcionamento?
P.60
42
99625635_A_ML.qxp 14/11/2005 11:32 Page 42
Page 43

43
Editorial
Estimado(a) Cliente,
Acabou de adquirir um forno BRANDT e estamos-lhe gratos por isso.
As nossas equipas de pesquisa conceberam, pensando em si, uma nova
geração de aparelhos para que o acto de cozinhar seja um prazer no dia
a dia .
Com linhas puras e uma estética moderna, o seu novo forno Brandt
integra-se harmoniosamente na sua cozinha e alia perfeitamente facilidade de utilização e performance de cozedura.
Encontrará igualmente na gama dos produtos Brandt, uma vasta escolha
de placas de cozedura, de exaustores, de máquinas de lavar loiça e de
refrigeradores integráveis, que poderá coordenar ao seu novo forno
Brandt.
Evidentemente, com a preocupação permanente de satisfazer da melhor
maneira possível as suas expectativas em relação aos nossos produtos, o
nosso serviço de consumidores encontra-se à sua disposição e à sua
escuta para responder a todas as suas perguntas ou sugestões (coordenadas no final do presente manual).
Na ponta da inovação, Brandt contribui assim para o melhoramento da
qualidade da vida do dia a dia, proporcionando-lhe produtos cada vez
mais performantes, de utilização simples, amigos do ambiente, com um
lindo design e fiáveis.
A Marca BRANDT.
PT
99625635_A_ML.qxp 14/11/2005 11:32 Page 43
Page 44

44
1
3
5
T˚c
1
2
3
4
5
6
Como se apresenta o seu forno?
Programador de temperatura
Programador
Selector de funções
DESCRIÇÃO DO APARELHO
1
2
3
Lâmpada
Indicador de alheta
Contacto de detecção de
abertura de porta
4
5
6
99625635_A_ML.qxp 14/11/2005 11:32 Page 44
Page 45

45
Acessórios (consoante o modelo)
Grelha de segurança
anti-oscilamento
A grelha pode ser utilizada para suportar
todos os pratos e formas contendo alimentos para cozer ou gratinar. Ela será utilizada
para os grelhados (a colocar directamente
em cima).
Prato multiusos
(pastelaria)
Serve de prato para bolos e dispõe de um
rebordo inclinado. Utiliza-se para a cozedura
de bolos tais como os choux à la creme,
suspiros, madalenas, massas folhadas...
Evite colocar directamente neste prato assados ou carnes porque se o fizer
provocará automaticamente projecções significativas contra as paredes do forno.
Prato oco
equipado com uma grelha de suporte
especial grelhados
Ele serve para recolher o molho e as gorduras
de cozedura realizados em grelhador forte ou
grelhador pulsado.
Pode ser utilizado como prato de cozedura adaptando o tamanho do pedaço a cozer (ex:
uma ave com legumes à volta, a temperatura moderada).
Nunca colocar este prato directamente sobre a base , excepto em posição GRELHADOR.
TR
FR
Punho para prato oco.
7
8
9
10
PT
99625635_A_ML.qxp 14/11/2005 11:32 Page 45
Page 46

46
Conselhos de Segurança
Agradecemos que tome conhecimento destes conselhos antes de instalar e utilizar o seu forno. Este forno foi concebido para ser utilizado por parti-
culares no seu local de habitação. Ele destina-se exclusivamente à cozedura de alimentos. Este forno não contém qualquer componente à base de amianto.
PRIMEIRA UTILIZAÇÃO:
Antes de utilizar o seu forno pela primeira vez, proceda ao aquecimento com o
forno vazio e a porta fechada, durante cerca de 15 minutos em posição máxima
afim de "rodar" o aparelho. No início, a lã mineral que reveste a cavidade do forno
pode desprender um cheiro particular devido à sua decomposição. Do mesmo
modo, é possível que possa constatar um desprendimento de fumo. Este fenómeno é normal.
UTILIZAÇÕES SEGUINTES:
- Assegure-se de que a porta do seu forno está bem fechada, a fim que a junta
de estanquecidade desempenhe correctamente a sua função.
- Não deixe ninguém apoiar-se ou sentar-se sobre a porta do forno aberta.
- Quando utilizar o grelhador com a porta entreaberta, as partes
acessíveis ou as superfícies podem aquecer. Mantenha as crian
ças afastadas.
- Durante a utilização o aparelho aquece. Tome precauções de maneira a
não tocar nos elementos aquecidos situados na cavidade do forno.
- Após uma cozedura, não segure qualquer acessório do forno (grelha,
espeto de manivela, pingadeira, berço de espeto de manivela...) com as
mãos desprotegidas, utilize luvas especiais ou um tecido isolante.
- Não guarneça o interior do seu forno com folha de alumínio. Caso contrário,
resultaria uma acumulação de calor que deturparia o resultado da cozedura e da
assadura e danificaria o esmalte.
- Não utilize um dispositivo de limpeza a vapor ou a alta pressão.
Durante a limpeza, as superfícies acessíveis aquecem mais do que durante uma
utilização normal. Mantenha as crianças afastadas.
- Para qualquer intervenção de limpeza na cavidade do forno, o forno
deve estar parado.
PROTECÇÃO DO AMBIENTE
Os materiais de embalagem deste aparelho são recicláveis. Por isso, participe na
reciclagem dos mesmos e contribua, assim, para a protecção do ambiente, depositando-os nos contentores municipais previstos para este efeito.
O seu aparelho contém também inúmeros materiais recicláveis. Por esta
razão, está marcado com este símbolo a fim de lhe indicar que os aparelhos usados não devem ser misturados com os restantes resíduos. A
reciclagem dos aparelhos organizada pelo fabricante será, pois, efectuada nas melhores condições, de acordo com a directiva europeia
2002/96/CE sobre os resíduos de equipamentos eléctricos e electrónicos.
Dirija-se à câmara municipal da sua residência ou ao seu revendedor
para conhecer os pontos de recolha de aparelhos usados, localizados mais perto
da sua residência.
Agradecemos, desde já, a sua colaboração na protecção do ambiente.
Deve colocar obrigatoriamente o selector de função na posição 0
para voltar a utilizar o seu forno.
99625635_A_ML.qxp 14/11/2005 11:32 Page 46
Page 47

47
Contador 20 A Mono
220-240 V ~50 Hz
Tomada de corrente
2 pólos + terra
norma CEI 83
Linha Mono 220-240 V ~
Ligação eléctrica
Cabo eléctrico
com cerca de
1,50 m de com-
primento
Disjuntor diferencial
ou fusível 16 A
Antes de efectuar a ligação, assegure-se de que a secção dos fios
da instalação eléctrica é suficientemente grande para alimentar
normalmente o aparelho (no mínimo, a secção deve ser igual à do
cabo eléctrico).
O fusível da sua instalação deve ser de 16 Amperes.
Como instalar o seu forno?
PT
99625635_A_ML.qxp 14/11/2005 11:32 Page 47
Page 48

48
Como instalar
Não podemos ser responsabilizados em caso de acidente consecutivo a uma ligação à terra inexistente, defeituosa ou incorrecta.
• O cabo eléctrico (H05 RR-F, H05 RN-F ou H05 VV-F) deverá ser suficientemente
comprido para ser ligado ao forno a encastrar colocado no chão em frente do móvel.
Para o fazer o aparelho deve estar desligado da rede:
• Abra o alçapão situado em baixo à direita da chapa traseira desatarraxando os 2
parafusos, em seguida gire o alçapão.
• Retire o revestimento de cada fio do novo cabo eléctrico ao longo de 12 mm.
• Torça cuidadosamente os filamentos.
• Desatarraxe os parafusos do bloco terminal e retire o fio eléctrico a substituir.
• Introduza o cabo eléctrico pelo lado da chapa no serra-cabos situado à direita do
bloco terminal.
• Ligue os fios do cabo em conformidade com as marca(s) inscrita(s) na caixa.
• Todos os filamentos dos fios eléctricos devem ficar presos sob os parafusos.
• O fio da fase sobre o terminal L.
• O fio de terra de cor verde-amarelo deve ser ligado ao terminal. .
• O fio do neutro (azul) ao terminal N.
• Aparafuse completamente os parafusos do bloco terminal e verifique a ligação
puxando por cada fio.
• Fixe o cabo por intermédio do serra-cabos situado à direita do terminal.
• Feche o alçapão servindo-se dos 2 parafusos.
Instalação e/ou substituição do cabo eléctrico
A ligação eléctrica deverá ser efectuada antes da instalação do aparelho no
móvel.
• O forno deverá ser ligado com um cabo eléctrico (normalizado) de 3 condutores
de 1,5 mm2 (1 ph + 1 N + terra
)
que deverão estar ligados à rede 220-240 V
monofásico por intermédio de uma tomada eléctrica 1 ph + 1 N + terra
normalizada CEI 83 ou com um dispositivo de corte omnipolar com uma distância de
abertura dos contactos de pelo menos 3 mm. O fio de protecção (verde-amarelo) é
ligado ao terminal do aparelho e deve ficar ligado à terra da instalação.
• Se a ligação for realizada com tomada de corrente, esta última deverá ficar acessível após a instalação do aparelho.
• O neutro do forno (fio azul) deverá estar ligado ao neutro da rede.
99625635_A_ML.qxp 14/11/2005 11:32 Page 48
Page 49

49
o seu forno?
Para ter a certeza de que a sua instalação é conforme, não hesite em
recorrer aos serviços de um técnico especializado em electrodomésticos.
Dimensões úteis para encastrar o seu forno
O forno pode ser instalado indiferentemente sob um plano de trabalho
ou num móvel em coluna (aberto* ou fechado) com as dimensões de encastramento adaptadas (ver esquema ao lado).
O seu forno possui uma circulação de ar optimizada que permite obter resultados
de cozedura e de limpeza notáveis respeitando os seguintes elementos:
• Centre o forno no móvel e de maneira a garantir uma distância mínima de 5 mm
em relação ao móvel vizinho.
• A matéria do móvel de encastramento deve resistir ao calor (ou ser revestido
com este tipo de matéria).
• Para uma maior estabilidade, fixe o forno no móvel através de 2 parafusos ou através
dos orifícios previstos para este efeito sobre os montantes laterais (confira o esquema).
Para o fazer:
1) Retire as tampas de borracha dos parafusos para aceder aos orifícios de fixação.
2) Efectue um orifício Ø 3 mm na parede do móvel para evitar estalar a madeira.
3) Fixe o forno com os 2 parafusos.
4) Coloque de novo as tampas de borracha dos parafusos (eles servem igualmen-
te para amortecer o fecho da porta do forno).
(*) Se o móvel é aberto, a sua abertura deve ser de 70 mm (no máximo).
PT
local de
colocação dos
parafusos de
fixação
local de
colocação dos
parafusos de
fixação
Corte 50x50
99625635_A_ML.qxp 14/11/2005 11:32 Page 49
Page 50

Como utilizar o seu forno?
50
1. Os pormenores do programador
5
3
4
2
8
9
10
1
7
6
1
3
4
5
6
7
9
10
8
2
Indicação dos tempos e durações
Indicação de temperatura
Indicador de duração de cozedura
Indicador de fim de cozedura
Indicador do temporizador
Indicador da função ECO
Indicador de porta trancada
Tecla de acesso aos diferentes
programas de regulação do
tempo
Teclas de regulação do tempo
99625635_A_ML.qxp 14/11/2005 11:32 Page 50
Page 51

51
Como utilizar o seu forno?
a) A a colocação sob tensão
• o visor acende por intermitência
• Ajuste a hora premindo as teclas + ou - (se mantiver a pressão do dedo na tecla pode obter um
desfile rápido)
Exemplo: 12 h 30.
O registo da hora acertada é automático no final de
alguns segundos -> a afixação da hora deixa de
acender por intermitência.
b) Ajustar o relógio
• Prima simultaneamente as teclas + e - durante alguns segundos até que a hora indicada acenda por
intermitência.
A hora indicada acende por intermitência para lhe
indicar que a regulação é agora possível.
Para a regulação, prima as teclas + ou - de maneira a aumentar ou diminuir a hora afixada.
• Prima a tecla para validar.
A regulação da hora não é possível se o selector de
cozedura estiver na posição "Pyro" ou "Pyro Eco".
2. Como ajustar a hora do relógio do seu forno
1
1
2
3
Se não houver validação por intermédio da tecla , o registo é
automático no final de alguns segundos.
PT
99625635_A_ML.qxp 14/11/2005 11:32 Page 51
Page 52

52
Como utilizar o seu forno?
3. Como realizar uma cozedura imediata?
O programador deve afixar apenas a hora; ela não deve acender por intermitência.
• Escolha o modo de cozedura:
gire o selector de funções sobre a posição da sua
escolha.
Exemplo: peixe “ ”-> o forno começa a funcionar.
O seu forno propõe-lhe a temperatura mais correntemente utilizada.
Coloque o seu prato no forno segundo as recomendações fornecidas no guia de cozedura.
No entanto, é possível ajustar a temperatura accionando o manípulo "T°c" no sentido + ou -.
Exemplo: “ ” ajustado a 210°.
Após estes passos, o forno aquece e a indicação da temperatura (210°c)
acende por intermitência.
É emitida uma série de sons quando o forno atinge a temperatura desejada.
A referida temperatura deixa de acender por intermitência.
Após um ciclo de cozedura, a turbina de ventilação continua a funcionar durante um certo tempo, a fim de arrefecer o forno.
99625635_A_ML.qxp 14/11/2005 11:32 Page 52
T˚c
Page 53

53
Como utilizar o seu forno?
4. Como programar uma cozedura
b) Como diferir uma cozedura? (hora de fim escolhida)
Proceda como uma cozedura programada.
Após a regulação da duração de cozedura,
Prima a tecla “ ” até que o
“ ” comece a acender por intermitência (fim de cozedura).
A afixação acende por intermitência para indicar que a
regulação é agora possível.
Prima a tecla + ou - para regular a hora de fim de cozedura.
Exemplo: Fim de cozedura às 13h.
Após estes passos, o início do aquecimento é diferido
para que a cozedura acabe às 13h.
Quando terminar a cozedura, reponha o selector de cozedura em "0".
No caso das cozeduras programadas, a cavidade é iluminada até a cozedura ini-
ciar assim como no fim da mesma.
No caso das cozeduras programadas e com ar quente circulante, sem reposição do
selector de funções, a ventoinha de circulação de ar continua a funcionar, de modo
a homogeneizar a temperatura no interior do forno.
a) Com início imediato
1. Regule o modo de cozedura desejado e eventual-
mente ajuste a temperatura.
Exemplo: posição “ ” temperatura 210°C.
2. Prima a tecla “ ” até fazer acender por intermitên-
cia o símbolo “ ” (duração de cozedura).
A afixação acende por intermitência às 0h00 para indicar que a regulação é agora possível.
3. Prima a tecla + ou - para ajustar o tempo desejado.
Exemplo: 25 mn de cozedura.
O registo da hora ajustada é automático no final de
alguns segundos, -> o visor deixa de acender por intermitência.
A contagem decrescente da duração faz-se imediatamente após a regulação.
Após estes 3 passos, o forno aquece:
É emitida uma série de sons quando o forno atinge a temperatura desejada.
PT
99625635_A_ML.qxp 14/11/2005 11:32 Page 53
Page 54

Como utilizar o seu forno?
5. Como utilizar o temporizador?
O seu forno está equipado com um temporizador electrónico
Independente do funcionamento do forno que permite fazer a contagem
decrescente de uma certa quantidade de tempo.
Neste caso, a afixação do temporizador é prioritária em relação à afixação da hora
do dia.
Prima a tecla “ ” até que o (Temporizador)
-> comece a acender por intermitência .
Prima a tecla (+ ou -) até obter a duração desejada
(máximo 60 minutos)
O visor deixa de acender por intermitência no final de
alguns segundos e o temporizador começa a funcionar
e a fazer a contagem decrescente, de segundo em segundo.
Uma vez decorrido o tempo, o temporizador emite sinais sonoros para o prevenir.
É possível alterar ou anular em qualquer altura a programação
do temporizador.
54
99625635_A_ML.qxp 14/11/2005 11:32 Page 54
Page 55

• A lâmpada está situada no tecto da cavidade interna do seu forno.
a) Desaparafuse a janela (ver ao lado).
b) Desenrosque a lâmpada no
mesmo sentido
Características da lâmpada:
- 15 W
- 220-240 V
- 300°C
- casquilho E 14
c) Mude a lâmpada e torne a montar a armação em forma de postigo. Ligue
novamente o forno.
Ampola
Desenrosque
Armação em forma de postigo
enfie uma luva de borracha para poder desmontar com mais
facilidade a armação e a lâmpada.
Desligue o seu forno antes de efectuar qualquer tipo de intervenção sobre a lâmpada e deixe arrefecer o aparelho, se necessário
for
6. Como mudar a lâmpada?
55
PT
99625635_A_ML.qxp 14/11/2005 11:32 Page 55
Page 56

56
Grelhador pulsado
A cozedura faz-se, alternativamente, pelo elemento superior e
a hélice de movimentação de ar.
Base pulsadae
A cozedura efectua-se através do elemento inferior associado a uma ligeira dosagem do grelhador e através
da hélice de movimentação de ar.
Grelhador variável
Pré-aquecimento inútil.
Aves e assados sumarentos
e estaladiços de ambos os
lados.
Efectue um pré-aquecimento
de 5 mn.
Introduza o prato multiusos
sobre a alheta de baixo.
Cozedura pela parte inferior com
ligeira dosagem por cima.
Coloque a grelha sobre a alheta
baixa.
Manter quente
Dosagem dos elementos superior
e inferior.
Conserva o calor.
Símbolo
Nome da função
Descrição da função
7. Modos de cozedura do forno
T
radicional
A cozedura efectua-se através dos
elementos inferior e superior sem
movimentação de ar.
Necessita um pré-aquecimento antes de enfornar o
prato.
Esta posição permite uma economia de energia conservando ao
mesmo tempo as qualidades de
cozedura. A posição ECO é utilizada para etiquetagem energética.
Tradicional ECO
A cozedura efectua-se através dos
elementos inferior e superior sem
movimentação de ar..
*
C
alor giratório
A cozedura efectua-se através da
resistência colocada no fundo do
forno e através da hélice de movimentação de ar.
É inútil pré-aquecer salvo
para as cozeduras cuja
duração é muito curta
(areias sobre vários níveis).
*
* Sequência(s) utilizada(s) para o anúncio escrito na etiqueta energética em confor
99625635_A_ML.qxp 14/11/2005 11:32 Page 56
Page 57

57
Para "saisir" e cozer até ao centro a perna de carneiro, costeletas de
vaca.
Para conservar o fundente aos "pavés" de peixe.
A potência é regulável de 30 a 100% de 1 a 4 . Para uma boa
eficácia, recomendamos-lhe que utilize as potências superiores
Recomendado para os pratos húmidos (quiches, tartes de frutos sumarentos...
A massa ficará bem cozida por cima.
Recomendado para os preparados que levedam (cake, brioche, kouglof...)
e para os souflés que não serão bloqueados por uma crosta por cima.
Recomendado para fazer levedar as massas de pão, de brioche,
kouglof... não ultrapassando 40°C (aquecedor de pratos, descongelação).
Recomendações
Modos de cozedura do forno
Recomendado para as cozeduras lentas e delicadas: caça macia...
Para "saisir" os assados de carne vermelha.
Para cozer lentamente em panela fechada os pratos que começaram a ser cozinhados na placa de cozedura (coq au vin, caça guisada...)
Nota: todas as cozeduras fazem-se sem pré-aqucimento.
Recomendado para conservar a maciez das carnes
Para os legumes, peixes e cozeduras múltiplas até 3 níveis.
PT
99625635_A_ML.qxp 14/11/2005 11:33 Page 57
Page 58

58
C
omo limpar a cavi
1. O que é a pirolise?
Quando há saída de fumo na altura em que se aquece o forno ou durante a
cozedura. O seu forno liberta um odor, mesmo quando está frio, após ter efectuado uma cozedura (carne de carneiro, peixe, grelhados, etc.).
2. Em que caso é necessário efectuar uma pirolise?
Não se deve deixar acumular demasiadamente a sujidade antes
de efectuar esta limpeza.
- O seu forno limpa-se sozinho, eliminando as sujidades resultantes de salpicos ou
derrames, por aquecimento a temperatura elevada. O fumo e odor emanados são
destruídos pela passagem através de um catalisador.
- No entanto, não é necessário realizar uma pirolise após cada cozedura, mas
somente se o grau de sujidade o justificar.
- Por medida de segurança, a porta bloqueia-se desde que a temperatura no interior do forno ultrapasse as temperaturas de cozedura. É então impossível abrir a
porta mesmo posicionando o manípulo "selector de funções" em 0.
COZEDURAS QUE Bolachas, legumes, bolos, Cozeduras sem salpicos: Não há
SUJAM POUCO pastéis, tartes salgadas, soufflé. necessidade de efectuar uma pirólise
COZEDURAS Carne, peixe (assados numa A pirólise justifica-se depois
QUE SUJAM travessa) Legumes recheados de efectuadas 3 cozeduras.
COZEDURAS QUE Peças de carne grandes, A pirólise pode ser feita após
SUJAM MUITO Assados no espeto, pato, uma cozedura deste tipo, se
peru, pernas de carneiro, houver muitas projecções.
99625635_A_ML.qxp 14/11/2005 11:33 Page 58
Page 59

3. Como realizar uma pirolise
dade do seu forno?
59
a) Retire o tacho do forno e elimine os eventuais derrames significa-
tivos.
b) Verifique se o programador exibe a hora do dia e se ele não acende por
intermitência
c) Colocar o manípulo "selector de funções" na
posição "PYRO ECO".
A pirolise dura 1h30 em "PYRO ECO" ou 2h em
"PYRO".
Este tempo não toma em consideração a duração
de arrefecimento do forno que é de cerca de 1/2 hora.
• Durante o ciclo de pirolise, um cadeado aparece
no visor, e indica-lhe que a porta está trancada.
• Quando o cadeado deixar de aparecer no visor, é possível abrir a porta
Ao longo do folheto.
d) Volte a colocar o selector de funções na posição 0.
e) Quando o forno está frio, utilize um pano húmido para retirar a cinza branca.
O forno está limpo e pode ser novamente
PT
99625635_A_ML.qxp 14/11/2005 11:33 Page 59
Page 60

60
Que fazer em caso de anomalias de
funcionamento?
O seu forno apresenta defeitos de funcionamento, isto não significa obriga-
toriamente que esteja avariado..
Seja qual for o problema, verifique os pon-
tos seguintes:
Problema constatado.
Causas possíveis O que se deve fazer?
Inscreva em baixo as indicações incluídas na placa de características do seu forno:
MADE IN FRANCE
220 - 240V ~ 50 Hz
BRANDT APPLIANCES SAS
7 rue Henri Becquerel
92500 RUEIL MALMAISON
O forno não aquece.
• O forno não está ligado.
• O fusível da sua instalação eléctrica
está fundido
• A temperatura seleccionada é demasiado baixa.
• O sensor está defeituoso
• O forno sofreu um sobreaquecimento, ele colocou-se em posição de
segurança.
- Ligar o forno.
- Mudar o fusível da sua instalação e
verificar a intensidade a que corresponde (16A).
- Aumentar a temperatura seleccionada.
- Chamar o Serviço de Assistência Pós-Venda.
- Chamar o Serviço de Assistência Pós-Venda.
- Chamar o Serviço de Assistência Pós-Venda.
Er: V é visualizado
Er: M é visualizado
• Trancagem da porta defeituosa
• Pedido de pirólise quando a porta
já se encontra bloqueada.
• Sensor de temperatura defeituoso.
- Chamar o Serviço de Assistência
Pós-Venda.
- Chamar o Serviço de Assistência
Pós-Venda.
A lâmpada do forno não funciona.
• A lâmpada está fundida.
• O forno não está ligado ou o fusível está fundido.
- Mudar a lâmpada.
- Ligar o forno ou mudar o fusível.
O ventilador de arrefecimento
continua a girar.
• A ventilação deve parar 1 hora
após o apagamento do forno, ou
assim que temperatura do forno
desce abaixo de 125°C.
• Se não se apaga após 1 hora
- Abrir a porta do forno para acelerar o arrefecimento do forno.
- Chamar o Serviço de Assistência PósVenda.
A limpeza por pirolise não se realiza.
• A porta está mal fechada.
• O sistema de trancagem está defeituoso.
•O captor de T° está defeituoso.
• O contacto de detecção de "porta
fechada" está defeituoso.
- Verificar o fecho da porta.
- Chamar o Serviço de Assistência PósVenda.
- Chamar o Serviço de Assistência PósVenda.
- Chamar o Serviço de Assistência PósVenda.
99625635_A_ML.qxp 14/11/2005 11:33 Page 60
Page 61

ΟΟ οοδδηηγγόόςς χχρρήήσσηηςς
ττοουυ φφοούύρρννοουυ σσααςς
ττηηςς
ΈΈννδδεειιξξηη:: FFPP 222255
GR
99625635_A_ML.qxp 14/11/2005 11:33 Page 61
Page 62

ΠΠεερριιεεχχόόµµεενναα
Σε όλο το εγχειρίδιο, το
σσααςς εεππιισσηηµµααίίννεειι ττιιςς οοδδηηγγίίεεςς αασσφφααλλεείίααςς,,
σσααςς εεππιισσηηµµααίίννεειι ττιιςς σσυυµµββοουυλλέέςς κκααιι τταα ττεεχχννάάσσµµαατταα
ΕΕιισσααγγωωγγήή
σσεελλ..
63
ΠΠωωςς φφααίίννεεττααιι οο φφοούύρρννοοςς σσααςς;;
ΠΠ
ως φαίνεται ο φούρνος σας;
σσεελλ..
64
ΕΕ
ξαρτήµατα
σσεελλ..
65
ΣΣυυµµββοουυλλέέςς αασσφφααλλεείίααςς
σσεελλ..
66
ΠΠωωςς νναα εεγγκκαατταασσττήήσσεεττεε ττοονν φφοούύρρννοο σσααςς
ΗΗ
λεκτρική σύνδεση
σσεελλ..
67-68
ΧΧ
ρήσιµες διαστάσεις για να εντοιχίσετε τον φούρνο σας
σσεελλ..
69
ΠΠωωςς νναα χχρρηησσιιµµοοπποοιιήήσσεεττεε ττοονν φφοούύρρννοο σσααςς
ΟΟ
ι λεπτοµέρειες του προγραµµατιστή σας
σσεελλ..
70
ΠΠ
ως να ρυθµίσετε την ώρα στο ρολόι του φούρνου
σσεελλ..
71
ΠΠ
ως να κάνετε ένα άµεσο ψήσιµο
σσεελλ..
72
ΠΠ
ως να προγραµµατίσετε ένα ψήσιµο
σσεελλ..
73
ΠΠ
ως να χρησιµοποιήσετε τον χρονοδιακόπτη
σσεελλ..
74
ΠΠωωςς νναα ααλλλλάάξξεεττεε ττηη λλυυχχννίίαα
σσεελλ..
75
ΤΤ
ρόποι ψησίµατος του φούρνου
σσεελλ..
76-77
ΠΠωωςς νναα κκααθθααρρίίσσεεττεε ττηηνν εεσσοοχχήή ττοουυ φφοούύρρννοουυ σσααςς;;
ΤΤ
ι είναι η πυρόλυση;
σσεελλ..
78
ΣΣ
ε ποια περίπτωση πρέπει να πραγµατοποιούµε µια πυρόλυση;
σσεελλ..
78
ΠΠ
ως να κάνετε µια άµεση πυρόλυση
σσεελλ..
79
ΤΤιι νναα κκάάννοουυµµεε σσεε ππεερρίίππττωωσσηη ααννωωµµααλλιιώώνν
σσττηη λλεειιττοουυρργγίίαα;;
σσεελλ..
80
62
99625635_A_ML.qxp 14/11/2005 11:33 Page 62
Page 63

63
ΕΕ ιι σσ αα γγ ωω γγ ήή
Αγαπητή Πελάτισσα, Αγαπητέ Πελάτη,
Μόλις αποκτήσατε έναν
φφοούύρρννοο BBRRAANNDDTT
και σας ευχαριστούµε γι' αυτό.
Οι ερευνητικές µας οµάδες σχεδίασαν για σας µια νέα γενιά συσκευών
για να µαγειρεύετε κάθε µέρα µε ευχαρίστηση.
Με απλές γραµµές και µοντέρνα αισθητική, ο νέος σας
φφοούύρρννοοςς BBrraannddtt
ενσωµατώνεται αρµονικά στην κουζίνα σας και συνδυάζεται άψογα
διευκολύνοντας τη χρήση και τις επιδόσεις του ψησίµατος.
Θα βρείτε επίσης στη σειρά των προϊόντων της Brandt, µια τεράστια
ποικιλία από σχάρες ψησίµατος, απορροφητήρων, πλυντηρίων πιάτων και
εντοιχιζόµενων ψυγείων που µπορείτε να ταιριάξετε µε το νέο σας
φφοούύρρννοο
BBrraannddtt
.
Φυσικά, νιώθοντας µια συνεχή αγωνία για την ικανοποίηση στο µέγιστο
των απαιτήσεών σας σε σχέση µε τα προϊόντα µας, η υπηρεσία
καταναλωτών µας βρίσκεται στη διάθεσή σας και σας περιµένει για να
απαντήσει σε όλες τις ερωτήσεις σας ή τις προτάσεις σας (τα στοιχεία της
στο τέλος αυτού του εγχειριδίου).
Στο αποκορύφωµα της πρωτοπορίας, η Brandt συµβάλλει στη βελτίωση
της καθηµερινής ποιότητας ζωής προσφέροντάς σας προϊόντα όλο και
πιο αποδοτικά, απλά στη χρήση, που σέβονται το περιβάλλον, καλαίσθ-
ητα και αξιόπιστα.
Το εµπορικό σήµα BRANDT.
GR
99625635_A_ML.qxp 14/11/2005 11:33 Page 63
Page 64

64
1
3
5
T˚c
1
2
3
4
5
6
ΠΠωωςς φφααίίννεεττααιι οο φφοούύρρννοοςς σσααςς;;
ΕΕππιιλλοογγέέααςς θθεερρµµοοκκρραασσίίααςς
ΠΠρροογγρρααµµµµααττιισσττήήςς
ΕΕππιιλλοογγέέααςς λλεειιττοουυρργγιιώώνν
ΠΠΕΕΡΡΙΙΓΓΡΡΑΑΦΦΗΗ ΣΣΥΥΣΣΚΚΕΕΥΥΗΗΣΣ
1
2
3
ΛΛάάµµππαα
∆∆εείίκκττηηςς σσκκάάλλααςς
∆∆ιιαακκόόππττηηςς ααννίίχχννεευυσσηηςς ττοουυ
ααννοοίίγγµµααττοοςς ττηηςς ππόόρρττααςς
4
5
6
99625635_A_ML.qxp 14/11/2005 11:33 Page 64
Page 65

ΒΒ
αθύ ταψί
εξοπλισµένο µε
σσχχάάρραα σσττήήρριιξξηηςς
ειδικό για ψητά στη σχάρα
Χρησιµεύει στη συγκέντρωση των χυµών και των
λιπών του ψησίµατος που γίνεται σε δυνατό γκριλ ή
γκριλ µε αέρα. Μπορεί να χρησιµοποιηθεί ως ταψί
ψησίµατος τακτοποιώντας το µέγεθος του
κοµµατιούπου θα ψηθεί (π.χ. ένα πουλερικό µε λαχανικά γύρω - γύρω, σε µέτρια θερµοκρασία).Μην τοποθετείτε ποτέ αυτό το ταψί στην πλάκα έδρασης, παρά µόνο στη θέση
ΓΚΡΙΛ.
65
ΕΕξξααρρττήήµµαατταα
(ανάλογα µε το µοντέλο)
ΣΣ
χάρα
αασσφφααλλεείίααςς
κκααττάά ττηηςς ππττώώσσηηςς
Η σχάρα µπορεί να χρησιµοποιηθεί για να στηρίξει
όλα τα ταψιά και τις φόρµες που περιέχουν
τρόφιµα για ψήσιµο ή για γκρατινάρισµα. Θα
χρησιµοποιηθεί και για τα ψητά στησχάρα (να
τοποθετούνται απευθείας πάνω της).
ΤΤ
αψί πολλών χρήσεων
(ζαχαροπλαστική)
Χρησιµεύει για ταψί για γλυκά και διαθέτει
χείλος µε κλίση. Χρησιµοποιείται για το ψήσιµο
γλυκών όπως σου µε κρέµα, µαρέγκες,
µανταλένες, ζύµες σφολιάτας… Αποφύγετε να
τοποθετήσετε απευθείας σ' αυτό το ταψί ψητά
ή κρέατα γιατί θα έχετε αυτοµάτως εκτοξεύσεις στα τοιχώµατα του φούρνου.
πίσω
Εµπρός
ΛΛ
αβή για βαθύ ταψί
7
8
9
10
GR
99625635_A_ML.qxp 14/11/2005 11:33 Page 65
Page 66

66
ΣΣυυµµββοουυλλέέςς αασσφφααλλεείίααςς
ΣΣααςς εευυχχααρριισσττοούύµµεε πποουυ µµεελλεεττάάττεε ααυυττέέςς ττιιςς σσυυµµββοουυλλέέςς ππρροοττοούύ εεγγκκαατταασσττήήσσεεττεε κκααιι
χχρρηησσιιµµοοπποοιιήήσσεεττεε ττοονν φφοούύρρννοο σσααςς..
Αυτός ο φούρνος έχει σχεδιαστεί για να
χρησιµοποιείται από ιδιώτες στο χώρο κατοικίας τους. Προορίζεται αποκλειστικά για το
ψήσιµο προϊόντων διατροφής. Αυτός ο φούρνος δεν περιέχει κανένα συστατικό µε βάση
τον αµίαντο.
ΠΠΡΡΩΩΤΤΗΗ ΧΧΡΡΗΗΣΣΗΗ::
Προτού χρησιµοποιήσετε τον φούρνο σας για πρώτη φορά, θερµάνετέ τον άδειο,
µε κλειστή την πόρτα, για 15 λεπτά περίπου στη µέγιστη θέση ούτως ώστε να
"στρώσετε" τη συσκευή. Το ορυκτό µαλλί που περιβάλλει την εσοχή του φούρνου
µπορεί να εκπέµπει, στην αρχή, µια ιδιαίτερη µυρωδιά που οφείλεται στη
σύνθεσή του. Οµοίως, θα διαπιστώσετε ίσως µια εκποµπή καπνού. Όλα αυτά
είναι φυσιολογικά.
ΕΕΠΠΟΟΜΜΕΕΝΝΕΕΣΣ ΧΧΡΡΗΗΣΣΕΕΙΙΣΣ::
- Βεβαιωθείτε ότι η πόρτα του φούρνου σας είναι καλά κλεισµένη ούτως ώστε ο
σύνδεσµος στεγανότητας να εκπληρώσει σωστά τη λειτουργία του.
- Μην αφήνετε κανέναν να ακουµπήσει ή να καθήσει πάνω στην ανοικτή πόρτα
του φούρνου.
-- ΚΚααττάά ττηη χχρρήήσσηη ττοουυ γγκκρριιλλ µµεε µµιισσάάννοοιιχχττηη ττηηνν ππόόρρτταα,, τταα ππρροοσσββάάσσιιµµαα µµέέρρηη ήή οοιι
εεππιιφφάάννεειιεεςς µµπποορρεείί νναα θθεερρµµααννθθοούύνν.. ΑΑπποοµµαακκρρύύννεεττεε τταα µµιικκρράά ππααιιδδιιάά..
- Κατά τη χρήση της η συσκευή θερµαίνεται. Προσέξτε να µην ακουµπάτε τα
θερµαντικά στοιχεία που βρίσκονται στο εσωτερικό του φούρνου.
- Μετά από ένα ψήσιµο, µην πιάνετε µε γυµνό χέρι τα σκεύη (σχάρα, σούβλα,
λαµαρίνα για τη συγκέντρωση λίπους, βάση στήριξης σούβλας…),
χρησιµοποιείστε ένα προστατευτικό γάντι ή ένα ύφασµα από µονωτικό υλικό.
- Μη γεµίζετε τον φούρνο σας µε αλουµινόχαρτα. ∆ιαφορετικά, θα προκύψει µια
συσσώρευση θερµότητας που θα επηρεάσει δυσάρεστα το αποτέλεσµα του
µαγειρέµατος και του ψησίµατος και θα βλάψει το σµάλτο.
- Προτού προχωρήσετε στον καθαρισµό µε πυρόλυση του φούρνου σας, αφαιρέστε όλα τα σκεύη και βγάλτε τις πολλές εκχύσεις.
- Μη χρησιµοποιείτε τον καθαριστή ατµού ή υψηλής πίεσης.
- Κατά τη διάρκεια µιας πυρόλυσης, οι προσβάσιµες επιφάνειες γίνονται πιο
ζεστές απ' ότι στην κανονική χρήση.
ΑΑπποοµµαακκρρύύννεεττεε τταα µµιικκρράά ππααιιδδιιάά..
-- ΣΣεε κκάάθθεε εεππέέµµββαασσηη κκααθθααρριισσµµοούύ σσττηηνν εεσσοοχχήή ττοουυ φφοούύρρννοουυ,, ηη λλεειιττοουυρργγίίαα ττοουυ φφοούύ--
ρρννοουυ ππρρέέππεειι νναα έέχχεειι δδιιαακκοοππεείί..
•• ΠΠΡΡΟΟΣΣΤΤΑΑΣΣΙΙΑΑ ΤΤΟΟΥΥ ΠΠΕΕΡΡΙΙΒΒΑΑΛΛΛΛΟΟΝΝΤΤΟΟΣΣ
Τα υλικά συσκευασίας αυτής της συσκευής είναι ανακυκλώσιµα. Μπορείτε να
συµµετάσχετε στη διαδικασία ανακύκλωσης, εναποθέτοντας τα υλικά
συσκευασίας στους ειδικούς κάδους που θέτει στη διάθεσή σας ο δήµος σας, και
να συµβάλλετε κατ’ αυτόν τον τρόπο στην προστασία του περιβάλλοντος.
Η συσκευή σας περιέχει επίσης πολλά ανακυκλώσιµα υλικά. Η συσκευή
φέρει αυτό το λογότυπο προκειµένου να σας υποδείξει ότι οι
χρησιµοποιηµένες συσκευές δεν πρέπει να εναποτίθενται µαζί µε άλλα
απορρίµατα. Ο κατασκευαστής των συσκευών οργανώνει, υπό τις
καλύτερες συνθήκες, την ανακύκλωσή τους, σύµφωνα µε την
ευρωπαϊκή οδηγία 2002/96/ΕΚ σχετικά µε τα απόβλητα ειδών ηλεκτρικού και ηλεκτρονικού εξοπλισµού. Απευθυνθείτε στο δήµο σας ή στον
εµπορικό σας αντιπρόσωπο προκειµένου να ενηµερωθείτε σχετικά µε
τα σηµεία περισυλλογής των χρησιµοποιηµένων συσκευών, που βρίσκονται
κοντά στην κατοικία σας.
Σας ευχαριστούµε για τη συµβολή σας στην προστασία του περιβάλλοντος.
ΒΒ άά λλττεε υυππ οοχχρρεεωωττιικκάά ττοο νν εεππιιλλ οογγέέ αα λλεε ιι ττ οουυρργγ ίί αα ςς σσττοο 00 γγ ιι αα νν αα
ξξααννααχχρρηησσιιµµοοπποοιιήήσσεεττεε ττοονν φφοούύρρννοο σσααςς..
99625635_A_ML.qxp 14/11/2005 11:33 Page 66
Page 67

67
Μετρητής 20Α Mono
220-240 V ~ 50 Hz
Πρίζα
2 πόλοι
++ γγεείίωωσσηη
πρότυπο CEI 83
Γραµµή Mono 220-240 V ~
Ηλεκτρική σύνδεση
Καλώδιο
τροφοδοσίας
µήκος 1,50 µ.
περίπου
∆ιαφορικός διακόπτης
ή ασφάλεια 16Α
ΠΠρροοττοούύ ππρρααγγµµααττοοπποοιιήήσσεεττεε ττηη σσύύννδδεεσσηη,, ββεεββααιιωωθθεείίττεε όόττιι τταα κκααλλώώδδιιαα ττηηςς
ηηλλεεκκττρριικκήήςς σσααςς εεγγκκααττάάσστταασσηηςς έέχχοουυνν εεππααρρκκήή δδιιααττοοµµήή γγιιαα νναα ττρροοφφοοδδοοττοούύνν
κκααννοοννιικκάά ττηη σσυυσσκκεευυήή ((δδιιααττοοµµήή ττοουυλλάάχχιισσττοονν ίίσσηη µµεε εεκκεείίννηη ττοουυ κκααλλώώδδιιοουυ
ττρροοφφοοδδοοσσίίααςς)).. ΗΗ αασσφφάάλλεειιαα ττηηςς εεγγκκααττάάσστταασσήήςς σσααςς ππρρέέππεειι νναα εείίννααιι 1166
AAmmppθθrreess..
ΠΠωωςς νναα εεγγκκαατταασσττήήσσεεττεε ττοονν φφοούύρρννοο σσααςς
GR
99625635_A_ML.qxp 14/11/2005 11:33 Page 67
Page 68

68
ΠΠ ωω ςς νν αα εε γγ κκ αα ττ αα σσ ττ ήή σσ
∆∆εενν έέχχοουυµµεε εευυθθύύννηη σσεε ππεερρίίππττωωσσηη ααττυυχχήήµµααττοοςς πποουυ οοφφεείίλλεεττααιι σσεε ααννύύππαα--
ρρκκττηη,, εελλααττττωωµµααττιικκήή ήή λλααννθθαασσµµέέννηη γγεείίωωσσηη..
• Το καλώδιο τροφοδοσίας (H05 RR-F, H05 RN-F ή Η05 W-F) πρέπει να έχει επαρκές
µήκος για να συνδεθεί µε τον φούρνο που θα εντοιχιστεί τοποθετηµένο στο έδαφος
µπροστά από το έπιπλο.
Γι' αυτό το λόγο η συσκευή πρέπει να είναι αποσυνδεδεµένη από το δίκτυο:
• Ανοίξτε το πορτάκι που βρίσκεται κάτω στα δεξιά του πίσω καλύµµατος
ξεβιδώνοντας τις 2 βίδες, έπειτα περιστρέψτε το πορτάκι.
• Απογυµνώστε κάθε σύρµα του νέου καλωδίου τροφοδοσίας σε 12mm.
• Συστρέψτε προσεκτικά τα ασωλήνωτα άκρα.
• Ξεβιδώστε τις βίδες της οµάδας ακροδεκτών και βγάλτε το καλώδιο
τροφοδοσίας που θα αλλαχθεί.
• Εισάγετε το καλώδιο τροφοδοσίας από την πλευρά του καλύµµατος στον
σφικτήρα καλωδίων που βρίσκεται στα δεξιά της οµάδας ακροδεκτών.
• Συνδέστε τα σύρµατα του καλωδίου σύµφωνα µε το(τα) σηµείο(α) αναφοράς
που είναι γραµµένο(α) στην οµάδα ακροδεκτών.
• Όλα τα ασωλήνωτα άκρα των καλωδίων τροφοδοσίας πρέπει να είναι
κλεισµένα κάτω από τις βίδες.
• Το σύρµα της φάσης στον πόλο L.
• Το σύρµα της γείωσης χρώµατος πρασινο-κίτρινου πρέπει να συνδεθεί µε τον πόλο
.
• Το σύρµα του ουδέτερου (µπλε) στον πόλο Ν.
• Βιδώστε καλά τις βίδες της οµάδας ακροδεκτών και ελέγξτε τη σύνδεση
τραβώντας κάθεσύρµα.
• Στερεώστε το καλώδιο µέσω του σφικτήρα καλωδίων που βρίσκεται στα δεξιά
της οµάδας ακροδεκτών.
• Ξανακλείστε το πορτάκι µε τη βοήθεια των 2 βιδών.
ΤΤ
οποθέτηση και/ή αλλαγή του καλωδίου τροφοδοσίας
Η ηλεκτρική σύνδεση πρέπει να πραγµατοποιείται πριν την τοποθέτηση της συσκευής
µέσα στο έπιπλο.
• Ο φούρνος πρέπει να συνδέεται µε ένα καλώδιο τροφοδοσίας (σύµφωνα µε το πρότυπο)
µε 3 αγωγούς 1,5 mm2 (1 ph + 1 N + γείωση ) που πρέπει να είναι συνδεδεµένοι µε
δίκτυο 220-240 V ~ µονοφασικό µέσω µιας πρίζας 1 ph + 1 Ν γείωση
σύµφωνα µε το
πρότυπο CEI 83 ή µέσω µιας διάταξης διακοπής ρεύµατος που συνδέει όλους τους πόλους
και που έχει απόσταση ανοίγµατος των επαφών τουλάχιστον 3 mm. Το καλώδιο προστασίας
(πράσινο-κίτρινο) συνδέεται µε τον πόλο της συσκευής και πρέπει να είναι συνδεδεµένο
µε τη γείωση της εγκατάστασης.
• Σε περίπτωση σύνδεσης µε πρίζα, αυτή πρέπει να παραµένει προσβάσιµη µετά την
εγκατάσταση της συσκευής.
• Το ουδέτερο του φούρνου (µπλε καλώδιο) πρέπει να είναι συνδεδεµένο µε το ουδέτερο του
δικτύου.
99625635_A_ML.qxp 14/11/2005 11:33 Page 68
Page 69

69
εε ττ εε ττ οο νν φφ οο ύύ ρρ νν οο σσ αα ςς
ΓΓιιαα νναα ββεεββααιιωωθθεείίττεε όόττιι ηη εεγγκκααττάάσστταασσηη έέγγιιννεε σσωωσσττάά,, µµηη δδιισσττάάσσεεττεε νναα
κκααλλέέσσεεττεε έένναανν εειιδδιικκόό σσττιιςς οοιικκιιαακκέέςς ηηλλεεκκττρριικκέέςς σσυυσσκκεευυέέςς..
Χρήσιµες διαστάσεις για να εντοιχίσετε τον φούρνο σας?
ΟΟ φφοούύρρννοοςς µµπποορρεείί νναα εεγγκκαατταασσττααθθεείί εεξξίίσσοουυ κκάάττωω ααππόό έένναα ττρρααππέέζζιι εερργγαασσίίααςς ήή
µµέέσσαα σσεε έένναα έέππιιππλλοο σσεε σσττήήλληη ((ααννοοιιχχττήή** ήή κκλλεειισσττήή)) έέχχοοννττααςς ππρροοσσααρρµµοοσσµµέέννεεςς
δδιιαασσττάάσσεειιςς εεννττοοιιχχιισσµµοούύ ((ββλλέέππεε ττοο ππααρραακκάάττωω σσχχεεδδιιάάγγρρααµµµµαα))..
Ο φούρνος σας περιέχει µια µεγιστοποιηµένη κυκλοφορία αέρα που επιτρέπει την
απόκτηση αξιοσηµείωτων αποτελεσµάτων στο ψήσιµο και τον καθαρισµό αν
τηρήσετε τα ακόλουθα στοιχεία:
• Εστιάστε τον φούρνο στο έπιπλο κατά τρόπο που να εγγυάται µια ελάχιστη
απόσταση 5 mm από το γειτονικό έπιπλο.
• Το υλικό του επίπλου εντοιχισµού πρέπει να είναι ανθεκτικό στη θερµότητα (ή
να είναιεπενδεδυµένο µε ένα τέτοιο υλικό).
• Για περισσότερη σταθερότητα, στερεώστε τον φούρνο στο έπιπλο µε 2 βίδες
µέσω των οπών που προβλέπονται γι' αυτόν τον σκοπό στους πλάγιους
ορθοστάτες (βλέπε σχεδιάγραµµα).
Για να γίνει αυτό:
11))
Αφαιρέστε τα καλύµµατα βίδας από καουτσούκ για να έχετε πρόσβαση στις
τρύπες στερέωσης.
22))
Ανοίξτε µια τρύπα Ψ 3 mm στο χώρισµα του επίπλου για να αποφύγετε να σκάσει το
ξύλο.
33))
Στερεώστε τον φούρνο µε τις 2 βίδες.
44))
Ξαναβάλτε τα καλύµµατα βίδας από καουτσούκ (αυτά χρησιµεύουν επίσης και
για να µειώσουν τη δύναµη του κλεισίµατος της πόρτας του φούρνου).
((**)) αανν ττοο έέππιιππλλοο εείίννααιι ααννοοιικκττόό,, ττοο άάννοοιιγγµµάά ττοουυ ππρρέέππεειι νναα εείίννααιι 7700 mmmm ((ττοο πποολλύύ))..
GR
θθέέσσηη γγιιαα
ββίίδδααςςεε
σσττεερρέέωωσσηηςς
θθέέσσηη γγιιαα
ββίίδδααςςεε
σσττεερρέέωωσσηηςς
ΤΤοοµµήή 5500xx5500
99625635_A_ML.qxp 14/11/2005 11:33 Page 69
Page 70

ΠΠωωςς νναα χχρρηησσιιµµοοπποοιιήήσσεεττεε ττοονν φφοούύρρννοο σσααςς
70
11..
ΟΟιι λλεεππττοοµµέέρρεειιεεςς ττοουυ ππρροογγρρααµµµµααττιισσττήή σσααςς
5
3
4
2
8
9
10
1
7
6
1
3
4
5
6
7
9
10
8
2
ΈΈννδδεειιξξηη χχρρόόννωωνν κκααιι δδιιααρρκκεειιώώνν
ΈΈννδδεειιξξηη θθεερρµµοοκκρραασσίίααςς
∆∆εείίκκττηηςς δδιιάάρρκκεειιααςς ψψηησσίίµµααττοοςς
∆∆εείίκκττηηςς ττέέλλοουυςς ψψηησσίίµµααττοοςς
∆∆εείίκκττηηςς χχρροοννοοδδιιαακκόόππττηη
∆∆εείίκκττηηςς λλεειιττοουυρργγίίααςς EECCOO
∆∆εείίκκττηηςς αασσφφααλλιισσµµέέννηηςς ππόόρρττααςς
ΠΠλλήήκκττρροο ππρρόόσσββαασσηηςς σσεε δδιιάάφφοορραα
ππρροογγρράάµµµµαατταα ρρύύθθµµιισσηηςς χχρρόόννοουυ
ΠΠλλήήκκττρραα ρρυυθθµµίίσσεεωωνν χχρρόόννοουυ
99625635_A_ML.qxp 14/11/2005 11:33 Page 70
Page 71

71
Πως να χρησιµοποιήσετε τον φούρνο σας
a) AAεφαρµογή ηλεκτρικής τάσης
• Η οπτική ένδειξη αναβοσβήνει στο 12:00.
• Ρυθµίστε την ώρα πατώντας τα πλήκτρα + ή (αφήνοντας το δάχτυλο στο πλήκτρο µπορείτε να
προχωρήσετε πιο γρήγορα)
Παράδειγµα : 12:30
Η καταχώρηση της προσαρµοσµένης ώρας γίνεται
αυτόµατα σε λίγα δευτερόλεπτα
-> η ένδειξη της ώρας δεν αναβοσβήνει πια.
b) ΕΕπαναρύθµιση της ώρας του ρολογιού
• Πατήστε ταυτόχρονα τα πλήκτρα + και - για µερικά
δευτερόλεπτα µέχρι να αναβοσβήσει η ένδειξη.
Η ένδειξη της ώρας αναβοσβήνει για να σας
υποδείξει ότι η ρύθµιση είναι δυνατή.
Για τη ρύθµιση, πατήστε τα πλήκτρα + ή - έτσι ώστε
να αυξήσετε ή να µειώσετε την ώρα.
• Πατήστε το πλήκτρο για να επικυρώσετε.
ΗΗ ρρύύθθµµιισσηη ττηηςς ώώρρααςς δδεενν εείίννααιι δδυυννααττήή αανν οο εεππιιλλοογγέέααςς
ψψηησσίίµµααττοοςς εείίννααιι σσττηη θθέέσσηη ""PPyyrroo"" ήή ""PPyyrroo EEccoo""..
22..
ΠΠ
ωωςς νναα ρρυυθθµµίίσσεεττεε ττοο ρροολλόόιι ττοουυ φφοούύρρννοουυ??
11
11
22
33
ΑΑνν δδεενν υυππάάρρχχεειι εεππιικκύύρρωωσσηη µµεε ττοο ππλλήήκκττρροο ,, ηη κκααττααχχώώρρηησσηη γγίίννεεττααιι
ααυυττόόµµαατταα µµεεττάά ααππόό µµεερριικκάά δδεευυττεερρόόλλεεππτταα..
GR
99625635_A_ML.qxp 14/11/2005 11:33 Page 71
Page 72

72
Πως να χρησιµοποιείτε τον φούρνο σας
33.. ΠΠωωςς νναα κκάάννεεττεε έένναα άάµµεεσσοο ψψήήσσιιµµοο
Ο προγραµµατιστής πρέπει να δείχνει µόνο την ώρα, αυτή δεν πρέπει να
αναβοσβήνει.
• Επιλέξτε τον τρόπο ψησίµατος:
Στρέψτε τον επιλογέα των λειτουργιών στη θέση
της επιλογής σας.
Παράδειγµα : θέση “ ”-> ο φούρνος αρχίζει να λειτου-
ργεί.
Ο φούρνος σας προτείνει τη θερµοκρασία που
χρησιµοποιείται συνήθως.
ΤΤοοπποοθθεεττήήσσττεε ττοο ττααψψίί σσααςς σσττοο φφοούύρρννοο ααννάάλλοογγαα µµεε ττιιςς
σσυυσσττάάσσεειιςς πποουυ δδίίννεειι οο οοδδηηγγόόςς ψψηησσίίµµααττοοςς..
Ωστόσο είναι δυνατόν να ρυθµίσετε τη θερµοκρασία
ενεργοποιώντας τον διακόπτη “TT°c” προς το + ή το -.
Παράδειγµα “ ” ρυθµισµένο στους 210°.
Μετά από αυτές τις ενέργειες, ο φούρνος θερµαίνεται και η ένδειξη της
θερµοκρασίας (210°C) αναβοσβήνει.
Μια σειρά ηχητικών µπιπ ηχεί µόλις ο φούρνος φθάσει την επιλεγµένη θερµοκρασία. Αυτή σταµατά να αναβοσβήνει.
ΜΜεεττάά ααππόό έένναανν κκύύκκλλοο ψψηησσίίµµααττοοςς,, ηη ττοουυρρµµππίίνναα ττοουυ ααννεεµµιισσττήήρραα σσυυννεεχχίίζζεειι νναα
λλεειιττοουυρργγεείί γγιιαα έένναα οορριισσµµέέννοο δδιιάάσσττηηµµαα,, οούύττωωςς ώώσσττεε νναα κκρρυυώώσσεειι οο φφοούύρρννοοςς..
99625635_A_ML.qxp 14/11/2005 11:33 Page 72
T˚c
Page 73

73
Πως να χρησιµοποιείτε τον φούρνο σας
44..
ΠΠ
ωωςς νναα ππρροογγρρααµµµµααττίίσσεεττεε έένναα ψψήήσσιιµµοο
bb
) ΠΠως να αναβάλλετε ένα ψήσιµο; (επιλεγµένη ώρα τέλους)
ΠΠρροοχχωωρρήήσσττεε όόππωωςς γγιιαα έένναα ππρροογγρρααµµµµααττιισσµµέέννοο ψψήήσσιιµµοο..
Πατήστε το πλήκτρο “ ” µέχρις ότου να αναβοσβήσει το
σύµβολο
le symbole “ ” (τέλος ψησίµατος).
Η ένδειξη αναβοσβήνει για να υποδείξει ότι η ρύθµιση
είναι πια δυνατή.
Πατήστε το πλήκτρο + ή - για να ρυθµίσετε την ώρα του
επιθυµητού τέλους.
Παράδειγµα: Τέλος ψησίµατος στις 13:00.
ΜΜεεττάά ααππόό ααυυττέέςς ττιιςς εεννέέρργγεειιεεςς,,
η έναρξη της θέρµανσης
αναβάλλεται ούτως ώστε το ψήσιµο να τελειώσει στις
13:00.
Όταν το ψήσιµο τελειώσει, ξαναβάλτε τον επιλογέα
ψησίµατος στο "0".
Σε περίπτωση προγραµµατισµένου ψησίµατος, ο
θάλαµος φωτίζεται στην αναµονή
έναρξης ψησίµατος και στο τέλος ψησίµατος.
Σε περίπτωση προγραµµατισµένου αεροθερµικού ψησίµατος, χωρίς να τεθεί στο
0 ο επιλογέας λειτουργιών, ο έλικας ανάδευσης αέρα συνεχίζει να λειτουργεί για
να επιτευχθεί οµογενής θερµοκρασία µέσα στο φούρνο.
aa
) ΜΜε άµεση εκκίνηση
11..
Ρυθµίστε τον επιλεγµένο τρόπο ψησίµατος και
ενδεχοµένως προσαρµόστε τη θερµοκρασία.
Παράδειγµα: θέση “ ” θερµοκρασία 210°C.
22..
Πατήστε το πλήκτρο “ ” µέχρι να αναβοσβήσει το
σύµβολο
“ ” (διάρκεια ψησίµατος).
Η ένδειξη αναβοσβήνει στο 0:00 για να υποδείξει ότι η
ρύθµιση είναι δυνατή.
33..
Πατήστε το πλήκτρο + ή - για να ρυθµίσετε τον
επιθυµητό χρόνο.
Παράδειγµα : 25 λεπτά ψησίµατος.
Η καταχώρηση της προσαρµοσµένης ώρας γίνεται
αυτόµατα µετά από µερικά δευτερόλεπτα,
-> η οπτική ένδειξη δεν αναβοσβήνει πια.
Ο υπολογισµός της διάρκειας γίνεται αµέσως µετά τη
ρύθµιση.
ΜΜεε ττ άά ααππ όό ααυυττέέςς ττιιςς 33 εενν έέρργγ εειιεεςς ,, οο φφ οούύ ρρννοοςς
θθεερρµµααίίννεεττααιι::
Μια σειρά ηχητικών µπιπ ηχεί µόλις ο φούρνος φθάσει
την επιλεγµένη θερµοκρασία.
GR
99625635_A_ML.qxp 14/11/2005 11:33 Page 73
Page 74

Πως να χρησιµοποιήσετε το φούρνο σας
55.. ΠΠωωςς νναα χχρρηησσιιµµοοπποοιιήήσσεεττεε ττοονν χχρροοννοοδδιιαακκόόππττηη
ΟΟ φφοούύρρννοοςς σσααςς εείίννααιι εεξξοοππλλιισσµµέέννοοςς µµεε έένναανν ηηλλεεκκττρροοννιικκόό χχρροοννοοδδιιαακκόόππττηη ααννεεξξάάρρττ--
ηηττοο ααππόό ττηη λλεειιττοουυρργγίίαα ττοουυ φφοούύρρννοουυ πποουυ εεππιιττρρέέππεειι νναα υυπποολλοογγίίσσεεττεε έένναα χχρρόόννοο..
Σ' αυτή την περίπτωση, η ένδειξη του χρονοδιακόπτη υπερισχύει της ένδειξης της ώρας.
Πατήστε το πλήκτρο “ ” µέχρις ότου να αναβοσβήσει το σύµβολο (Χρονοδιακόπτης)
-> η οπτική ένδειξη και µια µικρή κλεψύδρα αναβοσβήνουν.
Πατήστε το πλήκτρο (+ ή -) µέχρις ότου να αποκτήσετε
την επιθυµητή διάρκεια (60 λεπτά το πολύ).
Η οπτική ένδειξη σταµατά να αναβοσβήνει µετά από
µερικά δευτερόλεπτα και ο χρονοδιακόπτης ξεκινά και
µετρά το χρόνο από δευτερόλεπτο σε δευτερόλεπτο.
Αφού περάσει η διάρκεια, ο χρονοδιακόπτης εκπέµπει
ηχητικά µπιπ για να σας προειδοποιήσει.
ΕΕίίννααιι δδυυννααττόόνν νναα ττρροοπποοπποοιιήήσσεεττεε ήή νναα αακκυυρρώώσσεεττεε ααννάά ππάάσσαα σσττιιγγµµήή ττοονν
ππρροογγρρααµµµµααττιισσµµόό ττοουυ χχρροοννοοδδιιαακκόόππττηη..
74
99625635_A_ML.qxp 14/11/2005 11:33 Page 74
Page 75

• Η λυχνία βρίσκεται στην οροφή της εσοχής του φούρνου σας.
a) Ξεβιδώστε το φωτιστικό (βλέπε
απέναντι).
β) Ξεβιδώστε τη λυχνία προς την ίδια
κατεύθυνση.
Χαρακτηριστικά της λυχνίας:
- 15 W
- 220-240 V
- 300°C
- βάση E 14
γ) Αλλάξτε τη λυχνία, έπειτα ανεβάστε
το φωτιστικό και ξανασυνδέστε τον φούρνο σας.
ΝΝττοουυίί
ΦΦωωττιισσττιικκόό
ΞΞεεββιιδδώώσσττεε
γγιιαα νναα ξξεεββιιδδώώσσεεττεε ττοο φφωωττιισσττιικκόό κκααιι ττηη λλάάµµππαα,, χχρρηησσιιµµοοπποοιιήήσσττεε ππλλαασσττιικκόό
γγάάννττιιπποουυ θθαα δδιιεευυκκοολλύύννεειι ττηηνν ααπποοσσυυννααρρµµοολλόόγγηησσηη..
ΑΑπποοσσυυννδδέέσσττεε ττοονν φφοούύρρννοο σσααςς ππρριινν ααππόό κκάάθθεε ππααρρέέµµββαασσηη σσττηη λλυυχχννίίαα γγιιαα
νναα ααπποοφφύύγγεεττεε κκάάθθεε κκίίννδδυυννοο ηηλλεεκκττρροοππλληηξξίίααςς κκααιι εεάάνν χχρρεειιαασσττεείί ααφφήήσσττεε νναα
κκρρυυώώσσεειι ηη σσυυσσκκεευυήή..
66.. ΠΠωωςς νναα ααλλλλάάξξεεττεε ττηη λλυυχχννίίαα
75
GR
99625635_A_ML.qxp 14/11/2005 11:33 Page 75
Page 76

76
ΓΓ
κριλ µε αέρα
Το ψήσιµο πραγµατοποιείται,
εναλλακτικά, από το πάνω στοιχείο και
τον έλικα ανάµειξης αέρα.
ΠΠ
λάκα έδρασης µε αέρα
Το ψήσιµο πραγµατοποιείται
από το κάτω στοιχείο που
συνδέεται µε µια ελαφριά δόση
του γκριλ και µε τον έλικα
ανάµειξης αέρα.
ΚΚ
υµαινόµενο γκριλ
Περιττή η προθέρµανση.
Πουλερικά και ψητά ζουµερά
και τραγανά απ' όλες τις όψεις.
Πραγµατοποιήστε προθέρµανση για 5 λεπτά.
Βάλτε το ταψί πολλαπλών
χρήσεων στην κάτω σκάλα.
Ψήσιµο από κάτω µε ελαφριά
δόση από πάνω.
Τοποθετήστε τη σχάρα στην
κάτω σκάλα.
∆∆
ιατήρηση στο ζεστό
∆οσολογία των κάτω και πάνω
στοιχείων
∆ιατήρηση στο ζεστό.
ΣΣύύµµββοολλοο
ΌΌννοοµµαα λλεειιττοουυρργγίίααςς ΠΠεερριιγγρρααφφήή ττηηςς λλεειιττοουυρργγίίααςς
77.. ΤΤρρόόπποοιι ψψηησσίίµµααττοοςς ττοουυ φφοούύρρννοουυ
ΠΠ
αραδοσιακό
Το ψήσιµο πραγµατοποιείται
από τα πάνω και κάτω στοιχεία
χωρίς ανάµειξη αέρα.
Απαιτεί προθέρµανση προτού
να βάλετε το ταψί στο φούρνο.
Αυτή η θέση επιτρέπει κέρδος σε ενέργεια περίπου 20% διατηρώντας
ταυτόχρονα όλη την ποιότητα του
ψησίµατος. Η θέση ECO χρησιµοποιείται
για την τοποθέτηση ετικετών ενέργειας.
ΠΠ
αραδοσιακό ECO
Το ψήσιµο πραγµατοποιείται
από τα πάνω και κάτω στοιχεία
χωρίς ανάµειξη αέρα.
*
ΠΠ
εριστροφική θερµότητα
Το ψήσιµο πραγµατοποιείται µε
την αντίσταση τοποθετηµένη
στον πάτο του φούρνου καιµε
τον έλικα ανάµειξης αέρα.
Περιττή η προθέρµανση εκτός
από τα ψησίµατα που απαιτούν
πολύ σύντοµο χρόνο (κουλουράκια σε πολλά επίπεδα.
*
**
ΑΑκκοολλοουυθθίίαα((εεςς)) πποουυ χχρρηησσιιµµοοπποοιιεείίττααιι((οούύννττααιι)) γγιιαα ττηηνν γγρρααππττήή αανναακκοοίίννωωσσηη σσττηηνν εεττιικκέέτταα εεννέέρργγεειιααςς σσύύµµφφωω
99625635_A_ML.qxp 14/11/2005 11:33 Page 76
Page 77

77
Για να τσιγαρίσετε και να ψήσετε καλά
µµπποούύττιι
, βοδινά παϊδάκια. Για να
παραµείνουν µαλακές οι χοντρές φέτες
ψψααρριιοούύ
.
Η ισχύς είναι ρυθµιζόµενη από 30 έως 100% 1 έως 4 . Για µεγάλη
αποτελεσµατικότητα, σας συνιστούµε να χρησιµοποιήσετε τις
ανώτερες τιµές.
Συνιστάται για τα υγρά φαγητά (κις, τάρτες µε ζουµερά φρούτα…)
Η ζύµη θα είναι καλά ψηµένη από κάτω.
Συνιστάται για τα παρασκευάσµατα που φουσκώνουν (κέικ, µπριός, kouglof…) και για τα σουφλέ που δεν θα τα εµποδίζει η κρούστα από πάνω.
Συνιστάται για να
ffφφοουυσσκκώώσσοουυνν οοιι ζζύύµµεεςς γγιιαα ψψωωµµίί,, γγιιαα µµππρριιόόςς,, kkoouuggllooff
...
χωρίς να ξεπερνά τους 40°C (θέρµανση φαγητών, απόψυξη).
ΣΣυυσσττάάσσεειιςς
Τρόποι ψησίµατος του φούρνου
Συνιστάται για τα αργά και ευαίσθητα µαγειρέµατα: µαλακά θηράµατα…
Για να τσιγαρίσετε τα κόκκινα κρέατα.
Για να σιγοβράσετε σε κλειστή κατσαρόλα τα φαγητά. που έχετε προηγουµένως ξεκινήσει στα µάτια της κουζίνας (κόκορας κρασάτος, κρέας
βραστό µε λαχανικά…).
Σηµείωση: όλα τα ψησίµατα γίνονται
χχωωρρίίςς ππρροοθθέέρρµµααννσσηη..
Συνιστάται για τη διατήρηση της απαλής υφής των κρεάτων, για τα
λαχανικά, τα ψάρια και για τα πολλαπλά ψησίµατα έως και σε 3
επίπεδα.
GR
99625635_A_ML.qxp 14/11/2005 11:33 Page 77
Page 78

78
ΠΠ
ωω ςς νν αα κκ αα θθ αα ρρ ίί σσ εε ττ εε ττ ηη νν εε σσ οο χχ ήή
11..
ΤΤιι εείίννααιι ηη ππυυρρόόλλυυσσηη;;
ΨΨΗΗΣΣΙΙΜΜΑΑΤΤΑΑ ΠΠΟΟΥΥ
Μπισκότα, λαχανικά, γλυκά, Ψησίµατα χωρίς πιτσιλίσµατα
ΛΛΕΕΡΡΩΩΝΝΟΟΥΥΝΝ ΛΛΙΙΓΓΟΟ
κις, σουφλέ δεν χρειάζεται πυρόλυση
ΨΨΗΗΣΣΙΙΜΜΑΑΤΤΑΑ ΠΠΟΟΥΥ
κρέατα, ψάρια, (σε ταψί)
η πυρόλυση µπορεί να χρειαστεί
ΛΛΕΕΡΡΩΩΝΝΟΟΥΥΝΝ
γεµιστά λαχανικά µετά από κάθε 3 ψησίµατα
ΨΨΗΗΣΣΙΙΜΜΑΑΤΤΑΑ ΠΠΟΟΥΥ
µεγάλα κοµµάτια κρεάτων η πυρόλυση µπορεί να γίνει
ΛΛΕΕΡΡΩΩΝΝΟΟΥΥΝΝ ΠΠΟΟΛΛΥΥ
στη σούβλα από 1 ψήσιµο αυτού του τύπου
αν έγιναν πολλά πιτσιλίσµατα
Ο φούρνος σας καπνίζει κατά την προθέρµανση ή καπνίζει πάρα πολύ κατά το
ψήσιµο. Οφούρνος σας βγάζει εν ψυχρώ µια δυσάρεστη µυρωδιά µετά από
διάφορα ψησίµατα (αρνί,ψάρι, ψητά στη σχάρα…).
22.. ΣΣεε πποοιιαα ππεερρίίππττωωσσηη ππρρέέππεειι νναα ππρρααγγµµααττοοπποοιιεείίττεε µµιιαα ππυυρρόόλλυυσσηη;;
∆∆εενν ππρρέέππεειι νναα ππεερριιµµέέννεεττεε νναα γγεεµµίίσσεειι οο φφοούύρρννοοςς λλίίππηη γγιιαα νναα κκάάννεεττεε ααυυττόόνν
ττοονν κκααθθααρριισσµµόό..
- Η πυρόλυση είναι ένας κύκλος θέρµανσης της εσοχής του φούρνου σε πολύ
υψηλή θερµοκρασία που επιτρέπει την εξάλειψη όλων των βροµιών που
προέρχονται από πιτσιλίσµατα ή εκχύσεις. Οι καπνοί και οι µυρωδιές που
αναδύονται εξαφανίζονται µε το πέρασµα από έναν καταλύτη.
- Η πυρόλυση δεν είναι ωστόσο απαραίτητη µετά από κάθε ψήσιµο, αλλά µόνο
αν το απαιτεί ο βαθµός της βροµιάς.
- Ως µέτρο ασφαλείας, η διαδικασία του καθαρισµού πραγµατοποιείται µόνο
αφού µπλοκαριστεί αυτόµατα η πόρτα. Μόλις η θερµοκρασία στο εσωτερικό του
φούρνου ξεπεράσει τις θερµοκρασίες ψησίµατος, είναι αδύνατον να ανοίξετε την
πόρτα ακόµα και τοποθετώντας τον διακόπτη "επιλογέα λειτουργιών" στο 00.
99625635_A_ML.qxp 14/11/2005 11:33 Page 78
Page 79

33.. ΠΠωωςς νναα κκάάννεεττεε µµιιαα ππυυρρόόλλυυσσηη
79
a)
ΒΒγγάάλλττεε τταα σσκκεεύύηη ααππόό ττοο φφοούύρρννοο κκααιι ααφφααιιρρέέσσττεε ττιιςς ππιιοο πποολλλλέέςς εεκκχχύύσσεειιςς
πποουυ µµπποορρεείί νναα εείίχχαανν δδηηµµιιοουυρργγηηθθεείί..
b) Ελέγξτε ότι ο προγραµµατιστής δείχνει την ώρα και ότι δεν αναβοσβήνει.
c) Τοποθετήστε τον διακόπτη "επιλογέα λειτουργιών"
στη θέση "PYRO" ή "PYRO ECO".
Η διάρκεια της πυρόλυσης κυµαίνεται από 1:30 ώρα
στο "PYRO ECO" έως 2:00 στο "PYRO".
Αυτός ο χρόνος δεν περιλαµβάνει το χρόνο που
χρειάζεται για να κρυώσει ο φούρνος και που είναι
περίπου 1/2 ώρα.
• Κατά τη διάρκεια του κύκλου πυρόλυσης, ανάβει το φωτάκι του
κλειδώµατος για να σας υποδείξει ότι η πόρτα είναι κλειδωµένη (συµβολίζεται
µε ένα λουκέτο).
d) Ξαναβάλτε τον επιλογέα λειτουργιών στη θέση 0.
e) Όταν ο φούρνος κρυώσει, χρησιµοποιήστε ένα υγρό πανί για να αφαιρέσετε
την λευκή στάχτη. Ο φούρνος είναι καθαρός και µπορεί να χρησιµοποιηθεί ξανά
για να ψήσετε όπως επιθυµείτε.
GR
99625635_A_ML.qxp 14/11/2005 11:33 Page 79
Page 80

80
ΤΤιι νναα κκάά ννοουυµµεε σσ εε ππεερρίίππ ττωωσσ ηη
αανν ωωµµ ααλλιι ώώνν σσ ττ ηη λλ εειι ττοουυ ρργγ ίί αα;;
ΈΈχχεεττεε κκάάπποοιιαα ααµµφφιιββοολλίίαα γγιιαα ττηηνν κκααλλήή λλεειιττοουυρργγίίαα ττοουυ φφοούύρρννοουυ σσααςς
,αυτό δεν
σηµαίνει όµως οπωσδήποτε ότι υπάρχει κάποια βλάβη.
ΣΣεε κκάάθθεε ππεερρίίππττωωσσηη,,
εελλέέγγξξττεε τταα αακκόόλλοουυθθαα σσηηµµεείίαα::
∆∆
ιαπιστώνετε ότι...
ΟΟ
ι πιθανές αιτίες
ΤΤ
ι πρέπει να κάνω?
Μεταφέρετε παρακάτω τις ενδείξεις που εµφανίζονται στην περιγραφική πινακίδα του
φούρνου σας:
MMAADDEE IINN FFRRAANNCCEE
220 - 240V ~ 50 Hz
BRANDT APPLIANCES SAS
7 rue Henri Becquerel
92500 RUEIL MALMAISON
Ο φούρνος δεν θερµαίνεται.
• Ο φούρνος δεν είναι
συνδεδεµένος.
• Η ασφάλεια της εγκατάστασής
σας είναι εκτός λειτουργίας.
• Η επιλεγµένη θερµοκρασία είναι
πολύ χαµηλή.
• Ο συλλέκτης είναι ελαττωµ ατικός.
• Ο φούρνος έχει υποστεί µια υπερθέρµανση, και ασφαλίζεται.
- Συνδέστε τον φούρνο.
- Αλλάξτε την ασφάλεια της
εγκατάστασής σας και ελέγξτε την
τιµή της (16Α).
- Αυξήστε την επιλεγµένη θερµοκρασία.
- Καλέστε την Υπηρεσία Εξυπηρέτησης Μετά την Πώληση.
- Καλέστε την Υπηρεσία Εξυπηρέτησης Μετά την Πώληση.
- Καλέστε την Υπηρεσία Εξυπηρέτησης Μετά την Πώληση.
Eµφανίζεται Er
VV
Eµφανίζεται Er
MM
• Σφάλµα κλειδώµατος της πόρτας.
• Αίτηση πυρόλυσης ενώ η πόρτα
είναι ήδη ασφαλισµένη
• Ελαττωµατικός συλλέκτης
θερµοκρασίας.
- Καλέστε την Υπηρεσία Εξυπηρέτησης Μετά την Πώληση.
- Καλέστε την Υπηρεσία Εξυπηρέτησης Μετά την Πώληση.
Η λάµπα του φούρνου δεν λειτουργεί.
• Η λάµπα είναι εκτός λειτουργίας.
• Ο φούρνος δεν είναι
συνδεδεµένος ή η ασφάλεια είναι
εκτός λειτουργίας.
- Αλλάξτε τη λάµπα.
- Συνδέστε τον φούρνο ή αλλάξτε
την ασφάλεια.
Ο ανεµιστήρας για να κρυώσει ο
φούρνος συνεχίζει να γυρνά και
µετά το σταµάτηµα του φούρνου.
• Ο ανεµιστήρας λειτουργεί για 1
ώρα το πολύ µετά το ψήσιµο, ή
όταν η θερµοκρασία του φούρνου
σας είναι ανώτερη των 125°C.
• Αν δεν σταµατήσει µετά από 1
ώρα.
- Ανοίξτε την πόρτα του φούρνου
για να κρυώσει ο φούρνος πιο
γρήγορα.
- Καλέστε την Υπηρεσία Εξυπηρέτησης Μετά την Πώληση.
Ο καθαρισµός µε πυρόλυση δεν
γίνεται.
• Η πόρτα δεν είναι καλά
κλεισµένη.
• Το σύστηµα κλειδώµατος είναι
ελαττωµ ατικό.
• Ο συλλέκτης T° είναι
ελαττωµατικός.
• Ο διακόπτης ανίχνευσης της
“κλειστής πόρτας” είναι
ελαττωµ ατικός.
- Ελέγξτε το κλείσιµο της πόρτας.
- Καλέστε την Υπηρεσία Εξυπηρέτησης Μετά την Πώληση.
- Καλέστε την Υπηρεσία Εξυπηρέτησης Μετά την Πώληση.
- Καλέστε την Υπηρεσία Εξυπηρέτησης Μετά την Πώληση.
99625635_A_ML.qxp 14/11/2005 11:33 Page 80
Page 81

Gebruiksaanwijzing van uw oven
Referentie
: FP 225
NL
99625635_A_ML.qxp 14/11/2005 11:33 Page 81
Page 82

Inhoud
In deze gebruikshandleiding
geeft symbool
veiligheidsaanwijzingen en symbool,
tips en praktische richtlijnen aan
Inleiding P.83
Indeling van uw oven
Beschrijving van de oven
P.84
O
ventoebehoren
P.85
Veiligheidsaanwijzingen
P.86
Installatie van uw oven
Elektrische aansluiting P.87-88
Nuttige afmetingen voor de inbouw van uw oven P.89
Gebruik van uw oven
De programmaschakelaar P.80
I
nstellen van het uur van de oven
P.91
Onmiddellijk bakken P.92
Hoe programmeer ik een bakcyclus P.93
Gebruik van de schakelklok P.94
Vervanging van de ovenlamp
P.95
Bakwijzen van de oven P.96-97
Reiniging van de binnenzijde van de oven
Wat is een pyrolyse P.98
Wanneer is een pyrolysereiniging nodig ? P.98
Hoe voer ik een pyrolyse uit ? P.99
Problemen en oplossingen
P.100
82
99625635_A_ML.qxp 14/11/2005 11:33 Page 82
Page 83

83
Inleiding
Geachte klant,
U heeft net een oven van BRANDT aangekocht. We willen u hier graag
voor bedanken.
Onze onderzoeksteams hebben voor u een nieuwe generatie van
apparaten ontworpen waarmee koken en bakken dag na dag een waar
plezier wordt.
Dank zij het moderne en verfijnde ontwerp zal uw nieuwe BRANDT-
oven harmonieus in uw keuken kunnen worden ingepast. Uw oven is
een geslaagde combinatie van gebruiksvriendelijkheid, optimale
bakprestaties en esthetische schoonheid.
In het gamma van BRANDT-producten vindt u tevens een ruime keuze
aan kookplaten, afzuigkappen, vaatwasautomaten en koelkasten die
allemaal harmonieus met uw BRANDT-oven kunnen worden gecombineerd.
Uiteraard wensen wij onze klanten ook na de aankoop altijd tevreden te
houden. Onze servicedienst zal u altijd met uw vragen of suggesties
verderhelpen (zie achteraan deze handleiding).
BRANDT staat niet alleen voor technologische innovatie, maar verbetert
tevens de kwaliteit van uw dagelijkse leven. BRANDT biedt u immers
apparaten met een bijzonder mooie vormgeving die prestaties en
gebruiksgemak aan milieuvriendelijkheid en betrouwbaarheid koppelen.
BRANDT
NL
99625635_A_ML.qxp 14/11/2005 11:33 Page 83
Page 84

84
1
3
5
T˚c
1
2
3
4
5
6
I
ndeling van uw oven
Temperatuurknop
Programmaschakelaar
Keuzeknop
BESCHRIJVING VAN DE OVEN
1
2
3
Lamp
Nummer inschuifsleuf
Detectiecontact voor
openen en sluiten van de
ovendeur
4
5
6
99625635_A_ML.qxp 14/11/2005 11:33 Page 84
Page 85

85
Oventoebehoren (volgens model)
Ovenrooster met kantelbeveiliging
Op dit rooster kan u alle soorten schotels en
bakvormen met het te bereiden of te
gratineren gerecht plaatsen. Dit rooster wordt
gebruikt voor grillgerechten (plaats het gerecht
op het rooster).
Multifunctionele ovenschaal
(patisserieplaat)
Deze ovenschaal dient als bakplaat en heeft
een gebogen rand. Gebruik deze bakplaat
voor de bereiding van patisserie zoals soezen,
meringue, madeleinekoekjes, gebak van
bladerdeeg...
Leg nooit te roosteren of te braden vlees in de braadslee. De braadslee zal dan
sterk spatten op de ovenwanden.
Diepe ovenschaal
met een speciaal grillrooster
Plaats deze ovenschaal onder het ovenrooster om braadvet en braadsap op te vangen
(in de stand "sterke grill" of "grill +
hetelucht"). U kan deze ovenschaal ook als
bakplaat gebruiken.
Let er wel op dat de grootte van het te bakken gerecht aangepast is (bv.
gevogelte met een groentenkrans bij een matige temperatuur).
Plaats de ovenschaal nooit op de ovenbodem, behalve in de stand GRILL.
Achterzijde
Voorzijde
Handvat voor de diepe ovenschaal
7
8
9
10
NL
99625635_A_ML.qxp 14/11/2005 11:33 Page 85
Page 86

86
Veiligheidsaanwijzingen
Lees eerst aandachtig de volgende tips alvorens uw oven te installeren
en te gebruiken. Dit apparaat is bestemd voor huishoudelijk gebruik. Deze
oven is uitsluitend ontworpen voor het bakken van voedingsmiddelen. Deze oven
bevat geen enkel bestanddeel op basis van asbest.
EERSTE GEBRUIK :
Alvorens uw oven voor de eerste maal te gebruiken, laat u de lege oven eerst met
gesloten deur ongeveer 15 minuten in de maximumstand werken. Door de
specifieke samenstelling van de staalwolbekleding van de ovenruimte kan de oven
in het begin immers een bijzondere geur verspreiden. Bij deze proefverwarming
kan er mogelijk eveneens rookvorming optreden. Dit is normaal.
AANBEVELINGEN :
- Let erop dat de ovendeur altijd goed gesloten is. Enkel dan sluit de
afdichtingsvoeg de oven volledig af.
- Let erop dat niemand op een open ovendeur gaat leunen of zitten.
- Indien u de grill met de ovendeur op een kiertje gebruikt,
kunnen de ovenwanden en andere delen van de oven heet worden. Hou
kinderen op een afstand.
- Tijdens het gebruik van de oven wordt de oven warm. Raak uiteraard nooit de
verwarmingselementen binnen in de oven aan.
- Neem na een bakcyclus de oventoebehoren nooit met de blote hand vast
(rooster, draaispit, braadslee, draagkader voor het draaispit enz...). Gebruik altijd
een ovenwant of een hittebestendige doek.
- Plaats geen aluminiumfolie op de ovenwanden. Aluminiumfolie leidt tot
oververhitting van de oven wat tot een slecht bak- of braadresultaat en
beschadiging van het email kan leiden.
- Alvorens een pyrolysereiniging van de oven uit te voeren, verwijdert u alle
oventoebehoren uit de oven en verwijdert u tevens groffe (aangebakken)
etensresten.
- Gebruik geen hogedrukstoomreiniger.
- Tijdens een pyrolyse worden de wanden van de oven warmer dan tijdens een
gewone bakcyclus. Hou kinderen op een afstand!
- Zet de oven altijd af alvorens een reiniging aan de binnenzijde van de
oven uit te voeren.
MILIEUBESCHERMING
Het verpakkingsmateriaal van dit apparaat is recyclebaar. Doe mee aan de recycling en draag bij aan de bescherming van het milieu door dit materiaal in de hiervoor bestemde gemeentecontainers te deponeren.
Uw apparaat bevat tevens vele recyclebare materialen. Daarom is het
voorzien van dit logo wat aangeeft dat de gebruikte apparaten van ander
afval dienen te worden gescheiden. De recycling van de apparaten die
door uw fabrikant wordt georganiseerd wordt op deze manier onder de
beste omstandigheden uitgevoerd, overeenkomstig de Europese richtlijn
2002/96/CE betreffende elektrisch en elektronisch afval. Informeer bij
uw gemeente of bij uw verkoper naar de dichtstbijzijnde inzamelplaats
voor uw oude apparaten. Wij danken u voor uw bijdrage aan de bescherming van
het milieu.
Om de oven opnieuw te gebruiken, dient u de functieschakelaar
altijd opnieuw in de stand 0 te plaatsen.
99625635_A_ML.qxp 14/11/2005 11:34 Page 86
Page 87

87
20A teller mono
220-240 V ~ 50 Hz
Stopcontact 2 polen
+ aarding
CEI-norm 83
Monokabel 220-240 V ~
Elektrische aansluiting
Voedingskabel
lengte :
ongeveer 1,50 m
Differentieelschakelaar
of zekering 16 A
Controleer vóór de elektrische aansluiting of de doorsnede van
de elektrische installatiedraden groot genoeg is voor de
elektrische voeding van het fornuis.
De zekering van uw installatie dient 16 Ampère te bedragen.
Installatie van uw oven
NL
99625635_A_ML.qxp 14/11/2005 11:34 Page 87
Page 88

88
Installatie
Onze aansprakelijkheid vervalt bij een ongeval ten gevolge van
een afwezige, defecte of foute aarding.
• De voedingskabel (H05 RR-F, H05 RN-F of H05 W-F) dient lang genoeg te zijn om te
kunnen worden aangesloten op de oven wanneer de oven met het oog op de
inbouw op de grond voor het keukenmeubel wordt geplaatst.
Werkwijze (koppel eerst de oven van het elektriciteitsnet af) :
• Open het toegangsplaatje rechts onderaan de achterwand. Draai hiervoor de 2
schroeven los en draai het plaatje weg.
• Ontbloot elke draad van de nieuwe voedingskabel over een lengte van 12 mm.
• Tors de draadjes van elke draad voorzichtig ineen.
• Draai de schroeven van het klemmenbord los en verwijder de te vervangen
voedingskabel.
• Steek de voedingskabel langs de zijkant van de achterwand in de kabelklem rechts
van het klemmenbord.
• Verbind de draden van de voedingskabel overeenkomstig het (de) schema('s) op
het toegangsplaatje.
• Alle draadjes van elke draad van de voedingskabel dienen onder de schroeven vast te zitten.
• De fasedraad moet worden verbonden met de L-klem.
• De aardingsdraad (groen-geel) moet worden verbonden met de aardingsklem .
• De nulleider (blauwe draad) moet worden verbonden met de N-klem.
• Draai de schroeven van het klemmenbord stevig vast en controleer de stevigheid
van de
aansluiting door even aan elke draad te trekken.
• Leg de voedingskabel vast door middel van de kabelklem rechts van het
klemmenbord.
• Schroef het toegangsplaatje met de 2 schroeven opnieuw vast.
Plaatsing en/of vervanging van de voedingskabel
Voer de elektrische aansluiting uit alvorens de oven in het meubel in te bouwen.
• Voor de aansluiting van de oven gebruikt u een voedingskabel (genormaliseerd) met
3 geleiders met een doorsnede van 1,5 mm2 (1 fasedraad + 1 nulleider +
1 aarding
). Deze geleiders worden aangesloten op een elektriciteitsnet van 220-240
V ~ (monofasig) via een genormaliseerd stopcontact 1 fasedraad + 1 nulleider +
aarding overeenkomstig de norm of via een element met omnipolaire schakelaar
met een minimale afstand tussen de kontakten van 3 mm. De beschermingsdraad
(groen-geel) is verbonden met de aardingsklem van het apparaat en moet worden
verbonden met de aarding van de installatie.
• Indien u kiest voor een aansluiting op een stopcontact, dient u ervoor te zorgen dat
het stopcontact ook na de aansluiting gemakkelijk bereikbaar blijft.
• De nulleider van de oven (blauwe draad) dient met de nulleider van het
elektriciteitsnet te worden verbonden.
99625635_A_ML.qxp 14/11/2005 11:34 Page 88
Page 89

89
van uw oven
Voor een installatie overeenkomstig de wettelijke richtlijnen raden wij u
aan een beroep te doen op een erkend elektrotechnicus.
Nuttige afmetingen voor de inbouw van uw oven
De oven kan naar keuze onder een werkblad of een (open* of gesloten)
kolommeubel met de juiste afmetingen voor de inbouw van de oven
worden geïnstalleerd (zie schema).
Uw oven beschikt over een optimale luchtcirculatie die vlekkeloze bakresultaten en
een optimale reiniging garandeert. Voor een optimale luchtcirculatie dient u met de
volgende punten rekening te houden :
• Plaats de oven centraal in het meubel met een minimale afstand van 5 mm
tussen de zijwanden van de oven en de zijwanden van het inbouwmeubel.
• Het inbouwmeubel moet van hittebestendig materiaal gemaakt of ermee bekleed zijn.
• Voor meer stabiliteit schroeft u de oven met 2 schroeven in de in zijrand
voorziene schroefgaten in het meubel vast (zie schema).
Werkwijze :
1) Verwijder de rubberen schroefkapjes van de schroefgaten.
2) Maak een opening met een diameter van 3 mm in de wand van het meubel om te
vermijden dat het hout gaat barsten.
3) Bevestig de oven met de 2 schroeven.
4) Plaats de rubberen schroefkapjes opnieuw op de schroeven (de kapjes dempen
tevens het geluid bij het sluiten van de ovendeur).
(*) bij een open kolommeubel dient de opening (maximaal) 70 mm te bedragen.
NL
Schroefgaten
Schroefgaten
Uitsnijding 50 x 50
99625635_A_ML.qxp 14/11/2005 11:34 Page 89
Page 90

Gebruik van uw oven
90
1. D
e programmaschakelaar
5
3
4
2
8
9
10
1
7
6
1
3
4
5
6
7
9
10
8
2
Tijdsgegevens en bakduur
Temperatuur
Bakduur
Einde baktijd
Schakelklok
ECO-bakken
Vergrendeling ovendeur
Toets voor de activering van
de verschillende programma's
voor het instellen van de
tijdsgegevens
Toetsen voor tijdsinstellingen
99625635_A_ML.qxp 14/11/2005 11:34 Page 90
Page 91

91
Gebruik van uw oven
a) Tijdens het aansluiten van de oven
• De display knippert 12u00.
• Stel het uur met de toetsen + en - in (hou de
toets ingedrukt indien u de cijfers sneller wil doen
vorderen).
Voorbeeld : 12u30.
Na enkele sekonden wordt de uurinstelling
automatisch geregistreerd.
-> De display knippert niet meer.
b) Wijzigen van het ingestelde uur
• Druk gelijktijdig enkele sekonden lang op de
toetsen + en - tot de display begint te knipperen.
De uurvermelding knippert. U kan nu het uur
wijzigen.
Gebruik de toetsen + of - om het op de display
vermelde uur te verhogen of te verlagen.
• Druk op toets om het nieuwe uur te bevestigen.
U kan het uur niet instellen indien de keuzeknop in de
stand "Pyro" of "Pyro Eco" staat.
2.
Instellen van het uur van de oven
1
1
2
3
Indien u het nieuwe uur niet met de toets bevestigt, zal de
display na enkele sekonden zelf het uur bevestigen.
NL
99625635_A_ML.qxp 14/11/2005 11:34 Page 91
Page 92

92
Gebruik van uw oven
3. O
nmiddellijk bakken
De programmaschakelaar mag enkel het uur vermelden en mag niet knipperen.
• Kies de bakwijze :
Plaats de keuzeknop in de gewenste stand.
Voorbeeld : stand “ ”-> de oven begint te werken.
Uw oven stelt u nu de meest gebruikte temperatuur
voor.
Zet uw ovenschaal in de oven (zie aanbevelingen in
de bakgids).
U kan nu de temperatuur met de temperatuurknop“T°c”
instellen.
Voorbeeld : bakstand “ ” met een temperatuur
van 210°.
De oven begint nu op te warmen en de temperatuur (210°C) op de display
knippert.
Zodra de oven de ingestelde temperatuur heeft bereikt, hoort u een reeks
bieptonen. De temperatuur op de display stopt met knipperen.
Na een bakcyclus blijft de ventilator een tijdje doorwerken om de
oven af te koelen.
99625635_A_ML.qxp 14/11/2005 11:34 Page 92
T˚c
Page 93

93
Gebruik van uw oven
4.
Hoe programmeer ik een bakcyclus
b) Uitgesteld bakken (instelling van einduur)
Volg de aanwijzingen onder a.
Na de instelling van de bakduur gaat u als volgt tewerk :
Druk op de toets “ ” tot symbool
“ ” (bakduur) op de display knippert.
Het einde van de bakduur knippert. U kan nu het einde
van de bakduur instellen.
Gebruik de toetsen + en - om het gewenste einduur
van de bakcyclus in te stellen.
Voorbeeld : einde bakduur om 13u.
Na deze instelling zal de oven pas beginnen werken op het moment dat het
ingestelde einduur (in dit geval 13u) wordt bereikt.
Zet de keuzeknop na afloop van de bakcyclus op "0".
Bij geprogrammeerd bakken wordt de ovenruimte verlicht in afwachting van het
begin van de bakcyclus en aan het einde van de bakcyclus. Bij geprogrammeerd
bakken met hetelucht, zonder dat de keuzeknop terug op 0 komt te staan, blijft
de luchtvermengingsschroef draaien om in de oven tot een homogene
temperatuur te komen.
a) Onmiddellijk starten
1. Kies de gewenste bakwijze en pas eventueel de
temperatuur aan.
Voorbeeld : stand “ ” temperatuur 210°C.
2. Druk op de toets “ ” tot symbool
“ ”(bakduur) op de display knippert.
De bakduur knippert op 0h00. U kan de bakduur nu
instellen.
3. Met de toetsen + en - kan u nu de gewenste
bakduur instellen.
Voorbeeld : een bakduur van 25 minuten.
De gewijzigde bakduur wordt na enkele sekonden automatisch geregistreerd en de bakduur op de display
stopt met knipperen.
De bakduur begint onmiddellijk na de instelling te lopen.
De oven begint nu te werken :
Zodra de oven de ingestelde temperatuur heeft bereikt, hoort
u een reeks bieptonen.
NL
99625635_A_ML.qxp 14/11/2005 11:34 Page 93
Page 94

Gebruik van uw oven
5. Gebruik van de schakelklok
Uw oven is voorzien van een elektronische schakelklok die
onafhankelijk van de oven werkt en waarop u een bepaalde bakduur
kan instellen.
Bij het gebruik van de schakelklok wordt op de display het uur door de tijd van de
schakelklok vervangen.
Druk op de toets
“”
tot het symbool van de schakelklok
begint te
knipperen -> de display en een kleine zandloper knipperen.
U kan nu de gewenste bakduur met de toetsen (+ en
-) instellen (maximaal 60 minuten).
Na enkele sekonden stopt de display met knipperen en
begint de schakelklok de bakduur in sekonden af te
tellen.
Na afloop van de bakduur hoort u een reeks bieptonen
waarmee de schakelklok u wil melden dat de bakduur
is afgelopen.
U kan op elk moment de programmatie van de schakelklok
annuleren of wijzigen.
94
99625635_A_ML.qxp 14/11/2005 11:34 Page 94
Page 95

• De ovenlamp bevindt zich bovenaan in de ovenruimte.
a) Schroef het vensterkapje los (zie
tekening).
b) Draai de lamp naar links los.
Kenmerken van het lampje :
- 15 W
- 220-240 V
- 300°C
- schroeffitting E 14
c) Plaats een nieuwe lamp en draai het vensterkapje opnieuw dicht. Sluit de
oven opnieuw aan.
lampje
Losschroeven
Vensterkapje
Gebruik een rubberen handschoen voor het losschroeven van het
vensterkapje en de lamp (praktisch!).
Trek altijd de stekker van uw oven uit alvorens de ovenlamp te
vervangen om elektrische schokken te vermijden. Laat indien
nodig de oven afkoelen.
6. Vervanging van de ovenlamp
NL
95
99625635_A_ML.qxp 14/11/2005 11:34 Page 95
Page 96

96
Grill + hetelucht
Het bakken gebeurt afwisselend met het
bovenste verwarmingselement van de
oven en de luchtvermengingsschroef.
Hetelucht onderelement
Het bakken gebeurt met het
onderste verwarmingselement
en een lage grillstand in combinatie met de luchtvermengingsschroef.
Regelbare grill
Geen voorverwarming nodig.
Gevogelte en gebraad blijven
sappig en krokant aan alle
zijden.
Verwarm de oven 5 minuten voor.
Plaats de multifunctionele ovenschaal in de onderste inschuifsleuf.
Het gerecht wordt langs onder
gebakken met een lichte
bovenverwarming.
Plaats het ovenrooster in de
onderste inschuifsleuf.
Warmhouden
Het bakken gebeurt met het
bovenste en onderste
verwarmingselement.
Warmhouden.
Symbool
Functie Beschrijving van de functie
7. Bakwijzen van de oven
T
raditioneel
Het bakken gebeurt met het onderste en het bovenste
verwarmingselement van de oven
zonder de luchtvermengingsschroefr.
Verwarm de oven voor.
Traditioneel ECO-bakken
Het bakken gebeurt met het
onderste en het bovenste
verwarmingselement van de oven
zonder de luchtvermengingsschroefr.
*
Hetelucht
Het bakken gebeurt met het
onderste verwarmingselement van de oven en de
luchtvermengingsschroef.
Geen voorverwarming nodig, behalve
voor gerechten die slechts zeer kort
worden gebakken (zandkoekjes op
verschillende ovenniveaus
tegelijk).
*
* Gebruikte sekwenties voor de schriftelijke mededeling op het energie-etiket overeenk
In deze stand kan u energie besparen
zonder de bakkwaliteit te beïnvloeden.
De stand ECO-bakken past in het kader
van de Europese norm over energie-etikettering.
99625635_A_ML.qxp 14/11/2005 11:34 Page 96
Page 97

97
Om lamsbouten en grote stukken rundsvlees te doorbakken.
Om vismoten te grillen en tegelijk aan de binnenzijde zacht te houden.
Het grillvermogen is instelbaar tussen 30 en 100% (standen 1 tot 4 op de
display). Voor een goed grillresultaat raden wij u een hogere stand aan.
Aanbevolen voor vochtige bereidingen (quiches, taarten met saphoudend fruit...).
Het deeg krijgt onderaan een goed gebakken en krokante structuur.
Aanbevolen voor bereidingen met gistdeeg (cake, brioche, kuglof...) en
soufflés die bovenaan geen hinderlijke korst nodig hebben.
Aanbevolen stand voor het bakken van brood, brioches, kouglof...
zonder dat de temperatuur boven de 40°C uitkomt (opwarmen van borden, ontdooien).
Aanbevelingen
Bakwijzen van de oven
Aanbevolen voor langzame en delicate bereidingen : zachte
wildgerechten...
Braden van rood vlees.
Stoven van gerechten in een stoofpot met deksel waarvan de bereiding
op een kookplaat is begonnen (coq au vin, wildragout...).
Opmerking : alle bereidingen gebeuren zonder voorverwarming.
Aanbevolen stand om vlees, vis en groenten zacht te houden. Deze
stand kan worden gebruikt om tot 3 gerechten samen te bereiden.
NL
99625635_A_ML.qxp 14/11/2005 11:34 Page 97
Page 98

98
R einiging van de binnenz
1. Wat is een pyrolyse
WEINIG BEVUILENDE Biscuits, groenten, patisserie Bakken zonder spatten
GERECHTEN quiches, soufflés. Geen pyrolyse nodig
NORMAAL BEVUILENDE Vlees, vis (in een ovenschotel) Voer eventueel om de
GERECHTEN gevulde groenten 3 bakcycli een pyrolyse uit
STERK BEVUILENDE Grote vleesstukken, Voer de pyrolyse meteen na
GERECHTEN gerechten op het braadspit de bakcyclus uit indien er
eend, kalkoen, lamsbout. teveel spatten op de
ovenwanden zitten.
Een pyrolysereiniging is ook nodig indien er bij het voorverwarmen rookvorming
optreedt of tijdens een bakcyclus overmatig veel rook wordt ontwikkeld.
Een pyrolysereiniging is ook nodig indien uw oven na de bereiding van verschillende
gerechten (schaap, vis, grillgerecht...) een onaangename geur verspreidt.
2. Wanneer is een pyrolysereiniging nodig
Wacht niet tot de oven als het ware onder het vet bedolven zit
alvorens een pyrolysereiniging uit te voeren.
- Bij een pyrolysereiniging wordt de binnenzijde van de oven bij zeer hoge
temperatuur gereinigd waardoor alle spat- of overkookresten worden verwijderd.
De bij de pyrolyse vrijkomende rook en geuren worden via een catalysator
vernietigd.
- U hoeft niet na elke bakcyclus een pyrolysereiniging uit te voeren, maar enkel
indien de oven te vuil is (wordt door de oven vermeld).
- Om veiligheidsredenen wordt de ovendeur vóór het begin van een pyrolysereiniging
geblokkeerd. Zodra de temperatuur in de oven boven de baktemperatuur uitstijgt,
kan u de ovendeur niet meer openen, ook niet door de keuzeknop in de stand 0
te zetten.
99625635_A_ML.qxp 14/11/2005 11:34 Page 98
Page 99

3. Hoe voer ik een pyrolyse uit?
ijde van de oven
99
a) Verwijder alle oventoebehoren uit de oven. Verwijder eventuele
grove bakresten.
b) Op de programmaschakelaar staat normaal het uur vermeld (mag niet
knipperen).
c) Plaats de keuzeknop in de stand “PYRO” of
“PYRO ECO”.
De pyrolyseduur bedraagt 1u30 in de stand
“PYRO ECO” en 2u in de stand “PYRO”.
In de pyrolyseduur is de afkoelingstijd van de oven
(ongeveer 30 minuten) niet inbegrepen.
• Tijdens de pyrolysecyclus brandt het
vergrendelingslampje (hangslot) op de display om aan te geven dat de
ovendeur vergrendeld is.
• Zodra de zandloper van de display verdwijnt, kan u de ovendeur openen.
d) Zet de keuzeknop opnieuw in de stand 0.
e) Zodra de oven koud is, veegt u met een vochtige doek de witte assen op. De
oven is nu opnieuw proper en klaar voor een nieuwe bakcyclus!
NL
99625635_A_ML.qxp 14/11/2005 11:34 Page 99
Page 100

100
Problemen en oplossingen
U twijfelt over de goede werking van uw oven. Dit betekent niet automatisch
dat er een defect is.
Controleer in elk geval eerst de volgende punten :
Probleem
Mogelijke oorzaken Oplossingen
De oven wordt niet warm.
• De oven is niet aangesloten.
• De zekering van de installatie is
defect.
• De baktemperatuur is te laag.
• De sensor is defect.
• Oververhitting van de oven. De
oven staat nu op veiligheid.
- Sluit de oven aan.
- Vervang de zekering van uw
installatie (16 A).
- Verhoog de baktemperatuur.
- Neem contact op met de
servicedienst.
- Neem contact op met de
servicedienst.
- Neem contact op met de
servicedienst.
Fout : V verschijnt op de display.
Fout : M verschijnt op de display.
• De ovendeur is niet vergrendeld.
• Verzoek om pyrolysereiniging
terwijl de ovendeur reeds vergrendeld is.
• Defecte temperatuursensor.
- Neem contact op met de
servicedienst.
- Neem contact op met de
servicedienst.
De ovenverlichting werkt niet meer.
• De lamp is defect.
• De oven is niet aangesloten of de
zekering is defect.
- Vervang de lamp.
- Sluit de oven aan of vervang de
zekering.
De ventilator blijft na het
stoppen van de oven doorwerken.
• De ventilator blijft maximaal 1
uur na het stoppen van de oven
doorwerken (of zolang de
temperatuur van de oven meer
dan 125° bedraagt).
• Indien de oven na 1 uur niet stopt.
- Open de ovendeur om de oven
sneller te laten afkoelen.
- Neem contact op met de
servicedienst.
De pyrolysereiniging werkt niet.
• De ovendeur is niet goed gesloten.
• Het vergrendelingssysteem is
defect.
• Defecte temperatuursensor.
•Het sensorcontact "gesloten
ovendeur" is defect.
- Controleer of de ovendeur
goed.
- Neem contact op met de
servicedienst.
- - Neem contact op met de
servicedienst.
- - - Neem contact op met de
servicedienst.
-
Noteer hieronder de gegevens van het identificatieplaatje van uw oven :
MADE IN FRANCE
220 - 240V ~ 50 Hz
BRANDT APPLIANCES SAS
7 rue Henri Becquerel
92500 RUEIL MALMAISON
99625635 11/05
99625635_A_ML.qxp 14/11/2005 11:34 Page 100
 Loading...