

Page 1
User Guide
LOCKOUT-PROTM Graphical Procedure Writing Software
v3.0 Desktop Version
Page 2

YOU SHOULD CAREFULLY READ THE FOLLOWING TERMS AND CONDITIONS OF THIS
LICENSE AGREEMENT BEFORE OPENING THIS PACKAGE. IF YOU DO NOT AGREE WITH
THESE TERMS AND CONDITIONS, PLEASE PROMPTLY RETURN THIS PACKAGE FOR A
FULL REFUND.LICENSE AGREEMENT
Brady Worldwide, Inc. (hereafter "Brady") hereby grants you a non-exclusive, nontransferable license to
use this software and the accompanying documentation according to the following terms:
1. LICENSE GRANT: You may 1) install the software on only one computer at a time, and 2) make one
(1) copy of the software in machine readable form solely for backup purposes.
2. LICENSE RESTRICTIONS: You may not: 1) transmit the software over a network without an
additional license; 2) modify, adapt, translate, reverse engineer, decompile, disassemble, create
derivative works based on, or copy (except for the backup copy) this software or the accompanying
documentation; 3) rent, transfer or grant any rights in the software or accompanying documentation
without the prior, express written consent of Brady; or 4) remove any proprietary notices, labels, or marks
on the software and accompanying documentation.
3. NATURE OF THIS AGREEMENT: This license is not a sale. License fees paid by you, if any, are in
consideration of the licenses granted under this Agreement. Title and copyrights to the software,
accompanying documentation, and any copy made by you, remain the property of Brady or its suppliers.
Unauthorized copying of the software or the accompanying documentation, or failure to comply with the
above restrictions, shall automatically terminate this license, without further notice, and terminate your
rights to use the software, and Brady shall, in addition to its other legal remedies, be entitled to its
reasonable attorney fees.
4. LIMITED WARRANTY: Brady warrants that, for a period of ninety (90) days from the date of delivery
to you as evidenced by a copy of your receipt, the software, as furnished, under normal use, will perform
without significant errors that make it unusable. Brady's entire liability and your exclusive remedy under
this warranty (which is subject to you returning the software to Brady) will be, at the option of Brady, to
attempt to correct or help you around errors, to replace the software with functionally equivalent software
or diskettes, or to refund the license fee of the software and terminate this Agreement.
EXCEPT FOR THE ABOVE EXPRESS LIMITED WARRANTY, BRADY MAKES AND YOU RECEIVE
NO WARRANTIES, EXPRESS, IMPLIED, STATUTORY OR IN ANY COMMUNICATION WITH YOU,
AND BRADY SPECIFICALLY DISCLAIMS ANY IMPLIED WARRANTY OF MERCHANTABILITY OR
FITNESS FOR A PARTICULAR PURPOSE. BRADY DOES NOT WARRANT THAT THE OPERATION
OF THE PROGRAM WILL BE UNINTERRUPTED OR ERROR FREE.
Some states do not allow the exclusion of implied warranties so the above exclusions may not apply to
you. This warranty gives you specific legal rights. You may also have other rights which vary from state
to state.
5. LIMITATION OF LIABILITY: IN NO EVENT WILL BRADY BE LIABLE FOR ANY DAMAGES,
INCLUDING LOSS OF DATA, WHEN LOADING THIS SOFTWARE OR OTHERWISE, OR LOST
PROFITS, COST OF COVER OR OTHER SPECIAL, INCIDENTAL, CONSEQUENTIAL OR INDIRECT
DAMAGES ARISING FROM THE USE OF THE PROGRAM OR ACCOMPANYING
DOCUMENTATION, HOWEVER CAUSED AND ON ANY THEORY OF LIABILITY. THIS
LIMITATION WILL APPLY EVEN IF BRADY HAS BEEN ADVISED OF THE POSSIBILITY OF SUCH
DAMAGE.
Some states do not allow the limitation or exclusion of liability for incidental, or consequential damages,
so the above limitation may not apply to you.
6. GENERAL: This Agreement shall be governed by, and interpreted under, the laws of the State of
Wisconsin, USA. You acknowledge that U.S. law and regulations may restrict the export/re-export of the
software. You agree not to export/re-export the software or portions thereof in any form without the
appropriate U.S. and foreign government licenses. This obligation shall survive and continue after this
Agreement terminates. This Agreement is the entire agreement between the parties and supersedes any
other communications or advertising with respect to the software and accompanying documentation. If
any provision of this Agreement is held invalid, the remainder of this Agreement shall continue in full
force and effect.
6555 West Good Hope Road, P.O. Box 571, Milwaukee, Wisconsin 53201-0571, USA, tlf. +1 (414) 358-6600
•
•
•
2
•
•
•
LOCKOUT-PROTM DESKTOP USER GUIDE
Page 3

C
ONTENTS
• • • • • •
Getting Started 1
Exploring Lockout-PRO 2
Key Functions of LOCKOUT-PRO
Viewer Version of LOCKOUT-PRO
System Requirements
Installing LOCKOUT-PRO: Standard Version
Installing LOCKOUT-PRO: Viewer Version
Uninstalling LOCKOUT-PRO
Launching LOCKOUT-PRO
How to Get Help Using LOCKOUT-PRO
Online Tutorial
Online Help
User Guide
Contacting Technical Support
LOCKOUT-PRO & Energy-control Programs
Fast, Simple Procedure Generator
Powerful Tools to Customize Procedures
Information for a Complete Energy-Control Program
Getting to Know the Main LOCKOUT-PRO Window
Layout of the Main Window
Main Menu
Primary Options Taskbar
Window Tab Bar
Procedure Sections Panel
Display Area of the Main Window
Text Editing Toolbar
How to Use Standard Interaction Features
1–4
1–7
1–7
1–8
2–5
2–8
2–10
1–1
1–3
1–4
1–5
1–6
1–6
1–6
1–8
2–1
2–2
2–2
2–4
2–8
2–9
2–9
2–10
2–4
2–4
Viewing & Printing Procedures 3
Viewing an Existing Procedure
Printing Procedures, Tags & Labels
Options for Printers & Paper Stock
Printing a Procedure
Printing Lockout Tags
Printing Energy Source Labels
Saving a Procedure
LOCKOUT-PROTM DESKTOP USER GUIDE 1
3–7
3–3
3–4
3–1
3–2
3–6
3–2
•
•
•
•
•
•
Page 4

Creating/Revising Procedures 4
Choosing Which Form to Use for a New Procedure
When to Use a Long Form
When to Use a Short Form
When to Use a Combined Form
Comparing the Forms
Opening a LOCKOUT-PRO Procedure File
Starting a New Procedure from a Template
Opening an Existing Procedure
Long Form: Entering & Modifying Details
Header/Footer Information
General Information
Lockout Steps
Short Form: Entering & Modifying Details
Header/Footer Information
Energy Sources
Images
General Information
Combined Form: Entering & Modifying Details
Header/Footer Information
Energy Sources
Images
General Information
Lockout Application & Lockout Release Steps
Working with images in your procedure
Adding Images to Procedures
Editing Images in Procedures
Using Labels on Images
4–15
4–21
4–1
4–2
4–2
4–2
4–3
4–4
4–4
4–5
4–6
4–6
4–7
4–8
4–11
4–11
4–12
4–16
4–16
4–17
4–18
4–22
4–22
4–25
4–25
4–27
4–28
Using Related Information 5
Overview of LOCKOUT-PRO’s Related Information
Regulations
Corporate Policy
Employee Training
Device Guide
Viewing & Printing Related Information
5–1
5–2
5–2
5–2
5–2
5–1
Importing/Exporting Procedures 6
Importing LOCKOUT-PRO Procedures
Format Differences in Earlier Versions
Importing a Single Procedure
Importing Multiple Procedures
Exporting Procedures to Other Formats
6–1
6–2
6–2
6–3
6–3
Setting Defaults in Lockout PRO 7
How Defaults Work
Accessing System Defaults
Setting & Changing Energy Source Defaults
Change Energy Source Identifier Default
Change Energy Source Type Defaults
Energy Source Description Defaults
Setting & Changing Basic Data Defaults
•
•
•
2
•
•
•
7–1
7–2
7–3
7–3
7–4
7–6
7–7
LOCKOUT-PROTM DESKTOP USER GUIDE
Page 5

Header “Note” Defaults
Change Controls & Methods Defaults
Change Location Defaults
Change Lockout Device Defaults
Setting and Changing Lockout Step Defaults:
Change Lockout Step Defaults
Change Defaults for Energy Source Checks
Setting & Changing Procedure Defaults
Changing Section Settings Defaults
Working with Templates 8
Understanding LOCKOUT-PRO Templates
Templates vs. Defaults
Deciding How to Customize Templates
What Can Be Changed on a Template
What Cannot Be Changed on a Template
Illustration of Editable Areas on Templates
Editing a Procedure Template
7–8
(Combined Form only)
8–2
7–10
7–11
7–13
7–14
7–15
7–17
7–18
7–19
8–1
8–2
8–2
8–3
8–3
8–8
•
•
LOCKOUT-PROTM DESKTOP USER GUIDE 3
•
•
•
•
Page 6

Copyright
This manual is copyrighted with all rights reserved. No portion of this
manual may be copied or reproduced by any means without the prior
consent of Brady Worldwide, Inc.
While every precaution has been taken in preparation of this document,
Brady assumes no liability to any party for any loss or damage caused
by errors or omissions or by statements resulting from negligence,
accident, or any other cause. Brady further assumes no liability arising
out of the application or use of any product or system described, herein;
nor any liability for incidental or consequential damages arising from
the use of this document. Brady disclaims all warranties of
merchantability or fitness for a particular purpose.
Brady reserves the right to make changes without further notice to any
product or system herein to improve reliability, function, or design.
Reproduction of this material, in part or whole, is strictly prohibited
without the written permission of Brady Worldwide, Inc.. For more
information, contact: Brady Worldwide, Inc. Signmark® Division, 2221
W. Camden Road, Milwaukee, WI 53209.
Disclaimer
Every effort h a s been made to m a k e this guide as accurate and complete
as possible. Brady Worldwide, Inc. is not responsible for inaccuracies
and omissions occurring during the use of this guide.
This manual is proprietary to Brady Worldwide, Inc. and may be revised
from time to time without notice. Brady Worldwide, Inc. disclaims any
understanding to provide you with revisions, if any.
All brand or product names referenced in this manual are trademarks
or registered trademarks of their respective companies or organizations.
LOCKOUT-PRO, GlobalMark, and HandiMark are trademarks of
Brady Worldwide, Inc.
© 2006 Brady Worldwide, Inc. All rights reserved.
www.bradycorp.com
•
•
•
4
•
•
•
LOCKOUT-PROTM DESKTOP USER GUIDE
Page 7

C
HAPTER
G
• • • • • •
Welcome to LOCKOUT-PROTM Graphical Procedure Writing Software
from Brady Corporation!
1
ETTING
S
TARTED
LOCKOUT-PRO
compliant energy-control program with easy-to-follow standardized
procedures. Lockout tags and labels can be printed for each energy
source and are cross-referenced to the procedure, making lockout
activities virtually foolproof.
This chapter of the
An overview of LOCKOUT-PROTM’s primary functions
System requirements for installing LOCKOUT-PRO
How to install LOCKOUT-PROTM — both the
Viewer Version,
the
but not create or change them
How to launch LOCKOUT-PROTM after installation
How to get help using LOCKOUT-PRO
TM
provides all the tools you need to create an effective,
User Guide
which allows you to view and print procedures,
includes the following:
Key Functions of LOCKOUT-PRO
Standard Version
TM
TM
and
With LOCKOUT-PROTM, you can perform the following key
functions, all of which are explained in detail in this
User Guide
:
Use simple, powerful templates to create OSHA-compliant
lockout/tagout procedures.
different types of procedure layouts to accommodate the varying needs
of different types of procedures. For any given procedure, you determine
whether a Long Form, Short Form, or Combined Form template is best.
(See “Choosing Which Form to Use for a New Procedure” on page 4-1 for
details.)
LOCKOUT-PROTM DESKTOP USER GUIDE GETTING STARTED 1- 1
LOCKOUT-PROTM includes three
•
•
•
•
•
•
Page 8

Create procedures in minutes using built-in defaults.
TM
PRO
Graphical Procedure Writing Software comes with an extensive
LOCKOUT-
database of standard lockout procedural terminology that allows you to
simply click your choices from lists and have them formatted and placed
in the right places on the procedure. This ensures the accuracy of your
procedures and makes them fast and easy to create.
(See Chapter 4,
“Creating/Revising Procedures” for details.)
Customize templates and defaults to meed the needs of your
organization.
your standards. You can change the terminology on the templates that
determine the information that always appears on a procedure. You can
also add text of your own, which allows you to insert your custom text
into procedures with point-and-click efficiency.
Defaults in Lockout PRO” and Chapter 8, “Working with Templates” for
details.)
Edit any or all of the templates’ text and graphics to
(See Chapter 7, “Setting
Insert and edit images that clearly illustrate steps of the lockout
procedure.
procedures. With its built-in image editing features, you can crop,
rotate, adjust brightness and contrast, and even add and precisely place
multiple labels onto images to make them easy for employees to
understand.
for details.)
LOCKOUT-PROTM allows you to easily add images to your
(See “Working with images in your procedure” on page 4-25
Print procedures, lockout tags, and energy labels on your choice
of printer.
information from a particular procedure to print onto the lockout tags
and energy labels associated with it. You can use any standard sheetfed inkjet or laser printer, or you can simplify the printing process even
more by using the special templates for printing with Brady
Corporation’s GlobalMark or HandiMark printers.
Procedures, Tags & Labels” on page 3-2 for details.)
LOCKOUT-PROTM does the work of pulling relevant
(See “Printing
Make procedures readily available to all employees who need
them.
the software can be installed on any PC to give your employees quick
access to viewing and printing procedures, tags, and energy labels.
“Viewing & Printing Procedures” on page 3-1 for details.
Revise procedures on schedule.
time- and date-stamping of procedures to stay on top of revisions
schedules.
The free LOCKOUT-PROTM Viewer that comes packaged with
(See
)
Use LOCKOUT-PROTM’s automatic
1-2
•
•
•
G
ETTING STARTED
•
•
•
LOCKOUT-PROTM DESKTOP USER GUIDE
Page 9

Use the built-in sample energy control policy to develop or revise
your own.
Graphical Procedure Writing Software is a sample of a corporate energy
control policy that satisfies OSHA regulations.
on page 5-2 for details.
Among the many support features of LOCKOUT-PROTM
(See “Corporate Policy”
)
Quickly access government standards for procedures.
clicks in LOCKOUT-PRO
the most up-to-date regulations.
details.)
TM
will take you directly to a website to view
(See “Regulations” on page 5-1 for
Train your employees on your energy control programs and
devices.
and printable materials that covers all aspects of a typical energy
control program. In addition, the built-in
training clips on how to use most of Brady Corporation’s lockout devices.
(See “Employee Training” on page 5-2 and “Device Guide” on page 5-2 for
details.)
LOCKOUT-PROTM includes an extensive training outline
Use the on-screen tutorial to learn the main LOCKOUT-PROTM
functions.
through the creation of a lockout/tagout procedure. This tutorial will
launch automatically the first time that you use the program, and is
always accessible from the Help menu.
LOCKOUT-PRO” on page 1-6 for details.)
LOCKOUT-PROTM features a tutorial that will walk you
Viewer Version of LOCKOUT-PRO
A couple of
Device Guide
provides video
(See “How to Get Help Using
As with previous versions, LOCKOUT-PROTM Desktop v3.0 comes with
a Viewer Version that allows you to:
•
Open, view, and print lockout procedures.
•
Print lockout tags, and energy source labels.
•
View and print the related information (regulations, policies,
training, device guides).
The Viewer Version is designed for users who need to reference the
lockout procedures and/or print them, but who lack the organizational
authority to write or modify procedures.
The LOCKOUT-PRO
TM
Viewer is provided as a separate executable file
that is installed separately from the full version, but from the same
installation CD as the full-featured application. It requires no license
and can be installed on as many PCs as you need.
•
•
LOCKOUT-PROTM DESKTOP USER GUIDE GETTING STARTED 1- 3
•
•
•
•
Page 10
For detailed information on viewing and printing procedures and
secondary materials, see
For information on viewing and printing related information, see
Chapter 5, “Using Related Information”
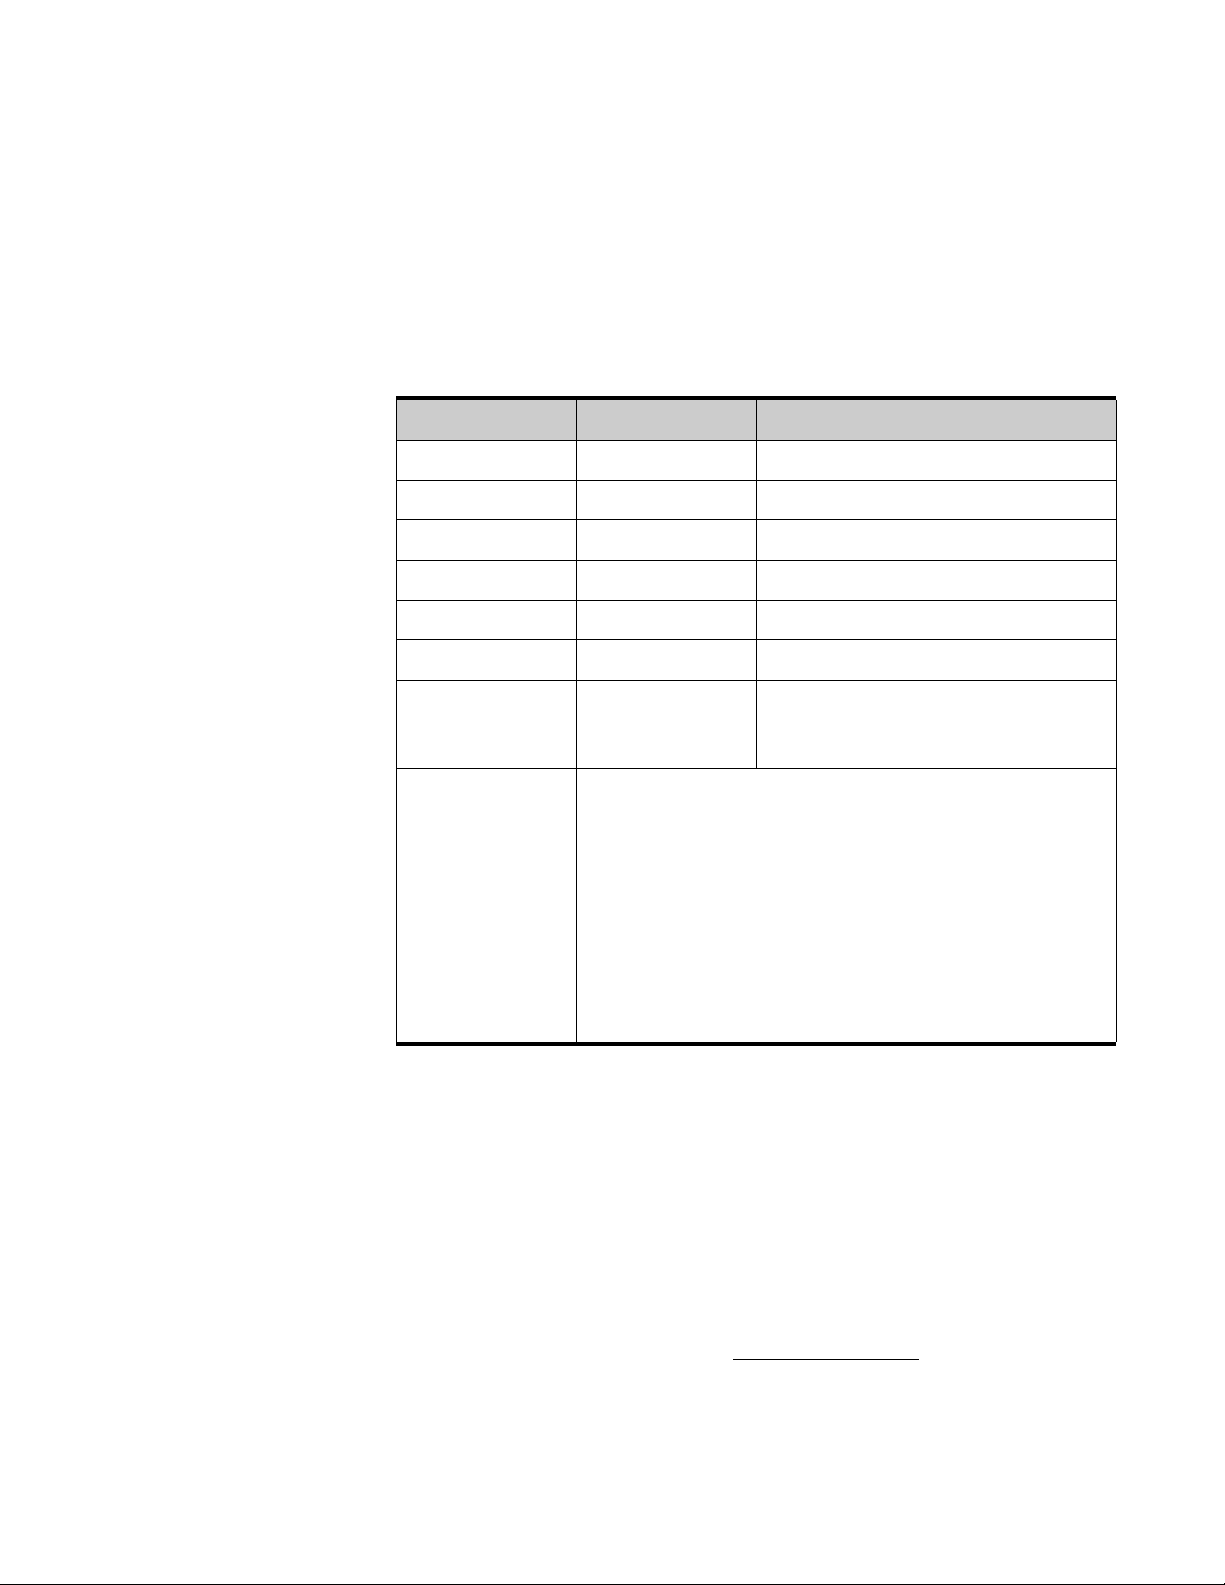
System Requirements
LOCKOUT-PRO
Requirement: Minimum: Recommended:
Processor 1.2 GHz or better Same
Display Resolution 800x600 or better 1024x768 or higher
Memory (RAM) 512 MB Same
Disk Space 500 MB Same
Operating System Windows 2000/XP Same
Internet Explorer v5.0 or higher v6.0 or newer
.NET framework v1.1 or higher Provided on LOCKOUT-PRO
Printer Drivers for the printer(s) you will use with LOCKOUT-PRO
should be installed. At least one printer must be installed to
run the application. See your printer’s documentation for
information on installing your printer.
Chapter 3, “Viewing & Printing Procedures”
.
SYSTEM REQUIREMENTS FOR
TM
Graphical Procedure Writing Software
installation CD for user to install if not
already on user's system.
TM
.
TM
1-4
GlobalMark
uninstall the printer from your computer. Install the new
GlobalMark
installation CD. (NOTE: This driver has not been tested or
validated to work with MarkWare
other Brady software.)
TM
printers only: Updated driver is required. First,
TM
driver included on the LOCKOUT-PROTM
Installing LOCKOUT-PRO: Standard Version
Installing LOCKOUT-PROTM is a short, simple process during which
the application will be set up on your computer.
•
•
•
G
ETTING STARTED
•
•
•
NOTE:
copy of Microsoft Internet Explorer 5.01 or newer installed on your
system. If not, install a copy of Internet Explorer before continuing.
The latest version of Internet Explorer can be downloaded for free
or ordered on CD from www.microsoft.com
Before you install LOCKOUT-PROTM you must first have a
LOCKOUT-PROTM DESKTOP USER GUIDE
TM
, Surf on SignsTM, or any
.
Page 11

To install the Standard Version:
1
Close all programs that are currently running, including any email or
anti-virus programs
2
Insert the LOCKOUT-PROTM CD into your CD-ROM drive. The
installation program will launch automatically. If it does not open after
a short while, you can manually launch it by taking these steps:
•
Open your
•
Double-click on your CD drive to open the LOCKOUT-PROTM CD
contents.
•
Locate and double-click on the file:
3
When the installer window appears, select the menu option:
Install Lockout PRO Desktop
4
When requested, select the language you want to use in the application.
5
When the “Welcome” screen appears, click the choice to install
LOCKOUT-PRO
6
Read and check the option that you agree to the license agreement.
7
When requested, enter the serial number of your LOCKOUT-PROTM
copy. The serial number can be found on a label attached to the CD case
containing your LOCKOUT-PRO
My Computer
Lockout PRO 3.0 Installer.exe
folder.
.
TM
Graphical Procedure Writing Software.
TM
CD.
8
You will be asked to verify the directory in which LOCKOUT-PROTM
will be installed. It is recommended that you use the default installation
directory.
9
When the registration page appears, follow the instructions on your
screen to register your copy of the software.
Installing LOCKOUT-PRO: Viewer Version
To install the Viewer Version:
1
Insert the LOCKOUT-PROTM CD into your computer’s CD-ROM drive.
2
The installation program will launch automatically from the CD. If it
does not open after a short while, you can manually launch it by taking
these steps:
•
Open your
•
Double-click on your CD drive to open the LOCKOUT-PROTM CD
contents.
•
Locate and double-click on the file:
When the installer window appears, select the menu option:
3
Install Lockout PRO Viewer
LOCKOUT-PROTM DESKTOP USER GUIDE GETTING STARTED 1- 5
My Computer
Lockout PRO 3.0 Installer.exe
folder.
•
•
•
•
•
•
Page 12

4
When requested, select the language you want to use in the application.
5
When the “Welcome” screen appears, click the choice to install the
LOCKOUT-PRO
6
Read and check the option that you agree to the license agreement.
7
You will be asked to verify the directory in which LOCKOUT-PROTM
TM
Viewer.
will be installed. It is recommended that you use the default installation
directory.
Uninstalling LOCKOUT-PRO
To remove LOCKOUT-PRO from your system:
1
From the
Programs
2
In the
entry in the list of programs.
3
Click the
4
Follow the prompts during the uninstall process.
Start
menu, select
.
Add/Remove Programs
Add/Remove
button.
Settings > Control Panel > Add/Remove
dialog box select the
Brady Lockout PRO
5
Restart your computer if prompted.
Launching LOCKOUT-PRO
Once you’ve installed LOCKOUT-PROTM
PRO: Standard Version” on page 1-4)
usual Windows program-launching methods:
•
Open your PC’s
Start
menu
Programs
shortcut, and click on it.
•
Find the LOCKOUT-PROTM shortcut on your PC’s desktop, and
- OR -
double-click on it.
- OR -
•
From an open folder window displaying LOCKOUT-PROTM
procedures, double-click on a procedure.
(see “Installing LOCKOUT-
, you can launch it by any of the
, locate the LOCKOUT-PRO
How to Get Help Using LOCKOUT-PRO
LOCKOUT-PROTM provides several ways of learning and getting help
with the application.
•
Online tutorial
TM
3
1-6
•
•
•
G
ETTING STARTED
•
•
•
LOCKOUT-PROTM DESKTOP USER GUIDE
Page 13

•
Online help
•
LOCKOUT-PROTM DESKTOP User Guide
•
Brady Corporation Technical Support
Online Tutorial
When you first start LOCKOUT-PROTM, a window opens on the right
side of the screen containing the Online Tutorial. This tutorial includes:
•
A brief overview of the three forms
•
Tips for using LOCKOUT-PRO
•
Basic instructions for creating new procedures
•
Steps for saving procedures
•
Steps for printing procedures, lockout tags, and energy source labels
To navigate through the tutorial:
1
Click the
Next, Back,
or other prompts at the bottom of each tutorial
window to move forward or backward.
To close the tutorial window:
TM
1
By default, the tutorial opens whenever you open LOCKOUT-PROTM
Graphical Procedure Writing Software. To close the tutorial window
Close
temporarily, click the
2
To change the default so the tutorial does not open every time you open
LOCKOUT-PRO
TM
, click to uncheck the box by
button at the bottom of the tutorial window.
Show on Startup
bottom of the tutorial window.
To open the tutorial window:
1
Click the
2
Select the
of the main LOCKOUT-PRO
Help
menu on the LOCKOUT-PROTM main menu.
Show Tutorial
option. The tutorial will open on the right side
TM
window.
Online Help
The online help within LOCKOUT-PROTM offers detailed information
about every aspect of the application.
To access online help:
1
Click the
Help
menu item on the LOCKOUT-PROTM main menu.
at the
2
Click
Help Topics
LOCKOUT-PROTM DESKTOP USER GUIDE GETTING STARTED 1- 7
from the submenu.
•
•
•
•
•
•
Page 14

3
The online help will open to the table of contents and first page. Click
the item on the table of contents that you want to view.
4
To close online help, click the X in the top right corner of its window.
User Guide
This
User Guide
LOCKOUT-PRO
it on your computer, and you can also print any or all pages of the guide.
is installed onto your computer when you install the
TM
application. You can view the
User Guide
by opening
To view the
1
Open
My Computer
User Guide
:
and browse to the folder where LOCKOUT-PROTM
was installed. The default location is in
2
Open the
3
Open the folder titled
4
Locate the
Lockout PRO
LOPuserguide.pdf
NOTE:
You will need to have the free Adobe Acrobat Reader
folder.
Documentation
file and double-click to open it.
installed on your computer to open the user guide.
To print the
1
With the
window.
2
Choose the options for printing.
3
Click the
User Guide
User Guide
Print
button.
:
open, click the
Contacting Technical Support
C:\Program Files\Brady
.
File>Print
menu in the
.
User Guide
’s
1-8
•
•
•
G
ETTING STARTED
•
•
•
Technical Support Numbers
United States and other C/S countries
Tel: 800-368-3362
Fax: 414-228-5799
Email: technical_support@bradycorp.com
Canada
Tel: 888-262-7576
Fax: 905-764-5557
Email: techsupportcanada@bradycorp.com
LOCKOUT-PROTM DESKTOP USER GUIDE
Page 15

Mexico
Tel: 800-368-3362
Fax: 525-527-5586
Email: bradymexico@bradycorp.com
Brazil
Tel (PABX): 55 11 3686-4720
Tel (Direct): 55 11 3686-5697
Fax: 55 11 3686-5236
Email: brady_sevice_brazil@bradycorp.com
•
•
LOCKOUT-PROTM DESKTOP USER GUIDE GETTING STARTED 1- 9
•
•
•
•
Page 16

1-10
•
•
•
G
ETTING STARTED
•
•
•
LOCKOUT-PROTM DESKTOP USER GUIDE
Page 17

C
HAPTER
E
• • • • • •
Brady Corporation’s LOCKOUT-PROTM Graphical Procedure Writing
Software allows you to create and implement a thorough lockout/tagout
program throughout your facility or organization with ease. The
automated features and built-in templates allow you to work faster and
more efficiently than ever.
2
XPLORING LOCKOUT
-PRO
This chapter of the
familiarizes you with its overall functions, how you interact with it, and
how to navigate around the application. This chapter talks about:
LOCKOUT-PROTM’s role in an organization’s overall energy-control
program, and specifically in generating lockout/tagout procedures
How to find the functions you want on the main application window
How to easily navigate around and interact with LOCKOUT-PRO
User Guide
offers a tour of LOCKOUT-PROTM that
LOCKOUT-PRO & Energy-control Programs
LOCKOUT-PROTM is a graphical procedure-writing application that
provides simple tools for creating and printing lockout procedures,
lockout tags, and energy labels. In addition, it provides information that
can help you create a comprehensive energy-control program
throughout your organization.
As you’ll see in this section, LOCKOUT-PRO
•
Handling the format and structure of procedures and automating
repetitive functions to make procedure-writing faster and easier
•
Incorporating powerful tools for customizing the data and text
formatting of procedures
•
Providing related information that covers all key aspects of an
energy-control program
TM
benefits you by:
TM
•
•
LOCKOUT-PROTM DESKTOP USER GUIDE EXPLORING LOCKOUT-PRO 2- 1
•
•
•
•
Page 18

Fast, Simple Procedure Generator
LOCKOUT-PROTM Graphical Procedure Writing Software does
much of the work of writing your procedures, using:
•
Color-coded, graphical formats
to understand and apply
•
A
database
energy-source information important to include on procedures
•
Three
•
A clear and thorough process that
elements of an effective lockout/tagout procedure
•
Lockout-tag and energy-label formats
directly from the procedure for fast and easy printing of
supplemental or related materials to use in your energy-control
program
•
A
built-in image editor
of graphics, terms, methods, controls, steps, and other
templated forms
to handle virtually any size procedure
that makes the application self-contained
When it’s time to write a procedure, you:
•
Make selections specific to the identity and location of the equipment
and energy sources involved.
•
Optionally select images to insert, and add any additional notes, if
desired.
•
Print the procedure, fully laid out and incorporating your selections
and notes.
•
Print lockout tags and energy labels, which pull their data from the
procedure just created.
that ensure procedures are easy
prompts you
that pull information
through all
2-2
•
•
•
E
XPLORING LOCKOUT
•
•
•
NOTE:
For details on how to write procedures in LOCKOUT-
PROTM, see Chapter 4, “Creating/Revising Procedures”.
Powerful Tools to Customize Procedures
Behind the simplicity of LOCKOUT-PROTM’s procedure-writing
capability lies a robust database engine with many easy-to-customize
features to meet the specific needs of your organization.
You can customize for a specific procedure, as well as for all procedures
by changing the database of system defaults and by editing the
templates.
-PRO LOCKOUT-PROTM DESKTOP USER GUIDE
Page 19

For a specific procedure, you can use these customization options
to:
•
Replace default text with text you input.
•
Change the formatting of text — for example, to emphasize a warning
statement.
•
Insert, edit, title, and label photos and other graphics showing the
specific equipment and energy sources.
•
Add your own special notes to the procedure.
For all procedures, you can customize the default data in the
following ways:
•
Add to the extensive built-in lists of da t a from w hich y o u sele c t as yo u
create procedures. Among the default lists you can add to are:
-
Energy source types
-
Secondary descriptions of energy sources
-
Options for notes to print on procedure headers
-
Controls, and methods of applying and checking them
-
Terms for identifying locations
-
Lockout devices
-
Lockout application and lockout release steps
•
Change the description of any item on the default lists.
•
Delete any item from the default lists.
•
Change the format for the date and time stamps.
•
Change the icons used to indicate type of energy sources.
•
Choose the way graphic indicators of energy sources are displayed
(icon or abbreviation).
NOTE:
For details on customizing defaults, see Chapter 7, “Setting
Defaults in Lockout PRO”.
Procedure templates can also be edited to:
•
Change the text titles and labels that appear automatically on a
procedure.
•
Use different logo graphics.
•
Change the wording of the text that appears by default on each
procedure.
•
Change the formatting (font, size, color, emphasis, etc.) of any of the
titles, labels, or other text elements that appear by default on each
procedure.
NOTE:
For details on editing procedure templates, see Chapter 8,
“Working with Templates”.
•
•
LOCKOUT-PROTM DESKTOP USER GUIDE EXPLORING LOCKOUT-PRO 2- 3
•
•
•
•
Page 20

Information for a Complete Energy-Control Program
LOCKOUT-PROTM Graphical Procedure Writing Software includes
more than just the lockout/tagout procedures. It provides tools and
related information to help you with your overall energy-control plan.
Ways in which LOCKOUT-PROTM supports your overall energycontrol program include:
•
Automatic dating of new procedures and revisions for use in a
procedure-review program
•
Ability to export procedures in other formats so they can be used with
systems such as CMMS, ERP, and other document management
systems
•
Direct access to OSHA standards for lockout/tagout procedures
•
A sample corporate lockout/tagout policy following OSHA guidelines,
which you can edit to fit your organization
•
Recommended employee training program and materials
•
Training videos on how to use lockout devices manufactured by
Brady Corporation
NOTE:
For more information on these additional tools, see
Chapter 5, “Using Related Information”.
Getting to Know the Main LOCKOUT-PRO Window
LOCKOUT-PROTM opens in a window that provides access to all of the
functions and options within the application. Becoming familiar with
this window will help you get up to speed quickly in LOCKOUT-PRO
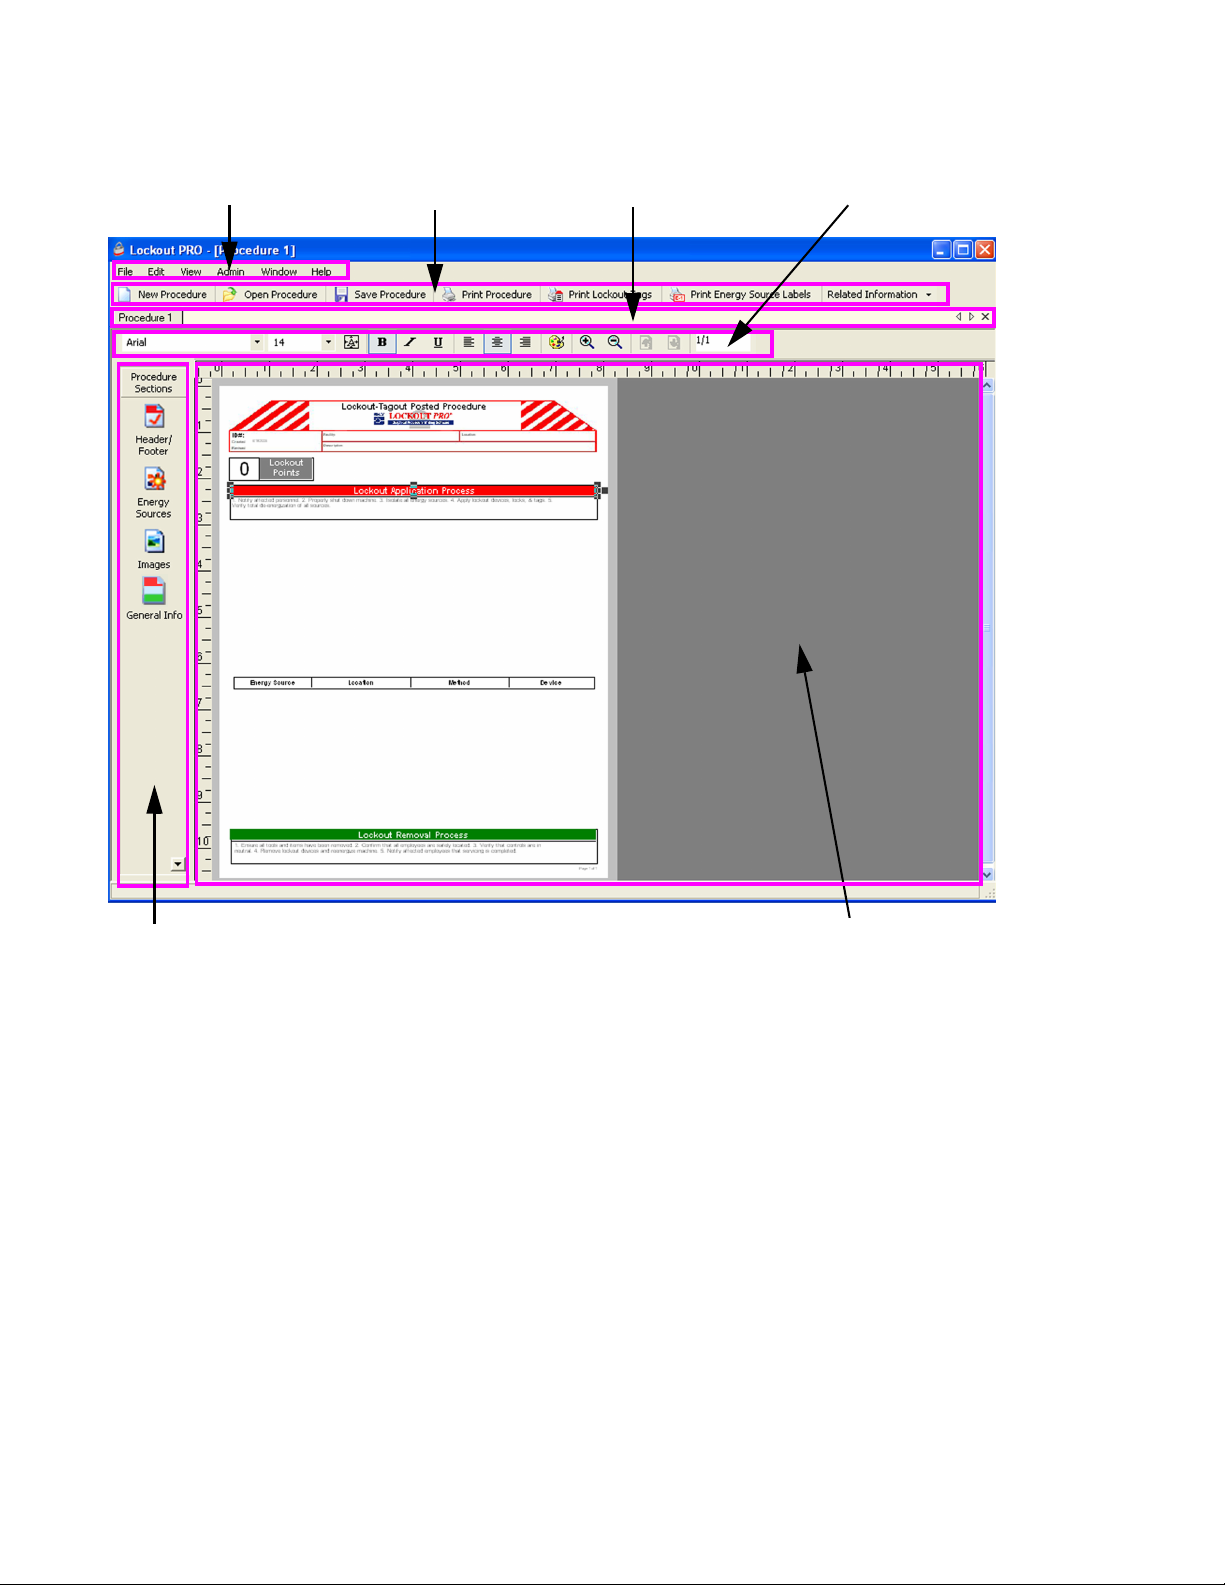
Layout of the Main Window
The main window is designed for speed and ease of use. Take a look at
the illustration of the main LOCKOUT-PRO
illustration purposes, the major divisions of the window are highlighted
by boxes, and labeled as follows:
•
Main Menu Bar
•
Primary Options Taskbar
•
Window Tab Bar
•
Procedure Sections Panel
•
Display Area
•
Text Editing Toolbar
TM
window below. For
TM
.
2-4
•
•
•
E
XPLORING LOCKOUT
•
•
•
-PRO LOCKOUT-PROTM DESKTOP USER GUIDE
Page 21
In the pages that follow, each area of the main window, as well as its
purpose and features are described in more detail.
Main Menu Bar Primary Options Taskbar Window Tab Bar
Text Editing Toolbar
Procedure Sections Panel Display Area
Example of main application window of LOCKOUT-PROTM DESKTOP v3.0
Main Menu
The LOCKOUT-PROTM Graphical Procedure Writing Software Main
File
Menu consists of six items displayed across the top of the window:
Edit, View, Admin, Window
To open any menu
, and
Help
.
, simply click on the menu name (e.g.,
File
), and the
items on that menu will appear in a drop-down list.
If any item has a submenu,
you will see a right arrowhead displayed
next to the name. Click on the item to see its submenu.
LOCKOUT-PROTM DESKTOP USER GUIDE EXPLORING LOCKOUT-PRO 2- 5
,
•
•
•
•
•
•
Page 22
2-6
•
•
•
E
XPLORING LOCKOUT
•
•
•
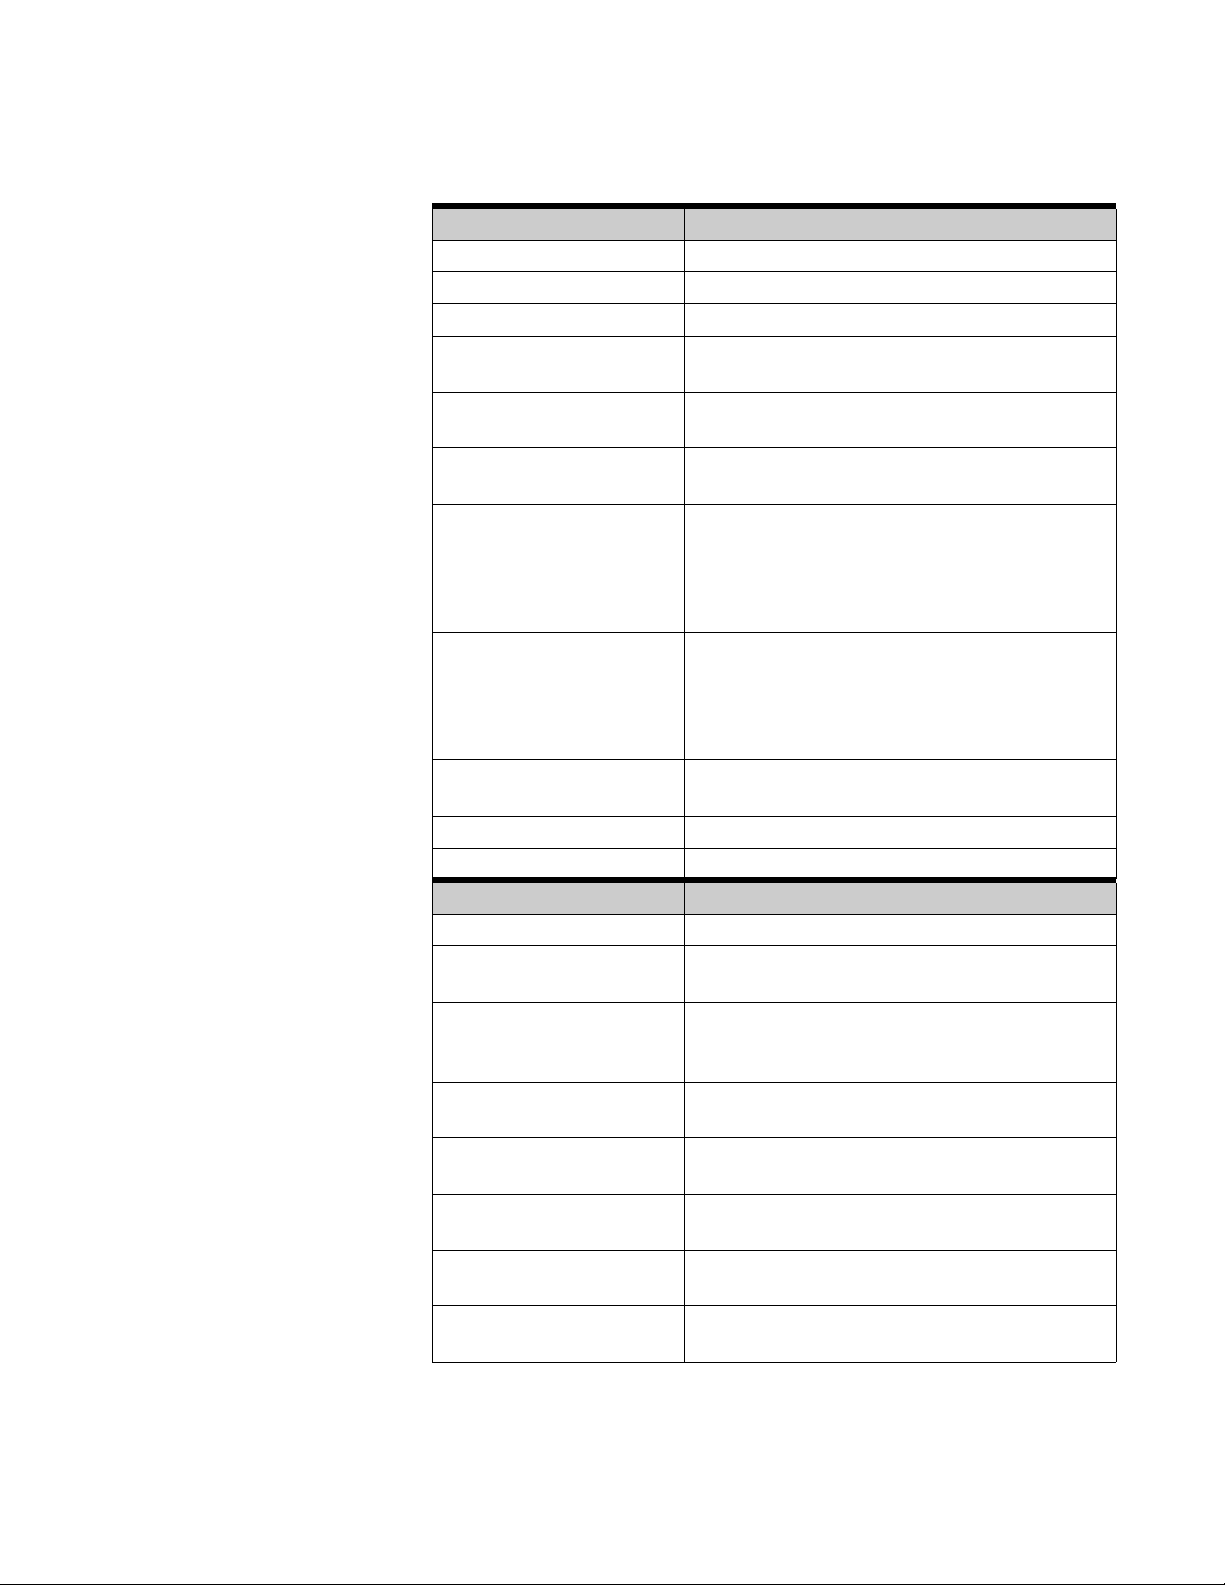
The following chart shows each menu and submenu, and the primary
function of all menu options.
MAIN MENU ITEMS AND THEIR FUNCTIONS
FILE Menu Items: Primary Function:
New Start creating a new procedure
Open Open an existing procedure
Save Save the active procedure
Save As Save the active procedure under a different
name
Print Lockout Tags Print lockout tags related to the active
procedure
Print Energy Labels Print energy labels related to the active
procedure
Import >
Convert v1.x Files
Convert v2.x Files
Convert procedures from earlier versions of
LOCKOUT-PRO
TM
Graphical Procedure Writing
Software, either individually or in a batch
Procedure File (v1x &
v2.x)
Export Procedure >
To P D F
To Color TIFF
Save the active LOCKOUT-PRO
one of four other formats to use with other
applications (ERP, CMMS, etc.)
TM
procedure to
To Black & White TIFF
To JPEG
(your recently opened
files)
Open a recent file (the last four files opened in
LOCKOUT-PRO
TM
are listed)
Close Procedure Close the active procedure
Exit Close the LOCKOUT-PRO
TM
application
EDIT Menu Items: Primary Function:
Undo Undo the most recent action taken
Header/Footer Work with header and footer information for the
active procedure
Energy Sources Work with energy source information for the
active procedure (Short and Combined Forms
only)
Images Work with images for the active procedure
(Short and Combined Forms only)
General Info Work with the general information for the active
procedure
Lockout Steps Work with the detailed lockout steps for the
active procedure (Long Form only)
Lockout Application
Steps
Lockout Release Steps Work with the lockout release steps for the
-PRO LOCKOUT-PROTM DESKTOP USER GUIDE
Work with the lockout application steps for the
active procedure (Combined Form only)
active procedure (Combined Form only)
Page 23

VIEW Menu Items: Primary Function:
Regulations Access OSHA regulations that apply to your
energy-control program
Corporate Policy View an editable template for a corporate
lockout/tagout policy
Employee Training View employee training materials
Device Guide View text and video guides to lockout/tagout
devices offered by Brady Corporation
Language > Change the language used byLOCKOUT-
TM
PRO
Graphical Procedure Writing Software
(a list of available languages displays)
ADMIN Menu Items: Primary Function:
Edit Templates Modify the template for any of the three forms:
Long, Short, or Combined
Set Defaults Add, delete, or modify any of the default data
and graphical collections available for creating
or revising procedures, and modify the source
of related information
WINDOW Menu Items: Primary function:
Maximize Enlarge the LOCKOUT-PROTM window so it fills
the screen
Minimize Reduce the LOCKOUT-PRO
TM
window to a tab
at the bottom on the screen
Normal Display the LOCKOUT-PRO
TM
window at its
default size
HELP Menu Items: Primary function:
Help Topics Access help on how to use LOCKOUT-PRO
Show Tutorial Toggle the tutorial panel on
About LOCKOUT-PRO
TM
View version information for LOCKOUT-PRO
TM
TM
•
•
LOCKOUT-PROTM DESKTOP USER GUIDE EXPLORING LOCKOUT-PRO 2- 7
•
•
•
•
Page 24
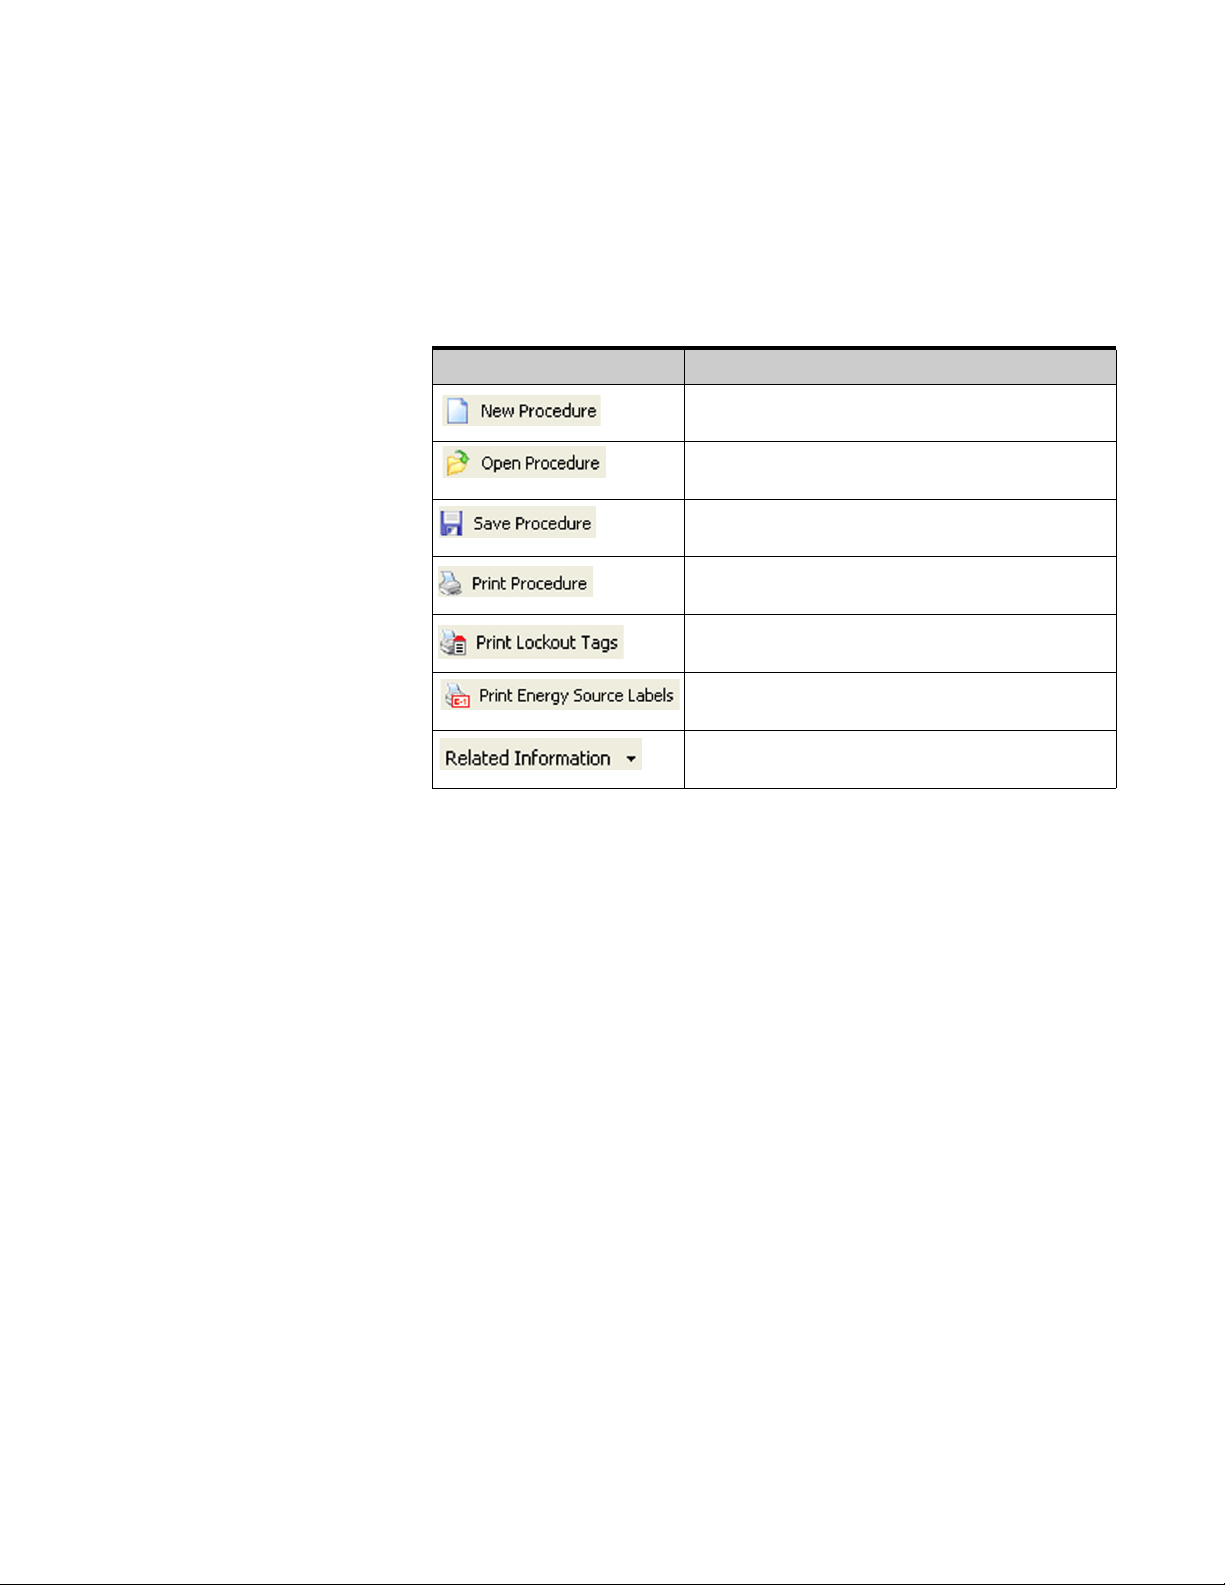
Primary Options Taskbar
Directly under the Main Menu Bar is the
Primary Options Taskbar
The taskbar provides quick access to the most frequently used functions
TM
in LOCKOUT-PRO
Graphical Procedure Writing Software. Instead of
using menus to locate these options, you can simply click on the function
you want.
PRIMARY OPTIONS AND THEIR FUNCTIONS
Primary Option: Function:
Click to begin creating a new procedure
Click to open an existing procedure
Click to save the active procedure
Click to print the active procedure
Click to open the lockout tag print window for the
active procedure
Click to open the energy source labels print
window for the active procedure
Click the drop-down arrow and select an option
to open related information
.
2-8
•
•
•
E
XPLORING LOCKOUT
•
•
•
Window Tab Bar
Directly beneath the row of Primary Options is the
This feature allows you to open multiple procedures and documents,
and easily switch back and forth between them.
Here’s how the Window Tab Bar works:
•
Each time you create or open a procedure
procedure is displayed in the tab bar. If you leave that procedure open
and then open another, a second tab will appear.
•
If you open one of the related information documents
(regulations, policy, etc.), a tab is also added for that.
•
To display the procedure or document associated with a tab,
simply click on that tab.
The tab for the active window is
highlighted, and its label appears in bolder type. The labels on the
other, inactive tabs are grayed-out.
-PRO LOCKOUT-PROTM DESKTOP USER GUIDE
Window Tab Bar
, a tab for that
.
Page 25
•
If you have opened more procedure and information
windows than there is space to display their tabs,
you can click
the right and left arrows on the right side of the tab bar to scroll to
the additional tabs.
•
To close a procedure or document window without exiting
from LOCKOUT-PROTM Graphical Procedure Writing Software,
simply click the tab to display that procedure or document, and then
click the
procedure that has not been saved, LOCKOUT-PRO
X
on the far right of the tab bar. If you are closing a
TM
will prompt
you to save it first.
TIP: When you have more than one procedure open, remember that
whatever you do to a procedure affects the active one. Be sure you’ve clicked
the tab of the procedure you wish to work with before performing a function.
Procedure Sections Panel
The
Procedure Sections
TM
LOCKOUT-PRO
window whenever a procedure is displayed. This
panel displays clickable icons and the names for each main section of the
type of procedure.
panel appears on the left side of the main
The Procedure Sections icons are form-specific. Thus, each form (Long,
Short, and Combined) have different sections displayed here. The
functions represented here are also found on the Main Menu. However,
these icons provide single-click shortcuts to each section’s editing
window where you enter or revise the information for that section.
TIP: When creating a new procedure, you can use the Procedure Sections
Panel icons as an outline of all the information you will need to include in the
procedure. Many users access the sections in the order shown in the panel,
thus ensuring they enter all the necessary information.
Display Area of the Main Window
This large rectangle on the main window is the primary viewing and
working area of LOCKOUT-PRO
•
When you work with procedures,
displayed here.
•
As you make changes to a procedure,
modify information, your changes are reflected in the procedure’s
image.
LOCKOUT-PROTM DESKTOP USER GUIDE EXPLORING LOCKOUT-PRO 2- 9
TM
.
the image of the procedure is
each time you add or
•
•
•
•
•
•
Page 26

•
When you view one of the Related Information documents
that document will be displayed in this area.
•
When a procedure or document exceeds the size of the display
area
, vertical and/or horizontal scroll bars will appear for ease of
moving around in the document.
Text Editing Toolbar
When you are creating or revising a procedure, the display area also
includes a ruler and a
Text Editing Toolbar
, as shown in the example.
This toolbar includes:
•
Functions to change the formatting of text in the procedure
•
Magnification controls that let you zoom in and zoom out on the
procedure
•
Arrows that let you display additional pages when a procedure is
longer than one page
How to Use Standard Interaction Features
,
LOCKOUT-PROTM Graphical Procedure Writing Software uses the
same interaction and navigation conventions that Microsoft Windows
uses. If you have worked with other Windows-based software, you will
find the same type of operations in LOCKOUT-PRO
TM
. Below is a quick
reference to the more common interaction functions.
Options with arrows (>) and ellipses (. . .)
When a menu item includes a right-arrow (>) or an ellipsis (...), or when
you see an ellipsis on a button, this indicates that you have additional
choices, as follows:
•
An arrowhead on a menu item means that item has a submenu from
which you can select additional options.
•
An ellipsis (...) on either a menu item or a button indicates that a
window will open allowing you to make further choices or add
information before continuing.
For example, the
ellipses.
•
As the following example shows,
submenus, allowing you to choose the type of file to import or export
to.
File
menu contains options with both arrows and
Import
and
Export Procedure
have
2-10
•
•
•
E
XPLORING LOCKOUT
•
•
•
-PRO LOCKOUT-PROTM DESKTOP USER GUIDE
Page 27
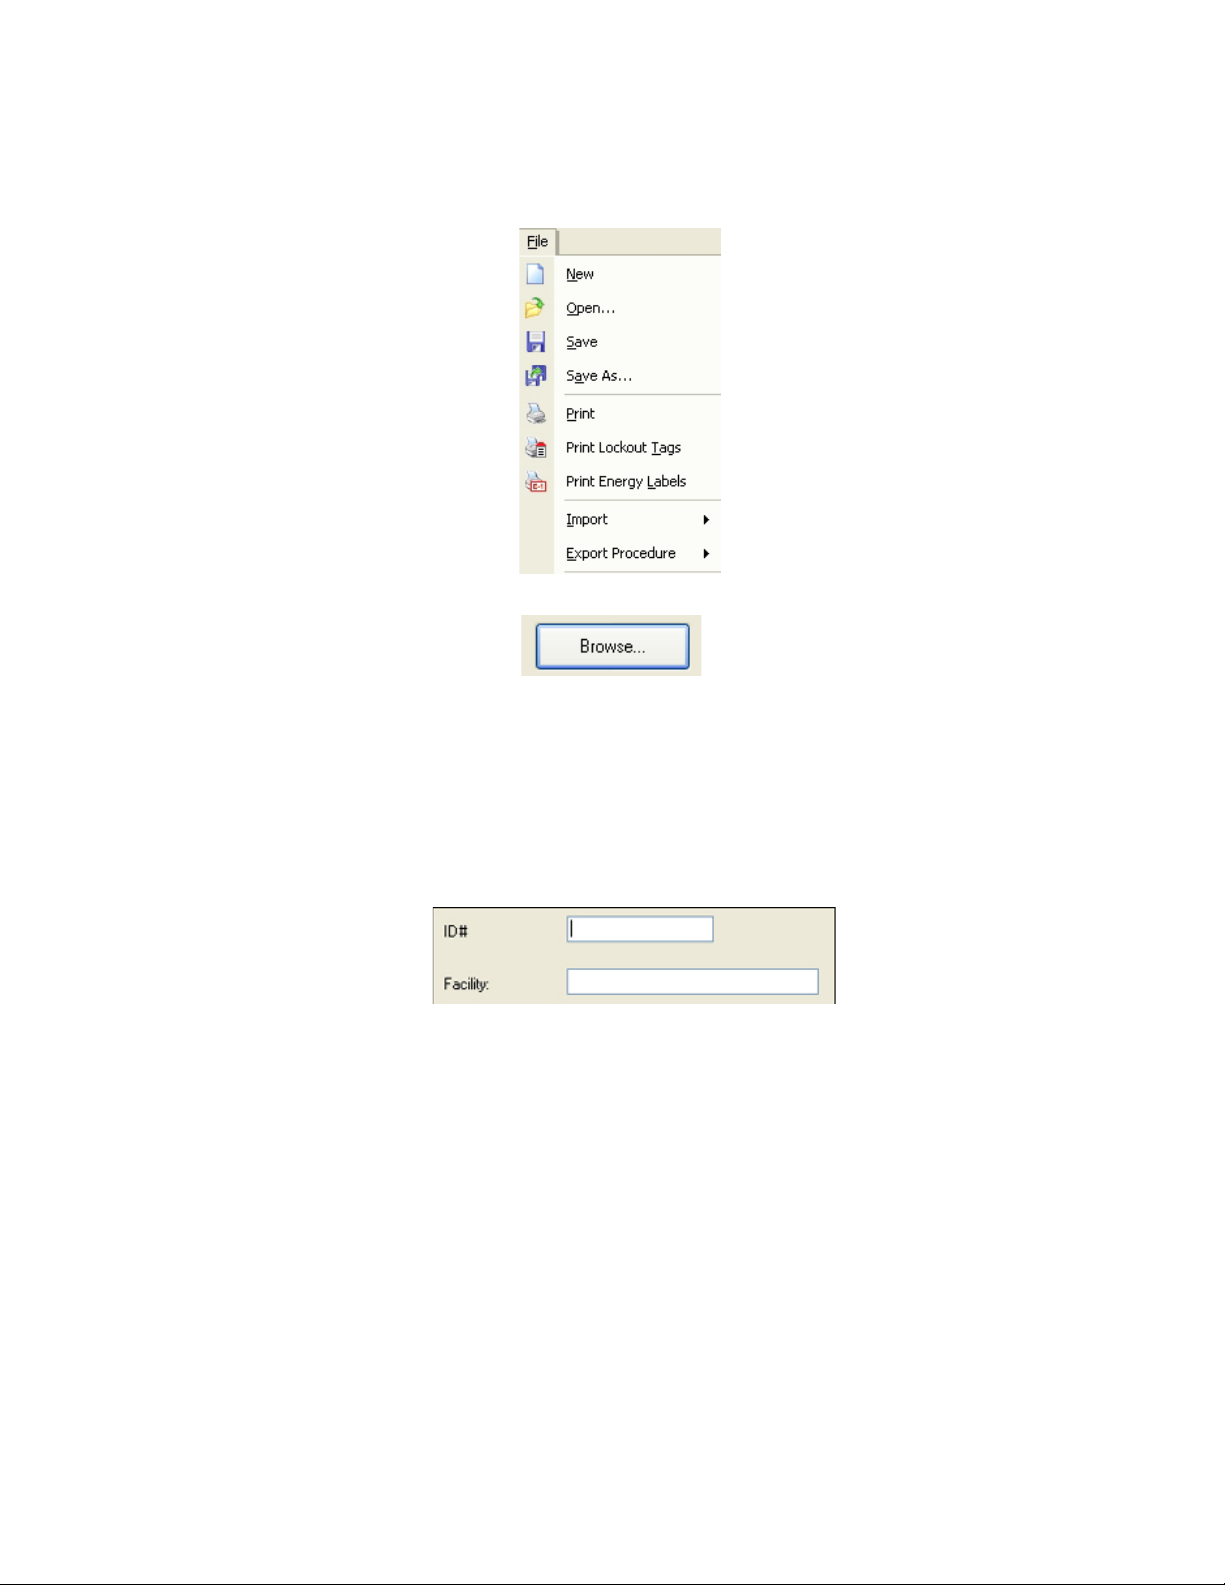
•
On the same menu, the options for
Open...
and
Save As...
contain
ellipses, meaning that when you click on them, another window will
open in which you will further refine your choice.
Example of menu with arrows and ellipses
Example of button with ellipsis
Text boxes for entering information:
•
Text boxes, or fields as they are often called, are typically displayed
to the right of their labels.
•
To enter information, move your cursor into the box and click once to
activate it. Then type in your information using the keyboard.
Example of text boxes:
Radio buttons:
•
Radio buttons are the small circles next to options. They are used
when you have two or more options to select from, and you can only
choose one.
•
To make a choice among radio-button options, move your cursor to
the circle in front of the option you want, and then click once with
your mouse. A dot will appear inside the circle to confirm your choice.
•
•
LOCKOUT-PROTM DESKTOP USER GUIDE EXPLORING LOCKOUT-PRO 2- 11
•
•
•
•
Page 28

Example of radio buttons:
Checkboxes:
•
Checkboxes are the small squares next to a list of choices. They are
used when you have several options and can select any, all, or none.
•
To select checkbox options, move your cursor to the box by the option
you want, and then click once with your mouse. A checkmark will
appear in the box to confirm your choice.
Example of checkboxes:
Drop-down lists:
•
Drop-down lists are indicated by a down-arrow on the right edge of a
text box.
•
To select from a drop-down list, move your cursor to the down-arrow
and click once. A list will “drop down” from the text box. Place your
cursor on the option you want, and then click once with your mouse.
Example of drop-down list:
2-12
•
•
•
E
XPLORING LOCKOUT
•
•
•
-PRO LOCKOUT-PROTM DESKTOP USER GUIDE
Page 29

Zoom in/out controls:
•
In any window that displays the image of a graphic or document, you
can change the magnification of the image by using these controls.
•
To increase the magnification to better see the image’s detail, click on
the zoom-in button with your cursor. The more times you click, the
more magnified the image will become.
•
To decrease the magnification to see all or a larger portion of the
image at once, click on the zoom-out button with your cursor. The
more times you click, the smaller the image will become.
Example of zoom controls:
Clickable buttons:
•
Buttons are labeled rectangles that initiate an action such as saving
or cancelling a function.
•
To use a button, simply move your cursor to the button, and then click
once on it with the left mouse button.
Example of clickable buttons:
•
•
LOCKOUT-PROTM DESKTOP USER GUIDE EXPLORING LOCKOUT-PRO 2- 13
•
•
•
•
Page 30

Standards Used in This Guide:
This user guide supplies step-by-step instructions for performing
functions in LOCKOUT-PRO
TM
Graphical Procedure Writing
Software. Terms and formatting used in this guide are defined
below.
•
When directed to
click
something in LOCKOUT-PROTM,
quickly depress the left-side button of the mouse once, and then
release it.
•
When directed to
double-click
, depress the left mouse button
twice in rapid succession.
•
When directed to
drag
, depress and hold the left mouse button
down, then move your cursor without releasing the mouse
button until you have finished the move.
•
To help distinguish between LOCKOUT-PROTM’s elements and
the instructions for using those elements, this guide uses a
different font style when naming the element. Some examples:
-
Click the
-
Click the
-
The
The bold type used for the words
you know that you will find LOCKOUT-PRO
File
menu to open it.
Save
button.
Label Image
window will open.
File, Save
, and
Label Image
TM
elements of the
lets
same name displayed on your screen or in a menu.
2-14
•
•
•
E
XPLORING LOCKOUT
•
•
•
-PRO LOCKOUT-PROTM DESKTOP USER GUIDE
Page 31

C
HAPTER
V
• • • • • •
3
IEWING
& P
RINTING
P
ROCEDURES
This chapter includes step-by-step instructions for performing the
following functions in LOCKOUT-PRO
Software:
View existing lockout/tagout procedures in LOCKOUT-PROTM, both
Standard and Viewer Version.
Print a lockout procedure, both Standard and Viewer Version.
Print lockout tags and energy labels for a procedure, both Standard
and Viewer Version.
Save procedures in LOCKOUT-PROTM Standard Version.
Viewing an Existing Procedure
The following steps are for
of LOCKOUT-PRO
TM
To open and view an existing procedure:
both the Standard and Viewer Versions
Desktop.
TM
Graphical Procedure Writing
1
From the main LOCKOUT-PROTM window, click the
tab on the primary options toolbar.
- OR -
From the main menu, select
When the
2
open, then click the
Double-click the name of the file in the window.
Open
- OR -
NOTE:
window appears, click the name of the file you wish to
Open
If the procedure you wish to open does not appear on the
File>Open...
button.
list, click the drop-down arrow at the right of the
Open Procedure
Look in
box, and
then browse to the folder containing the procedure file you want.
•
•
LOCKOUT-PROTM DESKTOP USER GUIDE VIEWING & PRINTING PROCEDURES 3- 1
•
•
•
•
Page 32

3
When opened, the procedure appears in the window’s display area,
scaled to fit the display space. Several options on the text-editing toolbar
are available while viewing procedures:
•
Zoom controls:
You can increase or decrease magnification
of the document image by clicking the zoom-in (plus sign) and zoomout (minus sign) buttons just above the image.
•
Moving between pages:
When a procedure is longer than
one page, icons on the text-editing toolbar allow you to move from
page to page. To move ahead a page, click the down-arrow icon. To
move back a page, click the up-arrow icon.
•
Scrolling on a single page:
If the image is enlarged such that it no
longer fits in the window on your screen, scroll bars will appear on
the right side and/or bottom so you can scroll to view the rest of the
image.
Printing Procedures, Tags & Labels
You can print a procedure from either the Standard Version or Viewer
Version of LOCKOUT-PRO
The following steps are for
LOCKOUT-PRO
TM
lets you easily print not just the lockout/tagout
procedure, but also the secondary materials associated with the
procedure: lockout tags and energy source labels.
TM
Graphical Procedure Writing Software.
both the Standard and Viewer Versions
.
3-2
In addition, you can print these materials on both plain paper and
specially designed label stock using either standard sheet-fed printers
or Brady’s specialty printers, GlobalMark and HandiMark.
Options for Printers & Paper Stock
Printing procedures:
laser printers to print procedures on either plain paper or on Brady Sign
& Label Blanks made of durable polyester with permanent, pressuresensitive adhesive backing for easy posting at lockout sites.
You can also use Brady’s GlobalMark printer and any of its industrialgrade, heavy-duty tapes to print procedures specially formatted for the
4-inch tape rolls that can be easily applied at equipment lockout sites.
•
•
•
V
IEWING
& P
•
•
•
RINTING PROCEDURES
You can use most standard sheet-fed inkjet or
LOCKOUT-PROTM DESKTOP USER GUIDE
Page 33

Printing lockout tags:
Lockout tags can also be printed on either
sheet-fed or GlobalMark printers using any of several sizes of Brady
label or tag stock designed for use on and near machines.
Energy source labels:
Energy source labels can be printed on sheetfed and GlobalMark printers in several sizes, as well as on Brady’s
HandiMark printer to create 2-by-4-inch labels.
The following table summarizes these printing options by type of printer
and also lists the Brady stock number for the various tag and label
stock.
Brady GlobalMark
printer
Sheet-fed inkjet
or laser printer
Brady
HandiMark
printer
Procedures • 4” roll GlobalMark tape • 8 1/2” X 11” plain paper
• 7” x 10” labels
(Brady stock #12902)
Lockout
tags
Energy
source
labels
• 3” or 4” roll GlobalMark tape
- and -
• 8” or 16” full-color paneled
GlobalMark ribbons
• 3” or 4” roll GlobalMark tape
- and -
• 8” or 16” full-color paneled
GlobalMark ribbons
• 2-tag sheet
(Brady stock #12772)
• 6-tag sheet
(Brady stock #12771)
• 8-tag sheet
(Brady stock #12770)
• 1.75” x 2.5” labels
(Brady stock #12834)
• 3.5” x 5” labels
(Brady stock #12900)
N/A
N/A
• 2” tape
(prints 2x4inch
labels)
Printing a Procedure
To print a procedure:
1
With the procedure open in the display area of the main window:
Click the
Print Procedure
- OR -
From the main menu, select
2
When the
Print Procedure
want to use is the one listed in the
arrow and select a different printer.
3
On the
Print Procedure
window with the correct printer displayed, make
any desired changes to the default options:
•
Print all the pages in the procedure, or enter one or a range of pages.
•
Choose the number of copies to print (default is 1).
LOCKOUT-PROTM DESKTOP USER GUIDE VIEWING & PRINTING PROCEDURES 3- 3
button in the primary options taskbar.
File>Print
.
window appears, verify that the printer you
Printer
box. If not, click the down-
•
•
•
•
•
•
Page 34

•
In the
Offsets
section, enter a different number if you want to change
the amount of horizontal (
the edge of the paper and where the printing starts.
•
To change any of the printer’s properties, click the
to access your printer’s options.
4
Review the pages in the
•
Use the zoom in/out controls to change the magnification.
•
Use the up/down arrows to scroll to other pages in the procedure.
5
When you are finished, click the
Preview
X Offset
) or vertical (
area. If desired:
Print
button in the lower right corner.
Y Offset
Properties...
) space between
button
NOTE:
the original settings in the
If you wish to discard all changes you made and return to
Print Procedure
window, click the
button.
6
When you are finished printing, click the
Close
button to return to the
main window where your procedure is displayed.
Printing Lockout Tags
To print lockout tags:
1
With the procedure open in the display area of the main window:
Click the
Print Lockout Tags
- OR -
From the main menu, select
2
When the
Print Lockout Tags
want to use is the one listed in the
arrow and select a different printer.
3
If you want to change any of your printer’s properties, click the
Settings
button to access your printer’s options.
button in the primary options taskbar.
File>Print Lockout Tags
.
window appears, verify that the printer you
Printer
box. If not, click the down-
Reset
More
3-4
NOTE:
Any changes you make in the following steps that affect how
the lockout tag will print are reflected in updates to the tag’s image
in the
Preview
4
With the correct printer displayed, make any desired changes to the
Supplies
•
or
Material
For
GlobalMark
-
From the drop-down list under
the tape roll you’re using.
•
For
sheet-fed
-
From the drop-down list under
sheet you’re using.
•
•
•
V
IEWING
& P
•
•
•
RINTING PROCEDURES
box.
options, depending on your printer:
printers:
Supplies
printers:
Material
, choose the
, choose the type of tag
LOCKOUT-PROTM DESKTOP USER GUIDE
Tape Width
of
Page 35

-
The
Available Labels
sheet, based on the paper stock you chose. It allows you to uncheck
boxes if you want to print fewer tags than the sheet contains.
-
In the
Offsets
section, enter a different number if you want to
change the amount of horizontal (
space between the edge of the paper and where the printing starts.
5
In the
•
Lockout Information
The
Date Locked Out
date and time. Use the up and down arrows to change these to a
different date and/or time.
•
In the
Lockout By
box, type the name of the person authorized to
remove the lockout.
•
GlobalMark printers only:
None
. If you wish to add the picture of the person named in the
Lockout By
click the
•
In the
box, click the radio button next to the empty box, and then
Select
button to locate and insert the photo.
Remarks
box, type in any additional information you wish to
print on the tags.
•
In the
Expected Completion
energization process should be finished.
6
Review the lockout tag in the
•
Use the zoom in/out controls to change the magnification.
•
Use the up/down arrow controls to scroll if the entire tag does not fit
in the window.
section shows how many tags will print on a
X Offset
) or vertical (
Y Offset
section:
and
Time Locked Out
The
Employee Picture
boxes display the current
section defaults to
box, enter the time when the re-
Preview
area.
)
NOTE:
window, click the
If you wish to discard all the changes you entered on this
Reset
button in the lower left corner. The
window will refresh and display the default information.
7
When you are ready to print:
Print
Click the
NOTE:
button in the lower right corner.
The
Print Lockout Tags
window remains open until you close
it, so you can check your printed tags and make any changes to
them, or print more, without having to re-take the steps above.
8
When finished, click the
where your procedure is displayed
LOCKOUT-PROTM DESKTOP USER GUIDE VIEWING & PRINTING PROCEDURES 3- 5
Close
button to return to the main window
•
•
•
•
•
•
Page 36

Printing Energy Source Labels
To print energy source labels:
1
With the procedure open in the display area of the main window:
2
Click the
taskbar.
From the main menu, select
3
When the
printer you want to use is the one listed in the
the down-arrow and select a different printer.
4
If you want to change any of your printer’s properties, click the
Settings
button to access your printer’s options.
Print Energy Source Labels
- OR -
File>Print Energy Labels
Print Energy Source Labels
button in the primary options
.
window appears, verify that the
Printer
box. If not, click
More
NOTE:
Any changes you make in the following steps that affect how
the printed energy label will look are reflected in updates to the
label’s image in the
5
With the correct printer displayed, make any desired changes to the
options listed on the left side of the window. These options vary
according to the printer you chose.
•
For
GlobalMark
-
From the drop-down list under
depending on the type of tape you are using.
-
In the
print all energy source labels associated with that procedure, or
select the specific label (e.g., E-1, C-1, etc.) from the list displayed.
•
For
-
In the
wish to print. (You can print only one label at a time with this
printer.)
•
For
-
From the drop-down list under
stock you’re using.
-
The
sheet, based on the paper stock you chose. It allows you to uncheck
boxes if you want to print fewer labels than the sheet contains.
-
In the
print all energy source labels associated with that procedure, or
select the specific label (e.g., E-1, C-1, etc.) from the list displayed.
-
In the
change the amount of horizontal (
space between the edge of the paper and where the printing starts.
Print Label
HandiMark
Print Label
sheet-fed
Available Labels
printers:
Print Label
Offsets
section, enter a different number if you want to
Preview
box.
printers:
Shape/Size
, select your choice,
section, select the label(s) to print. Select
printers:
section, select the energy source whose label you
Material
, choose the type of label
section shows how many labels will print on a
section, select the label(s) to print. Select
X Offset
) or vertical (
Y Offset
All
All
to
to
)
3-6
•
•
•
V
IEWING
& P
•
•
•
RINTING PROCEDURES
LOCKOUT-PROTM DESKTOP USER GUIDE
Page 37

6
In the
Layout
section, you can pull from the procedure two additional
pieces of data to add to the label, along with its identifier and icon. Click
the down-arrow in the text boxes for
Data Field 1
and
Data Field 2
choose. The options are the same in both fields. You can select from the
following data for either field:
•
ID# of the procedure
•
Facility
•
Location
•
Description from the procedure header
•
Energy source description related to the specific energy source
7
Review the pages in the
•
Use the zoom in/out controls to change the magnification.
•
Use the up/down arrows to view all the labels.
Preview
area. If desired:
to
NOTE:
window, click the
window will refresh and display the default information.
8
When you are ready to print, click the
corner.
NOTE:
you close it so you can check your printed labels and make any
changes to them, or print more, without having to re-take the steps
above.
9
When finished, click the
window to return to the main window where your procedure is
displayed.
Saving a Procedure
You can save a new or existing procedure only with the Standard
Version of LOCKOUT-PRO
TIP: It’s a good practice to save a NEW procedure when you first begin
entering data into it. This avoids the loss of work in the event of a problem
with the computer or its power source. LOCKOUT-PRO
you to save the procedure before you exit.
If you wish to discard all the changes you entered on this
Reset
button in the lower left corner. The
Print
button in the lower right
The
Print Energy Source Labels
Close
button in the lower right corner of the
TM
Graphical Procedure Writing Software.
window remains open until
TM
will also prompt
To save a procedure:
1
Click the
From the main menu, select
LOCKOUT-PROTM DESKTOP USER GUIDE VIEWING & PRINTING PROCEDURES 3- 7
Save Procedure
- OR -
button on the primary options taskbar.
File>Save.
•
•
•
•
•
•
Page 38

2
If this is an
existing procedure
, the file is now saved.
If this is a
standard Windows
•
If this is your first time using LOCKOUT-PROTM Graphical
new procedure
Save As
that hasn’t been previously saved, the
window will appear.
Procedure Writing Software, the window will display the directory
\My Lockout Procedures.
•
If you have used this installation of LOCKOUT-PROTM before, the
window will display the last-used directory.
In either case, ensure this is the directory you wish to save the
procedure to. If it is not, use the Windows browse function to find the
directory for saving procedures.
NOTE:
After saving one procedure, LOCKOUT-PROTM will go to
the same directory for future saves unless you change the directory.
3
Enter the name of the procedure into the
4
Click
Save
. The file is now saved under the name entered.
File Name
box.
3-8
•
•
•
V
IEWING
& P
•
•
•
RINTING PROCEDURES
LOCKOUT-PROTM DESKTOP USER GUIDE
Page 39

C
HAPTER
C
• • • • • •
4
REATING
/R
EVISING
P
ROCEDURES
The ability to create and revise procedures is the primary reason for
using LOCKOUT-PRO
chapter provides the step-by-step instructions for generating and
effective and professional procedures in LOCKOUT-PRO
modifying existing ones. This chapter explains how to:
Choose which form (Long, Short, or Combined) to use for a new
lockout procedure.
Enter or revise the details of a lockout procedure for all three forms,
including header/footer information, energy sources, general and
specific lockout steps, and images.
Insert, modify, and delete images in a procedure.
Change the text formatting for a procedure.
TM
Graphical Procedure Writing Software. This
TM
, and
Choosing Which Form to Use for a New Procedure
Through its templated forms, LOCKOUT-PROTM saves a lot of time and
repetitive work otherwise involved in writing procedures. Because of
the variety of procedures, three different template forms are provided.
When creating a new lockout/tagout procedure, your first step is to
choose which of these forms to use:
•
Long Form
•
Short Form
•
Combined Form
•
•
LOCKOUT-PROTM DESKTOP USER GUIDE CREATING/REVISING PROCEDURES 4- 1
•
•
•
•
Page 40

When to Use a Long Form
The
Long Form
is the most flexible of the forms. It can include as many
pages as needed to accommodate the images and text required to
document the lockout steps.
Consider using a Long Form when:
• You have a procedure that involves many energy sources and
images, and requires detailed lockout steps.
• You want to create a comprehensive document with all of the
information required for a particular lockout/tagout procedure.
• You want a single document to describe a complete procedure
that you can use as a backup reference for shorter procedures
that describe the different steps of the overall procedure.
When to Use a Short Form
The
Short Form
a single page, though it will expand to as many pages as needed for the
information entered. You can insert up to two images in this form.
is the most compact and concise form. It typically is
Consider using a Short Form when:
• You want to document a relatively short procedure that requires
only one or two images for clarity.
• You want to summarize the key steps of a longer procedure for
posting as a quick reference near the lockout site.
• You want to create separate documents for each segment of a
longer procedure that you can post separately at the lockout
location.
When to Use a Combined Form
The
Combined Form
from each of the other two forms. It consists of two different page
layouts:
•
The
front page
additional pages, displays summary information similar to the Short
Form, except that the Combined Form can accommodate up to three
images on this summary page.
•
The
back pages
front page, display the detailed lockout steps similar to the Long
Form, but for both lockout application and lockout release steps.
is, as its name implies, a combination of features
, which is usually the first page, but can extend to
, which consist of all procedure pages that follow the
4-2
•
•
•
C
REATI NG/REVISING PROCEDURES
•
•
•
LOCKOUT-PROTM DESKTOP USER GUIDE
Page 41
Consider using a Combined Form when:
• You want to create a procedure that gives employees access to
BOTH a summary and a detailed version in one place.
• You want to document and illustrate a short procedure on a
single page but you need to include more images than the two
accommodated by the Short Form layout.
• You want to have in one document both the concise procedure
summary and the step-by-step detailed version.
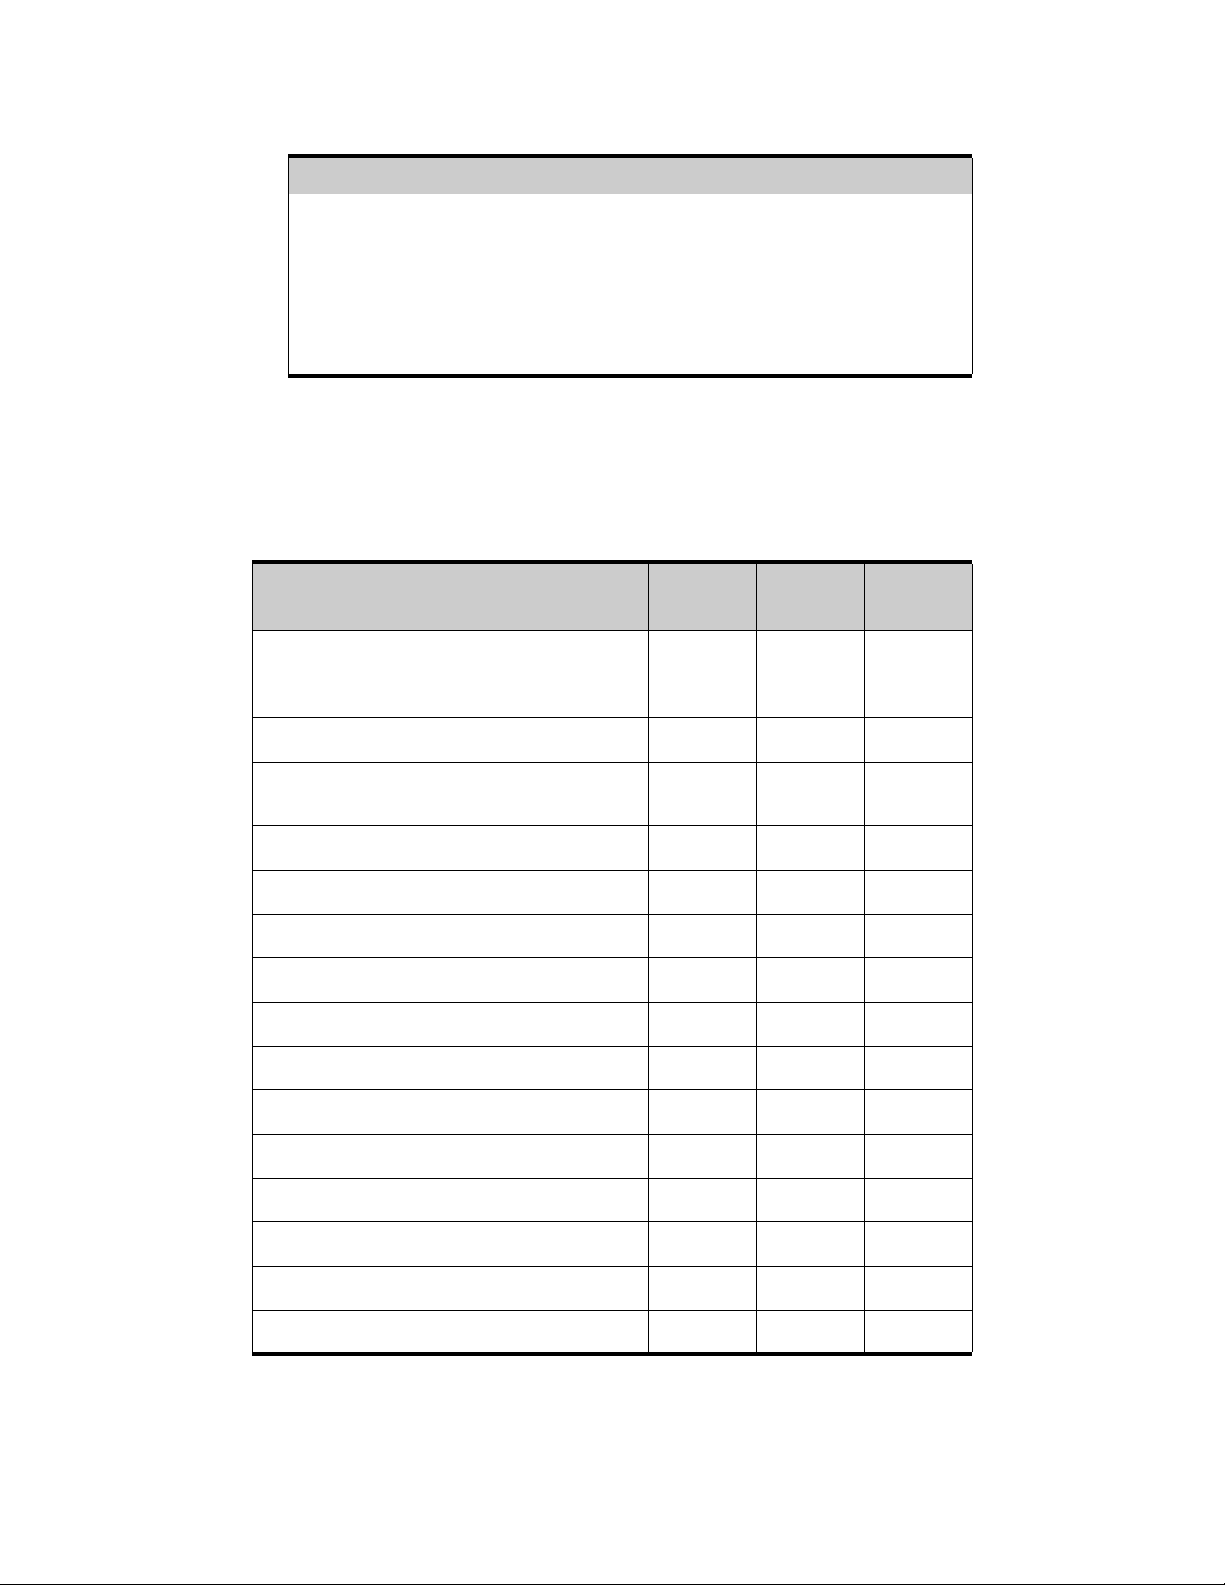
Comparing the Forms
The following table summarizes the differences among the forms:
COMPARISON OF FEATURES OF THREE FORM TYPES
STANDARD FEATURES: Long
Form
Length
Lockout/tagout procedure ID number
Facility, location, and description of the
equipment the procedure applies to
Procedure creation and revision dates
Name of author
Name of revisor
Auditor’s name and date of next audit
Number of lockout points involved
General lockout application process
Energy source types and descriptions
Location of energy sources
as many
pages as
needed
333
333
333
333
33
333
333
Short
Form
typically
1page
Combined
Form
typically
2 pages
3
3
3
Methods to disable energy sources
Lockout devices to use
Steps to check a lockout is enabled
Detailed table of lockout steps
LOCKOUT-PROTM DESKTOP USER GUIDE CREATING/REVISING PROCEDURES 4- 3
333
333
3
3
•
•
•
•
•
•
Page 42

COMPARISON OF FEATURES OF THREE FORM TYPES (Continued)
STANDARD FEATURES: Long
Form
Detailed list of lockout application and
release steps with option for images
Summary table of energy sources and their
lockout methods
Images
General lockout removal process
Specific lockout release steps
Emergency contact information
Procedure change notification steps
Customizable fields for notes and footer
information
1 per step up to 2
33
333
Short
Form
Combined
Form
3
33
up to 3 on
first page; 1
per step on
subsequent
pages
3
3
3
Opening a LOCKOUT-PRO Procedure File
If you are creating a new procedure
Graphical Procedure Writing Software, you will open a blank template
and enter your data.
If you are revising an existing procedure or using another
procedure as the basis for creating a new one
existing procedure and change the data it contains.
Starting a New Procedure from a Template
When you start with a template, you choose which of the three forms to
use (Long Form, Short Form, or Combined Form), then save it as a
procedure with its own name.
file in LOCKOUT-PROTM
, you will open an
4-4
•
•
•
C
REATI NG/REVISING PROCEDURES
•
•
•
LOCKOUT-PROTM DESKTOP USER GUIDE
Page 43
To create a new procedure from a blank template:
1
From the main window:
Click the
New Procedure
button on the primary options taskbar.
- OR -
From the main menu, select
2
When the
Select Template
File>New...
window appears, click the image of the form
you wish to use (Combined, Long, or Short).
3
Click OK. The window will close and a blank form will appear in the
main window.
TIP: To minimize the risk of losing any data, you should immediately save
this file under its new name, as well as saving it frequently as you work on it.
4
Next, you will enter the details of the new procedure. Follow the steps
for the specific type of form you’re working with:
•
“Long Form: Entering & Modifying Details” on page 4-6
•
“Short Form: Entering & Modifying Details” on page 4-11
•
“Combined Form: Entering & Modifying Details” on page 4-16
Opening an Existing Procedure
You will typically open an existing procedure when you want to revise it
or to use it as the basis for a new procedure.
To open an existing procedure:
1
From the main window:
Click the
Open Procedure
button on the primary options taskbar.
- OR -
From the main menu, select
2
When the
Open
window appears:
Click the name of the file you wish to open, then click the
File>Open...
Open
button.
- OR -
Double-click the name of the file. The procedure will appear in the main
window.
NOTE:
list, click the drop-down arrow at the right of the
If the procedure you wish to open does not appear on the
Look in
box, and
then browse to the folder containing the procedure file you want.
3
Your next step is to modify the procedure. For details on revising the
procedure, follow the steps for the type of form you’re working with:
•
“Long Form: Entering & Modifying Details” on page 4-6
•
“Short Form: Entering & Modifying Details” on page 4-11
•
“Combined Form: Entering & Modifying Details” on page 4-16
•
•
LOCKOUT-PROTM DESKTOP USER GUIDE CREATING/REVISING PROCEDURES 4- 5
•
•
•
•
Page 44

Long Form: Entering & Modifying Details
As the icons in the
Procedure Sections
panel show, a Long Form displays
lockout information in three main sections:
•
Header/Footer
•
General Information
•
Lockout Steps
Following are the specific steps for working with each of these sections
in LOCKOUT-PRO
TM
Graphical Procedure Writing Software.
Header/Footer Information
In this section, you can add or modify the content of the header and
footer areas of all pages of the procedure.
To enter or modify header/footer information for a Long Form procedure:
1
Click on the
From the main menu, select
2
In the
modify information in the following fields:
• ID#:
• Facility:
equipment
• Location:
the facility
• Description:
example, its name, serial number, and/or other feature
Header/Footer
icon
in the
Procedure Sections
- OR -
Identification
Edit>Header
section of the
Edit Header/Footer
.
window, enter or
The identification number for this procedure
Information that identifies the facility housing the
Information that identifies the equipment’s location within
Identifying information about the equipment itself — for
panel.
4-6
•
•
•
C
REATI NG/REVISING PROCEDURES
•
•
•
3
In the
Page Footers
section of the
Edit Header/Footer
window, you can
enter or modify:
• Page Footer (left):
Any text you wish to appear on the bottom left of
every page
• Page Footer (center):
Any text you wish to appear on the bottom
center of every page
NOTE:
LOCKOUT-PROTM automatically inserts the current and
total page numbers in the footer on the bottom right side of the
page.
4
In the
additional information about the equipment. Select one of the three
options:
Note
section of the
Edit Header/Footer
LOCKOUT-PROTM DESKTOP USER GUIDE
window, you can enter
Page 45

• None
• Predefined
, if you have no additional information to add.
, if you are choosing from a list; if so, click the down-arrow
in the text box, and then click the text to use.
• Custom
, if you intend to enter information that is not predefined. Just
type the information into the text box, or revise the existing text.
NOTE:
The text you select or type in will appear in the “NOTE”
section of the procedure header.
5
Click OK to add the header and footer information to your procedure.
The window will close and the procedure in the main window will be
updated with the information you added.
NOTE:
to your procedure, click the
If you
don’t
want to add the new or modified information
Cancel
button instead. Your changes
will be discarded.
General Information
“General Info” is the term for the general steps involved in both the
lockout process and the lockout removal process. These steps are not
specific to an energy source lockout point, but must be taken to ensure
the safety of the entire process. Steps in the lockout process appear in
the header, while steps of the lockout process appear in the footer.
To add or modify the general information steps for a Long Form procedure:
1
Click the
General Info
icon in the
Procedure Sections
panel.
- OR -
From the main menu, select
2
The
General Information
Edit>General Info
.
window that appears will display standard
steps for both the application and removal processes. In this window,
you may:
•
Use the text already shown in either or both boxes.
•
Modify the text in either or both boxes.
•
Delete the existing text and enter your own.
3
When done, click OK. The window will close and the procedure in the
main window will be updated with the information you added.
NOTE:
to your procedure, click the
If you
don’t
want to add the new or modified information
Cancel
button. Your changes will be
discarded.
•
•
LOCKOUT-PROTM DESKTOP USER GUIDE CREATING/REVISING PROCEDURES 4- 7
•
•
•
•
Page 46

Lockout Steps
In the lockout step section, you can:
•
Define each energy source to be locked out and describe the specific
methods and devices for doing so.
•
Add or modify images that illustrate the lockout points or other
equipment features relevant to the procedure.
•
Add lockout steps in any order, rearrange them, and delete them.
To add lockout steps to a Long Form procedure:
1
Click on the
From the main menu, select
2
On the
•
If the window displays
fields, proceed to the next step.
•
If the window displays
appears
button.
Lockout Steps
- OR -
Procedure Steps
in the fields for
icon in the
Edit>Lockout Steps.
Procedure Sections
window, take either of these actions:
only
a
Step #1
tab, and no data appears in its
tabs for several steps and/or information
Step #1
, first click the
panel.
Add Procedure Step
TIP: Before you enter new information into a field, be sure to double-check
that you are not accidentally overwriting existing data or otherwise making
unwanted changes to a procedure.
3
Choose the energy type for the step by clicking the down-arrow in the
text box under
Energy Type
, and then click your selection from the drop-
down list. An icon for that energy source will appear below the name,
Action
and text containing its abbreviation will later appear in the
field
after you have entered the location.
4
Choose the energy source description by clicking the down-arrow in the
box under
Description
, and then click the description you want to use.
Or, type your own description into the box. The description you’ve
chosen or entered will be added to the energy source box.
NOTE:
Some descriptions (such as volts and psi) display “xx” to
remind you to enter a specific number. When this occurs, click on
the x’s, delete them, and type in the actual number.
TIP: The Lockout Step section lets you pull together and/or enter specific
instructions for the lockout step. You can type your own text into any of the
text boxes, and it will appear on the procedure. However, built-in default text
can make your work much easier. Simply click the down-arrow in each box
to see the options. Click an option and the text will appear in the text box on
this window and on the actual procedure.
4-8
•
•
•
C
REATI NG/REVISING PROCEDURES
•
•
•
LOCKOUT-PROTM DESKTOP USER GUIDE
Page 47

If these default lists do NOT contain the text or terms you often use, can
easily add them. See Chapter 7, “Setting Defaults in Lockout PRO” for
details.
5
In the
on the machine. The location is then added to the text in the
6
In the
Location
Control
box, choose or type in the location of the energy source
Action
box, choose or type in the method to use to disconnect the
energy source for the step. The control method is then inserted into the
text in the
7
In the
energy source for this step. The device type is then added to the
Action
box.
Device
box, choose or type in the lockout device to use on the
Action
box.
8
The
Info
section of this window lets you indicate whether you want
additional text or an image (or neither) to appear in the “Info” column
of the procedure.
•
To add text, click the
Text
radio button and type in the text in the box
available.
•
To use a photo, drawing, or other type of image, click the
Select
button and then click the
button to locate and insert your
Image
radio
image.
box.
NOTE:
For specific details on adding, editing, and labeling images,
see “Working with images in your procedure” on page 4-25.
9
When you are finished, click OK.
10
For each additional lockout step in the procedure, click the
Procedure Step
11
When you are finished adding lockout steps, click OK. You will return to
button and repeat steps 2-9.
Add
the main window, where the steps you added will appear on the
procedure.
NOTE:
click the
If you
Cancel
don’t
want to add the new steps to your procedure,
button instead. Your changes will be discarded.
To revise one or more lockout steps on a Long Form:
1
Click on the
From the main menu, select
The
Procedure Steps
for each of the existing steps.
2
Click the tab of the step you wish to revise. The details for that step will
be displayed in the
Lockout Steps
- OR -
window will appear, with a tab displayed at the top
Procedure Steps
icon in the
Edit>Lockout Steps.
window.
Procedure Sections
panel.
3
Make your changes to the information on the screen.
•
•
LOCKOUT-PROTM DESKTOP USER GUIDE CREATING/REVISING PROCEDURES 4- 9
•
•
•
•
Page 48

4
When finished, click
OK.
You will return to the main window, where the
changes you made will appear on the procedure.
NOTE:
click the
5
To rearrange lockout steps on a Long Form:
6
Click on the
If you
don’t
Cancel
Lockout Steps
button instead. Your changes will be discarded.
want to add the revisions to your procedure,
icon in the
Procedure Sections
- OR -
From the main menu, select
The
Procedure Steps
window will appear, with a tab displayed at the top
Edit>Lockout Steps.
for each of the existing steps, in the order they will appear on the
printed procedure.
7
Click on the
8
When the
step to move, and then click the
Arrange Procedure Steps
Arrange Energy Sources
button.
window appears, click to select the
Up
or
Down
button to move it. Repeat
the procedure until the steps are in the order you wish.
NOTE:
tab until you return to the
Each step’s original number will remain on the list and the
Procedure Steps
window, where the
steps will appear in the new order.
9
When finished, click OK.
10
When you are finished with the
will return to the main window, where the changes you made will
appear on the procedure.
Procedure Steps
window, click OK. You
panel
.
4-10
•
•
•
C
REATI NG/REVISING PROCEDURES
•
•
•
NOTE:
the
If you
Cancel
don’t
want to use the rearranged order of steps, click
button instead. Your changes will be discarded.
To remove lockout steps from a Long Form:
1
Click on the
From the main menu, select
The
Procedure Steps
for each of the existing steps.
2
Click the tab (
3
When the step appears in the window, click the
button.
4
A dialog box will appear asking if you are sure. Click
delete the step, or
Lockout Steps
- OR -
window will appear, with a tab displayed at the top
Step #1, Step #2
No
if you want to keep it.
icon in the
Edit>Lockout Steps.
Procedure Sections
, etc.) for the step you wish to remove.
LOCKOUT-PROTM DESKTOP USER GUIDE
panel
.
Remove Procedure Step
Yes
if you want to
Page 49

NOTE:
If you answer
Yes
, the step and all of its information will be
deleted from the procedure, and the steps that follow it will be
renumbered.
5
When you are finished with the
will return to the main window, where the changes you made will
appear on the procedure.
Procedure Steps
window, click OK. You
NOTE:
Cancel
If you want to
restore
the step(s) you deleted, click the
button instead. Your changes will be discarded.
Short Form: Entering & Modifying Details
As the icons in the
involves working with data in four main sections:
•
Header/Footer
•
Energy Sources
•
Images
•
General Information
Following are the specific steps for working with each of these sections.
Header/Footer Information
In this section, you can add or modify the content of the header and
footer areas of the procedure.
Procedure Sections
panel show, the Show Form
To enter or modify header/footer information for a Short Form procedure:
1
Click on the
From the main menu, select
2
In the
modify information in the following fields:
• ID#:
• Facility:
equipment
• Location:
the facility
• Description:
example, its name, serial number, and/or other feature
3
In the
enter or modify:
LOCKOUT-PROTM DESKTOP USER GUIDE CREATING/REVISING PROCEDURES 4- 11
Header/Footer
icon
in the
Procedure Sections
- OR -
Identification
Edit>Header
section of the
Edit Header/Footer
.
window, enter or
The identification number for this procedure
Information that identifies the facility housing the
Information that identifies the equipment’s location within
Identifying information about the equipment itself — for
Page Footers
section of the
Edit Header/Footer
window, you can
panel.
•
•
•
•
•
•
Page 50

• Page Footer (left):
Any text you wish to appear on the bottom left of
every page
• Page Footer (center):
center of every page
Any text you wish to appear on the bottom
NOTE:
LOCKOUT-PROTM Graphical Procedure Writing Software
automatically inserts the current and total page numbers in the
footer on the bottom right side of the page.
4
In the
Note
section of the
Edit Header/Footer
window, you can enter
additional information about the equipment. Select one of the three
options:
• None
• Predefined
, if you have no additional information to add.
, if you are choosing from a list; if so, click the down-arrow
in the text box, and then click the text to use.
• Custom
, if you intend to enter information that is not predefined. Just
type the information into the text box, or revise the existing text.
NOTE:
The text you select or type in will appear in the “NOTE”
section of the procedure header.
5
Click OK to add the header and footer information to your procedure.
The window will close and the procedure in the main window will be
updated with the information you added.
NOTE:
to your procedure, click the
If you
don’t
want to add the new or modified information
Cancel
button instead. Your changes
will be discarded.
4-12
•
•
•
C
REATI NG/REVISING PROCEDURES
•
•
•
Energy Sources
In this section, you can define or revise each energy source to be locked
out, and identify the methods and devices for doing so. You can also
rearrange the order of energy sources and delete energy sources from
the procedure.
To add energy sources to a Short Form procedure:
1
Click on the
From the main menu, select
The
Energy Sources
•
If the
fields are blank, you can proceed to the next step.
•
If the window displays
the
Energy Sources
- OR -
window will open.
Energy Sources
Add Energy Source
window displays only the tab
icon in the
Edit>Energy Sources.
Procedure Sections
New Source
panel.
tabs for one or more energy sources,
button to open a window without existing data.
LOCKOUT-PROTM DESKTOP USER GUIDE
and all
click
Page 51

TIP: Before you enter new information into a field, be sure to double-check
that you are not accidentally overwriting existing data or otherwise making
unwanted changes to a procedure.
2
Choose the energy type by clicking the down-arrow in the text box under
Energy Type,
and then click your selection from the drop-down list. An
icon for that energy source appears below the name, and its label will be
added to the
3
Choose the energy source description by clicking the down-arrow in the
box under
Location
Description
text box when you enter the location.
, and then click the description you want to use.
Or, type your own description into the box. The description you’ve
chosen or entered will be added to the energy source box.
NOTE:
Some descriptions (such as volts and psi) display “xx” to
remind you to enter a specific number. When this occurs, click on
the x’s, delete them, and type in the actual number.
TIP: The Lockout Process section of the Energy Sources window lets you pull
together and/or enter specific instructions for the lockout step. You can type
your own text into any of the text boxes, and it will appear on the procedure.
However, built-in default text can make your work much easier. Simply click
the down-arrow in each box to see the options. Click an option and the text
will appear in the text box on this window and on the actual procedure.
If these default lists do NOT contain the text or terms you often use, can
easily add them. See Chapter 7, “Setting Defaults in Lockout PRO” for
details.In the
source on the machine.
4
In the
disconnect the energy source.
5
In the
energy source.
6
To add the next energy source, click the
repeat steps 2-6 above.
Location box, choose or type in the location of the energy
Control/Method
Device
box, choose or type in the lockout device to use on the
box, choose or type in the method to use to
Add Energy Source
button and
7
When finished, click OK. You will return to the main window, where the
energy sources you added will appear on the procedure.
NOTE:
procedure, click the
If you
don’t
want to add the energy sources to your
Cancel
button instead. Your changes will be
discarded.
•
•
LOCKOUT-PROTM DESKTOP USER GUIDE CREATING/REVISING PROCEDURES 4- 13
•
•
•
•
Page 52

To revise one or more energy sources on a Short Form:
1
Click on the
From the main menu, select
The
Energy Sources
each of the existing energy sources.
2
Click the tab of the energy source you wish to revise. The details for that
step will be displayed in the
3
Make your changes to the information on the screen.
4
When finished, click OK. You will return to the main window, where the
revisions you made will appear on the procedure.
Energy Sources
- OR -
window will open, with a tab displayed at the top for
icon in the
Edit>Energy Sources.
Energy Sources
Procedure Sections
window.
panel.
NOTE:
If you
don’t
want to keep the revisions, click the
button instead. Your changes will be discarded.
To rearrange energy sources on a Short Form:
1
Click on the
From the main menu, select
The
Energy Sources
for each of the existing energy sources, in the order they will appear on
the printed procedure.
2
Click on the
3
When the
step to move, and then click the
the procedure until the energy sources are in the order you wish.
4
Click OK to close the
5
When finished, click OK on
the main window, where the revisions you made will appear on the
procedure.
Energy Sources
icon in the
- OR -
Edit>Energy Sources.
window will appear, with a tab displayed at the top
Arrange Energy Sources
Arrange Energy Sources
Arrange Energy Sources
Energy Sources
Procedure Sections
panel.
button.
window appears, click to select the
Up
or
Down
button to move it. Repeat
window.
window. You will return to
Cancel
4-14
•
•
•
C
REATI NG/REVISING PROCEDURES
•
•
•
NOTE:
If you
don’t
want to keep the revisions, click the
button instead. Your changes will be discarded.
To remove an energy source on a Short Form:
1
Click on the
From the main menu, select
The
Energy Sources
each of the existing energy sources.
Energy Sources
- OR -
window will open, with a tab displayed at the top for
icon in the
Edit>Energy Sources.
LOCKOUT-PROTM DESKTOP USER GUIDE
Procedure Sections
Cancel
panel.
Page 53

2
Click the tab (
3
When the information for the energy source appears in the window,
click the
4
A dialog box will appear asking if you are sure. Click
delete the energy source, or
E-1, H-1
Remove Energy Source
, etc.) for the energy source you wish to remove.
No
button.
if you want to keep it.
Yes
if you want to
NOTE:
If you answer
Yes
, the energy source and all of its related
information will be deleted from the procedure.
5
When finished, click OK on
Energy Sources
window. You will return to
the main window, where the revisions you made will appear on the
procedure.
NOTE:
click the
If you want to
Cancel
button instead. Your changes will be discarded.
restore
the energy source(s) you deleted,
Images
In this section, you can add one or two images to the Short Form. They
will appear above the table of energy sources. You can also label the
images to indicate control points or other features.
To add an image to a Short Form procedure:
1
Click on the
From the main menu, select
When the
2
or Image 2
Images
icon
in the
Procedure Sections
- OR -
Edit>Images.
Edit Image
window appears, click the tab at the top (
) for the image you want to add.
panel.
Image 1
3
Click the
NOTE:
Image 1
If no images have been added, the window will default to
with no content.
Browse...
button to browse to the folder where your images are
stored.
4
When you locate your image, double-click on it. It will be copied into the
Edit Image
window.
NOTE:
To edit and label the image, follow the steps in the
procedure below, “Working with images in your procedure” on
page 4-25.
5
To add another image, click the next image tab and repeat steps 3-4.
6
When you are finished, click OK to return to the main window.
•
•
LOCKOUT-PROTM DESKTOP USER GUIDE CREATING/REVISING PROCEDURES 4- 15
•
•
•
•
Page 54

General Information
“General Info” is the term for the general steps involved in both the
lockout process and the lockout removal process. These steps are not
specific to an energy source lockout point, but must be taken to ensure
the safety of the entire process. Steps in the lockout process appear in
the header, while steps of the lockout process appear in the footer.
To add or modify the general information steps for a Short Form procedure:
1
Click the
From the main menu, select
2
The
steps for both the application and removal processes. In this window,
you may:
•
Use the text already shown in either or both boxes.
•
Modify the text in either or both boxes.
•
Delete the existing text and enter your own.
3
When done, click OK. The window will close and the procedure in the
main window will be updated with the information you added.
General Info
icon in the
- OR -
General Information
Procedure Sections
Edit>General Info
.
panel.
window that appears will display standard
NOTE:
to your procedure, click the
If you
don’t
want to add the new or modified information
Cancel
button. Your changes will be
discarded.
Combined Form: Entering & Modifying Details
As the icons in the
uses information in six main sections:
•
Header/Footer
•
Energy Sources
•
Images
•
General Information
•
Lockout Application Steps
•
Lockout Release Steps
You can access and complete the first four sections when a Front Page
is displayed on your screen. You can access and complete the two
lockout-step sections only when a Back Page is displayed. The
Header/Footer and General Information sections are accessible at any
time.
Procedure Sections
panel show, a Combined Form
4-16
•
•
•
C
REATI NG/REVISING PROCEDURES
•
•
•
LOCKOUT-PROTM DESKTOP USER GUIDE
Page 55

Following are the specific steps for working with each of the Combined
Form’s six sections.
Header/Footer Information
In this section, you can enter or change the information that appears in
the header and footer areas of the procedure.
To enter or modify header/footer information for a Combined Form procedure:
1
Click on the
From the main menu, select
2
In the
modify information in the following fields:
• ID#:
• Facility:
equipment
• Location:
the facility
• Description:
example, its name, serial number, and/or other feature
Header/Footer
icon
in the
Procedure Sections
- OR -
Identification
Edit>Header
section of the
Edit Header/Footer
.
window, enter or
The identification number for this procedure
Information that identifies the facility housing the
Information that identifies the equipment’s location within
Identifying information about the equipment itself — for
panel.
3
In the
Note
section of the
Edit Header/Footer
window, you can enter
additional information about the equipment. Select one of the three
options:
• None
• Predefined
, if you have no additional information to add.
, if you are choosing from a list; if so, click the down-arrow
in the text box, and then click the text to use.
• Custom
, if you intend to enter information that is not predefined. Just
type the information into the text box, or revise the existing text.
NOTE:
The text you select or type in will appear in the “NOTE”
section of the header on the Front Page.
4
In the
Page Footers
section of the
Edit Header/Footer
window, you can
enter or modify:
• Page Footer (left):
Any text you wish to appear on the bottom left of
every page
• Page Footer (center):
Any text you wish to appear on the bottom
center of every page
NOTE:
LOCKOUT-PROTM Graphical Procedure Writing Software
automatically inserts the current and total page numbers in the
footer on the bottom right side of the page.
•
•
LOCKOUT-PROTM DESKTOP USER GUIDE CREATING/REVISING PROCEDURES 4- 17
•
•
•
•
Page 56

5
In the
•
•
Author
If you are creating a new procedure, the
current date, and the
section, the dates are automatically displayed.
Created Date
Next Audit Date
shows the current date plus the
audit interval specified in the system’s defaults. The
field is blank. Only the
Next Audit Date
If you are revising an existing procedure, the
can be changed.
Revised Date
shows the
Revised Date
shows the
current date. The other dates are those generated when the
procedure was created. Only the
6
In the three name fields —
Created by, Revised by,
Next Audit Date
can be changed.
and
Next Audit by
you can either type in a name or select one from the drop-down list that
displays when you click the down-arrow in the box. If you enter a name
not on the list, it will be automatically added to the list for future
selection.
7
Click OK to add the header and footer information to your procedure.
The window will close and the procedure in the main window will be
updated with the information you added.
—
NOTE:
to your procedure, click the
If you
don’t
want to add the new or modified information
Cancel
button instead. Your changes
will be discarded.
Energy Sources
In this section, you can define or revise each energy source to be locked
out, and identify the methods and devices for doing so. You can also
rearrange the order of energy sources and delete energy sources from
the procedure.
To add energy sources to a Combined Form procedure:
1
Click on the
From the main menu, select
The
Energy Sources
•
If the
fields are blank, you can proceed to the next step.
•
If the window displays
the
Energy Sources
- OR -
window will open.
Energy Sources
Add Energy Source
window displays only the tab
icon in the
Edit>Energy Sources.
Procedure Sections
New Source
tabs for one or more energy sources,
button to open a window without existing data.
panel.
and all
click
4-18
•
•
•
C
REATI NG/REVISING PROCEDURES
•
•
•
TIP: Before you enter new information into a field, be sure to double-check
that you are not accidentally overwriting existing data or otherwise making
unwanted changes to a procedure.
LOCKOUT-PROTM DESKTOP USER GUIDE
Page 57

2
Choose the energy type by clicking the down-arrow in the text box under
Energy Type,
and then click your selection from the drop-down list. An
icon for that energy source appears below the name, and its label will be
added to the
3
Choose the energy source description by clicking the down-arrow in the
box under
Location
Description
text box when you enter a location.
, and then click the description you want to use.
Or, type your own description into the box. The description you’ve
chosen or entered will be added to the energy source box above.
NOTE:
Some descriptions (such as volts and psi) display “xx” to
remind you to enter a specific number. When this occurs, click on
the x’s, delete them, and type in the actual number.
TIP: The Lockout Process section of the Energy Sources window lets you pull
together and/or enter specific instructions for the lockout step. You can type
your own text into any of the text boxes, and it will appear on the procedure.
However, built-in default text can make your work much easier. Simply click
the down-arrow in each box to see the options. Click an option and the text
will appear in the text box on this window and on the actual procedure.
If these default lists do NOT contain the text or terms you often use, can
easily add them. See Chapter 7, “Setting Defaults in Lockout PRO” for
details.In the
source on the machine.
4
In the
on the machine.
5
In the
disconnect the energy source.
6
In the
energy source.
Location box, choose or type in the location of the energy
Location
Control/Method
Device
box, choose or type in the location of the energy source
box, choose or type in the method to use to
box, choose or type in the lockout device to use on the
7
In the
Check
box, choose or type in the method for checking to ensure
that the energy source is, indeed, locked out.
8
To add the next energy source, click the
Add Energy Source
button and
repeat steps 2-8 above.
9
When finished, click OK. You will return to the main window, where the
energy sources you added will appear on the procedure.
NOTE:
procedure, click the
If you
don’t
want to add the energy sources to your
Cancel
button instead. Your changes will be
discarded.
•
•
LOCKOUT-PROTM DESKTOP USER GUIDE CREATING/REVISING PROCEDURES 4- 19
•
•
•
•
Page 58
To revise one or more energy sources on a Combined Form:
1
Click on the
From the main menu, select
The
Energy Sources
each of the existing energy sources.
2
Click the tab of the energy source you wish to revise. The details for that
step will be displayed in the
3
Make your changes to the information on the screen.
4
When finished, click OK. You will return to the main window, where the
revisions you made will appear on the procedure.
Energy Sources
- OR -
window will open, with a tab displayed at the top for
icon in the
Edit>Energy Sources.
Energy Sources
Procedure Sections
window.
panel.
NOTE:
If you
don’t
want to keep the revisions, click the
button instead. Your changes will be discarded.
To rearrange energy sources on a Combined Form:
1
Click on the
From the main menu, select
The
Energy Sources
for each of the existing energy sources, in the order they will appear on
the printed procedure.
2
Click on the
3
When the
step to move, and then click the
the procedure until the energy sources are in the order you wish.
4
Click OK to close the
5
When finished, click OK on
the main window, where the revisions you made will appear on the
procedure.
Energy Sources
icon in the
- OR -
Edit>Energy Sources.
window will appear, with a tab displayed at the top
Arrange Energy Sources
Arrange Energy Sources
Arrange Energy Sources
Energy Sources
Procedure Sections
button.
window appears, click to select the
Up
or
Down
button to move it. Repeat
window.
window. You will return to
Cancel
panel.
4-20
•
•
•
C
REATI NG/REVISING PROCEDURES
•
•
•
NOTE:
If you
don’t
want to keep the revisions, click the
button instead. Your changes will be discarded.
To remove an energy source on a Combined Form:
1
Click on the
From the main menu, select
The
Energy Sources
each of the existing energy sources.
Energy Sources
- OR -
window will open, with a tab displayed at the top for
icon in the
Edit>Energy Sources.
Procedure Sections
LOCKOUT-PROTM DESKTOP USER GUIDE
Cancel
panel.
Page 59

2
Click the tab (
3
When the information for the energy source appears in the window,
click the
4
A dialog box will appear asking if you are sure. Click
delete the energy source, or
E-1, H-1
Remove Energy Source
, etc.) for the energy source you wish to remove.
No
button.
if you want to keep it.
Yes
if you want to
NOTE:
If you answer
Yes
, the energy source and all of its related
information will be deleted from the procedure.
5
When finished, click OK on
Energy Sources
window. You will return to
the main window, where the revisions you made will appear on the
procedure.
NOTE:
click the
If you want to
Cancel
button instead. Your changes will be discarded.
restore
the energy source(s) you deleted,
Images
In this section, you can add up to three images to the Combined Form.
They will appear above the table of energy sources. You can add labels
to the images to indicate control points or other features.
To add an image to a Combined Form procedure:
1
Click on the
From the main menu, select
When the
2
Image 2
Images
- OR -
Edit Image
, or
Image 3
icon
in the
Edit>Images.
Procedure Sections
panel.
window appears, click the tab at the top (
) for the image you want to add.
Image 1
,
3
Click the
NOTE:
Image 1
If no images have been added, the window will default to
with no content.
Browse...
button to browse to the folder where your images are
stored.
4
When you locate your image, double-click on it. It will be copied into the
Edit Image
window.
NOTE:
To edit and label the image, follow the steps in the
procedure below, “Working with images in your procedure” on
page 4-25.
5
To add another image, click the next image tab and repeat steps 3-4.
6
When you are finished, click OK to return to the main window.
•
•
LOCKOUT-PROTM DESKTOP USER GUIDE CREATING/REVISING PROCEDURES 4- 21
•
•
•
•
Page 60

General Information
The “General Info” for the Combined Form consists of information you
can enter to display in these areas of the procedure:
•
Emergency contact information, which is displayed at the bottom of
the Front Page
•
Notes that are displayed on the top of the
•
Procedure change information, which is displayed at the bottom of
the
last
Back Page
To add or modify the general information for a Combined Form procedure:
1
Click the
From the main menu, select
window will appear.
2
In the
information, which will appear in a box at the bottom of the Front Page.
3
In the
in a box at the top of the first Back Page.
General Info
icon in the
- OR -
Edit>General Info
Emergency Contact Information
Notes
text b o x, ent e r or mo d ify t h e infor matio n , whic h will a ppear
text box, enter or modify the
first
Back Page of the form
Procedure Sections
. The
General Information
panel.
4
In the
Procedure Change Notification
text box, enter or modify the
information, which will appear in a box at the bottom of the last Back
Page.
5
When done, click OK. The window will close and the procedure in the
main window will be updated with the information you added.
NOTE:
to your procedure, click the
If you
don’t
want to add the new or modified information
Cancel
button. Your changes will be
discarded.
Lockout Application & Lockout Release Steps
The Combined Form provides a format for listing the specific steps to
take in both
this procedure includes default steps for both processes. However, you
can add to or modify the default text, select new default text, type in
your own text, add steps, delete steps, and rearrange steps.
The process for adding and modifying
Steps and the Lockout Release Steps is the same, with these exceptions:
•
You click on
•
The windows and buttons for each type are l
appropriate name (
applying
the lockout and
different icons
either “Application” or “Lockout
releasing
both
the Lockout Application
it. The template for
or menu items for the two types.
abeled
with their
”).
4-22
•
•
•
C
REATI NG/REVISING PROCEDURES
•
•
•
LOCKOUT-PROTM DESKTOP USER GUIDE
Page 61

To add a lockout application OR lockout release step to a Combined Form procedure:
1
Click the
the
From the main menu, select
Release Steps.
The
default steps appearing as tabs across the top. The window will display
all the default information for the step whose tab is active.
2
Click the
next higher step number will be added, and the fields in the
Application
3
Type the description of the step in the
of default steps by clicking the down-arrow in the text box
click the text from the drop-down list.
4
In the text box under
step.
5
The
want additional text or an image (or neither) to appear in the
“Additional Info” column of the step.
•
To add text, click the
available.
•
To use a photo, drawing, or other type of image, click the
button and then click the
image.
Lockout Application Steps
Procedure Sections
- OR -
Lockout Application
Add Lockout Application
(or)
Release Steps
Additional Info
section of this window lets you indicate whether you
panel.
Edit>Lockout Application Steps
(or)
Release Steps
window will be blank.
Instructions
Text
radio button and type in the text in the box
Select
OR
Lockout Release Steps
icon in
OR
window will open with the
(or)
Release Step
Step
tex t box, o r c h o os e f r om a list
button. A tab with the
Lockout
,
and then
, enter the detailed instructions for the
Image
button to locate and insert your
Lockout
radio
NOTE:
For specific details on adding, editing, and labeling images,
see “Working with images in your procedure” on page 4-25.
6
When you are finished, click OK.
7
For each additional lockout step in the procedure, click the
(or)
Application
8
When you are finished adding steps, click OK. You will return to the
Release Step
button and repeat steps 3-6.
Add Lockout
main window, where the steps you added will appear on the procedure.
NOTE:
click the
If you
Cancel
don’t
want to add the new steps to your procedure,
button instead. Your changes will be discarded.
To revise a lockout application (OR release) step on a Combined Form:
1
Click on the
in the
From the main menu, select
LOCKOUT-PROTM DESKTOP USER GUIDE CREATING/REVISING PROCEDURES 4- 23
Lockout Application Steps
Procedure Sections
- OR -
OR
Lockout Release Steps
panel.
Edit>Lockout Application Steps
icon
OR
Lockout
•
•
•
•
•
•
Page 62

Release Steps.
The
Lockout Application
(or)
Release Steps
window will appear, with a tab
displayed at the top for each of the existing steps.
2
Click the tab of the step you wish to revise. The details for that step will
be displayed in the window.
3
Make any changes you wish to the information on the screen, using the
details outlined in the procedure above
OR lockout release step to a Combined Form procedure”)
4
When finished, click
OK.
You will return to the main window, where the
(“To add a lockout application
.
changes you made will appear on the procedure.
NOTE:
click the
If you
Cancel
don’t
want to add the revisions to your procedure,
button instead. Your changes will be discarded.
To rearrange lockout application (OR release) steps on a Combined Form:
1
Click on the
in the
From the main menu, select
Release Steps.
The
Lockout Application
displayed at the top for each of the existing steps, appearing in the order
they will appear on the printed procedure.
2
Click on the
3
When the
step to move, and then click the
the procedure until the steps are in the order you wish.
Lockout Application Steps
Procedure Sections
panel.
OR
Lockout Release Steps
- OR -
Edit>Lockout Application Steps
(or)
Release Steps
Arrange Lockout Application
Arrange Energy Sources
NOTE:
Each step’s original number will remain on the list and the
tab until you return to the
Steps
window, where the steps will appear in their new order.
window appears, click to select the
Up
Arrange Lockout Application
window will appear, with a tab
(or
Release) Steps
or
Down
button to move it. Repeat
icon
OR
.
(or)
Lockout
Release
4-24
•
•
•
C
REATI NG/REVISING PROCEDURES
•
•
•
4
When you are finished with the
Arrange Energy Sources
window, click OK.
You will return to the main window, where the changes you made will
appear on the procedure.
NOTE:
the
If you
Cancel
don’t
want to use the rearranged order of steps, click
button instead. Your changes will be discarded.
LOCKOUT-PROTM DESKTOP USER GUIDE
Page 63

To remove a lockout application (OR release) step from a Combined Form:
1
Click on the
in the
From the main menu, select
Release Steps.
The
Lockout Application
displayed at the top for each of the existing steps, appearing in the order
they will appear on the printed procedure.
2
Click the tab (
3
When the information for that step appears in the window, click the
Remove Lockout Application
4
A dialog box will appear asking if you are sure. Click
delete the step, or
Lockout Application Steps
Procedure Sections
- OR -
(or)
Step #1, Step #2
No
if you want to keep it.
OR
Lockout Release Steps
pane.
Edit>Lockout Application Steps
Release Steps
window will appear, with a tab
, etc.) for the step you wish to remove.
(or)
Release Step
button.
Yes
icon
OR
if you want to
Lockout
NOTE:
If you answer
Yes
, the step and all of its information will be
deleted from the procedure, and the steps that follow it will be
renumbered.
5
When you are finished with the
OK
window, click
. You will return to the main window, where the
Lockout Application
changes you made will appear on the procedure.
NOTE:
Cancel
If you want to
restore
the step(s) you deleted, click the
button instead. Your changes will be discarded.
Working with images in your procedure
All three forms in LOCKOUT-PROTM Graphical Procedure Writing
Software allow you to insert photos, drawings, or other images that help
illustrate the steps in the procedure. Although the location and number
of images varies according to the form, the procedure for inserting and
editing an image is the same for all forms.
Adding Images to Procedures
(or)
Release Steps
You can insert any image with one of these file types into a procedure:
•
Bitmap (file type extension:
•
TIFF (file type extension:
•
JPEG (file type extension:
•
Portable Network Graphics (file type extension:
LOCKOUT-PROTM DESKTOP USER GUIDE CREATING/REVISING PROCEDURES 4- 25
.tif
.jpg
.bmp
)
)
)
.png
)
•
•
•
•
•
•
Page 64

To add an image to a procedure, or to replace an existing image:
1
With your procedure open and displayed in the main window, access the
Edit Image
with.
window according to the type of procedure you’re working
For a Short Form or the front page of a Combined Form:
•
Click on the
From the main menu, select
•
When the
the image you wish to work with:
Energy Sources
-
OR -
Edit Image
icon in the
Edit>Images.
Procedure Sections
window appears, click the appropriate tab for
Image 1
or
Image 2
(or
the Combined Form).
For a Long Form or the back page(s) of a Combined Form:
•
Click on the appropriate
Sections
•
When when the
panel.
Procedure Step
Lockout Steps
window opens, click the tab for the
icon in the
lockout step you wish to add or replace an image in.
•
Click the radio button for
Image
, then click
Select
. The
window will open with the option for only one image.
NOTE:
Long Form procedures and the back pages of a Combined
Form procedure can incorporate multiple images, but only one per
lockout step.
2
Click the
stored.
Browse...
button to browse to the folder where your images are
panel,
Image 3
Procedure
Edit Image
, for
4-26
•
•
•
C
REATI NG/REVISING PROCEDURES
•
•
•
3
When you locate your image in the Windows
Open
and then click the
file. The image will be copied into the
NOTE:
If you are replacing an existing image, the new image will
button, OR simply double-click on the image
Edit Image
Open
dialog box, click on it
window.
overwrite the existing one at this point.
4
Enter or modify the title you want to assign the image by typing it into
the
Image Title
the list.
box or clicking the down-arrow and selecting one from
LOCKOUT-PROTM DESKTOP USER GUIDE
Page 65

Editing Images in Procedures
LOCKOUT-PROTM Graphical Procedure Writing Software includes
several built-in image-editing functions to ensure your image is clear
and informative. These functions, whose controls appear on the right
side of the
•
Make the entire image darker or lighter.
•
Increase or decrease the contrast between the light and dark areas of
the image.
•
Crop the photo to display only the area you want to include.
•
Rotate the image as much as you wish.
Each adjustment you make to the image will be reflected in the preview
window as soon as you make it. In addition, you can also dynamically
change the magnification level of the image to see a close-up or more
distant view. Simply click on the zoom-in or zoom-out buttons in the
editing controls section of the window.
To edit an image in a procedure:
1
Open the image in the
Edit Image
window, allow you to:
Edit Image
window:
NOTE:
When you add an image to a procedure, a
copy
of the image
you are using is created and stored with the procedure. As a result,
you can crop and otherwise modify an image for the procedure
without affecting the original image file.
2
Adjust
moving it to the left to make the picture lighter, or to the right to make
it darker.
3
Adjust
mo v i n g i t to t he l eft to reduce the contrast, or to the right to increase the
contrast.
4
To crop the image:
•
•
•
5
To rotate the image, click the
Rotate
6
If you do not want to keep the editing changes you have made, click the
Reset
the preview window will look as it did when you first opened it.
Brightness
Contrast
Click the
by clicking and holding your cursor on the slider and
by clicking and holding your cursor on the slider and
Crop
button.
Drag your cursor to outline the area of the image you want to keep.
The mouse will draw a rectangle where you move it.
Release the mouse button to crop the area outside the rectangle.
Rotate
button once. Each time you click
, the image rotates 90 degrees clockwise.
button. All edits you have made will be undone, and the image in
•
•
LOCKOUT-PROTM DESKTOP USER GUIDE CREATING/REVISING PROCEDURES 4- 27
•
•
•
•
Page 66

NOTE:
The
Reset
button only cancels the edits you make before
you click OK. If you edit an image, close this window, and then come
back, the edits you made previously can no longer be reset.
Using Labels on Images
LOCKOUT-PROTM Graphical Procedure Writing Software offers the
capability of adding energy source labels or text labels to the images in
your procedures. You can use labels to pinpoint the control points or to
direct attention to another part of the photo.
To add labels to an image:
1
After adding the image to the procedure
Procedures” on page 4-25)
2
Click the
3
To add an energy source label (e.g., E-1, H-1), select the energy source
Label Image...
, access the image in the
button to open the
from the list of sources in the box to the right of the image. Then click
the
< Add to Image
button. The energy source abbreviation appears in a
box in the upper left corner of the image. Follow the same steps to add
other energy sources from the list.
(see “Adding Images to
Edit Image
Label Image
window.
window.
4
In the
the image, and click the
5
To move each label to its appropriate location on the image, click on the
Custom Text
box, enter any text you want to appear in a label on
< Add to Image
button beneath it.
label and drag it to the correct place on the image.
6
If you want to remove a label you’ve added, click on the label itself,
where it appears on the image, and then click the
7
When you are done adding and placing labels, click OK.
Remove Label
button.
4-28
•
•
•
C
REATI NG/REVISING PROCEDURES
•
•
•
LOCKOUT-PROTM DESKTOP USER GUIDE
Page 67

C
HAPTER
U
5
SING
R
ELATED INFORMATION
• • • • • •
LOCKOUT-PROTM Graphical Procedure Writing Software provides a
range of related information for reference in creating a comprehensive
energy-control program. These related materials include:
•
OSHA regulations
•
A corporate lockout/tagout policy template
•
Employee training
•
Video and text guides for using Brady lockout devices
TM
In addition, LOCKOUT-PRO
information to make it even more specific to your organization.
lets you change the source of any of the
Overview of LOCKOUT-PRO’s Related Information
LOCKOUT-PROTM’s
documentation that supports your energy-control program. Unlike the
secondary materials (lockout tags and energy source labels), related
information is not connected to any specific procedure; it is provided for
reference only. Four types of related information are included:
Related Information
consists of HTML-based
Regulations
The
Regulations
OSHA regulation that requires lockout/tagout,
1910.147 - The control of hazardous energy
This feature lets you quickly access the regulations that affect your
entire energy control program.
LOCKOUT-PROTM DESKTOP USER GUIDE USING RELATED INFORMATION 5- 1
section provides a direct link to the full text of the
OSHA regulation
(lockout/tagout).
•
•
•
•
•
•
Page 68

Corporate Policy
The second item of related information consists of a sample generic
Corporate Policy
on lockout/tagout and other features of an energycontrol program. You can use this fully editable document as a template
for your own company’s policy by clicking on the link provided in the
sample policy.
Employee Training
The
Employee Training
section guides you through a thorough training
program for employees and other personnel working in your facility. It
includes an outline and more detailed information about recommended
training topics, as well as materials that can be used during the
training.
Device Guide
The
Device Guide
from your Brady distributor. For the most common devices, this section
also includes training videos that clearly show the proper application of
each device.
presents information on the lockout devices available
TIP: You can easily change the sources used in Related Information. For
example, you may want to link the Corporate Policy section to your own
organization’s policy. You can make these changes using the Edit Defaults
function of LOCKOUT-PRO
Settings Defaults” on page 7-19.
TM
. For details on how, see “Changing Section
Viewing & Printing Related Information
You can view and print any of these materials from either LOCKOUT-
TM
PRO
To v ie w R e la te d I n f o r m a t i o n :
1
From the main window, click the down-arrow on the
shortcut on the primary options taskbar.
Click
Standard Version of Viewer Version.
-OR-
View
on the main menu.
Related Information
5-2
•
•
•
U
SING RELATED INFORMATION
•
•
•
LOCKOUT-PROTM DESKTOP USER GUIDE
Page 69

2
From either drop-down menu, click the item you wish to view.
The HTML document containing the information will appear in the
main window, and a tab for it will be added to the window tab bar.
3
To access information from the main page of the information, click on
any link.
To print Related Information:
1
With the page you want to print displayed in the main window, click
from the main menu.
2
Click
Print
from the drop-down menu.
3
In the
4
Click the
Print
window that opens, select your options.
Print
button.
File
•
•
LOCKOUT-PROTM DESKTOP USER GUIDE USING RELATED INFORMATION 5- 3
•
•
•
•
Page 70

5-4
•
•
•
U
SING RELATED INFORMATION
•
•
•
LOCKOUT-PROTM DESKTOP USER GUIDE
Page 71

C
HAPTER
I
• • • • • •
Through its import function, LOCKOUT-PROTM Graphical Procedure
Writing Software v3.0 has the ability to easily convert lockout/tagout
procedures created in all earlier versions of LOCKOUT-PRO
It also can export files created in or converted to LOCKOUT-PRO
to a variety of other formats for use in other applications. This chapter
explains how to:
6
MPORTING
Import and convert earlier versions of LOCKOUT-PROTM files to
LOCKOUT-PRO
Export a LOCKOUT-PROTM v3.0 file to any of four other file
formats:
•
PDF document (file type *.pdf)
•
Color TIFF graphic (file type *.tif)
•
Black and white TIFF graphic (file type *.tif)
•
JPEG graphic (file type *.jpg)
/E
XPORTING
TM
v3.0.
P
ROCEDURES
TM
.
TM
v3.0
Importing LOCKOUT-PRO Procedures
In most cases, importing a previous version of a LOCKOUT-PROTM file
is fast and easy. However, there are some differences that may require
you to make a choice or adapt the procedure once it is converted.
In addition to converting a
process to convert
LOCKOUT-PROTM DESKTOP USER GUIDE IMPORTING/EXPORTING PROCEDURES 6- 1
multiple
single
procedure, you can use a batch
procedures.
•
•
•
•
•
•
Page 72

Format Differences in Earlier Versions
Format of energy source identifier:
LOCKOUT-PROTM Graphical
Procedure Writing Software v3.0 initially sets the icon as the default
way of representing an energy source. The format of a converted
procedure will automatically default to whatever default has been set in
v3.0. You can also change the format after conversion.
default itself, see “Change Energy Source Type Defaults” on page 7-4)
Number of images in Short Form:
With the addition of the
(To change the
.
Combined Form in v3.0, it is no longer necessary to try to accommodate
slightly longer procedures with the Short Form. As a result, the Short
Form now supports only two images, whereas earlier versions permitted
additional images on subsequent pages if the procedure exceeded a
single page. When you import a Short Form with more than two images,
LOCKOUT-PRO
Custom energy types:
TM
will prompt you to select the two images to leave in.
If you are importing a procedure that contains
a custom energy type you added to the system defaults in v2.x, the
converted procedure will keep that custom energy type. However, the
import process will not add the custom energy type to the system
defaults in v3.0. If you want the custom energy type to be available for
other procedures in v3.0, you will need to add it to the defaults.
(See
“Setting & Changing Energy Source Defaults” on page 7-3).
Energy source legend:
Version 1.0 included a static legend line
identifying the energy source abbreviations used on the procedure form.
This area was eliminated in v2.x and is not present in the v3.0
templates either, so that element is discarded from procedures
converted from v1.0.
“Control panel” label:
Version 1.0 included a “control panel” image
label, in addition to the energy source labels supported in v2.x and v3.0.
When you convert v1.0 procedures to v3.0, these labels are changed to
custom text labels and remain on the image in the imported procedure.
Importing a Single Procedure
To import a single procedure into LOCKOUT-PRO v3.0:
1
With LOCKOUT-PROTM v3.0 open, click
Procedure File (v1.x & v2.x)
2
When the Windows
Open
.
dialog box appears, it displays the files in the
default directory for LOCKOUT-PRO
click
Open
. LOCKOUT-PROTM will begin converting the file to v3.0.
File>Import>
TM
. Select the file to import and
6-2
•
•
•
I
MPORTING/EXPORTING PROCEDURES
•
•
•
LOCKOUT-PROTM DESKTOP USER GUIDE
Page 73

NOTE:
If the file to convert is in a different directory, use the
dialog box functions to locate the directory and display the file.
3
When the procedure appears in the main display area, it has been
converted, and you can make any changes to it that you wish
“Creating/Revising Procedures” on page 4-1)
the
Save Procedure
4
The Windows
button on the primary options taskbar.
Save As
dialog box will open. Type in the name you want
the procedure saved as. The conversion process is complete.
. When you are done, click
(see
Open
NOTE:
If you use the same name as the v1.x or v2.x procedure, the
v3.0 procedure will automatically overwrite the earlier one.
Importing Multiple Procedures
You can import multiple v1.x or v2.x procedures into v3.0 in one batch
process, as long as the procedures to be imported are all located in the
same directory.
To import multiple procedures into v3.0:
1
With LOCKOUT-PROTM v3.0 open, click
Convert v1.x Files
or
Convert v2.x Files
earlier files were created in.
2
In the
Batch Convert
window that appears, make sure the directory
containing the files to be converted appears in the
directory where the converted files are to be saved appears in the
Destination
box.
NOTE:
You can use the
Browse
correct directories for both fields.
File>Import
and then either
, depending on which version your
Source
box, and the
function to find and display the
3
With the correct directories displayed, click the
During the conversion process, LOCKOUT-PRO
•
Place a checkmark next to each file as it is converted.
•
If necessary, prompt you to choose images for Short Form procedures
Start Conversion
TM
will:
button.
containing more than two.
4
When the conversion is done, you can browse to another directory
containing more files you want to convert, or you can close the
Convert
window and return to the main LOCKOUT-PROTM window.
Batch
Exporting Procedures to Other Formats
One of the benefits of LOCKOUT-PROTM is that you can export
procedures you’ve already created into formats that can be used by other
applications, such as CMMS systems.
•
•
LOCKOUT-PROTM DESKTOP USER GUIDE IMPORTING/EXPORTING PROCEDURES 6- 3
•
•
•
•
Page 74

To export a v3.0 procedure to another format:
1
In LOCKOUT-PROTM, open the procedure to export, making sure it is
displayed as the active tab.
2
From the
Select the format you want to export the procedure to:
3
• PDF
• Color TIFF
• Black & White TIFF
• JPEG
4
The standard Windows
you wish to use for the exported file.
File
menu, select
(file type *.pdf)
(file type *.tif)
(file type *.jpg)
Export Procedure.
(file type *.tif)
Save As
dialog box will appear. Type in the name
NOTE:
If the correct directory is not displayed, use the Windows
browse function to access that directory.
5
Click the
format, making it accessible from the application you wish to use it
with.
Save
button. The procedure will be saved in your chosen
6-4
•
•
•
I
MPORTING/EXPORTING PROCEDURES
•
•
•
LOCKOUT-PROTM DESKTOP USER GUIDE
Page 75

C
HAPTER
S
• • • • • •
One of the powerful features of LOCKOUT-PROTM Graphical Procedure
Writing Software is its built-in structure of data and text defaults that
can save countless hours of entering repetitive data every time you
create or revise a procedure.
7
ETTING
D
EFAULTS IN LOCKOUT
PRO
In addition, you can customize the data in LOCKOUT-PRO
your own organization’s terminology, equipment, and other
lockout/tagout data. When you customize the defaults, your changes
will appear whenever you use the program.
This chapter explains how you can:
Add a new energy source type to the list of sources.
Add or modify basic data, such as header notes, energy source
locations, controls, and lockout device selections.
Add or modify the default lockout application steps and lockout
release steps.
Modify date formats.
Change the content of related information.
How Defaults Work
TM
to match
The process of generating a lockout/tagout procedure in LOCKOUT-
TM
PRO
easy to understand, and in compliance with regulations.
Brady Corporation has already programmed into LOCKOUT-PRO
information that is frequently used by numerous companies to create
effective lockout/tagout procedures. These information “defaults”
automatically appear in the windows and dialog boxes used to create or
edit a procedure.
LOCKOUT-PROTM DESKTOP USER GUIDE SETTING DEFAULTS IN LOCKOUT PRO 7- 1
involves compiling information into a format that is accurate,
TM
•
•
•
•
•
•
Page 76

In addition, LOCKOUT-PROTM Graphical Procedure Writing Software
provides the flexibility to create your own defaults and to modify or
delete the ones included with the application. As a result, you can
customize the application to meet your specific needs in terms of images
and text that appear on a procedure.
When you make any changes to the default lists, those changes will
appear every time you work in LOCKOUT-PRO
Accessing System Defaults
You can change any of LOCKOUT-PROTM’s system defaults from the
Admin
option on the main menu.
To access the system defaults:
1
From the main menu, click
2
Click
Set Defaults
3
The
Set Defaults
for each category of defaults. Click the category tab for the settings you
wish to change.
4
Follow the specific steps listed below for working with each type of
default:
•
Energy source defaults
•
Basic data defaults
•
Lockout step defaults
•
Procedure defaults
•
Section settings defaults
from the submenu.
window will open, displaying five tabs at the top — one
Admin
TM
from that point on.
.
7-2
•
•
•
S
ETTING DEFAULTS IN LOCKOUT
•
•
•
5
When you are done working with the defaults, click the OK button on the
Set Defaults
TIP: When changing a default, be sure to verify that your changes are correct
before you click the
can restore the existing defaults by clicking the
Defaults window. The window will close, and your changes will be discarded.
PRO LOCKOUT-PROTM DESKTOP USER GUIDE
window to return to the main LOCKOUT-PROTM window.
OK button. If you make an error or change your mind, you
Cancel button on the Set
Page 77

Setting & Changing Energy Source Defaults
When the
Sources
•
Indicate how the energy source
Set Defaults
window first opens, the information in the
tab is on top. From this tab, you can:
identifier
should appear on the
procedure (icon or abbreviation format).
•
Add, change, or remove
•
Add, change, or remove energy source
types
of energy sources.
descriptions
.
Following are the step-by-step instructions for making changes to any
of these three default types.
Change Energy Source Identifier Default
When an energy source is displayed graphically, LOCKOUT-PROTM
Graphical Procedure Writing Software automatically inserts either an
icon
or an
these options to set as the default.
To set the default for energy source identifiers:
1
Access the
2
In the
description of how you want energy sources to appear visually on
procedures:
•
The option to
example, for electrical energy sources).
•
The option to
abbreviation
sources).
abbreviation
Set Defaults
Identifier
as an identifier. You can determine which of
window and select the
Energy Sources
tab.
section of the window, click the radio button next to the
Show energy source icon
Show energy source identifier
as the default (for example,
sets
icons
as the default (for
sets the
E-1
letter-number
for electrical energy
Energy
3
In the
Set Defaults
window, click OK to save your changes or
Cancel
to
discard them.
•
•
LOCKOUT-PROTM DESKTOP USER GUIDE SETTING DEFAULTS IN LOCKOUT PRO 7- 3
•
•
•
•
Page 78
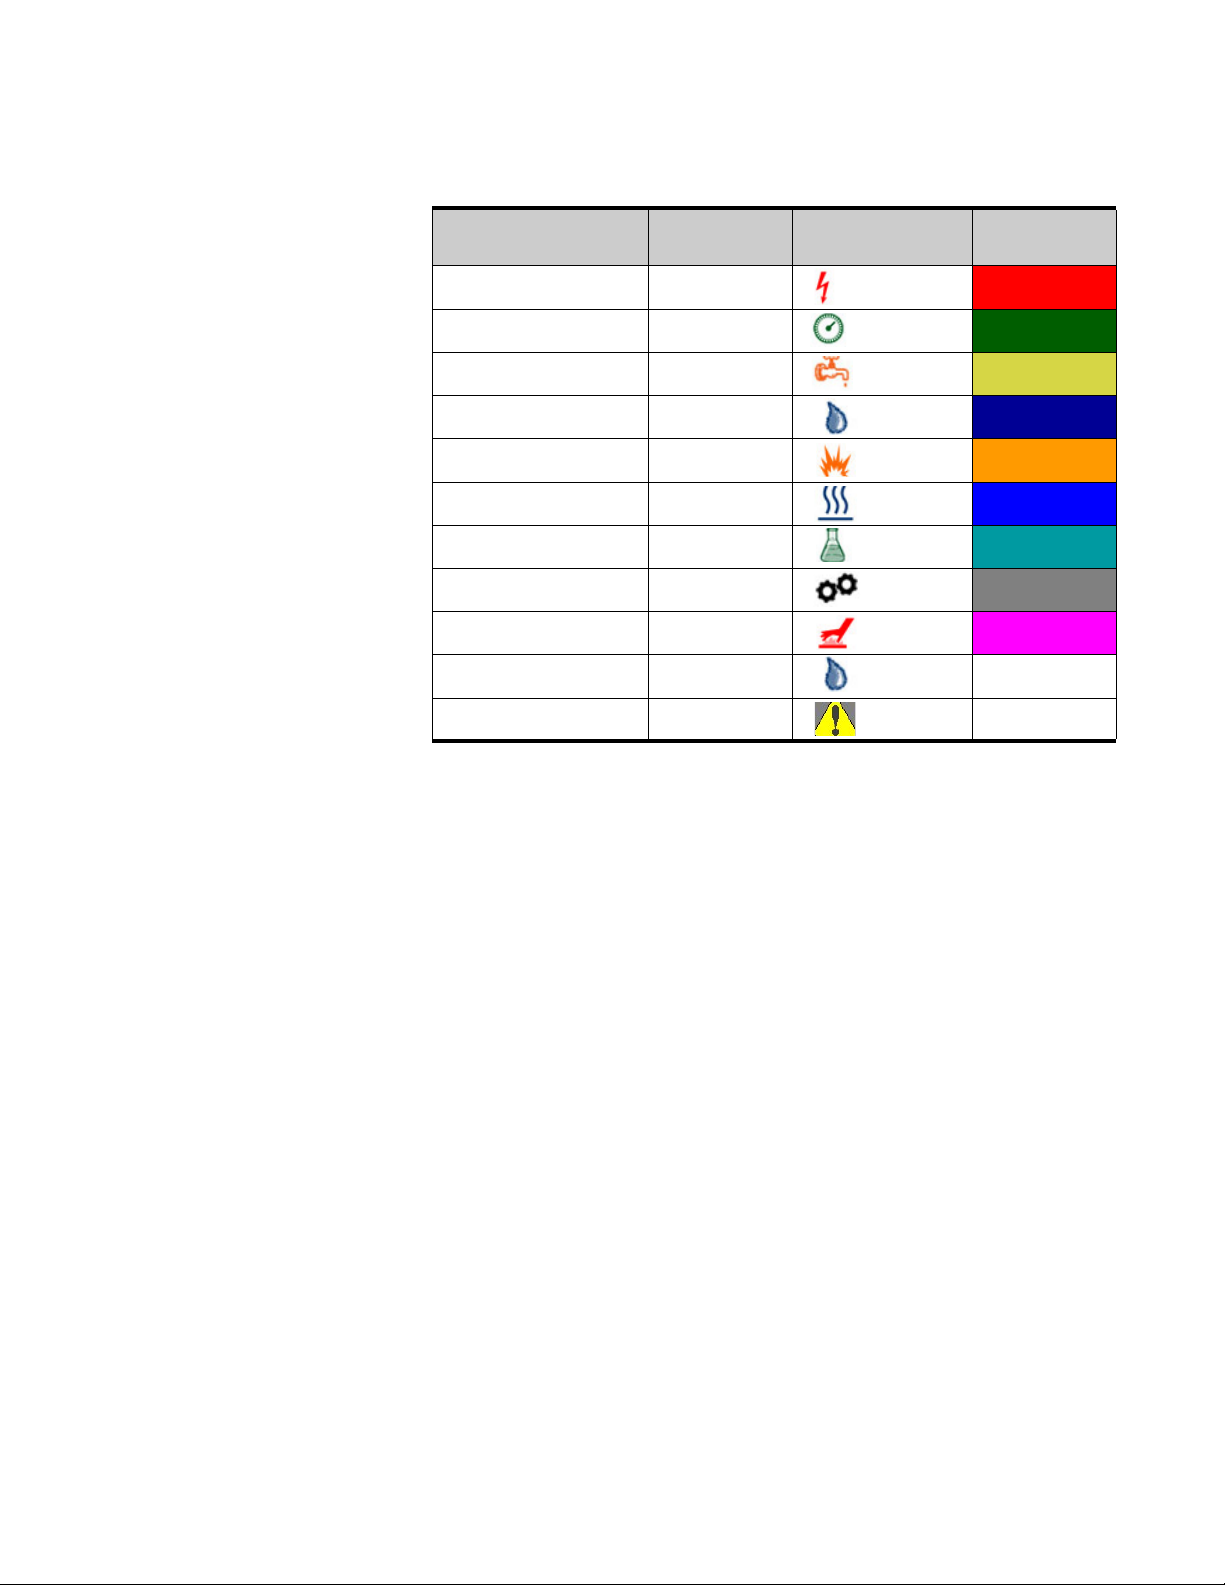
Change Energy Source Type Defaults
BUILT-IN OPTIONS FOR ENERGY SOURCE TYPES
Name: Abbre-
Icon: Color:
viation:
Electrical E
Pneumatic P
Hydraulic H
Water W
Gas G
Steam S
Chemical C
Kinetic K
Thermal T
Valve V
Note !
To add an energy source type to the default list:
7-4
•
•
•
S
ETTING DEFAULTS IN LOCKOUT
•
•
•
1
Access the
2
Click the
types already defined in LOCKOUT-PRO
Set Defaults
New
button under the box that displays the energy source
window and select the
TM
Graphical Procedure
Energy Sources
tab.
Writing Software.
3
In the
of the energy source in the
4
In the
Add/Edit Energy Source Type
Energy Type
Abbreviation
box, enter the abbreviation to use (usually one or two
window that appears, enter the name
box.
letters or other characters).
5
Choose a color to represent the new energy source type by clicking the
Select
button to the right of the
6
When the
click
7
To associate an icon with this new energy source, click the
to the right of the
8
When the
Color
window appears, click the color you want to use and then
OK
. The color will appear in the
Icon
box.
Select Energy Source Icon
your choice, and then click
PRO LOCKOUT-PROTM DESKTOP USER GUIDE
Color
box.
Color
box.
window appears, click the icon of
OK
. The icon will appear in the
Select
Icon
button
box.
Page 79

9
When finished, click OK in the
return to the
10
In the
Set Defaults
Set Defaults
window, click OK to save your changes or
Add/Edit Energy Source Type
window.
window to
Cancel
discard them.
To edit an energy source type on the default list:
1
Access the
2
In the box displaying the energy source types, click the one you want to
change. Then click the
3
The
Add/Edit Energy Source Type
information displayed for that type. Make the changes you wish in these
fields:
• Energy Type:
• Abbreviation:
• Color:
color in the
• Icon:
box. Then click the new icon in the
and click
Set Defaults
window and select the
Edit
button under the box.
window will appear with all the current
Enter changes to the name of the source.
Enter changes to the abbreviation
Change the color by clicking the
Color
window, and then click OK.
Change the icon by clicking the
Select Energy Source Icon
OK
.
Energy Sources
Select
button. Click the new
Select
button to the right of the
tab.
window
to
4
In the
Set Defaults
window, click OK to save your changes or
Cancel
discard them.
To remove an energy source type from the default list:
1
Access the
2
In the box displaying the energy source types, click the energy source
Set Defaults
window and select the
Energy Sources
tab.
you want to remove.
3
Click the
Remove
button. The energy source type will be removed from
the display.
NOTE:
You cannot remove the “Note” type from the list of energy
source types.
4
In the
discard them.
Set Defaults
window, click OK to save your changes or
Cancel
to
to
•
•
LOCKOUT-PROTM DESKTOP USER GUIDE SETTING DEFAULTS IN LOCKOUT PRO 7- 5
•
•
•
•
Page 80

Energy Source Description Defaults
BUILT-IN DEFAULT OPTIONS FOR
ENERGY SOURCE DESCRIPTIONS
Name:
Primary Feed
Secondary Feed
xx volts
xx psi
Inlet
Discharge
Supply
Return
To add an energy source description to the default list:
1
Access the
Set Defaults
window and select the
Energy Sources
tab.
2
Under the
the
New
3
In the
in the
4
Click OK. The
Descriptions
box displaying the current list of defaults, click
button.
Add/Edit Descriptions
Name
box.
Add/Edit Descriptions
window that appears, enter the description
window will close, and the
description will be added to the bottom of the list.
5
In the
Set Defaults
window, click OK to save your changes or
discard them.
To modify an energy source description on the default list:
1
Access the
2
In the
Edit
button under the box.
3
In the
the
Name
4
Click OK. The
description will appear in the list.
5
In the
discard them.
Set Defaults
Descriptions
Add/Edit Descriptions
window and select the
box, click the one you want to change. Then click the
box.
Add/Edit Descriptions
Set Defaults
window, click OK to save your changes or
Energy Sources
window that appears, enter your changes in
window will close, and the revised
Cancel
tab.
Cancel
to
to
7-6
•
•
•
S
ETTING DEFAULTS IN LOCKOUT
•
•
•
PRO LOCKOUT-PROTM DESKTOP USER GUIDE
Page 81

To remove an energy source description from the default list:
1
Access the
2
In the
3
Click the
display.
Set Defaults
Descriptions
Remove
window and select the
Energy Sources
box, click the description you want to remove.
button. The description will be removed from the
tab.
NOTE:
button on the
If you accidentally remove a description, click the
Set Defaults
window. The window will close, and
when you return, the description will be restored.
4
In the
Set Defaults
window, click OK to save your changes or
discard them.
Setting & Changing Basic Data Defaults
As you create a lockout/tagout procedure, you will find “shortcuts” to
adding text to the procedure via lists of words or phrases that you can
click to insert into the procedure. These lists include information for
header notes, energy source locations, controls, and lockout devices.
You can customize these lists by adding, modifying, or deleting items.
From the
•
Add, modify, or remove items on a list of statement to use in the
“
Note
•
Add, modify, or remove items on a list of
Basic Data
” section of a header.
instructions.
•
Add, modify, or remove items on a list of machine
insert into lockout instructions.
•
Add, modify, or remove items on a list of
in lockout instructions.
tab in the
Set Defaults
window, you can:
controls
lockout devices
Cancel
Cancel
to
to use in lockout
location points
to specify
to
Following are the step-by-step instructions for making changes to any
of these default lists.
•
•
LOCKOUT-PROTM DESKTOP USER GUIDE SETTING DEFAULTS IN LOCKOUT PRO 7- 7
•
•
•
•
Page 82

Header “Note” Defaults
A lockout/tagout procedure often requires special notes, such as
warnings, information about a machine feature, or other
communication that is not part of a specific lockout step. LOCKOUT-
TM
PRO
procedure headers where that information can be inserted. To speed up
the process, LOCKOUT-PRO
from which you can select — or you can customize the list to meet your
specific needs.
Graphical Procedure Writing Software provides a display box on
TM
also provides a list of common notes
BUILT-IN OPTIONS FOR TEXT “NOTES” IN HEADERS
Name: Text That Will Appear on Procedure:
Capacitor This machine has internal capacitors. You must ensure
they are fully discharged before proceeding.
Chiller This machine is capable of generating extremely cold
temperatures. Allow it to return to room temperature
before proceeding.
Flywheel This machine has an internal flywheel. You must ensure
that it has come to a complete stop before proceeding.
Heater This machine is capable of generating extremely high
temperatures. Allow it to return to room temperature
before proceeding.
Molding Press You must ensure the internal capacitors are fully
discharged before proceeding. This procedures does
not deenergize the external electrical outlets.
Injection Molder Machine generates extreme heat and pressure. Ensure
pressure has vented and press is room temperature
before proceeding.
To add a note to the default list:
1
Access the
2
In the
Set Defaults
Notes (Procedure Header)
window and select the
Basic Data
tab.
section of the window, click the
button.
3
When the
note in the
Add/Edit Notes
Name
box.
NOTE:
When you are creating the header of a procedure, the list
window appears, enter the short name of the
of default notes will display only these names — not the full text of
the note.
New
7-8
•
•
•
S
ETTING DEFAULTS IN LOCKOUT
•
•
•
4
In the
Text
box, type in the full text of the note as you want it to appear
on the procedure.
PRO LOCKOUT-PROTM DESKTOP USER GUIDE
Page 83

5
Click OK to add the note. The name you entered will be added to the list
6
on the
In the
Set Defaults
Set Defaults
window.
window, click OK to save your changes or
Cancel
discard them.
To modify a header note on the default list:
1
Access the
2
In the
wish to edit, then click the
3
When the
Set Defaults
Notes (Procedure Header)
Add/Edit Notes
window and select the
Edit
window appears, enter your changes to either
Basic Data
tab.
section of the window, click the note you
button.
or both the short name and the full text of the note.
4
When finished, click OK to return to the
5
In the
Set Defaults
window, click OK to save your changes or
Set Defaults
window.
Cancel
discard them.
To remove a header note from the default list:
1
Access the
2
In the
the list that you wish to remove.
Set Defaults
Notes (Procedure Header)
window and select the
Basic Data
tab.
section of the window, click the note on
to
to
3
With the note’s name highlighted, click the
NOTE:
the
If you accidentally remove a note, click the
Set Defaults
window. The window will close, and when you
return, the note will be back on the list.
4
In the
discard them.
Set Defaults
window, click OK to save your changes or
Remove
button.
Cancel
button on
Cancel
to
•
•
LOCKOUT-PROTM DESKTOP USER GUIDE SETTING DEFAULTS IN LOCKOUT PRO 7- 9
•
•
•
•
Page 84

Change Controls & Methods Defaults
BUILT-IN OPTIONS FOR CONTROLS AND METHODS
Name: Text Description of Method:
Disconnect Turn Disconnect to the off position and lock out.
Breaker Turn Breaker to the off position and lock out.
Plug Unplug and apply lockout device.
Ball Valve Turn Valve to the off position and lock out.
Globe/Gate Valve Turn Globe/Gate Valve to the off position and lock out.
Dump Valve Turn Dump Valve to the off position and lock out.
To add a control and its method to the default list:
1
Access the
2
In the
3
When the
control in the
Set Defaults
Controls
section of the window, click the
Add/Edit Controls
Name
window and select the
window appears, enter the name of the
box.
Basic Data
New
button.
tab.
4
In the
Text
box, enter the description of the method used to apply the
control, just as you want it to appear on the procedure.
5
Click OK to add the control and return to the
Set Defaults
window, where
the control will be added to the list.
6
In the
Set Defaults
window, click OK to save your changes or
Cancel
discard them.
To modify a control and/or method on the default list:
1
Access the
2
In the
then click the
3
When the
either or both the name of the control and the description of its method.
4
Click OK to save the changes and return to the
5
In the
discard them.
Set Defaults
Controls
Set Defaults
section of the window, click the control you wish to edit,
Edit
button.
Add/Edit Controls
window and select the
Basic Data
tab.
window appears, enter your changes to
Set Defaults
window, click OK to save your changes or
window.
Cancel
to
to
7-10
•
•
•
S
ETTING DEFAULTS IN LOCKOUT
•
•
•
PRO LOCKOUT-PROTM DESKTOP USER GUIDE
Page 85

To remove a control from the default list:
1
Access the
2
In the
you wish to remove.
3
With the control’s name highlighted, click the
Set Defaults
Controls
window and select the
section of the window, click the control on the list that
Basic Data
Remove
button.
tab.
NOTE:
on the
If you accidentally remove a control, click the
Set Defaults
window. The window will close, and when you
return, the control will be restored.
4
In the
Set Defaults
window, click OK to save your changes or
discard them.
Change Location Defaults
BUILT-IN OPTIONS FOR SPECIFYING LOCATIONS
Name:
North Front
South Back
East Infeed
West Discharge
Top Left
Cancel
Cancel
button
to
Bottom Right
To add a location to the default list:
1
Access the
2
In the
3
When the
Name
4
Click OK to add the location. It will be added to the list of locations in the
Set Defaults
5
In the
discard them.
LOCKOUT-PROTM DESKTOP USER GUIDE SETTING DEFAULTS IN LOCKOUT PRO 7- 11
Set Defaults
Locations
section of the window, click the
Add/Edit Locations
box.
window.
Set Defaults
window and select the
Basic Data
New
button.
tab.
window appears, enter the location in the
window, click OK to save your changes or
Cancel
to
•
•
•
•
•
•
Page 86

To modify a location on the default list:
1
Access the
2
In the
then click the
3
When the
Name
4
Click OK to save the changes and return to the
5
In the
Set Defaults
Locations
section of the window, click the location you wish to edit,
Edit
Add/Edit Locations
text box.
Set Defaults
window and select the
button.
window appears, enter your changes in the
window, click OK to save your changes or
discard them.
To remove a location from the default list:
1
Access the
2
In the
you wish to remove.
3
With the location’s name highlighted, click the
Set Defaults
Locations
window and select the
section of the window, click the location on the list that
Basic Data
Set Defaults
Basic Data
Remove
button.
tab.
window.
Cancel
tab.
to
4
In the
discard them.
NOTE:
on the
If you accidentally remove a location, click the
Set Defaults
window. The window will close, and when you
return, the location will be restored.
Set Defaults
window, click OK to save your changes or
Cancel
Cancel
button
to
7-12
•
•
•
S
ETTING DEFAULTS IN LOCKOUT
•
•
•
PRO LOCKOUT-PROTM DESKTOP USER GUIDE
Page 87
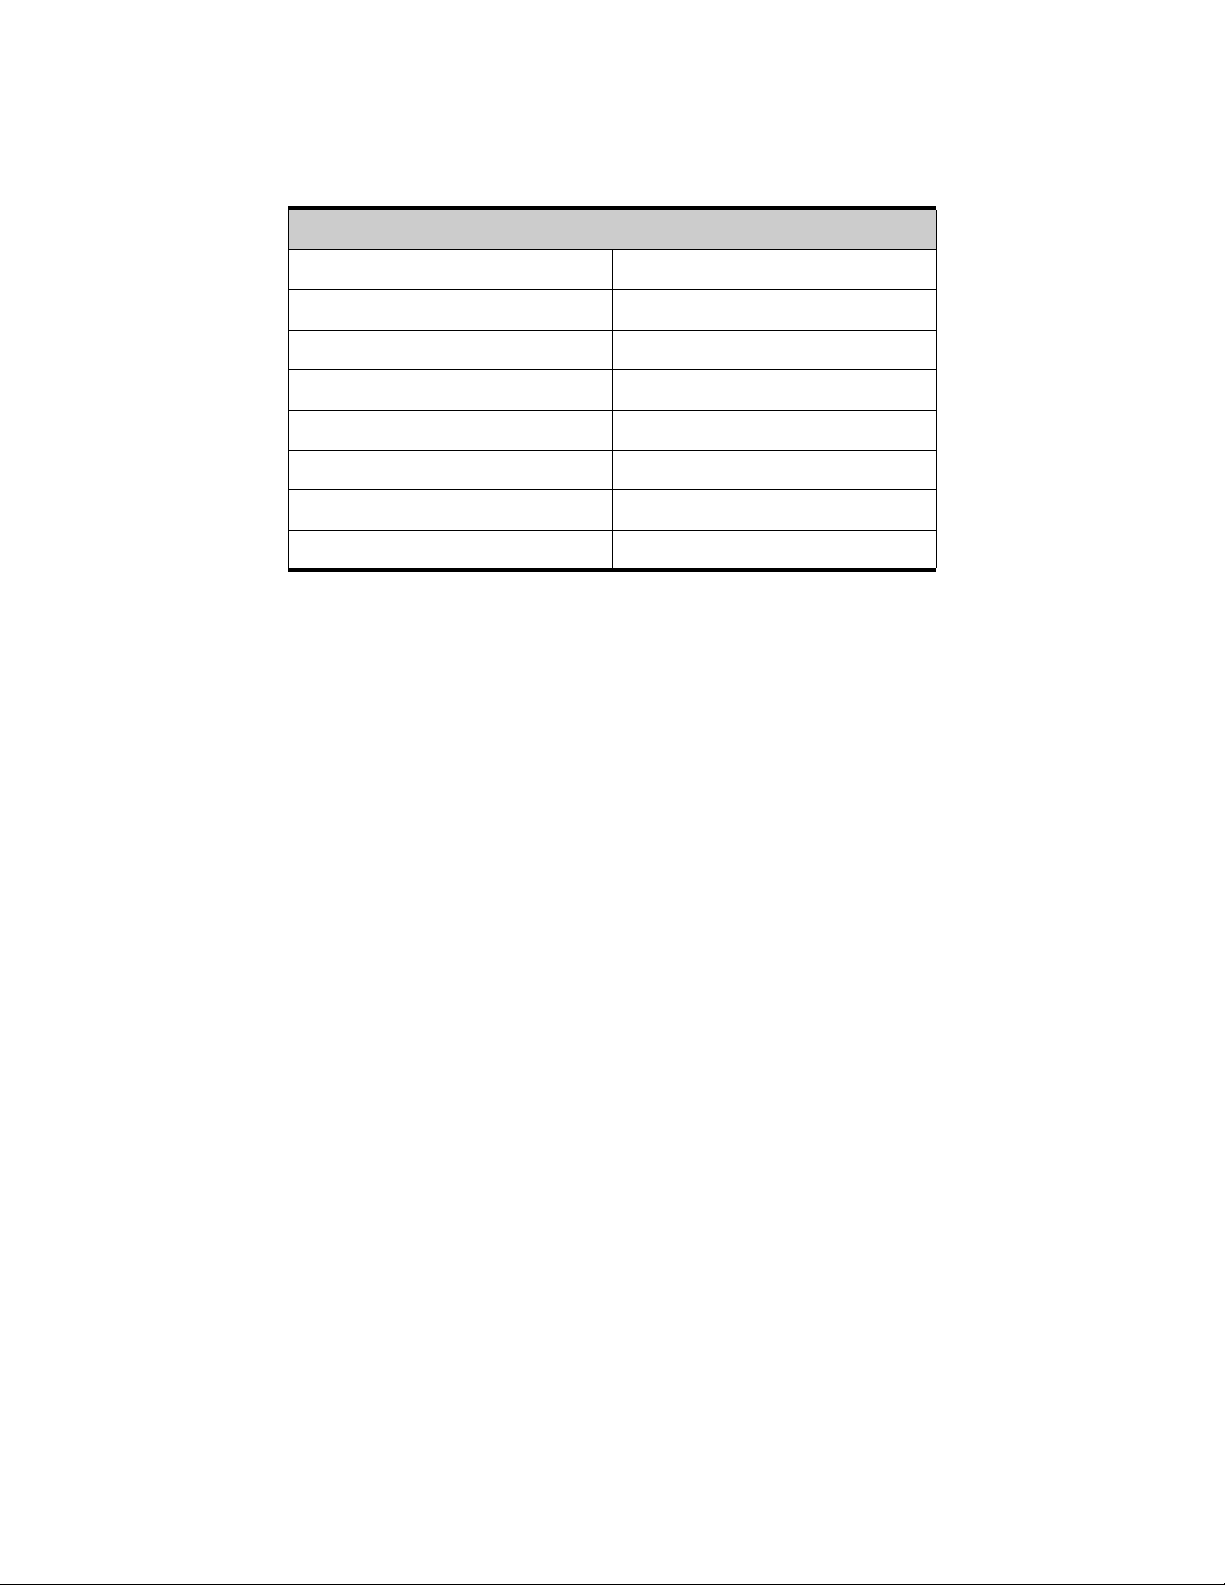
Change Lockout Device Defaults
BUILT-IN DEFAULTS FOR LOCKOUT DEVICES
Name:
Ball valve lockout Lock
Cable lockout Lock and chain
Chain Lock and hasp
Circuit breaker lockout Pneumatic disconnect lockout
Electrical plug lockout Universal ball valve lockout
Fuse blockout Wall switch lockout
Gas cylinder lockout Die block
Gate valve lockout Pin
To add a lockout device to the default list:
1
Access the
2
In the
Set Defaults
Devices
window and select the
section of the window, click the
Basic Data
New
button.
tab.
3
When the
the
Name
4
Click OK to add the device and return to the
5
In the
Add/Edit Devices
box.
Set Defaults
window appears, enter the lockout device in
window, click OK to save your changes or
discard them.
To modify a lockout device on the default list:
1
Access the
2
In the
edit, then click the
3
When the
Name
4
Click OK to return to the
5
In the
discard them.
Set Defaults
Devices
section of the window, click the device name you wish to
Add/Edit Devices
text box.
Set Defaults
window and select the
Edit
button.
window appears, enter your changes in the
Set Defaults
window.
window, click OK to save your changes or
Set Defaults
Basic Data
window.
Cancel
tab.
Cancel
to
to
•
•
LOCKOUT-PROTM DESKTOP USER GUIDE SETTING DEFAULTS IN LOCKOUT PRO 7- 13
•
•
•
•
Page 88

To remove a lockout device from the default list:
1
Access the
2
In the
list that you wish to remove.
3
With the lockout device’s name highlighted, click the
Set Defaults
Devices
window and select the
section of the window, click the name of the device on the
Basic Data
Remove
tab.
button.
NOTE:
on the
If you accidentally remove a device, click the
Set Defaults
window. The window will close, and when you
return, the device will be restored.
4
In the
Set Defaults
window, click OK to save your changes or
discard them.
Setting and Changing Lockout Step Defaults: (Combined Form only)
The Back Page(s) of a Combined Form displays the steps involved in
both applying the lockout and releasing it. These steps are essential for
including on the procedure so employees are reminded to follow them.
However, they are usually described in general terms that are
applicable to most lockout/tagout procedures. To simplify the process of
adding these steps to a procedure, LOCKOUT-PRO
Procedure Writing Software includes the steps and their specific
instructions in default lists for you to choose from.
Unlike the other default lists, the lockout application and release step
defaults have two layers of functioning: 1) the list itself, and 2)
checkboxes to include a step automatically or manually. You can
customize both the contents of the lists, as well as which ones are
automatically included in a procedure.
TM
Graphical
Cancel
Cancel
button
to
7-14
•
•
•
S
ETTING DEFAULTS IN LOCKOUT
•
•
•
You can change these defaults by going to the
Set Defaults
•
Add, change, or remove
release steps
•
Indicate which steps should appear automatically by default, and
window, where you can:
lockout application steps
on the default list.
Lockout Steps
and
tab in the
lockout
which ones appear only if manually selected for a procedure.
•
Add, change, or remove items on a list of
checks
for ensuring an
energy source is fully de-energized.
Following are the step-by-step instructions for making changes to these
defaults.
PRO LOCKOUT-PROTM DESKTOP USER GUIDE
Page 89

Change Lockout Step Defaults
Although the defaults for lockout
release
steps consist of two different lists, the process for setting and
application
steps and lockout
changing these defaults is identical. You can use the procedures that
follow for
either
list.
BUILT-IN OPTIONS FOR LOCKOUT APPLICATION STEPS
Name: Text of Lockout Application Step:
Notify Employees Notify all affected employees that the machine or
equipment will be shutdown and locked out.
Review Procedure Ensure that each authorized employee
understands the type and magnitude of the energy
present, the associated hazards and the proper
methods of control.
Shutdown Equipment If the machine or equipment is operating, shut it
down by the normal stopping procedure.
Isolate Energy De-activate the energy isolating devices(s) so that
the machine or equipment is isolated from the
energy source(s).
Lockout Controls Lockout the energy isolating device(s) as indicated
on the front of this procedure.
Dissipate Energy Dissipate any stored or residual energy as
indicated on the front of this procedure.
Verify Isolation Verify that the energy source has been isolated as
indicated on the front of this procedure.
BUILT-IN OPTIONS FOR DEFAULT LOCKOUT RELEASE STEPS
Name: Text of Lockout Release Step:
Inspect Equipment Check the equipment to ensure that the components
are operationally intact.
Check Area Check the immediate area to ensure that all
employees have been safely positioned, and that
any nonessential items have been removed.
Check Neutral Verify that operating controls are in neutral.
Re-Energize Remove the lockout device(s) and activate the
energy isolating device(s) to re-energize the
equipment.
Notify Employees Notify affected employees that the servicing or
maintenance is completed and the equipment is
ready for use.
Startup Equipment Startup equipment and monitor for several operating
cycles to ensure it is functioning properly.
•
•
LOCKOUT-PROTM DESKTOP USER GUIDE SETTING DEFAULTS IN LOCKOUT PRO 7- 15
•
•
•
•
Page 90

To add a lockout step to either default list:
1
Access the
2
In the
the
New
3
When the
appears, enter the short version of the step in the
4
In the
on the procedure.
5
Click OK to add the step. The short version of the step you entered in the
Name
and the box next to it will be checked to appear automatically on the
procedure.
Set Defaults
Application
window and select the
or
Lockout Release Steps
Lockout Steps
section of the window, click
button.
Add/Edit Lockout Application
Text
box, enter the full text of the step as you want it to appear
box will be added to the list of steps in the
(or)
Release Steps
window
Name
box.
Set Defaults
tab.
window,
NOTE:
If you do
not
want the new step to appear automatically on
the procedure, click in the checkbox in front of it to remove the
check.
6
In the
Set Defaults
window, click OK to save your changes or
Cancel
discard them.
To modify a lockout step on either default list:
1
Access the
2
In the
the step you wish to edit, then click the
3
When the
Set Defaults
Application
Add/Edit Lockout Application
window and select the
or
Lockout Release Steps
Lockout Steps
tab.
section of the window, click
Edit
button.
(or)
Release Steps
window
appears, enter your changes to either or both the short version of the
step (in the
4
Click OK to save the changes and return to the
5
In the
Name
Set Defaults
box) or the long version (in the
Text
box).
Set Defaults
window, click OK to save your changes or
window.
Cancel
discard them.
To remove a lockout step from either default list:
to
to
7-16
•
•
•
S
ETTING DEFAULTS IN LOCKOUT
•
•
•
1
Access the
2
In the
Set Defaults
Application
window and select the
or
Lockout Release Steps
Lockout Steps
tab.
section of the window, click to
highlight the step you wish to remove.
3
With the step highlighted, click the
NOTE:
the
If you accidentally remove a step, click the
Set Defaults
window. The window will close, and when you
Remove
button.
Cancel
button on
return, the step will be restored to the list.
4
In the
discard them.
Set Defaults
PRO LOCKOUT-PROTM DESKTOP USER GUIDE
window, click OK to save your changes or
Cancel
to
Page 91

Changing which Lockout Steps Appear Automatically
When you are creating a procedure, the lockout application and release
steps on the default list will either appear automatically on the
procedure, or will show up in a list from which you can select. You
determine which will happen by setting those defaults, as well.
To indicate the steps to appear automatically by default:
1
Access the
2
In the
•
Click to display a checkmark in empty boxes in front the steps you do
want to be added automatically to procedures.
•
Click to remove the checkmark from any boxes of steps you
want to be added automatically.
3
In the
discard them.
Set Defaults
Application
Set Defaults
window and select the
or
Lockout Release Steps
Lockout Steps
section of the window:
window, click OK to save your changes or
tab.
do not
Cancel
Change Defaults for Energy Source Checks
to
The Combined Form provides space to include a method for checking
whether a given energy source is fully locked out after completion of a
step. You can select from a default list of common checks. You can also
add to the list, edit the existing checks, or remove checks from the list.
BUILT-IN OPTIONS FOR DEFAULT CHECKS
Text for Checks:
Attempt to restart at control panel.
Open drain valve to dissipate pressure.
Verify gauge pressure reads zero.
Verify zero voltage reading with meter.
To add a lockout check to the default list:
1
Access the
2
In the
3
When the
Name
the
4
Click OK to add the check. It will be added to the list of checks in the
Defaults
Set Defaults
Checks
section of the window, click the
Add/Edit Checks
box.
window.
window and select the
Lockout Steps
New
button.
tab.
window appears, enter the check procedure in
Set
5
In the
Set Defaults
window, click OK to save your changes or
Cancel
to
discard them.
•
•
LOCKOUT-PROTM DESKTOP USER GUIDE SETTING DEFAULTS IN LOCKOUT PRO 7- 17
•
•
•
•
Page 92

To modify a lockout check on the default list:
1
Access the
2
In the
3
When the
Name
4
Click OK to save the changes and return to the
5
In the
Set Defaults
Checks
section of the window, click the
Add/Edit Checks
text box.
Set Defaults
window and select the
window appears, enter your changes in the
window, click OK to save your changes or
discard them.
To remove a lockout check from the default list:
1
Access the
2
In the
that you wish to remove.
3
With the check highlighted, click the
Set Defaults
Checks
window and select the
section of the window, click the lockout check on the list
Remove
Lockout Steps
Edit
button.
Set Defaults
Lockout Steps
button.
tab.
window.
Cancel
tab.
to
NOTE:
on the
If you accidentally remove a check, click the
Set Defaults
window. The window will close, and when you
return, the check will be restored.
4
In the
Set Defaults
window, click OK to save your changes or
discard them.
Setting & Changing Procedure Defaults
The fourth tab on the
you change the default settings for three additional pieces of data:
•
The
length of time
•
How
the date and time will be displayed on procedures
Set Defaults window — Procedure Defaults — lets
before the procedure next needs to be audited
Cancel
Cancel
button
to
7-18
•
•
•
S
ETTING DEFAULTS IN LOCKOUT
•
•
•
PRO LOCKOUT-PROTM DESKTOP USER GUIDE
Page 93

BUILT-IN OPTIONS FOR PROCEDURE DEFAULTS
Data: Initially set to: Can change to:
Next audit date interval 12 months Any monthly interval
Date format Date without time Date with time
To change any of the procedure defaults:
1
Access the
2
Make changes as desired:
•
To change the
Set Defaults
window and select the
Next Audit Date Interval
, type in a different number or
use the up and down arrows to shorten or lengthen the interval.
•
To change the
Date Format
, click the radio button next to the format
you want to use.
3
In the
Set Defaults
window, click OK to save your changes or
discard them.
Changing Section Settings Defaults
Procedure Defaults
Cancel
tab.
to
The fifth tab on the
Set Defaults
window —
Section Settings
— lets you
change the source of the four sets of related information available from
the
View
menu or the
Related Information
shortcut on the primary
options taskbar.
LOCKOUT-PRO
TM
Graphical Procedure Writing Software provides
these supplementary materials to support your overall energy-control
program.
“Using Related Information”.)
(For more information about these materials, see Chapter 5,
At any time you can change a section
setting to access a different HTML document.
•
•
LOCKOUT-PROTM DESKTOP USER GUIDE SETTING DEFAULTS IN LOCKOUT PRO 7- 19
•
•
•
•
Page 94

To change any of the section setting defaults:
1
Access the
2
Select the
for each item of related material.
Set Defaults
Section Settings
window.
tab. The window displays four sections, one
NOTE:
Except for the additional field in the
Regulations
section, the
functions for all four sections work identically.
3
In the
country, click the down-arrow in the text box for
Regulations
section only:
To link to the regulations for a different
Country
and click the
country of your choice. The regulations for that country will now appear
in the related information.
4
For all four sections:
radio button by
5
Enter the address of the new source in the text box.
•
If the document links to a website, type in the full URL.
TIP: You can also paste a URL you’ve copied from an Internet or intranet site.
Simply open the desired page in your browser, select the address, and copy
it. Then paste it into this field in LOCKOUT-PROTM.
•
If the document links to an HTML file on your computer or server,
you can type in the address or click the
To link to a different HTML document, click the
Address (url)
in the section you are changing.
Browse...
button to find the
file in the customary way.
NOTE:
Only HTML documents can be used for the related
information links.
7-20
•
•
•
S
ETTING DEFAULTS IN LOCKOUT
•
•
•
6
Click the
Test
button for the section. A window will open with the new
document in it. If the document is the one you want displayed in
Information
7
In the
, close the window. If not, repeat step 5.
Set Defaults
window, click OK to save your changes or
Cancel
discard them.
PRO LOCKOUT-PROTM DESKTOP USER GUIDE
Related
to
Page 95

C
HAPTER
W
• • • • • •
8
ORKING WITH TEMPLATES
The ability to use templates when creating lockout/tagout procedures is
one of the key benefits of LOCKOUT-PRO
Writing Software. Templates let you create procedures faster and
ensure that they contain all the information needed for safety and
regulatory purposes.
For each of the three forms — Long, Short, and Combined —
LOCKOUT-PRO
printers and the Brady GlobalMark printer, which prints the procedure
onto a tape roll.
You can also modify these templates in many ways to customize them
for your particular needs. This chapter goes into detail on templates,
explaining:
How templates are used to create procedures
How templates differ from defaults
What aspects of the templates can be customized
Step-by-step instructions for modifying the templates
TM
provides templates designed for both sheet-fed
TM
Graphical Procedure
Understanding LOCKOUT-PRO Templates
Procedure templates define how content is included and formatted, and
determine what content is standard. They also control the titles, text,
colors, and layout, for example, and warnings or messages that need to
be on every procedure.
Using templates helps ensure that your employees know exactly where
to look for a specific type of information and that the information is
presented clearly. They also ensure that terms, descriptions,
instructions, and so forth are used in a consistent manner.
•
•
LOCKOUT-PROTM DESKTOP USER GUIDE WORKING WITH TEMPLATES 8- 1
•
•
•
•
Page 96

While the templates are designed by Brady’s lockout/tagout specialists
to ensure compliance, they also provide you the flexibility to modify
them to best meet your needs.
Templates vs. Defaults
Templates and defaults both customize LOCKOUT-PROTM Graphical
Procedure Writing Software to make it work effectively for you, but they
focus on different aspects.
•
Templates control the type and format of content that
appears on a procedure
wording of choices for a given type of content.
, while defaults control the specific
For example:
Defaults offer a list of energy source types from which
you can choose when creating a specific procedure. Templates, on
the other hand, determines how that energy source type appears on
the printed procedure.
•
Template changes, are specific to a certain form
or Combined — and printer — sheet-feed or GlobalMark, while
changes to the lists of defaults apply to all three forms.
For example:
If you change the default so an energy source
identifier uses an abbreviation vs. an icon, that default will show up
on every procedure after changing it once. However, if you want to
substitute the LOCKOUT-PRO
TM
logo with one of yours on all
procedures, you must make that change on all three templates for
each type of printer, if you use both sheet-fed and GlobalMark
printers.
For more on
defaults
and how to customize them, see Chapter 7,
“Setting Defaults in Lockout PRO”.
Deciding How to Customize Templates
— Long, Short,
8-2
•
•
•
W
ORKING WITH TEMPLATES
•
•
•
Before you make change a template, it’s a good idea to look at the
existing one and decide changes will best meet your needs.
What Can Be Changed on a Template
In general, the following changes can be made to templates:
•
The content of text that appears automatically on procedures can be
changed, and the format (e.g., size, font, bold, italics, color) can be
modified.
LOCKOUT-PROTM DESKTOP USER GUIDE
Page 97

•
The format of text that will be added to the procedure when it is
written can be changed.
•
Graphics can be replaced with other graphics.
What Cannot Be Changed on a Template
LOCKOUT-PROTM Graphical Procedure Writing Software procedures
look like word-processed documents, but in fact are the output of a
powerful database engine. As a result, their templates cannot be
changed as you might expect to change a word-processed document.
TM
While LOCKOUT-PRO
offers a range of customization options, it does
not allow the following types of changes to templates:
•
Lines, rectangles, and other graphic elements cannot be deleted.
•
Boxes, the location of images, and other objects cannot be moved,
resized, rotated, or deleted.
•
Additional graphics or text boxes cannot be added.
Illustration of Editable Areas on Templates
To help you identify your customization needs, look at the sample forms
that follow. Although these examples utilize the templates for sheet-fed
printers, the same items and areas exist on forms templated for
GlobalMark printers.
NOTE:
The sample illustrations that follow are marked up to show
how they can be changed. The following table explains the meaning
of the marks.
KEY TO TEMPLATE CHANGES INDICATED ON SAMPLE FORMS
If the template area is: You can make these changes:
Outlined by a
blue rectangle
Outlined by a
rounded teal
rectangle
Indicated by a
dark-green arrow
• Edit any or all of the text contained in the
template
• Change the formatting of the text
• Change the formatting of the text contained
in the template
• Change the formatting of the procedurespecific text that will be added when the
procedure is created or revised
• Replace the graphic
•
•
LOCKOUT-PROTM DESKTOP USER GUIDE WORKING WITH TEMPLATES 8- 3
•
•
•
•
Page 98

SAMPLE SHORT FORM: EDITABLE TEMPLATE AREAS
8-4
•
•
•
W
ORKING WITH TEMPLATES
•
•
•
Page Footer (left) Page Footer (center)
LOCKOUT-PROTM DESKTOP USER GUIDE
Page 99

SAMPLE LONG FORM: EDITABLE TEMPLATE AREAS
Page Footer (left) Page Footer (center)
•
•
LOCKOUT-PROTM DESKTOP USER GUIDE WORKING WITH TEMPLATES 8- 5
•
•
•
•
Page 100
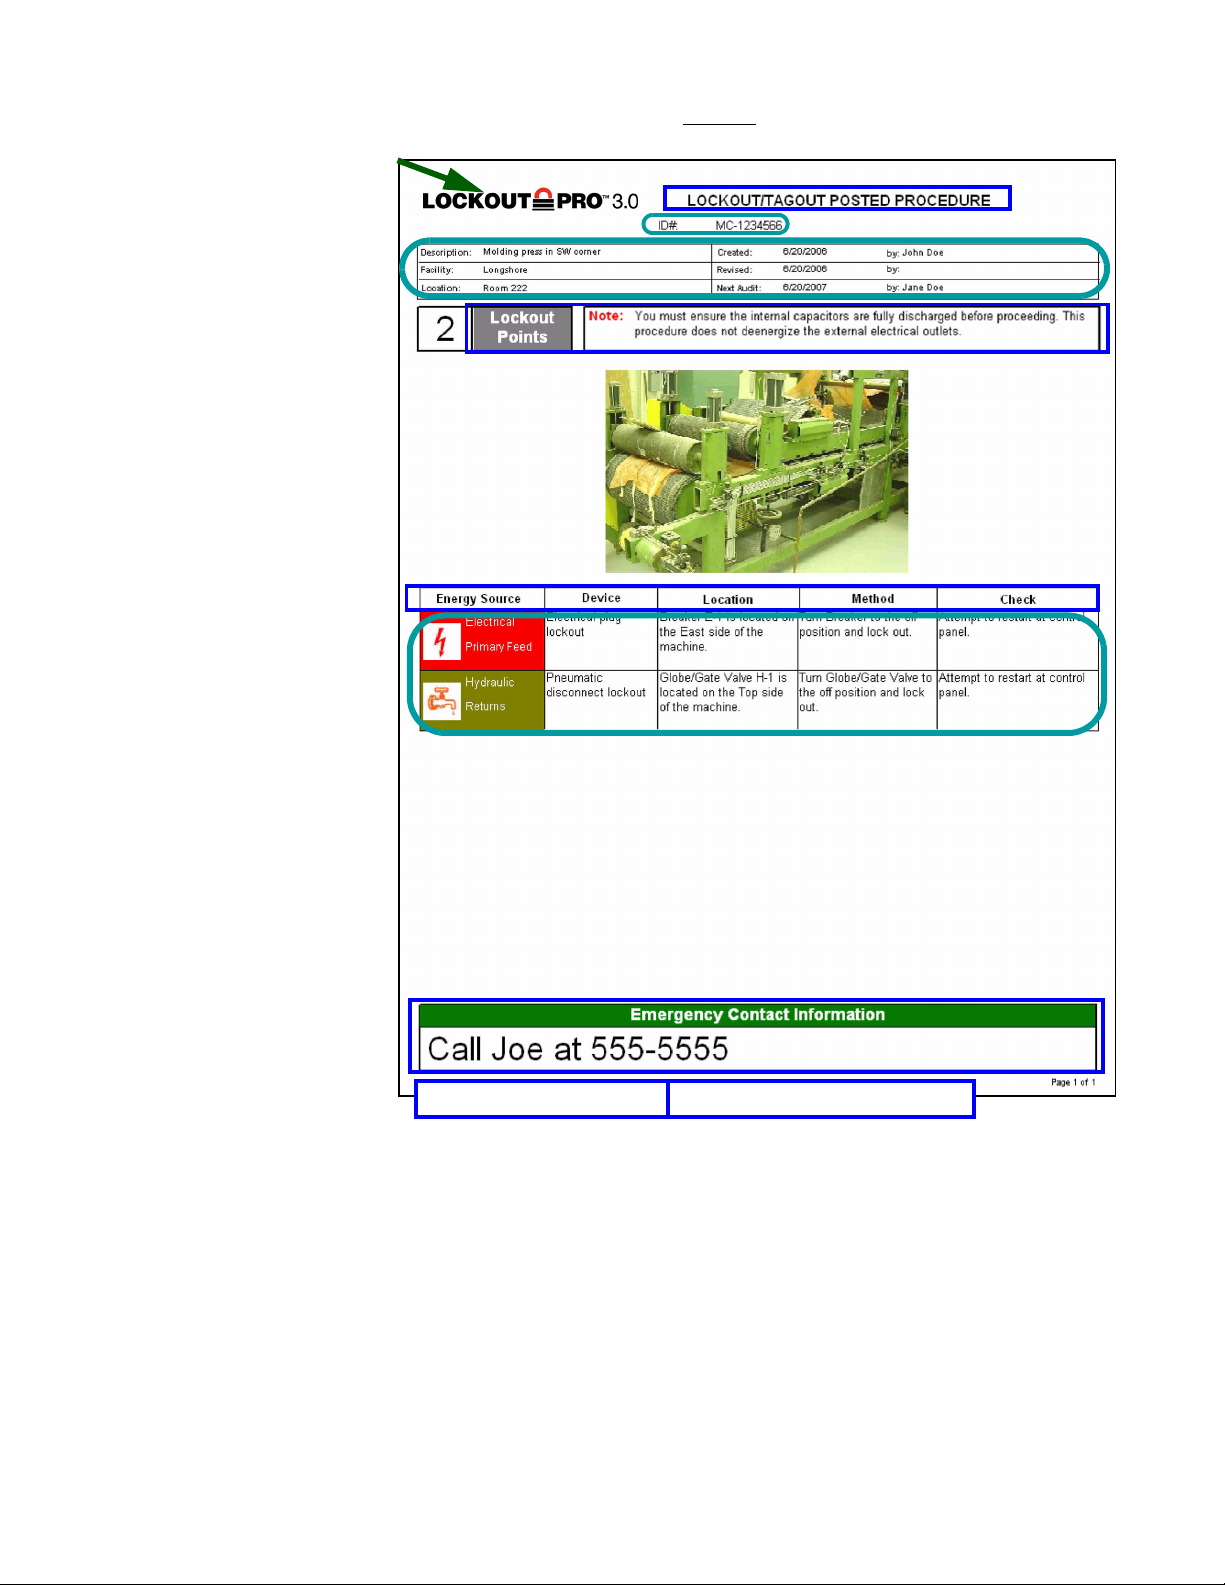
SAMPLE COMBINED FORM - FRONT PAGE: EDITABLE TEMPLATE AREAS
8-6
•
•
•
W
ORKING WITH TEMPLATES
•
•
•
Page Footer (left) Page Footer (center)
LOCKOUT-PROTM DESKTOP USER GUIDE
 Loading...