

Administrator’s Guide
LOCKOUT-PROTM Graphical Procedure Writing Software
v3.0 Enterprise Version

YOU SHOULD CAREFULLY READ THE FOLLOWING TERMS AND CONDITIONS OF THIS
LICENSE AGREEMENT BEFORE OPENING THIS PACKAGE. IF YOU DO NOT AGREE WITH
THESE TERMS AND CONDITIONS, PLEASE PROMPTLY RETURN THIS PACKAGE FOR A
FULL REFUND.
LICENSE AGREEMENT
Brady Worldwide, Inc. (hereafter "Brady") hereby grants you a non-exclusive, nontransferable license to
use this software and the accompanying documentation according to the following terms:
1. LICENSE GRANT: You may 1) install the software on the number of computers covered by invoices for
this license from Brady, which are hereby incorporated by reference; 2) use and transmit the software on
a network within a site if authorized by an invoice from Brady; 3) install the software on one server or
multiple servers as invoiced for a single server or multiple servers which invoices are hereby incorporated
by reference; and 4) make copies of the software in machine readable form for backup purposes only.
2. LICENSE RESTRICTIONS: You may not: 1) modify, adapt, translate, reverse engineer, decompile,
disassemble, create derivative works based on, or copy (except for the backup copy) the software or the
accompanying documentation; 2) rent, transfer or grant any rights in the software or accompanying
documentation without the prior, express written consent of Brady; or 3) remove any proprietary notices,
labels, or marks on the software and accompanying documentation.
3. NATURE OF THIS AGREEMENT: This license is not a sale. License fees paid by you, if any, are in
consideration of the licenses granted under this Agreement. Title and copyrights to the software,
accompanying documentation, and any copy made by you, remain the property of Brady or its suppliers.
Unauthorized copying of the software or the accompanying documentation, or failure to comply with the
above restrictions, shall automatically terminate this license, without further notice, and terminate your
rights to use the software, and Brady shall, in addition to its other legal remedies, be entitled to its
reasonable attorney fees.
4. LIMITED WARRANTY: Brady warrants that, for a period of ninety (90) days from the date of delivery
to you as evidenced by a copy of your receipt, the software, as furnished, under normal use, will perform
without significant errors. Brady's entire liability and your exclusive remedy under this warranty (which
is subject to you returning the software to Brady) will be, at the option of Brady, to attempt to correct or
help you around errors, to replace the software with functionally equivalent software or diskettes, or to
refund the license fee of the software and terminate this Agreement.
EXCEPT FOR THE ABOVE EXPRESS LIMITED WARRANTY, BRADY MAKES AND YOU RECEIVE
NO WARRANTIES, EXPRESS, IMPLIED, STATUTORY OR IN ANY COMMUNICATION WITH YOU,
AND BRADY SPECIFICALLY DISCLAIMS ANY IMPLIED WARRANTY OF MERCHANTABILITY OR
FITNESS FOR A PARTICULAR PURPOSE. BRADY DOES NOT WARRANT THAT THE OPERATION
OF THE PROGRAM WILL BE UNINTERRUPTED OR ERROR FREE.
Some states do not allow the exclusion of implied warranties so the above exclusions may not apply to
you. This warranty gives you specific legal rights. You may also have other rights which vary from state
to state.
5. LIMITATION OF LIABILITY: IN NO EVENT WILL BRADY BE LIABLE FOR ANY DAMAGES,
INCLUDING LOSS OF DATA, WHEN LOADING THIS SOFTWARE OR OTHERWISE, OR LOST
PROFITS, COST OF COVER OR OTHER SPECIAL, INCIDENTAL, CONSEQUENTIAL OR INDIRECT
DAMAGES ARISING FROM THE USE OF THE PROGRAM OR ACCOMPANYING DOCUMENTATION, HOWEVER CAUSED AND ON ANY THEORY OF LIABILITY. THIS LIMITATION WILL
APPLY EVEN IF BRADY HAS BEEN ADVISED OF THE POSSIBILITY OF SUCH DAMAGE.
Some states do not allow the limitation or exclusion of liability for incidental, or consequential damages,
so the above limitation may not apply to you.
6. GENERAL: This Agreement shall be governed by, and interpreted under, the laws of the State of
Wisconsin, USA. You acknowledge that U.S. law and regulations may restrict the export/re-export of the
software. You agree not to export/re-export the software or portions thereof in any form without the
appropriate U.S. and foreign government licenses. This obligation shall survive and continue after this
Agreement terminates. This Agreement is the entire agreement between the parties and supersedes any
other communications or advertising with respect to the software and accompanying documentation. If
any provision of this Agreement is held invalid, the remainder of this Agreement shall continue in full
force and effect.
6555 West Good Hope Road, P.O. Box 571, Milwaukee, Wisconsin 53201-0571, USA, tlf. +1 (414) 358-6600
•
•
•
•
•
•
LOCKOUT-PROTM ENTERPRISE USER GUIDE

T
ABLE OF
• • • • • •
Administering LOCKOUT-PRO
LOCKOUT-PRO Enterprise Server Functions
System Requirements for Server & Client Applications
Installing & Setting Up Server Applications
Using the Administrator Application
Performing Other Administrative Tasks
Troubleshooting Enterprise Functions
C
ONTENTS
A–1
Server Components
User Permission Levels
Preparing for Installation
Installation Overview
Installing the Enterprise Server Applications
Activating & Configuring LOCKOUT-PRO
Distributing LOCKOUT-PRO to Clients
Becoming Familiar with Administrator
Viewing & Managing Domains
Managing User Groups
Maintaining Users & Permission Levels
Managing User Files
Starting/Stopping Network Service
Viewing LOCKOUT-PRO Events
A–1
A–2
A-5
A–5
A–5
A–8
A–9
A–10
A–10
A–12
A–13
A–14
A–15
A–15
A–15
A–16
A–4
A–6
A–7
•
•
LOCKOUT-PROTM ENTERPRISE ADMINISTRATOR’S GUIDE III
•
•
•
•

Copyright
This manual is copyrighted with all rights reserved. No portion of this
manual may be copied or reproduced by any means without the prior
consent of Brady Worldwide, Inc.
While every precaution has been taken in preparation of this document,
Brady assumes no liability to any party for any loss or damage caused
by errors or omissions or by statements resulting from negligence,
accident, or any other cause. Brady further assumes no liability arising
out of the application or use of any product or system described, herein;
nor any liability for incidental or consequential damages arising from
the use of this document. Brady disclaims all warranties of
merchantability or fitness for a particular purpose.
Brady reserves the right to make changes without further notice to any
product or system herein to improve reliability, function, or design.
Reproduction of this material, in part or whole, is strictly prohibited
without the written permission of Brady Worldwide, Inc.. For more
information, contact: Brady Worldwide, Inc. Signmark® Division, 2221
W. Camden Road, Milwaukee, WI 53209.
Disclaimer
Every effort has been made to make this guide as accurate and complete
as possible. Brady Worldwide, Inc. is not responsible for inaccuracies
and omissions occurring during the use of this guide.
This manual is proprietary to Brady Worldwide, Inc. and may be revised
from time to time without notice. Brady Worldwide, Inc. disclaims any
understanding to provide you with revisions, if any.
All brand or product names referenced in this manual are trademarks
or registered trademarks of their respective companies or organizations.
LOCKOUT-PRO, GlobalMark, and HandiMark are trademarks of
Brady Worldwide, Inc.
© 2006 Brady Worldwide, Inc. All rights reserved.
www.bradycorp.com
IV
•
•
•
•
•
•
LOCKOUT-PROTM ENTERPRISE ADMINISTRATOR’S GUIDE

A
• • • • • •
The Enterprise Version of LOCKOUT-PROTM Graphical Procedure
Writing Software includes tools that allow the application’s
administrator to easily manage usage across an entire organization.
This
and how to use these tools, including:
DMINISTERING
Administrator’s Guide
An overview of LOCKOUT-PROTM Enterprise server functions
How to install and set up the LOCKOUT-PROTM Enterprise server
components and prepare for client installations
How to manage user domains, user groups, users, and files
How to start and stop the network service and view LOCKOUT-
TM
PRO
Common error messages and how to troubleshoot them
events
LOCKOUT-PRO
explains more about the Enterprise version
LOCKOUT-PRO Enterprise Server Functions
LOCKOUT-PROTM Enterprise Version is designed for larger
organizations that want to deploy the software over a network and
centralize control of user rights, procedure templates, defaults, and
enhanced security. LOCKOUT-PRO
side administrator utilities and a network service with the desktop
application running on the client PC.
Server Components
There are three primary components active on the LOCKOUT-PROTM
Enterprise server:
•
Administrator Application
•
Network Service
•
Event Viewer Entry
LOCKOUT-PROTM ENTERPRISE ADMINISTRATOR’S GUIDE
TM
Enterprise v3.0 combines server-
•
•
•
A
- 1
•
•
•

LOCKOUT-PROTM Administrator Application
Through this utility, administrators of LOCKOUT-PROTM Graphical
Procedure Writing Software can monitor client users and files, register
users, assign them to groups, and set user rights. The utility also allows
you to copy files from one group to another, and to unlock files that have
been “checked out” and cannot be unlocked using the normal process
(due to a client PC crash, for example).
The Administrator Application is set up on the server only once.
However, after setting up at least one administrator on the server, you
can establish additional administrators who can run a “remote” version
of the Administrator Application from their client PCs.
LOCKOUT-PROTM Network Service
This service running on the Enterprise server is the means by which
LOCKOUT-PRO
TM
client users connect to the server for access to online
files. This service can be started and stopped using standard Windows
administrator tools (Services Function), or by using controls provided in
TM
the LOCKOUT-PRO
You can start and stop the service
Administrator Application.
only
from the server, using either the
standard Windows tools or the Administrator Application. These
functions cannot be performed when running the Administrator
Application remotely.
Event Viewer Entry
Every step or “transaction” by client users is logged and can be viewed
using the standard Windows Event Viewer. The specific entry for
LOCKOUT-PRO
access to the service, file open/save, number of users online, whether a
user tries to open a locked resource, any server problems, and
administrative service functions.
You can view or save Event Viewer entries only from the server. These
functions cannot be performed when running the Administrator
Application remotely.
TM
is named
LOPE
. Logged transactions include: user
A-2
•
•
•
A
•
•
•
DMINISTERING
User Permission Levels
LOCKOUT-PROTM Enterprise incorporates three permission levels for
users:
LOCKOUT-PRO LOCKOUT-PROTM ENTERPRISE ADMINISTRATOR’S GUIDE

•
Administrator
: A user with
Admin
rights may perform all functions
available in both the client and server components of LOCKOUT-
TM
PRO
•
Author
.
: A user with
Author
rights may create and edit procedures
from the client application, as well as view and print, but cannot
modify templates, defaults, or the related information.
•
Viewer
A user with
Viewer
rights may only view and print
procedures, lockout tags, energy source labels, and related
information.
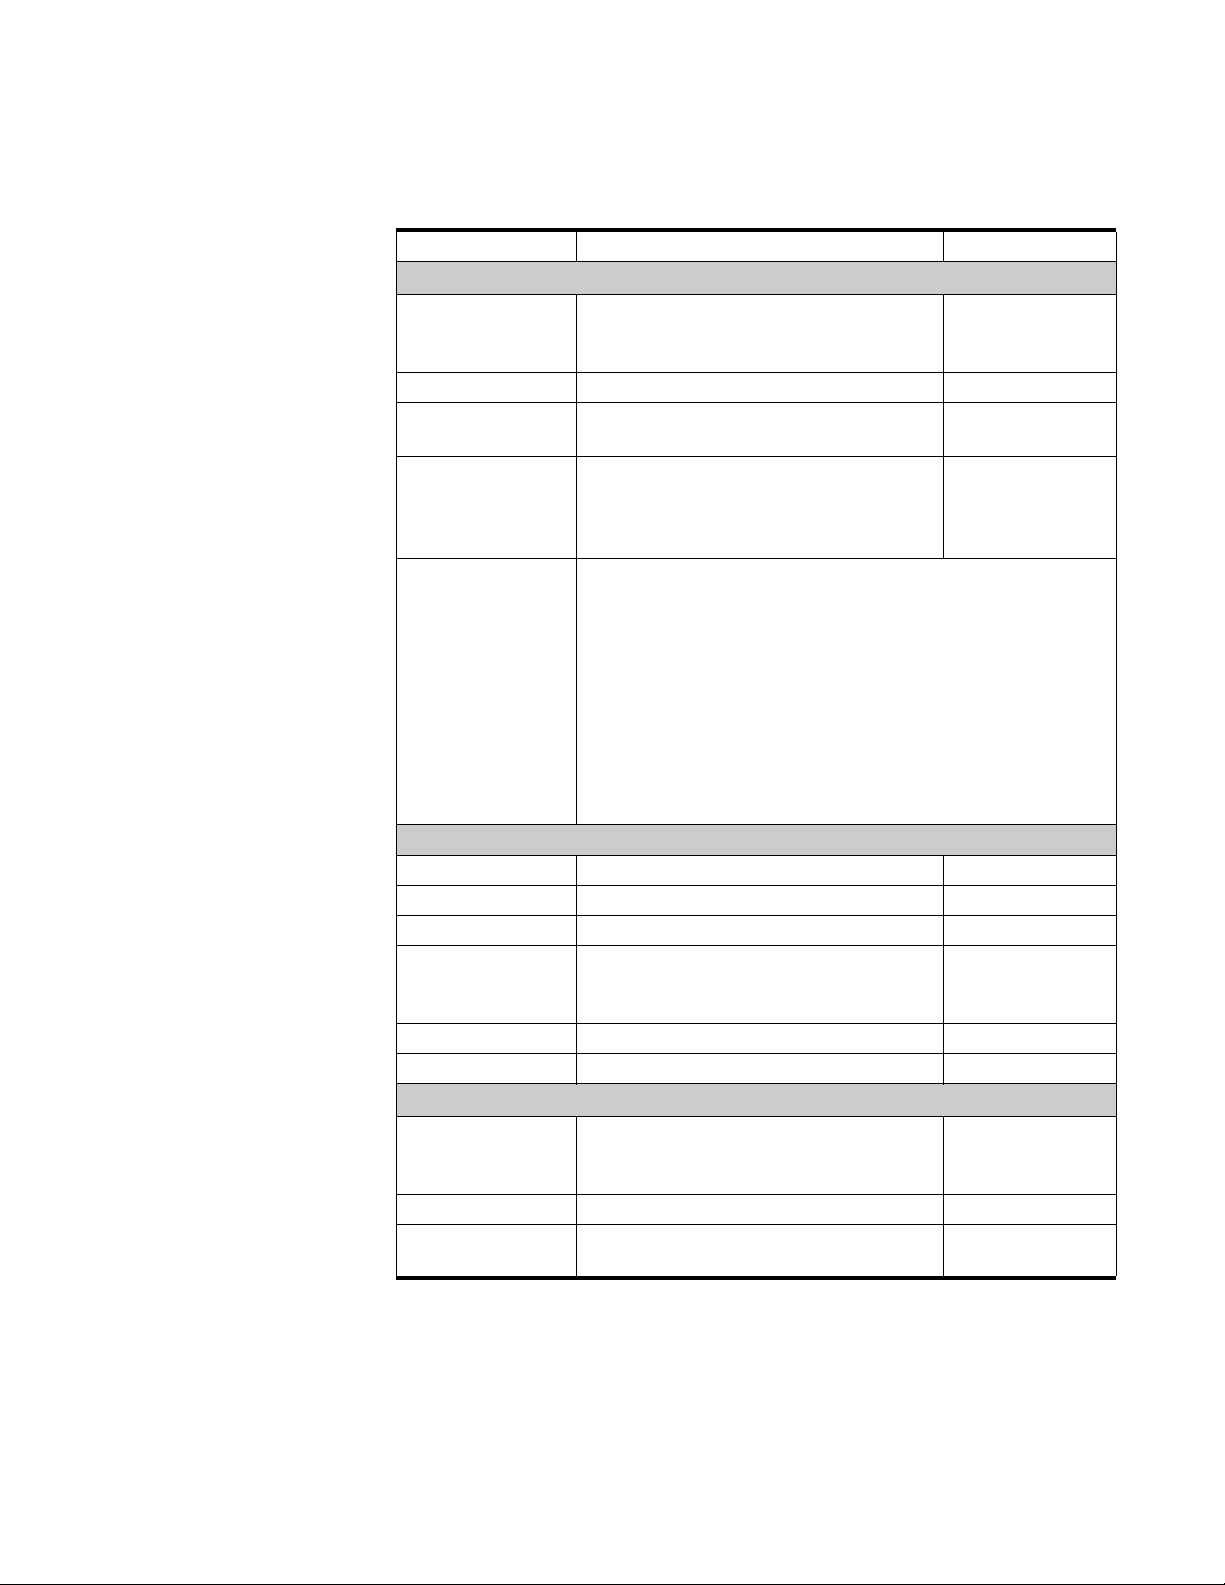
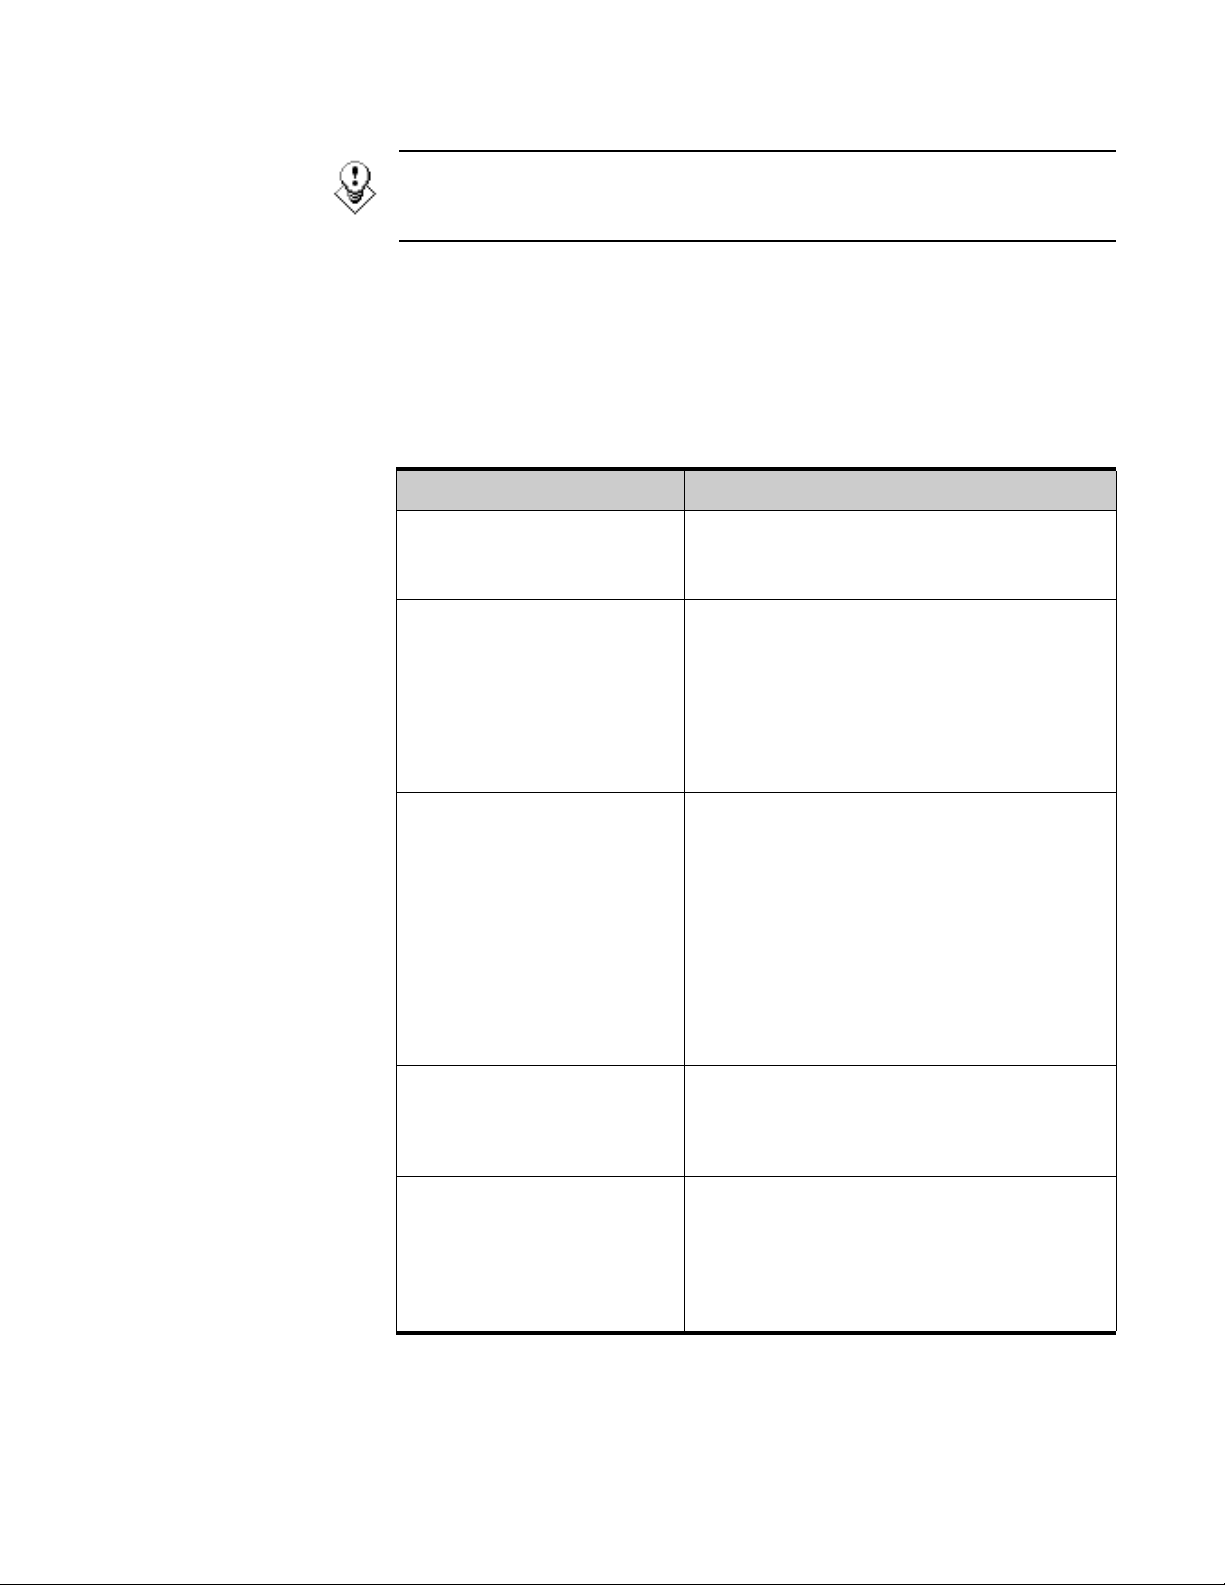
The following table lists the primary functions in LOCKOUT-PRO
Enterprise and to which permission levels they are assigned.
FUNCTIONS ASSIGNED BY USER PERMISSION LEVELS
TM
Functions Admin
View existing procedures
Print procedures, tags, energy source labels
View the related information in LOCKOUT-
TM
PRO
Create new procedures
Revise existing procedures
Import earlier versions of LOCKOUT-PROTM
files
Export procedures to other file formats
Save new or revised procedures
Administer LOCKOUT-PROTM client licenses
Maintain user permission levels
Edit procedure templates
Change LOCKOUT-PROTM default lists
Author Viewer
Modify the related information in LOCKOUT-
TM
PRO
Transfer procedures between user groups
LOCKOUT-PROTM ENTERPRISE ADMINISTRATOR’S GUID
•
•
E
•
A- 3
•
•
•
System Requirements for Server & Client Applications
SYSTEM REQUIREMENTS FOR
LOCKOUT-PRO
DESKTOP CLIENT
Network
Connection
Protocol TCP/IP
Operating System Windows 2000
Printers Supported GlobalMark
Printer Drivers for the printer(s) you will use with LOCKOUT-PRO
TM
Graphical Procedure Writing Software
Minimum: Recommended:
Access to installation of LOCKOUT-
TM
PRO
intranet
Windows XP Professional
HandiMark
only)
Sheet-fed laser or inkjet
should be installed. At least one printer must be installed to
run the application. See your printer’s documentation for
information on installing your printer.
Enterprise Server over an
TM
TM
(energy source labels
Same
TM
GlobalMark
TM
printers only: Updated driver is required. First,
uninstall the printer from your computer. Install the new
GlobalMark
TM
driver included on the LOCKOUT-PROTM
installation CD. (NOTE: This driver has not been tested or
validated to work with MarkWare
TM
, Surf on SignsTM, or any
other Brady software.)
SERVER
Processor 1.2 GHz or better 2.6 GHz
Memory (RAM) 512 MB 1G
Disk Space 500 MB Same
Operating System Windows 2000 Advanced Server
Same
Windows 2003 Server
Windows XP
IIS support V5 or v6, configured and enabled
ASP .NET V1.1, installed
REMOTE ADMINISTRATOR
Network
Connection
Protocol TCP/IP
Operating System Windows 2000
Access to installation of LOCKOUT-
TM
PRO
Enterprise Server over an
intranet
Windows XP Professional
Same
A-4
•
•
•
A
•
•
•
DMINISTERING
LOCKOUT-PRO LOCKOUT-PROTM ENTERPRISE ADMINISTRATOR’S GUIDE

Installing & Setting Up Server Applications
All LOCKOUT-PROTM Graphical Procedure Writing Software
components are installed on the server which contains the application’s
templates and defaults, and which client users will access to create and
store procedures.
Preparing for Installation
Before LOCKOUT-PROTM
can be installed, the following Micrsoft
applications must be installed on your server:
•
Internet Information Services (IIS)
•
.NET Framework
•
Data Access Components (MDAC) v2.8
•
Active Directory
These applications are essential for LOCKOUT-PRO
TM
’s full
functionality. They are available from www.microsoft.com, which also
provides extensive support documentation on how to install and
configure them.
TIP: Although this guide provides the basic setup structure, be sure to
consult your network or domain administrator before installing. Your
administrator may require additional settings for security purposes, or may
use a third-party software package for client installation.
Installation Overview
Once the required server software is properly installed and configured,
the process of installing LOCKOUT-PRO
these basic steps, each of which will be explained in detail below:
•
Install the server applications using the LOCKOUT-PROTM CD.
•
In the LOCKOUT-PROTM Administrator Application, activate the
software and configure your network settings.
•
Choose either the LOCKOUT-PROTM Web Installer or a silent
installer such as Microsoft’s Group Policy Management tool to
distribute the client-side application to user machines.
•
If you want to set up additional users to run the Administrator
Application remotely, choose either the LOCKOUT-PRO
Installer or a silent installer such as Microsoft’s Group Policy
Management Tool to distribute the Administrator Application to
additional administrator user machines.
TM
on your server involves
TM
Web
LOCKOUT-PROTM ENTERPRISE ADMINISTRATOR’S GUID
•
•
E
•
A- 5
•
•
•

Installing the Enterprise Server Applications
Your first step is to install the server applications using the LOCKOUT-
TM
PRO
To install Enterprise server applications:
1
Insert the LOCKOUT-PROTM CD in the CD-ROM drive of the enterprise
server. The installation program will launch automatically. If it does not
open after a short while, you can manually launch it by taking these
steps:
•
•
When the installer window appears, select the menu option:
2
Install Lockout PRO Server
3
When prompted, choose the language you want.
4
When the Install Shield Wizard opens, click
5
When prompted, read and accept the license agreement by clicking
6
Enter your name, company name, and serial number from the CD
package, and then click
Enterprise CD.
Open the folder for the drive containing the LOCKOUT-PROTM CD.
Locate and double-click on the file:
Lockout PRO 3.0 Installer.exe
.
Next
to begin installation.
Next
.
Yes
.
7
Accept the destination folder for the program by clicking
8
Accept or select the Programs Folder and then click
9
The
Setup Statu
s window appears while the installer completes the
Next
Next
.
.
following tasks:
•
Install the LOCKOUT-PROTM Administrator Application on the
server.
•
Install the LOCKOUT-PROTM Network Service through which client
users connect to the server.
•
Create the required folders on the enterprise server.
•
Copy the LOCKOUT-PROTM Enterprise database to the appropriate
folder on the server.
•
Install the files for LOCKOUT-PROTM Enterprise on the server.
•
Install the documentation on the server.
•
Install the Event Viewer Entry.
10
When the setup is completed, click the
11
When your browser opens the registration page, follow the prompts to
register LOCKOUT-PRO
12
Close the browser and the installation window.Activating &
Configuring LOCKOUT-PRO
TM
.
TM
Finish
button to continue.
A-6
•
•
•
A
•
•
•
DMINISTERING
LOCKOUT-PRO LOCKOUT-PROTM ENTERPRISE ADMINISTRATOR’S GUIDE

Activating & Configuring LOCKOUT-PRO
After installation, you will need to activte the software using the
activation code provided by Brady. The code is an encrypted key that
specifies the number of licenses your organization has purchased. These
are “floating licenses” meaning that they can be used on any computer
on your network, as long as the total number of licenses in use at any
given time does not exceed the number of licenses purchased.
Once activated, you will need to add the domains and configure the
network settings.
NOTE:
You must complete the following procedure before you can
distribute LOCKOUT-PROTM to clients or additional Administrator
Application users.
To activate and configure LOCKOUT-PRO:
1
Open the Administrator Application from a desktop shortcut or your
Start>Programs
2
When prompted, enter the product key that is provided on the license
certificate you received with the software, and then click
3
(Optional)
language by clicking the
menu.
OK
.
When the Administrator window opens, you can change the
Language
menu item at the top left and
choosing the language you want to use for the Administrator
Application interface.
NOTE:
The language choice here only sets the language for the
Administrator Application. Users can select the language
individually on their client machines.
4
Click the
Administrator
5
In the
LAN/Wireless
address, if your network uses VPN.
Network Interface Settings
menu item at the top of the
window.
Network Interface Settings
window, enter the network’s
address for the LOCKOUT-PROTM server and the
VPN
NOTE:
Cancel
6
Enter the
7
Click OK.
8
A dialog box appears asking you to verify these settings are correct. If
they are, click
9
In the
Administrator
To discard the data you’ve entered into this window, click
. The fields will be blanked out.
Port number
Yes
.
window, enter the domain name in the
textbox, and click the
left navigation panel.
LOCKOUT-PROTM ENTERPRISE ADMINISTRATOR’S GUID
you want to use.
Domain
Add
button. The domain name will appear in the
E
•
•
•
A- 7
•
•
•

Distributing LOCKOUT-PRO to Clients
After you’ve activated and configured LOCKOUT-PROTM, you can
distribute the client installation files to users’ computers, as well as
send the Administrator Application to additional administrator user
machines. There are two ways to distribute theese files:
•
Use the provided Web Installer, which offers an easy interface
instructing users how to save the installation files and then install
LOCKOUT-PRO
•
Use Microsoft’s Group Management Policy tool to silently “push” the
installation files to the client machines. (You may also have a thirdparty software application that you use to perform such silent
installs.)
To distribute to client machines using the Web Installer:
1
When you add a domain in the Administrator Application, LOCKOUT-
TM
PRO
user in that domain.
2
When the user next reboots, the installation icon will appear. Doubleclicking on this icon opens the Web Installer window with instructions
for proceeding.
will automatically place a Web Install file on the desktop for each
TM
.
NOTE:
The Web Installer address should be:
http://<server name or IP address>/LOPClientSetup/
3
The user will be instructed to right-click on each of two links and choose
Save Target As
to save the file connected to each link into the same folder
on the client machine.
4
The user then double-clicks the
LOCKOUT-PRO 3.0
icon to begin
installation.
5
When the
6
When prompted to choose the program folder, the user clicks
7
When asked to confirm the installation, the user clicks
8
After the program finishes installing, the user clicks the
Windows Installer
opens, the user clicks
Next
.
Next
.
Close
Next
button.
To distribute to client machines using the Group Policy tool:
1
On the server where LOCKOUT-PROTM is installed, locate and open the
folder
2
Find the
Properties
LOPE
.
ClientFiles
window.
folder, then right-click on it to open the
ClientFiles
.
A-8
•
•
•
A
•
•
•
DMINISTERING
LOCKOUT-PRO LOCKOUT-PROTM ENTERPRISE ADMINISTRATOR’S GUIDE

3
Click the option to
wish), then click
4
From the Windows
Share the folder
OK
.
Start
menu, open the
(and change any other settings you
Group Policy Management
tool.
NOTE:
This tool is only available with Windows 2003 Server and
XP Pro. It is a free download from www.microsoft.com if it is not
already on your server.
5
In the
Forest
6
Under your server, right-click the
from the menu.
7
The
point, you have two options:
•
•
8
Right-click on
menu.
9
Navigate to:
Network>
3.0.msi file
Group Management Policy
, locate your domain and server.
Group Policy Object Editor
To set up a push install for every
Software Seetings
folder under
To set up a push install for every
Software Settings
select
Properties
options
Properties
window, choose
, and then close the window.
My Network Places>Entire Network>Microsoft Windows
folder under
. In the
Software Settings,
your domain>your server
.
window’s navigation panel, under
Default Domain Policy
, and select
window for your domain will open. At this
computer
Computer Configuration
user
User Configuration
Deployment
Basic
under
then choose
>ClientFiles folder>Lockout PRO
tab of the
on the domain, select the
.
on the domain, select the
. Right-click on it and
Lockout PRO 3.0
Installation user interface
New>Package
from the
Edit
10
In the
your organization’s policies, then click
Deploy Software
NOTE:
For help in using the Group Policy Management tool, go to
window, configure the deployment according to
OK
.
http://support.microsoft.com/kb/816102/.
11
When users next log on, their desktop will display either an installation
icon or the icon for the installed LOCKOUT-PRO
deployment settings you selected in the Group Policy Management tool).
NOTE:
Follow your organization’s policies and procedures for
either the Group Policy Management tool. If using third-party
software, refer to its user documentation for specific instructions
on setting up a silent install of LOCKOUT-PROTM.
Using the Administrator Application
The Administrator Application provides an easy-to-use interface to
manage the enterprise server functions.
LOCKOUT-PROTM ENTERPRISE ADMINISTRATOR’S GUID
E
TM
(depending on the
•
•
•
A- 9
•
•
•
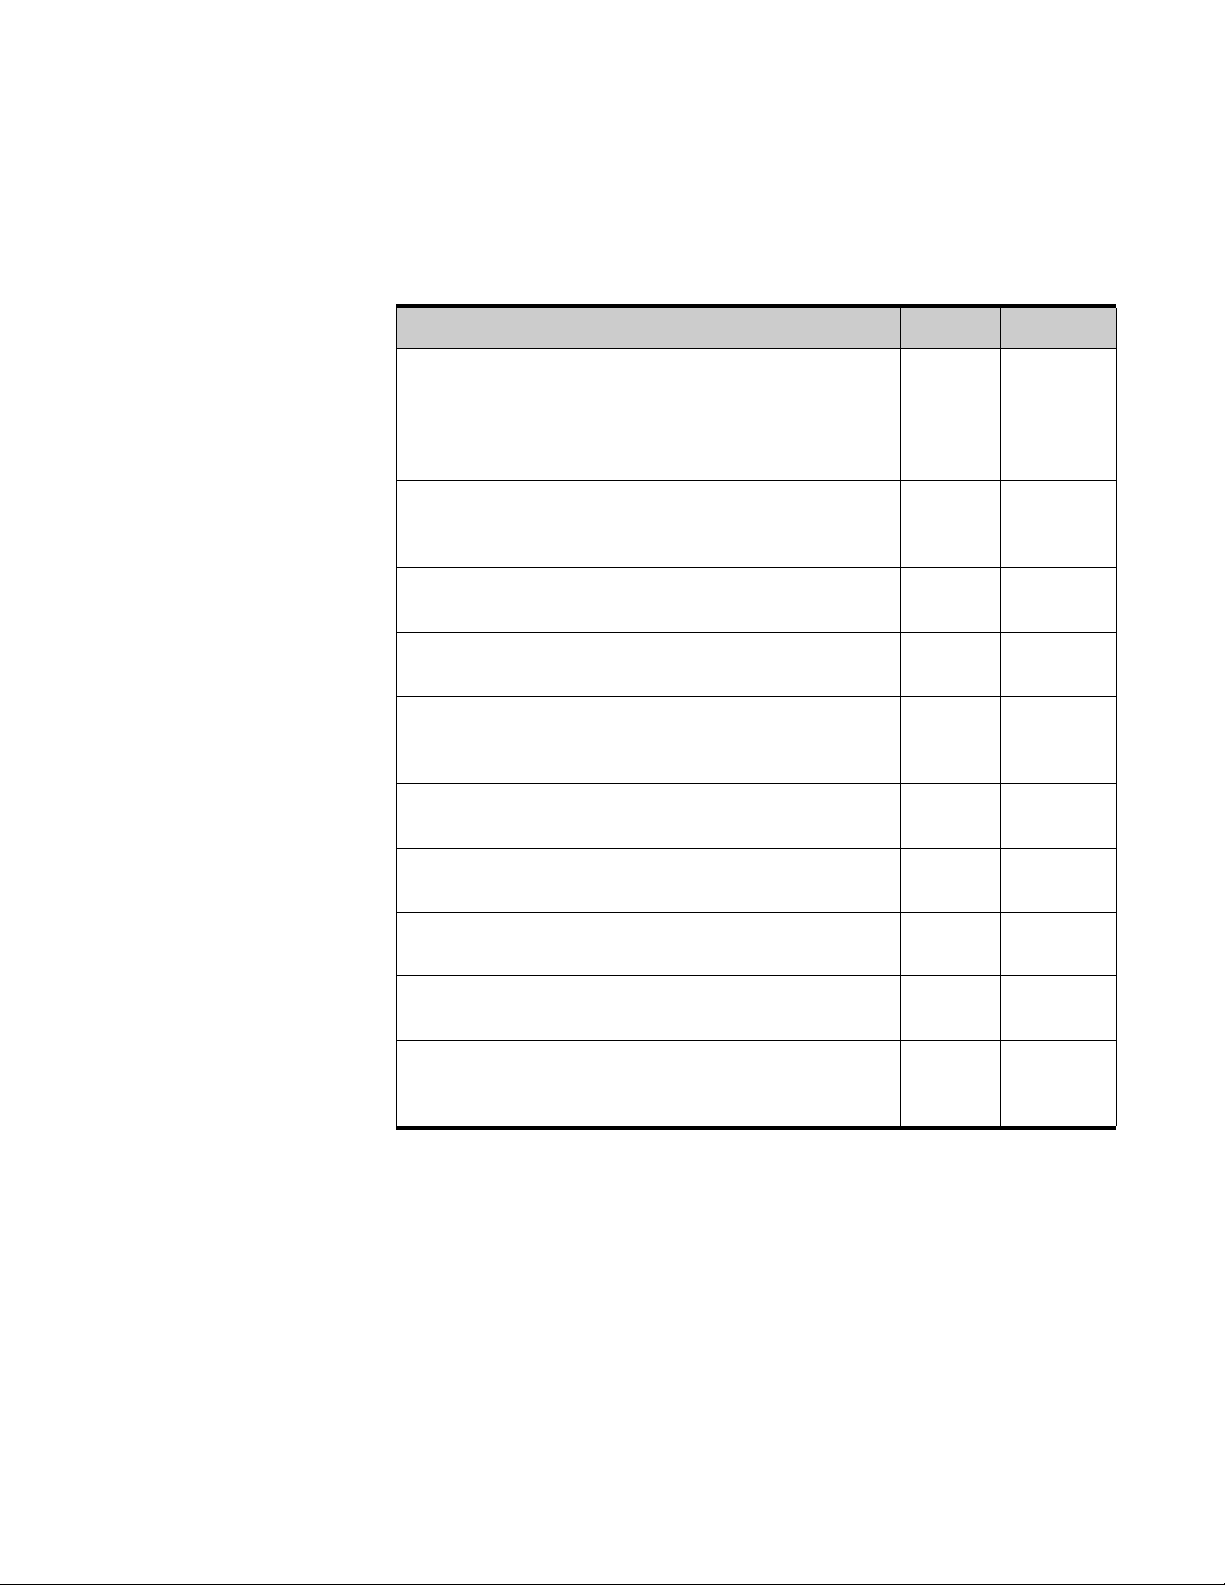
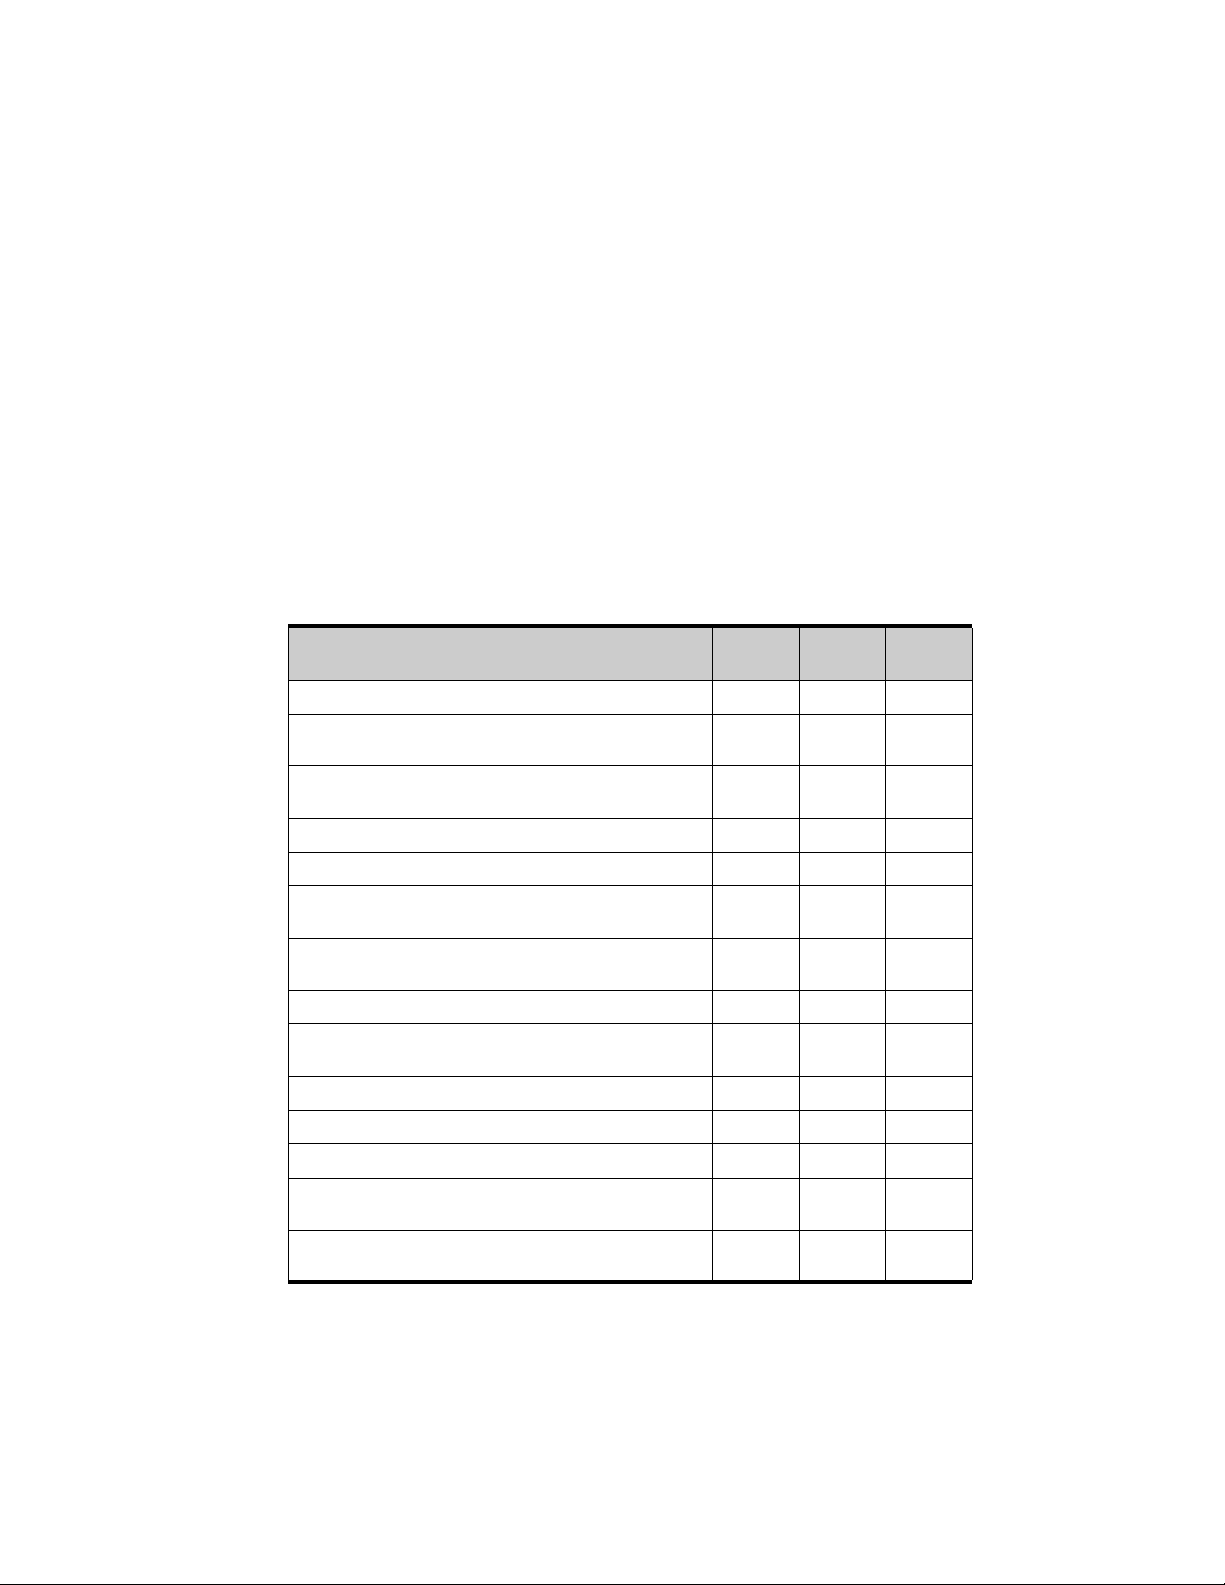
Becoming Familiar with Administrator
When the Administrator Application is launched, it opens the
Administrator
whether they are available when using the application remotely.
ADMINISTRATOR APPLICATION COMPONENTS & FEATURES
window with the following components and features, and
Functions Server
Main menu across the top of the window
Domain panel along the left side that provides access to
domains, user groups, individual users, and permission
levels
Unlock File button, which allows you to free a file
accidentally locked
Groups button, which opens a window allowing you to
add or delete user groups on a domain
Browse button, which opens a Windows Explorer-type
window that displays the information in the Domain
panel in a directory tree and file format
Performance Monitor button, which accesses the
Windows Performance Monitor
Refresh button, which refreshes your displayed
information whenever you click it
Remote
(except
Network
Interface
Settings
)
A-10
•
•
•
A
•
•
•
DMINISTERING
Start Network Service button, which allows you to
resume the service when stopped
Stop Network Service button, which allows you to stop
service to the network
Display area to the right where you can view the
domain, group, and user information in a Windows
Explorer-type window with editing icons
Viewing & Managing Domains
From the
have already been entered, along with their user and file information.
You can also add other domains in your network.
LOCKOUT-PRO LOCKOUT-PROTM ENTERPRISE ADMINISTRATOR’S GUIDE
Administrator
window, you can view network domains that
To v ie w d o ma in s :
1
Launch the Administrator Application.
2
View the list of domains in the window directly under
panel. These are all the domains already entered.
The list of domains provides an overview of all users, licenses in use, and
files in use. To view the details for a given information type, click the
(+)
plus sign
to the left of the label.
The following table further describes the information available.
DOMAIN VIEW
Label Details
Registered Users Names of all registered users of LOCKOUT-PROTM
Graphical Procedure Writing Software for the
domain
Domain
in the left
Pending Users Names of users who have installed the client version
of LOCKOUT-PRO
TM
but have not yet been
registered in the database by the network
administrator
Licenses in Use (x) The number and names of all users in this domain
who are currently using LOCKOUT-PRO
TM
licenses
(i.e., have launched the client version of LOCKOUT-
TM
PRO
)
Users On-line The names of all users who are currently on-line,
regardless of whether they have a license checked
out
Locked Files The names of all procedure files, and their assigned
group, that are currently in use and thus “locked out”
for anyone else’s use
TIP: If you wish to view the domain list in a two-paneled window similar to
Windows Explorer, click the
Browse... button on the bottom left. An Explorer-
type window will open in the display area to the right.
To add a domain:
1
Launch the Administrator Application.
2
In the text box under
3
Click the
Administrator
LOCKOUT-PROTM ENTERPRISE ADMINISTRATOR’S GUID
Add
button. The name will be added to the list in the
window.
Domain Name
E
, type in the name of the domain.
•
•
•
A- 11
•
•
•

Managing User Groups
Each domain incorporates one or more user groups. Individual users in
that domain must be assigned to a specific user group as part of the
registration process.
TIP: One of the benefits of user groups is that you can modify procedure
templates to meet the needs of a specific group. For example, a production
group’s templates can include default wording or text formatting that creates
the best procedures for that group, while a research group’s templates can
be edited differently for their specific needs.
To add a user group:
1
In the
2
Click the
3
When the
Name
4
Click the
5
When finished, click OK.
Administrator
Groups
Groups
textbox.
Add Group
window, select the domain for the new group.
button beneath the list of domains, groups, and users.
window opens, type the group’s name into the
Group
button.
To delete a user group:
1
In the
2
Click the
3
When the
Administrator
Groups
button beneath the list of domains, groups, and users.
Groups
window opens, the list of available groups will be
window, select the domain for the group.
displayed.
4
Select the group from the list in the
Delete Group
5
A dialog box will open asking you to confirm your action. Deleting a
button.
Group Name
text box, and click the
group deletes all contents in that group’s folder on the server.
NOTE:
You cannot delete a group to which users are currently
assigned. You must first reassign the users to a different group. For
information on how to do so, see the procedure below “To change
a user’s group or permission level:”.
6
When finished, click OK.
A-12
•
•
•
A
•
•
•
DMINISTERING
LOCKOUT-PRO LOCKOUT-PROTM ENTERPRISE ADMINISTRATOR’S GUIDE

Maintaining Users & Permission Levels
When a user first launches LOCKOUT-PROTM Graphical Procedure
Writing Software on a client computer, a request is sent that the user
be added as a registered user. As administrator, you complete the user’s
registration by accessing the user’s data on the
setting the permission level, and then adding the user name to the list
Registered Users
of
.
You can also reassign registered users to different groups and/or change
their permission levels.
To complete a pending user’s registration:
1
In the
to expand it to view all the user information under that domain.
2
Click on
3
Click on the name of the user to be registered.
4
The
group in the
•
•
Domain
Edit User
panel of the
Pending Users
Administrator
window, click the domain name
to display the user names.
window will open, displaying the domain’s first listed
Group
text box.
If the group shown is the one you wish to add the user to, proceed to
the next step.
If you wish to add the user to a different group, click the down-arrow
Group
in the
text box and select another from the list.
Pending Users
list,
5
In the
Permissions
box, the permission defaults to
different permission level, click the down-arrow and select the level you
wish.
6
Click the
Users
list.
NOTE:
Update
button. The user’s name is now moved to the
Once a user is added to the Registered Users list on the
admin server, the client must re-launch LOCKOUT-PRO
To remove a user from the Registered Users list:
1
In the
Users
2
When the
Administrator
window, click the user’s name on the
list under the domain name you’re working with.
Edit User
window opens, click the
will close, and the user will be moved to the
this list are not allowed access to the LOCKOUT-PRO
To change a user’s group or permission level:
1
In the
list under the relevant domain and group name.
LOCKOUT-PROTM ENTERPRISE ADMINISTRATOR’S GUID
Administrator
window, click the user’s name on the appropriate
Viewer.
Disable
Pending Users
E
button. The window
To set a
Registered
TM
.
Registered
list. Users on
TM
server data.
•
•
•
A- 13
•
•
•

2
When the
Permissions
3
Click the
Edit User
window opens, select a different
option in either or both boxes.
Update
button. The window will close, and the user
Group
and/or
information will be changed.
Managing User Files
The enterprise version of LOCKOUT-PROTM Graphical Procedure
Writing Software ensures the integrity of procedure files by storing
these files in a single location on the server and, with the use of groups
and permission levels, restricting them from being changed by
unauthorized users. LOCKOUT-PRO
changed by more than one user at the same time through use of a “file
lockout” feature.
The Administrator Application allows you to work around those
restrictions when needed. Two common situations where you may need
to manage files manually are:
•
When users in different groups wish to share files between groups
•
When a file that has been checked out cannot be checked back in by
the client user because of technical problems, such as a PC crash
TM
also keeps a file from being
To copy, cut, paste, or delete user files:
1
In the
Administrator
window, click the
Browse
button to open the browser
window on the right.
2
Navigate to the relevant folder containing the file(s) you wish to
manage.
3
Perform the desired function as appropriate:
•
To copy-and-paste or cut-and-paste a file, click on the file, then click
Copy
or
Cut
the
destination directory, and click on the
•
To delete a file, click on the file, then click the
icon on the browser window’s toolbar. Navigate to the
Paste
icon.
Delete
icon on the
browser window’s toolbar.
To unlock a locked file:
1
In the
under the appropriate group and domain.
2
Click on the file to select it.
3
Click the
becomes available for any other authorized user to access it.
4
Click the
Administrator
Unlock File
Refresh
button to update the list under
window, locate the locked file in the
button below the
Domain
panel. The file now
Locked Files
Locked Files
list
.
A-14
•
•
•
A
•
•
•
DMINISTERING
LOCKOUT-PRO LOCKOUT-PROTM ENTERPRISE ADMINISTRATOR’S GUIDE

NOTE:
If the original user made any changes to the file since it was
last saved on the server, those changes will be lost. Also, if the user
did not shut down LOCKOUT-PROTM normally, the license being
used by that user will not be released when the file is unlocked. To
release the license, the user must log in and shut down LOCKOUTPROTM normally.
Performing Other Administrative Tasks
Starting/Stopping Network Service
Starting and stopping network service is a standard Windows
administrative function. The Administrator Application provides
simple one-click buttons to perform these functions when running the
application on the server. (You cannot start or stop network service from
a remote installation of the Administrator Application.)
To start or stop the network service:
1
From
Administrator
•
If the network service is currently
restart it, click the
running on the LOCKOUT-PROTM server:
not
running and you wish to
Start Network Service
button.
NOTE:
Once the network service has been restarted, users must
relaunch LOCKOUT-PROTM on their client machines to reconnect.
•
If the service currently is running and you wish to disconnect clients
from the enterprise server, click the
NOTE:
(
Start>Control Panel>Administrative Tools>Services
You can also use the Windows Services function
Stop Network Service
button.
) to start or
stop the network service.
Viewing LOCKOUT-PRO Events
You must be running the Event Viewer on the server (not remotely) in
order to view LOCKOUT-PRO
To view transactions in Event Viewer:
1
Open the Windows Event Viewer (
Tools>Event Viewer
2
Select the
events.
LOPE
).
entry to display the LOCKOUT-PROTM Enterprise
TM
transactions:
Start>Control Panel>Administrative
LOCKOUT-PROTM ENTERPRISE ADMINISTRATOR’S GUID
•
•
E
•
A- 15
•
•
•
3
To see additional details for an event, double-click on the event.
TIP: It is recommended that you periodically save the LOCKOUT-PROTM
event log by right-clicking the LOPE entry in Windows Event Viewer and
selecting the Save option.
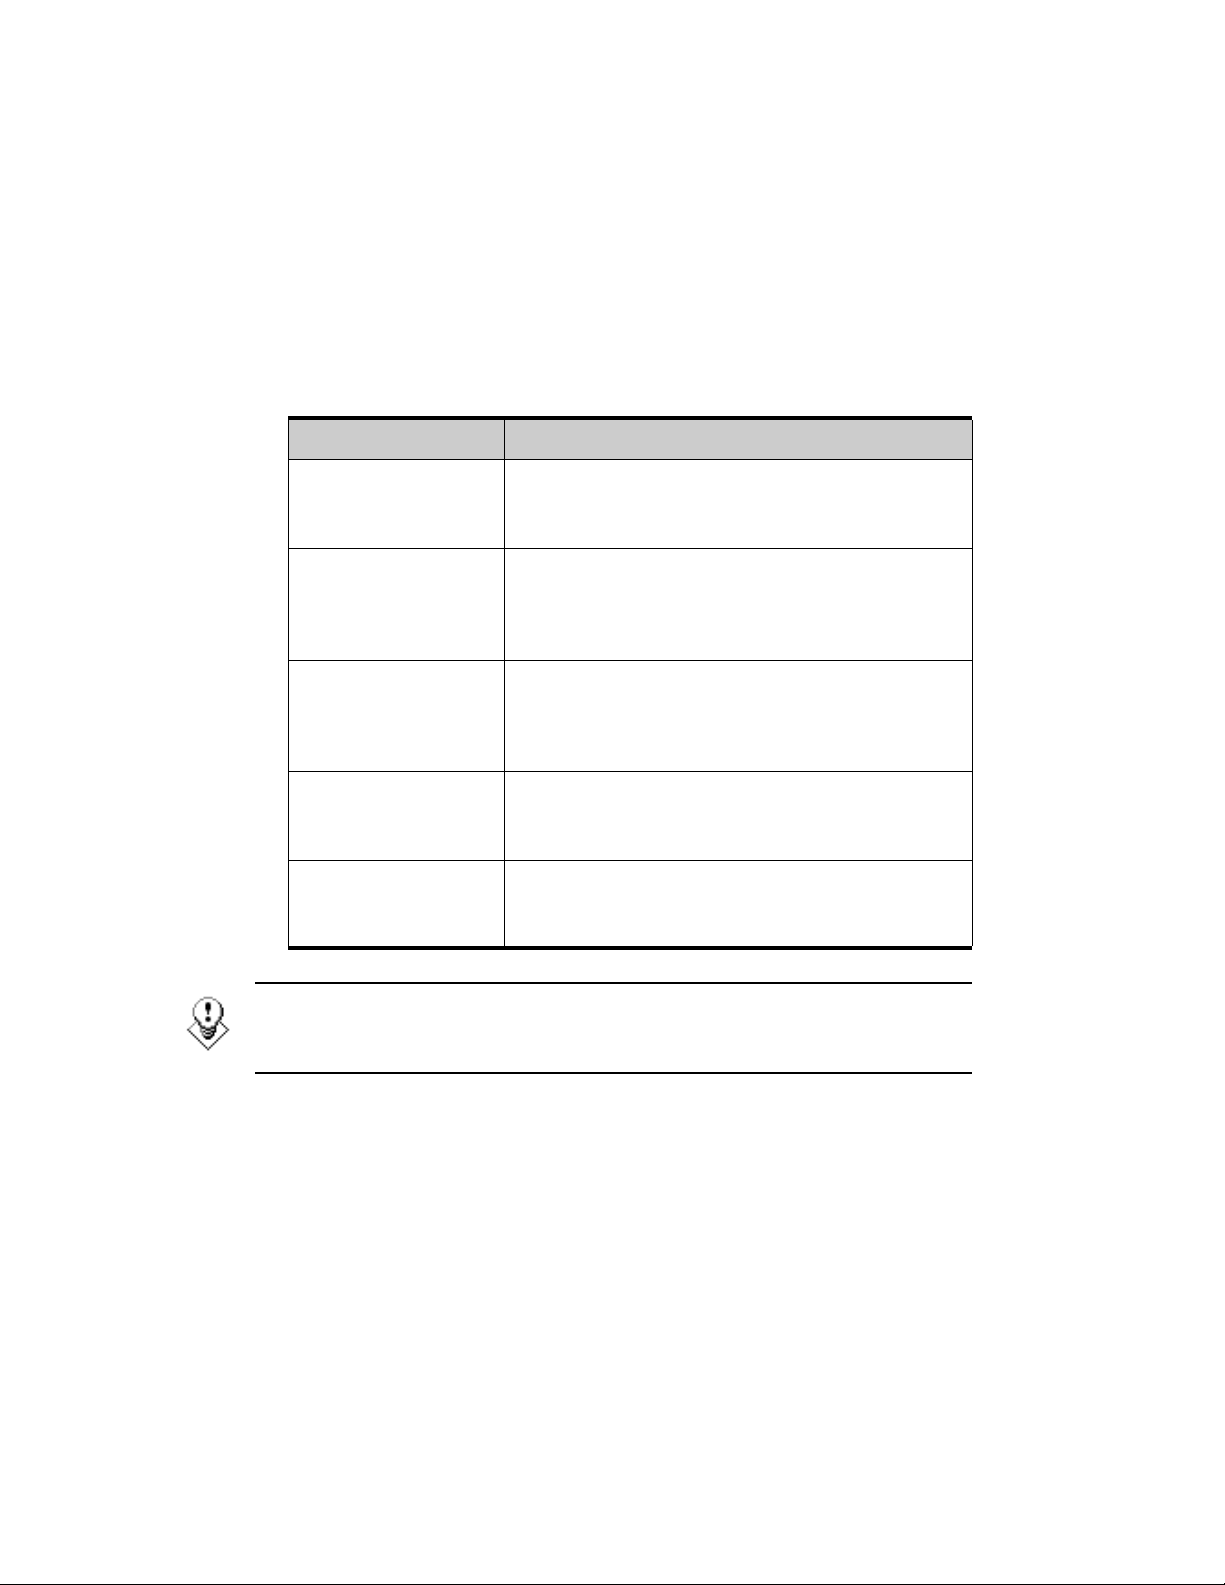
Troubleshooting Enterprise Functions
The following table shows the most common problems users are likely to
encounter.
CLIENT-SIDE ERROR CONDITIONS/MESSAGES
Error Conditions/Messages Possible Causes/Solutions
User gets an error message
box, but no message is
displayed.
User cannot log on, because
either all the licenses are in use
or the user account is not
found.
Remote path not found. Check
connection settings.
Default base file path not found
on server.
Cannot retrieve date/time of
base template on server.
User group not found or
assigned.
User group not found or
assigned
User is unable to ping to the server, or the
service on the server side is stopped.
1) The user is not a registered user. Users
logging on for the first time may see this error if
they remain in the Pending Users list.
2) The maximum number of floating licenses
has been reached. The user will have to wait
until another user logs out and releases a
license.
Any of these errors might occur if, by accident,
folders on the server are deleted or not copied
due to an installation error.
Check to see if all shared folders exist on the
server. (See “Figure 1: Folder Structure for
LOCKOUT-PROTM Enterprise Installed Files”)
If any folders are missing, copy them from the
LOCKOUT-PRO
TM
CD, or call Brady Technical
Support.
The user may not be assigned to a user group.
To fix the situation, add the user to a group. (See
“Managing User Groups” on page 1-12 for
details.)
A-16
•
•
•
A
•
•
•
DMINISTERING
Access denied The user may be trying to perform a function not
included at the permission level set for that user.
(See “Maintaining Users & Permission Levels”
for details.)
(continued)
LOCKOUT-PRO LOCKOUT-PROTM ENTERPRISE ADMINISTRATOR’S GUIDE

CLIENT-SIDE ERROR CONDITIONS/MESSAGES (Continued)
The server is performing
correctly and the user is fully
registered, with appropriate
permission levels, and is
assigned to a group, yet is still
unable to log on to the server.
1) Check the user’s
app.config file, which is
located in
c:\program files\brady\lockoutPro 3.0 folder
on the client machine, and verify the data in that
file is correct. (See “The full basic structure of
the app.config file is shown in Figure 2 below.
Users can check their settings from the
File>Connection Settings option on the main
menu. Note that the data in the app.config file is
case-sensitive, so be sure to warn users not to
modify the file.” below for an example of the full
basic structure of the app.config file.)
2) The user’s computer may be missing some
needed files, such as:
• MDAC 2.8
• .Net Framework 1.1 Version 1.4322
Check if the files are installed (by accessing the
Add/Remove Programs window from the
Control Panel) or, in the case of Windows 2000,
check the folder:
C:\windows\Microsoft.net\framework
Any missing files can be downloaded from
Microsoft’s website.
SERVER-SIDE TROUBLESHOOTING
For User Connection/Access Problems on the Enterprise Server:
1 Verify that the network service is running.
2 Verify that the Network Address is correct.
3 Verify that the port settings are correct and that the port specified in the client
configuration file matches that port setting.
4 If these steps do not solve the problem, please contact technical support.
LOCKOUT-PROTM ENTERPRISE ADMINISTRATOR’S GUID
•
•
E
•
A- 17
•
•
•
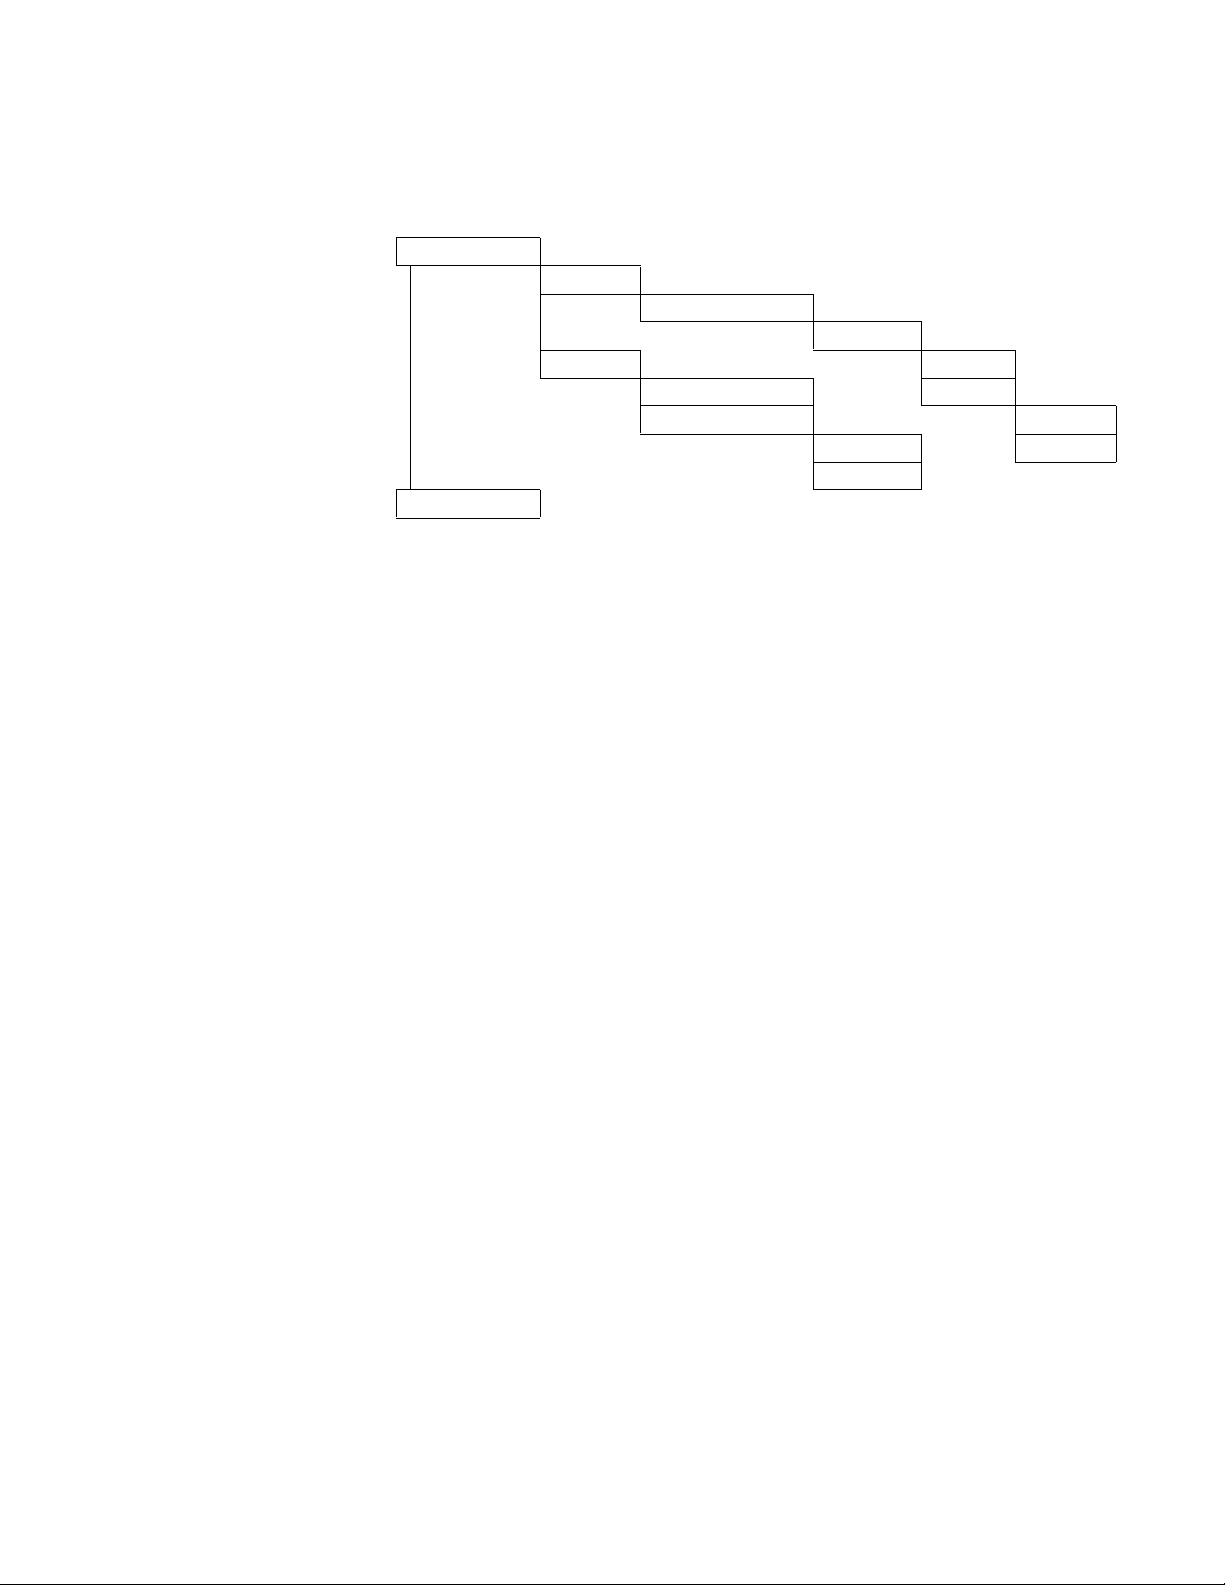
Folder Structure for Installed Files
The following files and directory structure are installed in the
Brady
during installation:
LOPE (Shared)
Data
Domain Name
Group Name
Database Files
LOPStorage.mbd Common
Common Files BaseFiles
BaseFiles ConfigFiles
ConfigFiles
Lockout Pro 3.0
Figure 1: Folder Structure for LOCKOUT-PROTM Enterprise Installed Files
Basic Structure of Client app.config File
The full basic structure of the
Users can check their settings from the
the main menu. Note that the data in the
be sure to warn users not to modify the file.
app.config
file is shown in Figure 2 below.
File>Connection Settings
app.config
file is case-sensitive, so
folder
option on
A-18
•
•
•
A
•
•
•
<?xml version="1.0" encoding="utf-8"?>
<configuration>
<APPSETTINGS SERVERID="172.20.94.161"
CONNECTIONSTRING="tcp://172.20.94.161:8032/LOPUser"
DEFAULTLOCALPATH="U:\My Documents\New Folder" CONNECTIONTYPE="1" />
</configuration>
Figure 2. Basic Structure of Client User’s app.config File
DMINISTERING
LOCKOUT-PRO LOCKOUT-PROTM ENTERPRISE ADMINISTRATOR’S GUIDE
Guia do Administrador
Software de Redação Gráfica de Procedimentos LOCKOUT-PRO™
Versão Enterprise v3.0

LEIA COM ATENÇÃO OS TERMOS E AS CONDIÇÕES A SEGUIR REFERENTES A ESTE
CONTRATO DE LICENÇA ANTES DE ABRIR ESTE PACOTE. CASO VOCÊ NÃO CONCORDE
COM ESSES TERMOS E ESSAS CONDIÇÕES, DEVOLVA IMEDIATAMENTE ESTE PACOTE
A FIM DE OBTER REEMBOLSO COMPLETO.
CONTRATO DE LICENÇA
Brady Worldwide, Inc. (doravante denominada “Brady”) concede por meio deste documento uma licença
não-exclusiva e intransferível para usar este software e a documentação que o acompanha, de acordo com
as seguintes condições:
1. CONCESSÃO DE LICENÇA: Você pode 1) instalar o software no número de computadores coberto pelas
faturas desta licença da Brady, incorporadas aqui para referência; 2) usar e transmitir o software em uma
rede em um local, se autorizado por uma fatura da Brady; 3) instalar o software em um ou vários servidores,
conforme faturado para um ou vários servidores, cujas faturas estão incorporadas aqui para referência;
e 4) fazer cópias do software em uma forma legível pela máquina, apenas para fins de backup.
2. RESTRIÇÕES DA LICENÇA: Você não pode: 1) modificar, adaptar, traduzir, fazer engenharia reversa,
descompilar, desmontar, criar trabalhos derivados ou copiar (exceto para a cópia de backup) este software
ou a documentação que o acompanha; 2) alugar, transferir ou conceder quaisquer direitos no software ou na
documentação que o acompanha, sem o consentimento prévio expresso por escrito da Brady ou 3) remover
quaisquer avisos, etiquetas ou marcas de propriedade existentes no software ou na documentação que o
acompanha.
3. NATUREZA DESTE CONTRATO: Esta licença não representa uma venda. As taxas de licença pagas por
você, se existirem, são relacionadas às licenças concedidas sob este Contrato. O titulo e os direitos autorais
relativos ao software, à documentação que o acompanha e a qualquer cópia feita por você permanecem
propriedades da Brady ou de seus fornecedores. Cópias não autorizadas do software ou da documentação que o
acompanha ou o não cumprimento das restrições mencionadas acima encerrarão automaticamente esta licença,
sem notificação anterior, e cancelarão seus direitos de usar o software. Além disso, a Brady poderá, além de
outras medidas legais, cobrar pelos honorários advocatícios cabíveis.
4. GARANTIA LIMITADA: A Brady garante que, por um período de noventa (90) dias contados a partir da data
de entrega a você comprovada no seu recibo de compra, o software, sob uso normal, será executado sem erros
significativos. A responsabilidade da Brady e a sua solução exclusiva sob esta garantia (que está sujeita à sua
devolução do software à Brady) será, a critério da Brady, tentar corrigir ou ajudá-lo com os erros, substituir o
software por software ou disquetes de funcionalidade equivalente ou reembolsar o valor da licença do software
e encerrar este Contrato.
COM EXCEÇÃO DA GARANTIA LIMITADA EXPRESSA DESCRITA ACIMA, A BRADY NÃO CONCEDE
A VOCÊ NENHUMA GARANTIA EXPRESSA, IMPLÍCITA OU LEGAL E SE ISENTA DE QUALQUER
GARANTIR IMPLÍCITA DE COMERCIALIZAÇÃO OU ADEQUAÇÃO A UM PROPÓSITO ESPECÍFICO.
A BRADY NÃO GARANTE QUE A OPERAÇÃO DO PROGRAMA SERÁ ININTERRUPTA OU LIVRE DE
ERROS.
Alguns estados não permitem a exclusão de garantias implícitas; nesses casos, as exclusivas descritas acima
podem não se aplicar a você. Esta garantia concede a você direitos legais específicos. Você também pode ter
outros direitos, que variam de estado para estado.
5. LIMITAÇÃO DE RESPONSABILIDADE: EM NENHUMA CIRCUNSTÂNCIA, A BRADY SERÁ RESPONSÁVEL POR QUAISQUER DANOS, INCLUINDO PERDA DE DADOS, DURANTE O CARREGAMENTO
DESTE SOFTWARE, OU PERDA DE LUCRO, CUSTO DE COBERTURA OU OUTROS DANOS ESPECIAIS,
INCIDENTAIS, CONSECUTIVOS OU INDIRETOS DECORRENTES DO USO DO PROGRAMA OU DA
DOCUMENTAÇÃO QUE O ACOMPANHA, QUALQUER QUE SEJA A CAUSA OU A TEORIA DE RESPONSABILIDADE. ESSA LIMITAÇÃO SERÁ APLICADA MESMO SOB CIRCUNSTÂNCIAS EM QUE A BRADY
TENHA SIDO NOTIFICADA DA POSSIBILIDADE DE TAL DANO.
Alguns estados não permitem a limitação ou exclusão de responsabilidade por danos incidentais ou
consecutivos; nesses casos, a limitação descrita acima pode não se aplicar a você.
6. GERAL: Este Contrato será regido e interpretado pelas leis do Estado de Wisconsin, Estados Unidos.
Você receonhece que as leis e regulamentações dos Estados Unidos podem restringir a exportação/reexportação do software. Você concorda em não exportar/re-exportar o software ou partes dele em qualquer
forma,, sem autorização adequada dos governos dos Estados Unidos e do país estrangeiro em questão.
Esta obrigação perdurará mesmo após o término deste Contrato. Este Contrato representa todo o contrato
entre as partes e substitui qualquer outra comunicação ou publicação relacionada ao software e à
documentação que o acompanha. Se qualquer provisão deste Contrato for considerada inválida, a parte
restante do Contrato continuará em total vigor.
6555 West Good Hope Road, P.O. Box 571, Milwaukee, Wisconsin 53201-0571, Estados Unidos.
Telefone +1 (414) 358-6600
•
•
•
•
•
•
LOCKOUT-PRO™ — G
UIA DO ADMINISTRADOR ENTERPRISE

C
ONTEÚDO
• • • • • •
Administrando o LOCKOUT-PRO
Funções do servidor do LOCKOUT-PRO Enterprise
Componentes do servidor
Aplicativo do Administrador do LOCKOUT-PRO™
Serviço de Rede do LOCKOUT-PRO™
Entrada do Visualizador de Eventos
Níveis de permissões do usuário
Requisitos do sistema para aplicativos do Servidor e Cliente
Instalando e configurando aplicativos do servidor
Preparando para instalação
Panorama da instalação
Instalando os aplicativos de servidor do Enterprise
Ativando e configurando o LOCKOUT-PRO
Distribuindo o LOCKOUT-PRO aos Clientes
Distribuindo o Aplicativo do Administrador Remoto
Usando o Aplicativo do Administrador
Familiarizando-se com o Administrador
Exibindo e gerenciando domínios
Gerenciando grupos de usuários
Mantendo os níveis de permissões do usuário
Gerenciando arquivos de usuários
Executando outras tarefas administrativas
Iniciando/Interrompendo o serviço de rede
Visualizando eventos do LOCKOUT-PRO
A–1
A-2
A-2
A–3
A–5
A–5
A–11
A–11
A–12
A–13
A–15
A–17
A–17
A–1
A-2
A–5
A–6
A–7
A–8
A–10
A–14
A–17
A–4
LOCKOUT-PROTM —
Solucionando problemas com funções do Enterprise
Estrutura de pastas para arquivos instalados
Estrutura básica do arquivo app.config cliente
G
UIA DO ADMINISTRADOR DO
A–18
A-20
A-20
•
•
ENTERPRISE III
•
•
•
•

Direitos Autorais
Este manual está protegido por leis de direitos autorais. Todos os
direitos reservados. Nenhuma parte deste manual pode ser copiada ou
reproduzida, em qualquer forma, sem o consentimento prévio da Brady
Worldwide, Inc.
Embora todas as precauções tenham sido tomadas durante o preparo
deste documento, a Brady não assume qualquer responsabilidade por
perdas ou danos causados por erros ou omissões ou por afirmações
resultantes de negligência, acidente ou qualquer outra causa. Além
disso, a Brady não assume qualquer responsabilidade pela aplicação ou
pelo uso de qualquer produto ou serviço aqui descrito nem por quaisquer
danos incidentais ou consecutivos decorrentes do uso deste documento.
A Brady renuncia a todas as garantias de comercialização ou adequação
para um propósito específico.
A Brady se reserva o direito de fazer alterações sem qualquer aviso em
qualquer produto ou sistema aqui mencionado a fim de melhor a
confiabilidade, a função ou o projeto.
A reprodução parcial ou total deste material é estritamente proibida
sem a permissão por escrito da Brady Worldwide, Inc.. Para obter mais
informações, entre em contato com : Brady Worldwide, Inc. Signmark®
Division, 2221 W. Camden Road, Milwaukee, WI 53209.
Isenção de Responsabilidade
Todos os esforços foram feitos a fim de tornar este guia o mais preciso e
completo possível. A Brady Worldwide, Inc. não se responsabiliza por
imprecisões e omissões surgidas durante o uso deste guia.
Este manual é de propriedade da Brady Worldwide, Inc. e pode ser
revisado periodicamente sem notificação prévia. A Brady Worldwide,
Inc. se isenta de qualquer entendimento relacionado ao fornecimento de
revisões a você, caso existam.
Todos os nomes de marcas e produtos mencionados neste manual são
marcas comerciais ou marcas comerciais registradas de suas
respectivas empresas ou organizações.
LOCKOUT-PRO, GlobalMark e HandiMark são marcas comerciais da
Brady Worldwide, Inc.
©2006 Brady Worldwide, Inc. Todos os direitos reservados
•
•
•
IV LOCKOUT-PRO
•
•
•
www.bradycorp.com
TM
—
G
UIA DO ADMINISTRADOR DO
ENTERPRISE

A
• • • • • •
A Versão Enterprise do Software de Redação Gráfica de Procedimentos
LOCKOUT-PRO™ inclui ferramentas que permitem ao administrador
do aplicativo gerenciar o uso com facilidade em toda uma organização.
O
Enterprise e como usar essas ferramentas, incluindo:
DMINISTRANDO O
Guia do Administrador
Uma visão geral das funções do servidor do LOCKOUT-PRO™
Enterprise
Como instalar e configurar os componentes do servidor do
LOCKOUT-PRO™ Enterprise e preparar as instalações
de clientes
Como gerenciar domínios de usuários, grupos de usuários,
usuários e arquivos
Como iniciar e interromper o serviço de rede e exibir eventos
do LOCKOUT-PRO™
fornece explicações extras sobre a versão
LOCKOUT-PRO
Mensagens de erro comuns e como solucioná-los
Funções do servidor do LOCKOUT-PRO Enterprise
A versão Enterprise do LOCKOUT-PRO™ foi desenvolvida para
organizações maiores que desejam implantar o software em uma
rede e centralizar o controle de direitos de usuários, modelos de
procedimentos, padrões e segurança aprimorada. A Versão 3.0 do
LOCKOUT-PRO™ Enterprise combina utilitários de administração
do servidor e um serviço de rede com o aplicativo da área de trabalho
executando no PC cliente.
Componentes do servidor
Estes são os principais componentes ativos no servidor do
LOCKOUT-PRO™ Enterprise:
LOCKOUT-PRO™ — G
UIA DO ADMINISTRADOR ENTERPRISE
•
•
•
A- 1
•
•
•

•
Aplicativo do Administrador
•
Serviço de Rede
•
Entrada do Visualizador de Eventos
Aplicativo do Administrador do LOCKOUT-PRO™
Com esse utilitário, os administradores do Software de Redação Gráfica
de Procedimentos LOCKOUT-PRO™ podem monitorar usuários e
arquivos-cliente, registrar usuários, atribuí-los a grupos e definir
direitos dos usuários. O utilitário também permite copiar arquivos de
um grupo para outro e desbloquear arquivos que tenham passado por
checkout e que não podem ser desbloqueados por meio do processo
normal (devido a uma falha do PC cliente, por exemplo).
O Aplicativo do Administrador é configurado apenas uma vez no servidor.
Entretanto, após a configuração de pelo menos um administrador no
servidor, você pode estabelecer mais administradores capazes de
executar uma versão “remota” do Aplicativo do Administrador em
seus respectivos PCs clientes.
Serviço de Rede do LOCKOUT-PRO™
Este serviço, executando no servidor Enterprise, é o meio pelo qual
os usuários de clientes do LOCKOUT-PRO™ se conectam ao servidor
para obter acesso a arquivos on-line. Este serviço pode ser iniciado
e interrompido usando as ferramentas de administração padrão do
Windows (Função Serviços) ou os controles fornecidos no Aplicativo
do Administrador do LOCKOUT-PRO™.
Você pode iniciar e interromper o serviço
apenas
no servidor, utilizando
as ferramentas padrão do Windows ou o Aplicativo do Administrador.
Essas funções não podem ser realizadas durante a execução remota do
Aplicativo do Administrador.
Entrada do Visualizador de Eventos
Cada etapa ou transação realizada por usuários clientes é registrada
e pode ser visualizada usando o visualizador de eventos padrão do
Windows. A entrada específica do LOCKOUT-PRO™ é chamada de
LOPE
. As transações registradas incluem: acesso do usuário ao serviço,
abrir/salvar arquivos, número de usuários on-line, tentativa por parte
de um usuário de abrir um recurso bloqueado, qualquer problema com
o servidor e funções de serviço administrativo.
•
•
•
A- 2 A
•
•
•
DMINISTRANDO O
Você pode exibir ou salvar as entradas do Visualizador de Eventos
apenas a partir do servidor. Essas funções não podem ser realizadas
durante a execução remota do Aplicativo do Administrador.
LOCKOUT-PRO LOCKOUT-PRO™ — G
UIA DO ADMINISTRADOR ENTERPRISE
Níveis de permissões do usuário
O LOCKOUT-PRO™ Enterprise incorpora três níveis de permissão
para os usuários:
•
A
dministrador:
todas as funções disponíveis nos componentes cliente e servidor
do LOCKOUT-PRO™.
• Autor:
um usuário com direitos
procedimentos com base no aplicativo cliente, bem como exibir
e imprimir, mas não pode modificar modelos, padrões ou as
informações relacionadas.
• Visualizador:
e imprimir procedimentos, etiquetas de bloqueio, rótulos de fontes
de energia e informações relacionadas.
A tabela a seguir lista as principais funções no LOCKOUT-PRO™
Enterprise e para quais níveis de permissão elas são atribuídas.
FUNÇÕES ATRIBUÍDAS POR NÍVEIS DE PERMISSÃO DE USUÁRIOS
um usuário com direitos
Autor
pode criar e editar
um usuário com direitos
Admin
pode executar
Visualizador
só pode exibir
Funções Admin Autor
Exibir procedimentos já existentes
Imprimir procedimentos, etiquetas e rótulos
de fonte de energia
Exibir as informações relacionadas no
LOCKOUT-PRO™
Criar novos procedimentos
Examinar procedimentos já existentes
Importar versões anteriores de arquivos
do LOCKOUT-PRO™
Exportar procedimentos para outros
formatos de arquivos
Salvar procedimentos novos ou revisados
Administrar licenças de clientes
do LOCKOUT-PRO™
Manter níveis de permissão do usuário
Editar modelos de procedimento
Alterar listas de padrões do LOCKOUT-PRO™
Modificar as informações relacionadas
no LOCKOUT-PRO™
Transferir procedimentos entre grupos
de usuários
Visuali-
zador
LOCKOUT-PRO™ — G
UIA DO ADMINISTRADOR ENTERPRISE
•
•
•
A- 3
•
•
•

Requisitos do sistema para aplicativos
do Servidor e Cliente
REQUISITOS DO SISTEMA PARA
SOFTWARE DE REDAÇÃO GRÁFICA DE PROCEDIMENTOS LOCKOUT-PRO™
Mínimo: Recomendado:
CLIENTE DA ÁREA DE TRABALHO
Conexão em rede Acesso à instalação do servidor do
LOCKOUT-PRO™ Enterprise em
uma Intranet
Protocolo TCP/IP
Sistema
operacional
Impressoras
suportadas
Impressora Os drivers para a(s) impressora(s) que você for usar com
SERVIDOR
Processador 1,2 GHz ou superior 2,6 GHz
Memória (RAM) 512 MB 1G
Espaço em disco 500 MB Igual
Sistema
operacional
Suporte a IIS V5 ou v6, configurada e habilitada
ASP .NET V1.1, instalada
ADMINISTRADOR REMOTO
Conexão em rede Acesso à instalação do servidor do
Protocolo TCP/IP
Sistema
operacional
Windows 2000
Windows XP Professional
GlobalMark™
HandiMark™
energia)
Impressora jato de tinta ou laser com
alimentação de folha individual
o LOCKOUT-PRO™ devem estar instalados. Ao menos uma
impressora deve estar instalada para que o aplicativo seja
executado. Consulte o manual de sua impressora para obter
informações sobre como instalá-la.
Apenas para as impressoras GlobalMark
atualizado é obrigatório. Primeiro, desinstale a impressora
do seu computador. Instale o novo driver da GlobalMark
que acompanha o CD de instalação do LOCKOUT-PRO™.
(NOTA: o funcionamento deste driver não foi testado nem
validado com o MarkWare™, o Surf on Signs™, nem com
qualquer outro software da Brady.)
Windows 2000 Advanced Server
Windows 2003 Server
Windows XP
LOCKOUT-PRO™ Enterprise em uma Intranet
Windows 2000
Windows XP Professional
(apenas etiquetas de fontes de
Igual
™: um driver
™
Igual
Igual
•
•
•
A- 4 A
•
•
•
DMINISTRANDO O
LOCKOUT-PRO LOCKOUT-PRO™ — G
UIA DO ADMINISTRADOR ENTERPRISE

Instalando e configurando aplicativos do servidor
Todos os componentes do Software de Redação Gráfica de
Procedimentos LOCKOUT-PRO™ são instalados no servidor
que contém os modelos e padrões do aplicativo e que os clientes
acessarão para criar e armazenar procedimentos.
Preparando para instalação
Antes que o LOCKOUT-PRO™ possa ser instalado, os seguintes
aplicativos da Microsoft devem ser instalados no seu servidor:
•
Internet Information Services (IIS)
•
.NET Framework
•
Data Access Components (MDAC) v2.8
•
Active Directory
•
ASP.NET
Esses aplicativos são essenciais para que o LOCKOUT-PRO™ funcione
plenamente. Eles podem ser obtidos em www.microsoft.com, que
também oferece ampla documentação de suporte sobre como instalá-los
e configurá-los.
DICA: Embora este guia apresente a estrutura básica de instalação,
não deixe de consultar o seu administrador de rede ou domínio antes
da instalação. O seu administrador poderá precisar de mais parâmetros
para fins de segurança, ou poderá usar um pacote de software de outro
fornecedor para a instalação dos clientes.
LOCKOUT-PRO™ — G
Panorama da instalação
Assim que o software de servidor necessário estiver corretamente
instalado e configurado, o processo de instalação do LOCKOUT-PRO™
no seu servidor envolverá estas etapas básicas, cada uma das quais
sendo explicada detalhadamente a seguir:
•
Instale os aplicativos do servidor utilizando o CD do
LOCKOUT-PRO™.
•
No Aplicativo do Administrador do LOCKOUT-PRO™, ative
o software e configure seus parâmetros de rede.
•
Escolha o Instalador do LOCKOUT-PRO™ pela Web ou um
instalador silencioso, como a ferramenta Gerenciamento de
Diretiva de Grupo da Microsoft, para distribuir o aplicativo
cliente nas máquinas dos usuários.
•
Se desejar criar mais usuários que possam executar remotamente
o Aplicativo do Administrador, selecione o Instalador do LOCKOUTPRO™ pela Web ou um instalador silencioso, como a ferramenta
UIA DO ADMINISTRADOR ENTERPRISE
•
•
•
A- 5
•
•
•

Gerenciamento de Diretiva de Grupo da Microsoft, para distribuir
o Aplicativo do Administrador em mais máquinas de usuários
administradores.
Instalando os aplicativos de servidor
do Enterprise
A primeira etapa é instalar os aplicativos de servidor utilizando o CD
do LOCKOUT-PRO™ Enterprise.
Para instalar aplicativos de servidor do Enterprise:
1
Insira o CD do LOCKOUT-PRO™ na unidade de CD-ROM do servidor
do Enterprise. O programa de instalação será iniciado automaticamente.
Se ele não abrir após um pequeno intervalo, você poderá iniciá-lo
manualmente seguindo os passos abaixo:
•
Abra a pasta da unidade que contém o CD do LOCKOUT-PRO™.
•
Localize o arquivo e clique duas vezes nele:
LockoutPRO3.0Installer.exe
2
Quando a janela do instalador for aberta, selecione a opção do menu:
Instalar o Lockout PRO Server
.
3
Quando for solicitado, escolha o idioma desejado.
4
Quando o Assistente do Install Shield for aberto, clique em
Avançar
começar a instalação.
5
Quando solicitado, leia e aceite o contrato de licença, clicando em
6
Digite seu nome, o nome da empresa e o número de série na embalagem
do CD; em seguida, clique em
7
Aceite a pasta de destino para o programa, clicando em
8
Aceite ou selecione a pasta Programas e clique em
9
A janela
Status da instalação
Avançar
.
Avançar
Avançar
.
é exibida enquanto o instalador realiza
as seguintes tarefas:
•
Instalar o Aplicativo do Administrador do LOCKOUT-PRO™ no
servidor.
•
Instalar o Serviço de Rede do LOCKOUT-PRO™ por meio do qual
os usuários clientes se conectam ao servidor.
•
Criar as pastas necessárias no servidor Enterprise.
•
Copiar o banco de dados do LOCKOUT-PRO™ Enterprise na pasta
adequada do servidor.
•
Instalar os arquivos do LOCKOUT-PRO™ Enterprise no servidor.
•
Instalar a documentação no servidor.
.
para
Sim
.
•
•
•
A- 6 A
•
•
•
DMINISTRANDO O
10
Quando a instalação for concluída, clique no botão
continuar.
LOCKOUT-PRO LOCKOUT-PRO™ — G
Concluir
UIA DO ADMINISTRADOR ENTERPRISE
para

11
Quando o navegador abrir a página de registro, siga os prompts
para registrar o LOCKOUT-PRO™.
12
Feche o navegador e a janela de instalação LOCKOUT-PRO™.
Ativando e configurando o LOCKOUT-PRO
Após a instalação, você precisará ativar o software usando o código de
ativação fornecido pela Brady. Esse código é uma chave criptografada
que certifica o número de licenças que sua organização adquiriu. Essas
licenças são “flutuantes”, o que significa que elas podem ser usadas em
qualquer computador da rede, desde que o número total de licenças em
uso em um determinado momento não exceda ao número de licenças
adquiridas.
Após a ativação, você precisará incluir os domínios e configurar os
parâmetros de rede.
NOTA:
Você deve concluir o procedimento a seguir antes de
distribuir o LOCKOUT-PRO™ aos clientes ou a mais usuários
do Aplicativo do Administrador.
Para ativar e configurar o LOCKOUT-PRO:
1
Abra o Aplicativo do Administrador em um atalho da área de trabalho
ou no menu
2
Quando solicitado, digite a chave do produto que é fornecida no
Iniciar>Programas
.
certificado de licença que você recebeu com o software e clique em
3
(Opcional)
o idioma, clicando no item de menu
Quando a janela Administrador abrir, você poderá alterar
Idioma
, localizado na parte superior
esquerda, e escolhendo o idioma que você deseja usar para a interface
Aplicativo do Administrador.
NOTA:
O idioma escolhido aqui define apenas o idioma para
o Aplicativo do Administrador. Os usuários podem selecionar
o idioma individualmente em suas máquinas cliente.
4
Clique no item de menu
na parte superior da janela
5
Na janela
LAN/Sem Fio
VPN
, caso a sua rede utilize uma VPN.
Configurações da interface de rede
da rede do servidor LOCKOUT-PRO™ e o endereço da
Configurações da interface de rede
Administrador
.
, selecione o endereço
, localizado
OK
.
6
7
8
LOCKOUT-PRO™ — G
Informe o
Número da porta
que deseja usar.
Clique em OK.
Uma caixa de diálogo é exibida, pedindo que você confirme se essas
configurações estão corretas. Se estiverem corretas, clique em
UIA DO ADMINISTRADOR ENTERPRISE
Sim
.
•
•
•
A- 7
•
•
•

9
Na janela
Domínio
Administrador
, digite o nome do domínio na caixa de texto
e clique no botão
Adicionar
. O nome do domínio será exibido no
painel de navegação à esquerda.
Distribuindo o LOCKOUT-PRO aos Clientes
Após ativar e configurar o LOCKOUT-PRO™, você pode distribuir
os arquivos de instalação do cliente nos computadores dos usuários
utilizando um dos dois métodos a seguir:
•
Use o Instalador pela Web fornecido, que oferece uma interface fácil
que orienta os usuários sobre como salvar os arquivos de instalação
e, em seguida, instalar o LOCKOUT-PRO™.
•
Use a ferramenta Gerenciamento de Diretiva de Grupo da Microsoft
para enviar silenciosamente os arquivos de instalação às máquinas
clientes. (Você também pode ter um aplicativo de outro fornecedor
para realizar essas instalações silenciosas.)
Paras realizar a distribuição entre as máquinas clientes usando
o Instalador pela Web:
1
Oriente os usuários do cliente para navegar até:
http://<nome ou endereço IP do servidor>/LOPClientSetup/
O usuário será orientado para clicar com o botão direito do mouse em
2
cada um dos dois links e selecionar
Salvar destino como
para salvar na
mesma pasta na máquina cliente o arquivo relacionado a cada link.
3
Então, o usuário clica duas vezes no ícone
LOCKOUT-PRO 3.0
para iniciar
a instalação.
4
Quando o
Avançar
5
Quando for solicitado que escolha a pasta do programa, o usuário deve
clicar em
6
Quando for solicitado que confirme a instalação, o usuário deverá clicar
Avançar
em
7
Após o final da instalação do programa, o usuário deverá clicar no botão
Fechar
Windows Installer
.
Avançar
.
.
.
for aberto, o usuário deverá clicar em
Paras realizar a distribuição entre as máquinas clientes usando
a ferramenta Diretiva de Grupo:
1
No servidor em que o LOCKOUT-PRO™ está instalado, localize e abra
a pasta
2
Localize a pasta
a janela
LOPE
.
ClientFiles
Propriedades de ClientFiles
e clique com o botão direito nela para abrir
.
•
•
•
A- 8 A
•
•
•
DMINISTRANDO O
LOCKOUT-PRO LOCKOUT-PRO™ — G
UIA DO ADMINISTRADOR ENTERPRISE

3
Clique na opção
Compartilhar a pasta
configurações que desejar) e clique em
4
No menu
Diretiva de Grupo
Iniciar
do Windows, abra a ferramenta
.
(e alterar todas as outras
OK
.
Gerenciamento de
NOTA:
Essa ferramenta é fornecida apenas no Windows 2003
Server e no XP Pro. Trata-se de um download gratuito no site
www.microsoft.com, caso a ferramenta ainda não esteja
instalada no seu servidor.
5
No painel de navegação da janela do
localize, em
6
No servidor, clique com o botão direito em
selecione
7
A janela
Nesse ponto, você tem duas opções:
•
Para enviar uma instalação a cada
a pasta
•
Para enviar uma instalação a cada
pasta
com o botão direito nela e selecione
da janela
da interface de usuário para instalação
8
Clique com o botão direito do mouse em
em seguida, selecione
9
Navegue até:
Windows
Lockout PRO 3.0.msi.
Forest
, o seu domínio e o seu servidor.
Editar
no menu.
Editor de objetos de diretiva de grupo
Configurações de software
Configurações de software
Propriedades do Lockout PRO 3.0
Novo>Pacote
Meus locais de rede>Toda a rede>Rede Microsoft
>
seu domínio>seu servidor
Gerenciamento de Diretiva de Grupo
Diretiva de domínio padrão
do seu domínio será aberta.
computador
em
Configuração do computador
usuário
em
Configuração do usuário
Propriedades
, selecione
do domínio, selecione
do domínio, selecione a
. Clique
. Na guia
Implantação
Básica
em
e, em seguida, feche a janela.
Configurações de software
no menu.
>
pasta ClientFiles >arquivo
,
e
.
Opções
e,
10
11
LOCKOUT-PRO™ — G
Na janela
as políticas da sua empresa e clique em
Implantar software
NOTA:
Para obter ajuda com o uso da ferramenta
, configure a implantação de acordo com
OK
.
Gerenciamento de Diretiva de Grupo, visite
http://support.microsoft.com/kb/816102/.
No próximo login dos usuários, a área de trabalho exibirá um ícone de
instalação ou o ícone do LOCKOUT-PRO™ instalado (dependendo dos
parâmetros de implantação selecionados na ferramenta Gerenciamento
de Diretiva de Grupo).
NOTA:
Siga as políticas e os procedimentos da sua organização com
a ferramenta Gerenciamento de Diretiva de Grupo. Se você estiver
usando um software de outro fornecedor, consulte a respectiva
documentação do usuário para obter instruções específicas sobre
como configurar uma instalação silenciosa do LOCKOUT-PRO™.
UIA DO ADMINISTRADOR ENTERPRISE
•
•
•
A- 9
•
•
•

Distribuindo o Aplicativo do
Administrador Remoto
Você também pode usar o Instalador pela Web ou a ferramenta
Gerenciamento de Diretiva de Grupo da Microsoft para distribuir
o Aplicativo do Administrador do LOCKOUT-PRO™ entre PCs de
usuários remotos.
Para distribuir o Administrador com o Instalador pela Web:
1
Oriente os usuários para navegar até:
http://<nome ou endereço IP do servidor>/LOPRemoteAdmin/
2
O usuário será orientado para clicar com o botão direito do mouse em
cada um dos dois links e selecionar
mesma pasta na máquina cliente o arquivo relacionado a cada link.
3
Então, o usuário clica duas vezes no ícone
iniciar a instalação.
4
Quando o
Avançar
5
Quando for solicitado que escolha a pasta do programa, o usuário deve
clicar em
Windows Installer
.
Avançar
.
for aberto, o usuário deverá clicar em
Salvar destino como
Remote Admin Install.msi
para salvar na
para
6
Quando for solicitado que confirme a instalação, o usuário deverá clicar
Avançar
em
7
Após o final da instalação do programa, o usuário deverá clicar no botão
Fechar
.
.
Para distribuir o Administrador usando a ferramenta
Diretiva de Grupo:
1
No servidor em que o LOCKOUT-PRO™ está instalado, localize e abra
LOPE
a pasta
2
Localize a pasta
para abrir a janela
3
Clique na opção
configurações que desejar) e clique em
4
No menu
Diretiva de Grupo
5
No painel de navegação da janela do
localize, em
6
No servidor, clique com o botão direito em
selecione
.
Iniciar
Forest
Editar
RemoteAdminInstall
Propriedades de ClientFiles
Compartilhar a pasta
e clique com o botão direito nela
.
(e alterar todas as outras
OK
.
do Windows, abra a ferramenta
.
Gerenciamento de Diretiva de Grupo
, o seu domínio e o seu servidor.
Diretiva de domínio padrão
no menu.
Gerenciamento de
,
e
•
•
•
A- 10 A
•
•
•
DMINISTRANDO O
LOCKOUT-PRO LOCKOUT-PRO™ — G
UIA DO ADMINISTRADOR ENTERPRISE

7
A janela
Editor de objetos de diretiva de grupo
Nesse ponto, você tem duas opções:
•
Para enviar uma instalação a cada
a pasta
•
Para enviar uma instalação a cada
pasta
Configurações de software
Configurações de software
com o botão direito nela e selecione
da janela
da interface de usuário para instalação
8
Clique com o botão direito do mouse em
em seguida, selecione
9
Navegue até:
Windows>
Remote Admin Install.msi
10
Na janela
Propriedades do Lockout PRO 3.0
Novo>Pacote
Meus locais de rede>Toda a rede>Rede Microsoft
seu domínio>seu servidor
.
Implantar software
, configure a implantação de acordo com
as políticas da sua empresa e clique em
do seu domínio será aberta.
computador
em
Configuração do computador
usuário
em
Configuração do usuário
Propriedades
, selecione
do domínio, selecione
do domínio, selecione a
. Clique
. Na guia
Implantação
Básica
em
e, em seguida, feche a janela.
Configurações de software
no menu.
>RemoteAdminInstall >arquivo
OK
.
.
Opções
e,
NOTA:
Para obter ajuda com o uso da ferramenta
Gerenciamento de Diretiva de Grupo, visite
http://support.microsoft.com/kb/816102/.
11
No próximo login dos usuários, a área de trabalho exibirá um ícone de
instalação ou o ícone do LOCKOUT-PRO™ instalado (dependendo dos
parâmetros de implantação selecionados na ferramenta Gerenciamento
de Diretiva de Grupo).
NOTA:
Siga as políticas e os procedimentos da sua organização com a
ferramenta Gerenciamento de Diretiva de Grupo. Se você estiver
usando um software de outro fornecedor, consulte a respectiva
documentação do usuário para obter instruções específicas sobre
como configurar uma instalação silenciosa do LOCKOUT-PRO™.
Usando o Aplicativo do Administrador
O Aplicativo do Administrador fornece uma interface fácil de usar para
gerenciar as funções do servidor do Enterprise.
Familiarizando-se com o Administrador
LOCKOUT-PRO™ — G
A tabela a seguir relaciona os componentes e recursos da janela
principal do
Administrador
, indicando quais não estão disponíveis para
o uso remoto do aplicativo.
UIA DO ADMINISTRADOR ENTERPRISE
•
•
•
•
•
•
A- 11

COMPONENTES E RECURSOS DO APLICATIVO DO ADMINISTRADOR
Funções Servidor Remoto
Menu principal na parte superior da janela
Painel Domínio na lateral esquerda, que fornece acesso
a domínios, grupos de usuários, usuários individuais
e níveis de permissão
Botão Desbloquear arquivo, que permite liberar um
arquivo que tenha sido bloqueado acidentalmente
Botão Grupos, que abre uma janela permitindo que você
adicione ou exclua grupos de usuário em um domínio
Botão Localizar, que abre uma janela do tipo do Windows
Explorer, a qual exibe as informações no painel Domínio
em uma árvore de diretórios e formato de arquivo
Botão Monitor de desempenho, que acessa o Monitor
de desempenho do Windows
Botão Atualizar, que atualiza as informações exibidas,
sempre que você clica nele
Botão Iniciar serviços de rede, que permite retomar
o serviço quando ele é interrompido
Botão Interromper serviços de rede, que permite
interromper o serviço na rede
Uma Área de exibição à direita onde você pode exibir
informações sobre o domínio, o grupo e o usuário em uma
janela do tipo do Windows Explorer com ícones de edição
(exceto
Configurações
da interface
de rede
)
•
•
•
A- 12 A
•
•
•
DMINISTRANDO O
Exibindo e gerenciando domínios
Na janela
tenham sido especificados, juntamente com informações de usuários
e arquivos. Você também pode adicionar outros domínio na rede.
Para exibir domínios:
1
Inicie o Aplicativo do Administrador.
2
Exiba a lista de domínios na janela diretamente abaixo de
no painel esquerdo. Esses são todos os domínios já especificados.
A lista de domínios fornece uma visão geral de todos os usuários e
de licenças e arquivos em uso. Para exibir os detalhes para um tipo
específico de informação, clique no sinal de mais
etiqueta.
LOCKOUT-PRO LOCKOUT-PRO™ — G
Administrador
, você pode exibir domínios de rede que já
Domínio
(+)
à esquerda da
UIA DO ADMINISTRADOR ENTERPRISE
,

A tabela a seguir descreve as informações disponíveis.
EXIBIÇÃO DO DOMÍNIO
Etiqueta Detalhes
Usuários registrados Nomes de todos os usuários registrados do Software
de Redação Gráfica de Procedimentos LOCKOUTPRO™ para o domínio
Usuários pendentes Nomes de usuários que instalaram a versão cliente
do LOCKOUT-PRO™, mas que ainda não foram
registrados no banco de dados pelo administrador
da rede
Licenças em uso (x) O número e os nomes de todos os usuários deste
domínio que estão usando licenças do LOCKOUTPRO™ no momento (isto é, iniciaram a versão
cliente do LOCKOUT-PRO™)
Usuários on-line Os nomes de todos os usuários que estão on-line
no momento, independentemente de terem ou não
feito o checkout de uma licença
Arquivos bloqueados Os nomes de todos os arquivos de procedimentos
e o respectivo grupo atribuído que estão em uso no
momento e, portanto, “bloqueados” para uso por outra
pessoa
DICA: Se você deseja exibir a lista de domínios em uma janela de dois
painéis semelhante ao Windows Explorer, clique no botão
na parte inferior esquerda. Uma janela do tipo do Explorer será aberta
na área de exibição à direita.
Localizar...,
1
2
3
DICA: Um dos benefícios dos grupos de usuário é que você pode modificar
modelos de procedimentos para atender às necessidades de um grupo
específico. Por exemplo, os modelos de um grupo de produção podem
incluir formatação de palavras ou texto padrão que cria os melhores
procedimentos para esse grupo, enquanto os modelos de um grupo de
pesquisas podem ser editados de forma diferente para atender às suas
necessidades específicas.
LOCKOUT-PRO™ — G
Para adicionar um domínio:
Inicie o Aplicativo do Administrador
Na caixa de texto abaixo de
Clique no botão
Administrador
Adicionar
.
Nome do domínio
, digite o nome do domínio.
. O nome será acrescentado à lista na janela
Gerenciando grupos de usuários
Cada domínio incorpora um ou mais grupos de usuários. Usuários
individuais desse domínio devem ser atribuídos a um grupo específico
de usuários, como parte do processo de registro.
UIA DO ADMINISTRADOR ENTERPRISE
•
•
•
•
•
•
A- 13

Para adicionar um grupo de usuários:
1
Na janela
2
Clique no botão
Administrador
Grupos
, selecione o domínio para o novo grupo.
, localizado abaixo da lista de domínios, grupos
eusuários.
3
Quando a janela
Nome do grupo
4
Clique no botão
5
Quando tiver concluído, clique em OK.
Grupos
abrir, digite o nome do grupo na caixa de texto
.
Adicionar grupo
.
Para excluir um grupo de usuários:
1
Na janela
2
Clique no botão
eusuários.
3
Quando a janela
4
Selecione o grupo na lista da caixa de texto
clique no botão
5
Uma caixa de diálogo será aberta, pedindo confirmação da sua ação.
A exclusão do grupo exclui todo o conteúdo da pasta desse grupo no
servidor.
Administrador
Grupos
Grupos
Excluir grupo
, selecione o domínio para o novo grupo.
, localizado abaixo da lista de domínios, grupos
abrir, a lista de grupos disponíveis será exibida.
Nome do grupo
e, em seguida,
.
NOTA:
Você não pode excluir um grupo ao qual há usuários
atribuídos no momento. Primeiro, você precisa reatribuir os
usuários a um grupo diferente. Para obter mais informações
sobre como fazer isso, consulte o procedimento em “Para
alterar um grupo ou um nível de permissão de um usuário:”.
6
Quando tiver concluído, clique em OK.
Mantendo os níveis de permissões do usuário
Quando um usuário inicia o Software de Redação Gráfica de
Procedimentos LOCKOUT-PRO™ pela primeira vez em um
computador cliente, uma solicitação é enviada para que o usuário
seja adicionado como um usuário registrado. Como administrador,
você conclui o registro do usuário, acessando os dados do usuário na
lista
Usuários pendentes
adicionando o nome do usuário à lista de
Você também pode reatribuir usuários registrados a diferentes grupos
e/ou alterar seus níveis de permissão.
, definindo o nível de permissão e, em seguida,
Usuários registrados
.
•
•
•
A- 14 A
•
•
•
DMINISTRANDO O
LOCKOUT-PRO LOCKOUT-PRO™ — G
UIA DO ADMINISTRADOR ENTERPRISE

Para concluir o registro de um usuário pendente:
1
No painel
domínio para expandi-lo a fim de exibir todas as informações dos
usuários nesse domínio.
2
Clique em
3
Clique no nome do usuário a ser registrado.
4
A janela
do domínio na caixa de texto
•
Se o grupo exibido for aquele ao qual você deseja adicionar o usuário,
continue com a próxima etapa.
•
Para adicionar o usuário a um grupo diferente, clique na seta para
baixo, na caixa de texto
5
Na caixa
um nível de permissão diferente, clique na seta para baixo e selecione
o nível desejado.
6
Clique no botão
lista
Domínio
Usuários pendentes
Editar usuário
Permissões
Usuários registrados
da janela
será aberta, exibindo o primeiro grupo listado
, a permissão padrão é
Atualizar
Administrador
, clique no nome do
para exibir os nomes dos usuários.
Grupo
.
Grupo
e selecione um outro na lista.
Visualizador.
Para definir
. O nome do usuário é agora movido para a
.
NOTA:
Depois que um usuário é adicionado à lista Usuários
registrados no servidor Admin, o cliente deve reiniciar o
LOCKOUT-PRO™.
Para remover um usuário da lista Usuários registrados:
1
Na janela
registrados
2
Quando a janela
será fechada e o usuário será movido para a lista
Administrador
, clique no nome do usuário na lista
Usuários
no nome do domínio com o qual você está trabalhando.
Editar usuário
abrir, clique no botão
Usuários pendentes
Desativar
. A janela
Os usuários dessa lista não têm acesso aos dados do servidor do
LOCKOUT-PRO™.
Para alterar um grupo ou um nível de permissão de um usuário:
1
Na janela
no nome do domínio ou do grupo relevante.
2
Quando a janela
Permissões
3
Clique no botão
usuário serão alteradas.
Administrador
Editar usuário
, clique no nome do usuário na lista adequada,
abrir, selecione uma opção de
diferente em uma ou nas duas caixas.
Atualizar
. A janela será fechada, e as informações do
Grupo
.
e/ou
LOCKOUT-PRO™ — G
Gerenciando arquivos de usuários
A versão Enterprise do Software de Redação Gráfica de Procedimentos
LOCKOUT-PRO™ garante a integridade dos arquivos de procedimento,
UIA DO ADMINISTRADOR ENTERPRISE
•
•
•
•
•
•
A- 15

armazenando-os em um único local do servidor e, com o uso de grupos
e níveis de permissão, impedindo que eles sejam alterados por usuários
não autorizados. O LOCKOUT-PRO™ também impede que um arquivo
seja alterado por mais de um usuário ao mesmo tempo com o uso de um
recurso “bloqueio de arquivo”.
O Aplicativo do Administrador permite trabalhar essas restrições,
quando necessário. Duas situações comuns em que você pode precisar
gerenciar arquivos manualmente são:
•
Quando os usuários em grupos diferentes desejam compartilhar
arquivos entre grupos
•
Quando o check-out de um arquivo não pode ser revertido pelo
usuário cliente devido a problemas técnicos, por exemplo, uma falha
do PC)
Para copiar, recortar, colar ou excluir arquivos de usuários:
1
Na janela
do navegador à direita.
2
Navegue até a pasta relevante que contém os arquivos a serem
gerenciados.
3
Execute as funções desejadas da forma adequada:
•
Para copiar e colar ou recortar e colar um arquivo, clique no arquivo
e, em seguida, no ícone
da janela do navegador. Navegue até o diretório de destino e, em
seguida, clique no ícone
•
Para excluir um arquivo, clique no arquivo e, em seguida, no ícone
Excluir
Administrador
, clique no botão
Copiar
ou
Recortar
Colar
.
Procurar
para abrir a janela
na barra de ferramentas
na barra de ferramentas da janela do navegador.
•
•
•
A- 16 A
•
•
•
DMINISTRANDO O
Para desbloquear um arquivo bloqueado:
1
Na janela
bloqueados
2
Clique no arquivo para selecioná-lo.
3
Clique no botão
Administrador
, localize o arquivo bloqueado na lista
no grupo ou domínio adequado.
Desbloquear arquivo
, no painel
fica disponível para qualquer usuário autorizado a acessá-lo.
4
Clique no botão
NOTA:
Atualizar
para atualizar a lista em
Se o usuário original fez qualquer alteração no arquivo
desde que ele foi salvo pela última vez no servidor, essas
alterações serão perdidas. Além disso, se o usuário não encerrar
o LOCKOUT-PRO™ normalmente, a licença que está sendo
usada por esse usuário não será liberada quando o arquivo for
desbloqueado. Para liberar a licença, o usuário deve efetuar
login e encerrar o LOCKOUT-PRO™ normalmente.
LOCKOUT-PRO LOCKOUT-PRO™ — G
Arquivos
Domínio
UIA DO ADMINISTRADOR ENTERPRISE
. O arquivo agora
Arquivos bloqueados
.

Executando outras tarefas administrativas
Iniciando/Interrompendo o serviço de rede
A inicialização e a interrupção do serviço de rede é uma função
administrativa padrão do Windows. O Aplicativo do Administrador
oferece botões simples, por um clique, para realizar essas funções
durante a execução do aplicativo no servidor. (Não é possível iniciar
nem interromper o serviço de rede a partir de uma instalação remota
do Aplicativo do Administrador.)
Para iniciar ou interromper os serviços de rede:
1
A partir do
•
Se o serviço de rede
você deseja reiniciá-lo, clique no botão
Administrador
não
executado no servidor LOCKOUT-PRO™:
estiver sendo executando no momento e
Iniciar serviço de rede
.
NOTA:
Depois que o serviço de rede for reiniciado, os usuários
deverão reiniciar o LOCKOUT-PRO™ nas máquinas clientes
para serem reconectados.
•
Se o serviço de rede
estiver
sendo executando no momento e você
desejar desconectar clientes do servidor Enterprise, clique no botão
Interromper Serviço de Rede
NOTA:
(
Você também pode usar a função Serviços do Windows
Iniciar>Painel de controle>Ferramentas administrativas>Serviços
.
para iniciar ou interromper o serviço de rede.
Visualizando eventos do LOCKOUT-PRO
Você deve estar executando o Visualizador de Eventos no servidor (não
remotamente) para ver as transações do LOCKOUT-PRO™:
Para ver as transações no Visualizador de Eventos:
1
Abra o Visualizador de Eventos do Windows (
>Ferramentas administrativas>Visualizador de Eventos
2
Selecione a entrada
LOPE
para exibir os eventos do LOCKOUT-PRO™
Enterprise.
Iniciar>Painel de controle
).
)
3
DICA: É recomendável salvar periodicamente o registro de ocorrências do
LOCKOUT-PRO™, clicando na entrada LOPE no Visualizar de Eventos do
Windows e selecionando a opção Salvar.
LOCKOUT-PRO™ — G
Para ver detalhes adicionais de um evento, clique duas vezes nele.
UIA DO ADMINISTRADOR ENTERPRISE
•
•
•
•
•
•
A- 17

Solucionando problemas com funções do Enterprise
A tabela a seguir mostra os problemas mais comuns que os usuários devem
encontrar.
CONDIÇÕES/MENSAGENS DE ERRO NO CLIENTE
Condições/mensagens de erro Causas/soluções possíveis
O usuário recebe uma caixa de
mensagem de erro, mas
nenhuma mensagem é exibida.
O usuário não pode efetuar o
logon porque todas as licenças
estão sendo usadas ou a conta
do usuário não foi encontrada.
O caminho remoto não foi
encontrado. Verifique as
configurações de conexão.
O caminho predefinido do
arquivo básico não foi
encontrado no servidor.
Não é possível acessar a
data/hora do modelo básico no
servidor.
O grupo de usuários não foi
encontrado ou atribuído.
O grupo de usuários não foi
encontrado ou atribuído
Acesso negado O usuário pode estar tentando executar uma
O usuário não consegue executar o comando
PING para o servidor, ou o serviço no servidor está
interrompido.
1) O usuário não é um usuário registrado. Os
usuários que estão efetuando logon pela primeira
vez podem ver esse erro se permanecem na lista
Usuários pendentes.
2) O número máximo de licenças flutuantes foi
atingido. O usuário terá que esperar até que outro
usuário efetue logout e libere uma licença.
Qualquer um desses erros poderá ocorrer se, por
acidente, pastas do servidor forem excluídas ou
não forem copiadas devido a um erro de
instalação.
Verifique se todas as pastas compartilhadas
existem no servidor.
(Consulte “Figura 1: Estrutura de pastas para
arquivos instalados do LOCKOUT-PRO™
Enterprise”).
Se uma pasta estiver faltando, copie-a do CD
do LOCKOUT-PRO™ ou entre em contato com
o Suporte Técnico da Brady.
O usuário pode não ter sido atribuído a um grupo
de usuários. Para corrigir a situação, adicione
o usuário a um grupo. (Consulte “Gerenciando
grupos de usuários” na página A-13 para obter
detalhes.)
função que não esteja incluída no nível de
permissões definido para ele.
(Consulte “Mantendo os níveis de permissões do
usuário” para obter detalhes.)
•
•
•
A- 18 A
•
•
•
DMINISTRANDO O
LOCKOUT-PRO LOCKOUT-PRO™ — G
UIA DO ADMINISTRADOR ENTERPRISE

CONDIÇÕES/MENSAGENS DE ERRO NO CLIENTE (Continuação)
O servidor está funcionando
corretamente, o usuário está
totalmente registrado, com os
níveis de permissão adequados,
e está atribuído a um grupo, mas
ainda assim não consegue
efetuar logon no servidor.
1) Verifique o arquivo
está localizado na pasta
c:\arquivos de programas\brady\lockoutPro 3.0
da máquina cliente, e verifique se os dados
desse arquivo estão corretos. (Consulte “Figura 2.
Estrutura básica do arquivo app.config do usuário
cliente” a seguir para obter um exemplo da
app.config do usuário, o qual
estrutura básica completa do arquivo app.config.)
2) Alguns arquivos necessários podem estar
faltando no computador, por exemplo:
• MDAC 2.8
• .Net Framework 1.1 Versão 1.4322
Verifique se os arquivos estão instalados
(acessando a janela Adicionar ou remover
programas do Painel de controle), ou no caso
do Windows 2000, verifique a pasta:
C:\windows\Microsoft.net\framework
Qualquer arquivo que esteja faltando pode
ser baixado do site da Microsoft.
SOLUCIONANDO PROBLEMAS DO SERVIDOR
Para problemas de conexão/acesso do usuário no servidor Enterprise:
1 Verifique se o serviço de rede está em execução.
2 Verifique se o endereço de rede está correto.
3 Verifique se as configurações das portas estão corretas e se a porta
especificada no arquivo de configuração do cliente corresponde à
configuração dessa porta.
4 Se essas etapas não resolverem o problema, entre em contato com o
suporte técnico.
LOCKOUT-PRO™ — G
UIA DO ADMINISTRADOR ENTERPRISE
•
•
•
•
•
•
A- 19

Estrutura de pastas para arquivos instalados
Os arquivos e a estrutura de diretórios a seguir são instalados na pasta
Brady
LOPE
(Compartilhado)
Lockout Pro 3.0
durante a instalação:
Dados
Nome do domínio
Nome do
grupo
Banco de
dados
LOPStorage.mbd Comuns
Arquivos comuns Arquivos
Arquivos
básicos
Arquivos de
configuração
Figura 1: Estrutura de pastas para arquivos instalados do LOCKOUT-PRO™
Enterprise
Arquivos
básicos
Arquivos de
configuração
Estrutura básica do arquivo app.config cliente
A estrutura básica completa do arquivo
a seguir. Os usuários podem verificar suas configurações na opção
Arquivo>Configurações de conexão
dados no arquivo
app.config
, no menu principal. Observe que os
diferenciam letras maiúsculas de minúsculas;
portanto, avise os usuários para não modificarem o arquivo.
<?xml version="1.0" encoding="utf-8"?>
<configuração>
<APPSETTINGS SERVERID="172.20.94.161"
CONNECTIONSTRING="tcp://172.20.94.161:8032/LOPUser"
DEFAULTLOCALPATH="U:\Meus documentos\Nova pasta" CONNECTIONTYPE="1" />
</configuration>
Figura 2. Estrutura básica do arquivo app.config do usuário cliente
app.config
é mostrada na Figura 2
•
•
•
A- 20 A
•
•
•
DMINISTRANDO O
LOCKOUT-PRO LOCKOUT-PRO™ — G
UIA DO ADMINISTRADOR ENTERPRISE

Guide de l’administrateur
Logiciel d’écriture de procédures graphiques LOCKOUT-PRO
Enterprise version 3.0
MD

VOUS DEVEZ LIRE ATTENTIVEMENT LES CONDITIONS DE LA PRÉSENTE
LICENCE AVANT D’OUVRIR L’EMBALLAGE. SI VOUS N’ÊTES PAS D’ACCORD
AVEC CES CONDITIONS, VEUILLEZ RETOURNER RAPIDEMENT LE PRÉSENT
PAQUET POUR OBTENIR UN REMBOURSEMENT.
LICENCE
Par la présente, Brady Worldwide, Inc. (ultérieurement « Brady ») vous accorde une licence d’utilisation
non exclusive et non transférable du présent logiciel et de la documentation connexe selon les conditions
suivantes :
1. OCTROI DE LA LICENCE : Vous pouvez 1) installer le logiciel dans plusieurs ordinateurs couverts
par les factures pour cette licence de Brady, lesquelles sont incluses dans le présent document à titre de
référence; 2) utiliser et transmettre le logiciel sur le réseau d’un site, si autorisé par une facture de Brady;
3) installer le logiciel dans un ou plusieurs serveurs, tel que facturé pour un seul ou plusieurs serveurs et
dont les factures sont par la présente incluses à titre de référence; et 4) faire des copies du logiciel sous forme
lisible à la machine à des fins de sauvegarde uniquement.
2. RESTRICTIONS DE LA LICENCE : Vous ne pouvez pas : 1) modifier, adapter, traduire, appliquer des
techniques de rétroingénierie, décompiler, désassembler le produit et sa documentation, créer un produit
dérivé basé sur ceux-ci ou en faire une copie (autre que pour des fins de sauvegarde); 2) louer ou transférer
le produit et sa documentation ou accorder des droits sur ceux-ci sans avoir obtenu préalablement le
consentement écrit de Brady ou 4) retirer tout avis, étiquette ou marque de propriété sur le logiciel et
sa documentation.
3. NATURE DE LA PRÉSENTE ENTENTE : La présente licence ne constitue pas une vente. Les frais de
licence que vous avez payés, le cas échéant, ont été chargés en fonction des licences octroyées en vertu du
présent contrat. Le titre et les droits d’auteur du logiciel, de sa documentation et de toute copie que vous
avez faite demeurent la propriété de Brady ou de ses fournisseurs. Toute copie non autorisée du logiciel ou
de sa documentation ou toute violation des restrictions susmentionnées entraînera automatiquement la
résiliation de la présente licence, sans autre avis, ainsi que la résiliation de vos droits d’utilisation de ce
logiciel. De plus, Brady aura droit, en plus de ses autres recours judiciaires, à se voir rembourser des frais
de représentations.
4. GARANTIE LIMITÉE : Brady garantit, pour une période de quatre-vingt-dix (90) jours à compter de la
date de livraison, telle qu’elle apparaît sur votre copie du reçu, que le logiciel, comme il a été fourni, dans
des conditions d’utilisation normale, fonctionnera sans erreur importante qui le rendrait inutilisable. La
seule responsabilité de Brady, et votre seul recours judiciaire en vertu de la présente garantie (sujette à
votre retour du logiciel chez Brady), sera, au choix de Brady, de tenter de corriger l’erreur ou de vous aider
à la contourner, de remplacer le logiciel par un logiciel aux fonctions équivalentes ou à des disquettes, ou
de rembourser les frais de licence du logiciel et de résilier le présent contrat.
SAUF POUR LA GARANTIE LIMITÉE EXPRESSE CI-DESSUS, BRADY N’EXPRIME AUCUNE
GARANTIE ET VOUS NE RECEVEZ AUCUNE GARANTIE, EXPLICITE OU IMPLICITE, LÉGALE,
DANS TOUTE COMMUNICATION AVEC VOUS. BRADY DÉCLINE TOUTE GARANTIE IMPLICITE
DE COMMERCIALITÉ OU D’APTITUDE À UN USAGE PRÉCIS. BRADY NE GARANTIT PAS QUE
L’UTILISATION DU LOGICIEL SERA ININTERROMPUE OU SANS ERREUR.
Certains états ne permettent pas l’exclusion des garanties implicites; l’exclusion ci-dessus peut donc
ne pas s’appliquer à vous. Cette garantie vous accorde des droits légaux précis. Vous pouvez également
bénéficier d’autres droits, qui varient d’un état à l’autre.
5. LIMITE DE LA RESPONSABILITÉ : EN AUCUN CAS BRADY NE SERA RESPONSABLE DE
QUELQUE DOMMAGE QUE CE SOIT, Y COMPRIS LA PERTE DE DONNÉES, AU MOMENT
DE CHARGER CE LOGICIEL OU À TOUT AUTRE MOMENT, OU DE TOUTE PERTE DE
PROFIT, FRAIS DE COUVERTURE OU DE TOUT AUTRE DOMMAGE SPÉCIAL, ACCIDENTEL,
CONSÉCUTIF OU INDIRECT DÉCOULANT DE L’UTILISATION DU PRÉSENT LOGICIEL OU
DE SA DOCUMENTATION, PEU IMPORTE LA CAUSE ET EN VERTU DE N’IMPORTE QUELLE
THÉORIE DE RESPONSABILITÉ. LA PRÉSENTE LIMITE S’APPLIQUE MÊME SI BRADY A ÉTÉ
AVERTIE DE LA POSSIBILITÉ DE TELS DOMMAGES.
Certains états ne permettent pas la limitation ou l’exclusion de la responsabilité en cas de dommages
accidentels ou consécutifs; la limite ci-dessus peut donc ne pas s’appliquer à vous.
6. GÉNÉRALITÉS : Ce Contrat doit être régi et interprété conformément aux lois de l’État de Wisconsin,
É.-U. Vous consentez que la loi et les règlements américains peuvent restreindre l’exportation/réexportation
du logiciel. Vous consentez à ne pas exporter/réexporter le logiciel ou une partie sous toute forme sans les
licences gouvernementales américaine et étrangères appropriées. Cette obligation demeurera en vigueur
après la fin du présent contrat. Le présent contrat constitue l’entente complète entre les parties et
supplante toute autre communication ou publicité en ce qui a trait au logiciel et à sa documentation.
Si toute disposition du présent contrat s’avère non valide, le reste du présent contrat demeurera en vigueur.
6555 West Good Hope Road, P.O. Box 571, Milwaukee, Wisconsin 53201-0571, É.-U., téf. +1 (414) 358-6600
•
•
•
•
•
•
G
UIDE DE L’ADMINISTRATEUR DE
LOCKOUT-PROMD E
NTERPRISE

T
ABLE DES MATIÈRES
• • • • • •
Gestion de LOCKOUT-PRO
Fonctions du serveur LOCKOUT-PRO Enterprise
Composants du serveur
Application Administrator de LOCKOUT-PROMD
Service du réseau LOCKOUT-PROMD
Observateur d’événements
Niveaux de permission de l’utilisateur
Exigences système pour les applications serveur et client
Installation et configuration des applications serveur
Préparation à l’installation
Aperçu de l’installation
Installation des applications du serveur Enterprise
Activation et configuration de LOCKOUT-PRO
Distribution de LOCKOUT-PRO aux clients
Distribution de l’application Administrator à distance
Utilisation de l’application Administrator
Familiarisation avec l’application Administrator
Affichage et gestion des domaines
Gestion des groupes d’utilisateurs
Maintien des niveaux de permission et de l’utilisateur
Gestion des fichiers d’utilisateurs
Accomplissement des autres tâches administratives
Démarrage/Arrêt du service du réseau
Afficher des événements LOCKOUT-PRO
A–1
A-2
A-2
A–3
A–5
A–5
A–11
A–12
A–13
A–16
A–17
A–1
A-2
A–4
A–6
A–7
A–8
A–11
A–17
A–18
A–4
A–10
A–15
Fonctions de dépannage
GUIDE DE L’ADMINISTRATEUR DE LOCKOUT-PROMD ENTERPRISE III
A–18
•
•
•
•
•
•

Droits d’auteurs
Le présent manuel est protégé par droits d’auteur avec tous droits
réservés. Il est interdit de copier ou de reproduire le présent manuel en
tout ou en partie de quelque façon que ce soit sans avoir préalablement
obtenu le consentement de Brady Worldwide, Inc.
Bien que toutes les précautions ont été prises durant la préparation
du présent document, Brady n’assume aucune responsabilité envers
quelque parti que ce soit en ce qui a trait aux dommages causés par
des erreurs, des omissions ou des énoncés résultant d’une négligence,
d’une omission ou de toute autre cause. De plus, Brady n’assume
aucune responsabilité découlant de l’utilisation du logiciel ou de
l’utilisation de tout produit ou système décrit aux présentes et
n’assume aucune responsabilité en ce qui a trait aux dommages
accidentels ou consécutifs découlant de l’utilisation du présent
document. Brady décline toute responsabilité ayant trait à la
commercialité ou à l’adaptation à un usage particulier.
Brady se réserve le droit d’apporter des changements sans autre
préavis à tout produit ou système mentionné aux présentes afin d’en
améliorer la fiabilité la fonction ou le concept.
Il est strictement interdit de reproduire ce document en tout ou en
partie sans avoir préalablement obtenu l’autorisation écrite de
Brady Worldwide, Inc. Pour obtenir de plus amples renseignements,
veuillez communiquer avec : Brady Worldwide, Inc. Signmark®
Division, 2221 W. Camden Road, Milwaukee, WI 53209.
Avis de non responsabilité
Tous les efforts ont été déployés pour rendre le présent guide aussi
exact et complet que possible. Brady Worldwide, Inc. n’est pas
responsable des imprécisions et des omissions pouvant se produire
durant l’utilisation du présent guide.
Ce présent manuel est la propriété de Brady Worldwide, Inc. et peut
être révisé de temps à autres sans préavis. Brady Worldwide, Inc.
décline toute entente implicite de vous fournir des mises à jour, le
cas échéant.
Toutes les marques et les noms de produit indiqués dans le présent
guide sont des marques de commerce ou des marques déposées des
entreprises ou des organismes respectifs.
LOCKOUT-PRO, GlobalMark et HandiMark sont des marques de
commerce de Brady Worldwide, Inc.
© 2006 Brady Worldwide, Inc. Tous droits réservés.
www.bradycorp.com
•
•
•
IV GUIDE DE L’ADMINISTRATEUR DE LOCKOUT-PRO
•
•
•
MD
ENTERPRISE

G
• • • • • •
La version logiciel d’écriture de procédures graphiques LOCKOUTPRO
strateur de l’application de gérer facilement une entreprise complète.
Ce
de la version Enterprise et de l’utilisation de ces outils, dont :
ESTION DE
MD
Enterprise comprend des outils qui permettent à l’admini-
Guide de l’administrateur
LOCKOUT-PRO
donne davantage d’explications à propos
Un aperçu des fonctions du serveur de LOCKOUT-PROMD
Enterprise
La manière d’installer et de configurer les composants du
serveur de LOCKOUT-PRO
MD
Enterprise, en plus de préparer
les installations client
La manière de gérer les domaines de l’utilisateur, les groupes
de l’utilisateur, les utilisateurs ainsi que les fichiers
La manière de démarrer et d’arrêter le service du réseau et
d’afficher les événementsLOCKOUT-PRO
MD
Des messages d’erreur communs et la manière de les résoudre
Fonctions du serveur LOCKOUT-PRO Enterprise
La version LOCKOUT-PROMD Enterprise est conçue pour les grandes
entreprises qui désirent utiliser le logiciel sur un réseau et centraliser
le contrôle des droits d’utilisateurs, les modèles des procédures, les
G
UIDE DE L’ADMINISTRATEUR DE
valeurs par défauts, et le renforcement de la sécurité. La version 3.0
de LOCKOUT-PRO
du côté serveur et un service du réseau avec l’application de bureau
s’exécutant sur le PC du client.
Composants du serveur
Il existe trois principaux composants actifs sur le serveur
LOCKOUT-PRO
•
Application Administrator
LOCKOUT-PROMD E
MD
Enterprise regroupe les utilités d’administrateur
MD
Enterprise :
NTERPRISE
•
•
•
A-1
•
•
•

•
Service du réseau
•
Observateur d’événements
Application Administrator de LOCKOUT-PRO
MD
Par l’entremise de cet utilitaire, les administrateurs du logiciel
d’écriture de procédures graphiques LOCKOUT-PRO
MD
peuvent
surveiller les utilisateurs client et les fichiers, enregistrer les
utilisateurs, affecter les utilisateurs à des groupes, en plus d’établir
les droits d’usage. L’utilitaire vous permet aussi de copier des fichiers
d’un groupe vers un autre, et de déverrouiller des fichiers qui ont été
« vérifiés » et qui ne peuvent pas être déverrouillés par le processus
normal (p. ex., en raison d’une panne de l’ordinateur).
L’application Administrator est configurée sur le serveur qu’une seule
fois. Cependant, après avoir configuré au moins un administrateur sur
le serveur, vous pouvez configurer des administrateurs supplémentaires
qui peuvent exécuter une version « à distance » de l’application
Administrator de leur PC client.
Service du réseau LOCKOUT-PRO
MD
Ce service exécuté sur le serveur Enterprise est la méthode par laquelle
les utilisateurs client de LOCKOUT-PRO
MD
se connectent au serveur
pour accéder aux fichiers en ligne. Ce service peut être commencé et
terminé à l’aide des outils Administrateur Windows (Fonction de
services), ou à l’aide des contrôles fournis dans l’application
Administrator de LOCKOUT-PRO
MD
.
•
•
•
A-2 G
•
•
•
ESTION DE
Vous pouvez démarrer et arrêter le service
serveur, à l’aide des outils Windows ou de l’application Administrator.
Ces fonctions ne peuvent être réalisées en exécutant l’application
Administrator à distance.
Observateur d’événements
Chaque étape ou « transaction » des utilisateurs client est inscrite et
peut être affichée à l’aide de l’Observateur d’événements. L’entrée
spécifique de LOCKOUT-PRO
enregistrées comprennent : l’accès de l’utilisateur au service,
l’ouverture/l’enregistrement du fichier, le nombre d’utilisateurs en
ligne, si un utilisateur essaie d’ouvrir une ressource verrouillée, tous
les problèmes serveur, ainsi que les fonctions du service administratif.
Vous pouvez visualiser ou enregistrer les entrées de l’Observateur
d’événements uniquement à partir du serveur. Ces fonctions ne peuvent
être réalisées en exécutant l’application Administrator à distance.
LOCKOUT-PRO G
seulement
MD
se nomme
UIDE DE L’ADMINISTRATEUR DE
LOPE
depuis le
. Les transactions
LOCKOUT-PROMD E
NTERPRISE

Niveaux de permission de l’utilisateur
LOCKOUT-PROMD Enterprise comprend trois niveaux de permission
pour les utilisateurs :
•
A
dministrateur :
l’administrateur
des composants client et serveur de LOCKOUT-PRO
• Auteur :
Un utilisateur qui dispose des droits de
et modifier des procédures de l’application client, en plus d’afficher et
d’imprimer, sans toutefois pouvoir modifier les modèles, les défauts
ou les informations connexes.
• Visualiseur :
peut seulement afficher et imprimer des procédures, des balises de
verrouillage, des étiquettes de source d’énergie et des informations
connexes.
Un utilisateur qui dispose des droits de
peut exécuter toutes les fonctions disponibles
MD
.
l’auteur
Un utilisateur qui dispose des droits du
peut créer
visualiseur
Affichage d’une procédure existante
Impression de procédures, balises, étiquettes
de source d’énergie
Affichage des informations connexes
de LOCKOUT-PRO
Création de nouvelles procédures
Révision de procédures existantes
Importation des versions antérieures des
fichiers LOCKOUT-PRO
Exportation de procédures vers un autre format
de fichier
Enregistrement de nouvelles procédures ou de
procédures révisées
Gestion des licences client LOCKOUT-PRO
Maintien des niveaux de permission de l’utilisateur
Édition des modèles de procédures
Changement des listes des valeurs par défaut
dans LOCKOUT-PRO
Modification des informations connexes dans
LOCKOUT-PRO
Transfert des procédures entre les groupes
de l’utilisateur
G
UIDE DE L’ADMINISTRATEUR DE
Le tableau suivant dresse la liste des principales fonctions de
MD
LOCKOUT-PRO
Entreprise et au niveau de permission elles
sont assignées.
FONCTIONS ASSIGNÉES PAR NIVEAUX
DE PERMISSION DE L’UTILISATEUR
Fonctions Admin. Auteur
MD
MD
MD
MD
MD
LOCKOUT-PROMD E
NTERPRISE
Visua-
liseur
•
•
•
A-3
•
•
•
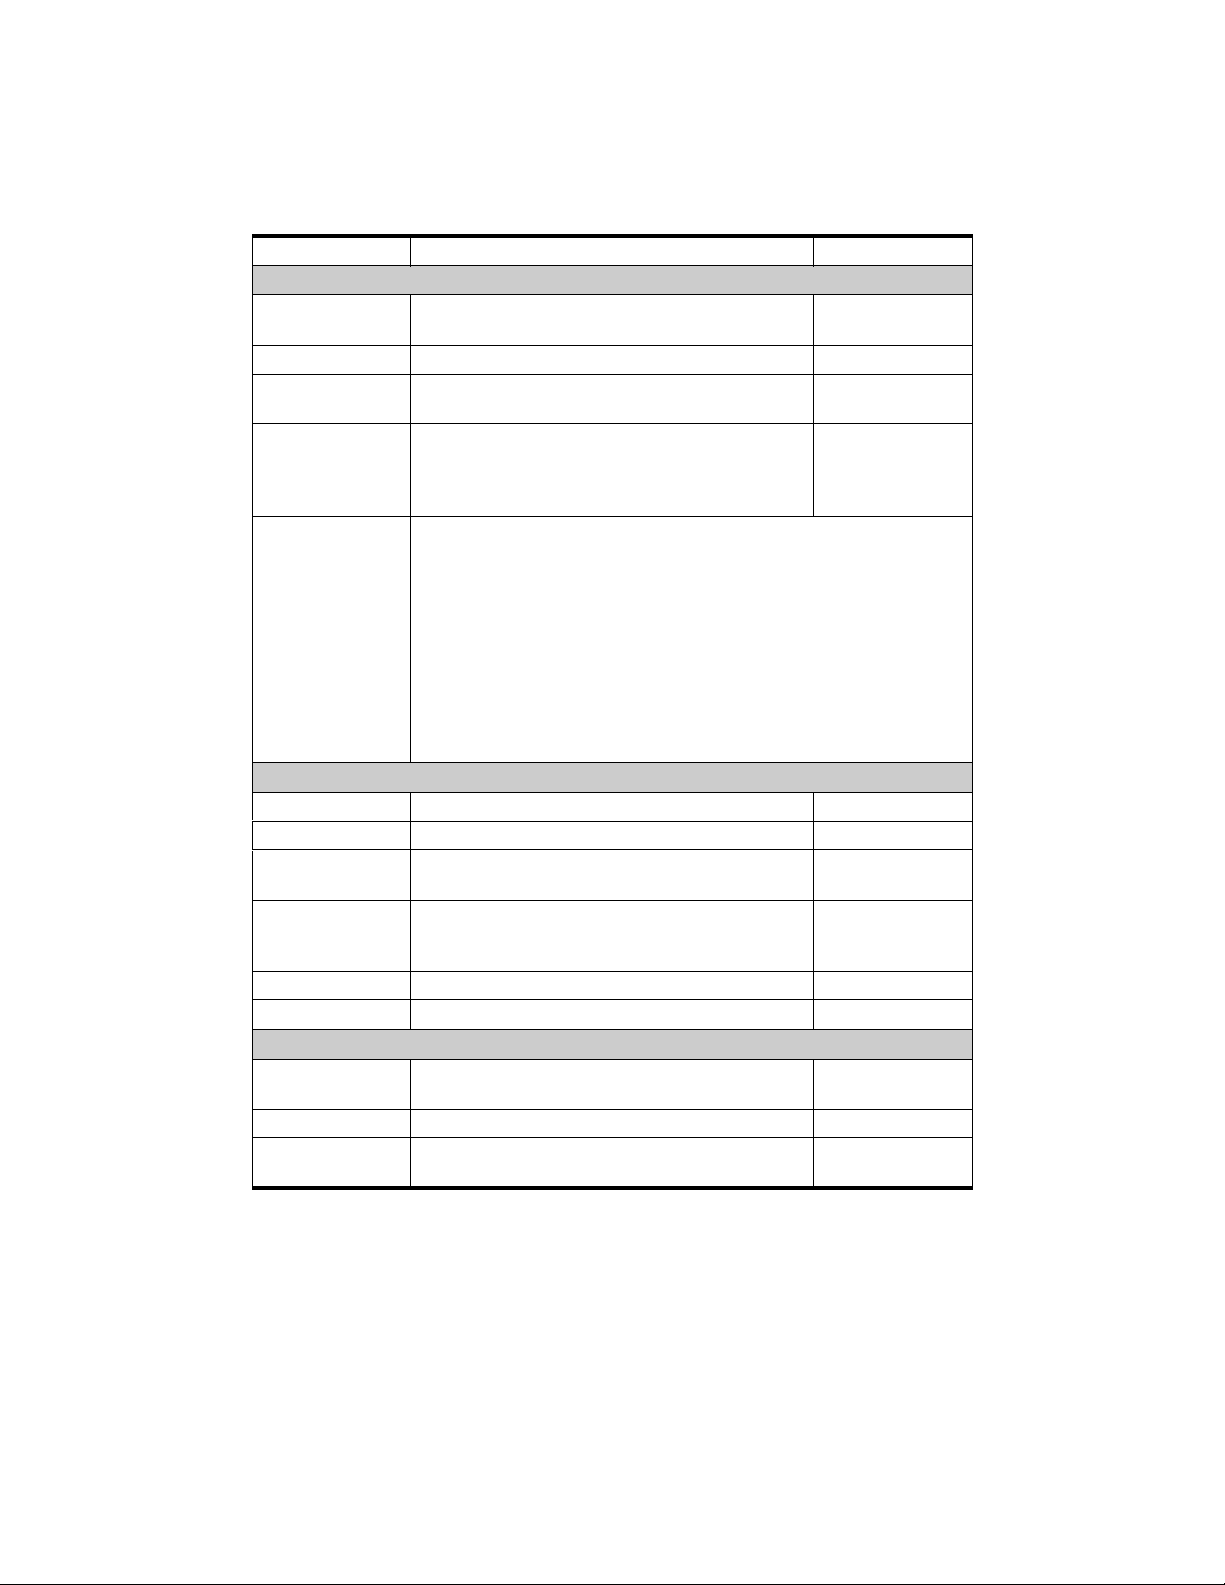
Exigences système pour les applications
serveur et client
EXIGENCES MATÉRIELLES DU LOCKOUT-PRO
MD
Minimum : Recommandées :
CLIENT DESKTOP
Connexion de
réseau
Accès à l’installation du serveur LOCKOUT-
MD
PRO
Enterprise sur l’intranet
Protocole TCP/IP
Système
d’exploitation
Imprimantes
acceptées
Windows 2000
Windows XP Professionnel
GlobalMark
HandiMark
MD
MD
(étiquettes de source
Même
d’énergie seulement)
Laser à feuilles ou jet d’encres
Imprimante Les pilotes de l’imprimante que vous désirez utiliser avec
LOCKOUT-PRO
MD
doivent être installés. Pour exécuter
l’application, au moins une imprimante doit être installée.
Consultez la documentation de votre imprimante pour savoir
comment l’installer.
Imprimante GlobalMark
est nécessaire. Vous devez d’abord désinstallez l’imprimante de
votre ordinateur. Installez le nouveau pilote GlobalMark
sur le LOCKOUT-PRO
pilote n’a pas été testé ou validé pour fonctionner avec les logiciels
MarkWare
MD
, Surf on SignsMD, ou tout autre logiciel Brady.)
MD
uniquement : La mise à jour des pilotes
MD
MD
DC d’installation. (REMARQUE : Ce
SERVEUR
Processeur 1,2 GHz ou supérieur 2,6 GHz
Mémoire (RAM) 512 Mo 1 Go
Espace sur
500 Mo Même
le disque
Système
d’exploitation
Windows 2000 Advanced Server
Windows 2003 Server
Même
Windows XP
Support IIS version 5 ou v6, configurée et activée
ASP .NET V1.1, installée
ADMINISTRATOR À DISTANCE
Connexion
de réseau
Accès à l’installation du serveur LOCKOUT-
MD
PRO
Enterprise sur l’intranet
Protocole TCP/IP
Système
d’exploitation
Windows 2000
Windows XP Professionnel
Même
inclut
•
•
•
A-4 G
•
•
•
Installation et configuration des applications serveur
ESTION DE
Tous les composants du logiciel d’écriture de procédures graphiques
LOCKOUT-PRO
modèles et les valeurs par défauts de l’application, en plus d’offrir aux
LOCKOUT-PRO G
MD
sont installés sur le serveur, lequel comprend les
UIDE DE L’ADMINISTRATEUR DE
LOCKOUT-PROMD E
NTERPRISE

utilisateurs client la possibilité d’accéder à la création et au stockage
des procédures.
Préparation à l’installation
Avant d’installer LOCKOUT-PROMD,
les applications Microsoft
suivantes doivent être installées sur votre serveur :
•
Services d’information Internet (SII)
•
Infrastructure .NET
•
Composants de l’accès aux données (MDAC) version 2.8
•
Répertoire actif
•
ASP.NET
Ces applications sont essentielles pour la fonctionnalité
intégrale de LOCKOUT-PRO
MD
. Elles sont disponibles sur le
site www.microsoft.com, lequel fournit aussi de la documentation
sur la manière de les installer et de les configurer.
CONSEIL : Bien que ce guide assure une structure de configuration de
base, veillez à consulter votre administrateur réseau ou de domaine
avant l’installation. Votre administrateur peut nécessiter des paramètres
supplémentaires pour des raisons de sécurité, ou peut utiliser un progiciel
tiers pour l’installation client.
Aperçu de l’installation
Lorsque le logiciel serveur nécessaire est correctement installé et
configuré, le processus d’installation de LOCKOUT-PRO
serveur comprend ces étapes de base, lesquelles seront expliquées
en détails :
•
Installatez les applications serveur au moyen du DC de
LOCKOUT-PRO
•
Dans l’application Administrator de LOCKOUT-PROMD, activez le
MD
.
logiciel et configurez les paramètres du réseau.
•
Choisissez l’installation Web LOCKOUT-PROMD ou une installation
silencieuse comme l’outil de gestion de la stratégie de groupe de
Microsoft pour distribuer l’application côté-client aux ordinateurs
des utilisateurs.
MD
sur votre
G
UIDE DE L’ADMINISTRATEUR DE
•
Si vous désirez configurer des utilisateurs additionnels pour exécuter
l’application Administrator à distance, choisissez une installation
Web LOCKOUT-PRO
MD
ou une installation silencieuse comme l’outil
de gestion de la stratégie de groupe de Microsoft pour distribuer
l’application côté-client aux ordinateurs des utilisateurs.
LOCKOUT-PROMD E
NTERPRISE
•
•
•
A-5
•
•
•

Installation des applications du
serveur Enterprise
Vous devez d’abord installer les applications serveur à l’aide du DC
MD
de LOCKOUT-PRO
Enterprise.
Pour installer les applications serveur Entreprise :
1
Insérez le DC de LOCKOUT-PROMD dans le lecteur DC du serveur
Enterprise. L’installation devrait démarrer automatiquement. Si
l’installation ne démarre pas après une courte période, vous pouvez
la lancer manuellement en exécutant les étapes suivantes :
•
Ouvrez le dossier pour le lecteur contenant le DC de
LOCKOUT-PRO
•
Repérez et cliquez deux fois sur le fichier :
LockoutPRO3.0Installer.exe
2
Lorsque la fenêtre d’installation est affichée, sélectionnez l’option
de menu :
3
Lorsque vous y êtes invité, choisissez la langue désirez.
4
Lorsque l’assistant d’installation s’affiche, cliquez sur le bouton
Suivant
5
Lorsque vous y êtes invité, lisez et acceptez le contrat de licence
Installer Lockout PRO Serveur
pour commencer l’installation.
en cliquant sur
6
Inscrivez votre nom, nom d’entreprise et numéro de série du DC, puis
cliquez sur
Suivant
Oui
MD
.
.
.
.
•
•
•
A-6 G
•
•
•
ESTION DE
7
Acceptez le dossier de destination du programme en cliquant sur
.
ant
8
Acceptez ou sélectionnez le dossier des programmes, puis cliquez sur
Suivant
9
La fenêtre
.
Statut de configuration
complète les tâches suivantes :
•
installation de l’application Administrator de LOCKOUT-PROMD sur
le serveur;
•
installation du service du réseau de LOCKOUT-PROMD par lequel
les utilisateurs client se connectent au serveur;
•
copie des fichiers nécessaires sur le serveur Enterprise;
•
copie de la base de données LOCKOUT-PROMD Entreprise dans
le dossier approprié sur le serveur.
•
installation des fichiers pour LOCKOUT-PROMD Entreprise sur
le serveur;
•
installation de la documentation sur le serveur.
10
Lorsque la configuration est terminée, cliquez sur le bouton
pour continuer.
LOCKOUT-PRO G
s’affiche pendant que l’installation
Terminer
UIDE DE L’ADMINISTRATEUR DE
LOCKOUT-PROMD E
Suiv-
NTERPRISE

11
Lorsque votre navigateur ouvre la page d’enregistrement, suivez les
messages de guidage pour enregistrer LOCKOUT-PRO
12
Fermez le navigateur et la fenêtre d’installation.
MD
.
Activation et configuration de LOCKOUT-PRO
Une fois l’installation complétée, vous devrez activer le logiciel à l’aide
du code d’activation fourni par Brady. Ce code est une clé encryptée qui
spécifie le nombre de licences que votre entreprise a acheté. Il s’agit de
« licences flottantes », ce qui signifie qu’elles peuvent être utilisées sur
n’importe quel ordinateur de votre réseau, tant que le nombre total de
licences en cours d’utilisation dans un temps donné n’excède pas le
nombre de licences achetées.
Une fois activée, vous devrez ajouter les domaines et configurer les
configurations du réseau.
REMARQUE :
Vous devez compléter la procédure suivante avant
d'être en mesure de distribuer LOCKOUT-PROMD aux clients ou
aux utilisateurs additionnels de l’application Administrator.
Pour activer et configurer LOCKOUT-PRO :
1
Ouvrez l’application Administrator à partir du raccourci sur le bureau
ou de votre menu
2
Lorsque le message s’affiche, entrez la clé du produit inscrite sur le
Démarrer>Programmes
.
certificat de licence que vous avez reçu avec le logiciel, puis cliquez
sur
OK
.
3
(Facultatif)
pouvez changer la langue en cliquant sur le menu
Lors de l’ouverture de la fenêtre Administrateur, vous
Langue
situé dans
le coin supérieur gauche et en choisissant la langue que vous désirez
utiliser pour l’interface de l’application Administrateur.
REMARQUE :
Le choix de langue établit uniquement la langue de
l’application Administrator. Les utilisateurs peuvent sélectionner
la langue individuellement sur leurs machines client.
4
Cliquez sur le menu
de la fenêtre
5
Dans la fenêtre
réseau
VPN
LAN/Sans fil
si votre réseau utilise VPN.
Administrateur
Paramètres de l’interface réseau
situé dans le haut
.
Paramètres de l’interface réseau
, sélectionnez l’adresse
pour le serveur LOCKOUT-PROMD, et l’adresse
6
7
8
G
UIDE DE L’ADMINISTRATEUR DE
Entrez le
numéro de port
que vous désirez utilisez.
Cliquez sur OK.
Une boîte de dialogue apparaît alors, demandant de vérifier si ces
paramètres sont corrects? Si tel est le cas, cliquez sur
LOCKOUT-PROMD E
NTERPRISE
Oui
.
•
•
•
A-7
•
•
•

9
Dans la fenêtre
de texte
Domaine
Administrateur
, entrez le nom de domaine dans la boîte
, puis cliquez sur le bouton
Ajouter
. Le nom de domaine
s’affichera dans le coin gauche du panneau de navigation.
Distribution de LOCKOUT-PRO aux clients
Suite à l’activation et la configuration de LOCKOUT-PROMD, vous
pouvez distribuer les fichiers d’installation du client aux ordinateurs
des utilisateurs par l’une des méthodes suivantes :
•
Utilisez l’installation Web fourni, laquelle présente un interface
facile mentionnant aux utilisateurs la manière d’enregistrer les
fichiers d’installation, puis comment installer LOCKOUT-PRO
•
Servez-vous de l’outil de la stratégie de gestion du groupe de
Microsoft pour « distribuer » silencieusement les fichiers
d’installation sur les ordinateurs des clients. (Vous pouvez
utiliser une application de logiciel tierce pour exécuter de telles
installations.)
Pour distribuer vers les ordinateurs des clients à l’aide
de l’installation Web :
1
Donnez des instructions aux clients pour naviguer :
http://<nom ou adresse IP du serveur>/LOPClientSetup/
L’utilisateur sera avisé de cliquer avec le bouton droit sur chaque lien
2
et de sélectionner
Enregistrer la cible sous
chaque lien dans le même dossier sur l’ordinateur de l’utilisateur.
3
Puis, l’utilisateur doit cliquer deux fois sur l’icône
avant de commencer l’installation.
4
Lorsque l’installateur Windows est affiché, l’utilisateur clique sur le
bouton
5
Lorsque vous êtes invité à choisir le dossier du programme, l’utilisateur
Suivant
clique sur
6
Lorsque vous êtes invité à confirmer l’installation, l’utilisateur clique
sur
Suivant
7
Suite à l’installation du programme, l’utilisateur clique sur le bouton
Fermer
.
.
Suivant
.
.
pour enregistrer le fichier vers
LOCKOUT-PRO 3.0
MD
.
•
•
•
A-8 G
•
•
•
ESTION DE
Pour distribuer vers les ordinateurs des clients à l’aide
de l’outil de Stratégie de groupe :
1
Sur le serveur, à l’emplacement de LOCKOUT-PROMD, repérez et
ouvrez le dossier
2
Trouvez le dossier
ouvrir la fenêtre
3
Cliquez sur l’option
désiré), puis cliquez sur
LOCKOUT-PRO G
LOPE
.
FichiersClients
Propriétés des FichiersClients
Partager un dossier
OK
.
, puis cliquez avec le bouton droit pour
.
(et changez tout autre paramètre
UIDE DE L’ADMINISTRATEUR DE
LOCKOUT-PROMD E
NTERPRISE

4
Dans le menu
Démarrer
, ouvrez l’outil
Gestion de la stratégie de groupe
.
REMARQUE :
Cet outil est disponible seulement avec
Windows 2003 Server et XP Pro. Il est possible de le
télécharger gratuitement sur le site www.microsoft.com
si vous ne l’avez pas déjà sur votre serveur.
5
Dans le panneau de configuration de la fenêtre
groupe
6
Sur votre serveur, cliquez avec le bouton droit sur
par défaut
7
La fenêtre
s’ouvrira. À ce moment, deux options vous sont offertes :
•
•
8
Cliquez avec le bouton droit sur
Nouveau>Progiciel
9
Naviguer vers :
>
PRO 3.0.msi
, sous
Forest
, repérez votre domaine et votre serveur.
, et sélectionnez
Édition d’objet de la stratégie de groupe
Édition
à partir du menu
Pour configurer une installation par distribution pour chaque
ordinateur
du logiciel
sur le domaine, sélectionnez le dossier
sous
Configuration de l’ordinateur
.
Pour configurer une installation par distribution pour chaque
utilisateur
logiciel
sur le dossier, puis sélectionnez
de la fenêtre
Options d’installation de l’interface de l’utilisateur
sous
sur le domaine, sélectionnez le dossier
sous
Configuration de l’utilisateur
Propriétés
Propriétés de Lockout PRO version 3.0
. Cliquez avec le bouton droit
. Sous l’onglet
fenêtre.
Paramètres du logiciel,
depuis le menu.
Mon réseau>Tout le réseau>Réseau de Microsoft Windows
votre domaine>votre serveur
>
Dossier FichiersClients>fichier Lockout
.
Stratégie de gestion de
Politique de domaine
pour votre domaine
Paramètres
Paramètres du
Déploiement
, choisissez
De base
, puis fermez la
puis sélectionnez
10
11
G
UIDE DE L’ADMINISTRATEUR DE
Dans la fenêtre
les politiques de votre entreprise, puis cliquez sur le bouton
REMARQUE :
Déploiement de logiciel
, configurez le déploiement selon
Pour obtenir de l’aide pour utiliser l’outil
OK
.
de gestion de la stratégie de groupe, rendez-vous au
http://support.microsoft.com/kb/816102/.
Lorsque les utilisateurs se connectent, leur bureau affichera une icône
d’installation ou l’icône de LOCKOUT-PRO
déploiement sélectionnés sous l’outil de gestion de la stratégie de
groupe).
REMARQUE :
Suivez les politiques et les procédures de votre entreprise
MD
(selon les paramètres de
relatives à l’outil de gestion de la stratégie de groupe. Si vous utilisez un
logiciel d’une tierce partie, référez-vous aux documents de l’utilisateur
pour obtenir des instructions spécifiques sur la configuration d’une
installation silencieuse de LOCKOUT-PRO
LOCKOUT-PROMD E
NTERPRISE
MD
.
•
•
•
A-9
•
•
•

Distribution de l’application
Administrator à distance
Vous pouvez aussi utiliser l’installateur Web ou l’outil de gestion
des politiques de groupe de Microsoft pour distribuer l’application
Administrator de LOCKOUT-PRO
distance.
Pour distribuer l’application Administrator au moyen
de l’installation Web :
1
Donnez des instructions aux utilisateurs pour naviguer :
http://<nom ou adresse IP du serveur>/LOPRemoteAdmin/
L’utilisateur sera avisé de cliquer avec le bouton droit sur chaque lien
2
et de sélectionner
chaque lien dans le même dossier sur l’ordinateur de l’utilisateur.
3
Puis, l’utilisateur doit cliquer deux fois sur l’icône
Install.msi
4
Lorsque l’installateur Windows est affiché, l’utilisateur clique sur
Suivant
5
Lorsque vous êtes invité à choisir le dossier du programme, l’utilisateur
avant de commencer l’installation.
.
clique sur le bouton
6
Lorsque vous êtes invité à confirmer l’installation, l’utilisateur clique
Suivant
sur
7
Suite à l’installation du programme, l’utilisateur clique sur le bouton
Fermer
.
.
Enregistrer la cible sous
Suivant
.
MD
pour les PC utilisateurs à
pour enregistrer le fichier vers
Remote Admin
•
•
•
A-10 G
•
•
•
ESTION DE
Pour distribuer l’application Administrator au moyen
de l’outil des politiques de groupe :
1
Sur le serveur, à l’emplacement de LOCKOUT-PROMD, repérez et
LOPE
ouvrez le dossier
2
Trouvez le dossier
pour ouvrir la fenêtre
3
Cliquez sur l’option
désiré), puis cliquez sur
4
Du menu
5
Dans le panneau de configuration de la fenêtre
groupe
6
Sur votre serveur, cliquez avec le bouton droit sur
par défaut
7
La fenêtre
Démarrer
, sous
Forest
, et sélectionnez
Édition d'objet de la stratégie de groupe
s’ouvrira. À ce moment, deux options vous sont offertes :
LOCKOUT-PRO G
.
RemoteAdminInstall
Propriétés des FichiersClients
Partager un dossier
OK
.
, ouvrez l’outil
, repérez votre domaine et votre serveur.
Édition
, puis cliquez avec le bouton droit
.
(et changez tout autre paramètre
Gestion de la politique de groupe
Politique de gestion de
Politique de domaine
à partir du menu.
pour votre domaine
UIDE DE L’ADMINISTRATEUR DE
LOCKOUT-PROMD E
.
NTERPRISE

•
Pour configurer une installation par distribution pour chaque
ordinateur
du logiciel
•
Pour configurer une installation par distribution pour chaque
utilisateur
logiciel
sur le dossier, puis sélectionnez
de la fenêtre
Options d’installation de l’interface de l’utilisateur
sous
sur le domaine, sélectionnez le dossier
sous
Configuration de l’ordinateur
sur le domaine, sélectionnez le dossier
sous
Configuration de l’utilisateur
Propriétés
Propriétés de Lockout PRO version 3.0
. Cliquez avec le bouton droit
.
. Sous l’onglet
fenêtre.
8
Cliquez avec le bouton droit sur
Nouveau>Progiciel
9
Naviguer vers :
votre domaine>votre serveur
>
Admin Install.msi
10
Dans la fenêtre
depuis le menu.
Mon réseau>Tout le réseau>Réseau de Microsoft Windows
.
Déploiement de logiciel
Paramètres du logiciel,
>RemoteAdminInstall
, configurez le déploiement selon
>fichier
les politiques de votre entreprise, puis cliquez sur le bouton
Paramètres
Paramètres du
Déploiement
, choisissez
De base
, puis fermez la
puis sélectionnez
Remote
OK
.
REMARQUE :
Pour obtenir de l’aide pour utiliser l’outil
de gestion de la stratégie de groupe, rendez-vous au
http://support.microsoft.com/kb/816102/.
11
Lorsque les utilisateurs se connectent, leur bureau affichera une icône
d’installation ou l’icône de LOCKOUT-PRO
MD
(selon les paramètres de
déploiement sélectionnés sous l’outil de Gestion de la politique de
groupe).
REMARQUE :
Suivez les politiques et les procédures de votre
entreprise relatives à l’outil de gestion de la stratégie de groupe.
Si vous utilisez un logiciel d’une tierce partie, référez-vous à ses
documents de l’utilisateur pour des instructions spécifiques sur la
configuration d’une installation silencieuse de LOCKOUT-PROMD.
Utilisation de l’application Administrator
L’application Administrator offre une interface facile à utiliser afin de
gérer les fonctions du serveur Enterprise.
Familiarisation avec l’application Administrator
G
UIDE DE L’ADMINISTRATEUR DE
Le tableau suivant dresse les composants et les caractéristiques de
la fenêtre principale
Administrator
, et indique lesquels ne sont pas
disponibles lors de l’utilisation de l’application à distance.
LOCKOUT-PROMD E
NTERPRISE
•
•
•
A-11
•
•
•

COMPOSANTS ET CARACTÉRISTIQUES
DE L’APPLICATION ADMINISTRATOR
Fonctions Serveur
Menu principal par la partie supérieure de la fenêtre
La zone Domaine apparaissant à la gauche de l’écran
permet l’accès aux domaines, aux groupes de l’utilisateur,
aux utilisateurs individuels et aux niveaux de permission.
Déverrouiller le fichier vous permet de débloquer
un fichier verrouillé par inadvertance
Groupes, vous permet d’ouvrir une fenêtre qui vous
permet d’ajouter ou de supprimer les groupes de
l’utilisateur sur un domaine.
Parcourir, vous permet d’ouvrir une fenêtre de type
Explorateur dans Windows qui affiche les informations du
panneau Domaine sous forme d’arborescence avec format
de fichier.
Contrôleur de performance, vous permet d’accéder
au Contrôleur de performance de Windows
Actualiser, vous permet d’actualiser vos informations
d’affichage lorsque vous cliquez sur ce bouton
À distance
(à l’exception
des
Paramètres
de l’interface
radio
)
•
•
•
A-12 G
•
•
•
ESTION DE
Démarrer le service réseau, vous permet de redémarrer
le service lorsqu’il est arrêté
Arrêter le service réseau, vous permet d’arrêter le service
sur le réseau
Une zone d’affichage apparaissant à la droite vous
permet d’afficher le domaine, le groupe et les informations
de l’utilisateur dans une fenêtre de type Explorateur dans
Windows, laquelle comprend des icônes d’édition
Affichage et gestion des domaines
À partir de la fenêtre
du réseau que vous avez déjà entrés, en plus des informations de
l’utilisateur et de fichier. Vous pouvez aussi ajouter d’autres domaines
sur votre réseau.
Affichage des domaines :
1
Lancez l’application Administrator.
2
Affichez la liste des domaines directement à partir de la fenêtre sous
l’onglet
déjà inscrits.
LOCKOUT-PRO G
Domaine
Administrateur
dans l’affichage gauche. Il s’agit de tous les domaines
, vous pouvez afficher les domaines
UIDE DE L’ADMINISTRATEUR DE
LOCKOUT-PROMD E
NTERPRISE

La liste des domaines offre un aperçu de tous les utilisateurs, des
licences en cours utilisation ainsi que des fichiers en cours d’utilisation.
Pour visualiser les détails pour un type d’information donné, cliquez
sur le signe plus
(+)
situé à la gauche de l’affichage.
Le tableau suivant décrit davantage les informations disponibles.
AFFICHAGE D’UN DOMAINE
Étiquette Détails
Utilisateurs enregistrés Noms de tous les utilisateurs enregistrés du logiciel
d’écriture de procédures graphiques LOCKOUT-
MD
PRO
pour le domaine
Utilisateurs en suspens Noms des utilisateurs qui ont installé la version client du
LOCKOUT-PRO
enregistrés dans la base de données par l’administrateur
réseau
Licences en usage (x) Le nombre et les noms de tous les utilisateurs dans
ce domaine qui utilisent actuellement des licences
LOCKOUT-PRO
LOCKOUT-PRO
Utilisateurs en ligne Le nom de tous les utilisateurs qui sont actuellement
en ligne, que leur licence ait été vérifiée ou non
Fichiers verrouillés Le nom de tous les fichiers de procédure, et leur groupe
assigné, qui sont actuellement en cours d’utilisation, puis
« verrouillés » pour éviter l’utilisation par une autre
personne
MD
, mais qui ne sont pas encore
MD
(c.-à-d., ont lancé la version client de
MD
)
CONSEIL : Si vous désirez afficher la liste de domaine dans une fenêtre
à deux affichages similaire à l’Explorateur Windows, cliquez sur le bouton
Parcourir... situé dans le coin inférieur gauche. Une fenêtre de type
Explorateur s’ouvrira à la droite de la zone d’affichage.
Ajout d’un domaine :
1
Lancez l’application Administrator.
2
Dans la zone de texte de
3
Cliquez sur le bouton
fenêtre
Administrateur
Nom de domaine
Ajouter
. Le nom sera ajouté à la liste dans la
.
, inscrivez le nom du domaine.
G
UIDE DE L’ADMINISTRATEUR DE
Gestion des groupes d’utilisateurs
Chaque domaine comprend un ou plusieurs groupes d’utilisateurs.
Les utilisateurs individuels dans ce domaine doivent être assignés
à un groupe de l’utilisateur spécifique dans le cadre du processus
d’enregistrement.
LOCKOUT-PROMD E
NTERPRISE
•
•
•
A-13
•
•
•

CONSEIL : Un des avantages des groupes d’utilisateurs consiste à la
possibilité de modifier les modèles des procédures afin de satisfaire aux
besoins d’un groupe particulier. Par exemple, des modèles du groupe de
production peuvent comprendre une formulation par défaut ou un format
de texte qui créé les meilleures procédures pour ce groupe, tandis que les
modèles du groupe de recherche peuvent être modifiés différemment pour
leurs besoins spécifiques.
Pour ajouter un groupe d’utilisateurs :
1
Dans la fenêtre
Administrateur
, sélectionnez le domaine pour le
nouveau groupe.
2
Cliquez sur le bouton
Groupes
situé sous de la liste des domaines,
des groupes et des utilisateurs.
3
Lorsque la fenêtre
la zone de texte
4
Cliquez sur le bouton
5
Lorsque vous avez terminé, cliquez sur OK.
Groupes
Nom du groupe
s’ouvre, inscrivez le nom du groupe dans
Ajouter un groupe
.
.
Suppression d’un groupe d’utilisateurs :
1
Dans la fenêtre
2
Cliquez sur le bouton
Administrateur
Groupes
, sélectionnez le domaine pour le groupe.
situé sous de la liste des domaines, des
groupes et des utilisateurs.
3
Lorsque la fenêtre
Groupes
s’ouvre, la liste des groupes disponibles
s’affichera.
4
Sélectionnez le groupe de la liste dans la zone de texte
puis cliquez sur le bouton
5
Une boîte de dialogue s’ouvrira vous demandant de confirmer votre
Supprimer le groupe
.
Nom de groupe
action. Supprimer un groupe supprime tout le contenu dans le fichier
de ce groupe sur le serveur.
REMARQUE :
Vous ne pouvez pas supprimer un groupe auquel des
utilisateurs sont actuellement affectés. Vous devez tout d’abord
réaffecter les utilisateurs à un groupe différent. Pour obtenir des
informations sur la manière de procéder, consultez la procédure
ci-dessous « Changement de groupe d’un utilisateur ou d’un niveau
de permission : ».
6
Lorsque vous avez terminé, cliquez sur OK.
,
•
•
•
A-14 G
•
•
•
ESTION DE
LOCKOUT-PRO G
UIDE DE L’ADMINISTRATEUR DE
LOCKOUT-PROMD E
NTERPRISE

Maintien des niveaux de permission
et de l’utilisateur
Lorsqu’un utilisateur lance le logiciel d’écriture de procédures
graphiques LOCKOUT-PRO
MD
pour la première fois sur l’ordinateur
d’un client, une demande est envoyée afin que l’utilisateur soit ajouté
en tant qu’utilisateur enregistré. À titre d’administrateur, vous
complétez l’enregistrement de l’utilisateur en accédant aux données
de l’utilisateur dans la liste
Utilisateurs en suspens
, établissant le
niveau de permission, puis en ajoutant le nom d’utilisateur à la liste
Utilisateurs enregistrés
. Vous pouvez aussi réaffecter des utilisateurs
enregistrés aux différents groupes et/ou changer leurs niveaux de
permission.
Complétion de l’enregistrement d’un utilisateur en suspens :
1
Dans l’affichage
de domaine pour la développer afin de visualiser toutes les informations
de l’utilisateur sous ce domaine.
2
Cliquez sur
3
Cliquez sur le nom de l’utilisateur à enregistrer.
4
La fenêtre
affiché du domaine dans la zone de texte
•
Si le groupe affiché est celui que vous désirez ajouter à l’utilisateur,
passez à l’étape suivante.
•
Si vous désirez ajouter l’utilisateur à un groupe différent, cliquez
sur la flèche descendante de la zone de texte
un autre groupe à partir de la liste.
Domaine
Utilisateurs en suspens
Modifier l’utilisateur
de la fenêtre
Administrateur
, cliquez sur le nom
pour afficher le nom des utilisateurs.
s’ouvrira, affichant le premier groupe
Groupe
.
Groupe
et sélectionnez
5
6
1
2
G
UIDE DE L’ADMINISTRATEUR DE
Dans la boîte
Visualiseur.
Permissions
, la permission est établie par défaut à
Pour régler à un niveau de permission différent, cliquez
sur la flèche descendante et sélectionnez le niveau désiré.
Cliquez sur le bouton
maintenant affiché sur la liste
REMARQUE :
Mettre à jour
. Le nom de l’utilisateur est
Utilisateurs enregistrés
.
Lorsqu’un utilisateur a été ajouté à la liste
Utilisateurs enregistrés sur le serveur admin, le client doit
relancer LOCKOUT-PRO
MD
.
Suppression d’un utilisateur de la liste des
utilisateurs enregistrés :
Dans le fenêtre
la liste
Utilisateurs enregistrés
travaillez.
Lorsque la fenêtre
Désactiver
Utilisateurs en suspens
liste
peuvent pas accéder aux données du serveur LOCKOUT-PRO
LOCKOUT-PROMD E
Administrateur
, cliquez sur le nom de l’utilisateur de
sous le nom de domaine avec lequel vous
Modifier l’utilisateur
s’ouvre, cliquez sur le bouton
. La fenêtre se fermera, puis l’utilisateur sera inscrit sur la
. Les utilisateurs inscrits sur cette liste ne
NTERPRISE
MD
.
•
•
•
A-15
•
•
•

Changement de groupe d’un utilisateur ou d’un niveau
de permission :
1
Dans la fenêtre
Administrateur
, cliquez sur le nom de l’utilisateur de la
liste appropriée sous le nom de domaine et le nom de groupe pertinents.
2
Lorsque la fenêtre
Groupe
et/ou de
Éditer l’utilisateur
Permissions
différente dans l’une des deux boîtes ou les
s’ouvre, sélectionnez une option de
deux boîtes.
3
Cliquez sur le bouton
Mettre à jour
. La fenêtre se fermera, puis les
informations de l’utilisateur seront changées.
Gestion des fichiers d’utilisateurs
La version Enterprise du logiciel d’écriture de procédures graphiques
LOCKOUT-PRO
MD
assure l’intégrité des fichiers de procédure en
stockant ces dossiers dans un emplacement simple sur le serveur et,
avec l’utilisation des groupes et des niveaux de permission, et empêche
que des utilisateurs non autorisés ne les changent. LOCKOUT-PRO
conserve aussi un fichier afin qu’ils ne soient pas changés par plus d’un
utilisateur en même temps par l’entremise de la fonctionnalité de
verrouillage de fichier.
L’application Administrator vous permet de changer ces restrictions
lorsque nécessaire. Voici deux situations communes où vous pouvez
avoir besoin de gérer les fichiers manuellement :
•
Lorsque des utilisateurs de groupes différents désirent partager
des fichiers entre les groupes
•
Lorsqu’un fichier qui a été vérifié ne peut pas être revérifié par
l’utilisateur client en raison de problèmes techniques, comme une
panne d’ordinateur
Copie, coupage, collage ou suppression des fichiers
de l’utilisateur :
1
Dans la fenêtre
ouvrir la fenêtre du navigateur situé à la droite.
Administrateur
, cliquez sur le bouton
Parcourir
pour
MD
•
•
•
A-16 G
•
•
•
ESTION DE
2
Naviguez jusqu’au fichier contenant le ou les fichiers que vous
désirez gérer.
3
Exécution de la fonction :
•
Pour copier-coller ou couper-coller un fichier, cliquez sur le fichier,
puis cliquez sur l’icône
Copier
fenêtre du navigateur. Naviguez jusqu’au répertoire destinataire,
puis cliquez sur l’icône
•
Pour supprimer un fichier, cliquez sur le fichier, puis cliquez sur
l’icône
LOCKOUT-PRO G
Supprimer
de la barre d’outils de la fenêtre du navigateur.
Coller
ou
Couper
de la barre d’outils de la
.
UIDE DE L’ADMINISTRATEUR DE
LOCKOUT-PROMD E
NTERPRISE

Déverrouillage d’un fichier verrouillé :
1
Dans la fenêtre
Fichiers verrouillés
2
Cliquez sur le fichier pour le sélectionner.
3
Cliquez sur le bouton
Tout autre utilisateur autorisé peut maintenant y accéder.
4
Cliquez sur le bouton
verrouillés
.
Administrateur
, localisez le fichier verrouillé de la liste
sous le groupe et le domaine appropriés.
Déverrouiller le fichier
Actualiser
pour mettre à jour la liste sous
sous l’affichage
Domaine
Fichiers
.
REMARQUE :
Si l’utilisateur initial apporte des changements au
fichier depuis qu’il a été sauvegardé pour la dernière fois sur
le serveur, ces changements seront perdus. D’autre part, si
l’utilisateur n’a pas fermé LOCKOUT-PROMD normalement,
la licence utilisée par cet utilisateur ne sera pas mise à jour
lorsque le fichier sera déverrouillé. Pour mettre à jour la licence,
l’utilisateur doit se connecter et fermer LOCKOUT-PROMD
normalement.
Accomplissement des autres tâches administratives
Démarrage/Arrêt du service du réseau
Démarrer et arrêter le service du réseau est une fonction administrative
standard de Windows. L’application Administrator fournit des boutons
à simple clic de souris pour exécuter ces fonctions lors de l’exécution
de l’application sur le serveur. (Vous ne pouvez pas démarrer ou
arrêter le service réseau d’une installation à distance de l’application
Administrator.)
Démarrage ou arrêt du service du réseau :
1
Depuis l’application
LOCKOUT-PRO
Administrator
MD
:
s’exécutant sur le serveur
G
UIDE DE L’ADMINISTRATEUR DE
•
Si le service du réseau
vous désirez le redémarrer, cliquez sur le bouton
service réseau
REMARQUE :
.
n’est pas
exécuté en ce moment et que
Démarrer le
Une fois que le service du réseau a été redémarré,
les utilisateurs doivent relancer LOCKOUT-PROMD sur les
machines de leurs clients pour se reconnecter.
•
Si le service fonctionne
actuellement
et que vous désirez
déconnecter les clients du serveur Enterprise, cliquez sur le
bouton
Arrêter le service réseau
REMARQUE :
de Windows (
d’administration >Services
Vous pouvez aussi utiliser la fonction Services
Démarrer>Panneau de configuration>Outils
.
) pour démarrer ou arrêter le
service réseau.
LOCKOUT-PROMD E
NTERPRISE
•
•
•
A-17
•
•
•
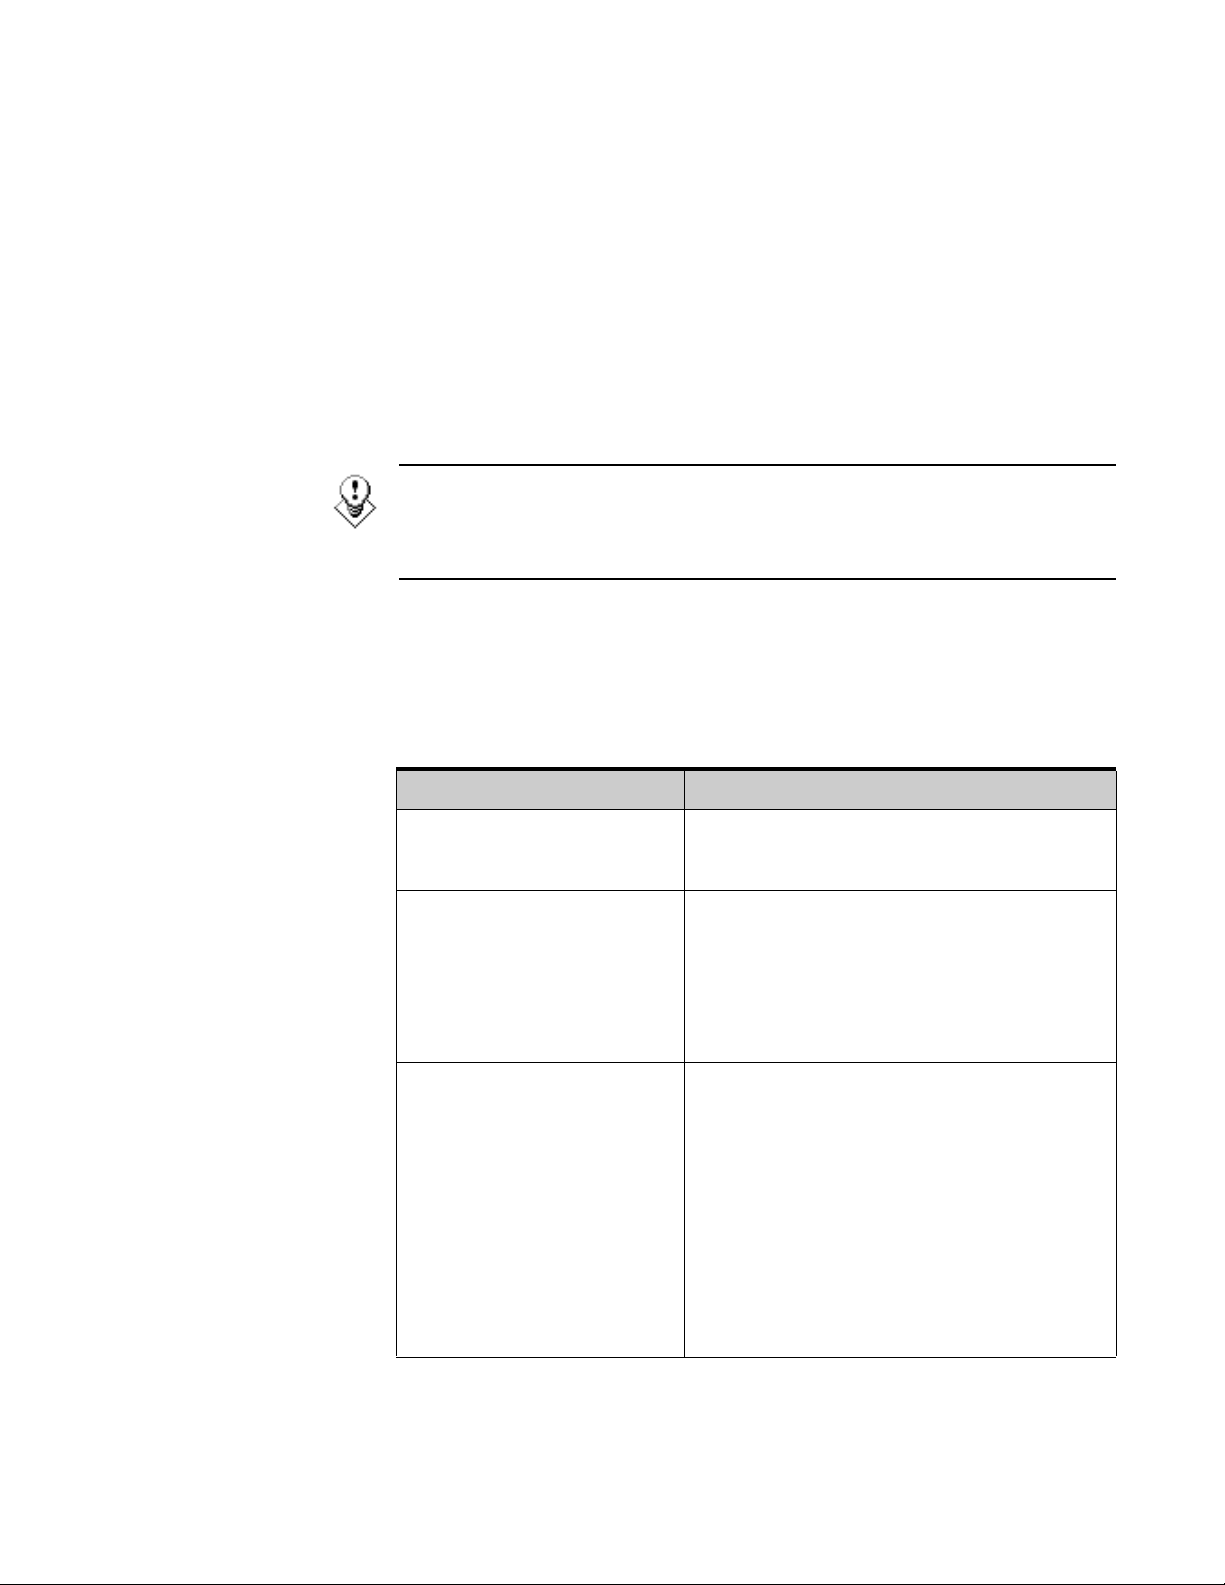
Afficher des événements LOCKOUT-PRO
Vous devez exécutez le l’observateur d’événements sur le serveur, et non
à distance, afin d’afficher les transactions de LOCKOUT-PRO
Pour afficher les transactions dans l’observateur d’événements :
1
Ouvrez l’observateur d’événements Windows (
configuration>Outils d’administration>Observateur d’événements
2
Sélectionnez l’entrée
LOCKOUT-PRO
3
Pour obtenir plus de détails pour un événement, cliquez deux fois sur
MD
Entreprise.
l’événement.
CONSEIL : Il est recommandé de sauvegarder régulièrement le fichier
d’événements LOCKOUT-PRO
LOPE dans l’observateur d’événements Windows, puis sélectionnez l’option
Enregistrer.
Fonctions de dépannage
Le tableau suivant fait mention des problèmes les plus communs que les
utilisateurs puissent rencontrer.
CONDITIONS/MESSAGES D’ERREUR DU CÔTÉ CLIENT
Démarrer>Panneau de
LOPE
pour afficher les évènements de
MD
en cliquant avec le bouton droit sur l’entrée
MD
).
:
Conditions/messages d’erreur Causes/solutions possibles
L’utilisateur obtient un message
d’erreur, mais aucun message
n’est affiché.
L’utilisateur ne peut pas se
connecter soit parce que toutes
les licences sont en cours
d’utilisation, soit parce que le
compte de l’utilisateur est
introuvable.
Chemin distant introuvable.
Vérifiez les paramètres de
connexion.
Le chemin du fichier principal
par défaut est introuvable sur
le serveur.
Impossible de récupérer la
date/heure du modèle principal
sur le serveur.
Le groupe de l’utilisateur est
introuvable ou n’a pas été
affecté.
L’utilisateur n’est pas en mesure d’envoyer une
commande Ping pour vérifier la connexion au
serveur, ou le service sur le serveur est arrêté.
1) L’utilisateur n’est pas un utilisateur enregistré.
Les utilisateurs qui se connectent pour la première
fois peuvent voir ce message d’erreur s’ils sont sur
la liste Utilisateurs en suspens.
2) Le nombre maximal de licences flottantes a été
atteint. L’utilisateur devra attendre que l’utilisateur
se déconnecte et libère une licence.
Une de ces erreurs peut survenir si, par
inadvertance, les fichiers sur le serveur sont
supprimés ou non copiés à la suite d’une erreur
d’installation.
Vérifiez si tous les fichiers partagés existent sur
le serveur. (Voir « Figure 1 : Structure de dossier
pour les fichiers LOCKOUT-PROMD Enterprise
installés »).
Si des fichiers sont manquants, copiez-les à partir
du DC LOCKOUT-PRO
le soutien technique de Brady.
MD
, ou communiquez avec
(suite)
•
•
•
A-18 G
•
•
•
ESTION DE
LOCKOUT-PRO G
UIDE DE L’ADMINISTRATEUR DE
LOCKOUT-PROMD E
NTERPRISE

CONDITIONS/MESSAGES D’ERREUR DU CÔTÉ CLIENT (Suite)
Le groupe de l’utilisateur
est introuvable ou n’a pas
été affecté
L’utilisateur peut ne pas être affecté à un groupe
de l’utilisateur. Pour corriger la situation, ajoutez
l’utilisateur à un groupe. (Voir « Gestion des
groupes d’utilisateurs » à la page A-14 pour
obtenir de plus amples détails.)
Accès refusé L’utilisateur peut tenter d’exécuter une fonction
non incluse au niveau de permission établi pour
cet utilisateur. (Voir « Maintien des niveaux de
permission et de l’utilisateur » pour obtenir de plus
amples détails.)
Le serveur fonctionne
correctement et l’utilisateur
est entièrement enregistré,
avec les niveaux de permission
appropriés, et est affecté à
un groupe, sans toutefois être
capable de se connecter
au serveur.
1) Vérifiez le fichier
situé dans le dossier:
c:\program files\brady\lockoutPro 3.0
sur la machine du client, puis vérifiez l’exactitude
des données de ce fichier. (Voir « Figure 2.
Structure de base du fichier app.config de
l’utilisateur client » ci-dessus pour obtenir un
exemple d’une structure de base complète du
app.config de l’utilisateur,
fichier app.config.)
2) L’ordinateur de l’utilisateur peut ne pas avoir
certains fichiers nécessaires, tels :
• MDAC 2.8
• .Net Framework 1.1 Version 1.4322
Vérifiez si les fichiers sont installés (en accédant
à la fenêtre Ajout/Suppression de programmes
à partir du Panneau de configuration) ou, dans
le cas de Windows 2000, vérifiez le fichier :
C:\windows\Microsoft.net\framework
Tout fichier manquant peut être téléchargé sur
le site Web de Microsoft.
Pour les problèmes de connexion de l’utilisateur/d’accès sur le serveur Entreprise :
1 Assurez-vous du bon fonctionnement du service du réseau.
2 Assurez-vous de l’exactitude de l’adresse du réseau.
3 Assurez-vous de l’exactitude des réglages du port et que le port spécifié
4 Si ces étapes ne résolvent pas le problème, veuillez communiquer avec le
G
UIDE DE L’ADMINISTRATEUR DE
RÉSOLUTION DE PROBLÈMES DU SERVEUR
dans le fichier de configuration du client correspond au réglage de ports.
soutien technique.
LOCKOUT-PROMD E
NTERPRISE
•
•
•
A-19
•
•
•

Structure de dossier pour les fichiers installés
Les fichiers suivants et la structure de répertoire sont installés dans le
dossier
LOPE (Partagé)
Lockout Pro 3.0
Brady
au cours de l’installation :
Données
Nom de domaine
Base de
données
LOPStorage.mbd Commun
Fichiers communs Fichiers
Nom du
groupe
Fichiers
principaux
Fichiers de
configuration
Fichiers
principaux
Fichiers de
configuration
Figure 1 : Structure de dossier pour les fichiers LOCKOUT-PROMD Enterprise
installés
Structure de base du fichier client app.config
La structure de base complète du fichier
Figure 2 ci-dessous. Les utilisateurs peuvent vérifier leurs réglages à partir
de l’option
données du fichier
Fichier>Paramètres de connexion
app.config
distinguent les majuscules des minuscules,
ainsi assurez-vous d’avertir les utilisateurs de ne pas modifier le fichier.
<?xml version="1.0" encoding="utf-8"?>
<configuration>
<APPSETTINGS SERVERID="172.20.94.161"
CONNECTIONSTRING="tcp://172.20.94.161:8032/LOPUser"
DEFAULTLOCALPATH="U:\My Documents\New Folder" CONNECTIONTYPE="1" />
<configuration>
Figure 2. Structure de base du fichier app.config de l’utilisateur client
app.config
est démontré à la
du menu principal. Notez que les
•
•
•
A-20 G
•
•
•
ESTION DE
LOCKOUT-PRO G
UIDE DE L’ADMINISTRATEUR DE
LOCKOUT-PROMD E
NTERPRISE

Guía del administrador
Software de escritura gráfica de procedimientos LOCKOUT-PRO™
Versión empresarial v3.0

LEA DETENIDAMENTE LOS SIGUIENTES TÉRMINOS Y CONDICIONES DE ESTE
ACUERDO DE LICENCIA ANTES DE ABRIR EL PAQUETE. SI NO ESTÁ DE ACUERDO
CON DICHOS TÉRMINOS Y CONDICIONES, SÍRVASE DEVOLVER RÁPIDAMENTE
ESTE PAQUETE PARA OBTENER UN REEMBOLSO TOTAL.
ACUERDO DE LICENCIA
Por este medio, Brady Worldwide, Inc. (de ahora en adelante “Brady”) le otorga una licencia no exclusiva e
intransferible para usar este software y la documentación adjunta de acuerdo con los siguientes términos:
1. OTORGAMIENTO DE LICENCIA: Usted puede 1) instalar el software en la cantidad de equipos cubierta
por las facturas para esta licencia de Brady, que se incorporan de ahora en adelante para referencia; 2) usar y
transmitir el software en una red dentro de un sitio si así lo autoriza Brady por escrito; 3) instalar el software
en un servidor o en múltiples servidores según lo mencionado en la factura para un único servidor o para
múltiples servidores, cuyas facturas se incorporan de ahora en adelante para consulta; y 4) realizar copias del
software en formato legible por máquina con fines de respaldo únicamente.
2. RESTRICCIONES DE LA LICENCIA: Usted no puede: 1) modificar, adaptar, traducir, hacer ingeniería
inversa, descompilar, desarmar, crear trabajos derivados basados en el software ni copiar el software (excepto
por la copia de respaldo) o a la documentación anexa; 2) alquilar, transferir o garantizar ningún derecho al
software o la documentación anexa sin el previo consentimiento expreso por escrito de Brady; o 3) eliminar
cualquier tipo de aviso, etiqueta o marca de propiedad en el software y la documentación anexa.
3. NATURALEZA DE ESTE CONVENIO: Esta licencia no implica venta. Los aranceles de las licencias que
usted pague, en caso de hacerlo, son en contraprestación de las licencias otorgadas según este Acuerdo. El título
y las patentes del software, la documentación anexa y cualquier copia que usted realice, continúan siendo
propiedad de Brady o de sus proveedores. Las copias no autorizadas del software o de la documentación anexa
o el no cumplir con las restricciones mencionadas anteriormente pondrán fin automáticamente a esta licencia,
sin previo aviso, y pondrán fin a sus derechos de utilizar el software; además de otros recursos legales, Brady
tendrá derecho a recibir honorarios razonables para solventar gastos de abogado.
4. GARANTÍA LIMITADA: Brady garantiza que, durante un período de noventa (90) días a partir de la entrega
según lo demuestre una copia de su comprobante de recibo, el software, según se suministra, en condiciones de
uso normal, funcionará sin errores de importancia. La responsabilidad legal de Brady y el remedio exclusivo
del cual usted goza bajo esta garantía (que está sujeto a la devolución del software a Brady) consistirán, a
elección de Brady, en intentar corregir o ayudarlo a resolver los errores, reemplazar el software con software
o disquetes funcionalmente equivalentes, o reembolsar los aranceles de la licencia del software y dar por
terminado este Acuerdo.
EXCEPTO POR LA GARANTÍA LIMITADA EXPLÍCITA MENCIONADA ARRIBA, BRADY NO REALIZA NI
USTED RECIBE GARANTÍA DE NINGÚN TIPO, EXPRESA, IMPLÍCITA, OBLIGATORIA O EN NINGUNA
COMUNICACIÓN CON USTED, Y BRADY SE DESLIGA ESPECÍFICAMENTE DE CUALQUIER GARANTÍA
IMPLÍCITA DE COMERCIABILIDAD O IDONEIDAD PARA UN PROPÓSITO DETERMINADO. BRADY NO
GARANTIZA QUE EL PROGRAMA FUNCIONE EN FORMA ININTERRUMPIDA O QUE EL MISMO ESTÉ
LIBRE DE ERRORES.
Algunos estados no permiten la exclusión de garantías implícitas, de modo que las exclusiones arriba
mencionadas pueden no aplicarse a usted. Esta garantía le otorga derechos legales específicos. También
es posible que usted goce de otros derechos que varían de un estado a otro.
5. LIMITACIÓN DE LA RESPONSABILIDAD LEGAL: EN NINGÚN CASO BRADY SERÁ RESPONSABLE
DE NINGÚN DAÑO, INCLUYENDO LA PÉRDIDA DE DATOS AL CARGAR O NO ESTE SOFTWARE, O LA
PÉRDIDA DE GANANCIAS, COSTOS O COBERTURA U OTROS DAÑOS ESPECIALES, ACCIDENTALES,
RESULTANTES O INDIRECTOS QUE SURJAN DEL USO DEL PROGRAMA O LA DOCUMENTACIÓN
ANEXA, CAUSADOS NO OBSTANTE Y EN CUALQUIER TEORÍA DE RESPONSABILIDAD LEGAL. ESTA
LIMITACIÓN SE APLICA AÚN CUANDO BRADY HAYA SIDO ADVERTIDO DE LA POSIBILIDAD DE
TALES DAÑOS.
Algunos estados no permiten la limitación o exclusión de la responsabilidad legal para los daños accidentales
o resultantes, de modo que esta limitación puede no aplicarse a usted.
6. GENERAL: Este Acuerdo estará regido por, e interpretado según, las leyes del estado de Wisconsin, EE.UU.
Usted reconoce que las leyes y normas de EE.UU. pueden restringir la exportación / reexportación del software.
Usted se compromete a no exportar ni reexportar el software o porciones del mismo de ninguna forma sin
las licencias del gobierno de EE.UU. y los gobiernos extranjeros pertinentes. Esta obligación perdurará y
continuará después de la finalización de este Acuerdo. Este Acuerdo constituye el convenio completo entre las
partes e invalida cualquier otra comunicación o publicidad con respecto al software y la documentación anexa.
Si cualquier provisión de este Acuerdo fuera declarada no válida, el resto de este Acuerdo permanecerá vigente
y en efecto.
•
6555 West Good Hope Road, P.O. Box 571, Milwaukee, Wisconsin 53201-0571, EE.UU, tel. +1 (414) 358-6600
•
•
•
•
•
LOCKOUT-PRO™ — G
UÍA DEL ADMINISTRADOR EMPRESARIAL

C
ONTENIDO
• • • • • •
Administración de LOCKOUT-PRO
Funciones del servidor empresarial de LOCKOUT-PRO
Componentes del servidor
Aplicación de administración de LOCKOUT-PRO™
Servicio de red de LOCKOUT-PRO™
Entrada del visor de eventos
Niveles de permisos de usuarios
Requisitos del sistema para aplicaciones servidor y cliente
Instalación y configuración de aplicaciones de servidores
Preparación para la instalación
Generalidades sobre la instalación
Instalación de aplicaciones del servidor empresarial
Activación y configuración de LOCKOUT-PRO
Distribución de LOCKOUT-PRO a clientes
Distribución de la aplicación de administración remota
Uso de la aplicación de administración
Familiarizarse con el administrador
Visualización y administración de dominios
Administración de grupos de usuarios
Mantenimiento de usuarios y niveles de permiso
Administración de archivos de usuarios
Ejecución de otras tareas administrativas
Inicio/detención del servicio de red
Visualización de eventos de LOCKOUT-PRO
A–2
A–2
A–2
A–3
A–5
A–5
A–8
A–11
A–11
A–12
A–13
A–16
A–17
A–17
A–17
A–1
A–2
A–6
A–7
A–14
A–4
A–5
A–10
LOCKOUT-PRO™ — G
Localización y solución de fallas en funciones empresariales
UÍA DEL ADMINISTRADOR EMPRESARIAL
A–18
•
•
•
III
•
•
•

Copyright
Este manual está registrado como propiedad intelectual y tiene todos los
derechos reservados. No está permitido copiar ni reproducir de ningún
modo ninguna de las secciones de este manual sin el consentimiento
previo de Brady Worldwide, Inc.
Si bien se han tomado las debidas precauciones durante la preparación
de este documento, Brady no asume responsabilidad legal hacia otros
por ninguna pérdida o daño causado por errores u omisiones, o por
declaraciones surgidas por negligencia, accidente o cualquier otra
causa. Además, Brady no asume ninguna responsabilidad legal que
surja de la aplicación o el uso de cualquier producto o sistema descrito
en este documento, ni tampoco asume responsabilidad civil por daños
accidentales o resultantes del uso de este documento. Brady se desliga
de toda garantía de comerciabilidad o idoneidad para un propósito
determinado.
Brady se reserva el derecho de realizar cambios sin previo aviso a
cualquier producto o sistema incluido en este documento, con el
propósito de mejorar la confiabilidad, la función o el diseño.
Está estrictamente prohibido reproducir este material, en su totalidad
o en partes, sin el permiso por escrito de Brady Worldwide, Inc. Para
obtener más información, comuníquese con: Brady Worldwide, Inc.
Signmark® Division, 2221 W. Camden Road, Milwaukee, WI 53209,
EE.UU.
IV
Descargo de responsabilidad
Se han realizado todos los esfuerzos necesarios para que esta guía
sea lo más precisa y completa posible. Brady Worldwide, Inc. no se
responsabiliza por los errores y omisiones que puedan ocurrir durante
el uso de esta guía.
Este manual es propiedad de Brady Worldwide, Inc. y puede ser
corregido ocasionalmente sin previo aviso. Brady Worldwide, Inc.
rechaza todo compromiso de proporcionarle las versiones revisadas,
si las hubiere.
Todas las marcas y los nombres de productos mencionados en este
manual son marcas comerciales o marcas registradas de sus respectivas
compañías u organizaciones.
LOCKOUT-PRO, GlobalMark, y HandiMark son marcas comerciales
de Brady Worldwide, Inc.
© 2006 Brady Worldwide, Inc. Todos los derechos reservados.
www.bradycorp.com
•
•
•
•
•
•
LOCKOUT-PRO™ — G
UÍA DEL ADMINISTRADOR EMPRESARIAL

A
DMINISTRACIÓN DE
• • • • • •
La versión empresarial del Software de escritura gráfica de
procedimientos LOCKOUT-PRO™ incluye herramientas que
permiten al administrador de la aplicación gestionar fácilmente el
uso en toda la organización. Esta
más explicaciones acerca de la versión empresarial y el modo de
utilizar esas herramientas, incluyendo:
LOCKOUT-PRO
Guía del administrador
Generalidades de las funciones del servidor empresarial
de LOCKOUT-PRO™
Cómo instalar y configurar los componentes del servidor
empresarial de LOCKOUT-PRO™ y prepararse para
instalaciones de clientes
Cómo administrar dominios de usuarios, grupos de usuarios,
usuarios y archivos
Cómo iniciar y detener el servicio de red y visualizar eventos
de LOCKOUT-PRO™
proporciona
Mensajes de error comunes y cómo solucionarlos
Funciones del servidor empresarial
de LOCKOUT-PRO
La versión empresarial de LOCKOUT-PRO™ está diseñada para
organizaciones de mayor envergadura que desean implementar el
software a través de una red y centralizar el control de los derechos
de los usuarios, las plantillas de procedimientos, opciones predeterminadas y la seguridad mejorada. La versión 3.0 empresarial de
LOCKOUT-PRO™ combina los programas utilitarios del administrador
en el servidor y un servicio de red con la aplicación de escritorio que
se ejecuta en el equipo cliente.
LOCKOUT-PRO™ — G
UÍA DEL ADMINISTRADOR EMPRESARIAL
•
•
•
A-1
•
•
•

Componentes del servidor
Hay tres componentes principales activos en el servidor empresarial
de LOCKOUT-PRO™:
•
Aplicación del administrador
•
Servicio de red
•
Entrada del visor de eventos
Aplicación de administración de LOCKOUT-PRO™
Mediante este programa utilitario, los administradores del Software de
escritura gráfica de procedimientos LOCKOUT-PRO™ pueden controlar
los usuarios y archivos cliente, registrar usuarios, asignarlos a grupos
y configurar derechos de usuarios. El programa utilitario también le
permite copiar archivos de un grupo a otro y desbloquear archivos que
han sido “verificados” y no se pueden desbloquear usando el proceso
normal (debido a una falla en el equipo cliente, por ejemplo).
La aplicación de administración se configura en el servidor sólo una
vez. Sin embargo, luego de configurar al menos un administrador en el
servidor, se pueden establecer administradores adicionales que pueden
ejecutar una versión "remota" de la aplicación de administración desde
sus equipos cliente.
Servicio de red de LOCKOUT-PRO™
Este servicio que se ejecuta en el servidor empresarial es el medio
por el cual los usuarios cliente de LOCKOUT-PRO™ se conectan al
servidor para acceder a archivos en línea. Este servicio se puede
iniciar y detener usando herramientas administradoras de Windows
estándar (función Servicios), o usando los controles provistos en la
aplicación de administración de LOCKOUT-PRO™.
Puede iniciar y detener el servicio
únicamente
desde el servidor,
usando las herramientas de Windows estándar o la aplicación de
administración. Estas funciones no se pueden realizar cuando se
ejecuta la aplicación de administración de forma remota.
Entrada del visor de eventos
Cada paso o “transacción” realizada por usuarios cliente se registra y
se puede visualizar usando el Visor de eventos de Windows estándar.
La entrada específica para LOCKOUT-PRO™ se denomina
Las transacciones registradas incluyen: acceso del usuario al servicio,
abrir/guardar archivos, cantidad de usuarios en línea, si un usuario
intenta abrir un recurso bloqueado, cualquier problema del servidor
y funciones administrativas de servicio.
LOPE
.
•
•
•
A-2 A
•
•
•
DMINISTRACIÓN DE
Puede ver o guardar entradas del Visor de eventos únicamente desde
LOCKOUT-PRO LOCKOUT-PRO™ — G
UÍA DEL ADMINISTRADOR EMPRESARIAL

el servidor. Estas funciones no se pueden realizar cuando se ejecuta la
aplicación de administración de forma remota.
Niveles de permisos de usuarios
La versión empresarial de LOCKOUT-PRO™ incorpora tres niveles de
permiso para los usuarios:
•
A
dministrador:
todas las funciones disponibles tanto en los componentes del cliente
como en los del servidor de LOCKOUT-PRO™.
• Autor:
Un usuario con derechos de
procedimientos desde la aplicación cliente, además de visualizar
e imprimir, pero no puede modificar plantillas, opciones
predeterminadas o la información relacionada.
• Visor:
Un usuario con derechos de
procedimientos, etiquetas de bloqueo, etiquetas de fuentes de
energía e información relacionada.
La siguiente tabla enumera las funciones principales en LOCKOUTPRO™ empresarial y los niveles de permiso a los que están asignadas.
FUNCIONES ASIGNADAS POR NIVELES DE PERMISO DE USUARIOS
Un usuario con derechos de
Autor
puede crear y editar
Visor
sólo puede ver e imprimir
Admin.
puede realizar
Funciones Admin. Autor Visor
Ver procedimientos existentes
Imprimir procedimientos, etiquetas,
etiquetas de fuentes de energía
Ver la información relacionada en
LOCKOUT-PRO™
Crear nuevos procedimientos
Actualizar procedimientos existentes
Importar versiones anteriores de archivos
LOCKOUT-PRO™
Exportar procedimientos a otros formatos de archivo
Guardar procedimientos nuevos o actualizados
Administrar licencias de clientes de
LOCKOUT-PRO™
Mantener niveles de permisos de usuarios
Editar plantillas de procedimientos
Cambiar listas predeterminadas de
LOCKOUT-PRO™
Modificar la información relacionada
en LOCKOUT-PRO™
Transferir procedimientos entre grupos de usuarios
LOCKOUT-PRO™ — G
UÍA DEL ADMINISTRADOR EMPRESARIAL
•
•
A- 3
•
•
•
•

Requisitos del sistema para aplicaciones
servidor y cliente
REQUISITOS DEL SISTEMA PARA
SOFTWARE DE ESCRITURA GRÁFICA DE PROCEDIMIENTOS LOCKOUT-PRO™
Mínimo: Recomendado:
CLIENTE DE ESCRITORIO
Conexión de red Acceso a la instalación del servidor
empresarial de LOCKOUT-PRO™
en una intranet
Protocolo TCP/IP
Sistema operativo Windows 2000
Windows XP Professional
Impresoras
compatibles
Impresora Debe instalar los controladores para las impresoras que utilizará
SERVIDOR
Procesador 1.2 GHz o superior 2.6 GHz
Memoria (RAM) 512 MB 1G
Espacio en disco 500 MB Igual
Sistema operativo Windows 2000 Advanced Server
Soporte a IIS V5 o v6, configurado y activado
ASP .NET V1.1, instalado
ADMINISTRACIÓN REMOTA
Conexión de red Acceso a la instalación del servidor
Protocolo TCP/IP
Sistema operativo Windows 2000
GlobalMark™
HandiMark
energía únicamente)
Impresora láser o de inyección de
tinta de alimentación por hojas
con LOCKOUT-PRO™. Se debe instalar al menos una impresora
para ejecutar la aplicación. Consulte la documentación de su
impresora para obtener información sobre cómo instalarla.
Impresoras GlobalMark™ únicamente: Se requiere un controlador
actualizado. Primero, desinstale la impresora de su equipo.
Instale el nuevo controlador de GlobalMark™ incluido en el CD
de instalación de LOCKOUT-PRO™. (NOTA: No se ha probado
o validado que este controlador funcione con MarkWare™,
Surf on Signs™ o cualquier otro software de Brady).
Windows 2003 Server
Windows XP
empresarial de LOCKOUT-PRO™ en
una intranet
Windows XP Professional
™
(etiquetas de fuentes de
Igual
Igual
Igual
•
•
•
A-4 A
•
•
•
DMINISTRACIÓN DE
LOCKOUT-PRO LOCKOUT-PRO™ — G
UÍA DEL ADMINISTRADOR EMPRESARIAL

Instalación y configuración de aplicaciones
de servidores
Todos los componentes del Software de escritura gráfica de
procedimientos LOCKOUT-PRO™ se instalan en el servidor que
contiene las plantillas y opciones predeterminadas de la aplicación,
y al cual los usuarios cliente podrán acceder para crear y guardar
procedimientos.
Preparación para la instalación
Antes de poder instalar LOCKOUT-PRO™, se deben instalar en
el servidor las siguientes aplicaciones de Microsoft:
•
Internet Information Services (IIS)
•
Estructura .NET
•
Data Access Components (MDAC) v2.8
•
Active Directory
•
ASP.NET
Estas aplicaciones son esenciales para el funcionamiento de
LOCKOUT-PRO™. Están disponibles en www.microsoft.com,
que también ofrece una amplia documentación de soporte sobre
cómo instalarlas y configurarlas.
CONSEJO: Si bien esta guía proporciona la estructura de configuración
básica, asegúrese de consultar al administrador de red o dominio antes
de proceder con la instalación. El administrador puede requerir opciones
adicionales de configuración por razones de seguridad, o puede usar
un paquete de software de otro fabricante para la instalación de cliente.
Generalidades sobre la instalación
Una vez que se haya instalado y configurado correctamente el software
de servidor requerido, el proceso de instalación de LOCKOUT-PRO™
en su servidor incluye estos pasos básicos, que se explican en detalle
a continuación:
•
Instale las aplicaciones servidor con el CD de LOCKOUT-PRO™.
•
En la aplicación de administración de LOCKOUT-PRO™, active el
software y configure las opciones de red.
•
Seleccione el Instalador Web de LOCKOUT-PRO™ o un instalador
silencioso como la herramienta Administración de directivas de
grupo de Microsoft para distribuir la aplicación cliente en las
máquinas de los usuarios.
•
Si desea configurar usuarios adicionales para que ejecuten la aplicación de administración de forma remota, elija el Instalador Web de
LOCKOUT-PRO™ — G
UÍA DEL ADMINISTRADOR EMPRESARIAL
•
•
A- 5
•
•
•
•

LOCKOUT-PRO™ o un instalador silencioso como la herramienta
Administración de directivas de grupo de Microsoft para distribuir
la aplicación a máquinas de usuarios administradores adicionales.
Instalación de aplicaciones del
servidor empresarial
El primer paso consiste en instalar las aplicaciones de servidor usando
el CD de la versión empresarial de LOCKOUT-PRO™.
Para instalar las aplicaciones del servidor empresarial:
1
Inserte el CD de LOCKOUT-PRO™ en la unidad de CD-ROM
del servidor empresarial. El programa de instalación se ejecutará
automáticamente. Si no se abre después de transcurrido cierto
tiempo, puede ejecutarlo manualmente siguiendo estos pasos:
•
Abra la carpeta para la unidad que contiene el CD de
LOCKOUT-PRO™.
•
Ubique y haga doble clic en el archivo:
LockoutPRO3.0Installer.exe
2
Cuando aparezca la ventana del instalador, seleccione la opción
de menú:
Instalación del servidor de Lockout PRO
.
3
Cuando se le indique, elija el idioma que desea.
4
Cuando se abra el asistente de instalación (Install Shield Wizard),
Next
haga clic en
5
Cuando se le indique, lea y acepte el acuerdo de licencia haciendo
clic en
6
Ingrese su nombre, el nombre de la empresa y el número de serie del
Yes
(Sí).
paquete del CD, y luego haga clic en
7
Acepte la carpeta de destino para el programa haciendo clic en
8
Acepte o seleccione la carpeta Programas y luego haga clic en
9
Aparecerá la ventana
(Siguiente) para comenzar la instalación.
Next
.
Setup Status
(Estado de configuración) mientras
el instalador realiza las siguientes tareas:
•
Instalar la aplicación de administración de LOCKOUT-PRO™ en
el servidor.
•
Instalar el servicio de red de LOCKOUT-PRO™ mediante el cual
los usuarios cliente se conectan al servidor.
•
Crear las carpetas necesarias en el servidor empresarial.
•
Copiar la base de datos empresarial de LOCKOUT-PRO™ en
la carpeta correspondiente del servidor.
•
Instalar los archivos para la versión empresarial de LOCKOUTPRO™ en el servidor.
•
Instalar la documentación en el servidor.
Next
Next
.
.
•
•
•
A-6 A
•
•
•
DMINISTRACIÓN DE
LOCKOUT-PRO LOCKOUT-PRO™ — G
UÍA DEL ADMINISTRADOR EMPRESARIAL

10
Cuando la configuración haya terminado, haga clic en el botón
Finish
(Finalizar) para continuar.
11
Cuando su navegador abra la página de registro, siga las indicaciones
para registrar LOCKOUT-PRO™.
12
Cierre el navegador y la ventana de instalación.
Activación y configuración de LOCKOUT-PRO
Después de la instalación, deberá activar el software usando el código
de activación provisto por Brady. El código es una clave encriptada que
especifica la cantidad de licencias que ha comprado su organización.
Estas son “licencias circulantes”, es decir que se pueden utilizar en
cualquier equipo de la red siempre y cuando la cantidad total de
licencias en uso en un momento dado no exceda la cantidad de
licencias compradas.
Una vez activado, deberá agregar los dominios y configurar las opciones
de red.
NOTA:
distribuir LOCKOUT-PRO™ a los clientes o usuarios adicionales
de la aplicación de administración.
Debe realizar el siguiente procedimiento antes de poder
Para activar y configurar LOCKOUT-PRO:
1
Abra la aplicación de administración desde el acceso directo del
escritorio o desde el menú
2
Cuando se le indique, ingrese la clave del producto provista con el
Inicio>Programas
.
certificado de licencia que recibió junto con el software y luego haga
clic en
3
(Opcional)
idioma haciendo clic en el elemento del menú
Aceptar
.
Cuando se abra la ventana Administrador, podrá cambiar el
Idioma
ubicado en la parte
superior izquierda y eligiendo el idioma que desea usar para la interfaz
de la aplicación de administración.
NOTA:
Esta opción de idioma únicamente configura el idioma para
la aplicación de administración. Los usuarios pueden seleccionar el
idioma en forma individual en sus máquinas cliente.
4
Haga clic en el elemento del menú
ubicado en la parte superior de la ventana
5
En la ventana
LAN/inalámbrica
dirección
6
Ingrese el
Configuración de la interfaz de red
de la red para el servidor de LOCKOUT-PRO™ y la
VPN
si su red usa VPN.
Número de puerto
que desea usar.
Configuración de la interfaz de red
Administrador
.
, seleccione la dirección
7
LOCKOUT-PRO™ — G
Haga clic en
UÍA DEL ADMINISTRADOR EMPRESARIAL
Aceptar
.
•
•
A- 7
•
•
•
•

8
Aparecerá un cuadro de diálogo pidiéndole que verifique que estas
opciones de configuración sean correctas. Si lo son, haga clic en
9
En la ventana
de texto
Administrador
Dominio
, ingrese el nombre de dominio en el cuadro
y haga clic en el botón
Agregar
. El nombre de dominio
aparecerá en el panel de navegación izquierdo.
Distribución de LOCKOUT-PRO a clientes
Una vez que haya activado y configurado LOCKOUT-PRO™, puede
distribuir los archivos de instalación de cliente.
•
Use el Instalador Web provisto, que ofrece una interfaz sencilla
que le indica a los usuarios cómo guardar los archivos de instalación
y luego instalar LOCKOUT-PRO™.
•
Use la herramienta Administración de directivas de grupo de
Microsoft para enviar silenciosamente los archivos de instalación
a las máquinas cliente. (También puede usar una aplicación de
software de otro fabricante para realizar dichas instalaciones
silenciosas).
Para distribuirlos a máquinas cliente con el Instalador Web:
1
Instruya a los usuarios cliente que naveguen a:
http://<dirección de IP o nombre del servidor>/LOPClientSetup/
Sí
.
2
Se le indicará al usuario que haga clic con el botón secundario del ratón
en cada uno de los dos enlaces y elija
Guardar destino como
para guardar
el archivo conectado con cada enlace en la misma carpeta en la máquina
cliente.
3
Luego el usuario hace doble clic en el icono de
LOCKOUT-PRO 3.0
comenzar la instalación.
4
Cuando se abra el
Siguiente
5
Cuando se le indique elegir la carpeta de programas, el usuario hace
clic en
6
Cuando se le pida confirmar la instalación, el usuario hace clic en
Siguiente
7
Una vez que se termine de instalar el programa, el usuario hace clic
en el botón
.
Siguiente
.
Cerrar
Instalador de Windows
.
.
, el usuario hace clic en
Para distribuirlos a máquinas cliente con la herramienta
Directiva de grupo:
1
En el servidor en que está instalado LOCKOUT-PRO™, ubique y
abra la carpeta
2
Busque y haga clic con el botón secundario del ratón en la carpeta
ClientFiles
LOPE
.
para abrir la ventana
Propiedades de ClientFiles
.
para
•
•
•
A-8 A
•
•
•
DMINISTRACIÓN DE
LOCKOUT-PRO LOCKOUT-PRO™ — G
UÍA DEL ADMINISTRADOR EMPRESARIAL

3
Haga clic en la opción para
Compartir la carpeta
de configuración que desee) y luego haga clic en
4
Desde el menú
de directivas de grupo
Inicio
de Windows, abra la herramienta
.
(y cambie las opciones
Aceptar
.
Administración
NOTA:
Esta herramienta sólo está disponible con Windows 2003
Server y XP Pro. Si no está instalada en su servidor, puede
descargarla gratuitamente de www.microsoft.com.
5
En el panel de navegación de la ventana
, en
de grupo
6
Debajo de su servidor, haga clic con el botón secundario del ratón en
Directiva de dominio predeterminada
7
Se abrirá la ventana
Bosque
, ubique su dominio y servidor.
Editor de objetos de directiva de grupo
dominio. En este punto, tiene dos opciones:
•
Para configurar una instalación forzada para cada
el dominio, seleccione la carpeta
Configuración del equipo
•
Para configurar una instalación forzada para cada
.
el dominio, seleccione la carpeta
Configuración de usuario
. Haga clic con el botón secundario del
ratón en esta opción y seleccione
Implementación
Básica
elija
de la ventana
en
Opciones de interfaz de usuario de instalación
Propiedades de Lockout PRO 3.0
luego cierre la ventana.
8
Haga clic con el botón secundario del ratón en
y luego elija
9
Navegue a:
su dominio
10
En la ventana
Nuevo>Paquete
Mis sitios de red>Toda la red>Red de Microsoft Windows
>
su servidor
Implementar software
del menú.
>
carpeta ClientFiles>archivo Lockout PRO 3.0.msi
de acuerdo con las directivas de su organización y luego haga clic
en
Aceptar
.
Administración de directivas
y seleccione
Editar
desde el menú.
para su
equipo
Configuración de software
usuario
Configuración de software
Propiedades
. En la ficha
Configuración de software
, configure la implementación
en
en
en
en
y
,
>
.
11
LOCKOUT-PRO™ — G
NOTA:
Para obtener ayuda sobre el uso de la herramienta
Administración de directivas de grupo, vaya a
http://support.microsoft.com/kb/816102/.
La próxima vez que los usuarios inicien sesión, su escritorio mostrará
un icono de instalación o el icono de LOCKOUT-PRO™ instalado (según
las opciones de configuración de implementación seleccionadas en la
herramienta Administración de directivas de grupo).
NOTA:
Siga las normas y los procedimientos de su organización para
la herramienta Administración de directivas de grupo. Si usa el
software de otro fabricante, consulte la documentación de usuario
para obtener instrucciones específicas sobre cómo configurar una
instalación silenciosa de LOCKOUT-PRO™.
UÍA DEL ADMINISTRADOR EMPRESARIAL
A- 9
•
•
•
•
•
•

Distribución de la aplicación de
administración remota
También puede usar el Instalador Web o la herramienta Administración
de directivas de grupo de Microsoft para distribuir la aplicación de
administración de LOCKOUT-PRO™ a usuarios de equipos remotos.
Para distribuir la aplicación de administración usando
el Instalador Web:
1
Instruya a los usuarios que naveguen a:
http://<dirección de IP o nombre del servidor>/LOPRemoteAdmin/
2
Se le indicará al usuario que haga clic con el botón secundario del ratón
en cada uno de los dos enlaces y elija
el archivo conectado con cada enlace en la misma carpeta en la máquina
cliente.
3
Luego el usuario hace doble clic en el icono de
para comenzar la instalación.
4
Cuando se abra el
Siguiente
5
Cuando se le indique elegir la carpeta de programas, el usuario hace
clic en
.
Siguiente
Instalador de Windows
.
Guardar destino como
Remote Admin Install.msi
, el usuario hace clic en
para guardar
6
Cuando se le pida confirmar la instalación, el usuario hace clic en
Siguiente
7
Una vez que se termine de instalar el programa, el usuario hace clic
en el botón
.
Cerrar
.
Para distribuir la aplicación de administración usando
la herramienta Directiva de grupo:
1
En el servidor en que está instalado LOCKOUT-PRO™, ubique y abra
LOPE
la carpeta
2
Busque y haga clic con el botón secundario del ratón en la carpeta
RemoteAdminInstall
3
Haga clic en la opción para
de configuración que desee) y luego haga clic en
4
Desde el menú
de directivas de grupo
5
En el panel de navegación de la ventana
de grupo
6
Debajo de su servidor, haga clic con el botón secundario del ratón en
Directiva de dominio predeterminada
, en
.
Inicio
Bosque
para abrir la ventana
Compartir la carpeta
Propiedades de ClientFiles
(y cambie las opciones
Aceptar
de Windows, abra la herramienta
.
Administración de directivas
, ubique su dominio y servidor.
y seleccione
Editar
.
Administración
desde el menú.
.
•
•
•
A-10 A
•
•
•
DMINISTRACIÓN DE
LOCKOUT-PRO LOCKOUT-PRO™ — G
UÍA DEL ADMINISTRADOR EMPRESARIAL

7
Se abrirá la ventana
Editor de objetos de directiva de grupo
su dominio. En este punto, tiene dos opciones:
•
Para configurar una instalación forzada para cada
el dominio, seleccione la carpeta
Configuración del equipo
•
Para configurar una instalación forzada para cada
.
el dominio, seleccione la carpeta
Configuración de usuario
. Haga clic con el botón secundario del ratón
en esta opción y seleccione
de la ventana
de interfaz de usuario de instalación
8
Haga clic con el botón secundario del ratón en
y luego elija
9
Navegue a:
su dominio
Install.msi
10
En la ventana
.
Propiedades de Lockout PRO 3.0
Nuevo>Paquete
Mis sitios de red>Toda la red>Red de Microsoft Windows>
>
su servidor
Implementar software
del menú.
>RemoteAdminInstall >archivo Remote Admin
Configuración de software
Configuración de software
Propiedades
y luego cierre la ventana.
, configure la implementación
. En la ficha
, elija
Configuración de software
equipo
usuario
Implementación
Básica
de acuerdo con las directivas de su organización y luego haga clic
en
Aceptar
.
para
en
en
en
en
en
Opciones
NOTA:
Para obtener ayuda sobre el uso de la herramienta
Administración de directivas de grupo, vaya a
http://support.microsoft.com/kb/816102/.
11
La próxima vez que los usuarios inicien sesión, su escritorio mostrará
un icono de instalación o el icono de LOCKOUT-PRO™ instalado (según
las opciones de configuración de implementación seleccionadas en la
herramienta Administración de directivas de grupo).
NOTA:
Siga las normas y los procedimientos de su organización para
la herramienta Administración de directivas de grupo. Si usa el
software de otro fabricante, consulte la documentación de usuario
para obtener instrucciones específicas sobre cómo configurar una
instalación silenciosa de LOCKOUT-PRO™.
Uso de la aplicación de administración
La aplicación de administración proporciona una interfaz fácil de usar
para administrar las funciones del servidor empresarial.
Familiarizarse con el administrador
LOCKOUT-PRO™ — G
La siguiente tabla enumera los componentes y las funciones de la
ventana principal
Administrador
e indica los que no están disponibles
cuando se usa la aplicación de forma remota.
UÍA DEL ADMINISTRADOR EMPRESARIAL
A- 11
•
•
•
•
•
•

FUNCIONES Y COMPONENTES DE LA APLICACIÓN DE ADMINISTRACIÓN
Funciones Servidor Remoto
Menú principal en la parte superior de la ventana
Panel de Dominio en el lado izquierdo que brinda acceso
a dominios, grupos de usuarios, usuarios individuales y
niveles de permiso
Botón Desbloquear archivo, que le permite desbloquear
un archivo bloqueado en forma accidental
Botón Grupos, que abre una ventana que le permite
agregar o eliminar grupos de usuarios en un dominio
Botón Examinar, que abre una ventana del tipo Windows
Explorer que muestra la información del panel Dominio
en un árbol de directorio y en formato de archivo
Botón Control de rendimiento, que accede al control de
rendimiento de Windows
Botón Actualizar, que actualiza la información mostrada
cada vez que lo pulsa
Botón Iniciar servicio de red, que le permite reanudar el
servicio cuando se detiene
Botón Detener servicio de red, que le permite detener el
servicio a la red
(excepto
Configuración
de la interfaz
de red)
•
•
•
A-12 A
•
•
•
DMINISTRACIÓN DE
Un área de visualización a la derecha, donde puede
ver información sobre dominio, grupo y usuario en una
ventana de tipo Windows Explorer con iconos de edición
Visualización y administración de dominios
Desde la ventana
han ingresado, junto con la información de usuarios y archivos. También
puede agregar otros dominios en su red.
Para ver dominios:
1
Ejecute la aplicación de administración.
2
Consulte la lista de dominios en la pantalla ubicada directamente
debajo de
que ya se han ingresado.
La lista de dominios proporciona una descripción general de todos los
usuarios, las licencias en uso y los archivos en uso. Para ver los detalles
de un tipo de información dado, haga clic en el signo más
izquierda de la etiqueta.
LOCKOUT-PRO LOCKOUT-PRO™ — G
Dominio
Administrador
, puede ver los dominios de red que ya se
en el panel izquierdo. Estos son todos los dominios
(+)
a la
UÍA DEL ADMINISTRADOR EMPRESARIAL

La tabla a continuación describe más detalladamente la información
disponible.
VISTA DEL DOMINIO
Etiqueta Detalles
Usuarios registrados Nombres de los usuarios registrados del Software de escritura
gráfica de procedimientos LOCKOUT-PRO™ para el dominio
Usuarios pendientes Nombres de los usuarios que han instalado la versión cliente
de LOCKOUT-PRO™ pero que aún no han sido registrados en
la base de datos por el administrador de la red
Licencias en uso (x) La cantidad y los nombres de todos los usuarios de
este dominio que utilizan actualmente licencias de LOCKOUTPRO™ (es decir, que han ejecutado la versión cliente de
LOCKOUT-PRO™)
Usuarios en línea Los nombres de todos los usuarios que están actualmente en
línea, sin importar que hayan verificado la licencia o no
Archivos bloqueados Los nombres de todos los archivos de procedimiento, y sus
grupos asignados, que están actualmente en
uso y “bloqueados” de ese modo para ser usados por
cualquier otra persona
CONSEJO: Si desea ver la lista de dominios en una ventana de dos paneles
similar a Windows Explorer, haga clic en el botón
parte inferior izquierda. Una ventana de tipo Explorer se abrirá en el área de
visualización a la derecha.
Examinar... ubicado en la
1
2
3
CONSEJO: Una de las ventajas de los grupos de usuarios es que no es
posible modificar las plantillas de procedimientos para satisfacer las
necesidades de un grupo específico. Por ejemplo, las plantillas de un
grupo de producción pueden incluir texto predeterminado o formato
de texto destinado a crear los mejores procedimientos para ese grupo,
mientras que las plantillas de un grupo de investigación se pueden
editar de un modo diferente para satisfacer las necesidades específicas
de ese grupo.
LOCKOUT-PRO™ — G
Para agregar un dominio:
Ejecute la aplicación de administración.
En el cuadro de texto en
Nombre de dominio
, escriba el nombre del
dominio.
Haga clic en el botón
la ventana
Administrador
Agregar
.
. El nombre se agregará a la lista en
Administración de grupos de usuarios
Cada dominio incorpora uno o más grupos de usuarios. Los usuarios
individuales en ese dominio se deben asignar a un grupo específico
de usuarios como parte del proceso de registro.
UÍA DEL ADMINISTRADOR EMPRESARIAL
A- 13
•
•
•
•
•
•

Para agregar un grupo de usuarios:
1
En la ventana
2
Haga clic en el botón
Administrador
Grupos
, seleccione el dominio para el nuevo grupo.
que se encuentra debajo de la lista de
dominios, grupos y usuarios.
3
Cuando se abra la ventana
cuadro de texto
4
Haga clic en el botón
5
Al finalizar, haga clic en
Nombre del grupo
Grupos
.
Agregar grupo
Aceptar
.
, escriba el nombre del grupo en el
.
Para eliminar un grupo de usuarios:
1
En la ventana
2
Haga clic en el botón
dominios, grupos y usuarios.
3
Cuando la ventana
disponibles.
4
Seleccione el grupo de la lista en el cuadro de texto
y haga clic en el botón
5
Se abrirá un cuadro de diálogo en el que se le solicitará que confirme su
acción. Al borrar un grupo se eliminan todos los contenidos de la carpeta
de ese grupo en el servidor.
Administrador
Grupos
Grupos
se abra, aparecerá la lista de grupos
Borrar grupo
, seleccione el dominio para el grupo.
que se encuentra debajo de la lista de
Nombre del grupo
.
NOTA:
No es posible eliminar un grupo que tiene usuarios
asignados en ese momento. Primero deberá reasignar los
usuarios a un grupo diferente. Para obtener información sobre
el modo de hacerlo, consulte el procedimiento que se encuentra
a continuación de “Para cambiar un grupo de usuarios o un nivel de
permiso:”.
6
Al finalizar, haga clic en
Aceptar
.
Mantenimiento de usuarios y niveles de permiso
Cuando un usuario ejecuta por primera vez el Software de escritura
gráfica de procedimientos LOCKOUT-PRO™ en un equipo cliente,
se envía una solicitud para que ese usuario sea agregado como usuario
registrado. Como administrador, usted completa el registro del usuario
al acceder a los datos del usuario en la lista
rar el nivel de permiso y luego agregar el nombre del usuario a la lista
de
Usuarios registrados
.
También puede reasignar usuarios registrados a grupos diferentes y/o
cambiar sus niveles de permiso.
Usuarios pendientes
, configu-
•
•
•
A-14 A
•
•
•
DMINISTRACIÓN DE
LOCKOUT-PRO LOCKOUT-PRO™ — G
UÍA DEL ADMINISTRADOR EMPRESARIAL

Para completar el registro de un usuario pendiente:
1
En el panel
nombre del dominio para expandirlo y ver toda la información de los
usuarios en ese dominio.
2
Haga clic en
usuarios.
3
Haga clic en el nombre del usuario a registrar.
4
Se abrirá la ventana
del dominio listado en el cuadro de texto
•
Si el grupo que aparece es al que usted desea agregar el usuario,
continúe con el siguiente paso.
•
Si desea agregar el usuario a un grupo dife rente, h aga c lic en la flecha
que apunta hacia abajo en el cuadro de texto
de la lista.
5
En el cuadro
en
Visor.
flecha que apunta hacia abajo y seleccione el nivel que desee.
6
Haga clic en el botón
a la lista de
Dominio
Usuarios pendientes
Permisos
de la ventana
Administrador
, haga clic en el
para visualizar los nombres de los
Editar usuario
, que mostrará el primer grupo
Grupo
.
Grupo
y seleccione otro
, el permiso se establecerá de forma predeterminada
Para configurar un nivel de permiso diferente, haga clic en la
Actualizar
Usuarios registrados
. El nombre del usuario ahora se traslada
.
NOTA:
Cuando se haya agregado un usuario a la lista de Usuarios
registrados en el servidor de administración, el cliente deberá
volver a ejecutar LOCKOUT-PRO™.
Para eliminar un usuario de la lista de usuarios registrados:
1
En la ventana
la lista
Usuarios registrados
Administrador
, haga clic en el nombre del usuario de
en el nombre de dominio con que está
trabajando.
2
Cuando se abra la ventana
Desactivar
Usuarios pendientes
de
. La ventana se cerrará y el usuario será trasladado a la lista
Editar usuario
, haga clic en el botón
. A los usuarios de esta lista no se les permite el
acceso a los datos del servidor LOCKOUT-PRO™.
Para cambiar un grupo de usuarios o un nivel de permiso:
1
En la ventana
lista correspondiente bajo el dominio y nombre del grupo de relevancia.
2
Cuando se abra la ventana
y/o la opción
3
Haga clic en el botón
del usuario cambiará.
Administrador
Permisos
en cualquiera o en ambos cuadros.
Actualizar
haga clic en el nombre del usuario de la
Editar usuario
, seleccione un
Grupo
diferente
. La ventana se cerrará y la información
LOCKOUT-PRO™ — G
UÍA DEL ADMINISTRADOR EMPRESARIAL
•
•
A- 15
•
•
•
•

Administración de archivos de usuarios
La versión empresarial del Software de escritura gráfica de
procedimientos LOCKOUT-PRO™ garantiza la integridad de los
archivos de procedimientos al guardarlos en una única ubicación en
el servidor y, con el uso de grupos y niveles de permisos, impedir que
usuarios no autorizados los cambien. LOCKOUT-PRO™ también evita
que una archivo sea cambiado por más de un usuario al mismo tiempo
mediante el uso de una función de “bloqueo de archivo”.
La aplicación de administración le permite saltear esas restricciones
cuando es necesario. Dos situaciones comunes donde posiblemente sea
necesario administrar archivos manualmente son:
•
Cuando los usuarios en grupos diferentes desean compartir archivos
entre grupos
•
Cuando un archivo que ha sido verificado no puede ser verificado
nuevamente por el usuario cliente debido a problemas técnicos, como
una falla en el equipo
Para copiar, cortar, pegar o borrar archivos de usuarios:
1
En la ventana
la ventana del navegador a la derecha.
Administrador
, haga clic en el botón
Examinar
para abrir
2
Navegue hacia la carpeta relevante que contiene el o los archivos que
desea administrar.
3
Realice las funciones que desee como corresponda:
•
Para copiar y pegar o cortar y pegar un archivo, haga clic en el archivo
Copiar
o
Cortar
y luego en el icono
en la barra de tareas de la ventana
del navegador. Navegue al directorio de destino y haga clic en el icono
Pegar
.
•
Para borrar un archivo, haga clic en el archivo y luego en el icono
Borrar
en la barra de tareas de la ventana del navegador.
Para desbloquear un archivo bloqueado:
1
En la ventana
de
Archivos bloqueados
2
Haga clic en el archivo para seleccionarlo.
3
Haga clic en el botón
panel
Dominio
usuario autorizado pueda accederlo.
4
Haga clic en el botón
bloqueados
Administrador
, ubique el archivo bloqueado en la lista
con el grupo y dominio que correspondan.
Desbloquear archivo
que se encuentra debajo del
. El archivo ahora está disponible para que cualquier
Actualizar
para actualizar la lista en
Archivos
.
•
•
•
A-16 A
•
•
•
DMINISTRACIÓN DE
LOCKOUT-PRO LOCKOUT-PRO™ — G
UÍA DEL ADMINISTRADOR EMPRESARIAL

NOTA:
Si el usuario original realizó cambios al archivo desde que
se guardó en el servidor, esos cambios se perderán. Además, si el
usuario no cerró LOCKOUT-PRO™ normalmente, la licencia que
esté usando no será liberada cuando el archivo se desbloquee.
Para retirar la licencia, el usuario debe iniciar sesión y cerrar
LOCKOUT-PRO™ normalmente.
Ejecución de otras tareas administrativas
Inicio/detención del servicio de red
Iniciar y detener el servicio de red es una función administrativa
estándar de Windows. La aplicación de administración proporciona
botones simples de una sola pulsación para realizar estas funciones
cuando se ejecuta la aplicación en el servidor. (No puede iniciar o
detener el servicio de red desde una instalación remota de la aplicación
de administración).
Para iniciar o detener el servicio de red:
1
Desde la aplicación de
LOCKOUT-PRO™:
•
Si el servicio de red no está funcionando actualmente y usted desea
reiniciarlo, haga clic en el botón
administración
que se ejecuta en el servidor de
Iniciar servicio de red
.
1
LOCKOUT-PRO™ — G
NOTA:
Cuando el servicio de red se haya reiniciado, los
usuarios deberán volver a ejecutar LOCKOUT-PRO™
en sus máquinas cliente para volver a conectarse.
•
Si el servicio actualmente
a los clientes del servidor empresarial, haga clic en el botón
servicio de red
NOTA:
(
Inicio>Panel de control>Herramientas administrativas>Servicios
.
También puede usar la función Servicios de Windows
está
funcionando y usted desea desconectar
Detener
para iniciar o detener el servicio de red.
Visualización de eventos de LOCKOUT-PRO
Para ver transacciones de LOCKOUT-PRO™ debe estar ejecutando el
Visor de eventos en el servidor (no de forma remota):
Para ver transacciones en el Visor de eventos:
Abra el Visor de eventos de Windows (
Herramientas administrativas>Visor de eventos
UÍA DEL ADMINISTRADOR EMPRESARIAL
A- 17
Inicio>Panel de control>
).
)
•
•
•
•
•
•

2
Seleccione la entrada
LOPE
para visualizar los eventos empresariales
de LOCKOUT-PRO™.
3
Para ver los detalles adicionales de un evento, haga doble clic en el
mismo.
CONSEJO: Se recomienda que guarde periódicamente el registro de eventos
de LOCKOUT-PRO™ haciendo clic con el botón secundario del ratón en la
entrada LOPE del Visor de eventos de Windows y seleccionando la opción
Guardar.
Localización y solución de fallas en
funciones empresariales
La siguiente tabla muestra los problemas más comunes que pueden
encontrar los usuarios.
CONDICIONES/MENSAJES DE ERROR EN EL CLIENTE
Condiciones/mensajes de error Causas/soluciones posibles
El usuario recibe un cuadro de
mensaje de error que no muestra
mensajes.
El usuario no puede iniciar sesión
porque todas las licencias están en
uso o no se encuentra la cuenta del
usuario.
No se ha encontrado la ruta
remota. Revise la configuración
para la conexión.
No se ha encontrado la ruta
predeterminada del archivo
base en el servidor.
No se puede recuperar la
fecha/hora de la plantilla base
en el servidor.
No se ha encontrado o asignado
el grupo de usuarios.
No se ha encontrado o asignado
el grupo de usuarios
El usuario no puede conectarse al servidor, o el
servicio en el servidor se ha detenido.
1) El usuario no está registrado. Los usuarios que
inician sesión por primera vez ven este error si
permanecen en la lista de usuarios pendientes.
2) Se ha alcanzado la cantidad máxima de licencias
circulantes. El usuario deberá esperar hasta que otro
usuario finalice la sesión y libere una licencia.
Cualquiera de estos errores podría ocurrir si, por
accidente, las carpetas en el servidor se borran o no
se copian debido a un error de instalación.
Controle que todos los archivos compartidos estén en
el servidor. (Consulte “Figura 1: Estructura de carpeta
para los archivos LOCKOUT-PRO™ empresariales
instalados”).
Si falta alguna carpeta, cópiela desde el CD de
LOCKOUT-PRO™ o llame al servicio técnico de
Brady.
Es posible que el usuario no esté asignado a un
grupo de usuarios. Para solucionar el problema,
agregue al usuario a un grupo.
(Consulte “Administración de grupos de usuarios” en
la página A-14 para obtener más detalles).
•
•
•
A-18 A
•
•
•
DMINISTRACIÓN DE
LOCKOUT-PRO LOCKOUT-PRO™ — G
UÍA DEL ADMINISTRADOR EMPRESARIAL

CONDICIONES/MENSAJES DE ERROR EN EL CLIENTE (Continuación)
Acceso negado Es posible que el usuario esté intentando ejecutar
una función que no está incluida en el nivel de
permiso configurado para ese usuario.
(Consulte “Mantenimiento de usuarios y niveles de
permiso” para obtener más detalles).
El servidor está funcionando
correctamente y el usuario está
completamente registrado, con
los niveles de servicio adecuados,
y está asignado a un grupo,
pero no puede iniciar sesión
en el servidor.
1) Controle el archivo
está ubicado en la carpeta
c:\program files\brady\lockoutPro 3.0
en la máquina cliente, y controle que los datos en ese
archivo sean correctos. (Consulte “Figura 2.
Estructura básica del archivo app.config del usuario
cliente” a continuación para obtener un ejemplo de
la estructura básica completa del archivo app.config).
2) Al equipo del usuario le pueden faltar algunos
archivos necesarios, tales como:
app.config del usuario, que
• MDAC 2.8
• .Net Framework 1.1 Versión 1.4322
Controle que los archivos estén instalados
(accediendo a la ventana Agregar o quitar
programas desde el Panel de control) o, en
el caso de Windows 2000, controle la carpeta:
C:\windows\Microsoft.net\framework
Cualquier archivo faltante se puede descargar
del sitio Web de Microsoft.
LOCALIZACIÓN Y SOLUCIÓN DE FALLAS EN EL SERVIDOR
Para problemas de acceso/conexión del usuario en el servidor empresarial:
LOCKOUT-PRO™ — G
1 Controle que el servicio de red esté funcionando.
2 Controle que la dirección de red sea la correcta.
3 Controle que las configuraciones del puerto sean las correctas y que
el puerto especificado en la configuración del cliente coincida con la
configuración de ese puerto.
4 Si estos pasos no resuelven el problema, comuníquese con el personal
de servicio técnico.
UÍA DEL ADMINISTRADOR EMPRESARIAL
A- 19
•
•
•
•
•
•

Estructura de carpeta para los archivos instalados
La siguiente estructura de directorios y los siguientes archivos se
instalan en la carpeta
LOPE
(compartido)
Datos
Base de
datos
Lockout Pro 3.0
Figura 1: Estructura de carpeta para los archivos LOCKOUT-PRO™
empresariales instalados
Brady
durante la instalación:
Nombre del
dominio
LOPStorage.mbd
Archivos
comunes
Nombre del
grupo
Archivos
Común
Archivos base
Archivos de
configuración
Archivos base
Archivos de
configuración
Estructura básica del archivo cliente app.config
A continuación se muestra la estructura básica completa del archivo
app.config
ciones desde la opción
menú principal. Tenga en cuenta que los datos en el archivo
distinguen mayúsculas de minúsculas; por lo tanto, asegúrese de
advertir a los usuarios que no modifiquen el archivo.
<?xml version="1.0" encoding="utf-8"?>
<configuración>
CONNECTIONSTRING="tcp://172.20.94.161:8032/LOPUser"
DEFAULTLOCALPATH="U:\Mis Documentos\Nueva carpeta"
CONNECTIONTYPE="1" />
</configuración>
Figura 2. Estructura básica del archivo app.config del usuario cliente
en la Figura 2. Los usuarios pueden controlar sus configura-
Archivo>Configuraciones para la conexión
<APPSETTINGS SERVERID="172.20.94.161"
en el
app.config
•
•
•
A-20 A
•
•
•
DMINISTRACIÓN DE
LOCKOUT-PRO LOCKOUT-PRO™ — G
UÍA DEL ADMINISTRADOR EMPRESARIAL
 Loading...