


Contents
LOCKOUT-PROTM v3.0 Quick Start Guide . . . . . . . 2
TM
Manual de Início Rápido do LOCKOUT-PRO
. . . . 12
Guide de démarrage rapide de LOCKOUT-PRO
TM
version 3.0 . . . . . . . . . . . . . . . . . . . . . . . . . . . . . . . . . 23
Guía de inicio rápido de LOCKOUT-PRO
TM
3.0 . . . 35
LOCKOUT-PROTM v3.0 Quick Start Guide
LOCKOUT-PROTM Graphical Procedure Writing
Software provides all the tools you need to create an
effective energy-control program with easy-to-follow
standardized procedures. Lockout tags and labels crossreferenced to the procedure can be printed for each energy
source, making lockout activities nearly foolproof.
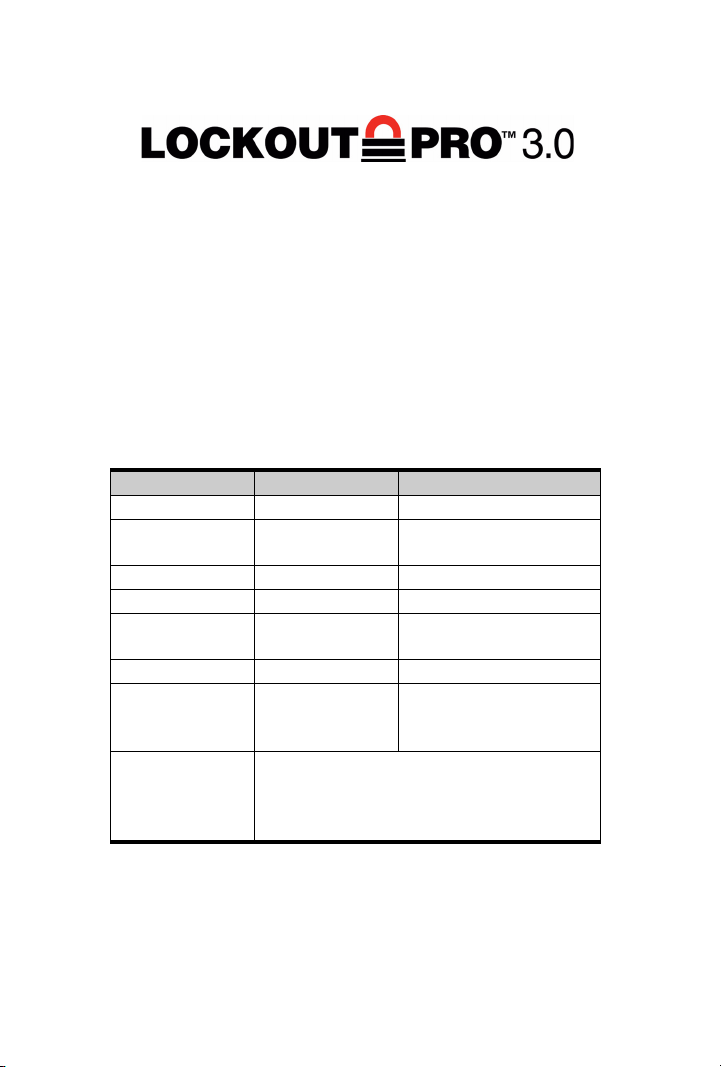
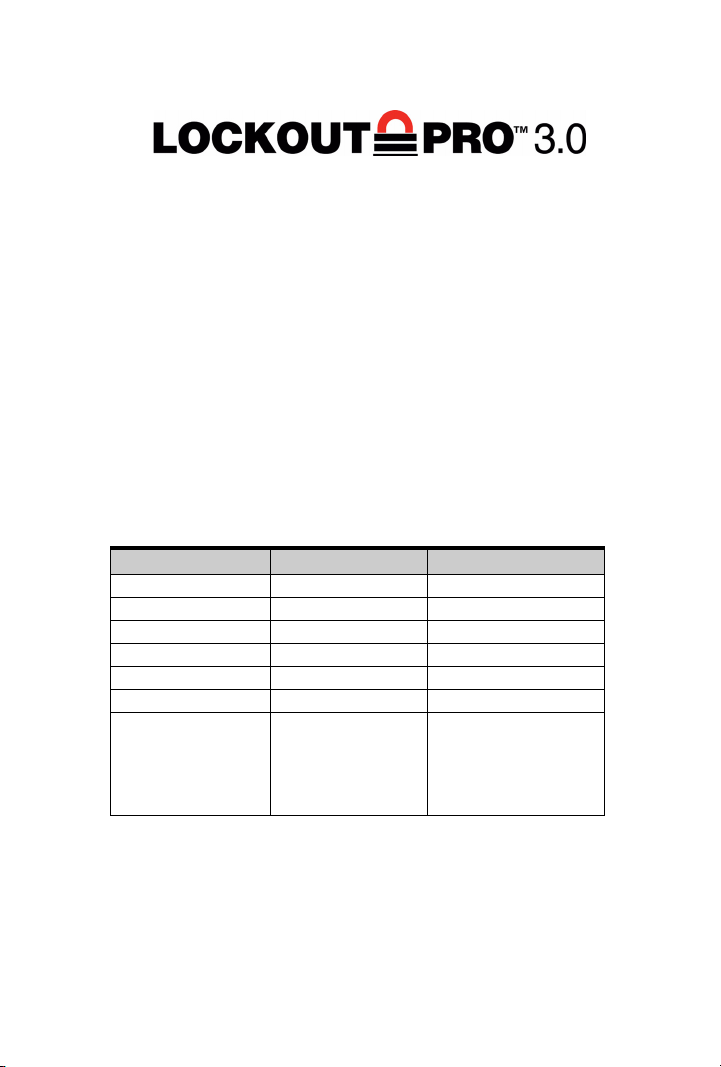
System Requirements
Requirement: Minimum: Recommended:
Processor 1.2 GHz or better Same
Display
Resolution
Memory (RAM) 512 MB Same
Disk Space 500 MB Same
Operating System Windows 2000/XPSame
Internet Explorer v5.0 or higher v6.0 or newer
.NET framework v1.1 or higher Provided on Lockout
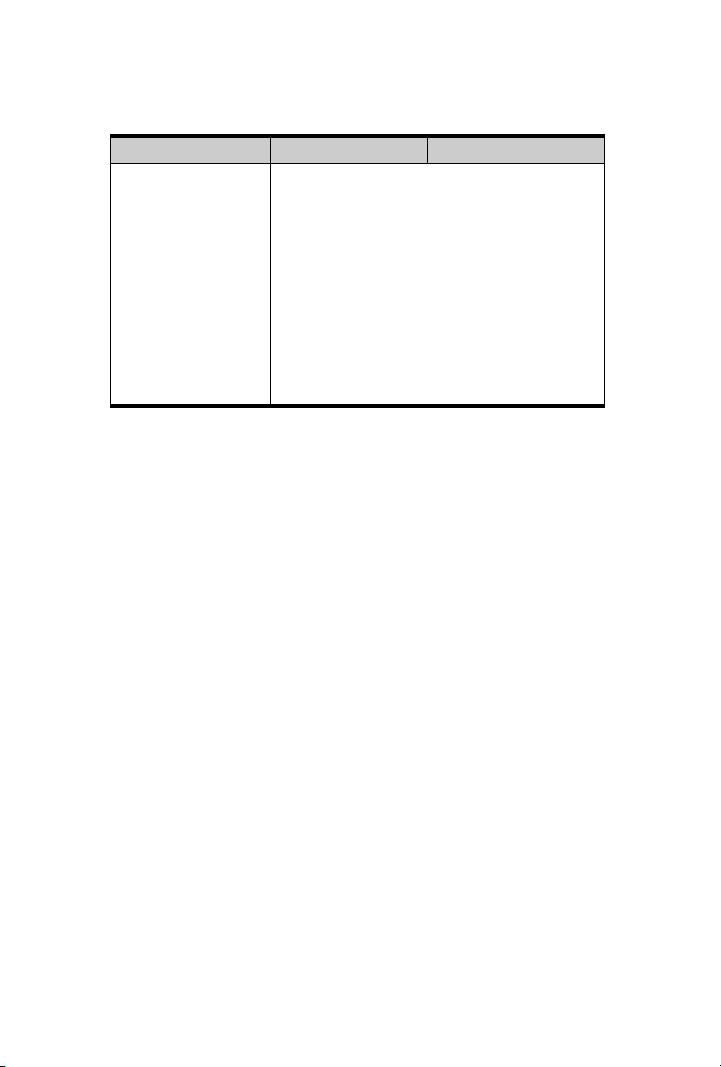
Printer Drivers for printer(s) you will use should be
800x600 or better 1024x768 or higher
PRO installation CD for
user to install if needed
installed. At least one printer must be
installed to run the application. See your
printer’s documentation for ihow to install it.
2

Installing LOCKOUT-PRO: Standard Version
1
Close all programs that are currently running,
including any email or anti-virus programs
2
Insert the LOCKOUT-PROTM CD into your CD-ROM
drive.
3
The installation program will launch automatically
from the CD. If it does not open after a short while,
you can manually launch it by taking these steps:
•
Open the
•
Click on
•
In the
replacing D: with the letter of your CD-ROM drive.
4
When requested, select the language you want to use
in the application.
5
When the “Welcome” screen appears, click the choice
to install LOCKOUT-PRO
6
Read and check the option that you agree to the
license agreement.
7
When requested, enter the serial number of your
LOCKOUT-PRO
found on a label attached to the CD case.
8
When asked, verify the directory in which
LOCKOUT-PRO
directory is recommended.
9
When the registration page displays, follow the
instructions
software.
Start
menu.
Run…
Open:
text box, type:
TM
copy. The serial number can be
TM
will be installed. Using the default
on your screen to register your copy of the
D:\Setup.exe
TM
.
Installing LOCKOUT-PRO: Viewer Version
1
Insert the LOCKOUT-PROTM CD into your
computer’s CD-ROM drive.
3

2
When requested, select the language you want to use
in the application
3
When the “Welcome” screen appears, click the choice
to install the LOCKOUT-PRO
4
Read and check the option that you agree to the
TM
Viewer.
license agreement.
5
When asked, verify the directory in which
LOCKOUT-PRO
TM
will be installed. Using the default
directory is recommended.
Launching LOCKOUT-PRO
•
Open your PC’s
LOCKOUT-PRO
•
-OR-
Find the LOCKOUT-PROTM shortcut on your
PC’s desktop, and double-click on it
•
-OR-
From an open folder window displaying
Start
menu
TM
shortcut and click on it..
Programs
, locate the
procedures, double-click on a file.
Viewing Existing Procedures
The following steps are for
Viewer Versions
of LOCKOUT-PROTM v3.0 Desktop.
both the Standard and
To open and view an existing procedure:
1
From the main window, click the
Open Procedure
on the primary options toolbar.
-OR-
Select
File>Open...
2
In the
Open
window, click the name of the file you
wish to open, then click the
-OR-
Double-click the name of the file in the window.
3
The file will appear in the main display window.
on the main menu.
Open
button.
Printing Procedures, Tags & Labels
The following steps are for
Viewer Versions
of LOCKOUT-PROTM v3.0 Desktop.
both the Standard and
4
tab

To print a procedure:
1
With the procedure open, click the
Print Procedure
button in the primary options taskbar.
-OR-
From the main menu, select
2
When the
Print Procedure
window appears, verify or
change the printer listed in the
3
Make any desired changes to the printer defaults.
4
5
Click the
Click
Print
button in the lower right corner.
Close
to return to the main window.
File>Print
Printer
box.
To print lockout tags:
1
With the procedure open, click the
button in the primary options taskbar.
-OR-
From the main menu, select
Print Lockout Tags
2
When the
Print Lockout Tags
.
or change the printer in the
3
With the correct printer displayed, make any desired
changes to
•
For
-
•
For
-
Supplies
GlobalMark
or
Material
printers:
From the drop-down list under
the
Tape Width
sheet-fed
of the tape roll you’re using.
printers:
From the drop-down list under
the type of tag sheet you’re using.
4
In the
Lockout Information
•
Use the up and down arrows to change the
Locked Out
•
In
Lockout By
and
Time Locked Out
, enter the name of the person
authorized to remove the lockout.
•
GlobalMark printers only:
defaults to
None
. To add a picture of the person
Print Lockout Tags
File>
window appears, verify
Printer
box..
.
Supplies
Material
section:
.
The
Employee Picture
.
, choose
, choose
Date
5

named in the
next to the empty box, and then click
locate and insert the photo.
•
In the
information you wish to print on the tags.
•
In the
Expected Completion
re-energization process should be finished.
5
Click the
6
Click
Close
Lockout By
Remarks
Print
to return to the main window.
box, type in any additional
button in the lower right corner.
box, click the radio button
box, enter the time the
Select
To print energy source labels:
1
With the procedure open, click the
Source Labels
-OR-
Select
menu.
2
When the
appears, verify or change the printer.
3
With the correct printer displayed, make any desired
changes to the options listed on the left side of the
window, depending on the printer you chose.
•
For
GlobalMark
-
Under
-
In the
energy source labels associated with that
procedure, or select a specific label from the list.
•
For
HandiMark
-
In the
source whose label you wish to print. (You can
print only one label at a time with this printer.)
•
For
sheet-fed
-
Under
using.
button in the primary options taskbar.
File>Print Energy Labels
Print Energy Source Labels
printers:
Shape/Size
Print Label
Print Label
Material
, select the tape you are using.
section, select
printers:
section, select the energy
printers:
, choose the label stock you’re
Print Energy
on the main
window
All
to print all
to
6

-
The
Available Labels
labels will print on one sheet. Uncheck boxes if
you want to print fewer labels.
-
In the
Print Label
energy source labels associated with that
procedure, or select a specific label from the list.
4
In the
Layout
Data Field 1
section, click the down-arrow in the
and
Data Field 2
information to the label.
5
6
Click the
Click
Print
button in the lower right corner.
Close
to return to the main window.
Saving a Procedure
section shows how many
section, select
All
to print all
text boxes to add this
You can save a new or existing procedure
Standard Version
.
only with the
To save a procedure:
1
Click the
Save Procedure
button on the primary
options taskbar.
-OR-
Select
If this is
File>Save
on the main menu.
an existing procedure
, the file is now
saved.
2
If this is a
standard Windows
3
Enter the procedure
4
Click
new procedure
Save As
Save
to save the file under the name entered.
not previously saved, the
window will appear.
File Name
.
Creating a New Procedure
To create a new procedure from a blank template:
1
From the main window, click the
button on the primary options taskbar.
-OR-
Select
File>New...
from the main menu.
7
New Procedure

2
In the
Select Template
window, click the form you
wish to use (Combined, Long, or Short). For details
about each form, see the
3
Click OK. A blank form will appear.
4
To enter the procedure’s details, one at a time, click on
each icon in the
Procedure Sections
User Guide.
)
panel on the left,
and select or enter the specifics on the windows that
appear.
5
Click the
Save Procedure
button.
To create a new procedure from an existing one:
1
From the main window, click the
button on the primary options taskbar.
-OR- select
2
When the
file you want, then click
-OR-
3
Immediately save the procedure under its new name
File>Open...
Open
window appears, click the name of the
from the main menu.
Open
Double-click the name of the file.
to avoid inadvertent changes to the existing one.
4
Revise the procedure’s details by clicking, one at a
time, on each icon in the
Procedure Sections
the left, and then selecting or entering changes in the
windows that appear.
5
Click the
Save Procedure
button.
Open Procedure
.
panel on
Importing Earlier Versions of Procedures
To import a single LOCKOUT-PROTM v2.x procedure
into v3.0:
1
With LOCKOUT-PROTM v3.0 open, click
File>Import>Procedure File
2
From the Windows
import and click
Open
Open
.
dialog box, select the file to
.
8

3
When the procedure appears in the main display area,
it has been converted, and you can make any changes
to it that you wish.
4
When you are done, click the
Save Procedure
button
on the primary options taskbar.
5
In the
Save As
dialog box, type in a new name if you
wish. (If you use the same name as the v2.x procedure,
the v3.0 version will overwrite it..)
To batch-import multiple LOCKOUT-PROTM v2.x
procedures into v3.0:
1
With LOCKOUT-PROTM v3.0 open, click
File>Import>Convert v2.x Files
2
In the
Batch Convert
window, make sure the
.
directory containing the files to be converted appears
in the
Source
box, and the directory where the
converted files are to be saved appears in the
Destination
3
Click the
box.
Start Conversion
button.
Getting Additional Help
Online Tutorial:
TM
PRO
, the Online Tutorial window opens on the right.
When you first launch LOCKOUT-
The tutorial contains basic steps for creating, saving, and
printing procedures and related material. You can
navigate through the tutorial using the
Next, Back,
and
other prompts in the window.
Online Help:
The online help in LOCKOUT-PROTM
offers detailed information about every aspect of the
application.
To access online help:
•
On the main menu, click
Help>Help Topics
9
.

User Guide:
TThe detailed
User Guide
is installed on
your computer along with LOCKOUT-PRO
view the
User Guide
and print any or all pages.
TM
. You can
To v i e w t h e
1
Open
LOCKOUT-PRO
is
2
Open the
Documentation
3
In the
LOPuserguide.pdf
To p r i n t t h e
1
Click
2
Choose the options for printing.
3
Click the
User Guide
My Computer
C:\Program Files\Brady
Lockout PRO
:
and browse to the folder where
TM
was installed. The default location
folder and locate the
folder.
Documentation
folder, locate the
file and double-click to open it.
User Guide
File>Print
Print
:
on main menu of the
button.
.
User Guide
Contacting Technical Support
United States and other C/S countries:
Tel: 800-368-3362
Fax: 414-228-5799
Email: technical_support@bradycorp.com
Canada:
Tel: 888-262-7576
Fax: 905-764-5557
Email: techsupportcanada@bradycorp.com
.
Mexico:
Tel: 800-368-3362
Fax: 525-527-5586
Email: bradymexico@bradycorp.com
10

Brazil:
Tel (PABX): 55 11 3686-4720
Tel (Direct): 55 11 3686-5697
Fax: 55 11 3686-5236
Email: brady_sevice_brazil@bradycorp.com
All Rights Reserved.
www.bradycorp.com
©2006 Brady Worldwide, Inc.
11
Manual de Início Rápido
do LOCKOUT-PRO
TM
O Software de Redação Gráfica de Procedimentos
LOCKOUT-PRO
TM
oferece todas as ferramentas de
que você precisa para criar um programa eficiente de
controle de energia, com procedimentos padronizados
e fáceis de seguir. As etiquetas de bloqueio relacionadas
ao procedimento podem ser impressas para cada fonte de
energia, tornando as atividades de bloqueio praticamente
infalíveis.
Sistema necessário
Requisito: Mínimo: Recomendado:
Processador 1.2 GHz ou mais veloz Igual
Resolução da tela 800x600 ou superior 1024x768 ou superior
Memória (RAM) 512 MB Igual
Espaço em disco 500 MB Igual
Sistema operacional Windows 2000/XP Igual
Internet Explorer v5.0 ou posterior v6.0 ou mais recente
.NET framework v1.1 ou posterior Fornecido no CD de
instalação do LOCKOUT
PRO para que o usuário
instale se for necessário
>>
12
Sistema necessário
Requisito: Mínimo: Recomendado:
Impressora Os drivers da(s) impressora(s) que você utilizará
devem estar instalados. Ao menos uma
impressora deve estar instalada para que
o aplicativo seja executado.
Consulte a documentação da sua impressora
para saber como instalá-la.
Apenas para as impressoras GlobalMark™:
um driver atualizado é obrigatório. Primeiro,
desinstale a impressora do seu computador.
Instale o novo driver da GlobalMark™
que acompanha o CD de instalação do
LOCKOUT-PRO
TM
.
Instalando o LOCKOUT-PRO: Versão Padrão
A
Versão Padrão
LOCKOUT-PRO
1
Encerre todos os programas que estiverem sendo
executados no momento, inclusive programas de
e-mail ou antivírus
2
Insira o CD do LOCKOUT-PROTM na unidade de CD.
O programa de instalação será iniciado automaticamente. Se ele não abrir após um pequeno intervalo,
você poderá iniciá-lo manualmente seguindo as
etapas abaixo:
•
Abra a pasta
•
Clique duas vezes na unidade de CD para abri-la.
•
Clique duas vezes no arquivo:
LockoutPRO3.0Installer.exe
3
Quando a janela do instalador for aberta, selecione
a opção do menu:
4
Escolha o idioma que deseja usar.
5
Quando a tela “Bem-vindo” for exibida, clique na
opção para instalar o LOCKOUT-PRO
é a versão completa do
TM
Desktop.
Meu computador
Instalar o Lockout PRO Desktop
.
TM
.
.
13

6
Leia e marque a opção de concordância com o contrato
de licença.
7
Quando for solicitado, informe o número de série da
sua cópia do LOCKOUT-PRO
TM
. O número de série
pode ser encontrado em uma etiqueta fixada na caixa
do CD.
8
Quando for solicitado, verifique o diretório em que o
LOCKOUT-PRO
TM
será instalado. É recomendável
utilizar o diretório padrão.
9
Quando a página de registro for exibida, siga as
instruções na tela para registrar a cópia do software.
Instalando o LOCKOUT-PRO:
Versão de Visualização
A
Versão de Visualização
mente em qualquer computador. Ela permite que os
usuários vejam e imprimam procedimentos e informações
relacionadas, mas não permite a criação ou a revisão.
1
Insira o CD do LOCKOUT-PROTM na unidade de CD.
O programa de instalação será iniciado automaticamente. Se ele não abrir após um pequeno intervalo,
você poderá iniciá-lo manualmente seguindo as
etapas abaixo:
•
Abra a pasta
•
Clique duas vezes na unidade de CD para abri-la.
•
Clique duas vezes no arquivo:
Lockout PRO 3.0 Installer.exe
2
Quando a janela do instalador for aberta, selecione
a opção do menu:
3
Escolha o idioma que deseja usar.
4
Na tela “Bem-vindo”, clique na opção de instalação
Meu computador
Instalar o Lockout PRO Viewer
do LOCKOUT-PRO
pode ser instalada livre-
.
TM
Viewer.
.
14

5
Leia e marque a opção de concordância com o contrato
de licença.
6
Verifique o diretório em que o LOCKOUT-PROTM será
instalado (o diretório padrão é recomendado).
Iniciando o LOCKOUT-PRO
•
Abra o menu
o atalho do LOCKOUT-PRO
-OU-
Localize o atalho do LOCKOUT-PROTM na área
Iniciar Programas
TM
do seu PC, localize
e clique nele.
de trabalho do seu PC e clique duas vezes nele.
-OU-
Na janela de uma pasta aberta exibindo os
procedimentos, clique duas vezes em um arquivo.
Exibindo procedimentos existentes
Os passos seguintes são para
de Visualização
1
Na janela principal, clique na guia
procedimento
do LOCKOUT-PROTM v3.0 Desktop.
da barra de ferramentas
as Versões Padrão e
Abrir
principal de opções.
-OU-
Selecione
2
Na janela
abrir e, em seguida, clique no botão
-OU-
Clique duas vezes no nome do arquivo na
Arquivo>Abrir...
Abrir
, clique no nome do arquivo que deseja
no menu principal.
Abrir
.
janela.
3
O arquivo será exibido na janela principal de
visualização.
Imprimindo procedimentos e etiquetas
Os passos seguintes são para
Visualização
do LOCKOUT-PROTM v3.0 Desktop.
as Versões Padrão e de
15

Para imprimir um procedimento:
1
Com o procedimento aberto, clique no botão
Imprimir procedimento
na barra de tarefas principal
de opções.
-OU-
No menu principal, selecione
Imprimir
2
Quando a janela
.
Imprimir procedimento
Arquivo>
confirme ou altere a impressora listada na caixa
Impressora
3
Faça as alterações desejadas nas configurações
.
padrão da impressora.
4
Clique no botão
5
Clique em
Fechar
Imprimir
no canto inferior direito.
para retornar à janela principal.
Para imprimir as etiquetas de bloqueio:
1
Com o procedimento aberto, clique no botão
Imprimir etiquetas de bloqueio
tarefas principal de opções.
-OU-
No menu principal, selecione
Imprimir etiquetas de bloqueio
2
Quando a janela
Imprimir etiquetas de bloqueio
for exibida, confirme ou altere a impressora na
caixa
Impressora
3
Quando a impressora correta for exibida, faça
.
as alterações desejadas em
Material
•
•
.
Para as impressoras
-
Na lista suspensa, em
Largura da fita
GlobalMark
do rolo que você estiver usando.
Para impressoras com
individual
-
Na lista suspensa, em
:
folha de etiquetas que você está utilizando.
na barra de
Arquivo>
.
Suprimentos
™:
Suprimentos
alimentação de folha
Material
, escolha o tipo de
for exibida,
ou em
, escolha a
16

4
Na seção
•
Use as setas para cima e para baixo para mudar
Data de bloqueio
•
Em
Informações de bloqueio
e
Hora do bloqueio
Bloqueado por
, insira o nome da pessoa
:
.
autorizada a retirar o bloqueio.
•
Apenas para as impressoras GlobalMark™:
Imagem do funcionário
Nenhuma
na caixa
. Para incluir uma foto da pessoa indicada
Bloqueado por
tem como valor padrão
, clique no botão de rádio ao
lado da caixa vazia e, em seguida, clique em
cionar
para localizar e inserir a foto.
•
Na caixa
Observações
, digite as informações
adicionais que você deseja imprimir nas etiquetas.
•
Na caixa
Conclusão esperada
, informe a hora
em que o processo de reenergização deve ser
concluído.
5
Clique no botão
6
Clique em
Fechar
Imprimir
no canto inferior direito.
para retornar à janela principal.
Para imprimir etiquetas de fonte de energia:
1
Com o procedimento aberto, clique no botão
etiquetas de fonte de energia
principal de opções.
-OU-
Selecione
energia
2
Quando a janela
energia
3
Com a impressora correta exibida, faça as alterações
no menu principal.
for exibida, confirme ou altere a impressora.
Arquivo>Imprimir etiquetas de
Imprimir etiquetas de fonte de
desejadas nas opções relacionadas no lado esquerdo
da janela, dependendo da impressora escolhida.
•
Para as impressoras
-
Em
Forma/Tamanho
GlobalMark
você está usando.
na barra de tarefas
™:
, selecione a fita que
a
Sele-
Imprimir
17

-
Na seção
imprimir todas as etiquetas de fonte de energia
associadas a esse procedimento, ou selecione
uma etiqueta específica na lista.
•
Para as impressoras
-
Na seção
de energia cuja etiqueta deseja imprimir.
(Só é possível imprimir uma etiqueta por
vez nessa impressora.)
•
Para impressoras com
individual
-
Em
que está utilizando.
-
A seção
etiquetas serão impressas em uma única folha.
Desmarque as caixas se quiser imprimir menos
etiquetas.
-
Na seção
imprimir todas as etiquetas de fonte de energia
associadas a esse procedimento, ou selecione
uma etiqueta específica na lista.
4
Na seção
de texto
incluir essas informações na etiqueta.
5
Clique no botão
6
Clique em
Imprimir etiqueta
HandiMark
Imprimir etiqueta
:
Material
Layout
Campo de dados 1
, escolha o material da etiqueta
Etiquetas disponíveis
Imprimir etiqueta
, clique na seta para baixo das caixas
Imprimir
Fechar
para retornar à janela principal.
alimentação de folha
e
no canto inferior direito.
, selecione
, selecione a fonte
mostra quantas
, selecione
Campo de dados 2
Tudo
™:
Tudo
para
para
para
Salvando um procedimento
1
Clique no botão
tarefas principal de opções.
-OU-
Selecione
Se for
um procedimento existente
será salvo.
Salvar procedimento
Arquivo>Salvar
18
na barra de
no menu principal.
, o arquivo

2
Se for um
salvo, a janela padrão
novo procedimento
Salvar como
que ainda não foi
do Windows
será exibida.
3
Insira o
4
Clique em
Nome do Arquivo
Salvar
para salvar o arquivo com o
do procedimento.
nome inserido.
Criando um novo procedimento
De um modelo em branco:
1
Na janela principal, clique no botão
procedimento
-OU-
2
Na janela
Selecione
da barra de tarefas principal de opções.
Arquivo>Novo...
Selecionar um modelo
formulário que deseja usar (Combinado, Completo
ou Restrito). Para saber mais sobre cada formulário,
consulte o
3
Clique em OK. Um formulário vazio será exibido.
4
Para informar os detalhes do procedimento, um
Guia do Usuário.
)
por vez, clique em cada ícone do painel
procedimentos
à esquerda, e selecione ou informe
as especificidades nas janelas que forem exibidas.
5
Clique no botão
Salvar procedimento
Novo
no menu principal.
, clique no
Seções de
.
De um procedimento existente:
1
Na janela principal, clique no botão
procedimento
-OU-
selecione
2
Quando a janela
do arquivo desejado e, em seguida, clique em
-OU-
clique duas vezes no nome do arquivo.
da barra de tarefas principal de opções.
Arquivo>Abrir...
Abrir
for exibida, clique no nome
no menu principal.
19
Abrir
Abrir
.

3
Salve imediatamente o procedimento com o
novo nome para evitar mudanças indesejáveis
no procedimento existente.
4
Examine os detalhes do procedimento, um por
vez, clicando em cada ícone do painel
procedimentos
à esquerda, e selecione ou informe
Seções de
as especificidades nas janelas que forem exibidas.
5
Clique no botão
Salvar procedimento
.
Importando versões anteriores
de procedimentos
Para importar um único procedimento:
1
Com o LOCKOUT-PROTM v3.0 aberto, clique em
Arquivo>Importar>Arquivo de procedimentos (v1.x
e v2.x)
2
Na caixa de diálogo
de arquivo (v1.x ou v2.x) a ser importado, selecione o
arquivo na lista e clique em
3
Quando o procedimento aparecer na área principal de
exibição, ele terá sido convertido e você poderá fazer
todas as alterações que desejar.
4
Quando tiver concluído, clique no botão
procedimento
5
Na caixa de diálogo
se desejar.
.
Abrir
do Windows, selecione o tipo
Abrir
.
Salvar
na barra de tarefas principal de opções.
Salvar como
, digite um novo nome
Para importar vários procedimentos em lote:
1
Com o LOCKOUT-PROTM v3.0 aberto, clique
em
Arquivo>Importar
arquivos da v1.x
dependendo da versão na qual seus arquivos
anteriores foram criados.
e, em seguida,
ou
Converter arquivos da v2.x
Converter
20
,

2
Na janela
Conversão em Lote
, verifique se o diretório
que contém os arquivos a serem convertidos aparece
na caixa
Origem
e se o diretório no qual os arquivos
convertidos serão gravados aparece na caixa
3
Clique no botão
Iniciar conversão
.
Obtenha mais ajuda
Destino
.
Tutorial on-line:
LOCKOUT-PRO
ao iniciar pela primeira vez o
TM
, a janela do Tutorial on-line será
aberta à direita. O tutorial apresenta os passos básicos
para criar, salvar e imprimir procedimentos e materiais
relacionados. Você pode navegar pelo tutorial utilizando
as opções
Ajuda on-line:
Seguinte, Voltar
e outras opções na janela.
a Ajuda on-line do LOCKOUT-PROTM
apresenta informações detalhadas sobre todos os aspectos
do aplicativo.
•
No menu principal, clique em
ajuda
Guia do Usuário:
Para acessar a Ajuda on-line:
Ajuda>Tópicos de
.
o
Guia do Usuário
detalhado
é instalado no seu computador juntamente com
o LOCKOUT-PRO
Usuário
Para ler o
1
e imprimir uma ou mais páginas dele.
Guia do Usuário
Abra
Meu computador
em que o LOCKOUT-PRO
O padrão é
2
Abra a pasta
Documentos
3
Na pasta
TM
. Você pode ler o
Guia do
:
e navegue até a pasta
TM
foi instalado.
C:\Arquivos de programas\Brady
Lockout PRO
.
Documentos
e localize a pasta
, localize
LOPuserguide.pdf
.
e clique duas vezes para abri-lo.
21

Para imprimir o
1
Clique em
do
Guia do Usuário.
2
Escolha as opções de impressão.
3
Clique no botão
Guia do Usuário
Arquivo>Imprimir
Imprimir
.
:
no menu principal
Entre em contato com o suporte técnico
Estados Unidos e outros países C/S
Tel: 800-368-3362
Fax: 414-228-5799
Email: technical_support@bradycorp.com
Canadá:
Tel: 888-262-7576
Fax: 905-764-5557
Email: techsupportcanada@bradycorp.com
México:
Tel: 800-368-3362
Fax: 525-527-5586
Email: bradymexico@bradycorp.com
Brasil:
Tel (PABX): 55 11 3686-4720
Tel (Direto): 55 11 3686-5697
Fax: 55 11 3686-5236
Email: brady_service_brazil@bradycorp.com
Todos os direitos reservados.
www.bradycorp.com
©2006 Brady Worldwide, Inc.
:
22

Guide de démarrage rapide de
TM
LOCKOUT-PRO
version 3.0
Le logiciel d’écriture de procédures graphiques
LOCKOUT-PRO
TM
vous offre tous les outils dont
vous avez besoin pour créer un programme de contrôle
de l’énergie efficace et comportant des procédures
normalisées faciles à exécuter. Vous pouvez imprimer des
étiquettes de verrouillage et de contrôle des sources
d’énergie directement liées aux procédures pour chaque
source d’énergie, rendant ainsi vos activités de
verrouillage pratiquement à toute épreuve.
Exigences matérielles
Exigences
matérielles :
Processeur 1,2 GHz ou
Résolution de
l’écran
Mémoire (RAM) 512 Mo Même
Espace sur le
disque
Système
d’exploitation
Internet Explorer v 5.0 ou plus
Infrastructure .NET v 1.1 ou ultérieure Fournie sur le DC
Minimum : Recommandées :
Même
supérieur
800 x 600 ou plus 1024 x 768 ou plus
500 Mo Même
Windows 2000
ou XP
récente
Même
v 6.0 ou plus récente
d’installation de Lockout PRO
pour l’installer au besoin
>>
23

Exigences
matérielles :
Imprimante Les pilotes de l’imprimante que vous désirez utiliser
Minimum : Recommandées :
doivent être installés. Pour exécuter l’application,
au moins une imprimante doit être installée.
Consultez la documentation de votre imprimante
pour savoir comment l’installer.
Imprimante GlobalMark
jour des pilotes est nécessaire. Vous devez d’abord
désinstallez l’imprimante de votre ordinateur.
Installez le nouveau pilote GlobalMarkMD inclut sur
le DC d’installation LOCKOUT-PRO
MD
uniquement : La mise à
TM
.
Installation de LOCKOUT-PRO :
Ver sio n co mpl ète
La
version complète
LOCKOUT-PRO
1
Fermez tous les programmes actuellement actifs dans
TM
votre ordinateur, y compris votre programme
de courriel et votre logiciel antivirus.
2
Insérez le DC de LOCKOUT-PROTM dans le lecteur de
DC de votre ordinateur. L’installation devrait
démarrer automatiquement. Si l’installation ne
démarre pas après une courte période, lancez-la
manuellement en exécutant les étapes suivantes :
•
Ouvrez votre fichier
•
Cliquez deux fois sur votre lecteur de DC pour
ouvrir le fichier.
•
Cliquez deux fois sur le fichier :
LockoutPRO3.0Installer.exe
Lorsque la fenêtre d'installation est affichée,
3
sélectionnez l’option de menu :
Installer Lockout PRO Desktop
4
Sélectionnez la langue que vous désirez utilisez.
est une version complète de
Desktop.
Mon ordinateur
.
.
24

5
À l’écran de bienvenue, sélectionnez l’installation
de LOCKOUT-PRO
6
Lisez la licence d’utilisation et sélectionnez l’option
TM
.
indiquant que vous l’acceptez.
7
À l’invite, entrez le numéro de série de votre
exemplaire de LOCKOUT-PRO
TM
. Vous trouverez
le numéro sur une étiquette apposée sur le boîtier
du DC.
8
Vous devez ensuite confirmer le répertoire d’installation de LOCKOUT-PRO
TM
. Il est recommandé
d’utiliser le répertoire par défaut.
9
À la page d’enregistrement, suivez les instructions à
l’écran pour enregistrer votre exemplaire du logiciel.
Installation de LOCKOUT-PRO :
Version de visualisation
La
version de visualisation
librement sur n’importe quel ordinateur. Cela permet aux
utilisateurs de visualiser et d’imprimer les procédures et
les informations connexes, sans toutefois être en mesure
de créer ou de modifier.
1
Insérez le DC de LOCKOUT-PROTM dans le lecteur de
DC de votre ordinateur. L’installation devrait
démarrer automatiquement. Si l’installation ne
démarre pas après une courte période, lancez-la
manuellement en exécutant les étapes suivantes :
•
Ouvrez votre fichier
•
Cliquez deux fois sur votre lecteur de DC
pour ouvrir le fichier.
•
Cliquez deux fois sur le fichier :
Lockout PRO 3.0 Installer.exe
Lorsque la fenêtre d'installation est affichée,
2
sélectionnez l’option de menu :
peut être installée
Mon ordinateur
Installer la version de
.
25

visualisation de Lockout PRO
3
Sélectionnez la langue que vous désirez utilisez.
4
À l’écran de bienvenue, sélectionnez l’installation
de l’observateur de LOCKOUT-PRO
5
Lisez la licence d’utilisation et sélectionnez l’option
.
TM
.
indiquant que vous l’acceptez.
6
Vérifiez le répertoire où LOCKOUT-PROTM sera
installé (le répertoire par défaut est recommandé).
Démarrage de LOCKOUT-PRO
•
Sélectionnez l’option
Programmes
du menu
de votre PC, repérez le raccourci de LOCKOUT-
TM
PRO
-OU-
et cliquez sur celui-ci.
Repérez le raccourci de LOCKOUT-PROTM
sur le bureau de votre PC et cliquez sur celui-ci.
-OU-
À partir d’un répertoire contenant des
procédures, cliquez deux fois sur une procédure.
Affichage d’une procédure existante.
Les étapes suivantes s’appliquent à
complète et de visualisation
Desktop version 3.0.
1
Dans le menu principal, cliquez sur le bouton
de la barre des tâches principales.
-OU-
Sélectionnez
Fichier>Ouvrir...
principal.
2
Dans la fenêtre
Ouvrir
, cliquez sur le nom du fichier
que vous désirez ouvrir, puis cliquez sur le bouton
vrir
.
-OU-
Cliquez deux fois sur le nom du fichier dans la
fenêtre.
3
Le fichier apparaît alors dans la fenêtre principale.
la version
de LOCKOUT-PROTM
du menu
Démarrer
Ouvrir
Ou-
26

Impression des procédures et des étiquettes
Les étapes suivantes s’appliquent à
et de visualisation
de LOCKOUT-PROTM Desktop
version 3.0.
Pour imprimer une procédure :
1
Lorsque la procédure est ouverte, cliquez sur le
bouton
Imprimer la procédure
tâches principales.
-OU-
Fichier>Imprimer
2
Lorsque la fenêtre
Dans le menu principal, sélectionnez
.
Imprimer la procédure
affichée, assurez-vous que l’imprimante que vous
voulez utiliser figure dans la case
n’est pas le cas, sélectionnez-la.
3
Apportez les changements désirés aux réglages de
l’imprimante.
4
Cliquez sur le bouton
Imprimer
droit.
5
Cliquez sur le bouton
Fermer
fenêtre principale.
Pour imprimer des étiquettes de verrouillage :
1
Lorsque la procédure est ouverte, cliquez sur le
bouton
la barre des tâches principales.
-OU- Dans la barre de menu principal, sélectionnez
Fichier>Imprimer des étiquettes de verrouillage
2
Dans la fenêtre
verrouillage
sélectionnée dans le champ
pas le cas, sélectionnez-la.
3
Lorsque la bonne imprimante est sélectionnée,
apportez les changements désirés à la section
Imprimer des étiquettes de verrouillage
Imprimer des étiquettes de
, vérifiez que la bonne imprimante est
la version complète
dans la barre des
est
Imprimante
dans le coin inférieur
pour retourner à la
Imprimante
; si ce n’est
; si ce
dans
.
27

Consommables
•
Dans le cas de l’imprimante
-
Dans le menu déroulant
sélectionnez la
ou
Matériel
Largeur du ruban
.
GlobalMarkMD :
Consommables
du rouleau que
vous utilisez.
•
Dans le cas des imprimantes
-
Dans le menu déroulant
feuille à feuille
Matériel
, sélectionnez le
type de feuille d’étiquettes que vous utilisez.
4
Dans la section
•
Utilisez les flèches vers le haut et vers le bas
pour changer la valeur des champs
verrouillage
•
Dans le champ
Informations sur le verrouillage
Date de
et
Heure du verrouillage
Verrouillé par
, tapez le nom de
la personne autorisée à retirer le dispositif de
verrouillage.
•
Imprimante GlobalMarkMD uniquement :
par défaut de la section
Aucune
. Si vous désirez ajouter la photo de
Photo de l’employé est
la personne mentionnée dans la boîte de texte
Verrouillé par
, cliquez sur le bouton radio à côté
de la boîte de texte vide, puis cliquez sur le bouton
Sélectionner
•
Dans le champ
pour trouver la photo et l’insérer.
Remarques
, ajoutez toutes les
informations supplémentaires que vous désirez
imprimer sur l’étiquette.
•
Dans le champ
Achèvement prévu
, entrez l’heure à
laquelle le retrait du verrouillage devrait être
terminé.
5
Cliquez sur le bouton
Imprimer
dans le coin inférieur
droit.
6
Cliquez sur le bouton
Fermer
pour retourner à la
fenêtre principale.
,
.
La valeur
:
:
28

Pour imprimer des étiquettes de source d’énergie :
1
Lorsque la procédure est ouverte, cliquez sur le
bouton
barre des tâches principales.
-OU- Sélectionnez
étiquettes d’énergie
2
Lorsque la fenêtre
d’énergie
et changez-la au besoin.
3
Lorsque la bonne imprimante est sélectionnée,
apportez les changements désirés aux options
d’impression par défaut indiquées dans la partie
gauche de l’écran en fonction de l’imprimante que
vous avez sélectionnée.
•
•
•
Imprimer les étiquettes d'énergie
Fichier>Imprimer les
dans le menu principal.
Imprimer les étiquettes de source
apparaît, vérifiez l’imprimante sélectionnée
Dans le cas de l’imprimante
-
Dans le champ
ruban que vous désirez utiliser.
-
Dans le champ
tionnez
d’énergie associées à la procédure ou
sélectionnez une étiquette précise dans la liste.
Dans le cas de l’imprimante
Brady :
-
Dans la section
sélectionnez les sources d’énergie pour lesquelles
vous désirez imprimer une étiquette. (Cette
imprimante ne vous permet d’imprimer qu’une
étiquette à la fois.)
Dans le cas des imprimantes
-
Dans le champ
que vous désirez utiliser.
Tout
Forme/Taille
Imprimer l’étiquette
pour imprimer toutes les étiquettes
Imprimer l’étiquette
Matériel
GlobalMarkMD :
, sélectionnez le
HandiMarkMD de
feuille à feuille
, sélectionnez le papier
dans la
, sélec-
,
:
29

-
La section
Étiquettes disponibles
nombre d’étiquettes qui s’imprimeront sur une
feuille. Vous pouvez décocher des cases si vous
désirez imprimer moins d’étiquettes.
-
Dans le champ
sélectionnez
Imprimer l’étiquette
Tout
pour imprimer toutes les
étiquettes d’énergie associées à la procédure ou
sélectionnez une étiquette précise dans la liste.
4
Dans la section
déroulants
données 2
Disposition
Champ de données 1
, ouvrez les menus
et
pour ajouter des informations sur
l’étiquette.
5
Cliquez sur le bouton
Imprimer
dans le coin
inférieur droit.
6
Cliquez sur le bouton
Fermer
pour retourner à
la fenêtre principale.
Enregistrement d'une procédure
1
Cliquez sur le bouton
la barre des tâches principales.
-OU-
Sélectionnez l’option
menu principal.
S’il s’agit
d’une
maintenant enregistré.
2
S’il s’agit d’une
été enregistrée, la fenêtre standard
de Windows apparaîtra.
3
Entrez le
4
Cliquez sur le bouton
nom du fichier
procédure sous le nom que vous avez entré.
Enregistrer la procédure
Fichier>Ouvrir...
procédure existante
nouvelle procédure
de la procédure.
Enregistrer
indique le
,
Champ de
dans
du
, le fichier est
qui n’a jamais
Enregistrer sous
pour enregistrer la
Création d’une nouvelle procédure
À partir d’un modèle vierge :
1
Dans la fenêtre principale, cliquez sur le bouton
30
Nou-

velle procédure
-OU-
Fichier>Nouveau…
2
Lorsque la fenêtre
Dans le menu principal, sélectionnez
dans la barre des tâches principales.
.
Sélectionner un modèle
apparaît,
cliquez sur le gabarit désiré (combiné, long ou court).
Pour obtenir de plus amples détails sur chaque
gabarit, consultez le
3
Cliquez sur OK. Un gabarit vierge apparaît à l’écran.
4
Pour entrer les détails de la procédure une section à la
Guide de l’utilisateur
.)
fois cliquez sur chacune des icônes du panneau des
Sections de procédure
dans la partie de gauche, puis
sélectionnez des valeurs par défaut ou entrez les
détails dans les fenêtres qui apparaissent.
5
Cliquez sur le bouton
Enregistrer la procédure
À partir d’une procédure existante :
1
Dans la fenêtre principale, cliquez sur le bouton
Ouvrir une procédure
principales.
-OU- Sélectionnez
principal.
2
Lorsque la fenêtre
du fichier que vous désirez ouvrir, puis cliquez sur le
bouton
-OU-
3
Enregistrez immédiatement la procédure sous son
Ouvrir
.
Cliquez deux fois sur le nom du fichier.
nouveau nom pour éviter de modifier la procédure
existante par inadvertance.
4
Révisez les détails de la procédure une section à la fois
en cliquant sur chacune des icônes du panneau des
Sections de procédure
en sélectionnant des valeurs par défaut ou en entrant
les détails dans les fenêtres qui apparaissent.
5
Cliquez sur le bouton
dans la barre des tâches
Fichier>Ouvrir...
Ouvrir
apparaît, cliquez sur le nom
du menu
dans la partie de gauche, puis
Enregistrer la procédure
.
.
31

Importer une version antérieure d’une procédure
Pour importer une seule procédure :
1
Dans LOCKOUT-PROTM version 3.0, sélectionnez
l’option
(v1.x et v2.x)
2
Dans la fenêtre
le type de fichier (v1.x ou v2.x) à importer, puis
sélectionnez le fichier à partir de la liste, et cliquez sur
le bouton
3
Une fois convertie, la procédure est affichée dans
la zone d’affichage principale; vous pouvez alors y
apporter tous les changements que vous désirez.
4
Lorsque vous avez terminé, cliquez sur le bouton
Enregistrer la procédure
principales.
5
Dans la boîte de dialogue
un nouveau nom si vous le désirez.
Pour importer des procédures multiples :
1
Grâce à la v 3.0 LOCKOUT-PROTM ouverte,
sur
fichiers v1.x
version de vos fichiers précédents.
2
Dans la fenêtre
le répertoire dans lequel se trouvent les fichiers à
convertir est affiché dans le champ
répertoire où vous désirez enregistrer les procédures
converties est affiché dans le champ
3
Cliquez sur le bouton
Fichier>Importer>Fichier de procédure
.
Ouvrir
de Windows, sélectionnez
Ouvrir
.
de la barre des tâches
Enregistrer sous
Fichier>Importer
ou
Conversion d’un lot
, puis sur
Convertir les fichiers v2.x
Convertir les
, assurez-vous que
Source
Destination
Démarrer la conversion
, entrez
cliquez
, selon la
et que le
.
.
Obtention d’une aide supplémentaire
Didacticiel en ligne :
LOCKOUT-PRO
didacticiel en ligne est affichée dans la partie droite de
TM
Lorsque vous démarrez
pour la première fois, la fenêtre du
32

l’écran. Ce didacticiel explique les étapes de base pour
créer, enregistrer et imprimer les procédures et la
documentation connexe. Vous pouvez naviguer dans le
didacticiel à l’aide des boutons
Suivant, Précédent
et des
autres invites de la fenêtre.
Aide en ligne :
L’aide en ligne dans LOCKOUT-PROTM
offre des informations détaillées sur tous les aspects du
programme.
•
Dans le menu principal, cliquez sur l’option
Aide>Rubriques d’aide
Guide de l’utilisateur :
Pour accéder à l’aide en ligne :
.
Le
Guide de l’utilisateur
détaillé est installé dans votre ordinateur en même temps
que LOCKOUT-PRO
de l’utilisateur
Pour consulter le
1
Cliquez sur l’icône
dossier où vous avez installé LOCKOUT-PRO
TM
. Vous pouvez consulter le
Guide
et l’imprimer en sections ou en entier.
Guide de l’utilisateur
Poste de travail
:
et accédez au
TM
.
Le répertoire par défaut est
C:\Program Files\Brady
2
Ouvrez le dossier
dossier
3
Dans le dossier
intitulé
Documentation
LOPuserguide.pdf
Lockout PRO
Documentation
.
et accédez au
.
, repérez le fichier
et cliquez deux fois sur
celui-ci pour l’ouvrir.
Pour imprimer le
1
Cliquez sur l’option
principal du
2
Sélectionnez les options d’impression.
3
Cliquez sur le bouton
Guide de l’utilisateur
Fichier>Imprimer
Guide de l’utilisateur.
Imprimer
.
:
du menu
33

Communiquer avec le soutien technique
États-Unis et autres pays associés
Tél. : 800-368-3362
Téléc. : 414-228-5799
Courriel : technical_support@bradycorp.com
Canada :
Tél. : 888-262-7576
Téléc. : 905-764-5557
Courriel : techsupportcanada@bradycorp.com
Mexique :
Tél. : 800-368-3362
Téléc. : 525-527-5586
Courriel : bradymexico@bradycorp.com
Brésil :
Tél. (PABX) : 55 11 3686-4720
Tél. (direct) : 55 11 3686-5697
Téléc. : 55 11 3686-5236
Courriel : brady_service_brazil@bradycorp.com
Tous droits réservés.
www.bradycorp.com
© 2006 Brady Worldwide, Inc.
:
34
Guía de inicio rápido de
TM
LOCKOUT-PRO
3.0
El software de escritura gráfica de procedimientos
LOCKOUT-PRO
TM
le proporciona todas las herramientas
que necesita para crear un programa eficaz de control de
energía con procedimientos estandarizados fáciles
de seguir. Es posible imprimir las etiquetas de bloqueo
relacionadas con el procedimiento para cada fuente de
energía, lo que hace a las actividades de bloqueo muy
sencillas de manejar.
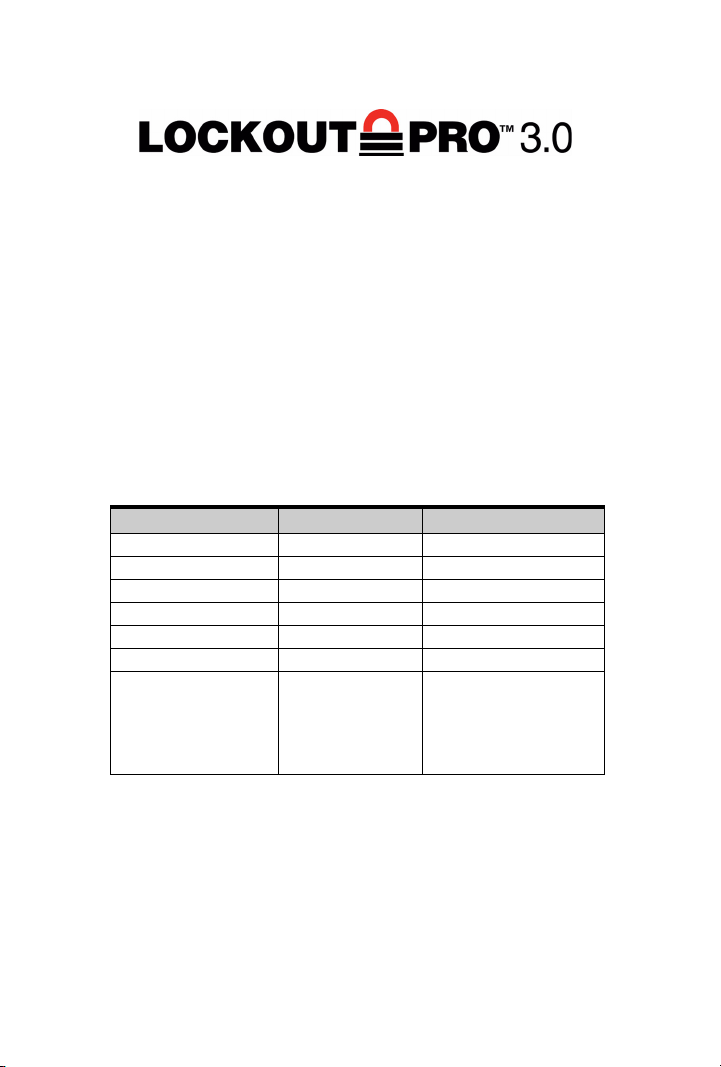
Requisitos del sistema
Requisito: Mínimo: Recomendado:
Procesador 1.2 GHz o superior Igual
Resolución del monitor 800x600 o superior 1024x768 o superior
Memoria (RAM) 512 MB Igual
Espacio en disco 500 MB Igual
Sistema operativo Windows 2000/XP Igual
Internet Explorer v5.0 o superior v6.0 o más reciente
Estructura .NET v1.1 o superior Provisto en el CD de
instalación de LOCKOUTPRO para que el usuario
instale si es necesario
>>
35

Requisito: Mínimo: Recomendado:
Impresora Se deben instalar los controladores para
la(s) impresora(s) que vaya a utilizar. Se debe
instalar al menos una impresora para ejecutar
la aplicación. Consulte la documentación de
su impresora para saber cómo instalarla.
Impresoras GlobalMark™ únicamente:
Se requiere un controlador actualizado.
Primero, desinstale la impresora de su
equipo. Instale el controlador GlobalMark™
nuevo incluido en el CD de instalación de
LOCKOUT-PRO
TM
.
Instalación de LOCKOUT-PRO:
Ver sión es tán dar
La
Versión estándar
escritorio de LOCKOUT-PRO
1
Cierre todos los programas que están en ejecución
actualmente, incluyendo los programas antivirus y de
correo electrónico.
2
Inserte el CD de LOCKOUT-PROTM en la unidad
de CD. El programa de instalación se ejecutará
automáticamente. Si no se abre después de
transcurrido cierto tiempo, ejecútelo manualmente
siguiendo estos pasos:
•
Abra la carpeta
•
Haga doble clic en la unidad de CD para abrirla.
•
Haga doble clic en el archivo:
LockoutPRO3.0Installer.exe
Cuando aparezca la ventana del instalador, seleccione
3
la opción del menú:
Instalación del escritorio de Lockout PRO
4
Seleccione el idioma que desea usar.
5
Cuando aparezca la pantalla de bienvenida, haga
es la versión completa de
TM
.
Mi PC
.
.
36

clic en la opción para instalar LOCKOUT-PROTM.
6
Lea el acuerdo de licencia y marque la opción que
indica aceptación.
7
Cuando se le solicite, ingrese el número de serie de
su copia de LOCKOUT-PRO
TM
. El número de serie
se encuentra en una etiqueta adherida al estuche
del CD.
8
Cuando se le solicite, verifique el directorio en el que
LOCKOUT-PRO
TM
será instalado. Se recomienda
usar el directorio predeterminado.
9
Cuando aparezca la página de registro, siga las
instrucciones
en pantalla para registrar la copia
del software.
Instalación de LOCKOUT-PRO:
Versión de visor
La
Versión de visor
computadora. Les permite a los usuarios ver e imprimir
procedimientos e información relacionada, pero no crear o
actualizar.
1
Inserte el CD de LOCKOUT-PROTM en la unidad
de CD. El programa de instalación se ejecutará
automáticamente. Si no se abre después de
transcurrido cierto tiempo, ejecútelo manualmente
siguiendo estos pasos:
•
Abra la carpeta
•
Haga doble clic en la unidad de CD para abrirla.
•
Haga doble clic en el archivo:
Lockout PRO 3.0 Installer.exe
Cuando aparezca la ventana del instalador, seleccione
2
la opción del menú:
Instalación del visor de Lockout PRO
se puede instalar en cualquier
Mi PC
.
.
37

3
Seleccione el idioma que desea usar.
4
En la pantalla de bienvenida, haga clic en la opción
para instalar el visor de LOCKOUT-PRO
5
Lea el acuerdo de licencia y marque la opción que
TM
.
indica aceptación.
6
Verifique el directorio en el que LOCKOUT-PROTM
será instalado (se recomienda usar el directorio
predeterminado).
Ejecución de LOCKOUT-PRO
•
Abra los
localice el acceso directo de LOCKOUT-PRO
Programas
del menú de
Inicio
de su equipo,
TM
y haga
clic en él.
-O-
Encuentre el acceso directo de LOCKOUT-PROTM
en el escritorio de su equipo y haga doble clic en él
-O- Desde una ventana de carpeta abierta que
muestra procedimientos, haga doble clic en un
archivo.
Visualización de procedimientos existentes
A continuación se describen los pasos para
estándar y de visor
LOCKOUT-PRO
1
Desde la ventana principal, haga clic en la ficha
Abrir procedimiento
de la versión de escritorio de
TM
v3.0.
en la barra de tareas de opciones
las versiones
principales.
-O-
Seleccione
2
En la ventana
Archivo>Abrir...
Abrir
, haga clic en el nombre del
en el menú principal.
archivo que desea abrir y luego en el botón
-O-
Haga doble clic en el nombre del archivo en
la ventana.
38
Abrir
.

3
El archivo aparecerá en la ventana de visualización
principal.
Impresión de procedimientos y etiquetas
A continuación se describen los pasos para
versiones estándar y de visor
de escritorio de LOCKOUT-PRO
de la versión
TM
v3.0.
las
Para imprimir un procedimiento:
1
Con el procedimiento abierto, haga clic en
el botón
Imprimir procedimiento
en la barra
de tareas de opciones principales.
-O-
Desde el menú principal, seleccione
Archivo>Imprimir
2
Cuando aparezca la ventana
procedimiento
que figura en el cuadro
3
Realice los cambios que desee a las opciones
.
Imprimir
, verifique o cambie la impresora
Impresora
.
predeterminadas de la impresora.
4
Haga clic en el botón
Imprimir
ubicado en el
ángulo inferior derecho.
5
Haga clic en
Cerrar
para regresar a la ventana
principal.
Para imprimir etiquetas de bloqueo:
1
Con el procedimiento abierto, haga clic en el botón
Imprimir etiquetas de bloqueo
de opciones principales.
-O-
Desde el menú principal, seleccione
Imprimir Etiquetas de bloqueo
2
Cuando aparezca la ventana
bloqueo
en el cuadro
, verifique o cambie la impresora que figura
Impresora
.
en la barra de tareas
Archivo>
.
Imprimir etiquetas de
39

3
Cuando aparezca la impresora correcta, realice los
cambios que desee a
•
Para impresoras
-
Desde la lista desplegable en
el
Ancho de cinta
Suministros
GlobalMark
o
Material
™:
Suministros
del carrete de cinta que está
utilizando.
•
Para impresoras
-
Desde la lista desplegable en
de alimentación por hojas
Material
tipo de hoja de etiquetas que está utilizando.
4
En la sección
•
Use las flechas de dirección para cambiar la
Fecha de bloqueo
•
En
Bloqueo por
Información de bloqueo
y la
Hora de bloqueo
:
, ingrese el nombre de la persona
autorizada a retirar el bloqueo.
•
Impresoras GlobalMark™ únicamente:
La
Imagen del empleado
predeterminada en
se establece de forma
Ninguna
. Para agregar una
imagen de la persona nombrada en el cuadro
Bloqueo por
cerca del cuadro vacío y luego en
, haga clic en el botón de opción ubicado
Seleccionar
localizar la foto e insertarla.
•
En el cuadro
Comentarios
, escriba cualquier
información adicional que desee imprimir en
las etiquetas.
•
En el cuadro
Terminación esperada para el
ingrese la hora en que debe finalizar el proceso
de volver a energizar.
5
Haga clic en el botón
Imprimir
ubicado en el ángulo
inferior derecho.
6
Haga clic en
Cerrar
para regresar a la ventana
principal.
.
, elija
:
, elija el
.
para
,
40

Para imprimir etiquetas de fuentes de energía:
1
Con el procedimiento abierto, haga clic en el botón
Imprimir etiquetas de fuentes de energía
de tareas de opciones principales.
-O-
Seleccione
energía
2
Cuando aparezca la ventana
fuentes de energía
3
Cuando aparezca la impresora correcta, realice los
cambios que desee a las opciones que figuran a la
izquierda de la ventana, según la impresora que elija.
•
•
•
en el menú principal.
Para impresoras
-
En
está utilizando.
-
En la sección
para imprimir todas las etiquetas de fuentes de
energía asociadas con ese procedimiento, o
seleccione de la lista una etiqueta específica.
Para impresoras
-
En la sección
fuente de energía cuya etiqueta desea imprimir.
(Puede imprimir sólo una etiqueta por vez con
esta impresora).
Para impresoras
-
En
utilizando.
-
La sección
cantidad de etiquetas que se imprimirán en una
hoja. Desmarque los cuadros si desea imprimir
menos etiquetas.
-
En la sección
para imprimir todas las etiquetas de fuentes de
Archivo>Imprimir etiquetas de
Imprimir etiquetas de
, verifique o cambie la impresora.
GlobalMark
Forma/Tamaño
Material
, elija las etiquetas que está
Etiquetas disponibles
, seleccione la cinta que
Imprimir etiqueta
HandiMark
Imprimir etiqueta
de alimentación por hojas
Imprimir etiqueta
™:
™:
en la barra
, seleccione
, seleccione la
muestra la
, seleccione
Todo
:
Todo
41

energía asociadas con ese procedimiento, o
seleccione de la lista una etiqueta específica.
4
En la sección
abajo de los cuadros de texto
Campo de datos 2
Formato
, haga clic en la flecha hacia
Campo de datos 1
para agregar esta información
a la etiqueta.
5
Haga clic en el botón
Imprimir
ubicado en el
ángulo inferior derecho.
6
Haga clic en
Cerrar
para regresar a la ventana
principal.
Guardar un procedimiento
1
Haga clic en el botón
la barra de tareas de opciones principales.
-O-
Seleccione
principal.
Si este
procedimiento
quedará guardado.
2
Si este procedimiento es
anteriormente, aparecerá la ventana estándar de
Windows
3
Ingrese el
4
Haga clic en
Guardar como
Nombre del archivo
Guardar
el nombre ingresado.
Guardar procedimiento
Archivo>Guardar
ya existe
nuevo
en el menú
, el archivo
y no ha sido guardado
.
del procedimiento.
para guardar el archivo con
y
en
Creación de un nuevo procedimiento
A partir de una plantilla en blanco:
1
Desde la ventana principal, haga clic en el botón
Nuevo procedimiento
opciones principales.
-O-
Seleccione
principal.
en la barra de tareas de
Archivo>Nuevo...
42
en el menú

2
En la ventana
Seleccionar plantilla
, haga clic en el
formulario que desea utilizar (Combinado, Largo
o Corto). Para obtener más detalles acerca de cada
formulario, consulte la
3
Haga clic en
Aceptar
Guía del usuario
.
. Aparecerá un formulario en
blanco.
4
Para ingresar los detalles del procedimiento, de a uno
por vez, haga clic en cada icono del panel
del procedimiento
a la izquierda y seleccione o
Secciones
ingrese los datos específicos en las ventanas que
aparezcan.
5
Haga clic en el botón
Guardar procedimiento
A partir de un procedimiento existente:
1
Desde la ventana principal, haga clic en el botón
procedimiento
principales.
-O-
Seleccione
2
Cuando aparezca la ventana
el nombre del archivo que desea y luego en
-O-
Haga doble clic en el nombre del archivo.
3
Guarde inmediatamente el procedimiento con
su nuevo nombre para evitar hacer cambios
involuntarios al procedimiento existente.
4
Revise los detalles del procedimiento haciendo clic, de
a uno por vez, en cada icono del panel
procedimiento
ingresando cambios en las ventanas que aparezcan.
5
Haga clic en el botón
en la barra de tareas de opciones
Archivo>Abrir...
en el menú principal.
Abrir
, haga clic en
Abrir
Secciones del
a la izquierda, y luego seleccionando o
Guardar procedimiento
.
Abrir
.
.
43

Importación de versiones anteriores
de procedimientos
Para importar un único procedimiento:
1
Con LOCKOUT-PROTM v3.0 abierto, haga clic en
Archivo>Importar>Archivo de procedimiento (v1.x
y v2.x)
2
Desde el cuadro de diálogo
seleccione el tipo de archivo (v1.x o v2.x) a
importar, luego seleccione el archivo de la lista y haga
clic en
3
Cuando el procedimiento aparezca en el área de
visualización principal, ya habrá sido convertido
y usted podrá realizar los cambios que desee.
4
Al finalizar, haga clic en el botón
procedimiento
opciones principales.
5
En el cuadro de diálogo
un nuevo nombre si lo desea.
Para importar por lotes múltiples procedimientos:
1
Con LOCKOUT-PROTM v3.0 abierto,
Archivo>Importar
v1.x
en que fueron creados sus archivos anteriores.
2
En la ventana
el directorio que contiene los archivos a convertir
aparezca en el cuadro
donde los archivos convertidos se van a guardar
aparezca en el cuadro
3
Haga clic en el botón
.
Abrir
.
en la barra de tareas de
y luego en
o
Convertir archivos v2.x
Conversión por lotes
Fuente
Destino
Iniciar conversión
Abrir
de Windows,
Guardar
Guardar como
haga clic en
Convertir archivos
, según la versión
, asegúrese de que
, y que el directorio
.
, escriba
.
44

Cómo obtener ayuda adicional
Tutorial en línea:
LOCKOUT-PRO
Al ejecutar por primera vez
TM
, se abre la ventana Tutorial en línea a
la derecha. El tutorial contiene los pasos básicos para
crear, guardar e imprimir procedimientos y material
relacionado. Puede navegar por el tutorial usando los
indicadores
Siguiente, Atrás
y otros que aparecen en
la ventana.
Ayuda en línea:
TM
PRO
aspecto de la aplicación.
ofrece información detallada acerca de cada
La ayuda en línea en LOCKOUT-
Para acceder a la ayuda
en línea:
•
En el menú principal, haga clic en
de ayuda
Guía del usuario:
.
La
Guía del usuario
instalada en su equipo junto con LOCKOUT-PRO
Puede ver la
Guía del usuario
e imprimir una o todas
Ayuda>Temas
detallada está
TM
.
las páginas.
Para ver la
1
Abra
instaló LOCKOUT-PRO
es
2
Abra la carpeta
Documentación
3
En la carpeta
LOPuserguide.pdf
Guía del usuario
Mi PC
y navegue hacia la carpeta donde se
C:\Archivos de programa\Brady
Lockout PRO
:
TM
. La ruta predeterminada
y ubique la carpeta
.
Documentación
, localice el archivo
y haga doble clic en el mismo para
.
abrirlo.
Para imprimir la
1
Haga clic en
de la
Guía del usuario.
2
Elija las opciones para imprimir.
3
Haga clic en el botón
Guía del usuario
Archivo>Imprimir
Imprimir
:
en el menú principal
.
45

Cómo comunicarse con el soporte técnico
Estados Unidos y otros países asociados
Tel: 800-368-3362
Fax: 414-228-5799
Correo electrónico: technical_support@bradycorp.com
Canadá:
Tel: 888-262-7576
Fax: 905-764-5557
Correo electrónico: techsupportcanada@bradycorp.com
México:
Tel: 800-368-3362
Fax: 525-527-5586
Correo electrónico: bradymexico@bradycorp.com
Brasil:
Tel (PABX): 55 11 3686-4720
Tel (discado directo): 55 11 3686-5697
Fax: 55 11 3686-5236
Correo electrónico: brady_service_brazil@bradycorp.com
Todos los derechos reservados.
www.bradycorp.com
©2006 Brady Worldwide, Inc.
:
46
 Loading...