

Page 1

User’s Manual
www.bradyid.com/labxpert
Page 2

Copyright
This manual is copyrighted with all rights reserved. No portion of this manual may be copied or
reproduced by any means without the prior written consent of Brady Corporation.
While every precaution has been taken in the preparation of this document, Brady assumes no
liability to any party for any loss or damage caused by errors or omissions or by statements resulting
from negligence, accident, or any other cause. Brady further assumes no liability arising out of the
application or use of any product or system described, herein; nor any liability for incidental or
consequential damages arising from the use of this document. Brady disclaims all warranties of
merchantability of fitness for a particular purpose.
Trademarks
TM
LABXPERT
Font Fusion
is a trademark of Brady Corporation.
TM
is a registered trademark of Bitstream®.
Brady reserves the right to make changes without further notice to any product or system described
herein to improve reliability, function, or design.
© 2005 Brady Corporation. All Rights Reserved.
Revision A, 1/2005
Firmware Version 1.0
Brady Corporation
6555 West Good Hope Road
P.O. Box 2131
Milwaukee, WI 53201
Main Switchboard: (800) 541-1686
(414) 358-6600
FAX: (800) 292-2289
Sales/Customer Support: (800) 537-8791
ii User’s Manual
Page 3

Regulatory Information
Note: This equipment has been tested and found to comply with the limits for a Class A digital
device, pursuant to part 15 of the FCC Rules. These limits are designed to provide reasonable
protection against harmful interference when the equipment is operated in a commercial environment.
This equipment generates, uses, and can radiate radio frequency energy and, if not installed and used
in accordance with the instruction manual, may cause harmful interference to radio communications.
Operation of this equipment in a residential area is likely to cause harmful interference in which case
the user will be required to correct the interference at his/her own expense.
The user is cautioned that any changes or modifications not expressly approved by Brady Worldwide
could void the user’s authority to use the equipment.
This Class A digital apparatus meets all requirements of the Canadian Interference-Causing
Equipment Regulations
Cet appareil numerique de la classe A respecte toutes les exigencies du Reglement sur le material
broilleur du Canada.
This is a Class A product. In a domestic environment this product may cause radio interference, in
which case the user may be required to take adequate measures.
Brady Warranty
Brady products are sold with the understanding that the buyer will test them in actual use and
determine for him or herself their adaptability to his/her intended uses. Brady warrants to the buyer
that its products are free from defects in material and workmanship, but limits its obligations under
this warranty to replacement of the product shown to Brady’s satisfaction to have been defective at
the time Brady sold it. This warranty does not extend to any persons obtaining the product from the
buyer.
THIS WARRANTY IS IN LIEU OF ANY OTHER WARRANTY, EXPRESS OR IMPLIED
INCLUDING, BUT NOT LIMITED TO ANY IMPLIED WARRANTY OF MERCHANTABILITY
OR FITNESS FOR A PARTICULAR PURPOSE, AND OF ANY OTHER OBLIGATIONS OR
LIABILITY ON BRADY’S PART. UNDER NO CIRCUMSTANCES WILL BRADY BE LIABLE
FOR ANY LOSS, DAMAGE, EXPENSE OR CONSEQUENTIAL DAMAGES OF ANY KIND
ARISING IN CONNECTION WITH THE USE, OR INABILITY TO USE, BRADY’S PRODUCTS.
User’s Manual iii
Page 4

Technical Support
Choose one of the following options to contact system support provided by Brady Corporation:
U.S. and Canada
Phone: (800) 643-8766, Monday - Friday 7:00 a.m. - 6:00 p.m. (CST).
Fax: (414) 358-6767.
E-Mail: tech_support@bradycorp.com.
Assistance is available 24 hours per day / 7 days per week. Go to: www.bradyid.com, and then
select Knowledge Base from the left-hand panel.
Belgium / Luxembourg /
The Netherlands
Phone: +32 52 457 397
Fax: +32 52 457 800
E-Mail: tsbelgium@bradycorp.com
Italy
Phone: +39 02 96 28 60 14
Fax: +39 02 96 70 08 82
E-Mail: tsitaly@bradycorp.com
UK / Ireland
Phone: +44 1295 228 205
Fax: +44 1295 27 17 55
E-Mail: tsuk@bradycorp.com
Mexico
Phone: 01 800 112 7239
Fax: 52 55 5527 55 86
E-Mail: bradymexico@bradycorp.com
France
Phone: +33 169.296 717
+800 907 107
Fax: +33 169 296 718
E-Mail: tsfrance@bradycorp.com
Germany / Austria / Switzerland
Phone: +49 6103 75 98 451
Fax: +49 6103 7598 670
E-Mail: tsgermany@bradycorp.com
Sweden / Norway / Finland/Denmark
Phone: 46 85 90 057 30
Fax: 46 85 90 818 68
E-Mail: tssweden@bradycorp.com
Brazil
Phone: 55 11 3604 7729/7715
Fax: 55 11 3686-5236
E-Mail: brady_service_brazil@bradycorp.com
Latin America & Caribbean
Phone: (414) 438-6868
Fax: (414) 438-6870
E-Mail: bradyintl@bradycorp.com
Africa
Israel
Middle East
Turkey
Eastern Europe
Greece
Portugal
Malta
Russia
Spain
Phone: +33 437 245 234
Fax: +33 472 74 45 54
E-Mail: tsspain@bradycorp.com
Phone: +32 52 457 937
Fax: +32 52 457 800
E-Mail: tsbelgium@bradycorp.com
iv User’s Manual
Page 5

Table of Contents
CHAPTER 1 INTRODUCTION........................................................................................................... 1
PACKAGE CONTENTS ................................................................................................................................1
PRODUCT REGISTRATION..........................................................................................................................1
ABOUT THE USER’S MANUAL ................................................................................................................... 1
TECHNICAL SPECIFICATIONS .................................................................................................................... 2
CERTIFICATION ......................................................................................................................................... 3
SAFETY INFORMATION .............................................................................................................................. 3
CHAPTER 2 PRINTER COMPONENTS ........................................................................................... 4
KEYPAD LAYOUT ......................................................................................................................................4
BATTERY COMPARTMENT......................................................................................................................... 4
CONNECTIONS ........................................................................................................................................... 5
ACCESSORIES FOR YOUR LABXPERT
TM
LABORATORY LABELING SYSTEM............................................. 5
MATERIAL CARTRIDGES ...........................................................................................................................6
CHAPTER 3 GETTING STARTED .................................................................................................... 7
SETTING UP THE PRINTER.......................................................................................................................... 7
CHAPTER 4 USING THE DISPLAY SCREEN, MENU, AND KEYPAD ......................................9
THE DISPLAY SCREEN............................................................................................................................... 9
MENU BASICS ........................................................................................................................................... 9
MENU SELECTIONS ................................................................................................................................. 10
GUIDE TO KEYS.......................................................................................................................................11
CHAPTER 5 CREATING AND PRINTING LABELS....................................................................13
CREATING A BASIC LABEL...................................................................................................................... 13
FONT SIZES.............................................................................................................................................. 14
SYMBOLS................................................................................................................................................. 15
INTERNATIONAL CHARACTERS ............................................................................................................... 16
PRINTING LABELS ...................................................................................................................................16
CHAPTER 6 FORMATTING LABELS USING MENU CHOICES..............................................17
SETTING VIAL SIZE .................................................................................................................................17
SETTING LEGEND JUSTIFICATION ........................................................................................................... 18
ROTATING LEGENDS ...............................................................................................................................19
CHAPTER 7 GENERAL SETTINGS................................................................................................ 20
SETTING THE TIME/DATE STAMP............................................................................................................ 20
PRINTING THE TIME/DATE STAMP .......................................................................................................... 22
SETTING UNITS........................................................................................................................................ 22
SETTING MENU LANGUAGE ....................................................................................................................23
CHAPTER 8 ADVANCED FEATURES ...........................................................................................24
CONTINUOUS MEDIA............................................................................................................................... 24
SERIALIZED LABELS................................................................................................................................25
BARCODE LABELS...................................................................................................................................27
MULTI-ZONE LABELS ............................................................................................................................. 28
PC CONNECTIVITY / PERIPHERAL MODE................................................................................................ 32
User’s Manual v
Page 6

CHAPTER 9
SAVING A LABEL TO MEMORY ............................................................................................................... 33
RECALLING A LABEL FROM MEMORY .................................................................................................... 33
DELETING A LABEL FROM MEMORY....................................................................................................... 34
CHAPTER 10 MAINTENANCE ...................................................................................................... 35
CLEANING ...............................................................................................................................................35
ACCESSORY PARTS LIST .........................................................................................................................36
CHAPTER 11 TROUBLESHOOTING ...........................................................................................37
TROUBLESHOOTING GUIDE ..................................................................................................................... 37
ERROR MESSAGES................................................................................................................................... 38
APPENDIX A MENU TREE............................................................................................................. 39
APPENDIX B FONT SIZE CHART ................................................................................................ 40
APPENDIX C SYMBOL LIBRARY................................................................................................ 42
APPENDIX D GLOSSARY OF TERMS......................................................................................... 44
MEMORY .....................................................................................................................33
vi User’s Manual
Page 7
Chapter 1 Introduction
This chapter contains introductory information about the LABXPERTTM Laboratory Labeling System
as well as information about the User’s Manual.
Package Contents
Before you begin setting up the printer, verify that you have received the following items in your
packaging:
LABXPERT
A/C Power Supply
Free Media Cartridge: XSL-86-461
PC Communication Cable
Printed Quick Start Guide – 4 languages
Product CD containing:
o Quick Start Guide
o Sample Label Tutorial
o User’s Manual
o Printer Driver
o Link to Product Registration/Warranty
Save Your Packaging
The packaging surrounding your LABXPERT
shipments of the printer and accessories.
TM
Printer
TM
printer should be saved in the event of any future
Product Registration
Register your LABXPERT
http://www.bradycorp.com/register
WARNING: Never ship the LABXPERT
batteries and disengaging the print head.
TM
Laboratory Labeling System on-line at
.
TM
printer without first removing the alkaline
About the User’s Manual
This manual contains information on the features, functions, and maintenance requirements for the
LABXPERT
TM
Laboratory Labeling System. Important information found in this manual is marked
as follows:
WARNING: May cause physical injury. May also cause damage to equipment and data
loss.
Note: Helpful additional information and tips for use.
User’s Manual 1
Page 8

Additional User Documentation
Quick Start Guide
Do you want to create and print a label fast? See the LABXPERT
TM
Quick Start Guide, included with
your printer, for basic instructions on creating and printing labels.
Sample Label Tutorial
Do you want to practice creating and printing labels? See the LABXPERT
included on the product CD for this printer.
Technical Specifications
The LABXPERT
TM
printer has the following physical and environmental characteristics:
Physical Specifications
Dimensions
Metric U.S.
190.5 x 241.3 x 88.9 mm 7.5” x 9.5” x 3.5”
TM
Sample Label Tutorial,
Weight—Printer only
Weight—Printer and Cartridge
Weight—Printer and Batteries
Weight—Printer, Cartridge, and
Batteries
.77 kg 1.70 lbs.
.98 kg 2.15 lbs.
.91 kg 2 lbs.
1.11 kg 2.45 lbs.
Environmental Specifications
Operation Storage
Temperature*
Relative Humidity
4o to 40 o C (40 o to 105 o F) -18 o to 60 o C (0 o to 140 o F)
20% to 95% (non-condensing) 10% to 80% (non-condensing)
*Exposing the LABXPERTTM printer to direct sunlight is not recommended.
POWER: Six AA 1,5V
Alkaline Batteries or AC Adapter 9V ; 3,3A.
2 User’s Manual
Page 9

Certification
TM
The LABXPERT
Laboratory Labeling System complies with the following:
• FCC Part 15 Class A
• ANSI/UL 60950
• CAN/CSA-C22.2 No. 60950
• NOM-019-SCFI-1998
• EN 55024
• EN55022 Class A
• EN60950
• AS/NZS 3548 Industry Canada ICES-003 Issue 3
Safety Information
WARNING: Please heed the following precautions before setting up and using your
LABXPERTTM Laboratory Labeling System:
• Do not immerse the printer or A/C adaptor in water. Doing so may cause electrical shock.
• Avoid exposing the printer to unusually high levels of heat and humidity.
• Do not attempt to use batteries other than those recommended in this manual.
User’s Manual 3
Page 10

Chapter 2 Printer Components
This chapter provides the locations and descriptions of the components that make up the
LABXPERT
TM
printer.
Keypad Layout
The LABXPERT
TM
Laboratory Labeling System is available in standard QWERTY keyboard
layout style.
4
1
2
3
5
1. Material Cartridge
2. Cutting Lever
3. Locking Lever
4. LCD Screen
5. Keypad
6. Battery
Compartment
7. Battery Cover
Battery Compartment
6
7
4 User’s Manual
Page 11
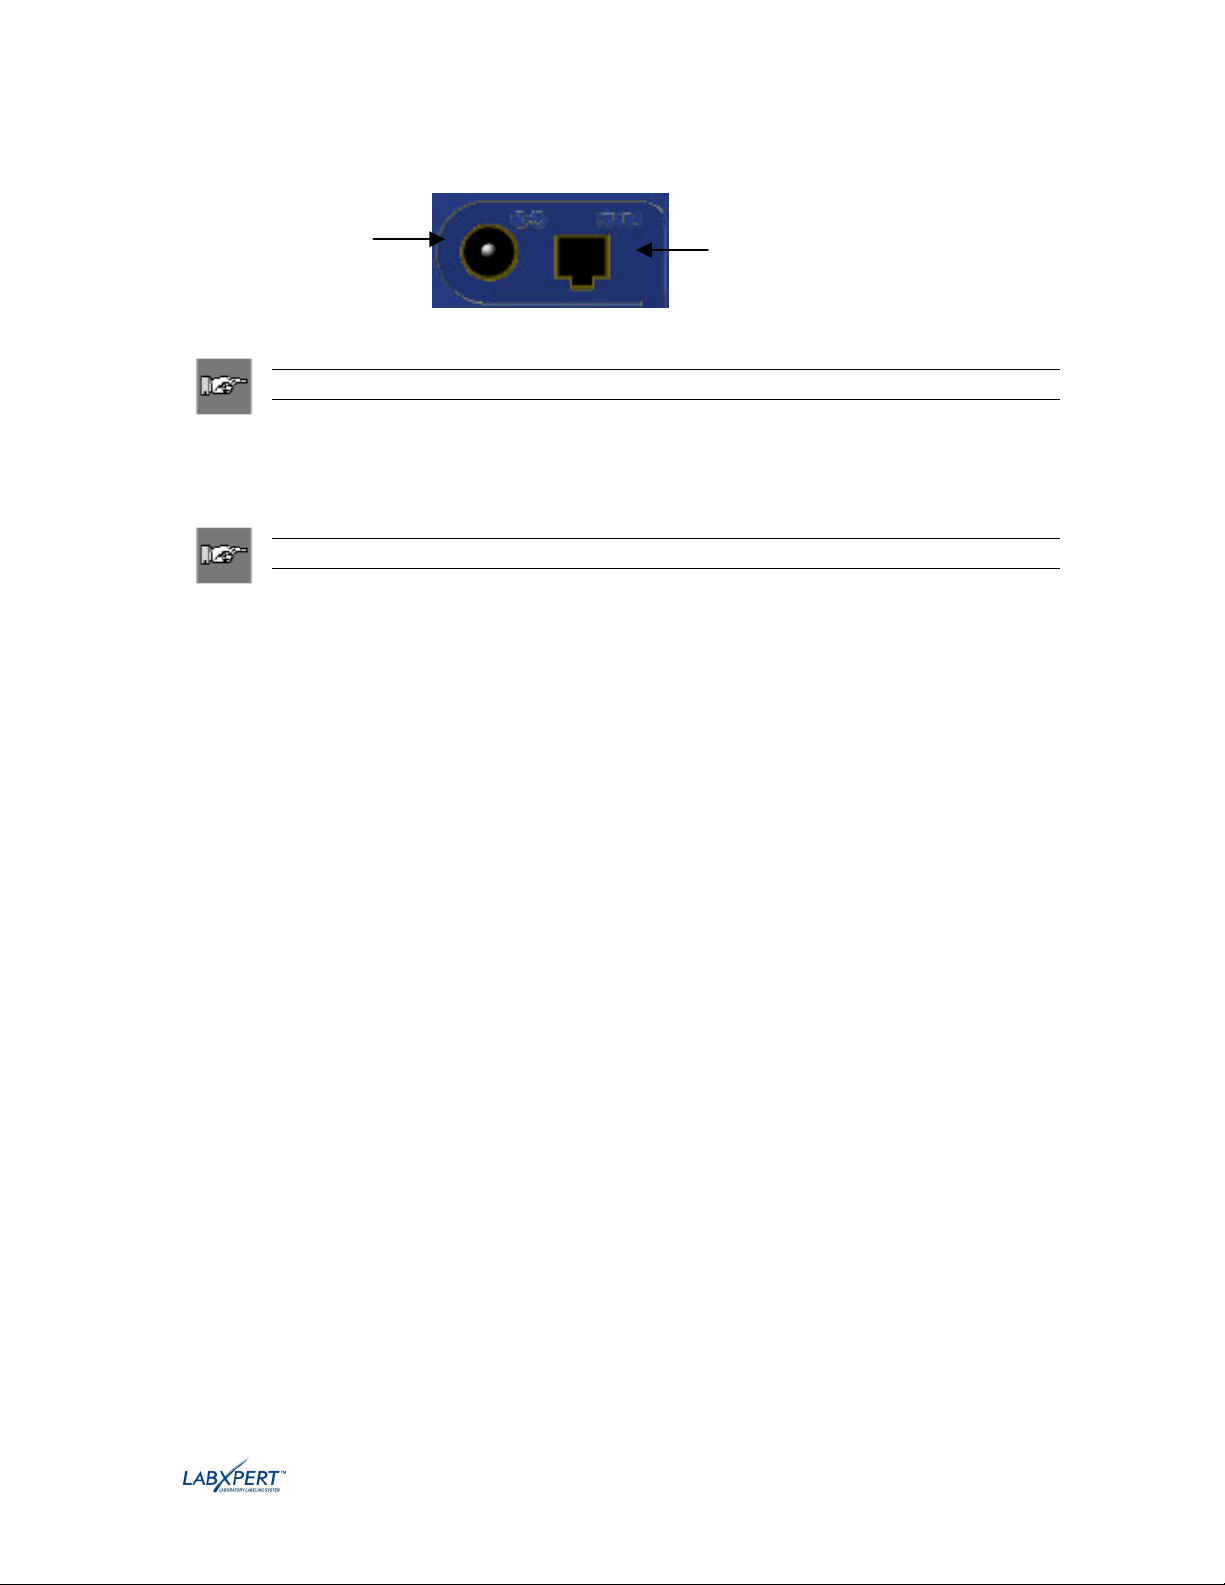
Connections
Connect A/C
Adaptor
Note: Connections are found on the top of the printer.
TM
Accessories for your LABXPERT
Laboratory Labeling System
These accessories may be ordered from your Brady distributor:
Note: See also the Accessory Parts List on page 36.
• Hard Side Carrying Case
• PC Communication Cable
• A/C Adaptor
• Cleaning Kit
Serial Port
User’s Manual 5
Page 12
Material Cartridges
Thanks to innovative smart-cell technology, the LABXPERT
and automatically adjusts to it, saving setup time and effort.
Note: Most label formatting default settings are based on the cartridge installed in the
printer. Please see the chapters on formatting later in this manual for information on
changing the default settings.
TM
Cartridges available for your LABXPERT
Laboratory Labeling System
Material Description Applications
TM
printer recognizes the label material
B-461 Self-laminating
Polyester
Extremely low profile material for self-laminating vial,
tube, and slide ID.
Withstands liquid nitrogen (-195º C), freezer (-80º C),
autoclave, hot water bath, and centrifuge. Low profile
prevents jamming in racks and centrifuge.
B-427 Self-laminating
Vinyl
Self-laminating vial, tube, slide, straw, and bottle ID.
Withstands liquid nitrogen (-195º C), and freezer
(-80º C).
B-488 Chemical Resistent
Matte Polyester
Chemical-resistent label for slides, plates, bottles, and
general laboratory ID.
Withstands Xylene, DMSO, Ethanol,
freezer (-80º C), autoclave, and hot water bath.
B-490 White Polyester
Freezerbondz™
Adheres to frozen surfaces including vials, glass, and
polypropylene stored in liquid nitrogen.
Note: When applying, material should wrap around to
re-touch itself.
B-499 Nylon Cloth Permanent adhesive – for general laboratory ID, vial,
tube, slide, bottle, and box ID.
Withstands liquid nitrogen (-195º C), freezer (-80º C),
and autoclave.
B-498 Vinyl Cloth Repositionable adhesive – for general
laboratory ID, vial, tube, slide, bottle, and box ID.
Withstands freezer (-80º C).
B-351 Tamper-evident
Vinyl Seals
Security ID for bottles, vials, test tubes, well plates,
boxes, and general lab applications requiring evidence
of tampering.
6 User’s Manual
Page 13
Chapter 3 Getting Started
This chapter provides instructions on setting up your LABXPERTTM printer and creating a basic
label. Refer to the following chapter for details on how to use the keypad and menu.
Setting up the printer
Follow these steps to set up your printer prior to creating your first label.
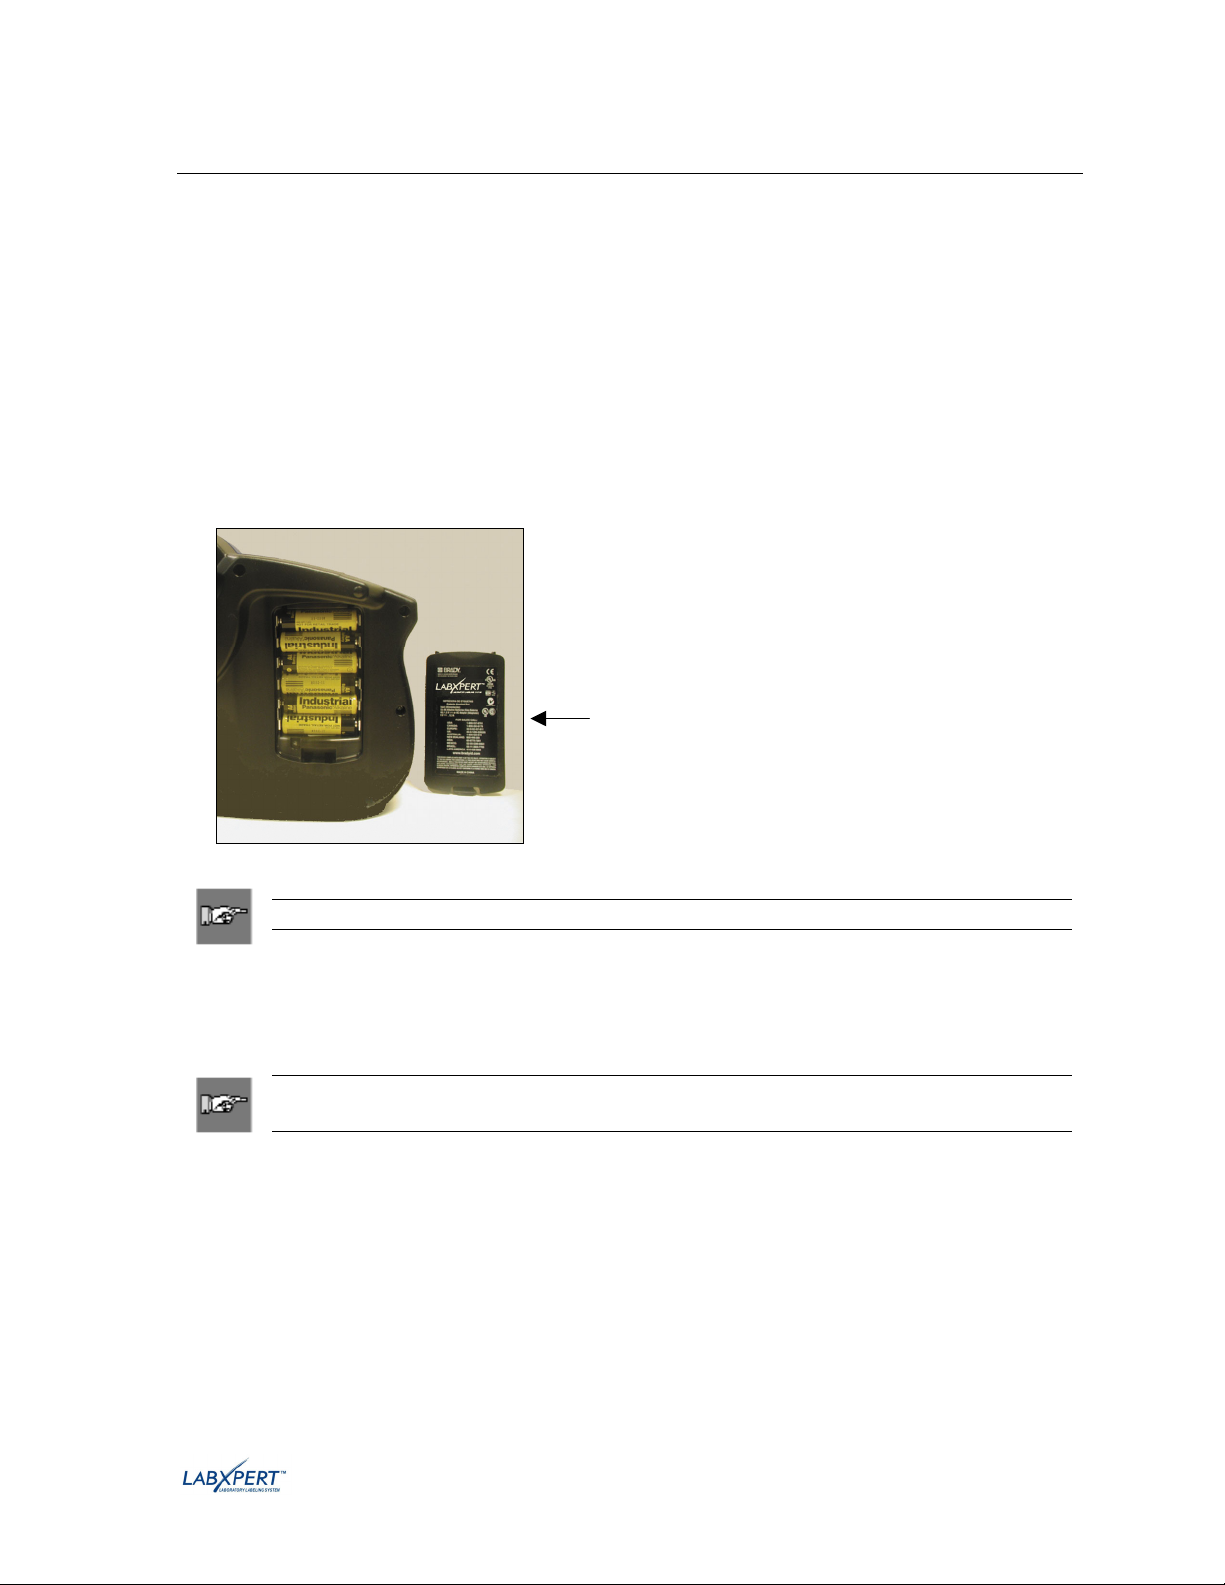
Step 1. Install batteries or connect to power
To insert six AA alkaline batteries (not included),
1. Remove the battery cover located on the backside of the printer.
2. Install the batteries as shown. See inside the battery compartment for the battery-positioning grid.
3. Close the battery compartment.
Battery
Cover
Note: You can print up to 650 labels between battery changes.
The LABXPERTTM printer can also be powered by use of the A/C adaptor provided with your
printer. See the Connections section on page 5.
Step 2. Replace material cartridge
Note: Make sure to cut off any excess label material before removing an existing
cartridge.
Your printer ships with a cartridge installed. Follow the instructions on the next page to replace the
existing cartridge.
User’s Manual 7
Page 14
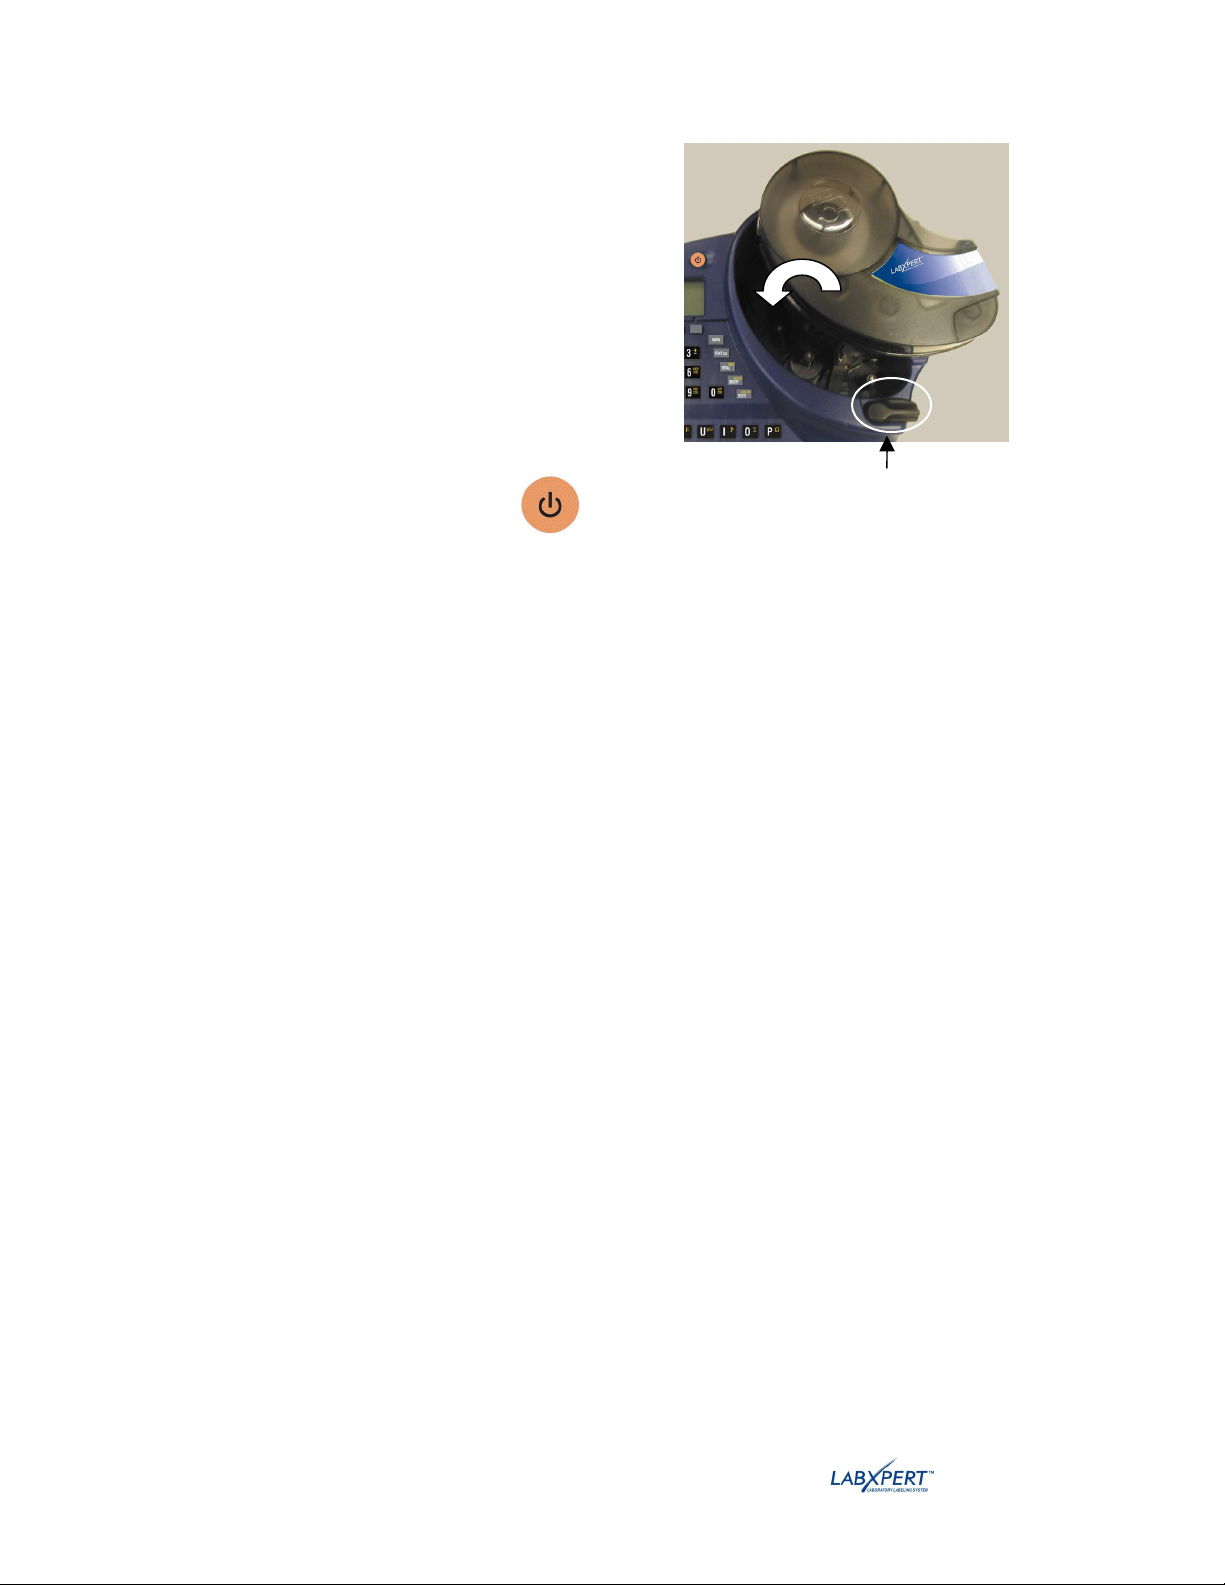
1. Turn the locking lever down to unlock the
cartridge.
2. Locate the cartridge release button on the
backside of the printer and push firmly to eject
cartridge.
3. Remove the existing cartridge.
4. Install the new cartridge as shown.
5. Turn the locking lever up to lock both the
cartridge and print head.
Step 3. Turn the printer ON.
Press the POWER key.
Locking Lever
8 User’s Manual
Page 15
Chapter 4 Using the Display Screen, Menu, and Keypad
This chapter provides information about the display screen and menu. It also provides information on
the keys found on the LABXPERT
TM
printer and their corresponding functions.
The Display Screen
When the Power button is pressed, the display screen appears.
The display allows you to see up to
three lines of text and 16 characters per
line. The display auto-scrolls when you
enter more than the maximum displayed
lines or characters. Use the arrows on
your keypad to navigate the screen.
Status Bar
The status bar, located on the bottom of the display, indicates the current text line, font size, and label
zone.
Contrast
In order to change the contrast on the display, press
• Press
+ to darken.
and then:
• Press
+ to lighten.
Menu Basics
This section provides basic instructions on using the menu as well as an overview of the menu
selections. Use the menu and related softkeys to perform many of the label formatting commands.
Note: See Chapter 6 Formatting Labels Using Menu Choices for more information.
Also See Appendix A Menu Tree.
To access the menu:
Step 1. Press
.
When the MENU key is pressed, a series of menu choices appears. The gray softkeys correspond
to the menu choices shown on the screen.
SOFTKEYS
User’s Manual 9
Page 16

Step 2. Press [NEXT] to advance to the next set of menu choices:
Pressing [NEXT] again cycles back to the first set of menu choices when the last menu choice is
reached.
Step 3. Press [CLEAR/ESC] to either back up to the
previous menu level, or exit menu mode and
return to the display screen.
Menu Selections
To perform types of formatting, press [MENU] and the corresponding softkey. Following is a list of
the high-level menu selections and the corresponding softkey:
Menu Selection Softkey
Vial – Choose from available sizes of .6 ml, 1.5 ml, 1.8 ml, 2-4 ml.
15 ml, and 50 ml, and AUTO.
Note: To clear a previously set vial size, select AUTO from the Vial
menu.
Continuous – Choose AUTO for label length that is determined by
font size and characters entered, LEN (length) to enter specific
length, or SEP (separator) to enter option of NONE, TIC, or LINE.
Justify – Set horizontal and vertical justification of legend.
Rotate – Set rotation of legend to 0, 90, 180, or 270 degrees.
Units – Change units (to inches, millimeters, or points) for displaying
label and font sizes.
Barcode – Add Code 39 or Code 128 barcodes.
Set Time – Set the time to print a real-time stamp on your label.
Set Date – Set the date to print a real-time date stamp on your label.
Language – Change the default language.
See Appendix A , Menu Tree for a listing of submenus related to each section.
[VIAL]
[CONT]
[JUST]
[ROT]
[UNIT]
[BAR]
[TIME]
[DATE]
[LANG]
10 User’s Manual
Page 17

Guide to Keys
POWER – powers on the printer.
Press the POWER button again to power off the printer. The printer automatically
shuts off after 10 minutes of non-use.
FUNCTION – accesses a secondary function or character when pressed along with the
desired key.
A secondary function or character is shown in yellow on each button.
ARROW – adjusts cursor positioning by one character or one line.
FUNCTION + ARROW – adjusts cursor positioning to the first or last character
position or line.
ENTER – creates a new line when typing text.
Pressing ENTER confirms menu selection when in MENU mode.
DELETE – clears the character immediately behind the cursor position.
FUNCTION +
Clear Text? – Select this to clear the text only.
Clear All? – Select this to clear all text and formatting, including font size.
When in MENU mode, the Clear/Esc function backs out of the menu. This works the
same whether or not you use it in conjunction with the Function key.
– brings up two choices on the display screen:
PRINT – prints one copy of the legend.
FUNCTION +
– prints up to 99 copies of the legend.
FONT SIZE – displays font size and allows font size changes through softkeys.
See Appendix B Font Size Chart.
Also toggles BOLD on/off.
MENU – toggles through softkey menu options and displays additional soft key
choices.
FEED – feeds material through the printer without printing. Use for fixed length
continuous labels in order to advance the label strip to the cut position.
MEMORY – accesses Save, Recall, and Delete softkeys used to store legends.
FUNCTION +
– toggles between text and barcode mode.
SERIAL – performs a standard serialization of the character on which the cursor is
placed. A serialization results in a series of legends that is incremented by one number
(0-9) and/or one letter (A-Z, a-z).
FUNCTION + – accesses the symbol library.
See Appendix C , Symbol Library.
User’s Manual 11
Page 18

SPACE – creates a space between characters when creating legends.
FUNCTION +
– toggles CAPS on and off.
FUNCTION + – brings up a selection of international characters. Use either the
softkey or keypad arrows to navigate the character menu.
FUNCTION + – navigates to the previous zone when entering text and when
viewing or editing previously entered text on continuous or die-cut labels, in predefined zones. When using a zone that is not pre-defined, this functions only for
viewing or editing previously entered text.
FUNCTION + – navigates to the next zone when entering text and when viewing
or editing previously entered text on continuous or die-cut labels, in pre-defined zones.
When using a zone that is not pre-defined, this only functions for viewing or editing
previously entered text.
FUNCTION + then entering the character – enables formatting of the entered
character to display and print as superscript.
FUNCTION + then entering the character – enables formatting of the entered
character to display and print as sub-script.
FUNCTION + – enables insertion of the time by hour and minute or in 12/24
hour format. Note: Pressing FUNCTION + the fourth softkey while in the TIME menu
toggles lock/unlock access for changing the time.
FUNCTION + – enables insertion of the date by day, month, and year (current
date appears by default). Note: Pressing FUNCTION + the fourth softkey while in the
DATE menu toggles lock/unlock access for changing the date.
FUNCTION + – not functional; reserved for future use.
12 User’s Manual
Page 19

Chapter 5 Creating and Printing Labels
This chapter provides information on creating and printing labels, including information on changing
font sizes and bold status. It also provides instructions for adding symbols and international characters
to a label.
Creating a Basic Label
Follow these steps to create and print a basic label. For details and information on advanced features,
refer to the following chapters of this manual.
TM
Note: See the LABXPERT
creating a variety of labels.
Step 1. Press POWER.
Step 2. Press FONT SIZE.
The display screen shows the
current font size and bold status.
Sample Label Tutorial for step-by-step instructions on
Step 3. Use the up/down arrow softkeys – or the arrows on your keypad – to select a font
size. [▲] [▼]
Note: See the Font Size Chart on page 40.
Step 4. Press the [BOLD] softkey to toggle bold ON or OFF.
Step 5. Press ENTER.
Step 6. Type Text. Press ENTER after each line of text.
Note: You may also select from a list of symbols to include on your label. See the Symbol
Library on page 42.
Step 7. Press PRINT.
For multiple copies, press FUNCTION + PRINT/MULTI-PRINT.
Step 8. Pull the cutter lever down to cut the label.
User’s Manual 13
Page 20

Font Sizes
Fonts are available in these point sizes: 4, 6, 7, 10, 13, 20, 26, 38, 45, 51, 76, and 102. Symbols and
numbers can also be printed in these font sizes. The LABXPERT
TM
Laboratory Labeling System also
offers a 126 pt. (1.25”, 31.75mm) font for uppercase characters only.
Note: Refer to Appendix B Font Size Chart to view samples of the available font sizes.
Default Font Size
TM
When a cartridge is loaded and the unit is turned on, the LABXPERT
printer reads the label size
information stored in the smart-cell. This information is used to automatically set an initial font size
for your label. The method used to set this default is intended to help approximate an optimal starting
point for sizing your text.
For continuous printed labels (banners), the default font size is the largest font that prints on the
selected marker width in horizontal orientation.
Changing the Font Size
The maximum font size selectable for a particular label line depends on several factors including label
size, number of characters of text entered on the label line, number of lines of text entered on the
label, and the font sizes chosen for the label lines.
The printer allows a maximum of 50 characters per line and 24 lines per label. These limits are
dependent on factors such as number and type of characters, font size, and label type.
To set or change a font size:
1. Press
. The font size and bold status appear on the display screen.
2. Press the up/down arrow softkeys – or the arrows on your keypad [▲] [▼] – to select a size.
3. Press
.
Once the font is set for a label line, the size remains the same for any new lines that follow, and
remains at the size you choose until you decide to change it.
If you attempt to enter too many characters on a label line, you will receive this error message:
Cannot Fit. To allow more characters to fit on the line, you must decrease the font size.
Creating Boldface Text
Boldface text is created on a line-by-line basis. To create a boldface line of text:
1. Place your cursor anywhere in the line of text.
2. Press
.
3. Press [BOLD]. Pressing the BOLD softkey toggles bold on and off on a line-by-line basis.
When BOLD is toggled to ON, it stays bold until OFF is selected.
4. Press
.
14 User’s Manual
Page 21

Symbols
The LABXPERT
TM
Laboratory Labeling System offers a variety of symbols in these categories:
Refer to Appendix C , Symbol Library for a list of symbols available for printing within each
category.
• Greek Symbols
• Laboratory Symbols
• PPE/Mandatory
• Hazard Warning
• Prohibition
• First Aid/Fire
• Hazardous Materials (WHMIS)
• Hazardous Materials (HSID)
• Arrows/Misc.
To select a symbol:
1. Place your cursor anywhere in the line of text.
2. Press
+ .
3. A list of symbol categories appears on the display screen:
Use the up/down arrow
softkeys – or the arrows on
your keypad [▲] [▼] – to
scroll through the symbol
categories.
4. Press
to select the desired symbol category.
The symbols appear, one at a time, for the category selected.
5. Press the up/down arrow softkeys – or the arrows on your keypad [▲] [▼] – to scroll
through the symbols in the selected category.
6. Press
to select the desired symbol.
The symbol will appear on the display screen at the current cursor position. Some symbols will
appear as a generic character symbol
on the display, but will appear as intended when printed.
Symbols can be printed in all font sizes. See the section on Font Sizes on page 14 for instructions
on changing font sizes.
User’s Manual 15
Page 22

International Characters
TM
The LABXPERT
Laboratory Labeling System offers these international characters corresponding
to the 10 non-English languages offered.
International Characters—Upper Case
International Characters—Lower Case
To select an international character:
1. Press
+ . A selection of international characters appears on the display screen.
2. Press either the softkey or keypad arrows to navigate the character menu.
3. When the desired character is reached, press . The selected international character is
inserted in the cursor position.
Printing Labels
To print multiple copies of a label:
To print one copy of a label, press
Note: If your label cartridge runs out of
labels before the print job is completed, the print
job will be aborted. You will need to initiate a
new print job to continue printing the remaining
labels.
.
1. Press
+ . A prompt appears
asking you to enter how many copies are
needed.
No. of Copies? 1
2. Enter a number between 1 and 99.
3. Press
.
16 User’s Manual
Page 23

Chapter 6 Formatting Labels Using Menu Choices
This chapter provides information on the formatting options available through the LABXPERTTM
menu. See Menu Basics on page 9 for general menu use instructions.
Note: Most label formatting default settings are based on the cartridge installed in the
printer.
Note: In the instruction in this and other sections,
softkey choices will be named in brackets. For
example, if you are to press the Vial softkey, you will be
instructed to “Press [VIAL]”. This means that you
should press the gray softkey just below VIAL.
Setting Vial Size
The LABXPERT
put-up (vial/vial top) labels (see Chapter 8, Advanced Features for multi-zone label details). Vial
labels can be created using any continuous media; the length is automatically determined by the vial
size chosen.
To create a vial label:
TM
Laboratory Labeling System allows printing of vial labels, including multiple
1. Press
2. Press the [VIAL] softkey.
.
3. Press a vial size softkey, or [NEXT] for
more size options.
4. Pressing [NEXT] advances to the
next set of vial size options:
5. Pressing [NEXT] again advances to the
[AUTO] option. Selecting [AUTO] will
clear a previously set vial size.
6. Make a vial size selection, then press
.
Note: You may also change a previously set vial size by selecting menu option [CONT], then
selecting [AUTO], then selecting a new vial size under the [VIAL] menu.
User’s Manual 17
Page 24

Setting Legend Justification
Use the menu selections to justify your legends horizontally or vertically. Selections for each type of
justification are as follows:
Horizontal Vertical
123
Left Center Right Top Center Bottom
To justify your legend,
1. Press
2. Press the [JUST] softkey.
The following menu options appear:
123
.
123 123
123
123
• For horizontal justification, press [HORIZ], then [LEFT], [CENT], or [RIGHT].
• For vertical justification, press [VERT], then [TOP]
3. Press
Note: The LABXPERT™ printer allows you to specify justification within separate zones.
See Chapter 8, Advanced Features for more information.
18 User’s Manual
.
, [CENT], or [BOT].
Page 25

Rotating Legends
p
Use the Menu selections to rotate your legends 0, 90, 180, or 270 degrees.
To rotate your legend:
1. Press
2. Press the [NEXT] softkey.
.
3. Press the [ROT] softkey.
The following menu options appear:
The display shows the current
rotation setting.
4. Press [0], [90], [180], or [270].
5. Press
.
Examples:
Rotation
examples are
shown as the
label exits the
rinter.
Note: The LABXPERT™ printer allows you to specify rotation within separate zones in a
multi-zone label. See Chapter 8, Advanced Features for more information.
0
BRADY
o
90 o 180 o 270 o
BRADY
BRADY
User’s Manual 19
Page 26

Chapter 7 General Settings
This chapter provides information on general settings. Settings for the LABXPERTTM printer are set
using the menu and corresponding softkeys.
Setting the Time/Date Stamp
The printer allows you to print a real time and/or date field on your labels. First you must set the time
and date on the printer. To set the time:
1. Press
2. Press the [NEXT] softkey
twice.
The following menu options appear,
allowing you to set the time by hour
and minute, or by 12/24 format.
• Pressing the [HOUR] softkey scrolls to the correct hour and pressing [MIN] scrolls to the
correct minute.
.
3. Press the [TIME] softkey.
The display shows the current
time setting.
• Pressing [12/24] toggles in and out of 12/24 format.
4. Press
Note: Pressing FUNCTION + the fourth softkey while in the [TIME] menu toggles
lock/unlock access for changing the time.
20 User’s Manual
to set the entered time.
Page 27

To set the date:
1. Press
.
2. Press the [NEXT] softkey
twice.
3. Press the [DATE] softkey.
The following menu options appear,
The display shows the current date setting.
allowing you to set the day, month,
and year.
4. Press the following softkeys to cycle to the correct month, day, or year:
[DAY] – cycles to the correct day.
[MON] – cycles to the correct month.
[YEAR] – cycles to the correct year.
5. Press .
Note: Pressing FUNCTION + the fourth softkey while in the [DATE] menu toggles
lock/unlock access for changing the date.
User’s Manual 21
Page 28

Printing the Time/Date Stamp
Print Time
To print the time stamp, press
the time symbol
appears in the place in which you have your cursor. If it does not fit, you will
+ (Insert Time). If the time stamp fits on your label,
receive this error message: Cannot Fit.
The time prints on your label (Hour/Minute or 12/24 format), for example, 9:30 PM or 21:30.
Print Date
To print the date stamp, press
+ (Insert Date). If the date stamp fits on your label,
the date symbol appears in the place in which you have your cursor. If it does not fit, you will
receive this error message: Cannot Fit.
The date prints on your label in dd/MON/yy format. For example, 22/OCT/05.
Note: The time and date stamp reflects real time. Therefore, the time and date printed
on a label reflects the time at printing.
Setting Units
The printer allows you to view both label measurements and font sizes in a variety of units. To
change default units:
1. Press
2. Press the [NEXT] softkey.
.
3. Press the [UNIT] softkey.
The following menu options appear:
The display shows the current unit settings.
• To change the default unit for label measurements, press [LABL],
then press [INCH], or
[MM].
• To change the default unit for fonts, press [FONT], then press [POINT], [INCH], or
[MM]. Inches, millimeters, and points refer to the height of a character.
4. Press
.
22 User’s Manual
Page 29

Setting Menu Language
The printer allows you to view menu choices in eleven different languages. To set the default
language:
1. Press
2. Press the [NEXT] softkey
.
3. Press the [LANG] softkey.
twice.
The display shows the current
language setting.
4. Select your default language.
To select this language Press
English
French
German
Dutch
Italian
Portuguese (Brazilian)
Spanish
Danish
Finnish
Norwegian
Swedish
[ENG]
[FRE]
[GER]
[DUT]
[ITAL]
[PORT]
[SPAN]
[DAN]
[FIN]
[NOR]
[SWE]
5. Press .
Note: All menu prompts and messages will be displayed in the language selected.
User’s Manual 23
Page 30

Chapter 8 Advanced Features
This chapter provides information on creating and printing continuous labels (both automatic and
fixed length), serialized labels, barcode labels, and multi-zone labels.
Continuous Media
The LABXPERT
and to insert separators between continuous media labels.
To set label length and add separators:
TM
Laboratory Labeling System allows you to set label length for continuous media
1. Press
.
2. Press the [CONT] softkey.
The following menu options appear:
• Choose [AUTO] to have the specified font size and characters determine label length
automatically (up to a maximum of 50 characters or 19 in. (482mm), whichever is
reached first. The default value is [AUTO].
• Choose [LEN] (length) to enter a specific length in the popup window. Minimum length
is .2” (5mm); Maximum length is 19” (482mm).
Note: To set a specific length in inches, type two places after the decimal point. For
example, to set a length of .2”, type 20. You do not need to type the decimal point.
• Choose [SEP] (separator) to enter the option of [NONE], [TIC], or [LINE]. The default
value is [NONE].
Examples
:
3.
Press .
Line Separation
Tic Separation
24 User’s Manual
Page 31

Serialized Labels
The printer allows you to perform basic alpha or numeric serializations. Serializing a character results
in a series of labels that increment the character by either one number or one letter. For example:
Numeric Serialization when the
serialized character is 3.
Alpha Serialization when the
serialized character is C.
To create labels containing serialized data:
1. Enter the text to be serialized on the desired legend line.
2. Use the arrows on your keypad (right/left) to position the cursor under the character in the
legend to be serialized.
3. Press
number.
4. Enter the number of times to increment the serial number.
5. Press
print.
The following example shows 2 copies of a numeric serialization when the serialized
character is 3:
. The screen prompts you to enter the number of times to increment the serial
. The screen prompts you to enter the number of copies of the serialization to
123, 124, 125, 126…
ABC, ABD, ABE, ABF…
126
6. Enter the number of copies.
7. Press
Note: To serialize multi-zone labels, go to Multi-Zone Labels on page 30.
126
.
125
125
124
124
123
123
User’s Manual 25
Page 32

General Guidelines for Serialization
Following are general guidelines for serializing:
• Both lowercase and uppercase characters can be serialized.
• Serialized characters can be incremented only (cannot decrement).
• Serialized text is limited to one line and one sequence per label.
• The printer first serializes the character the cursor is highlighted on when
When this character reaches its maximum value (9, z, or Z), the character immediately to the
left is incremented, and the right most character cycles back to its minimum value (0, a,
or A).
• Once a serialized character has reached its maximum value and the next character
encountered to the left is a non-serializable character (such as a space, accented character, or
symbol), the serial pattern cycles back to begin incrementing again from the rightmost
serialized character.
• After printing a series of serial characters, the display screen shows the next logical character
in the serial pattern (example: Print 1 to 5. After print job is completed, screen displays 6).
is pressed.
26 User’s Manual
Page 33

Barcode Labels
The printer allows you to print Code 39 and Code 128 barcode labels. Barcode heights are available
in inches or millimeters.
Human Readable – Text in 10-point font size can be toggled on or off. The human readable text will
be centered and positioned below the barcode.
Barcodes are selectable on a line-by-line basis. Text and barcodes cannot be combined on the same
line.
A barcode symbol in the
status bar (on the display
screen) indicates that a line
is designated as a barcode.
To designate a line or lines as a barcode, press
toggles the barcode function off.
Note: There are some data types such as symbols that cannot be entered or printed while
in barcode mode. If you try to enter this type of information while in barcode mode, you
will receive this error message: Invalid Character.
To change barcode symbology, height, and human readable attributes:
1. Press
2. Press the [NEXT] softkey.
The following menu options appear:
.
+ . Pressing this combination again
3. Press the [BAR] softkey.
The display shows the current barcode settings.
Choose from the following options:
• [SYMB] (Symbology)
Select 39 (check digit on/off), or 128.
• [HGT] (Height)
Available barcode heights range from .1” to 1.2”. Pressing the up and down softkey
arrows raises and lowers barcode height in .1” increments.
User’s Manual 27
Page 34

Note: To change the barcode height unit type (inches vs. millimeters), you must change
f
the label units. See Setting Units on page 22.
• [HR] (Human Readable)
Select ON or OFF (HR Font Size = 10 pt.)
4. Press
(if HR has been selected, the text will be centered below).
Multi-Zone Labels
The multi-zone label feature works with specific die-cut label media, for instance, a Lab Vial Side
and Top cartridge such as X-98-499. Once you install the appropriate cartridge, the printer will
recognize it and allow you to create and format multi-zone labels.
Multi-Zone Label Example
Zone 1
Note: Continuous and Vial modes are disabled when die-cut label media is installed.
If you have continuous label media installed, the printer will not recognize entry of
multi-zone commands. See Glossary of Terms on page 44 for complete definitions.
To create a multi-zone label:
1. Install a multi-zone (die-cut label) cartridge. 2. Enter characters for Zone 1.
. When you print the label, the line(s) designated as barcode will print as such
Zone 2
The display will
show that you are
in Zone 1 o
2.
3. Press
5. Press
28 User’s Manual
+ .
The display will
show that you are
in Zone 2 of 2.
.
4. Enter characters for Zone 2.
Note: Pressing
toggles back to Zone 1.
+
Page 35

To set justification of a legend within a multi-zone label:
You may set legend justification within individual zones. For instance, the following example shows
Zone 1 with vertical TOP and horizontal LEFT justification; Zone 2 shows vertical CENTER and
horizontal CENTER justification.
Zone 1
Zone 2
Before setting justification, note the zone you are in as indicated in the lower right corner of the
display.
Note: Pressing FUNCTION +
and FUNCTION + toggles between zones.
1. Press .
2. Press the [JUST] softkey.
The following menu options appear:
• For horizontal justification, press
• For vertical justification, press
3. Press
.
[HORIZ], then [LEFT], [CENT], or [RIGHT].
[VERT], then [TOP], [CENT], or [BOT].
4. Navigate to the next or previous zone (see Note above) and repeat Steps 1–3.
Note: Go to Setting Legend Justification on page 18 to see how selected settings will
appear and print.
User’s Manual 29
Page 36

To set rotation of a legend within a multi-zone label:
You may set legend rotation within individual zones. For instance, the following example shows
Zone 1 with a 0 degree rotation; Zone 2 shows a 270 degree rotation.
Zone 1
Before setting rotation, note the zone you are in as indicated in the lower right corner of the display.
Note: Pressing FUNCTION +
1. Press .
2. Press the [NEXT] softkey.
The following menu options appear:
and FUNCTION + toggles between zones.
Zone 2
3. Press the [ROT] softkey.
4. Press [0], [90], [180], or [270].
5. Press
6. Navigate to the next or previous zone (see Note above) and repeat Steps 1–5.
Note: Go to Rotating Legends on page 19 to see how selected rotation settings will
appear and print.
30 User’s Manual
.
Page 37

To serialize a multi-zone label:
The printer allows you to perform basic alpha or numeric serializations within any one zone in a
multi-zone label. Note the following:
• The serialization cannot occur within more than one zone per label.
• When performing multiple-zone serialization, the zone you are in when you select
is the zone that will serialize.
• Ensure that all text and characters are entered into all zones before pressing
the zone (and specified character) you want serialized, as this will start the serialization
and printing process.
• If you must back out of the serialization process, press
zone you were last in.
To create multi-zone labels containing serialized data:
1. Enter text into all zones on the label.
2. Go to the zone you wish to create the serialization in and using the arrows on your keypad
(right/left) highlight the character you want serialized.
3. Press . The screen prompts you to enter the number of times to increment the serial number
(or character).
4. Press
The following example shows 2 copies of a numeric serialization in Zone 2 (of two zones) when the
serialized character is 3:
. The screen prompts you to enter the number of copies of the serialization to print.
+ to return to the
from
5. Enter the number of copies.
6. Press
.
Note: See Serialized Labels on page 25 and General Guidelines for Serialization on
page 26 for more information.
User’s Manual 31
Page 38

PC Connectivity / Peripheral Mode
To connect your printer to a PC, use the Driver Installation link on the printer CD. Then do the
following:
1. Press
2. Press the [NEXT] softkey
three times.
The display shows the following:
4. Install compatible software, i.e., IdentiLab™ or CodeSoft™ (all LABXPERT™
cartridge label formats can be selected from these programs).
5. To exit Peripheral (PC) mode, press [DELETE].
.
3. Press the [PC] softkey.
32 User’s Manual
Page 39

Chapter 9 Memory
This chapter provides information on saving, retrieving, and deleting labels using the memory
function.
Note: You can create, recall, edit, and save labels on your LABXPERT
Labeling System without a cartridge. Labels are created and saved based on the
attributes of the last cartridge installed.
Saving a Label to Memory
You may save up to ten labels and then recall them for future use.
To save a label to memory:
1. Press
.
A grid appears showing the 10 storage
locations. A bold number indicates a storage
location is occupied. Additionally, the first line
of text and part name are displayed for easy
retrieval of the correct label.
2. Use the arrows on your keypad
– [▲] [▼] – to navigate to the desired storage location on
the grid.
3. Press
[SAVE]. If you try to save the legend to an occupied space, you will get the option
to overwrite it.
TM
Laboratory
Recalling a Label from Memory
To recall a label from memory:
1. Press
. A grid appears showing the 10 storage locations (see above). A bold
number indicates a storage location is occupied.
2. Use the arrows on your keypad
the grid. The part number (cartridge)
the display to help you identify the saved legend.
3. Press
[RCL].
Caution: Pressing Recall will delete any text you have currently showing on the display
screen.
Note: You must have a part number in the printer that is equal to or greater than (in print
width and height) the part that was used when saving the legend. If the part number is too
small, you will receive this error message: Cannot Fit
If you save a label using a new part number, it will be saved with the new part.
– [▲] [▼] – to navigate to the desired storage location on
– along with the first line of label text – shows in
User’s Manual 33
Page 40

Deleting a Label from Memory
To delete a label from memory:
1. Press
. A grid appears showing the 10 storage locations (see above). A bold
number indicates a storage location is occupied.
2. Use the arrows on your keypad
– [▲] [▼] – to navigate to the desired storage location on
the grid. The first line of label text shows in the display to help you identify the saved
legend.
3. Press
[DEL]. A message appears asking if you are sure you want to delete the label.
4. Press [YES].
5. Press FUNCTION + CLEAR/ESC
to exit the memory function.
+
34 User’s Manual
Page 41

Chapter 10 Maintenance
This chapter provides instructions on cleaning your LABXPERTTM Laboratory Labeling System as
well as an accessories list.
Cleaning
Follow these instructions to keep your printer running at optimal performance.
1. Remove Label Cartridge.
2. Use a cotton swab moistened with isopropyl alcohol and thoroughly wipe the following:
WARNING: Make sure you use a foam swab (with black handle) provided in your
cleaning kit. See the Accessories Parts List on page 36.
WARNING: Make sure to wait five minutes after cleaning so the printer is dry before
installing a cartridge.
a. Print head – Try cleaning the print head with a dry swab first. Wipe the print line
(black) area only. Do not wipe the green area.
b. Deflector plate – This is located above the print head, to the right of the platen roller.
See Illustration B on the following page.
c. Label exit slot – Make sure to wipe the breaker bar located on the inside of the label exit
slot. The cutter blade meets the breaker bar when a label is cut.
User’s Manual 35
Page 42

Accessory Parts List
Description Catalog No. *UPC Part No.
Hard side Carrying Case LABXPERT-HC-KEY 60902
AC Adapter – North America XPERT-AC 60544
AC Adapter – Europe XPERT-ACEUR 60545
AC Adapter – UK XPERT-ACUK 60546
PC Communication Cable PCCABLE-1 18574
Cleaning Kit PCK-4 33969
*North America Only
36 User’s Manual
Page 43

Chapter 11 Troubleshooting
If your LABXPERTTM Laboratory Labeling System is not performing as documented in this user’s
manual, use the following troubleshooting and error message guides to determine the corrective
action you should take. If the corrective action does not work, contact Brady’s Technical Support
Group.
Troubleshooting Guide
Symptom Cause Corrective Action
Poor quality printing.
Printer does not
power up when
turned on.
Printer will not feed
labels. Continued.
WARNING: When cutting die-cut labels, make sure to cut in between labels. For
continuous media, cut just before a notch. DO NOT cut into the notch!
The leading edge of the
The print head and platen
roller are dirty.
Battery power is low. Replace batteries.
Wrinkled media.
Dead Batteries Replace batteries.
No Batteries Insert batteries.
A/C adaptor not plugged
in.
The leading edge of the
media roll is uneven or
torn (not a straight edge).
media roll is either out
past the cartridge edge or
has retracted back into it.
Clean the printer. See Cleaning on page
35.
Press
Ensure A/C adaptor is plugged into a
proper outlet.
Use a pair of scissors to cut a straight
leading edge on the marker roll.
Ensure that the medial roll edge is flush
with edge of cartridge and under the
material guides.
.
Notch edges may be
folded. Printer is not
detecting a notch in the
media.
Label material has
retracted into
cartridge.
Fixed length label
text gets cut off.
Label material jams
in printer.
User’s Manual 37
Excessive jarring during
transportation of material.
was not pressed
before cutting.
Retaining label was not
removed.
Fold left edge back up so that the notch can
be read.
Ensure that retention label is reapplied
when storing the cartridge.
Press to move the fixed length
label to the cut position.
Remove retaining label from cartridge
before inserting into printer.
Page 44

Error Messages
Error Message Cause Corrective Action
Head Open The printer head mechanism is not
engaged.
Out of Labels The printer label cartridge is
empty.
No Cartridge
Installed
Cannot Fit
Invalid Label The printer cartridge is not valid. Install a new label cartridge. See
Invalid Character This character cannot be used in
A cartridge is not inserted into
printer.
The printable information will not
fit on current label.
The legend rotation was changed
and the existing text will no longer
fit.
The currently installed label is too
small for legend retrieval.
the current printer mode. For
example, you cannot enter a
symbol when in barcode mode.
Lock the cartridge locking lever.
Install a new label cartridge. See
Replace material cartridge on
page 7.
Install a label cartridge. See
Replace material cartridge on
page 7.
Either reduce the font size of the
legend, or use a larger label size.
Reduce the font size of the legend,
change the rotation, or use a larger
label size.
Install a cartridge containing
larger labels. See Replace
material cartridge on page 7.
Replace material cartridge on
page 7.
Either use a different character or
switch printer mode. For example,
toggle out of barcode mode.
38 User’s Manual
Page 45

Appendix A Menu Tree
User’s Manual 39
Page 46

Appendix B Font Size Chart
Point
Size
Inch mm PRINT SAMPLE
4 .04 1
6 .05 1.4
7 .06 1.5
10 .10 2.5
13 .13 3.3
20 .20 5.1
26 .25 6.4
38 .38 9.6
45 .45 11.0
BRADY 12345
BRADY 12345
BRADY 12345
BRADY 12345
BRADY 12345
BRADY 12345
BRADY 12345
BRADY 12324
BRADY 12345
51 .50 13.0
76 .75 19.0
102 1.00 25.0
BRADY 12345
BRADY 1
BRADY
40 User’s Manual
Page 47

Point
Size
126 1.25 33.0
Inch mm PRINT SAMPLE
User’s Manual 41
Page 48

Appendix C Symbol Library
See the section on Symbols on page 15 for instructions on selecting and printing the symbols shown
below:
Greek
Symbols
Laboratory
Symbols
PPE/
Mandatory
Hazard
Warning
42 User’s Manual
Page 49

Prohibition
First Aid/
Fire
Haz Mat’ls
(WHMIS)
Haz Mat’ls
(HSID)
European
Arrows/
Misc.
User’s Manual 43
Page 50

Appendix D Glossary of Terms
It may be helpful to review these terms while using this manual:
Cartridge (Material Cartridge) – The cartridge containing the label material, ribbon, and smart-cell.
Continuous Media (Labels) – Marking media in a continuous roll, not pre-cut or separated by spaces
and notches.
Die Cut Labels – Marking media that is pre-cut and separated into individual markers by spaces and
notches.
Label – Once a marker contains printed text, it is referred to as a label.
Legend – The actual text to be printed on a marker. The legend appears on the LCD screen and can
be stored in memory.
Marker – A blank label. Until a label is actually printed, the material is referred to as a marker.
Markers are available in a variety of sizes.
Serialize – To automatically print labels in a numeric or alphabetical sequence.
Multi-Zone Label – A label containing more than one area (zone) for entering alpha or numeric text
and characters. The zones can be navigated and edited separately.
44 User’s Manual
 Loading...