

Page 1

LabelMark 3.2 User Guide
Page 2

Page 3

Table Of Contents
Preface............................................................................................................................................................1
Copyright and Trademarks........................................................................................................................1
Technical Support Contact Information.....................................................................................................1
Getting Started ..............................................................................................................................................3
System Requirements................................................................................................................................3
Installing LabelMark ................................................................................................................................. 3
Upgrading From a Previous Version of LabelMark ..................................................................................3
Installing Printer Drivers ...........................................................................................................................4
What’s New...............................................................................................................................................5
LabelMark Documentation........................................................................................................................5
Online User's Guide Overview..................................................................................................................6
Quick Start Guide – Creating a Basic Text Label......................................................................................7
LabelMark Overview..................................................................................................................................11
Label Editor Screen .................................................................................................................................11
Menu Bar and Toolbars...........................................................................................................................11
Standard Toolbar .....................................................................................................................................12
Format Toolbar........................................................................................................................................13
Action Toolbar.........................................................................................................................................14
Using Views ............................................................................................................................................14
Label Navigation Toolbar........................................................................................................................17
Two-Sided Sleeve Toolbar...................................................................................................................... 17
Changing User Defaults...........................................................................................................................18
Basic LabelMark Techniques.....................................................................................................................21
Creating a New Label File.......................................................................................................................21
Creating a New Label Using the DataComm Wizard..............................................................................21
DataComm Wizard Parts Sub-Categories................................................................................................25
Adding Text to a Label............................................................................................................................25
Formatting Text.......................................................................................................................................26
WireMarking Labels................................................................................................................................28
Serializing Labels (Simple) .....................................................................................................................28
Modifying Serialization...........................................................................................................................29
Inserting Date and Time Information ......................................................................................................30
Modifying Date and Time Information....................................................................................................31
Working with Linked Objects..................................................................................................................31
Selecting Text and Labels........................................................................................................................33
Copying and Pasting Text and Labels .....................................................................................................34
Making Data Fit on a Label.....................................................................................................................34
Repeating Common Commands..............................................................................................................35
Finding and Replacing.............................................................................................................................36
Undoing/Redoing Actions.......................................................................................................................36
Selecting a Different Label Part...............................................................................................................37
Saving a File............................................................................................................................................37
i
Page 4

Table Of Contents
Closing a Label File.................................................................................................................................38
Opening an Existing Label File ...............................................................................................................38
Moving Between Open Files...................................................................................................................38
Advanced LabelMark Techniques.............................................................................................................39
Modifying a Label Part............................................................................................................................39
Creating a Custom Label Part..................................................................................................................41
Deleting a Custom Label Part..................................................................................................................42
Creating Zones on a Label.......................................................................................................................43
Creating a Favorite Label Parts List ........................................................................................................50
Using a Favorite Part List........................................................................................................................51
Serializing Labels (Advanced).................................................................................................................51
Serialization Types Table........................................................................................................................55
110 Block, BIX Block and Patch Panel Parts..........................................................................................56
Serializing 110/BIX Blocks.....................................................................................................................56
Setting Continuous Label and Terminal Block Options..........................................................................58
Using the Flip-Flop Feature.....................................................................................................................58
Printing Label Files.....................................................................................................................................61
Printing a Label File ................................................................................................................................61
Selecting Print Ranges.............................................................................................................................62
Setting Two-Sided Sleeve Print Options .................................................................................................64
Selecting a Printer....................................................................................................................................64
Troubleshooting Printer and Part Problems.............................................................................................65
Creating and Using Templates...................................................................................................................67
Creating a Template .................................................................................................................................67
Template Toolbar.....................................................................................................................................68
Editing an Existing Template ..................................................................................................................68
Creating a Label File from a Template....................................................................................................69
Importing Data into a File Based on a Template .....................................................................................70
Importing Files ............................................................................................................................................71
Data Import Overview.............................................................................................................................71
Importing Data into Label Files (Simple)................................................................................................71
Importing Data into Label Files (Advanced)...........................................................................................75
Importing Into a Two-Sided Sleeve.........................................................................................................80
Data Import Types...................................................................................................................................80
Importing Data From a Database.............................................................................................................81
Filtering Import Data...............................................................................................................................82
Formatting Import Data...........................................................................................................................84
Working With Objects - LabelMark Plus.................................................................................................85
LabelMark vs. LabelMark Plus ...............................................................................................................85
Draw Toolbar...........................................................................................................................................85
Inserting Text...........................................................................................................................................85
Modifying Text........................................................................................................................................86
Inserting Barcodes...................................................................................................................................86
Modifying Barcodes................................................................................................................................87
ii
Page 5

Table Of Contents
Inserting Images.......................................................................................................................................88
Modifying Images....................................................................................................................................89
Inserting Rectangles and Lines................................................................................................................89
Modifying Rectangles and Lines.............................................................................................................89
Importing Data into LabelMark Plus (Simple) ........................................................................................90
Importing Data into LabelMark Plus (Advanced) ...................................................................................90
Selecting Objects in LabelMark Plus.......................................................................................................92
Object Toolbar.........................................................................................................................................93
Moving an Object....................................................................................................................................93
Resizing an Object...................................................................................................................................94
Deleting an Object...................................................................................................................................94
Cutting, Copying and Pasting Objects.....................................................................................................95
Symbols Guide.............................................................................................................................................97
Symbol Library........................................................................................................................................97
Index...........................................................................................................................................................101
iii
Page 6

Page 7

Preface
Copyright and Trademarks
This manual is proprietary to Brady Worldwide, Inc. (hereafter "Brady"), and may be revised from time to
time without notice. Brady disclaims any understanding to provide you with such revisions, if any.
This manual is copyrighted with all rights reserved. No portion of this manual may be copied or reproduced
by any means without the prior written consent of Brady.
While every precaution has been taken in the preparation of this document, Brady assumes no liability to
any party for any loss or damage caused by errors or omissions or by statements resulting from negligence,
accident, or any other cause. Brady further assumes no liability arising out of the application or use of any
product or system described, herein; nor any liability for incidental or consequential damages arising from
the use of this document. Brady disclaims all warranties of merchantability of fitness for a particular
purpose.
Brady reserves the right to make changes without further notice to any product or system described herein
to improve reliability, function, or design.
Microsoft, Windows, Excel, Access and SQL Server are regist ered trademarks of Microsoft Corporation.
Lotus 1-2-3 is a registered trademark of Lotus Development Corporation.
LabelMark™ (hereafter "LabelMark") User’s Guide. LabelMark is a trademark of Brady Worldwide, Inc.
All brand or product names referenced in this manual are trademarks (™) or registered trademarks (®) of
their respective companies or organizations.
© 2007 Brady Worldwide, Inc. All Rights Reserved
Technical Support Contact Information
Brazil
Phone:
E-Mail:
55 11 3604-7700
55 11 3686-5236
FAX:
brady_service_brazil@bradycorp.com
Preface 1
Page 8

LabelMark User Guide
Europe
Country Phone E-Mail Address
France +800 907 107 tsfrance@bradycorp.com
Germany, Austria,
Switzerland
Belgium 0903/99 438 tsbelgium@bradycorp.com
Netherlands 0900/0400 439 tsbelgium@bradycorp.com
Scandinavia +46 85 90 057 33 tscandinavia@bradycorp.com
United Kingdom +44 1295 228 231 tsuk@bradycorp.com
Other Countries +32 52 45 73 97 tsbelgium@bradycorp.com
+49 6103 75 98 451 tsgermany@bradycorp.com
Italy +39 02 96 28 60 14 tsitaly@bradycorp.com
Spain +33 437 245 234 tsspain@bradycorp.com
Latin America and Caribbean
Phone:
E-Mail:
414-438-6868
414-438-6870
FAX:
bradyintl@bradycorp.com
Mexico
Phone:
E-Mail:
01 800 112 72 39
52 55 5527 55 86
FAX:
bradymexico@bradycorp.com
United States and Canada
Phone:
E-Mail:
1-800-643-8766
(M-F 7 AM - 6 PM CST)
1-800-358-6767
FAX:
tech_support@bradycorp.com
2 Preface
Page 9

Getting Started
System Requirements
Following are the recommended requirements for installing and running LabelMark:
• Intel® Pentium® processor (minimum 66 MHz 486DX2)
• Operating system:
Microsoft® Windows®XP
Microsoft® Windows® 2000 with Ser vi ce Pack 3
• Microsoft® Internet Explorer 5.01
• 64MB of RAM (minimum 16 MB of RAM)
• 100 MB of available hard-disk space
• 16-bit or greater video display card
• 800x600 or greater monitor resolution
• CD-ROM Drive
Installing LabelMark
Note: You must have administrative rights on your computer to install LabelMark. If you do not have
administrative rights, speak with your company’s computer system administrator.
To run LabelMark, you must first install it on your computer’s hard drive.
1. Insert the LabelMark CD into your CD drive. The install screen appears.
If the install does not start automatically, select Start Run, type D:\setup.exe and click OK
(replace D: with your CD drive.)
2. Click Install LabelMark.
Note: Installation occurs in a new directory (C:\Program Files\Brady\LabelMark 3), so earlier
versions of LabelMark (prior to version 3.0) will not be overwritten; however, version 3.
overwrite version 3.0.
3. Follow the prompts on your screen.
2 will
Upgrading From a Previous Version of LabelMark
If you are upgrading from a previous version of LabelMark, k eep the following in mind:
• The new version does not overwrite versions of LabelMark that are older than version 3.0. You
will be able to run older versions until you remove them from your computer; however, version
3.2 will overwrite version 3.0.
• You will lose your default settings from the previous version of LabelMark. See
Defaults
• Copy the existing label files you want to keep using to the new default label Files folder.
• You can open old label files (created with version 1.2 and greater) in the new version of
LabelMark.
Getting Started 3
to set new preferences.
Changing User
Page 10

LabelMark User Guide
In LabelMark Plus you may have to change the Files of type: setting in the Open dialog box to list
the old files. If you open a LabelMark 2.x file in LabelMark Plus, the system will change its file
extension.
• You cannot open version 2.x templates in the new version.
• After you save a file created in a previous version of LabelMark in the new version, you can no
longer open it in the old version.
• Run the Part Conversion Utility (Start Programs Brady LabelMark 3 Part
Conversion Utility) to import your pre-3.0 custom label parts and custom parts list into the new
application. Note: This is necessary for upgrades from pre-3.0 versions only.
Installing Printer Drivers
The LabelMark CD includes Windows® printer drivers for Brady thermal transfer printers. (For dot matrix,
laser, and inkjet printers, install the appropriate standard Windows® driver.) You can install one or more of
these drivers on your PC depending on your needs.
Note: The TLS2200® Portable Printer does not require a driver.
Note: To install the Brady TLS PC Link™ driver, do not follow the procedure below. Rather, insert the
LabelMark CD and click Printer Drivers TLS PC Link.
To install a printer driver:
1. Click Start Settings Printers.
2. From the Windows Printer dialog box, select Add Printer.
3. Follow the prompts to install a new printer. When prompted, select Local Printer and Have Disk.
4. Insert the LabelMark CD into the CD drive (usually D:) on your PC.
5. In the Install from Disk box, type in or browse to D:\ (or your designated CD drive) and the path
appropriate for your selected driver:
D:\Printer Drivers\ BP 1024, 2024, 2034, 1244, 1344, 2461, 3481, 6441, T300, T200
(Windows 2000, XP)
D:\Printer Drivers\ BP X-Plus II, M-e, MVP (Windows 2000, XP)
6. Click OK.
7. Select the port that you will use when connecting the printer to your PC – usually COM Port 1.
8. The Printer Name box displays the names of the printers. Select the printer you want to use; for
example, Brady Printer THT Model 3481.
9. Select Yes if you want to set this printer to be the default printer.
10. Click Finish.
4 Getting Started
Page 11

Getting Started
What’s New
LabelMark™ allows you to create labels for a variety of industrial applications. Version 3.2 has all of the
features found in earlier versions and adds many enhancements:
• Multiple Zones on Labels – LabelMark now supports up to four unique label zones on an
individual label.
• DataComm Label Selection Wizard – Guides you with its user-friendly interface to the correct
part to use for your specific datacomm labeling applications.
• Automatic Text Fo rmatting – LabelMark provides the option to automatically shrink text as
needed to fit on the label. Specifications can be set on an individual label and line basis or globally
within the User Defaults settings.
• 2-D Bar Codes – LabelMark Plus now supports 2-D (DataMatrix) bar code symbology.
• More Graphical Format Compatibility – LabelMark Plus also now accepts these graphic file
formats:
o .bmp o .jpg o .gif
o .tif o .pcx o .wmf
• Simpler Data Import – Importing data now includes individual record selection. In addition,
LabelMark accepts Microsoft Access as a primary data source.
• Automatic Data Refresh – Data and Date/Time information can now be "refreshed"
automatically when a file is opened or printed by setting the refresh options within the User
Defaults. Note: This function can still be performed manually from the Tools menu or the Action
toolbar.
• Rotation View – By a click of the Rotation View button, you can rotate your label view by
90-degree increments.
Updated Interface – The DataComm Wizard icon connecting to an intuitive user interface for
•
choosing specific datacomm labels is now available, as well as Undo and Redo icons. The Import
Data icon connects to streamlined data import options, and a Rotation View button has been added
to LabelMark Plus.
Rulers – Automatically appear to indicate the height and width of the printable area of the label
•
when you are in Single Label View in LabelMark Plus.
LabelMark Documentation
Brady provides two sources of documentation for your reference when using LabelMark and LabelMark
Plus:
• Online User’s Guide – User’s Guide .PDF File – A printable version of the online user’s guide is
installed with the application. (select Help User's Guide).
• Tutorials .PDF File – A printable version of the online tutorials is installed with the application.
LabelMark Plus Note: The vast majority of LabelMark information in this guide applies to LabelMark
Plus as well. The Working With Objects – LabelMark Plus section contains information specific to
LabelMark Plus. References to LabelMark Plus elsewhere in the guide are highlighted.
Getting Started 5
Page 12

LabelMark User Guide
Online User's Guide Overview
Select Help User’s Guide to display the LabelMark electronic reference system.
6 Getting Started
Page 13
Getting Started
Quick Start Guide – Creating a Basic Text Label
This section guides you through the process of creating a simple text label file. Refer to later sections of
this guide for detailed information on working with label files.
1. Double-click the LabelMark icon
2.
Create a New File:
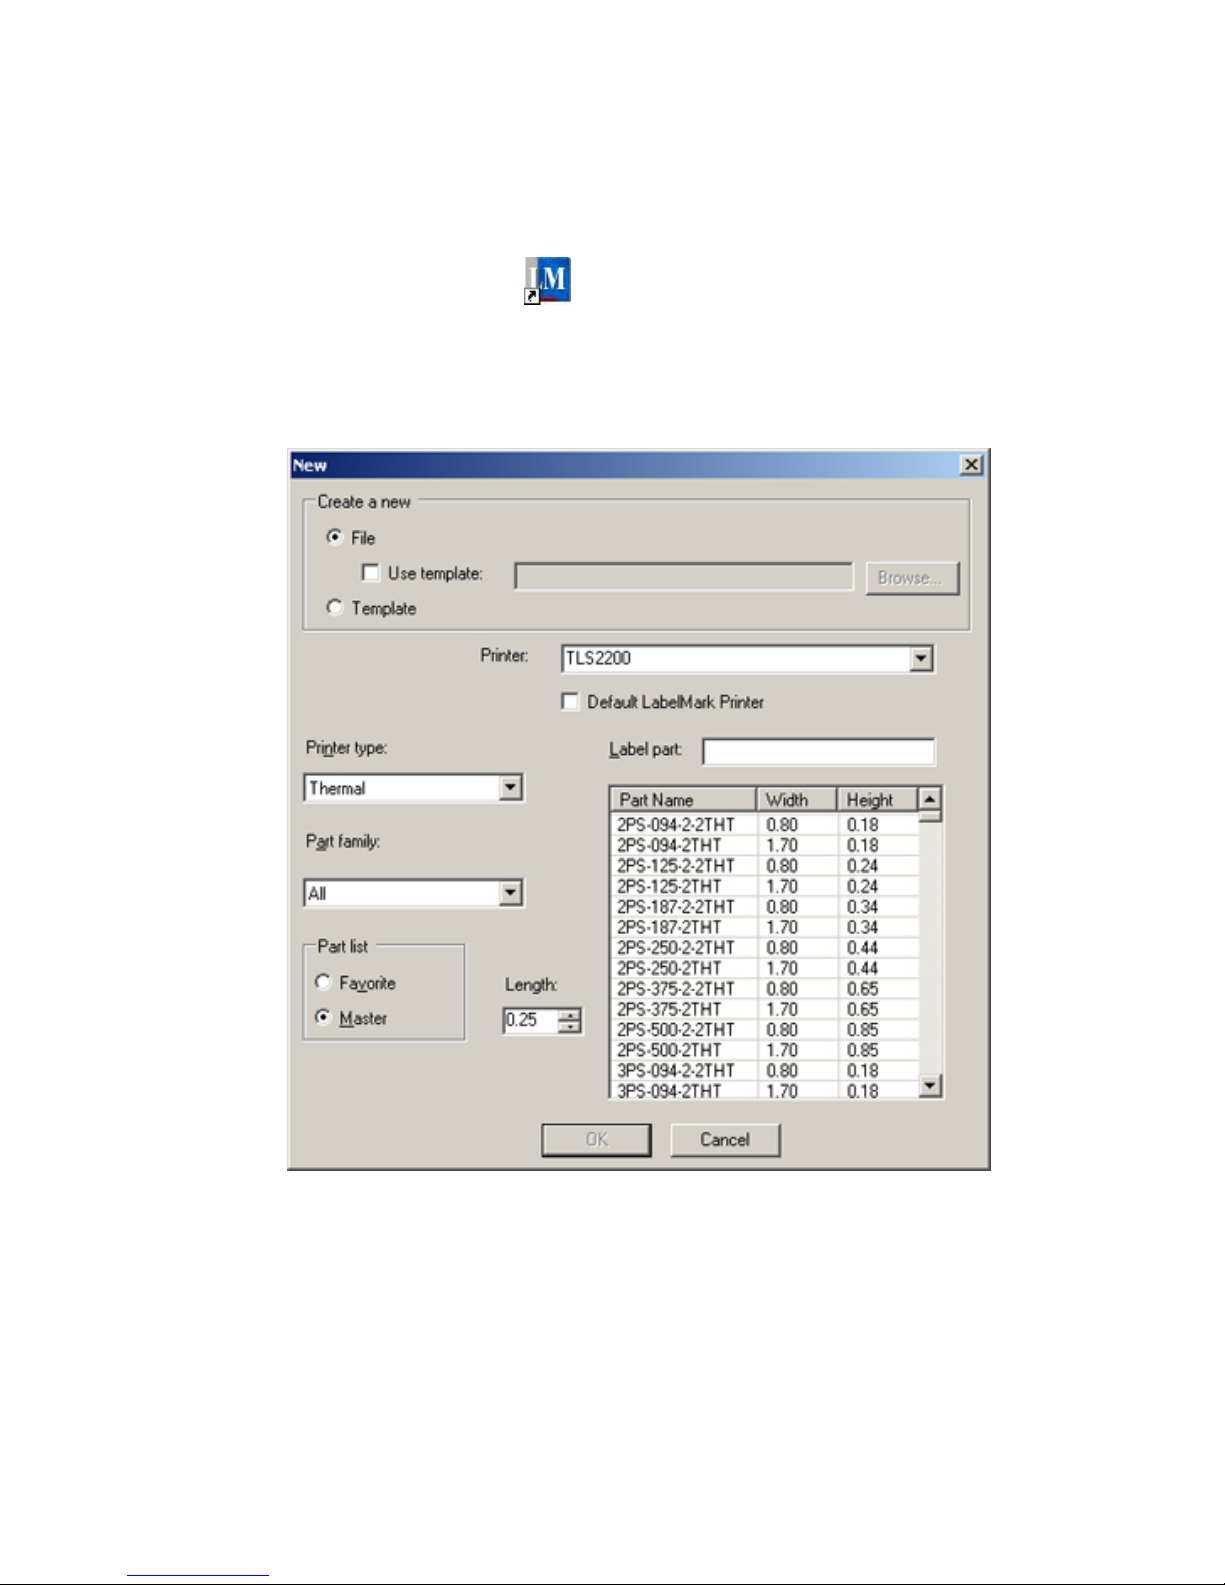
When you start LabelMark the Welcome screen appears. Select Create new file and click
OK. (If LabelMark is already running, click FileNew…)
The New file screen appears:
on the Windows® desktop
Select the Printer to use from the list of available printers. (Select the Default LabelMark
printer option to use this printer for future label files as well.)
Select the Printer type from the list (DotMatrix, InkJet, Laser, Thermal, TLS2200/TLS PC
Link or Wraptor™ Wire ID Printer Appli cat or) .
Select the
Getting Started 7
Part family from the list.
Page 14

LabelMark User Guide
The part family names are:
Part Family Description
Die-Cut
Terminal
Standard pre-cut labels, tags, and sleeves
Continuous media (including terminal blocks)
Block/Continuous
Two-Sided Sleeve
All
Two-sided printable sleeves
All of the above part families
Click your desired Part Name in the table or type the part name in the Label part box:
o Sort the list by Part Name, Width or Height by clicking on the appropriate column
heading. The table sorts in ascending and descen di n g or der with re peat ed cl i cks.
o The Part List defaults to Master (all Brady stock parts). If you select Favorite, you will
only see Printer types, Part families and Parts in your favorite list (see
Favorite Label Parts List
).
o If you created custom parts, they appear in the list along with the master Brady parts.
If you selected a continuous part, set the Length.
Click OK to create your label file.
The label editor screen appears.
3.
Add and Format Label Data:
Type text in one or more labels and format your label text. Refer to
Format Toolbar for a complete
list of formatting commands and how to use them.
Creating a
LabelMark Plus Note: If you open LabelMark Plus, you may also add bar codes, images,
rectangles and lines to your labels. Refer to LabelMark vs. LabelMark Plus.
8 Getting Started
Page 15
4.
Print Labels:
Getting Started
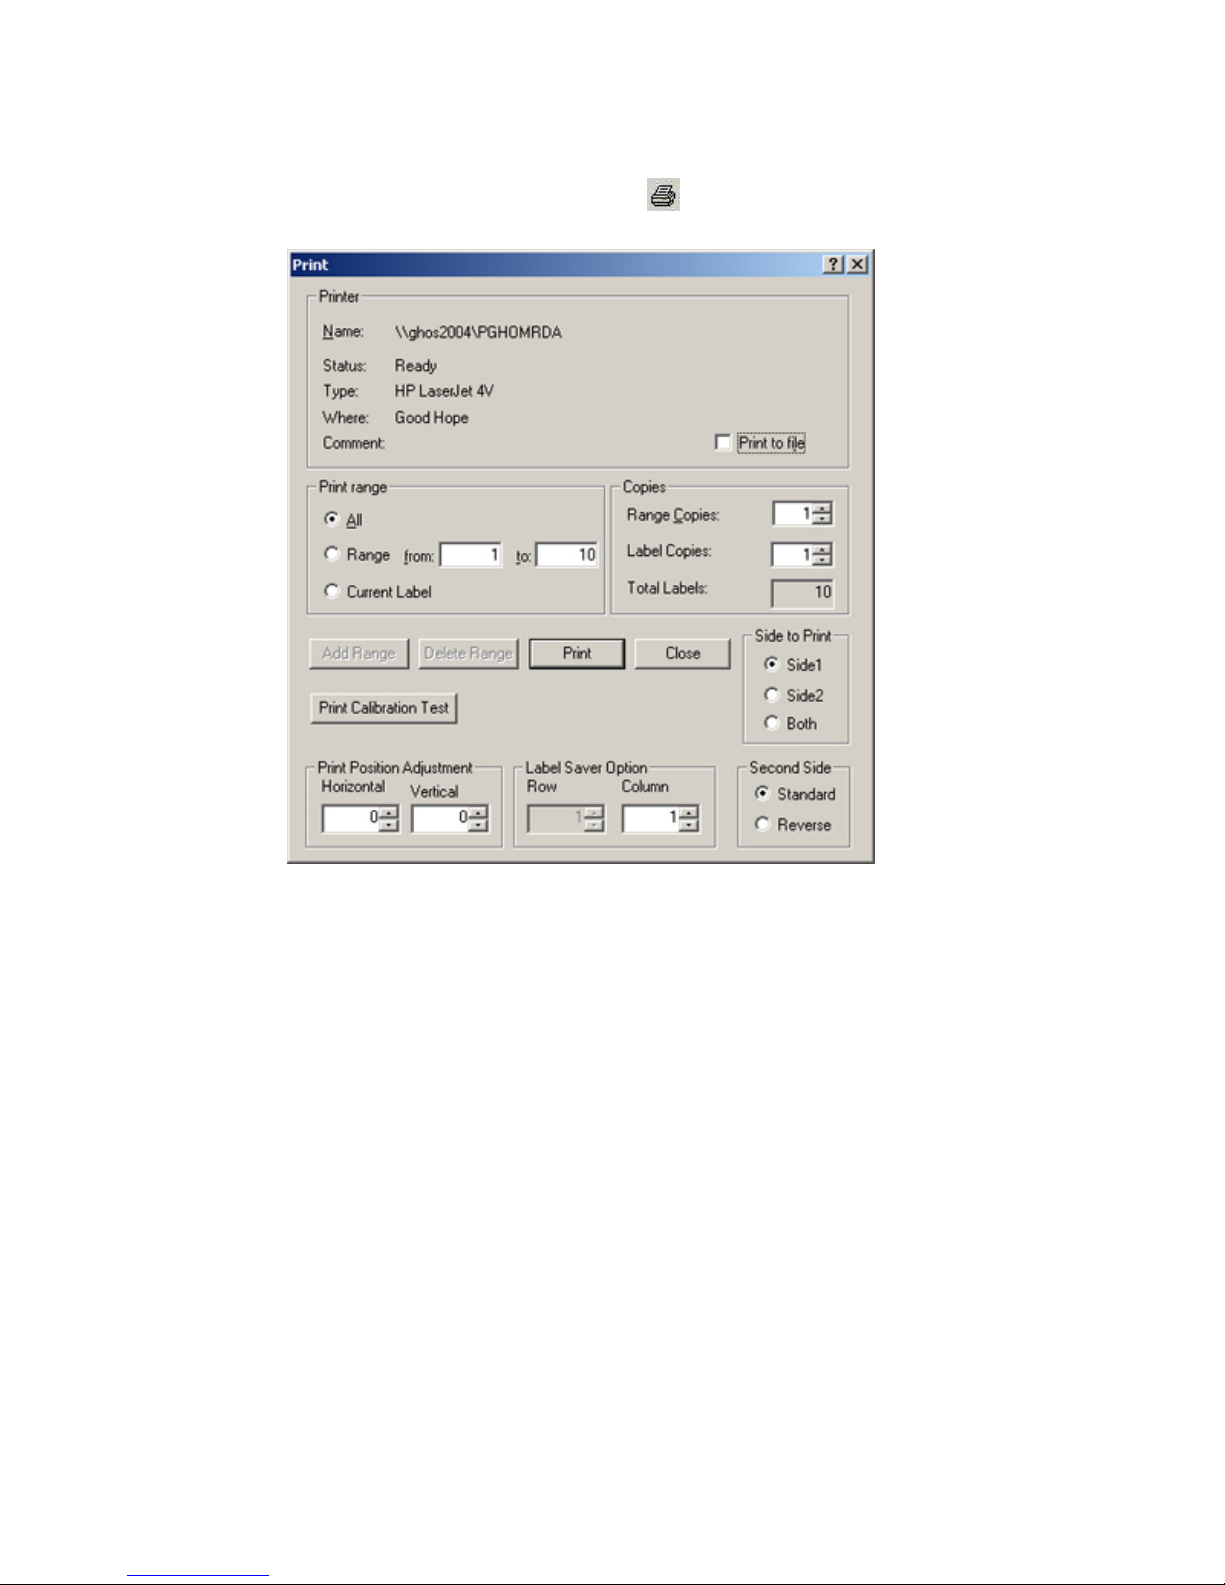
Click FilePrint… (or click the Print icon
appears.
on the toolbar). The Print dialog box
Set the print options (if necessary) and click Print.
Getting Started 9
Page 16
LabelMark User Guide
5.
Save Label File:
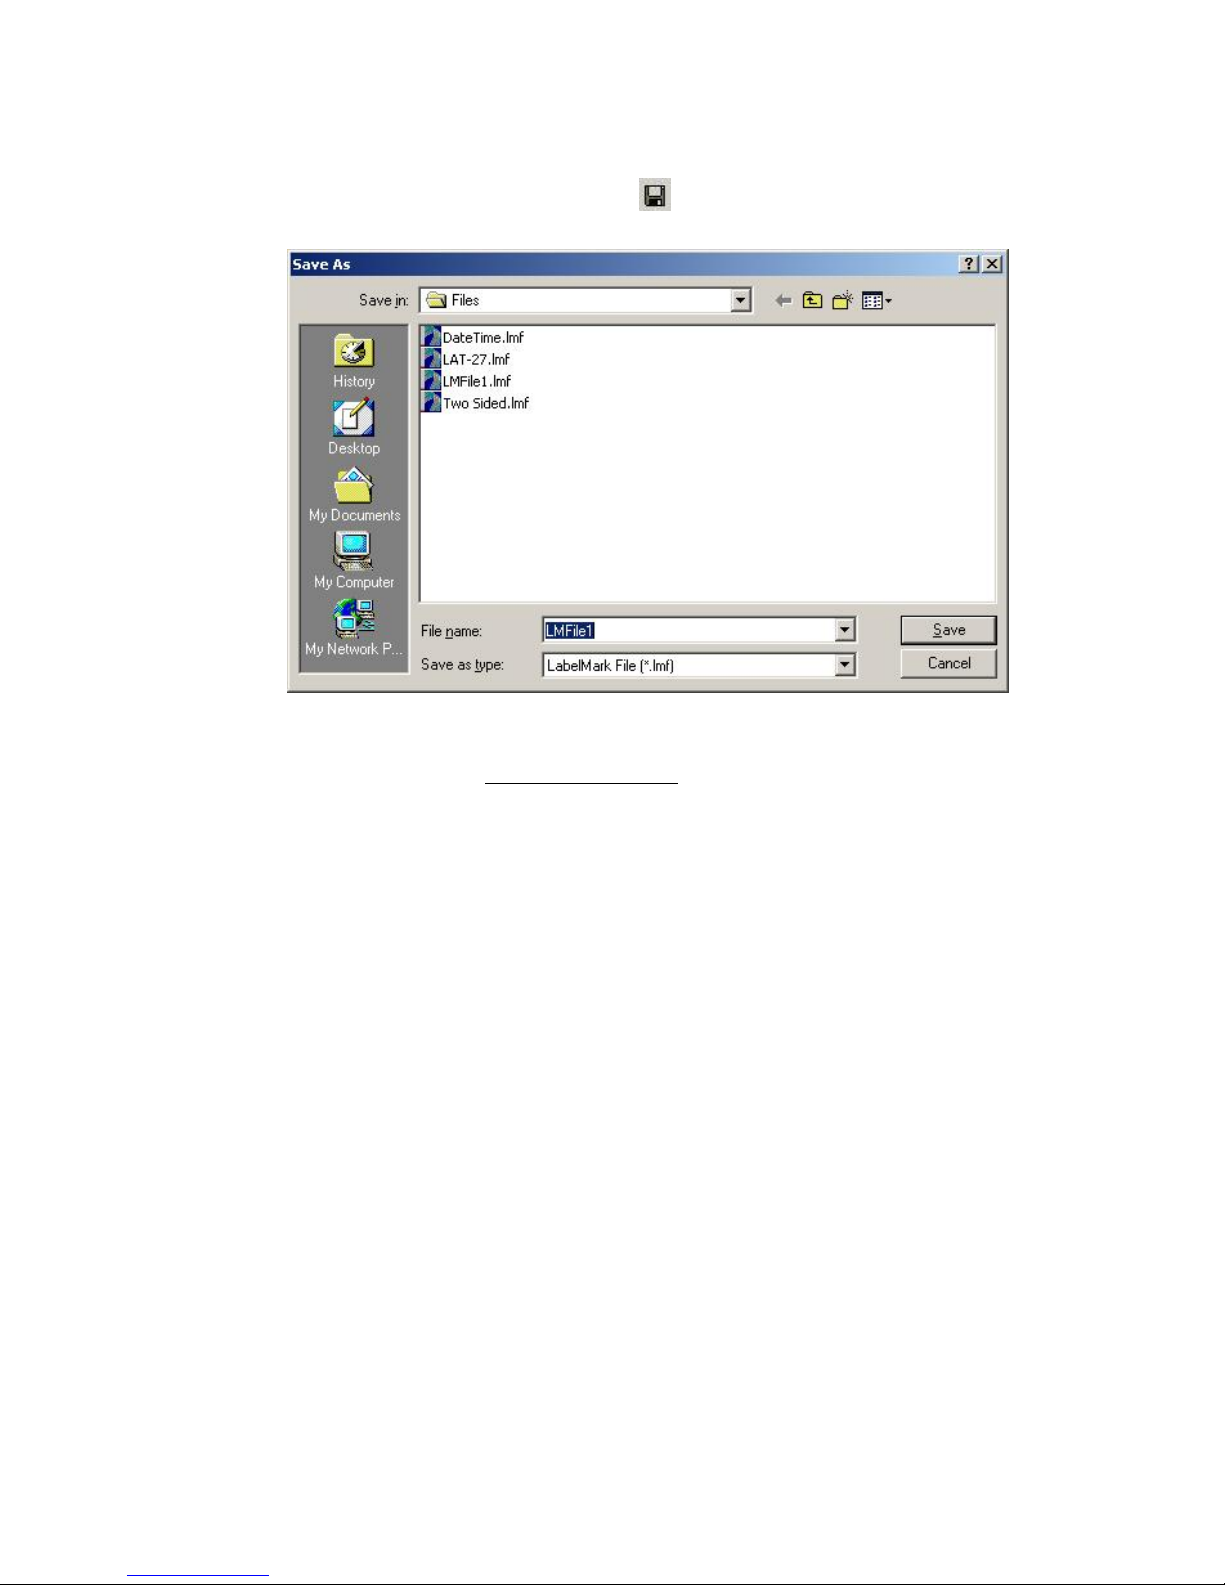
Click FileSave… (or click the Save icon
on the toolbar). The Save As dialog box
appears.
Type the file name and click Save.
LabelMark displays the default file location. You may change to a different folder or change
the default location (see
Changing User Defaults).
10 Getting Started
Page 17
LabelMark Overview
Label Editor Screen
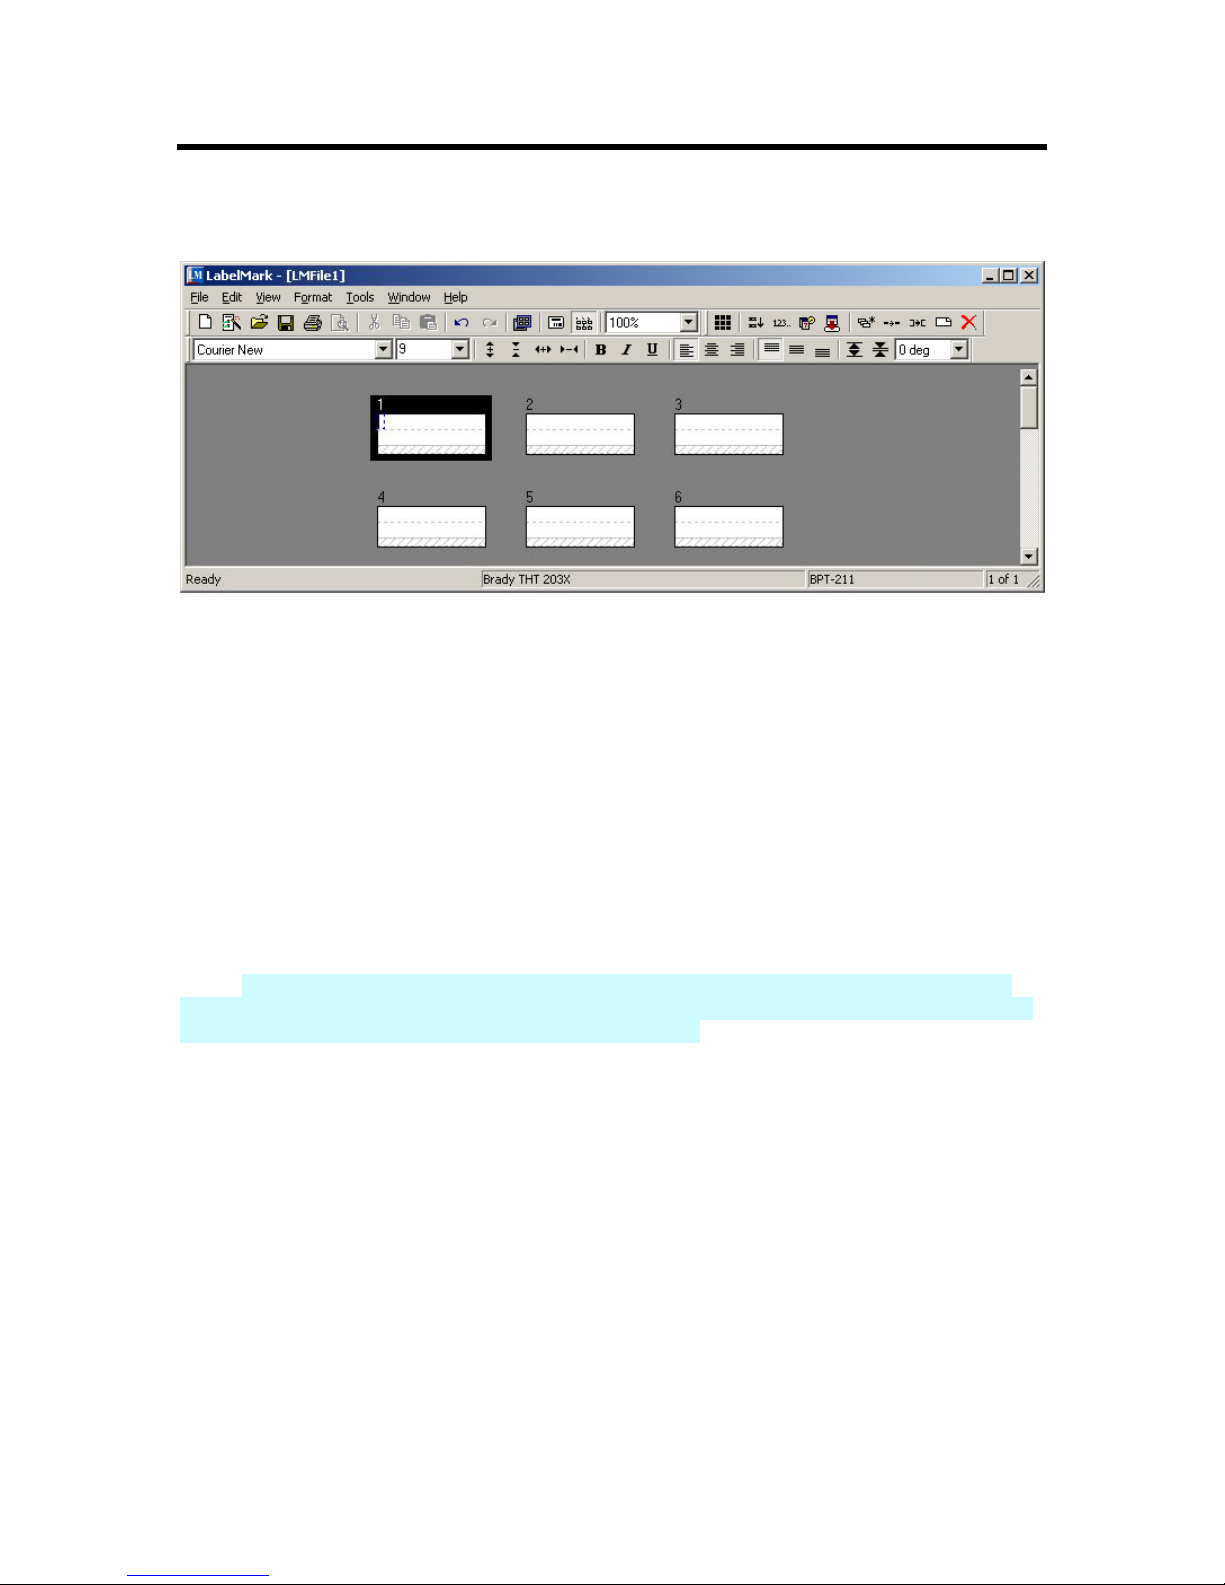
When you create or open a label file, the label editor screen appears. It includes the following:
• Menus and toolbars.
• The editor displays the labels approximately as they will print.
• The dashed lines show the size of the text. The gray hatch marks represent a partial line(s) of text
– you are not allowed to place anything in this area and it will not print. The size and location of
the gray hatch marks depends on the font size and vertical justification.
• The dark gray area is the label background. (Double-click the background to select all labels.)
• The active (or current) label is outlined. When you select more than one label, the darker shaded
label is active. A file can include up to 10,000 labels.
• The flashing text cursor shows where text will appear when you start typing.
• The status bar at the bottom of the screen lists: application status and useful information such as
the current printer, label part, etc.
Note: The editor described above is for the LabelMark application, which allows you to create text-only
labels. The LabelMark Plus application, also included on the LabelMark CD, allows you to incorporate
images, barcodes, rectangles and lines on your labels. The LabelMark Plus editor adds menus and toolbars
for these additional objects (see LabelMark vs. LabelMark Pl us).
Menu Bar and Toolbars
Use the pull-down menu bar and toolbars to access commands you need to create, open, format, save and
print label files.
The commands available depend on what is selected and on whether you are working in LabelMark or
LabelMark Plus. The system enables or disables commands as appropriate. Disabled commands appear
grayed out on the menu or toolbar.
You can also access many commands via a right-click with your mouse.
• Right-click text or an object to display the commands that apply to it.
• Right-click the label background to display commands that apply to the entire labe l file.
• Right-click the label header (the area immediately above the label) or the empty space in a label to
display commands that apply to that specific label.
LabelMark Overview 11
Page 18
LabelMark User Guide
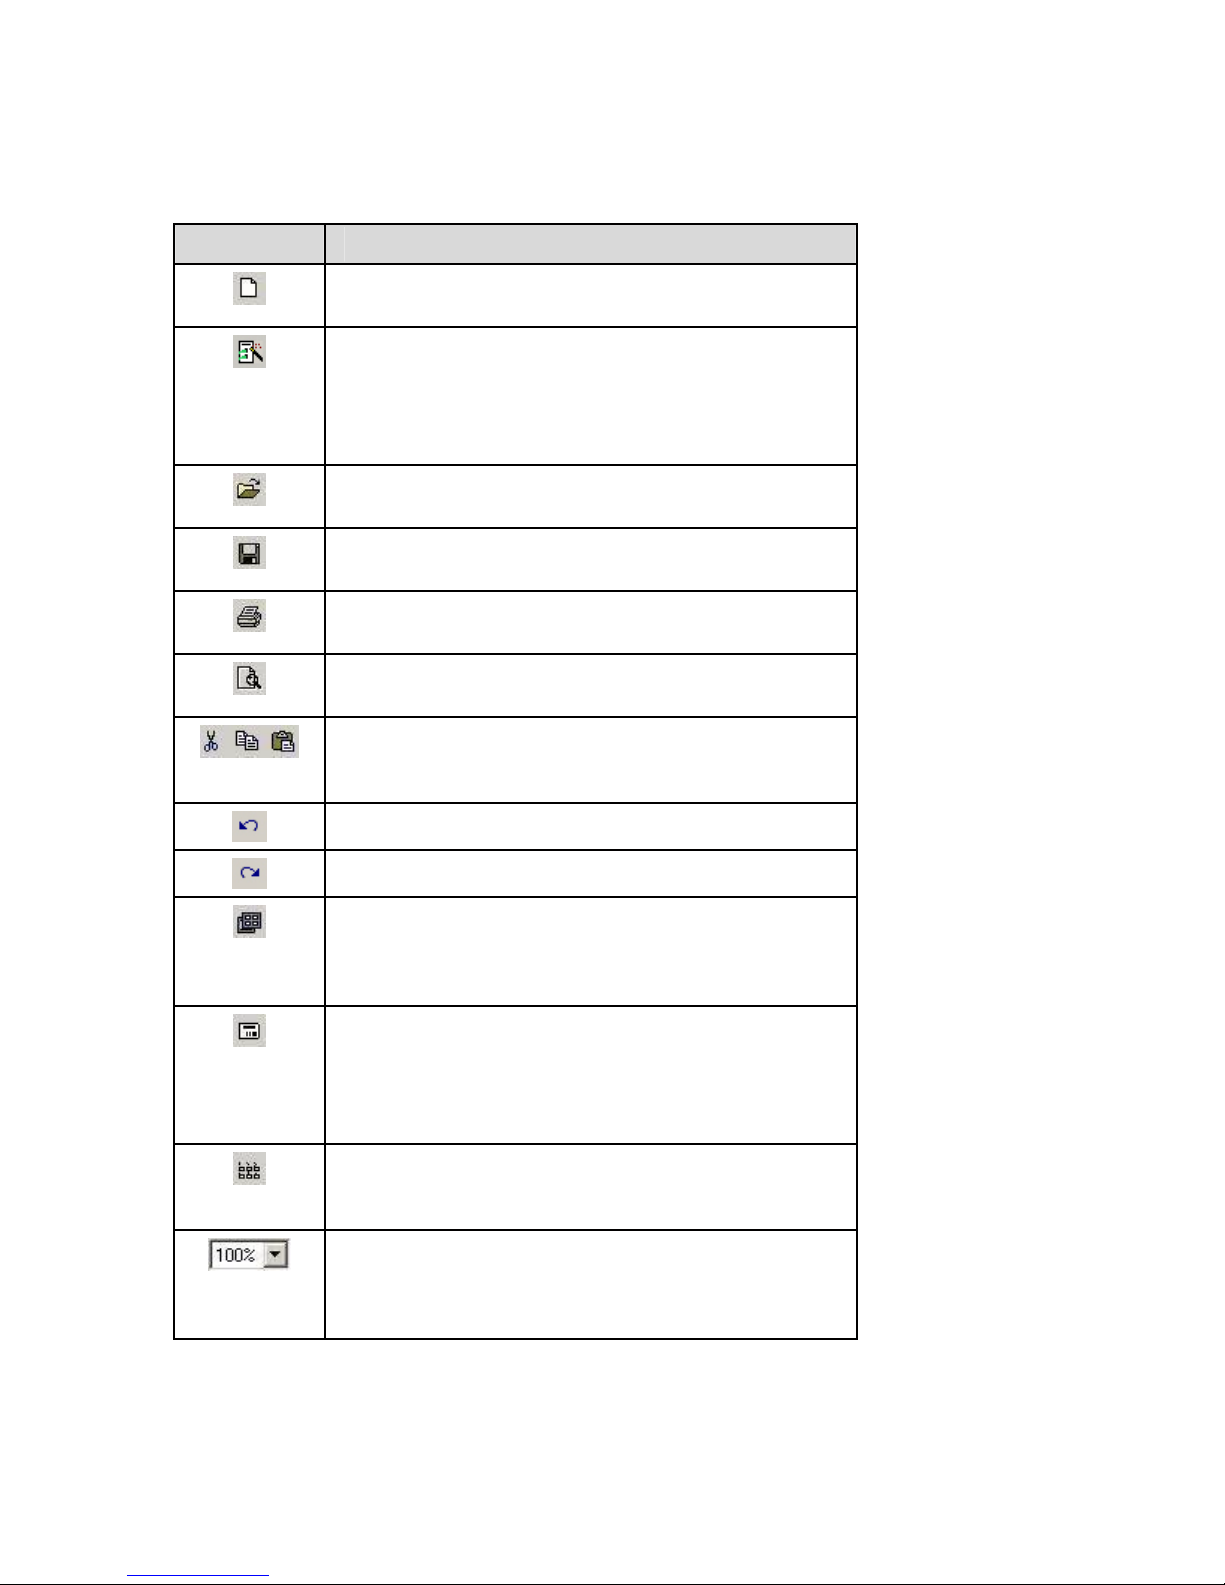
Standard Toolbar
The Standard toolbar is for editing at the document level.
Icon Description
New – Creates a new label file (menu equivalent:
File New…)
DataComm File Creation Wizard – Provides the
corresponding parts lists (organized by output type) for
specific datacomm labeling applications (menu equivalent:
File New DataComm File (Wizard)...
Note: Available in Standard LabelMark only.
Open – Opens an existing label file (menu equivalent:
File Open…)
Save – Saves the active label file (menu equivalent:
File Save)
Print – Prints the active label file (menu equivalent:
File Print…)
Print Preview – Displays the active label file as it will print
(menu equivalent: File Print Preview)
Cut, Copy, Paste – Allows you to cut or copy the selected
object or label and paste it in a new location (menu
equivalents: Edit Cut, Copy or Paste)
Undo – Reverses an action
Redo – Performs an action again
Label Part Setup – Allows you to switch to a different part
after you have created your file or to modify the label
parameters to create a new part (menu equivalent:
File Label Part Setup…)
Single Label Layout – Displays only the active label on the
screen (menu equivalent: View Single Label Layout)
Note: The Label Navigation toolbar appears when you
display a single label. See
details.
Multiple Label Layout – Displays the active label and other
labels that will fit on the screen based on the label layout and
zoom (menu equivalent: View Multiple Label Layout)
Zoom – Select an option from the zoom pull-down on the
toolbar to zoom in or out as needed while creating labels.
Page Width zooms in as far as possible while showing a
complete row of labels. (menu equivalent: View Zoom…)
Label Navigation Toolbar for
12 LabelMark Overview
Page 19

LabelMark Overview
Format Toolbar
The Format toolbar allows you to change the font and alignment of text items on a label.
Icon/Box Description/Values
Font – Sets font type (menu equivalent: Format Font…)
Font Size – Sets font size (menu equivalent: Format Font…)
Font Resize – Increases or decreases font size
Follows the font size list
Text Width – Expands or condenses text width
Takes place in 5% increments
Bold, Italic, Underline – Bolds, italicizes or underlines selected
text (menu equivalent: Format Font…)
Horizontal Justification – Aligns text to the left, center or right
of the label (menu equivalent: Format Horizontal Justification)
Note: LabelMark Plus justifies within the selected text block
rather than the label.
Vertical Justification – Lines up text to the top, middle or
bottom of the label (menu equivalent: Format Vertical
Justification)
Note: LabelMark Plus justifies within the selected text block
rather than the label.
Line Spacing – Increases or decreases the space between lines of
text on the label
Takes place in 5% increments
Rotation – In LabelMark, this feature rotates all text on the label
in 90-degree increments. In LabelMark Plus, this feature rotates
just the selected object. (menu equivalent: Format Rotation)
LabelMark Overview 13
Page 20
LabelMark User Guide
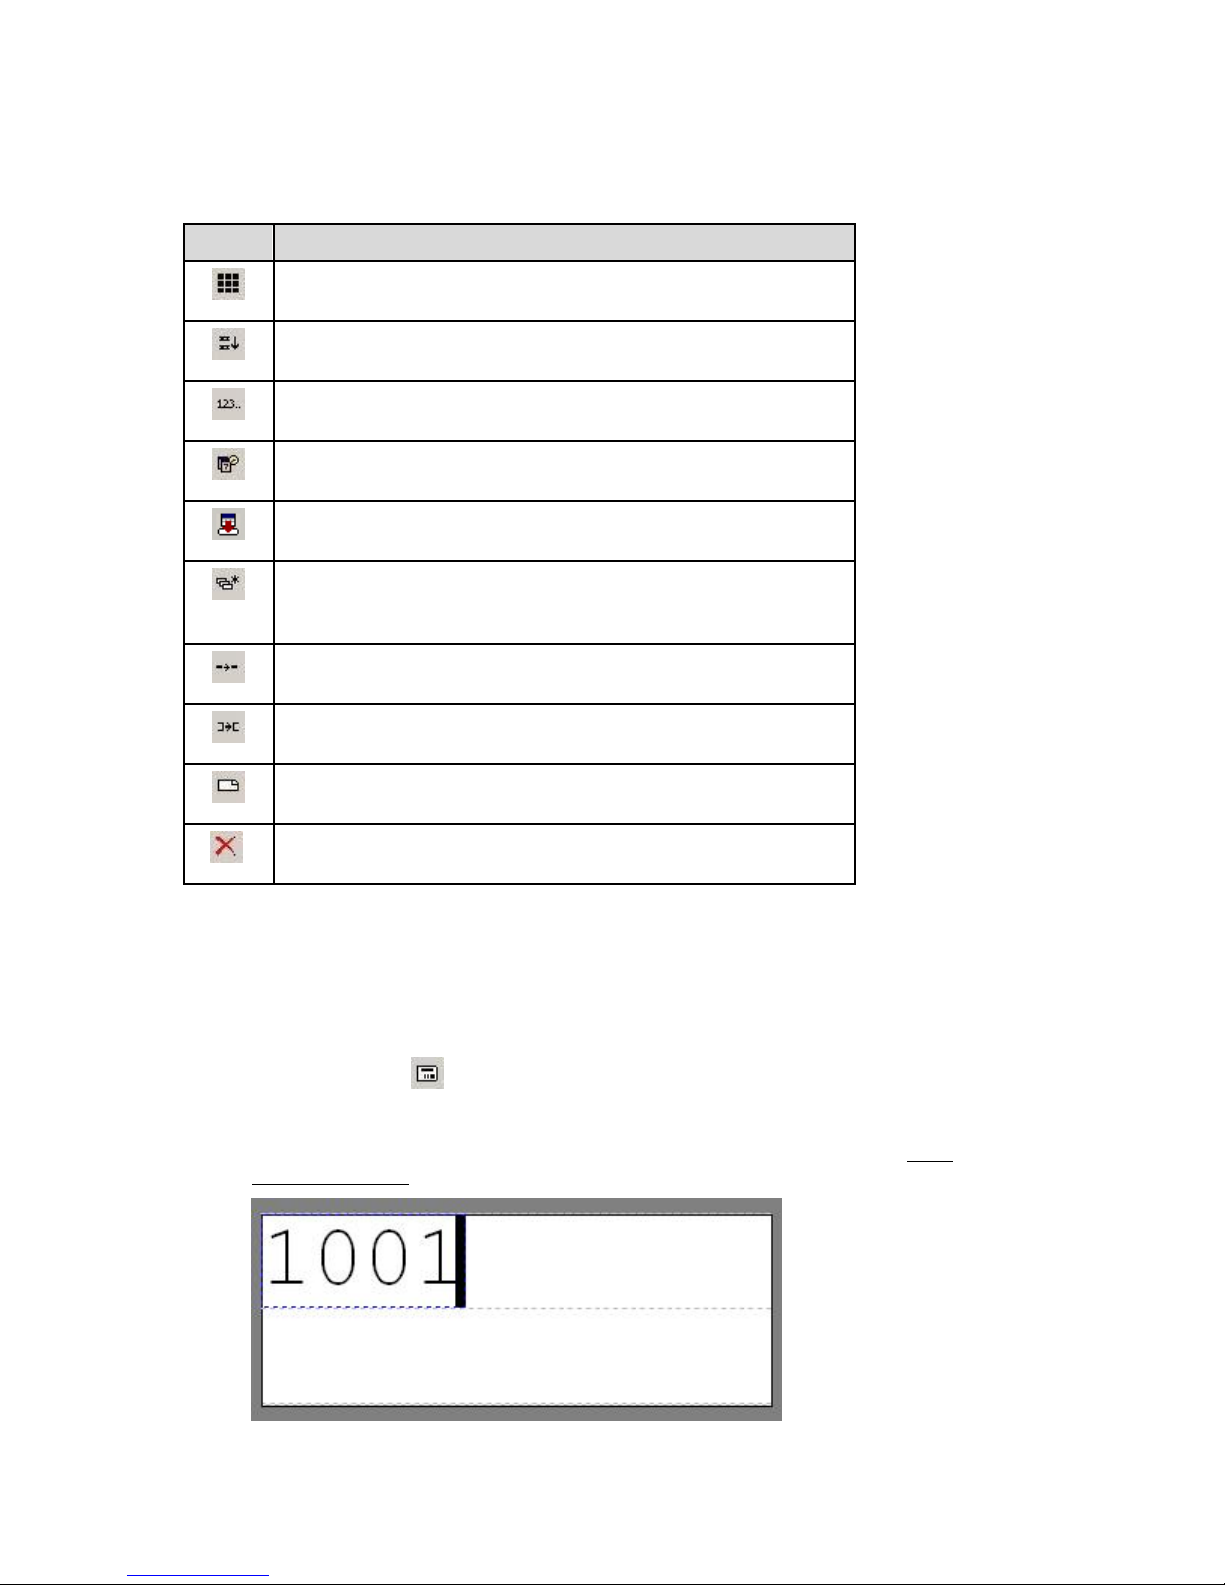
Action Toolbar
The Action toolbar is for editing at the label level.
Icon Description
Select All Labels – selects all labels with data in the open file
(menu equivalent: Edit Select All)
WireMark – duplicates all lines of text as many times as they will fit
on the label (menu equivalent: Format WireMark)
Simple Serialization – generates serial data (menu equivale nt :
Tools Serialization)
Date/Time – displays date and time options you can insert on labels
(menu equivalent: Tools Date/Time…)
Import Data – allows simple data import from other sources via
wizard or tabbed dialog (menu equivalent: Tools Import Data...)
Command Multiplier – repeats a command (such as copying a
label) for a specified number of times (menu equivalent:
Edit Command Multiplier…)
Copy Line or Copy Object – copies the selected item into the next
label (menu equivalent: Edit Copy Line or Copy Object)
Copy Label – copies the active label and inserts a duplicate label
into the label file (menu equivalent: Edit Copy Label)
Insert New Label – inserts a new label before the active label
(menu equivalent: Edit Insert Label )
Delete Label – deletes the selected label(s) (menu equivalent:
Edit Delete Label)
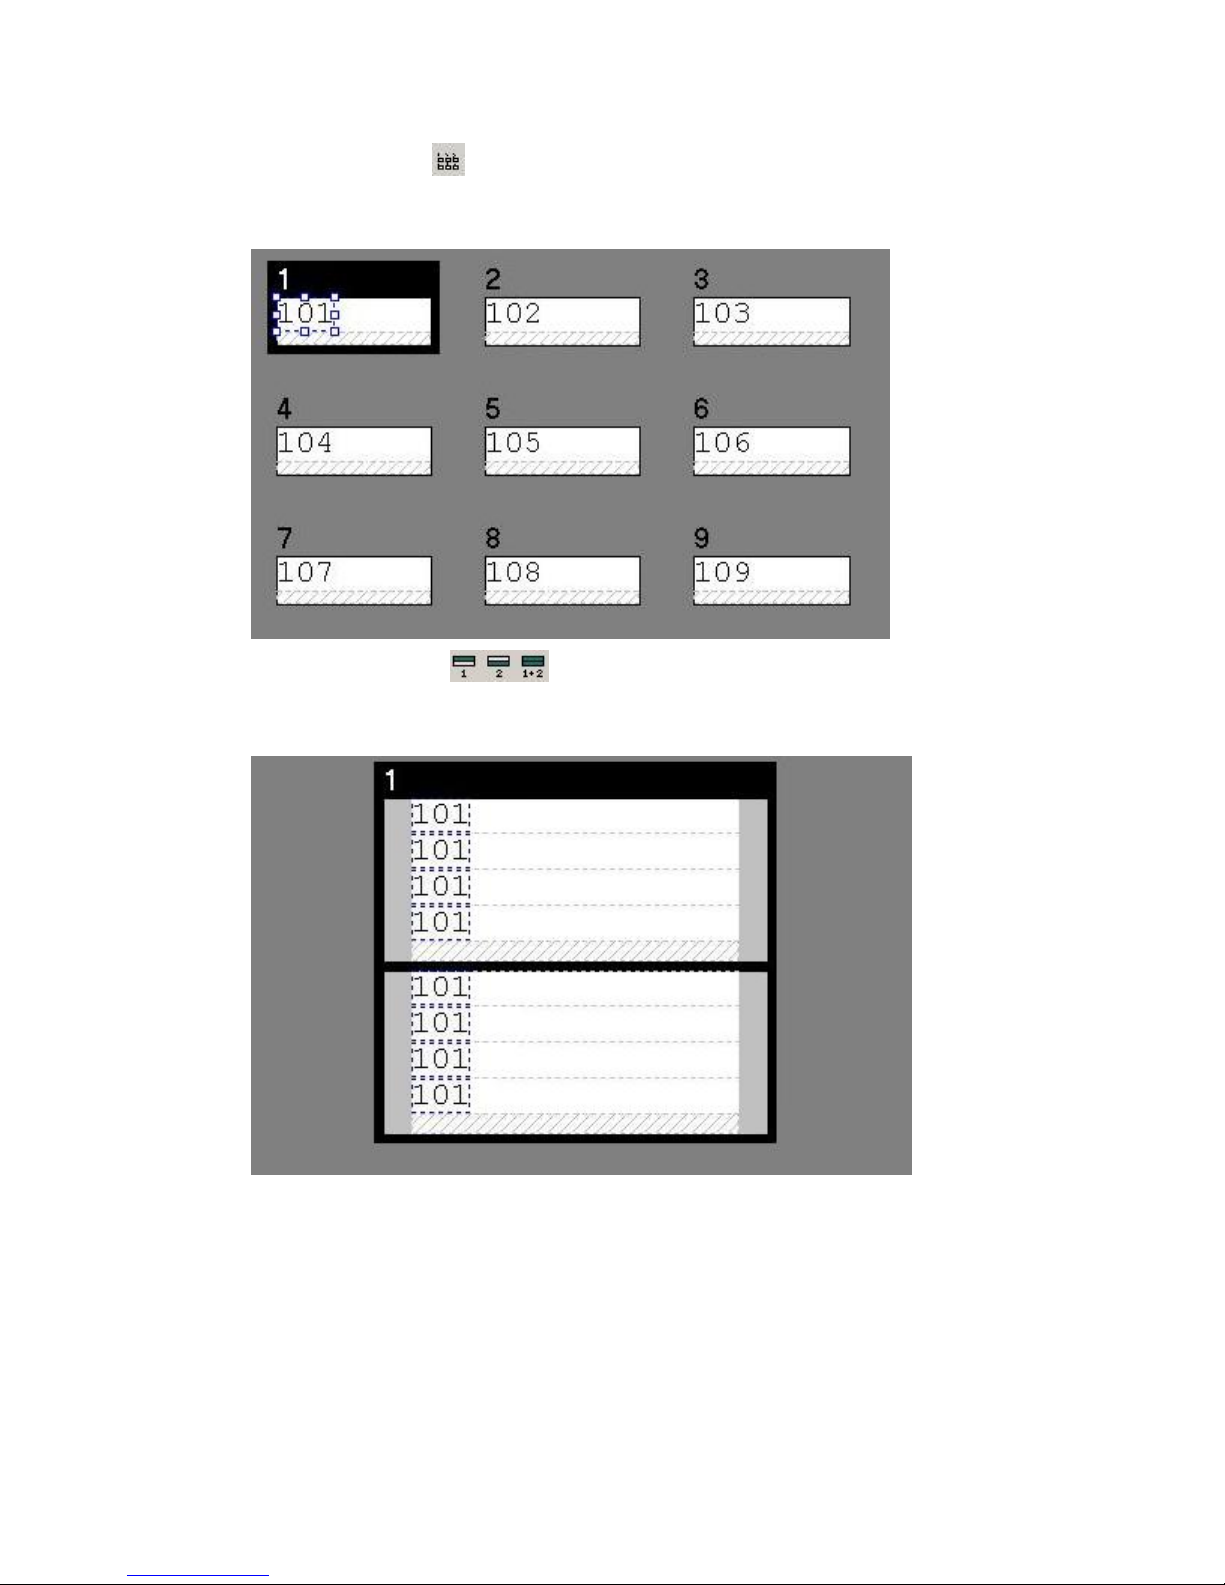
Using Views
There are four views to choose from in LabelMark: Single Label, Multiple Label, Two-Sided Sleeve (for
two-sided sleeve parts only), and Rotation. You can edit in all four views. Click on the appropriate icon on
the toolbar to change views or select the appropriate View menu option:
• Single Label View
You will see just the active label.
Note: The Label Navigation toolbar appears when you display a single label. See
Navigation Toolbar for details.
Label
14 LabelMark Overview
Page 21
LabelMark Overview
•
Multiple Label View
You will see as many labels in the file that will fit on your screen. Select the last label in the file
and press Tab to create a new label.
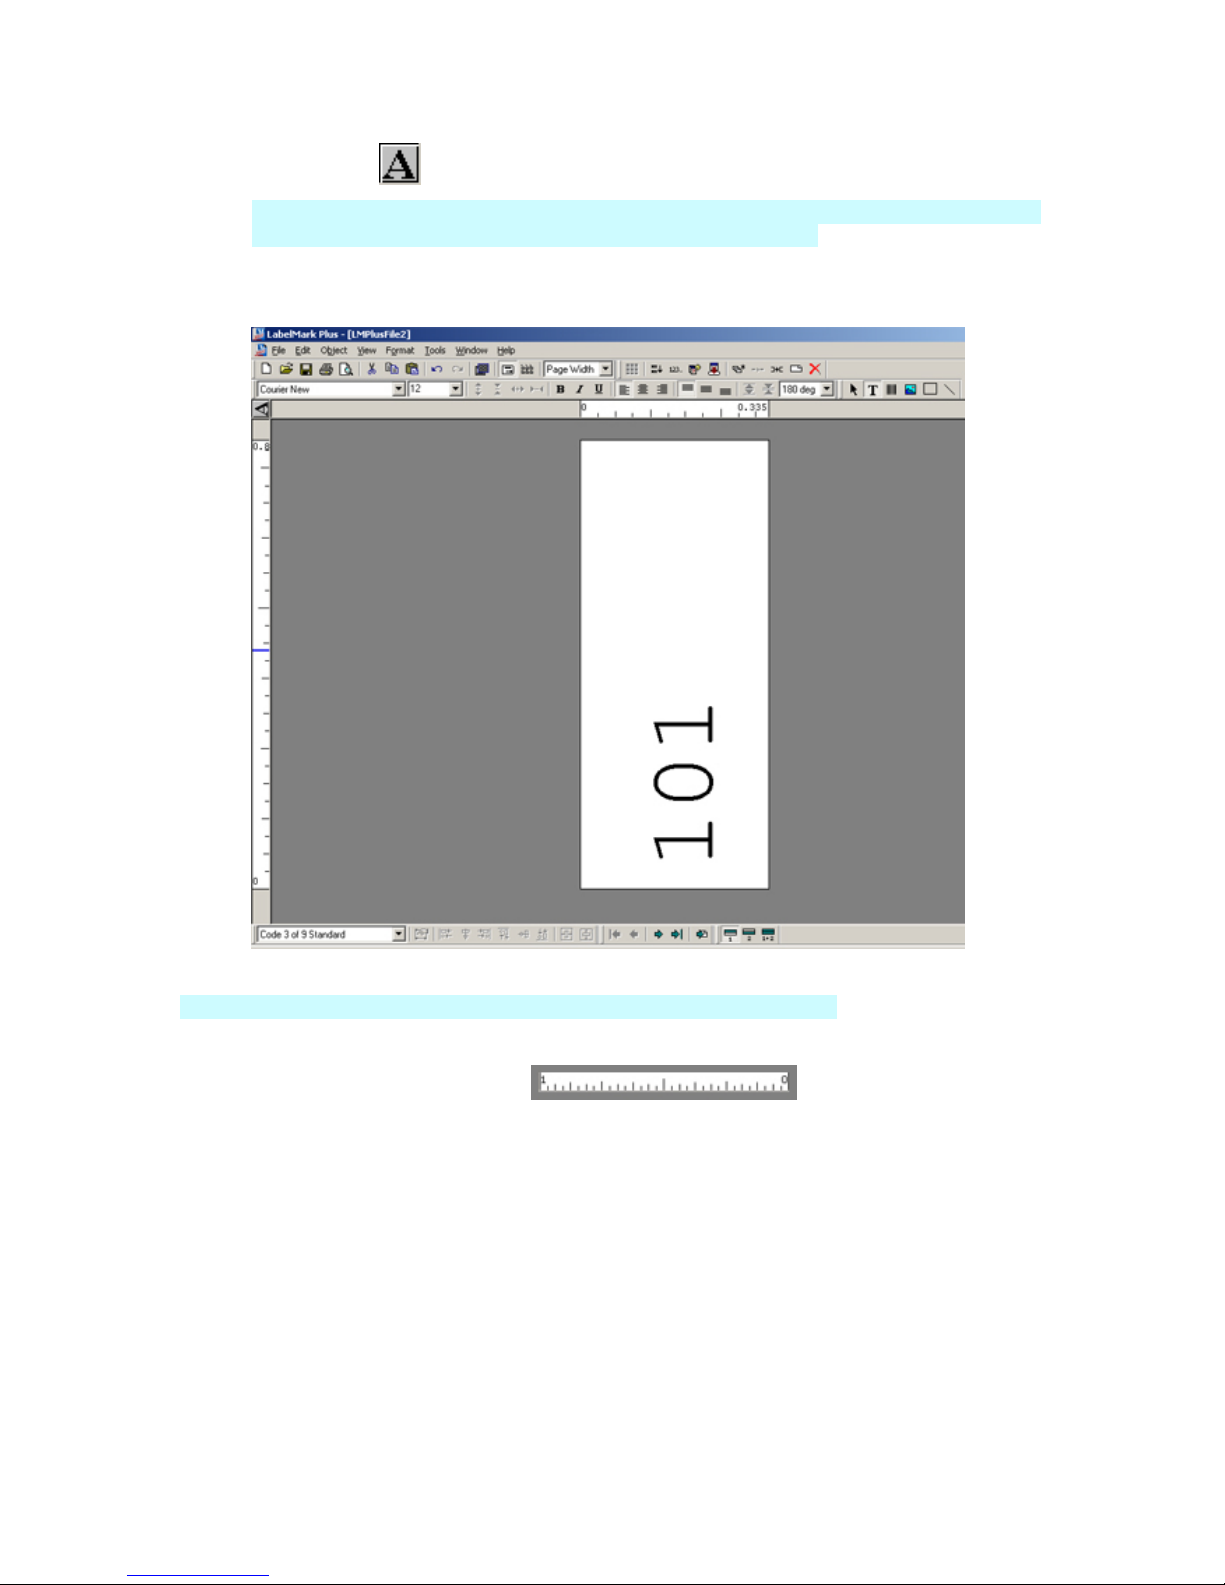
Two-Sided SleeveView
•
When working with a two-sided printable sleeve, you can display either side or both sides.
The Two-Sided Sleeve toolbar is disabled for other label parts.
LabelMark Overview 15
Page 22
LabelMark User Guide
Rotation View
The Rotation View icon is located in the upper left corner of the display scree n in LabelMark Plus.
By clicking the icon, you can rotate the view by 90-degree increments. (In LabelMark, go to
Format Rotate...and select the desired rotation view.) The label will subsequently display the
corresponding orientation. Note: You must be in Single Label View in order for this option to be
available.
In addition to the four views listed above, Rulers are available in LabelMark Plus.
• Rulers View (see above example)
16 LabelMark Overview
Page 23
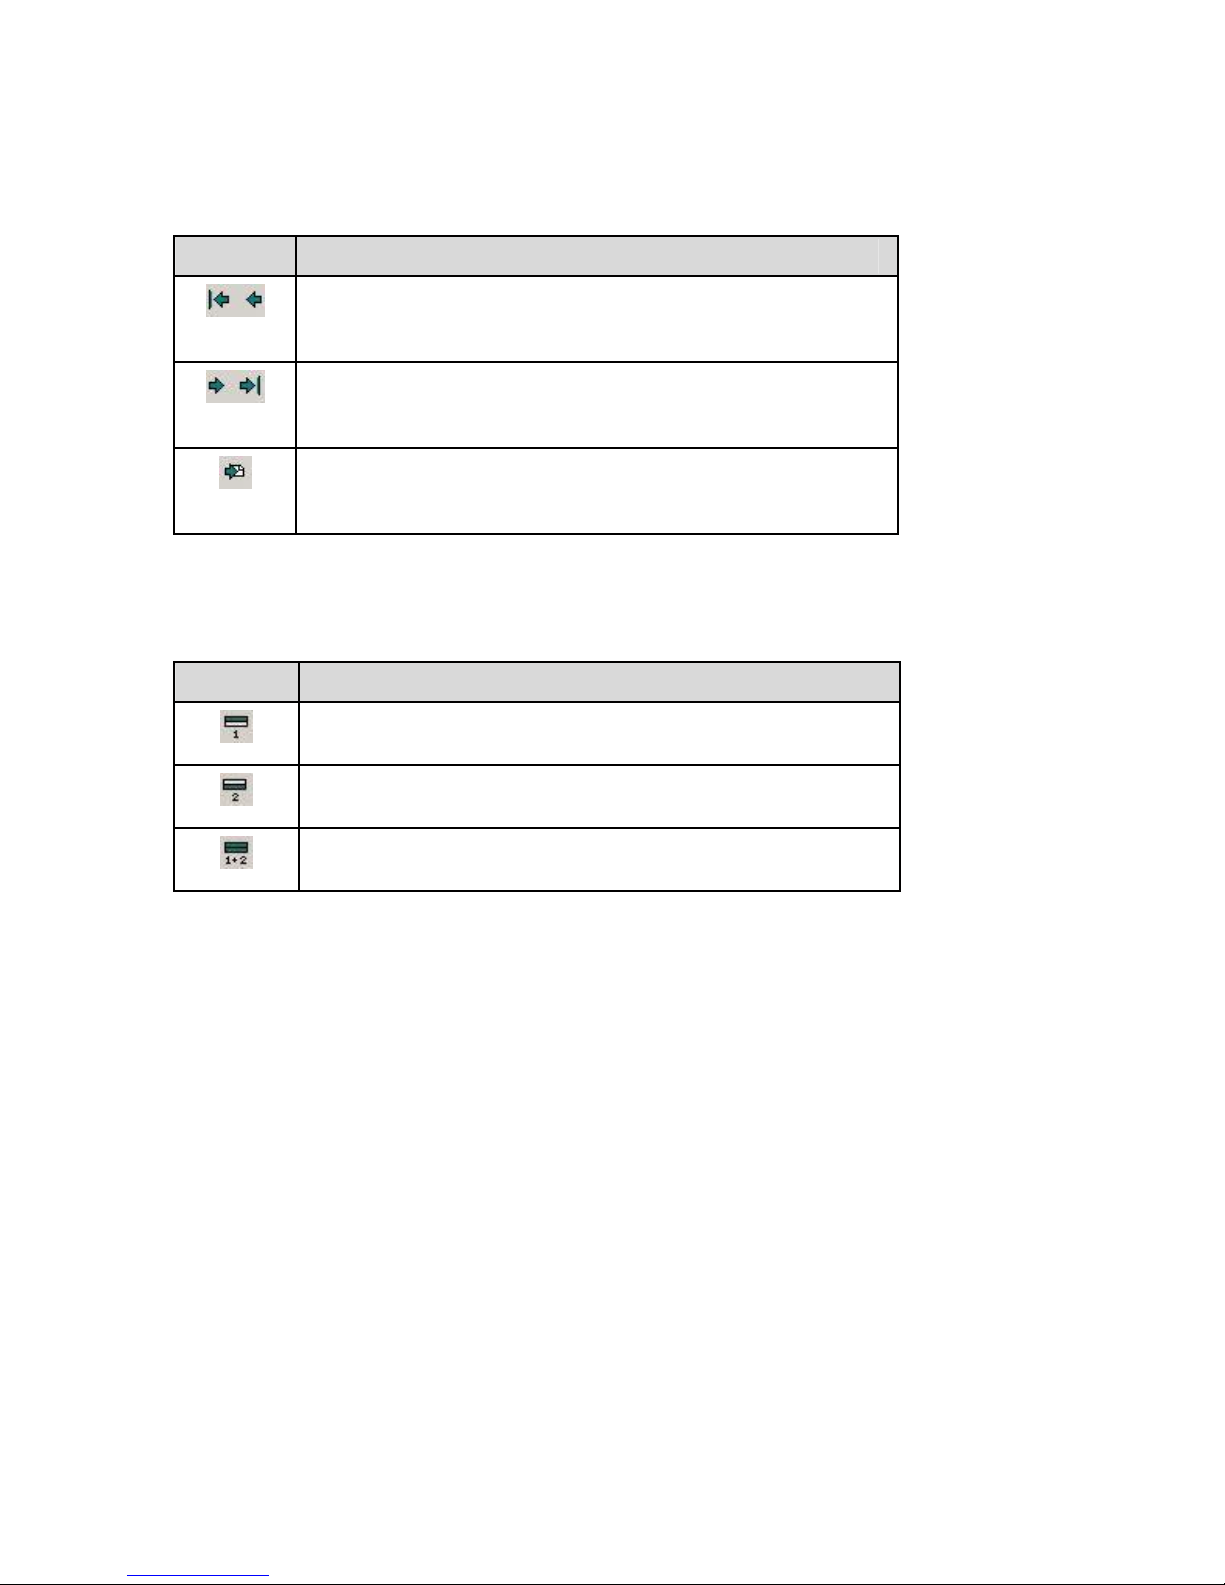
Label Navigation Toolbar
The Label Navigation toolbar appears when you display the single label view.
Icon Description
First and Previous – jumps to the first label in the file or the
previous label in the file. You can also press Shift+Home to go to
the first label.
Next and Last – jumps to the next label in the file or the last label
with data in the file. You can also press Shift+End to go to the last
label. When the last label is active, Next creates a new label.
LabelMark Overview
Go to Label – jumps to a specific label number that you enter. You
can also press F7 or select Edit Go To Label… to access the go to
function.
Two-Sided Sleeve Toolbar
The Two-Sided Sleeve toolbar appears when you are workin g wit h a two-sided sleeve part.
Icon Description
Show Side One – displays the first side of the two-sided sleeve
(menu equivalent: View Two Sided Sleeve Side 1)
Show Side Two – displays the second side of the two-sided sleeve
(menu equivalent: View Two Sided Sleeve Side 2)
Show Both Sides – displays both sides of the two-sided sleeve
(menu equivalent: View Two Sided Sleeve Both)
LabelMark Overview 17
Page 24

LabelMark User Guide
Changing User Defaults
LabelMark maintains a list of your preferences as user defaults. To change the user defaults, select
Tools User Defaults… The User Defaults o pt io ns di al o g bo x ap pears:
•
General tab options (the basic application settings):
Click the appropriate Browse button to change the default location for your label files,
templates or images.
Select your default LabelMark printer and Dimensions preferences.
Un-select the Show Welcome Screen if you would prefer not to see it each time you start
LabelMark.
Select the 6/9 Underline box if you want all
Un-select the appropriate Use wizard for: option if you would prefer to enter information on
your own in a tabbed dialog box rather than being guided through the process with a wizard.
Change the language setting for the LabelMark program by selecting a language from the
drop-down list box. The language setting will take effect the next time you start LabelMark.
Designate a flip character to use with the flip-flop feature. Note: Do not use a character you
might use elsewhere in your label files.
Select the COM port for TLS2200 printer (the Brady portable thermal transfer printer).
18 LabelMark Overview
6 and 9 characters underlined.
Page 25

LabelMark Overview
Refresh tab options (refresh data from an external source):
•
Select the desired Date/TimeRefreshOptions to refresh manually (this is the default setting), or
to refresh automatically upon either opening or printing a file.
Select the desired Imported Data Refresh Options to refresh manually, or to refresh
automatically upon either opening or printing a file.
Format tab options (the initial settings when you add text):
•
Note: These changes take effect for new label files, not for existing files.
Select your desired default text font, size and style.
Set Line Spacing for text editing. Numbers > 100 increase line spacing and < 100 reduce line
spacing.
Set the Expand/Condense width for text editing. Numbers > 100 expand text width and < 100
condense text width.
Set Horizontal and Vertical alignment for text editing.
Select Wiremark to copy text down a label as many times as it will fit.
Designate Automatic Text Formatting to automatically fit text to each line, if desired. When
the end of a line is reached, text size decreases as necessary as each additional character is
added, down to a minimum of four points.
In LabelMark Plus, select the Auto match text size option (also found in the Format drop-
down menu), if desired. Text size and condensing values remain the same for any text added
within a print zone, keeping formatting within the print zone consistent from line to line (this
is done on a zone-by-zone basis).
Label tab options (set the default part, part list, etc.):
•
To select a default part number (the suggested part when you create a new label file):
Click Deselect label to clear the previous default part number.
Select your desired Printer type and Part family.
Select Favorite from the Part list box if you want to default to your favorite list when
creating a new file.
Enter a default terminal block repeat value in the Repeat box. Refer to
Setting Continuous
Label and Terminal Block Options for information on terminal block repeat values.
Click the desired Part name from the list if you want to designate a default part.
Data Import tab options (set the default data source):
•
Select the default Data Source Type (if desired) from the drop-down menu (Text, Excel
spreadsheet, Lotus spreadsheet, Access database, or Other data source).
Find and select the Data Source.
If text, choose the Delimiter: Comma, Tab, or Other.
When you are finished setting defaults, click OK. Settings are applied immediately and will remain until
changed.
LabelMark Overview 19
Page 26

Page 27
Basic LabelMark Techniques
Creating a New Label File
To create a new label file:
Follow the steps in
Quick Start Guide – Creating a Basic Text Label.
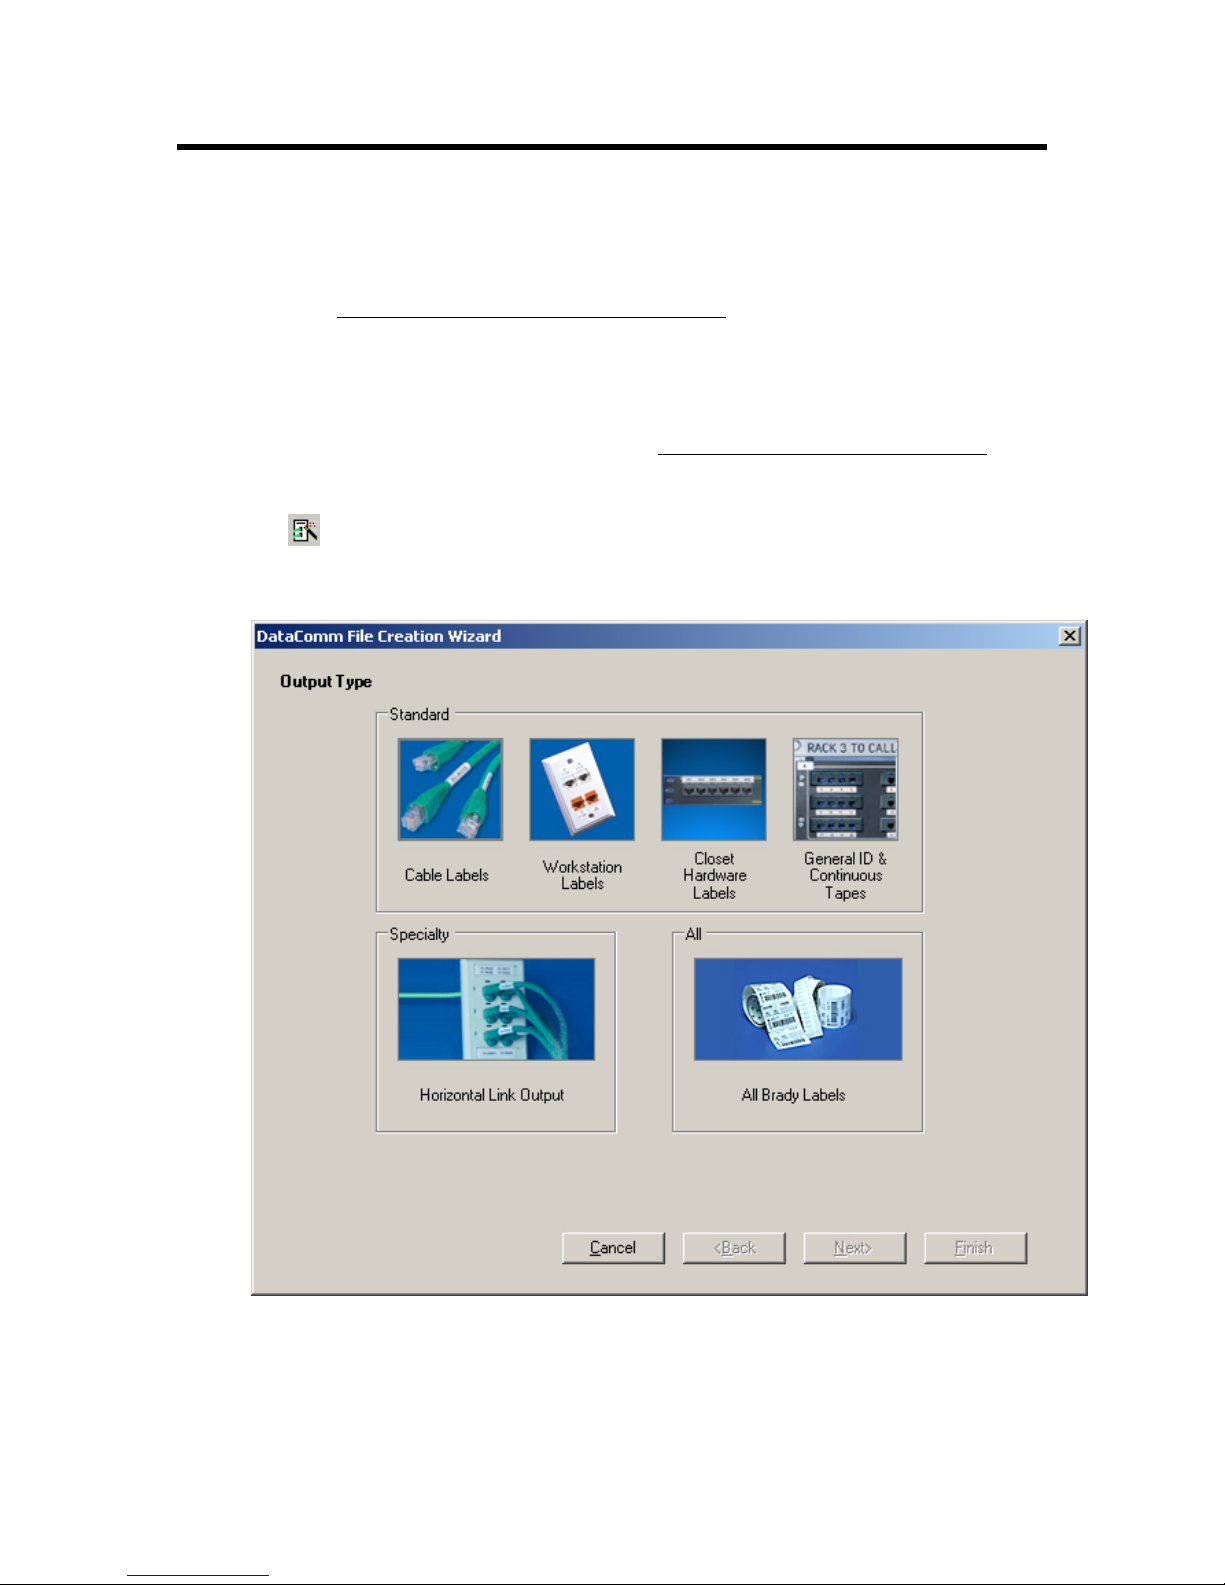
Creating a New Label Using the DataComm Wizard
The DataComm File Creation Wizard (available only in LabelMark™) guides you to the correct part to use
for your specific datacomm labeling application. By choosing the output type, you are directed to the
available label part categories and corresponding parts (see DataComm Wizard Parts Sub-Categories),
listed by name and dimension and displayed in preview mode.
To open the Wizard, go to File New DataComm File (Wizard) or click the DataComm File Creation
Wizard icon
In the
DataComm File Creation Wizard, six output type options are available. These are categorized as
Standard, Specialty, or All. Note: The graphics showing these output type options are click able buttons.
on the Standard toolbar.
Basic LabelMark Techniques 21
Page 28
LabelMark User Guide
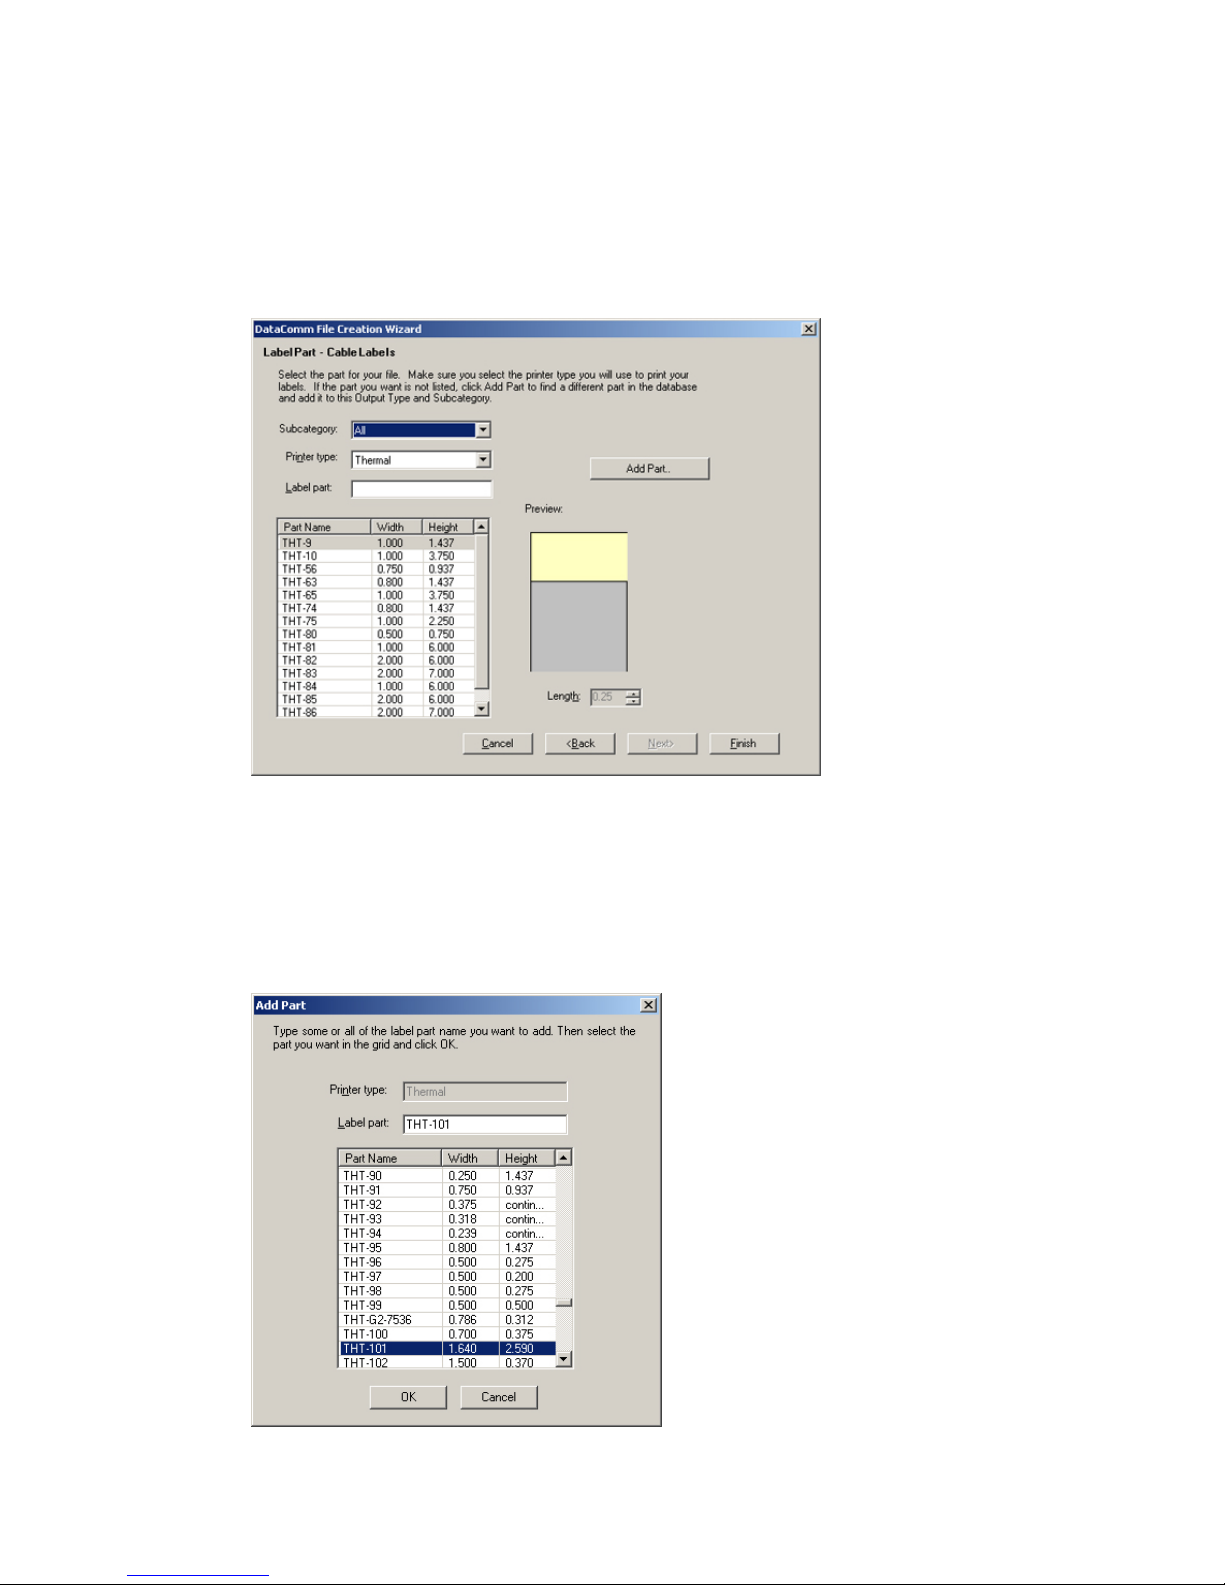
Standard Output
Selecting one of the Standard output types will take you to a Label Part page. The Subcategory field filters
the parts within the output type selected on the previous page. The Printer Type field selection further
filters the list of parts within the selected output type and subcategory. When a label part is highlighted in
the grid, the Preview area shows a preview of the blank label; if the label is a continuous part, the Length
field becomes available so you can specify the label length.
The Standard output types are comprised of the following:
Cable Labels
Workstation Labels
Closet Hardware Labels
General ID & Continuous Tape
You may also choose the
parts database for the currently selected output type and subcategory.
Add Part feature to search for a specific part by label part name and add it to the
22 Basic LabelMark Techniques
Page 29
Basic LabelMark Techniques
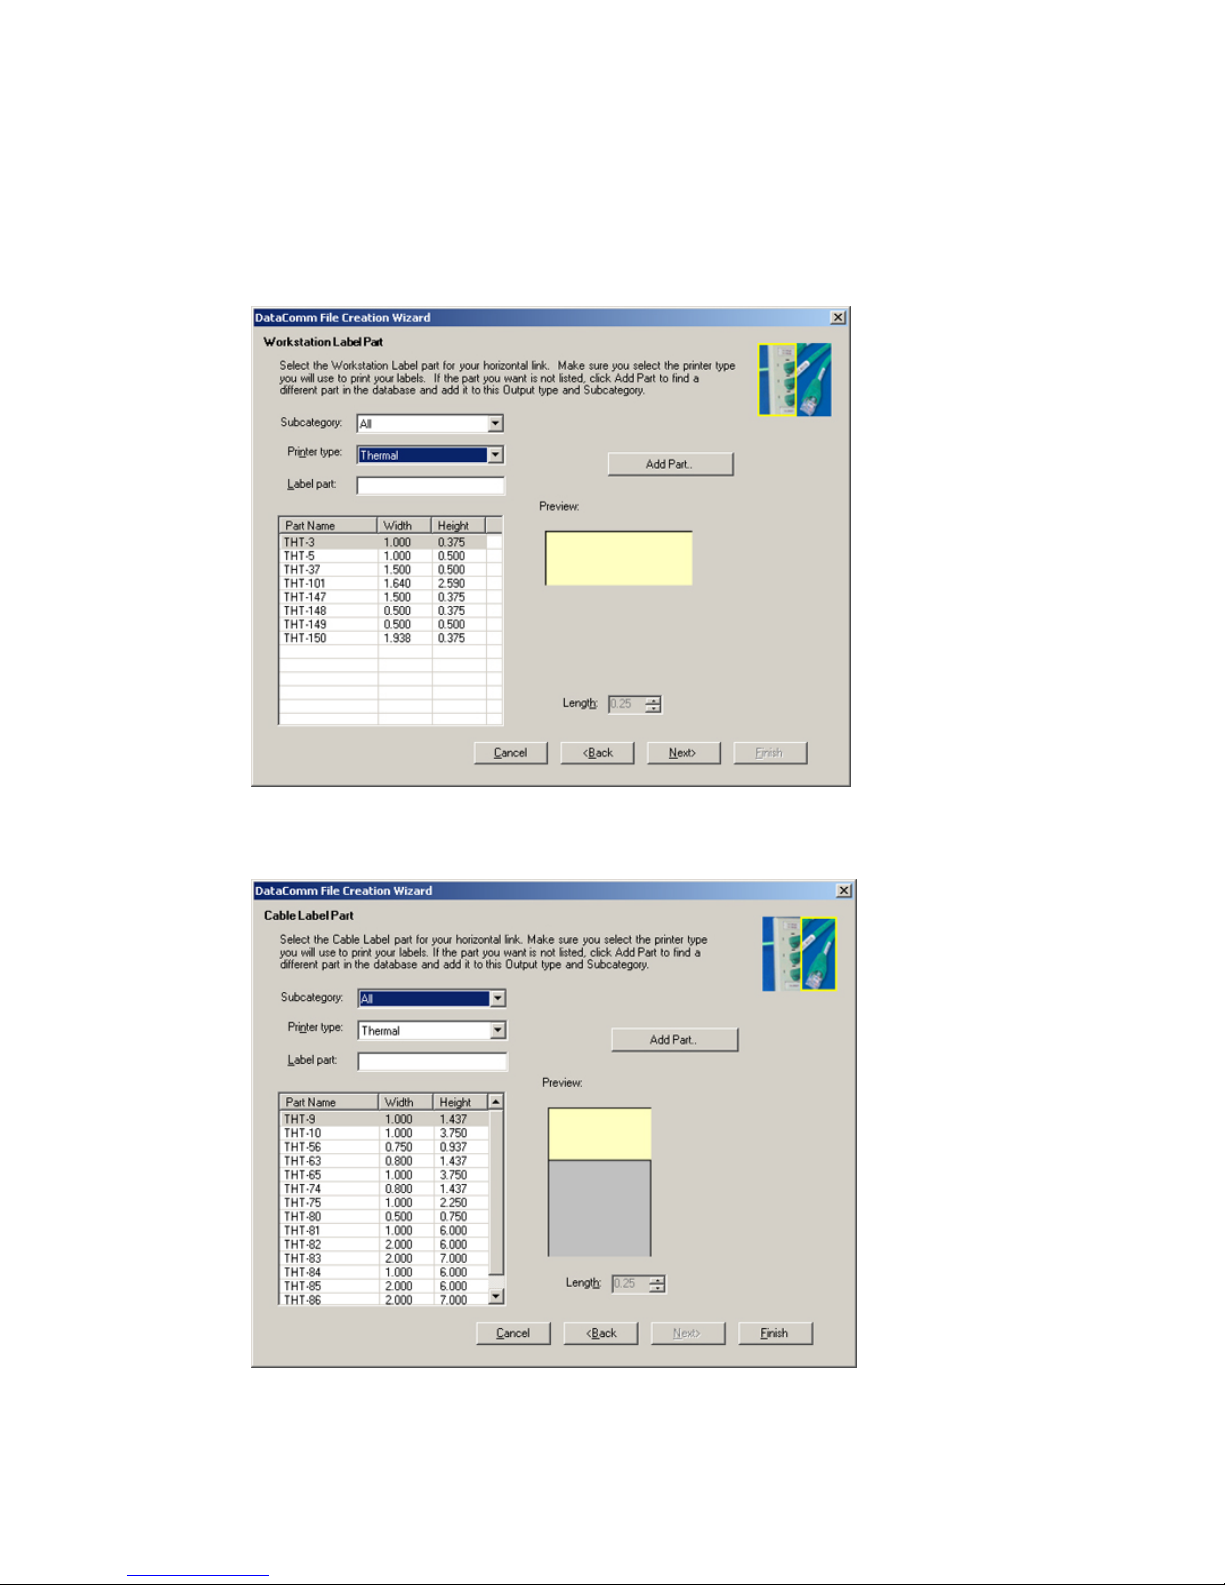
Specialty Output
Selecting Horizontal Link Output (the only available sub-category) from the Specialty category will take
you to the Workstation Label Part page, which will prompt you to identify the label part to use for the
workstation portion of the horizontal link. (A graphic in the upper right corner of the page shows which of
the two portions of the link you are working on.) The Subcategory field shows the subcategories from the
Workstation Labels output grou p.
Once you identify the workstation label part and click Next, the
identify the label part to use for the cable label portion of the horizontal link. The Subcategory field shows
the subcategories from the Cable Labels output group.
Cable Label Part page will prompt you to
Note: As with Standard Output, you may also choose the
label part name and add it to the parts database for the currently selected output type and subcategory.
Basic LabelMark Techniques 23
Add Part feature to search for a specific part by
Page 30
LabelMark User Guide
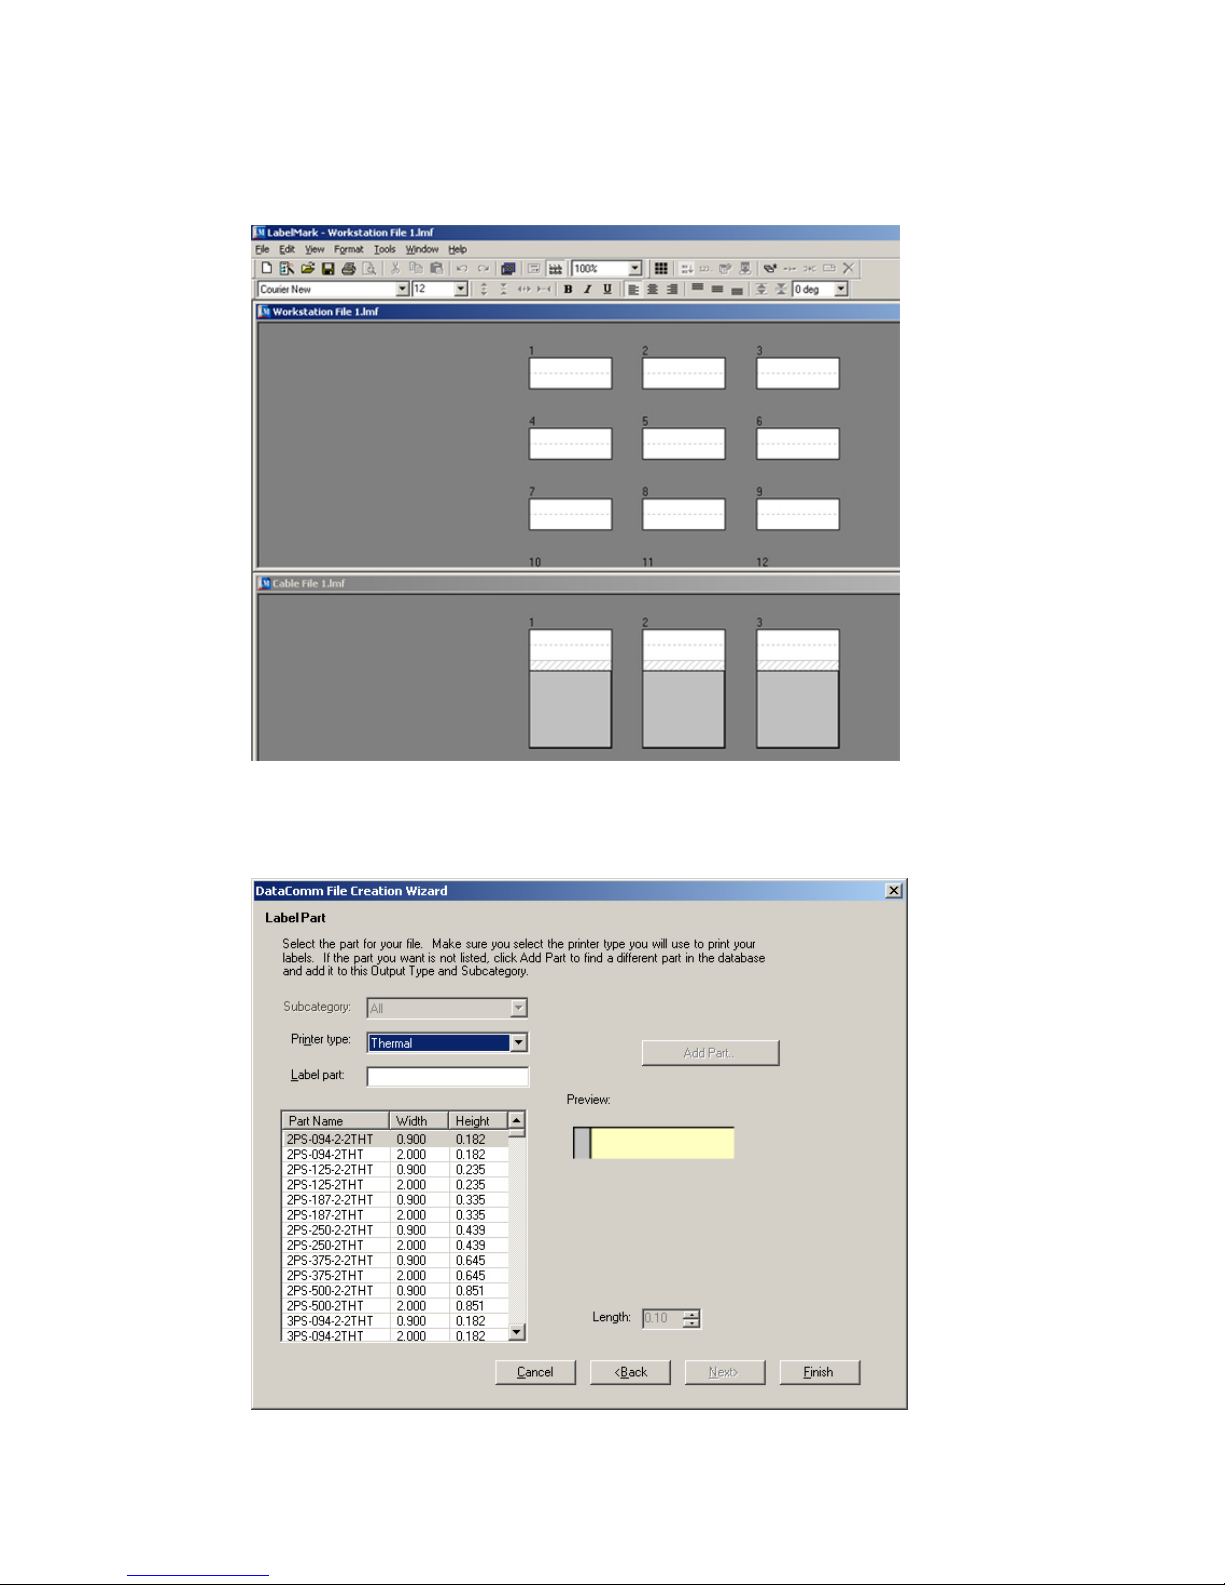
When you click Finish, the wizard creates the two files and displays them (
Files) tiled in the main editor window. Note: You can copy and paste linked objects between the two
separate files.
Workstation and Cable Label
All Output
Selecting All Brady Labels allows you to see the entire list of Brady parts, and filter them according to
printer type. By default, you cannot add a part to the database as all available parts are listed here.
24 Basic LabelMark Techniques
Page 31

DataComm Wizard Parts Sub-Categories
Output Type Sub-Categories
Cable Labels 2 Pair Filter
4 Pair STP, 25 Pair Copper
4 Pair UTP, CAT 5, CAT 5E
50 Pair Copper, 100 Pair Copper
Backbone Cable
Cable Bundles and Tags
Fiber Strands
Power and Ground Tags
Workstation Labels Desi Strip Inserts
Outlet, Faceplate, and Location
Closet Hardware Labels 110 Blocks
66 Blocks
BIX Blocks
Continuous Tapes for Patch Panels
Lucent PatchMax
Patch Panels - 4 Port
Patch Panels - 6 Port
Patch Panels Individual Port
Basic LabelMark Techniques
General ID & Continuous Tapes All
Horizontal Link Output Desi Strip Inserts
Outlet, Faceplate, and Location
Adding Text to a Label
To add text to a label:
1. Click on the desired location on the label to place the text.
2. Type your desired text. You may also import data (see
Importing Data into Label Files (Advanced) for details).
3. See
Formatting Text (below) for details on changing formatting and spacing.
Importing Data into Label Files (Simple) or
Basic LabelMark Techniques 25
Page 32

LabelMark User Guide
Formatting Text
In LabelMark, formatting is done at the line level. Formatting is applied to the entire selected line(s) of text.
There are several ways to format text:
• Set text formatting globally by using the
User Defaults…). Aside from the common settings of Font, Size, Style, and Justification, you may
choose to apply the following formatting specifications to your label:
Format Tab within the User Defaults settings (Tools
o Line Spacing: Increases or decreases the space below a line of text in one-percent
increments.
o Expand/Condense: Stretches and shrinks the length and width proportionately in one-
percent increments.
o Wiremark: Turns on wiremarking for all labels. When Wiremark is selected here, you can
turn off this option for an individual label by using the Format Menu or the Wiremark
button on the Action Toolbar. Note: When using LabelMark Plus, you must turn off
wiremarking for any individual label you wish to add non-text objects to.
o Automatic text formatting:
Auto fit text lines – When the end of a line is reached, text size decreases as necessary
as each additional character is added, down to a minimum of four points.
Auto match text size (also found in the Format drop-down menu) – Text size and
condensing values remain the same for any text added within a label zone, keeping
formatting within the label zone consistent from line to line (this is done on a zoneby-zone basis). Note: The Match all text in block option is available only in
LabelMark Plus.
26 Basic LabelMark Techniques
Page 33

Basic LabelMark Techniques
Note: This global formatting can be overwritten on individual labels by utilizing any of the following
options:
Click the line of text to select it (or use Ctrl + click to select multiple lines) and go to the
Format Menu.
Select the line of text and use the
Format Toolbar options.
Right-click on the text and use the
Properties Menu.
Basic LabelMark Techniques 27
Page 34

LabelMark User Guide
WireMarking Labels
When you WireMark a label(s), text copies down the label as many times as it will fit.
To create WireMarked labels:
1. Enter text on the label(s).
2. Select the label(s) you want to WireMark (see
3. Click the WireMark icon
Note: You can also click the WireMark icon before typing text on the label or select Wiremark
under the Formatting tab in the User Defaults section (Tools User Defaults… ) to turn on
wiremarking for all labels by default.
To remove WireMarking from labels:
• Select the label(s).
• Click the WireMark icon
Additional WireMarking notes:
• You can WireMark multiple lines of text.
• The gray hatch marks represent a partial line(s) of text – you are not allowed to place anything in
this area and it will not print.
• You can modify a WireMarked label by changing its text.
• Users commonly bottom align WireMarked labels.
• WireMarking creates a text block in LabelMark Plus; however, you cannot place any other objects
on the label.
• When using LabelMark Plus, you must turn off wiremarking for any individual label you wish to
add non-text objects to.
on the Action toolbar.
again.
Selecting Text and Labels)
Serializing Labels (Simple)
The serialization feature automatically generates serial data based on the values entered in the Serialization
Attributes dialog. The process described below is for simple serialization. For more complex serialization
options, see Serializing Label s (A dv anced).
To access the simple serialization feature:
1. Click the desired location on the label to place the serialization information.
LabelMark Plus Note: In LabelMark Plus, select the Text icon or Barcode icon before
clicking the desired location.
28 Basic LabelMark Techniques
Page 35

Basic LabelMark Techniques
2. Click the
Enter data values:
3.
Text or Barcode – Only in LabelMark Plus; select if you want to create text or a barcode.
Serialization icon on the Action toolbar.
Serial type – Select the type of serialization from the list (see Serialization Types Table for
details).
Start – Enter the starting value. To create serial numbers with leading zeros, enter the starting
value with zeros. For example, 001 instead of 1.
End – Enter the ending value. You may perform serializations that increment or decrement.
To decrement a serial number, enter a lower value in the End box than you have in the Start
box.
Step – Enter a positive number by which to increment or decrement the count.
Number of labels – The system-calculated number of labels to create based on Start, End and
Step. For example, a Start of 1, End of 3, Step of 1 and Number of labels of 3 would result in
1,2,3. If you change the Number of label s to 6 the system would print the series twice –
1,2,3,1,2,3.
Prefix – Check the box and enter a value that should precede each string. This value is
constant.
Suffix – Check the box and enter a value that should end each string. This value is constant.
Preview – Displays a sample of the first serial number including Prefix and Suffix.
4. Click OK.
See
Working with Linked Objects to edit the serialization, if necessary.
Note: In LabelMark the serialization appears alone on a text line. You cannot combine the serialization
with other text. In Lab e lM ark Plus, you can place other text next to a serialization object.
Modifying Serialization
To change, format or delete an existing serialization, see Working with Linked Objects.
Basic LabelMark Techniques 29
Page 36

LabelMark User Guide
Inserting Date and Time Information
To insert date/time information into your label(s):
1. Click the desired location on the label to place the date/time information.
LabelMark Plus Note: In LabelMark Plus, select the Text icon before clicking the desired
location.
2. Click the
Build the date/time string that appears in the Format: box:
3.
Date/Time icon on the Action toolbar.
Clear All deletes the contents of the Format: box, so you can start over.
Add date/time elements by clicking on the desired buttons e.g. January, AM/PM, etc.:
o Click the Date tab to add date elements to the string or click Time to add time elements.
o Click Space to insert a space.
o Click Add to insert the character in the text box (you may change the character at any
time).
Remove Last deletes the date/time element you added most recently.
Specify the number of labels and which labels the date/time should appear on with the
Options tab. See
Specify the data and copy options:
4.
Specify the date/time data to use:
o Click Use system date/time to use the current date/time setting on your computer.
o Or, click Select date/time and type the specific date and time you want to insert.
Set the number of labels on which to insert the date/time field with Copies.
Select an Include date/time on radio button to skip labels if desired.
30 Basic LabelMark Techniques
Serializing Labels (Simple) for an explanation of the options.
Page 37

Basic LabelMark Techniques
5. Click OK to add the date/time string to your label(s).
To manually refresh the date and time:
• Go to Tools Refresh Date/Time each time you wish to refresh the date and time.
To automatically have the date and time refresh either each time you open a file, each time you print
a file, or both:
• Go to Tools User Defaults Refresh Date/Time Refresh Options and define your
settings
.
Note: In LabelMark the date/time appears alone on a text line. You cannot combine the date/time with
other text. In LabelMark Plus , you can place another text object next to a date/time object.
Modifying Date and Time Information
• To change, format or delete an existing date/time field, see Working with Linked Objects.
• To manually or automatically refresh the date and time, see
Inserting Date and Time Information.
Working with Linked Objects
When you import data, serialize labels or insert a date/time field, LabelMark creates linked objects. The
linked objects contain the attributes for modifying the item. As a result, you cannot manually edit linked
objects, you must modify their attributes through the original dialog box as described below.
To edit linked objects:
1. Double-click one of the linked objects.
2. The system displays the appropriate multi-tab dialog box with the linked object attributes.
Basic LabelMark Techniques 31
Page 38

LabelMark User Guide
Note: Even if you used a wizard to create the linked objects, you will not see the wizard when you
edit a linked object. You will see a multi-tab dialog box (
below) that lets you make all the necessary changes to the objects.
see the advanced serialization example
3. Modify the attributes as desired and click OK to regenerate the import, serialization or date/time
fields.
To delete a linked object(s):
If you select a linked object and press Delete, the system asks if you want to delete all items linked to those
in the current selection?
• If you select No, the system deletes only the selected item.
• If you select Yes, the system deletes all of the linked items.
• If you select Cancel, the system deletes nothing.
To format linked objects:
1. Click one of the linked objects.
Note: You can select and format one linked object without affecting the others.
2. Select Edit Select All Linked Objects.
3. Format the objects as desired.
32 Basic LabelMark Techniques
Page 39

Basic LabelMark Techniques
Selecting Text and Labels
You can select, edit, copy and format text and labels. The selection determines if the formatting comes
along when you paste. The following table lists selection items, how to select them and paste
characteristics:
Item To select… Formatting included?
A portion of a line of
text, click and drag.
The selected text is
white on a black
background.
A complete line of
text, double-click it
or select Edit
Select All Text.
Use Ctrl+click to
select multiple lines
of text.
Text is white on a
black background
when selected.
A single label, click
on the label header
(the area immediately
above the label). Use
Ctrl+click to select
multiple labels.
Label has border
when selected.
No
No
(To copy formatting in
LabelMark, refer to
Repeating Common
Commands
Yes
.)
A range of labels,
click and drag across
the labels you want
to select.
The entire file, doubleclick the gray
background, select Edit
Select All Labels
or click the Select All
Labels icon
Basic LabelMark Techniques 33
Yes
Note: Pasted labels are
inserted starting with the
active label. The active and
following labels are moved
after the inserted pasted
labels.
Yes
Page 40

LabelMark User Guide
Copying and Pasting Text and Labels
Note: The command multiplier is also useful for copying text or labels (see Repeating Common
Commands).
To copy text and labels:
1. Select the data (see
2. Click the Copy icon
To paste text and labels:
1. Select the label you want to paste the data on.
Note: To paste the copied data to more than one label, select a range of labels.
2. Click the Paste icon
Note: You can also copy text from other Windows® applications and paste it into LabelMark.
Selecting Text and Labels).
on the Standard toolbar.
on the Standard toolbar.
Making Data Fit on a Label
If your data does not fit on a label, LabelMark displays it in red and it will not print properly until you
make it fit. For additional information about text formatting, see Formatting Text.
To make an oversized item fit, you can do one of the following:
• For text (see
Reduce the font size.
Condense the text.
Use Automatic Text Formatting, set in the
o Auto fit text lines (also found in the Format drop-down menu) – When the end of a line is
o Auto match text size (also found in the Format drop-down menu) – Text size and
• Change to a larger label part (see
• Move the object to left and towards the top of the label in LabelMark Plus (see Moving an
Object).
If you are importing data, serializing or inserting date/time information and the data does not fit:
• Click on one of the imported data elements, select Edit Select All Linked Objects and
change the font attributes until the data fits.
Format Toolbar):
User Defaults:
reached, text size decreases as necessary as each additional character is added, down to a
minimum of four points.
condensing values remain the same for any text added within a label zone, keeping
formatting within the label zone consistent from line to line (this is done on a zone-byzone basis). Note: The Auto match text size option is available only in LabelMark Plus.
Selecting a Different Label Part).
34 Basic LabelMark Techniques
Page 41

Basic LabelMark Techniques
Repeating Common Commands
The Command Multiplier repeats certain commands the specified number of times. It’s useful when
inserting or deleting a large number of labels or when copying a number of labels or objects.
To use the Command Multiplier:
1. If you are copying a labels or objects, select them now.
Note: If you are copying objects, the objects you select must be on one label.
2. Click the
Command Multiplier icon on the Action toolbar.
Select the action:
3.
Copy line or object – Copies the selected text or object(s) to the Start at label location the
number of times specified in the Copies field.
You may have to move or delete objects that interfere with the placement of the items being
pasted in LabelMark Plus.
Copy label – Copies the active label or the selected labels to the Start at label location the
number of times specified in the Copies field. Existing labels are bumped to accommodate the
new label(s).
Note: If more than one label is selected, the active label is the one with darker highlighting.
Insert label – Inserts the number of blank labels specified in the Copies field before the Start
at label.
Delete label – Deletes the number of labels specified in the Copies field starting with the
Start at label.
Basic LabelMark Techniques 35
Page 42

LabelMark User Guide
4.
Determine the labels to be affected:
Copies: – The number of times the selected Action will occur.
Start at label: – The label number to start the action on.
Apply action to: – Select a radio button to determine if you want to perform the action on
every label or to skip over labels.
5. Click OK.
Finding and Replacing
To find text in a label file:
• Select Edit Find.
• Type the text you want to search for in the Find what box.
• Check Match case if you want to find the exact text including upper and lowercase characters.
• Select the Direction for the search.
• Click Find Next.
To find and replace text:
• Select Edit Replace.
• Type the text you want to search for in the Find what box.
• Type the text you want to replace it with in the Replace with box.
• Check Match case if you want to find the exact text including upper and lowercase characters.
• Select the Direction for the search.
• Click Find Next and click Replace to replace each occurrence or click Replace All to
immediately replace all occurrences of the text.
Note: You can search for text in linked objects (imported, serialized or date/time fields), but you cannot
replace text. To modify a linked object, double-click it (see
Working with Linked Objects).
Undoing/Redoing Actions
LabelMark allows you to undo and redo editing and formatting commands.
• To reverse an action, click Edit Undo. Or use the
• To perform an action again, click Edit Redo. Or use the
36 Basic LabelMark Techniques
icon from the Standard Toolbar.
icon from the Standard Toolbar.
Page 43

Basic LabelMark Techniques
Selecting a Different Label Part
LabelMark allows you to switch to a different label part (within the same part family) after you create your
label file. This eliminates the need to start over should you decide on a label part other than the one you
used to create the file.
To change to a different label part:
1. Click the
Label Part Setup icon on the Standard toolbar.
2. Select a new Printer type and Part Name from the Select New Part tab.
3. Click Apply to File to preview the new part. Click Restore to change back to the Original part.
Note: If the new part is smaller than the original, your data may no longer fit (see
on a Label
4. Click Close when finished.
Note: The other tabs on the L abel Part Setup dialog box are covered in
Custom Label Part
).
and Deleting a Custom Label Part.
Modifying a Label Part, Creating a
Making Data Fit
Saving a File
To save a label file or template:
1. Select File Save or click the Save icon
2. In the File name box, type a name for your label file. The system adds the appropriate file
extension.
3. Click Save.
Basic LabelMark Techniques 37
on the toolbar.
Page 44

LabelMark User Guide
File extensions and default locations vary de pen di n g o n fil e type.
Extension File Type File Location *
LMF LabelMark file C:\Program Files\Brady\LabelMark 3\Files
LMT LabelMark template C:\Program Files\Brady\LabelMark
LPF LabelMark Plus file C:\Program Files\Brady\LabelMark 3\Files
LPT LabelMark Plus template C:\Program Files\Brady\LabelMark
3\Templates
3\Templates
* Refer to
Changing User Defaults for information on changing file locations.
Closing a Label File
To close the active label file and keep LabelMark open, select File Close.
To close all open label files and LabelMark, select File Exit.
Opening an Existing Label File
To open an existing label file:
1. From the Welcome screen, select Open saved file and click OK. If you are already in the
application, select File Open…
2. Select the file you want to open and click Open.
Note: LabelMark displays the appropriate files for the application you are running – LabelMark or
LabelMark Plus. Additionally, in LabelMark 3.2 you can open standard LabelMark files using LabelMark
Plus.
Moving Between Open Files
LabelMark allows you to open and work between multiple label files.
To view the files that are open:
• Click on the Window menu. LabelMark lists the open label files.
• Click on the file name you want to view.
To view more than one open file on the label editor screen:
• Select Window Tile to arrange all open files on the screen.
• Select Window Cascade to stack all open files on top of one another. Click a file’s title bar to
bring it to the front.
38 Basic LabelMark Techniques
Page 45

Advanced LabelMark Techniques
Modifying a Label Part
LabelMark contains an extensive list of master Brady parts. However, you may need to modify an existing
label part. The Label Part Setup feature allows you to do this by setting the
Standard Sheet-Fed Part Layout
label size, margins, etc.
A – Top margin
B – Left margin
C – Horizontal gap
D – Vertical gap
E – Label width
F – Label height
G – Printable width
H – Printable height
Note: X- and Y-
Offset are zero.
To modify an existing label part’s settings:
1. Click Label Part Setup
2. Click the Edit Part tab.
3. Make your desired modifications to the label settings:
Restore – click Restore at any time to bring back the original settings and refresh the label
file if you applied the changes to the file.
Labels per page – the number of labels on the page for a sheet or roll of labels.
Across
Down
Margins – the absolute margin from the physical edge of the label liner to the label.
Left
on the Standard toolbar.
The number of labels across a sheet (left to right) or across
the width of a roll.
The amount of rows per page.
For Dot Matrix, Thermal, and TLS2200/TLS PC Link
parts, this will generally be 1 to minimize label waste.
For Ink Jet and Laser parts, enter the amount that fits on
your page (8 1/2”x11” or A4).
The distance from the left edge of the liner to the left edge
of the label.
Top
Advanced LabelMark Techniques 39
The distance from top edge of the sheet liner to the top
edge of the label. Set Top to 0 for roll-fed parts, since it is
not applicable. Roll-fed parts use the horizon tal and
vertical gaps for this purpose.
Page 46

LabelMark User Guide
Gap between labels – space between each label.
Horizontal
Vertical
The horizontal space between each label column.
The vertical space between each label row.
Label size – full physical label size.
Width
Height
Physical width of the label part.
Physical height of the label part.
Printable area – the portion of the label that will print. See Creating Zones on a Label for
information regarding utilizing more than one printable area.
Width
Height
X-Offset
The width of the printable area of the label.
The height of the printable area of the label.
The distance between the left side of the label and the
printable area.
Y-Offset
The distance between the top of the label and the printable
area.
A – Top margin
B – Left margin
C – Horizontal gap
D – Vertical gap
E – Label width
F – Label height
G – Printable width
H – Printable height
I – X-Offset
J – Y-Offset
Note: A clear overlaminate extends
past the label on each side. As a
result, the printable area is smaller
than the label size.
TM
Permashield
Part Layout
4.
Save your changes:
Click Save Part to Database to make your custom part available along with the master Brady
parts the next time you create a label file. LabelMark prompts for a part name and ensures that
you do not overwrite a master part. Your new part will appear at the bottom of the Master
parts list.
Click Apply to File to use the modified part only in the current file. You will not see your
custom part along with the master Brady parts the next time you create a new label file. The
system adds an asterisk to the part in the status bar to indicate it is modified.
40 Advanced LabelMark Techniques
Page 47

5. Click Close when finished.
Creating a Custom Label Part
To create a new label part from scratch:
Advanced LabelMark Techniques
1. Click the Label Part Setup icon
2. Click the Create New Part tab.
(irrelevant settings for the displayed part are disabled).
on the Standard toolbar.
LabelMark displays the settings for the active part
3. Select the desired Printer type and Part family, if necessary.
4. Modify the label part settings (see
5. Select Rotated if the label part is physically rotated on the liner.
Advanced LabelMark Techniques 41
Modifying a Label Part). Click Clear at any time to start over.
Page 48

LabelMark User Guide
Enter the dimensions as shown
print properly.
Landscape View of Rotated Sheet-Fed Part Layout
6. Click Save Part to Database to create a new custom label part that you can use in other label
files. LabelMark prompts for a part name and ensures that you do not overwrite a master part
name.
in the example below and then select Rotated so your labels will
A – Top margin
B – Left margin
C – Horizontal gap
D – Vertical gap
E – Label width
F – Label height
G – Printable width
H – Printable height
K – Overlaminate
Note: X- and Y-
Offset are zero for
this example.
Note: The part you create will appear in the parts list the next time you create a new label file.
7. Click Close when finished.
Deleting a Custom Label Part
To delete a custom label part:
1. Click the Label Part Setup icon
on the Standard toolbar.
42 Advanced LabelMark Techniques
Page 49

2.
Click the Delete Part tab.
Advanced LabelMark Techniques
3. Select the Printer type and Part family options for the part you want to delete.
4. Click the custom label part in the list (use Ctrl+click or Shift+click to select more than one part).
5. Click Delete.
Note: Existing label files based on the custom part are unaffected by the deletion.
6. Click Close when finished.
Creating Zones on a Label
LabelMark allows you to create multiple label zones (up to four, printable and non-printable) on an
individual label. You can also set shape and positioning parameters for the separate zones, similar to
Creating a Custom Label Part. The shapes include Rectangle/Square, Circle/Oval, and Rounded Rectangle
and can be positioned using X and Y offsets. In LabelMark, you can insert text and characters into each
zone; in LabelMark Plus, you can also insert text and characters; additionally, you can add bar codes,
graphics, and imported data. Note: LabelMark allows data import also, one zone at a time).
1. Click Label Part Setup
2. The screen displays. Click the Create New Part tab.
3. Within the Create New Part screen, in the Printable Area field, you have three options:
on the Standard toolbar or go to File Label Part Setup.
Advanced LabelMark Techniques 43
Page 50

LabelMark User Guide
Single label zone – rectangle only
By selecting this option, you will be able to enter the desired rectangle parameters in the fields shown in the
screen below.
1. Once you have entered all dimensions, click Save Part to Database.
2. Name the part and click OK.
44 Advanced LabelMark Techniques
Page 51

Advanced LabelMark Techniques
Single label zone – other shape
By selecting this option, you will be able to create a shape for an individual label zone other than a basic
rectangle.
1. Click Add/Edit Label Zones. The screen will display as follows, allowing you to select one of four
shapes and define the shape, type, and zone area parameters for the individual zone:
Advanced LabelMark Techniques 45
Page 52

LabelMark User Guide
2. Click Apply to set the zone and view its layout in the preview area in the upper right section of the
screen, and to adjust dimensions if necessary.
3. Click OK to select the new label zone.
4. Click Save Part to Database.
5. Name the part and click OK.
Note: If you choose the Rounded Rectangle option, you have an additional option to determine Corner
Roundness. To define this, use fractional increments that are fifty percent or less of the total maximum zone
dimension. For instance, for a zone with a 0.8" width and 0.335" height, the maximum zone dimension is
0.8", therefore, choose a roundness setting of 0.4" (half of the 0.8") or less. Any higher figure will
essentially result in an oval shape instead of a rectangle with rounded corners.
Multiple label zones
By selecting this option, you will be able to create a label with up to four individual zones.
46 Advanced LabelMark Techniques
Page 53

Advanced LabelMark Techniques
1. Click Add/Edit Label Zones. The screen will display as follows, allowing you to select and define up
to four label zones.
2. In the Label zone drop-down menu, select the zone (1,2,3, or 4) that you want t o defi ne. Note: You can
navigate between the zones to modify them using this drop-down menu.
3. In the Shape drop-down menu, select Rectangle/Square, Circle/Oval, or Rounded Rectangle (see
Corner Roundness note in
Note: The first zone's shape displays as "Rectangle/Square" by default. "Empty" displays in zones 2
through 4 until a shape is selected for the specified zone; leaving a zo ne empty is the same as
removing the zone.
Advanced LabelMark Techniques 47
Single label zone – other shape, above).
Page 54

LabelMark User Guide
4. From the Type menu, select Printable or Non-Printable. Note: Designating a zone as Non-Printable
makes it unavailable for object placement, i.e., used for clear or open sections of self-laminating labels,
tags, etc.
5. Set the parameters for the specified zone in the Zone Area field, including Width, Height, X Offset,
and Y Offset. See example of dimension specification, below.
A – Top margin
B – Left margin
C – Horizontal gap
D – Vertical gap
E – Label height
F – Printable height
G – Label width
H – Printable width –
Zone 1
I – Non-printable
width – Zone 2
J – Printable width –
Zone 3
Note: X- and YOffset are zero for
this example.
Landscape View of Multi-Zone Label
6. Click Apply to set the zone and view its layout in the preview area in the upper right section of the
screen. The active zone will display with a white background; all inactive zones display a pale yellow
background. Note: Make sure that the combined dimensions for all zones, including offsets, do not
exceed the total label size.
48 Advanced LabelMark Techniques
Page 55

Advanced LabelMark Techniques
7. Repeat steps 1 through 6 for each zone you want to create. Click OK when you have completed setting
all zones and their parameters.
8. Click Save Part to Database. Name the part in the Label part field and click OK.
Note: This will create a new custom label part that you can use in other label files; it appears in the
parts list the next time you create a new label file (File New Part Names).
9. Click Close when finished.
Advanced LabelMark Techniques 49
Page 56

LabelMark User Guide
Creating a Favorite Label Parts List
To create a list of your favorite (most commonly used) label parts:
1. Select Tools
Favorite Parts List…
2. Select the Printer type and Part family to display in the Master parts list.
3. Select a part from the Master parts list grid or scroll to the part by typing the part name in the
Label part box (use Ctrl+click or Shift+click to select more than one part).
4. Click Copy to add the part to your list of favorites.
Note: Parts added to your favorite part list remain in the master part list.
5. To remove a part from your favorites list, select the part from the Favorite parts list grid and click
Remove.
6. When you are finished, click OK.
50 Advanced LabelMark Techniques
Page 57

Advanced LabelMark Techniques
Using a Favorite Part List
Once you create a favorite list, you have the option to select from that list when you create a file.
1. From the Welcome or New screen, select Favorite from the Part List.
To default to your favorite list, change the default Part list (see
If you create your favorite list using parts that belong to different part families and printer
types, only the parts in the selected Part family and Printer type will be shown.
2. Select the part as you normally would.
Changing User Defaults).
Serializing Labels (Advanced)
The Advanced Serialization function allows you to define serialization strings comprised of multiple
components that increment or decrement separately.
To perform a multi-string serialization:
1. Select the label you would like to start on.
2. Select Tools Serialization Advanced…
The Advanced Serialization Wizard guides you through the process unless you have turned off the
option (see
Changing User Defaults).
Advanced LabelMark Techniques 51
Page 58

LabelMark User Guide
3.
Create each component string:
Refer to
Serializing Labels (Simple) for details on the basic options.
Select the Priority # to set the order in which the component strings will increment or
decrement:
o Values are 0-10.
o Priority 0 serializes independent of other strings.
o A higher priority string will reach its ending value before a lower priority string starts to
increment (e.g. a string of Priority 2 will not increment until a string of Priority 1 has
reached its end value).
Click Clear All Values at any time to start over on this component string.
If you want to define another component string, click Yes.
Note: If you only enter one component in the Advanced Serialization dialog, you will actually
create a simple serialization. When you edit it, the simple serialization dialog box will
appear.
Click Next.
52 Advanced LabelMark Techniques
Page 59

4.
Review and modify the composite string:
Advanced LabelMark Techniques
To change the order of the component strings: click the row selector button to the left of the
string and then click the
or button to move the string up or down in the list.
To delete a component string: click the row selector button to the left of the string and click
the button.
To create an additional component string, click Add Component.
Change the Type, Priority, Start, End or Step by clicking it in the grid and selecting or typing
the revised value.
Check the Preview to see what the first serialization will look like.
LabelMark calculates the Total number of labels required to complete the serialization. Enter
a smaller number if you do not want the entire sequence. Enter a larger number if you want
the sequence to complete and start over again.
Add constant text before or after the serialization with Prefi x or Suffix (if desired).
Click Next.
Advanced LabelMark Techniques 53
Page 60
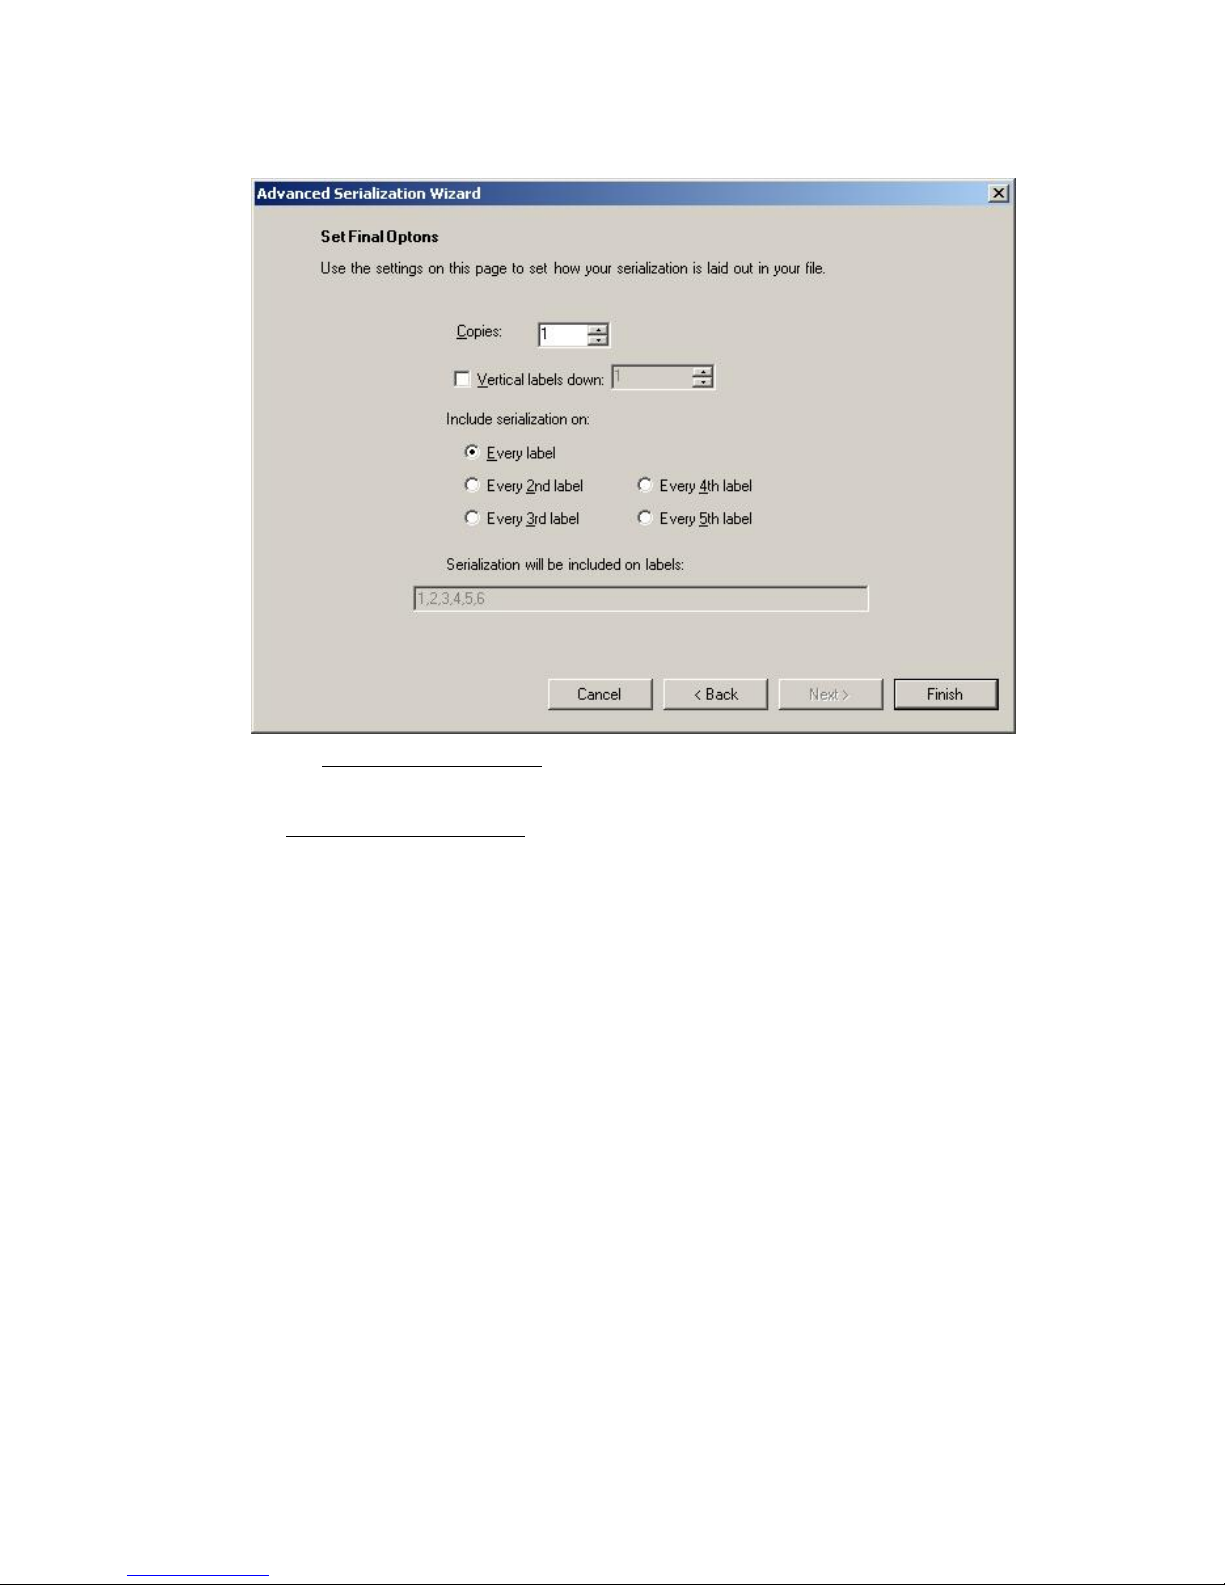
LabelMark User Guide
5.
Set final options (as needed):
Refer to
Serializing Labels (Simple) for details.
6. Click Finished to serialize the labels.
See
Working with Linked Objects to edit the serialization, if necessary.
54 Advanced LabelMark Techniques
Page 61

Advanced LabelMark Techniques
Serialization Types Table
Note: These serialization types are applicable for simple and advanced serialization, but not for 110/BIX
Block serialization.
Serial Type Description
Decimal Decimal (0-9) serialization. (Base 10)
Hex Hexadecimal (Base 16) 0-F numeric serialization: 0, 1, 2, 3, 4, 5, 6,
7, 8, 9, A, B, C, D, E, F, 10, 11, 12, 13, 14, 15, 16, 17, 18, 19, 1A,
1B, 1C, 1D, 1E, 1F, etc.
Octal Octal (Base 8) 0-7 numeric serialization: 0, 1, 2, 3, 4, 5, 6, 7, 10, 1 1,
12, 13, 14, 15, 16, 17, etc.
Custom User enters a custom serialization sequence. The sequence defines
how the characters or numbers will be stepped (ascending order
only).
Alpha Aa-Zz Alphabetic (Aa-Zz) serialization. (Base 26)
Alphanumeric 0-9; Aa-Zz Combination of alphabetic and decimal serialization. (Base 36)
Constant Full ASCII (256) character set. Priority, end and step are irrelevant
for the Constant serial type.
Advanced LabelMark Techniques 55
Page 62

LabelMark User Guide
110 Block, BIX Block and Patch Panel Parts
LabelMark allows you to customize formats for printing 110 Block, BIX Block and Patch Panel labels.
The parts used for these are:
Label Type Printer Type Part Number
110 Block
BIX Block Laser LAT-178 3 Pair (BIX Block)
Patch Panel
Laser
InkJet
Dot Matrix
Laser
Dot Matrix
LAT-177 3 Pair (110 Block)
LAT-177 4 Pair (110 Block)
LAT-177 5 Pair (110 Block)
LAT-177 Blank (110 Block)*
JET-177 3 Pair (110 Block)
JET-177 4 Pair (110 Block)
JET-177 5 Pair (110 Block)
JET-177 Blank (110 Block)*
DAT-177 3 Pair (110 Block)
DAT-177 4 Pair (110 Block)
DAT-177 5 Pair (110 Block)
DAT-177 Blank (110 Block)*
LAT-178 4 Pair (BIX Block)
LAT-178 5 Pair (BIX Block)
LAT-178 Blank (BIX Block)*
LAT-43 (4 Port Patch Panel)
LAT-43 Blank (Patch Panel)*
LAT-44 (6 Port Patch Panel)
LAT-44 Blank (Patch Panel)*
DAT-191 (4 Port Patch Panel)
DAT-191 Blank (Patch Panel)*
DAT-192 (6 Port Patch Panel)
DAT-192 Blank (Patch Panel)*
* Use blank parts for custom pairs.
Serializing 110/BIX Blocks
LabelMark can automatically serialize to identify each pair of wires for a backbone installation and
serialize each 4-pair cable for a horizontal run application.
To create and serialize a 110/BIX Block:
1. From the Welcome screen, select Create New File. (If you are already in the application, select
File New…)
2. Select Laser, Dot Matrix or Ink Jet as the Printer type and Die-Cut as the Part family.
56 Advanced LabelMark Techniques
Page 63

Advanced LabelMark Techniques
3. Select the appropriate 110 Block part from the parts list (see
110 Block, BIX Block and Patch
Panel Parts) and click OK.
4. Use the serialization function. Select Tools Serialization 110/BIX Block…
To perform a 110/BIX Block horizontal serialization:
o Select 110/BIX Horizontal as the serialization Type.
o Type the starting number (e.g. 001).
o Type the number of strips (e.g. 2).
Note: A 5 pair has 10 sections per label strip, a 4 pair has 12 sections per label strip and a
3 pair has 16 sections per label strip.
o Click OK.
See
Working with Linked Objects to edit the serialization, if necessary.
Following is an example of a 4-pair 110 block horizontal serialization and lines, as it would
print out on 110-strip labels:
001 002 003 004 005 006
007 008 009 010 011 012
013 014 015 016 017 018
019 020 021 022 023 024
To perform a 110/BIX Block backbone serialization:
o Select 110/BIX Backbone as the serialization Type.
o Enter the starting number (e.g. 1).
o Enter the number of strips (e.g. 2).
Following is an example of a 4-pair 110 block backbone serialization and lines, as it would
print out on 110-strip labels:
1 4 8 12 16 20 24
25 28 32 36 40 44 48
49 52 56 60 64 68 72
73 76 80 84 88 92 96
Advanced LabelMark Techniques 57
Page 64
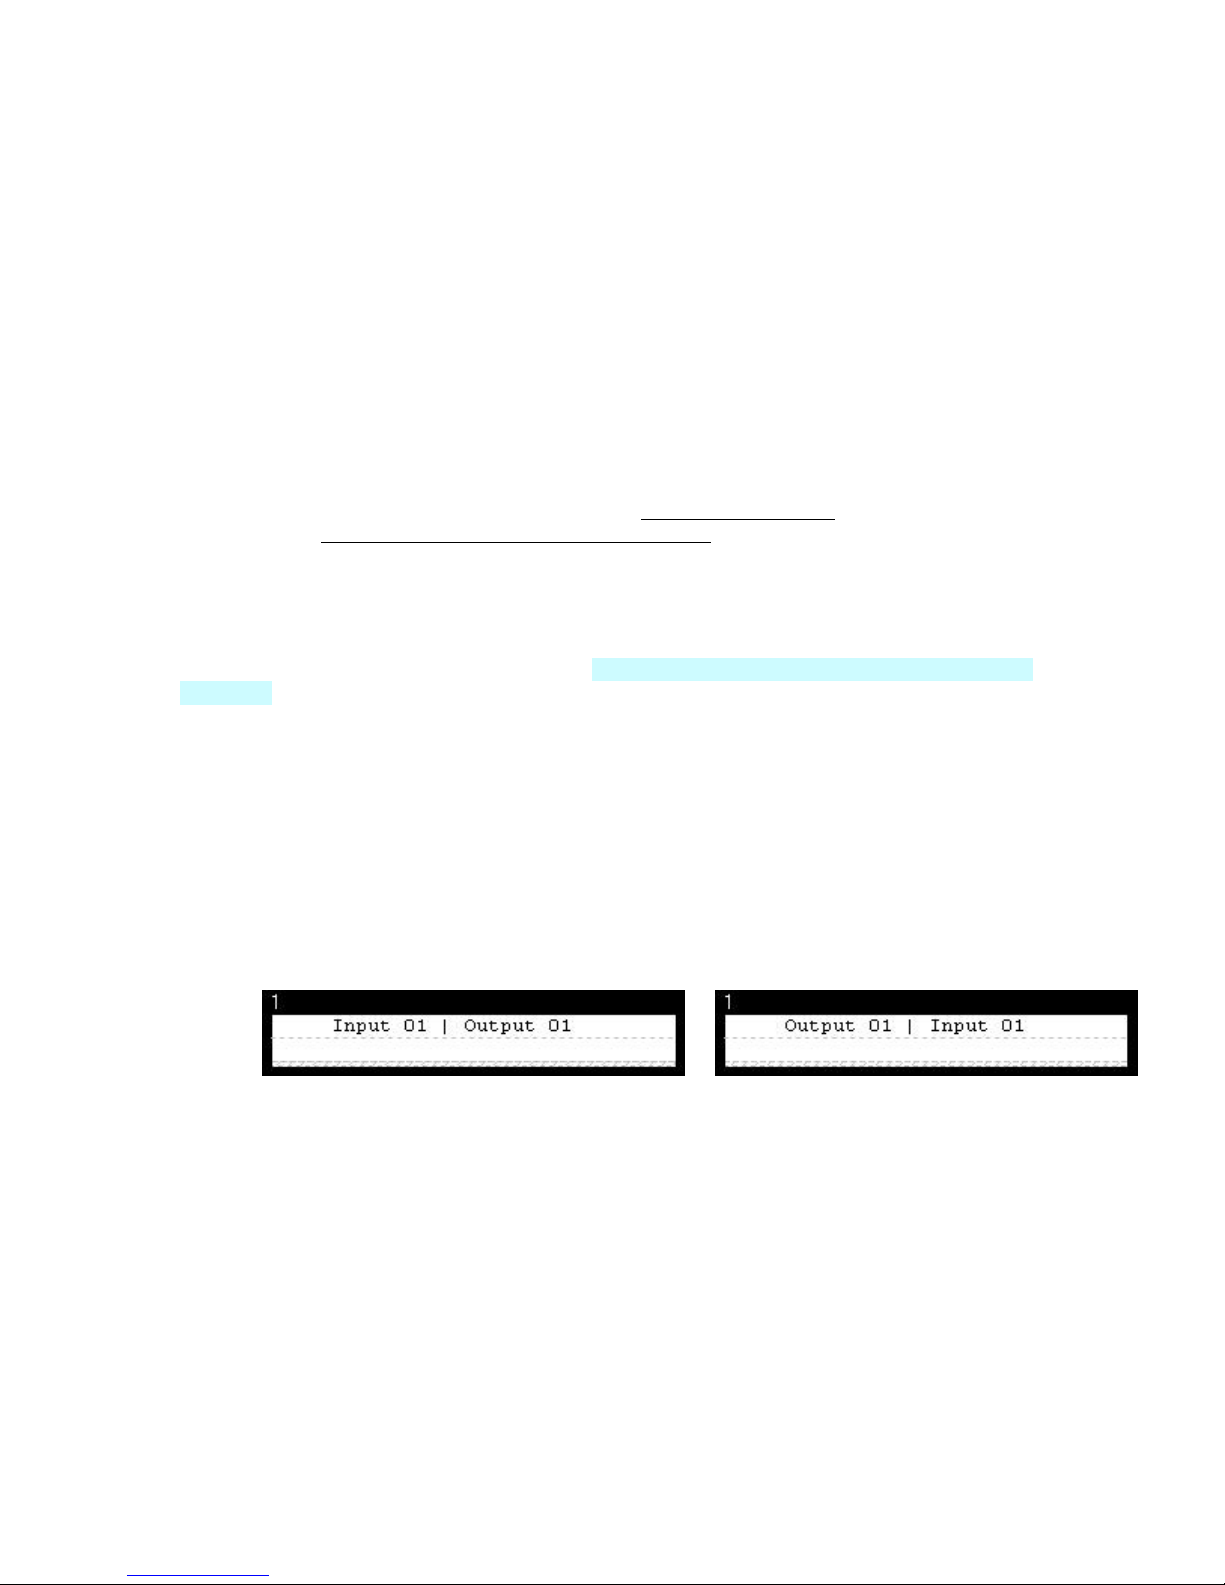
LabelMark User Guide
Setting Continuous Label and Terminal Block Options
Keep the following in mind when working with continuous labels and terminal blocks:
• When printing terminal blocks on a dot matrix or thermal printer, you can only print one page at a
time.
• When you create a new file with a continuous part, the value you enter in the Length (or Width for
rotated parts) box determines:
The length of the label if printing a banner label.
The center-to-center spacing for terminal block labels.
• The maximum length for continuous TLS PC Link parts is 6” (152.4 mm).
• Repeat value limits are 0.1” (2.54 mm) minimum to 32” (812.8 mm) maximum.
• Set repeat value limits in your user defaults (see
file (see
Quick Start Guide – Creating a Basic Text Label).
Changing User Defaults) or when you create your
Using the Flip-Flop Feature
The flip-flop feature allows you to transpose text around a flip point. For example 123|456 would flip-flop
to 456|123. You designate the flip point by placing the flip character in a line of text. The feature is useful
for identifying parts that are connected end-to-end . In LabelMark Plus, flip-flop works for text objects and
text blocks.
To perform a flip-flop:
1. Insert the flip character at the point around which you want the flip-flop to occur.
Note: The default flip character is the pipe symbol “|” (found on the “\” key on your keyboard).
See
Changing User Defaults to designate a different character.
2. Select the label(s) you want to flip.
3. Select Tools Flip-Flop, and one of these options:
Left to Right – Transposes text to the left of the flip character to the right and vice versa.
Before After
58 Advanced LabelMark Techniques
Page 65

Advanced LabelMark Techniques
Left to Right Insert All – Inserts a flipped version next to the original. This option doubles
the number of labels.
Before
After
Remove Flip Character – Deletes the flip character from the selected label(s) after you have
performed your left-to-right flip-flop.
Top to Bottom – Transposes text above the centerline to below the centerline and vice versa.
Note: You do not need a flip character for top-to-bottom flip-flop. It transposes text above
the vertical center of the label with text below the vertical center.
Before After
Advanced LabelMark Techniques 59
Page 66

LabelMark User Guide
Top to Bottom Insert All – Inserts a flipped version next to the original. This option doubles
the number of labels.
Before
After
60 Advanced LabelMark Techniques
Page 67

Printing Label Files
Printing a Label File
Note: To change your printer, see Selecting a Printer or Changing User Defaults.
To print a label file:
1. Display the Print dialog box:
To print without previewing your file, click Print
Or, to preview your file before printing, click Preview
o Click Next and Prev to scroll through the pages in your file.
o Click Zoom In and Zoom Out to look at varying levels of detail.
o Click Print… to continue.
2. From the
calibrated. LabelMark prints three concentric rectangles centered on the label and spaced .05"
(1.27 mm) apart. Refer to your printer documentation to adjust the printer.
Print dialog, click Print Calibration Test to confirm that the printer is properly
on the Standard toolbar.
on the Standard toolbar:
3. Select your desired print options:
To select a subset of labels and number of copies to print, see
If necessary change the Print Position Adjustment settings to fine tune the way your labels
print. These settings are saved with the label file, so you will not have to make the change s
again the next time you open the file.
Printing Label Files 61
Selecting Print Ranges.
Page 68

LabelMark User Guide
Skip previously printed labels on sheet fed parts by using the Label Saver Option. Enter the
Row and Column number you want to begin printing on.
To set the options for a two-sided sleeve part, see
4. Click Print or click Close to exit without printing.
Setting Two-Sided Sleeve Print Options.
Selecting Print Ranges
LabelMark allows you to specify the number of copies to print and sections of a label file (or ranges) to
print.
To specify a single range of labels to print:
• Click the Range radio button (in the Print dialog box).
• Type the from: (starting label number) and to: (ending label number) for your range.
Note: If you select a range of labels before printing, LabelMark fills in the from: and to: fields for
you.
Set the number of copies:
•
To set the number of copies to print for this range, change the Range Copies. For example, if
you set Range Copies to 2 for the range of labels 1 through 3, the label sequence will print as
follows:
#1 #2 #3 #1 #2 #3
To change the number of times a label will print before printing the next label, change the
Label Copies. For example, if you set Label Copies to 2 for the range of labels 1 thro u gh 3,
the label sequence will print as follows:
#1 #1 #2 #2 #3 #3
Note: If you set both the Range Copies and Label Copies, LabelMark applies the Label
Copies first and then it applies the Range Copies. For example, if you set Range Copies to 2
and Label Copies to 2 for the range of labels 1 through 3, the label sequence will print as
follows:
#1 #1 #2 #2 #3 #3 #1 #1 #2 #2 #3 #3
To specify multiple label ranges to print:
• Click the Range radio button (in the Print dialog box).
• Type the from: (starting label number) and to: (ending label number) for your range. These
entries can be in ascending or descending order e.g. 1 to 100 or 100 to 1.
• Set the number of copies for this range as described above.
62 Printing Label Files
Page 69

Printing Label Files
• Click
Labels field.
Add Range. LabelMark adds your range to the Range Selection table and updates the Total
• Repeat this process to add up to 10 ranges to a file. Note: Ranges print in the order they were
added.
To delete a range:
• Click the range you want to delete in the Range Selection table (in the Print dialog box).
• Click Delete Range.
To print the active label:
• Click the Current Label radio button (in the Print dialog box).
• Set the number of copies as described above.
Printing Label Files 63
Page 70

LabelMark User Guide
Setting Two-Sided Sleeve Print Options
When printing a two-sided sleeve you will follow the standard print procedure (see Printing a Label File),
but you will have a few additional print options.
To set the Two-Sided Sleeve print options (in the Print dialog b ox ):
• Select the Side to Print:
Side 1 prints only the first side of the labels
Side 2 prints only the second side of the labels
Both prints the first and second side of the labels
(Note: LabelMark prompts you to reverse the part to print side 2)
• Select how to print the Second Side of the sleeve:
Option Side 1 Side 2
Standard
Reverse
Selecting a Printer
Note: See Changing User Defaults to change the LabelMark default printer.
To select a printer other than the LabelMark default for the active file:
1. Select File
Print Setup….
64 Printing Label Files
Page 71

2. Select the printer Name from the list.
3. Leave the system default for Orientation since LabelMark will set it.
4. Set the Properties if necessary.
Note: With some operating systems (or some printer drivers) you must set printer properties in the
windows Control Panel. Refer to your printer’s user manual or printer driver help file for
information on setting printer properties.
5. Click OK.
Troubleshooting Printer and Part Problems
Symptom/Message Possible Cause Corrective Action
Printing Label Files
Printer is not printing Your print job may have been
sent to the wrong printer.
"Out of Labels" message
(TLS2200 and TLS PC Link
printers only)
"Out of Ribbon" message
(TLS2200 and TLS PC Link
printers only)
The COM port settings on
your printer may not be set
correctly.
The label part used to design
the LabelMark file does not
match the labels loaded in the
printer.
The printer is out of label
material.
The computer chip on the TLS
label roll is not making
contact with the sensor in the
printer.
Printer is out of ribbon. Replace ribbon cartridge.
Select the correct printer. See
Selecting a Printer.
Refer to the user's guide for
your printer.
Change to the proper label
part. See
Label Part.
Replace the label material roll.
Make sure the label roll is
seated correctly and snugly
between the material guides.
Selecting a Different
"Error Writing to COM 1"
message
Printer is disconnected from
Printing Label Files 65
Printer is turned off. Turn the printer on.
Connect the printer to the
the computer.
computer.
Page 72

Page 73

Creating and Using Templates
Creating a Template
A template is a saved label format that allows you to have static data (e.g. logos and unchangeable text) as
well as fields for variable data entry that are located at fixed locations on the label. You can create
templates in both LabelMark and LabelMark Plus.
To create a new template:
1. From the Welcome screen, select Create new template and click OK.
(If you are already in the application, select File New… Then click the Template radio button.)
2. Select the Printer, Printer type, Part family and the Label Part you want to use and click OK.
The single label view for your part appears and the Template toolbar displays at the bottom of the
screen (see Template Toolbar for details)
3. Add items to the label and format them:
Add text items for variable data entry to the label and fill them with placeholder text. The
placeholder text allows you to properly size and format the text and it will be replaced by your
data when you create a file based on the template.
Note: Date/time, serialization and data import are unavailable during the template creation
and editing process. The functions are available when working with a file based on a
template.
Example of Placeholder Text in a LabelMark Template
LabelMark Plus Note: In LabelMark Plus objects will automatically be named T1, T2, T3,
etc. As in LabelMark, the placeholder text is replaced by your data when you create a file
based on the template (see also Importing Data into LabelMark Plus (Advanced).
LabelMark Plus Note: With LabelMark Plus you can also add barcodes, images, rectangles
and lines.
Format the items as needed (see
Select a label item(s) and apply Template Toolbar features:
o Make items non-printable
not on the final printout.
Format Toolbar).
if you want them to appear on the computer screen but
o Lock items that are the same or static for every label in the file. Images, rectangles
and lines are locked by default.
o Unlock (or do not lock) items to be used for variable data entry. Text and barcodes are
unlocked by default.
Creating and Using Templates 67
Page 74

LabelMark User Guide
o Autosize
not of a fixed length. Autosize items are unlocked by default and grow to accommodate
the data. If you do not Autosize an item, data cannot exceed the length of the placeholder
text you entered when you created the template.
4. Select File Save As… and save the template. See
text and barcodes to be used for variable data entry when the data size is
Unlocked/Autosized Objects in LabelMark Plus
Saving a File for details.
Template Toolbar
The Template toolbar appears on the bottom of the screen when you are creating or modifying a template.
Icon Description
Non-Printable – Makes the selected item appear on the computer screen, but not in the
printed label. Non-printable items are automatically locked and display on the screen in gray.
Lock – Prevents users from editing the item. Lock items that are static or unchanging from
label to label.
An unlocked item is a placeholder that designates a field for variable data entry when you use
the template to create a file. When the template is applied to a file, it appears as a green box.
Autosize – Used for variable data entry. Allows the selected item to grow to accommodate
the data a user enters. Autosize fields are automatically unlocked.
Editing an Existing Template
Note: When you edit (or delete) an existing template, the changes you make do not affect files you
previously created based on the template. The changes only affect new files you create based on the
template.
To edit an existing template:
1. Prepare to open the template:
From the Welcome screen, select Edit saved template and click OK.
From within the application, select File Open…
o Change Files of type selection to Templates.
o Change to the Templates folder.
68 Creating and Using Templates
Page 75

2.
Select the template you want to edit and click Open:
Creating and Using Templates
3. Follow the instructions in
4. Select File Save to save the updated template.
5. Select File Close to close the template.
Creating a Template and Template Toolbar to modify the template.
Creating a Label File from a Template
To create a new label file based on a template:
1. Prepare to create the file:
From the Welcome screen, select Use a template to create new file and click OK.
If the application is already active, select File New…
o Select the File radio button.
o Select the Use template check box.
2. Click the Browse… button, select the desired template file and click Open.
3. Click OK to create your new file.
4.
Enter data in the unlocked fields:
You can import data into the file from another source (see
on a Template
Use the arrow keys on the keyboard to move through the unlocked fields. Use the Tab key to
move to the next label (Shift+Tab to move to the previous label).
).
Importing Data into a File Based
You can also click a green data entry box to enter text or barcode information as appropriate:
o Type text in text fields.
o In LabelMark Plus, use the Select tool to double-click the green-outlined data entry
objects.
Creating and Using Templates 69
Page 76

LabelMark User Guide
o Type barcode data in barcode fields.
Variable data entry locations in a file
based on a LabelMark Plus template
5. Save your label file (see
Note: You cannot add any other objects to a label file created with a template. Additionally, not all label
files created from templates made in previous versions of LabelMark will be useable in Version 3.2.
Saving a File for details).
Importing Data into a File Based on a Template
Keep the following in mind when importing data into a label file based on a template:
• Data only imports into unlocked text or barcode fields.
• In LabelMark, imported data fills unlocked text fields in labels from top-to-bottom.
• In LabelMark Plus, the Use existing objects option allows you to map the data to specific template
fields. See Importing Data into LabelMark Plus (Advanced).
• To import barcodes into LabelMark Plus, see Inserting Barcodes.
• If imported data does not fit, LabelMark displays a message and changes the font color to red. See
Making Data Fit on a Label for suggestions on making the data fit.
• Refer to
• Deleting or editing a template does not affect files that were based on it.
Importing Data into Label Files (Advanced) for details on importing data.
70 Creating and Using Templates
Page 77

Importing Files
Data Import Overview
LabelMark and LabelMark Plus allow you to import data from other sources, either simply or by using
more advanced settings. Using
Using Advanced import, you start by performing simple data import, and have additional options of
filtering, sorting, SQL query editing, and individual record selection with results preview and layout
options.
Note: Advanced Import is available using either a tabbed Import Data dialog or the Data Import Wizard
(the Data Import Wizard appears by default unless you deactivate it under the General tab in the
settings).
Default
Some things to keep in mind when importing data:
• You can import ASCII text files, Microsoft® Excel™ and Lotus 1-2-3™ spreadsheets, Microsoft®
Access™ and other database files.
• You can import data into a standard label file or into a label file based on a template.
• Imported data is not dynamically linked to the source data. If you make changes to the source data,
the imported data remains unchanged unless you refresh it. You can set your
automatically refresh it, if desired.
Simple import, you collect data by type, source, and ordered field only.
User
User Defaults to
• You can also set a default data source under the Import Data tab in the User Default settings.
• ODBC import is still available, but there is now a method to import Excel™ and Lotus 1-2-3™
spreadsheets and Access data that is easier to use (see
• When importing a Lotus 1-2-3™ spreadsheet, first save it as a WK1, WK3 or WK4 file. Lotus 1-
2-3™ versions after WK4 are not recognized. If you cannot save to an earlier version, save your
data as a delimited ASCII text file and import it as text.
• The data imports into the active file starting at the active label.
• Each record in the imported data creates one label in the label file.
• Imported data will overwrite existing label data in LabelMark and overlap existing data in
LabelMark Plus.
• For specifics on importing data into LabelMark Plus, see Importing Data into LabelMar k Pl us
(Simple) or Importing Data into LabelMark Plus (Advanced).
Importing Data into Label Files - Simple ).
Importing Data into Label Files (Simple)
To import data into a label file using basic features:
1. Create or open a label file.
2. Select the starting point for the import by clicking the desired label.
Note: In LabelMark the import data appears alone on a text line. You cannot combine the import
data with other text. In L abelMark Plus, you can combine other text with the import data on a
"line".
3. Display the import data dialog by clicking the Import Data Simple icon
Import Data…Simple.
4. Select the type of data to import. See
Importing Files 71
, or select Tools
Data Import Types for details.
Page 78

LabelMark User Guide
5. Select the data source and data criteria, and import the data:
Text file:
o Select Text from the drop-down menu.
o Click Select Data Source and find the ASCII text file. Click Open.
o Select the Delimiter.
o The Table field displays as Text Import Data.
o Select the fields to include in the import:
Fields are column headings in the import data.
Change the import order by selecting a field and clicking
Select a field and click Delete Field to exclude it from the import.
Click Restore All Fields to restore all deleted fields.
o Click OK when finished.
or .
Excel or Lotus 123 spreadsheet file or Access database file:
o Select Excel spreadsheet, Lotus spreadsheet, or Access database from the drop-down menu.
o Click Select Data Source and find the appropriate file. Click Open.
o Select the desired Table (spreadsheet worksheet or database table).
o Select the fields to include in the import:
Fields are column headings in the import data.
Change the import order by selecting a field and clicking
Select a field and click Delete Field to exclude it from the import.
Click Restore All Fields to restore all deleted fields.
o Click OK when finished.
72 Importing Files
or .
Page 79
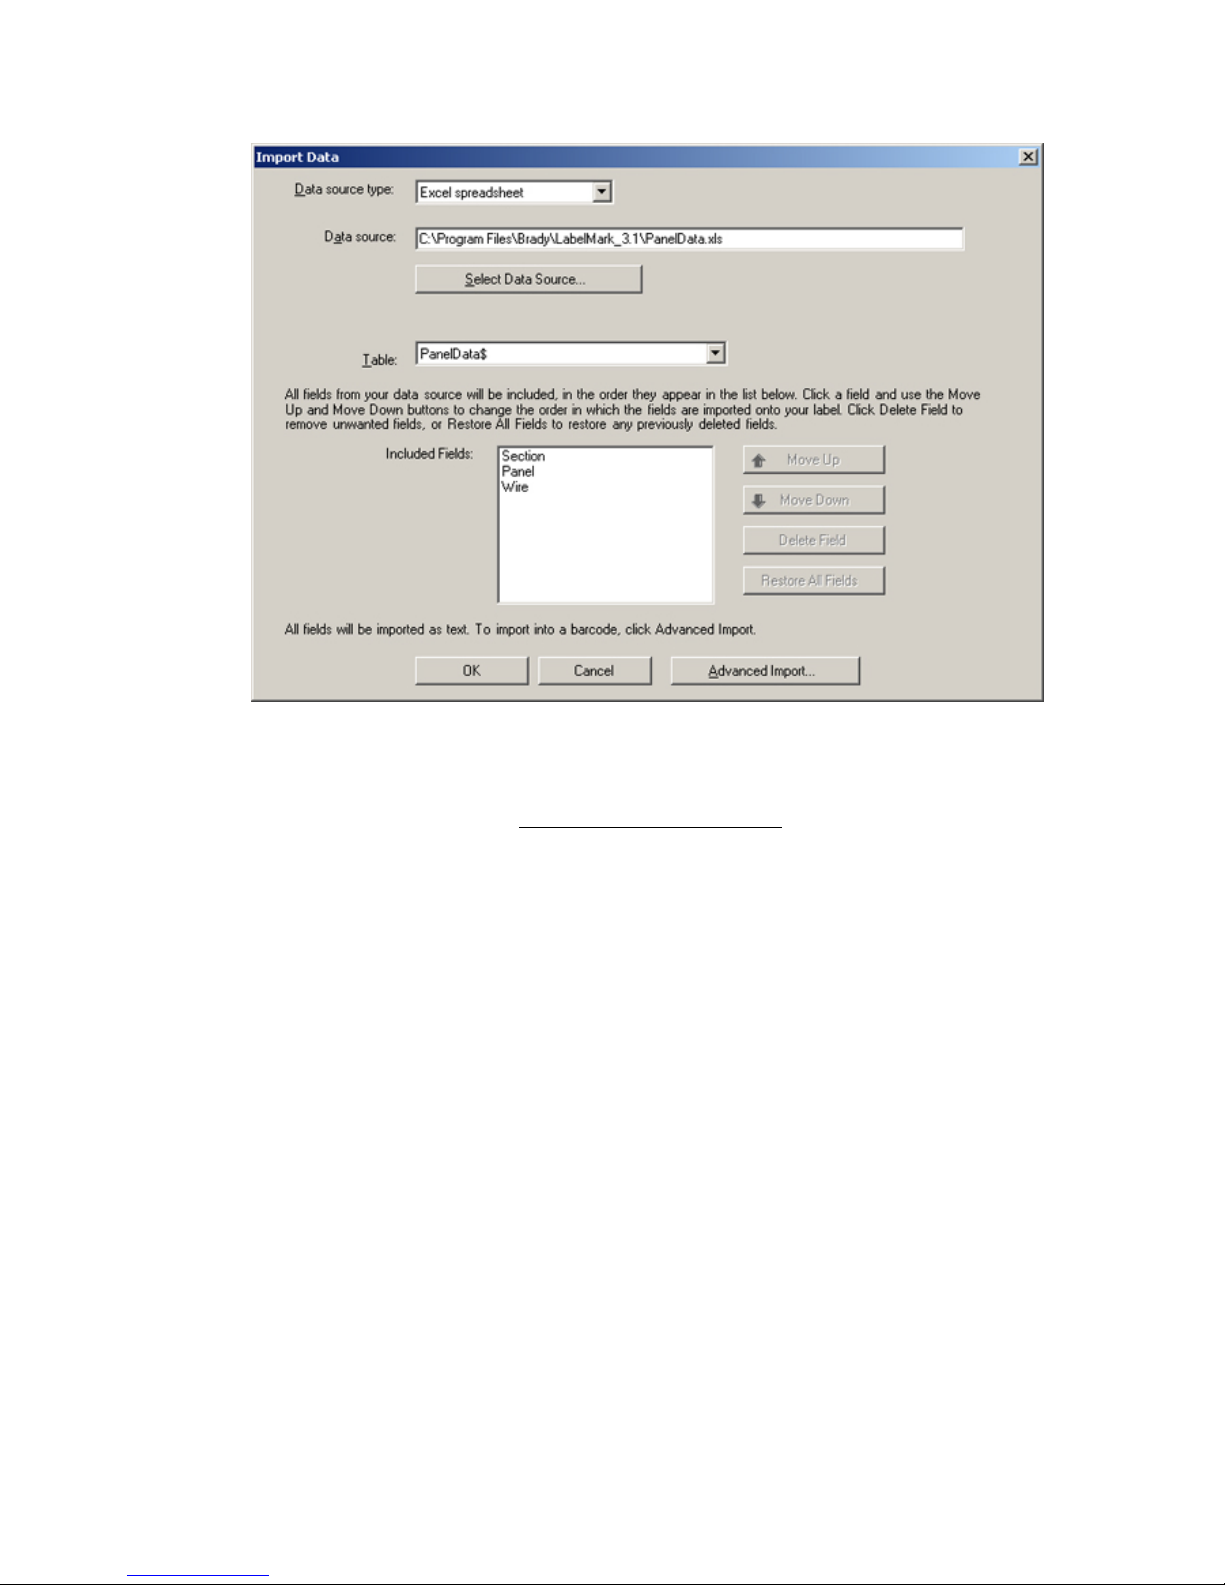
Importing Files
Other data source:
o If you are importing from a database other than Access, enter the necessary Other data
source information (see
Importing Data From a Database).
Importing Files 73
Page 80

LabelMark User Guide
To manually refresh data:
• Go to Tools Refresh Imported Data.
To automatically have data refresh either each time you open a file, each time you print a file, or
both:
• Go to Tools User Defaults Refresh Imported Data Refresh Options and define your
settings.
Note: You can set a default data source under the Data Import tab in the
74 Importing Files
User Defaults settings.
Page 81

Importing Data into Label Files (Advanced)
To import data into a label file using advanced features:
1. Create or open a label file.
2. Select the starting point for the import by clicking the desired label.
Note: In LabelMark the import data appears alone on a text line. You cannot combine the import
data with other text. In L abelMark Plus, you can combine other text with the import data on a
"line".
Importing Files
3. Display the import data wizard by clicking the Import Data Simple icon
Advanced Import, or by selecting Tools Import Data… Advanced.
Note: If you choose not to use the wizard by deactivating it in the User Defaults (see
Overview), the same options described below are still available, but you can select each option
individually using tabs in the Import Data dialog.
4. Select the type of data to import and click Next:
See Data Import Types for details.
, then clicking
Data Import
5. Select the data file and click Next:
Text file:
o Click Browse.
o Select the ASCII text file and click Open.
o Select the delimiter.
Importing Files 75
Page 82

LabelMark User Guide
Excel or Lotus 123 spreadsheet file or Access database file:
o Click Browse.
o Select the spreadsheet file and click Open.
Other data source:
o If you are importing from a database other than Access, enter the necessary Other data
source information (see
Importing Data From a Database).
(Note: You can set a default data source under the Data Import tab in the User Defaults settings):
Select the tables and fields to include and click Next:
6.
Select the desired Table (spreadsheet worksheet or database table).
76 Importing Files
Page 83

Select the fields to include in the import:
o Fields are column headings in the import data.
Importing Files
o Change the import order by selecting a field and clicking
or .
o Select a field and click Delete Field to exclude it from the import.
o Click Restore All Fields to restore all deleted fields.
Filter the data (if desired) and click Next:
7.
See Filtering Import Data for details.
Importing Files 77
Page 84

LabelMark User Guide
8.
Sort the data (if desired) and click Next:
Select the fields you want to sort by and the direction for each sort.
Manually edit the SQL statement (if desired) and click Next:
9.
Warning: Refrain from editing the query string unless you are skilled with SQL. You cannot
filter, sort, etc. after editing the SQL statement.
78 Importing Files
Page 85

10.
Review the resulting data and click Next. If the results are not what you expect,
click Back and modify the import settings.
Importing Files
Set layout options (as needed) and click Finish. See Serializing Labels (Simple) for descriptions
11.
of the options.
To manually refresh data:
• Go to Tools Refresh Imported Data.
To automatically have the data refresh either each time you open a file, each time you print a file, or
both:
• Go to Tools User Defaults Refresh Import ed Dat a R efresh Options and define your
settings.
Importing Files 79
Page 86

LabelMark User Guide
Note: You can set a default data source under the Data Import tab in the
User Defaults settings.
Importing Into a Two-Sided Sleeve
When importing data into a two-sided sleeve label file, you have the option to automatically copy the
contents of the first side of the sleeve to the second side.
To import data into a two-sided sleeve label file:
1. Complete the first 5 steps of the
2. When the Fields dialog appears:
Select the desired Table (workbook worksheet or database table).
Select the fields to include in the import:
o Select the Duplicate Side 1 on Side 2 for two-sided sleeves option if desired.
Select the fields to include in the import:
o Fields are column headings in the import data.
o Change the import order by selecting a field and clicking
o Select a field and click Delete Field to exclude it from the import.
o Click Restore All Fields to restore all deleted fields.
3. Continue with step 7 in the
Importing Data into Label Files (Advanced) process.
or .
Importing Data into Label Files (Advanced) process.
Data Import Types
You can import the following data types into your label file (see Importing Data into Label Files
(Advanced):
• Text – An ASCII text file consists of alphabetic and numeric ASCII characters. Individual pieces
of data (or fields) are delimited with a character such as a comma. A carriage return marks the end
of each line of text (or record). The following is an example of a comma-delimited ASCII text file:
80 Importing Files
Page 87

Importing Files
• Excel™ or Lotus 1-2-3™ spreadsheet – A Microsoft® Excel™ or Lotus 1-2-3™ spreadsheet
consists of a heading row followed by the import data. The import wizard allows you to select the
specific worksheet to use if there is more than one in the file. The following is an example of an
Excel™ spreadsheet:
Note: When importing a Lotus 1-2-3™ spreadsheet, first save it as a WK1, WK3 or WK4 file.
Lotus 1-2-3™ versions after WK4 are not recognized. If you cannot save to an earlier version,
save your data as a delimited ASCII text file and import it as text.
• Access™ database – A Microsoft® Access™ database may be presented as forms, reports, or data
access pages, and may contain linked tables. The import wizard automatically connects you to the
database once you select the source, and allows you to select all available tables and fields and
arrange the import order of the data into your labels.
• Other data source – The Other data source option allows you to import data from virtually any
database or data source (see
Importing Data From a Database, below).
Importing Data From a Database
To import database data (as opposed to ASCII text or spreadsheet data, and other than Microsoft®
Access™ data) into your label file, you will have to perform a few additional steps to connect to the
database.
To connect to a database (other than Microsoft® Access™) file:
1. Follow the first 3 steps of
Label Files (Simple).
2. On the Importing External Data dialog (Advanced) or Data Source Type menu (Simple), select
Other data source as the type of data source.
3. The Data Link Properties dialog appears. Click Help for additional assistance if required. Select
the appropriate OLE DB Provider and click Next.
To import a Microsoft® SQL Server™ database, select Microsoft OLE DB Provider for
SQL Server
To use an ODBC data source, select Microsoft OLE DB Provider for ODBC Drivers
4. Enter the Connection information. Click Help for additional assistance if required. The required
information varies by provider. For example:
For a Microsoft® SQL Server database:
o Select the server name.
o Enter logon and password information.
Importing Data into Label Files (Advanced) or Importing Data into
For example:
o Select the database on the server.
o Click Test Connection to confirm the provider, server, logon information and database.
o Click OK.
Importing Files 81
Page 88

LabelMark User Guide
For an ODBC data source:
o Specify the data source (if your data source is not listed, use the Data Sources tool in the
Windows® Control Panel to create one).
o Enter logon information.
o Click Test Connection to confirm the provider, data source and logon information.
o Click OK.
5. Continue with step 6 of the
the data as is without using advanced features (see Importing Data into Label Files (Simple).
Importing Data into Label Files (Advanced) process or simply import
Filtering Import Data
The filter feature allows you to add conditions to import fields. Data must meet the conditions to be
included in your label file.
To filter your import data:
1. Complete the first 6 steps of the
2. When the Filter Your Records dialog appears, enter your condition details:
Select the Field you want to filter from the list. (Fields are column headings in a spreadsheet
or field names in a database.)
82 Importing Files
Importing Data into Label Files (Advanced) process.
Page 89

Importing Files
Select the Operator from the list:
= The field is the same as the value
<> The field is not the same as the value
> The field is numerically larger than the value
< The field is numerically smaller than the value
>= The field is numerically larger or the same as the value
<= The field is numerically smaller or the same as the value
IN The field appears in the list of values
LIKE The field is similar to the value
Type the Value for which the condition applies:
o Unless the value is strictly numeric, enclose it in single quotes. For example, Value = 'A'.
o The wildcard for one or more characters is % (not * as in past versions). For example,
Value = 'A-%' would return A-East, A-West, A-North, etc.
o The single character wildcard is _ (not ? as in past versions). For example, Value = '_-
East' would return A-East, B-East, C-East, etc.
For more than one condition, use the “AND/OR” radio buttons: AND requires both
conditions to be met. OR requires one of the conditions to be met.
Select the Exclude duplicate rows/records to include only unique data.
Click Add to include the condition statement in the list. Click a condition statement in the list
and click Delete to remove it from the list.
Repeat these bullet points to add other conditions.
3. When you have entered all of your conditions, click Next and continue with step 8 of the
Importing Data into Label Files process.
Filter examples:
• This example imports wires numbered between 1000 and 2000 from panel C:
Field Operator Value AND/OR
Panel = 'C' AND
Wire >= 1000 AND
Wire <= 2000 AND
• This example imports all panels starting with the letter A (the % is the wildcard character):
Field Operator Value AND/OR
Panel LIKE 'A%' AND
Importing Files 83
Page 90

LabelMark User Guide
• This example imports panels from A-East and A-West:
Field Operator Value AND/OR
Panel = 'A-East' OR
Panel = 'A-West' OR
• The IN operator offers a concise way to handle a long list of values:
Field Operator Value AND/OR
Panel IN ('A-East', 'A-West') AND
The list is enclosed in parentheses and each member of the list is in single quotes.
Formatting Import Data
To format imported data see Working with Linked Objects.
84 Importing Files
Page 91

Working With Objects - LabelMark Plus
LabelMark vs. LabelMark Plus
You can create and edit your label files in one of two applications: LabelMark or LabelMark Plus.
• LabelMark is the standard application for text-only labels – similar to "line mode" in version 2.x.
Editing attributes are set on a line-by-line basis. This is how earlier versions of LabelMark
handled editing.
• LabelMark Plus includes all the LabelMark features, but also allows you to add images, barcodes,
rectangles and lines to your labels – similar to "free form mode" in version 2.x. You can place
these objects anywhere on your label to create a custom layout.
Draw Toolbar
The Draw toolbar allows you to create and select text, barcode, image, rectangle, and line objects in
LabelMark Plus.
Icon Description
Select – Selects object for moving or sizing
Text – Creates text objects
Barcode – Creates barcode objects
Images – Imports image files
(allows bmp, jpg, pcx, tif, wmf, and gif formats)
Rectangle – Creates rectangle objects
Line – Creates line objects
Inserting Text
To add text to a label in La b el M ark Pl us:
1. Select the Text icon
2. Click on the desired location on the label to place the text object.
3. Type your information.
Note: Press Enter to start a new text object below the one you just created. It will then be
possible to select this “block” of text objects using the Select
4. See
Modifying Text for details on modifying a text object.
on the Draw toolbar.
tool to format it, move it, etc.
Working With Objects - LabelMark Plus 85
Page 92

LabelMark User Guide
Modifying Text
To edit and format existing text in LabelMark Plus:
1. Select the Text icon
2. Click the text object you want to edit.
3. Type your updated information.
4. See
Formatting Text for details on formatting a text object.
Note: To format all of the text objects within a text block at once, click it with the Select
To select one line of text within a text block, click it with the Text
the Select
tool. Use Alt+click to select multiple lines within a text block.
on the Draw toolbar.
Inserting Barcodes
To add a barcode to a label in LabelMark Plus:
1. Select the Barcode icon
2. Click on the desired location for the barcode’s top-left corner on the label.
Note: If the barcode will not fit in the selected location, the system beeps and displays a message
in the status bar.
3. Type your information.
Note: You are only allowed to type the characters valid for the symbology you are using.
4. See
Modifying Barcodes for details on changing a barcode object.
on the Draw toolbar.
tool.
tool or double-click it with
Note: At any time during this process you may change the barcode symbology by clicking an option from
the Symbology drop-down list
on the Object toolbar.
86 Working With Objects - LabelMark Plus
Page 93

Modifying Barcodes
To edit an existing barcode in LabelMark Plus:
Working With Objects - LabelMark Plus
1. Select the barcode object using the Select
2. Click the Properties
scroll to Properties to get to the barcode tab). For all barcodes except 2-D (datamatrix) a dialog
with the following fields appears:
icon and click the Barcode tab (or right-click on the barcode object and
tool.
The following table describes the fields:
Property Field Description
Data
Symbology
Ratio
Checksum
Include human readable
text
Position
Size
Human readable text
The information you want to present
The barcode symbology used to represent the data
Adjusts the ratio of wide to narrow bars
Includes the checksum digit in the barcode
Note: Disabled when not appropriate (e.g. Code 93)
Includes readable text along with barcode
Location of readable text in relation to barcode
Width and height of individual bar
The size and look of the readable text
Working With Objects - LabelMark Plus 87
Page 94

LabelMark User Guide
If you are modifying a DataMatrix (2-D) barcode, a dialog with the following fields appears:
The following table describes the 2-D-specific fields:
Property Field Description
Character Set
Error Correction Code
Element Width
Border Width
Barcode Shape
3. Click OK when you are finished modifying the properties.
Setting for the symbol's allowable character set, i.e.,
numeric, uppercase, punctuation, ASCII, or combinations
thereof
Setting for the readability detail of the symbol (higher value
= more error correction capability)
Setting for the barcode's overall width, from 5 to 50 mils
(1 mil = .001")
Provides a border on the left and bottom of the symbol for
better ease of scanning ID
Options for a DataMatrix barcode are Square or Rectangle
Inserting Images
To import an image into a LabelMark Plus label:
1. Select the Images icon on the Draw toolbar.
2. Click the desired location on the label for the image’s top-left corner.
3. Browse to the location of the image (bmp, jpg, pcx, tif, wmf, or gif format), select it and click
Open. LabelMark Plus sizes the image to fit in the available space if it is too large.
Note: LabelMark Plus includes a library of commonly used symbol images (see Symbol Library).
88 Working With Objects - LabelMark Plus
Page 95

Modifying Images
To edit an existing image in LabelMark Plus:
Working With Objects - LabelMark Plus
1. Select the image object using the Select
2. Click the Properties
Property Field Description
Position
Size
Rotation
Image file name
3. Click OK when you are finished modifying the properties.
icon.
The location of the image from the top-left corner of the label (the
top-left corner of a label is 0, 0)
The height and width of the image
Notes: You can also resize an image by dragging its selection
handles. LabelMark Plus maintains the width to height ratio of the
image as you resize it.
Rotates the image in 90-degree increments.
The path and name of the displayed image – click Browse to
modify.
tool.
Inserting Rectangles and Lines
To insert a rectangle or line into a LabelMark Plus label:
1. Select the Rectangle or Line icon on the Draw toolbar.
2. Click on the desired starting location and drag the mouse (with the left mouse button pressed) to
draw the object. Release the mouse button to place the object.
Modifying Rectangles and Lines
To edit an existing rectangle or line in LabelMark Plus:
1. Select the rectangle or line object using the Select
2. Click the Properties
Property Field Description
Position
Size
Rotation
Line weight
3. Click OK when you are finished modifying the properties.
icon.
The location of the rectangle or line from the top-left corner of the
label (the top-left corner of a label is 0, 0)
The height and width of the rectangle or line
Note: You can also resize a rectangle or line by dragging its
selection handles
Rotates the rectangle or line in 90-degree increments
The thickness of the line (in dots based on printer resolution)
tool.
Working With Objects - LabelMark Plus 89
Page 96

LabelMark User Guide
Importing Data into LabelMark Plus (Simple)
Importing data into LabelMark Plus and LabelMark is similar with a few exceptions: LabelMark Plus
allows you to import text along with barcode data and it allows you to better control which data fills each
object in the label file. See Importing Data into LabelMark Plus (Advanced) below.
To import data into a LabelMark Plus file using basic (simple) features:
See
Importing Data into Label Files (Simple), as the methods for basic data import are identical for
LabelMark Plus and LabelMark.
Importing Data into LabelMark Plus (Advanced)
The advanced options allow you to import barcode data along with text and objects, and to filter, sort, edit
SQL queries, select and arrange individual records, and preview results and layout options. Note: Ensure
that you are using a label part large enough to accommodate the data you intend to include on it, or select a
smaller font, or use the Automatic Text Formatting option (see
error message will appear:
Formatting Text); otherwise the following
To import data into a LabelMark Plus file using advanced features:
1. Create or open a label file.
2. Select the starting point for the import by clicking the desired label.
3.
Display the import data wizard by clicking Tools Import Data Advanced...or click on the
Import Data Simple
Note: If you choose not to use the wizard by deactivating it in the User Defaults (see
Overview), the same options described below are still available, but you can select each option
individually using tabs in the Import Data dialog.
4. Add text and/or barcode objects for the data to be imported:
Barcode Import Notes: Two options, Use existing objects and Create data objects for me are
available for importing barcode data into a label file. You can only import characters valid for
the selected symbology. Invalid characters are ignored and an error will appear.
Use Existing Objects Import Notes:
o If you plan to use the Use existing objects import option to map your fields to the import
data, add text items for variable data entry to the label and fill them with placeholder text.
The placeholder text allows you to properly size and format the text, and it will be
replaced by your data when you create a file. Objects in fields will be automatically
displayed in order as either text (e.g., T1, T2) or barcode (e.g., B1, B2) and will be visible
in the preview area.
icon, then click Advanced Import.
Data Import
o You can Autosize
entry when the data size is not of a fixed length. Autosize items are unlocked by default
and grow to accommodate the data. If you do not Autosize an item, data cannot exceed
the length of the placeholder text you entered when you created the template file. See
Creating a Template for further example.
5. Select the type of data to import (see
90 Working With Objects - LabelMark Plus
text and barcodes (see the Template Toolbar) for variable data
Data Import Types) and click Next:
Page 97

Working With Objects - LabelMark Plus
6. Select the data file and click OK:
Select the ASCII text file, Excel™ or Lotus 1-2-3™ spreadsheet file, or Access™ database
file to import and click Open, or
If you are importing from a database other than Access, enter the necessary Other data source
information (see
7.
In the Fields dialog, select your fields and mapping details and click OK:
Importing Data From a Database).
Select the Table that contains the data you want to import.
Determine how you wish to put data on your label, by do i ng o ne of the f oll owing:
o Have the data objects created for you (fills label top to bottom using order in the
Included list). Note: When you import data into a file based on a template, it fills the
objects from left to right and top to bottom.
o Use existing objects (allows you to assign which field fills each label). If you
select Use
existing objects as the Sort order for importing data, LabelMark Plus adds an Object
column to the Included list. If you selected the Use existing objects import option, map
each data field to the appropriate object on the label. Click the Object assigned to the
field and select the desired object to import the field into from the list that appears.
Note: The Use existing objects option is disabled if the active label does not include any
objects.
Designate an object as either barcode or text by clicking on it, which creates a text or barcode
selection drop-down menu (see image above).
Using the Move Up and Move Down arrow buttons and the Delete Field and Restore All
Fields buttons, select the import order of the table’s fields.
8. When you have entered all of your fields and object mappings, click Next and continue with step 8
of the
Importing Data into Label Files (Advanced) process.
See also
Inserting Barcodes and Modifying Barcodes for more information about barcodes.
Working With Objects - LabelMark Plus 91
Page 98

LabelMark User Guide
Selecting Objects in LabelMark Plus
The items placed on a label in LabelMark Plus are objects. Objects include text, barcodes, images, lines
and rectangles.
To select an object:
• Use the Select tool
• To select more than one object, hold down the Ctrl key and click on the objects you wish to edit.
• To select all objects on the active label, select Edit Select All Objects or right-click the
label and click Select All Objects.
• To deselect an object, click outside of it.
to click the object you wish to edit.
92 Working With Objects - LabelMark Plus
Page 99

Working With Objects - LabelMark Plus
Object Toolbar
The Object toolbar allows you to manipulate objects (text, barcodes, images, rectangles and lines)
in LabelMark Plus. First select the object you want to modify and then select the appropriate Object
toolbar button.
Icon Description
Symbology – Allows you to change the
symbology (e.g. Code 39, Datamatrix, Code 128,
etc.) for a barcode object (menu equivalent:
Object Properties…)
Properties – Displays information about selected
object (menu equivalent: Object Properties…)
Alignment – Six icons that allow you to line up
multiple selected objects in relation to each other
– left, center, right, top, middle or bottom (menu
equivalent: Object Align)
Note: Items are aligned to the last item selected.
Icons are disabled if one object or no objects are
selected.
Center Horizontally – Moves the selected
object(s) to the middle (side-to-side) of the label
(menu equivalent: Object Align)
Note: This is a one-time action. If you resize,
add text, etc., you will have to re-center the
object.
Center Vertically – Moves the selected object(s)
to the middle (top-to-bottom) of the label (menu
equivalent: Object Align)
Note: This is a one-time action. If you resize,
add text, etc., you will have to re-center the
object.
Moving an Object
There are two ways to move the selected object in LabelMark Plus:
• Click the Properties
Note: The top-left corner of a label is 0, 0.
• Place the cursor over the selected object(s) until the cursor turns into a 4-headed arrow.
Click and drag the object to the new location and release the mouse button to place it.
Note: LabelMark Plus will not allow you to move an object beyond the printable boundaries of the label.
Making Data Fit on a Label for d e tails.
See
Working With Objects - LabelMark Plus 93
icon, type your desired Left and Top values and click OK.
Page 100

LabelMark User Guide
Resizing an Object
Note: You cannot resize text and barcode objects. They grow based on their data.
There are two ways to resize the selected object in LabelMark Plus:
• Click the Properties icon
, type your desired Width and Height and click OK.
• With the Select tool
, “grab” one of the solid blue sizing handles and drag it to re-size.
Deleting an Object
To delete an object(s) in LabelMark Plus :
1. Select the object(s) using the Select
2. Delete the object:
Press the Delete key on the keyboard to delete the object.
Click the Cut icon
94 Working With Objects - LabelMark Plus
to delete the object but keep it available for pasting.
tool.
 Loading...