

Page 1

Page 2

Page 3

Copyright
Trademarks
This manual is copyrighted with all rights reserved. No portion of this manual may be copied
or reproduced by any means without the prior written consent of BRADY Worldwide, Inc.
While every precaution has been taken in the preparation of this document, BRADY assumes
no liability to any party for any loss or damage caused by errors or omissions or by statements
resulting from negligence, accident, or any other cause. BRADY further assumes no liability
arising out of the application or use of any product or system described, herein; nor any
liability for incidental or consequential damages arising from the use of this document.
BRADY disclaims all warranties or merchantability of fitness for a particular purpose.
BMP®51 Label Printer is a trademark of BRADY Worldwide, Inc.
Microsoft and Windows are registered trademark of Microsoft Corporation.
BRADY reserves the right to make changes without further notice to any product or system
described herein to improve reliability, function, or design.
© 2011 BRADY Worldwide, Inc. All Rights Reserved
Printed February 2011
Software Version 2
BMP®51 User’s Manual
Page 4

UNITED STATES
NoteNote
WARNINGWARNINGWARNING
This equipment has been tested and found to comply with the limits for a Class A
digital device, pursuant to part 15 of the FCC Rules. These limits are designed to
provide reasonable protection against harmful interference when the equipment is
operated in a commercial environment. This equipment generates, uses, and can
radiate radio frequency energy and, if not installed and used in accordance with the
instruction manual, may cause harmful interference to radio communications.
Operation of this equipment in a residential area is likely to cause harmful
interference in which case the user will be required to correct the interference at his
own expense.
Changes or modifications not expressly approved by the party responsible for compliance
could void the user’s authority to operate the equipment.
INDUSTRY CANADA
This Class A digital apparatus meets all requirements of the Canadian Interference-Causing
Equipment Regulations.
Cet appareil numerique de la classe A respecte toutes les exigences du Reglement sur le
Materiel Brouilleur du Canada.
EUROPE
This is a Class A product. In a domestic environment, this product may cause radio
interference in which case the user may be required to take adequate measures.
RoHS Directive 2002/95/EC
Waste Electrical and Electronic Equipment Directive
In accordance with the European WEEE Directive, this device
needs to be recycled in accordance with local regulations.
This statement clarifies Brady's product compliance with the European Union's Directive
2002/95/EC, Restriction of Hazardous Substances.
BMP®51 User’s Manual
Page 5

Batteries Directive 2006/66/EC
This product contains a lithium battery. The crossed-out wheeled bin shown
to the left is used to indicate 'separate collection' for all batteries and
accumulators in accordance with European Directive 2006/66/EC. Users
of batteries must not dispose of batteries as unsorted municipal waste. This
Directive determines the framework for the return and recycling of used
batteries and accumulators that are to be collected separately and recycled
at end of life. Please dispose of the battery according to your local
regulations.
Notice to Recyclers
To remove the lithium battery:
1. Disassemble printer and locate the lithium cell battery located on the main circuit board.
2. To remove, push down on the center tab of the battery retainer, remove the battery from
the board, and dispose of in accordance with local regulations.
To remove the Lithium Ion battery:
1. Turn the printer over, open the battery compartment door, and remove the lithium ion
battery.
2. Release the battery from the printer and dispose of in accordance with local regulations.
BMP®51 User’s Manual
Page 6

BRADY Warranty
Our products are sold with the understanding that the buyer will test them in actual use and
determine for him or herself their adaptability to his/her intended uses. BRADY warrants to
the buyer that its products are free from defects in material and workmanship, but limits its
obligation under this warranty to replacement of the product shown to BRADY’s satisfaction
to have been defective at the time BRADY sold it. This warranty does not extend to any
persons obtaining the product from the buyer.
THIS WARRANTY IS IN LIEU OF ANY OTHER WARRANTY, EPXRESSED OR
IMPLIED INCLUDING, BUT NOT LIMITED TO ANY IMPLIED WARRANTY OF
MERCHANTABILITY OR FITNESS FOR A PARTICULAR PURPOSE, AND OF ANY
OTHER OBLIGATIONS OR LIABILITY ON BRADY’S PART. UNDER NO
CIRCUMSTANCES WILL BRADY BE LIABLE FOR ANY LOSS, DAMAGE, EXPENSE
OR CONSEQUENTIAL DAMAGES OF ANY KIND ARISING IN CONNECTION WITH
THE USE, OR INABILITY TO USE, BRADY’S PRODUCTS.
YOU SHOULD CAREFULLY READ THE FOLLOWING TERMS & CONDITIONS OF
THIS LICENSE AGREEMENT. IF YOU DO NOT AGREE WITH THESE TERMS &
CONDITIONS, PLEASE PROMPTLY RETURN THIS PACKAGE FOR A FULL REFUND.
BMP®51 User’s Manual
Page 7

BMP®51 User’s Manual
Page 8

Page 9

Table of Contents
Introduction. . . . . . . . . . . . . . . . . . . . . . . . . . . . . . . . . . . . . . . . . . . . . . . . . . . . . . . . . 1
Unpack Your Printer . . . . . . . . . . . . . . . . . . . . . . . . . . . . . . . . . . . . . . . . . . . . . . . . 2
Save Your Packaging . . . . . . . . . . . . . . . . . . . . . . . . . . . . . . . . . . . . . . . . . . . . 2
Register Your Printer . . . . . . . . . . . . . . . . . . . . . . . . . . . . . . . . . . . . . . . . . . . . 2
®
BMP
Physical and Environmental Characteristics . . . . . . . . . . . . . . . . . . . . . . . . . . . . . 3
Firmware Upgrades . . . . . . . . . . . . . . . . . . . . . . . . . . . . . . . . . . . . . . . . . . . . . . . . 4
External View . . . . . . . . . . . . . . . . . . . . . . . . . . . . . . . . . . . . . . . . . . . . . . . . . . . . . . . 5
Power Source . . . . . . . . . . . . . . . . . . . . . . . . . . . . . . . . . . . . . . . . . . . . . . . . . . . . . . . 6
Loading the Battery Tray . . . . . . . . . . . . . . . . . . . . . . . . . . . . . . . . . . . . . . . . . . . . 8
Loading the BMP Lithium Ion Battery Pack . . . . . . . . . . . . . . . . . . . . . . . . . . . . . . 9
AC Power Adapter . . . . . . . . . . . . . . . . . . . . . . . . . . . . . . . . . . . . . . . . . . . . . . . . 10
Connecting . . . . . . . . . . . . . . . . . . . . . . . . . . . . . . . . . . . . . . . . . . . . . . . . . . . . . . . . .11
Connecting to a PC . . . . . . . . . . . . . . . . . . . . . . . . . . . . . . . . . . . . . . . . . . . . . . . 12
Wireless Driver Installation . . . . . . . . . . . . . . . . . . . . . . . . . . . . . . . . . . . . . . . . . . 14
Load Cartridge . . . . . . . . . . . . . . . . . . . . . . . . . . . . . . . . . . . . . . . . . . . . . . . . . . . 15
Unload Cartridge . . . . . . . . . . . . . . . . . . . . . . . . . . . . . . . . . . . . . . . . . . . . . . . . . 16
Power On. . . . . . . . . . . . . . . . . . . . . . . . . . . . . . . . . . . . . . . . . . . . . . . . . . . . . . . . . . 17
Display Screen . . . . . . . . . . . . . . . . . . . . . . . . . . . . . . . . . . . . . . . . . . . . . . . . . . . 18
Keypad. . . . . . . . . . . . . . . . . . . . . . . . . . . . . . . . . . . . . . . . . . . . . . . . . . . . . . . . . . . . 19
Navigation and Editing Keys. . . . . . . . . . . . . . . . . . . . . . . . . . . . . . . . . . . . . . . . . 19
Function Keys. . . . . . . . . . . . . . . . . . . . . . . . . . . . . . . . . . . . . . . . . . . . . . . . . . . . 22
Menus . . . . . . . . . . . . . . . . . . . . . . . . . . . . . . . . . . . . . . . . . . . . . . . . . . . . . . . . . . . . 24
Dialog Boxes. . . . . . . . . . . . . . . . . . . . . . . . . . . . . . . . . . . . . . . . . . . . . . . . . . . . . . . 25
Drop Down Field Lists . . . . . . . . . . . . . . . . . . . . . . . . . . . . . . . . . . . . . . . . . . . . . 26
Data Fields . . . . . . . . . . . . . . . . . . . . . . . . . . . . . . . . . . . . . . . . . . . . . . . . . . . . . . 27
Spinner Boxes . . . . . . . . . . . . . . . . . . . . . . . . . . . . . . . . . . . . . . . . . . . . . . . . . . . 28
Radio Buttons and Option Boxes . . . . . . . . . . . . . . . . . . . . . . . . . . . . . . . . . . . . . 29
Accept Dialog Box Edits . . . . . . . . . . . . . . . . . . . . . . . . . . . . . . . . . . . . . . . . . . . . 29
Cancel a Menu or Dialog Box. . . . . . . . . . . . . . . . . . . . . . . . . . . . . . . . . . . . . . . . 29
51 System Specifications . . . . . . . . . . . . . . . . . . . . . . . . . . . . . . . . . . . . . . . 3
Brady AC Adapters . . . . . . . . . . . . . . . . . . . . . . . . . . . . . . . . . . . . . . . . . . . . . 10
Attaching the Adapter . . . . . . . . . . . . . . . . . . . . . . . . . . . . . . . . . . . . . . . . . . . 10
Download Print Drivers . . . . . . . . . . . . . . . . . . . . . . . . . . . . . . . . . . . . . . . . . . 12
Pause/Cut Preference. . . . . . . . . . . . . . . . . . . . . . . . . . . . . . . . . . . . . . . . . . . 13
Status Information. . . . . . . . . . . . . . . . . . . . . . . . . . . . . . . . . . . . . . . . . . . . . . 18
i
BMP®51 User’s Manual
Page 10

ii
Setup . . . . . . . . . . . . . . . . . . . . . . . . . . . . . . . . . . . . . . . . . . . . . . . . . . . . . . . . . . . . . 30
Pause/Cut. . . . . . . . . . . . . . . . . . . . . . . . . . . . . . . . . . . . . . . . . . . . . . . . . . . . . . . 30
Wireless . . . . . . . . . . . . . . . . . . . . . . . . . . . . . . . . . . . . . . . . . . . . . . . . . . . . . . . . 31
Config . . . . . . . . . . . . . . . . . . . . . . . . . . . . . . . . . . . . . . . . . . . . . . . . . . . . . . . . . . 31
Time/Date . . . . . . . . . . . . . . . . . . . . . . . . . . . . . . . . . . . . . . . . . . . . . . . . . . . . . . . 32
Units . . . . . . . . . . . . . . . . . . . . . . . . . . . . . . . . . . . . . . . . . . . . . . . . . . . . . . . . . . . 32
Language . . . . . . . . . . . . . . . . . . . . . . . . . . . . . . . . . . . . . . . . . . . . . . . . . . . . . . . 33
Initial Language Setup . . . . . . . . . . . . . . . . . . . . . . . . . . . . . . . . . . . . . . . . . . 33
Font Settings . . . . . . . . . . . . . . . . . . . . . . . . . . . . . . . . . . . . . . . . . . . . . . . . . . . . 33
Getting Started . . . . . . . . . . . . . . . . . . . . . . . . . . . . . . . . . . . . . . . . . . . . . . . . . . . . . 35
Entering Text. . . . . . . . . . . . . . . . . . . . . . . . . . . . . . . . . . . . . . . . . . . . . . . . . . . . . 35
Editing Text . . . . . . . . . . . . . . . . . . . . . . . . . . . . . . . . . . . . . . . . . . . . . . . . . . . . . . 35
Inserting Text . . . . . . . . . . . . . . . . . . . . . . . . . . . . . . . . . . . . . . . . . . . . . . . . . 35
Deleting Text. . . . . . . . . . . . . . . . . . . . . . . . . . . . . . . . . . . . . . . . . . . . . . . . . . 36
Clear . . . . . . . . . . . . . . . . . . . . . . . . . . . . . . . . . . . . . . . . . . . . . . . . . . . . . . . . 36
Error Messages. . . . . . . . . . . . . . . . . . . . . . . . . . . . . . . . . . . . . . . . . . . . . . . . 37
Default Settings. . . . . . . . . . . . . . . . . . . . . . . . . . . . . . . . . . . . . . . . . . . . . . . . 37
Font Size. . . . . . . . . . . . . . . . . . . . . . . . . . . . . . . . . . . . . . . . . . . . . . . . . . . . . 38
Printing a Label. . . . . . . . . . . . . . . . . . . . . . . . . . . . . . . . . . . . . . . . . . . . . . . . . . . 39
Formatting. . . . . . . . . . . . . . . . . . . . . . . . . . . . . . . . . . . . . . . . . . . . . . . . . . . . . . . . . 41
Font . . . . . . . . . . . . . . . . . . . . . . . . . . . . . . . . . . . . . . . . . . . . . . . . . . . . . . . . . . . 41
Size . . . . . . . . . . . . . . . . . . . . . . . . . . . . . . . . . . . . . . . . . . . . . . . . . . . . . . . . . 42
Font Attributes. . . . . . . . . . . . . . . . . . . . . . . . . . . . . . . . . . . . . . . . . . . . . . . . . 43
Expand/Condense . . . . . . . . . . . . . . . . . . . . . . . . . . . . . . . . . . . . . . . . . . . . . 45
Superscript/Subscript . . . . . . . . . . . . . . . . . . . . . . . . . . . . . . . . . . . . . . . . . . . . . . 46
Multi-Characters . . . . . . . . . . . . . . . . . . . . . . . . . . . . . . . . . . . . . . . . . . . . . . . 46
Symbols . . . . . . . . . . . . . . . . . . . . . . . . . . . . . . . . . . . . . . . . . . . . . . . . . . . . . . . . 47
Remove a Symbol. . . . . . . . . . . . . . . . . . . . . . . . . . . . . . . . . . . . . . . . . . . . . . 48
Date and Time . . . . . . . . . . . . . . . . . . . . . . . . . . . . . . . . . . . . . . . . . . . . . . . . . . . 49
Labels and Areas . . . . . . . . . . . . . . . . . . . . . . . . . . . . . . . . . . . . . . . . . . . . . . . . . . . 50
Fixed Length. . . . . . . . . . . . . . . . . . . . . . . . . . . . . . . . . . . . . . . . . . . . . . . . . . . . . 51
Add Areas. . . . . . . . . . . . . . . . . . . . . . . . . . . . . . . . . . . . . . . . . . . . . . . . . . . . . . . 52
Go To An Area . . . . . . . . . . . . . . . . . . . . . . . . . . . . . . . . . . . . . . . . . . . . . . . . . . . 52
Shortcut. . . . . . . . . . . . . . . . . . . . . . . . . . . . . . . . . . . . . . . . . . . . . . . . . . . . . . 52
Delete Area. . . . . . . . . . . . . . . . . . . . . . . . . . . . . . . . . . . . . . . . . . . . . . . . . . . . . . 53
Justification. . . . . . . . . . . . . . . . . . . . . . . . . . . . . . . . . . . . . . . . . . . . . . . . . . . . . . 54
Rotate . . . . . . . . . . . . . . . . . . . . . . . . . . . . . . . . . . . . . . . . . . . . . . . . . . . . . . . . . . 55
Frame . . . . . . . . . . . . . . . . . . . . . . . . . . . . . . . . . . . . . . . . . . . . . . . . . . . . . . . . . . 57
Reverse . . . . . . . . . . . . . . . . . . . . . . . . . . . . . . . . . . . . . . . . . . . . . . . . . . . . . . . . 58
Vertical Text . . . . . . . . . . . . . . . . . . . . . . . . . . . . . . . . . . . . . . . . . . . . . . . . . . . . . 59
BMP®51 User’s Manual
Page 11

Barcode . . . . . . . . . . . . . . . . . . . . . . . . . . . . . . . . . . . . . . . . . . . . . . . . . . . . . . . . 61
Barcode Settings. . . . . . . . . . . . . . . . . . . . . . . . . . . . . . . . . . . . . . . . . . . . . . . 61
Add a Barcode . . . . . . . . . . . . . . . . . . . . . . . . . . . . . . . . . . . . . . . . . . . . . . . . . . . 62
Edit Barcode Data . . . . . . . . . . . . . . . . . . . . . . . . . . . . . . . . . . . . . . . . . . . . . . . . 64
Serialization . . . . . . . . . . . . . . . . . . . . . . . . . . . . . . . . . . . . . . . . . . . . . . . . . . . . . . . 65
How Serialization Works. . . . . . . . . . . . . . . . . . . . . . . . . . . . . . . . . . . . . . . . . . . . 65
Examples of Serialization . . . . . . . . . . . . . . . . . . . . . . . . . . . . . . . . . . . . . . . . . . . 66
Numbers in Sequences. . . . . . . . . . . . . . . . . . . . . . . . . . . . . . . . . . . . . . . . . . 67
Add Serialization. . . . . . . . . . . . . . . . . . . . . . . . . . . . . . . . . . . . . . . . . . . . . . . . . . 68
Edit a Sequence . . . . . . . . . . . . . . . . . . . . . . . . . . . . . . . . . . . . . . . . . . . . . . . . . . 70
File Management . . . . . . . . . . . . . . . . . . . . . . . . . . . . . . . . . . . . . . . . . . . . . . . . . . . 71
File Naming Standards . . . . . . . . . . . . . . . . . . . . . . . . . . . . . . . . . . . . . . . . . . . . . 71
Save . . . . . . . . . . . . . . . . . . . . . . . . . . . . . . . . . . . . . . . . . . . . . . . . . . . . . . . . . . . 71
Remove File from Screen . . . . . . . . . . . . . . . . . . . . . . . . . . . . . . . . . . . . . . . . 75
Open a File . . . . . . . . . . . . . . . . . . . . . . . . . . . . . . . . . . . . . . . . . . . . . . . . . . . . . . 76
Delete a File . . . . . . . . . . . . . . . . . . . . . . . . . . . . . . . . . . . . . . . . . . . . . . . . . . . . . 78
Printing . . . . . . . . . . . . . . . . . . . . . . . . . . . . . . . . . . . . . . . . . . . . . . . . . . . . . . . . . . . 81
Cancel a Print Job . . . . . . . . . . . . . . . . . . . . . . . . . . . . . . . . . . . . . . . . . . . . . . . . 81
Print Preview . . . . . . . . . . . . . . . . . . . . . . . . . . . . . . . . . . . . . . . . . . . . . . . . . . . . 82
Scrolling in Print Preview . . . . . . . . . . . . . . . . . . . . . . . . . . . . . . . . . . . . . . . . 83
Multi-Print . . . . . . . . . . . . . . . . . . . . . . . . . . . . . . . . . . . . . . . . . . . . . . . . . . . . . . . 84
Collate. . . . . . . . . . . . . . . . . . . . . . . . . . . . . . . . . . . . . . . . . . . . . . . . . . . . . . . 84
Mirror Print . . . . . . . . . . . . . . . . . . . . . . . . . . . . . . . . . . . . . . . . . . . . . . . . . . . 86
Label Types. . . . . . . . . . . . . . . . . . . . . . . . . . . . . . . . . . . . . . . . . . . . . . . . . . . . . . . . 87
Accessing a Label Type . . . . . . . . . . . . . . . . . . . . . . . . . . . . . . . . . . . . . . . . . . . . 87
General Label Type. . . . . . . . . . . . . . . . . . . . . . . . . . . . . . . . . . . . . . . . . . . . . . . . . . 89
WireMarker . . . . . . . . . . . . . . . . . . . . . . . . . . . . . . . . . . . . . . . . . . . . . . . . . . . . . . . . 90
Terminal Block, Patch Panel, 66 Block. . . . . . . . . . . . . . . . . . . . . . . . . . . . . . . . . . 92
Flags . . . . . . . . . . . . . . . . . . . . . . . . . . . . . . . . . . . . . . . . . . . . . . . . . . . . . . . . . . . . . 94
110-Block, Bix Block Label Type. . . . . . . . . . . . . . . . . . . . . . . . . . . . . . . . . . . . . . . 96
Vial . . . . . . . . . . . . . . . . . . . . . . . . . . . . . . . . . . . . . . . . . . . . . . . . . . . . . . . . . . . . . . . 99
DesiStrip . . . . . . . . . . . . . . . . . . . . . . . . . . . . . . . . . . . . . . . . . . . . . . . . . . . . . . . . . . 99
Appendix A - Symbols . . . . . . . . . . . . . . . . . . . . . . . . . . . . . . . . . . . . . . . . . . . . . . 101
iii
BMP®51 User’s Manual
Page 12

Page 13

Introduction
The BMP®51 Label Printer is capable of printing on a variety of both die-cut and continuous
supplies, up to 1.5 inches (38 mm) wide. It includes the following features:
• Targeted applications to simplify the creation of specific label types
• Battery operation - printing 1000 or more standard Brady labels with a fresh pack of 8
disposable AA alkaline batteries or fully charged Brady battery pack.
• Ability to use the printer while the BMP-UBP Lithium Ion battery pack is charging
•Large display
• Easy to use graphic user interface
• 300 dpi print resolution
•USB 2.0
• One step media installation
• Smart-cell technology that works intelligently with Brady consumables
• Wireless connectivity
Introduction
1
BMP®51 User’s Manual
Page 14

Introduction
WARNINGWARNING
2
Unpack Your Printer
Unpack Your Printer
The following items are included in
®
the standard BMP
®
•BMP
51 printer
51 package:
• MC-1500-595-WT-BK
cartridge
• USB connection cable
•Product CD
• Brady Printer Drivers CD
• Quick Start Guide
The following items are accessories
®
available for the BMP
51 printer:
• BMP Lithium Ion Battery Pack
(BMP-UBP)
• AC adapter (M50-AC)
• Magnet (M50-Magnet)
These items can be purchased separately or as a kit from your distributor.
Save Your Packaging
The packaging surrounding your BMP®51 printer should be saved in the event you have to
ship the printer and accessories back to the supplier.
Never ship the BMP®51 printer without first removing the BMP-UPB Lithium Ion battery
pack from the printer.
If shipping both the printer and battery pack, remove the battery pack from the printer
and place the items in the original shipping material before transporting. Batteries must
be shipped according to state, federal, or municipal regulations. Consult your courier
before shipping lithium-ion battery packs.
BMP®51 User’s Manual
Page 15

Physical and Environmental Characteristics
BMP®51 System Specifications
The BMP®51 printer has the following specifications:
• Weight 2.6 lbs (1.2 kg) (with AA batteries and full compartment)
• Thermal Transfer Print Mechanism 300 dpi
• Optical Registration System for Precise Print Registration
• Elastomeric Keypad
• Custom True Type Fonts
• Print Width - 1.5 inches (38 mm) maximum label width
• Maximum print length for labels: 39” (990.6 mm)
• Prints up to 1000 1” x 2” labels per battery charge
Physical and Environmental Characteristics
The BMP®51 printer has the following physical and environmental characteristics:
Introduction
3
Physical Metric Units U.S. Units
Dimensions 262 x 91 x 152 mm 10.3 x 3.6 x 6 in.
Weight (with battery pack) 1.2 kg 2.6 lbs
Note: The table below refers to the BMP
performance may vary.
®
51 printer only. Consumable
BMP®51 User’s Manual
Page 16

Introduction
WARNINGWARNING
4
Firmware Upgrades
Environmental Operation Storage
Temperature* (Printer) 4° to 43° C (40° to 110° F)
-18° to 43° C (0° to 110° F)
Be mindful, when using the
AC adapter with the printer,
that the AC adapter is rated
at a maximum temperature
of 30° C (86° F).
Relative Humidity
(Printer)
20% to 90% (noncondensing)
10% to 90% (noncondensing
*Exposing the BMP®51 printer to direct sunlight is not recommended.
Avoid using the system near water, in direct sunlight, or near a heating device.
Do not attempt to use batteries other than those recommended in this manual.
BMP®51 User’s Manual
Page 17

External View
External View
Firmware Upgrades
5
1 Power key 4 Print key 7 USB port
2 Feed key 5 Navigation keys with
ENTER button
3 Function keys 6 AC Adaptor Port 9 Brady Network Card
8 Thumb Drive-Port
port
BMP®51 User’s Manual
Page 18

Power Source
WARNINGWARNING
WARNINGWARNING
6
Firmware Upgrades
Power Source
Power is supplied to the BMP®51 printer through a battery tray containing eight AA batteries
(alkaline or rechargeable), a BMP-UBP Lithium Ion battery pack, or through an AC power
adapter.
Do not expose batteries to temperatures above 60C (140F).
Do not disassemble or mistreat the battery pack.
Do not attempt to open, damage, or replace components in the battery pack.
®
The Battery Pack should only be used in the BMP
Do not use any other rechargeable battery pack other than the BMP-UBP in the
®
51 and BMP®53 printers.
BMP
Do not allow metal or other conductive materials to touch the battery terminals.
51 and BMP®53 printers.
Keep the battery pack away from sparks, flames, or other heat sources.
Keep the battery pack away from water.
Never lay objects on top of the battery pack.
Store your battery pack only in a cool, dry place.
Keep the battery pack out of the reach of children.
The battery pack must be recycled or disposed of properly according to federal, state,
and municipal regulations.
BMP®51 User’s Manual
Page 19

Power Source
WARNINGWARNING
Firmware Upgrades
Do not dismantle, open or shred secondary cells or batteries.
Do not expose cells or batteries to heat or fire. Avoid storage in direct sunlight.
Do not short-circuit a cell or a battery. Do not store cells or batteries haphazardly in a
box or drawer where they may short-circuit each other or be short-circuited by other
metal objects.
Do not remove a cell or battery from its original packaging until required for use.
Do not subject cells or batteries to mechanical shock.
In the event of a cell leaking, do not allow the liquid to come in contact with the skin or
eyes. If contact has been made, wash the affected area with copious amounts of water
and seek medical advice.
Do not use any charger other than that specifically provided for use with the equipment.
Observe the plus (+) and minus (-) marks on the cell, battery and equipment and ensure
correct use.
Do not use any cell or battery which is not designed for use with the equipment.
7
Do not mix cells of different manufacture, capacity, size or type within a device.
When using alkaline cells, always use fresh, new batteries and never mix used batteries
with new batteries.
Keep cells and batteries out of the reach of children.
Seek medical advice immediately if a cell or a battery has been swallowed.
Always purchase the correct cell or battery for the equipment.
Keep cells and batteries clean and dry.
Wipe the cell or battery terminals with a clean dry cloth if they become dirty.
Secondary cells and batteries need to be charged before use. Always use the correct
charger and refer to the manufacturer's instructions or equipment manual for proper
charging instructions.
Do not leave a battery on prolonged charge when not in use.
After extended periods of storage, it may be necessary to charge and discharge the cells
or batteries several times to obtain maximum performance.
Secondary cells and batteries give their best performance when they are operated at
normal room temperature (20 °C ± 5 °C).
Retain the original product literature for future reference.
Use only the cell or battery in the application for which it was intended.
When possible, remove the battery from the equipment when not in use.
BMP®51 User’s Manual
Page 20

Power Source
8
Loading the Battery Tray
Loading the Battery Tray
1. With your thumb on
the arrow, slide the top
panel of the battery
tray downward to open
the tray.
4. On the backside of the
printer, using your
thumb, pull the door
release latch
downward, then swing
the battery
compartment door up
and out. (The door will
come off.)
2. Insert eight AA batteries
into the tray, observing
the correct + and polarity alignment.
5. With the tray cover facing
outward, insert the pegs of
the battery tray into the
peg slots at the top of the
compartment; then tip the
battery tray downward
into place.
3. When all eight AA batteries are
securely in place, replace the
top panel by lining up the flaps
of the top panel over the lips of
the battery tray; then slide the
top panel back into place.
6. Re-insert the battery door
hinges at the base of the
compartment and swing the
battery compartment door
closed, snapping it into place.
BMP®51 User’s Manual
Page 21

Loading the BMP Lithium Ion Battery Pack
Loading the BMP Lithium Ion Battery Pack
If using a BMP Lithium Ion battery pack, please consult the instructions enclosed with the
battery pack for charging and discharging the BMP-UBP rechargeable battery.
Power Source
9
1. On the backside of the
printer, using your thumb,
pull the door release latch
downward, then swing the
battery compartment door
up and out. (The door will
come off.)
2. With the battery label
facing outward, insert the
battery pegs into the peg
slots at the top of the
compartment; then tip the
battery downward into
place.
3. Re-insert the battery door
hinges at the base of the
compartment and swing
the battery compartment
door closed, snapping it
into place.
BMP®51 User’s Manual
Page 22

Power Source
WARNINGWARNING
10
AC Power Adapter
AC Power Adapter
The printer can be powered through an AC/DC power adapter (optional). When the adapter is
plugged in, it is also charging the BMP-UBP Lithium Ion battery (if installed).
Use only the 18 VDC, 3.3A, Brady AC/DC adapters, shown below, for supplying power
to the BMP®51.
Brady AC Adapters
Catalog Number Region
M50-AC North America,
Australia
M50-AC-INTL Europe
M50-AC-AR Argentina
M50-AC-BR Brazil
Attaching the Adapter
The printer can be powered through a designated AC power adapter. When the adapter is
plugged in, it will also charge the BMP-UBP Lithium Ion Battery Pack if one is inserted in the
battery compartment. (It will NOT charge AA rechargeable batteries.)
1. Insert the round end of the adapter cable
into the plug-in port on the left side of the
printer.
2. Plug the other end of the cord into an
electrical outlet.
BMP®51 User’s Manual
Page 23

Connecting
The BMP®51 Label Printer is equipped with a USB port and Brady Network Card port,
enabling you to connect via USB, Bluetooth, or WIFI (sold separately) to a PC, Mobile
Device, or Smart Phone. You can create labels in various applications (such as LabelMark™
Labeling Software or Mobile Software) and send the data to be printed on the BMP®51. You
can also transfer files to be printed to the BMP
can be connected directly to the BMP
®
51 printer.
Connecting
AC Power Adapter
®
51 by placing the files on a thumb drive which
11
1 AC Adaptor Port 3 Thumb Drive-Port
2 USB port 4 Brady Network Card port
BMP®51 User’s Manual
Page 24

Connecting
12
Connecting to a PC
Connecting to a PC
In order to send data from a Brady PC labeling program to the BMP®51 printer, you must
®
install the BMP
Drivers CD enclosed with your BMP
The BMP
®
51 printer driver. The printer drivers can be found on the Brady Printer
®
51 printer package.
51 printer is a “plug-and-play” printer which means your PC will automatically
recognize the new hardware (printer) when it is attached and will launch a wizard that will
auto-install the printer drivers.
To install the printer drivers:
1. Attach the small end of the USB cable to the
printer, then the flat end of the cable to the PC.
2. Turn the printer on.
On the PC, “Found New Hardware” pops up in the
lower right corner of the screen.
3. Insert the Brady Printer Drivers CD into the CD
drive of your computer.
The printer drivers wizard is launched.
4. Follow the prompts on the screen for installation of a particular driver.
Note: After successful completion of the installation process, follow the directions
included with the Label Software. If it appears that the printer has lost
communication with the host computer while still connected via the USB cable,
turn the printer off, then restart it to restore the connection.
BMP®51 User’s Manual
Page 25

Connecting to a PC
Pause/Cut Preference
After the printer driver is installed, access the printer and set the Pause/Cut preference.
1. In Windows, click Start.
2. Choose Settings>Printers and Faxes.
3. In the list of available printers, right click BMP51 and choose Printing Preferences.
The Layout tab of Printing Preferences displays.
4. Click button.
5. On the Advanced Options screen, click Properties button for Custom Settings.
Connecting
13
BMP®51 User’s Manual
Page 26
Connecting
14
Wireless Driver Installation
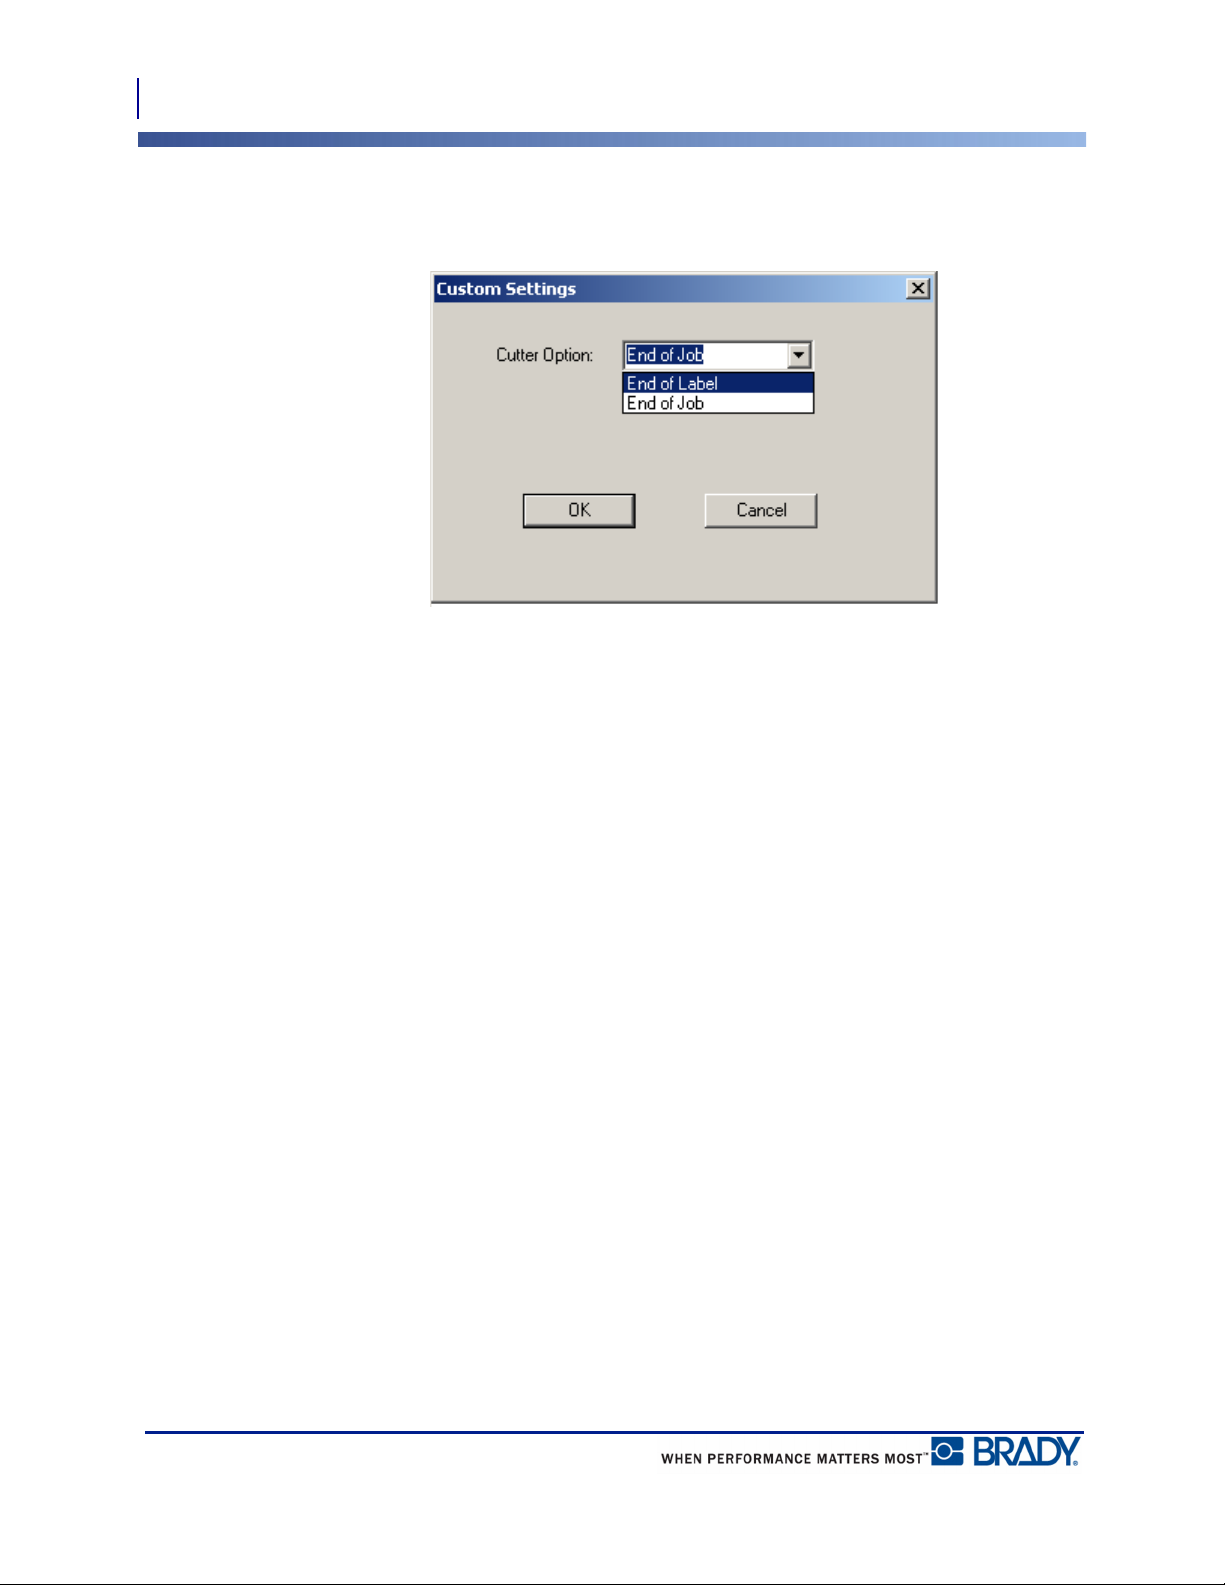
6. On the Custom Settings screen, click the down arrow in Cutter Option field and select if
you want to pause the printer for cutting at the end of each label or at the end of the job.
7. Click OK to accept the changes. (You may have to click OK a number of times as you
back out of the Printing Preferences screens.)
Wireless Driver Installation
The Brady Network Card, USB, and Wireless drivers, along with the driver installation
instructions, can be found on the Brady Printer Drivers CD.
1. Insert the Brady Printer Drivers CD into the CD drive of your computer.
2. Follow the prompts on the screen for installation of a particular driver.
BMP®51 User’s Manual
Page 27
Media Cartridge
The media and ribbon supplies for the BMP®51 printer are combined in a plastic cartridge for
easy one-step loading. To load the cartridge:
Load Cartridge
Media Cartridge
Load Cartridge
15
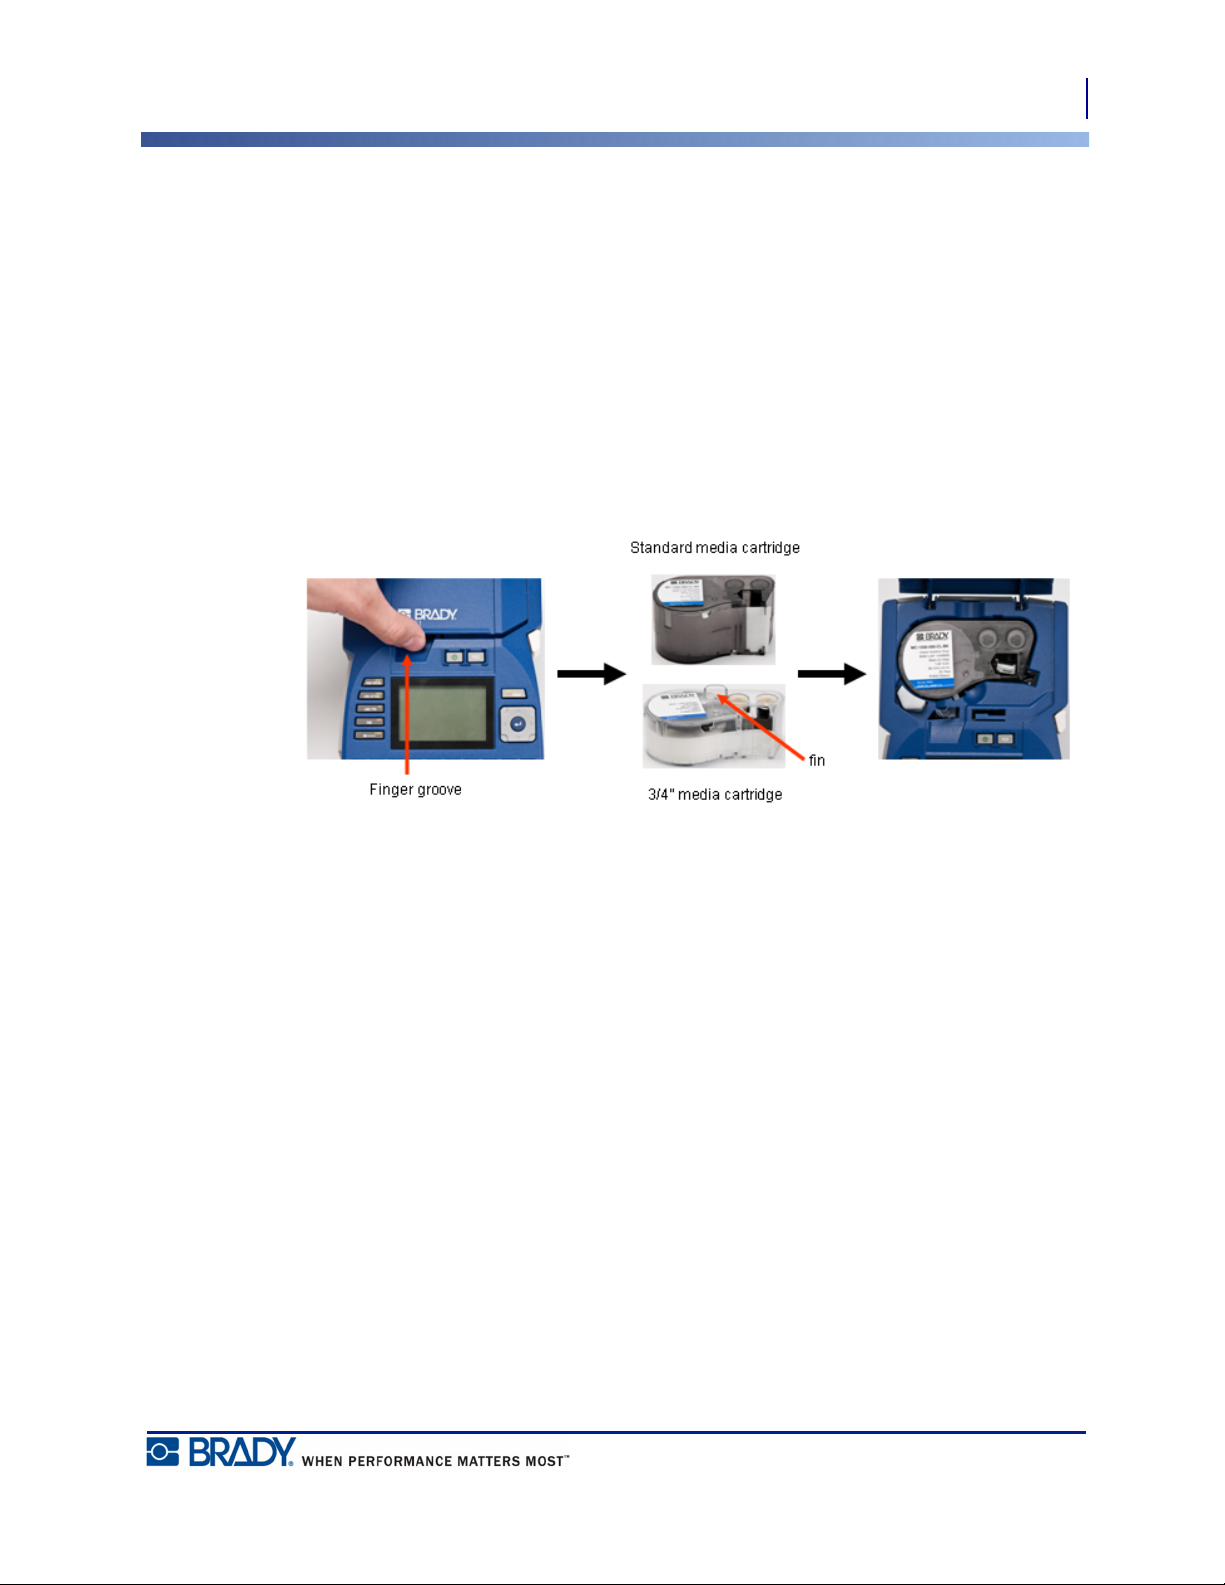
1. Place your thumb in
the finger groove and
push up on the cover
lip to open the printer
cover.
Although the printer can be operated with the cover open, it is recommended that the cover
remain closed during printing and standby operation.
2. With the cartridge label facing up, drop the cartridge into
the cartridge well, pushing gently until it snaps into place.
Close the cover by pushing down on it until it snaps into
place.
Note: If using the shorter cartridge, hold the cartridge by
the fin when dropping into place.
BMP®51 User’s Manual
Page 28

Media Cartridge
16
Unload Cartridge
Unload Cartridge
To remove the media cartridge:
1. Place your thumb in
the finger groove and
push up on the cover
2. Push down on the
cartridge eject
button.
3. Placing your fingers in the
cartridge grip areas, grasp the
cartridge and pull it out.
lip to open the printer
cover.
Note: If using the shorter
cartridge, grab the cartridge fin
and pull up.
If the cartridge is empty, recycle according to local regulations.
The media gauge at the bottom of the display screen indicates how much media remains. Store
the cartridge in a cool, dry place. Unused media will last up to six months before deterioration
sets in.
BMP®51 User’s Manual
Page 29

Power On
To turn the system on or off:
To preserve battery life, when the printer detects a time of inactivity, it automatically shuts
down. Any data on the screen at the time of auto shutdown is retained and available the next
time the [Power] key is pressed to restart the printer. (See page 31 for information on setting
the shut off delay time.)
The first time the printer is turned on, you may want to choose a language in which to display
screen items. Language selection is performed in the Setup function. (For more information,
see “Setup Language” on page 33.)
Whenever the printer is powered on, the system performs an initialization process. Part of this
process is recognizing the media installed. While it is possible to power on the printer without
installing media, if you choose not to install any, the printer reverts to the last media installed
in the printer.
1. Press Power .
Power On
Unload Cartridge
17
BMP®51 User’s Manual
Page 30

Power On
18
Display Screen
Display Screen
The display screen enables you to view font attributes and other formatting features directly on
the screen while you are entering and editing data.
The screen displays one label, or one area on a multi-area label, at a time. For labels with
multiple areas, use Print Preview (see page 82) to view all areas together.
Status Information
A status bar displays permanently at the top and bottom of the screen and contains the
following:
1 Label part number 5 Number of areas on current label
2 Font size, with Auto size indicator 6 Media remaining
3 Degree of rotation 7 Indicates CAPS Lock is on
4 Label size 8 Battery charge remaining
BMP®51 User’s Manual
(default)
Page 31
Keypad
Navigation and Editing Keys
Navigation and Editing Keys
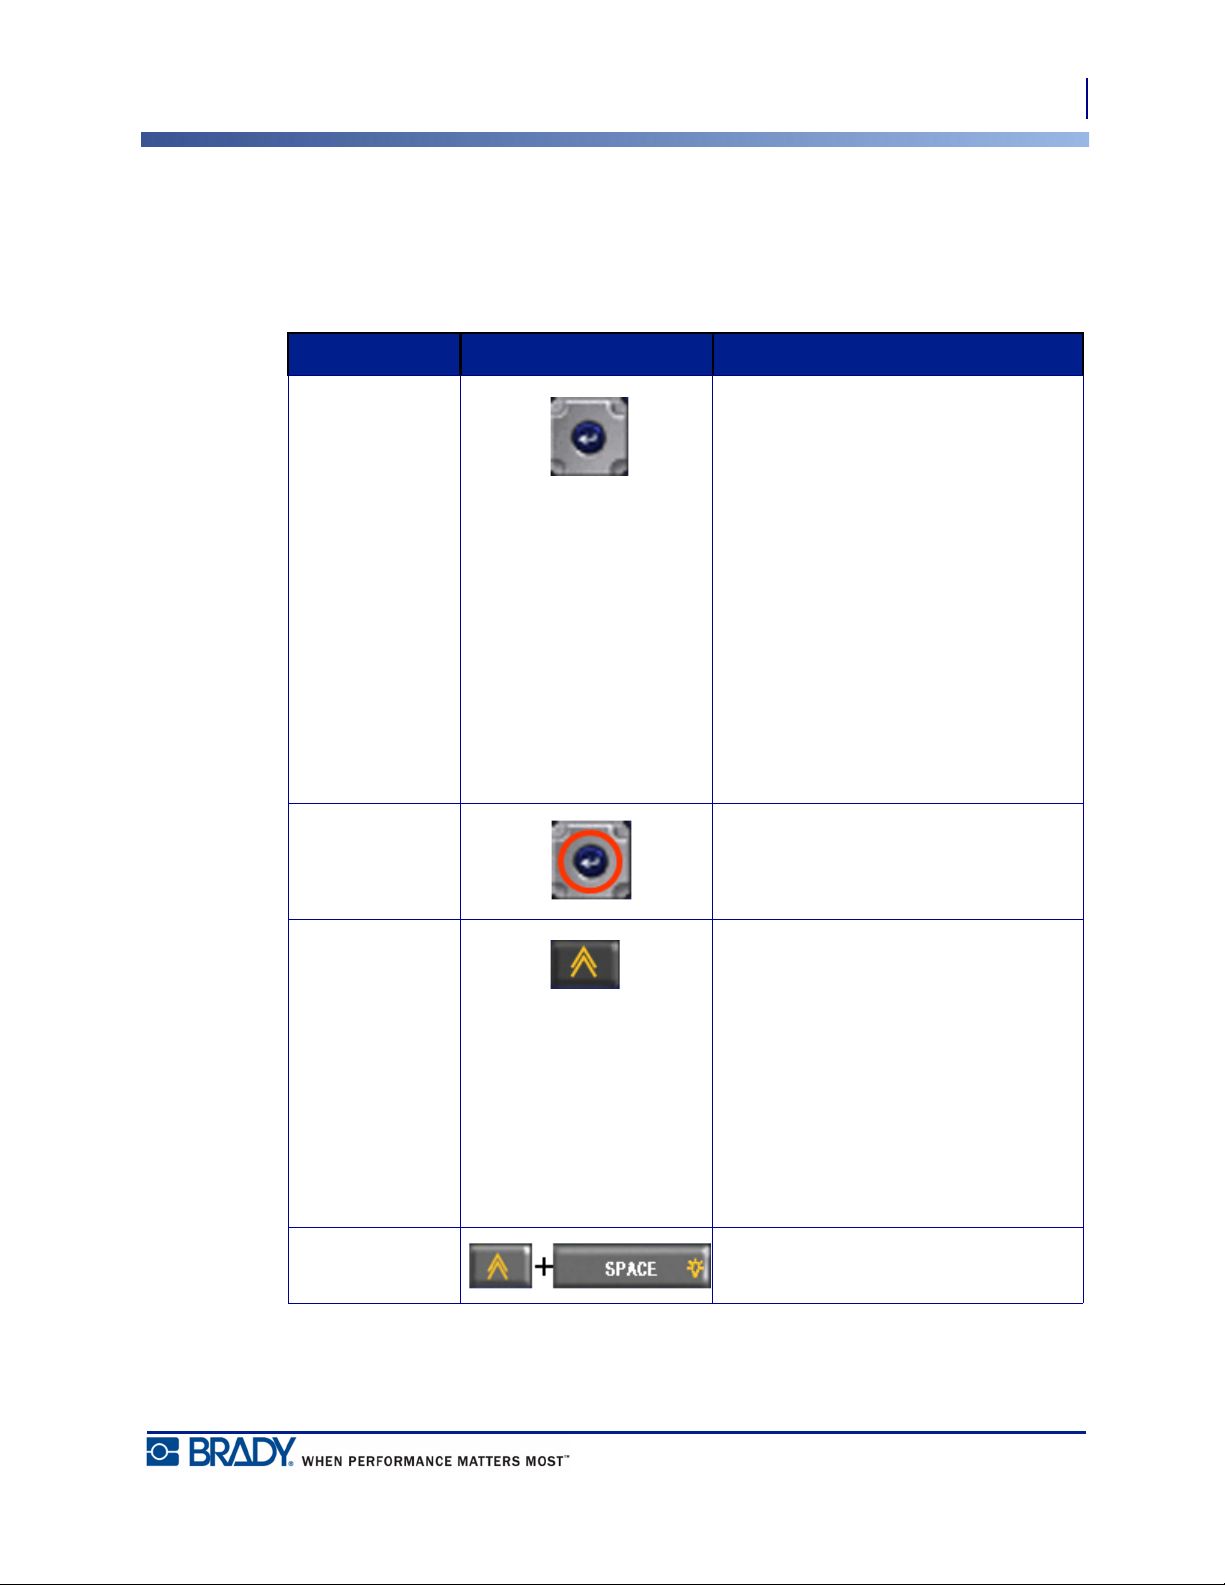
Function Key Description
Navigation Keys Navigation keys:
• In a line of text, move the cursor left
or right a character at a time, or up
and down a line at a time.
• In menus, move the selection left or
right in a primary menus; up or
down through a secondary, or submenu.
• In a dialog box, move up/down or
left/right through the fields. In a field
with a drop down list, after pressing
OK, moves the cursor up or down
through the list.
• In Print Preview, scrolls left or right
through multiple areas on a label.
Keypad
19
ENTER Key
• Adds a new blank line to a label.
• Accepts menu items and attributes.
Alt Key
• Used in conjunction with the
alternate function (displayed in
gold) on some of the keys. Press
the Alt key, then press the alternate
function key.
OR
Hold the Alt key while
simultaneously pressing the key
that has the alternate function.
• Used to access special characters
on the alphabetical keys.
Backlight Key Increases readability of screen in low
light conditions.
BMP®51 User’s Manual
Page 32

Keypad
20
Navigation and Editing Keys
Function Key Description
Backspace Key
• Removes characters one at a time,
moving to the left.
• Backs out of menu options and
functions, one screen at a time.
Note: Depending on how deep you are
into menus and functions, you may
have to press Backspace multiple
times.)
Caps Lock Key Acts as a toggle to lock text into
uppercase as data is entered.
Clear Key Clears data from the screen.
Superscript Key
• Places the next typed character in
superscript format, displaying
slightly above the line of text.
• Will place multiple characters in
superscript if the characters are
highlighted first. (Refer to
for information on highlighting
characters.)
page 44
Subscript Key
Move to Next
Area Key
Move to Previous
Area Key
• Places the next typed character in
subscript format, displaying slightly
below the line of text.
• Will place multiple characters in
subscript if the characters are
highlighted first. (Refer to
for information on highlighting
characters.)
On a multi-area label, moves to the next
area from the current area.
In a multi-area label, moves to the
previous area from the current area.
page 44
BMP®51 User’s Manual
Page 33

Keypad
Navigation and Editing Keys
Function Key Description
Highlight Text Highlights (selects) text on the editing
screen, left or right a character at a
time, enabling you to add font attributes
(bold, italics, underline) to text already
entered.
21
Font Size
Increment
On the editing screen, increases or
decreases the font size, a point at a
time. Hold the [SHIFT] key while
pressing the up or down navigation key.
Decimal Point Adds a decimal point or period.
BMP®51 User’s Manual
Page 34

22
Keypad
Function Keys
Function Keys
Function Key Description
Setup Key Defines the printer’s default
parameters.
Print Preview
Key
Serial Key Sets the values for single, multiple, or
Label Settings
Key
File Key Saves, opens, or deletes a label.
Label Type Key Accesses the different applications/
Font Key Provides font sizes and attributes (such
Multi-Print Key Brings up options to set various print
Previews the label as it will look when
printed.
linked serialization.
Provides formatting that affects the
entire label (e.g., centering data on the
label, framing the label, rotating data).
label types installed (i.e., wiremarker,
flags, terminal blocks, etc.).
as bold and italics).
parameters (such as number of copies,
print range, and mirror print) before
printing.
Print Key Prints all labels in a label file.
Feed Key Feeds the media through the printer.
Symbol Key Accesses the various symbols
Barcode Key Places a text string in Barcode format,
BMP®51 User’s Manual
(graphics) available in the printer.
toggling the barcode on and off.
Page 35

Keypad
Function Keys
Function Key Description
International Key Accesses characters specific to some
international alphabets with diacritical
and accent marks incorporated into the
characters.
Insert Time Key Inserts the current time, as set on the
printer.
Insert Date Key Inserts the current date, as set on the
printer.
Area Key Adds, removes, and formats areas on a
label.
23
BMP®51 User’s Manual
Page 36

24
Menus
Menus
Function Keys
Menus display at the bottom of the screen and are activated by the function keys (the set of
keys to the left of the display). Use navigation keys to access the different menus items.
Continue to press the navigation keys to access the overflow menus. When you have reached
the last menu item displayed, the menus cycle back to the first menu item.
Figure 1 • Menus
To access the menus:
1. Press the Function key for the menu you want to access.
The menu choices for that particular function display.
2. Press the left/right navigation keys to access the main menu items.
As you navigate over a menu item, if a sub-menu is available, it immediately pops-up.
To access a sub-menu:
3. Press the up/down navigation keys.
An accessed menu displays as a depressed button with a darker shade of gray.
4. To activate the highlighted sub-menu, press Enter .
A menu option remains in effect until a different menu option is activated.
The various functions and menus are discussed in further detail in the Formatting section of
this manual, starting on page 41.
BMP®51 User’s Manual
Page 37

Dialog Boxes
Some function keys display dialog boxes, rather than sub-menus.
Note: You will know that a dialog box is associated with a menu if a sub-menu
does not immediately pop up when highlighting the main menu option.
To access the dialog box, with the desired main menu selected:
1. Press Enter .
A dialog box displays.
Dialog Boxes
Function Keys
25
Figure 2 • Dialog box
2. Press the up/down and left/right navigation keys to move to the different fields.
An activated field displays in a darker shade of gray.
BMP®51 User’s Manual
Page 38

Dialog Boxes
26
Drop Down Field Lists
Drop Down Field Lists
If a field has a drop down list associated with it, a small arrow displays on the right side of the
field. To select an option from the drop down list:
1. Press Enter to open the drop down list.
2. Use up/down navigation keys to highlight the desired option.
3. Press Enter to select the option.
BMP®51 User’s Manual
Figure 3 • Drop down fields
Page 39

Data Fields
In fields requiring user-supplied data:
1. Using navigation keys, navigate to the data field.
2. Enter data using the keyboard.
3. Use navigation keys to move off the field after entering data.
Dialog Boxes
Data Fields
27
Figure 4 • Data input fields
BMP®51 User’s Manual
Page 40

Dialog Boxes
28
Spinner Boxes
Spinner Boxes
A spinner box lets you toggle through a range of values in a field. To use a spinner box:
1. Navigate to the field containing the spinner box.
2. Press Enter .
3. Use the up/down navigation keys to toggle through the range of values.
4. When the desired value is reached, press Enter .
BMP®51 User’s Manual
Figure 5 • Spinner boxes
Note: Some fields containing spinner boxes allow you to type numbers directly in
the field. The presence of a cursor in the field indicates you can directly enter
numbers.
Page 41

Radio Buttons and Option Boxes
To check or uncheck a radio button or option box:
1. Navigate to the desired option.
2. Press Enter .
Dialog Boxes
Cancel a Menu or Dialog Box
29
Figure 6 • Radio buttons, Option boxes and OK button
Accept Dialog Box Edits
To accept all edits in a dialog box:
1. Navigate to at the bottom of the dialog box.
2. Press Enter .
Cancel a Menu or Dialog Box
To cancel a menu or dialog box, without accepting changes:
1. Press Backspace .
BMP®51 User’s Manual
Page 42
30
Setup
Pause/Cut
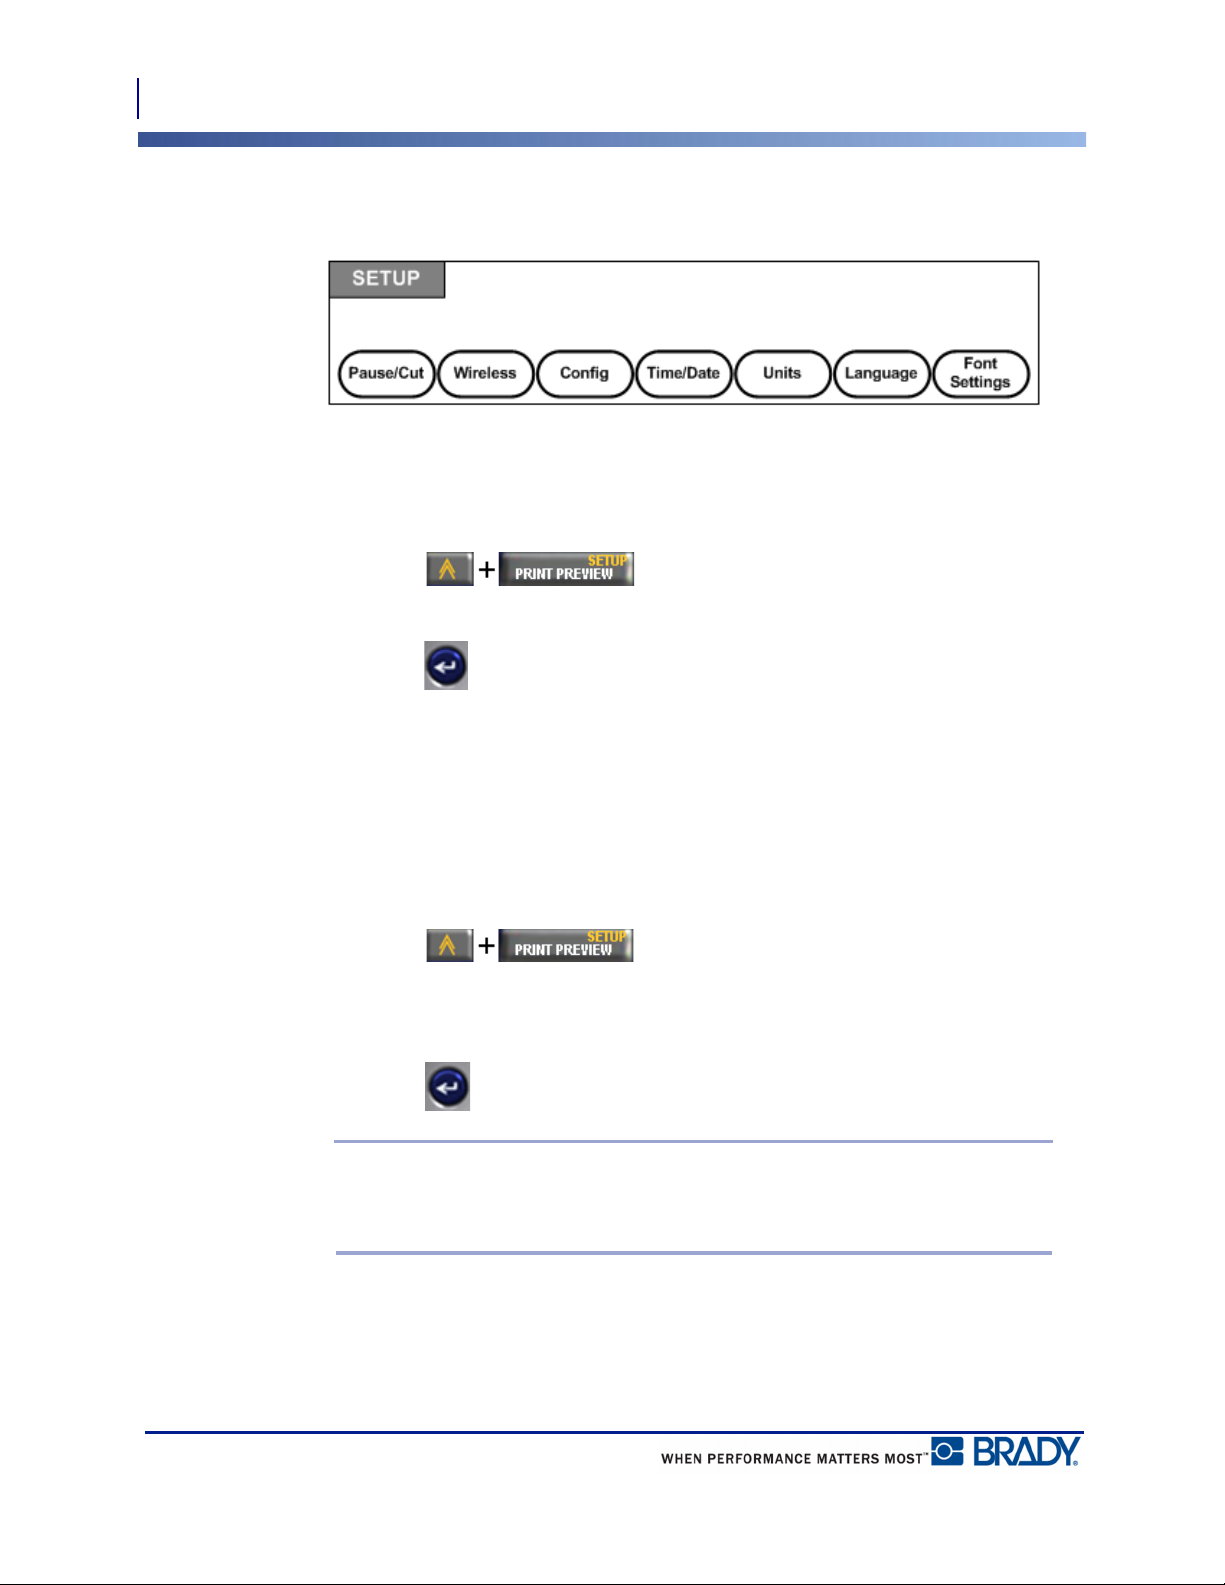
Setup
Figure 7 • Setup menu options
The Setup function key is used to determine the default settings for the printer. To change
Setup functions:
1. Press Setup .
2. Using navigation keys, choose the setup function to change.
3. Press Enter .
If a dialog box is associated with the specific Setup function, it displays upon pressing OK.
Pause/Cut
The Pause/Cut function allows you to remove a label from the printer before another label
starts printing. If this feature is turned on, when printing a string of labels, cutting a label
initiates the next label to print. To turn on the Pause/Cut function:
1. Press Setup .
The Pause/Cut menu, being first in the list of primary menus, is already selected.
2. Using navigation keys, choose Pause/Cut>On.
3. Press Enter .
Note: Your Pause/Cut preferences, whether to pause the printer for cutting after
each label or at the end of the job, must be set in the printer’s properties. Refer to
page 13 of this document for information on setting these preferences.
BMP®51 User’s Manual
Page 43
Wireless
A wireless connection can be used to download label files from a PC, Mobile Device, or Smart
Phone to the BMP®51 printer. The BMP®51 printer comes equipped with Bluetooth. A WiFi
card is sold separately. (Refer to the Brady Printer Drivers CD for information on installing
and using the wireless drivers and mobile software.) To turn on the wireless connection:
1. If using a WiFi card, insert the wireless card into the Brady Network Card port on the left
side of the printer.
2. Press Setup .
3. Using navigation keys, choose Wireless>On.
4. Press Enter .
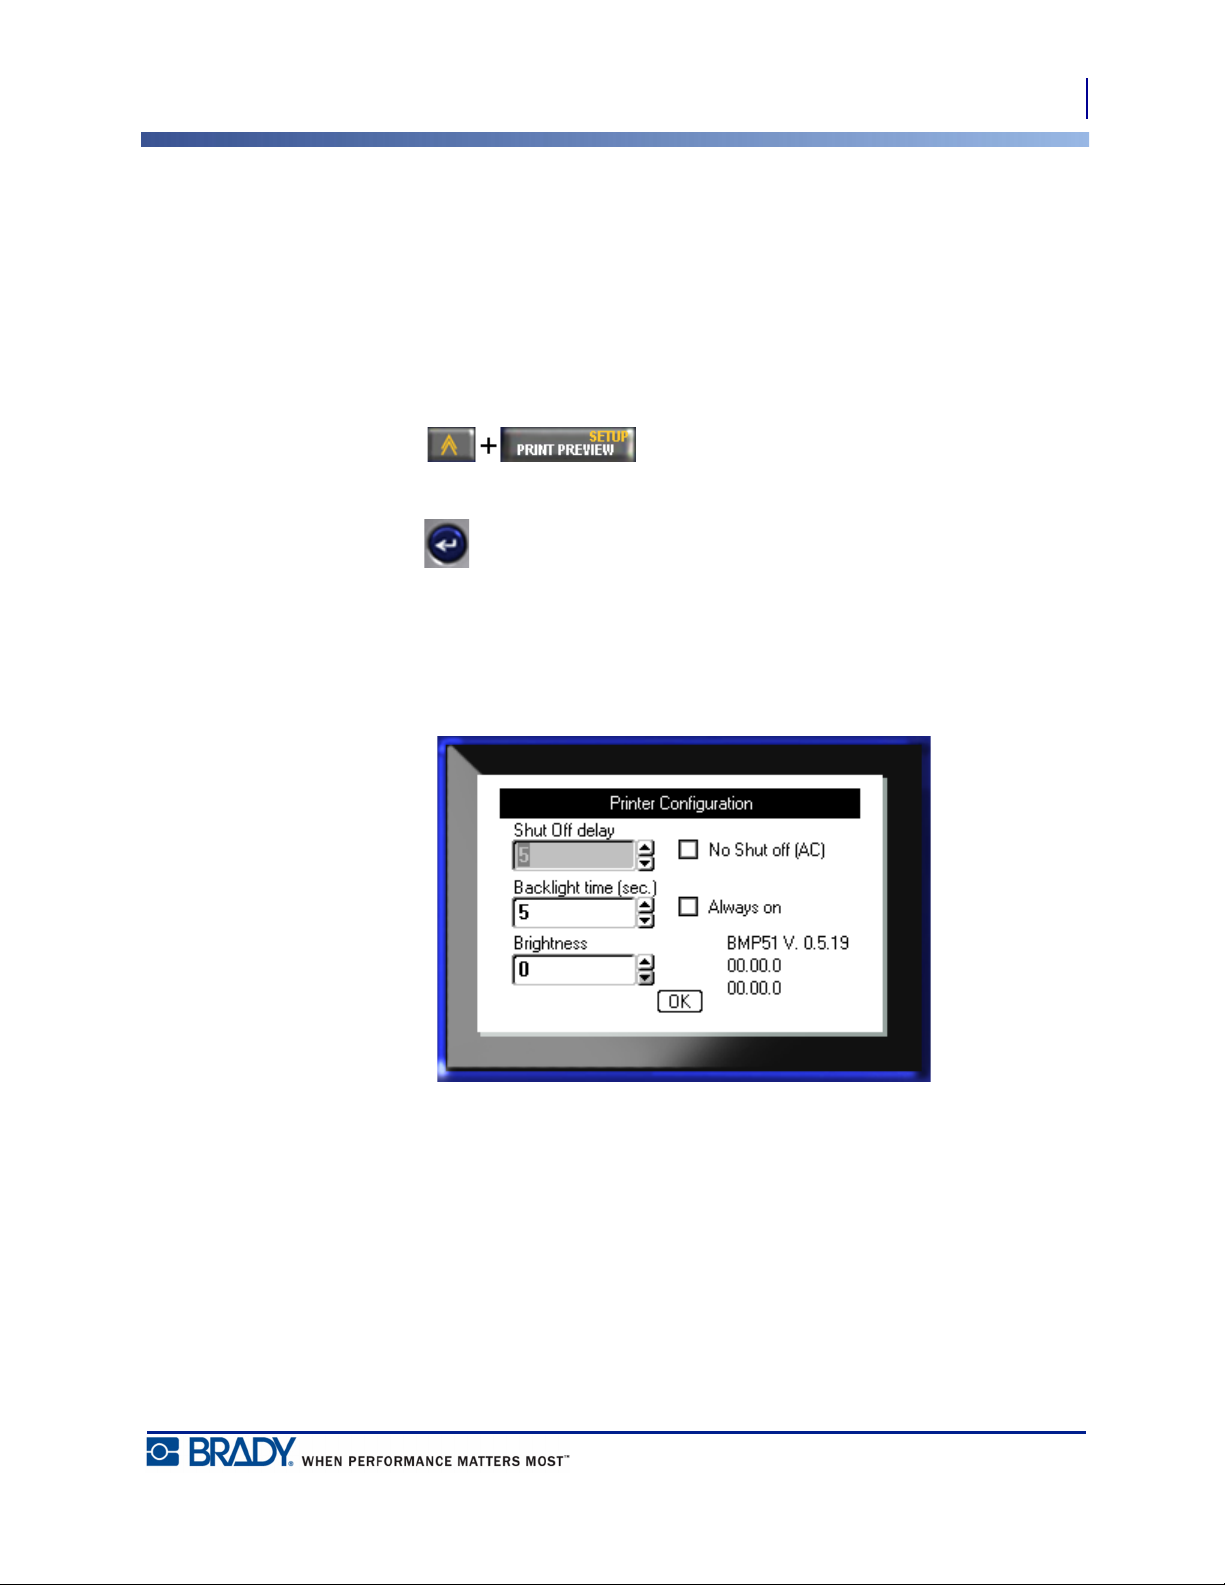
Config
Setup
Config
31
The following settings can be found under the Config menu in the Setup function.
Figure 8 • Printer configuration in Setup settings
The Shut Off Delay sets the auto-off time-out. This refers to the number of minutes of
inactivity after which the printer automatically shuts off.
When using the AC adapter, power is constant so there is no drain on the battery. In this case,
you can turn off the Shut Off Delay by choosing No Shut off (AC).
BMP®51 User’s Manual
Page 44

32
Setup
Units
The Backlight time (sec.) sets the backlight auto-off time-out. This refers to the number of
seconds of inactivity after which the backlight automatically shuts off.
If you prefer to keep the backlight on at all times while using the AC adapter, choose Always
on.
The Brightness setting increases or decreases the brightness of the display screen.
Time/Date
The following settings can be found under the Time/Date menu in the Setup function. Set the
Time/Date options upon initial start-up of the printer.
Units
The Units setting is used to configure label parameter measurements for the printer. The units
are:
• Inches
• Millimeters
Once configured, you do not have to indicate “inches” or “millimeters” (or their globally
accepted abbreviations or marks) when entering numbers in data fields. Likewise, in any scale
or range of measurement field (using spinner boxes or in a drop down list), the range of
measurements will automatically configure to the units selected in the Setup function.
BMP®51 User’s Manual
Figure 9 • Time/Date settings in Setup function
Page 45
Language
The following languages can be found under the Language menu in the Setup function.
Initial Language Setup
When turning the printer on for the first time, immediately go to the Setup function and choose
the language in which you want all printer menus, functions, and data displayed.
English Norwegian
French Finnish
Spanish Swedish
German Italian
Portuguese Danish
Dutch
Setup
Font Settings
33
1. Press Setup .
2. Using navigation keys, choose Language>desired language.
3. Press Enter to accept the choice.
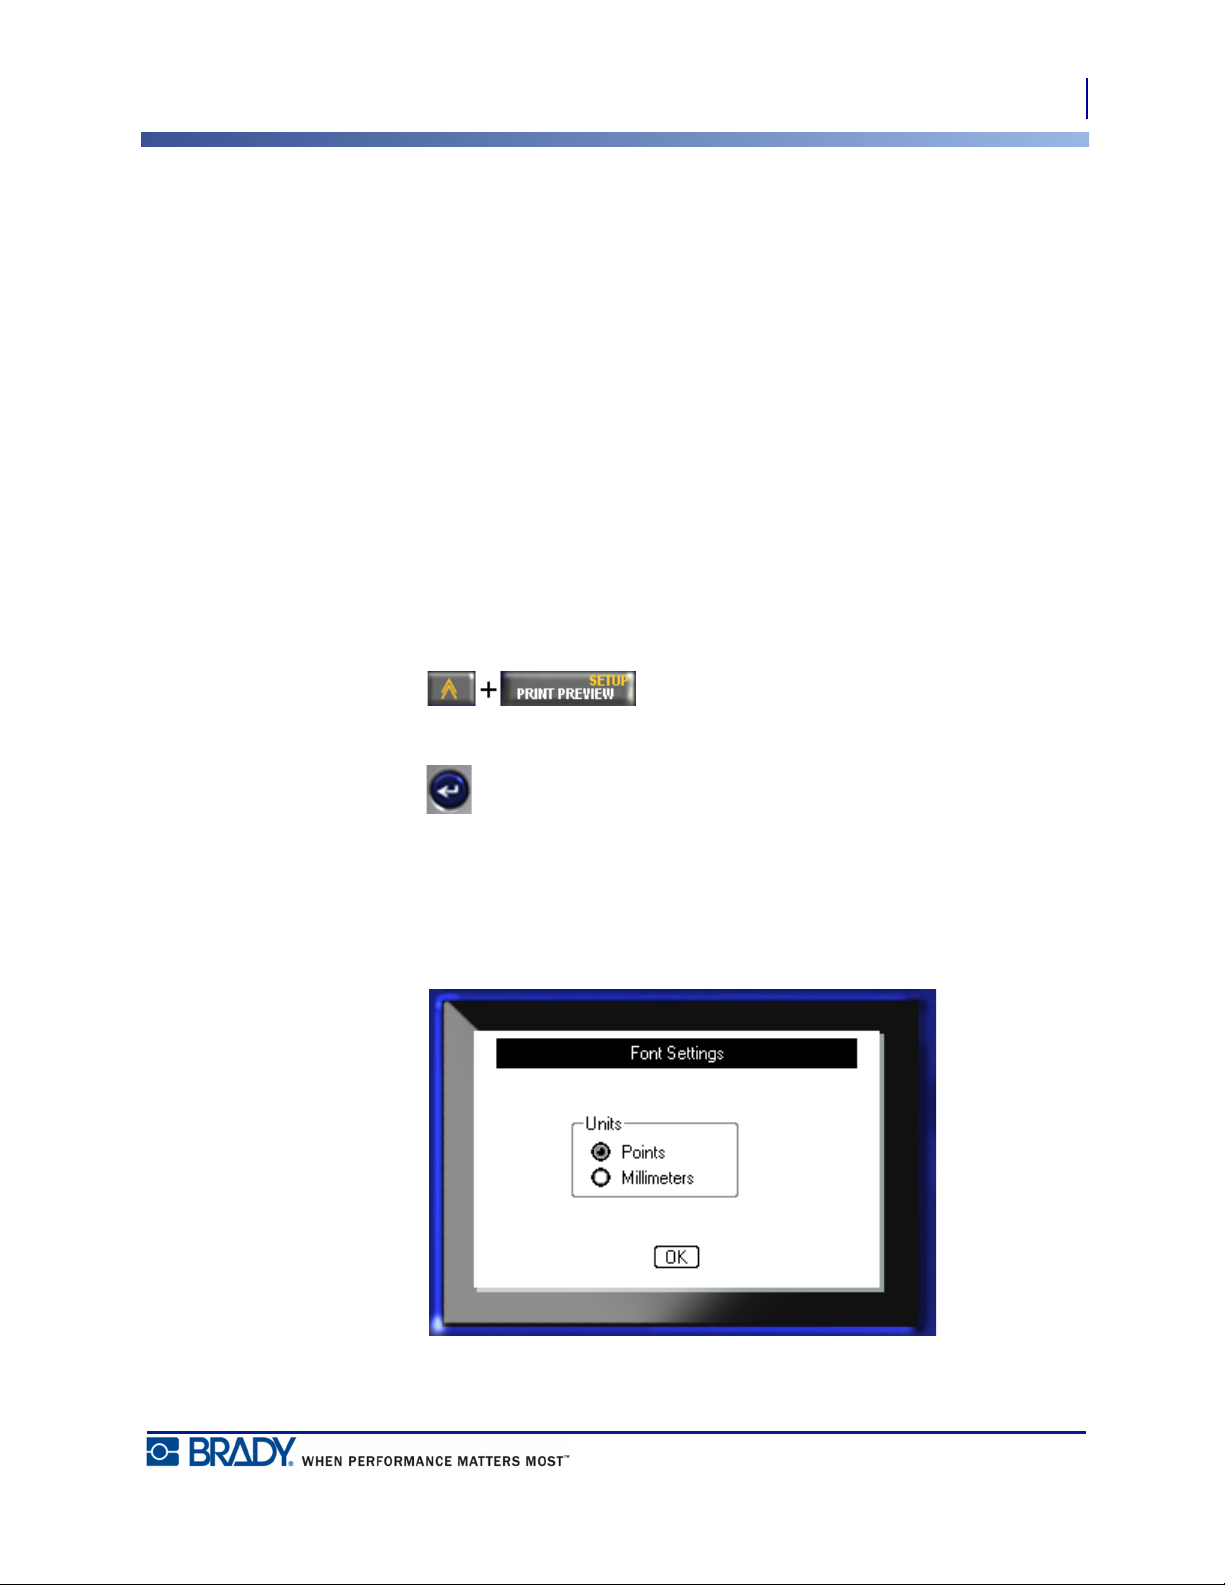
Font Settings
Use the Font Settings to indicate if you want the font size to be measured in points or
millimeters.
Figure 10 • Font settings in Setup function
BMP®51 User’s Manual
Page 46

This page intentionally left blank.
Page 47

Getting Started
This section describes the process of creating a text label with minimal formatting, using basic
editing techniques, and printing the label.
Entering Text
Before entering label text, be sure the media cartridge is loaded and the power is ON.
The vertical bar on the display screen is the cursor and is the starting point for every label you
create using the BMP
moves across the screen as you enter data. If you want another line of text, press [ENTER]
.
Editing Text
If you have entered some text in error or want to change the content or format of your label,
edit the information before printing.
Getting Started
Editing Text
®
51 printer. Begin entering text at the position of the cursor. The cursor
35
Inserting Text
To insert additional text within a line of text:
1. Using navigation keys, position the cursor at the point where text should be inserted.
2. Enter the text.
Existing data positioned to the right of the cursor moves progressively to the right to make
room for the inserted text. If a fixed font size is selected, when the end of the line is reached,
no more data can be inserted. To add more data, press [ENTER] to start another line or
decrease the size of the font.
BMP®51 User’s Manual
Page 48

Getting Started
36
Editing Text
Deleting Text
To remove characters, one at a time, from the position of the cursor TO THE LEFT
(backwards):
1. Press Backspace .
Clear
[CLEAR] is used to clear data from the screen or cancel a function.
Clear Data
To Clear data:
1. Press Clear .
You are presented with two options:
• Clear Text
• Clear All
Clear Text removes all data on the label, but leaves the formatting in place (e.g., font size,
number of areas, etc.)
Clear All removes all data and formatting from the label.
2. Choose the desired option.
3. Press Enter .
BMP®51 User’s Manual
Page 49

If using Clear All, a message displays asking confirmation.
4. Press Enter to confirm the deletion.
Getting Started
Editing Text
37
If you do not want to delete the labels:
5. Press Backspace to cancel the Clear All function.
You are returned to the screen with all labels and data intact.
Cancel Functions
Backspace is also used to cancel functions, a menu, or dialog box. When
pressing Backspace in the middle of a function, you are walked out of the function a
screen at a time. You may have to press Backspace several times to completely exit the
function.
Error Messages
If a function does not operate under current conditions, an error or information message
displays indicating the problem and/or offers situational advice. Read the message carefully
and follow the instructions.
Default Settings
Default settings are determined by the printer for the installed media. When the label supply
and/or application label type is reloaded, it will return to these settings.
BMP®51 User’s Manual
Page 50

Getting Started
38
Editing Text
Font Size
Font size is applied on a line-by-line basis. If the size is changed before the data is entered, all
the data in the current and subsequent lines, takes on the new font size until font size is
changed again.
Changing the font size on pre-entered data changes the size on the entire line, regardless of
where the cursor is in the line. However, the font size will not change on subsequent lines of
pre-entered data. You must change the font size on each individual line of pre-entered data.
Autosize
Autosize starts with the largest font size that fits on the label. When a line of text reaches the
edge of a label it scales downward until you press [ENTER] or the minimum font size is
reached. When working with autosize and multiple lines of text, all lines on a label maintain
the same size.
By default, autosize is turned on for all labels and is displayed as an ‘A’ in the upper left corner
of the Status Bar.
BMP®51 User’s Manual
Figure 11 • Text entered with Autosize turned on
Page 51

To turn autosize on (if not already on):
1. Press Font .
2. Choose Size>Auto.
3. Press Enter .
Autosize remains on for the entire area or label, until a different font size is selected. However,
after being turned off, any previous text entered using autosize retains the size generated by
autosize.
Printing a Label
To print a label:
1. Press Print .
After printing, to cut the label:
Getting Started
Printing a Label
39
2. Push the cutter lever down as far as it will
go.
The label exit chute contains rubber grips that
hold the label in place after cutting so it will
not fall off.
3. Gently pull the label away from the label exit chute.
®
Printing from the BMP
51 printer occurs in the background, meaning you can continue to edit
or create new labels while a label is printing.
BMP®51 User’s Manual
Page 52

This page intentionally left blank.
Page 53
Formatting
Formatting refers to the layout, structure, and appearance of a label. Different formatting
features can be found under the Font, Label and Area functions.
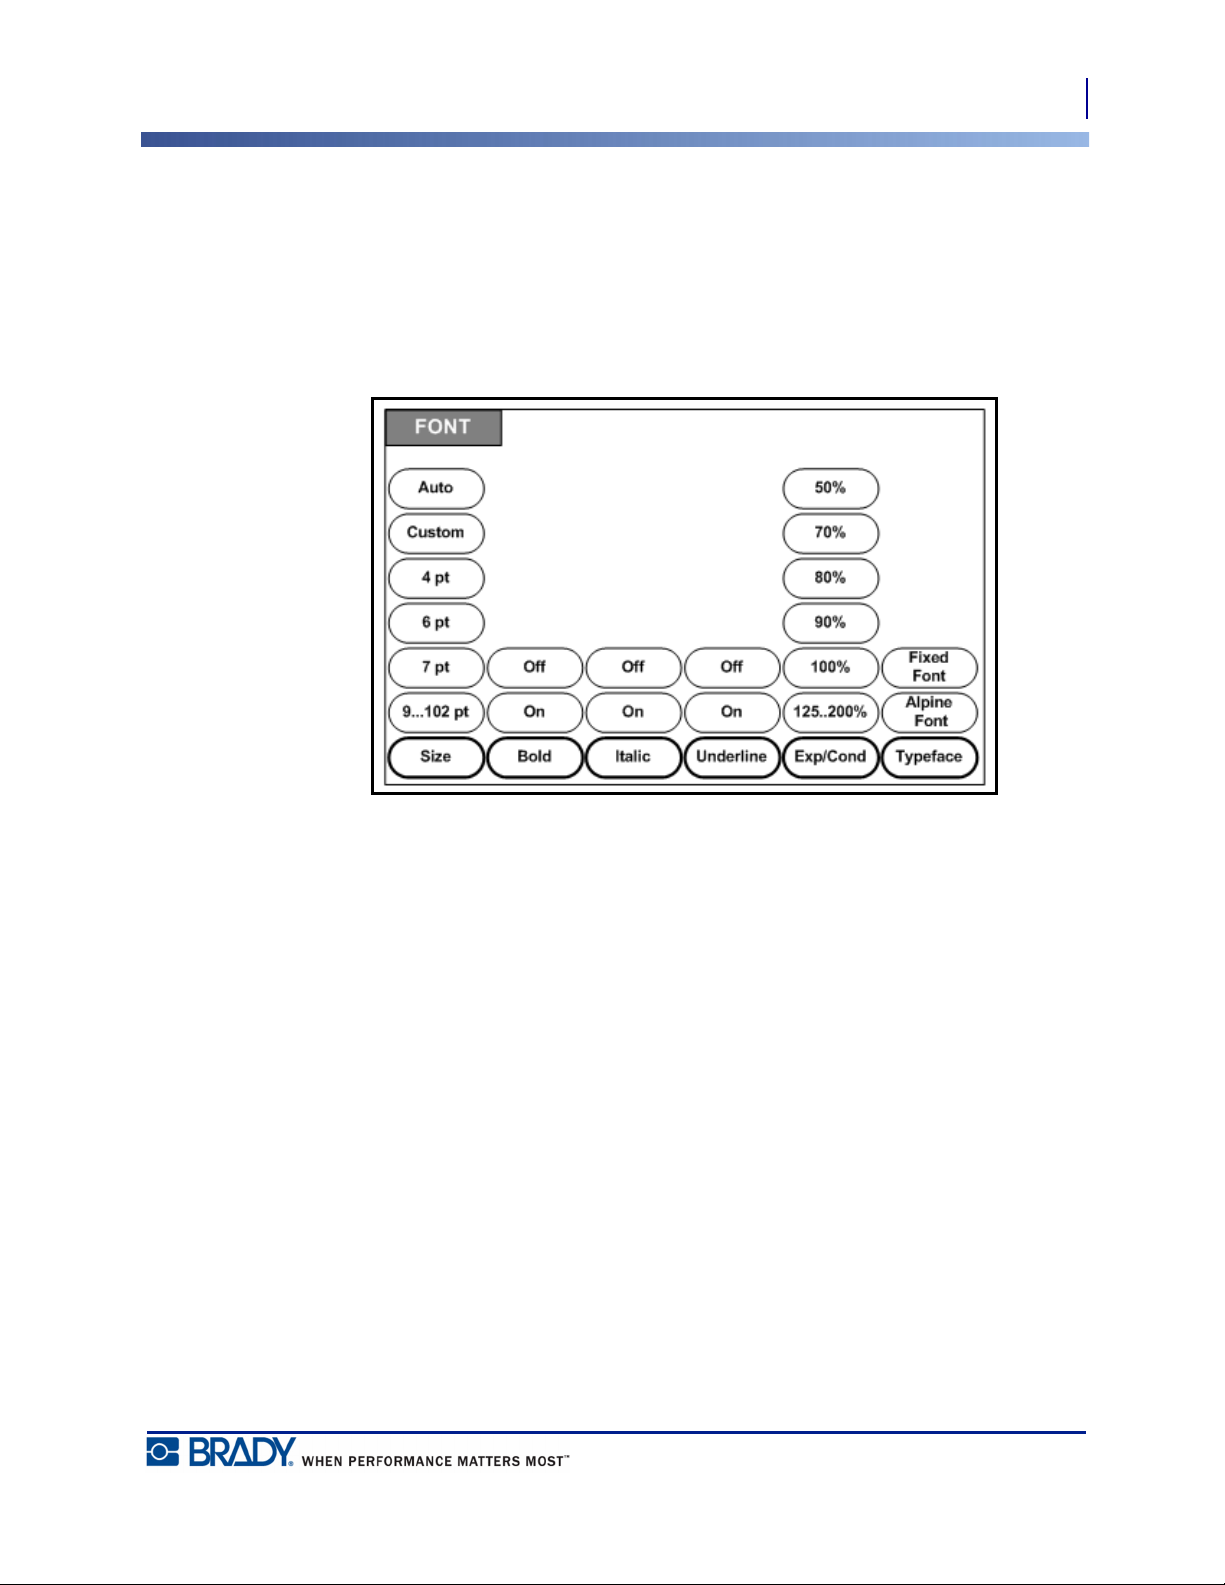
Font
Formatting
Font
41
Figure 12 • Font menu options
Character/line formats are called attributes that change the appearance of the fonts, such as
size, weight (bold), and angle (italics).
BMP®51 User’s Manual
Page 54

42
Formatting
Font
Size
Font size applies to an entire line of data at a time and is measured in point size or millimeters,
as determined in the Setup function. To change the size of the chosen font:
1. Press Font .
A sub-menu displays the available font sizes for the media installed.
2. Choose Size>font size desired.
3. Press Enter .
Custom Size
If the desired size is not displayed, you can manually enter a font size within the valid size
range. This option is available under “Custom” of the Size menu.
To manually enter a font size:
1. Choose Custom and enter the font size.
2. Press Enter .
When entering a custom font size, a minimum/maximum range is presented to accommodate
the label size loaded in the printer. The minimum size reflects readability and the maximum
size accommodates proper fit on a label. If you enter a size smaller than the minimum or larger
than the maximum, an error message displays indicating the entered size exceeds lower or
upper limits.
BMP®51 User’s Manual
Page 55

Formatting
Shortcut
You can increase or decrease the size of the font, one point at a time using the navigation keys:
1. Hold the [Shift] key and press the Up/Down navigation keys enough times to reach the
desired font size.
Font Attributes
Font attributes (bold, italics, underline) can be applied to individual characters in a line of text.
To turn an attribute on:
1. Position the cursor where the attribute should take affect.
2. Press Font .
3. Choose the desired attribute, then choose ON.
4. Press Enter .
Font
43
5. Enter the text to be affected by the attribute.
The attribute stays on until it is turned off, or until you move to a new area.
To turn the attribute off:
1. Press Font .
2. Choose the attribute, then choose OFF.
3. Press Enter .
BMP®51 User’s Manual
Page 56

44
Formatting
Font
Pre-Existing Data
To apply an attribute to previously entered text:
1. Hold Shift while pressing the left/right navigation keys to move the cursor across
the characters on which the attribute will take affect.
This highlights the data.
Note: Highlighting works on a line-by-line basis. You cannot highlight more than
one line at a time.
2. Press Font .
3. Choose the attribute, then choose ON.
4. Press Enter .
All highlighted text displays the attribute.
Note: To remove the highlighting from the characters, press any navigation key.
To remove an attribute that was previously applied to some text:
1. Hold Shift while pressing the left/right navigation keys to move the cursor across
the characters from which the attribute will be removed.
2. Press Font .
3. Choose the attribute, then choose OFF.
4. Press Enter .
The attribute is removed from the text.
BMP®51 User’s Manual
Page 57

Formatting
Expand/Condense
Expanding and condensing data affects character width and the spacing between characters in
a word. Data can be expanded or condensed according to predefined percentages.
Figure 13 • Expanded and condensed text
To Expand or Condense data, as it is entered:
Font
45
1. Position the cursor where Expand or Condense should take affect.
2. Press Font .
3. Choose Exp/Cond>percentage desired.
4. Press Enter .
While entering data, the expand or condense attribute stays on until it is returned to 100%, or
until you move to a new area.
To expand or condense pre-existing data:
1. Hold Shift while moving the cursor across the characters that are to be expanded
or condensed.
This highlights the data.
2. Press Font .
3. Choose Exp/Cond>percentage desired.
4. Press Enter .
All highlighted text takes on the attribute.
BMP®51 User’s Manual
Page 58
Formatting
46
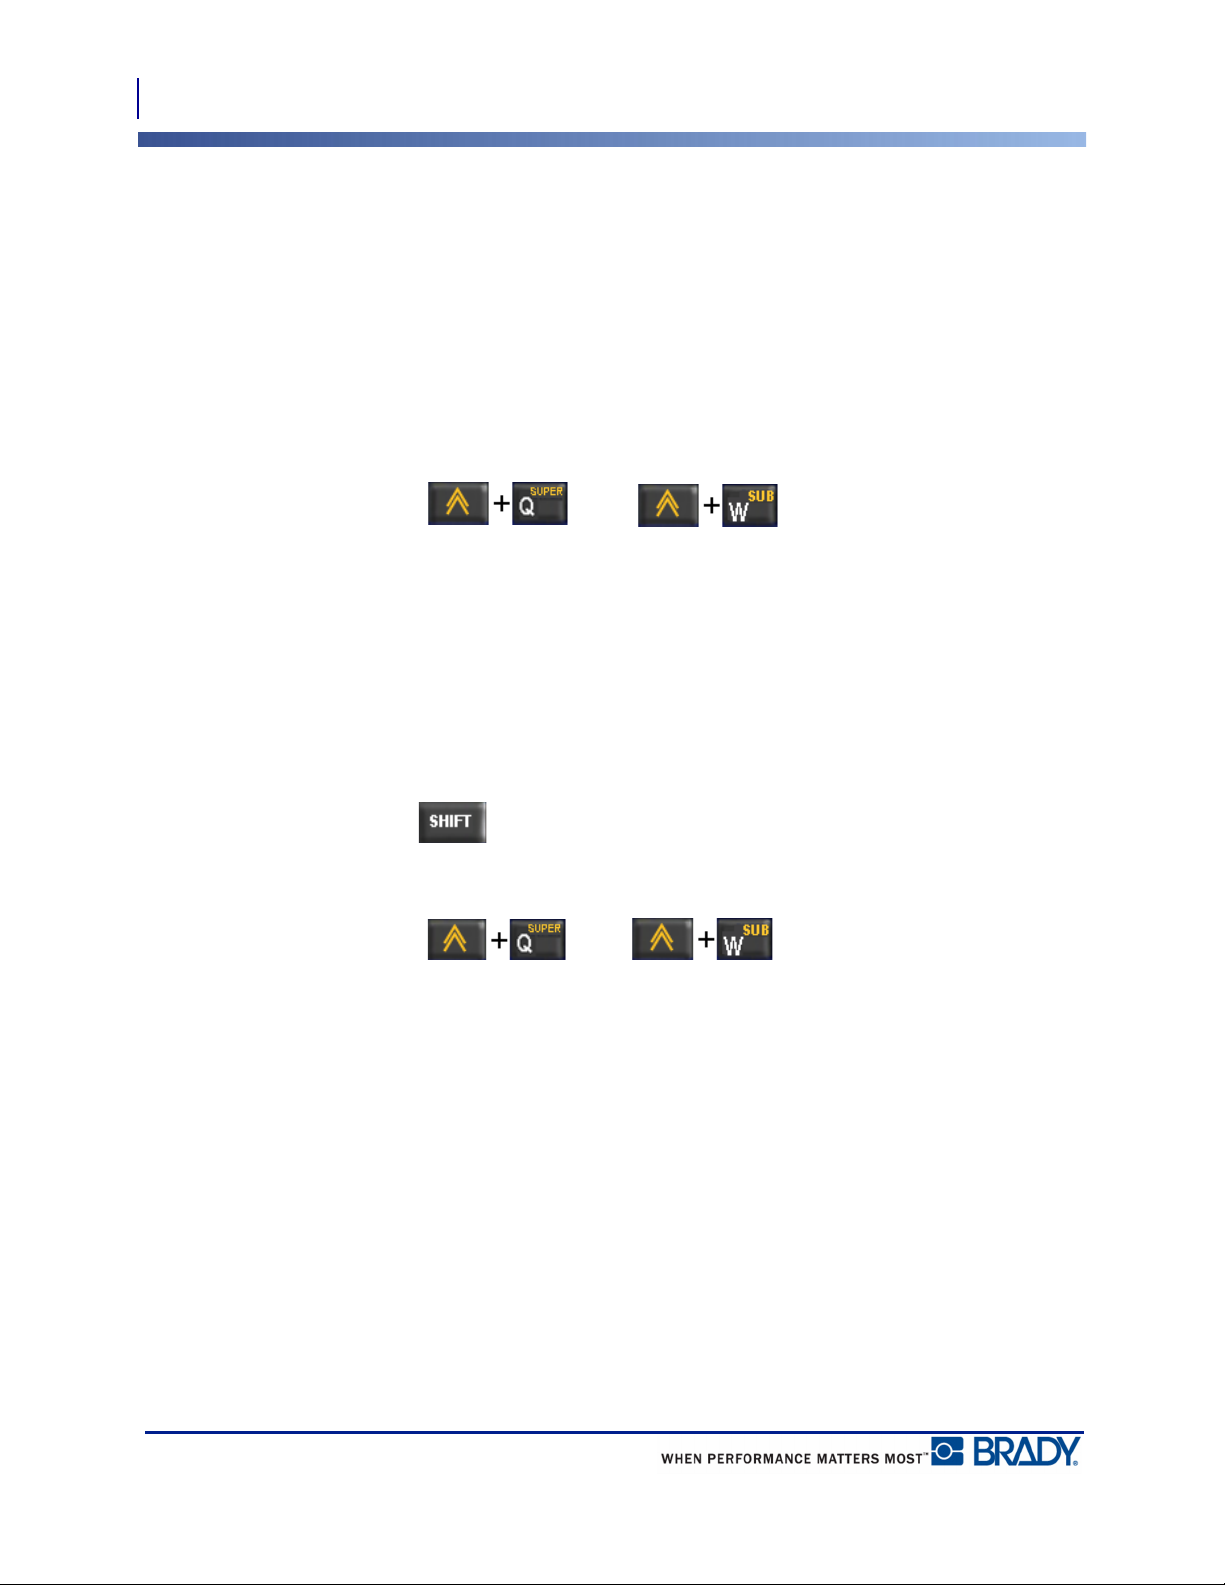
Superscript/Subscript
Superscript/Subscript
Superscript places a character slightly above the line of type and subscript places a character
slightly below. The super- or subscript character also displays slightly smaller than the normal
line of type. Superscript and subscript functions are on the numeric keypad. Pressing either the
superscript or subscript key applies that format to the next character typed. It immediately
turns off after the character is entered and you are returned to the normal line of type.
To apply Superscript or Subscript:
1. Position the cursor in the line of text where the superscript or subscript character will
display.
2. Press Super or Sub .
3. Type the character to be displayed in superscript or subscript.
Only the character typed directly after pressing the superscript or subscript key is displayed in
super- or subscript.
Multi-Characters
To place a number of characters in Super- or Subscript:
1. Enter the text that should display in super- or subscript.
2. Hold Shift while moving the cursor across the characters that will display in
super- or subscript.
This highlights the characters.
3. Press Super or Sub .
All the highlighted characters display in super- or subscript.
4. To remove the highlighting, press any navigation key.
BMP®51 User’s Manual
Page 59
Symbols
Formatting
Symbols
47
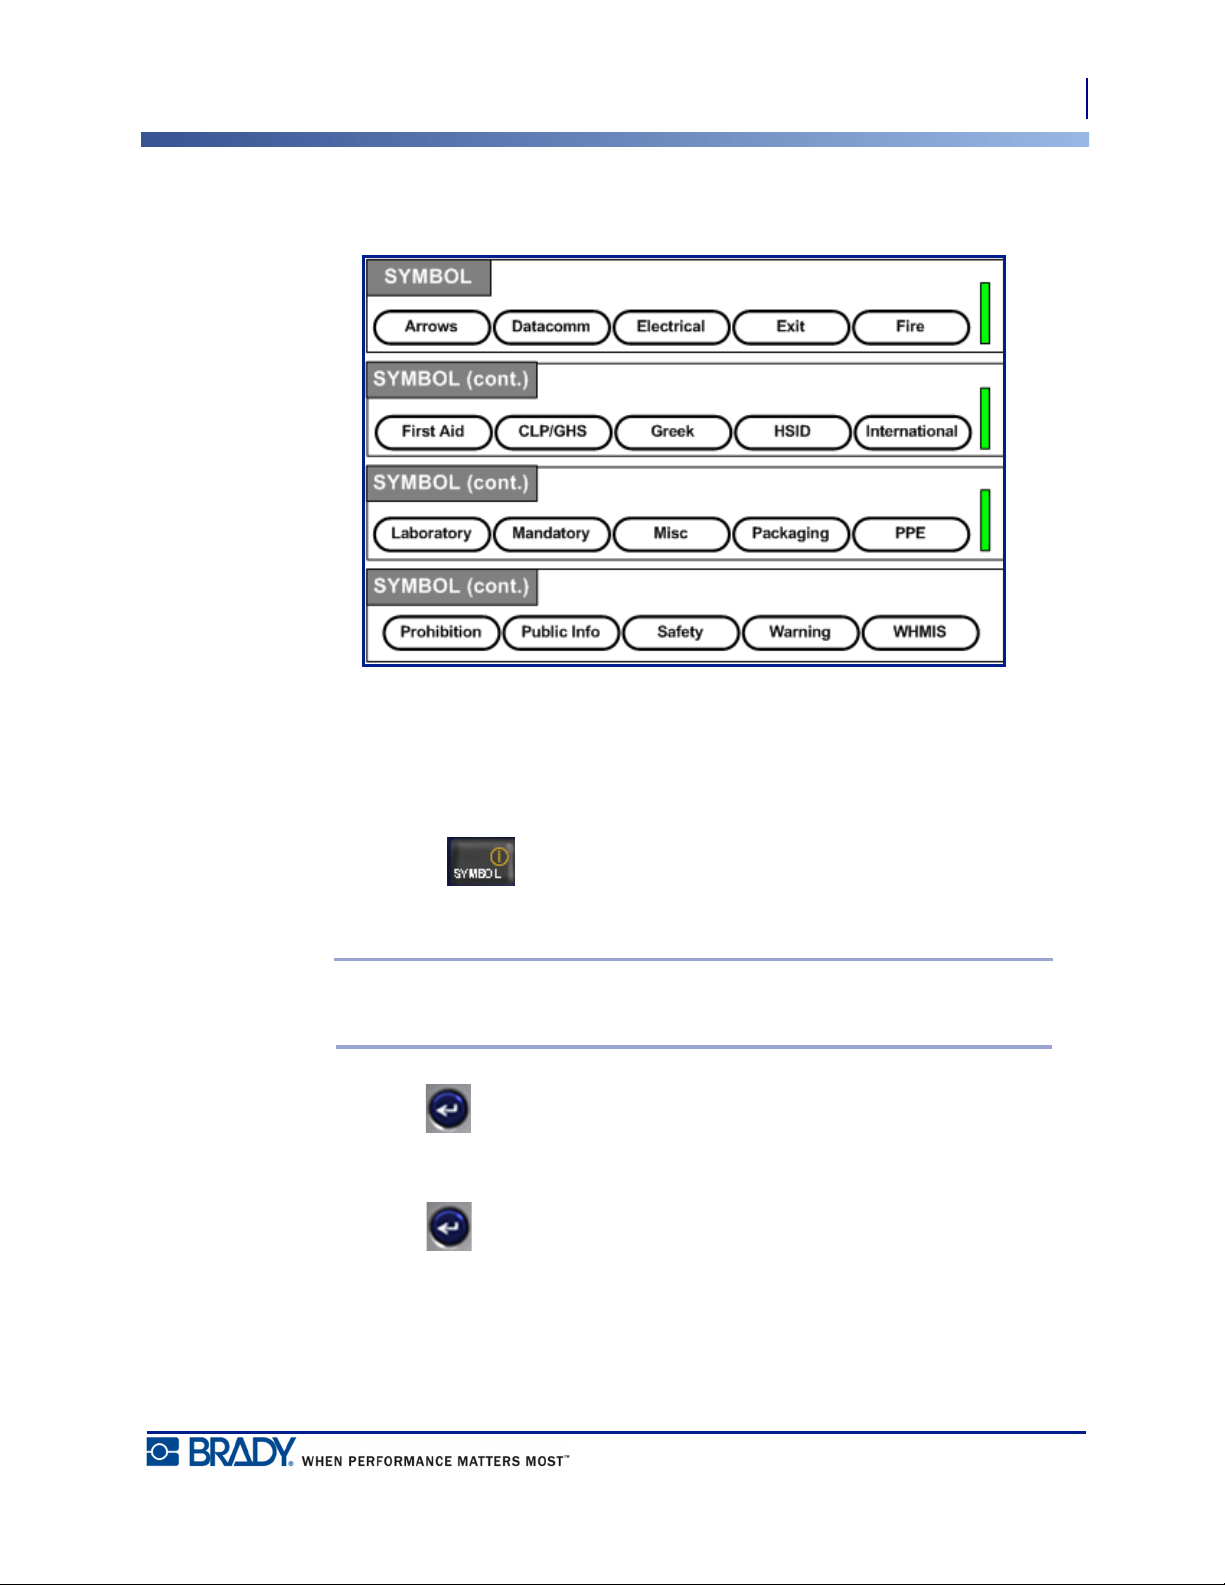
Figure 14 • Symbol categories
®
The BMP
51 printer contains hundreds of symbols (graphics) that can be used for a variety of
applications. To add a symbol to the label:
1. Position the cursor at the point where you want the symbol to display.
2. Press Symbol .
3. Navigate to the desired symbol category.
Note: When adding symbols, the printer will always return to the last symbol
category used.
4. Press Enter to pick the symbol category.
5. Using navigation keys, select the desired symbol.
6. Press Enter .
BMP®51 User’s Manual
Page 60
48
Formatting
Symbols
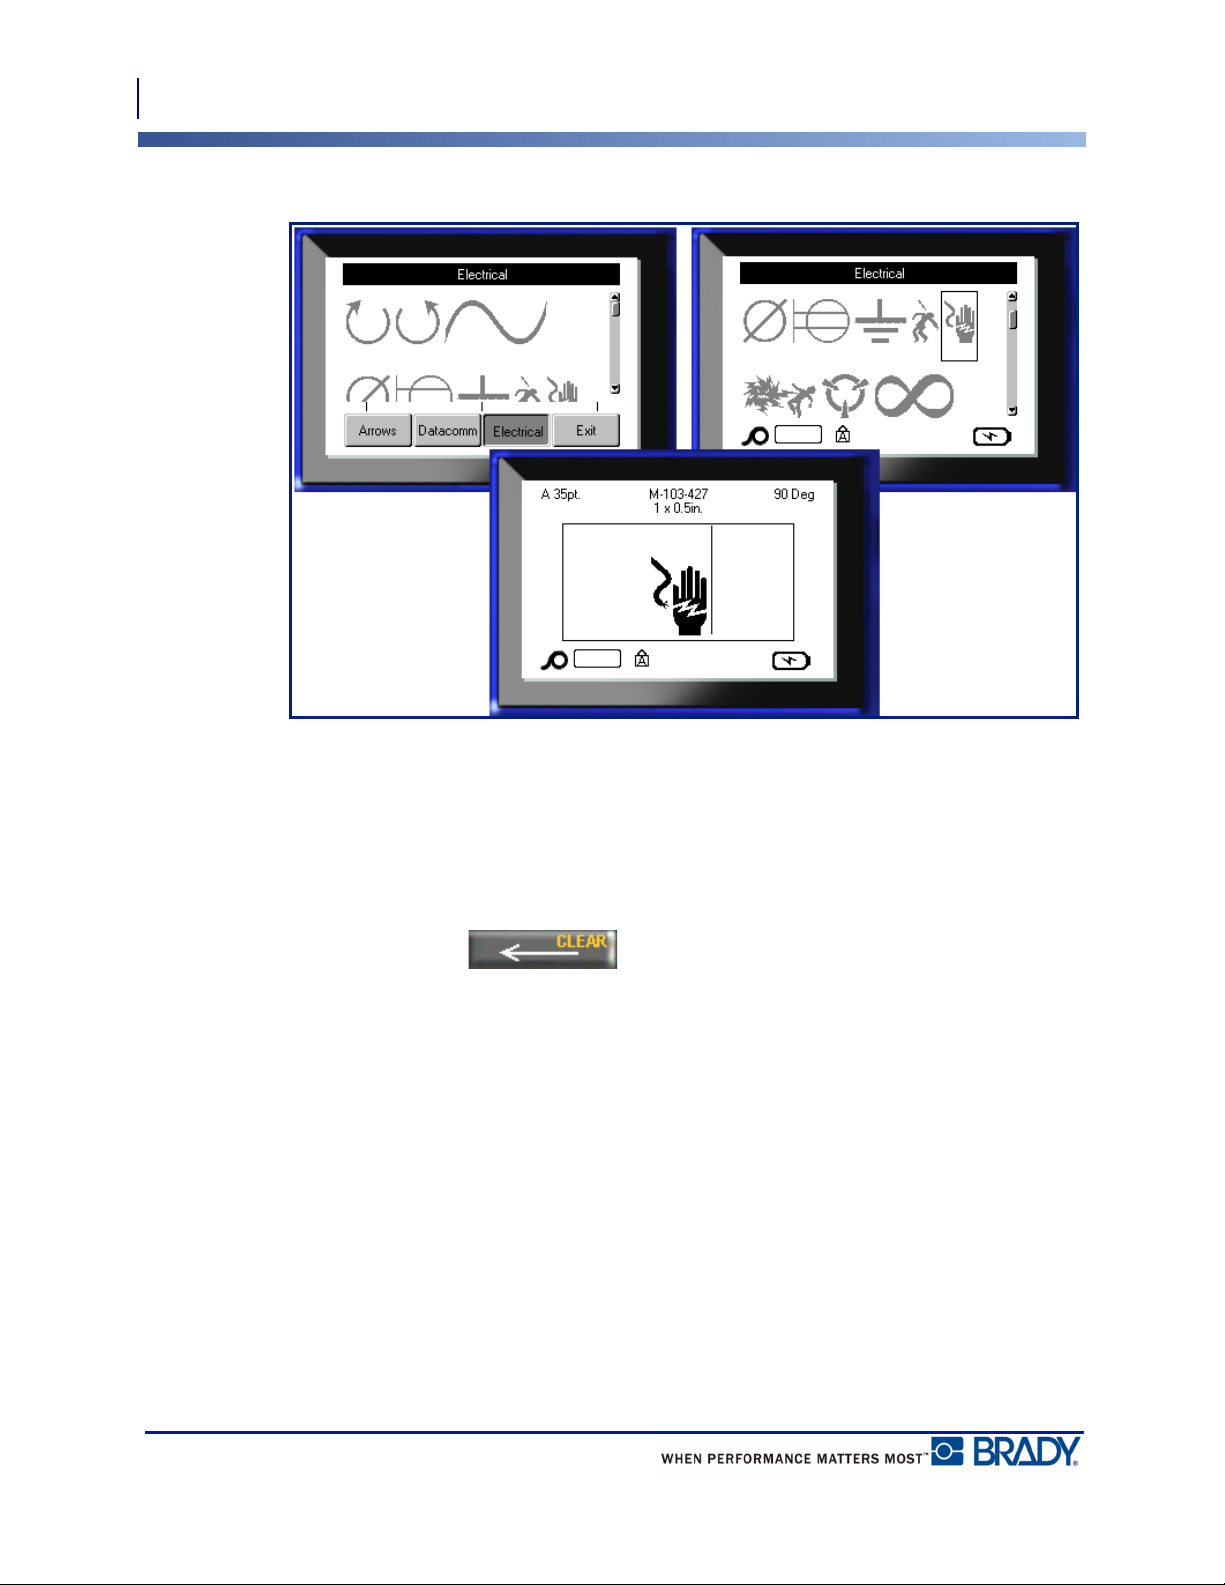
The symbol displays with the same font size that is currently in use.
Figure 15 • Selecting a symbol
Remove a Symbol
The symbol is the same as any other character. To remove a symbol:
1. Position the cursor to the right of the symbol.
2. Press Backspace .
BMP®51 User’s Manual
Page 61

Date and Time
To have the current date and/or time inserted on each label:
1. Position the cursor at the point on the label where you want the date and/or time to be
inserted.
2. To insert the date, press Insert Date .
3. To insert the time, press Insert Time .
The BMP51 printer inserts the current Date or Time data using the current system clock value
at the time of printing and the date/time format defined in the Setup function. (For more
information, see “Time/Date”settings on page 32.)
Formatting
Date and Time
49
BMP®51 User’s Manual
Page 62
Labels and Areas
50
Date and Time
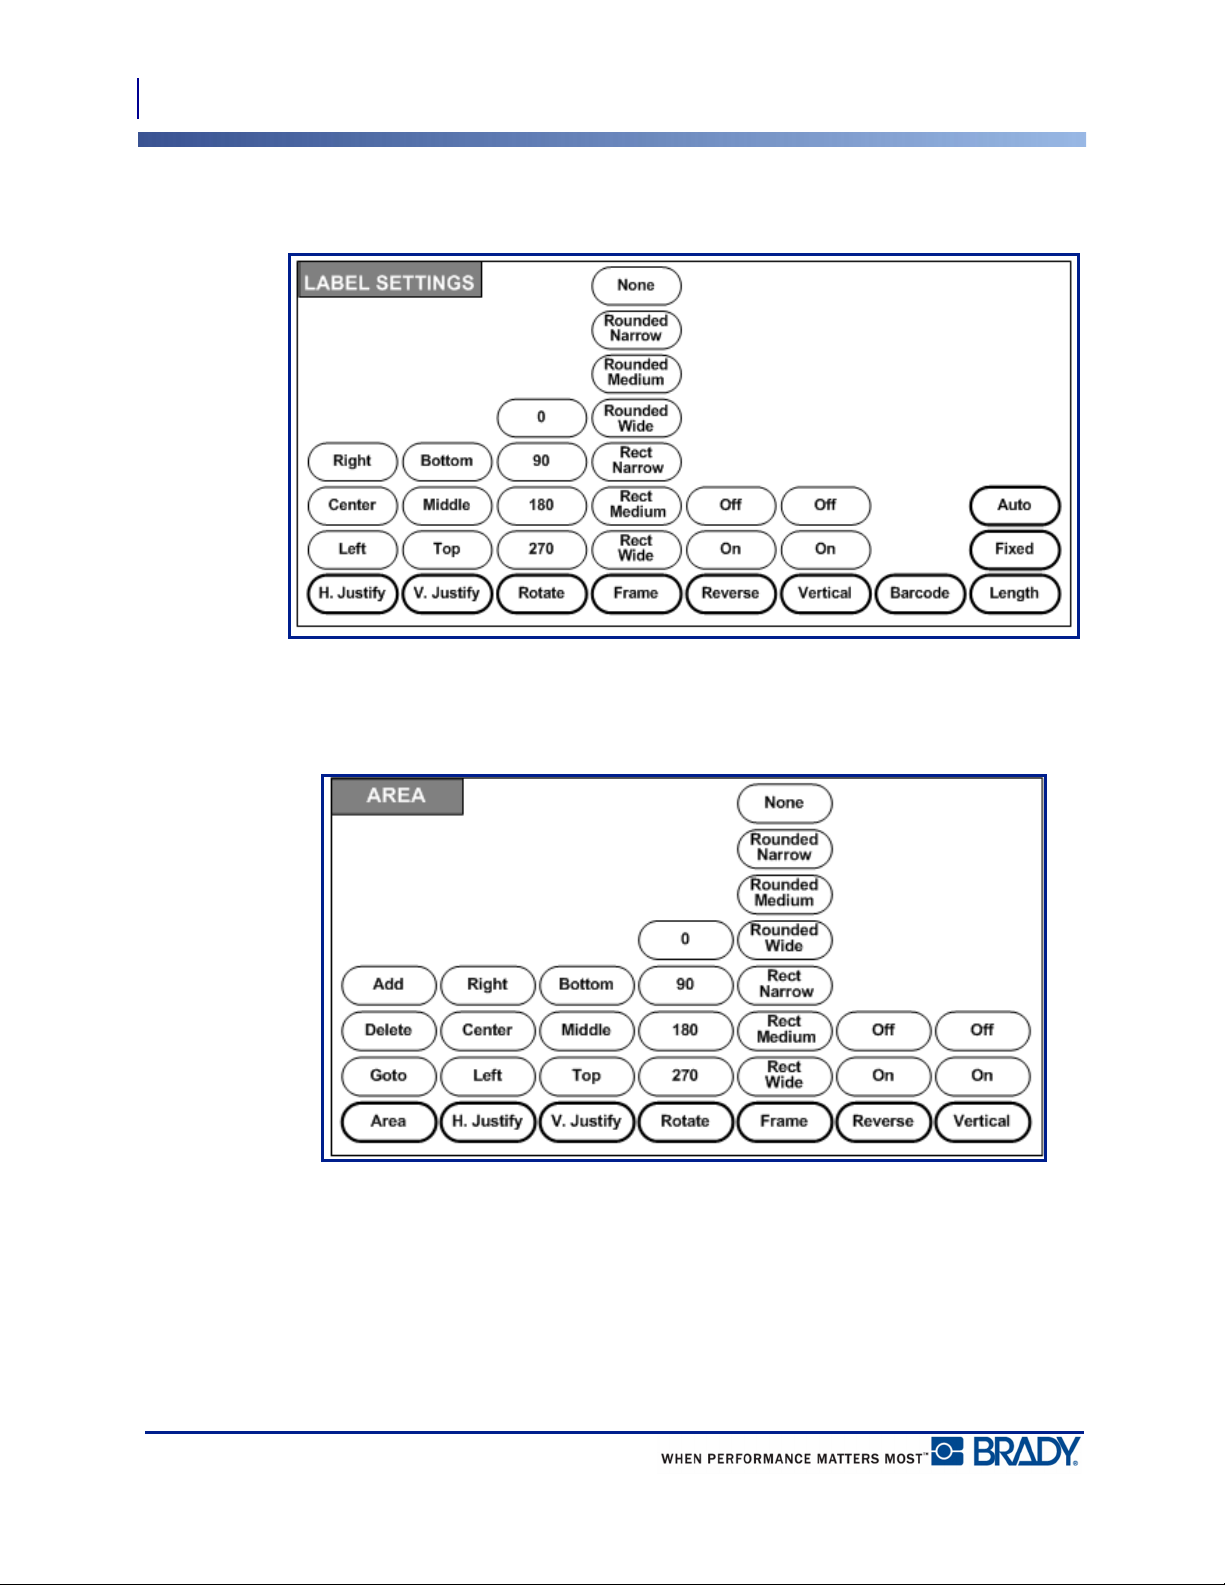
Labels and Areas
Figure 16 • Label Settings menu options
Label settings, with few exceptions, apply to the entire label, not individual data.
Figure 17 • Area menu options
Areas are used to apply different formatting (such as justification, rotation, and frames) to
different parts of a single label. Areas can only be added to continuous media set to auto length
mode. However, area formatting can be applied to die cut labels that have pre-defined areas.
Only the current area displays on the editing screen. Use Print Preview (see page 82) to view
the label with all its areas.
BMP®51 User’s Manual
Page 63
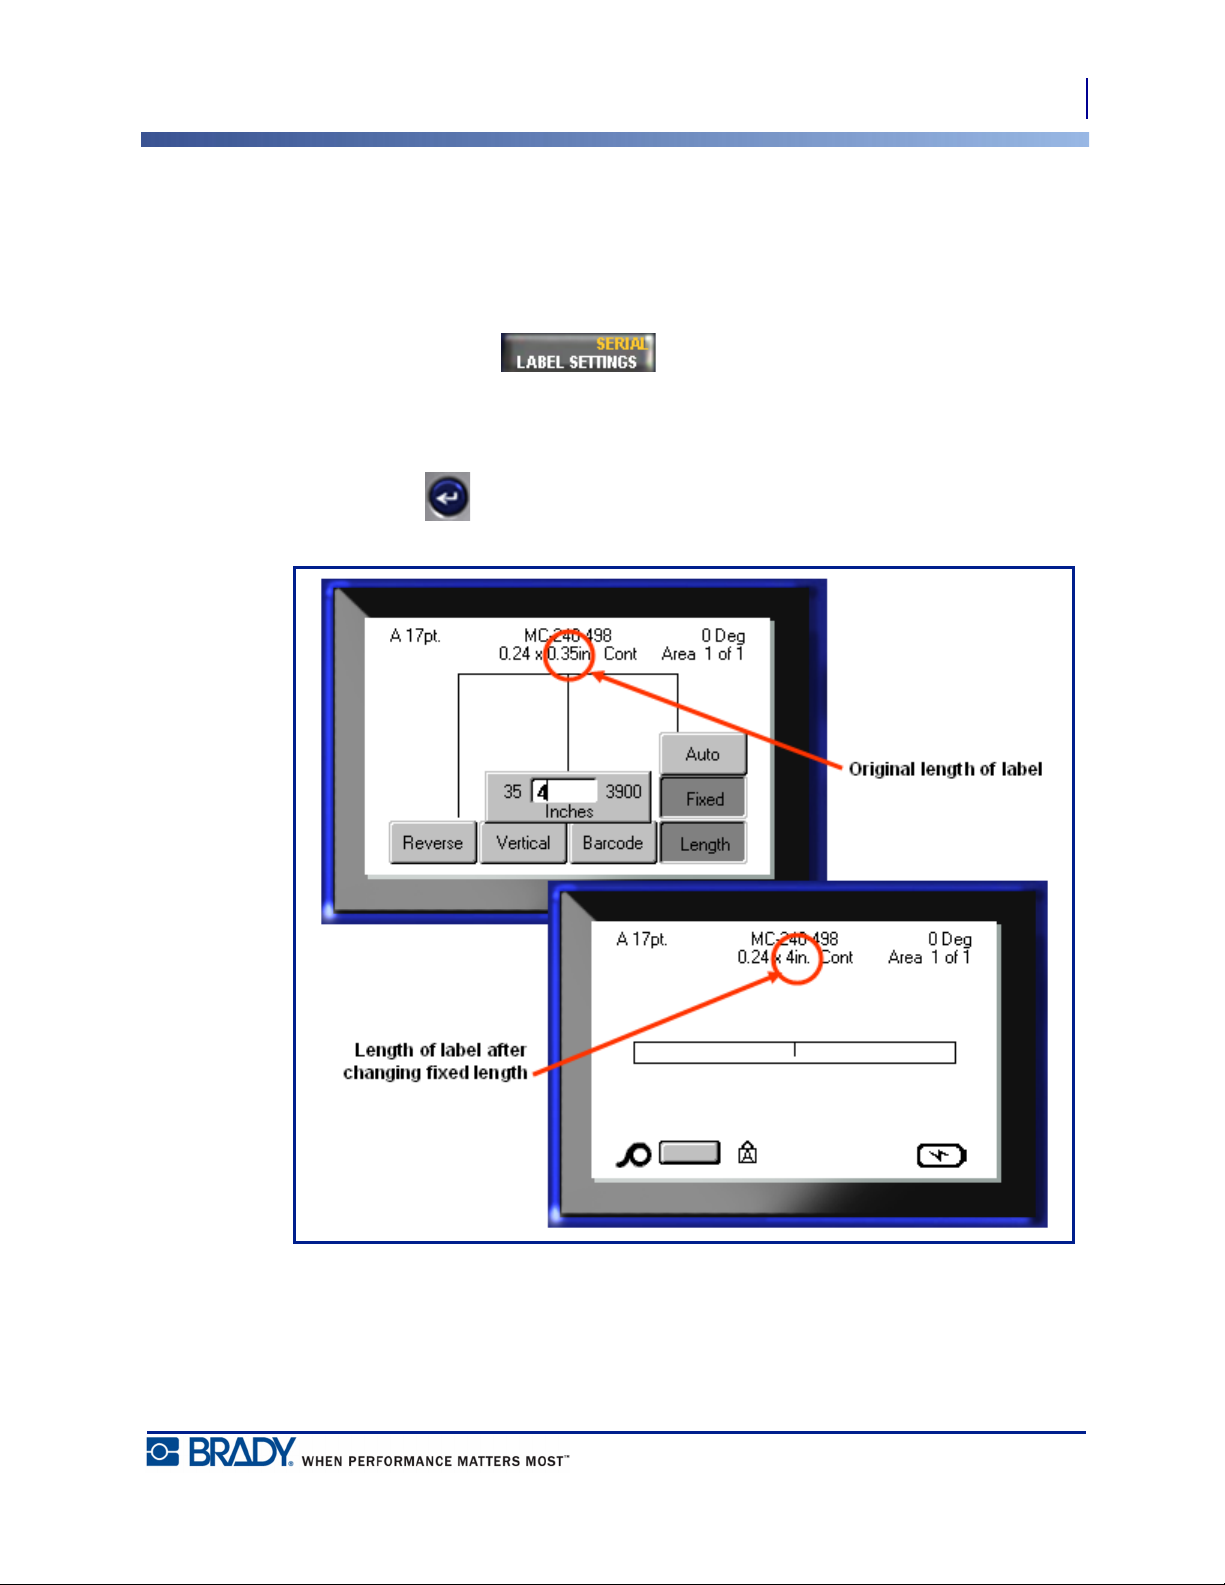
Fixed Length
If using continuous media, the label length will be as long as necessary to accommodate the
font size and attributes applied to the label. However, you can set the length of the media to a
fixed length. To set a fixed length for continuous media:
1. Press Label Settings .
2. Navigate to Length>Fixed.
3. Enter the desired fixed length in the pop-up field.
4. Press Enter .
Labels and Areas
Fixed Length
51
Figure 18 • Adding a fixed length
BMP®51 User’s Manual
Page 64

Labels and Areas
52
Go To An Area
Add Areas
To add an area to a label:
1. Press Area .
2. Choose Add.
3. Press Enter .
A new area is added at the end of existing areas and is reflected on the upper right side of the
display screen. The font size used on the first line of the previous area carries over to the new
area.
Go To An Area
To move to another area on a multi-area label:
1. Press Area .
2. Choose GoTo, then enter the number of the label or area to go to.
3. Press Enter .
Shortcut
To go to the next area on a multi-area label:
1. Press Next Area .
To go to the previous area on a multi-area label:
2. Press Previous Area .
BMP®51 User’s Manual
Page 65

Delete Area
To delete an area:
1. Navigate to the area you want to delete.
2. Press Area .
3. Choose Delete.
A delete confirmation message displays.
Labels and Areas
Delete Area
53
To delete the area:
4. Press Enter .
To cancel the delete function, thereby not removing the specific area from the label:
5. Press Backspace .
BMP®51 User’s Manual
Page 66

Labels and Areas
54
Justification
Justification
Justification refers to the alignment of data between boundaries on a label or in an area. There
are two types of justification: horizontal and vertical. Horizontal justification (H. Justify)
aligns data between the left and right boundaries of a label or area, while Vertical justification
(V. Justify) aligns data between the top and bottom boundaries of a label or area. Justification
is applied to an area or a label. It cannot be applied line-by-line.
To apply justification:
1. Navigate to the label or area where justification is to be applied.
2. To apply justification to a label, press Label Settings .
OR
To apply justification to an area, press Area .
3. Choose H. Justify or V. J u s t i f y.
4. Choose the horizontal or vertical justification desired.
5. Press Enter .
Every line of data on the label or in an area is justified according to the option selected.
Different justification can be applied to different areas on one label.
BMP®51 User’s Manual
Page 67

Rotate
Rotation flips the data on a label, counter-clockwise, at 90° increments. Rotation affects all
data on a label.
Data cannot be rotated on a line-by-line basis. When adding a new area, the rotation is the
same as the previous area.
Labels and Areas
Figure 19 • Degrees of rotation on printed label
Note: If rotation is applied individually to areas, you cannot apply rotation to the
entire label.
Rotate
55
To rotate data:
1. Navigate to the label or area where rotation will take affect.
2. To set rotation for the label, press Label Settings .
OR
To set rotation for an area, press Area .
3. Choose Rotate>degree of rotation.
4. Press Enter .
BMP®51 User’s Manual
Page 68

Labels and Areas
56
Rotate
Note: If the auto font size is selected, rotated data is autosized to accommodate the
height vs. the width of the label. However, if using a fixed font size, the rotated data
may not fit on the label. If this occurs, an error message displays indicating rotated
text will not fit. The Rotate function is canceled and data is not rotated.
To clear the error message:
1. Press Backspace
The Rotate function is canceled and data is not rotated.
BMP®51 User’s Manual
Page 69

Frame
A frame (border) can be added to an area or a label, but not to a line of text. You can have a
different frame, or no frame, on individual areas in a multi-area label. You can also place a
frame on a label that contains area frames.
Labels and Areas
Frame
57
Figure 20 • Available frame options
1. To add a frame to a label, press Label Settings .|
OR
To add a frame to an area, press Area .
2. Choose Frame>frame type.
3. Press Enter .
Frames do not display on the editing screen. Use Print Preview (see page 81) to view the label
or area frames.
To remove the Frame:
1. Navigate to the label or area that contains the Frame.
2. Press Label Settings .
OR
Press Area .
3. Chooses Frame>None.
4. Press Enter .
BMP®51 User’s Manual
Page 70

Labels and Areas
58
Reverse
Reverse
The Reverse function switches the foreground and background colors of data on a label, based
on the media installed.
Figure 21 • Reverse text
For instance, black lettering on a yellow background, if reversed, would print yellow lettering
on a black background.
You can apply Reverse formatting to areas or labels. Reverse cannot be applied to an
individual line of text or to a barcode.
To apply Reverse formatting to a label or area:
1. Press Label Settings .
OR
Press Area .
2. Choose Reverse>ON.
3. Press Enter .
The system formats the edge-to-edge data so that the foreground and background colors are
switched.
To remove the Reverse function:
1. Navigate to the label or area displayed in Reverse.
2. Press Label Settings .
OR
Press Area .
3. Choose Reverse>OFF.
4. Press Enter .
BMP®51 User’s Manual
Page 71

Vertical Text
In Vertical text, each character drops down a line below the preceding character.
Vertical text can only be applied to an area or a label. It cannot be applied line-by-line.
To format text vertically:
1. Navigate to the label or area where you want to display text vertically.
2. Press Label Settings .
OR
Example: The word “WIRE” as vertical text displays as such:
W
I
R
E
Labels and Areas
Ver tica l Text
59
Press Area .
3. Choose Ver ti ca l> On .
4. Press Enter .
The word(s) display vertically on the label or in the area.
If more than one line of text is present, the second and subsequent lines of text display
vertically to the right of the first line of text.
Multiple lines, before applying Vertical text
(autosized)
Figure 22 • Multi-line vertical alignment
Multiple lines, after applying Vertical text
(autosized)
BMP®51 User’s Manual
Page 72

Labels and Areas
60
Ver tica l Text
If a barcode is in the line of text to be placed vertically, or if the height of the label cannot
accommodate the vertical placement of text, an error message displays.
Figure 23 • Error messages when applying Vertical text
After removing the error message, the text is displayed in its original format, without applying
the vertical text option.
1. Navigate to the label or area displaying data as Vertical Text.
2. Press Label Settings .
OR
Press Area .
3. Choose Ver ti ca l> OF F.
4. Press Enter .
The text realigns according to predefined formats.
BMP®51 User’s Manual
Page 73

Barcode
Barcode data can be displayed in the same line as other data (text or symbols). It is not
necessary to have a separate area for the barcode. Barcode data on the same line as text will
not overwrite the text already on the line but will be placed next to it.
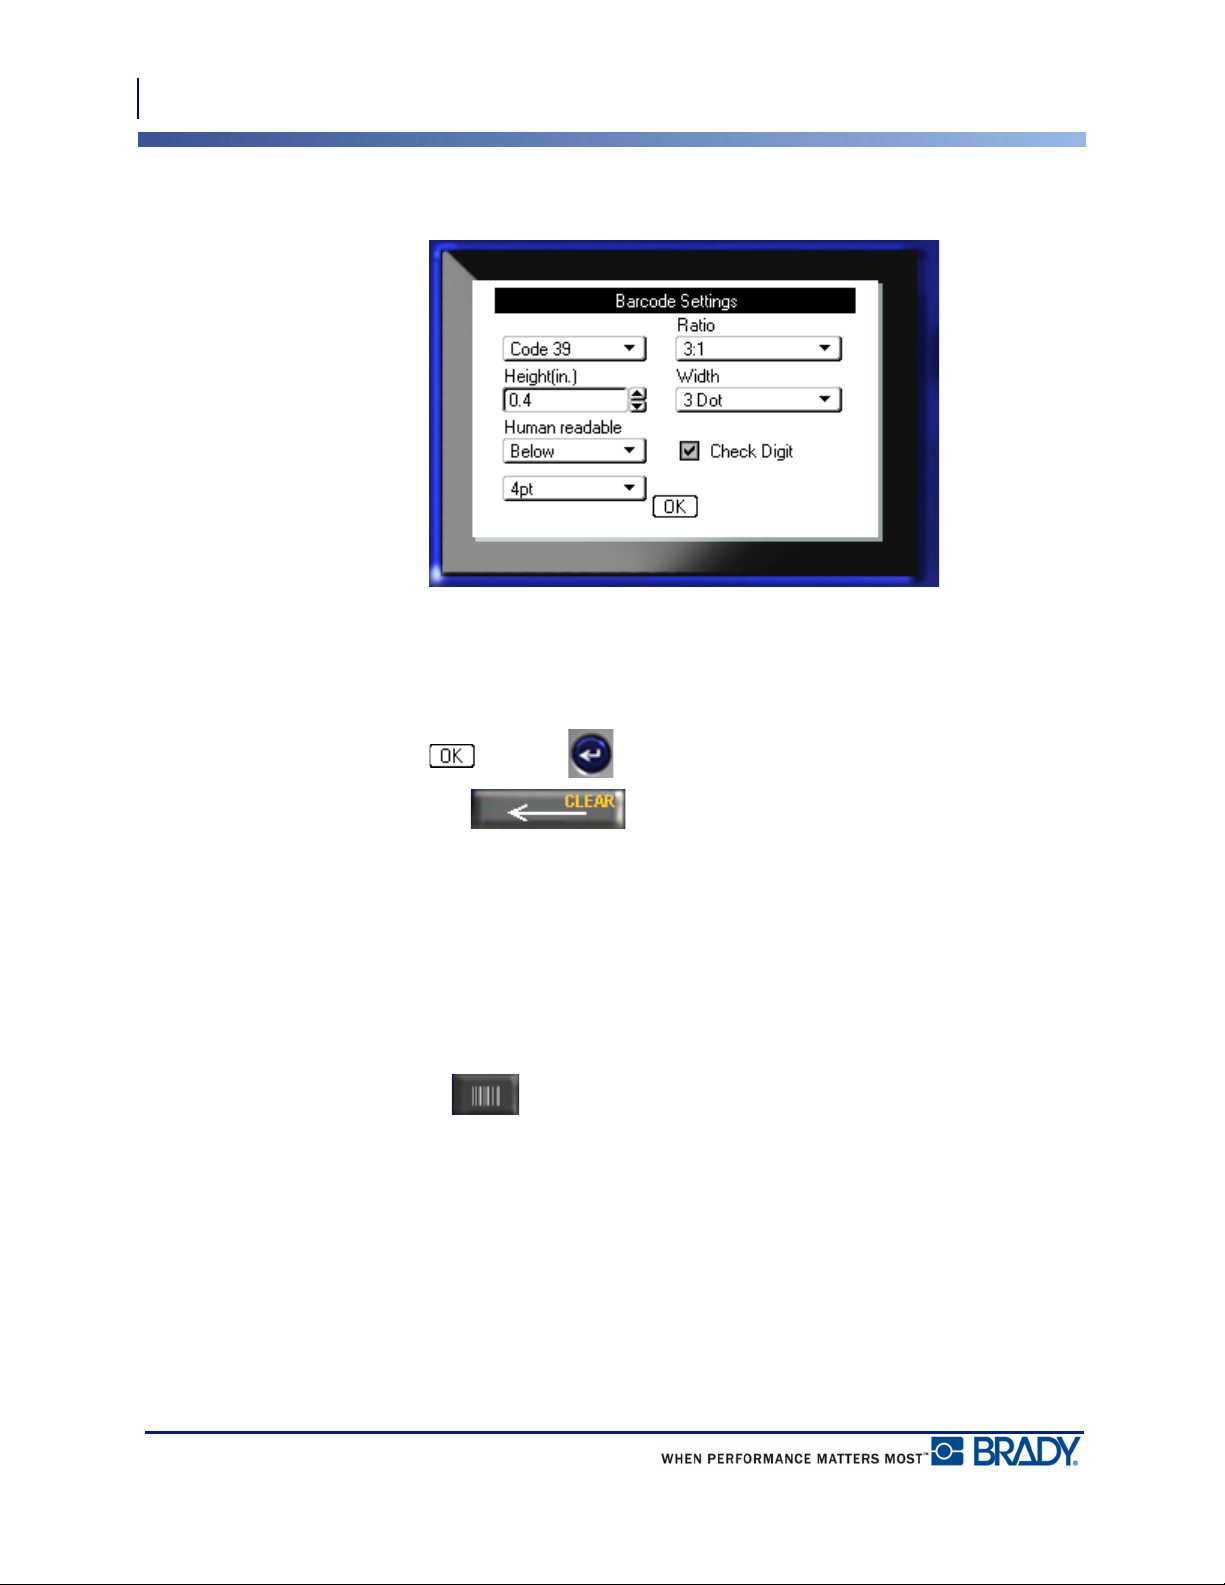
Barcode Settings
Field To Use
Labels and Areas
Barcode
61
Barcode Symbology The BMP
®
51 Label Printer supports Code 128 and Code
39 barcode symbology.
Ratio
Height
The ratios available are 2:1 and 3:1.
The height of the bars in a barcode can vary, with a
minimum of 0.1 inch (2.54 mm) and a maximum of 1.2
inches (30.48 mm).
Width The width of the narrow bar of a barcode is 1, 2, or 3 dots.
Human Readable Human Readable text can be placed above or below the barcode, or
you can choose not to display it.
Check Digit A check digit is used for error detection when using a Code 39
barcode. You can turn the check digit function on or off.
To change any of the barcode settings:
1. Press Label Settings .
2. Navigate to Barcode main menu.
3. Press Enter .
BMP®51 User’s Manual
Page 74
Labels and Areas
62
Add a Barcode
A dialog box displays.
4. Use navigation keys to access the various fields that you want to change. (See page 25 for
more information on working with dialog boxes.)
When finished, to accept all changes:
5. Navigate to and press .
6. Press Backspace to exit out of the Label Settings menus.
Add a Barcode
The barcode key acts as a toggle between a barcode and text. Press once to turn it on, press
again to turn it off.
To add a barcode:
1. Position the cursor where you want to add the barcode.
2. Press Barcode .
The barcode displays start and stop characters following the barcode parameters determined in
the Barcode main menu under Label Settings function.
3. Enter the barcode data.
BMP®51 User’s Manual
Page 75
Labels and Areas
Add a Barcode
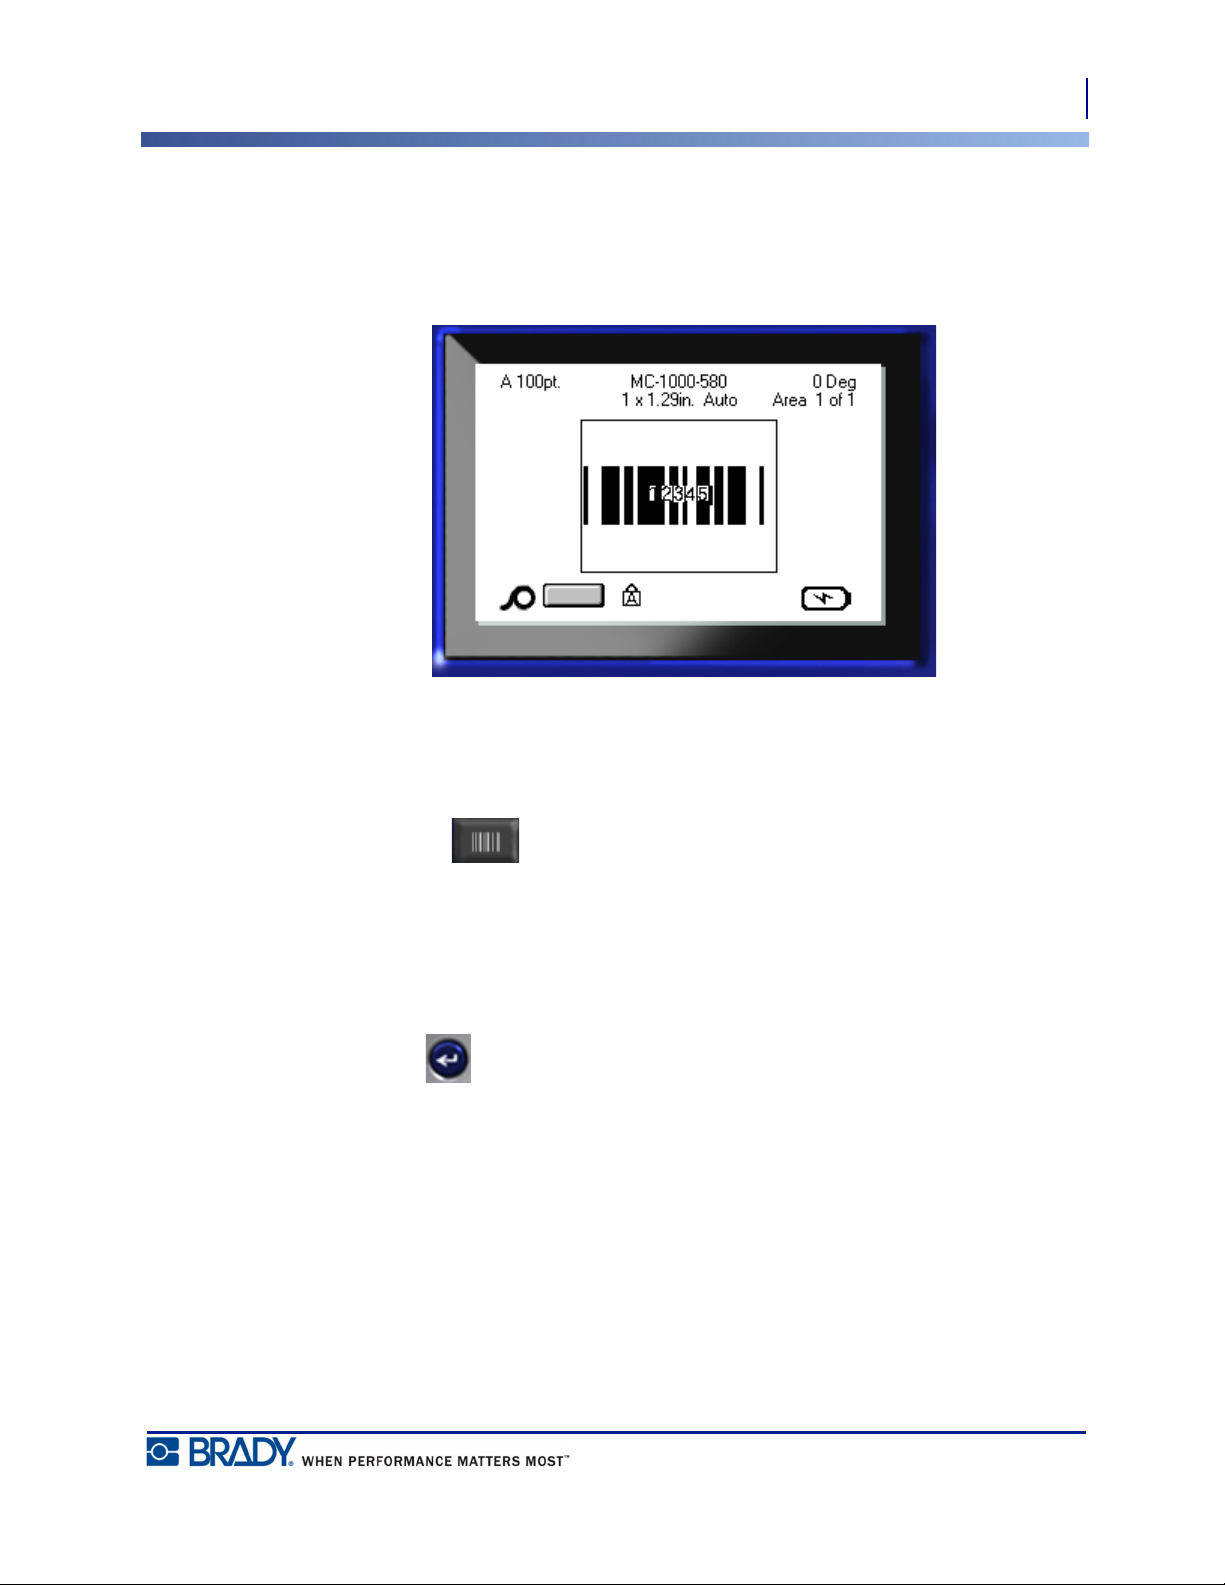
The barcode displays on the screen as the data is being entered. If the Human Readable option
has been turned off (i.e., “None” is selected), a data entry box displays directly over the
barcode, enabling you to view and edit the barcode data as you enter it. The data in this entry
box does not print out. If you want the actual data that the barcode represents to print out,
select Below or Above in the Human Readable field of the Barcode main menu.
63
Figure 24 • Barcode non-printable text box when HR option turned off
When finished with the barcode entry, if you want to enter more data on the same line of text
as the barcode:
4. Press Barcode again.
This turns the Barcode mode off and returns to text mode.
OR
When finished with the barcode entry, if you want to start a new line of text BELOW the
barcode entry:
5. Press Enter .
Pressing OK moves the cursor to the next line, automatically turning off the Barcode function.
BMP®51 User’s Manual
Page 76

Labels and Areas
64
Edit Barcode Data
Edit Barcode Data
To edit barcode data:
1. Position the cursor in the barcode text.
The barcode mode automatically turns on.
2. Edit the barcode text.
The barcode mode automatically turns off when you move past the last character of the
barcode.
BMP®51 User’s Manual
Page 77

Serialization
Serialization (or sequencing) automatically adds a series of sequential numbers or letters to the
printed labels. The Serial function consecutively places the next number or letter in the defined
sequence on individual labels. The number of labels created is defined by the sequence values
you enter. You can view the serialized labels before they print through the Print Preview
function. (See “Print Preview” on page 82 for more information.)
Serialization can be combined with other data on a label. Any data displayed on a label that
includes serialization will be repeated on every label along with the serial data.
How Serialization Works
Serialization is alphanumeric, with numbers from 0 to 9, and letters A-Z. Serialization can be
simple or linked, with a maximum of two sequences per label.
Note: You can incorporate serialized data into a barcode.
Serialization
How Serialization Works
65
Serialization consists of a Start Value, End Value, and Increment. The Start Value is the
number, letter, or combination of numbers and letters that begin the serialization sequence.
The End Value is the termination point of the sequence.
The Increment is the value that is added to the previous number in the sequence to produce the
next sequence number. (You cannot have an increment value of 0.) For instance, a start value
of 1, an end value of 25, and an increment of 4 would produce 1, 5, 9, 13, 17, 21, 25.
BMP®51 User’s Manual
Page 78

Serialization
66
Examples of Serialization
Examples of Serialization
In a simple serialization, a sequence runs through its full range of numbers and/or letters (i.e.,
0 to 9, or A to Z), one number/letter for each label.
Example: Simple serialization:
Sequence #1
Start Value: 1
End Value: 10
Increment: 1
Produces: 1, 2, 3, 4, 5, 6, 7, 8, 9, 10
You can combine letters and numbers in a single serialization. When the right-most character
in the Start Value reaches its maximum value (9, Z), the character immediately to the left is
incremented, and the right character cycles back to its minimum value (0, A)
Example: Combined, single serialization:
Sequence #1
Start Value: A1
End Value: D4
Increment: 1
Produces: A1…A9, B0...B9, C0...C9, D0...D4
In a multi-sequence serialization, where the second set of values is NOT dependent on the first
set (i.e., Linked box NOT checked), the two sequences increment sequentially, independent of
each other.
Example: Multiple serializations (where the second set of values is NOT
dependent on the first set of values):
Sequence #1 Sequence #2
Start Value: 1 Start Value: A
End Value: 10 End Value: C
Increment: 1 Increment: 1
Produces: 1A, 2B, 3C, 4A, 5B, 6C, 7A, 8B, 9C, 10A
BMP®51 User’s Manual
Page 79
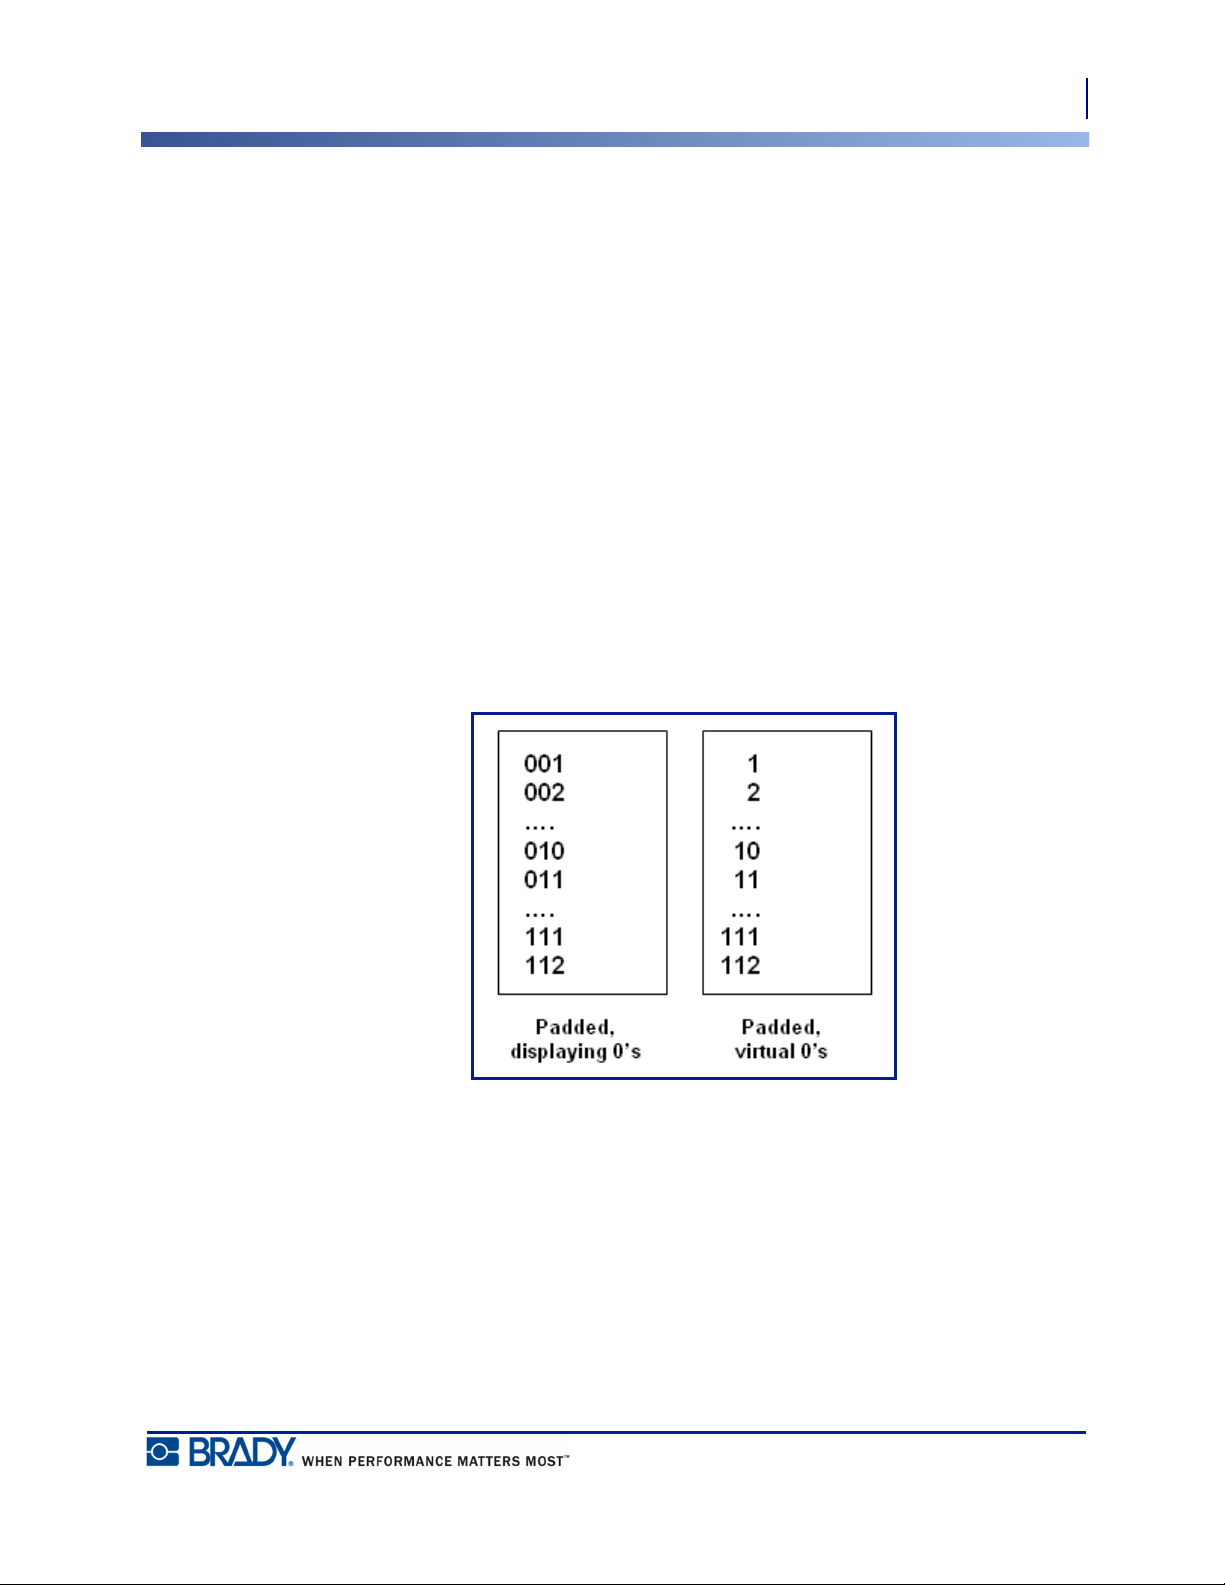
Serialization
Examples of Serialization
In a multi-sequence “linked” serialization (i.e., Linked box checked), the second set of values
is dependent on the first set. The second sequence holds its initial value until the first sequence
completes, after which it moves to the next value.
Multiple linked serialization:
Sequence #1 Sequence #2
Start Value: 1 Start Value: A
End Value: 10 End Value: C
Increment: 1 Increment: 1
Produces: 1A..10A, 1B..10B, 1C..10C
Numbers in Sequences
Single digit numbers are “padded” with zeros (0), which you can display if desired. To display
zeros, enter a zero before single-digit numbers (e.g., 01, 02, 03…). If the 0 is not entered, it
becomes a virtual 0 acting as a placeholder, allowing for better alignment of numbers/letters.
67
Figure 25 • Displayed vs. virtual zeros in sequences
BMP®51 User’s Manual
Page 80

Serialization
68
Add Serialization
Add Serialization
To add serialization to labels:
1. Position the cursor on the label where you want the serialization to display.
2. Press Serial .
A dialog box displays where you can enter the start value of the serialization, the end value,
and the increment value.
For simple serialization:
3. With the cursor immediately displayed in the Start Value field of Sequence #1, enter the
start value of the sequence.
If the start value is larger than the end value, the series will decrement automatically.
4. In the End Value field, enter the end value of the sequence.
5. In the Increment field, enter the increment value.
The default increment is 1. If that is the desired increment, skip this entry field.
6. Navigate to and press Enter .
BMP®51 User’s Manual
Page 81

Serialization
Add Serialization
For multiple serialization:
7. Complete Steps 1 through 6 above.
8. On the Editing screen, navigate to the next sequence location (cursor position) on the
label.
Note: If creating a compound serialization to display at the same cursor position
on the label, complete Steps 1-5 above, then proceed immediately to Step 10 below.
9. Press Serial .
The previous serialization values display in the dialog box presented.
10. Navigate to the Add Seq 2 option box and press Enter .
69
A second set of sequence value fields is presented.
11. In the Sequence #2 Start Value field, enter the start value for that sequence.
12. In the Sequence #2 End Value field, enter the end value for that sequence.
13. In the Sequence #2 Increment field, enter the increment for that sequence.
BMP®51 User’s Manual
Page 82

Serialization
70
Edit a Sequence
For Linked serialization:
Note: Linked serializations do not have to display at the same position on the
label. They can be in separate locations within the label.
14. Navigate to the Linked option box and press Enter .
15. When finished, navigate to and press Enter .
Edit a Sequence
You can change the serialization values after a sequence has been determined. To edit the
sequence values:
1. Press Serial .
The Serial dialog box displays with the current values listed.
2. Navigate to the value fields to change and enter the new value.
3. Navigate to and press Enter .
BMP®51 User’s Manual
Page 83

File Management
A label can be saved as a file, to be opened and reused at a later date.
File Naming Standards
To create a file on the BMP®51 printer, the file must be given a name. Names can be up to 20
characters long and can consist of letters, numbers, and spaces.
When creating files, remember this rule: You cannot have two files with the same name. If you
do, the most recent file with the name will overwrite the previous file with that name. A onecharacter difference in the name creates a different file and will not overwrite a previous file.
Figure 26 • File menu options
File Management
Save
71
Save
You can save a file internally on the BMP®51 printer or on some external device (such as a
thumb drive). The saved file retains the label data, data attributes, and alignment parameters.
This file is available for reuse whenever needed.
To save labels as a file:
1. Press File .
2. Choose Save, then press Enter .
To save internally (on the BMP
®
51 printer), proceed to Step 4.
BMP®51 User’s Manual
Page 84

File Management
72
Save
To save externally (on a thumb drive):
3. Navigate to the External option box.
Note: If storing externally, ensure the thumb drive is plugged into the appropriate
port
4. Press Enter .
To save your file, proceed to Step 9.
BMP®51 User’s Manual
Page 85

File Management
Save
To create a directory system for ease of locating files, place the files into folders. To create a
folder:
5. Navigate to <New Folder> and press Enter .
6. Enter a name for the folder in the field provided, and press Enter .
73
The folder is automatically opened. To save a file in this open folder, proceed to Step 9. To
save the label file in a different folder from the one that is open:
7. Navigate to and press Enter .
8. Navigate to the desired folder and press Enter .
9. In the <New File> entry box, enter a name for the label file and press Enter .
BMP®51 User’s Manual
Page 86

File Management
74
Save
If the name already exists, a message displays asking if you want to overwrite the previous file
with that name.
10. To overwrite, press Enter .
OR, to remove the message from the screen and return to the file name entry box:
Press Backspace .
11. To enter a different file name repeat Step 9 above.
BMP®51 User’s Manual
Page 87
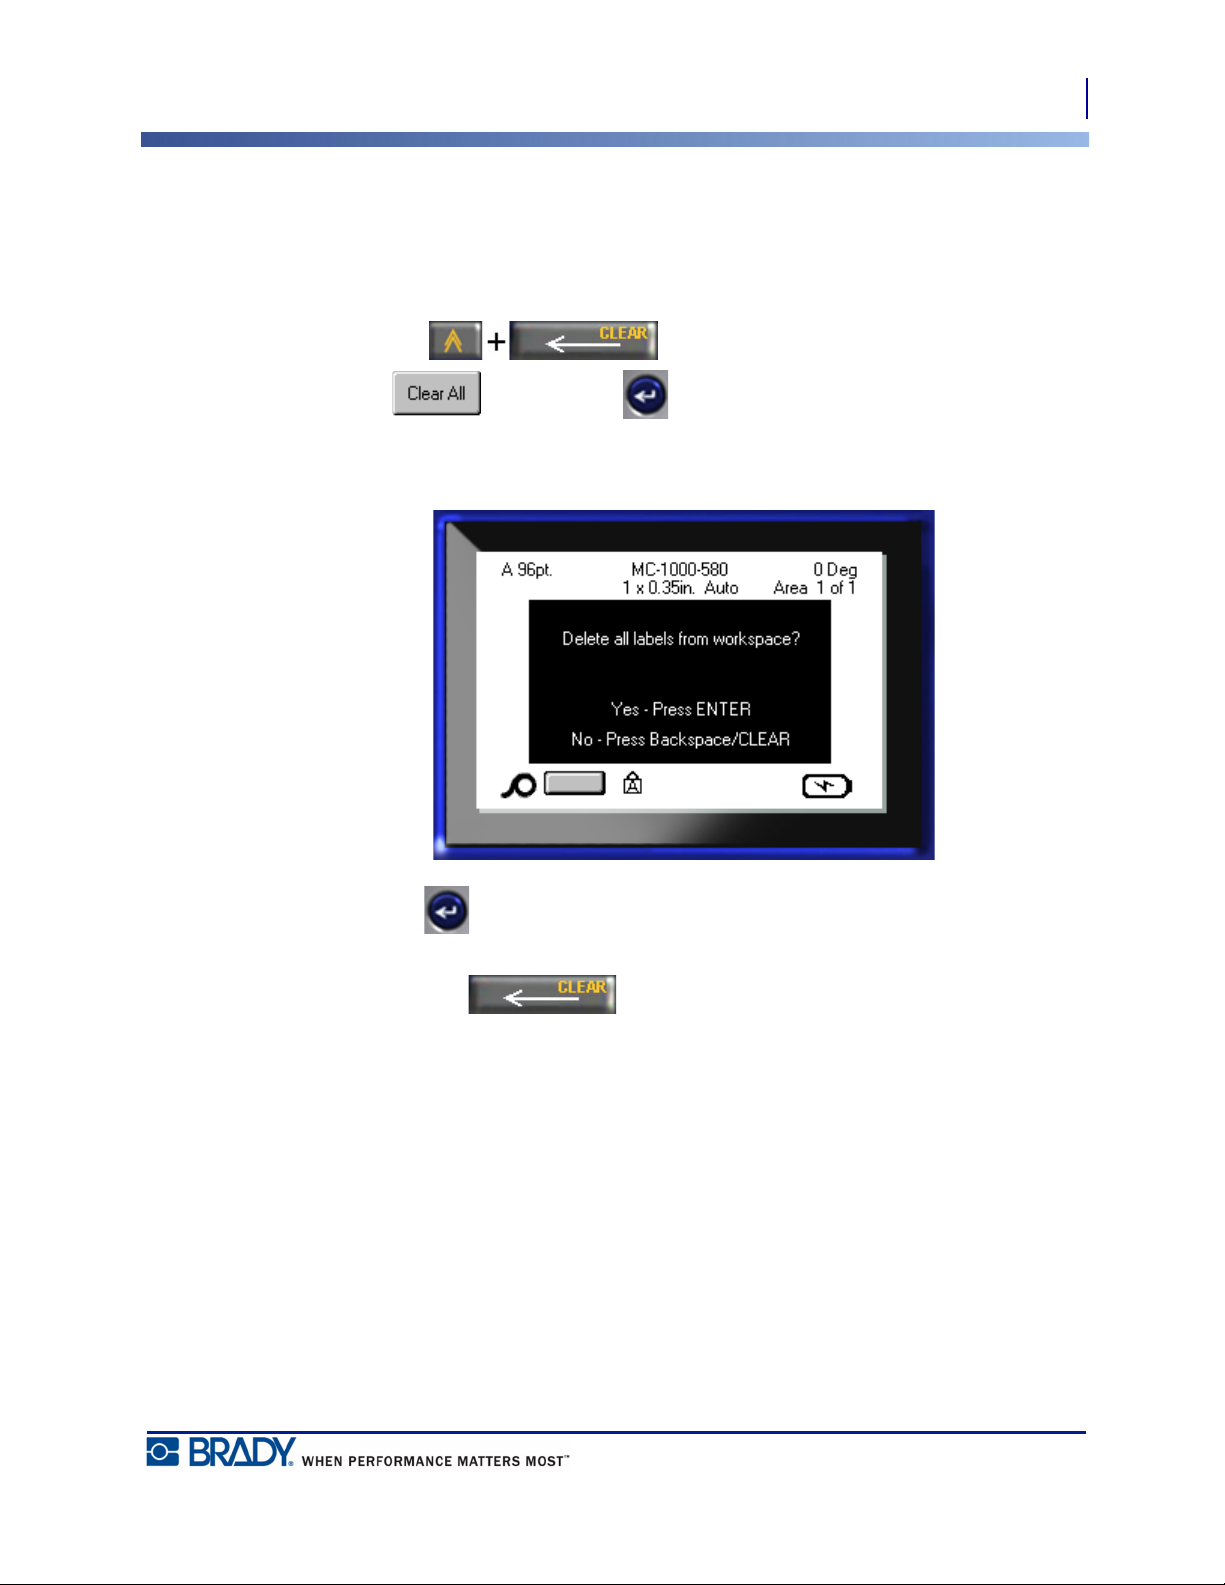
File Management
Remove File from Screen
When the file is saved, you are returned to the Editing screen with the saved file still displayed.
To remove the saved file from the screen:
1. Press Clear .
2. Choose and press Enter .
A message displays confirming the removal of all labels from the display.
Save
75
3. Press Enter to delete the label from the display.
OR, to remove the error message and cancel the Clear All function:
Press Backspace .
BMP®51 User’s Manual
Page 88
File Management
76
Open a File
Open a File
To open (recall) a saved file:
1. Press File .
2. Choose Open and press Enter .
3. Indicate if the file to open is stored internally on the BMP
®
51 printer, or externally on a
thumb drive.
Note: If the file to be opened is stored externally, in order to get the desired list of
files, be sure to plug the thumb drive into the appropriate port.
4. Press Enter .
A list of previously saved files and folders displays. If the file is stored in a folder:
5. Navigate to the desired folder to open and press Enter .
6. Then, navigate to the desired file to open and press Enter .
Only one file can be displayed on the screen at a time. When opening a saved file, if the
Editing screen contains other data, you are prompted to save the data before the screen is
cleared. If you decide to save the displayed data, the Save function is invoked and you are
allowed to give the data a file name before the requested file to open is displayed in the Editor.
BMP®51 User’s Manual
Page 89

File Management
Open a File
When opening a file, if the stored data does not fit on the installed media, an error message
displays.
77
You must use label media that can accommodate the data in the file being opened. You cannot
place data saved with die-cut media on continuous media, and vice versa.
7. Press Enter to remove the error message and install the correct media to
accommodate the data.
BMP®51 User’s Manual
Page 90
File Management
78
Delete a File
Delete a File
The display screen does not have to be cleared before deleting a file. A file can be deleted with
other data still on the screen.
To delete a previously saved file:
1. Press File .
2. Choose Delete and press Enter .
3. In the dialog box presented, use navigation keys to move to the option box indicating if
the file to be deleted is stored internally on the BMP
drive, PC, etc.
Note: If the file to be deleted is stored externally, be sure to connect to the external
source in order to get the desired list of files.
®
51 printer, or externally on a thumb
4. Press Enter .
A list of previously saved files displays.
5. Using navigation keys, choose the file to delete.
6. Press Enter .
BMP®51 User’s Manual
Page 91

A delete confirmation message displays.
File Management
Delete a File
79
7. Press Enter to accept the deletion.
OR, to cancel the delete function:
Press Backspace .
When a file is deleted, it is removed from the system and is no longer available for use.
BMP®51 User’s Manual
Page 92

This page intentionally left blank.
Page 93
Printing
Printing
Cancel a Print Job
The Print function prints the current file.
To print:
1. Press Print .
The data is printed.
After printing, to cut the label:
2. Push the cutter lever down as far as it will go.
Rollers on the label exit chute hold the label in place after it has been cut to avoid dropping. To
remove the label:
3. Gently pull the label from the rollers.
®
Printing from the BMP
or create new labels while the file is printing.
51 printer occurs in the background, meaning you can continue to edit
81
Cancel a Print Job
If a print job is interrupted, for instance when media runs out, or you intentionally open the
cover, the system automatically stops the print job and displays a message. While the message
remains on the screen, follow the instructions on the display to resume printing.
To intentionally cancel a print job:
1. Press Shift+Alt+Print
BMP®51 User’s Manual
Page 94
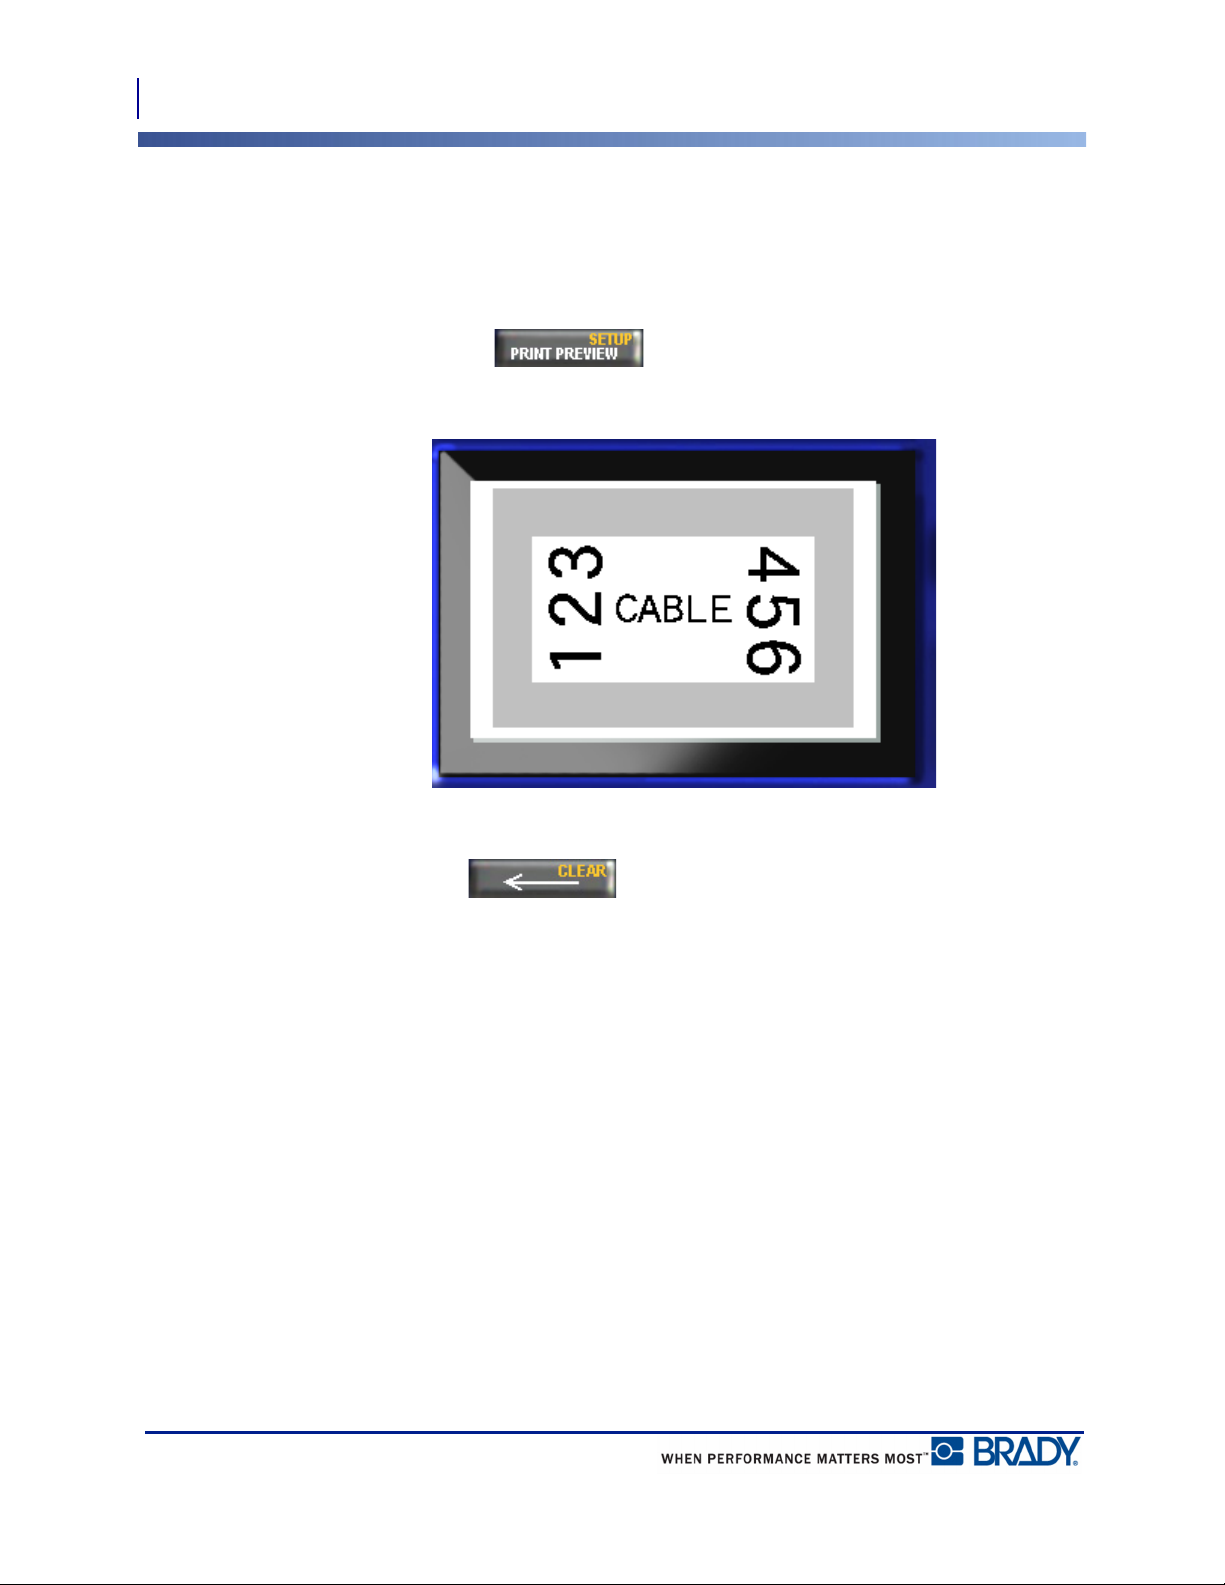
82
Printing
Print Preview
Print Preview
The Print Preview function of the BMP®51 printer enables you to view your label file prior to
printing.
To preview the label:
1. Press Print Preview .
The label contents display as they will print out.
To exit Print Preview and return to the editing screen:
1. Press Backspace .
You are returned to the editing screen.
BMP®51 User’s Manual
Page 95
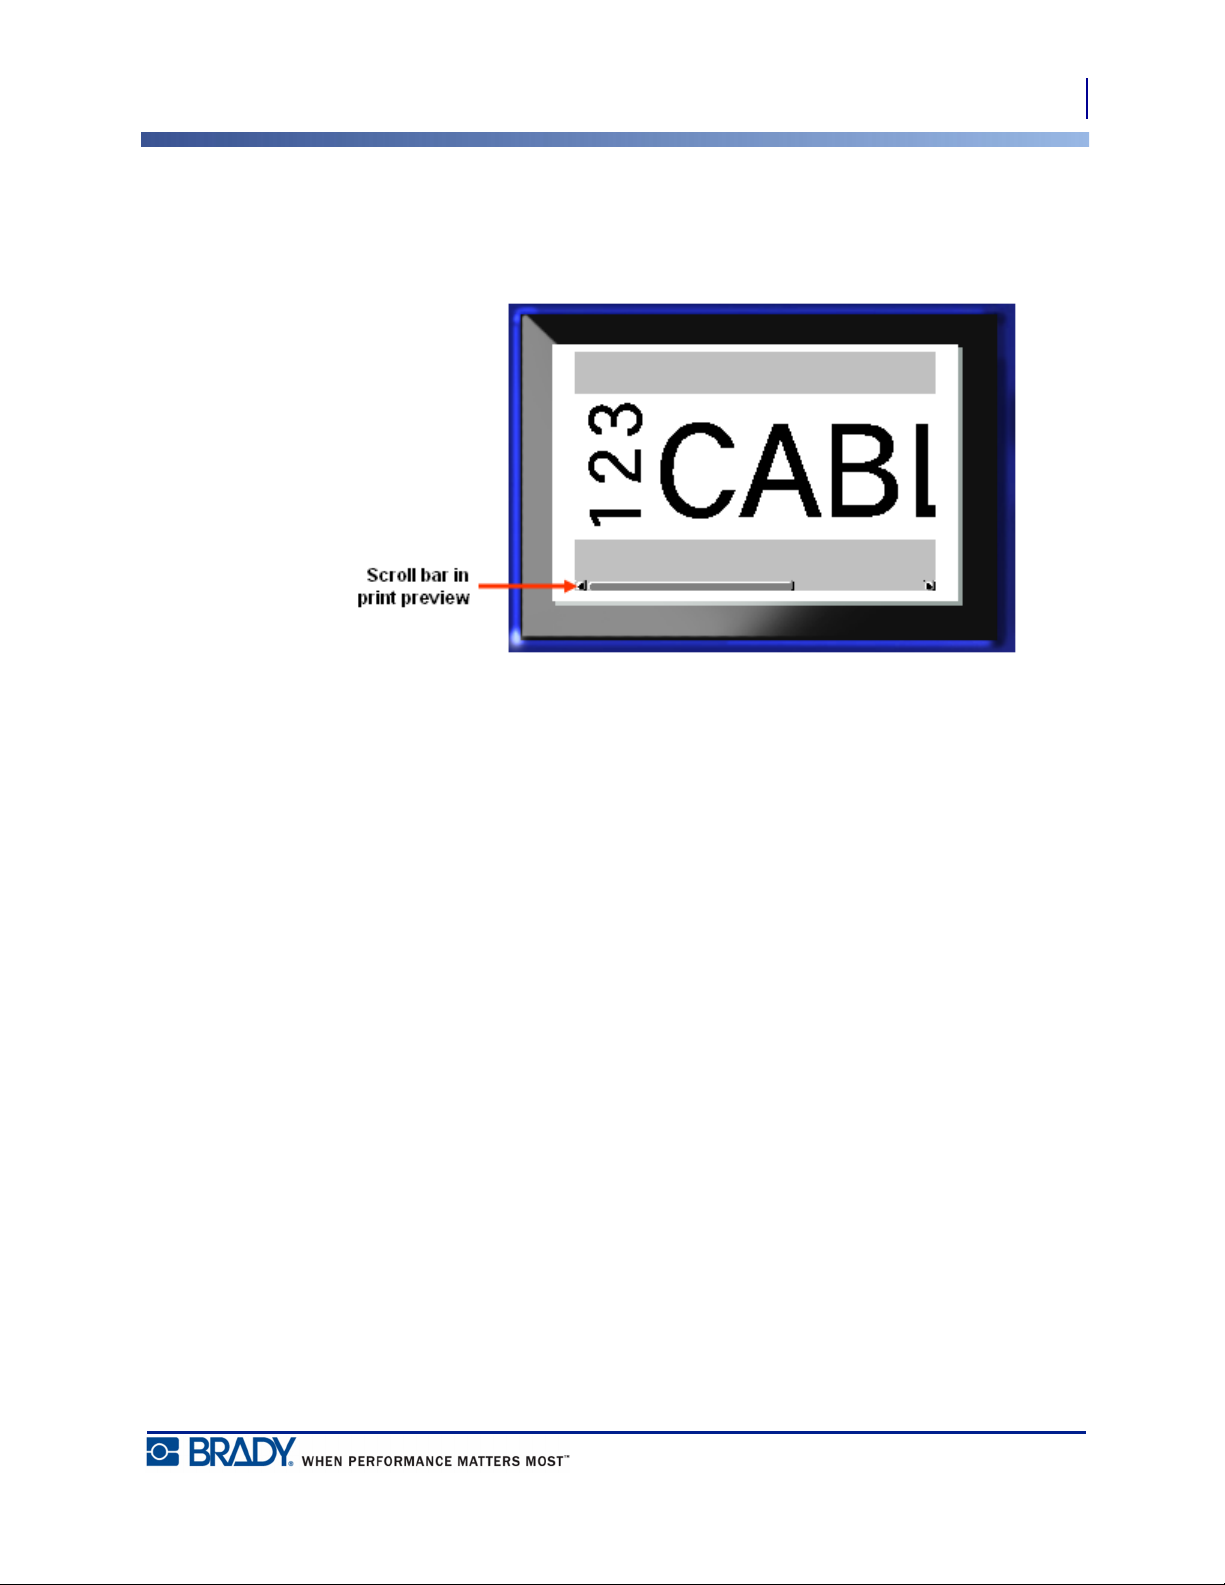
Print Preview
Scrolling in Print Preview
If a label file is particularly long it may not be completely visible on one screen in print
preview. The Print Preview screen displays a scroll bar indicating there is more data to view.
Printing
83
To scroll through a preview of a long label:
1. Press Left/Right navigation keys, as applicable.
Scrolling in Multi-Area Preview
When using serialization, multiple area are created. To scroll through the different labels in
print preview:
1. Press Up/Down navigation keys, as applicable.
BMP®51 User’s Manual
Page 96

84
Printing
Multi-Print
Multi-Print
Pressing the Multi-Print key brings up a dialog box displaying the following options:
Multi-print lets you print a number of copies of a label or a range of labels in a multi-label
(series) file. If printing a number of copies, you can also determine if you want the copies
collated or not.
Collate
Collating refers to the way a series of labels print out, if more than one copy or set of labels is
requested.
Collated – All sequential numbers print once, then the entire sequence prints again.
Figure 27 • Three copies of five labels, collated
BMP®51 User’s Manual
Page 97

Printing
Multi-Print
Non-collated – Prints all first numbers in a sequence, then all second numbers, etc.
Figure 28 • Three copies of five labels, non-collated
To print a number of copies:
1. Press Multi-Print .
2. With the cursor in the No. of Copies field, enter the number of copies desired.
Determine if the copies should be collated. The default is to print collated. If you do not want
to collate the copies:
85
3. Navigate to the Collate option box and press Enter to remove the checkmark.
When printing (or re-printing) a single label in a series, or a range of labels in a series, use the
Print Range feature.
4. Navigate to the From field, under Print Range, and enter the number of the first label to be
printed.
5. Navigate to the To field, under Print Range, and enter the number of the last label to be
printed.
BMP®51 User’s Manual
Page 98

86
Printing
Multi-Print
Mirror Print
Mirrored print takes all data on a label and flips it to provide a mirror image. Mirroring
displays on the printed label only.
Figure 29 • Mirror image
Mirrored print is label-based, meaning all data on the label is mirrored. You cannot mirror data
in an individual area.
To provide a mirror image of label contents, in the Multi-Print dialog box:
1. Navigate to the Mirrored Print option box and press Enter to place a checkmark in
the field.
2. When finished with desired options, navigate to and press Enter .
BMP®51 User’s Manual
Page 99

Label Types
The general editing mode of the BMP51 printer contains standard functions and formats used
for most generic labels. Label types, however, provide templates that guide and control the
layout for specific label formats.
Figure 30 • Label Type menu options
Label Types
Accessing a Label Type
87
Accessing a Label Type
To work with a label type:
1. Press Label Type .
2. Choose the desired Label Type.
3. Press Enter .
For most label types, a dialog box displays to collect information for automatically formatting
the specific label type.
4. Enter data requested in the dialog box.
5. When finished, navigate to and press Enter .
BMP®51 User’s Manual
Page 100

Label Types
88
Accessing a Label Type
The label type’s template is launched. The name of the specific type being used is displayed on
the left side of the Status bar, below the font size.
Figure 31 • Display of label type in status bar
BMP®51 User’s Manual
 Loading...