

User Guide
Instructions
Instrukties / Instruções
Instruktionen / Instrucciones
www.bradyid.com

Contents
Copyright ............................................................................................................ iii
Trademarks ....................................................................................................iii
Brady Warranty ............................................................................................. iv
Technical Support .............................................................................................. v
Regulatory Information ..................................................................................... vi
Product Registration .......................................................................................... 1
Power ................................................................................................................... 1
Batteries ......................................................................................................... 1
A/C Power ...................................................................................................... 1
Display Description ............................................................................................ 2
Change Label Cartridge ..................................................................................... 3
Create Labels ...................................................................................................... 4
Creating Wire Labels ..................................................................................... 4
Creating Serialized Label in Banner Landscape ............................................ 5
Creating Terminal Block Labels* .................................................................... 6
Creating Fixed-Length label with Autosize ...................................................... 7
Creating a Barcode Label .............................................................................. 8
Creating a Patch Panel* Label ....................................................................... 9
Creating Terminal Block Labels without Serialization* ................................. 10
Creating Symbols Labels ............................................................................. 11
File Management .............................................................................................. 12
Saving and Opening Files ............................................................................ 12
Replacing a Label File ................................................................................. 13
Deleting a Label File .................................................................................... 14
Saving and Opening a Serialization File ...................................................... 15
Setup .................................................................................................................. 17
Setting Up Multiple Prints ............................................................................. 17
Changing Unit of Measure ........................................................................... 17
Changing the Language ............................................................................... 17
Changing International Characters .............................................................. 18
Toggling the Backlight .................................................................................. 18
Keypad Descriptions ........................................................................................ 19
Cartridge Selection Guide ............................................................................... 21
ii BMP21 User Guide

Copyright
This manual is copyrighted with all rights reserved. No portion of this manual may be
copied or reproduced by any means without the prior written consent of Brady
Corporation.
While every precaution has been taken in the preparation of this document, Brady
assumes no liability to any party for any loss or damage caused by errors or omissions, or
by statements resulting from negligence, accident or any other cause. Brady further
assumes no liability arising out of the application or use of any product or system
described, herein; nor any liability for incidental or consequential damages arising from the
use of this document. Brady disclaims all warranties of merchantability of fitness for a
particular purpose.
Trademarks
Brady reserves the right to make changes without further notice to any product or system
described herein to improve reliability, function, or design.
© 2009 Brady Worldwide, Inc. All Rights Reserved.
Brady Corporation
6555 West Good Hope Road
P.O. Box 2131
Milwaukee, WI 53201
Main Switchboard: (800) 541-1686
(414) 358-6600
Fax: (800) 292-2289
Sales/Customer Support: (800) 537-8791
This manual is proprietary to Brady Worldwide, Inc. (hereafter “Brady”), and may be
revised from time to time without notice. Brady disclaims any understanding to provide
you with such revisions, if any.
All brand or product names referenced in this manual are trademarks (
trademarks (®) of their respective companies or organizations.\
TM
) or registered
BMP21 User Guide iii

Brady Warranty
Brady products are sold with the understanding that the buyer will test them in actual use
and determine for him or herself their adaptability to his/her intended uses. Brady
warrants to the buyer that its products are free from defects in material and workmanship,
but limits its obligations under this warranty to replacement of the product shown to
Brady’s satisfaction to have been defective at the time Brady sold it. This warranty does
not extend to any persons obtaining the product from the buyer.
THIS WARRANTY IS IN LIEU OF ANY OTHER WARRANTY, EXPRESS OR IMPLIED
INCLUDING, BUT NOT LIMITED TO, ANY IMPLIED WARRANTY OF
MERCHANTABILITY OR FITNESS FOR A PARTICULAR PURPOSE, AND OF ANY
OTHER OBLIGATIONS OR LIABILITY ON BRADY’S PART. UNDER NO
CIRCUMSTANCES WILL BRADY BE LIABLE FOR ANY LOSS, DAMAGE, EXPENSE
OR CONSEQUENTIAL DAMAGES OF ANY KIND ARISING IN CONNECTION WITH
THE USE, OR INABILITY TO USE, BRADY’S PRODUCTS.
iv BMP21 User Guide

Technical Support
Please contact Brady Worldwide, Inc. with any questions or concerns. The contact support
numbers for each region are listed below.
USA
1-888-272-3946
E-Mail: technicalsupport@bradycorp.com
Belgium
(Belgium, Netherlands, Luxemburg, Africa &
Middle-East)
Lindestraat 20, 9240 Zele
E-Mail: csbelgium@bradycorp.com
Italy
Via Pitagora 18
20128 Milano MI
E-Mail: tsitaly@bradycorp.com
UK / Ireland
Wildmere Industrial Estate
Banbury, Oxon OX16 3JU
E-Mail: tsuk@bradycorp.com
Mexico
E-Mail: bradymexico@bradycorp.com
Spain
(Spain & Portugal)
E-Mail: tsspain@bradycorp.com
Canada
E-Mail: techsuppcanada@bradycorp.com
Web: www,bradycanada.com
Africa, Denmark, Isreal, Middle East, Turkey, Eastern Europe, Greece, Portugal,
Malta, Russia
E-Mail: tsbelgium@bradycorp.com
France
Parc EUROCIT
45, avenue de l'Europe
59436 Roncq Cedex
E-Mail: tsfrance@bradycorp.com
Germany
(Germany, Austria & Switzerland)
Otto-Hahn-Str. 5-7, 63225 Langen
E-Mail: tsgermany@bradycorp.com
www.bradyeurope.com/services
Sweden / Norway / Finland
Karins Väg 5
194 54 Upplands Väsby
E-Mail: www.bradyeurope.com/services
Brazil
E-Mail: at@bradycorp.com
Latin America & Caribbean
E-Mail: soporte_tecnico@bradycorp.com
Netherlands
E-Mail: tbelgium@bradycorp.com
BMP21 User Guide v

Regulatory Information
United States
FCC Class B Notice
Note: This equipment has been tested and found to comply with the limits for a Class B
digital device, pursuant to Part 15 of the FCC Rules. These limits are designed to provide
reasonable protection against harmful interference in a residential installation. This
equipment generates, uses, and can radiate radio frequency energy and, if not installed
and used in accordance with the instructions, may cause harmful interference to radio
communications. However, there is no guarantee that interference will not occur in a
particular installation. If this equipment does cause harmful interference to radio or
television reception, which can be determined by turning the equipment off and on, the
user is encouraged to try to correct the interference by one or more of the following
measures:
• Reorient or relocate the receiving antenna.
• Increase the separation between the equipment and receiver.
• Connect the equipment into an outlet on a circuit different from that to which the
receiver is connected.
• Consult a dealer or an experienced radio/television technician for help.
Modifications: The user is cautioned that any changes or modifications not expressly
approved by Brady Corporation could void the user’s authority to use the equipment.
vi BMP21 User Guide

Canada
ICES-003 Class B Notice, Classe B
This Class B digital apparatus meets all requirements of the Canadian InterferenceCausing Equipment Regulations.
Cet appareil numerique de la classe B respecte toutes les exigences du Reglement sur le
Materiel Brouilleur du Canada
EUROPE
Warning – This is a Class B product. This product has been tested and found to comply
with the limits for Class B Information Technology Equipment according to the CISPR 22 /
European Standard EN 55022. The limits for Class B equipment were derived for typical
residential environments to provide reasonable protection against interference with
licensed communication devices.
Waste Electrical and Electronic Equipment Directive
In accordance with the European WEEE Directive, this device needs to be recycled in
accordance with local regulations.
Batteries Directive 2006/66/EC
Users of batteries must not dispose of batteries as unsorted municipal waste. This
Directive determines the framework for the return and recycling of used batteries and
accumulators that are to be collected separately and recycled at end of life. Please
dispose of batteries according to your local regulations.
BMP21 User Guide vii
Product Registration
Product Registration
Register on-line at www.bradyid.com.
Power
You can use the BMP21 with batteries or an optional AC power supply.
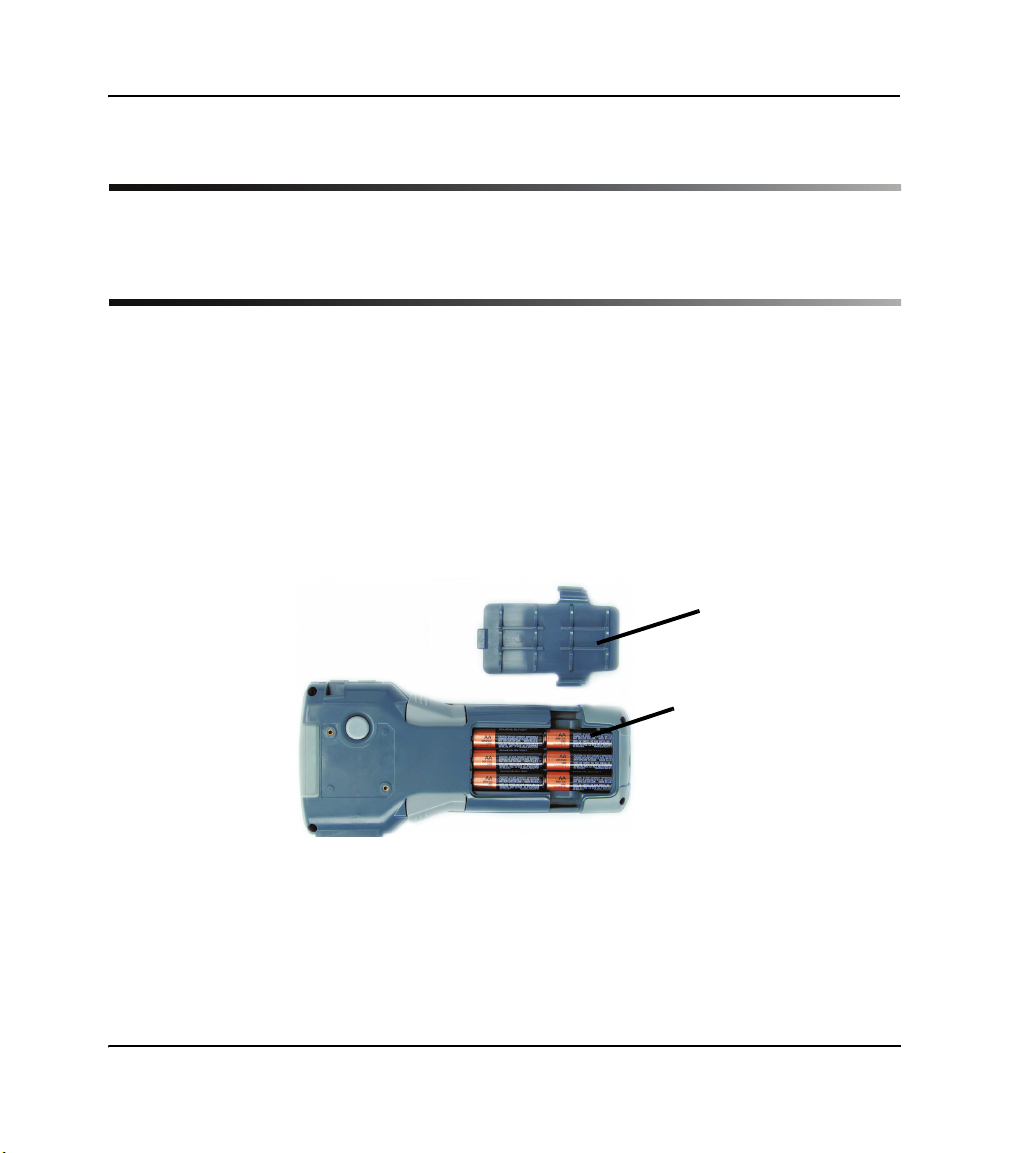
Batteries
1. Remove the battery cover from the battery compartment, located on the back of
the unit.
2. Insert six AA alkaline batteries. See inside the battery compartment for the
battery-positioning grid.
3. Close battery compartment.
1
2
A/C Power
1. Plug in optional A/C Power Supply into the power connection located on the upper
left side of the printer.
2. Plug the opposite end into the wall outlet.
BMP21 User Guide 1
Display Description
Display Description
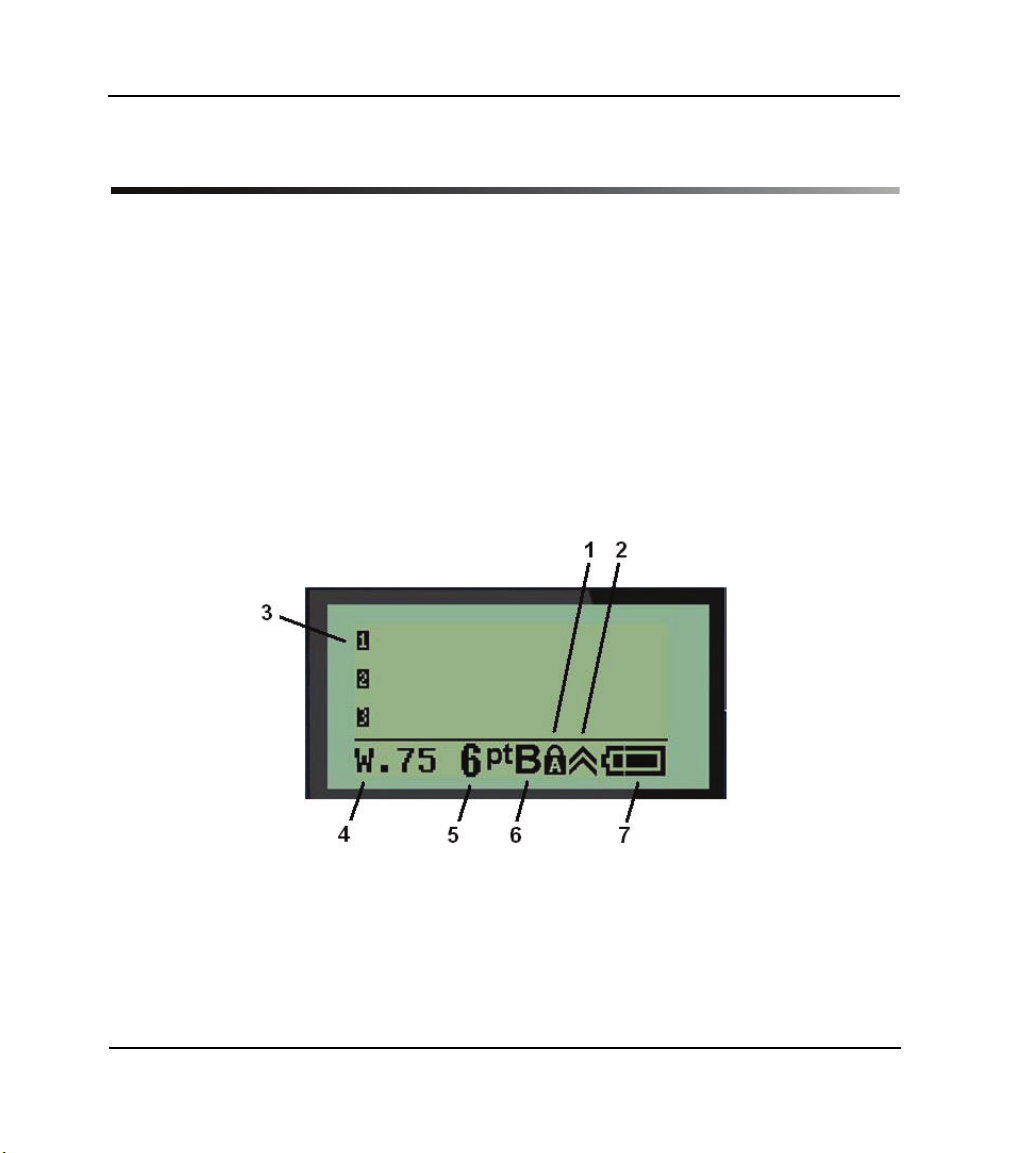
When the power button is pressed, the main screen displays the following:
1 Caps Lock
2 Function Indicator
3 Text Lines
4 Label Type
5 Font Size
6 Bold
7 Battery Life Indicator
2BMP21 User Guide

Change Label Cartridge
Change Label Cartridge
1. Slide the Locking Lever (1) down to unlock.
2. On the back of the unit, push the Release Button (2).
3. Remove the old cartridge.
4. Insert the new cartridge and push solidly into place.
5. Slide the Locking Lever up to lock.
3, 4
1, 5
2
BMP21 User Guide 3

Create Labels
Create Labels
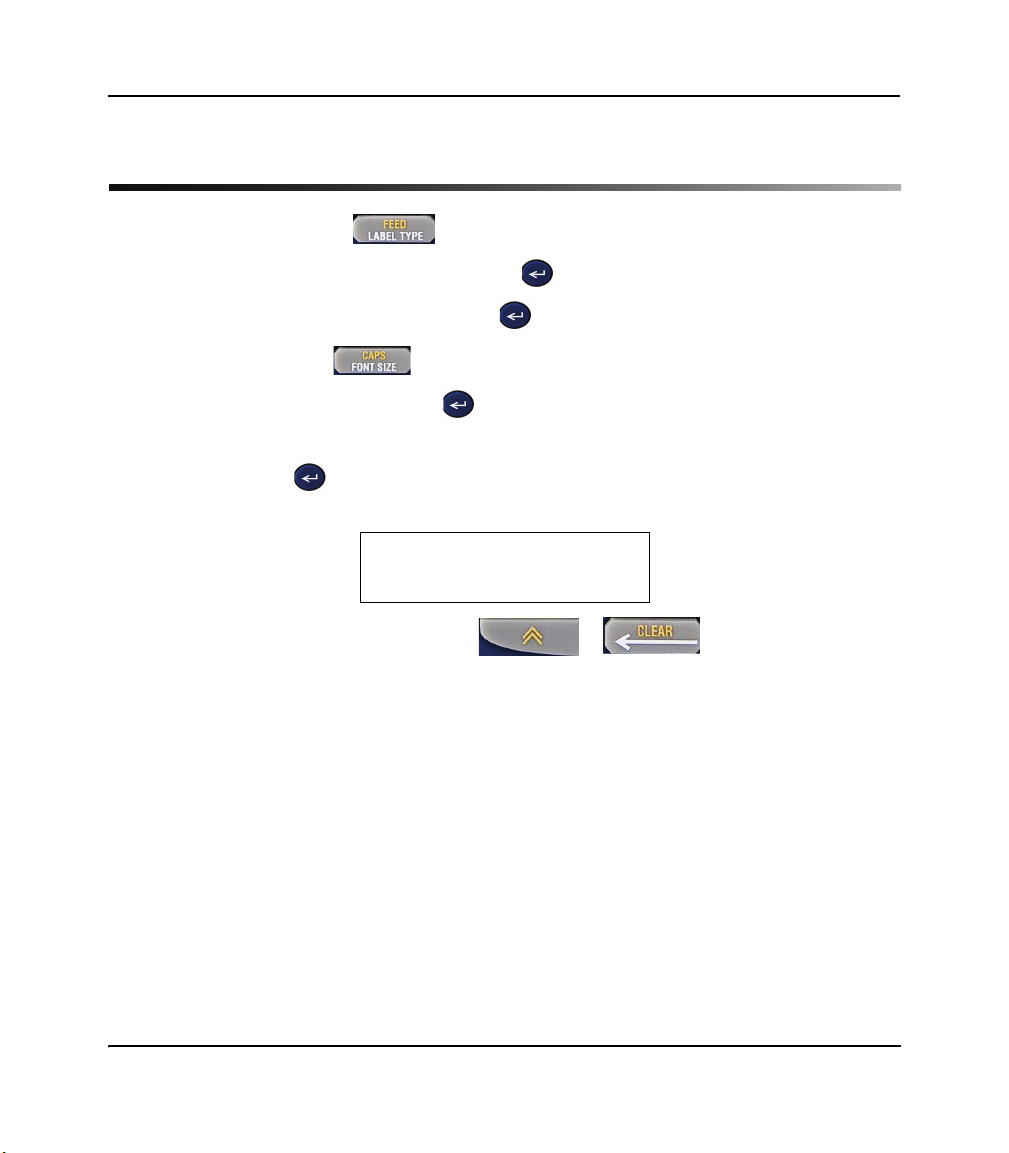
Creating Wire Labels
1. Press Power .
2. Press Label Type.
3. Select Wire, then press Enter .
4. Select .75” (16-10AWG), then press Enter .
5. Press Font Size , select 6pt., then press Enter .
6. Type: 12345.
7. Press Print.
8. Press the two side buttons together, or individually, to cut the label.
8
9. Clear text from the screen: Press + .
4BMP21 User Guide
8

Create Labels
Creating Serialized Label in Banner Landscape
1. Press Label Type.
2. Select Banner Landscape and press Enter .
3. Enter: 12345, then press .
4. Select Serial and Increment By 01.
5. Press
6. Press
7. Press Print.
8. Either Cut or Print the 2
9. Clear text from the screen: Press + .
T to End, then X arrow until the screen reads: 12347.
- or -
Type: 347.
T to Copies then X until the screen reads 02.
- or -
Type: 2 and press Enter .
nd
thru 6th label.
12345 12345 12346 12346 12347 12347
BMP21 User Guide 5

Create Labels
Creating Terminal Block Labels*
*Use part numbers M21-375-499 or M21-500-499 when performing this procedure.
1. Press Label Type.
2. Select Terminal Block and press Enter .
3. Press
4. Press T to Serial, then X until the screen reads: On.
5. Press
6. Press
7. Press Enter.
8. Type: E000.
9. Press Print.
10. Clear text from the screen: Press + .
X until screen reads: Spacing = .2”.
Note: Press X to the flashing cursor and enter the desired spacing.
T to # of Terminations, then X until the screen reads: 3
- or - Type: 3.
T to Rotation then X until the picture displays a vertical
legend .
6BMP21 User Guide
Creating Fixed-Length label with Autosize
Creating Fixed-Length label with Autosize
1. Press Label Type.
2. Select Fixed Length and press Enter .
3. Select Fixed: 2.0” and press Enter .
4. Press Font Size .
5. Select Auto and press Enter .
6. Type: 12345.
7. Press Enter and type: WM12.
8. Press Print.
12345
WM12
9. Clear text from the screen: Press + .
BMP21 User Guide 7

Creating Fixed-Length label with Autosize
Creating a Barcode Label
1. Install a ¾” label size in the printer.
2. Press Label Type.
3. Select Banner Landscape.
4. Press Font Size and select 20 pt and press Enter .
5. Enter: AA
6. Press , then select Barcode.
7. Press Enter .
- or -
Press + 2.
8. Select Code 39 and press Enter
9. In the box, type: 12345 (the box indicates text that will appear in barcode format)
10. Press
11. Press: Print
12. Clear text from the screen: Press + .
8BMP21 User Guide
X to exit the barcode box, then type: BB

Creating Fixed-Length label with Autosize
Creating a Patch Panel* Label
*Use part numbers M21-375-499 or M21-500-499 when performing this procedure.
1. Press Label Type.
2. Select Patch Panel and press Enter .
3. Press
4. Press T to Serial, then X until the screen reads: On.
5. Press
6. Press
7. Press Enter .
8. Type: E000.
9. Press Print
X until screen reads: Spacing = .2”.
Note: Press X to the flashing cursor and enter the desired spacing.
T to # of Ports, then X until the screen reads: 3
- or -
Type: 3
T to Rotation, then X until the pictures displays a horizontal
legend .
.
10. Clear text from the screen: Press + .
BMP21 User Guide 9

Creating Fixed-Length label with Autosize
Creating Terminal Block Labels without Serialization*
*Use part numbers M21-375-499 or M21-500-499 when performing this procedure.
1. Press Label Type .
2. Select Terminal Block and press Enter .
3. Press
4. Press T to Serial, then X until the screen reads: OFF.
5. Press
6. Press
7. Press Enter .
8. Type: E000, then press Print.
9. Press + , then type: B1B2.
10. Press Print
11. Press + , then type: 45TS
12. Press Print
13. Cut the label.
X until screen reads: Spacing = .2”.
Note: Press X to the flashing cursor and enter the desired spacing.
T to # of Terminations, until the screen reads: 3 or Type: 3.
T to Rotations, then X until the pictures displays a vertical
legend .
14. Clear text from the screen: Press + .
10 BMP21 User Guide

Creating Fixed-Length label with Autosize
Creating Symbols Labels
1. Press Label Type. .
2. Select Banner Landscape, then press Enter .
3. Press , then select Symbols.
4. Press Enter .
- or -
Press +1
5. Select the symbol , then press Enter .
6. Type: CAUTION, then press Print.
7. Clear text from the screen: Press + .
BMP21 User Guide 11

File Management
File Management
Saving and Opening Files
To save a file:
1. With the last label still in your editor, press , then select File and press
Enter .
2. Select Save, then press Enter
Note: You can save labels to 12 locations. If a name is next to the number, a
label is currently being stored in that location.
3. Move your cursor to a number where you want the label saved, then
press Enter .
4. Type the label file name: ONE, then press Enter .
5. Press + to clear the display
To open a saved label:
1. Press , then select File.
2. Press Enter , then select Open.
3. Press Enter .
4. Move the cursor to the number and name of the saved label.
5. Press Enter . Your file is displayed on the screen.
12 BMP21 User Guide
.

File Management
Replacing a Label File
To replace a file previously saved:
1. Press + to clear your editor.
2. Press , then select Symbol.
- or -
Press + .
3. Select any symbol and Enter .
4. Type: SAMPLE
5. Press , then select File.
6. Press Enter .
7. Select Save, the press Enter .
8. Move the cursor to the number and name of your last saved label, then press
Enter .
9. When prompted to replace the file, select Yes.
10. Type the label file name: NEW, then press Enter .
11.
Press + to clear the display.
BMP21 User Guide 13

File Management
Deleting a Label File
1. Press + to clear your editor.
2. Press .
3. Select File, then press Enter .
4. Select Delete, then press Enter
5. Move the cursor to the number and name of the saved label and
press Enter .
6. When prompted to delete the file, select Yes. Your file is deleted and will not
longer display in the list.
14 BMP21 User Guide

File Management
Saving and Opening a Serialization File
1. Press Label Type .
2. Select Banner Landscape, then press Enter .
3. Type: 12345, then press .
4. Select Serial and Increment By 01.
5. Press
6. Press
7. Press Enter .
8. Press and select File.
9. Select Save and press Enter .
10. Move your cursor to a number where you want the serialization label saved,
11. Type the label file name: SERIAL, then press Enter .
12. Press Print.
13. When your serialization file is printed, press + to clear the
T to End, then X arrow until the screen reads: 12347.
- or -
Type: 347.
T to Copies, then X arrow until the screen reads: 02.
Note: You can save labels to 12 locations. If a name is next to the number, a
label is currently being stored in that location.
then press Enter .
display.
BMP21 User Guide 15

File Management
To open a saved serialization file:
1. Press , then select File.
2. Press Enter , then select Open.
3. Press Enter .
4. Move the cursor to the number and name of the saved label.
5. Press Enter . The first label in the serialization file is displayed on the screen.
16 BMP21 User Guide

Setup
Setup
Setting Up Multiple Prints
1. With legend on the screen, press + Print .
2. Change number of copies to: 02
3. Press Enter .
Changing Unit of Measure
1. Press , then select Units.
2. Press Enter .
3. Select either Inches or Millimeters, then press Enter .
Changing the Language
1. Press , then select Language.
2. Press Enter .
3. Select one of the six languages, then press Enter .
BMP21 User Guide 17

Setup
Changing International Characters
Use this procedure to enter an international character on your screen.
1. Press , then select International.
2. Press Enter .
- or -
Press + .
3. Use the arrow keys to choose the international character you want.
Note: To jump directly to a letter in the list of international characters, you can
also enter the letter you are looking for. In the bottom left of the display is a
character code. This code is the letter and location number of the character. To
jump directly to the desired character, you can also enter the letter and location
number.
4. Press Enter .
Toggling the Backlight
Note: The backlight will automatically turn off when the printer shuts off.
To turn the backlight on:
1. Press .
2. Press .
To turn the backlight off:
1. Press .
2. Press .
18 BMP21 User Guide

Keypad Descriptions
Keypad Descriptions
The following table describes the keypad key, option and a description of each.
Option Key Description
Label Type Includes: Banner Landscape, Wire, Terminal Block,
Patch Panel, Fixed Length, Banner Portrait.
Menu Includes: Symbols, International Characters,
Barcode, File, Language and Units.
Font Size Includes: Auto, 6, 9, 14, 20, 28, 40
(Bold available in each size.)
Function FUNCTION provides access to the yellow
designated menu options on the keyboard.
Backlight FUNCTION + SPACE key.
Barcode In Menu or FUNCTION + 2.
CAPS Lock FUNCTION + FONT SIZE.
Clear FUNCTION + CLEAR key.
(Clears whole legend.)
Delete Deletes text and exits menu screens.
Enter The Enter key works to accept choices with menus
and to add additional lines to text.
Feed FUNCTION + LABEL TYPE.
BMP21 User Guide 19

Keypad Descriptions
Option Key Description
International In Menu or FUNCTION + 6.
Multi-Print FUNCTION + PRINT.
Serial FUNCTION + MENU
(Serializes based on cursor location. Allows for
increment and copies.)
Symbols
In Menu or FUNCTION +1.
20 BMP21 User Guide

Cartridge Selection Guide
Cartridge Selection Guide
Outdoor
Application Nylon
Smooth Surfaces X X X
Textured Surface X X
Cable and Wire X X X
Highly Textured Surfaces X
Terminal Blocks X
Patch Panel X
General ID X X X
Vinyl
Perma-
Sleeve Polyester
Self Lam
Vinyl
BMP21 User Guide 21


Copyright 2009 Brady Worldwide, Inc.
Y954346
All Rights Reserved
BRADY WORLDWIDE, INC.
P.O. Box 2131 Milwaukee, Wisconsin 53201-2131 U.S.A.
 Loading...