

Page 1

Brady WavePoint™ XE2000 User's Guide Notices
Copyright
This manual is copyrighted with all rights reserved. No portion of the manual
may be copied or reproduced by any means without the prior written consent of
Brady Worldwide, Inc.
While every precaution has been taken in the preparation of this document,
Brady assumes no liability to any party for any loss or damage caused by errors
or omissions or by statements resulting from negligence, accident, or any other
cause. Brady further assumes no liability arising out of the application or use of
any product or system described, herein; no any liability for incidental or
consequential damages arising from the use of this docume nt. Brady disclaims
all warranties of merchantability of fitness for a particular purpose.
Trademarks
WavePoint™ is a registered trademark of Brady Worldwide, Inc.
Pentium™ is a trademark of Intel Corporation.
Windows
Brady reserves the right to make changes without further notice to any product or
system described herein to improve reliability, function, or design.
©2000 Brady Worldwide, Inc. All Rights Reserved
U.S. & Canada Europe
®
and Windows NT® are registered trademarks of Microsoft Corporation.
Brady Worldwide, Inc.
6555 West Good Hope Road
P.O. Box 2131
Milwaukee, WI 53201
Brady Worldwide, Inc.
Lindestraat 20
9240—Zele
Belgium
Main Switchboard: (800) 541-1686
32-52-457.994
(414) 358-6600
FAX: (800) 292-2289
Sales/Customer
(800) 537-8791
Support:
Copyright © 2000, Brady Worldwide, Inc.
1
Page 2

Notices Brady WavePoint™ XE2000 User's Guide
Regulatory Statements
FCC Notice — U. S. Only
This device complies with Part 15 of the FCC Rules. Operation is subject to the
following conditions:
1. This device may not cause harmful interference.
2. This device must accept any interference received, including
interference that may cause undesired operation.
3. Changes or modifications not expressly approved by the party
responsible for compliance could void the user's authority to operate the
equipment.
Warning
Changes or modifications not expressly approved by the party responsible for compliance
could void the user’s authority to operate the equipment.
RF Exposure
To comply with FCC RF exposure requirements for mobile transmitting devices, this
transmitter should only be used or installed at locations where there is at least 20cm
separation distance between the antenna and all persons.
FCC ID
NUC-BEPM13
2
Copyright © 2000, Brady Worldwide, Inc.
Page 3

Brady WavePoint™ XE2000 User's Guide Notices
Brady Warranty
Brady products are sold with the understanding that the buyer will test them in
actual use and determine for him or herself their adaptability to his/her intended
uses. Brady warrants to the buyer that its products are free from defects in
material and workmanship during the period of one year from the date of
purchase, but limits its obligation under this warranty to replacement of the Brady
WavePoint™ XE2000 RFID Smart Label Encoder shown to Brady's satisfaction
to have been defective. This warranty does not extend to any persons obtaining
the product from the buyer.
THIS WARRANTY IS IN LIEU OF ANY OTHER WARRANTY, EXPRESS OR
IMPLIED, INCLUDING, BUT NOT LIMITED, TO ANY IMPLIED WARRANTY OF
MERCHANTABILITY OR FITNESS FOR A PARTICULAR PURPOSE, AND OF
ANY OTHER OBLIGATIONS OR LIABILITY ON BRADY'S PART. UNDER NO
CIRCUMSTANCES WILL BRADY BE LIABLE FOR ANY LOSS, DAMAGE,
EXPENSE OR CONSEQUENTIAL DAMAGES OF ANY KIND ARISING IN
CONNECTION WITH THE USE, OR INABILITY TO USE, BRADY'S
PRODUCTS.
Copyright © 2000, Brady Worldwide, Inc.
3
Page 4

Notices Brady WavePoint™ XE2000 User's Guide
License Agreement
YOU SHOULD CAREFULLY READ THE FOLLOWING TERMS & CONDITIONS
OF THIS LICENSE AGREEMENT. IF YOU DO NOT AGREE WITH THESE
TERMS & CONDITIONS, PLEASE PROMPTLY RETURN THIS PACKAGE FOR
A FULL REFUND.
Brady Worldwide, Inc. (hereafter "BRADY") hereby grants you a non-exclusive,
non-transferable license to use the software and accompanying documentation
according to the following terms:
1. LICENSE GRANT: You may only use this software with the Brady
WavePoint™ XE2000 RFID Smart Label Encoder or other Brady
WavePoint™ products.
2. LICENSE RESTRICTIONS: You may not: 1) transmit the software over
a network without agreeing to an additional license; 2) modify, adapt,
translate, reverse engineer, decompile, disassemble, create derivative
works based on, or copy (except for one back-up copy) the software or
the accompanying documentation; 3) rent, transfer, or grant any rights
in the software or accompanying documentation without prior, express
written consent of BRADY; or 4) remove any proprietary notices, labels,
or marks on the software and accompanying documentation.
3. NATURE OF THIS AGREEMENT: This license is not a sale. Title and
copyrights to the software, and accompanying documentation remains
the property of BRADY. Unauthorized copying of the software or the
accompanying documentation, or failure to comply with the above
restrictions, shall automatically terminate this license without further
notice, and terminate your rights to use the software, and BRADY shall,
in addition to its other legal remedies, be entitled to its reasonable
attorney fees.
4. LIMITED WARRANTY: BRADY warrants that, for a period of one year
from the date of delivery to you as evidenced by a copy of your receipt,
the software, as furnished, under normal use, will perform without
significant errors that make it unusable. BRADY's entire liability and
your exclusive remedy under this warranty (which is subject to you
returning the software to BRADY) will be, at the option of BRADY, to
attempt to correct or help you around errors, or to replace the software
with functionally equivalent software or diskettes.
4
Copyright © 2000, Brady Worldwide, Inc.
Page 5

Brady WavePoint™ XE2000 User's Guide Notices
EXCEPT FOR THE ABOVE EXPRESS LIMITED WARRANTY, BRADY
MAKES AND YOU RECEIVE NO WARRANTIES, EXPRESS, IMPLIED,
STATUTORY OR IN ANY COMMUNICATION WITH YOU, AND
BRADY SPECIFICALLY DISCLAIMS ANY IMPLIED WARRANTY
MERCHANTABILITY OR FITNESS FOR A PARTICULAR PURPOSE.
BRADY DOES NOT WARRANT THAT THE OPERATION OF THE
PROGRAM WILL BE UNINTERRUPTED OR ERROR FREE.
Some states do not allow the exclusion of implied warranties so the
above exclusion may not apply to you. This warranty gives you specific
legal rights. You may also have other rights which vary from state to
state.
5. LIMITATION OF LIABILITY: IN NO EVENT WILL BRADY BE LIABLE
FOR ANY DAMAGES, INCLUDING LOSS OF DATA, LOST PROFITS,
COST OF COVER OR OTHER SPECIAL, INCIDENTAL,
CONSEQUENTIAL OR INDIRECT DAMAGES ARISING FROM THE
USE OF THE PROGRAM OR ACCOMPANYING DOCUMENTATION,
HOWEVER CAUSED AND ON ANY THEORY OF LIABILITY. THIS
LIMITATION WILL APPLY EVEN IF BRADY HAS BEEN ADVISED OF
THE POSSIBILITY OF SUCH DAMAGE. YOU ACKNOWLEDGE THAT
THE LICENSE FEE REFLECTS THIS ALLOCATION OF RISK.
Some states do not allow the limitation or exclusion of liability for
incidental, or consequential damages, so the above limitation may not
apply to you.
6. General: This Agreement shall be governed by, and interpreted under,
the laws of the State of Wisconsin. This Agreement is the entire
agreement between the parties and supersedes any other
communications or advertising with respect to the software and
accompanying documentation. If any provision of the Agreement is held
invalid, the remainder of this Agreement shall continue in full force and
effect.
Copyright © 2000, Brady Worldwide, Inc.
5
Page 6

Notices Brady WavePoint™ XE2000 User's Guide
Technical Support
Brady Worldwide, Inc. provides severa l Brady WavePo i nt™ XE2000 system
support options:
1. To speak with a Technical Support Representative, call (800) 643-8766;
Monday – Friday 7:00 a.m. – 7:00 p.m. (CST), or
2. FAX your inquiry to (414) 358-6767, or
3. Contact Brady's Technical Support Team on-line at:
tech_support@bradycorp.com
Technical Support / Canada (800) 643-8766
Technical Support / Europe 32-52-457.994
.
6
Copyright © 2000, Brady Worldwide, Inc.
Page 7

Brady WavePoint™ XE2000 User's Guide Notices
Copyright © 2000, Brady Worldwide, Inc.
7
Page 8

Brady WavePoint™ XE2000 User's Guide
Table of Contents
Chapter 1 - Getting Started..........................................................................10
Unpacking the XE2000................................................................................10
Equipment Checklist and Inspection...........................................................10
Components Included.............................................................................. 11
Reporting Damage...................................................................................12
Storage and Reshipping..........................................................................12
Chapter 2 - XE2000 Specifications.............................................................. 14
Power Adapter Specifications .....................................................................14
Chapter 3 - System Requirements..............................................................16
Chapter 4 - Product Description..................................................................18
Background Information...........................................................................18
XE2000 Components.................................................................................. 19
Chapter 5 - XE2000 Setup and Positioning ................................................22
XE2000 Setup.............................................................................................22
Software Installation................................................................................23
Power Connection ...................................................................................24
Serial Connection....................................................................................24
XE2000 Positioning.....................................................................................25
Encoder Module Height Adjustment........................................................26
Encoder Module Horizontal Adjustment...................................................26
LED Functions.............................................................................................27
XE2000 Status.........................................................................................27
Positioning the XE2000 for Use with RFID Smart Labels............................ 28
Using the XE2000 Utilities Program for Positioning Options.................... 31
Testing XE2000 Connectivity and Positioning.............................................33
Testing XE2000 Connectivity...................................................................33
Testing XE2000 Positioning.....................................................................35
Troubleshooting XE2000 Setup..................................................................37
Chapter 6 - Encoding Smart Labels with the XE2000................................ 38
Delay for Encoding......................................................................................39
Appendix A – Replacement Information..................................................... 40
Appendix B – Delay for Encoding............................................................... 42
Approximating the Delay for Encoding........................................................ 43
Appendix C – Working with Printers........................................................... 46
Printhead Pressure for Thermal Transfer Printers.......................................46
Temperature Settings for Thermal Transfer Printers................................... 47
Print Speed for Thermal Transfer Printers...................................................48
Backfeed.....................................................................................................48
Printhead Pressure Adjustment (for Zebra Printers) ...................................49
Appendix D – Using the Brady RFID Smart Label Demo........................... 50
8
Copyright © 2000, Brady Worldwide, Inc.
Page 9

Brady WavePoint™ XE2000 User's Guide
Index..............................................................................................................52
Copyright © 2000, Brady Worldwide, Inc.
9
Page 10

Getting Started Brady WavePoint™ XE2000 User's Guide
Chapter 1 - Getting Started
Brady WavePoint™ XE2000 is designed to be an integral part of
your asset management and tracking system. The XE2000 is easy
to use right out of the box, and works with a variety of RFID Smart
Labels and thermal transfer printers.
Unpacking the XE2000
Take a few moments to read over this documentation and inventory
the contents of your shipment.
When unpacking the Brady WavePoint™ XE2000, use a sharp knife
or razor to carefully cut along the taped seam on top of the carton,
and open it. Remove the material cushioning the XE2000 and lift it
from the carton.
Save all packing materials.
Equipment Checklist and Inspection
Upon receipt of your XE2000 shipment, check your packa ge
contents for the items listed below, then fill out and return the
enclosed product registration card.
If shortages exist, please contact your local distributor or Brady
Worldwide, Inc. immediately.
10
Copyright © 2000, Brady Worldwide, Inc.
Page 11
Brady WavePoint™ XE2000 User's Guide Getting Started
Components Included
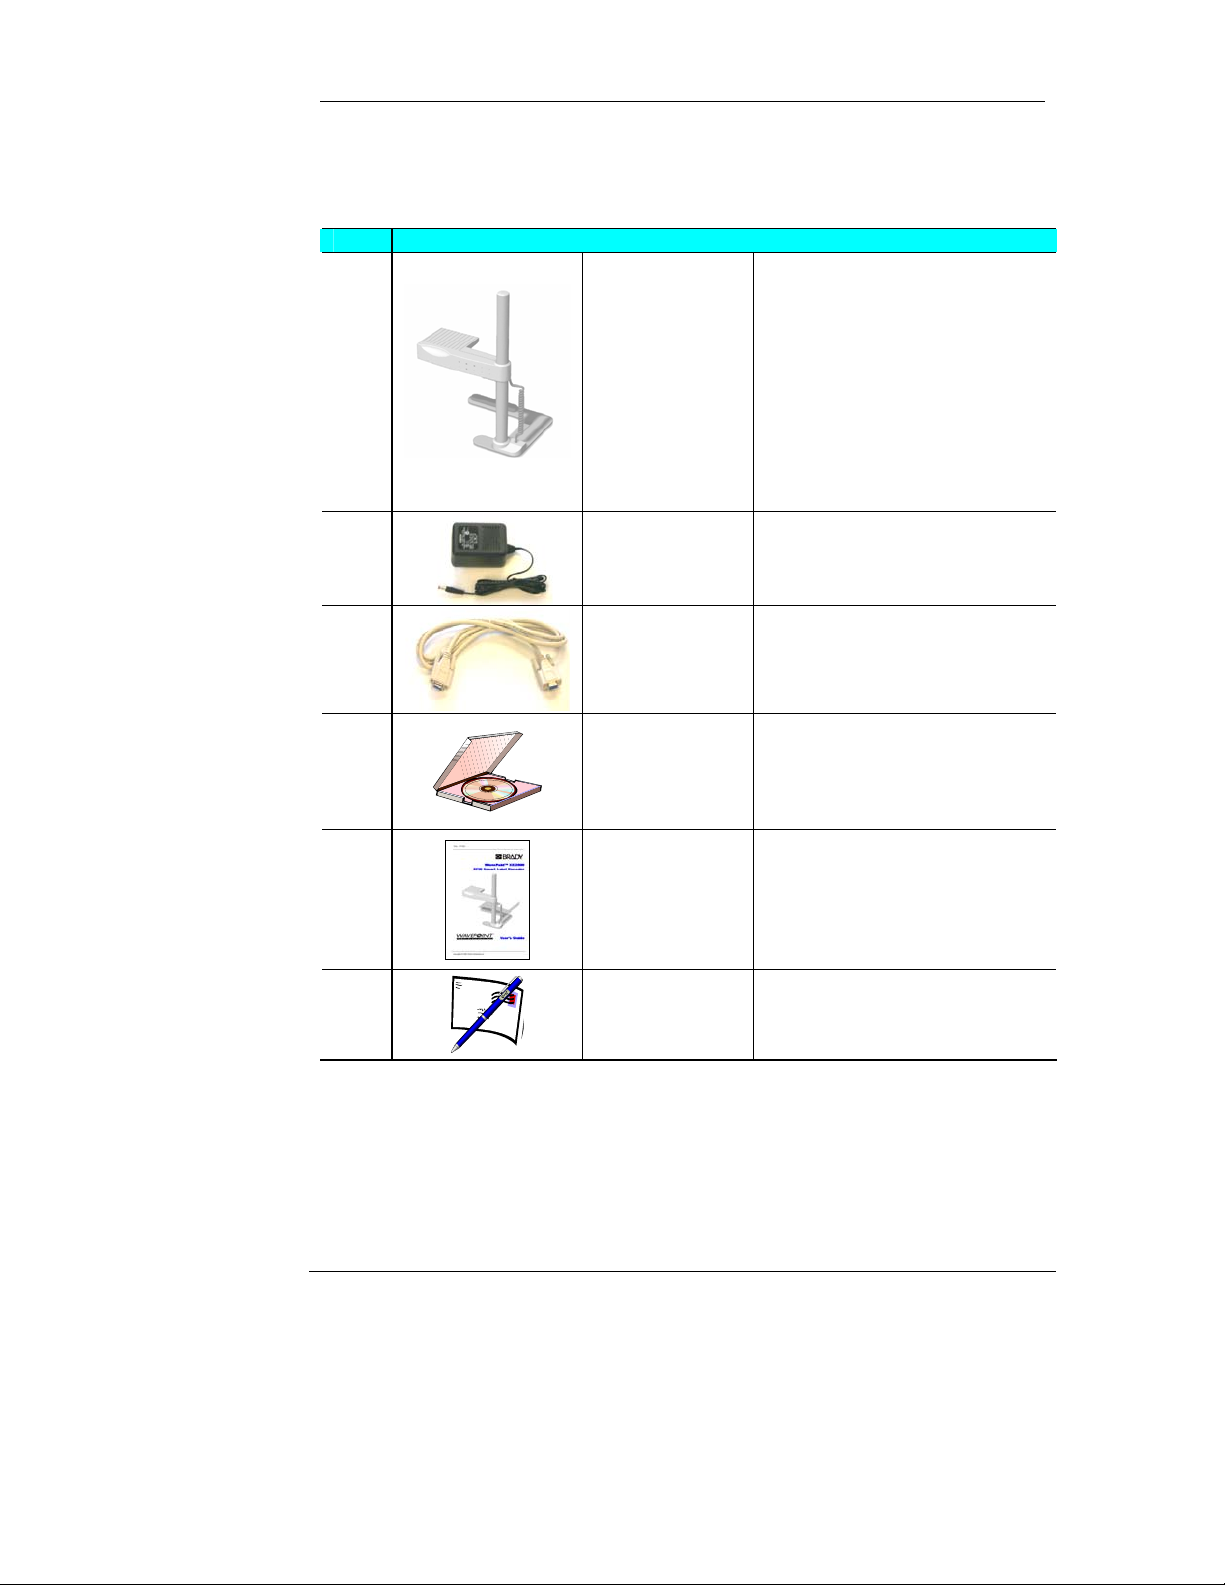
Item Description
Encodes RFID Smart Labels
after the labels are imaged by
a thermal transfer printer.
The Mounting Base provides a
rigid structure for the XE2000.
The Post for the XE2000 is
mounted to the base, allowing
the XE2000 to be positioned
using the bolt, spring, and
adjustment knob.
1
Brady
WavePoint™
XE2000
(including
Mounting Base,
Foam Spacer,
Feet, Post, Bolt,
Adjustment
Knob, Spring,
and Retaining
Ring)
2
3
4
5
6
12V DC Power
Adapter
RS-232 Cable
XE2000
Software CD
(including
documentation)
XE2000 User's
Guide
(this manual)
Product
Registration
Card
Provides power to the Brady
WavePoint™ XE2000.
Connects the XE2000 to a host
computer.
Used to install XE2000 host
library functions on the host
PC. Documentation is also
included on the CD, in PDF
form.
Explains how the XE2000 is
assembled, along with setup
and positioning tips, and offers
suggestions for properly using
the XE2000 and RFID Smart
Labels.
Registers your product for
support, warranty, and product
updates.
Copyright © 2000, Brady Worldwide, Inc.
11
Page 12

Getting Started Brady WavePoint™ XE2000 User's Guide
Reporting Damage
Inspect the XE2000 for possible damage incurred during shipment.
If you discover shipping damage upon inspection, do the follo wing:
1. Immediately notify the shipping company of the damage.
2. Retain all packaging material for shippin g company
inspection.
3. File a Damage Report with the shipping company and notify
your local distributor and Brady Worldwide, Inc. of the
damage. Brady Worldwide, Inc. is not responsible for any
damage occurring during shipment of the equipment and
will not repair this damage under warranty. Immediate
notification of damage to the shipping company or its
insuring agency will generally result in ensuring any
damage claim validity and ultimate monetary compensation.
Storage and Reshipping
If not operating the XE2000 immediately, repackage it using the
original packing materials. The Brady WavePoint™ XE2000 may be
stored under the following conditions:
Temperature
-4° to 140° F (-20° to 60° C)
Relative Humidity 20% to 85% non-condensing
Should it become necessary to ship your Brady WavePoint™
XE2000, carefully pack it in a suitable container to avoid damage
during transit. Whenever possible, the original container from the
factory should be used. If you use a different container, follow a
similar procedure to that originally used to packa ge the XE2000.
12
Copyright © 2000, Brady Worldwide, Inc.
Page 13

Brady WavePoint™ XE2000 User's Guide Getting Started
Copyright © 2000, Brady Worldwide, Inc.
13
Page 14
XE2000 Specifications Brady RFID XE2000 User's Guide
Chapter 2 - XE2000 Specifications
Consider the following product specifications when setting up or
working with the Brady WavePoint™ XE2000:
Input Voltage
Input Current
While Activated
Standby
+12V DC Nominal
150 mA
20 mA
-
Frequency of Operation 13.56 MHz
Temperature
Operating
Storage
o
5
to 40o C (41o to 104o F)
20% to 85% RH, non-condensing
o
to 60o C (-4o to 140o F)
-20
20% to 85% RH, non-condensing
RS-232 Communications 19.2kb, 8 data, 1 stop, No parity
+
Host Software OS Windows 95, 98, or NT 4.0 (or later)
Power Adapter Specifications
Consider the following product specifications with regard to the
120V AC-DC/12V DC power adapter.
Input Voltage
120VAC +
(UL and CSA approvals)
Output 12V DC, 1 A
Temperature
Operating
Storage
o
0
to 40o C (continuous) (32o to 104o F)
10% to 90% RH, non-condensing
o
-20
10% to 90% RH, non-condensing
14
10%, 60Hz
to 80o C (-4o to 176o F)
Copyright © 2000, Brady Worldwide, Inc.
Page 15

Brady WavePoint™ XE2000 User's Guide Specifications
Copyright © 2000, Brady Worldwide, Inc.
15
Page 16

System Requirements Brady WavePoint™ XE2000 User's Guide
Chapter 3 - System Requirements
The Brady WavePoint™ XE2000 requires the following hardware
and softwar e co mponents:
• Pentium processor-based personal computer running
Windows 95, 98, or NT 4.0 (or later) as the operating
system.
• 16 MB of RAM
• CD-ROM drive
• Free Serial Port
• 50 MB of (free) hard drive space
16
Copyright © 2000, Brady Worldwide, Inc.
Page 17

Brady WavePoint™ XE2000 User's Guide System Requirements
Copyright © 2000, Brady Worldwide, Inc.
17
Page 18

Product Description Brady WavePoint™ XE2000 User's Guide
Chapter 4 - Product Description
The Brady WavePoint™ XE2000 is an encoding device for RFID
Smart Labels, generally used with label creation software. The
XE2000 provides a peripheral approach to programming RFI D
Smart Labels. This external approach allows various label
configurations to be used with existing thermal transfer printers.
The external approach also checks the RFID functionality of the
label to verify that it was not damaged during the printing process by
high printhead pressure or extreme angles.
Background Information
RFID Smart Labels are an alternative to traditional RFID cards and
tags. The labels operate at a higher frequency than traditional RFID
cards and tags, which allows the physical construct ion to be thinner,
more flexible, and lower in cost.
With the advent of RFID functionality embedded into standard
converted labels, there is a growing need for a seamless system
with which to image and encode labels. The combination of the
Brady WavePoint™ XE2000, label creation s oftware, RFID Smart
Labels, and a thermal transfer pri nter—along with Brady's traditional
application and integration support—brings the full RFID solution to
hand.
To learn more about Brady RFID Smart Labels and label creation
software, refer to the PDF included on the XE2000 software CDROM, or visit the Brady RFID website at
http://www.bradyrfid.com
.
18
Copyright © 2000, Brady Worldwide, Inc.
Page 19

Brady WavePoint™ XE2000 User's Guide Product Description
XE2000 Components
The following components make up the total Brady WavePoint™
XE2000 unit.
6
1
5
2
3
4
Figure 4-1 XE2000 Components
1. Encoder Module 4. Serial & Power Connection
2. Post 5. Mounting Base
3. Power & Serial Cable Coil 6. Foam Spacer
Copyright © 2000, Brady Worldwide, Inc.
19
Page 20

Product Description Brady WavePoint™ XE2000 User's Guide
h
b
s
Figure 4-2 Encoder Module
The Encoder Module is the portion of
the XE2000 that reads and writes to
RFID Smart Labels. The Encoder
Module is placed adjacent to the exit
bay of the printer so labels are
encoded as they rest over it after
being printed.
The Encoder Module contains three LEDs to indicate the operation
status of the XE2000 (see Chapter 5 for more information).
Figure 4-3 Mounting Base and Post
The mounting base and post provide the
XE2000 Encoder Module
foundation for use with a thermal transfer
printer. The base is positioned under the
printer and is held in place by a foam
spacer an d rubber feet.
The post supports the Encoder Module via
a bolt and adjustment knob located on the
back of the pos t . The height of t h e E nc o der
Module can be adjusted by loosening the
knob and sliding the module up or down.
The XE2000 can be set up and used to
encode a wide variety of labels simply by
adjusting the Encoder Module’s
the post. For example, the Encoder Module may be placed directly
adjacent to the exit bay of the printer for shorter labels, while longer
labels may require a gap between the module and the exit bay.
with a rigid
position on
Deleted: 
Deleted: ,
Deleted: w
capability of
Deleted: a
Deleted: it
20
Copyright © 2000, Brady Worldwide, Inc.
Page 21

Brady WavePoint™ XE2000 User's Guide Product Description
The post also allows the Encoder Module to swing out of the way s o
the user can gain access to the printer or the printed labels.
The physical construction of the base, post, and spring loaded
retaining ring precludes—for the most part—accidental movement of
the XE2000. This is extremely helpful in averting possible alignment
issues during encoding.
Figure 4-4 12V DC Adapter
The adapter provides the XE2000 with
12 volts direct current for proper
operation. The output of the adapter
plugs into the connector located on the
mounting base. The power is then
supplied to the Encoder Module via the
coiled cable.
Figure 4-5 Serial Cable
The serial cable provides a
communication channel between the
host and the XE2000. A connector
located on the mounting base routes
signals (along with power) to the
Encoder Module via the coiled cable.
Copyright © 2000, Brady Worldwide, Inc.
21
Page 22

XE2000 Setup and Positioning Brady WavePoint™ XE2000 User's Guide
Chapter 5 - XE2000 Setup and Positioning
Setting up the Brady WavePoint™ XE2000 is remarkably simple.
Right out of the box, all you need to do is connect the power and
serial cables, and install the software. Correctly positioning the
XE2000 with respect to your thermal transfer printer—although
equally simple—may require a bit of trial and error.
Following is a summary of the steps necessary to setup and position
the XE2000. Detailed instructions for each step follow later in this
chapter. After completing these steps, you are ready to begin
encoding labels.
Step Brief Summary of Step Page
Setup XE2000
Position XE2000
Check LED Display
Position XE2000
For Use with RFID
Smart Labels
Test
Install software. Connect power and serial
cable.
Position mounting base arm under the
printer. Adjust encoder module vertically
and horizontally.
Determine XE2000 status and optimal
positioning.
Optimize label location. Use the XE2000
Utilities Program to view positioning
options.
Test for connectivity and positioning using
the XE2000 Utilities Program.
XE2000 Setup
The following sections describe how to set up the XE2000 to work
with your printer and host PC.
22
25
27
28
33
22
Copyright © 2000, Brady Worldwide, Inc.
Page 23
Brady WavePoint™ XE2000 User's Guide XE2000 Setup and Positioning
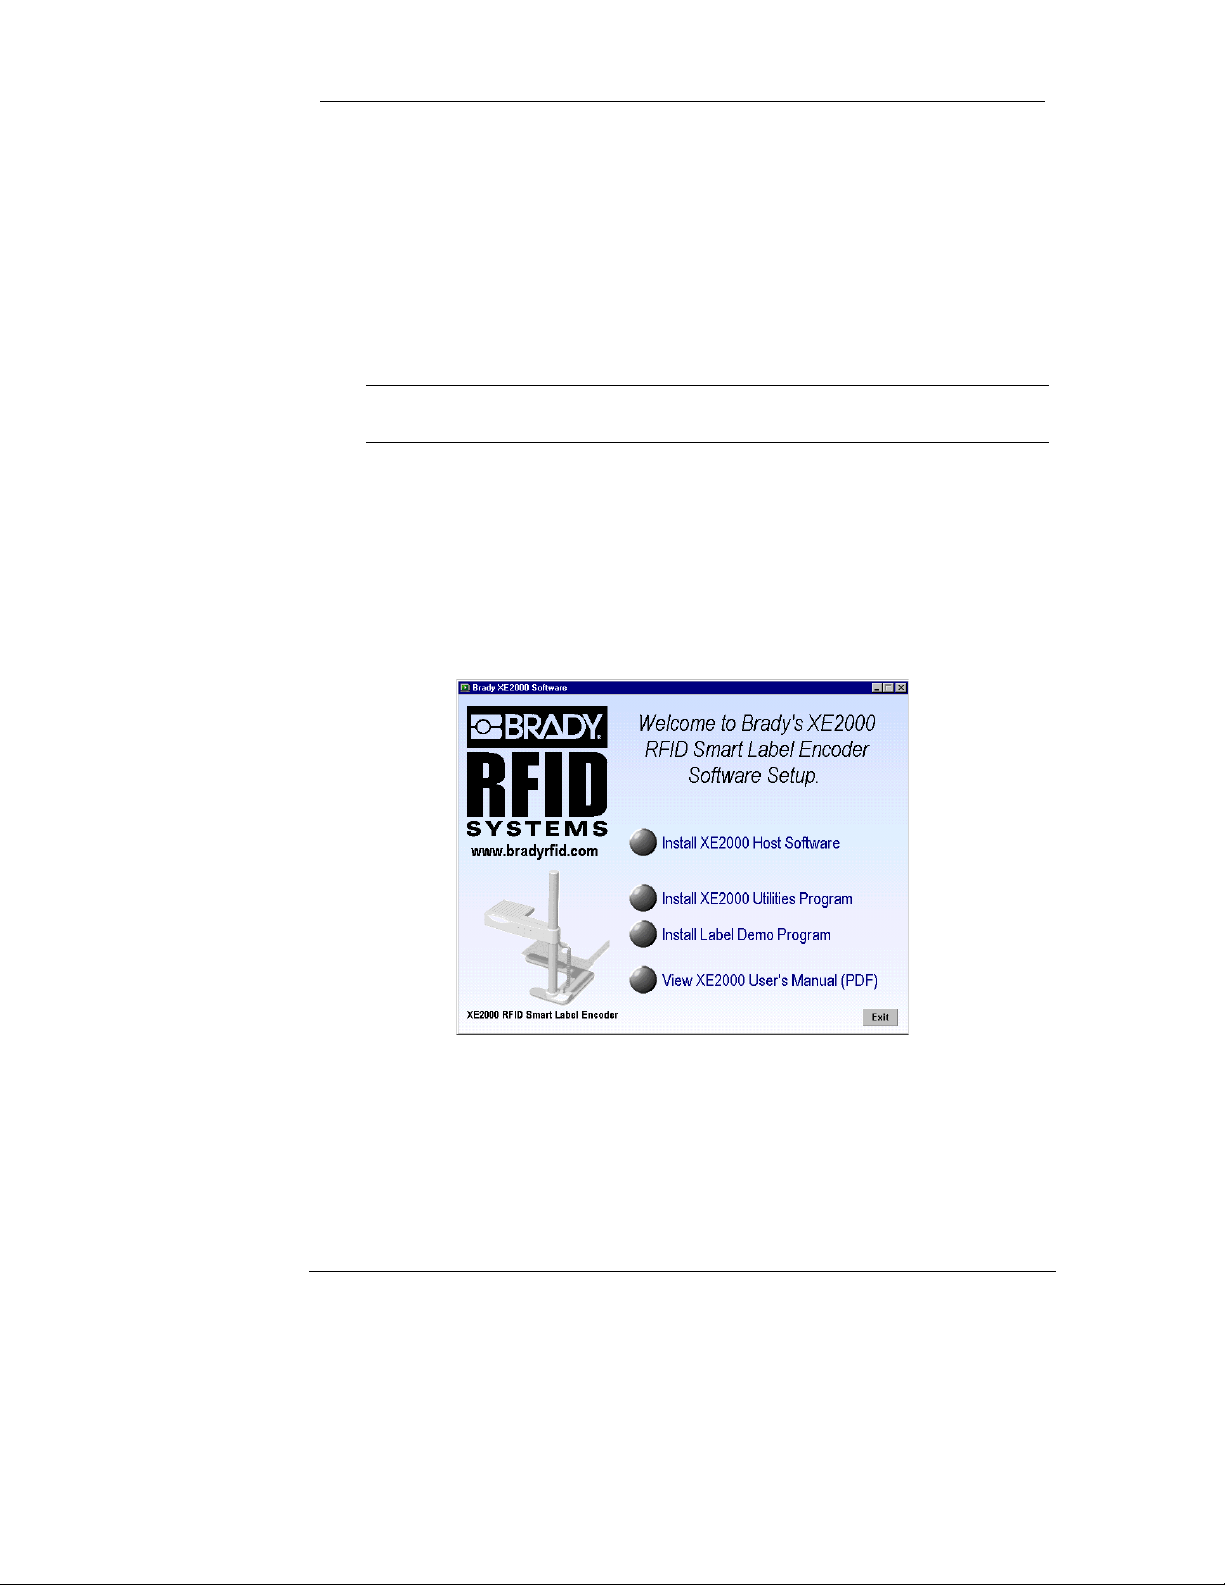
Software Installation
The CD that accompanies the XE2000 contains software necessary
for XE2000-enabled programs to interface with the module. The
software also contains a test program.
Use the auto-run CD to install the software on the PC that will serve
as the host.
The XE2000-enabling software should not be confused with your
label design and/or creation software application.
In addition to the host software installation program, the CD also
includes:
• XE2000 Utilities Program
• Brady RFID Smart Label Demo
• Documentation PDFs
Figure 5-1 XE2000 Software Setup Screen
To verify the hardware is working correctly, all software applications
and programs on the CD must be installed.
Copyright © 2000, Brady Worldwide, Inc.
23
Page 24

XE2000 Setup and Positioning Brady WavePoint™ XE2000 User's Guide
Power Connection
Plug one end of the 12V DC power connection into an outlet and the
other end into the power port on the back of the mounting base
(near the post). When properly connected, the amber LED on the
XE2000 is activated, indicating it is receiving power.
Serial Connection
Plug one end of the DB9 serial cable into the host PC, and the other
end into the DB9 connector next to the power connection on the
XE2000.
1
2
1. The Serial Connection is plugged in on the right side (when
viewed from back) of the coiled cable.
2. The 12V DC Power Connection is plugged in on the left side
(when viewed from back).
Formatted
Formatted
24
Copyright © 2000, Brady Worldwide, Inc.
Page 25

Brady WavePoint™ XE2000 User's Guide XE2000 Setup and Positioning
n
e
l
p
b
o
XE2000 Positioning
Positioning of the XE2000 is crucial to operational effectiveness in
reading and encoding RFID Smart Labels.
differ depending on the printer and labels being used.
padded portion of the mounting base (mounting base arm) is
The
designed to go under the printer.
Figure 5-2 Mounting Base Arm
Tilt the printer slightly to position the mountin g base arm about
halfway under the printer. This is a good starting position, but the
exact position depends on the printer and labels, and therefore may
require adjustment.
When the XE2000 mounting base is positioned correctly, the
Encoder Module itself should be located in such a manner that it
easily swings out of the way without catching on—or hitting—any
part of the printer. This allows for easy adjustments to the Encoder
Module, as well as providing access to the label exit area on the
printer.
Exact positioning will
Deleted: ,
Deleted: a
Deleted: d
Deleted: 
Deleted: Ti
so you can
Deleted: a
Deleted: p
adjustment.
Figure 5-3 XE2000 Mounting Base Positioned to Printer
Copyright © 2000, Brady Worldwide, Inc.
25
Page 26

XE2000 Setup and Positioning Brady WavePoint™ XE2000 User's Guide
Encoder Module Height Adjustment
The Encoder Module height can be adjusted by loosening the
adjustment knob on the back of the post and sliding the module up
or down.
The height of the Encoder Module should be such that the Encod er
Module sits just beneath the label exit area of the printer
(approximately 1/8 inch below the horizontal exit plane of the
labels). This ensures that labels will flow easily out of the printer and
over the Encoder Module.
Encoder Module Horizontal Adjustment
The encoder module can be adjusted horizontally by positioning the
mounting base arm either more or less under the printer. The exact
horizontal or vertical adjustment will depend on the printer and
labels.
The XE2000 Encoder Module was intentionally designed to have a
long but narrow "RF Active Area" for encoding RFID Smart Labels.
RF Active Areas
Antennas in both the Brady WavePoint™ XE2000 Encoder Module
and RFID Smart Labels are used to send and receive RF energy
and data. The areas where these antennas receive most of the
energy are referred to as RF Active Areas in this manual. Refer to
Figure 5-5 RFID Smart Label RF Active .
The length of the Encoder Module's RF Active Area allows for a
variety of label widths, while the narrowness allows you to encode
either long or short labels without encoding adjacent labels. The
current offering of Brady RFID Smart Label sizes can be found on
the CD-ROM provided, or by visiting the Brady RFID website at
http://www.bradyrfid.com
26
.
Copyright © 2000, Brady Worldwide, Inc.
Page 27

Brady WavePoint™ XE2000 User's Guide XE2000 Setup and Positioning
LED Functions
Once the XE2000 is positioned adjacent to the printer, and the
power and serial connections are made, refer to the LEDs (Light
Emitting Diodes) on the front of the XE2000 to check its status and
help determine its optimal positioning.
Figure 5-4 LED Display
XE2000 Status
The following list indicates the XE2000 state to which each LED
corresponds.
Amber
XE2000 is receiving power
Red
Green
Copyright © 2000, Brady Worldwide, Inc.
XE2000 is attempting to read/write a label
XE2000 has successfully read/written a
label
27
Page 28

XE2000 Setup and Positioning Brady WavePoint™ XE2000 User's Guide
Positioning the XE2000 for Use with RFID Smart Labels
There is no size standard for RFID Smart Labels, so the optimal
placement of various labels cannot be specified exactly. It is
suggested, however, that the most advantageous placement for an
effective read/write of an RFID Smart Label is one w here a majority
of the label's RF Active Area rests over the XE2000's RF Active
Area after the label exits the thermal transfer printer, as shown in
the following illustration:
3
1
2
Figure 5-5 RFID Smart Label RF Active Area—Not Drawn to Scale
1. RFID Smart Label RF Active Area
2. XE2000 RF Inactive Area
3. XE2000 RF Active Area (Inside the antenna coil)
Use the XE2000 Utilities Program to familiarize yourself with proper
label positioning. Refer to Using the XE2000 Utilities Program for
Positioning Options on page 31 of this document.
28
Copyright © 2000, Brady Worldwide, Inc.
Formatted
Page 29

Brady WavePoint™ XE2000 User's Guide XE2000 Setup and Positioning
The XE2000 was also intentionally designed to have a very large
"RF Inactive Area" next to the RF Active Area. When a label is
completely within this RF Inactive Area, there is no energy
transferred between the XE2000 and the label. This functionality
provides additional protection against encoding unnecessary or
undesired labels that may be adjacent to labels actually being
encoded.
To optimize label location, before printing on RFID Smart Labels, it
is suggested that you test non-RFID labels of the same size. This
allows for proper positioning of the labels (as well as a test of their
design and presentation), without wasting the more costly RFID
Smart Labels.
On exiting the printer, a large portion of the label's RF Active Area
should be positioned over the XE2000's RF Active Area. If this isn't
the case, adjusting the backfeed of the printer, or physically moving
the XE2000 with respect to the printer, can help you achieve the
correct positioning.
Refer to Appendix C – Working with Printers, for more information
on backfeed.
Copyright © 2000, Brady Worldwide, Inc.
29
Page 30

XE2000 Setup and Positioning Brady WavePoint™ XE2000 User's Guide
The following illustrations show examples of good and bad RFID
Smart Label positioning over the XE2000:
Figure 5-6 Good XE2000 & Label Positioning
Figure 5-7 Bad XE2000 & Label Positioning
30
Copyright © 2000, Brady Worldwide, Inc.
Page 31

Brady WavePoint™ XE2000 User's Guide XE2000 Setup and Positioning
Using the XE2000 Utilities Program for Positioning Options
Use the XE2000 Utilities Program to familiarize yourself with label
positioning that falls within the acceptable placement range.
1. Double-click the XE2000 Utilities Program icon
located on your desktop (installed from XE2000
CD).
2. When the XE2000 Utilities Program window is displayed,
click either the Square Label or Rectangle Label button to
indicate the type of label with which you are working.
3. Click and drag the label over the XE2000 to determine
where to position the label in order for it to be successfully
encoded by the XE2000.
The program's background color changes from green to red as you
move into an d ou t of accepta ble placem en t zones.
Figure 5-8 Good Placement Zone
Copyright © 2000, Brady Worldwide, Inc.
31
Page 32

XE2000 Setup and Positioning Brady WavePoint™ XE2000 User's Guide
Figure 5-9 Bad Placement Zone
4. Click the Close (X) button in the upper right corner of the
window to close the XE2000 Utilities Program.
32
Copyright © 2000, Brady Worldwide, Inc.
Page 33

Brady WavePoint™ XE2000 User's Guide XE2000 Setup and Positioning
Testing XE2000 Connectivity and Positioning
After the XE2000 is in position and the software is installed, you
should test both the connectivity and positioning using the XE2000
Utilities Program.
Testing XE2000 Connectivity
Prior to loading your thermal transfer printer with RFID Smart
Labels, run the following test using one label t o ensur e your XE 200 0
has power and is communicating with the host PC.
1. Double-click the XE2000 Utilities Program icon
located on your desktop (installed from XE2000
CD).
2. Click the Read Labels button located at the bottom right
corner of the XE2000 Utilities
Program window.
3. The COMM P o r t Number dialog is displayed:
Enter the COMM port to which you are connecting and click
the OK button.
4. The Reader Output window is displayed, and each label is
read as the user places a label over the XE2000’s RF
Active, its serial number is displayed:
Copyright © 2000, Brady Worldwide, Inc.
33
Page 34

XE2000 Setup and Positioning Brady WavePoint™ XE2000 User's Guide
At this point, the amber LED on the front of the XE2000
should be continually displayed (with no blinking),
indicating the XE2000 is receiving power
The red LED should be blinking, indicating it is
communicating with the host PC and is reading/writing (or
attempting to) labels.
When the XE2000 reads an RFID Smart Label (when the
XE2000 active area and the label active area overlap), the
green LED flashes quickly, indicating a successful read.
If a label is placed over the XE2000 and the green LED is not
activated, consider the possibility that the chip in the label is
damaged and can't be read. Try another l abel to verify that the
problem is not a damaged label.
5. When you are satisfied with the XE2000's connectivity, click
the Close (X) button on the Reader Output window to close
the XE2000 Utilities Program.
34
Copyright © 2000, Brady Worldwide, Inc.
Page 35

Brady WavePoint™ XE2000 User's Guide XE2000 Setup and Positioning
Testing XE2000 Positioning
Once you've confirmed the XE2000 is communicating with the host
PC, load RFID Smart Labels into your thermal transfer printer and
use the same XE2000 Utilities Program to check the positioning of
the XE2000. You will probably need to calibrate the printer (the
procedure for which depends on the specific printer being used).
1. Double-click the XE2000 Utilities Program
icon located on your desktop.
2. Click the Read Labels button located at the
bottom right corner of the XE2000
Utilities Program window.
3. The COMM P o r t Number dialog is displayed.
Enter the COMM port to which you are connecting and click
OK.
4. When the Reader Output window is displayed, press the
feed button on your printer to send a label through the
printer and over the XE2000.
Copyright © 2000, Brady Worldwide, Inc.
35
Page 36

XE2000 Setup and Positioning Brady WavePoint™ XE2000 User's Guide
5. As each label is read, its serial number should be displayed
on the Reader Output window. If a serial number is not
displayed, either the RF Active Areas are not aligned
properly or the RFID Smart Label could be damaged.
6. Advance (or feed) labels—one at a time—through the
printer and over the XE2000 to ensure its horiz ontal and
vertical position is correct. Feeding the labels one at a time
through without tearing them off, should further ensure your
positioning is good. Three to five labels should be sufficient
to test the XE2000's positioning.
It is suggested that you move the Encoder Module slightly in all
directions during testing to verify that it is not physically located in
an area that occasionally might not be encoded, due to RF Active
Areas not overlapping correctly.
7. Once you feel comfortable with the positioning of the
XE2000, print a few labels (using your label creation
software) to verify that your design is accurate, the delay for
encoding is sufficient (refer to Appendix B – Delay for
Encoding), and that the desired results are being achieved.
8. When you are done testing the positioning, click the Close
(X) button on the Reader Output window to close the
XE2000 Utilities Program.
Refer to your label creation software documentation for details on
enabling the RFID Smart Label functionality of the package.
36
Copyright © 2000, Brady Worldwide, Inc.
Page 37

Brady WavePoint™ XE2000 User's Guide XE2000 Setup and Positioning
Troubleshooting XE2000 Setup
.Use the following flowchart to troubleshoot problems encountered
when setting up your XE2000.
contact Brady Support. Refer to Technical Support on page 6 of this
document for contact numbers.
For further troubleshooting assistance,
1
1. XE2000 appears to be dead.
2. Is Amber LE D on?
3. Is the +12V DC power supply
connected?
4. Plug in supply and test XE2000
2
No
3
No
4
again.
5. Run XE2000 Utilities Program.
Yes
6. Are errors displayed?
7. XE2000 hardware and host software
5
are functioning; check label creation
software.
8. Is error software related?
6
Yes
8
No
No
7
9
9. Verify correct serial cable is properly
connected.
10. Is cabling OK?
11. Correct cabling problems and test
XE2000 again.
12. Uninstall XE2000 host software and
reinstall.
Yes
13. Is problem fixed?
14. Contact your supplier or Brady RFID
12
13
Yes
No
10
Yes
14
No
11
support.
15. Verify no problem exists with label
creation software.
15
Copyright © 2000, Brady Worldwide, Inc.
37
Page 38

Encoding Smart Labels with the EPM Brady WavePoint™ XE2000 User's Guide
Chapter 6 - Encoding Smart Labels with the
XE2000
Using the Brady WavePoint™ XE2000 to encode RFID Smart
Labels is typically done in conjunction with label creation software
and a thermal transfer printer.
Due to the variety of both software and printer products that may
suit your needs, specifics on using either are not covered in this
manual.
For details and instructions on formatting labels, refer to your label
creation software documentation. Likewise, for instructions on
loading and calibrating your printer, refer to the printer
documentation.
These steps provide a general procedure that may be followed
when printing RFID Smart Labels and encoding them with the
XE2000.
1. Open your label creation software program, which probably
requires you to indicate the label and library to be printed.
2. Click the "Print" button to send the labels to the printer.
3. Typically, a message is displayed, keeping you apprised of
the print status. The length of time this message is
displayed depends on the number of labels in the print job.
It is likely this message does not provide an encoding
status, merely a printing status.
4. Upon completion of the print/encoding job, the label creation
software can produce a log indicating the status of the
XE2000 label reads.
38
Copyright © 2000, Brady Worldwide, Inc.
Page 39

Brady WavePoint™ XE2000 User's Guide Encoding Smart Labels with the XE2000
Delay for Encoding
A delay is required during the printing process in order for the
XE2000 to encode the label.
The label creation software sends a print job to the printer and is
aware when the printer is finished accepting the job. However, the
label creation software is not aware of when the label is actually
printed and has come to a stop.
Therefor e, the delay for encoding is ba sed—primarily—on the time it
takes for the printer to physically print the label; and, possibly, for
the printer to backfeed the label into the printer (for printing).
A large variety of thermal transfer printers, RFID Smart Label sizes,
and label creation software packages exist. Therefore the delay
required is usually different for the variety of applications and must
be set accordingly to that application.
Refer to Appendix B – Delay for Encoding, for more information.
Copyright © 2000, Brady Worldwide, Inc.
39
Page 40

Appendix A – Replacement Information Brady WavePoint™ XE2000 User's Guide
Appendix A – Replacement Information
There is no maintenance required for the XE2000. If replacement
parts are needed, contact Brady, using the following part numbers.
Part # Description
Brady WavePoint™ XE2000 (including Encoder Unit and
63986
63987 XE2000 Software CD
63988 XE2000 User's Guide—English
63994 Power Supply
20887 European Power Supply
63073 Serial Cable
63989 Carriage Bolt/Spring Assembly
63990 Screws
63991 Rubber Feet
63992 Foam Spacers
63993
63995 XE2000 User's Guide—French
63996 XE2000 User's Guide—German
63997 XE2000 User's Guide—Spanish
63998 XE2000 User's Guide—Italian
63999 XE2000 User's Guide—Dutch
Electronics, XE2000 Software CD, XE2000 Users Guide,
Power Supply, and Serial Cable)
Serial Cable Adapter (to convert 9-pin female to 25-pin
female)
40
Copyright © 2000, Brady Worldwide, Inc.
Page 41

Brady WavePoint™ XE2000 User's Guide Appendix A – Replacement Information
Copyright © 2000, Brady Worldwide, Inc.
41
Page 42

Appendix B – Delay for Encoding Brady WavePoint™ XE2000 User's Guide
Appendix B – Delay for Encoding
A delay is required during the printing process in order for the
XE2000 to encode the label. This required minimum delay is an
estimate based on the overall printing and encoding process.
The label creation software sends a print job to the printer and is
aware when the printer is finished accepting the job. However, the
label creation software is not aware of when the label is actually
printed and has come to a stop.
Therefor e, the delay for encoding is ba sed—primarily—on the time it
takes for the printer to physically print the label; and, possibly, for
the printer to backfeed the label into the printer (for printing). The
overall delay should also include a margin of error for other minor,
unknown factors.
42
Copyright © 2000, Brady Worldwide, Inc.
Page 43

Brady WavePoint™ XE2000 User's Guide Appendix B – Delay for Encoding
i
i
Approximating the Delay for Encoding
Calculate the following to determine the encoding delay based on
the label and printer parameters. Examples are given below:
Setting Value Description
Backfeed Speed 2 in/sec Usually fixed
Backfeed Amou nt 0.5 in
Label Print Speed 4 in/sec
Label Length 2 in User-defined when formatting labels
Suggested Margin +150%
The following example demonstrates this calculation based on the
values in the preceding table:
Delay =
0.5in 2in
n
(
+ ) * 150% = (250ms + 500ms) * 1.50 = 1125ms
2
n
sec
4 sec
Typically user-defined, but can be
fixed
Typically user-defined, but can be
fixed
Equates to 50% more time than the
backfeed speed & amount, and the
label print speed and length. The
margin can be reduced as the user
becomes familiar with the system.
Copyright © 2000, Brady Worldwide, Inc.
43
Page 44

Appendix B – Delay for Encoding Brady WavePoint™ XE2000 User's Guide
The delay should not be reduced below the minimum required
value, as below this value there is a significant chance the label
might still be moving from the printing process.
Since alignment of the XE2000 and label RF active areas is critical,
lowering the delay could negatively affect the encoding process.
This negative effect could manifest itself as failing to read good
labels, not properly writing to good labels, not proper ly recognizing
bad labels, etc.
If an unknown—yet significant—delay factor exists outside the
parameters of the previous calculation, the system will attempt to
encode labels before they come to a stop. The same negative
effects (mentioned earlier) could also be seen in this circumstance.
Although it may seem the human ear and eye are not perceptive
enough to distinguish if the delay is appropriate; in fact, the ear and
eye combination should be able to recognize a delay of a few
hundred milliseconds, and determine if the delay is sufficient.
A good rule of thumb is to listen for the printing to stop and w atch for
the red LED to display.
Delay for encoding settings can be managed from the RFID Options
window in certain label creation software packages.
44
Copyright © 2000, Brady Worldwide, Inc.
Page 45

Brady WavePoint™ XE2000 User's Guide Appendix B – Delay for Encoding
Copyright © 2000, Brady Worldwide, Inc.
45
Page 46

Appendix C – Working with Printers Brady WavePoint™ XE2000 User's Guide
Appendix C – Working with Printers
Some printer settings can have an impact on the XE2000's ability to
encode RFID Smart Labels. For example, if the printhead pressure
is too high, the chip can be damaged.
This appendix is not meant to be an all-inclusive guide to working
with your thermal transfer printer, but is provided to point you in the
direction of the most obvious answers to the most common
questions you may have with regard to using the XE2000 and your
thermal transfer printer.
In all cases, refer to your printer documentation for specific
adjustments and recommendations from the printer manufacturer.
Printhead Pressure for Thermal Transfer Printers
The more pressure applied to the printhead, the greater the
possibility of chip damage. Therefore, it is generally advisable to try
increasing the printing temperature to achieve the desired print
quality, as opposed to increasing the printhead pressure.
Note: Using the lowest pressure that produces the desired print
quality maximizes printhead life.
46
Copyright © 2000, Brady Worldwide, Inc.
Page 47

Brady WavePoint™ XE2000 EPM User's Guide Appendix C – Working with Printers
Temperature Settings for Thermal Transfer Printers
The temperature setting for thermal transfer printers refers to the
temperature at which the resin is transferred to the label surface.
Increasing the temperature when printing labels causes the amount
of resin transferred to the label to increase. This may cause printed
images to appear blotchy, which can severely affect barcode quality.
Higher temperatures also reduce printhead life. Print quality is
determined by temperature, print speed, and printhead pressure.
Darkness (or temperature) settings are dependent upon a variety of
factors, including ribbon type, media, and the condition of the
printhead. You may find it necessary to adjust the temperature
parameter on your printer for consistent high-quality printing.
If print is too light or if there are voids in printed areas, you should
increase the temperature.
If print is too dark or if there is spreading or bleeding of printed
areas, you should decrease the temperature.
Caution: Set the temperature to the lowest setting possible while
maintaining the desired print quality. A temperature set too high for
a given ribbon may cause smearing and/or burning through the
ribbon.
Copyright © 2000, Brady Worldwide, Inc.
47
Page 48

Appendix C – Working with Printers Brady WavePoint™ XE2000 User's Guide
Print Speed for Thermal Transfer Printers
Print speed refers to the speed at which the label is printed.
Reducing print speed will usually increase print quality. Print quality
is usually determined by print head pressure, print speed, and
printing temperature.
Backfeed
Some printers have the ability to backfeed the label so that it is
easier to tear off the last label printed.
The backfeed offset is the amount of label that is advanced beyond
the end of a printing batch. When printing is resumed, the label is
drawn back into the printer to its starting position.
48
Copyright © 2000, Brady Worldwide, Inc.
Page 49

Brady WavePoint™ XE2000 EPM User's Guide Appendix C – Working with Printers
Printhead Pressure Adjustment (for Zebra Printers)
The following procedure is specific to Zebra printers, but can be
used to help determine how to adjust the printhead pressure on
other types of printers.
If printhead pressure must be adjusted (for example if the printer is
printing too light on one side of the label, or if a thick media is used),
follow these steps (or those specified by your thermal transfer
printer manufacturer).
1. Lower the Darkness setting and print PAUSE test label at
speed A.
2. Loosen the knurled (upper) locking nut.
3. Increase or decrease spring pressure (using the knurled
adjustment nut on the shaft of the toggle) until the left and
right edges of the printed area are equally dark.
4. Increase Darkness to optimum level for the media being
used.
5. Retighten locking nut.
Copyright © 2000, Brady Worldwide, Inc.
49
Page 50

Appendix D – Smart Label Demo Brady WavePoint™ XE2000 User's Guide
Appendix D – Using the Brady RFID Smart Label
Demo
From time to time you may have a need to verify encoding results,
and the Brady RFID Smart Label Demo provides you visual
verification, quickly and easily.
1. Double-click the Label Demo icon on your
desktop (installed from XE2000 CD).
2. When the Brady RFID Smart Label Demo opens, position a
label on the XE2000 and click the Repeatedly Read Labels
button:
3. The label read times out after 10 seconds, and you are
prompted to place another label on the XE2000:
Click the Stop Reading button to freeze the screen display
by disabling the timeouts.
50
Copyright © 2000, Brady Worldwide, Inc.
Page 51

Brady WavePoint™ XE2000 EPM User's Guide Appendix D – Smart Label Demo
The demo program recognizes unprogrammed labels, as
shown her e:
4. When you finish reading labels, click the Stop Reading
button on the Brady RFID Smart Label Demo dialog and
close all windows related to this program.
Copyright © 2000, Brady Worldwide, Inc.
51
Page 52
Index Brady WavePoint™ XE2000 User's Guide
Index
1
12V DC Power Adapter.........12, 22
B
Backfeed .....................................49
Getting Started............................ 11
Inspecting the XE2000................ 11
G
I
amount.....................................44
speed.......................................44
Brady RFID External Programming
Module.....................................19
description ...............................19
XE2000....................................19
Brady RFID Smart Labels............19
Label Creation Software
using........................................39
Labels
length ...................................... 44
L
print speed...............................44
C
License Agreement....................... 5
License Restrictions...................... 5
Components - XE2000..........12, 20
Limited Warranty........................... 5
Copyright.......................................1
Customer Support.........................7
D
Delay for Encoding......................40
calculating................................44
Demo...........................................51
Description of XE2000.................19
Ordering Information................... 41
Power Adapter............................22
Power Supply Specifications....... 15
O
P
input voltage............................15
E
operating temperature.............15
output......................................15
Encoding
Smart Labels............................39
Encoding Delay.....................40, 43
Equipment Checklist....................11
storage temperature................ 15
Printing
adjusting printhead pressure...50
backfeed.................................. 49
delay for encoding................... 43
F
FCC ID..........................................2
FCC Notice....................................2
52
label length..............................44
label print speed...................... 44
print speed...............................49
temperature settings.......... 47, 48
working with printers................47
Copyright © 2000, Brady Worldwide, Inc.
Page 53
Brady WavePoint™ XE2000 EPM User's Guide Appendix D – Smart Label Demo
R
Reordering Information................41
storage temperature................ 15
Technical Support......................... 7
Trademarks............................... 1, 2
Replacement Parts
ordering....................................41
W
Reporting Damage
from shipping...........................13
Warranty.......................................4
RFID Smart Label Demo.............51
RFID Smart Labels......................19
encoding..................................39
X
RS-232
serial cable...............................22
RS-232 Cable..............................12
RS-232 Communications.............15
XE2000
components included ........ 12, 20
demo.......................................51
description............................... 19
encoding Smart Labels............ 39
S
equipment checklist................. 11
External Programming Module 21
Serial Cable.................................22
Setup and Positioning .................23
Shipping ......................................13
Smart Label Demo ......................51
Smart Labels...............................19
encoding..................................39
Software CD................................12
software installation.................24
Software Installation....................24
Storage........................................13
humidity ...................................13
temperature .............................13
Support..........................................7
System Requirements.................17
power adapter .........................22
reporting damage....................13
serial cable..............................22
setup ....................................... 23
setup and positioning .............. 23
shipping...................................13
storage....................................13
storage humidity...................... 13
storage temperature................ 13
system requirements............... 17
technical specifications............ 15
XE2000
getting started with..................11
inspecting contents..................11
unpacking................................11
T
Technical Specifications..............15
host software OS.....................15
input current.............................15
input voltage ............................15
operating sys tem for host
software................................15
operating temperature..............15
operational frequency ..............15
RS-232 communications..........15
XE2000 Setup............................. 23
software installation.................24
XE2000 Specifications................ 15
input current ............................15
input voltage............................15
operating system..................... 15
operating temperature.............15
operational frequency.............. 15
power supply specifications..... 15
RS-232 Communications.........15
storage temperature................ 15
Copyright © 2000, Brady Worldwide, Inc.
53
 Loading...