

Page 1

Page 2

2
Copyright This manual is copyrighted with all rights reserved. No portion of this manual may be copied or
reproduced by any means without the prior consent of Brady Worldwide, Inc.
While every precaution has been taken in preparati on of this do cume nt, Brad y assume s no liab ility to any part y
for any loss or damage caused by errors or omissions or by statements resulting from negligence, accident, or
any other cause. Brady further assumes no liability arising out of the application or use of any product or system
described, herein; nor any liability for incidental or consequential damages arising from the use of thi s
document. Brady disclaims all warranties of merchantability or fitness for a particular purpose.
Brady reserves the right to make changes without further notice to any product or system herein to improve
reliability, function, or design.
Reproduction of this material, in part or whole, is strictly prohibited without the written permission of Brady
Worldwide, Inc. For mo re inf ormat ion, contact: Brady Worldwide, Inc. 6555 W. Good Hope Road, Milwaukee,
WI 53223.
Disclaimer Every effort has been made to make this guide as accurate and complete as possible. Brady
Worldwide, Inc. is not responsible for labeling inaccuracies and omissions occurring during the use of this
guide.
This manual is proprietary to Brady Worldwide, Inc. and may be revised from time to time without notice.
Brady Worldwide, Inc. disclaims any understanding to provide you with revisions, if any.
Trademarks Windows CE is a trademark of the Microsoft Corporation.
Adobe Illustrator is a trademark of the Adobe Corporation.
All brand or product names referenced in this manual are trademarks (™) or registered trademarks (®) of their
respective companies or organizations.
Y885775 BradyConnect 10/100 Internal Print Server User Guide 7/18/08
Page 3

Contents
About This Document . . . . . . . . . . . . . . . . . . . . . . . . . . . . . . . . . . . . . . . 7
Who Should Use This Document. . . . . . . . . . . . . . . . . . . . . . . . . . . . . . . . . . . .8
How This Document Is Organized . . . . . . . . . . . . . . . . . . . . . . . . . . . . . . . . . . .8
Contacts. . . . . . . . . . . . . . . . . . . . . . . . . . . . . . . . . . . . . . . . . . . . . . . . . . . . . . .9
Corporate Headquarters . . . . . . . . . . . . . . . . . . . . . . . . . . . . . . . . . . . . . . .9
Technical Service. . . . . . . . . . . . . . . . . . . . . . . . . . . . . . . . . . . . . . . . . . . . .9
Other Websites . . . . . . . . . . . . . . . . . . . . . . . . . . . . . . . . . . . . . . . . . . . . . .9
Document Conventions . . . . . . . . . . . . . . . . . . . . . . . . . . . . . . . . . . . . . . . . . .10
Related Documents . . . . . . . . . . . . . . . . . . . . . . . . . . . . . . . . . . . . . . . . . . . . .12
1 • Introduction . . . . . . . . . . . . . . . . . . . . . . . . . . . . . . . . . . . . . . . . . . . 13
Overview . . . . . . . . . . . . . . . . . . . . . . . . . . . . . . . . . . . . . . . . . . . . . . . . . . . . .14
Components. . . . . . . . . . . . . . . . . . . . . . . . . . . . . . . . . . . . . . . . . . . . . . . .14
Requirements. . . . . . . . . . . . . . . . . . . . . . . . . . . . . . . . . . . . . . . . . . . . . . . . . .15
Firmware . . . . . . . . . . . . . . . . . . . . . . . . . . . . . . . . . . . . . . . . . . . . . . . . . .15
Browser Support . . . . . . . . . . . . . . . . . . . . . . . . . . . . . . . . . . . . . . . . . . . .15
Protocols . . . . . . . . . . . . . . . . . . . . . . . . . . . . . . . . . . . . . . . . . . . . . . . . . .15
Hardware . . . . . . . . . . . . . . . . . . . . . . . . . . . . . . . . . . . . . . . . . . . . . . . . . .15
Compatibility. . . . . . . . . . . . . . . . . . . . . . . . . . . . . . . . . . . . . . . . . . . . . . . . . . .16
Technical Specifications for the 10/100 Internal PS . . . . . . . . . . . . . . . . . . . . .17
2 • 10/100 Internal Print Server . . . . . . . . . . . . . . . . . . . . . . . . . . . . . . . 19
10/100 Internal PS Features . . . . . . . . . . . . . . . . . . . . . . . . . . . . . . . . . . . . . .20
Status and Configuration . . . . . . . . . . . . . . . . . . . . . . . . . . . . . . . . . . . . . .20
Print Server Status . . . . . . . . . . . . . . . . . . . . . . . . . . . . . . . . . . . . . . . . . . .28
Reset . . . . . . . . . . . . . . . . . . . . . . . . . . . . . . . . . . . . . . . . . . . . . . . . . . . . .30
Restore. . . . . . . . . . . . . . . . . . . . . . . . . . . . . . . . . . . . . . . . . . . . . . . . . . . .31
07/18/2008 BradyConnect 10/100 Internal Print Server User Guide Y885775
Page 4

4
Contents
3 • Getting Started . . . . . . . . . . . . . . . . . . . . . . . . . . . . . . . . . . . . . . . . . 33
Before You Begin . . . . . . . . . . . . . . . . . . . . . . . . . . . . . . . . . . . . . . . . . . . . . . .34
Using the Control Panel to View and Modify Print Server Parameters . . . . . .37
Defaulting the 10/100 Internal PS . . . . . . . . . . . . . . . . . . . . . . . . . . . . . . . . . .38
Defaulting the 10/100 PS on the BBP81 (4”) and BBP81 (6”) Printers . . .38
WebView . . . . . . . . . . . . . . . . . . . . . . . . . . . . . . . . . . . . . . . . . . . . . . . . .39
Assigning an IP Address . . . . . . . . . . . . . . . . . . . . . . . . . . . . . . . . . . . . . . . . .40
With Dynamic Host Configuration Protocol (DHCP) . . . . . . . . . . . . . . . . .40
Without DHCP . . . . . . . . . . . . . . . . . . . . . . . . . . . . . . . . . . . . . . . . . . . . . .40
In a Non-Windows Environment. . . . . . . . . . . . . . . . . . . . . . . . . . . . . . . . .41
A • BradyConnect WebView . . . . . . . . . . . . . . . . . . . . . . . . . . . . . . . . . 45
WebView . . . . . . . . . . . . . . . . . . . . . . . . . . . . . . . . . . . . . . . . . . . . . . . . . . . . .46
Home Page . . . . . . . . . . . . . . . . . . . . . . . . . . . . . . . . . . . . . . . . . . . . . . . .46
View Printer Configuration . . . . . . . . . . . . . . . . . . . . . . . . . . . . . . . . . . . .47
Print Server Settings . . . . . . . . . . . . . . . . . . . . . . . . . . . . . . . . . . . . . . . . .50
View and Modify Printer Settings. . . . . . . . . . . . . . . . . . . . . . . . . . . . . . . .51
Setting the Primary Network Print Server . . . . . . . . . . . . . . . . . . . . . . . . .57
TCP/IP Settings . . . . . . . . . . . . . . . . . . . . . . . . . . . . . . . . . . . . . . . . . . . . .59
Printer Controls . . . . . . . . . . . . . . . . . . . . . . . . . . . . . . . . . . . . . . . . . . . . .63
Directory Listing . . . . . . . . . . . . . . . . . . . . . . . . . . . . . . . . . . . . . . . . . . . .64
Alert Setup . . . . . . . . . . . . . . . . . . . . . . . . . . . . . . . . . . . . . . . . . . . . . . . . . . . .65
Setting Alerts . . . . . . . . . . . . . . . . . . . . . . . . . . . . . . . . . . . . . . . . . . . . . . .66
Establishing Email Alert Messaging . . . . . . . . . . . . . . . . . . . . . . . . . . . . .69
Checking 10/100 Internal PS Configuration Settings. . . . . . . . . . . . . . . . . . . .72
Browser . . . . . . . . . . . . . . . . . . . . . . . . . . . . . . . . . . . . . . . . . . . . . . . . . . .72
Configuring the Print Server. . . . . . . . . . . . . . . . . . . . . . . . . . . . . . . . . . . . . . .75
Sending Email to Your Brady Printer . . . . . . . . . . . . . . . . . . . . . . . . . . . . . . . .76
B • Hardware Troubleshooting . . . . . . . . . . . . . . . . . . . . . . . . . . . . . . . 81
Troubleshooting the 10/100 PS . . . . . . . . . . . . . . . . . . . . . . . . . . . . . . . . . . . .82
Defaulting the 10/100 PS on the BBP81 (4”) and BBP81 (6”) Printers . . .82
10/100 Internal PS Network Status/Activity Indicator. . . . . . . . . . . . . . . . .83
Unable to Print . . . . . . . . . . . . . . . . . . . . . . . . . . . . . . . . . . . . . . . . . . . . .84
C • Print Protocols . . . . . . . . . . . . . . . . . . . . . . . . . . . . . . . . . . . . . . . . . 87
FTP . . . . . . . . . . . . . . . . . . . . . . . . . . . . . . . . . . . . . . . . . . . . . . . . . . . . . . . . .88
D • Print Queues . . . . . . . . . . . . . . . . . . . . . . . . . . . . . . . . . . . . . . . . . . 89
Berkeley Software Distribution (BSD)-Style Print Queue. . . . . . . . . . . . . . . . .90
Configuring the Print Queue. . . . . . . . . . . . . . . . . . . . . . . . . . . . . . . . . . . .90
Y885775 BradyConnect 10/100 Internal Print Server User Guide 07/18/2008
Page 5

Contents
System V Queue Installation . . . . . . . . . . . . . . . . . . . . . . . . . . . . . . . . . . . . . .91
Configuring Operating System V Queue for BradyConnect Printing . . . . .91
Prerequisites . . . . . . . . . . . . . . . . . . . . . . . . . . . . . . . . . . . . . . . . . . . . . .91
Spool Print Job Configuration. . . . . . . . . . . . . . . . . . . . . . . . . . . . . . . . . . .91
E • Frequently Asked Questions . . . . . . . . . . . . . . . . . . . . . . . . . . . . . 93
Glossary . . . . . . . . . . . . . . . . . . . . . . . . . . . . . . . . . . . . . . . . . . . . . . . . . 97
Index . . . . . . . . . . . . . . . . . . . . . . . . . . . . . . . . . . . . . . . . . . . . . . . . . . . 101
5
07/18/2008 BradyConnect 10/100 internal Print Server User Guide Y885775
Page 6

6
Contents
This page intentionally left blank.
Y885775 BradyConnect 10/100 Internal Print Server User Guide 07/18/2008
Page 7

About This Document
This section provides you with contact information, documen t struc ture and organization, and
additional reference documents.
Contents
Who Should Use This Document. . . . . . . . . . . . . . . . . . . . . . . . . . . . . . . . . . . . . . . . . . . . 8
How This Document Is Organized . . . . . . . . . . . . . . . . . . . . . . . . . . . . . . . . . . . . . . . . . . . 8
Contacts. . . . . . . . . . . . . . . . . . . . . . . . . . . . . . . . . . . . . . . . . . . . . . . . . . . . . . . . . . . . . . . 9
Corporate Headquarters . . . . . . . . . . . . . . . . . . . . . . . . . . . . . . . . . . . . . . . . . . . . . . . . 9
Technical Service. . . . . . . . . . . . . . . . . . . . . . . . . . . . . . . . . . . . . . . . . . . . . . . . . . . . . . 9
Other Websites . . . . . . . . . . . . . . . . . . . . . . . . . . . . . . . . . . . . . . . . . . . . . . . . . . . . . . . 9
Document Conventions . . . . . . . . . . . . . . . . . . . . . . . . . . . . . . . . . . . . . . . . . . . . . . . . . . 10
Related Documents . . . . . . . . . . . . . . . . . . . . . . . . . . . . . . . . . . . . . . . . . . . . . . . . . . . . . 12
07/18/2008 BradyConnect 10/100 Internal Print Server User Guide Y885775
Page 8

About This Document
8
Who Should Use This Document
Who Should Use This Document
This user guide is intended to be used by any person who will install and work with the
10/100 Internal PS for the BBP81 printer.
How This Document Is Organized
This user guide is set up as follows:
Section Description
Introduction on page 13 This chapter provides a high-level overview of the
10/100 Internal PS device, installation types,
standard network configurations, and how to work
with 10/100 Internal PS.
10/100 Internal Print Server
on page 19
Getting Started on page 33 This chapter provides you with information and
WebView on page 46 The appendix provides you with detailed
Troubleshoot ing the 10/100 PS
on page 82
Print Protocols on page 87 In this appendix, an exercise is provided to
Print Queues on page 89 This appendix provides information and
Frequently Asked Questions
on page 93
Glossary on page 97 This appendix is a list of terms and associated
This chapter provides you with details on the
10/100 Internal PS features.
procedures for working with the most frequently
used 10/100 Internal PS features.
information that allows you to use the enhanced
functionality of your BradyConnect-enabled
printer with the 10/100 Internal PS.
This appendix provides you with solutions to
known issues.
experiment with File Transfer Protocol (FTP)
support.
instructions on configuring your print queue.
This appendix provides a group of frequently
asked questions (FAQs) about 10/100 Internal PS.
definitions.
Y885775 BradyConnect 10/100 Internal Print Server User Guide 07/18/2008
Page 9

Contacts
You can contact Brady Worldwide Inc. at the following:
Corporate Headquarters
Brady Worldwide, Inc.
6555 West Good Hope Road
Milwaukee, WI 53223 U.S.A.
T: 414-358-6600 USA Domestic
F: 414-438-6958
Technical Service
Brady Technical Service and the Brady Knowledge Center may be contacted at
www.bradyid.com.
About This Document
Contacts
9
Other Websites
USA www.bradyid.com
Canada www.bradycanada.com
Mexico www.bradylatinamerica.com
Asia www.bradycorp.com
Europe www.bradyeurope.com
07/18/2008 BradyConnect 10/100 Internal Print Server User Guide Y885775
Page 10
About This Document
10
Document Conventions
Document Conventions
The following conventions are used throughout this document to convey certain information:
Alternate Color (online only) Cross-references contain links to other sections in this guide.
If you are viewing this guide online, click the blue text to jump to its location.
Command Line Examples All command line examples appear in Courier New font.
For example, type the following to get to the Post-Install scripts in the
Ztools
Files and Directories All file names and directories appear in Courier New font. For
example, the
Cautions, Important, Note, and Example
Caution • Warns you of the potential for electrostatic discharge.
bin directory:
Brady<version number>.tar file and the /root directory.
Caution • Warns you of a potential electric shock situation.
Caution • Warns you of a situation where excessive heat could cause a burn.
Caution • Advises you that failure to take or avoid a specific action could result in physical
harm to you.
Caution • Advises you that failure to take or avoid a specific action could result in physical
harm to the hardware.
Caution • Advises you need to wear protective eye wear.
Important • Advises you of informatio n that is essential to complete a task.
Note • Indicates neutral or positive information that emphasizes or supplements important
points of the main text.
Example • Provides an example, often a scenario, to better clarify a section of text.
Y885775 BradyConnect 10/100 Internal Print Server User Guide 07/18/2008
Page 11
About This Document
1
2
Document Conventions
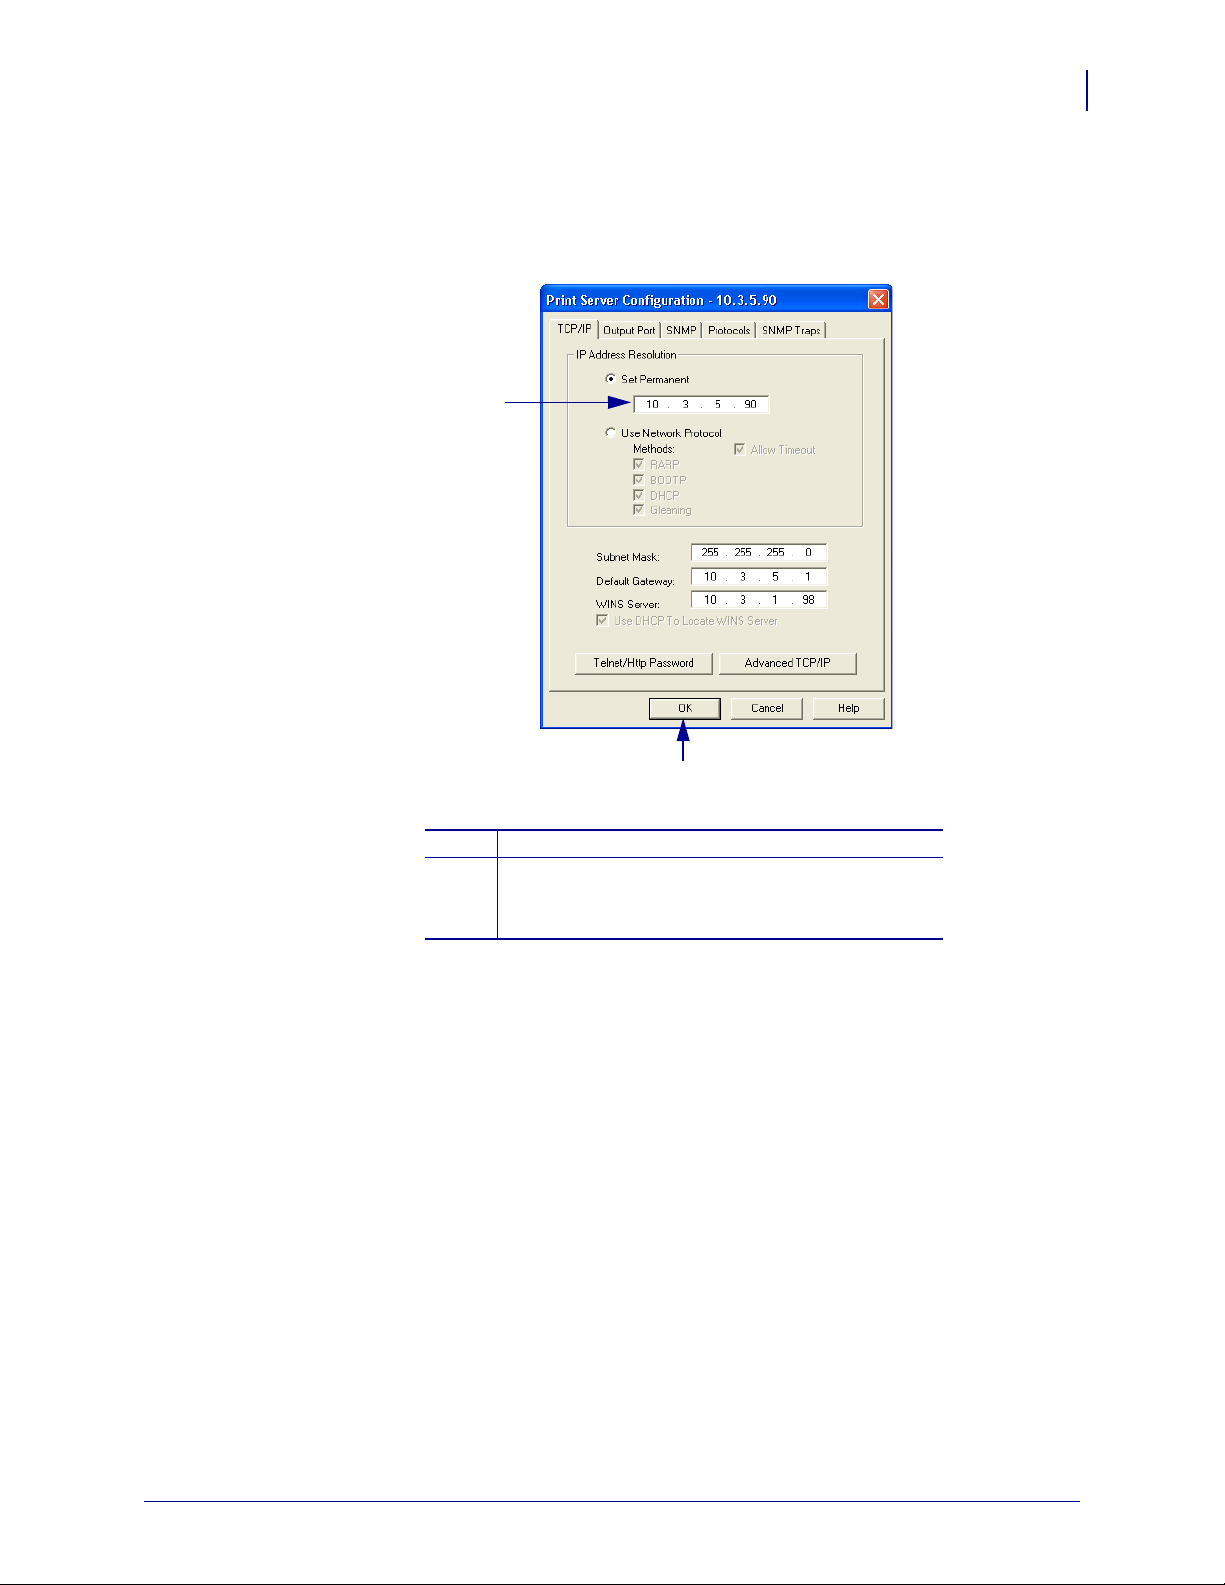
Illustration Instructions Used when an illustration contains either information about a
dialog box or step(s) to accomplish in a dialog box.
One illustration instruction identifies a section of the dialog box and the other shows steps to
follow .
11
Set Permanent text-box.
1
a. In the Set Permanent text-box, type in the print
2
server’s IP address.
b. When you are finished, click OK.
07/18/2008 BradyConnect 10/100 Internal Print Server User Guide Y885775
Page 12

About This Document
12
Related Documents
Related Documents
The following documents might be helpful references:
• ZPL II
• ZPL II
• EPL
®
Programming Guide For x.10 through x.13 Firmware
®
Programming Guide For x.14 Firmware and Later
™
Programming Guide
Y885775 BradyConnect 10/100 Internal Print Server User Guide 07/18/2008
Page 13

1
Introduction
This chapter provides a high-level overview of the 10/100 Internal PS device, installation
types, standard network configurations, and how to work with 10/100 Internal PS.
Contents
Overview . . . . . . . . . . . . . . . . . . . . . . . . . . . . . . . . . . . . . . . . . . . . . . . . . . . . . . . . . . . . . 14
Components. . . . . . . . . . . . . . . . . . . . . . . . . . . . . . . . . . . . . . . . . . . . . . . . . . . . . . . . . 14
Requirements. . . . . . . . . . . . . . . . . . . . . . . . . . . . . . . . . . . . . . . . . . . . . . . . . . . . . . . . . . 15
Firmware . . . . . . . . . . . . . . . . . . . . . . . . . . . . . . . . . . . . . . . . . . . . . . . . . . . . . . . . . . . 15
Browser Support . . . . . . . . . . . . . . . . . . . . . . . . . . . . . . . . . . . . . . . . . . . . . . . . . . . . . 15
Protocols . . . . . . . . . . . . . . . . . . . . . . . . . . . . . . . . . . . . . . . . . . . . . . . . . . . . . . . . . . . 15
Hardware . . . . . . . . . . . . . . . . . . . . . . . . . . . . . . . . . . . . . . . . . . . . . . . . . . . . . . . . . . . 15
Compatibility. . . . . . . . . . . . . . . . . . . . . . . . . . . . . . . . . . . . . . . . . . . . . . . . . . . . . . . . . . . 16
Technical Specifications for the 10/100 Internal PS. . . . . . . . . . . . . . . . . . . . . . . . . . . . . 17
07/18/2008 BradyConnect 10/100 Internal Print Server User Guide Y885775
Page 14
Introduction
1
14
Overview
Overview
The 10/100 Internal Print Server (PS) is an optional factory- or field-installed device that
connects the network and your BradyConnect-enabled printer. 10/100 Internal PS provides
you with a browser interface for printer and print server settings.
Components
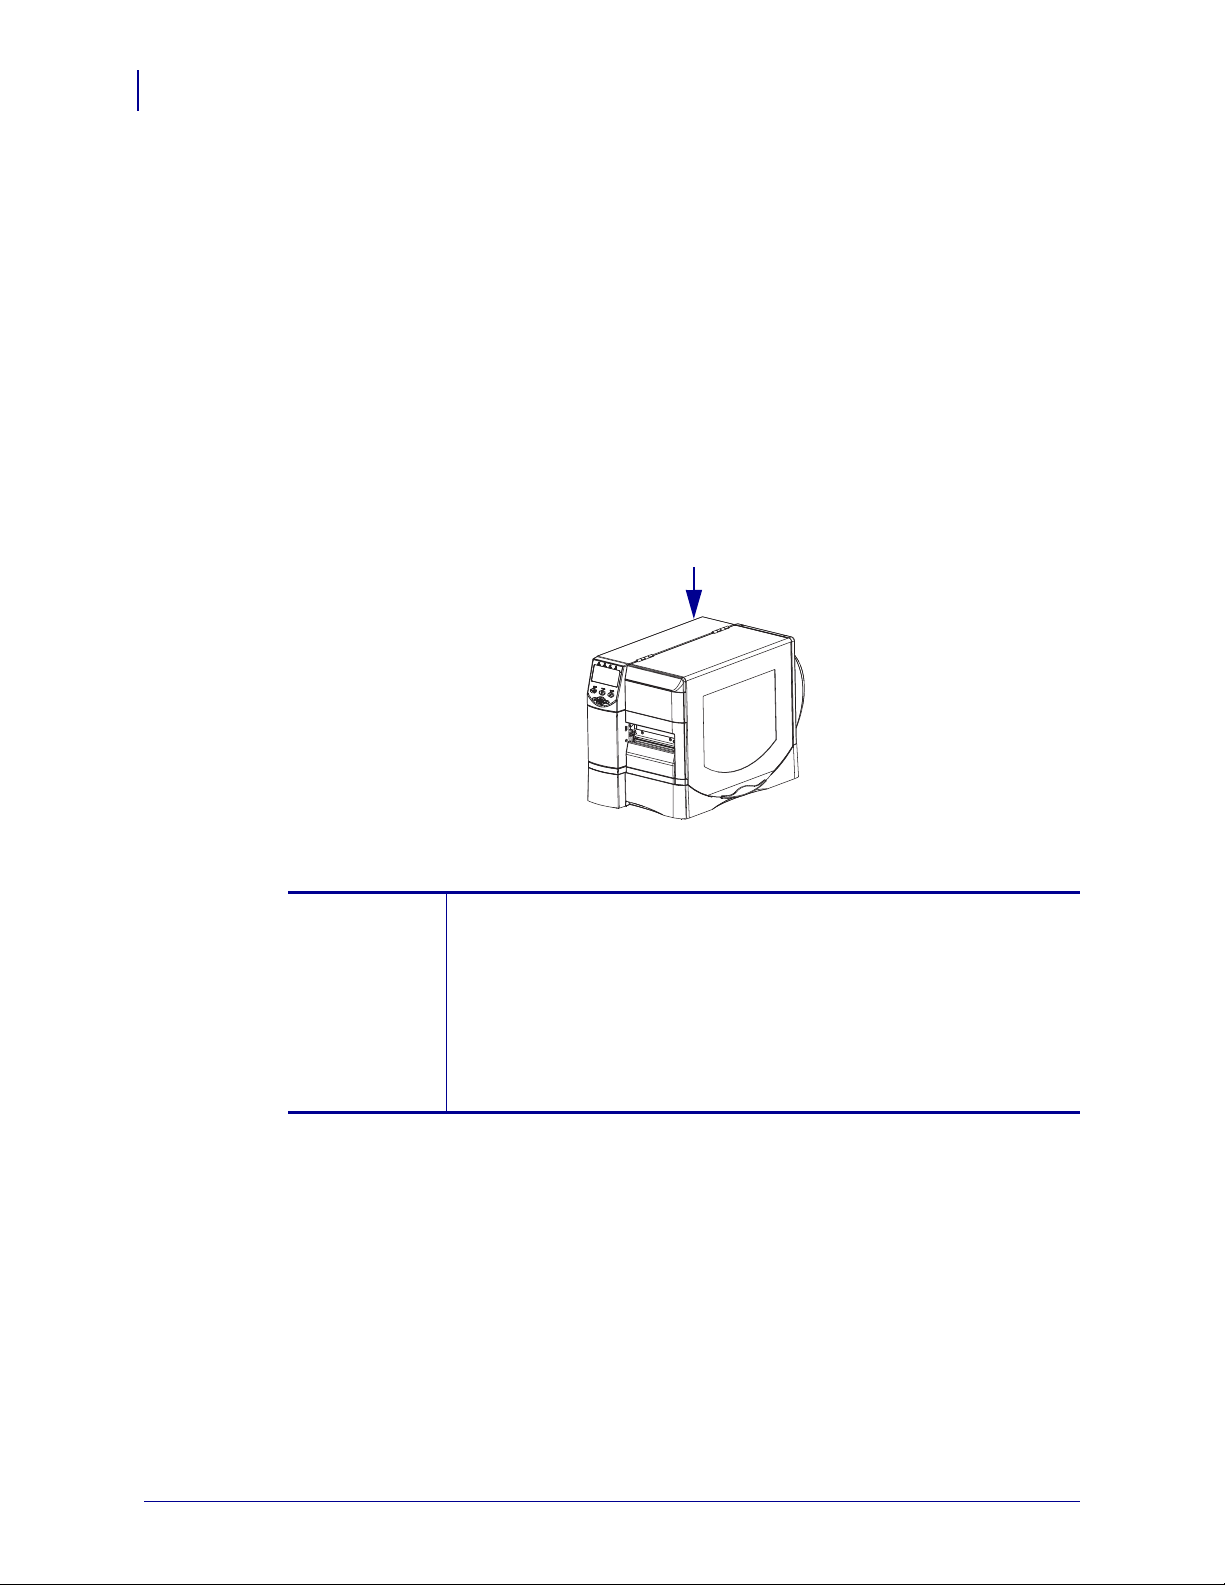
Figure 1 shows the components of a printer equipped with a 10/100 Internal PS. Table 1
identifies the various components and the functions each performs.
Figure 1 • Components
Ta ble 1 • Components and Functions
1
Printer with 10/100 Internal PS—10/100 Internal PS gives your printer
these features:
• Print server and printer setup using a browser
• Remote monitoring and configuration capability of the
10/100 Internal PS using a browser
• Alerts
• The ability for you to send unsolicited printer status messages via
email-enabled devices
Y885775 BradyConnect 10/100 Internal Print Server User Guide 07/18/2008
Page 15

Requirements
This section lists the minimum requirements for 10/100 Internal PS, which include firmware,
software, browser support, protocols, and hardware.
Firmware
Table 2 shows the appropriate firmware version for each printer.
Printer Firmware Version
BBP81 (4”) ZZSP1148A or later
BBP81 (6”) ZZSP1148A or later
Important • You can upgrade your firmware by visiting our website: www.bradyid.com
Table 2 • Firmware Version by Printer
Introduction
Requirements
15
Browser Support
• HTML v3.2 or higher
• Internet Explorer or Netscape Navigator
Protocols
• TCP/IP: ARP, RARP
• TCP/IP & UDP: DHCP, BOOTP, SNMP v1.0
• HTTP v1.0
Hardware
The following are the 10/100 Internal Print Server options available for different printer
models:
Table 3 • Server Options for Printer Models
Printers
BBP81 (4”) • •
External
Internal
Factory
BBP81 (6”)
07/18/2008 BradyConnect 10/100 Internal Print Server User Guide Y885775
Page 16

Introduction
16
Compatibility
Compatibility
This section identifies the various components that are compatible with 10/100 Internal PS.
Software IBM
®
: Tivoli® v7.1.3, HP®: Web JetAdmin™ v7.0, OpenView™ V6.4, and any
SNMP management application all work with 10/100 Internal PS.
Y885775 BradyConnect 10/100 Internal Print Server User Guide 07/18/2008
Page 17

Technical Specifications for the 10/100 Internal PS
Technical Specifications for the 10/100 Internal PS
General Specifications
Network Connection Ethernet 10BaseT and 100BaseT UTP RJ-45
connection Half and Full Duplex Communications
User Interface A single (two element) LED activity indicator:
• bi-color display of operational status (solid
green or solid amber)
• bi-color display of speed and network activity
(flashing green or flashing amber)
Height (external dimensions) 0.5 in. 13.4 mm
Width (external dimensions) 2.2 in. 55.9 mm
Length (external dimensions) 3.7 in. 92.9 mm
Weight 0.9 oz 26 g
Temperature Operating 32° to 140°F 0° to 60°C
Storage –40° to 140°F –40° to 60°C
Introduction
17
Relative Humidity Operating 20% to 80%, non-condensing
Storage 5% to 85%, non-condensing
Warranty One year
07/18/2008 BradyConnect 10/100 Internal Print Server User Guide Y885775
Page 18

Introduction
Notes • ___________________________________________________________________
__________________________________________________________________________
__________________________________________________________________________
__________________________________________________________________________
__________________________________________________________________________
__________________________________________________________________________
__________________________________________________________________________
__________________________________________________________________________
__________________________________________________________________________
__________________________________________________________________________
18
Technical Specifications for the 10/100 Internal PS
Y885775 BradyConnect 10/100 Internal Print Server User Guide 07/18/2008
Page 19

2
10/100 Internal Print
Server
This chapter provides you with details on the 10/100 Internal PS features.
Contents
10/100 Internal PS Features . . . . . . . . . . . . . . . . . . . . . . . . . . . . . . . . . . . . . . . . . . . . . . 20
Status and Configuration . . . . . . . . . . . . . . . . . . . . . . . . . . . . . . . . . . . . . . . . . . . . . . . 20
Print Server Status. . . . . . . . . . . . . . . . . . . . . . . . . . . . . . . . . . . . . . . . . . . . . . . . . . . . 28
Reset . . . . . . . . . . . . . . . . . . . . . . . . . . . . . . . . . . . . . . . . . . . . . . . . . . . . . . . . . . . . . . 30
Restore . . . . . . . . . . . . . . . . . . . . . . . . . . . . . . . . . . . . . . . . . . . . . . . . . . . . . . . . . . . . 31
07/18/2008 BradyConnect 10/100 Internal Print Server User Guide Y885775
Page 20

10/100 Internal Print Server
20
10/100 Internal PS Features
10/100 Internal PS Features
This section covers features available for the 10/100 Internal PS only, not the printer’s
features. Some of the features you access in this section prompt you to enter the default user
ID and password, as follows:
• User ID: admin
• Password: 1234
Status and Configuration
The steps that follow are based on the navigation of a BBP81 printer.
Important • You can upgrade your firmware by visiting our web site: www.bradyid.com
Y885775 BradyConnect 10/100 Internal Print Server User Guide 07/18/2008
Page 21
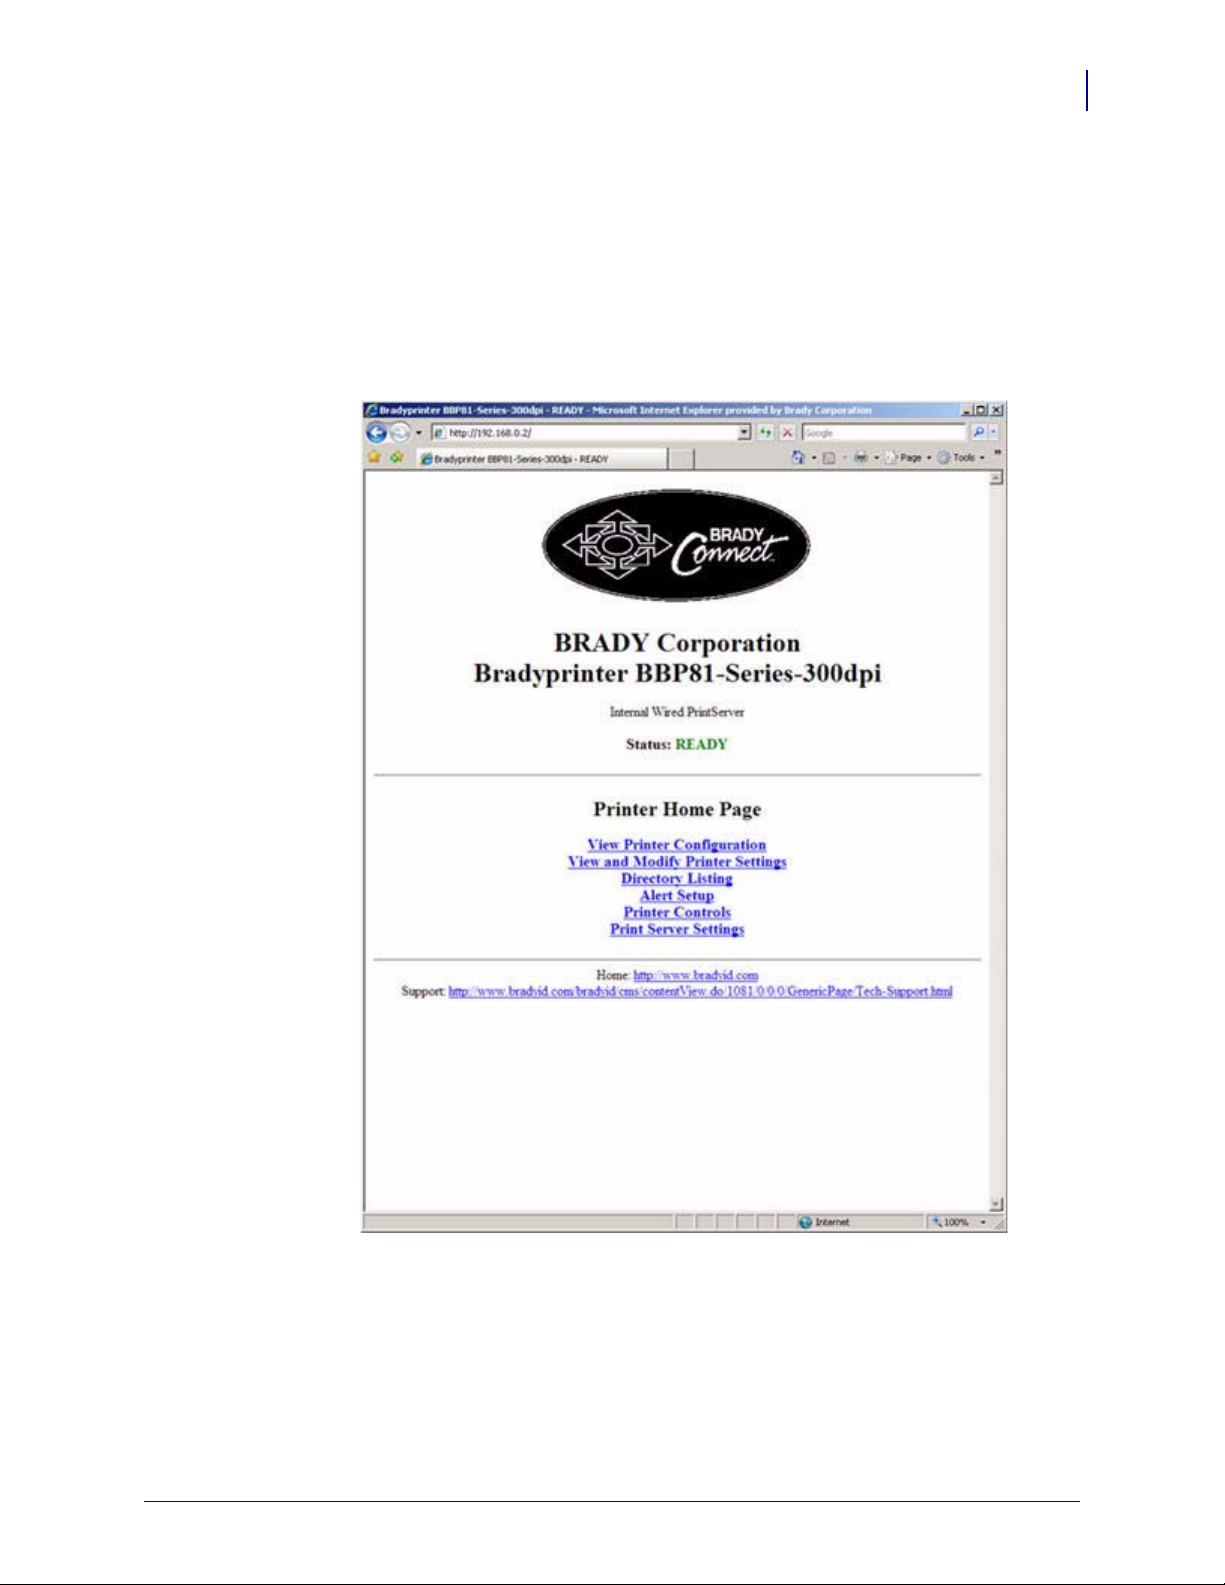
To access the print server settings, complete these steps:
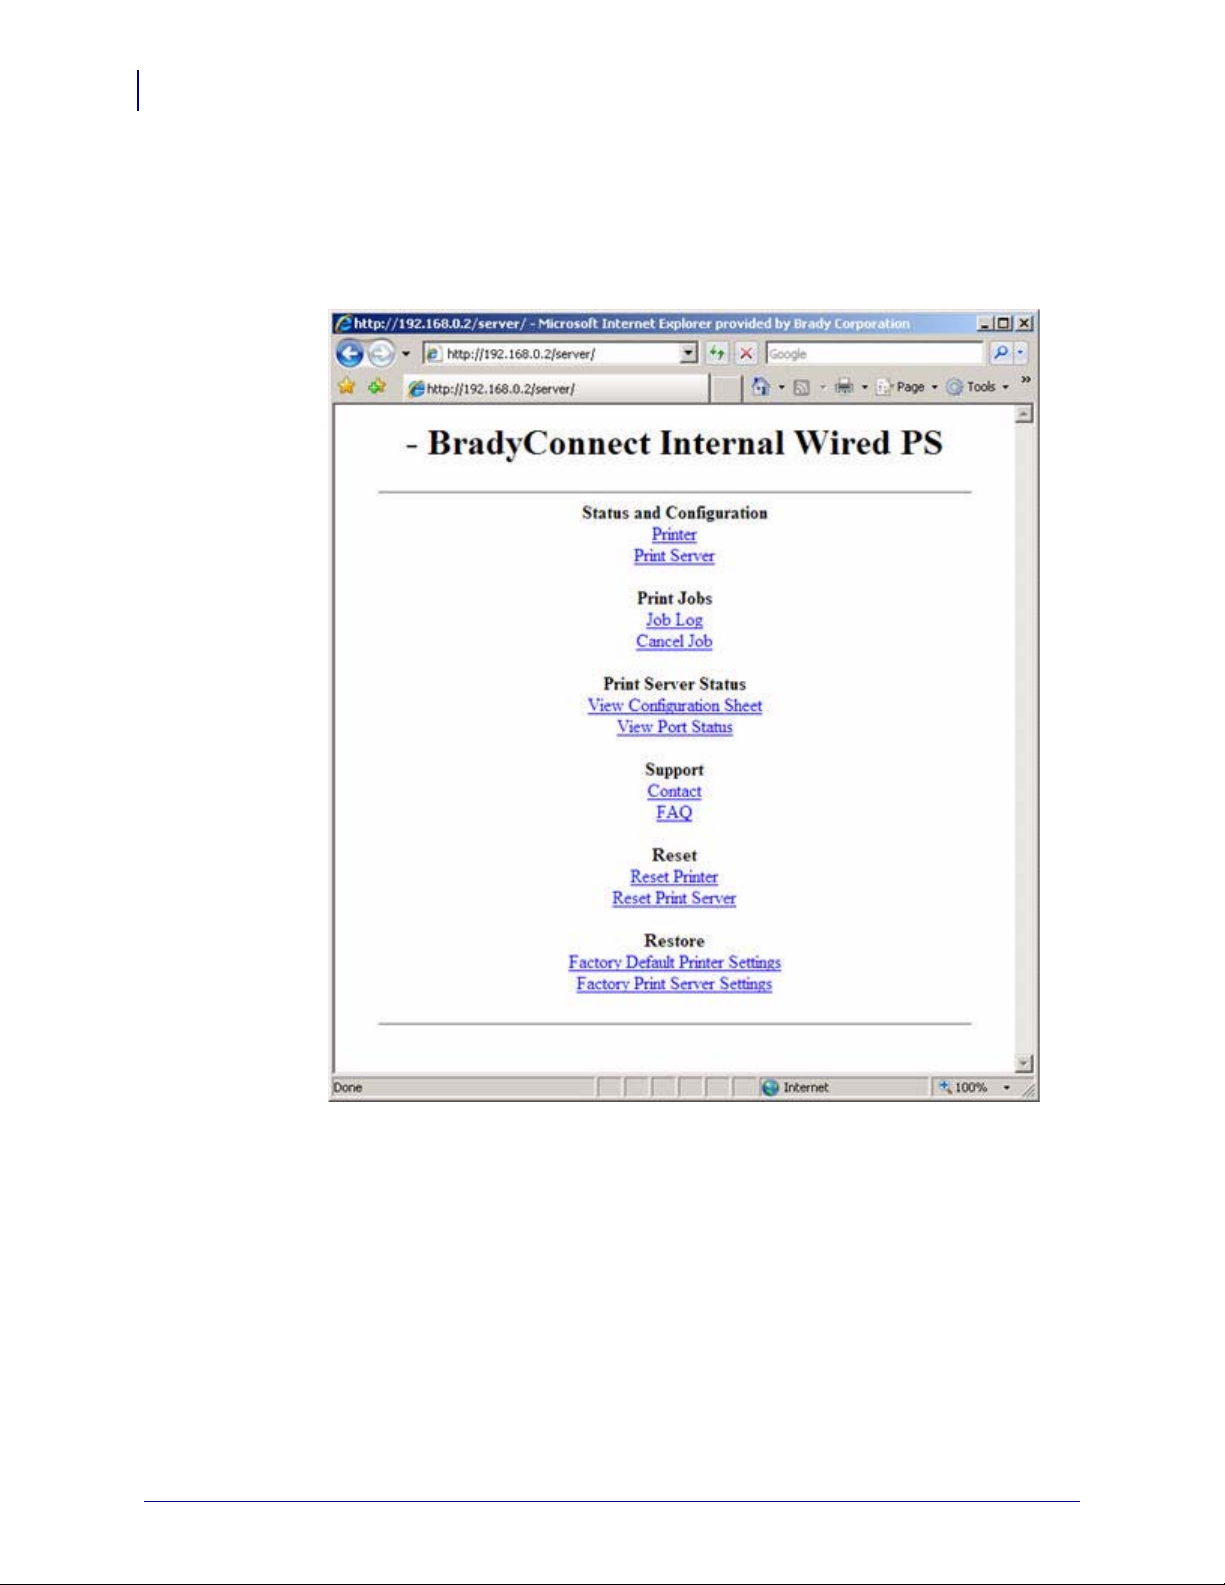
1. Open a Web browser.
2. In the Address text-box, type your printer’s IP address, and press Enter.
The Printer Home Page opens.
Figure 2 • Printer Home Page
10/100 Internal Print Server
10/100 Internal PS Features
21
07/18/2008 BradyConnect 10/100 Internal Print Server User Guide Y885775
Page 22
10/100 Internal Print Server
22
10/100 Internal PS Features
3. From the Printer Home Page, click Print Server Settings.
The Print Server Settings Page opens.
Figure 3 • Print Server Settings Page
Y885775 BradyConnect 10/100 Internal Print Server User Guide 07/18/2008
Page 23
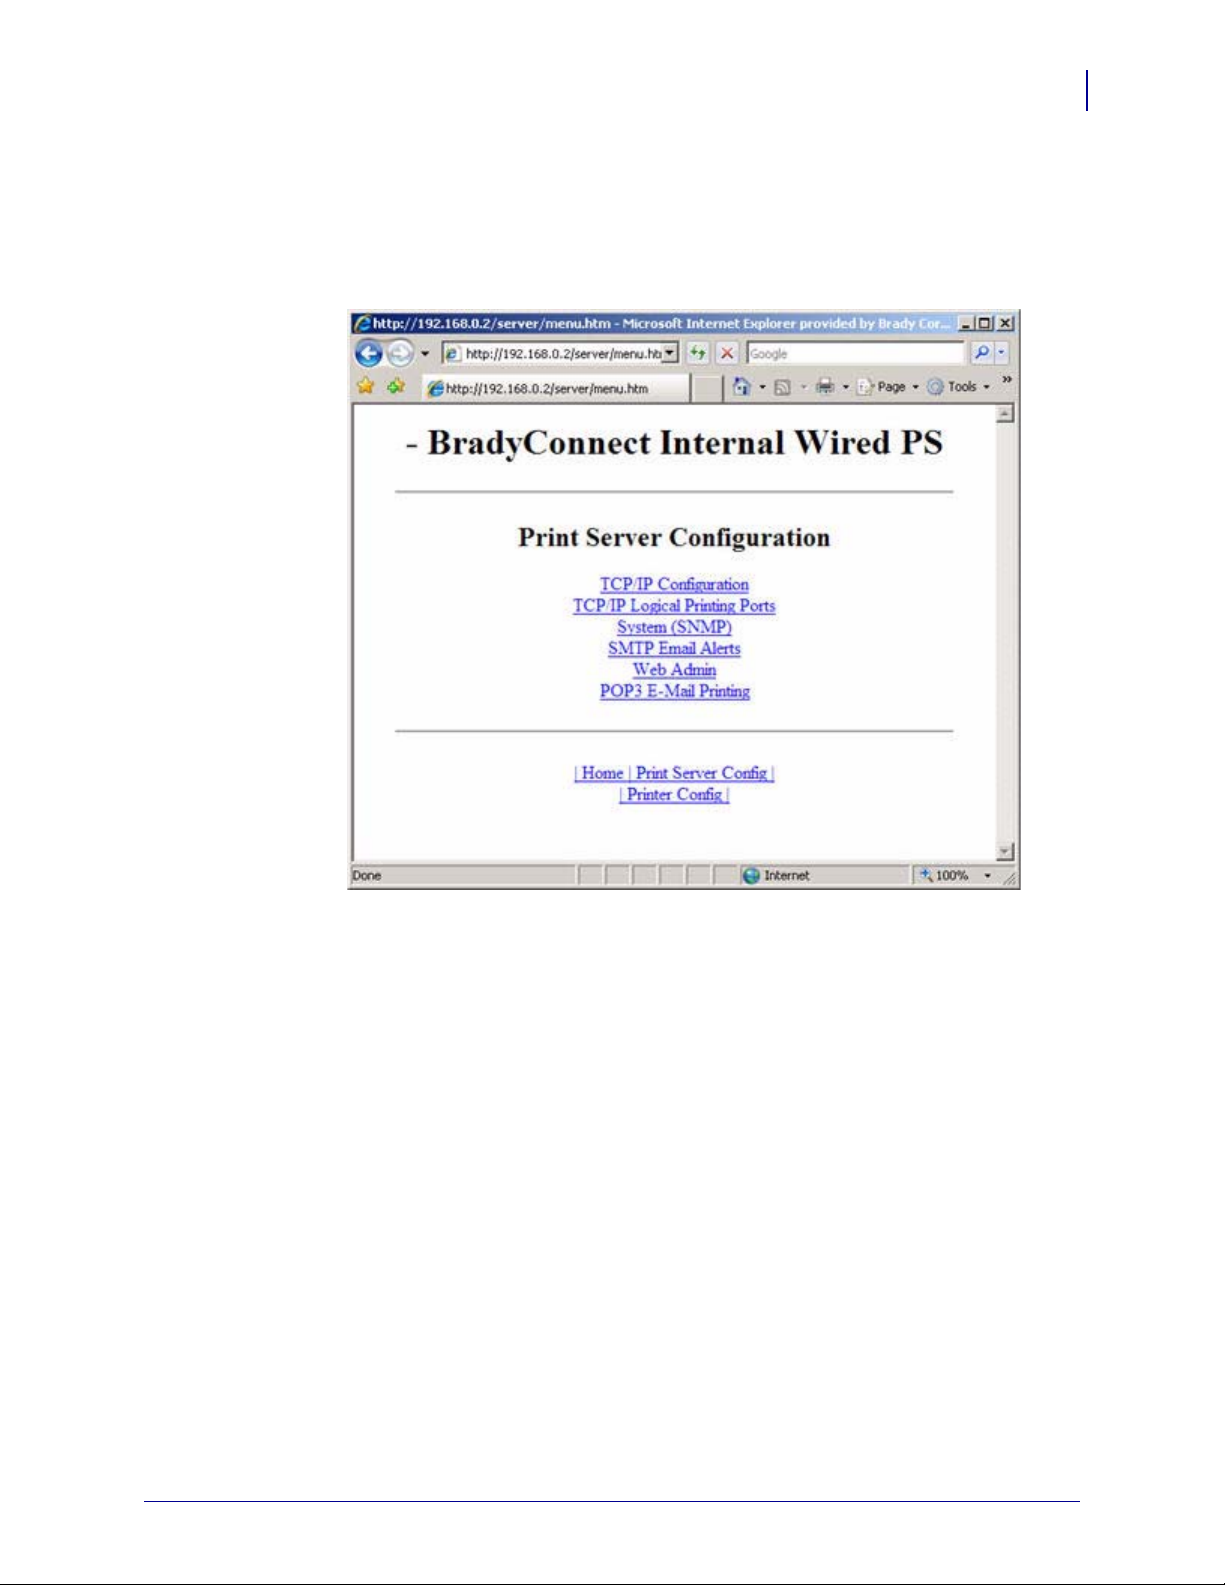
4. From the Print Server Settings Page, click Print Server.
The Print Server Configuration page opens.
Figure 4 • Print Server Configuration
10/100 Internal Print Server
10/100 Internal PS Features
23
5. In the Print Server Configuration page, you have a menu from which to choose. Table 4
identifies each menu option page.
07/18/2008 BradyConnect 10/100 Internal Print Server User Guide Y885775
Page 24
10/100 Internal Print Server
24
10/100 Internal PS Features
Ta ble 4 • Menu Options
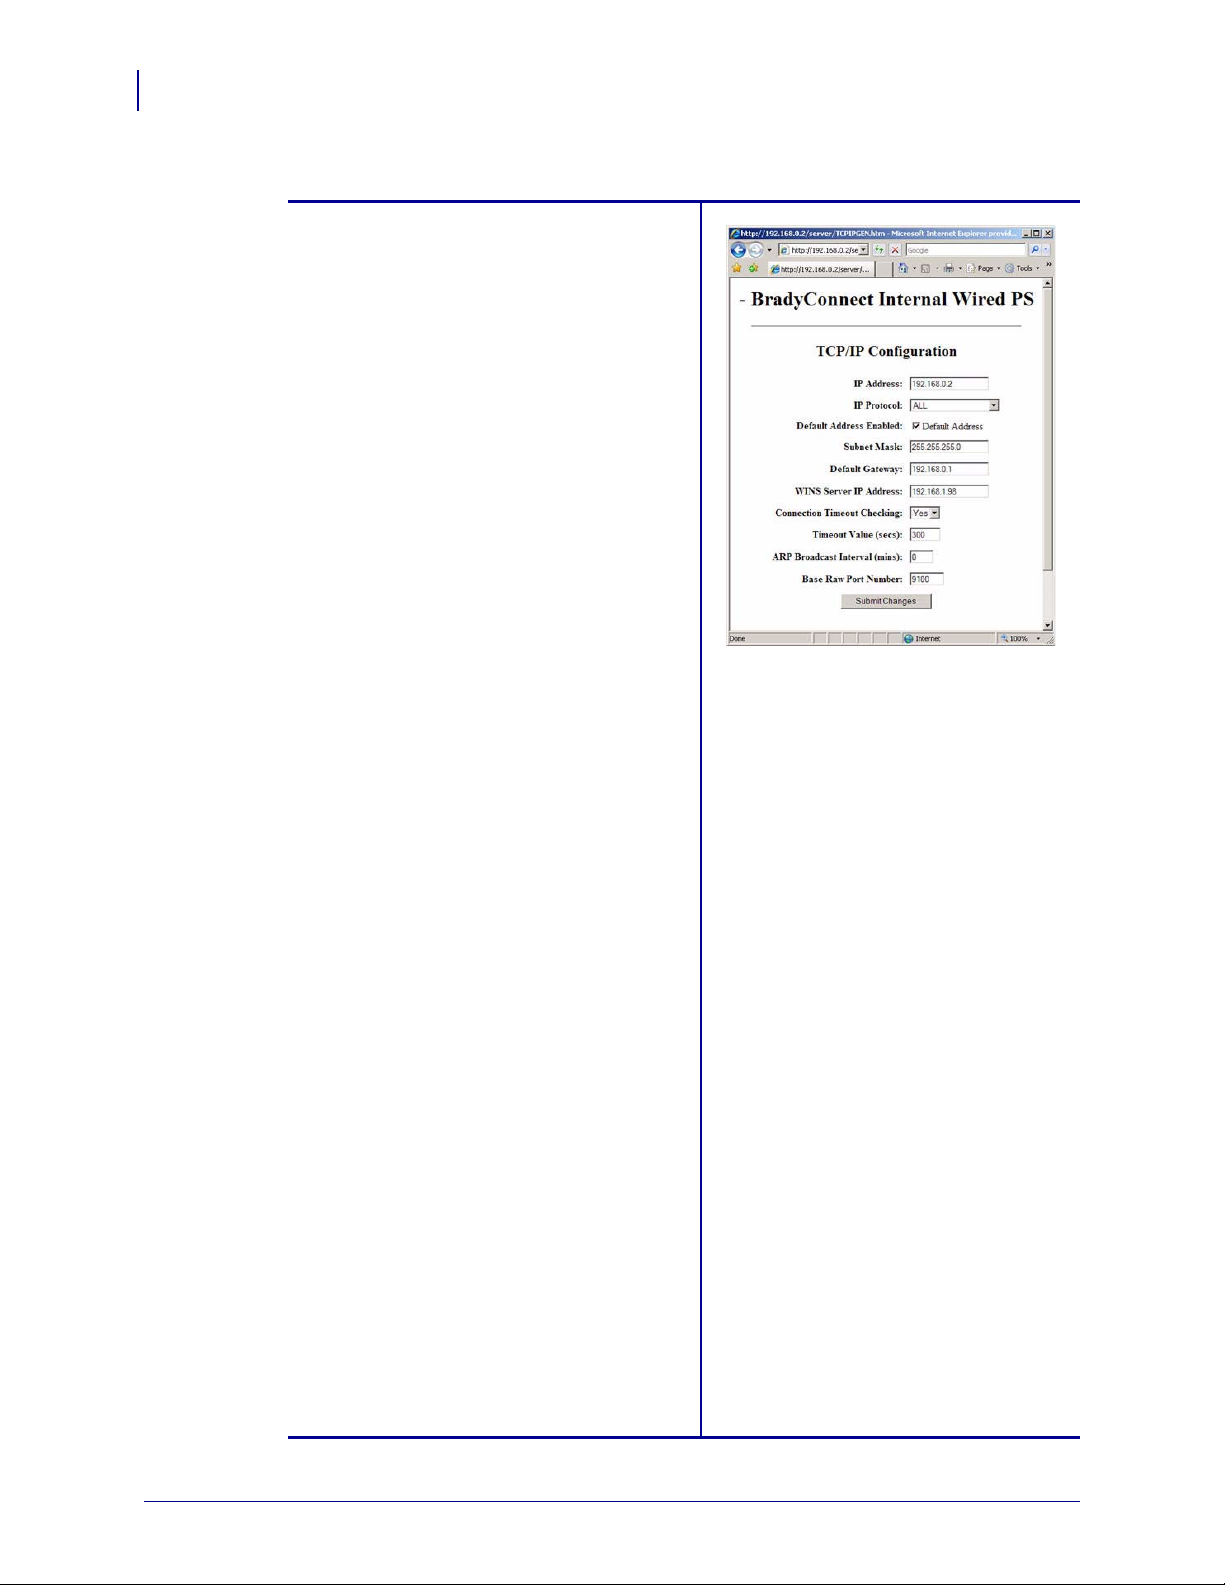
TCP/IP Configuration
You can change the TCP/IP configuration of
the 10/100 Internal PS.
• IP Address: Use this feature to set the IP
address if using the Permanent addressing
method.
• IP Address Resolution: Use this feature to
select the addressing method to use
(Dynamic or Permanent).
• Dynamic Protocols: Use this feature to
select the Dynamic Addressing method to use
at startup. Choices include RARP, BOOTP,
DHCP, Gleaning or Default Address.
• Subnet Mask: Use this feature to set the
subnet mask. The subnet mask must follow
the format XXX.XXX.XXX.XXX, where
each XXX is a number between 0 and 255.
• Default Gateway: Use this feature to set the
default gateway. This gateway will be used
whenever messages need to be sent to
another network. This gateway address must
follow the format XXX.XXX.XXX.XXX,
where each XXX is a number between 0 and
255.
• WINS Server IP Address: Use this feature
to set or view the IP address of the WINS
Server.
• Connection Timeout Checking: Use this
feature to enable or disable the Connection
Timeout feature. The timeout is used to close
network TCP/IP connections that are idle for
more than the number of seconds entered in
the Timeout Value.
• Timeout Value (secs): Use this feature to
set the Connection Timeout Value. The V alid
range is 10 to 3600 seconds. The default is
300 seconds.
• ARP Broadcast Interval (mins): Use this
feature to set interval for sending an ARP
Broadcast. The valid range is 1 to 30 minutes.
Address Resolution Protocol (ARP)
broadcast packets allow other network
devices to associate the print server's IP
Address with its hardware address.
• Base Raw Port Number: Use this feature
to set the raw TCP port that the print server
will use for printing tasks. The default is port
9100.
Y885775 BradyConnect 10/100 Internal Print Server User Guide 07/18/2008
Page 25
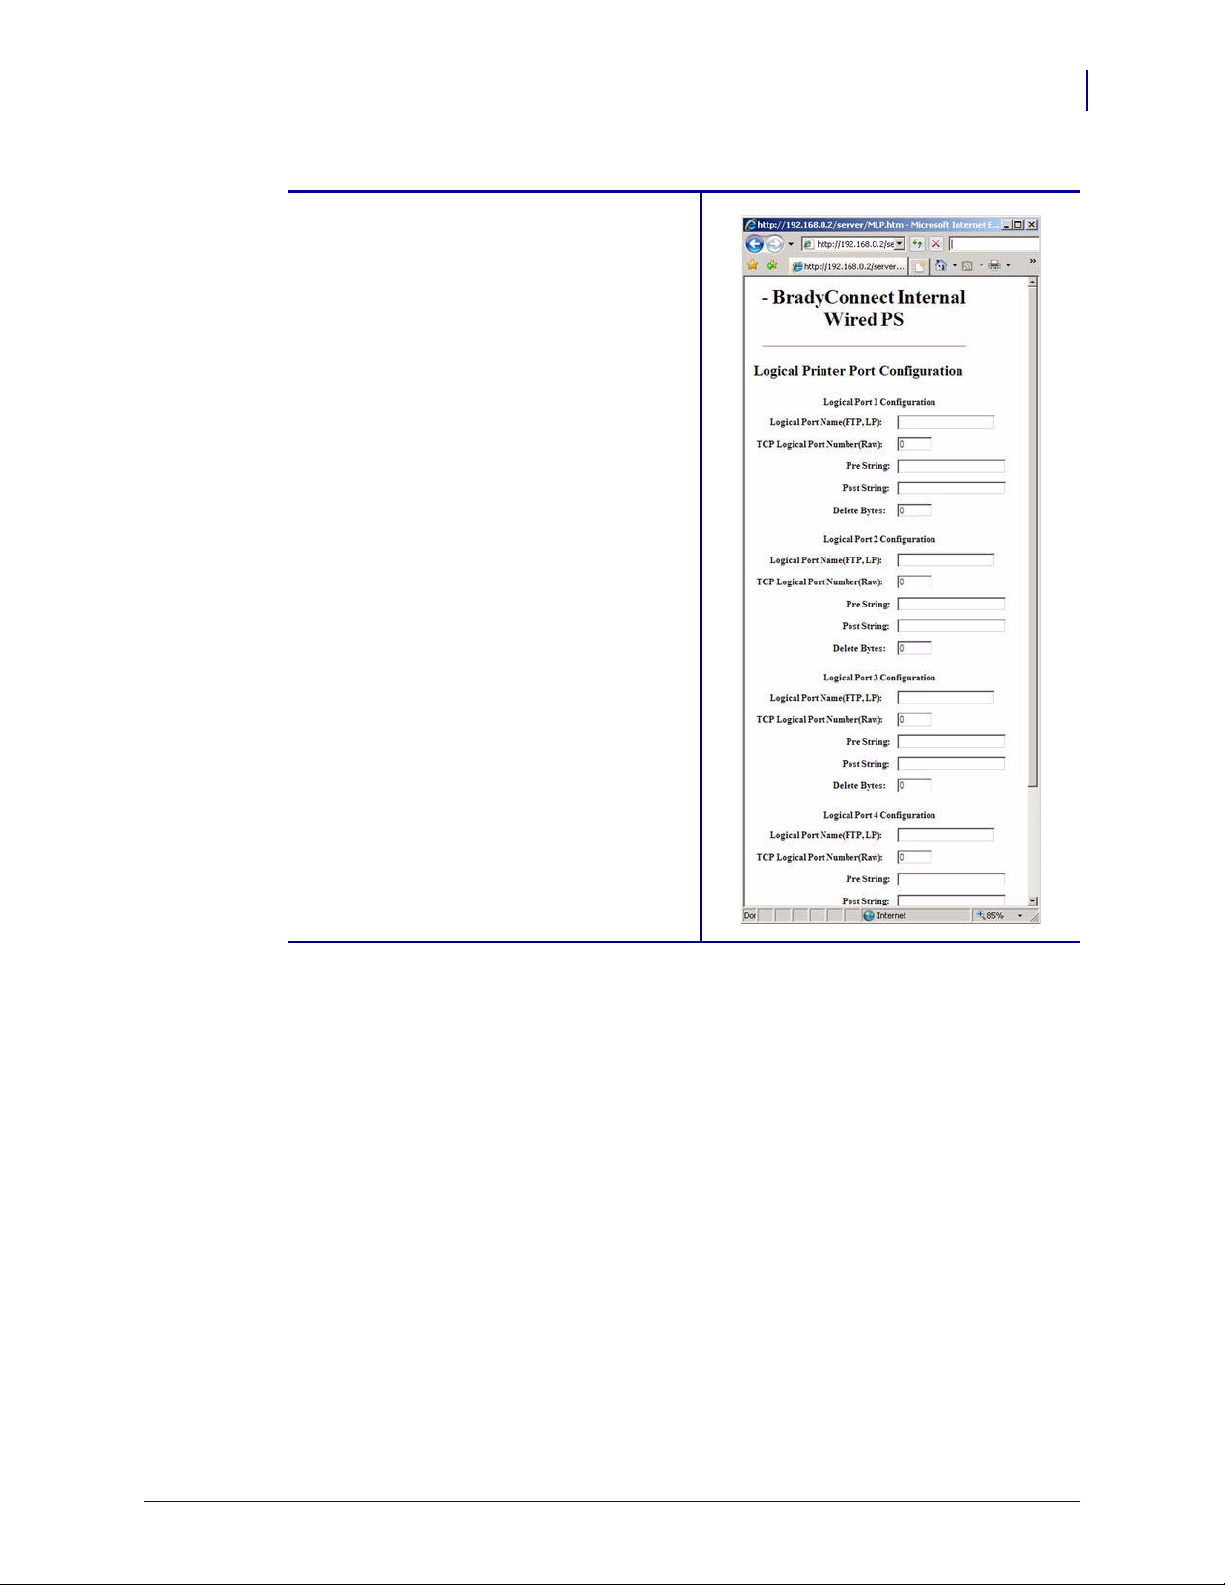
Table 4 • Menu Options (Continued)
TCP/IP Logical Printing Ports
Logical printers allow you to set up multip le
pre- and post-processing configurations for
each output port. Each logical port
configuration can perform the following:
• Add user-configured strings before and
after the print data.
• Remove unwanted characters from the
beginning of the print data.
• Four logical printer configurations are
supported for each output port on the
printer . T he configurat ions can be assigned
to any port, and all of these configurations
can be assigned to a single output port.
10/100 Internal Print Server
10/100 Internal PS Features
25
07/18/2008 BradyConnect 10/100 Internal Print Server User Guide Y885775
Page 26
10/100 Internal Print Server
26
10/100 Internal PS Features
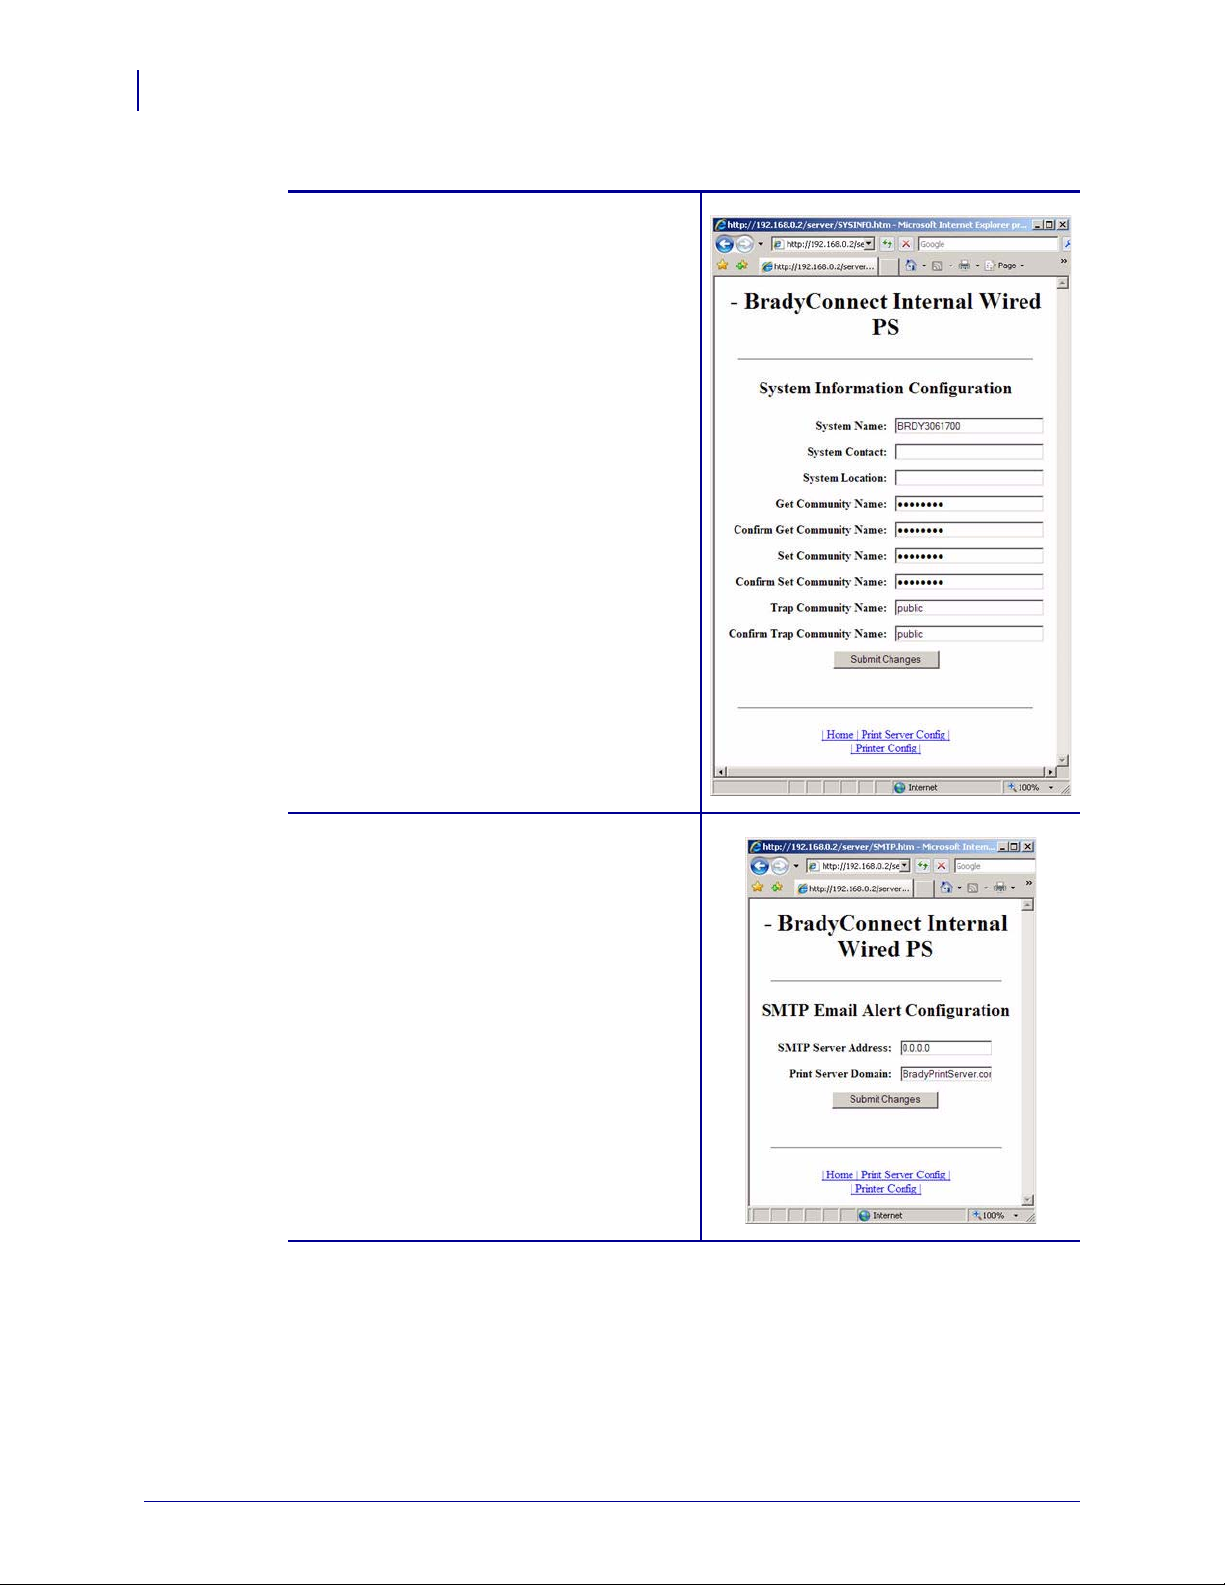
Table 4 • Menu Options (Continued)
System (SNMP)
This feature gives you the ability to manage
multiple devices on a network, be it printers,
computers, or other network-attached devices.
On this page, you can define the SNMP system
name, system location (10/100 Internal PS
description), and other SNMP settings for your
10/100 Internal PS. Uses SNMP protocol.
SMTP Email Alert Configuration
This feature allows you to enter data regarding
System Information on the network that is
being used. Typically, a Network
Administrator would use this.
Y885775 BradyConnect 10/100 Internal Print Server User Guide 07/18/2008
Page 27
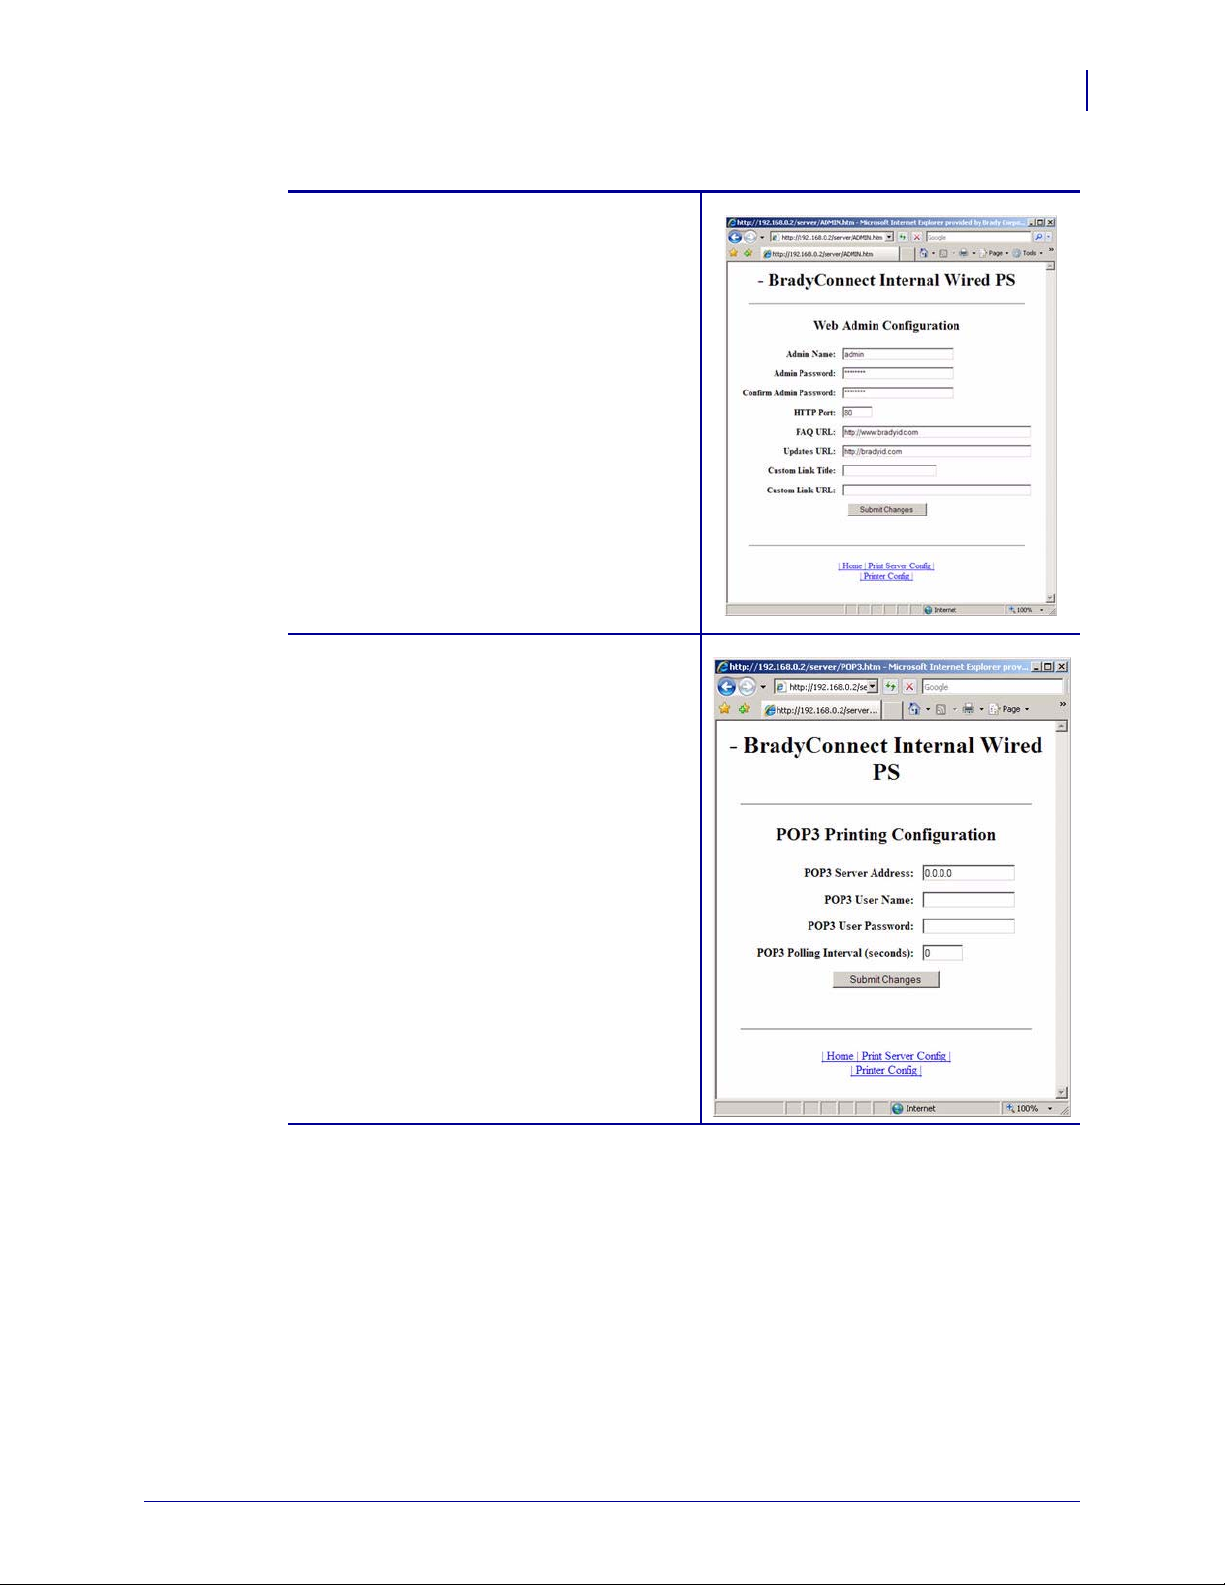
Table 4 • Menu Options (Continued)
Web Admin
This page allows you to configure the Admin
name and password. Links to upgrades and
support information can also be altered.
POP3 Email Printing
This feature helps you set up the print server to
receive email messages containing formats
that can be printed. The POP3 settings must be
set to retrieve emails from the email server.
Important • Brady recommends setting the
POP3 polling interval no lower than 30. Some
email servers will lock accounts after repeated
login attempts.
10/100 Internal Print Server
10/100 Internal PS Features
27
07/18/2008 BradyConnect 10/100 Internal Print Server User Guide Y885775
Page 28
10/100 Internal Print Server
28
10/100 Internal PS Features
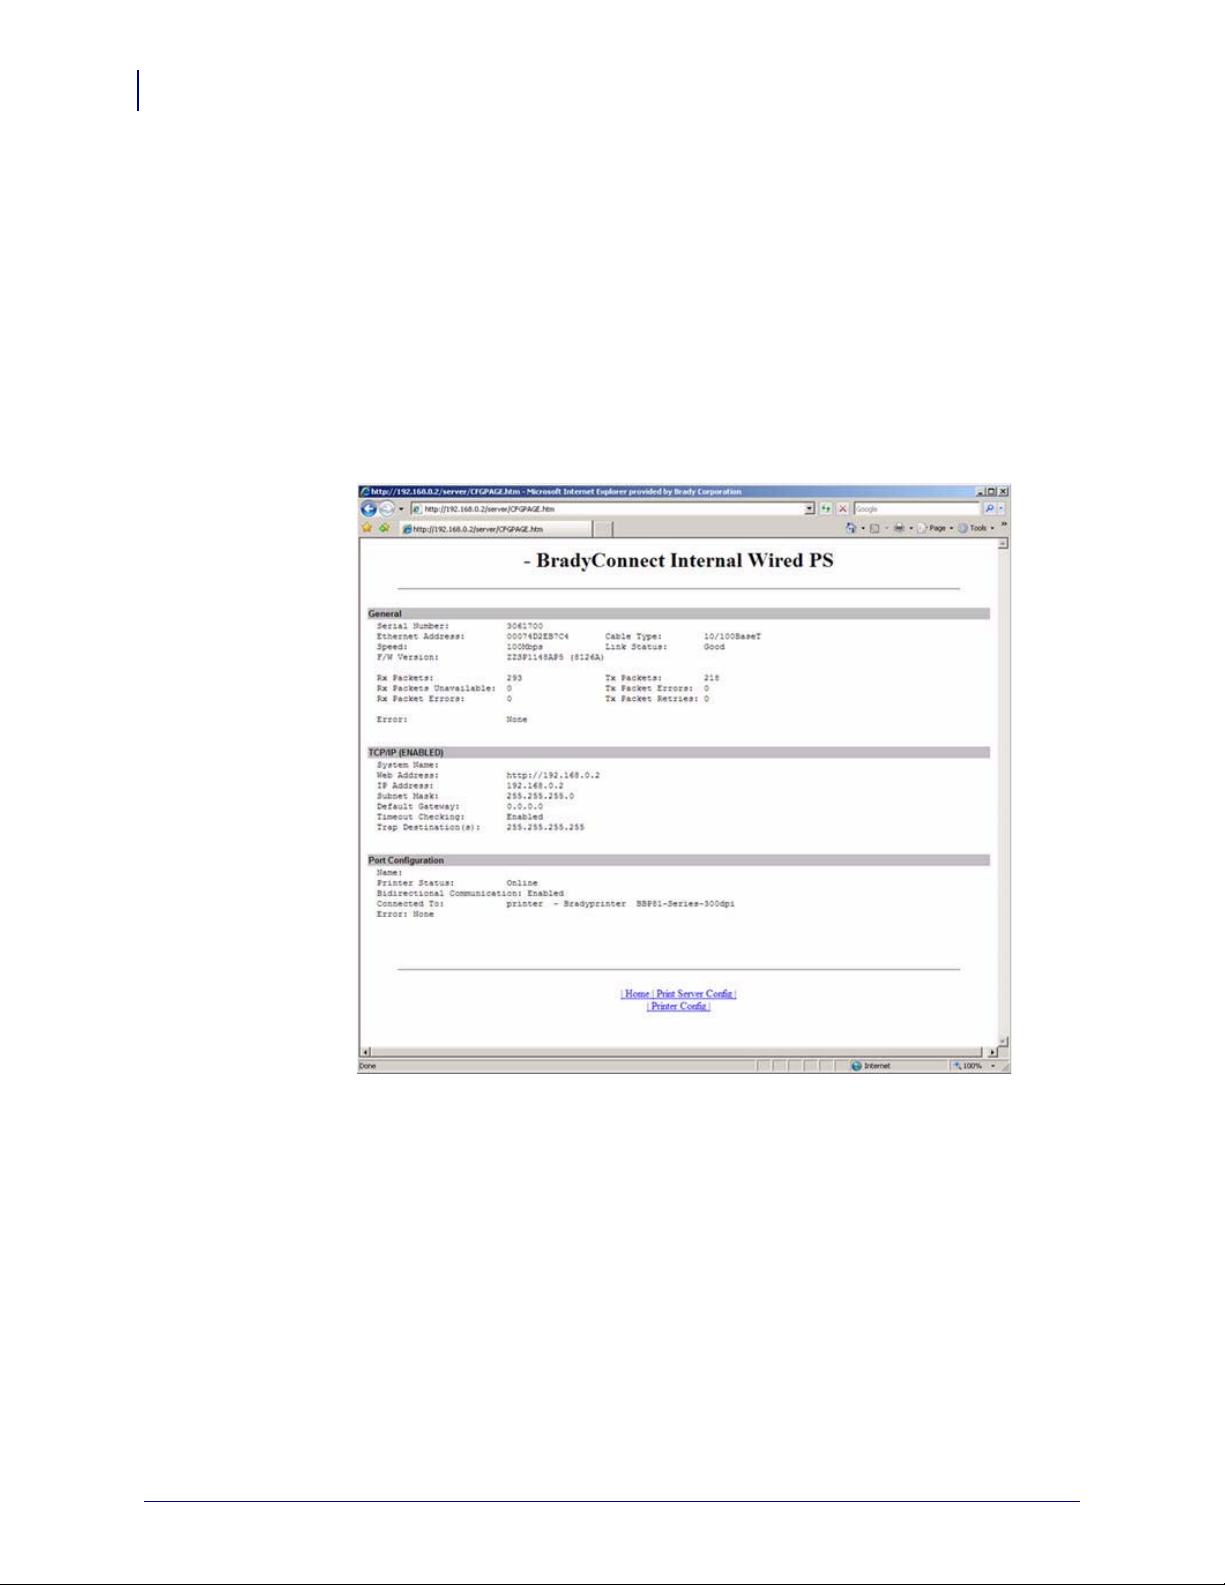
Print Server Status
To open the 10/100 Internal PS configuration page, complete this step:
From the Print Server page in the Print Server Status section, you can access the
10/100 Internal PS configuration sheet and port status.
1. From the Print Server Settings Page, click View Configuration Sheet.
The Configuration Sheet opens.
Figure 5 • Configuration Sheet
Y885775 BradyConnect 10/100 Internal Print Server User Guide 07/18/2008
Page 29
10/100 Internal Print Server
10/100 Internal PS Features
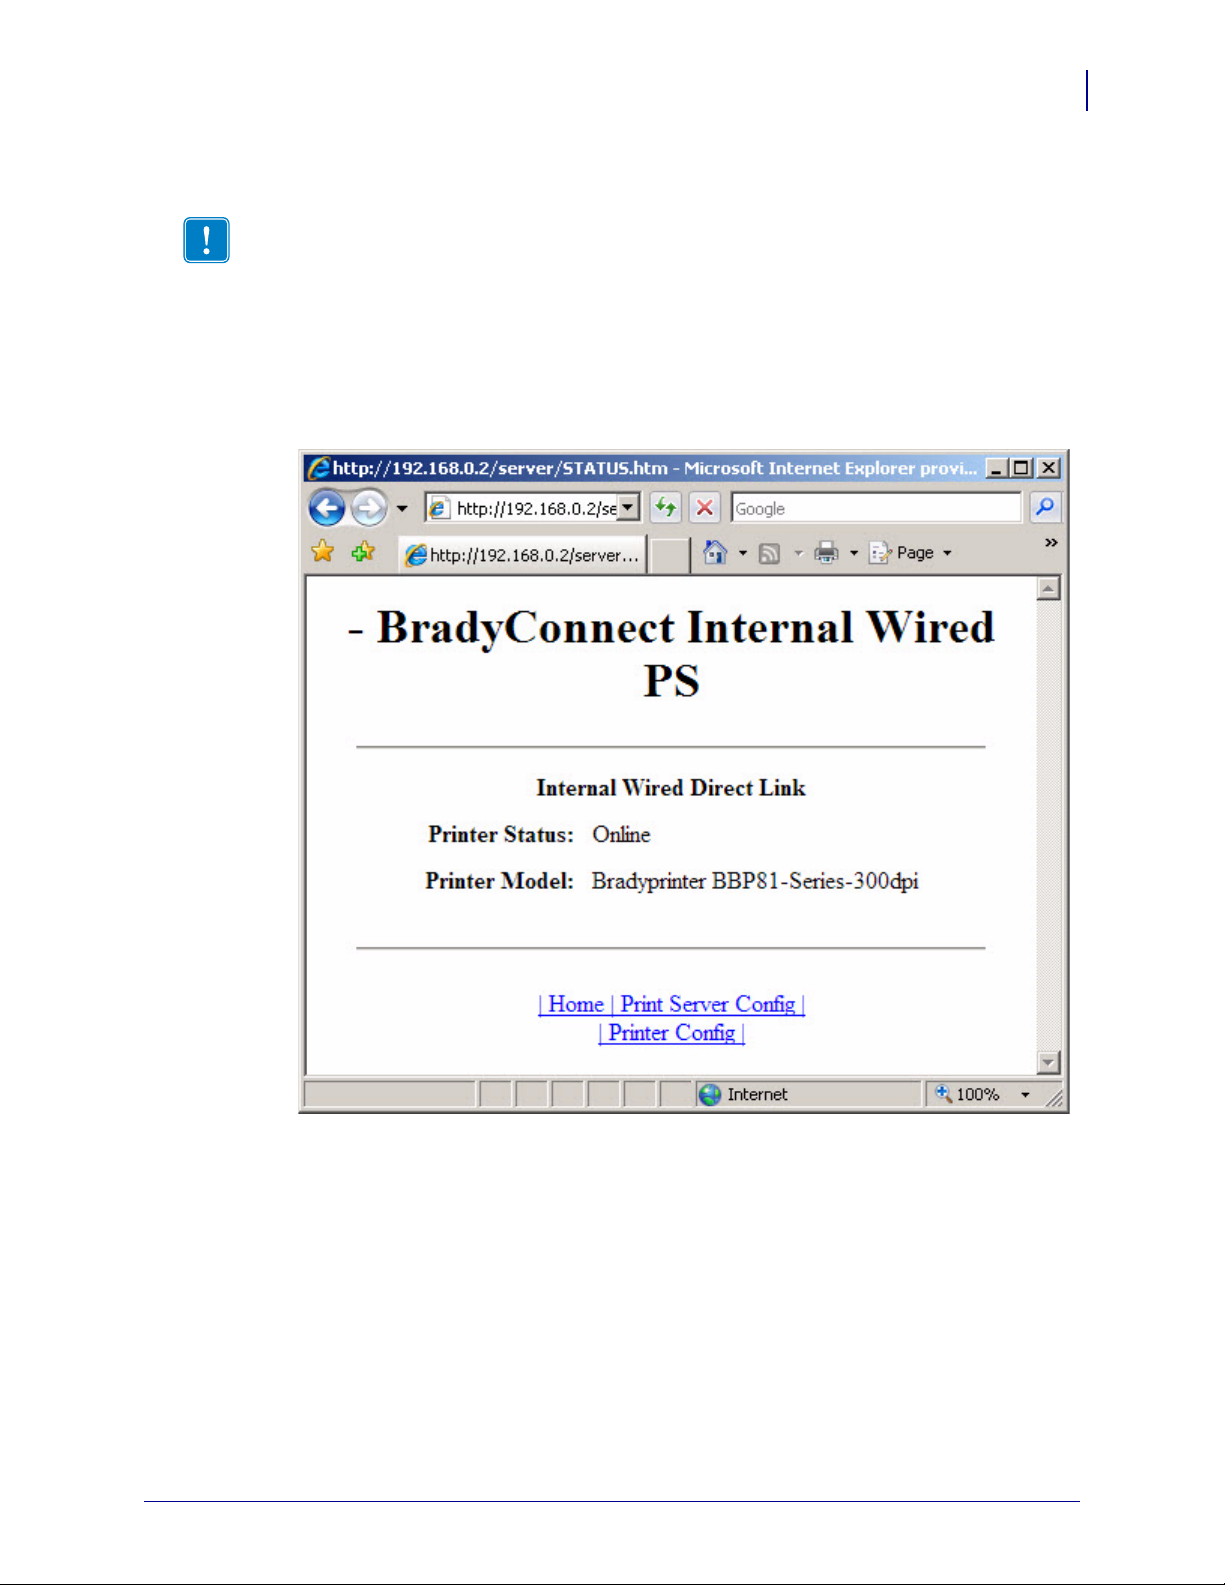
To view the port status, complete this step:
Important • The default user ID and password is required to access this page.
1. From the Print Server page, click View Port Status.
The Port Status page opens.
Figure 6 • Port Status
29
07/18/2008 BradyConnect 10/100 Internal Print Server User Guide Y885775
Page 30
10/100 Internal Print Server
30
10/100 Internal PS Features
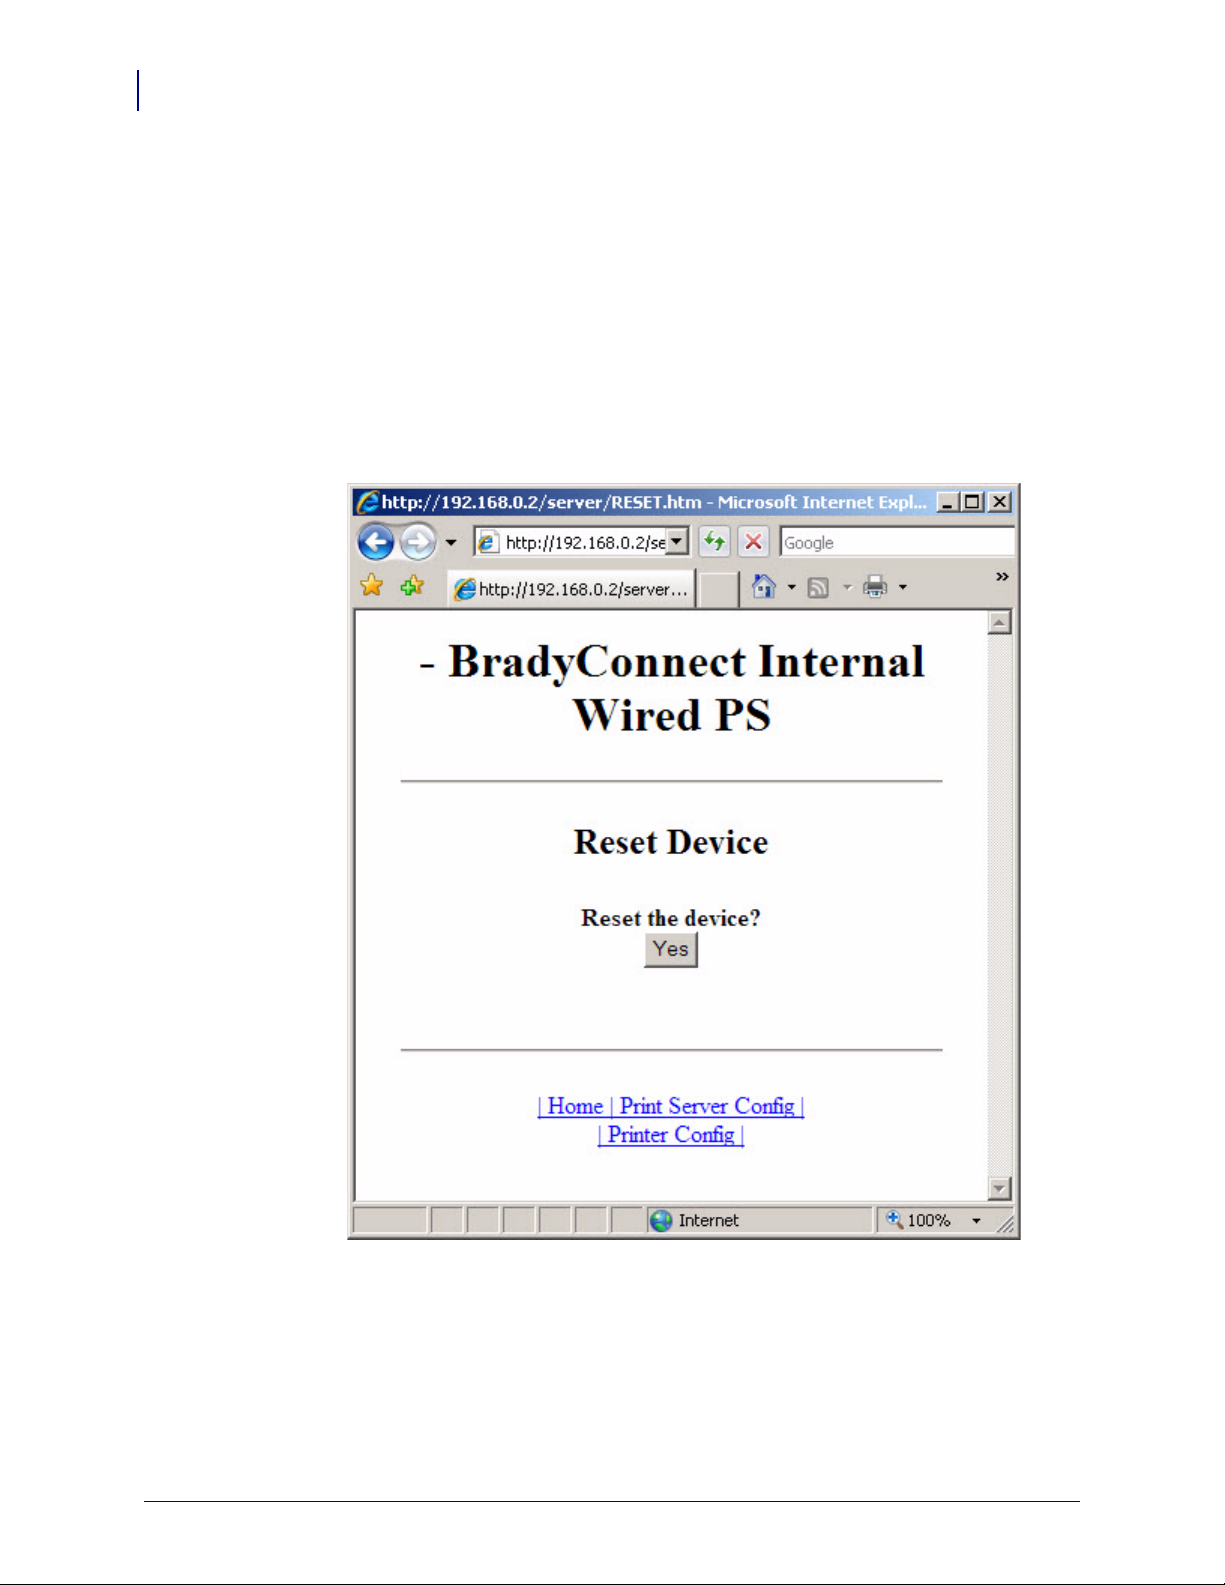
Reset
To reset the 10/100 Internal PS, complete these steps:
From the Print Server page in the Reset section, you can perform a soft reboot of the print
server.
1. From the Print Server Settings page, click Reset Print Server.
The Reset Print Server page opens.
Figure 7 • Reset Print Server
2. To reset 10/100 Internal PS, click Yes.
Y885775 BradyConnect 10/100 Internal Print Server User Guide 07/18/2008
Page 31

Restore
To restore 10/100 Internal PS to the default factory settings, complete these
steps:
10/100 Internal Print Server
10/100 Internal PS Features
From the Print Server page in the Restore section, you can restore 10/100 Internal PS to the
default factory settings:
1. From the Print Server page, click Factory Print Server Settings.
The Restore To Factory Defaults page opens.
Figure 8 • Restore to Factory Settings
31
2. Make the selections you want, and click Submit Changes.
07/18/2008 BradyConnect 10/100 Internal Print Server User Guide Y885775
Page 32

10/100 Internal Print Server
Notes • ___________________________________________________________________
__________________________________________________________________________
__________________________________________________________________________
__________________________________________________________________________
__________________________________________________________________________
__________________________________________________________________________
__________________________________________________________________________
__________________________________________________________________________
__________________________________________________________________________
__________________________________________________________________________
32
10/100 Internal PS Features
Y885775 BradyConnect 10/100 Internal Print Server User Guide 07/18/2008
Page 33

3
Getting Started
This chapter provides you with information and procedures for working with the most
frequently used 10/100 Internal PS features.
Contents
Before You Begin . . . . . . . . . . . . . . . . . . . . . . . . . . . . . . . . . . . . . . . . . . . . . . . . . . . . . . . 34
Using the Control Panel to View and Modify Print Server Parameters . . . . . . . . . . . . . . 37
Defaulting the 10/100 Internal PS . . . . . . . . . . . . . . . . . . . . . . . . . . . . . . . . . . . . . . . . . . 38
Defaulting the 10/100 PS on the BBP81 (4”) and BBP81 (6”) Printers . . . . . . . . . . . . 38
WebView . . . . . . . . . . . . . . . . . . . . . . . . . . . . . . . . . . . . . . . . . . . . . . . . . . . . . . . . . . . 39
Assigning an IP Address . . . . . . . . . . . . . . . . . . . . . . . . . . . . . . . . . . . . . . . . . . . . . . . . . 40
With Dynamic Host Configuration Protocol (DHCP) . . . . . . . . . . . . . . . . . . . . . . . . . . 40
Without DHCP . . . . . . . . . . . . . . . . . . . . . . . . . . . . . . . . . . . . . . . . . . . . . . . . . . . . . . . 40
In a Non-Windows Environment . . . . . . . . . . . . . . . . . . . . . . . . . . . . . . . . . . . . . . . . . 41
07/18/2008 BradyConnect 10/100 Internal Print Server User Guide Y885775
Page 34

Getting Started
34
Before You Begin
Before You Begin
10/100 Internal PS offers many features, but how you access and work with them is dependent
on your environment. Before you begin, you need to get information from the 10/100 Internal
PS configuration label.
Important • Make sure the printer is turned off (O).
Table 5 shows the minimum label widths needed to print a 10/100 Internal PS configuration
label with different DPI printheads.
To print a network configuration label for BBP81 (4”) and BBP81 (6”) printers
with a 10/100 Internal PS, complete these steps:
Table 5 • Label Width
DPI Inches MM
300 2.50 63.50
1. Turn on (I) the printer and let it complete its power-up cycle.
2. When the POST cycle is complete, press Setup/Exit to enter the Setup Mode.
3. Scroll through the parameters using the Plus (+ key) until you reach List Network.
4. Press Select to access List Network. Print+ displays.
5. Press Plus (+ key) to print the network configuration label.
Y885775 BradyConnect 10/100 Internal Print Server User Guide 07/18/2008
Page 35

Getting Started
Before You Begin
Figure 9 • Network Configuration Label for BBP81 (4”)/BBP81 (6”)
35
07/18/2008 BradyConnect 10/100 Internal Print Server User Guide Y885775
Page 36

Getting Started
36
Before You Begin
6. Press Setup/Exit to exit the Setup Mode.
7. From the network configuration label, you need to look for these numbers:
• IP PROTOCOL
• IP ADDRESS
•SUBNET MASK
• DEFAULT GATEWAY
• MAC ADDRESS
8. On the network configuration label that prints out for your 10/100 Internal PS device,
circle the aforementioned settings. You can now proceed to Assigning an IP Address
on page 40.
Y885775 BradyConnect 10/100 Internal Print Server User Guide 07/18/2008
Page 37

Using the Control Panel to View and Modify Print Server Parameters
Using the Control Panel to View and Modify Print
Server Parameters
You may change several print server parameters using the cont rol panel on the p rinter. Table 6
shows the parameters that may be viewed or modified through the printer’s control panel for
BBP81 (4”) and BBP81 (6”) printers with firmware version ZZSP1148A or later.
Table 6 • Print Server Paramete rs
Getting Started
37
Parameter
Function
LIST NETWORK Print a Network Configuration Label
Use this parameter to print a network configuration label (see Figure 9
on page 35).
IP PROTOCOL
IP ADDRESS
SUBNET MASK
DEFAULT GATEWAY
RESET NETWORK
1
View the Method to Obtain an IP Address
This parameter tells if the user (permanent) or the server (dynamic) selects
the IP address. If a dynamic option is chosen, this parameter tells the
method(s) by which the print server (wired or wireless) receives the IP
address from the server.
Selections: ALL, BOOTP, DHCP, DHCP AND BOOTP, PERMANENT
Default Value: All
1
View the Print Engine’s IP Address
Default Value: 0.0.0.0
1
View the Subnet
Default Value: 255.255.255.0
1
View the Gateway
Default Value: 0.0.0.0
1
Reset the Wired or Wireless Network
Use this parameter to reinitialize the wire less radio card and the print server
(wired or wireless) when the wireless print server is running. This
parameter also causes any wireless radio card in the printer to reassociate to
the wireless network.
ACTIVE PRINTSRVR
View the Active Print Server
Selections: Wired, Wi reless
Default Value: Wired
PRIMARY NETWORK
View the Primary Network
Default Value: Internal Wired
1 These parameters appear after the system recognizes the existence of a BradyConnect print server (wired or wireless). After
the print server is recognized, all zeroes (000.000.000.000) will display until the printer obtains an IP address or defaults to
address 192.168.254.254.
07/18/2008 BradyConnect 10/100 Internal Print Server User Guide Y885775
Page 38

Getting Started
38
Defaulting the 10/100 Internal PS
Defaulting the 10/100 Internal PS
This section provides you with instructions for defaulting the 10/100 Internal PS to factory
settings using the control panel and WebView.
Defaulting the 10/100 PS on the BBP81 (4”) and BBP81 (6”) Printers
To default the 10/100 Internal PS to factory settings using the control panel on
the BBP81 (4’) or BBP81 (6”) printers, complete these steps:
1. From the control panel, press Setup/Exit two times.
2. Press Plus (+ key) five times.
The control panel will read DEFAULT NET.
3. Press Setup/Exit to save the change.
4. After the printer defaults all settings, the control panel will show PRINTER READY.
Y885775 BradyConnect 10/100 Internal Print Server User Guide 07/18/2008
Page 39

WebView
To default the 10/100 Internal PS to factory settings using WebView, complete
these steps:
1. From the BradyConnect PrintServer view, click Factory Print Server Settings.
The Restore to Factory Defaults page opens:
Figure 10 • Restore to Factory Defaults
Getting Started
Defaulting the 10/100 Internal PS
39
2. Enable the check box for the settings you want to reset, and click Submit Changes.
Important • During the reset cycle, the web pages are unavailable. Upon completion,
check the IP address of the 10/100 Internal PS as it may have changed during the reset
cycle.
07/18/2008 BradyConnect 10/100 Internal Print Server User Guide Y885775
Page 40

Getting Started
40
Assigning an IP Address
Assigning an IP Address
Before you can begin working with 10/100 Internal PS, you must get or assign an IP address
for the 10/100 Internal PS device.
There are three different ways to assign an IP address. Here is a list and a brief description of
each method:
• Web View — Browser-enabled method to assign an IP address.
• DHCP — See your LAN administrator for more information.
• Telnet — DOS command to assign an IP address.
Important • Throughout the procedures in this cha pter , there are some feat ures that require the
default User ID and/or default password. If you are prompted, these are the defaults:
• User ID: admin
• Password: 1234
With Dynamic Host Configuration Protocol (DHCP)
If your network uses DHCP, your 10/100 Internal PS device is assigned a temporary IP
address.
Note • Check with your Network Administrator to see whether your network uses DHCP.
Without DHCP
If your network does not use a dynamic IP addressing system (such as DHCP), you need to set
a permanent IP address for the 10/100 Internal PS device.
Y885775 BradyConnect 10/100 Internal Print Server User Guide 07/18/2008
Page 41

In a Non-Windows Environment
These steps can be used to assign an IP address using the control panel (LCD).
Assigning an IP address from the printer LCD
To assign an IP address from the printer LCD, complete these steps:
1. Connect Ethernet before turning on the printer.
2. Turn on (I) the printer and wait until the LCD says PRINTER READY. If you do not
have a network cable in the port, the 10/100 Internal PS prints the configuration label
when it is ready.
3. On the printer control panel, press SETUP/EXIT.
4. On the printer control panel, press PREVIOUS until you reach the NETWORK
SETTINGS menu item.
5. You can edit any of the following network settings in order to communicate with any
10/100 Internal PS in your network environment.
Getting Started
Assigning an IP Address
41
Important • To change any of these settings, you need to enter the printer password. The
default password is
• ip resolution (dynamic, permanent): The printer menu item
must be set to
1234.
IP RESOLUTION
PERMANENT if attempting to assign the IP address from the
control panel.
• default gateway (default setting of 000.000.000.000)
• subnet mask (default setting 255.255.255.0)
• ip address (if initial default setting is 0.0.0.0, after 2 minutes this defaults to
192.168.254.254)
• ip protocol (gleaning only, RARP, BOOTP, DHCP, DHCP and BOOTP, all)
07/18/2008 BradyConnect 10/100 Internal Print Server User Guide Y885775
Page 42

Getting Started
42
Assigning an IP Address
Assigning an IP Address via a Telnet Session
If your environment is not Windows-based, this section is for you. However, this method can
be used in a Windows environment, too.
The methods used for assigning an IP address with a Telnet session are Static Route and
Gleaning.
Important • This applies to any TCP/IP-capable workstation/host networked with the Brady
printer. Both, the workstation/host and the 10/100 Internal PS, must be on the same network
segment.
Before you can Telnet to the 10/100 Internal PS and configure it, you must first assign the
10/100 Internal PS a temporary IP address.
Static Route
To use this method, complete these steps:
1. Turn on (I) the printer and wait for 2 minutes to allow for the device to complete the
self-test.
During this time, the 10/100 Internal PS performs an address broadcast. If no address is
assigned to the unit (via DHCP or Bootp), it use s a default address. The default a ddress for
10/100 Internal PS is 192.168.254.254. Print the 10/100 Internal PS configuration
label to confirm the address. For details, see Before You Begin on page 34.
2. You can use the route add command to place the default IP address into the
workstation's network routing table.
Example • In the next step, **** is the IP address on the 10/100 Internal PS
configuration label.
3. At the workstation/host command prompt (in Windows, at the DOS prompt), type:
route add **** "IP address of the workstation" 0
Note • The zero (0) placed at the end of the “route add” command is optional on some
systems.
4. Telnet to the 10/100 Internal PS by typing:
"Telnet xxx.xxx.xxx.xxx"
(where xxx.... is the IP addres of the printer).
The password is 1234.
5. At this point, you can alter the settings as desired. When complete, do a reset and allow
the 10/100 Internal PS self-test to complete before proceeding with any communications
activity.
Y885775 BradyConnect 10/100 Internal Print Server User Guide 07/18/2008
Page 43

Getting Started
Assigning an IP Address
Gleaning
A method by which the 10/100 Internal PS uses the IP address of the first ping packet that is
sent to its hardware address.
Note • Gleaning works only on local subnets at routers. It does not pass Address Resolution
Protocol (ARP) broadcasts.
To use this method, complete these steps:
1. Add an entry to the ARP table that assigns an IP a ddress to an Ethernet (hardware)
address.
The syntax for this command is:
arp -s "temporary ipaddress of print server" "MAC Address
(print server hardware address)" arp -s <temporary ip
address> <MAC Address>
Example • You would type:
arp -s 10.3.50.59 00-07-4d-68-1D-B9-86
43
2. Power cycle the printer.
3. As the printer reboots, begin a continuous ping to the address assigned previously.
Note • Most UNIX systems use a continuous ping.
To use a continuous ping from a Windows host, you must issue the command:
ping -t "ipaddress".
4. When the 10/100 Internal PS begins to respond, stop the ping activity.
In Windows,
5. Telnet to the 10/100 Internal PS and assign the appropriate IP address, subnet mask, and
Ctrl + C halts the pinging.
gateway, if applicable.
6. Once this is complete, reset the 10/100 Internal PS.
For details on resetting the 10/100 Internal PS, see Reset on page 30.
07/18/2008 BradyConnect 10/100 Internal Print Server User Guide Y885775
Page 44

Getting Started
Notes • ___________________________________________________________________
__________________________________________________________________________
__________________________________________________________________________
__________________________________________________________________________
__________________________________________________________________________
__________________________________________________________________________
__________________________________________________________________________
__________________________________________________________________________
__________________________________________________________________________
__________________________________________________________________________
44
Assigning an IP Address
Y885775 BradyConnect 10/100 Internal Print Server User Guide 07/18/2008
Page 45

A
BradyConnect WebView
The appendix provides you with detailed information that allows you to use the enhanced
functionality of your BradyConnect-enabled printer with the 10/100 Internal PS.
Contents
WebView . . . . . . . . . . . . . . . . . . . . . . . . . . . . . . . . . . . . . . . . . . . . . . . . . . . . . . . . . . . . . 46
Home Page . . . . . . . . . . . . . . . . . . . . . . . . . . . . . . . . . . . . . . . . . . . . . . . . . . . . . . . . . 46
View Printer Configuration. . . . . . . . . . . . . . . . . . . . . . . . . . . . . . . . . . . . . . . . . . . . . . 47
Print Server Settings . . . . . . . . . . . . . . . . . . . . . . . . . . . . . . . . . . . . . . . . . . . . . . . . . . 50
View and Modify Printer Settings. . . . . . . . . . . . . . . . . . . . . . . . . . . . . . . . . . . . . . . . . 51
Setting the Primary Network Print Server . . . . . . . . . . . . . . . . . . . . . . . . . . . . . . . . . . 57
TCP/IP Settings . . . . . . . . . . . . . . . . . . . . . . . . . . . . . . . . . . . . . . . . . . . . . . . . . . . . . . 59
Printer Controls . . . . . . . . . . . . . . . . . . . . . . . . . . . . . . . . . . . . . . . . . . . . . . . . . . . . . . 63
Directory Listing. . . . . . . . . . . . . . . . . . . . . . . . . . . . . . . . . . . . . . . . . . . . . . . . . . . . . . 64
Alert Setup . . . . . . . . . . . . . . . . . . . . . . . . . . . . . . . . . . . . . . . . . . . . . . . . . . . . . . . . . . . . 65
Setting Alerts . . . . . . . . . . . . . . . . . . . . . . . . . . . . . . . . . . . . . . . . . . . . . . . . . . . . . . . . 66
Establishing Email Alert Messaging. . . . . . . . . . . . . . . . . . . . . . . . . . . . . . . . . . . . . . . 69
Checking 10/100 Internal PS Configuration Settings. . . . . . . . . . . . . . . . . . . . . . . . . . . . 72
Browser . . . . . . . . . . . . . . . . . . . . . . . . . . . . . . . . . . . . . . . . . . . . . . . . . . . . . . . . . . . . 72
Configuring the Print Server. . . . . . . . . . . . . . . . . . . . . . . . . . . . . . . . . . . . . . . . . . . . . . . 75
Sending Email to Your Brady Printer . . . . . . . . . . . . . . . . . . . . . . . . . . . . . . . . . . . . . . . . 76
07/18/2008 BradyConnect 10/100 Internal Print Server User Guide Y885775
Page 46

BradyConnect WebView
46
WebView
WebView
Home Page
W ebView provides the System Administrator or user complete, easy, one-step control over the
printing environment. It provides real-time configuratio n, cont rol, and moni toring capabi lities
with the convenient graphic interface of a Web browser.
The Web pages return ed by Brady printers are not static. They contain real-time information
about the printer’s present state of operatio n, inc luding o n-line sta tus, erro r conditio ns, and al l
printing parameters.
Note • To access the printer’s Web page, you need the IP address. For instructions on getting
the IP address, see Assigning an IP Address on page 40.
When you connect to the print se rver, the Printer Home Page displays. From this page you can
go to any other page in the Webview, allowing you to modify or view the following:
• Network Status, Error, and Warning reports
• BradyConnect 10/100 Internal PS configuration
• Printer settings
• Directories of objects stored in Flash memory and RAM devices
• Objects, stored fonts, images, programs, and ZPL II formats
• Brady Worldwide Inc. support and home pages
Additionally, from the Home Page you can visit the Brady website, www.bradyid.com, or the
Brady Technical Support page.
Y885775 BradyConnect 10/100 Internal Print Server User Guide 07/18/2008
Page 47

To open WebView for your printer, complete these steps:
1. Open a Web browser.
2. In the Address text-box, type your printer’s IP address, and press Enter.
The Printer Home Page opens.
Figure 11 • Printer Home Page
BradyConnect WebView
WebView
47
View Printer Configuration
The V iew Pri nter Co nfigurat ion menu optio n prov ides accurat e, up-to-the-min ute informa tion
on the printer’s current state. An administrator can conveniently find any information on the
virtual configuration label and also check on the status of printer ports.
07/18/2008 BradyConnect 10/100 Internal Print Server User Guide Y885775
Page 48

BradyConnect WebView
48
WebView
To see the View Printer Configuration menu option, complete these steps:
1. From the Printer Home Page, click View Printer Configuration.
The WebView displays the configuration settings.
Figure 12 • Configuration Settings
Y885775 BradyConnect 10/100 Internal Print Server User Guide 07/18/2008
Page 49

BradyConnect WebView
WebView
2. To update the printer information from this view, click Refresh and the printer sends
current information to the Web browser.
3. When you are finished reviewin g:
If... Then...
You want to return to the Home page Click the Home link.
You want to print a label Scroll to the bottom of this page and click
Label
.
Print
49
07/18/2008 BradyConnect 10/100 Internal Print Server User Guide Y885775
Page 50

BradyConnect WebView
50
WebView
Print Server Settings
This section provides you with instructions for viewing the current printer settings.
To view the print server menu, complete this step:
• From the Printer Home Page, click Print Server Settings.
The Print Server Settings Page opens.
Figure 13 • Print Server Settings Page
Y885775 BradyConnect 10/100 Internal Print Server User Guide 07/18/2008
Page 51

View and Modify Printer Settings
This section provides you with steps for accessing and modifying printer settings with a
BradyConnect-enabled printer. It also provides illustrations of the various pages you can
access.
Important • To apply changes made in this section, you need to use the default password for
your printer:
Password: 1234
BradyConnect WebView
WebView
51
07/18/2008 BradyConnect 10/100 Internal Print Server User Guide Y885775
Page 52

BradyConnect WebView
52
WebView
To view and modify printer settings, complete these steps:
1. From the Printer Home Page, click View and Modify Printer Settings.
The View and Modify Printer Settings page opens.
Figure 14 • View and Modify Printer Settings
Y885775 BradyConnect 10/100 Internal Print Server User Guide 07/18/2008
Page 53

BradyConnect WebView
WebView
2. On the View and Modify Printer Settings page, you have a menu to choose from. Table 7
identifies each menu option page.
Note • Refer to the User Guide for a further explanation of these options.
Ta ble 7 • Menu Options
General Setup
53
Serial Communications Setup
07/18/2008 BradyConnect 10/100 Internal Print Server User Guide Y885775
Page 54

BradyConnect WebView
54
WebView
Table 7 • Menu Options (Continued)
Network Configuration
Print Listings on Label
Y885775 BradyConnect 10/100 Internal Print Server User Guide 07/18/2008
Page 55

Media Setup
Table 7 • Menu Options (Continued)
BradyConnect WebView
WebView
55
Calibration
07/18/2008 BradyConnect 10/100 Internal Print Server User Guide Y885775
Page 56

BradyConnect WebView
56
WebView
Table 7 • Menu Options (Continued)
ZPL Control
Advanced Setup
Y885775 BradyConnect 10/100 Internal Print Server User Guide 07/18/2008
Page 57

Setting the Primary Network Print Server
The BBP81 (4”) and BBP81 (6”) printers support the simultaneous installation of an internal,
external, and a wireless print server. Even though all three print servers may be installed, only
one is connected to the network and is the active print server. Table 8 outlines priorities and
identifies which device becomes the active print server when multiple print servers are
installed.
Table 8 • Primary Print Server
BradyConnect WebView
WebView
57
If the
Primary
Network
is set
to:
Installed and
Connected to a Live
Ethernet Network
Internal External
Then, the
Active Print
Server will be:
X X Internal
Wired
X External
This section provides you with steps for changing the primary network.
07/18/2008 BradyConnect 10/100 Internal Print Server User Guide Y885775
Page 58

BradyConnect WebView
58
WebView
To change the primary network, complete these steps:
1. From the Printer Home Page, click View and Modify Printer Settings.
The View and Modify Printer Settings page opens.
Figure 15 • View and Modify Printer Settings
2. When prompted, enter the printer’s password.
Important • To apply changes made in this section, you need to use the default password for
your printer:
Password: 1234
Y885775 BradyConnect 10/100 Internal Print Server User Guide 07/18/2008
Page 59

3. Click Network Configuration.
The Network Configuration page opens.
Figure 16 • Network Configuration Page
(BBP81 (4”)/BBP81 (6”) Web Page Shown)
BradyConnect WebView
WebView
59
TCP/IP Settings
TCP/IP settings may be viewed and modified in this section. Several of these settings include:
•IP Address
• IP Protocol
• Subnet mask
• Default gateway
07/18/2008 BradyConnect 10/100 Internal Print Server User Guide Y885775
Page 60

BradyConnect WebView
60
WebView
To change the TCP/IP settings, complete these steps:
1. From the Printer Home Page, click View and Modify Printer Settings.
The View and Modify Printer Settings page opens.
Figure 17 • View and Modify Printer Settings
2. Click on Network Configuration.
The Network Configuration page opens.
Y885775 BradyConnect 10/100 Internal Print Server User Guide 07/18/2008
Page 61

BradyConnect WebView
Figure 18 • Network Configuration Page
(BBP81 (4”)/BBP81 (6”) Web Page Shown)
WebView
61
3. Click TCP/IP Settings.
The TCP/IP Settings page opens.
07/18/2008 BradyConnect 10/100 Internal Print Server User Guide Y885775
Page 62

BradyConnect WebView
62
WebView
Figure 19 • TCP/IP Settings Page
(BBP81 (4”)/BBP81 (6”) Web Page Shown)
4. From the TCP/IP Settings page, you can modify settings for all installed print servers.
Note • The BBP81 (4”) and BBP81 (6”) printers support the simultaneous installation of
an internal, external, and a wireless print server. See Table 8 on page 57 for more detailed
information on priorities and setti ng the act ive print serve r when mul tiple print servers are
present.
5. Click Submit Changes to accept and save your changes or click Reset Changes to revert
to your previous settings.
Y885775 BradyConnect 10/100 Internal Print Server User Guide 07/18/2008
Page 63

Printer Controls
This page offers control over basic printer functions.
Other functions are also accessible from this page. These include:
•
Feed — causes printer to feed one label.
• Cancel One Format — cancels the currently printing format.
•
Cancel All Formats — cancels all formats.
• Reset Printer — causes printer to perform its standard reset without cycling power.
To view Printer Controls, complete these steps:
1. From the Printer Home Page, click Printer Controls.
This Printer Controls page opens.
Figure 20 • Printer Controls
BradyConnect WebView
WebView
63
Important • In this view, you must have administrative rights to make changes to the printer
controls.
07/18/2008 BradyConnect 10/100 Internal Print Server User Guide Y885775
Page 64

BradyConnect WebView
64
WebView
Directory Listing
The directory page provides a listing of all file system devices (B:, E:, R:, Z:). The size, name,
and location of each stored object appears.
Buttons are available to perform file management operations on the objects. The file
management operations include:
• Delete object — Not available for objects in read-only memory (Z:).
• Copy object to a new name and/or device — Not available for objects in read-only
memory (Z:).
To view the Directory Listing, complete these steps:
1. From the Printer Home Page, click Directory Listing.
The Directory Listing page opens. There are several fields to select in this view.
Figure 21 • Directory Listing
2. To create a script, click Create New Script.
Y885775 BradyConnect 10/100 Internal Print Server User Guide 07/18/2008
Page 65

Alert Setup
To configure the printer’s interaction with BradyConnect Alert to be completely functional,
SNMP settings must be established in these a reas:
The BradyConnect messaging system provides for more than SNMP notification. Alerts can
be routed to various destinations:
• T he printer, via the WebView interface.
• The Alert Printer Management Utility for logging SNMP traps.
•TCP
•UDP
•email
• serial port
• parallel port destinations
•SNMP
•USB
BradyConnect WebView
Alert Setup
65
07/18/2008 BradyConnect 10/100 Internal Print Server User Guide Y885775
Page 66

BradyConnect WebView
66
Alert Setup
Setting Alerts
Your 10/100 Internal Print Server allows you to configure your printer to send unsolicited
Alerts.
Table 9 shows the conditions that can trigger alerts.
Table 9 • Alerts
Alert Type Error Condition
BradyConnect Alerts • Media out
• Ribbon out
• Printhead over-temp warning
• Printhead under-temp warning
• Head open
• Power supply over-temp
• Ribbon warning (in direct-thermal mode)
• Rewind full
• Cut error
• Printer paused
• PQ job completed
• Label taken
• Head element out
• Power on
This section has step-by-step instructions for setting up an alert using BradyConnect.
Important • If you do not have a BradyConnect-enabled printer, th ese step s will not work.
Y885775 BradyConnect 10/100 Internal Print Server User Guide 07/18/2008
Page 67

BradyConnect WebView
To view Alert Setup using BradyConnect, complete these steps:
1. Open a Web browser.
2. In the Address text-box, type your printer’s IP address, and press Enter.
The Printer Home Page opens.
Figure 22 • Printer Home Page
Alert Setup
67
07/18/2008 BradyConnect 10/100 Internal Print Server User Guide Y885775
Page 68

BradyConnect WebView
68
Alert Setup
3. From the Printer Home Page, click Alert Setup.
The Alert Messaging System page opens.
Figure 23 • Alert Messaging System
To add an alert, you need the default password.
4. To add an alert, click Add Alert Message.
5. Select accordingly.
6. You can use BradyConnect Alert to monitor alerts set through a BradyConnect-enabled
printer.
From this Web page, you can add alert messages notifying you when a printer is out of
paper, needs a ribbon, and so on.
Y885775 BradyConnect 10/100 Internal Print Server User Guide 07/18/2008
Page 69

Establishing Email Alert Messaging
You can have multiple email addresses set up for routing different error messages, or split
notifications between email and other network management tools.
To begin receiving email notification of errors, complete these steps:
1. Open a Web browser.
2. In the Address text-box, type in the printer’s IP address.
The Printer Home Page opens.
Figure 24 • Printer Home Page
BradyConnect WebView
Alert Setup
69
3. From the Printer Home Page, click Alert Setup.
The Alert Setup page shows a list of message notifications and their respective
destinations (if no notifications are listed).
07/18/2008 BradyConnect 10/100 Internal Print Server User Guide Y885775
Page 70

BradyConnect WebView
70
Alert Setup
4. To set up email notification, go to the Alert Setup page and click Add Alert Message.
The Add Alert Message page opens.
Figure 25 • Add Alert Message
5. Specify the condition to send over email, such as HEAD ELEMENT BAD or PAPER
OUT.
6. Set Destination to Email.
7. In the SET drop-down box, select YES.
You will be notified via email whenever your specific condition is detected.
8. In the CLR drop-down box, select YES if you wish to be notified when the specific
condition is cleared.
Y885775 BradyConnect 10/100 Internal Print Server User Guide 07/18/2008
Page 71

BradyConnect WebView
Alert Setup
9. Enter a valid email address to send the alert messages to.
Example • admin@yourcompany.net (The Port field can be ignored for
email setup.)
Important • A password is required. If you forget to enter the password, the alerts you just
set are deleted.
10. Click Add Alert Message .
T o receive email alert, yo u must give 10/100 Internal PS the IP address of your mail server
that is running SMTP.
11. To save current settings, click Save Printer Setting.
71
12. Enter the password and click Save Current Configuration.
.
Important • The printer accepts only the last configuration made.
13. You can continue to add more Alerts, if finished:
• From the Printer Home Page, select
.
Setup
PrintServer Settings > Network Communications
•Click SMTP Email Alerts.
• Specify your SMTP server address.
Note • The SMTP Server address might be referred to as Mail Server address.
When these steps are done, you can begin receiving email notification messages.
07/18/2008 BradyConnect 10/100 Internal Print Server User Guide Y885775
Page 72

BradyConnect WebView
72
Checking 10/100 Internal PS Configuration Settings
Checking 10/100 Internal PS Configuration Settings
This section provides steps on how to check the 10/100 Internal PS configuration settings
using a browser.
Browser
This section provides steps on how to check the 10/100 Internal PS configuration settings
using its Web pages.
To access the 10/100 Internal PS settings, complete these steps:
1. Open a Web browser.
2. In the Address text-box, type your printer’s IP address, then press Enter.
Your browser page looks similar to Figure 26.
Figure 26 • Browser View
Y885775 BradyConnect 10/100 Internal Print Server User Guide 07/18/2008
Page 73

Checking 10/100 Internal PS Configurati on Settings
3. From the Printer Home Page, click Print Server Settings.
The default User ID and password are required.
The Print Server Settings Page opens.
Figure 27 • Print Server Settings Page
BradyConnect WebView
73
07/18/2008 BradyConnect 10/100 Internal Print Server User Guide Y885775
Page 74

BradyConnect WebView
74
Checking 10/100 Internal PS Configuration Settings
To access the 10/100 Internal PS settings, complete these steps:
1. From the Printer Home page, click Print Server.
The Print Server Configuration page opens.
Figure 28 • Print Server Configuration
2. For details on the configuration choices, see Configuring the Print Server on page 75.
Y885775 BradyConnect 10/100 Internal Print Server User Guide 07/18/2008
Page 75

Configuring the Print Server
This section provides the steps to configure the 10/100 Internal PS using BradyConnect
WebView and a web browser.
To change the TCP/IP Configuration, complete these steps:
1. From the Printer Home page, click Print Server Settings.
The Print Server Configuration page opens.
2. From the Print Server Configuration page, click Print Server.
The Print Server Configuration page opens.
Figure 29 • Print Server Configuration
BradyConnect WebView
Configuring the Print Server
75
07/18/2008 BradyConnect 10/100 Internal Print Server User Guide Y885775
Page 76

BradyConnect WebView
76
Sending Email to Your Brady Printer
3. From the Print Server Configuration page, you have a menu from which to choose. See
Table 4 on page 24 for more detailed information on these settings.
4. Select the appropriate link to make your change(s).
Sending Email to Your Brady Printer
To easily transfer instructions and data to your printer from a remote location, the
10/100 Internal PS allows you to send email to the printer. This is set up under the link POP3
Email Printing. You need to provide the address of the network POP3 server , a user na me, and
a password. With this opti on , you can create a text-based email containing ZPL II code and
transfer it to the printer.
Note • Email attachments sent to the printer are not supported.
By using the proper ZPL II commands, files can be saved, loaded, printed, copied, and deleted,
just as if the data were transferred from a serial or parallel port.
Y885775 BradyConnect 10/100 Internal Print Server User Guide 07/18/2008
Page 77

To access POP3, complete these steps:
1. From the Printer Home page, click Print Server Settings.
The Print Server Settings Page opens.
Figure 30 • Print Server Settings Page
BradyConnect WebView
Sending Email to Your Brady Printer
77
07/18/2008 BradyConnect 10/100 Internal Print Server User Guide Y885775
Page 78

BradyConnect WebView
78
Sending Email to Your Brady Printer
2. From the Print Server Settings Page, click Print Server.
The Print Server Configuration Page opens.
Figure 31 • Print Server Configuration
Y885775 BradyConnect 10/100 Internal Print Server User Guide 07/18/2008
Page 79

BradyConnect WebView
Sending Email to Your Brady Printer
3. From the Print Server Configuration page, click POP3 E-mail Printing.
The POP3 Printing Configuration page opens.
Figure 32 • POP3 Printing Configuration
79
4. Make the necessary changes, and click Submit Changes.
07/18/2008 BradyConnect 10/100 Internal Print Server User Guide Y885775
Page 80

BradyConnect WebView
Notes • ___________________________________________________________________
__________________________________________________________________________
__________________________________________________________________________
__________________________________________________________________________
__________________________________________________________________________
__________________________________________________________________________
__________________________________________________________________________
__________________________________________________________________________
__________________________________________________________________________
__________________________________________________________________________
80
Sending Email to Your Brady Printer
Y885775 BradyConnect 10/100 Internal Print Server User Guide 07/18/2008
Page 81

Hardware
Troubleshooting
This appendix provides you with solutions to known issues.
B
Contents
Troubleshooting the 10/100 PS . . . . . . . . . . . . . . . . . . . . . . . . . . . . . . . . . . . . . . . . . . . . 82
Defaulting the 10/100 PS on the BBP81 (4”) and BBP81 (6”) Printers . . . . . . . . . . . . 82
10/100 Internal PS Network Status/Activity Indicator. . . . . . . . . . . . . . . . . . . . . . . . . . 83
Unable to Print. . . . . . . . . . . . . . . . . . . . . . . . . . . . . . . . . . . . . . . . . . . . . . . . . . . . . . . 84
07/18/2008 BradyConnect 10/100 Internal Print Server User Guide Y885775
Page 82

Hardware Troubleshooting
82
Troubleshooting the 10/100 PS
Troubleshooting the 10/100 PS
Defaulting the 10/100 PS on the BBP81 (4”) and BBP81 (6”) Printers
To default the 10/100 Internal PS to factory settings using the control panel,
complete these steps:
Note • Only the BBP81 (4”) and BBP81 (6”) printers have a control panel.
1. From the control panel, press Setup/Exit two times.
2. Press Plus (+ key) five times.
The control panel will read DEFAULT NET.
3. Press Setup/Exit to save the change.
4. After the printer defaults all settings, the control panel will show PRINTER READY.
Y885775 BradyConnect 10/100 Internal Print Server User Guide 07/18/2008
Page 83

Troubleshooting the 10/100 PS
10/100 Internal PS Network Status/Activity Indicator
For the BBP81 (4”) and BBP81 (6”) printers
Alongside of the RJ45 connector, there is a single LED containing a red element and a green
element. By turning on and off different combinations of these two LED elements, the LED
indicates Ethernet links, activity, and speed.
LED State Description
Off No Ethernet link detected
Amber 10 Mbps link detected
Amber, blinking 10 Mbps link detected and Ethernet activity detected
Green 100 Mbps link detected
Green, blinking 100 Mbps link detected and Ethernet activity detected
Hardware Troubleshooting
83
07/18/2008 BradyConnect 10/100 Internal Print Server User Guide Y885775
Page 84

Hardware Troubleshooting
84
Troubleshooting the 10/100 PS
Unable to Print
Ping the Printer
To ping the printer, complete these steps:
If you are having problems printing, verify that there is communication between the
10/100 Intern al PS and the printer. Suggestions include the following:
• Ping the printer to determine the ability to communicate with the printer. See Ping the
Printer.
• Or open a Telnet session and send a ZPL command to print a configuration label. See
Telnet on page 85 for more information.
• Check obvious error conditions such as head open, out of media, out of ribbon, etc.
• If problems persist, contact Technical Support.
1. Open a DOS window.
To open a DOS window, click on
Start > Run.
2. In the Open text box, type: cmd
3. From the DOS prompt, type:
ping xxx.xxx.xxx.xxx
where xxx.xxx.xxx.xxx is the IP address of the print server
4. See Figure 33. You see a reply from the print server indicating a connection.
Figure 33 • Example of a Successful Ping
If the issue is a communication problem, you would have received an error message.
Y885775 BradyConnect 10/100 Internal Print Server User Guide 07/18/2008
Page 85

Telnet
Open a telnet session to send a ZPL command from a DOS prompt. This procedure can be
used when running Vx.15.x or later firmware. In this example, a ZPL II command is used to
cause a label to print.
Note • You do not need to open a telnet session if you pinged the printer using the previous
procedure. The purpose of these two procedures is to identify whether your PC can
communicate with your printer.
To open a telnet session on your PC, complete these steps:
1. Open a DOS window.
To open a DOS window, click on
2. In the Open text box, type: cmd
3. From the DOS prompt, type:
telnet xxx.xxx.xxx.xxx 9100
where xxx.xxx.xxx.xxx is the IP address of the print server.
This will connect your PC to the 10/10 0 Internal PS through the p arallel port of the printer.
Start > Run.
Hardware Troubleshooting
Troubleshooting the 10/100 PS
85
4. Enter ~WC.
This ZPL command will print a configuration label on your printer.
5. Click the X in the upper ri ght-hand corner of the window to exit.
If the configuration label prints, the issue is not a communicat ion problem between the prin ter ,
the print server, or the PC.
07/18/2008 BradyConnect 10/100 Internal Print Server User Guide Y885775
Page 86

Hardware Troubleshooting
Notes • ___________________________________________________________________
__________________________________________________________________________
__________________________________________________________________________
__________________________________________________________________________
__________________________________________________________________________
__________________________________________________________________________
__________________________________________________________________________
__________________________________________________________________________
__________________________________________________________________________
__________________________________________________________________________
86
Troubleshooting the 10/100 PS
Y885775 BradyConnect 10/100 Internal Print Server User Guide 07/18/2008
Page 87

C
Print Protocols
In this appendix, an exercise is provided to experiment with File Transfer Protocol (FTP)
support.
Contents
FTP . . . . . . . . . . . . . . . . . . . . . . . . . . . . . . . . . . . . . . . . . . . . . . . . . . . . . . . . . . . . . . . . . 88
07/18/2008 BradyConnect 10/100 Internal Print Server User Guide Y885775
Page 88

Print Protocols
88
FTP
FTP
Embedded within the 10/100 Internal PS is an FTP server application that processes file
transfers from a host computer to the printer.
If the printer is on a network, label formats can be generated and data can be transferred
without setting up a print queue.
To send information to the printer in a Windows environment, try this exercise:
1. In Notepad, generate the following ZPL II code:
^XA
^FO100,100
^CF0,55^FDBrady Corporation^FS
^XZ
2. Save the file with the name: c:\test.txt.
3. Open the MS-DOS Command Prompt and type:
ftp <IP of 10/100 PS>
Example • If the IP address of your 10/100 Internal PS device is 12.3.4.123, you
would type:
ftp 12.3.4.123
This opens a session with the FTP server.
Note • The default user name is blank.
4. Type your user name and press Enter.
5. Type:
put c:\test.txt
This transfers test.txt to the printer, and the printer generates a labe l.
6. To terminate the FTP session, type:
quit
Y885775 BradyConnect 10/100 Internal Print Server User Guide 07/18/2008
Page 89

D
Print Queues
This appendix provides information and instructions on configuring your print queue.
Contents
Berkeley Software Distribution (BSD)-Style Print Queue. . . . . . . . . . . . . . . . . . . . . . . . . 90
Configuring the Print Queue . . . . . . . . . . . . . . . . . . . . . . . . . . . . . . . . . . . . . . . . . . . . 90
System V Queue Installation . . . . . . . . . . . . . . . . . . . . . . . . . . . . . . . . . . . . . . . . . . . . . . 91
Configuring Operating System V Queue for BradyConnect Printing . . . . . . . . . . . . . . 91
Prerequisites . . . . . . . . . . . . . . . . . . . . . . . . . . . . . . . . . . . . . . . . . . . . . . . . . . . . . . . . 91
Spool Print Job Configuration . . . . . . . . . . . . . . . . . . . . . . . . . . . . . . . . . . . . . . . . . . . 91
07/18/2008 BradyConnect 10/100 Internal Print Server User Guide Y885775
Page 90

Print Queues
90
Berkeley Software Distribution (BSD)-Style Print Queue
Berkeley Software Distribution (BSD)-Style Print Queue
BSD is a version of the UNIX OS that includes TCP/IP.
Configuring the Print Queue
For remote BSD-style LPD printing, add the 10/100 Internal PS as a remote printer in the
/etc/printcap database to each host printing to the 10/100 Internal PS. You can add printcap
options as needed. If you are unfamiliar with these options, consu lt the printe r documentat ion.
Important • You must be logged in as root.
The entry looks similar to this:
local_print_queue_name|[printer_model_and_manufacturer]:\
:lp=:mx#0:rm=BradyConnect_name:\
:rp=remote_print_queue_name:\
:sd=path_to_spool_directory:lf=just log_file_name
local_print_queue_name — This defines the name of the printcap entry. It is used by
the LPR/LPD utilities to specify which printcap entry is being refe re nced. Additio nal printca p
entries can be added as needed for different queue types. Each entry must have a unique
local_print_queue_name and a different spool directory to work properly. When you are ready
to print, use the local_print_queue_name that matches the data type of the file to be printed.
BradyConnect_name — This is the name (alias) of the BradyConne ct 10 /100 Internal PS.
This must be the same name as entered in the /etc/ hosts file or your NIS or DNS system.
An IP address may also be used here.
remote_print_queue_name — This entry determines the BradyConnect port where the
print job will be printed and optionally specifies ASCII printing that mu st end for LF1.
path_to_spool_directory — This is the path to a directory where the print jobs will
be spooled for this queue. You must create a unique spool directory for each printcap entry.
log_file_name — This is the path to a file where error information from the LPD will be
logged.
Example • Your printcap entries might look similar to this:
Ascii_files|form.feed.Queue_on_Port_1:\
:lp=:mx#0:rm=pserver1:rp=MYQUEUELF1:\
:sd=/usr/spool/myqueuelf1:\
:lf=/usr/spool/myqueuelf1/queue.log
Important • Each printcap entry must have a different spool directory to work properly.
Y885775 BradyConnect 10/100 Internal Print Server User Guide 07/18/2008
Page 91

Print Queues
System V Queue Installation
System V Queue Installation
Configuring Operating System V Queue for BradyConnect Printing
This section describes the configuration of the printing system on the UNIX operat ing system.
For clarity and brevity, the following specific names are used to represent general devices or
concepts.
lj4 — The local queue name on the UNIX system to which you want 10/100 Internal PS
print jobs directed.
BBP81PRINTER — The host name or IP address of the remote system that is the
10/100 Internal PS device. For example, to Telnet to the 10/100 Internal PS and invoke the
10/100 Internal PS configuration utility, you would enter:
Telnet BBP81PRINTER
A host name is not required for the 10/100 Internal PS — the IP address can be used.
yourqueuename — This is the name of the queue on the BradyConnect and must end with
LF1.
91
Prerequisites
Before you proceed, the following prerequisites must be met:
• T he name BBP81PRIN TER and the IP address assigned to the 10/100 Internal PS are in
the /etc/hosts file on the UNIX system.
• T he LPD must be running on the UNIX system.
Spool Print Job Configuration
To configure the UNIX machine so users can spool print jobs to the PCL print
queue on the BradyConnect named BBP81PRINTER, complete these steps:
1. Log in to the UNIX machine as root.
2. Type:
lpsystem -t bsd BBP81PRINTER
3. Type:
lpadmin -p lj4 -s BBP81PRINTER!yourqueuename - I any
4. Type:
accept lj4
5. Type:
enable lj4
6. Try printing by typing the command:
lp -d lj4 [filename]
07/18/2008 BradyConnect 10/100 Internal Print Server User Guide Y885775
Page 92

Print Queues
Notes • ___________________________________________________________________
__________________________________________________________________________
__________________________________________________________________________
__________________________________________________________________________
__________________________________________________________________________
__________________________________________________________________________
__________________________________________________________________________
__________________________________________________________________________
__________________________________________________________________________
__________________________________________________________________________
92
System V Queue Installation
Y885775 BradyConnect 10/100 Internal Print Server User Guide 07/18/2008
Page 93

E
Frequently Asked
Questions
This appendix provides a group of frequently asked questions (FAQs) about 10/100 Internal
PS.
FAQs
Can the BradyConnect 10/100 Internal PS option work on a computer network
that is running both TCP/IP and IPX protocols simultaneously? Yes. The
BradyConnect 10/100 Internal PS runs all of its available protocols simultaneously. This
means that the BradyConnect 10/100 In ternal PS can run on mixed networks such as a
network using Microsoft, and UNIX.
Important • The BradyConnect 10/100 Internal PS does not support IPX, but it can function
on networks that use IPX protocols.
Will the BradyConnect 10/100 Internal PS allow connectivity to anything other
than a PC network? Yes. The BradyConnect 10/100 Internal PS allows connectivity to
systems such as IBM’s AS400, provided that it is configured using TCP/IP.
07/18/2008 BradyConnect 10/100 Internal Print Server User Guide Y885775
Page 94

Frequently Asked Questions
94
What if a print job makes it to the queue, but never leaves the queue? The label
does not print. These are the things to check:
What are the minimum requirements to network a printer?
• Confirm that the printer is turned on and receiving power.
• Confirm that the network cable is plugged in and that you can ping the printer.
• If that does not solve the issue, it is likely that there was a misconfiguration while creating
the queue. The queue must be recreated verifying the following:
• Confirm that you use the print server’s valid IP address.
• If you are using a UNIX or AS/400 host, there is an option for the remote queue name.
There is only one valid response to use: PORTLF1.
• If Windows does not have LPR installed, the above required option should be left
blank.
• See the documentation for other operating system specific queue creation.
• Cat-5 network cable with RJ45 connector
• 10/100 Internal PS
•Hub or Switch
• If a hub or switch is NOT used, you need a cross-over cable.
• Workstation running a TCP stack with print services installed.
What is the default User ID and password for the print server?
• The User ID is admin and the password is 1234.
What ports are open on 10/100 Internal PS and related software?
TCP Ports:
•21 FTP
•23 Telnet
• 80 HTTP Server
• 515 Printer port
• 9100 Raw socket connection
UDP Ports:
• 161 SNMP broadcast from 10/100 Internal PS
• 162 SNMP trap on BradyConnect Alert
• 4201 discovery destination on 10/100 Internal PS
Y885775 BradyConnect 10/100 Internal Print Server User Guide 07/18/2008
Page 95

Frequently Asked Questions
What are my network connectivity options based on when using a
10/100 Internal PS?
It depends on your environment, but the print se rv er acc ept s pr in t jo bs in any of the fo llowing
ways:
• FTP — ZPL/EPL files can be sent to the prin ter as standard ASCII files via an FTP client.
• HTTP — Using the script option on the printers Directory web page, you can type ZPL
into a specified location of the Web browser and send it to the printer.
• LPR/LPD — Sometimes referred to as queue-based printing. LPR/LPD is the standard in
network printing. Most TCP/IP operating systems are compatible with this option.
• Raw socket connection — You can connect to the printer directly via the network,
bypassing everything in between. This option is commonly use d to integrate ZPL/EPL into
existing programs, such as VB scripts.
• POP3 — With proper configuration, you can place valid label format instructions into the
body of an email, and it will print. The print server periodically checks this email box at
the specified intervals and prints the body of the message.
IMPORTANT: Attachments and subject lines are not supported.
95
07/18/2008 BradyConnect 10/100 Internal Print Server User Guide Y885775
Page 96

Frequently Asked Questions
Notes • ___________________________________________________________________
__________________________________________________________________________
__________________________________________________________________________
__________________________________________________________________________
__________________________________________________________________________
__________________________________________________________________________
__________________________________________________________________________
__________________________________________________________________________
__________________________________________________________________________
__________________________________________________________________________
96
Y885775 BradyConnect 10/100 Internal Print Server User Guide 07/18/2008
Page 97

Glossary
10BaseT A type of Ethernet that uses unshielded twist ed pair cable.
100BaseT A type of Ethernet that can transmit 100Mb of data per second wi th a
twisted-pair cable.
ARP The standard TCP/IP method for determining the actual network address of a device
based on its IP address.
ASCII A standard for the binary representation of characters.
BOOTP BOOTP (Bootstrap Protocol) is a protocol that lets a network client configure
automatically. It can automatically configure any of the following information: IP address,
gateway, subnet, system name, name server, and more. It automatically assigns the necessary
settings from a pool of pre-determined addr esse s for a certain duration of time. BOOTP is the
basis for a more advanced network manager protocol, the DHCP (Dynamic Host
Configuration Protocol).
BradyConnect Allows you to connect and control your bar code printers anywhere and
anytime.
BradyConnect 10/100 Print Server An Ethernet connectivity solution.
broadcast In a network, a situation when all destinations on the network receive a given
packet.
client A workstation or PC in a client/server environment.
community For SNMP, a relationship between an agent and a set of SNMP managers that
defines security characteristics. The community concept is a local one, defined at the agent.
Each community is given a unique community name.
current mode (parallel port) A mode that the printer and print server negotiate.
07/18/2008 BradyConnect 10/100 Internal Print Server User Guide Y885775
Page 98

98
Glossary
DHCP (Dynamic Host Configuration Protocol) DHCP is an alternative to another
network IP management protocol, Bootstrap Protocol (BOOTP). Like BOOTP, DHCP can
configure an IP address, gateway, subnet, system name, and name server. When speaking
about the 10/100 Internal PS, BOOTP, and DHCP configure the same options.
delete bytes This number is used to remove characters from the beginning of every job sent
to the logical printer. The value for delete bytes can range from 0 to 255.
dynamic A dynamic configuration, as the name implies, means that it ch anges. BOOTP and
DHCP offer time-based leases for the configurations they assign . Their changes depen d on the
time-based lease, and how often the printer itself is offline and online again. A dynamic
configuration can include BOOTP or DHCP.
Ethernet A widely used local area network system based on the IEEE 802.3 standard.
firmware Software routines that are stored in ROM (Read Only Memory). This is typically
part of a device, such as a printer or 10/100 Inte rnal PS.
FTP File Transfer Protocol, a TCP/IP-related protocol for transferring files between devices
on a network.
Flash memory A type of memory that allows read-and-write operations, but permanently
stores data when the power is turned off. Useful for storing firmware beca use it can be easily
updated by downloading new code.
gateway A device that converts one higher-level network protocol to a different higher level
protocol.
gleaning A temporary, local configuration option. Gleaning lets you add the address of the
device you want to configure to your local workstation’s ARP table. This configuration is not
permanent and is valid only from the workstation from which you entered the ARP
information. After the information is entered into the workstation’s ARP table, the user
follows up with a Telnet session to enter the information permanently.
IP Internet Protocol, a packet-based protocol used for delivering data across networks.
IP address A network address used by the TCP/IP protocol.
JetAdmin A Hewlett-Packard printer ma nagement program available fo r NetWare and
TCP/IP.
logical Refers to conceptual rather than physical. For example, a computer might have a
single physical connection to the network (an Ethernet adapter card), but could have logical
connections to several other devices on the network.
LPD LPD stands for Line Printer Daemon; it is the part that receives and processes the
request. A "daemon" is a server or agent.
MAC Address Media Access Control. Ethernet address that corresponds to the assigned IP
address.
Y885775 BradyConnect 10/100 Internal Print Server User Guide 07/18/2008
Page 99

Glossary
name server A workstation on a TCP/IP network that provides a list of all workstations on
the network.
node A device connected to a network, such as a computer or print server.
parallel port A port on a device that sends information in groups of bits over multiple
wires, one wire for each bit in a group.
ping A TCP/IP command that determines whether a device is accessible on the network.
POP3 Post Office Protocol, the protocol used to retrieve email through a mail server.
port A physical connector, such as the parallel port, or a logical connection to a device.
post-string A string that is sent at the end of every job going to the logical printer.
Maximum 64 characters long.
pre-string A string that is sent at the beginning of each job that goes to the logical printer.
Max 64 characters long.
99
print server A device in a network that changes a network protocol into a printer protocol.
protocol A method of sending and receiving data between two or more workstations on a
network, and ensuring that the data is received without errors.
RARP Reverse Arp, a standard TCP/IP method of determin ing a device’s IP address based
on its Ethernet address.
raw TCP port A type of TCP port in which data is passed unmodified to the receiving node.
RJ45 A type of modular jack connector similar to a telephone connector with up to eight
wires. Used for 10BaseT Ethernet connections and for serial port connections.
serial port On a printer or print server , a port that transfers data one bit at a time. Seri al ports
usually have either a 25-pin, 9-pin “D,” or RJ-45 connector setting mode (parallel port).
A mode that the print server is set to for the highest level of parallel port communications.
server A device on a local area network that provides services to client computers on the
network.
SMTP Simple Mail Transfer Protocol, a protocol used to send email messages through a mail
server.
SNMP Simple Network Management Protocol, a protocol for monitoring and controlling
devices on a network.
spooling In printing applications, spooling is the transfer of data to a temporary storage area
on disk (the print queue) prior to printing. Spo ol in g al lo ws ma ny job s to be qu eu ed to a single
printer.
static Refers to a static IP address. A ll info rmation is provided by the network admini strator.
07/18/2008 BradyConnect 10/100 Internal Print Server User Guide Y885775
Page 100

100
Glossary
subnet mask A TCP/IP method of dividing a network into several smaller subnetworks.
TCP/IP Transmission Control Protocol/Internet Protocol, the de facto standard for Internet
communications that is widely used on local area networks.
TCP Port A method of accessing a TCP/IP service, where a device with a single IP address
can have multiple TCP ports.
Telnet A TCP/IP protocol that allows two devices to communicate over a LAN.
trap An unsolicited message sent by an SNMP agent to an SNMP management station. It
notifies the management station of some unusual event.
UNIX A general-purpose computer operating system used on many different kinds of
computers.
Windows 95 and Windows 98 Microsoft’s PC operating systems that feature built-in
peer-to-peer networking.
Windows NT Microsoft’ s multitasking operating system that can be used either as a client o r
as a server.
Windows 2000 Microsoft’s multitasking operating system that replaces Windows NT; can
be used either as a client or as a server.
Windows XP Microsoft’s multitasking operating system that replaces Windows 2000; can
be used either as a client or as a server.
ZPL II Zebra Programming Language II is a powerful label-defini tio n and pri nt er-control
language.
Y885775 BradyConnect 10/100 Internal Print Server User Guide 07/18/2008
 Loading...