

Page 1
®
BBP
LABEL PRINTER
USER’S MANUAL
35/37
Page 2

Page 3

Copyright and Trademarks
Disclaimer
This manual is proprietary to Brady Worldwide, Inc. (hereafter "Brady"), and may be revised
from time to time without notice. Brady disclaims any understanding to provide you with such
revisions, if any.
This manual is copyrighted with all rights reserved. No portion of this manual may be copied
or reproduced by any means without the prior written consent of Brady.
While every precaution has been taken in the preparation of this document, Brady assumes no
liability to any party for any loss or damage caused by errors or omissions or by statements
resulting from negligence, accident, or any other cause. Brady further assumes no liability
arising out of the application or use of any product or system described, herein; nor any
liability for incidental or consequential damages arising from the use of this document. Brady
disclaims all warranties of merchantability of fitness for a particular purpose.
Brady reserves the right to make changes without further notice to any product or system
described herein to improve reliability, function, or design.
Copyright and Trademarks
Trademarks
Rev A BBP®35/37 User’s Manual
Page 4

End User License Agreement for Microsoft Windows
CE©
End User License Agreement for Microsoft
Windows CE©
You have acquired a device that includes software licensed by Brady Worldwide, Inc. from
Microsoft Licensing or its affiliates (“MS”). Those installed software products of Microsoft
origin, as well as associated media, printed materials, and “online” or electronic
documentation (“SOFTWARE”) are protected by international intellectual property laws and
treaties. The SOFTWARE is licensed, not sold. All rights reserved.
IF YOU DO NOT AGREE TO THIS END USER LICENSE AGREEMENT, DO NOT USE
THE DEVICE OR COPY THE SOFTWARE. INSTEAD, PROMPTLY CONTACT BRADY
WORLDWIDE, INC. FOR INSTRUCTIONS ON RETURN OF THE UNUSED DEVICE
FOR A REFUND. ANY USE OF THE SOFTWARE, INCLUDING BUT NOT LIMITED TO
USE ON THE DEVICE, WILL CONSTITUTE YOUR AGREEMENT TO THIS END USER
LICENSE AGREEMENT (OR RATIFICATION OF ANY PREVIOUS CONSENT).
GRANT OF SOFTWARE LICENSE: This End User License Agreement grants you the
following license:
You may use the SOFTWARE only on the DEVICE.
NOT FAULT TOLERANT. THE SOFTWARE IS NOT FAULT TOLERANT. BRADY
WORLDWIDE, INC. HAS INDEPENDENTLY DETERMINED HOW TO USE THE
SOFTWARE IN THE DEVICE, AND MS HAS RELIED UPON BRADY WORLDWIDE,
INC. TO CONDUCT SUFFICIENT TESTING TO DETERMINE THAT THE SOFTWARE
IS SUITABLE FOR SUCH USE.
NO WARRANTIES FOR THE SOFTWARE. The SOFTWARE is provided “as is” and with
all faults. THE ENTIRE RISK AS TO SATISFACTORY QUALITY, PERFORMANCE,
ACCURACY, AND EFFORT (INCLUDING LACK OF NEGLIGENCE) IS WITH YOU.
ALSO, THERE IS NO WARRANTY AGAINST INTERFERENCE WITH YOUR
ENJOYMENT OF THE SOFTWARE OR AGAINST INFRINGEMENT. IF YOU HAVE
RECEIVED ANY WARRANTIES REGARDING THE DEVICE OR THE SOFTWARE,
THOSE WARRANTIES DO NOT ORIGINATE FROM, AND ARE NOT BINDING ON,
MS.
Note on Java support. The SOFTWARE may contain support for programs written in Java.
Java technology is not fault tolerant and is not designed, manufactured, or intended for use or
resale as online control equipment in hazardous environments requiring fail-safe
performances, such as in the operation of nuclear facilities, aircraft navigation or
communication systems, air traffic control, direct life support machines, or weapons systems,
in which the failure of Java technology could lead directly to death, personal injury, or severe
physical or environmental damage. Sun Microsystems, Inc. has contractually obligated MS to
make this disclaimer.
BBP®35/37 User’s Manual Rev A
Page 5

Brady Warranty
Trademarks
No Liability for Certain Damages. EXCEPT AS PROHIBITED BY LAW, MS SHALL HAVE
NO LIABILITY FOR ANY INDIRECT, SPECIAL, CONSEQUENTIAL OR INCIDENTAL
DAMAGES ARISING FROM OR IN CONNECTION WITH THE USE OR
PERFORMANCE OF THE SOFTWARE. THIS LIMITATION SHALL APPLY EVEN IF
ANY REMEDY FAILS OF ITS ESSENTIAL PURPOSE. IN NO EVENT SHALL MS BE
LIABLE FOR ANY AMOUNT IN EXCESS OF U.S. TWO HUNDRED FIFTY DOLLARS
(U.S.$250.00).
Limitations on Reverse Engineering, Decompilation, and Disassembly. You may not reverse
engineer, decompile, or disassemble the SOFTWARE, except and only to the extent that such
activity is expressly permitted by applicable law not withstanding this limitation.
SOFTWARE TRANSFER ALLOWED BUT WITH RESTRICTIONS. You may permanently
transfer rights under this End User License Agreement only as part of a permanent sale or
transfer of the Device, and only if the recipient agrees to this End User License Agreement. If
the SOFTWARE is an upgrade, any transfer must also include all prior versions of the
SOFTWARE.
EXPORT RESTRICTIONS. You acknowledge that SOFTWARE is of US-origin. You agree to
comply with all applicable international and national laws that apply to the SOFTWARE,
including the U.S. Export Administration Regulations, as well as end-user, end-use, and
country destination restrictions issued by U.S. and other governments. For additional
information on exporting the SOFTWARE, see http://www.microsoft.com/exporting.
Brady Warranty
Our products are sold with the understanding that the buyer will test them in actual use and
determine for him or herself their adaptability to his/her intended uses. Brady warrants to the
buyer that its products are free from defects in material and workmanship, but limits its
obligation under this warranty to replacement of the product shown to Brady’s satisfaction to
have been defective at the time Brady sold it. This warranty does not extend to any persons
obtaining the product from the buyer.
THIS WARRANTY IS IN LIEU OF ANY OTHER WARRANTY, EXPRESS OR IMPLIED,
INCLUDING, BUT NOT LIMITED TO, ANY IMPLIED WARRANTY OF
MERCHANTABILITY OR FITNESS FOR A PARTICULAR PURPOSE, AND OF ANY
OTHER OBLIGATIONS OR LIABILITY ON BRADY’S PART. UNDER NO
CIRCUMSTANCES WILL BRADY BE LIABLE FOR ANY LOSS, DAMAGE, EXPENSE
OR CONSEQUENTIAL DAMAGES OF ANY KIND ARISING IN CONNECTION WITH
THE USE, OR INABILITY TO USE, BRADY’S PRODUCTS.
Rev A BBP®35/37 User’s Manual
Page 6

Agency Compliance and Approvals
Europe
Agency Compliance and Approvals
United States
FCC Notice-US Only
Warning: This equipment generates, uses and can radiate radio frequency energy. If not
installed and used in accordance with the manufacturer’s instructions, it may cause
interference to radio communications. It has been tested and found to comply with the limits
for a Class A computing device pursuant to Subpart B of Part 15 of the FCC rules, which are
designed to provide reasonable protection against interference when operating in a commercial
environment. Operation of this equipment in a residential area is likely to cause interference,
in which case required corrective measures will be at the owner’s expense.The user is
cautioned that any changes or modifications not expressly approved by Brady Worldwide, Inc.
could void the user’s authority to use the equipment.
Canada
ICES-003 Class A Notice, Classe A
This Class A digital apparatus meets all requirements of the Canadian Interference-Causing
Equipment Regulations.
Cet appareil numerique de la classe A respecte toutes les exigences du Reglement sur le
material broilleur du Canada.
Europe
Warning – This is a Class A product. In a domestic environment this product may cause radio
interference, in which case the user may be required to take adequate measures.
Waste Electrical and Electronic Equipment Directive
RoHS Directive 2011/65/EU
This statement clarifies Brady’s product compliance with the European Union’s Directive
2011/65/EU, Restriction of Hazardous Substances in electrical and electronic equipment.
In accordance with the European WEEE Directive, this device must be recycled in
the European Union country in which it was purchased.
BBP®35/37 User’s Manual Rev A
Page 7

Turkey
Turkish Ministry of Environment and Forestry
(Directive on the Restriction of the use of certain hazardous substances in electrical and
electronic equipment).
Türkiye Cumhuriyeti: EEE Yönetmeliğine Uygundur
Mexico
Energy Statement:
Consumo de energia en operacion: ___ Wh
(Energy consumption in operation mode)
Consumo de energia en modo de espera: ___Wh
(Energy consumption in standby mode)
Agency Compliance and Approvals
TAIWAN
China Class A Emissions Statement
TAIWAN
Rev A BBP®35/37 User’s Manual
Page 8

Safety and Environment
Precautions
Safety and Environment
Please read and understand this manual before using the BBP®35/37 Label Printer for the first
time. This manual describes all of the main functions of the BBP
Precautions
Before using the BBP®35/37 printer, please note the following precautions:
• Read all instructions carefully before operating the printer and prior to performing any
procedure.
• Do not place the unit on an unstable surface or stand.
• Do not place anything on top of the unit.
• Keep the top clear of obstructions.
• Always use the printer in a well ventilated area. Do not block the slots and opening on the
unit, which are provided for ventilation.
• Only use the power source indicated on the rating label.
• Use only the power cord that comes with the unit.
• Do not place anything on the power cord.
®
35/37 printer.
BBP®35/37 User’s Manual Rev A
Page 9

Replaceable Batteries
If an equipment is provided with a replaceable battery, and if replacement by an incorrect type
could result in an explosion (for example, with some lithium batteries), the following applies:
• if the battery is placed in an OPERATOR ACCESS AREA, there shall be a marking close
to the battery or a statement in both the operating and the servicing instructions;
• if the battery is placed elsewhere in the equipment, there shall be a marking close to the
battery or a statement in the servicing instructions.
This marking or statement shall include the following or similar text:
RISK OF EXPLOSION IF BATTERY IS REPLACED
DISPOSE OF USED BATTERIES ACCORIDNG
Safety and Environment
Batteries remplaçables
CAUTION
BY AN INCORRECT TYPE
TO THE INSTRUCTIONS
Batteries remplaçables
Si un équipement comporte une batterie remplaçable et si son remplacement par un type de
batterie incorrect risque d'entraîner une explosion (par exemple, causée par des batteries au
lithium), ce qui suit s'applique :
• si la batterie se trouve dans une ZONE D'ACCÈS DE L'OPÉRATEUR, il doit exister un
signal près de la batterie ou une annonce dans les instructions d'opération et de service ;
• si la batterie se trouve ailleurs dans l'équipement, il doit exister un signal près de la
batterie ou une annonce dans les instructions de service.
Ce signal ou cette annonce inclura l'intitulé suivant ou un texte s'en rapprochant :
RISQUE D'EXPLOSION SI LA BATTERIE EST REMPACÉE PAR UN TYPE DE
BATTERIE INCORRECT - METTRE LES BATTERIES AU REBUT SELON LES
MISE EN GARDE
INSTRUCTIONS STIPULÉES
Rev A BBP®35/37 User’s Manual
Page 10

Technical Support and Registration
Contact Information
For repair or technical assistance, locate your regional Brady Technical Support office by
going to:
• United States: www.bradyid.com
• Europe: www.bradyeurope.com
• Asia Pacific: www.bradycorp.com
• Australia: www.bradyaust.com.au
• Canada: www.bradycanada.ca
• Latin American: www.bradylatinamerica.com
Registration Information
To register your printer, go to:
• www.bradycorp.com/register
• www.bradyaust.com.au/register (Australia)
Repair and Return
If for any reason you need to return the BBP®35/37 printer for repair, please contact Brady
Technical Support for repair and replacement information.
Page 11

Table of Contents
Introduction. . . . . . . . . . . . . . . . . . . . . . . . . . . . . . . . . . . . . . . . . . . . . . . . . . . . . . . . . 1
Unpack Your Printer . . . . . . . . . . . . . . . . . . . . . . . . . . . . . . . . . . . . . . . . . . . . . . . . 1
Save Your Packaging . . . . . . . . . . . . . . . . . . . . . . . . . . . . . . . . . . . . . . . . . . . . . . . 1
Register Your Printer . . . . . . . . . . . . . . . . . . . . . . . . . . . . . . . . . . . . . . . . . . . . . . . 1
System Specifications (BBP
Compatible Applications . . . . . . . . . . . . . . . . . . . . . . . . . . . . . . . . . . . . . . . . . . . . . 2
Firmware Upgrades . . . . . . . . . . . . . . . . . . . . . . . . . . . . . . . . . . . . . . . . . . . . . . . . 2
Keyboard Configurations . . . . . . . . . . . . . . . . . . . . . . . . . . . . . . . . . . . . . . . . . . . . . 3
External View . . . . . . . . . . . . . . . . . . . . . . . . . . . . . . . . . . . . . . . . . . . . . . . . . . . . . . . 4
Setting Up the Printer. . . . . . . . . . . . . . . . . . . . . . . . . . . . . . . . . . . . . . . . . . . . . . . . . 5
Connect Power . . . . . . . . . . . . . . . . . . . . . . . . . . . . . . . . . . . . . . . . . . . . . . . . . . . . 5
Install Ribbon Cartridge . . . . . . . . . . . . . . . . . . . . . . . . . . . . . . . . . . . . . . . . . . . . . 6
Remove Ribbon Cartridge . . . . . . . . . . . . . . . . . . . . . . . . . . . . . . . . . . . . . . . . 7
Install Label Media (Tape) . . . . . . . . . . . . . . . . . . . . . . . . . . . . . . . . . . . . . . . . . . . 8
Remove Label Media (Tape) . . . . . . . . . . . . . . . . . . . . . . . . . . . . . . . . . . . . . 10
Power On/Off . . . . . . . . . . . . . . . . . . . . . . . . . . . . . . . . . . . . . . . . . . . . . . . . . . . . .11
Sleep Mode. . . . . . . . . . . . . . . . . . . . . . . . . . . . . . . . . . . . . . . . . . . . . . . . . . . 11
Resetting the Printer . . . . . . . . . . . . . . . . . . . . . . . . . . . . . . . . . . . . . . . . . . . . 11
Display Screen . . . . . . . . . . . . . . . . . . . . . . . . . . . . . . . . . . . . . . . . . . . . . . . . . . . . . 12
Home Page. . . . . . . . . . . . . . . . . . . . . . . . . . . . . . . . . . . . . . . . . . . . . . . . . . . . . . 12
Menus. . . . . . . . . . . . . . . . . . . . . . . . . . . . . . . . . . . . . . . . . . . . . . . . . . . . . . . . . . 13
Dialog Boxes . . . . . . . . . . . . . . . . . . . . . . . . . . . . . . . . . . . . . . . . . . . . . . . . . . . . 13
Drop Down Field . . . . . . . . . . . . . . . . . . . . . . . . . . . . . . . . . . . . . . . . . . . . . . . 14
Spinner Boxes. . . . . . . . . . . . . . . . . . . . . . . . . . . . . . . . . . . . . . . . . . . . . . . . . 14
Data Fields . . . . . . . . . . . . . . . . . . . . . . . . . . . . . . . . . . . . . . . . . . . . . . . . . . . . . . 15
Option Boxes . . . . . . . . . . . . . . . . . . . . . . . . . . . . . . . . . . . . . . . . . . . . . . . . . . . . 16
Scroll Bars . . . . . . . . . . . . . . . . . . . . . . . . . . . . . . . . . . . . . . . . . . . . . . . . . . . . . . 17
Cancel a Menu Option or Data Field . . . . . . . . . . . . . . . . . . . . . . . . . . . . . . . . . . 17
System Defaults . . . . . . . . . . . . . . . . . . . . . . . . . . . . . . . . . . . . . . . . . . . . . . . . . . . . 18
Clock Settings. . . . . . . . . . . . . . . . . . . . . . . . . . . . . . . . . . . . . . . . . . . . . . . . . . . . 18
Sleep Mode. . . . . . . . . . . . . . . . . . . . . . . . . . . . . . . . . . . . . . . . . . . . . . . . . . . 19
Set the Date . . . . . . . . . . . . . . . . . . . . . . . . . . . . . . . . . . . . . . . . . . . . . . . . . . 19
Language . . . . . . . . . . . . . . . . . . . . . . . . . . . . . . . . . . . . . . . . . . . . . . . . . . . . . . . 22
Initial Language Setup . . . . . . . . . . . . . . . . . . . . . . . . . . . . . . . . . . . . . . . . . . 22
Units of Measure. . . . . . . . . . . . . . . . . . . . . . . . . . . . . . . . . . . . . . . . . . . . . . . 23
Text Defaults . . . . . . . . . . . . . . . . . . . . . . . . . . . . . . . . . . . . . . . . . . . . . . . . . . . . . 24
Barcode Defaults . . . . . . . . . . . . . . . . . . . . . . . . . . . . . . . . . . . . . . . . . . . . . . . . . 25
Printing Defaults . . . . . . . . . . . . . . . . . . . . . . . . . . . . . . . . . . . . . . . . . . . . . . . . . . 28
Auto Cut Settings . . . . . . . . . . . . . . . . . . . . . . . . . . . . . . . . . . . . . . . . . . . . . . 29
Supply Saver Settings. . . . . . . . . . . . . . . . . . . . . . . . . . . . . . . . . . . . . . . . . . . 29
Over Print Setting . . . . . . . . . . . . . . . . . . . . . . . . . . . . . . . . . . . . . . . . . . . . . . 30
®
35/37) . . . . . . . . . . . . . . . . . . . . . . . . . . . . . . . . . . . . . 2
Rev A i BBP®35/37 User’s Manual
Page 12

Table of Contents
Getting Started . . . . . . . . . . . . . . . . . . . . . . . . . . . . . . . . . . . . . . . . . . . . . . . . . . . . . 31
Entering Text. . . . . . . . . . . . . . . . . . . . . . . . . . . . . . . . . . . . . . . . . . . . . . . . . . . . . 31
Editing Text . . . . . . . . . . . . . . . . . . . . . . . . . . . . . . . . . . . . . . . . . . . . . . . . . . . . . . 31
Inserting Text . . . . . . . . . . . . . . . . . . . . . . . . . . . . . . . . . . . . . . . . . . . . . . . . . 31
Deleting Text. . . . . . . . . . . . . . . . . . . . . . . . . . . . . . . . . . . . . . . . . . . . . . . . . . 32
Replacing Text . . . . . . . . . . . . . . . . . . . . . . . . . . . . . . . . . . . . . . . . . . . . . . . . 32
Clear . . . . . . . . . . . . . . . . . . . . . . . . . . . . . . . . . . . . . . . . . . . . . . . . . . . . . . . . 32
Zoom . . . . . . . . . . . . . . . . . . . . . . . . . . . . . . . . . . . . . . . . . . . . . . . . . . . . . . . . . . 33
Scrolling . . . . . . . . . . . . . . . . . . . . . . . . . . . . . . . . . . . . . . . . . . . . . . . . . . . . . . . . 33
Selecting/Deselecting Text . . . . . . . . . . . . . . . . . . . . . . . . . . . . . . . . . . . . . . . . . . 34
Sizing Text (Autosize) . . . . . . . . . . . . . . . . . . . . . . . . . . . . . . . . . . . . . . . . . . . . . . 35
Font Size. . . . . . . . . . . . . . . . . . . . . . . . . . . . . . . . . . . . . . . . . . . . . . . . . . . . . 35
Printing a Label. . . . . . . . . . . . . . . . . . . . . . . . . . . . . . . . . . . . . . . . . . . . . . . . . . . 37
Formatting a Label . . . . . . . . . . . . . . . . . . . . . . . . . . . . . . . . . . . . . . . . . . . . . . . . . . 38
Label Objects/Elements . . . . . . . . . . . . . . . . . . . . . . . . . . . . . . . . . . . . . . . . . . . . 38
Selecting an Object Element. . . . . . . . . . . . . . . . . . . . . . . . . . . . . . . . . . . . . . 39
Moving an Element . . . . . . . . . . . . . . . . . . . . . . . . . . . . . . . . . . . . . . . . . . . . . 40
Behavior Common to All Object Elements . . . . . . . . . . . . . . . . . . . . . . . . . . . . . . 41
Delete an Element . . . . . . . . . . . . . . . . . . . . . . . . . . . . . . . . . . . . . . . . . . . . . 41
Undo . . . . . . . . . . . . . . . . . . . . . . . . . . . . . . . . . . . . . . . . . . . . . . . . . . . . . . . . 42
Size . . . . . . . . . . . . . . . . . . . . . . . . . . . . . . . . . . . . . . . . . . . . . . . . . . . . . . . . . 42
Rotate . . . . . . . . . . . . . . . . . . . . . . . . . . . . . . . . . . . . . . . . . . . . . . . . . . . . . . . 43
Help. . . . . . . . . . . . . . . . . . . . . . . . . . . . . . . . . . . . . . . . . . . . . . . . . . . . . . . . . 43
Zoom. . . . . . . . . . . . . . . . . . . . . . . . . . . . . . . . . . . . . . . . . . . . . . . . . . . . . . . . 43
Alignment . . . . . . . . . . . . . . . . . . . . . . . . . . . . . . . . . . . . . . . . . . . . . . . . . . . . 44
Exact Size & Position . . . . . . . . . . . . . . . . . . . . . . . . . . . . . . . . . . . . . . . . . . . 45
Color . . . . . . . . . . . . . . . . . . . . . . . . . . . . . . . . . . . . . . . . . . . . . . . . . . . . . . . . 46
Frames . . . . . . . . . . . . . . . . . . . . . . . . . . . . . . . . . . . . . . . . . . . . . . . . . . . . . . . . . 47
Text Object Element . . . . . . . . . . . . . . . . . . . . . . . . . . . . . . . . . . . . . . . . . . . . . . . 49
Adding Text. . . . . . . . . . . . . . . . . . . . . . . . . . . . . . . . . . . . . . . . . . . . . . . . . . . 49
Font . . . . . . . . . . . . . . . . . . . . . . . . . . . . . . . . . . . . . . . . . . . . . . . . . . . . . . . . . . . 51
Importing Fonts . . . . . . . . . . . . . . . . . . . . . . . . . . . . . . . . . . . . . . . . . . . . . . . . 52
Font Attributes. . . . . . . . . . . . . . . . . . . . . . . . . . . . . . . . . . . . . . . . . . . . . . . . . 53
Special Characters . . . . . . . . . . . . . . . . . . . . . . . . . . . . . . . . . . . . . . . . . . . . . 54
Accented Characters . . . . . . . . . . . . . . . . . . . . . . . . . . . . . . . . . . . . . . . . . . . 55
Justification . . . . . . . . . . . . . . . . . . . . . . . . . . . . . . . . . . . . . . . . . . . . . . . . . . . 58
Vertical Text . . . . . . . . . . . . . . . . . . . . . . . . . . . . . . . . . . . . . . . . . . . . . . . . . . 59
Reverse. . . . . . . . . . . . . . . . . . . . . . . . . . . . . . . . . . . . . . . . . . . . . . . . . . . . . . 60
Expand/Condense . . . . . . . . . . . . . . . . . . . . . . . . . . . . . . . . . . . . . . . . . . . . . 61
Set Data Source . . . . . . . . . . . . . . . . . . . . . . . . . . . . . . . . . . . . . . . . . . . . . . . 62
Print/Cut . . . . . . . . . . . . . . . . . . . . . . . . . . . . . . . . . . . . . . . . . . . . . . . . . . . . . 65
BMP®35/37 User’s Manual ii Rev A
Page 13

Table of Contents
Barcode Object Element. . . . . . . . . . . . . . . . . . . . . . . . . . . . . . . . . . . . . . . . . . . . 66
Add a Barcode . . . . . . . . . . . . . . . . . . . . . . . . . . . . . . . . . . . . . . . . . . . . . . . . 66
Change Barcode . . . . . . . . . . . . . . . . . . . . . . . . . . . . . . . . . . . . . . . . . . . . . . . 67
Size . . . . . . . . . . . . . . . . . . . . . . . . . . . . . . . . . . . . . . . . . . . . . . . . . . . . . . . . . 67
Ratio . . . . . . . . . . . . . . . . . . . . . . . . . . . . . . . . . . . . . . . . . . . . . . . . . . . . . . . . 68
Density . . . . . . . . . . . . . . . . . . . . . . . . . . . . . . . . . . . . . . . . . . . . . . . . . . . . . . 68
Human Readable Text . . . . . . . . . . . . . . . . . . . . . . . . . . . . . . . . . . . . . . . . . . 68
Font. . . . . . . . . . . . . . . . . . . . . . . . . . . . . . . . . . . . . . . . . . . . . . . . . . . . . . . . . 69
Check Digit . . . . . . . . . . . . . . . . . . . . . . . . . . . . . . . . . . . . . . . . . . . . . . . . . . . 69
Start/Stop Code . . . . . . . . . . . . . . . . . . . . . . . . . . . . . . . . . . . . . . . . . . . . . . . 70
Graphic Object Elements . . . . . . . . . . . . . . . . . . . . . . . . . . . . . . . . . . . . . . . . . . . 71
Importing Graphics . . . . . . . . . . . . . . . . . . . . . . . . . . . . . . . . . . . . . . . . . . . . . 71
Cut-Out Shapes . . . . . . . . . . . . . . . . . . . . . . . . . . . . . . . . . . . . . . . . . . . . . . . 74
Serial Object Elements . . . . . . . . . . . . . . . . . . . . . . . . . . . . . . . . . . . . . . . . . . . . . 76
How Serialization Works. . . . . . . . . . . . . . . . . . . . . . . . . . . . . . . . . . . . . . . . . . . . 76
Date/Time Object Elements . . . . . . . . . . . . . . . . . . . . . . . . . . . . . . . . . . . . . . 79
File Management . . . . . . . . . . . . . . . . . . . . . . . . . . . . . . . . . . . . . . . . . . . . . . . . . . . 81
File Naming Standards . . . . . . . . . . . . . . . . . . . . . . . . . . . . . . . . . . . . . . . . . . . . . 81
Save . . . . . . . . . . . . . . . . . . . . . . . . . . . . . . . . . . . . . . . . . . . . . . . . . . . . . . . . . . . 81
New Label. . . . . . . . . . . . . . . . . . . . . . . . . . . . . . . . . . . . . . . . . . . . . . . . . . . . . . . 84
Open a File . . . . . . . . . . . . . . . . . . . . . . . . . . . . . . . . . . . . . . . . . . . . . . . . . . . . . . 85
Delete a File . . . . . . . . . . . . . . . . . . . . . . . . . . . . . . . . . . . . . . . . . . . . . . . . . . . . . 86
Printing . . . . . . . . . . . . . . . . . . . . . . . . . . . . . . . . . . . . . . . . . . . . . . . . . . . . . . . . . . . 88
Cancel a Print Job . . . . . . . . . . . . . . . . . . . . . . . . . . . . . . . . . . . . . . . . . . . . . . . . 89
System Interruption. . . . . . . . . . . . . . . . . . . . . . . . . . . . . . . . . . . . . . . . . . . . . 89
User Interruption . . . . . . . . . . . . . . . . . . . . . . . . . . . . . . . . . . . . . . . . . . . . . . . 89
Print Preview . . . . . . . . . . . . . . . . . . . . . . . . . . . . . . . . . . . . . . . . . . . . . . . . . . . . 91
Mirror Print . . . . . . . . . . . . . . . . . . . . . . . . . . . . . . . . . . . . . . . . . . . . . . . . . . . . . . 92
Advanced Settings . . . . . . . . . . . . . . . . . . . . . . . . . . . . . . . . . . . . . . . . . . . . . . . . 93
Printing Files from PC. . . . . . . . . . . . . . . . . . . . . . . . . . . . . . . . . . . . . . . . . . . . . . 95
Connecting through USB . . . . . . . . . . . . . . . . . . . . . . . . . . . . . . . . . . . . . . . . 95
Connecting through Brady Network Card . . . . . . . . . . . . . . . . . . . . . . . . . . . . 95
Copies . . . . . . . . . . . . . . . . . . . . . . . . . . . . . . . . . . . . . . . . . . . . . . . . . . . . . . . . . 96
XY Cutting (BBP
XY Cutter Blade Height
Using the XY Cutter . . . . . . . . . . . . . . . . . . . . . . . . . . . . . . . . . . . . . . . . . . . . 98
Labels . . . . . . . . . . . . . . . . . . . . . . . . . . . . . . . . . . . . . . . . . . . . . . . . . . . . . . . . . . . 100
Label Fixed Length . . . . . . . . . . . . . . . . . . . . . . . . . . . . . . . . . . . . . . . . . . . . . . . 100
Orientation . . . . . . . . . . . . . . . . . . . . . . . . . . . . . . . . . . . . . . . . . . . . . . . . . . . . . 101
Label Width. . . . . . . . . . . . . . . . . . . . . . . . . . . . . . . . . . . . . . . . . . . . . . . . . . . . . 103
Framing a Label . . . . . . . . . . . . . . . . . . . . . . . . . . . . . . . . . . . . . . . . . . . . . . 105
Label Types . . . . . . . . . . . . . . . . . . . . . . . . . . . . . . . . . . . . . . . . . . . . . . . . . . . . . . . 107
General Templates . . . . . . . . . . . . . . . . . . . . . . . . . . . . . . . . . . . . . . . . . . . . . . . 107
Customizing the Home Page . . . . . . . . . . . . . . . . . . . . . . . . . . . . . . . . . . . . 109
®
37 ONLY) . . . . . . . . . . . . . . . . . . . . . . . . . . . . . . . . . . . . . . . . . . . 97
®
(BBP
37 ONLY) . . . . . . . . . . . . . . . . . . . . . . . . . . . . . . . 97
Rev A iii BBP®35/37 User’s Manual
Page 14

Table of Contents
Application Label Types . . . . . . . . . . . . . . . . . . . . . . . . . . . . . . . . . . . . . . . . . . . . .111
Clearing an Application Label Type . . . . . . . . . . . . . . . . . . . . . . . . . . . . . . . . . . .112
Save, Open, Delete Application Label Types . . . . . . . . . . . . . . . . . . . . . . . . 112
Arc Flash Label Type . . . . . . . . . . . . . . . . . . . . . . . . . . . . . . . . . . . . . . . . . . . . . .117
Circle Gauge Label Type . . . . . . . . . . . . . . . . . . . . . . . . . . . . . . . . . . . . . . . . . . .119
Gauge Colors . . . . . . . . . . . . . . . . . . . . . . . . . . . . . . . . . . . . . . . . . . . . . . . . 121
Cut Out Gauge (BBP
Gradient Scale . . . . . . . . . . . . . . . . . . . . . . . . . . . . . . . . . . . . . . . . . . . . . . . . . . 124
GHS/CLP . . . . . . . . . . . . . . . . . . . . . . . . . . . . . . . . . . . . . . . . . . . . . . . . . . . . . . 127
Right-To-Know . . . . . . . . . . . . . . . . . . . . . . . . . . . . . . . . . . . . . . . . . . . . . . . . . . 131
Setting RTK Preferences . . . . . . . . . . . . . . . . . . . . . . . . . . . . . . . . . . . . . . . 135
Pipe Markers . . . . . . . . . . . . . . . . . . . . . . . . . . . . . . . . . . . . . . . . . . . . . . . . . . . 139
Standard Pipe Marker . . . . . . . . . . . . . . . . . . . . . . . . . . . . . . . . . . . . . . . . . . 139
Set Up Pipe Marker Options . . . . . . . . . . . . . . . . . . . . . . . . . . . . . . . . . . . . . 143
Rollform Pipe Marker . . . . . . . . . . . . . . . . . . . . . . . . . . . . . . . . . . . . . . . . . . 145
Symbol or Arrow Tape Pipe Marker . . . . . . . . . . . . . . . . . . . . . . . . . . . . . . . 147
CLP PipeMarkers (Not available in all regions) . . . . . . . . . . . . . . . . . . . . . . . . . 149
CLP Standard PipeMarker . . . . . . . . . . . . . . . . . . . . . . . . . . . . . . . . . . . . . . 149
CLP Rollform Pipe Marker . . . . . . . . . . . . . . . . . . . . . . . . . . . . . . . . . . . . . . 154
CLP Arrow Pipe Marker . . . . . . . . . . . . . . . . . . . . . . . . . . . . . . . . . . . . . . . . 158
HSID Pipe Markers (Not available in all regions) . . . . . . . . . . . . . . . . . . . . . . . . 160
HSID Standard Pipe Marker . . . . . . . . . . . . . . . . . . . . . . . . . . . . . . . . . . . . . 160
HSID Rollform Pipe Marker. . . . . . . . . . . . . . . . . . . . . . . . . . . . . . . . . . . . . . 164
HSID Arrow Pipe Marker. . . . . . . . . . . . . . . . . . . . . . . . . . . . . . . . . . . . . . . . 166
QuickLabel . . . . . . . . . . . . . . . . . . . . . . . . . . . . . . . . . . . . . . . . . . . . . . . . . . . . . 167
Tags . . . . . . . . . . . . . . . . . . . . . . . . . . . . . . . . . . . . . . . . . . . . . . . . . . . . . . . . . . 169
WHMIS . . . . . . . . . . . . . . . . . . . . . . . . . . . . . . . . . . . . . . . . . . . . . . . . . . . . . . . . 170
Printer Maintenance . . . . . . . . . . . . . . . . . . . . . . . . . . . . . . . . . . . . . . . . . . . . . . . . 173
Cleaning the Printer . . . . . . . . . . . . . . . . . . . . . . . . . . . . . . . . . . . . . . . . . . . . . . 173
Materials Required . . . . . . . . . . . . . . . . . . . . . . . . . . . . . . . . . . . . . . . . . . . . 173
Cleaning the Touch Screen . . . . . . . . . . . . . . . . . . . . . . . . . . . . . . . . . . . . . . . . 174
Materials Required . . . . . . . . . . . . . . . . . . . . . . . . . . . . . . . . . . . . . . . . . . . . 174
Cleaning the Cutter Blade . . . . . . . . . . . . . . . . . . . . . . . . . . . . . . . . . . . . . . . . . 174
Materials Required . . . . . . . . . . . . . . . . . . . . . . . . . . . . . . . . . . . . . . . . . . . . 174
Cleaning the Cutter Blade Exit Area. . . . . . . . . . . . . . . . . . . . . . . . . . . . . . . . . . 178
Materials Required . . . . . . . . . . . . . . . . . . . . . . . . . . . . . . . . . . . . . . . . . . . . 178
Cleaning the Sensors . . . . . . . . . . . . . . . . . . . . . . . . . . . . . . . . . . . . . . . . . . . . . 179
Materials Required . . . . . . . . . . . . . . . . . . . . . . . . . . . . . . . . . . . . . . . . . . . . 179
Dust Cleaning . . . . . . . . . . . . . . . . . . . . . . . . . . . . . . . . . . . . . . . . . . . . . . . . . . . 181
Materials Required . . . . . . . . . . . . . . . . . . . . . . . . . . . . . . . . . . . . . . . . . . . . 181
Cleaning the Printhead . . . . . . . . . . . . . . . . . . . . . . . . . . . . . . . . . . . . . . . . . . . . 182
Materials Required . . . . . . . . . . . . . . . . . . . . . . . . . . . . . . . . . . . . . . . . . . . . 182
®
37 ONLY) . . . . . . . . . . . . . . . . . . . . . . . . . . . . . . . . . 123
BMP®35/37 User’s Manual iv Rev A
Page 15

Table of Contents
Cleaning the Media Wiper . . . . . . . . . . . . . . . . . . . . . . . . . . . . . . . . . . . . . . . . . 183
Materials Required . . . . . . . . . . . . . . . . . . . . . . . . . . . . . . . . . . . . . . . . . . . . 183
Cleaning the XY Cutter Blade (BBP
Materials Required . . . . . . . . . . . . . . . . . . . . . . . . . . . . . . . . . . . . . . . . . . . . 184
Cleaning Upper Guide and Cut Pad. . . . . . . . . . . . . . . . . . . . . . . . . . . . . . . . . . 186
Materials Required . . . . . . . . . . . . . . . . . . . . . . . . . . . . . . . . . . . . . . . . . . . . 186
Upgrading Printer Firmware . . . . . . . . . . . . . . . . . . . . . . . . . . . . . . . . . . . . . . . . 189
Upgrade from a PC . . . . . . . . . . . . . . . . . . . . . . . . . . . . . . . . . . . . . . . . . . . . 189
Upgrade from USB Flash Drive . . . . . . . . . . . . . . . . . . . . . . . . . . . . . . . . . . 191
Troubleshooting . . . . . . . . . . . . . . . . . . . . . . . . . . . . . . . . . . . . . . . . . . . . . . . . . . . 192
Appendix A - Reference Images . . . . . . . . . . . . . . . . . . . . . . . . . . . . . . . . . . . . . . 201
Quick Label Reference Images - Europe . . . . . . . . . . . . . . . . . . . . . . . . . . . . . . 201
Quick Label Reference Images - North America . . . . . . . . . . . . . . . . . . . . . . . . 201
Admittance, Exit, Confined Spaces. . . . . . . . . . . . . . . . . . . . . . . . . . . . . . . . 201
Alerts and First Aid . . . . . . . . . . . . . . . . . . . . . . . . . . . . . . . . . . . . . . . . . . . . 202
Chemical - Hazardous Materials. . . . . . . . . . . . . . . . . . . . . . . . . . . . . . . . . . 202
Conduit - Voltage . . . . . . . . . . . . . . . . . . . . . . . . . . . . . . . . . . . . . . . . . . . . . 203
Electrical Hazard - Lockout . . . . . . . . . . . . . . . . . . . . . . . . . . . . . . . . . . . . . . 203
Fire . . . . . . . . . . . . . . . . . . . . . . . . . . . . . . . . . . . . . . . . . . . . . . . . . . . . . . . . 204
Funny Signs . . . . . . . . . . . . . . . . . . . . . . . . . . . . . . . . . . . . . . . . . . . . . . . . . 204
Graphics - Mandatory . . . . . . . . . . . . . . . . . . . . . . . . . . . . . . . . . . . . . . . . . . 205
Graphics - Packaging . . . . . . . . . . . . . . . . . . . . . . . . . . . . . . . . . . . . . . . . . . 206
Graphics - PPE . . . . . . . . . . . . . . . . . . . . . . . . . . . . . . . . . . . . . . . . . . . . . . . 207
Graphics - Prohibition . . . . . . . . . . . . . . . . . . . . . . . . . . . . . . . . . . . . . . . . . . 208
Graphics - Signal Words . . . . . . . . . . . . . . . . . . . . . . . . . . . . . . . . . . . . . . . . 209
Graphics - Warning . . . . . . . . . . . . . . . . . . . . . . . . . . . . . . . . . . . . . . . . . . . . 210
Inspection . . . . . . . . . . . . . . . . . . . . . . . . . . . . . . . . . . . . . . . . . . . . . . . . . . . 211
Machine - Operational. . . . . . . . . . . . . . . . . . . . . . . . . . . . . . . . . . . . . . . . . . 211
No Smoking . . . . . . . . . . . . . . . . . . . . . . . . . . . . . . . . . . . . . . . . . . . . . . . . . 211
Pipe Marker Arrows . . . . . . . . . . . . . . . . . . . . . . . . . . . . . . . . . . . . . . . . . . . 212
Pipe Markers. . . . . . . . . . . . . . . . . . . . . . . . . . . . . . . . . . . . . . . . . . . . . . . . . 213
Protective . . . . . . . . . . . . . . . . . . . . . . . . . . . . . . . . . . . . . . . . . . . . . . . . . . . 215
Warning Stakes. . . . . . . . . . . . . . . . . . . . . . . . . . . . . . . . . . . . . . . . . . . . . . . 215
Appendix B - Character Mapping & Keyboard Layouts . . . . . . . . . . . . . . . . . . . 216
Character Mapping . . . . . . . . . . . . . . . . . . . . . . . . . . . . . . . . . . . . . . . . . . . . . . . 216
Americas QWERTY . . . . . . . . . . . . . . . . . . . . . . . . . . . . . . . . . . . . . . . . . . . 216
European AZERTY . . . . . . . . . . . . . . . . . . . . . . . . . . . . . . . . . . . . . . . . . . . . 217
European QWERTZ . . . . . . . . . . . . . . . . . . . . . . . . . . . . . . . . . . . . . . . . . . . 218
European QWERTY . . . . . . . . . . . . . . . . . . . . . . . . . . . . . . . . . . . . . . . . . . . 219
European Cyrillic. . . . . . . . . . . . . . . . . . . . . . . . . . . . . . . . . . . . . . . . . . . . . . 219
Keyboard Layouts. . . . . . . . . . . . . . . . . . . . . . . . . . . . . . . . . . . . . . . . . . . . . . . . 220
®
37 ONLY) . . . . . . . . . . . . . . . . . . . . . . . . . 184
Rev A v BBP®35/37 User’s Manual
Page 16

Page 17

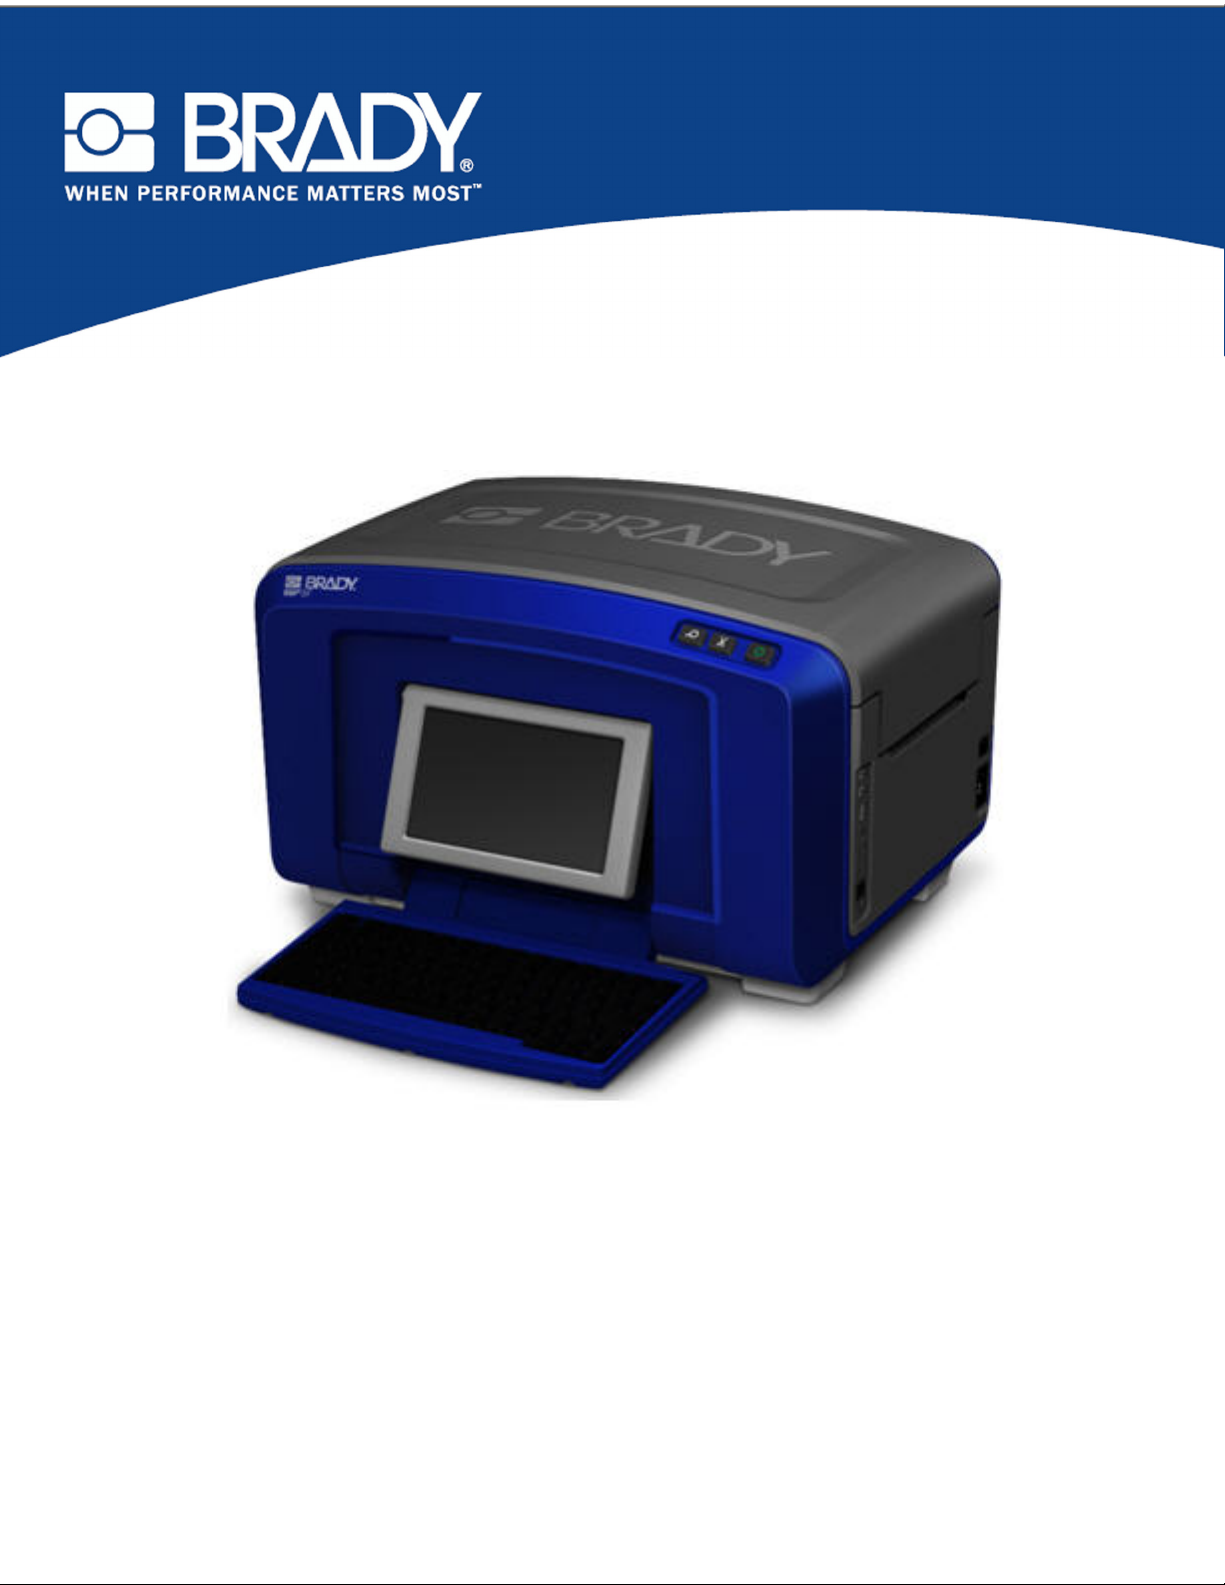
Introduction
The BBP®35/37 is a thermal transfer printer with a 4-inch (101.6 mm) printable width that can
handle tapes from 0.5 in to 4 in (12.7 mm to 101.6 mm). It includes the following features:
• Color touch screen LCD display, plus keyboard input for ease of use.
• Pre-designed layouts for many standard-use label applications.
• Hundreds of graphics for inclusion on your labels.
• Single or Multi-color job printing at 300 DPI.
• Print speed up to 5 ips.
• Up to 4.0 in (101.6mm) printable width and up to 100 ft. (30m) printable length.
• Continuous and die-cut label supplies in a variety of high-performance materials and
colors.
• Transfer graphics from USB flash drive. Supported graphic formats are Windows Metafile
(*.wmf), JPEG (*.jpg), Portable Network Graphics (*.png) and Bitmap (*.bmp).
• Automatic Cutter (BBP
®
35 & 37), XY Cutter (BBP®37)
Introduction
• Wireless and Ethernet capabilities with Brady Network Card. See the Brady Network
Card Installation Manual for details.
Unpack Your Printer
The following items are included in the standard BBP®35/37 printer package:
•BBP
• Documentation CD including electronic Quick Start Guide, User’s Manual, and web links
•Power Cord
• USB Type B Cable
• Quick Start Guide
• Cleaning Kit
®
35/37 Label Printer
Save Your Packaging
The packaging surrounding your BBP®35/37 Label Printer should be saved in the event you
have to ship the printer and accessories back to the supplier.
Register Your Printer
Register your printer on-line at www.bradycorp.com/register and receive free product support
and updates!
Rev A 1 BBP®35/37 User’s Manual
Page 18

System Specifications (BBP®35/37)
System Specifications (BBP®35/37)
The BBP®35/37 printer has the following specifications:
• Weight: ~35 lbs (~20 kg)
• Dimensions (W x H x D stored) : 18.5 in. x 11 in. x 14.2 in. (47 cm x 28 cm x 36 cm)
• Operating Temperature: 50 – 104°F (15 – 40°C)
• Relative Humidity: 15% to 80% RH non-condensing
• Storage: -4 - 122°F (-20°C to 50°C) at 15% to 90% RH non-condensing
• Voltage: 100 to 240 VAC, 50 to 60 Hz
• Print Resolution: 11.8 dot/mm, 300 dpi
• Ribbon Sizes: 4.0 in. (10.2 cm) and lengths of up to 200 ft (60.8 m) for monochrome
ribbon
• Tape Sizes: 0.5 in. to 4.0 in. width and lengths of up to 195 ft (B30C-4000-8423)
• Minimum label length (cut): 0.5 in. (12.7 mm)
• Maximum label length (continuous media):
- Single color : 102 in.
- Multi color : 48 in. (by swapping monochrome ribbons)
- Multi color : 14 in. (by using panelled ribbons)
Compatible Applications
The BBP®35/37 Label Printer is compatible with Brady Workstation software.
When used with this software package, the printer will automatically recognize all enabled and
compatible materials.
Note: Only B30 supplies will work with the BBP
Firmware Upgrades
Future upgrades to BBP®35/37 firmware can be downloaded from Brady’s website.
1. Access www.bradyid.com.
2. Click Support, then click Downloads.
®
35/37 printer.
3. Select BBP®35/37 from the list of products.
(See page 189 for instructions on upgrading your printer’s firmware from a USB flash drive or
from your PC.)
BBP®35/37 User’s Manual 2 Rev A
Page 19
Keyboard Configurations
Your keyboard configuration depends on the region where you do business. The following are
the currently supported keyboard configurations.
There are five keypad configurations available for the BBP
layouts and the language supported by each are listed in the table below.
Keyboard Type Language Applied
Americas QWERTY English, Spanish, French, Portuguese, Simplified Chinese, Traditional
Chinese, Japanese, Korean
QWERTY English, Danish, Finnish, Italian, Dutch, Norwegian, Polish,
Portuguese, Romanian, Spanish, Swedish
AZERTY English, French, Dutch
QWERTZ English, Czech, German, Hungarian, Slovakian, Slovenian, French,
Italian
Keyboard Configurations
®
35/37 Label Printer. The keypad
Cyrillic English, Bulgarian, Russian
See “Accented Characters” on page 55 for instructions on how to access all of the keyboard
characters.
Rev A 3 BBP®35/37 User’s Manual
Page 20
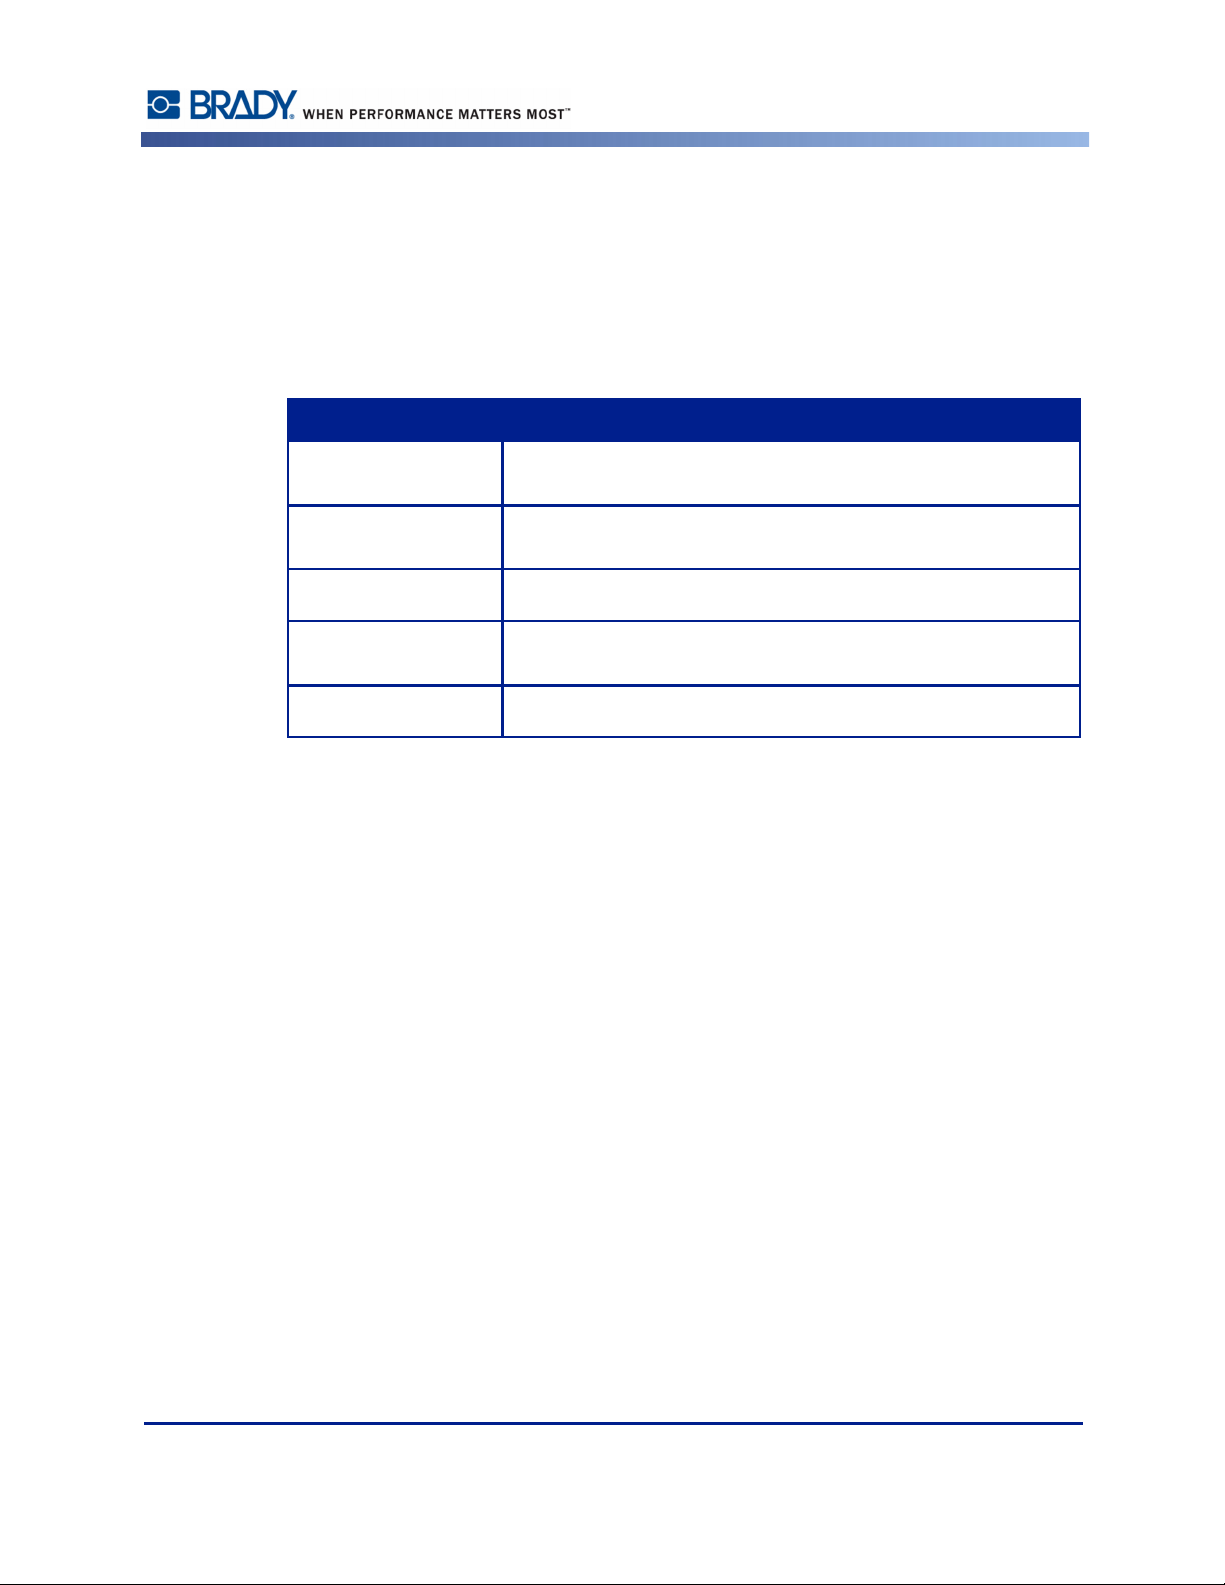
External View
External View
1 Cover 7 Label exit chute
2 Power button (green) 8 Cover release latch
3 Cut media button 9 USB, Expansion Ports and
4 Feed media button
5 Touch screen (flips out) 10 Power cord connection
6 Keyboard (flips down) 11 On/Off switch
BBP®35/37 User’s Manual 4 Rev A
Brady Network Card
Page 21
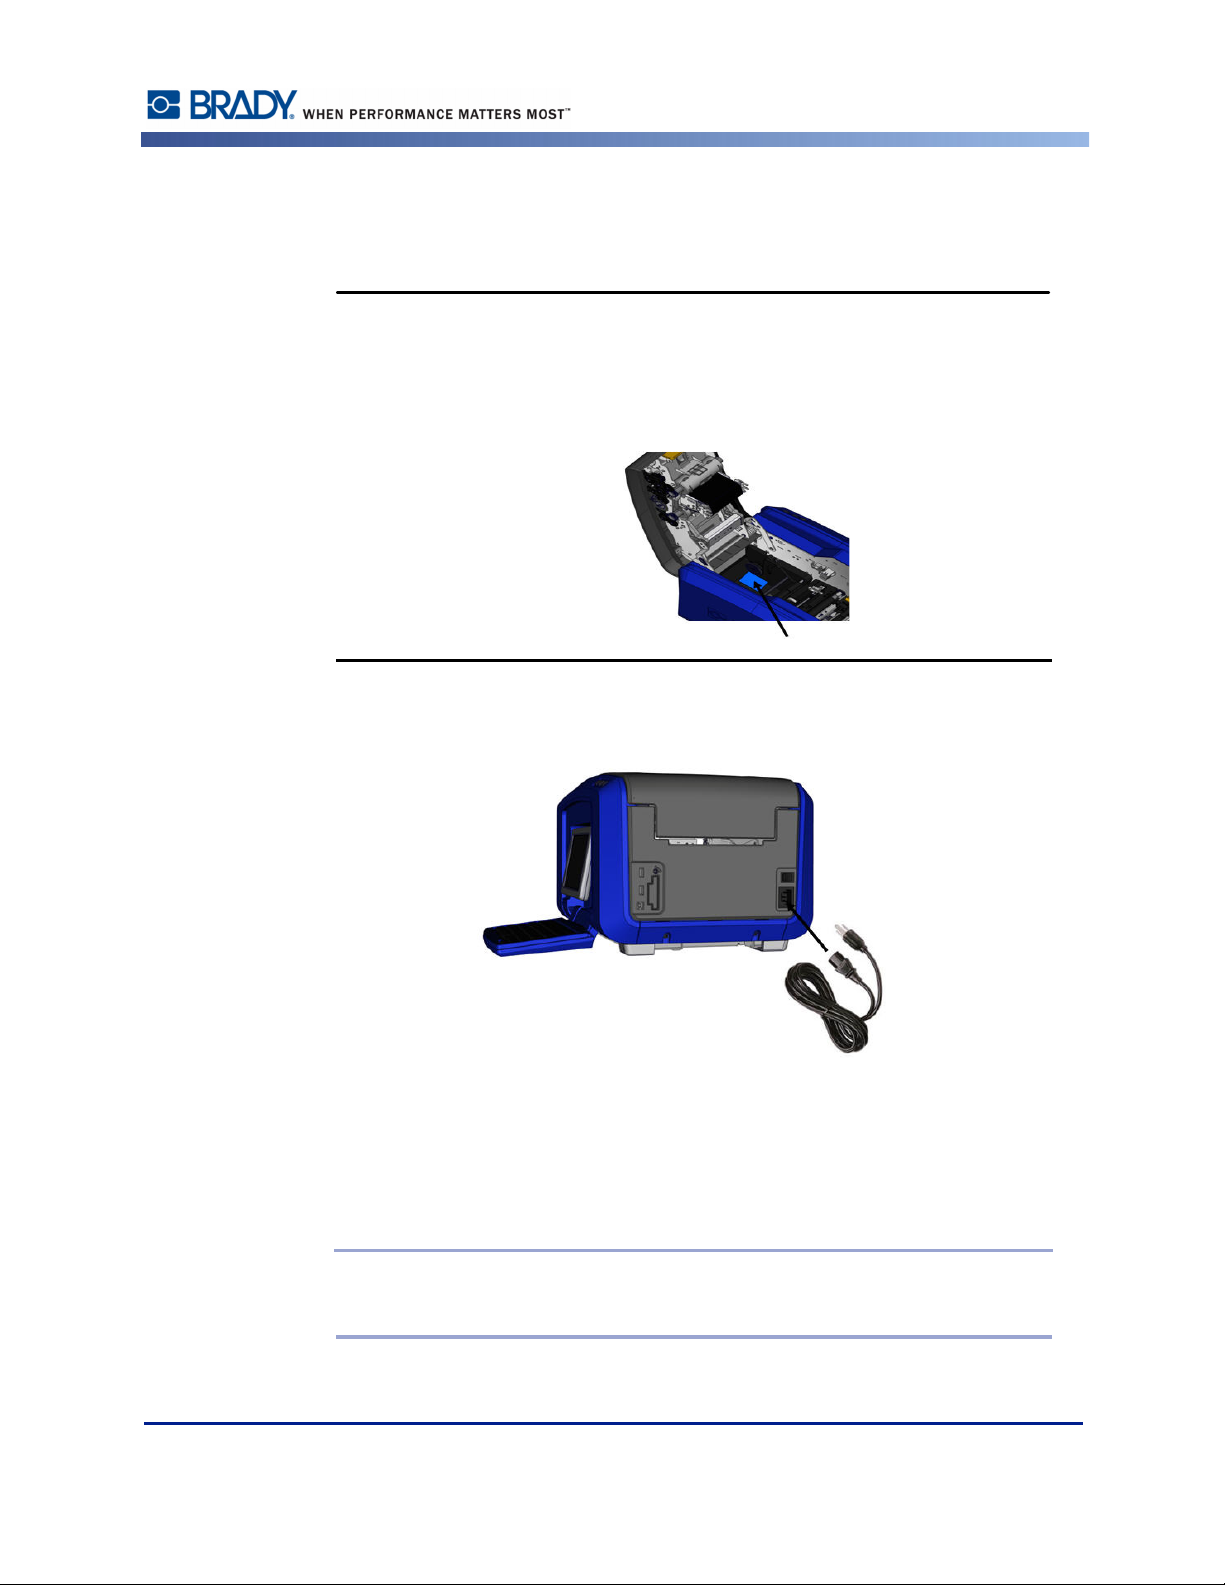
Setting Up the Printer
CAUTIONCAUTION
Connect Power
Before connecting power, be sure to remove the dessicant from inside the
media bay.
Setting Up the Printer
1. Plug the power cord into the power cord connection port on the right side of the printer.
2. Plug the other end of the power cord into an electrical outlet.
3. Turn the On/Off switch to the ON position.
The printer automatically displays the primary Home Page. The size and color of the currently
installed media and other status indicators are shown.
Note: If there is no ribbon or media installed, the system defaults to black ribbon
and 4 in. [101.6 mm] wide continuous white media.
Rev A 5 BBP®35/37 User’s Manual
Page 22
Setting Up the Printer
CAUTIONCAUTION
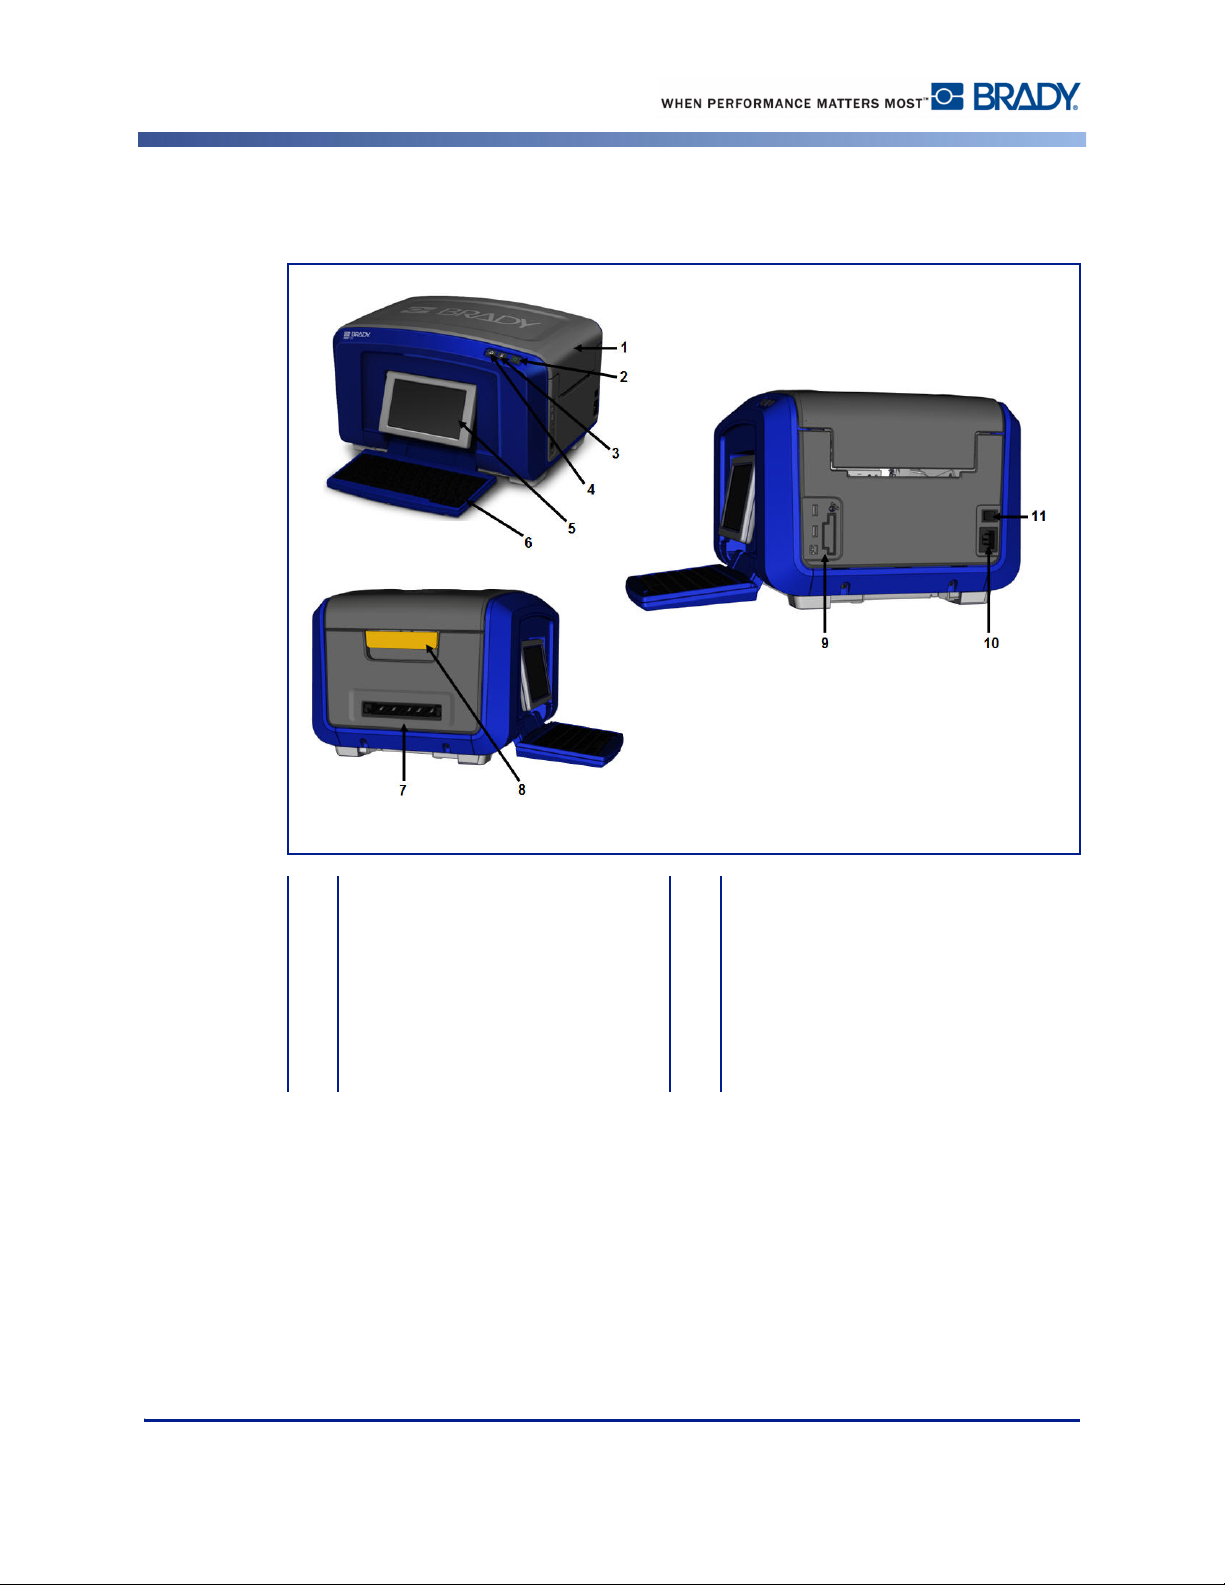
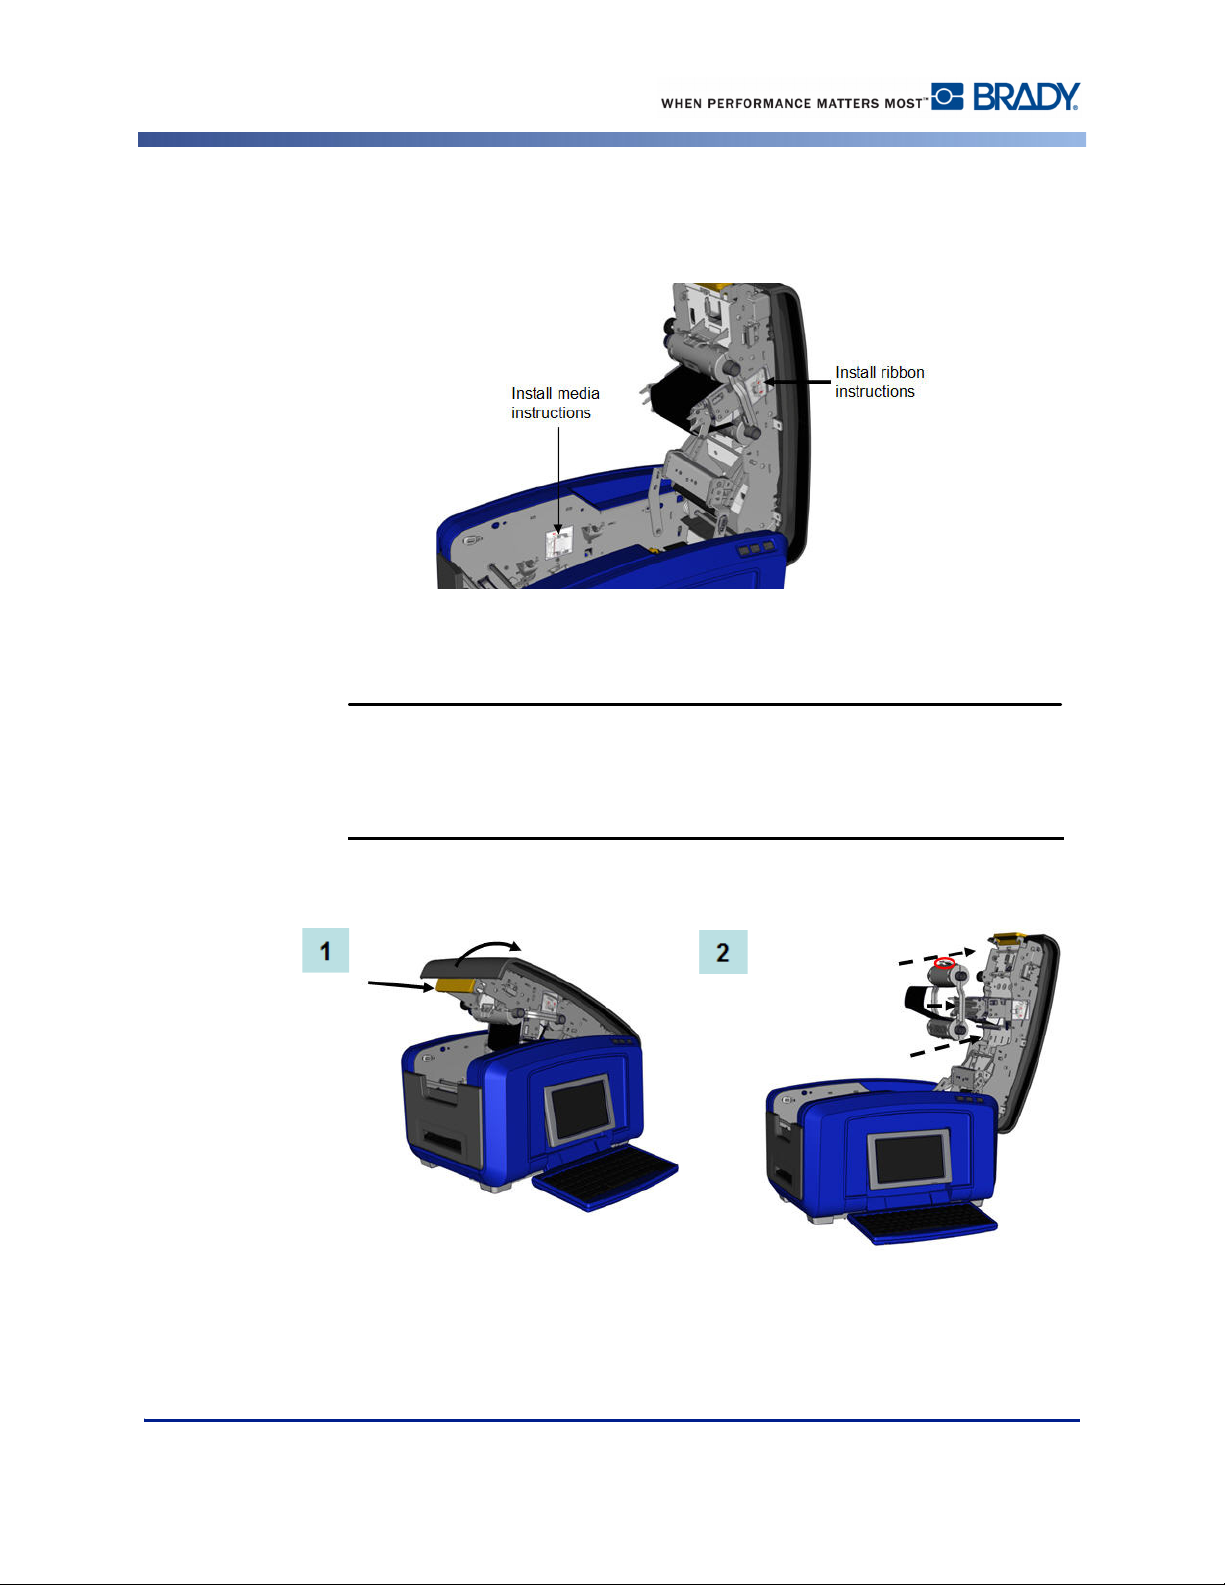
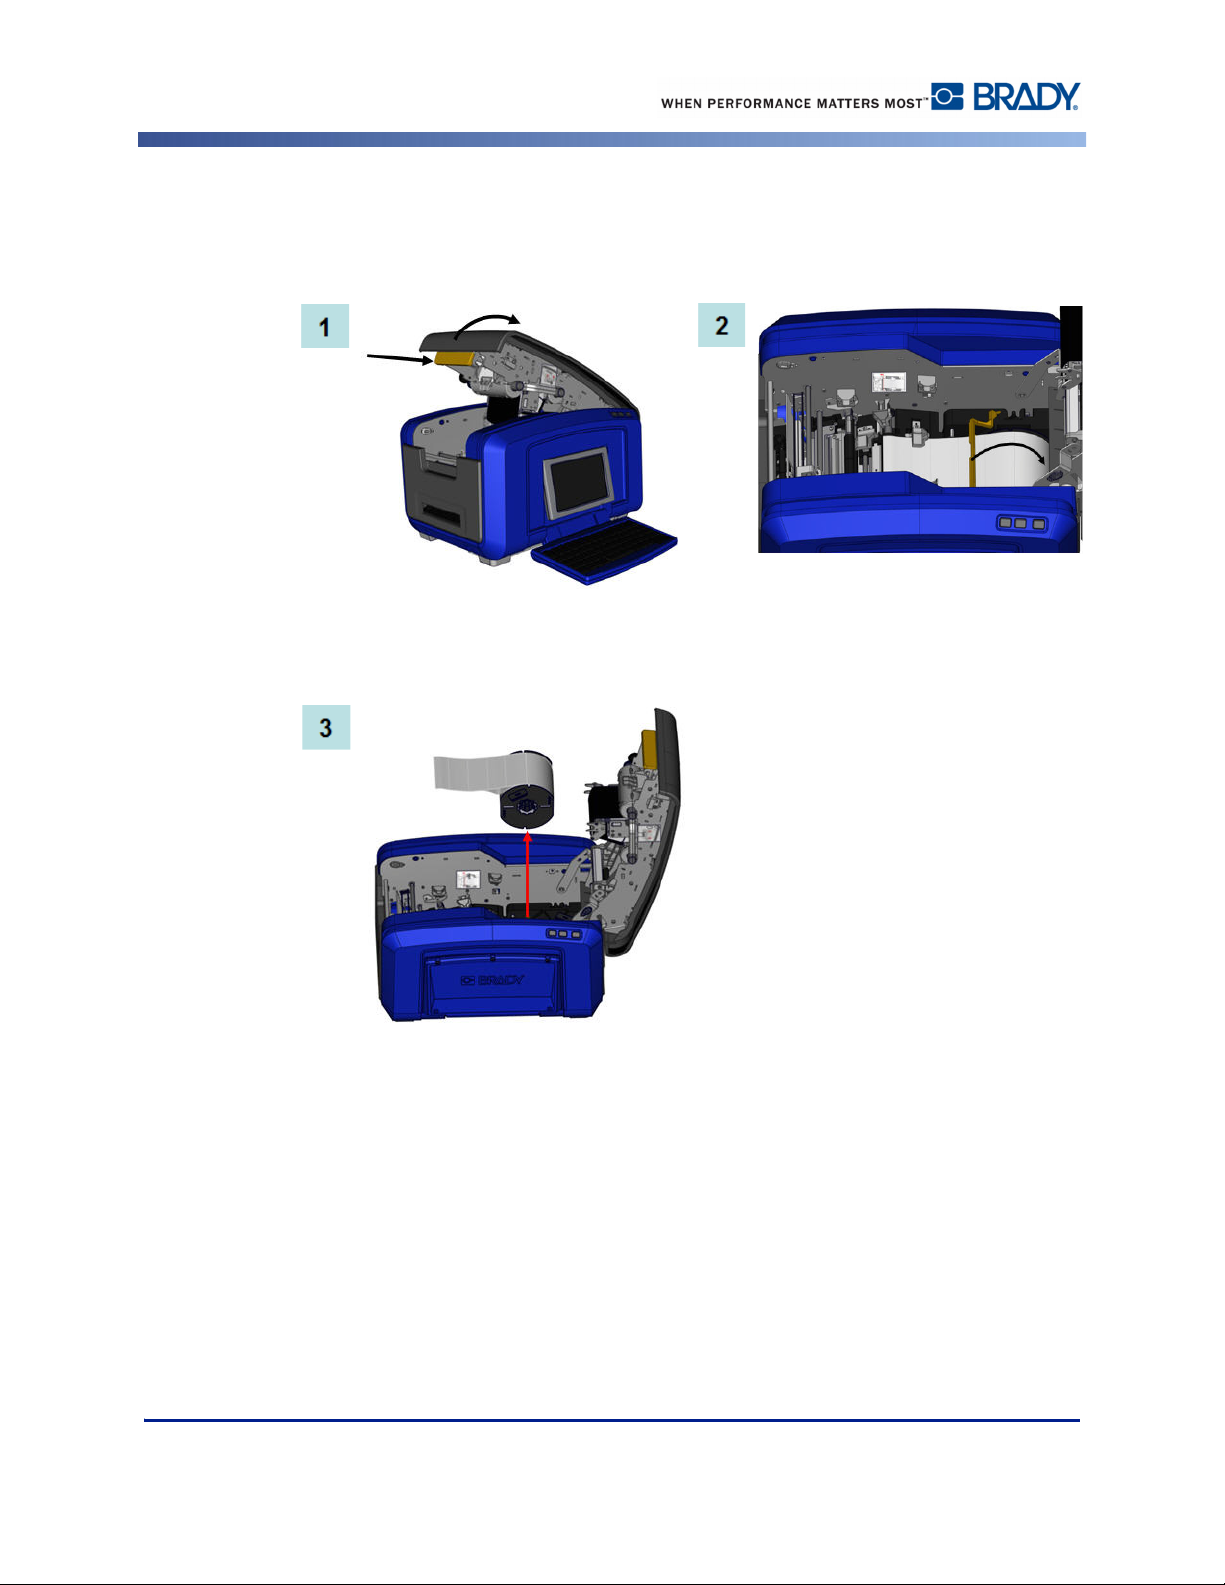
Install Ribbon Cartridge
Illustrations on the inside of the cover show how to install the ribbon and label media (tape).
1. Open the cover by pulling up on the bottom of the yellow latch.
The cover pops open quickly. To ease the opening, place a hand on the
cover as you release the latch.
2. With the cartridge tab on top, facing outward, place the exposed ribbon over the print
head, then push the cartridge forward until it snaps into place.
BBP®35/37 User’s Manual 6 Rev A
Page 23
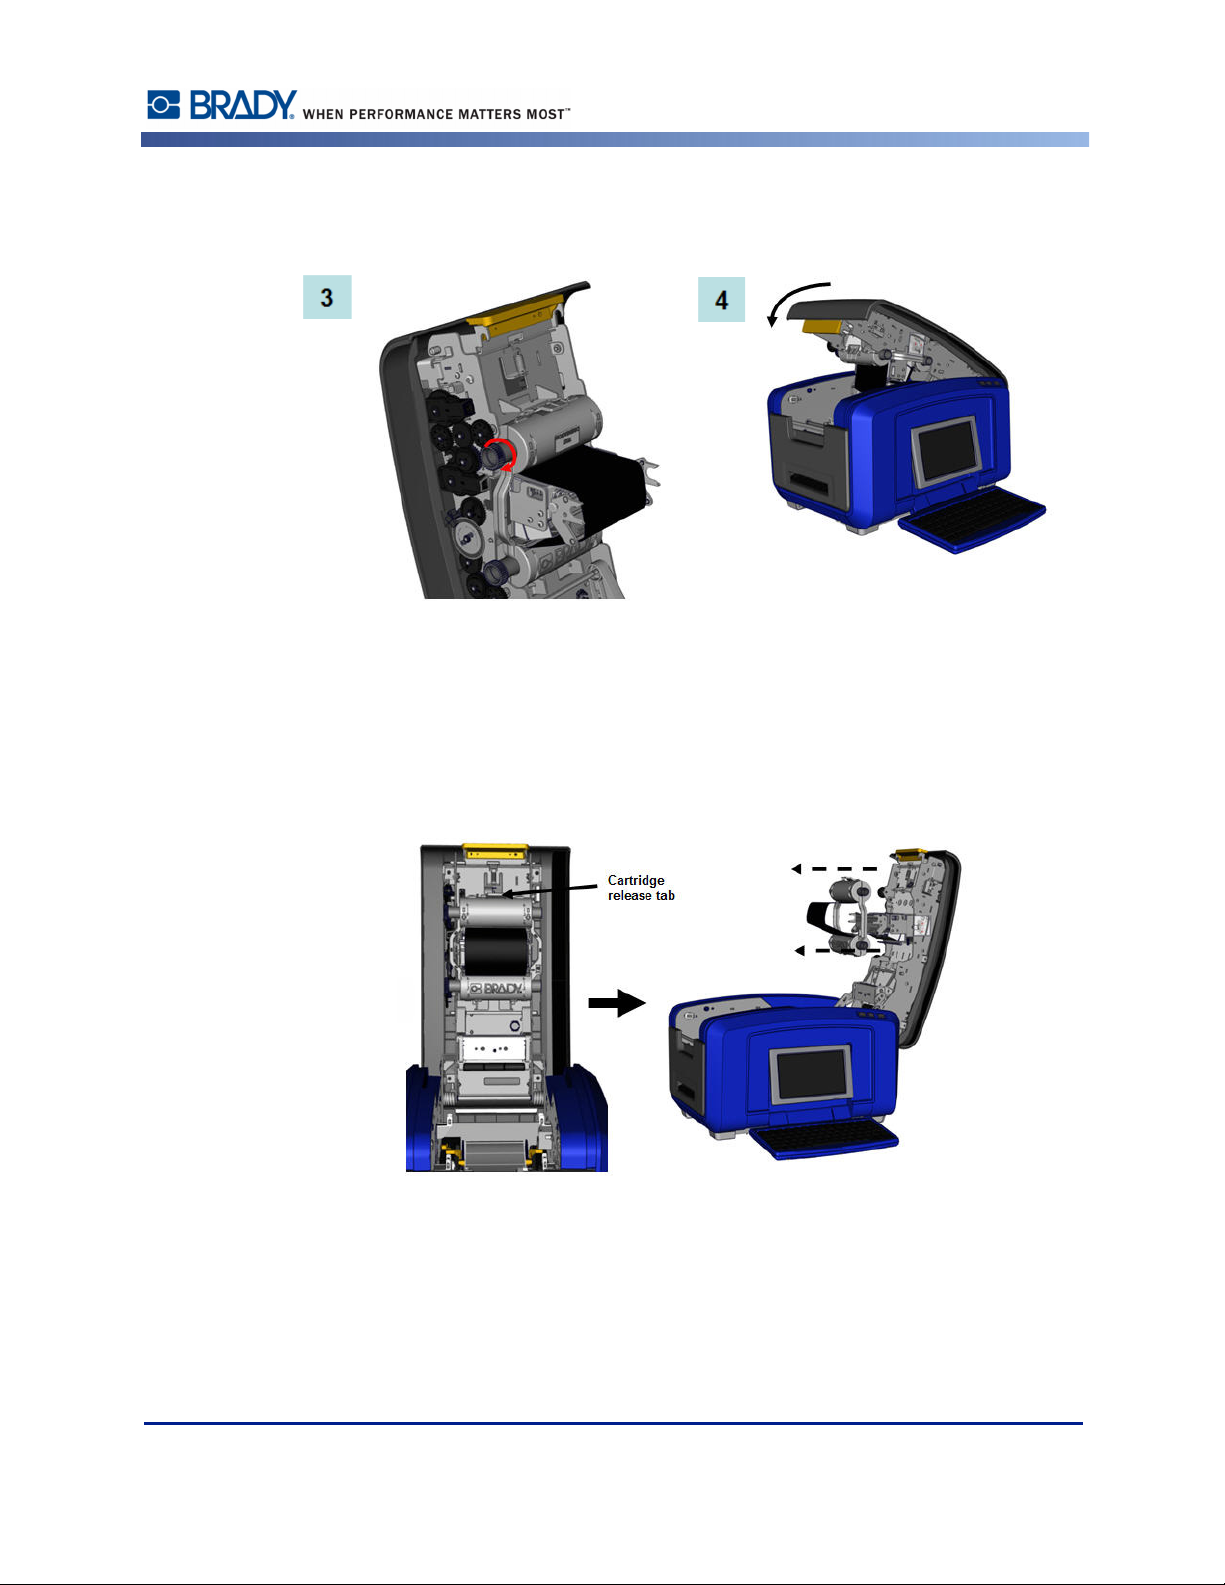
Setting Up the Printer
3. Turn the ribbon spindle knob to tighten the ribbon over the printhead.
4. Close the cover.
Remove Ribbon Cartridge
To remove a previously installed ribbon, press down on the ribbon cartridge release tab
then grasp the top barrel of the cartridge by the two sides and pull the the cartridge
straight out from the printhead.
Rev A 7 BBP®35/37 User’s Manual
Page 24
Setting Up the Printer
CAUTIONCAUTION
Install Label Media (Tape)
To install label media:
1. Open the cover by pulling up on the bottom of the yellow latch.
2. Swing the media wiper bar up, out of the tape well.
The cover pops open quickly. To ease the opening, place a hand on the
cover as you release the latch.
3. Grasp the tape roll with the tape coming off the top of the roll and the touch cell on the
left.
4. Drop the tape roll into the tape well, lining up the touch cell with the touch cell reader.
BBP®35/37 User’s Manual 8 Rev A
Page 25
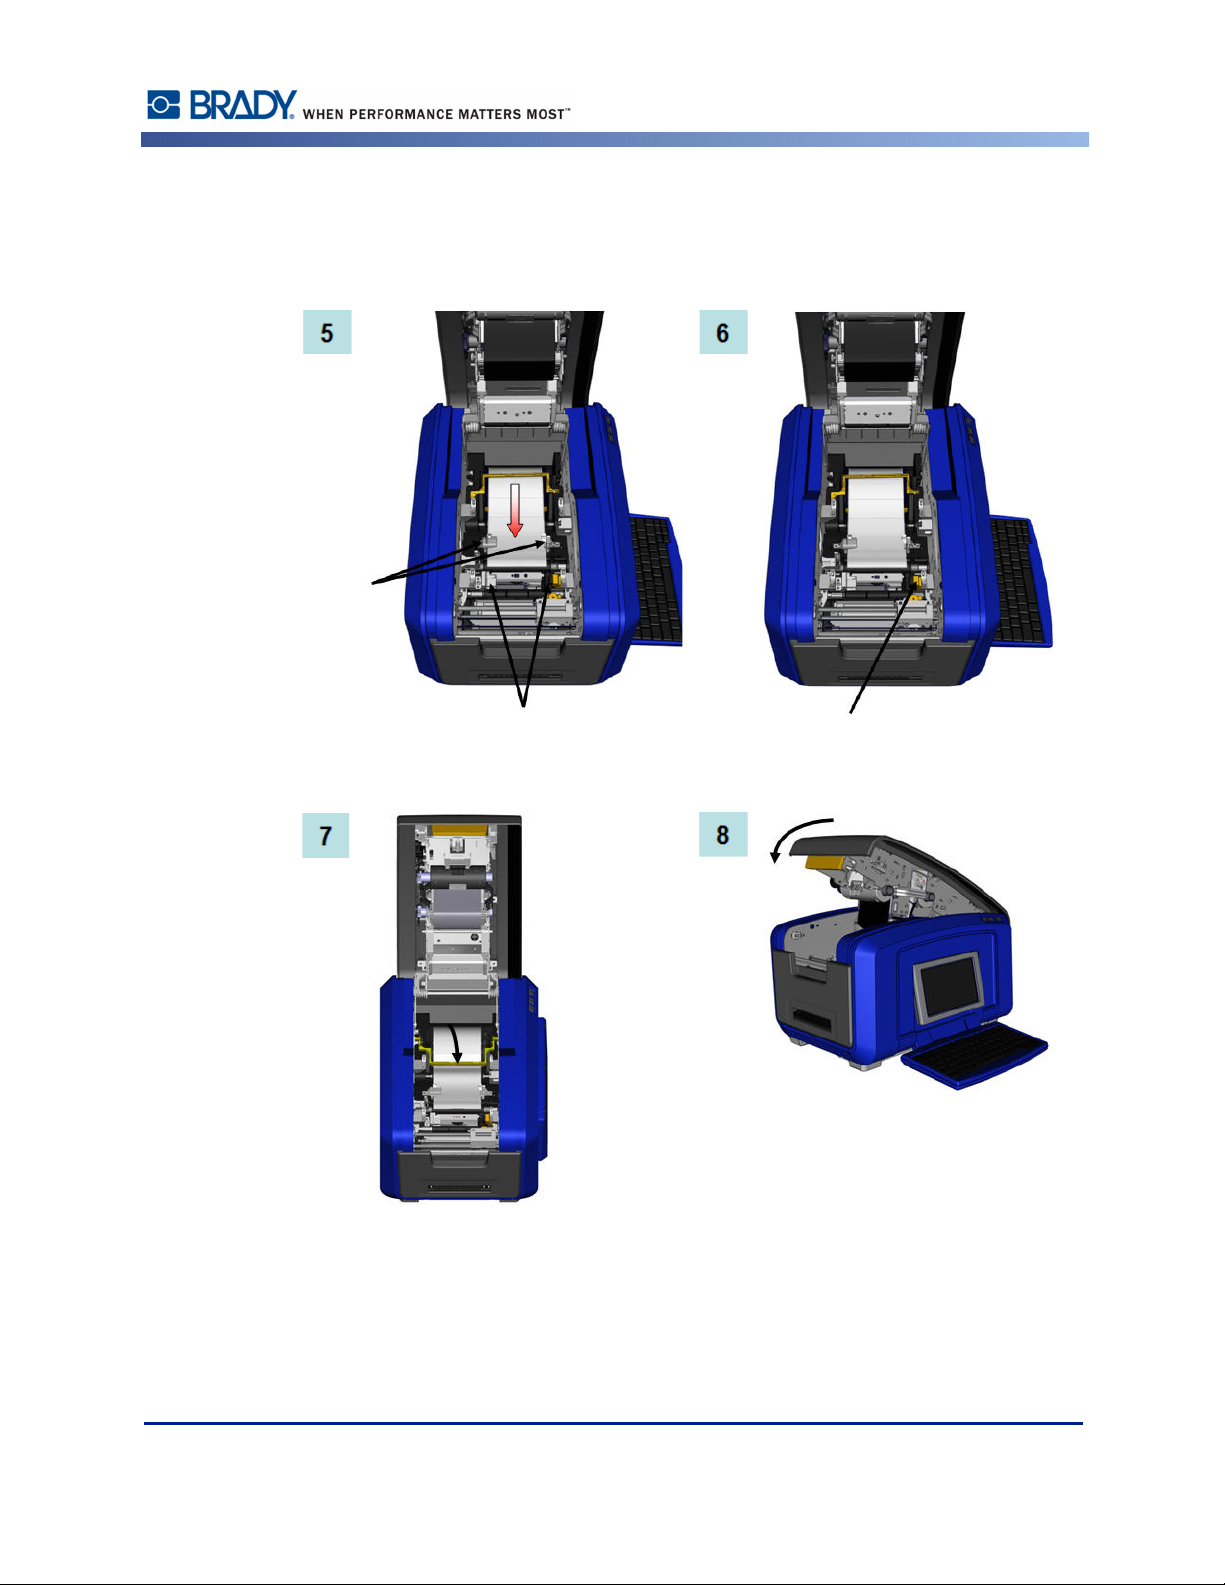
Setting Up the Printer
5. Thread the label tape under and through the media guides, until the tape covers the
black roller.
6. Pinch the tape adjustment lever and slide the media guides until they are lined up with
the edges of the tape liner.
7. If using continuous media, lower the media bar.
8. Close the cover.
Rev A 9 BBP®35/37 User’s Manual
Page 26
Setting Up the Printer
Remove Label Media (Tape)
1. Open the cover by pulling up on the bottom of the yellow latch.
2. If removing continuous media, lift the media wiper bar up off of the tape.
3. Grasp the tape roll and pull up, sliding the media out from under the guides.
BBP®35/37 User’s Manual 10 Rev A
Page 27
Power On/Off
To turn the display on or off:
1. Press Power .
Note: To completely shut down the printer, turn the On/Off switch, located above
the power cord, to the OFF position.
Sleep Mode
To preserve energy, when the printer detects a time of inactivity it automatically turns off the
display and goes into a low-power consumption mode called Sleep Mode. The current label
and settings are retained.
To wake the printer from sleep mode:
Setting Up the Printer
1. Press or touch the screen.
The Editor displays the label or menu you were on when the printer went to sleep.
Note: If a label is defined when the system goes into sleep mode and the media is
changed to a supply where the label no longer fits, you will be prompted to make
the data fit or save the existing label before continuing. If you choose the option to
make the data fit, the system will move and/or resize the objects so they fit on the
new media size.
You can set the elapsed time of inactivity the printer should detect before entering Sleep Mode.
See page 19 for information on setting the shut off delay time.
Resetting the Printer
If the screen “freezes” (i.e., does not accept any keystrokes), reset the printer.
1. Press and hold for 5 seconds.
The system performs the initialization process and starts the printer.
If the printer still does not initialize after holding the power button:
2. Using the On/Off switch, turn the power off, then turn it back on.
Any data in the Editor at the time of the reset will be lost.
Rev A 11 BBP®35/37 User’s Manual
Page 28

Display Screen
Display Screen
The BBP35/37 printer uses touch screen technology. Using your finger, touch the desired
option on the display screen.
Home Page
The Home page automatically displays when you first start the printer.
Item # Icon Description
1
2
3
4
Editor
5
Control
Panel
6
Status Bar
7
Tools Panel
BBP®35/37 User’s Manual 12 Rev A
Home: Returns you to the Home page from anywhere in the
application. When you are on the Home page, the button is
grayed out.
Menu: Displays File, Label and System options.
Print: Displays the Print dialog box for printing the current label.
If there is nothing in the Editor, the print button is grayed out.
Text or object entry area. Type, touch or select objects to display
and edit in this area. The Editor also shows the color and size of
the installed media and ribbon.
Primary area for selecting options for creating, editing and
working with labels and objects. The panel changes depending
on what option is selected.
Shows the current label size and indicators for the amount of
media and ribbon remaining.
Provides additional options for the specific tool selected. The
Tools panel changes according to the object selected.
Page 29

Menus
The main Menu button displays a list of sub-menus for different label or system functions. To
display menu or sub-menu options:
Display Screen
1. Touch to display the sub-menus.
2. In the pop-up list, touch the desired sub-menu option.
The selected sub-menu, in turn, can display another sub-menu.
3. Keep touching a sub-menu option until a dialog box displays.
Dialog Boxes
A dialog box contains various options for the specific sub-menu that you selected. It may
contain drop down field lists, spinner boxes, data fields, options boxes and scroll bars. A
dialog box enables you to make a number of changes to the label at one time. To accept all
edits in a dialog box:
1. Touch OK .
To cancel edits in a dialog box and/or to back out of sub-menus:
2. Touch Cancel .
Rev A 13 BBP®35/37 User’s Manual
Page 30

Display Screen
Drop Down Field
If a field has a drop down menu item associated with it, a downward facing arrow displays on
the right side of the field. To display the drop down menu item:
1. Touch the drop down arrow .
Spinner Boxes
A spinner box lets you toggle through a range of values in a field. To use a spinner box:
1. Touch the up arrow to increase the values.
2. Touch the down arrow to decrease the values
BBP®35/37 User’s Manual 14 Rev A
Page 31

Data Fields
For some menu items, there may be data fields requesting additional information.
Display Screen
To enter the information:
1. Touch the desired option.
If a data field is associated with the option, a blinking cursor displays in the field.
2. At the point of the cursor, enter data using the keyboard.
Figure 1 • Data input fields
Rev A 15 BBP®35/37 User’s Manual
Page 32

Display Screen
Option Boxes
Some data fields contain default (pre-set) information. To change the information in these data
fields:
3. Touch the option for the pre-set data field.
The pre-set data highlights.
4. Using the keyboard, enter new data directly over the highlighted pre-set data.
5. To accept options and data entered, touch OK .
Option boxes signify system defined choices or values. To use a system defined option:
1. Touch the box preceding the desired choice.
A checkmark displays in the box, signifying the option has been selected. To remove the
checkmark (and thereby de-selecting the choice):
2. Touch the option box again.
Some option box choices are connected to highler level choices. In that case, the sub-choices
are not available (are grayed out) if the higher level choice is not selected.
BBP®35/37 User’s Manual 16 Rev A
Page 33

Scroll Bars
If more choices are available than will fit in the specific option area of the dialog box, a scroll
bar displays to the right of that option area. To view more choices:
1. Touch the up or down arrow in the scroll bar, to move up or down through the list of
choices.
When only one arrow is highlighted (the other is grayed out), you can only scroll in that
direction. When you have reached the end of the list (top or bottom), the opposite arrow
highlights.
Cancel a Menu Option or Data Field
To cancel a menu option or data field, without accepting changes:
1. Touch Cancel .
Depending on how far you have drilled into the menu options, you may have to touch Cancel a
number of times to back out of the options.
Display Screen
Rev A 17 BBP®35/37 User’s Manual
Page 34

System Defaults
System Defaults
System defaults are set to provide a consistent operating environment for the work you do with
your printer. Once the defaults are set, they remain in effect until you change them. The
following system default settings can be found using the Menu key .
• Clock Settings
• Localization (Language)
•Text Defaults
• Barcode Defaults
• Printing Defaults
Clock Settings
The following settings can be found under the Clock Settings menu option. Set the Date and
Time options upon initial start-up of the printer. To access Clock Settings:
1. Touch Menu .
2. Under System, touch Setup .
3. Touch Clock Settings .
4. Touch the option(s) desired. (You can configure all three options - Sleep Mode, Date, and
Time at one time.)
5. When finished with the Clock Settings options, touch OK .
Figure 2 • Time/Date settings in Clock Setting option
BBP®35/37 User’s Manual 18 Rev A
Page 35

System Defaults
Sleep Mode
Sleep mode is the low power consumption mode that the printer automatically activates when
it detects a period of inactivity. Touch the desired inactivity time interval. If you do not want
Sleep Mode to ever be activated, touch Never.
Set the Date
Set the date on your printer to reflect the date that you want to print on your labels. To set the
date, on the Clock Settings screen:
1. Touch the month, day, or year section in the Date data field.
2. Using the keyboard, enter the desired month, day, or year.
Using the Calendar
You can also enter the date by using the calendar function. To access the calendar, on the Clock
Settings screen:
1. Touch the drop-down arrow to the right of the Date field.
Rev A 19 BBP®35/37 User’s Manual
Page 36

System Defaults
To change the month:
2. Touch the left or right arrow at the top of the calendar, until the desired month is
displayed.
OR
Touch the displayed month name at the top of the calendar.
A pop-up menu displays.
3. Touch the desired month.
To change the year:
4. Touch the year displayed at the top of the calendar.
BBP®35/37 User’s Manual 20 Rev A
Page 37

System Defaults
5. Using the keyboard, enter the desired year.
OR
Touch the up or down arrows of the toggle button to increase or decrease the year number.
6. To exit out of the year data field, touch anywhere on the calendar.
Once the correct month and year have been selected, to change the date:
7. Touch the desired date in the displayed calendar.
You will be returned to the Date data field on the Clock Settings screen.
Set the Time
To set the time, on the Clock Settings screen:
1. Touch the hour, minute, or seconds section in the Time: data field.
2. Using the keyboard, enter the desired hour, minute, or seconds.
OR
Touch the up/down arrows of the toggle button to the right of the Time: field to increase or
decrease the time.
Note: Entering seconds may prove futile as seconds pass quickly. The internal
clock in the printer starts the seconds based on the minutes you have chosen.
Time is based on a 12-hour clock, so you must indicate A.M. or P.M.
Touch the A.M. (or P.M.) section of the Time: data field. The data automatically toggles to
A.M. or P.M., depending on which option is currently displayed in the field.
3. When finished setting the Clock Settings defaults, press OK .
The date and time set in Clock Settings are stored on the printer and automatically increment
forward to the current date or time, even when the printer is turned off. This date and time can
be stamped on your labels when printing. However, you can enter any date or time, in any
format, on a label. Entered data is not affected by the internal clock.
Rev A 21 BBP®35/37 User’s Manual
Page 38

System Defaults
Language
Initial Language Setup
The languages in which all printer menus, functions, and data display vary according to
country, region, or keyboard type.
When turning the printer on for the first time, immediately go to the System
Setup>Localization function to choose the language you want displayed. To set the language:
1. Touch Menu .
2. Under System, touch Setup .
3. Touch Localization .
4. Under Language, touch the desired language.
BBP®35/37 User’s Manual 22 Rev A
Page 39

System Defaults
Units of Measure
The Units of measure setting is used to configure label parameters for the printer. The units
are:
• Inches
• Millimeters
Once configured, you do not have to indicate “inches” or “millimeters” (or their globally
accepted abbreviations or marks) when entering numbers in data fields. Likewise, in any scale
or range of measurement field (as found under Label Type), the range of measurements will
automatically configure to the units selected in the Menu function.
To set the default units, on the Localization screen:
1. Under Units of Measure, touch the desired measurement.
The initial default is inches. If you touch millimeters, a checkmark is placed in the box
preceding “millimeters” and is removed from the box preceding “inches.”
2. When finished with the Localization screen, press OK to accept the changes.
Rev A 23 BBP®35/37 User’s Manual
Page 40

System Defaults
Text Defaults
If you know most of your labels will use a specific font or justification (e.g., left aligned or
centered), set these options as defaults. Default settings are determined by the printer for the
installed media. While you can always change the attributes for a specific label or label type,
when the label supply and/or application label type is reloaded, it will return to these settings.
To set text defaults:
1. Touch Menu .
2. Under System, touch Setup .
3. Touch Text Defaults button .
4. Under Font:, touch the desired font to use as the default font.
5. Under Text units, touch the desired measurement to use for text sizing (points, inches, or
millimeters).
6. Under Justification, touch the desired alignment of text on a label (left, centered, right).
Note: Justification refers to the alignment of text between the left and right margin
of the label.
7. When finished setting the text defaults, touch OK to accept the changes.
BBP®35/37 User’s Manual 24 Rev A
Page 41

Barcode Defaults
Barcodes are generated following industry standard symbology. A typical barcode is
composed of vertical lines (bars) and spaces of varying thickness, depending on the text
entered. Barcode elements support vertical resizing (height) only. The width of the barcode is
based on data and symbology. However, some barcode widths (depending on symbology used)
can be altered by changing the ratio and density of the bar code.
To set barcode defaults:
1. Touch Menu .
2. Under System, touch Setup .
3. Touch Barcode Defaults button .
Multiple symbologies are presented. To view more symbology options:
4. Touch the up/down arrows to the right of the list of symbologies to move through the
different options.
System Defaults
5. Touch the desired symbology.
Rev A 25 BBP®35/37 User’s Manual
Page 42

System Defaults
A check digit is used for error detection in a barcode. It consists of a single digit computed
from the other digits in the barcode. If you want to use a check digit:
6. Touch Include check character.
7. When Include check character is touched, the Readable check character button displays. If
you want the check digit to display with your barcode, touch Readable check character.
When using symbology Code 39 or Code 128, you are given the option to have the start/stop
code readable with the barcode. The start code is a special character that signals the start of the
barcode. Likewise, the stop code is a character that signals the end of the barcode.
If you want to display the start/stop code for the chosen symbology:
8. Touch Readable start/stop (*).
A barcode is made up of a series of narrow and wide bars and spaces (called elements). The
difference between the width of the narrowest and widest element is the ratio. Not all barcode
types allow you to change the ratio. If you are using a Barcode Type that does not support this
option, the Ratio field will not display.
To change the ratio (when available):
9. Under Ratio, touch the desired ratio to use.
BBP®35/37 User’s Manual 26 Rev A
Page 43

System Defaults
Density refers to the thickness of the bars and spaces within a barcode. You can change the
density (which in turn lengthens the barcode), but the size of the bars and spaces retain the
same ratio to each other. For the most effective and reliable scanning, implement with the
lowest possible density.
To change the density:
10. Touch the Density button .
The density is measured in mils.
11. Touch the desired density.
12. Touch OK to accept the density change.
Barcodes are made up of bars and spaces, meant to be read by machines. Human readable text
is the text that makes up the barcode, but able to be read by humans. You have the option to
never display the human readable text, display the text above the barcode or below the
barcode.
13. Under Human readable text, touch the desired option.
14. When finished setting the barcode defaults, touch OK to accept the changes.
Rev A 27 BBP®35/37 User’s Manual
Page 44

System Defaults
Printing Defaults
To set the printing defaults for your printer:
1. Touch Menu .
2. Under System, touch Setup .
3. Touch Printing button .
BBP®35/37 User’s Manual 28 Rev A
Page 45

System Defaults
Auto Cut Settings
The Auto Cut Settings default determines when the printer should pause for cutting.
Note: The auto cut settings are only available if a monochrome ribbon is installed.
If using a paneled ribbon, these settings are disabled.
There are two modes to choose from:
• Cut between labels
• Cut at end of job
In a multiprint job (e.g., serialized labels) cut mode determines if the printer should pause
between each label for cutting the individual labels. If you select Cut at end of job, all labels in
a serialized sequence print out as one long string, pausing for cutting only after the last label is
printed.
To set the cut mode:
1. Under Auto cut settings, touch the desired printing option. A checkmark is placed in front
of that option.
Supply Saver Settings
Supply Saver automatically groups labels that are narrower than the tape. This option is only
used with paneled ribbon and is disabled if using a monochrome ribbon. When this option is
selected, the printer recognizes that more labels will fit within an area that can be covered by
one panel of ribbon. It then groups the labels together to maximize how many labels will print
with that set of ribbon panels. If the option is turned off, only one label prints per ribbon set.
This is inefficient if you are printing a number of 2" x 2" labels and have 8-inch long paneled
ribbons installed.
The Supply Saver option is selected by default. If you want to turn this option off:
1. Touch Supply Saver to remove the checkmark.
Rev A 29 BBP®35/37 User’s Manual
Page 46

System Defaults
Over Print Setting
Over Print is related to multicolor printing with colors that overlap each other. If ON, Over
Print prints a base color, then prints the second color on top of the first. An example of when
you want the over print setting turned on is a yellow triangle symbol. The black pictogram
prints on top of a yellow background color. Because black covers yellow so well, the yellow
color does not distort the black image.
Example of when Over Print should be
turned ON. (Black is over printing a yellow
background.)
Example of when Over Print should be
turned OFF. (Black does not print where
the red slash intersects the black image.)
If OFF, the printer prints the base color on everything except the items where the second color
overlaps. This is preferred in situations where the second color is lighter than the first and you
do not want the base color showing through and distorting the color where they overlap. A
good example of where you want the over print setting turned off is printing a prohibition
symbol. Black will not print where the red slash overlaps it, thereby not distorting the red
color.
The Over Print option is selected by default. If you want to turn this option off:
1. Touch Over Print to remove the checkmark.
2. When finished setting printing defaults, touch OK to accept the changes.
Note: Touching OK on the individual Setup screens (e.g., Clock Settings, Text
Defaults, etc.) saves those particular settings. However, to exit out of the main
Setup screen, it does not matter if you press OK or Cancel.
BBP®35/37 User’s Manual 30 Rev A
Page 47

Getting Started
This section describes the process of creating a text label with minimal formatting, using basic
editing techniques, and printing the label.
Entering Text
When the printer is first turned on, you are presented with the Home page, displaying a
blinking vertical bar (the cursor) and the message “Type or touch here...”
The cursor is the starting point for every label you create using the BBP
Using the keyboard, begin entering text at the position of the cursor. The opening message will
disappear and your entered text displays on the screen, surrounded by a frame. The frame
indicates you are working with a text object. (See page 38 for more information about
objects.) The cursor moves across the screen as you enter data. If you want another line of text,
press [ENTER] on the keyboard.
Editing Text
Getting Started
®
35/37 Label Printer.
If you have entered some text in error or want to change the content or format of your label,
edit the information before printing.
Inserting Text
To insert additional text within a line of text:
1. Touch the screen at the point where text should be inserted.
OR
Using the navigation arrows on the keyboard, position the cursor where text should be
inserted.
2. Enter the text.
Existing data positioned to the right of the cursor moves progressively to the right to make
room for the inserted text.
If a fixed font size is selected, when the end of the line is reached, no more data can be
inserted. To add more data, press [ENTER] on the keyboard to start another line of text. If
Autosizing is invoked, the font size decreases as more data is entered. (See Auto Size on
page 35.)
Rev A 31 BBP®35/37 User’s Manual
Page 48

Getting Started
Deleting Text
Replacing Text
To remove characters, one at a time, from the position of the cursor TO THE LEFT
(backwards):
1. Press Backspace on the keyboard.
To remove characters, one at a time, from the position of the cursor TO THE RIGHT
(forward):
2. Press Delete on the keyboard.
Note: If multiple words are highlighted, pressing Backspace or Del deletes all the
highlighted text. (See page 34 for options on selecting text.)
You can change text without having to delete it first. To replace text:
1. Select the text that should be changed. The text highlights.
2. Enter the new text directly over the highlighted text.
Clear
To clear all text from the text box, with the text box selected (i.e., the frame is visible):
1. In the Text Control Panel, touch Select All Chars .
2. On the Keyboard, press Backspace or Del . This clears the highlighted
text.
To delete all text and remove the text box,
3. In the Tools, touch Delete .
All text in the selected text box is deleted and the text box is removed.
BBP®35/37 User’s Manual 32 Rev A
Page 49
Zoom
To view label text in larger or smaller increments, use the Zoom controls in Tools.
1. To enlarge the label view, touch Zoom In button as many times as needed to increase
2. To decrease the label view, touch Zoom Out button as many times as need to
Scrolling
The Editor supports horizontal and vertical scrolling when displayed elements do not fit the
display area.
Getting Started
to the desired size of the view.
decrease to the desired size of the view.
Note: Zooming in or out only increases or decreases the size of the view. It does
not change the size of the printed text.
To view hidden parts of a label:
1. Touch a scroll arrow to scroll in the direction you want to view.
The ruler value updates automatically as the label view changes. If the entire label is shown on
the display, no scroll arrows display.
2. Continue to touch the scroll arrow as many times as needed to scroll in the direction you
want. (You can hold the scroll arrow down to continuously scroll.)
3. To return to normal viewing mode, touch the scroll arrow(s) in the opposite direction until
the label contents are in view.
OR
Touch Zoom Out enough times to bring all the label contents back in view.
Rev A 33 BBP®35/37 User’s Manual
Page 50

Getting Started
Selecting/Deselecting Text
Function Option Description
Select a Word
Select multiple
words
Select characters To select characters, hold the Shift key
Select characters
to beginning of
text
Select characters
to end of text
Touch In the text box, touch the word to
highlight.
Touch the first word in a line of text.
Press and hold the Shift key and touch
the last word in the line of text.
All text between the first touched word
and the last touched word are
highlighted.
while pressing the arrow key in the
direction you want to highlight.
To select text from the position of the
cursor to the beginning of all lines of
text, hold the Shift key while pressing
Home key.
To select text from the position of the
cursor to the end of all lines of text, hold
the Shift key while pressing the End
key.
Select all
characters
Deselect a Word Touch If a word is highlighted, touch the word
Deselect all but
one word
Deselect all
highlighted
words
BBP®35/37 User’s Manual 34 Rev A
Touch To deselect all highlighted words
When inside the text box, touch Select
All Characters button.
All text in the text box is highlighted.
again to deselect. The highlighting is
removed.
EXCEPT one word, touch the word that
you want to keep highlighted. All other
highlighted words deselect.
Hold the Shift key and touch anywhere
in the highlighted words. All words are
deselected.
Page 51

Sizing Text (Autosize)
Font Size
Font size can be applied on a single character, a word, or a line of text. If the size is changed
before the data is entered, all the data in the current and subsequent lines, takes on the new font
size until font size is changed again.
Autosize
The amount of text a label can hold depends on the type of label media being used and the
label length setting. The BBP35/37 printer automatically adjusts the size of the font as data is
entered. When text reaches the label boundaries, it scales downward until you press [ENTER]
or the minimum font size is reached. When working with autosize and multiple lines of text,
all lines on a label maintain the same text size.
Getting Started
Figure 3 • Autosizing with two lines of text
Rev A 35 BBP®35/37 User’s Manual
Page 52

Getting Started
Changing Text Box Size
In addition to autosizing text to fit the label, you can adjust the size of the text box. Vertically
changing the size of the text box decreases the font size. Horizontally changing the size of the
text box expands or condenses the text. (See page 61 for information on expanding and
condensing text.)
Figure 4 • Changing kerning in text box
To change the size of the text box:
1. With the cursor in the text box, from Tools, touch Size button.
A left/right, up/down, and diagonal arrow display on the text box.
2. To increase or decrease the height of the text box, touch the up/down arrow and drag your
finger down, or up, on the screen.
3. To increase or decrease the length of the text box, touch the left/right arrow and drag your
finger right, or left, on the screen.
4. To increase or decrease the height and length of the text box at one time, touch the
diagonal arrow and drag your finger diagonally on the screen.
BBP®35/37 User’s Manual 36 Rev A
Page 53

Printing a Label
To print a label:
1. Touch Print .
Getting Started
2. Touch Start Print .
Rev A 37 BBP®35/37 User’s Manual
Page 54
Formatting a Label
Formatting a Label
Formatting refers to the layout, structure, and appearance of a label. Each label contains object
elements that represent user content, such as text, barcodes, etc. This section details these
elements.
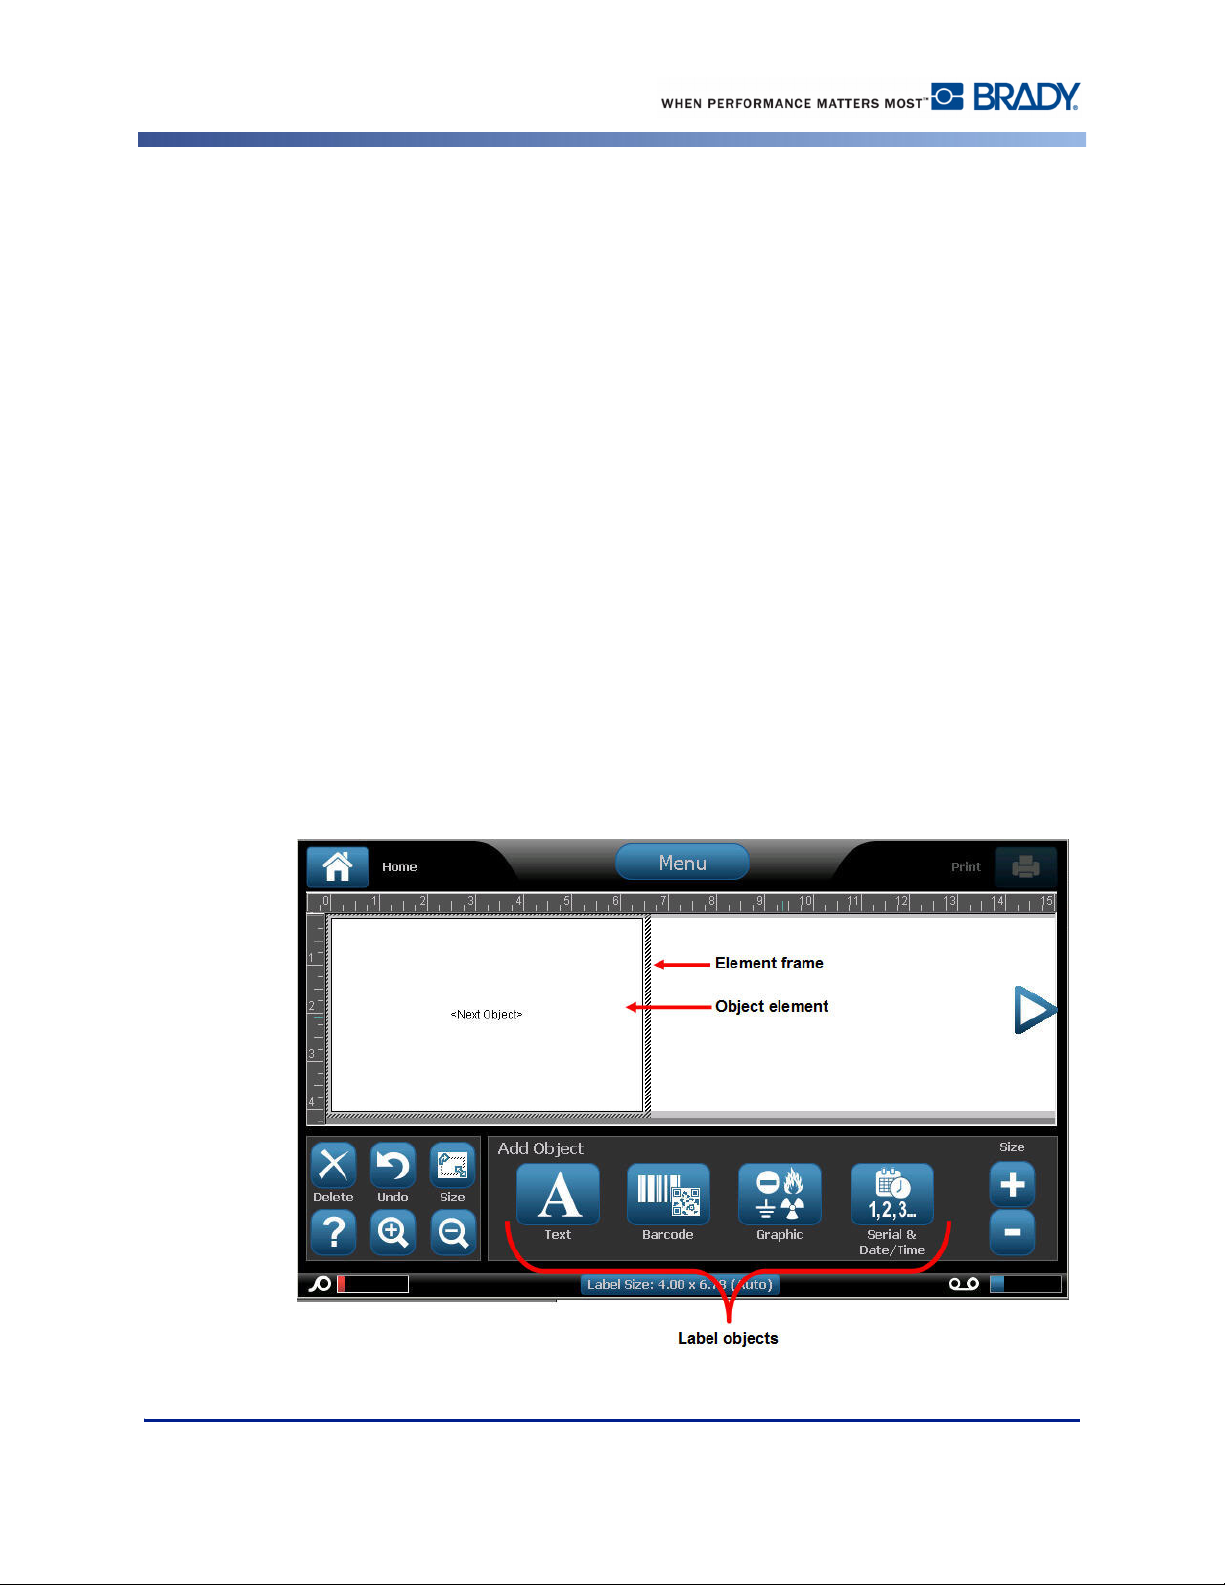
Label Objects/Elements
Label Objects are tools used to place different data elements on a label. These objects include:
•Text
• Graphics (Pictures, symbols, and shapes)
• Barcode
• Serial data
• Date and Time
The Object is the tool (button) found in the control panel. The tool is used to place a bound
data box in the Editor. Once this data box is in the Editor it is referred to as an Object Element,
or simply “Element.” To place an object element on a label:
1. Touch a blank area of the label where you want to insert an object.
The Add Object portion of the Control Panel displays.
BBP®35/37 User’s Manual 38 Rev A
Page 55

2. Touch the desired object button.
Formatting a Label
Selecting an Object Element
In order to format, edit, size, or move an object element, it must be selected. Selecting an
element places the focus on the element, enabling formatting functions to be performed only
on that element. The options in the Control Panel change depending on which object element
has been selected on the label. To select an object element:
1. On the label (Editor screen), touch the object element you want to work with.
OR
Press Tab key on keyboard.
A border displays around the element, indicating that the element is selected.
To remove the border (deselect the element):
2. Touch a different element or anywhere on the Editor screen.
Rev A 39 BBP®35/37 User’s Manual
Page 56

Formatting a Label
Moving an Element
There are two ways to move an element to a different location on a label. You can drag the
element or use the keyboard arrows.
To drag an element:
1. In the Editor, touch the element you want to move.
2. With your finger on the element, drag the element to the new location.
If you drag an object off the edge of the displayed part of the label (but still within the label
boundary), the display automatically scrolls so the object stays visible.
If you move an object so that some or all of the object is outside the printable area, the object
repositions within the label boundary.
To move an element using the keyboard:
1. In the Editor, touch the element you want to move.
2. On the keyboard, press the up, down, left, or right arrow key to
move the object in the corresponding direction.
If you hold down the Shift key while pressing the arrows, the elements move in larger
increments.
Note: For text elements, the main text editing control panel cannot be displayed if
you want to move the text element using the keyboard. If the main text editing
control panel is displayed, using the keyboard moves the cursor within the text line.
To use the keyboard to move a text element to another position on the label, touch
More Options one time. This moves the text element off of the main text editing
control panel. You can now use the keyboard to move the text element.
BBP®35/37 User’s Manual 40 Rev A
Page 57

Behavior Common to All Object Elements
The options displayed in the Control Panel depend on which object element is selected.
However, there are some options that are common to all object elements. These options are
displayed in the following graphic and discussed below.
Formatting a Label
Delete an Element
To delete an object element from your label:
1. Touch the element to be removed.
2. Touch Delete .
OR
Press Delete on the keyboard.
Rev A 41 BBP®35/37 User’s Manual
Page 58

Formatting a Label
Undo
The Undo function “undoes” the last action taken, whether editing an element, adding
information, or deleting data. To Undo the last action:
1. Touch Undo .
No specific element needs to be selected. Undo puts the element and/or label back to the state
it was in before the last action was taken. Undo can be pressed multiple times to keep undoing
previous actions.
Size
Changes the size of the object element boundary (height and width). To change the size of the
element:
1. Touch the object element to select it.
2. From Tools, touch Size .
A left/right, up/down, and diagonal arrow display on the element boundary.
3. To increase or decrease the height of the box, touch the up/down arrow and drag your
finger down, or up, on the screen.
4. To increase or decrease the length of the box, touch the left/right arrow and drag your
finger right, or left, on the screen.
5. To increase or decrease the height and length of the box at one time, touch the diagonal
arrow and drag your finger diagonally on the screen.
You can manually increase or decrease the size of your selected element. To manually change
the size:
1. In the Control Panel for the selected element, touch the Plus button to increase the
size; touch the Minus button to decrease the size.
Manually changing the size affects the entire element, regardless of what is selected within
that element (i.e., a specific word in a text element).
BBP®35/37 User’s Manual 42 Rev A
Page 59

Formatting a Label
Rotate
The Rotation button displays along with the size arrows on an element. Each time the Rotation
button is touched, the element rotates 90° counter-clockwise (to the left). To rotate an element:
1. Touch the element to rotate.
2. Touch Size .
3. Touch Rotate as many times as needed to reach the desired rotation.
Note: When rotated, the text font will be reduced so that the entire text box fits on
the label. The font size will stay reduced even if the object is rotated back to its
original position (a full 360°).
Help
Help provides context sensitive instructions on how to use the various options available for the
different object elements. Whenever you need help on a particular element:
1. Touch the element on which you want Help.
2. Touch Help .
Zoom
Zoom enlarges or decreases the label view - it does NOT change the size of the label element itself.
No specific element needs to be selected, as the Zoom tools affect the entire label view. To zoom in
on a label (enlarge the label view):
1. Touch Zoom In as many times as needed to enlarge the label view to the desired
magnification.
To zoom out on a label (decrease the label view):
2. Touch Zoom Out as many times as need to decrease the label view to the desired
view size.
Rev A 43 BBP®35/37 User’s Manual
Page 60

Formatting a Label
Alignment
The Center on Label buttons center the selected element vertically or horizontally to the
boundaries (margins) of the label, not to other elements. To center an element on a label:
1. Touch the element to be centered.
2. Touch the Right Arrow button under More Options, until the Center on Label
buttons are displayed.
3. Touch the Center on Label button desired (vertically or horizontally).
The Align to Label Edge buttons align the selected element to the left, right, top or bottom
edge of the label. Only the alignment options relevant to element are available. For instance, if
an element is already aligned to the top of the label, the top alignment button is grayed out.
BBP®35/37 User’s Manual 44 Rev A
Page 61

Formatting a Label
To align an element to the label:
1. Touch the element to align.
2. Touch the Right Arrow button under More Options, until the Align to Label Edge
buttons are displayed.
3. Touch the desired available Align to Label Edge buttons.
Exact Size & Position
The alignment buttons place an element at an approximate location on the label. For precise
placement of an element on a label, use the Exact Size & Position button to specify the exact
location. The measurements are recorded in inches or millimeters, depending on what you
have set as the default unit of measure. For precise placement of the element:
1. Touch the element to be aligned.
2. Touch the Right Arrow button under More Options, until the Exact Size & Position
button displays.
3. Touch Exact Size & Position .
4. Touch the appropriate data fields for the desired size or position, then enter the increment.
(You do not have to specify “inches” or “mm.”)
5. When finished, touch OK .
Note: If the values entered result in the object being positioned outside the
printable area, the system resizes and repositions the object to fit on the label.
Rev A 45 BBP®35/37 User’s Manual
Page 62

Formatting a Label
Color
You can change the color of the data in each element (text, barcode, graphic, etc.). To change
the data color:
1. Touch the element containing the data on which you want to change color.
2. In the element’s main control panel screen, touch Color .
Note: If a full color ribbon is installed, a wider palette of colors displays.
3. On the Choose the Object Color screen, touch the desired color.
Note: The colored square with the embedded ribbon icon indicates the
colored ribbon you currently have installed in the printer. If you do not have the
selected color ribbon installed, a message prompts you to install the specific color
ribbon before printing.
4. Touch OK .
BBP®35/37 User’s Manual 46 Rev A
Page 63

Frames
A printable frame (border) can be added to an individual text element or graphic element. You
can have a different frame, or no frame, on individual elements in a multi-element label. You
can also place a frame around all elements on the entire label. (See page 105 for information
on framing an entire label.)
Formatting a Label
Figure 5 • Available frame options
To add a frame to a text or graphic element:|
1. In the Editor, touch the text element you want to frame.
2. In the Control Panel, in More Options, touch left or right enough times to reach
the Object Frame screen.
3. Under Shape, touch the desired frame shape, Rect. or Rounded .
Rev A 47 BBP®35/37 User’s Manual
Page 64

Formatting a Label
4. Under Line Width, touch the desired width of the frame lines, Narrow , Medium
, or Wide .
Remove a Frame
To remove an element frame:
1. Touch the element whose frame you want to remove.
2. In the Control Panel, in More Options, touch left or right to move to the Object
Frame screen.
3. Under Shape, touch None .
BBP®35/37 User’s Manual 48 Rev A
Page 65

Text Object Element
Text elements contain user-defined text and characters, allowing direct data entry on the label.
Only alphanumeric characters can be used in a text element. Text elements can be single or
multi-line, however the text element does not “wrap¨ text (i.e., automatically start a new line
when the label boundary has been reached).
Adding Text
When you power on the BBP®35/37 printer, you are presented with the Home page, displaying
the Editor (the screen where the label is created). The Editor automatically starts in text mode,
designated by the message “Type or touch here...”. You can immediately start entering data,
directly over the displayed message. The opening message disappears and your entered text
displays on the screen. A border (frame) displays around the text as it is being entered. This
border represents the text line. For a multi-line text entry, press [Enter] on the keyboard to start
a new line of text in the same text element.
To add another text element to a label:
1. Touch the Editor screen outside the current text element.
Formatting a Label
2. In the Add Object control panel, touch Text .
OR
From anywhere on the Editor:
1. In the Control Panel, touch Add Object button.
2. Touch Text .
Rev A 49 BBP®35/37 User’s Manual
Page 66

Formatting a Label
3. Enter the text.
A blinking cursor displays inside the text element. The text element border (text line) extends
as text is entered.
To add another line of text in the same text element:
4. Press [Enter].
5. When finished entering the text, touch anywhere on the screen to remove the text line
borders.
BBP®35/37 User’s Manual 50 Rev A
Page 67

Font
Formatting a Label
The BBP®35/37 printer supports different fonts, or typefaces. When you add a text object, the
text defaults to the font defined in System Setup. You can change the font for the entire text
element on a specific label, or on just a few characters in the text element. To change the font:
1. In the text element, select the text (characters, words, or entire text) on which to change
the font.
2. In the Control Panel, touch Font .
3. In the list of available fonts, touch the desired font.
4. To view more fonts, touch the down arrow in the scroll box to the right of the
Available fonts list.
5. Touch the Size: data field and enter the desired point size for the selected font.
6. When finished, touch OK button.
Rev A 51 BBP®35/37 User’s Manual
Page 68

Formatting a Label
Importing Fonts
You can also import your own fonts for use in labels created on the printer. Only True-Type
fonts can be imported. A USB flash drive must be used to import fonts to the printer.
To import fonts:
1. First, copy the fonts to import into the root directory of a USB flash drive.
2. Plug the flash drive into any available USB port on the printer.
3. On the printer, touch Menu .
4. Under System, touch Import .
5. Touch Fonts .
6. Under External USB:, touch the font file name that you want to import.
7. Touch Import .
The imported graphics display in the Imported: section.
8. When ready, touch OK .
Note: If there is not enough space available to store the imported font(s), you will
have to clear some space on the system before you can import any new fonts. You
can clear space by deleting saved files. There is approximately 56MB of storage
space available.
BBP®35/37 User’s Manual 52 Rev A
Page 69

Formatting a Label
Font Attributes
Character/line formats are called attributes that change the appearance of the fonts, such as
underline, weight (bold), and angle (italics).
To add attributes to the font:
1. Select the characters, words, or lines of text on which to add the attributes.
2. In the Control Panel for text elements, touch Bold , Italic , and/or Underline
, as desired.
OR, with text selected:
1. Touch Font .
2. On the Font screen, touch Bold, Italic, and/or Underline.
3. Touch OK .
Rev A 53 BBP®35/37 User’s Manual
Page 70

Formatting a Label
Special Characters
There are some characters that are not available on a standard keyboard, such as the degree or
®
copyright symbol, accented characters in different languages, fractions, etc. The BBP
35/37
printer provides many of these symbols for use in text elements.
Note: The available characters depend on the font in use.
To add a special character in the text element:
1. Position the cursor in the text element where the special character is to be placed.
2. Touch Special Characters .
3. On the Special Characters screen, touch the scroll arrows to move up or down through the
list of available characters.
4. In the list, touch the character(s) you want to enter. (You can select more than one
character at a time.)
The selected character(s) immediately display in the Characters to insert area. You can also
type in the Characters to Insert area.
BBP®35/37 User’s Manual 54 Rev A
Page 71

Formatting a Label
Previously used special characters are displayed in the Recent: field. These characters remain
in the Recent: field as long as the printer remains turned on. To re-use these characters:
5. In the Recent: field, touch the desired character.
6. When ready, touch OK .
The special character displays at the indicated position in the text element.
Accented Characters
As with standard PC keyboards, each character key supports multiple characters when used in
combination with the <Shift> and <Alt Gr> keys.
Keycaps show characters in one of four positions (see Figure 6). The character position on the
physical key indicates how to access the characters with the <Shift> and <Alt Gr> keys.
Characters that require two keystrokes are not differentiated in any way, however, they
respond differently when selected. For example, when an accented character is typed, it does
not display until the letter to be modified is also typed. The accented character is then
displayed with the letter.
Rev A 55 BBP®35/37 User’s Manual
Page 72

Formatting a Label
In Figure 6, Example 1 shows how to access characters in normal operation (caps lock and
Alt-GR keys not activated). Example 2 shows how to access characters when caps lock is on.
Example 3 shows how to access characters using the Alt-GR key.
Understanding Keystroke Combinations
Figure 6 • Keystroke Combinations
• The term "Key" represents the physical key on which the accent character is located.
• The Alt-GR key is also referred to as the "switch" key.
• The "+" sign indicates that two or more keys should be pressed simultaneously.
• A comma separating a keystroke combination indicates that the first set of keys should be
released before typing the next keystroke combination.
Typing Accented Characters
Typing the key combinations may vary depending on the keyboard configuration you are
using. The following shows an example of using each of the four key combinations.
Note: See “Appendix B - Character Mapping & Keyboard Layoutsn page 216 for
a list of accent characters available with specific keyboards and the keyboard
configurations.
BBP®35/37 User’s Manual 56 Rev A
Page 73

Formatting a Label
To type an accented character:
1. On the keyboard, locate the key with the accented character you want applied.
2. Type the appropriate keystroke combination (see Figure 6). The table shows example
keystroke combinations.
Note: The following tables show an example of North American QWERTY and
European QWERTY keystroke combinations.
North American QWERTY Key Combination Example
Result Accent Key Keystroke Combination
ç
ô
à
é
ñ
ä
å
Cedilla Lower Case: Alt Gr + Key
Upper Case: Shift + Alt Gr + Key
Circumflex
Grave
Acute
Tilde
Diaeresis
(umlaut)
Ring Lower Case: Alt + Key, Letter
Lower Case: Shift + Alt GR + Key, Letter
Upper Case: Shift + Alt GR + Key, Shift + Letter
Lower Case: Alt-GR + Key, Letter
Upper Case: Alt-GR + Key, Shift + Letter
Lower Case: Shift + Key, Letter
Upper Case: Shift + Key, Shift + Letter
Upper Case: Alt + Key, Shift + Letter
European QWERTY Key Combination Example
Result Accent Key Euro QWERTY Keystroke Combination
ç
ô
à
é
ñ
ä
å
Rev A 57 BBP®35/37 User’s Manual
Cedilla Lower Case: Alt Gr + Key, Letter
Upper Case: Alt Gr + Key, Shift + Letter
Circumflex
Grave
Acute Lower Case: Shift + Key, Letter
Tilde Lower Case: Shift + Key, Letter
Diaeresis
(umlaut)
Ring Lower Case: Alt + Key, Letter
Lower Case: Alt + Key, Letter
Upper Case: Shift + Key, Shift + Letter
Upper Case: Shift + Key, Shift + Letter
Upper Case: Shift + Key + Letter
Lower Case: Shift + Key, Letter
Upper Case: Shift + Key, Shift + Letter
Upper Case: Alt + Key, Shift + Letter
Page 74

Formatting a Label
Justification
Justification refers to the horizontal alignment of data between the left and right boundaries
(margins) in a text element. Justification applies to the entire text element. It cannot be applied
line-by-line. (To align the text element on the label, see Alignment on page 44.)
To apply justification:
1. Touch the text element where justification is to be applied.
2. In the Text Control Panel, above More Options, touch the right arrow .
3. Touch the desired horizontal justification (Left , Center , or Right ).
Every line of data in the text element is justified according to the option selected.
BBP®35/37 User’s Manual 58 Rev A
Page 75

Formatting a Label
Vertical Text
In Vertical text, each character drops down a line below the preceding character.
Example: The word “WIRE” as vertical text displays as such:
W
I
R
E
Vertical text can only be applied to an entire text element. It cannot be applied line-by-line.
To format text vertically:
1. Touch the text element you want to display vertically.
2. In the Text Control Panel, above More Options, touch the right arrow .
3. Touch Vertical .
The word(s) display vertically on the label.
If more than one line of text is present, the second and subsequent lines of text display
vertically beneath each other. In order for the text to fit on the label, the font size automatically
decreases.
Text before vertical applied Text after vertical applied
Figure 7 • Multi-line vertical alignment
Note: Once text has been sized to fit vertically, selecting Vertical again does not
change the text back to the original size. While the text is again displayed
horizontally, you have to manually change the text size back to its original setting.
Rev A 59 BBP®35/37 User’s Manual
Page 76

Formatting a Label
Reverse
The Reverse function switches the foreground and background colors of data on a label, based
on the media installed.
Text before reverse applied Text after reverse applied
Figure 8 • Reverse text
For instance, black lettering on a yellow background, if reversed, would print yellow lettering
on a black background.
Reverse formatting is applied to the entire text element. It cannot be applied to an individual
line of text.
To apply Reverse formatting to a text element:
1. Touch the text element you want to display in reverse coloring.
2. In the Text Control Panel, above More Options, touch the right arrow .
3. Touch Reverse .
The system formats the data so that the foreground and background colors are switched.
To remove the Reverse function:
4. Touch Reverse again.
BBP®35/37 User’s Manual 60 Rev A
Page 77

Formatting a Label
Expand/Condense
Expanding and condensing data affects character width and the spacing between characters in
a word. Data can be expanded or condensed according to predefined percentages, 50% to
200% in 10% increments. If the limits are reached, the Expand/Condense buttons have no
further effect.
Standard Expanded Condensed
Figure 9 • Expanded and condensed text
To Expand or Condense text:
1. Touch the text element you want to expand or condense.
2. In the Text Control Panel, above More Options, touch the right arrow .
3. Touch Expand or Condense ,as desired.
Each time Expand or Condense is touched, the data in the text element is expanded or
condensed incrementally. You may have to touch Expand or Condense a number of times to
achieve the desired size.
Rev A 61 BBP®35/37 User’s Manual
Page 78

Formatting a Label
Set Data Source
You can convert an existing text or barcode object element into a serial or date/time element on
the label. This applies to both template or freeform object elements. However, you cannot add
serial data to a graphic.
To convert text or barcode to serial data:
1. In the Editor, touch the text or barcode element that you want to use for the serial data.
2. For a text element, touch More Options, then touch Set Data Source.
3. For a barcode, touch Change Barcode , then touch Set Data Source.
You have three options to choose from: Constant, Serial, and Date/Time.
• Constant keeps the data the same on every label printed. The data is fixed (or nonvariable), it does not increment or decrement.
• Serial automatically adds a series of sequential numbers or letters to the printed labels.
The Serial function consecutively places the next number or letter in the defined sequence
on individual labels. (See page 76 for information on defining a series.)
• Date/Time places the date and/or time on every printed label in a series. It is not the
system date or time, but rather a date or time you define. (See page 19 for information on
defining the date and/or time.)
4. In the Set Data Source dialog box, touch the desired option.
BBP®35/37 User’s Manual 62 Rev A
Page 79
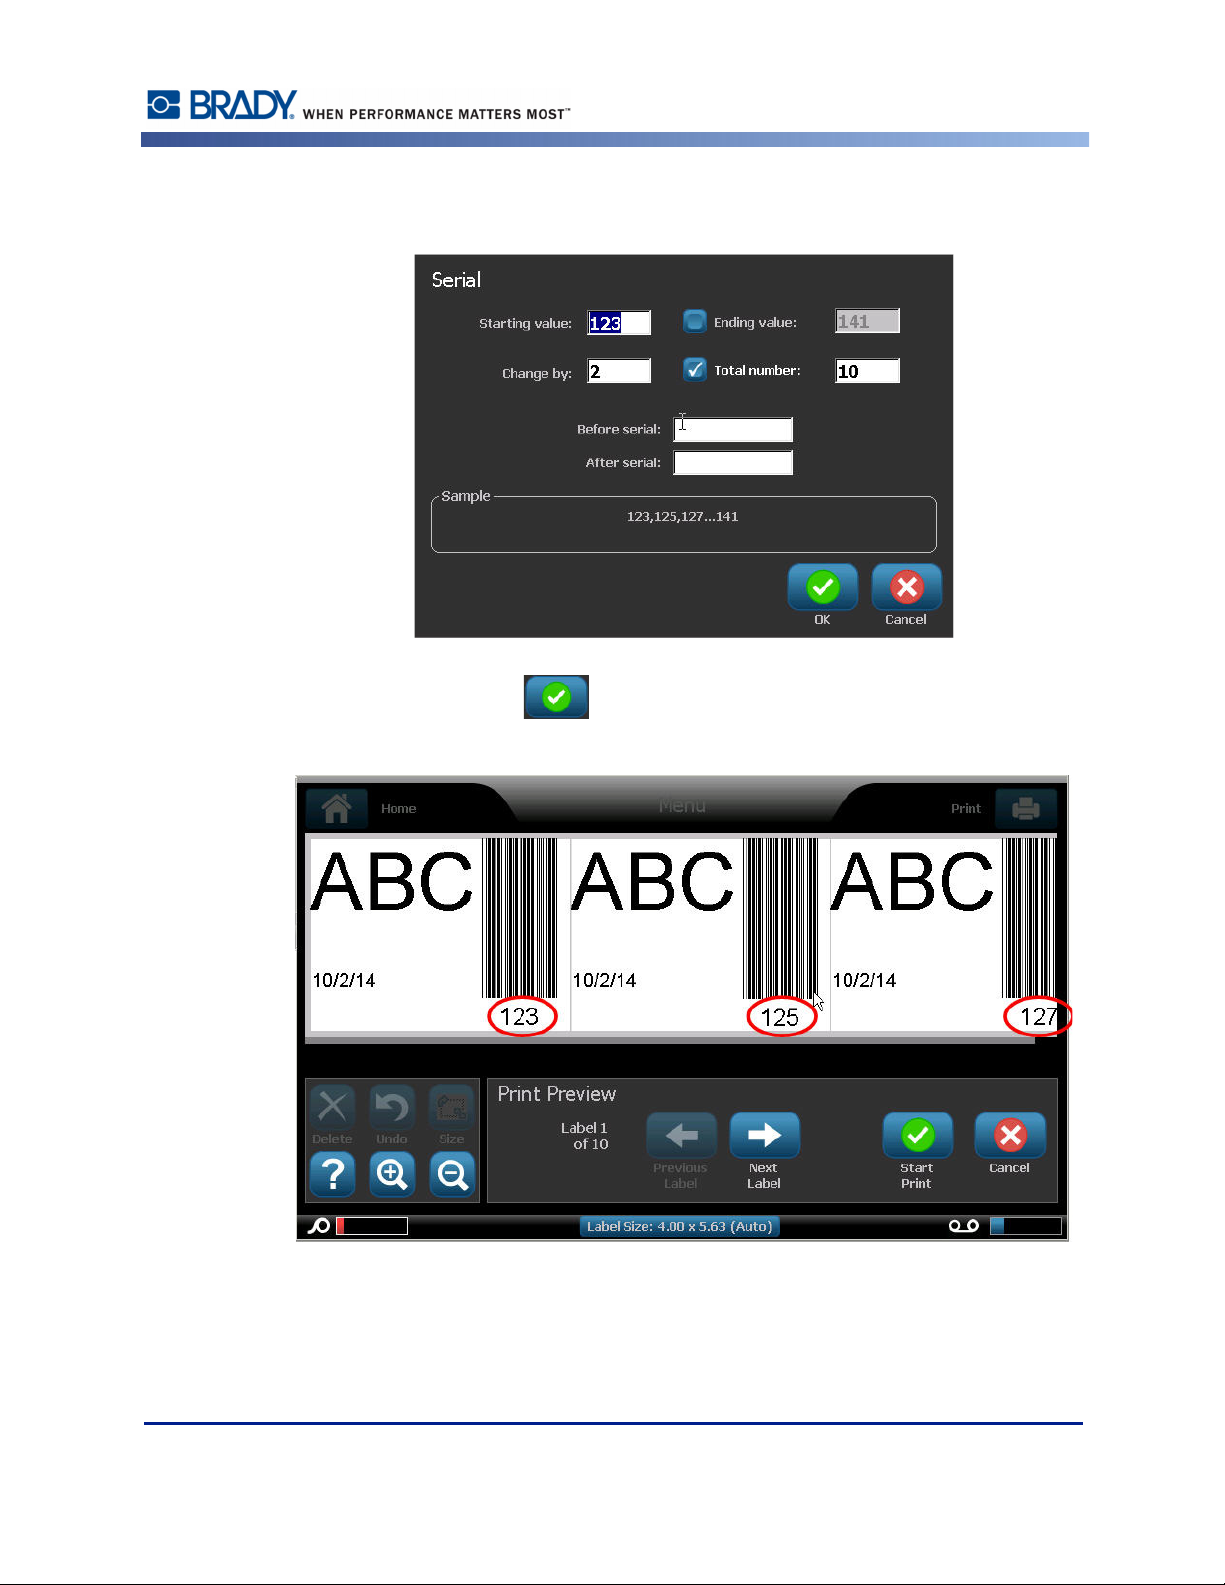
5. If Serial or Date/Time is selected, fill in the requested data.
Formatting a Label
6. When ready, touch OK .
The text or barcode object is converted to a serial element on the label.
Rev A 63 BBP®35/37 User’s Manual
Page 80

Formatting a Label
Convert from Serial Data
To change serial data to constant data:
1. In the Editor, touch the serialized text element or barcode element that you want converted
2. For a text element, touch More Options.
3. Touch Set Data Source .
4. In the Set Data Source dialog box, touch Constant .
If you are changing a barcode to constant data, the barcode dialog box opens. You are given
the option to change the data value. If you do not change the data value, it defaults to the value
shown in the Data value box.
to constant data.
OR
For a barcode, touch Change Barcode .
5. Touch OK .
The element changes to fixed (non-serialized) data.
Convert from Date/Time to Constant
To convert a date/time element to constant data:
1. Touch the date or time element.
2. Touch More Options, then touch Set Data Source .
3. Touch Constant .
The date/time is converted to editable data.
BBP®35/37 User’s Manual 64 Rev A
Page 81

Formatting a Label
Print/Cut
If using the BBP®37 printer, you have the ability to cut out the label text. The default is set to
Print, thereby printing the label text when the Print button is selected. To cut out text, using
printer model BBP
1. Touch the text element containing the text to cut.
2. In the Text Control Panel, above More Options, touch the left arrow to reach the
Print/Cut screen.
3. Touch Cut option box.
Weeding
Weeding affects printing and cutting multiple lines of text. When there are multiple lines of
text, weeding by line cuts out the letters and also cuts out a box for each line. Weeding by line
enables you to remove the background tape one line at a time. Weeding by object cuts out the
letters and cuts out a box surrounding all the letters. If Weeding is turned off, no box is cut.
®
37:
To access Weeding:
1. In the Control Panel, in More Options, touch Left to move to the Print/Cut screen.
2. Touch Cut Text option box.
3. Under Weeding, touch the desired weeding option (None, Line, Object) , ,
.
Refer to XY Cutting on page 97 for information on actually cutting out the text.
Note: To more accurately transfer the cut out text to the application surface, use
Brady Transfer Tape #76737.
Rev A 65 BBP®35/37 User’s Manual
Page 82

Formatting a Label
Barcode Object Element
A Barcode element represents a barcode graphic generated from user input. Barcodes are
generated following industry standard symbology. A typical barcode is composed of vertical
lines (bars) and spaces of varying thickness, depending on the text entered. It can also include
“human readable text.” Human readable text is the data entered that makes up the barcode.
Because you cannot read bars and spaces, you can have the actual text that makes up the
barcode display.
Barcode elements support vertical resizing (height) only. The width of the barcode is based on
data and symbology and cannot be changed. However, some barcode widths (depending on
symbology used) can be altered by changing the ratio and density of the bar code. (See
page 68 for information on ratio and density.)
Barcode data can be displayed in the same line as other data (text or symbols). It is not
necessary to have a separate area for the barcode. Barcode data on the same line as text will
not overwrite the text already on the line but will be placed next to it.
Like other object elements on the BBP
aligned, and rotated.
®
35/37 printer, barcode elements can be positioned,
Note: To get better quality barcode print outs, reduce the printer speed. (See Print
Speed on page 94.)
Add a Barcode
To add a barcode to a label:
1. Touch anywhere in the Editor.
OR, if you are already on a label:
Touch Add Object .
2. In Add Object control panel, touch Barcode .
BBP®35/37 User’s Manual 66 Rev A
Page 83

Formatting a Label
In the Barcode dialog box, under Symbology:
3. Touch the up/down arrows in the scroll bar to the right of the barcode symbology to access
more barcode types.
4. Touch the desired barcode type.
5. Touch the Data value: field and enter the data the barcode represents.
Note: If a typed character is invalid for the active symbology, the typed character
does not display. The cursor remains in the position (does not move forward) until a
valid character is entered.
6. Select OK .
Change Barcode
To change the type of barcode after the barcode is established:
1. In the Editor, touch the barcode element.
2. In the Barcode control panel, touch Change Barcode .
3. In the Barcode dialog box, touch the desired barcode type and change any of the barcode
data as necessary.
4. When ready, touch OK .
Size
Sizing the barcode affects only the height (vertical length) of the barcode, from top to bottom.
To increase or decrease the height of the barcode:
1. In the Editor, touch the barcode element.
2. In the Barcode control panel, touch Plus to increase the height, or touch Minus
to decrease the height.
Note: The font type and size affects the height of the barcode. The barcode and the
human readable text must fit in the frame of the barcode element. As the size of the
human readable text increases, it decreases the height of the barcode.
Rev A 67 BBP®35/37 User’s Manual
Page 84
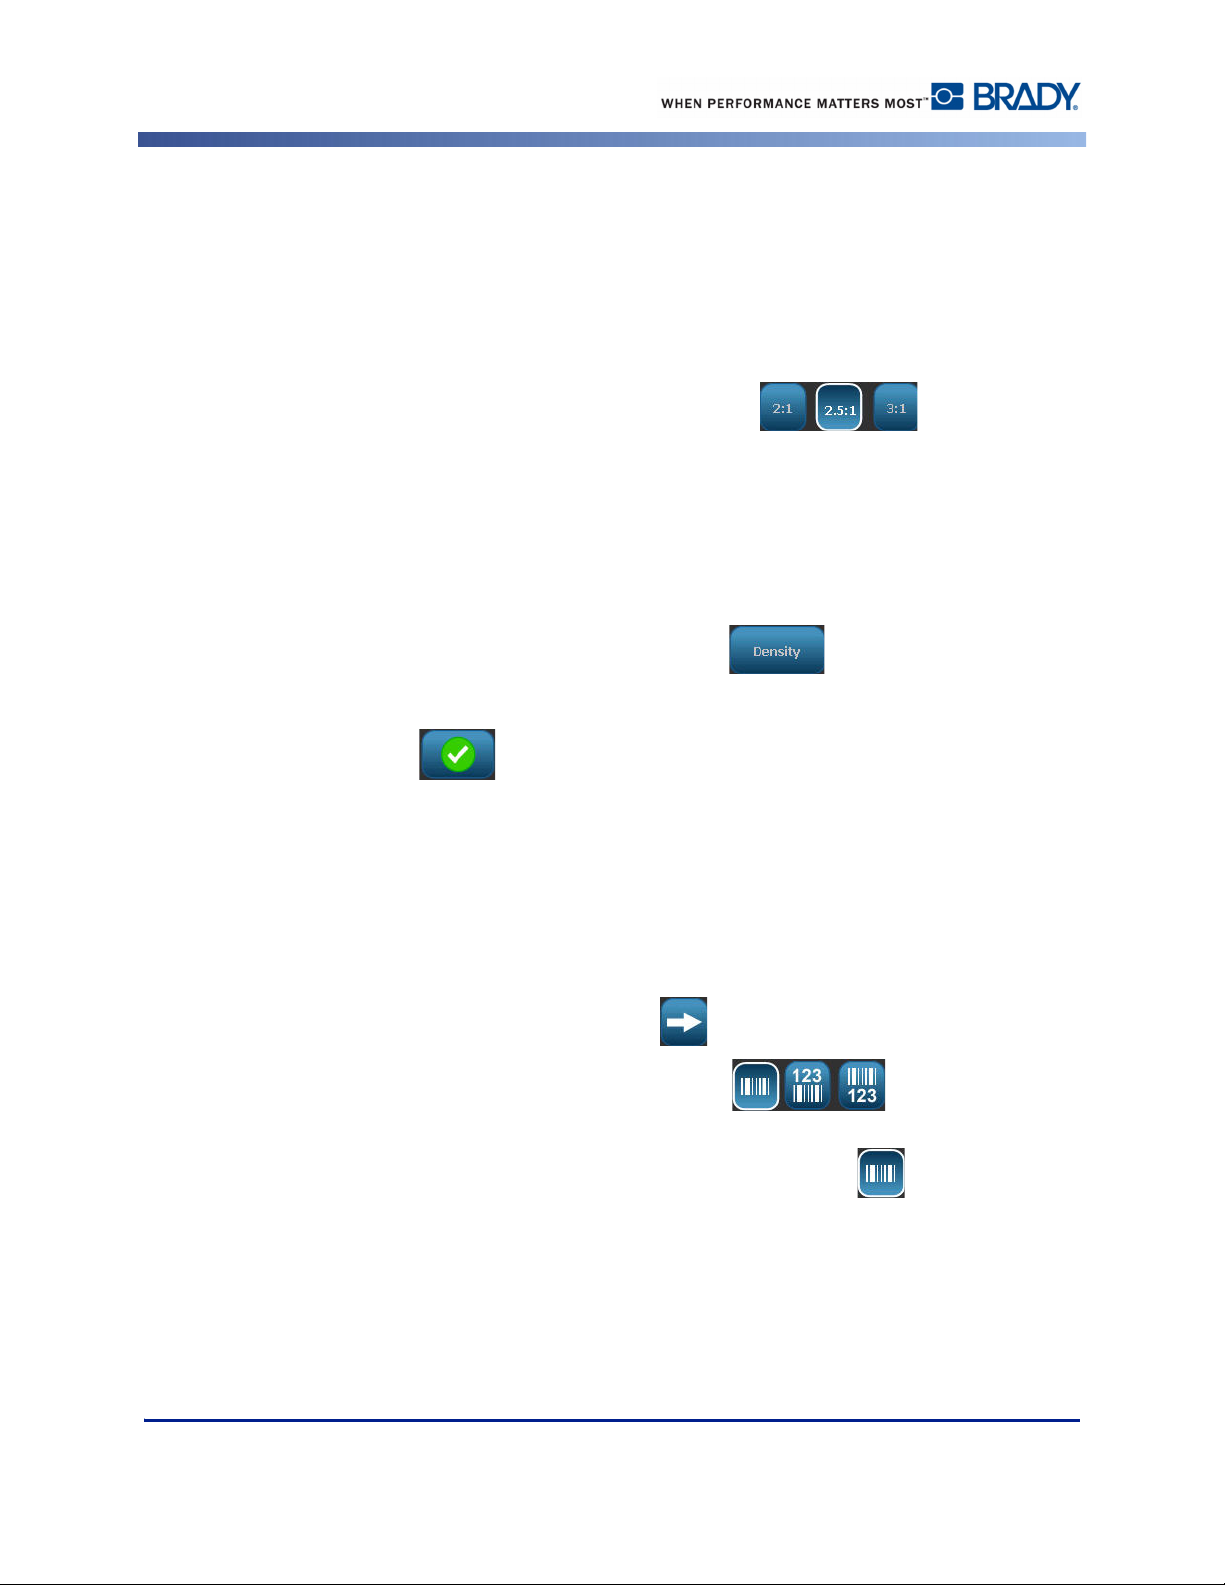
Formatting a Label
Ratio
Ratio indicates the ratio of bar height to symbol length. Not all barcode symbology allows you
to change the ratio. If you are using a symbology that does not support this option (i.e., QR
Code (2D) or PDF417 (2D), the Ratio buttons do not display. For those that do support it, to
change the ratio:
1. In the Editor, touch the barcode element.
2. In the Barcode control panel, touch the ratio button desired.
Density
The density refers to the thickness of the bars and spaces within a barcode. To change the
density:
1. In the Editor, touch the barcode element.
2. In the Barcode control panel, touch the Density button.
3. In the Density dialog box, touch the desired density button.
4. Touch OK .
Human Readable Text
Human readable text is the data entered that makes up the barcode. Because you cannot read
bars and spaces, you can display the actual text that makes up the barcode. To display Human
Readable Text:
1. In the Editor, touch the barcode element.
2. In More Options, touch the right arrow .
3. Next to Human Readable Text, touch the button that displays where
you want the human readable text to display (above the barcode or below).
4. If you do not want human readable text to display, touch None button.
BBP®35/37 User’s Manual 68 Rev A
Page 85

Formatting a Label
Font
To change the font of the human readable text:
1. In the Editor, touch the barcode element.
1. In More Options, touch the right arrow .
2. Under Human Readable Text, touch Font .
3. Under Available fonts, touch the up or down arrow in the scroll bar to display more fonts.
4. Touch the desired font.
5. Touch the Size: data field and enter the desired size of the font.
6. Touch the desired attribute to use (Bold, Italic, or Underline).
7. When finished, touch OK .
Check Digit
A check digit is used for error detection in a barcode. It consists of a single digit computed
from the other digits in the barcode. To include a check digit character in your barcode:
1. In the Editor, touch the barcode element.
2. In More Options, touch the right arrow .
3. Touch the Include check character option box to place a checkmark in the box.
4. To have the check character display with the barcode, check Readable check character
option box.
Note: The Readable check character option box is only available when the Include
check character option box is checked.
Rev A 69 BBP®35/37 User’s Manual
Page 86

Formatting a Label
Start/Stop Code
Most barcodes contain a Start and Stop code signifying, in a line of text, where the barcode
starts and ends. The most common Start and Stop code is an asterisk (*), although some
barcoes required an opening and closing parenthesis ( ). To view the start and stop code
currently assigned to your barcode symbology:
1. In the Editor, touch the barcode element.
2. In More Options, touch the right arrow .
3. Touch the Readable Start/Stop (*) option box to place a checkmark in the box.
The Start/Stop code displays with the readable text in the barcode element.
BBP®35/37 User’s Manual 70 Rev A
Page 87

Graphic Object Elements
Use the graphic object to place pictures, shapes, or signs on your label.
To add a graphic object element:
1. Touch anywhere in the Editor.
OR, if you are already in a label:
Touch Add Object .
2. In the Add Object control panel, touch Graphic .
3. In the Select Graphics dialog box, under Category, touch the category containing the
graphic you want to add.
4. In the displayed list of graphics, touch the desired graphic.
Formatting a Label
The graphic is added to the label.
Importing Graphics
You can also import your own graphics and use them just as you would use the graphics
included in the BBP
The imported graphics must be in the supported file format of Windows metafile (*.wmf) or a
monochrome bitmap (*.bmp). Windows metafile (*.wmf) formats are vector images that
maintain their clarity and crispness when they are resized. Bitmap files (*.bmp) are composed
of pixels which may appear fuzzy and become distorted when they are resized. You can also
import portable network graphics (*.png) and Joint Photographic [Experts] Group graphics
(*.jpg). Be sure to choose the correct format for the graphic you are using.
The maximum size for graphics that can be imported is 1 megapixel (the height x width of the
graphic = 1,000,000 pixels). Larger graphic files cannot be imported. If you get an “out-ofmemory” error when importing an image, it means the image is too large. Try resizing the
graphic on your PC to a smaller size, then import the graphic.
Note: Any paint program on your PC will indicate the image size when you open
the image file. Use that paint program to resize the image to fit the memory
requirements on the BBP®35/37 printer.
®
35/37 printer. You import graphics through the use of a USB flash drive.
You can also import colored graphics, however the color of an imported graphic cannot be
changed. The color picker feature is disabled when working with an imported colored graphic.
Rev A 71 BBP®35/37 User’s Manual
Page 88

Formatting a Label
To import graphics from a USB flash drive:
1. First, copy the graphics to import into the root directory of the USB flash drive.
2. Plug the flash drive into any available USB port on the printer.
3. On the printer, touch Menu .
4. Under System, touch Import .
5. Touch Graphics (if not already selected).
6. Under External USB:, touch the graphic file name that you want to import.
7. Touch Import .
The imported graphics display in the Imported: section.
8. When ready, touch OK .
BBP®35/37 User’s Manual 72 Rev A
Page 89

Formatting a Label
Delete Imported Graphics
Imported graphics that are no longer needed should be deleted. To delete an imported graphic:
1. On the printer, touch Menu .
2. Under System, touch Import .
3. In the Import dialog box, touch Graphics (if not already selected).
4. In the Imported: list, touch the graphic you want to delete.
5. Touch Delete .
A message displays requesting confirmation of the deletion.
6. Touch Yes to confirm the deletion.
The graphic is deleted from the Imported: list. It is NOT deleted from the USB flash drive.
7. Repeat Steps 4 through 6 to delete additional graphics.
8. When finished, touch OK .
Rev A 73 BBP®35/37 User’s Manual
Page 90

Formatting a Label
Cut-Out Shapes
Shapes and graphics can be added to your label. However, only the BBP®37 printer allows you
to cut out the shape. Shapes are added to your label through the Graphic Object. To add a
shape to your label:
1. Touch the Editor screen where you want the shape to be added.
2. In the Add Object control panel, touch Graphic .
3. On the Select Graphic dialog box, under Category, touch Shapes.
4. From the list under Shapes, touch the desired shape.
BBP®35/37 User’s Manual 74 Rev A
Page 91

Formatting a Label
The selected shape is displayed in the Editor. You can have the shape display as an outline or
have it filled in with color.
To fill in the shape:
1. In the control panel, touch Fill .
To change the color of the fill pattern:
2. Touch the color button , touch the desired color, then touch OK .
If you want to change from fill back to outline:
3. Touch Outline .
Be aware that changing back to outline format from a fill pattern leaves the outline in the color
that was previously selected for the fill. For instance, if you elected to fill the shape with the
color red, when reverting back to outline format, the outline displays in red.
®
Refer to XY Cutting (page 97) for information on cutting out the shape with the BBP
37
printer.
Rev A 75 BBP®35/37 User’s Manual
Page 92

Formatting a Label
Serial Object Elements
Serialization lets you create labels that contain number or letter sequences that print as
multiple labels at print time.
Serialization (or sequencing) automatically adds a series of sequential numbers or letters to the
printed labels. The Serial function consecutively places the next number or letter in the defined
sequence on individual labels. The number of labels created is defined by the sequence values
you enter. You can view the serialized labels before they print through the Print Preview
function. (See “Print Preview” on page 91 for more information.)
Serialization can be combined with other data on a label. Any data displayed on a label that
includes serialization will be repeated on every label along with the serial data.
How Serialization Works
Serialization is alphanumeric, with numbers from 0 to 9, and letters A-Z.
Note: You can incorporate serialized data into a barcode.
Serialization consists of a Start Value, End Value, and Increment (Change by). The Start Value
is the number, letter, or combination of numbers and letters that begin the serialization
sequence. The End Value is the termination point of the sequence.
The increment (Change by) is the value that is added to the previous number in the sequence to
produce the next sequence number. (You cannot have an increment value of 0.) For instance, a
start value of 1, an end value of 25, and an increment (Change by) of 4 would produce 1, 5, 9,
13, 17, 21, 25.
To add a serial object:
1. Touch anywhere in the Editor.
OR
If you are already in a label, touch Add Object .
2. In the Add Object control panel, touch Serial & Date/Time .
BBP®35/37 User’s Manual 76 Rev A
Page 93

Formatting a Label
3. In the Serial & Date/Time dialog box, touch either Serial Text or Serial Barcode,
depending on what you want to serialize.
Note: A serialized barcode places the serialized data in barcode format on the
label.
4. In the Serial dialog box, touch the Starting value: data field and enter the starting value of
the data to be serialized.
5. Touch the Change by: data field, and enter the increment by which you want the serialized
data to advance. You can use positive or negative values.
6. Touch the Ending value: option box, then enter the ending value of the serialized data in
the Ending value: data field.
OR
Touch the Total number: option box, then enter the total number of labels you desire.
Note: You can either enter the ending value or the total number of labels desired.
You can not use both. If you choose ending value, the system automatically
calculates how many labels to print to accommodate the entire serialization. The
total number of labels to be printed is reflected in the grayed out Total number
field. If Total number is used, the serialization progresses until the total number of
labels is reached.
Rev A 77 BBP®35/37 User’s Manual
Page 94

Formatting a Label
Serial data with ending value
(The number of labels to be generated is
reflected in the Total number field.)
Serial data with total number
(The data that will display on the last label
generated is reflected in the Ending value
field.)
If you want to add constant, uniform text before or after the serialized data, use Prefix (for text
displaying before the serialized characters) or Suffix (for text displaying after the serialized
characters). To add a Prefix and/or Suffix (you can use both):
7. Touch Before serial: data field, and enter the data that will display before the serialized
data.
AND/OR
Touch After serial: data field, and enter the data that will display after the serialized data.
8. When ready, touch OK .
BBP®35/37 User’s Manual 78 Rev A
Page 95

Formatting a Label
Date/Time Object Elements
The Date/Time object places a time stamp on the label, in text or barcode format. You can add
a date, time, or date and time combined.
To add a date/time object:
1. Touch anywhere in the Editor.
OR
If you are already in a label, touch Add Object .
2. In the Add Objects panel, touch Serial & Date/Time .
3. In the Serial & Date/Time dialog box, touch either Date/Time Text or Date/Time Barcode,
depending on how you want the date and time to display.
In the Date/Time dialog box, the default is to include the date AND the time (the Include date
and Include time option boxes are already selected. If you want ONLY the date or Only the
time:
4. Touch the option box of the item you DO NOT want on the label. This removes the
checkmark.
To include the date, under Date format:
5. Use the up/down arrows in the scroll bar to the right of the date formats to view different
date formats.
6. Touch the date format to include on the label.
Rev A 79 BBP®35/37 User’s Manual
Page 96

Formatting a Label
To include the Time, under Time format:
7. Touch the time format to include on the label.
8. Under Hour format, touch the clock format to use 12 hour or 24 hour.
So far you have just been able to select the date and time format. The system will stamp the
current date and/or time on the label in the formats you choose. However, to change the date
and/or time to something other than the current date and time, change the Clock Settings.
9. In the Date/Time dialog box, touch Clock Settings .
10. Follow the procedures on page 19 to change the date and time settings.
11. When finished changing the date and time settings, touch OK to exit the Clock
Settings dialog box.
12. Touch OK again to exit the Date/Time dialog box and place the date and/or time
on the label.
Note: When printed, the date/time value of each label will reflect the current date
and time when printing.
BBP®35/37 User’s Manual 80 Rev A
Page 97

File Management
A label can be saved as a file, to be opened and reused at a later date.
File Management
Figure 10 • File menu options
File Naming Standards
To create a file on the BBP®35/37 printer, the file must be given a name. Names can be any
length and consist of letters, numbers, and spaces.
When creating files, remember this rule: You cannot have two files with the same name, in the
same storage area (category). If you do, the most recent file with the name overwrites the
previous file with that name. A one-character difference in the name creates a different file and
will not overwrite a previous file.
Save
You can save a file internally on the BBP®35/37 printer or on an external device (such as a
thumb drive). The saved file retains the label data, data attributes, and alignment parameters.
This file is available for reuse whenever needed.
To save labels as a file:
1. Touch Menu .
2. Touch Save File .
Rev A 81 BBP®35/37 User’s Manual
Page 98

File Management
You have the option of saving files directly on your printer (Internal Memory) or on a
removable, external flash drive (External USB).
The printer defaults to Internal Memory. To save externally (on a USB flash drive):
3. Touch External USB .
Note: If storing externally, ensure the USB flash drive is plugged into a USB port.
For ease in locating files, create a directory system by placing the files into Categories. The
®
35/37 printer provides an initial category (My Labels), which is automatically selected
BBP
when you save a label. To create a new Category:
4. Touch New Category .
BBP®35/37 User’s Manual 82 Rev A
Page 99

File Management
5. In the Name: data field, enter a Category name, then touch OK .
The Category is automatically selected. To save a file in this Category, proceed to Step 7. To
save the label file in a different category from the one that is selected:
6. On the Save File screen, touch the Category in which the label should be saved.
7. In the File Name data field, enter a name for the label file, then touch OK .
If the name already exists, a message displays asking if you want to overwrite the previous file
with that name.
8. To overwrite, touch Replace .
OR, to remove the message from the screen and return to the file name entry box:
Touch No .
9. To enter a different file name repeat Step 7 above.
Rev A 83 BBP®35/37 User’s Manual
Page 100

File Management
New Label
When the file is saved, you are returned to the Editor screen with the saved file still displayed.
To start a new file:
1. Touch Home .
OR
Touch Menu , then touch New File
The previously saved label is removed from the Editor and a new label is started. If using a
Text object, the font and font attributes return to the defaults.
Note: If you start a new file by touching Home, the Editor defaults to a Text object
where you can immediately begin entering data from the keyboard. To use a
different object (i.e., graphic, barcode, etc.), touch the Editor screen, then touch the
desired object button in the control panel.
BBP®35/37 User’s Manual 84 Rev A
 Loading...