

Page 1
User’s Manual
Page 2

Copyright and Trademarks
Disclaimer
This manual is proprietary to Brady Worldwide, Inc. (hereafter "Brady"), and may
be revised from time to time without notice. Brady disclaims any understanding to
provide you with such revisions, if any.
This manual is copyrighted with all rights reserved. No portion of this manual m ay
be copied or reproduced by any means without the p rior written consent o f Brady.
While every precaution has been taken in the preparation of this docume nt, Brady
assumes no liability to any party for any loss or damage caused by errors or
omissions or by statements resulting from negligence, accident, or any other
cause. Brady further assumes no liability arising out of the application or use of
any product or system described, herein; nor any liability for incidental or
consequential damages arising from the use of this documen t. Brady disclaims all
warranties of merchantability of fitness for a particular purpose.
Brady reserves the right to make changes without further notice to any produ ct or
system described herein to improve reliability, function, or design.
Copyright and Trademarks
Trademarks
Trademarks
BBP™31 is a trademark of Brady Worldwide, Inc.
Microsoft, Windows, Excel, Access and SQL Server are registered trademarks of
Microsoft Corporation.
Lotus 1-2-3 is a registered trademark of Lotus Development Corporation.
All brand or product names referenced in this manual are trademarks (™) or
registered trademarks (
© 2010 Brady Corporation. All Rights Reserved.
Y1097081
Revision A
Brady Corporation
6555 West Good Hope Road
P.O. Box 2131
Milwaukee, WI 53201-2131
www.bradycorp.com
Sales/Customer Support:(800) 537-8791
®
) of their respective companies or organizations.
BBP™31 Sign & Label Printer
User Guide
iii
Page 3

End User License Agreement for Microsoft
Windows CE©
End User License Agreement for Microsoft
Windows CE
You have acquired a device that includes software licensed by Brady Worldwide,
Inc. from Microsoft Licensing or its affiliates (“MS”). Those installed software
products of Microsoft origin, as well as associated media, printed materials, and
“online” or electronic documentation (“SOFTWARE”) are protected by internatio nal
intellectual property laws and treaties. The SOFTWARE is licensed, not sold. All
rights reserved.
IF YOU DO NOT AGREE TO THIS END USER LICENSE AGREEMENT, DO
NOT USE THE DEVICE OR COPY THE SOFTWARE. INSTEAD, PROMPTLY
CONTACT BRADY WORLDWIDE, INC. FOR INSTRUCTIONS ON RETURN OF
THE UNUSED DEVICE FOR A REFUND. ANY USE OF THE SOFTWARE,
INCLUDING BUT NOT LIMITED TO USE ON THE DEVICE, WILL CONSTITUTE
YOUR AGREEMENT TO THIS END USER LICENSE AGREEMENT (OR
RATIFICATION OF ANY PREVIOUS CONSENT).
GRANT OF SOFTWARE LICENSE: This End User License Agree m en t gr an ts
you the following license:
©
You may use the SOFTWARE only on the DEVICE.
NOT FAULT TOLERANT. THE SOFTWARE IS NOT FAULT TOLERANT.
BRADY WORLDWIDE, INC. HAS INDEPENDENTLY DETERMINED HOW TO
USE THE SOFTWARE IN THE DEVICE, AND MS HAS RELIED UPON BRADY
WORLDWIDE, INC. TO CONDUCT SUFFICIENT TESTING TO DETERMINE
THAT THE SOFTWARE IS SUITABLE FOR SUCH USE.
NO WARRANTIES FOR THE SOFTWARE. The SOFTWARE is provided “as
is” and with all faults. THE ENTIRE RISK AS TO SATISFACTORY QUALITY,
PERFORMANCE, ACCURACY, AND EFFORT (INCLUDING LACK OF
NEGLIGENCE) IS WITH YOU. ALSO, THERE IS NO WARRANTY AGAINST
INTERFERENCE WITH YOUR ENJOYMENT OF THE SOFTWARE OR
AGAINST INFRINGEMENT. IF YOU HAVE RECEIVED ANY WARRANTIES
REGARDING THE DEVICE OR THE SOFTWARE, THOSE WARRANTIES DO
NOT ORIGINATE FROM, AND ARE NOT BINDING ON, MS.
Note on Java support. The SOFTWARE may contain support for programs
written in Java. Java technology is not fault tolerant and is not designed,
manufactured, or intended for use or resale as online control equipment in
hazardous environments requiring fail-safe performances, such as in the
operation of nuclear facilities, aircraft navigation or communication systems, air
traffic control, direct life support machines, or weapons systems, in which the
failure of Java technology could lead directly to death, personal injury, or severe
physical or environmental damage. Sun Microsystems, Inc. has contractually
obligated MS to make this disclaimer.
iv BBP™31 Sign & Label Printer
User Guide
Page 4

Brady Warranty
Trademarks
No Liability for Certain Damages. EXCEPT AS PROHIBITED BY LAW, MS
SHALL HAVE NO LIABILITY FOR ANY INDIRECT, SPECIAL,
CONSEQUENTIAL OR INCIDENTAL DAMAGES ARISING FROM OR IN
CONNECTION WITH THE USE OR PERFORMANCE OF THE SOFTWARE.
THIS LIMITATION SHALL APPLY EVEN IF ANY REMEDY FAILS OF ITS
ESSENTIAL PURPOSE. IN NO EVENT SHALL MS BE LIABLE FOR ANY
AMOUNT IN EXCESS OF U.S. TWO HUNDRED FIFTY DOLLARS
(U.S.$250.00).
Limitations on Reverse Engineering, Decompilation, and Disassembly. You
may not reverse engineer, decompile, or disassemble the SOFTWARE, except
and only to the extent that such activity is expressly permitted by applicable law
not withstanding this limitation.
SOFTWARE TRANSFER ALLOWED BUT WITH RESTRICTIONS. You may
permanently transfer rights under this End User License Agreement only as part
of a permanent sale or transfer of the Device, and only if the recipient agrees to
this End User License Agreement. If the SOFTWARE is an upgrade, any transfer
must also include all prior versions of the SOFTWARE.
EXPORT RESTRICTIONS. You acknowledge that SOFTWARE is of US-origin.
You agree to comply with all applicable international and national laws that apply
to the SOFTWARE, including the U.S. Export Administration Regulations, as well
as end-user, end-use, and country destination restrictions issued by U.S. and
other governments. For additional information on exporting the SOFTWARE, see
http://www.microsoft.com/exporting/.
Brady Warranty
Our products are sold with the understanding that the buyer will test them in actual
use and determine for him or herself their adaptability to his/her intended uses.
Brady warrants to the buyer that its products are free from defects in materia l and
workmanship, but limits its obligation under this warranty to replacement of the
product shown to Brady’s satisfaction to have been defective at the time Brady
sold it. This warranty does not extend to any persons obtaining the product from
the buyer.
THIS WARRANTY IS IN LIEU OF ANY OTHER WARRANTY, EXPRESS OR
IMPLIED, INCLUDING, BUT NOT LIMITED TO, ANY IMPLIED WARRANTY OF
MERCHANTABILITY OR FITNESS FOR A PARTICULAR PURPOSE, AND OF
ANY OTHER OBLIGATIONS OR LIABILITY ON BRADY’S PART. UNDER NO
CIRCUMSTANCES WILL BRADY BE LIABLE FOR ANY LOSS, DAMAGE,
EXPENSE OR CONSEQUENTIAL DAMAGES OF ANY KIND ARISING IN
CONNECTION WITH THE USE, OR INABILITY TO USE, BRADY’S PRODUCTS.
BBP™31 Sign & Label Printer
User Guide
v
Page 5

Agency Compliance and Approvals
Europe
Agency Compliance and Approvals
United States
FCC Notice-US Only
Warning: This equipment generates, uses and can radiate radio frequency
energy. If not installed and used in accordance with the manufacturer’s
instructions, it may cause interference to radio communications. It has been tested
and found to comply with the limits for a Class A computing device pursuant to
Subpart B of Part 15 of the FCC rules, which are designed to provide reasonable
protection against interference when operating in a commercial environmen t.
Operation of this equipment in a residential area is likely to cause interference, in
which case required corrective measures will be at the owner’s expense.The user
is cautioned that any changes or modifications not expressly approved by Brady
Worldwide, Inc. could void the user’s authority to use the equipment.
Canada
ICES-003 Class A Notice, Classe A
This Class A digital apparatus meets all requirements of the Canadian
Interference-Causing Equipment Regulations.
Cet appareil numerique de la classe A respecte toutes les exigences du
Reglement sur le material broilleur du Canada.
Europe
Warning – This is a Class A product. In a domestic environment this product may
cause radio interference, in which case the user may be requir ed to take adequate
measures.
Waste Electrical and Electronic Equipment Directive
In accordance with the European WEEE Directive, this device must be recycled in
the European Union country in which it was purchased.
RoHS Directive 2002/95/EC
This statement clarifies Brady’s product compliance with the European Union’s
Directive 2002/95/EC, Restriction of Hazardous Substances
vi BBP™31 Sign & Label Printer
User Guide
Page 6

Safety and Environment
Please read and understand this manual before using the BBP™31 Sign & Label
Printer for the first time. This manual describes all of the main functions of the
BBP™31 printer.
Precautions
Safety and Environment
Precautions
Before using the BBP™31
• Read all instructions carefully before operating the printer and prior to
performing any procedure.
• Do not place the unit on an unstable surface or stand.
• Do not place anything on top of the unit.
• Keep the top clear of obstructions.
• Always use the printer in a well ventilated area. Do not block the slots and
opening on the unit, which are provided for ventilation.
• Only use the power source indicated on the rating label.
• Use only the power cord that comes with the unit.
• Do not place anything on the power cord.
printer
, please note the following precautions:
BBP™31 Sign & Label Printer
User Guide
vii
Page 7

Technical Support and Registration
Repair and Return
Technical Support and Registration
Contact Information
For repair or technical assistance, locate your regional Brady Technical Support
office by going to:
•
Americas
•
Europe
•
Asia Pacific
Registration Information
To register your printer, go to www.bradycorp.com/register.
Repair and Return
If for any reason you need to return the BBP™31 printer for repair, please contact
Brady Technical Support for repair and replacement information.
:
www.bradyid.com
:
www.bradyeurope.com
:
www.bradycorp.com
viii BBP™31 Sign & Label Printer
User Guide
Page 8

Overview
About this Document
The purpose of this guide is to provide information and instructions on using the
BBP™31 Sign & Label Printer.
Conventions
When using this document, it is important that you understand the conventions
used throughout the manual.
• All User actions are indicated by Bold text.
• References to Menus, dialog boxes, button and screens are ind icated by Italics
text.
• See
“About Menus, Dialog Boxes and Screens” on p age 1-4
the menus and controls.
Overview
Conventions
for a description of
BBP™31 Sign & Label Printer
User Guide
ix
Page 9

Contents
1 - Introduction
Contents
Copyright and Trademarks ......................................................................................iii
End User License Agreement for Microsoft Windows CE©...................................iv
Brady Warranty ...........................................................................................................v
Agency Compliance and Approvals.........................................................................vi
Safety and Environment...........................................................................................vii
Technical Support and Registration ......................................................................viii
Overview.....................................................................................................................ix
Features and Functions ......................................................................................... 1-1
Compatible Applications........................................................................................ 1-2
System Specifications............................................................................................ 1-2
Keyboard Configurations....................................................................................... 1-3
About Menus, Dialog Boxes and Screens............................................................ 1-4
Home Page ....................................................................................................... 1-4
Tools Panel ....................................................................................................... 1-5
Menu ................................................................................................................. 1-6
Control Panel ....................................................................................................1-7
Button Actions ........................................................................................................ 1-8
Available Label Types ............................................................................................ 1-9
2 - Setting up Your Printer
Unpacking and Setting up Printer......................................................................... 2-1
What’s in the Box .............................................................................................. 2-1
System Components ......................................................................................... 2-2
Setting up the Printer ........................................................................................2-3
Connect Printer Power................................................................................ 2-3
Install or Change Supplies ..........................................................................2-4
Feeding and Cutting Label Stock ...................................................................... 2-8
System Power ......................................................................................................... 2-9
Starting Printer from a Non-powered (Cold) State ............................................ 2-9
Waking the Printer from Sleep Mode ................................................................ 2-9
Powering Off the Printer .................................................................................. 2-10
Resetting the Printer .......................................................................................2-10
Creating Your First Label..................................................................................... 2-11
Using Your Printer with a PC............................................................................... 2-12
Installing USB Driver ....................................................................................... 2-12
Creating and Printing Labels from a PC .......................................................... 2-12
BBP™31
Sign & Label Printer
User Guide
xi
Page 10

Contents
Setting up the System Defaults ........................................................................... 2-13
Set Clock...................................................................................................2-14
Localization and Unit of Measure..............................................................2-15
Set Text Defaults.......................................................................................2-16
Set Barcode Defaults.................................................................................2-17
Set Printing................................................................................................2-18
Customizing Home Page Defaults....................................................................... 2-19
Displaying System Information............................................................................2-20
3 - Working with Labels
Create Labels........................................................................................................... 3-1
Creating a Label from a Template .....................................................................3-1
Creating a Custom Label ...................................................................................3-3
Set Label Attributes ................................................................................................3-4
Creating Fixed-Length Label .............................................................................3-4
Creating Auto-Sized Label ................................................................................3-4
Orientation ......................................................................................................... 3-5
Framing a Label ................................................................................................3-6
Tools......................................................................................................................... 3-7
Zooming the Label View ....................................................................................3-7
Scrolling the Label View ....................................................................................3-7
4 - Working with Objects
Overview .................................................................................................................. 4-1
What is an Object? ............................................................................................4-1
Object Types .....................................................................................................4-1
Undo .................................................................................................................. 4-2
Object Sizing .....................................................................................................4-2
Adding Objects........................................................................................................ 4-3
Text Objects ......................................................................................................4-3
Graphic Objects .................................................................................................4-4
Barcode Objects ................................................................................................4-5
Serial Objects ....................................................................................................4-6
Date/Time Objects .............................................................................................4-8
Working with Text .................................................................................................4-10
Selecting or Deselecting Text ..........................................................................4-10
Increase or Decrease Text Size ......................................................................4-11
Delete/Clear Text ............................................................................................4-11
Changing Character Font, Size or Style ..........................................................4-12
Horizontal Text Justification ............................................................................4-14
Vertical Text ....................................................................................................4-14
Expanding or Condensing Text .......................................................................4-15
Reversing Text ................................................................................................4-15
Typing Text and Accented Characters ............................................................4-16
Understanding Keystroke Combinations ...................................................4-16
Typing Accented Characters.....................................................................4-17
Entering Special Characters ............................................................................4-18
xii BBP™31 Sign & Label Printer
User Guide
Page 11

Contents
Working with Barcodes........................................................................................ 4-19
Changing a Barcode .......................................................................................4-19
Changing Barcode Options ............................................................................. 4-20
Barcode Size............................................................................................. 4-20
Barcode Ratio ........................................................................................... 4-20
Barcode Density........................................................................................ 4-21
Human-Readable Text Options................................................................. 4-22
Handling Objects .................................................................................................. 4-23
Editing Objects ................................................................................................ 4-23
Moving Objects ...............................................................................................4-23
Drag Objects .............................................................................................4-23
Use Keyboard Arrow Keys........................................................................ 4-23
Set Object Position.................................................................................... 4-24
Aligning Objects .............................................................................................. 4-25
Sizing Objects ................................................................................................. 4-26
Use Size Buttons....................................................................................... 4-26
Drag Objects to Size .................................................................................4-27
Set Object Size ......................................................................................... 4-28
Deleting an Object ........................................................................................... 4-29
Framing an Object ........................................................................................... 4-29
Rotating an Object ..........................................................................................4-30
Converting Text or Barcode to Variable Data .................................................4-31
Convert to Serial Data............................................................................... 4-31
Convert from Serial Data........................................................................... 4-33
Convert to Date/Time................................................................................ 4-34
Convert from Date/Time .................................................................................. 4-35
5 - Printing Your Labels
Previewing Labels................................................................................................... 5-1
Previewing a Label without Serialized Objects .................................................5-1
Previewing a Label with Serialized Objects ......................................................5-2
Printing Labels........................................................................................................ 5-3
Printing Labels without Serialized Objects ........................................................ 5-3
Printing Labels with Serialized Objects ............................................................. 5-4
Printing Mirror-Image Labels ............................................................................. 5-5
Canceling a Print Job ........................................................................................ 5-5
Resuming an Interrupted Print Job ...................................................................5-6
Adjusting Print Energy ....................................................................................... 5-7
Adjusting Print Offset ........................................................................................5-8
Printing from a PC ............................................................................................. 5-9
6 - Working with Label Files
Save a Label File..................................................................................................... 6-1
Open a Label File .................................................................................................... 6-2
Delete a Label File................................................................................................... 6-3
BBP™31
Sign & Label Printer
User Guide
xiii
Page 12

Contents
7 - Using System Tools
Import Graphics ......................................................................................................7-1
Delete Imported Graphics.......................................................................................7-3
Import Fonts ............................................................................................................7-4
Printer Upgrades ..................................................................................................... 7-5
Installing Software Upgrades................................................................................. 7-5
Upgrade from a PC ...........................................................................................7-5
Upgrade from USB Flash Drive..........................................................................7-6
8 - Maintenance
Printer Maintenance................................................................................................ 8-1
Removing Power and Media from Printer .........................................................8-1
Cleaning the Printer ...........................................................................................8-3
Cleaning Residue from Printer and Keyboard.............................................8-3
Cleaning the Touch Screen.........................................................................8-4
Cleaning the Cutter Blade ...........................................................................8-5
Cleaning the Sensors..................................................................................8-7
Cleaning the Cutter Blade Exit Area............................................................8-8
Dust Cleaning..............................................................................................8-9
Cleaning the Printhead..............................................................................8-10
Replacing the Media Wiper .............................................................................8-11
Clearing Jams .................................................................................................8-12
9 - Troubleshooting
Messages ................................................................................................................9-1
Problem Resolution ...............................................................................................9-2
Hardware Errors ................................................................................................9-2
Media Errors .....................................................................................................9-3
Ribbon Errors ...................................................................................................9-3
Power Errors ....................................................................................................9-4
Printing Errors ...................................................................................................9-5
A - Glossary of Terms
B - Character Mapping & Keyboard Layouts
Character Mapping................................................................................................. B-1
Americas QWERTY ..........................................................................................B-1
European AZERTY ...........................................................................................B-2
European QWERTZ .........................................................................................B-3
European QWERTY .........................................................................................B-4
European Cyrillic ..............................................................................................B-4
Keyboard Layouts.................................................................................................. B-4
xiv BBP™31 Sign & Label Printer
User Guide
Page 13

C - Specialty Label Types
Pipe Markers............................................................................................................C-1
Set Up Pipe Marker Options .............................................................................C-1
Create Pipe Marker Labels ...............................................................................C-3
Save, Open or Delete a Pipe Marker Label ....................................................C-10
QuickLabels...........................................................................................................C-11
Creating Quick Labels .....................................................................................C-11
Quick Label Reference Images............................................................................C-13
Admittance, Exit, Confined Spaces .................................................................C-13
Alerts and First Aid ..........................................................................................C-14
Chemical - Hazardous Materials .....................................................................C-14
Conduit - Voltage ............................................................................................C-15
Electrical Hazard - Lockout .............................................................................C-15
Fire ..................................................................................................................C-16
Funny Signs ....................................................................................................C-16
Graphics - Mandatory ......................................................................................C-17
Graphics - Packaging ......................................................................................C-18
Graphics - PPE ...............................................................................................C-18
Graphics - Prohibition ......................................................................................C-19
Graphics - Signal Words .................................................................................C-20
Graphics - Warning .........................................................................................C-21
Inspection ........................................................................................................C-21
Machine - Operational .....................................................................................C-22
No Smoking .....................................................................................................C-22
Pipe Marker Arrows .........................................................................................C-22
Pipe Markers ...................................................................................................C-23
Protective ........................................................................................................C-25
Warning Stakes ...............................................................................................C-25
Right to Know........................................................................................................C-26
Arc Flash................................................................................................................C-26
WHMIS....................................................................................................................C-26
Contents
BBP™31
D - Material Ribbon Cross Reference
Sign & Label Printer
User Guide
xv
Page 14

1 Introduction
Thank you for purchasing the BBP™31 Sign & Label Printer, which yo u can use to create
and print professional-looking industrial labels and signs. All you have to do is:
• Drop in a ribbon cartridge. You can choose from a wide range of single-color ribbons.
• Drop in a media cartridge. You can choose media in widths that range from 0.5 in. to 4
in (12.7 mm to 101.6 mm), and come in many colors, styles, and materials.
• Type your text and insert objects or symbols of your choice; or choose a preformatted
layout design.
Material and ribbons from Brady Corporation are programmed with the ability to
communicate with the printer and software. This allows you to gain the full benefit of the
system,
Features and Functions
The following are just some of the features that make this system so easy to use and
ready to meet your label-making requirements:
BBP™31 Sign & Label Printer
• Small, lightweight (approximately 15 lbs [6.8 kg]) unit, ready for your desktop.
• Color touch screen LCD display, plus keyboard input for ease of use.
• Pre-designed layouts for many standard-use label applications.
• Hundreds of graphics for inclusion on your labels.
• Single-color job printing at 300 DPI, up to 4 in. (101.6 mm) wide and up to
9.8 ft. (3 m) long.
• Wide variety of ribbon colors.
• Easy loading label and ribbon supplies.
• Continuous and die-cut label supplies in a variety of high-performance materials.
• Transfer graphics from PC or USB flash drive. Supported graphic format s are Windows
metafile (*.wmf) and Bitmap (*.bmp).
• Print labels from PC.
• Automatic cutter.
User Guide
1-1
Page 15

Compatible Applications
Compatible Applications
The BBP™31 Sign & Label Printer is compatible with the following software
applications (when connected to a PC):
When used with one of these software packages, the printer will automatically
recognize all enabled and compatible materials up to 4 in. (101.6 mm) wide. For
operation of the printer with other software, refer to the documentation for your
application.
Note: Only BBP31™ supplies will work with this printer.
•
LOCKOUT-PRO™
•
CHEMLABEL™
•
NetDoc
•
MarkWare
• MarkWare™ EXPRESS Facility Identification Software
Cable Management Software System
™
Graphical Procedure Writing Software
Software
Tape and Label Software
System Specifications
•
Weight
•
Dimensions
•
Operating Temperature
•
Relative Humidity
•
Storage
•
Volta g e
Print Resolution
•
•
Output media size
•
Maximum label length
: 15 lbs (6.8 kg)
(stored): 8.9 in. x 12.0 in. x 9.5 in. (22.6 cm x 30.5 cm x 24.1 cm)
: 50 - 104°F (10-40°C)
: 10% to 80% RH non-condensing
: -4 to 122°F (-20 to 50°C) at 15% to 90% RH non-condensing
: 90 to 264 VAC, 47 to 63 Hz
: 11.8 dot/mm, 300 dpi
: 0.5 in. to 4 in. (12.7 mm to 101.6 mm)
(continuous media): 9.8 ft (3 m)
1-2 BBP™31 Sign & Label Printer
User Guide
Page 16
Keyboard Configurations
Your keyboard configuration depends on the region where you do business. The
following are the currently supported keyboard configurations.
There are five keypad configurations available for the BBP™31 Sign & Label
Printer. The keypad layouts and the language supported by each are as follows:
Keyboard Type Language Applied
Americas QWERTY North American Spanish, French Canadian,
Portuguese, English
QWERTY English, Danish, Finnish, Italian, Dutch, Norwegian,
Polish, Portuguese, Romanian, Spanish, Swedish
AZERTY English, French, Dutch
QWERTZ English, Czech, German, Hungarian, Slovakian,
Slovenian, French, Italian
Cyrillic English, Bulgarian, Russian
Asia English, Simplified Chinese, Traditional Chinese,
Japanese, Korean
Keyboard Configurations
See “Typing Text and Accented Characters” on page 4-16 for instructions on how
to access all of the keyboard characters.
BBP™31 Sign & Label Printer
User Guide
1-3
Page 17
About Menus, Dialog Boxes and Screens
4
5
6
3
2
7
1
Home Page
About Menus, Dialog Boxes and Screens
The following information describes the menus, d ialog bo xe s and scr ee ns used in
the BBP™31 Sign & Label Printer system.
Home Page
The Home page automatically displays when you first start the printer. The main
sections of the Home page are:
Item
#
1
2
3
4
5
6
7
Icon Description
Status Bar
Tools Panel
Editor
Control Panel
Shows the current label size and indicators for the amount of
media and ribbon remaining.
Depending on the option selected, provides buttons for
Object Sizing, Delete, Undo, Zoom In/Out, and Help.
Text or object entry area. Type, touch or select objects to
display and edit in this area. Shows color of installed media
and ribbon.
Home
: Returns you to the Home page from anywhere in the
application. Button is greyed out on the Home page.
Menu
: Displays File, Label and System options.
Print
: Displays the Print dialog box where you can choose
options for printing the current label. Not available unless an
object is in the Editor.
Primary area for selecting all of your options for creating,
editing and working with labels and objects. The panel
changes depending on what option is selected.
1-4 BBP™31 Sign & Label Printer
User Guide
Page 18
Tools Panel
The Tools panel contains options for editing a label. If no label is selected, the
panel contains only the Help button.
Undo is available only when there is an operation to undo. Delete and Size are
available only when you have an object selected. Help, Zoom In and Zoom Out
buttons are always available.
About Menus, Dialog Boxes and Screens
Tools Panel
The Tools panel contains the following options:
Icon Description
Delete: Deletes the selected object (text, barcode or graphic).
Undo: Lets you undo a limited number of actions. If there is no undo
action available, the undo button is greyed out. There is no redo option
available.
Size: Toggles the display of sizing handles so you can change the size or
rotation of the selected object.
Help: Context sensitive help that displays information about the selected
item or area on the menu. See the User’s Manual for additional
information about Help topics.
Zoom In: Lets you increase the view of the object(s) on the label. Scroll
arrows appear if the objects are zoomed larger than the available display
area.
Zoom Out: Lets you decrease the view of the object(s) on the label.
BBP™31 Sign & Label Printer
User Guide
1-5
Page 19
About Menus, Dialog Boxes and Screens
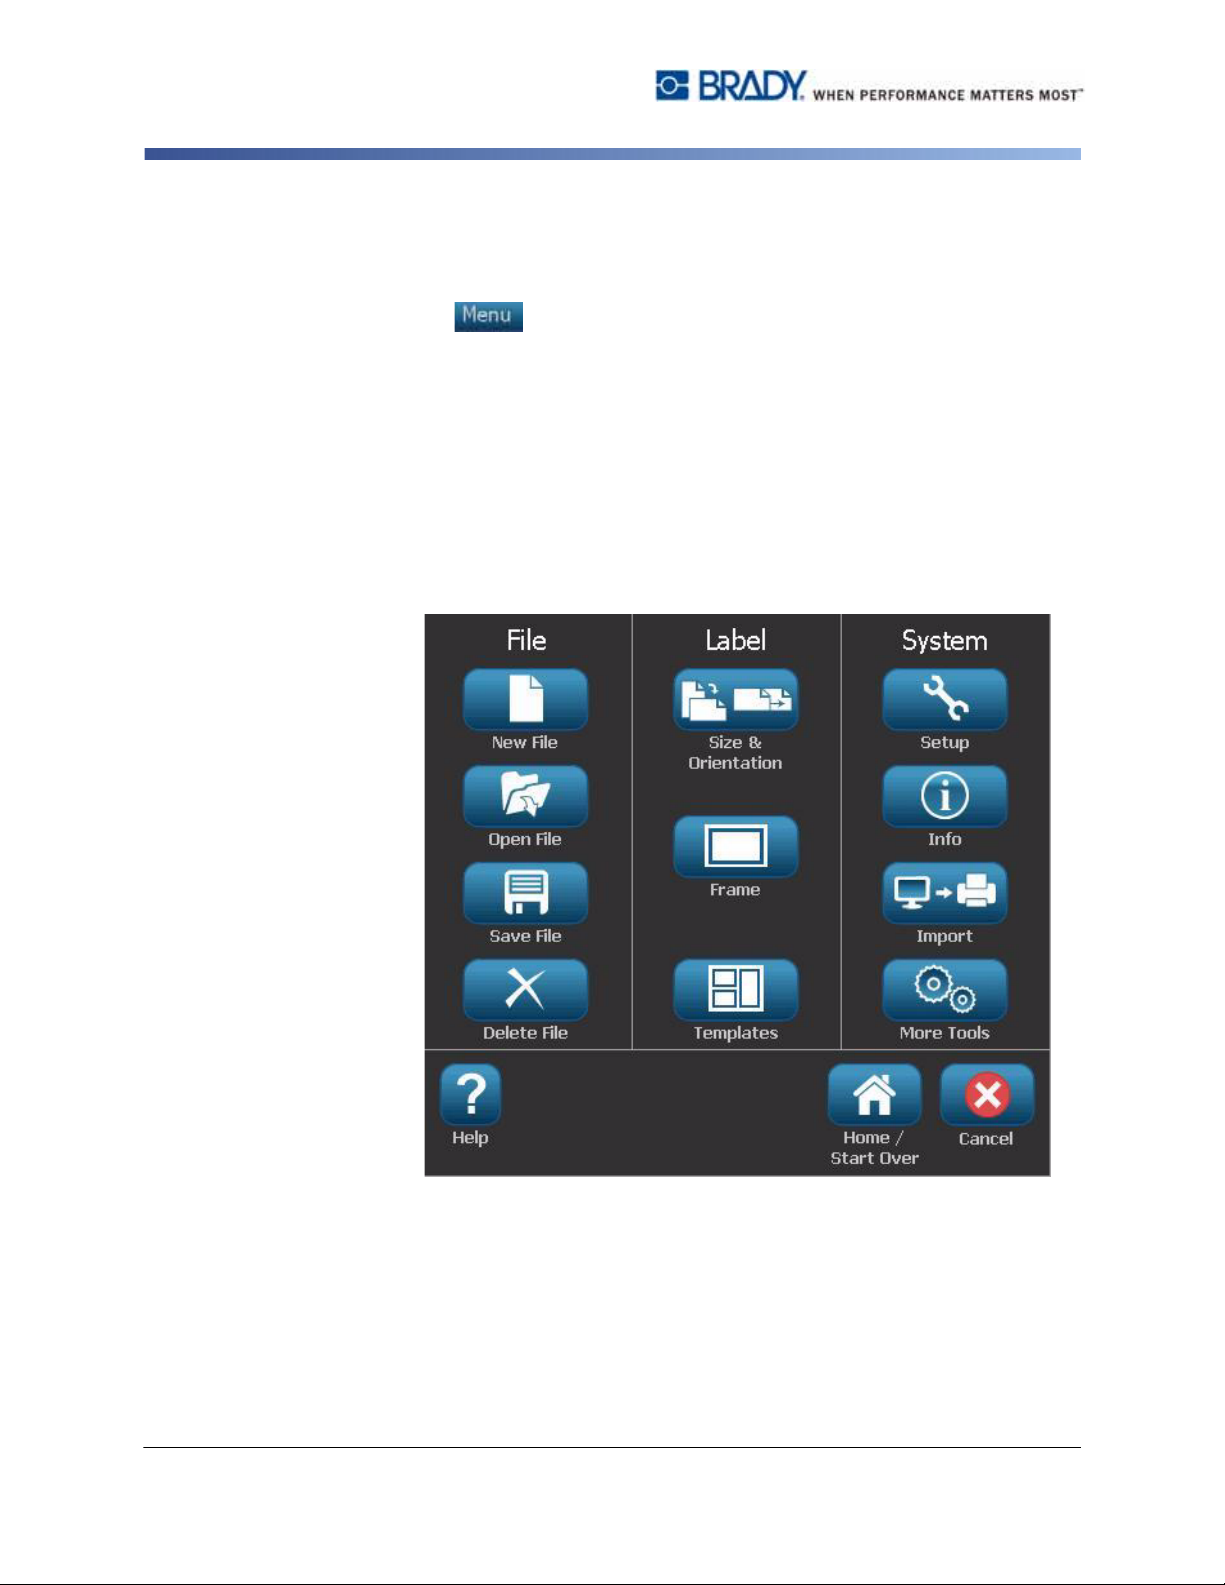
Menu
Menu
To display menu options:
1. Touch to display the menu options.
2. Choose from the following areas:
•
File
: Create new file, open existing file, save a file or delete a file.
•
Label
: Change the size and orientation, add a frame around the label, or
choose a template.
•
System
import data, or get more tools.
•
Help
•
Home/Start Over
•
Cancel
: Set up the printer, view printer information (e.g., software version),
: Displays help for the options listed on the menu.
: Cancels the current action and returns you to the previous location.
: Returns you to the
Home
page.
1-6 BBP™31 Sign & Label Printer
User Guide
Page 20
Control Panel
The Control Panel provides options specific to the object selected or the function
being performed.
Home Page Control Panel
From the Home page, the control panel provides options for selecting available
label types (e.g., Pipe Markers, Right-to-Know, etc.). These label types provide a
starting point for creating your label. Depending on the label type you select, the
options for populating the objects will vary.
Add Object Panel
About Menus, Dialog Boxes and Screens
Control Panel
The Add Object control panel provides options for adding additional objects (e.g.,
text, graphic, etc.). Once selected, the options available for that object type
display. This control panel is accessed when you press Add Object from other
panels, touching a blank part of the label or touching the home screen label area.
With an Object Selected
With an object selected, the control panel provides options for editing the object.
From this panel, you can also add more objects or see more editing options. The
panel changes depending on the type of object selected.
The following example shows one of the text-editing panels. Pressing one of the
options in the panel either immediately changes the option or provides additional
options that you can select.
BBP™31 Sign & Label Printer
User Guide
1-7
Page 21
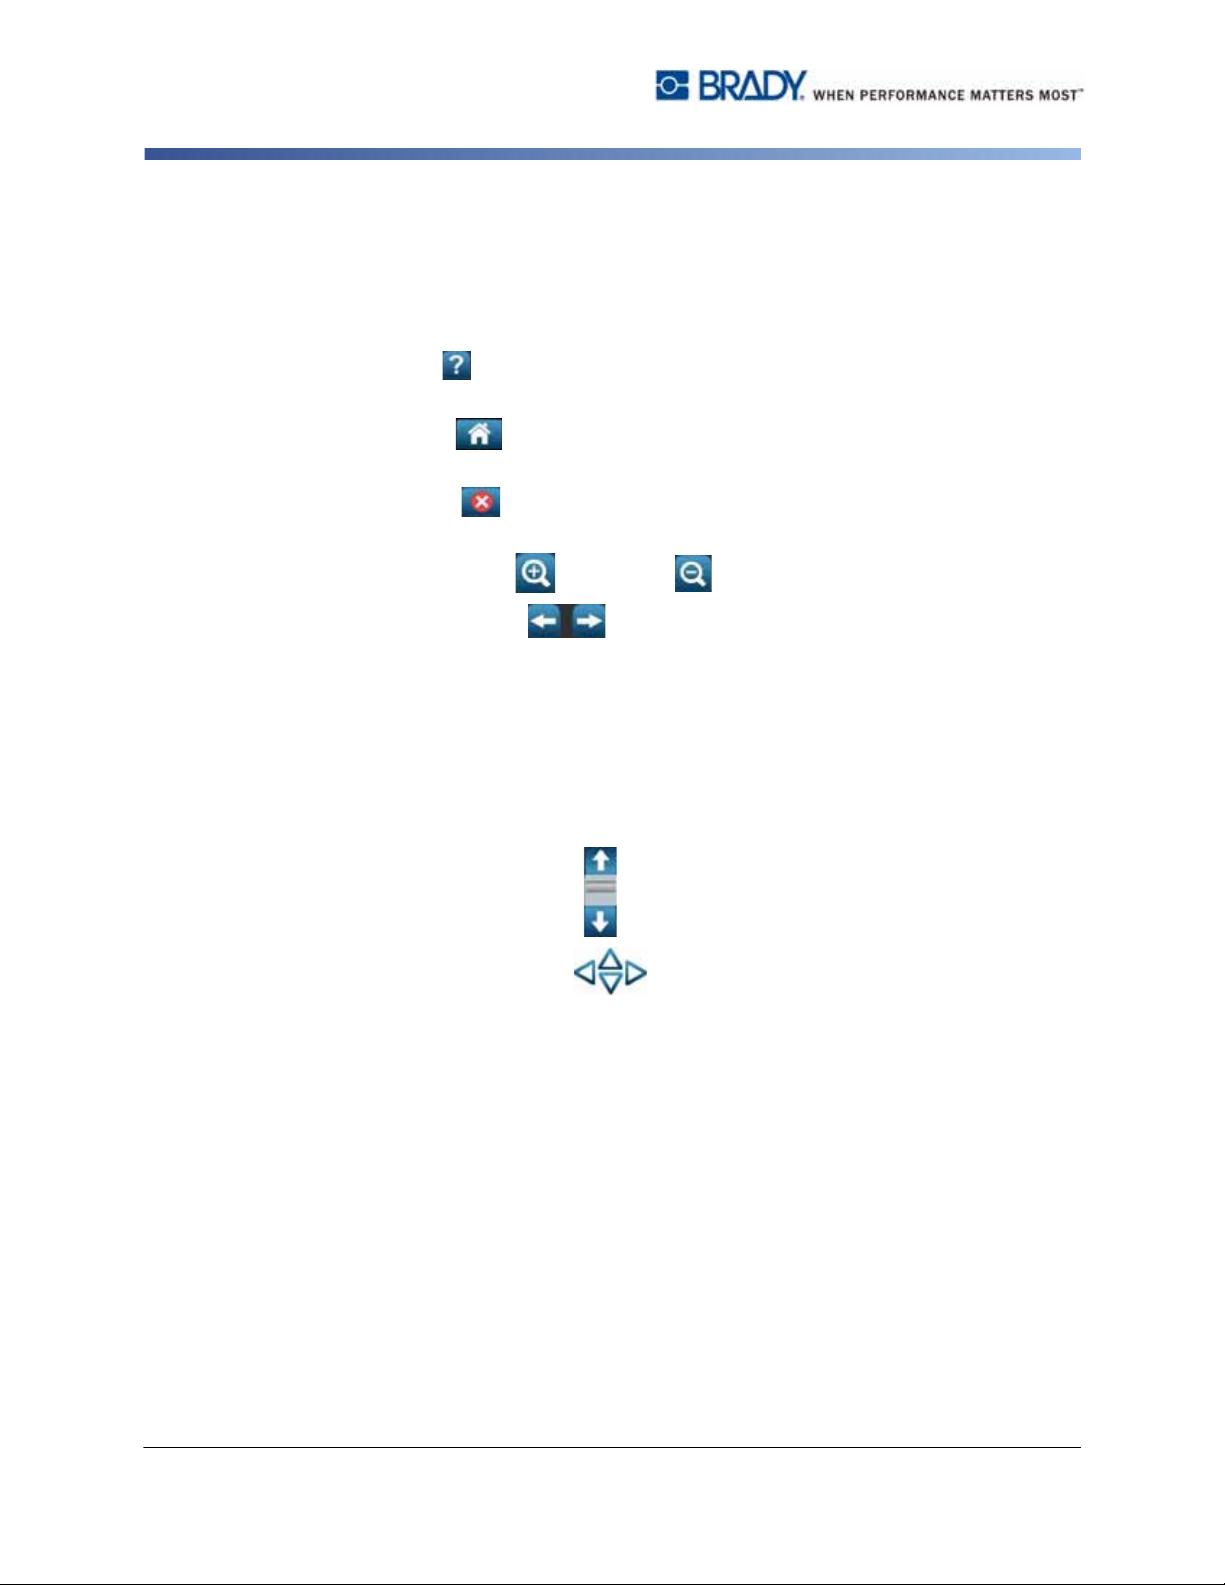
Button Actions
Control Panel
Button Actions
These button actions are used throughout the system. Unless necessary, button
actions are assumed to be understood and are not included in the procedures.
•
Help
: Available at any time by touching the help button. You can also access
the user guide from the product CD that comes with the printer.
•
Home
: Select from anywhere in the application to return to the
You may be prompted to save your current label file.
•
Cancel
previous screen without making any changes.
•
Zoom
: In most cases, you can press Cancel at any time to return to the
: Touch to zoom in or to zoom out. Applies to
labels
Home
page.
, not objects.
More Options
•
additional options that are available for the currently-selected object.
-
-
-
-
•
Scroll Arrows
screen or menu. There are two types of scroll arrows:
-
-
: Used throughout the system and lets you choose from
Fonts
: Choose a font type.
Text Features
Label Alignment
Object Framing
: Display whenever there are more items than can be shown on a
Up or Down
Navigation
: Choose one of the text options.
: Align an object on a label.
: Place a frame around an object.
: Use to move through a list of items in a menu.
: Use to view all parts of a label.
1-8 BBP™31 Sign & Label Printer
User Guide
Page 22
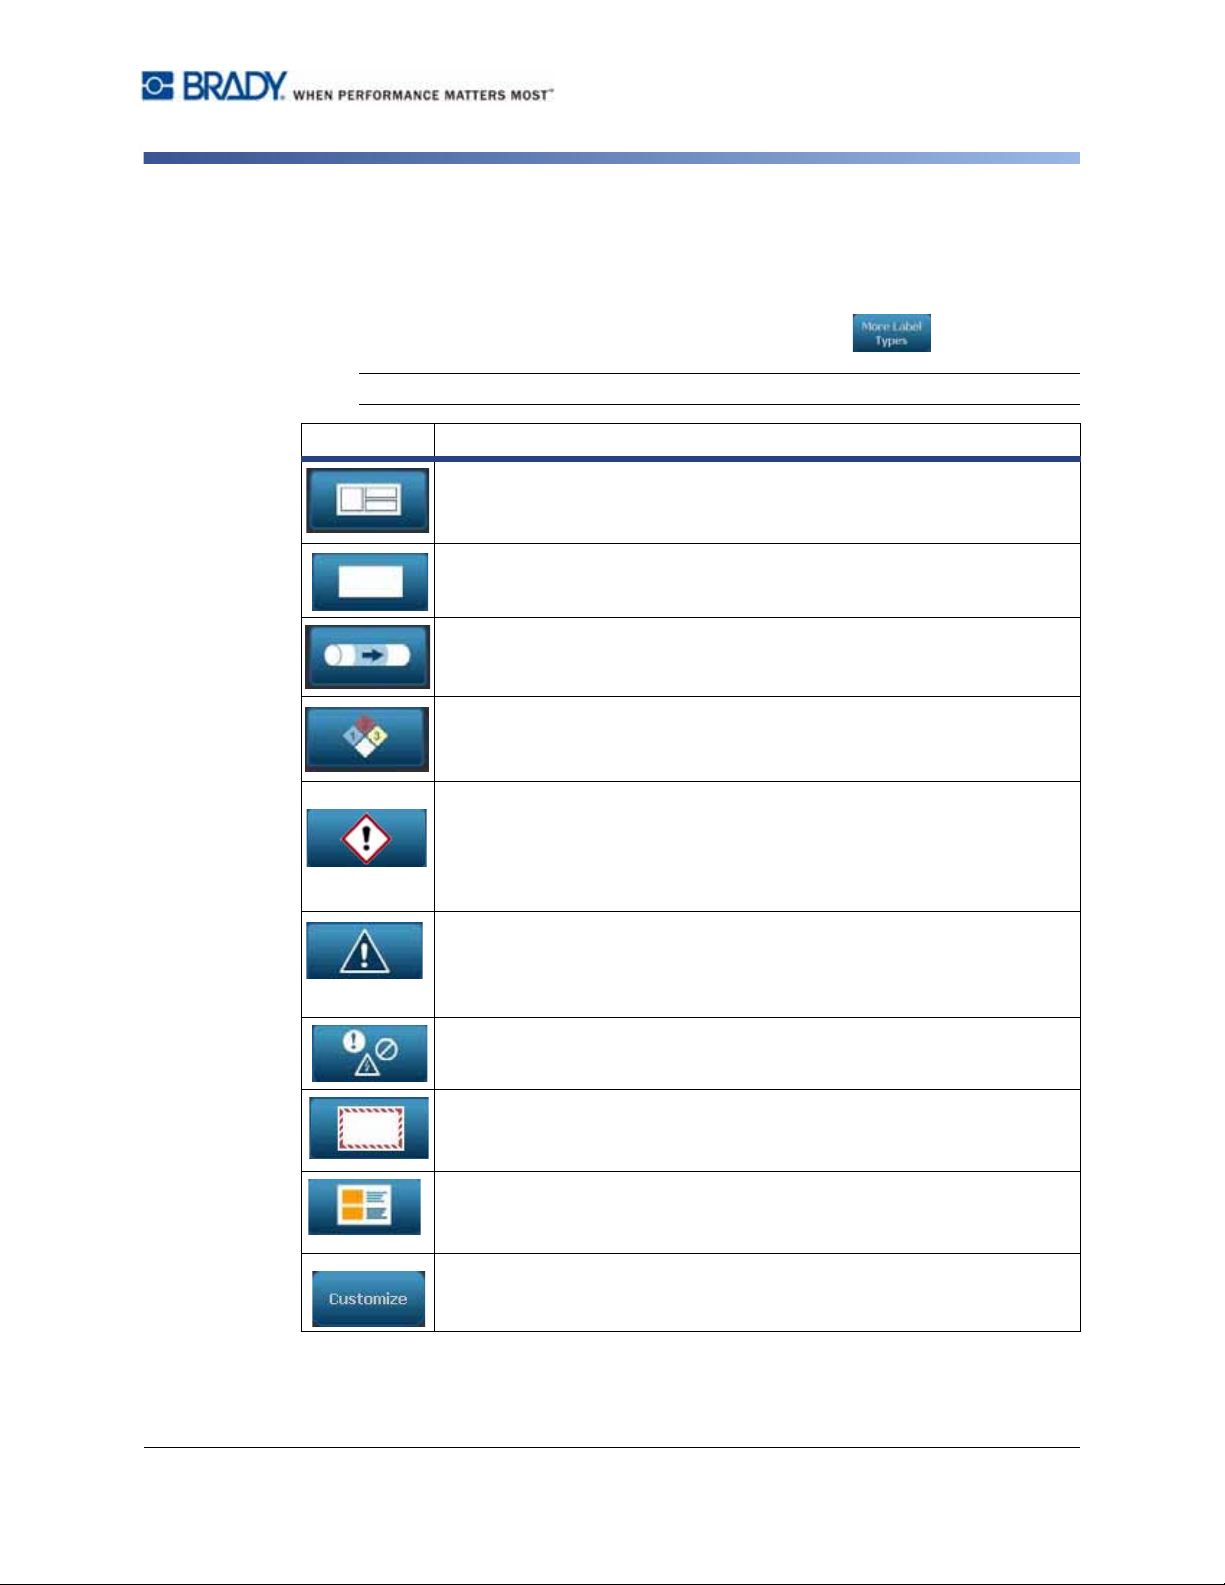
Available Label Types
From the Home page, you can access all of the available label types. You can see
all available label types by pressing More Label Types .
Note: Not all label types will be available with all configurations.
Icon Description
General Templates: Templates for creating commonly-used label
types.
Custom Label: Lets you create a label without a template.
Pipe Markers: Standard or roll-form pipe markers and symbol and
arrow-tape pipe markers.
Available Label Types
Control Panel
Right To Know (RTK): OSHA (Occupational Safety and Health
Administration) compliant chemical warning labels.
CLP [GHS] Globally Harmonized System: Compliant chemical
warning labels for use in Europe. Classification and Labeling intended to
minimize physical, health and environmental risks associated with
chemicals during transport, storage, use and disposal.These templates
are installed for European regions only.
Arc Flash: Product Safety Signs and Labels for implementing compliant
labels appropriate for work practices that are required to safeguard
workers from injury while working on or near exposed electrical parts
that could become energized.
QuickLabel: Specialty labels that let you select from a list of predefined
labels.
WHMIS: (Workplace Hazardous Materials Information system).
Canada’s national hazard communication program for hazardous
workplace chemicals of controlled products and hazard o us m ate r ials.
HSID: (Hazardous Substances Identification). Compliant chemical
warning labels for use in Europe. These templates are installed for
European regions only.
Customize: Lets you determine which three (default) label types will
display on the Home page.
BBP™31 Sign & Label Printer
User Guide
1-9
Page 23

2 Setting up Your Printer
Unpacking and Setting up Printer
Carefully unpack and inspect the printer surfaces (interior and exterior) and the labeling
system for possible damage during shipping.
Note: Be sure to remove any transportation protection from around the printhead and
inside the enclosure cover.
What’s in the Box
•
BBP™31 Sign & Label Printer
• Documentation CD including: electronic Quick Start Guide, electronic User’s Manual and
web links
• Printer Driver CD
• Power Cord
• USB Type B Cable
• Printed “Quick Start Guide”
• Cleaning Kit
Note: Please keep the original packaging, including the box, in case the printer must be
returned.
BBP™31 Sign & Label Printer
User Guide
2-1
Page 24
Unpacking and Setting up Printer
2
1
4
5
10
6
8
12
11
9
3
7
13
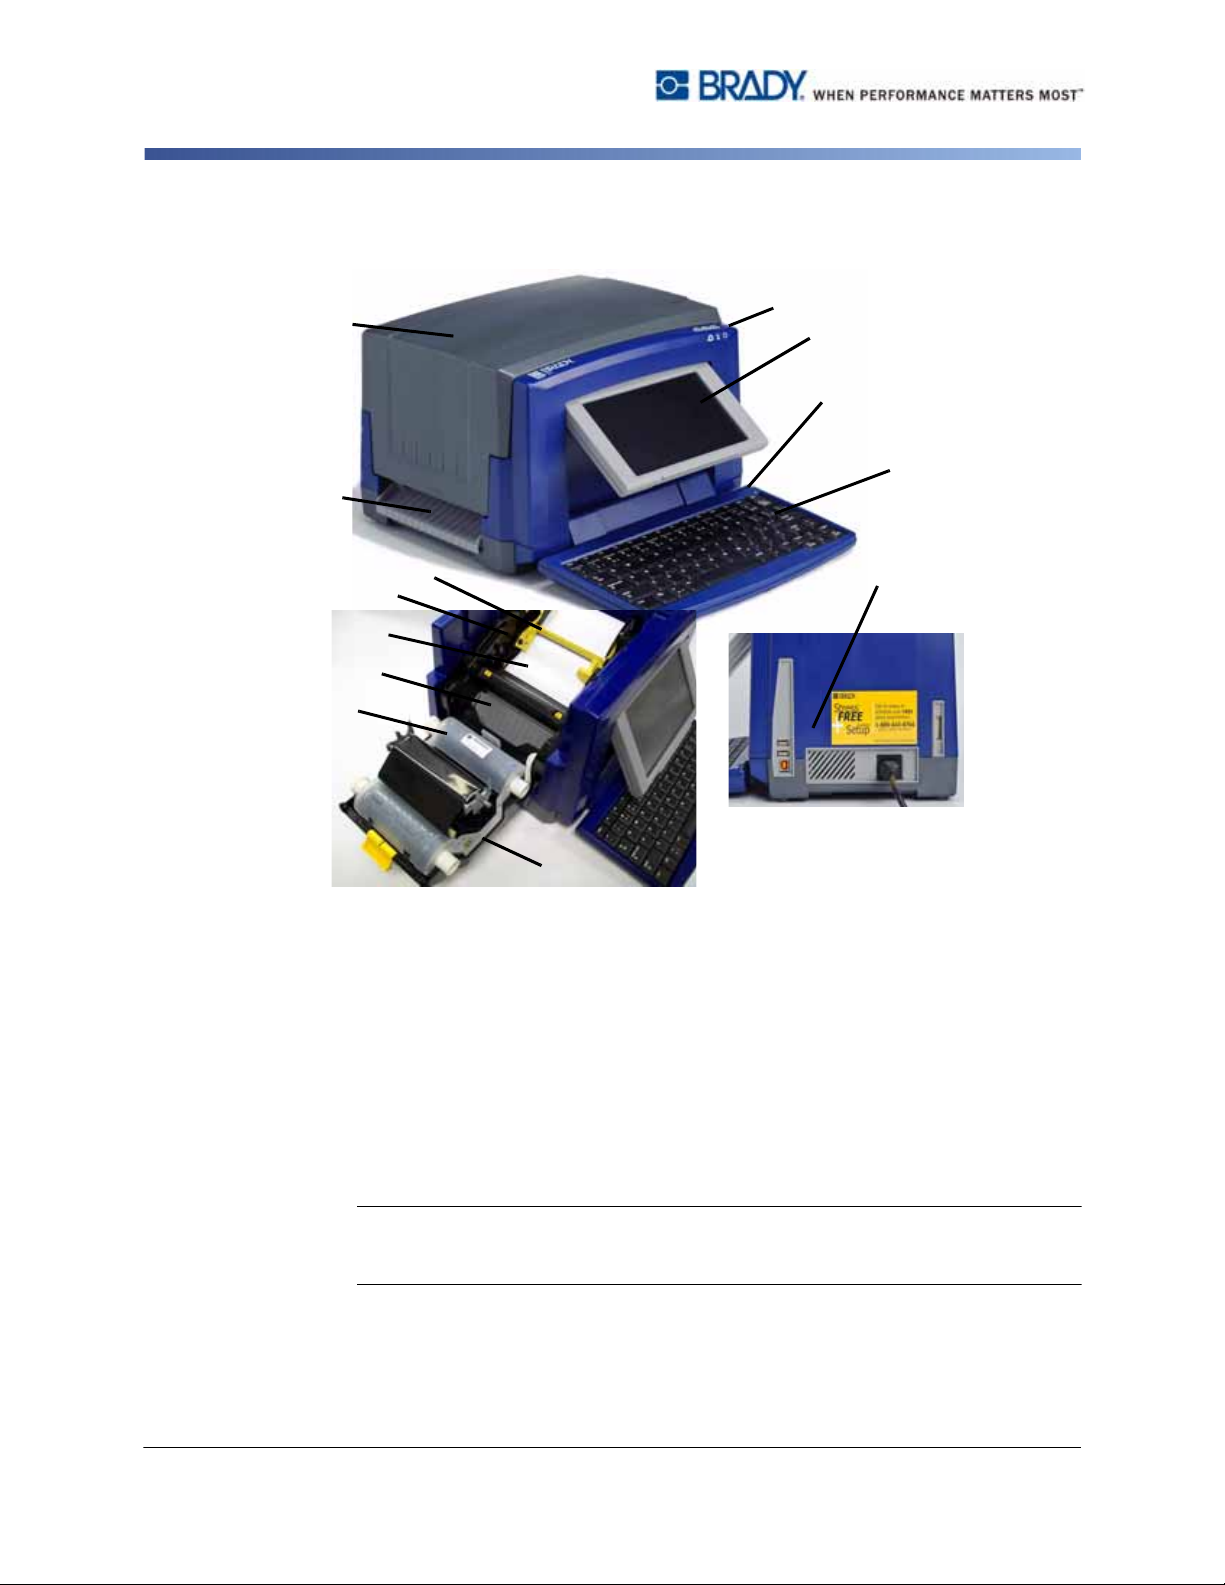
System Components
System Components
Figure 2-1. Printer Components
1 Stylus 2 Display (with touchscreen)
3 Power Button 4 Enclosure Cover
5 Label Exit 6 Media Wiper
7 Media Guides 8 Media
9 Cutter 10 Ribbon Cartridge
11 Ribbon Cover 12 USB and Expansion Ports
13 Keyboard
Note: The printer is equipped with a universal power supply and can be operated
with a supply voltage of 100 to 240 V~, 50- to 6 0 Hz. The printer senses the voltage
type and automatically adjusts for the power source.
2-2 BBP™31 Sign & Label Printer
User Guide
Page 25
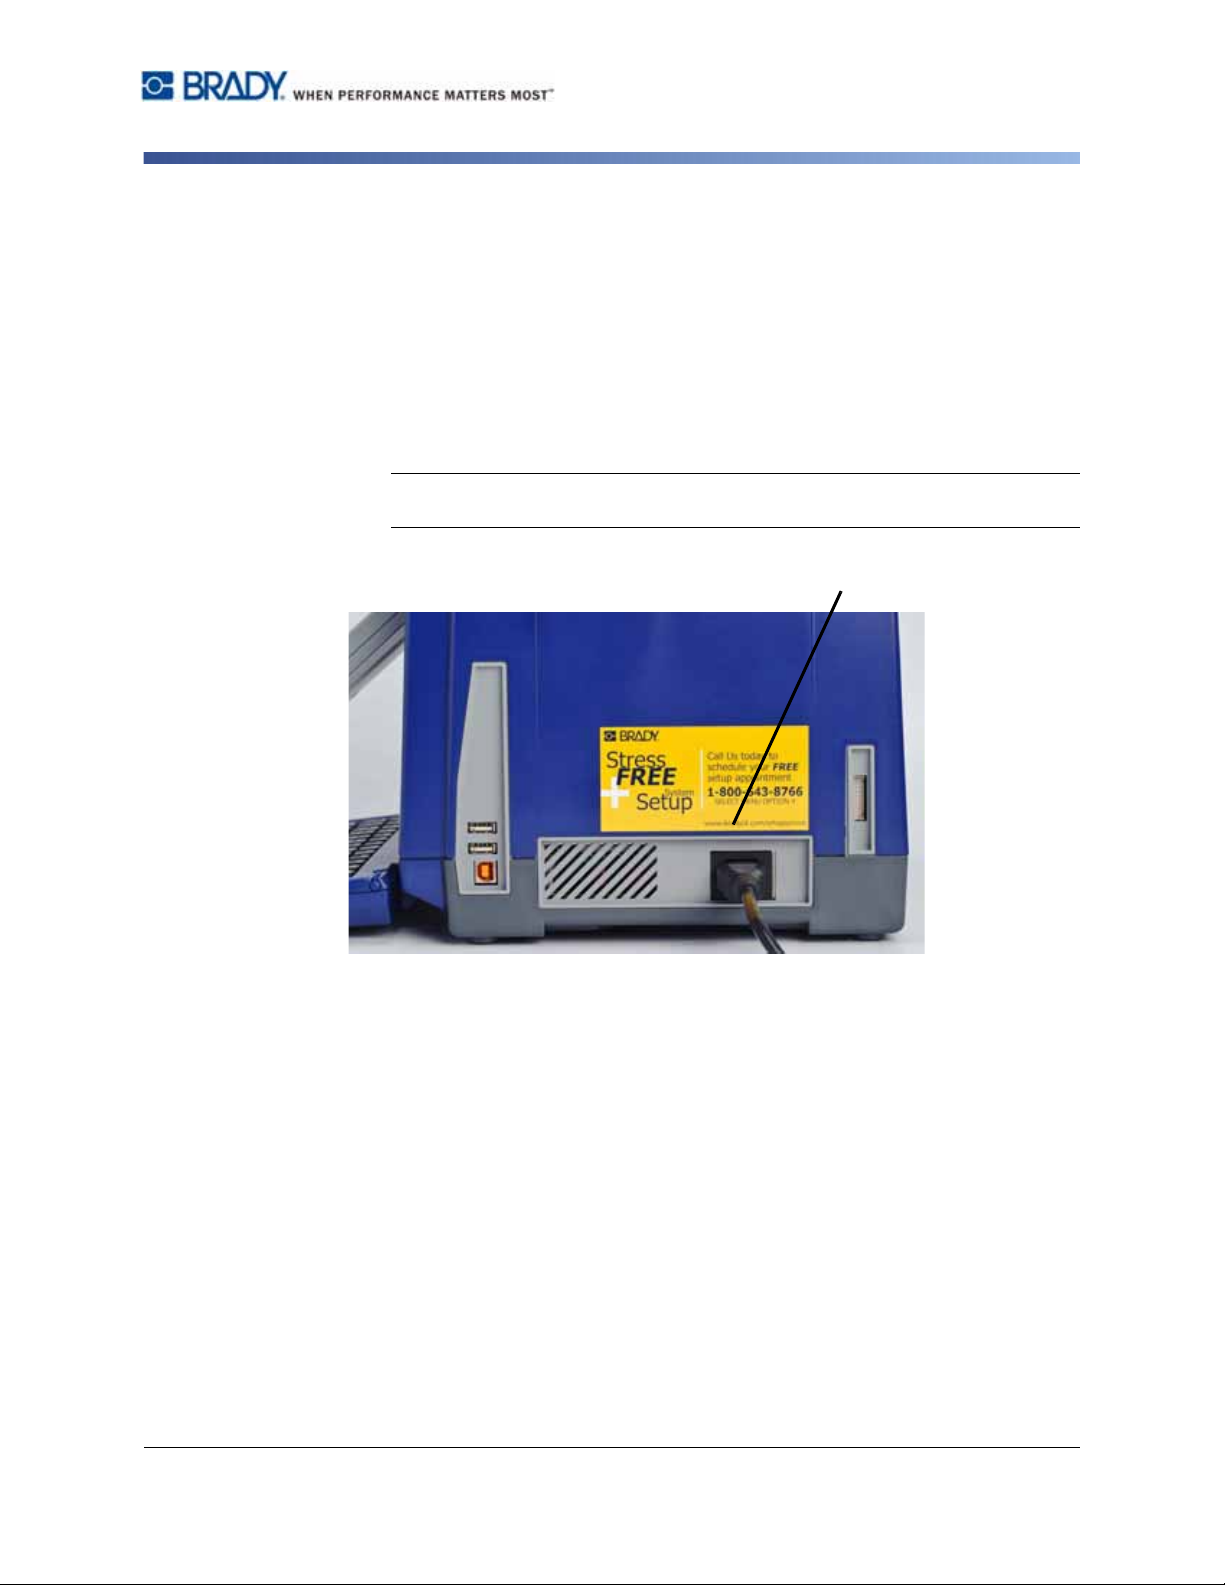
Setting up the Printer
Power Cord
Connect Printer Power
To setup the printer:
1. Plug the power cord into the printer at the location shown.
2. Plug the other end of the power cord into an AC power outlet. The printer
automatically comes on and displays the primary Home Page. The size and
color of the currently installed media and other status indicators are shown.
Note: If there is no ribbon or media installed, the system defaults to black
ribbon and 4 in. [101.6 mm] wide continuous white media.
Unpacking and Setting up Printer
Setting up the Printer
BBP™31 Sign & Label Printer
User Guide
2-3
Page 26
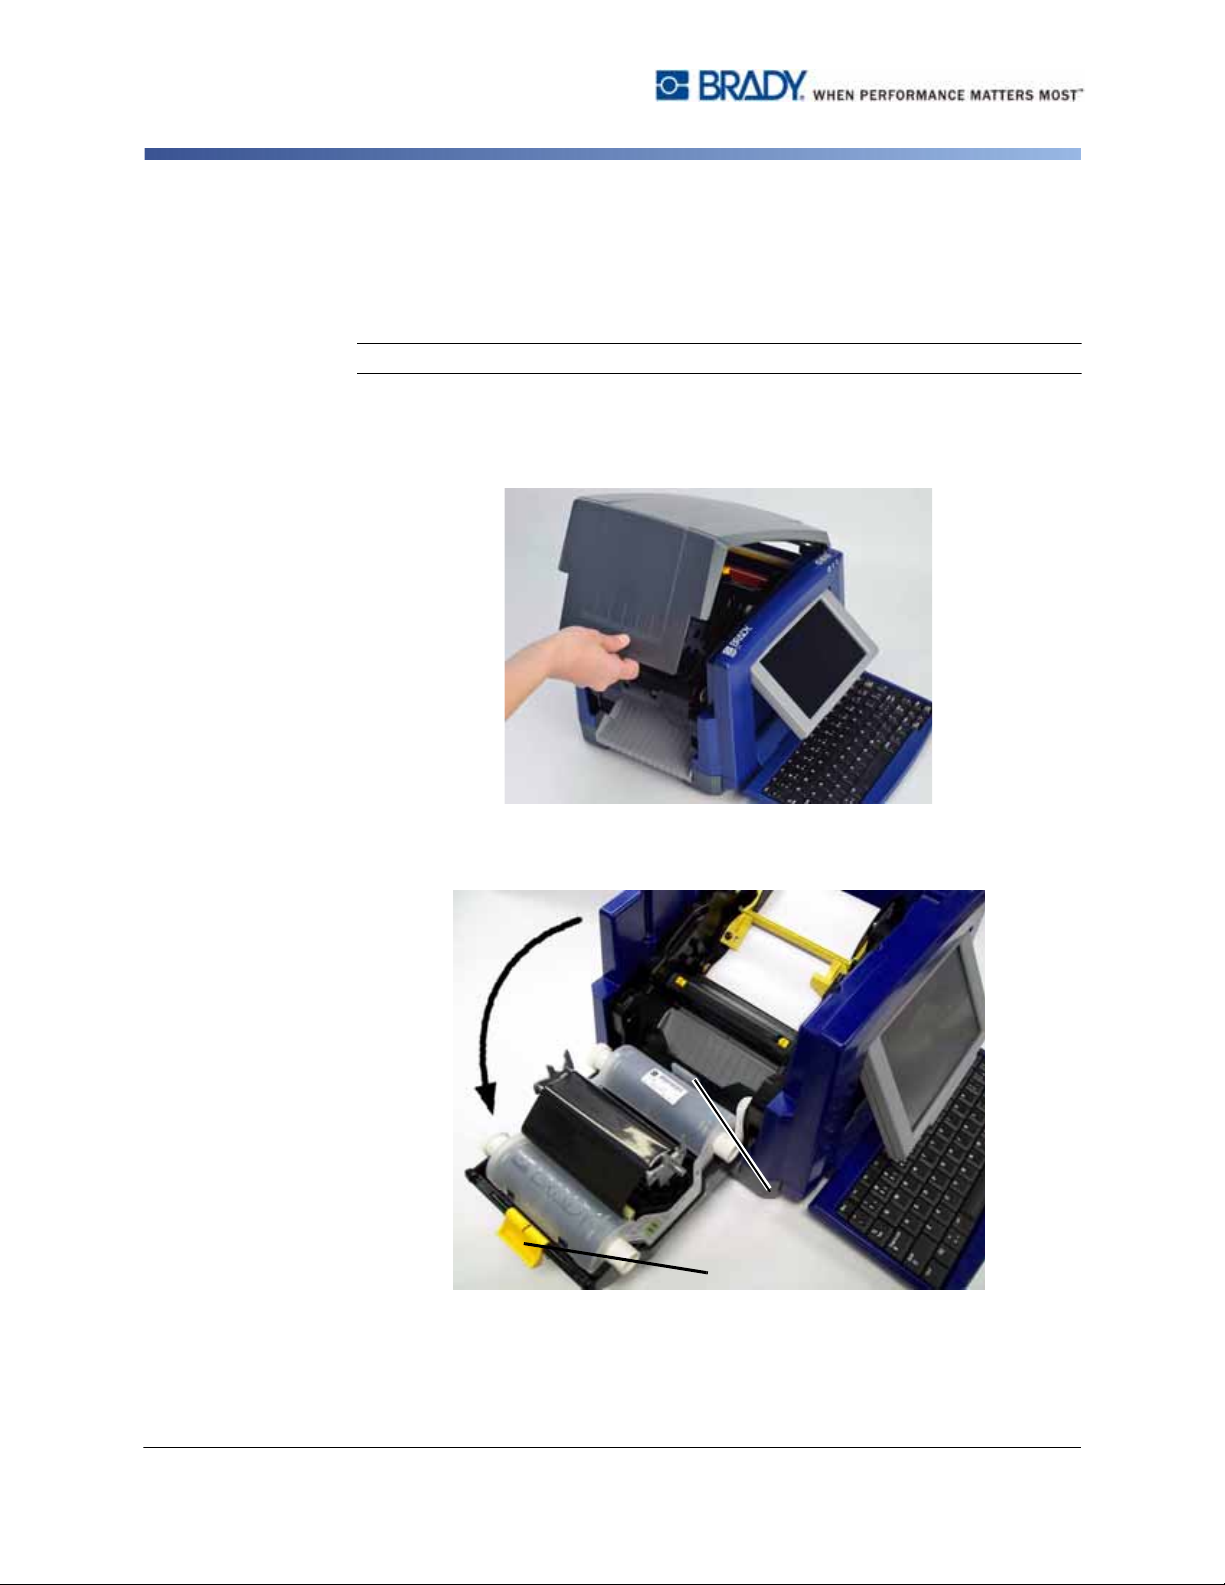
Unpacking and Setting up Printer
3
2
Setting up the Printer
Install or Change Supplies
The media and ribbon supply cartridges use a “smart cell” to define and track the
supply information. The system automatically recognizes the supply information
for the installed media and ribbon.
Note: The printer can be either on or off when changing supplies.
To install or change ribbon:
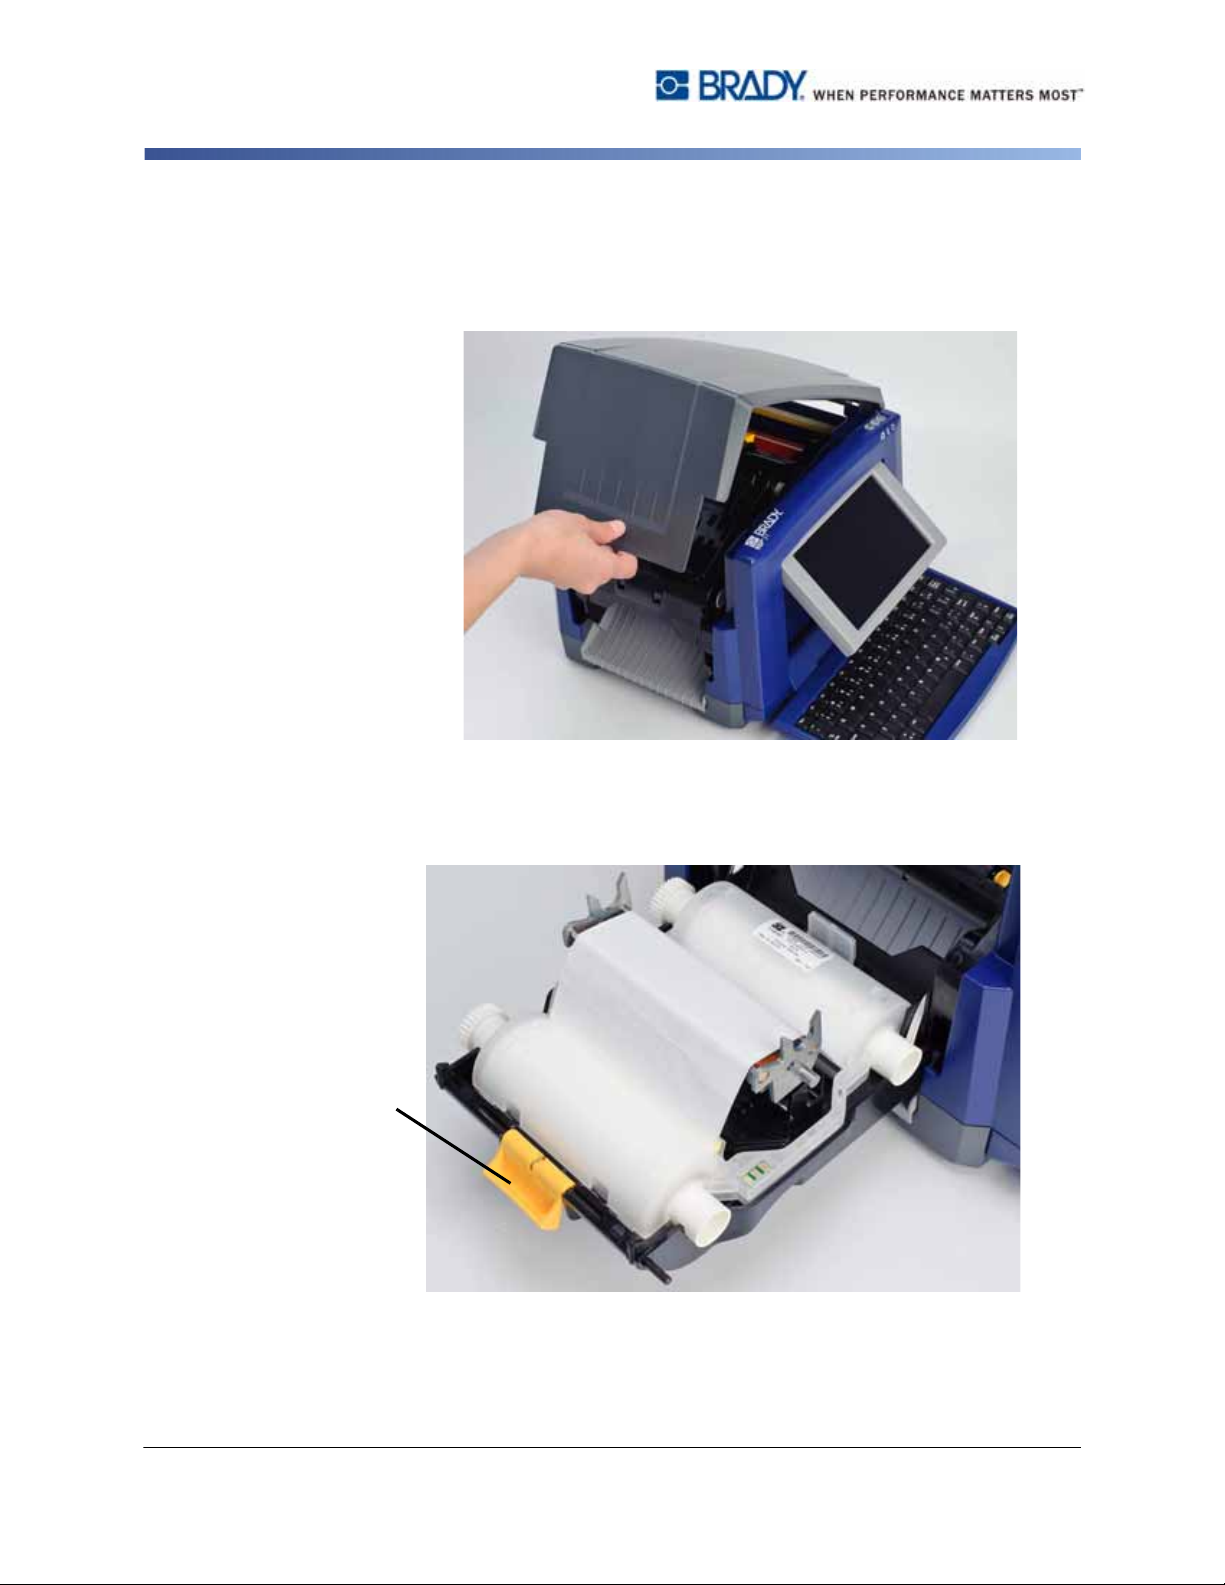
1. To remove ribbon, open the enclosure cover (opens from left).
2. Release the latch on the ribbon cover [2] and swing open.
3. Release the ribbon cartridge latch [3] and lift the ribbon cartridge up and out.
2-4 BBP™31 Sign & Label Printer
User Guide
Page 27
Unpacking and Setting up Printer
4
Setting up the Printer
4. Place ribbon cartridge with ribbon over print head (product label toward
machine), then snap into place.
5. Close and latch the ribbon cover.
6. Close the enclosure cover.
7. If printer was off, press . The system detects the installed supplies, sets
media and ribbon colors, indicates the label dimensions and the amount of
remaining supplies.
BBP™31 Sign & Label Printer
User Guide
2-5
Page 28
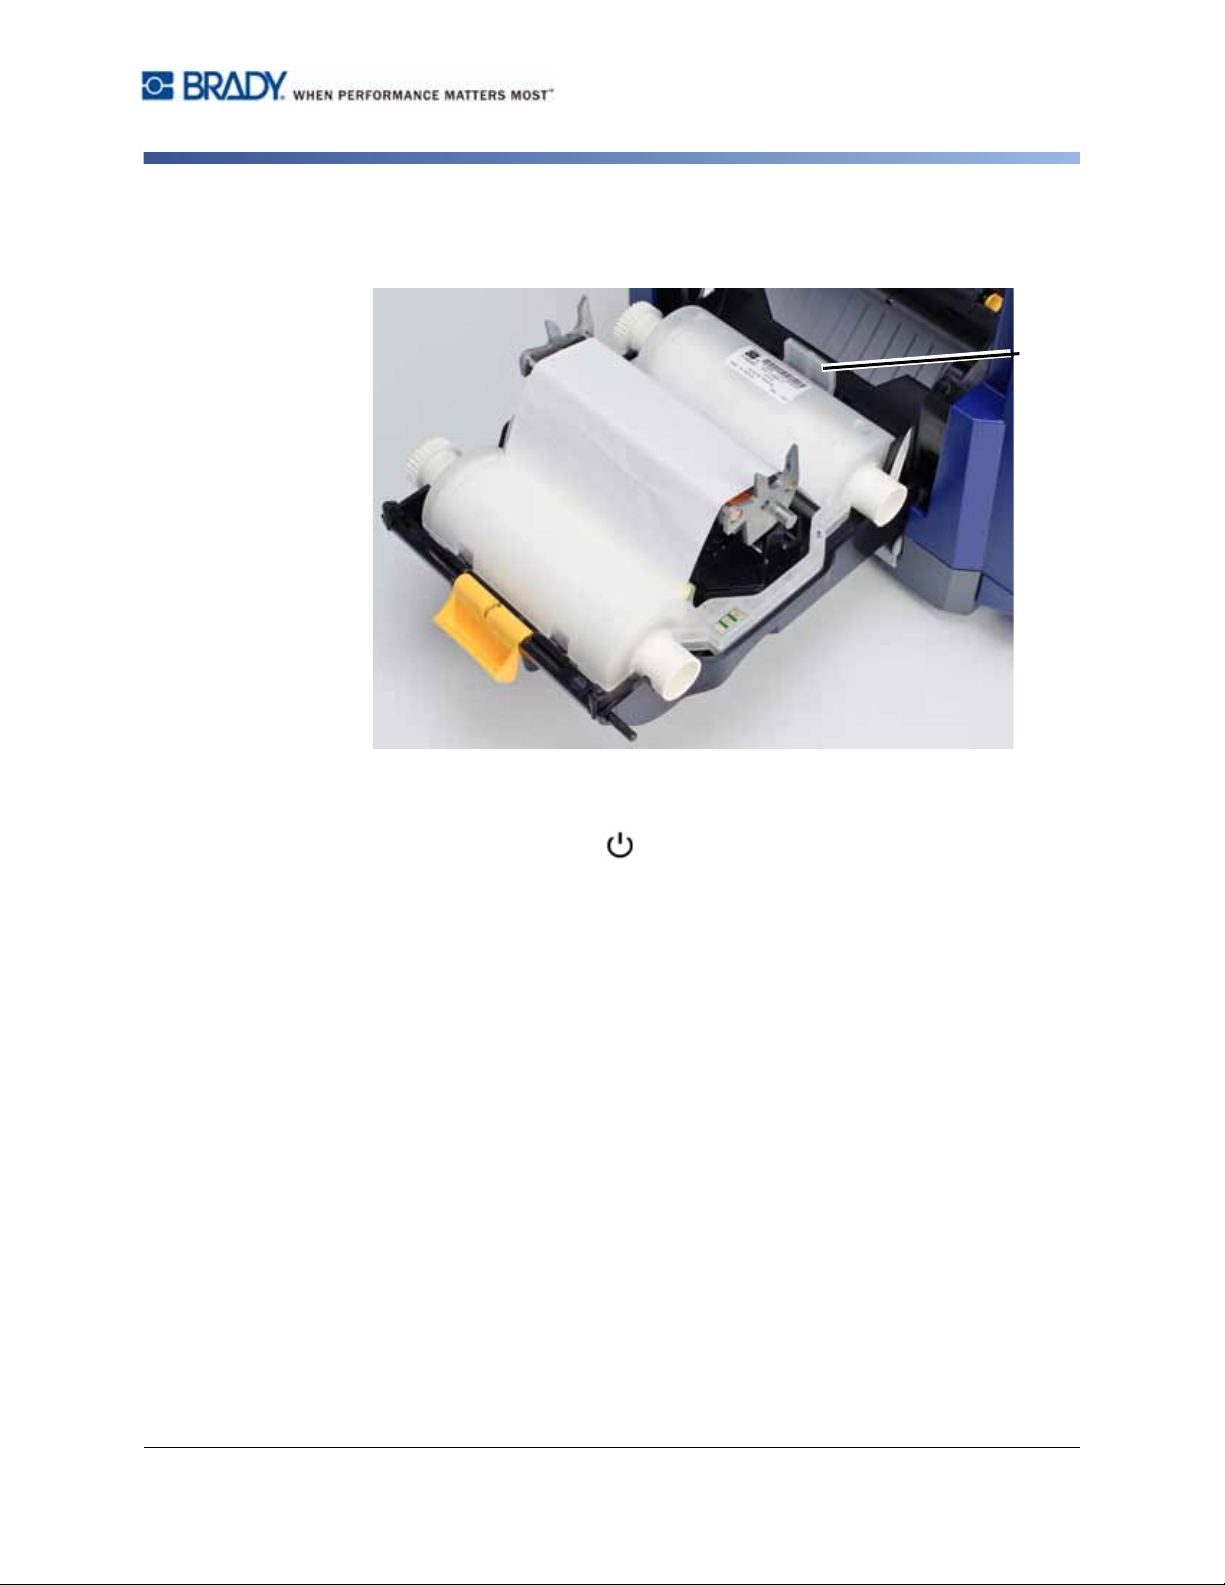
Unpacking and Setting up Printer
2
Setting up the Printer
To install or change media:
1. Open the enclosure cover (opens from left).
2. Release the latch on the ribbon-cover [2] and swing ribbon cartridge open.
2-6 BBP™31 Sign & Label Printer
User Guide
Page 29
Unpacking and Setting up Printer
3
6
4
5
Setting up the Printer
3. Swing yellow media wiper [3] to far right (when facin g displa y), if enga g ed .
4. Slide yellow media guides [4] to full-open.
5. Remove existing media, if installed, by pulling cartridge from printer. Media
unwinds from the top of the roll.
6. Insert media cartridge until spindle ends rest in slots of media holder [5].
7. Feed media from top of roll until it sits on top of black rubber roller ~.25 in.
(6.35 mm) from cutter entrance.
8. Close media guides until they touch edge of media liner with media under the
guides.
9. Move media wiper into position so it rests on media.
Note: Not all media requires the use of the media wiper. Engage the media
wiper only if needed for the supply installed.
10. Close and latch ribbon cover, then close enclosure cover.
11. If printer was off, press . The system detects the installed supplies, sets
BBP™31 Sign & Label Printer
background and foreground colors, indicates the label dimensions and the
amount of remaining supplies.
User Guide
2-7
Page 30
Unpacking and Setting up Printer
Feeding and Cutting Label Stock
Feeding and Cutting Label Stock
Use this procedure to advance the media to the cut position, and (optionally) cut
the media.
To feed and/or cut label stock:
1. With the printer power on, press and hold Feed until the length of media
you want exits the printer.
Note: F or die-cut media, the media is adva nced to the cut position which is the
next die-cut label. For continue media, the media advances until you release
the Feed button.
2. If desired, press Cut . The printer will cut off the media.
2-8 BBP™31 Sign & Label Printer
User Guide
Page 31

Waking the Printer from Sleep Mode
System Power
Starting Printer from a Non-powered (Cold) State
This procedure describes the power-up sequence when starting from a nonpowered state (i.e., printer has been unplugged). The pr inter does not retain the
label during a power interruption.
Note: With power removed (i.e., printer disconnected from power source), the
system clock retains its settings for about 30 days.
To start the printer from a cold state:
1. Plug the printer into a power source. The system automatically recognizes the
supply information for the installed media and ribbon and open s to the
Home Page.
2. On the Home page, continue with your label activities.
Waking the Printer from Sleep Mode
System Power
If you do not touch the screen or press any keyboard or other keys/buttons for a
defined period of time, the system turns off the d i splay and go es into a lo w-power
consumption mode (see “Set Clock” on page 2-15 for details). The current label
and settings are retained.
To wake the printer from sleep mode:
1. Press or touch the screen. The Editor displays the label or menu you
were on when the printer went to sleep.
2. Continue with your label activities.
Note: If a label is defined when the system goes into sleep mode and the
media is changed to a supply where the label no longer fits, you will be
prompted to make the data fit or save the existing label before continuing. If
you choose the option to make the data fit, the system will move and/or resize
the objects so they fit on the new media size.
BBP™31 Sign & Label Printer
User Guide
2-9
Page 32

System Power
Resetting the Printer
Powering Off the Printer
When the system is shut down, the display turns off and the system goes into a
low power consumption state but does not require a cold start to turn back on. In
this state, you can either touch the screen or press the power button to return the
system to the same state it was in before going into lower power consumption
mode.
Note: To completely shut down the printer, you must disconnect the system from
the power source.
To turn off printer power:
1. With the printer on, press .
2. If there are unsaved changes in the currently active file, you will be prompted
to save the current label file:
• To power off without saving the current label file, press No.
• To save the current label file, press
page 6-1
for further instructions.
Yes
. See
“Save a Label File” on
Resetting the Printer
Use this procedure to reset the printer (e.g., if the screen freezes).
To reset the printer:
1. Press and hold for at least 5 seconds. The system performs the
initialization process and starts the printer. Any data in the Editor at the time of
the reset will be lost.
2. When the Home page displays, you can continue with your label activities.
2-10 BBP™31 Sign & Label Printer
User Guide
Page 33

Creating Your First Label
Creating your first label on the BBP™31 Sign & Label Printer is as easy as
starting to type! You don’t need special software an d yo u do n’t hav e to be
connected to a PC to create or print labels.
This procedure describes how to create a text label with minimal formatting, using
basic editing techniques, and printing the label.
Note: Take advantage of the powerful label creation and editing capabilities by
using the pre-designed layouts, te mplates and graphics included with the BBP™31
Sign & Label Printer. See the procedures in this manual for detailed instructions.
To create a text-only label:
1. From the Home page, start typing.
2. To create another line in your text object, press Enter.
3. To change the look of your text, you can select any of the available font or text
attributes that display in the Control Panel as soon as you start typing.
Creating Your First Label
Resetting the Printer
To print your label:
1. When you are done creating your label, select Print .
2. In the Print dialog box, type the number of copies you want to print.
3. Press Start Print .
BBP™31 Sign & Label Printer
Note: The printer must have ribbon and tape installed before you can print.
User Guide
2-11
Page 34

Using Your Printer with a PC
To PC
To Prin ter
Creating and Printing Labels from a PC
Using Your Printer with a PC
You can use a personal computer to install software upgrades, or to create labels
on the PC rather than working directly on the printer.
Note: You must have labeling software installed on your computer to create, edit or
print labels from the PC. Refer to your labeling software documentation for
instructions about installing and using the sof tware. See “Comp atible Applications”
on page 1-2 for more details.
Installing USB Driver
If you are connecting the BBP31™ printer to your PC, you will need the USB
device driver installed on your PC. Once connected, the PC should automatically
detect and install the USB driver, if it is not already installed.
1.
Attach the small end of the USB cable to the printer, then the flat end of the
cable to the PC.
Turn the printer on. On the PC, “Found New Hardware” pops up in the lower
2.
right corner of the screen and the print driver wizard is launched.
3.
In the Wizard, click Install the software automatically (if it is not already
selected).
Click Next. The print driver installs. This takes a minute or two.
4.
5.
When complete, in the Wizard, click Finish.
The BBP™31 printer is now available to receive information from your computer
labeling program.
When printing from the PC, the printer must be attached to the PC via the USB
cable. Be sure to select the BBP™31 printer in the print dialog box of the PC
labeling program you are using.
Creating and Printing Labels from a PC
1. Connect the USB cable from the printer to any available USB port on the PC.
2. From your labeling software, print your labels to the BBP™31 printer.
Note: You cannot save labels or templates from the PC to the printer.
2-12 BBP™31 Sign & Label Printer
User Guide
Page 35

Setting up the System Defaults
Setting up the System Defaults
The System Setup function is used to set the printer default settings. Default
values are common settings that are pre-assigned to make the system usable as
soon as power is applied (e.g., date and time are set to your local date and time).
By changing the defaults, you can set the settings to your specific requirements.
To change setup functions use the following procedures. Any defaults set here will
stay in effect even when power is removed from the printer, and during upgrades.
To change system default settings:
1. Select Menu .
2. In the menu list, select Setup . The Setup menu displays.
3. From the Setup menu, choose any option(s) to change the system
configuration:
Creating and Printing Labels from a PC
BBP™31 Sign & Label Printer
User Guide
2-13
Page 36

Setting up the System Defaults
Creating and Printing Labels from a PC
Set Clock
To set date, time and sleep mode:
Note: With power removed (i.e., printer disconnected from powe r so urce ), th e
system clock retains its settings for about 30 days.
1. Select Menu .
2. In the menu list, select Setup .
3. In the Setup menu, select Clock Settings .
4. In the Clock Settings popup, change any of the following options (this also
sets the system clock, which is needed if you want a time stamp on your
label):
•
Sleep mode timeout
before entering sleep mode.
•
Date
choose from the calendar display.
•
Time
arrows to change the time. Touch
: Choose the amount of time you want the system to wait
: Touch to highlight the
: Touch to highlight the
Month, Day
Hour, Minute
AM/PM
or
Year
, then touch the T arrow to
or
Second
to toggle between AM and PM.
, then touch the S or T
5. When done, select OK .
2-14 BBP™31 Sign & Label Printer
User Guide
Page 37

Setting up the System Defaults
Creating and Printing Labels from a PC
Localization and Unit of Measure
To choose a language and unit of measure:
1. Select Menu.
2. In the menu list, select Setup .
3. From the Setup menu, select Localization .
4. In the Language list, choose the language you want the system to display.
5. Select a Unit of measure (Inches vs. Millimeters).
6. When done, select OK .
BBP™31 Sign & Label Printer
User Guide
2-15
Page 38

Setting up the System Defaults
Creating and Printing Labels from a PC
Set Text Defaults
To set the text defaults:
1. Select Menu .
2. In the menu list, select Setup .
3. In the Setup menu, select Text Defa u lts .
4. In the Text Defaults menu, change any of the following options:
Note: Text/object options
objects are not affected.
•
Font
•
Text units
•
Justification
5. When done, press OK .
take effect with the next text object created. Existing text
2-16 BBP™31 Sign & Label Printer
User Guide
Page 39

Setting up the System Defaults
Creating and Printing Labels from a PC
Set Barcode Defaults
To set the barcode defaults:
1. Select Menu .
2. In the menu list, select Setup .
3. In the Setup menu, select Barcode Defaults .
4. In the Barcode Defaults menu, change any of the following options:
• Symbology
•
Check Characters
•Ratio
•Density
• Human readable text
5. When done, select OK .
BBP™31 Sign & Label Printer
User Guide
2-17
Page 40

Setting up the System Defaults
Creating and Printing Labels from a PC
Set Printing
To set the printing defaults:
1. Select Menu .
2. In the menu list, select Setup .
3. Select Printing .
4. In the Printing dialog, change the Auto cut settings to your desired options.
5. When done, select OK .
2-18 BBP™31 Sign & Label Printer
User Guide
Page 41

Customizing Home Page Defaults
Creating and Printing Labels from a PC
Customizing Home Page Defaults
You can choose which three label types to display on your Home page. The
selected label types will be set as the default on your printer.
The Preview area will immediately reflect the changes.
To select label type defaults:
1. From the Home page, select More Label Types .
2. From the Label Types dialog, select Customize . The Customize
dialog box opens.
3. From the Included list, select a label type you do not want displayed, then
4. From the Available list, select a label type to include and then select
5. If desired, change the display order by pressing Order .
6. When done, select OK .
BBP™31 Sign & Label Printer
select Remove .
Include .
User Guide
2-19
Page 42

Displaying System Information
Creating and Printing Labels from a PC
Displaying System Information
Use this procedure to view additional information about the system, such as the
current software or firmware version and the available memory.
To view system information:
1. From the Editor, select Menu .
2. In the menu options list, select Info . The System Information dialog box
displays.
3. Select OK when you are done viewing the system information.
Note: Select Cancel at any time to cancel the operation and return to the
Editor.
2-20 BBP™31 Sign & Label Printer
User Guide
Page 43

3 Working with Labels
Create Labels
Creating a Label from a Template
Use this procedure to create a label using a general template or specialty template.
To create a label from a general template:
1. From the Home page, select General Templates .
2. On the Select Template dialog box, select a Category.
BBP™31 Sign & Label Printer
User Guide
3-1
Page 44

Create Labels
Creating a Label from a Template
3. Choose a template from the list of available templates. The label is displayed
4. To choose a different template, select Change Template .
5. In the Editor, select an object using one of these methods:
6. To enter text, select a text object and start typing. You can change the look of
7. To change a barcode, touch the barcode object and change any of the
8. To change a graphic, touch the graphic object and choose from any of the
in the Editor with the objects scaled to fit the installed media.
Notes:
• Once you have defined data for at least one of the objects, the option to
change the template is no longer available.
• If there are unsaved changes in the currently active file, the system will
prompt you to save the file before continuing.
•
Screen
•
Keyboard
•
Buttons
: Touch the object.
: Press
: Select
Tab
key to move to the next object.
Next Object
(only available if there are undefined
placeholder objects).
your text by selecting any of the available font or text attributes that display in
the Control Panel as soon as you start typing
options in the Barcode dialog box.
available graphics in the Select Graphic dialog box.
9. To add an object, select Add Object (if available) and choose from any
of the available object types.
Note: You can only add more objects to the label if all template objects have
been defined.
10. Continue selecting objects and entering data until all objects are defined.
3-2 BBP™31 Sign & Label Printer
User Guide
Page 45

Creating a Custom Label
Use this procedure to create a label without usin g a predefine d templa te. You can
add objects to a label by touching a blank area in the Editor, or by using the Add
Object button.
To create a custom label by touching the Editor:
1. On any screen, touch a blank area in the Editor to add an object.
2. In the Add Object control panel, choose an object type. The available options
for the selected object will display.
Create Labels
Creating a Custom Label
Note: When in the Add Object panel, you can also touch
label to create a placeholder object at that location. The object type you create will
then insert into the placeholder object.
3. To add another object, touch a blank area in the Editor, then choose th e object
type you want to add.
To create a custom label using Add Object button:
You can also add an object by using the Add Object button when it is available on
the control panel.
1. From any screen, select Add Object to add an object to the label.
2. In the Add Object menu, press a button to add an available object type.
Note: The object is placed on the label at a default size and position that varies
depending on the dimensions of the label.
an empty area of the
3. To add another object, select Add Object again, or touch a blank area
Note: If the label is full and there is no place to add a new object, the object will be
placed at the right-most edge of the label and you will have to move and/or resize it.
Note: See “Specialty Label Types” on page C-1 for creating other label types.
BBP™31 Sign & Label Printer
on the label, then choose the object type you want to add.
User Guide
3-3
Page 46

Set Label Attributes
Creating Auto-Sized Label
Set Label Attributes
Creating Fixed-Length Label
Use this procedure to create a label where the continuous-media label length is
set, not variable. Once selected, the printable area shown on the label is reduced
by the amount of the leader/trailer required for the installed sup ply, so that the total
label length output matches the selected length.
Note: The label size for die-cut media is already set and cannot be adjusted.
To create a fixed-length label:
1. From the Home page, select Menu .
2. In the menu list, select Size & Orientation .
Note: You can also access the Label Size & Orientation box by touching the
Label Size text at the bottom of the screen.
3. On the Label Size & Orientation dialog box, select Fixed Length .
4. In the Length field, enter the desired label length.
Note: Minimum supported length is 0.5 in. (12.7 mm). Maximum supported
length is 120 in. (3048 mm).
5. Select OK. The Status Bar indicates the new label length.
Creating Auto-Sized Label
Use this procedure to create a label where the continuous-media label length
adjusts to fit the data that you add to the label (variable label length).
Note: The label size for die-cut media is already set and cannot be adjusted.
To create an auto-sized label:
1. From the Home page, select Menu .
2. In the menu list, select Size & Orientation .
3. Select Autosize to Fit Data . When entering data, the label size
will automatically be adjusted to fit the data.
4. Select OK .
3-4 BBP™31 Sign & Label Printer
User Guide
Page 47

Orientation
Use this procedure to set the label in either portrait or landscape orientation. You
can change the label orientation even if you are working on a label in the Editor.
To set the label orientation:
1. Select Menu .
2. In the menu list, select Size & Orientation .
3. In the Label Options dialog box, select one of the orientation buttons to
choose the orientation of your label:
•
• Landscape : Length from left to right.
Note: If the current data will not fit on the selected length, you will be prompted to
have the system make the data fit, or cancel the change. If you choose to make the
data fit, the objects will be moved and/or resized so they fit on the label; however,
the objects will not be rearranged into a new orientation.
Portrait
:
Length from top to bottom.
Set Label Attributes
Orientation
4. Select OK .
BBP™31 Sign & Label Printer
User Guide
3-5
Page 48

Set Label Attributes
Framing a Label
Framing a Label
Note: When printing with frames around the labels, be sure the media guides fit
snug against the media so the tape does not shift while printing. For making fine
adjustments to the frame, see “Adjusting Print Offset” on page 5-8.
Use this procedure if you want to place a frame (border) around the entire label.
The following conditions apply:
•
Fixed-size labels
applied to the
changes with the label size.
•
Auto-sized labels
to fit the objects on the label
changes after that, the frame is
label after making a size change.
To place a frame around the label:
Note: If you are not working with a fixed-length label, you must have at least one
object on your label before you can place a frame around the label.
: When using continuous or die-cut supplies, the frame is
outer
perimeter of the printable area. If changed, the frame size
: When objects determine the label length, the frame is sized
when the frame is applied
not
resized. Y ou must reapply the frame to the
. If the label size
1. Select Menu .
2. In the menu list, select Frame .
3. From the Label Frame menu:
a. Select the frame shape (none, rectangle, rounded rectangle).
b. Select the frame line width (narrow, medium, wide).
Note: Line width options are available only when the rectangle or rounded
rectangle frame shape is selected.
4. When your changes are complete, select OK . The changes are applied.
3-6 BBP™31 Sign & Label Printer
User Guide
Page 49

Tools
Zooming the Label View
To zoom a label view:
1. Touch to zoom in or to zoom out.
2. T ouch the zoom control again, as necessary, until you re ach the desired zoom
level.
Note: If all of the label object s cannot be displayed on the screen, the scroll arro ws
display. See “Scrolling the Label View” on page 3-7 for details.
3. Touch as needed to return to normal viewing mode.
Scrolling the Label View
Tools
Scrolling the Label View
Use this procedure to view part of the label that is no longer displayed on the
screen, either vertically or horizontally, without changing the zoom level.
To view hidden parts of a label:
1. When one or more scroll arrows appear in the Editor, touch a scroll arrow to
scroll in the direction you want to view. The ruler value updates automatically
as the label view changes.
Note: If the entire label is shown on the display, no scroll arrows appear.
2. Touch the scroll arrow again to continue scrolling in the direction you want. If
you hold the scroll arrow down, the system will continue scrolling.
3. To return to normal viewing mode, touch until you can see the entire
BBP™31 Sign & Label Printer
label content.
User Guide
3-7
Page 50

4 Working with Objects
Overview
What is an Object?
An object can be any text, graphic or barcode element on a label. Objects can be edited,
moved, aligned, deleted, rotated, framed and/or sized. Some objects also have
characteristics that can be added or changed (e.g., bold, justified, underlined, density).
Object Types
Object types include Text, Graphics, Barcodes, Serialization, and Date/Time. To add
objects:
•
Touch the Editor screen
with any of the object types.
•
Touch Add Object button
object which you can then populate with any of the object types.
•
Add Empty Object
label will create a placeholder object at the location you touched. The object type you
create will then insert into the placeholder object.
: Inserts a placeholder object which you can then populate
(located in the
(when at the
Control Panel
Add Object
): Inserts a placeholder
panel): Touching an empty area of the
BBP™31 Sign & Label Printer
User Guide
4-1
Page 51

Overview
Object Sizing
Undo
Undo allows you to restore the last editing operation(s) that have t aken p l ace. For
example, if a segment of text has been deleted or changed, performing an undo
will restore the original text.
The number of undo actions are limited and are based on the complexity of the
label and the specific objects on the label.Typically, the fewer objects on the label,
the more undo actions can be done. If you take an action that you cannot undo,
the Undo option will no longer be available.
Actions that you can undo are:
• Add object
• Format objects or change object attributes
• Delete objects
• Size or move objects
• Type text
Actions that you cannot undo are:
• Any file operation (save, open, delete)
• Change printer defaults
• Print/cut operations
• Select a label template
To undo an action:
1. Select Undo . The last action is canceled and the label returns to its
previous state.
2. Repeat Step 1 to undo multiple actions.
Object Sizing
The system automatically reduces the object size to fit on the label and will move
or resize the object so it stays within the printable area of the label (text will not be
truncated).
4-2 BBP™31 Sign & Label Printer
User Guide
Page 52

Adding Objects
The easiest way to add an object is to touch a blank area of the Editor. If you are
currently editing an object, touch the screen twice, once to deselect the current
object and once to insert a new object.
You can also add objects using any of the following the methods.
Text Objects
To add a text object:
1. Use one of the following methods to add a text object:
•
Start typing
already placeholder objects in the
available (empty) placeholder.
•
Touch a blank area of the screen
will be added to that object.
Adding Objects
Text Objects
: A text box is added and filled with the typed text. If there are
Editor
, the text will be added to the first
: A text box is added and any typed text
•
Select Add Object
be added to that object.
Note: As soon as a text object is selected, the system goes to the text editing
panel and you can type and/or edit the text.
2. To edit the text, see “Working with Text” on page 4-10.
: Select
Tex t
. A text box is added and typed text will
BBP™31 Sign & Label Printer
User Guide
4-3
Page 53

Adding Objects
Graphic Objects
Graphic Objects
To add a graphic object:
1. Use one of the following methods to add a graphics object:
• Touch anywhere in the
- or -
Editor
.
• If you are already in a label, select
2. In the Add Object panel, select Graphic .
3. In the Select Graphics dialog box, choose the Category for the graphic you
want to add.
4. Touch the desired graphic. The graphic is added to the label (or replaces the
selected graphic placeholder).
Add Object
,
Note: You can also import your own graphics and use them like the graphics
included in the system. See “Import Graphics” on page 7-1.
4-4 BBP™31 Sign & Label Printer
User Guide
Page 54

Barcode Objects
To add a barcode object:
1. Use one of the following methods to add a barcode object:
• Touch anywhere in the
- or -
Editor
Adding Objects
Barcode Objects
.
• If you are already in a label, select
2. In the Add Object panel, select Barcode .
3. In the Barcode Content dialog box:
a. Select a barcode Symbology.
b. Type a Data Value.
Note: You can set a different symbology as the default by using System Setup
(see “Set Barcode Defaults” on page 2-18).
Note: To set a different data source, see “Converting Text or Barcode to
Variable Data” on page 4-31.
Add Object
,
4. Select OK .
BBP™31 Sign & Label Printer
Note: If a typed character is invalid for the active symbology, a message will
display indicating that you have entered an incorrect character. Options for
entering barcode data and selecting symbology will remain displayed until valid
characters are entered or you cancel the operation.
User Guide
4-5
Page 55

Adding Objects
Serial Objects
Serial Objects
Serialization lets you create labels that contain number or letter sequences that
print as multiple labels at print time.
Note: This procedure applies only when not using a te mplate. If using a te mplate,
see “Converting Text or Barcode to Variable Data” on page 4-31.
To add a serial object:
1. Use one of the following methods to add a barcode object:
• Touch anywhere in the
- or -
Editor
.
• If you are already in a label, select
2. In the Add Object panel, select Serial & Date/Time .
3. In the Serial & Date/Time dialog box, select either:
•
Serial Text
• Serial Barcode
Add Object
,
4-6 BBP™31 Sign & Label Printer
User Guide
Page 56

Adding Objects
Serial Objects
4. In the Serial dialog box, type or select values for setting the serial attributes
(the Sample area will immediately display an example of the selections):
•
Starting Value
alpha or numeric (positive or negative) values.
•
Ending Value
Number of labels is entered). Can use alpha or numeric (positive or negative)
values.
•
Change by
label. Can use positive or negative values.
•
Total number
is entered).
•
Before serial
•
After serial
: Starting label value for the serialization to begin. Can use
: Ending label value for the serialization to stop (not used if Total
: Number that the serial value increments or decrements for each
: Number of labels that will be printed (not used if Ending Value
: Prefix (text or spaces) before the serial value.
: Suffix (text or spaces) after the serial value.
5. When done, select OK . The system displays the initial (first) value of the
BBP™31 Sign & Label Printer
serialization on the label.
User Guide
4-7
Page 57

Adding Objects
Date/Time Objects
Date/Time Objects
The Date/Time option lets you place a time stamp on your label (text or barcode).
Depending on the options you choose, you can add a date, time or d ate and time.
You can change the clock settings at any time by selecting Clock Settings (see
“Set Clock” on page 2-15, starting at Step 4 for more details).
Note: With power removed (i.e., printer disconnected from powe r so urce ), th e
system clock retains its settings for about 30 days.
To add a date/time object:
1. To add a date/time object:
• Touch anywhere in the
- or -
Editor
.
• If you are already in a label, select
2. In the Add Objects panel, select Serial & Date/Time .
3. In the Serial & Date/Time dialog box, select:
•
Date/Time Tex t:
•
Date/Time Barcode
Places a date/time object on your label.
: Places a barcode object with date/time data.
Add Object
,
4-8 BBP™31 Sign & Label Printer
User Guide
Page 58

Adding Objects
Date/Time Objects
4. In the Date/Time menu, select the format(s) you want included on the label.
The Preview area immediately displays the changes.
•
Include date:
•
Include time:
•
Date Format:
•
Time Format:
•
Hour Format:
Toggles the date on or off.
Toggles the time on or off.
Format for date printed on label(s).
Format for time printed on label(s).
12-hour (AM or PM) or 24-hour time format
5. When done, select OK . An object with the current date/time value is
added to the label.
Note: When printed, the date/time value of each label will reflect the current
date and time of the printer.
Note: If the system clock has not been set, the system displays a message
requesting that you set the system clock. Selecting OK takes you to Clock
Settings. Selecting Cancel returns you to the Editor.
BBP™31 Sign & Label Printer
User Guide
4-9
Page 59

Working with Text
Selecting or Deselecting Text
Working with Text
Selecting or Deselecting Text
To select or deselect words in a text box:
1. In the Editor, touch the word(s) you want to select:
•
Select a single word
•
Extend the selection
object. The system highlights the additional word(s).
•
Deselect a word
If more than one word is highlighted, the system deselects everything
the word that was touched.
To select individual characters in a text box:
1. In the Editor, choose the object with the character(s) you want to select.
2. Touch the area where you want the selection to start (or use the keyboard
: Touch the word. The system highlights the word.
: Press
: T ouch the highlighted word. The system deselects the word.
Shift
and touch another word in the same text
except
I or J arrow keys).
3. On the keyboard, hold Shift and press the
cursor to the position where you want the selection to end.
I or J arrow keys to move the
Note: Until Shift is released, the selection will be extended by one character each
time you press an arrow key.
To select all characters in a text box:
1. In the Editor, select a text object.
2. Select Select All Chars . The system selects all characters in the
text object.
4-10 BBP™31 Sign & Label Printer
User Guide
Page 60

Increase or Decrease Text Size
When you change a character-level attribute, any highlighted text will reflect the
change and
You can grow or shrink the text sizing by this procedure.
To increase text size:
• Type text into a text box. The text will automatically size to fit the size of the
new text following the current cursor position will also reflect the change.
text box or as it reaches the label boundary.
Working with Text
Delete/Clear Text
• Touch or select a text box and then in the
• See also
To decrease text size:
• Press
• Touch or select a text box and then in the
Enter
text box.
Delete/Clear Text
To delete/clear text in a text box:
1. With a text label in the Editor, touch a text object. The cursor (blinking) is
positioned at the end of the text box.
2. To delete or remove text, use these keys on the keyboard:
•
Backspace:
•
Highlighted Characters:
Backspace
Note: Pressing Enter deletes any highlighted text and starts a new line.
3. To clear all text and leave the text box:
Control Panel
“Changing Character Font, Size or Style” on page 4- 12
. A new line will be started and the text size decreased to fit the
Control Panel
Deletes character(s) to the
If characters are highlighted, pressing
deletes all of the highlighted text.
left
of the cursor:
, select
, select
Size
.
.
Size
.
4. To delete all text and remove the text box, touch Delete in the Tools
BBP™31 Sign & Label Printer
a. Select Select All Chars .
b. On the Keyboard, press Backspace. Clears highlighted text.
section. All text in the selected text box is deleted and the text box is removed.
User Guide
4-11
Page 61

Working with Text
Changing Character Font, Size or Style
Changing Character Font, Size or Style
Character-level attributes are those that affect a single character or characters in
an object (e.g., The "T" in the word Text). Character-level attributes include font,
font size and font style (bold, italic and underline).
When you change a character-level attribute, any highlighted text will reflect the
change and
To change a character font, size or style in the Text Attributes control panel:
Note: When you change the text attributes from the control p anel, the changes are
immediately reflected in the Editor. Any subsequent changes will also reflect this
change.
1. In the Editor, select a single character or characters from the text box.
2. In the Text Attributes control panel:
new text following the current cursor position will also reflect the change.
•Press
• Press any of the following buttons: .
Font
, then select the new font type and press OK.
4-12 BBP™31 Sign & Label Printer
User Guide
Page 62

Working with Text
Changing Character Font, Size or Style
To change a character font, size or style in the Fonts dialog box:
1. In the Editor, select a single character or characters from the text box.
2. In the Text Attributes controls, select Fonts
3. In the Fonts dialog box, select or change any of the following attributes:
•
Fonts
: Select from the list of available fonts.
•
Size
: Type a size for the text. Any highlighted text will change to the new size
and new text following the current cursor position will also reflect the change.
•
Style
: Select Bold, Italic and/or Underline (also see
Text Size” on page 4-11
).
“Increase or Decrease
4. When you are done, select OK .
BBP™31 Sign & Label Printer
User Guide
4-13
Page 63

Working with Text
Vertical Text
Horizontal Text Justification
Use this procedure to set or change how text is horizontally aligned within the
object. This primarily affects text objects with multiple lines; the alignment setting
is either at the left edge, center, or right edge of the object.
Note: Horizontal alignment affects the way the text grows as characters are added.
Left-justified text grows to the right, center-justified text grows both directions and
right-justified text grows to the left.
To set text horizontal justification:
1. In the Editor, select the text object you want to change.
2. If not already displayed, select More Options to go to the
Justification controls.
3. Select the desired justification option (left, center, right) . The
text is immediately displayed and justified to the new setting.
Note: Text objects can all be formatted with different alignments, however the
last text object set becomes the default for any new text objects during the
current editing session. See “Set Text Defaults” on page 2-17 for more details.
Vertical Text
Use this procedure to align text vertically as a string of characters.
Once text has been sized to fit vertically, selecting the vertical setting again will not
change the text back to the original size. You will have to manually change the text
size back to its original setting.
To set text vertically:
1. In the Editor, select the text object you want to change.
2. In the Control Panel, select More Options to navigate to the
Vertical controls.
3. Select Vertical . The text is immediately displa yed ve rtica lly on the labe l.
4. To toggle the vertical setting on and off, select Vertical again.
Notes:
• Line breaks in the text are treated as spaces when the text is formatted
vertically.
• If the vertical object does not fit on the label, the object and text will be
resized so it fits within the printable ar ea of the label (i.e., text is not
truncated).
4-14 BBP™31 Sign & Label Printer
User Guide
Page 64

Expanding or Condensing Text
Use this procedure to expand or condense the text characters horizontally. This
does not change the font size.
To expand or condense text:
1. In the Editor, select the text object you want to expand or condense.
2. In the Control Panel, select More Options to navigate to the
Expand/Condense controls.
3. Select Expand or Condense . The text is immediately displayed
expanded or condensed on the label.
Note: Text exp ands or condenses 50% to 200% in 10% increments. If the limits
are reached, the Expand/Condense buttons have no fu rther effect.
4. Repeat Step 3 to continue expanding or condensing the text.
Reversing Text
Working with Text
Reversing Text
Use this procedure to format text with the foreground and background colors
reversed (i.e., black on white background or white on black background).
To set reverse text output:
1. In the Editor, select the text object you want formatted in reverse.
2. In the Control Panel, select More Options to navigate to the
Reverse control.
3. Select Reverse . The text is immediately displayed with the foreground
and background colors reversed.
4. To toggle the setting on or off, select Reverse again.
BBP™31 Sign & Label Printer
User Guide
4-15
Page 65

Working with Text
Typing Text and Accented Characters
Typing Text and Accented Characters
As with standard PC keyboards, each character key supports multiple characters
when used in combination with the <Shift> and <Alt Gr> keys.
Keycaps show characters in one of four positions (see Figure 4-1). The character
position on the physical key indicates how to access the characters with the
<Shift> and <Alt Gr> keys.
Characters that require 2 keystrokes are not differentiated in any way, however,
they will respond differently when selected. For example, when an accented
character is typed, it will not display until the letter to be modified is also typed. The
accented character will then be displayed with the letter.
Understanding Keystroke Combinations
• The term "Key" represents the physical key on which the accent character is
located.
• The "+" sign indicates that two or more keys should be pressed simultaneously.
• A comma separating a keystroke combination indicates that the first set of keys
should be released before typing the next keystroke combination.
Figure 4-1. Keystroke Combinations
4-16 BBP™31 Sign & Label Printer
User Guide
Page 66

Working with Text
Typing Text and Accented Characters
Typing Accented Characters
To access accented characters, typing the key combina tions may vary depe nding
on the keyboard configuration you are using. The following shows an example of
using each of the 4 key combinations.
Note: See “Character Mapping & Keyboard Layouts” on page B-1 for a list of
accent characters available with specific keyboards and the keyboard
configurations.
To type an accented character:
1. On the keyboard, locate the key with the accented character you want
applied.
2. Type the appropriate keystroke combination (see Figure 4-1). The table
shows example keystroke combinations.
Note: The keyboard configuration used in all of the examples is North American
QWERTY, except the ring, which used the European QWERTY.
Result Accent Key Keystroke Combination
ç
ô
à
é
ñ
ä
å
Cedilla
Circumflex
Grave
Acute
Tilde
Diresis (umlaut)
Ring
Lower Case: Alt Gr + Key
Upper Case: Shift + Alt Gr + Key
Lower Case: Shift + Alt GR + Key, Letter
Upper Case: Shift + Alt GR + Key, Shift + Letter
Lower Case: Alt-GR + Key, Letter
Upper Case: Alt-GR + Key, Shift + Letter
Lower Case: Shift + Key, Letter
Upper Case: Shift + Key, Shift + Letter
Lower Case: Alt + Key, Letter
Upper Case: Alt + Key, Shift + Letter
BBP™31 Sign & Label Printer
User Guide
4-17
Page 67

Working with Text
Entering Special Characters
Entering Special Characters
Use this procedure to enter text characters, such as accented characters or
special characters, that are not present on the physical keyboard.
To enter special characters:
1. In the Editor, choo se a text object then select Special Characters . A list
of available characters is displayed.
Note: The available characters depend on the font you are using.
2. Select the character(s) you want to enter (you can select more than one
character at a time). The selected character(s) immediately display in the
Characters to Insert area.
Notes:
• If you want to mix special and normal characters, you can also type in to the
Characters to Insert area.
•Press Up or Down arrows to scroll through the available
characters.
3. To delete characters from the area, press Backspace or highlight the
characters and press Delete.
4. When you are done choosing special character(s), select OK . The
special characters are inserted in the active text object at the current cursor
position.
4-18 BBP™31 Sign & Label Printer
User Guide
Page 68

Working with Barcodes
Changing a Barcode
To change a barcode:
1. In the Editor, select a barcode object.
2. Select Change Barcode .
Working with Barcodes
Changing a Barcode
3. In the Barcode dialog box, change the desired options:
4. When done, select OK .
BBP™31 Sign & Label Printer
• Data value
• Symbology
•
Set Data Source
Variable Data” on page 4-31
User Guide
(optional). See
for details.
“Converting Text or Barcode to
4-19
Page 69

Working with Barcodes
Changing Barcode Options
Changing Barcode Options
Barcode options include changing the barcode symbology and data value, setting
a different ratio and density and increasing or decreasing the barcode size.
Barcode Size
To change the barcode size:
1. In the Editor, select a barcode object.
2. In the Control Panel
barcode vertically. Changes are immediately reflected in the
, select
Size
to increase or to decrease the
Editor
.
Barcode Ratio
Ratio is the thickness between a narrow bar and a wide bar (overall width of the
barcode). Usually, the ratio is between 2:1 and 3:1. Does not apply to all
symbologies.
To change a barcode ratio:
1. In the Editor, select a barcode object. If the Barcode Content dialog box
opens, select Cancel.
2. In the Control Panel
Changes are immediately reflected in the
, choose from one of the three options .
Editor
.
4-20 BBP™31 Sign & Label Printer
User Guide
Page 70

Working with Barcodes
Changing Barcode Options
Barcode Density
Density controls the width of the barcode lines and spaces (choose between 10
and 80 mils). Typically, the thinner the bar and spaces, the higher the bar code
density and the less space it takes on a label.
To change the barcode density:
1. In the Editor, select a barcode object.
2. In the Control panel, select Density .
3. In the Barcode Density dialog box, choose a density for your barcode.
4. Select OK. The changes are immediately reflected in the Editor.
BBP™31 Sign & Label Printer
User Guide
4-21
Page 71

Working with Barcodes
Changing Barcode Options
Human-Readable Text Options
Barcode text options let you choose whether to show any human-readable text on
your barcode and where it should be positioned (above or below the barcode).
You can also decide whether you want the text to include a check character or a
start/stop character.
To add human-readable text:
1. In the Editor, select a barcode object.
2. Select More Options and go to the Human Readable Text control
panel.
3. Choose the Human-Readable Text option you want: none, above barcode or
below barcode.
4. To choose a font and/or size for your human-readable text,
select Font .
5. In the Font dialog box, choose a font, size and/or style fo r the human-readable
text that will be included on your barcode.
6. When done, select OK . The barcode reflects the changes.
7. Select the check character options you want for your barcode. The changes
are immediately reflected in the Editor.
4-22 BBP™31 Sign & Label Printer
User Guide
Page 72

Handling Objects
Editing Objects
To edit an object, touch the object and then edit it using any of the settings and/or
attributes available in the Control Panel. If you want to change to a different
graphic or barcode, select Change Graphic or Change Barcode, then change
any of the options available in the Barcode or Select Graphic dialogs.
Moving Objects
Use this procedure to reposition objects on the label. Objects can be positioned
either by dragging, using arrow keys on the keyboard, or by settin g specific x- and
y-coordinates. They can also be positioned by aligning them to one of the edges
of the label or centering them either horizontally or vertically on the label.
Note: Objects must be entirely contained within the printable area of the label.
Drag Objects
Handling Objects
Moving Objects
To drag an object:
1. In the Editor, select the object you want to move.
2. Drag the object to the new location.
Notes:
• If you drag an object off the edge of the displayed part of the label (but still
within the label boundary), the display will automatically scroll so the object
stays visible.
• If you move an object so that some or all of the object is outside the
printable area of the label, the object will be repositioned within the label
boundary.
3. Repeat Step 2 until the object is where you want it.
Use Keyboard Arrow Keys
To move an object using keyboard keys:
1. In the Editor, select the object you want to move.
2. On the keyboard, press the up, down, left, or right arrow key [
move the object in the corresponding direction. If you hold down the shift key
while using the arrows, the objects move in larger increments.
Note: The text-editing panel cannot be displayed if you want to move a text
object using the arrow keys. If the text-editing panel is displayed, using the
arrow keys will move the cursor within the text box. To exit text editing mode,
select More Options, then use the arrow keys to move your object.
LIJK] to
3. Repeat Step 2 until the object is positioned where you want it.
BBP™31 Sign & Label Printer
User Guide
4-23
Page 73

Handling Objects
Moving Objects
Set Object Position
Use this procedure if you want to move an item on the label to a specific position
by setting the specific x- and y-coordinates.
To move an object using object positio n coordinates:
1. In the Editor, select the object you want to move.
2. In the Control Panel, select More Options to navigate to
the Exact Size & Position option.
3. Select Exact Size & Position .
4. Type a value for:
•
Distance from the top of label
•
Distance from left edge
(X coordinate).
(Y coordinate).
5. When done, select OK . The object is displayed at the specified position.
Note: If the values entered result in the object being positioned outside the
printable area, the system resizes and repositions the object to fit on the labe l.
4-24 BBP™31 Sign & Label Printer
User Guide
Page 74

Aligning Objects
To align objects on label:
1. In the Editor, select the object you want to align.
2. Choose More Options and go to the alignment Control Panel:
3. Choose the alignment option(s) you want (changes are immediately reflecte d
in the Editor):
•
Center on Label
the label.
•
Align to Label Edge
If the object already reflects an option, or if the option cannot be used for this
object, the button is greyed out.
: Positions the object in the
: Align object to
top, bottom, left
vertical
Handling Objects
Aligning Objects
or
horizontal
or
right
center of
of label edge.
Note: If an option is unavailable, or if the object already reflects the change,
the option button(s) are greyed out.
Example:
To move an object to the upper left corner:
a. Touch (top).
b. Touch (left).
BBP™31 Sign & Label Printer
User Guide
4-25
Page 75

Handling Objects
Sizing Objects
Sizing Objects
Use this procedure to set the object size. Objects can be sized by using the size
buttons, dragging objects to size or setting object label length and width.
Note: Sizing an object too large may cause it to overlap or cover othe r objects in
the Editor.
Use Size Buttons
To use the size buttons:
1. In the Editor, select the object you want to resize.
2. In the Toolbar, touch increase or decrease button. Increasing or
decreasing the object size with the Size buttons result s in proportional resizing
only.
Note: For barcode object s, resizing occurs only in the direction of the barcode
bars (usually the vertical direction, unless the barcode has been rotated).
3. Repeat Step 2 until the object is the size you want.
4-26 BBP™31 Sign & Label Printer
User Guide
Page 76
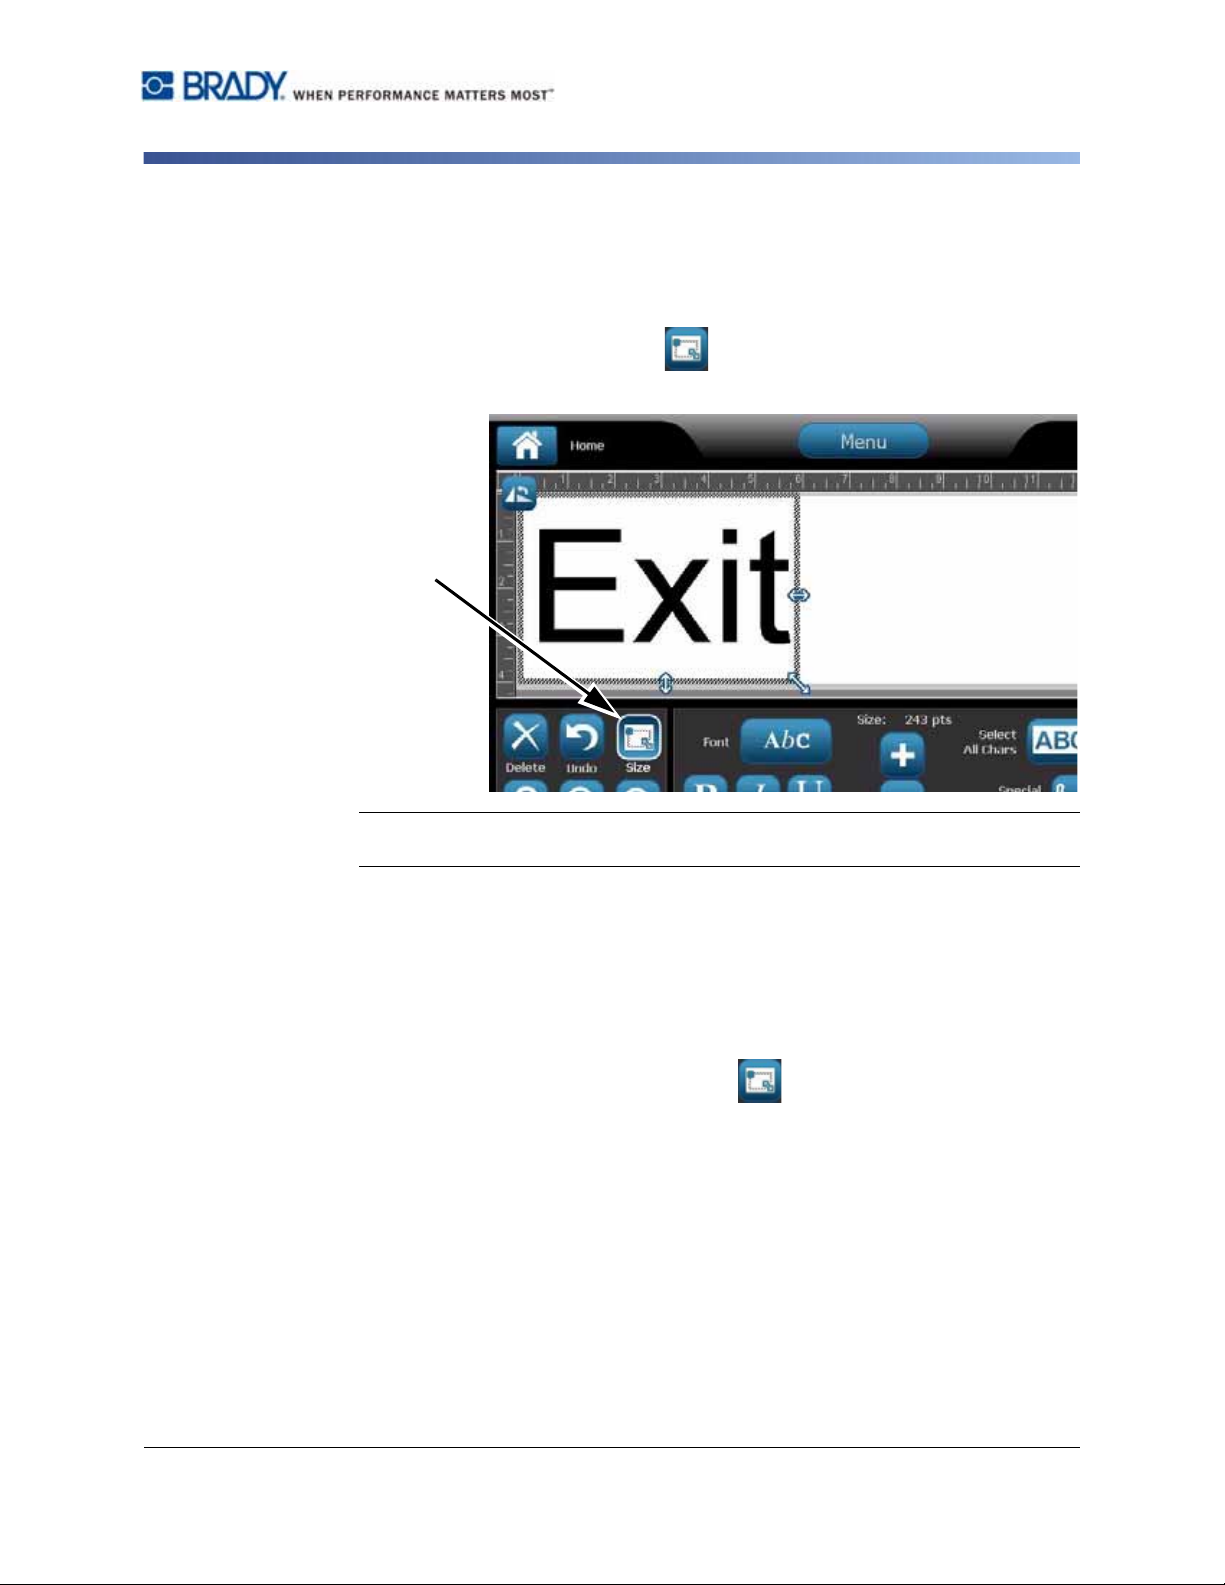
Handling Objects
Drag Objects to Size
To drag objects to size:
1. In the Editor, select the object you want to resize.
2. In the Tools panel, touch Size to display the sizing handles on the
object.
Sizing Objects
Note: If an object is rotated, the non-proportional sizing han dles are hidden. T o size
non-proportionally, return the object to an unrotated state (0 degrees).
3. Touch a handle and drag on the touch screen to resize the object:
•
Proportionally
•
Non-Proportionally (Width)
: Drag the corner handle to resize the object proportionally.
: Drag the right-side handle to stretch or shrink
the object width in the direction of the handle only.
•
Non-Proportionally (Height)
: Drag the bottom handle to stretch or shrink
the object width in the direction of the handle only.
4. To hide the sizing handles, touch Size again.
BBP™31 Sign & Label Printer
User Guide
4-27
Page 77

Handling Objects
Sizing Objects
Set Object Size
Use this procedure if you want to size an object by setting the object height and
width.
To size an object using object dimensions:
1. In the Editor, select the object you want to resize.
2. In the Control Panel, select More Options to navigate to
the Exact Size & Position option.
3. Select Exact Size & Position .
4. To maintain the object proportions, select Keep width-height ratio.
5. Type a value for:
•Object width
• Object height
6. When done, select OK . The object is displayed at the specified size.
Note: If the values entered result in the object being positioned outside the
printable area, the system resizes and repositions the object to fit on the labe l.
4-28 BBP™31 Sign & Label Printer
User Guide
Page 78

Deleting an Object
To delete an object from a label:
Note: This procedure does not delete the text within an object. To delete text,
see “Delete/Clear Text” on page 4-11.
1. In the Editor, select the object you want to delete.
2. Touch Delete or press Del on the keyboard.
Framing an Object
To place (or remove) a frame around an object, the object must be either text or
graphic. Barcode objects cannot be framed. When selected, changes are
immediately reflected in the Editor.
Note: To frame the entire label, see “Framing a Label” on page 3-6.
To frame an object on a label:
Handling Objects
Framing an Object
1. With a label defined in the Editor, select the object you want to frame.
2. Select More Options and go to the Object Frame panel.
3. Select the Shape you want around the object (none, rectangle, rounded).
4. Select a Line Width for the frame (narrow, medium, wide).
BBP™31 Sign & Label Printer
User Guide
4-29
Page 79

Handling Objects
1
2
Rotating an Object
Rotating an Object
To rotate an object:
1. In the Editor, touch the object you want to rotate.
2. In the Tools Panel, touch Size [1] to display the sizing and rotation
handles.
3. On the label, touch Rotate [2]. The object is rotated 90°
counterclockwise.
Note: When rotated, the text font will be reduced so that the entire text box fits
on the label. The font size will stay reduced even if the object is rotated back to
its original position (a full 360°).
4. Repeat S tep 3 to rot ate the object further (selecting Rotate 4 times returns the
object to the original unrotated state).
4-30 BBP™31 Sign & Label Printer
User Guide
Page 80

Converting Text or Barcode to Variable Data
Converting Text or Barcode to Variable Data
Use these procedures to convert an existing text or barcode object into a seri al or
date/time object on the label. This applies to both template or freeform objects .
Note: You cannot add serial data to a graphic.
Convert to Serial Data
To convert text or barcode to serial data:
1. In the Editor, select the text or barcode object that you want to use for the
serial data.
2. Text: Select More Options and go to Set Data Source.
- or -
Barcode: Select Change Barcode .
3. Select to Set Data Source .
Handling Objects
4. In the Set Data Source dialog box, select from the following options to choose
5. Select Serial .
BBP™31 Sign & Label Printer
the data source and change the format options:
•
Constant
•
Serial
•
Date/Time
“Serial Objects” on page 4-6
User Guide
: Fixed (non-variable) object.
: Places a date/time object on your label.
Displays the
for details.
Serial & Date/Time dialog box
. See
4-31
Page 81

Handling Objects
Converting Text or Barcode to Variable Data
6. In the Serial dialog box, type or select values for setting the serial attributes
(the Sample area will immediately display an example of the selectio ns) :
7. When you select OK , The text or barcode object is converted to a serial
object on the label.
4-32 BBP™31 Sign & Label Printer
User Guide
Page 82

Handling Objects
Converting Text or Barcode to Variable Data
Convert from Serial Data
Use this procedure if you want to convert a serial object to constant data.
To convert text or barcode to c onstant data:
1. In the Editor, select the serialized text or barcode object that you want
converted to constant data.
2. Text: Select More Options and go to Set Data Source.
- or -
Barcode: Select Change Barcode .
3. Select Set Data Source .
4. In the Set Data Source dialog box, select Constant . The Barcode
5. Select OK . The object will change to fixed (non-serialized) data.
BBP™31 Sign & Label Printer
dialog opens and gives you the option to change the data value.
Note: If you do not change the data value, it will default to the value shown in
the Data value box.
User Guide
4-33
Page 83

Handling Objects
Converting Text or Barcode to Variable Data
Convert to Date/Time
To convert a date/time object to constant data:
1. Select an object.
- or -
Touch the Editor to create an object.
2. Touch Serial & Date/Time . Displays the Date/Time dialog box. See
“Serial Objects” on page 4-6 for instructions.
3. In the Serial & Date/Time dialog box, choose either Date/Time Text or
Date/Time Barcode.
4. In the Date/Time dialog box, choose the settings you want for the object.
5. When done, touch OK .
4-34 BBP™31 Sign & Label Printer
User Guide
Page 84

Convert from Date/Time
To convert a date/time object to constant data:
1. Select the date or time object.
2. Select More Options to go to the Set Data Source option.
3. Select Set Data Source .
Handling Objects
Convert from Date/Time
4. Select Constant . The da te/time is converted to editable data.
BBP™31 Sign & Label Printer
User Guide
4-35
Page 85

5 Printing Your Labels
Previewing Labels
The Preview options differ depending on whether the label is a standard label or a
serialized label.
Previewing a Label without Serialized Objects
To preview a label with no serial data:
1. With a defined label in the Editor, select Print .
2. From the Print dialog box, select Preview . The entire label is displayed for your
3. Select Start Print or Cancel .
BBP™31 Sign & Label Printer
review.
User Guide
5-1
Page 86

Previewing Labels
Previewing a Label with Serialized Objects
Previewing a Label with Serialized Objects
To preview a serialized label:
1. With a defined label in the Editor, select Print .
2. Select Preview . The entire label is displayed, plus options to view the
other labels generated by the serial object.
3. Select Next Label or Previous Label to view the labels generated
from the serial object.
4. Select Start Print or Cancel .
5-2 BBP™31 Sign & Label Printer
User Guide
Page 87

Printing Labels
As you print your labels, keep the following in mind:
• During printing, the print status is displayed and the Editor is unavailable.
When printing is complete, you are returned to the Editor.
• The printer cuts between labels or at the end of the job, according to the
selected cut settings.
• If there is no media or ribbon installed, printing does not start and you will be
prompted to install media or ribbon.
• If you open the ribbon cover during the print operation, printing stops and a
message displays prompting you to close the cover. The print job is canceled.
To print the label(s), you must restart the print job.
Printing Labels without Serialized Objects
Use this procedure to print your label. If your label contains a serial object, see
“Printing Labels with Serialized Objects” on page 5-4.
Printing Labels
Printing Labels without Serialized Objects
To print labels without serialized objects:
1. With a defined label in the Editor, select Print . The Print dialog box
displays with default copies set to 1.
2. From the Print dialog box, select the print options:
•
Copies
•
Mirror
• Preview
•
Print energy
•
Adjust Offset
(accessed from the
(accessed from the
Advanced Settings
Advanced Settings
button)
button)
3. Select Start Print to start printing the label.
BBP™31 Sign & Label Printer
User Guide
5-3
Page 88

Printing Labels
Printing Labels with Serialized Objects
Printing Labels with Serialized Objects
Use this procedure to print labels that contain a serial object. If your label does
not contain a serialized object, see “Printing Labels without Serialized Objects” on
page 5-3.
Note: You can only select one set of copies when printing labels that contain
serialized objects. However, If the label includes more than one serial object, the
option to “print all labels” results in one complete set of the labels generated from
the serial object that prints the most labels; the shorter series will repeat until the
longer series is completed.
To print labels with serialized objects:
1. With a serial label in the Editor, select Print .
2. From the Print dialog box, select the print options:
•
Labels to print
•
Mirror
• Preview
•
Print energy
•
Adjust Offset
(print all labels, or select a range of labels to print)
(accessed from the
(accessed from the
Advanced Settings
Advanced Settings
button)
button)
3. Select Start Print to start printing the labels.
5-4 BBP™31 Sign & Label Printer
User Guide
Page 89

Printing Mirror-Image Labels
Use this procedure to print labels suitable for reading in a mirror or through the
back of the label.
To print a mirror-image label:
1. With a defined label in the Editor, select Print .
2. From the Print dialog box, select Mirror .
3. Select Start Print to start printing the labels. The labels are printed
mirrored across the media.
Note: T he Mirror setting is not reta ined for the next print job. The Mirror setting
must be reselected each time you want to print mirror-image labels.
Canceling a Print Job
This procedure assumes that a print job has been initiated and is currently
printing.
Printing Labels
Canceling a Print Job
To cancel a print job:
1. In the Printing Status dialog box, select Cancel . The printer immediately
stops printing, displays a print job cancelled message, and cuts the media.
Note: Once Cancel is selected, the print job cannot be resumed.
BBP™31 Sign & Label Printer
User Guide
5-5
Page 90

Printing Labels
Resuming an Interrupted Print Job
Resuming an Interrupted Print Job
Use this procedure to resume a print job that was interrupted.
To resume an interrupted print job :
1. When the job interruption message displays, corr ect the condition that caused
2. Select the option to continue:
the interruption (e.g., replace the media or ribbon).
•
Resume Current
•
Resume Next
- or -
•
Cancel
the print job.
(reprints the current label, then continues printing)
(prints the next label, then continues printing)
5-6 BBP™31 Sign & Label Printer
User Guide
Page 91

Adjusting Print Energy
CAUTION!
If your printing is spotty, you may want to increase the print energy to make sure
more of the ribbon ink transfers to the label. However, if your ribbon is sticking or
tearing during printing, the heat energy may be too high and should be reduced.
Constantly printing at high energy levels may cause printer jams or other printing
errors and may reduce the overall life of your printhead.
To adjust the print energy:
1. With a defined label in the Editor, select Print .
2. In the Print dialog, select Advanced Settings .
Printing Labels
Adjusting Print Energy
3. In the Print Energy area, select the appropriate box to increase or decrease
4. Select OK . The print energy level is changed and the Print dialog box
5. Choose your print options and select Start Print . The system uses the
BBP™31 Sign & Label Printer
the print energy level.
Note: By default, the print energy is at the nominal setting for the best overall
performance.
is displayed.
new setting for printing the label(s) in this print job.
Note: The selected print energy setting will stay in effect for all subsequent
print jobs with the currently installed media. When new media is installed, the
print energy level is reset to the default setting. The print energy level is also
reset by rebooting the system.
User Guide
5-7
Page 92

Printing Labels
Adjusting Print Offset
Adjusting Print Offset
Print Offset is a value that will move the image from its "nominal" position slightly
in one direction or another on the label. Adjust Offset is typically used to do a fine
adjustment of the printed image on a die-cut label, or to move the image slightly
closer or further from the edge of a continuous supply.
To adjust the print offset:
1. With a defined label in the Editor, select Print .
2. In the Print dialog, select Advanced Settings .
3. In the Adjust Offset area, enter a value in the horizontal and/or vertical offset
boxes:
•
Horizontal Offset
right or left.
•
Vertical Offset
5-8 BBP™31 Sign & Label Printer
: shifts the image (printed portion of the label) to the
: shifts the image (printed portion of the label) up or down.
User Guide
Page 93

Printing from a PC
Use this procedure to print labels that you created on a PC. See “Compatible
Applications” on page 1-2 for more details.
Note: To use this procedure, the printer must be physically connected to PC, the
appropriate drivers (i.e., printer driver , USB driver) must be installed on the PC ( see
“Using Your Printer with a PC” on page 2-12) and the BBP™31 printer must be
powered on.
To print from a PC:
1. From the label creation application at the PC, start the print job. The PC will
send the data to the printer.
Note: If the printer is already printing when the data is sent from the PC, the
printer will not acknowledge the data and eventually the PC will time out and
display an error message.
2. When the printer starts printing the job, let the job print, or select Cancel
Printing Labels
Printing from a PC
to cancel the print job.
Note: All standalone printer capabilities are disabled or unavailable while
printing from the PC.
BBP™31 Sign & Label Printer
User Guide
5-9
Page 94

6 Working with Label Files
Save a Label File
Use this procedure to save a label file.
1. With a label created in the Editor, select Menu .
2. Select Save File . The Save File dialog box displays.
Note: If the label was previously saved, the system defaults to that location and file name.
If the storage location is no longer available (e.g., the external storage location has been
removed), the system defaults to the internal memory location.
3. Choose a Label Location:
•
Internal Memory
•
External USB (file is saved on a US
be saved until one or more files in that location are deleted.
(file is saved on the printer).
B flash drive). If the location is full, no files can
Note: The system will support only one USB flash drive at a time.
4. Choose a Category or select New Category and type a category name.
5. Choose a Filename: Type a name for the label file, or confirm the existin g label file
name, if the file has been previously saved in this location. The system will not let you
type illegal characters.
Note: If filename already exists, the system will ask if you want to replace the existing file.
6. Select OK to save the label file. The label remains displayed in the Editor.
BBP™31 Sign & Label Printer
User Guide
6-1
Page 95

Open a Label File
Open a Label File
Use this procedure to retrieve a label file that has been saved in internal or
external storage.
1. Select Menu .
2. Select Open File . If a label file with unsaved changes is currently in
the Editor, you will be prompted to save the current label. Click No if you do
not want to save the label.
3. In the Open Label File dialog box, select the Location and Category where
the file is stored. The system will display all of the label files available at that
location.
4. Select the label file you want to open. The label will immediately open in the
Editor.
Note: If the selected label does not fit on the currently installed media, you will
be prompted to have the system make the data fit, or cancel the operation. If
you choose to make the data fit, objects will be moved and/or resized to fit on
the label.
6-2 BBP™31 Sign & Label Printer
User Guide
Page 96

Delete a Label File
To delete a label file:
1. Select Menu .
2. In the menu list, select Delete File .
3. In the Delete Label File dialog box, choose the location where the file is
located:
•
Internal Memory
•
External USB
Delete a Label File
(label files saved on the printer)
(label files saved on a USB flash drive)
4. Choose the Category where the label is saved. The system will display the
5. Touch the label file you want de le te d.
6. At the prompt to confirm file deletion, select Yes. The file is permanently
BBP™31 Sign & Label Printer
label files available in the selected location.
deleted.
- or -
Select No if you want to return to the previous screen without deleting the file.
Note: If you delete all labels in a category, the system will automatically delete
the category (except My Labels).
User Guide
6-3
Page 97

7 Using System Tools
Import Graphics
Use this procedure to add your own graphics for use in labels that will be created on the
printer. Graphics that will be imported must be in the supported format(s) and imported
from a USB flash drive. Supported graphics file formats are Windows metafile (*.wmf) and
Bitmap (*.bmp).
Note: This is a monochrome printer. Imported graphics should be black and white.
Windows metafile (*.wmf) formats are vector images that maintain their clarity and
crispness when they are resized. Bitmap files (*.bmp) are composed of pixels which may
appear fuzzy and become distorted when they are resized. Be sure to choose the correct
format for the graphic you are using.
To import a graphic:
1. Copy the graphics you want to import into the root director y of the USB flash drive yo u
will be using.
2. Connect the USB flash drive that contains the graphic(s) to a ny available USB por t on
the printer.
Note: The system will only support one USB flash drive at a time.
3. Select Menu .
BBP™31 Sign & Label Printer
User Guide
7-1
Page 98

Import Graphics
4. Select Import . The Import dialog box displays.
5. In the Import dialog box, select Graphics .
6. In the Available: list, select the graphic you want to import. A preview of the
selected graphic shows at the bottom of the dialog box.
7. Select Import . The graphic will be imported and the name will display
in the Installed list.
8. Repeat Step 5 until all of your graphics have been selected.
9. Select OK .
Note: If there is not enough space available to store the imported graphic(s),
you will have to clear some space by deleting saved files (“Delete a Label File”
on page 6-3) or deleting previously imported files (“Delete Imported Graphics”
on page 7-3) before you can import any new graphics. There is approximately
56MB of storage space available.
7-2 BBP™31 Sign & Label Printer
User Guide
Page 99

Delete Imported Graphics
Use this procedure to delete your own imported graphics that you no longer need.
To delete a graphic:
1. Select Menu .
2. Select Import . The Import dialog box displays.
Delete Imported Graphics
3. In the Import dialog box, select Graphics .
4. In the Installed: list, select the graphic you want to delete.
5. Select Delete .
6. Select Yes to confirm the deletion. The graphic will be deleted from the
7. Repeat Step 5 to delete additiona l graphics.
8. Select OK to exit the dialog.
BBP™31 Sign & Label Printer
Installed list.
User Guide
7-3
Page 100

Import Fonts
Import Fonts
Use this procedure to add your own fonts for use in labels created on the printer.
Only True-Type fonts can be imported.
To import a font:
1. Copy the fonts you want to import into the root directory of the USB flash drive
you will be using.
2. Connect the USB flash drive to any available USB port on the printer.
Note: The system will only support one USB flash drive at a time.
3. Select Menu .
4. In the menu options list, select Import . The Import dialog box
displays.
5. In the Import dialog box, select Fonts .
6. In the Available list, select the font you want to import.
7. Select Import . The font will be imported and the name will display in
the Installed list.
8. Repeat Step 5 until all of your fonts have been selected.
9. Select OK .
Note: If there is not enough space available to store the imported font(s), you
will have to clear some space on the system before you can impo rt any new
fonts. You can clear space by deleting saved files. There is approximately
56MB of storage space available.
7-4 BBP™31 Sign & Label Printer
User Guide
 Loading...