

Page 1
®
BBP
LABEL PRINTER
USER’S MANUAL
30
Page 2

Page 3

Copyright
Trademarks
This manual is copyrighted with all rights reserved. No portion of this manual may be copied
or reproduced by any means without the prior written consent of BRADY Worldwide, Inc.
While every precaution has been taken in the preparation of this document, BRADY assumes
no liability to any party for any loss or damage caused by errors or omissions or by statements
resulting from negligence, accident, or any other cause. BRADY further assumes no liability
arising out of the application or use of any product or system described, herein; nor any
liability for incidental or consequential damages arising from the use of this document.
BRADY disclaims all warranties or merchantability of fitness for a particular purpose.
BBP®30 Sign and Label Printer is a trademark of BRADY Worldwide, Inc.
Microsoft and Windows are registered trademarks of Microsoft Corporation.
BRADY reserves the right to make changes without further notice to any product or system
described herein to improve reliability, function, or design.
© 2015 BRADY Worldwide, Inc. All Rights Reserved
Printed July 2015
Firmware Version 1
Brady Worldwide Inc.
6555 West Good Hope Road
Milwaukee, WI 53223 U.S.A.
Telephone: 414-358-6600 USA Domestic
Facsimile: 414-438-6958
iBBP
®
30 User’s Manual
Page 4

UNITED STATES
NoteNote
This equipment has been tested and found to comply with the limits for a Class B
digital device, pursuant to part 15 of the FCC Rules. These limits are designed to
provide reasonable protection against harmful interference in a residential
installation. This equipment generates and may radiate radio frequency energy and,
if not installed and used in accordance with the instructions, may cause harmful
interference to radio communications. However, there is no guarantee that
interference will not occur in a particular installation. If this equipment does cause
harmful interference to radio or television reception, which can be determined by
turning the equipment off and on, the user is encouraged to try to correct the
interference by one or more of the following measures:
• Reorient or relocate the receiving antenna.
• Increaase the separation between the equipment and receiver.
• Connect the equipment into an outlet on a circuit different from that to which the
receiver is connected.
• Consult BRADY Technical Support for help.
Changes or modifications not expressly approved by the party responsible for compliance
could void the user’s authority to operate the equipment.
This device complies with Part 15 of the FCC Rules. Operation is subject to the following two
conditions: (1) This device may not cause harmful interference and, (2) this device must
accept any interference received, including interference that may cause undesired operation.
INDUSTRY CANADA
Industry Canada ICES-003:
CAN ICES-3 (A)/NMB-3(A)
EUROPE
Waste Electrical and Electronic Equipment Directive
In accordance with the European WEEE Directive, this device needs to be
recycled in accordance with local regulations.
BBP®30 User’s Manual ii
Page 5

RoHS Directive 2011/65/EU
This product is CE marked and complies with the European Union's Directive 2011/65/EU OF
THE EUROPEAN PARLIAMENT AND OF THE COUNCIL of 8 June 2011 on the
restriction of the use of certain hazardous substances in electrical and electronic equipment.
Turkey
Turkish Ministry of Environment and Forestry
(Directive on the Restriction of the use of certain hazardous substances in electrical and
electronic equipment).
Türkiye Cumhuriyeti: EEE Yönetmeliğine Uygundur
iii BBP®30 User’s Manual
Page 6

BRADY Warranty
Our products are sold with the understanding that the buyer will test them in actual use and
determine for him or herself their adaptability to his/her intended uses. BRADY warrants to
the buyer that its products are free from defects in material and workmanship, but limits its
obligation under this warranty to replacement of the product shown to BRADY’s satisfaction
to have been defective at the time BRADY sold it. This warranty does not extend to any
persons obtaining the product from the buyer.
THIS WARRANTY IS IN LIEU OF ANY OTHER WARRANTY, EPXRESSED OR
IMPLIED INCLUDING, BUT NOT LIMITED TO ANY IMPLIED WARRANTY OF
MERCHANTABILITY OR FITNESS FOR A PARTICULAR PURPOSE, AND OF ANY
OTHER OBLIGATIONS OR LIABILITY ON BRADY’S PART. UNDER NO
CIRCUMSTANCES WILL BRADY BE LIABLE FOR ANY LOSS, DAMAGE, EXPENSE
OR CONSEQUENTIAL DAMAGES OF ANY KIND ARISING IN CONNECTION WITH
THE USE, OR INABILITY TO USE, BRADY’S PRODUCTS.
YOU SHOULD CAREFULLY READ THE FOLLOWING TERMS & CONDITIONS OF
THIS LICENSE AGREEMENT. IF YOU DO NOT AGREE WITH THESE TERMS &
CONDITIONS, PLEASE PROMPTLY RETURN THIS PACKAGE FOR A FULL REFUND.
BBP®30 User’s Manual iv
Page 7

Technical Support
Technical Support Numbers/On-line Help
For repair or technical assistance, find your regional Brady Tech Support office in the
following list.
•United States: 1-800-643-8766
• Australia: 1-800 644 834 or via the web at www.bradyid.com.au/en-au/supportlanding
• Canada: 1-888-262-7576 or via the web at www.bradycanada.ca
• Mexico & Latin America: 01-800-212-8181 or via the web at
www.bradylatinamerica.com
• Europe: +44 333 333 1111 or via the web at www.bradyeurope.com/services
Repair and Replacement Parts
Brady Corporation offers repair and replacement services. Contact Brady Technical Support
for repair and replacement information.
or via the web at www.bradyid.com/techsupport
vBBP
®
30 User’s Manual
Page 8

Page 9

Table of Contents
Introduction. . . . . . . . . . . . . . . . . . . . . . . . . . . . . . . . . . . . . . . . . . . . . . . . . . . . . . . . . 1
Features and Functions . . . . . . . . . . . . . . . . . . . . . . . . . . . . . . . . . . . . . . . . . . . . . 1
Compatible Applications . . . . . . . . . . . . . . . . . . . . . . . . . . . . . . . . . . . . . . . . . . . . . 1
System Specifications. . . . . . . . . . . . . . . . . . . . . . . . . . . . . . . . . . . . . . . . . . . . . . . 2
Keypad and Menu Functions. . . . . . . . . . . . . . . . . . . . . . . . . . . . . . . . . . . . . . . . . . . 3
User Interface . . . . . . . . . . . . . . . . . . . . . . . . . . . . . . . . . . . . . . . . . . . . . . . . . . . . . 3
Display Screen . . . . . . . . . . . . . . . . . . . . . . . . . . . . . . . . . . . . . . . . . . . . . . . . . . . . 4
Ready Mode . . . . . . . . . . . . . . . . . . . . . . . . . . . . . . . . . . . . . . . . . . . . . . . . . . . 4
Menu Selection Mode. . . . . . . . . . . . . . . . . . . . . . . . . . . . . . . . . . . . . . . . . . . . . . . 5
User Interface Menu Structure . . . . . . . . . . . . . . . . . . . . . . . . . . . . . . . . . . . . . . . . . 6
Printer Set Up . . . . . . . . . . . . . . . . . . . . . . . . . . . . . . . . . . . . . . . . . . . . . . . . . . . . . . . 7
Unpack and Set up Printer . . . . . . . . . . . . . . . . . . . . . . . . . . . . . . . . . . . . . . . . . . . 7
What’s in the Box . . . . . . . . . . . . . . . . . . . . . . . . . . . . . . . . . . . . . . . . . . . . . . . 7
System Components . . . . . . . . . . . . . . . . . . . . . . . . . . . . . . . . . . . . . . . . . . . . . . . 8
Set up the Printer . . . . . . . . . . . . . . . . . . . . . . . . . . . . . . . . . . . . . . . . . . . . . . . . . . 9
Connect Printer Power . . . . . . . . . . . . . . . . . . . . . . . . . . . . . . . . . . . . . . . . . . . 9
Install or Change Supplies . . . . . . . . . . . . . . . . . . . . . . . . . . . . . . . . . . . . . . . . 9
Feeding and Cutting Label Stock . . . . . . . . . . . . . . . . . . . . . . . . . . . . . . . . . . . . . 14
System Power. . . . . . . . . . . . . . . . . . . . . . . . . . . . . . . . . . . . . . . . . . . . . . . . . . . . . . 15
Starting Printer . . . . . . . . . . . . . . . . . . . . . . . . . . . . . . . . . . . . . . . . . . . . . . . . . . . 15
Powering Off the Printer . . . . . . . . . . . . . . . . . . . . . . . . . . . . . . . . . . . . . . . . . . . . 15
Rebooting the Printer . . . . . . . . . . . . . . . . . . . . . . . . . . . . . . . . . . . . . . . . . . . . . . 15
Connect Printer to a PC via USB. . . . . . . . . . . . . . . . . . . . . . . . . . . . . . . . . . . . . . . 16
User Interface Menu . . . . . . . . . . . . . . . . . . . . . . . . . . . . . . . . . . . . . . . . . . . . . . . . . 17
Cut Media . . . . . . . . . . . . . . . . . . . . . . . . . . . . . . . . . . . . . . . . . . . . . . . . . . . . . . . 17
Status Info. . . . . . . . . . . . . . . . . . . . . . . . . . . . . . . . . . . . . . . . . . . . . . . . . . . . . . . 18
Printer Settings . . . . . . . . . . . . . . . . . . . . . . . . . . . . . . . . . . . . . . . . . . . . . . . . . . . 19
Language . . . . . . . . . . . . . . . . . . . . . . . . . . . . . . . . . . . . . . . . . . . . . . . . . . . . 19
Tools . . . . . . . . . . . . . . . . . . . . . . . . . . . . . . . . . . . . . . . . . . . . . . . . . . . . . . . . . . . 20
Upgrade from USB Flash Drive . . . . . . . . . . . . . . . . . . . . . . . . . . . . . . . . . . . 20
Diagnostics . . . . . . . . . . . . . . . . . . . . . . . . . . . . . . . . . . . . . . . . . . . . . . . . . . . . . . . . 21
Enter Diagnostic Mode . . . . . . . . . . . . . . . . . . . . . . . . . . . . . . . . . . . . . . . . . . . . . 21
Sensors . . . . . . . . . . . . . . . . . . . . . . . . . . . . . . . . . . . . . . . . . . . . . . . . . . . . . . . . 21
Print Engine Base (PEB) Settings. . . . . . . . . . . . . . . . . . . . . . . . . . . . . . . . . . 21
Sensor Conditions. . . . . . . . . . . . . . . . . . . . . . . . . . . . . . . . . . . . . . . . . . . . . . 22
Analog Readings. . . . . . . . . . . . . . . . . . . . . . . . . . . . . . . . . . . . . . . . . . . . . . . 23
Copy Error Logs . . . . . . . . . . . . . . . . . . . . . . . . . . . . . . . . . . . . . . . . . . . . . . . . . . 23
Printer Error Log . . . . . . . . . . . . . . . . . . . . . . . . . . . . . . . . . . . . . . . . . . . . . . . 23
Script Error Log. . . . . . . . . . . . . . . . . . . . . . . . . . . . . . . . . . . . . . . . . . . . . . . . 24
Rev A vii BBP®35/37 User’s Manual
Page 10

Table of Contents
USB Test. . . . . . . . . . . . . . . . . . . . . . . . . . . . . . . . . . . . . . . . . . . . . . . . . . . . . . . . 25
USB Flash Drive Test . . . . . . . . . . . . . . . . . . . . . . . . . . . . . . . . . . . . . . . . . . . 25
USB Type-B Cable Test . . . . . . . . . . . . . . . . . . . . . . . . . . . . . . . . . . . . . . . . . 25
Keyboard Setup . . . . . . . . . . . . . . . . . . . . . . . . . . . . . . . . . . . . . . . . . . . . . . . . . . 26
Info . . . . . . . . . . . . . . . . . . . . . . . . . . . . . . . . . . . . . . . . . . . . . . . . . . . . . . . . . . . . 26
Advanced Diagnostics . . . . . . . . . . . . . . . . . . . . . . . . . . . . . . . . . . . . . . . . . . . . . 26
Printer Maintenance . . . . . . . . . . . . . . . . . . . . . . . . . . . . . . . . . . . . . . . . . . . . . . . . . 27
Removing Power and Media from Printer. . . . . . . . . . . . . . . . . . . . . . . . . . . . . . . 27
Cleaning the Printer . . . . . . . . . . . . . . . . . . . . . . . . . . . . . . . . . . . . . . . . . . . . . . . 29
Remove Dust . . . . . . . . . . . . . . . . . . . . . . . . . . . . . . . . . . . . . . . . . . . . . . . . . 29
Clean Printer and Keypad Residue. . . . . . . . . . . . . . . . . . . . . . . . . . . . . . . . . 30
Clean LCD Screen . . . . . . . . . . . . . . . . . . . . . . . . . . . . . . . . . . . . . . . . . . . . . 31
Clean Auto-Cutter Blade . . . . . . . . . . . . . . . . . . . . . . . . . . . . . . . . . . . . . . . . . 32
Clean Sensors . . . . . . . . . . . . . . . . . . . . . . . . . . . . . . . . . . . . . . . . . . . . . . . . 34
Clean Tape Entrance . . . . . . . . . . . . . . . . . . . . . . . . . . . . . . . . . . . . . . . . . . . 35
Clean the Cutter Blade Exit Area . . . . . . . . . . . . . . . . . . . . . . . . . . . . . . . . . . 37
Clean Printhead . . . . . . . . . . . . . . . . . . . . . . . . . . . . . . . . . . . . . . . . . . . . . . . 38
Replacing the Media Wiper . . . . . . . . . . . . . . . . . . . . . . . . . . . . . . . . . . . . . . . . . 39
Clearing Jams. . . . . . . . . . . . . . . . . . . . . . . . . . . . . . . . . . . . . . . . . . . . . . . . . . . . 39
Replacing/Adjust Media End Caps . . . . . . . . . . . . . . . . . . . . . . . . . . . . . . . . . . . . 39
Troubleshooting . . . . . . . . . . . . . . . . . . . . . . . . . . . . . . . . . . . . . . . . . . . . . . . . . . . . 41
Messages . . . . . . . . . . . . . . . . . . . . . . . . . . . . . . . . . . . . . . . . . . . . . . . . . . . . . . . 41
Printing Errors. . . . . . . . . . . . . . . . . . . . . . . . . . . . . . . . . . . . . . . . . . . . . . . . . . . . 41
Hardware Errors . . . . . . . . . . . . . . . . . . . . . . . . . . . . . . . . . . . . . . . . . . . . . . . . . . 42
Media Errors . . . . . . . . . . . . . . . . . . . . . . . . . . . . . . . . . . . . . . . . . . . . . . . . . . . . . 43
Ribbon Errors . . . . . . . . . . . . . . . . . . . . . . . . . . . . . . . . . . . . . . . . . . . . . . . . . . . . 44
BMP®30 User’s Manual viii Rev A
Page 11

Introduction
Thank you for purchasing the BBP®30 Label Printer mono-color peripheral printer. This
compact, easy-to-operate thermal transfer printer easily connects to your computer for printing
labels that you produce using Brady Workstation software. Media and ribbons from Brady
Corporation are programmed to work specifically with the printer.
Features and Functions
The following are just some of the features that make this system so easy to use and ready to
meet your label-printing requirements:
• Small, lightweight (approximately 11 lbs [4.9 kg]) unit, ready for your desktop.
• A variety of media colors, styles and materials and a wide range of single-color ribbons.
• Smart-cell technology that works intelligently with Brady consumables.
• Easy loading media and ribbon supplies.
• Continuous and die-cut media in a variety of high-performance materials.
• Maximum print speed of 4 ips.
Introduction
• 300 dpi (11.8 dot/mm) print resolution.
• USB device ports.
• Brady Workstation
• Built-in autocutter.
• LED display screen to view system status and set printer defaults and options.
Compatible Applications
The BBP®30 Sign and Label Printer is compatible with Brady Workstation software. When
used with this software package, the printer automatically recognizes all enabled and
compatible media.
Note: Only Brady BBP
®
30 supplies work with this printer.
Rev A 1 BBP®30 User’s Manual
Page 12

Introduction
System Specifications
• Wei ght: 11 lbs (4.9 kg)
• Dimensions (stored): 8.9 in. x 12.0 in. x 9.5 in. (22.6 cm x 30.5 cm x 24.1 cm)
• Operating Temperature: 50 to 104°F (10-40°C)
• Relative Humidity: 10% to 80% RH non-condensing
• Storage: -4 to 122°F (-20 to 50°C) at 15% to 90% RH non-condensing
• Vo lt age : 90 to 264 VAC, 47 to 63 Hz
• Print Resolution: 300 dpi, 11.8 dot/mm
• Output media size: up to 4 in. (101.6 mm) wide
BBP®30 User’s Manual 2 Rev A
Page 13
Keypad and Menu Functions
Keypad and Menu Functions
The following describes the keys, buttons and display screen that are used to navigate through
and use the BBP
User Interface
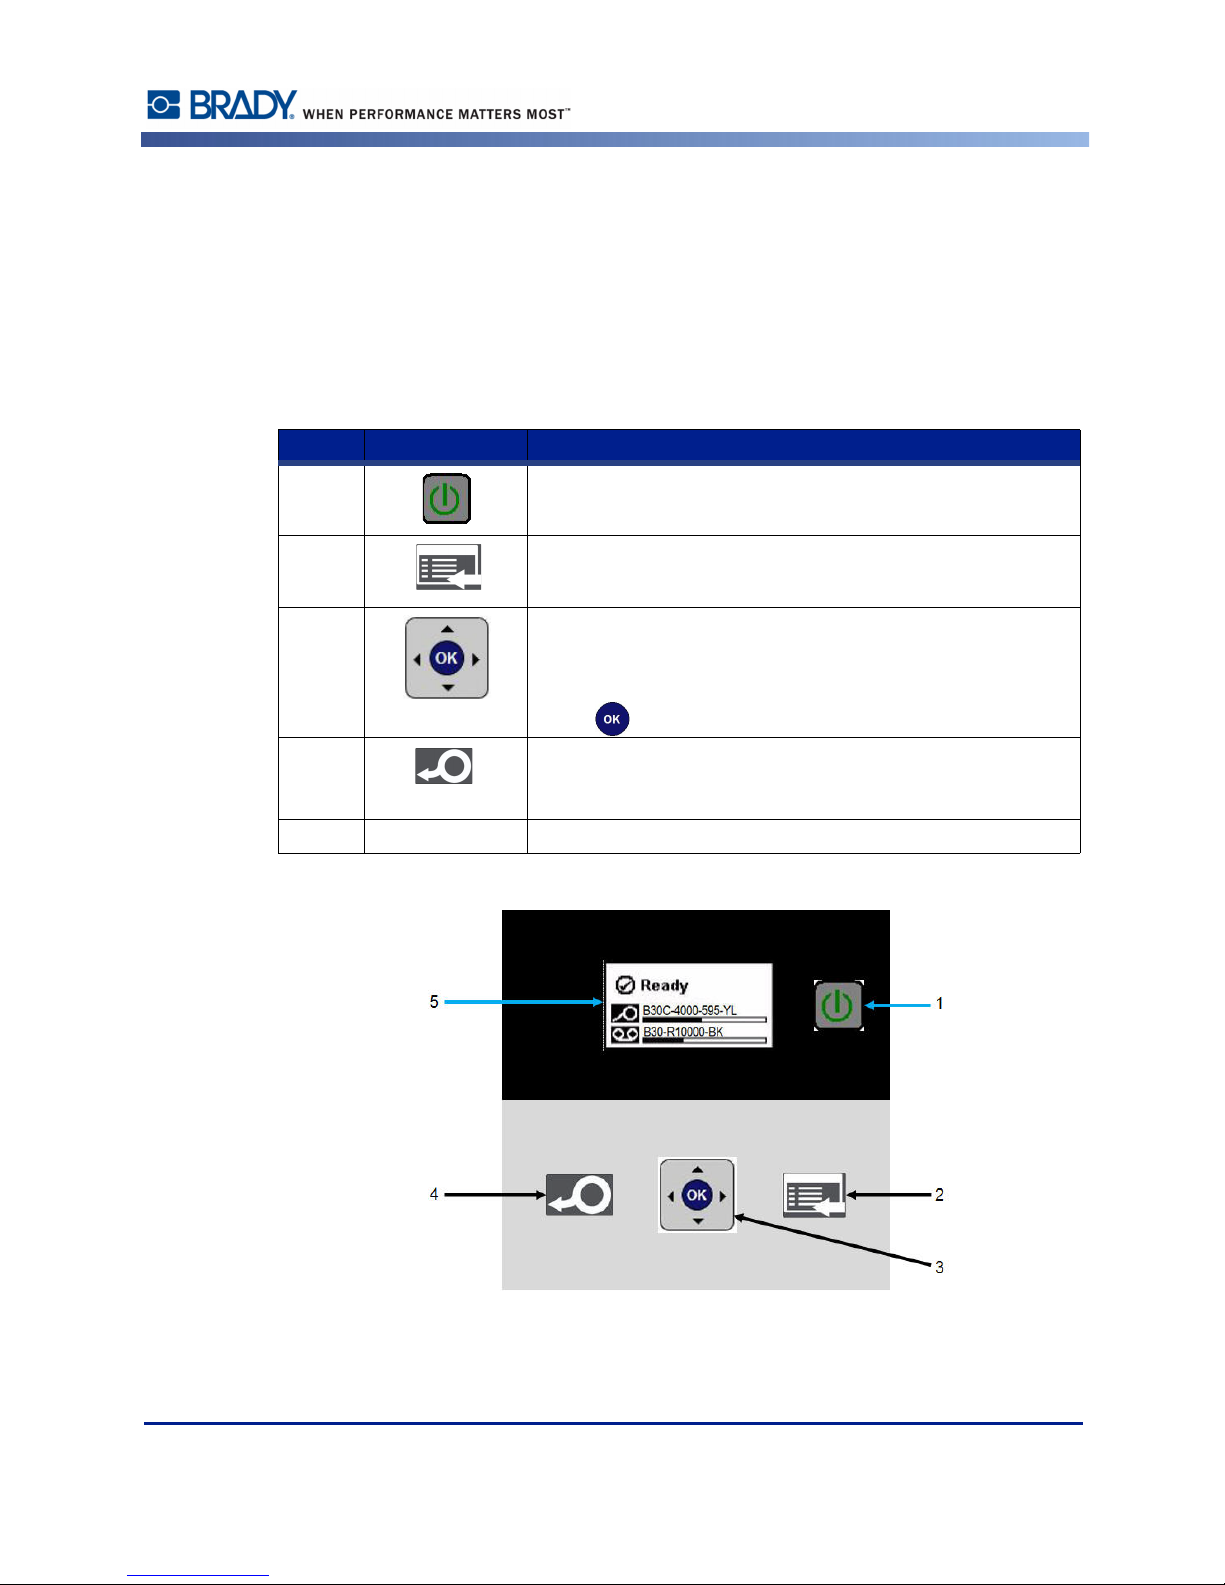
The user interface (UI) contains the keypad and buttons for using the printer. The main
functions are as follows:
Item # Icon Description
1 Power Button: Turns the printer on and off.
2 Menu: The display screen.
3 Keypad:
4 Feed: Feeds the labels through the printer to the next notch
5 -- Display Screen: See “Display Screenn page 4 for details.
®
30 Label Printer.
Press or to move through primary menu.
Press to exit or move up a menu.
Press for menu support functions.
Press to accept a selection or move through submenus.
on the liner. Feeds a full label for die cut; 0.5-inch (12.7 mm)
for continuous.
Rev A 3 BBP®30 User’s Manual
Page 14
Keypad and Menu Functions
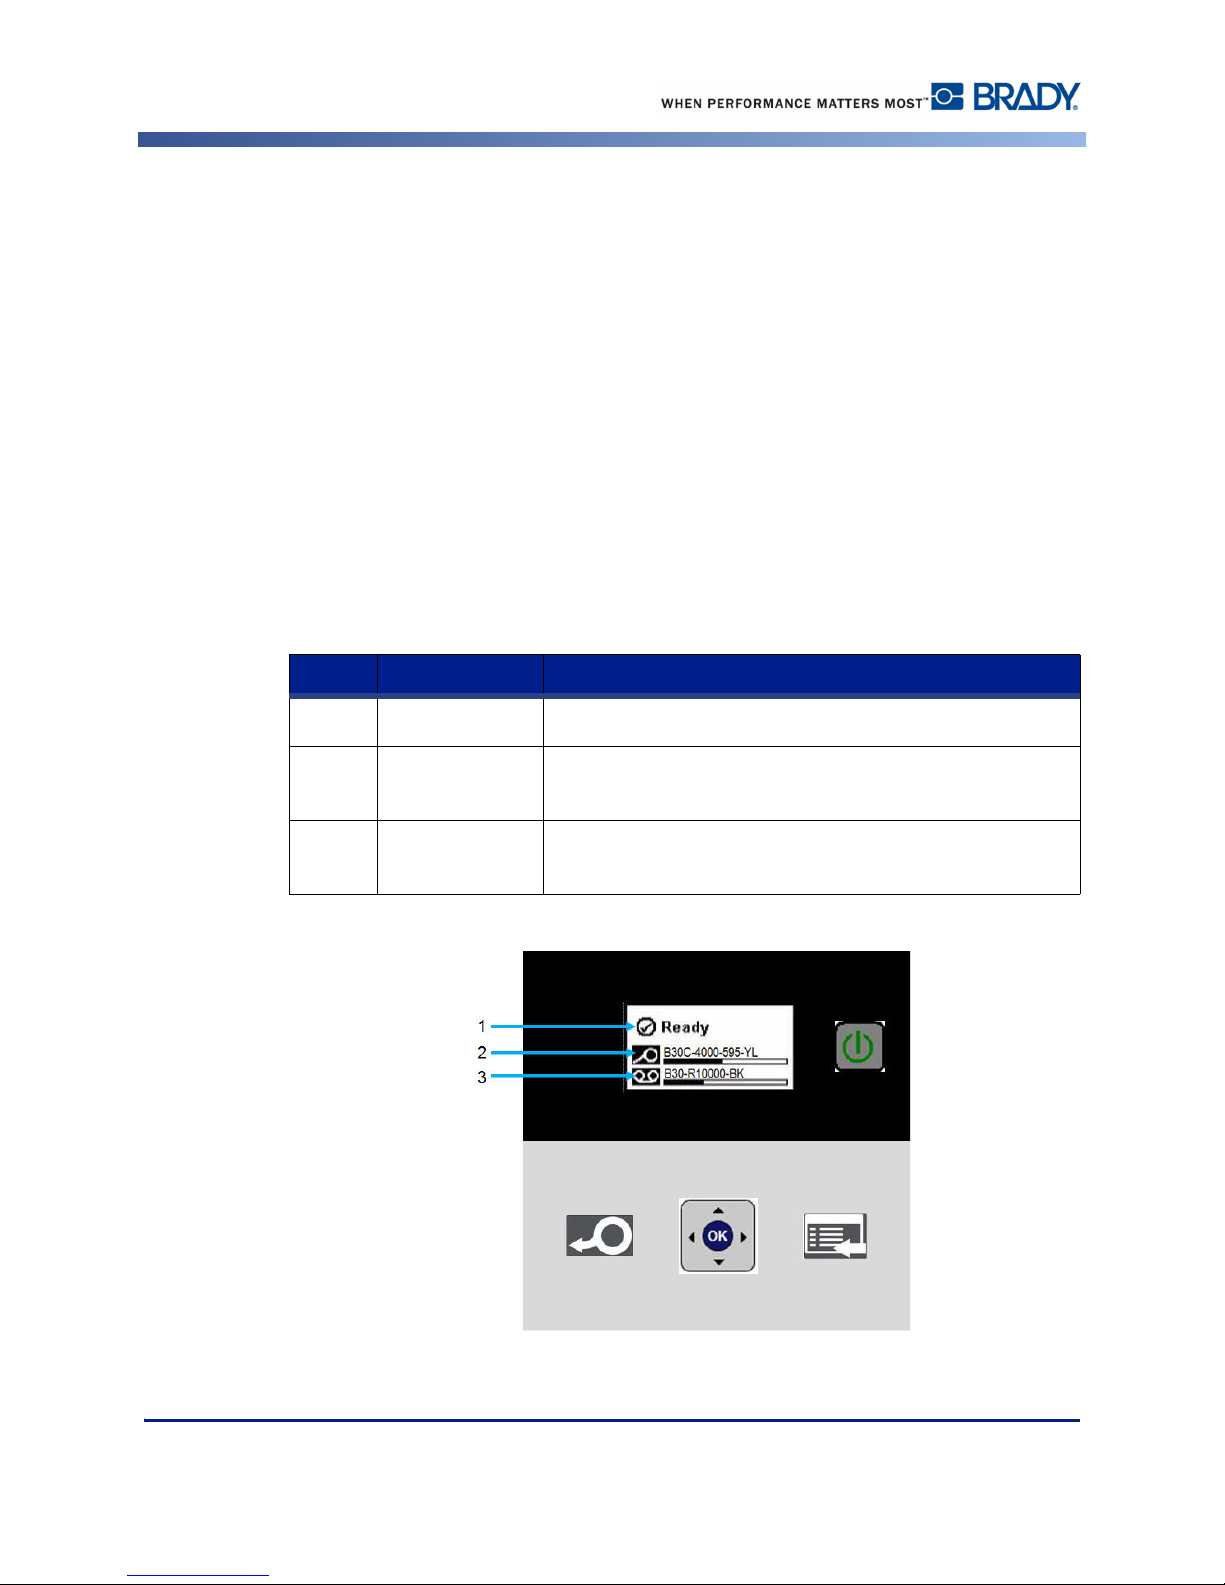
Display Screen
The display screen has two modes:
•
Ready Mode: Indicates printer status and displays estimated remaining media and
estimated remaining ribbon. Also indicates the media and ribbon installed.
Menu Selection Mode: Lets you configure system defaults, view and set printer
•
information, perform input and output operations and perform diagnostics.
Ready Mode
The printer has three ready modes:
Initializing
•
• Ready
• Ready - USB Only
The table describes the display screen when in idle (Ready) mode.
Item # Condition Description
1 Printer Status Displays the online printer status.
2 Media Status Displays media part number and estimated amount of
remaining media.
3 Ribbon Status Displays ribbon part number and estimated amount of
remaining ribbon.
BBP®30 User’s Manual 4 Rev A
Page 15
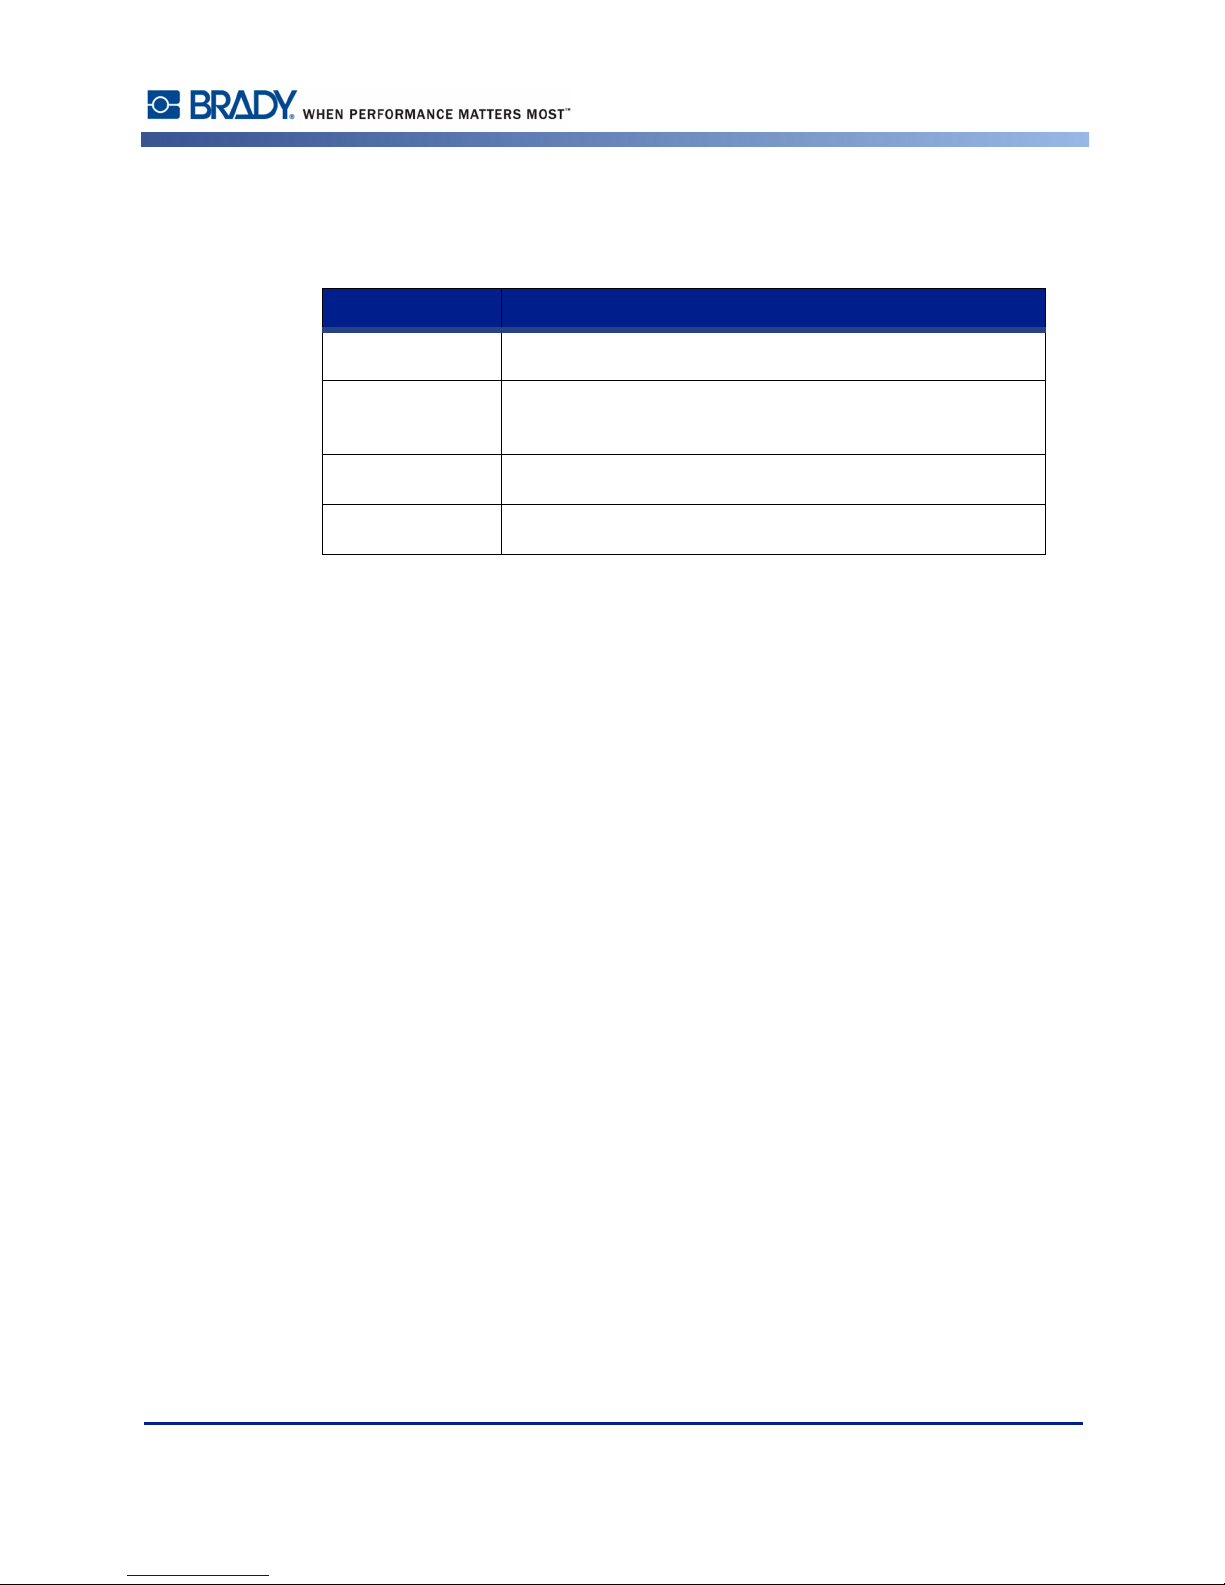
Menu Selection Mode
The table describes the main options of the display screen when in menu selection mode. See
page 6 for a list of all the menu options.
Menu Item Description
Cut Media Used to automatically cut the media.
Status Info Options to display or print status and configuration
Printer Settings Options to set up printer defaults for language.
Tools Upgrade from a USB device.
Keypad and Menu Functions
information, font list and/or graphic list.
Rev A 5 BBP®30 User’s Manual
Page 16

User Interface Menu Structure
User Interface Menu Structure
BBP®30 User’s Manual 6 Rev A
Page 17

Printer Set Up
Unpack and Set up Printer
Carefully unpack and inspect the printer surfaces (interior and exterior) and the labeling
system for possible damage during shipping.
Note: Be sure to remove any transportation protection from around the printhead
and inside the enclosure cover.
What’s in the Box
•BBP®30 Label Printer
•Power Cord
• USB Type B Cable
Printer Set Up
• Printed Quick Start Guide
• Product CD including: electronic Quick Start Guide, electronic User’s Manual and web
links
• Cleaning Kit (Cat # B31-CCT), not available in all regions - includes foam swabs,
adhesive scraping tool, plastic bottle
Note: Please keep the original packaging, including the box, in case the printer
must be returned.
Rev A 7 BBP®30 User’s Manual
Page 18

Printer Set Up
System Components
Figure 1 • Printer Components
1 Enclosure cover 6 Media guides
2 Label exit chute/auto cutter 7 Ribbon cartridge
3 Power button 8 Ribbon cover latch
4 Media 9 Ribbon cover
5 Media wiper 10 Ribbon cartridge latch
BBP®30 User’s Manual 8 Rev A
Page 19

Set up the Printer
Connect Printer Power
To setup the printer:
1. Plug the power cord into the printer at the location shown.
2. Plug the other end of the power cord into an AC power outlet. The printer automatically
turns on and displays the printer status and the size and color of the currently installed
media.
Printer Set Up
Rev A 9 BBP®30 User’s Manual
Page 20

Printer Set Up
Install or Change Supplies
The media and ribbon supply cartridges use a “smart cell” to define and track the supply
information. The system automatically recognizes the supply information for the installed
media and ribbon.
Note: The printer can be either on or off when changing supplies.
To install or change ribbon:
1. Open the enclosure cover 2. Release the latch on the ribbon cover and
swing open.
3. Release the ribbon cartridge latch and lift the ribbon cartridge up and out.
BBP®30 User’s Manual 10 Rev A
Page 21

To install a ribbon:
Printer Set Up
1. Place the ribbon cartridge with the ribbon
over the print head and the product label
toward machine, then snap into place.
3. Close the enclosure cover.
2. Close and latch the ribbon cover.
4. If printer was off, press . The system
detects the media and ribbon colors and
sets the amount of remaining supplies.
Rev A 11 BBP®30 User’s Manual
Page 22

Printer Set Up
To install or change media:
1. Open the enclosure cover. 2. Release the latch on the ribbon cover and
swing open.
3. If engaged, swing yellow media wiper to
the back.
5. Remove existing media, if installed, by pulling the cartridge from printer.
4. Slide yellow media guides out to the sides
to fully open.
BBP®30 User’s Manual 12 Rev A
Page 23

Printer Set Up
6. Insert the media cartridge until spindle
ends rest in slots of media holder. Media
unwinds from the top of the roll and the
smart cell should be on the left side of the
spindle.
8. Slide the media guides inward from the
sides until they touch the edge of the
media liner, with the media under the
guides.
7. Feed media from the top of the roll until it
sits just past the black rubber roller.
9. Move the media wiper into position so it
rests on the media.
Note: Not all media requires the use of the media wiper. Engage the media wiper
only if continuous media is installed.
Rev A 13 BBP®30 User’s Manual
Page 24

Printer Set Up
Feeding and Cutting Label Stock
10. Close and latch the ribbon cover. 11 . Close the enclosure cover.
If printer was off, press . The system
detects the media and ribbon colors and
sets the amount of remaining supplies.
Use this procedure to advance the media to the cut position, and (optionally) cut the media.
Note: For die-cut media, the media is advanced to the cut position which is the
next die-cut label. For continuous media, the media advances until you release the
Feed button.
To feed and cut the label stock:
1. With printer power on, press and hold Feed until the length of media you want
exits the printer.
To cut the media:
2. Press Menu to go to the navigation menu.
3. Press or to scroll to Cut Media, then press . The media is cut.
BBP®30 User’s Manual 14 Rev A
Page 25

System Power
These procedures describe how to power-up the printer when starting from a non-powered
state (i.e., printer has been unplugged) and how to remove power from the printer.
Note: With power removed (i.e., printer disconnected from power source), the
system clock retains its settings for about 30 days.
Starting Printer
1. To start printer from a cold state: Plug the printer into a power source. The system
automatically recognizes the supply information for the installed media and ribbon and the
display panel indicates
System Power
Ready.
Note: The
2. To turn on the backlight: Press any button.
backlight for the display panel turns off after a pre-defined period of time.
Powering Off the Printer
When the system is shut down, the display turns off.
To completely remove printer power:
1. Disconnect the power cord from the printer.
To perform a soft power down:
2. Press and release the Power button . The screen goes blank and the backlight goes
off.
Rebooting the Printer
Use this procedure to reboot the printer (e.g., if the screen freezes).
To reset the printer:
1. Press and hold the Power button for at least 5 seconds. The system performs the
initialization process and restarts the printer.
2. When the Ready displays, you can continue printing your labels.
Rev A 15 BBP®30 User’s Manual
Page 26

Connect Printer to a PC via USB
Connect Printer to a PC via USB
Unless you are using Brady Workstation and Direct Print, to use your PC with the BBP®30
Sign and Label printer, you must have the USB device driver installed on your PC.
Note: See Compatible Applications (page 1) for a list of software applications that
®
are compatible with the BBP
for instructions about installing and using the software.
30. Refer to your labeling software documentation
BBP®30 User’s Manual 16 Rev A
Page 27

User Interface Menu
The User Interface (UI) menu provides feedback and also allows you to access and change
printer settings, printer status and tools. A 5-way navigation keypad lets you navigate through
the menu structure to choose the option(s) you want.
User Interface Menu
In Ready mode, the UI menu indicates
and ribbon.
Navigation is divided into 4 major functions:
• Cut Media
• Status Info
• Printer Settings
• Tools
Cut Media
Selecting Cut Media from the menu sends a signal to the printer telling it to cut the media.
To set the cut option:
1. Press Menu to go to the navigation menu. Cut Media is the first option.
2. When you are ready to cut, press . The printer cuts at the current position of the
media.
printer status and displays estimated remaining material
In Menu Selection mode, the display changes to a navigation-type menu.
Note: The menu stays on Cut Media until you exit the menu.
3. When done, press to exit to the main menu.
Rev A 17 BBP®30 User’s Manual
Page 28

User Interface Menu
Status Info
Status Info includes information about the printer configuration and fonts. From this menu,
you can print a configuration label.
To view system information:
1. Press Menu to go to the navigation menu.
2. Press or to scroll to Status Info, then press .
3. Press or and choose from one of the following options, then press :
Note: Press to exit a menu at any time.
Note: For print options, use continuous media to get the best results.
Info: Displays the current application and firmware version.
•
• Print Configuration: Prints current printer configuration.
4. When done, press twice to exit to the main menu.
BBP®30 User’s Manual 18 Rev A
Page 29

Printer Settings
The Printer Settings menu lets you set the default values for the printer. Defaults are common
settings that are pre-assigned to make the system usable as soon as power is applied (e.g., set
date and time to your local date and time). By changing the defaults, you can set the printer to
your specific requirements.
Any defaults set here will stay in effect even when power is removed from the printer, and also
during upgrades.
Note: If password protection has been implemented, you will need to enter a
password to have access to these functions.
Language
To change language setting:
User Interface Menu
1. Press Menu to go to the navigation menu.
2. Press or to scroll to Printer Settings, then press .
3. Press to scroll to Language, then press .
4. Press or to scroll to the language you want.
5. Press to accept the change. It takes a few moments for the settings to take effect.
6. When done, press twice to exit to the main menu.
Rev A 19 BBP®30 User’s Manual
Page 30

User Interface Menu
CAUTI ONCAUTI ON
Tools
Upgrade from USB Flash Drive
Use this procedure to upgrade the firmware or software from a USB flash drive that contains
the upgrade. The system will support only one USB device at a time.
To upgrade software from a USB flash drive:
1. Copy the upgrade files to the root directory of your USB flash drive.
2. Connect the USB flash drive to any available USB port on the printer.
Do not interrupt power during an upgrade from a USB flash drive.
3. Press Menu
4. Press or to scroll to Tools, then press .
5. Press to scroll to Upgrade from USB, then press . The printer automatically
to go to the navigation menu.
downloads and installs the firmware/software from the root directory of the USB flash
drive.
Note: During the upgrade, the screen goes blank. It may take a few moments for
the upgrade to complete. When done, the printer returns to the Ready menu.
BBP®30 User’s Manual 20 Rev A
Page 31

Diagnostics
Some diagnostics are not available for users. Advanced diagnostics are password protected
and to be used only with Brady Technical Support. The password is assigned by Brady.
Enter Diagnostic Mode
Use this procedure to access any of the diagnostics menus.
To enter diagnostics mode:
Diagnostics
Note: A password is required to access the Advanced Diagnostics menus.
1. Press
2. Press or to scroll to Tools, the press to go to the submenu.
3. Press to scroll to Diagnostics, then press to go to the diagnostics list.
4. When done, press
to go to the navigation menu.
to exit the test.
Sensors
Print Engine Base (PEB) Settings
This procedure displays the PEB settings on the printer.
To view the PEB settings:
1. Access Diagnostic mode (see “Enter Diagnostic Moden page 21).
2. Press to select Sensors.
3. Press to select PEB Settings. The PEB settings display results for the following:
4. Press repeatedly to exit to the main menu or to return to the PEB Settings menu.
Rev A 21 BBP®30 User’s Manual
CutLine - Lead.
Leading - Print
Print - Diecut
Diecut - Tapeout
Rocker Steps
Print - Center
xxxx
xxxx
xxxx
xxxx
xxxx
xxxx
Page 32

Diagnostics
Sensor Conditions
This diagnostic detects the sensor conditions for ribbon motion, door, cutter, leading (edge),
diecut, tapeout, wiper, and center.
Conditions are:
BL (blocked)
•
•
Clos (closed) or Open
• Hom (home position)
• Eng (engaged)
•
UnB (unblocked)
To view the PEB settings:
1. Access Diagnostic mode (see page 21).
2. Press to scroll to Sensor Conditions, then press . The sensor settings display
results for the following:
RibbonMotion
Door
Cutter
Leading
Diecut
TapeOut
Wiper
Center
3. Press repeatedly to exit to the main menu or to return to the Sensor Conditions
BL
Clos/Open
Hom
BL
BL
BL
Eng
BL
menu.
BBP®30 User’s Manual 22 Rev A
Page 33

Analog Readings
This diagnostic detects the analog readings for the diecut analog/digital converter, head
voltage and thermistor temperature.
To view the analog readings:
1. Access Diagnostic mode (see page 21).
2. Press to scroll to Analog Readings, then press . The readings display for the
following:
Diagnostics
3. Press repeatedly to exit to the main menu or to return to the Analog Readings
menu.
Copy Error Logs
Printer Error Log
1. Insert a USB drive into any available port on the printer.
2. Access Diagnostic mode (see page 21).
3. Press to go to Copy Error Logs, then press .
4. Press to select Printer Error Log, then press . The error log is written to the
USB drive and the message Successfully Copied Error Log displays.
Note: A message will display if no USB device is detected.
Diecut A/D
Head Voltage
Thermistor
xxxx
xxxx
xxxx
5. Press repeatedly to exit to the main menu.
To view the error log:
6. Remove the USB drive from the printer and insert into your PC.
7. In Windows Explorer, navigate to the USB drive and open the folder BBP30 Error Logs.
8. Double-click the file PRINTER_ERROR_LOG.txt to view the log.
Rev A 23 BBP®30 User’s Manual
Page 34

Diagnostics
Script Error Log
1. Access Diagnostic mode (see page 21).
2. Press to go to Copy Error Logs, then press .
3. Press to go to Script Error Log.
4. Press . The error log is written to the USB drive and the message Successfully Copied
BPL Error Log and Successfully Copied SM Error Log displays.
Note: A message will display if no USB device is detected.
5. Press repeatedly to exit to the main menu.
To view the error log:
6. Remove the USB drive from the printer and insert into your PC.
7. In Windows Explorer, navigate to the USB drive and open the folder BBP30 Error Logs.
8. Double-click either of the following files to view the logs:
•
BPL_ERROR_LOG.txt
• SCRIPT_ERROR_LOG.txt
BBP®30 User’s Manual 24 Rev A
Page 35

USB Test
The USB test verifies that the USB ports are active. The tests can be performed with a flash
drive or a type-B cable.
USB Flash Drive Test
To perform a USB test:
1. Access Diagnostic mode (see page 21).
2. Press or to go to USB Test, then press to select the test.
3. Press to start the test.
4. Insert a USB flash drive into the Lower USB port. The display indicates
DSK2: attached.
5. Remove the USB flash drive. The display indicates DSK2: removed.
Diagnostics
6. Repeat steps 4 and 5 for the Upper USB port.
7. When done, press
to exit the test.
USB Type-B Cable Test
To perform a USB test with a type-B cable:
1. Access Diagnostic mode (see page 21).
2. Press or to go to USB Test, then press to select the test. The USB Test Status
screen displays.
3. Insert a USB type-B cable from the Lower Host port to the Function port. The display
indicates LPT1: attached.
4. Remove the USB type-B cable. The display indicates LPT1: removed.
5. Repeat Steps 3 and 4 for the Upper Host port.
6. When done, press
to exit the test.
Rev A 25 BBP®30 User’s Manual
Page 36

Diagnostics
Keyboard Setup
Info
This procedure configures the printer to use the selected regional USB keyboard.
To configure a keyboard:
1. Access Diagnostic mode (see page 21).
2. Press or to go to Keyboard Setup, then press . The list of keyboard options
displays.
3. Press or to select the regional configuration you want, then press . The printer is
configured for use with the selected keyboard.
4. Press repeatedly to exit to the main menu.
Lists the length of label media printed, number of cuts made and the last errors displayed.
To view printer information:
1. Access Diagnostic mode (see page 21).
2. Press or to go to Info, then press .
3. Press or to select the information you want displayed:
•
Printed: Displays the number of ft (mm) of media printed to date.
• Cuts: Displays the total number of cuts made to date. (Note: The number actually
reflects the number of times the printer has retracted the material for a new print.)
Last Errors: Displays the last 15 printer error message numbers.
•
4. Press to display the error messages.
Note: The errors displayed are for actual messages received. So, if you get the
same error multiple times, the screen will display that error once for each
occurrence (up to 15).
5. Press repeatedly to exit to the main menu.
Advanced Diagnostics
A password is required to enter the advanced diagnostic procedures. Contact your Brady
Technical Support contact for help with these diagnostics.
BBP®30 User’s Manual 26 Rev A
Page 37

Printer Maintenance
Removing Power and Media from Printer
Before performing any maintenance procedure that involves opening the enclosure cover, you
should remove the power and media from the printer.
To remove printer power and media:
1. Remove the power plug from the printer.
Printer Maintenance
2. Open the enclosure cover.
3. Release the latch on the ribbon cover and swing open.
4. Release the ribbon cartridge latch and lift the ribbon cartridge up and out.
Rev A 27 BBP®30 User’s Manual
Page 38

Printer Maintenance
5. Move yellow media wiper to the back.
6. Move yellow media guides to full-open.
7. Remove media cartridge from the slots of media holder.
BBP®30 User’s Manual 28 Rev A
Page 39

Cleaning the Printer
CAUTI ONCAUTI ON
Remove Dust
Dust generated by media cuts can accumulate in the unit. If a significant amount of dust is
built up, clean the unit using this procedure.
Materials Required
• Isopropyl Alcohol
• Compressed Air Bottle, purchased locally (e.g., HOSA AIR-464 Gear Duster)
To clean dust from the printer:
Always wear safety glasses when using compressed air.
Printer Maintenance
1. Remove power and media from the printer (see page 27).
2. Using compressed air, spray all visible areas inside the printer to remove accumulated
dust.
3. Using a cloth moistened with isopropyl alcohol, wipe any remaining dust from inside the
printer.
4. Wipe exterior cover and frame of printer for dirt and residue.
Rev A 29 BBP®30 User’s Manual
Page 40

Printer Maintenance
CAUTI ONCAUTI ON
Clean Printer and Keypad Residue
Whenever performing any maintenance on the printer, you should also clean any residue
caused by the media.
Materials Required
• Compressed Air Bottle, purchased locally (e.g., HOSA AIR-464 Gear Duster)
• Lint-free Cloth
• Isopropyl Alcohol
• Safety Glasses
To clean residue from the printer:
Always wear safety glasses when using compressed air.
1. Remove power and media from the printer (see page 27).
2. With safety glasses on, spray compressed air on any parts of the printer that have built-up
residue.
Note: If compressed air is not available, use a lint-free cloth lightly moistened
with isopropyl alcohol and wipe off residue.
3. If necessary, use a moistened, lint-free cloth to clean the keypad.
4. Replace the ribbon and tape.
5. Close all covers and plug in the power cord.
BBP®30 User’s Manual 30 Rev A
Page 41

Printer Maintenance
Clean LCD Screen
Materials Required
• Lint-free Cloth, non-abrasive
• Isopropyl Alcohol
- or -
• Pre-moistened Cloth (appropriate for cleaning PC screens)
To clean the LCD screen:
Note: Normal cleaners with ammonia, soaps, or any acids can damage the screen.
Use only a lint-free cloth dampened with isopropyl alchohol.
1. Lightly moisten a lint-free cloth with isopropyl alcohol, or use a pre-moistened cloth
suitable for cleaning a PC screen.
2. Gently rub the damp cloth across the screen until all of the residue is removed.
Rev A 31 BBP®30 User’s Manual
Page 42

Printer Maintenance
Clean Auto-Cutter Blade
Materials Required
• Isopropyl Alcohol
• Cleaning Kit (Cat # B31-CCT), includes foam swabs, adhesive scraping tool, plastic bottle
To clean the cutter:
1. Remove power and media from the printer.
2. Squeeze the two yellow cutter tabs [2a] to release the cutter. The cutter mechanism and
Note: When cleaning the cutter, you should also clean the media and cutter
sensors (see page 34).
(not available in all regions)
exit chute [2b] will slide down behind the ribbon cover.
3. Fill the plastic bottle from the cleaning kit with isopropyl alcohol.
BBP®30 User’s Manual 32 Rev A
Page 43

Printer Maintenance
4. Clean metal cutting blade:
• If the cutting blade shows significant residue, use the adhesive scraping tool from the
cleaning kit, or other flat-edged tool, to gently scrape the reside off the cutting blade.
• Moisten one of the foam swabs from the cleaning kit with the alcohol. Do not allow
the alcohol to drip from the swab.
• Clean cutting blade with moistened swab until all residue is removed.
5. Close the cutting blade by pushing up on the exit chute until the cutter tabs snap into
place.
Note: You may need to hold ribbon cover up slightly to access the exit chute.
6. Replace the ribbon and tape.
7. Close all covers and plug in the power cord.
Rev A 33 BBP®30 User’s Manual
Page 44

Printer Maintenance
CAUTI ONCAUTI ON
Clean Sensors
The sensors are located inside the printer and may be covered with dust that results from
cutting the media. The media sensor is located under the yellow media guide.
Materials Required
• Cleaning Kit (Cat # B31-CCT), includes foam swabs, adhesive scraping tool, plastic bottle
• Isopropyl Alcohol
To clean the sensors:
1. If necessary, remove power and media from the printer (see page 27).
2. With the ribbon cover open, use a pre-moistened swab and thoroughly clean the surface of
(not available in all regions)
the sensors
at the locations shown:
Do not allow the alcohol to drip from the swab
.
• Center die-cut sensor [2a]
• Tape out/die-cut sensors [2b]
Note: Sensor is located under the yellow media guide.)
(
BBP®30 User’s Manual 34 Rev A
Page 45

Printer Maintenance
CAUTI ONCAUTI ON
CAUTI ONCAUTI ON
Clean Tape Entrance
This procedure cleans the tape entrance, exit area and exit chute. The tape entrance can
become sticky because of adhesive buildup
Note: Clean the exit area after cleaning the sensors (see page 34). The cleaning
swab may be damaged when cleaning the exit area.
Materials Required
• Cleaning Kit (Cat # B31-CCT), includes foam swabs, adhesive scraping tool, plastic bottle
(not available in all regions)
®
•Kimwipes
• Isopropyl Alcohol
• Compressed Air Bottle, purchased locally (e.g., HOSA AIR-464 Gear Duster)
or other non-abrasive cloth
Always wear safety glasses when using compressed air.
To clean the tape entrance:
1. Lightly moisten a lint-free cloth with isopropyl alcohol.
Do not use isopropyl alcohol on the print head! Isopropyl alcohol may
permanently damage the print head.
2. At the top of the tape entrance, rub along entire length of the tape entrance to remove the
adhesive residue [2]. If necessary, use the adhesive scraping tool or other flat-edged tool,
covered with the Kimwipe, to push against the tape entrance to clean all of the residue
from the entrance.
Rev A 35 BBP®30 User’s Manual
Page 46

Printer Maintenance
CAUTI ONCAUTI ON
3. Wet a cotton swab with isopropyl alcohol and thoroughly clean along the entire media
entrance area.
When cleaning, don’t pinch or gouge the platen roller. Use only compressed air
.
4. Use compressed air to clean off dust on the entire printer, including the platen roller.
BBP®30 User’s Manual 36 Rev A
Page 47

Printer Maintenance
Clean the Cutter Blade Exit Area
This procedure cleans the cutter blade exit area and the exit chute.
Note: You should clean the exit area after cleaning the cutter blade and sensors.
The cleaning swab may be damaged when cleaning the exit area.
Materials Required
• Cleaning Kit (Cat # B31-CCT), includes foam swabs, adhesive scraping tool, plastic bottle
(not available in all regions)
• Isopropyl Alcohol
To clean the exit chute:
1. If necessary, remove power and media from the printer (see page 27).
2. Close the ribbon cover. It does not need to snap into place.
3. Using a swab pre-moistened with alcohol, clean the exit chute entrance [3a] and exit chute
ramp [3b].
Note: To reach all areas of the exit chute, you can close the enclosure cover and
tilt the printer up.
4. Replace the ribbon and tape.
5. Close covers and plug in the power cord.
Rev A 37 BBP®30 User’s Manual
Page 48

Printer Maintenance
CAUTI ONCAUTI ON
CAUTI ONCAUTI ON
Clean Printhead
Materials Required
• Cleaning Kit (Cat # B31-CCT), includes foam swabs, adhesive scraping tool, plastic bottle
• Isopropyl Alcohol
To clean the printhead:
1. Remove power and media from the printer (see page 27).
2. Fill the plastic bottle from the cleaning kit with isopropyl alcohol.
(not available in all regions)
Use only the materials supplied in the cleaning kit. Using other materials may
permanently damage the printhead.
Do not rub the swab over the bronze-colored area of the printhead. This
may permanently damage the printhead.
3. Moisten one of the foam swabs from the cleaning kit with the alcohol and gently rub
across the
4. Replace the ribbon and tape.
5. Close all covers and plug in the power cord.
green and black area only of the printhead [3].
BBP®30 User’s Manual 38 Rev A
Page 49

Replacing the Media Wiper
Materials Required
• Media Wiper (5 pack) Kit, Cat #B31-WIPER (sold separately)
To replace the media wiper:
1. Remove power and media from the printer (see page 27).
2. LIft and hold the wiper arm while grasping the tab of the wiper insert [2].
3. Pull the tab slightly forward and then slide the wiper insert out of the wiper arm.
4. To replace the wiper, insert the lip of the wiper insert into the slot [4] of the wiper arm and
slide in until the tab snaps into place.
Printer Maintenance
5. Replace the ribbon and tape.
6. Close all covers and plug in the power cord.
Clearing Jams
To clear jams from the printer:
1. Remove all damaged ribbon and/or media from the printer.
2. Check that there is no damage to the print head, sensors, or any other parts.
3. Check whether any cleaning is needed. If cleaning is required, see page 29 for details.
4. Reload ribbon and media and clear all error messages.
Replacing/Adjust Media End Caps
In the unlikely even that your tape roll comes apart, contact Tech Support for assistance in
replacing or adjusting the end caps. See page v for details.
Rev A 39 BBP®30 User’s Manual
Page 50

Printer Maintenance
BBP®30 User’s Manual 40 Rev A
Page 51

Troubleshooting
Messages
The BBP®30 Label Printer contains error messages that describe what action you should take
to resolve any messages or errors.
Messages indicate the problem for the task being performed and also provide a possible
corrective action.
Printing Errors
Problem Cause Corrective Action
Troubleshooting
Printer not ready.
Error: 15
Printer Error.
Error: 16
Printer Error
Error: 21
Printer Error
Error: 22
Poor print quality.
Error: 1024
The ribbon cover is open or
the cutter is not in operating
position.
Ribbon cover was opened
during printing.
Media wiper is not
engaged.
Media wiper is engaged but
should not be used on this
media.
Printhead needs cleaning. Clean printhead with
Close and latch ribbon
cover or move cutter to
operational position.
Close ribbon cover.
Engage media wiper arm.
Disengage the media wiper
arm.
isopropyl alcohol and swab.
Rev A 41 BBP®30 User’s Manual
Page 52

Troubleshooting
Hardware Errors
Problem Cause Corrective Action
Printer too warm. Print job
canceled.
Error: 18
Printer too cold. Print job
canceled.
Error: 20
Media jam. Print job
canceled.
Errors: 45, 80, 85, 87
Cut quality poor.
Error: 1025
Residue on labels.
Error: 1027
The printhead is too hot. The printhead has reached
maximum operating
temperature. Allow printer
to cool down
approximately 10 minutes,
then re-initiate the print job.
The printhead has not
reached operating
temperature.
Normal operating range is
between
50-104°F (10-40°C). Allow
printer to warm up to
operating temperature
before printing.
Media is jammed in the
printer [45]; Media is in the
media guides, but not
Clear media path and
reinstall media, then re-
initiate the print job.
detected by the cutter
home sensor [80]; Media is
in the home position but
not detected by the media
If error persists, contact
Technical Support.
out notch sensor [85];
Media is in the printer but
not detected by the leading
edge sensor [87].
Cutter needs cleaning
because of adhesive build
up on the cutter.
• Unlatch cutter and push
down away from roller.
• Remove residue from
blades with flat-edged tool,
then clean with isopropyl
alcohol.
• Close cutter and printer.
• From exit chute, swab
back of blades with
isopropyl alcohol.
Media wiper needs to be
replaced.
• Swing media wiper arm to
upright position.
• Slide wiper out of wiper
arm toward left side of the
printer.
• Slide replacement wiper
into slot on wiper arm.
Poor media detection on
the printer, or print
registration problems.
BBP®30 User’s Manual 42 Rev A
Media end cap not
centered on spindle.
Adjust the center position
of the media roll.
Page 53

Media Errors
Troubleshooting
Problem Cause Corrective Action
Error reading media
memory cell. Reload or
replace media.
Errors: 48, 49, 50, 51, 52
Media out.
Error: 53
Media is jammed.
Error: 54
Media not detected.
Error: 55
Printer cannot read the
media memory cell: media
validation failed [48];
cannot read media cell
[49]; cannot read memory
CRC [50]; cell is wrong
version [51]; media counter
shows no media remaining
[52].
Media sensor shows end
of media. Print job
canceled.
Media is jammed
somewhere in the printer.
Print job canceled.
Media is not loaded
correctly.
Replace media. If problem
persists, contact Technical
support.
Verify media guides are
positioned correctly at the
edge of the media or
replace roll if empty.
Clear the media path and
re-initiate the print job.
Reload media:
1. Insert media.
2. Feed media between
guides to middle of black
roller.
3. Verify guides are
positioned to media
edge.
Rev A 43 BBP®30 User’s Manual
Page 54

Troubleshooting
Ribbon Errors
Problem Cause Corrective Action
Ribbon Out.
Error: 58
Ribbon too narrow.
Error: 62
Error reading ribbon
memory cell.
Errors: 64, 65, 66, 67, 68
Media mismatch.
Error: 69
The ribbon ran out or broke
during the print job.
The installed ribbon is
narrower than the installed
media.
The printer cannot read the
ribbon memory cell:
memory cell code incorrect
[64], cannot read cell [65],
data in cell is corrupted
[66], cell is wrong version
[67], ribbon counter shows
no ribbon remaining [68].
The installed ribbon is not
recommended for use with
the current media.
Replace ribbon and close
inside printer cover. Reinitiate the print job.
Replace the ribbon
cartridge with wider ribbon.
- or -
Replace the media with a
width that matches the
ribbon.
Replace the ribbon. If
problem persists, contact
Technical Support.
Replace the ribbon with a
type that is compatible with
the media.
- or -
Replace the media with a
type that is compatible with
the ribbon.
BBP®30 User’s Manual 44 Rev A
Page 55

Page 56

© 2015 Brady Worldwide, Inc. All Rights Reserved.
Y4181115
 Loading...