

Page 1

19462 Powder Hill Place
Poulsbo, WA 98370
800.762.575
360.779.7901
www.boxlight.com
USER MANUAL
Page 2

Interactive P r o j ec t o r
- 2 -
About user’s manual . . . . . . . . . . . . . . . . . . . . . . . . . . . . . . . . . . . . . . . . . . . . . .
.
Contents . . . . . . . . . . . . . . . . . . . . . . . . . . . . . . . . . . . . . . . . . . . . . . . . . . . . . . . . . . . .
Safety Instructions . . . . . . . . . . . . . . . . . . . . . . . . . . . . . . . . . . . . . . . . . . . . . . . . .
. . . . . . . . . . . . . . . . . . . . . . . . . . . . . . . . . . . . . . .
Checkin g the Packa g e Contents . . . . . . . . . . . . . . . . . . . . . . . . . . . . . . . . . . . . .
Part Names and Function . . . . . . . . . . . . . . . . . . . . . . . . . . . . . . . . . . . . . . . . . .
Main Unit .......................................................................................
Control Panel ...............................................................................
Rear View I/O Board ........................................................................
Bottom View ...................................................................................
Remote Control ...............................................................................
Inserting the batteries ......................................................................
1
2
4
9
1 0
1
2
12
14
16
18
19
20
Installation . . . . . . . . . . . . . . . . . . . . . . . . . . . . . . . . . . . . . . . . . . . . . . . . . . . . . . . . .
Setting up the projector ...................... .............................................
Screen size and projection distance ....................................................
Adjusting the image position .............................................................
Moving the projector ........................................................................
Software and Hardware Install - System Requirements ...........................
.
Software and Hardware driver - Installation .........................................
Software and Hardware driver - Function key of “Pointer” ...................
Software and Hardware driver - Calibration ........................................
Software and Hardware driver - Function of icon .................................
23
23
25
26
27
31
31
38
39
44
Location of product safety labels
Remote Control ...............................................................................
Inserting the batteries ......................................................................
21
22
Turning on projector ........................................................................ 28
Connecting PC to the projector .......................................................... 30
1/21/2008
Page 3

Interactive P r o j ec t o r
- 3 -
Basic Operation
. . . . . . . . . . . . . . . . . . . . . . . . . . . . . . . . . . . . . . . . . . . . . . . . . . . . .
Adjusting the screen image
................................................................
48
48
Function of Menu(OSD)
. . . . . . . . . . . . . . . . . . . . . . . . . . . . . . . . . . . . . . . . . . . .
Keypad operating
............................................................................
Computer mode
..............................................................................
Video mode
...................................................................................
Maintenance and Troubleshooting .......................................................
List of Support Monitor displays
...........................................................
50
50
51
58
66
73
Turning off the projector
.....................................................................
49
How to connect . . . . . . . . . . . . . . . . . . . . . . . . . . . . . . . . . . . . . . . . . . . . . . . . . . . . .
Desktop PC ....................................................................................
Laptop PC ................................................................................ ......
Video ................................................................................ ..... .......
45
45
46
47
1/21/2008
Page 4
Interactive Projector
T
T
1/21/2008
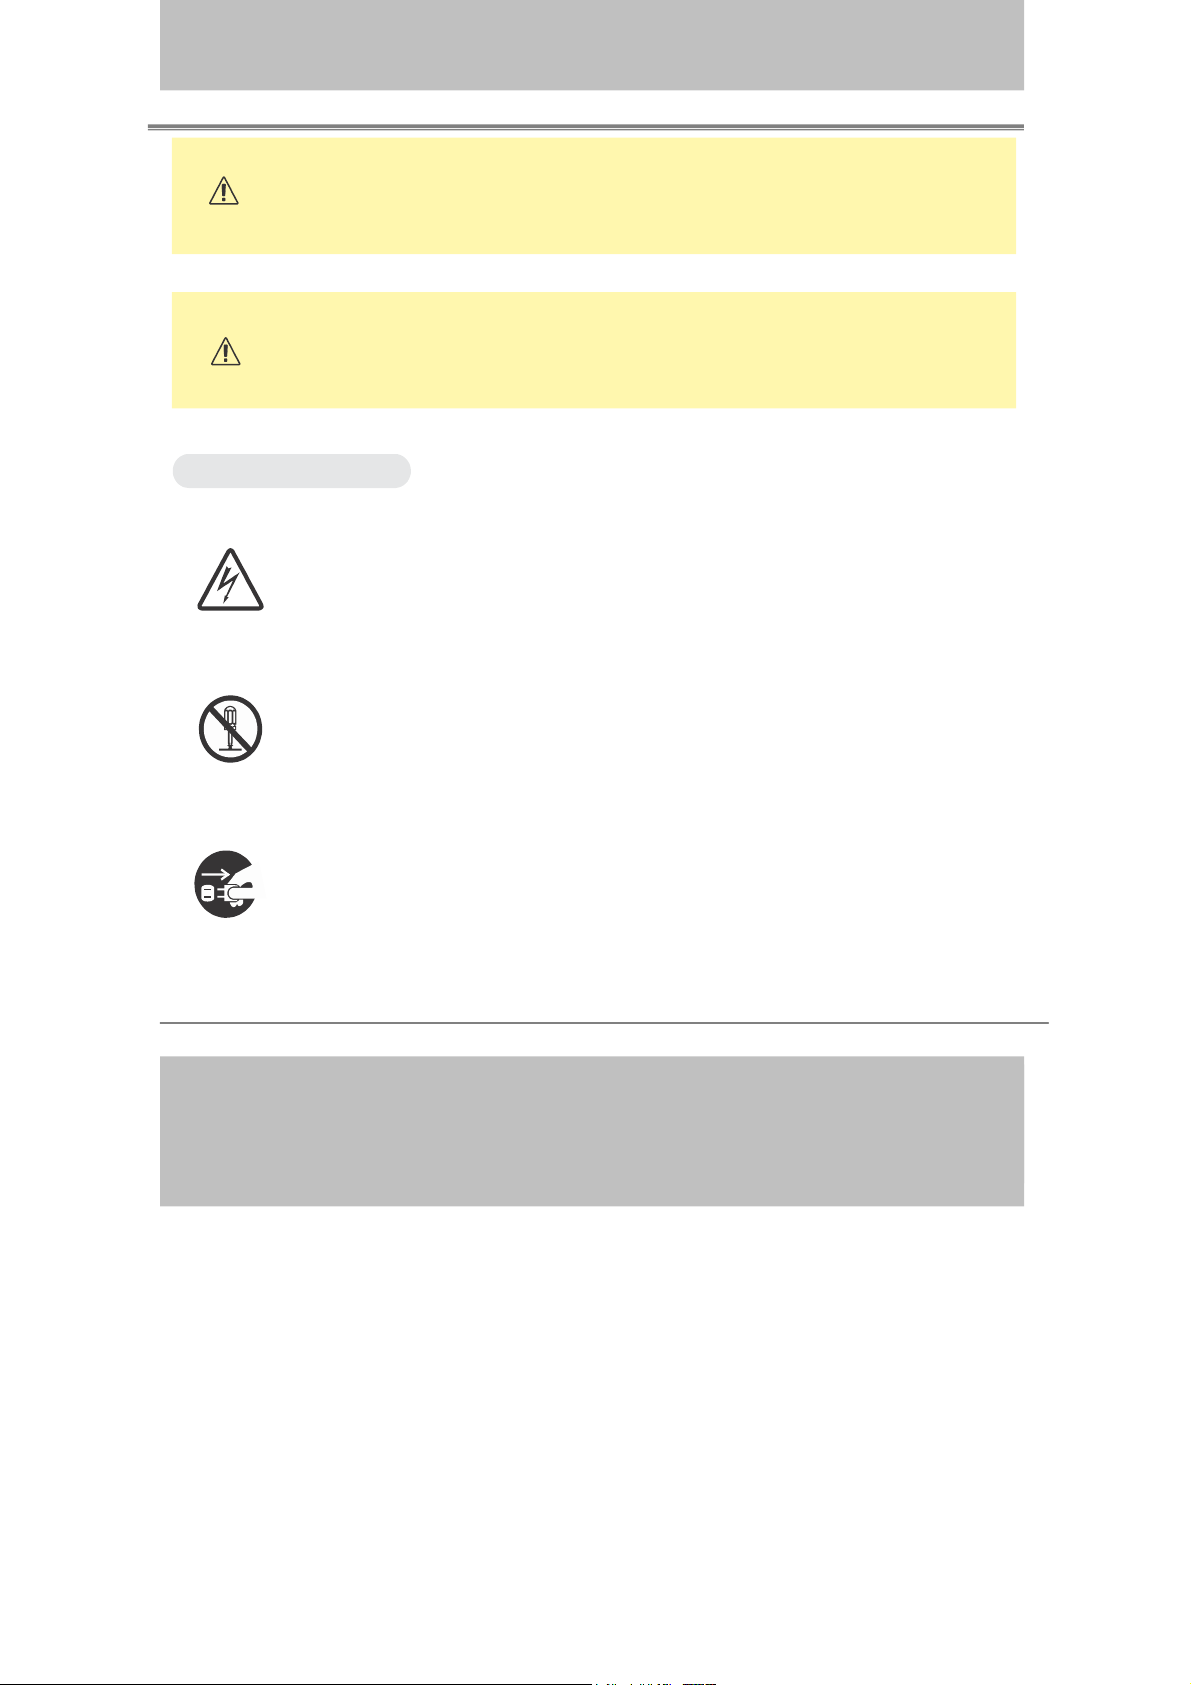
WARNING
CA U T I O N
Typical Symbols
s s ymbol i ndica t es an addit ional warning (inclu d ing caut ions).
Thi
A n i l l u s t r a t i o n i s p r o v i d e d t o c l a r i f y t h e c o n t e n t s ( f o r e x a m p l e :
the illustration to the l e f t i n d i c a t e s da n g e r o f electrical s h ock ) .
This symbol indicates a prohibited action.
indicated in an illustration or desc ription near the symbol (for example:
th
e symbol to the left indicates that disassembly is prohibited).
This symbol indicates information that, if ignored,
could possibly result in personal injury or even death.
This symbol indicates information that, if ignored,
ld result in personal injury or physical damage.
cou
he contents will be clearly
This symbol i n d i ca te s a compulsory ac t ion .
cle
arly i ndicat ed in an i llustra t ion or d escript ion near the symbo l
( f o r e x a m p l e : t h e s y m b o l t o t h e l e f t s h o w s t h a t t h e p o w e r p l u g
sh o u ld b e d i s c o n ne c t ed f r om t h e p o w er o u t le t ) .
-4-
he conten t s wi l l be
Page 5
Interactive Projector
1/21/2008
WARNING
If a problem should occur
If smoke or strange odors arise, continued use could result in fire or electrical
sho ck. I n such c ase, imm ediately turn off the po wer swit ch and t hen
disconnect the power plug from the power outlet. After making sure that
e smoke or odor ha s stopped, contact your dealer for repairs. Neve
th
attempt to make repairs yourself because it could result in serious injury.
Do not use this projector if there is no image or sound, or if the sound is
distorted. Continued use could result in fire or electrical shock. In such
case, immediately turn off the power switch; disconnect the power plug
from the power outlet and contact your dealer.
If water gets inside of the projector, immediately turn off the power switch,
disconnect the power plug from the power outlet and contact
your dealer.
Do
not install on an unstable surface.
Do no t ins tall this projecto r on an unst able surfa ce
such as a wobbly stand or incline because this could
lt in the projector falling and could cause injury.
resu
Do
not open the cabinet.
Never open the cabinet. There is high voltage inside
which can cause electrical shock.
Do not modify.
Do not modify this projector because this could result in fire or electrical shock.
r
Do not use in the bathroom or near water.
Do not expose this unit to rain or use near water… for example, in the
bathroom, a wet basement, near a swimming pool, etc…
Do not insert objects into the Projector.
Do not insert metal objects through the ventilation openings, etc., of this
projector or drop such objects inside because this could result in fire,
damage or electrical shock.
If a foreign object should enter this projector, immediately turn off
the power switch, disconnect the power plug from the power outlet
and contact your dealer.
Continued use could result in fire or electrical shock. Use special caution
household and where
in
children are present.
-5-
Page 6
Interactive Projector
1/21/2008
WARNING
Do not look through the lens when the lamp is on.
Nev
er look through the lens when the lamp is on. The powerful
ligh
t could adversely affect visio n. Use special caution in
ho
useholds where chi ldren ar e presen t.
oid shock or impact on the projector.
Av
If the projector should fall, resulting in damage to the cabinet, immediately
tur
n off the power switch, disconnect the power plug from the power outlet
and contact your dealer.
Continued use could result in fire or electrical shock.
Do not place this projector in a container containing liquid. Do not
plac
e flower vases, flowerpots, cups, cosmetics, liquids such as
water, etc., on top of this projector.
Do not use any power cable except those supplied with the
projector.
e use of any other power cable could result in fire or electrical
Th
shock.
Do not shine the laser beam onto yourself or other persons.
The laser pointer function of projector remote control emits class Ⅱ laser
beam.Do not look directly into the laser beam or direct the laser beam
at other people. Vision can be impaired if the laser beam enters the eyes.
Especially pay attention if children are present
.
High temperatures are generated when the lamp is lit, so do not
place objects in front of the lens.
-6-
Page 7

Interactive Projector
1/21/2008
CAUTION
Placing heavy objects on top of this projector could result in loss
of balance or falling and cause personal injury or damage the
ojector.
pr
not block the ventilation openings.
Do
Do not block the ventilation openings of this projector.
Blocking ventilation could lead to internal overheating which
ld result in fire.
cou
Do not place this projector on its side during use or push it into a small,
orly ventilated location.
po
Do not place this projector o n a carpe t or bedd ing or co ver it wi th a
tablecloth, etc. Also, when installing this projector, make sure the ventilation
op
enings are at least 30cm(12in) clearance around the projector.
Care and maintenance.
For safety purposes, disconnect the power plug from the power outlet
before performing any maintenance on this projector.
Battery usage.
Replace the batteries with the same type only.
Do not mix old and new batteries; this could result in fire or
personal injury due to battery cracking or leakage.
Make sure the p lus a nd minus t erminals are cor rectl y aligned
when loadi ng the bat terie s.
Incorrect loading co ul d result in person al injury o r contamina tion of
the sur roundings d ue to batte ry cracking or lea kage.
Have the p rojector interi or cl eaned regu larly .
Contact your dealer to arrange for the s ervic e.
Accu
mulations of dust inside the projector can result in fire or
malfunction if not cleaned for an extended period.
Ask your dealer for detai ls about i ntern al cl eanin g.
-7-
Page 8

Interactive Projector
1/21/2008
CAUTION
Avoid installation in humid or dusty locations. Do not install this
ojector in a humid or dusty location. This could result in fire or
pr
elec
trical shock.
Do not handle the power cord roughly. Keep the power cord away
fr
om heaters;
The heat could melt the power cord and cause fire or electrical shock.
Do not touch the power plug with wet hands;
This could result in electrical shock.
n disconnecting the power plug, do not pull on the power cord.
Whe
This could damage the power cord and cause fire or electrical shock.
Always grip the plug when disconnecting.
When the projector is not to be used for an extended period.
If the projector is not to be used for an extended period because of
trav e l, etc. , disconn ect the power pl ug from the pow er outlet and
lace lens cover.
rep
-8-
Page 9
Interactive Projector
1/21/2008
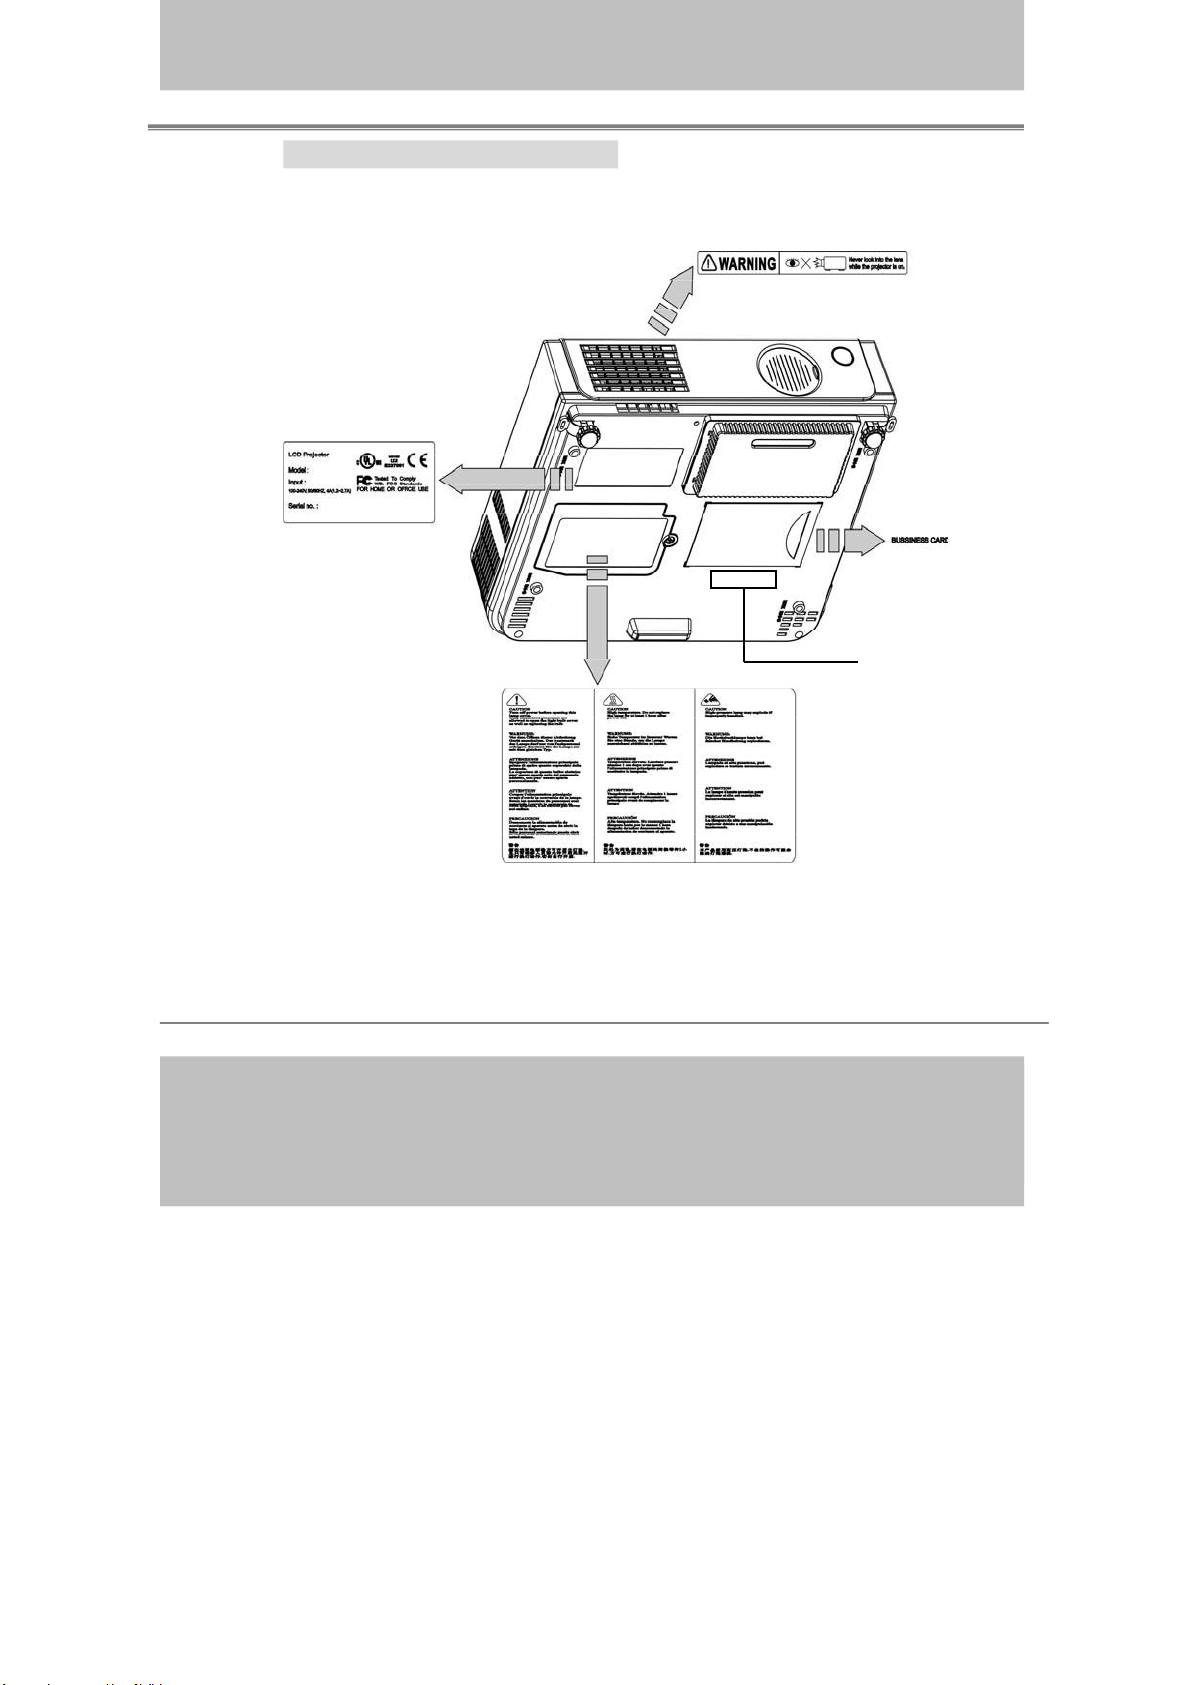
Location of product safety labels
Safety labels are used on or within the projector to alert you to items or areas
requiring your attention.
Patent Label
-9-
Page 10
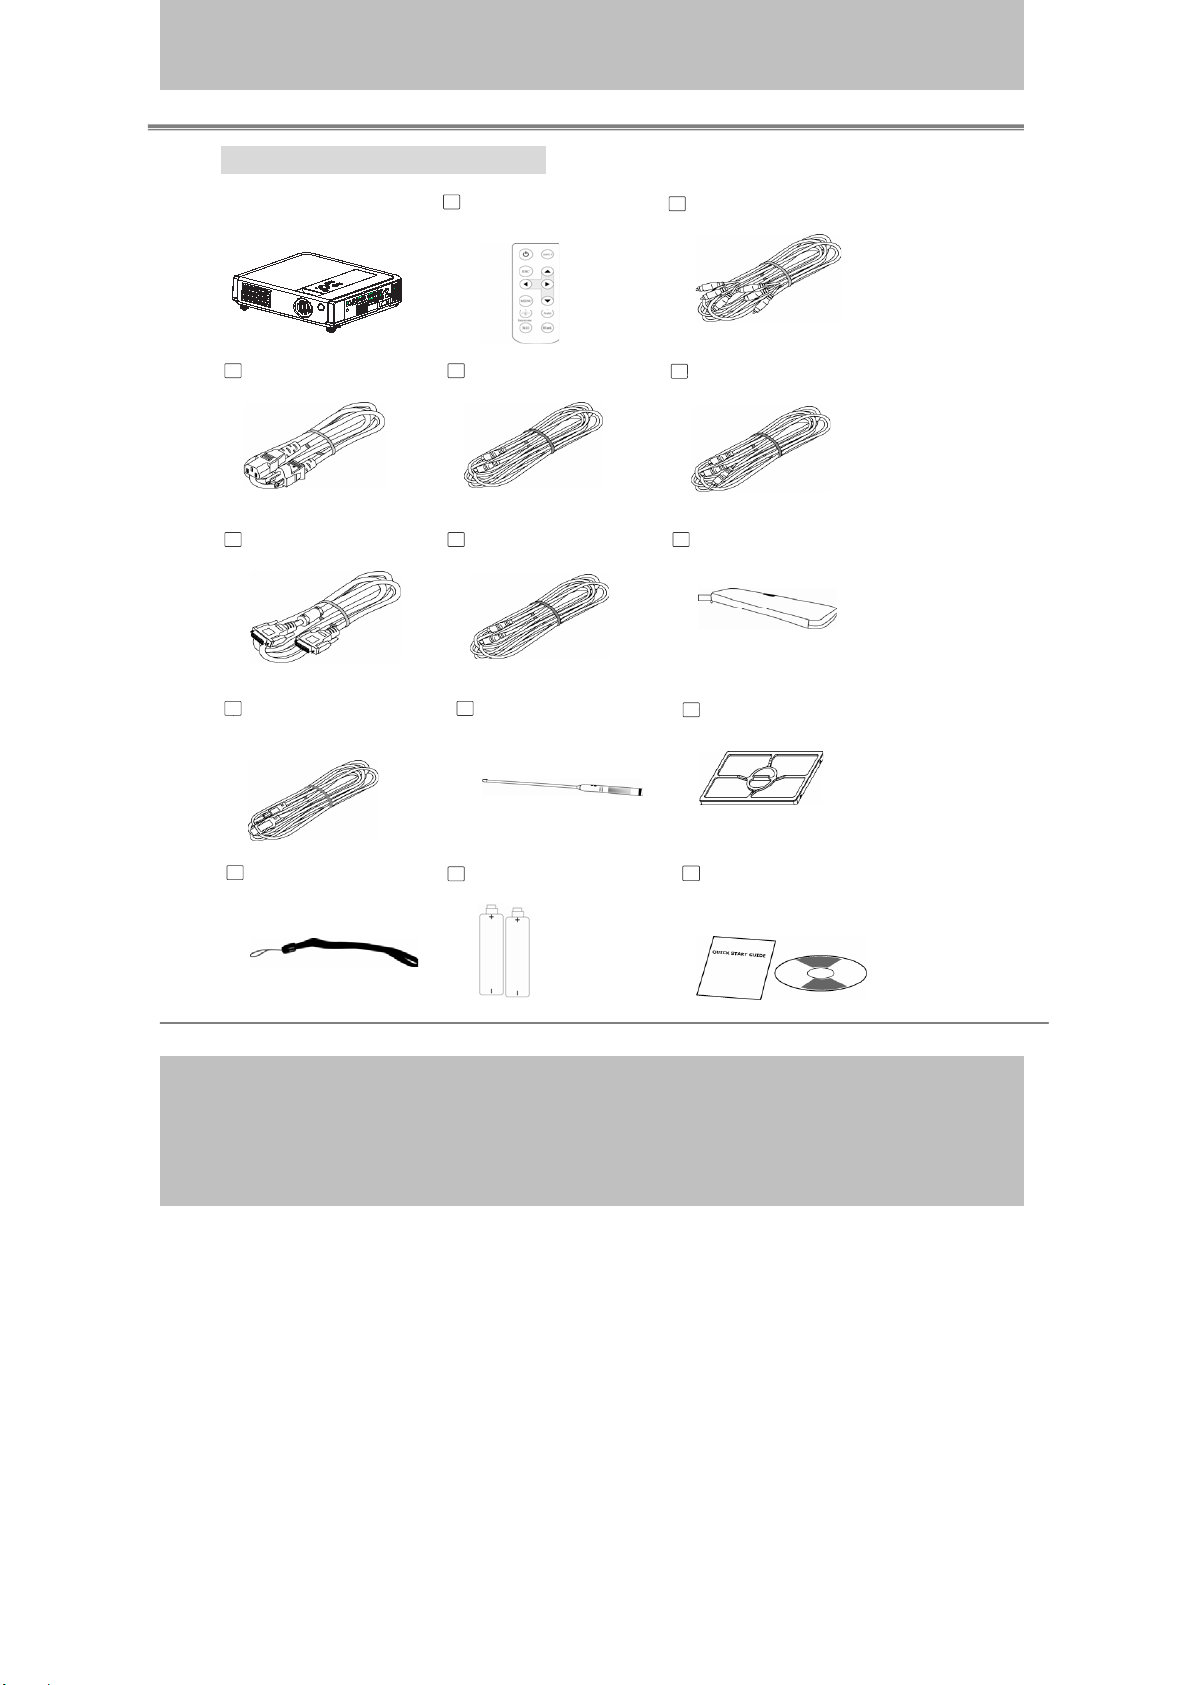
Checking the Package Contents
1/21/2008
Interactive Projector
□
Projector
er Cord
Pow
Computer cable Speaker Cable
USB Cable(1.5M)
Remote Control
wit
h batteries
S-Video Cable
Pointer & Pen
Video Cable
Audio Cable
Accessory Bag
Filter
Hanging String
Batteries
Quick Start Guide
/ Owner’s Manual CD
-10-
Page 11
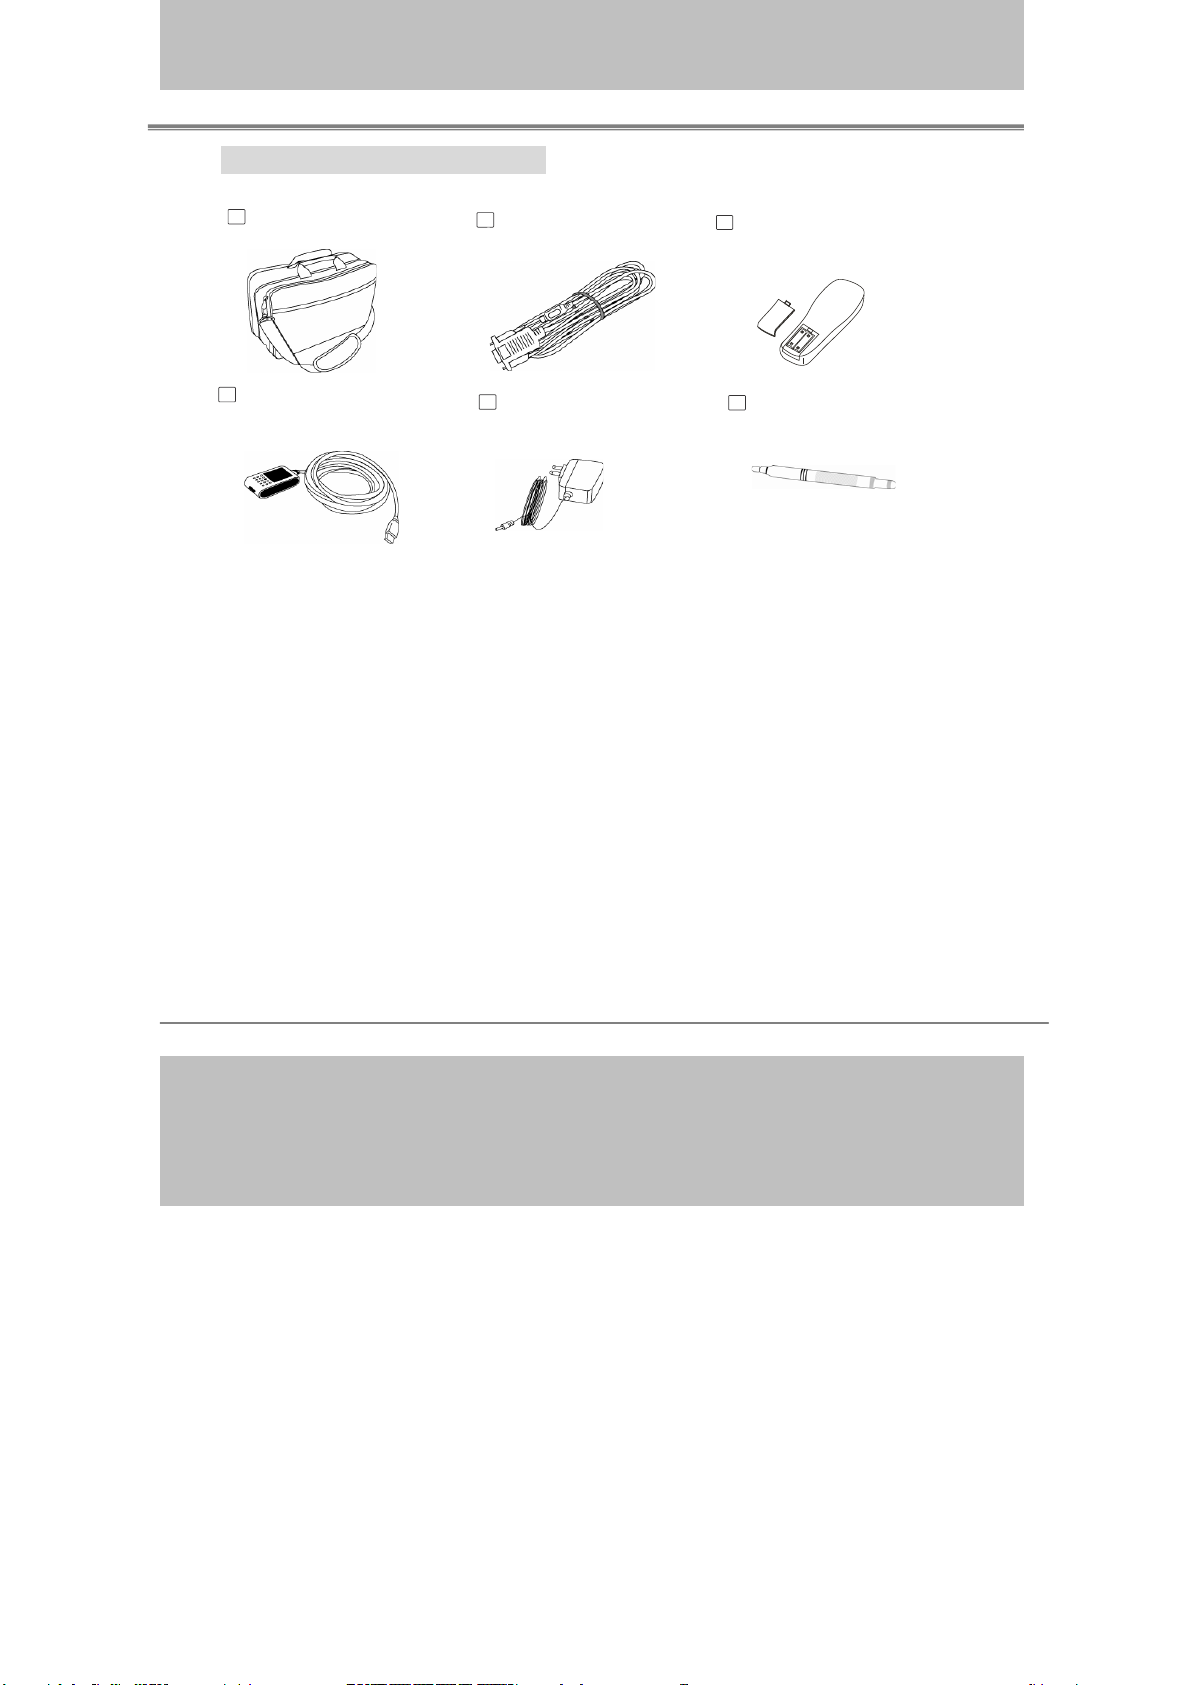
Checking the Package Contents
1/21/2008
Bag
Carry
(Option
al)
RS232 Cable
(Opti
onal)
Interactive Projector
Remote Control
with batteries(Optional)
Extension USB
Cable(16.5'Optional)
pter
Ada
(Optional)
Pen(Optional)
-11-
Page 12
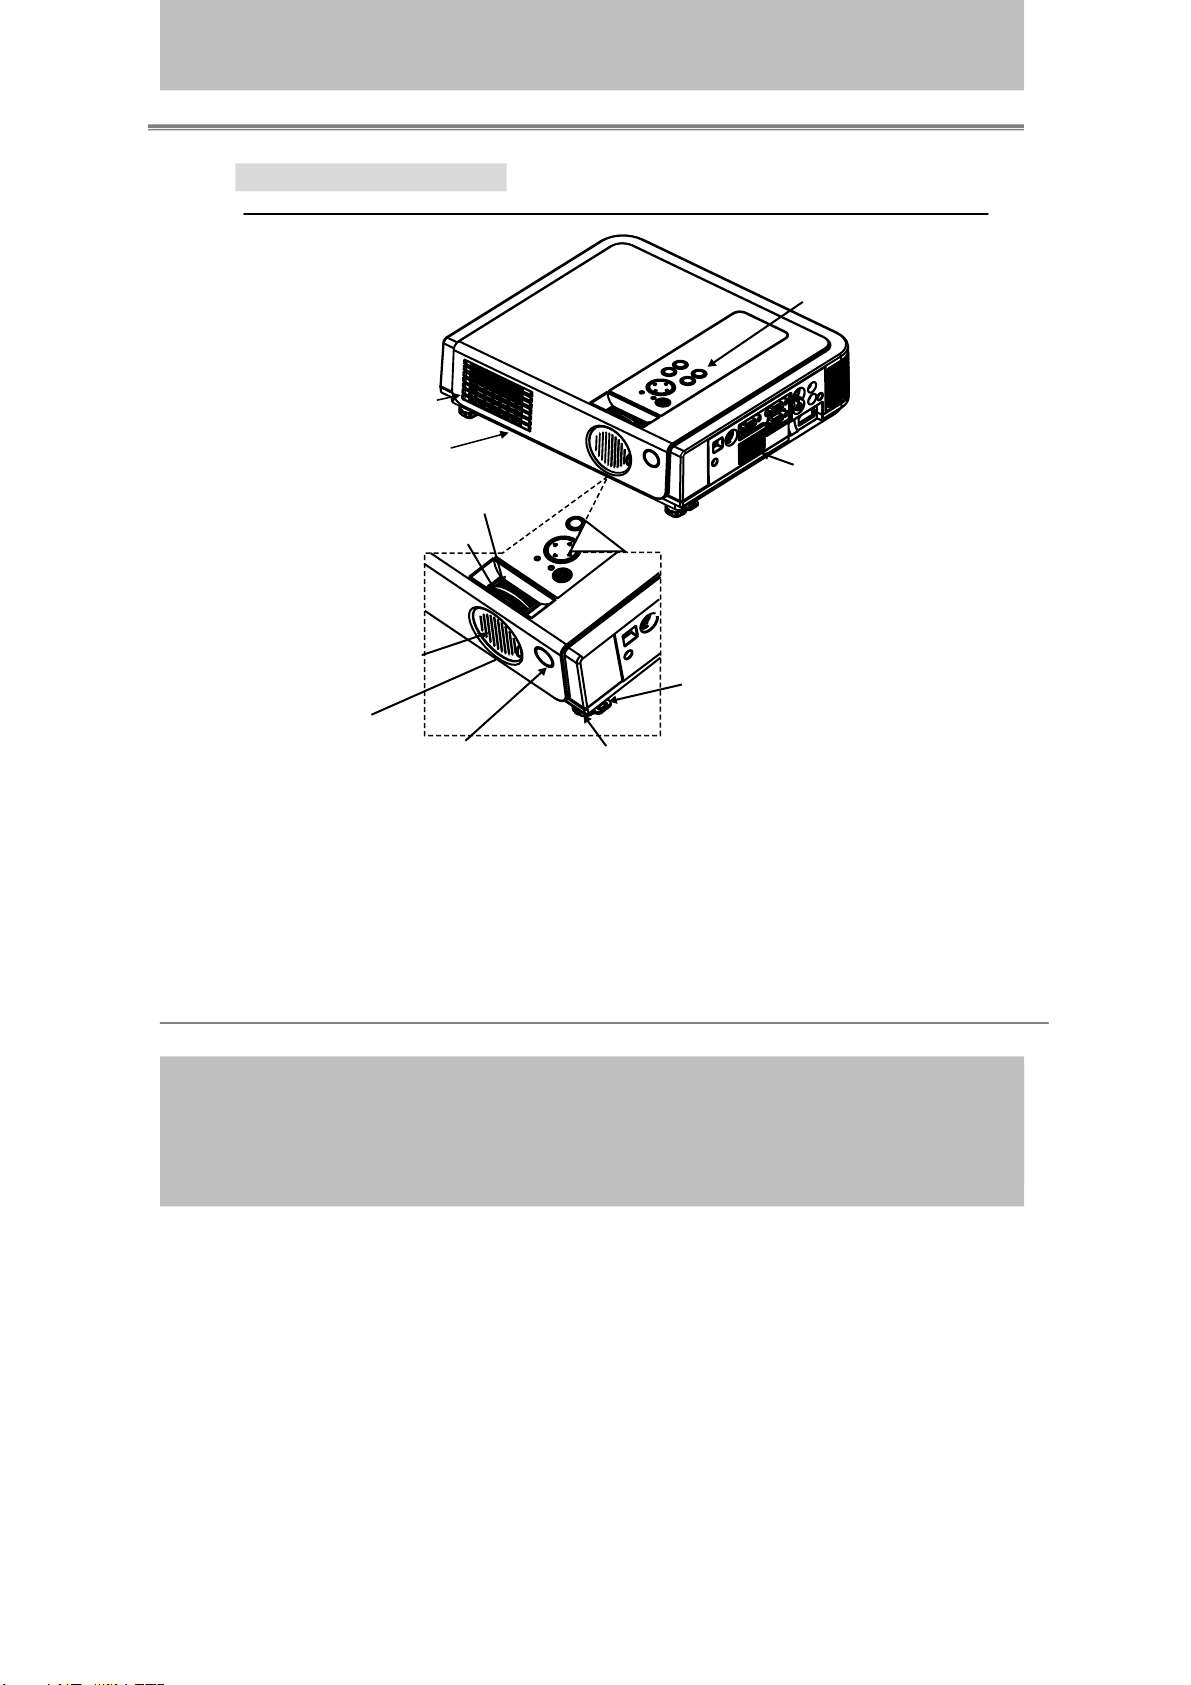
Part Names and Function:
1/21/2008
Main Unit
Outlet ventilation
cover(bottom)
4.Filter
cover(bottom)
1.Zoom ringring
2.Focus ring
7.Lens cover
Interactive Projector
8.Control panel
Speaker
6.Footadjustbutton6.Footadjustbutton
CMOS sensor
1.
Zoom Ring
Use
the Zoom Ring to adjust the size of the projected image.
3.Front IR receiver
5.Front adjustable foot5.Front
Rotate the Zoom Ring until the image is the desired size.
2. Focus Ring
Use
the Focus Ring to focus the projector image.
Rotate the Focus Ring until the image is clear.
Front IR receiver
3.
Wh
en using the remote control, point the remote control at this sensor.
-12-
Page 13
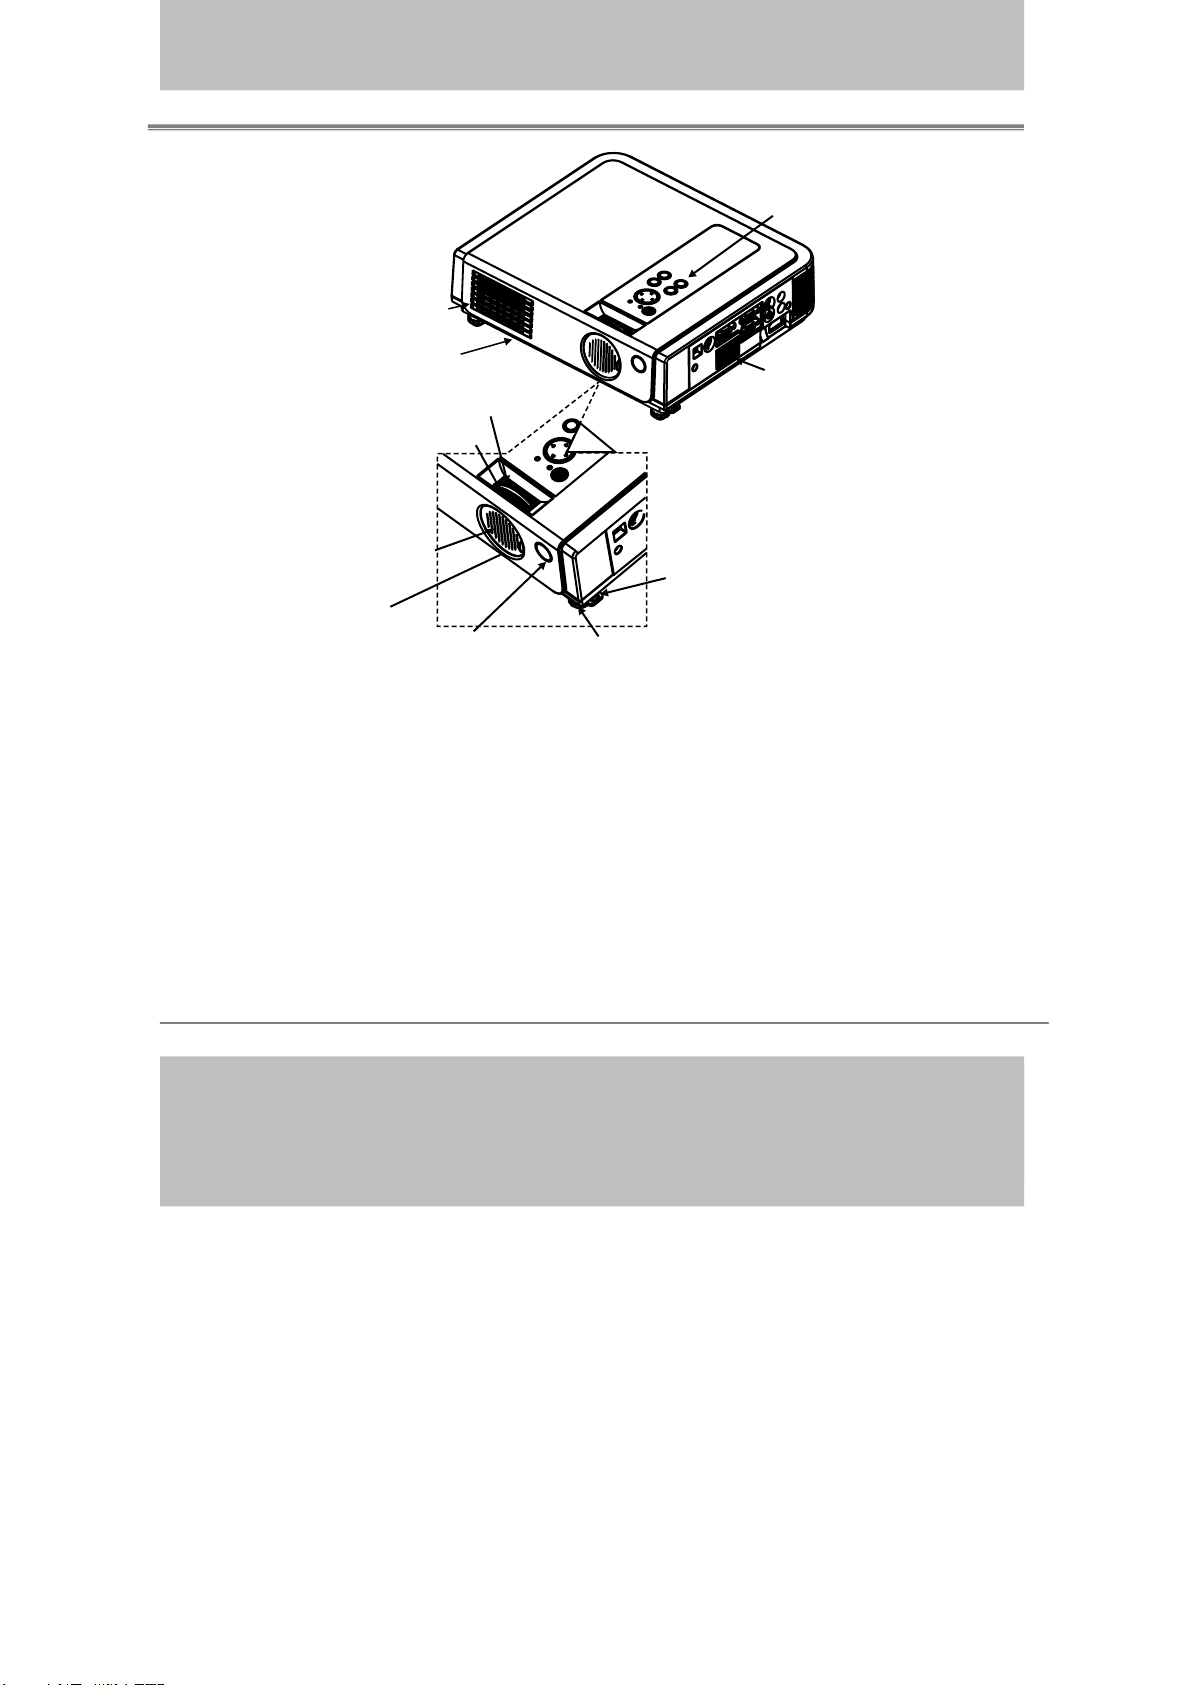
Outlet ventilation
1/21/2008
4.Filter
7.Lens cover
CMOS sensor
bottom)
cover(bottom)
1.Zoom ringring
2.Focus ring
Interactive Projector
8.Control panel
Speaker
6.Footadjustbutton6.Footadjustbutton
3.Front IR receiver
5.Front adjustable foot5.Front
4. Filter cover
Prevents dust and other foreign particles from getting into the projector.
Remove the Filter cover to clean the air filter.
5. Front adjustable foot
Raise & lower to adjust the projection elevation.
6. Foot adjust button
Lo
ck/unlock the adjustable foot.
7. Lens cover
Close when not using to protect the lens from becoming dirty or damaged.
8. Control panel (keypad)
Op
erating system.
-13-
Page 14
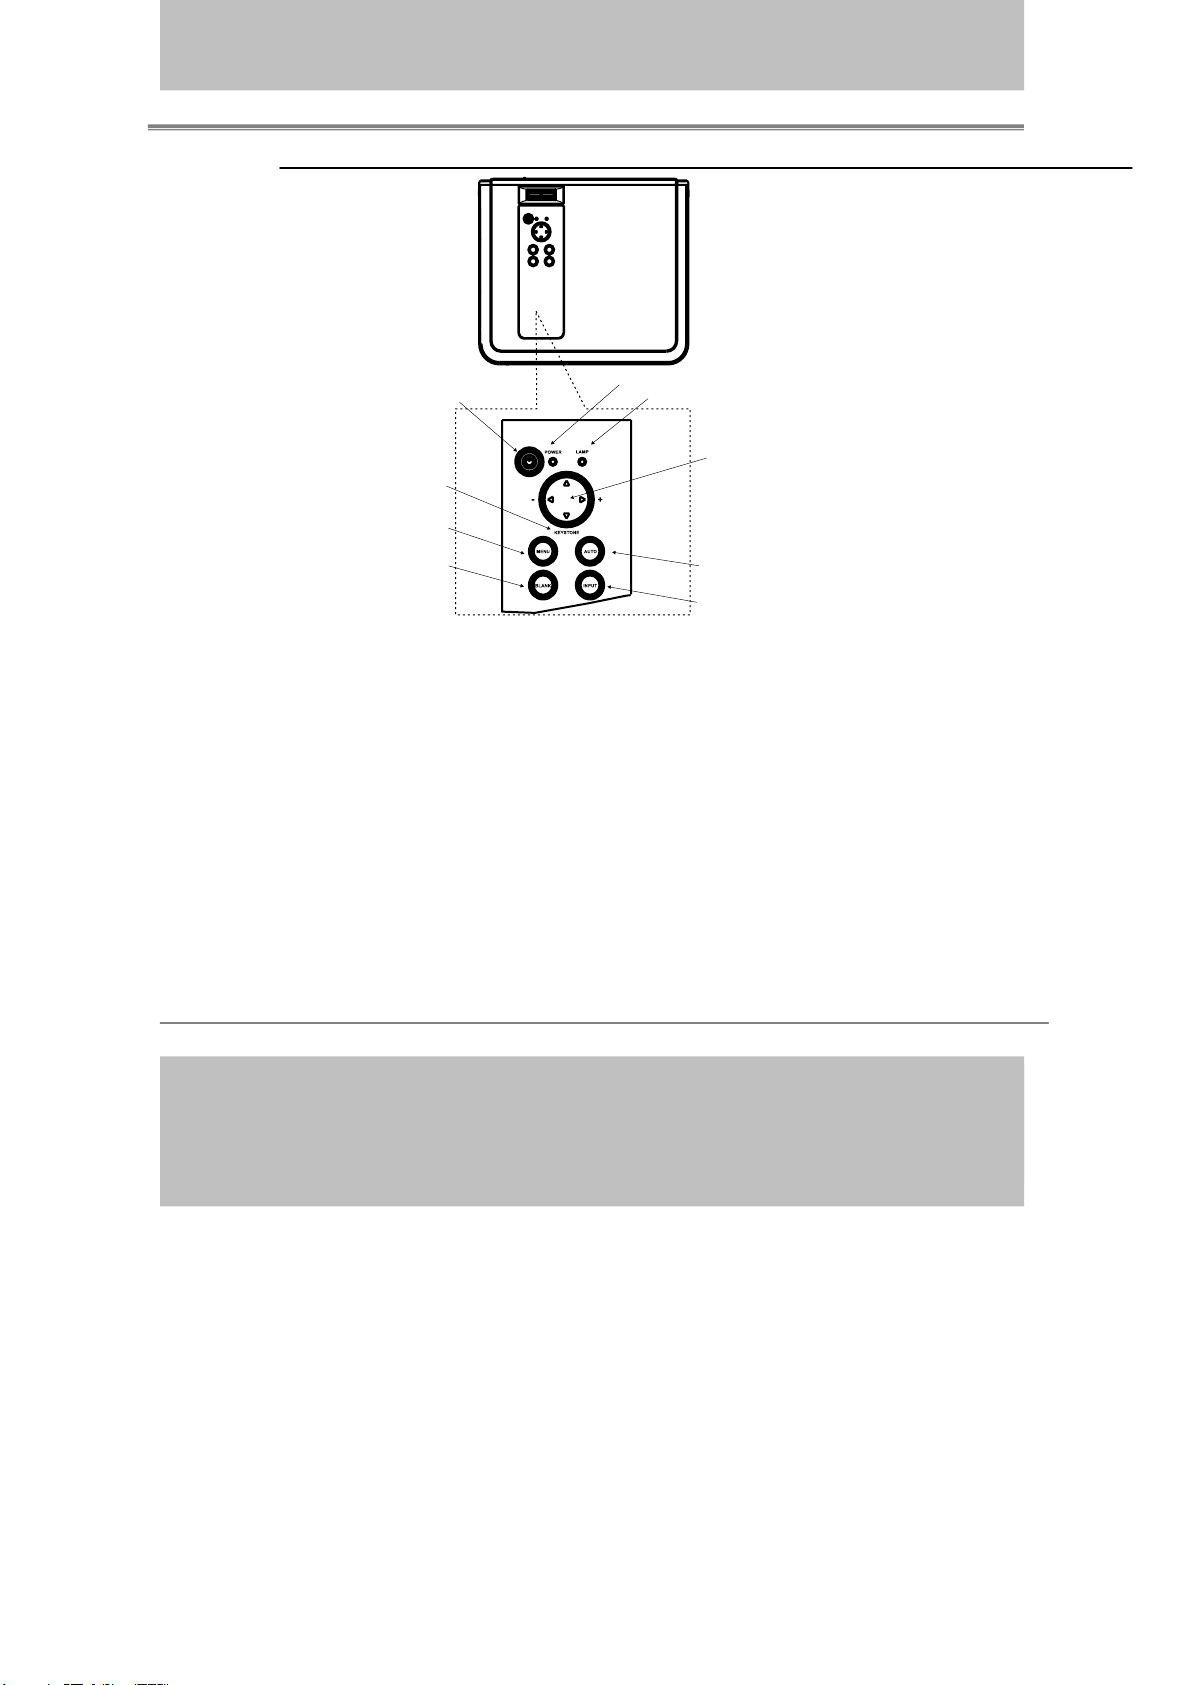
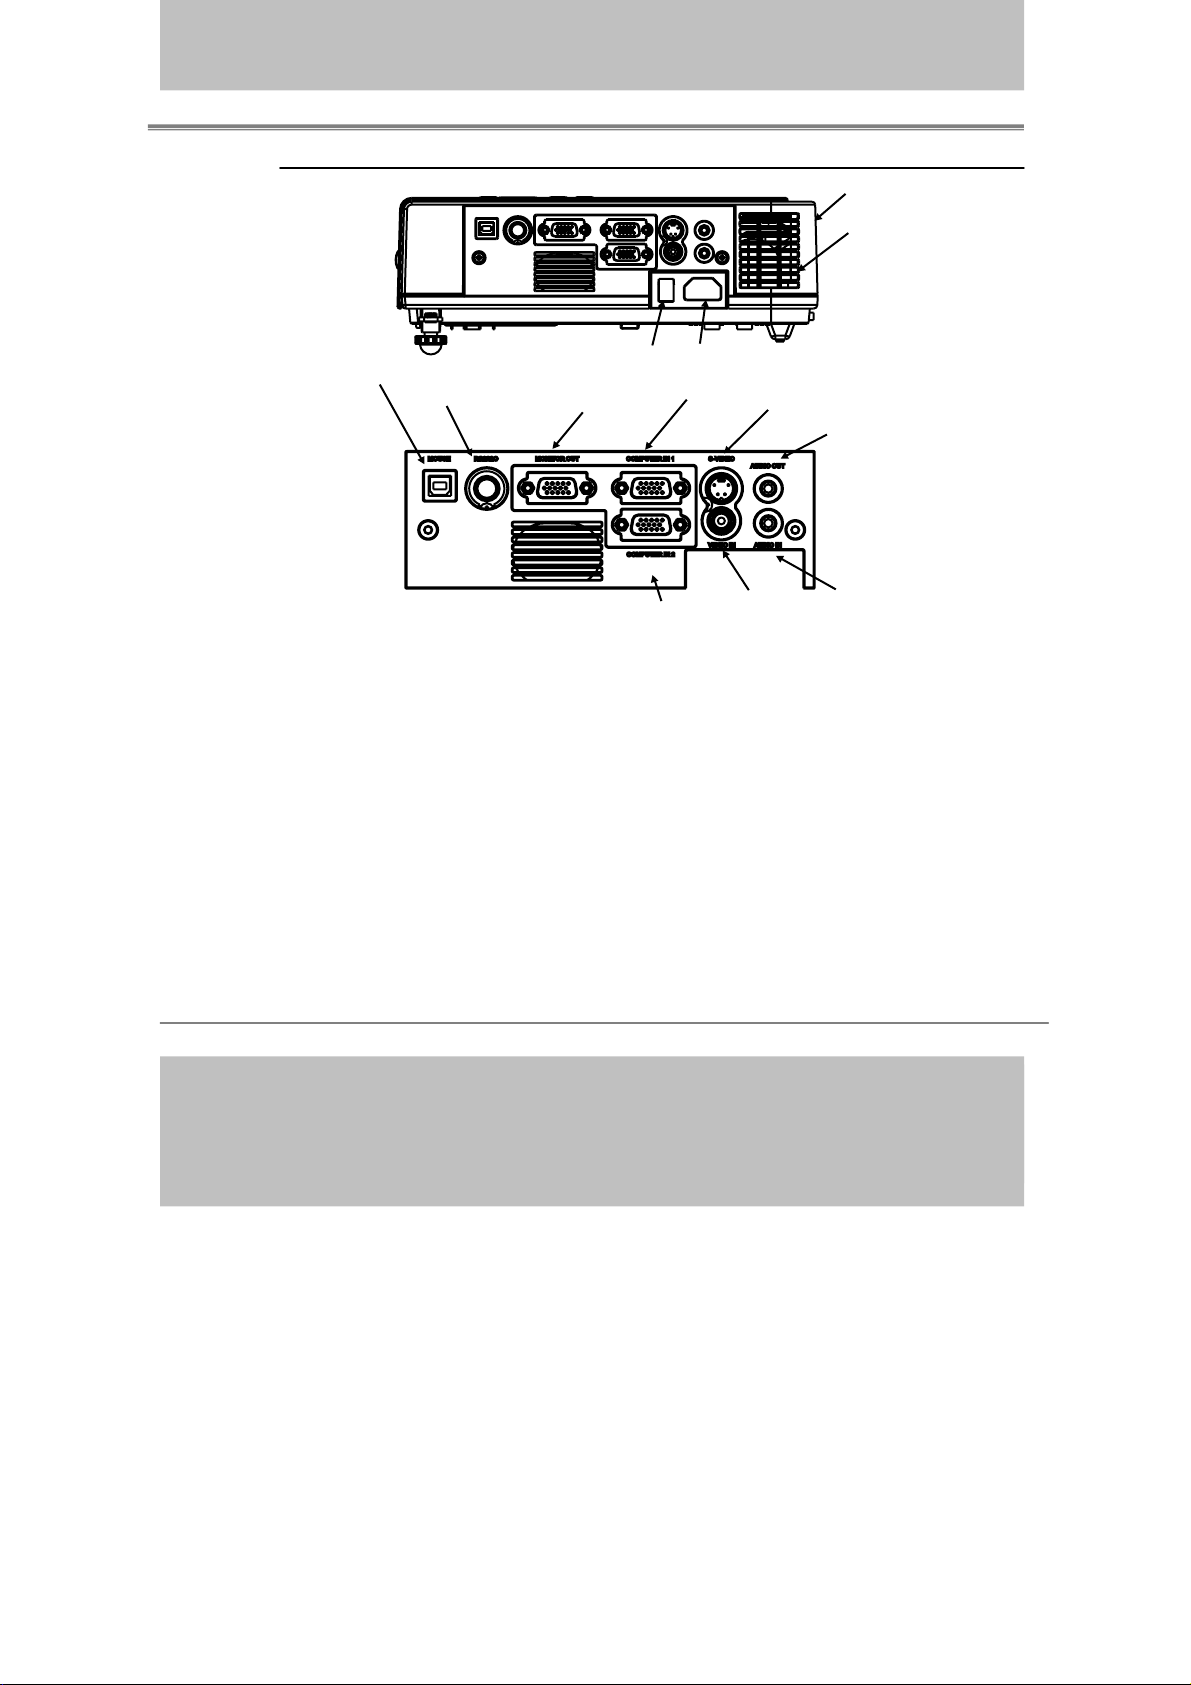
Control panel
1/21/2008
7. Keystone7. Keystone
5. Menu5. Menu
1. Power1. Power
8. Power indicator8. Power indicator
9. Lamp indicator9. Lamp indicator
6. Menu-left/ right,
6. Menu-left/ right,
Menu-up/down
Menu-up/down
Interactive Projector
3. Blank3. Blank
4.Auto4.Auto
2. Input2. Input
1. Power button
Power on / operation mode, Standby mode, Cooling-down mode
Brightness function,when sensor detects the surrounding light lower than
150 lux,”power button”will flash blue.
2. Input
Selects between RGB input source-Computer 1 → Computer 2(RGB or
YPbPr) → AV →S-Video → Computer1 ,System will auto detect YPbPr or
RGB signal in computer 2 port.
3. Blank
Blanks the projected image. If the projector is left in blank mode for more
than 15 minutes, the projector will automatically shut down.
4. Auto
Automatically adjusts the setting to match the current input.
-14-
Page 15
1. Power1. Power
1/21/2008
7. Keystone7. Keystone
5. Menu5. Menu
8. Power indicator8. Power indicator
9. Lamp indicator9. Lamp indicator
6. Menu-left/ right,
6. Menu-left/ right,
Menu-up/down
Menu-up/down
Interactive Projector
3. Blank3. Blank
4.Auto4.Auto
2. Input2. Input
5. Menu
Display or hides the OSD main menu page.
6.Menu-up /down, Menu-right / left
Selecting OSD menu item up or down.
Selecting and adjusting the function of OSD menu item
Keystone
7.
Adjusts the vertical keystone with menu-right, menu-left
8.
Power indicator
Lights on or flashes to indicate the operating status of the projector (See
53)
Page
9. Lamp indicator
Indicate a problem in the internal projector temperature, lamp cover or
cooling down. (See Page 53)
-15-
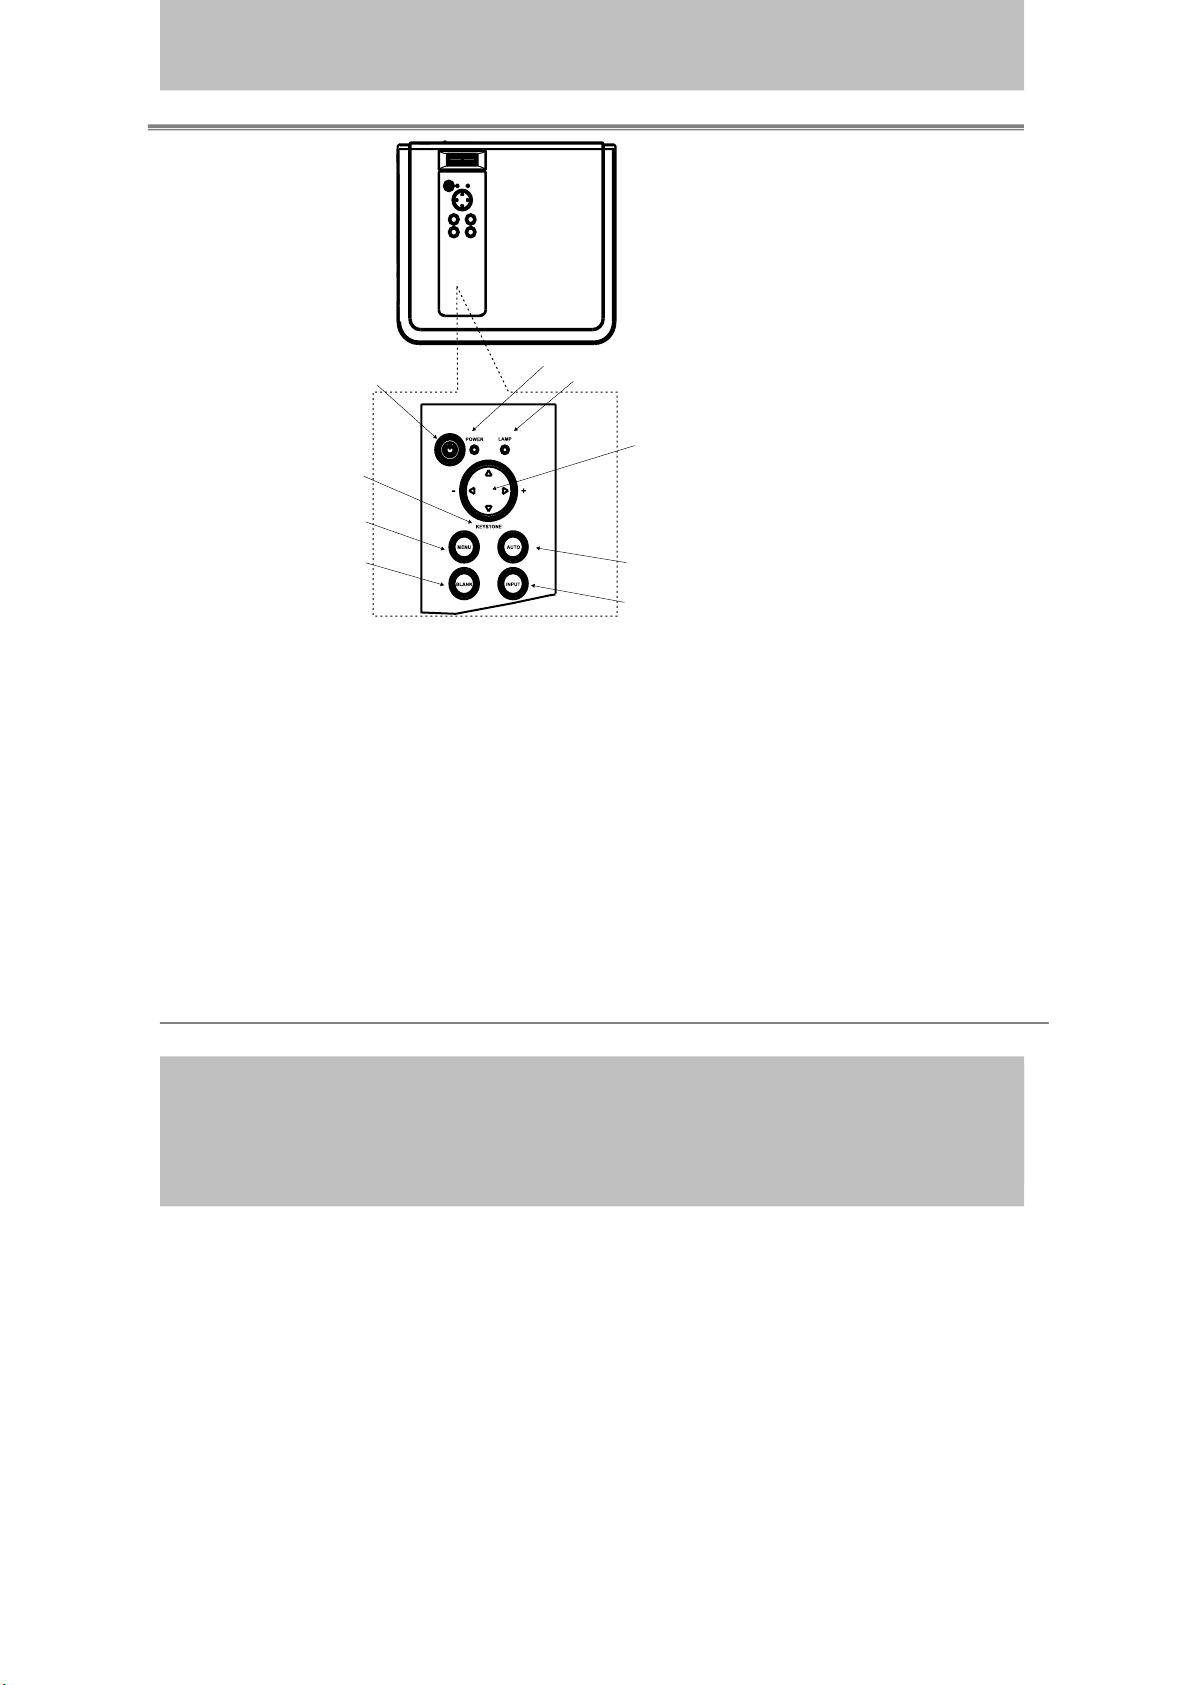
Page 16
Rear View / IO Board
1/21/2008
Interactive Projector
12.Rear IR receiver
Inlet ventilation
2
9.USB mouse connector
4.RS-232C
11.Power Switch
3.Monitor out
2.Computer In 2
/YPbPr
10. Power socket
1. Computer in 1
/YPbPr/YPbPr
5.S-video
6.Video In
7.Audio out
8.Audio In
1. Computer in 1
Input Analog RGB video signal from a computer
2. Computer in 2 /YPbPr
When input signal from computer 2, it may encounter incorrect picture
color. Please press "Auto" button again. The picture will be corrected.
3. Monitor out connector
Connect an external monitor to this connection view the Computer1 input.
4. Control (RS-232C)
l data port for controlling the projector with a computer or other RS-232
Seria
control device.
5. S-Video connector
S-Video signal from a video source.
-16-
Page 17
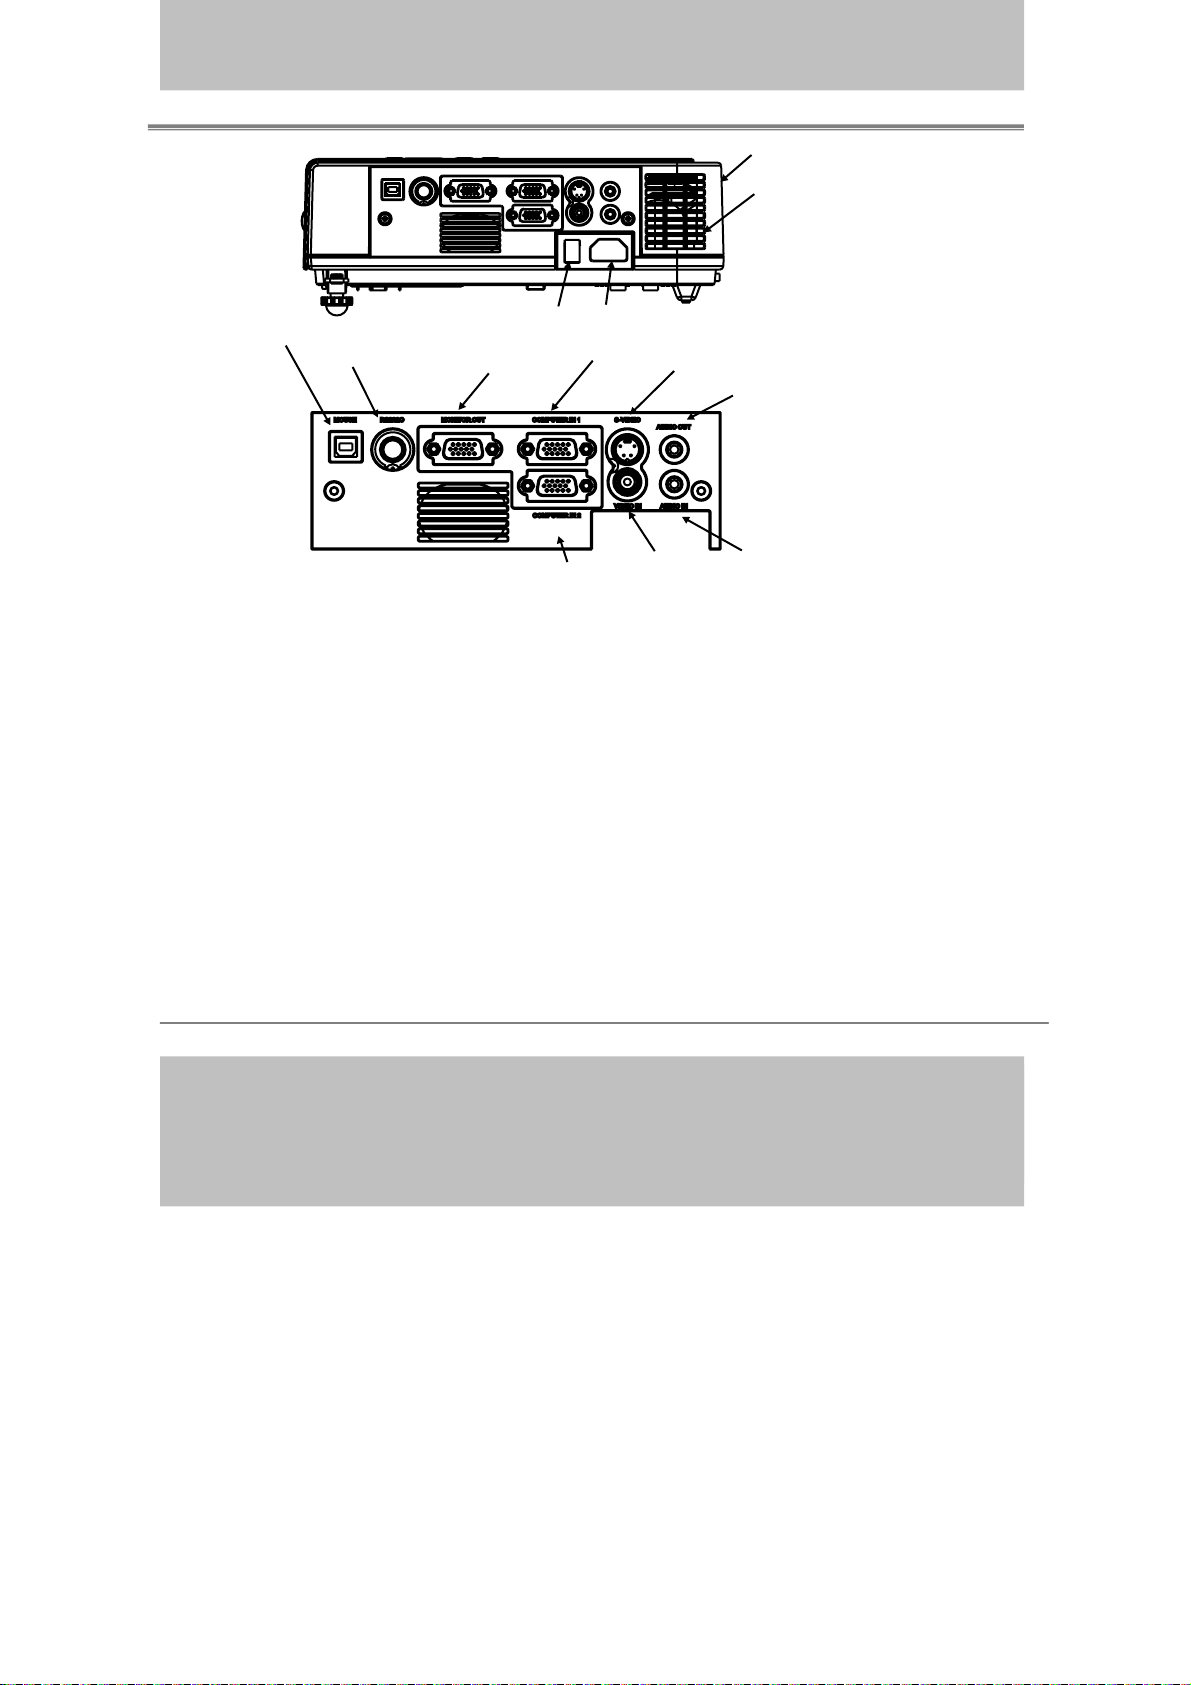
Interactive Projector
1/21/2008
12.Rear IR receiver
Inlet ventilation
2
9.USB mouse connector
4.RS-232C
6. Video in
Component video signal from a video source.
7. Audio out
Connectin
8. Audio in
Stereo mini jack for PC input
USB mouse connector
9.
Connects
ower socket
10. P
Connects the power core to this connection.
11.Power Switch
3.Monitor out
2.Computer In 2
/YPbPr
10. Power socket
1. Computer in 1
/YPbPr/YPbPr
5.S-video
6.Video In
7.Audio out
8.Audio In
g to an external speaker system.
a USB mouse cable to a computer to control computer mouse functions.
11.
Power switch
Turns the power on/off.
Rear IR receiver
12.
When using the remote control, point the remote control at this sensor.
-17-
Page 18
Bottom View
1/21/2008
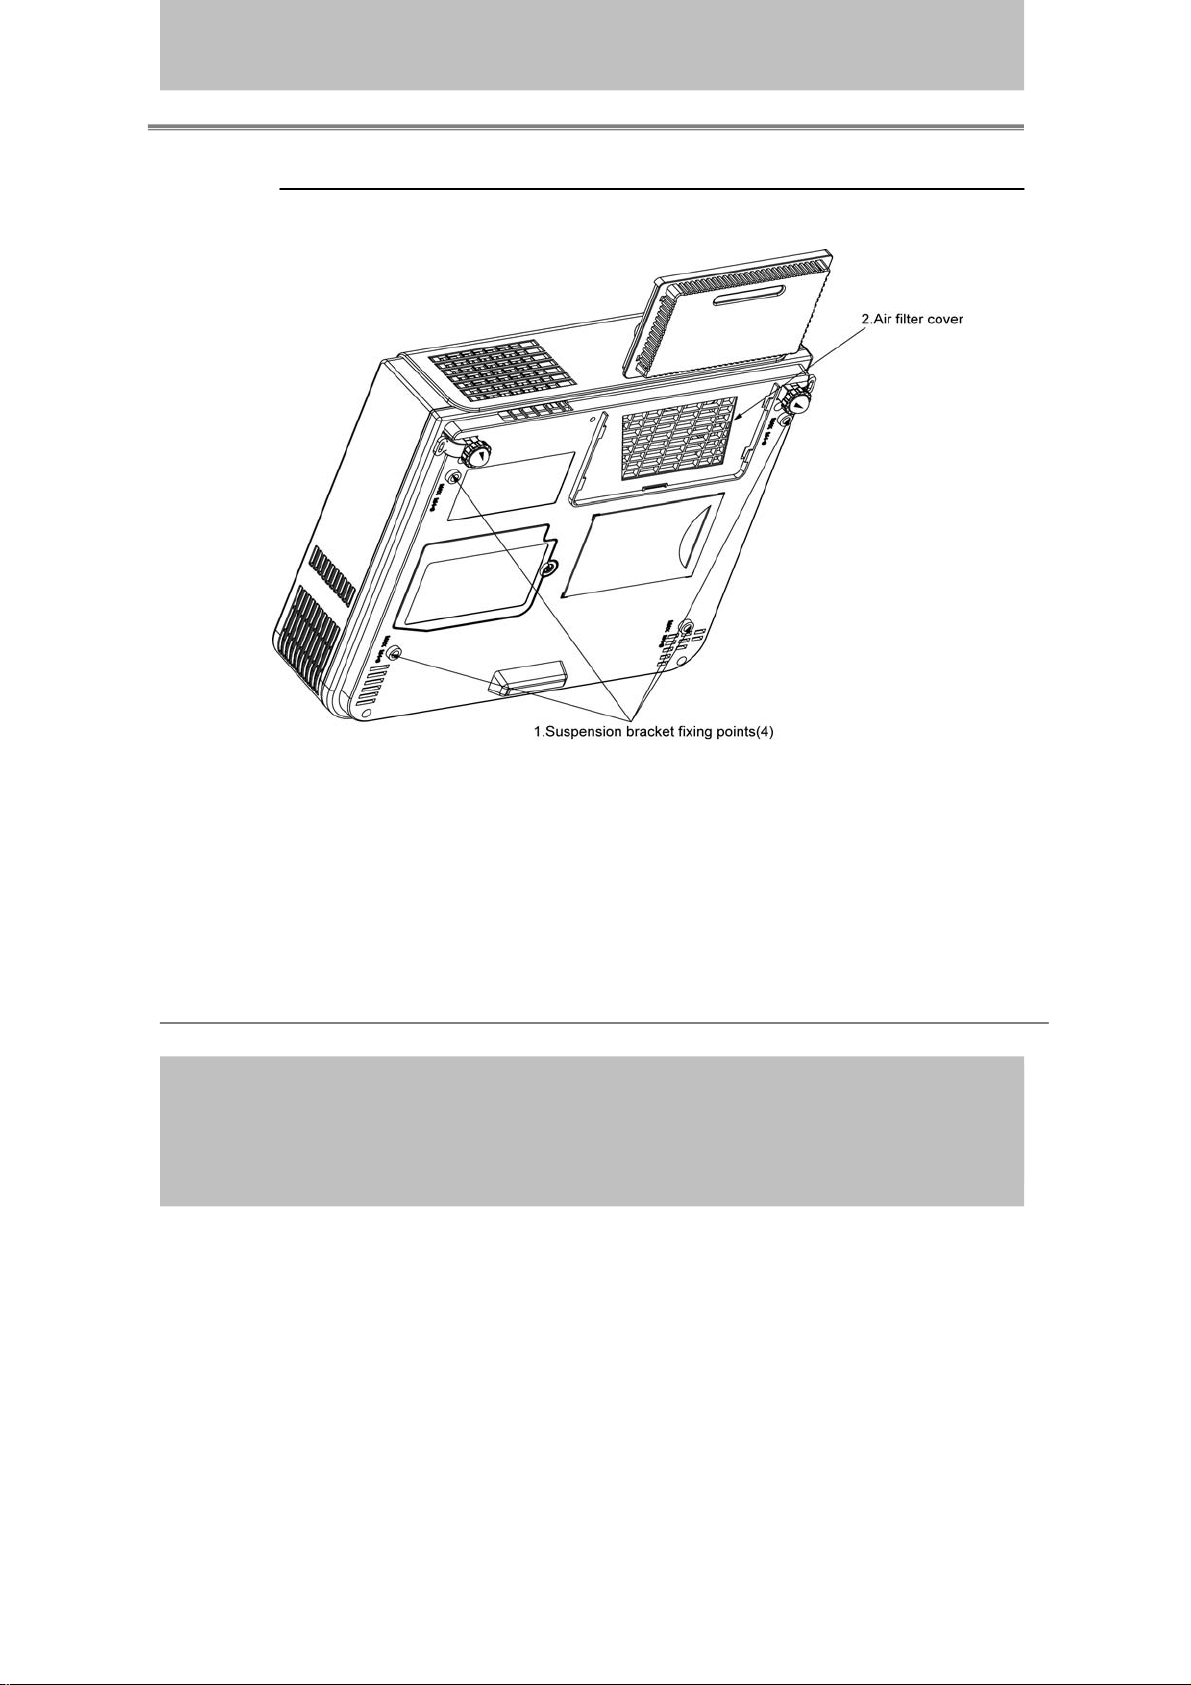
Interactive Projector
1. Mounting bracket holes (4 points)
Install the optional ceiling mount here when suspending the projector from
the ceiling.
Air filter cover
2.
Prevents dust and other foreign particles from getting into the projector
-18-
Page 19
Remote Control
1/21/2008
Interactive Projector
1. Power
Power on / operation
Standby mode,
mode,
Cooling-down mode
2 Esc
Press”ESC”b
close”Menu”p
Volume up/ down
3.
Sound louder or lower
utton,it will
icture.
4. Menu
Display or hide the
OSD main menu page.
5. Keystone
Adjusts the vertical
keystone function.
6.Still
Keep the current image
on the Screen.
8.Auto Sync
Refresh the current
image.
9. Menu down/ up,
Menu left/right
Selecting and adjusting
the function of OSD
10. INPUT source
Select input source:
Computer 1→Computer 2
→ Composite Video→
Video→Computer 1
S-
7.Blank
Hide the current image,
beco
me black color on
the screen.
-19-
Page 20
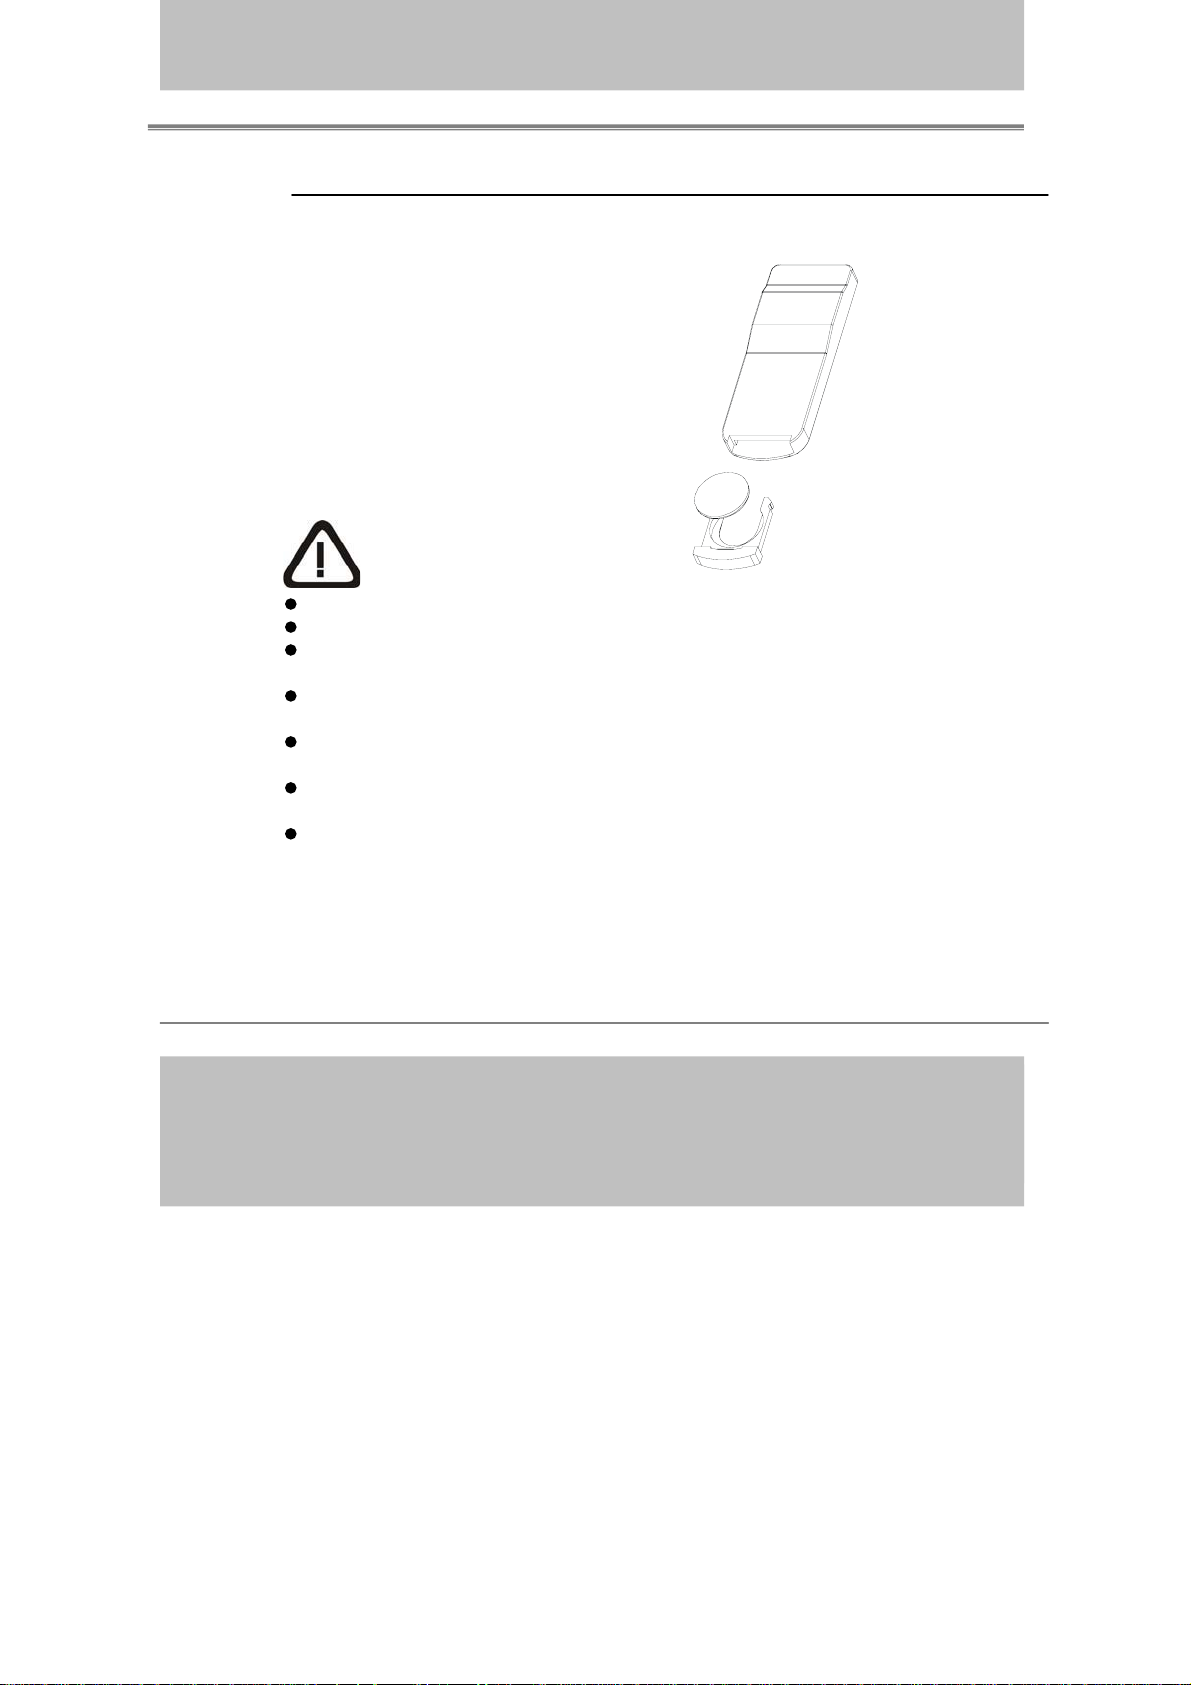
Remote Control Batteries Installation
1/21/2008
1. Remove the battery cover.
2. Load the batteries.
Make sure the plus and minus are
correctly oriented.
3. Close the battery cover.
Caution
Avoid excessive heat and humidity.
Do not drop the remote control.
Do not expose the remote control to water or moisture, this could result
in malfunction.
When the remote control will not be used for an extended period,
remove the batteries.
Replace the batteries when remote control operation becomes sluggish
or unresponsive.
Do not place the remote control close to the cooling fan of the
projector.
Do not disassemble the remote control. If the remote control needs
service.
Please contact your dealer
Interactive Projector
-20-
Page 21
Interactive Projector
1/21/2008
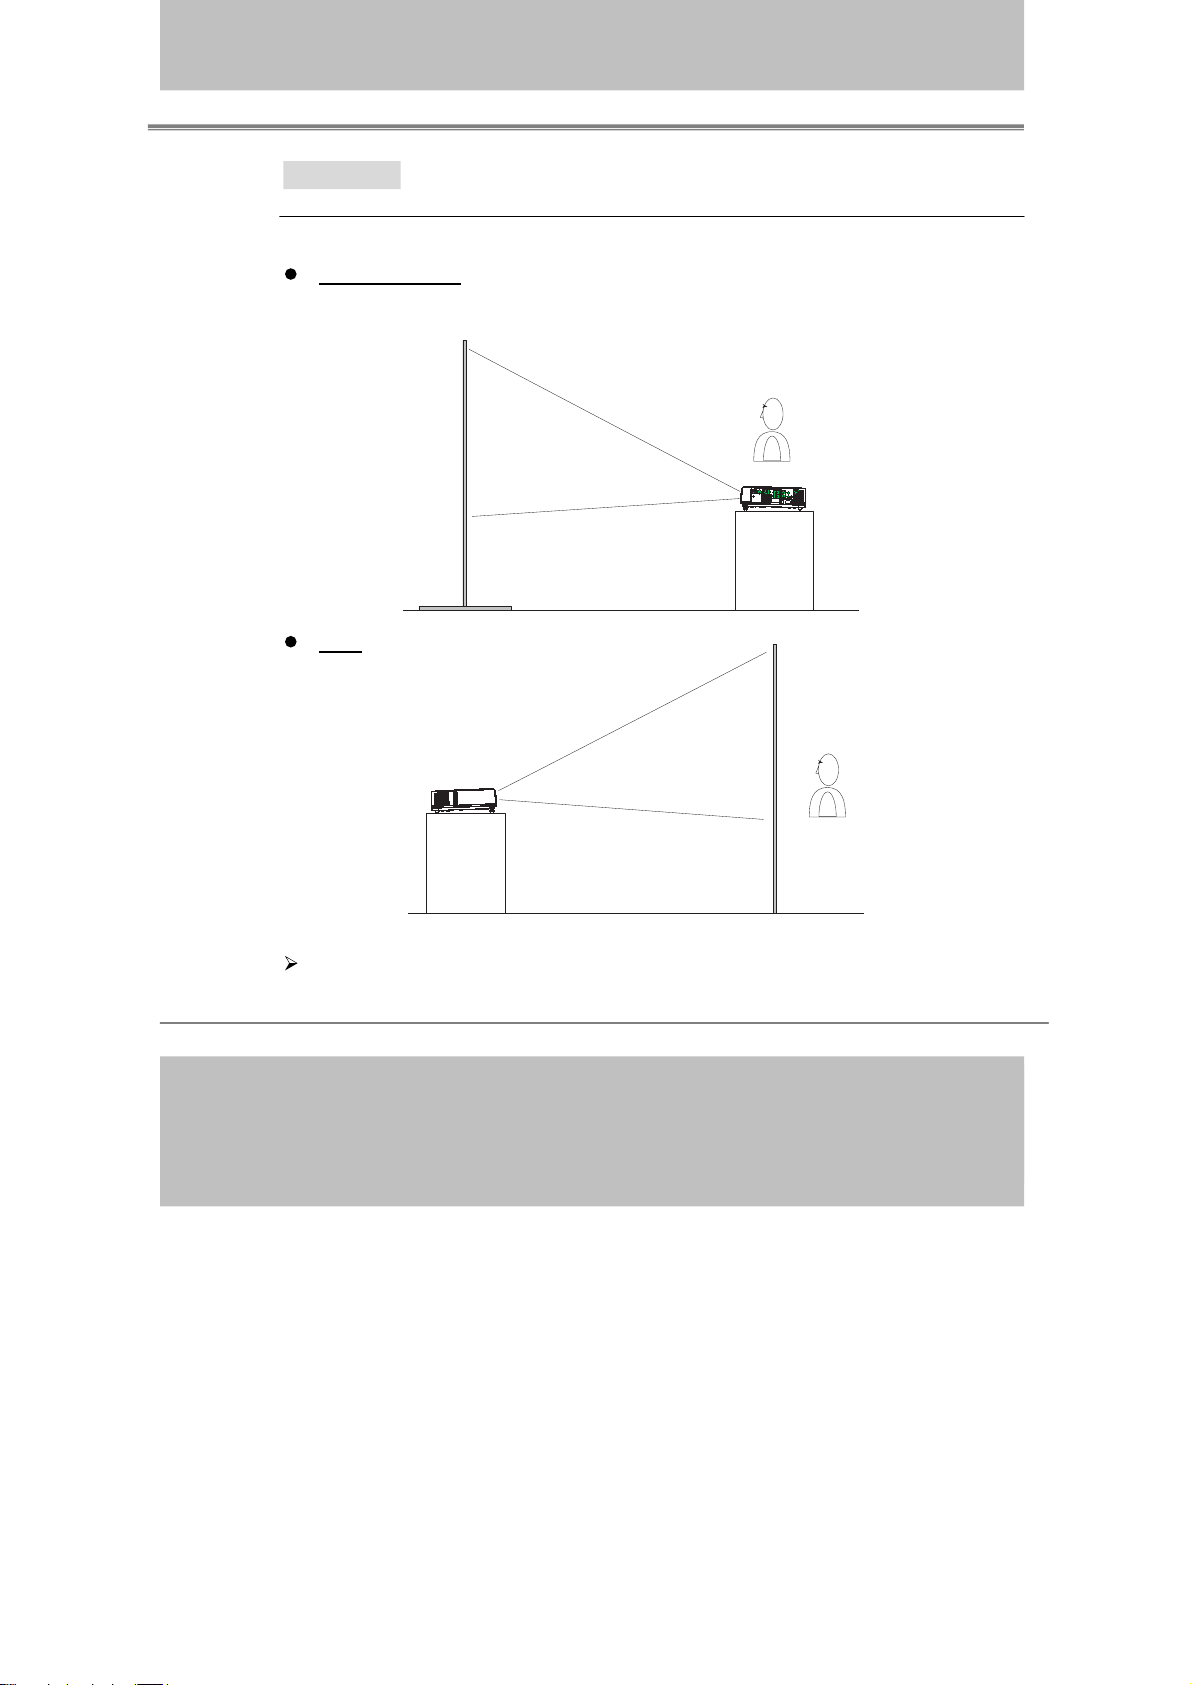
Installation
Setting Up the Projector
The projector supports the following four different projection methods
Front projection
Rear
A special method of installation is required in order to suspend the
projector from the ceiling. Please ask your dealer for details.
-23-
Page 22

Rear ceiling projection
1/21/2008
Front ceiling projection
Interactive Projector
A special method of installation is required in order to suspend the
projector from the ceiling. Please ask your dealer for details.
-24-
Page 23

Interactive Projector
1/21/2008
Size and Projection Distance
The distance between the projector and screen determines the actual image
size.
Refer to the table below to determine the image size at a given
distance.
Distance(m) Image Size
(Inch)
40 1.37 1.11
60 2.08 1.7
80 2.78 2.29
100 3.49 2.88
150 5.26 4.36
200 7.03 5.83
300 10.57 8.79
Wide
Tele
-25-
Page 24

Interactive Projector
1/21/2008
Adjusting the Image Position
Use the adjustable foot at the front of the projector to set the image height.
Rotate
the adjustable foot at the rear of the projector to fine-tune the image
position.
When the foot is adjusted, it may cause the shape of the projected image
become distorted,so use the keystone correction function to correct the
to
distortion.
To retract the front adjustable foot, press the foot release button. The
front adjustable foot will slowly retract inside the projector.
-26-
Page 25

Interactive Projector
1/21/2008
Moving the projector
1. Use the carrying handle when moving the projector.
2. Shut the lens cover and retract the front adjustable feet when
transporting the projector to prevent damage.
carry bag
( O p t i o n a l , p l e a s e c o n t a c t y o u r d e a l e r f o r m o r e i n f o r m a t i o n )
CA U T IO N
The optional carry bag is intended to protect the projector
from dust and scratches on the surface of the cabinet. It is
designed to protect the projector from external shock.
not
Do not transport the projector in an unsuitable transport
case when using a courier or transport service. This may
cause damage to the projector.
-27-
Page 26

Turning on projector (1)
1/21/2008
Open the lens cover.
Connect the projector’s power cable with the projector,and insert the
power cable into a wall socket.
Interactive Projector
Turn on the AC power switch of projector.The power indicator is
green and slowflashing. Projector is in standby mode.
Press the [Power] button to turn on the projector. The power
LED appears green and lamp LED appears red,Indicating the
lamp is lit.
-28-
Page 27

Interactive Projector
1/21/2008
Turnung on projector (2)
When using a laptop or a PC with an in built monitor, select
external video output on the computer.
Pow e r
Mou se
L
R
Input
WARNING
If no image is displayed , change the input
-297-
Page 28

Connecting PC to the projectorFirst
1/21/2008
First connect VGA cable then the USB cable.
Mouse port
USB cable
USB port
Interactive Projector
To Computer monitor port
Computer cable
-30-
Computer
in
1 or Computer
in
2
Page 29

Interactive Projector
1/21/2008
S o f t w a re a nd H a r d w a re i n s tal l
1.Section one : System Requirements
System Requirements
OS Required Microsoft Windows2000(SP4)XP(SP2)above
essor Type
Proc
RAM
Min. Free disk space
2.
S e c tion t w o(A) : LightPen software Setup.
Intel Pentium IV or above
256 MB or above
30
MB
CD-ROM Driver & available USB 2.0 port
Please connect VGA cable and USB cable before setup.
Step 1:Insert the Disc to the PC.
Step 2:Execute LightPen\ setup.exe
Step 3 : Next.
-31-
Page 30

Interactive Projector
-32-
Software and Hardware install
2.
Section two(A):
Step 4: Next
1/21/2008
Page 31

Interactive Projector
-33-
Software and Hardware install
2.
Section two(A):
Step 5: Install
1/21/2008
Page 32

Interactive Projector
-34-
Software and Hardware install
2.
Section two(A):
Step 6: Finish (“LightPen” software installation)
1/21/2008
Page 33

Interactive Projector
-35-
Software and Hardware install
2.Section two(B):SP driver setup
Step 7:”Choose Setup Language” as Step 1,then select”OK” to
install “USB Camera driver”.
Please execute” LightPen \SP Driver\Setup.exe”.
St ep 1
If shown”The USB Carema-SP has not found !”please
plug inth e USB Ca ble a nd then run in stall ation again .
Please c lick” OK” as below.
1
OK
Warning!
If LightPen work correctly,please don’t install from Step 7
to step 9.
1/21/2008
Page 34

Interactive Projector
-36-
Software and Hardware install
2.Section two(B):
Step 8:Next
1/21/2008
Page 35

Interactive Projector
-37-
Software and Hardware install
2.
Section two(B):
Step 9:Finish(SP Driver installation)
1/21/2008
Page 36

Interactive Projector
-38-
3.Section three: Functional key of “Pointer”
LED lamp
Button:Mouse left key
1/21/2008
Page 37

4.Section four: Calibration
1/21/2008
Interactive Projector
Step 1: Execute “LightPen” shortcut
de
sktop.
on the Windows
Step 2: Located the “LightPen” Icon in your toolbar & then right click
with your mouse to select Calibration.
-39-
Page 38

Interactive Projector
1/21/2008
4.Section four: Calibration
Step 3: Locate the green square in the upper-left of the screen.
Place the E-Wand/E-Pen in the center of the square and
click the button on the handle to execute. Repeat this
process nine times to complete the calibration process.
-40-
Page 39

Interactive Projector
1/21/2008
4.Section four: Calibration
How to use the “Right Mouse Click ”?
Point to the top or bottom of the screen just outside the border
of the image and push the button to bring up the menu.
-41-
Page 40

Interactive Projector
1/21/2008
4.Section four: Calibration
There is another quick way to move the toolbar from one side of the
screen to the other or even hide it.
Po
int to the left or right of screen just outside the border & push the
button on the
“Pointer”.
-42-
Page 41

5.Section five: Toolbar Options
1/21/2008
Toolbar location
Push t he b u t t o n o f “ wand/pen” t o relocate this
on eithe r the right-side or left-side of screen.
Mouse
Pen
Interactive Projector
Erase
Select
Select
Er
r
the line thickness
the color of pen
ase all
Save files
Recall
Virtual keyboard
-44-
Page 42

Multimedia LCD Projector
1/21/2008
How to Connect
Before starting, make sure that the projector and computer are both
turned off.
Connect the computer cable.
1.
1.1 Connect either end of the vga cable to the computer
mputer 1/ computer port.
co
1.2 Dsconnect the monitor cable from the computer and connect the
other end of the terminal where the monitor cable is disconnected
m the computer.
fro
1.3 If needed, connect the monitor cable of the computer monitor to
the projector’s Computer out.
1.4 Tighten the screws on all connectors.
2.Connect the audio cable if necessary.
2.1 Connect one end of the audio cable to the Audio in jack on the
projector.
2.2 Connect the other end of the audio cable to the audio output port on
computer sound card.
the
-45-
Page 43

-49-
Interactive Projector
1/21/2008
Turning off the projector
1. Press the power button on the projector or remote control. The power off
nfirmation message appears .If you do not want to power off the
co
projector, ignore the message and it will disappear.
2. Press the power button again and the projector will enter cool-down
mode. The lamp shuts off, the lamp indicator flashes red, and the fans
nue to run for approximately two minutes. During the cool down
conti
uence the projector will not respond to any control panel or remote
seq
trol buttons.
con
Caution: Do not set the power switch to off or unplug the projector during the
cool-down sequence. Not allowing the lamp to cool properly will greatly reduce the
lif
e of the lamp.
3. After the cool-down sequence is complete the fans will shut off and the
lamp indicator will stop flashing. The projector is now in standby mode
and can be turned back on with the remote control or control panel. If the
projector will not be used for an extended period, set the power switch to
off and disconnect the power cord.
Page 44

-46-
Laptop PC
Before beginning, make sure that the projector and computers are both turned
off.
1.
Connect the computer cable.
1.1 Connect either end of the computer cable to the projector’s
co
mputer 1 port.
1.2 Connect the other end of the project cable to the monitor out
connection on the laptop.
1.3 Tighten the all connectors.
2.Connect the audio cable if necessary.
2.1 Connect one end of the audio cable to the Audio in jack on the
projector.
2.2 Connect the other end of the audio cable to the audio output port
on the laptop PC.
Interactive Projector
1/21/2008
Page 45

-47-
Video
Connect to a video source
The
Projector can receive composite AV ,YPbPr and S-Video.
1 Connect RCA plug at projector and video source ( like DVD player) for
video signal.
2 . Connect RCA plug ( white and red) to audio source ( like DVD player)
and connect the phone jack to projector for audio signal.
3 . Connect YPbPr plug at projector computer in 2 port and video
source
( like DVD player) for video signal.
4 For S-Video, using S-Video cable connect to projector and video
source
for video signal.
Interactive Projector
1/21/2008
Page 46

-48-
Interactive Projector
1/21/2008
Adjust the Screen Image
1. Adjusting the image size
rn the zoom ring on the projector to adjust the image size.
Tu
2.Adjusting the image height.
Extend or retract the front adjustable feet to adjust the height of the image.
3.Corre
*Correcting vertical keystone distortion
cting Keystone Distortion
Use
the [
Keystone] button on the projector's control panel.
Page 47

-50-
Functions of Menu (OSD)
Keypad Operating:
1. : Turn on and turn off the projector
2. Blank: Blanks the projected image. If the projector is left in Blank
mode for more than 15 minutes, the projector will automatically shut
off the lamp and enter cool-down mode.
3. Auto: Automatically adjusts the settings to match the current input.
4. Source: Selects VIDEO or PC input source.
5. Menu: Enter or exit the main menu (Show and hide the OSD)
6.
: Up / Down arrow buttons, used to navigate through the OSD
Menus.
: Right / Left arrow buttons, used to select and adjust OSD Menu
functions.
7. Keystone: Adjusts the vertical keystone with the right and left arrow
butt
ons.
**There is a “Quick Key“ on the remote control and projector keypad as
well.
**Press the “Volume” button on remote control, you can adjust value, and
se
lect between Brightness – Contrast – Keystones – Volume directly.
There is the same function for pressing the button on the keypad
Interactive Projector
1/21/2008
Page 48

-51-
Computer mode
1. PICTURE
Brightness 000/100 Adjusts the overall image brightness
Contrast 000/100 Adjusts the difference between light and dark
ar
ea
s of the image
sharpness 000/002 Adjusts the image sharpness
Display mode Select
Powerful
Video
Presentatio
n
Natura
l
Cinem
a
User
Enhance
brightness
Keep
the soft tender color
For computer presentation use
Nature
color
En
hance contrast mode for Cinema mode
adju
stments of each RGB color
User Red
User Green
User
Blue
000/100
000/100
000/100
Interactive Projector
1/21/2008
Page 49

-52-
2. AUDIO
Volume 000/040 Adjusts the volume
Mute off/on Mutes the volume on/off
Interactive Projector
1/21/2008
Page 50

-53-
3.SETTING
H position 000/100 Move the image position horizontally
V position 000/100 Move the image position vertically
Phase 000/100 Set the synchronization polarity
Frequency 000/100 Set the horizontal scanning frequency
Auto keystone execute Automatically Corrects keystone distortion in image i.e.
press once to do once
Keystone V -80/+80 Corrects vertical keystone distortion in image
Auto sync execute Sets all of the above settings automatically
Auto search off/on Search signal source automatically.
Interactive Projector
1/21/2008
Page 51

-54-
Interactive Projector
1/21/2008
Page 52

-55-
Blank on
If
the projector is left in Blank mode for more than 15 minutes, the
projector will automatically shut off the lamp and enter cool-down mode.
Reset all
1. After you select [reset all] on the OSD men u, the following
confirmation message will appear on the screen.
2. Press reset button on the remote control or the button on the keypad to
reset
the OSD Menu values. Press the ESC button or ignore the
messa
ge to exit the Reset All function without changing any settings.
4.ADVANCE
Zoom/pan execute Execute digital zoom and pan function
Still on/off Freezes the current image on the screen.
Blank on/off Hide the image, displays a blank, black screen*(see below)
Reset all execute Resets all OSD Menu function to their factory default
values*( see below)
Resize 4:3/16:9 Select the image size
Language English Select the language that the OSD Menu and on screen
massage are display in English / Chinese(s) / Chinese(t) /
Italian / Spanish / French / German / Korean / Polish
Select source execute Select the input source from:
Computer 1 / Computer2 (RGB or YPbPr) / Video / S-Video
Interactive Projector
1/21/2008
Page 53

-56-
Interactive Projector
5.PRESENTATION
Auto ceiling off/on Automatically inverts the image when the projector
is turned upside down i.e. when the projector is
mounted
on the ceiling
Front execute Normal projection mode
Ceiling execute Inverts the image vertically, used when the
project
or is mounted upside down
Rear execute Inverts the image horizontally, used when
projecting
onto a rear projection screen
Ceiling and
Rear
exec
ute Inverts the image horizontally and vertically, used
when
the projector is mounted upside down and
projecting
onto a rear projection screen
Auto Brightness off/on Auto detects brightness; it turns to economic mode
auto
matically when the brightness is low.
Lamp mode
(some model doesn’t
hav
e this mode)
normal
economi
c
Economic
mode reduces the lamp brightness
economic
to extend lamp life and quiet the
project
or
Lamp Show Lamp timer
Reset lamp timer
(optional
)
exec
ute After changing a new lamp,execute this function
for
reset the Lamp timer.(see below)
1/21/2008
Page 54

-57-
Interactive Projector
1/21/2008
Reset Lamp Timer
1.After you select[Reset Lamp Timer]on the OSD menu, the following confirmation
message will appear on the screen.
2.You choose[Yes], It will reset the lamp time back to [0].
*The replacement warning message is set to appear after about 2000 hours of lamp
use
in order to maintain the initial brightness and quality of the projected images.
When the lamp replacement message appears, replace the lamp with a new one as
soon as possible, even if it is still working.
Page 55

-58-
1. PICTURE
Brightness 000/100 Adjusts the overall image brightness
Contrast 000/100 Adjusts the difference between light and dark
area
s of the image
sharpness 000/002 Adjusts the image sharpness
Color 000/100 Adjusts the image color
Tint 000/100 Adjusts the image tint
Display mode Adjusts the color temperature of the image
Powerful
Video
Presentatio
n
Natura
l
Cinem
a
User
Enhance
brightness
Keep
the soft tender color
For computer presentation use
Nature
color
En
hance contrast mode for Cinema mode
adju
stments of each RGB color
User Red
User Green
User
Blue
000/100
000/100
000/100
Interactive Projector
Video Mode
1/21/2008
Page 56

-59-
2. AUDIO
Volume 000/040 Adjusts the volume
Mute off/on Mutes the volume off/on
Interactive Projector
1/21/2008
Page 57

-60-
3.SETTING
Auto keystone execute Automatically Corrects keystone distortion in image
i.e. press once to do once
Keystone V -80/+80 Corrects vertical keystone distortion in image
Auto search off/on Search signal source automatically.
Interactive Projector
1/21/2008
Page 58

-61-
Interactive Projector
1/21/2008
Page 59

-62-
Blank on
If
the projector is left in Blank mode for more than 15 minutes, the
projector will automatically shut off the lamp and enter cool-down mode.
Reset all
1. After you select [reset all] on the OSD men u, the following
confirmation message will appear on the screen.
2. Press reset button on the remote control or the
button on the
keypad to reset the OSD Menu values. Press the ESC button or ignore
the message to exit the Reset All function without changing any
settings.
Interactive Projector
4.ADVANCE
Zoom/pan execute Execute digital zoom and pan function
Still on/off Freezes the current image on the screen.
Blank on/off Hide the image, displays a blank, black screen*(see below)
Reset all execute Resets all OSD Menu function to their factory default
values*( see below)
Resize 4:3/16:9 Select the image size
Language English Select the language that the OSD Menu and on screen
massage are display in English / Chinese(s) / Chinese(t) /
Italian / Spanish / French / German / Korean / Polish
Select source execute Select the input source from:
Computer 1 / Computer2 (RGB or YPbPr) / Video / S-Video
1/21/2008
Page 60

-63-
Interactive Projector
5.PRESENTATION
Auto ceiling off/on Automatically inverts the image when the projector
is turned upside down i.e. when the projector is
mounted
on the ceiling
Front execute Normal projection mode
Ceiling execute Inverts the image vertically, used when the
project
or is mounted upside down
Rear execute Inverts the image horizontally, used when
projecting
onto a rear projection screen
Ceiling and
Rear
exec
ute Inverts the image horizontally and vertically, used
when
the projector is mounted upside down and
projecting
onto a rear projection screen
Auto Brightness off/on Auto detects brightness; it turns to economic mode
auto
matically when the brightness is low.
Lamp mode
(some model doesn’t
hav
e this mode)
normal
economi
c
Economic
mode reduces the lamp brightness
economic
to extend lamp life and quiet the
project
or
Lamp Show Lamp timer
Reset lamp timer
(optional
)
exec
ute After changing a new lamp,execute this function
for
reset the Lamp timer.(see below)
1/21/2008
Page 61

-64-
Interactive Projector
1/21/2008
Reset Lamp Timer
1.After you select[Reset Lamp Timer]on the OSD menu, the following confirmation
message will appear on the screen.
2.You choose[Yes],the lamp timer will reset back to [0].
*The replacement warning message is set to appear after about 2000 hours of lamp
use
in order to maintain the initial brightness and quality of the projected images.
When the lamp replacement message appears, replace the lamp with a new one as
soon as possible, even if it is still working.
Page 62

-65-
Ceiling Mounted Installation Guide
Attach the optional ceiling mount at four-suspension bracket fixing points when
suspending
the from a ceiling.
*A special method of installation is required in order to suspend the projector
from the ceiling. Please ask your dealer for more details.
Interactive Projector
1/21/2008
Page 63

-66-
Interactive Projector
1/21/2008
Maintenance and Troubleshooting
1.Cleaning the projector
Warning: Always unplug the projector before performing any maintenance.
n the projector case by wiping it gently with a soft cloth.
Clea
necessary, the case can be cleaned using a neutral detergent and a soft cloth
If
sure the case is completely dry before turning the projector back on.
en
2.Cleaning the lens
Use a commercially available air blower, or use lens clean in g paper and lens
ner approved for use on optical coatings.
clea
Do not clean the lens with harsh materials or subject the lens to shock, as it
easily become damaged. Close the lens cover when the projector not in
can
.
use
3.Change Air Filter
When the air filter becomes clogged with dust, etc., the projector may
erheat and turn itself off to prevent internal damage.
ov
Clean
the air filter every 100-hours or as often as needed
*If the filter is difficult to clean or if it is deteriorating, it should be replaced
1.Remove the filter cover from the bottom of projector.
2.Pull out the air filter.
3.Install the new air filter.
AIR FILTE R COV ER
Page 64

-67-
Interactive Projector
1/21/2008
4.Q: Why can’t I install the program?
A: You might need to log in as “administrator” before you can install the software
on your computer. Ask your IT department for assistance
5.
Q: Why is it showing “No lightpen found”?
A: The possible reasons for this might be:
(1).USB cable might not be making a good connection.
ease check and make sure the cable is well connected between the PC and
Pl
Projector.
* Some Anti-virus program will disable the USB port. Please close the
anti-virus program and start the “LightPen” program again.
(2).U
SB driver is not properly installed
).The len
(3
th
purchase the proper USB extension cable from your dealer.
).USB port on computer malfunction
(4
Please make sure the USB port is working properly If not, please contact your
IT department.
Some note book computers will disable USB ports when the battery is low.
Pl
ease try to use AC power. Some note book computers do not
ide standard 500mA to the USB ports or the USB converter is not
prov
working properly, in this case please use our standard USB cable.
Q: Why the green cross target does not appear after running lightpen
6.
calibration?
A: This is signaling too weak caused by using USB cable either poor quality or
too long. Try a better quality USB cable or use proper USB extension cable.
7.Q: Why can’t I make the green cross target turn into black in calibration
ocedure?
pr
A: Possible reasons are the wand or light pen is out of battery or the system
t working properly because of strong ambient light interference.
is no
gth of USB cable is too long. The USB cable should be shorter
an 1.5M.
If you require a longer cable ,then please
Page 65

-68-
Interactive Projector
1/21/2008
8.Q: Why the green cross target turns into black itself?
A: This is caused by strong ambient light interference. Try to contro l the
ambient light.
Q: What is considered as “strong ambient light interference”?
9.
A: Strong ambient light is usually caused by the following:
(1).Sun light directly on the projector screen.
Q: Why is the cursor not at the position pointed?
10.
The
A:
11.
A: The reasons for this are:
possible reasons for this are:
(1
).The system needs to be recalibrated. Try to point to the “center” of green
cr
oss target when calibrating the screen.
(2).The position o
f the projector, screen or projection size has been changed
(3).The image resolution has been changed
the calibration procedure again to resolve the problem.
Run
Q: Why is the lightpen not working?
(1).When using the lightpen, writing outside of the screen area won’t work
because signal can’t be received by the sensor.
.
(2).Lightpen battery is low or battery cap is loose
(3).Strong ambient light interference.
(4).USB cable not well connected.
Q: Why is the cursor jumping?
12.
A: This is caused by strong ambient light interference. Try to avoid
strong ambient light interference especially direct sunlight on the
screen .
Page 66

-69-
Interactive Projector
1/21/2008
13.Q: Why is the lightpen not working after the computer wake up from
standby?
A: In some cases if the computer goes into standby mode, the computer will
sho
t the USB port. In this case, close the light pen program and then run
it again.
Remarks
1.The lightpen is working on light signal. Strong ambient light interference will
cause it to work abnormally. Make sure there is not strong ambient light
(ex. Sunlight or Tungsten lamp directly projection to the screen or the sensor.
2.The operation system must be Windows 2000 s e r vic e pa c k 2 and above.
USB port must support USB2.0.
4..It is required to use USB cable shorter than 1.5m
For more longer requirement such as ceiling application, please contact with your
dealer to purchase proper USB extension cable.
Page 67

Multimedia LCD Projector
1/21/2008
Lamp Replacement
Caution: The lamp and inside of the projector is very hot while
the projection lamp is lit. Allow the projector to cool for at least 15 minutes
prior to opening the lamp door.
1. Release the Lamp Door Latch using a small screwdriver or similar tool
to slide the latch towards the projector lens.
Remove the Lamp Door.
2.
Remove the two Phillips head screws that hold the lamp in place.
3.
4. Grasp the handle on the top of the lamp and pull the lamp straight up
t of the projector.
ou
Warning: Do not touch the bulb. Touching the bulb will greatly
decrease the life of the lamp and could cause the bulb to explode.
5.
Slide the replacement lamp into place and press firmly to seat the lamp.
Reinstall the screws removed in step 3.
6.
7. Reinstall the lamp door and press on the side closest to the lens until the
snaps into place and the lamp door is flush with the top of the
latch
projector.
-70-
Page 68

-71-
Indicators
The Power and Lamp indicators show the status of the projector. Before
requesting repair, check the projector status using the chart below. If the
problem cannot be resolved contact your dealer.
Power
(Green)
Lamp
(R
ed)
Cond
itions Notes
Slow
flashi
ng
Off
Stand by
mode
*Projector is ready to be turned on (normal)
On
Off On mode *Projector is on and operating normally
On
Slow
flashi
ng
Cool-down
mode
*Projector is in cool-down mode and will not
respo
nd to user input (normal)
On
Fast
flashi
ng
Fan-fault
mode
*
The projector has detected a problem with
an internal fan, the lamp will shut off
automatically, contact your dealer
Fast
flashi
ng
On Lamp-cover
op
en
*The lamp cover is open or there is a
problem with the lamp. If the lamp door is
closed and replacing the lamp does not
correct
the issue, contact your dealer.
Fast
flashi
ng
Fast
flashi
ng
High
temperature
*The projector has overheated and shut the
lamp off. Correct the over temp condition
imme
diately.
1. Check that the ventilation slots are free
from obstructions
2. Check the cleanliness of the air filter.
3.
If the condition persists, contact your
dealer
Slow
flashi
ng
Slow
flashi
ng
Lamp-fault
mode
The lamp does not light., come back ”stand
by mode”, and turn on the power button.
Interactive Projector
1/21/2008
Page 69

-72-
Symptom Possible cause Remedy
The power is
no
t turned on
*The main power switch is not
tu
rned on.
*The power cord is disconnected.
*Turn on the main power
switc
h.
*P
lug the power cord into an
AC
power outlet
No video *The input is not correctly
connected.
*No signal input
*No open lens cover
*Select
the appropriate input
source
*Connect
correctly
*Remove the lens cover
No audio *The projector is not correctly
connected.
*The volume is set to minimum.
*Mute is turned on
*Check audio cable connect
correctly.
*Adjust the volume.
*Press the MUTE button
No remote
function
*No battery
*Remote signal be obstructed
*Check battery of remote
con
troller
*Re
move obstacle between
projector and remote controller
Colors are
pa
le
*Color density and color matching
are
not correctly adjusted.
*Color lose
*Adjust the RGB setting.
*Check VGA cable.
Abnormal
br
ightness &
con
trast
*Brightness and contrast are not
correctly
adjusted.
*The lamp is nearing the end of
its
service life
*Adjust the brightness and
contrast setting.
*Replace
with a new lamp
Video is
blurred
*Focus or RGB phase is out of
adjustment.
*Adjust the focus and phase.
Note:Although bright spots or dark spot may appear on the screen ,this
is
a unique characteristic of liquid crystal displays,and it does not
con
stitute or imply a machine defect.
Interactive Projector
1/21/2008
Page 70

-73-
List of Supported Monitor Displays
Computer mode
Signal Refresh Rate(Hz) Resolution(dots)
VGA 60 640X480
VESA 60/72/75/85 640X480
SVGA 56/60/72/75/85 800X600
XGA 60/70/75/85 1024X768
SXGA 70/75 1152X864
SXGA 60/75 1280X960
SXGA 60 1280X1024
MAC 67 640x480
MAC 75 832x624
MAC 75 1024x768
MAC 75 1152x870
Component(YPbPr)
Signal Refresh Rate(Hz) Resolution(dots)
SDTV(480i) 30 720X480
SDTV(480p) 60 720X480
HDTV(720p) 60 1280X720
HDTV(1080i) 30 1920x1080
Composite/S-video
Signal Refresh Rate(Hz) Resolution(dots)
TV(NTSC) 60 720X480
TV(PAL,SECAM) 50 720X576
Interactive Projector
1/21/2008
 Loading...