

Page 1
Micro Portable LCD Projector
USER’S MANUAL
MAIN PAGE
Page 2

CONTENTS
Overview
Features & Warnings ............................................................................. 1
Checking the Accessories
Standard and Optional Accessories ....................................................... 2
Definitions of Keys and Indicators
Remote Controller and Keys of Control Panel ...................................... 3
Definitions of Indicators and Definitions of key functions ................... 4
Setting Up
Location for Setting Up ......................................................................... 5
Zoom , Focus and Height Adjustment ................................................... 6
External Connections
Connecting to PC ................................................................................... 7
Connecting to Video Signals ................................................................. 8
OSD (On Screen Display) Menu
Display/Exit OSD Menu ........................................................................ 9
Image Quality Adjustment ..................................................................... 9
Advanced Setting Adjustment ............................................................... 10
Advanced Scale Adjustment (Digital Zoom) ........................................ 11
Options .................................................................................................. 12
Audio Adjustment ................................................................................. 13
PIP Adjustment ...................................................................................... 13
Maintenance
Handling of Abnormality ...................................................................... 14
Replacing Main Lamp ........................................................................... 15
Appendix....................................................................................................... 16
Page 3

Overview
Features
!2.7kgs Micro-Portable projector.
!High Brightness with high Contrast ratio, total power consumption 220 W.
!A wide variety of External Connections available for D-Sub 15 pin, S-Video,
RCA composite signal and DVI Input(XGA Type).
!Good Compatibility:horizontal scanning frequency from 15 to 90KHz, and
vertical scanning frequency from 43 to 85Hz , VGA to SXGA Signals.
!Short projection distance for Big image size.
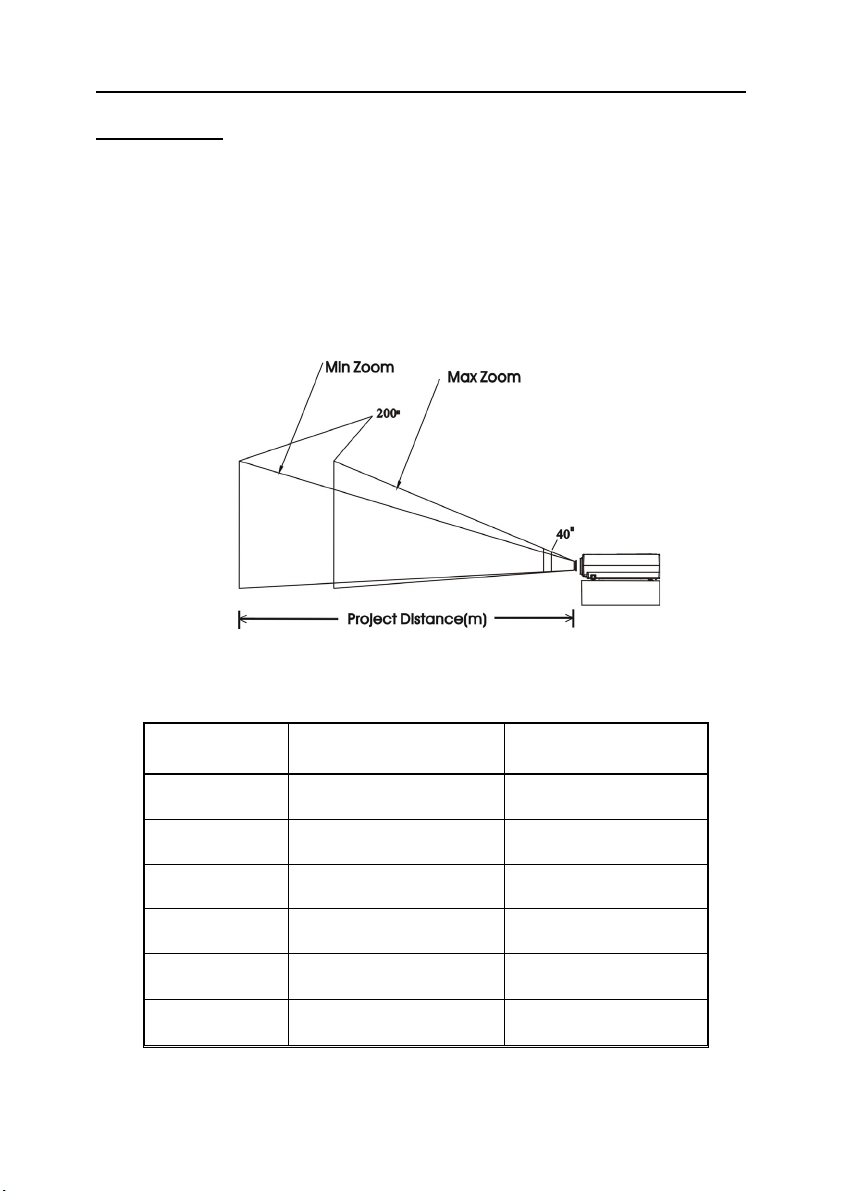
Projection distance 1.33m〜8.33m with screen size from 40”to 200”.
!Powerful functions:Keystone correction function、freeze and blank function
、Digital zoom adjustment and PIP(Picture In Picture) function.
!Remote controller with Track Ball Mouse function and Laser Pointer
function.
Warnings
!While projector is working, don’t look into the lens to avoid harm of eyes.
!Do not use projector near heater or water.
!While projector is working, make sure that there is no barrier to the heat
dissipation holes of the front and rear side of projector.
!Do not use multiplex socket, to avoid overload or short circuit.
!The lamp of the projector is high voltage mercury lamp, which needs
specific driving circuit. Please use the specific lamp provided by your dealer.
!Never let water or other things splash into the heat dissipation holes.
!To shut down the projector, when you press the Power key, a message will
show on the image asking if you’re sure you’d like to shut down, press
Power key again to proceed the heat dissipation and shut down procedure.
!Do not turn off the power without using the heat dissipation and shut down
procedure. You must wait until the cooling fun stop. If the machine is not to
be used for a long time, the power plug must be pulled off to avoid danger.
!No further dismantle of the projector except listing in the operation manual.
!When cleaning filter sponge, please use vacuum cleaner than water to avoid
moisture entering the projector.
!When replacing the lamp module, please wait for the lamp cool down.
!When changing the lamp module, do not touch the glass in front of the lamp.
It will effect the lamp life.
1
Page 4
Checking the Accessories
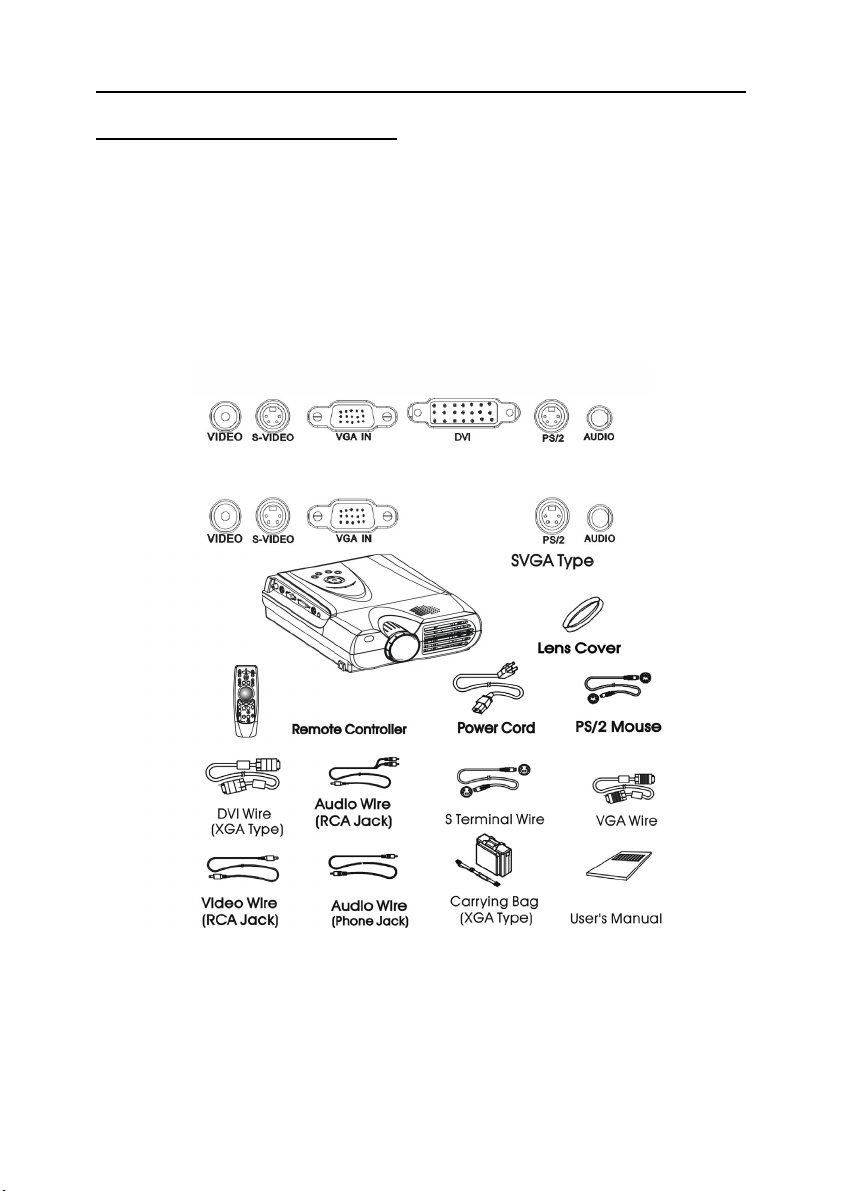
Standard Accessories
! Projector ! D-Sub 15pin Cable
! Lens Cover ! Audio Wire-RCA Jack
!
! Power Cord
! Remote Controller ! Video Wire-RCA Jack
! No.4 AAA Battery x 2 ! PS/2 Mouse connecting wire
! Audio Wire-Phone Jack ! User’s Manual
! S-Video Wire
DVI Interface connecting wire
Carrying bag for projector and accessories
!
XGA Type
Optional Accessories
!Spare Lamp
!Sponge for air filter
You can perchance these spare accessories from your dealer.
(XGA Type)
(XGA Type)
2
Page 5
Definitions of Keys and Indicators
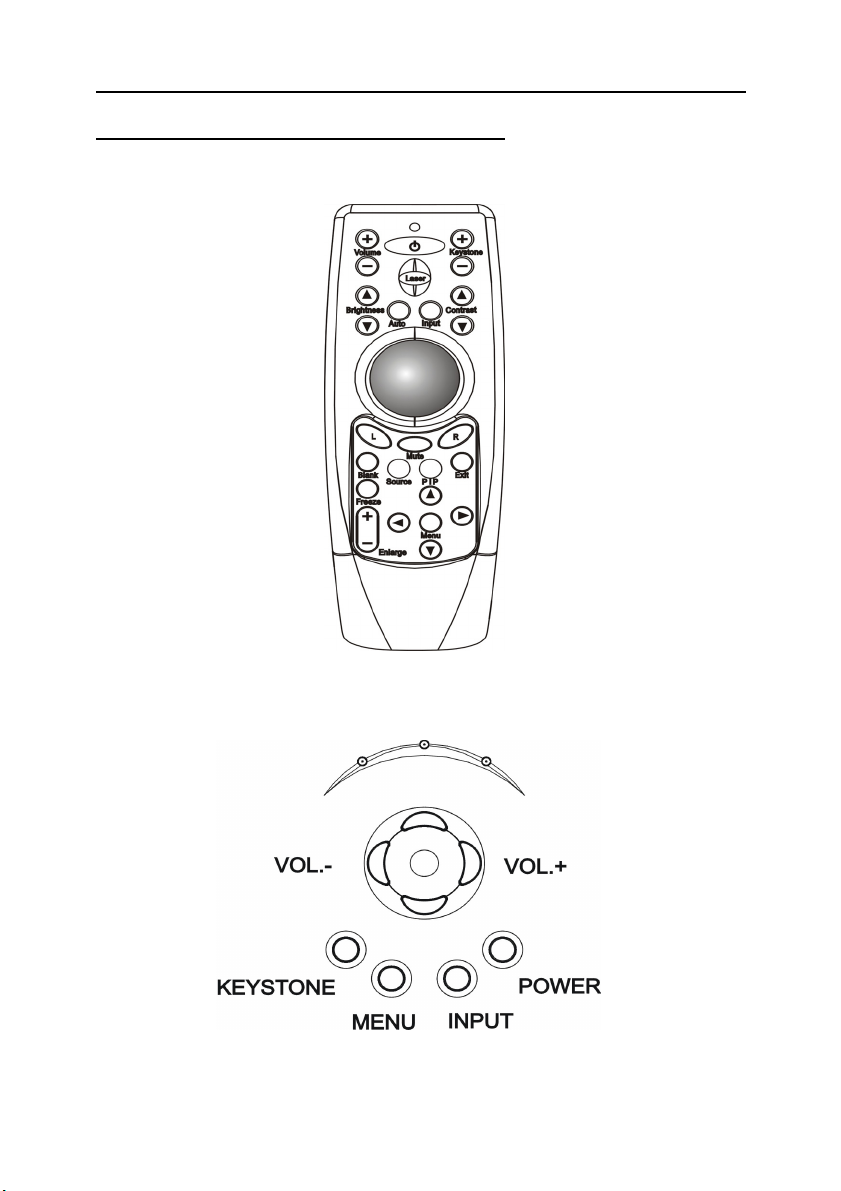
Remote Controller
Keys of Control Panel
3
Page 6
Definitions of Indicators
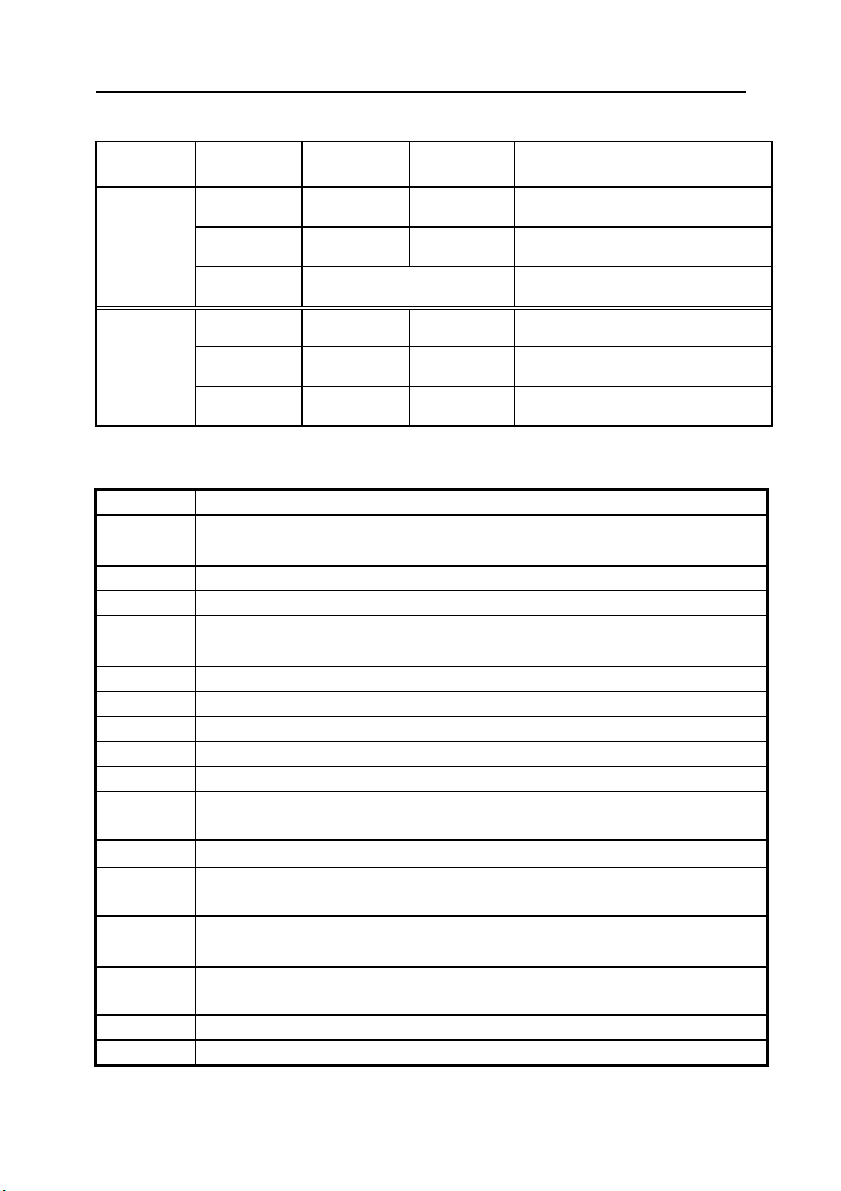
◎Red ◎Green ◎Orange
Normal
Indicator
Abnormal
Indicator
Off On Off Standby Mode
Off Off On Normal Working Mode
Off
Flash Off On
Flash Off Off Abnormal Fan
Off Off Off No Power
Alternate Flash per second
Meaning
Heat Dissipating
Abnormal Fan
(Heat Dissipating)
Definitions of key functions
Key Function (Under normal working mode)
Power
Menu ! Press Menu button to bring up the OSD menu.
Exit ! Press Exit button to leave OSD menu.
Input
Keystone
Volume
Laser ! Laser Pointer.
Auto ! Auto adjust the image quality (Only on VGA mode).
L/R ! L : Left click of the mouse. R : Right click of the mouse.
Track ball ! Use the track ball to move the cursor, press the track ball to active
Mute
Black ! Press Black key to let the image blank, press again when you want
Freeze
Enlarge ! Press the Enlarge Key and press +/- key to enlarge or reduce the
Source ! Switch the sub picture as AV input or S-Video input.
PIP ! Picture in Picture Function.
! Press Power button to turn on the projector.
! Press Power button twice to shut down the projector.
! Select input signal of VGA、S-Video、AV or DVI(XGA Type)
in sequence.
! Adjust Shape of Image from keystone to square.
! Adjust the volume.
the drag function.
! Press Mute key for Sound Off,sound On when you press again.
the image show again.
! Press the Freeze Key to let the image freeze(stop) in a picture, press
again when you want to continue.
Image press " #$ % to move the image.
4
Page 7
Setting Up
Locations for Setting Up
! Projector shall be placed on steady desktop or use specific tooling to hand
on solid ceiling.
! Adjust projector so the lens is perpendicular to screen, otherwise, the image
on screen will have trapezoidal shape.
Projection Distance /Size Table
Projection
Size/inch
40” 1.33 1.67
50” 1.67 2.08
60” 2.00 2.50
100” 3.33 4.17
150 5.00 6.25
200” 6.67 8.33
Project Distance /m
Max Zoom
5
Project Distance/m
Min Zoom
Page 8
Zoom, Focus and Height Adjustment
Focus , Magnitude Adjustment
!When the image appears on the screen, use these functions to focus and
adjust screen alignment.
!Actual projected display size depends on the distance between the projector
and the screen, as well as the magnitude of projector lens.
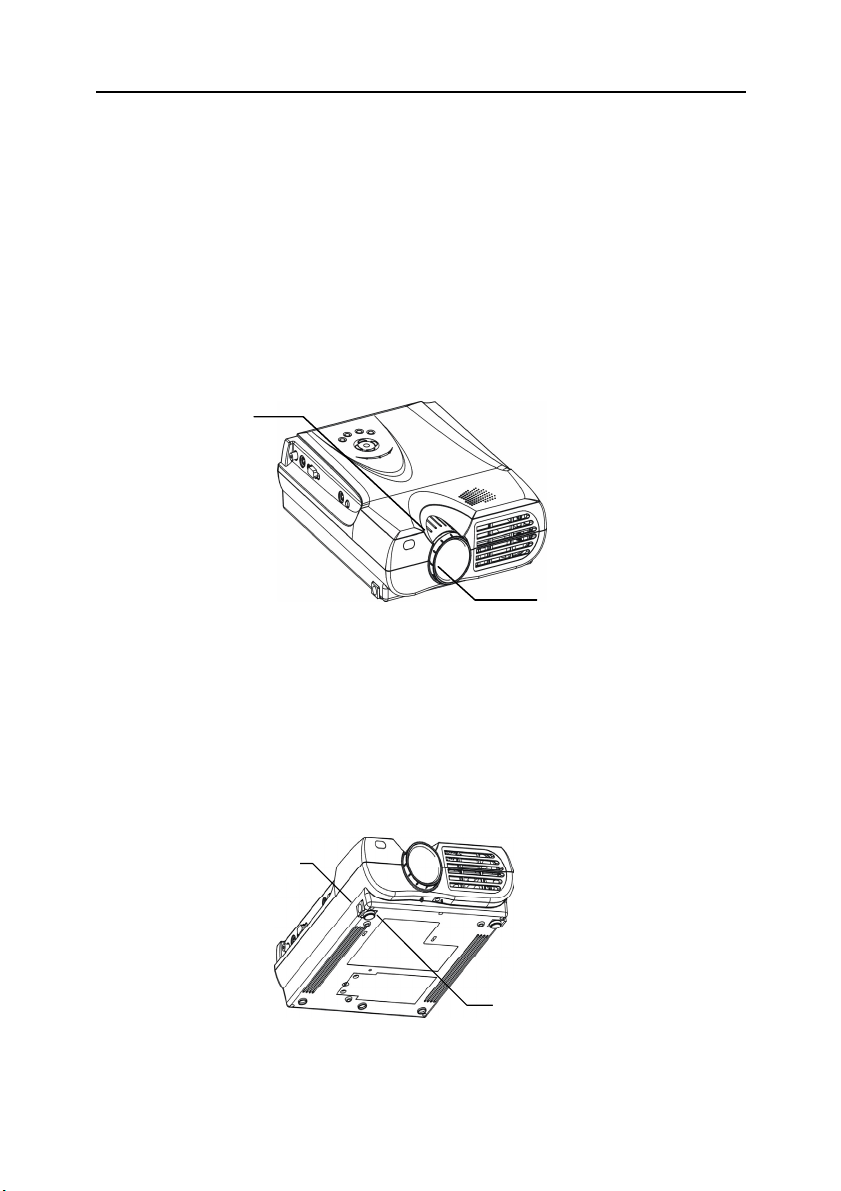
!Focus adjustment:Turn the focusing ring of the lens, which is the outer ring
at the lens in front side of projector.
!Size adjustment:Turn the inner side zoom ring, increase when clockwise.
Zoom
Focus
Adjustment for Height and Deformation of Projection
!Stand behind the projector and raise up the forward projector with both
hands, then press the release button to lower the elevating feet.
!Free the release button to lock the
carefully.
!Be careful when operating and keep the projector from dropping.
Release Button
sustaining foot and set the projector down
Sustaining Foot
6
Page 9
External Connections
Connecting to PC
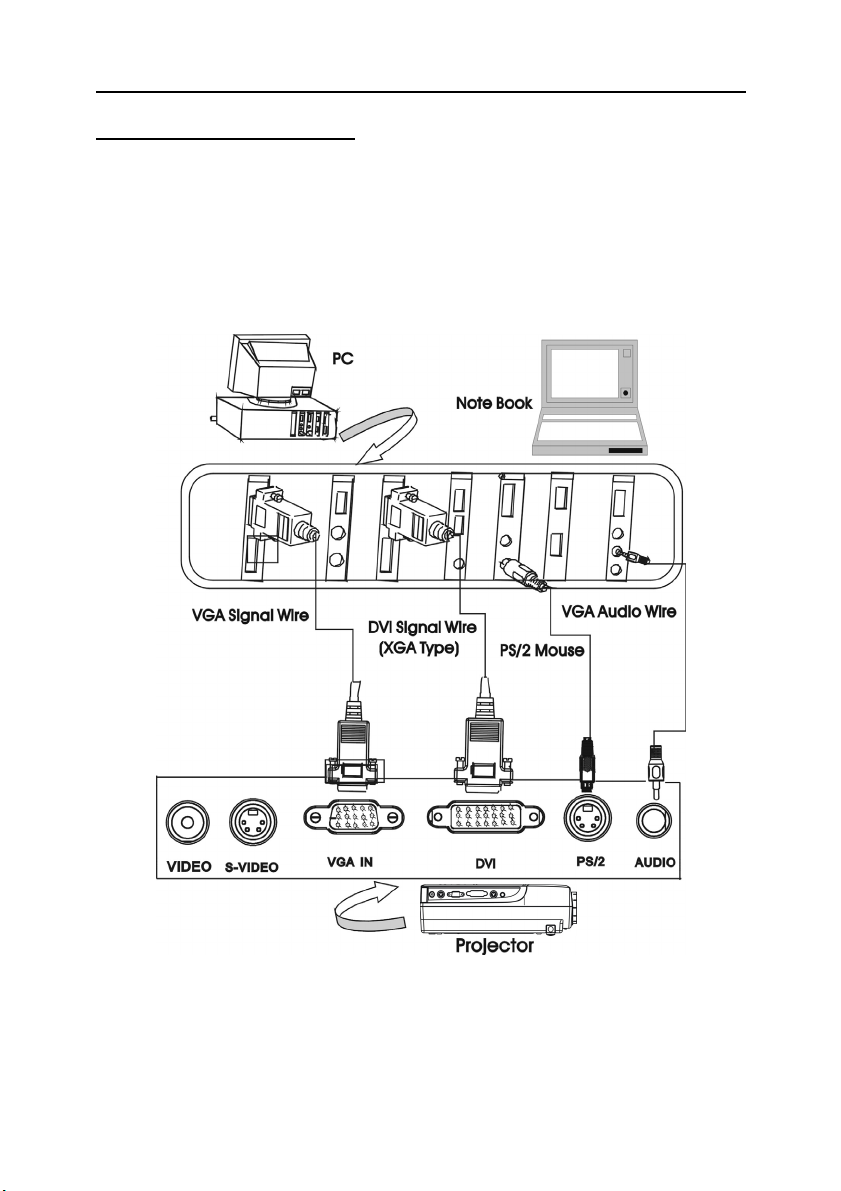
! Connect the D-Sub 15 pin cable
VGA IN
! Mark sure that both parts have a good connection.
! Turn on projector first then computer.
terminal of the projector .
from
the VGA card of the computer into the
7
Page 10
Connecting to Video Signals
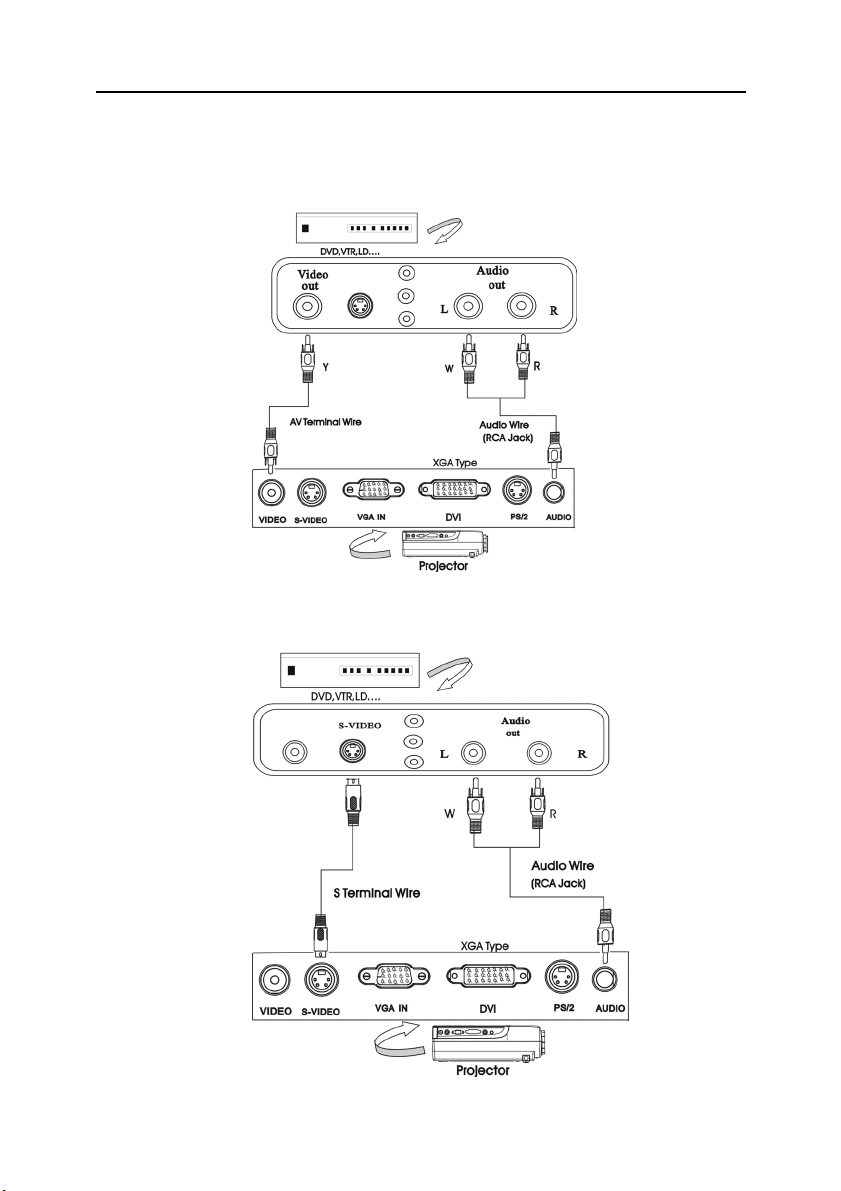
!Connecting to video signal sources such as VTR , DVD or LD.
!The method for connecting
!The method for connecting S-Video Wire is shown below
RCA jack AV wire is shown below
8
Page 11
OSD (On Screen Display) Manu
Display/Exit OSD Menu
!Press MENU key to display the main menu.
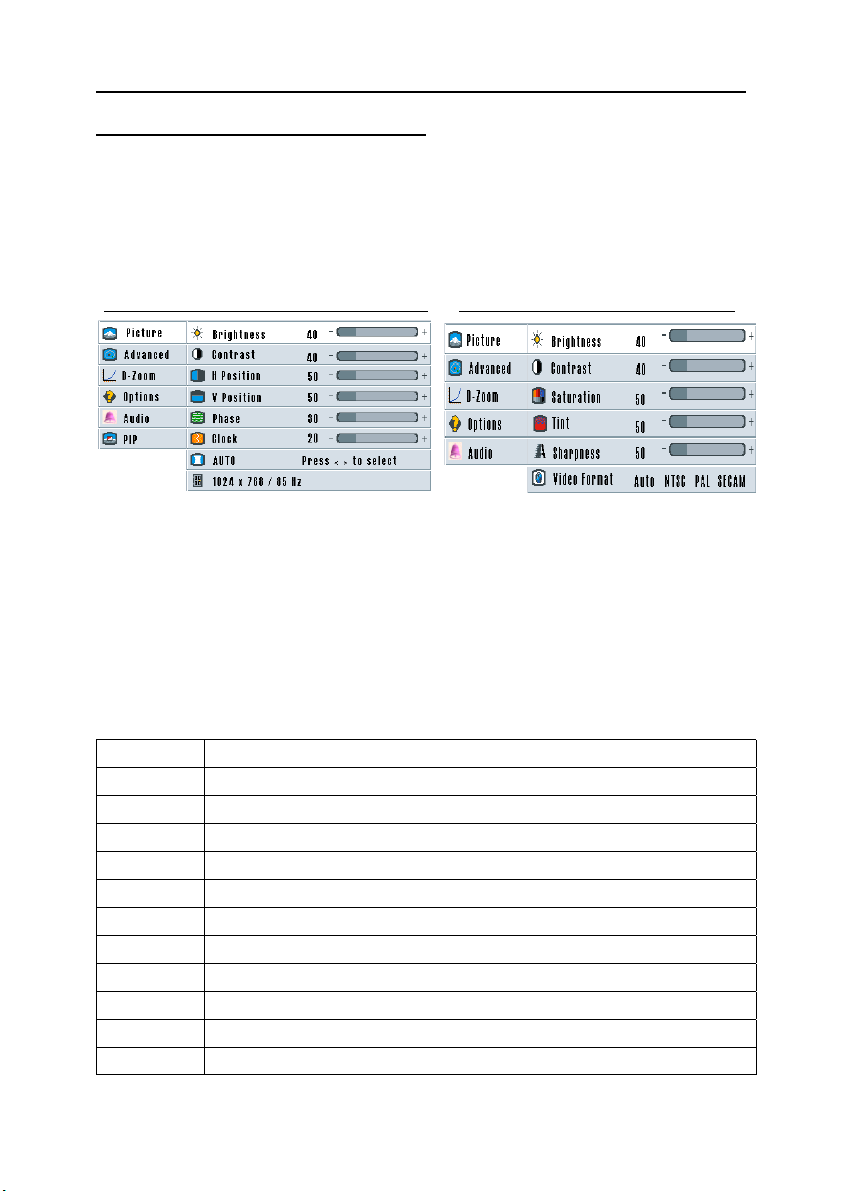
!The contents of main menu are different according to various input signals
which are shown as the following:
!Press EXIT key to Exit the main menu.
Input signals of
VGA or DVI
(XGAType)
Input signals of AV or S -VIDEO
Image Quality Adjustment
!After displaying main menu, press
!Press $ key to enter sub menu.
!Press " # key to move Bar to the option which needs to be adjusted .
!Press $ % key to set the value and press MENU key to return to main
menu.
!Press EXIT key to exit the menu and save the setting.
!The “Adjust Option” is different according to various input signals which
are shown as the following:
Options The instruction
Brightness To adjust the brightness value of the image .
Contrast To adjust the contrast of image (higher value means high contrast)
H position
V position
Phase
Clock
Auto Tune
Saturation
Tint
Sharpness
Video
To adjust the horizontal position
To adjust the vertical position
To adjust the Phase value of the image.
To adjust the Clock value of the image.
To adjust the Phase and Clock Automatically.
To adjust color saturation
To adjust the Tint
To adjust the Sharpness of the image.
To select input signal as
" #
key to move Bar to “Picture ”
Auto、NTSC、PAL or SECAM
format.
9
Page 12
Advanced Setting Adjustment
!After displaying OSD menu, press
!Press
!Press
!Press
$
key to enter sub menu.
" #
key to move Bar to the option which needs to be adjusted .
$ %
key to set the value and press
!Press EXIT key to exit the menu and save the setting.
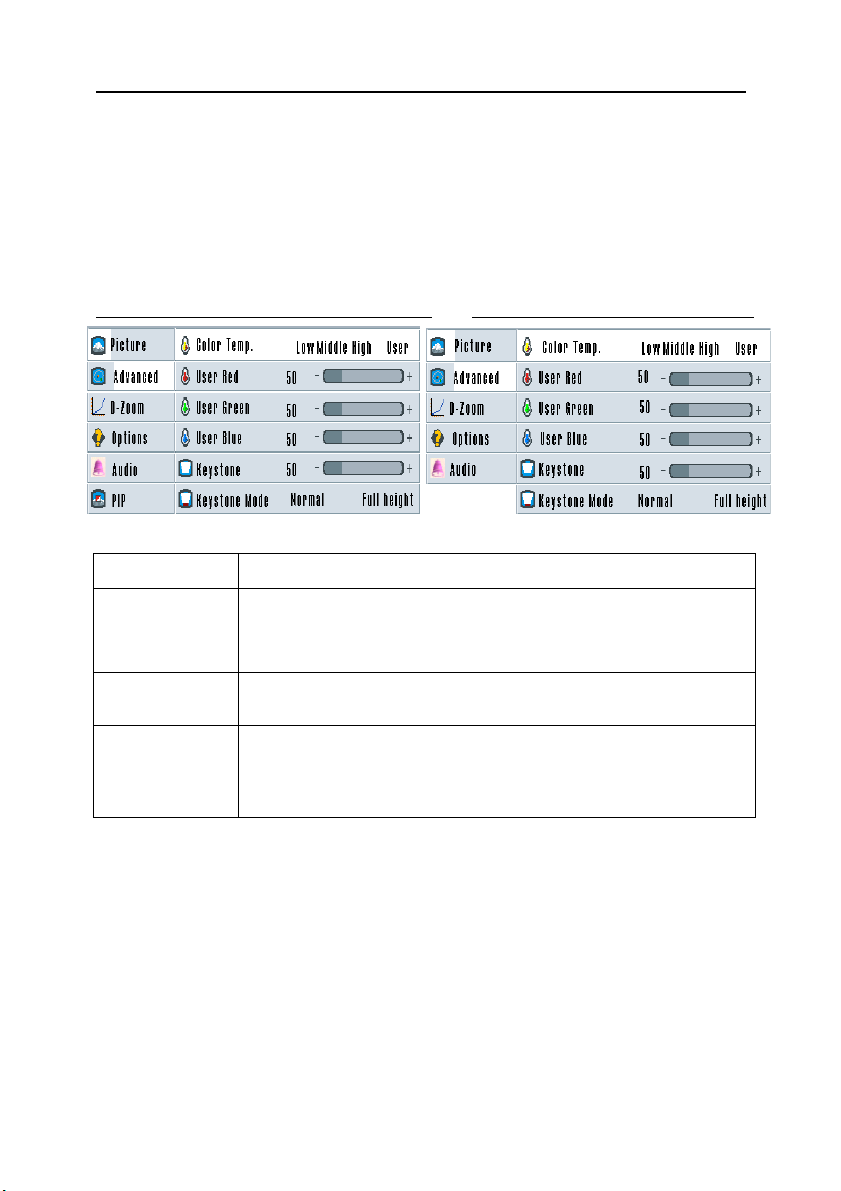
!The adjustment option are shown below:
" #
key to move the Bar to “Advanced ”
MENU
key to return to main menu.
Input signals of
VGA or DVI
(XGAType) Input signals of AV or S-VIDEO
Options
Color Temp
Keystone
Keystone Mode
The instruction
To adjust color temperature of image to personal performance.
(Normal temp value is Middle) For cool color, select higher
Color Temperature, for warm color, select lower Color Temp.
Compensating the trapezoid distorted images up to ± 15
degrees. (Normal value is 50)
To select to Normal or Full Height mode.
Under Full Height mode, only the horizontal size of
keystone will accompany keystone adjustment.
10
Page 13
Advanced Scale Adjustment (Digital Zoom)
!After displaying OSD menu, press
Scale ”.
!Press
!Press
!Press
$
key to enter sub menu.
" #
key to move Bar to the option which needs to be adjusted.
$ %
key to set the value and press MENU key to return to main menu.
!Press EXIT key to exit the menu and save the value.
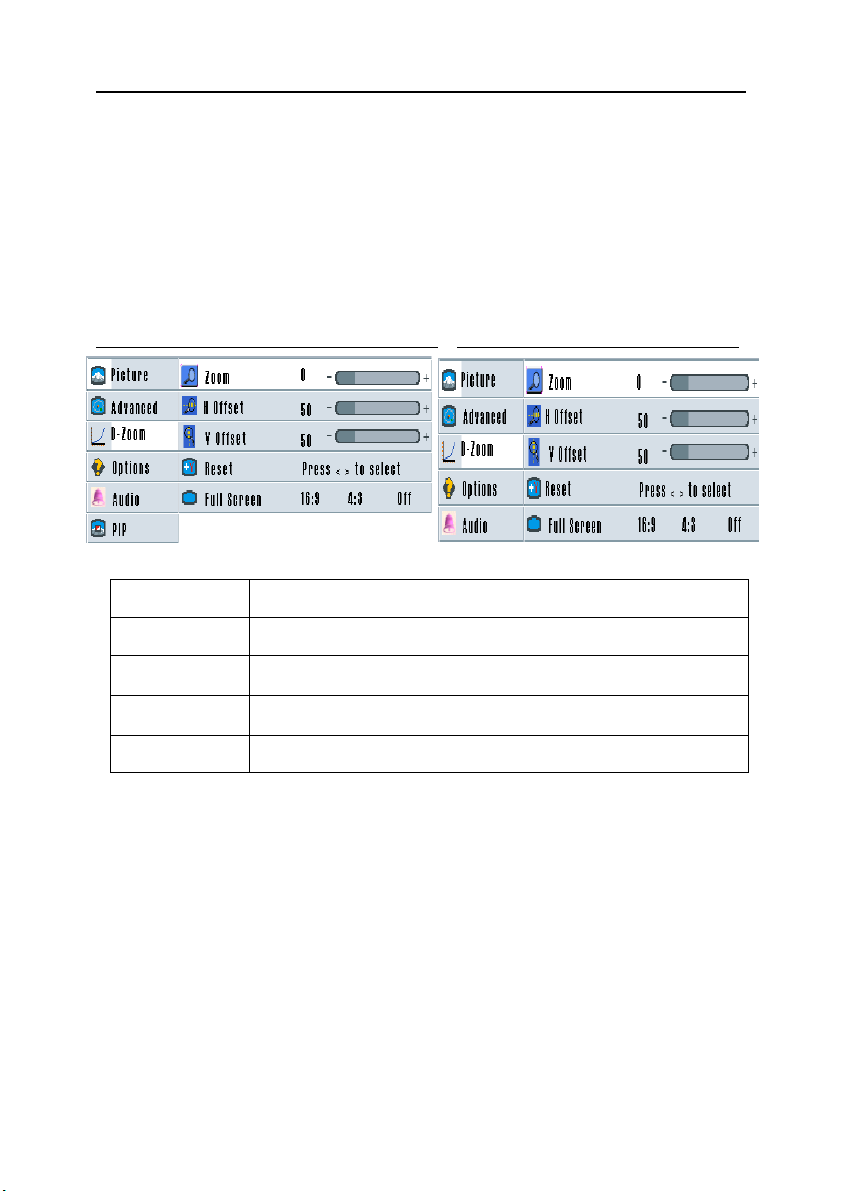
!The options to be adjusted are shown as the following:
" #
key to move the Bar to “Adv.
Input signals of VGA
(XGAType) Input signals of AV or S-VIDEO
or DVI
Adjust options The instruction
Zoom Digital zoom
H offset After zooming, display screen can be moved horizontally.
V offset After zooming, display screen can be moved vertically
Full Screen To adjust the image into full screen or 16:9 or 4:3
11
Page 14
Options
!After display Main-menu,press
$
!Press
!Press
!Press
key to enter sub-Menu.
" #
key to move Bar to the option which needs to be adjusted.
$ %
key to set value and press MENU key to return to main menu.
!Press EXIT key to exit the menu and save the value.
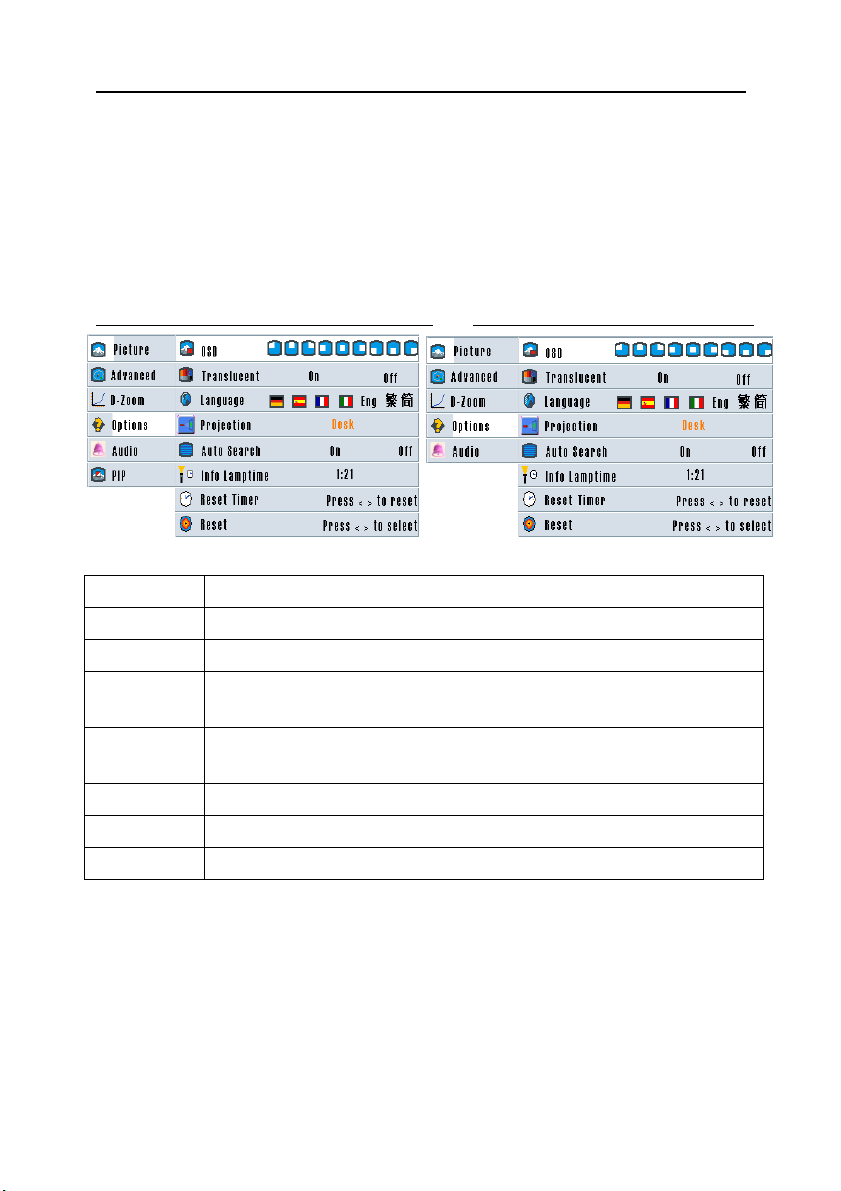
!The option to be adjusted as the following:
" #
key to move Bar to “Options ”
Input signals of
VGA or DVI
(XGAType)
Input signals of AV or S-VIDEO
Options
The instruction
OSD To select OSD position on screen.
Translucent To select OSD Translucent function for on or off.
Language
Projection
To select language for English、French、German、Italian、
Esperanto、簡体、繁體.
Press $ % key to select Projection for Desk、Ceiling、Rear or
Rear Ceiling.
Auto Search To select Auto Input Signal Search for on or off.
Factory Reset To return all parameters to factory default value
Lamp Timer To show the accumulation of the working time for lamp module
12
Page 15
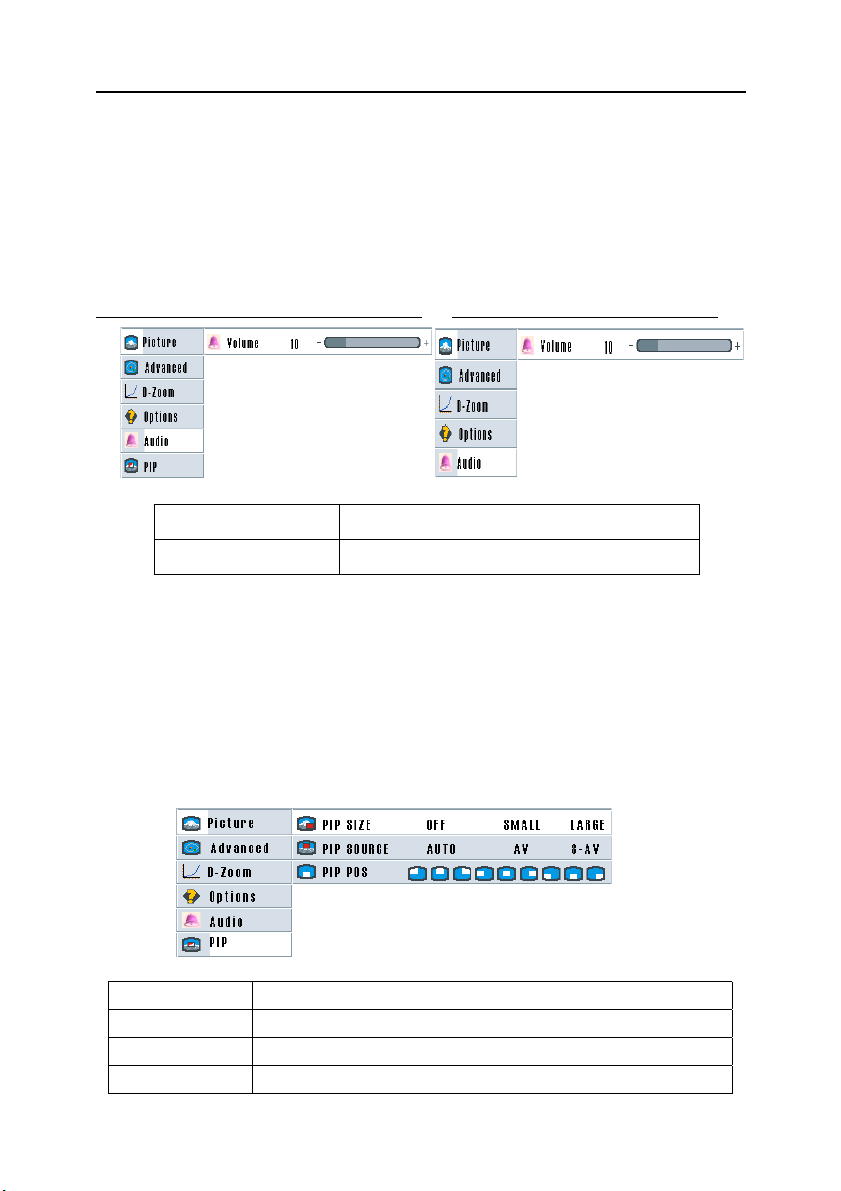
Audio Adjustment
!After displaying main menu,press
$
!Press
!Press
!Press
key to enter sub menu.
" #
key to move Bar to the option which is about adjusted.
$ %
key to set the value and press
!Press EXIT key to hide the menu and save the set value.
!The options to be adjusted are shown as the following:
" #
key to move Bar to “Audio ” .
MENU
key to return to main menu.
Input signals of
VGA or DVI(XGAType)
Input signals of AV or S-VIDEO
Adjust options The instruction
Volume To adjust the volume of speaker
PIP Adjustment
!After displaying main menu,press
!Press $ key to enter sub menu.
!Press " # key to move Bar to the option which is about adjusted.
!Press $ % key to set the value and press MENU key to return to main
menu.
!Press EXIT key to hide the menu and save the set value.
!The options to be adjusted are shown as the following:
" #
key to move Bar to “PIP ” .
Adjust options The instruction
PIP SIZE To adjust the size of sub picture.
PIP SOURCE To choose the signal source with AV or S-Video
PIP POS To choose the position of sub picture
13
Page 16

Maintenance
Handling of Abnormality
Abnormality of Indicators
!When Red indicator is on, it means the heat dissipation or fan is at fault,
please contact with your dealer.
!If there is No indicator on, please check whether the power cord connect
properly. If it still doesn’t work, please contact with your dealer.
Abnormality of Lighting-up Lamp
!When the red indicator is flashing and orange indicator is on , it’s abnormal
and possibly due to damaged lamp or unstable voltage , just turn off
Projector and restart again. If it still doesn’t work, please contact with your
dealer.
Cleaning the Projector
! Un-plug the power of projector before cleaning. Clean with a non-cotton
dry cloth or with slight water and neutral detergent if necessary.
Cleaning of Air Filter
!Turn off the projector and un-plug the power.
!Use star type screwdriver to loosen the screw and take the filter out.
!Clean the filter
!If the filter is hard to clean and need to replace a new one, please contact
with your dealer.
! When cleaning filter sponge , please use vacuum cleaner than water to avoid
moisture entering the projector. We recommend you to clean Projector
every 100 working hours.
14
Page 17
Replacing Main Lamp
Replacing Lamp Module
!When the red indicator is flashing and the lamp doesn’t lighting up, the lamp
source might abnormal or burn out.
!When the projection image is too dark, or the projection image is unstable
and flashing , please change the lamp.
!Please use specific lamp module provided by your local dealer.
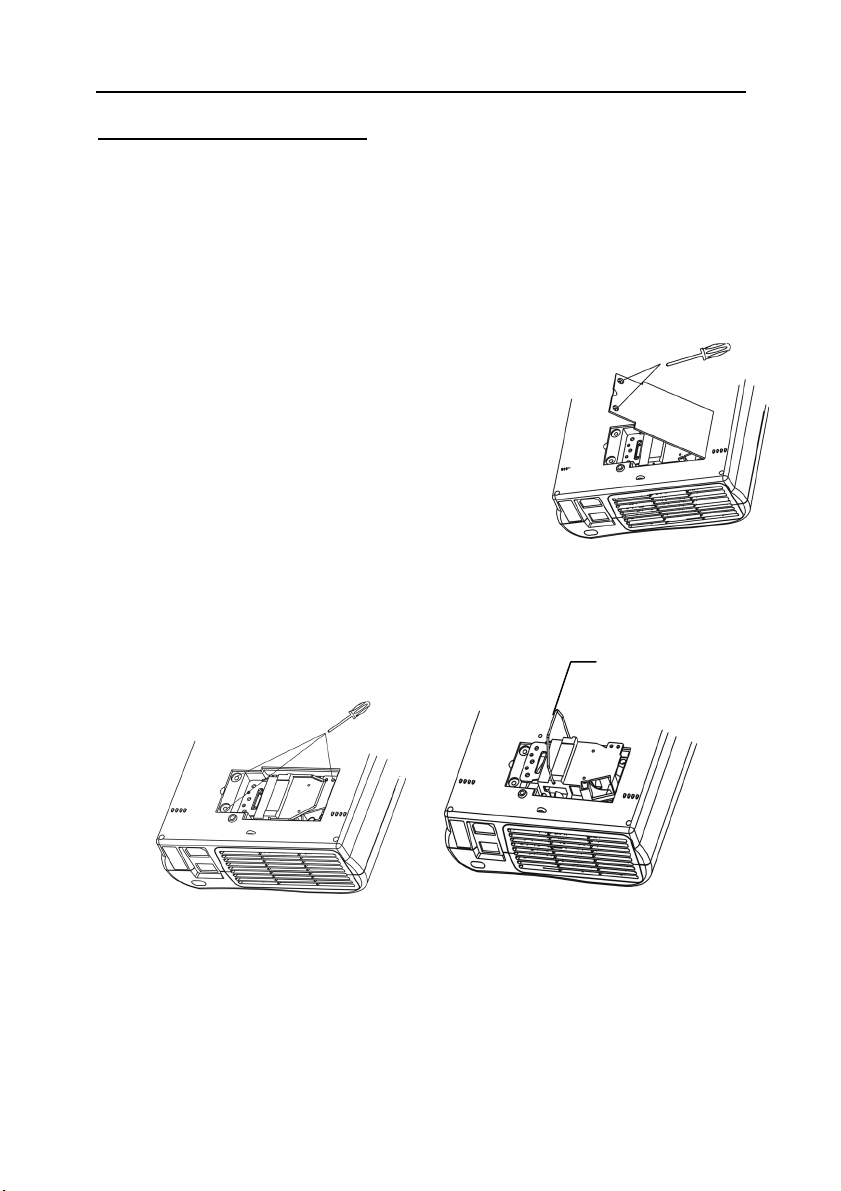
!Turn off projector and unplug power cord.
!Loosen the 2 screws of the cap of lamp module.
!You need to find a special star type screwdriver.
!When screws are loosed, take off the cap of lamp module.
!Loosen the 3 screws placed on the lamp module.
!Pull up the handle of the lamp module and pull the lamp module out of
projector
Lamp Module
!Install the new lamp module provided by your dealer into the projector.
!Fasten the 3 screws of the lamp module.
!Install the cap of lamp module then fasten 2 screws of the cap.
15
Page 18
Appendix
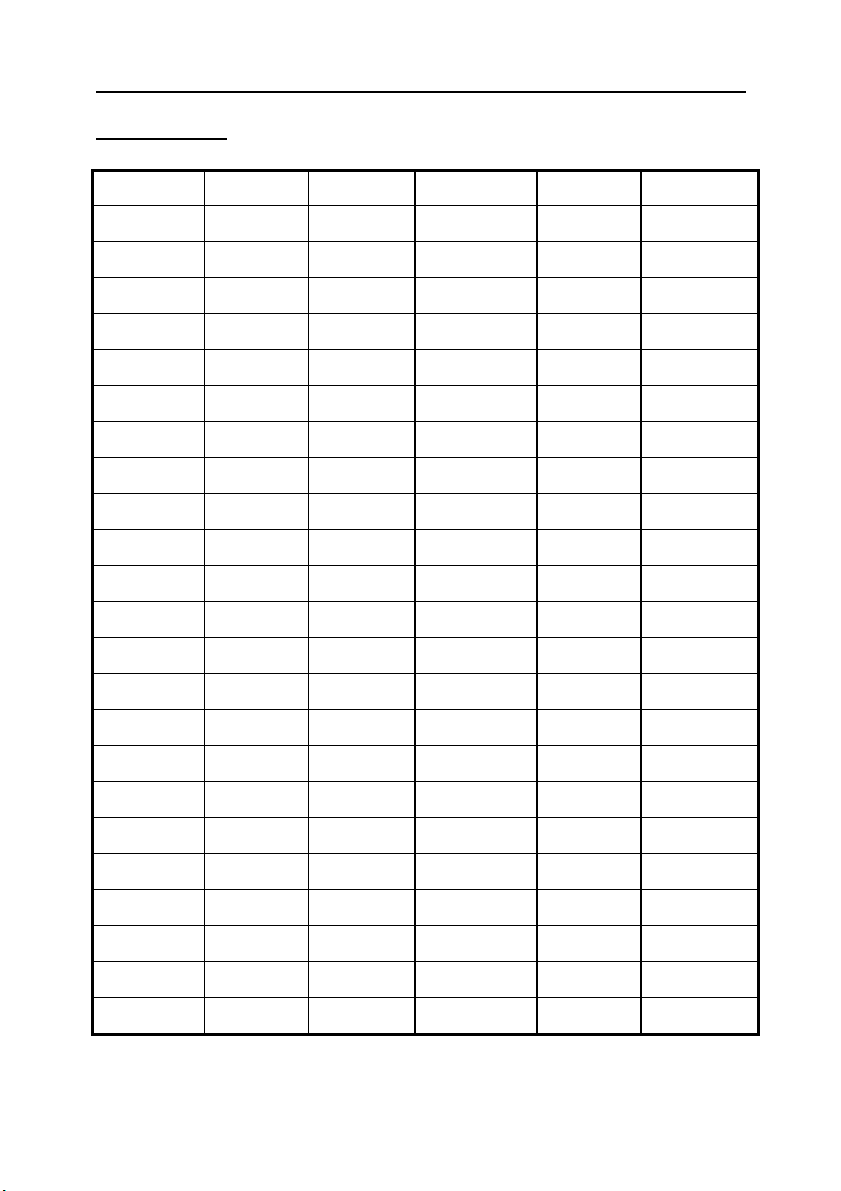
Resolution
Compatible Modes
V. Frequency H. Frequency
Resolution
V. Frequency H. Frequency
720 × 420
640 × 350
720 × 400
640 × 350
640 × 480
640 × 480
640 × 480
640 × 480
640 × 480
640 × 400
640 × 400
800 × 600
800 × 600
800 × 600
800 × 600
800 × 600
70Hz 31.5KHz
70Hz 31.5KHz
85Hz 37.9KHz
85Hz 37.9KHz
60Hz 31.5KHz
67Hz 35KHz
72Hz 37.9KHz
75Hz 37.5KHz
85Hz 43.3KHz
70Hz 31.5KHz
85Hz 37.9KHz
56Hz 35.2KHz
60Hz 37.9KHz MAC-13LC 67Hz 35KHz
72Hz 48.1KHz MAC-15 75Hz 68.7KHz
75Hz 46.9KHz MAC-16 75Hz 49.1KHz
85Hz 53.7KHz MAC-19 75Hz 60.2KHz
1152 ×864
1152 ×864
1152 ×864
1152 ×864
1152 ×864
1280 ×960
1280 ×960
1280 ×960
1280 ×1024
1280 ×1024
1280 ×1024
1280 ×1024
60Hz 54.3KHz
70Hz 63.9KHz
70Hz 64KHz
75Hz 67.5KHz
85Hz 77.1KHz
60Hz 60KHz
75Hz 75.93KHz
85Hz 85.93KHz
43Hz 46.6KHz
60Hz 64KHz
74Hz 78.8KHz
75Hz 79KHz
832 × 624
1024 ×768
1024 ×768
1024 ×768
1024 ×768
1024 ×768
1024 ×768
75Hz 49.7KHz MAC-1960 60Hz 48.2KHz
43Hz 35.5KHz
60Hz 48.4KHz
70Hz 56.5KHz
72Hz 57.8KHz
75Hz 60.0KHz
85Hz 68.7KHz
16
 Loading...