

Page 1
The Bowflex Conquest
WWWBOWFLEXCOM
Home Gym
Assembly Instructions
™
P/N 001-6841 Rev C (04/2007)
Page 2

Table of Contents
Qty 2 Button Head Screws 3/8” X 3”
Qty 37 Washer 3/8”
Qty 10
Hex Nut 3/8”
Qty 2 Button Head Screws 3/8” X 4”
Qty 1 Button Head Screws 3/8” X 4 1/4”
Qty 2 Button Head Screws 3/8” X 5”
Qty 8 Button Head Screws 5/16” X 3/4”
Qty 8 Washers 5/16”
Qty 2 Button Head Screws 3/8” X 2 3/4”
Qty 2 Button Head Screws 3/8” X 2 1/2”
Qty 3 Washers 1/4”
Qty 3 Self Tapping Screws #10 x 1”
Qty 4 Self Tapping Screws #10 x 3/4”
Qty 2 Button Head Screws 3/8” X 3 1/4”
Before You Start .......................................................................................... 2
Tools You Will Need / Hardware Chart ........................................................ 3
Parts List ................................................................................................... 4
Weight and Multi-carton Box Contents ............................................ 5
Assembling Your Bowflex Conquest™ Home Gym ..................................... 6
Contact Information .................................................................................. 15
Before You Start
Before You Assemble
Select where you are going to locate your Bowflex Conquest™ home gym carefully. The best place for your
Bowflex Cnquest™ home gym is on a hard, level surface. For best results, assemble your Bowflex Conquest™
home gym in the location where you intend to use it. Allow a workout area of at least 8’4”L x 6’6”W (2.6m L x
2m W) of free space for safe operation of the Bowflex Conquest™ home gym.
Every effort has been made to provide you with a clear and accurate assembly / owners manual. Should you
find any inconsistencies, have questions about your (model) or have suggestions for improving our manuals,
please call 1-800-NAUTILUS f(628-8458) for assistance.
Basic Assembly Principles
Here are a few basic tips that will make your assembly of the Bowflex Conquest™ home gym quick and easy.
By using these principles, you can simplify each process and save yourself extra time and effort.
1. To make the assembly process go faster, gather the pieces you need for each step and thoroughly read
the assembly instructions for that step prior to starting assembly for the step.
2. When tightening a locknut on a bolt, use a combination wrench to grip the locknut and ensure that it is
fastened securely.
3. When attaching two pieces, gently lift and look through the bolt holes to help guide the bolt through the
holes.
4. As a general rule, and for all bolts and nuts on your Bowflex Conquest
toward the right to tighten and left to loosen. Or you can remember the mnemonic: “Righty tighty, lefty
loosey.”
™
home gym, turn bolts or nuts
2
2
Page 3

Tools You Will Need
Qty 2 Button Head Screws 3/8” X 3”
Qty 37 Washer 3/8”
Qty 10
Hex Nut 3/8”
Qty 2 Button Head Screws 3/8” X 4”
Qty 1 Button Head Screws 3/8” X 4 1/4”
Qty 2 Button Head Screws 3/8” X 5”
Qty 8 Button Head Screws 5/16” X 3/4”
Qty 8 Washers 5/16”
Qty 2 Button Head Screws 3/8” X 2 3/4”
Qty 2 Button Head Screws 3/8” X 2 1/2”
Qty 3 Washers 1/4”
Qty 3 Self Tapping Screws #10 x 1”
Qty 4 Self Tapping Screws #10 x 3/4”
Qty 2 Button Head Screws 3/8” X 3 1/4”
Hex Wrenches Are Provided in the Box
3/16” Hex Key for 5/16” Button Head Screws:
7/32” Hex Key for 3/8” Button Head Screws:
Hardware Chart (1:1 Scale)
These Tools Are Not Provided in the Box
Wrench (9/16”) or Adjustable Wrench
(not provided):
Phillips Head Screwdriver
(not provided) :
* Specifications subject to change without notice.
3
3
Page 4
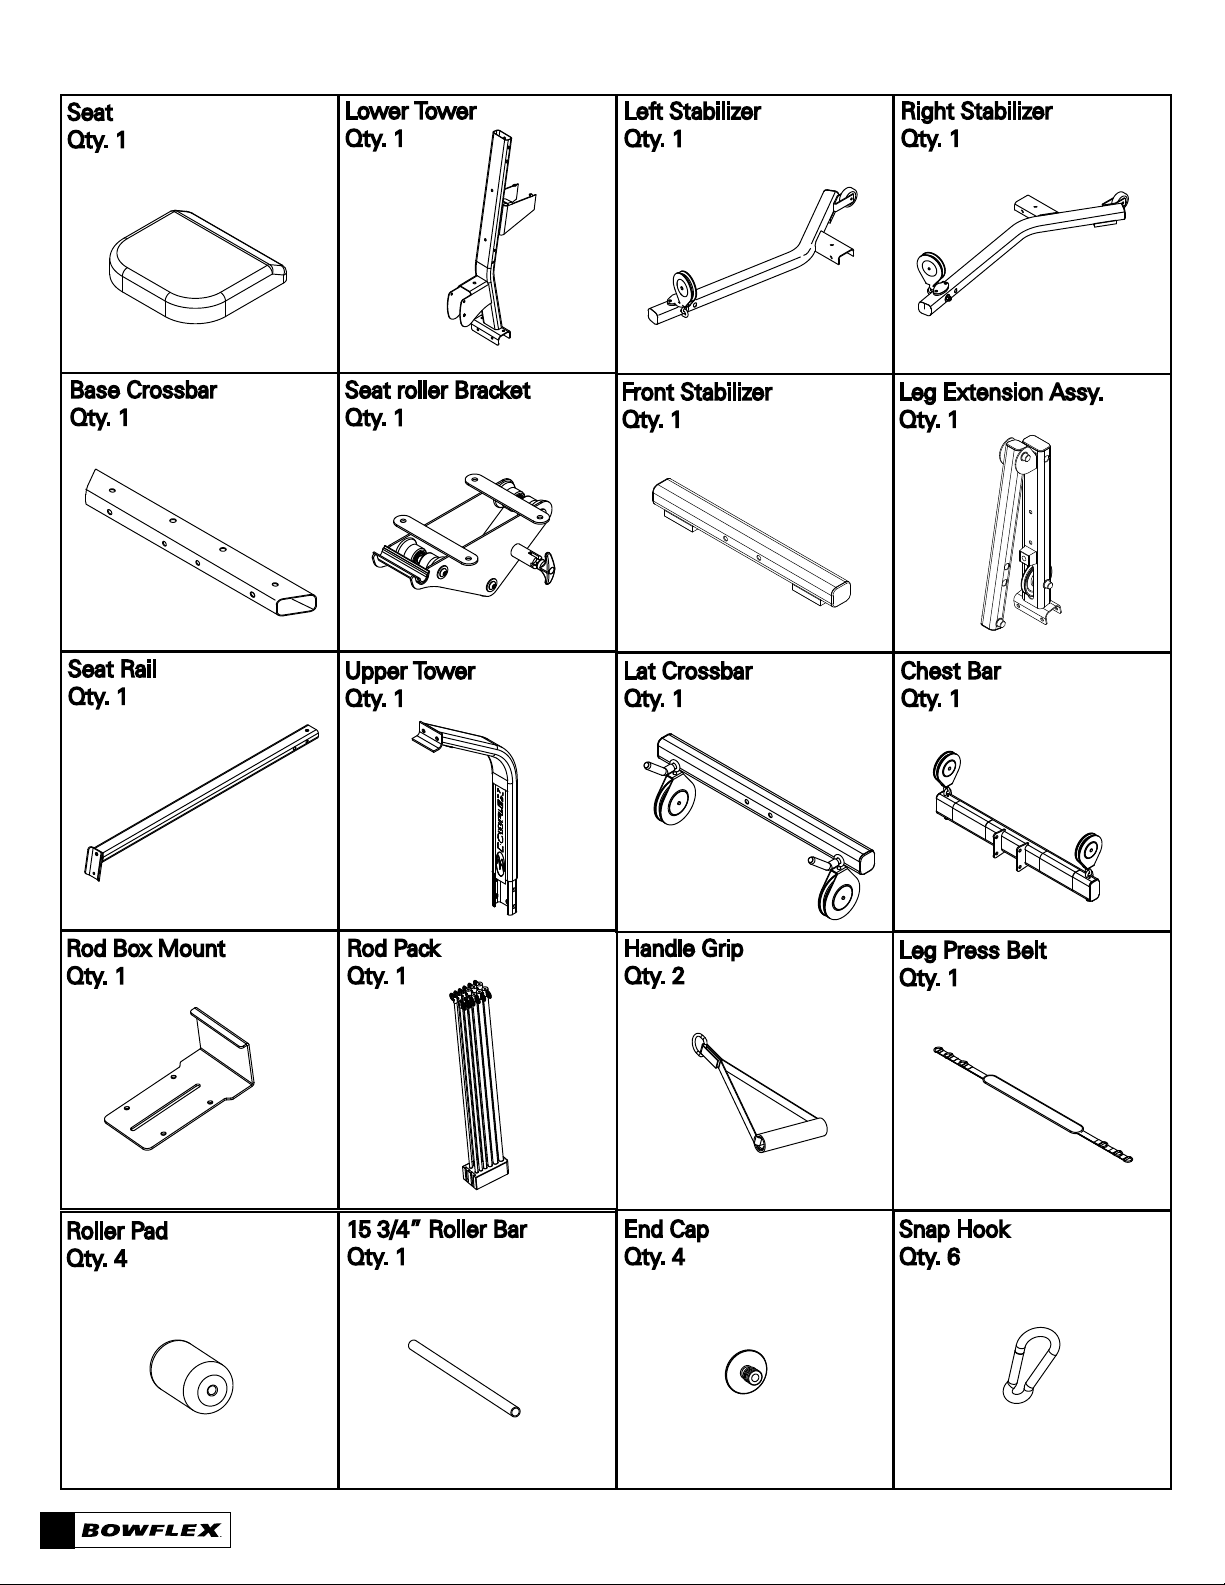
Bowflex Conquest™ Home Gym Parts List
4
Page 5

Bowflex Conquest™ Home Gym Parts List
Bench
Qty. 1
Lat Bar
Qty. 1
Squat Bar
Qty. 2
Locking Knob
Qty. 1
Low Row Bar
Qty. 1
Rubber Mat
Qty. 1
Squat Bar Strap
Qty. 2
Grip Ankle Cuff
Qty. 2
Face PLate
Qty. 1
Back Panel
Qty. 2
Squat Platform
Qty. 1
16 1/2” Roller Bar
Qty. 1
Assembled Unit Weight: 154 lbs. [82.1 kg.]
Shipping Box Weight and Contents for Multi-carton Package:
Box 1: Shipping Weight: 15 lbs. [6.8kg.]
210# Rod Pack
Assembly Manual
Owners Manual
Box 2: Shipping Weight: 63 lbs. [28.5kg.]
Front Stabilizer
Bench
Lat Crossbar
Seat Rail
Leg Extension Assembly
Lat Bar
Seat Rail
Seat Roller bracket
Squat Bar
Adjustable Belt
Seat
Low Row Bar
Squat Bar Straps
Box 3: Shipping Weight: 74 lbs. [33.5kg.]
Lower Tower
Upper Tower
Chest Bar
Face Plate
Back Plates
Handle Grips
Grip Ankle Cuffs
Rod Box Mount
Roller Pads
Roller Bars
Snap Hooks
Endcaps
Box 4: Shipping Weight: 52 lbs. [23.5kg.]
Right Stabilizer
Left Stabilizer
Base Crossbar
Squat Platform
Rubber Mat
5
Page 6

Assembling Your Bowflex Conquest™Home Gym
Step 1 Attach Stabilizers to Crossbar
Parts:
• Left and Right Stabilizers
• Base Crossbar
Tools:
• 7/32” Allen wrench
1-1 Insert Left and Right Stabilizers into
the Base Crossbar.
1-2 Install but do not tighten the hardware.
Hardware (1:1):
Left Stabilizer
3/8”x 3/4” Button
Head Screw
Base Crossbar
3/8”x 3/4” Button
Head Screw
3/8” Washer
Right Stabilizer
6 Button Head Screw (3/8” X 3/4”)
6 Washer (3/8”)
Step 2 Attach Squat Platform To Base Assembly
Parts:
• Base Assembly (from step 1)
• Squat Platform
Tools:
• 7/32” Allen Wrench
• 9/16” Wrench or Adjustable
2-1 Align the tabs on the Squat Platform
with the holes in the Base Assembly.
2-2 Install and completely tighten hardware
Squat Platform
from steps 1 and 2.
Hardware (1:1):
3/8” Washer
Base Assembly
3/8”x 3 1/4” Button
Head Screw
3/8” Nylock Nut
2 Button Head Screw (3/8” X 3 1/4”)
6
4 Washer (3/8”)
2 Nylock Nut (3/8”)
Page 7

Assembling Your Bowflex Conquest™Home Gym
Step 3 Attach Lower Tower to Base Assembly
Parts:
• Base Assembly (from step 2)
• Lower Tower
Tools:
• 7/32” Allen wrench
• 9/16” Wrench or Adjustable
3-1 Align the holes in the Lower Tower with
the holes in the Base Assembly.
3-2 Install and completely tighten the hardware.
Hardware (1:1):
3/8”x 4” Button
Head Screw
Lower Tower
3/8”x 3/4” Button
Head Screw
3/8” Nylock Nut
3/8” Washer
2 Button Head Screw (3/8” X 3/4”)
2 Button Head Screw (3/8” X 4”)
Step 4 Attach Chest Bar to Lower Tower
Parts:
• Chest Bar
Tools:
• 7/32” Allen wrench
• 9/16” Wrench or Adjustable
4-1 With the pulleys pointing up, align the holes in the
Chest Bar with the holes in the Lower Tower.
4-2 Install and completely tighten the hardware.
2 Nylock Nut (3/8”)
Base Assembly
6 Washer (3/8”)
3/8” Nylock Nut
3/8” Washer
3/8” x 5” Button
Head Screw
Hardware (1:1):
2 Button Head Screw (3/8” X 5”)
2 Nylock Nut (3/8”)
4 Washer (3/8”)
7
Page 8

Assembling Your Bowflex Conquest™Home Gym
Step 5 Attach Seat to Seat Roller Bracket
Parts:
• Seat
• Seat Rail with Seat Roller Bracket
Tools:
• 3/16” Allen wrench
5/16” Washer
5-1 Align Seat with holes in Seat Roller Bracket.
Make sure the beveled edge of the Seat is
pointing toward the U shaped channel on
the Seat Roller Bracket.
5-2 Install and completely tighten hardware.
Hardware (1:1):
Seat
Beveled Edge
U shaped Channel
Seat Rail
Seat Roller Bracket
5/16”x 3/4” Button
Head Screw
4 Button Head Screw (5/16” X 3/4”)
4 Washer (5/16”)
Step 6 Attach Front Stabilizer to Leg Extension Assembly
Parts:
• Leg Extension Assembly
• Front Stabilizer
Tools:
• 7/32” Allen Wrench
3/8”x 3”
Button Head
Screw
• 9/16” Wrench or Adjustable
6-1 Align the holes in the Front Stabilizer with
the holes in the Leg Extension Assembly.
6-2 Install and completely tighten hardware.
Hardware (1:1):
Leg Extension Assembly
3/8” Nylock Nut
3/8” Washer
Front Stabilizer
2 Button Head Screw (3/8” X 3”)
8
4 Washer (3/8”)
2 Nylock Nut (3/8”)
Page 9

Assembling Your Bowflex Conquest™Home Gym
Step 7 Attach Lower Tower to Base Assembly
Parts:
• Seat Rail Assembly (from step 5)
• Leg Extension Assembly (from step 6)
Tools:
• 7/32” Allen wrench
• 9/16” Wrench or Adjustable Wrench
7-1 Align the holes in the Seat Rail with the
holes in the Leg Extension Assembly.
7-2 Install and completely tighten
the hardware
Hardware (1:1):
2 Button Head Screw (3/8” X 2 3/4”)
3/8”x 2 3/4”
Button Head
Screw
Seat Rail Assembly
Leg Extension Assembly
1 Nylock Nut (3/8”)
3/8” Nylock Nut
3/8” Washer
3 Washer (3/8”)
Step 8 Attach Seat Rail
Parts:
• Seat Rail Assembly (from step 7)
• Locking Knob
Tools:
Bushing
3/8” Nylock Nut
• 7/32” Allen wrench
• 9/16” Wrench or Adjustable Wrench
8-1 Remove twist tie holding bushings
in seat rail.
Seat Rail Assembly
8-2 Align bushings in Seat Rail with
holes in Seat Rail Bracket.
8-3 Install hardware and tighten but allow seat rail to pivot freely.
8-4 Install Locking Knob.
Locking Knob
3/8” Washer
3/8”x 4 1/2”
Button Head
Screw
Hardware (1:1):
1 Button Head Screw (3/8” X 4 1/4”)
1 Nylock Nut (3/8”)
2 Washer (3/8”)
9
Page 10

Assembling Your Bowflex Conquest™Home Gym
Step 9 Attach Lat Crossbar to Upper Tower
Parts:
• Upper Tower
• Lat Crossbar
3/8”x 2 1/4”
Tools:
• 7/32” Allen wrench
Button Head
Screw
9-1 Make sure hooks on Lat Crossbar are
pointing up and Align holes in Lat Bar with
holes in Upper Tower.
9-2 Install and completely tighten hardware.
Hardware (1:1):
Lat Crossbar
Upper Tower
3/8” Washer
2 Button Head Screw (3/8” X 2 1/2”)
2 Washer (3/8”)
Step 10 Attach Upper Tower Assembly (from step 9)
Parts:
• Upper Tower Assembly
Tools:
• 7/32” Allen Wrench
10-1 Insert Upper Tower into Lower Tower.
10-2 Install and completely tighten hardware.
Hardware (1:1):
Upper Tower
3/8” Washer
3/8”x 3/4”
Button Head
Screw
Lower Tower
6 Button Head Screw (3/8” X 3/4”)
10
6 Washer (3/8”)
Page 11

Assembling Your Bowflex Conquest™Home Gym
Step 11 Attach Face Plate and Back Panels
Parts:
• Face Plate
Back Panel
• Back Panels
Tools:
• Phillips Head Screwdriver
11-1 Place the Face Plate against the
Lower Tower.
11-2 Position the Back Panels against the back
of the Lower Tower and around the Rod Box.
11-3 Install and completely tighten the hardware.
Hardware (1:1):
#10 x .75” Self
Threading
Screw
Rod Box
Face Plate
Back Panel
4 Self Threading Screw ( #10 x .75” )
Step 12 Attach Rod Box Mount
Parts:
• Rod Pack
• Rod Box Mount
Tools:
• Phillips Head Screwdriver
12-1 Place the Rod Box Mount on the bottom of the
Rob Pack.
12-2 Install and completely tighten the hardware.
Hardware (1:1):
3 Self Threading Screw ( #10 x 1” )
3 Washer (1/4”)
11
Page 12

Assembling Your Bowflex Conquest™Home Gym
Step 13 Install Rod Pack
Parts:
• Rod Pack Assembly (from step 12)
Tools:
• 3/16” Allen wrench
13-1 Position Rod Pack Assembly in the Rod Box
with the 50lb. Rods closest to the Back Plates
13-2 Install and completely tighten hardware.
Hardware (1:1):
Back Plate
5/16” Washer
5/16”x 3/4”
Button Head
Screw
Rod Pack
Assembly
Rod Box
4 Button Head Screw (5/16” X 3/4”)
4 Washer (5/16”)
Step 14 Install Roller Pads
Parts:
• Roller Pads
• 15 3/4” Roller Tube
• 16 1/2” Roller Tube
• End Caps
14-1 Insert the 16 1/2” Roller Tube into the
upper holes on the Leg Extension Assembly.
14-1 Insert the 15 3/4” Roller Tube into the
lower holes on the Leg Extension Assembly.
14-2 Slide the Roller Pads onto the Roller Tubes.
End Cap
Roller Pad
16 1/2” Roller Tube
Upper Hole
15 3/4” Roller Tube
14-3 Insert the End Caps into the Roller Tubes.
12
Leg Extension Assembly
Page 13

Assembling Your Bowflex Conquest™Home Gym
Step 15 Install Bench
Parts:
• Bench
15-1 Place the frame of the Bench in the U-shaped
bracket on the Seat Roller Assembly and lay
the Bench on the Seat Rail.
Step 16 Route the Rod Cables
16-1 Unwrap the Cables from the Chest Bar
Pulleys. Extend the Rod Hooks up to the
Rod Caps and hook in place on preferred
rod or rods.
Bench
Seat Rail
U Shaped Bracket
Rod Cap
Chest Bar Pulley
Rod Cap
Rod Hook
Rod Hook
13
Page 14

Assembling Your Bowflex Conquest™Home Gym
7 ! 2 . ) . '
Step 17 Store the Lat Cables
17-1 Unwrap the Lat Cables and tuck inside the Lat
Tower until needed.
Step 18 Final Inspection
Please inspect your machine to ensure that all fasteners are tight and components are properly
assembled. Review all warnings affixed to machine.
Congratulations! You have successfully completed assembly of your Bowflex Conquest™ home gym!
Failure to visually check and test assembly
before use can cause damage to the Bowflex
Conquest™ home gym and serious injury
to users and bystanders and can also
compromise the effectiveness of your exercise
program.
14
Page 15

Important Contact Numbers
If you need assistance, please have both the serial number of your machine and the date of
purchase available when you contact the appropriate Nautilus office listed below.
OFFICES IN THE UNITED STATES:
E-mail: customerservice@nautilus.com
• TECHNICAL/CUSTOMER SERVICE
Nautilus, Inc.
World Headquarters
16400 SE Nautilus Drive
Vancouver, Washington, USA 98683
Phone: 800-NAUTILUS (800-628-8458)
Email: customerservice@nautilus.com
Fax: 877-686-6466
• CORPORATE HEADQUARTERS
Nautilus, Inc.
World Headquarters
16400 SE Nautilus Drive
Vancouver, Washington, USA 98683
Phone: 800-NAUTILUS (800-628-8458)
INTERNATIONAL OFFICES:
For technical assistance and a list of distributors in your
area, please call or fax one of the following numbers.
• INTERNATIONAL CUSTOMER SERVICE
Nautilus International S.A.
Rue Jean Prouvé 6
1762 Givisiez / Switzerland
Tel: + 41-26-460-77-77
Fax: + 41-26-460-77-70
Email: technics@nautilus.com
BUSINESS OFFICES:
• SWITZERLAND OFFICE
Nautilus Switzerland S.A.
Tel: + 41-26-460-77-66
Fax: + 41-26-460-77-60
• GERMANY and AUSTRIA OFFICE
Nautilus GmbH
Tel: +49-2203-2020-0
Fax: +49-2203-2020-4545
• ITALY OFFICE
Nautilus Italy s.r.l.
Tel: +39-051-664-6201
Fax: +39-051-664-7461
• UNITED KINGDOM OFFICE
Nautilus UK Ltd.
Tel: +44-1908-267-345
Fax: +44-1908-267-346
• CHINA OFFICE
Nautilus Representative Office
Tel: +86-21-523-707-00
Fax: +86-21-523-707-09
15
Page 16

©2007 Nautilus Inc. All rights reserved. Nautilus, Inc. World Headquarters, 16400 SE Nautilus Drive, Vancouver, WA, USA 98683.
Bowflex, Bowflex Conquest, Power Rod and the Bowflex and Nautilus logos are either registered trademarks or trademarks of Nautilus, Inc.
Printed in China
 Loading...