

Bowers & Wilkins Z2 Owner's Manual

Firmware version 4.8.52
Operation may differ from other rmware versions
Z2

2
ENGLISH
www.bowers-wilkins.com
Welcome to Bowers & Wilkins and Z2
Thank you for choosing Bowers & Wilkins. When John Bowers
rst established our company he did so in the belief that
imaginative design, innovative engineering and advanced
technology were keys that could unlock the enjoyment of audio
in the home. His belief is one that we continue to share and it
inspires every product we design.
Z2 is more than just an iPod
®
dock. As well as listening to
audio stored on your iPod or iPhone
®
you can use it to:
• Play audio directly from iTunes
®
via either a cable or wireless
network connection.
• Connect and listen to an external audio source such as a TV or
a non-USB portable music player.
This manual will tell you everything you need to know to get the
most from your Z2. It begins by describing the contents of the Z2
carton.

3
ENGLISH
1. Z2 Carton Contents
1. Z2
2. Power supply
3. Remote control
4. Document pack
Environmental Information
This product complies with international directives,
including but not limited to the Restriction of
Hazardous Substances (RoHS) in electrical and
electronic equipment, the Registration, Evaluation,
Authorisation and restriction of CHemicals (REACH)
and the disposal of Waste Electrical and Electronic
Equipment (WEEE). Consult your local waste
disposal authority for guidance on how properly to
recycle or dispose of this product.
The Lightning connector works with iPhone 5,
iPod touch (5th generation) and iPod nano
(7th generation).
AirPlay works with iPhone, iPod touch and iPad with
iOS 4.3.3 or later, Mac with OS X Mountain Lion, or
Mac and PC with iTunes 10.2.2 or later.

4
ENGLISH
2. Connecting to your Z2
You can connect to your Z2 three different ways:
• Using AirPlay
®
.
• Using the Lightning
™
connector.
• Using the Auxilary input.
Diagram 1 illustrates the Z2 rear panel connection
sockets.
AirPlay Connection
Z2 is able to play audio from iTunes either wirelessly
or via a wired (Ethernet) connection using AirPlay
streaming technology. When connected to the same
network as a computer running iTunes, Z2 can
appear as an output option in the pop-up AirPlay
menu. See Section 5 for information on conguring
Z2 to join your home network and on conguring
iTunes to play through Z2.
Note: Please ensure you have installed the latest
version of iTunes.
Note: A standard Ethernet cable is required if you
wish to connect your Z2 to an Ethernet network.
As well as streaming audio from iTunes, AirPlay
also makes it possible to stream audio directly to
Z2 from an iPod touch, iPhone or iPad
®
. Any iPod
touch, iPhone or iPad application that incorporates
a volume control will have an additional icon that
enables selection of available remote speakers for
playback. Any AirPlay device within wireless range
will be included in the selection list.
Lightning Connector
Z2's Lightning connector is compatible with iPhone
5, iPod touch (5th generation) and iPod nano
(7th generation). Older iPod or iPhone models,
or alternative music players, may be used by
connecting their headphone sockets to the Z2
rear panel AUX input. iPhone and iPod models are
charged when docked if the Z2 is on or in Sleep or
Standby mode.
Auxiliary Input (AUX)
If you wish to listen to an external analogue source,
connect it to Z2 AUX input socket using an analogue
cable terminated with a mini-jack plug.
Mains Input (POWER)
Connect Z2 to a mains outlet socket using the
power supply. When rst connected to mains power
Z2 will automatically power up with its indicator
pulsing red.
Note: The table in Section 4 describes all Z2
indicator colours and their meanings.
Diagram 1
Z2 back panel
Z2
B&W Group Ltd. Worthing Engl and
Designed in the UK M ade in China
5
ENGLISH
Diagram 3
Z2 insulating tab removal
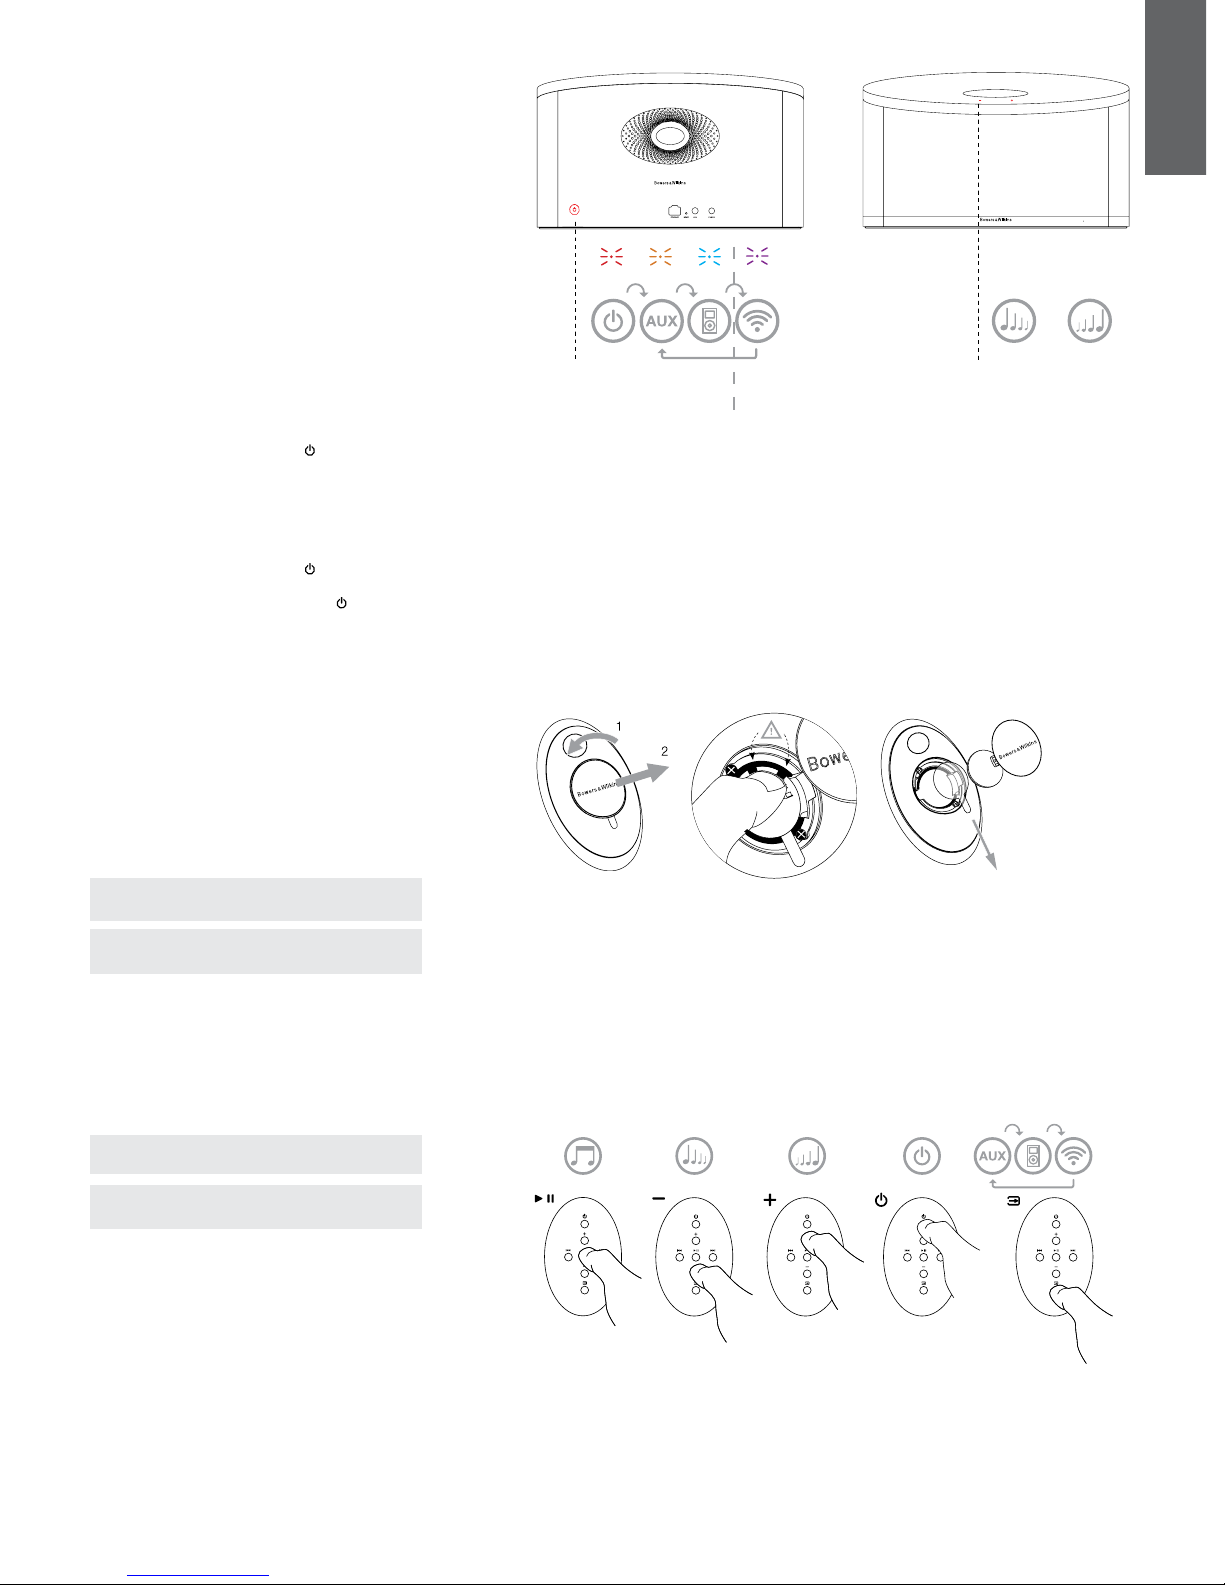
3. Using Z2
Z2 can be operated either from the controls on
its body, or from the remote control. If the remote
control is to be used, the battery insulating tab must
rst be removed. This is illustrated in Diagram 3
Diagram 4 illustrates the control key functions.
3.1 Switching On and Off
In addition to normal operating mode, Z2 has both
Standby and Sleep modes. In Standby mode,
all Z2 functions are switched off and the power
consumption minimised. In Sleep mode, the Z2
wireless function remains connected to the network.
The Z2 indicator illuminates dim red in Sleep mode
and will turn off in Standby mode.
Z2 can be switched from Standby mode by the
following actions:
• Pressing the Z2 Standby button
.
• Docking an iPod or iPhone.
Z2 can be switched from Sleep mode by the
following actions:
• Pressing the Z2 Standby button
.
• Pressing remote control Standby key
.
• Docking an iPod or iPhone.
• Streaming music to Z2 by Airplay.
• Play music through the AUX input.
When Z2 is switched on from Standby or Sleep, the
last input used will be selected if it is still connected.
If the last input used is no longer connected, Z2 will
automatically scan its inputs AUX, Dock, AirPlay,
and select the rst connected one it nds. The Z2
indicator will change to the colour that designates
the selected input. If no connected input is found, Z2
will select the AirPlay input by default.
Note: For rst time power up when AirPlay has
not been set up the indicator will ash Yellow.
Note: The table in Section 4 describes all the Z2
indicator colours and their meanings.
To switch Z2 into Sleep mode, either press the
remote control Standby key or press and hold the Z2
Standby button for 2 seconds. The Z2 indicator will
illuminate dim red.
To switch Z2 into Standby mode, press and hold the
Z2 Standby button for 4 seconds. The Z2 indicator
will turn off.
Note: It is not possible to switch Z2 into Standby
mode from the remote control.
Note: The Z2 will automatically enter Sleep mode
if left inactive for more than 30 minutes.
Diagram 2
Z2 controls explained
Diagram 4
Z2 remote control explained
Z
2
B&W Group Ltd. Worthing England
Designed in the UK Made in China
Only applicable when
AirPlay has been set up.
6
ENGLISH
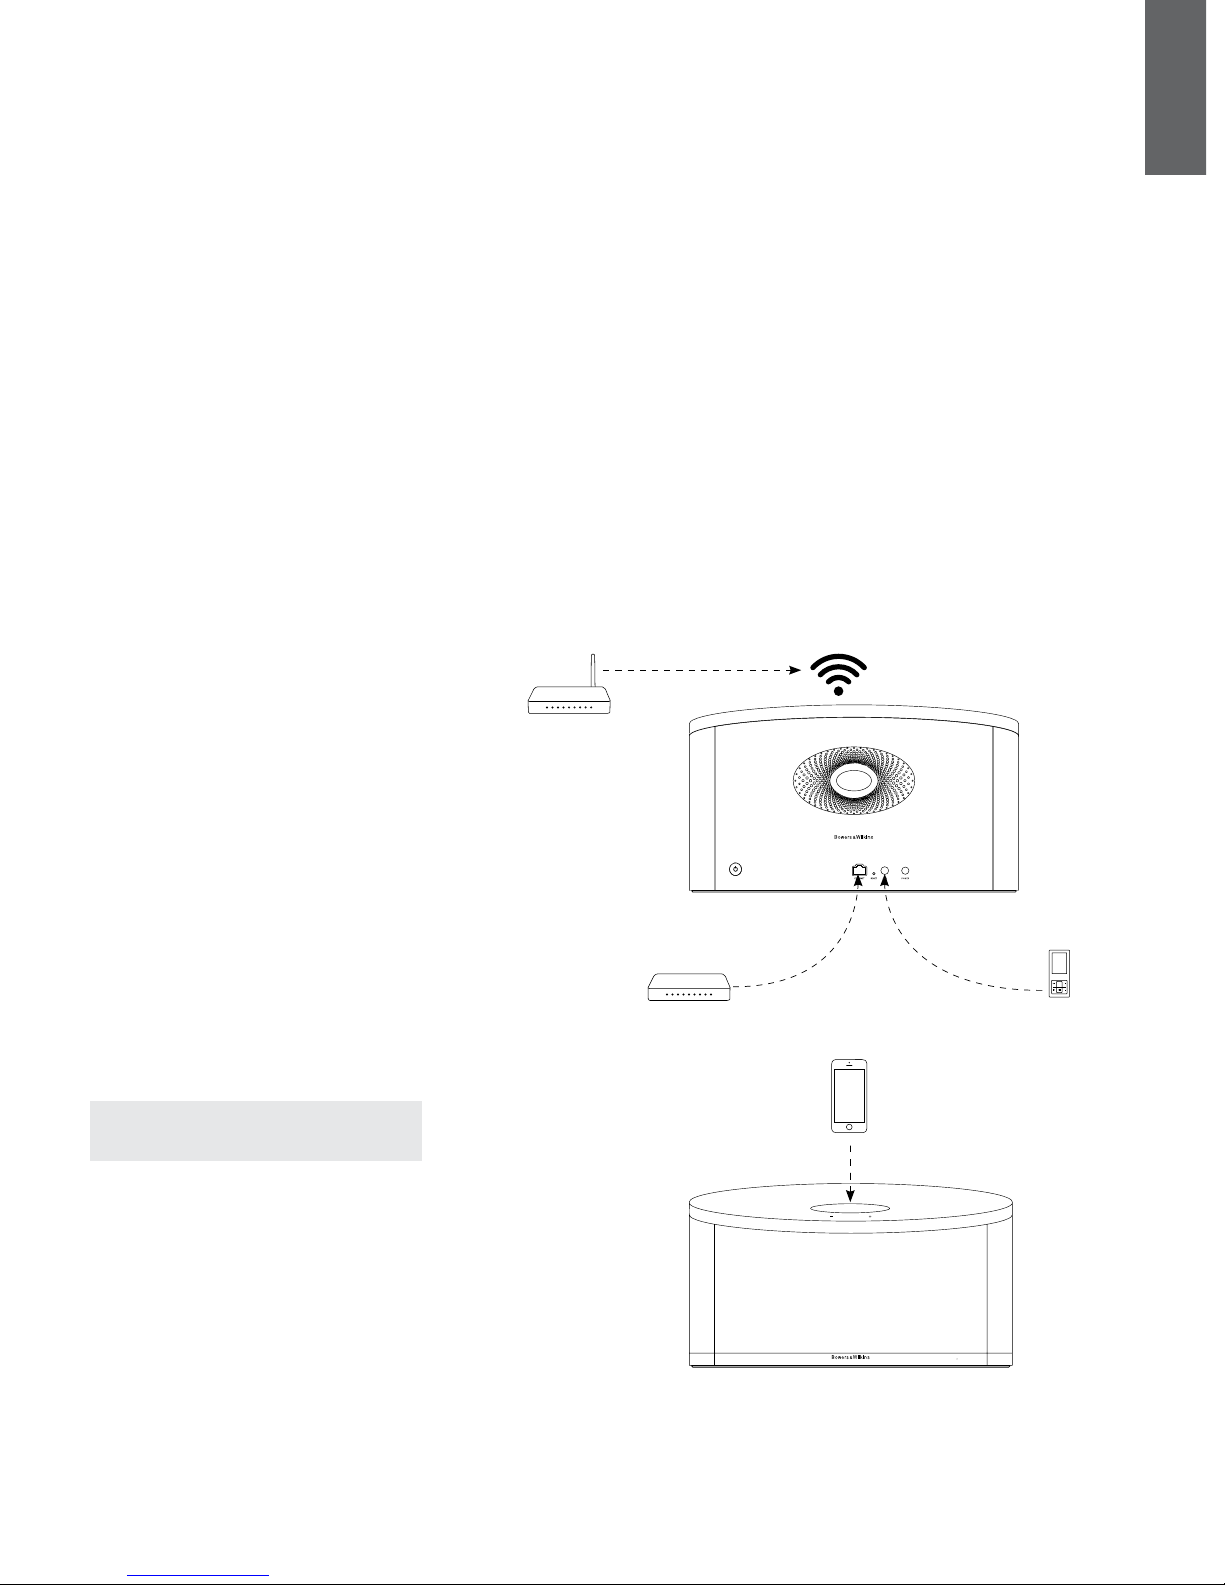
3.2 Z2 Functions
Diagram 5 illustrates Z2's connectivity.
With the Z2 switched on from Standby
or Sleep:
• You can listen to your iPod or iPhone audio.
• You can connect to a wired or wireless network
and stream audio via AirPlay.
• You can listen to other analogue audio sources via
the Z2 AUX input.
• You can use the remote control Volume keys or the
Z2 Volume buttons to control volume.
• If an iPod or iPhone is docked, or Z2 is connected
to iTunes via AirPlay, you can use the remote
control Play/Pause key to play or pause audio, or
the Next and Previous keys to select the next or
previous track.
• You can use the remote control Input key or
the Z2 Standby button sequentially to select
connected inputs.
3.3 Adjusting the Z2 sound
A Z2 used close to a wall or near a room corner may
overemphasise the bass elements of music played
on it. You can reduce the bass by following the steps
below.
• With the Z2 switched on from Standby, dock an
iPod or iPhone and play some music. While the
music is playing, select the iPod or iPhone Settings
icon.
• Scroll to the bottom of the Settings page and
select Speakers.
• The default Z2 setting is Bass 0. This is appropriate
for a Z2 used away from walls and corners. Bass
-1 reduces the bass output appropriately for a Z2
used with its back close to a wall. Bass -2 reduces
the bass output appropriately for a Z2 used near
a room corner. Bass +1 and Bass -3 options are
also provided to enable personal preferences also
to be accommodated. You should select whichever
option you feel sounds best on a range of music.
The bass adjustment happens as soon as you
highlight the option.
• The selected bass adjustment is retained by the Z2
once the docked iPod or iPhone is removed and is
applied to all the Z2 inputs.
Note: When you use Z2 with AirPlay or a docked
iPod or iPhone it is best to switch-off any
equalisation. Select the “at” equalisation option.
3.4 Z2 Automatic Input Switching
In some circumstances the Z2 will automatically
switch to its AirPlay input or switch on from Sleep
mode:
• If iTunes streamed audio is present on the AirPlay
input when the dock input is selected and a
docked iPod or iPhone stops playing, the AirPlay
input will automatically be selected.
• If iTunes streamed audio is present on the AirPlay
input when the AUX input is selected but no audio
playing, the AirPlay input will automatically be
selected.
• If iTunes streamed audio is present on the
AirPlay input when Z2 is in Sleep mode, it will
automatically switch on and play the streamed
audio.
• When Z2 is in Sleep mode for more than one
minute and an audio signal is detected through the
AUX input, it will automatically switch on and play
the AUX input audio.
Diagram 5
Z2 connectivity
MENU
Z2
B&W Group Ltd. Worthing Engl and
Designed in the UK Ma de in C hina

7
ENGLISH
4. The Z2 Indicator
The Z2 indicator illuminates in a range of colours
to indicate different operational conditions. Table 1
describes the colours and their meanings.
5. Joining Wireless Networks and
conguring iTunes
In order to play your iTunes music on your Z2 using
AirPlay, your Z2 must join the same network as the
computer on which iTunes is installed and running.
Z2 network addressing is set to DHCP which means
that once it has joined the wireless network it will
not require any further conguration. You will need
to know your home wireless network name and
password before you start.
5.1 Set up your Z2 with your iOS device
(iPod touch, iPad or iPhone)
• Get ‘Bowers & Wilkins Control’ App from the
App Store or by visiting www.bowers-wilkins.
com/control
• Follow the onscreen instructions.
5.2 Set up with Mac or PC
• Get ‘Bowers & Wilkins Control’ App from the
App Store or by visiting www.bowers-wilkins.
com/control
5.3 Setting up Z2 using a wired
connection
To set up Z2 to join your wireless network you
should rst connect it physically to the Mac/PC using
an Ethernet cable. You will need to ensure that your
Mac/PC wireless capabilities are disabled. Once
connected you can browse to the Z2 setup page.
Follow the steps described below.
Note: Z2 can also use a wired network for AirPlay
streaming.
• Unplug every cable from the Z2 and undock any
docked iPod or iPhone.
• Using an Ethernet cable connect the Z2 rear panel
ETHERNET socket to an Ethernet socket on the
computer.
• Connect the power cable. Z2 will switch on with
the indicator pulsing red.
• Once the Z2 indicator begins to ash yellow.
Press and hold the '+' volume button on Z2 for 4
seconds. Z2's indicator will show solid purple once
the wired network connection is established.
• Using an internet browser application running on
the computer connected to the Z2 type the Z2
default network address (http://169.254.1.1) in
the browser address eld and press “return”. This
will open the Z2 setup page.
• The setup page provides the option to change
the Z2 name. Changing the name is useful if more
than one Z2 is to be connected to the network.
Enter a new name (Z2 Kitchen for example) in the
Name box.
• Select your home network Name from the
drop down list and enter the Password in the
appropriate box. Take care to type the password
correctly.
• When you are nished, click on the Apply button,
then close the Z2 setup page. Disconnect the
Ethernet cable.
• The Z2 indicator will change to steady purple when
the wireless network connection is established.
This will take up to 3 minutes.
Note: If Z2 fails to connect to your home wireless
network, the most likely fault is an incorrectly
entered network password. Follow the reset
instructions in Section 7 and begin the network
setup procedure again.
5.4 Conguring iTunes
With Z2 connected to your home network (wired or
wireless) you can congure iTunes to use it as an
output device. Select Z2 as an output option in the
pop-up AirPlay menu. iTunes will now play through
the Z2.
Multiple Z2 units can be connected to the wireless
network and used to provide audio in separate
rooms. Each will be available in the iTunes devices
menu, identied by either the names specied in the
setup page, or by default the last three digits of their
serial numbers.
Indicator Colour Meaning Input Selected
Off Standby N/A
Dim Red Sleep N/A
Pulsing Red Powering up N/A
Flash Red twice Reset started N/A
Blue On Dock
Fast ashing Blue Volume adjustment Dock
Orange On Aux
Fast ashing Orange Volume adjustment Aux
Purple On AirPlay
Fast ashing purple Volume adjustment AirPlay
Slow ashing purple No network connected AirPlay
Fast ashing Red Invalid operation Any
Slow ashing Yellow Wireless setup mode N/A
White Firmware update N/A
Flashing white Firmware error N/A
Table 1
Indicator colour and meaning
8
ENGLISH
Z2
B&W Group Ltd. Worthing Engl and
Designed in the UK Ma de in C hina
6. Z2 Firmware Update
Updated Z2 rmware may from time to time be made
available for download from Z2's support section of
the Bowers & Wilkins website.
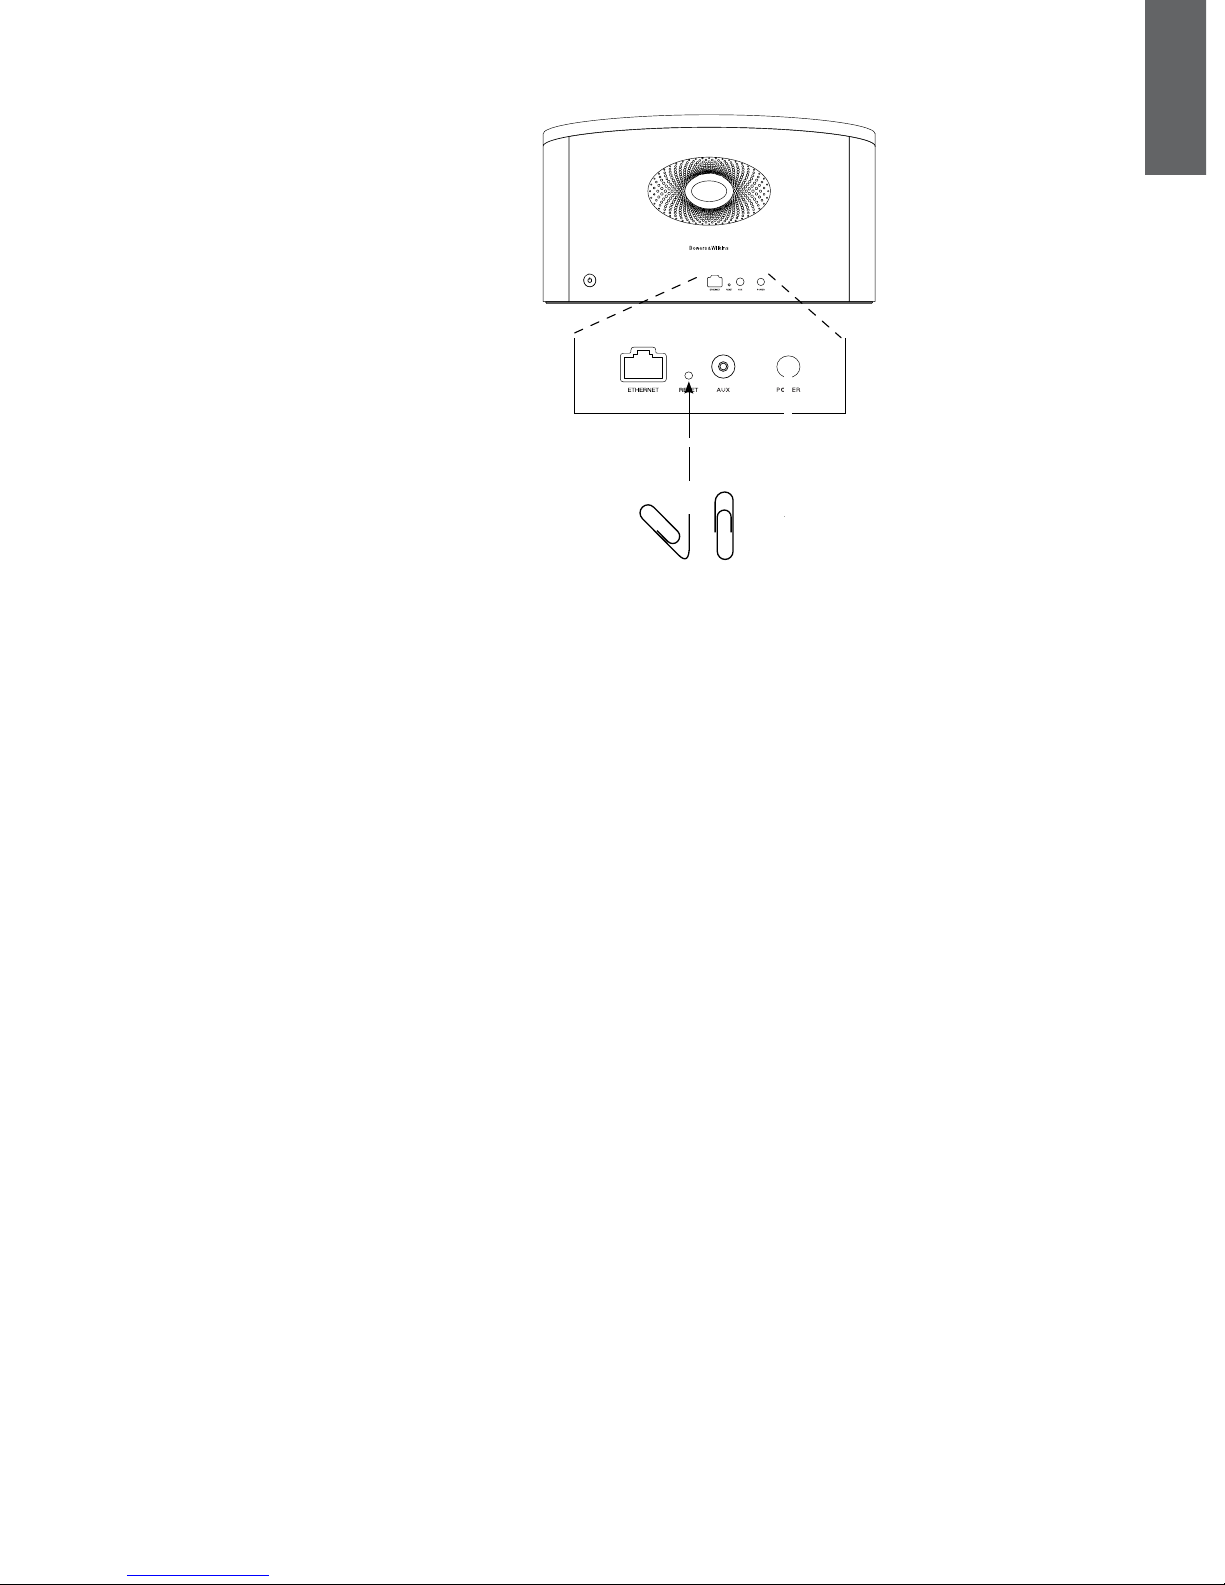
7. Z2 Factory Reset
Z2 has a pin-hole reset button located on its rear
connection panel. The reset button is illustrated in
Diagram 6. To return the Z2 network settings (AirPlay
input) to the factory defaults, ensure the power cable
is connected, and power the Z2 on. Press and hold
the reset button for 2 seconds. The indicator will
ash red twice.
8. Cleaning Z2
Use a lint-free cloth to clean the Z2. If you wish to
use a cleaning agent, apply it onto the cleaning
cloth, not directly onto the Z2. Test a small area rst,
as some cleaning products may damage some of
the surfaces. Avoid products that are abrasive, or
contain acid, alkali or anti-bacterial agents.
9. Troubleshooting
If you need help troubleshooting a specic problem,
or have a question you’d like answered, please
consult our Troubleshooting guide, or Frequently
Asked Questions section on the Z2 Product
Support page of our website.
www.bowers-wilkins.com
Diagram 6
Z2 factory reset
RESET
 Loading...