

Boston Acoustics Horizon Solo XT User Manual
Horizon Solo XT
High Performance DAB/FM Radio
An about-face in radio design
OWNER’S MANUAL / SAFETY INSTRUCTIONS / COMPLIANCE INFORMATION
Español
Radio DAB/FM de alta performance
Innovación total en diseño de radios
Français
Radio AM/FM à haute performance
Un changement majeur dans la
conception des appareils radio
Italiano
Radio DAB/FM ad alte prestazioni
Una rivoluzione nel mondo delle radio
Svenska
Högpresterande DAB/FM-radio
En helomvändning inom radiodesign
Deutsch
Hochleistungsfähiges DAB/FM-radio
Innovatives Radiodesigns
A Boston P.O.P. Product Make it your own...
E
N
G
IMPORTANT SAFETY INSTRUCTIONS
L
I
S
H
This symbol found on the apparatus indicates
hazards arising from dangerous voltages.
This symbol found on the apparatus indicates the
user should read all safety statements found in the
user manual.
This symbol found on the apparatus indicates
double insulation.
Warning! To reduce the risk of re or electrical
shock, do not expose this apparatus to rain or
moisture.
This symbol found on the apparatus indicates
that the apparatus must be placed in a separate
collection facility for electronic waste and not
disposed with household waste.
1. Read these instructions.
2. Keep these instructions.
3. Heed all warnings.
4. Follow all instructions.
5. Do not use this apparatus near water.
6. Clean only with dry cloth.
7. Do not block any ventilation openings. Install in
accordance with the manufacturer’s instructions.
8. Do not install near any heat sources such as radiators,
heat registers, stoves, or other apparatus (including
ampli ers) that produce heat.
9. Do not defeat the safety purpose of the polarized or
grounding type plug. A polarized plug has two blades
with one wider than the other. A grounding-type plug
has two blades and a third grounding prong. The wide
blade or the third prong is provided for your safety. If
the provided plug does not t into your outlet, consult
an electrician for replacement of the obsolete outlet.
10. Protect the power cord from being walked on or
pinched particularly at plugs, convenience receptacles,
and the point where they exit from the apparatus.
11. Only use attachments/accessories speci ed by the
manufacturer.
12. Unplug this apparatus during lightning storms or when
unused for long periods of time.
13. Refer all servicing to quali ed service personnel.
Servicing is required when the apparatus has been
damaged in any way, such as power-supply cord or
plug is damaged, liquid has been spilled or objects
have fallen into the apparatus, the apparatus has been
exposed to rain or moisture, does not operate normally,
or has been dropped.
14. Maintain a minimum distance of 2” (50mm) around
the front, rear, and sides of the apparatus for su cient
ventilation. The ventilation should not be impeded
by covering the ventilation openings or placing on or
around the apparatus items such as newspapers, tablecloths, curtains, etc.
15. No open ame sources, such as lighted candles, should
be placed on the apparatus.
16. The apparatus shall not be exposed to dripping or
splashing. No objects lled with liquids, such as vases,
shall be placed on the apparatus.
17. Either the power inlet connector on the rear of the
apparatus or the power plug at the wall must remain
accessible, to be able to disconnect power from the
apparatus.
18. To completely disconnect this apparatus from the AC
Mains, disconnect the power supply cord plug from the
AC receptacle.
19. The mains plug of the power supply cord shall remain
readily operable.
American Users:
Note: This equipment has been tested and found to
comply with the limits for a Class B digital device, pursuant
to part 15 of the FCC Rules. These limits are designed to
provide reasonable protection against harmful interference
in a residential installation. This equipment generates, uses,
and can radiate radio frequency energy and, if not installed
and used in accordance with the instructions, may cause
harmful interference to radio communications. However,
there is no guarantee that interference will not occur in a
particular installation. If this equipment does cause harmful
interference to radio or television reception, which can be
determined by turning the equipment o and on, the user
is encouraged to try to correct the interference by one or
more of the following measures:
• Reorient or relocate the receiving antenna.
• Increase the separation between the equipment and
receiver.
• Connect the equipment into an outlet on a circuit
di erent from that to which the receiver is connected.
• Consult the dealer or an experienced radio/TV
technician for help.
Caution: Unauthorized changes or modi cations to
the receiver could void user’s authority to operate the
equipment.
Canadian Users
This class B digital apparatus complies with Canadian
ICES-003.
Cet appareil numérique de classe B est conforme á la norme
NMB-003 du Canada.
2

Introduction
Thank you for choosing Boston Acoustics and congratulations on your purchase of the Horizon Solo XT High
Performance Tabletop DAB Radio. If you own other Boston products, the outstanding audio performance
and ease-of-use of the Solo XT should come as no surprise. If you’re new to Boston, welcome -- we think
you’ve made a great choice. The Solo XT is a sophisticated DAB/FM radio with dual alarms, aux in and line/
headphone outputs, all in a high-style, soft-touch enclosure -- all the things “Play Smart.” So check out all the
features and functions of your new music system. We know you’ll enjoy it for years to come.
Features
• Outstanding audio performance from a 31/2-inch speaker in a vented acoustic chamber
• BassTrac® audio processing for satisfying bass at any volume
• Three intuitive, easy to use controls operate all the Solo XT features
• Large, easy to read display with adjustable brightness that dims automatically in low light conditions
• Highly sensitive DAB/FM Stereo tuner
• 20 radio station presets
• Supports DAB Band III and L-Band for a wide variety of digital radio stations
• High performance antenna is included; can also be used with an external antenna
• Dual alarm functions each with wake-to-alarm and / or wake-to-radio
• Alarms gradually increase in volume for a gentle wake up
• S-n-o-o-o-o-o-z-e bar - the entire front aluminum trim is a touch-sensitive, can’t-miss-it snooze bar
• Sleep function lets you listen to the radio for up to 90 minutes before the Solo XT turns itself o
• Make it your own! Customize your Solo XT with optional grilles available at bostonacoustic.com/POP
• Time setting, station presets and alarms settings are remembered during power outages
• Front panel headphone output jack
• Auxiliary audio input for portable music players
• Internal power supply - no bulky external adapter needed
© 2008. All rights reserved. Boston, Boston Acoustics and BassTrac are registered trademarks, and the
B/A ellipse symbol, make it your own, and Play Smart are trademarks of Boston Acoustics, Inc.
3
Contents
Unpacking and Setting Up Your Horizon Solo XT 4
Placement 4
Horizontal or Vertical Position 4
Power Connection 5
Antenna 5
About the Front Panel Controls 5
Basic Control Operations 6
Turning the Solo XT On or O 6
Adjusting the Volume 6
Selecting Sources or Setup Functions 6
About the Setup Options Functions 6
Setting the Clock, Time, Date and
Related Functions 7
FM Radio 7
Tuning in an FM Station 7
FM Station Seek 7
DAB Radio 8
The DAB Station List 8
Tuning in a DAB Station 8
The DAB Display 8
DAB Station Setup 9
About Station Presets 9
Setting a Station Preset 10
Tuning in a Preset Station 10
Removing One or More Presets 10
Alarm Clock Features 10
Alarm Setup 10
Turning Alarms On or O 11
How the Alarms Work 11
The Snooze Feature 11
Sleep Function 12
Audio Controls 12
Display Controls 13
Resetting To Factory Default 14
Connecting Other Equipment 14
Connecting Headphones 14
Using Aux Inputs 14
Line Output 14
Security Cable Connection 14
About Clock Memory 14
Limited Warranty 15
If Service Seems Necessary 15
Unpacking and Setting Up Your Horizon Solo XT
Carefully unpack Horizon Solo XT. If there is any sign of damage from transit, report it immediately to your
dealer and/or delivery service. Keep the shipping carton and packing materials for future use. Be sure to
keep your purchase receipt in a safe place, as it may be required for warranty purposes.
In the box you should nd the Solo XT (with the antenna attached) and the power cord.
Placement
Your Horizon Solo XT will sound great just about anywhere. But if you put it near a wall or corner the bass
response will be enhanced. Blocking the bass port will result in a loss of performance.
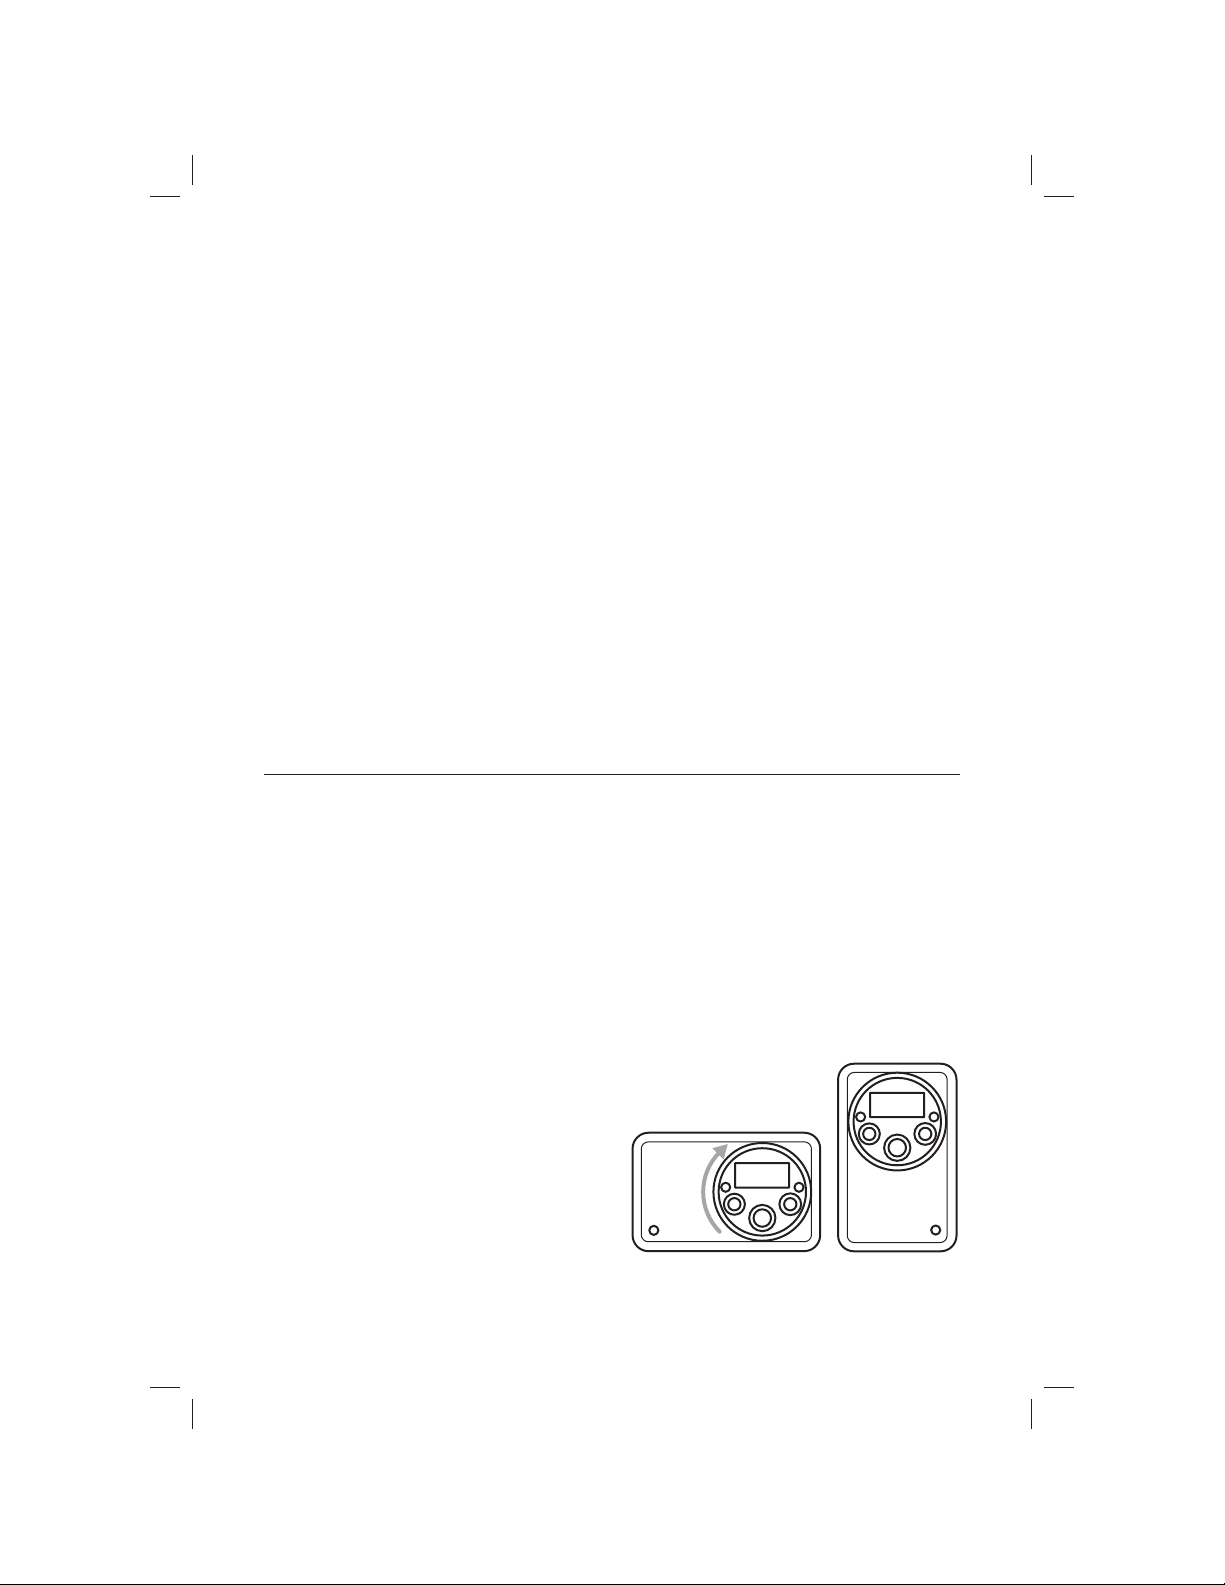
Horizontal or Vertical Position
The Solo XT control panel can be rotated to allow for
horizontal or vertical use. If you want to change the
orientation of the radio, grasp the ring around the
control panel and turn it 90°.
4
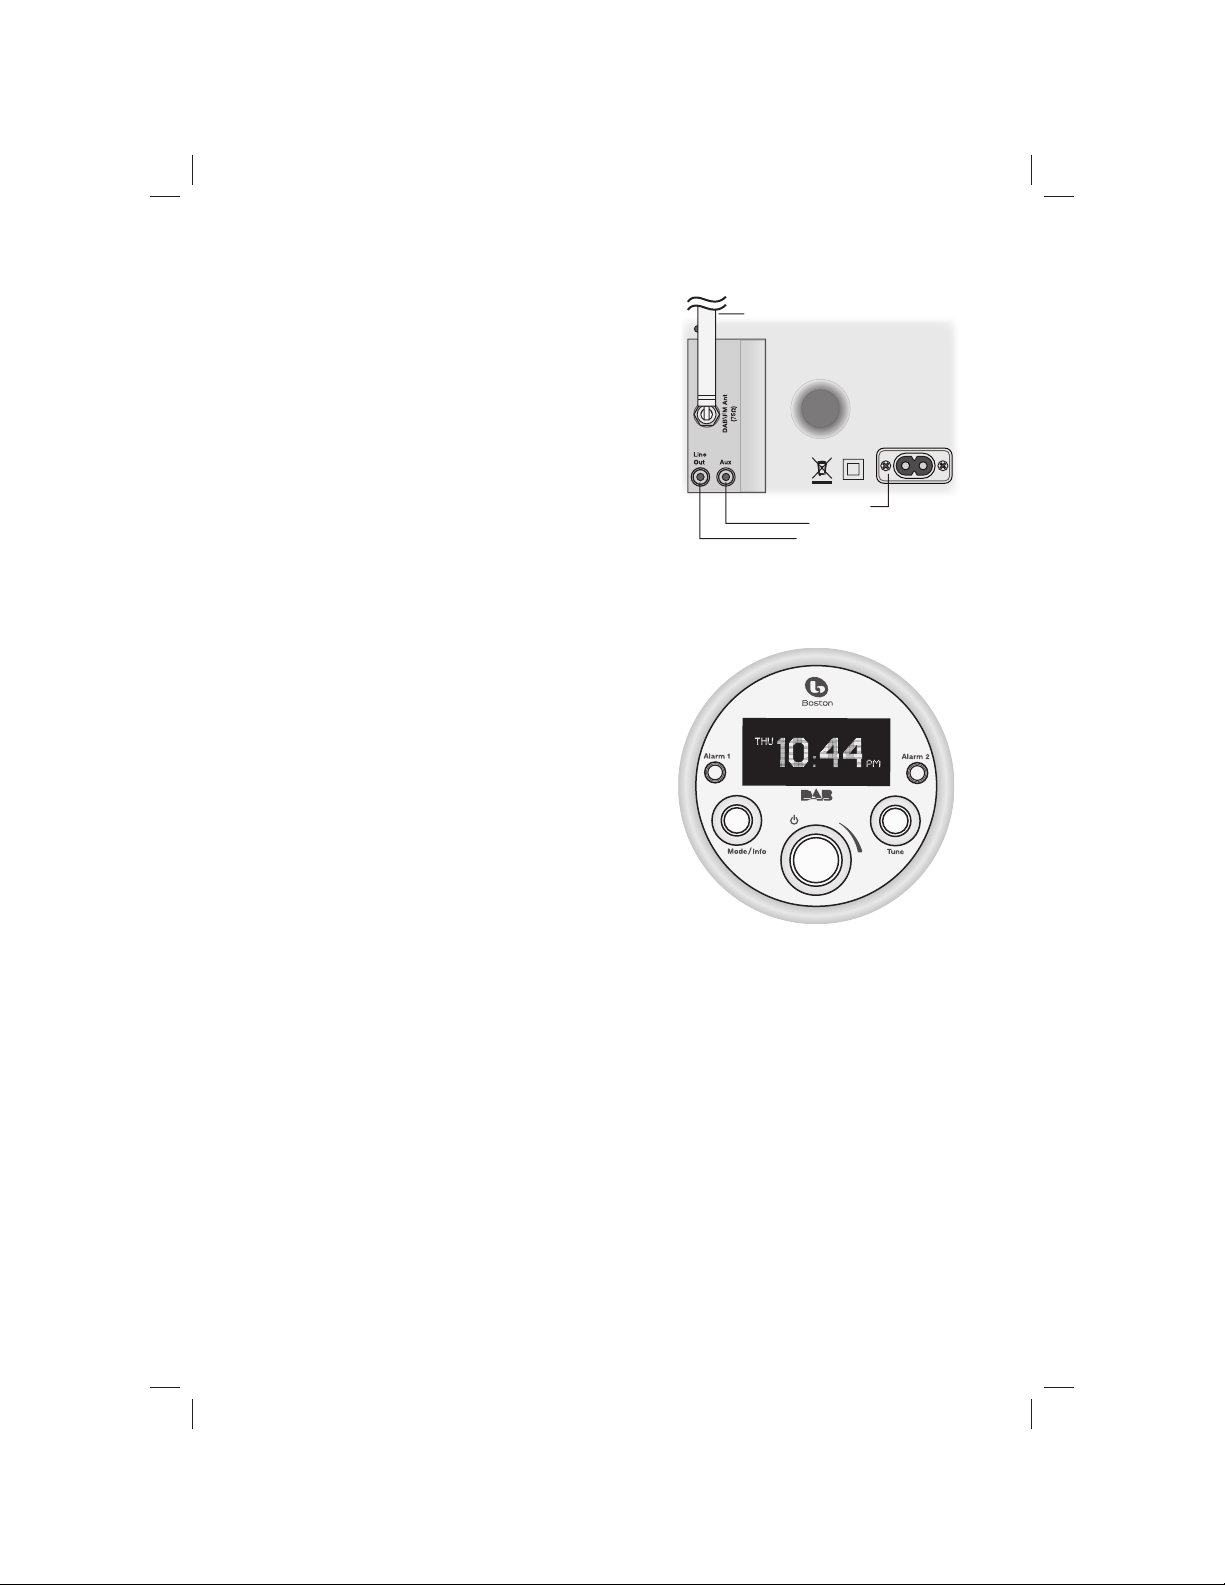
Power Connection
Just connect the power cord to the back of the Solo XT and
plug it into a power outlet.
DAB/FM Antenna
Antenna
The Horizon Solo XT is shipped with an extendable antenna
connected to a rear panel input.
Note: Boston Acoustics has found that in situations where
the supplied antenna is not used with the product, strong
signals can interfere with normal performance.
AC Input
Aux Input
Line Output
About the Front Panel Controls
Almost all of the Horizon Solo XT functions are operated by the three controls on the front panel.
Power/Volume – Is controlled by the large knob centered
low on the panel.
Mode/Info – Selects the input you want to use or the
function you want to adjust.
Tune – Tunes in a new radio station.
These logical, intuitive controls make it easy to operate the
Horizon Solo XT. The way you use them is the same for each
feature. Once you learn how to control one of the features
the rest of them will be easy. You may not need to refer
to this manual once you understand the way the controls
work.
5
 Loading...