

Page 1

RT3Undercarriage
2018andAfterPolarisRanger1000UTV
PartNo.LTA12380—SerialNo.400000000andUp
FormNo.MSC12395RevA
InstallationInstructions
BOSSProductslimitedconsumerwarrantyandBOSS
Productscommercialwarrantypoliciesarelocated
atwww.BOSSPlow.com.
Safety
•Alwaysfollowthevehiclemanufacturer’s
recommendationsrelatingtosysteminstallation.
•Duetothevarietyofequipmentthatyoucan
installusingtheundercarriage,ensurethat
thegross-vehicle-weightrating(GVWR)isnot
exceededatanytime.Youmayneedtoweighthe
vehicleandaddballastorlimitthepayloadofthe
vehicletocompensate.
Installation
Determinetheleftandrightsidesofthemachinefrom
thenormaloperatingposition.
1.Parkthemachineonalevelsurface,shutoffthe
engine,waitforallmovingpartstostop,engage
theparkingbrake,andremovethekey.
2.Removetheexistingfastenersfromthebottom
ofthevehiclefrontbumper.
3.Aligntheskidplateholeswiththefrontbumper
holes.
4.Usetheholesinthefaceoftheskidplatetodrill
holesthroughthebumper.
5.Use2bolts(M10),2angenuts(M10),2
hex-headbolts(3/8inch),2washers,and2nuts
(3/8inch)tolooselysecuretheskidplatetothe
bumper(Figure1).
©2018—BOSSProducts
P .O.Box787
IronMountain,MI49801
Registeratwww.bossplow.com.
Figure1
1.Bumper
2.Hex-headbolt(3/8inch)6.Nut(3/8inch)
3.Flangenut(M10)
4.Bolt(M10)
5.Vehicleframe
7.Washer
6.Use4carriagebolts(3/8inch),4washers,4nuts
(3/8inch)and2spacerstolooselysecurethe
supportmountstothevehicleframe(Figure2).
Ifyourvehicleisequippedwithawinch,usethe
notchedspacers.
Note:Figure2illustratesthefullspacer
includedinthiskit.Usetheappropriatesetof
spacersforyourvehicle.
OriginalInstructions(EN)
PrintedintheUSA
AllRightsReserved
*MSC12395*A
g248458
Page 2
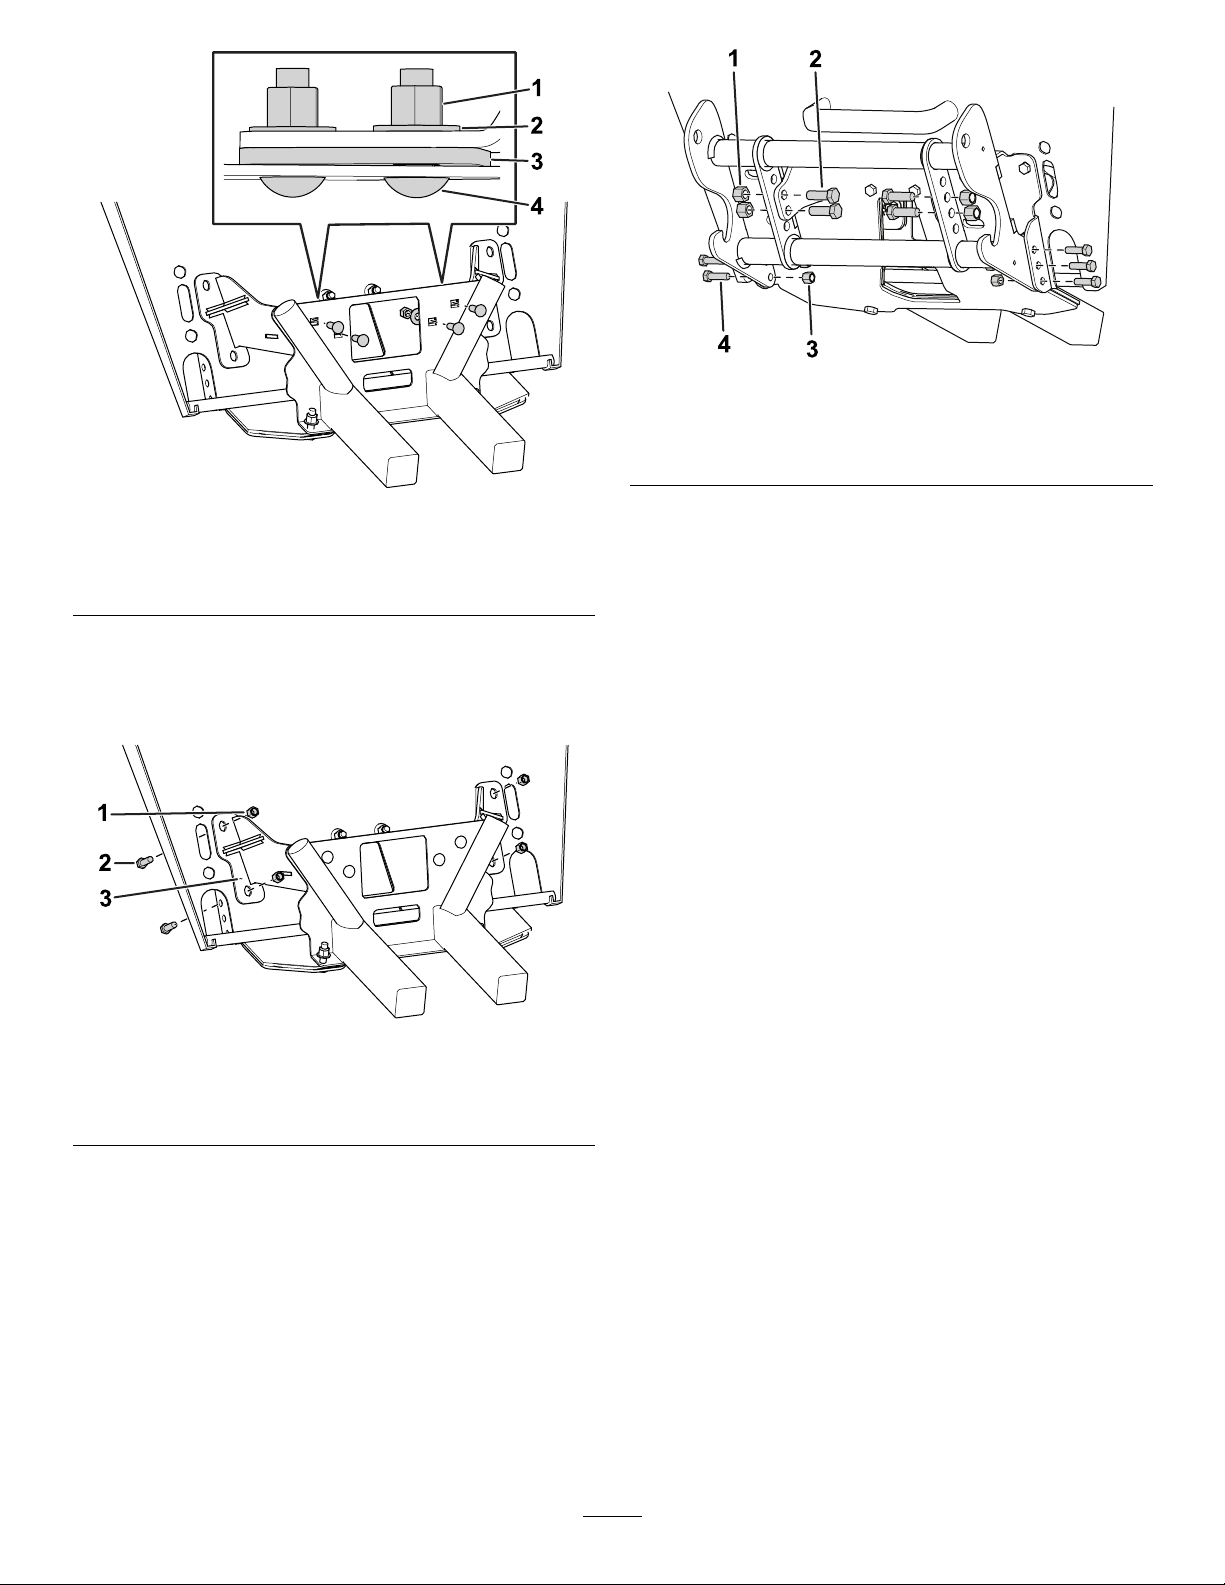
Figure2
1.Nut(3/8inch)
2.Washer
3.Fullspacer
4.Carriagebolt(3/8inch)
7.Use4hex-headbolts(3/8inch)and4nuts(3/8
inch)tolooselysecurethefrontoftheskidplate
andthesupportmountstothebumper(Figure
3).
g249174
Figure4
1.Hex-headbolt(1/2inch)3.Hex-headbolt(3/8inch)
2.Nut(1/2inch)4.Nut(3/8inch)
g249173
9.Torqueallthefastenerstothefollowing
specications:
•3/8-inchbolts:31N∙m(23ft-lb)
•1/2-inchbolts:76N∙m(56ft-lb)
•M10bolts:66N∙m(49ft-lb)
Figure3
1.Nut(3/8inch)3.Supportmount
2.Hex-headbolt(3/8inch)
8.Use6hex-headbolts(3/8inch),6nuts(3/8
inch),4hex-headbolts(1/2inch),and4nuts
(1/2inch)tolooselysecurethepushbeam
assemblytotheskidplate(Figure4).
g249172
2
Page 3

Parts
g248378
Ref.
PartNumber
1LT A123861
2LT A123811
3PBA125351
4LT A123881
5
LT A123942
6LT A123922
7
HDW123851
Description
Qty.
SUPPORTMOUNT ,DRIVER
SIDE
SKIDPLA TEASSEMBL Y
PUSHBEAM
SUPPORTMOUNT ,
PASSENGERSIDE
SPACER,FULL
SPACER,NOTCHED
FASTENERKIT
Ref.
PartNumber
7:1HDW055764
7:2HDW0172016
7:3HDW017336
7:4HDW123792
7:5
HDW123782
7:6HDW017284
7:7
HDW0177112
3
Description
Qty.
BOLT ,CARRIAGE,3/8-16X
1-1/4,GR5,YZN
NUT,3/8-16,NYLINS,YZN
WASHER,3/8,USSFLAT ,
YZN
NUT,FLANGE,NYLINS,
M10-1.5,YZN
HHCS,M10-1.5X40MM,
GR8.8,ZN
HHCS,1/2-13X1-1/2,NC,
GR5,YZN
HHCS,3/8-16X1-1/4,NC,
GR5,YZN
Page 4

 Loading...