

Page 1
BR-600 Digital Recorder
Workshop
Using the Built-in Rhythm
© 2007 BOSS Corporation U.S.
All rights reserved. No part of this publication may be reproduced in any form without the
written permission of BOSS Corporation U.S.
BR600WS02
1
Page 2
About the Workshop Booklets
Hot Links
The BOSS BR-600 Digital Recorder packs an incredible amount of recording
power into an amazingly small, portable package. With its eight playback
tracks—and 64 V-Tracks—built-in effects, and onboard drum machine,
the BR-600 is truly a studio-to-go. It even has a built-in stereo microphone
and can be battery-operated so you can capture new music wherever and
whenever.
Each BR-600 Workshop Series booklet focuses on one BR-600 topic, and is
intended as a companion to the BR-600 Owner’s Manual.
About This Booklet
The BR-600’s rhythm function is a full-featured drum machine with 12
velocity-sensitive pads and 14 different drum kits. There are hundreds
of built-in patterns in many musical styles, and you can create your own
patterns as well. Using rhythm arrangements, you can play patterns in
sequential order to add the perfect backing to your songs.
In this workshop, we’ll cover BR-600 rhythm basics such as selecting patterns
and drum kits and playing sounds with the pads. We’ll also show you how to
create your own patterns and rhythm arrangements.
Understanding the Symbols in This Booklet
Throughout this booklet, you’ll come across information that deserves
special attention—that’s the reason it’s labeled with one of the following
symbols.
A note is something that adds information about the topic at hand.
A tip offers suggestions for using the feature being discussed.
Each Workshop booklet is meant to be read in order from beginning
to end. However, if we mention an upcoming section—and you see
this arrow—you can click the arrow to jump there immediately.
Getting Started
The BR-600’s rhythm acts as an onboard “drummer” that’s always playing
along with your song. It’s integrally connected to the eight audio tracks, so
you never have to worry about synchronization—whenever you press the
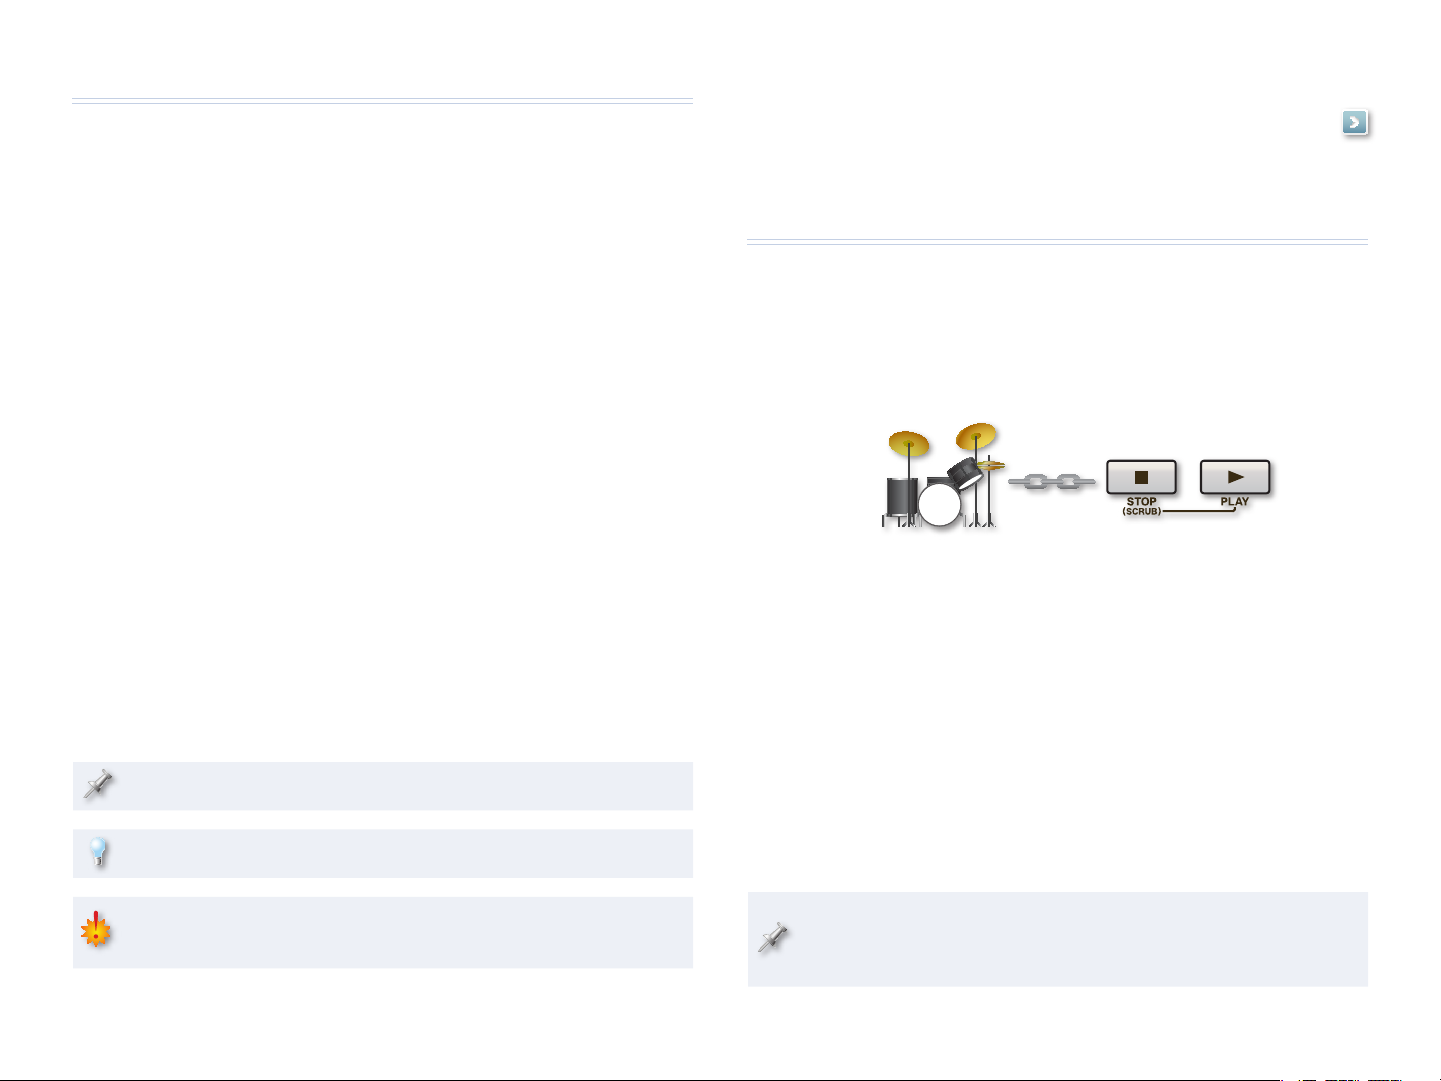
PLAY button, the rhythm always starts with the audio; when you press STOP,
both the rhythm and audio stop together. (Of course, if you don’t want to use
the rhythm in a particular song, you can always turn it off.)
Before we begin learning about the rhythm, let’s clear the slate and create
a new song. It’s best to set up the desired rhythm and tempo first so you’ll
have something to play along with when you start recording the song’s
audio.
To create a new song:
1
Press PAD so it’s not lit.
Press UTILITY.2
Use the CURSOR buttons to select [NEW], and then press ENTER.3
Use the TIME/VALUE dial to select the recording type.4
Press ENTER. When “Are you sure?” is displayed, press ENTER again to 5
complete the new song process.
Warnings contain important information that can help you avoid
possible damage to your equipment, your data, or yourself.
As we move forward, you’ll need to monitor the sound of the BR-600,
either with a speaker system or headphones. To learn how to make the
proper connections, see the BR-600 Owner’s Manual.
2
Page 3
About the BR-600’s Home Screens
The BR-600 has two top-level “home” screens. These are the screens you’ll
always be coming back to after performing operations on the BR-600’s
various other screens.
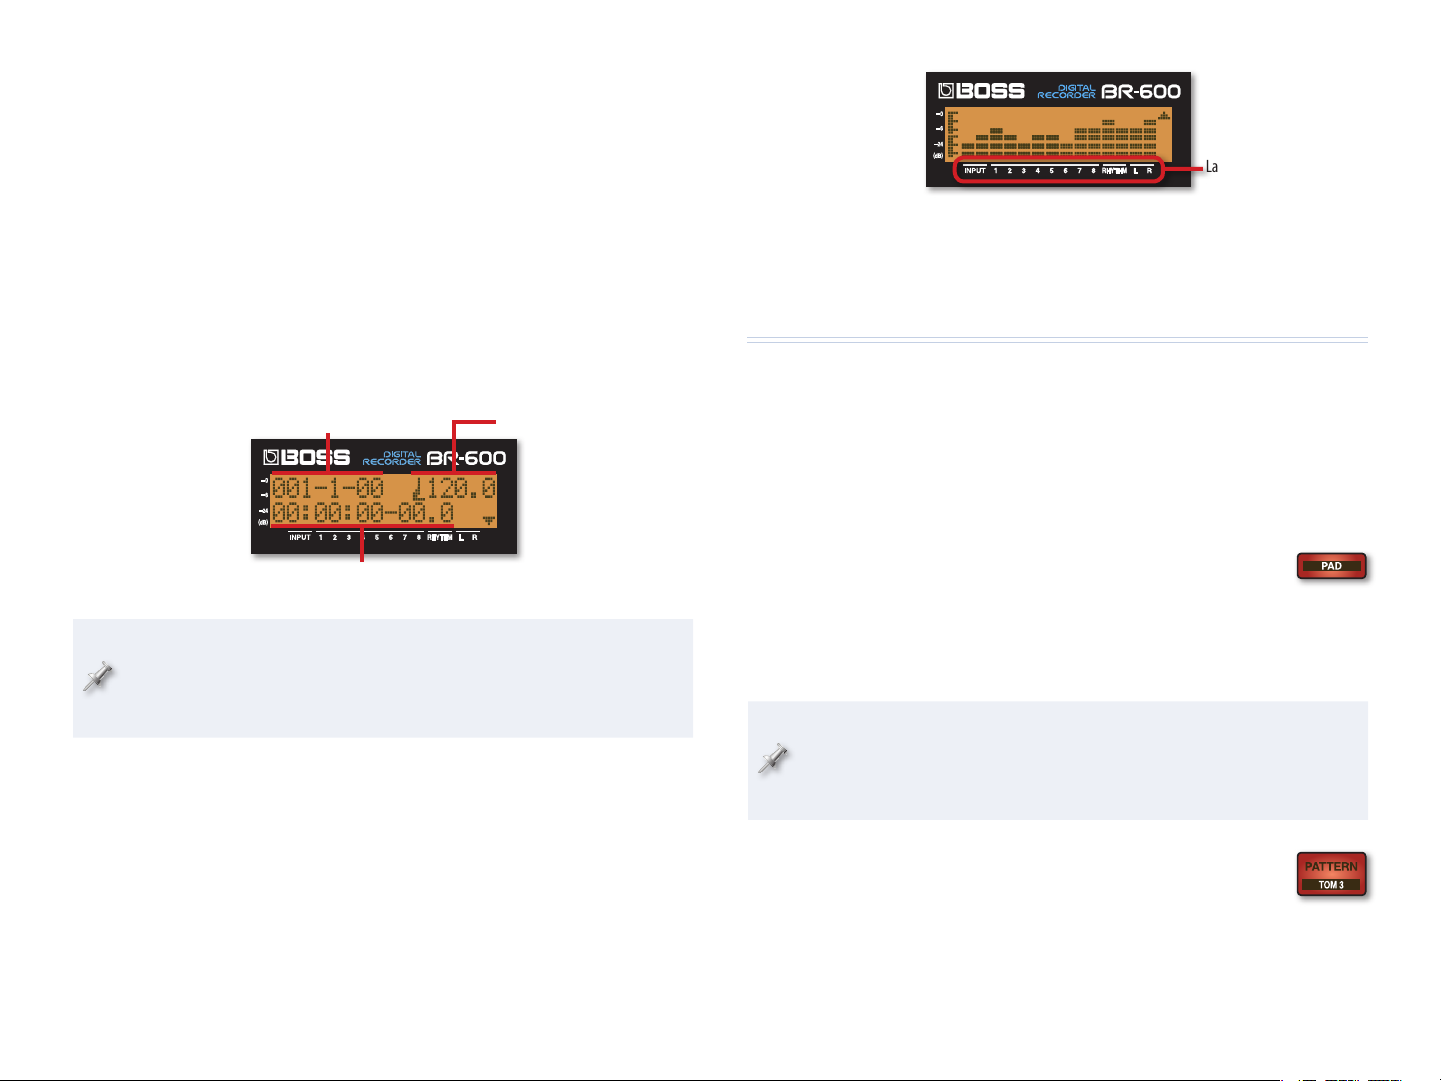
Labels
You can return to the home screens from any other screen by pressing EXIT
one or more times.
The Play Screen
The Play screen is the screen that’s displayed when you first power up the
BR-600. It shows the current song position—in both measure/beat/clock
units and time (including frames)—and the tempo of the rhythm.
Song position (measure/beat/clock)
Song position (hours/minutes/seconds/frames)
In the measure/beat/clock display, clocks are subdivisions of the beats.
Similarly, in the time display, frames are subdivisions of the seconds.
These subdivisions allow you to view and set the current song position
in extremely fine resolution.
On the Play screen, you can move the song position and adjust the rhythm’s
tempo using the CURSOR buttons and the TIME/VALUE dial.
Tempo
To display the Level Meters screen from the Play screen, press the 6 CURSOR
button. To return to the Play screen from the Level Meters screen, press the
5 CURSOR button.
Key Rhythm Elements
Let’s go over the BR-600’s main rhythm elements.
• A drum kit is a group of drum sounds that are used by the
Drum kits—
rhythm. The BR-600 contains nine different preset drum kits that cover
a variety of musical styles. Additionally, you can create up to five custom
drum kits per song. These “song” drum kits can use any of the drum
sounds in the preset kits, WAV or AIFF files imported from a computer
via USB, or audio that’s been recorded in a BR-600 audio track.
• The drum pads allow you to play sounds
Drum pads—
in the currently selected drum kit, either for pattern
creation or live playing. There are 12 pads, and each triggers a different
sound in the kit. The pads are velocity sensitive, so they respond to your
playing dynamics. If desired, you can set them to play sounds at a fixed
velocity instead.
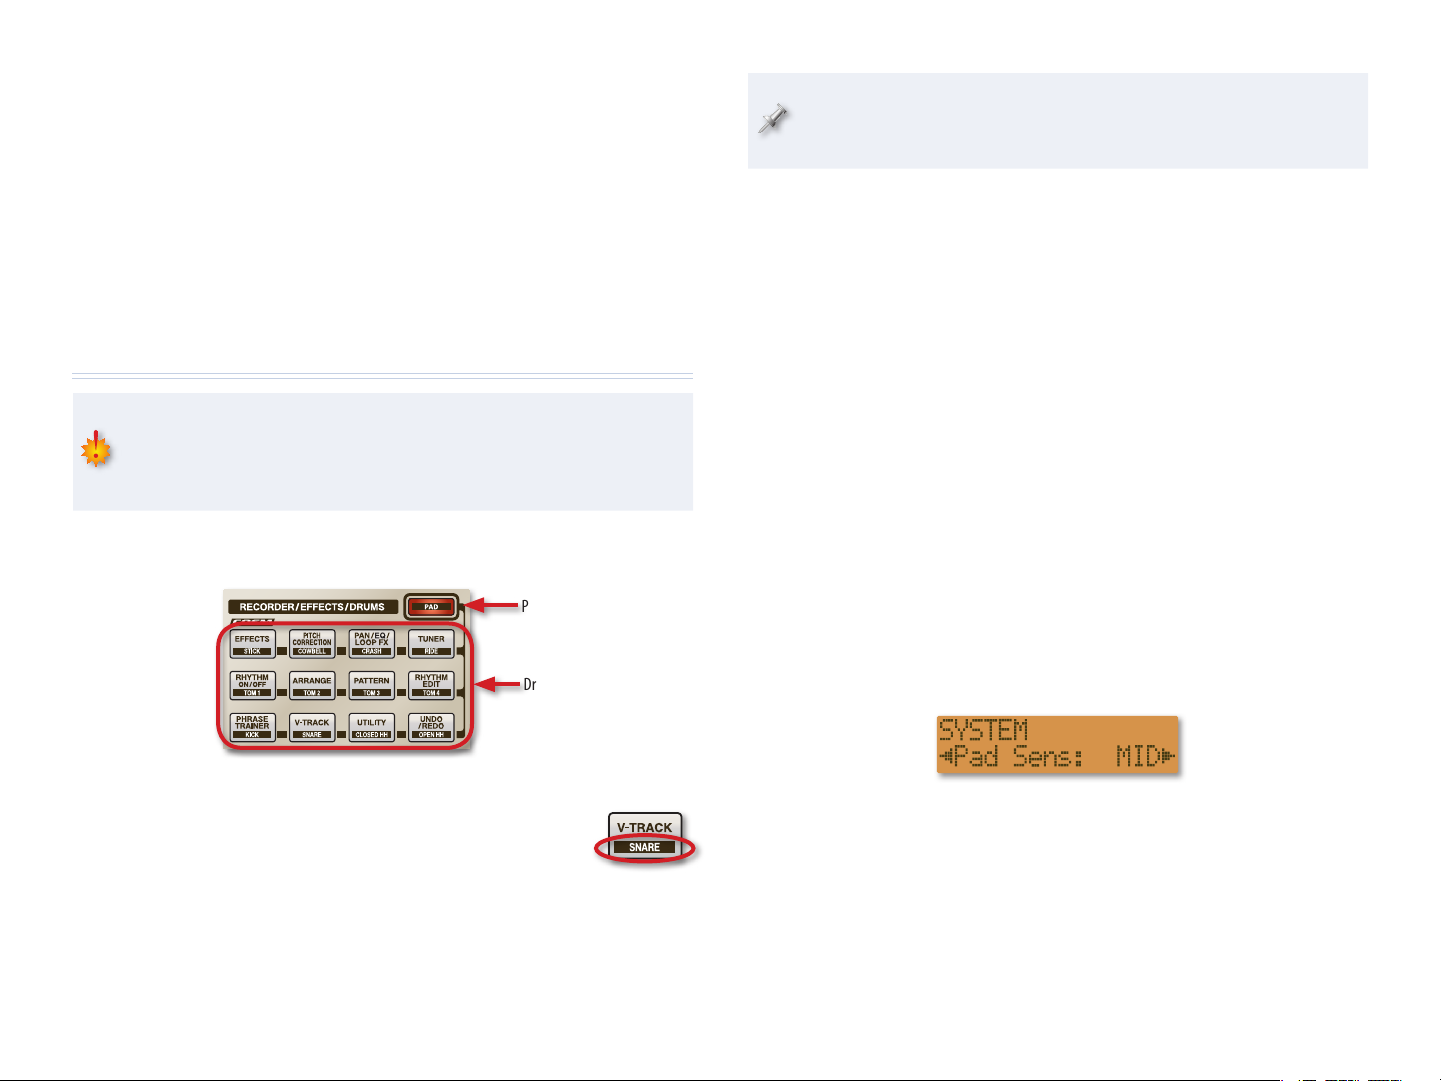
When you’re not using them to play drum sounds, the drum pads act as
selection buttons for various BR-600 functions. Use the PAD button to
toggle between this functionality. (When PAD is lit, the drum pads play
drum sounds. When it’s not lit, the drum pads act as buttons.)
The Level Meters Screen
The Level Meters screen displays the levels of various audio signals in the
BR-600: inputs, audio tracks, the rhythm, and the left and right master levels.
The individual audio signal levels are shown above the corresponding labels
on the display panel.
• A pattern is a drum performance that’s one or
Patterns—
more measures in length. You can have a single pattern
play over and over along with your song, or you can
string two or more patterns together to create a rhythm “arrangement.”
The BR-600 provides 327 preset patterns, as well as 100 patterns in
each song in which you can create and store your own custom drum
patterns.
3
Page 4
Some musicians refer to drum patterns as “beats.”
Working with Drum Kits
Arrangements—• An arrangement is a series of steps that
tell BR-600 patterns to play in a particular order. There are
50 preset arrangements and five song arrangements.
Preset arrangements utilize the preset patterns, while song
arrangements are created by you using any combination of preset or
song patterns. By creating an arrangement, you can add a sophisticated
drum backing (with beat variations and fills) that perfectly matches
your song.
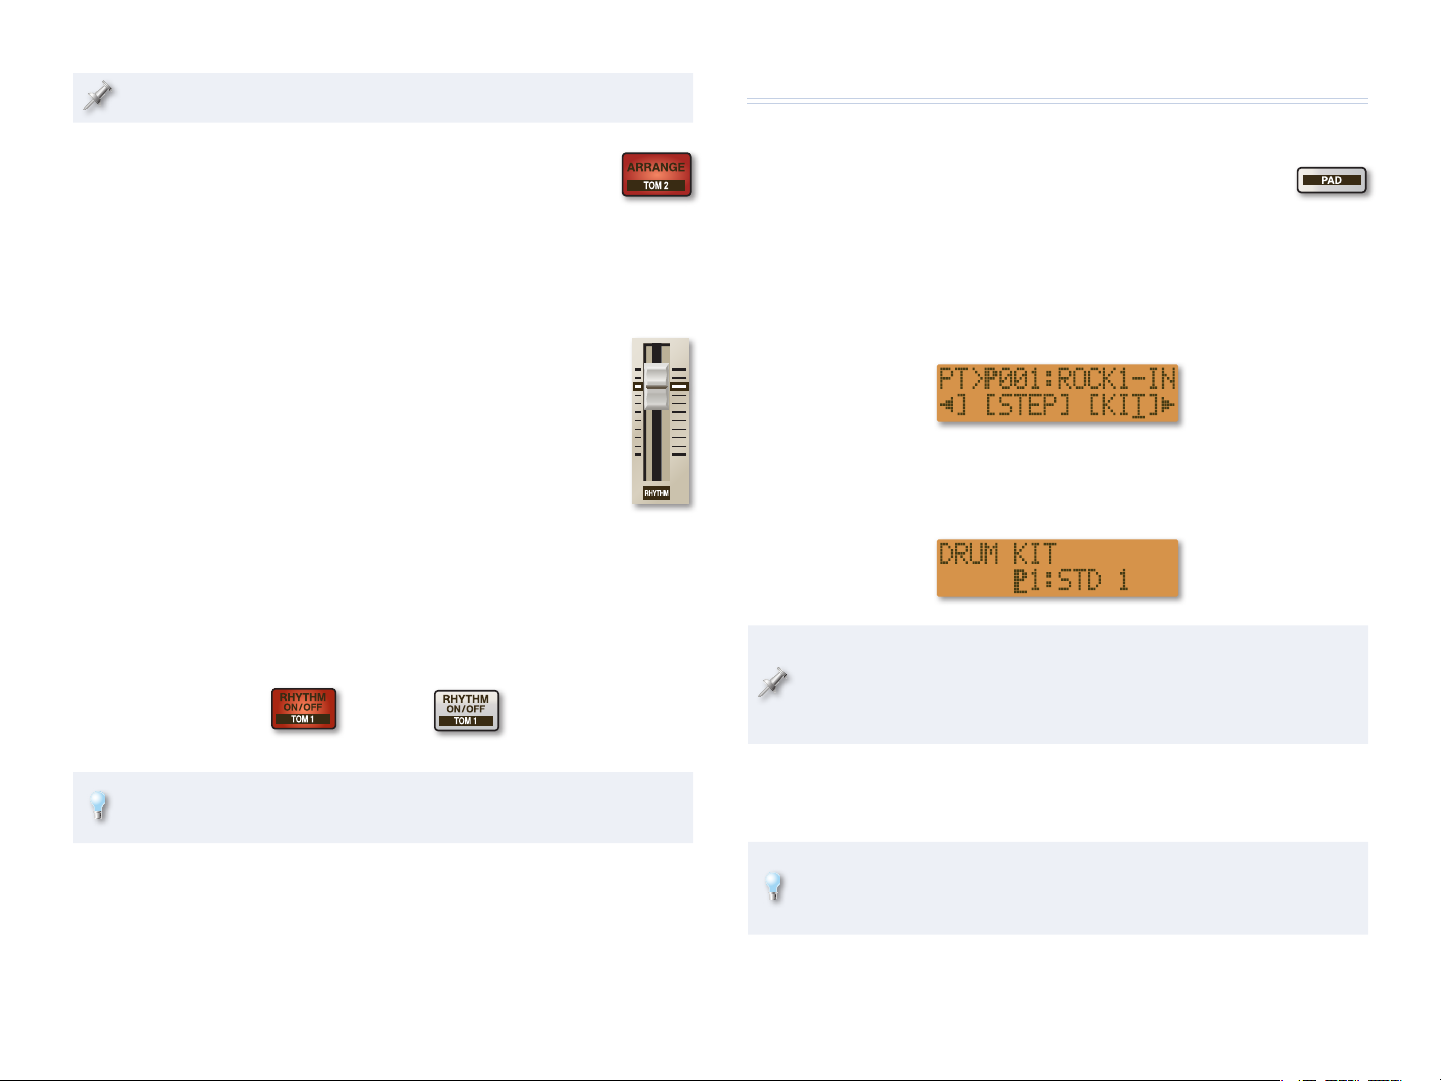
• The RHYTHM fader in the TRACK MIXER
RHYTHM fader—
controls the volume of the rhythm in relation to the audio
tracks. Adjust it as necessary to create the proper balance
for your song. Setting the RHYTHM fader’s level near the
dark band (as shown) is a good starting point.
Turning the Rhythm On and Off
With playback stopped, you can turn the rhythm on and off using the
RHYTHM ON/OFF button.
1
Press STOP to stop playback.
Press PAD so its indicator goes out. 2
Press the Rhythm ON/OFF button to toggle its setting.3
On
In lieu of turning the rhythm off, you can simply turn it down with the
RHYTHM fader instead.
Off
Selecting a Drum Kit
Press PAD so its indicator goes out.1
Press RHYTHM ON/OFF so its indicator lights.2
Press PATTERN so its indicator lights.3
Press RHYTHM EDIT to display the Pattern Edit screen.4
Use the CURSOR buttons to place the onscreen cursor under [KIT], 5
and then press ENTER.
Use the CURSOR buttons to place the onscreen cursor under the 6
leftmost character, and then use the TIME/VALUE dial to select the
desired drum kit group: “P” for preset or “S” for song.
Song drum kits are empty until you load them with sounds. If you select
one of these empty kits, you won’t hear any sound when you play the
pads. For our purposes here, you should select the preset drum kit
group.
7
Use the CURSOR buttons to place the onscreen cursor under the
drum kit number, and then use the TIME/VALUE dial to select the
desired drum kit.
You can audition the selected drum kit using the drum pads (press PAD
so it lights, and then strike the pads). We’ll discuss the pads in detail in
the next section.
8
When you’re done, press EXIT twice to return to the home screens.
4
Page 5
About Song Drum Kits
As we mentioned earlier, the BR-600 provides five different “song” drum kits
with each song. If you can’t find a preset drum kit you like, you can create
your own custom kit in a song drum kit. When you first create a new BR-600
song, the song drum kits are empty. If you want to use them, you’ll need to
manually load sounds into them.
Creating song drum kits is beyond the scope of this workshop. To learn
how to create them, please refer to the chapter “Creating Original Drum Kits
(Tone Load)” in the BR-600 Owner’s Manual.
Using the Pads
Before playing drum sounds, make sure the MASTER volume is set to a
comfortable listening level. If you’re in doubt, turn down the MASTER
fader all the way, and slowly raise it to the desired level while playing
the drum sounds.
Playing Drum Sounds with the Pads
PAD Button
Drum pads
When you create a song drum kit, you’re free to assign any sound you
want to any drum pad; as such, the sounds you assign don’t have to
correspond to the label on the pad.
3
If needed, adjust the drum sounds’ volume with the RHYTHM fader.
Adjusting the Pads’ Sensitivity to Playing Dynamics
You can easily adjust how the pads respond to your playing dynamics. There
are four different settings available:
• is for a heavy playing touch.
HEAVY—
• is for an average playing touch.
MID—
• is for a light playing touch.
LIGHT—
• sets the drum sounds to play at a fixed level, no matter how hard
FIX—
you strike the pads.
To adjust the pads’ sensitivity:
1
Press PAD so its indicator goes out.
Press UTILITY to display the Utility screen (on this screen, UTIL is 2
shown in the upper left-hand corner of the display).
3
Use the CURSOR buttons to place the onscreen cursor under [SYS],
and then press ENTER.
4
Use the CURSOR buttons to display Pad Sens.
Press the PAD button so it lights.1
Strike the drum pads to play sounds in the current 2
drum kit. The bottom part of each pad is labeled
with the drum sound it will play in a preset drum
kit.
This pad plays a
snare sound
Use the TIME/VALUE dial to select the desired setting: HEAVY, MID, 5
LIGHT, or FIX. To try out the selected setting, press PAD so it lights,
and then strike the pads.
6
When you’re done, press EXIT twice to return to the home screens.
5
Page 6

Applying Reverb to the Drum Sounds
The BR-600 provides two different loop effects that
can be used on the input signal, the audio tracks,
and the rhythm. The loop effects settings are shared
by all of these audio sources, but you can choose how much (if any) of a loop
effect is applied to each. This is accomplished by adjusting an effects “send”
level from each source.
If you can’t hear much change in sound as you adjust the send level—or
if you don’t hear any reverb at all—you might need to adjust the overall
volume of the reverb effect. We’ll show you how next.
7
When you’re done, press EXIT twice to return to the home screens.
Adjusting the Reverb’s Overall Sound
One of the loop effects is a reverb effect. Reverb is useful for adding
ambience to the sound, and you may want to use it on the drum sounds to
add a sense of space and realism to them. Here’s how:
1
Press PAD so its indicator goes out.
Press PAN/EQ/LOOP FX to display the PAN/EQ/LOOP FX screen.2
Use the CURSOR buttons to place the onscreen cursor under [REV], 3
and then press ENTER.
4
Use the CURSOR buttons to display “Rhy Send.”
Alternately, you can immediately jump to the rhythm send by pressing
TAP TEMPO.
5
Press PAD so its button lights. (This allows you to play the drum pads
so you can listen to the sound as you adjust the rhythm send.)
6
Use the TIME/VALUE dial to adjust the amount of reverb that’s
applied to the drum sounds (higher values will apply more reverb).
Play the pads to listen to the sound difference as you’re adjusting the
send level.
The reverb effect has settings that allow you to tailor its sound to best suit
your song.
1
Press PAD so its indicator goes out.
Press PAN/EQ/LOOP FX to display the PAN/EQ/LOOP FX screen.2
Use the CURSOR buttons to place the onscreen cursor under [REV], 3
and then press ENTER.
4
Press PAD so its button lights. (This allows you to play the drum pads
so you can listen to the sound as you adjust the reverb effect.)
5
To adjust the reverb sound, use the cursor buttons to display
the following screens, and use the TIME/VALUE dial to adjust the
settings:
• This sets the type of reverb. HALL simulates the ambience
Type—
of a large concert hall, while ROOM simulates the ambience of a
smaller space like a studio or a living room.
• This determines the spaciousness of the reverb effect
Rev Time—
(larger settings equal more spaciousness).
• Adjusts the brightness of the reverb effect.
Tone—
• Adjusts the overall level of the reverb effect.
E.Level—
6
When you’re done making settings, press EXIT twice to return to the
home screens.
The BR-600’s other loop effect can be used to add chorus or delay to any
sound, including the rhythm. To learn more about the loop effects, see
“Using Effects” in the BR-600 Owner’s Manual.
6
Page 7

Working with Patterns
About the Preset Patterns
The BR-600’s 327 preset patterns cover a wide range of musical genres.
To view a list of the preset patterns, refer to the Appendices in the BR-600
Owner’s Manual.
Selecting Preset Patterns
Press PAD so its indicator goes out.1
Press PATTERN to display the PATTERN screen.2
The preset patterns are organized into musical styles, with descriptive
names such as ROCK4, POP2, JAZZ1, and so on. Furthermore, each style has
a number of related pattern variations that are designed for intros, verses,
choruses, fills, etc.
For example, the ROCK1 patterns have a number of variations, as shown in
the following table.
Pattern # Name Description and Suggested Use
P001 ROCK1—IN Song introduction. (Most “IN” patterns begin
with a count-in.)
P002 ROCK1—V1 A basic pattern, good for verses.
P003 ROCK1—F1 A short pattern with a drum fill, good for a
transition to another song section.
P004 ROCK1—V2 A subtle variation of P002, good for a second
verse or a chorus.
P005 ROCK1—F2 An alternate fill pattern.
P006 ROCK1—E A short pattern with a distinct stop, good for
ending a song.
These pattern variations come in handy when you wish to organize
patterns to play in sequential order as an arrangement. (We’ll
discuss creating an arrangement in a little while.)
If you’re going to use a single preset pattern for the duration of your
song, you’ll probably want to choose one with “V1” or “V2” at the end
of its name.
Pattern group Pattern number
Use the CURSOR buttons to move the onscreen cursor under the 3
pattern group, and then use the TIME/VALUE dial to select “P.”
4
Use the CURSOR buttons to move the onscreen cursor under the
pattern number, and then use the TIME/VALUE dial to select the
desired pattern.
5
Press the ZERO button to move the time locator to the start of the
song. (This ensures that the pattern will play from its beginning.)
6
Press PLAY to start the selected pattern playing. Adjust the MASTER
and RHYTHM faders as necessary to set the desired volume. While a
pattern is playing, you can use the TIME/VALUE dial to select other
patterns. When selected this way, a pattern is “cued up,” and will start
playing when the currently playing pattern reaches its end.
7
Once you’ve found a pattern you like, press EXIT to return to the
home screens.
Controlling Pattern Playback
Starting and Stopping a Pattern
Now that you’ve got a pattern selected, you can start and stop it simply by
using the BR-600’s transport buttons. Since the transport buttons control the
audio tracks, too, the pattern gives you a rhythmic guide to play along with
while recording a song.
7
Page 8

Setting the Tempo
The rhythm’s current tempo is always shown in the upper right hand corner
of the BR-600’s Play screen.
You can set the tempo anywhere from 25 to 250 beats per minute—or
“BPM”—with a resolution as fine as one-tenth of a BPM.
To set the pattern’s tempo on the Play screen, use the CURSOR buttons to
move the onscreen cursor under the desired digit, and then use the TIME/
VALUE dial to set the desired value.
An alternate way you can set the tempo is by repeatedly
pressing—or “tapping”—the TAP TEMPO button. This allows
you to easily set the tempo by tapping a beat with your finger.
The tempo is determined by the interval between your taps.
It’s important to remember that adjusting the tempo only affects the
speed of the rhythm, and not any recorded audio tracks. As such, it
makes sense to decide on the desired tempo before you start recording
any audio your in song, so your music will always be in time with the
rhythm.
Creating Your Own Patterns
If you can’t find a preset pattern that you like, you can create your own. These
custom patterns are called “song patterns,” and you can create up to 100 of
them per song.
Step recording—• lets you enter drum sounds one-by-one while looking
at a note grid on the display. Step recording is most useful when you
wish to create intricate or rigidly-timed patterns that would be hard to
play in real time.
Selecting a Song Pattern for Recording
Stop playback and press PAD so its indicator goes out.1
Press RHYTHM ON/OFF so its indicator lights.2
Press PATTERN so its indicator lights.3
Press RHYTHM EDIT. The Rhythm Edit screen is displayed.4
Use the CURSOR buttons to move the onscreen cursor under the 5
pattern group, and then use the TIME/VALUE dial to select “S.”
Use the CURSOR buttons to move the onscreen cursor under the 6
pattern number, and then use the TIME/VALUE dial to select the
desired song pattern.
In a new song, the 100 song patterns are empty, and each
has “EMPTY” in its name (EMPTY001, EMPTY002, etc.). After
you create a pattern, you can give it a more descriptive name
in another step. We’ll show you how in a bit.
Okay, now that you’ve selected a pattern, you can choose a recording
method and start recording.
Song patterns can be created two different ways.
• allows you to play the pads and record drum
Realtime recording—
sounds in real time while listening to a metronome. This is probably the
easiest and most intuitive way to create drum patterns.
8
Page 9

Realtime Recording
On the Rhythm Edit screen, use the CURSOR buttons to move the 1
onscreen cursor under [REAL], and then press ENTER. The Recording
Standby screen appears, the REC button flashes, and the metronome
starts playing. (If you can’t hear the metronome, make sure the
RHYTHM fader is turned up.)
The “ding” of the metronome indicates the first beat of each measure,
while the “clicks” indicate all other beats.
2
Use the CURSOR buttons and the TIME/VALUE dial to make settings
for pattern recording.
3
Press the REC button. After a one-measure count-in, recording starts.
During recording, the pattern loops continuously over its length (per
the measures value set in Step 2).
4
Now, play the drum pads to record drum sounds in the pattern.
During recording, you may want to access the following functions:
• If you wish to erase a drum sound that
Erasing drum sounds—
you’ve recorded, press and hold the DELETE/MUTE button, and
then press the desired drum pad (or pads). The corresponding
drum sounds are erased for as long as the drum pad is pressed.
Measures
Time signature
Quantize
Measures—• This setting determines the number of measures in
your pattern. Patterns can be anywhere from 1-999 measures
in length.
• Set the tempo to any speed that’s most comfortable for
Tempo—
you to record your pattern.
You can also set the tempo by tapping the TAP TEMPO button.
Time signature—• The time signature determines how many
beats are in each measure, and the note value of each beat.
The default is 4/4, but there are many other time signatures
available.
• While you’re recording your pattern, the drum
Quantize—
sounds you play are automatically adjusted to the nearest note
value indicated by the quantize setting. This ensures that your
pattern’s drum sounds will play in time, even if you strike the
pads a little off-time. The default quantize setting is a sixteenth
note, but you can adjust it to arrive at the most appropriate
setting for recording your pattern.
Tempo
Tempo—• If the tempo is too fast or too slow, you can adjust it at
any time during recording.
• You can also adjust quantize settings at any time
Quantize—
during recording.
• You can adjust the metronome’s level in
Metronome level—
relation to the drum sounds in the pattern. Repeatedly press the
4 CURSOR button to place the onscreen cursor under the “Click”
value, and then use TIME/VALUE to adjust the level to the desired
setting: 0-3. (Setting the level to 0 silences the metronome.)
5
After you’re done recording all the sounds you want in your pattern,
press STOP.
Step Recording
Choose a pattern for recording using the procedures described in 1
“Selecting a Song Pattern for Recording.”
2
On the Rhythm Edit screen, use the CURSOR buttons to move the
onscreen cursor under [STEP], and then press ENTER. The Recording
Standby screen appears.
3
As described in Step 2 of “Realtime Recording,” make the desired
measure, tempo, and time signature settings. (Don’t worry about the
quantize setting for now; we’ll adjust it in a minute.)
9
Page 10

Use the CURSOR buttons to place the onscreen cursor under [REC], 4
and then press ENTER. The Pattern screen is displayed, and the
pattern is ready to accept step entry. The following illustration shows
the various components of the Pattern screen:
Beat Quantize
Measure SoundClock
Note grid
Once a drum sound is entered on the grid, you can fine-tune its
velocity with Fader 1. When the fader is moved, the current velocity
(V001-V127) is briefly shown in the upper right-hand corner of the
display.
9
Use the procedures described in Steps 5-8 to enter, delete, or edit
the velocity of additional drum sounds in the pattern. If you wish to
hear the pattern play as you’re entering drum sounds, press the PLAY
button. To adjust the tempo of pattern playback, tap the TAP TEMPO
button. To stop playback, press STOP.
10
When you’re done entering drum sounds, press EXIT.
To choose the desired note value for step entry, move the onscreen 5
cursor under the quantize value, and then use the TIME/VALUE dial
to select the desired note value. The onscreen note grid adjusts to
reflect the new setting.
6
To choose the drum sound that you wish to record, move the onscreen
cursor under the drum sound in the upper right hand corner, and
then use the TIME/VALUE dial to select the desired sound.
7
Now, move the onscreen cursor to the note grid on the lower portion
of the display, and move the cursor under the desired grid position.
The measure, beat, and/or clock values will update to show the
current position.
In this example, C. HH (closed hi-hat) is selected as the drum sound, the note
grid is set to sixteeth notes, and the first grid position is selected with the
cursor (as indicated by the circle).
To enter the selected drum sound at the grid position, turn the TIME/8
VALUE dial. You can enter the sound at one of four different settings:
off, low velocity, medium velocity, or high velocity. The grid position
shows the current setting:
You can mix-and-match recording styles while recording a pattern. For
example, you might want to set up the basic beat with step recording,
and then switch to realtime recording to play some fills over the top.
Naming a Pattern
Using the procedure described in “Selecting a Pattern for Recording,” 1
select a song pattern that you’ve recorded.
2
On the Rhythm Edit screen, use the CURSOR buttons to move the
onscreen cursor under [NAME], and then press ENTER.
3
Use the CURSOR buttons and TIME/VALUE dial to name the pattern.
When you’re done, press EXIT.4
Erasing a Pattern
On the Rhythm Edit screen, use the CURSOR buttons to move the 1
onscreen cursor under [ERASE], and then press ENTER.
2
Use the TIME/VALUE dial to select the song pattern you want to
erase.
3
Press ENTER. “Are you sure?” is displayed. To complete the erase
procedure, press ENTER again. If you decide that you don’t want to
erase the pattern, press EXIT instead.
Off Low Medium High
10
Page 11

Copying a Pattern
About the Preset Arrangements
You can copy any preset or song pattern into any song pattern location. This
allows you to use an already-created pattern as the starting point for a new
pattern.
1
On the Rhythm Edit screen, use the CURSOR buttons and TIME/VALUE
dial to select the pattern you wish to copy.
2
Use the CURSOR buttons to place the onscreen cursor under [COPY],
and then press ENTER.
3
Use the TIME/VALUE dial to select the song pattern you’d like to copy
the preset pattern to.
Copying one pattern to another pattern location overwrites any data
that’s in the destination pattern. Before proceeding, make sure that
you want to overwrite the data in the destination pattern. Or, better
yet, simply select an empty pattern instead.
Press ENTER. “Are you sure?” is displayed. To complete the copy 4
procedure, press ENTER again. If you decide that you don’t want to
copy the pattern, press EXIT instead.
Importing a Standard MIDI File into a Pattern
If you’ve got drum patterns in Standard MIDI File (SMF) format stored on
a personal computer, you can import them into BR-600 patterns via a USB
connection. To learn how to import SMFs—and do a lot more things using
USB—see the chapter “Using USB” in the BR-600 Owner’s Manual.
The 5o preset arrangements utilize the BR-600’s preset patterns. Most play
through all the pattern variations in a particular pattern style, and then
repeat a single pattern over and over. You can use preset arrangements for
your own songs, or they can be copied into song arrangements and used as
starting points for creating new arrangements.
To view a list of the preset arrangements, refer to the Appendices in the
BR-600 Owner’s Manual.
About Song Arrangements
Each song has five different song arrangements into which you can create
sequences of preset and/or song patterns. Having five arrangements
available gives you to the ability to try out different pattern sequences with
your song.
Selecting an Arrangement
With playback stopped, press PAD so its indicator isn’t lit.1
Press RHYTHM ON/OFF so its indicator lights.2
Press ARRANGE so its indicator lights.3
Arrangements
An arrangement tells the BR-600 to play patterns in a particular
order. You can create an arrangement at the beginning of the
song process, and then play along with it as you record audio
tracks in your song. Or, if you record your song’s audio tracks in reference
to one of the BR-600’s patterns, you can go back after the fact and create
the arrangement at the end of the process. The key is to record in time with
the BR-600’s rhythm; as long as you do that, you’re free to experiment with
rhythm arrangements at any point in the song process.
Use the CURSOR buttons and TIME/VALUE dial to select the desired 4
preset or song arrangement.
When a new song is created, all the song arrangements are (almost)
empty. An empty arrangement plays Preset Pattern P314—a metronome
pattern—at 120 BPM.
5
Press EXIT to return to the home screens.
11
Page 12

Controlling Arrangement Playback
Starting and Stopping an Arrangement
Like pattern playback, arrangement playback is controlled using the BR-600’s
transport controls.
• use the
To start and stop the arrangement—
PLAY and STOP buttons.
• press the ZERO
To jump to the start of the arrangement—
button.
• use
To move to a specific point in the arrangement—
the REW and FF buttons. (Alternately, you can use
the CURSOR buttons and TIME/VALUE dial on the Play screen.)
Temporarily Adjusting the Tempo
Unlike patterns, each arrangement has its own tempo setting. (In fact, an
arrangement can contain multiple tempos.) When you select an arrangement,
it’ll play at its stored tempo.
If you wish to temporarily override the arrangement’s tempo, you can adjust
the tempo on the Play screen or tap in the desired tempo with the TAP
TEMPO button. If you want to make a permanent tempo adjustment, you’ll
need to create or edit a song arrangement, as discussed next.
If you wish to create a song arrangement with tempo changes, you
need to create it before recording any audio tracks. That way, you can
record your audio tracks while following the arrangement’s tempo
changes.
Each song arrangement can contain up to 50 steps. During playback, the
steps play in sequential order, with the last step repeating until playback is
stopped.
To give you an illustration of how steps are organized in a song arrangement,
let’s take a look at the steps in Preset Arrangement P01:ROCK1.
Step # Pattern #/Name Starting
Measure
1 P001:ROCK1—IN 1 130
2 P002:ROCK1—V1 2 130
3 P003:ROCK1—F1 4 130
4 P004:ROCK1—V2 6 130
5 P005:ROCK1—F2 8 130
6 P004:ROCK1—V2 10 130
7 P006:ROCK1-E 12 130
8 P327:BREAK 16 130
9 P002:ROCK1-V1 19 130
Tempo
Creating Your Own Arrangement
When you create a song arrangement, you’re actually creating a series of
“steps.” Each step contains:
• This is the pattern that plays at the selected step.
a pattern number—
• This is the measure that the step’s pattern begins
a starting measure—
playing at. Once it starts, the pattern will play continuously until the next
step’s starting measure. If the step is the last step in the arrangement,
the step’s pattern will play continuously until the arrangement is
stopped.
• This is the tempo that the step’s pattern plays at. Normally,
a tempo—
you’d leave this at the same setting throughout a song. However, if you
wish to introduce tempo changes in your song, you can do it here.
As you can see, there are nine separate steps in this arrangement, and most
play the different ROCK1 pattern variations. The tempo at each step is 130
BPM, so the arrangement will play at a consistent tempo throughout.
Now, let’s create a song arrangement from scratch.
1
With playback stopped, press PAD so its indicator isn’t lit.
Press RHYTHM ON/OFF so its indicator lights, and then press ARRANGE 2
so its indicator lights.
3
Press RHYTHM EDIT.
Use the CURSOR buttons and TIME/VALUE dial to select an empty 4
song arrangement.
12
Page 13

Use the CURSOR buttons to place the onscreen cursor under [STEP], 5
and then press ENTER to display the following screen:
Starting measure
Time signature
Step Pattern number
play the pattern in the current step—• press PLAY. When another
arrangement step is selected during playback, the currently
playing pattern will continue playing to the end of the measure,
and then playback will switch to the current step’s pattern. To
stop playback, press STOP.
10
When you’re done, press EXIT to return to the home screens.
Tempo
Pattern name
When you first enter the above screen, Step 1 is already selected, and 6
Measure 1 is fixed as the starting measure. Use the CURSOR buttons
and TIME/VALUE dial to choose a pattern and tempo for Step 1.
The time signature that’s displayed on the Recording Standby screen
indicates the time signature of the selected pattern.
7
Now, use the CURSOR buttons and TIME/VALUE dial to select Step 2
in your arrangement. Select a starting measure, pattern, and tempo
for this step.
When you select a new, empty step, the previous step’s tempo setting
is carried over.
8
Repeat Step 7 above to make settings for additional arrangement
steps.
9
If you need to change settings in any arrangement step, just select it
and make the desired changes. If you’d like to:
• use the CURSOR buttons
insert a new step at the current step—
to place the onscreen cursor under [INSERT], and then press
ENTER.
• use the CURSOR buttons to place the
erase the current step—
onscreen cursor under [ERASE], and then press ENTER.
Naming an Arrangement
With playback stopped, press PAD so its indicator isn’t lit.1
Press RHYTHM ON/OFF so its indicator lights, and then press ARRANGE 2
so its indicator lights.
3
Press RHYTHM EDIT.
Use the CURSOR buttons and TIME/VALUE dial to select the song 4
arrangement you wish to name.
5
Use the CURSOR buttons to place the onscreen cursor under [NAME],
and then press ENTER.
6
Use the CURSOR buttons and TIME/VALUE dial to name the song
arrangement.
7
When you’re done, press EXIT twice to return to the home screens.
Erasing an Arrangement
Follow Steps 1-3 in “Naming an Arrangement” (above).1
Use the CURSOR buttons to place the onscreen cursor under [ERASE], 2
and then press ENTER.
3
Use the TIME/VALUE dial to select the song arrangement you wish
to erase.
4
Press ENTER. “Are you sure?” is displayed. To complete the erase
procedure, press ENTER again. If you decide that you don’t want to
erase the pattern, press EXIT instead.
13
Page 14

Copying an Arrangement
You can copy a preset or song arrangement into any song arrangement
location. This allows you to use an already-created arrangement as a starting
point for a new arrangement.
1
Follow Steps 1-3 in “Naming an Arrangement.”
Use the CURSOR buttons and TIME/VALUE dial to select the song 2
arrangement you wish to copy.
3
Use the CURSOR buttons to place the onscreen cursor under [COPY],
and then press ENTER.
4
Use the TIME/VALUE dial to select the destination song
arrangement.
Note the tempo—• If you use a pattern as the rhythm reference while
recording audio tracks, make a note of the tempo setting so you can
enter it in the first step of your arrangement.
• If you wish to have a count-in at the beginning of your
Count-in—
song, use one of the metronome patterns (P295-P326) as the pattern
assigned to the first step in your arrangement.
• The last step in a song
Silence at the end of your arrangement—
arrangement plays continuously until playback is stopped, which is fine
if your song fades out. However, if you want silence at the end of your
song, use Preset Pattern P327:BREAK as the pattern assigned to the last
arrangement step; this is a pattern that has no sounds playing in it. (As
its name suggests, P327:BREAK also works great when you want the
drums to stop, or “break,” in the middle of your song.)
Copying an arrangement to another arrangement location overwrites
any data that’s in the destination arrangement. Before proceeding,
make sure that you want to overwrite the data in the destination
arrangement, or select an empty arrangement instead.
Press ENTER. “Are you sure?” is displayed. To complete the copy 5
procedure, press ENTER again. If you decide that you don’t want to
copy the arrangement, press EXIT instead.
Rhythm Strategies
Here are a few tips to keep in mind while working with patterns
and rhythm arrangements.
• make sure you set up a
If you plan on using rhythm with your song—
pattern or song arrangement and play along with it while recording
your audio tracks. If you don’t record to a rhythm, you’ll find it extremely
difficult (if not impossible) to add the BR-600’s rhythm later and get it to
play in time with your audio tracks..
• As
You don’t need to create or complete a song arrangement right away—
long as you record your audio in reference to a pattern, a preset
arrangement, or a simplified song arrangement, you can always go
back after the audio tracks have been recorded and create or complete
an arrangement.
The End
We hope you’ve found this workshop helpful. Keep an eye out for other
BR-600 Workshop booklets available for downloading at www.BOSSUS.com
and www.RolandUS.com.
14
 Loading...