

Page 1
Wave
Owner’s Guide
®
Radio
,,
®
A mark
of quality
Page 2
Safety Information
WARNING:
To reduce the risk of fire or electrical shock, do not expose the product to rain or moisture.
WARNING: The apparatus shall not be exposed to dripping or splashing, and objects filled with
liquids, such as vases, shall not be placed on the apparatus. As with any electronic products, use
care not to spill liquids into any part of the system. Liquids can cause a failure and/or a fire hazard.
CAUTION:
To reduce the risk of electric shock, do not disassemble this product unless you are
qualified. Refer servicing to qualified service personnel.
The lightning flash with arrowhead symbol within an equilateral triangle alerts the user to the presence
of uninsulated dangerous voltage within the system enclosure that may be of sufficient magnitude to
constitute a risk of electrical shock.
The exclamation point within an equilateral triangle, as marked on the system, is intended to alert the
user to the presence of important operating and maintenance instructions in this owner’s guide.
CAUTION:
To prevent electric shock, match the wide blade of the line cord plug to the wide slot of the AC (mains)
receptacle. Insert fully.
WARNING:
Do not recharge, disassemble, heat above 100
K
eep the remote control battery away from children. It may cause a fire or chemical burn if mishandled.
º
C (212ºF), or incinerate. Dispose of used batteries promptly.
Replace only with a battery of the correct type and model number.
Please dispose of used batteries properly,
following any local regulations. Do not incinerate.
WARNING: No naked flame sources, such as lighted candles, should be placed on the apparatus.
Note:
The product label is located on the bottom of the product.
Please read this owner’s guide
Please take the time to follow the instructions in this owner’s guide carefully. It will help you set up and operate your
system properly and enjoy all of its advanced features. Please save this owner’s guide for future reference.
Svenska Nederlands Italiano Français Español Deutsch Dansk EnglishDanskDeutschItalianoNederlandsSvenska Français Español English
2
©1994-2005 Bose Corporation. No part of this work may be reproduced, modified, distributed or otherwise used without prior
®
written permission. All trademarks referenced herein are property of Bose Corporation. The Wave
trademark of Bose Corporation.
radio II design is a registered
Page 3

Important Safety Instructions
1. Read these instructions – for all components
before using this product.
2. Keep these instructions – for future reference.
3. Heed all warnings – on the product and in the
owner’s guide.
4. Follow all instructions.
5. Do not use this apparatus near water or
moisture – Do not use this product near a bathtub,
washbowl, kitchen sink, laundry tub, in a wet basement, near a swimming pool, or anywhere else that
water or moisture are present.
6. Clean only with a dry cloth – and as directed by
Bose Corporation. Unplug this product from the wall
outlet before cleaning.
7. Do not block any ventilation openings. Install in
accordance with the manufacturer’s instructions – To ensure reliable operation of the product and
to protect it from overheating, put the product in a
position and location that will not interfere with its
proper ventilation. For example, do not place the
product on a bed, sofa, or similar surface that may
block the ventilation openings. Do not put it in a builtin system, such as a bookcase or a cabinet that may
keep air from flowing through its ventilation openings.
8. Do not install near any heat sources, such as
radiators, heat registers, stoves or other apparatus (including amplifiers) that produce heat.
9. Do not defeat the safety purpose of the polarized or grounding-type plug. A polarized plug
has two blades with one wider than the other. A
grounding-type plug has two blades and a third
grounding prong. The wider blade or third prong
is provided for your safety. If the provided plug
does not fit in your outlet, consult an electrician
for replacement of the obsolete outlet.
10. Protect the power cord from being walked on or
pinched, particularly at plugs, convenience
receptacles, and the point where they exit from
the apparatus.
11. Only use attachments/accessories specified by
the manufacturer.
12. Use only with the cart, stand, tripod,
bracket or table specified by the
manufacturer or sold with the apparatus. When a cart is used, use caution when moving the cart/apparatus
combination to avoid injury from tip-over.
13. Unplug this apparatus during lightning storms
or when unused for long periods of time – to
prevent damage to this product.
14. Refer all servicing to qualified service person-
nel. Servicing is required when the apparatus
has been damaged in any way: such as powersupply cord or plug is damaged; liquid has been
spilled or objects have fallen into the apparatus;
the apparatus has been exposed to rain or moisture, does not operate normally, or has been
dropped – Do not attempt to service this product
yourself. Opening or removing covers may expose you
to dangerous voltages or other hazards. Please call
Bose to be referred to an authorized service center
near you.
15. To prevent risk of fire or electric shock, avoid
overloading wall outlets, extension cords, or
integral convenience receptacles.
16. Do not let objects or liquids enter the product –
as they may touch dangerous voltage points or shortout parts that could result in a fire or electric shock.
17. See product enclosure bottom for safety related
markings.
Information about products that generate
electrical noise
If applicable, this equipment has been tested and found to
comply with the limits for a Class B digital device, pursuant to Part 15 of the FCC rules. These limits are designed
to provide reasonable protection against harmful interference in a residential installation. This equipment generates, uses, and can radiate radio frequency energy and, if
not installed and used in accordance with the instructions,
may cause harmful interference to radio communications.
However, this is no guarantee that interference will not
occur in a particular installation. If this equipment does
cause harmful interference to radio or television reception,
which can be determined by turning the equipment off and
on, you are encouraged to try to correct the interference
by one or more of the following measures:
• Reorient or relocate the receiving antenna.
• Increase the separation between the equipment and
receiver.
• Connect the equipment to an outlet on a different circuit
than the one to which the receiver is connected.
• Consult the dealer or an experienced radio/TV techni-
cian for help.
Note: Unauthorized modification of the receiver or radio
remote control could void the user’s authority to operate this
equipment.
This product complies with the Canadian ICES-003 Class
B specifications.
English Deutsch FrançaisDansk Español Italiano SvenskaNederlandsDansk Italiano SvenskaDeutsch NederlandsEnglish FrançaisEspañol
2a
Page 4
Important Safety Instructions
18. Use Proper Power Sources – Plug the product into
a proper power source, as described in the operating
instructions or as marked on the product.
19. Avoid Power Lines – Use extreme care when installing an outside antenna system to keep from touching
power lines or circuits, as contact with them may be
fatal. Do not install external antennas near overhead
power lines or other electric light or power circuits, nor
where an antenna can fall into such circuits or power
lines.
20. Ground All Outdoor Antennas – If an external
antenna or cable system is connected to this product,
be sure the antenna or cable system is grounded. This
will provide some protection against voltage surges
and built-up static charges.
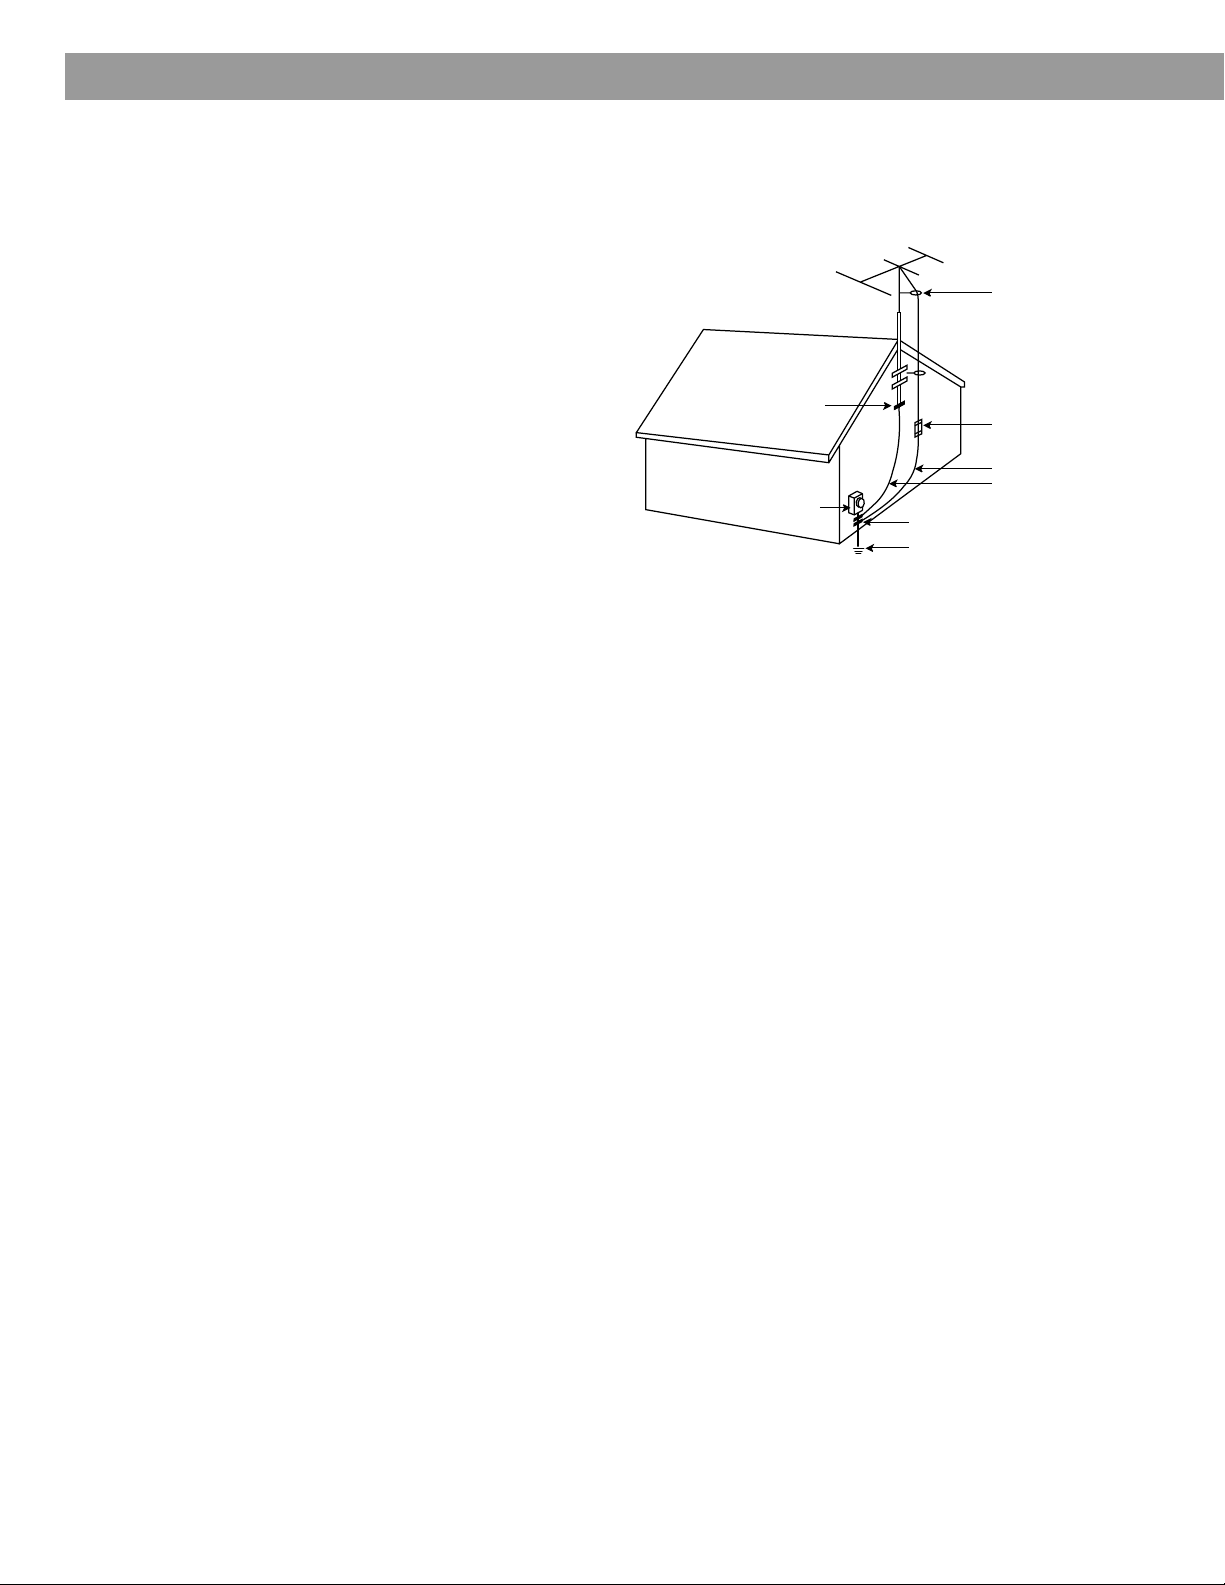
Section 810 of the National Electrical Code ANSI/
NFPA No. 70 provides information with respect to
proper grounding of the mast and supporting structure, grounding of the lead-in wire to an antenna discharge unit, size of grounding conductors, location of
antenna-discharge unit, connection to grounding electrodes, and requirements for the ground electrode.
Refer to the antenna grounding illustration on this
page.
Antenna grounding
Example of antenna grounding as per National Electrical
Code, ANSI/NFPA 70.
Antenna lead-in wire
Ground clamp
Electric service
equipment
Ground clamps
Power service grounding electrode
system (NEC ART 250, Part H)
Antenna discharge unit
(NEC Section 810-20)
Grounding conductors
(NEC Section 810-21)
Note to CATV system installer
This reminder is provided to call the CATV system
installer’s attention to Article 820-40 of the NEC (of USA)
that provides guidelines for proper grounding. In particular,
it specifies that the cable ground shall be connected to the
grounding system of the building, as close to the point of
cable entry as is practical.
Svenska Nederlands Italiano Français Español Deutsch Dansk EnglishDanskDeutschItalianoNederlandsSvenska Français Español English
2b
Page 5

Where to find ...
Setting Up Your Wave® Radio ,, . . . . . . . . . . . . . . . . . . . . . . . . . . . . . . . . . . . . . . . . . . . . . . . . . . . 4
A Brief Introduction to Some Special Features . . . . . . . . . . . . . . . . . . . . . . . . . . . . . . . . . . . . . . . . 6
Operating Your Wave
Listening to FM/AM Radio ,, . . . . . . . . . . . . . . . . . . . . . . . . . . . . . . . . . . . . . . . . . . . . . . . . . . . . . . 9
Setting and Using The Alarm . . . . . . . . . . . . . . . . . . . . . . . . . . . . . . . . . . . . . . . . . . . . . . . . . . . . . 11
Connecting Other Equipment . . . . . . . . . . . . . . . . . . . . . . . . . . . . . . . . . . . . . . . . . . . . . . . . . . . . . 13
Personalizing Your Wave
Maintaining Your Wave
Index . . . . . . . . . . . . . . . . . . . . . . . . . . . . . . . . . . . . . . . . . . . . . . . . . . . . . . . . . . . . . . . . . . . . . . . . 23
Contents
Unpacking . . . . . . . . . . . . . . . . . . . . . . . . . . . . . . . . . . . . . . . . . . . . . . . . . . . . . . . . . . . . . . . . 4
Selecting a location . . . . . . . . . . . . . . . . . . . . . . . . . . . . . . . . . . . . . . . . . . . . . . . . . . . . . . . . . 4
Connecting to power . . . . . . . . . . . . . . . . . . . . . . . . . . . . . . . . . . . . . . . . . . . . . . . . . . . . . . . . 4
Setting the clock . . . . . . . . . . . . . . . . . . . . . . . . . . . . . . . . . . . . . . . . . . . . . . . . . . . . . . . . . . . . 5
Introduction . . . . . . . . . . . . . . . . . . . . . . . . . . . . . . . . . . . . . . . . . . . . . . . . . . . . . . . . . . . . . . . 6
Special Features . . . . . . . . . . . . . . . . . . . . . . . . . . . . . . . . . . . . . . . . . . . . . . . . . . . . . . . . . . . . 6
®
Remote control operating guide . . . . . . . . . . . . . . . . . . . . . . . . . . . . . . . . . . . . . . . . . . . . . . . . 7
Reading the display . . . . . . . . . . . . . . . . . . . . . . . . . . . . . . . . . . . . . . . . . . . . . . . . . . . . . . . . . 8
Turning the Wave
Controlling the volume . . . . . . . . . . . . . . . . . . . . . . . . . . . . . . . . . . . . . . . . . . . . . . . . . . . . . . . 8
Setting up automatic shutoff (Sleep) . . . . . . . . . . . . . . . . . . . . . . . . . . . . . . . . . . . . . . . . . . . . 8
Turning the radio on . . . . . . . . . . . . . . . . . . . . . . . . . . . . . . . . . . . . . . . . . . . . . . . . . . . . . . . . . 9
Tuning the radio . . . . . . . . . . . . . . . . . . . . . . . . . . . . . . . . . . . . . . . . . . . . . . . . . . . . . . . . . . . . 9
Storing a radio station to memory (Presets) . . . . . . . . . . . . . . . . . . . . . . . . . . . . . . . . . . . . . . . 10
TALK RADIO mode . . . . . . . . . . . . . . . . . . . . . . . . . . . . . . . . . . . . . . . . . . . . . . . . . . . . . . . . . . 10
Setting the alarm . . . . . . . . . . . . . . . . . . . . . . . . . . . . . . . . . . . . . . . . . . . . . . . . . . . . . . . . . . . 11
Selecting a radio station to wake to . . . . . . . . . . . . . . . . . . . . . . . . . . . . . . . . . . . . . . . . . . 11
Setting the alarm time . . . . . . . . . . . . . . . . . . . . . . . . . . . . . . . . . . . . . . . . . . . . . . . . . . . . 11
Using the alarm . . . . . . . . . . . . . . . . . . . . . . . . . . . . . . . . . . . . . . . . . . . . . . . . . . . . . . . . . . . . 12
Stopping a sounding alarm . . . . . . . . . . . . . . . . . . . . . . . . . . . . . . . . . . . . . . . . . . . . . . . . 12
Turning alarm on and off . . . . . . . . . . . . . . . . . . . . . . . . . . . . . . . . . . . . . . . . . . . . . . . . . . 12
Snoozing an alarm . . . . . . . . . . . . . . . . . . . . . . . . . . . . . . . . . . . . . . . . . . . . . . . . . . . . . . . 12
Rear panel input/outputs . . . . . . . . . . . . . . . . . . . . . . . . . . . . . . . . . . . . . . . . . . . . . . . . . . . . . 13
Connecting an external FM antenna . . . . . . . . . . . . . . . . . . . . . . . . . . . . . . . . . . . . . . . . . . . . 13
Connecting your Wave
Using headphones . . . . . . . . . . . . . . . . . . . . . . . . . . . . . . . . . . . . . . . . . . . . . . . . . . . . . . . . . . 14
Changing the volume level of headphones . . . . . . . . . . . . . . . . . . . . . . . . . . . . . . . . . . . . 14
Using your Wave
The setup menu . . . . . . . . . . . . . . . . . . . . . . . . . . . . . . . . . . . . . . . . . . . . . . . . . . . . . . . . . . . . 17
Adjusting the snooze time . . . . . . . . . . . . . . . . . . . . . . . . . . . . . . . . . . . . . . . . . . . . . . . . . . . . 18
Changing the clock time format . . . . . . . . . . . . . . . . . . . . . . . . . . . . . . . . . . . . . . . . . . . . . . . . 18
Adjusting the display brightness . . . . . . . . . . . . . . . . . . . . . . . . . . . . . . . . . . . . . . . . . . . . . . . 19
Setting the room code . . . . . . . . . . . . . . . . . . . . . . . . . . . . . . . . . . . . . . . . . . . . . . . . . . . . . . . 19
Performing a system reset . . . . . . . . . . . . . . . . . . . . . . . . . . . . . . . . . . . . . . . . . . . . . . . . . . . . 20
Cleaning . . . . . . . . . . . . . . . . . . . . . . . . . . . . . . . . . . . . . . . . . . . . . . . . . . . . . . . . . . . . . . . . . . 21
Replacing the remote control battery . . . . . . . . . . . . . . . . . . . . . . . . . . . . . . . . . . . . . . . . . . . . 21
Troubleshooting . . . . . . . . . . . . . . . . . . . . . . . . . . . . . . . . . . . . . . . . . . . . . . . . . . . . . . . . . . . . 22
Customer service . . . . . . . . . . . . . . . . . . . . . . . . . . . . . . . . . . . . . . . . . . . . . . . . . . . . . . . . . . . 22
Limited warranty . . . . . . . . . . . . . . . . . . . . . . . . . . . . . . . . . . . . . . . . . . . . . . . . . . . . . . . . . . . . 22
Technical information . . . . . . . . . . . . . . . . . . . . . . . . . . . . . . . . . . . . . . . . . . . . . . . . . . . . . . . . 22
Radio ,, . . . . . . . . . . . . . . . . . . . . . . . . . . . . . . . . . . . . . . . . . . . . . . . . . . . 7
®
radio ,, on and off . . . . . . . . . . . . . . . . . . . . . . . . . . . . . . . . . . . . . . . . . . . 8
®
radio ,, to a Lifestyle® system . . . . . . . . . . . . . . . . . . . . . . . . . . . . . . 14
®
radio ,, with other audio equipment . . . . . . . . . . . . . . . . . . . . . . . . . . . . . . 15
®
Radio ,, . . . . . . . . . . . . . . . . . . . . . . . . . . . . . . . . . . . . . . . . . . . . . . . . . 17
®
Radio ,, . . . . . . . . . . . . . . . . . . . . . . . . . . . . . . . . . . . . . . . . . . . . . . . . . . 21
English Deutsch FrançaisDansk Español Italiano SvenskaNederlandsDansk Italiano SvenskaDeutsch NederlandsEnglish FrançaisEspañol
3
Page 6
Setting Up Your Wave® Radio ,,
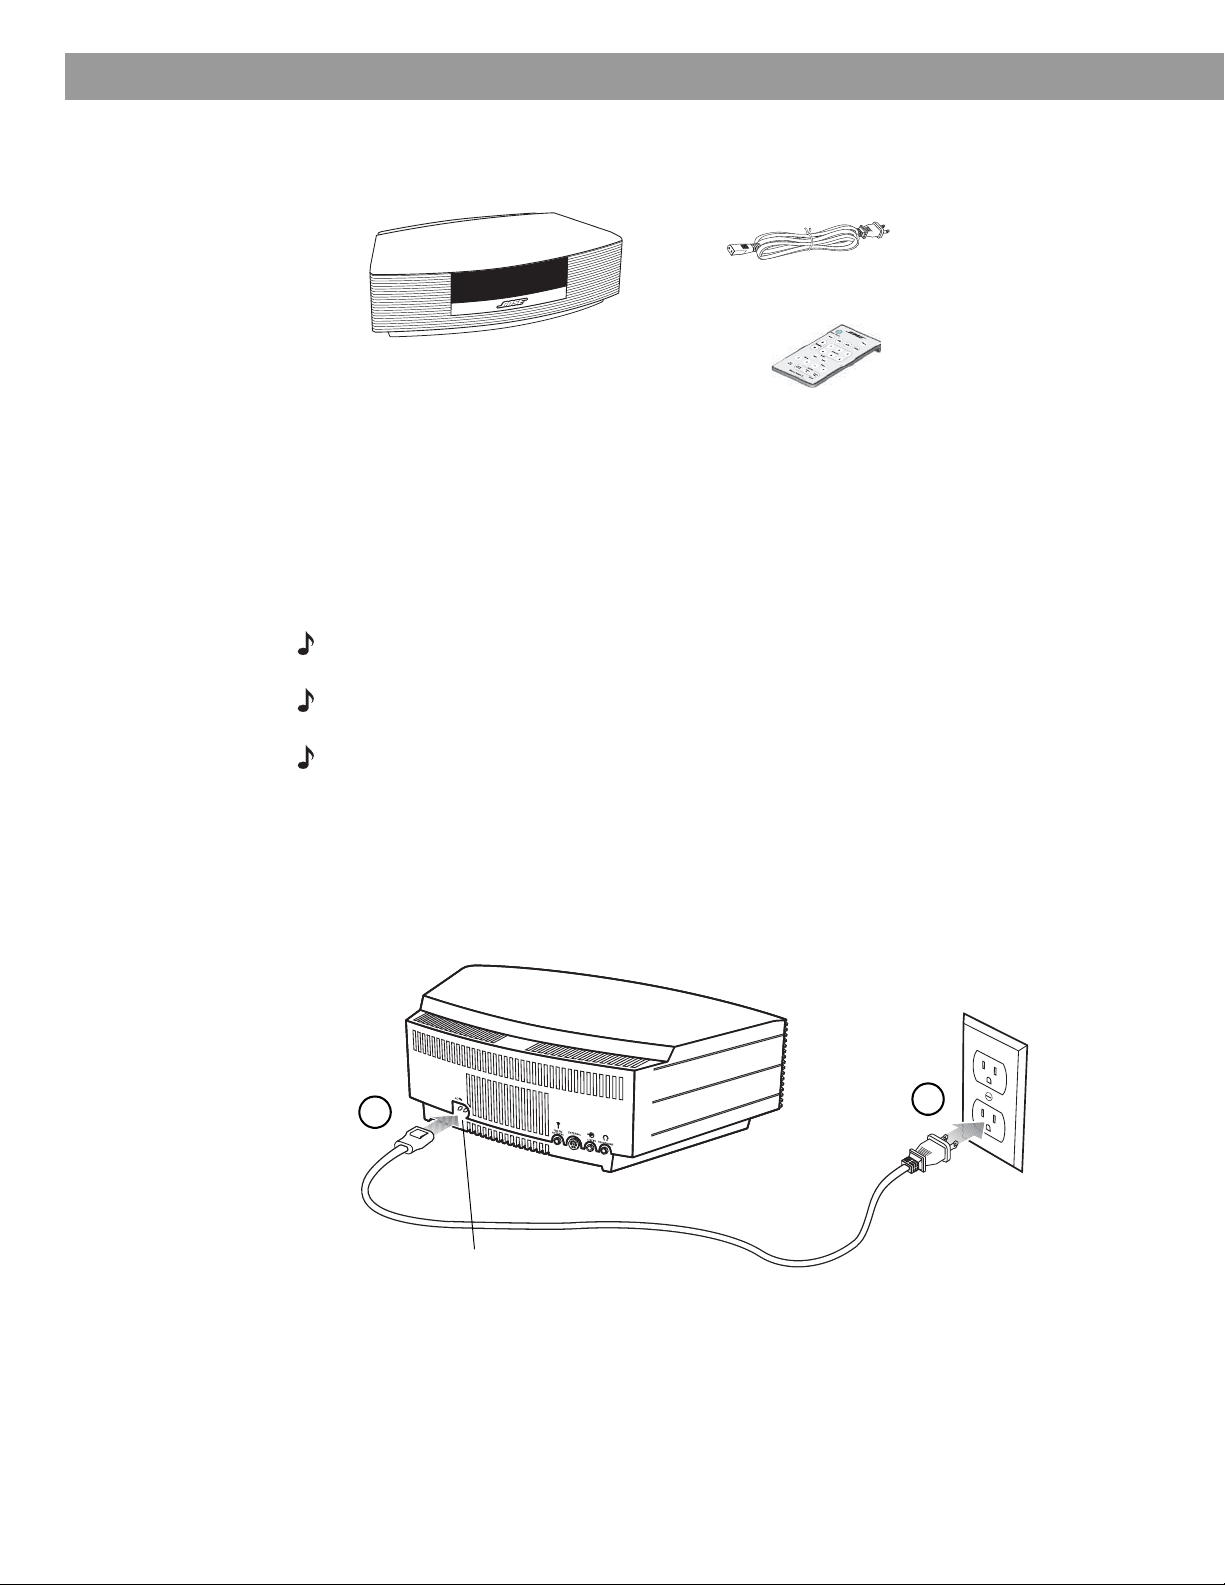
Unpacking
Please check the shipping carton for the following items:
AC power cord
®
Selecting a location
• Place your Wave® radio ,, on a table or other flat surface.
• To enjoy maximum performance, place your Wave
will be listening.
• For best performance, place your Wave
placing directly in a corner.
Note:
AM reception.
Note:
equipment, it generates some heat.
Note:
moisture can get inside.
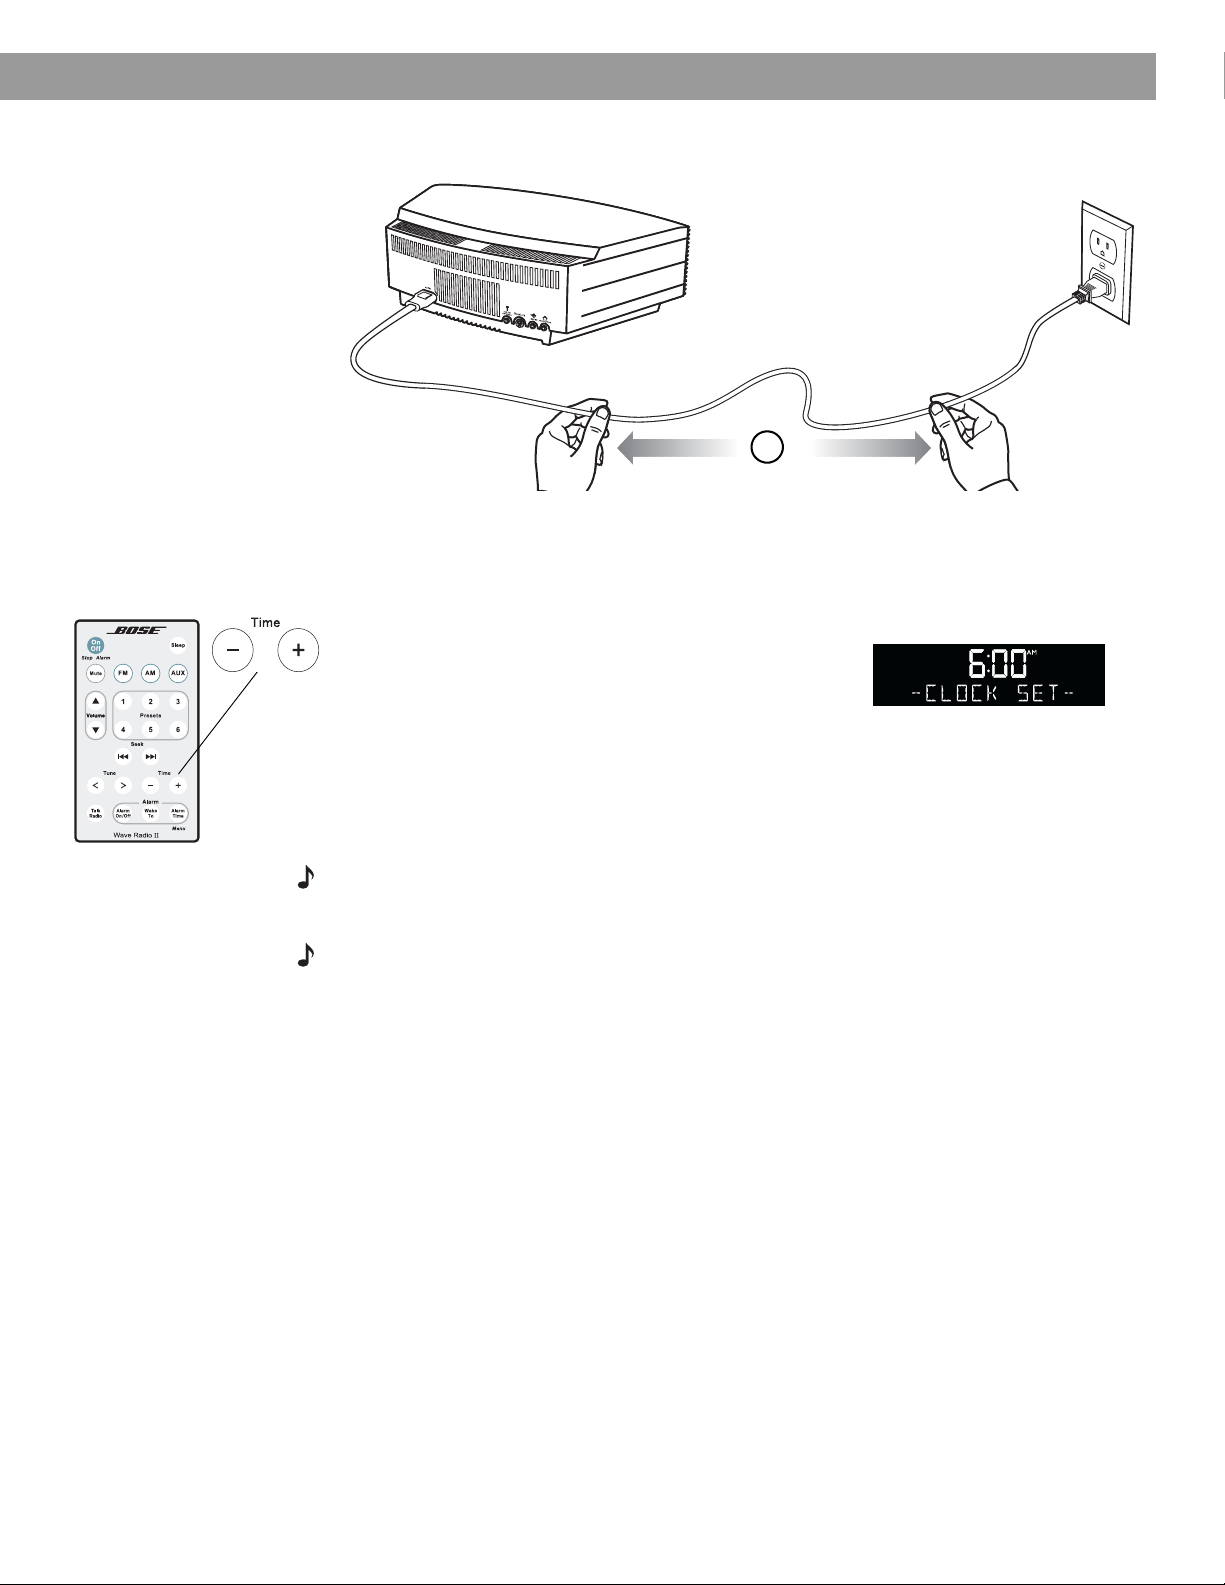
Connecting to power
1. Insert the small end of the power cord into the connector labeled AC POWER on the rear
2. Plug the power cord into an electrical outlet.
Wave® radio ,,
®
radio ,, across the room from where you
®
radio ,, within two feet of a wall, and avoid
Remote control
(battery pre-installed)
Do not place your Wave® radio ,, on a metal surface. It could interfere with
Do not place your Wave® radio ,, on a heat-sensitive surface. Like all electrical
Do not use your Wave® radio ,, in a damp location or any other place where
panel of your Wave
®
radio ,,.
Svenska Nederlands Italiano Français Español Deutsch Dansk EnglishDanskDeutschItalianoNederlandsSvenska Français Español English
4
1
AC POWER connector
2
Page 7
Setting Up Your Wave® Radio ,,
Setting the clock
3. Unwind and straighten the power cord to ensure the best FM reception. Your
®
Wave
radio ,, uses the power cord as an FM antenna.
3
After plugging in your Wave® radio ,,, set the clock using the remote.
easily operated using the remote control. Just aim the remote at the front panel and press the
buttons.
1. Press and hold Time – or Time + for one second until
– CLOCK SET – appears on the display.
2. Press Time – to adjust the displayed time backward or
press Time + to adjust the displayed time forward until
it matches the current time. You can also press and hold for rapid adjustment.
Your Wave® radio,, is
English Deutsch FrançaisDansk Español Italiano SvenskaNederlandsDansk Italiano SvenskaDeutsch NederlandsEnglish FrançaisEspañol
3. Wait five seconds for the system to exit the clock setup mode automatically.
To change the clock display from 12-hour (AM/PM) time to 24-hour (Military) time, see
“Changing the clock time format” on page 18.
Note:
In the event that the Wave® radio,, loses power, the clock time and other system settings
are stored in backup memory for up to 48 hours. This feature retains the systems settings when
you unplug and move the unit or when a power outage occurs.
Note:
Press-and-hold operations require holding the button down for at least one second.
5
Page 8
A Brief Introduction to Some Special Features
Introduction
Thank you for purchasing the Bose® Wave® radio ,,, an elegant way to bring high quality
sound into any room.
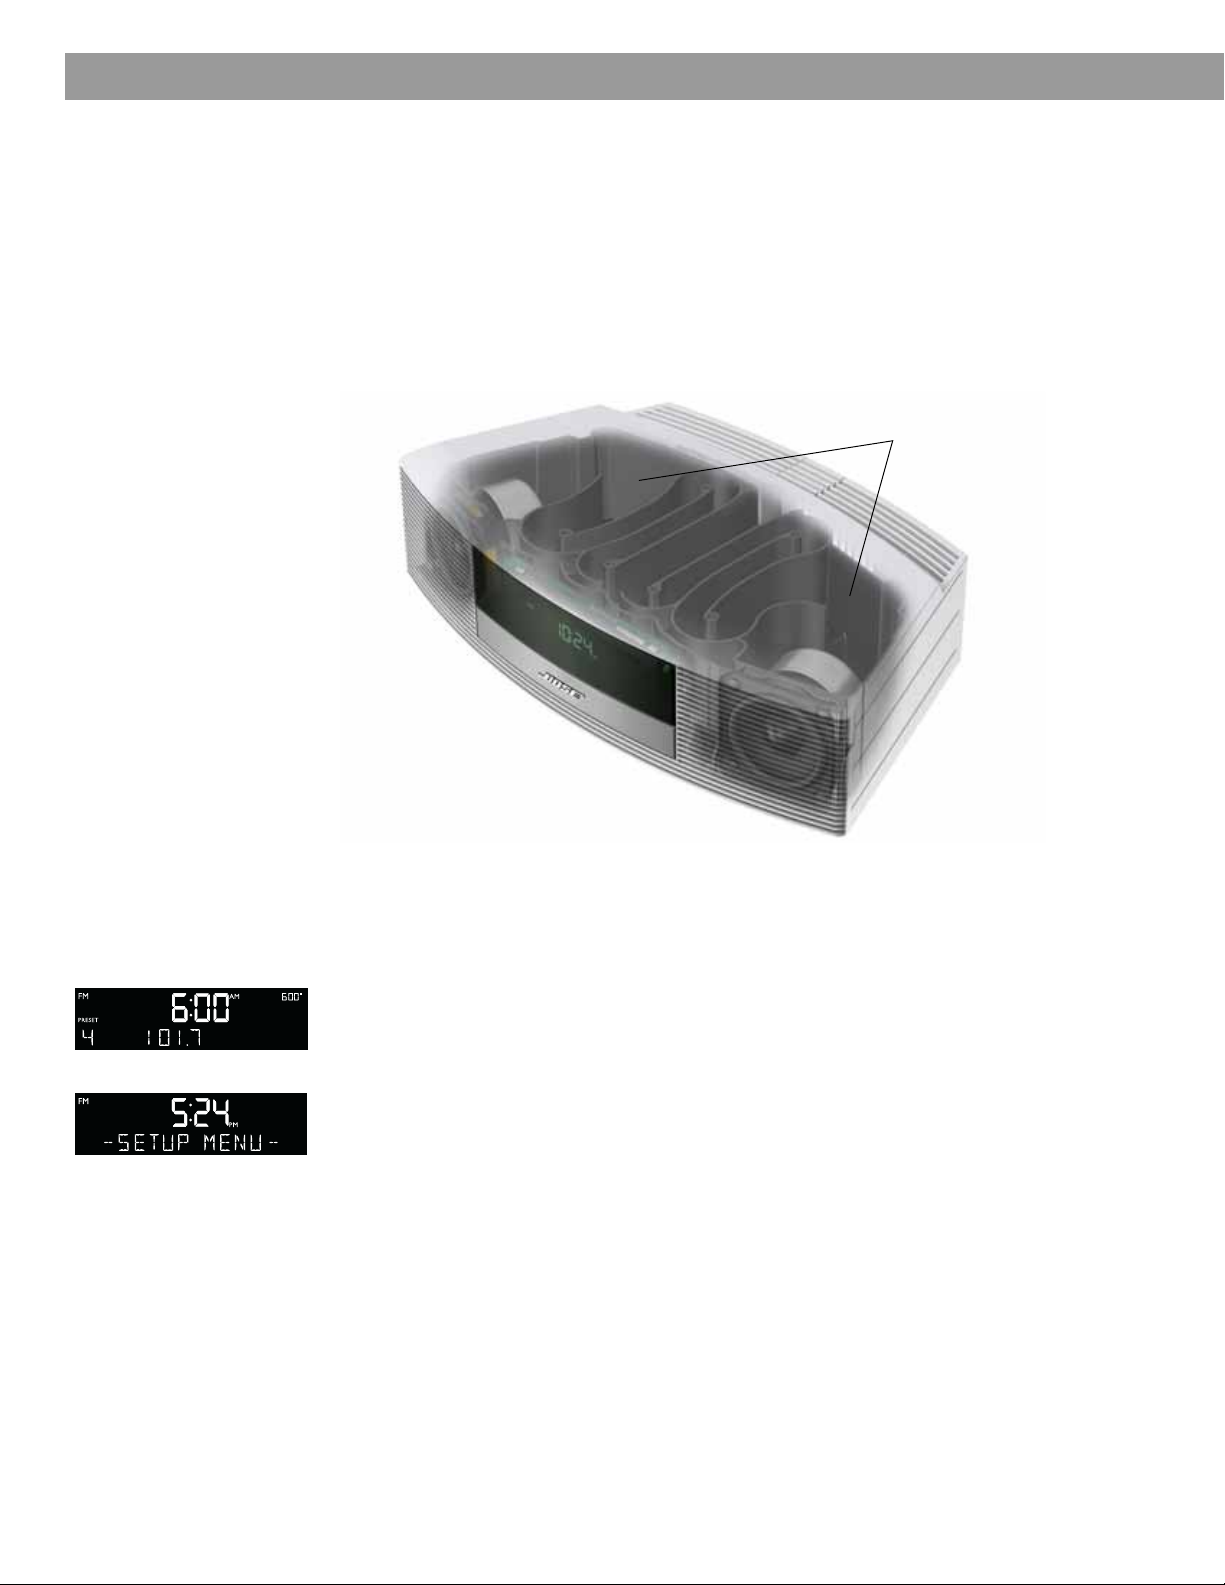
Over fourteen years of research by Bose Corporation brings you the benefits of award-winning
patented acoustic waveguide speaker technology. Using this technology, a tube efficiently
transfers energy from a small speaker to the outside air over a wide range of low frequencies.
And, long waveguides, folded into intricate patterns, fit into products small enough to be
placed comfortably in your home. Your Wave
speaker technology, connecting two speakers to two 26" tapered waveguides which combine to produce unprecedented instrument timbre from a system this size.
®
radio ,, features new dual tapered waveguide
Dual tapered waveguides
Special Features
Svenska Nederlands Italiano Français Español Deutsch Dansk EnglishDanskDeutschItalianoNederlandsSvenska Français Español English
Alarm settings let you wake to your favorite radio station
You can set your Wave® radio ,, to wake to your favorite radio station. For more details, see
“Selecting a radio station to wake to” on page 11.
The setup menu allows you to personalize system operation
Factory system settings have been set to satisfy most owners. If you wish to change the
settings, see “Personalizing Your Wave
The setup menu allows you to change the following system settings to your liking:
• Snooze time • Display brightness level
• Clock time format (12- or 24-hour)
®
Radio ,,” on page 17.
•Bose
• Reset to factory settings
®
link room code
6
Page 9
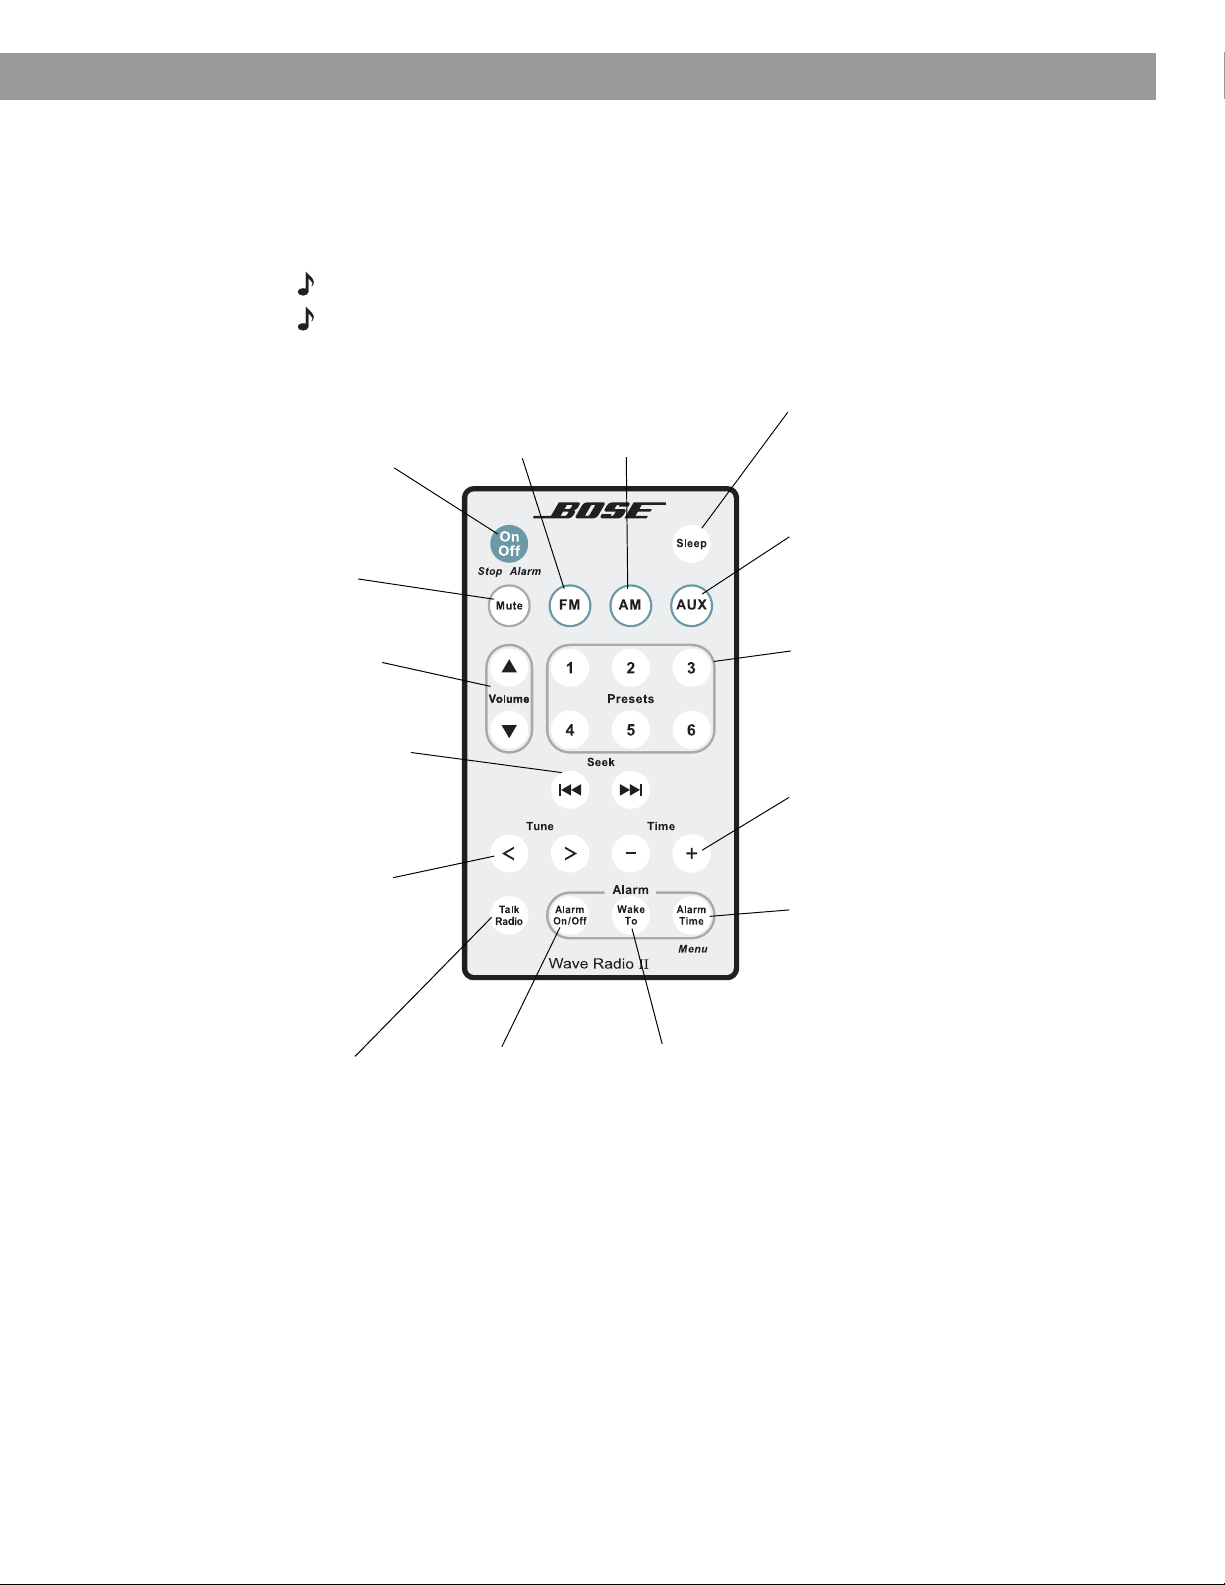
Remote control operating guide
Your Wave® radio,, is easily operated using the remote control. Just aim the remote at the front
panel and press the buttons. The remote normally works within 20 feet of the front panel.
Throughout this owner’s guide you will see button icons to the left of the operating instructions. These icons refer to buttons located on the remote control.
Note:
Press-and-hold operations require holding the button down for at least one second.
Note:
Pressing FM, AM or AUX automatically turns on the Wave®radio ,, to the source selected.
Operating Your Wave® Radio ,,
English Deutsch FrançaisDansk Español Italiano SvenskaNederlandsDansk Italiano SvenskaDeutsch NederlandsEnglish FrançaisEspañol
On/Off (Stop Alarm)
• Turns the power on or off (page 8).
• Stops a sounding alarm (page 12).
Mute
• Press to silence audio (page 8).
• Press again to restore audio.
Volume
• Turns volume up or down (page 8).
Seek
• Press: Finds the next radio station with
a strong signal (page 9).
• Press and hold: Rapidly moves forward/
backward through radio frequencies
with a strong signal (page 9).
Tune
• Press: Skips to next/previous radio
frequency (page 9).
• Press and hold: Rapidly moves forward/backward through radio frequencies (page 9).
FM
• Turns on the
radio to FM
(page 9).
AM
• Turns on the
radio to AM
(page 9).
Sleep
• Snoozes a sounding alarm (page 12).
• Sets unit to shut off automatically after
10-90 minutes (page 8).
AUX
• Press to hear audio from an external
source connected to the AUX IN input
(page 15).
Presets
• Press: Recalls a stored radio station
(page 10).
• Press and hold: Stores a radio station for
quick recall (page 10).
Time
• Sets clock time (page 5).
• In Alarm Set mode, sets alarm time
(page 11).
Alarm Time
• Press once: Enters alarm time setup mode
(page 11).
• Press and hold: Enters the setup menu
(page 17).
Talk Radio
• Turns TALK RADIO mode on or off
for AM or FM (page 10).
Alarm On/Off
• Turns alarm on
or off (page 12).
Wake To
• Press and hold: Sets alarm to
wake you to your chosen
radio station (page 11).
7
Page 10

Operating Your Wave® Radio ,,
Reading the display
FM, AM, AUX, or Bose® link
appears for the selected source.
Displays operating information for the active
source or the setup menu.
Clock time in 12-hour (AM/PM)
time or 24-hour (Military) format
Turning the Wave®radio ,, on and off
On
Press On/Off once to turn the Wave®radio ,, on or off. The Wave® radio ,, turns on to the last
Off
source played.
OR
Press any source button to turn the Wave®radio ,, on to that source. Pressing the AUX does
AUX
not turn on an auxiliary source (such as your TV), so turn that on first.
Controlling the volume
Alarm time appears when alarm is
set.
SLEEP appears when the sleep
timer is activated.
Press and hold Volume or to adjust the volume level. VOLUME - 0 (silent) to 99
(loud) appears on the display to indicate the level.
Press Mute to silence the Wave
Mute
To lower the volume before unmuting, press Volu me
When the Wave®radio ,, is off, the volume can only be adjusted between 10 and 75.
Note:
Setting up automatic shutoff (Sleep)
Press Sleep to set the Wave®radio ,, to shut off automatically after a selected period of time.
Sleep
• After pressing Sleep, SLEEP - 30 MIN appears on the display and the sleep timer
begins counting down. If your Wave
immediately set the sleep time. The last source selected will start playing as the sleep
timer counts down.
• While the SLEEP setting is displayed, press Sleep again to set the sleep timer to
10-90 minutes (in 10-minute increments) or OFF.
Note:
While in sleep timer setup mode, if more than 10 seconds elapses between button
presses, the Wave
• To review the remaining sleep time, press Sleep.
®
radio ,, will automatically exit the sleep timer setup mode.
®
radio ,,. Press Mute again, or press Volume to unmute.
while muted.
®
radio ,, is off, press Sleep to turn it on and
Svenska Nederlands Italiano Français Español Deutsch Dansk EnglishDanskDeutschItalianoNederlandsSvenska Français Español English
8
• To cancel the sleep timer, press On/Off.
Page 11

Turning the radio on
D
Press FM or AM to turn on the radio to the FM or AM station last selected. Press FM or AM
again to switch between FM and AM.
• When the radio is playing, radio station information is displayed:
FM
source
Listening to FM/AM Radio
English Deutsch FrançaisDansk Español Italiano SvenskaNederlandsDansk Italiano SvenskaDeutsch NederlandsEnglish FrançaisEspañol
Clock time
Tuning the radio
Seek
Selected
preset
station
Station
frequency
Press FM to switch to FM.
Press AM to switch to AM.
Station
frequency
isplay while tuning
FM
source
When you press FM, AM, Seek, or Tune
to tune to a radio station, the frequency
appears in the center of the display while
you are tuning.
Selected
preset
station
P
ress Seek to find a lower frequency station with a strong signal; press Seek to find
a higher frequency station with a strong signal.
Tune
Press Tune < to manually tune to a lower frequency; press Tune > to manually tune to a
higher frequency.
Press and hold Tune < to move rapidly down through the frequency band; press and hold
Tune > to move rapidly up through the frequency band.
Note:
Five seconds after releasing FM, AM, Tune, or Seek, the clock time returns to the center
of the display and the radio frequency appears below it.
Note:
If AM reception is weak, rotate your Wave® radio ,, clockwise or counterclockwise to
improve AM reception. If FM reception is weak, make sure the power cord is straightened as
much as possible. To improve FM reception, you can install an external FM antenna. See
“Connecting an external FM antenna” on page 13.
9
Page 12

Listening to FM/AM Radio
Storing a radio station to memory (Presets)
123
Presets
456
TALK RADIO mode
You can store up to six FM and six AM radio stations for quick recall using the
Presets
buttons.
1. Tune to the station you want to save as a preset.
2. Press and hold one of the six
Presets
buttons until you hear a double beep and the
preset number and station frequency appear on the display.
3. Press one of the Presets buttons to quickly tune to a previously stored FM or AM
station.
Note:
Storing a preset will replace any station previously stored to that preset number.
Note:
During a power outage, stored presets are saved in a backup memory.
Talk radio broadcasts can be greatly affected by either the microphone selection or the boosting of low frequencies by some radio stations. They do so in an attempt to improve speech
when heard through conventional radios. In high-quality audio products, this results in sound
that is unnatural or bass heavy. By selecting the TALK RADIO mode, your Wave
®
radio ,, auto-
matically adjusts to compensate for artificially boosted low frequencies.
When the radio is playing, press Ta l k R a d i o twice to turn the TALK RADIO mode on or off.
When on, TALK RADIO– ON is displayed. When off, TALK RADIO– OFF is displayed.
Note:
The TALK RADIO setting is automatically cancelled when you tune to another station,
switch to another source, or turn your Wave
®
radio ,, off.
Svenska Nederlands Italiano Français Español Deutsch Dansk EnglishDanskDeutschItalianoNederlandsSvenska Français Español English
10
Page 13

Setting the alarm
Wake
To
Setting and Using The Alarm
Selecting a radio station to wake to
1. Turn on your Wave® radio ,, and select
the radio station you would like to wake to.
2. Adjust the volume to the level you would like
to wake to.
3.
Press and hold Wake To until you hear a
double beep. Your alarm is now set to wake
you to your chosen radio station.
1
2
3
Press and hold
for at least
one second
English Deutsch FrançaisDansk Español Italiano SvenskaNederlandsDansk Italiano SvenskaDeutsch NederlandsEnglish FrançaisEspañol
Setting the alarm time
Alarm
1.
Time
Alarm
Time
Press Alarm Time to enter the alarm time setup mode. The alarm time is displayed in
the center of the display and flashes in the upper right corner.
Press Time – or Time + to set your wake-up time.
2.
Press Alarm Time again. Your alarm time is now set.
3.
While in alarm time setup mode, if more than 10 seconds elapses between button
Note:
presses, the Wave
To confirm the alarm time and Wake To settings, press Alarm Time. Alarm time and
Note:
®
radio ,, will automatically exit the alarm time setup mode.
Wake To settings will be displayed for 10 seconds.
Alarm time
FM radio alarm
Alarm time flashing
Preset number
Radio station frequency
Example: Alarm is set to play radio station Preset 4,
101.7 FM, at 6:00 A.M.
11
Page 14

Setting and Using The Alarm
Using the alarm
Stopping a sounding alarm
On
Press On/Off (Stop Alarm) to stop a sounding alarm and reset it for the next day.
Off
Stop Alarm
On/Off
Sleep
Turning alarm on and off
Alarm
Press Alarm On/Off to turn alarm on or off. It’s on when the alarm time is displayed in the
upper right-hand corner. It’s off when the alarm time is not visible in the upper right-hand
corner of the display.
Snoozing an alarm
Press Sleep to snooze a sounding alarm.
During the snooze time, SNOOZE is displayed. After the snooze time expires, the alarm
sounds again. Pressing Sleep again will silence the alarm again for another 10 minutes.
(Factory default is 10 minutes for the snooze time. See “Adjusting the snooze time” on
page 18.
Svenska Nederlands Italiano Français Español Deutsch Dansk EnglishDanskDeutschItalianoNederlandsSvenska Français Español English
12
Page 15

Rear panel input/outputs
The rear panel of your Wave®radio ,, provides connections for external equipment.
Connecting Other Equipment
English Deutsch FrançaisDansk Español Italiano SvenskaNederlandsDansk Italiano SvenskaDeutsch NederlandsEnglish FrançaisEspañol
Bose link
EXTERNAL
75: FM ANTENNA
A 3.5 mm (
1
/8") FM
Bose® link connector
Connects to Bose®link-
enabled Lifestyle
®
systems.
antenna connector.
Connecting an external FM antenna
The Wave® radio ,, power cord includes a built-in FM antenna. If, after adjusting the position
of the power cord, you still experience poor reception, you may need to use an external FM
antenna. An external FM dipole antenna can be ordered through Bose Customer Service. See
the phone numbers listed inside the back cover of this guide.
To connect an external FM antenna:
• Plug the 3.5 mm (
rear panel of your Wave
• Extend the ends of the antenna to establish optimum FM reception.
• Extend the ends of the antenna as far from the unit and other external equipment as
possible to establish optimum reception.
1
/8") plug of the FM antenna into the 75: FM ANTENNA connector on the
®
radio ,,.
AUX IN
AUX IN
1
A 3.5 mm (
/8") stereo
input connector for
connecting external
sources.
HEADPHONE
1
A 3.5 mm (
/8") stereo
headphone connector.
The Wave® radio ,, speakers
are muted when headphones
are connected.
FM dipole antenna (not included)
Bose link
AUX IN
75: FM ANTENNA
connector
13
Page 16

Connecting Other Equipment
Connecting your Wave® radio ,, to a Lifestyle® system
You can use your Wave® radio ,, as a multi-room expansion speaker system for a
®
Bose
link-enabled Lifestyle® home entertainment system.
Contact Bose Customer Service to obtain the required cables and instructions.
See the phone numbers listed inside the back cover of this guide. See page 19 to set the
room code
Using headphones
For private listening, connect headphones to the headphone connector on the rear
panel of the Wave
®
radio ,,.
• The speakers are automatically muted when you plug in your headphones.
CAUTION:
Long-term exposure to loud music may cause hearing damage. It is best to
avoid extreme volume when using headphones, especially for extended periods.
Note:
The speakers will automatically unmute when headphones are disconnected from the
®
Wave
radio ,,. Because, headphone volume levels may vary from speaker volume levels,
be sure to lower the volume of the Wave
®
radio ,, before connecting or disconnecting
headphones.
Note:
If an alarm sounds while using headphones, it will sound through the Wave® radio ,,
speakers.
Changing the volume level of headphones
Press Volume or to adjust the listening level of your headphones.
Svenska Nederlands Italiano Français Español Deutsch Dansk EnglishDanskDeutschItalianoNederlandsSvenska Français Español English
14
(Headphones not included)
HEADPHONE connector
Page 17

Connecting Other Equipment
Using your Wave® radio ,, with other audio equipment
When using a TV, VCR, computer, video game or cassette tape player, you can enhance your
listening experience by playing the audio device through your Wave
Connecting an audio device to your Wave
• Male-to-male
3.5 mm (
1
/8") stereo cable
®
radio ,,, requires one of the following cables:
®
radio ,,.
English Deutsch FrançaisDansk Español Italiano SvenskaNederlandsDansk Italiano SvenskaDeutsch NederlandsEnglish FrançaisEspañol
On
Off
AUX
• Dual RCA male to 3.5 mm (
1
/8") male
stereo cable
To obtain the correct cable, contact Bose
®
Customer Service or visit a local electronics store.
See the phone numbers listed inside the back cover of this guide.
To connect an audio device, such as your TV, to your Wave
®
radio ,,:
1. Connect one end of the stereo cable to the output of the audio device.
2. Connect the other end of the cable to the AUX IN connector on the rear panel of your
®
Wave
radio ,,.
3.
Turn on your Wave® radio ,, and the audio device.
Press AUX.
4.
5.
Press and hold Volume or to adjust the listening level.
Note:
If the volume level of your Wave® radio ,, cannot be adjusted high enough, try to increase
the volume level of the connected audio device.
TV
AUX IN
connector
Dual RCA male to 3.5mm (
1
/8") male stereo cable
15
Page 18

Personalizing Your Wave® Radio ,,
Factory defaults have been set to satisfy most owners.
However, if you wish to adjust the system settings see
the instructions on pages 17 to 20.
Svenska Nederlands Italiano Français Español Deutsch Dansk EnglishDanskDeutschItalianoNederlandsSvenska Français Español English
16
Page 19

Personalizing Your Wave® Radio ,,
The setup menu
The setup menu allows you to customize the operation of the Wave® radio ,,.
Alarm
1.
Time
Menu
Tune
Alarm
Time
Menu
System Setting Menu Item Factory Setting Choices Description
Press and hold Alarm Time (Menu) until -SETUP MENU- is displayed.
2. Press Tune
> until the menu item you want to change is displayed.
3. Press Time – or Time + to change the value or selection.
4. Press Alarm Time (Menu) to exit the setup menu or wait 10 seconds for the setup menu
to end automatically.
®
Wav e
radio ,, Setup Menu
English Deutsch FrançaisDansk Español Italiano SvenskaNederlandsDansk Italiano SvenskaDeutsch NederlandsEnglish FrançaisEspañol
Snooze Control SNOOZE- 10 MIN 10 MIN, 20 MIN,
Determines the snooze time.
30 MIN, 40 MIN,
50 MIN, 60 MIN
Clock Time
Format
Display High
Brightness Level
Display Low
Brightness Level
Room Code ROOM- B
TIME- 12 HOUR 12-HOUR,
24-HOUR
Sets the clock display for 12-hour (AM/PM) or
24-hour (Military) time.
BRIGHT HI- 12 8-15 Sets the display brightness level when the unit
detects high ambient light conditions.
BRIGHT LO- 4 1-8 Sets the display brightness level when the unit
detects low ambient light conditions.
_ _ _ – B _ _ _ –, C _ _ – _,
D _ _ – –, E _ – _ _,
F _ – _ –, G _ – – _,
H _ – – –, I – _ _ _,
J – _ _ –, K – _ – _,
Sets the room code for your Wave
it is connected to your Lifestyle® system through a
Bose® link network.
The dashes following the room letter indicate how
the microswitches should be set on the Lifestyle
remote control.
L – _ – –, M – – _ _,
N – – _ –, O – – – _
System Reset RESET ALL- NO NO, YES Restores the Wave
settings.
®
®
radio ,, to factory
radio ,, when
®
17
Page 20

Personalizing Your Wave® Radio ,,
Adjusting the snooze time
This setting determines the duration of time the system remains silent when the snooze
function is activated.
Alarm
1.
Press and hold Alarm Time (Menu) until -SETUP MENU- is displayed.
2. Press Tune
> once until SNOOZE- 10 MIN is displayed.
3. Press Time – or Time + to change the snooze time to 10-60 minutes (in 10-minute
increments).
4. Press Alarm Time (Menu) to exit the setup menu or wait 10 seconds for the
setup menu to end automatically.
Tune
Time
Menu
Alarm
Time
Menu
Changing the clock time format
You can choose to have the display show the time in 12-hour (AM/PM) or 24-hour (Military)
time.
Alarm
1.
Press and hold Alarm Time (Menu) until -SETUP MENU- is displayed.
2. Press Tune
> three times until TIME- is displayed.
3. Press Time – or Time + to select 12 HOUR or 24 HOUR.
4. Press Alarm Time (Menu) to exit the setup menu or wait 10 seconds for the setup menu
to end automatically.
Tune
Time
Menu
Alarm
Time
Menu
Svenska Nederlands Italiano Français Español Deutsch Dansk EnglishDanskDeutschItalianoNederlandsSvenska Français Español English
18
Page 21

Adjusting the display brightness
The brightness level of the display automatically adjusts itself for low and high ambient light
conditions. This feature brightens the display for better visibility in high ambient light conditions and dims the display making it less intrusive in low ambient light conditions. High and
low brightness settings can be set independently.
Alarm
1.
Time
Menu
Tune
Tune
Press and hold Alarm Time (Menu) until -SETUP MENU- is displayed.
2. Press Tune
> four times until BRIGHT HI- is displayed.
3. Press Time – or Time + to set the high display brightness level to a value from 8-15.
4. Press Tune
> once until BRIGHT LO- is displayed.
Personalizing Your Wave® Radio ,,
English Deutsch FrançaisDansk Español Italiano SvenskaNederlandsDansk Italiano SvenskaDeutsch NederlandsEnglish FrançaisEspañol
5. Press Time – or Time + to set the low display brightness level from 1-8.
Alarm
6. Press Alarm Time (Menu) to exit the setup menu or wait 10 seconds for the
Time
Menu
setup menu to end automatically.
Setting the room code
Your Wave® radio ,, comes from the factory ready to operate as a second room (room code B)
when connected to a Bose
radio ,, with your Lifestyle® system beyond a second room you will need to change the room
code to match that of the remote control you are using for that room.
Refer to your Lifestyle
Tune
Alarm
Time
Menu
Press and hold Alarm Time (Menu) until -SETUP MENU- is displayed.
1.
2. Press Tune
room letter indicate how the microswitches should be set on the Lifestyle
control.
®
link enabled Lifestyle® system. If you want to use your Wave
®
system owner’s guide for more information on room codes.
®
> six times until ROOM- B is displayed. The dashes following the
®
remote
3. Press Time – or Time + to select a room code other than room B.
Alarm
4. Press Alarm Time (Menu) to exit the setup menu or wait 10 seconds for the setup menu
Time
Menu
to end automatically.
19
Page 22

Personalizing Your Wave® Radio ,,
Performing a system reset
If you wish, you can restore your Wave® radio ,, to the original factory settings.
Alarm
1.
Press and hold Alarm Time (Menu) until -SETUP MENU- is displayed.
2. Press Tune
> seven times until RESET ALL- NO is displayed.
3. Press Time – or Time + to change RESET ALL- NO to RESET ALL- YES.
4. When PRESS 2 TO CONFIRM appears on the display, press Presets button 2. When
the reset is complete, DEFAULTS RESET is displayed.
5. Press Alarm Time (Menu) to exit the setup menu or wait 10 seconds for the setup menu
to end automatically.
Tune
Time
Menu
Alarm
Time
Menu
Svenska Nederlands Italiano Français Español Deutsch Dansk EnglishDanskDeutschItalianoNederlandsSvenska Français Español English
20
Page 23

Cleaning
e
o
p
e
ra
tin
g
n
s
tru
c
tio
n
s
fo
r ty
p
e
s
o
f
b
a
tte
ry
to
b
e
u
s
e
d
Maintaining Your Wave® Radio ,,
Use only a soft dry cloth to clean the enclosure of your Wave® radio ,,. If necessary, you may
use a soft-bristled attachment to gently vacuum the front of the enclosure. Do not use any liquid cleaning solutiuons, solvents, chemicals, alcohol, ammonia, or abrasives.
English Deutsch FrançaisDansk Español Italiano SvenskaNederlandsDansk Italiano SvenskaDeutsch NederlandsEnglish FrançaisEspañol
CAUTION:
Do not allow liquids to spill into any openings in the enclosure. If liquids get into the
unit, turn it off immediately. Call Bose
vice. See the list of phone numbers inside the back cover.
Replacing the remote control battery
WARNING: Keep the remote control battery away from children. It may cause a fire or chemical
burn if mishandled. Do not recharge, disassemble, heat above 212ºF (100ºC), or incinerate.
Dispose of a used battery promptly. Replace only with a battery of the correct type and model
number.
CAUTION:
Eveready, Energizer, Maxell, Toshiba, or Shun Wo CR2032 or DL2032, 3-volt Lithium battery.
To replace the remote battery:
1. Place the remote face down on a flat surface.
2. Using your finger, push the tab lock to the side as shown and hold. Slide the battery
compartment open.
Danger of explosion if battery is incorrectly replaced. Replace only with Duracell,
®
Customer Support as soon as possible to arrange for ser-
f
o
s
d
e
g
e
p
s
tin
ty
u
r
ra
e
e
fo
b
p
s
o
n
to
e
ry
e
tio
c
S
tte
a
tru
b
s
in
3. Remove the old battery and install the new one with the plus (+) symbol facing up.
f
o
s
d
e
g
e
p
tin
us
r ty
ra
e
e
b
p
o
ns fo
e
ry to
e
S
tte
uctio
tr
ba
ins
4. Gently slide the battery compartment closed. It locks automatically
21
Page 24

Maintaining Your Wave® Radio ,,
Troubleshooting
Problem What to do
System does not function • Make sure the power cord is fully plugged into an operating electrical outlet.
• Press On/Off to see if the display lights.
No sound • Turn the volume up.
• Disconnect headphones.
• Check connections for an auxiliary source.
• Press AUX to listen to an external source connected to the AUX IN input.
• Make sure the external source is turned on.
Remote control is inconsistent or does not work
AM reception is weak • Adjust the internal antenna by rotating the unit slightly one way and then the other.
FM reception is weak • Extend the power cord as much as possible. The power cord acts as an FM antenna.
• Operate the remote control closer to the unit.
• Check that the remote control battery is installed with positive (+) polarity facing up.
• Replace the remote control battery.
• Check for interference from room lighting, sunlight, or dust or dirt on lens.
• Try the unit in a different location.
• Move the unit farther from a TV, refrigerator, fluorescent lamps, halogen lamps, dimmer
switches, or other electronic equipment that generates electrical noise.
• If neither suggestion works, you may be in an area of weak AM signal coverage.
• Try an external antenna. Call Bose
®
Customer Service to order an external FM antenna.
Customer service
If you lose your remote, additional remotes are available from Bose® Customer Service.
For additional help in solving problems, contact Bose Customer Service. See the phone
numbers listed inside the back cover of this guide.
Limited warranty
Your Bose Wave® radio ,, is covered by a limited transferable warranty. Details of the limited
warranty are provided on the product registration card that is included in the carton. Please
complete the information section on the card and mail it to Bose. Failure to do so will not
affect your limited warranty rights.
Technical information
Svenska Nederlands Italiano Français Español Deutsch Dansk EnglishDanskDeutschItalianoNederlandsSvenska Français Español English
22
AC power rating
120V~ 50/60Hz 60W
Dimensions
14.6" W x 8.6" D x 4.2" H (36.8 cm x 21.9 cm x 10.6 cm)
Weight
8.7 lb (3.9 kg)
Page 25

Index
A
AC power 4
AC power rating 22
acoustic waveguide 6
alarm volume level 11
alarms, using the 12
AM 9
AM reception 22
AM/PM (12-hour) time 5, 17, 18
ambient light conditions 17, 19
audio device, connecting 15
audio equipment, other 15
automatic shutoff (Sleep) 8
AUX IN connector 13, 15
auxiliary source 8, 22
B
backup memory 5, 10
battery replacement 21
Bose® link 13, 14, 17, 19
brightness level 17, 19
C
cleaning 21
clock display 8
clock setup mode 5
clock time 5, 8
clock time format 5, 18
clock, setting the 5
computer 15
connecting other equipment 13
connections 22
customer service 22
customizing operation 17
D
dimensions 22
dimmer switches 22
dipole antenna 13
display 8, 11, 22
display brightness 17, 19
E
electrical noise 22
electrical outlet 22
external equipment 13
external FM antenna 9, 13, 22
external source 13, 22
F
factory settings 6, 17, 20
factory snooze time setting 12
fluorescent lamps 22
FM 9
FM antenna 5, 13, 22
FM reception 5, 9, 13, 22
FM source 9
frequency band 9
H
halogen lamps 22
headphones 13, 14, 22
help in solving problems 22
I
internal antenna 22
L
Lifestyle® systems 13, 14, 17, 19
listening level 14, 15
listening to FM/AM radio 9
location, selecting a 4
M
military (24-hour) time 5, 17, 18
multi-room expansion 14
N
no sound 22
O
operating information 8
P
personalizing 17
poor reception 13
power 4
power cord 4, 5, 9, 13, 22
power outage 5, 10
preset number 10
presets 10
press and hold operations 7
Q
quick recall 10
English Deutsch FrançaisDansk Español Italiano SvenskaNederlandsDansk Italiano SvenskaDeutsch NederlandsEnglish FrançaisEspañol
23
Page 26

Index
R
radio alarm 11
radio frequency 9
radio station 9, 10
rapid adjustment 5
rear panel 13, 14, 15
refrigerator 22
registration card 22
remote control 7
remote control battery 21, 22
restore audio 7
room code, setting 17, 19
S
second room 19
setting alarm 11
setup menu 17, 19
shipping carton 4
sleep timer setup mode 8
snooze 12
snooze control 17
snooze time 12, 18
sounding alarm 12
station frequency 9, 10
stereo cable 15
stereo headphone connector 13
stereo input connector 13
stopping a sounding alarm 12
stored presets 10
storing a radio station 10
system operation 6
system reset 20
system settings 6, 8, 17, 18, 19, 20
system setup mode 20
T
talk radio broadcasts 10
TALK RADIO mode 10
tapered waveguide 6
technical information 22
time increment 18
troubleshooting 22
tuning the radio 9
turning alarm on and off 12
turning the radio on 9
TV 15, 22
U
unpacking 4
V
VCR 15
video game 15
volume level 8, 15, 22
W
wake to a FM/AM radio, setting 11
wake-up time 11
warranty 22
waveguide speaker technology 6
weak AM reception 22
weak FM reception 22
weak reception 9
weight 22
Svenska Nederlands Italiano Français Español Deutsch Dansk EnglishDanskDeutschItalianoNederlandsSvenska Français Español English
24
Page 27

Bose Corporation
USA Customer Support
Bose Corporation, The Mountain
Framingham, MA 01701-9168
1-800-367-4008
USA Customer Service
Bose Corporation, 1 New York Ave.
Framingham, MA 01701-9168
1-508-766-1900
Canada Customer Support
Bose Ltd., 1-35 East Beaver Creek Rd.
Richmond Hill, Ontario L4B 1B3
1-800-465-2673
European Office
Bose Products B.V., Nijverheidstraat 8
1135 GE Edam, Nederland
TEL 0299-390111
FAX 0299-390114
Australia
Bose Pty Limited,
Unit 3, 2 Holker Street,
Newington NSW, 2127
TEL +61 (0)2 8737 9999
FAX +61 (0)2 8737 9924
Deutschland
Postfach 1468
48504 Nordhorn
TEL 0130-2673555
FAX 05921-724250
France
6, Rue Saint Vincent
78100 Saint Germain en Laye
TEL 01-3061 6363
FAX 01-3061 4105
Nederland
Bose B.V., Nijverheidstraat 8
1135 GE Edam, Nederland
TEL 0299-390111
FAX 0299-390114
United Kingdom
Customer Support
Freepost EX 151
Exeter EX1 1ZY
TEL 0800 614 293
FAX 0870 240 2013
Bose China
Bose Electronics (Shanghai Co., Ltd)
2203-2205 22F, West Gate Tower
1038 West Nanjing Road
MeiLongzhen Plaza
Shanghai 200041,
Peoples Republic of China
TEL 86 21 62713800
Bose Hong Kong
Bose Limited
Suite 2410-11 Shell Tower
Times Square
1 Matheson Street
Causeway Bay, Hong Kong
TEL 852 2110 3330
Bose Taiwan
Worldwide House
Room 905, Floor 9
131 Min Sheng East Road
Section 3
Taipei, Taiwan
TEL 886 2 2514 7676
Bose India
Bose Corporation India Private Limited
4th Floor, Shriram Bhartiya Kala Kendra
1 Copernicus Marg
New Delhi 110 001,
India
TEL 91 11 2307 3825 / 26 /27
India Toll Free: 1600 11 2673
Website: www.boseindia.com
Atlas Hi-Fi Pte. Ltd.
68 Orchard Road
#03-19/21 Plaza Singapura
Singapore 238839,
Republic of Singapore
TEL 65-6-339-0966
The Asavasopon Co. Ltd.
50-52 Siphya Road
Mahaprudtharam, Bangrak
Bangkok 10500,
Thailand
TEL 66-2-234-6467
PT Audio Pratama
JL. Lodan Raya No. 1
Block CO/CN
Jakarta 14430,
Indonesia
TEL 62-21-659-8719
CSI Corporation
Seki Building
23, 2-Ga Namsan-Dong
Joong-Gu
Seoul 100-042,
South Korea
TEL 82-2-344-635-114
Eleksis Marketing
Corporation
269 Connecticut Street
Greenhills East
Mandaluyong City
Metro Manila 1550,
Philippines
TEL 63-2-724-9566
G&M International L.L.C.
P.O. Box 1229
Dubai
United Arab Emirates
TEL 971-4-2669-000
Sound Imports
Shop 40
The Mall of Rosebank
Cradock Avenue
Rosebank 2196,
South Africa
TEL 27-11-880-1933
World Wide Web
www.bose.com
English Deutsch FrançaisDansk Español Italiano SvenskaNederlandsDansk Italiano SvenskaDeutsch NederlandsEnglish FrançaisEspañol
25
Page 28

©2005 Bose Corporation, The Mountain,
Framingham, MA 01701-9168 USA
282989 AM Rev.00 CCM-001471
 Loading...