


 Loading...
The Wave/PC™ Interactive System
Owner’s Guide
April 12, 2001
PDF259774_00

Safety Information
WARNING: To reduce the risk of fire or electric shock, do not expose the Wave/PC™ system to rain or moisture.
As with any electronic product, use care not to spill liquids into any part of the Wave/PC unit. Liquids can cause a failure and/or a fire hazard.
Keep the remote control lithium battery away from children. It may cause a fire or chemical burn if mishandled. Do not recharge, disassemble, heat above 100˚C (212˚F), or incinerate. Dispose of used battery promptly. Replace only with a battery of the correct type and model number.
CAUTION |
RISK OF ELECTRICAL SHOCK |
DO NOT OPEN |
CAUTION: TO REDUCE THE RISK OF ELECTRIC SHOCK, |
DO NOT REMOVE COVER (OR BACK). |
NO USER-SERVICABLE PARTS INSIDE. |
REFER SERVICING TO QUALIFIED PERSONNEL. |
AVIS |
RISQUE DE CHOC ÉLECTRIQUE |
NE PAS OUVRIR |
ATTENTION : POUR RÉDUIRE LE RISQUE DE DÉCHARGE |
ÉLECTRIQUE, NE RETIREZ PAS LE COUVERCLE (OU |
L’ARRIÈRE). IL NE SE TROUVE ÀL’INTÉRIEURAUCUNE |
PIÈCE POUVANT ÊTRE RÉPARÉE PAR L’USAGER. |
S’ADRESSER À UN RÉPARATEUR COMPÉTENT. |
These CAUTION marks are located on the bottom of your Wave/PC unit:
The lightning flash with arrowhead symbol, within an equilateral triangle, is intended to alert the user to the presence of uninsulated dangerous voltage within the system enclosure that may be of sufficient magnitude to constitute a risk of electric shock.
The exclamation point within an equilateral triangle, as marked on the system, is intended to alert the user to the presence of important operating and maintenance instructions in this owner’s guide.
CAUTION: To prevent electric shock, match wide blade of plug to wide slot, insert fully.
ATTENTION: Pour éviter les chocs électriques, introduire la lame la plus large de la fiche dans la borne correspondante de la prise et pousser jusqu’au fond.
Batteries
Please dispose of used batteries properly, following any local regulations. Do not incinerate.
Please read this owner’s guide
Please take the time to follow this owner’s guide carefully. It will help you set up and operate your system properly, and enjoy all of its advanced features. Save your owner’s guide for future reference.
Note: No naked flame sources, such as lighted candles, should be placed on the apparatus.
Note: DO NOT place the Wave/PC unit on any heat-sensitive surface, such as the finished surface of fine furniture. Like all electrical equipment, it generates some heat.
© 2001 Bose Corporation. No part of this work may be reproduced, modified, distributed or otherwise used without prior written permission.
Bose, Wave, Wave/PC and the Wave radio design are registered trademarks of Bose Corporation.
All other trademarks referenced herein are property of their respective owners.
2 |
April 12, 2001 |
PDF259774_00 |

Safety Information
1.Read these instructions – for all components before using this product.
2.Keep these instructions – for future reference.
3.Heed all warnings – on the product and in the owner’s guide.
4.Follow all instructions.
5.Do not use this apparatus near water or moisture –
Do not use this product near a bathtub, washbowl, kitchen sink, laundry tub, in a wet basement, near a swimming pool, or anywhere else that water or moisture are present.
6.Clean only with a dry cloth – and as directed by Bose® Corporation. Unplug this product from the wall outlet before cleaning.
7.Do not block any ventilation openings. Install in accordance with the manufacturer’s instructions –
To ensure reliable operation of the product and to protect it from overheating, put the product in a position and location that will not interfere with its proper ventilation. For example, do not place the product on a bed, sofa, or similar surface that may block the ventilation openings. Do not put it in a built-in system, such as a bookcase or a cabinet that may keep air from flowing through its ventilation openings.
8.Do not install near any heat sources, such as radiators, heat registers, stoves or other apparatus (including amplifiers) that produce heat.
9.Do not defeat the safety purpose of the polarized or grounding-type plug. A polarized plug has two blades with one wider than the other. A groundingtype plug has two blades and a third grounding prong. The wider blade or third prong are provided for your safety. If the provided plug does not fit in your outlet, consult an electrician for replacement of the obsolete outlet.
10.Protect the power cord from being walked on or pinched, particularly at plugs, convenience receptacles, and the point where they exit from the apparatus.
11.Only use attachments/accessories specified by the manufacturer.
12.Use only with a cart, stand, tripod, bracket or table specified by the manufacturer or sold
with the apparatus. When a cart is used, use caution when moving the cart/apparatus combination to avoid injury from tip-over.
13.Unplug this apparatus during lightning storms or when unused for long periods of time – to prevent damage to this product.
14.Refer all servicing to qualified service personnel. Servicing is required when the apparatus has been
damaged in any way: such as power-supply cord or plug is damaged; liquid has been spilled or objects have fallen into the apparatus; the apparatus has been exposed to rain or moisture, does not operate normally, or has been dropped – Do not attempt to service this product yourself. Opening or removing covers may expose you to dangerous voltages or other hazards. Please call Bose to be referred to an authorized service center near you.
15.To prevent risk of fire or electric shock, avoid overloading wall outlets, extension cords, or integral convenience receptacles.
16.Do not let objects or liquids enter the product – as they may touch dangerous voltage points or short-out parts that could result in a fire or electric shock.
17.See product enclosure bottom for safety related markings.
18.Use Proper Power Sources – Plug the product into a proper power source, as described in the operating instructions or as marked on the product.
19.Avoid Power Lines – Use extreme care when installing an outside antenna system to keep from touching power lines or circuits, as contact with them may be fatal. Do not install external antennas near overhead power lines or other electric light or power circuits, nor where an antenna can fall into such circuits or power lines.
20.Ground All Outdoor Antennas – If an external antenna or cable system is connected to this product, be sure the antenna or cable system is grounded. This will provide some protection against voltage surges and built-up static charges.
Section 810 of the National Electrical Code ANSI/ NFPA No. 70 provides informaiton with respect to proper grounding of the mast and supporting structure, grounding of the lead-in wire to an antenna discharge unit, size of grounding conductors, location of antenna-discharge unit, connection to grounding electrodes, and requirements for the ground electrode. Refer to the antenna grounding illustration on this page.
PDF259774_00 |
April 12, 2001 |
3 |
Safety Information
Information about products that generate electrical noise
If applicable, this equipment has been tested and found to comply with the limits for a Class B digital device, pursuant to Part 15 of the FCC rules. These limits are designed to provide reasonable protection against harmful interference in a residential installation. This equipment generates, uses, and can radiate radio frequency energy and, if not installed and used in accordance with the instructions, may cause harmful interference to radio communications. However, this is no guarantee that interference will not occur in a particular installation. If this equipment does cause harmful interference to radio or television reception, which can be determined by turning the equipment off and on, you are encouraged to try to correct the interference by one or more of the following measures:
•Reorient or relocate the receiving antenna.
•Increase the separation between the equipment and receiver.
•Connect the equipment to an outlet on a different circuit than the one to which the receiver is connected.
•Consult the dealer or an experienced radio/TV technician for help.
Note: Unauthorized modification of the receiver or radio remote control could void the user’s authority to operate this equipment.
This product complies with the Canadian ICES-003 Class B specifications.
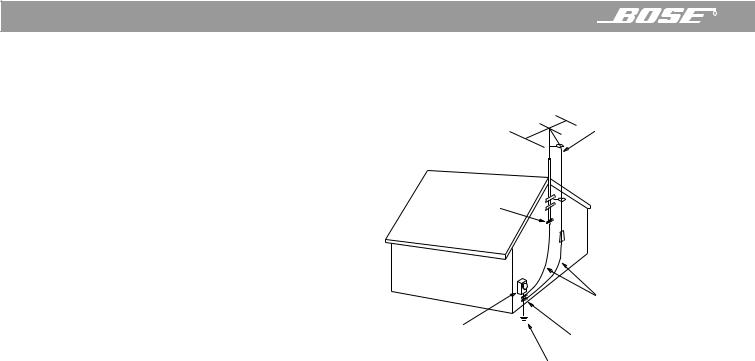
Antenna grounding
Example of antenna grounding as per National Electrical Code, ANSI/NFPA 70.
Antenna lead-in wire
Ground clamp
Antenna discharge unit

 (NEC Section 810-20)
Grounding conductors (NEC Section 810-21)
Electric service |
|
equipment |
Ground clamps |
Power service grounding electrode system (NEC ART 250 Part H)
Note to CATV system installer
This reminder is provided to call the CATV system installer’s attention to Article 820-40 of the NEC (of USA) that provides guidelines for proper grounding. In particular, it specifies that the cable ground shall be connected to the grounding system of the building, as close to the point of cable entry as is practical.
4 |
April 12, 2001 |
PDF259774_00 |

Contents
System Setup . . . . . . . . . . . . . . . . . . . . . . . . . . . . . . . . . . . . . . . . . . . . . . . . . . . . . . . . . . . . . . . . . . . . . |
6 |
Before you begin . . . . . . . . . . . . . . . . . . . . . . . . . . . . . . . . . . . . . . . . . . . . . . . . . . . . . . . . . . . . |
6 |
Installing the Wave/PC™ system hardware . . . . . . . . . . . . . . . . . . . . . . . . . . . . . . . . . . . . . . . . . |
7 |
Installing the Wave/PC application software . . . . . . . . . . . . . . . . . . . . . . . . . . . . . . . . . . . . . . . |
12 |
System Overview . . . . . . . . . . . . . . . . . . . . . . . . . . . . . . . . . . . . . . . . . . . . . . . . . . . . . . . . . . . . . . . . . . . |
15 |
The Wave/PC system controls . . . . . . . . . . . . . . . . . . . . . . . . . . . . . . . . . . . . . . . . . . . . . . . . . . |
15 |
Turning your Wave/PC system on and off . . . . . . . . . . . . . . . . . . . . . . . . . . . . . . . . . . . . . . . . . |
15 |
Wave/PC application window . . . . . . . . . . . . . . . . . . . . . . . . . . . . . . . . . . . . . . . . . . . . . . . . . . |
16 |
Wave/PC remote control . . . . . . . . . . . . . . . . . . . . . . . . . . . . . . . . . . . . . . . . . . . . . . . . . . . . . . |
17 |
Wave/PC system audio and your computer system . . . . . . . . . . . . . . . . . . . . . . . . . . . . . . . . . |
17 |
The Wave/PC system monitor . . . . . . . . . . . . . . . . . . . . . . . . . . . . . . . . . . . . . . . . . . . . . . . . . . |
19 |
Operating the CD Player/Recorder . . . . . . . . . . . . . . . . . . . . . . . . . . . . . . . . . . . . . . . . . . . . . . . . . . . . . |
20 |
Playing an audio CD . . . . . . . . . . . . . . . . . . . . . . . . . . . . . . . . . . . . . . . . . . . . . . . . . . . . . . . . . . |
20 |
Recording an audio CD . . . . . . . . . . . . . . . . . . . . . . . . . . . . . . . . . . . . . . . . . . . . . . . . . . . . . . . |
22 |
Setting CD player/recorder setup options . . . . . . . . . . . . . . . . . . . . . . . . . . . . . . . . . . . . . . . . . |
24 |
Listening to Music Files . . . . . . . . . . . . . . . . . . . . . . . . . . . . . . . . . . . . . . . . . . . . . . . . . . . . . . . . . . . . . . |
27 |
Selecting the music files player . . . . . . . . . . . . . . . . . . . . . . . . . . . . . . . . . . . . . . . . . . . . . . . . . |
27 |
Navigating the music finder . . . . . . . . . . . . . . . . . . . . . . . . . . . . . . . . . . . . . . . . . . . . . . . . . . . . |
28 |
Maintaining your music library . . . . . . . . . . . . . . . . . . . . . . . . . . . . . . . . . . . . . . . . . . . . . . . . . . |
31 |
Creating your own music playlists . . . . . . . . . . . . . . . . . . . . . . . . . . . . . . . . . . . . . . . . . . . . . . . |
32 |
Setting the Music Files player setup options . . . . . . . . . . . . . . . . . . . . . . . . . . . . . . . . . . . . . . . |
33 |
Listening to Web Radio Stations . . . . . . . . . . . . . . . . . . . . . . . . . . . . . . . . . . . . . . . . . . . . . . . . . . . . . . . |
36 |
Selecting the Web Radio mode . . . . . . . . . . . . . . . . . . . . . . . . . . . . . . . . . . . . . . . . . . . . . . . . . |
36 |
Setting presets to play Web radio stations . . . . . . . . . . . . . . . . . . . . . . . . . . . . . . . . . . . . . . . . |
38 |
Setting Web radio setup options . . . . . . . . . . . . . . . . . . . . . . . . . . . . . . . . . . . . . . . . . . . . . . . . |
39 |
Listening to AM/FM Radio Stations . . . . . . . . . . . . . . . . . . . . . . . . . . . . . . . . . . . . . . . . . . . . . . . . . . . . |
40 |
Selecting the AM/FM radio . . . . . . . . . . . . . . . . . . . . . . . . . . . . . . . . . . . . . . . . . . . . . . . . . . . . . |
40 |
Setting presets to play AM/FM radio stations . . . . . . . . . . . . . . . . . . . . . . . . . . . . . . . . . . . . . . |
42 |
Setting AM/FM radio setup options . . . . . . . . . . . . . . . . . . . . . . . . . . . . . . . . . . . . . . . . . . . . . . |
42 |
General and Internet Setup Options . . . . . . . . . . . . . . . . . . . . . . . . . . . . . . . . . . . . . . . . . . . . . . . . . . . . |
44 |
Setting general setup options . . . . . . . . . . . . . . . . . . . . . . . . . . . . . . . . . . . . . . . . . . . . . . . . . . |
44 |
Setting Internet setup options . . . . . . . . . . . . . . . . . . . . . . . . . . . . . . . . . . . . . . . . . . . . . . . . . . |
45 |
Using the Wave/PC Unit Controls . . . . . . . . . . . . . . . . . . . . . . . . . . . . . . . . . . . . . . . . . . . . . . . . . . . . . . |
47 |
The Wave/PC unit control panel . . . . . . . . . . . . . . . . . . . . . . . . . . . . . . . . . . . . . . . . . . . . . . . . . |
47 |
The Wave/PC unit display . . . . . . . . . . . . . . . . . . . . . . . . . . . . . . . . . . . . . . . . . . . . . . . . . . . . . |
47 |
Setting the clock time . . . . . . . . . . . . . . . . . . . . . . . . . . . . . . . . . . . . . . . . . . . . . . . . . . . . . . . . . |
49 |
Using the sleep mode . . . . . . . . . . . . . . . . . . . . . . . . . . . . . . . . . . . . . . . . . . . . . . . . . . . . . . . . |
49 |
Setting and using alarms . . . . . . . . . . . . . . . . . . . . . . . . . . . . . . . . . . . . . . . . . . . . . . . . . . . . . . |
49 |
Making External Input/Output Connections . . . . . . . . . . . . . . . . . . . . . . . . . . . . . . . . . . . . . . . . . . . . . . |
51 |
Connecting an external audio source to the Wave/PC unit . . . . . . . . . . . . . . . . . . . . . . . . . . . . |
51 |
Selecting an external audio source . . . . . . . . . . . . . . . . . . . . . . . . . . . . . . . . . . . . . . . . . . . . . . |
51 |
Connecting external speakers to your Wave/PC unit . . . . . . . . . . . . . . . . . . . . . . . . . . . . . . . . |
51 |
Input connection details . . . . . . . . . . . . . . . . . . . . . . . . . . . . . . . . . . . . . . . . . . . . . . . . . . . . . . . |
52 |
Reference . . . . . . . . . . . . . . . . . . . . . . . . . . . . . . . . . . . . . . . . . . . . . . . . . . . . . . . . . . . . . . . . . . . . . . . . |
53 |
Cleaning the Wave/PC unit . . . . . . . . . . . . . . . . . . . . . . . . . . . . . . . . . . . . . . . . . . . . . . . . . . . . |
53 |
Replacing the batteries . . . . . . . . . . . . . . . . . . . . . . . . . . . . . . . . . . . . . . . . . . . . . . . . . . . . . . . |
53 |
Technical information . . . . . . . . . . . . . . . . . . . . . . . . . . . . . . . . . . . . . . . . . . . . . . . . . . . . . . . . . |
53 |
Warranty period . . . . . . . . . . . . . . . . . . . . . . . . . . . . . . . . . . . . . . . . . . . . . . . . . . . . . . . . . . . . . |
53 |
Troubleshooting . . . . . . . . . . . . . . . . . . . . . . . . . . . . . . . . . . . . . . . . . . . . . . . . . . . . . . . . . . . . . |
54 |
Glossary . . . . . . . . . . . . . . . . . . . . . . . . . . . . . . . . . . . . . . . . . . . . . . . . . . . . . . . . . . . . . . . . . . . . . . . . . . |
59 |
Index . . . . . . . . . . . . . . . . . . . . . . . . . . . . . . . . . . . . . . . . . . . . . . . . . . . . . . . . . . . . . . . . . . . . . . . . . . . . |
61 |
PDF259774_00 |
April 12, 2001 |
5 |

System Setup
Before you begin
Thank you for purchasing the Bose® Wave/PC™ interactive system. This system combines the power of your computer with the benefits of award-winning patented acoustic waveguide speaker technology to provide an entirely new way to listen to music. The Wave/PC system gives you one-touch access to your favorite AM/FM or Internet radio stations, music files, and your entire music collection in one easy-to-use package.
To fully appreciate the exciting features of this system, please take the time to read this owner’s guide. It tells you how to set up and operate your Wave/PC interactive system and enjoy extraordinary sound.
System benefits
•Play and record CDs using your computer’s CD-ROM drive.
•Listen to AM/FM radio with the system’s high performance stereo tuner.
•Listen to Web radio stations through your Internet connection.
•Listen to music files stored on your computer’s hard drive.
•Assign up to six presets for AM/FM, Web Radio, and Music Files.
•Control the system from anywhere in the room using the Wave/PC remote control.
•Set one or both of the independent alarms.
•Listen to an additional sound source, such as a tape player, through an auxiliary input.
System installation
The Wave/PC interactive system is installed in two phases. The first phase, “Installing the Wave/PC™ system hardware” on page 7, describes setting up the hardware components of the system. The second phase, “Installing the Wave/PC™ application software” on page 12, guides you through the software installation process.
For your records
The Wave/PC system serial number is located on the bottom of the Wave/PC unit. Serial number: ____________________________
Purchase date: ______________________________________
We suggest you keep your sales receipt and warranty card together with this owner’s guide.
6 |
April 12, 2001 |
PDF259774_00 |
System Setup
Installing the Wave/PC™ system hardware
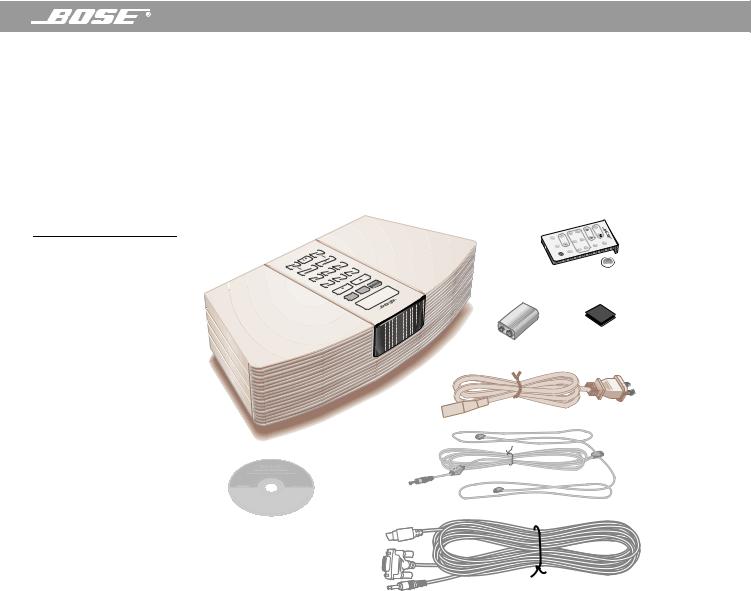
Unpacking the carton
Carefully unpack your system (Figure 1) and save all packing materials. The original packing materials provide the safest way to transport your Wave/PC system. If any part of the product appears damaged, do not attempt to use it. Notify Bose® Customer Service immediately. (See phone number listings on the inside back cover.)
 Note: Find the serial number on the bottom of the Wave/PC unit. Write it on your warranty card and in the space provided on page 6.
Figure 1
Wave/PC unit
Carton contents
A |
|
|
|
g |
Al |
Remote control |
|
|
|
1 |
T |
amr |
|
|
4 |
|
|
unni |
|
|
UX |
V |
|
|
|
|
|
|
olume |
5 |
Presets |
2 |
|
|
Wave |
F AM |
|
|
|
|
|
|
M |
|
|
3 |
|
|
Radio |
M |
|
6 |
|
|
|
|
ute |
|
|
|
|
|
 Lithium battery
Remote control
mounting strip
9V battery
Power
cord
Wave/PC |
FM dipole |
|
Installation CD |
||
antenna |
||
|
Wave/PC system cable (15 ft (4.6m))
Selecting a location for the Wave/PC unit
Your Wave/PC unit includes a 15 ft (4.6 m) interface cable allowing for greater flexibility in placement. Feel free to place and position the Wave/PC unit where you find the sound most pleasing. However, keep these useful guidelines in mind when selecting its location:
 Note: Do not place the Wave/PC unit very close to your computer monitor. Doing so will degrade AM/FM tuner reception.
•Make sure the Wave/PC unit is within reach (15 ft (4.6m)) of your computer.
•For best performance, place the Wave/PC unit at least 2 ft (61 cm) away from your typical seating position.
•Do not place your Wave/PC unit on top of the monitor.
•For best bass performance, locate your Wave/PC unit within 2 ft (61 cm) of a wall.
•Place the Wave/PC unit on a flat surface.
•Do not place the Wave/PC unit on a metal surface. Doing so could degrade AM reception.
PDF259774_00 |
April 12, 2001 |
7 |
System Setup
Setting up the Wave/PC™ remote control
WARNING: Keep the remote control battery away from children. It may cause a fire or chemical burn if mishandled. Do not recharge, disassemble, heat above 100˚C (212˚F), or incinerate. Dispose of used battery promptly.
 CAUTION: Danger of explosion if battery is incorrectly replaced. Replace only with the same or equivalent type.
 Note: Some remote control functions will not work until your Wave/PC unit is connected to your computer and the Wave/PC software is installed.
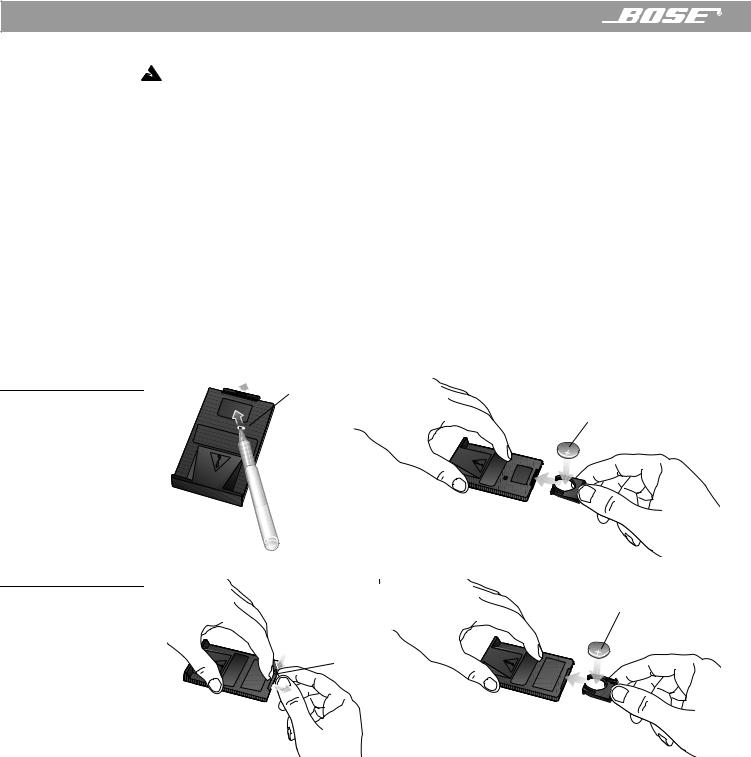
Your remote control may be one of two types. Each is identified by the way the battery compartment unlocks to install or replace the battery (Figure 2 or Figure 3).
1.Place the remote control face down on a flat surface.
2.If your remote has a slot on the back (Figure 2), follow step A. Otherwise, follow step B and refer to Figure 3:
A.Insert the tip of a ballpoint pen into the slot. Push to the side (as shown) and hold. Slide the battery compartment open with your finger.
B.Using your finger, push the tab lock to the side (as shown) and hold. Slide the battery compartment open.
Figure 2
Slot
Locating the slot-type |
|
|
|
|
safety lock |
|
|
|
+ Symbol |
|
|
|
|
|
of |
used |
be |
|
|
|
types for |
to |
battery |
|
|
operating |
See |
||
Figure 3
Locating the tab-type safety |
+ Symbol |
lock |
Tab
 Note: Use only a Duracell, Eveready, Maxell, or Toshiba CR2032 or DL2032 lithium battery (available at electronics stores). If you have difficulty finding a replacement battery, contact Bose® Customer Service. (See phone numbers on the inside back cover.)
3.Keeping the remote control face down, insert the new battery into the compartment with the + symbol facing up.
4.Gently slide the battery compartment closed. It locks automatically.
8 |
April 12, 2001 |
PDF259774_00 |
System Setup
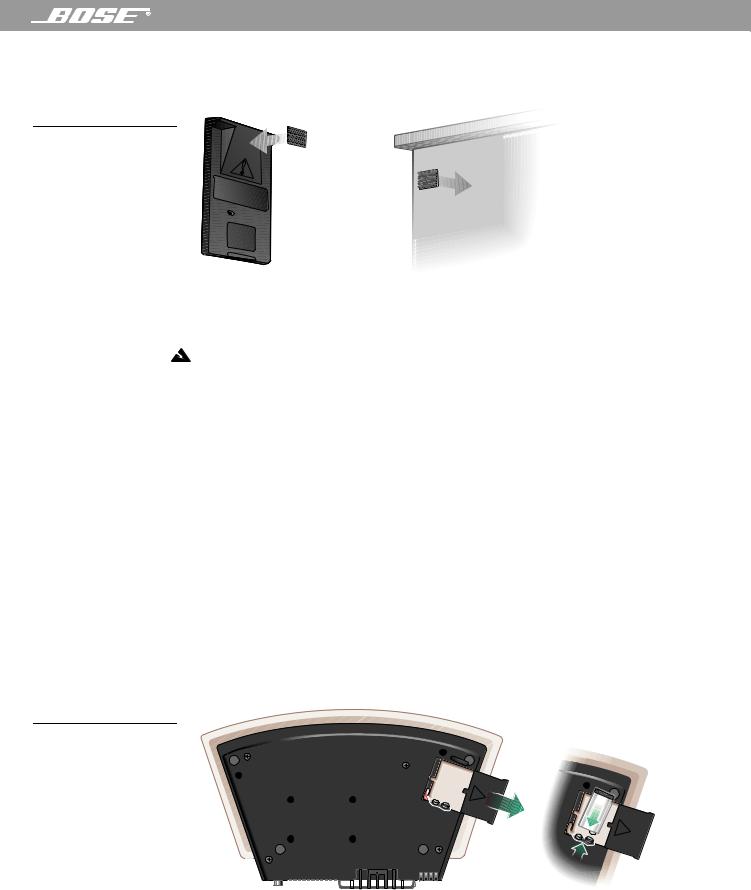
5.Use the supplied mounting strip if you want to attach the remote to a surface in your listening room. Peel off the protective backing to stick one piece to the back of the remote and the other to the selected surface (Figure 4).
Figure 4
Installing the mounting strip for the remote control
See operating |
|
|||
instructions |
|
|
|
|
battery |
for |
types |
of |
|
to |
|
|||
|
be |
|||
|
|
|
used |
|
Installing the 9V battery in the Wave/PC™ unit
WARNING: Keep the battery away from children. It may cause a fire or chemical burn if mishandled. Do not recharge, disassemble, heat above 100˚C (212˚F), or incinerate. Dispose of a used battery promptly. Replace only with a battery of the same type or equivalent.
The 9V battery maintains clock and alarm settings and operates the Wave/PC™ unit’s alarm system for approximately 48 hours during a power loss, or while the radio is temporarily unplugged.
 Note: The battery does not provide power for Wave/PC unit operation or for its display.
Operating without this battery results in the loss of clock and alarm settings, and preset button settings in the event of a power loss, but does not harm the radio.
Use a standard 9V battery (IEC 6F22 in Europe), available at most retail stores.
1.Carefully turn the Wave/PC unit upside down.
2.Locate the battery compartment on the bottom (Figure 5).
3.Press the arrow on the cover to slide the compartment open.
4.Lift the battery clip out of the compartment and align it with the battery as shown. Make sure you match the polarity of the battery with that of the battery clip.
5.Snap the battery clip firmly onto the battery.
6.Place the battery in the compartment and slide the cover closed. Then turn the Wave/PC unit right side up.
Figure 5
Installing the 9V battery

 +
+
|
|
|
|
|
|
|
|
|
|
|
|
|
|
|
|
PDF259774_00 |
April 12, 2001 |
9 |
|||||

System Setup
Connecting the Wave/PC™ unit to your computer
This step tells you how to connect the Wave/PC unit to your computer using the cable supplied with your Wave/PC system. Illustrations of the two most typical computer connection panels are provided (Figure 6 and Figure 7). Refer to the figure that best represents your computer and the following steps.
 Note: If you are using stereo speakers with your computer, disconnect them before continuing with this procedure.
1.Turn your computer off.
2.Insert the DIN connector of the Wave/PC system cable into the DIN socket on the rear panel of the Wave/PC unit (Figure 6 or Figure 7).
3.Connect the serial data port (DB-9) connector of the Wave/PC system cable to the serial (RS232) data port of your computer (Figure 6 or Figure 7).
4.Connect the audio plug (3.5 mm) of the Wave/PC system cable to the audio output jack of your computer (Figure 6 or Figure 7).
 CAUTION: Do not connect the Wave/PC unit to an AC (mains) outlet until after connecting your Wave/PC unit to your PC.
Figure 6
Example 1: Wave/PC system connections
Serial data port
Serial data port (DB9) connector
Rear panel of computer
DIN socket
Audio |
output |
jack |
DIN connector
Wave/PC system cable
Audio plug
10 |
April 12, 2001 |
PDF259774_00 |
|
|
System Setup |
Figure 7 |
Rear panel of computer |
|
Example 2: Wave/PC™ |
|
|
|
|
|
system connections |
|
|
Audio plug |
Audio |
DIN socket |
|
output |
|
|
jack |
|
Serial data port
|
DIN connector |
Serial data |
Wave/PC system cable |
port (DB9) |
|
connector |
|
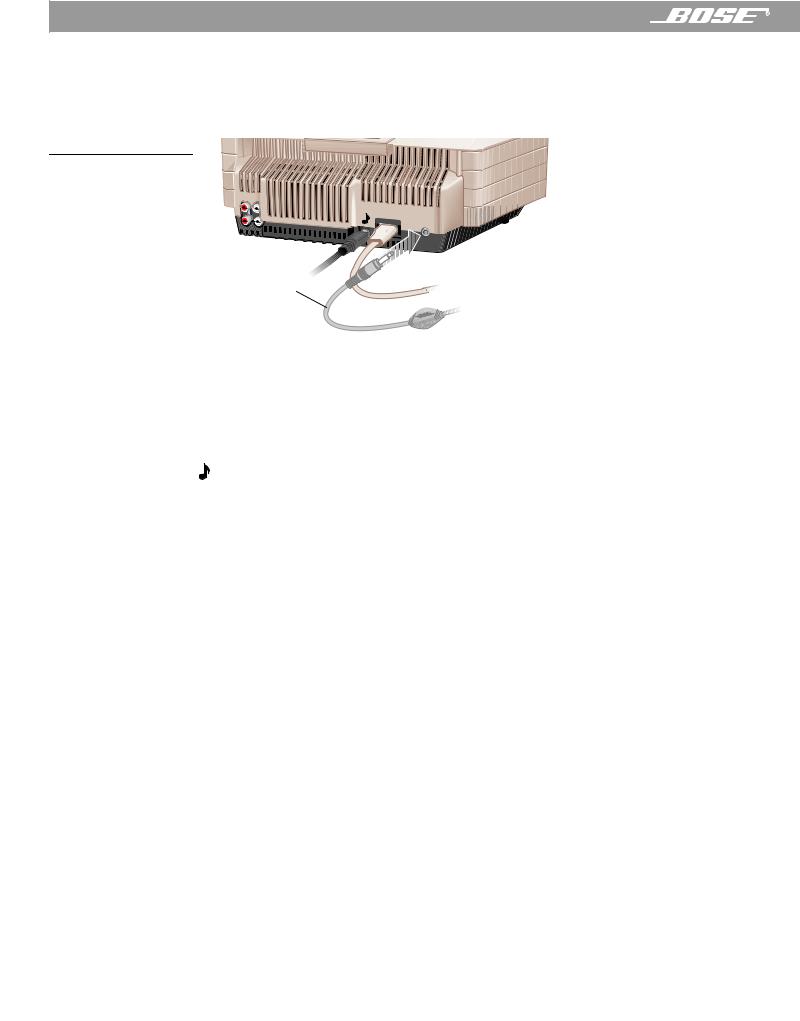
Connecting the power cord to the Wave/PC unit
1.Plug the small end of the power cord into the power jack on the back of your Wave/PC unit (Figure 8). The connector is shaped to fit in only one direction. Line up the flat edge of the plug with the flat edge on the side of the jack.
2.Connect the other end of the power cord to an AC (mains) outlet. The clock time display should begin flashing. The flashing will stop during software installation when the clock is set by your computer.
Figure 8
Connecting the power cord
|
|
|
|
|
|
|
|
|
|
|
|
|
|
|
|
|
|
|
|
|
|
|
|
|
|
|
|
|
|
|
|
|
|
|
|
|
|
|
|
|
|
|
|
|
|
|
|
|
|
|
|
|
|
|
|
|
|
|
|
|
|
|
|
|
|
|
|
|
|
|
|
|
|
|
|
|
|
|
|
|
|
|
|
PDF259774_00 |
|
|
|
|
|
April 12, 2001 |
11 |
||||
System Setup
Connecting the external FM antenna
FM radio reception is improved by connecting the supplied FM antenna to the external antenna connector on the back of the Wave/PC™ unit (Figure 9).
 Note: If you are not using the FM dipole antenna, the power cord serves as an antenna.
Figure 9
Location of external FM antenna connector
External FM antenna (supplied)
Installing the Wave/PC™ application software
The installation CD will install the Wave/PC application software and several music samples on your computer’s hard drive. If you have any trouble with the installation, see “Installation troubleshooting” on page 58.
Note: Before you install the software:
•Make sure the Wave/PC system hardware is correctly set up before installing the application software (see “Installing the Wave/PC™ system hardware” on page 7).
•Make sure your computer has at least 32 MB RAM and 200 MB of free hard drive space.
•Exit all Windows programs and turn off virus detection and screen-saver software. This frees up memory and prevents possible conflicts between the installation and other programs.
•If you are using a portable computer, or any computer with a dial-type volume control, set the volume control to maximum.
1.Turn on your computer.
2.Insert the Wave/PC software CD into your computer’s CD-ROM drive. If the install program does not start automatically, go to the Start menu and select Run. In the Run window, open d:\Setup.exe, where d is the letter of your computer’s CD-ROM drive.
3.Wait while the Wave/PC setup program prepares to install the software.
4.When the End User License Agreement appears, please read it. Then, select “I agree to the terms of this license agreement” and click Next.
 Note: If you do not agree with the license agreement, the setup program will not proceed.
5.The “New Installation” dialog box appears with a description of the installation process. Click Next to continue.
6.In the “Directory Selection” dialog box, click Next to accept the default directory, or click Browse to select another directory, and then click Next.
7.In the “Bose® Music Collection” dialog box, select one of the options (to install the music files or not). Click Next to accept the default destination directory, or click Browse to select another directory, and then click Next.
12 |
April 12, 2001 |
PDF259774_00 |

System Setup
 Note: If the Next button is not available, check to see if your computer’s hard drive has at least 200 MB of free storage space.
8.In the AM/FM station tables dialog box you can choose to install station tables for the entire US (occupies an additional 150 MB of disk space) or just your local area. Select one and click Next. Setup proceeds to install the software and related components.
9.Select one of the restart options. When you are ready to restart your computer, remove any disks from their drives and click Next.
10.After restarting your computer, wait while the Windows operating system begins to configure your system. It may take a minute or two for the installation to continue.
 Note: After restart, if the Wave/PC™ system cable is not correctly installed, you are prompted to make the necessary connections before proceeding. Follow the instructions on the screen. If necessary, refer to “Connecting the Wave/PC™ unit to your computer” on page 10. When you see “Connection Established”, click the Next button.
11.When you see the “Check your sound card connection” dialog box, you should hear music playing. If so, your audio connection is correct. If you cannot hear the music, try moving the volume slider control to raise the volume. If you still do not hear music, check your audio connection again. See “Connecting the Wave/PC™ unit to your computer” on page 10, or refer to the user’s guide for your computer.
Click Next to start a volume calibration and continue.
12.Choose a way to register your product:
•Select “Connect to the Internet now. Register the product and get the latest station information now.” Click Next to continue.
OR
•Select “Work offline. Establish an Internet connection later. Get station information from the installation CD.” Click Next to continue.
 Note: Product registration requires an Internet connection. If you are required to launch a separate application for connecting to the Internet, do so now.
Registration information is used to configure your Wave/PC system and provide product support. The registration process also enables some basic functionality, such as the CDDB lookup feature. If you do not register, the CDDB lookup feature will not work.
The information gathered during registration is for the sole use of Bose Corporation and CDDB, Inc. CDDB is a free on-line service that provides artist, title, track, and other information about the CDs you play. For more information, see “Using CDDB” on page 23.
13.Enter your registration information.
A.Enter your first name, last name and E-mail address. Click Next.
B.Enter your ZIP code. All other fields are optional. Click Next.
C.Select any or all of the next four options and click Next.
D.The setup program logs on to the Bose® server and uploads the registration information. AM/FM and Web Radio station information is downloaded.
14.When prompted, insert the Wave/PC installation CD into the CD-ROM drive to begin the CD-ROM drive test. This test determines if your CD-ROM drive supports digital audio playback and recording. When the test is finished, the results are shown. To understand the CD-ROM test results, see “To test your CD-ROM drive:” on page 26. Click Next when you are ready to continue.
15.Click Begin to start scanning for AM/FM radio stations in your local area. When the scan is done, the program advances to the next step.
PDF259774_00 |
April 12, 2001 |
13 |

System Setup
16.In this step, the setup program searches your hard drive for any music files you may already have:
A.Select the types of music files to include in your search. You can select MP3 or WAV. By default, only MP3 is selected.
B.Specify the minimum file length. When importing files, you may want to exclude short files containing operating system or game sounds. By default, the search process ignores files less than 20 seconds long.
C.Specify the folders or directories to search. Use the Add Folder, Edit Folder, and Delete Folder buttons to edit the list. Use the check boxes to the left of the directory names to temporarily select/unselect folders.
D.Click the Search button. A progress dialog box pops up to keep you informed of the search status. When finished, the progress box displays the number of files found and the number added to the music finder database. You may notice that not all files found were added to the music finder database. This can happen if the file already exists in the database or if the file length is less than the specified minimum.
E.Click the Done button when the search is complete.
17.Click Finish to exit the setup program and launch the Wave/PC™ application.
14 |
April 12, 2001 |
PDF259774_00 |
System Overview
The Wave/PC™ system controls
You can find controls for your Wave/PC interactive system in three locations:
•The Wave/PC software application window –
This is the main user interface for the Wave/PC system. It provides you with the controls you need to play and record CDs, create your own playlists, and maintain your music library. For more details, see “Wave/PC™ application window” on page 16.
•The Wave/PC remote control – The remote control provides you with the necessary controls for listening to the CD tracks, music files, AM/FM stations, or Web broadcasts that you have built into your music library. For more details, see “Wave/PC™ remote control” on page 17.
•The Wave/PC unit control panel – Like the remote control, this panel provides controls for selecting and listening to items from your music library. In addition, it has control buttons for setting and operating the clock and alarms. Clock and alarm times can only be set from this control panel. For more details, see “Using the Wave/PC™ Unit Controls” on page 47.
|
nooz |
||
On |
S |
e |
|
Mute |
|||
Off |
|||
|
|
||
|
rm |
Volume |
|
|
la |
Of |
|
|
A |
f |
|
|
PC |
|
|
CD |
File |
Web |
|
Track |
AM |
||
Tune |
FM |
||
1 |
2 |
3 |
|
|
Presets |
||
4 |
5 |
6 |
|
|
Wave/PC |
||
Alarm |
|
Clock |
|
Set |
|
Set |
|
1 |
2 |
3 |
|
|
Presets |
||
4 |
5 |
6 |
|
AUX |
AM/FM |
On/Off |
|
|
Sleep/Snooze |
||
|
Wave/PC™ |
||
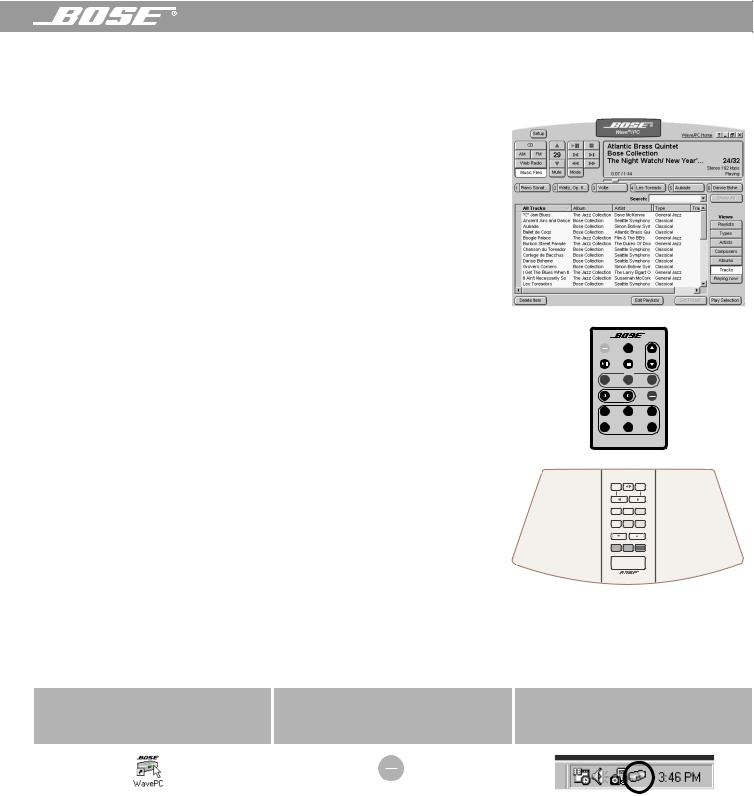
Turning your Wave/PC system on and off
There are three ways to turn your Wave/PC system on or off:
1 |
2 |
3 |
Using the Wave/PC |
Using the Wave/PC |
Using the Wave/PC |
Application Icon |
Remote Control |
Monitor Icon |
On
Off
To turn the system on, double-click the Wave/PC application icon on the desktop. To turn the system off, click the close ( ) button in the Wave/PC application window.
To turn the system on, point the remote control at the front of the Wave/PC unit and press the On/Off button. To turn the system off, press the On/Off button again.
To turn the system on, double-click the Wave/PC monitor icon in the Windows Task bar, or right-click the monitor icon and select Start Bose® Wave®/PC. To turn the system off, click the close ( ) button in the Wave/PC application window.
PDF259774_00 |
April 12, 2001 |
15 |

System Overview
Wave/PC™ application window
Figure 10 shows you the Wave/PC application window and describes the features and controls. Controls can also be accessed using right-click menus. Right-click anywhere in the blue background of the window to open these menus.
Figure 10 |
3 |
4 |
5 |
6 |
The Wave/PC application |
2 |
|
|
window |
|
|
7 |
|
1 |
8
9
10
Music source selection buttons – Selects the CD, AM, FM, Web Radio, or Music Files music source. When a
1source is selected, the Wave/PC application window changes to show source-related controls.
2Setup button – Opens the setup options window for the selected source.
3Volume control buttons – Raises, lowers or mutes the volume of the Wave/PC unit.
4Music source control buttons – Controls the selected music source. This set of buttons changes for each source.
5Wave/PC Home – Links you to the Bose® Wave/PC system owner’s web site.
6Window control buttons – Provides standard window control buttons: What’s this? Help, Minimize, Resize and Close.
7Information window – Shows you the status of the active music source.
8Six preset buttons – Selects or stores up to six presets for AM, FM, Web Radio, and Music Files.
9Music finder window – Shows you the music selections available for the active source and the source-related control buttons.
10 Small application window – Small view of the Wave/PC window, created by clicking the resize button ( ).
).
16 |
April 12, 2001 |
PDF259774_00 |
System Overview
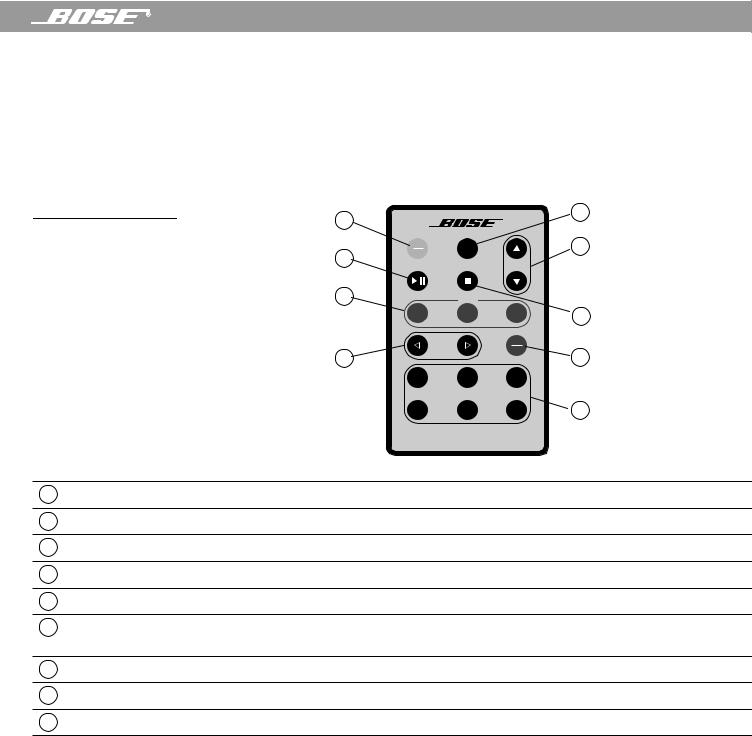
Wave/PC™ remote control
Figure 11
The Wave/PC remote control functions
You can use the Wave/PC remote control (Figure 11) to operate some of the basic functions included in the Wave/PC system application window. Aim the remote control at the front of the Wave/PC unit and press the button for the function you want.
The remote normally works up to 20 feet (6.1 m) in front of the radio, and six feet (1.8 m) from either side. Replace the remote control battery when the remote stops operating, or its range seems reduced (normally every year or two). Keep in mind that lighting and other room conditions, in addition to battery age, can affect the operating range of an infrared remote control.
1 |
|
|
|
|
|
|
2 |
|
|
|
|
|
|
|
|
|
|
|
|
oo |
z |
|
|
|
|
|
n |
|
|
||
|
On |
S |
|
e |
|
3 |
|
|
|
|
|
|
|||
|
|
Mute |
|
||||
5 |
Off |
|
|
||||
|
|
|
|
|
|
||
|
|
|
rm |
|
Volume |
|
|
|
|
l |
Of |
|
|||
|
|
A |
a |
f |
|
|
|
|
|
|
|
|
|
|
|
6 |
|
|
|
PC |
|
|
|
|
CD |
|
|
File |
Web |
4 |
|
|
|
|
|
|
|
|
|
|
|
Track |
|
|
|
AM |
|
7 |
|
Tune |
|
|
|
FM |
8 |
|
|
|
|
|
|
||
|
1 |
|
|
2 |
|
3 |
|
|
|
Presets |
|
|
|||
|
4 |
|
|
5 |
|
6 |
9 |
Wave/PC
1Power On/Off – Turns Wave/PC system on (launches application) or off (closes application).
2Mute (Snooze) – Silences the audio of the Wave/PC unit (pauses the alarm for 10 minutes).
3Volume – Raises, lowers or mutes the volume of the Wave/PC unit.
4Stop (Alarm Off) – Stops playback of the active source (turns off a sounding alarm).
5Play/Pause – Plays/pauses a track, music file, or Web station.
6CD/File/Web music sources – Selects one of the computer-related music sources: CD player/recorder, Music Files, or Web Radio (computer connection required).
7Track/Tune – Tunes up/down the band for AM/FM, or selects next/previous item for CD, File, or Web.
8AM/FM – Selects the AM or FM tuner in the Wave/PC unit.
9Presets – Selects or stores up to six presets for AM, FM, Web Radio, and Music Files.
Wave/PC™ system audio and your computer system
After installing the Wave/PC interactive audio system, the Wave/PC unit becomes the default speakers for your computer. This means that sounds generated by your computer system are delivered to you through the Wave/PC unit.
Sound sources and quality
When playing an AM/FM radio station what you hear is generated by the Wave/PC unit. However, when listening to a CD, Web Radio station, or a music file, the audio you hear is generated by your computer, not the Wave/PC unit. Because the audio is computer generated, certain factors affect the sound quality. For example, when the computer is busy printing or scanning you may experience audio drop-outs.
PDF259774_00 |
April 12, 2001 |
17 |
System Overview
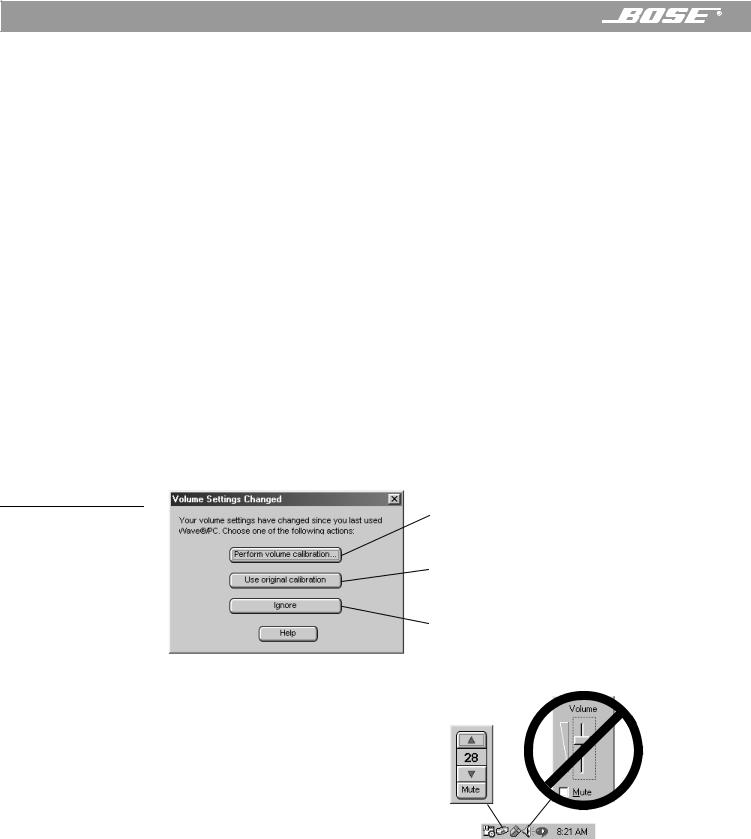
Figure 12
Options when volume settings no longer match
The audio from a Web Radio station is delivered over an Internet connection. While using an Internet connection, you can experience delays, periodic drop-outs and even disconnection. This can affect the quality and continuity of Internet audio broadcasts. The ability of your Wave/PC system to play and record CDs, or play music files, is limited by the capabilities of your computer hardware and software components.
Getting the best possible sound quality
Your computer hardware is assessed during installation of the Wave/PC software. This is done to make sure that the Wave/PC system is fully operational within the limitations of your computer hardware and software components. Upgrading your computer hardware with a better sound card, more RAM, and a faster CD-ROM drive, hard drive or modem, can improve the sound quality and overall performance of your Wave/PC system. For more information, refer to your computer manufacturer.
While using the Wave/PC system, you can optimize the sound and overall performance of the system by minimizing the number of tasks being performed by your computer. Traditional background software applications, such as e-mail or web browsers, have a minimal effect on Wave/PC system performance when they are not in the process of moving large amounts of information.
Changes in volume settings
When you installed the Wave/PC software application, the volume settings were automatically calibrated. This calibration matched the relative volume level of computer-generated audio with the audio generated by the AM/FM tuner in the Wave/PC unit. If you change the volume level on your computer (such as in the Task bar) outside of the Wave/PC application, these volume levels will no longer match.
If the volume levels are unmatched the next time you open the Wave/PC application, the dialog box in Figure 12 opens. Select the appropriate action.
Calibrates the volume settings (see “Setting general setup options” on page 44).
Restores the volume control settings obtained from the last volume calibration.
Leaves the volume control in the current uncalibrated setting.
 Note: After installing the Wave/PC system application, use the Wave/PC system volume control on your computer to adjust the volume level. Right click on the Wave/PC monitor icon in the system tray to bring up the volume control buttons.
18 |
April 12, 2001 |
PDF259774_00 |
System Overview
The Wave/PC™ system monitor
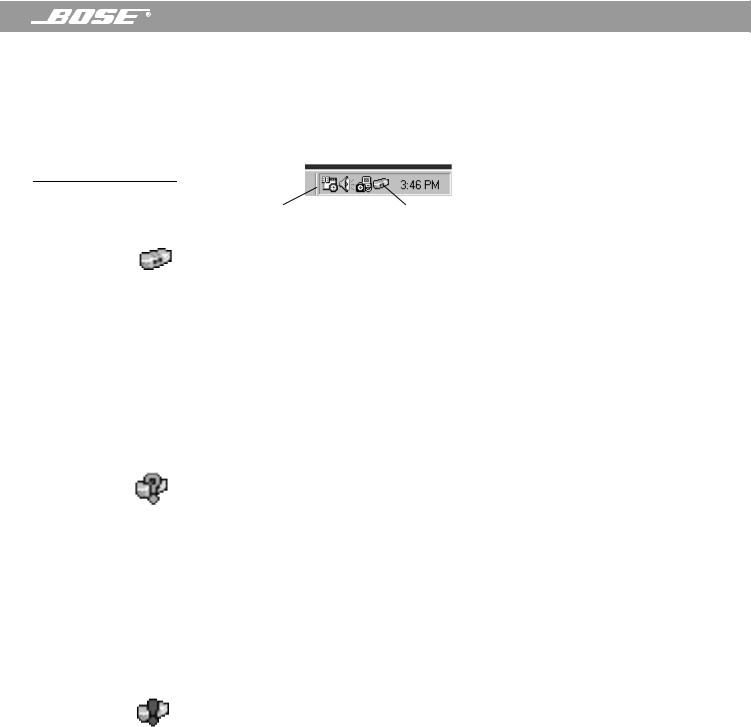
The Wave/PC application software includes a program called the Wave/PC Monitor which was installed during the software installation process. This program runs in the background whenever your computer is on and enables the computer-generated audio to play through your Wave/PC unit. A status icon (Figure 13) for this program appears in the portion of the Windows Task bar where the clock is located.
Figure 13
Location of the Wave/PC monitor icon
Windows system tray |
Wave/PC monitor icon |
Normal operation
During normal operation, you should always see the Wave/PC monitor icon in the Windows Task bar. This icon indicates that your computer and the Wave/PC unit are synchronized, and as long as the Wave/PC monitor is running, your computer uses the Wave/PC unit for its speakers. This means that sounds generated by your computer are heard through the Wave/ PC unit. You can adjust your computer’s volume at any time using the volume buttons on the remote control or the Wave/PC unit control panel. Also, you can click the Wave/PC monitor icon and use the up/down buttons in the pop-up volume control. The Wave/PC system also acts as your computer speakers even when the Wave/PC application is not running.
If you right-click the Wave/PC monitor icon, you can either start the Wave/PC application, or exit the Wave/PC monitor program.
 Note: If you exit the Wave/PC monitor, the sounds played by your computer will no longer be heard through your Wave/PC unit.
If you see the icon with a yellow question mark
If you see a yellow question mark appear over the Wave/PC monitor icon, this means the Wave/PC monitor is running but it can’t synchronize with the Wave/PC unit. Some possible causes for this problem are:
•The Wave/PC unit is not connected to your computer
•The Wave/PC unit is unplugged
•The serial port of your computer is disabled
•The serial port of your computer is being used by another program
 Note: Make sure your Wave/PC unit is correctly connected to your computer and a serial port is available. Click the Setup button and click the General tab. Then click the Search for Wave/PC button.
If you see the icon with a red exclamation mark
A red exclamation mark over the Wave/PC monitor icon means there is a software problem and the Wave/PC application cannot be launched. To try to correct this problem, restart your computer. If the problem persists, contact Bose® Customer Service.
If the Wave/PC monitor icon is missing
If the Wave/PC monitor icon is not present in the Task bar, the Wave/PC monitor is not running, and therefore, the Wave/PC unit is not synchronized with your PC. The sounds played by your computer will not be heard through your Wave/PC unit. To start the Wave/PC monitor again, double-click the Wave/PC icon on the desktop to start the Wave/PC application. The Wave/PC monitor icon should reappear in the Task bar.
PDF259774_00 |
April 12, 2001 |
19 |
Operating the CD Player/Recorder
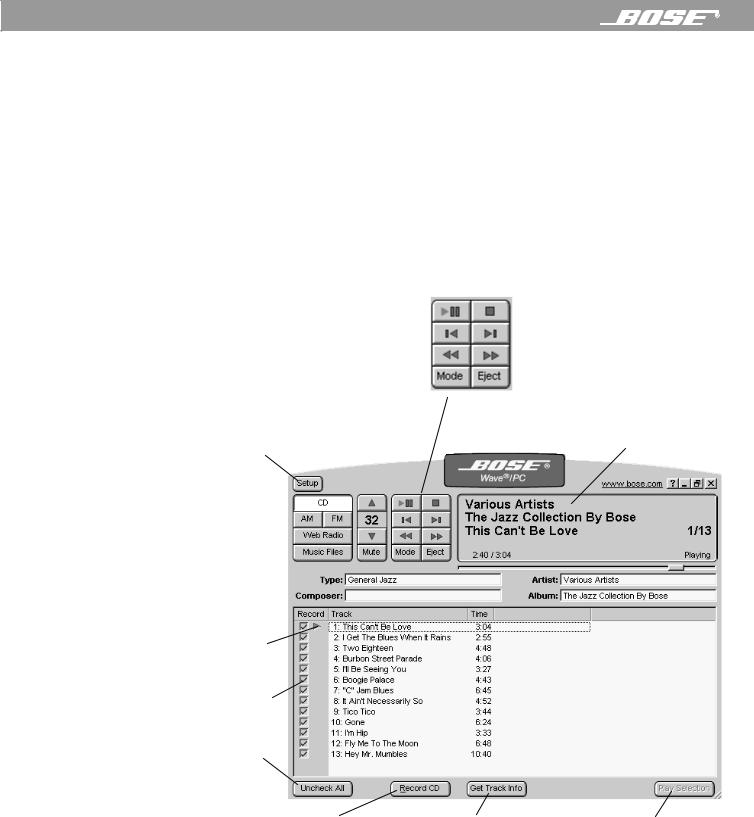
Playing an audio CD
The Wave/PC™ interactive audio system can play any audio CD. Whenever you insert a CD into your computer’s CD-ROM drive, the Wave/PC system automatically selects the CD player (Figure 14) and begins playing the CD.
When the Wave/PC system plays a CD for the first time, and you have an Internet connection, the application automatically links your computer to a free Internet database service, called CDDB, and downloads CD track information. CDDB is a large on-line repository that provides artist, title, track, credit, and other information about the CDs you play. For more information about CDDB, see “Using CDDB” on page 23.
 Note: The check marks appearing in the check column of the music finder window are used to select tracks you want to record. To record your CD, see “Recording an audio CD” on page 22.
Figure 14 |
CD control buttons |
|
CD player/recorder window |
Plays/pauses the CD |
Stops the CD |
|
||
|
Skips to previous track |
Skips to next track |
|
Scans backward through CD |
Scans forward through CD |
|
Changes CD play mode |
Opens or closes the CD-ROM tray |
|
(Shuffle, Shuffle Repeat, Repeat, Repeat Track) |
|
Opens the CD |
Shows current CD |
track information |
|
setup options |
|
window |
|
|
® |
Points to track being played
Checks indicate tracks to be recorded
Checks/unchecks
all tracks
Start/stop recording |
Gets CDDB information |
Plays selected track |
20 |
April 12, 2001 |
PDF259774_00 |
Loading...