

Page 1
Wave/PC™ Interactive System USB Adapter Kit
Installation Guide
Page 2

Safety Information
1. Read these instructions for all components before using this product.
2. Keep these instructions for future reference.
3. Heed all warnings on the product and in the owner’s guide.
4. Follow all instructions.
5. Do not use this apparatus near water or moisture.
6. Clean only with a dry cloth and as directed by Bose
7. Install in accordance with the manufacturer’s instructions.
8. Do not install near any heat sources, such as radiators, heat registers, stoves or
other apparatus (including amplifiers) that produce heat.
9. Only use attachments/accessories specified by the manufacturer.
10. Refer all servicing to qualified service personnel. Servicing is required when the
apparatus has been damaged in any way: such as power supply cord or plug is
damaged; liquid has been spilled or objects have fallen into the apparatus; the
apparatus has been exposed to rain or moisture, does not operate normally, or
has been dropped. Do not attempt to service this product yourself. Please call Bose to
be referred to an authorized service center near you.
®
Corporation.
Information about products that generate electrical noise
This equipment has been tested and found to comply with the limits for a Class B digital
device, pursuant to Part 15 of the FCC rules. These limits are designed to provide reasonable protection against harmful interference in a residential installation. This equipment
generates, uses, and can radiate radio frequency energy and, if not installed and used in
accordance with the instructions, may cause harmful interference to radio communications.
However, this is no guarantee that interference will not occur in a particular installation. If
this equipment does cause harmful interference to radio or television reception, which can
be determined by turning the equipment off and on, you are encouraged to try to correct
the interference by one or more of the following measures:
• Reorient or relocate the receiving antenna.
• Increase the separation between the equipment and receiver.
• Connect the equipment to an outlet on a different circuit than the one to which the
receiver is connected.
• Consult the dealer or an experienced radio/TV technician for help.
This product complies with the Canadian ICES-003 Class B specifications.
©2001 Bose Corporation. No part of this work may be reproduced, modified, distributed or otherwise used without prior written permission.
®
Bose
tion. All other trademarks referenced herein are property of their respective owners.
, Wave
®
, Wave/PC™ and the Wave
®
radio design are registered trademarks of Bose Corpora-
2
Page 3

Where to find …
Before You Begin . . . . . . . . . . . . . . . . . . . . . . . . . . . . . . . . . . . . . . 4
Installation Procedure . . . . . . . . . . . . . . . . . . . . . . . . . . . . . . . . . . . 5
Audio Settings . . . . . . . . . . . . . . . . . . . . . . . . . . . . . . . . . . . . . . . . . 9
Reference Information . . . . . . . . . . . . . . . . . . . . . . . . . . . . . . . . . . 11
Contents
Installing the Wave/PC
Adding new hardware to Windows 98SE systems . . . . . . 6
Adding new hardware to Windows ME systems . . . . . . . . 8
Adding new hardware to Windows 2000 systems . . . . . . . 8
Installing the new Wave/PC
Setting the audio output device . . . . . . . . . . . . . . . . . . . . . . . . 9
When your system volume setting changes . . . . . . . . . . . . . . . 10
Cleaning the Wave/PC™ system USB adapter . . . . . . . . . . . . 11
Electrical rating . . . . . . . . . . . . . . . . . . . . . . . . . . . . . . . . . . . . . 11
Warranty period . . . . . . . . . . . . . . . . . . . . . . . . . . . . . . . . . . . . 11
Contacting customer service . . . . . . . . . . . . . . . . . . . . . . . . . . 11
TM
system USB adapter cable . . . . . . . 5
TM
software . . . . . . . . . . . . . . . . . . 8
3
Page 4
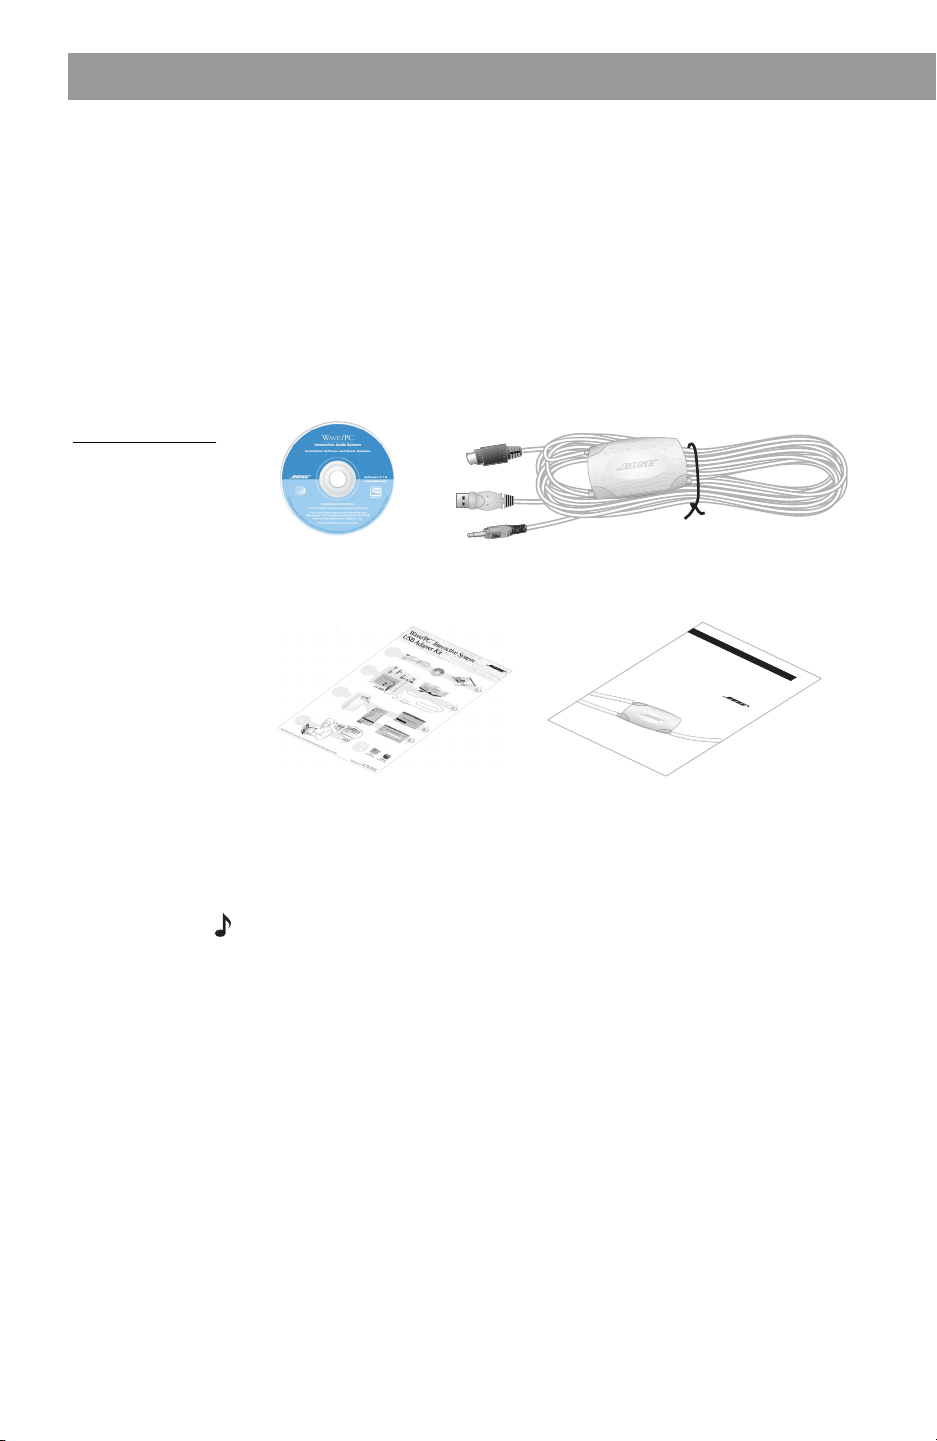
Wave/PCTM system
installation software CD
Wave/PC
TM
system USB adapter
Wave/PC
TM
system USB
adapter installation guide
Wave/PCTM system USB
adapter quick setup guide
Before You Begin
Thank you for purchasing the Wave/PC™ interactive system USB
adapter kit. This adapter kit allows you to operate your Wave/PC™ interactive system through a USB port on your computer.
USB adapter benefits:
• Makes your serial port available for other devices.
• Provides improved audio quality. You have the option of bypassing
your computer’s sound card and enjoying full digital audio.
Carefully unpack the contents of the carton (Figure 1) and save all packing materials. Save the quick setup guide and this owner’s guide for
future reference.
Figure 1
Kit contents
4
Please take the time to follow this installation guide carefully. It will help
you to upgrade your Wave/PC™ system application software and connect the Wave/PC™ system unit to your computer’s USB port.
Note: Your installation procedure will vary according to which Windows
operating system you are using on your computer: Windows 98SE, Windows ME, or Windows 2000. Before starting the installation procedure,
identify which operating system is installed on your computer. This will
enable you to follow the installation procedure correctly.
Page 5
Sound card output USB port
DIN socket
Wave/PC
TM
unit
Computer
Installation Procedure
Installing the Wave/PC
The Wave/PC™ system USB adapter cable includes a connector for the
USB port of your computer and a mini-stereo plug for your sound card
output (Figure 2). Connecting both cords to your computer is standard.
However, you have the option of receiving digital audio and bypassing
your computer’s sound card. Be sure to read the “Audio Settings” on
page 9.
Figure 2
USB adapter
connections
1. If your Wave/PC™ system was previously installed, remove the orig-
inal Wave/PC™ system cable connecting the Wave/PC™ unit to
your computer.
2. Plug the DIN connector of the USB adapter into the DIN socket on
the rear of the Wave/PC™ unit.
3. Plug the mini-stereo plug into the audio output of your computer’s
sound card.
4. Plug the USB connector into your computer’s USB port.This action
launches the Windows “Add New Hardware Wizard.” Completing
this installation from this point depends on what operating system
your computer is using:
For Windows 98SE systems , see “Adding new hardware to Win-
dows 98SE systems” on page 6.
For Windows ME systems , see “Adding new hardware to Windows
ME systems” on page 8.
For Windows 2000 systems , see “Adding new hardware to Win-
dows 2000 systems” on page 8.
TM
system USB adapter cable
5
Page 6

Installation Procedure
Adding new hardware to Windows 98SE systems
If you are installing the USB adapter on a Windows 98SE system, three
drivers will be installed during this procedure:
• USB composite device driver
• USB human interface device driver
• USB audio device driver
1. USB composite device driver installation.
A. After connecting the USB adapter to your computer’s USB port,
the “Add New Hardware Wizard” opens to begin searching for
the USB composite device driver. Click Next to continue.
B. When the wizard asks you, “What do you want Windows to
do?,” select “Search for the best driver for your device” and
click Next (Figure 3).
Figure 3
Window for
selecting a
method for
locating drivers
Figure 4
Window for
selecting search
locations
6
C. The next window (Figure 4) asks you to specify other locations
to include in the search for the device driver. Leave all boxes
unchecked and click Next to start the search.
Page 7

Installation Procedure
D. The next window that appears shows you where the driver is
located. Click Next to install the driver.
E. When Windows tells you it has finished the driver installation,
click Finish.
2. USB human interface device driver installation.
A. The “Add New Hardware Wizard” tells you it is ready to search
for the USB human interface device driver. Click Next to start.
B. When the wizard asks you, “What do you want Windows to
do?,” select “Search for the best driver for your device” and
click Next (Figure 3).
C. The next window asks you to specify other locations, in addition
to your hard drive, to include in the search for the device driver.
Leave all boxes unchecked and click Next to start the search
(Figure 4).
D. The next window that appears shows you where the driver is
located. Click Next to install the driver.
E. When Windows tells you it has finished the driver installation,
click Finish.
3. USB audio device driver installation.
A. The “Add New Hardware Wizard” tells you it is ready to search
for the USB audio device driver. Click Next to start.
B. When the wizard asks you, “What do you want Windows to
do?,” select “Search for the best driver for your device” and
click Next (Figure 3).
C. The next window asks you to specify other locations, in addition
to your hard drive, to include in the search for the device driver.
Leave all boxes unchecked and click Next to start the search
(Figure 4).
D. The next window that appears shows you where the driver is
located. Click Next to install the driver.
E. When Windows tells you it has finished the driver installation,
click Finish.
7
Page 8

Installation Procedure
Adding new hardware to Windows ME systems
After you connect the USB adapter to your computer’s USB port, the
“Add New Hardware Wizard” opens to tell you that a new USB audio
device was found (Figure 5).
Figure 5
Windows ME
screen when new
hardware is found
Select “Automatic search for a better driver,” and click Next to continue.
When the next window tells you that Windows has finished installing the
driver, click Finish.
Adding new hardware to Windows 2000 systems
After you connect the USB adapter to your computer’s USB port, the
new device drivers are installed automatically. Four different displays will
briefly flash on the screen during this process.
Installing the new Wave/PC
Note: You must connect the USB adapter cable before installing the
new Wave/PC™ interactive system software.
Insert the Wave/PC™ software CD into your computer’s CD-ROM drive.
If the install program does not start automatically, go to the Start menu
and select Run. In the Run window, open d:\Setup.exe, where d is the
letter of your computer’s CD-ROM drive.
If you need more help with this installation, refer to the “System Setup”
section of your Wave/PC™ system owner’s guide.
TM
software
8
Page 9
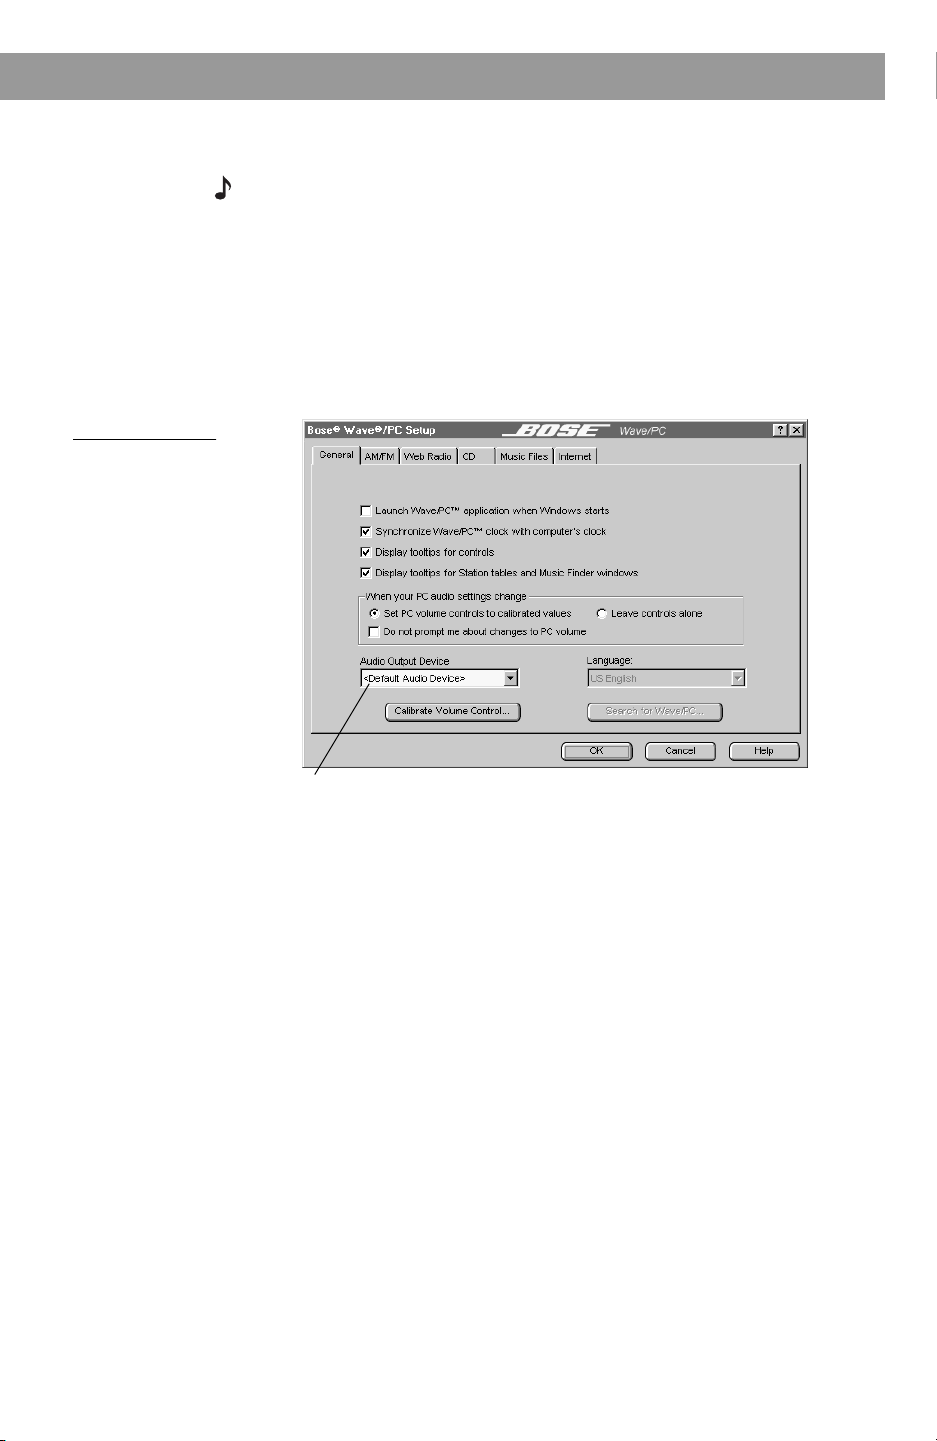
Setting the audio output device
Audio output
device selection
Note: Because of the high bandwidth requirements of computer-gener-
ated audio, older computers may experience audio dropouts while you
perform other operations. If you experience dropouts, select your computer’s sound card.
Using the “Audio Output Device” drop list in the “General” setup window
(Figure 6), you can select where you want to send the Wave/PC
audio output. If you are using the original serial connection, select your
computer's sound card. If you are using a USB connection, you can
either select your computer's USB port or sound card.
Figure 6
“General” setup
window
Audio Settings
TM
system
9
Page 10

Audio Settings
When your system volume setting changes
When you installed the new Wave/PC
bration was automatically performed. This calibration matched the relative volume level of the computer-generated audio with the audio
volume of the Wave/PC
TM
system unit. If you change the volume level on
your computer (such as in the Task bar) outside of the Wave/PC
tem application, these volume levels no longer match.
If the volume levels are unmatched, the next time you open the Wave/PC
system application a dialog box appears (Figure 7) giving you the following
options:
• “Set PC volume controls to calibrated values”: Resets the volume
controls to the settings obtained from the last automatic volume calibration.
• “Leave controls alone”: Leaves the volume levels in the current uncali-
brated setting.
• “Do not prompt me about changes to PC volume”: Stops the system
from prompting you when it detects that volume levels do not match.
TM
system software, a volume cali-
TM
sys-
TM
Figure 7
Volume settings
change window
10
Page 11

Reference Information
Cleaning the Wave/PC
Use only a dry cloth to clean the outside of the Wave/PC system USB
adapter.
Do not use any solvents, chemicals, or cleaning solutions containing
alcohol, ammonia, or abrasives.
Do not allow liquids to spill on the USB adapter. If liquids get into the
product, disconnect it immediately. Call Bose
soon as possible to arrange for service.
TM
system USB adapter
Electrical rating
5V --- DC, 110mA
Warranty period
The Bose Wave/PC™ system USB adapter is covered by a limited 1year transferable warranty. See your warranty card for details. Be sure to
keep your receipt in a safe place. Proof of purchase is required when
arranging service during the warranty period.
Contacting customer service
For additional help in solving problems, contact:
Bose Customer Service, 1-800-851-2673
®
Customer Service as
11
Page 12

Bose Corporation
The Mountain
Framingham, MA 01701-9168 USA
262976 AM Rev.00 JN10557
 Loading...