

Page 1
®
Wave
Music System
Multi-CD Changer
!"#$%&'()*+,$
)*-.(,$(*'.%+/
0/1+2$(,&*1+3+1'.1+/#
Your Wave
El sistema de música Wave® debe actualizarse para controlar este accesorio.
Le système Wave
4
®
music system requires updating before it can operate this accessory.
®
doit être actualisé avant de pouvoir piloter cet accessoire.
Page 2
Français Español English
Safety Information
Please read this owner’s guide
Please take the time to follow the instructions in this owner’s guide carefully. It will help you set up and operate your system properly
and enjoy all of its advanced features. Save your owner’s guide for future reference.
WARNING:
WARNING: The apparatus shall not be exposed to dripping or splashing, and objects filled with liquids, such as vases, shall not be
placed on the apparatus. As with any electronic product, use care not to spill liquids into any part of the multi-disc changer. Liquids
can cause a failure and/or a fire hazard.
WARNING: No naked flame sources, such as lighted candles, should be placed on the apparatus.
Class B emissions limits
This Class B digital apparatus meets all requirements of the Canadian Interference-Causing Equipment Regulations.
To reduce the risk of fire or electric shock, do not expose the product to rain or moisture.
The lightning flash with arrowhead symbol, within an equilateral triangle, is intended to alert the user to the presence of
uninsulated dangerous voltage within the system enclosure that may be of sufficient magnitude to constitute a risk of
electric shock.
The exclamation point within an equilateral triangle, as marked on the system, is intended to alert the user to the presence of important operating and maintenance instructions in this owner’s guide.
CAUTION:
To prevent electric shock, match the wide blade of the line cord plug to the wide slot of the AC (mains) receptacle. Insert fully.
CAUTION: DO NOT place the product on any heat-sensitive surface, such as the finished surface of fine furniture. Like all electrical
equipment, it generates some heat.
CAUTION: Use of controls or adjustments or performance of procedures other than those specified herein may result in hazardous
radiation exposure. The multi-disc player should not be adjusted or repaired by anyone except properly qualified service personnel.
Class 1 Laser Product
This CD changer is classified as a CLASS 1 LASER PRODUCT according to !
EN 60825-1:1994 + A1+A2, IEC60825-1:1993+A1+A2.
CLASS 1 LASER PRODUCT
KLASSE 1 LASER PRODUKT
LUOKAN 1 LASER LAITE
KLASS 1 LASER APPARAT
Notes:
• The product label is located on the bottom of the product.
• Where the mains plug is used as the disconnect device, such disconnect device shall remain readily operable.
• The product must be used indoors. It is neither designed or tested for use outdoors, in recreation vehicles, or on boats.
• This product is intended to be used only with the Bose
®
Wave® music system.
The disc changer conforms to the EMC directive 89/336/EEC and to the Low Voltage Directive 73/23/EEC. The complete !
Declaration of Conformity can be found on www.bose.com.
WARNING:
K
eep the remote control battery away from children. It may cause a fire or chemical burn if mishandled. Do not recharge, disassemble, heat above 100ºC (212ºF), or incinerate. Dispose of used batteries promptly. Replace only with a battery of the correct type and
model number.
WARNING: Danger of explosion if battery is incorrectly replaced. Replace only with Duracell, Eveready, Energizer, Maxell, Toshiba,
or Shun Wo CR2032 or DL2032 3-volt lithium battery.
Please dispose of used batteries properly,
following any local regulations. Do not incinerate.
!"##$%&'()%*'+,'+-./'01%2'%,-+.%'3%.4/(%5'+6%7-8%9)%+),+':;<):=%7':/3/):=%:/(.+/9;.):%'+%'.4)+5/()%;():%5/.4';.%,+/'+%5+/..)0%,)+7/((/'01%
>??%.+-:)7-+6(%+)3)+)0<):%4)+)/0%-+)%.4)%,+',)+.8%'3%&'()%*'+,'+-./'01%@4)%A-B)
C
%7;(/<%(8(.)7%:)(/D0%/(%-%.+-:)7-+6%'3%&'()%*'+,'+-./'01
2
Page 3

Important Safety Instructions
1. Read these instructions – for all components
before using this product.
2. Keep these instructions – for future reference.
3. Heed all warnings – on the product and in the
owner’s guide.
4. Follow all instructions.
5. Do not use this apparatus near water or
moisture – Do not use this product near a bathtub,
washbowl, kitchen sink, laundry tub, in a wet basement, near a swimming pool, or anywhere else that
water or moisture are present.
6. Clean only with a dry cloth – and as directed by
Bose Corporation. Unplug this product from the wall
outlet before cleaning.
7. Do not block any ventilation openings. Install in
accordance with the manufacturer’s instructions – To ensure reliable operation of the product and
to protect it from overheating, put the product in a
position and location that will not interfere with its
proper ventilation. For example, do not place the
product on a bed, sofa, or similar surface that may
block the ventilation openings. Do not put it in a builtin system, such as a bookcase or a cabinet that may
keep air from flowing through its ventilation openings.
8. Do not install near any heat sources, such as
radiators, heat registers, stoves or other apparatus (including amplifiers) that produce heat.
9. Do not defeat the safety purpose of the polarized or grounding-type plug. A polarized plug
has two blades with one wider than the other. A
grounding-type plug has two blades and a third
grounding prong. The wider blade or third prong
are provided for your safety. If the provided plug
does not fit in your outlet, consult an electrician
for replacement of the obsolete outlet.
10. Protect the power cord from being walked on or
pinched, particularly at plugs, convenience
receptacles, and the point where they exit from
the apparatus.
11. Only use attachments/accessories specified by
the manufacturer.
12. Use only with the cart, stand, tripod,
bracket or table specified by the
manufacturer or sold with the apparatus. When a cart is used, use caution when moving the cart/apparatus
combination to avoid injury from tip-over.
13. Unplug this apparatus during lightning storms
or when unused for long periods of time – to !
prevent damage to this product.
14. Refer all servicing to qualified service person-
nel. Servicing is required when the apparatus
has been damaged in any way: such as powersupply cord or plug is damaged; liquid has been
spilled or objects have fallen into the apparatus;
the apparatus has been exposed to rain or moisture, does not operate normally, or has been
dropped – Do not attempt to service this product
yourself. Opening or removing covers may expose you
to dangerous voltages or other hazards. Please call
Bose to be referred to an authorized service center
near you.
15. To prevent risk of fire or electric shock, avoid
overloading wall outlets, extension cords, or
integral convenience receptacles.
16. Do not let objects or liquids enter the product –
as they may touch dangerous voltage points or shortout parts that could result in a fire or electric shock.
17. See product enclosure bottom for safety related
markings.
Information about products that generate
electrical noise
If applicable, this equipment has been tested and found to
comply with the limits for a Class B digital device, pursuant to Part 15 of the FCC rules. These limits are designed
to provide reasonable protection against harmful interference in a residential installation. This equipment generates, uses, and can radiate radio frequency energy and, if
not installed and used in accordance with the instructions,
may cause harmful interference to radio communications.
However, this is no guarantee that interference will not
occur in a particular installation. If this equipment does
cause harmful interference to radio or television reception,
which can be determined by turning the equipment off and
on, you are encouraged to try to correct the interference
by one or more of the following measures:
• Reorient or relocate the receiving antenna.
• Increase the separation between the equipment and
receiver.
• Connect the equipment to an outlet on a different circuit
than the one to which the receiver is connected.
• Consult the dealer or an experienced radio/TV techni-
cian for help.
Note: Unauthorized modification of the receiver or radio
remote control could void the user’s authority to operate this
equipment.
This product complies with the Canadian ICES-003 Class
B specifications.
English FrançaisEspañol
Page 4

Important Safety Instructions
18. Use Proper Power Sources – Plug the product into
a proper power source, as described in the operating
instructions or as marked on the product.
19. Avoid Power Lines – Use extreme care when installing an outside antenna system to keep from touching
power lines or circuits, as contact with them may be
fatal. Do not install external antennas near overhead
power lines or other electric light or power circuits, nor
where an antenna can fall into such circuits or power
lines.
20. Ground All Outdoor Antennas – If an external
antenna or cable system is connected to this product,
be sure the antenna or cable system is grounded. This
will provide some protection against voltage surges
and built-up static charges.
Section 810 of the National Electrical Code ANSI/
NFPA No. 70 provides information with respect to
proper grounding of the mast and supporting struc-
Français Español English
ture, grounding of the lead-in wire to an antenna discharge unit, size of grounding conductors, location of
antenna-discharge unit, connection to grounding electrodes, and requirements for the ground electrode.
Refer to the antenna grounding illustration on this
page.
Antenna grounding
Example of antenna grounding as per National Electrical
Code, ANSI/NFPA 70.
Antenna lead-in wire
Ground clamp
Electric service
equipment
Ground clamps
Power service grounding electrode
system (NEC ART 250, Part H)
Antenna discharge unit!
(NEC Section 810-20)
Grounding conductors!
(NEC Section 810-21)
Note to CATV system installer
This reminder is provided to call the CATV system
installer’s attention to Article 820-40 of the NEC (of USA)
that provides guidelines for proper grounding. In particular,
it specifies that the cable ground shall be connected to the
grounding system of the building, as close to the point of
cable entry as is practical.
Page 5

Contents
Setup . . . . . . . . . . . . . . . . . . . . . . . . . . . . . . . . . . . . . . . . . . . . . . . . . . . . . . . . . . . . . . 4
Updating your Wave
®
music system . . . . . . . . . . . . . . . . . . . . . . . . . . . . . . . . . . . . . . . . . . . . 4
Features and benefits of your Multi-CD Changer . . . . . . . . . . . . . . . . . . . . . . . . . . . . . . . . . . . 5
Unpacking the carton . . . . . . . . . . . . . . . . . . . . . . . . . . . . . . . . . . . . . . . . . . . . . . . . . . . . . . . . 5
Selecting a location for your system . . . . . . . . . . . . . . . . . . . . . . . . . . . . . . . . . . . . . . . . . . . . 6
Seating your Wave
Connecting the Multi-CD Changer to your Wave
®
music system on the Multi-CD Changer . . . . . . . . . . . . . . . . . . . . . . . . . 6
®
music system . . . . . . . . . . . . . . . . . . . . . . 7
Operation . . . . . . . . . . . . . . . . . . . . . . . . . . . . . . . . . . . . . . . . . . . . . . . . . . . . . . . . . . . 8
Remote control guide . . . . . . . . . . . . . . . . . . . . . . . . . . . . . . . . . . . . . . . . . . . . . . . . . . . . . . . . 8
Turning your multi-CD system on and off . . . . . . . . . . . . . . . . . . . . . . . . . . . . . . . . . . . . . . . . 8
Loading and unloading discs . . . . . . . . . . . . . . . . . . . . . . . . . . . . . . . . . . . . . . . . . . . . . . . . . . 9
Loading CDs into the Wave
®
music system (Disc 1) . . . . . . . . . . . . . . . . . . . . . . . . . . . . . 9
Loading CDs into the Multi-CD Changer (Disc 2 - Disc 4) . . . . . . . . . . . . . . . . . . . . . . . . . 9
Unloading discs . . . . . . . . . . . . . . . . . . . . . . . . . . . . . . . . . . . . . . . . . . . . . . . . . . . . . . . . . 9
Playing CDs . . . . . . . . . . . . . . . . . . . . . . . . . . . . . . . . . . . . . . . . . . . . . . . . . . . . . . . . . . . . . . . 10
Moving to another CD . . . . . . . . . . . . . . . . . . . . . . . . . . . . . . . . . . . . . . . . . . . . . . . . . . . . 10
Stopping a CD . . . . . . . . . . . . . . . . . . . . . . . . . . . . . . . . . . . . . . . . . . . . . . . . . . . . . . . . . . 10
Ejecting a CD . . . . . . . . . . . . . . . . . . . . . . . . . . . . . . . . . . . . . . . . . . . . . . . . . . . . . . . . . . . 10
Changing Play Modes . . . . . . . . . . . . . . . . . . . . . . . . . . . . . . . . . . . . . . . . . . . . . . . . . . . . 11
Listening to an External Audio Source . . . . . . . . . . . . . . . . . . . . . . . . . . . . . . . . . . . . . 12
Connecting an external audio source . . . . . . . . . . . . . . . . . . . . . . . . . . . . . . . . . . . . . . . . . . . . 12
Playing a connected audio source . . . . . . . . . . . . . . . . . . . . . . . . . . . . . . . . . . . . . . . . . . . . . . 12
Care and Maintenance . . . . . . . . . . . . . . . . . . . . . . . . . . . . . . . . . . . . . . . . . . . . . . . . . 13
Cleaning . . . . . . . . . . . . . . . . . . . . . . . . . . . . . . . . . . . . . . . . . . . . . . . . . . . . . . . . . . . . . . . . . . 13
Replacing the remote control battery . . . . . . . . . . . . . . . . . . . . . . . . . . . . . . . . . . . . . . . . . . . . 13
Troubleshooting . . . . . . . . . . . . . . . . . . . . . . . . . . . . . . . . . . . . . . . . . . . . . . . . . . . . . . . . . . . . 14
Customer Support . . . . . . . . . . . . . . . . . . . . . . . . . . . . . . . . . . . . . . . . . . . . . . . . . . . . . . . . . . 14
Limited warranty . . . . . . . . . . . . . . . . . . . . . . . . . . . . . . . . . . . . . . . . . . . . . . . . . . . . . . . . . . . . 15
Technical information . . . . . . . . . . . . . . . . . . . . . . . . . . . . . . . . . . . . . . . . . . . . . . . . . . . . . . . . 15
English FrançaisEspañol
3
Page 6

Setup
Updating your Wave
IMPORTANT!
Your Wave® music system requires updating before it can operate the Multi-CD
Changer. Be sure to use the Wave
Multi-CD Changer before setting up and attempting to operate the Wave
with the Multi-CD changer.
®
music system
®
music system UPDATE DISC supplied with your
®
music system
Français Español English
To update your Wave
1. Make sure your Wave
2. Insert the update disc into the Wave
3. Wait approximately 20 seconds while your Wave
®
music system:
®
music system is plugged in and nothing else is connected to it.
®
music system CD slot.
®
music system performs the update.
The display will show you a series of messages during this process:
LOADING
UPDATING FINISHED EJECTING
4. Wait for the system to automatically eject the update disc after updating is
finished. DO NOT eject the disc yourself.
After updating your Wave
®
music system, follow the setup instructions beginning on page 6.
Wave® music system update disc
4
Page 7

Features and benefits of your Multi-CD Changer
Thank you for purchasing the Bose® Wave® music system Multi-CD Changer accessory. !
Adding the Multi-CD Changer to your Wave
benefits:
• A four-disc Wave
®
music system – Allows you to load and play up to four audio CDs.
Provides hours of uninterrupted CD music.
• Elegant integrated pedestal design – Using the same footprint as the Wave
system, the changer complements the elegance and simplicity of the system.
• One integrated remote control – Provides the simplicity of using one remote control
and one-touch selection of all built-in sources.
• Multiple source switching – By adding two input connections for external audio devices,
you can enjoy listening to one or two other audio sources in your home through the Wave
music system.
®
music system provides you with some valuable
Unpacking the carton
Carefully unpack your Wave® music system Multi-CD Changer and save all packing materials
for possible future use. The original packing materials provide the safest way to transport
your new Multi-CD Changer.
Make sure you received the parts shown in the following diagram. If any part appears damaged, do not attempt to use it. Notify Bose customer service immediately (see phone numbers on the inside back cover).
Setup
®
music
English FrançaisEspañol
®
Wave® music system
update disc
Wave® music system Multi-CD Changer
®
music system
Wave
remote control
For your records
Now is a good time to record the serial number of your new Multi-CD Changer. The
serial number is located on the bottom of the product.
Serial number __________________________
Purchase date__________________________
We suggest you keep your sales receipt together with this owner’s guide.
5
Page 8

Setup
Selecting a location for your system
Your Multi-CD Changer is designed to fit directly under your Wave® music system. Before you
connect the Multi-CD Changer to the Wave
®
music system, select a good location for the
complete system using the following guidelines.
• Place the system on a table or other flat surface.
• To enjoy maximum performance, place the system across the room from where you will be
listening.
• Place the system within two feet of a wall, and avoid placing it directly in a corner.
CAUTION:
DO NOT place your system on a heat-sensitive surface. Like all electrical equipment,
it generates some heat.
CAUTION:
DO NOT use your system in a damp location or any other place where moisture can
get inside.
Note:
DO NOT place your system on a metal surface. It could interfere with AM reception.
Seating your Wave® music system on the Multi-CD Changer
Français Español English
With the changer placed in your chosen location, carefully set your Wave® music system on
top of the changer.
• Make sure the rear feet of the Wave
®
music system fit into the recesses on top of the
changer.
• Make sure the Wave
®
music system sits flat and the side edges of both units are aligned.
6
Page 9
Connecting the Multi-CD Changer to your Wave® music system
IMPORTANT!
Please make sure you
update your Wave® music
system before setting up
the Multi-CD Changer.
See “Updating your
Wave® music system” on
page 4.
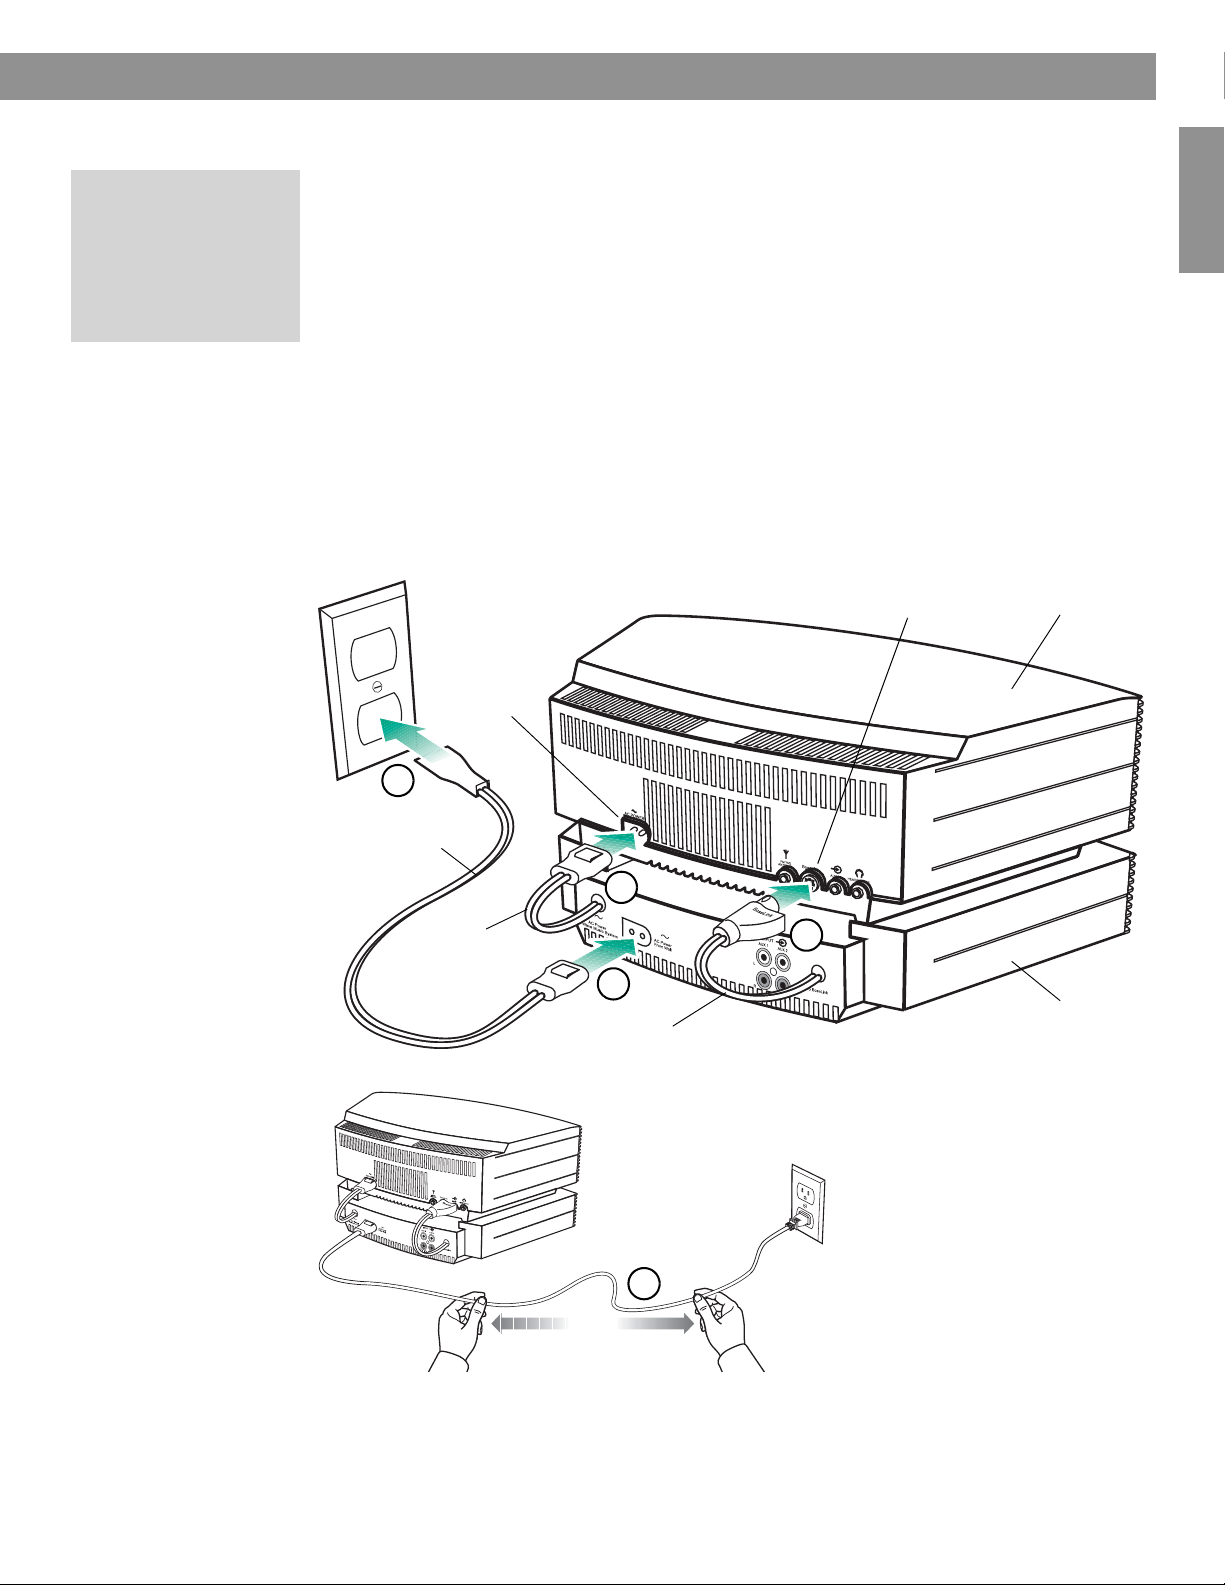
Before you start this setup procedure, disconnect the AC power cord on your
®
Wave
music system and set it aside. You will need to use it again in Step 3.
®
1. Plug the Bose
link cable from the changer into the Bose® link connector on your Wave
music system.
2. Plug the changer power cord into the AC power input connector on the back of the
®
Wave
music system.
®
3. Plug the Wave
music system AC power cord into the AC power input connector on the
back of the changer.
4. Plug the other end of the AC power cord into an AC (mains) wall outlet.
After applying power, “PLEASE WAIT” appears on the display for about 30
seconds while the system prepares itself for operation. DO NOT insert any
discs until this message disappears.
5. For best FM reception, straighten the AC power cord as much as possible. Your Wave
music system uses the power cord as an FM antenna.
Bose® link
connector
®
music
Wave
system
AC POWER
input
Setup
English FrançaisEspañol
®
®
Wave® music
system
4
Wave® music system
AC power cord
Changer
power
cord
2
3
Bose® link cable
For best FM reception,
straighten the power
cord as much as
possible.
5
1
Multi-CD
Changer
7
Page 10
Operation
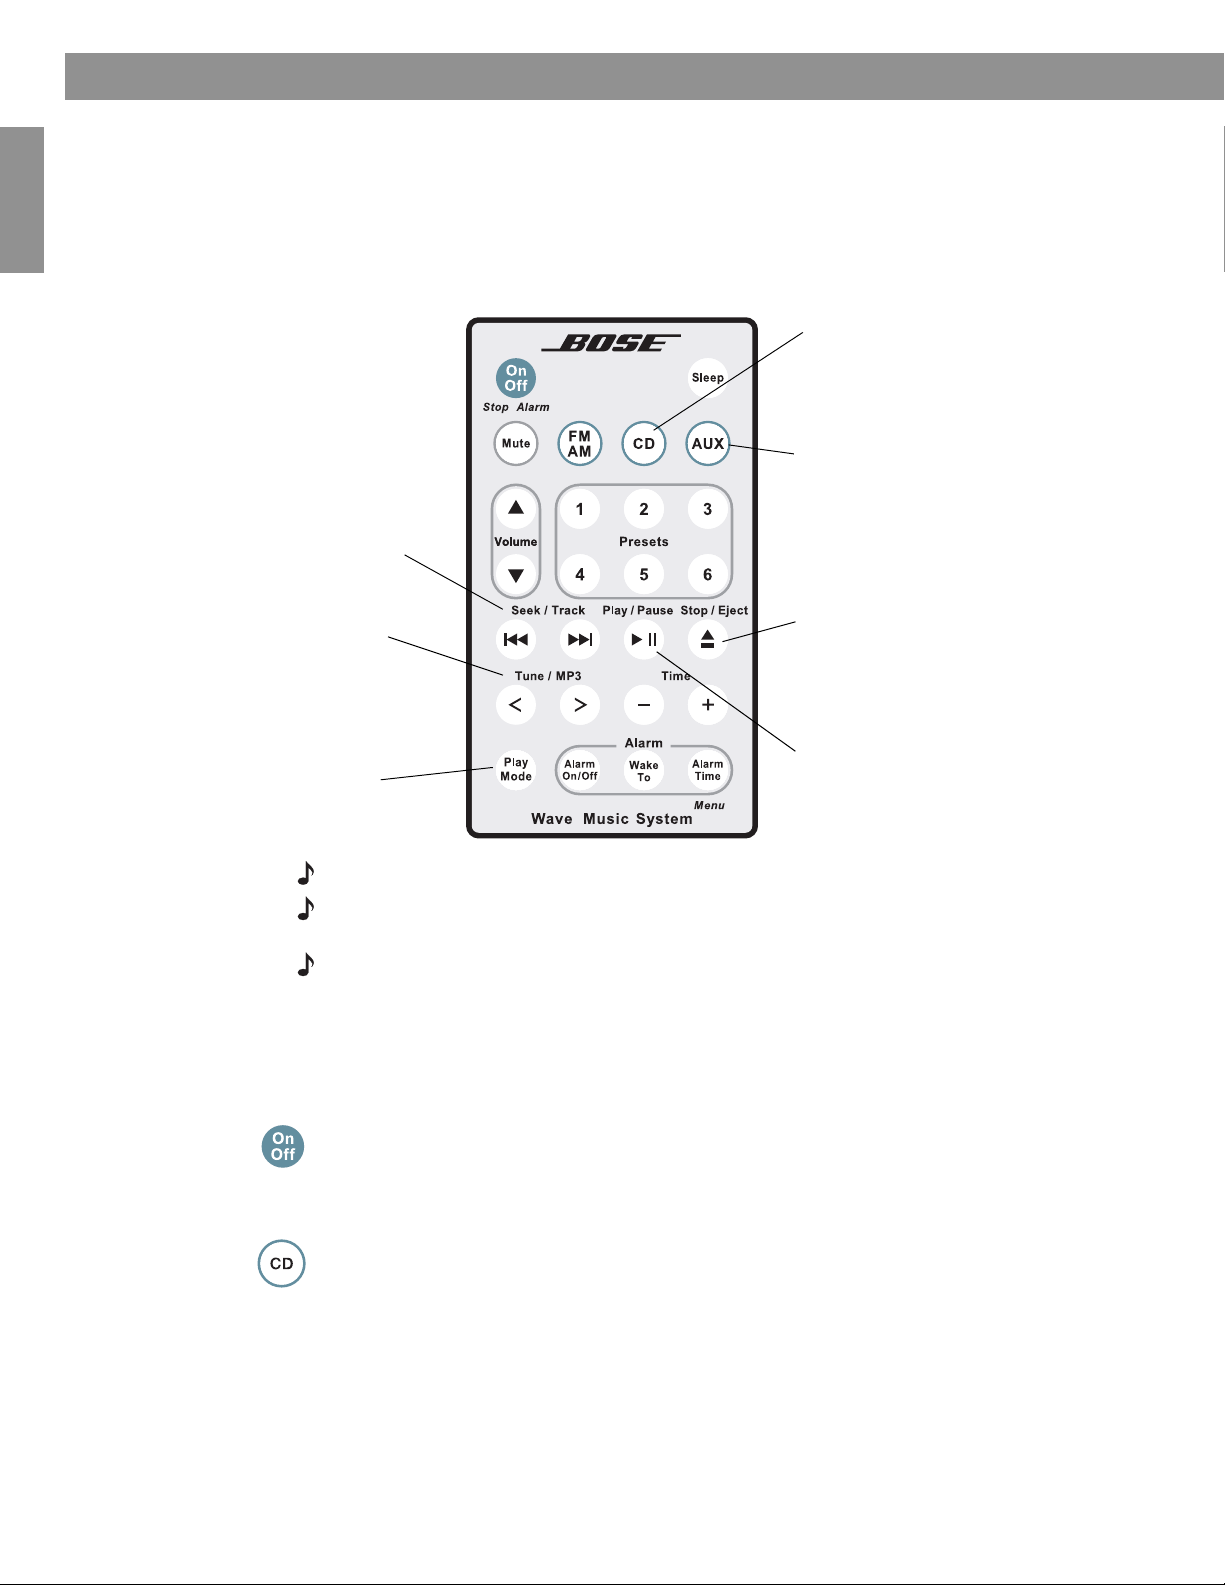
Remote control guide
Seek/Track
• Press: Skips to next/previous CD track
on the current disc.
• Press and hold: Rapidly skips to next/
previous CD track on the current disc.
Français Español English
Tune/MP3
• Press: Navigates between folders
when playing MP3 CDs.
• Press and hold: Rapidly scans forward/
backward through a CD track.
Play Mode
• Selects CD play modes (page 11).
An additional remote control is included with your Wave® music system Multi-CD Changer. This
remote is identical to the one used to control your Wave
®
music system. So, you can use either
remote to control the completed multi-CD system. Just aim the remote at the front panel and
press the buttons. The remote normally works within 20 feet of the front panel.
The following diagram describes the buttons used for playing CDs using the disc changer.
CD
• Press: Selects the CD source (page 10).
• Press again: Moves to the next disc
(page 10).
AUX
• Press to hear audio from an external
source connected to either the AUX 1 or
AUX 2 input on the changer (page 12).
• Press to switch between the AUX 1 and
AUX 2 input (page 12).
Stop/Eject
• Press once: Stops playing the current CD
(page 10).
• Press again: Ejects the stopped CD.
• Press and hold: Ejects a playing CD.
Play/Pause
• Press: Plays the current CD.
• Press again: Pauses a playing CD.
Note: Press-and-hold operations require holding the button down for at least one second.
Pressing FM/AM, CD, or AUX automatically turns on the Wave®music system to the
Note:
source selected.
Note:
While the Multi-CD changer is connected, you cannot change the Alarm Time if AM radio
is selected. To change Alarm Time, please select a source other than AM or turn the system off.
Throughout this owner’s guide you will see button icons to the left of the operating instructions. These icons refer to buttons located on the remote control.
Turning your multi-CD system on and off
Press On/Off once to turn your multi-CD Wave®music system on or off. The system turns on
to the last source played. If the last source was CD, the last disc selected starts to play.
Press On/Off again to turn the system off.
OR
Press CD to turn the system on to the CD source. The last disc selected will play.
8
Page 11
Loading and unloading discs
You can load and unload discs with the system on or off. If the system is off or in the CD
source mode, the first disc loaded starts playing automatically. Disc slots are numbered 1
through 4. The Wave
Loading CDs into the Wave® music
system (Disc 1)
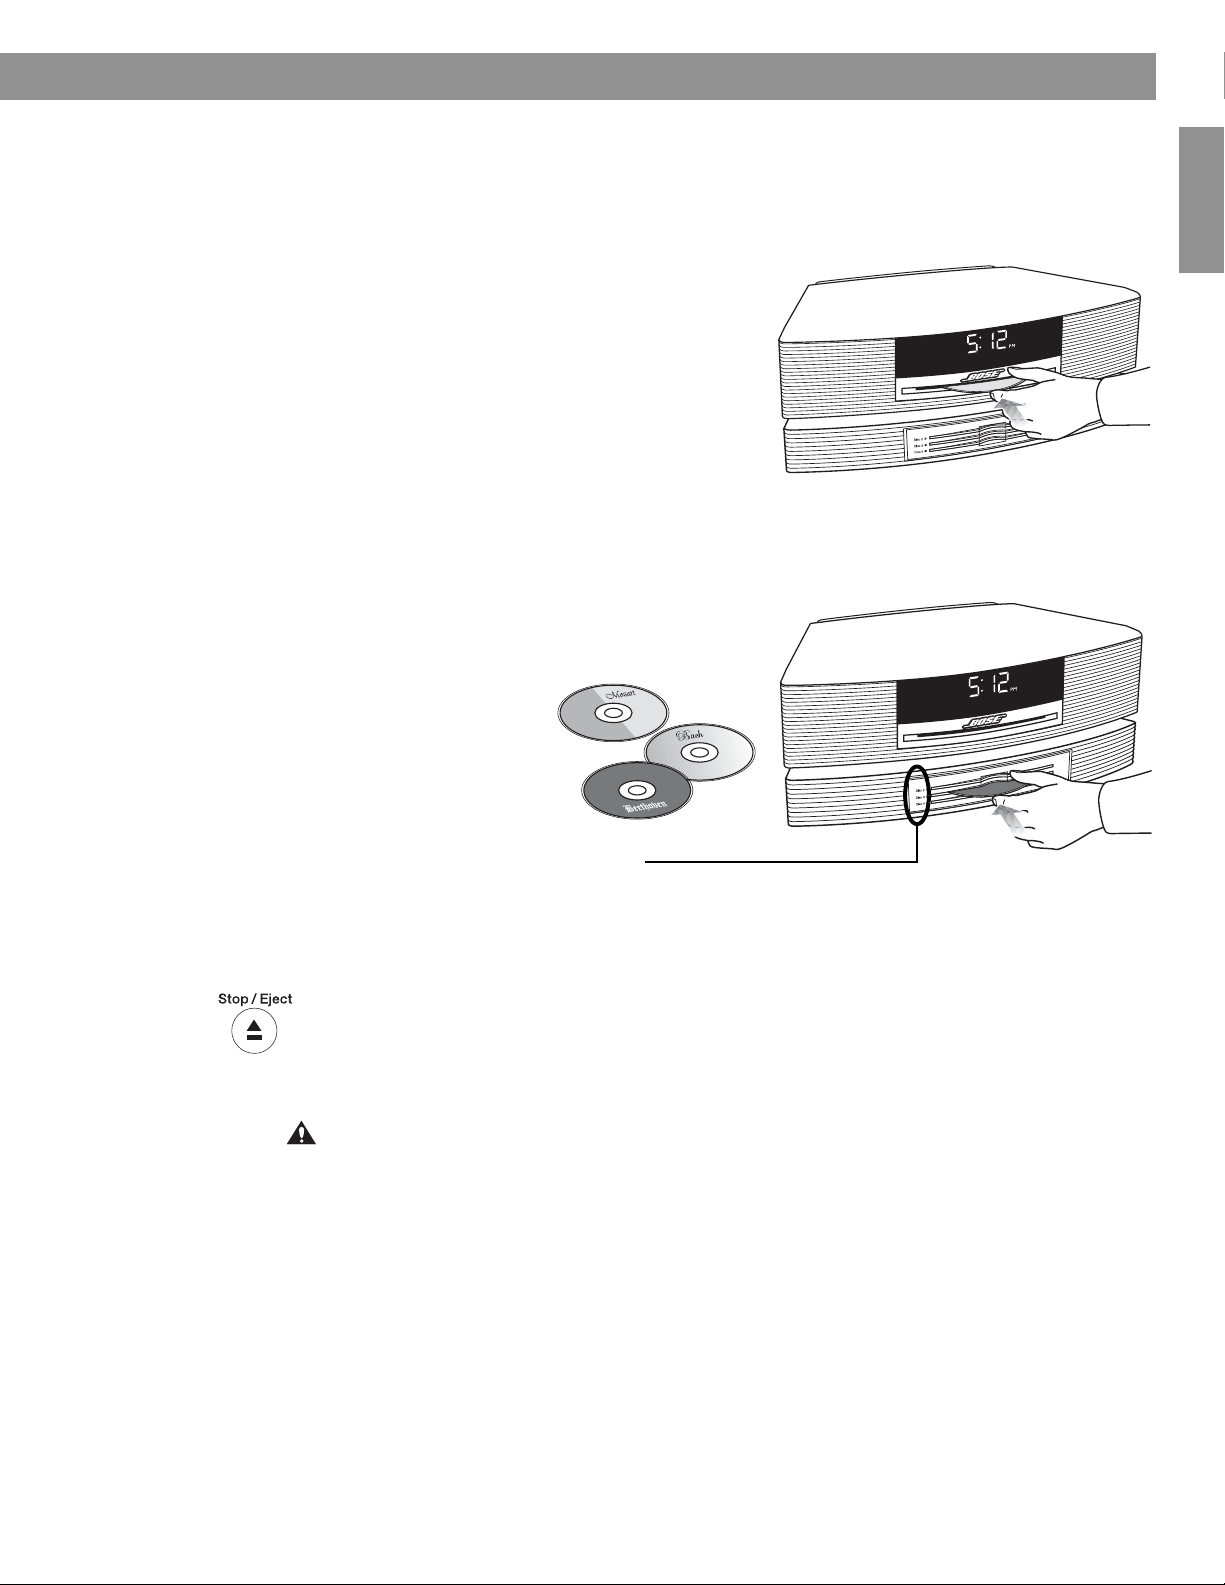
Insert the disc, label side up, into the CD slot
below the display. The disc player will automatically pull the disc in.
Loading CDs into the Multi-CD
Changer (Disc 2 - Disc 4)
Insert a disc, label side up, into an empty slot. An empty slot is indicated by an unlit disc slot
indicator. With your fingers on the outside edge of the disc, push the disc all the way into the
slot.
Operation
®
music system has disc slot 1. The changer has disc slots 2, 3 and 4.
English FrançaisEspañol
Disc slot indicators
Off .......................... Empty disc slot.
Solid green............. The current disc slot.
Solid amber............ The disc slot contains a CD, but it is not currently selected.
Unloading discs
You can unload discs while the system is off or in the CD source mode. Press Stop/Eject on
the remote control to eject the current disc. After removing the disc from its slot, the system
moves to the next available disc which then can be ejected by pressing Stop/Eject again.
For more information on using the Stop/Eject key, see “Ejecting a CD” on page 10.
CAUTION:
• DO NOT INSERT mini CDs or non-circular CDs into any disc slot. These discs may not play
properly and could interfere with the system’s ability to eject them.
• DO NOT INSERT more than one disc at a time into any disc slot.
• Doing either of the above can cause damage to the disc and/or the disc slot.
9
Page 12
Operation
Playing CDs
Français Español English
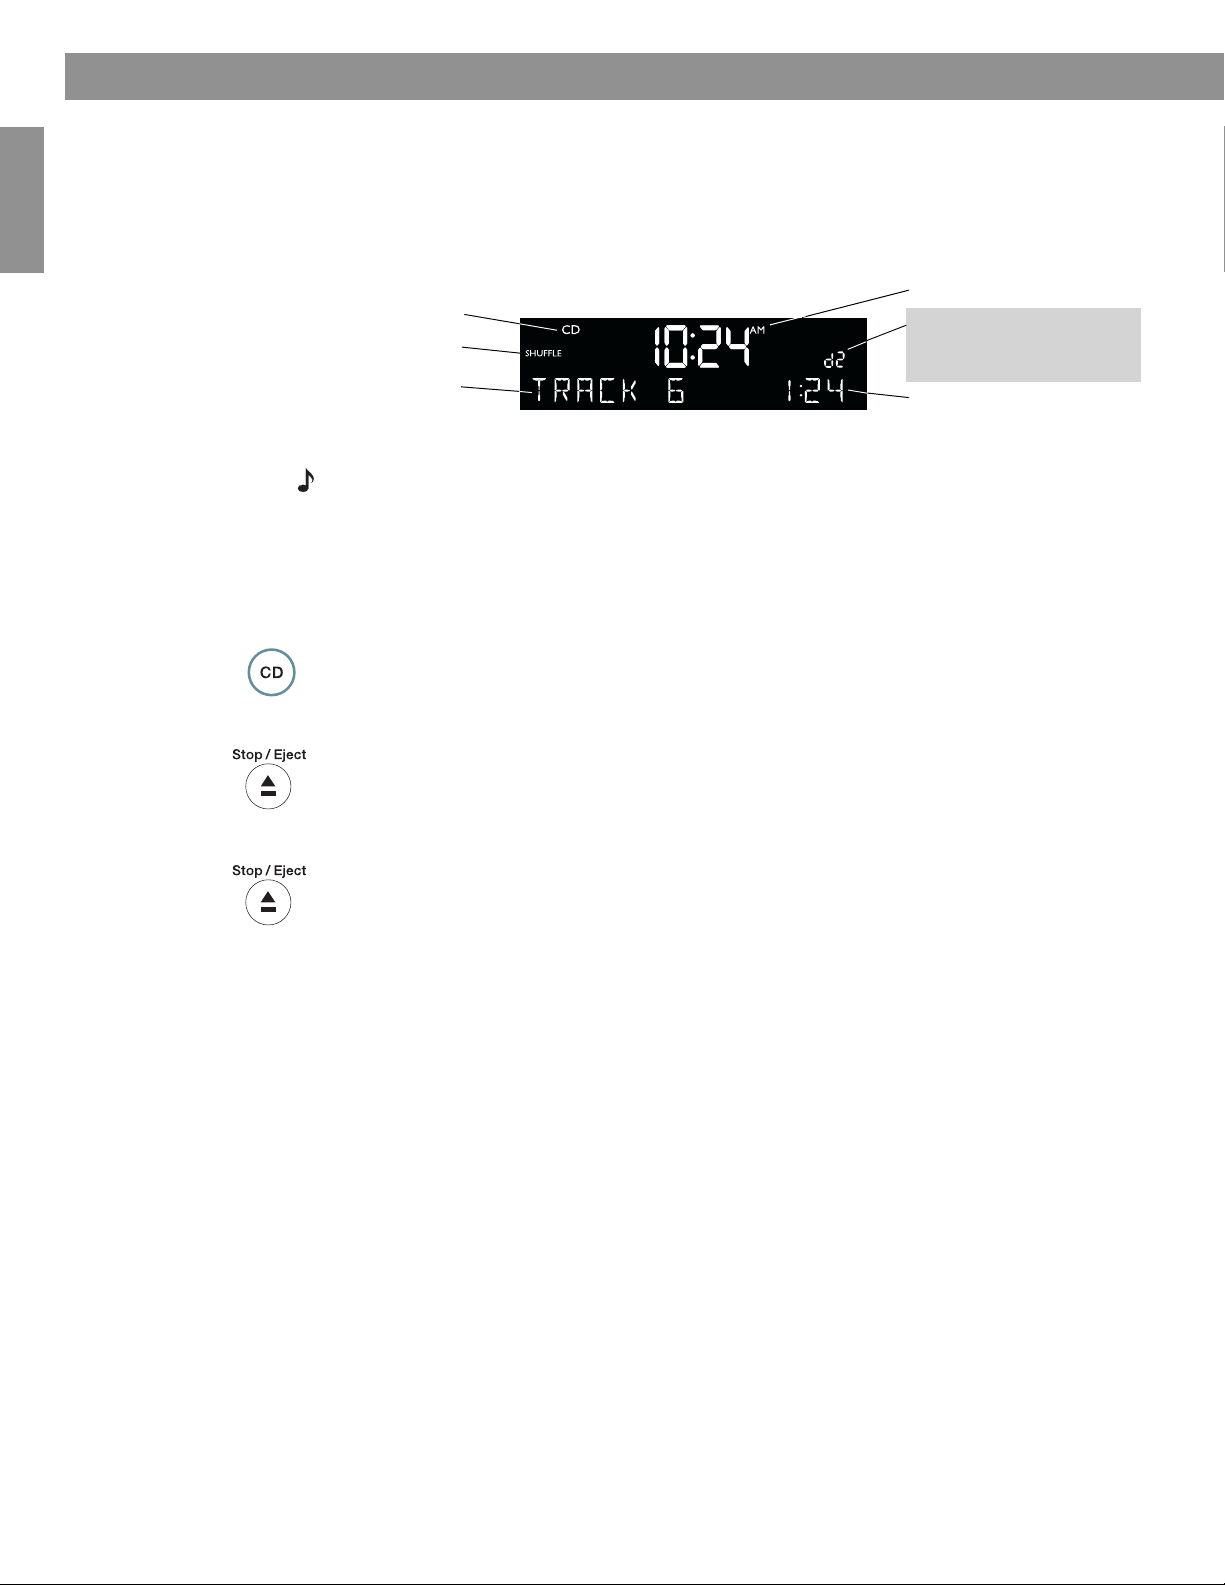
With the Multi-CD Changer installed, your Wave® music system operates as a four-disc
changer. Now, when you play CDs, all the normal CD information appears on the display with
one addition – the selected CD slot number (d1, d2, d3, or d4) appears above the elapsed
track time.
Clock time
Selected source
Play mode
Track number
Note: When switching from the FM, AM, or AUX source to the CD source, the CD in the most
recently used slot begins playing automatically. If that slot is empty, the next slot containing a CD
is selected.
The following information describes functions related to the Multi-CD Changer. Refer to your
Wave music system owner’s guide for complete instructions on playing the selected CD.
Number of selected CD slot:
d1 = Wave
d2, d3, d4 = changer
Elapsed track time
®
music system
Moving to another CD
Press CD to move to the next CD slot. The CD number on the display tells you which CD slot
is currently selected.
Stopping a CD
Press Stop/Eject once to stop a playing CD.
Ejecting a CD
Press CD on the remote to move to the CD you want to eject. Press Stop/Eject once to stop
a playing CD and then, press again to eject the CD.
For more information on ejecting CDs, see “Unloading discs” on page 9.
10
Page 13
Operation
Changing Play Modes
While the Multi-CD changer is connected, the following play modes are available. The !
system plays continuously in all modes except SHUFFLE dISC for audio and MP3 CDs, !
and SHUFFLE FOLDR for MP3 CDs only.
While playing a CD, press Play Mode repeatedly until the play mode you want is displayed.
Play modes for audio CDs
• NORMAL PLAY............. Plays all CDs in order.
• SHUFFLE .....................Plays all tracks on the selected CD in random order, then moves to
another CD, again playing all tracks in random order.
English FrançaisEspañol
• SHUFFLE dISC ............ Plays all tracks on the selected CD once
• SHUFF RPT dISC .........Repeats all tracks on the selected CD in random order.
• REPEAT dISC ............... Repeats all tracks on the selected CD in order.
• REPEAT TRACK ...........Repeats the selected track on the selected CD.
Play modes for MP3 CDs
• NORMAL PLAY.............Plays all CDs in order.
• SHUFFLE ...................... Plays all tracks on the selected CD in random order, then moves to
another CD, again playing all tracks in random order.
• SHUFFLE dISC ............ Plays all tracks on the selected CD once
• SHUFF RPT dISC .........Repeats all tracks on the selected CD in random order.
• REPEAT dISC ............... Repeats all tracks on the selected CD in order.
• SHUFFLE FOLDR ........Plays all tracks in the selected folder once
• SHUF RPT FLDR ..........Repeats all tracks in a folder in random order.
• REPEAT FOLDER ......... Repeats all tracks in a folder in order.
• REPEAT TRACK ...........Repeats the selected track on the selected CD.
Note:
When operating the Wave® music system without the Multi-CD changer, you can select a
music source in the setup menu to automatically play after a CD ends. Because the system plays
continuously while the Multi-CD changer is connected, this option is not available.
in random order.
in random order.
in random order.
11
Page 14
Listening to an External Audio Source
Connecting an external audio source
Français Español English
With the Multi-CD changer connected, any external audio devices you may have used with
your Wave
®
music system can be connected to the back of the Multi-CD changer. However,
you now need a dual RCA stereo cable.
The Wave
2) for external audio devices such as TV, VCR, DVD player, cassette player, or MP3 player.
This gives you the advantage of hearing Wave
®
music system Multi-CD Changer provides two rear panel inputs (AUX 1 and AUX
®
music system sound from a range of sources.
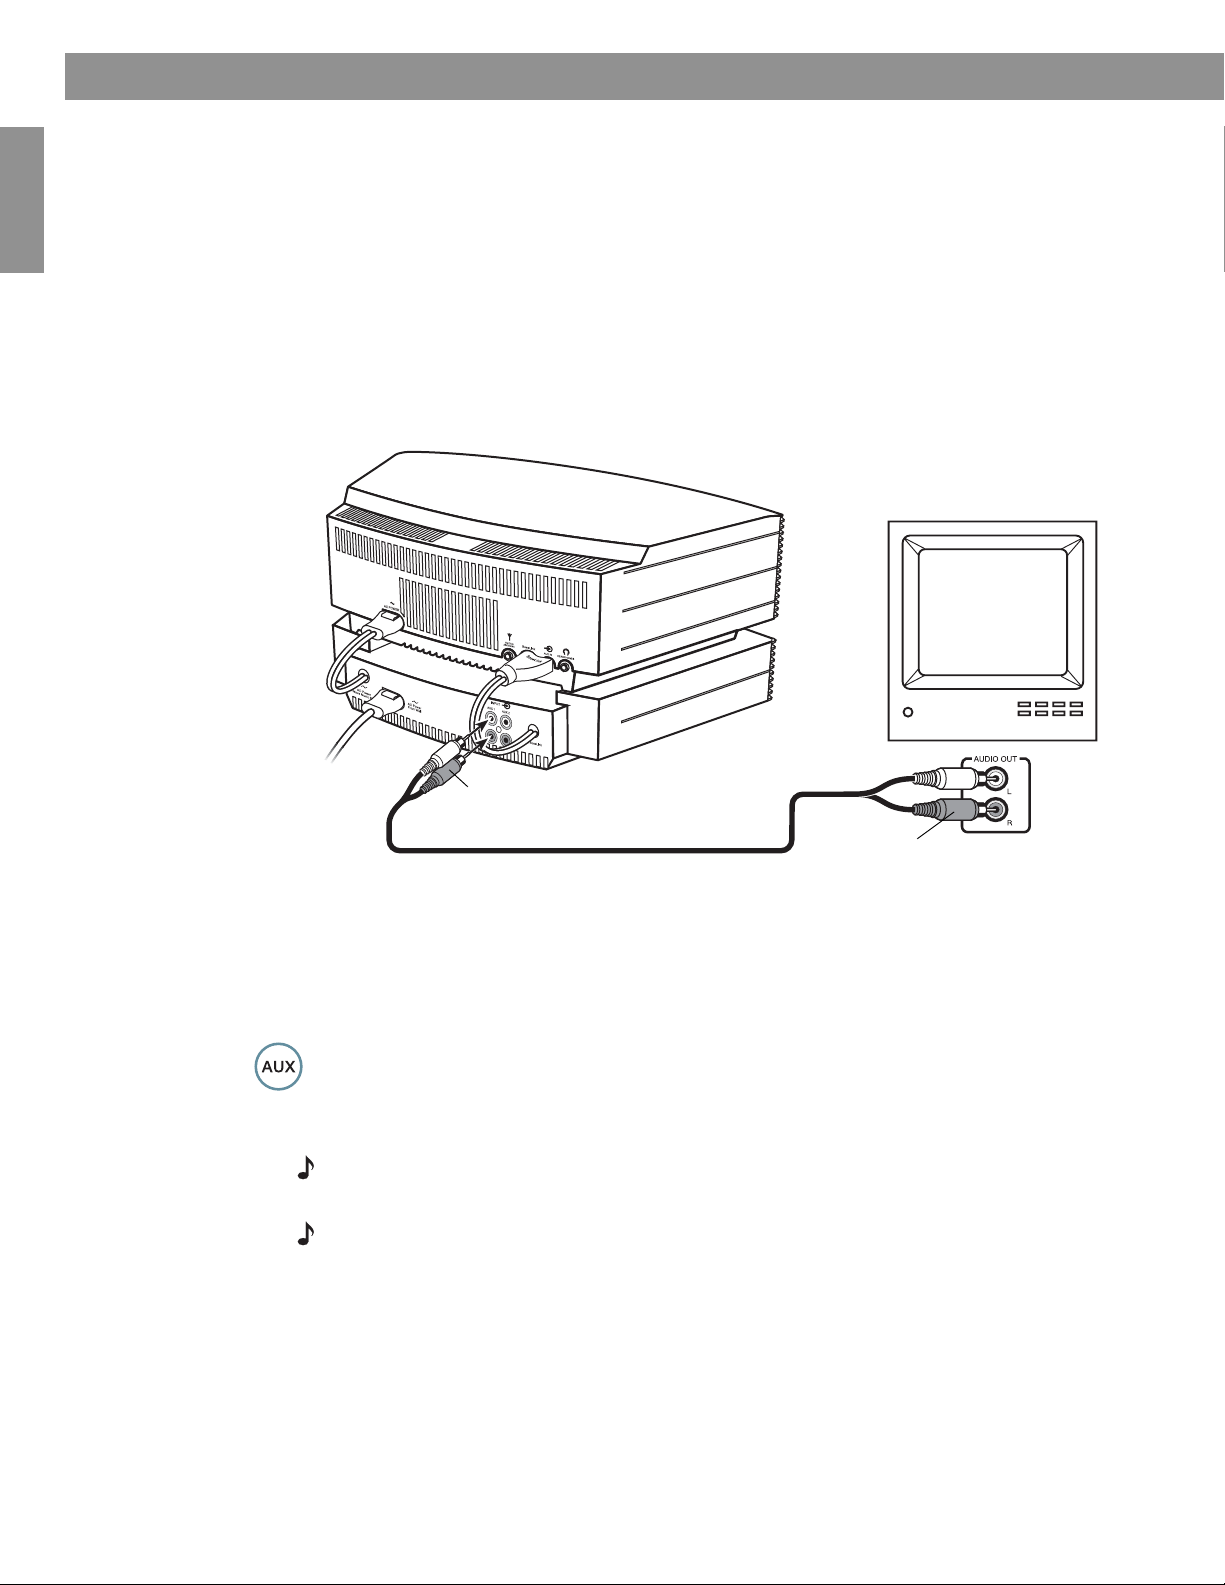
To connect a device, connect one end of the cable to the audio output jacks of the source
and the other end to one of the AUX inputs on the changer. Be sure to match the red and
white plugs on the cable to the red (R) and white (L) AUX jacks on the changer.
Connection example: a TV connected to the Multi-CD Changer
Red
Use only a stereo connection. You will not hear the connected
device if just the left (L) or right (R) channel is connected.
Playing a connected audio source
To listen to a connected source:
1. Turn on the external device.
2. Press AUX on the Wave
between the AUX 1 and AUX 2 inputs. AUX 1 or AUX 2 appears on the display to confirm
your selection.
3. Adjust the volume using the Wave
Note:
The Wave® music system remote control cannot turn a connected AUX device on or off, or
change its settings or selections.
Note:
Neither AUX 1 or AUX 2 can be selected as an alarm source.
Red
®
music system remote control. Press AUX again to switch
®
music system remote control.
12
Page 15
Cleaning
e
o
p
e
ra
tin
g
n
s
tru
c
tio
n
s
fo
r ty
p
e
s
o
f
b
a
tte
ry
to
b
e
u
s
e
d
Use only a soft dry cloth to clean your Wave® music multi-CD system. If necessary, you may
use a soft-bristled attachment to gently vacuum across the front. Do not use any liquid cleaning solutions, solvents, chemicals, alcohol, ammonia, or abrasives.
CAUTION:
Do not allow liquids to spill into any openings in the enclosure. If liquids get into the
unit, turn it off immediately. Call Bose
vice. See the list of phone numbers inside the back cover.
Replacing the remote control battery
WARNING: Keep the remote control battery away from children. It may cause a fire or chemical
burn if mishandled. Do not recharge, disassemble, heat above 212ºF (100ºC), or incinerate.
Dispose of a used battery promptly. Replace only with a battery of the correct type and model
number.
Care and Maintenance
®
Customer Support as soon as possible to arrange for ser-
English FrançaisEspañol
CAUTION:
Danger of explosion if battery is incorrectly replaced. Replace only with Duracell,
Eveready, Energizer, Maxell, Toshiba, or Shun Wo CR2032 or DL2032, 3-volt lithium battery.
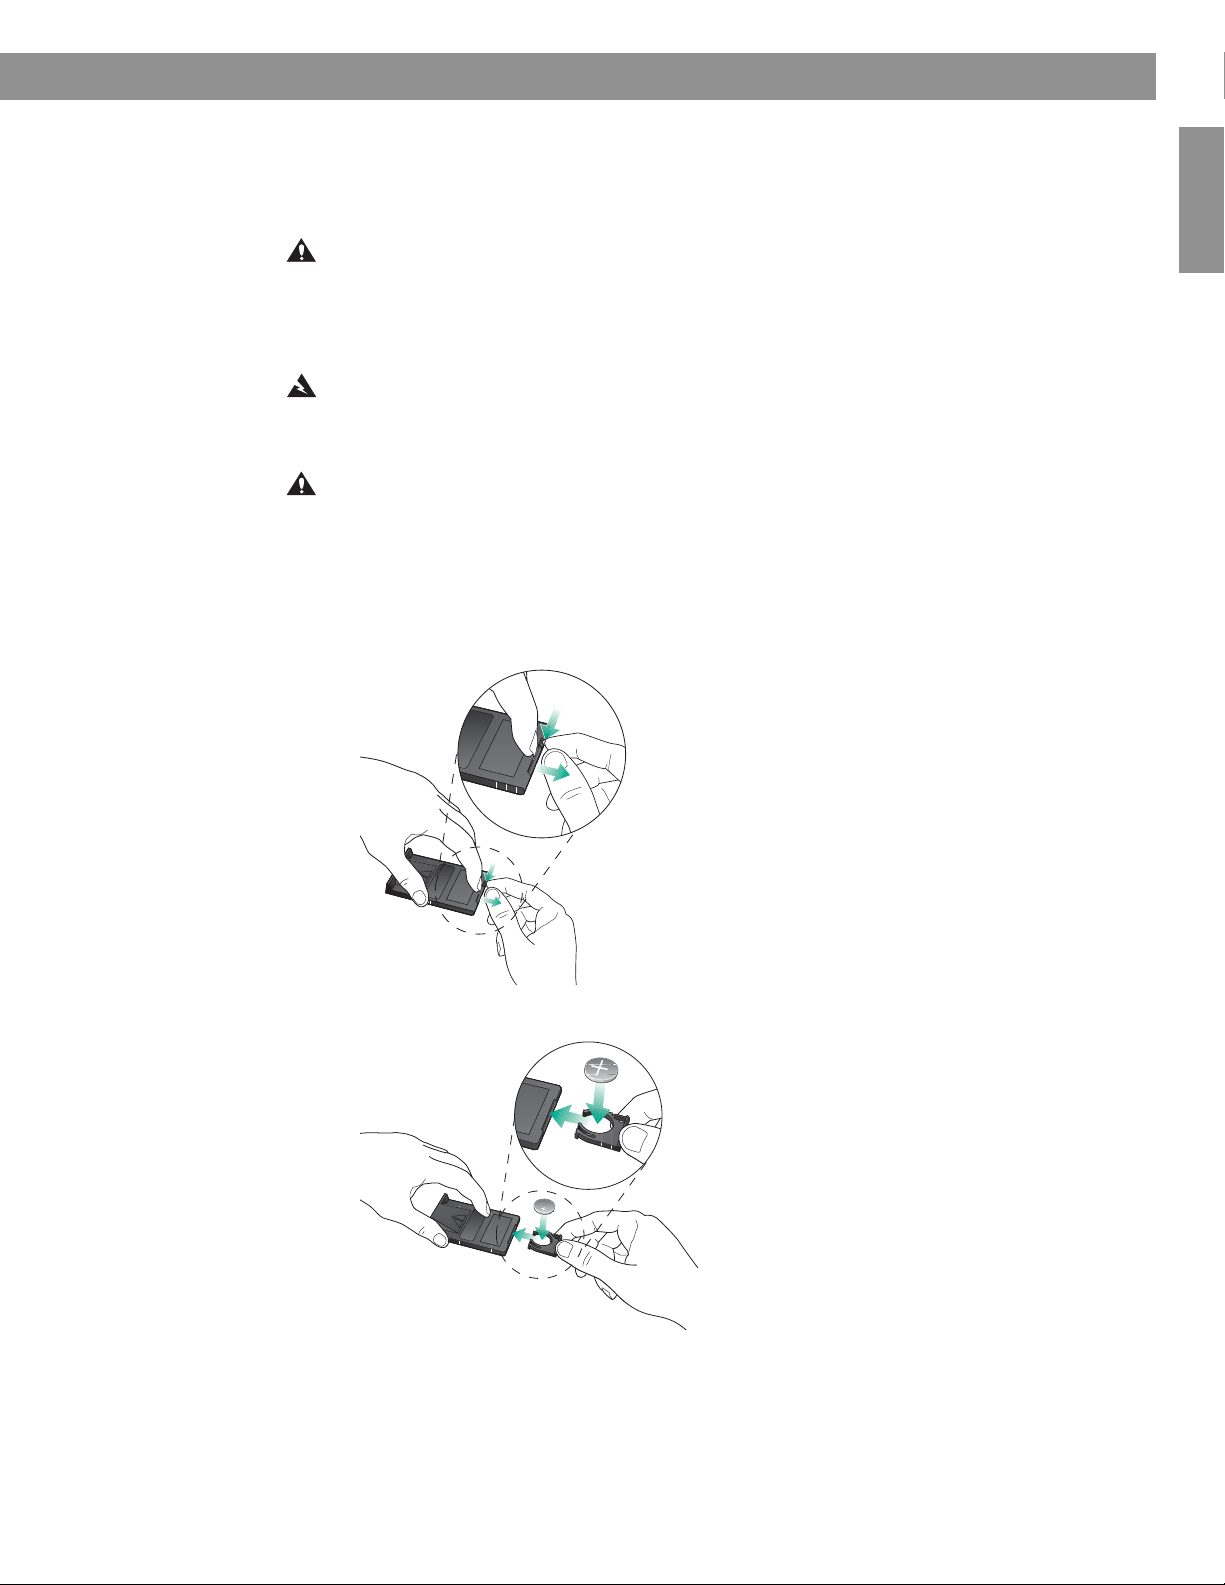
To replace the remote battery:
1. Place the remote face down on a flat surface.
2. Using your finger, push the tab lock to the side as shown and hold. Slide the battery
compartment open.
f
o
s
d
e
g
e
p
s
tin
ty
u
r
ra
e
e
fo
b
p
s
o
n
to
e
ry
e
tio
c
S
tte
a
tru
b
s
in
3. Remove the old battery and install the new one with the plus (+) symbol facing up.
f
o
d
g
pes
se
u
r ty
ratin
e
fo
b
pe
s
o
to
e
e
tion
c
S
attery
tru
b
s
in
4. Gently slide the battery compartment closed. It locks automatically.
13
Page 16

Care and Maintenance
Troubleshooting
Problem What to do
Wave music system is on
but changer does not
operate.
The system ejects the
update CD but does not
perform the update
No sound or !
sound is muffled
Français Español English
No sound heard from the
AUX device
• Check the power connections between the Wave
to “Connecting the Multi-CD Changer to your Wave
®
music system and the changer. Refer
®
music system” on page 7.
• Make sure you ran the system update disc.
• If you did, remove the power cord from the AC outlet, wait 10 seconds and plug it in
again.
• If you did not, disconnect the Multi-CD changer from your Wave music system and
refer to “Updating your Wave
• Disconnect the Multi-CD changer and insert the update disc into the disc slot of the Wave
music system. Refer to “Updating your Wave
®
music system” on page 4.
®
music system” on page 4.
• Make sure the Wave® Multi-CD Changer is plugged into a live power outlet and is turned on.
• Check the connections between the Wave® music system and the changer. Refer to “Connecting the Multi-CD Changer to your Wave
®
music system” on page 7.
• If the AUX source is selected, check the connections from the AUX source to the changer
and make sure the AUX device is turned on.
• Disconnect headphones.
• Make sure the RCA plugs on the stereo cable are pushed in as far as they can go.
• Press AUX on the remote and select the AUX input used by the device (AUX 1 or AUX 2).
• Make sure the AUX device is turned on.
CD skips • Make sure the system is not getting bumped in its current location. If so, move it to a more
protected location.
• Check the CD for smudges or dirt. If cleaning is necessary, wipe the CD straight out from
the center (NOT in a circular motion) to clean it.
CD does not play • Make sure there is a CD in the selected CD slot.
®
music system.
A CD is playing, but none
of the Multi-CD Changer
• Make sure CD is selected on the display of the Wave
• Check to see if the CD slot in the Wave
®
music system is selected, instead of a slot in the
Multi-CD Changer.
LEDs are lit
Customer Support
For additional help in solving problems, contact Bose® Customer Support. Refer to the
address list on the inside back cover of this guide.
14
Page 17

Limited warranty
Care and Maintenance
What is covered:
All parts defective in material or workmanship.
For how long:
One year from the purchase date.
What we will do:
We will, at our sole option, repair or replace any defective parts free of charge.
What you must do:
A. Call Bose
B. Properly pack the unit, if possible, in the original carton for shipping.
Other conditions:
This limited warranty is fully transferable for the one-year period following purchase.
THE PROVISIONS OF THIS LIMITED WARRANTY ARE IN LIEU OF ANY OTHER WARRANTY,
WHETHER EXPRESS OR IMPLIED, WRITTEN OR ORAL, INCLUDING ANY WARRANTY OF
MERCHANTABILITY OR FITNESS FOR A PARTICULAR PURPOSE. BOSE CORPORATION’S
MAXIMUM LIABILITY SHALL NOT EXCEED THE ACTUAL PURCHASE PRICE PAID BY YOU
FOR THE PRODUCT. IN NO EVENT SHALL BOSE BE LIABLE FOR SPECIAL, INCIDENTAL,
CONSEQUENTIAL, OR INDIRECT DAMAGES.
®
Customer Service and ask for shipping instructions.
English FrançaisEspañol
This limited warranty does not cover a defect that has resulted from improper or unreasonable use or maintenance, accident, improper packing, or unauthorized tampering, alteration,
or modification as determined solely by us. This limited warranty is void if the label bearing
the serial number has been removed or defaced.
Other Legal Rights:
This limited warranty gives you specific legal rights, and you may also have other rights which
vary from state to state or country to country. Some places do not allow limitations on implied
warranties or the exclusion or limitation of incidental or consequential damages, so the above
limitations or exclusions may not apply to you.
Technical information
Multi-CD Changer power rating
120V~ 50/60 Hz, 80W
Dimensions
2.6"H x 14.5"W x 9.9"D!
(6.6 cm x 36.8 cm x 25.2 cm)
Weight
4.5 lb (2.04 kg)
Color
Graphite Gray or Platinum White
15
Page 18

Français Español English
Información de seguridad
Lea esta guía del usuario.
Dedique el tiempo que sea necesario para seguir atentamente las instrucciones de esta guía del usuario, que le ayudará a
configurar y utilizar correctamente el sistema y a disfrutar de todas sus funciones avanzadas. Guarde la guía del usuario para
utilizarla como material de referencia en el futuro.
ADVERTENCIA:
ADVERTENCIA: Este aparato no debe estar expuesto a salpicaduras ni mojarse. No coloque sobre él objetos que contengan
líquidos como, por ejemplo, jarrones. Como con cualquier producto electrónico, evite que se derramen líquidos en los componentes
del cambiador de discos, ya que podrían provocar averías o riesgo de incendio.
ADVERTENCIA: No coloque sobre el aparato llamas vivas como, por ejemplo, velas.
El símbolo de relámpago con una flecha dentro de un triángulo equilátero indica al usuario que la caja del sistema puede
contener una tensión sin aislar de magnitud suficiente para constituir un riesgo de descarga eléctrica.
El signo de exclamación dentro de un triángulo equilátero, tal como aparece marcado en el sistema, avisa al usuario de
que existen instrucciones de operación y mantenimiento importantes en esta guía del usuario.
Con el fin de reducir el riesgo de descarga eléctrica, no exponga el producto a la lluvia o humedad.
Límites para las emisiones de clase B
Este aparato digital de clase B cumple todos los requisitos de las leyes de Canadá sobre equipos que causan interferencias.
PRECAUCIÓN:
ranura ancha de la toma de red e insértela completamente.
PRECAUCIÓN: NO coloque el producto sobre superficies termosensibles como, por ejemplo, muebles de calidad. Como todos
los equipos eléctricos, esta unidad genera cierta cantidad de calor.
PRECAUCIÓN: El uso de controles o ajustes o la realización de procedimientos distintos de los especificados en este documento
pueden ocasionar la exposición a radiaciones peligrosas. Sólo técnicos convenientemente cualificados deberán ajustar y reparar el
reproductor de discos múltiples.
Producto láser clase 1
Este cambiador de CD está clasificado como PRODUCTO LÁSER CLASE 1 de acuerdo con la norma
EN 60825-1:1994 + A1+A2, IEC60825-1:1993+A1+A2.
Notas:
• La etiqueta del producto se encuentra en la base.
• Si se utiliza la clavija de red como dispositivo de desconexión, deberá poder operarse fácilmente.
• Este producto debe utilizarse en espacios interiores. No está diseñado ni ha sido probado para uso al aire libre, en vehículos de
recreo o en embarcaciones.
• Este producto sólo se debe utilizar con el sistema de música Bose
El cambiador de discos cumple la directiva sobre compatibilidad electromagnética 89/336/EEC y la directiva sobre límites de
tensión 73/23/EEC. Podrá encontrar la declaración de conformidad completa en www.bose.com
ADVERTENCIA:
un incendio o una combustión química. No se debe recargar, desmontar, calentar por encima de los 100º C ni incinerar. Deseche las pilas
usadas cuanto antes. Asegúrese de que la pila que utiliza para cambiarla sea del tipo y modelo correctos.
ADVERTENCIA: Existe riesgo de explosión si no se cambia la pila correctamente. Cámbiela únicamente por pilas de litio de 3
voltios Duracell, Eveready, Energizer, Maxell, Toshiba o Shun Wo CR2032 o DL2032.
Para evitar que se produzcan descargas eléctricas, haga coincidir la patilla ancha de la clavija del cable de línea con la
CLASS 1 LASER PRODUCT
KLASSE 1 LASER PRODUKT
LUOKAN 1 LASER LAITE
KLASS 1 LASER APPARAT
®
Wave®.
.
Mantenga la pila del control remoto fuera del alcance de los niños. Si no se manipula correctamente, puede provocar
Deseche correctamente las pilas usadas,
!"##$%&'()%*'+,'+-./'01%2/0D;0-%,-+.)%:)%)(.-%'9+-%,;):)%+),+':;</+()=%7':/3/<-+()=%:/(.+/9;/+()%'%;(-+()%:)%0/0D;0-%'.+-%7-0)+-%(/0%
<'0()0./7/)0.'%,+)B/'%,'+%)(<+/.'1%@':-(%?-(%7-+<-(%<'7)+</-?)(%-%E;)%()%4-<)%+)3)+)0</-%)0%)(.)%:'<;7)0.'%('0%,+',/):-:%:)%&'()%*'+,'+-./'01%
F?%:/()G'%:)?%(/(.)7-%:)%7H(/<-%A-B)
C
%)(%;0-%7-+<-%<'7)+</-?%:)%&'()%*'+,'+-./'01
siguiendo las disposiciones locales. No las queme.
2
Page 19

Contenido
Instalación . . . . . . . . . . . . . . . . . . . . . . . . . . . . . . . . . . . . . . . . . . . . . . . . . . . . . . . . . . 4
Actualización del sistema de música Wave
®
. . . . . . . . . . . . . . . . . . . . . . . . . . . . . . . . . . . . . . 4
Características y ventajas del cambiador de CD . . . . . . . . . . . . . . . . . . . . . . . . . . . . . . . . . . . 5
Desembalaje de la caja . . . . . . . . . . . . . . . . . . . . . . . . . . . . . . . . . . . . . . . . . . . . . . . . . . . . . . 5
Selección de la ubicación del sistema . . . . . . . . . . . . . . . . . . . . . . . . . . . . . . . . . . . . . . . . . . . 6
Instalación del sistema de música Wave
Conexión del cambiador de CD al sistema de música Wave
®
en el cambiador de CD . . . . . . . . . . . . . . . . . . . . . 6
®
. . . . . . . . . . . . . . . . . . . . . . . . . 7
Funcionamiento . . . . . . . . . . . . . . . . . . . . . . . . . . . . . . . . . . . . . . . . . . . . . . . . . . . . . . 8
Guía del control remoto . . . . . . . . . . . . . . . . . . . . . . . . . . . . . . . . . . . . . . . . . . . . . . . . . . . . . . 8
Encendido y apagado del sistema de CD . . . . . . . . . . . . . . . . . . . . . . . . . . . . . . . . . . . . . . . . 8
Cargar y descargar discos . . . . . . . . . . . . . . . . . . . . . . . . . . . . . . . . . . . . . . . . . . . . . . . . . . . . 9
Carga de CD en el sistema de música Wave
®
(Disco 1) . . . . . . . . . . . . . . . . . . . . . . . . . . 9
Carga de CD en el cambiador de CD (Disco 2 - Disco 4) . . . . . . . . . . . . . . . . . . . . . . . . . 9
Descargar discos . . . . . . . . . . . . . . . . . . . . . . . . . . . . . . . . . . . . . . . . . . . . . . . . . . . . . . . . 9
Reproducción de CD . . . . . . . . . . . . . . . . . . . . . . . . . . . . . . . . . . . . . . . . . . . . . . . . . . . . . . . . 10
Pasar a otro CD . . . . . . . . . . . . . . . . . . . . . . . . . . . . . . . . . . . . . . . . . . . . . . . . . . . . . . . . . 10
Detener un CD . . . . . . . . . . . . . . . . . . . . . . . . . . . . . . . . . . . . . . . . . . . . . . . . . . . . . . . . . . 10
Expulsar un CD . . . . . . . . . . . . . . . . . . . . . . . . . . . . . . . . . . . . . . . . . . . . . . . . . . . . . . . . . 10
Cambiar el modo de reproducción . . . . . . . . . . . . . . . . . . . . . . . . . . . . . . . . . . . . . . . . . . 11
Reproducción de una fuente de audio externa . . . . . . . . . . . . . . . . . . . . . . . . . . . . . . . 12
Conexión de una fuente de audio externa . . . . . . . . . . . . . . . . . . . . . . . . . . . . . . . . . . . . . . . . 12
Reproducción de una fuente de audio conectada . . . . . . . . . . . . . . . . . . . . . . . . . . . . . . . . . . 12
Cuidado y mantenimiento . . . . . . . . . . . . . . . . . . . . . . . . . . . . . . . . . . . . . . . . . . . . . . . 13
Limpieza . . . . . . . . . . . . . . . . . . . . . . . . . . . . . . . . . . . . . . . . . . . . . . . . . . . . . . . . . . . . . . . . . . 13
Cambio de la pila del control remoto . . . . . . . . . . . . . . . . . . . . . . . . . . . . . . . . . . . . . . . . . . . . 13
Problemas y soluciones . . . . . . . . . . . . . . . . . . . . . . . . . . . . . . . . . . . . . . . . . . . . . . . . . . . . . . 14
Servicio de atención al cliente . . . . . . . . . . . . . . . . . . . . . . . . . . . . . . . . . . . . . . . . . . . . . . . . . 14
Garantía limitada . . . . . . . . . . . . . . . . . . . . . . . . . . . . . . . . . . . . . . . . . . . . . . . . . . . . . . . . . . . 15
Información técnica . . . . . . . . . . . . . . . . . . . . . . . . . . . . . . . . . . . . . . . . . . . . . . . . . . . . . . . . . 15
English FrançaisEspañol
3
Page 20

Instalación
Actualización del sistema de música Wave
IMPORTANTE
Deberá actualizar el sistema de música Wave® antes de utilizarlo con el cambiador
de CD. Utilice el DISCO DE ACTUALIZACIÓN del sistema de música Wave
Français Español English
suministra con el cambiador de CD antes de instalar o intentar utilizar el sistema de
música Wave
Para actualizar el sistema de música Wave®:
1. Compruebe que el sistema de música Wave
componente conectado.
2. Inserte el disco de actualización en la ranura para CD del sistema de música Wave
3. Espere unos 20 segundos mientras el sistema de música Wave
La pantalla mostrará una serie de mensajes durante el proceso:
4. Espere a que el sistema expulse automáticamente el disco de actualización
cuando termine la actualización. NO expulse el disco usted mismo.
Después de actualizar el sistema de música Wave
comienzan en la página 6.
®
con el cambiador de CD.
LOADING UPDATING FINISHED EJECTING
®
®
que se
®
está enchufado y que no tiene ningún otro
®
.
®
realiza la actualización.
®
, siga las instrucciones de instalación que
Disco de actualización del
sistema de música Wave
®
4
Page 21

Características y ventajas del cambiador de CD
Gracias por adquirir el cambiador de CD del sistema de música Bose® Wave®. La incorporación
del cambiador de CD al sistema de música Wave
• Un sistema de música Wave
cuatro CD de audio, proporcionando horas de música de CD sin interrupciones.
®
de cuatro discos: Permite cargar y reproducir hasta
Instalación
®
brinda ventajas considerables:
English FrançaisEspañol
• Diseño de pedestal integrado y elegante: El cambiador ocupa la misma superficie que
el sistema de música Wave
• Un control remoto integrado: Permite seleccionar fácilmente todas las fuentes
incorporadas con sólo pulsar un botón del control remoto.
• Cambio entre múltiples fuentes: Añadiendo dos conexiones de entrada para
dispositivos de audio externos podrá escuchar una o dos fuentes de audio adicionales en
el hogar a través del sistema de música Wave
Desembalaje de la caja
Desembale con cuidado el cambiador de CD del sistema de música Wave® y conserve todo
los materiales de embalaje por si lo necesitara en el futuro. Los materiales de embalaje
originales permiten transportar el cambiador de CD de la forma más segura.
Compruebe que ha recibido los componentes que se ilustran en el diagrama siguiente.
Si algún componente parece estar dañado, no lo utilice. Notifíqueselo al Servicio de atención
al cliente de Bose de inmediato (consulte los teléfonos de contacto en la cubierta trasera
interior).
®
, complementando la elegancia y sencillez del sistema.
®
.
Disco de actualización del
sistema de música Wave
®
Cambiador de CD del sistema de música Wave
®
Control remoto del
sistema de música Wave
Para conservar como referencia
Este es un buen momento para anotar el número de serie del cambiador de CD,
que se encuentra en el parte inferior del producto.
Número de serie________________________
Fecha de compra_______________________
Se recomienda conservar el recibo de compra junto con esta guía del usuario.
®
5
Page 22

Instalación
Selección de la ubicación del sistema
El cambiador de CD se ha diseñado para ajustarse directamente bajo el sistema de música
®
. Antes de conectar el cambiador de CD al sistema de música Wave®, seleccione una
Wave
ubicación adecuada para todo el sistema siguiendo las directrices que se exponen a
continuación.
• Coloque el sistema sobre una mesa u otra superficie plana.
• Para disfrutar al máximo del rendimiento, sitúe el sistema al otro lado de la habitación
donde vaya a escuchar la música.
• Sitúe el sistema a un máximo de 0,60 m de una pared y evite colocarlo directamente en un
rincón.
PRECAUCIÓN: NO coloque el sistema sobre una superficie termosensible. Como todos los
equipos eléctricos, esta unidad genera cierta cantidad de calor.
PRECAUCIÓN: NO utilice el sistema en lugares húmedos o en los que se pueda generar humedad.
Nota: NO coloque el sistema sobre superficies metálicas, ya que podría interferir en la recepción
de AM.
Français Español English
Instalación del sistema de música Wave® en el cambiador de CD
Con el cambiador instalado en el lugar elegido, coloque cuidadosamente el sistema de
música Wave
• Compruebe que las patas posteriores del sistema de música Wave
®
sobre el cambiador.
®
encajan en las ranuras
de la parte superior del cambiador.
• Asegúrese de que el sistema de música Wave
®
queda nivelado y que los bordes laterales
de ambas unidades están alineados.
6
Page 23

Instalación
Conexión del cambiador de CD al sistema de música Wave
IMPORTANTE
Asegúrese de actualizar
el sistema de música
Wave® antes de instalar el
cambiador de CD.
Consulte “Actualización
del sistema de música
Wave®” en la página 4.
Antes de llevar a cabo este procedimiento de instalación, desconecte el cable de
alimentación de CA del sistema de música Wave
®
y apártelo. Volverá a necesitarlo
en el Paso 3.
1. Conecte el cable Bose
de música Wave
®
®
link desde el cambiador hasta el conector Bose® link del sistema
.
2. Conecte el cable de alimentación del cambiador al conector de entrada de alimentación
de CA situado en la parte posterior del sistema de música Wave
3. Conecte el cable de alimentación de CA del sistema de música Wave
entrada de alimentación de CA situado en la parte posterior del cambiador.
4. Enchufe el otro extremo del cable de alimentación de CA en la toma de red de CA.
Al encender la unidad, aparecerá “PLEASE WAIT (ESPERE)” en la pantalla
durante 30 segundos aproximadamente mientras el sistema se prepara para
funcionar. NO inserte ningún disco hasta que desaparezca este mensaje.
5. Para obtener una recepción óptima de FM, enderece el cable de alimentación de CA
todo lo posible. El sistema de música Wave
®
utiliza el cable de alimentación como una
antena de FM.
Entrada de
alimentación de
CA del sistema
de música
®
Wave
®
®
Conector
Bose
.
®
al conector de
®
link
Sistema de
música Wave
English FrançaisEspañol
®
4
Cable de
alimentación de
CA del sistema de
música Wave
®
Cable de
alimentación
del cambiador
2
3
Cable Bose® link
Para obtener una
recepción óptima de
FM, enderece el cable
de alimentación todo
lo posible.
5
1
Cambiador
de CD
7
Page 24

Funcionamiento
Guía del control remoto
Seek/Track
• Pulse para pasar a la pista siguiente/
anterior del CD actual.
• Mantenga pulsado para
pasarrápidamente a la pista siguiente/
anterior del CD actual.
Français Español English
Tune/MP3
• Pulse para desplazarse por las
carpetas al reproducir CD en formato
MP3.
• Mantenga pulsado para avanzar o
retroceder rápidamente en una pista del
CD.
Play Mode
• Selecciona los modos de
reproducción de CD (página 11).
El cambiador de CD del sistema de música Wave® incluye un control remoto adicional. Este
control remoto es idéntico al empleado para controlar el sistema de música Wave
®
. Por tanto,
podrá emplear cualquiera de los dos para controlar el sistema de CD completo. Apunte con él al
panel frontal y pulse los botones. El control remoto funciona normalmente a una distancia de 6
metros desde el panel frontal.
El diagrama siguiente describe los botones empleados para reproducir CD con el cambiador
de discos.
CD
• Pulse para seleccionar la fuente de CD
(página 10).
• Vuelva a pulsar para pasar al disco
siguiente (página 10).
AUX
• Pulse para escuchar audio de una fuente
externa conectada a la entrada AUX 1 o
AUX 2 del cargador (página 12).
• Pulse para cambiar entre las entradas
AUX 1 y AUX 2 (página 12).
Stop/Eject
• Pulse una vez para dejar de reproducir el
CD actual (página 10).
• Vuelva a pulsar para expulsar el CD
detenido.
• Mantenga pulsado para expulsar el CD
que se está reproduciendo.
Play/Pause
• Pulse para reproducir el CD actual.
• Vuelva a pulsar para realizar una pausa en
el CD que se está reproduciendo.
Nota: Cuando deba mantener un botón pulsado, hágalo durante un segundo como mínimo.
Nota: Si pulsa FM/AM, CD, o AUX , se encenderá automáticamente el sistema de música
®
Wave
con la fuente seleccionada.
Nota: Mientras está conectado el cambiador de CD no podrá cambiar el tipo de alarma si está
seleccionada la radio AM. Para cambiar el tipo de alarma, seleccione una fuente distinta de AM o
apague el sistema.
En esta guía del usuario se muestran los iconos de los botones a la izquierda de las
instrucciones de funcionamiento. Estos iconos hacen referencia a los botones situados en el
control remoto.
Encendido y apagado del sistema de CD
Pulse On/Off una vez para encender y apagar el sistema de música Wave®. El sistema se
encenderá con la última fuente reproducida. Si la última fuente fue un CD, empezará a
reproducirse el último disco seleccionado.
Pulse On/Off otra vez para apagar el sistema.
O
Pulse CD para encender el sistema con la fuente de CD. Se reproducirá el último disco
seleccionado.
8
Page 25

Cargar y descargar discos
Puede cargar y descargar discos cuando el sistema está encendido o apagado. Si el sistema
está apagado o la fuente es CD, comenzará a reproducirse automáticamente el primer disco
cargado. Las ranuras de disco van numeradas del 1 al 4. El sistema de música Wave
número de ranura 1, mientras que los números 2, 3 y 4 corresponden al cambiador.
Funcionamiento
®
tiene el
English FrançaisEspañol
Carga de CD en el sistema de
música Wave
Inserte el disco, con la cara de la etiqueta hacia
arriba, en la ranura del CD, bajo la pantalla.
El reproductor de discos introducirá el disco
automáticamente.
®
(Disco 1)
Carga de CD en el cambiador de CD
(Disco 2 - Disco 4)
Inserte un disco con la etiqueta mirando hacia arriba en una ranura vacía. Cuando la ranura
está vacía aparece un indicador de ranura para discos no iluminado. Introduzca
completamente el disco en la ranura empujando con los dedos sobre el borde externo.
Indicadores de ranura de discos
Apagado................. Ranura de discos vacía.
Luz verde ............... Ranura de discos actual.
Luz ámbar .............. La ranura de discos contiene un CD, pero no está
seleccionado.
Descargar discos
Puede descargar discos cuando el sistema está apagado o la fuente es CD. Pulse Stop/
Eject en la unidad de control remoto para expulsar el disco cargado. Después de retirar el
disco de la ranura, el sistema pasará al siguiente disco disponible, que podrá expulsar
pulsando Stop/Eject de nuevo.
Para obtener más información sobre el uso de la tecla Stop/Eject, consulte “Expulsar un
CD” en la página 10.
PRECAUCIÓN:
• NO INSERTE mini-CD o CD no circulares en la ranura de discos. Es posible que estos discos
no se reproduzcan bien o que el sistema no los extraiga correctamente.
• NO INSERTE varios discos al mismo tiempo en una misma ranura de discos.
• Si lo hace puede dañarse el disco y/o la ranura de discos.
9
Page 26

Funcionamiento
Reproducción de CD
Con el cambiador de CD instalado, el sistema de música Wave® funciona como un cambiador
de cuatro discos. Ahora, cuando reproduzca CD aparecerá en la pantalla toda la información
normal del CD, junto con el número de la ranura de CD seleccionada (d1, d2, d3 o d4) sobre el
tiempo transcurrido de la pista.
Français Español English
Fuente
seleccionada
Modo de
reproducción
Número de
pista
Hora de reloj
Número de ranura de CD
seleccionada:
d1 = sistema de música
®
Wave
d2, d3, d4 = cambiador
Tiempo de pista
transcurrido
Nota: Cuando cambie de la fuente de FM, AM o AUX a la fuente de CD, comenzará a
reproducirse el CD de la ranura utilizada más recientemente. Si esa ranura está vacía,
se seleccionará la siguiente ranura que contenga un CD.
La información siguiente describe las funciones relacionadas con el cambiador de CD.
Consulte la guía del usuario del sistema de música Wave para obtener instrucciones
completas sobre la reproducción del CD seleccionado.
Pasar a otro CD
Pulse CD para pasar a la siguiente ranura de CD. El número de CD de la pantalla indica qué
ranura del CD se encuentra seleccionada.
Detener un CD
Pulse Stop/Eject para detener la reproducción de un CD.
Expulsar un CD
Pulse CD en el control remoto para pasar al CD que desea expulsar. Pulse Stop/Eject para
detener la reproducción de un CD y, a continuación, pulse otra vez para expulsar el CD.
Para obtener más información sobre la expulsión de CD, consulte “Descargar discos” en la
página 9.
10
Page 27

Funcionamiento
Cambiar el modo de reproducción
Cuando está conectado el cambiador de CD ofrece los siguientes modos de reproducción. El
sistema se reproduce continuamente en todos los modos salvo en SHUFFLE dISC para CD
de audio y MP3, y SHUFFLE FOLDR para CD de MP3 únicamente.
Mientras se reproduce un CD, pulse Play Mode repetidamente hasta que aparezca el modo
de reproducción deseado.
Modos de reproducción para CD de audio
• NORMAL PLAY................................Reproduce en orden todos los CD.
• SHUFFLE ........................................Reproduce todas las pistas del CD seleccionado en
orden aleatorio y, a continuación, pasa a otro CD,
reproduciendo de nuevo todas las pistas en orden
aleatorio.
English FrançaisEspañol
• SHUFFLE dISC ...............................Reproduce una vez
seleccionado en orden aleatorio.
• SHUFF RPT dISC ............................Repite todas las pistas del CD seleccionado en orden
aleatorio.
• REPEAT dISC ..................................Repite en orden todas las pistas del CD seleccionado.
• REPEAT TRACK ..............................Repite la pista seleccionada del CD seleccionado.
Modos de reproducción para CD de MP3
• NORMAL PLAY................................Reproduce en orden todos los CD.
• SHUFFLE .........................................Reproduce todas las pistas del CD seleccionado en
orden aleatorio y, a continuación, pasa a otro CD,
reproduciendo de nuevo todas las pistas en orden
aleatorio.
• SHUFFLE dISC ...............................Reproduce una vez
seleccionado en orden aleatorio.
• SHUFF RPT dISC ............................Repite todas las pistas del CD seleccionado en orden
aleatorio.
• REPEAT dISC ..................................Repite en orden todas las pistas del CD seleccionado.
• SHUFFLE FOLDR ...........................Reproduce una vez
seleccionada en orden aleatorio.
• SHUF RPT FLDR .............................Repite todas las pistas de una carpeta en orden
aleatorio.
• REPEAT FOLDER ............................Repite todas las pistas de una carpeta en orden.
• REPEAT TRACK...............................Repite la pista seleccionada del CD seleccionado.
Nota: Si utiliza el sistema de música Wave
fuente de música en el menú Configuración para reproducirla automáticamente cuando termine
un CD. Dado que el sistema reproduce continuamente cuando el cambiador de CD está
conectado, esta opción no está disponible en ese caso.
®
sin el cambiador de CD puede seleccionar una
todas las pistas del CD
todas las pistas del CD
todas las pistas de la carpeta
11
Page 28

Reproducción de una fuente de audio externa
Conexión de una fuente de audio externa
Français Español English
Cuando el cambiador de CD está conectado, puede conectar a la parte posterior los
dispositivos de audio externos que haya utilizado con el sistema de música Wave
®
.
Sin embargo, necesitará un cable estéreo dual RCA.
El cambiador de CD del sistema de música Wave
®
proporciona dos entradas en el panel
posterior (AUX 1 y AUX 2) para dispositivos de audio externos como el televisor o el
reproductor de vídeo, DVD, cassettes o MP3. Esto permite escuchar el sonido del sistema de
música Wave
®
procedente de diversas fuentes.
Para conectar un dispositivo, conecte un extremo del cable a las salidas de audio de la
fuente y el otro extremo a una de las entradas AUX del cambiador. Asegúrese de emparejar
los conectores rojo y blanco del cable con las tomas AUX roja (R) y blanca (L) del cambiador.
Ejemplo de conexión: un televisor conectado al cambiador de CD
Rojo
Utilice únicamente una conexión estéreo. No podrá oír el dispositivo
conectado si sólo conecta el canal izquierdo (L) o derecho (R).
Reproducción de una fuente de audio conectada
Para escuchar una fuente conectada:
1. Encienda el dispositivo externo.
2. Pulse AUX en el control remoto del sistema de música Wave
cambiar entre las entradas AUX 1 y AUX 2. Aparecerá AUX 1 o AUX 2 en la pantalla para
confirmar la selección.
3. Ajuste el volumen con el control remoto del sistema de música Wave
Nota: El control remoto del sistema de música Wave
dispositivo AUX conectado ni cambiar su configuración o sus selecciones.
Nota: No es posible seleccionar AUX 1 o AUX 2 como fuente de alarma.
Rojo
®
. Pulse AUX otra vez para
®
.
®
no puede encender o apagar un
12
Page 29

Limpieza
e
o
p
e
ra
tin
g
n
s
tru
c
tio
n
s
fo
r ty
p
e
s
o
f
b
a
tte
ry
to
b
e
u
s
e
d
Utilice únicamente un paño suave y seco para limpiar el cambiador de CD Wave del sistema
de música Wave
suavemente la parte delantera. No use soluciones detergentes, disolventes, o sustancias
químicas ni alcohol, amoníaco o abrasivos.
PRECAUCIÓN: No permita la entrada de líquidos por ninguna abertura. Si esto sucediera,
apague el producto y llame al Servicio de atención al cliente de Bose
solicitar asistencia técnica. Consulte la lista de números de teléfono situada en el interior de la
contraportada.
®
. Si fuera necesario, utilice un accesorio de cerdas blandas para aspirar
Cambio de la pila del control remoto
ADVERTENCIA: Mantenga la pila del control remoto fuera del alcance de los niños. Si no se
manipula correctamente, puede provocar un incendio o una combustión química. No se debe
recargar, desmontar, calentar por encima de los 100º C ni incinerar. Deseche las pilas usadas
cuanto antes. Asegúrese de que la pila que utiliza para reemplazarla es del tipo y modelo
correcto.
PRECAUCIÓN: Existe riesgo de explosión si no se reemplaza la pila correctamente. Cámbiela
únicamente por pilas de litio de 3 voltios Duracell, Eveready, Energizer, Maxell, Toshiba o Shun
Wo CR2032 o DL2032.
Para cambiar la pila del control remoto:
1. Coloque el control remoto boca abajo sobre una superficie plana.
2. Mantenga presionado el cierre de la lengüeta hacia un lado con el dedo tal y como se
muestra en la ilustración. Deslice el compartimento de la pila para abrirlo.
Cuidado y mantenimiento
®
lo antes posible para
English FrançaisEspañol
f
o
s
d
e
g
e
p
s
tin
ty
u
r
ra
e
e
fo
b
p
s
o
n
to
e
ry
e
tio
c
S
tte
a
tru
b
s
in
3. Retire la pila antigua y reemplácela por la nueva con el símbolo más (+) hacia arriba.
of
d
es
e
p
s
ting
r ty
ra
e u
e
fo
b
p
s
n
to
e o
ry
e
ctio
S
tru
batte
ins
4. Deslice el compartimento de la pila con cuidado hasta que se cierre. Se bloqueará
automáticamente.
13
Page 30

Cuidado y mantenimiento
Problemas y soluciones
Problema Acción
El sistema de música
Wave está encendido,
pero el cambiador no
funciona.
El sistema expulsa el CD
de actualización, pero no
realiza la actualización.
No hay sonido
o el sonido es apagado
Français Español English
No se reproduce ningún
sonido del dispositivo
AUX.
• Compruebe las conexiones eléctricas entre el sistema de música Wave
Consulte “Conexión del cambiador de CD al sistema de música Wave
®
y el cambiador.
®
” en la página 7.
• Compruebe si ha ejecutado el disco de actualización del sistema.
• Si es así, extraiga el cable de alimentación de la salida de CA, espere 10 segundos y
vuelva a conectarlo.
• Si no lo ha hecho, desconecte el cambiador de CD del sistema de música Wave y
consulte “Actualización del sistema de música Wave
• Desconecte el cambiador de CD e inserte el disco de actualización en la ranura de discos
del sistema de música Wave. Consulte “Actualización del sistema de música Wave
®
” en la página 4.
®
” en la
página 4.
• Compruebe que el cambiador de CD Wave® está conectado a una toma eléctrica con
corriente y que está encendido.
• Compruebe las conexiones entre el sistema de música Wave® y el cambiador. Consulte
“Conexión del cambiador de CD al sistema de música Wave
®
” en la página 7.
• Si está seleccionada la fuente AUX, compruebe las conexiones desde la fuente AUX con
el cambiador y asegúrese de que está encendido el dispositivo AUX.
• Desconecte los auriculares.
• Compruebe que los conectores RCA del cable estéreo están completamente insertados.
• Pulse AUX en el control remoto y seleccione la entrada AUX empleada por el dispositivo
(AUX 1 o AUX 2).
• Compruebe que el dispositivo AUX está encendido.
Se producen saltos en el
CD.
• Compruebe que el sistema no recibe sacudidas en su ubicación actual. Si es así,
cámbielo a un lugar más protegido.
• Compruebe si el CD está manchado o sucio. Si necesita limpiarlo, pásele un trapo desde
el centro hacia fuera (NO en movimiento circular).
El CD no se reproduce. • Compruebe que hay un CD en la ranura de CD seleccionada.
• Compruebe que está seleccionado CD en la pantalla del sistema de música Wave
Hay un CD
reproduciéndose, pero no
• Compruebe si está seleccionada la ranura de CD del sistema de música Wave
de una ranura del cambiador de CD.
está iluminado ninguno de
los indicadores luminosos
del cambiador de CD.
Servicio de atención al cliente
Para obtener ayuda adicional sobre la resolución de problemas, póngase en contacto con el
Servicio de atención al cliente de Bose
la cubierta trasera de esta guía.
®
. Consulte la lista de direcciones en la cara interior de
®
.
®
, en lugar
14
Page 31

Garantía limitada
Cuidado y mantenimiento
Cobertura de la garantía:
Todo defecto material o de fabricación.
Período de validez:
Un año a partir de la fecha de adquisición.
Sus derechos:
A su exclusiva discreción, Bose reparará o reemplazará gratuitamente toda parte defectuosa.
Sus obligaciones:
A. Llamar al Servicio de atención al cliente de Bose
B. Embalar adecuadamente la unidad, si es posible en su caja de envío original.
Otras condiciones:
Esta garantía limitada es totalmente transferible durante el periodo de un año posterior a la
fecha de adquisición.
LAS CONDICIONES DE LA PRESENTE GARANTÍA LIMITADA PREVALECEN SOBRE LAS DE
TODA OTRA, EXPRESA O IMPLÍCITA, ESCRITA U ORAL, DE COMERCIABILIDAD O
IDONEIDAD PARA DETERMINADOS FINES. LA RESPONSABILIDAD DE BOSE
CORPORATION NO SERÁ SUPERIOR AL PRECIO DE VENTA QUE EL CLIENTE HAYA
PAGADO EFECTIVAMENTE POR EL PRODUCTO. EN NINGÚN CASO BOSE SE
RESPONSABILIZARÁ POR DAÑOS ESPECIALES, INCIDENTALES, INDIRECTOS O
ESPECIALES.
®
y solicitar instrucciones de envío.
English FrançaisEspañol
La presente garantía limitada no abarca defectos que resulten de utilización o mantenimiento
inadecuados o irrazonables, accidentes, embalaje inadecuado, o manipulación, alteración o
modificaciones no autorizadas, cuya determinación es prerrogativa exclusiva de Bose.
La presente garantía limitada caduca si se ha quitado o deteriorado la etiqueta con el número
de serie.
Otros derechos legales:
La presente garantía limitada otorga al propietario derechos específicos. El propietario
puede, además, tener otros derechos que varían según los estados o los países. En algunos
lugares no se permite limitar garantías implícitas o excluir daños incidentales o indirectos,
por lo que las limitaciones o exclusiones anteriormente consignadas quizá no sean
aplicables.
Información técnica
Tensión del cambiador de CD
120 V~ 50/60 Hz, 80 W
Dimensiones
6,6 x 36,8 x 25,2 cm (alto x ancho x fondo)
Peso
2,04 kg
Color
Gris grafito o Blanco platino
15
Page 32

Français Español English
Informations relatives à la sécurité
Veuillez lire cette notice d’utilisation
Prenez le temps de lire attentivement les instructions de cette notice d’utilisation. Elles vous seront précieuses pour installer et
utiliser correctement votre système et vous aideront à tirer le meilleur parti de sa technologie. Conservez cette notice d’utilisation
pour référence ultérieure.
AVERTISSEMENT :
AVERTISSEMENT : Protégez-le de tout risque de ruissellement ou d’éclaboussure. Ne placez pas d’objets contenant des
liquides, tels que des vases, sur l’appareil. Comme pour tout appareil électronique, faites attention de ne pas renverser de liquides sur
une des pièces du changeur Les liquides peuvent provoquer des pannes et/ou un risque d’incendie.
AVERTISSEMENT : Ne placez jamais d’objets enflammés, tels que des bougies allumées, sur l’appareil.
Le symbole représentant un éclair avec une flèche à l’intérieur d’un triangle équilatéral est utilisé pour prévenir l’utilisateur
de la présence d’une tension électrique dangereuse non isolée à l’intérieur de l’appareil. Cette tension est d’un niveau
suffisamment élevé pour représenter un risque d’électrocution.
Le symbole représentant un point d’exclamation à l’intérieur d’un triangle équilatéral, tel qu’il figure sur le système,
signale dans cette notice d’installation des instructions importantes relatives au fonctionnement et à l’entretien de
l’appareil.
Afin de limiter les risques d’incendie ou d’électrocution, n’exposez pas l’appareil à la pluie ou à l’humidité.
Limites d’émission de classe B
Cet appareil numérique de classe B est entièrement conforme à la réglementation canadienne sur les équipements pouvant
causer des interférences.
ATTENTION :
prise d’alimentation. Veillez à l’engager à fond.
ATTENTION : N’INSTALLEZ PAS l’amplificateur sur une surface sensible à la chaleur, telle que le dessus de meubles fragiles.
Comme tout équipement électrique, il génère de la chaleur.
ATTENTION : L’utilisation de commandes, réglages ou procédures autres que ceux spécifiés dans le présent document peuvent
provoquer une exposition dangereuse aux rayonnements. Le lecteur de CD ne doit être réglé ou réparé que par une personne qualifiée.
Produit laser de classe 1
Ce lecteur de CD est classé CLASS 1 LASER PRODUCT selon les normes
EN 60825-1:1994+A1+A2, IEC60825-1:1993+A1+A2.
Remarques :
• L’étiquette d’identification du produit est située au-dessous de l’appareil.
• Lorsque la fiche d’alimentation est utilisée comme dispositif de débranchement de l’appareil, elle doit rester facilement accessible.
• Ce produit doit être utilisé à l’intérieur. Il n’a pas été conçu ni testé pour une utilisation en extérieur, dans des véhicules ou sur des
bateaux.
• Utilisez exclusivement ce produit avec le système Bose
Le chargeur de CD est conforme à la directive CEM 89/336/EEC et à la directive sur les basses tensions 73/23/EEC. L’attestation
complète de conformité est disponible à l’adresse suivante : http://www.bose.com
AVERTISSEMENT :
risque de provoquer un incendie ou des brûlures chimiques. Ne la rechargez pas, ne la démontez pas, ne la portez pas à une température
supérieure à 100 °C et ne l’incinérez pas. Pour jeter la pile usagée, respectez la manière appropriée définie par la réglementation locale.
Remplacez la pile uniquement par une pile de même type, portant la même référence.
AVERTISSEMENT : Une pile inappropriée risque d’exploser. Utilisez uniquement une pile au lithium de 3 volts Duracell, Eveready,
Energizer, Maxell, Toshiba ou Shun Wo, de type CR2032 ou DL2032.
Afin d’éviter tout risque d’électrocution, insérez bien la fiche du cordon d’alimentation dans la fente correspondante de la
CLASS 1 LASER PRODUCT
KLASSE 1 LASER PRODUKT
LUOKAN 1 LASER LAITE
KLASS 1 LASER APPARAT
®
Wave®.
.
Conservez la pile de la télécommande hors de portée des enfants. En cas de manipulation inappropriée, elle
Veillez à vous débarrasser de vos piles usagées conformément aux réglementations locales.
!"##$%&'()%*'+,'+-./'01%@';.)%+),+':;<./'0=%7':/3/<-./'0=%:/(.+/9;./'0%';%-;.+)%;./?/(-./'0=%7I7)%,-+./)??)=%:)%<)%:'<;7)0.%)(.%/0.)+:/.)%(-0(%
-;.'+/(-./'0%J<+/.)%,+J-?-9?)1@';.)(%?)(%7-+E;)(%:J,'(J)(%7)0./'00J)(%:-0(%?)%,+J()0.%:'<;7)0.%('0.%?-%,+',+/J.J%:)%&'()%*'+,'+-./'01%
K-%<'0<),./'0%:;%(8(.L7)%A-B)
C
%)(.%;0)%7-+E;)%<'77)+</-?)%:)%&'()%*'+,'+-./'01
Ne les incinérez pas.
2
Page 33

Table des matières
Installation . . . . . . . . . . . . . . . . . . . . . . . . . . . . . . . . . . . . . . . . . . . . . . . . . . . . . . . . . . 4
Actualisation du système Wave
®
. . . . . . . . . . . . . . . . . . . . . . . . . . . . . . . . . . . . . . . . . . . . . . . 4
Fonctions et avantages du chargeur multi-CD . . . . . . . . . . . . . . . . . . . . . . . . . . . . . . . . . . . . . 5
Déballage . . . . . . . . . . . . . . . . . . . . . . . . . . . . . . . . . . . . . . . . . . . . . . . . . . . . . . . . . . . . . . . . . 5
Choix de l’emplacement du système . . . . . . . . . . . . . . . . . . . . . . . . . . . . . . . . . . . . . . . . . . . . 6
Mise en place du système Wave
Branchement du chargeur de CD sur le système Wave
®
sur le chargeur multi-CD . . . . . . . . . . . . . . . . . . . . . . . . . . 6
®
. . . . . . . . . . . . . . . . . . . . . . . . . . . . . 7
Utilisation . . . . . . . . . . . . . . . . . . . . . . . . . . . . . . . . . . . . . . . . . . . . . . . . . . . . . . . . . . . 8
La télécommande . . . . . . . . . . . . . . . . . . . . . . . . . . . . . . . . . . . . . . . . . . . . . . . . . . . . . . . . . . . 8
Activation et désactivation du système multi-CD . . . . . . . . . . . . . . . . . . . . . . . . . . . . . . . . . . 8
Chargement et retrait de disques . . . . . . . . . . . . . . . . . . . . . . . . . . . . . . . . . . . . . . . . . . . . . . . 9
Chargement de CD dans le système Wave
®
(disque 1) . . . . . . . . . . . . . . . . . . . . . . . . . . 9
Chargement de CD dans le chargeur multi-CD (disques 2 à 4) . . . . . . . . . . . . . . . . . . . . . 9
Retrait de disques . . . . . . . . . . . . . . . . . . . . . . . . . . . . . . . . . . . . . . . . . . . . . . . . . . . . . . . 9
Lecture de CD . . . . . . . . . . . . . . . . . . . . . . . . . . . . . . . . . . . . . . . . . . . . . . . . . . . . . . . . . . . . . 10
Changement de CD . . . . . . . . . . . . . . . . . . . . . . . . . . . . . . . . . . . . . . . . . . . . . . . . . . . . . . 10
Arrêt d’un CD . . . . . . . . . . . . . . . . . . . . . . . . . . . . . . . . . . . . . . . . . . . . . . . . . . . . . . . . . . . 10
Éjection d’un CD . . . . . . . . . . . . . . . . . . . . . . . . . . . . . . . . . . . . . . . . . . . . . . . . . . . . . . . . 10
Modes de lecture . . . . . . . . . . . . . . . . . . . . . . . . . . . . . . . . . . . . . . . . . . . . . . . . . . . . . . . . 11
Écoute d’une source audio externe . . . . . . . . . . . . . . . . . . . . . . . . . . . . . . . . . . . . . . . 12
Connexion d’une source audio externe . . . . . . . . . . . . . . . . . . . . . . . . . . . . . . . . . . . . . . . . . . 12
Écoute d’une source audio externe . . . . . . . . . . . . . . . . . . . . . . . . . . . . . . . . . . . . . . . . . . . . . 12
Entretien . . . . . . . . . . . . . . . . . . . . . . . . . . . . . . . . . . . . . . . . . . . . . . . . . . . . . . . . . . . . 13
Nettoyage . . . . . . . . . . . . . . . . . . . . . . . . . . . . . . . . . . . . . . . . . . . . . . . . . . . . . . . . . . . . . . . . . 13
Remplacement de la pile de la télécommande . . . . . . . . . . . . . . . . . . . . . . . . . . . . . . . . . . . . 13
Dépannage . . . . . . . . . . . . . . . . . . . . . . . . . . . . . . . . . . . . . . . . . . . . . . . . . . . . . . . . . . . . . . . . 14
Service client . . . . . . . . . . . . . . . . . . . . . . . . . . . . . . . . . . . . . . . . . . . . . . . . . . . . . . . . . . . . . . 14
Garantie limitée . . . . . . . . . . . . . . . . . . . . . . . . . . . . . . . . . . . . . . . . . . . . . . . . . . . . . . . . . . . . . 15
Caractéristiques techniques . . . . . . . . . . . . . . . . . . . . . . . . . . . . . . . . . . . . . . . . . . . . . . . . . . . 15
English FrançaisEspañol
3
Page 34

Installation
Actualisation du système Wave
IMPORTANT !
le système Wave® doit être actualisé avant de pouvoir piloter le chargeur multi-CD.
Avant d’utiliser le système Wave
D’ACTUALISATION du système Wave
Actualisation du système Wave® :
1. Votre système Wave
2. Insérez le disque d’actualisation dans le lecteur de CD du système Wave
3. Attendez environ 20 secondes, pendant que le système Wave
L’écran affiche une série de messages durant cette opération :
4. Attendez que le système éjecte automatiquement le disque d’actualisation
Français Español English
lorsque l’opération est terminée. N’éjectez PAS le disque vous-même.
Après la mise à jour du système Wave
page 6.
®
®
avec le chargeur multi-CD, veillez à utiliser le DISQUE
®
fourni avec le chargeur multi-CD.
®
doit être branché, et aucun autre accessoire ne doit lui être raccordé.
®
est actualisé.
LOADING UPDATING FINISHED EJECTING
®
, suivez les instructions d’installation qui débutent en
®
.
Disque d’actualisation du système Wave
®
4
Page 35

Fonctions et avantages du chargeur multi-CD
Nous vous remercions d’avoir fait l’acquisition du chargeur multi-CD pour le système Bose
Wave®. L’ajout de cet accessoire à votre système Wave®offre de nombreux avantages :
• Un système Wave
CD audio, soit une lecture ininterrompue de CD pendant plusieurs heures.
®
à quatre disques : vous pouvez charger et écouter jusqu’à quatre
Installation
®
English FrançaisEspañol
Déballage
• Un design élégant à socle intégré : le chargeur a le même facteur de forme que le
système Wave
®
, complétant ainsi l’élégance et la simplicité du système.
• Une seule télécommande intégrée : il est beaucoup plus simple d’utiliser une seule
télécommande et une sélection à touche unique de toutes les sources intégrées.
• Commutation entre plusieurs source : vous pouvez connecter deux sources audio
externes pour les écouter dans toute la maison grâce au système Wave
®
.
Déballez soigneusement le chargeur multi-CD du système Wave®, et conservez l’emballage
pour une éventuelle utilisation ultérieure. En cas de besoin, les emballages d’origine
constitueront la façon la plus sûre de transporter cet appareil.
Vérifiez que tous les composants illustrés ci-dessous figurent dans l’emballage. Si vous
remarquez que l’un des éléments du système semble endommagé, n’essayez pas de
l’utiliser. Consultez les numéros de téléphone indiqués sur l’avant-dernière page de cette
notice pour avertir le Service client de Bose immédiatement.
Disque d’actualisation
du système Wave
®
Chargeur multi-CD du système Wave
®
Télécommande du
système Wave
®
Renseignements à conserver
Il est recommandé de noter dès maintenant le numéro de série de votre chargeur
multi-CD. Ce numéro de série est indiqué au-dessous de l’appareil.
Numéro de série :_______________________
Date d’achat : __________________________
Il est conseillé de conserver votre facture avec cette notice d’utilisation.
5
Page 36

Installation
Choix de l’emplacement du système
Le chargeur multi-CD est conçu pour s’insérer directement sous le système Wave®. Avant de
connecter le chargeur multi-CD au système Wave
®
, choisissez un emplacement adapté à
l’ensemble, en vous aidant des conseils suivants.
• Placez le système sur une surface horizontale stable.
• Pour obtenir les meilleures performances, placez le système de l’autre côté de la pièce,
par rapport au point d’écoute.
• Placez le système à moins de 60 cm d’un mur, en évitant de le positionner directement
dans un angle.
ATTENTION : Ne placez PAS le système sur une surface sensible à la chaleur. Comme tout
appareil électrique, il génère de la chaleur.
ATTENTION : N’utilisez PAS votre système dans un emplacement humide, ni dans tout endroit
où de l’humidité peut pénétrer à l’intérieur.
Remarque : Ne placez PAS le système sur une surface métallique. Celle-ci pourrait gêner la
réception AM.
Français Español English
Mise en place du système Wave® sur le chargeur multi-CD
Après avoir placé le chargeur à l’emplacement voulu, posez avec précaution le système
®
sur le chargeur.
Wave
®
• Vérifiez que les pieds arrières du système Wave
s’encastrent dans les cavités ménagées
sur le dessus du chargeur.
• Vérifiez que le système Wave
®
repose bien à plat et que les parois latérales des deux
appareils sont alignées.
6
Page 37

Installation
Branchement du chargeur de CD sur le système Wave
IMPORTANT !
Veillez à actualiser le
système Wave® AVANT
d’installer le chargeur
Multi-CD. Reportez-vous
à la section
« Actualisation du
système Wave®» page 4.
Avant de débuter l’installation, déconnectez le cordon d’alimentation du système
®
Wave
et mettez-le de côté. Vous l’utiliserez à nouveau à l’étape 3 de l’installation.
®
1. Branchez le câble Bose
Link du chargeur au connecteur Bose® Link du système Wave®.
2. Insérez le cordon d’alimentation du chargeur dans la prise appropriée, à l’arrière du
système Wave
3. Insérez le cordon d’alimentation du système Wave
®
.
®
du chargeur.
4. Branchez l’autre extrémité du cordon à une prise secteur.
Dès la mise sous tension, le message « PLEASE WAIT » s’affiche pendant une
trentaine de secondes, pendant que le système s’initialise. N’insérez pas de
disque tant que ce message n’a pas disparu.
5. Pour obtenir une bonne réception FM, le cordon d’alimentation doit être le plus droit
possible. En effet, le système Wave
Entrée
secteur
(AC POWER)
du système
Wave
®
®
utilise ce cordon d’alimentation comme antenne FM.
®
dans la prise appropriée, à l’arrière
Connecteur
®
Bose
Link
Système
®
Wave
English FrançaisEspañol
4
Câble secteur du
système Wave
®
Câble
d’alimentation
du chargeur
2
3
Câble Bose® Link
Pour obtenir une
bonne réception FM,
le cordon
d’alimentation doit
être le plus droit
possible.
5
1
Chargeur
multi-CD
7
Page 38

Utilisation
La télécommande
Seek/Track (Recherche/Piste)
• Appui sur la touche :Passage à la
piste précédente ou suivante du
disque actuel.
• Appui prolongé :Passage rapide à la
Français Español English
piste précédente ou suivante du
disque actuel.
Tune/MP3 (Accord/MP3)
• Appui sur la touche : Navigation entre
les dossiers des CD MP3.
• Appui prolongé : Recherche rapide
avant/arrière dans la piste en cours de
lecture.
Play Mode (Mode de lecture)
• Sélection du mode de lecture du CD
(page 11).
Une télécommande supplémentaire est fournie avec le chargeur multi-CD du système Wave®.
Cette télécommande est identique à celle qui est fournie avec le système Wave
®
. Vous pouvez
donc utiliser l’une ou l’autre télécommande pour contrôler le système multi-CD. Il suffit de pointer
la télécommande vers la face avant et d’appuyer sur les touches. Dans des conditions normales,
la télécommande fonctionne à une distance de 6 m de la face avant.
Le diagramme ci-dessous décrit les touches utilisées pour la lecture de CD à l’aide du
chargeur de disques.
CD
• Appui sur la touche : sélection de la
source CD (page 10).
• Nouvel appui :passage au CD suivant
(page 10).
AUX
• Écoute d’une source audio externe
connectée à l’entrée AUX 1 ou AUX 2 du
chargeur (page 12).
• Passage de la source AUX 1 à la source
AUX 2, et réciproquement (page 12).
Stop/Eject (Arrêt/Éjection)
• Appui unique : Arrêt de la lecture du CD
en cours (page 10).
• Nouvel appui : Éjection du CD arrêté.
• Appui prolongé : Éjection du CD en cours
de lecture.
Play/Pause (Lecture/Pause)
• Appui sur la touche : Lecture du CD en
cours.
• Nouvel appui : Mise en pause du CD en
cours de lecture.
Remarque : Toutes les opérations faisant appel à un appui maintenu nécessitent de maintenir
la touche enfoncée pendant une seconde au moins.
Remarque : Un appui sur la touche FM/AM, CD ou AUX active automatiquement la source
sélectionnée auprès du système Wave
®
.
Remarque : Lorsque le chargeur Multi-CD est connecté, il est impossible de modifier l’heure de
l’alarme si la radio AM est sélectionnée. Pour modifier l’heure de l’alarme, choisissez une autre
source que la radio AM ou éteignez l’appareil.
Vous verrez fréquemment, dans ce mode d’emploi, des icônes de touches à gauche des
instructions. Ces icônes symbolisent les touches de la télécommande.
Activation et désactivation du système multi-CD
Appuyez sur la touche On/Off pour allumer ou éteindre votre système Wave®avec chargeur
multi-CD. À sa mise en marche, le système active la dernière source utilisée. Si cette dernière
source était un CD, la lecture du dernier disque sélectionné débute immédiatement.
Appuyez à nouveau sur la touche On/Off pour éteindre le système.
OU
Appuyez sur la touche CD pour activer la source CD. La lecture du dernier disque sélectionné
débute.
8
Page 39

Chargement et retrait de disques
Il est possible de charger et extraire des disques même lorsque le système est éteint.
Si le système est éteint ou en mode Source CD, la lecture du premier disque chargé débute
automatiquement. Les emplacements de disques sont numérotés de 1à 4. L’emplacement 1
est celui du système Wave
®
. Le chargeur possède les emplacements 2, 3 et 4.
Utilisation
English FrançaisEspañol
Chargement de CD dans le système
Wave
Insérez un disque, face imprimée vers le haut,
dans la fente CD située sous l’afficheur. Le
lecteur charge automatiquement le disque.
®
(disque 1)
Chargement de CD dans le
chargeur multi-CD (disques 2 à 4)
Insérez un disque, face imprimée vers le haut, dans un emplacement vide. Les emplacements
vides sont reconnaissables à leur indicateur éteint. En posant les doigts sur la tranche du disque,
poussez celui-ci dans la fente d’insertion.
Indicateurs des emplacements de disques
Éteint...................... l’emplacement est vide.
Vert, fixe ................. Emplacement du disque en cours de lecture.
Orange, fixe............ L’emplacement contient un CD en attente.
Retrait de disques
Il est possible d’extraire des disques même lorsque le système est éteint ou en mode Source
CD. Appuyez sur la touche Stop/Eject de la télécommande pour éjecter le disque en cours.
Dès que vous avez retiré le disque de son emplacement, le système charge le disque actif
suivant, que vous pouvez alors éjecter en appuyant à nouveau sur la touche Stop/Eject.
Pour plus d’informations sur l’utilisation de la touche Stop/Eject, voir la section « Éjection
d’un CD » page 10.
ATTENTION :
• N’INSÉREZ PAS de mini CD ou de CD non circulaire dans le chargeur. La mauvaise stabilité
rotationnelle de certains de ces disques peut empêcher le système de les éjecter.
• N’INSÉREZ PAS plusieurs disques à la fois dans la même fente du chargeur.
• Vous risqueriez d’endommager le disque et/ou le chargeur.
9
Page 40

Utilisation
Lecture de CD
L’ajout du chargeur multi-CD à votre système Wave®permet à celui-ci de faire office de
lecteur à quatre plateaux. Une nouvelle information s’ajoute désormais à celles qui
apparaissent en temps normal sur l’écran : le numéro d’emplacement du CD sélectionné (d1,
d2, d3, or d4), qui s’affiche au-dessus du temps écoulé.
Français Español English
Source
sélectionnée
Mode de
lecture
Numéro
de la piste
Horloge
Numéro de l’emplacement
CD sélectionné :
d1 = emplacement du
système Wave
d2, d3, d4 = chargeur
Temps écoulé
®
Remarque : Lorsque la source passe de FM, AM ou AUX à CD, la lecture du dernier CD utilisé
débute automatiquement. Si le logement concerné est vide, le premier logement contenant un
CD est sélectionné.
Les informations suivantes décrivent les fonctions relatives au chargeur multi-CD.
Pour toutes instructions générales sur la lecture du CD sélectionné, reportez-vous au mode
d’emploi de votre système Wave.
Changement de CD
Appuyez sur la touche CD pour activer le CD de l’emplacement suivant. L’afficheur indique
l’emplacement de CD actuellement sélectionné.
Arrêt d’un CD
Appuyez sur la touche Stop/Eject pour arrêter la lecture d’un CD.
Éjection d’un CD
Appuyez sur la touche CD de la télécommande pour activer le CD à éjecter. Appuyez sur la
touche Stop/Eject pour arrêter la lecture du disque, puis appuyez à nouveau sur cette
touche pour éjecter le CD.
Pour plus d’informations sur l’éjection de CD, voir la section « Retrait de disques » page 9.
10
Page 41
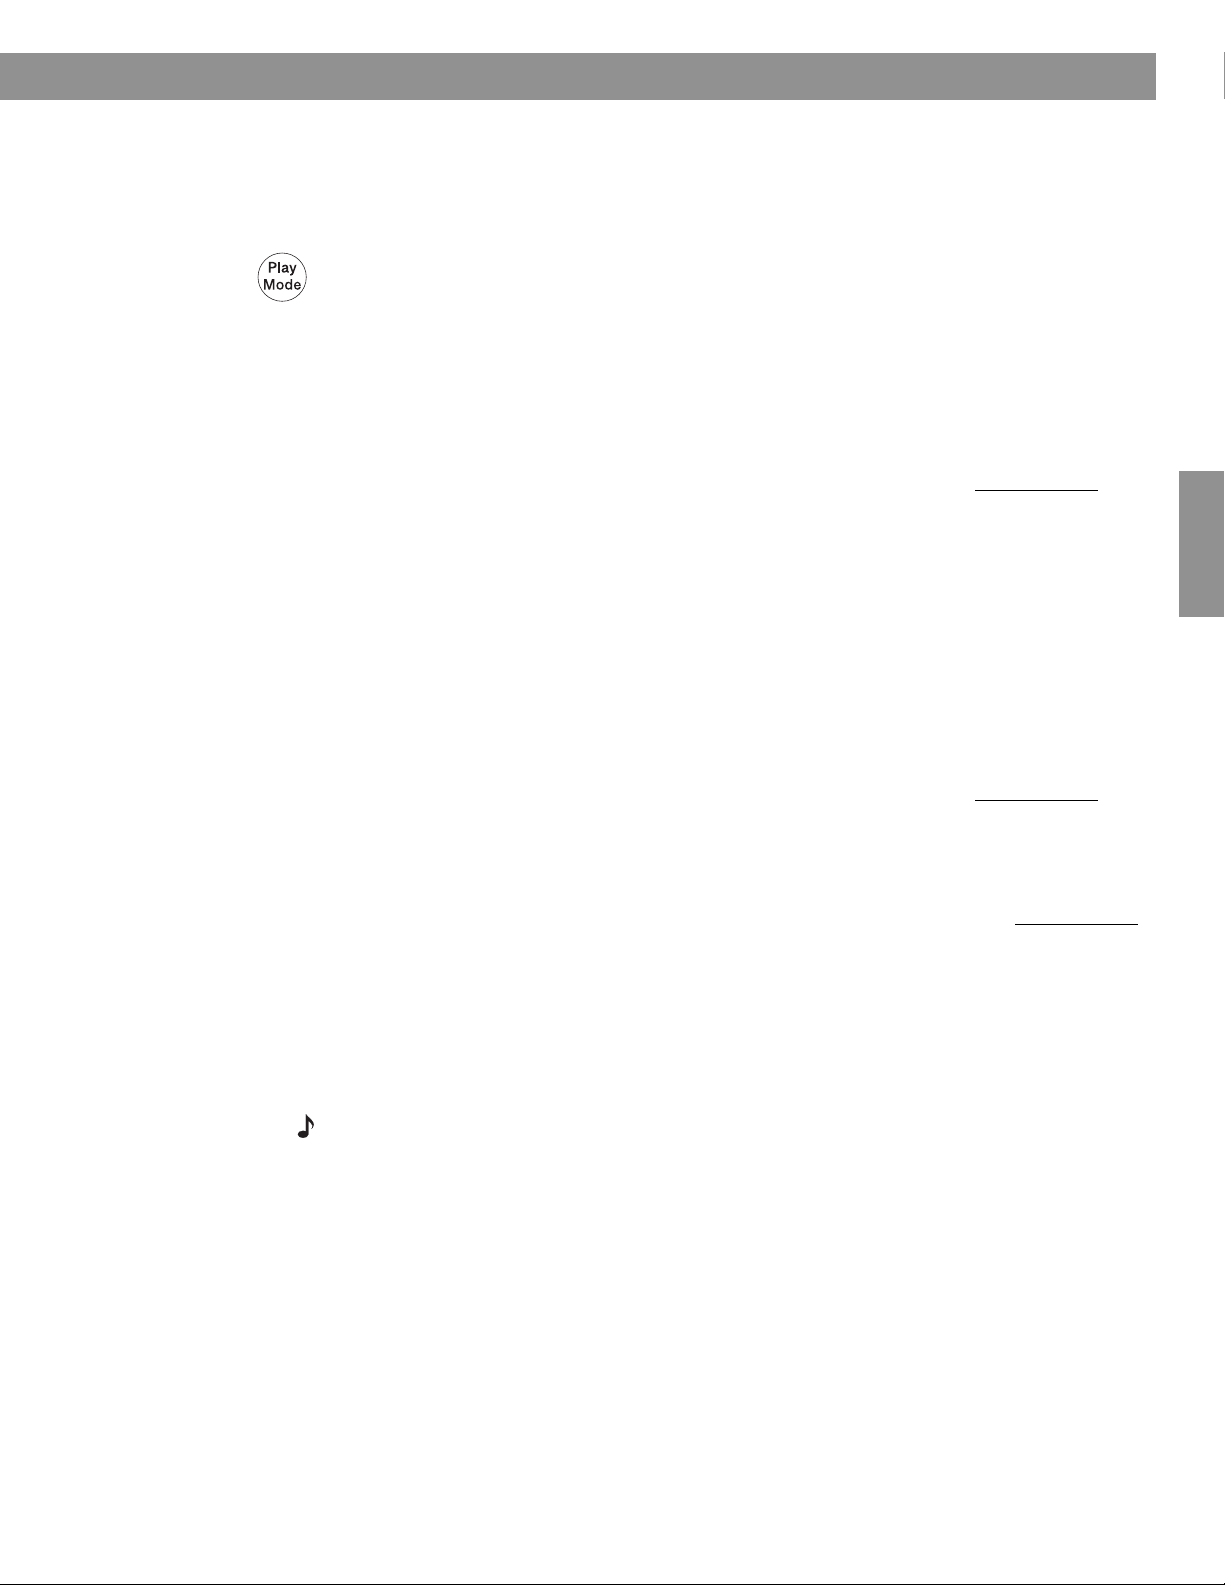
Utilisation
Modes de lecture
Les modes de lecture suivants sont disponibles lorsque le chargeur Multi-CD est connecté.
Le système effectue une lecture en continu dans tous les modes, sauf dans les modes
SHUFFLE dISC (ordre aléatoire) pour les CD audio et MP3, et SHUFFLE FOLDR (lecture de
toutes les pistes du dossier sélectionné en ordre aléatoire) pour les CD MP3.
Pendant la lecture d’un CD, appuyez à plusieurs reprises sur la touche Play Mode jusqu’à ce
que le mode de lecture désiré s’affiche.
Modes de lecture des CD audio
• NORMAL PLAY............. lecture normale de tous les CD, dans l’ordre.
• SHUFFLE ..................... lecture de toutes les pistes du CD dans un ordre aléatoire, puis
passage à un autre CD dont toutes les pistes du CD sont
également lues dans un ordre aléatoire.
English FrançaisEspañol
• SHUFFLE dISC ............lecture de toutes les pistes du CD sélectionné, une seule fois
ordre aléatoire.
• SHUFFLE dISC ............ lecture à répétition de toutes les pistes du CD, en ordre aléatoire.
• REPEAT dISC ...............lecture à répétition de toutes les pistes du CD, dans l’ordre.
• REPEAT TRACK ........... lecture à répétition de la piste sélectionnée du CD sélectionné.
Modes de lecture des CD MP3
• NORMAL PLAY.............lecture normale de tous les CD, dans l’ordre.
• SHUFFLE ..................... lecture de toutes les pistes du CD dans un ordre aléatoire, puis
passage à un autre CD dont toutes les pistes du CD sont
également lues dans un ordre aléatoire.
• SHUFFLE dISC ............lecture de toutes les pistes du CD sélectionné, une seule fois
ordre aléatoire.
• SHUFFLE dISC ............ lecture à répétition de toutes les pistes du CD, en ordre aléatoire.
• REPEAT dISC ...............lecture à répétition de toutes les pistes du CD, dans l’ordre.
• SHUFFLE FOLDR ........lecture de toutes les pistes du dossier sélectionné, une seule fois
et en ordre aléatoire.
• SHUF RPT FLDR .........lecture à répétition de toutes les pistes du dossier, en ordre
aléatoire.
• REPEAT FOLDER ......... lecture à répétition de toutes les pistes du dossier, dans l’ordre.
• REPEAT TRACK ........... lecture à répétition de la piste sélectionnée du CD sélectionné.
et en
et en
Remarque : Si vous utilisez le système Wave
configuration vous pouvez sélectionner une source musicale qui sera automatiquement activée à
la fin d’un CD. Cette option n’est pas disponible lorsque le chargeur Multi-CD est connecté,
car la lecture des CD est alors exécutée en continu.
®
sans le chargeur Multi-CD, dans le menu de
11
Page 42

Écoute d’une source audio externe
Connexion d’une source audio externe
Français Español English
Lorsque le chargeur Multi-CD est connecté, vous pouvez raccorder à l’arrière de celui-ci
toutes les sources audio externes que vous utilisiez auparavant avec votre système Wave
®
Toutefois, vous devez alors disposer d’un câble double RCA stéréo.
La face arrière du chargeur multi-CD du système Wave
®
comporte deux connecteurs
d’entrée (AUX 1 et AUX 2) permettant de raccorder deux sources audio externes (TV,
magnétoscope, lecteur de DVD, magnétocassette ou lecteur MP3). Vous avez ainsi la
possibilité d’écouter de la musique avec le système Wave
®
depuis différentes sources.
Pour connecter un appareil, raccordez une extrémité du câble aux connecteurs de sortie de
la source, et l’autre extrémité à l’une des entrées AUX du chargeur. Les couleurs des
connecteurs doivent correspondre à celles des prises, rouge sur rouge et blanc sur blanc.
Exemple de connexion : téléviseur connecté au chargeur multi-CD
.
Rouge
Utilisez uniquement une connexion stéréo. Vous ne pourrez pas entendre le son
de la source externe si vous connectez seulement le canal gauche (L) ou droite (R).
Écoute d’une source audio externe
Pour écouter une source externe :
1. Mettez l’appareil externe sous tension.
2. Appuyez sur la touche AUX de la télécommande du système Wave
nouvelle fois sur la touche AUX pour passer de la source AUX 1 à la source AUX 2, et
réciproquement. L’indication AUX 1 ou AUX 2 apparaît sur l’afficheur pour confirmer
votre sélection.
3. Pour régler le volume, utilisez la télécommande du système Wave
Remarque : La télécommande du système Wave
d’éteindre un appareil externe connecté à la prise AUX, ni de modifier ses réglages.
Remarque : Les sources AUX 1 et AUX 2 ne peuvent pas être sélectionnées pour l’alarme.
Rouge
®
. Appuyez une
®
.
®
ne permet pas de mettre sous tension ou
12
Page 43

Nettoyage
e
o
p
e
ra
tin
g
n
s
tru
c
tio
n
s
fo
r ty
p
e
s
o
f
b
a
tte
ry
to
b
e
u
s
e
d
Pour nettoyer le système à chargeur multi-CD Wave®, utilisez uniquement un chiffon doux et
sec. Si nécessaire, utilisez une brosse à poils souples pour nettoyer la façade à l’aide d’un
aspirateur. N’utilisez pas de solvants, de produits chimiques, ni de liquides de nettoyage
contenant de l’alcool, de l’ammoniac ou des substances abrasives.
ATTENTION : Veillez à ce qu’aucun liquide ne pénètre dans les ouvertures. Si du liquide pénètre
dans l’appareil, éteignez immédiatement celui-ci. Appelez le service après-vente de Bose
que possible pour faire vérifier l’appareil. Reportez-vous à la liste de numéros de téléphone, en
troisième page de couverture.
Remplacement de la pile de la télécommande
AVERTISSEMENT : Conservez la pile de la télécommande hors de portée des enfants. En cas
de manipulation inappropriée, elle risque de provoquer un incendie ou des brûlures chimiques.
Ne la rechargez pas, ne la démontez pas, ne la portez pas à une température supérieure à 100
°C et ne l’incinérez pas. Pour jeter la pile usagée, respectez la manière appropriée définie par la
réglementation locale. Remplacez la pile uniquement par une pile de même type, portant la
même référence.
ATTENTION : Une pile inappropriée risque d’exploser. Utilisez uniquement une pile au lithium de
3volts Duracell, Eveready, Energizer, Maxell, Toshiba ou Shun Wo, de type CR2032 ou DL2032.
Pour remplacer les piles de la télécommande :
1. Posez la télécommande à l’envers sur une surface plane.
2. Poussez du doigt la languette de sûreté comme le montre l’illustration et maintenez-la
enfoncée. Faites glisser le couvercle du compartiment à piles pour l’ouvrir.
Entretien
®
dès
English FrançaisEspañol
f
o
s
d
e
g
e
p
s
tin
ty
u
r
ra
e
e
fo
b
p
s
o
n
to
e
ry
e
tio
c
S
tte
a
tru
b
s
in
3. Extrayez l’ancienne pile, et installez la nouvelle avec le symbole plus (+) vers le haut.
of
d
es
e
p
s
ting
r ty
ra
e u
e
fo
b
p
s
n
to
e o
ry
e
ctio
S
tru
batte
ins
4. Faites glisser doucement le compartiment de la pile pour le refermer. Il se bloque
automatiquement.
13
Page 44

Entretien
Dépannage
Problème Mesure corrective
Le système Wave est
sous tension, mais le
chargeur ne fonctionne
pas.
Le système éjecte le CD
d’actualisation, mais
l’actualisation n’a pas été
effectuée
Pas de son, ou le son est
de mauvaise qualité
Français Español English
Aucun son ne provient de
la source connectée à la
prise AUX
• Vérifiez le branchement secteur entre le système Wave
section « Branchement du chargeur de CD sur le système Wave
®
et le chargeur. Reportez-vous à la
®
» page 7.
• Vérifiez que vous avez bien exécuté le disque d’actualisation du système.
• Si c’est bien le cas, débranchez le cordon secteur pendant une dizaaine de secondes
et rebranchez-le.
• Si ce n’est pas le cas, déconnectez le chargeur Multi-CD de votre système Wave et
consultez la section « Actualisation du système Wave
• Déconnectez le chargeur Multi-CD et insérez le disque d’actualisation dans le lecteur du
système Wave. Reportez-vous à la section « Actualisation du système Wave
®
» page 4.
®
» page 4.
• Vérifiez que le chargeur multi-CD Wave® est raccordé à une prise électrique alimentée et est
allumé.
• Vérifiez les connexion entre le système Wave® et le chargeur. Reportez-vous à la section
« Branchement du chargeur de CD sur le système Wave
®
» page 7.
• Si vous avez sélectionné la source AUX, vérifiez les connexions entre celle-ci et le
chargeur, et vérifiez que l’appareil connecté à la source AUX est allumé.
• Débranchez le casque.
• Vérifiez que les fiches RCA du câble stéréo sont correctement insérées.
• Appuyez sur la touche AUX de la télécommande et sélectionnez l’entrée AUX utilisée par
la source désirée (AUX 1 ou AUX 2).
• Vérifiez que l’appareil externe est sous tension.
Le CD saute. • Vérifiez que le système n’est pas installé en un emplacement sujet à des secousses ou
des vibrations. Si c’est le cas, placez-le dans un endroit sûr.
• Vérifiez que le CD n’est pas taché ou sale. Le cas échéant, nettoyez-le (ne l’essuyez pas
de manière circulaire, mais plutôt du centre du CD vers l’extérieur).
Le CD ne fonctionne pas. • Placez un CD dans le tiroir disque.
®
.
Un CD est en cours de
• Vérifiez que le CD est sélectionné sur l’afficheur du système Wave
• Vérifiez que le lecteur de CD du système Wave
®
, et non le chargeur, est allumé.
lecture, mais aucune
diode du chargeur multiCD n’est allumée.
Service client
Pour obtenir une aide supplémentaire afin de résoudre vos problèmes, contactez le service
client de Bose
notice d’utilisation.
®
. Consultez la liste des adresses qui figure sur l’avant-dernière page de cette
14
Page 45

Garantie limitée
Entretien
English FrançaisEspañol
Couverture :
Tout défaut de pièces et main-d’œuvre.
Durée de la garantie :
Un an à compter de la date d’achat.
Engagement de notre part :
Réparer ou remplacer, selon notre décision exclusive, toute pièce défectueuse et ce,
gratuitement.
Obligations de votre part :
A. Contacter le service Client Bose
B. Emballer avec soin le produit, si possible dans son carton d’origine.
Autres conditions :
Cette garantie limitée est totalement transférable durant une période d’un an suivant l’achat.
LES DISPOSITIONS DE LA PRÉSENTE GARANTIE LIMITÉE REMPLACENT TOUTE AUTRE
GARANTIE, EXPRESSE OU IMPLICITE, ÉCRITE OU ORALE, Y COMPRIS TOUTE GARANTIE
DE POTENTIEL COMMERCIAL OU D’ADÉQUATION À UN OBJECTIF PARTICULIER. LA
RESPONSABILITÉ MAXIMUM DE BOSE CORPORATION NE POURRA EXCÉDER LE PRIX
D’ACHAT RÉEL QUE VOUS AVEZ PAYÉ POUR LE PRODUIT. EN AUCUN CAS, BOSE NE
PEUT ÊTRE TENU RESPONSABLE DE DOMMAGES PARTICULIERS, FORTUITS,
SECONDAIRES OU INDIRECTS.
La présente garantie limitée ne couvre pas les dégâts résultant d’une utilisation ou
maintenance incorrecte ou anormale, d’un accident, d’un emballage incorrect, ni d’une
manipulation ou modification non-autorisée selon notre avis exclusif. Cette garantie limitée
est annulée si l’étiquette portant le numéro de série de l’appareil a été retirée ou effacée.
Autres droits :
La présente garantie limitée vous confère des droits particuliers ; vous pouvez bénéficier
d’autres droits de par la Loi de votre état ou de votre pays. Certaines législations n’admettent
pas les limites relatives aux garanties implicites, ni l’exclusion ou la limite des dommages
fortuits ou secondaires ; ces restrictions peuvent donc ne pas vous être applicables.
Caractéristiques techniques
®
et demander des instructions d’expédition.
Puissance nominale du chargeur multi-CD
120V alternatif, 50/60Hz, 80W
Dimensions
6,6 cm x 36,8 cm x 25,2 cm
Poids
2,04 kg
Couleur
gris graphite ou blanc platine
15
Page 46

Svenska Nederlands Italiano Français Español Deutsch Dansk EnglishDanskDeutschItalianoNederlandsSvenska Français Español English
Page 47

Bose Corporation
USA Customer Support
Bose Corporation, The Mountain!
Framingham, MA 01701-9168!
1-800-367-4008
USA Customer Service
Bose Corporation, 1 New York Ave.!
Framingham, MA 01701-9168!
1-508-766-1900
Canada Customer Support
Bose Ltd., 1-35 East Beaver Creek Rd.!
Richmond Hill, Ontario L4B 1B3!
1-800-465-2673
European Office
Bose Products B.V., Nijverheidstraat 8 !
1135 GE Edam, Nederland!
TEL 0299-390111!
FAX 0299-390114
Australia
Bose Pty Limited, !
Unit 3, 2 Holker Street, !
Newington NSW, 2127!
TEL +61 (0)2 8737 9999!
FAX +61 (0)2 8737 9924
United Kingdom
Customer Support
Freepost EX 151!
Exeter EX1 1ZY !
TEL 0800 614 293!
FAX 0870 240 2013
Poland
Bose Sp. z o.o.!
ul. Woloska 12!
02-675 Warszawa, Poland!
TEL (48-22) 852-2928!
FAX (48-22) 852-2927
Nederland
Bose B.V., Nijverheidstraat 8 !
1135 GE Edam, Nederland!
TEL 0299-390111!
FAX 0299-390114
Bose China
Bose Electronics (Shanghai Co., Ltd)!
2203-2205 22F, West Gate Tower!
1038 West Nanjing Road!
MeiLongzhen Plaza!
Shanghai 200041, !
Peoples Republic of China!
TEL 86 21 62713800
Atlas Hi-Fi Pte. Ltd.
68 Orchard Road!
#03-19/21 Plaza Singapura!
Singapore 238839, !
Republic of Singapore !
TEL 65-6-339-0966
The Asavasopon Co. Ltd.
50-52 Siphya Road!
Mahaprudtharam, Bangrak!
Bangkok 10500, !
Thailand!
TEL 66-2-234-6467
PT Audio Pratama
JL. Lodan Raya No. 1!
Block CO/CN!
Jakarta 14430, !
Indonesia!
TEL 62-21-659-8719
CSI Corporation
Seki Building!
23, 2-Ga Namsan-Dong!
Joong-Gu!
Seoul 100-042, !
South Korea!
TEL 82-2-344-635-114
English Deutsch FrançaisDansk Español Italiano SvenskaNederlandsDansk Italiano SvenskaDeutsch NederlandsEnglish FrançaisEspañol
Deutschland
Postfach 1468 !
48504 Nordhorn!
TEL 05921 3030 123!
FAX 05921-724250
Bose AG!
Hauptstraße 134!
CH-4450 Sissach!
TEL 061 975 77 33!
FAX 061 975 77 44
Bose Ges.m.b.H!
Wienerbergstraße 7!
A-1100 Wien!
TEL 01 604 043 40 !
FAX 01 604 043 423
France
Bose S.A.S!
12 rue de Témara!
F-78100 ST. GERMAIN-EN-LAYE!
France!
TEL 0820 820 995!
FAX 01 30 61 63 88
Bose Hong Kong
Bose Limited!
Suite 2410-11 Shell Tower!
Times Square!
1 Matheson Street!
Causeway Bay, Hong Kong!
TEL 852 2110 3330
Bose Taiwan
Worldwide House!
Room 905, Floor 9!
131 Min Sheng East Road!
Section 3!
Taipei, Taiwan!
TEL 886 2 2514 7676
Bose India
Bose Corporation India Private Limited!
4th Floor, Shriram Bhartiya Kala Kendra!
1 Copernicus Marg!
New Delhi 110 001, India!
TEL 91 11 2307 3825 / 26 /27!
India Toll Free: 1600 11 2673!
Website: www.boseindia.com
Eleksis Marketing
Corporation
269 Connecticut Street!
Greenhills East!
Mandaluyong City!
Metro Manila 1550, !
Philippines!
TEL 63-2-724-9566
G&M International LLC
P.O. Box 1229!
Dubai, United Arab Emirates!
TEL 971-4-2669-000
Sound Imports
Shop 40!
The Mall of Rosebank!
Cradock Avenue!
Rosebank 2196, !
South Africa!
TEL 27-11-880-1933
World Wide Web
www.bose.com
Page 48

©2005 Bose Corporation, The Mountain,
Framingham, MA 01701-9168 USA
291553 AM Rev.00 CCM-002573
 Loading...