


Bose Wave music, SoundLink Owner's Manual
WAVE
®
MUSIC SYSTEM
®
A mark
of quality
Owner’s Guide | Guía de usuario | Notice d’utilisation


Safety Information
CAUTIONCAUTION
RISK OF ELECTRICAL SHOCK
DO NOT OPEN
CAUTION: TO REDUCE THE RISK OF ELECTRIC SHOCK,
DO NOT REMOVE COVER (OR BACK).
NO USER-SERVICABLE PARTS INSIDE.
REFER SERVICING TO QUALIFIED PERSONNEL.
AVISVIS
RISQUE DE CHOC ÉLECTRIQUE
NE PAS OUVRIR
ATTENTION : POUR RÉDUIRE LE RISQUE DE DÉCHARGE
ÉLECTRIQUE, NE RETIREZ PAS LE COUVERCLE (OU
L’ARRIÈRE). IL NE SE TROUVE ÀL’INTÉRIEURAUCUNE
PIÈCE POUVANT ÊTRE RÉPARÉE PAR L’USAGER.
S’ADRESSER À UN RÉPARATEUR COMPÉTENT.
WARNING:
To reduce the risk of fire or electrical shock, do not expose the product to rain or moisture.
WARNING: The apparatus shall not be exposed to dripping or splashing, and objects filled with liquids,
such as vases, shall not be placed on the apparatus. As wi
th any electronic products, use care not to spill
liquids into any part of the system. Liquids can cause a failure and/or a fire hazard.
CAUTION:
Refer servicing to qualified serv
T o reduce the risk of electric shock, do not disassemble this product unless you are qualified.
ice personnel.
The lightning flash with arrowhead symbol within an equilateral triangle alerts the user to the presence of uninsulated dangerous voltage within the system enclosure that may be of sufficient magnitude to constitute a risk
of elec
trical shock.
The exclamation point within an equilateral triangle, as marked on the system, is intended to alert the user to
the pr
esence of important operating and maintenance instructions in this owner’s guide.
CAUTION:
To prevent electric shock, match the wide blade of the line cord plug to the wide slot of the AC (mains) receptacle.
Insert fully.
English FrançaisEspañol
CAUTION:
specified herein may result in hazardous radiation exposure. The compact disc player should
Use of controls or adjustments or performance of procedures other than those
not be adjusted or repaired by anyone except properly qualified service personnel.
Class 1 laser product
This CD player is classified as a CLASS 1 LASER PRODUCT according to EN 608251:1994+A1+A2, IEC 60825-1:1993+A1+A2.
The CLASS 1 LASER PRODUCT label is located on the bottom of
K
RNING:
WA
recharge, disassemble, heat above 100
eep the remote control battery away from children. It may cause a fire or chemical burn if mishandled. Do not
º
C (212ºF), or incinerate. Dispose of used batteries promptly. Replace only with a battery of
the unit.
the correct type and model number.
Please dispose of used batteries properly,
following any local regulations. Do not incinerate.
WARNING: No naked flame sources, such as lighted candles, should be placed on the
apparatus.
The product label is located on the bottom of the product.
Note:
CLASS 1 LASER PRODUCT
KLASSE 1 LASER PRODUKT
LUOKAN 1 LASER LAITE
KLASS 1 LASER APPARAT
Please read this owner’s guide
Please take the time to follow the instructions in this owner’s guide carefully. It will help you set up and operate your
system properly and enjoy all of its advanced features. Please save this owner’s guide for future re ference.
©1994-2004 Bose Corporation. No part of this work may be reproduced, modified, distributed or
otherwise used without prior written permission. All trademarks referenced herein are property of
Bose Corporation. The Wave® music system design is a registered trademark of Bose Corporation.
1
Important Safety Instructions
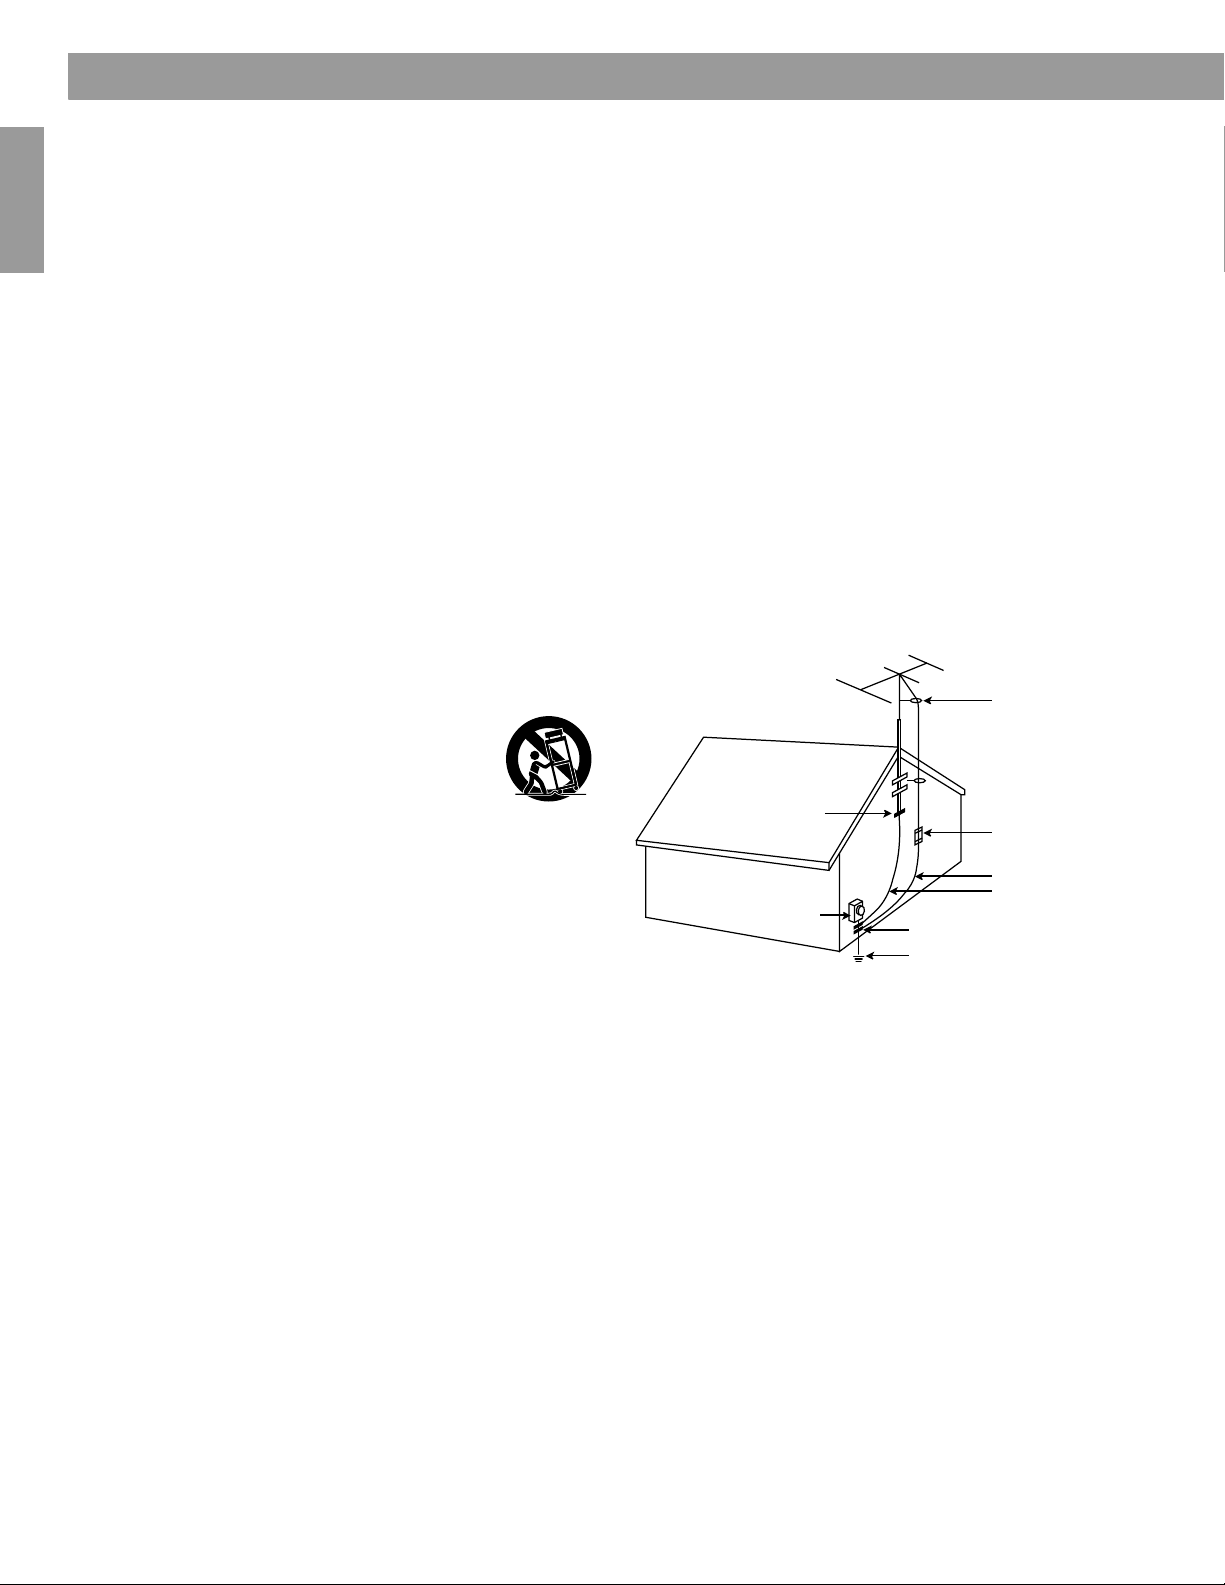
Antenna lead-in wire
Antenna discharge unit
(NEC Section 810-20)
Grounding conductors
(NEC Section 810-21)
Ground clamps
Power service grounding electrode
system (NEC ART 250, Part H)
Electric service
equipment
Ground clamp
1. Read these instructions – for all components before using this
product.
2. Keep these instructions –
3. Heed all warnings – on the pr
4. Follow all instructions.
5. Do not use this apparatus near water or moisture –
this product near a bathtub, washbowl, kitchen sink, laundry tub, in a
wet basement, near a swimming pool, or anywher e el se tha t wate r or
moisture are present.
6. Clean only with a dry clot
Corporation. Unplug this product from the wall outlet before cleaning.
7. Do not bl
with the manufacturer’s instructions – To ensure reliable
operation of the product and to protect it from overheating, put the
product in a position and location that will not interfere with its proper
ventilation. For example, do not place the product on a bed, sofa, or
similar surface that may block the ventilation openings. Do not put it
in a built-in system, such as a bookcase or a cabinet that may keep
air from flowing through its ventilation openings.
8. Do not install near any heat sources, such as radia
registers, stoves or other apparatus (including amplifiers)
that produce heat.
9. Do not d
grounding-type plug. A polarized plug has two blades with
one wider than the other. A grounding-type plug has two
blades and a third grounding prong. The wider blade or third
Français Español English
prong are provided for your safety. If the provided plug does
not fit in your outlet, consult an electrician for replacement of
the obsolete outlet.
10. Pr
part
where they exit from the apparatus.
11. Only use attachments/
manufacturer.
12. Use only with the car
table specified by the manufacturer or sold with
the apparatus. When a cart is used, use caution
when moving the cart/apparatus combination to
avoid injury from tip-over.
13. Un
or when unused for long per
prevent damage to this product.
14. Refer all servicing to qualified service personnel. Servicing is
equired when the apparatus has been damaged in any way:
r
such as power-supply cord or plug is damaged; liquid has
been spilled or objects have fallen into the apparatus; the
apparatus has been exposed to rain or moisture, does not
operate normally, or has been dropped – Do not attempt to
service this product yourself. Opening or removing covers may
expose you to dangerous voltages or other hazar ds. Please ca ll Bose
to be referred to an authorized service center near you.
o prevent risk of fire or electric shock, avoid overloading
15. T
wall outlets, extension cor
receptacles.
16. Do not let object
touch dangerous voltage points or short-out parts that could result in
a fire or electric shock.
17. See product enclosure bottom for safety related markings.
18. Use Proper Power Sources – Plug
source, as described in the operating instructions or as marked on
the product.
19. Avoid Power Lines – Us
antenna system to keep from touching power lines or circuits, as
contact with them may be fatal. Do not install external antennas near
overhead power lines or other electric light or power circuits, nor
where an antenna can fall into such circuits or power lines.
20. Gr
system is connected to this product, be sure the antenna or cable
system is grounded. This will provide some protection against
voltage surges and built-up static charges.
Section 810 of the National Elec
provides information with respect to proper grounding of the mast
and supporting structure, grounding of the lead-in wire to an antenna
discharge unit, size of grounding conductors, location of antennadischarge unit, connection to grounding electrodes, and
requirements for the ground electrode. Refer to the antenna
grounding illustration on this page.
2
ock any ventilation openings. Install in accordance
e
feat the safety purpose of the polarized or
otect the power cord from being walked on or pinched,
icularly at plugs, convenience receptacles, and the point
plug this apparatus during lightning storms
s or liquids enter the product – as they may
ound All Outdoor Antennas – If an exter
for future reference.
oduct and in the owner’s guide.
h – and as directed by Bose
accessor
t, stand, tripod, bracket or
e extreme care when installing an outside
ies specified by the
iods of time – to
ds, or integral convenience
the product into a proper power
nal antenna or cable
trica
l Code ANSI/NFPA No. 70
Do not use
ors, heat
t
Information about products that generate
electrical noise
If applicable, this equipment has been tested and found to comply with
the limits for a Class B digital device, pursuant to Part 15 of the FCC
rules. These limits are designed to provide reasonable protection against
harmful interference in a residential installation. This equipment
generates, uses, and can radiate radio frequency energy and, if not
installed and used in accordance with the instructions, may cause
harmful interference to radio communications. However, this is no
guarantee that interference will not occur in a particular installation.
If this equipment does cause harmful interference to radio or television
ception, which can be determined by turning the equipment off and on,
e
r
you are encouraged to try to correct the interference by one or more of
the following measures:
• Reorient or relocate the receiving antenna.
• Increase the separation between the equipment and receiver.
• Connect the equipment to an outlet on a diff
to which the receiver is connected.
• Consult the dealer or an experienced radio/TV technician for help.
d
Note: Unauthorize
could void the user’s authority to operate this equipment.
This product complies with the Canadian ICES
specifications.
modification of the receiver or radio remote control
erent circuit than the one
-003 Class B
Antenna grounding
Example of antenna grounding as per National Electrical Code, ANSI/
NFPA 70.
Note to CATV system installer
This reminder is provided to call the CATV system installer’s attention to
Article 820-40 of the NEC (of USA) that provides guidelines for proper
grounding. In particular, it specifies that the cable ground shall be
connected to the grounding system of the building, as close to the point
of cable entry as is practical.

Where to find...
Contents
Setting Up Your Wave® Music System . . . . . . . . . . . . . . . . . . . . . . . . . . . . . . . . . . . . . . . . . . . . . . 4
Unpacking . . . . . . . . . . . . . . . . . . . . . . . . . . . . . . . . . . . . . . . . . . . . . . . . . . . . . . . . . . . . . . . . 4
Selecting a location . . . . . . . . . . . . . . . . . . . . . . . . . . . . . . . . . . . . . . . . . . . . . . . . . . . . . . . . . 4
Connecting to power . . . . . . . . . . . . . . . . . . . . . . . . . . . . . . . . . . . . . . . . . . . . . . . . . . . . . . . . 4
Setting the clock . . . . . . . . . . . . . . . . . . . . . . . . . . . . . . . . . . . . . . . . . . . . . . . . . . . . . . . . . . . . 5
Introduction . . . . . . . . . . . . . . . . . . . . . . . . . . . . . . . . . . . . . . . . . . . . . . . . . . . . . . . . . . . . . . . 6
Special features . . . . . . . . . . . . . . . . . . . . . . . . . . . . . . . . . . . . . . . . . . . . . . . . . . . . . . . . . . . . 6
Operating Your Wave
®
Music System . . . . . . . . . . . . . . . . . . . . . . . . . . . . . . . . . . . . . . . . . . . . . . 7
Remote control operating guide . . . . . . . . . . . . . . . . . . . . . . . . . . . . . . . . . . . . . . . . . . . . . . . . 7
Reading the display . . . . . . . . . . . . . . . . . . . . . . . . . . . . . . . . . . . . . . . . . . . . . . . . . . . . . . . . . 8
Turning the Wave
®
music system on and off . . . . . . . . . . . . . . . . . . . . . . . . . . . . . . . . . . . . . . 8
Controlling the volume . . . . . . . . . . . . . . . . . . . . . . . . . . . . . . . . . . . . . . . . . . . . . . . . . . . . . . . 8
Setting up automatic shutoff (Sleep) . . . . . . . . . . . . . . . . . . . . . . . . . . . . . . . . . . . . . . . . . . . . 8
Listening to FM/AM Radio . . . . . . . . . . . . . . . . . . . . . . . . . . . . . . . . . . . . . . . . . . . . . . . . . . . . . . . 9
Turning the radio on . . . . . . . . . . . . . . . . . . . . . . . . . . . . . . . . . . . . . . . . . . . . . . . . . . . . . . . . . 9
Tuning the radio . . . . . . . . . . . . . . . . . . . . . . . . . . . . . . . . . . . . . . . . . . . . . . . . . . . . . . . . . . . . 9
Storing a radio station to memory (Presets) . . . . . . . . . . . . . . . . . . . . . . . . . . . . . . . . . . . . . . . 10
TALK RADIO mode . . . . . . . . . . . . . . . . . . . . . . . . . . . . . . . . . . . . . . . . . . . . . . . . . . . . . . . . . . 10
Playing Compact Discs . . . . . . . . . . . . . . . . . . . . . . . . . . . . . . . . . . . . . . . . . . . . . . . . . . . . . . . . . . 11
Playing audio compact discs (CDs) . . . . . . . . . . . . . . . . . . . . . . . . . . . . . . . . . . . . . . . . . . . . . 11
CD Play Modes . . . . . . . . . . . . . . . . . . . . . . . . . . . . . . . . . . . . . . . . . . . . . . . . . . . . . . . . . . . . . 11
Playing music file (MP3) CDs . . . . . . . . . . . . . . . . . . . . . . . . . . . . . . . . . . . . . . . . . . . . . . . . . . 12
Navigating through music files . . . . . . . . . . . . . . . . . . . . . . . . . . . . . . . . . . . . . . . . . . . . . . 13
Play modes for music file CDs . . . . . . . . . . . . . . . . . . . . . . . . . . . . . . . . . . . . . . . . . . . . . . 13
Setting and Using The Alarm . . . . . . . . . . . . . . . . . . . . . . . . . . . . . . . . . . . . . . . . . . . . . . . . . . . . . 14
Setting the alarm . . . . . . . . . . . . . . . . . . . . . . . . . . . . . . . . . . . . . . . . . . . . . . . . . . . . . . . . . . . 14
Waking to a radio station or CD . . . . . . . . . . . . . . . . . . . . . . . . . . . . . . . . . . . . . . . . . . . . . 14
Setting the alarm time . . . . . . . . . . . . . . . . . . . . . . . . . . . . . . . . . . . . . . . . . . . . . . . . . . . . 14
Using the alarm . . . . . . . . . . . . . . . . . . . . . . . . . . . . . . . . . . . . . . . . . . . . . . . . . . . . . . . . . . . . 15
Stopping a sounding alarm . . . . . . . . . . . . . . . . . . . . . . . . . . . . . . . . . . . . . . . . . . . . . . . . 15
Turning alarm on and off . . . . . . . . . . . . . . . . . . . . . . . . . . . . . . . . . . . . . . . . . . . . . . . . . . 15
Snoozing an alarm . . . . . . . . . . . . . . . . . . . . . . . . . . . . . . . . . . . . . . . . . . . . . . . . . . . . . . . 15
English FrançaisEspañol
Connecting Other Equipment . . . . . . . . . . . . . . . . . . . . . . . . . . . . . . . . . . . . . . . . . . . . . . . . . . . . . 16
Rear panel input/outputs . . . . . . . . . . . . . . . . . . . . . . . . . . . . . . . . . . . . . . . . . . . . . . . . . . . . . 16
Connecting an external FM antenna . . . . . . . . . . . . . . . . . . . . . . . . . . . . . . . . . . . . . . . . . . . . 16
Connecting your Wave
®
music system to a Lifestyle® system . . . . . . . . . . . . . . . . . . . . . . . . . 17
Using headphones . . . . . . . . . . . . . . . . . . . . . . . . . . . . . . . . . . . . . . . . . . . . . . . . . . . . . . . . . . 17
Changing the volume level of headphones . . . . . . . . . . . . . . . . . . . . . . . . . . . . . . . . . . . . 17
Using your Wave
Personalizing Your Wave
®
music system with other audio equipment . . . . . . . . . . . . . . . . . . . . . . . . . 18
®
Music System . . . . . . . . . . . . . . . . . . . . . . . . . . . . . . . . . . . . . . . . . . . . 19
The setup menu . . . . . . . . . . . . . . . . . . . . . . . . . . . . . . . . . . . . . . . . . . . . . . . . . . . . . . . . . . . . 20
Adjusting the snooze time . . . . . . . . . . . . . . . . . . . . . . . . . . . . . . . . . . . . . . . . . . . . . . . . . . . . 21
Selecting a music source to automatically play after a CD ends . . . . . . . . . . . . . . . . . . . . . . . 21
Changing the clock time format . . . . . . . . . . . . . . . . . . . . . . . . . . . . . . . . . . . . . . . . . . . . . . . . 22
Adjusting the display brightness . . . . . . . . . . . . . . . . . . . . . . . . . . . . . . . . . . . . . . . . . . . . . . . 22
Setting the room code . . . . . . . . . . . . . . . . . . . . . . . . . . . . . . . . . . . . . . . . . . . . . . . . . . . . . . . 23
Performing a system reset . . . . . . . . . . . . . . . . . . . . . . . . . . . . . . . . . . . . . . . . . . . . . . . . . . . . 23
Maintaining Your Wave
®
Music System . . . . . . . . . . . . . . . . . . . . . . . . . . . . . . . . . . . . . . . . . . . . . 24
Cleaning . . . . . . . . . . . . . . . . . . . . . . . . . . . . . . . . . . . . . . . . . . . . . . . . . . . . . . . . . . . . . . . . . . 24
Replacing the remote control battery . . . . . . . . . . . . . . . . . . . . . . . . . . . . . . . . . . . . . . . . . . . . 24
Troubleshooting . . . . . . . . . . . . . . . . . . . . . . . . . . . . . . . . . . . . . . . . . . . . . . . . . . . . . . . . . . . . 25
Customer service . . . . . . . . . . . . . . . . . . . . . . . . . . . . . . . . . . . . . . . . . . . . . . . . . . . . . . . . . . . 25
Limited warranty . . . . . . . . . . . . . . . . . . . . . . . . . . . . . . . . . . . . . . . . . . . . . . . . . . . . . . . . . . . . 26
Technical information . . . . . . . . . . . . . . . . . . . . . . . . . . . . . . . . . . . . . . . . . . . . . . . . . . . . . . . . 26
Index . . . . . . . . . . . . . . . . . . . . . . . . . . . . . . . . . . . . . . . . . . . . . . . . . . . . . . . . . . . . . . . . . . . . . . . . 27
3
Setting Up Your Wave® Music System
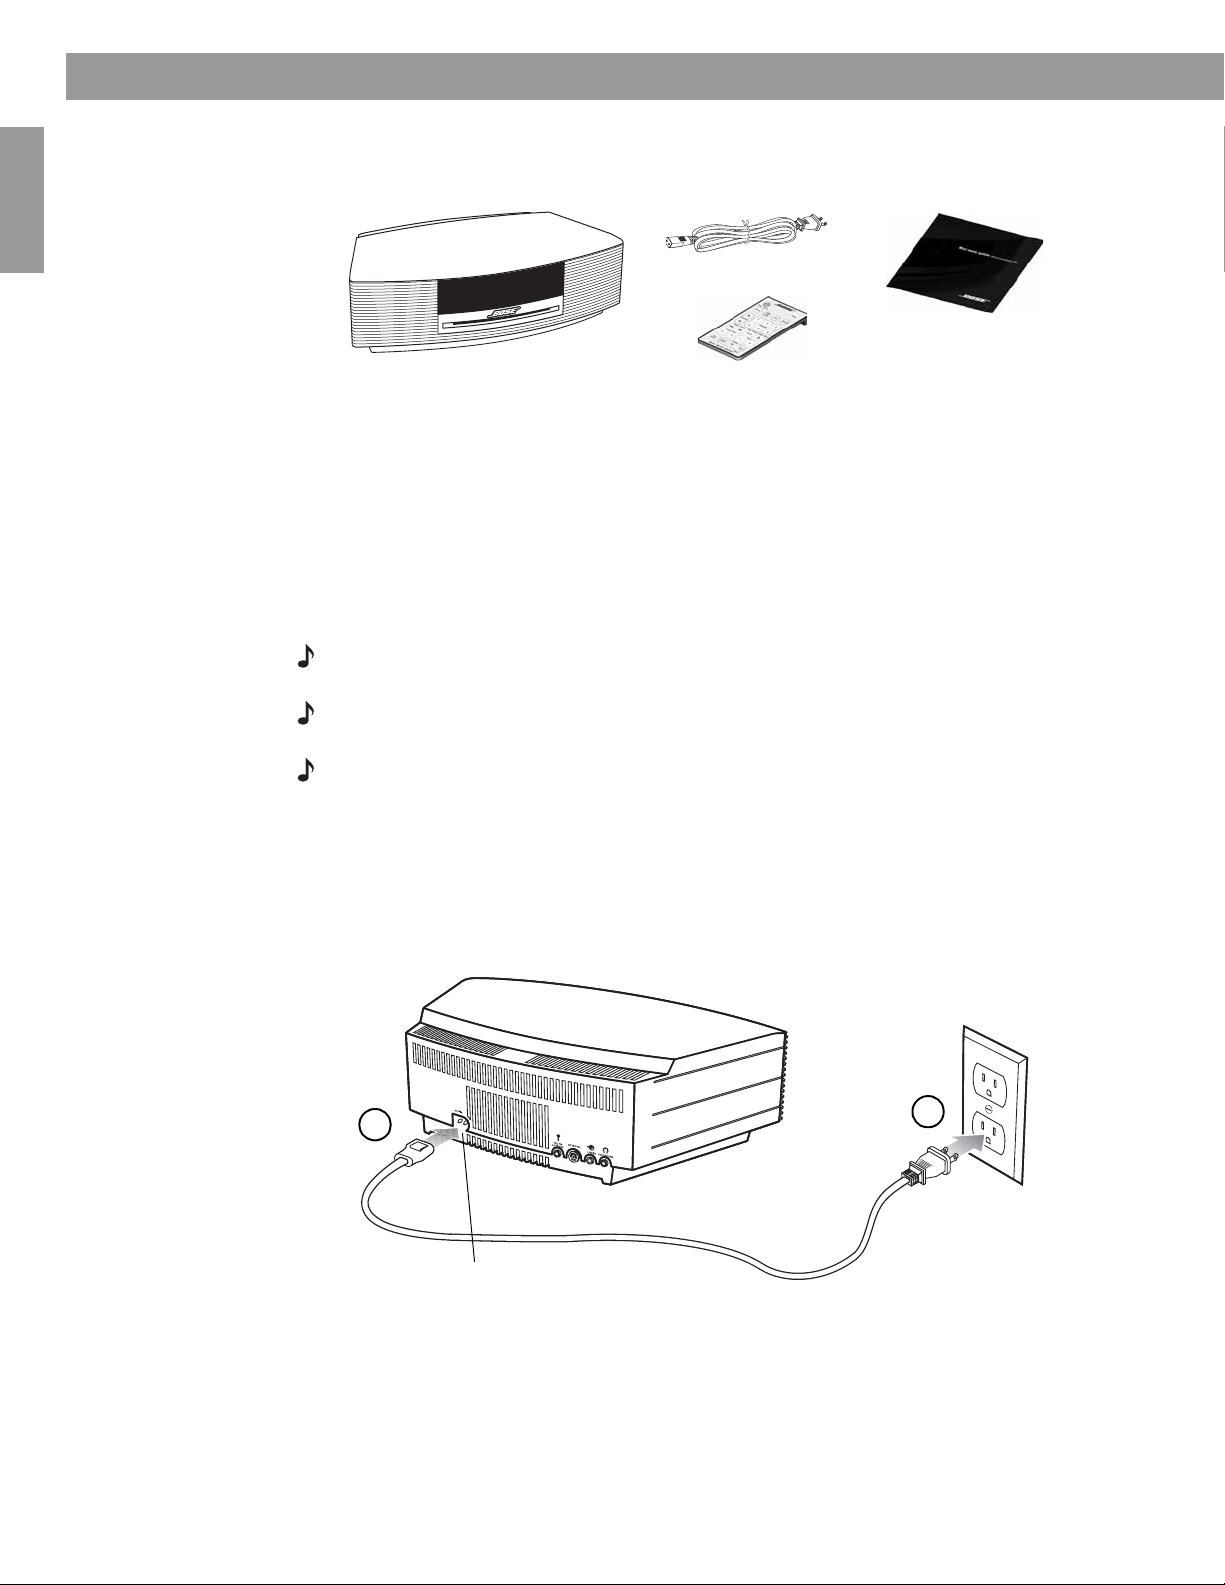
Unpacking
Please check the shipping carton for the following items:
AC power cord
Selecting a location
Français Español English
Connecting to power
Wave® music system
®
Remote control
(battery pre-installed)
Demonstration CD
• Place your Wave® music system on a table or other flat surface.
®
• To enjoy maximum performance, place your Wave
music system across the room from
where you will be listening.
• For best performance, place your Wave
®
music system within two feet of a wall, and avoid
placing directly in a corner.
Note: Do not place your Wave
®
music system on a metal surface. It could interfere with
AM reception.
Note: Do not place your Wave
®
music system on a heat-sensitive surface. Like all electrical
equipment, it generates some heat.
Note: Do not use your Wave
®
music system in a damp location or any other place where
moisture can get inside.
1. Insert the small end of the power cor d int o the conn ector lab eled AC POWER on the rear
panel of your Wave
®
music system.
2. Plug the power cord into an electrical outlet.
1
AC POWER connector
2
4
Setting the c lock
Setting Up Your Wave® Music System
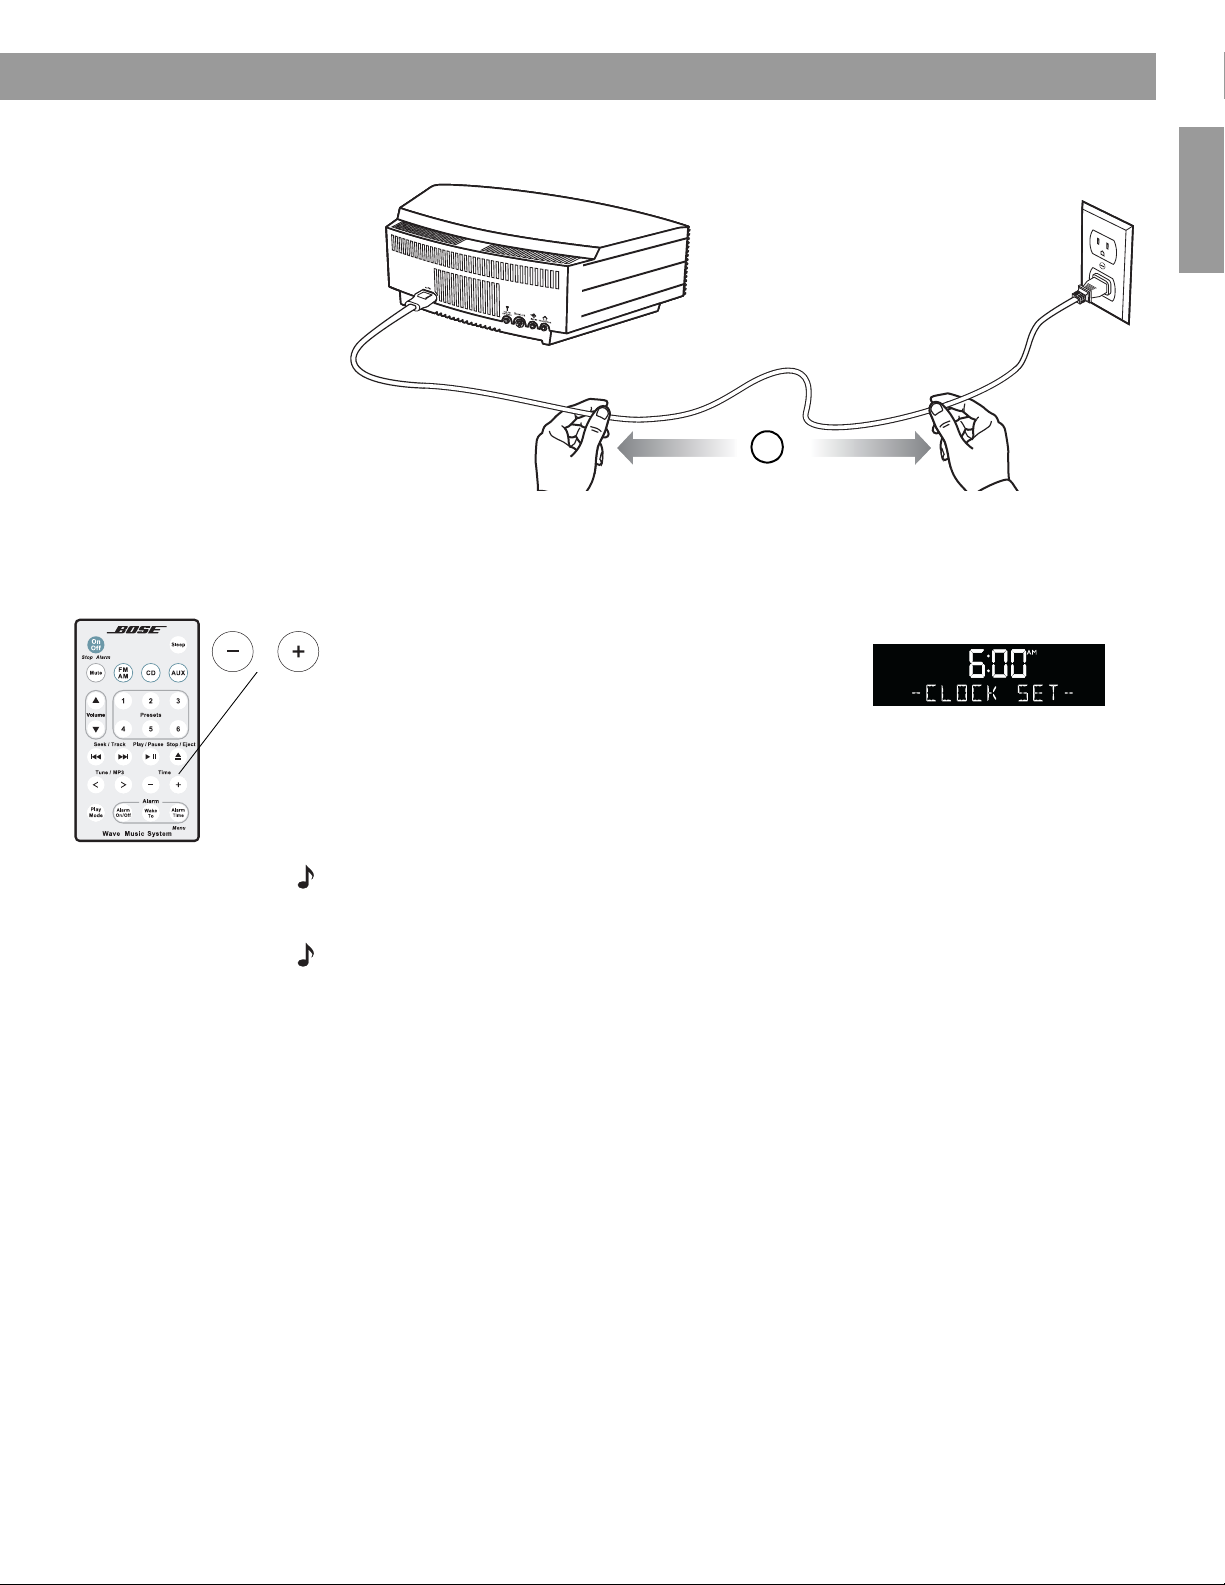
3. Unwind and straighten the power cord to ensure the best FM reception. Your Wave®
music system uses the power cord as an FM antenna.
3
English FrançaisEspañol
Time
After plugging in your Wave® music system, set the clock using the remote.
music system is easily operated using the remote control. Just aim the remote at the front panel
and press the buttons.
1. Press and hold Time – or Time + for one second until
– CLOCK SET – appears on the display.
2. Press Time – to adjust the displayed time backward or
press Time + to adjust the displayed time forward until
it matches the current time. You can also press and hold for rapid adjustment.
3. Wait five seconds for the system to exit the clock setup mode automatically.
To change the clock display from 12-hour (AM/PM) time to 24-hour (Military) time, see
“Changing the clock time format” on p age22.
Note: In the event that the Wave
settings are stored in backup memory for up to 48 hours. This feature retains the systems settings when you unplug and move the unit or when a power outage occurs.
Note: Press-and-hold operations require holding the button down for at least one second.
®
music system loses power, the clock time and other system
Your Wave®
5
A Brief Introduction to Some Special Features
Introduction
Français Español English
Thank you for purchasing the Bose® Wave® music system, an elegant way to bring high quality sound into any room.
We encourage you to begin by listening to the demonstration CD provided. Simply insert the
®
demonstration disc and your Wave
®
music system will play the CD automatically. For more
details on playing CDs see “Playing audio compact discs (CDs)” on page 11.
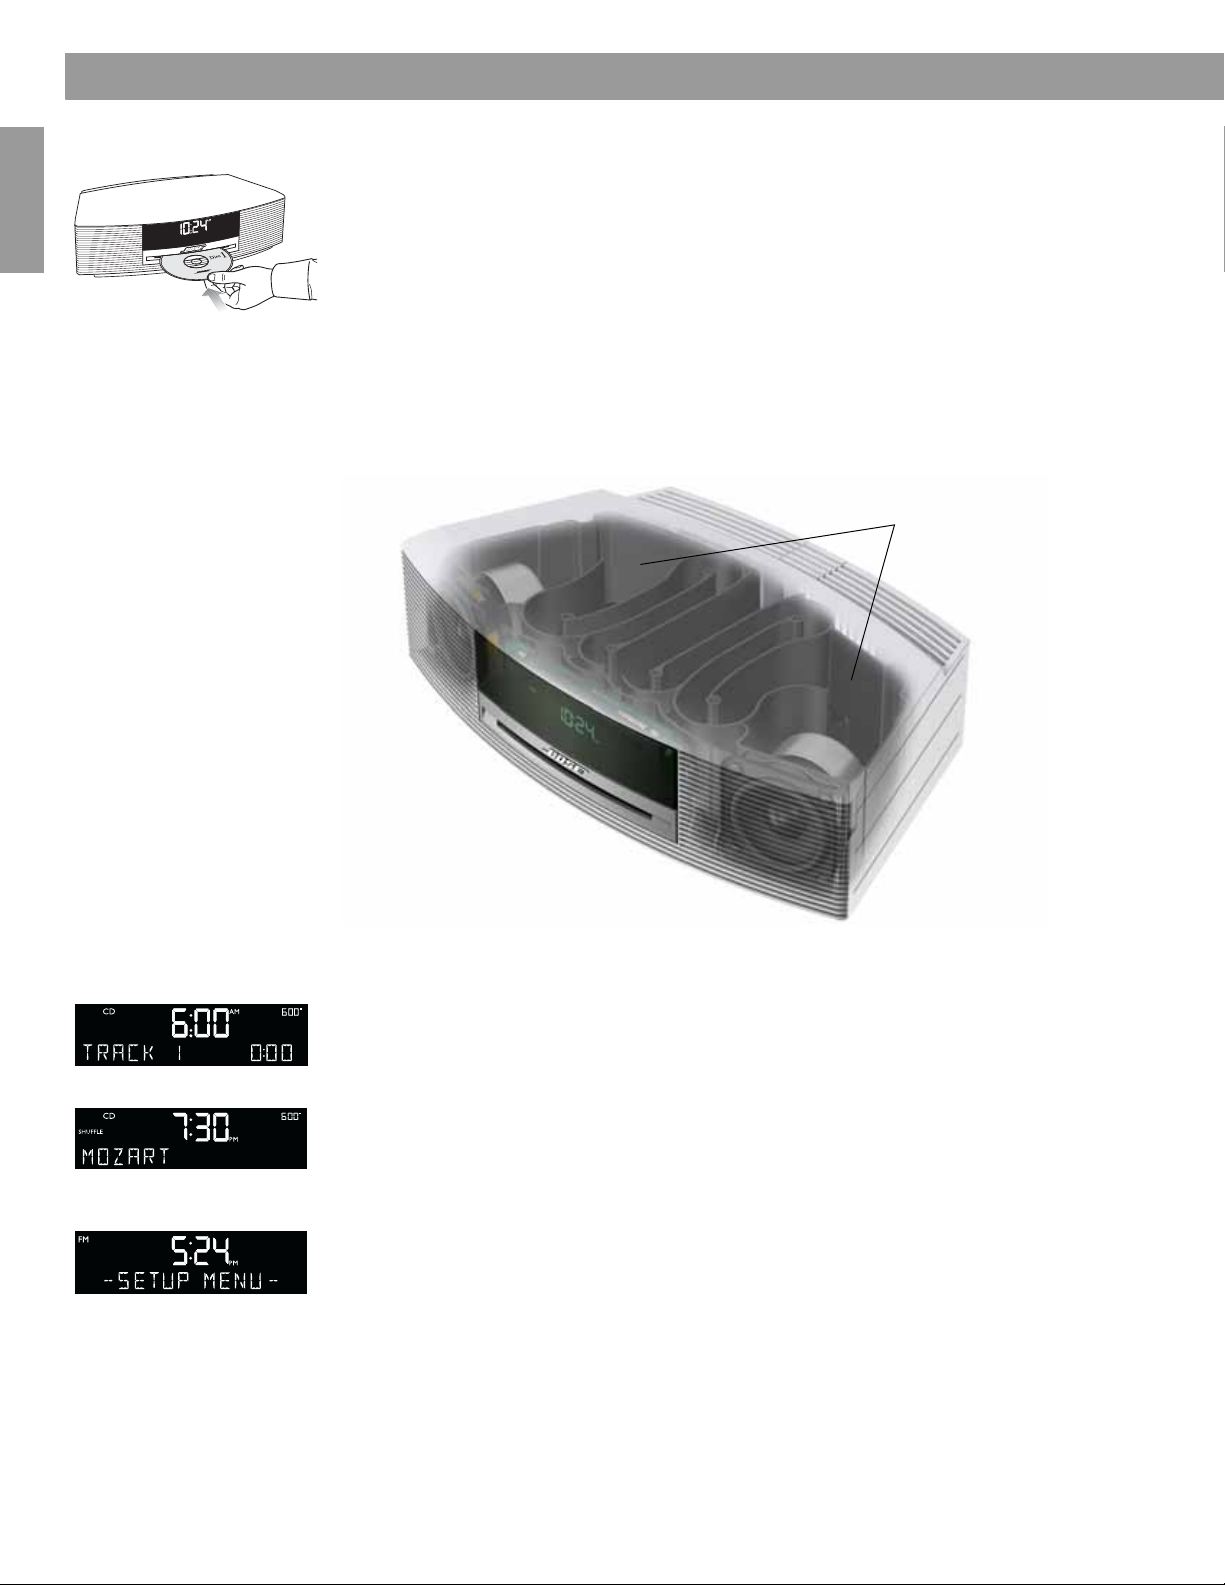
Over fourteen years of research by Bose Corporation brings you the benefits of award-winning
patented acoustic waveguide speaker technology. Using this technology, a tube efficiently
transfers ener gy fr om a small sp eaker to t he outsid e air over a wide range of l ow fr equenci es.
And, long waveguides, folded into intricate patterns, fit into products small enough to be
placed comfortably in your home. Your Wave
®
music system features new dual tapered
waveguide speaker technology, connecting two speakers to two 26" tapered waveguides
which combine to produce unprecedented instrument timbre from a system this size.
Dual tapered waveguides
Special Features
6
Alarm settings let you wake to your favorite radio station or CD track
You can set your Wave® music system to wake to your favorite CD track. For more details,
see “Waking to a radio station or CD” on page 14.
You can listen to your favorite music file (MP3) CDs
Your Wave® music system can play M P3 music files recorded on CD-R and CD-RW discs.
You can use the remot e control to easily navigate thro ugh you r MP3 fil es an d play your favorites. For details, see “Playing music file (MP3) CDs” on page 12.
The setup menu allows you to personalize system operation
Factory system settings have been set to satisfy most owners. If you wish to change the
settings, see “Personalizing Your Wave
The setup menu allows you to change the following system settings to your liking:
•Snooze time •Display brightness level
• Play a radio station automatically after a CD ends
• Clock time format (12- or 24-h o ur) • Reset to factory setti ngs
®
Music System” on page 20.
•Bose
®
link room code
Operating Your Wave® Music System
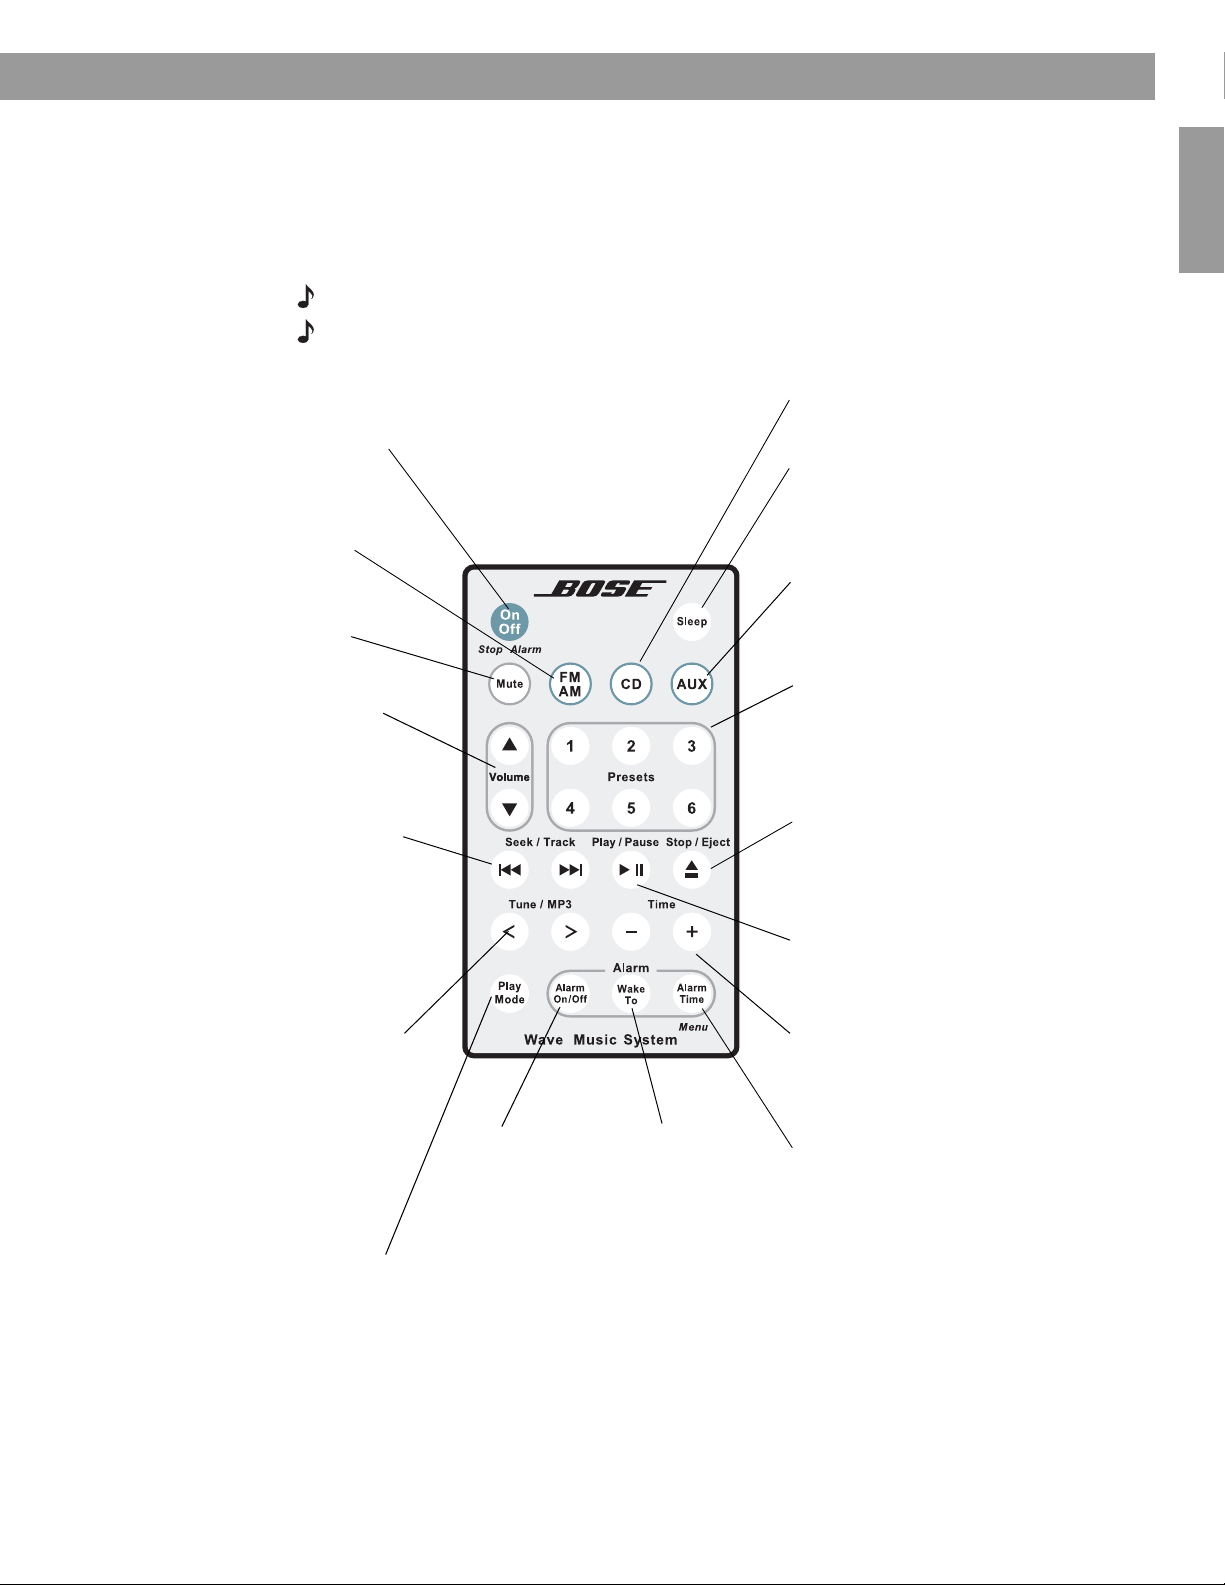
Remote control operating guide
Your Wave® music system is easily operated using the remote control. Just aim the remote at the
front panel and press the buttons. The remote normally works within 20 feet of the front panel.
Throughout this owner’s guide you will see button icons to the left of the operating instructions. These icons refer to buttons located on the remote control.
Note: Press-and-hold operations require holding the button down for at least one second.
Note: Pressing FM/AM, CD, or AUX automatically turns on the Wave
source selected.
On/Off (Stop Alarm)
• Turns the power on or off (page 8).
• Stops a s ounding alarm (page 15).
FM/AM
• Turns on the radio.
• Press again to switch between FM
and AM (page 9).
Mute
• Press to silence audio (page 8).
• Press again to restore audio.
Volume
• Turns volume up or down (page 8).
Seek/Track
• Press: Finds the next radio station with
a strong signal (page 9), or skips to
next/previous CD track (page 11).
• Press and hold: Rapidly moves forward/
backward through radio frequencies
with a strong signal (page 9), or rapidly
skips to next/previous CD tracks
(page 11).
Tune/MP3
• Press: Skips to next/previous radio
frequency (page 9), or navigates between folders when playing MP3 CDs
(page 12).
• Press and hold: Rapidly moves forward /b ac k war d through radio frequencies (p age9), or scans forwar d /
backward through a CD track
(page 11).
Play Mode
• Selects shuffle and repeat CD play
modes (page 11).
• Turns TALK RADIO mode on or off for
AM or FM (page 10).
Alarm On/Off
• Turns alarm on
or off (page 15).
Wake To
• Press and hold:
Sets playing
radio station or
CD as alarm
(page 14).
®
music system to the
CD
• Turns on the CD player (page 11).
Sleep
• Snoozes a sounding alarm (page 15).
• Sets unit to shut off automatically after
10-90 minutes (page 8).
AUX
• Press to hea r audio from an external
source connected to the AUX IN input
(page 18).
Presets
• Press: Recalls a stored radio station
(page 10).
• Press and hold: Stores a radio station for
quick recall (page 10).
Stop/Eject
• Press once: Stops a playing CD (page 11).
• Press again: Ejects a stopped CD
(page 11).
Play/Pause
• Plays a CD (page 11).
• Pauses a playing CD (page11).
Time
• Sets clock time (page 5).
• In Alarm Set mode, sets alarm time
(page 14).
Alarm Time
• Press once: Enters alarm time setup mode
(page 14).
• Press and hold: Enters the setup menu
(page 20).
English FrançaisEspañol
7
Operating Your Wave® Music System
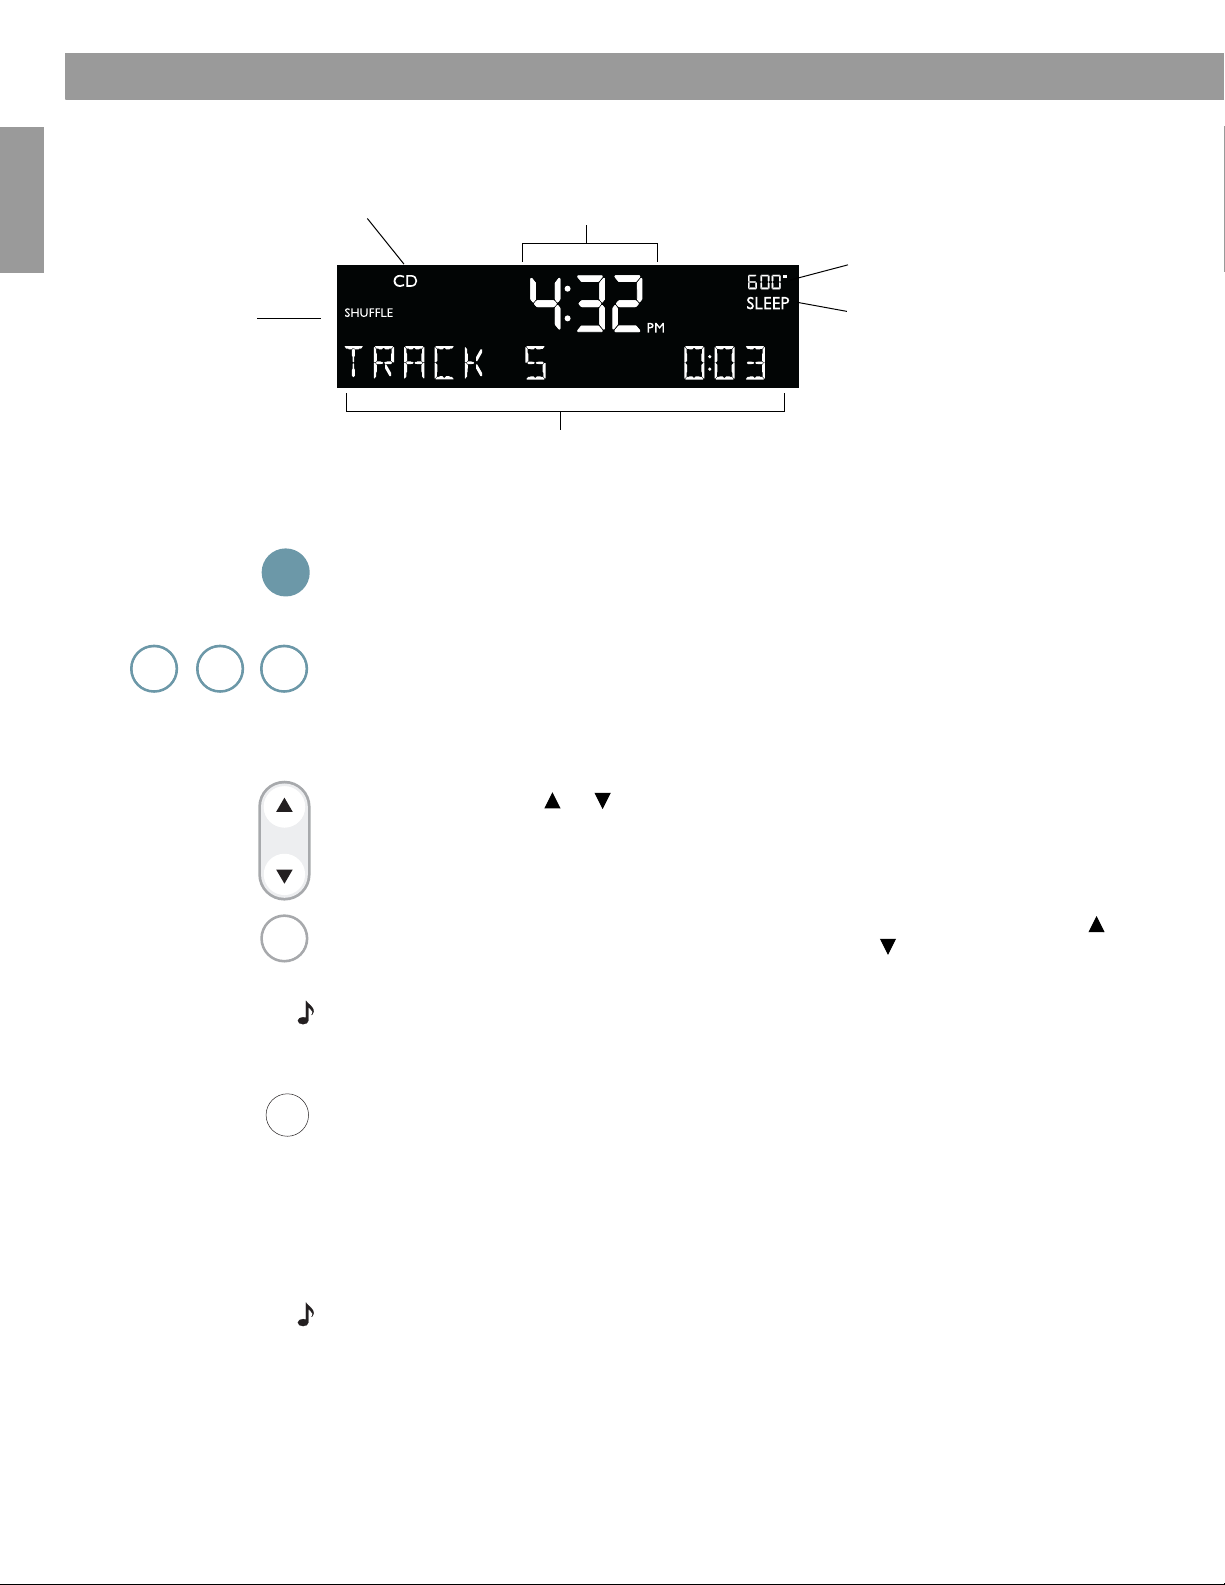
Reading the display
FM, AM, CD, AUX, or Bose
appears for the selected source.
SHUFFLE and/or
REPEAT appear
when the applicable
CD play mode is
selected.
Turning the Wave
On
Français Español English
FM
AM
CD
Off
AUX
Controlling the volume
®
link
Displays operating information for the active
source or the setup menu.
®
music system on and off
Press On/Off once to turn the Wave®
Clock time in 12-hour (AM/PM )
time or 24-hour (Milita ry) f ormat
Alarm time appears when alarm is
set.
SLEEP appears when the sleep
timer is activated.
music system on or of f. Th e Wave® music system turns
on to the last source played.
OR
Press any source button to turn the Wave
®
music system on to tha t sourc e. Pressing the AUX
does not turn on an auxiliary source (such as your TV), so turn that on first.
Press and hold Volume or to adjust the volume level. VOLUME - 0 (silent) to 99
VolumeVolume
(loud) appears on the display to indicate the level.
Press Mute to silence the Wave
Mute
unmute. To lower the volume before unmuting, press Volume while muted.
Note: When the Wave
®
music system is off, the volume can only be adjusted between 10 and 75.
Setting up automatic shutoff (Sleep)
Press Sleep to set the Wave®
Sleep
of time.
•After pressing Sleep, SLEEP - 30 MIN (or your last setting) appears on the display
and the sleep timer begins counting down. If your Wave
Sleep to turn it on and immediately set the sleep time. The last source selected will
start playing as the sleep timer counts down.
•While the SLEEP setting is displayed, press Sleep again to set the sleep timer to
10-90 minutes (in 10-minute increme nts) or OFF.
Note: While in sleep timer setup mode, if more than 10 seconds elapses between button
presses, the Wave
• To review the remaining sleep time, press Sleep.
®
music system will automatically exit the sleep timer setup mode.
®
music system. Press Mute again, or press Volume to
music system to shut off automatically after a select ed period
®
music system is off, press
• To cancel the sleep timer, press On/Off.
8