


Installation Guide
Installation Guide
Installationsvejledning
Installationsvejledning
Installationsanleitung
Installationsanleitung
Guia de instalaci6n
Guia de instalaci6n
Asennusopas
Asennusopas
Notice d'installation
Notice d'installation
Telepitesi utmutat6
Telepitesi utmutat6
di
installazione
di
Guida
Guida
Gebruikershandleiding
Gebruikershandleiding
installazione
Podr~cznik
Podr~cznik
Installationsanvisning
Installationsanvisning
~j:1
~j:1
~~j~m
~~j~m
-4
jill
-4
jill
instalacji
instalacji
<2}LHAi
<2}LHAi
Jil..l
Jil..l

SAFETY
SAFETY
INFORMATION
INFORMATION
Important
Important
Please read this owner's guide
Please read this owner's guide
Then carefully
Then carefully
taking the precautions referred
taking the precautions referred
If
you have
If
you have
contact
contact
electrician,
electrician,
describe the
describe the
to
to
~
WARNING: Installation shall be
~
WARNING: Installation shall be
section
section
National
National
methodandcompartment shall be such
methodand compartment shall be such
operation
operation
A CAUTIONS:
A CAUTIONS:
• Failure to follow the instructions in this owner's guide voids all
• Failure to follow the instructions in this owner's guide voids all
• These speakers are
• These speakers are
either the dealer you purchased the
either the dealer you purchased the
installation service.
installation service.
of
the National Electrical Code, ANSI/NFPA
of
the National Electrical Code, ANSI/NFPA
Fire
Fire
of
of
warranties on
warranties on
installation in walls, in ceilings
installation in walls, in ceilings
productisnot
productisnot
• This
• This
Spaces.
Spaces.
• Consult local building codes before you
• Consult local building codes before you
installation.
installation.
product
product
• See
• See
• Make no modifications
• Make no modifications
Unauthorized alterations maycompromise safety, regulatory
Unauthorized alterations maycompromise safety, regulatory
compliance,
compliance,
•
Be
sure to keep all insulation away from speakers in
•
Be
sure to keep all insulation away from speakers in
accordance with the installation instructions in this guide.
accordance with the installation instructions in this guide.
words
words
consider
consider
doubts
doubts
or
a professional
or
a professional
job
job
Alarm Code, ANSI/NFPA
Alarm Code, ANSI/NFPA
the speaker.
the speaker.
enclosures
enclosures
and
and
your
your
about
about
and request a
and request a
your
speakers.
your
speakers.
not
not
intended for use in Air-Handling Plenum
intended for use in Air-Handling Plenum
system performance.
system performance.
of
of
completely
completely
experience using the
experience using the
to
to
doing
this installation, you should
doing
this installation, you should
audio/video
audio/video
cost
cost
in
in
designedorrecommended for
designedorrecommended for
for
safety-related markings.
for
safety-related markings.
to the speakers
to the speakers
caution
caution
before you start.
before you start.
tools
here.
here.
installer. You can
installer. You can
estimate before
estimate before
accordance with the applicable
accordance with the applicable
72,
as applicable.
72,
as applicable.
as not to interfere with the
as not to interfere with the
of
masonry,orin drop ceilings.
of
masonry,orin drop ceilings.
or
or
tools
product
product
committing
committing
70,
70,
get
started with this
get
started with this
accessories.
accessories.
from, an
from, an
and/or the
and/or the
and
and
The
The
wiring
wiring
Mount
Mount
similar
similar
Each speaker requires a round
Each speaker requires a round
diameter,
diameter,
wallboard
wallboard
Bose
Bose
or
similar ceiling
or
similar ceiling
found
found
are specifictothis
are specifictothis
Important
Important
1. Read these instructions -
1. Read these instructions -
2. Keep these instructions -
2. Keep these instructions -
3. Heed all warnings - on the
3. Heed all warnings - on the
4. Follow all instructions.
4. Follow all instructions.
5. Install
5. Install
6. Only use attachments/accessories specified by the
6. Only use attachments/accessories specified by the
For
For
Serial numbers are located on the rearofeachofyour
Serial numbers are located on the rearofeachofyour
Invisible®
Invisible®
Serial numbers: _
Serial numbers: _
Dealer name:
Dealer name:
Dealer phone:
Dealer phone:
Purchase date: _
Purchase date: _
We
We
together
together
these
these
construction
construction
plusaminimum
plusaminimum
that
that
recommends
recommends
in
2 x 6 construction. These installation
in
2 x 6 construction. These installation
product.
product.
this
this
in
accordance with the manufacturer's instructions.
in
accordance with the manufacturer's instructions.
manufacturer.
manufacturer.
your
your
791
791
suggest
suggest
you keep
you keep
with this
with this
speakers
speakers
only
only
spaceof8
spaceof8
of
4'/8 in. (10.5 cm)
of
is a
maximum
is a
maximum
installing these speakers only in
installing these speakers only in
construction
construction
typeofinstallation only.
typeofinstallation only.
safety
safety
records
records
speakers.
speakers.
owner's
owner's
4'/8 in. (10.5 cm)
of
3/
of
3/
4
4
with adequately
with adequately
instructions
instructions
for
for
for
for
product
product
your
sales receipt and warranty card
your
sales receipt and warranty card
guide.
guide.
in
wood
in
wood
5
5
/a
in. (21.9 cm)
/a
in. (21.9 cm)
of
depth
of
in. (1.9 cm) thick.
in. (1.9 cm) thick.
all
components
all
components
future reference.
future reference.
and in the
and in the
depth
spaced
spaced
guide
guide
frame
frame
behind
behind
wood
frame
wood
frame
studs, as
studs, as
instructions
instructions
before using
before using
owner's
owner's
Virtually
Virtually
or
or
guide.
guide.
VIRTUALLY INVISIBLE is a registered trademarkofBose
VIRTUALLY INVISIBLE is a registered trademarkofBose
ii
ii
Corporation in the U.S.
Corporation in the U.S.
and
and
other
other
countries.
countries.
Basic
Basic
The instructions on the pages that follow will help you
The instructions on the pages that follow will help you
complete each
complete each
Step
Step
Choose approximate locations
Choose approximate locations
speaker.
speaker.
Step
Step
Observe the cautions and use the template
Observe the cautions and use the template
for precise placement.
for precise placement.
Step
Step
Cut the hole
Cut the hole
Step
Step
Wire each speaker.
Wire each speaker.
Step
Step
Insert and secure the speaker in the ceiling.
Insert and secure the speaker in the ceiling.
Step
Step
Test each speakertomake sure it works.
Test each speakertomake sure it works.
1:
1:
2:
2:
3:
3:
4:
4:
5:
5:
6:
6:
steps
steps
of
the steps below.
of
the steps below.
for
each speaker.
for
each speaker.
to
installation
to
installation
for
for
each
each
OVERVIEW
OVERVIEW
PREPARATION 2
PREPARATION 2
Before you begin... . . . . . . . . . . . . . . . . . . . . . . . . 2
Before you begin... . . . . . . . . . . . . . . . . . . . . . . . . 2
Unpacking . . . . . . . . . . . . . . . . . . . . . . . . . . . . . 2
Unpacking . . . . . . . . . . . . . . . . . . . . . . . . . . . . . 2
Other equipment you will need . . . . . . . . . . . . . 2
Other equipment you will need . . . . . . . . . . . . . 2
in
your
in
If painting is
If painting is
Selecting speaker cable 3
Selecting speaker cable 3
Preparing the cable wires 3
Preparing the cable wires 3
guidelines.
Placement
Placement
Using the arrow as a guide . . . . . . . . . . . . . . . . 4
Using the arrow as a guide . . . . . . . . . . . . . . . . 4
Placing speakers for stereo sound 4
Placing speakers for stereo sound 4
Placing speakers for home theater . . . . . . . . . . 5
Placing speakers for home theater . . . . . . . . . . 5
Other considerations . . . . . . . . . . . . . . . . . . . . . 5
Other considerations . . . . . . . . . . . . . . . . . . . . . 5
INSTALLATION 6
INSTALLATION 6
Preparing the ceiling 6
Preparing the ceiling 6
Using the template 6
Using the template 6
Drilling a pilot
Drilling a pilot
Cutting the speaker hole . . . . . . . . . . . . . . . . . . 7
Cutting the speaker hole . . . . . . . . . . . . . . . . . . 7
Getting the wire
Getting the wire
Connecting the
Connecting the
Finishing the installation 8
Finishing the installation 8
Securing the speaker 8
Securing the speaker 8
Testing each speaker 10
Testing each speaker 10
Attaching the grille 10
Attaching the grille 10
guidelines.
your
hole.
hole.
ready.
ready.
speaker.
speaker.
AND
AND
plan.
plan.
. . . . . . . . . . . . . . . . . . . . . 4
. . . . . . . . . . . . . . . . . . . . . 4
. . . . . . . . . . . . . . . . . . . . . . 6
. . . . . . . . . . . . . . . . . . . . . . 6
. . . . . . . . . . . . . . . . . . . 7
. . . . . . . . . . . . . . . . . . . 7
. . . . . . . . . . . . . . . . . . . 8
. . . . . . . . . . . . . . . . . . . 8
CONTENTS
CONTENTS
. . . . . . . . . . . . . . . . 2
. . . . . . . . . . . . . . . . 2
REFERENCE
REFERENCE
Painting the exterior parts
Painting the exterior parts
Painting the
Painting the
Painting the frame . . . . . . . . . . . . . . . . . . . . .
Painting the frame . . . . . . . . . . . . . . . . . . . . .
Troubleshooting . . . . . . . . . . . . . . . . . . . . . . . .
Troubleshooting . . . . . . . . . . . . . . . . . . . . . . . .
Customer service . . . . . . . . . . . . . . . . . . . . . . .
Customer service . . . . . . . . . . . . . . . . . . . . . . .
Limited warranty. . . . . . . . . . . . . . . . . . . . . . . .
Limited warranty. . . . . . . . . . . . . . . . . . . . . . . .
Accessories
Accessories
Technical information 14
Technical information 14
grille.
grille.
..
..
. . . . . . . . . . . . . . . . . . . .
. . . . . . . . . . . . . . . . . . . .
. . . . . . . . . . . . . . . . . . . . . . . . .
. . . . . . . . . . . . . . . . . . . . . . . . .
..
..
..
..
..
..
..
..
..
..
..
..
11
11
11
11
11
11
12
12
13
13
14
14
14
14
14
14
iii
iii
PREPARATION
PREPARATION
Before
Before
Thank you for choosing
Thank you for choosing
speakers for in-ceiling installation. Thesetop-of-the-Iine
speakers for in-ceiling installation. Thesetop-of-the-Iine
Virtually Invisible® speakers provide superior perfor-
Virtually Invisible® speakers provide superior perfor-
mance for stereo and home theater enjoyment. Their
mance for stereo and home theater enjoyment. Their
slim profile blends well into your room, so only the
slim profile blends well into your room, so only the
sound ...not the speakers...stands out.
sound ...not the speakers...stands out.
Please be sure
Please be sure
any cutting. There are many factorstoconsider before
any cutting. There are many factorstoconsider before
proceeding with this type
proceeding with this type
Unpacking
Unpacking
Carefully unpack the speakers. Checktobe sure the
Carefully unpack the speakers. Checktobe sure the
carton includes all the parts shown.
carton includes all the parts shown.
Template/Paint shield
Template/Paint shield
you
you
to
to
begin
begin
Bose®
Bose®
read this guide carefully before you
read this guide carefully before you
of
of
......
......
Virtually Invisible®
Virtually Invisible®
installation.
installation.
Speaker grilles
Speaker grilles
791
791
do
do
Other
Other
Hardware for securing the speakertoyour ceiling
Hardware for securing the speakertoyour ceiling
attachedtothe
attachedtothe
and the equipment below
and the equipment below
smoothly.
smoothly.
Square-head
Square-head
or
Phillips-head
or
Phillips-head
screwdriver
screwdriver
equipment
equipment
~
~
Sharp pencil
Sharp pencil
you will
you will
speaker.Inaddition, you need a ladder
speaker.Inaddition, you need a ladder
to
make the installation
to
make the installation
Wire cutter/stripper
Wire cutter/stripper
Power drill
Power drill
®~
®~
Painter's tape** Protective eyewear
Painter's tape** Protective eyewear
Tape measure
Tape measure
need
need
~
~
~
~
Stud finder
Stud finder
is
is
go
go
Speakers
Speakers
If any part
If any part
not use it. Notify Bose or your authorized Bose dealer
not use it. Notify Bose or your authorized Bose dealer
immediately. For Bose contact information, refer
immediately. For Bose contact information, refer
the address list includedinthe carton.
the address list includedinthe carton.
Note: With the speakers unpacked, you can find the serial
Note: With the speakers unpacked, you can find the serial
numbers on the back
numbers on the back
numbers onto your warranty cardand
numbers onto your warranty cardand
space on page
space on page
of
the speaker pair appears damaged,
of
the speaker pair appears damaged,
of
each one.
of
each one.
ii.
ii.
Then
you can copy the
Then
you can copy the
in
the "For your records"
in
the "For your records"
to
to
do
do
If
painting is in your plan
If
painting is in your plan
Be suretoread "Painting
Be suretoread "Painting
before you begin installing your speakers. There are a
before you begin installing your speakers. There are a
number
number
and spread the paint evenly on
and spread the paint evenly on
secure them
secure them
of
suggestions on
of
suggestions on
in
your ceiling.
in
your ceiling.
the
exterior parts" on page
the
exterior parts" on page
howtoprotect the speakers
howtoprotect the speakers
the
speakers before you
the
speakers before you
11
11
2
2
PREPARATION
PREPARATION
Selecting
Selecting
If your cables are not yet installed, use these guidelines
If your cables are not yet installed, use these guidelines
for choosing and using speaker cable. If your cables are
for choosing and using speaker cable. If your cables are
already installed, check
already installed, check
standards.
standards.
18 AWG (0.82
18 AWG (0.82
16 AWG (1.3
16 AWG (1.3
14 AWG
14 AWG
12 AWG (3.3
12 AWG (3.3
Consider the locationofthe speakers and be sure
Consider the locationofthe speakers and be sure
allow enough cabletoreach each one. This includes the
allow enough cabletoreach each one. This includes the
extra length needed for wiring the speaker before
extra length needed for wiring the speaker before
inserting it into the ceiling.
inserting it into the ceiling.
Gauge
Gauge
(2.1
(2.1
speaker
speaker
to
to
2
2
)
)
mm
mm
2
2
)
)
mm
mm
2
2
)
)
mm
mm
2
2
)
)
mm
mm
cable
cable
be sure they meet these
be sure they meet these
Maximum
Maximum
90ft(27
90ft(27
Length
Length
20 ft(6m)
20 ft(6m)
30 ft(9m)
30 ft(9m)
50ft(15
50ft(15
m)
m)
m)
m)
to
to
Preparing
Preparing
Speaker cable consistsoftwo
Speaker cable consistsoftwo
insulation around one wire is marked (striped, collared,
insulation around one wire is marked (striped, collared,
or
ribbed)toidentify it as positive. The other wire is
or
ribbed)toidentify it as positive. The other wire is
negative.
negative.
Note:
Note:
markings. Inspect both wires carefully.
markings. Inspect both wires carefully.
1.
1.
2.
2.
Be sure
Be sure
terminal, positive
terminal, positive
negative (-).
negative (-).
Note:
Note:
professional electrician oraudio/video installer, or look
professional electrician oraudio/video installer, or look
for reference books
for reference books
Itissometimes difficult to distinguish wire
Itissometimes difficult to distinguish wire
Strip approximately
Strip approximately
both wires.
both wires.
Twist the bare end of each wire so loose strands will
Twist the bare end of each wire so loose strands will
not touch across terminals.
not touch across terminals.
For information on installing cable, consult a
For information on installing cable, consult a
the
cable
the
cable
to
connect each wiretothe proper speaker
to
connect each wiretothe proper speaker
to
positive
to
positive
at
at
wires
wires
insulated wires. The
insulated wires. The
'/2
in.
(13
'/2
in.
a local home building retail store.
a local home building retail store.
mm)ofinsulation from
(13
mm)ofinsulation from
(+)
and negative
(+)
and negative
to
to
3
3
PREPARATION
PREPARATION
Placement
Placement
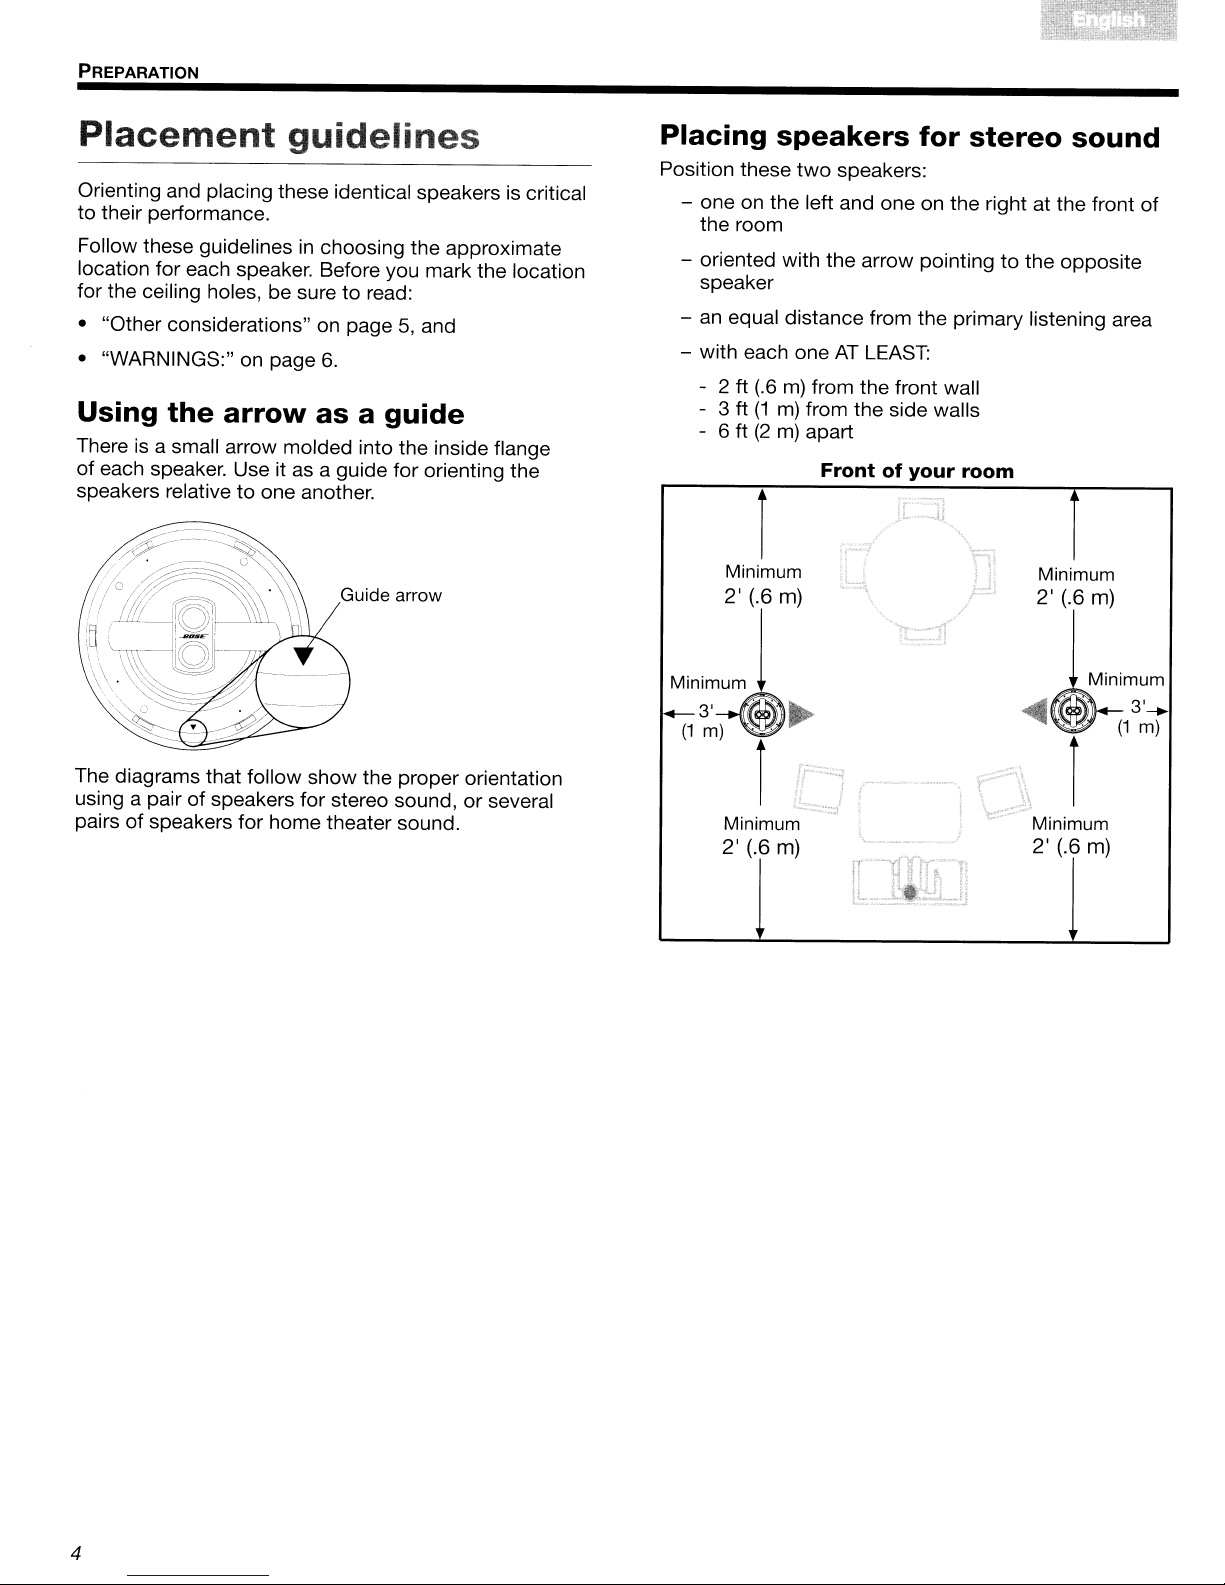
Orienting and placing these identical speakersiscritical
Orienting and placing these identical speakersiscritical
to
their performance.
to
their performance.
Follow these guidelines
Follow these guidelines
location for each speaker. Before you mark the location
location for each speaker. Before you mark the location
for the ceiling holes, be sure
for the ceiling holes, be sure
• "Other considerations" on page
• "Other considerations" on page
• "WARNINGS:" on page
• "WARNINGS:" on page
Using
Using
Thereisa small arrow molded into the inside flange
Thereisa small arrow molded into the inside flange
of each speaker. Use it as a guide for orienting the
of each speaker. Use it as a guide for orienting the
speakers relative
speakers relative
the
the
arrow
arrow
guidelines
guidelines
in
choosing the approximate
in
choosing the approximate
to
to
6.
6.
asaguide
asaguide
to
one another.
to
one another.
Guide
Guide
read:
read:
5,
and
5,
and
arrow
arrow
Placing
Placing
Position these
Position these
- one on the left and one on the right at the front
- one on the left and one on the right at the front
the room
the room
- oriented with the arrow pointing
- oriented with the arrow pointing
speaker
speaker
an
an
-
-
- with each one
- with each one
- 2ft(.6
- 2ft(.6
- 3ft(1
- 3ft(1
- 6ft(2
- 6ft(2
speakers
speakers
two
speakers:
two
speakers:
equal distance from the primary listening area
equal distance from the primary listening area
AT
AT
m)
from the front wall
m)
from the front wall
m)
from the side walls
m)
from the side walls
m)
apart
m)
apart
Frontofyour room
Frontofyour room
Minimum
Minimum
LEAST:
LEAST:
for
for
stereo
stereo
to
the opposite
to
the opposite
Minimum
Minimum
2'
2'
sound
sound
(.6 m)
(.6 m)
of
of
Minimum
Minimum
3'--.
3'--.
(1
m)
(1
m)
The diagrams that follow show the proper orientation
The diagrams that follow show the proper orientation
using a pair of speakers for stereo sound, or several
using a pair of speakers for stereo sound, or several
of
speakers for home theater sound.
of
pairs
pairs
speakers for home theater sound.
Minimum
Minimum
2'
(.6 m)
2'
(.6 m)
IT
IT
l
l
Minimum
Minimum
2'
(.6 m)
2'
(.6 m)
4
4
PREPARATION
PREPARATION
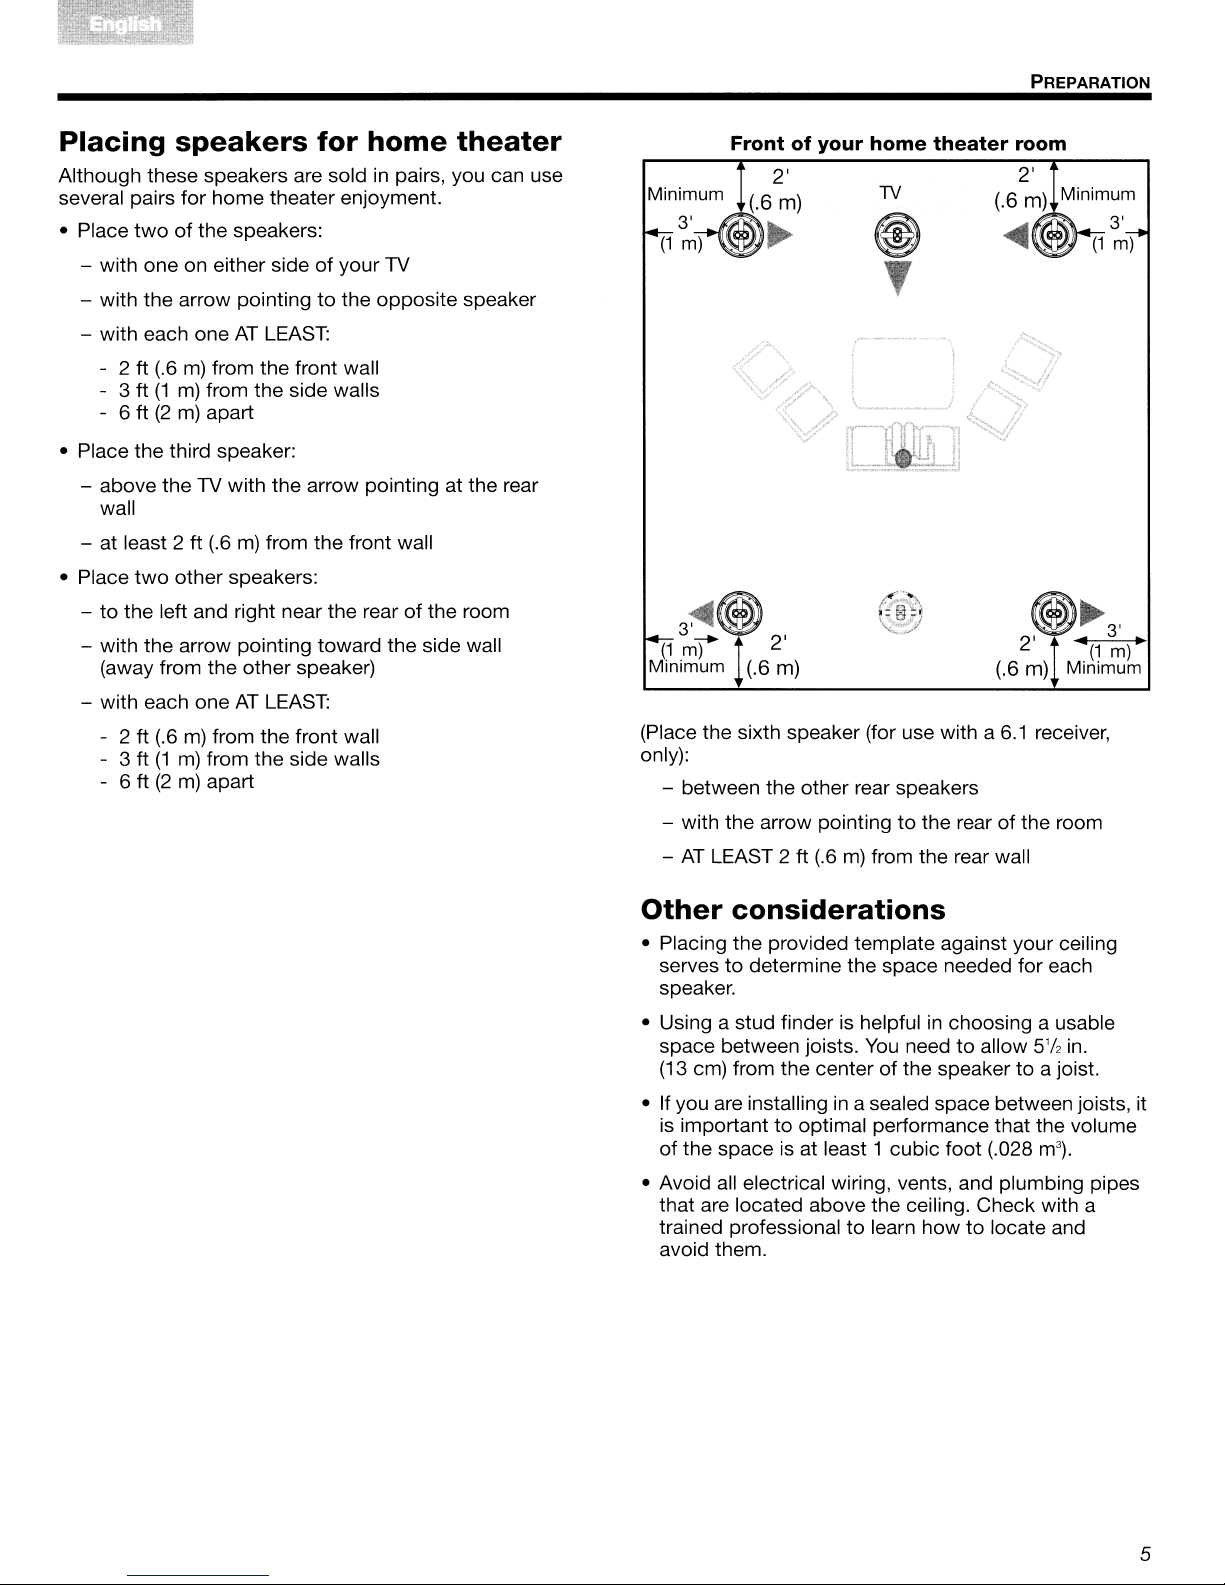
Placing
Placing
Although these speakers are sold in pairs, you can use
Although these speakers are sold in pairs, you can use
several pairs
several pairs
• Place
• Place
- with one on either side
- with one on either side
- with
- with
- with each one
- with each one
- 2
- 2
- 3
- 3
- 6
- 6
• Place
• Place
- above
- above
wall
wall
- at least 2
- at least 2
• Place
• Place
to
to
-
-
- with
- with
(away from the other speaker)
(away from the other speaker)
- with each one
- with each one
- 2
- 2
- 3
- 3
- 6
- 6
speakers
speakers
for
home theater enjoyment.
for
home theater enjoyment.
twoofthe speakers:
twoofthe speakers:
the
arrow pointingtothe
the
arrow pointingtothe
AT
AT
ft (.6
m)
ft (.6
ft
ft
ft
ft
the
the
two
two
the left and right near the rearofthe room
the left and right near the rearofthe room
the
the
ft
ft
ft
ft
ft
ft
from the front wall
m)
from the front wall
(1m)from the side walls
(1m)from the side walls
(2m)apart
(2m)apart
third speaker:
third speaker:
the
TV with the arrow pointing at the rear
the
TV with the arrow pointing at the rear
ft
(.6m)from the front wall
ft
(.6m)from the front wall
other speakers:
other speakers:
arrow pointing toward the side wall
arrow pointing toward the side wall
AT
AT
(.6m)from the front wall
(.6m)from the front wall
(1m)from the side walls
(1m)from the side walls
(2m)apart
(2m)apart
LEAST:
LEAST:
LEAST:
LEAST:
for
for
of
your TV
of
your TV
home
home
opposite speaker
opposite speaker
theater
theater
Frontofyour
Frontofyour
3~@)
3~@)
(1
m)
(1
m)
Minimum (.6 m)
Minimum (.6 m)
(Place the sixth speaker (for use with a
(Place the sixth speaker (for use with a
only):
only):
- between the other rear speakers
- between the other rear speakers
2'
2'
home
home
TV
TV
,
,
theater
theater
room
room
@)~3'
@)~3'
2' "(1
2' "(1
(.6 m) Minimum
(.6 m) Minimum
6.1
receiver,
6.1
receiver,
m)~
m)~
- with the arrow pointing
- with the arrow pointing
AT
LEAST 2ft(.6m)from the rear wall
AT
LEAST 2ft(.6m)from the rear wall
-
-
Other
Other
• Placing
• Placing
serves
serves
speaker.
speaker.
• Using a stud finder is helpful
• Using a stud finder is helpful
space between joists.
space between joists.
(13 cm) from the center
(13 cm) from the center
• If you are installing
• If you are installing
is important
is important
of
of
• Avoid all electrical wiring, vents, and plumbing pipes
• Avoid all electrical wiring, vents, and plumbing pipes
that are located above the ceiling. Check with a
that are located above the ceiling. Check with a
trained professional
trained professional
avoid them.
avoid them.
considerations
considerations
the
provided template against your ceiling
the
provided template against your ceiling
to
determine the space needed for each
to
determine the space needed for each
in
in
to
optimal performance that the volume
to
optimal performance that the volume
the
space is at least 1 cubic
the
space is at least 1 cubic
to
the rearofthe room
to
the rearofthe room
in
choosing a usable
in
choosing a usable
You
needtoallow
You
needtoallow
of
the speakertoa joist.
of
the speakertoa joist.
a sealed space between joists, it
a sealed space between joists, it
foot
foot
to
learn
to
howtolocate and
learn
howtolocate and
(.028
(.028
5'/2
5'/2
m3j.
m3j.
in.
in.
5
5
 Loading...