

Page 1
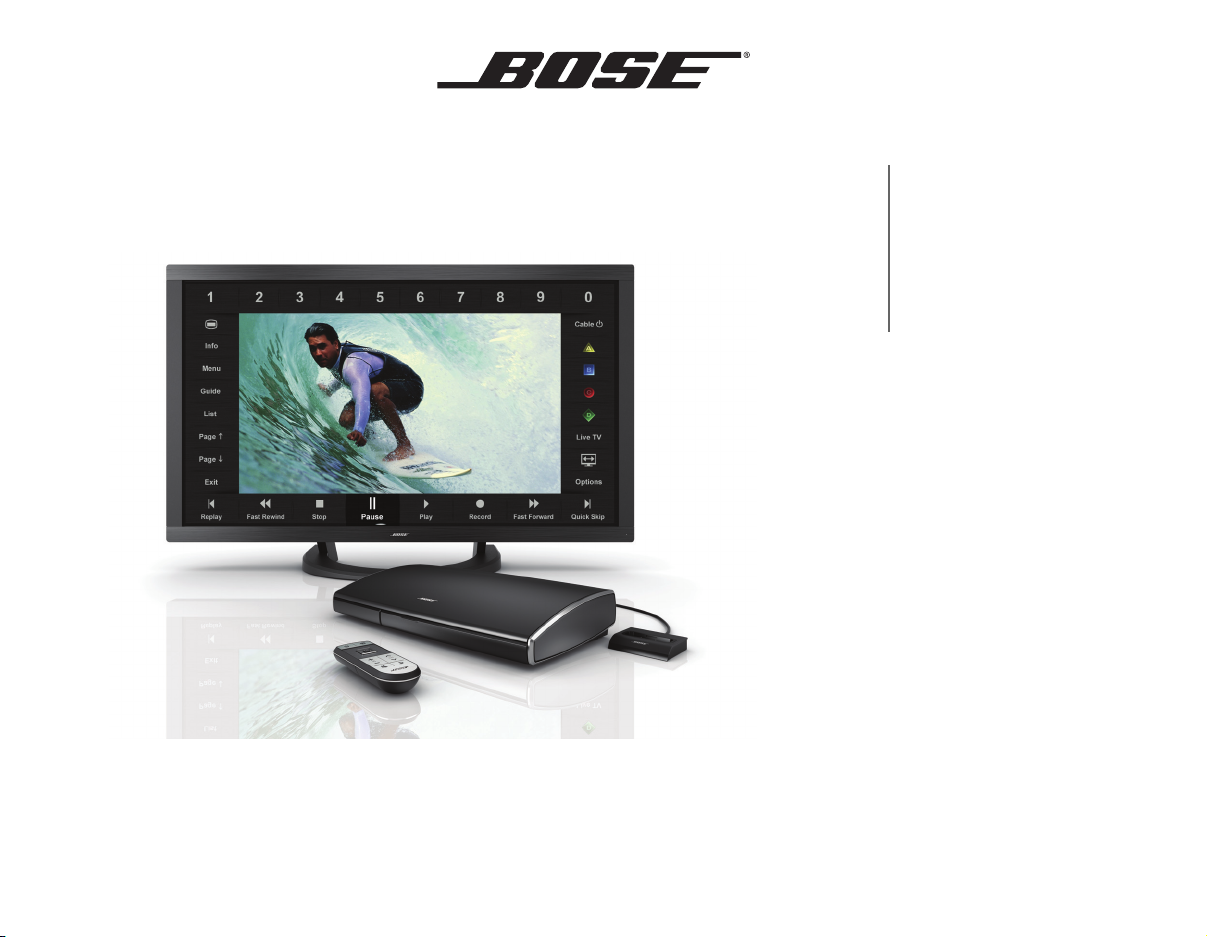
Operating Guide
Guía del usuario
Guide d’utilisation
V
IDEO
W
AVE
®
II
E
NTERTAINMENT SYSTEM
Page 2

IMPORTANT SAFETY INFORMATION
EnglishTAB 6TAB 8 TAB 7 TAB 3TAB 5 TAB 2TAB 4
Please review the important safety information in your
VideoWave
®
Entertainment System Setup Guide before
using your system. This will help you operate your
system properly and safely.
2
Page 3

TAB 5TAB 4TAB 6TAB 8TAB 7English TAB 3TAB 2
CONTENTS
INTRODUCTION 5
Welcome . . . . . . . . . . . . . . . . . . . . . . . . . . . . . . . 5
Product Overview . . . . . . . . . . . . . . . . . . . . . . . . 5
System overview . . . . . . . . . . . . . . . . . . . . . . . . . 6
Bose® click pad remote control overview . . . . . 7
Control frame overview . . . . . . . . . . . . . . . . . . . 8
Click pad overview . . . . . . . . . . . . . . . . . . . . . . 9
System updates . . . . . . . . . . . . . . . . . . . . . . . . . . 10
Registering your product . . . . . . . . . . . . . . . . . . . 10
Important safety information . . . . . . . . . . . . . . . . 10
BASIC SYSTEM OPERATION 11
Turning the system on/off . . . . . . . . . . . . . . . . . . 11
Selecting a source . . . . . . . . . . . . . . . . . . . . . . . . 12
Controlling the volume . . . . . . . . . . . . . . . . . . . . . 13
Moving through channels . . . . . . . . . . . . . . . . . . 13
CONTROLLING YOUR SOURCES 14
Control frame overview . . . . . . . . . . . . . . . . . . . . 14
Selecting source controls . . . . . . . . . . . . . . . . . . 15
Entering channel numbers . . . . . . . . . . . . . . . . . . 16
Interacting with source guides and menus . . . . . 17
SPECIAL FUNCTIONS 18
Changing the image view . . . . . . . . . . . . . . . . . . 18
Video muting . . . . . . . . . . . . . . . . . . . . . . . . . . . . 18
USING THE iPOD SOURCE 19
Selecting the iPod source . . . . . . . . . . . . . . . . . . . 19
iPod interface . . . . . . . . . . . . . . . . . . . . . . . . . . . . 19
Controlling iPod . . . . . . . . . . . . . . . . . . . . . . . . . . 19
CONTROL CONSOLE OVERVIEW 20
USING THE USB SOURCE 21
Viewing photos . . . . . . . . . . . . . . . . . . . . . . . . . . . 21
USB interface . . . . . . . . . . . . . . . . . . . . . . . . . . . . 21
Photo viewing controls . . . . . . . . . . . . . . . . . . . . . 21
USING THE FRONT ANALOG A/V AND
HDMI™ INPUTS 22
Connecting to the front analog A/V inputs . . . . . . 22
Controlling front A/V sources . . . . . . . . . . . . . . . . 22
CHANGING SOURCE AND SYSTEM OPTIONS 23
Changing settings . . . . . . . . . . . . . . . . . . . . . . . . . 24
Available settings . . . . . . . . . . . . . . . . . . . . . . . . . 24
Exit . . . . . . . . . . . . . . . . . . . . . . . . . . . . . . . . . . . 24
Play Bose
Program Language . . . . . . . . . . . . . . . . . . . . . . 25
Channel Number . . . . . . . . . . . . . . . . . . . . . . . . 25
Control Frame Sounds . . . . . . . . . . . . . . . . . . . 25
Video Settings . . . . . . . . . . . . . . . . . . . . . . . . . . 25
®
demonstration . . . . . . . . . . . . . . . . . 24
3
Page 4

CONTENTS
EnglishTAB 6TAB 8 TAB 7 TAB 3TAB 5 TAB 2TAB 4
Motion Smoothing . . . . . . . . . . . . . . . . . . . . . . 26
Restore Original Settings . . . . . . . . . . . . . . . . . 26
Automatic Off . . . . . . . . . . . . . . . . . . . . . . . . . . 26
CHANGING YOUR SYSTEM SETUP 27
Unify® system overview . . . . . . . . . . . . . . . . . . . . 27
Using the Unify menu . . . . . . . . . . . . . . . . . . . . . . 27
Unify system functions . . . . . . . . . . . . . . . . . . . . . 27
Resume initial setup . . . . . . . . . . . . . . . . . . . . . 27
Restart initial setup . . . . . . . . . . . . . . . . . . . . . . 27
Language . . . . . . . . . . . . . . . . . . . . . . . . . . . . . 27
ADAPTiQ
Play Bose® demonstration . . . . . . . . . . . . . . . . 27
Source setup . . . . . . . . . . . . . . . . . . . . . . . . . . . 28
Add a new device . . . . . . . . . . . . . . . . . . . . . . . 28
Homewide . . . . . . . . . . . . . . . . . . . . . . . . . . . . . 28
Update . . . . . . . . . . . . . . . . . . . . . . . . . . . . . . . 28
Teach mode . . . . . . . . . . . . . . . . . . . . . . . . . . . 28
Exit Unify
Customizing the control frame . . . . . . . . . . . . . . . 29
Installing the IR emitter . . . . . . . . . . . . . . . . . . . . 30
Controlling the system using
a third-party remote . . . . . . . . . . . . . . . . . . . . . . . 31
®
. . . . . . . . . . . . . . . . . . . . . . . . . . . . . 27
®
. . . . . . . . . . . . . . . . . . . . . . . . . . . . . 28
TROUBLESHOOTING 32
Troubleshooting table . . . . . . . . . . . . . . . . . . . . . . 32
Pairing the remote with the console . . . . . . . . . 33
Resetting the system . . . . . . . . . . . . . . . . . . . . . 33
Performing a system update . . . . . . . . . . . . . . . 34
Contacting customer service . . . . . . . . . . . . . . . . 34
CARE AND MAINTENANCE 35
Replacing the batteries . . . . . . . . . . . . . . . . . . . . . 35
Cleaning . . . . . . . . . . . . . . . . . . . . . . . . . . . . . . . . 35
Cleaning the monitor screen . . . . . . . . . . . . . . . 35
Cleaning the product enclosures . . . . . . . . . . . . 36
Limited warranty . . . . . . . . . . . . . . . . . . . . . . . . . . 37
Technical information . . . . . . . . . . . . . . . . . . . . . . 37
4
Page 5
TAB 5TAB 4TAB 6TAB 8TAB 7English TAB 3TAB 2
Monitor and stand
Dock for iPod
Control
console
Bose® click
pad remote
control
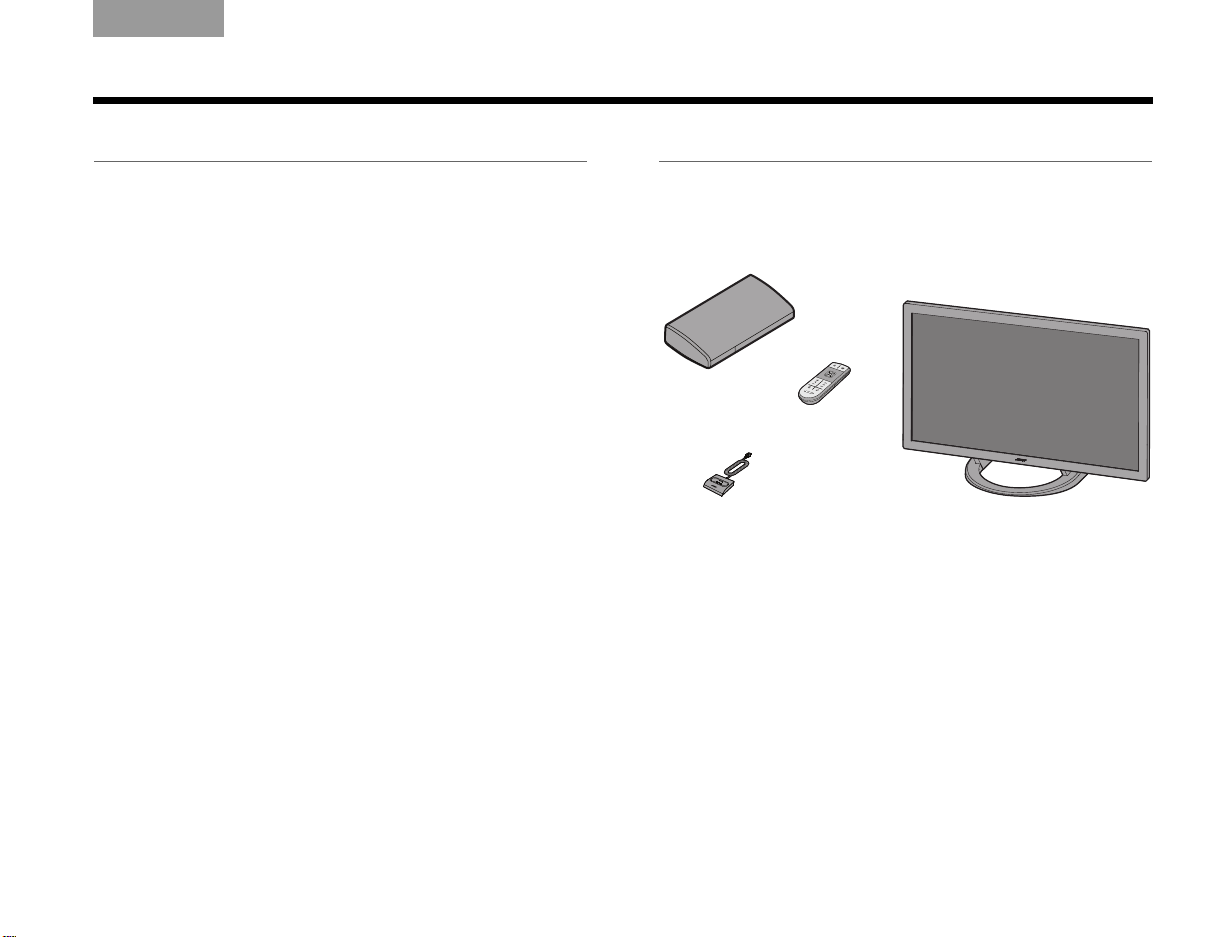
INTRODUCTION
Welcome
Thank you for choosing the Bose® VideoWave®
entertainment system for your home.
By now, your system should be successfully set up
and, after running the ADAPTiQ® audio calibration
system, the sound should be calibrated for your room.
If these tasks have not been performed, please refer to
the VideoWave system setup guide. If you wish to add
another device to your system, see “Changing Your
System Setup” on page 27.
This guide describes your new remote control and
shows you how to operate your system.
Product Overview
The VideoWave system features an HD monitor, and
comes with a control console, a remote control, and
a dock for iPod.
5
Page 6
INTRODUCTION
Control
frame
EnglishTAB 6TAB 8 TAB 7 TAB 3TAB 5 TAB 2TAB 4
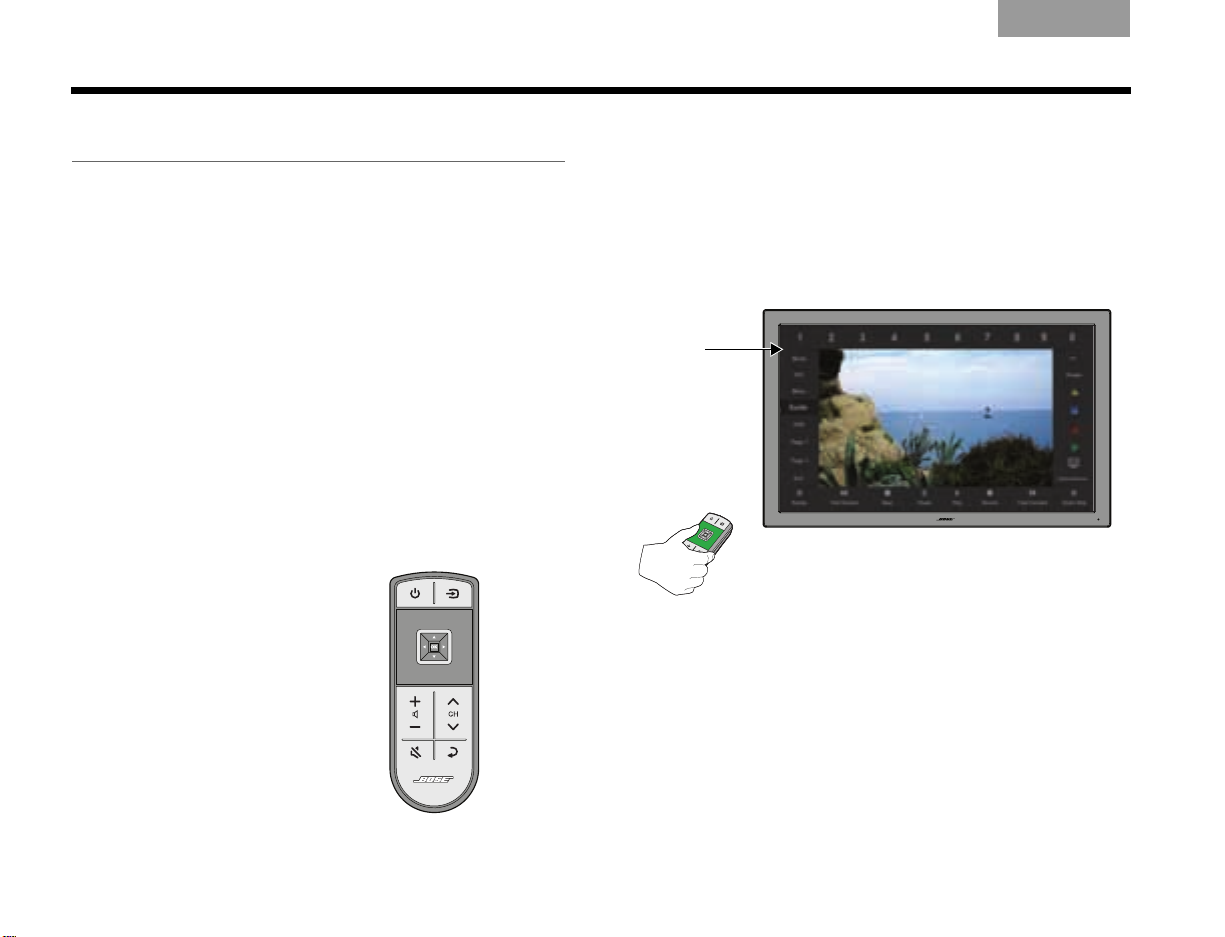
System overview
The VideoWave® entertainment system offers a unique
approach to controlling external devices like a cable
set-top box, Blu-ray Disc™ DVD player, or iPod. The
solution relies on a single remote control that is
significantly easier to use than conventional universal
remote controls.
The remote itself has only the buttons necessary for
basic control of the system. Controls that are unique to
your connected devices appear on the screen and are
accessed by using the click pad located on the remote
control. To select these additional controls, you touch
the click pad, glide your thumb to the function (or
control) you want, and press down on the click pad itself.
This approach is different and will likely require some
getting used to at the beginning, but we believe it offers
benefits that you will appreciate as you use the system:
• Simplified remote control.
Only the most basic functions
are located on the remote to
make it easy for anyone to
operate the system.
• You only see the controls you need. For example,
when you are watching a television program on your
cable set-top box and you touch the click pad, the
system activates the control frame on the screen,
presenting only the controls necessary to operate the
set-top box. Or, when you are viewing a DVD, the
system will present only the controls needed to
operate the DVD player.
• Your eyes don’t have to leave the screen.
When you want to select a control, instead of looking
down at the remote to find it, you can simply use your
thumb to highlight the control on the screen and
select. All without ever looking away from the screen.
6
Page 7

Bose® click pad remote control overview
Source selection
Selects connected devices from the
source menu.
See “Selecting a source” on page 12.
Last channel
Returns the current source to the previous
channel (page 13).
Mute/unmute
Suspends or restores the system audio.
See “Controlling the volume” on page 13.
Click pad
Displays and selects source and
system functions.
See “Click pad overview” on page 9 and
“Controlling Your Sources” on page 14.
Navigation pad
Provides up, down, left, right movement and
select functions for navigating on-screen
menus and program guides.
See “Interacting with source guides and
menus” on page 17.
Power on/off
Turns the system on/off including
connected devices.
See “Turning the system on/off” on
page 11.
Channel up/down
Changes the channel of the selected
program source.
See “Moving through channels” on page 13.
Volume up/down
Raises (+) or lowers (–) the system volume.
See “Controlling the volume” on page 13.
TAB 5TAB 4TAB 6TAB 8TAB 7English TAB 3TAB 2
INTRODUCTION
7
Page 8

INTRODUCTION
Numbers for entering channel, DVD chapter, music track, or
disc number. See “Entering channel numbers” on page 16.*
Playback controls used for sources such
as DVR, DVD, CD, and MP3 players.*
Additional controls for
the selected source.*
Additional
controls for
the selected
source.*
Image view control (page 18).
Source and system options
menu (page 23) and Bose
Demonstration (page 24)
Source power on/off control.
*For more information on using these controls, refer to the owner’s guide that came with the source you have selected to use.
EnglishTAB 6TAB 8 TAB 7 TAB 3TAB 5 TAB 2TAB 4
Control frame overview
The control frame consists of functions or controls used
by the source you have selected. These replace the
buttons on the remote control that came with the source.
Note: The content of the control frame can be modified
for each source. See “Customizing the control frame” on
page 29.
8
Page 9
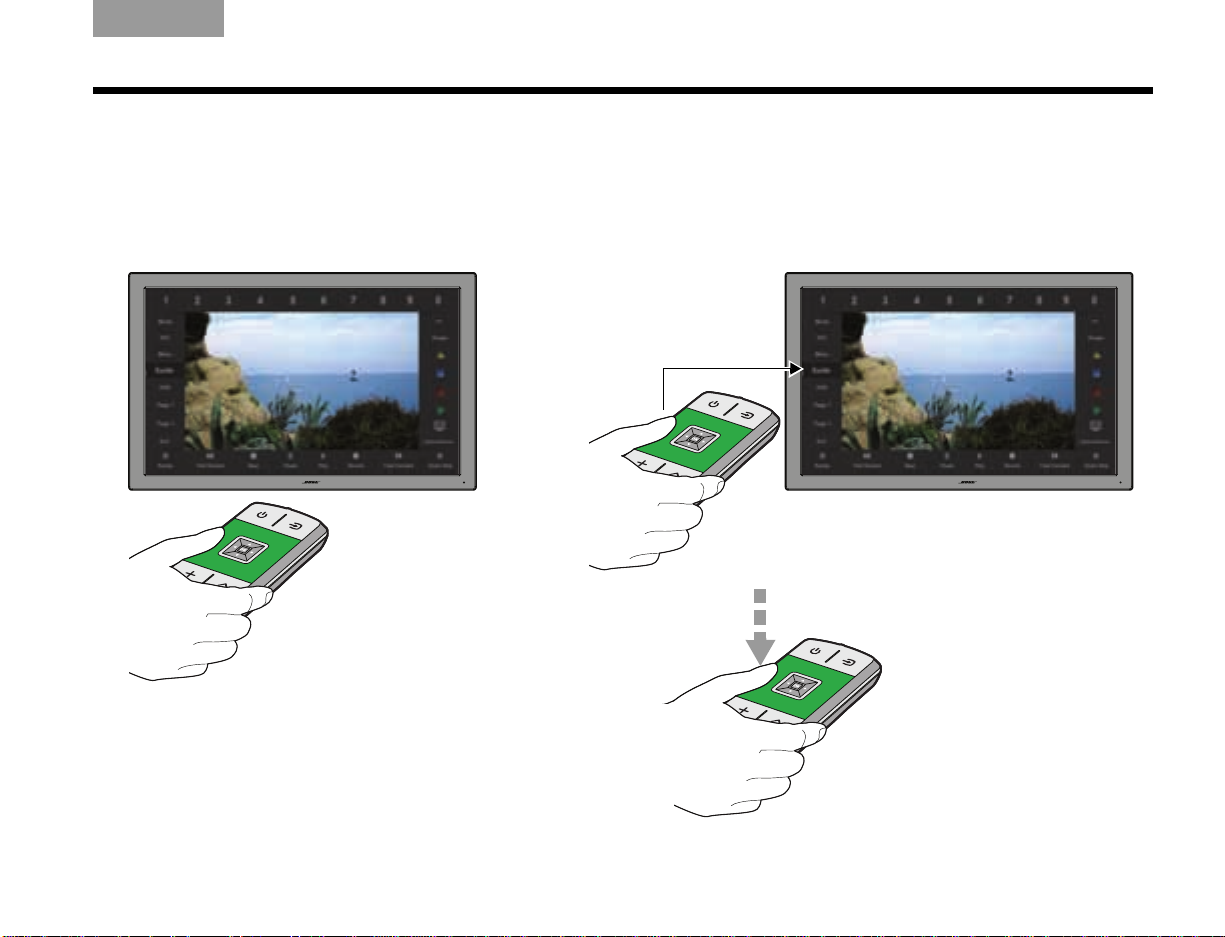
Click pad overview
1
TOUCH
Place your thumb on the click pad
to see the control frame.
2
GLIDE
Glide your thumb along the click
pad to highlight a control.
3
CLICK
Press down on the click pad
to select the highlighted
control.
TAB 5TAB 4TAB 6TAB 8TAB 7English TAB 3TAB 2
INTRODUCTION
9
Page 10

INTRODUCTION
EnglishTAB 6TAB 8 TAB 7 TAB 3TAB 5 TAB 2TAB 4
System updates
The Unify® intelligent integration system represents the
best way we know how to overcome the challenge of
trying to control external sources in a world where there
are no consistent industry standards for such control.
We believe that our approach is a vast improvement
over using multiple, complex remote controls.
However, in some cases, the system may be unable to
identify your particular source. For example, there may
be times when you need to perform a system update,
because you’ve purchased a new source with its own
non-standard remote control. Fortunately, we’ve made
the process easy, and it’s available for free from Bose.
Please see “Performing a system update” on page 34
for more information.
Registering your product
Registering your product enables you to receive
notifications of system software updates to keep your
product performing optimally.
Please follow the instructions on your product
registration card to register. Failure to register will not
affect your limited warranty rights or your eligibility to
obtain system software updates.
10
Page 11
TAB 5TAB 4TAB 6TAB 8TAB 7English TAB 3TAB 2
Power
BASIC SYSTEM OPERATION
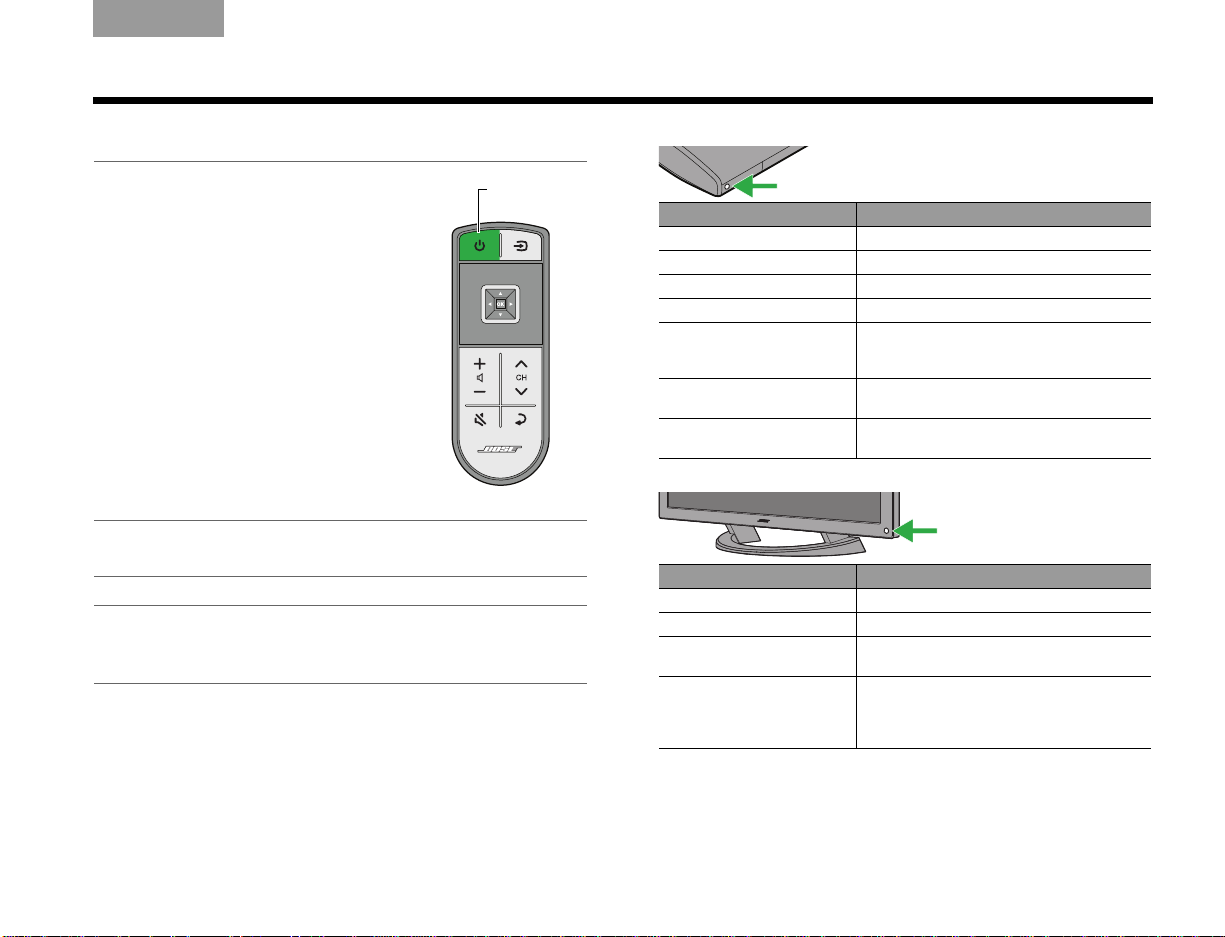
Turning the system on/off
Press the power button on
the remote to start the system.
When the system starts up, it also
automatically turns on your set-top
box (cable, satellite, etc.).
The state of the power light on the
control console and monitor
indicates the system status.
While the system starts up, the
monitor emits a start-up tone and
displays the Bose
progress bar under it.
Note: When you turn the system on, it will always select
and turn on your cable or satellite box.
Note: To keep energy consumption to a minimum, the
system operates in a very low power state when it is off.
This is why the system may take several seconds to start.
To turn off the system, including the connected
source, press the power button.
®
logo with a
Control console power light
Status Meaning
Red Off
Blinking green Starting up
Steady green On and ready to use
Orange Off and charging iPod
Blinking yellow for 30
seconds after shutting
system down
Slow blinking red while
system is off
Red blinking off every 5
seconds
®
system setup was started, but is
Unify
incomplete
Unify system setup is complete, but no
sources are present
Remote control batteries are low
Monitor power light
Status Meaning
Blinking green Starting up
Steady green Video muted (see page 18)
Slow blinking red Power removed from monitor but not
Slow blinking red to green
until power is restored
control console
System is shutting down in 10 seconds
due to an error. If the problem persists,
contact Bose. See the contact sheet
included with your system
11
Page 12
BASIC SYSTEM OPERATION
Source
Highlighted
source is the
selected
source
Satellite
Cable
Blu-ray
Source menu example
EnglishTAB 6TAB 8 TAB 7 TAB 3TAB 5 TAB 2TAB 4
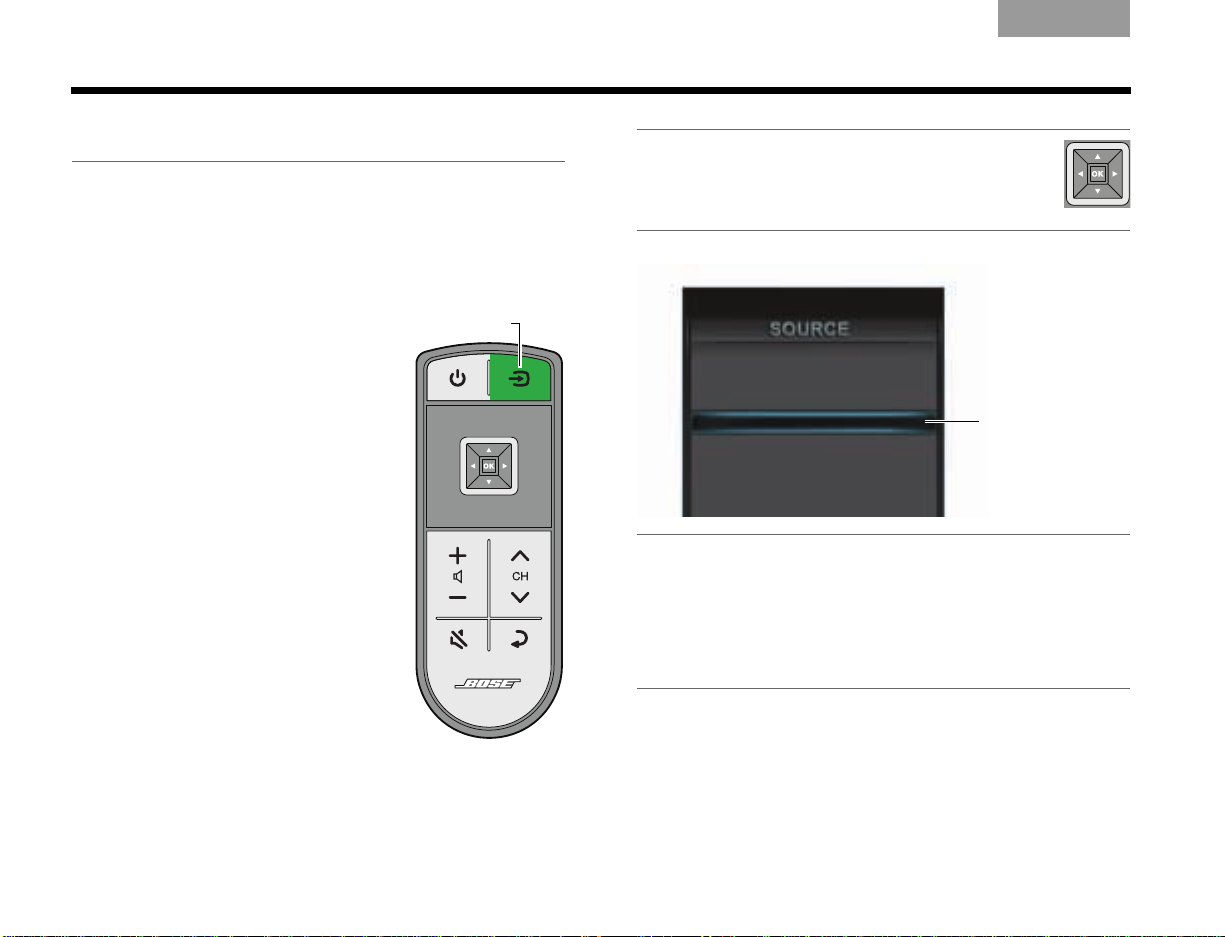
Selecting a source
From the SOURCE menu, you can select any of your
system sources (connected devices), such as a cable/
satellite set-top box, Blu-ray Disc™ player, DVR, DVD,
or CD player.
To select a source:
1. Press the Source button on
the remote control to display
the SOURCE menu.
The source that you last
selected is highlighted as
shown in the following example.
2. Continue pressing the Source
select button to move the
highlight down the list and
select the source you want.
Note: You can also move the highlight up and
down the list of sources using the up and down
navigation buttons. Pressing OK selects the
highlighted source.
Notes:
• The items listed in the SOURCE menu depend on
the types of sources you connected to your system
during setup.
• Your iPod must be docked for it to appear in the
SOURCE menu.
12
Page 13

TAB 5TAB 4TAB 6TAB 8TAB 7English TAB 3TAB 2
Volume
Mute
Channel
up/down
Last
BASIC SYSTEM OPERATION
Controlling the volume
Press volume plus (+)
or minus (–) to raise or
lower the volume.
Press the mute button
to suspend the system
audio. Press again
to restore.
Moving through channels
Press CH or CH to
move up or down
one channel.
Press the Last button to
move back and forth
between two channels.
For instructions on
moving to a specific
channel number, see
“Entering channel
numbers” on page 16.
13
Page 14

CONTROLLING YOUR SOURCES
Numbers for entering channel, DVD chapter, music track, or
disc number. See “Entering channel numbers” on page 16.*
Playback controls used for sources such
as DVR, DVD, CD, and MP3 players.*
Additional controls for
the selected source.*
Additional
controls for
the selected
source.*
Image view control (page 18).
Source and system options
menu (page 23) and Bose
Demonstration (page 24).
Source power on/off control.
*For more information on using these controls, refer to the owner’s guide that came with the source you have selected to use.
EnglishTAB 6TAB 8 TAB 7 TAB 3TAB 5 TAB 2TAB 4
Control frame overview
The control frame consists of functions or controls used
by the source you have selected. These replace the
buttons on the remote control that came with the source.
Note: The content of the control frame can be modified
for each source. See “Customizing the control frame” on
page 29.
14
Page 15

TAB 5TAB 4TAB 6TAB 8TAB 7English TAB 3TAB 2
Highlighted function
corresponds with your
thumb position on the
click pad
CONTROLLING YOUR SOURCES
Selecting source controls
1. Place your thumb anywhere on the click pad to
activate the control frame, which provides onscreen controls for the source you are using.
2. Glide your thumb along the click pad to highlight
the control you want.
3. Press down on the click pad to select the
highlighted control.
Note: When the control frame is activated, the picture is
resized to fit within the control frame.
15
Page 16

CONTROLLING YOUR SOURCES
Channel number
queue
EnglishTAB 6TAB 8 TAB 7 TAB 3TAB 5 TAB 2TAB 4
Entering channel numbers
The numbers along the top of the control frame appear
for any source that uses a keypad on an infrared (IR)
remote control. Although these controls are primarily
used for entering channel numbers for a set-top box,
you can use them to select chapter numbers for a DVD
player or track numbers for a CD player.
When you enter a number, it appears in a queue on the
screen. The number of digits the queue can hold is set
at the factory to a maximum of 3 digits. If your set-top
box requires a different number of digits for channel
numbers, you can change this in the Options menu
(page 25). For example, if you need to enter channel
numbers as high as 9999, you will need to change the
number of digits to 4. If your set-top box only goes up
to channel 99, then you should set the number of digits
to 2.
To enter a channel number:
1. Using the click pad remote, select the first digit of
the channel number.
The channel number queue appears on the screen
containing the first digit.
2. Select the remaining digits and add them to
the queue.
3. After selecting the last digit, wait for the queue to
shift the numbers to the left, indicating that they are
being sent to the source.
OR
Press the OK remote control button to send the
numbers immediately.
16
Page 17

TAB 5TAB 4TAB 6TAB 8TAB 7English TAB 3TAB 2
Navigation pad
Provides up, down, left, right movement
and select functions for navigating onscreen menus and program guides.
OK
Selects the highlighted item in
a guide or menu.
9:30 10:00 10:30 11:00 11:30
002
003
004
005
006
007
Major League BaseballNews
Seinfeld Seinfeld Simpsons Simpsons Everybody...
News
Late Show with David Lette...
Public programming
Animal Planet The Universe The Universe The Universe
Jailbreak Outside...
News
10:00pm to 1:00am:
Major League Baseball
Boston Red Sox at Oakland Athletics
Live
Example program guide
CONTROLLING YOUR SOURCES
Interacting with source guides
and menus
Many cable boxes, satellite receivers, and other
sources have a menu or program guide. You can
access this guide using the Guide control in the control
frame. Using the navigation pad on the remote, you can
select items in the menu or guide.
1. Select the Guide or Menu control in the control
frame. The selected function appears within the
control frame.
2. Lift your thumb off the click pad (the control frame
disappears) and use the navigation pad to move
the highlight to the on-screen item you want.
3. Press the OK button to select the item.
17
Page 18

SPECIAL FUNCTIONS
Press
and
hold
EnglishTAB 6TAB 8 TAB 7 TAB 3TAB 5 TAB 2TAB 4
Changing the image view
Select the image view control in the control
frame to display a menu of video formatting
choices. On the remote control, press the left
or right navigation button to highlight your choice.
The picture format will change momentarily after you
select a format.
Normal Does not modify the shape of
Auto-Wide Tries to make the video image
Stretch 1 Stretches video image evenly
Stretch 2 Stretches the edges of the
Zoom Enlarges the video image (press
Gray Bars Places vertical gray bars on the
the video image sent to your TV.
fill the entire width of your TV
screen without cropping any
content.
from the center.
video image while leaving the
center unmodified.
the up/down navigation buttons
to move the video up or down
on your screen).
left and right of a standard
definition video image.
Video muting
When you want to enjoy listening to music without
being distracted by video, or if you just want to
conserve energy, you can turn off the video screen.
To turn off the video screen,
press and hold the remote control
power button until the picture starts
to fade away.
While the screen is blank, the
monitor power light is steady green.
To turn on the video screen,
press and release the power button.
Note: When listening to audio
sources like iPod, the system will
automatically enter screen-saver
mode in order to prevent the risk of
screen burn-in. Press any button on
the click pad remote to restore
the picture.
18
Page 19

TAB 5TAB 4TAB 6TAB 8TAB 7English TAB 3TAB 2
USING THE iPOD SOURCE
Selecting the iPod source
1. Please be sure to dock your iPod. It will not appear
in the SOURCE menu until you dock it.
2. Press the source button on the remote and select
iPod. The iPod interface is displayed.
iPod interface
Your iPod menus and content appear on the left side of
your screen as shown in the following example. The
track you have selected appears on the right.
Controlling iPod
Use the click pad remote and the playback controls on
the control frame to operate your iPod.
Up one menu item
(press and hold to scroll quickly)
Remote
control
navigation
pad
OK Select
Page
Page
On-screen
control
frame
Down one menu item
(press and hold to scroll quickly)
Up one menu level (if playing video,
pause and return to menu)
Down one menu level (Select)
Up one page
Down one page
Play
Pause
Stop
Next track or audio bookmark
Previous track or audio bookmark
Fast forward
Fast rewind
Shuffle on/off
19
Page 20

CONTROL CONSOLE OVERVIEW
Power light
Indicates system status. Refer to “Control console
power light” on page 11.
Front A/V inputs
Used for temporarily connecting an audio/video device
such as a camcorder.
Right (R) audio channel (red)
Left (L) or mono audio channel (white)
Composite video (yellow)
Headphone output
Accepts stereo headphones with a 3.5 mm stereo
plug. Volume level is set by the volume buttons on
the remote control or control console.
Front USB input
Used for viewing photo files from a USB device or a digital
camera, and updating the system.
Front HDMI™ input
Used for temporarily connecting an HDMI device such as a
video camera.
Source Setup
Power
on/off
Source
selection
Mute/
unmute
Volume
down
Volume upUnify®
menu
(page 27)
Control buttons
1
3
5
6
2
1
2
3
4
5
6
4
Note: The click pad remote cannot be set up to control
devices connected to the front A/V or HDMI inputs.
EnglishTAB 6TAB 8 TAB 7 TAB 3TAB 5 TAB 2TAB 4
20
Page 21

TAB 5TAB 4TAB 6TAB 8TAB 7English TAB 3TAB 2
USING THE USB SOURCE
Viewing photos
Photo files in a .jpg or .jpeg format can be displayed
from a USB flash drive.
1. Plug the USB flash drive into the USB connector on
the front of the control console. It will not appear in
the SOURCE menu until it is plugged in.
2. Press the source button on the remote and select
USB. The USB interface is displayed.
USB interface
When selecting the USB source, folders appear at the
top of the list on the left followed by single image files.
Selecting a folder displays its contents.
Photo viewing controls
Use the click pad remote control and control frame
functions to access and view your photos.
Up one menu item
(press and hold to repeat)
Down one menu item
(press and hold to repeat)
Up one folder level, or exit and
Remote
control
OK
Page Up nine items
Page Down nine items
EXIT
On-screen
control
frame
return to browsing folders
(if viewing a slideshow)
Down one folder level
Down one folder level
(if a folder is highlighted), or
Play slideshow
(if a photo file is highlighted)
Exit slideshow and return to
browsing folders
Play slideshow of highlighted folder
Pause slideshow
Exit slideshow and return to
browsing folders
Next image
Previous image
21
Page 22

USING THE FRONT ANALOG A/V AND HDMI™ INPUTS
Analog A/V
For devices that
have composite
video and left/right
audio outputs.
HDMI
For devices that
have an HDMI
output.
Right (R) audio channel (red)
Left (L) or mono audio channel (white)
Composite video (yellow)
Connecting to the front analog
A/V inputs
The front analog A/V and HDMI inputs are provided
for temporarily connecting sources such as digital
and video cameras.
1. Plug the source into the analog A/V or HDMI
connector on the front of the control console. It will
not appear in the SOURCE menu until it is
plugged in.
2. Press the source button on the remote and select
A/V (Front) or HDMI (Front).
Controlling front A/V sources
The click pad remote cannot control a source
connected to either input. You need to use the controls
on the device itself or the remote that came with it.
EnglishTAB 6TAB 8 TAB 7 TAB 3TAB 5 TAB 2TAB 4
22
Page 23

TAB 5TAB 4TAB 6TAB 8TAB 7English TAB 3TAB 2
This section describes optional settings which affect operation
of the system and some sources that are connected to it.
Although factory settings have been selected to satisfy most
system owners, you can change them if you wish. The
instructions on the next two pages explain how to do this.
If you need help, please call Bose Customer Service. Refer to
the list of contact numbers included with your system.
CHANGING SOURCE AND SYSTEM OPTIONS
23
Page 24

CHANGING SOURCE AND SYSTEM OPTIONS
Highlighted
option
Selected
setting
Exit
Play Bose demonstration
Program Language
Select a track for language
Track 1
Channel Number
Control Frame Sounds
Video Settings
EnglishTAB 6TAB 8 TAB 7 TAB 3TAB 5 TAB 2TAB 4
Changing settings
The OPTIONS menu allows you to change
source-related and system settings. The items listed in
the menu will vary according to the source you
have selected.
1. Touch the click pad to activate the control frame.
2. Select OPTIONS on the lower right side to display
the menu.
The following is an example OPTIONS menu for an
A/V device.
3. Using the up/down navigation buttons, highlight
the option you want to change.
4. Using the left/right navigation buttons, change
the setting.
5. To exit the menu and save the changes, press the
OK button, or select “Exit Options” at the top or
bottom of the list.
Available settings
The following describes the settings that are available
for each option. The actual number of options
appearing in the menu may differ for each source.
The asterisk (*) indicates the factory setting.
Exit
Exits the menu and returns to normal viewing. This
function appears at the top and bottom of the menu.
Play Bose® demonstration
Plays the Bose audio/video demonstration. After
completion you are returned to the source
you were using.
24
Page 25

TAB 5TAB 4TAB 6TAB 8TAB 7English TAB 3TAB 2
CHANGING SOURCE AND SYSTEM OPTIONS
Program Language
Selects an alternate audio track, such as a Secondary
Audio Program (SAP), when it is available.
Track 1* ................ Selects track 1
Track 2 .................. Selects track 2
Both Tracks........... Selects tracks 1 and 2
Not Available......... Automatically selected when no alternate
track is available
Channel Number
Turns the channel number queue off or specifies the
maximum number of digits used for the source you
have selected. The size of the queue should be set to
hold the largest number used by the source.
2 digits .......Number sent after 2 digits entered (00 to 99)
3 digits*......Number sent after 3 digits entered (000 to 999)
4 digits .......Number sent after 4 digits entered (0000 to 9999)
Off..............Each digit sent immediately when selected
Control Frame Sounds
Provides audible feedback when you glide your thumb
along the click pad or select a highlighted function.
On*.................. Sound accompanies the movement of your
thumb on the click pad
Off...................No click pad sounds
*Factory setting
Video Settings
Provides video presets for dark, normal, and bright
ambient light conditions.
Dark Room ..... Optimized for very dark lighting conditions
Normal*........... Optimized for most lighting conditions
Bright.............. Optimized for very bright lighting conditions
*Factory setting
Basic video adjustments
The dark, normal, and bright room video presets were
optimized at the factory. However, if you choose to
make adjustments:
1. While “Video Settings” is highlighted, press and
hold the OK button on the remote to access the
basic video adjustments for the preset.
2. Use the up/down navigation buttons to select the
item. Use the left/right buttons to adjust the value.
3. Press OK to return to the OPTIONS menu.
Factory setting
Range Dark Normal Bright
Brightness 0 to 100 23 23 23
Contrast 0 to 100 64 64 64
Color 0 to 100 60 62 62
Tint 0 to 100 50 50 50
Video sharpness 1 to 3 2 2 2
Monitor backlight 0 to 10 3 5 8
Color temperature 1 to 3 3 3 3
25
Page 26

CHANGING SOURCE AND SYSTEM OPTIONS
EnglishTAB 6TAB 8 TAB 7 TAB 3TAB 5 TAB 2TAB 4
Gamma and color adjustments
Note: We recommend that these adjustments be made
by a qualified technician.
1. Access the basic video settings as previously
explained.
2. Press and hold OK again to toggle between the
basic video settings and the Gamma and color
settings.
3. Use the navigation buttons to adjust.
Factory setting
Range Dark Normal Bright
Gamma -3 to +3 0 0 0
Red gain 0 to 100 100 100 100
Green gain 0 to 100 100 100 100
Blue gain 0 to 100 100 100 100
Red cut 0 to 100 0 0 0
Green cut 0 to 100 0 0 0
Blue cut 0 to 100 0 0 0
Motion Smoothing
Provides an adjustable control to insure a smooth and
clear picture for sports and fast-moving action scenes.
None ...............No motion smoothing
Low .................Minimal motion smoothing
Default* ...........Normal motion smoothing
High.................Maximum motion smoothing
Note: Movies will appear to be more natural and lifelike
when motion smoothing is on. However, you can set
motion smoothing to None if you prefer to view films the
way the director intended them to appear.
Restore Original Settings
Returns all settings to factory values.
Automatic Off
Determines if the system automatically turns off after
4 hours of no user interaction (no remote control
button presses).
Enabled*................ 4-hour time-out is on
Disabled................ 4-hour time-out is off
Note:
The system will automatically turn off 15 minutes after you
no longer hear:
• Video and audio from a video source
or
• Audio from an audio source
The 4-hour Automatic Off setting does not affect
this function.
*Factory setting
26
Page 27

TAB 5TAB 4TAB 6TAB 8TAB 7English TAB 3TAB 2
CHANGING YOUR SYSTEM SETUP
Unify® system overview
The intelligent integration system guides you through
the initial process of setting up and configuring your
system. It helps you to choose the right cables and
inputs, and to program the click pad remote to operate
your connected devices.
After completing the initial setup, you can use the Unify
system at any time to change your system setup
and configuration.
Using the Unify menu
To access the Unify system:
1. Press the Setup button (page 20) on the front of the
control console to display the Unify menu.
2. Use the navigation buttons on the remote to highlight the function you want.
3. Press OK on the remote to activate the function.
4. When you are done, select “Exit Unify” at the
bottom of the menu.
Note: To exit the Unify menu at any time or cancel the
function you started to use, press the source select
button on the remote, or the Setup button on the
control console.
Unify system functions
Resume initial setup
This function is available only if the initial setup process
is not completed. Selecting this function returns you to
initial setup process at the last completed event.
Restart initial setup
This function is available only if the initial setup process
is not completed. Selecting this starts the initial setup
process from the beginning.
Language
This function allows you to change the language of the
on-screen information.
ADAPTiQ
Selecting ADAPTiQ runs the audio calibration process
that adjusts the system audio output for the best
performance in your room.
Play Bose® demonstration
Plays the Bose audio/video demonstration. After
completion you are returned to the Unify menu.
®
27
Page 28

CHANGING YOUR SYSTEM SETUP
EnglishTAB 6TAB 8 TAB 7 TAB 3TAB 5 TAB 2TAB 4
Source setup
A setup function will appear in the menu for each
connected device using the name assigned to it during
the initial setup process. For example, you might see
“Cable Setup,” “Satellite Setup,” or “DVD Setup.”
This function is available only after the initial setup
is completed.
This function allows you to:
• Change the name of a connected device
• Set up the remote control
• Manually enter remote control IR device codes
• Customize controls appearing in the control
frame (see “Customizing the control frame” on
page 29)
• Disable or enable automatic device power on/off
• Remove this device
• Add or change video or audio connections
Add a new device
This function guides you through the process of
connecting a new device to the system. It will help you
to choose the right cable and input, and to program the
click pad remote to operate the device. This function is
available only after the initial setup is completed.
Homewide
When your VideoWave® system is connected to another
Bose entertainment system as an expansion system,
this function allows you to change the room code.
Update
This function guides you through the process of
updating the software in your system. By using a
computer with an Internet connection, system software
updates from Bose can be downloaded to the USB
drive that is included with your system. Be sure to
carefully follow the instructions displayed on the
VideoWave monitor.
Teach mode
This function shows you how to program a third-party
learning remote to control your VideoWave system.
When in this mode, the VideoWave system transmits an
infrared (IR) code for each button pressed on the click
pad remote control. The third-party remote learns how
to control your system by recording these codes.
Follow the instructions displayed on the VideoWave
monitor. To exit this mode, press the Setup button on
the control console. This function is available only after
the initial setup is completed.
Exit Unify
Closes the menu and returns you to the last
source selected.
®
28
Page 29

TAB 5TAB 4TAB 6TAB 8TAB 7English TAB 3TAB 2
Selected device setup
Selected
control
Save - Saves the current settings
Cancel - Cancels changes made
Reset - Restores factory settings
Total number of controls you
can place on the left and right
sides of the control frame
Number of
controls you
selected
Controls counter:
CHANGING YOUR SYSTEM SETUP
Customizing the control frame
This function allows you to choose which controls you
want to see in the control frame for each source.
1. In the Unify
source you want to customize.
2. In the right-hand column, select Customize Control
Frame. The customizing menu will be displayed
(see the example below).
®
menu, select setup function for the
3. Using the navigation pad on the click pad remote,
select or remove controls for the selected device:
• Press or
to move across columns.
• Press and to select items in a column.
• Press OK to add or remove the checkmark next
to the control. A checkmark in the box adds the
control to the control frame.
4. Select Save to save the current settings.
29
Page 30

CHANGING YOUR SYSTEM SETUP
External
source
External
source
IR emitter
heads
IR
IR emitter
cable
Installing the IR emitter
In order to control external sources like a set-top box
or DVD player, the control console is designed to
transmit infrared (IR) signals to them. In some cases,
the sources may not reliably receive these signals,
resulting in inconsistent control. If this occurs, please
install the included IR emitter cable for one, two, or
three sources according to the following instructions.
1. Insert the plug on the IR emitter cable into the IR
connector on the control console.
2. Place each emitter head so the flat side is against
the front panel of each source.
3. Using the supplied adhesive pad, attach the
emitter head to the source.
EnglishTAB 6TAB 8 TAB 7 TAB 3TAB 5 TAB 2TAB 4
Note: You may need to change the position of each
IR emitter head to obtain reliable control of connected
sources.
30
Page 31

TAB 5TAB 4TAB 6TAB 8TAB 7English TAB 3TAB 2
CHANGING YOUR SYSTEM SETUP
Controlling the system using a
third-party remote
A third-party remote, such as your set-top box remote,
can be programmed to control your VideoWave
entertainment system.
Referring to the owner’s guide for your set-top box
remote, follow the instructions for programming the
remote to control a TV. When it is time to enter a device
code, enter “0000.”
Once programmed, the third-party remote should
control basic functions such as power on/off, volume,
and source input selection.
®
Third-party
remote function
TV power on/off
TV input
TV volume/mute
VideoWave system
function
31
Page 32

TROUBLESHOOTING
Troubleshooting table
Problem What to do
EnglishTAB 6TAB 8 TAB 7 TAB 3TAB 5 TAB 2TAB 4
The system is not responding
to initial operation of the click
pad remote
The Bose remote does not
control a device I connected to
the control console
System doesn’t do
anything
No sound
I hear a loud hum or buzz
coming from certain sources
• Press any remote key and watch the power light on the control console. It should blink with each press.
If not, see “Pairing the remote with the console” on page 33.
• Make sure the control console is turned on. Refer to the power light states on page 20.
• Make sure batteries are in the remote (see page 35).
• Reset the system. See “Resetting the system” on page 33.
• You may need to update your system. See “Performing a system update” on page 34.
• Install the IR emitter. Refer to “Installing the IR emitter” on page 30.
• Make sure the monitor and the power supply are fully plugged into a live AC (mains) outlet.
• Select a connected device from the SOURCE menu (refer to page 12).
• Pair the remote. See “Pairing the remote with the console” on page 33.
• Reset the system. See “Resetting the system” on page 33.
• Increase the volume.
• Check the input connections on the control console. Make sure you have selected the right source.
• Make sure the source you have selected is turned on.
• If using a coaxial or optical audio connection, make sure you have not made both types of connections to
the same input on the control console.
• Make sure the monitor cable is firmly plugged into the A/V OUT to Monitor connector on the
control console and the other end is firmly seated into the connector on the monitor. Refer to the setup
guide for details.
• Reset the system. See “Resetting the system” on page 33.
• Contact Bose® Customer Service to determine if and how other electrical devices in the room may be
creating unwanted signals, and to obtain possible remedies.
32
Page 33

Problem What to do
TAB 5TAB 4TAB 6TAB 8TAB 7English TAB 3TAB 2
TROUBLESHOOTING
Intermittent audio dropouts
heard on a coaxial digital audio
input
The quality of the video image
is not what I prefer
• Use the composite video cable included with your system for this coaxial digital audio connection.
Refer to “Source setup” on page 28.
• Use the OPTIONS menu to make adjustments. Refer to “Restore Original Settings” on page 26.
Note: When listening to audio sources like iPod, the
system will automatically enter screen-saver mode in
order to prevent the risk of screen burn-in. Press any
button on the click pad remote to restore the picture.
Pairing the remote with the console
1. Make sure your system is on. If not, press the
power button on the control console.
2. Hold the remote close to the control console.
3. Press and hold both the Mute button ( ) on the
control console and the OK button on the remote at
the same time for five seconds. The power light
blinks when pairing is complete.
4. Press any remote button and verify that the power
light on the control console blinks with each
button press.
Resetting the system
1. Press and hold the power button on the control
console for 5 seconds or until the power light on
the control console changes to red.
The power light on the control console changes to
red when the system shuts down.
2. Press and release the power button on the control
console to restart the system. The power light
changes to blinking green and then solid green
when the system is on and ready to use.
3. If you still cannot operate the system using the
remote, please follow the previous procedure to
pair the remote with the control console.
33
Page 34

TROUBLESHOOTING
Performing a system update
By using a computer with an Internet connection,
system software updates from Bose can be
downloaded to the USB drive that is included with
your system.
1. Press the Setup button on the front of the control
console to display the Unify
2. Using the remote navigation buttons, select Update.
3. Follow the instructions on the screen.
®
menu.
Contacting customer service
For additional help in solving problems, contact Bose®
Customer Service. See the address sheet included in
the carton.
EnglishTAB 6TAB 8 TAB 7 TAB 3TAB 5 TAB 2TAB 4
34
Page 35

TAB 5TAB 4TAB 6TAB 8TAB 7English TAB 3TAB 2
Battery compartment cover
AAA (IEC-LR3) batteries (2)
CARE AND MAINTENANCE
Replacing the batteries
A low-battery message appears on the monitor when
the remote batteries need replacing. When replacing
them, be sure to replace both batteries with new ones.
1. Remove the battery compartment cover and
remove the old batteries.
2. Install two new AAA (IEC-LR3) 1.5V batteries,
matching the polarity markings (+ and –) to the
markings inside the battery compartment.
3. Slide the battery cover back into place.
Cleaning
Be sure to adhere to the following instructions for
cleaning the outside surfaces of the product, especially
the monitor screen.
Cleaning the monitor screen
Before you start cleaning the screen, make sure you
have the recommended cleaning cloths and solutions.
Recommended cleaning cloths
A double-sided microfiber cloth is recommended for
cleaning the monitor screen. These are extremely soft,
non-abrasive, and non-electrostatic. Be sure to remove
any tags from the cloth before using it on the screen.
The tags are usually a different material that may
scratch surfaces of the screen.
Recommended cleaning solutions
Use a cleaning solution specifically made for cleaning
LCD screens. You can find these cleaning solutions
where electronic products are sold.
CAUTION:
• Use only cleaning solutions made specifically for cleaning monitors and monitor screens. Cleaning products
not made for monitors can scratch the LCD screen or
strip off the finish.
• DO NOT USE cleaning solutions that contain Acetone,
Isopropyl Alcohol (IPA), Ethyl Alcohol, Ethyl Acid,
Ammonia, or Methyl Chloride.
35
Page 36

CARE AND MAINTENANCE
EnglishTAB 6TAB 8 TAB 7 TAB 3TAB 5 TAB 2TAB 4
WARNING: To avoid the risk of electric shock, make sure
your hands are dry before unplugging your system from,
or plugging your system into, an electrical outlet.
CAUTION:
• When you clean your monitor, do not press down on the
LCD screen. Pressing down on the screen can scratch
or damage the display.
• Do not use paper towels or abrasive pads to clean the
monitor. Using these materials can scratch your LCD
screen.
• Do not spray any liquids directly onto the monitor screen
or cabinet. Spraying liquids directly onto the screen or
cabinet can cause damage. Always apply the cleaning
solution to a microfiber cleaning cloth first.
For a light cleaning
1. Turn the system off and disconnect the monitor
power cord from the wall receptacle.
2. Using as little pressure as possible, gently wipe the
surface of the monitor screen using a clean and dry
microfiber cloth.
Cleaning tough marks and smudges
1. Turn the system off and disconnect the monitor
power cord from the wall receptacle.
2. Spray a small amount of a non-abrasive cleaner on
a microfiber cloth.
3. Using as little pressure as possible, gently wipe the
surface of the monitor screen.
4. Wait until the monitor is completely dry before
plugging it in and starting the system up again.
Cleaning the product enclosures
• Wipe the product enclosures using ONLY a soft,
dry cloth.
• DO NOT use any solvents, chemicals, or sprays.
• DO NOT allow liquids to spill or objects to drop into
any openings.
• DO NOT blow compressed air into or vacuum
ventilation openings.
36
Page 37

TAB 5TAB 4TAB 6TAB 8TAB 7English TAB 3TAB 2
CARE AND MAINTENANCE
Limited warranty
Your Vid e oWa v e® entertainment system is covered by a limited
warranty. See your product registration card for details. Please be
sure to fill out the information section on the card and mail it to
Bose. Failure to do so will not affect your limited warranty.
To obtain limited warranty service
Contact Bose or your authorized Bose dealer.
Technical information
Remote control
Frequency: 2.4 GHz
Range: 33 ft. (10 m)
Control console power supply rating
AC input: 100-240V 50-60Hz, 0.5A (0,5A)
DC output: 12V 20W Max.
Monitor rating
AC input: 100-240V 50-60Hz 250W
Manufactured under license from Dolby
Laboratories. Dolby and the double-D symbol
are registered trademarks of Dolby Laboratories.
Manufactured under license under U.S.
Patent #’s: 5,956,647; 5,974,380; and 6,487,535
& other worldwide patents issued & pending.
DTS, the DTS Symbol and DTS+the DTS Symbol are registered
trademarks & the DTS logos are trademarks of DTS, Inc. Product
includes software. © 2010 DTS, Inc. All Rights Reserved.
Designed with UEI Technology™ Under License from Universal
Electronics Inc. ©UEI 2000-2010.
HDMI, the HDMI logo, and High-Definition Multimedia Interface
are trademarks or registered trademarks of HDMI Licensing LLC
in the United States and other countries.
iPhone, iPod, iPod classic, iPod nano, and iPod touch are
trademarks of Apple Inc., registered in the U.S. and other
countries.
Xbox is a trademark of Microsoft Corporation.
TiVo is a trademark of TiVo, Inc. or its subsidiaries.
Other trademarks are property of their respective owners.
37
Page 38

CARE AND MAINTENANCE
EnglishTAB 6TAB 8 TAB 7 TAB 3TAB 5 TAB 2TAB 4
“Made for iPod,” and “Made for
iPhone,” mean that an electronic
accessory has been designed to
connect specifically to iPod, or
iPhone, respectively, and has been
certified by the developer to meet Apple performance standards.
Apple is not responsible for the operation of this device or its
compliance with safety and regulatory standards. Please note
that the use of this accessory with iPod, or iPhone may affect
wireless performance.
Made for:
iPod touch (1st, 2nd, 3rd, and 4th generation)
iPod nano (3rd, 4th, 5th and 6th generation)
iPod classic
iPod with video
iPhone 4
iPhone 3GS
iPhone 3G
iPhone
Please complete and retain for your
records:
VIDEOWAVE model:
(on control console bottom panel) _______________________
Control console serial number
(on bottom panel): _____________________________________
Display Panel serial number
(under connector cover): _______________________________
Licensing information
This product contains one or more free or open source software
programs originating from third parties and distributed as part of
the STLinux software package. Visit www.stlinux.com/download
for further details. This free and open source software is subject
to the terms of the GNU General Public License, GNU Library/
Lesser General Public License, or other different and/or
additional copyright licenses, notices and disclaimers. To
understand your rights under these licenses, please refer to the
specific terms of the licenses, notices, and disclaimers, which are
provided to you in an electronic file, named “licenses.pdf,”
located within the product’s control console. To read this file, you
will need a computer with a USB port and a software program
that can view .pdf files. To download “licenses.pdf” from your
product’s control console:
1. Press and hold the Setup button on the front of the control
console to display the System Information screen.
2. Insert a USB drive (there should be one included in your system package) into the USB input on the front of the control
console.
3. Press the OK button on the remote control to copy the file to
the USB drive. This download process should be completed
within 30 seconds. You may then remove the USB drive.
4. To read the file “licenses.pdf,” plug the USB drive into a
computer with a USB port, navigate to the USB root directory,
and open “licenses.pdf” with a software program that can
view .pdf files.
To receive a copy of the source code for the open source
software programs included in this product, please mail your
written request to: Licensing Manager, Mailstop 6A2, Bose
Corporation, The Mountain, Framingham, MA 01701-9168. Bose
Corporation will distribute such source code to you on a disc for
a charge covering the cost of performing such distribution, such
as the cost of media, shipping, and handling. All of the above
referenced licenses, notices, and disclaimers are reproduced and
available with such source code. This offer is valid for a period of
three (3) years following the date of distribution of this product by
Bose Corporation.
38
Page 39

Product data logger
The VideoWave® system features a product data logger that
is designed to help Bose better understand product usage and
performance over time. The product data logger records certain
technical data and usage history, including but not limited to
volume levels, on/off data, user settings, source inputs,
temperature and power output, and setup data. We may use this
data to provide you with better service and support on your
VideoWave system and to improve product design in the future.
Special equipment is required to read the data stored by the
product data logger and such data can only be retrieved by Bose
if your VideoWave system is returned to Bose for service or as
returned merchandise. The product data logger does not collect
any personally identifiable information about you and does not
record title, genre or other information about the media content
you access while using your VideoWave system.
TAB 5TAB 4TAB 6TAB 8TAB 7English TAB 3TAB 2
CARE AND MAINTENANCE
39
Page 40

©2012 Bose Corporation, The Mountain,
Framingham, MA 01701-9168 USA
AM353022 Rev.01
 Loading...