


Owner’s Guide • Guía del propietario • Notice d’utilisation

Important Safety Instructions
Please read this owner’s guide carefully and save it for future reference.
Thelightningashwitharrowheadsymbolwithinanequilateraltrianglealertstheusertothepresenceofuninsulated,
dangerousvoltagewithinthesystemenclosurethatmaybeofsufcientmagnitudetoconstituteariskofelectricshock.
Theexclamationpointwithinanequilateraltrianglealertstheusertothepresenceofimportantoperatingandmaintenance
instructionsintheowner’sguide.
WARNINGS:
• Toreducetheriskofreorelectricshock,donotexposethisproducttorainormoisture.
• Donotexposethisapparatustodrippingorsplashing,anddonotplaceobjectslledwithliquids,suchasvases,onor
neartheapparatus.Aswithanyelectronicproducts,usecarenottospillliquidsintoanypartoftheproduct.Exposureto
liquidsmaycreateafailureand/orrehazard.
• ReplaceonlywithaAA(IECLR06)alkalinebattery(orbatteries).
• Donotplacenakedamesources,suchaslightedcandles,onorneartheproduct.
CAUTIONS:
• Donotmakeunauthorizedalterationstotheproduct;doingsomaycompromisesafety,regulatorycompliance,system
performance,andmayvoidthewarranty.
• Long-termexposuretoloudmusicmaycausehearingdamage.Itisbesttoavoidextremevolumewhenusing
headphones,especiallyforextendedperiods.
WARNING:Containssmallpartswhichmaybeachokinghazard.Notsuitableforchildrenunderage3.
WARNING: Thisproductcontainsmagneticmaterial.Contactyourphysicianifyouhavequestionsonwhetherthismight
affecttheoperationofyourimplantablemedicaldevice.
NOTES:
• Theproductlabelislocatedonthebottomoftheconsole.
• Wherethemainsplugorappliancecouplerisusedasthedisconnectdevice,suchdisconnectdeviceshallremain
readilyoperable.
• Thisproductmustbeusedindoors.Itisneitherdesignednortestedforuseoutdoors,inrecreationalvehicles,oronboats.
• Thespeakerwireandinterconnectcablesincludedwiththesystemarenotapprovedforin-wallinstallation.Pleasecheckyour
localbuildingcodesforthecorrecttypeofwireandcablerequiredforin-wallinstallation.
Important Safety Instructions
1. Readtheseinstructions.
2. Keeptheseinstructions.
3. Heedallwarnings.
4. Followallinstructions.
5. Donotusethisapparatusnearwater.
6. Cleanonlywithadrycloth.
7. Donotblockanyventilationopenings.Installinaccordancewiththemanufacturer’sinstructions.
8. Donotinstallnearanyheatsources,suchasradiators,heatregisters,stoves,orotherapparatus(includingampliers)that
produceheat.
9. Protectthepowersupplyorcordfrombeingwalkedonorpinched,particularlyatplugs,conveniencereceptacles,andthepoint
wheretheyexitfromtheapparatus.
10. Onlyuseattachments/accessoriesspeciedbythemanufacturer.
11. Unplugthisapparatusduringlightningstormsorwhenunusedforlongperiodsoftime.
12. Referallservicingtoqualiedservicepersonnel.Servicingisrequiredwhentheapparatushasbeendamagedinanyway:such
aspowersupplyorcordisdamaged;liquidhasbeenspilledorobjectshavefallenintotheapparatus;theapparatushasbeen
exposedtorainormoisture,doesnotoperatenormally,orhasbeendropped.
2 - English

Regulatory Information
Note: ThisequipmenthasbeentestedandfoundtocomplywiththelimitsforaClassBdigitaldevice,pursuanttoPart15ofthe
FCCRules.Theselimitsaredesignedtoprovidereasonableprotectionagainstharmfulinterferenceinaresidentialinstallation.Thisequipmentgenerates,uses,andcanradiateradiofrequencyenergyand,ifnotinstalledandusedinaccordance
withtheinstructions,maycauseharmfulinterferencetoradiocommunications.However,thereisnoguaranteethat
interferencewillnotoccurinaparticularinstallation.Ifthisequipmentdoescauseharmfulinterferencetoradioortelevision
reception,whichcanbedeterminedbyturningtheequipmentoffandon,theuserisencouragedtotrytocorrecttheinterferencebyoneormoreofthefollowingmeasures:
• Reorientorrelocatethereceivingantenna.
• Increasetheseparationbetweentheequipmentandreceiver.
• Connecttheequipmentintoanoutletonacircuitdifferentfromthattowhichthereceiverisconnected.
• Consultthedealeroranexperiencedradio/TVtechnicianforhelp.
ChangesormodicationsnotexpresslyapprovedbyBoseCorporationcouldvoidtheuser’sauthoritytooperatethisequipment.
Thisdevicecomplieswithpart15oftheFCCRulesandIndustryCanadalicense-exemptRSSstandard(s).Operationissubjectto
thefollowingtwoconditions:(1)Thisdevicemaynotcauseharmfulinterference,and(2)thisdevicemustacceptanyinterference
received,includinginterferencethatmaycauseundesiredoperation.
™
For SoundTouch
Thisequipmentshouldbeinstalledandoperatedwithaminimumdistanceof8in.(20cm)betweenthisdeviceandyourbody.
ThisClassBdigitalapparatuscomplieswithCanadianICES-003.
CANICES-3(B)/NMB-3(B)
ThisdevicecomplieswithFCCandIndustryCanadaRFradiationexposurelimitssetforthforgeneralpopulation.Itmustnotbe
co-locatedorbeoperatinginconjunctionwithanyotherantennasortransmitters.
wireless adapter:
Please dispose of used batteries properly,followinglocalregulations.Donotincinerate.
Thissymbolmeanstheproductmustnotbediscardedashouseholdwaste,andshouldbedeliveredtoanappropriate
collectionfacilityforrecycling.Properdisposalandrecyclinghelpsprotectnaturalresources,humanhealthandthe
environment.Formoreinformationondisposalandrecyclingofthisproduct,contactyourlocalmunicipality,disposal
service,ortheshopwhereyouboughtthisproduct.
BoseCorporationherebydeclaresthatthisproductisincompliancewiththeessentialrequirementsandother
relevantprovisionsofDirective1999/5/ECandallotherapplicable
EUdirectiverequirements.Thecompletedeclarationofconformitycanbefoundat:
www.Bose.com/compliance
Names and Contents of Toxic or Hazardous Substances or Elements
Toxic or Hazardous Substances and Elements
Lead
PartName
PCBs X O O O O O
Metalparts X O O O O O
Plasticparts O O O O O O
Speakers X O O O O O
Cables X O O O O O
ThistableispreparedinaccordancewiththeprovisionsofSJ/T11364.
O:Indicatesthatthistoxicorhazardoussubstancecontainedinallofthehomogeneousmaterialsforthispartisbelowthelimit
requirementofGB/T26572.
X:Indicatesthatthistoxicorhazardoussubstancecontainedinatleastoneofthehomogeneousmaterialsusedforthispartis
abovethelimitrequirementofGB/T26572
(Pb)
Mercury
(Hg)
Cadmium
(Cd)
Hexavalent
(CR(VI))
Polybrominated
Biphenyl (PBB)
Polybrominated
diphenylether (PBDE)
English - 3

Regulatory Information
Please complete and retain for your records:
Serial numbers can be found on the Acoustimass® module’s connector panel and on the packaging for the remote control.
Model number: ______________________________________________________________________
Module serial number: ________________________________________________________________
Remote serial number: ________________________________________________________________
Console serial number: ________________________________________________________________
Soundbar serial number: ______________________________________________________________
Purchase date: _______________________________________________________________________
We suggest you keep your receipt with this owner’s guide.
Date of manufacture
Thefourboldeddigitsintheserialnumberindicatethedateofmanufacture.Therstdigitistheyearof
manufacture;“5”is2005or2015.Digits2-4arethemonthanddate;“001”isJanuary1and“365”isDecember31.
China Importer:BoseElectronics(Shanghai)CompanyLimited,PartC,Plan9,No.353NorthRiyingRoad,China(Shanghai)
PilotFreeTradeZone
EU Importer: BoseGP,CastleblayneyRoad,Carrickmacross,Ireland
Taiwan Importer:BoseTaiwanBranch,Room905,9F,WorldwideHouse,131MinShengEastRd,Section3,Taipei,Taiwan,
105
AppStoreisaservicemarkofAppleInc.
Amazon,KindleandFirearetrademarksofAmazon.com,Inc.oritsafliates.
AndroidandGooglePlayaretrademarksofGoogleInc.
Blu-rayDisc
The Bluetooth
Corporationisunderlicense.
™
andBlu-ray™aretrademarksoftheBlu-rayDiscAssociation.
®
wordmarkandlogosareregisteredtrademarksownedbyBluetoothSIG,Inc.andanyuseofsuchmarksbyBose
ManufacturedunderlicensefromDolbyLaboratories.Dolbyandthedouble-DsymbolaretrademarksofDolby
Laboratories.
ForDTSpatents,seehttp://patents.dts.com.ManufacturedunderlicensefromDigitalTheaterSystems,INC.DTS,
theSymbol,&DTSandtheSymboltogetherareregisteredtrademarks,andDTSDigitalSurroundisatrademark
ofDTS,Inc.©DTS,Inc.AllRightsReserved.
ThetermsHDMIandHDMIHigh-DenitionMultimediaInterface,andtheHDMILogoaretrademarksorregistered
trademarksofHDMILicensingLLCintheUnitedStatesandothercountries.
iHeartRadioisaregisteredtrademarkofiHeartMedia,Inc.
ThisproductincorporatesSpotifysoftwarewhichissubjectto3rdpartylicensesfoundhere:
www.spotify.com/connect/third-party-licenses.
SpotifyisaregisteredtrademarkofSpotifyAB.
SoundTouchandthewirelessnotedesignaretrademarksofBoseCorporationintheU.S.andothercountries.
Wi-FiisaregisteredmarkoftheWi-FiAlliance.
©2015BoseCorporation.Nopartofthisworkmaybereproduced,modied,distributed,orotherwiseusedwithoutpriorwritten
permission.
4 - English

Contents
Introduction
About your SoundTouch™ 130 home theater system..................................................... 8
System Features ........................................................................................................... 8
SoundTouch™ ....................................................................................................................... 8
SoundTouch™ Features .............................................................................................. 8
Unpacking the system ......................................................................................................... 9
Placement guidelines .......................................................................................................... 10
Sample system placement ......................................................................................... 10
Setting Up the Acoustimass® Module
Attaching the rubber feet to the Acoustimass module ................................................ 11
Connecting the Acoustimass module to power ............................................................. 12
Setting Up the Console
Connecting the console to your TV ................................................................................... 13
Using the HDMI™ ARC connector ............................................................................... 13
TVs without an HDMI™ ARC connector ..................................................................... 14
Connecting the console to other sources ........................................................................ 14
Connecting to HDMI™ compatible sources .............................................................. 14
Connecting to non HDMI ™ compatible sources ..................................................... 15
Connecting to audio-only sources ............................................................................ 15
Connecting the SoundTouch™ wireless adapter ............................................................. 22
Setting Up the Soundbar
Connecting the soundbar ................................................................................................... 16
Attaching the optional extension feet to the soundbar ............................................... 17
Wall mounting the soundbar ............................................................................................. 17
Connecting the System to Power
Connecting the soundbar to power .................................................................................. 18
Connecting the console to power ...................................................................................... 18
Starting Up the System
Installing the remote control’s batteries ......................................................................... 19
Powering on the system and selecting your language ................................................. 19
Checking for sound ............................................................................................................... 20
English - 5

Contents
ADAPTiQ
Running the ADAPTiQ® audio calibration......................................................................... 21
Setting up SoundTouch™
Adding the system to your Wi-Fi® network...................................................................... 22
Using the System
Remote control buttons ...................................................................................................... 23
Programming the universal remote control ................................................................... 24
Source selection ................................................................................................................... 26
Universal source buttons and console connectors ........................................................ 26
Using the
Adjusting the volume .......................................................................................................... 28
Function buttons .................................................................................................................. 28
Programming a non-Bose remote control ....................................................................... 28
®
Add the system to an existing SoundTouch™ account ......................................... 22
Download and install the SoundTouch™ app .......................................................... 22
Connect the system to your home Wi-Fi® network ................................................ 22
Consumer Electronics Control ................................................................................... 24
Test your HDMI™-connected sources for CEC .......................................................... 24
Program the remote to control your source ............................................................ 25
Select a source connected to the Bose
Select a source connected to your TV ...................................................................... 26
button .................................................................................................. 27
SoundTouch™ ................................................................................................................ 27
Bluetooth® wireless technology ................................................................................ 27
SIDE AUX ........................................................................................................................ 27
®
system .................................................... 26
Using SoundTouch™
Accessing SoundTouch™ ..................................................................................................... 29
Using the SoundTouch™ app ...................................................................................... 29
Using the SoundTouch™ source................................................................................. 29
6 - English

Contents
Bluetooth
Pairing a Bluetooth® enabled device ................................................................................ 30
Connecting to a paired Bluetooth
Using the button ......................................................................................... 31
Using the Bluetooth
Getting System Information
Using the System menu ...................................................................................................... 32
Error messages ............................................................................................................. 33
Acoustimass
Care and Maintenance
Troubleshooting ................................................................................................................... 34
If your console cannot find the Acoustimass® module ......................................... 37
ADAPTiQ® audio calibration error messages ........................................................... 37
Factory reset the system ............................................................................................ 38
Reset a source button on the remote control ......................................................... 38
Service connectors on the Acoustimass® module ................................................. 38
Cleaning .................................................................................................................................. 39
Customer service .................................................................................................................. 39
Limited warranty .................................................................................................................. 39
Technical information .......................................................................................................... 39
®
®
enabled device ....................................................... 31
®
feature on the paired device ............................................... 31
®
module status indicator ........................................................................... 33
Appendix: Using a Computer for Setup
Important setup information ............................................................................................. 40
Using a desktop computer for setup ........................................................................ 40
Setting up the system using a computer ........................................................................ 40
English - 7

Introduction
About your SoundTouch™ 130
home theater system
The SoundTouch™ 130 home theater system provides Bose® quality
audio for video sources, SoundTouch
™
and Bluetooth® technology.
System Features
• Advanced Bose audio processing provides natural and lifelike sound.
• ADAPTiQ
®
audio calibration optimizes sound quality.
• Display provides access to system settings and information.
• HDMI
™
connectivity allows easy setup and ensures high-quality audio from your
connected sources.
• Supports Consumer Electronics Control (CEC).
• Programmable universal remote can control your TV, cable/satellite box and
other connected sources.
• Hideaway wireless Acoustimass
®
module provides impactful bass sound.
• Soundbar can be mounted on the wall (kit available separately).
• SoundTouch
™
wireless adapter enables SoundTouch™ and Bluetooth® on your
system.
SoundTouch™
SoundTouch™ provides clear, room-filling sound streamed wirelessly over your
home Wi-Fi network. If you have Wi-Fi
music in any room you want.
SoundTouch™ Features
• Enjoy wireless access to Internet radio, music services and your music library.
• Access your favorite music easily with your personalized Presets.
• Wireless setup using your smartphone or tablet.
• Works with your existing home Wi-Fi network.
• Stream music from Bluetooth
• Free SoundTouch
• Simply add additional systems at any time for a multi-room listening experience.
• Wide selection of Bose
any room.
™
app for your computer, smartphone, or tablet.
®
audio systems lets you choose the right solution for
®
at home, you’re ready to enjoy your favorite
®
enabled devices.
8 - English

Introduction
Unpacking the system
Carefully unpack the carton and confirm that the following parts are included:
Acoustimass® module Console
Acoustimass
power cord
Soundbar SoundTouch™ wireless
Universal remote control
Console
power cord
Soundbar
power cord
ADAPTiQ
HDMI™ cable Speaker cable USB cable
adapter series II
®
headset
Rubber feet
The appropriate power cords for your region are supplied.
Note: If part of the system is damaged, do not use it. Contact your authorized
®
Bose
dealer or Bose customer service. Refer to the contact sheet in
the carton.
English - 9

Introduction
Placement guidelines
To avoid wireless interference, keep other wireless equipment away from the
system. Place the system outside of and away from metal cabinets, away from
other audio/video components and away from direct heat sources.
Acoustimass®
module
Soundbar • Place the soundbar in front of your TV.
Console • Place the console near your TV. Do NOT place the TV on top of
SoundTouch
wireless adapter
™
Sample system placement
• Stand the Acoustimass module on its rubber feet along the same
wall as your TV, or along any other wall in the front third of the room.
• Choose a stable and level surface. Vibration can cause the
Acoustimass module to move, particularly on smooth surfaces like
marble, glass or highly polished wood.
• Make sure there is an AC (mains) outlet nearby.
• Do not place the soundbar inside a cabinet.
• Make sure there is an AC (mains) outlet nearby.
your console.
• Make sure there is an AC (mains) outlet nearby.
• Place the adapter 1 - 6 ft. (.3 - 1.8 m) away from the console,
Acoustimass module and other wireless devices to avoid wireless
interference.
10 - English

Setting Up the Acoustimass® Module
Attaching the rubber feet to the
Acoustimass module
Attach the rubber feet to the Acoustimass module to protect your floor.
1. Turn the Acoustimass module upside down onto a soft surface to protect it
from being damaged.
2. Attach the rubber feet to the bottom of the Acoustimass module.
Rubber foot
Bottom of Acoustimass module
3. Place the Acoustimass module on its feet.
Caution: Do not place the Acoustimass module on its front, back end, side or
top when in use.
4. Remove all protective films. These may affect acoustic performance if left
in place.
English - 11

Setting Up the Acoustimass® Module
Connecting the Acoustimass module
to power
1. Plug the power cord into the connector on the Acoustimass module.
2. Plug the power cord into an AC (mains) outlet.
12 - English

Setting Up the Console
Connecting the console to your TV
Use your TV’s HDMI connector labeled ARC or Audio Return Channel if available.
If your TV does not have an HDMI ARC connector, see page 14.
Using the HDMI™ ARC connector
Use the Bose® HDMI cable to connect the console to your TV.
1. Disconnect your HDMI connected sources, such as a cable/satellite box, DVD
or Blu-ray Disc
2. Insert one end of the Bose
3. Insert the other end of the HDMI cable into your TV’s HDMI connector.
™
player or game system, from your TV.
®
HDMI cable into the TV connector on the console.
English - 13

Setting Up the Console
TVs without an HDMI™ ARC connector
If your TV does not have an HDMI ARC connector, you may need to make a
secondary connection to the console with an optical, coaxial or analog stereo
audio cable. Without this secondary connection, you may not hear audio from the
®
Bose
system.
Use a secondary connection in the following configurations:
• You are using internal sources (such as Internet applications or an
over-the-air antenna).
• You are connecting sources to your TV.
Refer to your TV owner’s guide for more information.
Tip: If your TV has IN and OUT audio connector panels, use audio OUT for your
secondary connection.
Connecting the console to other sources
Connecting to HDMI™ compatible sources
You can connect the console to other sources, such as a cable/satellite box, DVD
or Blu-ray Disc
If your source is non HDMI compatible, see page 15 for configurations with
devices that do not support HDMI.
1. Insert one end of an HDMI cable into your source’s HDMI (OUT) connector.
2. Insert the other end of an HDMI cable into the appropriate HDMI connector on
the console. For example, to connect a game system, connect an HDMI cable
to the GAME connector.
™
player or game system with an HDMI cable (available separately).
Connect other sources to the
appropriate HDMI connector
on the console.
14 - English

Setting Up the Console
Connecting to non HDMI™ compatible sources
If your source is non HDMI compatible, connect it to your TV using audio and
video cables (available separately). Refer to your TV owner’s guide for more information.
Tip: If your source has IN and OUT audio connector panels, use audio OUT.
Connecting to audio-only sources
If your audio-only source, such as a media or CD player, is non HDMI compatible:
1. Connect your source to the console’s optical, coaxial, analog or SIDE AUX (
connector.
Note: You can use an optical, coaxial, analog or 3.5 mm audio cable
(available separately).
2. Set the optical, coaxial, analog or SIDE AUX input for the appropriate source.
You can access these settings using the System menu (see page 32).
Connecting the SoundTouch™
wireless adapter
Connect the adapter to the Bose® link connector on the console.
)
English - 15

Setting Up the Soundbar
Connecting the soundbar
1. Insert one end of the speaker cable into the Speaker Connection connector
on the console.
2. Insert the other end of the speaker cable into the connector on
the soundbar.
16 - English

Setting up the Soundbar
Attaching the optional extension feet
to the soundbar
Attach the optional extension feet to raise the soundbar to create
space underneath.
1. Turn the soundbar upside down onto a soft surface to protect it from being
damaged.
2. Attach the extension feet to the bottom of the soundbar.
3. Place the soundbar on its feet.
Wall mounting the soundbar
You can mount the soundbar on a wall. To purchase the WB-135 Wall Mount Kit,
contact your local Bose dealer or visit www.Bose.com
CAUTION: Do not use any other hardware to mount the soundbar.
English - 17

Connecting the System to Power
Connecting the soundbar to power
1. Plug the power cord into the connector on the soundbar.
2. Plug the power cord into an AC (mains) outlet.
Connecting the console to power
1. Plug the power cord into the Power connector on the console.
2. Plug the power cord into an AC (mains) outlet.
18 - English

Starting Up the System
Installing the remote control’s batteries
1. Slide open the battery compartment cover on the back of the remote control.
2. Insert the two provided AA (IEC-LR6) 1.5V batteries. Match the + and –
symbols on the batteries with the + and – markings inside the compartment.
3. Slide the battery compartment cover back into place.
Powering on your system and
selecting your language
1. Press on the remote.
The console powers on and 10 LANGUAGE
Note: After first time startup, the display defaults to your last used source.
appears on the display.
2. Press and to select your language.
3. Press
Tip: Look for the
language.
The system powers off after sixteen minutes of inactivity. You can disable AUTO
OFF using the System menu (see page 32).
.
icon in the System menu if you select the wrong
English - 19

Starting Up the System
Checking for sound
1. Power on your TV.
2. If you are using a cable/satellite box or other secondary source, power on
this source.
Tip: If your secondary source is connected to your TV, select the appropriate
TV input. You may need to use a different remote.
3. Power on the system.
4. Press the appropriate source button.
5. Check if sound is coming from the soundbar.
Note: If you do not hear sound from the soundbar, see “Troubleshooting” on
page 34.
6. Press
speakers.
Note: If you hear sound coming from your TV speakers, see “Troubleshooting”
on the remote control. Check that no sound is coming from the TV
on page 34.
20 - English

ADAPTiQ
Running the ADAPTiQ® audio calibration
The ADAPTiQ audio calibration customizes the sound of the system to the
acoustics of your listening area by taking five audio measurements. To perform
an audio calibration, you need 10 minutes when the room is quiet.
1. Put the ADAPTiQ headset on your head.
During the ADAPTiQ audio calibration, a microphone on the top of the
headset measures the sound characteristics of your room to determine
optimal sound quality.
2. Insert the ADAPTiQ headset cable into the connector on the console.
3. Press
4. Press
5. Press
6. Follow the voice prompts until the system completes the process.
Note: If you hear an error message and are unable to complete the ADAPTiQ
7. Unplug the ADAPTiQ headset from the console and store it in a safe place.
Note: If you move or mount the system or move any furniture, run the
on the remote control.
or until 14 ADAPTiQ appears on the display.
.
audio calibration, see page 37.
ADAPTiQ audio calibration again to ensure optimal sound quality.
®
English - 21

Setting up SoundTouch™
controller app
Adding the system to your Wi-Fi® network
You must download and install the SoundTouch™ app onto a smartphone or tablet
that is connected to your network. The app guides you through connecting the
system to your network.
Note: If you do not have a smartphone or tablet, you can use a computer for setup
(see page 40).
Add the system to an existing SoundTouch™ account
If you have already set up SoundTouch™ for another system, you do not need to
download the SoundTouch
1. On your smartphone or tablet, select
2. Select EXPLORE > SETTINGS > Systems > ADD SYSTEM to add
another system.
The app guides you through setup.
Download and install the SoundTouch™ app
If this is your first time setting up a SoundTouch™ system, you must install the app.
On your smartphone or tablet, download the SoundTouch
Bose® SoundTouchTM
™
app again.
to launch the app.
™
controller app.
• iOS users: download from the App Store
• Android
™
users: download from the Google Play™ store
• Amazon Kindle Fire users: download from the Amazon Appstore for Android
Connect the system to your home Wi-Fi® network
After you install the app, add the system to your network:
1. On your smartphone or tablet, select
The app guides you through connecting the system to your Wi-Fi
2. Follow the instructions in the app to complete setup, including creating a
SoundTouch
For more information on using SoundTouch
SoundTouch
22 - English
™
account, adding a music library and music services.
™
wireless adapter series II owner’s guide from the Bose website.
to launch the app.
®
network.
™
, see page 29 or download the

Using the System
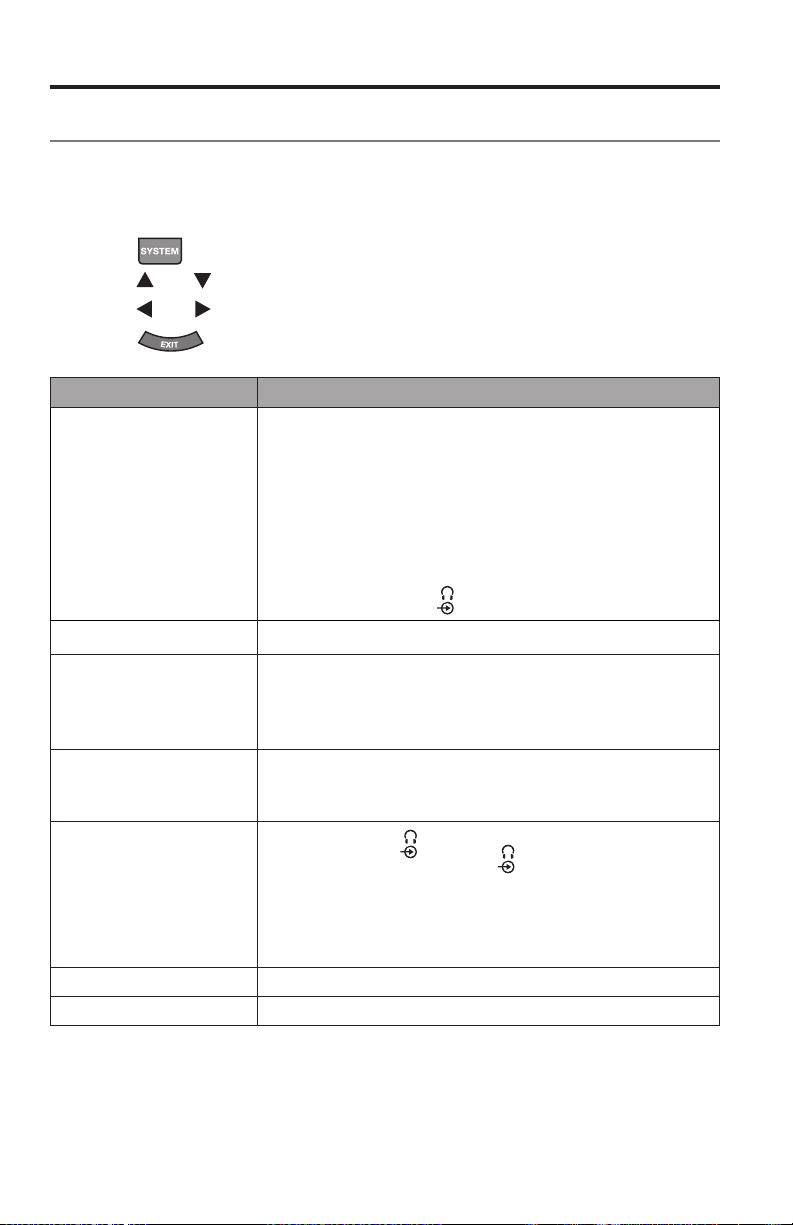
Remote control buttons
Use the remote to control sources connected to your system, adjust the system
volume, change channels, use playback functions, enable cable/satellite box
functions and navigate the System menu.
Toggles be-
tween SoundTouch™,
Bluetooth® and
Source selection
connector.
See page 27.
Selects a source
connected to
your TV
Navigation pad
Lists recorded
DVR programs
System menu
Powers on/off the
®
Bose
system
Powers on/off a
selected source
Displays the Internet
TV home page
Previous channel,
chapter or track
Playback
controls
Numeric keypad.
Numbers 1-6 can play
SoundTouch™ Presets.
TV aspect ratio
Closed captioning
Teletext mode
Function buttons
(see page 28)
English - 23

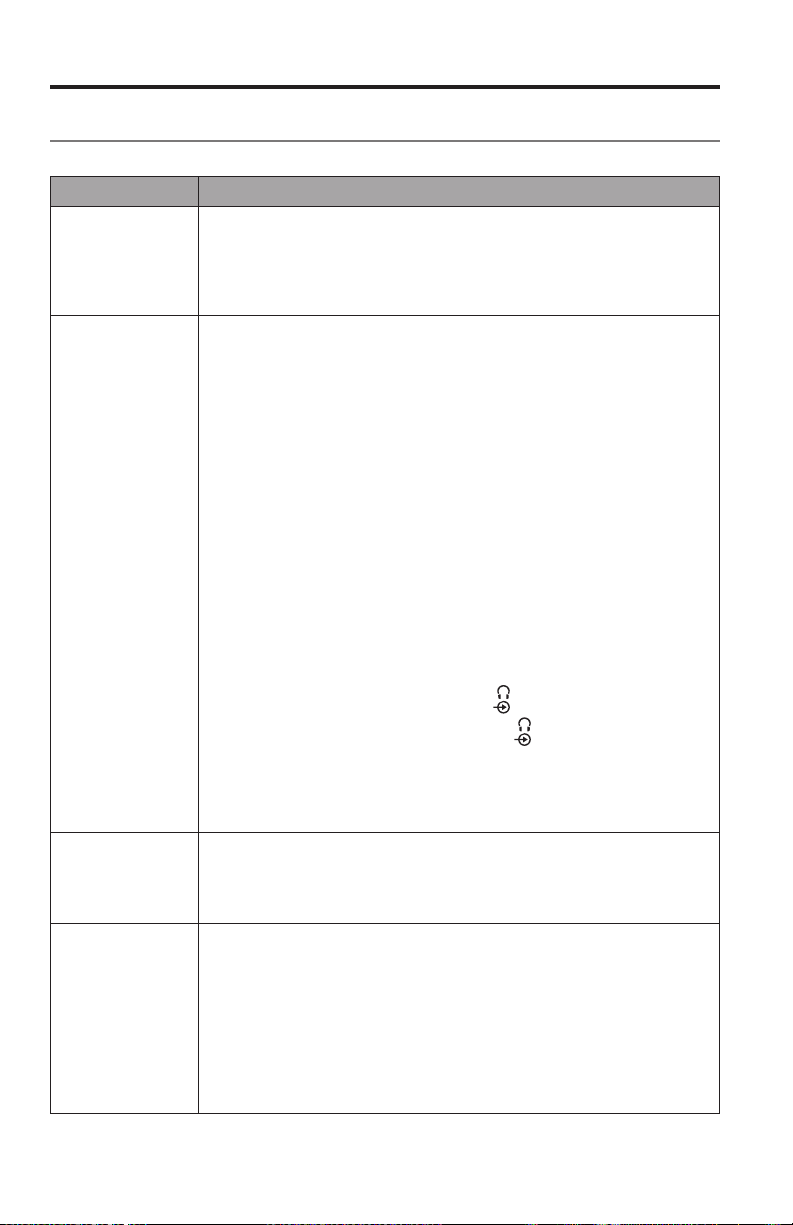
Using the System
Programming the universal remote control
You can use the remote to control your TV, cable/satellite box, DVD or
Blu-ray Disc
™
player, game system, DVR or other auxiliary source.
Consumer Electronics Control
The system supports Consumer Electronics Control (CEC). CEC allows you to
control multiple HDMI
can turn on/off CEC using the System menu (see page 32).
Your source may support CEC, but refer to it with a different name. Refer to your
source owner’s guide for more information.
Tip: You may need to use your source or TV’s system menu to enable CEC. Refer
to your source owner’s guide for more information.
™
-connected sources without programming the remote. You
CEC controls sources connected to
the console’s HDMI connectors.
Test your HDMI™ connected sources for CEC
If your sources successfully respond to their corresponding source buttons, you do
not have to program your remote.
Note: Your HDMI connected source may not support CEC. Refer to your source
owner’s guide for more information.
1. Power on the Bose
2. Press a variety of buttons that correspond with your source’s functions.
3. Press the
If your source does not perform one of the functions, program the remote
control (see page 25).
®
system, your TV, and the source you are testing.
button. The source powers off.
24 - English

Using the System
Program the remote to control your source
If your source does not support CEC, you can program the universal remote to
control your source, such as a TV, DVD/Blu-ray Disc
game system or DVR, by entering the code for your source’s brand. There may be
several codes for your source. You may need to perform this procedure multiple
times to locate the correct code.
Locate your source’s code
1. Power on your source.
2. Locate the code for your source’s brand in the Universal Remote Device
Codes book (provided).
Enter your source’s code
1. On the remote control, press and hold the appropriate source button until all
six source buttons glow, then release.
For example, to program your TV, press and hold
buttons glow, then release.
The appropriate source button continues to glow.
2. On the number keypad, enter the code for your source’s brand and press + on
the volume button.
Test your source’s code
1. Test your source for basic functions. Follow the instructions for your source:
• TV: press the channel buttons. Press
Press
• Cable/satellite box: press
Press
• DVD or Blu-ray Disc
Press
• Game system: press
2. Based on your source’s response to basic functions:
• Remote responds accurately: press
save your settings.
• Remote does not respond or does not respond accurately:
- If your source button glows: press + on the volume button to move to
- If your source button is off: your remote exited programming mode.
Note: Your source may not be compatible with IR universal remote controls. Refer
to your source’s owner’s guide for more information.
and to navigate.
. The programming guide appears.
and to navigate.
™
player: press . The settings menu appears.
and to navigate.
and to navigate through your menu.
the next code. Repeat steps 1-2 in “Test your source’s code”. You may
need to repeat this procedure 30 or more times. If all six buttons blink
three times, you have cycled through all codes for your source.
Repeat steps 1-2 in “Enter your source’s code” and steps 1-2 in “Test
your source’s code”.
™
player, cable/satellite box,
until all six source
. The settings menu appears.
to exit programming and
English - 25

Using the System
Source selection
You can switch between sources by pressing the appropriate source button on the
remote control. Before you begin, program the remote to control your source
(see page 24).
Select a source connected to the Bose® system
If your source is connected to the console and does not use CEC, follow this
procedure to set the console to the appropriate mode and turn on the source.
1. Power on the system.
2. Press the button for the source you want to control.
The source button glows.
3. Press
The source powers on.
Select a source connected to your TV
If your source is connected to your TV, follow this procedure to select the
appropriate TV input.
1. Power on the system, your TV and the appropriate source.
2. Press
You may need to press
the source.
On some TVs,
correct TV input and close this menu.
.
to select the correct input on your TV.
several times to select the TV input for
displays a menu. Use the remote control to choose the
Universal source buttons and
console connectors
The source buttons on your remote control correspond with the connectors on
the back of the console. For example,
™
HDMI
connector.
Your source buttons work with any source that is connected to the corresponding
connector. If you have a secondary DVD or Blu-ray Disc
the CBL-SAT connector, it can be programmed to work with
Note: Ensure you are using the remote code appropriate for the source rather than
the connection point when programming the remote.
26 - English
corresponds with the BD-DVD
™
player and connect it to
.

Using the System
Using the button
This multifunction button enables you to play music on your system.
• Access the SoundTouch
• Stream music from a connected Bluetooth
• Access the SIDE AUX connector
Press
to toggle between SoundTouch™ ( ), Bluetooth ( ), and the
™
source on your system
®
enabled device
SIDE AUX (
) connector.
SoundTouch™
You can control a subset of SoundTouch™ features on your system such as
playback controls and Presets. See “Using SoundTouch
™
” on page 29.
Bluetooth® wireless technology
Your system has Bluetooth wireless technology which lets you stream music from
Bluetooth enabled devices to your system. Your system stores eight previously
connected devices in its pairing list. See page 31.
SIDE AUX
The connector is a 3.5 mm connector located on the side of the console. When
set as a connector for an audio in source, the connector can be accessed through
the
See “5 SIDE AUX” on page 32 for information on how to change the connector
settings.
toggle.
English - 27

Using the System
Adjusting the volume
On the remote control:
• Press + to increase the volume.
• Press – to decrease the volume.
• Press
Note: If you hear sound coming from your TV, see “Troubleshooting” on page 34.
to mute or unmute the audio.
Function buttons
The red, green, yellow and blue buttons on the remote control correspond with the
color-coded function buttons on your cable/satellite box, Blu-Ray Disc
teletext functions.
• Cable/satellite box or Blu-Ray Disc
box owner’s guide.
• Teletext functions: correspond with color-coded page numbers, headings or
shortcuts on a teletext display.
™
player functions: refer to your cable/satellite
™
player or
Programming a non-Bose® remote control
You can program a non-Bose remote control, such as your cable/satellite box
remote, to control the system. Refer to your non-Bose remote control owner’s
guide or cable/satellite website for instructions.
Once programmed, the non-Bose remote controls basic functions such as power
on/off and volume.
28 - English

Accessing SoundTouch™
Using SoundTouch™
After you create a SoundTouch™ account, you are ready to enjoy SoundTouch™ on
your system. You can access SoundTouch
pressing
For more information on using SoundTouch
adapter series II owner’s guide.
on your remote control.
™
through the SoundTouch™ app or by
™
, download the SoundTouch™ wireless
Using the SoundTouch™ app
The SoundTouch™ app is a software application that enables you to set up and
control SoundTouch
your smart device acts as a rich remote for the SoundTouch
• Easily personalize Presets to your favorite music.
• Explore Internet radio, music services and your music library.
• Manage system settings.
™
from your smartphone, tablet, or computer. Using the app,
™
source.
Using the SoundTouch™ source
Once you have set up SoundTouch™, you can use the remote to control a subset of
features on your system:
• Personalize and play Presets using numbers 1-6 on the numeric keypad.
• Control playback (play, pause, stop, skip to the next track, etc.).
To start SoundTouch™:
Press on your remote.
A SOUNDTOUCH message appears on the display.
English - 29

Bluetooth
®
Pairing a Bluetooth® enabled device
Bluetooth® wireless technology enables you to stream music from Bluetooth
enabled smartphones, tablets, computers or other audio devices to your
SoundTouch
that are not part of your SoundTouch
or tablet.
Before you can stream music from a Bluetooth enabled device, you must pair the
device with your system.
1. On the remote control, press and release
message appears on the display.
™
system. You can even stream music from Bluetooth enabled devices
™
ecosystem, such as a guest’s smartphone
until a Bluetooth pairing
Note: Each time you press
SoundTouch
™
( ), Bluetooth ( ), and the connector.
the system toggles between
Make sure you see a Bluetooth pairing message on the display before you pair
your device.
2. On your Bluetooth
Tip: The Bluetooth feature is usually found in Settings. A gear icon (
®
enabled device, turn on the Bluetooth feature.
)
often represents Settings on the Home screen.
3. Select your SoundTouch™ system from the device list.
Once paired, your SoundTouch
™
system’s name appears connected in the
device list.
4. On the Bluetooth enabled device, play music to stream to your system.
If you cannot pair your device
You may need to clear the system’s Bluetooth pairing list (see “Troubleshooting” on
page 34 for more information). After you clear the list, try pairing again.
30 - English

Connecting to a paired Bluetooth®
enabled device
Bluetooth
®
You can stream audio from a Bluetooth® enabled device to your system. There are
two ways to stream audio from a paired device to your SoundTouch
If there are multiple devices stored in the system’s pairing list, it may take a minute
or two for the paired device to connect. Your system’s display indicates connection
status.
™
system.
Using the button
1. On the system’s remote control, press and release until a Bluetooth
connecting message appears on the display.
The system connects to the last device that streamed to your system.
2. On the device, play music.
Tip: If a paired device is connected, you do not need to press
.
If you cannot stream audio from a paired device
Your SoundTouch™ system may have lost connection to the device. Check the
system’s display. If the paired device is out of range of your system, move the
device within range.
Using the Bluetooth® feature on the paired device
1. On the Bluetooth enabled device, turn on the Bluetooth feature.
2. Select your SoundTouch
3. Once connected, on the Bluetooth enabled device, play music to stream to
your system.
™
system from the device list.
English - 31
Getting System Information
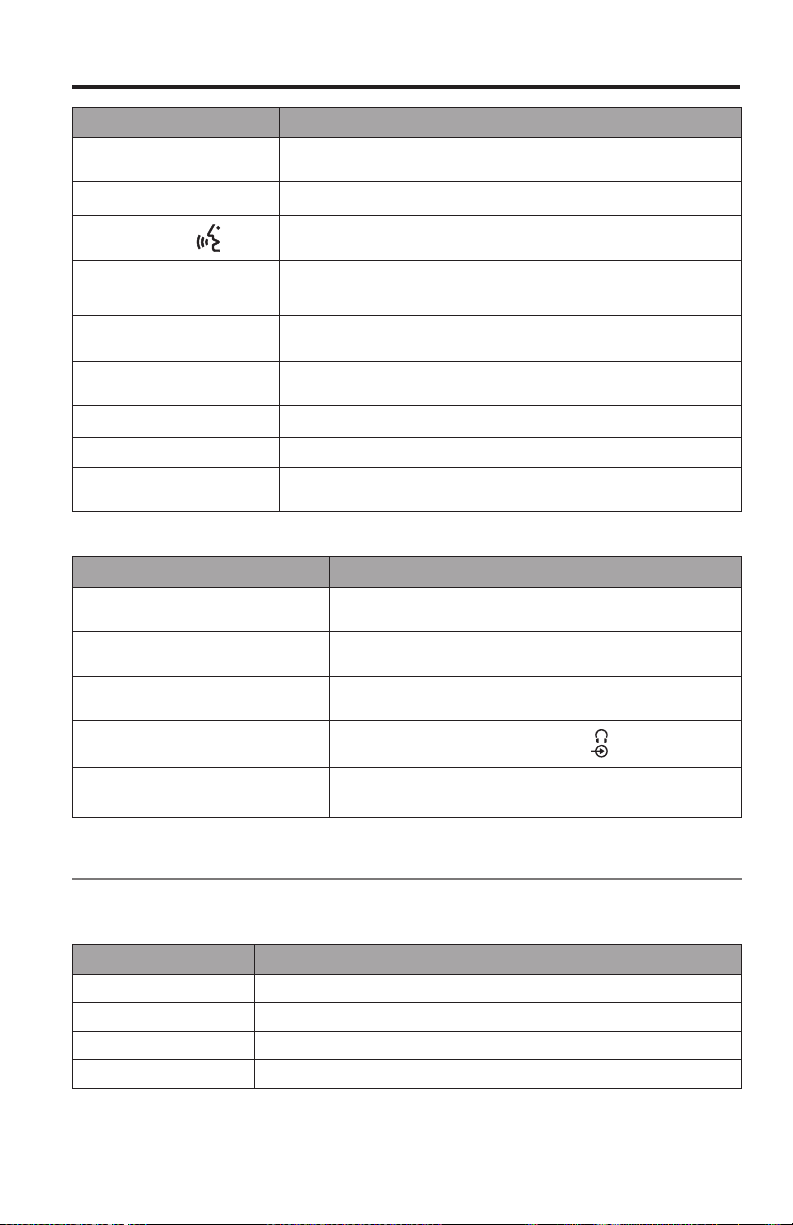
Using the System menu
Use the System menu to adjust audio levels, turn on/off features (such as
AUTO OFF), change the language, set the coaxial, analog and optical inputs for
a particular source, run the ADAPTiQ
module with the console or factory reset the system.
1. Press
2. Press
3. Press
4. Press
on the remote.
and to scroll through the System menu.
and to adjust the settings.
.
Display System state
1 AUDIO COMP
Off: (Default) No change to audio track.
Enhance dialogue: Increases the level of dialogue and sound
effects at low volume settings while
providing full audio impact at high volume settings.
Smart volume: Reduces the range of volume levels in a
movie soundtrack so the difference between extremely loud
outbursts and soft sounds is less noticeable.
Note: Enhance dialogue and smart volume features are not
®
audio calibration, pair your Acoustimass®
available for SoundTouch
connected to the connector.
™
, Bluetooth®, or devices
2 AUDIO/VIDEO SYNC
3 HDMI-CEC
4 AUTO OFF
5 SIDE AUX
6 BASS LEVEL
7 TREBLE LEVEL
32 - English
Adjusts the audio delay to synchronize audio and video.
Default On: (Default) Enables CEC (see page 24).
Alternate On: Prevents unintended source switching and may
fix CEC inconsistencies (see page 34).
Off: Disables CEC.
Enable: (Default) The system powers off after sixteen minutes
of inactivity (no sound coming from the system).
Disable: The system will not automatically power off.
Audio in: Sets the
Headphones: (Default) Sets the
phone output.
Note: If set to Headphones and a cable is connected, the
soundbar is muted.
Disconnect your headphones when not in use.
Adjusts bass level.
Adjusts treble level.
connector for an auxiliary source.
connector as a head-
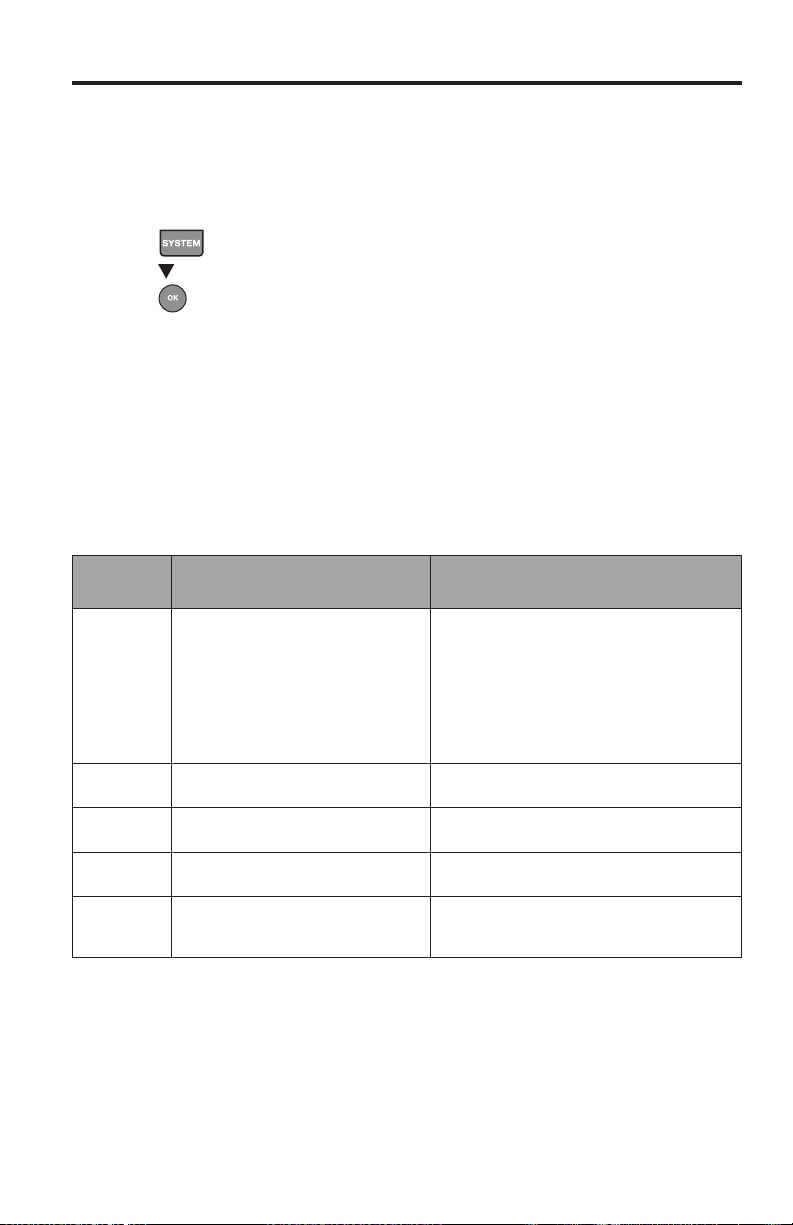
Display System state
8 CENTER LEVEL
9 SURROUND LEVEL
Increases or decreases the level of dialogue for movies and
TV.
NOT AVAILABLE.
Getting System Information
10 LANGUAGE
11 SET OPTICAL INPUT
12 SET COAXIAL INPUT
13 SET ANALOG INPUT
14 ADAPTIQ
15 PAIR ACOUSTIMASS
16 FACTORY RESET
Changes the language on the console and the ADAPTiQ audio
calibration.
Sets the optical connector to Auto/TV (Default),
CBL SAT, BD DVD, GAME or AUX source.
Sets the coaxial connector to Auto/TV (Default),
CBL SAT, BD DVD, GAME or AUX source.
Sets the analog connector to Auto/TV (Default),
CBL SAT, BD DVD, GAME or AUX source.
Starts the ADAPTiQ audio calibration process.
Reconnects the Acoustimass
Sets the System menu and the ADAPTiQ audio calibration to
the factory settings.
Error messages
Display System state
ERROR
Cannot find Acoustimass
ERROR
Cannot find soundbar
<SOURCE>
No signal
SIDE AUX
Nothing connected
ERROR
Call Bose
The Acoustimass
the console.
The soundbar is not connected to the console.
The source is not connected to the console, or the
source is connected to the console and powered off.
The source is not connected to the
the console.
Call Bose® customer service. Refer to the contact
sheet in the carton.
®
module to the system.
®
module is not connected to
connector on
Acoustimass® module status indicator
The status indicator on the back of the Acoustimass module provides information
on system activity.
Indicator activity Acoustimass module state
Amber Connected to the console.
Blinking amber Disconnected from the console.
Slow blinking amber Available to make a wireless connection to the console.
Red System error.
English - 33
Care and Maintenance
Troubleshooting
Problem What to do
No power • Secure the Acoustimass® module’s, soundbar’s and console’s
No sound • Unmute the system.
Sound is coming
from your TV
speakers
No or poor video • Switch to a different source, then return to the affected source to try
power cords.
• Reconnect the Acoustimass module’s, soundbar’s and console’s
power cords firmly into an AC (mains) outlet.
• Use the remote control to power on the system.
• Increase the volume.
• Plug the Acoustimass module, soundbar and console into a live AC
(mains) outlet.
• Insert the speaker cable into the Speaker Connections connector,
not the Bose® Link connector.
• Insert the HDMI™ cable into a connector on your TV labeled ARC
or Audio Return Channel. If your TV does not have an HDMI ARC
connector, use a secondary audio cable in addition to the HDMI
cable (see page 14).
• If using a secondary audio cable, insert the cable into a connector
on your TV labeled Output or OUT, not Input or IN.
• Secure all cable connections on the soundbar, TV and connected
sources.
• If your source is connected to your TV, select the correct TV input
(see page 26).
• Toggle CEC between Alternate On and Default On (see page 32).
• Disconnect headphones when not in use.
• If connecting your source through the connector, enable Audio in
using the System menu (see page 32).
• If you are connecting headphones to the connector, enable
Headphones using the System menu (see page 32).
• If you see the error message Cannot find Acoustimass, pair the
Acoustimass module with the console (see page 37).
• Reset the system (see page 37).
• Insert the HDMI cable into a connector on your TV labeled ARC or
Audio Return Channel (if available).
• Turn off your TV speakers (refer to your TV owner’s guide).
• Decrease your TV volume to its lowest setting.
and re-establish a signal.
• Disconnect and reconnect the HDMI cable of the affected source.
• Disconnect and reconnect the HDMI cable from the console to the
TV.
• Power off and on the affected source, TV and the console.
• If you assigned the optical, analog, or coaxial digital connector to
one of your HDMI
ing the system menu. See page 32.
™
sources, change it back to Auto/TV (Default) us-
34 - English

Care and Maintenance
Problem What to do
Remote control
is inconsistent or
does not work
System does not
sync with the
correct source /
selects the incorrect source after
delay (CEC)
CEC
inconsistent or
does not work
Poor or distorted
sound
Intermittent sound • Secure all cable connections on the soundbar, TV, and connected
• Match the + and – symbols on the batteries with the + and – markings inside the compartment (see page 19).
• Replace the battery (see page 19).
• Press the volume button on the remote control and see if the correct
source button flashes.
• Remove the protective film from the console.
• If using CEC:
- Point the remote control at the console.
- Use the Alternate On setting (see page 32).
- Disable CEC on your system (see page 32) and program the
remote to control your source (see page 24).
• If you have programmed the remote to control your source:
- Point the remote control at the appropriate source.
- Ensure you have entered the correct code for your source’s brand.
- Program the remote with another code (see page 24).
• Use the Alternate On setting (see page 32).
• Disable CEC on your source (refer to your source owner’s guide for
more information).
• Disable CEC on your system (see page 32) and program the
remote to control your source (see page 24).
• Use the Alternate On setting (see page 32).
• Disable CEC on your source (refer to your source owner’s guide for
more information).
• Disable CEC on your system (see page 32) and program the
remote control (see page 24).
• Remove all protective films from the system.
• Secure all cable connections on the soundbar, TV, and connected
sources.
• If you see the error message Cannot find Acoustimass:
®
- Plug in the Acoustimass
module.
- Pair the Acoustimass module with the console (see page 37).
• If using the analog or connector, decrease the volume on your
source.
• Factory reset the system (see page 37) and run the ADAPTiQ
®
audio calibration (see page 21).
sources.
• Move system away from potential interference, such as a wireless
router, cordless phone, television, microwave, etc.
• Toggle CEC between Alternate On and Default On (see page 32).
English - 35

Care and Maintenance
Problem What to do
Cannot complete
network setup
Cannot play
Bluetooth® audio
• Connect the system to AC (mains) power.
• Select correct network name and enter password.
• Connect the device and SoundTouch™ system to the same Wi-Fi®
network.
• Place the wireless adapter within range of the router.
• Enable Wi-Fi on the device (mobile or computer) you are
using for setup .
• If network name does not appear or is hidden, select
Manually Connect to Another Network on the
CONNECT TO HOME WI-FI NETWORK screen.
• Close other open applications.
• If using a computer for setup, check firewall settings to ensure that
the SoundTouch™ app and SoundTouch™ Music Server are allowed
programs.
• Test your Internet connection by loading www.SoundTouch.com
• Restart your mobile device, or computer, and router.
• Uninstall the app, reset the adapter, and restart setup.
On your system:
• Pair a device (page 30).
• Try pairing a different device.
• See “No sound”.
• Set up SoundTouch
• Clear the system’s pairing list using the SoundTouch™ app:
- Go to EXPLORE > SETTINGS > Systems and select your
SoundTouch™ system.
- Open the Bluetooth® item and clear the pairing list.
On your mobile device:
• Disable and re-enable the Bluetooth feature.
• Remove the system from the Bluetooth menu. Pair again.
• Refer to your Bluetooth enabled device’s documentation.
™
first, and perform all system updates.
36 - English
Care and Maintenance
If your console cannot find the Acoustimass® module
The Acoustimass module and console are paired at the factory. However, if you
see the error message Cannot find Acoustimass on the display, perform this
pairing procedure:
1. Unplug the Acoustimass module.
2. Press
3. Press
4. Press
Plug in Acoustimass appears on the display.
5. Plug the AC power cord into an AC (mains) outlet.
After the Acoustimass module connects to the console, Pairing complete
appears on the display.
Note: For alternate connection options due to excessive wireless interference,
ADAPTiQ® audio calibration error messages
Listen to the voice prompts for the following error messages:
Error
message
1 The microphone on the ADAPTiQ
2 The room is too loud. Restart the ADAPTiQ audio calibration
3 The ADAPTiQ headset is too
4 The listening locations are
5 The ADAPTiQ headset cannot
on the remote control.
until 15 PAIR ACOUSTIMASS appears on the display.
.
contact customer service.
Problem What to do
headset cannot detect sound.
close to the speakers.
too similar.
take measurements due to
movement.
• Secure all speaker cables.
• Ensure the microphone opening on the
top of ADAPTiQ headset is
not blocked.
• Your ADAPTiQ headset may be
damaged. Call Bose® customer service
for replacement parts. Refer to the
contact sheet in the carton.
when the room is quiet.
Move the ADAPTiQ headset farther away
from the speakers.
Move 1 - 2 ft. (.3 - .6 m) away from your
previous listening location.
Hold your head still.
After correcting your problem, you must restart the ADAPTiQ audio calibration
(see page 21).
If you hear a different error message, call Bose customer service for further
instructions. Refer to the contact sheet in the carton.
English - 37
Care and Maintenance
Factory reset the system
To troubleshoot problems, reset the System menu and the ADAPTiQ® audio
calibration to the factory settings.
1. Press
2. Press
3. Press 5.
The system resets.
4. Run the ADAPTiQ audio calibration
Reset a source button on the remote control
If you are experiencing problems with a source button on the remote control, reset
the source button to the factory settings.
After performing this procedure, your source button is in CEC mode.
1. On the remote control, press and hold the appropriate source button until all
six source buttons glow, then release.
Only the appropriate source button glows.
2. On the number keypad, enter 0140.
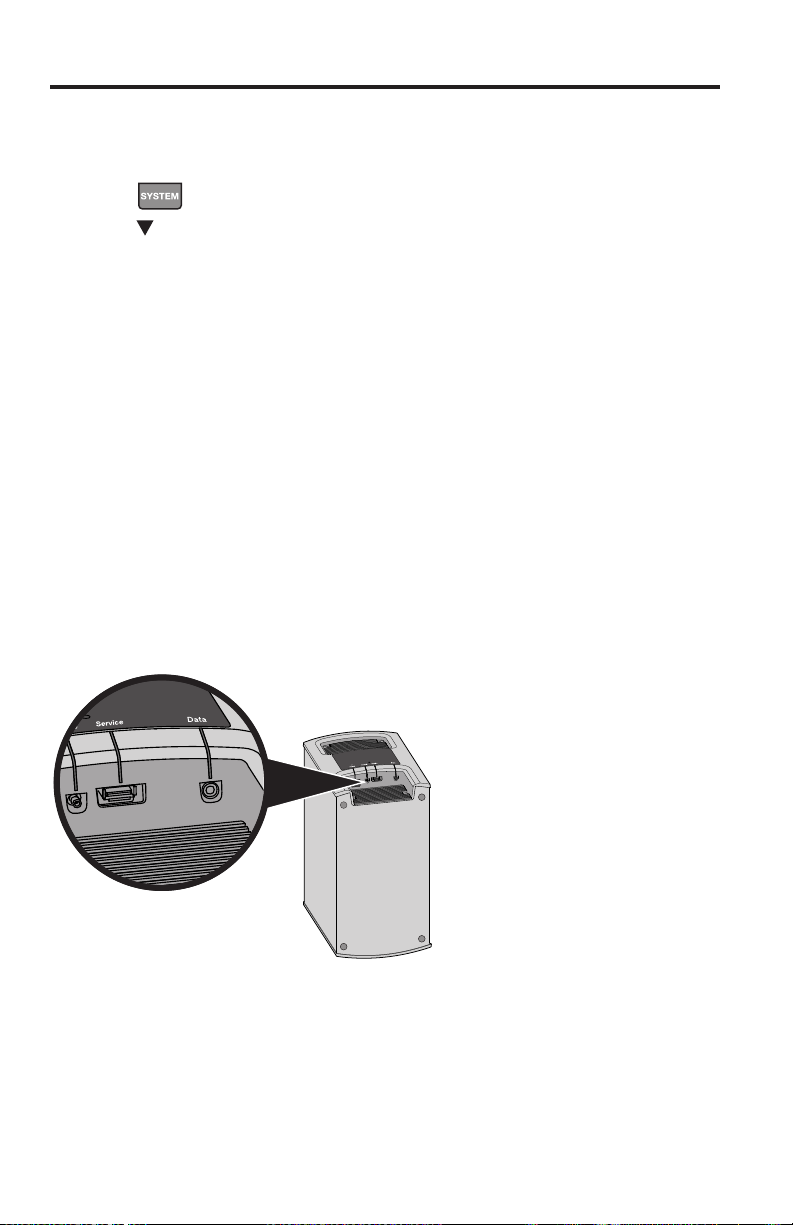
Service connectors on the Acoustimass® module
The Service and Data connectors are for service use only. Do not insert any cables
into these connectors.
on the remote control.
until 16 FACTORY RESET appears on the display.
(see page 21).
38 - English

Care and Maintenance
Cleaning
• Clean the surface of the system with a soft, dry cloth.
• Do not use any sprays near the system. Do not use any solvents, chemicals, or
cleaning solutions containing alcohol, ammonia or abrasives.
• Do not allow liquids to spill into any openings.
Customer service
For additional help using the system:
• Visit SoundTouch.com
• Contact Bose
®
Customer Service. Refer to the contact sheet in the carton.
Limited warranty
Your system is covered by a limited warranty. Details of the limited warranty are
provided on the product registration card that is in the carton. Please refer to the
card for instructions on how to register. Failure to register will not affect your limited
warranty rights.
The warranty information provided with this product does not apply in Australia
and New Zealand. See our website at www.Bose.com.au/warranty or
www.Bose.co.nz/warranty for details of the Australia and New Zealand warranty.
Technical information
Acoustimass® module
Power rating: 100-240V
Console
Power rating: 100-240V
Soundbar
Power rating: 100-240V
50/60Hz 150W
50/60Hz 60W
50/60Hz 60W
English - 39

Appendix: Using a Computer for Setup
Important setup information
• You can set up your system using a computer rather than a smartphone
or tablet.
• Use a computer that is on your Wi-Fi
• Use a computer where your music library is stored.
• You need the provided USB cable.
• Do not connect the USB cable until the app instructs you to connect the cable.
*
The SETUP A USB connector on the back of the system is for computer setup only. The USB
connectors are not designed to charge smartphones, tablets, or similar devices.
®
network.
*
Using a desktop computer for setup
If you are using a desktop computer, move the console and SoundTouch™
wireless adapter near the computer to set up your system. During setup,
the app prompts you to connect the USB cable from the computer to the
wireless adapter (temporarily).
After setup, disconnect the USB cable and the console from your computer and
from AC (mains power) and move the system to its permanent location.
Setting up the system using a computer
1. On your computer, open a browser and go to:
SoundTouch.com/app
Tip: Use the computer where your music library is stored.
2. Download and run the SoundTouch
3. Connect the system to your home network (see page 21).
The app guides you through setup.
™
app.
40 - English

English - 41

Instrucciones importantes de seguridad
Lea atentamente esta guía del propietario y consérvela para consultarla
en el futuro.
El símbolo de relámpago con punta de flecha dentro de un triángulo equilátero alerta al usuario acerca de la presencia de
tensión peligrosa no aislada dentro de la carcasa del sistema que puede ser de una magnitud suficiente para constituir un
riesgo de descarga eléctrica.
El signo de exclamación dentro de un triángulo equilátero alerta al usuario de la presencia de instrucciones operativas y de
mantenimiento importantes en la guía del propietario.
ADVERTENCIAS:
• Para reducir el riesgo de incendio o de choque eléctrico, no exponga este producto a la lluvia ni a la humedad.
• No exponga el aparato a goteos o salpicaduras, no coloque encima, ni cerca del aparato, objetos llenos con líquido como
jarrones. Al igual que con los productos electrónicos, tenga cuidado de no derramar líquidos en sobre ninguna pieza del
producto. La exposición a líquidos puede crear una falla o un peligro de incendio.
• Solo use una batería alcalina AA (IEC LR06)
• No coloque fuentes de llama al descubierto, como velas encendidas, cerca o sobre el producto.
PRECAUCIONES:
• No realice alteraciones no autorizadas al producto; al hacerlo puede comprometer la seguridad, el cumplimiento de las
normas, el rendimiento del sistema y puede invalidar la garantía.
• La exposición a largo plazo a música fuerte puede causar daños en la audición. Se recomienda evitar el uso de los
auriculares a un volumen extremo, especialmente durante largos períodos.
ADVERTENCIA: Contiene piezas pequeñas que pueden representar un peligro de asfixia. No es indicado para niños de
menos de tres años de edad.
ADVERTENCIA: Este producto contiene material magnético. Póngase en contacto con su médico si tiene preguntas
acerca de si esto podría afectar el funcionamiento de un dispositivo médico implantable.
NOTAS:
• La etiqueta del producto se encuentra en la parte inferior de la consola.
• Si se utiliza la clavija de conexión de red o el acoplador del artefacto como el dispositivo de desconexión, dicho dispositivo de
desconexión deberá permanecer listo para funcionar.
• Este producto se debe utilizar en interiores. No está diseñado ni probado para su uso al aire libre, en vehículos recreacionales o
en embarcaciones.
• El cable del altavoz y los cables de interconexión que se incluyen con el sistema no están aprobados para instalaciones en
pared. Consulte los códigos de edificación local para el tipo correcto de cables que se necesitan para las instalaciones en pared.
Instrucciones importantes de seguridad
1. Lea estas instrucciones.
2. Conserve estas instrucciones.
3. Tenga en cuenta las advertencias.
4. Siga todas las instrucciones.
5. No use este aparato cerca del agua.
6. Límpielo solamente con un paño seco.
7. No bloquee ninguna abertura de ventilación. Realice la instalación conforme a las instrucciones del fabricante.
8. No lo instale cerca de fuentes de calor como radiadores, rejillas de calefacción, estufas u otros aparatos (incluidos
amplificadores) que emanen calor.
9. Proteja la fuente o el cable de alimentación de forma que nadie lo pise o lo perfore, especialmente en enchufes, receptáculos
de tomas múltiples y en el punto donde salen del dispositivo.
10. Use solamente los accesorios especificados por el fabricante.
11. Desenchufe este aparato durante tormentas eléctricas o cuando no lo utilice durante períodos de tiempo prolongados.
12. Derive todas las tareas de servicio a personal de servicio calificado. Se requieren tareas de servicio cuando el aparato se haya
dañado de alguna manera, por ejemplo si se dañó el cable o la fuente de alimentación, si se derramó líquido o si cayeron
objetos dentro del aparato, el aparato estuvo expuesto a la lluvia o la humedad, no funciona normalmente, o se ha caído.
2 - Español

Información regulatoria
Nota: Este equipo ha sido sometido a prueba y se ha comprobado que cumple con los límites de un dispositivo digital Clase
B, conforme a la Parte 15 de las reglas de la FCC. Estos límites están diseñados para ofrecer una protección razonable
contra la interferencia perjudicial en una instalación domiciliaria. Este equipo genera, usa y puede irradiar energía de
radiofrecuencia y, si no se instala y se usa conforme a las instrucciones, puede causar una interferencia perjudicial a
las comunicaciones de radio. Sin embargo, no se garantiza que la interferencia no se produzca en una instalación en
particular. Si este equipo no causa interferencia perjudicial para la recepción de radio o televisión, que se puede determinar
al apagar y encender el equipo, se le aconseja al usuario intentar corregir la interferencia mediante una o más de las
siguientes medidas:
• Reoriente o reubique la antena receptora.
• Aumente la separación entre el equipo y el receptor.
• Conecte el equipo a una toma de corriente en un circuito diferente del cual el receptor está conectado.
• Consulte con el distribuidor o con un técnico en radio o televisión experimentado para obtener ayuda.
Los cambios o las modificaciones no aprobadas expresamente por Bose Corporation podrían invalidar la autoridad del usuario para
operar el equipo.
Este dispositivo cumple con la parte 15 de las reglas de la FCC y con las normas RSS sin licencia de la industria canadiense.
El funcionamiento está sujeto a las dos condiciones siguientes: (1) Es posible que este dispositivo no cause una interferencia
perjudicial y (2) este dispositivo debe aceptar cualquier interferencia recibida, incluida la interferencia que puede causar un
funcionamiento no deseado.
™
Para el adaptador inalámbrico SoundTouch
Este equipo debe instalarse y operarse a una distancia mínima de 20 cm (8 pulg.) entre el dispositivo y su cuerpo.
Este aparato digital Clase B cumple con las normas canadienses ICES-003.
CAN ICES-3 (B) / NMB-3 (B)
Este dispositivo cumple con los límites de exposición a la radiación de RF de la FCC y de la industria canadienses establecidos
para la población en general. No se lo debe coubicar ni operar conjuntamente con ninguna otra antena o transmisor.
Deseche las baterías usadas correctamente, cumpliendo con las reglamentaciones locales. No incinere.
Este símbolo significa que el producto no debe desecharse como residuo domiciliario y que debe entregarse a un centro
de recolección apropiado para reciclaje. La eliminación y el reciclado adecuados ayudan a proteger los recursos
naturales, la salud de las personas y el medioambiente. Para obtener más información sobre la eliminación y
el reciclado de este producto, póngase en contacto con su municipio, el servicio de administración de residuos o
el comercio donde compró este producto.
:
Por la presente, Bose Corporation declara que este producto cumple con los requisitos esenciales y con otras
cláusulas relevantes de la Directiva 1999/5/EC y con todos los demás requisitos de directivas correspondientes de
la UE. Puede encontrar la declaración completa de conformidad en www.Bose.com/compliance
Nombres y contenidos de las sustancias o elementos tóxicos o peligrosos
Sustancias y elementos tóxicos o peligrosos
Nombre de parte
PCB X O O O O O
Partes metálicas X O O O O O
Partes plásticas O O O O O O
Altavoces X O O O O O
Cables X O O O O O
Esta tabla está preparada conforme a las cláusulas de SJ/T 11364.
O: Indica que esta sustancia tóxica o peligrosa que está presente en todos los materiales homogéneos de esta parte se
encuentra por debajo del requisito de límite en GB/T 26572.
X: Indica que esta sustancia tóxica o peligrosa que está presente en al menos uno de los materiales homogéneos utilizados
para esta parte se encuentra por encima del requisito de límite en GB/T 26572
Plomo
(pb)
Mercurio
(Hg)
Cadmio
(Cd)
Hexavalente
Bifenilo
polibromado
(PBB)
Difeniléter
polibromado
(PBDE)
Español - 3

Información regulatoria
Complete y conserve para su registro:
Los números de serie se pueden encontrar en el panel del conector del módulo Acoustimass® y
en la caja del control remoto.
Número de modelo: __________________________________________________________________
Número de serie de módulo: ___________________________________________________________
Número de serie de control remoto _____________________________________________________
Número de serie de consola ___________________________________________________________
Número de serie de la barra de sonido:__________________________________________________
Fecha de compra: ____________________________________________________________________
Le sugerimos que guarde el recibo con esta guía del usuario
Fecha de fabricación
Los cuatro dígitos en negritas en el número de serie indican la fecha de fabricación. El primer dígito es el año de fabricación;
“5” es 2005 ó 2015. Los dígitos 2--4 son el mes y la fecha; “001” es 1 de enero y “365” es 31 de diciembre.
Importador en China: Bose Electronics (Shanghai) Company Limited, Part C, Plan 9, No. 353 North Riying Road,
China (Shanghai) Pilot Free Trade Zone
Importador en UE: Bose GP, Castleblayney Road, Carrickmacross, Irlanda
Importador en Taiwán: Bose Taiwan Branch, Room 905, 9F, Worldwide House, 131 Min Sheng East Rd, Section 3, Taipei,
Taiwán, 105
App Store es una marca de servicio de Apple Inc.
Amazon, Kindle y Fire son marcas comerciales de Amazon.com, Inc. o empresas asociadas.
Android y Google Play son marcas comerciales de Google Inc.
Blu-ray Disc
La marca y los logotipos de Bluetooth
dichas marcas por parte de Bose Corporation se encuentra bajo licencia.
™
y Blu-ray™ son marcas comerciales de Blu-ray Disc Association.
Fabricado con licencia de Dolby Laboratories. Dolby y el símbolo de las dos D son marcas comerciales de Dolby
Laboratories.
Para las patentes DTS, consulte http://patents.dts.com. Fabricado bajo la licencia de Digital Theater Systems,
INC. DTS, el símbolo y DTS y el símbolo en conjunto son marcas comerciales registradas, y DTS Digital Surround
es una marca comercial de DTS, Inc. © DTS, Inc. Reservados todos los derechos.
Los términos HDMI y HDMI High-Definition Multimedia Interface y el logotipo HDMI son marcas comerciales o
marcas comerciales registradas de HDMI Licensing LLC en los Estados Unidos y otros países.
®
son marcas comerciales registradas propiedad de Bluetooth SIG Inc. y cualquier uso de
iHeartRadio es una marca comercial registrada de iHeartMedia, Inc.
Este producto incorpora software de Spotify que está sujeto a licencias de otras empresas que se listan en:
www.spotify.com/conectar//third-party-licenses.
Spotify es una marca comercial registrada de Spotify AB.
SoundTouch y el diseño de la nota inalámbrica son marcas comerciales de Bose Corporation en los EE. UU. y otros países.
Wi-Fi es una marca registrada de Wi-Fi Alliance.
© 2015 Bose Corporation. No se puede reproducir, modificar, distribuir, o usar de otra manera ninguna parte de este trabajo sin
previo consentimiento por escrito.
4 - Español

Contenido
Introducción
Acerca del sistema de home theater SoundTouch™ 130 ............................................... 8
Características del sistema ........................................................................................ 8
SoundTouch™ ........................................................................................................................ 8
Características de SoundTouch™ ............................................................................... 8
Desembalado del sistema ................................................................................................... 9
Pautas de colocación ........................................................................................................... 10
Ejemplo de ubicación del sistema ............................................................................. 10
Configuración del módulo Acoustimass
Colocación de los pies de goma al móduloAcoustimass .............................................. 11
Conexión del módulo Acoustimass a la fuente de alimentación ................................ 12
®
Configuración de la consola
Conexión de la consola al televisor ................................................................................... 13
Uso del conector HDMI™ ARC ..................................................................................... 13
TV sin un conector HDMI™ ARC .................................................................................. 14
Conexión de la consola a otras fuentes ............................................................................ 14
Conexión a fuentes compatibles con HDMI™ .......................................................... 14
Conexión a fuentes no compatibles con HDMI™ ..................................................... 15
Conexión de fuentes de solo audio ........................................................................... 15
Conexión del adaptador inalámbrico SoundTouch™ ...................................................... 15
Configuración de la barra de sonido
Conexión de la barra de sonido .......................................................................................... 16
Colocación de pies de extensión opcionales ala barra de sonido ............................... 17
Montaje de la barra de sonido en la pared ....................................................................... 17
Conexión del sistema a la fuente de alimentación
Conexión de la barra de sonido a la fuente de alimentación ........................................ 18
Conexión de la consola a la fuente de alimentación ...................................................... 18
Inicio del sistema
Instalación de las baterías del control remoto ............................................................... 19
Encendido del sistema y selección del idioma ................................................................ 19
Verificación de sonido .......................................................................................................... 20
Español - 5

Contenido
ADAPTiQ
Ejecución de la calibración de audio ADAPTiQ® .............................................................. 21
Configuración de SoundTouch™
Incorporación del sistema a su red Wi-Fi® ....................................................................... 22
Uso del sistema
Botones del control remoto ................................................................................................ 23
Programación del control remoto universal ................................................................... 24
Selección de fuente .............................................................................................................. 26
Conectores de consola y botones de fuente universal ................................................. 26
Uso del botón
Ajuste del volumen .............................................................................................................. 28
Botones de funciones .......................................................................................................... 28
Programación de un control remoto que no sea de Bose
®
Agregar un sistema a una cuenta SoundTouch™ existente ................................. 22
Descargar e instalar la aplicación SoundTouch™ ................................................... 22
Conexión del sistema a la red Wi-Fi® doméstica .................................................... 22
Consumer Electronics Control ................................................................................... 24
Compruebe si las fuentes HDMI™ conectadas son compatibles con CEC .......... 24
Programe el control remoto para controlar la fuente............................................ 25
Selección de una fuente conectada al sistema Bose
Seleccione una fuente conectada a la TV................................................................. 26
......................................................................................................... 27
SoundTouch™ ................................................................................................................ 27
Tecnología inalámbrica Bluetooth® .......................................................................... 27
AUX LATERAL ................................................................................................................ 27
®
........................................... 26
®
........................................... 28
Uso de SoundTouch™
Acceso a SoundTouch™ ....................................................................................................... 29
Uso de la aplicación SoundTouch™ ........................................................................... 29
Uso de la fuente de SoundTouch™ ............................................................................ 29
6 - Español

Contenido
Bluetooth
Emparejamiento de un dispositivo con Bluetooth® ..................................................... 30
Conexión a un dispositivo emparejado con Bluetooth
Uso del botón ................................................................................................. 31
Uso de la función Bluetooth® en el dispositivo emparejado ................................ 31
Obtención de información del sistema
Uso del menú Sistema ......................................................................................................... 32
Mensajes de error ......................................................................................................... 33
Indicador de estado del módulo Acoustimass
Cuidado y mantenimiento
Resolución de problemas ................................................................................................... 34
Si la consola no puede encontrar el módulo Acoustimass® ................................. 37
Mensajes de error de calibración de audio ADAPTiQ® ........................................... 37
Restaure a la configuración de fábrica del sistema ............................................... 38
Restaure la configuración de un botón de la fuente en elcontrol remoto ........ 38
Conectores de servicio del módulo Acoustimass® ................................................. 38
Limpieza ................................................................................................................................. 39
Servicio de atención al cliente ........................................................................................... 39
Garantía limitada .................................................................................................................. 39
Información técnica ............................................................................................................. 39
®
®
............................................... 31
®
.............................................................. 33
Apéndice: Uso de una computadora para la configuración
Información importante sobre seguridad........................................................................ 40
Uso de un equipo de escritorio para la configuración ........................................... 40
Configuración del sistema con una computadora ......................................................... 40
Español - 7

Introducción
Acerca del sistema de home theater
SoundTouch™ 130
El sistema de home theater SoundTouch™ 130ofrece audio de calidad Bose® para
fuentes de video, SoundTouch™ y tecnología Bluetooth
®
.
Características del sistema
• El procesamiento avanzado de audio de Bose ofrece un sonido natural y real.
• La calibración de audio ADAPTiQ
®
optimiza la calidad del sonido.
• La pantalla brinda acceso a la configuración e información del sistema.
• La conectividad HDMI
™
permite una fácil configuración y asegura una audio de
alta calidad de las fuentes conectadas.
• Compatible con Consumer Electronics Control (CEC).
• El control remoto universal programable puede controlar la TV, el sistema de
cable/satélite y otras fuentes conectadas.
• El módulo oculto Acoustimass
®
inalámbrico ofrece un sonido profundo de bajos.
• La barra de sonido se puede montar en la pared (kit disponible por separado).
• El adaptador inalámbrico SoundTouch
Bluetooth
®
en su sistema.
™
permite utilizar SoundTouch™ y
SoundTouch™
SoundTouch™ ofrece sonido nítido que inunda el ambiente transmitido de forma
inalámbrica a través de la red Wi-Fi del hogar. Si tiene Wi-Fi
para comenzar a disfrutar de su música favorita en cualquier habitación que desee.
®
en casa, está listo
Características de SoundTouch™
• Disfrute el acceso inalámbrico a radio por Internet, servicios de música y a su
biblioteca de música.
• Acceda fácilmente su música favorita con ajustes predefinidos personalizados.
• Realice una instalación inalámbrica con su teléfono inteligente o tableta.
• Funciona con su red Wi-Fi doméstica existente.
• Transmita música desde dispositivos con Bluetooth
• Aplicación SoundTouch
™
gratuita para su computadora, teléfono inteligente
o tableta.
• Simplemente agregue más sistemas en cualquier momento para vivir una
experiencia auditiva en varias habitaciones.
• La amplia selección de sistemas de audio of Bose
adecuada para cualquier habitación.
8 - Español
®
.
®
le permite elegir la solución
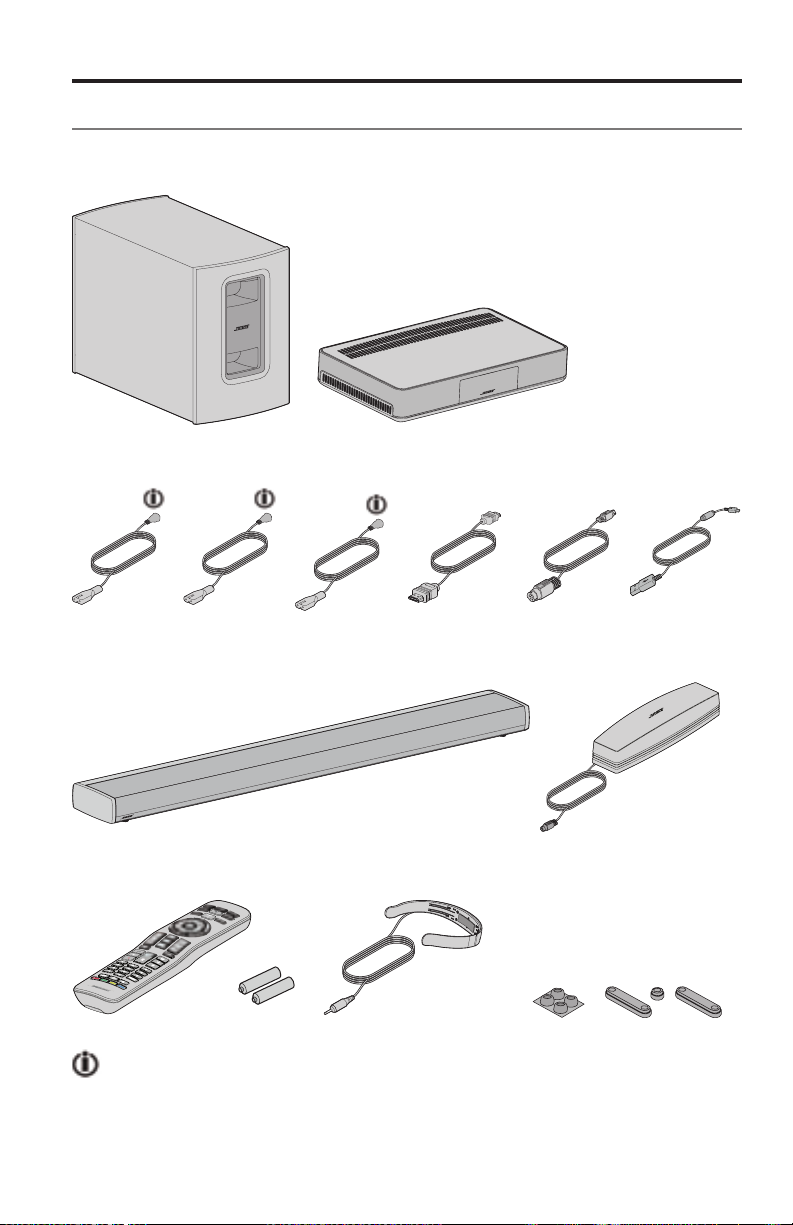
Introducción
Desembalado del sistema
Desembale cuidadosamente la caja y confirme que estén incluidas las
siguientes partes:
Módulo Acoustimass
Cable de
alimentación
Acoustimass
Barra de sonido Adaptador inalámbrico
®
Cable de
alimentación
de consola
Consola
Cable de
alimentación
Soundbar
Cable HDMI™Cable del
altavoz
SoundTouch™ serie II
Cable USB
Control remoto universal
Auriculares ADAPTiQ
®
Pies de goma
Los cables de alimentación adecuados para su región.
Nota: Si parte del sistema está dañado, no lo use. Comuníquese con un
representante autorizado de Bose
®
o al Servicio de atención al cliente de
Bose. Remítase a la hoja de contacto que se encuentra en la caja.
Español - 9
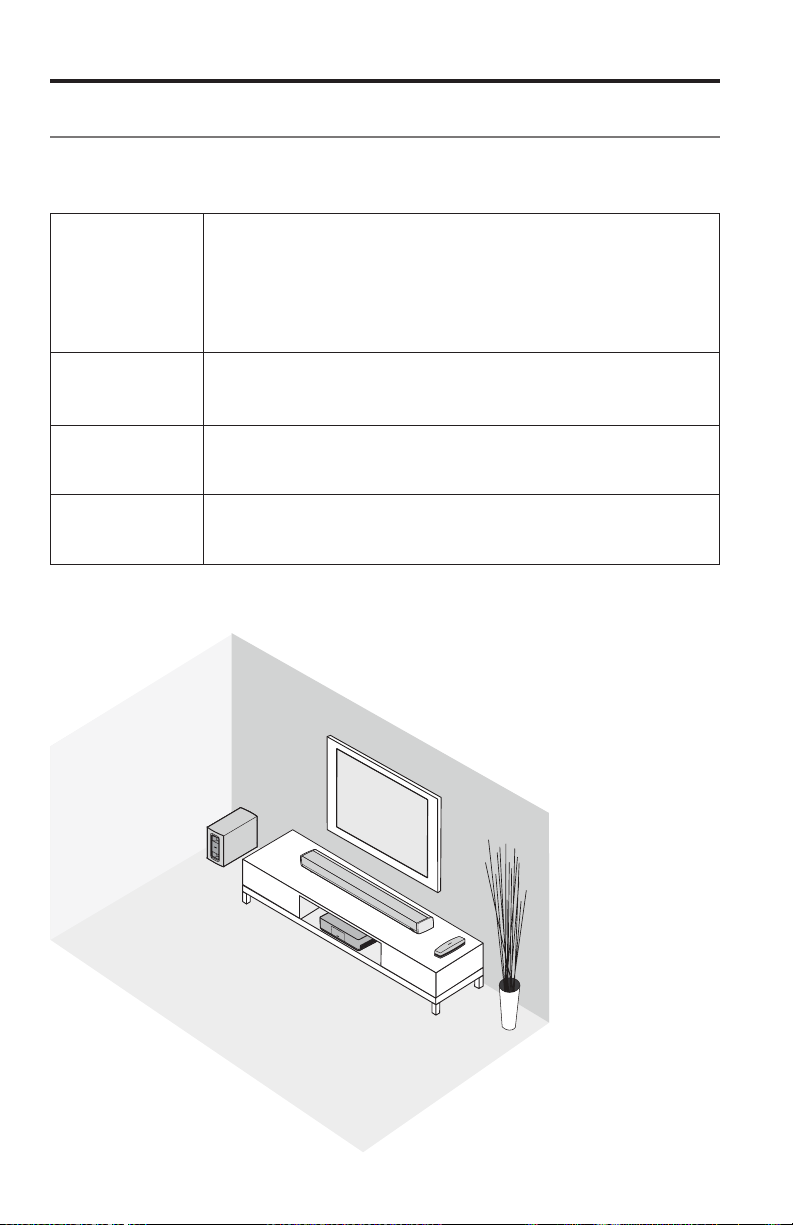
Introducción
Pautas de colocación
Para evitar la interferencia inalámbrica, mantenga el sistema alejado de cualquier
equipo inalámbrico. Coloque el sistema fuera y alejado de gabinetes metálicos,
alejado de otros componentes de audio/video y de fuentes de calor directo.
Módulo
Acoustimass
Barra de sonido • Coloque la barra de sonido delante de la TV.
Consola • Coloque la consola cerca de la TV. NO coloque la TV arriba de
Adaptador
inalámbrico
SoundTouch
™
Ejemplo de ubicación del sistema
• Apoye el módulo Acoustimass sobre los pies de goma junto a la
®
misma pared que la TV o alguna pared en la parte delantera de la
habitación.
• Elija una superficie estable y nivelada. La vibración puede hacer
que el módulo Acoustimass se mueva, particularmente sobre
superficies lisas como mármol, vidrio o madera altamente lustrada.
• Asegúrese de que haya una salida eléctrica de CA (red eléctrica) cerca.
• No coloque la barra de sonido dentro de un gabinete.
• Asegúrese de que haya una salida eléctrica de CA (red eléctrica) cerca.
la consola.
• Asegúrese de que haya una salida eléctrica de CA (red eléctrica) cerca.
• Coloque el adaptador a 1- 6 pies (0,3 - 1,8 m) de distancia
de la consola, el módulo Acoustimass y de otros dispositivos
inalámbricos para evitar interferencia inalámbrica.
10 - Español
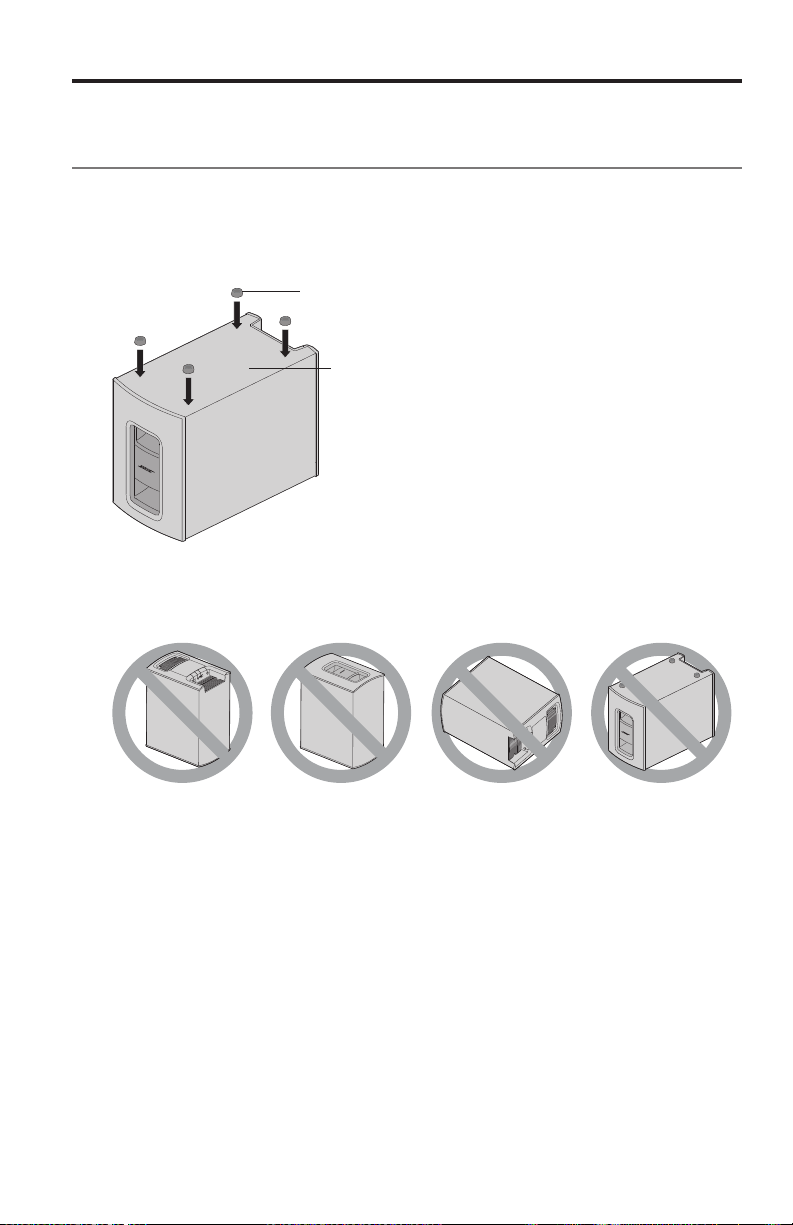
Configuración del módulo Acoustimass
Colocación de los pies de goma al
móduloAcoustimass
Coloque los pies de goma en el módulo Acoustimass para proteger el piso.
1. Coloque el módulo Acoustimass boca abajo sobre una superficie suave para
que no se dañe.
2. Coloque los pies de goma en la parte inferior del módulo Acoustimass.
Pie de goma
Parte inferior del módulo Acoustimass
3. Ponga el módulo Acoustimass de pie.
Precaución: No apoye el módulo Acoustimass sobre la cara anterior,
posterior o lateral cuando se está usando.
®
4. Quite todas las capas protectoras. Pueden afectar el desempeño acústico si
se las deja.
Español - 11
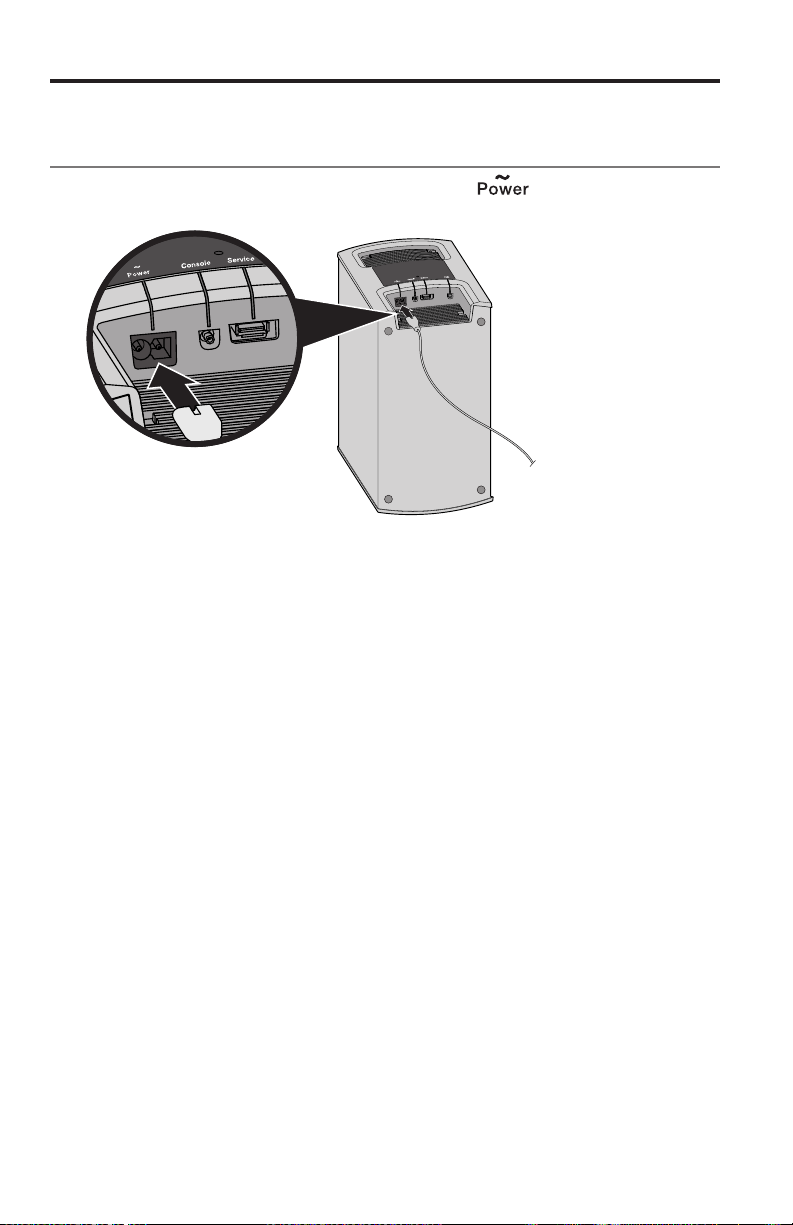
Configuración del módulo Acoustimass
®
Conexión del módulo Acoustimass a la fuente
de alimentación
1. Enchufe el cable de alimentación en el conector del módulo
Acoustimass.
2. Enchufe el cable de alimentación a una salida eléctrica de CA (red eléctrica).
12 - Español

Configuración de la consola
Conexión de la consola al televisor
Use el conector HDMI de la TV marcado ARC o Audio Return Channel si está
disponible. Si la TV no tiene un conector HDMI ARC, vea página 14.
Uso del conector HDMI™ ARC
Use el cable HDMI Bose® para conectar la consola a la TV.
1. Desconecte las fuentes conectadas a HDMI, como un sistema de cable/
satélite, reproductor de DVD o Blu-ray Disc
2. Inserte un extremo del cable HDMI Bose
3. Inserte el otro extremo del cable HDMI en el conector HDMI de la TV.
™
o videojuegos de la TV.
®
en el conector de la TV en la consola.
Español - 13
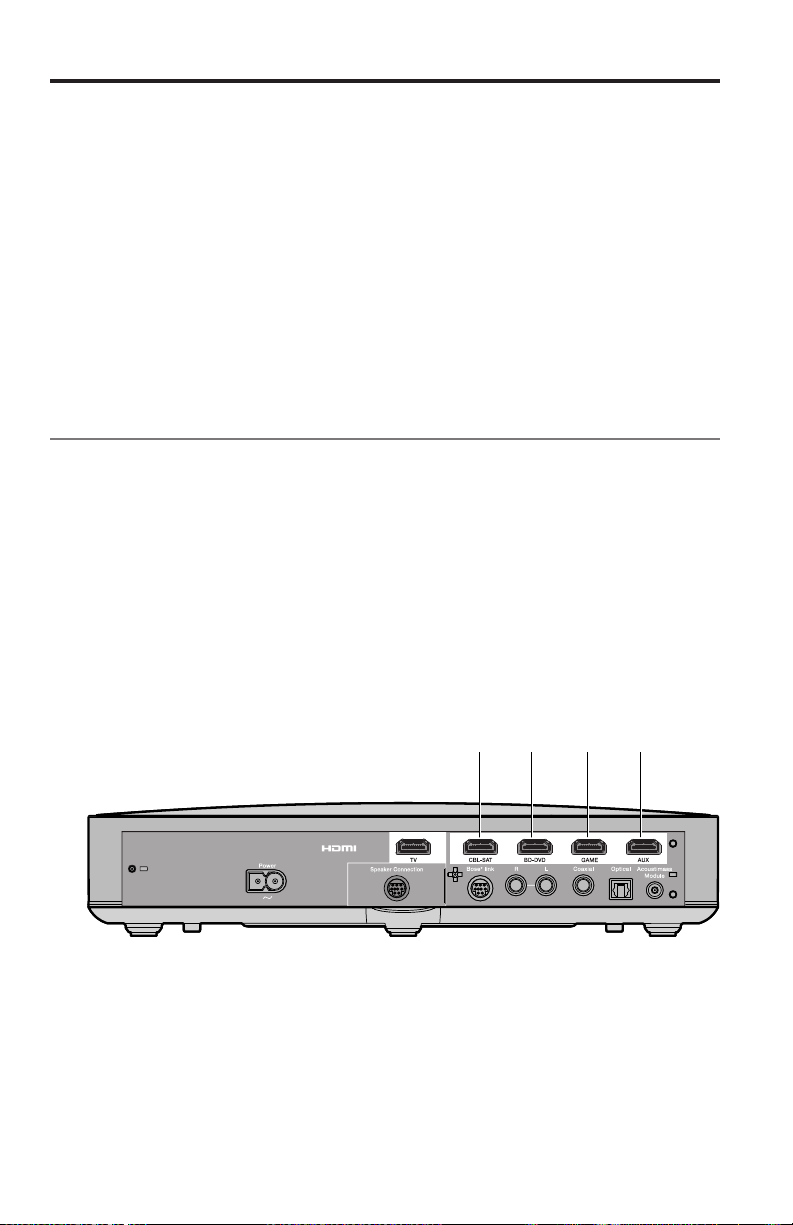
Configuración de la consola
TV sin un conector HDMI™ ARC
Si la TV no tiene un conector HDMI ARC, es posible que necesite realizar una
conexión secundaria a la consola con un cable de audio estéreo óptico, coaxial o
analógico. Sin esta conexión secundaria, no podrá escuchar audio del sistema Bose
Use una conexión secundaria en las siguientes configuraciones:
• Usa fuentes internas (como aplicaciones de Internet o una antena aérea).
• Conecta fuentes a la TV.
Consulte la guía del propietario de la TV para obtener más información.
Consejo: Si la TV tiene paneles de conectores de audio IN y OUT, use audio OUT
para la conexión secundaria.
Conexión de la consola a otras fuentes
Conexión a fuentes compatibles con HDMI™
Puede conectar la consola a otras fuentes, como un sistema de cable/satélite,
reproductor de DVD o Blu-ray Disc
por separado). Si la fuente no es compatible con HDMI, consulte página 15 para
obtener información sobre las configuraciones con dispositivos que no admiten HDMI.
1. Inserte un extremo del cable HDMI en el conector HDMI (OUT) de la fuente.
2. Inserte el otro extremo del cable HDMI en el conector HDMI adecuado en la
consola. Por ejemplo, para conectar un sistema de videojuegos, conecte un
cable HDMI al conector GAME.
™
o videojuegos con un cable HDMI (disponible
Conecte otras fuentes al
conector HDMI adecuado
en la consola.
®
.
14 - Español
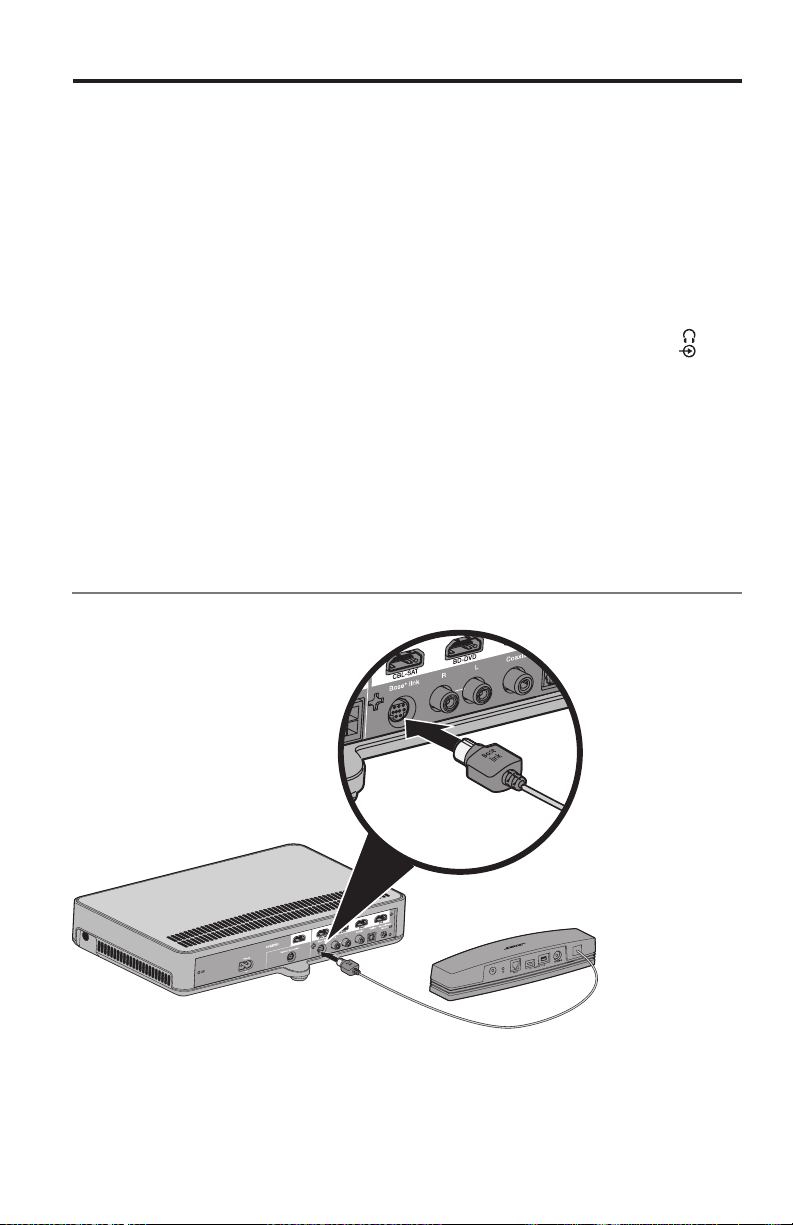
Configuración de la consola
Conexión a fuentes no compatibles con HDMI™
Si la fuente no es compatible con HDMI, conéctela a la TV usando cables de audio
y video (disponibles por separado). Consulte la guía del propietario de la TV para
obtener más información.
Consejo: Si la fuente tiene paneles de conectores de audio IN y OUT, use audio OUT.
Conexión de fuentes de solo audio
Si la fuente de solo audio, como un medio o un reproductor de CD, no es
compatible con HDMI:
1. Conecte la fuente al conector óptico, coaxial, analógico o SIDE AUX (
de la consola.
Nota: Puede usar un cable óptico, coaxial o analógico, o un cable de audio
de 3,5 mm (disponibles por separado).
2. Configure la entrada óptica, coaxial, analógica o SIDE AUX para la fuente
correspondiente. Puede acceder a esta configuración en el menú Sistema
(vea la página 32).
)
Conexión del adaptador inalámbrico
SoundTouch™
Conecte el adaptador al conector Bose® link en la consola.
Español - 15
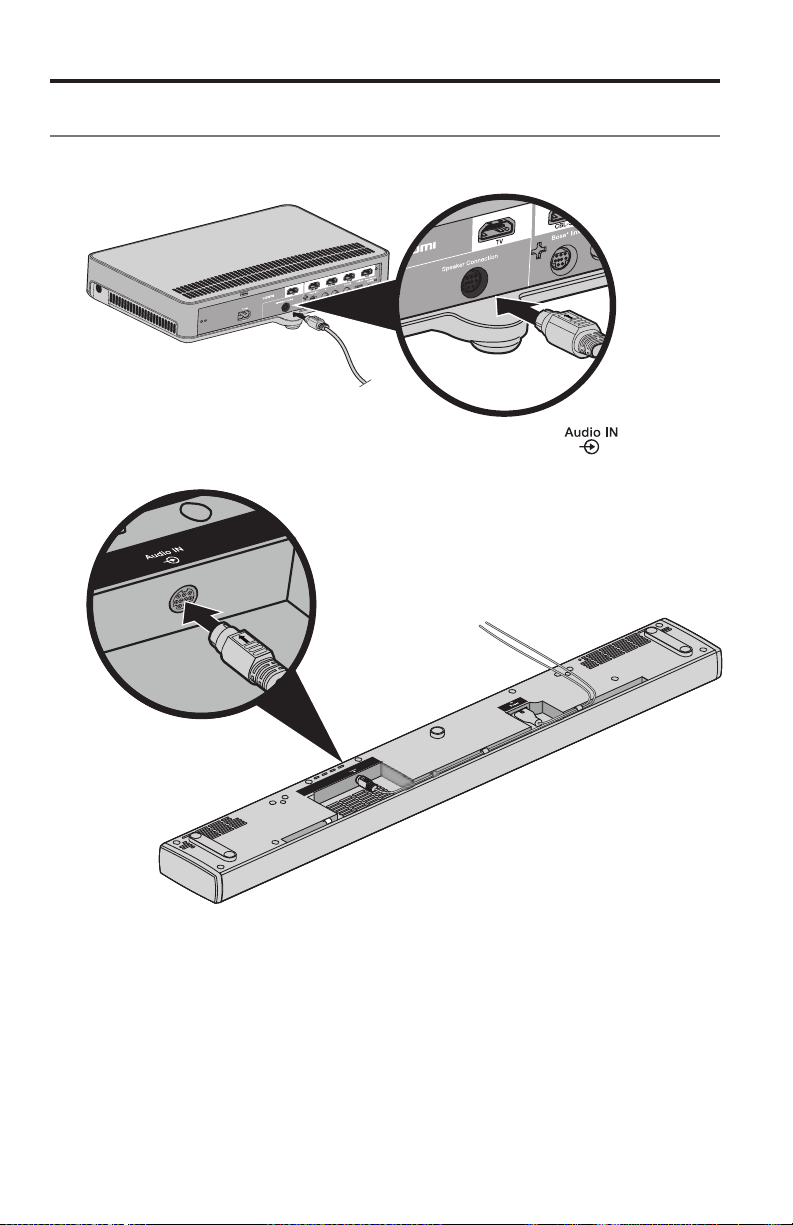
Configuración de la barra de sonido
Conexión de la barra de sonido
1. Inserte un extremo del cable del altavoz en el conector de Conexión de
altavoz en la consola.
2. Inserte el otro extremo del cable del altavoz en el conector en la barra
de sonido.
16 - Español
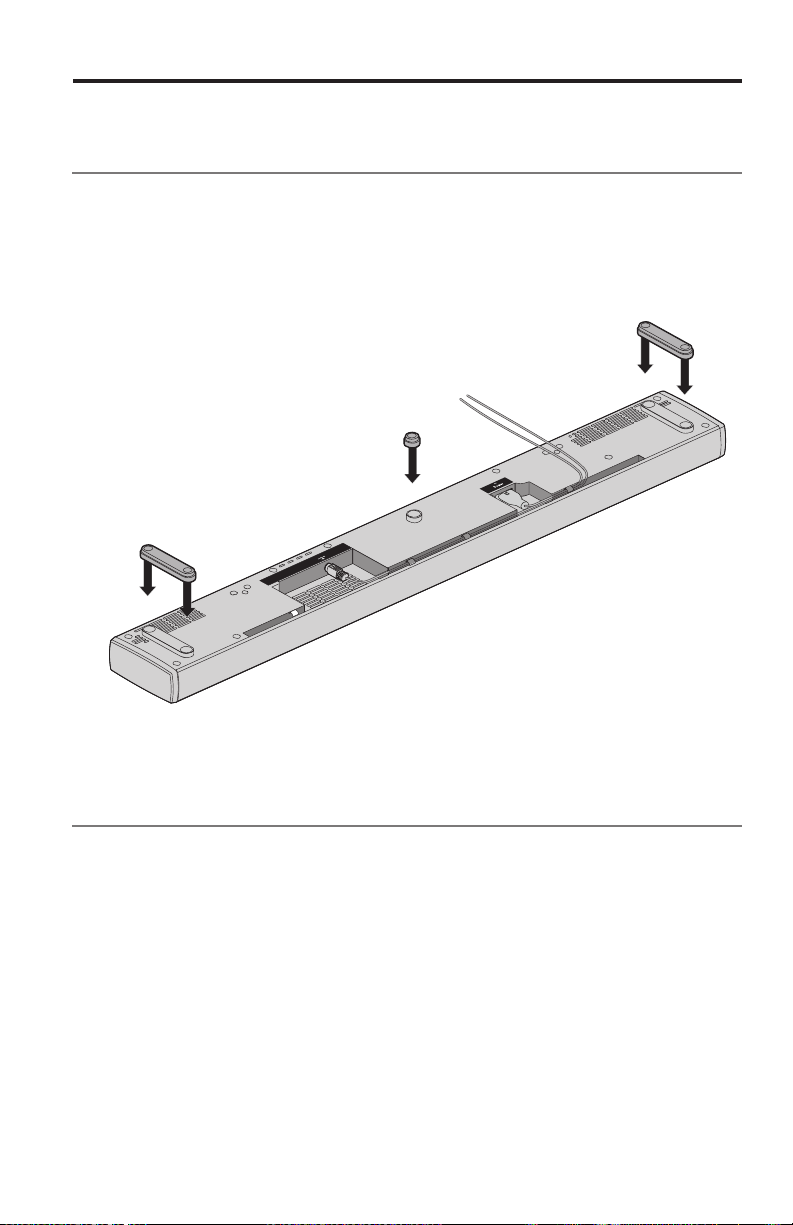
Configuración de la barra de sonido
Colocación de pies de extensión opcionales
ala barra de sonido
Coloque los pies de extensión opcionales para elevar la barra de sonido y crear un
espacio debajo.
1. Coloque la barra de sonido boca abajo sobre una superficie suave para que
no se dañe.
2. Coloque los pies de extensión en la parte inferior de la barra de sonido.
3. Ponga la barra de sonido de pie.
Montaje de la barra de sonido en la pared
Puede montar la barra de sonido en la pared. Para comprar el kit de montaje de
pared WB-135, contacte a su distribuidor local de Bose o visite www.Bose.com
PRECAUCIÓN: No use ningún otro hardware para montar la barra de sonido.
Español - 17

Conexión del sistema a la fuente de alimentación
Conexión de la barra de sonido a la fuente de
alimentación
1. Enchufe el cable de alimentación en el conector de la barra de sonido.
2. Enchufe el cable de alimentación a una salida eléctrica de CA (red eléctrica).
Conexión de la consola a la fuente de
alimentación
1. Enchufe el cable de alimentación en el conector Power en la consola.
2. Enchufe el cable de alimentación a una salida eléctrica de CA (red eléctrica).
18 - Español

Inicio del sistema
Instalación de las baterías del control remoto
1. Para abrir el compartimento, deslice la cubierta de la batería en la parte
posterior del control remoto.
2. Inserte las dos baterías AA (IEC-LR6) 1.5V suministradas. Haga coincidir los
símbolos + y – de las baterías con las marcas + y – dentro del compartimiento.
3. Vuelva a deslizar la cubierta del compartimiento de las baterías para cerrarlo.
Encendido del sistema y selección del idioma
1. Presione en el control remoto.
La consola se enciende y aparece 10 LANGUAGE
Nota: Después del primer inicio, la pantalla muestra de forma predeterminada
la última fuente utilizada.
en pantalla.
2. Presione y para seleccionar el idioma.
3. Presione
Consejo: Busque el icono
incorrecto.
El sistema se apaga después de dieciséis minutos de inactividad.
Puede desactivar la función de apagado automático en el menú Sistema (vea la
página 32 ).
.
en el menú Sistema si selecciona el idioma
Español - 19

Inicio del sistema
Verificación de sonido
1. Encienda la TV.
2. Si usa un sistema de cable/satélite u otra fuente secundaria, encienda la
fuente de alimentación.
Consejo: Si la fuente secundaria está conectada a la TV, seleccione la
3. Encienda el sistema.
4. Presione el botón de la fuente adecuado.
5. Verifique si la barra de sonido emite sonido.
Nota: Si no escucha sonido de la barra de sonido, vea “Resolución de
6. Presione
emitan sonido.
Nota: Si no escucha sonido de los altavoces de la TV, vea “Resolución de
entrada de TV adecuada. Es posible que necesite usar un control
remoto diferente.
problemas” en la página 34.
en el control remoto. Verifique que los altavoces de la TV no
problemas” en la página 34.
20 - Español

ADAPTiQ
®
Ejecución de la calibración de audio ADAPTiQ
La calibración de audio ADAPTiQ personaliza el sonido del sistema a la acústica
de su área de escucha al tomar cinco mediciones de audio. Para realizar una
calibración de audio, necesita 10 minutos cuando la habitación esté en silencio.
1. Colóquese los auriculares ADAPTiQ.
Durante la calibración de audio ADAPTiQ, un micrófono ubicado en la parte
superior del auricular mide las características del sonido de la habitación para
determinar una calidad de sonido óptima.
2. Enchufe el cable de los auriculares ADAPTiQ al conector en la consola.
3. Presione
4. Presione
5. Presione
6. Siga los avisos de voz hasta que el sistema complete el proceso.
Nota: Si escucha un mensaje de error y no puede completar la calibración de
audio ADAPTiQ, vea la página 37.
7. Desenchufe los auriculares ADAPTiQ de la consola y guárdelos en un
lugar seguro.
Nota: Si mueve o monta el sistema, o mueve algún mueble, vuelva a
ejecutar la calibración de audio ADAPTiQ para garantizar una calidad
de sonido óptima.
en el control remoto.
o hasta que aparezca 14 ADAPTiQ en la pantalla.
.
®
Español - 21

Configuración de SoundTouch™
controller app
Incorporación del sistema a su red Wi-Fi
®
Debe descargar e instalar la aplicación SoundTouch™ en un teléfono inteligente o
tableta que esté conectado a la red. La aplicación lo guía durante la conexión del
sistema a la red.
Nota: Si no tiene un teléfono inteligente o una tableta, puede usar una
computadora para configurarlo, vea la página 40).
Agregar un sistema a una cuenta SoundTouch™ existente
Si ya configuró SoundTouch™ para otro sistema, no es necesario que vuelva a
descargar la aplicación SoundTouch
1. En el teléfono inteligente o la tableta, seleccione
2. Seleccione EXPLORAR > CONFIGURACIÓN > Sistemas > AGREGAR
SISTEMA para agregar otro sistema.
La aplicación lo guía durante la configuración.
™
.
para iniciar la aplicación.
Descargar e instalar la aplicación SoundTouch™
Si esta es la primera vez que configura un sistema SoundTouch™, debe instalar la
aplicación. En el teléfono inteligente o la tableta, descargue la aplicación del
controlador de SoundTouch
Bose® SoundTouchTM
™
.
• Usuarios de iOS: descargar desde App Store
• Usuarios de Android
™
: descargar desde la tienda de Google Play
™
• Usuarios de Amazon Kindle Fire: descargar de Amazon Appstore para Android
Conexión del sistema a la red Wi-Fi® doméstica
Después de instalar la aplicación, agregue el sistema a la red:
1. En el teléfono inteligente o la tableta, seleccione
La aplicación lo guía durante la conexión del sistema a la red Wi-Fi
2. Siga las instrucciones en la aplicación para completar la configuración,
incluida la creación de una cuenta de SoundTouch
de música y servicios de música.
Para obtener más información sobre el uso de SoundTouch
descargue la guía del propietario del adaptador inalámbrico SoundTouch
desde el sitio web de Bose.
22 - Español
para iniciar la aplicación.
®
.
™
, al agregar una biblioteca
™
, vea la página 29 o
™
serie II

Uso del sistema
Botones del control remoto
Use el control remoto para controlar las fuentes conectadas al sistema, ajustar
el volumen del sistema, cambiar de canal, usar las funciones de reproducción,
activar las funciones del sistema de cable/satélite y navegar por el menú Sistema.
Alterna
entre SoundTouch™,
Bluetooth® y
Selección de fuente
Selecciona una fuente
conectada a la TV
Panel de navegación
el conector .
Vea la página 27.
Enciende/apaga el
sistema Bose
Enciende/
apaga la fuente
seleccionada
®
Lista los programas de
DVR grabados
Menú Sistema
Relación de
aspecto de TV
Subtitulado oculto
Muestra la página
de inicio de TV
por Internet
Canal, capítulo o
pista anterior
Controles de
reproducción
Teclado numérico Los
números 1-6 pueden
reproducir los ajustes
predefinidos de
SoundTouch™.
Modo Teletexto
Botones de función
(vea la página 28)
Español - 23
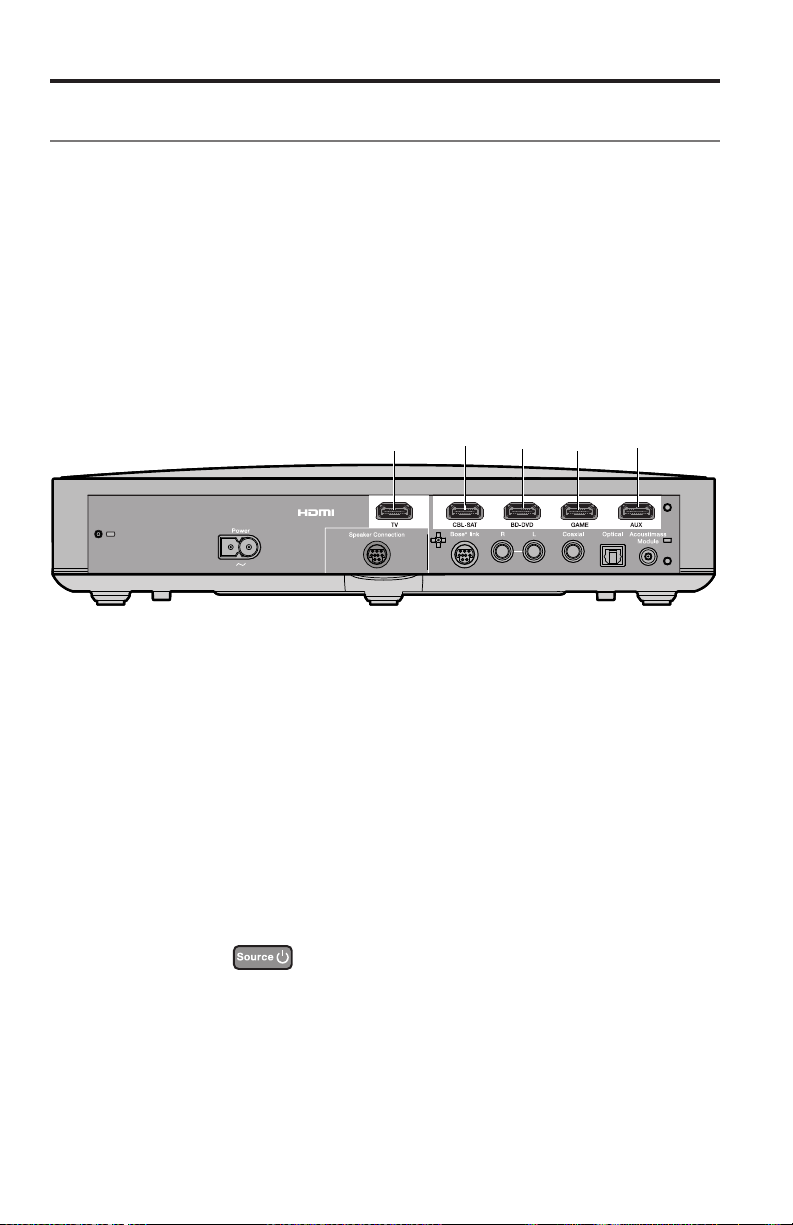
Uso del sistema
Programación del control remoto universal
Puede usar el control remoto para controlar la TV, sistema de cable/satélite,
reproductor de DVD o Blu-ray Disc
™
, videojuegos, DVR u otras fuentes auxiliares.
Consumer Electronics Control
El sistema es compatible con Consumer Electronics Control (CEC). CEC permite
controlar múltiples fuentes HDMI
remoto. Puede activar/desactivar la función CEC desde el menú Sistema (vea la
página 32).
Es posible que la fuente sea compatible con CEC, pero puede tener un nombre
diferente. Consulte la guía del propietario de la fuente para obtener más
información.
Consejo: Es posible que necesite usar el menú Sistema de TV para activar
CEC. Consulte la guía del propietario de la fuente para obtener más
información.
™
conectadas sin tener que programar el control
CEC controla las fuentes conectadas a
los conectores HDMI de la consola.
Compruebe si las fuentes HDMI™ conectadas son
compatibles con CEC
Si las fuentes responden correctamente a los botones de fuente correspondientes,
no es necesario que programe el control remoto.
Nota: Es posible que la fuente HDMI conectada no sea compatible con CEC.
Consulte la guía del propietario de la fuente para obtener más información.
1. Encienda el sistema Bose
2. Presione varios botones que se corresponden con las funciones de la fuente.
3. Presione el botón.
Si la fuente no responde a una de las funciones, programe el control remoto
(vea la página 25).
24 - Español
®
, el televisor y la fuente que está probando.
La fuente se apaga.
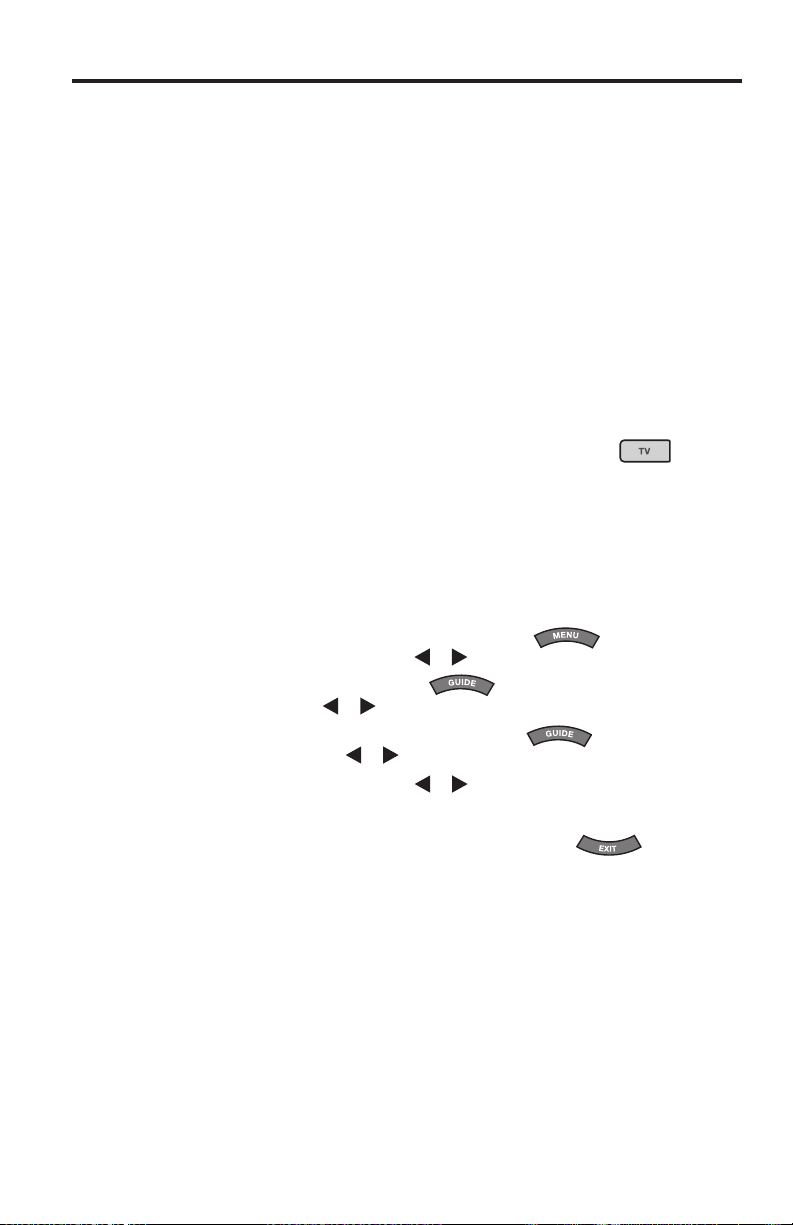
Uso del sistema
Programe el control remoto para controlar la fuente
Si la fuente no es compatible con CEC, puede programar el control remoto
universal para controlar la fuente, como un televisor, reproductor de DVD/Blu-ray
™
Disc
, sistema de cable/satélite, videojuegos, o DVR al introducir el código para la
marca de la fuente. Es posible que la fuente tenga varios códigos. Es posible que
deba realizar este procedimiento varias veces para identificar el código correcto.
Identificación del código de la fuente
1. Encienda la fuente.
2. Identifique el código de la marca de la fuente en el libro Códigos de dispositivo
del control remoto universal (suministrado).
Ingreso del código de la fuente
1. En el control remoto, mantenga presionado el botón de la fuente
correspondiente y no lo suelte hasta que se iluminen los seis botones de fuente.
Por ejemplo, para programar el televisor, mantenga presionado
que se iluminen los seis botones, luego suéltelo.
El botón de la fuente correspondiente sigue iluminado.
2. En el teclado numérico, introduzca el código de la marca de la fuente y
presione + en el botón de volumen.
Prueba del código de la fuente
1. Pruebe las funciones básicas de la fuente. Siga las instrucciones de la fuente:
• TV: presione los botones de los canales. Presione
el menú de configuración. Presione
• Sistema de cable/satélite: presione
programación. Presione
• Reproductor de DVD o Blu-ray Disc
de configuración. Presione
• Sistema de videojuegos: presione
2. En base a la respuesta de la fuente a las funciones básicas:
• El control remoto responde correctamente: presione
de la programación y guarde la configuración.
• El control remoto no responde o no responde correctamente:
- Si el botón de la fuente se ilumina: presione + en el botón de volumen
para pasar al próximo código. Repita los pasos 1-2 en “Prueba del código
de la fuente”. Es posible que deba repetir este procedimiento 30 veces
o más. Si los seis botones parpadean tres veces, significa que ya probó
todos los códigos de la fuente.
- Si el botón de la fuente está apagado: el control remoto salió del modo
de programación. Repita los pasos 1-2 in “Ingreso del código de la
fuente” y los pasos 1-2 en “Prueba del código de la fuente”.
Nota: Es posible que la fuente no sea compatible con controles remotos
universales IR. Consulte la guía del propietario de la fuente para obtener
más información.
y para desplazarse.
y para desplazarse.
y para desplazarse.
. Aparece la guía de
™
: presione . Aparece el menú
y para desplazarse por el menú.
. Aparece
hasta
para salir
Español - 25
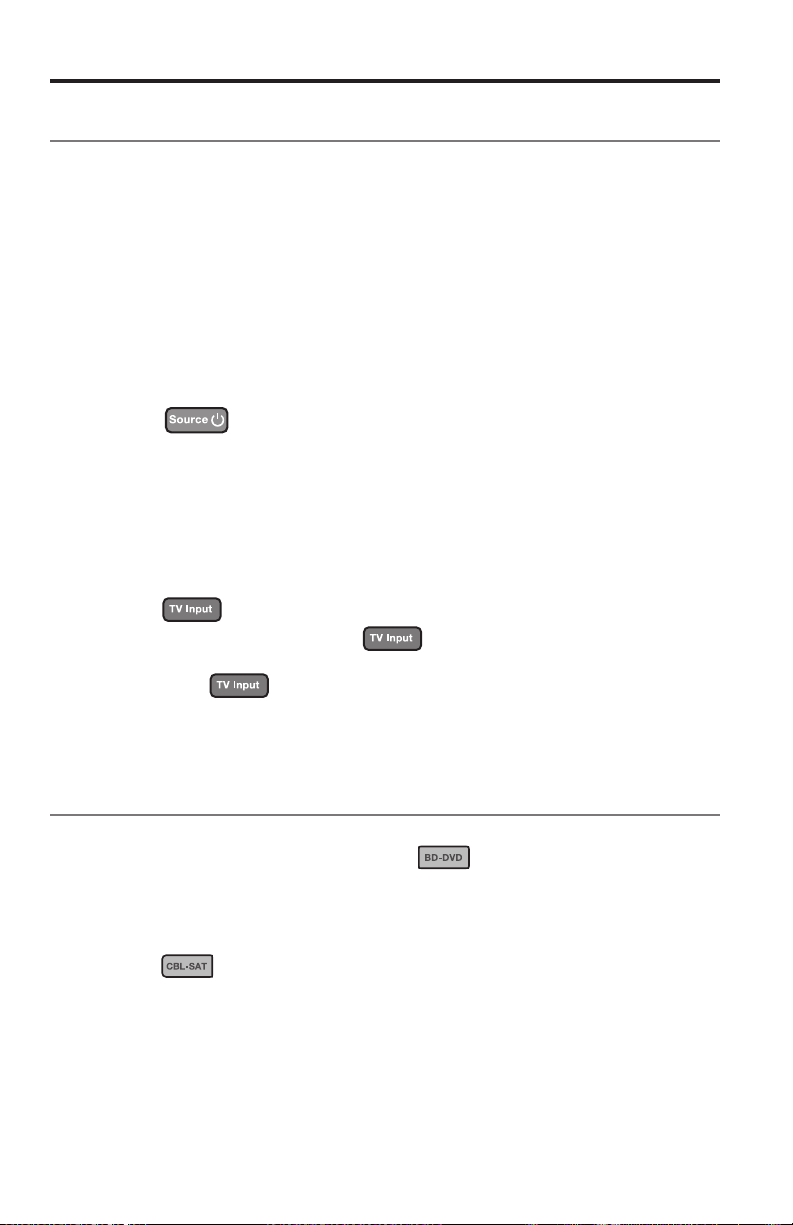
Uso del sistema
Selección de fuente
Puede cambiar entre fuentes presionando el botón de la fuente adecuado en
el control remoto. Antes de comenzar, programe el control remoto para controlar la
fuente (vea la página 24).
Selección de una fuente conectada al sistema Bose
Si la fuente está conectada a la consola y no usa CEC, siga este procedimiento
para configurar la consola al modo adecuado y encienda la fuente.
1. Encienda el sistema.
2. Presione el botón de la fuente que quiere controlar.
El botón de la fuente se ilumina.
3. Presione
La fuente se enciende.
.
®
Seleccione una fuente conectada a la TV
Si la fuente está conectada a la TV, siga este procedimiento para seleccionar la
entrada de TV adecuada.
1. Encienda el sistema, la TV y la fuente adecuada.
2. Presione
Es posible que necesite presionar
entrada de TV para la fuente.
En algunas TV,
la entrada de TV correcta y cierre este menú.
para seleccionar la entrada correcta en la TV.
varias veces para seleccionar la
se muestra un menú. Use el control remoto para elegir
Conectores de consola y botones de fuente
universal
Los botones de fuente en el control remoto corresponden a los conectores en
la parte posterior de la consola. Por ejemplo,
BD-DVD HDMI
Los botones de fuente funcionan con cualquier fuente que esté conectada al
conector correspondiente. Si tiene un reproductor de DVD o Blu-ray Disc
secundario y lo conecta al conector CBL-SAT, se puede programar para que
funcione con
Nota: Asegúrese de estar utilizando el código de control remoto adecuado para la
fuente, en lugar del punto de conexión al programar el control remoto.
26 - Español
™
.
.
corresponde al conector
™
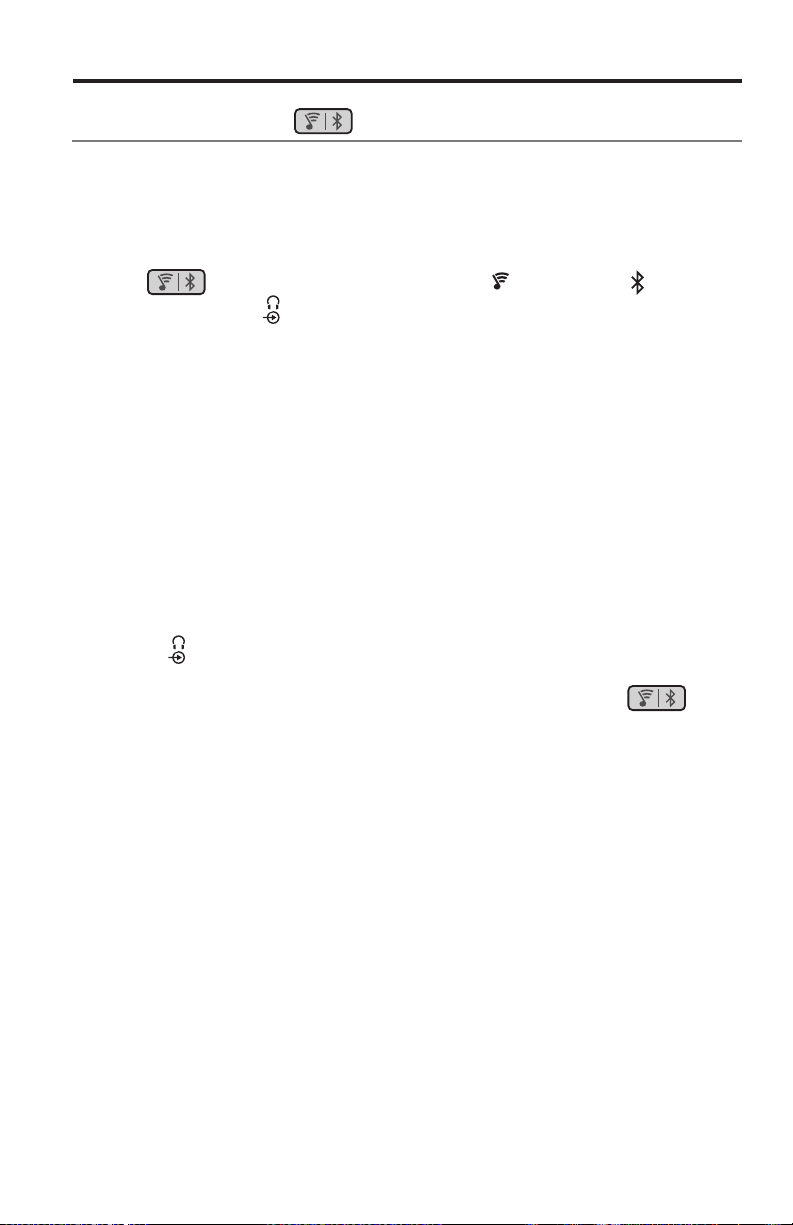
Uso del sistema
Uso del botón
Este botón multifunción permite reproducir música en su sistema.
• Acceda a la fuente SoundTouch
• Transmita música desde un dispositivo con Bluetooth
• Acceda al conector SIDE AUX.
Presione
el conector SIDE AUX (
para alternar entre SoundTouch™ ( ), Bluetooth ( ) y
SoundTouch™
Puede controlar un subconjunto de características de SoundTouch™ en su
sistema, como controles de reproducción y ajustes predefinidos. Consulte “Uso de
SoundTouch™” en la página 29.
™
en el sistema
®
conectado
).
Tecnología inalámbrica Bluetooth
El sistema cuenta con tecnología inalámbrica Bluetooth que le permite transmitir
música desde dispositivos Bluetooth a su sistema. Su sistema almacena ocho
dispositivos previamente conectados en la lista de dispositivos conectados. Vea la
página 31.
®
AUX LATERAL
El conector es un conector de 3,5 mm que se encuentra de un lado de la
consola. Cuando se configura como conector para una fuente de entrada de
audio, se puede acceder al conector a través del botón de selección
Consulte “5 AUX LATERAL” en la página 32 para obtener información sobre
cómo cambiar la configuración del conector.
.
Español - 27

Uso del sistema
Ajuste del volumen
En el control remoto:
• Presione + para aumentar el volumen.
• Presione – para disminuir el volumen.
• Presione
Nota: Si no escucha sonido de la TV, vea “Resolución de problemas” en la
para silenciar o restaurar el audio.
página 34.
Botones de funciones
Los botones rojo, verde, amarillo y azul en el control remoto corresponden a los
botones de función de colores de las funciones del sistema de cable/satélite,
reproductor de Blu-Ray Disc
• Funciones del sistema de cable/satélite o del reproductor de Blu-Ray Disc
consulte la guía del propietario del sistema de cable/satélite.
• Funciones de teletexto: corresponden a los códigos de colores de los números
de página, a los titulares o a los resúmenes del teletexto.
™
o teletexto.
™
:
Programación de un control remoto que no
sea de Bose
®
Puede programar un control remoto que no sea de Bose, por ejemplo un sistema
de cable/satélite, para controlar el sistema. Consulte la guía del propietario o
el sitio web del control remoto del sistema de cable/satélite para obtener las
instrucciones.
Una vez programados, el control remoto controla las funciones básicas como
encender/apagar y volumen.
28 - Español

Acceso a SoundTouch™
Uso de SoundTouch™
Después de crear una cuenta de SoundTouch™, está listo para disfrutar
SoundTouch
aplicación SoundTouch
Para obtener más información sobre el uso de SoundTouch
propietario del adaptador inalámbrico SoundTouch
™
en su sistema. Puede acceder a SoundTouch™ a través de la
™
o al presionar en el control remoto.
™
™
serie II.
, descargue la guía del
Uso de la aplicación SoundTouch™
La aplicación SoundTouch™ es una aplicación de software que le permite
configurar y controlar SoundTouch
computadora. Al usar la aplicación, el dispositivo inteligente actúa como un control
remoto de varias funciones para la fuente de SoundTouch
• Personalice fácilmente los ajustes predefinidos para su música favorita.
• Explore las opciones de radio por Internet, servicios de música y a su biblioteca
de música.
• Administración de la configuración del sistema.
™
desde su teléfono inteligente, tableta o
™
.
Uso de la fuente de SoundTouch™
Una vez que haya configurado SoundTouch™, puede usar el control remoto para
controlar un subconjunto de características en el sistema:
• Personalice y reproduzca los ajustes predefinidos 1-6 en el teclado numérico.
• Controlar la reproducción (reproducir, pausa, detener, avanzar a la próxima pista,
etc.
Para iniciar SoundTouch™:
Presione en el control remoto.
Aparece un mensaje SOUNDTOUCH en pantalla.
Español - 29
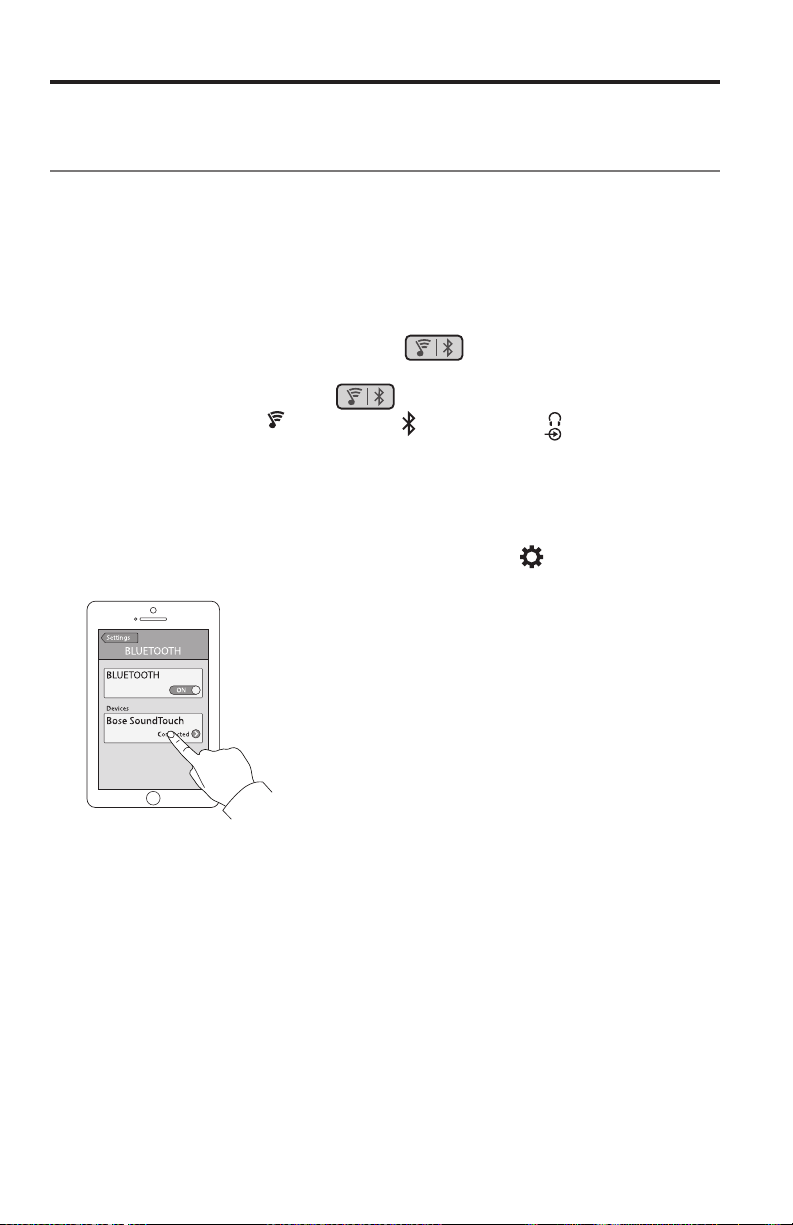
Bluetooth
®
Emparejamiento de un dispositivo con
Bluetooth
La tecnología inalámbrica Bluetooth® le permite transmitir música desde teléfonos
inteligentes, tabletas, computadoras u otros dispositivos de audio con Bluetooth al
sistema SoundTouch
que no forman parte del ecosistema SoundTouch
tableta de un amigo.
Antes de que pueda transmitir música desde un dispositivo con Bluetooth,
debe emparejar el dispositivo con el sistema.
1. En el control remoto, presione y suelte
pantalla un mensaje de emparejamiento de Bluetooth.
Nota: Cada vez que presiona
Asegúrese de que vea un mensaje de emparejamiento de Bluetooth en la
pantalla antes de emparejar el dispositivo.
2. En el dispositivo con Bluetooth
Sugerencia: Generalmente, la función Bluetooth se encuentra en el menú
®
™
. Puede transmitir música desde dispositivos con Bluetooth
SoundTouch
™
( ), Bluetooth ( ) y el conector .
®
, active la función Bluetooth.
Configuración. Un icono de engranaje (
representa la Configuración en la pantalla de Inicio.
™
, como un teléfono inteligente o
hasta que aparezca en
el sistema alterna entre
) a menudo
3. Seleccione su sistema SoundTouch™ de la lista de dispositivos.
Una vez que se empareja, el nombre del su sistema de SoundTouch
conectado en la lista de dispositivos.
4. En el dispositivo con Bluetooth, reproduzca música para transmitir a su sistema.
™
aparece
Si no puede emparejar el dispositivo
Es posible que deba borrar la lista de emparejamiento Bluetooth del dispositivo
(consulte “Resolución de problemas” en la página 34 para obtener más
información). Después de borrar la lista, intente emparejar el dispositivo otra vez.
30 - Español
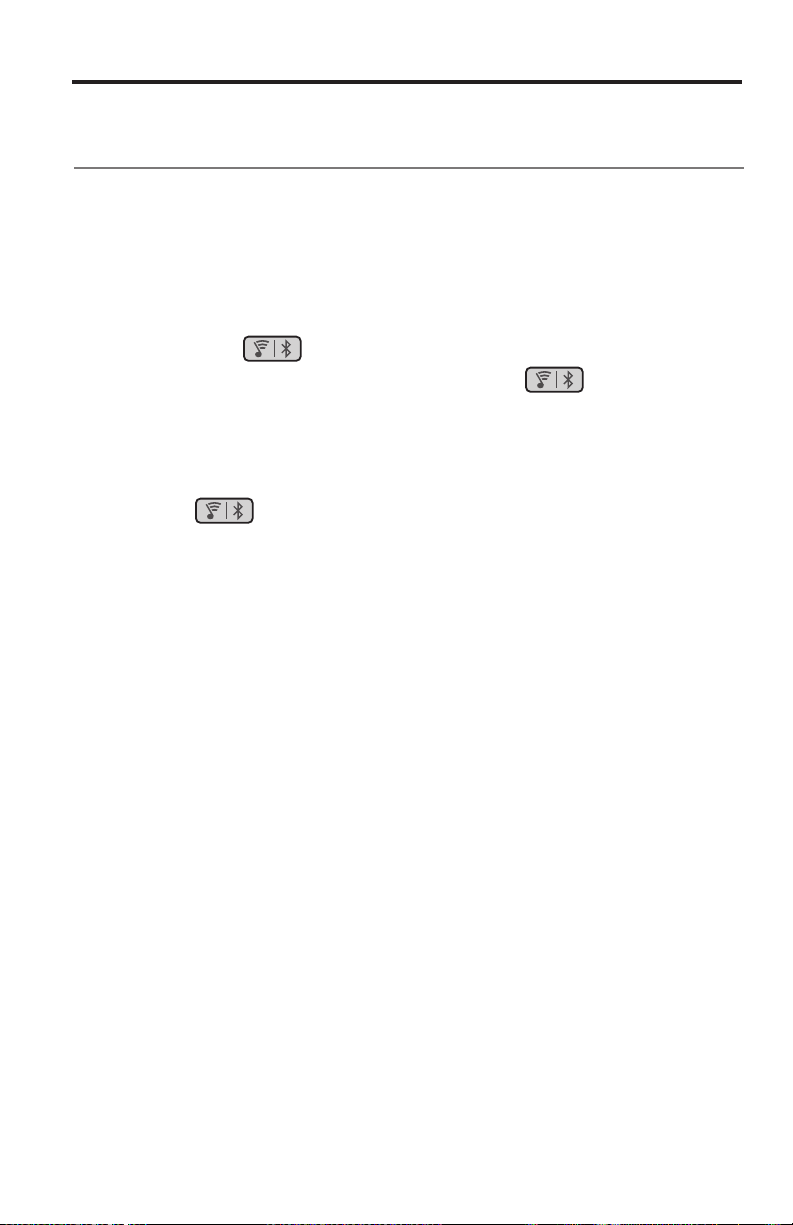
Bluetooth
®
Conexión a un dispositivo emparejado con
Bluetooth
Puede transmitir audio desde un dispositivo con Bluetooth® a su sistema. Hay
dos maneras de transmitir audio desde un dispositivo emparejado a su sistema
SoundTouch
Si hay múltiples dispositivos guardados en la lista de dispositivos conectados
del sistema, puede tardar unos minutos para que se conecte el dispositivo
emparejado. La pantalla del sistema indica el estado de la conexión.
Uso del botón
1. En el control remoto del sistema, presione y suelte hasta que
aparezca en pantalla un mensaje de conexión de Bluetooth.
El sistema se conecta al último dispositivo que transmitió al sistema.
2. En el dispositivo, reproduzca música.
Consejo: Si un dispositivo emparejado está conectado, no necesita presionar
Si no puede transmitir audio desde un dispositivo emparejado
Es posible que el sistema SoundTouch™ haya perdido la conexión al dispositivo.
Consulte la pantalla del sistema. Si el dispositivo emparejado está fuera del rango
de alcance del sistema, mueva el dispositivo dentro del rango de alcance.
Uso de la función Bluetooth® en el dispositivo emparejado
1. En el dispositivo con Bluetooth, active la función Bluetooth.
2. Seleccione su sistema SoundTouch
3. Una vez conectado, en el dispositivo con Bluetooth, reproduzca música para
transmitir a su sistema.
®
™
.
.
™
de la lista de dispositivos.
Español - 31
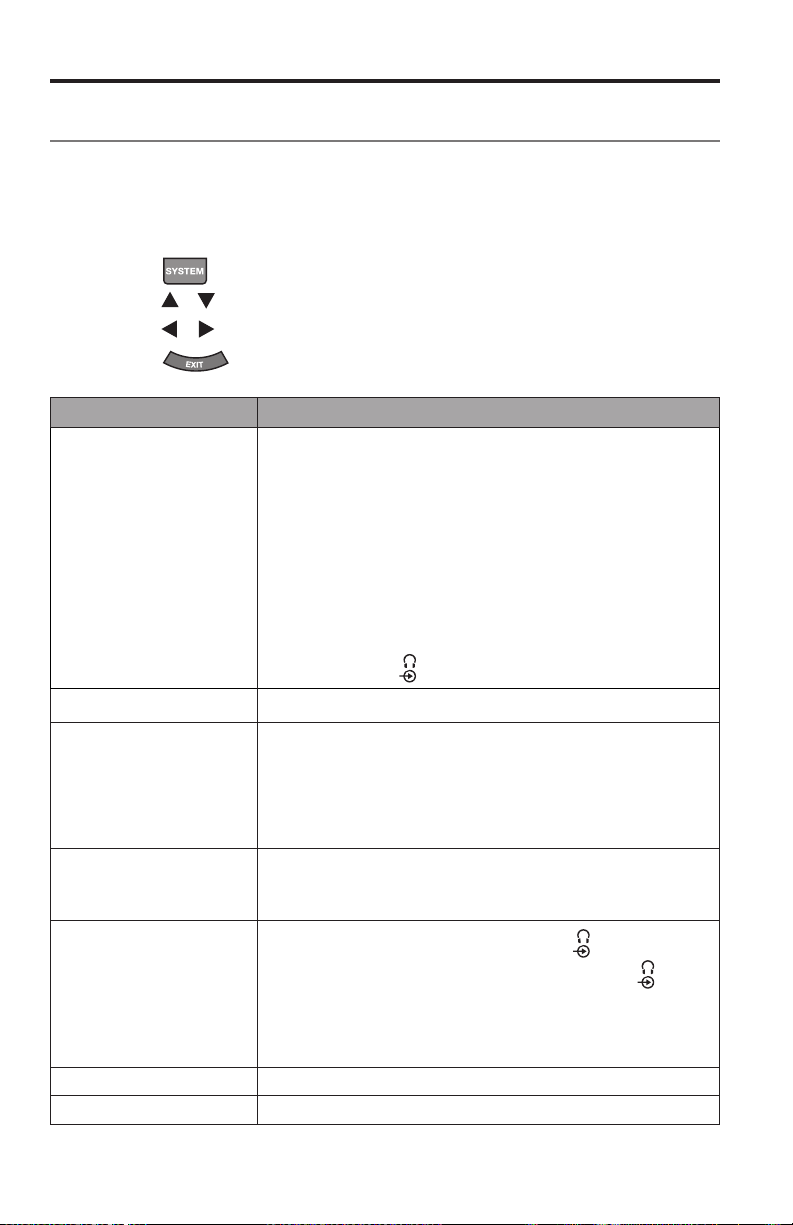
Obtención de información del sistema
Uso del menú Sistema
Use el menú Sistema para ajustar los niveles de audio, activar o desactivar
funciones (como AUTO OFF), cambiar el idioma, configurar las salidas coaxiales,
analógicas y ópticas de una fuente en particular, ejecutar la calibración de audio
ADAPTiQ
el sistema a sus valores de fábrica.
1. Presione
2. Presione
3. Presione
4. Presione
Pantalla Estado del sistema
1 COMP AUDIO
®
, emparejar el módulo Acoustimass® con la consola o restablecer
en el control remoto.
y para desplazarse por el menú Sistema.
y para ajustar la configuración.
.
Apagado: (Predeterminado) No hay cambios en la pista
de audio.
Realzar diálogo: Aumenta el nivel de diálogo y los
efectos de sonido en configuraciones de bajo volumen
mientras proporciona un impacto de audio completo en
configuraciones de alto volumen.
Volumen inteligente: Reduce el rango del volumen de la
banda sonora de una película para que la diferencia entre
sonidos extremos y suaves sea menos notable.
Nota: Las funciones de realce de diálogo y volumen
inteligente no se encuentran disponibles para
SoundTouch
al conector .
™
, Bluetooth®, o dispositivos conectados
2 SINC AUDIO/VIDEO
3 HDMI-CEC
4 APAGADO AUTO
5 AUX LATERAL
6 NIVEL BAJOS
7 NIVEL AGUDOS
32 - Español
Ajusta el retraso de audio para sincronizar el audio y el video.
Activo predeterminado: (Predeterminado) Activa CEC
(vea página 24).
Alternar Activado: Impide que la fuente cambie
accidentalmente y puede reparar las inconsistencias de CEC
(vea la página 34).
Apagado: Desactiva CEC,
Activar: (Predeterminado) El sistema se apaga después de
dieciséis minutos de inactividad (el sistema no emite sonido).
Desactivar: El sistema no se apaga automáticamente.
Entrada de audio: Configura el conector
fuente auxiliar.
Audífonos: (Predeterminado) Configura el conector
salida de auriculares.
Nota: Si se configura para auriculares y se conecta un
cable, la barra de sonido se silencia. Desconecte los
auriculares cuando no los usa.
Ajusta el nivel de bajos
Ajusta el nivel de agudos
para una
como

Obtención de información del sistema
Pantalla Estado del sistema
8 NIVEL CENTRAL
9 NIVEL ENVOLVENTE
Aumenta o disminuye el nivel de diálogo para películas
y TV.
NO DISPONIBLE
10 IDIOMA
11 ESTABLECER
ENTRADA ÓPTICA
12 ESTABLECER
ENTRADA COAXIAL
13 ESTABLECER ENTRADA
ANALÓGICA
14 ADAPTiQ
15 EMPAREJAR
ACOUSTIMASS
16 RESTABLECIMIENTO
DE FÁBRICA
Cambia el idioma de la consola y de calibración de
audio ADAPTiQ.
Configura el conector óptico para la fuente Auto/TV
(predeterminado), CBL SAT, BD DVD, GAME o AUX.
Configura el conector coaxial para la fuente Auto/TV
(predeterminado), CBL SAT, BD DVD, GAME o AUX.
Configura el conector analógico para la fuente Auto/TV
(predeterminado), CBL SAT, BD DVD, GAME o AUX.
Inicia el proceso de calibración de audio ADAPTiQ
Reconecta el módulo Acoustimass
Configura el menú Sistema y la calibración de audio
ADAPTiQ en la configuración de fábrica.
Mensajes de error
Pantalla Estado del sistema
ERROR
No se encuentra Acoustimass
ERROR
No se encuentra la barra
de sonido
<SOURCE>
Sin señal
SIDE AUX
Nada conectado
ERROR
Llamar a Bose
El módulo Acoustimass
La barra de sonido no está conectada a la consola.
La fuente no está conectada a la consola o la fuente
está conectada a la consola y apagada.
La fuente no está conectada al
Llame al servicio de atención al cliente de Bose
Remítase a la hoja de contacto que se encuentra en
la caja.
®
al sistema.
®
no está conectado a la consola.
conector en la consola.
®
.
Indicador de estado del módulo Acoustimass
El indicador de estado en la parte posterior del módulo Acoustimass ofrece
información sobre la actividad del sistema.
Actividad del indicador Estado del módulo Acoustimass
Ámbar Conectado a la consola.
Ámbar intermitente Desconectado de la consola.
Parpadeo lento ámbar Disponible para realizar una conexión inalámbrica a la consola.
Rojo Error del sistema.
Español - 33
®

Cuidado y mantenimiento
Resolución de problemas
Problema Qué hacer
No hay corriente • Conecte correctamente los cables de corriente del módulo
No emite sonido • Restaure el audio del sistema.
Los altavoces
de la TV
emiten sonido.
Sin video o con
video deficiente
Acoustimass®, la barra de sonido y la consola.
• Reconecte los cables de corriente del módulo Acoustimass, de la barra
de sonido y de la consola a una salida eléctrica de CA (red eléctrica).
• Use el control remoto para encender el sistema.
• Aumente el volumen.
• Enchufe el módulo Acoustimass, la barra de sonido y la consola a una
salida viva de CA (red eléctrica).
• Inserte el cable del altavoz en el conector Conexión de altavoz,
no el conector Bose® Link.
• Inserte el cable HDMI™ al conector en la TV marcado ARC o Audio
Return Channel. Si la TV no tiene un conector HDMI ARC, use un cable
de audio secundario además del cable HDMI (vea la página 14).
• Si usa un cable de audio secundario, inserte el cable en un conector
en la TV marcado Output o OUT, no Input o IN.
• Asegure todas las conexiones de cables en la barra de sonido, TV y
fuentes conectadas.
• Si la fuente está conectada a la TV, seleccione la entrada de TV
correcta (vea la página 26).
• Alterne CEC entre Alternar Activado y Activo predeterminado (vea la
página 32).
• Desconecte los auriculares cuando no los usa.
• Si está conectando la fuente a través del conecto , active Entrada
de audio con el menú Sistema (vea la página 32).
• Si está conectando los auriculares al conector , active los
Auriculares con el menú Sistema (vea la página 32).
• Si ve el mensaje de error No se encuentra Acoustimass, empareje
el módulo Acoustimass con la consola (vea la página 37).
• Reinicie el sistema (vea la página 38).
• Inserte el cable HDMI en el conector de TV etiquetado ARC o Audio
Return Channel (si está disponible).
• Apague los altavoces de la TV (consulte la guía del propietario de la TV).
• Disminuya el volumen de la TV al nivel más bajo.
• Cambie por otra fuente y luego regrese a la fuente afectada para
probarla y volver a establecer una señal.
• Desconecte y vuelva a conectar el cable HDMI de la fuente afectada.
• Desconecte y vuelva a conectar el cable HDMI desde la consola al
televisor.
• Apague y encienda la fuente afectada, el televisor y la consola.
• Si asignó el conector óptico, analógico o coaxial digital a una de las
fuentes HDMI
con el menú Sistema. Vea la página 33.
™
, cambie nuevamente a Auto/TV (Predeterminado)
34 - Español

Problema Qué hacer
El control
remoto no es
compatible o
no funciona
El sistema no
se sincroniza
con la correcta
fuente /
selecciona
la fuente
incorrecta
(CEC).
CEC no es
compatible o
no funciona
El sonido
es malo o
distorsionado
El sonido es
intermitente
• Haga coincidir los símbolos + y – de las baterías con las marcas + y –
que están dentro del compartimiento (vea la página 19).
• Reemplace la batería (vea la página 19).
• Presione el botón del volumen en el control remoto y vea si se ilumina
el botón de la fuente correcto.
• Quite la capa protectora de la consola.
• Si usa CEC:
- Apunte el control remoto a la consola.
- Use la función Alternar activado (vea la página 32).
- Desactive CEC en su sistema (vea la página 32) y programe
el control remoto para controlar la fuente (vea la página 24).
• Si programó el control remoto para controlar la fuente:
- Apunte el control remoto a la fuente adecuada.
- Verifique que haya ingresado el código correcto para la marca de
la fuente.
- Programe el control remoto con otro código (vea la página 24).
• Use la función Alternar activado (vea la página 32).
• Desactive CEC en la fuente (consulte la guía del propietario de la
fuente para obtener más información).
• Desactive CEC en su sistema (vea la página 32) y programe
el control remoto para controlar la fuente (vea la página 24).
• Use la función Alternar activado (vea la página 32).
• Desactive CEC en la fuente (consulte la guía del propietario de la
fuente para obtener más información).
• Desactive CEC en su sistema (vea la página 32) y programe
el control remoto (vea la página 24).
• Quite las capas protectoras del sistema.
• Asegure todas las conexiones de cables en la barra de sonido, TV y
fuentes conectadas.
• Si aparece el mensaje de error No se encuentra Acoustimass:
- Conecte el módulo Acoustimass
- Empareje el módulo Acoustimass con la consola (vea página 37).
• Si usa el conector analógico o , disminuya el volumen de la fuente.
• Restablezca la configuración de fábrica del sistema (vea la página 38)
y ejecute la calibración de audio ADAPTiQ® (vea la página 21).
• Asegure todas las conexiones de cables en la barra de sonido, TV y
fuentes conectadas.
• Aleje el sistema de posibles interferencias, como un router inalámbrico,
teléfono inalámbrico, televisión, microondas, etc.
• Alterne CEC entre Alternar Activado y Activo predeterminado (vea la
página 32).
Cuidado y mantenimiento
®
.
Español - 35

Cuidado y mantenimiento
Problema Qué hacer
No se puede
completar la
configuración
de red
No se puede
reproducir
audio de
Bluetooth
®
• Conecte el sistema a la CA (red eléctrica).
• Seleccione el nombre y contraseña de red correctos.
• Conecte el dispositivo y el sistema SoundTouch™ a la misma red Wi-Fi®.
• Coloque el adaptador inalámbrico dentro del alcance del router.
• Active el Wi-Fi en el dispositivo (móvil o computadora) que está
usando para configurar .
• Si el nombre de la red no aparece o está oculto, seleccione Conectar
manualmente a otra red en la pantalla CONECTAR A LA RED Wi-Fi
DEL HOGAR.
• Cierre otras aplicaciones que estén abiertas.
• Si usa una computadora para la configuración, verifique la
configuración de firewall para asegurarse que la aplicación
SoundTouch™ y SoundTouch™ Music Server sean programas
habilitados.
• Pruebe la conexión de Internet cargando www.SoundTouch.com
• Reinicie el dispositivo móvil o computadora y router.
• Desinstale la aplicación, resetee el adaptador y reinicie la
configuración.
En su sistema:
• Empareje un dispositivo (página 30).
• Intente emparejar otro dispositivo móvil.
• Consulte “No emite sonido”.
• Primero configure SoundTouch
actualizaciones del sistema.
• Borre la lista de emparejamiento del sistema con la aplicación
SoundTouch™:
- Vaya a EXPLORAR > CONFIGURACIÓN > SIstemAs y seleccione
el sistema SoundTouch™.
- Abra el elemento Bluetooth® y borre la lista de emparejamiento.
En su dispositivo móvil:
• Desactive y vuelva a activar la función de Bluetooth.
• Elimine el sistema del menú Bluetooth. Vuelva a asociar.
• Consulte la documentación del dispositivo con Bluetooth.
™
y luego realice todas las
36 - Español

Cuidado y mantenimiento
Si la consola no puede encontrar el módulo Acoustimass
®
El módulo Acoustimass y la consola se emparejan en fábrica. Sin embargo, si ve
el mensaje de error No se encuentra Acoustimass en la pantalla, realice este
procedimiento de emparejamiento:
1. Desconecte el módulo Acoustimass.
2. Presione
3. Presione
4. Presione
en el control remoto.
hasta que aparezca 15 EMPAREJAR ACOUSTIMASS en la pantalla.
.
Conectar Acoustimass aparece en la pantalla.
5. Enchufe el cable de alimentación de CA a una salida eléctrica de CA
(red eléctrica).
Después de que el módulo Acoustimass se conecta a la consola,
Emparejamiento terminado aparece en la pantalla.
Nota: Para obtener información sobre opciones de conexión alternativas
debido a interferencia inalámbrica excesiva, póngase en contacto con
el servicio de atención al cliente.
Mensajes de error de calibración de audio ADAPTiQ
®
Escuche los avisos de voz para los siguientes mensajes de error:
Mensaje
de error
1 El micrófono en el auricular
2 Hay demasiado ruido en
3 El auricular ADAPTiQ está
4 Los entornos de escucha son
5 El auricular ADAPTiQ no puede
Problema Qué hacer
ADAPTiQ no detecta sonido.
el entorno.
demasiado cerca de los
altavoces.
demasiado similares.
medir debido al movimiento.
• Ajuste todos los cables del altavoz.
• Verifique que la abertura del micrófono
en la parte superior del auricular
ADAPTiQ no esté bloqueada.
• El auricular ADAPTiQ puede estar
dañado. Llame al servicio de atención
al cliente de Bose® para obtener los
repuestos. Remítase a la hoja de
contacto que se encuentra en la caja.
Reinicie la calibración de audio ADAPTiQ
cuando el entorno esté en silencio.
Aleje el auricular ADAPTiQ de los altavoces.
Aléjelos 1 o 2 pies (3 a 6 m) del entorno de
escucha anterior.
No mueva la cabeza.
Después de corregir el problema, debe reiniciar la calibración de audio ADAPTiQ
(vea la página 21).
Si escucha un mensaje de error diferente, llame al servicio de atención al cliente
de Bose para recibir más instrucciones. Remítase a la hoja de contacto que se
encuentra en la caja.
Español - 37

Cuidado y mantenimiento
Restaure a la configuración de fábrica del sistema
Para solucionar los problemas, restablezca el menú Sistema y la calibración de
audio ADAPTiQ
1. Presione
2. Presione
la pantalla.
3. Presione 5.
El sistema se restablece.
4. Ejecute la calibración de audio ADAPTiQ (vea la página 21).
Restaure la configuración de un botón de la fuente en
elcontrol remoto
Si tiene problemas con un botón de la fuente en el control remoto, restaure la
configuración del botón de la fuente a la configuración de fábrica.
Después de realizar este procedimiento, el botón de la fuente está en el modo CEC.
1. En el control remoto, mantenga presionado el botón de la fuente
correspondiente y no lo suelte hasta que se iluminen los seis botones de fuente.
Solo el botón de la fuente correspondiente se ilumina.
2. Con el teclado numérico, escriba 0140.
®
a la configuración de fábrica.
en el control remoto.
hasta que aparezca 16 RESTABLECIMIENTO DE FÁBRICA en
Conectores de servicio del módulo Acoustimass
Los conectores de servicio y datos son se usan para operaciones de servicio.
No inserte ningún cable en estos conectores.
38 - Español
®

Cuidado y mantenimiento
Limpieza
• Limpie la superficie del sistema con un paño suave y seco.
• No use rociadores cerca del sistema. No use solventes, productos químicos ni
soluciones de limpieza que contengan alcohol, amoníaco o abrasivos.
• No permita que se derramen líquidos en las aberturas.
Servicio de atención al cliente
Para ayuda adicional sobre el uso del sistema:
• Visite SoundTouch.com
• Comuníquese con el servicio de atención al cliente de Bose
de contacto que se encuentra en la caja.
®
. Remítase a la hoja
Garantía limitada
El sistema está cubierto con una garantía limitada. En la tarjeta de registro del
producto en la caja se encuentran los detalles de la garantía limitada. Consulte
la tarjeta para obtener instrucciones sobre cómo registrarse. El no registrarlo no
afectará sus derechos de garantía limitada.
La información de la garantía que se proporciona con este producto no
se aplica en Australia y en Nueva Zelanda. Visite nuestro sitio web en
www.Bose.com.au/warranty o www.Bose.co.nz/warranty para obtener detalles de
la garantía de Australia y Nueva Zelanda.
Información técnica
Módulo Acoustimass®
Potencia nominal: -240 V
Consola
Potencia nominal: 100-240 V
Barra de sonido
Potencia nominal: 100-240 V
50/60 Hz 150 W
50/60 Hz 60 W
50/60 Hz 60 W
Español - 39

Apéndice: Uso de una computadora para la configuración
Información importante sobre seguridad
• Puede configurar el sistema con una computadora en lugar de un teléfono
inteligente o una tableta.
• Use una computadora que se encuentre en la red Wi-Fi
• Use una computadora en la que está almacenada la biblioteca de música.
• Necesita el cable USB suministrado.
• No conecte el cable USB hasta que la aplicación le ordene conectar el cable.
*
El conector SETUP A USB que se encuentra en la parte posterior del sistema solo sirve para
configurar la computadora. Los conectores USB no están diseñados para cargar teléfonos
inteligentes, tabletas o dispositivos similares.
*
®
.
Uso de un equipo de escritorio para la configuración
Si está usando un equipo de escritorio, mueva el amplificador y el adaptador
inalámbrico SoundTouch
Durante la configuración, la aplicación se solicita conectar el cable USB desde la
computadora al adaptador inalámbrico (temporalmente).
Luego de la configuración, desconecte el cable USB y la consola desde la
computadora y desde la CA (red eléctrica) y coloque el sistema en su ubicación
permanente.
™
cerca de la computadora para configurar el sistema.
Configuración del sistema con una
computadora
1. En la computadora, abra una página del explorador y vaya a:
SoundTouch.com/app
Consejo: Use la computadora en la que está almacenada la biblioteca
2. Descargue la aplicación SoundTouch
3. Conecte el sistema a su red doméstica (vea la página 22).
La aplicación lo guía durante la configuración.
40 - Español
de música.
™
.

Español - 41

Instructions importantes relatives à la sécurité
Consultez attentivement cette notice d’utilisation et conservez-la pour
toute référence future.
Le symbole représentant un éclair avec une flèche à l’intérieur d’un triangle équilatéral est utilisé pour prévenir l’utilisateur
de la présence d’une tension électrique dangereuse non isolée à l’intérieur de l’appareil. Cette tension est d’un niveau
suffisamment élevé pour représenter un risque d’électrocution.
Le symbole représentant un point d’exclamation à l’intérieur d’un triangle équilatéral signale à l’utilisateur la présence
d’instructions importantes relatives au fonctionnement et à l’entretien de l’appareil dans cette notice d’utilisation.
AVERTISSEMENTS:
• Afin de limiter les risques d’incendie ou d’électrocution, n’exposez jamais ce produit à la pluie ou à l’humidité.
• Protégez l’appareil de tout risque de ruissellement ou d’éclaboussure. Ne placez pas d’objets contenant des liquides,
tels que des vases, sur l’appareil. Comme avec tout produit électronique, veillez à ne pas renverser de liquide sur cet
appareil. L’exposition aux liquides risque de provoquer un dysfonctionnement et/ou un incendie.
• Remplacez les piles usagées uniquement avec des piles alcalines AA (IEC LR06).
• Ne placez jamais d’objets enflammés, tels que des bougies allumées, sur l’appareil.
ATTENTION:
• Toute modification non autorisée peut compromettre votre sécurité, le respect des réglementations et le bon
fonctionnement de l’appareil, et en invalidera la garantie.
• L’écoute prolongée de musique à volume élevé peut causer des troubles auditifs. Il est déconseillé d’utiliser les écouteurs
au volume maximum, notamment pendant des périodes prolongées.
AVERTISSEMENT: certaines pièces présentent un risque de suffocation. Ne les laissez pas à la portée des enfants de
moins de 3 ans.
AVERTISSEMENT: ce produit contient des composants magnétiques. Contactez votre médecin pour toute question
relative à l’effet de ces composants sur le fonctionnement d’un appareil médical implanté.
REMARQUES :
• L’étiquette d’identification du produit est située sous la console.
• Lorsque la fiche d’alimentation ou la prise multiple est utilisée comme dispositif de débranchement de l’appareil, elle doit rester
facilement accessible.
• Ce produit doit être utilisé à l’intérieur. Il n’a pas été conçu ni testé pour une utilisation en extérieur, dans des véhicules ou sur
des bateaux.
• Les câbles d’enceintes et d’interconnexion fournis avec cet appareil ne sont pas approuvés pour une installation encastrée.
Consultez la réglementation locale pour connaître le type de câblage correct pour une installation encastrée.
Instructions importantes relatives à la sécurité
1. Lisez attentivement ces instructions.
2. Conservez ces instructions.
3. Respectez tous les avertissements.
4. Suivez toutes les instructions.
5. N’utilisez pas cet appareil à proximité d’eau ou d’une source d’humidité.
6. Utilisez uniquement un chiffon sec pour le nettoyage.
7. Ne bloquez jamais les orifices d’aération. Suivez les instructions du fabricant pour l’installation.
8. N’installez pas cet appareil à proximité d’une quelconque source de chaleur, telle qu’un radiateur, une arrivée d’air chaud,
un four ou tout autre appareil (notamment des amplificateurs) produisant de la chaleur.
9. Placez l’adaptateur secteur ou le cordon d’alimentation contre les risques de piétinement ou de pincement, notamment au
niveau des fiches, des prises de courant et des branchements à l’appareil.
10. Utilisez uniquement les accessoires spécifiés par le fabricant.
11. Débranchez cet appareil pendant les orages ou au cours des longues périodes de non utilisation.
12. Confiez toute réparation à du personnel qualifié. Une réparation est nécessaire lorsque l’appareil a été endommagé de quelque
façon que ce soit (endommagement de l’adaptateur secteur ou du cordon d’alimentation, renversement d’un liquide ou de tout
objet sur l’appareil, exposition de l’appareil à la pluie ou à l’humidité, mauvais fonctionnement, chute de l’appareil, etc.).
2 - Français
Informations réglementaires
Remarque : cet appareil a fait l’objet de tests prouvant sa conformité aux limites imposées aux appareils numériques de
Toute modification non autorisée expressément par Bose Corporation est susceptible d’annuler le droit de l’utilisateur à mettre en
œuvre cet appareil.
Cet appareil est conforme à la partie 15 de la réglementation de la FCC, ainsi qu’aux normes RSS exemptes de licence d’Industrie
Canada. L’utilisation de cet appareil est soumise aux conditions suivantes : (1) cet appareil ne doit pas provoquer d’interférences et
(2) cet appareil doit tolérer les interférences externes, y compris celles qui peuvent provoquer un fonctionnement anormal de cet appareil.
Pour l’adaptateur pour réseau sans fil SoundTouch
Cet appareil doit être installé et utilisé en conservant une distance minimale de 20 cm entre l’appareil et votre corps.
Ce produit de classe B est conforme aux spécifications de la réglementation ICES-003 du Canada.
CAN ICES-3 (B)/NMB-3(B)
Cet appareil est conforme aux réglementations de la FCC et d’Industrie Canada sur les limites d’exposition aux rayonnements
électromagnétiques pour le grand public. Il ne doit pas être situé ou utilisé avec d’autres antennes ou émetteurs-récepteurs radio.
classe B, conformément à la partie 15 des réglementations de la FCC. Ces limites sont conçues pour offrir une
protection raisonnable contre les interférences nuisibles dans une installation résidentielle. Ce matériel génère,
utilise et est susceptible d’émettre de l’énergie à des fréquences radio. À ce titre, s’il n’est pas installé ou utilisé
conformément aux instructions, il est susceptible de perturber les communications radio. Cependant, il n’est
nullement garanti que de telles perturbations ne se produisent pas dans une installation donnée. Si cet appareil
perturbe effectivement la réception de la radio ou de la télévision (ce qui peut être vérifié en allumant et en
éteignant l’appareil), vous êtes invité à tenter de remédier au problème en prenant une ou plusieurs des mesures
ci-dessous :
• Réorientez ou déplacez l’antenne de réception.
• Augmentez la distance séparant le matériel du récepteur.
• Connectez l’appareil à une prise reliée à un circuit différent de celui auquel est connecté le récepteur.
• Consultez votre revendeur ou un technicien radio/TV expérimenté pour obtenir de l’aide.
™
:
Mettez au rebut les piles usagées conformément aux réglementations locales. Ne les incinérez pas.
Ce symbole signifie que le produit ne doit pas être jeté avec les déchets ménagers mais doit être déposé dans un centre
de collecte approprié pour recyclage. Une mise au rebut et un recyclage adéquats permettent de protéger les ressources
naturelles, la santé humaine et l’environnement. Pour plus d’informations sur l’élimination et le recyclage de ce produit,
contactez votre mairie, votre service de ramassage des ordures ou le magasin où vous avez acheté ce produit.
Bose Corporation déclare que ce produit est conforme aux critères essentiels et autres dispositions de la directive
1999/5/CE et des autres directives européennes applicables. L’attestation complète de conformité est disponible à
l’adresse : www.Bose.com/compliance
Noms et contenu des substances ou éléments toxiques ou dangereux
Substances ou éléments toxiques ou dangereux
Plomb
Nom
Polychlorobiphényles X O O O O O
Pièces métalliques X O O O O O
Pièces en plastique O O O O O O
Enceintes X O O O O O
Câbles X O O O O O
Les données de ce tableau sont conformes aux dispositions de la norme SJ/T 11364.
O : indique que la quantité de cette substance toxique ou dangereuse contenue dans tous les composants homogènes de
cette pièce est inférieure à la limite définie dans GB/T 26572.
X : indique que la quantité de cette substance toxique ou dangereuse contenue dans au moins un des composants
homogènes de cette pièce est supérieure à la limite définie dans GB/T 26572
Mercure
(Pb)
(Hg)
Cadmium
(Cd)
Chrome
hexavalent
(CR(VI))
Biphényle
polybromé
(PBB)
Éther de diphényle
polybromé (PBDE)
Français - 3

Informations réglementaires
Renseignements à noter et conserver :
Les numéros de série se trouvent sur le panneau de connexion du module Acoustimass® et sur
l’emballage de la télécommande.
Modèle : ____________________________________________________________________________
Numéro de série du module : __________________________________________________________
Numéro de série de la télécommande : __________________________________________________
Numéro de série de la console : ________________________________________________________
Numéro de série de la barre de son : ____________________________________________________
Date d’achat : ________________________________________________________________________
Nous vous conseillons de conserver votre reçu avec ce manuel de l’utilisateur.
Date de fabrication
Les quatre chiffres en caractères gras dans le numéro de série indiquent la date de fabrication. Le premier chiffre correspond à
l’année de fabrication (« 5 », c’est-à-dire 2005 ou 2015). Les deuxième, troisième et quatrième chiffres correspondent au mois et à
la date (« 001 » signifie 1er janvier et « 365 » 31 décembre).
Importateur pour la Chine: Bose Electronics (Shanghai) Company Limited, Part C, Plan 9, No. 353 North Riying Road,
Chine (Shanghaï) Pilot Free Trade Zone
Importateur pour l’UE: Bose GP, Castleblayney Road, Carrickmacross, Irlande
Importateur pour Taïwan: Bose Taiwan Branch, Room 905, 9F, Worldwide House, 131 Min Sheng East Rd, Section 3,
Taipei, Taïwan, 105
App Store est une marque de service d’Apple Inc.
Amazon, Kindle et Fire sont des marques de commerce d’Amazon.com, Inc. ou de ses filiales.
Android et Google Play sont des marques de commerce de Google, Inc.
Blu-ray Disc
La marque et le logo Bluetooth
l’objet d’un accord de licence.
™
et Blu-ray™ sont des marques de commerce de Blu-ray Disc Association.
Fabriqué sous licence de Dolby Laboratories. Dolby et le symbole du double D sont des marques de commerce
de Dolby Laboratories.
Pour les brevets DTS, consultez la page http://patents.dts.com. Fabriqué sous licence de Digital Theater Systems,
INC. DTS, le symbole associé, ainsi que DTS et le symbole utilisés ensemble sont des marques déposées,
et DTS Digital Surround est une marque de commerce de DTS, Inc.© DTS, Inc. Tous droits réservés.
Les termes HDMI et HDMI High-Definition Multimedia Interface (Interface multimédia haute définition) et le logo
HDMI sont des marques de commerce ou des marques déposées de HDMI Licensing LLC aux États-Unis et dans
d’autres pays.
®
sont des marques déposées de Bluetooth SIG, Inc., et leur utilisation par Bose Corporation fait
iHeartRadio est une marque déposée d’iHeartMedia, Inc.
Ce produit incorpore le logiciel Spotify, qui fait l’objet des licences tierces indiquées sur la page suivante :
www.spotify.com/connect/third-party-licenses.
Spotify est une marque déposée de Spotify AB.
SoundTouch et le design « wireless note » sont des marques commerciales de Bose Corporation aux États-Unis et dans d’autres pays.
Wi-Fi est une marque déposée de la Wi-Fi Alliance.
© 2015 Bose Corporation. Toute reproduction, modification, distribution ou autre utilisation, même partielle, de ce document est
interdite sans autorisation écrite préalable.
4 - Français

Sommaire
Introduction
À propos de votre système home cinéma SoundTouch™ 130 ...................................... 8
Caractéristiques du système ..................................................................................... 8
SoundTouch™ ........................................................................................................................ 8
Fonctions SoundTouch™ ............................................................................................. 8
Déballage du système ......................................................................................................... 9
Conseils de positionnement ............................................................................................... 10
Exemple de positionnement du système ................................................................ 10
Installation du module Acoustimass
Fixation des pieds en caoutchouc au moduleAcoustimass ........................................ 11
Raccordement du module Acoustimass àlaprise secteur ........................................... 12
®
Installation de la console
Raccordement de la console au téléviseur ...................................................................... 13
Utilisation du connecteur HDMI™ ARC ..................................................................... 13
Téléviseurs non munis d’un connecteur HDMI™ ARC ............................................ 14
Raccordement de la console à d’autres sources ............................................................. 14
Raccordement de sources compatibles avec la technologie HDMI™ .................. 14
Raccordement de sources non compatibles avec la technologie HDMI™ .......... 15
Raccordement à des sources audio uniquement ................................................... 15
Raccordement de l’adaptateur pour réseausans fil SoundTouch™ ............................ 15
Installation de la barre de son
Raccordement de la barre de son ...................................................................................... 16
Fixation des pieds d’extension en option àlabarre de son .......................................... 17
Fixation murale de la barre de son .................................................................................... 17
Raccordement du système à l’alimentation électrique
Raccordement de la barre de son àlaprisesecteur ....................................................... 18
Raccordement de la console à la prise secteur ............................................................... 18
Démarrage du système
Mise en place des piles de la télécommande .................................................................. 19
Mise sous tension du système et sélection de la langue.............................................. 19
Vérification du son ............................................................................................................... 20
Français - 5

Sommaire
ADAPTiQ
Exécution du système de calibrage audioADAPTiQ® ................................................... 21
Configuration de SoundTouch™
Ajout du système à votre réseau Wi-Fi® ........................................................................... 22
Utilisation du système
Boutons de la télécommande ............................................................................................ 23
Programmation de la télécommande universelle .......................................................... 24
Sélection d’une source ......................................................................................................... 26
Touches de sources universelles et connecteurs de la console .................................. 27
Utilisation de la touche
Réglage du volume ............................................................................................................... 28
Touches de fonction............................................................................................................. 28
Programmation d’une télécommande d’une autre marque que Bose
®
Ajout du système à un compte SoundTouch™ existant........................................ 22
Téléchargement et installation de l’application SoundTouch™ .......................... 22
Connexion du système à votre réseau Wi-Fi® ......................................................... 22
CEC (Consumer Electronics Control) ......................................................................... 24
Testez la fonctionnalité CEC sur vos sources connectées en HDMI™ ................. 24
Programmation de la télécommande en vue de contrôler votre source ........... 25
Sélection d’une source raccordée au système Bose
Sélection d’une source raccordée au téléviseur ..................................................... 26
........................................................................................ 27
SoundTouch™ ................................................................................................................ 27
Technologie sans fil Bluetooth® ................................................................................ 27
AUX. LAT. ........................................................................................................................ 27
®
............................................ 26
®
..................... 28
Utilisation de SoundTouch™
Accès à SoundTouch™ .......................................................................................................... 29
Utilisation de l’application SoundTouch™ ............................................................... 29
Utilisation de la source SoundTouch™ ..................................................................... 29
6 - Français

Sommaire
Bluetooth
Jumelage d’un appareil compatible Bluetooth® ............................................................. 30
Connexion à un appareil compatible Bluetooth
Utilisation de la touche ................................................................................ 31
Utilisation de la fonction Bluetooth® sur l’appareil jumelé .................................. 31
Obtention des informations système
Utilisation du menu système ............................................................................................. 32
Messages d’erreur ........................................................................................................ 33
Indicateur d’état du module Acoustimass
Entretien
Résolution des problèmes ................................................................................................. 34
Si votre console ne détecte pas le module Acoustimass® .................................... 37
Messages d’erreur lors de l’étalonnage audio ADAPTiQ® ...................................... 37
Restauration des réglages d’usine du système ...................................................... 38
Réinitialisation d’une touche de source sur la télécommande ........................... 38
Connecteurs d’assistance technique sur le module Acoustimass® .................... 38
Nettoyage ............................................................................................................................... 39
Service client ......................................................................................................................... 39
Garantie limitée .................................................................................................................... 39
Caractéristiques techniques .............................................................................................. 39
®
®
jumelé .............................................. 31
®
..................................................................... 33
Annexe: utilisation d’un ordinateur pour la configuration
Informations importantes relatives à la configuration ................................................. 40
Utilisation d’un ordinateur de bureau pour la configuration ............................... 40
Configuration du système à l’aide d’un ordinateur ........................................................ 40
Français - 7

Introduction
À propos de votre système home cinéma
SoundTouch™ 130
Grâce au système home cinéma SoundTouch™ 130, profitez de la qualité audio
®
Bose
pour vos sources vidéo, de la fonction SoundTouch™ et de la technologie
Bluetooth
Caractéristiques du système
• Le traitement audio avancé de Bose offre un son naturel et authentique.
• Le système de calibrage audio ADAPTiQ
• L’affichage permet d’accéder aux paramètres et aux informations du système.
• La connectivité HDMI
qualité provenant de vos sources connectées.
• Le système prend en charge la fonctionnalité CEC (Consumer Electronics Control).
• La télécommande universelle programmable peut contrôler votre téléviseur,
votre récepteur câble/satellite et vos autres sources connectées.
• Le module Acoustimass
percutantes.
• Il est possible d’installer la barre de son sur un mur (kit vendu séparément).
• L’adaptateur pour réseau sans fil SoundTouch
SoundTouch
®
.
™
facilite la configuration et garantit un son de grande
®
sans fil dissimulable offre des basses profondes
™
et Bluetooth® sur votre système.
®
optimise la qualité du son.
™
permet d’activer les fonctions
SoundTouch™
SoundTouch™ produit un son clair et ample via une liaison sans fil utilisant votre
réseau Wi-Fi domestique. Si vous disposez d’un réseau Wi-Fi
écouter votre musique préférée dans n’importe quelle pièce.
Fonctions SoundTouch™
• Accès sans fil aux stations radio et services musicaux sur Internet, ainsi qu’à la
bibliothèque musicale enregistrée sur votre ordinateur.
• Accès rapide à votre musique favorite grâce à vos propres présélections.
• Configuration sans fil à l’aide de votre smartphone ou tablette.
• Utilisation de votre réseau Wi-Fi existant.
• Diffusion de musique sur des appareils compatibles Bluetooth
• Application gratuite SoundTouch
• Il suffit d’ajouter des composants supplémentaires à tout moment pour pouvoir
écouter votre musique dans davantage de pièces.
• La vaste gamme de systèmes audio Bose
adaptée à chaque pièce.
8 - Français
™
pour votre ordinateur, smartphone ou tablette.
®
permet de choisir la solution la mieux
®
, vous voilà prêt à
®
.
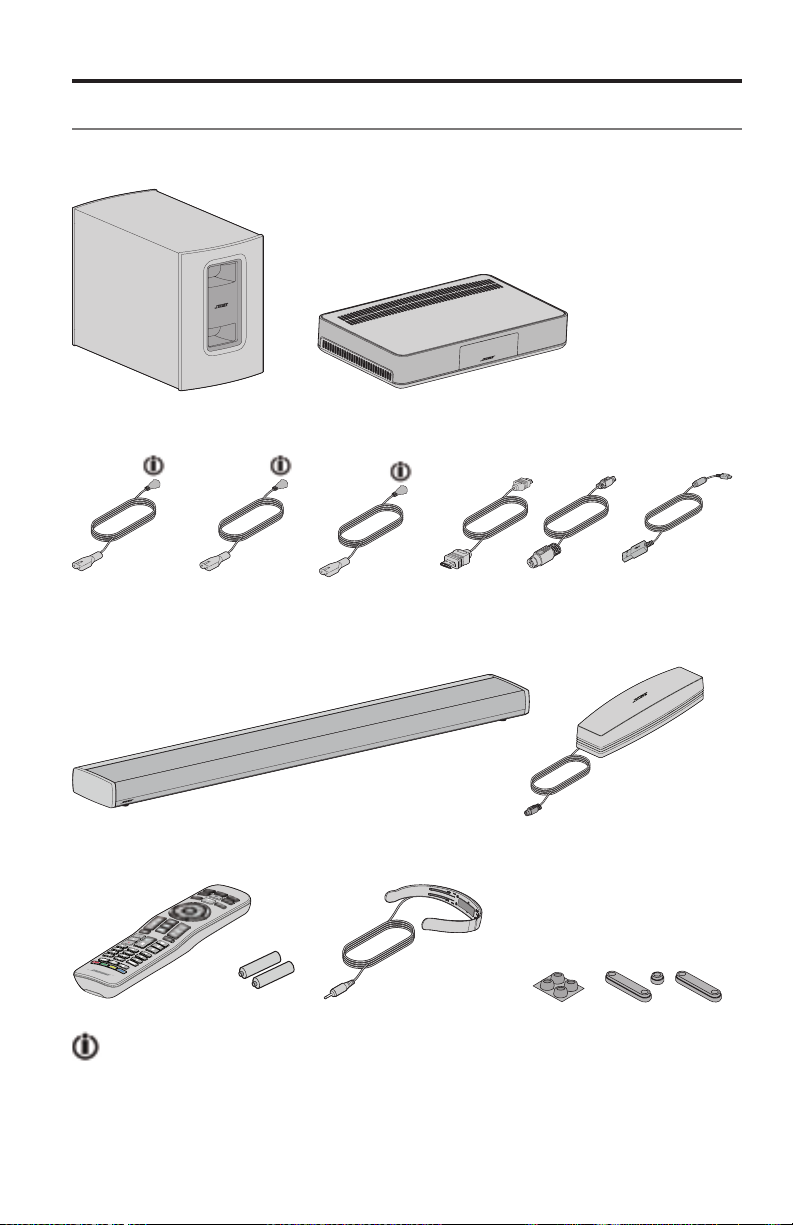
Introduction
Déballage du système
Déballez les éléments avec précaution et vérifiez la présence de tous
les composants décrits ci-dessous :
Module Acoustimass
Cordon
d’alimentation
du module
Acoustimass
Barre de son Adaptateur pour réseau
®
Cordon
d’alimentation
de la console
Console
Cordon
d’alimentation
de la barre
de son
Câble
HDMI
Câble
™
d’enceinte
sans fil SoundTouch™ série II
Câble
USB
Télécommande universelle
Casque ADAPTiQ
®
Pieds en caoutchouc
Le cordon d’alimentation approprié à votre région est fourni.
Remarque : si l’un des composants semble endommagé, n’essayez pas de
l’utiliser. Contactez immédiatement votre revendeur Bose
®
agréé ou
le service client de Bose. Consultez la liste d’adresses incluse dans le
carton d’emballage.
Français - 9

Introduction
Conseils de positionnement
Pour éviter les interférences sans fil, éloignez les autres appareils sans fil
du système. Tenez le système à l’écart de toute armoire métallique, de tout
composant audio/vidéo et de toute source de chaleur directe.
Module
Acoustimass
Barre de son • Placez la barre sonore devant votre téléviseur.
Console • Placez la console à proximité du téléviseur. Veillez à ne PAS placer
Adaptateur pour
réseau sans fil
SoundTouch
™
Exemple de positionnement du système
• Posez le module Acoustimass sur ses pieds en caoutchouc le long
®
du même mur que le téléviseur, ou le long d’un autre mur dans le
tiers avant de la pièce.
• Choisissez une surface plane et stable. Le module Acoustimass
risque de bouger sous l’effet des vibrations, en particulier s’il est placé
sur une surface lisse telle que du marbre, du verre ou du bois ciré.
• Placez le module à proximité d’une prise électrique.
• Ne placez pas la barre sonore dans un meuble fermé.
• Placez le module à proximité d’une prise électrique.
le téléviseur sur la console.
• Placez le module à proximité d’une prise électrique.
• Éloignez l’adaptateur de 0,3 à 1,8 m de la console, du module
Acoustimass et de tout autre appareil sans fil afin d’éviter
les interférences avec le réseau Wi-Fi.
10 - Français

Installation du module Acoustimass
Fixation des pieds en caoutchouc au
moduleAcoustimass
Fixez les pieds en caoutchouc au module Acoustimass afin de protéger votre sol.
1. Retournez le module Acoustimass sur une surface souple afin de ne pas
l’endommager.
2. Fixez les pieds en caoutchouc sous le module Acoustimass.
Pied en caoutchouc
Base du module Acoustimass
3. Placez le module Acoustimass sur ses pieds.
Attention : lorsque vous utilisez le module Acoustimass, veillez à ne pas le
poser sur sa face avant ou arrière, sur le côté ou à l’envers.
®
4. Retirez tous les films protecteurs, faute de quoi ils pourraient avoir un effet
négatif sur les performances acoustiques.
Français - 11

Installation du module Acoustimass
®
Raccordement du module Acoustimass
àlaprise secteur
1. Raccordez le cordon d’alimentation au connecteur du module
Acoustimass.
2. Branchez le cordon d’alimentation à une prise électrique.
12 - Français

Installation de la console
Raccordement de la console au téléviseur
Utilisez le connecteur HDMI de votre téléviseur portant la marque ARC ou
Audio Return Channel, s’il est disponible. Si votre téléviseur n’est pas muni d’un
connecteur HDMI ARC, reportez-vous à la page 14.
Utilisation du connecteur HDMI™ ARC
Utilisez le câble HDMI Bose® pour raccorder la console au téléviseur.
1. Débranchez vos sources raccordées via HDMI au téléviseur, à savoir
récepteurs câble/satellite, lecteurs de DVD ou de disques Blu-ray Disc
consoles de jeux.
2. Branchez l’une des extrémités du câble HDMI Bose
la console.
®
au connecteur TV de
™
ou
3. Branchez l’autre extrémité du câble HDMI au connecteur HDMI de votre
téléviseur.
Français - 13

Installation de la console
Téléviseurs non munis d’un connecteur HDMI™ ARC
Si votre téléviseur ne dispose pas d’un connecteur HDMI ARC, il peut être
nécessaire de procéder à une connexion secondaire à la console, notamment à
l’aide d’un câble audio stéréo analogique, optique ou coaxial. Sans cette connexion,
il est possible que vous ne puissiez pas reproduire le son du système Bose
Cas d’utilisation d’une connexion secondaire:
• Vous utilisez des sources internes (notamment des applications Internet ou
des antennes par liaison radio).
• Vous connectez des sources à votre téléviseur.
Reportez-vous à la notice d’utilisation de votre téléviseur pour plus d’informations.
Conseil : si votre téléviseur dispose de connecteurs audio IN et OUT, utilisez le
connecteur audio OUT.
®
.
Raccordement de la console à d’autres sources
Raccordement de sources compatibles avec la
technologie HDMI™
Vous pouvez raccorder la console à d’autres sources, notamment à un récepteur
câble/satellite, à un lecteur de DVD ou de disques Blu-ray Disc
console de jeux à l’aide d’un câble HDMI (vendu séparément). Si votre source
n’est pas compatible HDMI, reportez-vous à la section page 15 pour connaître
les configurations nécessaires avec les appareils ne prenant pas en charge la
technologie HDMI.
1. Branchez l’une des extrémités du câble HDMI au connecteur HDMI (OUT)
de votre source.
2. Branchez l’autre extrémité du câble HDMI au connecteur HDMI de la console.
Par exemple, pour raccorder une console de jeux, branchez un câble HDMI au
connecteur GAME.
Raccordez les autres
sources au connecteur HDMI
approprié sur la console.
™
, ou à une
14 - Français

Installation de la console
Raccordement de sources non compatibles avec la
technologie HDMI™
Si votre source n’est pas compatible HDMI, raccordez-la à votre téléviseur à
l’aide de câbles audio et vidéo (vendus séparément). Reportez-vous à la notice
d’utilisation de votre téléviseur pour plus d’informations.
Conseil : si votre source dispose de connecteurs audio IN et OUT, utilisez le
connecteur audio OUT.
Raccordement à des sources audio uniquement
Si votre source audio uniquement, notamment votre lecteur multimédia ou votre
lecteur de CD, n’est pas compatible HDMI :
1. Raccordez votre source au connecteur Optical, Coaxial, Analog ou
AUX. LAT. ( ) de votre console.
Remarque : vous pouvez utiliser un câble audio optique, coaxial ou
2. Sélectionnez l’entrée optique, coaxiale, analogique ou AUX. LAT.
correspondant à la source. Vous pouvez définir ces paramètres à l’aide du
menu système (reportez-vous à la page 32).
analogique de 3,5 mm (vendu séparément).
Raccordement de l’adaptateur pour
réseausans fil SoundTouch™
Raccordez l’adaptateur au connecteur Bose® link de la console.
Français - 15

Installation de la barre de son
Raccordement de la barre de son
1. Insérez l’une des extrémités du câble d’enceinte dans le connecteur Speaker
Connection de la console.
2. Insérez l’autre extrémité du câble d’enceinte dans le connecteur de la
barre de son.
16 - Français
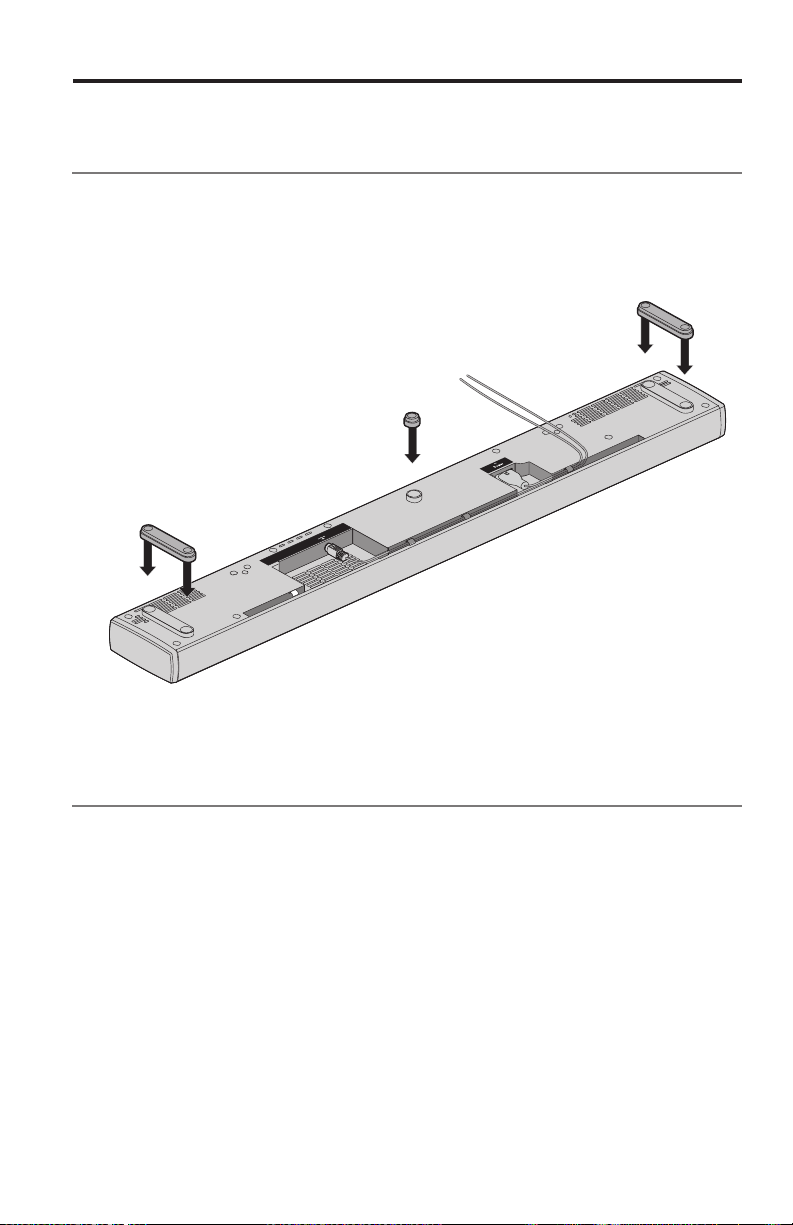
Installation de la barre de son
Fixation des pieds d’extension en option
àlabarre de son
Fixez les pieds d’extension en option pour élever la barre de son en vue de laisser
un espace sous cette dernière.
1. Retournez la barre de son sur une surface souple afin de ne pas l’endommager.
2. Fixez les pieds d’extension à la base de la barre de son.
3. Placez la barre de son sur ses pieds.
Fixation murale de la barre de son
Vous pouvez installer la barre de son sur un mur. Pour acheter le kit de montage mural
WB-135, contactez votre représentant local Bose ou consultez le site www.Bose.com
ATTENTION : n’utilisez aucun autre support pour fixer la barre de son.
Français - 17
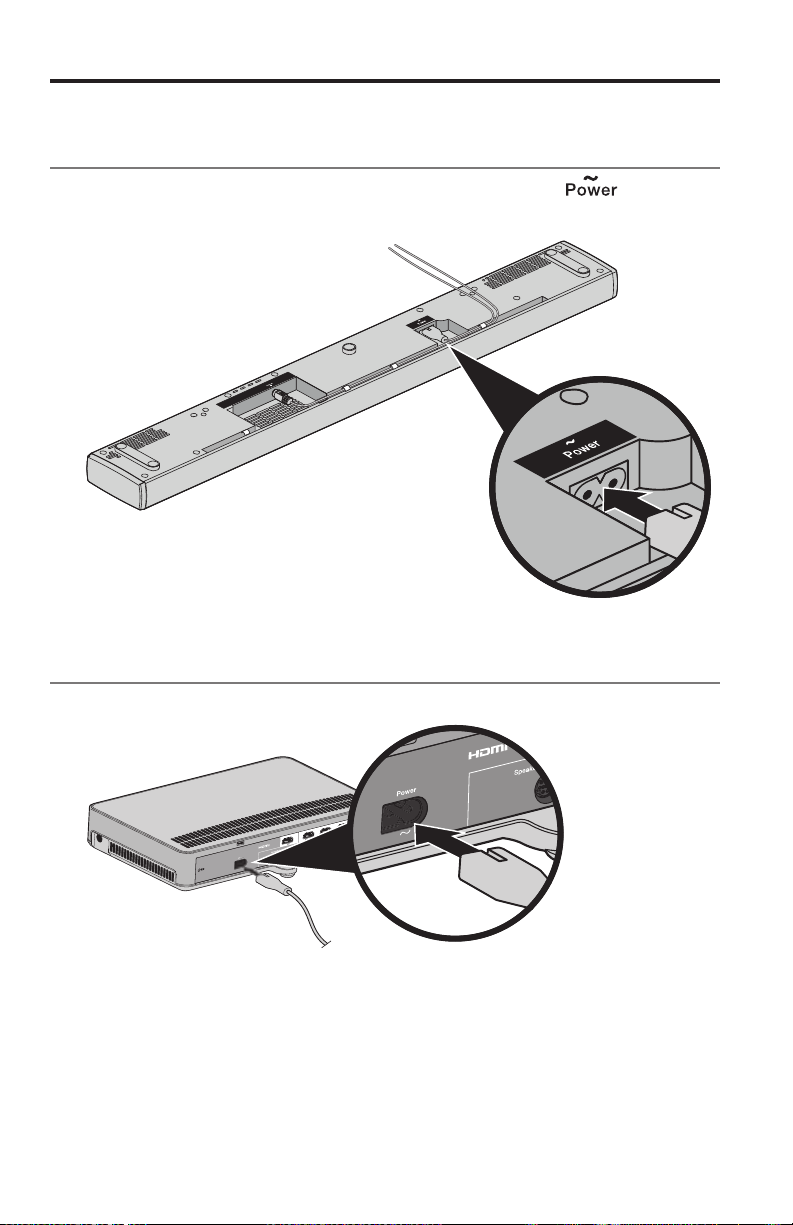
Raccordement du système à l’alimentation électrique
Raccordement de la barre de son
àlaprisesecteur
1. Raccordez le cordon d’alimentation secteur au connecteur de la barre
de son.
2. Branchez le cordon d’alimentation à une prise électrique.
Raccordement de la console à la prise secteur
1. Raccordez le cordon d’alimentation au connecteur Power de la console.
2. Branchez le cordon d’alimentation à une prise électrique.
18 - Français
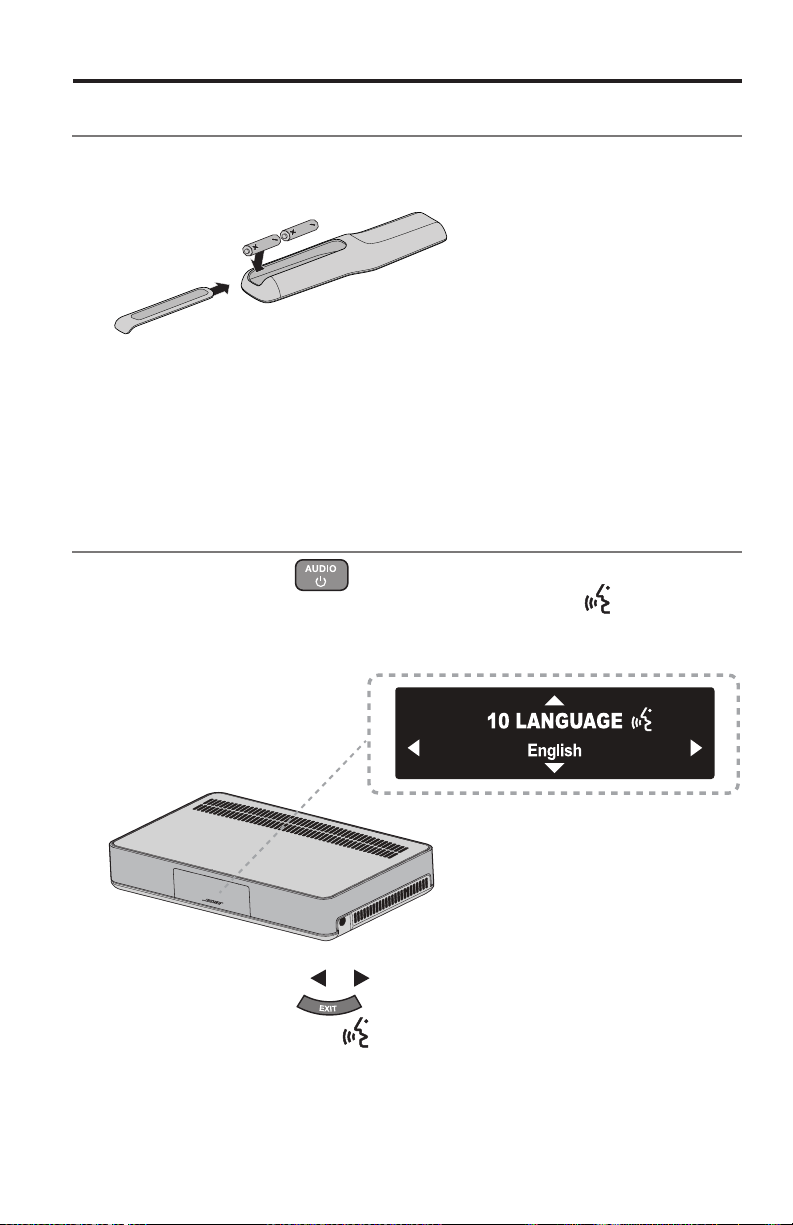
Démarrage du système
Mise en place des piles de la télécommande
1. Ouvrez le compartiment à piles situé à l’arrière de la télécommande en le
faisant glisser.
2. Insérez les deux piles AA (IEC-LR6) 1,5 V fournies. Faites correspondre
les symboles + et – des piles avec les repères + et – situés à l’intérieur du
compartiment.
3. Remettez le couvercle en place.
Mise sous tension du système et sélection
de la langue
1. Appuyez sur la touche de la télécommande.
La console se met sous tension et l’indication 10 LANGUE
Remarque : après le démarrage initial, l’afficheur indique la dernière source
utilisée.
s’affiche.
2. Appuyez sur les touches et pour sélectionner votre langue.
3. Appuyez sur la touche
Conseil : recherchez l’icône
sélectionné la langue correcte.
Le système se met hors tension après seize minutes d’inactivité. Vous pouvez
désactiver la mise hors tension automatique à l’aide du menu système (reportezvous à la page 32).
.
dans le menu système si vous n’avez pas
Français - 19

Démarrage du système
Vérification du son
1. Mettez votre téléviseur sous tension.
2. Si vous utilisez un récepteur câble/satellite ou une source auxiliaire, mettez
cette source sous tension.
Conseil : si votre source auxiliaire est raccordée à votre téléviseur,
3. Mise sous tension du système.
4. Appuyez sur la touche de source appropriée.
5. Vérifiez que le son provient de la barre sonore.
Remarque : si la barre de son n’émet aucun son, reportez-vous à la section
6. Appuyez sur la touche
pas des haut-parleurs du téléviseur.
Remarque : si le son provient des haut-parleurs du téléviseur, reportez-vous à
sélectionnez l’entrée TV appropriée. Il est possible que vous deviez
utiliser une autre télécommande.
« Résolution des problèmes », page 34.
de la télécommande. Vérifiez que le son ne provient
la section « Résolution des problèmes », page 34.
20 - Français
 Loading...