


Bose® FreeSpace® DS 100SE Loudspeaker
* For use by trained installers only.
* Kun til brug for erfarne installatører.
* Montage ausschließlich durch ausgebildetes Installationspersonal.
* Para uso exclusivo de instaladores capacitados.
* Réservé aux installateurs ayant suivi une formation.
* Solo per l’uso da parte di installatori professionisti.
* Uitsluitend voor gebruik door ervaren installateurs.
* Ska endast användas av utbildade installatörer.
Installation Guide*
Installationsvejledning*
Installationsanleitung*
Guía de instalación*
Guide d’installation*
Guida all’installazione*
Installatiehandleiding*
Installationsanvisning*
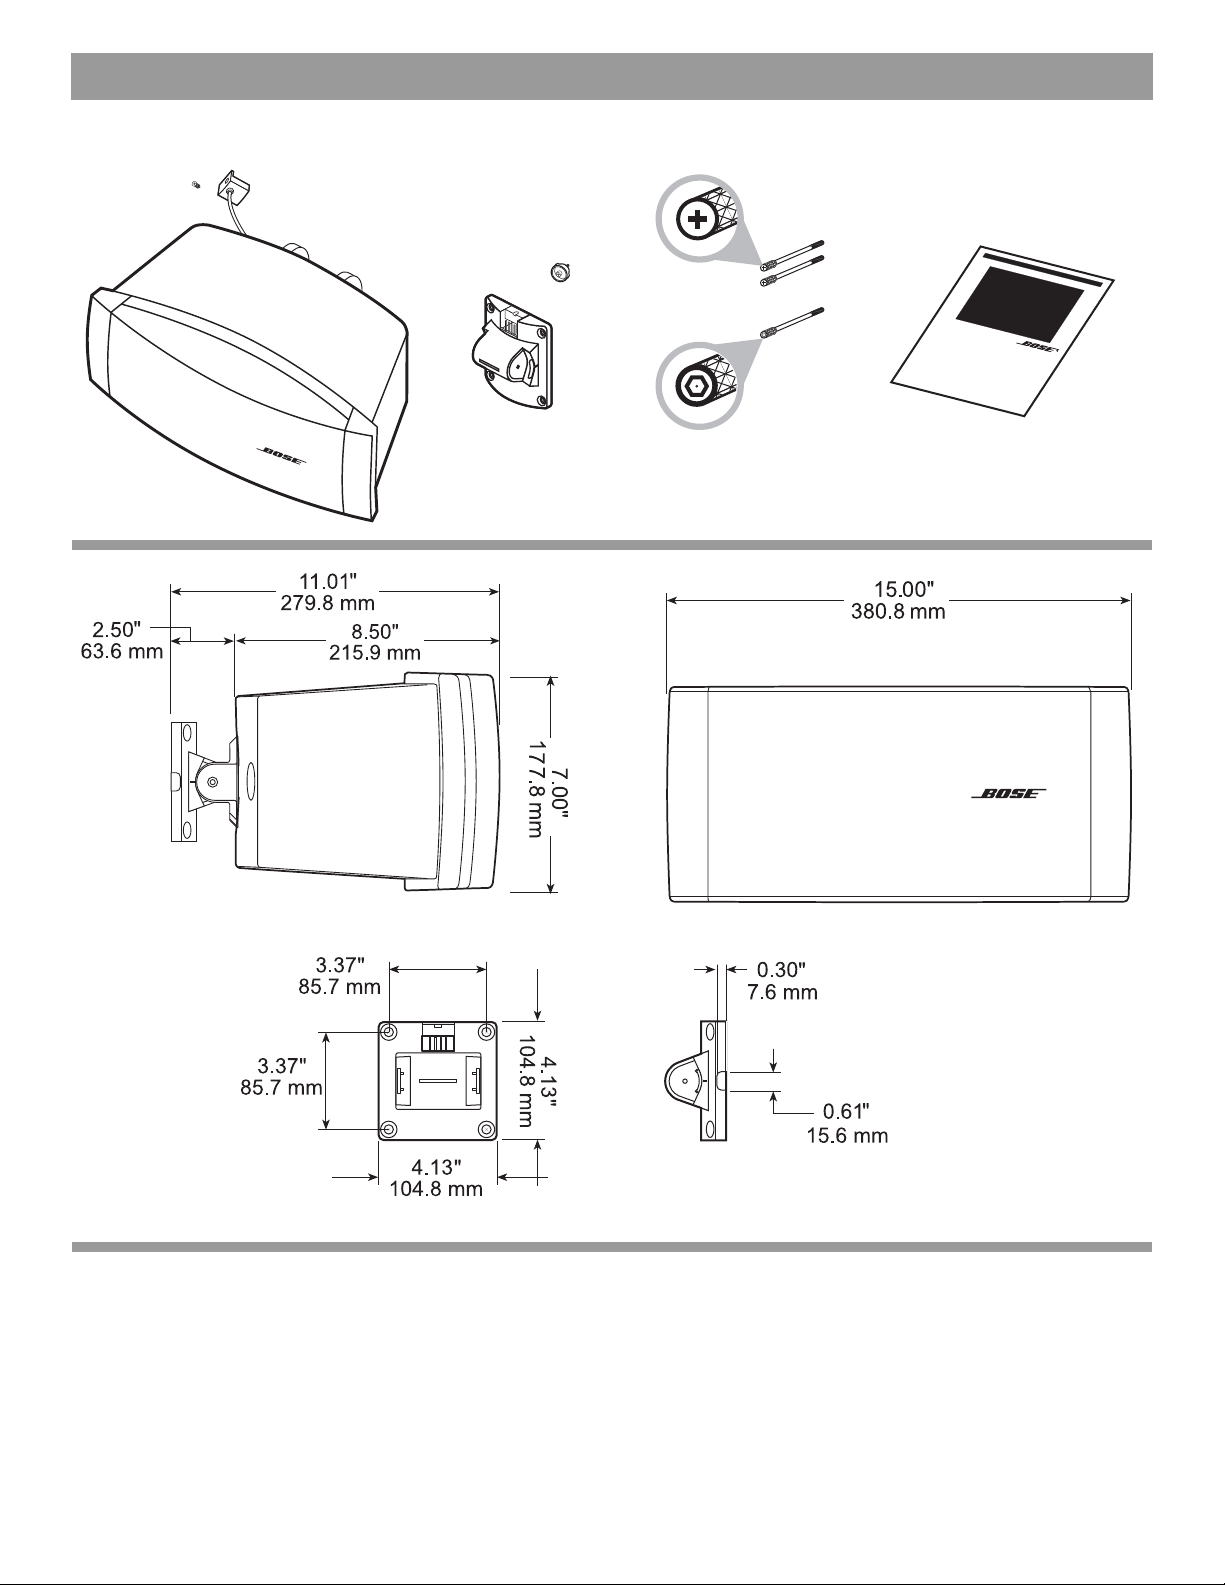
P2 Phillips head fasteners (2)
3mm pin-in-hex head
fastener (1)
FreeSpace® DS 100SE Loudspeaker
*S
*M
*P
ara
*Rése
*S
olo
*Uitsluitend voor gebru
ka
enda
*For use by trained i
*Kun til brug for erfar
ontage
uso
rvé aux instal
per l’uso da
st
exclusivo de instalador
a
nvända
Bose
®
FreeSpace
®
DS 100SE Loudspeaker
Installation Guide*
Installationsvejledning*
Installationsanleitung*
n
stallers only.
ausschl
n
e
i
nstallatøre
i
eß
lich durch ausgebi
r.
l
ateurs
l
detes
es
parte di inst
ayant
capacitad
Instal
suivi une
l
a
t
os.
a
ionspersona
i
k door ervare
llatori professionisti.
fo
rm
s av
at
i
ut
on
b
.
i
n
lda
instal
de i
n
lat
stalla
eurs.
tö
r
er.
Guía de instalación*
Guide d’installation*
Guida
all’installazione*
Installatiehandleiding*
l
.
Installationsanvisning*
Loudspeaker weight with bracket assembly 14lb (6.35kg) Højttalers vægt med beslag Lautsprechergewicht mit Halterungsvorrichtung Peso del altavoz con conjun
to de soporte
Loudspeaker weight with bracket assembly
Peso del diffusore con assemblaggio della
staffa
Gewicht van luidsprekerbox met montagebeugel
Högtalarens vikt med monteringskonsol
2

Installation Requirements
Installation
• Choose a mounting position, method, and hardware consistent
with local building codes and regulations.
• Due to various construction metho
the hardware for securing the loudspeaker to the mounting surface
is not supplied. Consult a building professional for the proper
mounting hardware before installing the loudspeaker.
• Ensure the mounting surface and the metho
loudspeaker to the surface is structurally capable of supporting
the weight of the loudspeaker. A 10:1 safety weight ratio is
r
ecommended.
• It is the responsibility of the installer
loudspeaker installation. Failure to properly install the loudspeaker
could result in damage, injury, or death.
ds and materials used today,
d of attaching the
to ensure the safety of the
Installation
• Vælg monteringssted, -metode og tilbehør, der er i
overensstemmelse med lokale byggevedtægter og -bestemmelser.
• På grund af forskellige konstruktio
bruges i dag, medfølger der ikke hardware til at fastgøre
højttaleren på monteringsoverfladen. Kontakt en professionel
fagmand for at få den korrekte monteringshardware, inden du
installerer højttaleren.
• Kontroller, at monteringsoverfladen og måden af fastgøre
høj
ttaleren til overfladen understøtter højttaler ens vægt. Et sikkert
10:1 vægtforhold anbefales.
• Det er installatørens ansvar at
installationen af højttaleren. Hvis højttaleren installeres forkert, kan
det resultere i skader, personlige skader eller dødsfald.
nsmetoder og materialer, der
kontrollere sikkerheden ved
Installation
• Wählen Sie eine Montageposition und -methode sowie
Werkzeuge, die den örtlichen Bauvorschriften entsprechen.
• Aufgrund der verschiedenen heute g
und -materialien wird das Werkzeug für die Sicherung der
Lautsprecher auf der Montagefläche nicht mitgeliefert. Fragen Sie
eine Fachkraft nach den geeigneten Montagewerkzeugen, bevor
Sie den Lautsprecher anbringen.
• Vergewissern Sie sich, dass die Montagefläche und die Methode
zum Befestigen
geeignet ist, um das Gewicht des Lautsprechers zu tragen. Es wird
ein Sicherheitsgewichtsverhältnis von 10:1 empfohlen.
• Die Gewährleistung der Sicherheit der
obliegt demjenigen, der den Lautsprecher anbringt. Die fehlerhafte
Montage des Lautsprechers kann zu Beschädigungen,
Verletzungen oder zum Tod führen.
des Lautsprechers an der Fläche strukturell
ebräuchlichen Baumethoden
Lautsprechermontage
Instalación
• Seleccione una posición, un método y accesorios de montaje que
respeten los códigos y normas de construcción locales.
• Debido a los distintos métodos de construcción y los materiales
empleado
fijar el altavoz a la superficie de montaje. Consulte con un
profesional de la construcción cuáles son los accesorios de
montaje adecuados antes de instalar el altavoz.
• Compruebe que la superficie de montaje y el método para fijar el
altavoz
el peso del altavoz. Se recomienda utilizar una r
seguridad de 10:1.
• Es responsabilidad del instalador garantizar la seguridad de la
insta
altavoz, pueden producirse daños, lesiones o muerte.
s en la actualidad, no se suministran los accesorios para
a la superficie son capaces estructuralmente de soportar
elación de peso de
lación del altavoz. En caso de no instalar correctamente el
Installation
• Pour le montage, choisissez une position, une méthode et des
composants conformes aux codes et réglementations en vigueur.
• En raison de la diversité des méthodes et matériaux de
construc
la surface de montage ne sont pas fournis. Avant d’installer
l’enceinte, consultez un professionnel du bâtiment pour connaître
les accessoires de montage adaptés.
• La surface de montage et les accessoires de fixation de l’enceinte
sur celle-ci do
le poids de l’enceinte. Il est conseillé de se baser su
poids de sécurité de 10:1.
• Il est de la responsabilité de l’installeur de veiller à la sécurité de
l’
l’enceinte est susceptible de provoquer des dommages matériels,
des blessures ou la mort.
tion existants, les accessoires de fixation de l’enceinte sur
ivent être structurellement capables de supporter
r un rapport de
installation de l’enceinte. Toute installation incorrecte de
Installazione
• Scegliere utensili, un metodo e una posizione di montaggio che
siano conformi alle normative e ai regolamenti edilizi locali.
• A causa dei diversi metodi di costruzione e
utensili necessari per fissare il diffusore alla superficie di
montaggio non vengono forniti. Prima di installare il diffusore,
rivolgersi a un professionista del settore edile per informazioni
sugli utensili di montaggio più idonei.
• Verificare che la superficie di montaggio e il
montare il diffusore alla superficie siano strutturalmente in grado di
supportare il peso del diffusore. È consigliabile un rapport o di 10:1.
• L’installatore è tenuto a garantire l
diffusore. Un’installazione non idonea del diffusore potrebbe
causare danni a cose e persone, lesioni o decesso.
a sicurezza dell’installazione del
materiali in uso, gli
metodo utilizzato per
Installatie
• Kies een locatie, een montagewijze en materiaal welke in
overeenstemming zijn met de plaatselijke bouwverordeningen en
regelgeving.
• Vanwege de verschillende constructiemetho
tegenwoordig worden gebruikt, wordt het materiaal waarmee de
luidsprekerbox op het bevestigingsoppervlak moet worden
vastgezet niet meegeleverd. Voordat u de luidsprekerbox
installeert, moet u contact opnemen met een vakman uit de bouw
voor het juiste bevestigingsmateriaal.
• Controleer of het bevestigingsoppervlak en de manier waarop de
luids
prekerbox daarop wordt bevestigd, leiden tot een constructie
die in staat is het gewicht van de luidspreker te dragen. Een
v
eiligheid-gewichtratio van 10:1 wordt aanbevolen.
• De installateur is verantwoordelijk voor
de luidsprekerbox. Als de luidsprekerbox niet correct wordt
geïnstalleerd, kan dit schade, lichamelijk letstel of de dood tot
gevolg hebben.
den en -materialen die
een veilige installatie van
Installation
• Välj placering, tillvägagångssätt och hjälpmedel som
överensstämmer med lokala bestämmelser och normer.
• Med anledning att de olika metoder och material som används
, medföljer inga tillbehör för att sätta upp högtalarna. Fråga en
idag
fackman om vad du ska använda för att sätta fast högtalarna.
• Försäkra dig om att underlaget och
att sätta upp högtalarna kan bära högtalarnas vikt. Vi
r
ekommenderar att du väljer ett viktförhållande på 10:1.
• Det är installatören som ansvarar för att högtalar
ett säkert sätt. Högtalare som inte sätts fast på ett säkert sätt kan
orsaka kroppsliga och materiella skador samt även dödsfall.
den metod du tänker välja för
na installeras på
3
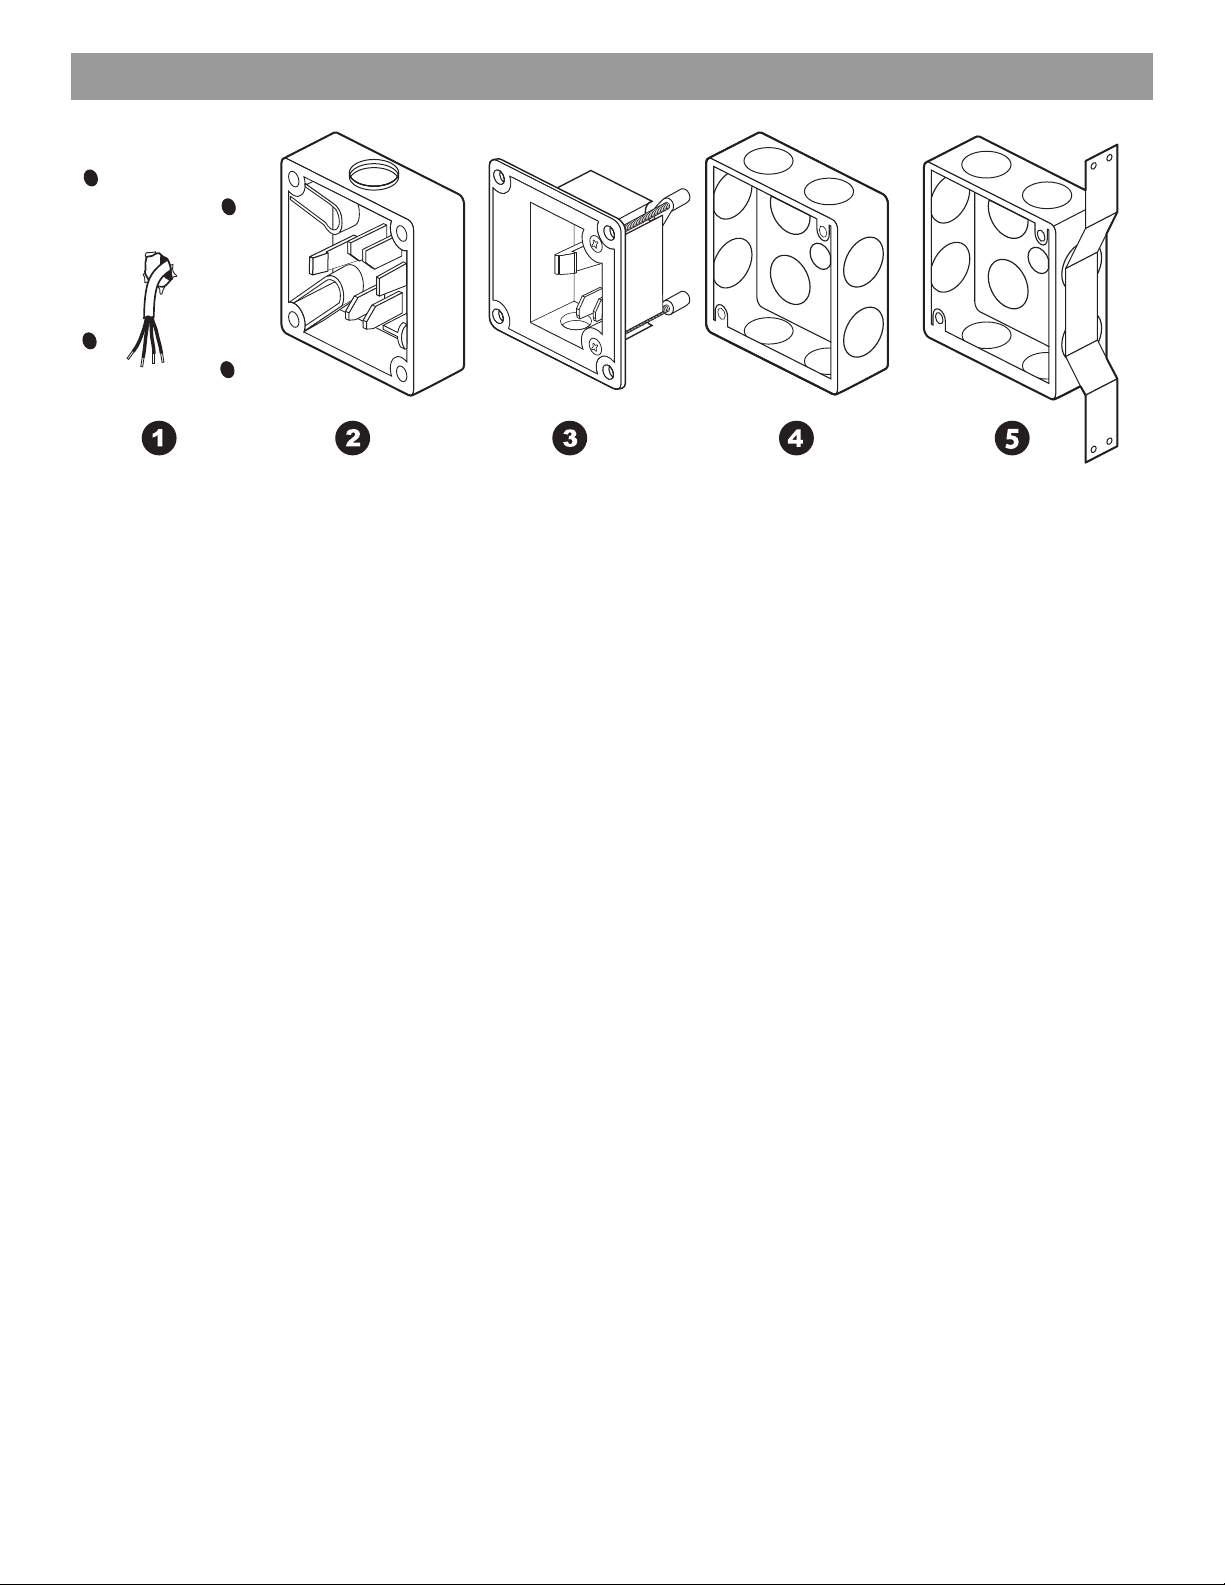
Installation Options
Mounting and junction box options
1. Direct mount (in-wall or on-wall wiring)
2. Bose
3. Bose
4. Standard steel 4" x 4" junction box (U.S. only)
5. Standard steel 4" x 4" junction box (U.S. only)
®
On-Wall Junction Box (accessory)
®
In-Wall Junction Box (accessory)
Indstillinger til montering og samlingsboks
1. Direkte montering (på væg eller i ophæng på væg)
2. Bose
3. Bose
4. Standard 4" x 4"-samlingsboks i stål (kun U.S.A.)
5. Standard 4" x 4"-samlingsboks i stål (kun U.S.A.)
®
-samlingsboks til montering på væggen (ekstraudstyr)
®
-samlingsboks til montering i væg (ekstraudstyr)
Montage- und Verbindungsdosenoptionen
1. Direkte Montage (Verkabelung unter oder über Putz)
2. Bose
3. Bose
4. 4" x 4" Standardstahl-Verbindungsdose (nur USA)
5. 4" x 4" Standardstahl-Verbindungsdose (nur USA)
®
Verbindungsdose für die Wandmontage (Zubehör)
®
Unterputz-Verbindungsdose (Zubehör)
Montage et options de la boîte de branchement
1. Montage direct (câblage encastré ou apparent)
2. Boîte de jonction pour montage mural en surface Bose
3. Boîte de jonction pour montage mural encastré Bose
4. Boîte de jonction standard 10 x 10 cm (USA uniquement)
5. Boîte de jonction standard 10 x 10 cm (USA uniquement)
®
(accessoire)
®
(accessoire)
Opzioni per il montaggio e la scatola di derivazione
1. Montaggio diretto (cablaggio a incasso o a parete)
2. Scatola di derivazione a parete Bose
3. Scatola di derivazione a incasso Bose
4. Scatola di derivazione standard in acciaio 10 cm x 10 c
5. Scatola di derivazione standard in acciaio 10 cm x 10 c
®
(opzionale)
®
(opzionale)
m (solo USA)
m (solo USA)
Verschillende montagewijzen
1. Rechtstreekse montage (bedrading in of op de wand)
2. Bose
3. Bose
4. Standaard stalen kabeldoos van 1
5. Standaard stalen kabeldoos van 1
®
-opbouwkabeldoos (accessoire)
®
-inbouwkabeldoos (accessoire)
0,2 x 10,2 cm (alleen VS)
0,2 x 10,2 cm (alleen VS)
Opciones de montaje y de la caja de conexiones
1. Montaje directo (cableado sobre o en la pared)
2. Caja de conexiones sobre pared Bose
3. Caja de conexiones en pared Bose
4. Caja de conexiones de acero estándar de 4
5. Caja de conexiones de acero estándar de 4
4
®
(accesorio)
®
(accesorio)
x 4 pulg. (sólo EE UU)
x 4 pulg. (sólo EE UU)
Montering och kopplingsdosan
1. Direktmontering (i eller på vägg)
2. Bose
3. Bose
4. Stål, 4 x 4 tum, kopplingsdo sa (endast USA)
5. Stål, 4 x 4 tum, kopplingsdo sa (endast USA)
®
kopplingsdosa på vägg (tillbehör)
®
kopplingsdosa i vägg (tillbehör)
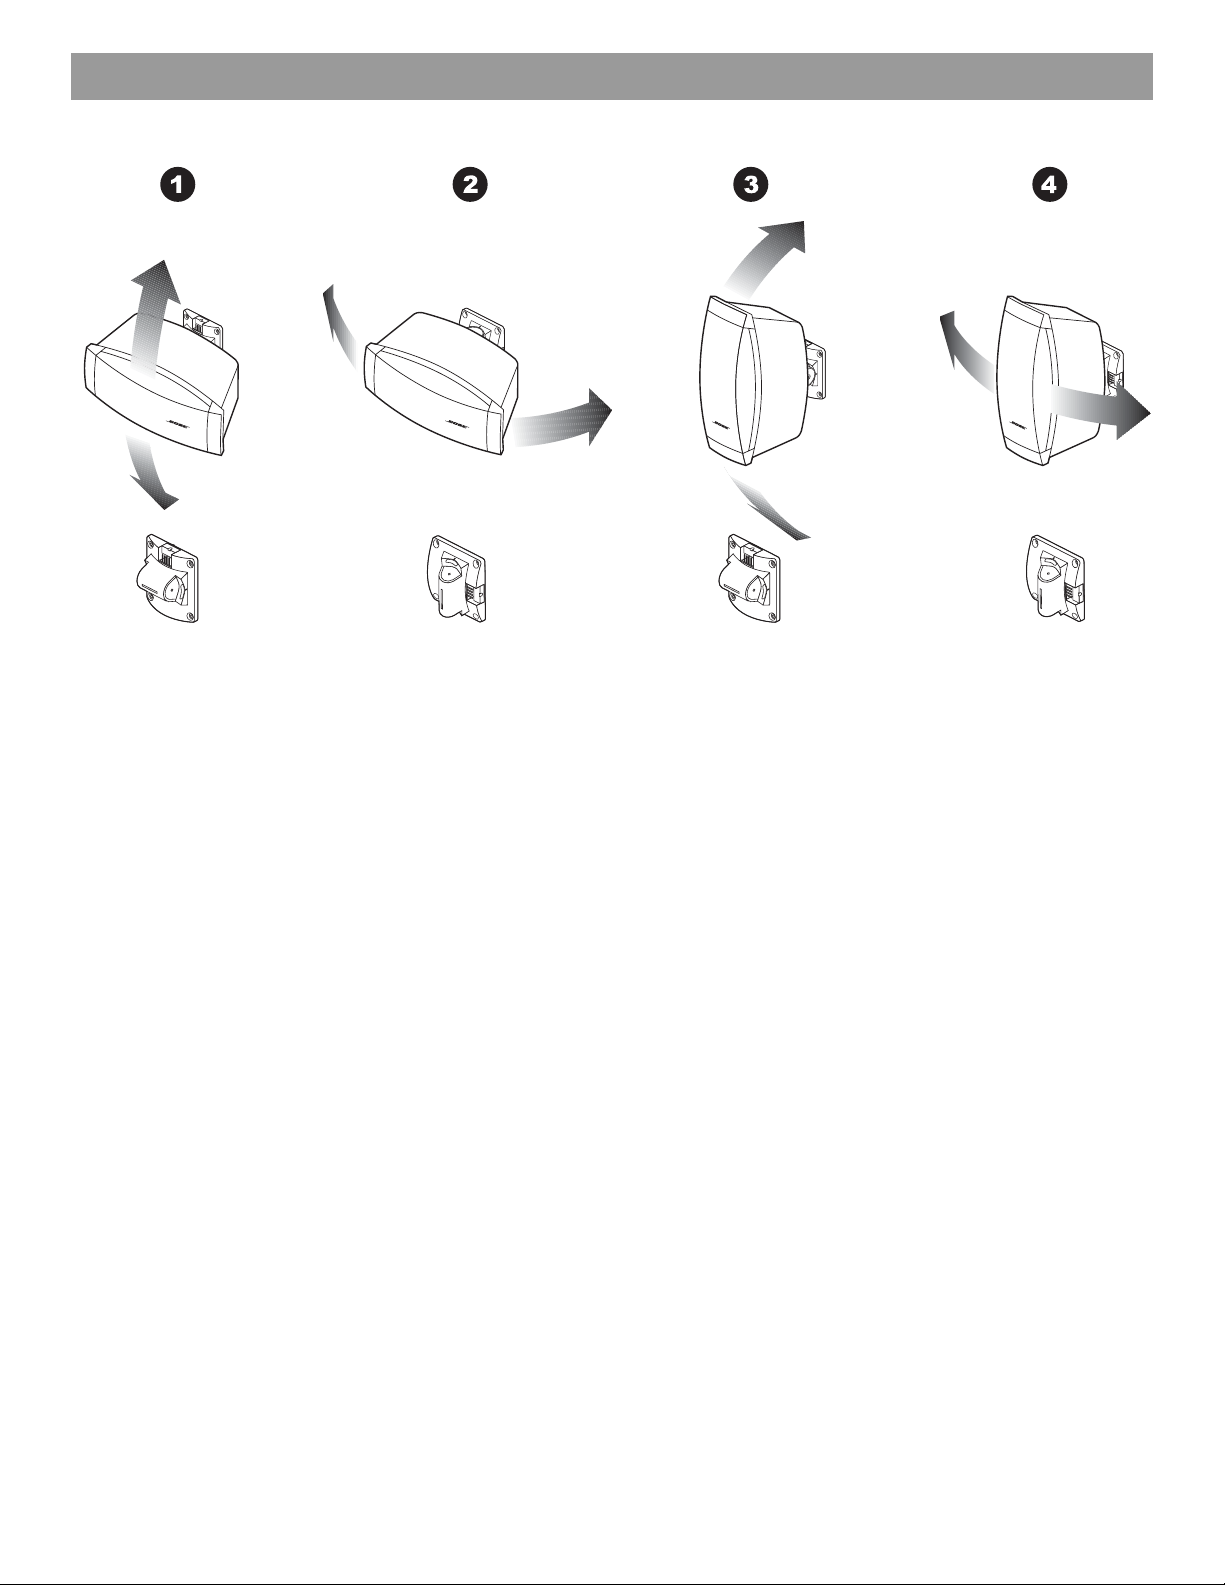
Installation Options
Loudspeaker orientation and angle
1. Horizontal and pitch — Adjustment range +45° – -45°
2. Horizontal and yaw — Adjustment range +30° – -30°
3. Vertical and pitch — Adjustmen t range +30° – -30°
4. Vertical and yaw — Adjustment range +45° – -45°
Højttalerretning og -vinkel
1. Vandret og hældning — Justeringsinterval +45° – -45°
2. Vandret og giring — Justeringsinterval +30° – -30°
3. Lodret og hældning — Justeringsinterval +30° – -30°
4. Lodret og giring — Justeringsinterval +45° – -45°
Lautsprecherausrichtung und Winkel
1. Horizontal und Drehung um Querachse — Einstellungsbereich +45° – -45°
2. Horizontal und Drehung um Hochachse — Einstellungsbereich +30° – -30°
3. Vertikal und Drehung um Querachse — Einstellungsbereich +30° – -30°
4. Vertikal und Drehung um Hochachse — Einstellungsbereich +45° – -45°
Orientación y ángulo de altavoz
1. Horizontal e inclinación — Intervalo de ajuste de +45° a -45°
2. Horizontal y oscilación — Intervalo de ajuste de +30° a -30°
3. Vertical e inclinación — Interva
4. Vertical y oscilación — Inter
lo de ajuste de +30° a -30°
valo de ajuste de +45° a -45°
Angle et orientation des enceintes
1. Horizontal et inclinaison verticale — Plage de réglage +45° – -45°
2. Horizontal et inclinaison latérale — Plage de réglage +30° – -30°
3. Horizontal et inclinaison verticale — Plage de
4. Horizontal et inclinaison latérale — Plage de réglage +45° – -45°
réglage +30° – -30°
Orientamento e angolazione diffusore
5. Orizzontale e angolazione alto/basso — Raggio di regolazione +45°– -45°
6. Orizzontale e angolazione destra/sinistra — Raggio di
r
egolazione +30°– -30°
7. Verticale e angolazione alto/basso — Raggio di regolazione +30°– -30°
8. Verticale e angolazione destra/sinistra — Raggio di regolazione +45°– -45°
Richting en hoek luidspreker
9. Helling bij horizontale montage — draaihoek +45° – -45°
10. Giering bij horizontale montag
11. Helling bij verticale
12. Giering bij verticale montage
montage — draaihoek +30° – -30°
e — draaihoek +30° – -30°
— draaihoek +45° – -45°
Högtalarorientering och vinkel
13. Horisontell och takvinkel — justeringsvinkel +45° – -45°
14. Horisontell och väggvinkel — justeringsvinkel +30° – -30°
15. Vertikal och takvinkel — justeringsvinkel +30° – -30°
16. Vertikal och väggvinkel — justeringsvinkel +45° – -45°
5
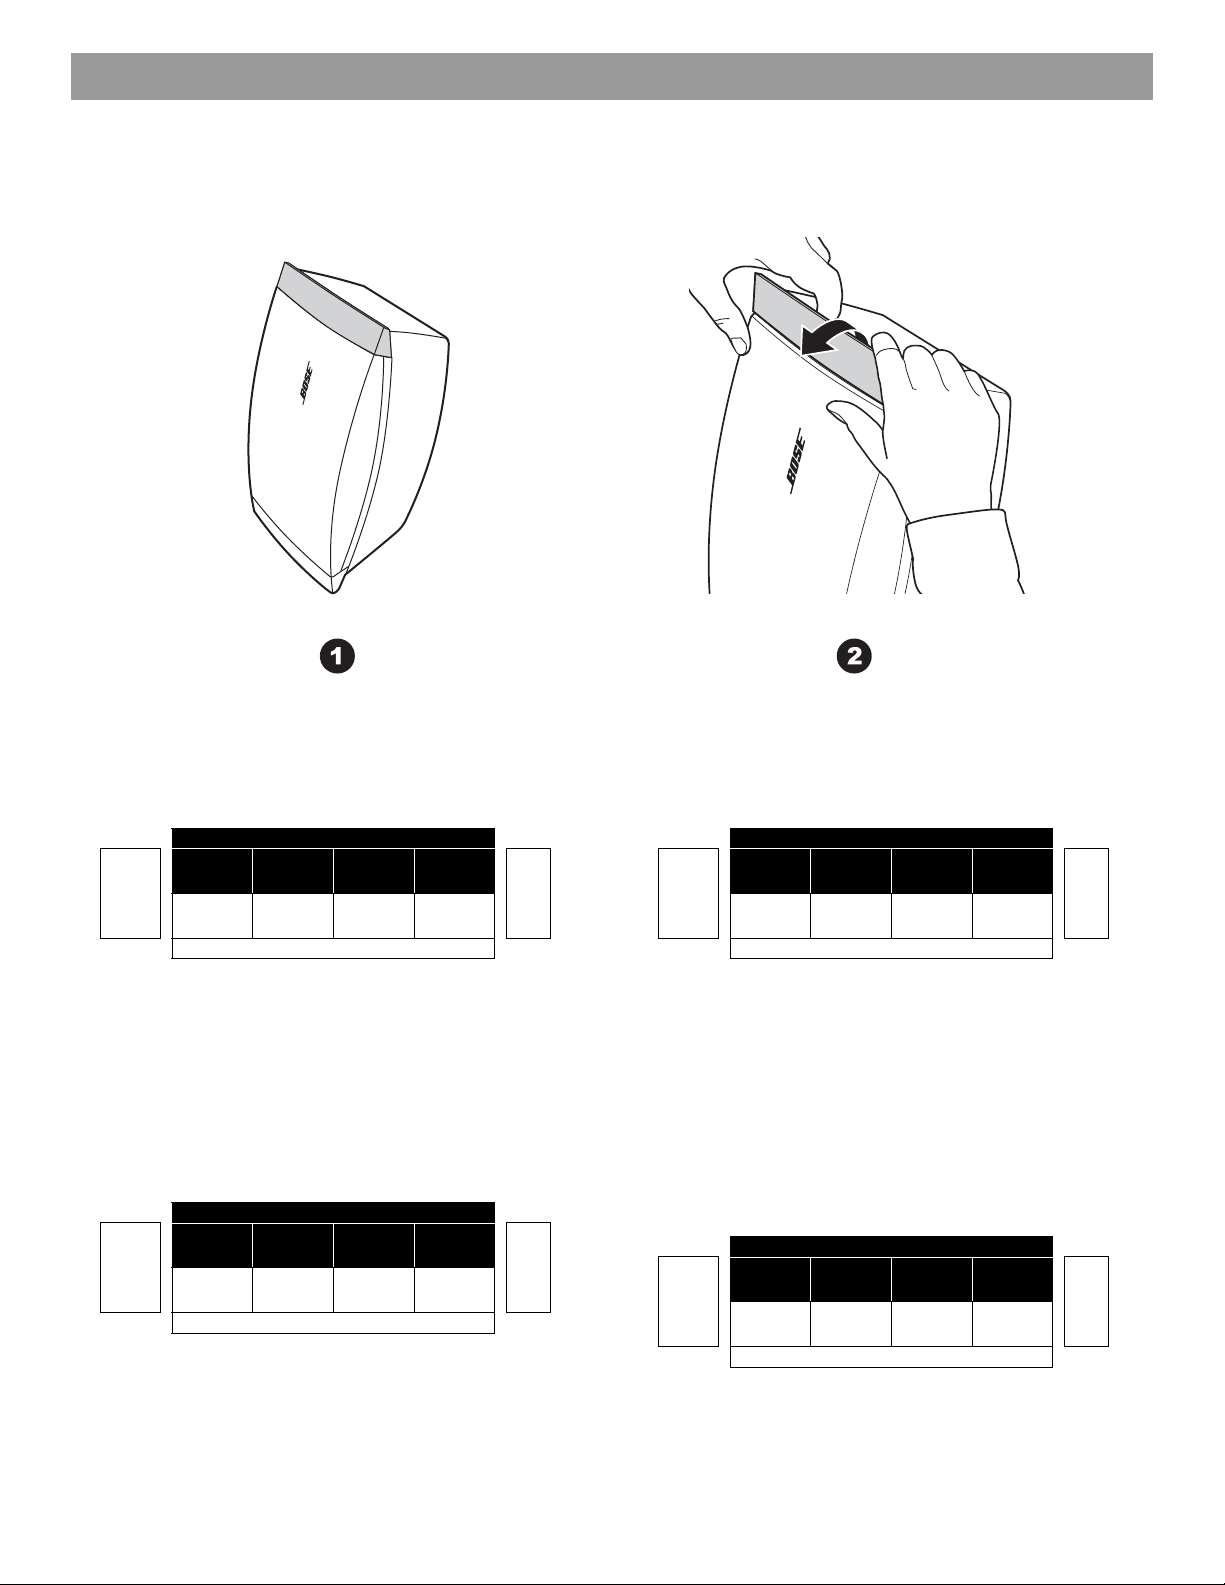
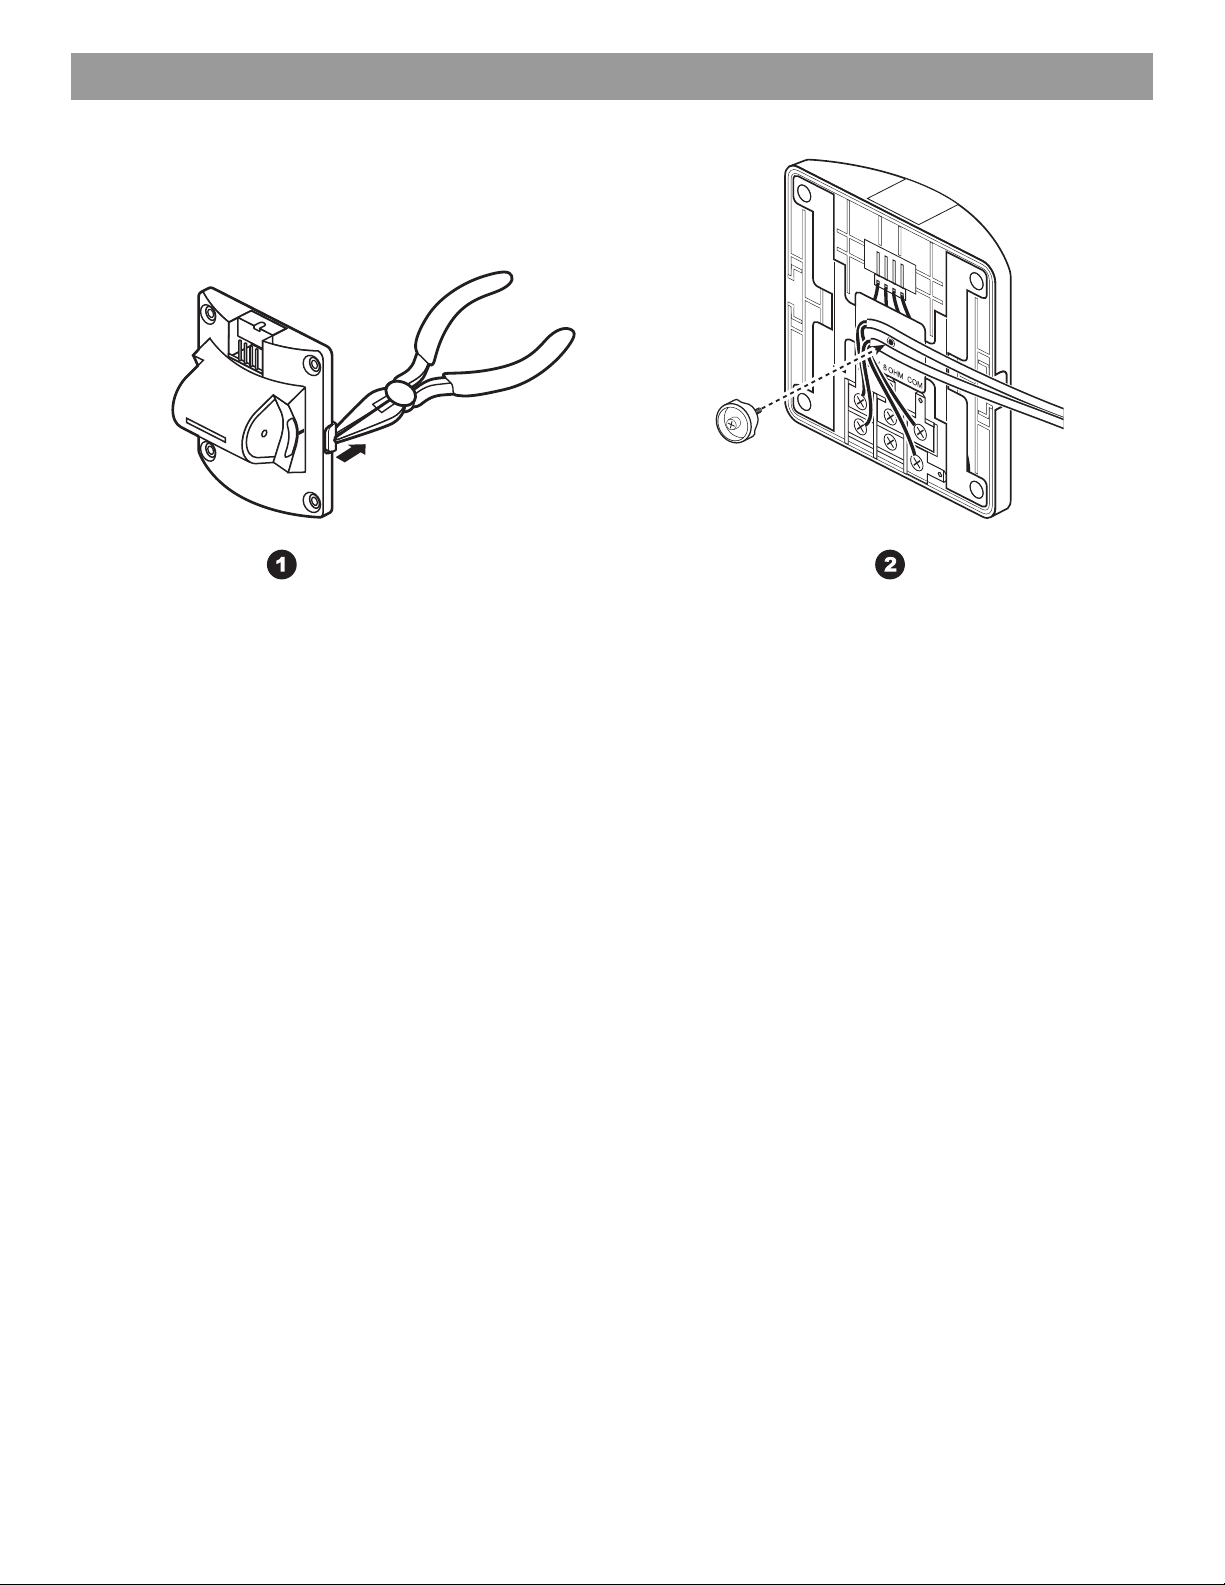
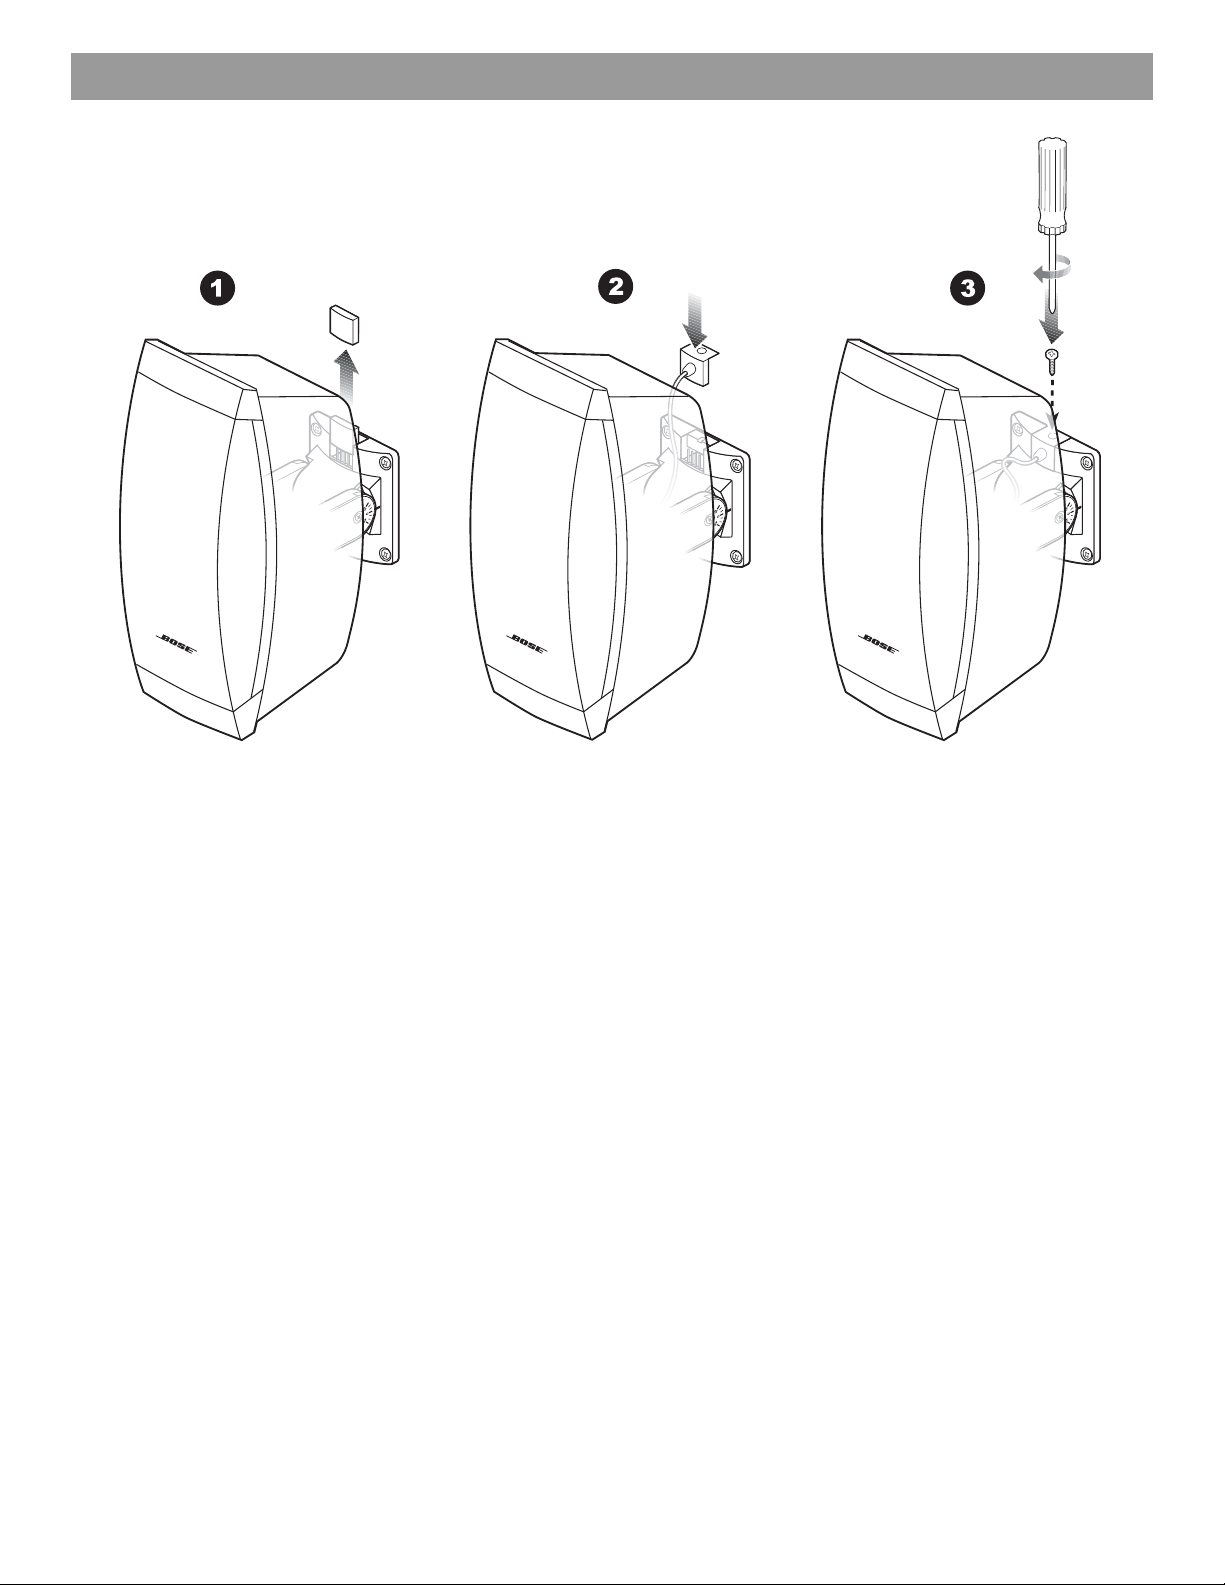
Removing End Cap and Accessing Tap Settings
Transformer tap setting
1. Position loudspeaker vertically with endcap closest to logo facing up.
2. Pull forward on endcap to remove.
3. Set tap by turning the thumb wh eel.
70V
12.5W* 25W 50W 100W
NC**
25W* 50W 100W NC**
100V
* Factory default ** NC: No Connection (do not use)
4. Press endcap into place — you should hear it click.
Note: If needed, you can remove the endcap and adjust the tap settings
after the loudspeaker is mounted.
8Ω
Indstilling af transformerudtag
1. Placer højttaler lodret med endebolten tættest på logo, der vender opad.
2. Træk fremad for at fjerne endebolten.
3. Indstil tap ved at dreje på tommelhjul.
70V
12.5W* 25W 50W 100W
NC**
25W* 50W 100W NC**
100V
* Fabriksstandard ** NC: Ingen forbindelse (undgå brug)
4. Tryk endebolten på plads - du skal høre et klik.
Bemærk: Hvis det er nødvendigt, kan du fjerne endebolten og justere
tappens indstillinger, når højttaleren er monteret.
8Ω
Einstellung für Transformatorabgriff
1. Positionieren Sie die Lautsprecher vertikal, wobei die Blende, die dem Logo am nächsten ist, nach oben weist.
2. Ziehen Sie die Blende nach
3. Stellen Sie den Abgriff durch Dr
12.5W* 25W 50W 100W
NC**
25W* 50W 100W NC**
* Werkseitiger Standard ** NC: Keine Verbindung (nicht verwenden)
4. Drücken Sie die Blende wieder fest,
Hinweis: Bei Bedarf können Sie die Blende entfernen und den Abgriff
nach der Montage des Lautsprechers ändern.
vorn, um sie zu entfernen.
ehen der Einstellscheibe ein.
70V
8Ω
100V
bis sie einrastet.
Ajuste de las derivaciones del transformador
1. Coloque el altavoz en vertical con el casquillo terminal más cercano al logotipo mirando hacia arriba.
2. Tire del casquillo terminal hacia delante
3. Configure el terminal girando la ruedecilla.
70V
12.5W* 25W 50W 100W
NC**
25W* 50W 100W NC**
100V
* Ajuste de fábrica ** NC: Sin conexión (no utilizar)
4. Presione el casquillo terminal has
Deberá oírse un clic.
Nota: Si es necesario, puede retirar el casquillo terminal y ajustar la
configuración las derivaciones después de montar el altavoz.
para retirarlo.
8Ω
ta que se ajuste en su sitio.
6

Removing End Cap and Accessing Tap Settings
Puissance du transformateur
1. Positionner l’enceinte verticalement, en orientant vers le haut le couvercle d’extrémité proche du logo.
2. Déposer le couvercle d’extrémité en tirant.
3. Tourner la molette pour régler la puissance.
70V
12.5W* 25W 50W 100W
NC**
25W* 50W 100W NC**
100V
* Position par défaut ** NC : Nn co
4. Remettre le couvercle d’extrémité
Remarque : Si nécessaire, il est possible de déposer le couvercle
d’extrémité et de modifier la puissance après le montage de l’enceinte.
nnecté (ne pas utiliser)
en place avec un déclic.
8Ω
Impostazione della potenza del trasformatore
1. Sistemare il diffusore in posizione verticale con la testata di chiusura più vicina al logo rivolta verso l’alto.
2. Rimuovere la testata di chiusura tir
3. Impostare la potenza mediante l’interruttore rotante.
12.5W* 25W 50W 100W
NC**
25W* 50W 100W NC**
* impostazioni predefinite
4. Premere la testata di chiusura fino a
Nota: Se necessario, è possibile rimuovere la testata di chiusura e
regolare le impostazioni della potenza anche in seguito al montaggio
del diffusore.
** NC: nessuna connessione (non utilizzare)
andola in avanti.
70V
8Ω
100V
quando scatta in posizione.
Aftappen bij de transformator
1. Plaats de luidsprekerbox verticaal met het afdekplaatje dat het dichtst bij het logo zit naar boven.
2. Trek het afdekplaatje naar voren om dit te verwijderen.
3. Stel de aftapping in door aan de draaiknop te draaien.
70V
12.5W* 25W 50W 100W
NC**
25W* 50W 100W NC**
100V
* Fabrieksinstelling ** NC: Niet aangesloten (niet gebruiken)
4. Druk het afdekplaatje op zijn
Opmerking: Indien nodig kunt u na de bevestiging van de luidsprekerbox
het afdekplaatje verwijderen en de aftapinstellingen aanpassen.
plaats — u hoort een klikgeluid.
8Ω
Justering av transformatoruttag
1. Placera högtalarna vertikalt med sidoskyddet vid logotypen vänd uppåt.
2. För sidoskyddet framåt för att ta bort det.
3. Ställ in nivån genom att vrida på ratten.
70V
12.5W* 25W 50W 100W
NC**
25W* 50W 100W NC**
100V
* Fabriksinställningar ** NC: Ingen anslutning (använd inte)
4. Sätt tillbaka sidoskyddet, du ska
Obs! Du kan även ta bort sidoskyddet och göra inställningarna sedan du
monterat högtalarna.
höra hur det klickar på plats.
8Ω
7
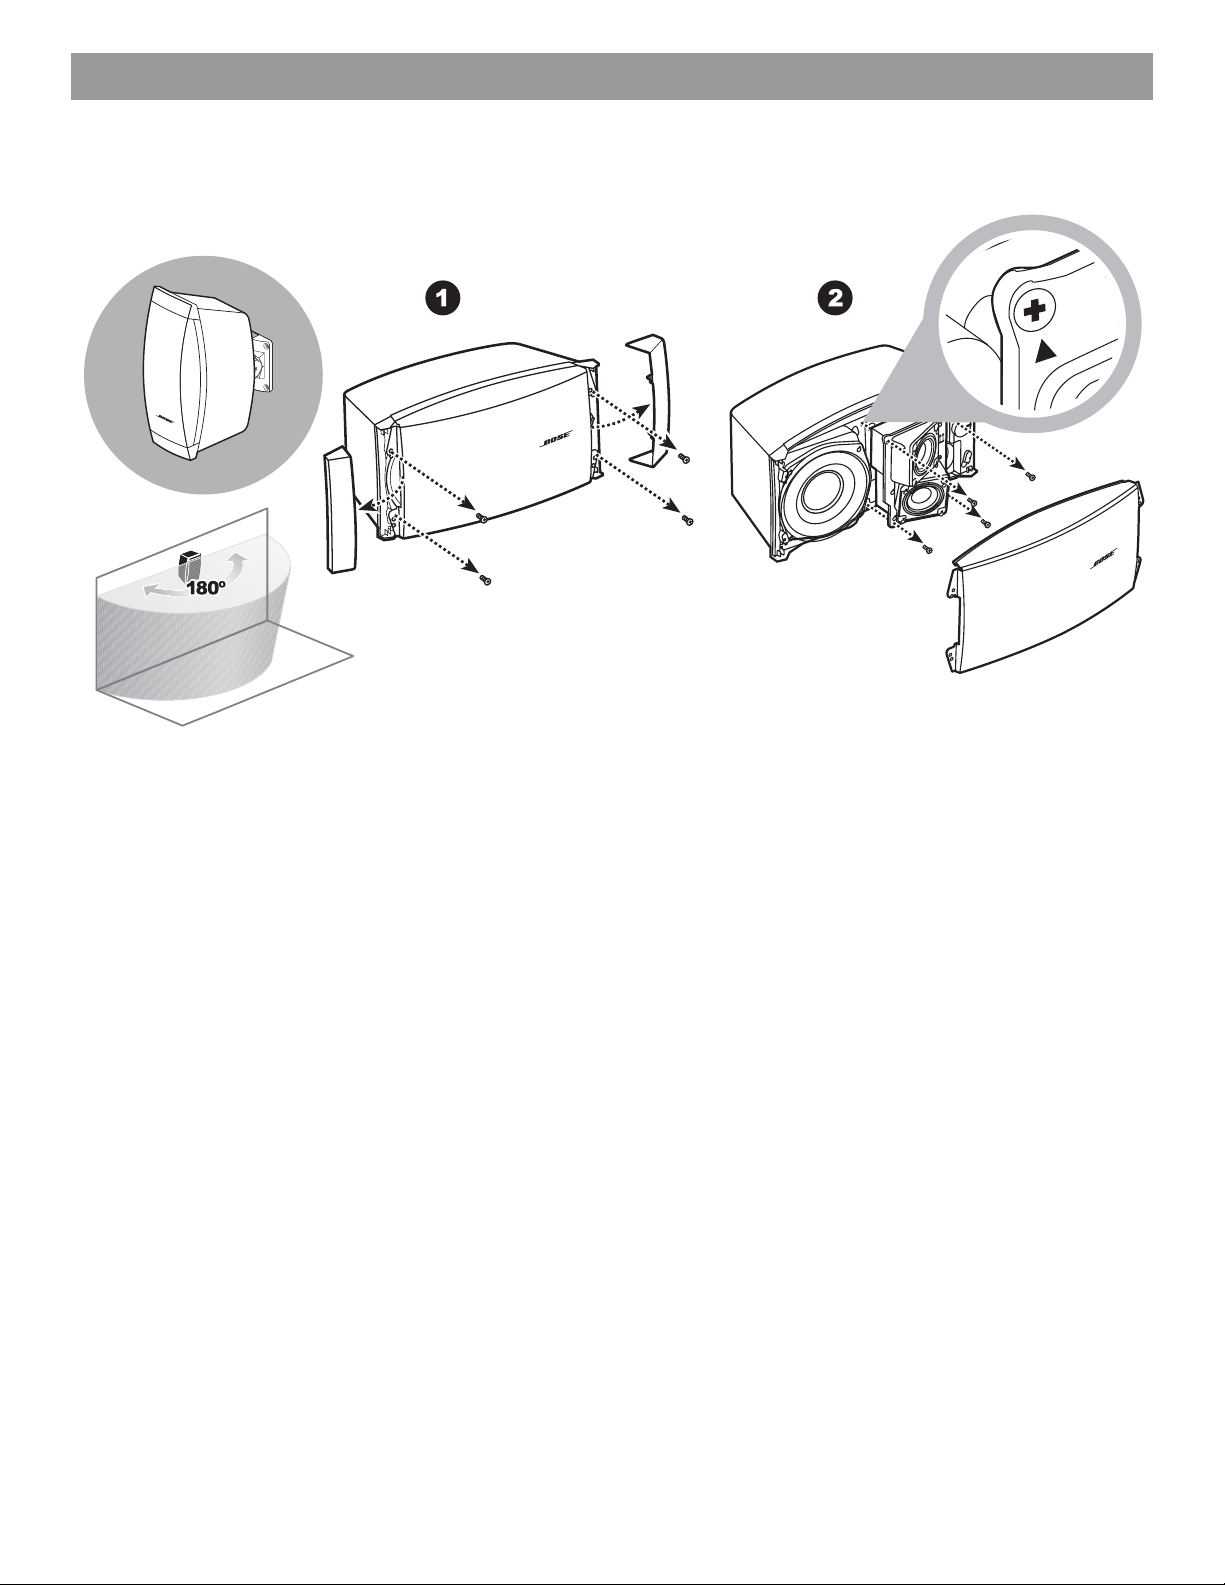
Preparing the Loudspeaker Before Mounting Vertically
Twiddler® array adjustment
To maintain 180° horizontal dispersion when the loudspeaker is
mounted vertically:
1. Remove endcaps and grille.
2. Remove screws from array.
3. Rotate array.
4. Reinsert screws.
5. Rotate loudspeaker.
6. Reattach grille and endcaps.
Justering af Twiddler®-serie
Bevarelse af 180° vandret spredning, når højttalere n er monter et lodr et:
1. Fjern endebolte og gitter.
2. Fjern skruer fra højttaler.
3. Drej højttaler.
4. Sæt skruer i igen.
5. Drej højttaler.
6. Sæt gitter og endebolte i igen.
Twiddler®-Array-Einstellung
So erhalten Sie den horizontalen 180 °- A b strah l un gs be reich b ei
vertikaler Montage:
1. Entfernen Sie die Blenden und das Gitter.
2. Entfernen Sie die Schrauben vom Array.
3. Drehen Sie das Array.
4. Bringen Sie die Schrauben wieder an.
5. Drehen Sie den Lautsprecher.
6. Bringen Sie Gitter und Blenden wieder an.
Ajuste de la matriz Twiddler
Para mantener una dispersión horizontal de 180° cuando el altavoz
está montado en vertical:
1. Retire los casquillos terminales y la rejilla.
2. Extraiga los tornillos de la matriz.
3. Gire la matriz.
4. Vuelva a insertar los tornillos.
5. Gire el altavoz.
6. Vuelva a insertar la rejilla y los casquillos terminales.
®
8

Preparing the Loudspeaker Before Mounting Vertically
Réglages de l’ensemble Twiddler
Pour préserver une dispersion horizontale sur 180° lorsque l’enceinte
est montée verticalement
1. Déposer les couvercles d’extrémité et la grille.
2. Déposer les vis du groupe de haut-parleurs.
3. Faire tourner le groupe de haut-parleurs:
4. Réinsérer les vis.
5. Faire pivoter l’enceinte.
6. Remettre en place les couvercles d’extrémité et la grille.
®
Regolazione dei componenti T widdler®
Per mantenere una dispersione orizzontale a 180° quando il dif fusor e
è montato in posizione verticale:
1. Rimuovere le testate di chiusura e la griglia.
2. Rimuovere le viti dal gruppo.
3. Ruotare il gruppo.
4. Reinserire le viti.
5. Ruotare il diffusore.
6. Riposizionare la griglia e le testate di chiusura.
Twiddler®-luidsprekers bijstellen
Voor een horizontale dispersie van 180° als de luidsprekerbox
verticaal is bevestigd:
1. Verwijder de afdekplaatjes en het rooster.
2. Draai de schroeven van de luidsprekers los en verwijder deze.
3. Draai de luidsprekers.
4. Plaats de schroeven weer terug.
5. Draai de luidsprekerbox.
6. Plaats het rooster en de afdekplaatjes terug.
Twiddler®-justering
Gör så här för att upprätthålla horisontell spridning på 180° när
högtalarna är lodrätt monterade:
1. Ta bort sidoskydden och fronten.
2. Ta bort skruvarna från högtalaruppsättningen.
3. Rotera högtalaruppsättningen.
4. Sätt tillbaka skruvarna.
5. Rotera högtalaren.
6. Sätt tillbaka fronten och sidoskydden.
9

Preparing the Loudspeaker Before Mounting Vertically
Rotating logo
For vertical mounting:
1. Firmly grasp logo and pull away from grille.
2. Rotate logo and release.
Roterende logo
Til lodret montering:
1. Tag godt fat om logo, og træk det væk fra gitteret.
2. Drej logo, og slip.
Logo drehen
Bei vertikaler Montage:
1. Halten Sie das Logo fest und ziehe
2. Drehen Sie das Logo und lassen Sie es los.
n Sie es vom Gitter weg.
Girar el logotipo
Para montaje en vertical:
1. Sujete el logotipo firmemente y retírelo de la rejilla.
2. Gire el logotipo y suéltelo.
Rotation du logo
Pour le montage vertical :
1. Saisissez fermement le logo et tirez pour l’écarter de la grille.
2. Faites tourner le logo et relâchez-le.
Rotazione del logo
Per il montaggio in posizione verticale:
1. Estrarre il logo dalla griglia afferrandolo con decisione.
2. Ruotare il logo e riposizionarlo.
Logo draaien
Bij verticale montage:
1. Pak het logo stevig vast en trek het naar u toe.
2. Draai het logo en laat het los.
Rotera logotyp
Gör så här för vertikal montering:
1. Ta ett stadigt tag i logotypen och ta bort fronten.
2. Rotera logotypen och släpp.
10

Preparing the Loudspeaker for Desired Adjustment
Rotating loudspeaker arm
For horizontal mounting with yaw adjustment or vertical mounting
with pitch adjustment:
1. Remove screws from loudspeaker arm.
2. Rotate arm.
3. Reinsert screws from loudspeaker arm.
Roterence højttalerarm
Til vandret montering med justeret giring eller lodret montering
med højdejustering:
1. Fjern skruer fra højttalerens arm.
2. Drej arm.
3. Fjern skruer fra højttalerens arm i igen.
Lautsprecherarm drehen
Für die horizontale Montage mit Hochachsenanpassung oder
vertikale Montage mit Querachsenanpassung:
1. Entfernen Sie die Schrauben vom Lautsprecherarm.
2. Drehen Sie den Arm.
3. Setzen Sie die Schrauben in den Lautsprecherarm ein.
Giro del brazo del altavoz
Para montaje en horizontal con ajuste de oscilación o montaje en
vertical con ajuste de inclinación:
1. Retire los tornillos del brazo del alt
2. Gire el brazo.
3. Vuelva a insertar los tornillos del brazo del altavoz.
avoz.
Rotation du bras de haut-parleur
Pour montage horizontal avec réglage de l’inclinaison latérale ou
montage vertical avec réglage de l’inclinaison verticale :
1. Enlever les vis du bras du haut-parleur.
2. Faites pivoter le bras.
3. Remettre les vis du bras du haut-parleur.
Rotazione del supporto del diffusore
Per il montaggio in posizione orizzontale con angolazione
destra/sinistra o il montaggio in po
alto/basso:
1. Rimuovere le viti dal supporto del diffusore.
2. Ruotare il supporto.
3. Reinserire le viti nel supporto del diffusore.
sizione verticale con angolazione
Luidsprekerarm draaien
Giering bijstellen bij horizontale bevestiging en helling bij verticale
bevestiging:
1. Verwijder de schroeven uit de luidsprekerarm.
2. Draai de arm.
3. Plaats de schroeven terug in de luidsprekerarm.
Rotera högtalarfästet
Gör så här för horisontell montering med väggvinkel eller vertikal
montering med takvinkel:
1. Ta bort skruvarna från högtalarfästet.
2. Rotera fästet.
3. Sätt tillbaka skruvarna för högtalarfästet.
11

Wiring the Bracket
12

Wiring the Bracket
Wire gauge requirements
From loudspeaker line wiring to bracket
Use 18 AWG (0.8 mm
2
) to 14 AWG (2.0 mm2) size wire only.
Krav til ledningens tykkelse
Fra højttalers tilslutning til beslag
Brug kun 18 AWG (0,8 mm
2
) til 14 AWG (2,0 mm2)-kabler.
Kabelquerschnittanforderungen
Von der Lautsprecherverkabelung zur Halterung
Verwenden Sie nur ein 18-20 AWG-Kabel (mit 0,8 bis 2,0 mm
2
Querschnitt.
Requisitos de calibre de los cables
Alinee el cableado del altavoz al soporte
Utilice únicamente cables de calibre de 18 AWG (0,8 mm
2
) a 14 AWG (2,0 mm2).
Diamètre des câbles
Du point de câblage de l’enceinte au support
Utiliser uniquement des câbles de 0,8 mm
2
) à 2,0 mm2.
Requisiti di spessore dei cavi
Dalla linea del diffusore alla staffa
Utilizzare solo cavi con spessore da 0,8 mm
2
(18 AWG) a 2,0 mm2 (14 AWG).
Eisen aan de draaddikte
Van de luidsprekerbox naar de beugel
Gebruik alleen draden van 18 AWG (0,8 mm
2
) tot 14 AWG (2,0 mm2).
Storlekskrav för kablar
Från högtalare till konsol
Använd endast kabelstorleken 0,8 mm
2
(18 AWG) till 2,0 mm2 (14 AWG).
13

Wiring the Bracket
Ceramic terminal and thermal switch
To meet combination systems specifications required in some regions of Europe (see page 30)
The ceramic block, thermal switch (fuse), and wires included with the
®
In-Wall and On-Wall Junction Boxes provide an installation
Bose
method that ensures that if an individual loudspeaker fai
cause a short circuit that would result in the failure of the rest of the
loudspeakers on the same line.
ls, it will not
Keramisk terminal og termisk sikring
For at overholde specifikationer til kombinationssystemer, der kræves i nogle områder af Europa (se side 30)
Den keramiske blok, termiske kontakt (sikring) og ledning er, der
følger med Boses
indeholder en installationsmetode, der sikrer, at hvis en enkelt
ttaler ikke fungerer, skaber det ikke en kortslutning, der kan
høj
resultere i, at resten af højttalerne på det samme linjeanlæg
ikke fungerer.
®
samlingsboks til montering i væg og på væg,
Keramische Terminals und Sicherung
In einigen Gebieten Europas erforderliche KombisystemSpezifikationen (siehe Seite 30)
Der keramische Block, die Sicherung und die Kabel, die Sie mit den
®
Verbindungsdosen für die Wandmontage erhalten,
Bose
ermöglichen eine Installationsmethode, die sicherstellt, dass beim
Ausfall eines einzelnen Lautsprechers kein Kurzschluss erzeugt wird,
der zum Ausfall der Lautsprecher an derselben Leitung führen würde.
Terminal cerámico y conmutador térmico
Para cumplir las especificaciones de sistemas combinados que se exigen en algunos países europeos (consult e la pági na 30)
El bloque cerámico, el conmutador térmico (fusible) y los cables
incluidos con las cajas de conexiones sobre pared y en pared Bose
proporcionan un método de instalación que garan
altavoz individual no se producirá un cortocircuito que provoque
daños en el resto de los altavoces de la misma línea.
tiza que si falla un
®
Borne en céramique et commutateur thermique
Pour répondre aux spécifications propres aux systèmes multiples en vigueur dans certaines zones d’Europe (voir page 30)
Le bornier céramique, le fusible thermique et les câbles fournis avec
les boîtes de jonction à montage encastré ou en surface Bose
représentent une méthode d’installation garantissant qu’en cas de
défaillance d’une enceinte, aucun court-circuit ne provoquera la
défaillance des autres enceintes sur la même ligne.
Terminale in ceramica e lamina bimetallica
Per soddisfare i requisiti per sistemi combinati presenti in alcune aree dell’Europa (vedere pagina 30)
Il blocco in ceramica, la lamina bimetallica (fusibile) e i cavi forniti con
le scatole di derivazione a parete e a incasso Bose
metodo di installazione che assicura che, in caso di guasto a un solo
fusore, non si verifichi un corto circuito che provocherebbe il
dif
guasto di tutti gli altri diffusori della stessa linea.
®
garantiscono un
Keramische aansluitklem en thermoschakelaar
Conform specificaties voor gecombineerde systemen die gelden in een aantal Europese landen (zie pagina 30)
Met de keramische aansluitklem, thermoschakelaar (zekering) en
bedrading die worden geleverd bij Bose
of inbouw, kunt u de luidsprekerbox zo installeren dat kortsluiting
rdt voorkomen wanneer één luidsprekerbox uitvalt zodat de rest
wo
van de luidsprekerboxen op dezelfde lijn niet uitvallen.
®
-kabeldozen voor opbouw
Keramisk terminal och termostat
Mer information om kraven för kombinationssystem i vissa länder i Europa finns på sidan 30.
Tack vare de keramiska delarna, säkringarna och kablarna som
medföljer Bose
kommer inte övriga högtalare i en slinga att kor
högtalare slutar fungera.
®
kopplingsdosa för montering i eller på vägg
tslutas när en
®
14

Wiring the Bracket
Wire gauge requirements
From bracket to ceramic block
Use thermal switch (fuse) and wires included with the
®
junction boxes.
Bose
From loudspeaker line wiring to ceramic block
Use 18 AWG (0.8 mm
2
) to 14 AWG (2.0 mm2) size wire only.
Krav til ledningens tykkelse
Fra beslag til keramisk blok
Brug termisk kontakt (sikring) og ledninger, der fulgte med Boses
samlingsbokse.
Fra højttalers tilslutning til keramisk blok
2
Brug kun 18 AWG (0,8 mm
) til 14 AWG (2,0 mm2)-kabler.
Kabelquerschnittanforderungen
Von der Halterung zum keramischen Block
Verwenden Sie die Sicherung und die Kabel, die Sie mit der Bose
Verbindungsdose erhalten haben.
Von der Lautsprecherverkabelung zum keramischen Block
2
Verwenden Sie nur ein 18-20 AWG-Kabel (mit 0,8 bis 2,0 mm
Querschnitt.
Requisitos de calibre de los cables
Del soporte al bloque cerámico
Utilice el conmutador térmico (fusible) y los cables incluidos
con las cajas de conexiones Bose
Alinee el cableado del altavoz al bloque cerámico
Utilice únicamente cables de calibre de 18 AWG (0,8 mm
a 14 AWG (2,0 mm
2
).
®
.
2
)
Diamètre des câbles
Du support au bornier céramique
Utiliser le fusible thermique et les câbles fournis avec les boîtes de
jonction Bose
®
.
Du point de câblage de l’enceinte au bornier céramique
Utiliser uniquement des câbles de 0,8 mm
2
) à 2,0 mm2.
Requisiti di spessore dei cavi
®
Dalla staffa al blocco in ceramica
Utilizzare la lamina bimetallica (fusibile) e i cavi forniti con le scatole
di derivazione Bose
®
Dalla linea del diffusore al blocco in ceramica
Utilizzare solo cavi con spessore da 0,8 mm
a 2,0 mm
2
(14 AWG).
2
(18 AWG)
Eisen aan de draaddikte
®
Van de beugel naar de keramische aansluitklem
Gebruik de thermoschakelaar (zekering) en bedrading die zijn
geleverd bij de Bose
®
-kabeldozen.
Van de luidsprekerbox naar de keramische aansluitklem
Gebruik alleen draden van 18 AWG (0,8 mm
2
) tot 14 AWG (2,0 mm2).
Storlekskrav för kablar
Från konsol till keramiskt block
Använd säkringarna och kablarna som medföljer
®
kopplingsdosor.
Bose
Från högtalare till keramiskt block
Använd endast kabelstorleken 0,8 mm
2
(18 AWG) till 2,0 mm2 (14 AWG).
15
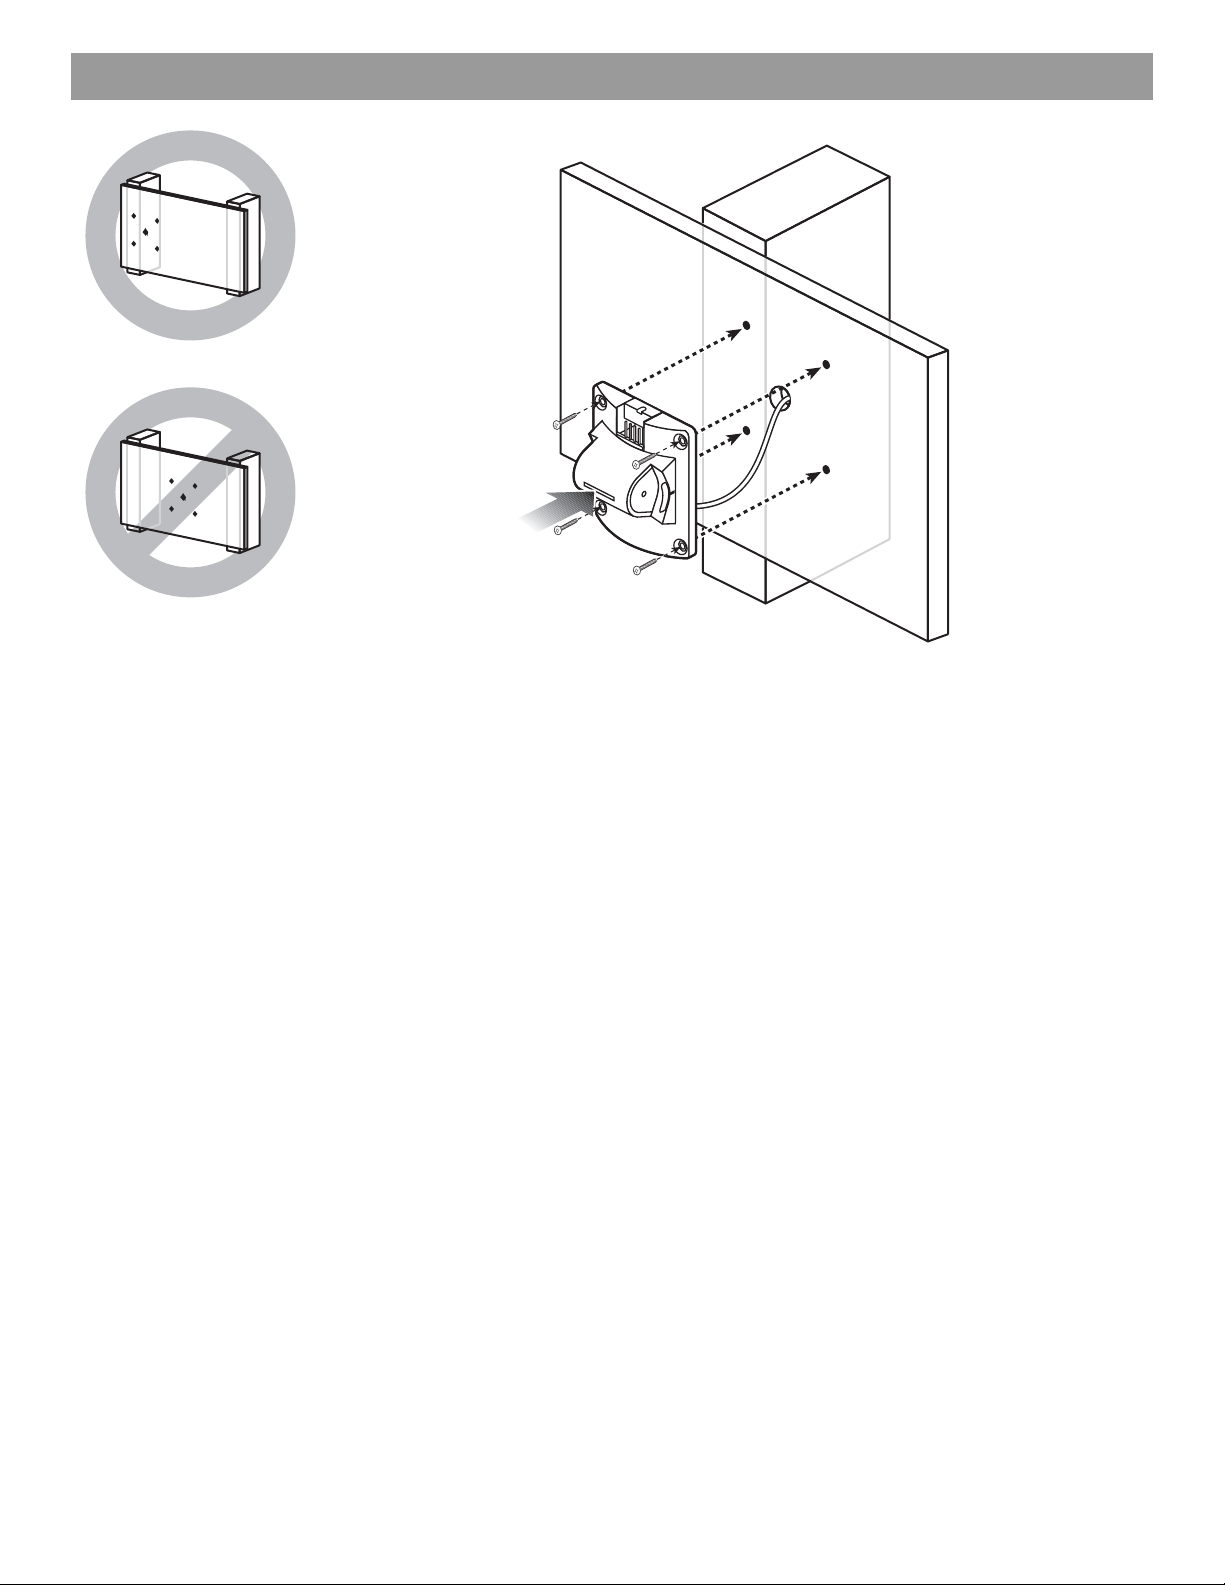
Mounting the Bracket
Direct mount with in-wall wiring
• Use M4 or #8 screws with appropriate anchors.
• At least two (2) screws must be used to hold the wall mount
bracket to
• Do not overtighten screws. If using a power drill, set to a low
orque setting.
t
the support structure (stud).
Direkte montering med ledninger i væggen
• Brug M4- eller nr. 8-skruer med egnede ankre.
• Mindst to (2) skruer skal bruges til at ho
beslag til den understøttende struktur (stolpe).
• Stram ikke skruerne for hårdt. Ved brug af en elektrisk
emaskine skal den indstilles til en lav momentindstilling.
bor
lde på vægmonteringens
Direkte Montage mit UnterputzVerkabelung
• Verwenden Sie M4- oder #8-Schrauben mit passenden Dübeln.
• Befestigen Sie die Wandmontagehalterung
Schrauben an der Stützstruktur.
• Ziehen Sie die Schrauben nicht zu fest an. We nn Sie einen
schrauber verwenden, stellen Sie eine niedrige
Akku
Geschwindigkeit ein.
mit mindestens zwei (2)
Montaje directo con cableado en la pared
• Utilice tornillos M4 o #8 con los tacos adecuados.
• Deberá utilizar un mínimo de dos (2) tornillos para sujetar el
soporte de
• No ajuste los tornillos en exceso.
ajústela a un par de apriete bajo.
montaje en pared a la estructura de soporte (perfil).
Si utiliza una taladradora,
Montage direct avec câbles dans le mur
• Utiliser des vis M4 ou n° 8 avec les chevilles appropriées.
• Utiliser au moins deux (2) vis pour fixer le support de montage
• Ne pas serrer excessivement les vis. Régler la visseuse électrique
à la structure de fixation.
mural
avec un faible
couple.
Montaggio diretto con cablaggio a incasso
• Utilizzare viti M4 o n.8 con tasselli adatti.
• È necessario utilizzare almeno due (2)
montaggio a muro alla struttura di supporto (montante).
• Non serrare eccessivamente le viti. Se si utilizza un trapano
ttrico, impostare una coppia di serraggio bassa.
ele
viti per montare la staffa di
Rechtstreeks monteren met bedrading in de wand
• Gebruik M4- of nr. 8-schroeven met geschikte pluggen.
• U moet minimaal twee (2) schroeven gebruiken om de
montagebeugel aan de
• Draai deze niet te strak aan. Als
gebruikt, stel deze dan in op een lage boorkracht.
constructie (balk) te bevestigen.
u een elektrische boormachine
Direktmontering med dold dragning
• Använd M4- eller #8-skruvar för fastsättningen.
• Minst två skruvar måste användas för
konsolen mot stödet.
• Dra inte fast skruvarna för hårt. Om du anv
ska du ställa in den på ett lågt vridmoment.
att hålla den väggmonterade
änder en skruvdragare
16
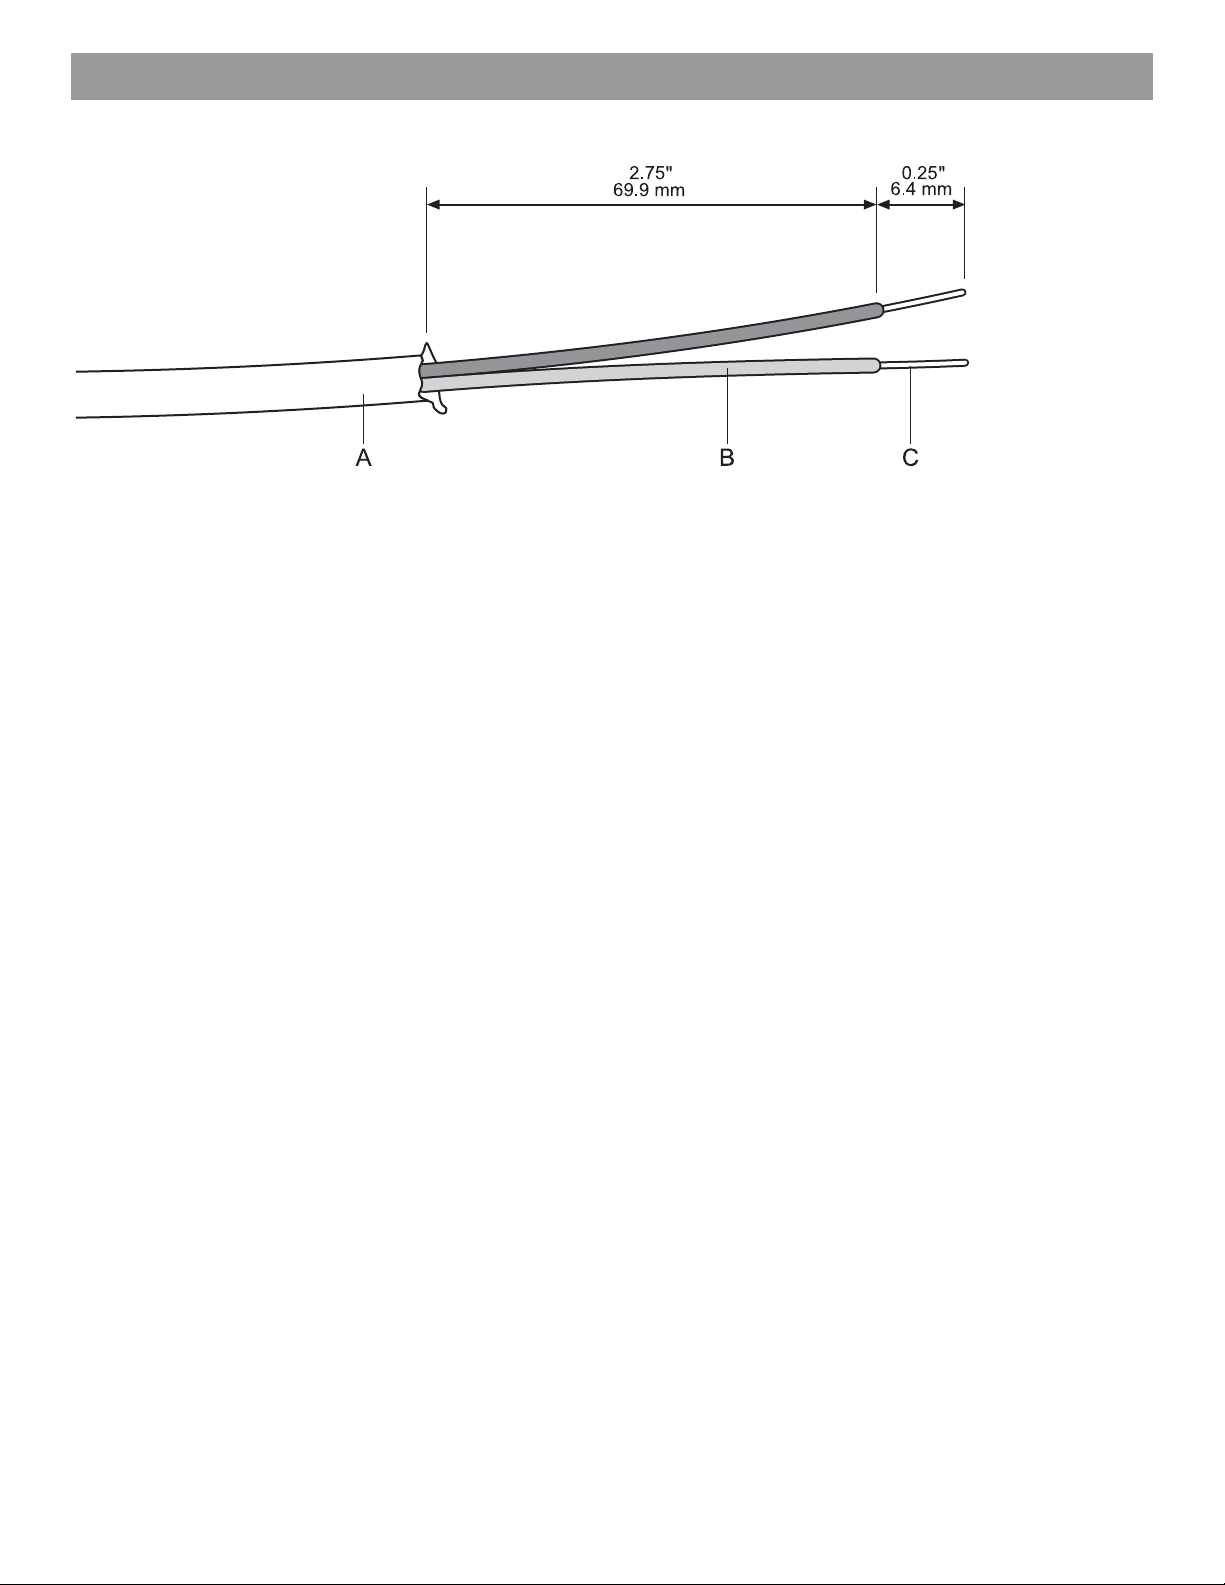
Mounting the Bracket
Preparing the wire for direct mount with on-wall wiring
Trim back the outer jacket (A) and some of the wire insulation (B) to
expose enough bare wire (C) to attach to the terminals.
Note: If mounting the loudspeaker bracket directly to a wall with on-wall
wiring, leave enough jacket on the wire to allow it to be held in place with
the strain relief clamp. See page 18 for more information about direct
mount with on-wall wiring.
Forberedelse af ledning til direkte montering med ledninger på væggen
Beskær bagsiden på det ydre stik (A) og noget af ledningens isolation
(B) for at få vist nok ledning (C) til at fastgøre til terminalerne.
Bemærk: Hvis højttalerens beslag skal monteres direkte på en væg med
ledningssæt i væggen, skal der være nok kappe på ledningen til at holde
den på plads med spændingsklemmen. Se side 18 for at få flere
oplysninger om direkte montering på væggen.
Vorbereitung des Kabels auf die
direkte Montage mit ÜberputzVerkabelung
Entfernen Sie die äußere Umhüllung (A) und einen Teil der Isolierung
(B), um genügend Leiterdraht (C) für den Anschluss an die
Anschlüsse freizulegen.
Hinweis: Wenn Sie die Lautsprecherhalterung direkt an einer Wand mit
Über-Putz-Verkabelung anbringen, lassen Sie genügend äußere
Umhüllung um den Leiterdraht, damit er mit dem Zug-Schutz fixiert
werden kann. Weitere Informationen zur direkten Wandmontage mit ÜberPutz-Verkabelung finden Sie unter Seite 18.
Preparación del cable para montaje directo con cableado sobre la pared
Pele el recubrimiento exterior (A) y parte del aislamiento del cable (B)
para dejar al descubierto suficiente cable desnudo (C) para conectar
a los terminales.
Nota: Si desea montar el soporte del altavoz directamente a una pared
con cableado sobre la pared, deje suficiente recubrimiento en el cable
para mantenerlo fijo con la pinza de anclaje. Consulte la página 18 si
desea más información sobre el montaje con cableado sobre la
pared.
Préparation du câble pour montage direct avec câblage sur le mur
Dénuder la gaine externe (A) et une partie plus courte de l’isolant
des fils (B) afin d’exposer la longueur
branchement.
Remarque : Si le support d’enceinte est monté directement sur le mur
avec le câblage apparent, laisser suffisamment de gaine externe en place
pour enserrer celle-ci dans la languette anti-traction. Pour plus
d’informations sur le montage mural direct avec câblage en surface,
voir page 18.
de fil nu (C) nécessaire au
Preparazione del cavo per il montaggio diretto con cablaggio a parete
Tagliare la guaina esterna (A) e parte della guaina isolante del cavo
(B) fino a esporre una porzione di cavo sufficiente (C) per il
collegamento ai terminali.
Nota: Se si esegue il montaggio della staffa del diffusore direttamente a
parete con cablaggio a parete, lasciare sul cavo una quantità di guaina
sufficiente per consentire il serraggio del cavo con il serracavo. Per
ulteriori informazioni sul montaggio diretto con cablaggio a parete,
vedere pagina 18.
De bedrading gereed maken bij rechtstreekse montage met bedrading op de wand
Verwijder een zodanig stuk van de buitenmantel (A) en de isolatie
rond de draad (B) dat voldoende van de draad (C) vrijkomt om deze
aan de aansluitklemmen te kunnen vastmaken.
Opmerking: Als u de luidsprekerbeugel rechtstreeks op de wand wilt
monteren en daarbij ook de bedrading op de wand wilt plaatsen, moet u
voldoende van de buitenmantel rond de draad laten zitten dat deze vast
blijft zitten in de trekontlasting. Zie pagina 18 voor meer informatie over
rechtstreekse montage met bedrading op de wand.
Förbereda kabeln för direktmontering på vägg
Skala av en del av det yttre skalet (A) och en del av kabelisoleringen
(B) så att den rena kabeln (C) som ska anslutas kommer fram.
Obs! Om du monterar högtalarkonsolen direkt på väggen med synlig
kabeldragning ska du lämna så pass mycket av ytterhöljet kvar så att
kabeln kan sättas fast med avlastningsklämman. Mer information om
direktmontering med synlig kabeldragning finns på sidan 18.
17
Mounting the Bracket
Direct mount with on-wall wiring
1. Remove bracket door(s).
2. Center wires over strain relief clamp
relief clamp:
• Make sure the wires are seated
wire channels.
• Make sure the wires are protected by
the point where the strain relief clamp is applied.
3. Tighten strain relief clamp.
4. Attach bracket to wall:
• Use M4 or #8 screws with appropriate anchors.
• At least two (2) screws must be used to hold the wall mount
bracket to
• Do not overtighten screws. If using a power drill, set to a low
rque setting.
to
the support structure (stud).
hole and insert strain
in the strain relief clamp
their outer jacket at
Direkte montering med ledninger på væggen
1. Fjern beslagets låg.
2. Centrer ledninger over spændingsklemmens hul, og isæt
spændi
ngsklemmen:
• Kontrolller , at ledningerne sidder fast i spændingsklemmens
ledn
ingskanaler.
• Kontroller, at ledningerne er beskyttet med deres ydre stik til
punkt, hvor spændingsklemmen anvendes.
det
3. Stram spændingsklemmen.
4. Sæt beslag i væg:
• Brug M4 eller nr. 8-skruer med egnede ankre.
• Mindst to (2) skruer skal bruges
beslag til den understøttende struktur (stolpe).
• Stram ikke skruerne for hå rdt. Ved brug af en elektrisk
emaskine skal den indstilles til en lav momentindstilling.
bor
til at holde på vægmonteringens
Direkte Montage mit ÜberputzVerkabelung
1. Entfernen Sie die Abdeckung(en) der Halterung.
2. Führen Sie die Leitungen über die Öffnung für den Zug-Schutz
un
d setzen Sie den Zug-Schutz ein.
• Achten Sie darauf, dass sich die Leitungen in den Führungen
des Zug-Schu
• Achten Sie darauf, dass die Leiterdrähte an
dem Zug-Schutz durch die äußere Umhüllung geschü tzt sind.
3. Ziehen Sie den Zug-Schutz fest.
4. Bringen Sie die Halterung an der Wand an:
• Verwenden Sie M4- oder #8-Schrauben
• Befestigen Sie die Wandmontagehalterung mit mindestens
• Ziehen Sie die Schrauben nicht zu fest an. Wenn Sie einen
(2) Schrauben an der Stützstruktur.
zwei
uschrauber verwenden, stellen Sie eine niedrige
Akk
Geschwindigkeit ein.
tzes befinden.
der Kontaktstelle mit
mit passenden Dübeln.
Montaje directo con cableado sobre la pared
1. Retire el acceso o accesos al soporte.
2. Centre los cables a través del agujero de la pinza de anclaje e
inserte la pinza
• Compruebe que los cables se encuentran asentados en los
canales
• Asegúrese de que los cables están protegidos por su
ecubrimiento exterior en el punto donde se aplica la pinza
r
de anclaje.
3. Apriete la pinza de anclaje.
4. Fije el soporte a la pared:
• Utilice tornillos M4 o #8 con los tacos adecuados.
• Deberá utilizar un mínimo de dos (2
soporte de montaje en pared a la estructura de soporte (perfil).
• No ajuste los tornillos en exceso.
eléctrico, ajústelo a un par de apriete bajo.
de anclaje:
de los cables de la pinza de anclaje.
) tornillos para sujetar el
Si utiliza un destornillador
18

Mounting the Bracket
Montage direct avec câbles sur le mur
1. Déposer le couvercle du support.
2. Centrer les câbles au-dessus de l’o
traction et insérer celle-ci :
• Les câbles doivent être correctement insérés dans les
canaux
de la languette anti-traction.
• Au niveau d’appui de la languette anti-traction,
être encore protégés par leur gaine externe.
3. Serrer la languette anti-traction.
4. Fixer le support au mur :
• Utiliser des vis M4 ou n° 8 avec les chevilles appropriées.
• Utiliser au moins deux (2) vis
montage mural à la structure de fixation.
• Ne pas serrer excessivement les vis. Régler la visseuse
électrique
avec un faible couple.
rifice de la languette anti-
les fils doivent
pour fixer le support de
Montaggio diretto con cablaggio a parete
1. Rimuovere le coperture della staffa.
2. Centrare i cavi sul foro dei serr
• Verificare che i cavi siano inseriti
• Verificare che i cavi siano protetti dalla
passano nel serracavo.
3. Serrare il serracavo.
4. Montare la staffa a muro:
• Utilizzare viti M4 o n.8 con tasselli adatti.
• È necessario utilizzare almeno due (2) viti per montare la
fa di montaggio a muro alla struttura di supporto
staf
(montante).
• Non serrare eccessivamente le viti. Se si
elettrico, impostare una coppia di serraggio bassa.
acavi e inserire nel serracavo:
nei relativi serracavi.
guaina nel punto in cui
utilizza un trapano
Rechtstreeks monteren met bedrading op de wand
1. Verwijder de klep(pen) van de beugel.
2. Leg de bedrading langs de opening van de trekontlasting en
plaa
ts de klem over de kabels:
• Controleer of de draden in de uitsparingen van de
tr
ekontlastingklem zijn geplaatst.
• Controleer of de draden door de buitenmantel worden
beschermd op
bevestigd.
3. Draai de trekontlastingklem v
4. Bevestig de beugel op de wand:
• Gebruik M4- of nr. 8-schroeven met geschikte pluggen.
• U moet minimaal twee (2) schroeven gebruiken om de
montagebeugel aan de
• Draai deze niet te strak aan. Als u
boormachine gebruikt, stel deze dan in op een lage
boorkracht.
de plek waar de trekontlastingklem wordt
ast.
constructie (balk) te bevestigen.
een elektrische
Direktmontering med synlig dragning
1. Ta bort dörren(arna) på konsolen.
2. Centrera kablarna över hålet för avl
fast klämman:
• Kontrollera att kablarna är fastsatta i avlastningsklämmans
kabelkana
• Kontrollera att kablarnas ytterhöljen skyddar där du sätter
fast
3. Skruva fast avlastningsklämman.
4. Så här sätter du fast konsolen på väggen:
• Använd M4- eller #8-skruvar för fastsättningen.
• Minst två skruvar måste användas för att hålla den
vägg
• Dra inte fast skruvarna för
skruvdragare ska du ställa in den på ett lågt vridmoment.
ler.
avlastningsklämman.
monterade konsolen mot stödet.
astningsklämman och sätt
hårt. Om du använder en
19

Mounting the Bracket
With Bose On-Wall Junction Box
1. Attach junction box to wall:
• Use M4 or #8 screws with appropriate anchors.
• At least two (2) screws must be used to hold the wall mount
bracket to
• Do not overtighten screws. If using a power drill, set to a low
rque setting.
to
2. Attach bracket to junction box using screws provided (A) with
unction box.
j
Note: The Bose On-Wall Junction Box is designed to provide a weatherresistant installation for DS loudspeakers, and is recommended for
outdoor applications.
the support structure (stud).
Med Bose-samlingsboks til montering på væggen
1. Sæt samlingsboks på væg:
• Brug M4- eller nr. 8-skrue
• Mindst to (2) skruer skal bruges til at holde på
vægmonteringe
struktur (stolpe).
• Stram ikke skruerne for hå rdt. Ved brug af en elektrisk
emaskine skal den indstilles til en lav momentindstilling.
bor
2. Monter beslag til samlingsboksen ved hjælp af skruer, der
er (A) med samlingsboksen.
følg
Bemærk: Boses samlingsboks til montering på væg er designet til at yde
en vejrbestandig installation til DS-højttalere, og det anbefales til
udendørs anvendelse.
ns beslag til den understøttende
r med egnede ankre.
Mit Bose® Verbindungsdose für die Wandmontage
1. Bringen Sie die Verbindungsdose an der Wand an:
• Verwenden Sie M4- oder #8-Schrauben
• Befestigen Sie die Wandmontagehalterung mit mindestens
• Ziehen Sie die Schrauben nicht zu fest an. Wenn Sie einen
2. Befestigen Sie die Halterung mit den Schrauben (A),
der Verbindungsdose erhalten haben, an der Verbindungsdose.
Hinweis: Die Bose Verbindungsdose für die Wandmontage ermöglicht
die wetterunempfindliche Installation von DS-Lautsprechern und wird für
den Einsatz im Außenbereich empfohlen.
(2) Schrauben an der Stützstruktur.
zwei
uschrauber verwenden, stellen Sie eine niedrige
Akk
Geschwindigkeit ein.
mit passenden Dübeln.
die Sie mit
Con la caja de conexiones sobre pared Bose
1. Fije la caja de conexiones a la pared:
• Utilice tornillos M4 o #8 con los tacos adecuados.
• Deberá utilizar un mínimo de dos (2
soporte de montaje en pared a la estructura de soporte (perfil).
• No ajuste los tornillos en exceso.
eléctrico, ajústelo a un par de apriete bajo.
2. Fija el soporte a la caja de conexiones e
suministrados (A) con la caja de conexiones.
Nota: La caja de conexiones sobre pared Bose está diseñada para
proporcionar una instalación resistente a la intemperie para altavoces DS,
y está recomendada para aplicaciones de exteriores.
) tornillos para sujetar el
Si utiliza un destornillador
mpleando los tornillos
20

Mounting the Bracket
Avec boîtier Bose® de branchement sur le mur
1. Fixer la boîte de jonction au mur :
• Utiliser des vis M4 ou n° 8 avec les chevilles appropriées.
• Utiliser au moins deux (2) vis
montage mural à la structure de fixation.
• Ne pas serrer excessivement les vis. Régler la visseuse
électrique
2. Fixer le support à la boîte de jonction à l’aide des vis (A) fournies avec celle-ci.
Remarque : La boîte de jonction pour montage mural Bose est conçue
pour assurer une installation des enceintes DS résistant aux intempéries.
Elle est donc recommandée pour les installations en extérieur.
avec un faible couple.
pour fixer le support de
Con scatola di derivazione a parete Bose
1. Montare la scatola di derivazione a muro:
• Utilizzare viti M4 o n.8 con tasselli adatti.
• È necessario utilizzare almeno due (2
di montaggio a muro alla struttura di supporto (montante).
• Non serrare eccessivamente le viti. Se si
elettrico, impostare una coppia di serraggio bassa.
2. Montare la staffa alla scatola di derivazion
fornite (A) con la scatola di derivazione.
Nota: la scatola di derivazione a muro Bose è stata progettata per
garantire un’installazione resistente alle intemperie per i diffusori DS ed è
consigliata per applicazioni esterne.
) viti per montare la staffa
utilizza un trapano
e mediante le viti
Montage met Bose-opbouwkabeldoos
1. Bevestig de kabeldoos op de wand:
• Gebruik M4- of nr. 8-schroeven met geschikte pluggen.
• U moet minimaal twee (2) schroeven gebruiken om de
montagebeugel aan de
• Draai deze niet te strak aan. Als u
boormachine gebruikt, stel deze dan in op een lage
boorkracht.
2. Bevestig de beugel aan de kabeldoos met de schroeven (A) die u bij de kabeldoos hebt ontvangen.
Opmerking: De Bose-opbouwkabeldoos is weerbestendig zodat u de
DS-luidsprekerboxen ook buiten kunt gebruiken. Bij gebruik van de
luidsprekerboxen buitenshuis wordt deze kabeldoos aanbevolen.
constructie (balk) te bevestigen.
een elektrische
Med Bose kopplingsdosa för väggmontering
1. Så här sätter du fast kopplingsdosan på väggen:
• Använd M4- eller #8-skruvar för fastsättningen.
• Minst två skruvar måste användas för att hålla den
vägg
monterade konsolen mot stödet.
• Dra inte fast skruvarna för
skruvdragare ska du ställa in den på ett lågt vridmoment.
2. Sätt fast konsolen på kopplingsdosan med skruvarna (A) som medföljde kopplingsdosan.
Obs! Kopplingsdosan för väggmontering är avsedd att ge en
väderbeständig installation av DS-högtalarna och rekommenderas för
utomhustillämpningar.
hårt. Om du använder en
21

Mounting the Bracket
With Bose® In-Wall Junction Box
1. Use cutting template and instructions included with the Bose In-Wall Junction Box.
2. Cut hole.
3. Insert junction box.
4. Tighten junction box anchors.
5. Attach bracket to junction box:
• Use M4 or #8 screws.
• Do not overtighten screws. If using a power drill,
set to a low torque setting.
Med Bose-samlingsboks til montering i væggen
1. Brug beskæringsskabelon og instruktioner, der fulgte med Boses samlingsboks til montering i væg.
2. Klip hul.
3. Isæt samlingsboks.
4. Stram ankre til saml
5. Sæt beslag i væg:
• Brug M4- eller nr. 8-skruer.
• Stram ikke skruerne for hå rdt. Ved brug af en elektrisk
bor
emaskine skal den indstilles til en lav momentindstilling.
ingsboks.
Mit Bose® Unterputz-V erbindungsdose
1. Verwenden Sie die Schnittschablone und die Anweisungen, die Sie mit der Bose Unterputz-Verbindungsdose erhalten haben.
2. Schneiden Sie ein Loch.
3. Setzen Sie die Verbindungsdose ein.
4. Ziehen Sie die Verankerungen der Verbindungsdose fest.
5. Bringen Sie die Halterung an der Wand an:
• Verwenden Sie M4- oder #8-Schrauben.
• Ziehen Sie die Schrauben nicht zu fest an. Wenn Sie einen
Akk
uschrauber verwenden, stellen Sie eine niedrige
Geschwindigkeit ein.
Con la caja de conexiones en la
pared Bose
1. Utilice la instrucciones de recorte y las instrucciones incluidas con la caja de conexiones en pared Bose.
2. Recorte un agujero.
3. Inserte la caja de conexiones.
4. Ajuste los tacos de la caja de conexiones.
5. Fije el soporte a la pared:
• Utilice tornillos M4 o #8.
• No ajuste los tornillos en exceso.
eléctrico, ajústelo a un par de apriete bajo.
®
Si utiliza un destornillador
22

Mounting the Bracket
Avec boîtier Bose® de branchement dans le mur
1. Utiliser le gabarit et le feuillet d’instructions fournis avec la boîte de jonction pour montage mural encastré Bose.
2. Découper l’orifice d’insertion.
3. Insérer la boîte de jonction.
4. Serrer les vis d’ancrage de la boîte de jonction.
5. Fixer le support au mur :
• Utiliser des vis M4 ou n° 8.
• Ne pas serrer excessivement les vis. Régler la visseuse
électrique
avec un faible couple.
Con scatola di derivazione
a incasso Bose
1. Utilizzare la sagoma di taglio e le istruzioni incluse con la scatola di derivazione a incasso Bose
2. Eseguire il foro.
3. Inserire la scatola di derivazione.
4. Stringere i tasselli della scatola di derivazione.
5. Montare la staffa a muro:
• Utilizzare viti M4 o n.8.
• Non serrare eccessivamente le viti. Se si
elettrico, impostare una coppia di serraggio bassa.
®
utilizza un trapano
Montage met Bose®-inbouwkabeldoos
1. Gebruik de sjabloon en de handleiding die u bij de Boseinbouwkabeldoos hebt ontvangen.
2. Maak de opening.
3. Plaats de kabeldoos in de opening.
4. Maak de pluggen van de kabeldoos vast.
5. Bevestig de beugel op de wand:
• Gebruik M4- of nr. 8-schroeven.
• Draai deze niet te strak aan. Als u
boormachine gebruikt, stel deze dan in op een lage
boorkracht.
Med Bose ® kopplingsdosa för
een elektrische
i-vägg-montering
1. Använd utskärningsmallen och instruktionerna som medföljde kopplingsdosan för i-vägg-montering.
2. Skär ut hålet.
3. Sätt in kopplingsdosan.
4. Skruva fast ankarpunkterna.
5. Så här sätter du fast konsolen på väggen:
• Använd M4- eller #8-skruvar.
• Dra inte fast skruvarna för
skruvdragare ska du ställa in den på ett lågt vridmoment.
hårt. Om du använder en
23

Mounting the Bracket
US-ONLY • KUN USA • NUR USA • SÓLO EE UU • ÉTATS-UNIS UNIQUEMENT • SOLO USA • ALLEEN VS • ENDAST USA
With standard steel 4" x 4" junction box
The FreeSpace® DS 100SE loudspeaker can be mounted directly on
standard U.S. steel 4" x 4" junction boxes. There may be several
junction boxes available that are compatible with the FreeSpace DS
100SE wall mount bracket, but Bose Corporation only recommends
the junction boxes it has validated.
U.S. 4" x 4" Standard Steel Junction Boxes Approved by Bose
Manufacturer:
Steel City
Catalog Number
52151-1/2 & 3/4-EW
Please check pro.Bose.com for an up-to-date list of
®
validated junction boxes.
Bose
Manufacturer:
Raco
232
8232
• It is the responsibility of the install
boxes to ensure the safety of the loudspeaker installation.
Consult a building professional for the proper junction box
nstallation methods before installing the loudspeaker.
i
• The junction box should be installed in such a way that it is
ucturally capable of supporting the weight of the loudspeaker.
str
A 10:1 safety weight ratio is recommended.
• Failure to properly install a junction bo
result in damage, injury, or death.
When installing the FreeSpace DS 100SE lo
validated on-wall junction box, only two (2) of the four (4) screw holes
of the wall mount bracket will be used. Bose has conducted
extensive tests to ensure that this loudspeaker mounting scheme
results in a safe installation. This loudspeaker mounting scheme has
passed a 10:1 safety weight ratio test.
• Use #8-32 x ¾ screws with #8 washers or #8-32 x ¾ truss head
ews to mount the bracket to the junction box.
scr
er to properly install junction
x or loudspeaker could
udspeaker on a Bose-
24

Mounting the Bracket
Bose DS Trim Plate (accessory)
US-ONLY • KUN USA • NUR USA • SÓLO EE UU • ÉTATS-UNIS UNIQUEMENT • SOLO USA • ALLEEN VS • ENDAST USA
With standard steel 4" x 4" junction box
The FreeSpace® DS 100SE loudspeaker can be mounted directly on
standard U.S. steel 4" x 4" junction boxes. There may be several
junction boxes available that are compatible with the FreeSpace DS
100SE wall mount bracket, but Bose Corporation only recommends
the junction boxes it has validated.
U.S. 4" x 4" Standard Steel Junction Boxes Approved by Bose
Manufacturer:
Steel City
Installation Type: Wooden Stud
Catalog Number
52151-V-1/2 & 3/4
Installation Type: Metal Stud
Catalog Number
52151-CV-1/2 & 3/4 237
Please check pro.Bose.com for an up-to-date list of
®
validated junction boxes.
Bose
Manufacturer:
Raco
235
8235
• It is the responsibility of the install
boxes to ensure the safety of the loudspeaker installation. Consult
a building professional for the proper junction box installation
methods before installing the loudspeaker.
• The junction box should be installed in such a way that it is
ucturally capable of supporting the weight of the loudspeaker.
str
A 10:1 safety weight ratio is recommended.
• Failure to properly install a junction bo
result in damage, injury, or death.
•Use #8-32 x 2" truss head screws (4) included
Bose DS Trim Plate.
er to properly install junction
x or loudspeaker could
with the accessory
25

Mounting the Loudspeaker to the Bracket
Positioning and securing the loudspeaker
1. Align the holes of the loudspeaker arm and bracket.
2. Insert, but DO NOT TI
P2 Phillips head
Theft-deterrent 3mm pin-in-hex head
3. Adjust the loudspeaker to the desired angle.
4. Support the loudspeaker at the desir
fastener to secure the loudspeaker in position.
Note: Do not overtighten screws. If using a power drill, set to a low
torque setting.
CAUTION: DO N
without completely loosening the fastener. Damage could occur if the
fastener is not completely loosened
loudspeaker angle.
OT attempt to change the loudspeaker’s position
GHTEN, the fastener:
ed angle, then fully tighten
before trying to adjust the
Placering og sikring af højttaler
1. Juster hullerne på højttalerens arm og beslag.
2. Isæt men STRAM IKKE befæst
P2 Phillips-hoved
Tyveripræventivt 3 mm skruehoved
3. Juster højttaleren til den ønskede vinkel.
4. Understøt højttaleren i den ønskede vinkel, stram
elseselementet for at fastgøre højttalerens position.
befæst
Bemærk: Stram ikke skruerne for hårdt. Ved brug af en elektrisk
boremaskine skal den indstilles til en lav momentindstilling.
FORSIGTIG: FORSØG IKKE at ændre højttalerens position uden at
befæstelseselementet helt. Der kan opstå skader, hvis
befæstelseselementet ikke er helt løsnet
højttalerens vinkel.
elseselementet:
løsne
inden forsøg på at justere
Positionieren und Sichern des Lautsprechers
1. Richten Sie die Löcher am Lautsprecherarm und an der Halterung aus.
2. Setzen Sie das Befestigungswerkzeug ein, ab
es nicht fest:
P2 Kreuzschlitz
3-mm-Inbus
3. Stellen Sie den Lautsprecher auf
4. Halten Sie den Lautsprecher im gewünschten Winkel und ziehen
Si
e das Befestigungswerkzeug dann fest, um den Lautsprecher
in seiner Position zu sichern.
Hinweis: Ziehen Sie die Schrauben nicht zu fest an. Wenn Sie einen
Akkuschrauber verwenden, stellen Sie eine niedrige Geschwindigkeit ein.
ACHTUNG: Ändern Sie NICHT die Lautspr
Befestigungswerkzeug vollständig zu lösen. Wenn das
Befestigungswerkzeug nicht vollständig gelöst ist,
Lautsprecherwinkel ändern, kann es zu Beschädigungen kommen.
den gewünschten Winkel ein.
echerposition, ohne das
er ziehen Sie
bevor Sie den
Colocación y fijación del altavoz
1. Alinee los agujeros del brazo del altavoz y del soporte.
2. Inserte el perno de fijación, pero SIN APRE
Cabeza Phillips P2
Cabeza de pin en hexágono de 3 mm antirrobo
3. Ajuste el altavoz con el ángulo deseado.
4. Apoye el altavoz con el ángulo deseado
completamente el perno de fijación para asegurar el altavoz en
su posición.
Nota: No ajuste los tornillos en exceso. Si utiliza un destornillador
eléctrico, ajústelo a un par de apriete
PRECAUCIÓN: NO
completamente e l perno de fijación. Pueden producirse daños si no
libera completamente el perno de fijación
ángulo del altavoz.
intente cambiar la posición del altavoz sin liberar
TARLO:
y, a continuación, apriete
antes de intentar ajustar el
26

Mounting the Loudspeaker to the Bracket
Positionnement et sécurisation du haut-parleur
1. Aligner les trous du montant de l’enceinte et du support.
2. Insérer l’axe à visser SANS LE
Tête cruciforme Phillips P2
Tête hexagonale antivol 3 mm
3. Ajuster l’enceinte à l’angle voulu.
4. Maintenir l’enceinte à cet angle, et serr
l’enceinte dans cette position.
Remarque : Ne pas serrer excessivement les vis. Régler la visseuse
électrique avec un faible couple.
ATTENTION : NE PAS tenter de modifier la position
avoir entièrement desserré l’axe. Si l’axe n’est pas entièrement desserré
avant toute modification de l’angle de l’enceinte, le support risque d’être
endommagé.
SERRER :
er l’axe pour bloquer
de l’enceinte sans
Posizionamento e fissaggio del diffusore
1. Allineare i fori del supporto del diffusore a quelli della staffa.
2. Inserire le viti di fissaggio SENZA SERRARLE: Con testa P2 Phillips Con testa esagonale da 3 mm a prova di manomissione
3. Regolare il diffusore nell’angolazione desiderata.
4. Tenere fermo il diffusore all’ang
fondo le viti di fissaggio per fissare il diffusore in posizione.
Nota: Non serrare eccessivamente le viti. Se si utilizza un trapano
elettrico, impostare una coppia di serraggio bassa.
ATTENZIONE: NON tentare di cambiare la posizione del diffusor
viti di fissaggio non sono state prima allentate completamente. Se la vite
di fissaggio non è completamente allentata
regolare l’angolazione del diffusore, si potrebbe danneggiare il diffusore.
olazione desiderata e serrare a
e se le
prima del tentativo di
De luidsprekerbox plaatsen en bevestigen
1. Lijn de openingen in de luidsprekerarm uit met openingen in de beugel.
2. Steek de bevestigingsschroef in de openingen maar DRAAI
DEZE
NIET AAN:
P2 kruiskop
Diefstalwerende inbus van 3 mm
3. Plaats de luidsprekerbox in de gewenste richting.
4. Houd de luidsprekerbox in de gewenste richting vast en draai de
igingsschroef stevig aan om de luidspreker in de juist
bevest
positie vast te zetten.
Opmerking: Draai deze niet te strak aan. Als u een elektrische
boormachine gebruikt, stel deze dan in op een lage boorkracht.
WAARSCHUWING: Probeer de positie van de lu
veranderen zonder eerst de bevestigingsschroef los te draaien. De
luidsprekerbox in een andere richting proberen te draaien
bevestigingsschroef volledig is losgedraaid, kan leiden tot beschadiging
van de box.
idspreker NIET te
voordat de
Placera och sätta fast högtalaren
1. Anpassa hålen på högtalararmen och fästet mot varandra.
2. Sätt in fästskruven MEN SKRUV
Krysspårning
Insexhuvud på 3 mm (för att minska stöldrisken)
3. Placera högtalaren i önskad vinkel.
4. Håll högtalaren i rätt vinkel och skruva sedan fast den.
Obs! Dra inte fast skruvarna för hårt. Om du använder en skruvdragare
ska du ställa in den på ett lågt vridmoment.
FÖRSIKTIGHET! Försök inte ändra högtalarvinkeln utan att först lätta på
uvarna. Du riskerar att orsaka skada om du inte lossar på skruvarna
skr
innan du försöker ändra högtalarnas vinkel.
A INTE FAST:
27
Connecting the Loudspeaker Wire to the Bracket
Plug the wire into the bracket
1. Remove paint shield (if not already removed).
2. Snap on loudspeaker wire plug to bracket connector.
3. Insert and tighten screw on plug.
Sæt den anden ende af kablet ind beslag
1. Fjern malingsskærm (hvis den ikke allerede er fjernet).
2. Klik stikket højttalerens ledning ned i beslagets stik.
3. Isæt og stram skruen i stikket.
Stecken Sie das andere Ende des Kabels in den Halterung
1. Entfernen Sie die Abdeckung für das Streichen (falls noch nicht entfernt).
2. Schließen Sie den Lautsprecherstecker an den
Halterungsanschluss
3. Setzen Sie die Schraube am Stecker ein
an.
und ziehen Sie sie fest.
Conecte el otro extremo del soporte
1. Retire el protector contra pintura (si aún no lo ha hecho).
2. Enganche la clavija del cable del altavoz al conector del soporte.
3. Inserte y apriete el tornillo en la clavija.
28
Insérez l’autre extrémité du câble dans le support
1. Déposer la pellicule de protection contre la peinture si ce n’est déjà fait.
2. Enclencher la prise du câble d’e
support.
3. Insérer la vis de la fiche et la serrer.
nceite sur le connecteur du
Inserire l’altra estremità del cavo nel staffa
1. Rimuovere la maschera protettiva, se non è già stato fatto.
2. Collegare la spina del cavo del diffusore al connettore della
st
affa.
3. Inserire e serrare la vite sulla spina.
Steek het andere uiteinde van de kabel in de beugel
1. Verwijder de verfafscherming (indien deze nog niet is verwijderd).
2. Steek de stekker van de luidsprekerdraad in de connector van de beugel.
3. Plaats de schroef in de stekker en draai deze aan.
Anslut kabelns andra ände till konsolen
1. Ta bort skyddsfärgen (om den inte redan är borttagen).
2. Sätt fast högtalarkabeln i kontakten på fästet.
3. Sätt in och skruva fast skruven i kontakten.

Other ConsiderationsOther Considerations
Using the safety cable insert
• Some regional construction codes require the use of a secondary
method of securing loudspeakers to support structures to provide
additional safety.
• Choose a mounting position, method, and hardware consistent
h local building codes and regulations.
wit
• A safety cable can be attached to the FreeSpace® DS 100SE
loudspeaker using the threaded insert on the back of the enclosure.
• The insert is sized for an M4 x 14 mm screw.
Brug af sikkerhedskablets indstik
• Nogle regionale konstruktionskoder kræver brug af en anden
metode til at fastgøre højttalere til understøttende strukturer for at
give yderligere sikkerhed.
• Vælg monteringssted, -metode og tilbehør, der er i
ensstemmelse med lokale byggevedtægter og -bestemmelser.
over
• Et sikkerhedskabel kan monteres på FreeSpace® DS 100SEhøjttaleren ved hjælp af det gevindskårede indstik bag på
kabinettet.
• Indstikket passer til en M4 x 14 mm skrue.
Sicherheitskabeleinsatz verwenden
• Einige Bauvorschriften schreiben aus Sicherheitsgründen eine
zweite Methode vor, um Lautsprecher an der Stützkonstruktion
zu sichern.
• Wählen Sie eine Montageposition und -methode sowie
erkzeuge, die den örtlichen Bauvorschriften entsprechen.
W
• Ein Sicherheitsband kann mith
Gehäuserückseite am FreeSpace
angebracht werden.
• Der Einsatz ist für eine M4x1
ilfe des Einsatzes auf der
®
DS 100SE Lautsprecher
4-mm-Schraube geeignet.
Uso de la pieza de ajuste del cable de seguridad
• Algunos códigos de construcción regionales requieren el uso de
un método secundario para fijar los altavoces a estructuras de
apoyo con el fin de obtener seguridad adicional.
• Seleccione una posición, un método y
respeten los códigos y normas de construcción locales.
• Puede conectar un cable de seguridad al altavoz FreeSpace
100SE utilizando la pieza de ajuste roscada de la parte posterior
de la caja.
• La pieza de ajuste sirve para un tornillo M4 de 14 mm.
accesorios de montaje que
®
DS
Utilisation du câble de sécurité en supplément
• Certains codes de la construction nécessitent d’utiliser une
méthode auxiliaire de fixation des enceintes à la structures de
soutien, par mesure de sécurité.
• Pour le montage, choisir une position, une méthode et des
• Il est possible de fixer un câble ou une chaîne de sécurité à
• Cet insert est dimensionné pour un boulon M4 x 14 mm.
sants conformes aux codes et réglementations en vigueur.
compo
l’enceinte F
du caisson.
reeSpace
®
DS 100SE, à l’aide de l’insert fileté à l’arrière
Uso dell’inserto del cavo di sicurezza
• In base ad alcune normative locali è necessario utilizzare un
secondo metodo per fissare i diffusori alle strutture di supporto al
fine di garantire maggiore sicurezza.
• Scegliere utensili, un metodo e una
siano conformi alle normative e ai regolamenti edilizi locali.
• È possibile collegare un cavo di sicur
FreeSpace
retro del telaio.
• La dimensione dell’inserto è compatibile con una vite M4 x 14 mm.
®
DS 100SE mediante l’inserto filettato presente sul
posizione di montaggio che
ezza al diffusore
Het inzetstuk voor de veiligheidskabel gebruiken
• In de bouwverordeningen van een aantal landen wordt het gebruik
van een tweede bevestigingsmethode voorgeschreven als extra
veiligheidsmaatregel bij montage van luidsprekerboxen op een
draagconstructie.
• Kies een locatie, een montagewijze en materiaal
overeenstemming zijn met de plaatselijke bouwverordeningen
en regelgeving.
• U kunt door middel van het inzetstuk met schroefdraad aan de
• Het inzetstuk is geschikt voor een M4-schroef van 14 mm.
rkant van de behuizing, een veiligheidskabel bevestigen aan
achte
de FreeSpace
®
DS 100SE-luidsprekerbox.
welke in
Sätta fast en säkerhetskabel
• Enligt vissa byggnormer krävs ett extra skydd vid upphängning
av högtalare.
• Välj placering, tillvägagångss
överensstämmer med lokala bestämmelser och normer.
• En säkerhetskabeln kan sättas fast
baksidan av höljet på FreeSpace
• För fastsättningen krävs en M4 x 14 mm skruv.
ätt och hjälpmedel som
i det gängande fästet på
®
DS 100SE-högtalaren.
29

Safety and Regulatory Compliance
The DS 100SE has passed extensive testing and complies with the following specifications and uses:
LISTED to ANSI/UL 1480-2005
• Fire Protective Signaling Use – UL Ca
Control Number 42S9 when installed with a junction box (on-wall or in-wall).
Not for use with DC-supervised systems.
• General Purpose Use – UL Category UEAY, Fil
• Suitable for use outdoors in wet locations.
• Suitable for installation using
Article 640.
• Suitable for use with fire alarm circuit wir
Article 760.
The DS 100SE has been designed to the requir
• British Standard Code of Practice BS 5839, Part 8.
• Tested to IEC60268-5.
UL Sensitivity Wattage Tap Sound Pressure Level dBA at 3.1 meters (10 feet):
Wattage ANSI/UL 1480-2005
Tap 70V 100V
Class 1, Class 2, or Class 3 wiring methods in accordance with NFPA 70, National Electric Code, 2002,
tegory UUMW, File Number S 3241.
e Number S 5591 Control Number 3N89.
ing methods in accordance with NFPA 70, National Electric Code, 2002,
ements defined in the following European regulatory specification for combination systems:
12.5 Watt 84 dBA –
25 Watt 86 dBA 86 dBA
50 Watt 88 dBA 88 dBA
100 Watt 91 dBA 91 dBA
8 Ohm 89 dBA
SPLs given are per the UL 1480 specified reporting method.
Frequency response:
Fire alarm: 400 Hz to 4 kHz
General signaling: 80 Hz to 16 kHz (±3dB)
Wire gauge
The FreeSpace® DS 100SE loudspeaker bracket is designed to work with 18 AWG (0.8 mm2) to 14 AWG (2.0 mm2) size wire only.
30


©2008 Bose Corporation, The Mountain
Framingham, MA 01701-9168 USA
AM300289 Rev.01
 Loading...