

Page 1
CC-1
CC-2
CC-3
ControlCenter
Zone Controllers
Installation and Operation Guide
Guía de Instalación y Funcionamiento
Guide d’installation et utilisation
Installations- und Bedienungsanleitung
Manuale di installazione e funzionamento
Installatie- en bedieningshandleiding
Page 2
Important Safety Instructions
Please read this owner’s guide carefully and save it for future reference.
This product is intended for installation by professional installers only! This document is intended to provide
professional installers with basic installation and safety guidelines for this product in typical fixed-installation systems.
Please read this document before attempting installation.
WARNING:
• All Bose products must be installed in accordance with local, state, federal and industry regulations. It is
the installer’s responsibility to ensure installation of the loudspeakers and mounting system is performed
in accordance with all applicable codes, including local building codes and regulations. Consult the local
authority having jurisdiction before installing this product.
• To reduce the risk of fire or electrical shock, do not expose the product to rain or moisture.
• Do not expose this apparatus to dripping or splashing, and do not place objects filled with liquids such as
vases, on or near the apparatus. Exposure to liquid may create a fire hazard.
• Do not place any naked flame sources, such as lighted candles, on or near the apparatus.
• This product is not intended for installation or use in indoor water facility areas (including, without
limitation, indoor pools, indoor water parks, hot tub rooms, saunas, steam rooms and indoor skating rinks).
Contains small parts which may be a choking hazard. Not suitable for children under age 3.
CAUTION:
• Do not make unauthorized alterations to the product; doing so may compromise safety, regulatory
compliance, system performance, and may void the warranty.
The exclamation point within an equilateral triangle, as marked on the system, is intended to alert the user to
the presence of important operating and maintenance instructions in this installation guide.
1. Read these instructions.
2. Keep these instructions.
3. Heed all warnings.
4. Follow all instructions.
5. Do not use this apparatus near water.
6. Clean only with a dry cloth.
7. Do not block any ventilation openings. Install in accordance with the manufacturer’s instructions.
8. Do not install near any heat sources, such as radiators, heat registers, stoves or other apparatus (including
amplifiers) that produce heat.
9. Only use attachments/accessories specified by the manufacturer.
10. Refer all servicing to qualified personnel. Servicing is required when the apparatus has been damaged in any
way, such as power-supply cord or plug is damaged, liquid has been spilled or objects have fallen into the
apparatus, the apparatus has been exposed to rain or moisture, does not operate normally, or has been dropped.
This product conforms to all applicable EU directive requirements. The complete Declaration of Conformity
can be found at www.Bose.com/compliance
pro.Bose.com
2 English
Page 3
pro.Bose.com
Lea atentamente esta guía del usuario y guárdela para consultarla en el futuro.
Solo un instalador profesional deberá montar este producto. Este documento está pensado para ofrecer a los
instaladores profesionales instrucciones básicas de instalación y seguridad relacionadas con este producto en sistemas típicos de instalaciones fijas. Lea este documento antes de intentar la instalación.
ADVERTENCIA:
• Para reducir el riesgo de incendio o descarga eléctrica, no exponga el producto a lluvia o humedad.
• No exponga este aparato a salpicaduras o goteo. No coloque objetos que contengan líquidos, por ejemplo,
jarrones, encima o cerca del aparato. Al igual que con cualquier producto electrónico, evite que se
derramen líquidos en los componentes del sistema, ya que pueden provocar averías o riesgo de incendio.
• No coloque llamas vivas, por ejemplo, velas, encima o cerca del aparato.
• This product is not intended for installation or use in indoor water facility areas (including, without
limitation, indoor pools, indoor water parks, hot tub rooms, saunas, steam rooms and indoor skating rinks).
• Todos los productos Bose se deben utilizar según lo estipulado en las normativas industriales locales,
regionales y nacionales. Será responsabilidad del instalador garantizar que la instalación del amplificador
se lleva a cabo según lo dispuesto en los códigos correspondientes, incluidos los códigos de construcción
locales y las normativas. Consulte a las autoridades locales pertinentes antes de instalar este producto.
Contiene piezas pequeñas que pueden suponer riesgo de asfixia. No adecuado para niños de menos de 3
años.
PRECAUCIÓN:
• No realice modificaciones al sistema ni a los accesorios. Las alteraciones no autorizadas pueden
comprometer la seguridad, el cumplimiento regulatorio y el desempeño del sistema.
El signo de exclamación dentro de un triánglo equilátero, tal como aparece marcado en el sistema, avisa al
usuario de que existen instrucciones de operación y mantenimiento imprtantes en esta guía de instalación.
1. Lea las siguientes instrucciones.
2. Guarde estas instrucciones para consultarlas en el futuro.
3. Respete todas las advertencias que se indican en el producto y en la documentación.
4. Siga todas las instrucciones.
5. No utilice este aparato cerca del agua.
6. Límpielo solo con un trapo seco.
7. No bloquee las aberturas de ventilación. Instálelo siguiendo las instrucciones del fabricante.
8. No lo instale cerca de fuentes de calor, tales como radiadores, salidas de aire caliente, cocinas u otros aparatos
(incluidos amplificadores) que generen calor.
9. Utilice solo conexiones y accesorios suministrados por el fabricante.
10. Toda reparación debe ser realizada por personal cualificado. Lleve el dispositivo a reparar si presenta algún
daño como, por ejemplo, si el cable de alimentación o el enchufe están dañados, si se han vertido líquidos o
se han caído objetos sobre el dispositivo o si éste ha estado expuesto a la lluvia o humedad; si no funciona
correctamente o se ha caído al suelo.
Este producto cumple los requisitos de todas las Directivas de la UE aplicables legalmente. Encontrará la
declaración de conformidad completa en www.Bose.com/compliance.
Instrucciones de Seguridad Importante
Español 3
Page 4
Instructions Importantes Relatives à la Sécurité
Consultez attentivement cette notice d’utilisation et conservez-la pour toute référence future.
L’installation de ce produit est réservée à un technicien professionnel! Ce document à l’intention des installateurs
professionnels contient les directives de pose et de sécurité relatives à ce produit en installation fixe. Lisez attentivement ce document avant l’installation.
AVERTISSEMENT:
• Tous les produits Bose doivent être utilisés en respectant les réglementations locales et nationales.
L’installateur est responsable du respect de tous les codes et règlements locaux et nationaux en vigueur
applicables à l’installation du produit. Consultez les autorités locales compétentes avant d’installer ce
produit.
• Pour limiter les risques d’incendie ou d’électrocution, n’exposez pas l’appareil à la pluie ou à l’humidité.
• Protégez l’appareil de tout risque de ruissellement ou d’éclaboussure. Ne placez pas d’objets contenant
des liquides, tels que des vases, sur l’appareil. L’exposition aux liquides peut induire un risque d’incendie.
• Ne placez aucune source de flamme nue, comme une bougie allumée, sur ou près de l’appareil.
• Ce produit n’est pas destiné à être monté ou utilisé dans des installations humides en intérieur (par
exemple piscine intérieure, parc aquatique intérieur, baignoire à remous, sauna, hammam, patinoire
intérieure, etc.).
Certaines pièces présentent un risque de suocation. Ne pas laisser à la portée des enfants de moins de 3
ans.
ATTENTION:
• Toute modification non autorisée peut compromettre votre sécurité, le respect des réglementations et le
bon fonctionnement de l’appareil, et en invalidera la garantie.
Ce symbole signale la présence d’instructions importantes relatives au fonctionnement et à l’entretien de
l’appareil dans ce guide.
1. Veuillez lire ces instructions.
2. Veuillez conserver ces instructions.
3. Respectez tous les avertissements.
4. Suivez toutes les instructions.
5. N’utilisez pas cet appareil à proximité d’eau ou d’une source d’humidité.
6. Utilisez uniquement un chion sec pour le nettoyage.
7. Ne bloquez jamais les orifices d’aération. Suivez les instructions du fabricant pour l’installation.
8. N’installez pas cet appareil à proximité d’une quelconque source de chaleur, telle qu’un radiateur, une arrivée
d’air chaud, un four ou tout autre appareil (notamment des amplificateurs) produisant de la chaleur.
9. Utilisez uniquement les accessoires spécifiés par le fabricant.
10. Confiez toute réparation à du personnel qualifié. Une réparation est nécessaire lorsque l’appareil a été
endommagé de quelque façon que ce soit (endommagement du cordon d’alimentation ou de la fiche électrique,
renversement d’un liquide ou de tout objet sur l’appareil, exposition de l’appareil à la pluie ou à l’humidité,
mauvais fonctionnement, chute de l’appareil, etc.).
Ce produit est conforme à toutes les directives de la Communauté Européenne qui s’y appliquent. L’attestation complète de conformité est disponible à l’adresse www.Bose.com/compliance.
pro.Bose.com
4 Français
Page 5
pro.Bose.com
Bitte lesen Sie diese Bedienungsanleitung durch und bewahren Sie sie zum späteren Nachschlagen auf.
Dieses Produkt darf nur von fachkundigen Monteuren installiert werden! Dieses Dokument soll fach-
kundigen Monteuren grundlegende Installations- und Sicherheitsrichtlinie für dieses Produkt in typischen
Festinstallationssystemen bieten. Bitte lesen Sie dieses Dokument vor der Installation durch.
WARNHINWEISE:
• Alle Bose-Produkte müssen gemäß den örtlichen und staatlichen Vorschriften sowie gemäß allen
Branchenbestimmungen verwendet werden. Der Monteur ist dafür verantwortlich, sicherzustellen, dass
die Installation des Produkts gemäß allen geltenden Vorschriften durchgeführt wird, einschließlich
örtlicher Bauvorschriften und Bestimmungen. Wenden Sie sich vor der Installation dieses Produkts an die
zuständige Abnahmebehörde.
• Um Brände und Stromschläge zu vermeiden, darf dieses Produkt weder Regen noch Feuchtigkeit
ausgesetzt werden.
• Schützen Sie das Gerät vor tropfenden oder spritzenden Flüssigkeiten, und stellen Sie keine mit
Flüssigkeiten gefüllten Gefäße (z.B. Vasen) auf das Gerät oder in die Nähe des Geräts. Durch den Kontakt
mit Flüssigkeiten entsteht ggf. Brandgefahr.
• Stellen Sie keine brennenden Kerzen oder ähnliches auf das Gerät oder in die Nähe des Geräts.
• Dieses Produkt ist nicht für die Installation oder Verwendung in Innenbereichen mit Wassereinrichtungen
(zum Beispiel Schwimmbädern, Wasserparks, Räume mit Whirlpools, Saunas, Dampfbäder und
Eislaufbahnen) gedacht.
Enthält kleine Teile, die verschluckt werden können und eine Erstickungsgefahr darstellen. Nicht geeignet für
Kinder unter drei Jahren.
ACHTUNG:
• Nehmen Sie keine Veränderungen am System oder am Zubehör vor. Nicht autorisierte Veränderungen
können die Sicherheit, die Erfüllung von Richtlinien und die Systemleistung beeinträchtigen.
Dieser Warnhinweis weist auf wichtige Bedien- und Wartungsinformationen in dieser Anleitung hin.
1. Lesen Sie die folgenden Anweisungen.
2. Bewahren Sie die Anweisungen auf.
3. Beachten Sie alle Warn- und Sicherheitshinweise.
4. Befolgen Sie alle Anweisungen.
5. Verwenden Sie dieses Gerät nicht in der Nähe von Wasser.
6. Reinigen Sie das Gerät nur mit einem sauberen, trockenen Tuch.
7. Achten Sie darauf, dass die Lüftungsönungen nicht blockiert sind. Stellen Sie das Gerät nur in
Übereinstimmung mit den Herstelleranweisungen auf.
8. Stellen Sie das Gerät nicht in der Nähe von Wärmequellen auf, wie Heizkörpern, Wärmespeichern, Öfen oder
anderen Geräten(auch Verstärkern), die Wärme erzeugen.
9. Verwenden Sie nur Zubehör-/Anbauteile, die vom Hersteller zugelassen sind.
10. Alle Reparatur- und Wartungsarbeiten nur von qualifiziertem Kundendienstpersonal durchführen lassen.
Wartungsarbeiten sind in folgenden Fällen nötig: Bei jeglichen Beschädigungen wie z.B. des Netzkabels oder
Netzsteckers, wenn Flüssigkeiten oder Gegenstände in das Gehäuse gelangt sind, das Gerät Regen oder
Feuchtigkeit ausgesetzt wurde, fallen gelassen wurde oder nicht ordnungsgemäß funktioniert.
Dieses Produkt erfüllt alle vorgeschriebenen EU-Richtlinien. Die vollständige Konformitätserklärung ist einsehbar unter www.Bose.com/compliance.
Wichtige Sicherheitshinweise
Deutsch 5
Page 6
Informazioni Importanti Sulla Sicurezza
Leggere questo manuale d’uso e conservarlo come riferimento per il futuro.
Questo prodotto deve essere installato esclusivamente da installatori professionisti. Il presente documento ha lo
scopo di fornire agli installatori professionisti le istruzioni di base per l’installazione e la sicurezza de prodotto negli
impianti convenzionali a installazione fissa. Leggere attentamente il documento prima di procedere all’installazione.
AVVERTENZE:
• Tutti i prodotti Bose devono essere installati in conformità con gli standard locali, statali, federali e
di settore. È responsabilità dell’installatore assicurare che l’installazione del prodotto sia eseguita in
conformità con tutte le normative vigenti, compresi i regolamenti edilizi locali. Prima di installare il
prodotto, chiedere informazioni all’autorità locale preposta.
• Per ridurre il rischio di incendio o scosse elettriche, il prodotto non deve essere esposto a pioggia o
umidità.
• Non esporre l’apparecchio a gocce o schizzi, e non porre oggetti contenenti liquidi quali vasi sopra o in
prossimità dell’apparecchio. L’esposizione ai liquidi può provocare il rischio di incendi.
• Non collocare sorgenti di fiamme libere (ad esempio, candele accese) sull’apparecchio o in prossimità di
esso.
• Il prodotto non deve essere installato o utilizzato in aree di servizio o intrattenimento vicine all’acqua (ad
esempio, piscine coperte, parchi acquatici al chiuso, sale con vasche riscaldate, saune, bagni turchi e piste
di pattinaggio al chiuso).
Contiene pezzi di piccole dimensioni che possono rappresentare un pericolo di soocamento. Nonadatto per
bambini di età inferiore ai 3 anni.
ATTENZIONE:
• Eventuali modifiche non autorizzate possono compromettere la sicurezza, la conformità alle normative e le
prestazioni del sistema, e quindi invalidare la garanzia.
Questo simbolo segnala le istruzioni importanti dal punto di vista del funzionamento e della manutenzione
all’interno della guida.
1. Leggere queste istruzioni.
2. Conservare queste istruzioni.
3. Prestare attenzione a tutte le avvertenze.
4. Seguire tutte le istruzioni.
5. Non utilizzare l’apparecchio in prossimità di acqua.
6. Utilizzare solo un panno asciutto per la pulizia.
7. Non ostruire le aperture di ventilazione. Installare il prodotto in conformità con le istruzioni fornite dal
produttore.
8. Non installare i diusori in prossimità di fonti di calore, quali termosifoni, radiatori, stufe o altri apparecchi
(compresi gli amplificatori) che generano calore.
9. Utilizzare solo sistemi di aggancio/accessori specificati dal produttore.
10. Adarsi a personale qualificato per tutti gli interventi di assistenza. Gli interventi di assistenza si rendono
necessari quando l’apparato ha subito danni di qualsiasi tipo, ad esempio se il cavo di alimentazione o la spina
sono danneggiati, se è stato versato del liquido o sono caduti oggetti sull’apparato, se l’apparato è stato esposto
a pioggia o umidità, se non funziona normalmente o è caduto.
Questo prodotto è conforme a tutte le direttive EU prescritte dalla legge. La dichiarazione di conformità
completa è disponibile all’indirizzo www.Bose.com/compliance.
pro.Bose.com
6 Italiano
Page 7
pro.Bose.com
Lees deze gebruikershandleiding zorgvuldig door en bewaar deze voor toekomstig gebruik.
Dit product is uitsluitend bestemd voor installatie door professionele installateurs! Dit document is bedoeld om
professionele installateurs essentiële installatie- en veiligheidsrichtlijnen te bieden voor dit product in standaardsystemen voor vaste installatie. Lees dit document door voordat u begint met de installatie.
WAARSCHUWINGEN:
• Alle Bose-producten moeten worden geïnstalleerd volgens de plaatselijke en landelijke voorschriften en
industrienormen. Het is de verantwoordelijkheid van de installateur om ervoor te zorgen dat de installatie
van het product wordt uitgevoerd volgens alle van toepassing zijnde voorschriften, inclusief plaatselijke
bouwvoorschriften. Neem contact op met de juiste plaatselijke overheidsinstanties voordat u dit product
installeert.
• Stel het apparaat niet bloot aan regen of vocht, om het risico van brand of elektrische schokken te
verlagen.
• Stel dit apparaat niet bloot aan druipende of spattende vloeistoen en plaats geen met vloeistoen
gevulde voorwerpen, zoals vazen, op of bij het apparaat. Blootstelling aan vloeistoen kan leiden tot
brandgevaar.
• Plaats geen open vlam, zoals een brandende kaars, op of bij het product.
• Dit product is niet bedoeld voor installatie of gebruik in overdekte ruimten voor wateractiviteiten
(waaronder overdekte zwembaden, overdekte waterparken, stoomruimten, sauna’s, bubbelbadkamers en
overdekte ijsbanen).
Bevat kleine onderdelen die een verstikkingsgevaar kunnen vormen. Niet geschikt voor kinderen jonger dan
3 jaar.
WAARSCHUWINGEN:
• Er mogen geen wijzigingen aan het product worden aangebracht door onbevoegden. Dergelijke
wijzigingen kunnen de veiligheid, de naleving van voorschriften en de werking van het systeem in gevaar
brengen en kunnen ertoe leiden dat de garantie vervalt.
Dit symbool geeft aan dat deze handleiding belangrijke gebruiks- en onderhoudsinstructies bevat.
1. Lees deze instructies door.
2. Bewaar deze instructies.
3. Neem alle waarschuwingen in acht.
4. Volg alle instructies.
5. Gebruik dit apparaat niet in de buurt van water.
6. Alleen met een droge doek reinigen.
7. Zorg dat u de ventilatieopeningen niet blokkeert. Installeer het apparaat volgens de instructies van de fabrikant.
8. Installeer het product niet in de buurt van warmtebronnen, zoals radiatoren, warmteroosters, kachels of andere
apparaten (waaronder versterkers) die warmte produceren.
9. Gebruik uitsluitend aansluitstukken/accessoires die door de fabrikant worden gespecificeerd.
10. Laat alle reparaties en onderhoud over aan bevoegde servicemedewerkers. Onderhoud is vereist als het
apparaat is beschadigd. Dit is bijvoorbeeld het geval als het netsnoer of de stekker is beschadigd, als er vloeistof
is gemorst of voorwerpen in het apparaat zijn gevallen, als het apparaat is blootgesteld aan regen of vocht, niet
normaal werkt of is gevallen.
Dit product voldoet aan alle vereisten van de EU-richtlijnen, zoals wettelijk vereist. De volledige
conformiteitsverklaring kunt u vinden op www.Bose.com/compliance.
Belangrijke Veiligheidsinstructies
Nederlands 7
Page 8
Introduction
pro.Bose.com
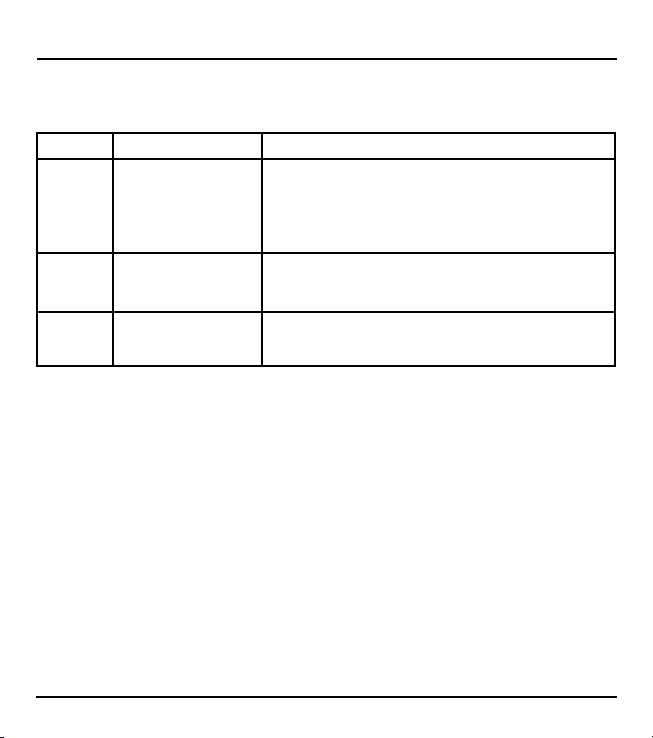
Product Features
Bose® ControlCenter zone controllers provide three options for remote volume control and input
source selection:
Controller Function Compatible Products
CC-1 Volume control only FreeSpace® IZA 190-HZ1, IZA 250-LZ1, IZA 2120-LZ/HZ
CC-2 Volume control with
CC-3 Volume control with
Each zone controller is available in white and black, and in North America, Japan, and EU
configurations. The North America zone controllers are sized for Decora® wall mounting, and
include two 1/2 inch #6-32 screws. The Japan zone controllers fit Wide 21 wall plates with a
face height of 1 mm above the thick wall plate cover; the controllers have approximately 3 mm
face height when used with other types of wall plate covers. Two 8 mm M4 screws are included.
Wall plate covers are not included with North America and Japan zone controllers. The EU zone
controllers come as a finished wall plate of size 86 mm x 86 mm, with 60 to 60.3 mm screw
spacing suitable for either vertical or horizontal mounting, and include two 18 mm M4 screws. All
models include a sheet of pre-printed color-matched labels.
A/B source selection
switch
A/B/C/D source
selection switch
FreeSpace ZA 2120-LZ/A - HZ/A
FreeSpace DXA 2120
PowerShare PS602, PS404A, PS604A
Any ControlSpace® processor
FreeSpace IZA 190-HZ, IZA 250-LZ, IZA 2120-LZ/HZ
FreeSpace DXA 2120
Any ControlSpace processor
Any ControlSpace processor
Connecting a Single Zone Controller
Connect a single zone controller to a FreeSpace or PowerShare amplifier using a CAT 5 cable
with maximum length of 609 meters (2000 feet). Connect to a ControlSpace ESP using a CAT
5 cable with a maximum length of 152 meters (500 feet) for a shielded cable or 30 meters (100
feet) for an unshielded cable.
The cable must be terminated on one end with an RJ-45 connection using TIA/EIA 568B pinout,
and on the other end with an RJ-45 connector for PowerShare amplifiers, or the Euroblock
connector appropriate for the FreeSpace amplifier or ControlSpace processor (2-pin, 4-pin, or
6-pin).
1
Operates with a fixed input (B). Amp front panel A/B switch is inactive.
8 English
Page 9
pro.Bose.com
Introduction
Connecting Multiple Zone Controllers
Some amplifier models allow adjacent zone controllers to be ganged together directly. Each zone
controller can be independently configured to control any output, or combination of outputs, for
bi-amping.
Use a CAT 5 cable with RJ-45 connectors to connect zone controllers to each other, then create
a single home run from the last zone controller in the chain back to the amplifier. The maximum
total cable length (from the first zone controller to the amplifier) is 609 meters (2000 feet). Use
standard CAT 5 cables and RJ-45 connectors as described in Connecting a Single Controller.
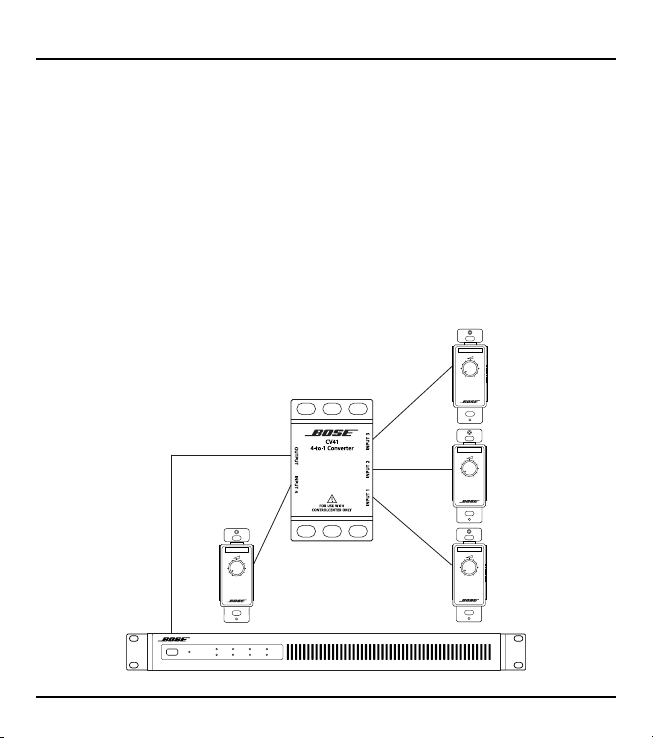
CV41 4-to-1 Converter
For PowerShare amplifier models, you can use the CV41 4-to-1 Converter to create a single home
run back to an amplifier from multiple zone controllers distributed throughout an installation.
Connect each zone controller to the CV41 converter using CAT 5 cables with RJ-45 connectors,
then run a single CAT 5 cable from the CV41 4-to-1 Converter to the amplifier. You can connect
up to two CC-1 zone controllers to a PS602 amplifier, and up to four CC-1 zone controllers to a
PS404A or PS604A amplifier, or any ControlSpace processor.
CAT 5 cable
7.6 m (25 ft) max
CAT 5 cable
609 m (2000 ft) max
PowerShare
Adaptable Power Amplier
POWER
SIGNAL
1234
LIMIT
PS604A
English 9
Page 10

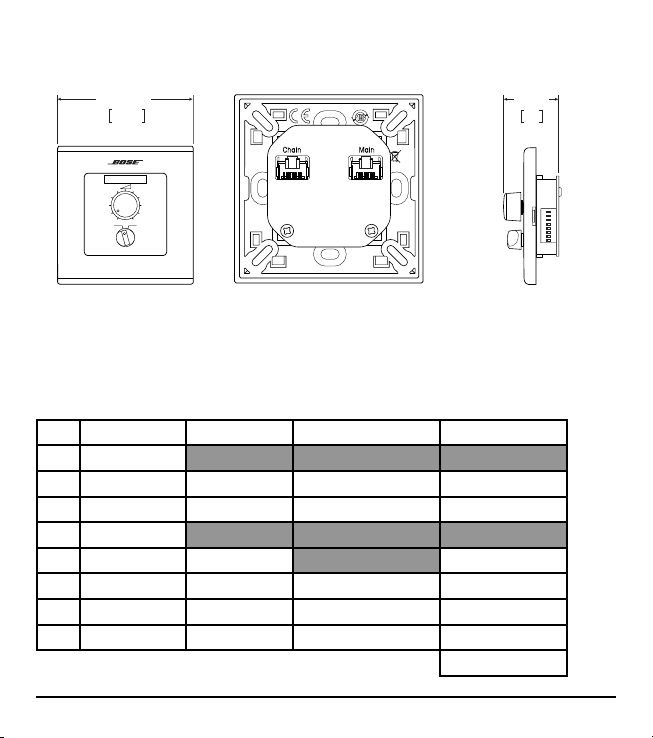
CC-1 Installation Guide
pro.Bose.com
CC-1 Zone Controller
The CC-1 zone controller provides volume control only. It is compatible with FreeSpace®
IZA 190-HZ, IZA 250-LZ, IZA 2120-LZ/HZ, ZA 2120-LZ/A - HZ/A; DXA 2120 amplifiers;
PowerShare PS602, PS404A, and PS604A amplifiers; and any ControlSpace® processor.
CC-1 Zone Controller - North America
38 mm
1.5 in
Chain Main
34 mm
1.3 in
105 mm
4.1 in
Front View
CC-1 Zone Controller - Japan
42 mm
1.7 in
110 mm
4. 3 in
Front View
10 English
DIPON
Rear View Side View
36.2 mm
1.4 in
Chain Main
DIPON
Rear View Side View
123 45678
1 234567 8
Page 11

pro.Bose.com
86 mm sq.
34 mm
CC-1 Zone Controller - EU
CC-1 Installation Guide
3.4 in sq.
Front View Rear View
1.4 in
DIPON
Side View
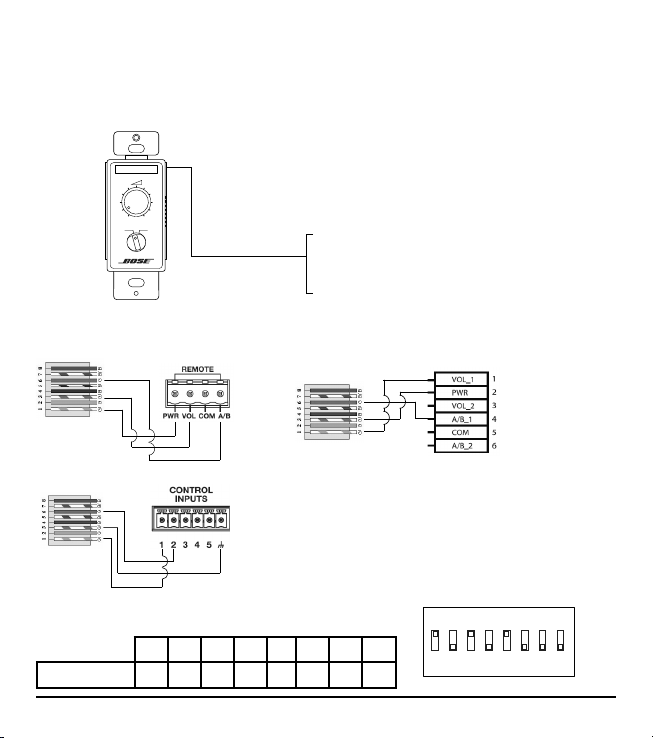
Pin-to-Remote Connections
Connections from the RJ-45 (TIA/EIA 568B wiring) connector on the CC-1 zone controller to
the REMOTE connector on the FreeSpace® amplifier or CONTROL INPUTS connector on the
ControlSpace® processor. Use GPI mode A- in CSD. PowerShare requires a separate wire in the
CAT 5 cable for COM, PWR, and each VOL_# connection.
Pin Color FreeSpace
IZA/ZA
FreeSpace
DXA2120
ControlSpace PowerShare
8 Brown COM
7 White/Brown
6 Green VOL #4 VOL_4
5 White/Blue VOL #3 VOL_3
4 Blue VOL #2 VOL #2 VOL_2
3 White/Green VOL #1 PWR VOL #1 VOL_1
2 Orange PWR #2 VOL_2
1 White/Orange PWR #1 VOL_1 COM PWR
CSD GPI Mode: A-
12345678
English 11
Page 12

FreeSpace
IZA 2120-LZ/HZ
Controller
CC-1 Installation Guide
FreeSpace
pro.Bose.com
Connecting the CC-1 Zone Controller
Connect one CC-1 zone controller to FreeSpace® amplifier models IZA 190-HZ1, IZA 250-LZ1,
IZA 2120-LZ/HZ, ZA 2120-LZ/A - HZ/A, or DXA 2120, or PowerShare amplifier models PS602,
PS404A, or PS604A, or any ControlSpace® processor. Use GPI mode A- CSD. If one CC-1 is to be
used in zone 2 of the DXA 2120, then wire into VOL_2. DIP switch settings are the same.
CAT 5 cable
Use either RJ-45
connection
CC-1 Zone
FreeSpace and PowerShare:
609 m (2000 ft) max
ControlSpace:
152 m (500 ft) max shielded cable
30 m (100 ft) max unshielded cable
FreeSpace IZA 190-HZ , IZA 250-LZ
FreeSpace IZA 2120-LZ/HZ
FreeSpace ZA 2120-LZ/A - HZ/A
FreeSpace DXA 2120
PowerShare PS602, PS404A, PS604A
ControlSpace Processor (Any)
Pin-to-Remote Connection Diagrams
FreeSpace
IZA 2120-LZ/HZ
Any ESP
RJ-45 (Main)
on CC-1 #1
Either RJ-45
on CC-1
RJ-45 (Main)
on CC-1
1
Operates with a fixed input (B). Amp front panel A/B switch is inactive.
12 English
1
1
Either RJ-45
on CC-1
If one CC-1 is to be used in zone 2,
then wire into VOL_2.
DIP switch settings are the same.
FreeSpace
ZA 2120-LZ/HZ
DXA 2120
Page 13

pro.Bose.com
CC-1 Installation Guide
Configure the CC-1 zone controller using the following DIP switch settings:
1 2 3 4 5 6 7 8
FreeSpace IZA/ZA 0 0 1 0 1 0 0 0
FreeSpace DXA 2120 0 0 1 0 1 0 0 0
PowerShare* 0 0 1 0 * * * *
ControlSpace** 0 0 1 0 ** ** ** ** CSD GPI Mode: A-
* For the PowerShare PS602, PS404A, and PS604A amplifiers, the CC-1 controls any outputs with corresponding DIP
switches in the ON position:
DIP 5 - OUTPUT 1
DIP 6 - OUTPUT 2
DIP 7 - OUTPUT 3 (PS404A and PS604A only)
DIP 8 - OUTPUT 4 (PS404A and PS604A only)
** For the DSPs, the DIP switch configuration determines the CC-1 ID:
DIP 5 - ID 1
DIP 6 - ID 2
DIP 7 - ID 3
DIP 8 - ID 4
FreeSpace IZA/ZA/DXA 2120,
PowerShare Amplifiers,
and ControlSpace Processors
DIPON
1 2 3 4 5 6 7 8
CC-1 Zone Controller #1
English 13
Page 14

CC-1 Installation Guide
Connect two ganged CC-1 zone controllers to FreeSpace® amplifier models IZA2120-HZ,
ZA2120-HZ/A or DXA2120; or PowerShare amplifier models PS602, PS404A, or PS604A; or any
ControlSpace processor.
CAT 5 cable
609 m (2000 ft)
max total length
FreeSpace IZA 2120-HZ
FreeSpace ZA 2120-HZ/A
FreeSpace DXA 2120
PowerShare PS602, PS404A, PS604A
ControlSpace Processor (Any)
pro.Bose.com
CC-1 Zone
Controller #1
Pin-to-Remote Connection Diagrams
RJ-45 (Main)
on CC-1 #1
Wiring with
Optional CAT 5
Daisy-Chain
RJ-45 (Chain)
on CC-1
on CC-1 #2
VOL #2
PWR #2
Any ESP
Wiring if Using
Two Home Runs
to IZA 2120-HZ
RJ-45 (Main)
14 English
CC-1 Zone
Controller #2
FreeSpace
IZA 2120-HZ
Wiring with
Optional CAT 5
Daisy-Chain
Wiring if Using
Two Home Runs
to ZA 2120-HZ
Wiring with
Optional CAT 5
Daisy-Chain
Wiring if Using
Two Home Runs
to DXA 2120
RJ-45 (Main)
on CC-1 #1
RJ-45 (Chain)
on CC-1 #2
RJ-45 (Main)
on CC-1 #1
RJ-45 (Chain)
on CC-1 #2
VOL #2
PWR #2
PWR
VOL_2
FreeSpace
ZA 2120-HZ
FreeSpace
DXA 2120
Page 15

pro.Bose.com
CC-1 Installation Guide
Configure the CC-1 zone controllers using the following DIP switch settings:
1 2 3 4 5 6 7 8
FreeSpace IZA/ZA
FreeSpace DXA 2120
PowerShare*
ControlSpace**
* For the PowerShare PS602, PS404A, and PS604A amplifiers, the CC-1 controls any outputs with corresponding
DIP switches in the ON position:
DIP 5 - OUTPUT 1
DIP 6 - OUTPUT 2
DIP 7 - OUTPUT 3 (PS404A AND PS604A only)
DIP 8 - OUTPUT 4 (PS404A AND PS604A only)
** For the DSPs, the DIP switch configuration determines the CC-1 ID:
DIP 5 - ID 1
DIP 6 - ID 2
DIP 7 - ID 3
DIP 8 - ID 4
Controller #1 0 0 1 0 1 0 0 0
Controller #2 0 0 0 1 0 1 0 0
Controller #1 0 0 1 0 1 0 0 0
Controller #2 0 0 0 1 1 0 0 0
Controller #1 0 0 1 0 * * * *
Controller #2 0 0 1 0 * * * *
Controller #1 0 0 1 0 ** ** ** **
Controller #2 0 0 1 0 ** ** ** **
CSD GPI Mode: A-
FreeSpace IZA/ZA
Amplifiers
DIPON
1 2 3 4 5 6 7 8
CC-1 Zone Controller #1
DIPON
1 2 3 4 5 6 7 8
CC-1 Zone Controller #2
FreeSpace DXA 2120
Amplifier
DIPON
1 2 3 4 5 6 7 8
CC-1 Zone Controller #1
DIPON
1 2 3 4 5 6 7 8
CC-1 Zone Controller #2
PowerShare Amplifiers/
ControlSpace DSP (Any)
DIPON
1 2 3 4 5 6 7 8
CC-1 Zone Controller #1
DIPON
1 2 3 4 5 6 7 8
CC-1 Zone Controller #2
English 15
Page 16
CC-1 Installation Guide
CC-1 Zone Controller #4
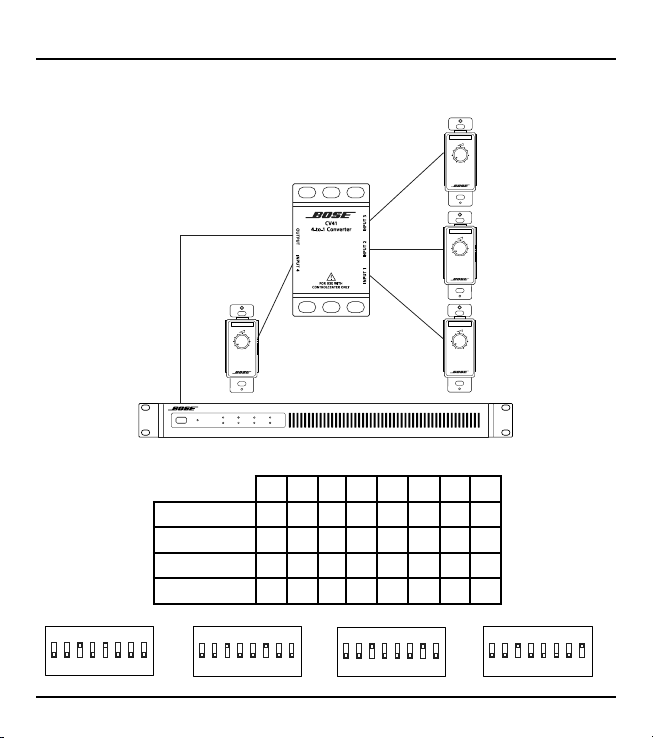
Connect up to four ganged CC-1 zone controllers to the PowerShare amplifier models PS404A
and PS604A, or any ControlSpace processor.
CAT 5 cable
609 m (2000 ft) max total length
PowerShare PS404A and PS604A
ControlSpace Processor (Any)
pro.Bose.com
CC-1 Zone
Controller #1
Configure the CC-1 zone controllers using the following DIP switch settings:
1 2 3 4 5 6 7 8
CC-1 Zone Controller #1
1 2 3 4 5 6 7 8
CC-1 Zone Controller #3
16 English
CC-1 Zone
Controller #2
CC-1 Zone
Controller #3
CC-1 Zone
Controller #4
1 2 3 4 5 6 7 8
Controller #1 0 0 1 0 1 0 0 0
Controller #2 0 0 1 0 0 1 0 0
Controller #3 0 0 1 0 0 0 1 0
Controller #4 0 0 1 0 0 0 0 1
DIPON
1 2 3 4 5 6 7 8
DIPON
CC-1 Zone Controller #2
DIPON
RJ-45 (Main)
on CC-1
DIPON
1 2 3 4 5 6 7 8
Any ESP
Page 17
pro.Bose.com
DIPON
1 2 3 4 5 6 7 8
CC-1 Zone Controller #1
CC-1 Zone Controller #2
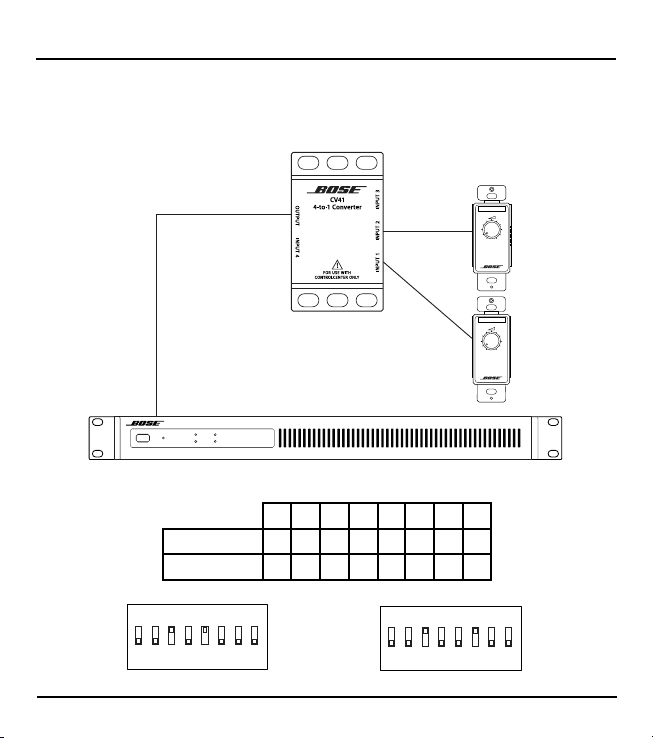
Connect multiple CC-1 zone controllers to PowerShare amplifier models PS602, PS404A, or
PS604A using the CV41 4-to-1 converter. Connect up to two CC-1 zone controllers to the PS602
amplifier or up to four CC-1 zone controllers to the PS404A and PS604A amplifiers, or any
ControlSpace processor.
CAT 5 cable
7.6 m (25 ft) max
SIGNAL
POWER
12
LIMIT
PowerShare
Adaptable Power Amplier
CC-1 Installation Guide
CAT 5 cable
609 m (2000 ft) max
PS602
Configure the CC-1 zone controllers using the following DIP switch settings:
1 2 3 4 5 6 7 8
Controller #1 0 0 1 0 1 0 0 0
Controller #2 0 0 1 0 0 1 0 0
DIPON
1 2 3 4 5 6 7 8
CC-1 Zone Controller #1
DIPON
1 2 3 4 5 6 7 8
English 17
Page 18
CC-1 Installation Guide
DIPON
1 2 3 4 5 6 7 8
CC-1 Zone Controller #2
DIPON
1 2 3 4 5 6 7 8
CC-1 Zone Controller #1
DIPON
1 2 3 4 5 6 7 8
CC-1 Zone Controller #4
DIPON
1 2 3 4 5 6 7 8
CC-1 Zone Controller #2
DIPON
1 2 3 4 5 6 7 8
CC-1 Zone Controller #2
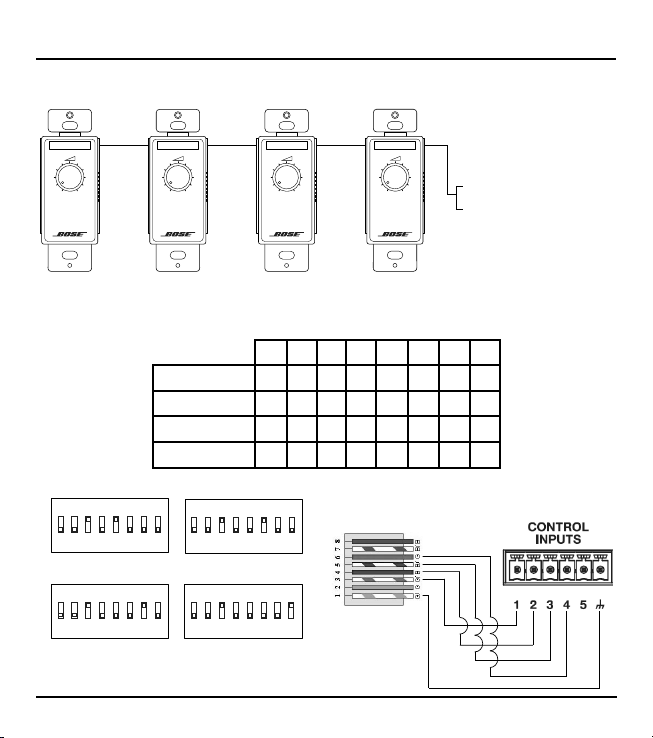
Connect up to four CC-1 zone controllers to the PowerShare PS404A and PS604A amplifier, or
any ControlSpace processor, using the CV41 4-to-1 converter.
CAT 5 cable
PowerShare
Adaptable Power Amplier
POWER
7.6 m (25 ft) max
SIGNAL
1234
LIMIT
CAT 5 cable
609 m (2000 ft) max
PS604A
pro.Bose.com
Configure the CC-1 zone controllers using the following DIP switch settings:
1 2 3 4 5 6 7 8
Controller #1 0 0 1 0 1 0 0 0
Controller #2 0 0 1 0 0 1 0 0
Controller #3 0 0 1 0 0 0 1 0
1 2 3 4 5 6 7 8
CC-1 Zone Controller #1
18 English
Controller #4 0 0 1 0 0 0 0 1
DIPON
1 2 3 4 5 6 7 8
CC-1 Zone Controller #2
DIPON
1 2 3 4 5 6 7 8
CC-1 Zone Controller #3
DIPON
1 2 3 4 5 6 7 8
CC-1 Zone Controller #4
DIPON
Page 19

pro.Bose.com
CC-2 Installation Guide
CC-2 Zone Controller
The CC-2 zone controller provides volume control and A/B source selection. It is compatible
with FreeSpace® amplifier models IZA 190-HZ, IZA 250-LZ, IZA 2120-LZ/HZ, DXA 2120, and any
ControlSpace® processor.
CC-2 Zone Controller - North America
38 mm
1.5 in
Chain Main
34 mm
1.3 in
105 mm
4.1 in
BA
Front View
CC-2 Zone Controller - Japan
42 mm
1.7 in
110 mm
BA
4.3 in
Front View
DIPON
Rear View Side View
36.2 mm
1.4 in
Chain Main
DIPON
Rear View Side View
12345678
1 2345678
English 19
Page 20
CC-2 Installation Guide
86 mm sq.
34 mm
CC-2 Zone Controller - EU
pro.Bose.com
3.4 in sq.
BA
Front View Rear View
1.4 in
Side View
Pin-to-Remote Connections
Connections from the RJ-45 (TIA/EIA 568B wiring) connector on the CC-2 zone controller to
REMOTE connector on the FreeSpace® amplifier or to CONTROL INPUTS connector on the
ControlSpace® processor. Use GPI mode A- in CSD.
Pin Color FreeSpace IZA FreeSpace DXA 2120 ControlSpace ESP
8 Brown
7 White/Brown A/B Select #2 A/B_2 A/B Select #2
6 Green A/B Select #1 A/B_1 A/B Select #1
5 White/Blue
4 Blue VOL #2 COM #2
3 White/Green VOL #1 PWR COM #1
2 Orange PWR #2 VOL_2 VOL #2
1 White/Orange PWR #1 VOL_1 VOL #1
CSD GPI Mode: A-
DIPON
12345678
20 English
Page 21
pro.Bose.com
FreeSpace
CC-2 Installation Guide
Connecting the CC-2 Zone Controller
Connect one CC-2 zone controller to FreeSpace® amplifier models IZA 250-LZ, IZA 190-HZ,
IZA2120-LZ/HZ, DXA 2120, and any ControlSpace® processor. Use GPI mode A- in CSD.
CAT 5 cable
FreeSpace and PowerShare:
609 m (2000 ft) max
ControlSpace:
152 m (500 ft) max shielded cable
30 m (100 ft) max unshielded cable
BA
Pin-to-Remote Connection Diagrams
Either RJ-45
on CC-2
IZA 190-HZ, IZA 250-LZ,
IZA 2120-LZ/HZ
FreeSpace IZA 250-LZ
FreeSpace IZA 190-HZ
FreeSpace IZA 2120-LZ/HZ
FreeSpace DXA 2120
ControlSpace Processor (Any)
RJ-45 (Main)
on CC-2
FreeSpace
DXA 2120
RJ-45 (Main)
on CC-2
Configure one CC-2 zone controller using the following DIP
switch settings:
Any ESP
If one CC-2 is to be used in zone 2,
then wire into VOL_2 and A/B_2.
DIP switch settings are the same.
1 2 3 4 5 6 7 8
Controller 1 0 1 0 1 0 0 0
DIPON
1 2 3 4 5 6 7 8
CC-2 Zone Controller
English 21
Page 22

CC-2 Installation Guide
FreeSpace
RJ-45 (Main)
DIPON
1 2 3 4 5 6 7 8
CC-2 Zone Controller #1
DIPON
1 2 3 4 5 6 7 8
CC-2 Zone Controller #2
DIPON
1 2 3 4 5 6 7 8
CC-2 Zone Controller #2
Connect two ganged CC-2 zone controllers to FreeSpace® amplifier model IZA 2120-HZ or
DXA2120, or any ControlSpace processor.
CAT 5 cable
609 m (2000 ft) max total length
BA
FreeSpace IZA 2120-HZ
BA
FreeSpace DXA 2120
ControlSpace Processor (Any)
pro.Bose.com
CC-2 Zone
Controller #1
CC-2 Zone
Controller #2
Pin-to-Remote Connection Diagrams
RJ-45 (Main)
on CC-2 #1
Wiring with
Optional CAT 5
Daisy-Chain
Wiring if Using
Two Home Runs
to IZA 2120-HZ
Configure two ganged CC-2 zone controllers using the
following DIP switch settings:
RJ-45 (Main)
on CC-2
RJ-45 (Chain)
on CC-2 #2
A/B #2
VOL #2
PWR #2
Any ESP
1 2 3 4 5 6 7 8
IZA 2120-HZ
Controller #1 1 0 1 0 1 0 0 0
IZA/ZA/DSP #2 0 1 0 1 0 1 0 0
DXA 2120 #2 0 1 0 1 1 0 0 0
22 English
on CC-2 #1
Wiring with
Optional CAT 5
Daisy-Chain
RJ-45 (Chain)
Wiring if Using
Two Home Runs
to DXA 2120
on CC-2 #2
IZA/ZA/DSP DXA 2120
A/B_2
PWR
VOL_2
FreeSpace
DXA 2120
Page 23

pro.Bose.com
CC-3 Installation Guide
CC-3 Zone Controller
The CC-3 zone controller provides volume control and A/B/C/D source selection. It is compatible
with any ControlSpace® processor.
CC-3 Zone Controller - North America
38 mm
1.5 in
BC
AD
105 mm
4.1 in
Chain Main
34 mm
1.3 in
Front View
CC-3 Zone Controller - Japan
42 mm
1 .7 in
BC
AD
110 mm
4. 3 in
Front View
Rear View Side View
36.2 mm
1.4 in
Chain
Main
Rear View Side View
English 23
Page 24

CC-3 Installation Guide
86 mm sq.
34 mm
CC-3 Zone Controller - EU
pro.Bose.com
3.4 in
BC
AD
Front View Rear View
1.4 in
Side View
Pin-to-Remote Connections
Connections from the RJ-45 (TIA/EIA 568B wiring) connector on the CC-3 zone controller to the
CONTROL INPUTS connector on the ESP. Use GPI mode A+ in CSD.
Pin Color ControlSpace
8 Brown COM
7 White/Brown A
6 Green B
5 White/Blue C
4 Blue D
3 White/Green VOL
2 Orange
1 White/Orange
CSD GPI Mode: A+
24 English
Page 25

pro.Bose.com
CC-3 Installation Guide
Connecting the CC-3 Zone Controller
Connect one CC-3 zone controller to any ControlSpace® processor. Use GPI mode A+ in CSD.
Any ControlSpace Processor
152 m (500 ft) max length CAT 5 shielded cable
30 m (100 ft) max length unshielded CAT 5 cable
B C
A D
Terminated with RJ-45 (TIA/EIA 568 pinout) on one end
and 6-pin phoenix on the other end
Pin-to-Remote Connection Diagrams
on CC-3
Any ESPRJ-45
English 25
Page 26

CC-3 Installation Guide
pro.Bose.com
Limited Warranty
Your product is covered by a limited warranty, Visit pro.Bose.com for warranty details.
The warranty information provided with this product does not apply in Australian and New
Zealand. See our website at www.bose.com/au/warranty or www.bose.com/nz/warranty for
details of the Australian and New Zealand warranty.
Decora® is a registered trademark of Leviton Manufacturing Co., Inc.
Importer Information
European Union
Bose Products B.V., Gorslaan 60, 1441 RG Purmerend, The Netherlands
China
Bose Electronics (Shanghai) Company Limited, Part C, Plan 9, No. 353 North Riying Road, China
(Shanghai) Pilot Free Trade Zone
Taiwan
Bose Taiwan Branch, 9F-A1, No. 10, Section 3, Minsheng East Road, Taipei City 104, Taiwan
Tel: 886 2 2514 7977
Mexico
Bose de México, S. de R.L. de C.V., Paseo de las Palmas 405-204, Lomas de Chapultepec, 11000
México, D.F.
Tel: 001 800 900 2673
26 English
Page 27

pro.Bose.com
Contact Information
Visit us on the web at pro.Bose.com.
Americas
(USA, Canada, Mexico, Central America, South America)
Bose Corporation
The Mountain
Framingham, MA 01701 USA
Corporate Center: 508-879-7330
Americas Professional Systems,
Technical Support: 800-994-2673
Australia
Bose Pty Limited
Unit 3/2 Holker Street
Newington NSW Australia
TEL 61 2 8737 9999
Belgium
Bose N.V. / S.A
Limesweg 2, 03700
Tongeren, Belgium
TEL (32) 012-390800
China
Bose Electronics (Shanghai) Co Ltd
36F, West Gate Tower
1038 West Nanjing Road
Shanghai, P.R.C. 200041 China
TEL 86 21 6271 3800
France
Bose S.A.S
12 rue de Temara
78100 St. Germain en Laye, France
TEL 01-30-61-63-63
Germany
Bose GmbH
Max-Planck Strasse 36D 61381
Friedrichsdorf, Deutschland
TEL 06172-7104-0
CC-3 Installation Guide
Hong Kong
Bose Limited
Suites 2101-2105, Tower One, Times Square
1 Matheson Street, Causeway Bay, Hong Kong
TEL 852 2123 9000
India
Bose Corporation India Private Limited
Salcon Aurum, 3rd Floor
Plot No. 4, Jasola District Centre
New Delhi – 110025, India
TEL 91 11 43080200
Italy
Bose SpA
Centro Leoni A – Via G. Spadolini
5 20122 Milano, Italy
TEL 39-02-36704500
Japan
Bose Kabushiki Kaisha
Shibuya YT Building
28-3 Maruyama-sho
Shibuya-Ku, Tokyo, 150, Japan
TEL 81-3-5489-0955
www.bose.co.jp
The Netherlands
Bose BV
Nijverheidstraat 8 1135 GE
Edam, Nederland
TEL 31 (0)299-390139
United Kingdom
Bose House
Quayside Chatham Maritime
Chatham, Kent ME4 4QZ, United Kingdom
TEL 44 (0)3330-142545
See website for other countries
English 27
Page 28

©2017 Bose Corporation, All rights reserved.
Framingham, MA 01701-9168 USA
All trademarks are the property of their respective owners
www.pro.Bose.com
AM771705 Rev. 01
May 2017
 Loading...