

Bose Acoustic Wave CD3000 Owner's Manual
Acoustic Wave® Multi-Disc Changer
Owner’s Giuide
Safety Information
Please read this owner’s guide
Please take the time to follow the instructions in this owner’s guide carefully. It will help you set up and operate your system
properly and enjoy all of its advanced features. Please save this owner’s guide for future reference.
WARNING: To reduce the risk of fire or electrical shock, do not expose the product to rain or moisture.
WARNING: The apparatus shall not be exposed to dripping or splashing, and objects filled with liquids, such as vases, shall not
be placed on the apparatus. As with any electronic products, use care not to spill liquids into any part of the system. Liquids can
cause a failure and/or a fire hazard.
CAUTION: To reduce the risk of electric shock, do not disassemble this product unless you are qualified. Refer servicing to quali-
fied service personnel.
Français Español English
CAUTION
RISK OF ELECTRICAL SHOCK
DO NOT OPEN
CAUTION: TO REDUCE THE RISK OF ELECTRIC SHOCK,
DO NOT REMOVE COVER (OR BACK).
NO USER-SERVICABLE PARTS INSIDE.
REFER SERVICING TO QUALIFIED PERSONNEL.
ATTENTION : POUR RÉDUIRE LE RISQUE DE DÉCHARGE
ÉLECTRIQUE, NE RETIREZ PAS LE COUVERCLE (OU
L’ARRIÈRE). IL NE SE TROUVE À L’INTÉRIEUR AUCUNE
PIÈCE POUVANT ÊTRE RÉPARÉE PAR L’USAGER.
S’ADRESSER À UN RÉPARATEUR COMPÉTENT.
AVIS
RISQUE DE CHOC ÉLECTRIQUE
NE PAS OUVRIR
The lightning flash with arrowhead symbol within an equilateral triangle alerts the user to the presence of uninsulated,
dangerous voltage within the system enclosure that may be of sufficient magnitude to constitute a risk of electrical
shock.
The exclamation point within an equilateral triangle, as marked on the system, is intended to alert the user to the presence of important operating and maintenance instructions in this owner’s guide.
Class B emissions
This Class B digital apparatus meets all requirements of the Canadian Interference-Causing Equipment Regulations (Canada only).
CAUTION:
fully.
CAUTION:
radiation exposure. The compact disc player should not be adjusted or repaired by anyone except properly qualified service personnel.
CAUTION:
compliance, and system performance.
Class 1 laser product
This CD player is classified as a CLASS 1 LASER PRODUCT according to
EN 60825-1:1994+A1+A2, IEC 60825-1:1993+A1+A2.
WARNING:
disassemble, heat above 100ºC (212ºF), or incinerate. Dispose of used batteries promptly. Replace only with a battery of the correct type
and model number.
WARNING:
or Shun Wo CR2032 or DL2032 3-volt lithium battery.
To
prevent electric shock, match the wide blade of the line cord plug to the wide slot of the AC (mains) receptacle. Insert
Us
e of controls or adjustments or performance of procedures other than those specified herein may result in hazardous
Make no modifications to the system or accessories. Unauthorized alterations may compromise safety, regulatory
CLASS 1 LASER PRODUCT
KLASSE 1 LASER PRODUKT
LUOKAN 1 LASER LAITE
KLASS 1 LASER APPARAT
K
eep the remote control battery away from children. It may cause a fire or chemical burn if mishandled. Do not recharge,
Danger of explosion if battery is incorrectly replaced. Replace only with Duracell, Eveready, Energizer, Maxell, Toshiba,
Please dispose of used batteries properly,
WARNING:
Note:
No naked flame sources, such as lighted candles, should be placed on the apparatus.
Where the mains plug or appliance coupler is used as the disconnect device, such disconnect device shall remain readily
operable.
This product conforms to the EMC Directive 89/336/EEC and to the Low Voltage Directive 73/23/EEC. The complete Declaration of Conformity can be found at www.bose.com/static/compliance/index.html.
©1994-2003 Bose Corporation. No part of this work may be reproduced, modified, distributed or otherwise used without prior written
permission. All trademarks referenced herein are the property of Bose Corporation. The Acoustic Wave® music system design is a trademark of
Bose Corporation.
2
following any local regulations. Do not incinerate.

Contents
Setting Up Your Multi-Disc Changer . . . . . . . . . . . . . . . . . . . . . . . . . . . . . . . . . . . . . . . . . . . . . . . . 4
Before you begin . . . . . . . . . . . . . . . . . . . . . . . . . . . . . . . . . . . . . . . . . . . . . . . . . . . . . . . . . . . . . 4
Benefits of the multi-disc changer . . . . . . . . . . . . . . . . . . . . . . . . . . . . . . . . . . . . . . . . . . . . 4
Unpacking the carton . . . . . . . . . . . . . . . . . . . . . . . . . . . . . . . . . . . . . . . . . . . . . . . . . . . . . . . . . 4
Selecting a location for your music system and changer . . . . . . . . . . . . . . . . . . . . . . . . . . . . . 5
Seating your Acoustic Wave® music system on the multi-disc changer . . . . . . . . . . . . . . . . . . 5
Connecting the multi-disc changer to your Acoustic Wave® music system . . . . . . . . . . . . . . . 6
Using Your Acoustic Wave® Multi-Disc Changer . . . . . . . . . . . . . . . . . . . . . . . . . . . . . . . . . . . . . . . 7
Operating with one remote control . . . . . . . . . . . . . . . . . . . . . . . . . . . . . . . . . . . . . . . . . . . . . . 7
Turning your complete system on and off . . . . . . . . . . . . . . . . . . . . . . . . . . . . . . . . . . . . . . . . . 8
Loading/unloading discs into the multi-disc changer . . . . . . . . . . . . . . . . . . . . . . . . . . . . . . . . 8
Two display panels, two sets of information . . . . . . . . . . . . . . . . . . . . . . . . . . . . . . . . . . . . 9
Playing the multi-disc changer . . . . . . . . . . . . . . . . . . . . . . . . . . . . . . . . . . . . . . . . . . . . . . . . . . 10
Playing the other sound sources . . . . . . . . . . . . . . . . . . . . . . . . . . . . . . . . . . . . . . . . . . . . . . . .11
Controlling both units as a complete system . . . . . . . . . . . . . . . . . . . . . . . . . . . . . . . . . . . . . . . 12
Adding External Components . . . . . . . . . . . . . . . . . . . . . . . . . . . . . . . . . . . . . . . . . . . . . . . . . . . . . . 13
Connecting other sound sources . . . . . . . . . . . . . . . . . . . . . . . . . . . . . . . . . . . . . . . . . . . . . . . . 13
Choose the component(s) you want to connect . . . . . . . . . . . . . . . . . . . . . . . . . . . . . . . . . 13
Making the power connection last . . . . . . . . . . . . . . . . . . . . . . . . . . . . . . . . . . . . . . . . . . . . 14
Playing an auxiliary component . . . . . . . . . . . . . . . . . . . . . . . . . . . . . . . . . . . . . . . . . . . . . . . . .14
Maintaining Your System . . . . . . . . . . . . . . . . . . . . . . . . . . . . . . . . . . . . . . . . . . . . . . . . . . . . . . . . . 15
Replacing the remote control battery . . . . . . . . . . . . . . . . . . . . . . . . . . . . . . . . . . . . . . . . . . . . . 15
Troubleshooting . . . . . . . . . . . . . . . . . . . . . . . . . . . . . . . . . . . . . . . . . . . . . . . . . . . . . . . . . . . . . 16
Customer Service . . . . . . . . . . . . . . . . . . . . . . . . . . . . . . . . . . . . . . . . . . . . . . . . . . . . . . . . . . . . 16
Warranty . . . . . . . . . . . . . . . . . . . . . . . . . . . . . . . . . . . . . . . . . . . . . . . . . . . . . . . . . . . . . . . . . . . 17
Technical Information . . . . . . . . . . . . . . . . . . . . . . . . . . . . . . . . . . . . . . . . . . . . . . . . . . . . . . . . . 17
Bose Corporation. . . . . . . . . . . . . . . . . . . . . . . . . . . . . . . . . . . . . . . . . . . . . . . . . . . .inside back cover
English
Deutsch Nederlands
Français
For your records
The serial number for the Acoustic Wave® multi-disc changer is located on the back panel.
Changer serial number:
Purchase date:
We suggest you keep your sales receipt together with this owner’s guide.
3

Setting Up Your Multi-Disc Changer
Before you begin...
Thank you for selecting the Bose® Acoustic Wave® multi-disc changer, designed as an acces-
sory for the Acoustic Wave® music system. As a high-quality solution for your multi-disc
needs, the changer also provides an attractive pedestal for the system and a connection hub
English
for auxiliary components.
Choosing the convenient option of connecting other sound sources to the changer allows
you to enjoy the full impact of their sound through your Acoustic Wave® music system.
Benefits of the multi-disc changer
• Hours of uninterrupted CD play
• New multi-disc remote control, that provides simplified, all-in-one system operation
• One button press turns on the changer, FM or AM radio or CD, or selects an auxiliary component
• Compact design that complements the lines of your Acoustic Wave® music system
• Option of hearing auxiliary audio sources through your Acoustic Wave® music system
• Quality construction and performance
Unpacking the carton
Figure 1
Contents of carton
• Acoustic Wave®
multi-disc changer
• Remote control
• Power cord
• Quick setup guide
Carefully unpack your Acoustic Wave® music system multi-disc changer. Save all packing
materials for possible future use. The original packing materials provide the safest way to
transport your new multi-disc changer.
Check to be sure you received the parts identified in Figure 1. If any part of the product
appears damaged, do not attempt to use it. Notify Bose customer service immediately (see
phone numbers on the inside back cover).
Note:
Now is a good time to locate the serial number on the back of your multi-disc changer,
then write it in the space provided on page 3.
Acoustic Wave
multi-disc changer
Power cord
Remote control
®
F
F
/O
N
O
Random
Next Disc
Stop
2
X
U
A
1
Play/Pause
X
U
A
Quick setup guide
4
Selecting a location for your music system and changer
The Acoustic Wave® multi-disc changer is designed to fit right under your Acoustic Wave®
music system. Before you connect the two, however, select a good location for the stacked
units.
CAUTION:
ter, for example) is not recommended. Doing so will prevent proper communication between
the two and will adversely affect operation.
When choosing the location, remember that the tonal quality of your Acoustic Wave® music
system, as with any high-performance sound system, will vary with room placement.
Feel free to try different locations, but keep in mind that…
• The Acoustic Wave® music system is designed to sound best when placed on a shelf,
counter, desk, or table top, 30 to 48 inches (75-120 cm) from the floor.
• The CD player in the Acoustic Wave® music system needs an allowance of several inches
for the CD cover on top of the music system to open.
• The music system should be near the horizontal center of a wall and 6 inches (15 cm) or
less from the surface behind it.
•To increase the bass response, move the unit toward any corner of the room; to decrease
bass response, move it away from the corner.
Setting up the two units separately (on different shelves of an entertainment cen-
Setting Up
English
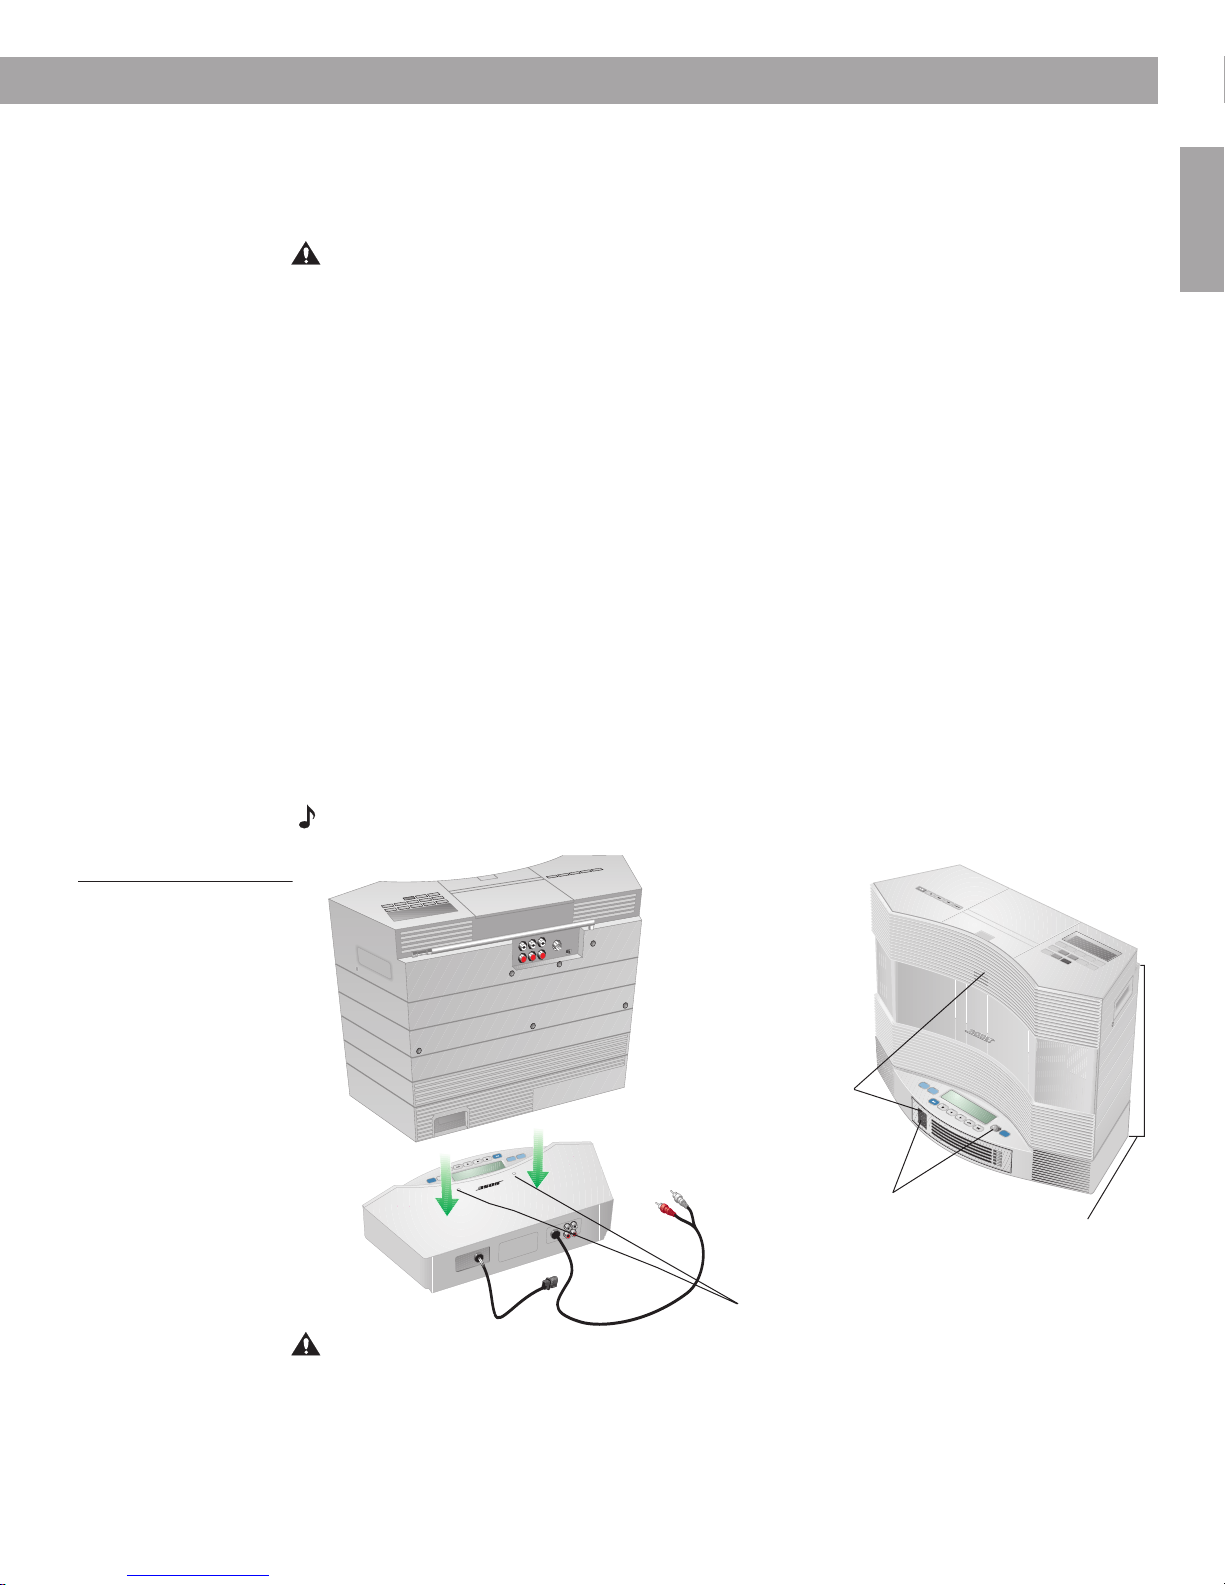
Seating your Acoustic Wave® music system on the multi-disc changer
1. Place the multi-disc changer in the location you have chosen, following the guidelines
above.
2. Carefully seat your Acoustic Wave® music system on top of the changer (Figure 2a). Make
sure that it sits flat and the side edges of both units are aligned (Figure 2b).
Note:
The music system slips onto raised guides on top of the changer.
Figure 2
Seating the Acoustic Wave®
music system (a) on top
of the multi-disc changer,
so (b) it sits flat and the two
units communicate
(a)
TM
P
l
a
y
/
P
a
u
s
e
A
S
U
t
X
o
p
1
A
U
X
2
N
e
x
t
D
i
s
c
R
a
n
d
o
m
O
N
/
O
F
F
(b)
IR signal
receivers
C
D
P
L
A
Y
/
P
A
U
S
E
S
T
O
P
S
K
I
P
/
S
C
A
N
A
U
X
1
A
U
X
2
P
l
a
y
/P
au
s
e
S
to
p
IR signal
emitters
R
A
N
D
R
O
E
M
P
E
A
T
A
C
O
U
S
T
I
C
W
A
V
E
®
M
U
S
I
C
S
Y
S
T
E
M
S
k
ip
/S
c
a
n
N
e
x
t D
is
c
R
a
n
d
O
o
m
N
/
O
F
F
1
1
V
2
O
L
P
U
R
M
E
E
S
1
E
F
T
M
S
3
A
U
A
X
M
4
O
N
/
O
F
‹
F
5
S
E
E
K
/
T
›
U
N
E
In alignment
CAUTION:
system, shown in Figure 2(b), is important. When the changer is turned on, it sends infrared
(IR) signals that also turn on the music system. If those signals are blocked, there may be no
sound when the changer is playing.
Raised
guides
Maintaining a clear optical path between the multi-disc changer and the music
5
Setting Up
Connecting the multi-disc changer to your Acoustic Wave® music system
On the back of the multi-disc changer there are two cables (Figure 3) that connect to your
Acoustic Wave® music system.
English
Figure 3
Connecting the multi-disc
changer to the Acoustic
®
music system
Wave
1. Insert the two connectors of the AUX input cable into
Acoustic Wave® music system. Be sure to match the colors of the connectors and jacks:
red to red, and white to white
.
2. Insert the plug of the AC power cable into the AC power receptacle on the back of the
Acoustic Wave® music system.
TM
AUX IN
jacks on the back of the
Figure 4
Plugging in the power cord
Power jack
Note:
The changer comes supplied with a detachable power cord, similar to the one provided
AC power cable
AUX input cable
with the Acoustic Wave® music system. You will need to use only one of these two supplied
power cords.
3. Plug the small end of the detachable power cord into the power jack on the back of the
changer (Figure 4).
CAUTION:
If you will be connecting auxiliary components to the changer, refer to “Connect-
ing other sound sources” on page 13.
4. Plug the other end of the power cord into an AC (mains) wall outlet and your setup is
complete.
Note:
When the multi-disc changer turns on after you plug it in, “PLEASE WAIT” flashes on its
display for a few seconds. When the flashing stops, you can load and play the changer.
6
 Loading...