Bosch WOL1650IL User Manual

Bosch WOL1650IL User Manual

WO

e

Internet:

http://www. bosch-hausgeraete.de

Table

of

Contents


(/-,/ )

+%,.*

0(,+


+2(.,+*$+0 )

.,0$"0(,+


,+/$.2 0(,+

//1$/


4


$+$. )


%$04

+/0.1"0(,+/


5


,!()(04


,1. $3 /'(+& "'(+$


8


$%,.$ /(+&

,1.

/'(+&

"'(+$

,. 0'$ (./0


(*$


--)( +"$

)(#

+# #.1*

)(#


.$- .(+&

,.0(+&

+#

,

#(+&

0'$


1+#.4


1+#.4

$0$.&$+0/

+# ##(0(2$/


8


$)$"0(+&


.,&. **$/


/'(+&


'$+ 0'$ .,&. **$


' /


+#$#


5


-$"( )

--)(" 0(,+/


)$ +(+&


+#

.$


8


.,1!)$/',,0(+& (+,. 1)0/


1/0,*$. $.2("$


,+/1*-0(,+


0$/


8


2

Please read this instruction manual and all other information accompanying the washing machine before operating the appliance.

Please retain all

documents

for future reference or

for a subsequent

appliance

owner.

Disposal Information

Disposing of the packaging

Disposing of your old appliance

The shipping package has protected your new appliance on its way to your home. All packaging materials are environment$friendly and recyclable. Please contribute to a better environment by disposing of packaging materials in an environmentally conscious manner.

Please

ask

your dealer or local authority

about be

means

of

disposal.


Danger

of

suffocation!


Keep children away from shipping carton and

packaging components. Danger of suffocation

from folding cartons and plastic film.


Old appliances are not worthless rubbish!


Environment$conscious recycling can reclaim


valuable

raw

materials.


Danger

of

fatal injury!


On out$of

service appliances, unplug mains plug.

Cut off

power

cord and discard with mains

plug.

Destroy the lock on the appliance lid. This will pre children from locking themselves in and suffocating.

3

Environmental Protection /

Conservation Issues

Through the economical use of energy, water and detergents, your appliance is kind to the environmen as well as your household budget. The consumption rates of this appliance can be found on Page 39.

Please observe the following in order to wash your laundry in an economical and environmentally friendly manner:

- o not

exceed the maximum

load

specifications:

ottons

+

Linens

5.0

kg

asy2care

2.0 kg

elicates

and Woollens

2.0

kg

or small amounts of laundry,

the

automatic wat

level control system reduces the consumption of

both water

and energy.


-Where possible, use the °60 •Intensive/Stains" programme instead of the ° 90 • ottons +

Linens"

programme.

The

extended washing

duration

means that

a

cleaning

result comparable

to that

of

the ° 90 programme is

achieved using

considerably

less energy.


- Avoid using the Prewash programme when washing lightly to normally soiled laundry.

-Add detergent according to the degree of soiling amount of laundry and water hardness, and observe the detergent manufacturer's instructions.

4

General Safety Instructions

Your

washing machine is intended:

-

For

domestic

use only.

-

For

washing

machine washable fabrics in washing

lye.

-For operation using cold tap water and conven tional laundry detergents and additives that are suitable for use in washing machines.

Never leave

children unattended in the proximity of

the washing

machine.

Keep domestic pets away from the washing machin

Do

not

grip the mains

plug with wet hands. Never

out

the

mains plug by

tugging the cable.

Caution when draining hot water.

Do not climb on the washing machine.

5

Mobility

Home position

The

lever

is situated under the front of the applianc

the

right

hand side.

Caution

When in use, the appliance must always be situate firmly on its feet (lever on right).

The appliance can be moved on its rollers to anoth installation location.

Caution

The appliance is designed to be moved within the room in which it is situated only and should not b moved on its rollers over greater distances.

When moving the appliance, do not run over the water connections (inlet and outlet) or the electrical connection (mains cable)!

The drainage hose can be fastened in the hose compartment on the rear of the appliance.

The mains cable can be wound up and the mains plug inserted in the park position on the rear of th appliance (see installation instructions).

Swivel the lever under the front of the appliance from right to left. The appliance is now standing on rollers.

6

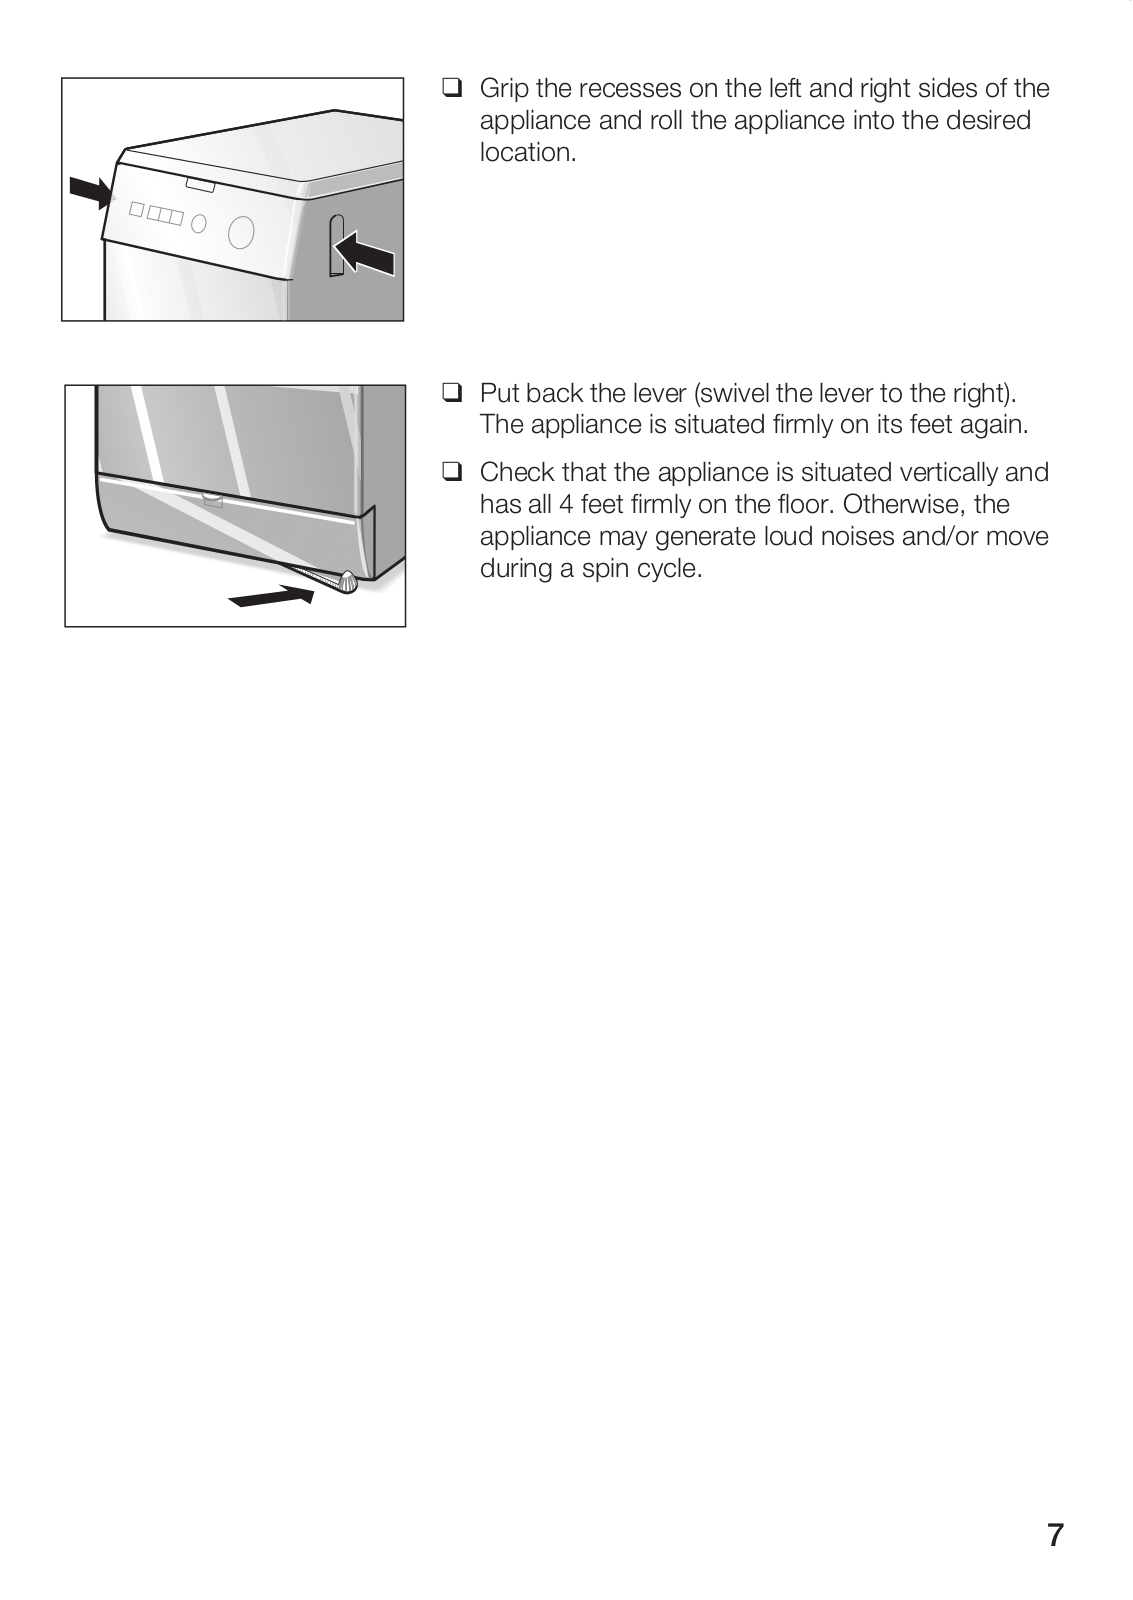
Grip the recesses on the left and right sides of appliance and roll the appliance into the desired location.

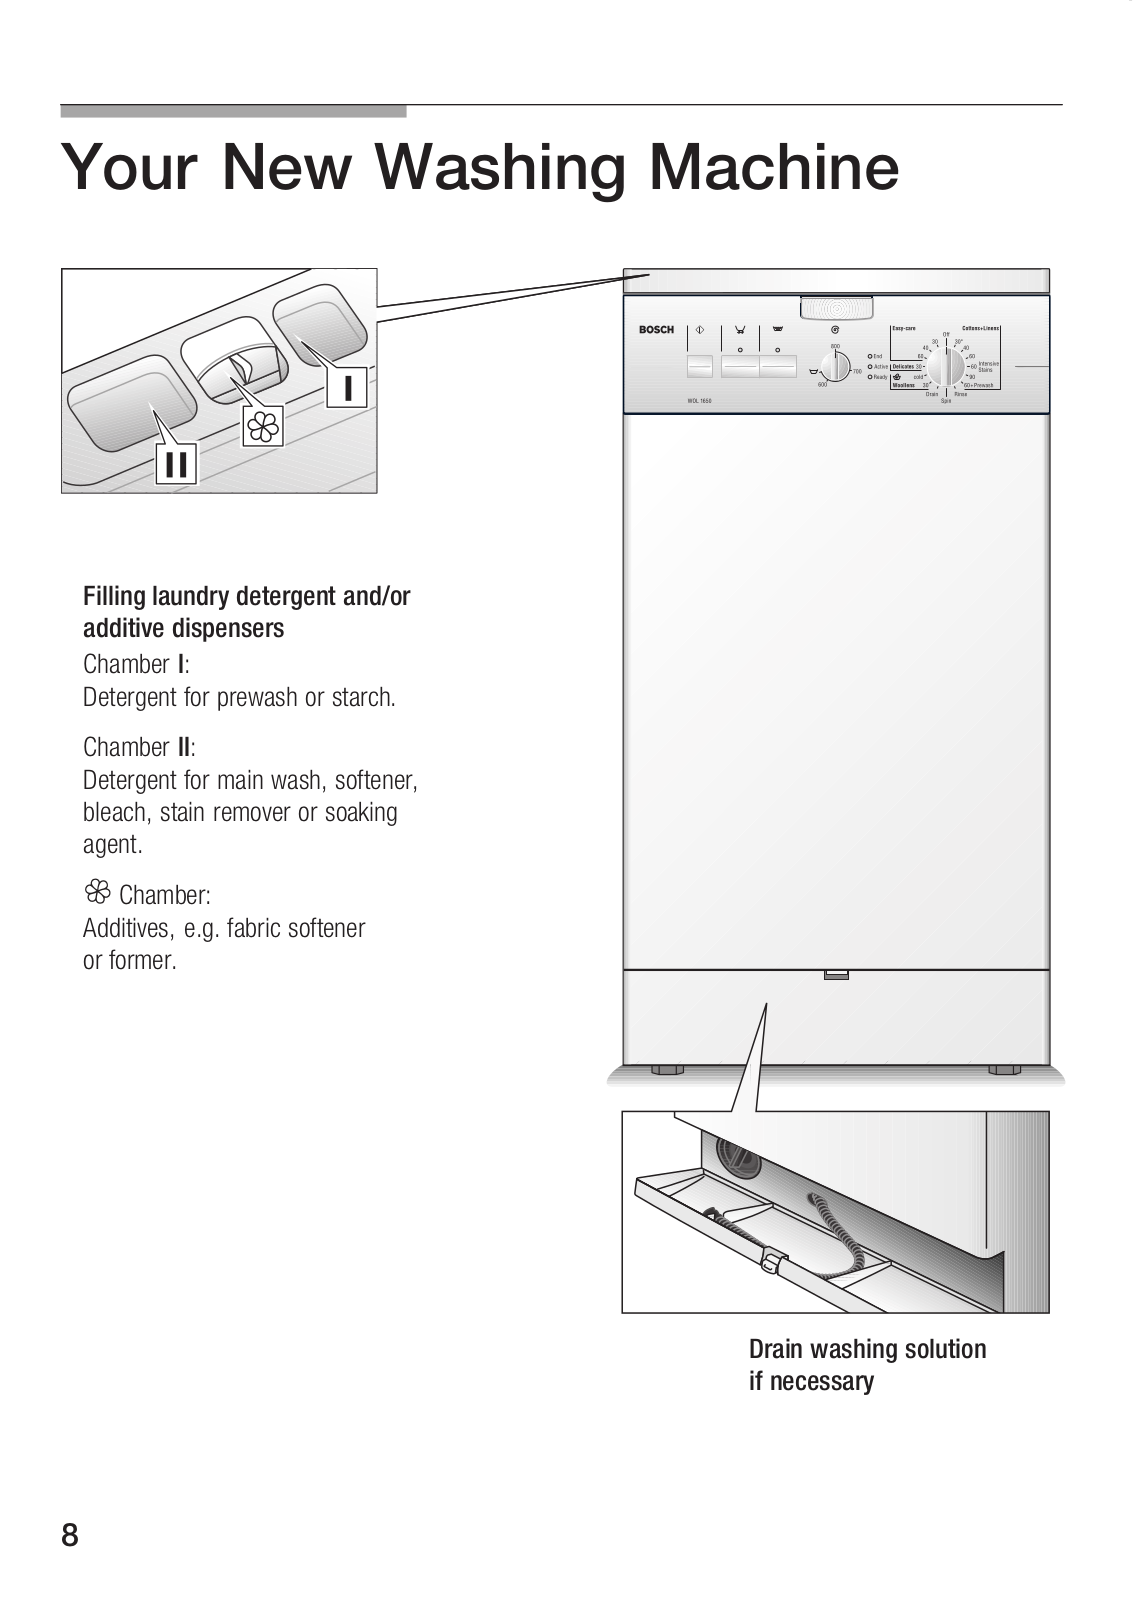
Put back the lever (swivel

the lever to the right).

The appliance is

situated

firmly on its feet again.

Check that the

appliance

is situated vertically and

has all 4 feet firmly on the floor. Otherwise, the appliance may generate loud noises and/or move during a spin cycle.

7

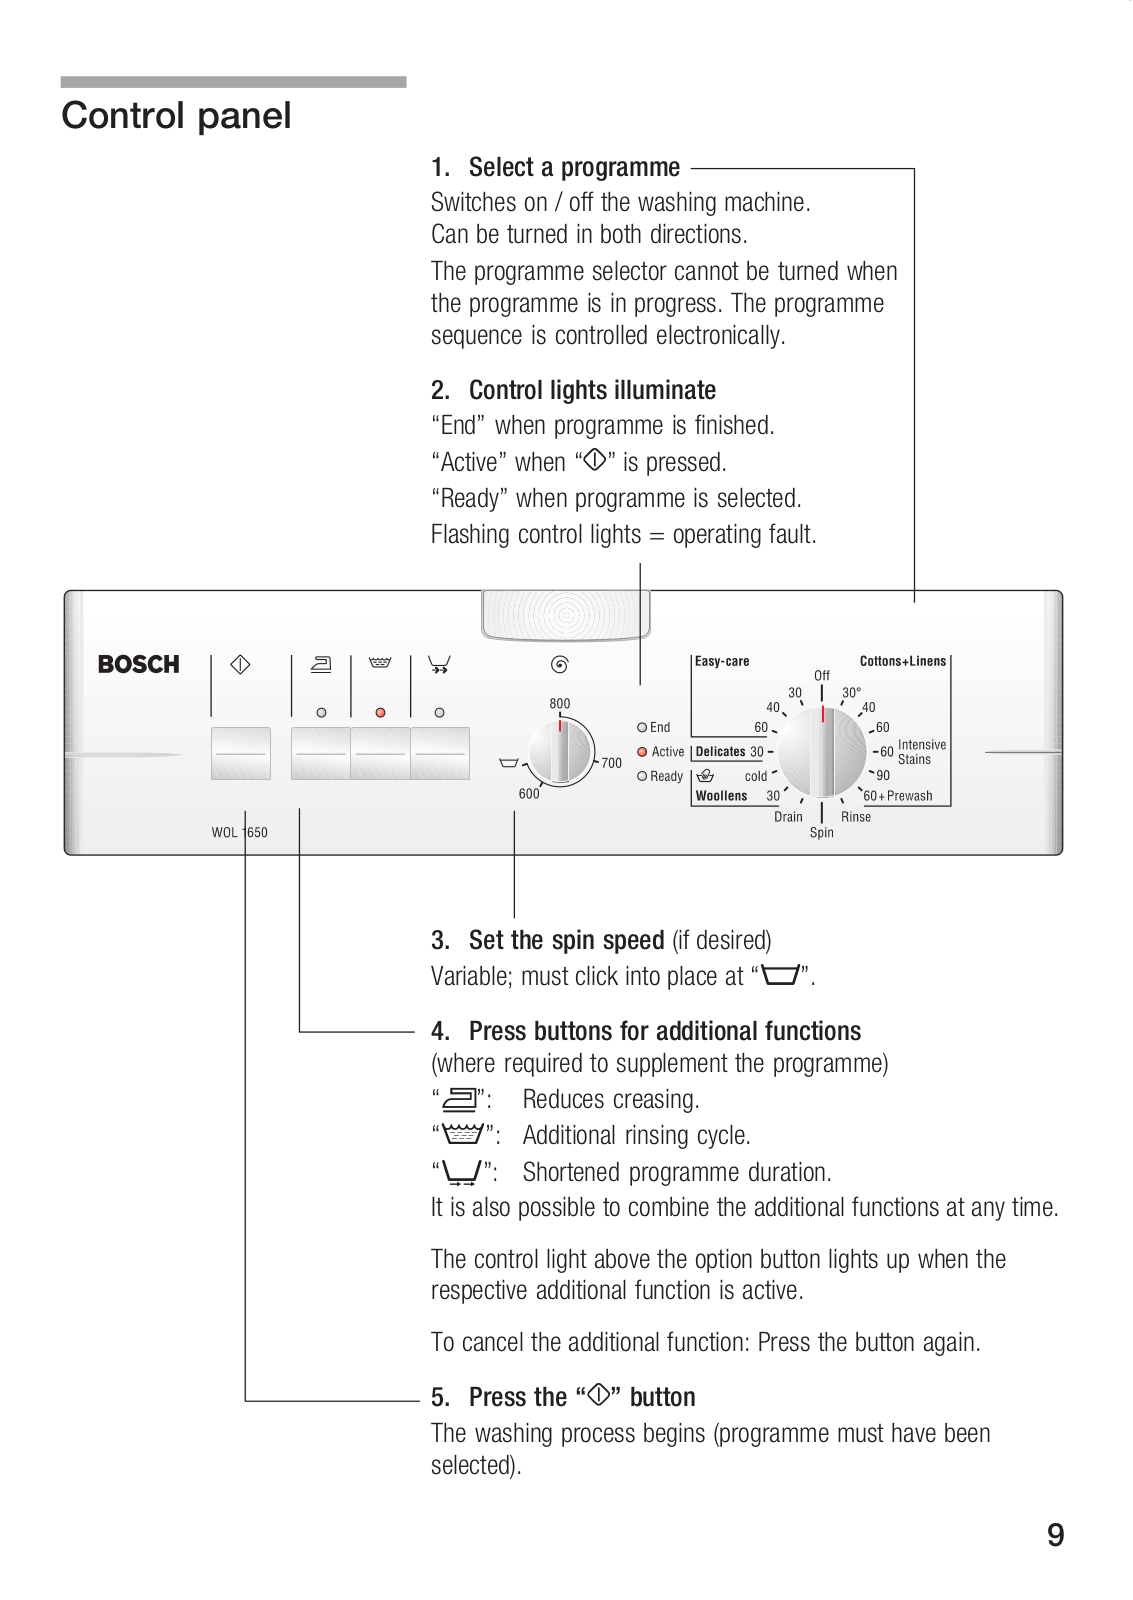
Your New Washing Machine

i i e e e

i i e i e e

b

f c

b

f f b c

b

f b c f

f

i i

i

if e e


8

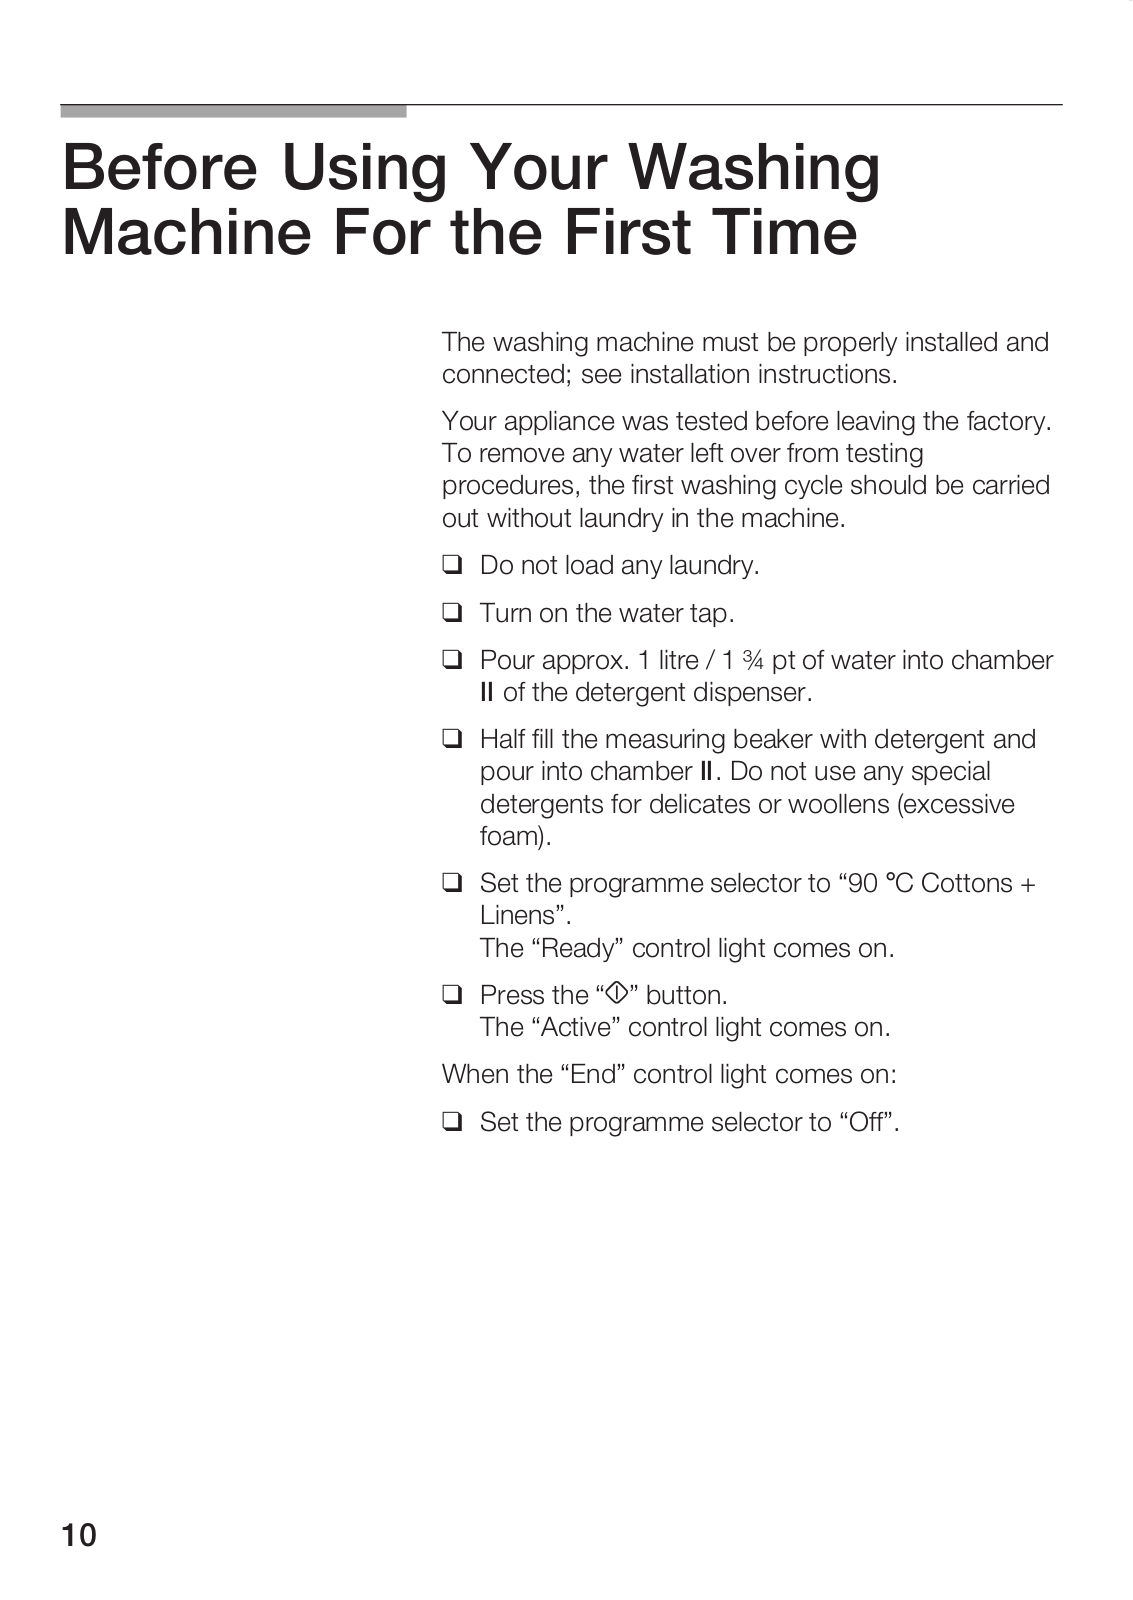
Control panel

1.

Select a programme


Switches

on / off the washing machine.


Can

be

turned

in

both

directions.


The

programme

selector

cannot be

turned

when


the programme is in progress. The programme


sequence

is

controlled

electronically.


2.

Control

lights

illuminate


•End" when programme is finished.


•Active"

when 3• "

is pressed.


•Ready" when programme is selected.


Flashing

control

lights

=


operating

fault.


3. Set the spin speed(if desired) Variable; must click into placeCat ".•

4. Press buttons for additional functions

(where

required to supplement the programme)

1":

Reduces

creasing.

•r":

Additional

rinsing cycle.

•D":

Shortened

programme duration.

It is also possible to combine the additional functions at any t

The control light above the option button lights up when the respective additional function is active.

To cancel the additional function: Press the button again.

5. Press the 3•" button

The washing process begins (programme must have been selected).

9

Before Using Your Washing

Machine For the First Time

The washing machine must be properly installed an connected; see installation instructions.

Your

appliance

was

tested

before

leaving the

factor

To remove any water left over from testing


procedures,

the

first washing cycle should be

carrie

out without

laundry

in

the

machine.


Do

not

load

any

laundry.


Turn

on

the

water

tap.


Pour

approx.

1 litre

/ 1 ¾ pt of water into ch


of

the detergent

dispenser.


Half

fill

the

measuring beaker

with detergent and

pour into chamber. Do not use any special detergents for delicates or woollens (excessive foam).

Set the programme selector to°C•90Cottons + Linens".

The •Ready" control light comes on.

Press the 3•" button.

The • ctive" control light comes on.

When the •End" control light comes on:

Set the programme selector to •Off".

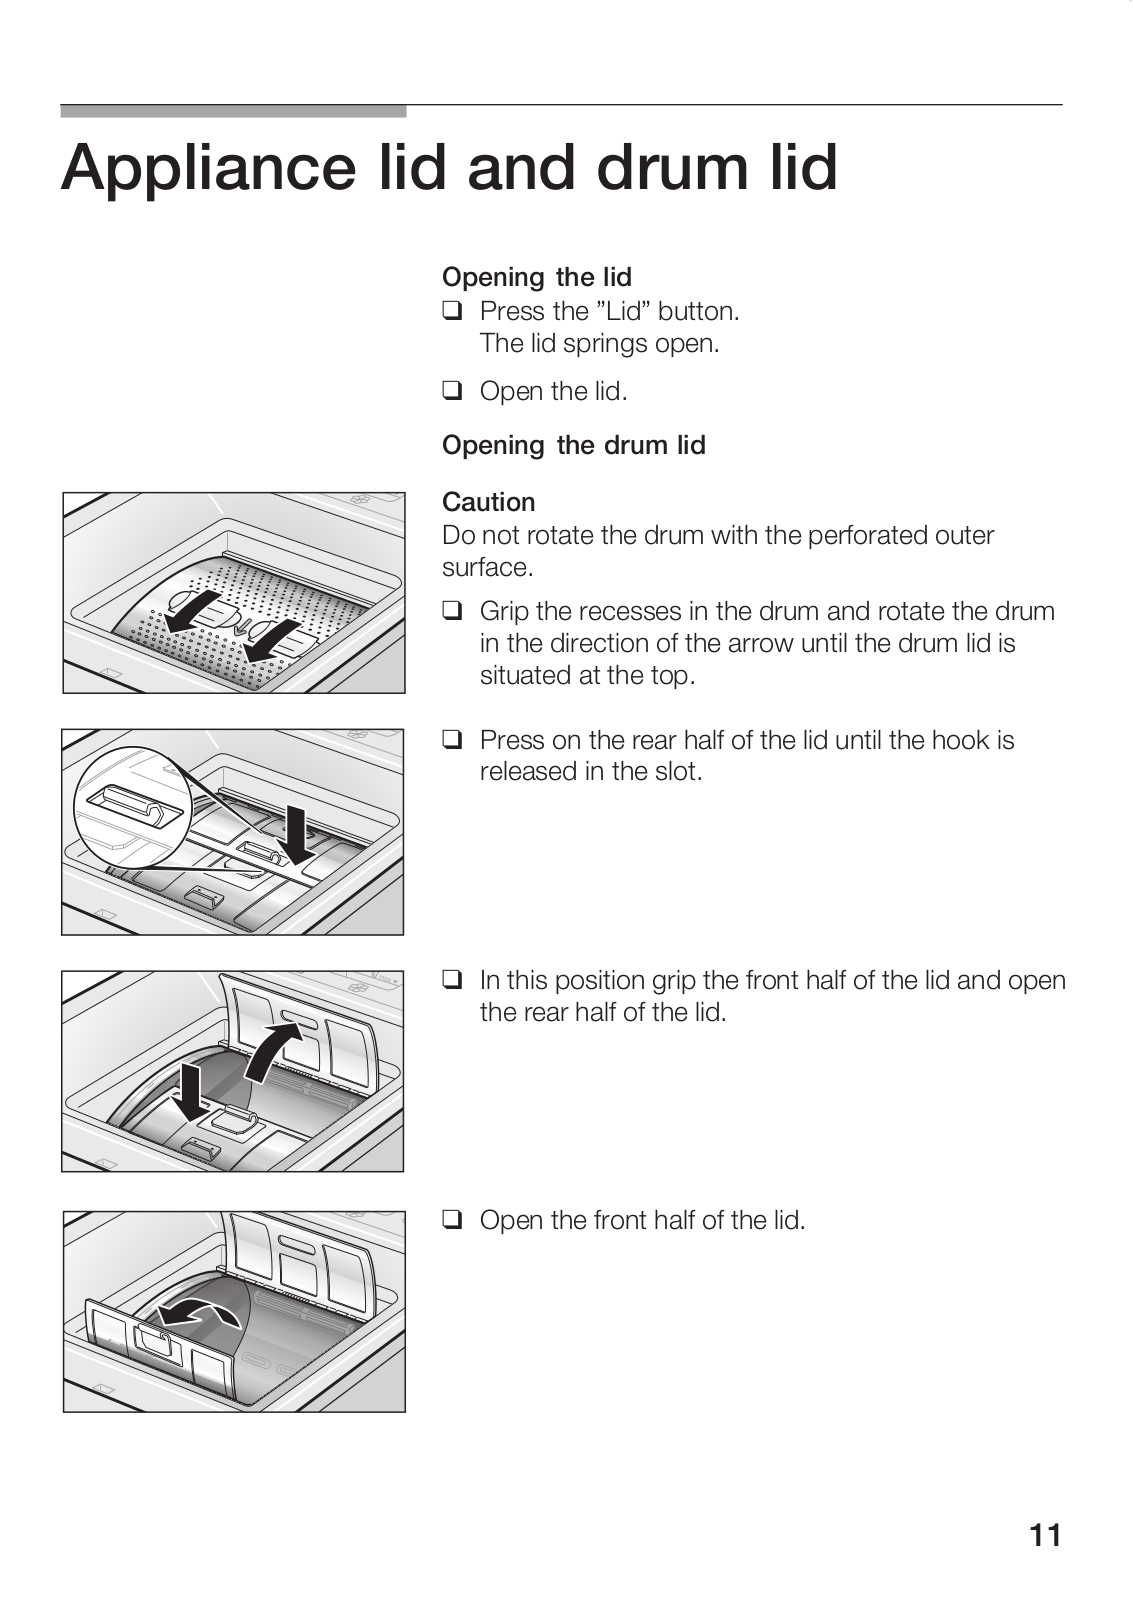
Appliance lid and d um lid

Opening the lid

Press the "Lid" button The lid springs open

Open the lid

Opening the d um lid

Caution

Do not rotate the drum with the perforated outer surface

Grip the

recesses in the drum and rotate the d

in the direction of the arrow until the drum lid

situated

at the top

Press on the rear half of the lid until the hook released in the slot


In this position grip

the front half of the lid and


the rear half of the

lid


Open the front half of the lid

11

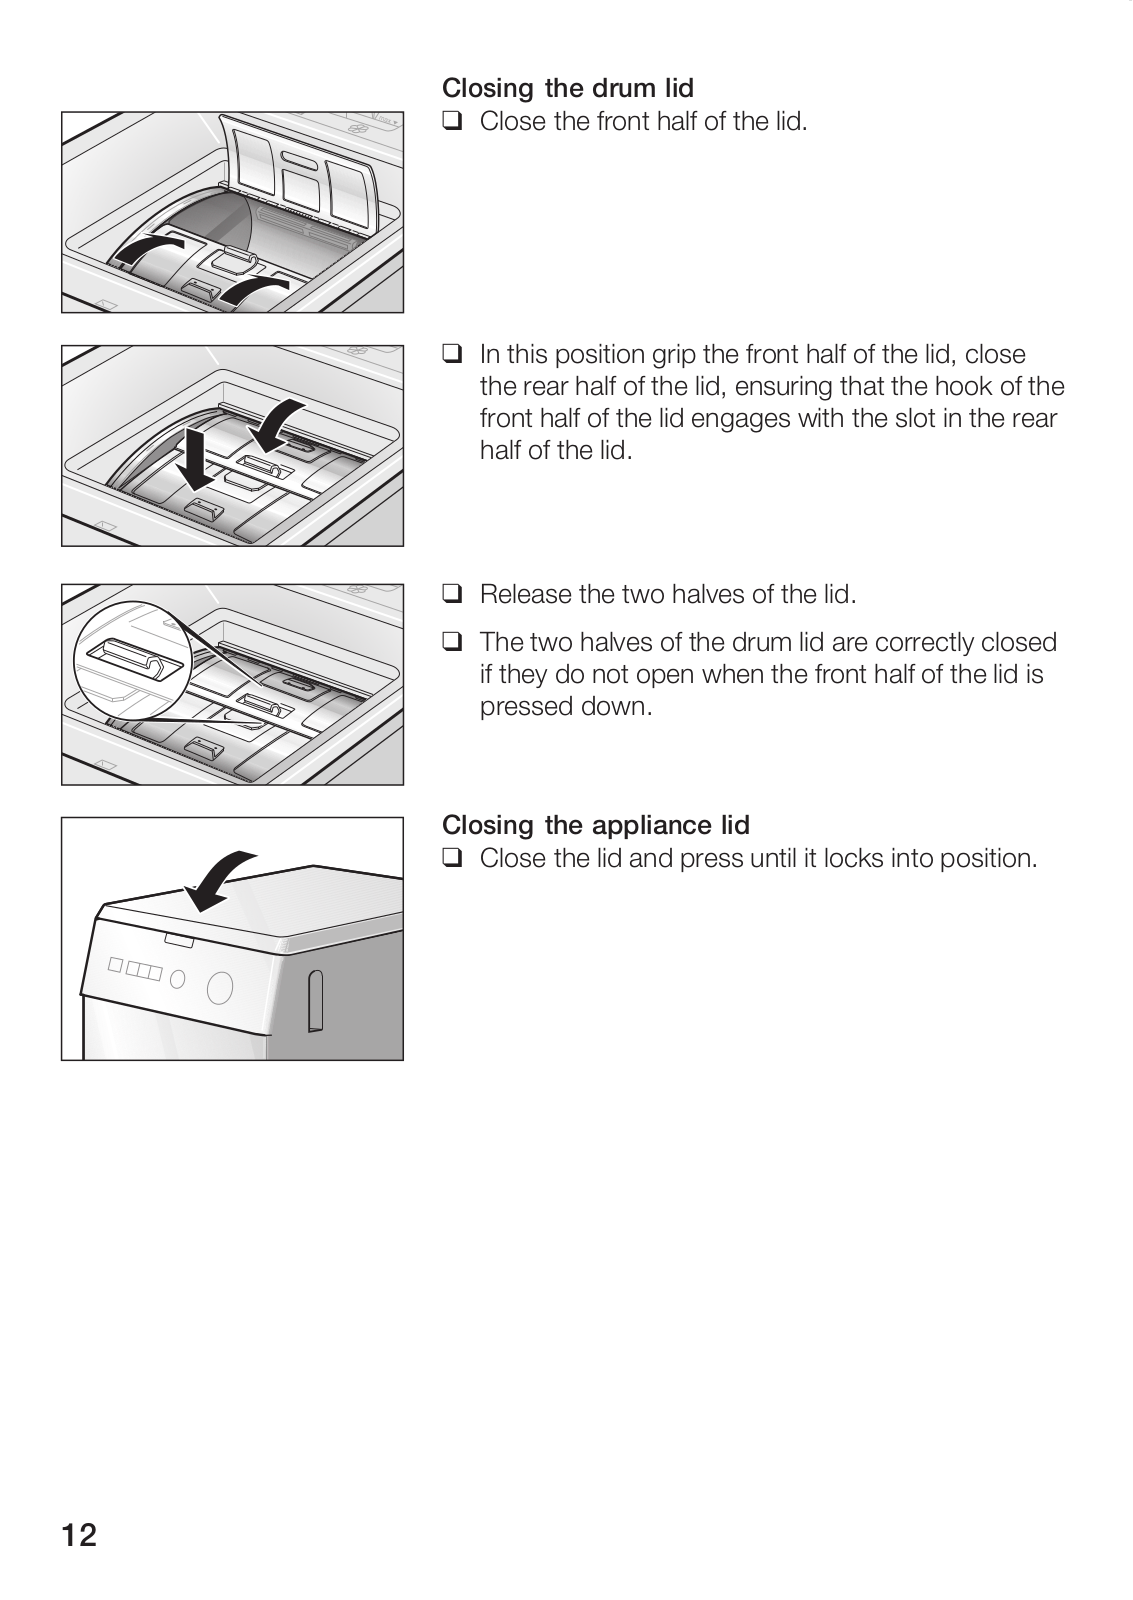
Closing

the

drum

lid

Close

the

front

half of the lid

In this

position

grip

the

front half of the lid clos

the rear half of the lid

ensuring

that

the

hook

front

half

of

the

lid

engages with

the

slot

in

the

half

of

the

lid


Release

the

two

halves

of the lid


The

two

halves

of the

drum lid are correctly

clo

if they do not open when the front half of the

pressed

down


Closing

the

appliance

lid


Close the

lid and press

until it locks

into

positio

12

Loading...
+ 28 hidden pages