

Page 1
Robert Bosch Hausgeräte GmbH
Carl-Wery-Straße 34
81739 München
Cod. 9000164778 E
Operating instructions
en
Gebruiksaanwijzing
nl
www.bosch-home.com
Page 2

Dear customer,
We would like to thank and congratulate you for your choice.
This practical modern appliance has been made using materials of
the highest quality, which have been put through the strictest of
Quality Controls during manufacture and meticulously tested to
ensure that they meet all of your cooking demands. To make life
easier, this instructions booklet is divided up into two sections:
instructions of use and installation instructions.
We kindly ask you to read and follow these simple instructions
in order to guarantee first-class results from the very start. This
booklet contains important information not only concerning use,
but also concerning your own personal safety and maintenance of
the appliance.
Our products need to be carefully packed to protect them during
transportation. All the material used for packing is considered
essential for this purpose and is also completely recyclable. You
too can contribut towards protecting the environment by disposing
of this material at your nearest recyclable refuse collection point.
Do not dispose of used cooking oil down the kitchen sink. Oil may
seriously damage the environment. Dispose of it in a closed container
at your nearest collection point or, failing this, dispose of it in your
rubbish bin. Although this last solution is far from perfect, your oil
will be taken to a controlled refuse dump where it will not be allowed
to pollute water. You and your children will appreciate it.
Render your old appliance useless before disposing of it at your
nearest recyclable refuse collection centre.
Your local authority will be pleased to inform you where your nearest
centre is.
If the symbol
appears on the specifications plate,
follow these instructions:
/1"$, 5)& "11-*"/$& "/% %*4104& 0' 5)& 1"$,"(*/(
*/ "/ &/7*30/.&/5"--:H3&410/4*#-& ."//&3
)*4 "11-*"/$& *4 -"#&--&% */ "$$03%"/$& 8*5) 5)&
6301&"/ *3&$5*7& $0/$&3/*/( 64&%
&-&$53*$"- "/% &-&$530/*$ "11-*"/$&4 8"45& &-&$53*$""/% &-&$530/*$ &26*1.&/5 !
)& (6*%&-*/& %&5&3.*/&4 5)& '3".&803, '03 5)& 3&563/
"/% 3&$:$-*/( 0' 64&% "11-*"/$&4 "4 "11-*$"#-&
1
Page 3

CONTENTS
Safety warnings
Your new hob 5
Gas burners
Recommended receptacle diameters 7
Cooking recommendations 8
Warnings of use
Cooking
Cleaning and maintenance
Troubleshooting
Conditions of warranty 12
10
11
3
6
9
9
2
Page 4
Safety warnings
Read this manual carefully in order to cook efficiently
and safely.
In accordance with current regulations, the installation
and adaptation of gas systems may only be performed
by an officially authorised technician.
Check all measurements before proceeding to install
your new hob.
These instructions are only valid for the countries indicated
on the appliance. Refer to the technical instructions to
adapt the appliance to the conditions of use for the
relevant country.
This appliance has been designed for home use only,
not for commercial or professional use. This appliance
cannot be installed on yachts or in caravans. The
warranty will only be valid if the appliance is used for
the purpose for which it was designed.
This appliance should not be connected to device for
extracting combustion products.
The appliance should not be exposed to strong draughts,
as these may blow the burners out.
This appliance leaves the factory set for the gas supply
indicated on the characteristics plate. Call the Service
Centre this it needs to be altered.
Do not tamper inside the appliance. If necessary, call
your local Service Centre.
Look after these instructions of use and installation so
as to be able to produce them should the appliance ever
change hands.
If your hob is supplied with a glass cover, do not subject
it to excessive force. If the glass should become detached
from the hob, call the Service Centre immediately for
them to repair or replace it.
Do not use a damaged appliance.
The surfaces on heating and cooking appliances get hot
when in use. Be careful. Keep children away from the
appliance.
3
Page 5
Only use your appliance for the preparation of food and
never for room-heating purposes.
Overheated fat or oil can easily catch fire. Never leave
the appliance unattended when cooking food with fat or
oil, e.g. chips.
Never pour water on burning fat or oil. DANGER OF
BURNS! Cover the receptacle to smother the flames
and turn the hob off.
In the event of a fault, cut the gas and electricity supplies
to the appliance. Call our Service Centre to repair the
fault.
Do not use unstable or uneven-based receptacles on
cooking plates or burners. They may accidentally tip
over.
If a gas supply knob/valve jams, do not force it. Call your
official Service Centre immediately for them to repair or
replace it.
Do not use steam clearing machines to clean the
hotplate, as there is risk of electrocution.
This appliance is not intended for use by persons
(including children) with reduced physical, sensory or
mental capabilities, or lack of experience and
knowledge, unless they have been given supervision or
instruction concerning use of the appliance by a person
responsible for their safety.
Never leave the appliance unattended during operation.
The illustrations used in this booklet are only intended
as a guide.
IF THESE INSTRUCTIONS ARE NOT FOLLOWED,
THE MANUFACTURER ACCEPTS NO
RESPONSIBILITY.
4
Page 6
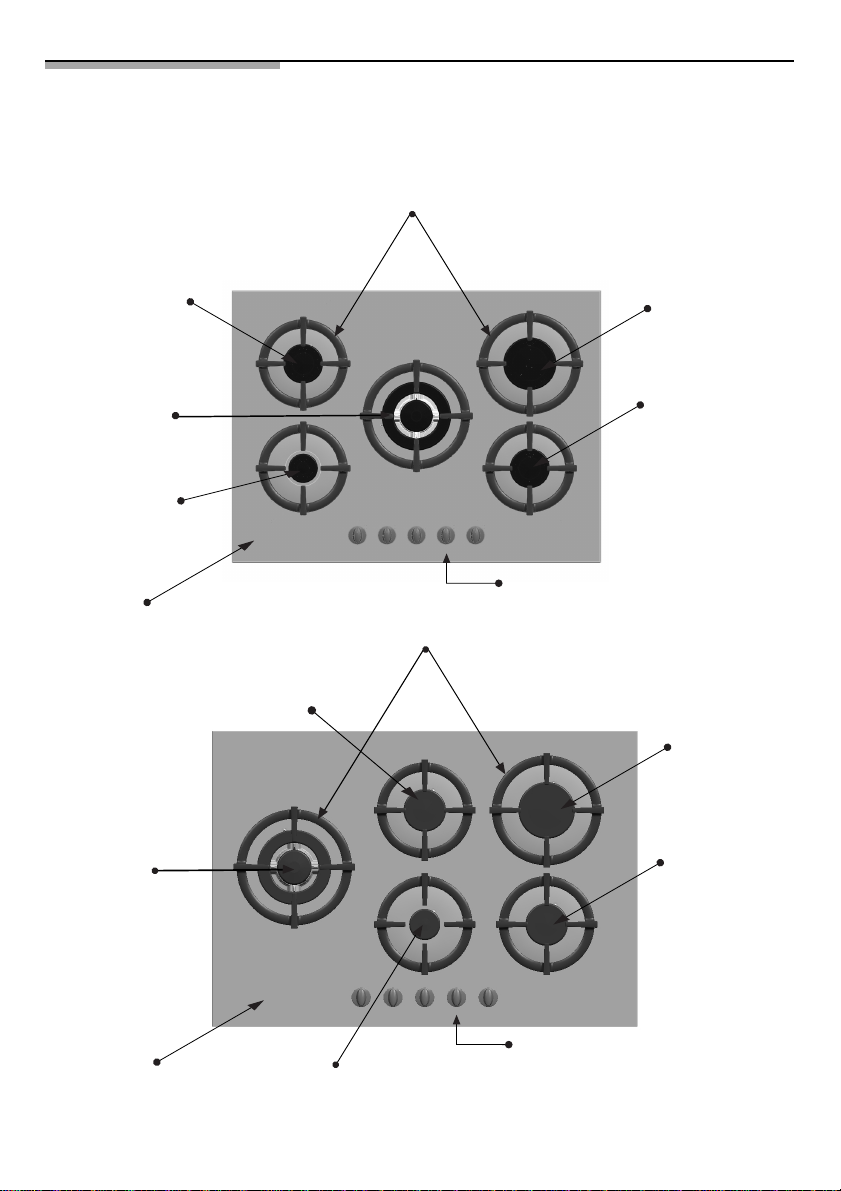
Your new hob:
Pan support
Burner up
to 1,75 kW
Triple flame
burner up
to 3,6 kW
Burner up
to 1 kW
Grease tray
Triple flame
burner up
to 3,6 kW
Burner up
to 3 kW
Burner up
to 1,75 kW
Control knob
Pan support
Burner up
to 1,75 kW
Burner up
to 3 kW
Burner up
to 1,75 kW
Grease tray
Control knob
Burner up
to 1 kW
5
Page 7
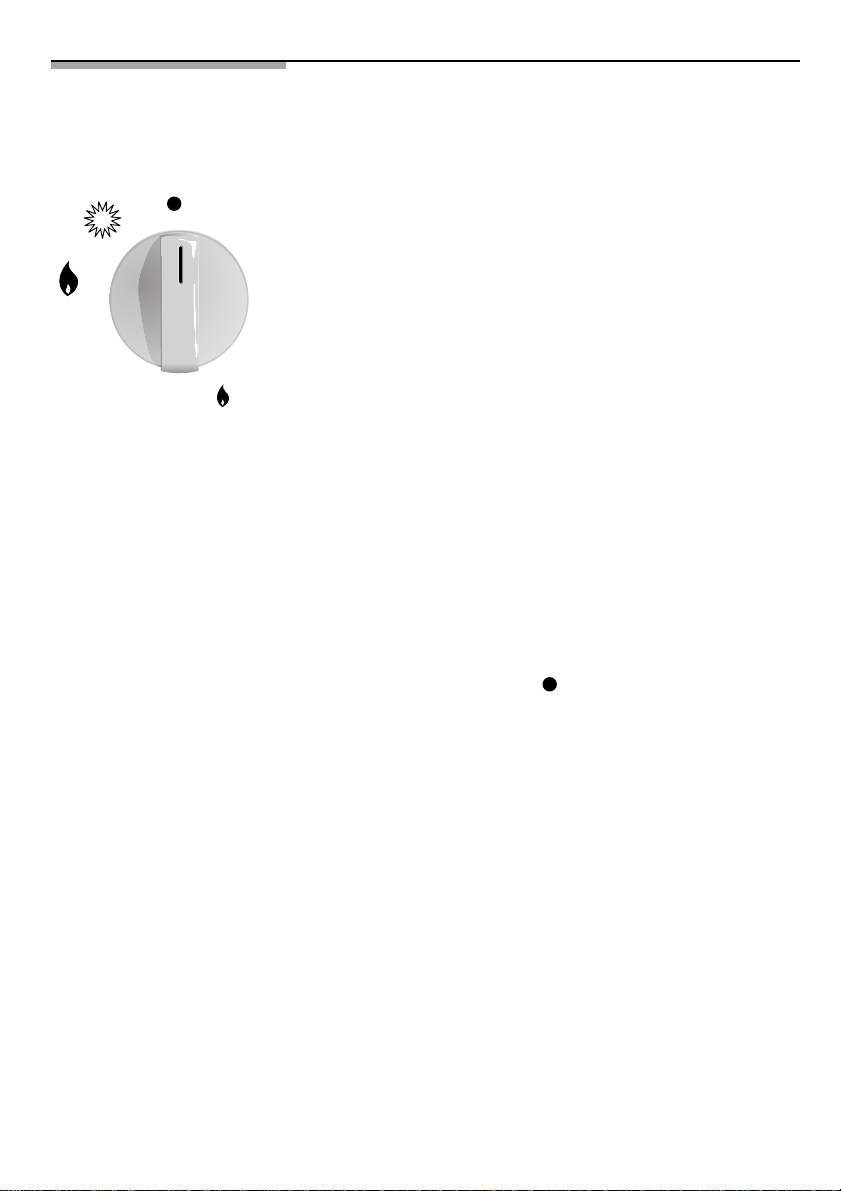
Gas burners
Fig 1.
Each control knob indicates which burner it controls.
Fig. 1.
To light a burner, press the burner switch and turn it
left to the maximum position, keeping it in this position
for a few seconds until the burner lights before releasing
and adjusting it to the required position.
the maximum
ignites and
desired setting. If
attempt, repeat the
If your hob does not come with any kind of automatic
ignition system, then light the burners with a naked flame
(cigarette lighter, matches, etc.).
If the spark plugs are dirty, then a fault may occur in the
ignition system. Keep them completely clean. Clean the
spark plugs using a small brush, remembering that the
plugs must not receive any kind of violent impact.
If your hob is equipped with burners with safety valves
which prevent gas from being released should the burners
accidentally go out, proceed to light as described above,
but keep the control knob pressed in until the burners
light and then for a few more seconds once alight. If
complete ignition does not occur, repeat the operation
keeping the knob pressed in for approx. 10 seconds.
To turn the burners off, turn the control knob in a
clockwise direction to the setting.
Your modern functional hob is equipped with progressive
valves which permit you to find the perfect flame setting
between maximum and minimum.
position for a few seconds until the burner
then release and set the knob to the
the burner does not light at the first
operation.
Hold the knob at
Depending on the model that you have purchased, your
hob may come with a triple-flame burner, the perfect
system for cooking paellas, using woks, etc.
Gas appliances create both heat and humidity in the
room they are used in. Make sure that your kitchen is
properly ventilated: keep natural ventilation outlets open
or install a mechanical ventilation system (extractor fan).
When using your appliance for a prolonged period of
time, it may be necessary to provide additional ventilation
e.g. by opening a window (without creating a draught)
or turning up the setting on your mechanical ventilation
system.
An orange-coloured flame is normal and it is
produced in the presence of dust in the atmosphere,
spillages, etc.
6
Page 8
Recommended receptacle
diameters (cm.)
Depending on model:
BURNER MINIMUMØRECEPTACLE MAXIMUMØRECEPTACLE
Triple flame:
Rapid:
Semi-rapid:
Auxiliary: 10 cm 12 cm
Additional
pan support:
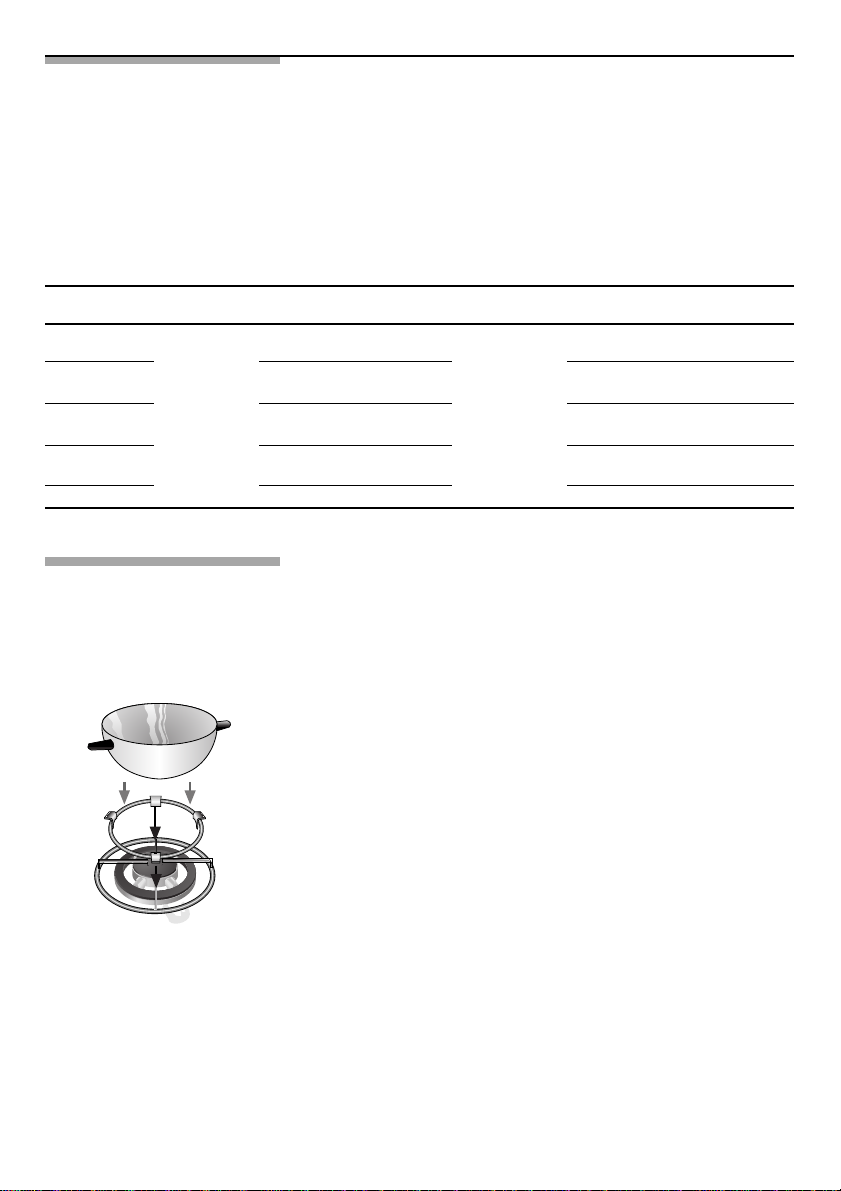
Fig 2.
22 cm 26 cm
12 cm 20 cm
Depending on the model that you have purchased, your
hob may come equipped with an additional pan support.
This pan support is essential when using the triple-flame
burner for receptacles with diameters of more than 26
cm, griddles, terracotta casseroles and all kinds of
concave receptacles (woks, etc...) Fig 2.
If you do not have a pan support, then these are available
from your Service Centre, code 484128.
Coffee pot support: Depending on the model that you
have purchased, your hob may come equipped with an
additional coffee pot support. This pan support is only
for use on the auxiliary burner for receptacles with
diameters of less than 10 cm. If you do not have a pan
support, then these are available from your Service
Centre, code 184200.
The manufacturer cannot be held responsible for
the non-use or misuse of these additional pan
support.
>22 cm
7
Page 9

Cooking
These recommendations are only intended as a guide
recommendations
Very strong Strong Medium Slow
Triple flame Boiling, stewing, grilling, Re-heating and keeping food
browning off, paellas, oriental warm: prepared food,
food (wok).
pre-cooked food.
Rapid
Semi-rapid
Auxiliary Stews, rice pudding, caramel. Thawing and Making/melting:
Escalope, steak, omelette, Rice, white Steaming:
fried food.
Steamed potatoes, fresh
vegetables, pasta.
sauce, ragout. fish,
vegetables.
Re-heating and keeping food
warm: pre-cooked food and
delicate stews.
slow boiling: Butter,
pulses, fruit, chocolate,
frozen food. jelly.
8
Page 10

Warnings concerning cooking:
DON'Ts DOs
Do not use small
receptacles on large
burners. The flame
should not touch the
sides of receptacles.
Do not cook without lids
or with lids only partially
covering receptacles.
You are wasting energy.
Do not use receptacles
with uneven bases. They
lengthen cooking times and
increase energy
consumption.
Do not place receptacles on
burners off centre. They
could tip over.
Do not use wide-based
receptacles on the burners
nearest to the controls.
When centred on the burner,
they could touch the controls
or raise the temperature in
the area. This may damage
the hob.
Do not place receptacles
directly on top of burners.
Always use suitably sized
receptacles on each
burner. This helps avoid
excessive gas
consumption and prevents
receptacles from getting
tarnished.
Always use lids.
Only use thick-,flat-based
saucepans, frying pans
and casseroles.
Always place
receptacles in the
middle of burners.
Always place receptacle
on the pans support.
Make sure that the metal
grids and the tops of the
burners are correctly
positioned before using
them.
Handle receptacles on
the hob with care.
Do not use excessive
weights or strike the hob
with heavy objects.
Only use one recipient
per burner. Use the
extra mental grid on the
burner with three
flames.
9
Page 11

10
Page 12

Troubleshooting
It is not always necessary to call the Service Centre. In
some cases, you may be able to solve the problem
yourself. This table contains some useful information.
Important information:
Only authorised personnel from our Service Centre are
qualified to work on the main gas and electric systems.
What´s wrong
...if none of the electrical
system works?
...if the electric ignition system
does not work?
...if the flame on the burners is
not evenly distributed?
...if the gas flow does not seem
normal or there is no gas flow
at all?
Possible cause Solution
-Faulty fuse. -Check the fuse in the
-The automatic circuit breaker
or mains differential has been
triggered.
-There may be food or cleaning
product particles between the
spark plugs and the burners.
-The burners are wet. -Dry the burner covers and
-The covers on the burners are
not in the right position.
-The burner components have
not been assembled properly.
-The gas outlets on the burners
are dirty.
-The gas flow has been cut at
an intermediate stopcock.
-If the gas is supplied from a
gas bottle, it may be empty.
main fuse box and
replace it if it is faulty.
-Check to see if the circuit
breaker or a differential has
been triggered in the mains
supply box.
-The gap between the spark
plug and the burner needs to
be cleaned carefully.
spark plugs carefully.
-Check that the covers
have been put in the
proper position.
-Put the components in their
correct positions.
-Clean the gas outlets on the
burners.
- Open any intermediate
stopcocks.
-Replace the gas bottle with
a full one.
...if the kitchen smells of gas? -One of the valves has been
...if the safety devices on the
different burners do not work?
left open.
-Possible leak on the gas bottle
coupling.
-The control knob has not been
kept pressed in for long
enough.
-The outlets on the burners are
dirty.
-Check to see if a valve has
been left open.
-Check that the coupling on
the gas bottle is in order.
-Once ignited, keep the
control knob pressed in for
a few seconds.
-Clean the gas outlets on the
burners.
11
Page 13

Should you need to contact our Service Centre, please quote the following information:
E - NR FD
These indications appear on your appliance's characteristics plate on the bottom of
your appliance.
Conditions of warranty
The conditions of warranty are those set out by our
company's representatives in the country where you
purchased your appliance. The salesperson that sold
you the appliance will be only too pleased to inform you
as to the details of these conditions. Proof of purchase
must be produced when making any kind of claim against
the warranty.
The manufacturer reserves the right to modify these
conditions.
12
Page 14

Geachte gebruiker
Wij danken u voor uw keuze voor dit apparaat. Dit praktische, moderne
en functionele apparaat is vervaardigd uit materialen van hoge kwaliteit,
die gedurende het hele proces zijn onderworpen aan een strenge
controle en die nauwkeurig getest zijn, zodat het apparaat aan al uw
eisen voor koken voldoet. Voor meer gemak bestaat deze
gebruiksaanwijzing uit twee onderdelen: Gebruik en Installatie.
Wij verzoeken u derhalve om deze eenvoudige aanwijzingen door
te lezen en op te volgen, zodat u vanaf het eerste gebruik verzekerd
bent van een optimaal resultaat. U vindt er belangrijke informatie,
niet alleen wat betreft gebruik, maar ook over veiligheid en onderhoud.
Om onze producten te vervoeren zijn er beschermende verpakkingen
nodig. Wij beperken de verpakkingen tot het hoogst noodzakelijke en
alle materialen zijn hergebruikbaar. U kunt, net als wij, meewerken aan
het behoud van het milieu, door de materialen in de dichtstbijzijnde
daarvoor bestemde container te gooien. Gebruikte olie dient niet door
de gootsteen te worden gespoeld, aangezien dat belastend is voor het
milieu. Giet het in een afsluitbare bak en lever het in bij een inzamelpunt
of gooi het, indien dat niet mogelijk is, in uw vuilnisemmer (het komt
dan uiteindelijk op een stortplaats terecht en, hoewel dit niet de beste
oplossing is, wordt op deze manier vervuiling van het water
tegengegaan). Alvorens een oud apparaat af te danken, dient u het
onbruikbaar te maken. Lever het daarna in bij een inzamelpunt voor
gescheiden afval. Uw gemeente kan u informeren waar zich het
dichtstbijzijnde inzamelpunt bevindt.
Als op het typeplaatje van uw apparaat het symbool
staat; volg dan de volgende aanwijzingen op:
", )&5 "11"3""5 6*5 &/ 70&3 %& 7&31",,*/( 01 &&/
.*-*&673*&/%&-*+,& ."/*&3 "'
*5 "11"3""5 *4 (&,&/.&3,5 */ 07&3&&/45&..*/( .&5
%& 6301&4& 3*$)5-*+/ #&53&''&/%&
"'(&%"/,5& &-&,53*4$$)& &/ &-&,530/*4$)& "11"3"5663
8"45& &-&$53*$"- "/% &-&$530/*$ &26*1.&/5 H !
& 3*$)5-*+/ (&&'5 )&5 ,"%&3 "// 7003 %& */ %&
(&-%*(& 5&36(/&.*/( &/ 7&38&3,*/( 70/ 06%&
13
Page 15

INHOUD
Waarschuwingen omtrent veiligheid
Onderdelen van de kookplaat
Gaspitten
Geadviseerde diameter van de pan (cm)
Kookadviezen
Waarschuwingen voor het gebruik
Koken
Reiniging en onderhoud
Storingen
Garantievoorwaarden
15
17
18
19
20
21
21
22
23
24
14
Page 16

Waarschuwingen omtrent veiligheid
Lees deze handleiding aandachtig door zodat u het
apparaat op een goede en veilige manier kunt gebruiken.
Volgens de geldende veiligheidsnormen, mag de
installatie en omvorming voor ander gassoorten alleen
worden uitgevoerd door officieel erkend personeel.
Controleer, alvorens uw nieuwe kookplaat te installeren,
of de afmetingen juist zijn.
Dit apparaat mag niet worden aangesloten op een
inrichting voor de afvoer van de verbrandingsproducten.
De volgende aanwijzingen gelden alleen voor
landen waarvan het symbool op het apparaat is
aangegeven. Voor het aanpassen aan de landelijke
gebruiksvoorwaarden dienen de technische aanwijzingen
te worden opgevolgd.
Dit apparaat is enkel ontworpen voor
commercieel of
toegelaten. Dit apparaat mag niet
in jachten of
zijn wanneer het gebruik nageleefd werd
ontworpen werd.
Op de plaats waar het apparaat komt te staan, moet een
perfect werkende reglementaire ventilatie-inrichting
aanwezig zijn. (Basisregels voor Installatie van Gas in
Gebouwen BOE nr.281,24-11-93)
Zorg ervoor dat het apparaat niet blootstaat aan
luchtstromen: de gaspitten zouden anders kunnen doven.
Dit apparaat is, als het van de fabriek komt, afgesteld
op de manier die op het typeplaatje is weergegeven.
Indien wijzigingen nodig zijn, dient u contact op te nemen
met onze klantenservice.
Sleutel niet aan de binnenkant van het apparaat.Neem
zonodig contact op met de klantenservice.
Bewaar de gebruiks- en installatievoorschriften, zodat
u ze aan een eventuele volgende eigenaar kunt geven.
Zet het apparaat niet aan indien het beschadigd is.
professioneel gebruik hiervan is niet
caravans. De garantie zal enkel geldig
huishoudelijk, het
worden geïnstalleerd
waarvoor deze
15
Page 17

Oppervlaktes van kachels of kooktoestellen
worden warm als ze aanstaan.
Wees daarom voorzichtig en zorg
ervoor dat kinderen niet in de buurt komen.
Gebruik het apparaat alleen voor het bereiden van
voedsel en nooit als kachel.
Vetten of oliën die oververhit zijn, zijn gemakkelijk
ontvlambaar. U dient derhalve altijd voorzichtig te werk
te gaan bij de bereiding van voedsel met vet of olie,
zoals patat.
Probeer brandend vet of olie nooit met water te blussen.
GEVAARLIJK! Doe een deksel op de pan om het vuur
te doven en zet de kookzone uit.
Bij storingen dient u de gastoevoer te sluiten en de
elektriciteit uit te schakelen. Bel in dat geval meteen
onze bevoegde klantenservice, die het euvel kan
verhelpen.
Zet geen vervormde of instabiele pannen op de platen
en gaspitten; deze kunnen omvallen
Indien een kraan vast zit, dient u deze niet te forceren.
Neem direct contact op met onze klantendienst,
die de kraan kan repareren of vervangen.
16
Gebruik geen stoomreinigers om de kookplaat te
reinigen, aangezien er risico op
Dit apparaat is niet bestemd om te worden gebruikt door
personen (met inbegrip van kinderen)
fysieke, sensoriële of mentale capaciteiten beperkt
zijn of die onvoldoende ervaring of kennis hebben,
behalve wanneer deze
hebben gehad inzake het gebruik van het apparaat door
een persoon die verantwoordelijk is voor hun veiligheid.
Zorg ervoor dat er tijdens het gebruik van het apparaat
altijd toezicht is.
De grafieken die in die boek staan afgebeeld, zijn slechts
ter oriëntatie.
INDIEN DE BETREFFENDE BEPALINGEN NIET IN
ACHT GENOMEN WORDEN, WIJST DE FABRIKANT
ELKE VERANTWOORDELIJKHEID AF.
toezicht of instructies zouden
elektrocutie bestaat.
waarvan de
Page 18

Onderdelen van de kookplaat
Roosters
Brander
tot 1,75 kW
Drievondige
vlam tot
3,6 kW
Brander
tot 1 kW
Opvangplaat
Drievondige
vlam tot
3,6 kW
Brander
tot 3 kW
Brander
tot 1,75 kW
Bedieningsknoppen
Roosters
Brander
tot 1,75 kW
Brander
tot 3 kW
Brander
tot 1,75 kW
Opvangplaat
Bedieningsknoppen
Brander
tot 1 kW
17
Page 19

Gaspitten
Fig. 1.
Bij iedere bedieningsknop die zich op het
bedieningspaneel bevindt, is de desbetreffende gaspit
aangegeven. Fig. 1.
Om een brander in te schakelen, drukken op de knop
van de gekozen brander en deze naar links draaien, tot
de maximumstand, en enkele seconden in deze stand
houden tot de brander aangaat en deze loslaten,
vervolgens in de gewenste positie afstellen.
Houd enkele
Laat de knop daarna weer los en zet hem in de gewenste
stand. Mocht de gaspit niet aangaan, verricht de handeling
dan opnieuw. Indien uw kookplaat niet is voorzien van
automatische ontsteking, dan dient de pit handmatig te
worden aangestoken (met een aansteker, lucifers, etc.).
Als de ontstekingsbougies niet schoon zijn, brandt de
gaspit niet goed. Zorg er dus voor dat deze schoon zijn.
Maak de bougies voorzichtig schoon met bijvoorbeeld
een kleine borstel.
Bij kookplaten die voorzien zijn van gaspitten met
veiligheidskleppen, die ervoor zorgen dat de gastoevoer
stopt als de pit per ongeluk uitgaat, gebeurt het aansteken
op dezelfde manier, maar moet de knop nadat de pit is
aangegaan nog enkele seconden worden vastgehouden.
Mocht de gaspit niet aangaan, verricht de handeling dan
nogmaals en houd de knop deze keer ongeveer 10
seconden vast.
De gaspit gaat uit door de bedieningsknop naar rechts
tot stand te draaien.
seconden vast, totdat de gaspit aangaat.
18
Deze moderne en functionele kookplaat is uitgerust met
afstelbare kranen, waarmee de grootte van de vlam
nauwkeurig kan worden afgesteld.
Afhankelijk van het model, kan uw kookplaat voorzien
zijn van een drievoudige vlam, die zeer praktisch is bij
het koken met een paella-pan, wok (voor Aziatische
gerechten) etc.. Bij gebruik van kookplaten met gas
ontstaat warmte en vochtigheid. Zorg ervoor dat de
keuken goed geventileerd is: houd de natuurlijke
ventilatieopeningen open of zorg voor mechanische
ventilatie (afzuigkap). Bij langdurig gebruik van het
apparaat kan extra ventilatie nodig zijn: zet dan
bijvoorbeeld het raam open (zorg ervoor dat het niet
tocht) of zet de afzuigkap op een hogere stand.
Een oranjekleurige vlam is normaal en kan voorkomen
wanneer er stof in de lucht aanwezig is, vloeistof gemorst
is, enz.
Page 20

Geadviseerde diameter van de pan
(cm)
GASPIT MINIMALE Ø PAN MAXIMALE Ø PAN
Drievoudige kroon:
Snel: 22 cm 26 cm
Half snel: 14 cm 20 cm
Auxiliair: 12 cm 14 cm
Afhankelijk van het model:
>22 cm
Extra
roosters:
Fig. 2.
Afhankelijk van het model, kan er bij uw kookplaat een
extra rooster zijn geleverd voor de gaspit met drievoudige
kroon bedoeld voor pannen met een diameter van meer
dan 26 cm, grilplaten, aardewerken en alle soorten
holronde pannen (Chinese wok, etc…) Fig. 2. Indien dit
niet het geval is, is dit rooster bij de klantendienst van
het merk verkrijgbaar onder codenummer 484128.
Rooster voor koffiepot: Afhankelijk van het model kan
er bij uw kookplaat een rooster voor koffiepotten zijn
geleverd. Deze is uitsluitend bestemd voor de auxiliair,
voor potten met een doorsnede van minder dan 10 cm.
Indien dit niet het geval is, is dit rooster bij de klantendienst
van het merk verkrijgbaar onder codenummer 184200.
De fabrikant stelt zich niet aansprakelijkheid voor
schade die veroorzaakt is door oneigen gebruik van
deze roosters of door het niet gebruiken ervan.
19
Page 21

Kookadviezen
Deze adviezen zijn slechts ter oriëntatie
Zeer hoog - Hoog Gemiddeld Laag
Drievoudige
vlam
Snel
Half snel
Auxiliair
Aan de kook brengen, braden,
aanbakken, paella, Aziatische
gerechten (wok).
Schnitzel, biefstuk,
omelet, gefrituurde
gerechten.
Gestoomde
aardappelen, verse
groente, stoofschotels,
pasta.
Koken: stoofschotels,
rijstepap, caramel.
Opwarmen en warm houden van
bereid voedsel, en kant-en-klare
maaltijden.
Rijst,
béchamelsaus,
ragout.
Opwarmen en warm houden van
bereide gerechten en verfijnde
schotels.
Ontdooien en
langzaam koken:
peulvruchten,
fruit,
diepvriesproducten
Stomen:
Vis, groente.
Smelten: boter,
chocolade,
gelatine.
20
Page 22

Waarschuwingen voor het gebruik
Koken
Waarschuwingen voor koken
NIET DOEN WEL DOEN
Gebruik geen kleine pannen
op grote gaspitten. De vlam
mag de zijkant van de pan
niet raken.
Zorg er bij het koken voor
dat de deksel correct op de
pan zit. Zo wordt er geen
energi verspild.
Gebruik geen pannen met
onregelmatige onderkant.
De kooktijd wordt hierdoor
verlengd en u verspilt
energi.
Plaats de pan niet scheef
op de gaspit, de pan kan
omvallen.
Gebruik geen grote pannen
op de gaspitten die zich
dicht bij de draaiknoppen
bevinden. Als deze midden
op de pit staan zouden ze
in aanraking kunnen komen
met de knoppen, waardoor
er door de warmte schade
kan ontstaan.
Gebruik altijd pannen die
die geschikt zijn voor de
brander. Op deze manier
bespaart u gas en komen
er geen brandplekken op de
pannen.
Doe altijd een deksel op de
pan.
Gebruik alleen pannen met
een egale en dikke bodem.
Plaats de pan niet midden
op de gaspit.
Plaats de pan op het
rooster Controleer voor het
gebruik of de roosters en
hoedjes van de branders
op de juiste wijze zijn
geplaatst.
Zet de pannen miet direct
op de branders.
Zorg ervoor dat de pan niet
te zwaar is en zet zware
voorwerpen niet hard op de
kookplaat neer.
Gebruik geen twee
gaspitten of warmtebronnen
voor één pan.
Zet grilplaten, aardewerken
potten, etc... niet te lang op
de hoogste stand.
Zet de pannen voorzichtig
op de kooplaat.
Gebruik maar één pan per
brander.
Maak op de drievoudige pit
gebruik van het extra
rooster.
21
Page 23

22
Page 24

Storingen
Het is niet altijd nodig om de klantenservice te bellen.
In veel gevallen kunt u de storing zelf verhelpen. In de
onderstaande tabel vindt u enkele adviezen.
Belangrijk: Alleen erkend personeel van onze Klantenservice
is bevoegd voor het verrichten van werkzaamheden aan gas en
elektriciteit.
Wat is er aan de hand
...als de elektriciteit uitvalt?
...als de elektrische
ontsteking niet werkt?
... als de vlam van de pitten
niet gelijkmatig is?
... als er geen gastoevoer is
of als de gastoevoer niet
normaal is?
Mogelijke oorzaak Oplossing
- De zekering is kapot.
- Een zekering of differentieel
kan zijn doorgeslagen.
- Misschien zitten er etensresten
of resten van
schoonmaakmiddelen tussen de
bougies en de gaspitten.
- De gaspitten zijn nat
- De hoedjes van de gaspitten
zijn niet juist geplaatst.
- De verschillende onderdelen
van de gaspit zijn niet goed
geplaatst.
- De openingen van de
gastoevoer zijn niet schoon.
- De gastoevoer is gesloten
doordat de tussenkranen dicht
zijn.
- Indien het gas afkomstig is uit
een gasfles, kan het zijn dat deze
leeg is.
- Controleer de zekering in
de meterkast en vervang
deze zonodig.
- Controleer in de meterkast
of een zekering of een
differentiaal is doorgeslagen.
- De ruimte tussen de bougie
en de gaspitten dient goed te
worden gereinigd.
- Maak de hoedjes van de
gaspit de bougies goed
droog.
-Controleer of de hoedjes
goed zijn geplaatst.
- Plaats alle onderdelen op
de juiste wijze.
- Maak deze opening
gastoevoer van de branders
schoon.
- Draai eventuele
tussenkranen open.
-Vervang de lege gasfles
door een volle.
... als het in de keuken naar
gas ruik?
... de aansteking van de
verschillende braders niet
goed werkt?
- Er staat een gaskraan open.
- Mogelijk lek in de aansluiting
aan de gasfles.
-De knop is niet lang genoeg.
Ingedrukt.
- De openingen van de
gastoevoer van de branders zijn
niet schoon.
- Controleer dit.
- Controleer of de aansluiting
goed is.
- Houd de knop, als de gaspit
aan is, nog enkele seconden
vast.
-Maak deze opening van de
gastoevoer van de branders
schoon.
23
Page 25

Indien u contact opneemt met onze Technische Dienst, vermeld dan:
E - NR FD
Deze aanwijzingen zijn aangegeven op het typeplaatje van uw apparaat. U vindt deze
onderaan op uw kookplaat.
Garantievoorwaarden
De garantievoorwaarden die voor dit apparaat gelden
zijn vastgesteld door de vertegenwoordiging van ons
bedrijf in het land waar u het apparaat heeft gekocht.
Uw leverancier kan u hierover desgewenst meer
informatie verschaffen. Om gebruik te kunnen maken
van de garantie dient u altijd uw koopbon te laten zien.
Recht op wijzigingen voorbehouden.
24
 Loading...