

Page 1
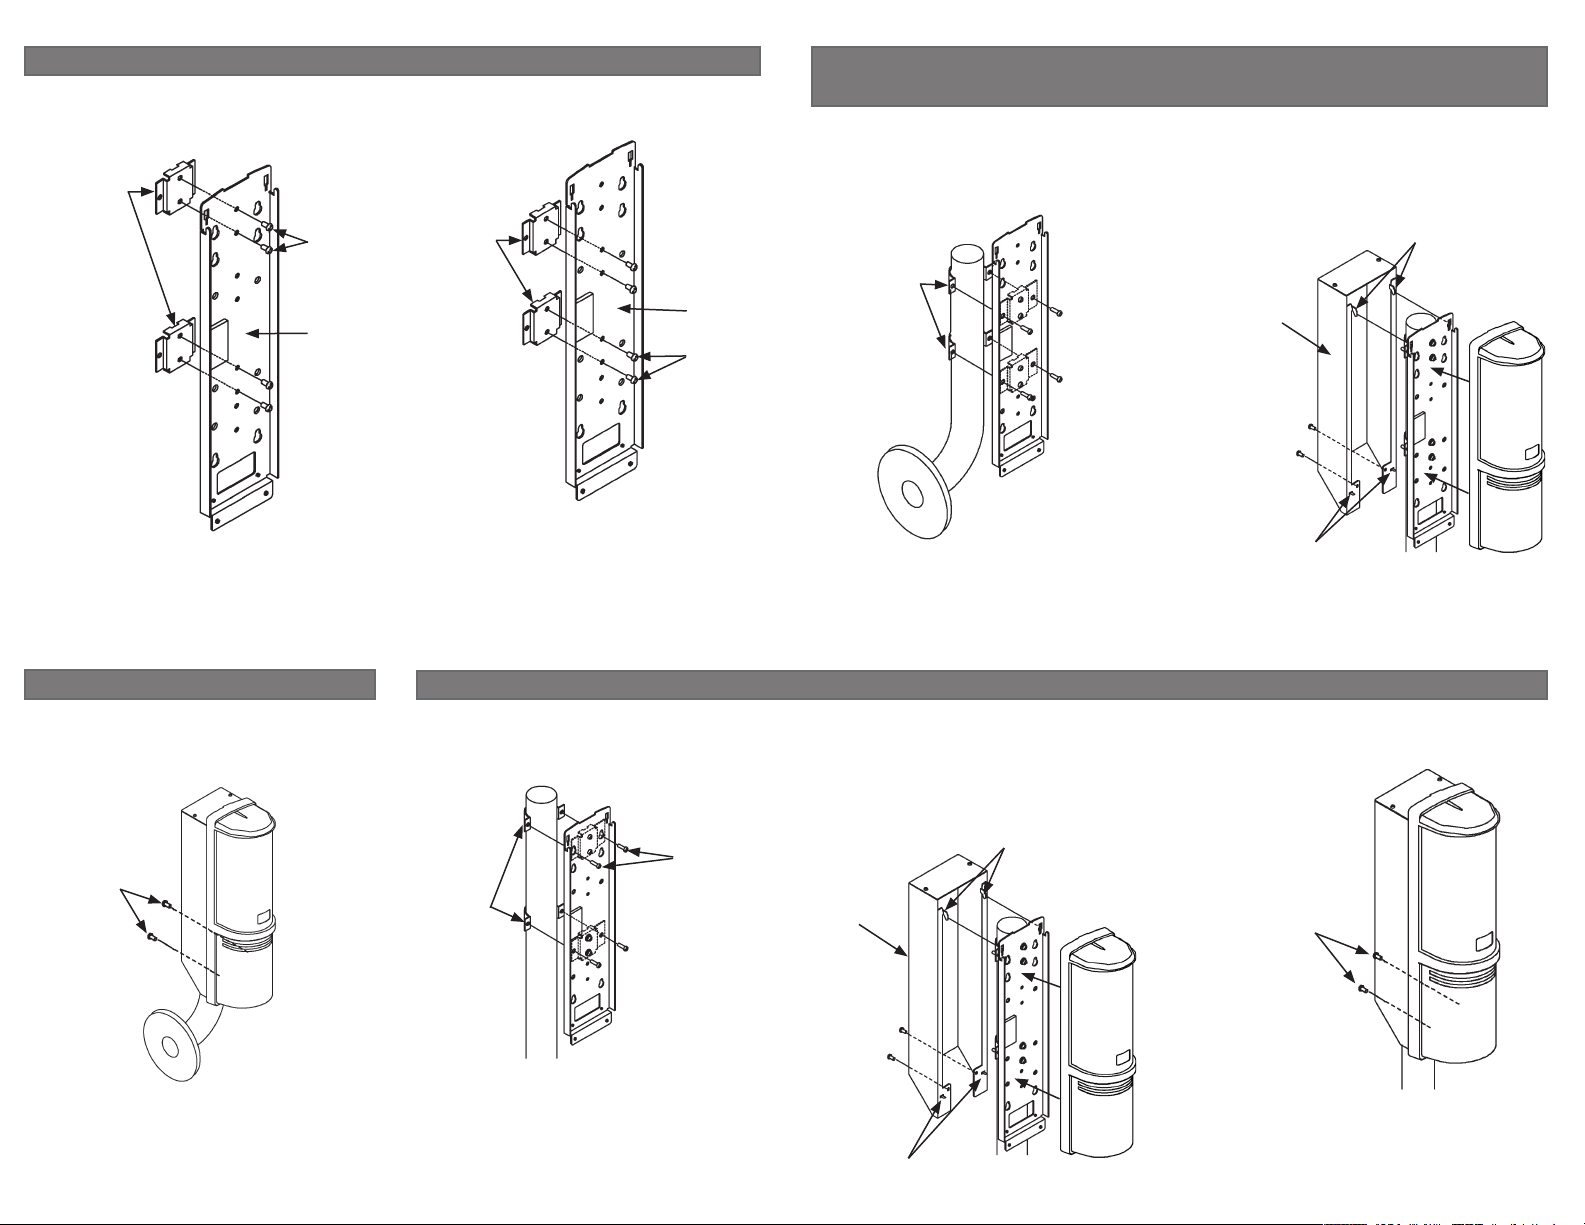
1 | Attach mount plate Крепление монтажной платы
Pole mount
Установка на столб
Mount plate
Монтажная
плата
Short
clamping
screws
Короткие
зажимные
винты
Chassis
Шасси
Wall pole mount
Установка на настенный столб
Mount
plate
Монтажная
плата
Chassis
Шасси
Screws
(short)
Винты
(короткие)
2.1 | Option 1 - Mount on wall pole
Вариант 1: установка на настенный столб
1. Attach the chassis to the pole using
the mount bracket. Прикрепите шасси
к столбу с помощью монтажного
кронштейна.
U clamps
U-образные
зажимы
2. Mount detector and attach pole
cover. Смонтируйте извещатель и
установите крышку для столба.
Attach the pole cover hooks to the chassis.
Прикрепите крюки, расположенные на
крышке для столба, к шасси.
Pole
cover
Крышка
для
столба
Press in the springs
at the bottom of
the cover. Нажмите
на пружины,
расположенные в
нижней части крышки.
Mount the detector
to the chassis.
Установите
извещатель на
шасси.
3. Attach the pole cover mounting
screws. Закрутите крепежные
винты на крышке для столба.
Pole cover
mounting
screws
Крепежные
винты на
крышке
для столба
2.2 | Option 2 - Mount at top of pole Вариант 2: установка в верхней части столба
1. Attach the chassis to the pole.
Прикрепите шасси к столбу.
Mount
bracket
Монтажный
кронштейн
Long
clamping
screws
Длинные
зажимные
винты
2. Mount detector and attach pole cover.
Смонтируйте извещатель и установите
крышку для столба.
Attach the pole cover hooks
to the chassis. Прикрепите
крюки, расположенные на
крышке для столба, к шасси.
Pole cover
Крышка
для
столба
Press in the springs at the
bottom. Нажмите на пружины,
расположенные внизу.
Mount the
detector to
the chassis.
Установите
извещатель на
шасси.
3. Attach the pole cover mounting
screws. Закрутите крепежные
винты на крышке для столба.
Pole cover
mounting screws
Крепежные
винты на
крышке для
столба
Page 2

2.3 | Option 3 - Mount at center of pole Вариант 3: установка по центру столба
1. Attach the chassis to the pole.
Прикрепите шасси к столбу.
Mount
bracket
Монтажный
кронштейн
Chassis
Шасси
Long
clamping
screws
Длинные
зажимные
винты
2. Depending on the diameter of the pole,
remove the cap knockout or the cap
from the pole cover. В зависимости от
диаметра столба снимите заглушку или
всю верхнюю часть крышки для столба.
Cap knockout
Заглушка в верхней части
For pole
diameters 38 - 39
mm, remove the
cap knockout.
Если столб имеет
диаметр 38–39
мм, снимите
заглушку.
Cap
Верхняя
часть
For pole
diameters
39 - 43 mm,
remove the
cap. Если
столб имеет
диаметр
39–43 мм,
снимите
всю
верхнюю
часть.
3. Mount detector and attach pole
cover. Смонтируйте извещатель и
установите крышку для столба.
PC1A Weather Enclosure
PC1AПогодозащитный кожух
en Installation Guide
ru Руководство по установке
Copyright
This document is the intellectual property of Bosch Security Systems, Inc. and is protected by copyright. All rights reserved.
Trademarks
All hardware and software product names used in this document are likely to be registered trademarks and must be treated
accordingly.
Bosch Security Systems, Inc. product manufacturing dates
Use the serial number located on the product label and refer to the Bosch Security Systems, Inc. website at
http://www.boschsecurity.com/datecodes/.
Bosch Security Systems, Inc.
130 Perinton Parkway
Fairport, NY 14450
USA
www.boschsecurity.com
© 2016 Bosch Security Systems, Inc.
Bosch Sicherheitssysteme GmbH
Robert-Bosch-Ring 5
85630 Grasbrunn
Germany
F.01U.320.448 | 01 | 2016.02
 Loading...