

Page 1
Gas hob
Placa de cocción a gas
Table de cuisson gaz
Gaskookplaat
PBP6B5B80V
[en] Instruction manual ....................3
[es] Instrucciones de uso ..............11
[fr] Notice d’utilisation ................. 19
[nl] Gebruiksaanwijzing ................ 27
Page 2
3%3%%9
1
2
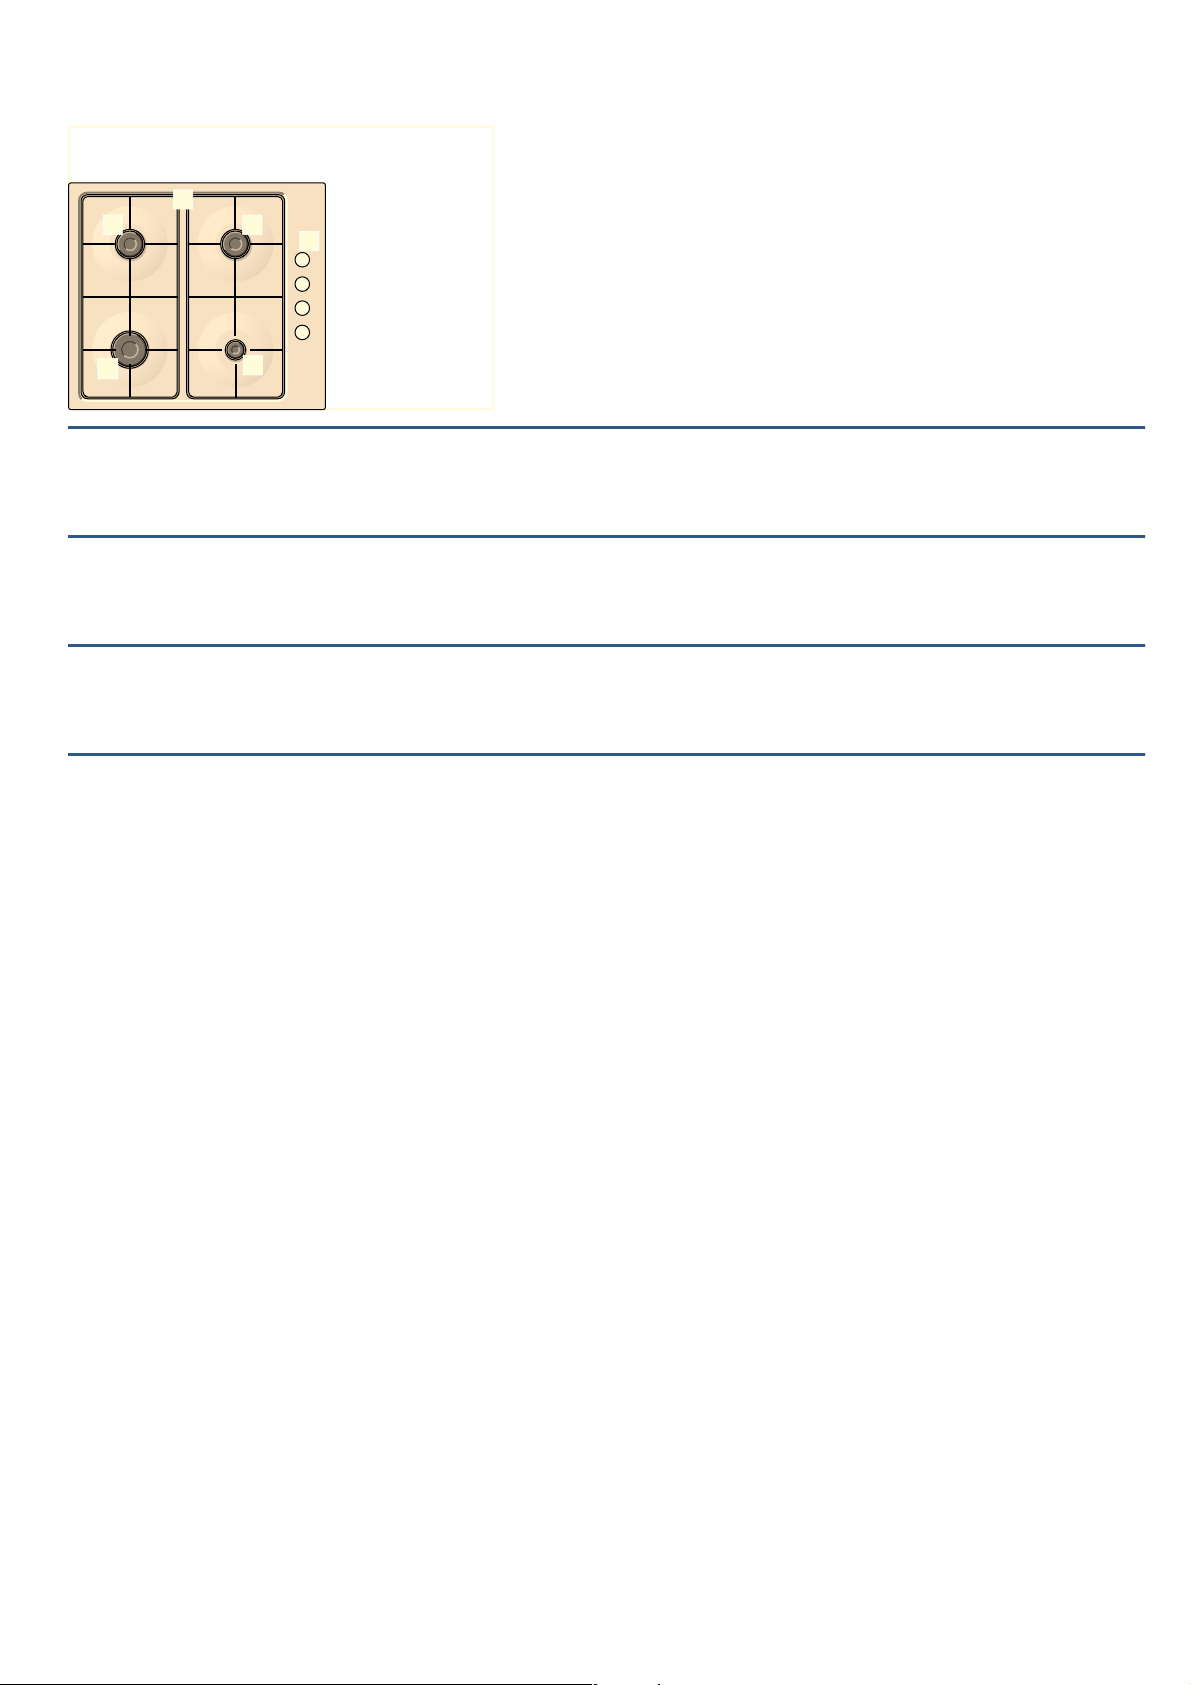
! Pan supports
" Control knobs
# Economy burner with an output of up to 1 kW
! Parrillas
" Mandos
# Quemador auxiliar de hasta 1 kW
! Grilles
" Boutons de commande
# Brûleur éco avec jusqu'à 1 kW
! Roosters
" Knoppen
# Hulpbrander met max. 1 kW
$ Standard-output burner with an output of up to 1.75 kW
% High-output burner with an output of up to 3 kW
$ Quemador semi-rápido de hasta 1,75 kW
% Quemador rápido de hasta 3 kW
$ Brûleur standard avec jusqu'à 1,75 kW
% Brûleur puissant avec jusqu'à 3 kW
$ Halfsnelbrander met max. 1,75 kW
% Sterke brander met maximaal 3 kW
2
Page 3

Table of contents
[en]Instruction manual
8 Intended use. . . . . . . . . . . . . . . . . . . . . . . . . . . . . 3
en
8Intended use
( Important safety information . . . . . . . . . . . . . . . 4
K General information. . . . . . . . . . . . . . . . . . . . . . . 5
Technical information . . . . . . . . . . . . . . . . . . . . . . . . . . 5
IMPORTANT. . . . . . . . . . . . . . . . . . . . . . . . . . . . . . . . . 5
* Getting to know your appliance . . . . . . . . . . . . . 6
Accessories . . . . . . . . . . . . . . . . . . . . . . . . . . . . . . . . .6
Ä Gas burners . . . . . . . . . . . . . . . . . . . . . . . . . . . . . 6
Switching on manually . . . . . . . . . . . . . . . . . . . . . . . . .6
Switching on automatically. . . . . . . . . . . . . . . . . . . . . . 6
Safety system. . . . . . . . . . . . . . . . . . . . . . . . . . . . . . . . 7
Switching off a burner . . . . . . . . . . . . . . . . . . . . . . . . . 7
Power levels. . . . . . . . . . . . . . . . . . . . . . . . . . . . . . . . . 7
Warnings . . . . . . . . . . . . . . . . . . . . . . . . . . . . . . . . . . . 7
Cooking guidelines . . . . . . . . . . . . . . . . . . . . . . . . . . . 7
Å Cooking pans . . . . . . . . . . . . . . . . . . . . . . . . . . . . 7
Suitable pans . . . . . . . . . . . . . . . . . . . . . . . . . . . . . . . . 7
Instructions for use. . . . . . . . . . . . . . . . . . . . . . . . . . . . 7
2 Cleaning and maintenance . . . . . . . . . . . . . . . . . 8
Cleaning. . . . . . . . . . . . . . . . . . . . . . . . . . . . . . . . . . . . 8
Maintenance. . . . . . . . . . . . . . . . . . . . . . . . . . . . . . . . . 8
3 Trouble shooting . . . . . . . . . . . . . . . . . . . . . . . . . 9
4 Customer service. . . . . . . . . . . . . . . . . . . . . . . . 10
Warranty conditions . . . . . . . . . . . . . . . . . . . . . . . . . .10
7 Environmental protection . . . . . . . . . . . . . . . . . 10
Intended use
Read these instructions carefully. You will only
be able to use your appliance safely and
effectively when you have read them. These
operating and installation instructions should
be retained, and passed onto the buyer if the
appliance is sold.
The manufacturer is exempt from all
responsibility if the requirements of this
manual are not complied with.
The images shown in these instructions are for
guidance only.
Do not remove the appliance from its
protective packaging until it is installed in the
unit. Do not switch on the appliance if it is
damaged in any way. Contact our Technical
Assistance Service.
This appliance is class 3 type, according to
the EN 30-1-1 regulation for gas appliances:
built-in appliance.
Before installing your new hob, ensure that it is
being installed according to the assembly
instructions.
This appliance cannot be installed on yachts
or in caravans.
This appliance must only be used in well
ventilated places.
This appliance is not intended for operation
with an external clock timer or a remote
control.
Produktinfo
Additional information on products, accessories,
replacement parts and services can be found at
www.bosch-home.com and in the online shop
www.bosch-eshop.com
All operations relating to installation,
connection, regulation and conversion to
other gas types must be performed by an
authorised technician, respecting all
applicable regulations, standards and the
specifications of the local gas and electricity
suppliers. Special attention shall be paid to
ventilation regulations.
This appliance leaves the factory set to the
gas type that is indicated on the specifications
plate. If this needs to be changed, please
consult the assembly instructions. It is
recommended you contact the Technical
Assistance Service to change to another gas
type.
This appliance has been designed for home
use only, not for commercial or professional
use. This appliance is only intended for
3
Page 4

en Important safety information
cooking purposes, not as a heating system.
The warranty will only be valid if the appliance
is used for the purpose for which it was
designed.
This appliance is intended for use up to a
maximum height of 2000 metres above sea
level.
Never leave the appliance unattended during
operation.
Do not use lids or protective barriers for
children which are not recommended by the
hob manufacturer. They may cause accidents
such as those due to the overheating, ignition
or detachment of fragments of materials.
This appliance may be used by children over
the age of 8 years old and by persons with
reduced physical, sensory or mental
capabilities or by persons with a lack of
experience or knowledge if they are
supervised or are instructed by a person
responsible for their safety how to use the
appliance safely and have understood the
associated hazards.
Children must not play with, on, or around the
appliance. Children must not clean the
appliance or carry out general maintenance
unless they are at least 15 years old and are
being supervised.
Keep children below the age of 8 years old at
a safe distance from the appliance and power
cable.
(Important safety
information
Import ant safet y informati on
:Warning – Risk of deflagration!
Accumulation of unburned gas in an enclosed
area carries a risk of deflagration. Do not
subject the appliance to draughts. These
might blow out the burners. Carefully read the
instructions and warnings on the operation of
gas burners.
:Warning – Risk of poisoning!
The kitchen will become hot and humid and
combustion products produced when this gas
appliance is used. Make sure the kitchen is
well ventilated, particularly when the hob is in
operation: either keep the natural ventilation
apertures open, or install a ventilation system
(extractor hood). Intense prolonged use of the
appliance may require additional or more
effective ventilation: open a window or
increase the power of the ventilation system.
:Warning – Risk of burns!
■ The hotplates and their immediate vicinity
get very hot. Never touch the hot surfaces.
Keep children under 8 years old well away
from this appliance.
Risk of burns!
■ If the liquefied gas bottle is not upright,
liquefied propane/butane can enter the
appliance. Intense darting flames may
therefore escape from the burners.
Components may become damaged and
start to leak over time so that gas escapes
uncontrollably. Both can cause burns.
Always use liquefied gas bottles in an
upright position.
:Warning – Risk of fire!
■ The hotplates get very hot. Do not rest
inflammable objects on the hob. Do not
store objects on the hob.
Risk of fire!
■ Do not store or use corrosive chemicals,
products which produce fumes,
inflammable materials or non-food products
below or near this domestic appliance.
Risk of fire!
■ Fat or oil which is overheated can catch fire
easily. Never leave fat or oil to heat up
unattended. If oil or fats do catch fire, never
use water to put the fire out. Put the fire out
by covering the pan with a lid and switch off
the hotplate.
4
Page 5

General information en
:Warning – Risk of injuries!
■ Pans which are damaged, are not the right
size, hang over the edge of the hob or are
not positioned correctly can cause serious
injuries. Follow the advice and warnings
provided relating to the cooking pans.
Risk of injuries!
■ In the event of a malfunction, turn off the
appliance’s gas and electricity supply. For
repairs, call our Technical Assistance
Service.
Risk of injuries!
■ Do not tamper with the appliance's interior.
If necessary, call our Technical Assistance
Service.
Risk of injury!
■ If a control knob is too stiff to turn or it is
loose, it must not be used. Contact our
after-sales service immediately to have the
control knob repaired or replaced.
:Warning – Risk of electric shock!
Do not clean the appliance using steam
cleaners.
KGeneral information
General informat i on
Technical information
Economy
burner
Thermal capacity 1,00 kW 1,75 kW 3,00 kW
Model
1 2 1
PBP6B5B80V
Regulation
options
NATURAL GAS G20/17,6 - 19,6 mbar; 1,76 1,96 kPa
LP GAS G30/27,5 mbar; 2,75 kPa
Electrical charac-
110 - 240 V∼ 50/60 Hz 0,0344/0,0158 A
teristics
NOTE: This product functions using LP gas. The stated
thermal capacity of the burners applies to both types of
gas (LP and natural). If you wish to operate the product
using natural gas, call our service center.
IMPORTANT
■ Place the pan supports and burners as shown in the
diagrams that describe the model.
■ Maintain the area surrounding the appliance free of
flammable materials, gasoline and other flammable
vapors or liquids.
■ Do not use as a space heater as this may be
dangerous.
Standard-output burner
High-output
burner
FOR YOUR SAFETY
IF YOU SMELL GAS:
■ OPEN THE WINDOWS
■ DO NOT TOUCH POWER SWITCHES
■ TURN OFF ALL FLAMES BY CLOSING THE MAIN
VALVE
■ CALL THE GAS LEAK HOTLINE OR YOUR GAS
PROVIDER
FOR YOUR SAFETY
■ DO NOT STORE GASOLINE OR OTHER
FLAMMABLE LIQUIDS NEAR THE APPLIANCE
■ INSTALL YOUR PRODUCT IN ACCORDANCE WITH
THE INSTALLATION GUIDE TO AVOID HEAT
DAMAGE TO YOUR CABINETS
5
Page 6
en Getting to know your appliance
*Getting to know your
appliance
Gett i ng to know your appl i ance
You can find your appliance and the burner powers in
the model overview. ~ Page 2
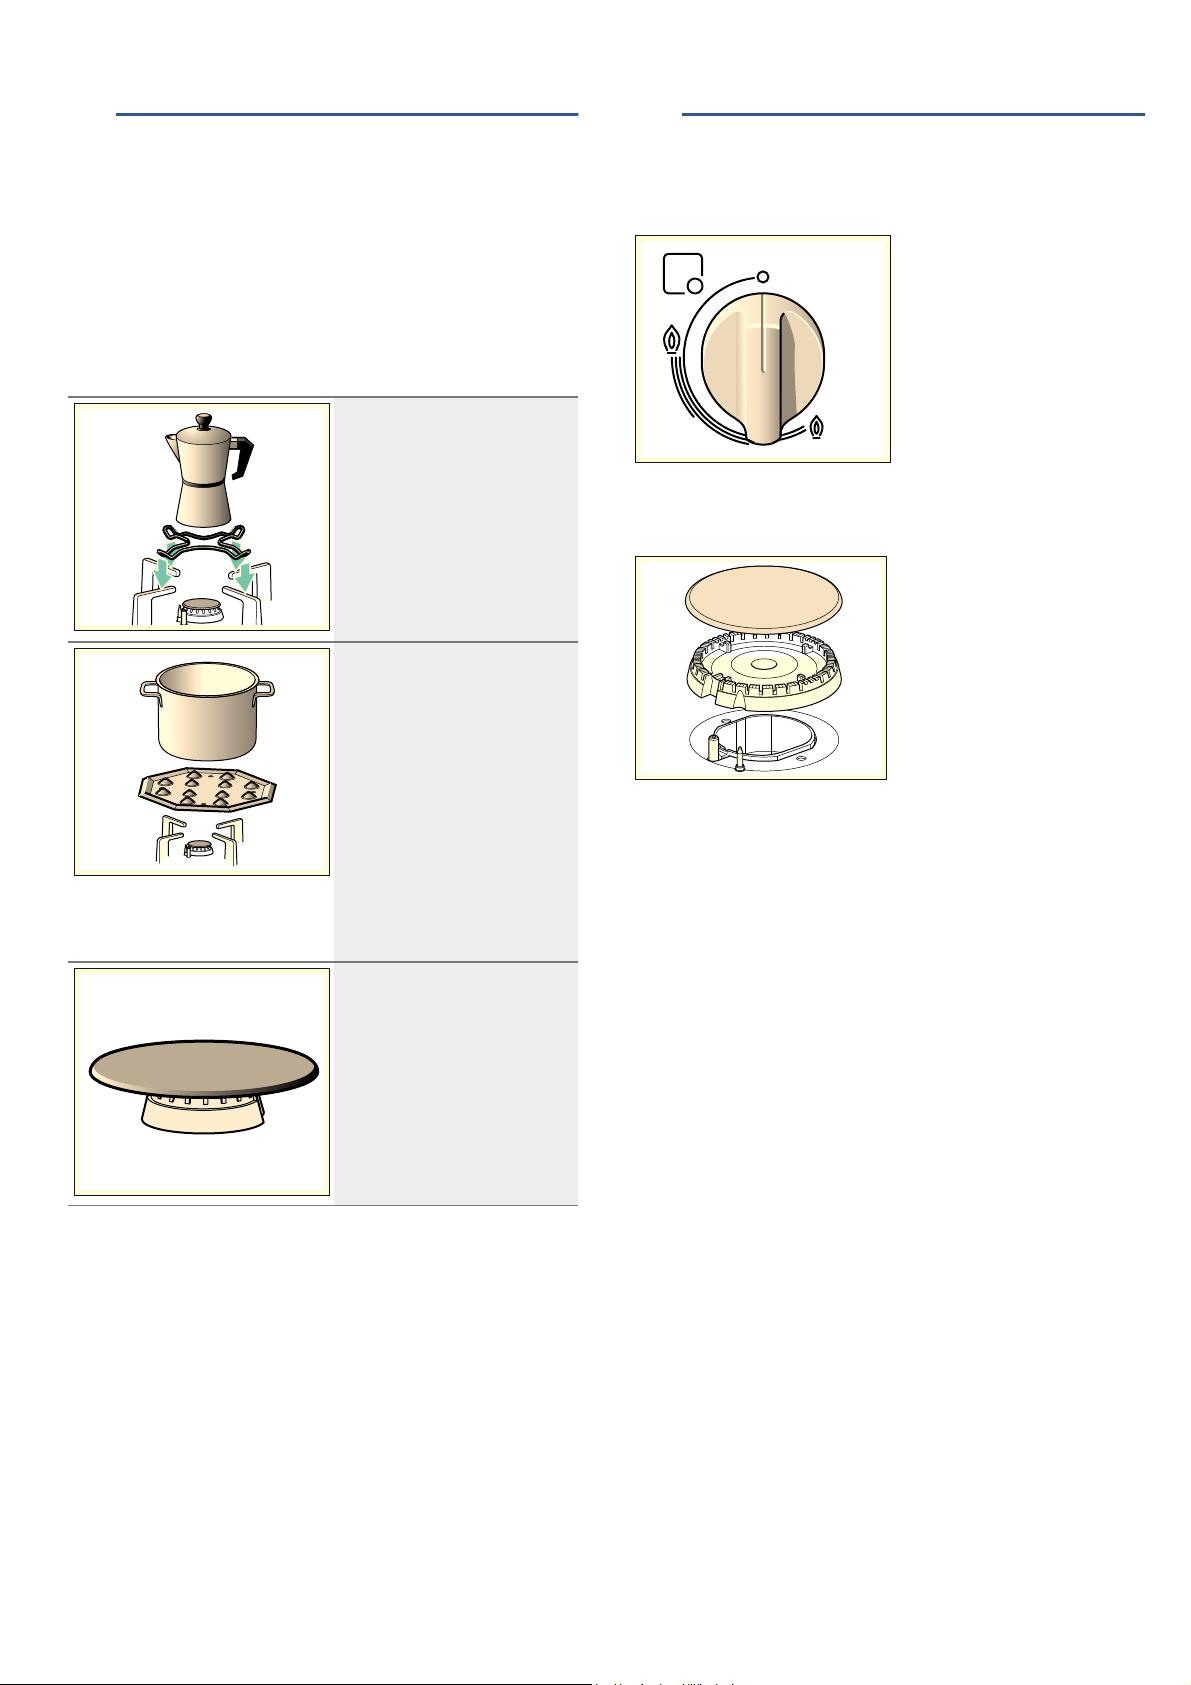
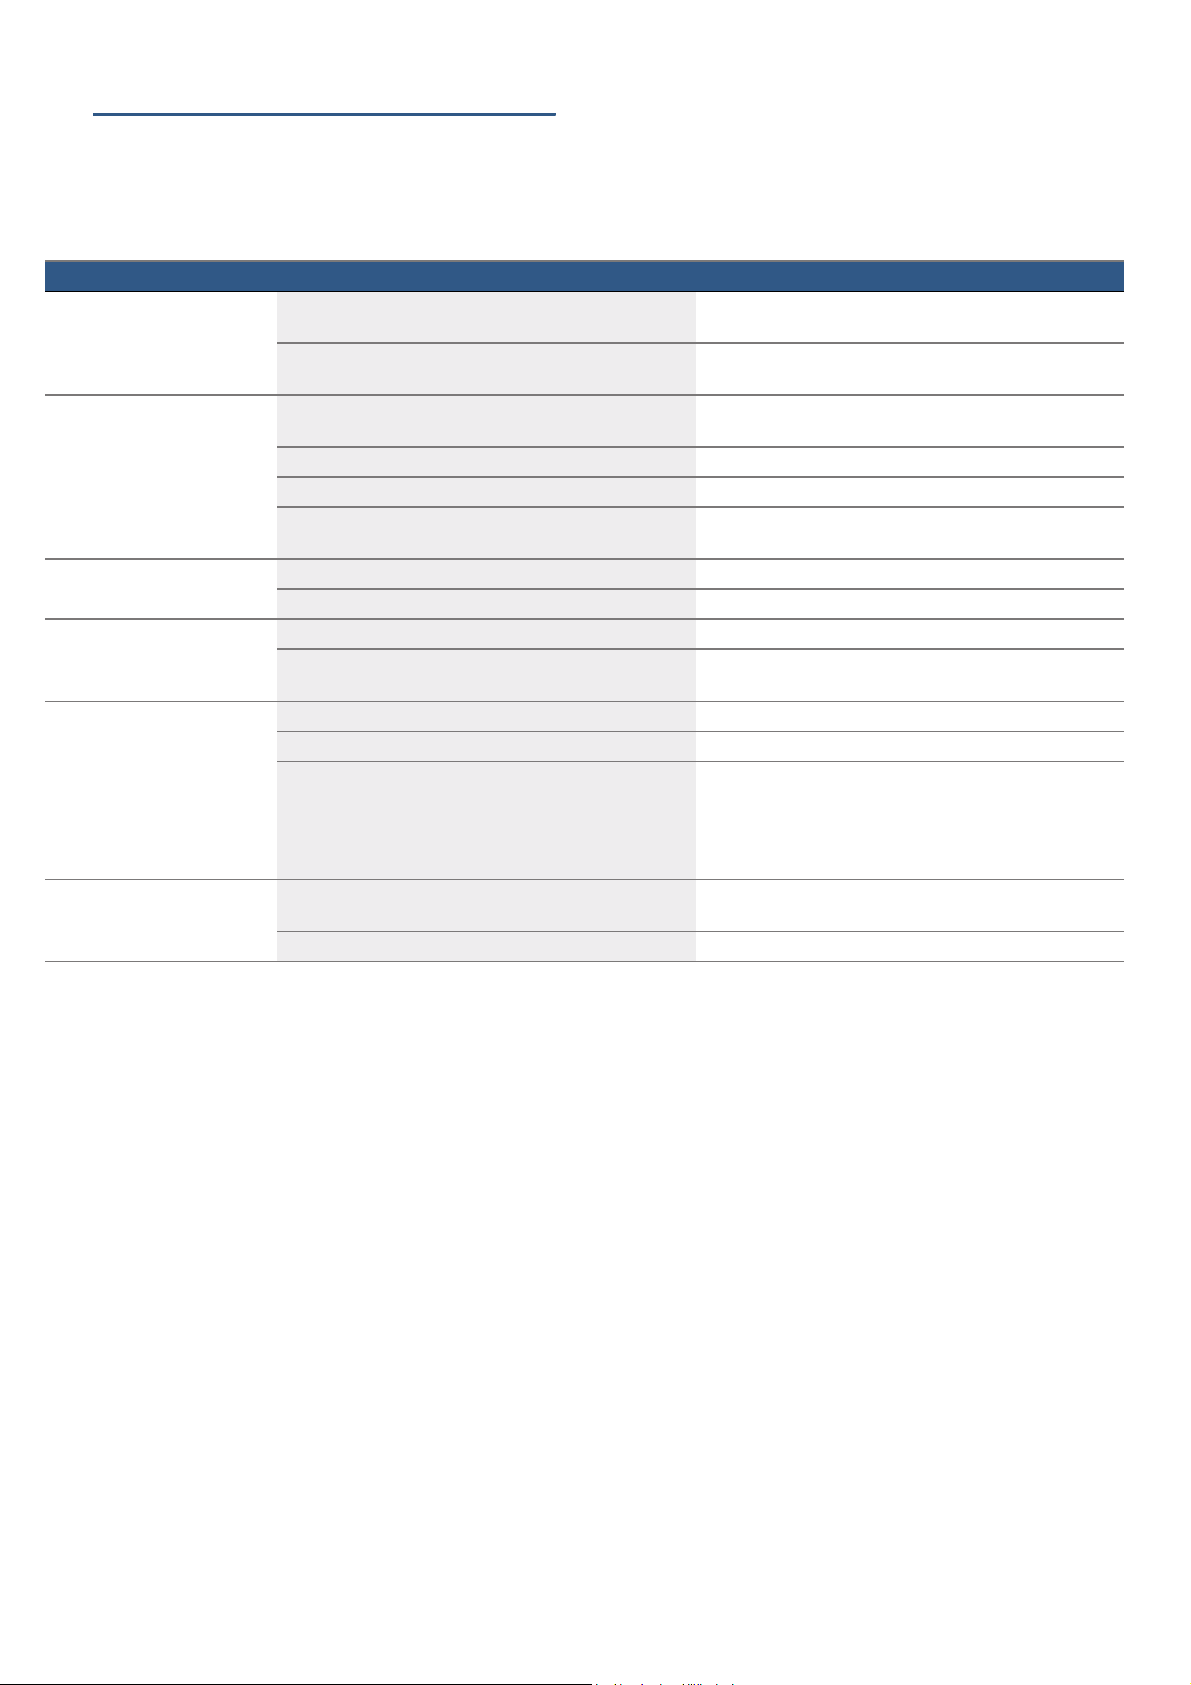
Accessories
The following accessories can be purchased from the
Technical Assistance Service:
Additional espresso maker
grid
Only suitable for use on the
smallest burner. Use cookware
with a diameter of less than
12 cm.
Simmer plate
This accessory part is only suitable for simmering. It can be
used with the economy burner
or the standard-output burner. If
your hob has several standardoutput burners, we recommend
placing the simmer plate on the
rear or front-right standard-output burner.
Place the accessory component
with the projections facing
upwards on the holder; never
place it directly on the burner.
Simmer cap
Burner that is used only when
cooking at minimum output. To
use it, the economy burner must
be removed and replaced with
the simmer cap.
--------
Code
HEZ298114 Additional espresso maker grid
HEZ298105 Simmer Plate
HEZ298104 Simmer cap
ÄGas burners
Gas bur ner s
There are indications to show which burner each
control knob operates.
It is essential to ensure that all the burner parts and pan
supports are correctly installed for the appliance to
work correctly. Do not swap the burner caps around.
Switching on manually
1. Press the chosen burner control knob and turn it
anticlockwise to the required setting.
2. Use any type of lighter or flame (cigarette lighter,
matches, etc.) and bring it close to the burner.
Switching on automatically
If your hob can be switched on automatically (ignition
sparkers):
1. Press the chosen burner control knob and turn it
anticlockwise to the maximum power setting.
While the control knob is still pressed down, sparks
are produced on all burners. The flame ignites.
2. Release the control knob.
3. Turn the control knob to the required setting.
If it does not come on, turn the control knob to the off
setting and repeat the steps above. This time, press
and hold the control knob for longer (up to 10
seconds).
The manufacturer accepts no liability if these
accessories are not used or are used incorrectly.
6
:Warning – Risk of deflagration!
If after 15 seconds the flame does not ignite, switch off
the burner and open a nearby window or door. Wait at
least one minute before trying to switch the burner back
on.
Page 7
Cooking pans en
Safety system
Your hob is equipped with a safety system
(thermocouple) that cuts off the gas when the burners
are accidentally switched off.
1 ignition sparker
2 thermocouple
To ensure that this device is active:
1. Switch on the burner as usual.
2. Without releasing the control knob, press and hold it
down firmly for 4 seconds after lighting the flame.
Switching off a burner
Turn the corresponding control knob clockwise to the 0
setting.
Power levels
Cooking guidelines
Burner Very high - High Medium Low
High-output
burner
Standard-output burner
Economy
burner
Escalopes, steaks,
omelettes, frying
Steamed potatoes,
fresh vegetables,
vegetable stews,
pasta
Cooking: casseroles, rice pudding,
caramel
Rice, white
sauce, ragout
Reheating, keeping things hot
and making tasty casseroles
Defrosting and
slow cooking:
vegetables,
fruit and frozen
products
Steaming: fish,
vegetables
Melting: butter,
chocolate, jelly
ÅCooking pans
Coo k i n g pans
Suitable pans
Burner Minimum diame-
ter of the cookware base
High-output burner 20 cm 26 cm
Standard-output burner 14 cm 22 cm
Economy burner 12 cm 16 cm
Maximum diameter of the cookware
base
The progressive control knobs can be used to control
the power needed, from minimum to maximum power.
Setting
High flame
Low flame
Control knob off
Û
Maximum capacity or aperture and electricity
—
on
Minimum capacity or aperture
˜
Warnings
It is normal to hear a soft whistling noise while the
burner is operating.
When first used, it is normal for the burner to give off
odours. This does not pose any risk and does not
indicate a malfunction. They will disappear in time.
An orange-coloured flame is normal. This is caused by
the presence of dust in the atmosphere, spilt liquids,
etc.
If the burner flames are accidentally blown out, switch
off the burner operating control knob and do not try to
relight it for at least 1 minute.
A few seconds after the burner is switched off, a sound
(thud) will be produced. This is not a fault - this means
that the safety device is no longer operating.
Keep the burner as clean as possible. If the ignition
sparkers are dirty they will not light properly. Clean
them periodically using a small non-wire brush. Bear in
mind that the ignition sparkers must not suffer any
serious impacts.
The cookware must not overhang the edge of the hob.
Instructions for use
Note: When using certain pots or pans, a slight and
temporary deformation of the steel cooking surface may
occur. This is normal and does not affect the
functionality of the appliance.
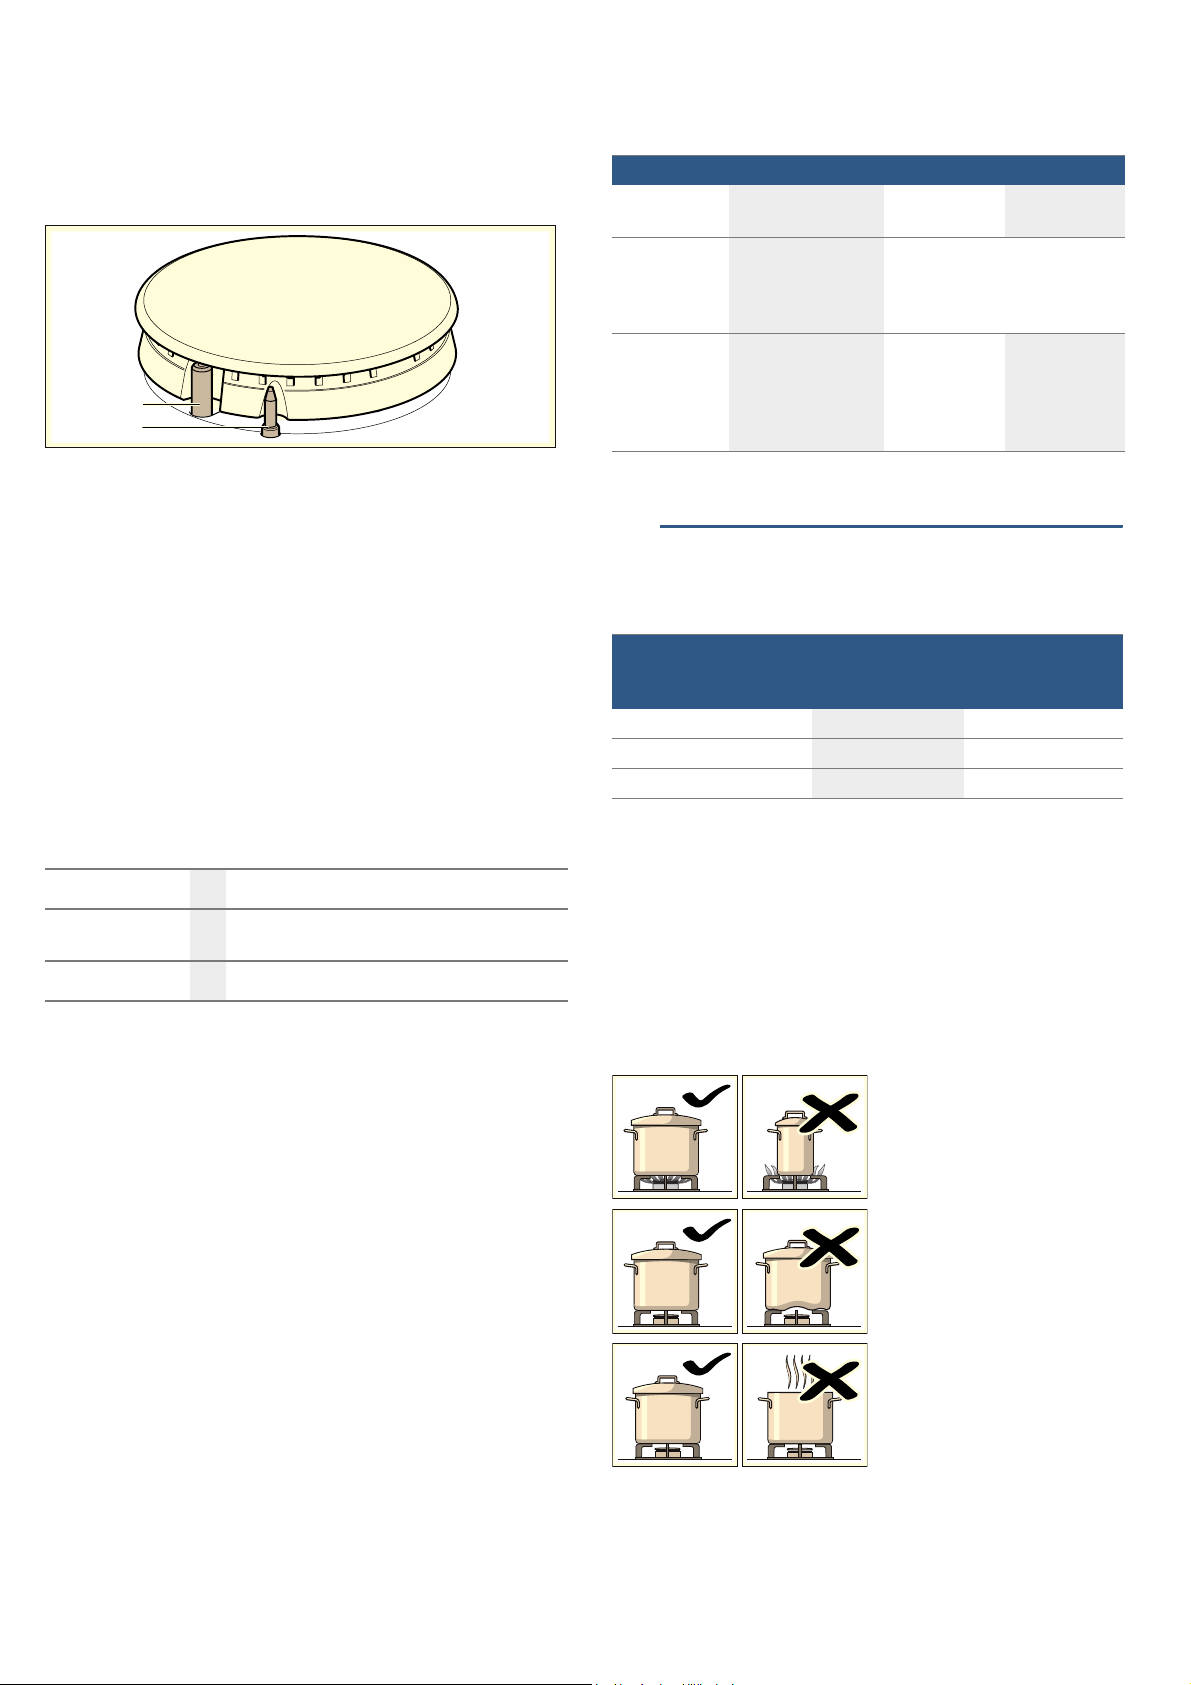
The following recommendations can help you save
energy and avoid damaging your cookware:
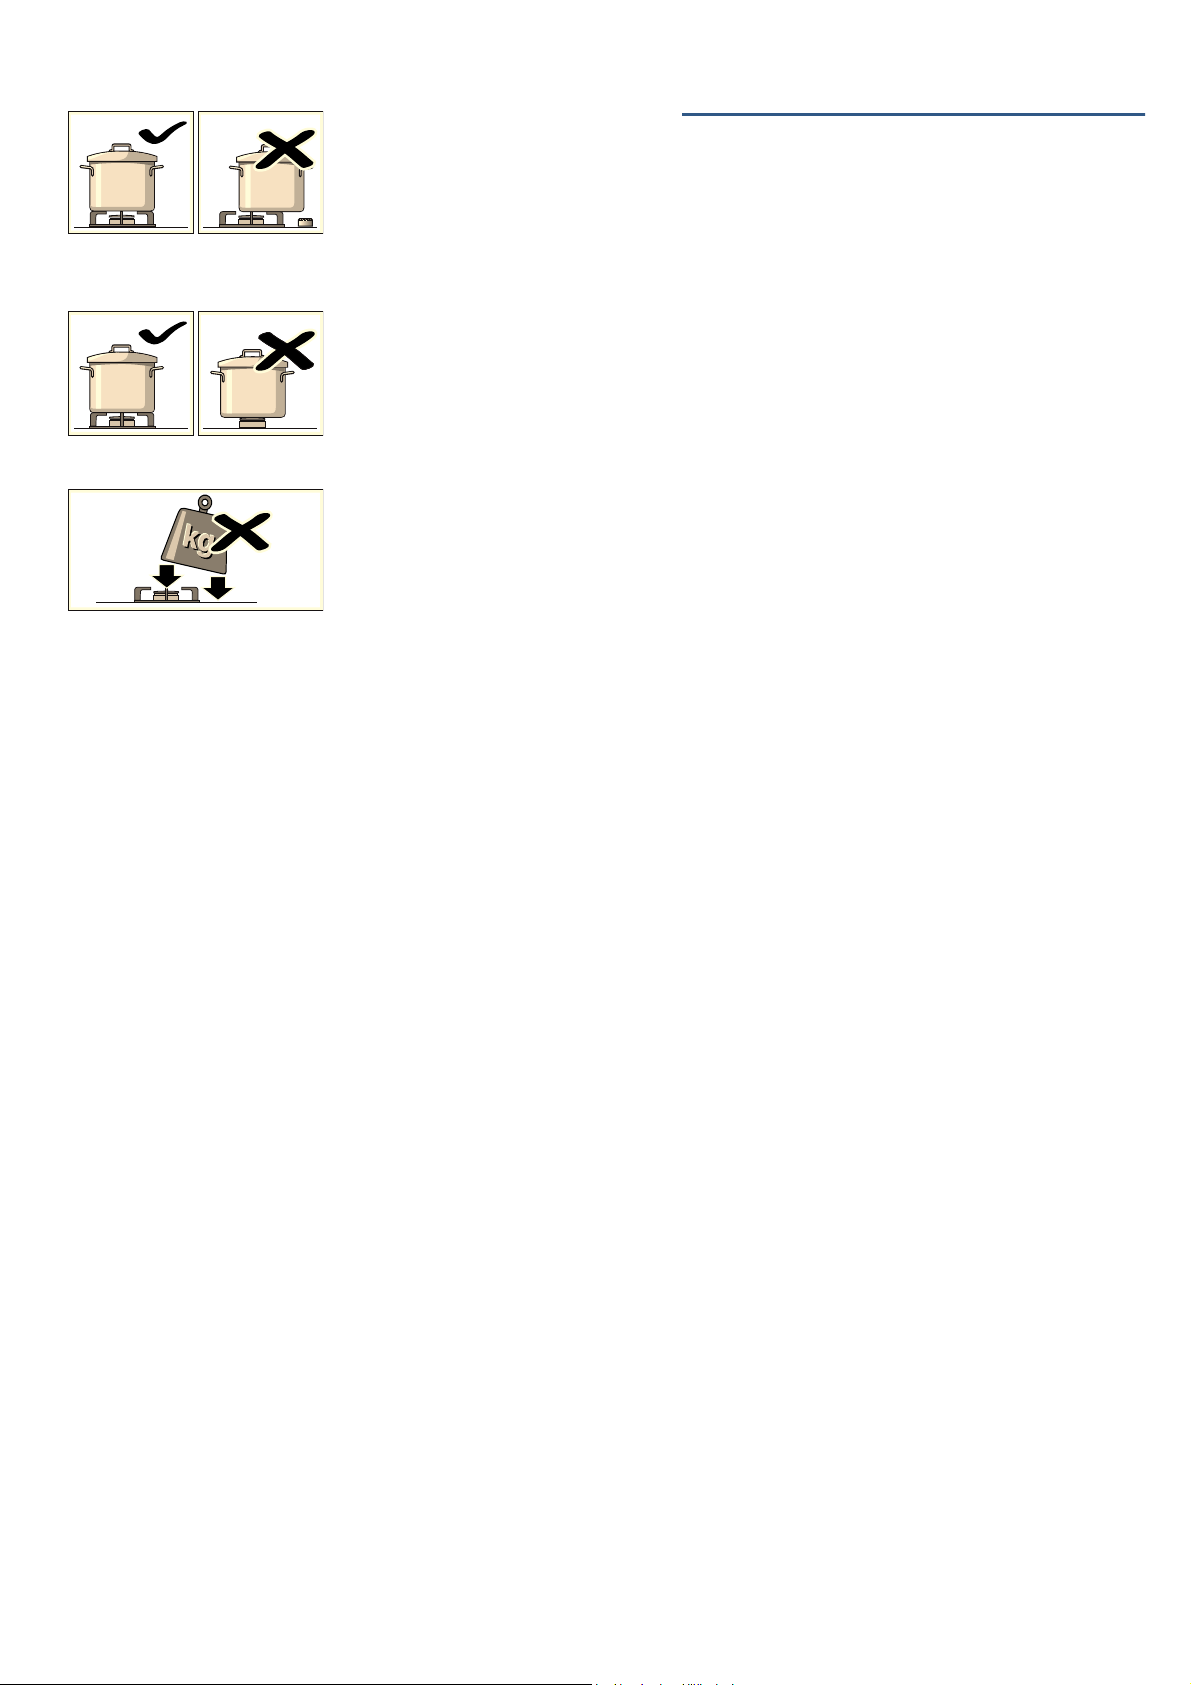
Use pans which are the
right size for each burner.
Do not use small pans on
large burners. The flame
must not touch the sides
of the pan.
Do not use damaged
pans, which do not sit
evenly on the hob. Pans
may tip over.
Only use pans with a
thick, flat base.
Do not cook without using
a lid and make sure the lid
is properly fitted. This
wastes energy.
7
Page 8
en Cleaning and maintenance
Always centre the pan
over the burner, not to one
side. Otherwise it could tip
over.
Do not place large pans
on the burners near the
control knobs. These may
be damaged by the very
high temperatures.
Place the pans on the pan
supports, never directly on
the burner.
Make sure that the pan
supports and burner caps
are correctly positioned
before using the
appliance.
Pans should be placed on
the hob carefully.
Do not strike the hob and
do not place excessive
weight on it.
2Cleaning and maintenance
Cl ea n i n g and mai nt enanc e
Cleaning
Once the appliance is cool, use a sponge to clean it
with soap and water.
After each use, clean the surface of the respective
burner parts once they have cooled down. If any
residue is left (baked-on food, drops of grease etc.),
however little, it will become stuck to the surface and
more difficult to remove later. The holes and grooves
must be clean for the flame to ignite properly.
The movement of some pans may leave metal residue
on the pan supports.
Clean the burners and pan supports using soapy water
and scrub with a non-wire brush.
If the pan supports are fitted with rubber rests, ensure
that these are also cleaned. The rests may come loose
and the pan support may scratch the hob.
Always dry the burners and pan supports completely.
Water droplets or damp patches on the hob at the start
of cooking may damage the enamel.
After cleaning and drying the burners, make sure the
burner caps are correctly positioned on the diffuser.
Caution!
■ Do not remove the control elements when cleaning
the appliance. The appliance may be damaged if
moisture finds its way inside.
■ Do not use steam cleaners. This could damage the
hob.
Maintenance
Always clean off any liquid as soon as it is spilt. This will
prevent food remains from sticking to the hob surface
and you will save yourself any unnecessary effort.
Due to the high temperatures endured, the wok burner
and the stainless steel zones (grease drip tray, burner
outline, etc.) can change colour. This is normal. After
each use, clean these areas with a product that is
suitable for stainless steel.
It is recommended that the cleaning product available
from our Technical Assistance Service (code 464524)
is used regularly.
Caution!
The stainless steel cleaner must not be used in the area
around the controls. The (printed) symbols may be
wiped off.
Do not leave acidic liquids (e.g. lemon juice, vinegar,
etc.) on the hob.
8
Page 9
3Trouble shooting
Troubl e shoot i ng
Sometimes certain faults detected can be easily
resolved. Before calling the Technical Assistance
Service, bear in mind the following advice:
Fault Possible cause Solution
The general electrical system
is malfunctioning.
The automatic switching on
function does not work.
The burner flame is not uniform.
The gas flow is not normal or
there is no gas.
The kitchen smells of gas. A gas tap has been left on. Turn off the taps.
The burner immediately
switches off after releasing the
control knob.
Defective fuse. Check the fuse in the main fuse box and change it if it is
damaged.
The automatic safety switch or circuit breaker has
tripped.
There may be food or cleaning products stuck between
the ignition sparkers and the burners.
The burners are wet. Dry the burner caps carefully.
The burner caps are not correctly positioned. Check that the burner caps are correctly positioned.
The appliance is not earthed, is poorly connected or the
earthing is faulty.
The burner components are not correctly positioned. Correctly place the parts on the appropriate burner.
The grooves on the burner are dirty. Clean the grooves on the burner.
The gas supply is blocked by gas taps. Open all gas taps.
If the gas is supplied from a gas cylinder, check that it is
not empty.
Incorrect coupling of gas cylinder. Check that the coupling is sound.
Possible gas leak. Shut off the gas supply, ventilate the premises and imme-
The control knob was not held down for long enough. Once the burner is on, hold the control knob down a few
The grooves on the burner are dirty. Clean the grooves on the burner.
Check the main control panel to see if the automatic safety
switch or circuit breaker has tripped.
The space between the ignition sparker and the burner
must be clean.
Contact the installation technician.
Change the gas cylinder.
diately notify an authorised installation technician to check
and certify the installation. Do not use the appliance until
ensuring that there is no gas leak in the installation or
appliance itself.
seconds longer.
Trouble shooting en
9
Page 10

en Customer service
4Customer service
Cus t o mer servi ce
When contacting our Technical Assistance Service,
please provide the product number (E-Nr.) and
production number (FD) of the appliance. This
information is given on the specifications plate located
on the lower section of the hob and on the label in the
user manual.
After-sales contact details for all countries can be found
in the attached after-sales service directory.
Warranty conditions
In the unlikely event that the appliance is damaged or
does not meet your expectations in terms of quality,
please inform us as soon as possible. For the warranty
to be valid, the appliance must not have been tampered
with, or used inappropriately.
The applicable warranty conditions are those set out by
the company's representative office in the country of
purchase. Detailed information is available from retail
outlets. Proof of purchase must be presented to obtain
the benefits of the warranty.
We reserve the right to introduce changes.
7Environmental protection
Env i r o n ment al pr ot ec t i on
To protect the environment, BSH Home Appliances
uses recyclable or reusable materials to package this
product.
The packaging provided was used to protect your
product for delivery to your home. Help the environment
by discarding packaging materials responsibly and, if
possible, by reusing them. This creates less waste and
promotes the efficient consumption of natural
resources, thus preventing deforestation.
Old domestic appliances are not useless junk!
Responsible recycling can generate valuable raw
materials.
Please help us recycle/reuse these materials by taking
them to designated recycling centers in your
community. For more information about proper waste
disposal, contact your local recycling association or city
government.
Your children and the environment will thank you!
10
Page 11

Índice
[es] I nst rucci ones de uso
8 Uso correcto del aparato. . . . . . . . . . . . . . . . . . 11
Uso correcto del aparato es
8Uso correcto del aparato
( Indicaciones de seguridad importantes . . . . . 12
K Consejos y advertencias generales . . . . . . . . . 13
Información técnica . . . . . . . . . . . . . . . . . . . . . . . . . . 13
IMPORTANTE. . . . . . . . . . . . . . . . . . . . . . . . . . . . . . . 13
* Presentación del aparato . . . . . . . . . . . . . . . . . 14
Accesorios . . . . . . . . . . . . . . . . . . . . . . . . . . . . . . . . . 14
Ä Quemadores de gas. . . . . . . . . . . . . . . . . . . . . . 14
Encendido manual . . . . . . . . . . . . . . . . . . . . . . . . . . . 14
Encendido automático . . . . . . . . . . . . . . . . . . . . . . . . 14
Sistema de seguridad . . . . . . . . . . . . . . . . . . . . . . . .15
Apagar un quemador. . . . . . . . . . . . . . . . . . . . . . . . . 15
Niveles de potencia . . . . . . . . . . . . . . . . . . . . . . . . . .15
Advertencias . . . . . . . . . . . . . . . . . . . . . . . . . . . . . . . 15
Consejos de cocinado . . . . . . . . . . . . . . . . . . . . . . . . 15
Å Recipientes de cocinado. . . . . . . . . . . . . . . . . . 15
Recipientes apropiados . . . . . . . . . . . . . . . . . . . . . . . 15
Advertencias de uso . . . . . . . . . . . . . . . . . . . . . . . . . 15
2 Limpieza y cuidados del aparato . . . . . . . . . . . 16
Limpieza. . . . . . . . . . . . . . . . . . . . . . . . . . . . . . . . . . .16
Mantenimiento . . . . . . . . . . . . . . . . . . . . . . . . . . . . . . 16
3 ¿Qué hacer en caso de avería? . . . . . . . . . . . . 17
4 Servicio de Asistencia Técnica. . . . . . . . . . . . . 18
Condiciones de garantía . . . . . . . . . . . . . . . . . . . . . . 18
7 Protección del medio ambiente . . . . . . . . . . . . 18
Us o corr ecto del aparat o
Lea atentamente estas instrucciones. Solo
entonces podrá manejar su aparato de
manera efectiva y segura. Conserve las
instrucciones de uso e instalación y
entréguelas con el aparato si este cambia de
dueño.
El fabricante queda exento de toda
responsabilidad si no se cumplen las
disposiciones de este manual.
Las imágenes representadas en estas
instrucciones tienen carácter orientativo.
No saque el aparato del embalaje protector
hasta el momento del encastre. Si observa
algún daño en el aparato, no lo conecte.
Póngase en contacto con nuestro Servicio
Técnico.
Este aparato corresponde a la clase 3, según
la norma EN 30-1-1 para aparatos a gas:
aparato encastrado en un mueble.
Antes de instalar su nueva placa de cocción
asegúrese de que la instalación se realiza
siguiendo las instrucciones de montaje.
Este aparato no puede ser instalado en yates
o caravanas.
Este aparato se debe utilizar únicamente en
lugares suficientemente ventilados.
Este aparato no está previsto para el
funcionamiento con un reloj temporizador
externo o un mando a distancia.
Produktinfo
Encontrará más información sobre productos,
accesorios, piezas de repuesto y servicios en internet:
www.bosch-home.com y también en la tienda online:
www.bosch-eshop.com
Todos los trabajos de instalación, conexión,
regulación y adaptación a otros tipos de gas
deben ser realizados por un técnico
autorizado, respetando toda la normativa y
legislación aplicables y las prescripciones
de las compañías locales proveedoras de
gas y electricidad. Se pondrá especial
atención a las disposiciones aplicables en
cuanto a la ventilación.
Este aparato sale de fábrica adaptado al tipo
de gas que indica la placa de características.
Si fuera necesario cambiarlo, consulte las
instrucciones de montaje. Se recomienda
llamar a nuestro Servicio Técnico para la
adaptación a otros tipos de gas.
Este aparato ha sido diseñado solo para uso
doméstico, no está permitido su uso
comercial o profesional. Utilice el aparato
únicamente para cocinar, nunca como
11
Page 12

es Indicaciones de seguridad importantes
calefacción. La garantía únicamente tendrá
validez en caso de que se respete el uso para
el que fue diseñado.
Este aparato está previsto para ser utilizado a
una altura máxima de 2.000 metros sobre el
nivel del mar.
Durante el funcionamiento, el aparato no debe
dejarse sin vigilancia.
No use tapas o barreras de protección para
niños que no estén recomendadas por el
fabricante de la placa de cocción. Pueden
provocar accidentes, p. ej. debido al
sobrecalentamiento, ignición o
desprendimiento de fragmentos de
materiales.
Este aparato puede ser utilizado por niños a
partir de 8 años y por personas con
limitaciones físicas, sensoriales o psíquicas, o
que carezcan de experiencia y conocimientos,
siempre y cuando sea bajo la supervisión de
una persona responsable de su seguridad o
que le haya instruido en el uso correcto del
aparato siendo consciente de los daños que
se pudieran ocasionar.
No dejar que los niños jueguen con el
aparato. La limpieza y el mantenimiento
rutinario no deben encomendarse a los niños
a menos que sean mayores de 15 años y lo
hagan bajo supervisión.
Mantener a los niños menores de 8 años
alejados del aparato y del cable de conexión.
(Indicaciones de seguridad
importantes
I ndi c aci ones de segur i dad impor t ant es
:Advertencia – ¡Peligro de deflagración!
La acumulación de gas sin quemar en un
recinto cerrado conlleva peligro de
deflagración. No someta el aparato a
corrientes de aire. Los quemadores podrían
apagarse. Lea atentamente las instrucciones y
advertencias relativas al funcionamiento de
los quemadores de gas.
:Advertencia – ¡Peligro de intoxicación!
El uso de un aparato de cocción a gas
produce calor, humedad y productos de
combustión en el local donde está instalado.
Asegure una buena ventilación de la cocina,
especialmente mientras la placa de cocción
esté en funcionamiento: mantenga abiertos
los orificios de ventilación natural o instale un
dispositivo de ventilación mecánica (campana
extractora). La utilización intensa y prolongada
del aparato puede necesitar una ventilación
complementaria o más eficaz: abra una
ventana o aumente la potencia de la
ventilación mecánica.
:Advertencia – ¡Peligro de quemaduras!
■ Las zonas de cocción y adyacentes se
calientan mucho. No toque nunca las
superficies calientes. Mantenga alejados a
los niños menores de 8 años.
¡Peligro de quemaduras!
■ Si la botella de gas líquido no está en
posición vertical, el propano/butano líquido
puede llegar al interior del aparato, por lo
que puede causar llamas vivas en los
quemadores. Con el tiempo, los
componentes pueden dañarse y perder
estanqueidad, de modo que puede
escaparse gas. Ambos casos pueden
producir quemaduras. Utilizar botellas de
gas líquido siempre en posición vertical.
12
:Advertencia – ¡Peligro de incendio!
■ Las zonas de cocción se calientan mucho.
No coloque objetos inflamables sobre la
placa de cocción. No almacene objetos
sobre la placa de cocción.
¡Peligro de incendio!
■ No almacene ni utilice productos químicos
corrosivos, vapores, materiales inflamables
ni productos no alimenticios debajo de este
electrodoméstico ni cerca de él.
¡Peligro de incendio!
Page 13

Consejos y advertencias generales es
■ Las grasas o aceites sobrecalentados se
inflaman fácilmente. No se ausente
mientras caliente grasa o aceite. Si se
inflaman, no apague el fuego con agua.
Cubra el recipiente con una tapa para
sofocar el fuego y desconecte la zona de
cocción.
:Advertencia – ¡Peligro de lesiones!
■ Los recipientes que presenten daños,
tengan un tamaño inadecuado, rebasen los
bordes de la placa de cocción o estén mal
situados pueden provocar lesiones graves.
Observe los consejos y advertencias
relativos a los recipientes de cocinado.
¡Peligro de lesiones!
■ En caso de avería, corte la alimentación
eléctrica y de gas del aparato. Para la
reparación, llame a nuestro servicio técnico.
¡Peligro de lesiones!
■ No manipule el interior del aparato. Si fuera
necesario, llame a nuestro servicio técnico.
¡Peligro de lesiones!
■ Si alguno de los mandos no se puede girar
o está suelto, no lo use. Llame
inmediatamente al servicio técnico para
que proceda a su reparación o sustitución.
:Advertencia – ¡Peligro de descarga
eléctrica!
No utilice máquinas de limpieza a vapor para
limpiar el aparato.
KConsejos y advertencias
generales
Consej os y adver t enci as gener al es
Información técnica
Quemador
auxiliar
Capacidad tér-
mica
Modelo
PBP6B5B80V
Opciones de
regulación
Características
eléctricas
NOTA: Este producto opera con gas L.P. Las
capacidades térmicas de los quemadores son para
ambos gases (L.P. y natural). Si se quiere utilizar el
producto con gas natural llame a nuestro centro de
servicio.
1,00 kW 1,75 kW 3,00 kW
1 2 1
GAS NATURAL G20/17,6 - 19,6 mbar; 1,76 - 1,96
kPa
GAS LP G30/27,5 mbar; 2,75 kPa
110 - 240 V∼ 50/60 Hz 0,0344/0,0158 A
IMPORTANTE
■ Coloque las parrillas y los quemadores como se
indica en los esquemas donde se describe el
modelo.
■ Mantenga los alrededores del aparato libres de
materiales combustibles, gasolina y otros vapores o
líquidos flamables.
■ No utilice el aparato como calefacción, ya que esto
es peligroso.
Quemador
semi-rápido
Quemador
rápido
PARA SU SEGURIDAD
SI HUELE A GAS:
■ ABRA LAS VENTANAS
■ NO TOQUE INTERRUPTORES ELÉCTRICOS
■ APAGUE TODAS LAS LLAMAS CERRANDO LA
VÁLVULA GENERAL DE PASO
■ LLAME INMEDIATAMENTE A LOS BOMBEROS O A
SU PROVEEDOR DE GAS
PARA SU SEGURIDAD
■ NO ALMACENE GASOLINA U OTROS FLUIDOS
FLAMABLES EN LA CERCANÍA DE SU APARATO
■ INSTALE SU PRODUCTO CONFORME A LAS
INSTRUCCIONES DEL EMPOTRE PARA EVITAR
DAÑO A SUS MUEBLES POR TEMPERATURA
13
Page 14

es Presentación del aparato
* Presentación del aparato
Present ac i ón del apar at o
En el resumen de los modelos encontrará una vista
general de su aparato así como la potencia de los
quemadores. ~ Página 2
Accesorios
Los siguientes accesorios se pueden adquirir en el
Servicio Técnico:
Parrilla supletoria cafetera
Para utilizar exclusivamente en
el quemador de menor potencia
con recipientes de diámetro
inferior a 12 cm.
Simmer Plate
Este accesorio ha sido diseñado
para cocinar a fuego lento. Se
puede utilizar sobre el quemador auxiliar o el semi-rápido. Si
su placa de cocción dispone de
varios quemadores semi-rápidos, se recomienda utilizar la
Simmer Plate sobre el quemador semi-rápido trasero o el
delantero derecho.
Colocar el accesorio directamente sobre la parrilla con los
volcanes hacia arriba, nunca
directamente sobre el quemador.
Simmer Cap
Quemador exclusivamente indicado para cocinar en la potencia mínima. Para su utilización
es preciso extraer el quemador
auxiliar y sustituirlo por el quemador Simmer Cap.
--------
Código
HEZ298114 Parrilla supletoria cafetera
HEZ298105 Simmer Plate
HEZ298104 Simmer Cap
El fabricante no asume responsabilidad si no se utilizan
o se utilizan incorrectamente estos accesorios.
ÄQuemadores de gas
Quemador es de gas
Cada mando de accionamiento tiene señalado el
quemador que controla.
Para un correcto funcionamiento del aparato es
imprescindible asegurarse de que las parrillas y todas
las piezas de los quemadores estén bien colocadas.
No intercambie las tapas de los quemadores.
Encendido manual
1. Presione el mando del quemador elegido y gírelo
hacia la izquierda hasta la posición deseada.
2. Acerque algún tipo de encendedor o llama
(mecheros, cerillas, etc.) al quemador.
Encendido automático
Si su placa de cocción dispone de encendido
automático (bujías):
1. Presione el mando del quemador elegido y gírelo
hacia la izquierda hasta la posición de máxima
potencia.
Mientras el mando está presionado se producen
chispas en todos los quemadores. La llama se
enciende.
2. Deje de presionar el mando.
3. Gire el mando a la posición deseada.
Si no se produce el encendido, gire el mando a la
posición de apagado y repita los pasos. Esta vez
mantenga el mando presionado durante más tiempo
(hasta 10 segundos).
:Advertencia – ¡Peligro de deflagración!
Si transcurridos 15 segundos la llama no se enciende,
apague el quemador y abra la puerta o ventana del
recinto. Espere al menos un minuto antes de intentar
encender el quemador.
14
Page 15

Recipientes de cocinado es
Sistema de seguridad
Su placa de cocción dispone de un sistema de
seguridad (termopar) que impide el paso de gas si los
quemadores se apagan accidentalmente.
1 Bujía
2 Termopar
Para garantizar que este dispositivo esté activo:
1. Encienda el quemador con normalidad.
2. Sin soltar el mando, manténgalo presionado
firmemente durante 4 segundos tras haberse
encendido la llama.
Apagar un quemador
Tenga en cuenta que las bujías no deben sufrir
impactos violentos.
Consejos de cocinado
Quemador Muy fuerte -
Fuerte
Quemador
rápido
Quemador
semi-rápido
Quemador
auxiliar
Escalope, bistec,
tortilla, frituras
Patatas al vapor,
verduras frescas, potajes, pastas
Cocer: guisos,
arroz con leche,
caramelo
Medio Lento
Arroz, bechamel,
ragout
Recalentar y mantener calientes platos cocinados y hacer guisos delicados
Descongelar y
cocer despacio:
legumbres, frutas, productos
congelados
Cocción al vapor:
pescado, verduras
Hacer/fundir:
mantequilla, chocolate, gelatina
ÅRecipientes de cocinado
Gire el mando correspondiente hacia la derecha hasta
la posición 0.
Niveles de potencia
Los mandos progresivos le permiten regular la potencia
que necesite entre los niveles máximo y mínimo.
Posición
Llama grande
Llama pequeña
Mando cerrado
Û
Apertura o capacidad máximas y encendido
—
eléctrico
Apertura o capacidad mínima
˜
Advertencias
Durante el funcionamiento del quemador es normal que
se escuche un leve silbido.
En los primeros usos es normal que se desprendan
olores. Esto no supone ningún riesgo ni mal
funcionamiento. Irán desapareciendo.
Una llama de color naranja es normal. Se debe a la
presencia de polvo en el ambiente, líquidos
derramados, etc.
En el caso de una extinción accidental de las llamas
del quemador, cierre el mando de accionamiento del
quemador y no intente reencenderlo durante por lo
menos 1 minuto.
Unos segundos después del apagado del quemador se
producirá un sonido (golpe seco). No es ninguna
anomalía, eso significa que la seguridad se ha
desactivado.
Mantenga la máxima limpieza. Si las bujías están
sucias el encendido será defectuoso. Límpielas
periódicamente con un cepillo no metálico pequeño.
Rec i p i e n t es de cocinado
Recipientes apropiados
Quemador Diámetro mínimo
de la base del recipiente
Quemador rápido 20 cm 26 cm
Quemador semi-rápido 14 cm 22 cm
Quemador auxiliar 12 cm 16 cm
El recipiente no debe rebasar los bordes de la placa de
cocción.
Diámetro máximo
de la base del recipiente
Advertencias de uso
Nota: El uso de algunos recipientes puede causar
cierta deformación temporal en la grasera. Esto es
normal y no tiene influencia en el funcionamiento del
aparato.
Los siguientes consejos le ayudarán a ahorrar energía y
a evitar daños en los recipientes:
Utilice recipientes de
tamaño apropiado a cada
quemador.
No utilice recipientes
pequeños en quemadores
grandes. La llama no
debe tocar los laterales
del recipiente.
No utilice recipientes
deformados que se
muestren inestables sobre
la placa de cocción. Los
recipientes podrían volcar.
Utilice solo recipientes de
base plana y gruesa.
15
Page 16

es Limpieza y cuidados del aparato
No cocine sin tapa o con
esta desplazada. Se
desperdicia parte de la
energía.
Coloque el recipiente bien
centrado sobre el
quemador. En caso
contrario podría volcar.
No coloque los
recipientes grandes en los
quemadores cercanos a
los mandos. Estos pueden
resultar dañados debido
al exceso de temperatura.
Coloque los recipientes
sobre las parrillas, nunca
directamente sobre el
quemador.
Asegúrese de que las
parrillas y tapas de los
quemadores estén bien
colocadas antes de su
uso.
Maneje los recipientes
con cuidado sobre la
placa de cocción.
No golpee la placa de
cocción ni coloque sobre
ella pesos excesivos.
2Limpieza y cuidados del
aparato
Li mpi eza y cui dados del apar at o
Limpieza
Una vez frío el aparato, límpielo con una esponja, agua
y jabón.
Después de cada uso, limpie la superficie de los
respectivos elementos del quemador una vez que se
haya enfriado. Si se dejan restos (alimentos recocidos,
gotas de grasa, etc.), por poco que sea, se incrustarán
en la superficie y serán luego más difíciles de eliminar.
Es necesario que los agujeros y ranuras estén limpios
para que la llama sea correcta.
El movimiento de algunos recipientes puede dejar
restos metálicos sobre las parrillas.
Limpie los quemadores y las parrillas con agua
jabonosa y frótelos con un cepillo no metálico.
Si las parrillas disponen de tacos de goma, tenga
cuidado al limpiarlas. Los tacos pueden soltarse y la
parrilla puede rayar la placa de cocción.
Seque completamente los quemadores y las parrillas
siempre. La presencia de gotas de agua o zonas
húmedas al comienzo de la cocción puede deteriorar el
esmalte.
Después de la limpieza y secado de los quemadores,
asegúrese de que las tapas estén bien colocadas
sobre el difusor.
¡Atención!
■ No extraiga los mandos para la limpieza del aparato.
Si la humedad penetra en el aparato puede dañarlo.
■ No utilice máquinas de limpieza a vapor. Podría
dañar la placa de cocción.
Mantenimiento
Limpie al instante los líquidos que se derramen. Así
evitará que los restos de comida se peguen y se
ahorrará esfuerzos innecesarios.
Debido a las altas temperaturas que soportan, el
quemador wok y las zonas de acero inoxidable
(grasera, contorno de los quemadores, etc.) pueden
cambiar de color. Esto es normal. Después de cada
uso, limpie dichas zonas con un producto apropiado
para acero inoxidable.
Se recomienda utilizar regularmente el producto de
limpieza disponible en nuestro Servicio Técnico con
código 464524.
¡Atención!
El limpiador de inoxidable no se debe utilizar en la zona
alrededor de los mandos. Las indicaciones (serigrafía)
se pueden borrar.
16
No deje líquidos ácidos (zumo de limón, vinagre, etc.)
sobre la placa de cocción.
Page 17

¿Qué hacer en caso de avería? es
3¿Qué hacer en caso de
avería?
¿Qué hac er en caso de aver í a?
En ocasiones, las anomalías detectadas se pueden
solucionar fácilmente. Antes de llamar al Servicio
Técnico tenga en cuenta los siguientes consejos:
Anomalía Posible causa Solución
El funcionamiento eléctrico
general está averiado.
El encendido automático no
funciona.
La llama del quemador no es
uniforme.
El flujo de gas no parece nor-
mal o no sale gas.
Hay olor a gas en la cocina. Algún grifo está abierto. Cerrar los grifos.
El quemador se apaga inme-
diatamente después de soltar
el mando.
Fusible defectuoso. Comprobar en la caja general de fusibles si el fusible está
averiado y cambiarlo.
El automático o un diferencial ha saltado. Comprobar en el cuadro general de mando si ha saltado
el automático o un diferencial.
Pueden existir residuos de alimentos o de limpieza entre
las bujías y los quemadores.
Los quemadores están mojados. Secar cuidadosamente las tapas del quemador.
Las tapas del quemador están mal colocadas. Comprobar que las tapas están bien colocadas.
El aparato no está conectado a tierra, está mal conectado
o la toma de tierra es defectuosa.
Las piezas del quemador están mal colocadas. Colocar correctamente las piezas sobre el quemador
Las ranuras del quemador están sucias. Limpiar las ranuras del quemador.
El paso de gas está cerrado por llaves intermedias. Abrir las posibles llaves intermedias.
Si el gas proviene de una bombona, comprobar que no
está vacía.
Mal acoplamiento de la bombona. Comprobar que el acoplamiento es perfecto.
Posible fuga de gas. Cerrar la llave general de gas, ventilar el recinto y avisar
No ha mantenido el mando presionado el tiempo suficiente.
Las ranuras del quemador están sucias. Limpiar las ranuras del quemador.
El espacio entre la bujía y el quemador debe estar limpio.
Póngase en contacto con el instalador eléctrico.
correspondiente.
Cambiar la bombona.
inmediatamente a un técnico de instalación autorizado
para la revisión y certificación de la instalación. No utilizar
el aparato hasta asegurarse de que no existe ninguna
fuga de gas en la instalación o el aparato.
Una vez encendido el quemador, mantener el mando presionado unos segundos más.
17
Page 18

es Servicio de Asistencia Técnica
4Servicio de Asistencia
Técnica
Ser vi c i o de Asi st enci a Té cni ca
Si se solicita nuestro Servicio Técnico, se debe facilitar
el número de producto (E-Nr.) y el número de
fabricación (FD) del aparato. Esta información figura en
la placa de características, situada en la parte inferior
de la placa de cocción, y en la etiqueta del manual de
uso.
Los datos de contacto del Servicio de Asistencia
Técnica de cada país se encuentran en el listado
adjunto.
Condiciones de garantía
Si, contrariamente a nuestras expectativas, el aparato
presentara algún daño o no cumpliera con sus
exigencias de calidad previstas, le rogamos nos lo
haga saber lo antes posible. Para que la garantía tenga
validez, el aparato no deberá haber sido manipulado, ni
sometido a un mal uso.
Las condiciones de garantía aplicables son las
establecidas por la representación de nuestra empresa
en el país donde se haya efectuado la compra. Puede
solicitarse información detallada en los puntos de
venta. Es necesario presentar el justificante de compra
para hacer uso de la garantía.
Reservado el derecho de modificaciones.
7Protección del medio
ambiente
Prot ec ci ón del medi o ambi ent e
BSH Electrodomésticos se preocupa por el medio
ambiente y evita contaminarlo utilizando en el empaque
del producto materiales reciclables o que tengan la
posibilidad de reutilizarse.
El embalaje suministrado ha protegido su equipo nuevo
durante el transporte de éste hasta su hogar.
Contribuya a mejorar el medio ambiente eliminando los
materiales del embalaje de una manera consciente y,
de ser posible, reutilícelos, ya que así generamos
menos residuos y el consumo de los recursos naturales
es eficiente, evitando así la tala de árboles.
¡Los viejos artefactos domésticos no son basura
inservible! Un reciclaje consciente puede generar
valiosas materias primas.
Contamos con su cooperación clasificando este
material para su reciclaje/reutilización en áreas
destinadas de su comunidad. Le pedimos acercarse a
su delegación o municipio para obtener información
acerca de cómo dar destino adecuado a sus residuos.
¡Sus hijos y la naturaleza se lo agradecerán!
18
Page 19

Table des matières
[fr]Notice d’ ut i l i sat i on
8 Utilisation conforme . . . . . . . . . . . . . . . . . . . . . 19
fr
8Utilisation conforme
( Précautions de sécurité importantes. . . . . . . . 20
K Consignes générales. . . . . . . . . . . . . . . . . . . . . 21
Information tecnique. . . . . . . . . . . . . . . . . . . . . . . . . . 21
IMPORTANT. . . . . . . . . . . . . . . . . . . . . . . . . . . . . . . . 21
* Présentation de l'appareil . . . . . . . . . . . . . . . . . 22
Accessoires . . . . . . . . . . . . . . . . . . . . . . . . . . . . . . . .22
Ä Brûleurs à gaz . . . . . . . . . . . . . . . . . . . . . . . . . . 22
Allumage manuel . . . . . . . . . . . . . . . . . . . . . . . . . . . . 22
Allumage automatique . . . . . . . . . . . . . . . . . . . . . . . . 22
Système de sécurité. . . . . . . . . . . . . . . . . . . . . . . . . . 23
Éteindre un brûleur. . . . . . . . . . . . . . . . . . . . . . . . . . . 23
Niveaux de chauffe . . . . . . . . . . . . . . . . . . . . . . . . . . 23
Avertissements. . . . . . . . . . . . . . . . . . . . . . . . . . . . . .23
Conseils pour cuisiner . . . . . . . . . . . . . . . . . . . . . . . .23
Å Récipients de préparation. . . . . . . . . . . . . . . . . 23
Récipients appropriés . . . . . . . . . . . . . . . . . . . . . . . .23
Conseils d'utilisation. . . . . . . . . . . . . . . . . . . . . . . . . . 23
2 Nettoyage et maintenance. . . . . . . . . . . . . . . . . 24
Nettoyage. . . . . . . . . . . . . . . . . . . . . . . . . . . . . . . . . . 24
Maintenance. . . . . . . . . . . . . . . . . . . . . . . . . . . . . . . . 24
3 Anomalies, que faire ?. . . . . . . . . . . . . . . . . . . . 25
4 Service après-vente . . . . . . . . . . . . . . . . . . . . . . 26
Conditions de garantie. . . . . . . . . . . . . . . . . . . . . . . . 26
7 Protection de l'environnement . . . . . . . . . . . . . 26
Ut i l i s a t i o n conf orme
Lisez attentivement ces instructions. Ce n'est
qu'à cette condition que vous pourrez utiliser
votre appareil efficacement et en toute
sécurité.Conservez la notice d'utilisation et
d'installation, et remettez-la avec l'appareil si
celui-ci change de propriétaire.
Le fabricant est exempt de toute
responsabilité si les instructions de cette
notice ne sont pas respectées.
Les images de cette notice sont proposées à
titre indicatif.
Ne retirez l'appareil de son emballage
protecteur qu'au moment de son
encastrement. Si vous constatez des
dommages sur l'appareil, ne le branchez
pas.Contactez notre Service Technique.
Cet appareil correspond à la classe 3, selon la
norme EN 30-1-1 pour les appareils à gaz :
appareil encastré dans un meuble.
Assurez-vous que l'installation de votre plaque
de cuisson est réalisée dans le respect de la
notice de montage.
Cet appareil ne peut pas être installé dans des
yachts ou des caravanes.
Cet appareil doit être utilisé uniquement dans
des endroits suffisamment ventilés.
Cet appareil n'est pas conçu pour un
fonctionnement avec une minuterie externe ou
une commande à distance.
Produktinfo
Vous trouverez des informations supplementaires
concernant les produits, accessoires, pièces de
rechange et services sur Internet sous : www.bosch-
home.com et la boutique en ligne : www.boscheshop.com
Tous les travaux d'installation, de
branchement, de réglage et d'adaptation à
un autre type de gaz doivent être réalisés par
un technicien agréé qui doit respecter les
normes et la législation applicables, ainsi
que les prescriptions des sociétés locales
de distribution d'électricité et de gaz. Les
dispositions applicables quant à la
ventilation seront attentivement respectées.
En sortie d'usine, cet appareil est adapté au
type de gaz indiqué sur la plaque signalétique.
S'il était nécessaire de le changer, veuillez
consulter la notice de montage.Il est
recommandé de faire appel à notre service
technique pour l'adaptation à un autre type de
gaz.
Cet appareil a été conçu pour une utilisation
domestique ; son utilisation à titre commercial
19
Page 20

fr Précautions de sécurité importantes
ou professionnel est interdite. N'utilisez
l'appareil que pour cuisiner, jamais comme
chauffage.La garantie ne sera valable que si
l'utilisation pour laquelle il a été conçu a été
respectée.
Cet appareil est conçu pour une utilisation
jusqu'à une altitude maximale de 2 000 m.
Ne laissez pas l'appareil sans surveillance
pendant son fonctionnement.
N'utilisez pas de couvercles ou de barrières
de protection pour enfants non recommandés
par le fabricant de la plaque de cuisson.Ils
peuvent provoquer des accidents, notamment
en raison de la surchauffe, de la combustion
ou du décollement de fragments de matériaux.
Cet appareil peut être utilisé par des enfants
de 8 ans ou plus et par des personnes dotées
de capacités physiques, sensorielles ou
mentales réduites ou disposant de
connaissances ou d’expérience insuffisantes,
sous la surveillance d'un tiers responsable de
leur sécurité ou bien lorsqu'ils ont reçu des
instructions liées à l'utilisation de l'appareil en
toute sécurité et qu'ils ont intégré les risques
qui en résultent.
Les enfants ne doivent pas jouer avec
l'appareil. Le nettoyage et l'entretien effectué
par l'utilisateur ne doivent pas être accomplis
par des enfants, sauf s'ils sont âgés de 15 ans
et plus et qu'un adulte les surveille.
Les enfants de moins de 8 ans doivent être
tenus à distance de l'appareil et du cordon
d'alimentation.
(Précautions de sécurité
importantes
Précaut i ons de sécur i t é impor t ant es
:Mise en garde – Risque de déflagration !
L'accumulation de gaz non brûlés dans un lieu
fermé pourrait comporter un risque de
déflagration. Ne placez pas l'appareil dans
des courants d'air. Les brûleurs pourraient
s'éteindre. Lisez attentivement les instructions
et les avertissements concernant le
fonctionnement des brûleurs à gaz.
:Mise en garde – Risque d'intoxication !
L'utilisation d'un appareil de cuisson à gaz
produit de la chaleur, de l'humidité et émet
des produits de combustion dans la pièce où
il est installé. Assurez-vous que la cuisine soit
bien ventilée, en particulier lorsque la plaque
de cuisson est en fonctionnement: laissez les
orifices de ventilation naturelle ouverts ou
installez un dispositif de ventilation mécanique
(hotte aspirante).Lorsque l'utilisation de
l'appareil est intense et prolongée, une
ventilation complémentaire ou plus efficace
peut être nécessaire: ouvrez une fenêtre ou
augmentez la puissance de la ventilation
mécanique.
:Mise en garde – Risque de brûlures !
■ Les zones de cuisson et les zones
adjacentes chauffent fortement.Ne touchez
pas les surfaces chaudes. Ne laissez pas
les enfants de moins de 8 ans s'approcher.
Risque de brûlure !
■ Si la bouteille de gaz liquide n'est pas à la
verticale, du propane/butane liquide peut
parvenir dans l'appareil. Des jets de flamme
violents peuvent alors sortir aux brûleurs.
Des composants peuvent être
endommagés et devenir non étanches avec
le temps, si bien que du gaz sort de
manière incontrôlée. Les deux peuvent
conduire à des brûlures. Utiliser les
bouteilles de gaz liquide toujours en
position verticale.
20
:Mise en garde – Risque d'incendie !
■ Les zones de cuisson chauffent
fortement.Ne posez pas d'objets
inflammables sur la plaque de
cuisson.N'entreposez pas d'objets sur la
plaque de cuisson.
Risque d'incendie !
■ Ne stockez ni utilisez de produits chimiques
corrosifs, de vapeurs, de matériels
inflammables ni de produits non
alimentaires sous cet appareil, ni à
proximité.
Page 21

Consignes générales fr
Risque d'incendie ! ■ Les graisses et les huiles surchauffées
s'enflamment facilement. Ne vous absentez
pas si vous avez mis de la graisse ou de
l'huile à chauffer. Si elles s'enflamment,
n'éteignez pas le feu avec de l'eau. Couvrez
le récipient avec un couvercle hermétique
pour étouffer le feu puis éteignez la zone de
cuisson.
:Mise en garde – Risque de blessures !
■ Les récipients qui présenteraient des
dommages, dont la taille ne serait pas
adaptée, qui dépasseraient de la plaque de
cuisson ou qui seraient mal placés,
pourraient occasionner des lésions graves.
Respectez les conseils et les
avertissements concernant les récipients de
cuisson.
Risque de blessures !
■ En cas d'incident, débranchez l'alimentation
électrique et de gaz de l'appareil. Pour la
réparation, contactez notre service
technique.
Risque de blessures !
■ Ne manipulez pas l'intérieur de l'appareil. Si
nécessaire, contactez notre service
technique.
Risque de blessures !
■ S'il n'est pas possible de tourner un bouton
de commande ou si celui-ci est mal fixé, il
ne doit plus être utilisé. Contactez
immédiatement le service après-vente afin
de faire réparer ou remplacer le bouton de
commande.
:Mise en garde – Risque de décharge
électrique !
Ne pas utiliser de machines de nettoyage à
vapeur pour nettoyer l'appareil.
KConsignes générales
Consi gnes génér al es
Information tecnique
Brûleur éco Brûleur
standard
Capacité ther-
mique
Modèle
PBP6B5B80V
Options de
réglage
Caractéris-
tiques élec-
triques
REMARQUE : Ce produit fonctionne au GPL. Les
capacités thermiques des brûleurs s'appliquent aux
deux gaz (GPL et gaz de ville). Si vous souhaitez utiliser
le produit avec du gaz de ville, contactez notre centre
de service.
1,00 kW 1,75 kW 3,00 kW
1 2 1
GAZ DE VILLE G20/17,6 - 19,6 mbar; 1,76 - 1,96
kPa
GPL G30/27,5 mbar; 2,75 kPa
110 - 240 V∼ 50/60 Hz 0,0344/0,0158 A
IMPORTANT
■ Placez les grilles et les brûleurs conformément aux
schémas de description du modèle.
■ Laissez les zones autour de l'appareil libres de tout
matériel combustible, essence et autres vapeurs ou
liquides inflammables.
■ N'utilisez pas de réchauffeur d'air, celui-ci étant
dangereux.
POUR VOTRE SÉCURITÉ
EN CAS D'ODEUR DE GAZ :
■ OUVREZ LES FENÊTRES
■ NE TOUCHEZ PAS LES INTERRUPTEURS
ÉLECTRIQUES
■ ÉTEIGNEZ TOUTES LES FLAMMES EN FERMANT
LA SOUPAPE GÉNÉRALE D'ADMISSION
■ CONTACTEZ IMMÉDIATEMENT LE CENTRE DE
FUITES OU VOTRE COMPAGNIE DE GAZ
Brûleur
puissant
POUR VOTRE SÉCURITÉ
■ NE STOCKEZ PAS D'ESSENCE OU D'AUTRES
LIQUIDES INFLAMMABLES À PROXIMITÉ DE
VOTRE APPAREIL
■ INSTALLEZ VOTRE APPAREIL CONFORMÉMENT
AUX INSTRUCTIONS D'ENCASTREMENT AFIN
D'ÉVITER D'ENDOMMAGER VOS MEUBLES AVEC
LA TEMPÉRATURE
21
Page 22

fr Présentation de l'appareil
*Présentation de l'appareil
Présent at i on de l ' apparei l
Sur la vue d'ensemble des modèles, vous retrouverez
votre appareil avec les puissances des brûleurs.
~ Page 2
Accessoires
Vous pourrez obtenir les accessoires suivants auprès
de notre Service Technique :
Grille supplémentaire pour
cafetière Espresso
Uniquement appropriée pour
l'utilisation sur le plus petit brûleur. Utilisez des ustensiles de
cuisson d'un diamètre inférieur
à 12 cm.
Plaque de cuisson à feu doux
Cette pièce d'accessoire est uniquement appropriée pour la
cuisson basse température. Elle
peut être utilisée avec le brûleur
éco ou le brûleur standard. Si
votre table de cuisson est dotée
de plusieurs brûleurs standards, il est recommandé de placer la plaque de cuisson à feu
doux sur le brûleur standard
arrière ou avant droit.
Placez la pièce d'accessoire
avec les renflements vers le
haut sur le support, jamais directement sur le brûleur.
Cache
Brûleur servant exclusivement à
cuire avec une puissance minimale. Lors de l'utilisation, retirez
le brûleur éco et remplacez-le
par le cache.
--------
Code
HEZ298114 Grille supplémentaire pour cafetière
Espresso
HEZ298105 Plaque de cuisson à feu doux
HEZ298104 Cache
Le fabricant décline toute responsabilité si ces
accessoires ne sont pas utilisés ou sont employés de
manière incorrecte.
ÄBrûleurs à gaz
Br û l e u r s à gaz
Chaque bouton de commande de mise en marche
indique le brûleur qu'il contrôle.
Pour un fonctionnement correct de l'appareil, il est
indispensable de s'assurer que les grilles et toutes les
pièces des brûleurs sont correctement mises en place.
N'intervertissez pas les couvercles des brûleurs.
Allumage manuel
1. Appuyez sur le bouton de commande du brûleur
choisi et tournez-le vers la gauche jusqu'à la position
souhaitée.
2. Approchez un allume-gaz ou une flamme (briquets,
allumettes, etc.) du brûleur.
Allumage automatique
Si votre plaque de cuisson dispose d'un allumage
automatique (bougies):
1. Appuyez sur le bouton de commande du brûleur
choisi puis tournez-le vers la gauche jusqu'à la
position de puissance maximum.
Quand le bouton de commande est enfoncé, des
étincelles se produisent sur tous les brûleurs. La
flamme s'allume.
2. Relâchez le bouton de commande.
3. Tournez le bouton de commande sur la position
souhaitée.
Si l'allumage ne se produit pas, tournez le bouton de
commande sur la position de déconnexion puis répétez
les étapes. Cette fois, maintenez le bouton de
commande enfoncé plus longtemps (pendant 10
secondes maximum).
22
:Mise en garde – Risque de déflagration !
Si au bout de 15 secondes la flamme ne s'est pas
allumée, éteignez le brûleur et aérez la pièce. Attendez au
moins une minute avant d'essayer de rallumer le brûleur.
Page 23

Récipients de préparation fr
Système de sécurité
Votre plaque de cuisson dispose d'un système de
sécurité (thermocouple) qui empêche le passage de
gaz si les brûleurs s'éteignent accidentellement.
1 bougie
2 thermocouple
Pour que cet dispositif soit actif :
1. Allumez le brûleur normalement.
2. Maintenez le bouton de commande enfoncé sans le
lâcher pendant 4 secondes après l'allumage de la
flamme.
Éteindre un brûleur
Tournez le bouton de commande correspondant vers la
droite jusqu'à la position 0.
Niveaux de chauffe
Les variateurs vous permettent de régler la puissance
dont vous avez besoin entre les niveaux maximum et
minimum.
Position
Flamme grande
Flamme petite
Bouton de commande éteint
Û
Ouverture ou capacité maximums et
—
connexion électrique
Ouverture ou capacité minimums
˜
Avertissements
Pendant le fonctionnement du brûleur, il est normal
d'entendre un léger sifflement.
Lors des premières utilisations, il est normal que des
odeurs se dégagent. Mais cela ne suppose aucun
dysfonctionnement. Ces odeurs disparaîtront petit à
petit.
Une flamme de couleur orange est normale. Ceci est
dû à la présence de poussière dans l'atmosphère, de
liquides déversés, etc.
S'il se produit une extinction accidentelle des flammes
du brûleur, éteignez le bouton de commande du brûleur
et attendez au moins 1 minute avant de le rallumer.
Quelques secondes après avoir éteint le brûleur, un son
est émis (coup sec). Il ne s'agit pas d'une anomalie,
ceci signifie que la sécurité a été désactivée.
Conservez le brûleur le plus propre possible. Si les
bougies sont sales, l'allumage sera défectueux.
Nettoyez-les régulièrement avec une petite brosse non
métallique. Attention, à ne pas cogner violemment les
bougies.
Conseils pour cuisiner
Brûleur Très fort - Fort Moyen Lent
Brûleur puissant
Brûleur standard
Brûleur éco Faire cuire :
Escalope, steak,
omelette, fritures
Pommes de terre
vapeur, légumes
frais, potages,
pâtes
ragoûts, riz au lait,
caramel
Riz, béchamel,
ragoût
Réchauffer/garder au chaud des
plats cuisinés et préparer des
ragoûts délicats
Décongeler et
cuire à feu doux
: légumes secs,
fruits, produits
congelés
Cuisson à la
vapeur : poisson, légumes
Faire fondre :
beurre, chocolat, gélatine.
ÅRécipients de préparation
Réc i p i e n t s de pr épar at i on
Récipients appropriés
Brûleurs Diamètre minimum
du fond du récipient
Brûleur puissant 20 cm 26 cm
Brûleur standard 14 cm 22 cm
Brûleur éco 12 cm 16 cm
Le récipient ne doit pas dépasser le bord du foyer.
Conseils d'utilisation
Remarque : En cas d'utilisation avec certaines poêles
ou casseroles, une légère déformation passagère de la
surface de cuisson en acier peut se produire. C'est
normal et cela ne nuit pas au bon fonctionnement de
l'appareil.
Les recommandations suivantes vous aident à
économiser de l'énergie et vous empêchent
d'endommager les ustensiles :
Utilisez des récipients de
la taille appropriée à
chaque brûleur.
N’utilisez pas de petits
récipients sur les grands
brûleurs. La flamme ne
doit pas toucher les côtés
du récipient.
N'utilisez pas de récipients
déformés, ayant tendance
à être instables sur la
plaque de cuisson. Les
récipients pourraient se
renverser.
N'utilisez que des récipients
à base plane et épaisse.
Diamètre maximum
du fond du récipient
23
Page 24

fr Nettoyage et maintenance
Ne cuisinez pas sans
couvercle ni avec celui-ci
mal mis. Vous risqueriez
ainsi de perdre une partie
de l'énergie.
Placez le récipient bien au
centre du brûleur. Dans le
cas contraire, il risque de
se renverser.
Ne placez pas les
récipients de grande taille
sur les brûleurs situés
près du boutons de
commandes. Ils
risqueraient d'être
endommagés en raison
de l'excès de chaleur.
Placez les récipients sur
les grilles, jamais
directement sur le brûleur.
Vérifiez que les grilles et
les couvercles des
brûleurs sont bien placés
avant de les utiliser.
Manipulez soigneusement
les récipients sur la
plaque de cuisson.
Ne cognez pas la plaque
de cuisson et n'y posez
pas d'objets lourds.
2Nettoyage et maintenance
Net t o y a ge et mai nt enance
Nettoyage
Quand l’appareil a refroidi, nettoyez-le avec une
éponge, de l’eau et du savon.
Après chaque utilisation, nettoyez la surface des
différents éléments du brûleur quand il a refroidi. Si des
restes sont laissés (aliments recuits, gouttes de graisse,
etc.), même infimes, ils s'incrusteront dans la surface et
seront plus difficiles à éliminer par la suite. Les trous et
les rainures doivent être propres afin que la flamme soit
optimale.
Le frottement de certains récipients peut laisser des
traces métalliques sur les grilles.
Lavez les brûleurs et les grilles à l'eau savonneuse et
frottez-les à l'aide d'une brosse non métallique.
Si les grilles disposent de chevilles en caoutchouc,
faites très attention en les nettoyant. Les chevilles
peuvent se détacher et la grille peut rayer la plaque de
cuisson.
Séchez toujours complètement les brûleurs et les
grilles. La présence de gouttes d'eau ou de zones
humides au début de la cuisson peut détériorer l'émail.
Après le nettoyage et le séchage des brûleurs, assurezvous que les couvercles sont bien placés sur le
diffuseur.
Attention !
■ Ne retirez pas les éléments de commande pour
nettoyer l'appareil. Si de l'humidité pénètre dans
l'appareil, cela risque de l'endommager.
■ N'utilisez pas de machines de nettoyage à vapeur.
Cela pourrait endommager la plaque de cuisson.
Maintenance
Nettoyez immédiatement tous les liquides qui coulent.
Vous éviterez ainsi que les restes d'aliment ne collent et
économiserez des efforts inutiles.
En raison des hautes températures supportées, le
brûleur wok et les zones en acier inoxydable (lèchefrite,
pourtour des brûleurs, etc.) peuvent changer de
couleur. Cela est normal. Après chaque utilisation,
nettoyez ces zones avec un produit adapté à l'acier
inoxydable.
Il est recommandé d'utiliser régulièrement le produit de
nettoyage disponible auprès de notre service technique
sous le code 464524.
Attention !
La nettoyant d’acier inoxydable ne doit pas être utilisé
dans la zone autour du bandeau de commandes. Les
indications (sérigraphie) pourraient être effacées.
Ne laissez pas de liquides acides (jus de citron,
vinaigre, etc.) sur la plaque de cuisson.
24
Page 25

3Anomalies, que faire ?
Ano mal i es, que faire ?
Dans certains cas, les défauts survenus peuvent
facilement être éliminés. Avant d'appeler le service
après-vente, observez les remarques suivantes :
Anomalie Cause probable Solution
Le fonctionnement électrique
général est en panne.
L'allumage automatique ne
fonctionne pas.
La flamme du brûleur n'est
pas uniforme.
Le flux de gaz ne paraît pas
normal ou aucun gaz ne sort.
Il y a une odeur de gaz dans la
cuisine.
Le brûleur s'éteint immédiate-
ment après avoir relâché le
bouton de commande.
Fusible défectueux. Vérifiez dans le boîtier de fusibles général si le fusible est
en panne et remplacez-le.
L'interrupteur magnétothermique ou un interrupteur différentiel a sauté.
Il peut y avoir des résidus d’aliments ou de nettoyage
entre les bougies et les brûleurs.
Les brûleurs sont mouillés. Séchez soigneusement les couvercles du brûleur.
Les couvercles du brûleur sont mal placés. Vérifiez que les couvercles sont bien placés.
L'appareil n'est pas raccordé à la terre, est mal raccordé
à la terre, ou la prise de terre est défectueuse.
Les pièces du brûleur sont mal placées. Placez correctement les pièces sur le brûleur correspon-
Les rainures du brûleur sont sales. Nettoyez les rainures du brûleur.
Le passage de gaz est obstrué par des robinets intermédiaires.
Si le gaz provient d'une bouteille, vérifiez qu'elle n'est pas
vide.
Un robinet est ouvert. Fermez les robinets.
Mauvais raccord de la bouteille. Vérifiez que le raccord est parfait.
Fuite de gaz éventuelle. Fermez l'arrivée générale du gaz, aérez l'enceinte et pré-
Vous n'avez pas maintenu le bouton de commande
enfoncé suffisamment longtemps.
Les rainures du brûleur sont sales. Nettoyez les rainures du brûleur.
Vérifiez dans le tableau de distribution électrique si l'interrupteur magnétothermique ou un interrupteur différentiel
a sauté.
L'espace entre la bougie et le brûleur doit être propre.
Contactez votre installateur électrique.
dant.
Ouvrez les robinets intermédiaires éventuels.
Changez la bouteille.
venez immédiatement un technicien d'installation agréé
afin qu'il vérifie et qu'il atteste du bon fonctionnement de
l'installation. N'utilisez pas l'appareil jusqu'à ce que
l'absence de fuite de gaz dans l'installation ou l'appareil ait
été vérifiée.
Une fois le brûleur allumé, maintenez le bouton de commande enfoncé quelques secondes de plus.
Anomalies, que faire ? fr
25
Page 26

fr Service après-vente
4Service après-vente
Ser vi c e après- vente
Si vous faites appel à notre Service Technique, vous
devez communiquer le numéro de produit (E-Nr.) ainsi
que le numéro de fabrication (FD) de l'appareil. Cette
information figure sur la plaque signalétique située sur
la partie inférieure de la plaque de cuisson, et sur
l'étiquette de la notice d'utilisation.
Pour les contacts dans les différents pays, consulter le
répertoire de SAV joint.
Conditions de garantie
Si, contrairement à nos attentes, l'appareil présente un
dommage ou ne respecte pas les exigences de qualité
prévues, veuillez nous l'indiquer dans les plus brefs
délais. Pour que la garantie soit valide, l'appareil ne
devra pas avoir été manipulé, ni soumis à une
mauvaise utilisation.
Les conditions de garantie applicables sont celles
établies par la représentation de notre entreprise dans
le pays où l'achat a été effectué. Il est possible d'obtenir
des informations détaillées dans les points de vente. Il
est nécessaire de présenter le bon d'achat pour
bénéficier de la garantie.
Tout droit de modification réservé.
7Protection de
l'environnement
Prot ec t i on de l ' envi r onnement
BSH Electrodomésticos se soucie de l'environnement
et évite de le contaminer en utilisant pour
l'empaquetage du produit des matériaux recyclables ou
pouvant être réutilisés.
L'emballage fourni a protégé votre appareil durant son
transport jusqu'à votre foyer. Notre compagnie
contribue à améliorer l'environnement en éliminant les
matériaux d'emballage de manière consciente et, si
possible, les réutiliser, permettant ainsi de générer
moins de déchets et d'utiliser plus efficacement les
ressources naturelles, ce qui évite l'abattage des
arbres.
Les vieux appareils domestiques ne sont pas des
déchets inutilisables ! Un recyclage approprié permet
de produire de précieuses matières premières.
Nous comptons sur votre coopération pour trier ce
matériel afin de le recycler/réutiliser, dans les zones
destinées à cet effet dans votre ville. Nous vous
demandons de vous renseigner auprès de votre
délégation ou municipalité pour obtenir plus
d'informations sur la mise au rebut appropriée de vos
déchets.
Vos enfants et la nature vous en remercient !
26
Page 27

Inhoudsopgave
[nl]Gebr ui k saanwi j z i ng
8 Gebruik volgens de voorschriften . . . . . . . . . . 27
nl
8Gebruik volgens de
( Belangrijke veiligheidsvoorschriften . . . . . . . . 28
K Algemene aanwijzingen. . . . . . . . . . . . . . . . . . . 29
Technische informatie . . . . . . . . . . . . . . . . . . . . . . . . 29
BELANGRIJK . . . . . . . . . . . . . . . . . . . . . . . . . . . . . . .29
* Het apparaat leren kennen . . . . . . . . . . . . . . . . 30
Toebehoren . . . . . . . . . . . . . . . . . . . . . . . . . . . . . . . . 30
Ä Gasbranders. . . . . . . . . . . . . . . . . . . . . . . . . . . . 30
Handmatige vonkontsteking. . . . . . . . . . . . . . . . . . . . 30
Automatische vonkontsteking . . . . . . . . . . . . . . . . . . 30
Veiligheidssysteem. . . . . . . . . . . . . . . . . . . . . . . . . . . 31
Een brander uitdoven. . . . . . . . . . . . . . . . . . . . . . . . . 31
Vermogensstanden . . . . . . . . . . . . . . . . . . . . . . . . . .31
Waarschuwingen . . . . . . . . . . . . . . . . . . . . . . . . . . . . 31
Tips bij het bereiden . . . . . . . . . . . . . . . . . . . . . . . . . 31
Å Kookpannen . . . . . . . . . . . . . . . . . . . . . . . . . . . . 31
Geschikte pannen . . . . . . . . . . . . . . . . . . . . . . . . . . . 31
Gebruiksaanwijzingen . . . . . . . . . . . . . . . . . . . . . . . . 31
2 Reinigen en onderhouden . . . . . . . . . . . . . . . . 32
Reiniging . . . . . . . . . . . . . . . . . . . . . . . . . . . . . . . . . . 32
Onderhoud. . . . . . . . . . . . . . . . . . . . . . . . . . . . . . . . . 32
3 Wat te doen bij storingen? . . . . . . . . . . . . . . . . 33
4 Servicedienst . . . . . . . . . . . . . . . . . . . . . . . . . . . 34
Garantievoorwaarden . . . . . . . . . . . . . . . . . . . . . . . . .34
7 Milieubescherming. . . . . . . . . . . . . . . . . . . . . . . 34
voorschriften
Gebrui k volgens de voorschri f t en
Lees deze instructies aandachtig. Alleen dan
kunt u uw apparaat op een juiste en veilige
manier gebruiken. Bewaar de gebruiks- en
installatie-instructies en overhandig deze met
het apparaat indien het van eigenaar wisselt.
De fabrikant is vrij van elke
verantwoordelijkheid, indien de
beschikkingen van deze handleiding niet
nageleefd worden.
De afbeeldingen die bij deze aanwijzingen
staan afgedrukt zijn slechts ter oriëntatie.
Haal het apparaat niet uit de beschermende
verpakking, tot het moment van de inbouw.
Indien u schade waarneemt aan het apparaat,
sluit het dan niet aan. Neem contact op met
onze Technische Dienst.
Dit apparaat behoort tot klasse 3, volgens de
norm EN 30-1-1 voor gasapparaten: apparaat
ingebouwd in een meubel.
Zorg, voordat uw nieuwe kookplaat
geïnstalleerd wordt, dat de installatie
uitgevoerd wordt volgens het
installatievoorschrift.
Dit apparaat mag niet worden geïnstalleerd in
jachten of caravans.
Dit apparaat mag alleen gebruikt worden in
voldoende geventileerde ruimtes.
Dit apparaat is niet bestemd voor gebruik met
een externe tijdschakelklok of een
afstandbediening.
Produktinfo
Meer informatie over producten, accessoires,
onderdelen en diensten vindt u op het internet:
www.bosch-home.com en in de online-shop:
www.bosch-eshop.com
Alle werkzaamheden betreffende installatie,
afstelling en aanpassing aan een ander soort
gas moeten worden uitgevoerd door een
bekwaam installateur, waarbij alle
toepasbare normen en wetgeving en de
voorschriften van de lokale gas- en
elektriciteitsmaatschappijen moeten worden
nageleefd. Er wordt met name gelet op de
voorschriften met betrekking tot ventilatie.
Dit apparaat is vanuit de fabriek aangepast
aan het soort gas dat vermeld staat op het
gegevensplaatje. Raadpleeg het
installatievoorschrift indien dat gewijzigd moet
worden.Het wordt aanbevolen onze
Technische dienst te bellen voor de
aanpassing aan een ander soort gas.
27
Page 28

nl Belangrijke veiligheidsvoorschriften
Dit apparaat is enkel ontworpen voor
huishoudelijk gebruik. Commercieel of
professioneel gebruik hiervan is niet
toegestaan. Gebruik het apparaat enkel om te
koken, nooit als verwarming. De garantie is
alleen geldig als het apparaat gebruikt wordt
voor het doel waarvoor het ontworpen is.
Dit apparaat is bestemd voor gebruik tot op
hoogten van maximaal 2.000 meter boven
zeeniveau.
Zorg ervoor dat er tijdens het gebruik van het
apparaat altijd toezicht is.
Gebruik geen deksels of
beschermingsbarrières voor kinderen die niet
aanbevolen worden door de fabrikant van de
kookplaat. Ze kunnen ongevallen veroorzaken,
bv. wegens oververhitting, ontsteking of
loskomen van materiaaldeeltjes.
Dit toestel kan worden gebruikt door kinderen
vanaf 8 jaar en door personen met beperkte
fysieke, sensorische of geestelijke vermogens
of personen die gebrek aan kennis of ervaring
hebben, wanneer zij onder toezicht staan van
een persoon die verantwoordelijk is voor hun
veiligheid of geleerd hebben het op een
veilige manier te gebruiken en zich bewust zijn
van de risico's die het gebruik van het toestel
met zich meebrengt.
Kinderen mogen niet met het apparaat spelen.
Reiniging en onderhoud van het toestel
mogen niet worden uitgevoerd door kinderen,
tenzij zij 15 aar of ouder zijn en onder toezicht
staan.
Zorg ervoor dat kinderen die jonger zijn dan
8 jaar uit de buurt blijven van het toestel of de
aansluitkabel.
(Belangrijke
veiligheidsvoorschriften
Belangr i j k e veiligheidsvoorschriften
:Waarschuwing – Deflagratiegevaar!
Ophoping van onverbrand gas in een
afgesloten ruimte veroorzaakt
deflagratiegevaar. Stel het apparaat niet bloot
aan luchtstromen. De branders zouden
kunnen uitgaan. Lees de aanwijzingen en
waarschuwingen omtrent de werking van
gasbranders aandachtig door.
:Waarschuwing – Risico op vergiftiging!
Het gebruik van een gaskookapparaat
veroorzaakt warmte, vocht en
verbrandingsproducten in de ruimte waar het
geïnstalleerd is. Zorg voor een goede
ventilatie in de keuken, met name wanneer
kookplaat aan staat: laat de natuurlijke
ventilatieopeningen open of installeer een
voorziening voor mechanische ventilatie
(afzuigkap). Bij intensief en langdurig gebruik
van het apparaat kan extra of doeltreffendere
ventilatie nodig zijn: zet een raam open of
verhoog het vermogen van de mechanische
ventilatie.
:Waarschuwing – Gevaar voor
brandwonden!
■ De kookzones en nabijgelegen zones
worden zeer heet. Raak de hete
oppervlakken nooit aan. Houd kinderen
jonger dan 8 jaar uit de buurt.
Risico van verbranding!
■ Wanneer de fles voor vloeibaar gas niet
loodrecht staat, kan het vloeibare propaan/
butaan/ in het apparaat terechtkomen. Er
kunnen dan heftige steekvlammen bij de
branders optreden. Onderdelen kunnen
beschadigd raken en in de loop van de tijd
ondicht worden, waardoor er op een
ongecontroleerde manier gas ontsnapt.
Deze beide oorzaken kunnen leiden tot
verbrandingen. Flessen voor vloeibaar gas
altijd in een loodrechte stand houden.
28
:Waarschuwing – Brandgevaar!
■ De kookzones worden zeer heet. Leg nooit
ontvlambare voorwerpen op de kookplaat.
Bewaar geen voorwerpen op de kookplaat.
Brandgevaar!
■ Sla geen corrosieve chemische producten,
stoom, ontvlambare materialen of nietvoedingsmiddelen op onder dit
huishoudelijk apparaat of in de buurt
daarvan.
Brandgevaar!
Page 29

Algemene aanwijzingen nl
■ Oververhit vet of olie vat gemakkelijk vlam.
Ga nooit weg terwijl u vet of olie verhit.
Indien dit vlam vat, doof het vuur dan niet
met water. Doe een deksel op de pan om
het vuur te doven en zet de kookzone uit.
:Waarschuwing – Risico op verwonding!
■ Pannen die beschadigd zijn, een
ongeschikte afmeting hebben, buiten de
randen van de kookplaat uitkomen of niet
goed geplaatst zijn kunnen ernstig letsel
veroorzaken. Neem de tips en
waarschuwingen omtrent pannen in acht.
Risico op verwonding!
■ Sluit bij storing de stroom- en gastoevoer
van het apparaat af. Bel voor de reparatie
onze Technische Dienst.
Risico op verwonding!
■ Manipuleer de binnenzijde van het apparaat
niet. Bel indien nodig onze Technische
Dienst.
Risico van letsel!
■ Wanneer een bedieningsknop los zit of er
niet aan kan worden gedraaid, mag hij niet
meer worden gebruikt. Neem direct contact
op met de servicedienst, om de knop te
laten repareren of vervangen.
KAlgemene aanwijzingen
Al gemene aanwi j zi ngen
Technische informatie
Hulp-brander
Thermisch vermogen
Model
PBP6B5B80V
Afstelmogelijkheden AARDGAS G20/17,6 - 19,6 mbar; 1,76 - 1,96
Elektrische eigenschappen
LET OP: Dit product werkt op vloeibaar petroleumgas.
De thermische capaciteit van de branders is geschikt
voor beide gastypes (zowel vloeibaar petroleumgas als
aardgas). Als u het product wilt gebruiken met aardgas,
neem dan contact op met ons servicecenter.
1,00 kW 1,75 kW 3,00 kW
1 2 1
kPa
VLOEIBAAR PETROLEUMGAS G30/27,5 mbar;
2,75 kPa
110 - 240 V∼ 50/60 Hz 0,0344/0,0158 A
BELANGRIJK
Halfsnel-brander
Sterke brander
:Waarschuwing – Gevaar voor elektrische
schokken!
Gebruik geen stoomreinigers om het apparaat
te reinigen.
■ Plaats de roosters en de branders zoals
aangegeven staat in de schema's waarop het model
wordt beschreven.
■ Houd het gebied rond het apparaat vrij van
brandbare materialen, benzine en andere brandbare
dampen en vloeistoffen.
■ Niet als verwarming gebruiken, dat is gevaarlijk.
VOOR UW VEILIGHEID
ALS U GAS RUIKT:
■ OPEN ALLE RAMEN
■ RAAK DE ELEKTRISCHE SCHAKELAARS NIET AAN
■ DOOF DE VLAMMEN DOOR DE HOOFD
DOORLAATKLEP TE SLUITEN
■ BEL DIRECT UW GASLEVERANCIER OF HET
CENTRALE NUMMER VOOR GASLEKKEN
VOOR UW VEILIGHEID
■ BEWAAR GEEN BENZINE OF ANDERE
BRANDBARE VLOEISTOFFEN IN DE NABIJHEID
VAN UW APPARAAT
■ INSTALLEER HET PRODUCT VOLGENS DE
GEBRUIKSAANWIJZING OM ZO WARMTESCHADE
AAN UW MEUBELS TE VOORKOMEN
29
Page 30
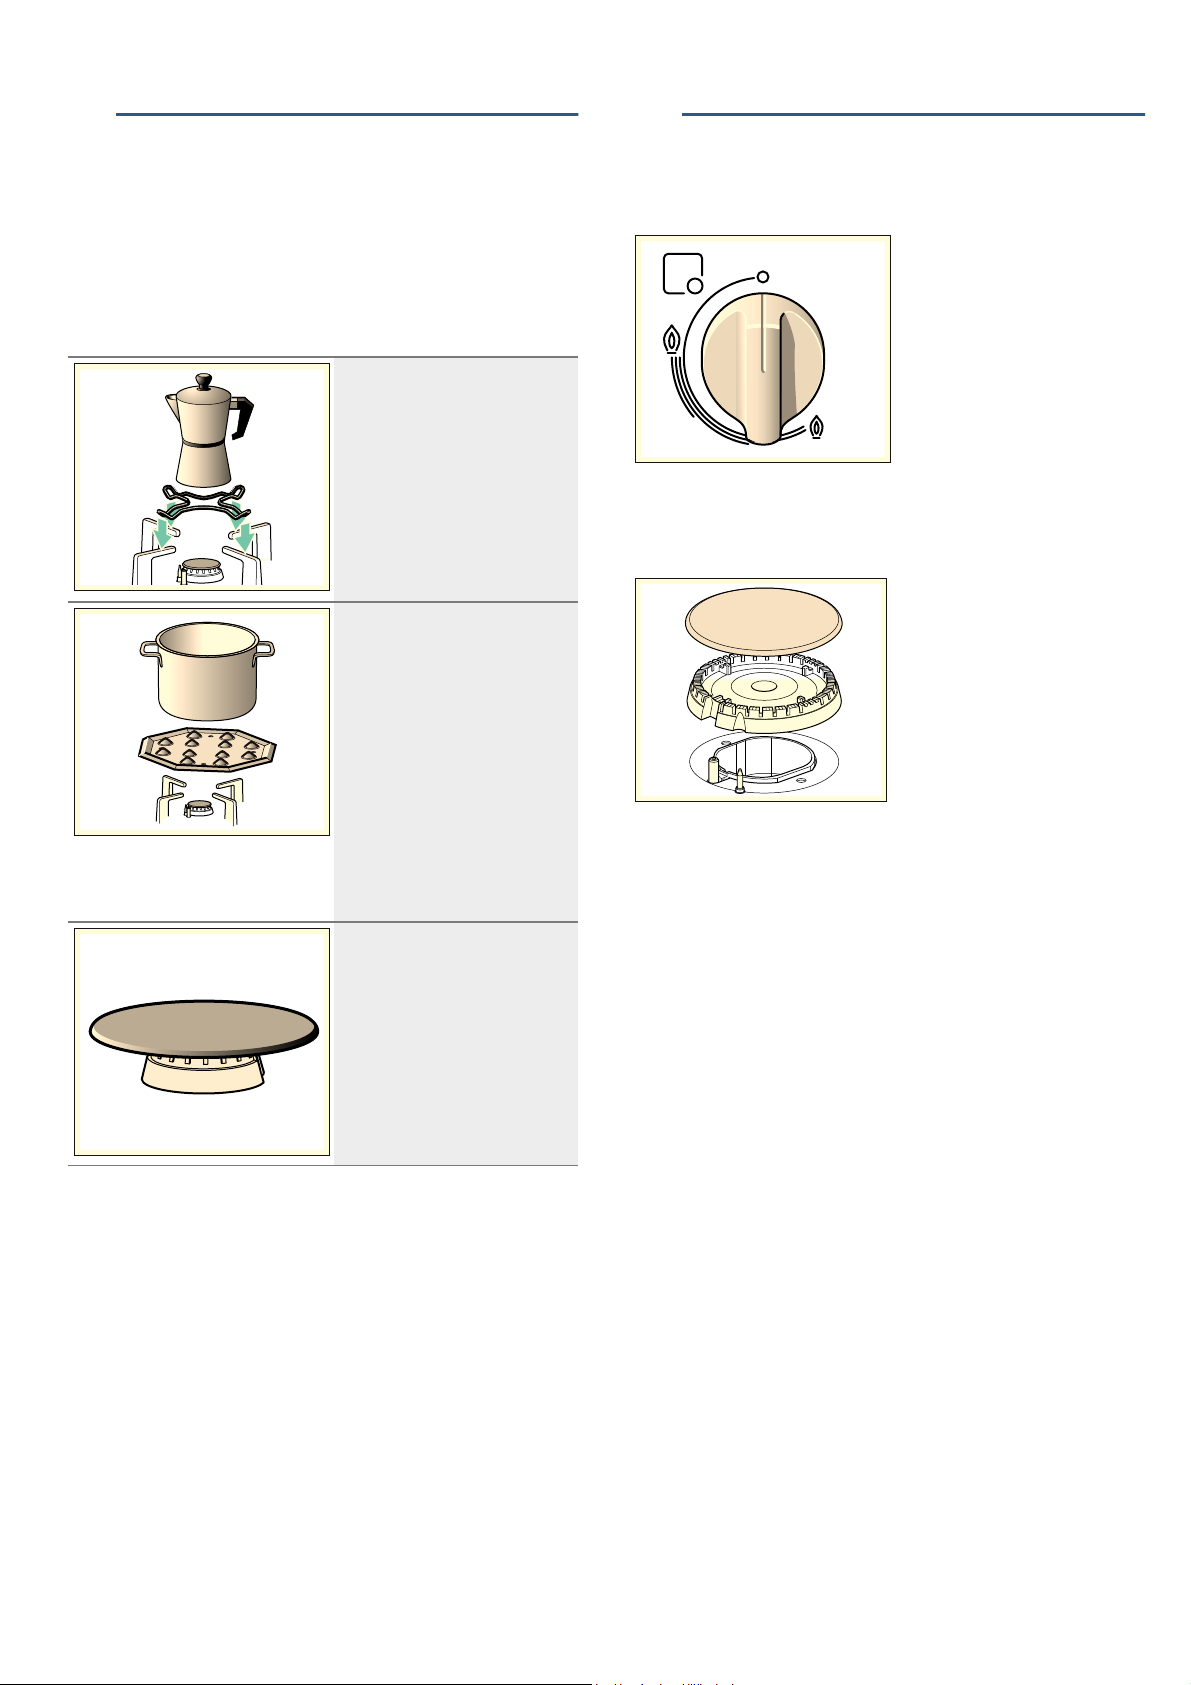
nl Het apparaat leren kennen
*Het apparaat leren kennen
Het appar aat leren kennen
In het modeloverzicht vindt u uw apparaat met de
brandervermogens. ~ Blz. 2
Toebehoren
Onderstaand toebehoren kan worden verkregen bij de
Technische Dienst:
Extra rooster espresso-koker
Alleen geschikt voor gebruik
met de kleinste brander.
Gebruik kookgerei met een diameter van minder dan 12 cm.
Sudderplaat
Dit accessoire is alleen geschikt
voor het garen op lage temperatuur. Het kan met de hulpbrander of de halfsnelbrander
worden gebruikt. Beschikt uw
kookplaat over meerdere halfsnelbranders, dan is het raadzaam om de sudderplaat op de
halfsnelbrander rechtsachter of
rechtsvoor te plaatsen.
Leg de plaat met de gewelfde
kant naar boven op de houder
en nooit direct op de brander.
Simmer cap
Brander die uitsluitend bestemd
is voor bereiding op het minimale vermogen. Om deze te
gebruiken dient de hulpbrander
te worden verwijderd en te worden vervangen door de simmer
cap.
--------
Code
HEZ298114 Extra rooster espressokoker
HEZ298105 Sudderplaat
HEZ298104 Simmer cap
De fabrikant neemt geen verantwoordelijkheid op zich
wanneer deze toebehoren niet of verkeerd gebruikt
worden.
ÄGasbranders
Gasbrander s
Op elke bedieningsknop staat de brander aangeduid
die deze controleert.
Voor een correcte werking van het apparaat is het
noodzakelijk om te controleren of de roosters en alle
delen van de branders juist geplaatst zijn. Verwissel de
deksels van de branders niet.
Handmatige vonkontsteking
1. Druk op de knop van de gekozen brander en draai
deze naar links tot de gewenste stand.
2. Breng een aansteker of vlam (aanstekers, lucifers,
enz.) bij de brander.
Automatische vonkontsteking
Indien uw kookplaat beschikt over automatische
vonkontsteking (bougies).
1. Druk op de knop van de gekozen brander en draai
deze naar links tot de maximale vermogensstand.
Terwijl de knop ingedrukt is, ontstaan vonken in alle
branders. De vlam gaat aan.
2. Laat de knop los.
3. Draai de knop in de gewenste stand.
Indien deze niet ontvlamt, draai de knop in de uitstand
en herhaal de stappen. Houd deze keer de knop langer
ingedrukt (tot 10 seconden).
:Waarschuwing – Deflagratiegevaar!
Indien na het verstrijken van 15 seconden de vlam niet
aangaat, schakel de brander uit en open de deur of het
venster van de ruimte. Wacht minstens een minuut
voordat u probeert de brander aan te steken.
30
Page 31

Kookpannen nl
Veiligheidssysteem
Uw kookplaat beschikt over een veiligheidssysteem
(thermokoppel) dat de gasuitlaat verhindert indien de
branders per ongeluk uitgaan.
1 bougie
2 thermokoppel
Om te garanderen dat deze voorziening actief zou zijn:
1. Ontsteek de brander op gewone wijze.
2. Laat de knop niet los, houd deze stevig ingedrukt
gedurende 4 seconden nadat de vlam ontstoken is.
Een brander uitdoven
mee dat de bougies geen harde schokken mogen
ondergaan.
Tips bij het bereiden
Brander Zeer hevig - He-
vig
Sterke brander Schnitzel, steak,
omelet, gefrituurde gerechten
Halfsnelbrander Gestoomde aard-
appelen, verse
groenten, maaltijdsoepen, pastagerechten
Hulpbrander Koken: stoof-
schotels, rijstepap, karamel
Middelhoog Laag
Rijst, bechamel, ragout
Opwarmen en warm houden
van kant-en klaarmaaltijden en
verfijnde stoofschotels bereiden
Ontdooien en
langzaam
koken: peulvruchten, fruit,
diepvriesproducten
Stomen: vis,
groenten
Bereiden/smelten: boter, chocolade,
gelatine
Draai de overeenstemmende knop naar rechts tot stand
0.
Vermogensstanden
Met de progressieve knoppen kan het vermogen
geregeld worden dat u nodig heeft, tussen de
maximum- en de minimumstand.
Stand
Grote vlam
Kleine vlam
Knop gesloten
Û
Maximale opening of capaciteit en elektrische
—
vonkontsteking
Minimale opening of capaciteit
˜
Waarschuwingen
Tijdens de werking van de brander is het normaal dat u
een zachte fluittoon hoort.
De eerste keren dat het apparaat gebruikt wordt is het
normaal dat er geuren vrijkomen. Dit betekent geen
risico noch defecte werking. Deze verdwijnen na
verloop van tijd.
Een vlam met een oranje kleur is normaal. Dit komt
door de aanwezigheid van stof in de omgeving,
gemorste vloeistof, enz.
Mocht de vlam van de brander per ongeluk uitgaan,
sluit dan de bedieningsknop van de brander en wacht
ten minste 1 minuut alvorens hem weer te proberen aan
te steken.
Enkele seconden nadat de brander uitgaat, klinkt er
een geluid (plof). Dit is geen afwijking, dit betekent dat
de veiligheid gedeactiveerd is.
Houd zo zuiver mogelijk. Indien de bougies vuil zijn, zal
de ontsteking gebrekkig zijn. Reinig deze regelmatig
met een kleine niet-metalen borstel, houd er rekening
ÅKookpannen
Kookpannen
Geschikte pannen
Branders Minimale diameter
van de bodem van
de pan
Sterke brander 20 cm 26 cm
Halfsnelbrander 14 cm 22 cm
Hulpbrander 12 cm 16 cm
De pan mag niet over de rand van de kookplaat
uitsteken.
Gebruiksaanwijzingen
Aanwijzing: Bij gebruik met bepaalde pannen kan er
een tijdelijke, lichte vervorming van de stalen
kookvlakken ontstaan. Dit is normaal en heeft geen
invloed op de werking van het apparaat.
De volgende adviezen helpen u om energie te sparen
en schade aan het kookgerei te voorkomen:
Gebruik pannen met een
geschikte maat voor elke
brander.
Gebruik geen kleine
pannen op grote
branders. De vlam mag de
zijkanten van de pan niet
raken.
Maximale diameter
van de bodem van
de pan
31
Page 32

nl Reinigen en onderhouden
Gebruik geen vervormde
pannen die onstabiel
staan op de kookplaat. De
pannen zouden kunnen
kantelen.
Gebruik altijd pannen met
een vlakke en dikke
bodem.
Kook niet zonder deksel
of met verschoven deksel.
Een deel van de energie
gaat verloren.
Plaats de pan op het
midden van de brander.
Zo niet, dan kan deze
omvallen.
Plaats geen grote pannen
op de branders naast de
knoppen. Deze kunnen
beschadigd worden
wegens te hoge
temperatuur.
Plaats de pannen op de
roosters, nooit
rechtstreeks op de
brander.
Controleer voor gebruik of
de roosters en de
branderdeksels op de
juiste wijze zijn geplaatst.
Hanteer de pannen
voorzichtig op de
kookplaat.
Stoot niet tegen de
kookplaat aan, noch
plaats hierop te hoge
gewichten.
2Reinigen en onderhouden
Rei n i g e n en onder houden
Reiniging
Wanneer het apparaat koud is, reinig het met een
spons, water en zeep.
Reinig na elk gebruik het oppervlak van de
verschillende elementen van de brander, nadat deze is
afgekoeld. Achtergebleven resten (aangekoekt voedsel,
vetdruppels, enz.), hoe weinig ook, zetten zich vast op
het oppervlak en zijn later moeilijker te verwijderen.
Voor een correcte vlam moeten de openingen en
gleuven schoon zijn.
De beweging van sommige pannen kan metaalresten
achterlaten op de roosters.
Reinig de branders en de roosters met zeepsop en wrijf
erover met een niet-metalen borstel.
Indien de roosters rubber voetjes hebben, wees
voorzichtig bij het reinigen hiervan. De voetjes kunnen
losraken en het rooster kan de kookplaat krassen.
Droog de branders en de roosters altijd volledig. De
aanwezigheid van waterdruppels of vochtige zones bij
de aanvang van het koken kan het email beschadigen.
Na het reinigen en drogen van de branders, zorg dat de
branderdeksels juist geplaatst zijn op de diffusor.
Attentie!
■ Het is niet toegestaan de bedieningselementen te
verwijderen om het apparaat schoon te maken. Het
apparaat kan dan beschadigd raken door inkomend
vocht.
■ Gebruik geen stoomreinigers. Dit zou de kookplaat
kunnen beschadigen.
Onderhoud
Reinig meteen gemorste vloeistof. Zo wordt vermeden
dat de etensresten zouden kleven en bespaart u
onnodige inspanningen.
Vanwege de hoge temperatuur kunnen de wokbrander
en de roestvrij stalen zones (vetpot, omtrek van de
branders, etc.) van kleur veranderen. Dit is normaal.
Reinig, na elk gebruik, deze zones met een geschikt
product voor roestvrij staal.
Er wordt aanbevolen regelmatig het reinigingsmiddel te
gebruiken dat beschikbaar is bij onze technische dienst
met code 464524.
32
Attentie!
Het schoonmaakmiddel voor roestvrij staal mag niet
gebruikt worden in de zone rond de
bedieningsknoppen. Dit om te voorkomen dat de
aanwijzingen (serigrafie) worden uitgeveegd.
Laat geen zure vloeistoffen (citroensap, azijn, enz..) op
de kookplaat.
Page 33

3Wat te doen bij storingen?
Wat te doen bi j s t or i ngen?
Soms kunnen storingen gemakkelijk worden
verholpen. Neem de volgende aanwijzingen in acht voor
u de servicedienst belt:
Afwijking Mogelijke oorzaak Oplossing
De algemene elektrische wer-
king is defect.
De automatische vonkontste-
king werkt niet.
De vlam van de brander is niet
gelijkmatig.
De gasstroom lijkt niet nor-
maal of er komt geen gas uit.
Het ruikt naar gas in de keu-
ken.
De brander gaat meteen uit
als de knop wordt losgelaten.
Defecte zekering. Controleer in de zekeringkast of de zekering stuk is en ver-
vang deze.
De automaat of een differentieel is gesprongen. Controleer op het schakelbord of de automaat of een diffe-
rentieel is gesprongen.
Er kunnen voedingsresten of resten van reinigingsmiddelen tussen de bougies en de branders zitten.
De branders zijn nat. Maak de branderdeksels zorgvuldig droog.
De branderdeksels zijn niet juist geplaatst. Controleer of de deksels juist geplaatst zijn.
Het apparaat is niet geaard, niet goed aangesloten of de
aardleiding is defect.
De delen van de brander zijn niet juist geplaatst. Plaats de onderdelen op de juiste wijze op de bijbeho-
De gleuven van de brander zijn vuil. Reinig de gleuven van de brander.
De gasuitlaat is gesloten met afsluitkranen. Open de mogelijke afsluitkranen.
Indien het gas uit een gasfles komt, kijk dan of deze leeg
is.
Een kraan is open. Sluit de kranen.
De gasfles is niet goed aangesloten. Controleer of de aansluiting perfect is.
Mogelijk gaslek. Draai de gaskraan dicht, ventileer de ruimte en waar-
De knop is niet lang genoeg ingedrukt. Houd de knop, nadat de brander ontvlamt, nog enkele
De gleuven van de brander zijn vuil. Reinig de gleuven van de brander.
De ruimte tussen de bougie en de brander moet schoon
zijn.
Neem contact op met de elektrische installateur.
rende brander.
Vervang de gasfles.
schuw onmiddellijk een installatietechnicus, voor controle
en certificatie van de installatie. Gebruik het apparaat niet
totdat zeker is gesteld dat er geen gaslek is in de installatie of het apparaat.
seconden ingedrukt.
Wat te doen bij storingen? nl
33
Page 34

nl Servicedienst
4Servicedienst
Servi cedi ens t
Indien onze Technische Dienst aangevraagd wordt,
dient het productnummer (E-Nr.) en het
fabricagenummer (FD) van het apparaat te worden
verstrekt. Deze informatie staat op het gegevensplaatje,
op de onderzijde van de kookplaat en op het label van
de gebruiksaanwijzing.
De contactgegevens voor alle landen vindt u in de
bijgaande klantenservicemap.
Garantievoorwaarden
Indien het apparaat, tegen onze verwachting in, schade
vertoont of niet voldoet aan de voorziene
kwaliteitseisen, verzoeken we u om ons dit zo snel
mogelijk te laten weten. Opdat de garantie geldig zou
zijn, mag het apparaat niet gemanipuleerd noch
onderworpen zijn aan een ongeschikt gebruik.
De garantievoorwaarden die van toepassing zijn,
worden bepaald door de vertegenwoordiging van onze
onderneming in het land waarin de aankoop uitgevoerd
is. U kunt gedetailleerde informatie aanvragen op onze
verkooppunten. U moet het aankoopbewijs tonen om
gebruik te maken van de garantie.
Recht op wijzigingen voorbehouden.
7Milieubescherming
Milieubescherming
BSH Home Appliances draagt zorg voor het milieu en
voorkomt verontreiniging door het gebruik van
recyclebaar materiaal of hergebruikbaar materiaal voor
de verpakking van het product.
Deze verpakking heeft uw nieuwe apparatuur tijdens het
transport naar uw huis beschermd. Draag bij aan een
beter milieu door het verpakkingsmateriaal op een
bewuste manier weg te werpen, probeer het te
recyclen, hierdoor zorgt u voor minder afval en wordt
het verbruik van natuurlijke hulpbronnen verminderd
waardoor ontbossing wordt tegengegaan.
Verouderde huishoudapparaten zijn geen waardeloos
afval! Bewuste recycling kan waardevolle grondstoffen
genereren.
Wij rekenen op uw medewerking bij het indienen van dit
materiaal voor recycling of hergebruik bij de
aangewezen instanties binnen uw gemeenschap. Wij
vragen u in contact te treden met uw gemeente om
meer informatie te verkrijgen over hoe u uw afval het
beste kunt recyclen.
Uw kinderen en het milieu zullen u dankbaar zijn!
34
Page 35

Page 36

Robert Bosch Hausgeräte GmbH
Carl-Wery-Straße 34
81739 München,
www.bosch-home.com
GERMANY
*9001044069*
9001044069
970620(B)
 Loading...